1
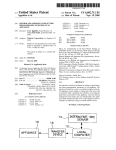
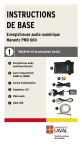
AUTOMATED RECORDING SYSTEM FOR MONITORING ANIMAL VOCALIZATIONS Froglogger V User’s Guide M.E. Dorcas 2000 June 2010 Bedford Technical www.frogloggers.com 1 Precautions: o o o o o o o o o o o o o Please read instructions carefully Always check the date and time before deploying the system in the field. Always do some trial recordings in the lab before the actual field installation. Install in accordance with manufacturer’s suggestions The system is weather resistant but not designed to be submerged in water. Do not set the unit down in mud as it can seal off the built in microphones which are mounted on the bottom. Install in a location free from danger of theft. Do not defeat the integrity of the watertight enclosure or the cable openings Protect the microphone(s) Use only accessories suggested/approved by the manufacturer For long-term storage add desiccant inside enclosure. Please contact Bedford Technical support with any questions. Don’t plug any part of the system into an AC outlet. 2 System Description: The froglogger consists of a timer/control unit, a recorder, stereo microphones, and batteries all in a weather-proof enclosure. The unit is setup to record at short intervals usually over several hours each day. The schedule is normally repeated each day. The unit is designed to record unattended for weeks or even months depending on the duty cycle which is based on the schedule(s). Power requirements: The system requires 6 to 7.5volt d.c. power. The simplest method to power the system is with four D-cell alkaline batteries. Because the recorder requires 5 volts, a simple voltage regulator circuit is also provided within the controller. If a lead-acid rechargeable battery is used instead of the alkaline it can be charged in the field with the optional solar-panel charger. Do not put batteries in recorder. Quick Start: It is suggested that you try out the froglogger in the lab for a couple of days before deployment. Place 4 D cells in the battery holder. Do not put batteries in the recorder. The Froglogger comes from the manufacturer already programmed with a couple of default recording schedules for use as a typical automated system for recording frog calls. Schedule A is programmed to start programming at 7:00PM each day and record for 5 min once each hour for 3 hours. It will be repeated for 3 days. (More details about default schedules can be found on page 9.) ____________________ Introduction: The use of automated recording systems can overcome many of the limitations of traditional manual sampling techniques. 3 The froglogger is revolutionizing conservation efforts around the world where monitoring is either time-intensive or physically difficult. More study is necessary to determine what is causing these declines. To do these studies it is mandatory that we have methods of monitoring frog populations. The use of the “froglogger” was introduced in papers by Dr. Michael E. Dorcas and Dr. Charles Peterson over 14 years ago. Since that time many improvements have been made in these automatic recording systems. These instruments are now in use by utility companies, state departments of natural resources, USGS, colleges and universities, NASA, and by independent environmental engineering companies. Frogloggers.com is dedicated to providing a method of monitoring frog, bird and other animal populations by the use of the Automatic Recording System (ARS, ARU or Froglogger). There is currently new interest in using the froglogger for monitoring populations of other wildlife such as wolves, coyotes, birds, insects, bats, and various marine species. The purpose of this automated recording system is to allow ecologists to record automatically the vocalizations of animals in the field where being there in person is prohibitive because of cost , time constraints. Sometimes a very large area needs to be monitored requiring many frogloggers to be employed. Recordings could include frogs, insects, birds, mammals and marine animals using a hydrophone. This system uses a user programmable timer/controller to automatically turn on and off a recorder and time-stamps the beginning of each sampling interval. The system is self contained, portable, and weather resistant. A hydrophone can be used along with the microphone(s) to record a vast array of animal sounds including those underwater. The froglogger consists of a timer/control unit, a recorder, a microphone and a battery. The unit is setup to record at short intervals usually over several hours each day. The schedule is normally repeated each day. The unit is designed to record unattended for weeks or even months depending on the duty cycle which is based on the schedule(s). A Typical Setup: The unit might be set to record for 5 minutes every hour from 7:00PM until mid-night. The system is setup in the field, turned on and left to run unattended for a week or more. At a predetermined time the user will return to the field, remove the SD memory card, replace the SD memory card with a freshly erased card, replace the batteries with fresh or recharged batteries, turn the unit back on and leave it to run its schedule for another extended period of time. 4 Frogloggers.com is dedicated to providing a method of monitoring frog, bird and other animal populations by the use of the Automatic Recording System (ARS, ARU or Froglogger). There is currently new interest in using the froglogger for monitoring populations of other wildlife such as wolves, coyotes, birds, insects, bats, and various marine species. General setup procedure: Press MENU and with the UP or DOWN button select the item you wish to program. Select a value by pressing the UP or DOWN buttons and then press SELECT to enter the value. Setting up a recording schedule: With the battery connected, turn on the power. (Do not place batteries in the recorder.) The red LED light indicator near the ON/OFF switch should be flashing once a second indicating that the unit is running. Immediately after power is turned on four different displays will automatically appear in succession. The initial “Froglogger Mark V ver. 1.xx “ appears first for about 4sec. followed by “© 2009 Bedford Technical “ , then “www.frogloggers.com “ and finally “ IDLE” with the date/time. The date/time should be checked at this step to see if any corrections need to be made during the 5 setup procedure. The “IDLE” screen indicates the unit is ready to use. If a schedule(s) has already been entered and enabled (ON) the schedule will execute as scheduled. The date/time will be set during testing at the factory and will normally be correct unless the user is in a time zone different than CST. The internal date/time clock and the Flash program memory have a backup battery with a lifetime of up to ten years. If you turn on the power during a scheduled recording period, it will begin to record immediately. Press MENU and the first menu item will appear - “Turn off rec and all schedules” . Press SELECT to turn the recording schedules off. NOTE: Turning “off” a schedule does not remove it from memory but simply disables it. Press the MENU button and then go up or down the list of menu selections with the UP or DOWN button. When you get to the desired menu item enter it by pressing the SELECT button. Menu items: (To select menu items, press the UP button until the desired setting is seen. The press SELECT to enter it.) Here is a description of what each menu item does: 1. 2. 3. 4. 5. Turn off rec and all schedules all schedules Set the DATE & TIME (normally remains set) Setup Schedule A Setup Schedule B (if desired; otherwise should be disabled) Recorder test (Recorder power turns on then 6seconds later the PMD620 records for 10 seconds then turns recorder off.) This function may be used to test the system in the lab before deployment in the field. 6. Software version 7. EXIT the menu 1. Turn off rec and all schedules – This menu item turns off both schedule A and B. This does not erase the schedules but only disables them. 6 2. Set DATE & TIME - (When the “IDLE” screen is displayed it will show the current date and time. If it is correct you can bypass the DATE & TIME setup.) Set the date and time in the Marantz recorder according to the instructions in the Marantz users guide. It is the time set in the Marantz recorder that will appear as the “time stamp” on each recording . When “DATE & TIME” appears on the display press the “Select” . The Date and time choices appear in the window. Using the UP button select the proper value and hit SELECT to enter it. The next item will then appear in the display. When you finish going through all the date & time settings the complete date and time will appear in the display. If satisfied with the settings press SELECT. The clock backup battery is rated to hold the date and time for up to 10 years but we suggest you check it each time during the unit is setup. 3. Setup Schedule A (or B) – a. Press MENU and navigate with the UP or DOWN button to “Set Schedule A”. Press SELECT. b. “Schedule A: ON(or OFF) “ will appears in the display indicating that A is enabled or disabled . Press UP or DOWN to select ON or OFF depending on whether you want to enable the schedule or not. When the display shows the desired setting, press SELECT to enter it. c. “Start same day unit is started” appears in the display. (The A or B in the top right of the display indicates which schedule you are working with.) If this is the desired operation press SELECT. If you want it to start a different day press UP or DOWN and set the desired date & time you want operation to begin. The procedure is the same as setting the DATE & TIME in item 2 above. d. “Start hour XX” - xx:xx:xx appears in the display. XX is the hour of the day in 24hour format which can indicate PM or AM. Example: if the display shows 19 it would indicate the 19th hour or 7PM. The xx:xx:xx indicates the actual start time in hours:min:sec. With the Up or DOWN button select the desired start hour and press SELECT. e. “Start min XX” - Select the correct minutes the same way as you did hours and press SELECT to enter the value. 7 f. “Length hrs XX” - This is the length of each recording. (In most froglogger applications you will probably set this to 00.) Select the hours by using the UP or Down buttons and press select when the desired value is reached. g. “Length min XX” - This is the length of each recording in minutes and is set by the same method as for hours. h. “Length sec XX” - This is the length of each recording in seconds and is set by the same method as for hours and minutes. i. “Cycle hrs XX & Cycle mins XX “ - This determines how often the unit records. Set hrs and mins using the method above. j. “Cycles XX” - This determines how many time the recording cycle set in the previous step is repeated. k. “Days rec XX” - Can be set to limit the number of days. (It’s a good idea to set a number of days instead of letting the unit run until the batteries are spent.) l. “Days skip XX” - You can schedule the unit to skips days if you want. For instance you may want it to remain in the field for a longer period of time by only running the recording schedule every 3 days. In that case you would schedule the unit to skip 2 days. (Skipped days are not included in the “Days rec” count. The days for the schedule to operate is the actual number of active days that it is actually recording.) m. “Config sched Save? - Press SELECT to save the schedule. n. Schedule B should be disabled. Let’s say we want to record for 2 minutes once every half hour from 7PM to midnight. And to cover a longer period of time in the field, we want to do this every other day. We plan for this to run for about 3 weeks at which time we will return to the field to retrieve the SD card, replace it with a blank SD card and replace the batteries with fresh ones. We will then turn the unit back on a leave it to run the same schedule for another 3 weeks. You would want to do this in the morning or afternoon so as not to interrupt the 7 to midnight schedule. Example: 8 The schedule A would look like this: (Schedule B is not needed and should remain disabled.) Schedule A Start same day Start at Length Cycle Cycles Days Skip ON YES 07:00:00 00:02:00 00:30 11 11 1 (having previously set our time to 12 hr format) (each track will be 2 minutes long) (records twice each hour) (7 to 12 is5 hrs x twice per hour = 11)** (every other day for 3 weeks = 22 days) (skips every other day) ** It would record at: 7pm, 7:30, 8, 8:30, 9, 9:30, 10, 10:30, 11, 11:30 & 12midnight 4. Recorder test - Selecting the RECORDER TEST starts a sequence that turns on the recorder, allows it time to boot up, starts recording and records for 10 seconds. When finished recording the power to the recorder is turned off. The purpose of this menu item is simply to test the recorder and the froglogger timer/control unit’s ability to control it. 5. Software version - Simply allows the user to check the version of the software in the microcomputer that controls the froglogger timer/control unit. 6. Exit menu - If you press SELECT with “Exit Menu” displayed the unit will return to the “idle” mode. In the “idle” mode the unit is standing by to record if a schedule(s) is enabled (ON) or is ready to be programmed. A Note about default schedules: 9 The Froglogger Mark V comes with a default schedule A and a default schedule B. These default schedules are of course erased as soon as the user reprograms a new schedule into the unit. These default schedules are simply designed to allow the user to check the operation of the complete unit easily. Of course, the default schedule(s) could be used if they meet the users requirements. Default Schedule A Starts the same day as power is applied Starts at 7:00PM Records for 5 min Records once each hour Number of cycles = 3 Repeats for 3 days Default Schedule B Starts the same day s powered up Starts at 4:00 AM Records for 5 min Records once each hour Number of cycles = 3 Repeats for 3 days If the user wants to reinstate the default programs A and/or B: To reinstate A turn off power. Hold down buttons MENU and UP and turn the power on. To reinstate B turn off power. Hold down buttons MENU and DOWN the turn the power on. Note: Defaults can be restored by turning off power, holding down multiple buttons while turning the power back on. If you restore schedule A, schedule B (if previously programmed) will not be altered & visa versa. MENU & UP restores A MENU & DOWN restores _____________________________ 10 Managing your recording sessions: Depending on your study, it may be very important to accurately keep track of the time intervals when analyzing the recordings. We recommend that you verbally record the date and location coordinates by speaking into the microphone on the first track of a recording session. If GPS information is not available for recording the location try using the coordinates found using earth.google.com. Taking digital photos of surrounding area may help locate the unit later. We also recommend numbering each flash card with a permanent marker and keeping a log of their use. What if I overlap schedule A and B? There is not a problem if they overlap. At any given moment, if either A or B have the FL scheduled to be recording, it does so. They can overlap in any manner whatsoever and it works fine. The system is a multi-level, multi-tasking state machine that takes care of such things logically and cleanly. If A is to start at 7:00 for 30 minutes, and then B is to start at 7:15 for 30 minutes, the result is that it will start at 7:00 and run for 45 minutes without stopping. It can overlap in any way whatsoever, and the schedules apply. At every second the program loop checks that if either A or B is scheduled to be recording, it does so. ______________________ High-Sensitivity Low-noise Weather-resistant Microphone Specifications: High signal-to-noise ratio, greater than 75 dB at 1 kHz (1 Pa, A weighted network) Self-noise (A weighted) = 19 dB Output Impedance : 1.5K ohms Omnidirectional Low handling noise Pickup angle - 360° Frequency response 20-20,000Hz High-sensitivity -32 dB + 3 at 1 kHz (0 dB at 1v/Pa) load=2K ohms, Vcc=3 VDC Maximum Sound Pressure Level: 125.0 dB SPL Power Requirements: nominal +3 Vdc (1 to 10 Vdc) Mic element is protected against humidity with a acoustically transparent water-proof seal. 11 Mic element mounted in rubber boot to reduce handling noise Designed specifically for automated nature recording The Marantz PMD620 Professional Recorder/Player: The recorder has a 3.5mm external mic input for use external microphone if recorder is used separate from the froglogger for field recording. The PMD660 is a flash recorder. The new “ultra” fast cards are not required. The LCD display is back-lit so settings can be made at night. Key Features of recorder: - Record directly to SD cards - Portable operation - No moving parts - MP3, WAV, format compatible - 44.1/48KHz sample rate selection - Unbalance line in and out - AA x 4 batteries (not used with froglogger) - The Marantz PMD620 is a compact bodied, full-scale digital recorder. - This solid state recorder can record audio files to widely available SD flash cards - USB port for direct file transfer & software updates The Marantz PMD620 recorder user manual is available at: http://www.frogloggers.com/Documents/PMD620.pdf Recorder Specifications: 12 ___________________ 13 What is included with the Froglogger V: Microcomputer based Timer/Controller Unit Weatherproof high-impact plastic case Battery holder for 4 D cells Sensitive Stereo microphones built in User’s Guide Marantz PMD620 recorder (slightly modified for use with froglogger) What is not included: Batteries (Do not put batteries in the recorder.) Larger SD card (unit comes with 2GB SD memory card) misc hardware for mounting unit in the field (depends on location) _______________________________ References: Bridges, A. S. and M. E. Dorcas. 2000. Temporal variation in anuran calling behavior: implications for surveys and monitoring programs. Copeia 2000:587-592. http://www.bio.davidson.edu/people/midorcas/research/herppub-pres/dorcaspdfs/BridgesandDorcas2000.pdf Dorcas, M.E. and K.D. Foltz. 1991. Environmental effects on anuran advertisement calling. American Zoologist 31:111A. Mohr, J. R. and M. E. Dorcas. 1999. A comparison of anuran calling patterns at two Carolina Bays in South Carolina. Journal of the Elisha Mitchell Scientific Society 115:6370. http://www.bio.davidson.edu/people/midorcas/research/herppub-pres/dorcaspdfs/MohrDorcas1999.pdf Peterson, C.R. and M.E. Dorcas. 1992. The use of automated data acquisition techniques in monitoring amphibian and reptile populations. pp. 369-378. in Wildlife 2001: Populations. (D.R. McCullough and R.H. Barrett, eds.). Elsevier Applied Science, London. http://www.bio.davidson.edu/people/midorcas/research/herppub-pres/dorcaspdfs/PetersonDorcas1992.pdf Peterson, C.R. and M.E. Dorcas. in press. Automated data acquisition. in Measuring and Monitoring Biological Diversity - Standard Methods for Amphibians. (W.R. Heyer, R.W. McDiarmid, M. Donnelly, and L. Hayek, eds.). Smithsonian Institution Press, Washington, D.C. http://www.bio.davidson.edu/people/midorcas/research/herppub-pres/dorcaspdfs/PetersonDorcas1994.pdf Dr. Michael E. Dorcas and Dr. Charles R. Peterson 1999. Development and Testing of an Automaed Recording System for Monitoring Anurans and Birds on the Savannah river Site. 14 Subcontract no. 97-162A between Idaho State University and Davidson College, FINAL REPORT. http://www.bio.davidson.edu/people/midorcas/research/Fundingawards/ARS.htm Berrill, M., S. Bertram, D. Brigham, and V. Campbell. 1992. A comparison of three methods of monitoring frog populations. pp. 87-93. in Declines in Canadian amphibian populations: designing a national survey. Occasional Papers Number 76 of the Canadian Wildlife Service. PARRIS, K.M., T.W. NORTON and R.B. CUNNINGHAM. 1999. A comparison of techniques for sampling amphibians in the forests of southeast Queensland, Australia. Herpetological 55: 271-283. VARHEGYI, G. S.P. MAVROIDIS, B.M. WALTON, C.A. CONAWAY, and A.R. GIBSON. 1998. Amphibian surveys in the Cuyahoga Valley National Recreation Area. Pp. 137154, In: M.J. Lannoo (ed.). Status and Conservation of Midwestern Amphibians. University of Iowa Press, Ioway City, IA. Todd, M. J., *R. R. Cocklin, and M.E. Dorcas. 2003. Temporal and spatial variation in anuran calling activity in the western Piedmont of North Carolina. Journal of the North Carolina Academy of Science 119:103-110. A list of LINKS to related information on Web is found on our Web site at: http://www.frogloggers.com NOTE: Recorder is included and may be removed and used as a stand-alone nature recorder or as a voice recorder with the built-in stereo microphones. Support: Warranted for 1 year. Email or telephone support. If you have any questions regarding the automated recording system’s hardware or operation, please do not hesitate to contact Gene Dorcas at: genedor @ frogloggers.com or call 817-360-5035. 15