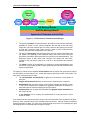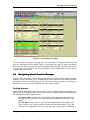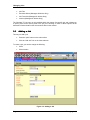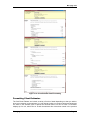
1
Infowit Creative Manager User’s Guide Version 3.5 Copyright 2000-2003, Infowit, Inc. All rights reserved. Infowit, the Infowit logo, "Infowit Creative Manager", "Create more, manage less." and "Get Creative. Get Infowit." are trademarks or registered trademarks of Infowit, Inc. Other brand and product names are trademarks or registered trademarks of their respective holders. Infowit has pending patents on material covered in this document. The furnishing of this document does not give you any license to these patents. Printed in the U.S.A. Document Number: PRD-IDC0350-0803 TABLE OF CONTENTS Infowit Creative Manager User's Guide TABLE OF CONTENTS .......................................................... .......................................................... I HOW TO USE THIS MANUAL ............................................... ............................................... III 1. OVERVIEW OF INFOWIT CREATIVE MANAGER .................... 1 1.1 1.2 1.3 1.4 1.5 2. USING INFOWIT CREATIVE MANAGER ............................. 9 2.1 2.2 2.3 2.4 2.5 2.6 2.7 2.8 2.9 2.10 2.11 3. What Can You Do With Infowit Creative Manager? ............................................... 1 What IS Infowit Creative Manager? ........................................................................ 3 Creating and Managing Jobs.................................................................................. 5 Controlling Workflow: Status Levels ....................................................................... 6 Modeling Your Business Processes ....................................................................... 7 Starting Infowit ........................................................................................................ 9 Logging In ............................................................................................................... 9 The Infowit Home Page ........................................................................................ 10 Navigating Infowit Creative Manager.................................................................... 11 The Tab, Navigate To, Manage and Job Jumper Menus ..................................... 13 The Agency Office Calendar................................................................................. 15 Adding Information................................................................................................ 16 Input Pages........................................................................................................... 17 Status.................................................................................................................... 18 Editing Information ................................................................................................ 18 The Creative Manager Work Areas ...................................................................... 19 MANAGING JOBS ..................................................... ..................................................... 21 3.1 3.2 3.3 3.4 3.5 3.6 3.7 3.8 3.9 3.10 3.11 3.12 3.13 3.14 3.15 3.16 3.17 The Jobs Area....................................................................................................... 21 Basic Job Information ........................................................................................... 22 Adding a Job ......................................................................................................... 24 Creating a Creative Brief ...................................................................................... 25 The Job Team....................................................................................................... 26 The Estimating Process........................................................................................ 28 Creating Time Estimates ...................................................................................... 30 Expense Estimates ............................................................................................... 33 Specifications: Job Details & Procurement........................................................... 34 RFQs & POs: The Procurement Process ............................................................. 36 Creating Client Estimates ..................................................................................... 40 Creating Task Assignments.................................................................................. 42 The Job Message Board....................................................................................... 44 The Job Files Area................................................................................................ 45 Managing Client Requests.................................................................................... 47 Job Tracking: Progress, Analysis and Financials ................................................. 48 Job Invoicing ......................................................................................................... 49 Table of Contents Page i Table of Contents 4. STAFF: ASSIGNMENTS, TIMECARDS & EXPENSES ........... 53 4.1 4.2 4.3 4.4 5. CLIENTS: REVIEW AND APPROVALS.............................. 58 5.1 5.2 5.3 6. Adding Prospects.................................................................................................. 70 Managing Prospects in Creative Manager ........................................................... 70 Tracking Prospects ............................................................................................... 71 INFOWIT ADMINISTRATION ......................................... ......................................... 72 7.1 7.2 7.3 7.4 7.5 Page ii Client and Vendor Company Information ............................................................. 58 Accessing the Infowit Client Interface................................................................... 64 Using the Infowit Client Interface.......................................................................... 65 PROSPECTING: THE SALES PROCESS ........................... 70 6.1 6.2 6.3 7. The Employees Area ............................................................................................ 53 My Assignments.................................................................................................... 54 Entering Timecards............................................................................................... 55 Entering Expenses................................................................................................ 56 Installation, Setup and Configuration.................................................................... 72 The Admin Area .................................................................................................... 73 Agency Reports .................................................................................................... 73 The Users Area..................................................................................................... 73 The System Area .................................................................................................. 74 Table of Contents HOW TO USE THIS MANUAL This is your go-to place for getting to know Creative Manager. Here you find out how to manage your time, open jobs, and manage projects. Your manual gives you detailed step-by-step instructions for using all aspects of the Creative Manager software. You are not expected or encouraged to read through this entire manual in one sitting. Start off by learning how to basically use and get around in the application. Then get to know the other sections as the need arises. • Chapter One, Overview of Infowit Creative Manager, offers a basic introduction to the key concepts in Infowit, and the various parts of the system. • Chapter Two, Using Infowit Creative Manager, introduces you to your agency “desktop.” This is all the stuff that helps you get to work on projects. It’s your organizer, your prioritizer, and your calendar all wrapped up in one. • Chapter Three, Managing Projects, surveys the core functions for managing jobs in the application. Here you will learn how to open and find jobs, create estimates, assemble a team, make schedules, manage client requests, and present documents and comps to clients for review and approval. • Chapter Four describes the main activities of the majority of the users of Infowit in the agency, the staff, and describes how to find assignments, fill in time cards and report expenses. • Chapter Five introduces you to the client side of the software. You will see how to add clients, manage contacts, present comps, manage requests, and learn how the client interacts with the software from their end. • Chapter Six showcases the prospecting management tools that separate Creative Manager from ordinary, run-of-the-mill project management systems. Here you’ll learn how to create prospects, how to track your progress, and how to convert a prospect to a client. • Finally, Chapter Seven introduces you to the administrative areas of the software. Most of you won’t be working in this area, but for those with the requisite permissions, you can view the Job Ticket, create purchase orders, manage quotes, prepare invoices, make system changes, and add clients, employees, and change aspects of the system. If you need additional help, don’t hesitate to use the help function in the software itself. Not only can you access general help, but each page has its own specific help screens to help you rapidly find the information you need. How To Use This Manual Page iii 1. OVERVIEW OF INFOWIT CREATIVE MANAGER 1.1 What Can You Do With Infowit Creative Manager? You are about to discover the most complete, most efficient, and intuitive project management software available. How can we make this claim? Because Infowit Creative Manager is the fruit of 30 years’ experience in the design, advertising, and creative industries. We, like you, spent valuable time and resources reviewing, purchasing, and implementing project management software only to be disappointed at clunky interfaces, dictatorial processes, and the inevitable shortcomings of that software. So we decided to make our own project management software. One that was easy to use and habit forming. One that met all the needs of agencies such as yours without forcing one particular way of managing projects. Above all else, Infowit Creative Manager is designed to create cohesive, efficient working teams mediated through the software. Using well-researched principles of group and task process, Infowit Creative Manager enables all members of the team – from the agency to the client to outside vendors – to work together productively. No matter how you use it, Infowit Creative Manager will become the most vital link in your agency. It will become your traffic manager, your reporter, your file cabinet, and your complete source for information on jobs, assets, employees, clients, vendors, and profitability. Best of all, you don’t have to change your management style to make the system help you work better and more profitably. Agency Principals & Creative Directors If you’re an agency principal, you can get a rapid and easy overview of your agency’s business. You can rapidly diagnose the health of any project going through the system, produce reports about the profitability of projects or clients, and see and print easily a list of all open jobs. If you want a quick look at any individual project, Infowit Creative Manager can give you a complete project snapshot or you can gauge a project’s financial health in the financial reports area. This means you don’t have to wander through the agency asking project managers or account managers for reports or updates; you don’t have to plod through a mountain of paperwork. You should spend your time getting to know the Reports workspace in the Administration area. These sections will let you in on the most vital information about your business. Infowit Creative Manager offers powerful tools for creative directors. With Job Files, Job Requests, and the Client module, creative directors have a powerful medium for organizing and presenting creative work as well as managing client comments and requests. From the very beginning of a project, creative directors can produce creative briefs and goals and objectives documents that are available to all members of the team, including the client and vendor teams. Infowit Creative Manager does not allow managers, staff, or clients to stray far from the creative goals of a project. Once designs and creative have been produced, Infowit Creative Manager allows creative directors, copywriters, and designers to upload creative, along with goals, notes, and comments, to the project workspace. The documents then can undergo several rounds of internal review and approvals before being presented to the client – all it takes is a click of a button for the client to view any creative piece. Clients can review, comment on, and make requests about the creative. They can revise documents and copy; the system catalogs revisions so that documents can be distributed among several client users. Overview of Infowit Creative Manager Page 1 Overview of Infowit Creative Manager Creative directors should learn how to produce specifications, creative briefs, and goals and objectives. They should become adroit at using the Job Files section, particularly in reviewing, commenting on, and making requests about images, comps, and documents. Account Executives Account executives can quickly and easily open jobs and survey the general health of the jobs under their administration. Jobs are easy to track and manage because all jobs are automatically opened sequentially and for each client with their own client identifier. So account executives can easily review all the projects for an individual client. An account executive can easily put together job specifications, creative briefs, estimates, and project assignments. They can then put together teams from client and vendor contacts and integrate them into the project workspace. And they can efficiently manage client requests and seamlessly integrate those requests into the project management system. Best of all, account executives can efficiently manage the myriad vendor relationships many projects entail. Rather than wade through mountains of vendor quotes, an account executive can easily create specifications and RFQs and manage the vendor quotes straight from the project area. And when it comes time to close off the project, Infowit Creative Manager brings together all the valuable job costing materials – time, rate, agency estimates, communications, approvals, expenses, and vendor quotes – into an efficient invoicing worksheet. Account Executives should spend their time learning to find and create jobs, build specifications, manage RFQs and purchase orders, make assignments, create estimates, put together schedules, manage client requests, and create invoices. Account Executives also want to learn the Financials workspace in the Administration area. Production Managers Production managers have a project area that allows them to guide and direct a job through its entire production cycle. The production manager can make production staff assignments, put together schedules, manage vendors, and access all the detailed information about the job. The production managers can translate the specifications and estimates into a series of tasks and assignments. The system allows the production manager to allocate tasks to the most skilled members of the team. The production manager assigns hours, start dates, and due dates to those tasks. Creative Manager then updates the To Do list for each member of the production staff. Employees then enter their hours and task status in their timecards so that the production manager can track the progress of all the tasks that make up a project. But in addition to tracking tasks, Infowit Creative Manager allows Production Managers to convert client requests into tasks and assign them to production staff. This allows you to not only track client requests, but the client can now track the request and its progress. And finally, the production manager can help prepare a job for invoicing by quickly and easily gathering together all the relevant information about the job. Infowit Creative Manager is a filing cabinet for all the relevant information for billing a job: hours, task notes, client comments, requests, approvals, and a decision archive. Production Managers should learn how to create and find jobs, create estimates and schedules, assign staff and tasks, and use the message board to keep production staff up-to-date. The Production Manager may want to become familiar with the RFQ and Quote system if they’re responsible for vendor management. Page 2 Overview of Infowit Creative Manager Overview of Infowit Creative Manager Production Staff Creative Manager is the employee’s workspace. Employees get a To Do list via their Creative Manager home page. From there, production staff can move easily to all the tasks and assignments they must accomplish for the day. At any time, an employee can move to any job they’re assigned to without searching or wasting time. Everything an employee needs to know about a job is there in the job area. Basic job information, assignments, important job documents, other job team members, and important updates on the message board. This is the place where designers can upload comps or comping images, where the creative director can post photography or stock images for client approval, and where copywriters go to save and post their drafts. Employees should really know how to find jobs, use the message board, manage comps and documents, search tasks, and, above everything else, keep great timecards. Accountants Accountants can discover many tools to make life easier in a creative agency. Although Infowit Creative Manager is not an accounting package, it integrates seamlessly with several accounting packages and offers accounting capabilities that tie in more closely with the nuts and bolts of the project itself. As managers and production staff use the system, they will enter work orders, purchase orders, RFQs, vendor quotes, and expenses. When a job is ready to bill, all that information appears in a single screen called Job Ticket. So accountants can quickly put together all the financial information about a job, including how much has already been billed on the job, and then prepare an invoice using Infowit Creative Manager easy-to-use Invoice Worksheet. And there is no double entry. Because Infowit Creative Manager integrates with accounting software, purchase orders and invoices are passed from Infowit Creative Manager to your accounting package. Agency accountants should become experts in Job Ticket and Invoice Worksheet. If the accountant is responsible also for vendor quotes, then she should turn to the RFQ, quote, and purchase order system, since these areas of Infowit Creative Manager will be her go-to place in the software. 1.2 What IS Infowit Creative Manager? Infowit Creative Manager is an environment that lets creative teams communicate and coordinate their activities with a focus on meeting your clients needs and their deadlines. To achieve these goals, Infowit provides two separate interfaces: The Agency Interface is designed for the staff of the creative department or agency that gives them access to the information they need to get their jobs done: • The Jobs the agency is working on and all the information associated with each job including estimates, schedules, purchases from vendors, expenses, and billing and invoicing information. Different employees and contractors can be given different levels of access, depending on what their responsibilities are within the agency or team. • The agency’s Clients contact information, locations of their offices, their corporate communication standards and common files, location information, and for account and agency managers a prospecting system for tracking new business opportunities. There are also places to store many details about each contact at the organization, your standard billing and markup rates for individual client organizations, and even your ratings on how fast they review content and when they pay their bills. Overview of Infowit Creative Manager Page 3 Overview of Infowit Creative Manager Agency Login Jobs Clients Client Login Vendors Employee Admin Jobs New Job Requests Job Message Boards Job Files Message Boards Approvals of Estimates and Job Files Figure 1.1: The Elements of Infowit Creative Manager • The agency’s Vendors contact information, their offices, and all of the information available for Clients. In fact, Infowit recognizes the fact that in the real world, Clients are quite often Vendors and vice versa, and even the Agency can be both a Client and a Vendor to itself. There is never a need to enter a company twice because they have both relationships to the Agency. • The agency’s Employees and contractors have their own contact information, and the system can optionally track individual billing rates and human resources information (information that is protected from access by non-administrators). The Employee section is also where staff members can quickly find their tasks, navigate to the jobs they’re working on, and fill in their timecards and expense reports. • The Admin section of the application is restricted to system administrators and executives, and provides access to Agency-wide reports, financial summaries and system customization. The Agency’s Clients have a separate Client Interface that is simpler and gives them access to the information you need them to see, review and approve during the course of the project. The client area is structured around Jobs: • The Job Estimates and Schedules for approval or to track the current status of their jobs. • Images and Documents that they need to review, comment upon or approve. • Assignments that are given to them by the project manager and appear in their “To Do” list to remind them of deadlines for approvals, submission of materials, or other tasks that are critical to keeping the project on time. • Company files such as logos and boilerplate and graphic design standards that are used in all jobs. • A Job Request form to specify the requirements for new jobs that the client wishes to initiate. Your clients now have a place that they can go to find out information from anywhere at anytime, while you have complete control over everything they see and do. Using a flexible permissions system and status controls, you move your clients through the process of completing their jobs and keeping them on schedule and the budget on target. Page 4 Overview of Infowit Creative Manager Overview of Infowit Creative Manager Job Template Create a Job Manage Vendor Bids Employee Tasks Predefined Tasks Client Boilerplate Specifications Create Team Assign Tasks Choose Vendors Build Quotes RFQs Quotes POs Time & Status Manage Team & Vendors Sharing & Communications Deliver On Time & Under Budget Reuse Templates & Assets Estimates & Schedules Client Input & Approvals Graphics, Copy & Comps Generate Invoices & Reports Figure 1.2 Creating and Managing Jobs 1.3 Creating and Managing Jobs In Infowit Creative Manager, Jobs involve a set of information and a process that leverages all of the knowledge you have about your business, your customers, and your vendors. The system is designed to save everything that you put into it so that you can reuse anything you’ve done on a previous job, and even modify it so that you do it better next time. The process of creating and managing jobs involves a variety of activities that leverage this reuse along with the facilities for communications between all of the people inside and outside your organization: • When you create a new Job, you choose one of the Job Types that are defined for your organization’s installation. This Job Type will give you a set of Job Templates to choose from that define the standard set of tasks to be performed for one of several variations of that Job Type. You or your client also can fill in a Creative Brief that specifies exactly what the goals and parameters of the project are. By choosing a particular client for that job, the system automatically includes the standard files and images for the company in the job for easy access by all the members of your team. You’ll also have access to the library of specifications for purchases that are appropriate to that job. • The next step is to finalize estimates and schedules and have your clients approve the deadlines and budgets. During this process you’ll work with vendors by sending them Requests for Quotations (RFQs) to get estimates for purchased products and services and create Purchase Orders (POs) to obtain them. You can also define any other expenses that need to be budgeted such as travel or messenger services. Then you’ll build the Job Team and begin assigning tasks to your staff and clients. Overview of Infowit Creative Manager Page 5 Overview of Infowit Creative Manager • During the course of managing the job, you’ll monitor the progress of your staff through their timecard entries and the completion of To Do list items you’ve assigned to your clients. The system maintains a message board for the Job as well as for each of the files and images you upload into the system, allowing your team and your clients to work together and collaborate on every part of the job. • At any point you can create additional estimates as requirements for the job change to add additional hours, add or change purchases, or account for increased expenses. Infowit’s flexible invoicing mechanism allows you to bill your clients at any time, and choose to charge or not charge them according to the needs of the particular job or client relationship. • Once you have completed a job, you can have the system store information from the job as templates that can be modified and reused for future jobs of a similar type and configuration. These features are designed to be combined in any way that makes sense for the particular job you are working on. It is important to note that Infowit is designed to be used for all of the various activities of your business so that you have a central repository for everything that you do: • One-time Client jobs • On-going Client jobs (e.g. retainer services) • Internal Agency jobs • Overhead tracking such as general office, vacation and sick time While the system is designed to track hours, depending on your needs you may track all hours, only billable hours or not track hours at all and simply use the system for estimating and invoicing. 1.4 Controlling Workflow: Status Levels One of the biggest challenges in any organization is coordinating the activities of the team, and ensuring that the company’s processes are controlled by the responsible managers. In a creative organization, these processes need to be flexible in order to adapt to unique situations in a job or In Progress Rejected Internal Approved At Client On Hold Client Approved Cancelled Figure 1.3 Status Levels Page 6 Overview of Infowit Creative Manager Overview of Infowit Creative Manager with a specific client. Infowit uses status levels throughout the product to let users know whether various stages have been completed, and whether clients have reviewed and approved estimates or content. The status values in the system vary based on the elements they refer to, but share these common definitions: • In Progress: This is the base status level that means the object is being defined. All aspects of the object can be changed while it is in progress, and it can be seen only by users inside the Agency. While at this status level, many next steps cannot be taken; for example, a PO cannot be created without an approved purchase Quotation. • Internal Approved: While ideally it would be nice to have formal client approval obtained before proceeding with the next step in a project, in the real world most agencies find themselves moving ahead on projects when they have a long-term relationship with a client. Internal Approved status allows many steps such as assigning tasks and performing work on jobs to proceed before there is a formal approval of an estimate. • At Client: This status is used to identify objects that are visible to clients through the Infowit Client interface and are marked as requiring approval by the client. Once an object is defined as being At Client, no more changes can be made to it. • Client Approved: This status can be set either by the client clicking approved status through the client interface, or by the project manager. As with At Client status, once this status is set, no more changes may be made to the object because it represents the exact definition of what the client has agreed to. • Rejected: This status is set when a client has rejected approval for an object. The system has automated routines that handle generating new estimates for work that has already been done on estimates that were Internally Approved. • On Hold: This status is used for objects that have been approved but are on hold for some reason, indicating that no work should be done, until the status is changed. • Cancelled: Objects that are cancelled are prevented from progressing, for example having additional assignments created. However actions like billing can proceed. There are other status values for objects such as Proposal, Open and Closed for projects. and Prospect and Active for Clients, based on the object in the system. These status values are introduced later in this manual. 1.5 Modeling Your Business Processes One of the unique features of Infowit is its ability to closely model your business processes. Every business is unique, and the unique practices of the business are what make it successful and differentiate it from the competition. When setting up Infowit, the following information, used throughout the system is set up to match the unique aspects of the Agency’s business: • Job Types: Job Types provide an easy way to categorize the projects you build and make it easy to find jobs and elements or templates for jobs within the system. These Job Types can be defined as broad categories that have many variables that are customized for individual projects, or they can be very specific, possibly having only a few or even a single template associated with them. • Billing Categories: These are the high-level categories that are used to measure how the business is doing. Usually, the values used for the Billing Categories are the same that are used in the company’s accounting system, however they may be more detailed or be set up in a completely different fashion. Some Overview of Infowit Creative Manager Page 7 Overview of Infowit Creative Manager Job Types Billing Categories Estimate Templates Task, Purchase, Expense Types Figure 1.4: Business Process Definitions organizations use logical categories such as “Copywriting” or “Illustration” while others use the phases used in each project, or even use the same values used for the Job Types. • Task/Purchase/Expense Types: Each Billing Category has a set of tasks, purchase item and expense types associated with it. These describe the tasks your staff performs, the products and services you buy and resell for projects and job-related or general office expenses. Some examples of these are: o Tasks: Copywriting, Illustration, Project Management, Copying o Purchases: Photography, Copywriting, Printing, Research, Delivery o Expenses: Travel, Food, Delivery As you can see, some items will appear in more than one usage, and some items will appear in several different Billing Categories as well. When you add one of these items to an estimate or estimate template, it uses the name of the item by default, but this name can be changed to anything that’s appropriate to better describe the specific item for the estimate. Even when this name is changed, it is tied to the underlying item type, so that its possible to do reporting from the system grouping costs or income based on the type of task, purchase or expense. • Time Estimate Templates: Time Estimate Templates are used to define standard tasks and schedules for completing projects or parts of projects. These templates are tied to the Job Types, and let you create more specific variations of certain types of jobs. For example you might have a Job Type called Brochures with templates for 4-page, 8-page, and 16-page brochure jobs, each requiring greater amounts of time for copywriting, photography, illustration and so forth. • Prospecting Tasks: Infowit has a streamlined mechanism for tracking prospecting activities with clients and potential clients. These tasks can be defined to match the activities and actions that you want your account managers to take in the sales process. • Industries and Industry Segments: Infowit includes a set of definitions for Industries and Industry Segments that provides for most industries, however your business may focus on very specific verticals and you may have many more segment definitions than are included. The system lets you define any values you wish for these segments. Infowit is initially configured with values for these areas during the consulting process when the software is installed. Any of these values can be changed or expanded at anytime by Infowit System Administrators in the Admin area of the system (see Chapter 7). Page 8 Overview of Infowit Creative Manager 2. USING INFOWIT CREATIVE MANAGER 2.1 Starting Infowit Because the application resides on a database, Intranet, and Web server, you don’t actually “start” the application. Rather, you access the application through web browser. PLEASE NOTE: The current version of Infowit requires one of the following web browsers to access the system: • Windows (all versions): Internet Explorer Version 5.5, 6.0 or greater • Macintosh OS 9: Internet Explorer 5.16 or greater • Macintosh OS X: Internet Explorer 5.22 or greater Other web browsers will be supported in the future, but you must have one of these versions at the present time or the system may not operate properly.Your system administrator will give you a URL that you will type into the “Location” field in the browser. This URL will come in one of two forms: a domain name, such as http://www.yourcompany.com/agency or a domain number, such as http://256.154.235.10/agency Both forms function the same way: they tell your browser where to find Infowit Creative Manager. When you type in the URL, the log-in screen will be displayed. You will not be allowed to proceed until you type in a working user name and password. The URL will change from company to company, so if you move from one agency to another and they both use Infowit Creative Manager, you will have to learn a new URL for the second company. If you type in the URL for Infowit Creative Manager and the application doesn’t load, you need to contact your system administrator to find the proper URL. Once you have reached the login page, we recommend you create a Once you successfully access the log-in page, you should add the page to your Favorites list on Internet Explorer. You should also arrange your favorites so that the Infowit Creative Manager log-in page is at the top of your Favorites list. That way, you can quickly come back to Infowit Creative Manager without having to remember or type in the Infowit Creative Manager URL. 2.2 Logging In Infowit Creative Manager contains valuable information about your company, your clients, and your projects. For that reason, it is kept secure on a server. To use Infowit Creative Manager, you must supply a correct user name and password. Your user name and password will be assigned to you by the system administrator. Both your user name and password are CASE SENSITIVE. This means that the upper- and lower-case letters in the user name and password must always be the same. So, if you have the user name and password Username: SHunter Password: copywriter Using Infowit Creative Manager Page 9 Using Infowit Creative Manager you can’t successfully log on if you type: Username: shunter Password: CopyWriter Unsuccessful Logins There are a variety of reasons that your login won’t work. If this is your first time logging into the system, then you should contact your system administrator immediately. You may not be entered into the system yet or you may have been provided with the wrong user name or password. Infowit Creative Manager is designed to help you with login problems. If your login is unsuccessful, Infowit Creative Manager gives you the option of sending away for your user name and password from the login screen itself. All you do is click Forget Password and type in your email address. Your system administrator will contact you with your login and password information. If the login problem persists, Infowit Creative Manager allows you to send for help directly to your system administrator, who will then resolve the problem for you. Remembering Your Password The Windows operating system will ask you if you want the system to “remember” your password. That means that whenever you type in your user name into the Infowit Creative Manager login screen, the Windows operating system will automatically fill in the password. This is a great boon if you have a million passwords to remember. However, we strongly advise that YOU NEVER ALLOW THE WINDOW OPERATING SYSTEM TO REMEMBER YOUR INFOWIT CREATIVE MANAGER PASSWORD. If you allow Windows to remember your password, anybody can get on your computer, access Infowit Creative Manager, and view sensitive information about you, your company, your clients, and your projects. The higher your permissions level (some people get to see more information than others about employees, clients, vendors, and jobs), the more we urge that you not allow Windows to remember your password. Changing Your User Name And Password Infowit Creative Manager does not allow you to change your user name and password directly. That change is done only by your system administrator. If you require a new user name or password, you should contact your system administrator. Some system administrators will follow good security practices and cycle your passwords on a regular basis, say, once a month or once per quarter. The system is designed to update you by email when your user name and password changes. Logging Off Logging off is not required by Infowit Creative Manager. In fact, the system will automatically log you off if your login is inactive for more than 20 minutes. The reason for this is to provide security so that if you leave your desk, someone is less likely to be able to use your system to access information by impersonating you. That’s why you should always log off when you’re finished with Infowit Creative Manager. If you remember to log off, you’ll ensure that the system is more secure. 2.3 The Infowit Home Page When you log into the system, a new application window will appear. While this window does not have the usual menus or browser buttons, it is a normal web browser window and the pages that appear operate in the way that you are used to having a web page operate. The initial page you Page 10 Using Infowit Creative Manager Using Infowit Creative Manager Figure 2.1: The Infowit Home Page see is the Infowit Home page. This page gives you a summary of everything that has occurred since you last logged into the system. There is a pull-down menu with the words “See What’s New Since” that lets you go back in time to see earlier events whenever you return to this screen. You can return to this screen at any time by clicking the “Home” shaped like a house in the top navigation bar of the screen. 2.4 Navigating Infowit Creative Manager Projects can be immensely complex and generate lots of information. Infowit Creative Manager, however, makes it simple for you to navigate through project information and between projects, and provides numerous shortcuts that you can use to move directly to places you wish to go in the system as you become more sophisticated in your usage of Infowit. Getting Around Infowit Creative Manager provides several layers of easy-to-master navigation that allow you to develop your own navigation style. All you need to know to navigate Infowit Creative Manager is that there are three main navigation areas: The Shortcut Bar: Across the top of the Infowit Creative Manager interface are icons that help you move quickly to the most important information and functions in the system. The Tab Menu: Next you see a group of tabs corresponding to the program’s five major sections: Jobs, Clients, Vendors, Employees, and Administration. This is the workhorse of the application, where you really get down to brass tacks in completing Using Infowit Creative Manager Page 11 Using Infowit Creative Manager The Shortcut Menu The Tab Menu The “Job Jumper” The “Navigate To” Menu The “Manage” Menu Figure 2.2: The Infowit Menus your projects or administering your business. The Work Bar also includes Job Jumper, a unique feature of Infowit Creative Manager that allows you to jump to any job on which you are a team member. The “Navigate To” Menu: Once you enter the project area for a specific job, client or vendor, you can navigate to various information for that particular project, client or vendor by using the “Navigate To” Menu, a pop-up menu always located to the right of the Job Title. The “Manage” menu directly under it is used to select the commands that are specific to the page you are viewing. The “Manage…” Menus: The “Manage” menus appear directly under the Navigate To menu and these are used to select the commands that are specific to the page you are viewing. The Shortcut Bar The Shortcut Bar is your quick way to the most important parts of the system. You can even use the Bookmarks icon to customize your Shortcut Bar. Back and Forward Buttons: These buttons work exactly the way they work on your browser: hitting the back button takes you back to the previous screen and hitting the forward button takes you forward to the next screen. Home Button: The Home Button takes you straight to the Infowit Home page that shows all activity on the jobs you are assigned to. Bookmarks: If there is a special page that you always return to, you can add it to your Shortcut Bar by using the Bookmarks button. You create a bookmark by clicking the Bookmarks Button and, when the Bookmarks pop-up window loads, you then click “Create Bookmark.” The system will then add the screen you’re on to your list of bookmarks. To return to that page in the future, just click the Bookmarks button and, when the pop-up window loads, click the page on the bookmarks list. You can add and delete bookmarks anytime. And if your bookmarked page is attached to a job, it is automatically removed from your Bookmark list when the job closes or is cancelled. That way, you’re not saddled with a mountain of old bookmarks! Timecard: The most important screen in the entire system is your timecard. You’ll be returning to your timecard many times a day. The quick way there is to press My Timecard button. Page 12 Using Infowit Creative Manager Using Infowit Creative Manager Forward & Back Bookmarks Infowit Home Timecard Calendar Add Job My Jobs Search Print Help Log Out Figure 2.3: The Shortcut Bar Calendar: The Calendar gives you an overview of all company events: vacations, absences, meetings, and so on. The only way to access the Calendar is by using the Calendar Button. Jobs: Want to know what jobs you’ve been assigned to? Click My Jobs Button and you’ll be given a complete list of all the open jobs you’ve been assigned to. Add Job: If you’re a project manager, you can quickly move to the Add Job screen of any job by clicking this button. Help: Infowit Creative Manager gives you a comprehensive online Help section. By clicking the Help button, you can get all your answers about general or page-specific questions. Print: At any time you can print the page that you’re currently viewing by clicking this button. Many report pages in the system also provide an option to export the displayed data to Microsoft Excel (via comma-separated value format). Quick Search: You can instantly search for all types of items in the system by using the Quick Search field. The Quick Search field lets you search by: o ID numbers for Jobs, Specifications, RFQs, Purchase Orders, Estimates, and Invoices o Strings in Messages, Image and Document descriptions, and Estimate Names To use the search function, fill in the number or string and select the item you wish to search for, and click the search icon or hit the enter key. Log Out: You log off the system by clicking the Log Out button. You should always log off when you’re finished with Infowit Creative Manager. 2.5 The Tab, Navigate To, Manage and Job Jumper Menus Immediately below the Shortcut Bar are a series of tabs that allow you to navigate all areas of Infowit Creative Manager. Once you are in each area of Infowit, the “Navigate To,” “Manage…” and “Job Jumper” menus let you move quickly to the information you need within the system. Using Infowit Creative Manager Page 13 Using Infowit Creative Manager Figure 2.4: The Tab Menu and Submenus Tab Menu There are five major sections in Infowit Creative Manager: Jobs, Clients, Vendors, Employees and Administration (Note: the Administration Tab will only appear if you are a system administrator). You can navigate to any of these sections by clicking on the appropriate tab. When you do so, a submenu will appear with global (not related to a specific job, client, vendor or employee) menu items immediately below the tab. Clicking the main tab will always take you to the page associated with the first submenu item under that tab: My Jobs, My Clients, My Vendors, or My Assignments. We will discuss these five sections and their menus in separate chapters. Navigate To Menu Once you enter the project area for a job, you can move around the pages for that job by using the pop-up menu to the right of the Job Title. This same “Navigate To” menu appears with different menu items in the Client and Vendor Tabs when you have selected a particular client or vendor in those sections as well. Once you begin working on a project, the Navigate To menu will be your most frequently used navigator. To make it easy to use, it operates as a rollover: simply move your cursor over the Navigate To rectangle and a pop-up menu will appear with the menu items available. You can then choose a menu item with a single click. Manage… Menus Most of the detail pages in the system also have a pull-down menu that appears directly underneath the Navigate To menu. These “Manage… Menus” provide you commands for working with or editing the information that is displayed on the current page. NOTE: These Manage menus will change based on the status of the information so that the Edit menu Page 14 Figure 2.5: Navigate To Menu Using Infowit Creative Manager Using Infowit Creative Manager item will not appear when the status of the information is “Client Approved” because the system is protecting that information and it cannot be changed. Job Jumper The Job Jumper is your quick and easy way to navigate to all the jobs you’ve visited recently. If you need to view or upload information to a job, all you have to do is select it from the Job Jumper pull-down menu. You will be taken in a flash to the Job Info page for that job. Search Pages Each of the Tab menus provide one or more “Search” pages that let you specify search criteria to easily locate jobs, clients, client contacts, and so forth. These windows will ask for general or specific information. All you need to do is give the system at least one piece of information. It can then go searching for you and return all the jobs, clients, or vendors that meet your search criteria. Of course, the more specific your search, the fewer results the system will return. If you enter general information that applies across several jobs, vendors, or clients, the system will give you a directory of all the results that match your search criteria: To open the page you want, you have to scan this list for the specific job, client, or vendor whose information you’re looking for. Once you’ve found the specific job, client, or vendor you’re looking for, clicking that job, client, or vendor will load the page you’re trying to open. Of course, if you provide search information specific to one job, one client, or one vendor, the page you wish to view will load immediately without your having to go through a directory first. Calendars There are several date-specific pages in Infowit Creative Manager, not the least of which is the Timecard. To open these pages, you first have to select a date. So, to fill out your timecard for yesterday, you have to first tell the system yesterday’s date to open that timecard! Infowit Creative Manager lets you choose a date using a Calendar Window. To choose a date, all you have to do is click the date. Infowit Creative Manager will then open the page specific to that date. To make life easier for you, Infowit Creative Manager always highlights today’s date in red. If you need to choose a date from a different month or year, you can navigate to a different month or year using the navigation at the Figure 2.6: Pop-up Calendar Date Selector top of the calendar window. 2.6 The Agency Office Calendar The Agency calendar, located in the shortcut menu, is not job specific but lists office events such as anniversaries, maintenance work, anything you want to post for your office to see when they click on the calendar button. The current date is highlighted and the first few words in the event’s description will appear on the date they occur. If you want to add an event, just click on the date and Infowit will prompt you to add a new calendar item. To add an event you must at least furnish a name, the event type, start date, end date, start time, and end time. You can also enter a rich Using Infowit Creative Manager Page 15 Using Infowit Creative Manager Figure 2.7: Office Calendar text description and assign a contact for the event. When you hit submit, your entry will appear on the calendar for anyone on the system to view. 2.7 Adding Information Infowit Creative Manager does not actually manage projects. That’s what you do. Infowit Creative Manager is an application that allows you to gather all the complex information and communications involved in project management in a single place. And it allows you, your team, and your organization to distribute project information, planning, and documents to the entire team or organization efficiently, quickly, and accurately. The Importance Of Information Think of Infowit Creative Manager as the information storehouse of your projects and your business – an electronic project and business filing cabinet. But unlike any filing cabinet you’ve ever met, Infowit Creative Manager actively and proactively distributes project information to every relevant member of the team. So while you may use Infowit Creative Manager to help manage your projects from planning to invoicing, you are fundamentally doing one of two things: you are viewing or entering information. Information is the lifeblood of a project, and Infowit Creative Manager is the heart that helps distribute it across your entire team and organization. But no information gets distributed unless you enter it in the first place. In fact, every member of your team is going to enter information into Infowit Creative Manager. Everyone in your organization is going to enter timecard information, and even clients are going to enter things like approvals, comments, and requests. Getting Information In It’s a simple process. If it’s unfamiliar to you now, don’t worry, it’ll be second nature in a few days. Almost all input pages follow a simple logic: you fill in the information and then hit Submit or other similar button. No information will be submitted until you push the Submit button. If you make a mistake or change your mind, simply click the Cancel button or move to a different page. No changes will be made to the information in Infowit Creative Manager. Infowit Creative Manager does not “maintain state” between input pages. If you enter information into a page and move to Page 16 Using Infowit Creative Manager Using Infowit Creative Manager another page without clicking Submit, Infowit Creative Manager will not remember the information you entered. If you return to the page, all the information you entered will be gone forever and you have to start over. Getting Information Right! Unlike many other applications that you work with, Infowit Creative Manager does not secondguess you when you enter and submit information. You’ll get no warning like, “Do you really want to make the changes you’ve made?” This means that you should strive to get the information correct the first time. But there are few dead ends in Infowit Creative Manager. Almost all information you enter is editable. So if you get it wrong, even on a timecard, you can always edit the incorrect information. The only exceptions are status changes. The rules governing editing status changes are relatively complex because they vary based on the information you’re changing. For instance, Infowit Creative Manager will not allow you to change a project status from “Cancelled” to “Open.” Once you cancel a job, it’s cancelled. If the client wants to start the project again, you have to open a new job. However, you can change an estimate from “Cancelled” to “Approved.” To understand status rules for specific types of project information, you need to consult each section on those specific types. 2.8 Input Pages A large part of Infowit Creative Manager is input pages that ask you to supply information by filling out Web-based forms. Understanding the basics of these forms is your most important task. In Infowit Creative Manager, you enter information in several ways: text input, pull-down menus, calendar menus, and file uploads. These are all called input fields. Text Input: Text input demands that you type in a value – words or numbers. Pull-down Menus: Pull-down menus demand that you choose one of a limited set of options. Sometimes pull-down menus will offer you a default choice as your first choice. Other pull-down menus will have Choose as the first choice. If you don’t choose anything – if you leave the select menu set to Choose – the system will not register any input for that select menu. Watch Out! On some input pages, pull-down menus relate to one another. You must make a selection from the first pull-down menu to get options available on the second and so on. There is so much information in Infowit Creative Manager, in fact, that these series of pull-down menus allow you to quickly and easily drill down the the precise information you want to input. Calendar Menus: Sometimes Infowit Creative Manager will ask that you supply a date for information. Because the system uses date information as key information, it will accept only a date in one format whereas there are a dozen or so ways any team member can enter a date. Infowit Creative Manager uses Calendar Menus that allow you to choose a date from a calendar. These calendar menus work the same way they do for navigation. You click the calendar icon and then select a date from the calendar. If you need to go to a different month or year, use the navigation at the top of the Calendar Menu. File Uploads: Sometimes you’ll be adding not information, but a document, image, or file. Even a video! To do so, you need to upload the file from an input page. Uploads require that you tell Infowit Creative Manager where the file is. You do this with a directory path. A directory path looks like this: C:\MyDocuments\Comps\cover1.jpg Using Infowit Creative Manager Page 17 Using Infowit Creative Manager This directory path tells Infowit Creative Manager to upload cover1.jpg, which is in a folder called Comps in the My Documents folder on the C drive. Whew! The good news is that you don’t have to type in a directory path if you don’t want to (and some people do). To find the location of a file to upload, all you need to do is push the Browse button. This will load a standard Windows or Macintosh Open window. You just browse the directories in that Open window and find the file you want to upload. Double-click the file name or hit Open and the directory path will automatically be inserted into the right input field. Required Information Some input pages demand that certain information always be inputted. For instance, if you’re creating a new client, the company name is always required. Infowit Creative Manager signals that information is required by putting it in red. So, if you are inputting a new client, several input fields are put in red, such as Company Name. Make sure you fill these out before you submit the information. If you try to submit information on a page without filling in the required fields, Infowit Creative Manager won’t accept the submission and will give you an alert. It will tell you what you’re missing so you can easily finish the form. 2.9 Status Status is a special kind of information. It tells you and your team what is open, active, inactive, closed, or whatever. For instance, whenever employees fill out timecards, they are working on In Progress tasks. If they’ve finished the task, they can change the task status to Completed right there on their timecard. This completely erases the task from their Assignments list and marks the task as completed in the job’s Task list. Status changes are done from pull-down menus. Some status changes, such as tasks, can be done by everyone on the system. Others, such as estimate or job status, can be done only by project or account managers. Almost every aspect of a project has a status. And the kind of status varies. For instance, a job is Open whereas a task is In Progress and an estimate is “Approved.” These mean about the same thing. Similarly, a job is Closed whereas a task is Completed. To learn about status and the rules governing how to change status for a certain aspect of a job, you should read the section on that aspect. This manual includes an index that outlines all the information in Infowit Creative Manager that takes a status, lists various kinds of status, and displays special rules regarding status change. 2.10 Editing Information With the exception of status changes, almost all information you enter in Infowit Creative Manager is editable. You’ll know this if you see the link Edit on an information page or related to any information on the page. Sometimes an individual piece of information will be a link. Clicking that link will load a tiny form that allows you to change just that one piece of information. You’ll become familiar with these instances by reading this manual and using the application. Clicking the Edit link will load an input form. This form may be identical to the form you used when you entered the information. The only difference is that all the information entered appears in the input fields. To edit any information, you simply change the information in the input fields and click Submit or the equivalent button. Sometimes the Edit screen will show more input fields than information that was displayed on the page. That’s because Infowit Creative Manager is designed only to display fields that have information in them and hide any fields that don’t have any information. For instance, when you Page 18 Using Infowit Creative Manager Using Infowit Creative Manager create a client, Business Fax is a field. If you enter no information for Business Fax, then the field won’t even appear on the Client Information page. 2.11 The Creative Manager Work Areas Creative Manager is divided into four work areas. It is like an office suite with separate departments for each of the major functions of a creative business. Some of you may spend all your time in just one of those work areas; others will be darting in and out of work areas as you keep the projects and accounts fully in order. Infowit Creative Manager reflects the complexity of projects and all the roles that people play within a project. To really understand Infowit Creative Manager, it’s helpful to think of it as being made up of several areas: The Jobs Area: this is where all the information about projects are stored – all the estimates, assignments, notes, creative briefs, job files, and so on. The Client and Vendor Areas: this is where you store information about your clients and vendors. It contains the usual information that you wish to track about companies like addresses, phone numbers and the people who work for these organizations. The Employee Area: this is the area that is focused on what you need to do on the jobs that you’re assigned to. It consists of your Task Assignments, your Timecard entries and your expenses. The Administrative Area: this is the area for account managers, accountants, and agency executives: it contains agency-wide reports, user management, and tools for configuring and. customizing the system. The Jobs Area The meat and potatoes of Creative Manager is the Jobs Area. Almost everybody in the agency, from the clerical staff to the creative staff to the folks at the top will be spending most of their time buzzing around inside the Jobs Area. This makes, of course, a certain perverse sense, since Creative Manager is, after all, a project management system. Here’s where all the action takes place. The Jobs Area displays every project as a job and neatly divides each job into specifications, RFQs, POs, estimates, assignments, schedules, messages, and job files. Used rigorously, the Jobs Area becomes • An efficient job tracking system that allows you to record and follow every move, every bump, and every twist a job takes through your shop. • A total job filing system that makes all relevant electronic files available to the entire team, including vendors and clients. • A powerful data warehouse that gives every member of your shop instant access to all the important assets in your shop. • An online presentation tool that allows other team members, including clients, to revise and comment on creative without the need of long distance phone calls, FedEx, or driving from here to beyond. • A procurement tool that allows production managers to easily create and manage RFPs, quotes, and POs, and pass them on to your accounting software. Infowit Creative Manager offers many points of entry into a project area: the Job Info screen (the job’s “home page”), project specifications, estimates, schedules, and so on. The most important screen is the project’s Job Info screen, which tells you at a glance all the pertinent information Using Infowit Creative Manager Page 19 Using Infowit Creative Manager about the project: the client, the team, estimates, and the hours management of the job. All project areas are color-coded according to the status of the job: green for active jobs, yellow for on-hold jobs, red for jobs that are finished and ready to bill, and gray for jobs that are closed or cancelled. Once you enter a project area, all the information about that job is contained in the project area. You can navigate to any section of a job’s information by using the pull-down menu in the project title bar. The Client and Vendor Areas The Clients Area organizes your clients like an efficient account executive. Besides being a data warehouse of all your clients’ information, the Clients Area allows you to include your clients in the development of a project, record their input, and manage them just as you would any other member of the team. Since some clients are only a promise rather than a project, the Clients Area also offers an efficient, easy-to-use prospect management system that helps you organize your prospecting tasks without months of training. The Vendors Area serves as a complete storehouse of vendor information. Used fully, however, the Vendors Area can become your own personal online procurement system. In the Jobs Area, you can create RFQs and manage them across all jobs here in the Vendors Area. So a production manager doesn’t have to search through all the jobs to manage vendor quotes – the entire process can be carried out from a single interface. Since all the vendor quotes are fully automated and organized by Client Manager, all you have to do is decide which quotes to turn into estimates or POs. The Employees Area When you log on to Infowit Creative Manager, this is the place you land. The Employee Area gives you all the information you need to get working on your projects. When you first log on, you land on the Home Page, also known as the What’s New Page that lets you know about everything that has happened since the last time you logged on to the system. It will tell you about new jobs, new assignments, changes in status, approvals so that you always know what’s happening. Your Task Assignments, or To Do list, catalogs all the tasks that have your name on them across all jobs. You can navigate to any job straight from this task list. The most important section of the Employee area is the Timecard. This is the key to Infowit Creative Manager’ ability to track project time. As project managers assign time to various team members, the tasks and the time appear on the employee’s timecard. The employee then fills out the timecard at the end of the day and records time on each task. This gives the project manager valuable information about the course of a job and gives principals and accountants daily timecards from which to prepare invoices and payroll. The Administrative Area Limited to only the administrators identified in the system, the Administrative section is where all finances, accounting, and system administration take place. What is available to a user in the Administrative area is determined by their login permissions. No employee will know, unless told, what they are not allowed to view in the Administrative section. The most important section of the Administrative area is the Job Financials page, which centralizes all information related to billing and costing a job. In Job Financials, a user can view all hours, expenses, purchases, estimates, approvals, inventory, and communications for a job. The user can then use Invoice Worksheet to create from all this information an invoice that is can be delivered to clients or be exported to external accounting packages. Page 20 Using Infowit Creative Manager 3. MANAGING JOBS 3.1 The Jobs Area When you click on the Jobs tab, Infowit Creative Manager loads the “My Jobs” screen, listing a table of your specific jobs. You can immediately go to a job’s info page by clicking the job’s number. You can also sort the table by Job Number, Job Type, Project Manager, Due Date, or Priority. Use the up or down arrows to execute a sort. By default, the table will only display open jobs. This is also true of the “Jobs Directory,” accessible from the Jobs submenu. To see other jobs based on their job status, use the job status filter located in the upper right hand of the table. From the dropdown menu, select an option (all, open, on hold, ready to bill, closed, or canceled). Jobs Think of a job as an organizer that allows you to link different resources together in order to successfully complete a deliverable product for your client. In a job, you can put together a team of employees, vendors, and client contacts, describe product specifications, draw up work estimates, assign tasks, and manage production flow. All of the above activities refer to a unique and meaningful job number made up of two elements: XY1234 The first (alphabetical) part of the job number refers to the Client Code. The Client Code is a unique set of letters (from 1 to 8 characters long) that is defined for each client. This way, looking at a job number immediately helps you identify the job’s client. The second (numerical) part of the job number is a sequence referring to the number of jobs that have been created in Infowit Creative Manager. The sequence does not refer to the number of jobs created for a particular client but to all jobs in Infowit Creative Manager. This way you are able to see immediately the age of a job in comparison to other jobs for other clients. Finding Jobs Infowit Creative Manager provides you flexibility with several ways for locating a job in the system: 1. My Jobs page: If you are searching for a job you are working on, the easiest method is to click the blue “Jobs” tab in the menu bar. This will load a table of all your open jobs. Once you’ve located your job, just click on its number to enter the job’s project area. If the job you are looking for is in another status other than open, use the dropdown status filter menu, located in the upper right-hand corner of the My Jobs table to run a new search. You can also sort the table using the up and down arrows located on either side of the following columns: o o o o Managing Jobs Job Number Job Type Project Manager Due Date Page 21 Managing Jobs Figure 3.1: Job Directory and Job Search o Priority 2. Jobs Directory: If you are looking for a job you are not a team member of, click the “Jobs Directory” link in the Jobs submenu. This will load a table similar to the one you see on the My Jobs page, except that it will list all company-wide open jobs. If there are more jobs than can fit the screen a navigation bar will appear below the table allowing you to search the other pages. Like the My Jobs page, the Jobs Directory page allows you to filter the list based on job status. Just use the dropdown status filter menu to run a new search. You can also sort the table the same way you sort the My Jobs table. See above. 3. Job Search: You can conduct a more refined search for a job by clicking the “Job Search” link in the Jobs submenu. This will open a pop-up window with several search criteria you can use. All criteria are optional, but the more criteria you use, the narrower your search results will become. Hitting the search button will load a table of your search results. If your search only yields one result, the screen instead will immediately load the job’s job info page. 4. Shortcut Bar Job Quick Search: Located in the Shortcut Toolbar, among the many things the quick menu can search for is a job number. Simply type in the numeric portion of the job number, choose “job number” from the dropdown menu, and click the search (magnifying glass) button. If the job number is valid, the page will load the job’s information page. 3.2 Basic Job Information When you a select a job from clicking any job number link in Infowit Creative Manager, the first page you see is the Job Info page. Consider it the home page for your job. It contains most of the Page 22 Managing Jobs Managing Jobs Figure 3.2: The Job Info Page job’s pertinent information, such as job type and status, start and due dates, job description, and the job’s project manager, at a quick glance. Perhaps the most important area of the Information page, however, is the Hours Analysis section. Here, immediately see valuable data necessary for you to make important decisions about your job’s production flow. The Job Navigate To Menu In the job status bar, you will notice a blue bar containing the text “Navigate To:” When you roll over the bar, a dropdown menu will appear with the following options available: • Job Info • Creative Brief • Job Team • Specifications • RFQ/Quotes • Estimates • Schedule • Assignments • Message Board Managing Jobs Page 23 Managing Jobs • Job Files • Purchase Orders (Managers & Admins Only) • Job Financials (Managers & Admins Only) • Invoices (Managers & Admins Only) The “Navigate To” job menu is only available within the context of a specific job, and it allows you to quickly move to the various parts of the job you’re working on. Each of these options will be discussed in further detail in their own sections later in this manual. 3.3 Adding a Job Two ways to add a job: • Press the “plus” button on the main toolbar • Click the “Add Job” link on the Jobs submenu To create a job, you need to assign the following: • Client • Client location Figure 3.3: Adding a Job Page 24 Managing Jobs Managing Jobs • A meaningful job title • Project manager • Start and end dates • Job type Hit the submit button to advance to the next screen where you can add a job description, a creative brief and other optional notes. Infowit Creative Manager provides default text, but we encourage you to overwrite it and add your own details. To access the text boxes for the optional sections, click on the down arrow in the section’s title bar and the section will expand. You will notice in the job title bar that your job now has been assigned a job number. Clicking the submit button will advance you to the final screen in the job creation process. Here you will add clients, vendors, and employees to your job’s team. As you will notice, the employee team table is already populated with two members: the client’s account manager and the project manager you selected from the first screen. From the employee job team table, you can change the access privileges of your team members by clicking on their access level. This will open a pop-up window with a dropdown list of other access options you can choose from. Make your selection and click the submit button. You can add team members by selecting the team category from the dropdown menu located in the upper right hand corner of the Job Team table. Making a selection will open a pop-up window listing all available team members for that category (be it employee, client, or vendor). To select a person, click the check box and choose an access level. Once you have select the people you want to add to the team, click the submit button. The Job Team table will update its list to display the new team members. From this point, you can begin managing your job. Create estimates and assignments. Produce specifications that you can later use to create RFQs for vendors. Upload artwork for client review. Assign team members tasks. 3.4 Creating a Creative Creative Brief Developing a creative brief is perhaps one of the most important steps in defining the scope and direction of your project. The creative brief documents the goals and objectives of the job, clarifies the target audience or consumer, defines important messaging and branding, as well as detailing any legal or technical issues pertaining to the job. Making the creative brief accessible on Infowit Creative Manager allows team members to ensure that during production the goals and expectations of the client are carefully considered and met in the final product. After you have opened a job, you can now add a creative brief by going to the blue dropdown menu in the job status and selecting “creative brief.” • Basically, there are only two fields required for you to create a creative brief: project description and project deliverables. However, we encourage you to be as detailed as possible and fill in the other optional fields, which you can access by clicking the down arrows in each of the section bars. The Creative Brief includes: • Job Information o Project Description (What is it?) o Project Deliverables (What are we delivering?) • Audience o Primary Target Audience (Who are we talking to) o Secondary Target Audience • Goals Managing Jobs Page 25 Managing Jobs o o o o o • Notes o o o Purpose (What must we accomplish?) Style & Tone (What image should we convey?) Copy Points (What are we trying to say?) Call to Action (What should the audience do?) Benefits (What makes it unique?) Legal Notes Technical Notes Additional Notes Once you are done, click “submit” to save the creative brief. In addition to editing the creative brief, the Manage menu on the creative brief page lets you print or e-mail the creative brief. Important Notes: Once the brief is saved, it is visible to team member is the agency, but you must change the creative brief status to “At Client” or “Client Approved” to make it visible to Client team members. If you use the “At Client” status, the client team members will be asked to approve the brief. Changing the status limits the options for changing the status: If the Creative Brief Status is: It can be changed to: In Progress or Internal Approved Any Status At Client Client Approved Rejected Client Approved Cancelled Rejected, On Hold, or Cancelled Any Status This forces agency users to follow status changes in a logical order, but allows the values to be reset if needed. 3.5 The Job Team In Infowit Creative Manager, your job team is not limited to only your employees. During the course of planning and production, you are in close contact with your clients and vendors who are just as integral to the success of the project as you are. In a real sense, they are also team members, and Infowit Creative Manager brings them on board by allowing you the opportunity to assign them to your job team. Job Team Page When you click the “job team” link in the blue dropdown menu in the job status bar, the main Job Team page loads. You will notice three tables: Employee Team Members, Client Team Members, and Vendor Team Members. Clicking on any of the team member’s names will open a pop-up window with contact information. The final column in each of the tables lists the access privilege of each team member. Depending on your own access level, you may see one or all access privileges activated as links. If you are a job user (the lowest access level), you can only change your own access level, which is limited to making yourself active or inactive. If you are an account manager or a project manager, you can update the access level of other team members as well as your own. Page 26 Managing Jobs Managing Jobs Adding Team Members 1. Add a team member by selecting the appropriate team category from the “Manage Job Team” dropdown box. 2. A pop-up window will appear listing all available people. As you may notice, current team members won’t appear in the list since they are, obviously, already members of the team. 3. For each person you want to add, select an access level and click the check box to add them. 4. After you are done, hit the submit button. The main Job Team page will reload with the new members added. Removing a member Because they have been associated with various actions and information related to a job, you cannot remove a member once added to the team, but you can deactivate them by doing the following: 1. From the main Job Team page, click on the member’s access link. Figure 3.4: The Job Team Managing Jobs Page 27 Managing Jobs 2. Click the “Inactive” checkbox and then hit the submit button. 3. The main Job Team page will reload listing the member as inactive. Reactivating a member You can reactivate a member at any time following the above procedure. Just click on the “Inactive” link and you will notice in the pop-up window that the checkbox is now labeled “active.” Check the box and click the submit button. 3.6 The Estimating Process One of the most important—and most complex—aspects of any creative business is building estimates for projects. Any estimation process must deal with a number of key realities of the way creative businesses operate: • Standard jobs, but unique every time: While a creative business has jobs that fit into standard job types, and may even have a fairly well understood level of variability, the reality is that every project is unique. • Clients always change their minds: Clients always run into changes that must be made during the course of a project, and you need to think quickly to determine whether the allowances you’ve made in the initial estimate will cover these changes or if you’ll need to add additional estimates to cover the “change orders.” • Creativity doesn’t always understand the time clock: You can never know exactly how long its going to take to perform a specific task, but you may need to create estimates that have fixed prices. • Your vendors have non-standard pricing: Vendors who do custom work like printers or photographers will have prices that vary widely from job to job, and you can’t predict a price until you’ve talked to the vendor. Of course your clients want to make sure you get them the best price or the best quality or the fastest turnaround, so you need to put every request out for bid to multiple vendors. Infowit is designed to give you the flexibility to deal with complex estimates that allow you to optimize your revenues from every project. Infowit builds flexibility into the estimating and scheduling process: • Estimates for all aspects of the job: Estimates include time for tasks by staff, purchases from outside vendors and expenses of any kind. These estimates can be combined into estimates that are submitted to clients in any combination. • Multiple estimates: You can submit any number of estimates to clients for approval, initially to choose between multiple options • Follow-on or change order estimates: As clients change their minds, or add additional requirements, you can add follow-on estimates to cover these changes, and choose whether or not, or how much to charge your clients for the additional work. • Schedules that change: If your clients miss review deadlines, the amount of work and even the cost may not change, but you do need to change the schedule, and tasks and assignments can be moved to match these shifts. • Specifications, RFQs, Quotes and Purchase Orders: You create specifications for purchases then submit requests for quotation (RFQs) to any number of vendors, manage their quotes and create purchase orders—with or without markups—for the winning bid. Page 28 Managing Jobs Managing Jobs The process of creating an estimate involves setting the variables related to the tasks, expenses and purchases that will be included in the job and then submitting this information to your client for approval. All of these elements are stored and tracked within Infowit even as you make changes, expand projects and adjust your operations to meet alterations and other client requests. Elements of Estimates in Infowit There are five basic elements that you use to estimate jobs in Infowit: • Time Estimates: These define the tasks that are going to be performed by the employees and contractors of the agency. Tasks are specified by the number of hours expected and the billing rate to be used for estimating the job. Tasks also specify the dates in which each task is expected to be completed, and thus generates the schedule for the job. Time estimates can also contain tasks for clients and vendors as well as your staff. • Purchase Quotes: These are quotes from vendors for various purchased items that are involved in the job. These are traditionally either more expensive items or products that are purchased from the agency or from vendors that usually— although not always—go through a bidding process. • Expense Estimates: These are the miscellaneous expenses that you expect to be incurred in the process of completing the job that will not go through a formal bidding process like travel, messenger and copy services, materials, and usage of agency assets that are direct-billed to the customer. These expenses are recorded by employees entering expenses into the system for the job. • Client Estimates: These estimates are created by combining Time Estimates, Purchase Quotes and Expense Estimates into an estimate that is delivered to the client for approval. They can combine any number of these estimates and they can be individually customized to show or hide various levels of detail in the underlying estimates. There can also be any number of client estimates for the job either initially or as follow on estimates created due to changes in the job. All estimates that are approved by the client for the job also set the underlying time Master Schedule Time Estimates Project Manager RFQ Review & Approve Client Client Estimates Expense Estimates Purchase Specifications Schedule Snapshot Quotes Purchase Order Review & Bid Vendors Figure 3.5: The Estimate Process Managing Jobs Page 29 Managing Jobs estimates, purchases and expenses to approved status, allowing time to be worked and expenses to be incurred. • Schedule Snapshots: Time Estimates include all of the dates necessary to generate a full master schedule for the project. Like the information on tasks, purchase and expense details, you don’t want or need to show every detail to the client. Schedule Snapshots allow you to create a timeline document for approval by your clients that has just the detail you want to show them about key dates in the project. These snapshots are archived so that you have a record of exactly what was promised and when. The estimating process takes you through most of the areas of the system, and drives all of the actions through the course of the job. You can use parts of the estimating process without others depending on the unique needs of your business. Billing Categories, Tasks & Expense Types Whether you are entering tasks, purchases or expenses, the system will ask you to choose a Billing Category and an associated Task, Specification or Expense Item Type. You can then provide a unique name and description for that item that is appropriate for that particular item in that particular job. The system uses these values to do reporting and tracking so that you can analyze your business, but also understands and can provide shortcuts for using the system: for example task types all have a standard hourly billing rate to be used as the default whenever that task is included in a job. For most users, these details will be invisible as they will principally use predefined Estimate Templates to create new jobs and the information will be set automatically. 3.7 Creating Time Estimates A time estimate defines the number of hours your agency believes it will take to complete specific tasks necessary to finish the final product. Depending on the job type, each job entails a series of specific tasks you pick then estimate hours for. Detailing an estimate into its component tasks is important not only for billing purposes (where tasks may have different charge rates) but also for Figure 3.6: Creating a Time Estimate Page 30 Managing Jobs Managing Jobs creating employee assignments and filling out timecards. Each of the Billing Categories and Tasks that you can be included in Time Estimates are unique to your agency and are organized to match the needs of your business. Each business may have dozens or even hundreds of items defined in the system depending on the level of detail tracked and the complexity of the business. To ease this complexity, Infowit provides a number of approaches to creating Time Estimates: • Time Estimate Templates: Templates are the easiest way to create Time Estimates. Templates can include any number of tasks from any number of billing categories, renamed to be specific to the needs of the job right down to client and internal notes. All these elements can be set in the template to serve a variety of uses that can be customized quickly. • Previous Estimates: You can copy a Time Estimate from any other job into your current job. When you do this, it will bring in that estimate exactly as it was defined with the exception that the start and due dates for the tasks will be adjusted based on the start date of the current job. • From Billing Categories: This option lets you build up a new Estimate by choosing the tasks for your estimate individually. You choose tasks by selecting the Billing Categories that include the tasks you wish to add, and fill in all the information for each task. Adding Tasks to a Time Estimate—or to a Time Estimate Template—involves specifying a variety of information that is used in different places throughout the system: • Selecting Tasks from Billing Categories: Tasks are selected from Billing Categories. As described earlier, Billing Categories and Tasks Items will be unique for your particular organization. However it is important to note that Tasks with similar names may appear in different Billing Categories. For this reason, building Estimates directly from Billing Categories should be performed by Figure 3.7: Creating a Time Estimate Managing Jobs Page 31 Managing Jobs managers who are familiar with all of the available categories and items, while other users should rely on Time Estimate Templates or estimates from previous jobs. • Adding Tasks: Once a Billing Category is selected, you can add Task Items to the estimate by filling in the number of hours for that particular task. NOTE: If the Hours field for a task is left blank, it will not be added to the estimate, and you can add tasks with zero hours by putting a ‘0’ in the hours field. Zerohour tasks are useful for items that are deadlines or special dates that will appear in schedules, or they can be used for tasks that will be marked as “completed” while hours are tracked in different tasks. If you make a mistake and add a task you did not mean to, you can easily delete it from the estimate later by using the Manage menu while editing the estimate. • Using Hours and Rates: In most creative businesses hours and billing rates are used to estimate the cost of services, and the estimate pages are designed around this model. However there are some elements in creative businesses that are built around fixed prices. For these items, you can build a “task” that represents the fee that will be paid for this service, but you can also estimate the number of hours and put in a billing rate that matches this fixed cost. In this way your employees can log hours in their time cards against this “task” so you can track your costs, however when it comes time to fill in the invoice, it is easy to simply transfer the original estimate amount to the invoice instead of the hourly costs. This makes it possible to manage your business intelligently and determine your profitability even when your business utilizes these fixed cost elements. • One task for many assignments: When you create a task for an estimate, it is normal (although not required) to assume that the task will be broken up and assigned to a number of different people. As discussed later you can also assign tasks to a department rather than an individual as well. You should be careful to allocate time appropriately, for example if four people are going to meet for one hour, four hours should be included for the meeting task. • Customizing Task Names and Descriptions: By default each task you add is given the name of the underlying Task Item Type, but in most cases you will want to customize it. There are also Internal and Client Notes fields that are used for more detailed descriptions or instructions for these items. NOTE: Client Estimates, Schedule Snapshots and Invoices can be set to hide or show the Task Name and Client Notes, so you should choose the text with the idea that you may want the client to read these. • Adding multiple copies of the same Task Item: You can add any number of copies of a single Task Item Type to an estimate. This is common for Task Items like “Review” or “Meeting” where you will want to specify which meeting or what is to be reviewed in the name as you add it. To add additional items of the same type, click the Insert Items button and then enter hours for the same task and click Insert Items again. If you are editing a previously saved estimate you can do the same operation through the Manage menu and selecting “Add Task Items.” • Dates for scheduling: When building a Time Estimate directly from Billing Categories, the dates filled in by default are the Job Start and Due dates. You can change these dates to match the time frames that are expected for these tasks. Remember that once you have created an estimate, you can easily create a Time Estimate Template from it so you can reuse it in the future. Page 32 Managing Jobs Managing Jobs Figure 3.8: The Job Schedule and Schedule Snapshots Scheduling and Schedule Snapshots Time Estimates are used not only to generate schedules but also to maintain them. In Infowit the job schedule is built from the dates in the Tasks defined in the Time Estimates. By combining the concepts of the schedule and the tasks together, any changes in the schedule affect the definition of the tasks and vice versa. The schedule dynamically updates itself with new tasks with each internally or client approved estimate. There is only one master schedule in the job, and it consists of all of the Tasks in all approved (Internal or Client) estimates. When you view a schedule from within a job (select Schedule from the job’s Navigate To menu), you can edit the schedule due dates, adjust the schedule, or take snapshots of the schedule to save a schedule version prior to any schedule updates. Clients can only view Schedule Snapshots, and only when you send an e-mailed or printed version of the snapshot or set the proper Viewing Permissions for the snapshot so that it is visible to them in the Client application. NOTE: Once a snapshot is created, the dates in it are fixed even if the master schedule changes. To show these changes to the Client, you must create a new snapshot. 3.8 Expense Estimates Before an employee can submit an expense report, expense items need to be estimated in advance. This is to ensure that job-related expenses are given clearance and approved by the client, if the client is to be billed for them, so that employees can be properly reimbursed. Most Agencies also set up a separate job with expense estimates for general office expenses that aren’t going to be assigned to a specific job. Filling out an expense estimate is simple: 1. Give the estimate a meaningful name: If you choose, this name may be the only thing that shows up on the Client Estimate and Invoices that the customer sees. 2. Select an estimate due date. This is when the estimate must be either approved or rejected internally prior to assembling the client estimate. Managing Jobs Page 33 Managing Jobs Figure 3.9: Creating an Expense Estimate 3. Provide an estimate description (optional). 4. Enter an estimated dollar amount for expense categories you wish to include in the estimate. Categories that are left blank will not be included in the estimate. You can customize the name of the individual expense, although the system will continue to track that item under the original category name shown. 5. Click the “pass through” checkbox if the estimated amount should not be marked up prior to submission to the client. 6. You can add notes to the expense estimate. Text added to “Client Notes” is viewable to clients, if desired, upon inclusion in the client estimate. Text added to the “Internal Notes” field can only be seen internally. It will also become the default text for notes generated from the expense estimate. 7. Hit the submit button to complete the estimate. At this point it will become available for internal review and will show up on the project manager’s home page the next time he or she logs into Infowit Creative Manager. Once you have created an Expense Estimate and it is approved, staff members can begin to enter expense reports against this estimate for the jobs to which they are assigned. You can set the approval status of the estimate directly or include it in a Client Estimate for approval. 3.9 Specifications: Job Details & Procurement In Infowit, a specification is a document that describes the production details specifying the requirements of a deliverable. Usually this is a deliverable that is to be purchased from an outside vendor that will be put through a bidding process, however specifications may simply be used as a place to store details about elements of the job. They can also be used to specify purchases of items from the agency that are not time related, for example software or manufactured goods. Page 34 Managing Jobs Managing Jobs For instance, if you are doing a brochure for a client, you may have specifications for the printer that includes the number of pages, finished size, how the brochure should be folded or bound, paper type, and inks; or you may have a specification for the photographer that includes number of photos, set and lighting requirements, as well as location. Specifications let you have a central definition—accessible to everyone on the team—that makes explicit: 1. The exact requirements for the job and the expectations of the client; and 2. The exact specifications for generating RFQs to vendors for purchases. Because they serve both these roles, Specifications are a separate item on the Navigate To menu within each job. Creating Specifications The Specification page that you can reach via the Navigate To menu houses a table listing all specifications for your job. Each specification is assigned a unique ID number listed in the first column of the table. The list can be sorted by specification number, item, and due date. To view the details of a specification, click its ID number. From the “Manage Specifications” dropdown box, located in the upper right-hand corner of the lookup table, select “Create Specification.” A new form page will load where you can enter your details for the following required fields: • Billing category • Item type • Item Figure 3.10: Creating a Specification Managing Jobs Page 35 Managing Jobs • Quantity • Description • Specifications • Due date • Vendor Name and Contact (use only if immediately entering a quote) This form allows you to simply enter the Specification or you can instantly enter a quote from a specific vendor by choosing that vendor and clicking “Create Spec & Enter Quote.” From the Manage menu you can also do a lookup of previous specifications, and load one from the database to use as a starting point. Choosing the right Billing Category is extremely important. If you are in doubt which billing category is appropriate for you, ask your billing department. Item types are determined by what billing category you choose. To help you create a meaningful specification, Infowit Creative Manager offers mark-up tools that allow you to add formatting to your text. While composing, you can add such elements to your text as the following: • Bolding • Italics • Underlining • Highlighting • Bulleted lists • Indenting • Hypertext links • Email links • Horizontal rules Infowit achieves this through HTML tags that are included in the text of the specification. If you are familiar with HTML and would like to hand-code your specifications in the text area, simply add the appropriate HTML tags and attributes (Note: please use double quotes when specifying attribute values in your HTML tags) 3.10 RFQs & POs: The Procurement Process Once you have created a set of specifications, you can begin the process of sending these specifications out to bid by your vendors. This procurement process involves several steps: • Define the specifications: Like most elements within Infowit, these specifications may be approved before proceeding to the next step. • Create Requests For Quotation (RFQs): These RFQs are sent to any number of different vendors for bidding. • Receive and evaluate quotes: As the vendors respond, you enter their quotes into the system. During this process you can optionally include a markup on the services or products provided by the vendor. • Submit Quotes to clients for approval: Once you have selected several quotes, you can combine them into Client Estimates for approval by the client. • Create Purchase Orders: Once a quote is approved, you can create a purchase order and then deliver it to the vendor to initiate the work. Page 36 Managing Jobs Managing Jobs Specifications: Print Paper Photography Illustrations Video Create or Reuse Project Manager Vendor A Request For Quotation (RFQ) Vendor B Vendor C Vendor Quotes Purchasing Manager Review & Approve Purchase Order (PO) Vendor B Figure 3.11: The Procurement Process The procurement process in Infowit can be formal or informal, and the system can allow shortcuts where necessary to fill different roles: • Quick Quotes: When you create a Specification you can immediately enter a quote from a vendor without creating an RFQ. • Agency as Vendor: You can enter the Agency as the vendor to manage purchases from the agency for items that are not based on time. • Vendor Quotes without purchasing: You can be the source of quotations for your vendors, but leave the purchase order and invoicing to your vendors for direct interaction with your client. Simply leave the markup for the purchase as zero, and the amount will not be included in the financial information for the system. • Purchasing roles: You can use the system to allow purchasing approvals either by the individual project manager or by an executive or purchasing manager. Any or all of these options may be used in your agency as is required by your specific needs. Creating RFQs It’s easy to generate RFQs in Infowit. From a specific job, select RFQs/Quotes from the Navigate To menu. A directory of RFQs and quotes will appear. To create a new RFQ, go to the Manage menu and select “Create RFQ.” A pop-up window will appear with a list of specifications for the job. Note: If there are no specifications listed, you cannot create an RFQ. Navigate to the specifications directory (by choosing the option from the main dropdown menu) and then create a Managing Jobs Page 37 Managing Jobs Figure 3.12: Creating an RFQ specification. Once you have created a specification, you can then go back and generate an RFQ. Once you have selected a specification, you simply select the vendor, the quote mailing date, the quote due date, and any notes you would like to add to the RFQ. Once you hit submit, you will be redirected to the detail page for your new RFQ. You will notice that Infowit creates a unique RFQ number. This will help both the system and you keep track of RFQs and match them with their vendor quotes. Managing Vendor Quotes Once you have started submitting RFQs to vendors, they will begin responding with bids on the Figure 3.13: Entering a Vendor Quote Page 38 Managing Jobs Managing Jobs RFQs. As these are received, simply go to the RFQ/Quotes page via the Navigate To menu, then select the RFQ for the vendor from the list and then enter the quotation. The system will display a popup window that allows you to fill in the following information: • The markup percentage that will be applied to the vendor’s quote. • The amount quoted by the vendor. • The amount that will be quoted to the client • The date the quote was received. This form will automatically do the computation for you if you enter the markup percentage, or you can simply enter the amount to quote the client directly. Once the quote is created you can either: • Approve the quote directly by changing its status to Client Approved, or • Change the status to Internal Approved. This will allow the Quote to be included in a Client Estimate. The Client Estimate can then be submitted to the Client for Approval. Once the Client Estimate is set to Client Approved, the status of the Quote will automatically be set to Client Approved. Note that Purchase Orders cannot be created until the Quote is set to the Internal or Client Approved status. Purchase Orders Once quotes are approved, you can generate a purchase order to submit to the vendor. The purchase order will automatically include the specification, the vendor information and the vendor Figure 3.14: Creating a Purchase Order Managing Jobs Page 39 Managing Jobs quote, but gives you a number of items to specify that are unique to the purchase order: • Billing Terms • Proof and Due dates • Ability to modify the Name of the purchase order and details of the Specification • Additional notes to the vendor • Ability to modify and set the total amount, and add sales taxes and freight charges. • The delivery location Once the purchase order is created you can print it out or e-mail it to your vendor for fulfillment. 3.11 Creating Client Estimates Client Estimates bring together the Time Estimates, Vendor Quotes and Expense Estimates into a single estimate that can be delivered to your client for approval. There are two steps to creating a Client Estimate: • Defining which Time, Quote and Expense Estimates to include in the estimate: Any number of estimates of any type can be included in the Client Estimate. • Defining the level of detail to show within the estimate: You can limit the estimate to a high level description and a total amount or show detail down to individual tasks, expenses and their amounts. These two steps allow you to both flexibly specify exactly what work is to be approved by the client as well as defining exactly the information you wish the client to see. Including Time, Quote and Expense Estimates To define a Client Estimate, click the Estimates menu item on the Navigate To menu, the select Create Client Estimate from the Manage menu on that page. A popup window will appear showing all estimates that have been set to Internal Approved status. If you do not see an estimate you expect to see, it is usually because it is still set to In Progress status: you must set the Time, Quote and Expense Estimates to Internal Approved before they can be included in a Client Estimate. On this page you can click the check box next to each estimate to include it, and then provide details of the name of the estimate and other comments to be included at the top level of the estimate. Figure 3.15: Creating a Client Estimate Page 40 Managing Jobs Managing Jobs Figure 3.16: Client Estimate Detail Formatting Formatting Client Estimates The final Client Estimate can include a variety of levels of detail depending on what you wish to show your customer on the estimate. You can choose to show or not show various groupings and line items in the estimate, with or without the amounts broken out next to each. To set these displays up for use, select Print or E-mail the estimate after it has been saved in the previous Managing Jobs Page 41 Managing Jobs step. A popup window will display showing you the estimate as it will appear when printed or mailed. At the top of this screen there are a set of check boxes that allow you to vary the information shown on the estimate, utilizing details from each of the underlying estimates. NOTE: Your settings are saved by the system so that you can go back and see exactly what was sent to the client. In addition, Invoices will carry over these settings so that the invoices will match the estimates. 3.12 Creating Task Assignments The Tasks in Time Estimates are used to generate Task Assignments for your staff, clients and vendors. Task Assignments serve several important roles: • Responsibilities and deadlines: Assignments make specific people or teams responsible for ensuring that specific jobs are completed on schedule. • Tracking hours: For your staff, the system provides a mechanism for knowing how many hours are available for doing particular tasks over a certain span of time. • Measuring employee loads: Even for agencies that are not formally tracking hours, assigning time allows managers to see how much time people on the team have available to work on new jobs. As these roles show, the task assignment mechanism can be used in a wide variety of ways depending upon how your agency or department is organized. In order to take advantage of this flexibility, it is important to understand the ways in which task assignments operate: • Each Task in a Time Estimate can be used to create any number of Task Assignments. A single task can even be assigned to an individual, a department, or a client, all at the same time. • Assignments can include any number of hours so that different individuals can be given part of a task to perform. • Each assignment has its own notes. While these notes are initially copied from the Internal Notes for the task, each assignment can have further information specified. Time Estimates Clients Tasks Tasks Tasks Task Assignments Complete To Do Items To Do List Task Assignments Employees Timecards Hours/ Completion Figure 3.17: Task Assignments Page 42 Managing Jobs Managing Jobs Figure 3.18: Creating Assignments • Employees who are given task assignments see those assignments in their time cards. They enter hours and set assignments to completed status and enter any status notes through their timecard entries. • Assignment hours can be set up to and beyond the amount projected for the task in the estimate. Going “over budget” on a task may be interpreted in a variety of ways: as a trip wire for preparing a follow on “change order” estimate, as a “learning experience” to create a higher estimate next time, or as a standard procedure to reallocate costs to different expense areas. Assignments may be created for members of the agency staff, or clients, however there are situations where an agency may want to occasionally—or as a regular practice—assign tasks to departments or teams. Departmental Assignments appear on the timecards of all staff members who belong to the department to which that item is assigned. Staff Workload To assist in assigning employees, the Employee Workload popup gives you a summary of the workload for each employee by week. This popup allows you to browse to different weeks, and assess when a particular assignment can be given to an employee. This feature is useful primarily Managing Jobs Figure 3.19: Staff Workload Page 43 Managing Jobs Figure 3.20: The Job Message Board if employees are fully assigned their work or if standards for assigned hours per week are in place for the agency. 3.13 The Job Message Board Each job has a central message board that allows users within the agency to discuss issues related to the job either among themselves or with clients. The message board is similar to many message board systems that users have used elsewhere to enhance ease of use: • Message topics are “threaded” allowing users to reply to specific issues and provides an easy mechanism to navigate to topics of interest even when there are many postings. • Messages can be marked as being visible only within the agency or by the client Figure 3.21: Posting a Message Page 44 Managing Jobs Managing Jobs users as well. They can also be limited to administrative and management team users. • Messages can be e-mailed to any set of people on the job team. This is useful for notifying infrequent client users, and directing them to participate directly in the discussion via the message board. • Messages can be marked with icons to quickly identify hot issues, budgetary, questions, request, or announcement topics. Note that there are separate message boards for each image and document uploaded for the job so that comments on these items can be stored with the items that are being discussed. These Files Message Boards work exactly the same as the Job Message Board 3.14 The Job Files Area The Job Files area lets you store important files such as graphics and documents directly with a job so you can share them with other team members and clients. By uploading files to a job through Infowit, you ensure that information is kept in a central location and available at any time for team members to download. You can upload any kind of file to your job, including Microsoft Office documents, PDFs, image files, fonts, and sound files. Job Files are separated into two groupings: • Images: This area is only for web-viewable images. The reason for this is that the images will be displayed directly within the Infowit interface using the enduser’s web browser. We also use resizing functions to allow very large images to be fit onto smaller displays (users can click on images to get full-size displays as well). The only formats of files you should upload to this area are GIF (not LZW compressed) and JPEG (RGB-mode only). It is highly recommended that when Figure 3.22: Job Files Managing Jobs Page 45 Managing Jobs Figure 3.23: Job Image with Comment Message Board and Approvals saving images for upload that you use Photoshop’s “Save for Web” feature. • Documents: This area is for files of any type, to allow them to be shared between users. Although there is a “type” field for documents, this value is for informational purposes only and there are no limits on the type of file that is uploaded, although it will NOT be viewable if the user downloading the file does not have the appropriate software on their local desktop system. • Images with Links: Images have associated with them a web link that can be used to direct users to external web sites or streaming media sources. Typically, you would upload an image taken from the source as a placeholder then specify the link when you upload this image. The specific function of “Images” is to allow staff and clients to review comps or prototypes of a job during pre-production. In general, you should only upload image files that are being used for review. If you want to upload an image as a resource or for archiving, upload it as a document. To add an image or document to a job, select the appropriate option from the Manage menu located below right of the main title bar. Managing Images and Documents Images and Documents are a major part of the review and approval process with clients. The system is designed to make it easy to control the sharing and usage of files within the system. There are multiple settings for managing access: Page 46 Managing Jobs Managing Jobs • Image/Document Audience: This value defines whether the file is intended for use only within the agency or if it should be shown to clients. • Image/Document Status: While the status of a file is In Progress, it is not visible to clients through the Infowit Client interface. Once the status is changed to “At Client” it appears in the Client interface with a request to approve the image. Approved and Rejected Images continue to appear in the client interface. • Admin Only: This checkbox limits access to the file only to agency employees who are project managers for the job or who have system administrator status. • Image/Document Keywords: Any number of keywords can be specified for a file and these keywords can be used to find files within any job in the system. Images and documents are stored inside the Infowit system, however the main intent for the system is to provide sharing and commentary on these files. Most organizations will want to maintain separate archives and backups for the original files to ensure against loss. 3.15 Managing Client Requests When clients request a new job through the Infowit Client interface, a new job request will appear on the home page of the person who is assigned as the account manager for that client. All users can get to open Job Requests by going to the client’s information page under the Client tab and then use the Navigate To menu to select Job Requests. NOTE: the Job Requests item on this menu will not appear unless there are outstanding Job Requests for that particular client. A Job Request is a form that essentially fills out a Creative Brief for a new job. The Account Manager can review this request and then convert it to an open job. When the new job is opened, all of the information entered for the Job Name, Type and Creative Brief will be inserted into the new job. While the requester is given the ability to select a Job Type for the job, the Account Manager can change this when the job is converted to an open job. Similarly, any other information entered can be edited or added by agency staff. Once the job request is converted to an open job, the request is no longer visible. Figure 3.24: A Job Request Managing Jobs Page 47 Managing Jobs Figure 3.25: Job Information Progress and Hours Analysis 3.16 Job Tracking: Progress, Analysis and Financials The Job Info page provides a summary of the information on the job. The graphs give a quick overview (not to scale in order to make it more useful) of the progress of the job based on days in the job, hours assigned and worked to date, and the number of assignments completed. It provides several short cuts to reports that can be reached by clicking the links on the Totals line of the Hours Analysis section: the Estimated Hours summary, Job Assignments, and Worked Hours summary. The Job Financials page—which is available only to project managers, account managers and administrators—provides all of the information you need to know to understand whether a job is on track or running over budget. It gives you the ability not only to view the current state of the job, but also to do “what-if” analysis by modifying values for work yet to be completed on the project. The Job Financials page contains several key pieces of information: • Labor income and cost analysis: The top half of the page shows both the number of hours approved and the number of hours worked to date. As Infowit supports the ability to track non-billable as well as billable hours but still track their ties to specific jobs, the display also includes all non-billable hours information identified as being part of the job. • Labor profitability: Labor profitability for the entire job can be estimated and options for increasing and decreasing hours to complete the job can be analyzed for its affect on both margin and comparison to the existing budget. • Labor billing rates and costs: Labor billing rates are based on actual hours and billing rates from estimates and timecards. The billing rate shown is the weighted average of these. Costs are based on a system defined labor cost rate that can be adjusted to match known mixes of labor costs. Page 48 Managing Jobs Managing Jobs Figure 3.26: The Job Financials Page • Total project income and cost analysis: The lower half of the page shows a summary of the information in the labor analysis at the top of the page, and includes vendor purchases and expenses for the project as well to show overall project profitability. The vendor purchases and expenses provide expandable areas that allow you to adjust and analyze different values for the expected final project revenue and costs. The Job Financials page allows managers and executives to quickly analyze the status of a job and quickly determine whether or not to create follow-on client estimates or identify any other changes necessary to keep the project profitable. 3.17 Job Invoicing The final step in any job is Invoicing. As with the Job Financials page, Job Invoicing is only available to project managers, account managers and system administrators. Like estimating, invoicing in Infowit is intended to be flexible. When you select “Invoices” on the Navigate To menu for a job, you will be taken to a page listing all invoices created for the job. A job can have any number of invoices, and the system allows you to track which invoices have been paid or partially paid. Invoices are created and managed through an Invoice Worksheet. The Invoice Worksheet page provides a listing of all approved estimates and shows all of the task, purchase, and expense items included in those estimates. Each of these items shows the number of hours worked or purchases and expenses incurred against which invoices can be created. As with any system intended to track financial information the main complexity in the Managing Jobs Page 49 Managing Jobs Figure 3.27: The Invoice Worksheet invoicing process is in performing this mapping between what was estimated and what work has been done, and Infowit automates computing this information. At the same time, the Invoice Worksheet gives you the flexibility to bill for any amount at any time in the process, even ignoring actual hours worked in creating invoices for payment: • The worksheet displays the amount taken from the original estimates. This value can be transferred directly to the Billable column (the amount that will be included on the invoice you are creating), by clicking the red arrow next to the estimated value. • Amounts billed on previous invoices are totaled in the “Billed” column to allow you to see how much of each item has been covered by other invoices. • Items are organized by revenue/expense type (time, purchases and expenses), estimate name, billing category, task/expense/purchase line item. • For task items, the number of hours worked to date—broken out by regular and “rush” hours—are shown. The rate displayed by default is the rate used in the original estimate. More complex rates can be calculated by clicking the calculator icon next to the rate (see below) • As hourly rates are entered or changed, the Billable column is filled in with the computed amount based on multiplying the rate times the hours. • To leave a line item out of the invoice, be sure that the Billable column for that item is blank. A zero amount will include that line item in the Invoice with a value of zero. • Like task items, purchases and expenses can be filled in from estimate amounts for either the entire or partial amounts. • Items that are taxable can be checked, and the taxable amounts are computed for all taxable items on the invoice at the bottom of the invoice. Page 50 Managing Jobs Managing Jobs Figure 3.28: Invoice Worksheet Totals and Details • As with other documents generated by the system the invoice is given a descriptive name that identifies its purpose (e.g. “Initial Invoice for Brochure”), and will be printed on the invoice itself. • The invoice is printed with the date it is to be issued, the date that it is due, and the billing terms, all of which are printed on the invoice. • Client purchase order numbers may be included on the invoice. Note if you do not have these initially, you can add them by returning to edit the invoice prior to approval. • To recalculate values on the invoice click the “Calculate” button at the bottom of the listing of estimates. When you have completed the invoice you can save it by clicking the “Save Invoice” button at the bottom of the page. You can return to edit the information on the invoice, and add or delete items from the invoice at a later time. Calculating Invoice Hourly Rates Tasks listed from the invoice may contain different hours from different employees. In addition, there may be standard rates that are used in different situations that may be different from those used in the original estimate. While by default the Invoice Worksheet uses the values for the hourly rate given in the original estimate for a task, there are many ways that you may wish to change this value, and Infowit provides a popup window to assist with this computation. By clicking the “calculator” icon next to the hourly rate opens this window: • The window displays all of the time card entries for each employee who performed work on that task. Managing Jobs Page 51 Managing Jobs Figure 3.29: Calculating the Billing Rate • Initially the hourly rate for the task as shown in the estimate is used. Next to each hourly rate entry is a pull down field that will automatically bring in one of the following values stored in the system: o Estimated: The rate from the original estimate o Category: The standard rate for the Billing Category o Task: The standard rate for the Task Item Type within the Billing Category o Employee: The standard rate for the particular staff member o Client: The standard rate for the client Any of these values may be used or a different value may be entered. • The system will compute the weighted average billing rate for all of the entries for the task being computed, as well as the total amount to be billed for the task Once the proper billing rate is calculated, clicking the “Copy Values” button will move the data into the related task line item in the Invoice Worksheet. Printing and E-Mailing Invoices Once completed, an Invoice can be printed or e-mailed. To make it easy for the user and maintain consistency for client purchasing managers, the default format for the invoice will be set to include the same level of detail as used in the client estimates that were originally approved by the client. All of the same options are provided for showing the detail of tasks, purchases and expenses as are available for the estimates. Page 52 Managing Jobs 4. STAFF: ASSIGNMENTS, TIMECARDS & EXPENSES 4.1 The Employees Area The Employees tab in Infowit takes you to the area that is the focal point for most employees who are working with the system. This area has four main parts: • The Home Page: While not formally part of the Employee area, this page—which is displayed on login to the system and can be viewed by clicking the Home icon in the Shortcut Bar—provides a quick summary of activities in the system that are unique to you because you belong to job teams or have specific roles in the system. • My Assignments: This page shows all of the assignments that the currently assigned to you. • My Timecards: This page also displays all of your assignments, but as a timecard format that allows you to enter time for each task as you work on it. • My Expenses: This page allows you to enter your direct expenses for reimbursement, although it may also be used as a mechanism for charging clients for the usage of agencies resources such as copying or printing. Figure 4.1: The Infowit Employee Home Page Staff: Assignments, Timecards & Expenses Page 53 Staff: Assignments, Timecards & Expenses Figure 4.2: The My Assignments Page Staff members normally have System User access status and can view all of the general Job information for the jobs they are assigned to, so that they can find the information they need to perform their tasks. They will be using the Job Files area most frequently to exchange information, content they are creating and participate in team discussions. However they will mostly use these three functions in the Employees area. 4.2 My Assignments The My Assignments page lists the assignments that are currently assigned to you. As you complete assignments, they will disappear from this list. New assignments will show up on your home page and will be added to the My Assignments page as well. This page contains a number of columns so that you can quickly locate and prioritize tasks. The elements on the page can be sorted and are flagged in a variety of ways: • Sorting: Assignments can be sorted by job number (by client code first), task description, start and due dates, assignment status, and priority. • Jump to Job: By clicking on the job number you will go directly to the Job Info page for that job. • Assignment Dates Overdue: A red exclamation point next to a date indicates that the assignment is overdue. • Assignment Status: You can change the status of an assignment directly by clicking on the status and changing it in the popup window that appears. Also, while you can set the status to completed, the project manager may disagree and set it back to In Progress! • Job Status Color Coding: Assignments with a green background indicate the job is Open. A yellow background means the job is On Hold. A red background means the job is Ready to Bill. Although Closed and Cancelled jobs will never appear in this page, a gray background indicates that the job is in one of these two statuses. Page 54 Staff: Assignments, Timecards & Expenses Staff: Assignments, Timecards & Expenses Figure 4.3: Entering Timecard Information 4.3 Entering Timecards Timecards are the primary mechanism for tracking work performed within the agency. Your agency will have different policies and practices on how to fill out time cards. Timecards display all of the tasks that are assigned to you, and your agency may have practices that involve entering hours for some tasks, but only marking others as completed. The system is intended to accommodate varying agency practices. One of these options is that users my be shown daily or weekly timecards to fill out. This chapter only discusses weekly timecards, however daily timecards operate in an identical fashion. When you click the My Timecards menu item, you will first be shown a popup window that lets you select the date that you wish to add a timecard entry. The system will then display the timecard page for the week that includes the day that you select. This page has three main sections: • Employee Assignments: This section lists the assignments that have your name on them, and you are solely responsible for completing them. • Department Assignments: This section lists assignments that have been given to your department or group for completion. If you work on these assignments, you should enter your hours as appropriate. • Timecard Entries: At the bottom of the previous two sections is an Add to Timecard button: when you click this button the entries you have filled in so far will be added to this section. This allows you to make multiple entries for each task, so you can for a single task add 8 regular hours and 2 hours marked as “Rush” (may be considered overtime in your agency) to your time sheet. This section has its own Submit Timecards button which you should click when you have no more timecard entries for the day or the week: this button marks you timecard as completed for the day or week. Staff: Assignments, Timecards & Expenses Page 55 Staff: Assignments, Timecards & Expenses Within the Employee Assignments and Department Assignments sections there are several pieces of information that you can specify: • Completed Checkbox: Check this button when you have completed the assignment. If you do not enter any hours, it will create a timecard entry with zero hours. • Hours by day: You enter the number of hours into the appropriate day of the week. PLEASE NOTE: THESE ARE IN HOURS NOT HOURS AND MINUTES: If you want to enter an “hour and a half” enter “1.5” in the field. • Rush Checkbox: The Rush checkbox may be interpreted in different ways by the agency, as overtime or as a mechanism to use a higher billing rate to charge the client. Check this box if the hours you are entering should be considered “Rush.” Note: ALL of the hours for that line will be marked as “Rush” if the box is checked. If a single task has both rush and non-rush hours, first enter the nonrush hours, click the Add to Timecard button then add the rush hours with the Rush box checked. • Total Hours: This column shows you the total number of hours you have entered for the week for an assignment, along with the hours left available for that assignment. Note: You can add more hours than are available for the assignment. The system will warn you that you have gone over, but you can still enter the actual number of hours you have worked. 4.4 Entering Expenses The last section in the Employees tab lets you enter expenses for projects and create expense reports. The expense reporting mechanism is extremely flexible. It recognizes that employees may have expenses for a variety of different projects within a single expense report, but these expenses may need to be individually approved by the project managers for each of the projects. Expenses go through the following process: • Project managers create expense estimates for jobs. Expenses can only be entered if an expense estimate has been created and has at least a status of Internal Approved. Like Tasks and Task Assignments, a single expense entry in an Expense Estimate can be used for any number of Expense Items that employees enter for their expenses. Agencies may create “General Office” jobs that have expense estimates that are for company related expenses that are not associated with a specific job. • Employees enter expense items as they are incurred. Expense Items are individual expenses. Page 56 Figure 4.4: Creating an Expense Item Staff: Assignments, Timecards & Expenses Staff: Assignments, Timecards & Expenses Figure 4.5: Expense Items Based on the agency policy, employees then create and submit expense reports that can contain any number of expense items related to any number of jobs. • Expense Items appear under each job under the Expenses item on the Navigate To menu. Project managers can review these and approve or disapprove the expense for the job. • Expense Reports appear to the manager of the employee (entered when the report is created) on the manager’s Home Page. The manager can review the report (waiting for approval of the individual project managers if desired) before approving the expense report. • Accountants can run reports from the Admin area each week to run a listing of outstanding expense reports for payment. The use of status within the system is open to allow a variety of policies to be practiced depending on the requirements of the agency. Figure 4.6: Creating an Expense Report Staff: Assignments, Timecards & Expenses Page 57 5. CLIENTS: REVIEW AND APPROVALS This chapter is divided into two primary parts. The first part provides information on tracking company and contact information that is common to both Clients and Vendors in the system. The second part of this section gives you an overview of the Infowit Client interface used by clients for review and approvals 5.1 Client and Vendor Company Information The Clients and Vendors tabs in Infowit take you to the areas in which you manage company and contact information about those organizations. This information is organized in a way that is slightly more complex that most contact management systems, but results in a dramatic decrease in data entry and data clean-up when changes occur: • Companies: Company information is organized first around Companies all contacts must have a company specified before being entered into the system. Company information focuses on tying together information that is common to the entire company. These include financial information such as standard billing rates and company payment ratings, company files such as logos and boilerplate that can be included in every job, as well as marketing information and industry research • Company Locations: Each company has one or more locations that are identified as an address. Each location may have up to three addresses: the street address, the shipping address and the billing address. There also may be Location specific files. • Company Contacts: Contacts within a company are tied to the Company Location that is their main office. Information for contacts includes their direct Financial Data & Ratings Company Files Graphics Standards Marketing Information Industry Research Company Company Company Company Locations Locations Locations Company Company Company Locations Locations Contacts Addresses Phones Web Sites Location-specific Files Direct Phones E-Mail addresses Infowit Access/Login Personal Information Figure 5.1: Company Information in Infowit Clients: Review and Approvals Page 58 Clients: Review and Approvals Figure 5.2: Company Information phone and e-mail information, personal information, and most importantly the login information for them to access Infowit via the Infowit Client interface. Important Notes about how company information is used in the system: • Most information that is tracked in the system as being related to a client or a vendor is actually tied to a specific Company Location. This allows you to keep separate divisions of the same company separate, especially to divide their contacts into groups. • Company Locations can also be treated as departments of the company if the department distinction is more important for the company and all departments have the same location addresses. • Depending on the specific needs of the agency and the client, it may make sense to create different divisions of a company as separate companies. Differences Between Client & Vendor Company Info The Vendors area is almost identical to the Clients area. There are only a few differences in the Vendors area: • Vendors do not have a prospecting function. • The Vendors Navigate To menu shows current RFQs and Purchase Orders where the Client Navigate To menu does not. • The Vendors Navigate To menu does not show Prospecting, Jobs or Standards. In all other respects the information in this section on adding and managing Vendor information is identical to that for Clients. In the rest of this section, you can perform the capabilities shown for Vendors as well as Clients, even though we use the terminology “Client.” Clients: Review and Approvals Page 59 Clients: Review and Approvals Figure 5.3: Searching for Companies Finding Clients When you initially click the Clients tab, you will be shown the “My Clients” page, unless you are not an account manager for any clients, in which case you will be shown the “Clients Directory” page. Both of these pages operate in exactly the same way: • You are shown a list of all clients in the system, initially sorted by Company Name. • If there are more companies than will fit on a single page, there are page navigation links at the bottom of the page that let you move to names quickly. • You can sort the companies by any of the columns shown in the table by clicking the up and down arrows in the column headers. • The “Status Filter” pull-down menu lets you limit the list to Active, Inactive, or Prospect companies, or show all companies no matter what their status. To find companies quickly, click the “Client Search” menu item on the Tab Menu. This will bring up a popup window that lets you fill in information that will let you quickly navigate to specific clients. You can search based on: • The client name or code (you can use partial names) • The company status • The client industry and segment • Clients assigned to a specific account manager When you click the search button, all companies that match your search criteria will be shown. The “Contact Search” menu item operates in the same way as the Client Search pop-up does, but it allows you to jump directly to a contact within a company. Once you click on a client name from these lists, you will be taken to the Client Info page that shows the information for the client, and lists the locations known by the system for that particular company. Page 60 Clients: Review and Approvals Clients: Review and Approvals Figure 5.4: Adding a new company and its main office location Adding a Client Company Infowit consolidates information about your clients. Rather than having to enter and re-enter common information about contacts at a company, information about clients is structured around the company, company locations and contacts at each location. This is the primary form for adding a new client to the system. To create a new client, you must fill out at least all fields bolded in red. Infowit also includes a dropdown list of company codes already in use so you can create a new client code easily. If you cannot find an appropriate industry or dominant segment for the client, required under the Marketing Information section, contact your Infowit administrator about defining a new industry. After you submit the client’s basic information, you will be directed to another form where you will enter more detailed information, such as billing address, shipping address, and mark-ups. Adding a Client Company Location The Client Info page lists all of the locations known by the system for that company. Infowit makes it easy for you to manage your clients and vendors by creating multiple locations each with its own contact list. By allowing you to store multiple locations for a single client or vendor, Infowit provides you with the flexibility to create RFQs, purchase orders, shipping orders, and invoices for specific departments. This also makes follow up and tracking easy for you and for your external team members. Once you have selected a client, you will be redirected to the client’s detail page. On the Client details page, select “Locations” from the “Navigate To” dropdown menu. This will access the table of locations for that particular client. By clicking on the location name you can view detailed information, including separate shipping address and Web site links. Clients: Review and Approvals Page 61 Clients: Review and Approvals From the client’s location page (see above section for access instructions), select “add location” from the context sensitive dropdown menu located directly below the “Navigate To” menu. This will load a new location entry page. To create a new location, you must fill out the minimum required fields marked in red. Infowit, however, provides additional fields for detailed information that takes into account that other businesses may specific destinations even within the same location. Infowit assumes that a client location can have as many as three separate addresses: • The main mailing address • A shipping address • A billing address. This is handy in situations when one location my require bills sent directly to their local office while another location may need bills, invoices, or payments sent to corporate headquarters. Adding Client Contacts You can have multiple contacts for any given client or vendor. When you set up a client for the first time, you are prompted to create a contact, but you are not limited to only having one. As clients can have multiple offices, you can set up one or more contact for each them. 1. Select a client (from My Accounts, the Clients Directory, or by doing a Client search). 2. From the “Navigate To” dropdown menu, choose “contacts.” A directory of all contacts for Figure 5.5: Adding a Company Contact Page 62 Clients: Review and Approvals Clients: Review and Approvals that client will appear. 3. From the “manage contacts” dropdown menu (directly below “Navigate To”), choose “Add Contact.” 4. To set up a new contact, you must fill out the required fields in the Basic contact information section. However, Infowit provides additional fields for storing more detailed information about the client. To expand the other sections, click on the white down arrow. 5. When you are done, hit the submit button. The contact directory page will reload with you new entry. To add another contact, repeat steps 3 and 4. Add Web Site Infowit allows you even to centralize vital FTP information required for uploading and downloading information to and from clients and vendors. 1. Select a client or vendor 2. On the Client/Vendor Info page, select “add web site” from the dropdown box located immediately below the “Navigate To” dropdown menu. 3. Select a location from the dropdown box 4. Enter a descriptive name for the web site. 5. For the URL, place your cursor after the preset text (http://) and type the full URL. 6. Fill out the other fields and hit the submit button. Add Company Research Infowit offers you the opportunity to store important information regarding your clients, such as market research, client campaign history and strategy, as well as details regarding client competition. Infowit divides company research into three categories: company research; company assessment; and industry research. 1. Select a client (from My Accounts, the Clients Directory, or by doing a Client search). 2. From the “Navigate To” dropdown menu, choose “Research.” 3. The Research detail page will display research information for the three research categories. To add company research, select the option from the dropdown menu directly below the “Navigate To” box. 4. When you are finished adding the details, click the submit button. After you have created a research profile for any of the three categories, you can go back and revise following the same steps. 5. Adding information to the other two categories is simply a matter of choosing the appropriate option from the dropdown box. Editing Client and Contact Information After you have created a contact for a client, you can update that contact’s information at any time by clicking on the contact’s name from the contact directory page. You can access the contact directory page by either selecting the option from a particular job’s main dropdown menu or by running a search from the Client Search button on the Clients submenu. Once you have Clients: Review and Approvals Page 63 Clients: Review and Approvals clicked on the contact’s name, the contact’s current information will load. To edit or add information to the contact, select the Edit Contact Info from the context sensitive dropdown menu located below right of the main title bar. After you have updated the appropriate information in the form fields (to expand or collapse sections of the form, click on the down arrow located in the olive colored section title bar), hit Submit to save your changes. Infowit will redirect you to the client’s info page so you can review the changes you have made. 5.2 Accessing the Infowit Client Interface This is a Web-based application that allows clients to interface with the project from their end – they can view estimates, schedules, creative briefs, and view and approve comps, illustrations, photography, and other creative materials. Employees and project staff never actually enter the Client Area. Unlike Infowit Creative Manager, Infowit Clients resides on a Web server and is available as a password-protected Web site across the Internet. Your clients can access their own project area for the job as easily as they would access any other Web site. When you create specifications, creative briefs, estimates, schedules, and upload job files, you can make these available to your client on Infowit Clients by simply clicking a button. Clients will then be able to access in their own project area much of the same information you can view in the Project Area in Infowit Creative Manager. In addition, clients can make approvals and requests and follow the progress of those requests as you assign and complete the work. Granting Access to Client Contacts In order for your client contact to be able to access the Infowit Client Interface there are two key steps: • Grant access to Infowit: You need to go into the contact’s record, set Infowit Access to “Active” and then give them a username and password. See the previous section on adding a client contact. • Add the Client Contacts to the relevant Job Teams: For each job that you wish that client to access, they must be added to each Job’s Job Team. Logging In to the Infowit Client Interface The method of logging into Infowit Client is identical to logging into the Agency interface EXCEPT that a different URL is used by clients. In most cases, if the URL for logging into the Agency interface is: http://xxxxx/Agency Then the client login page will be: http://xxxxx/Client Check with your Infowit system manager to confirm the URL to give to your client contacts. Typically, you will give them this URL via e-mail, or link it into your company’s web site. To test what your client will see you can log into the system as a particular client contact by going to that contact’s information page under the Client tab, expanding the “Infowit Access” section on their information page and clicking the link labeled “Launch Client View as …” This will open up Infowit Client in a separate window. You can log out of this interface and resume using the Agency interface at any time. Page 64 Clients: Review and Approvals Clients: Review and Approvals Figure 5.6: The Infowit Client Home page 5.3 Using the Infowit Client Interface Infowit Client is a simplified version of the agency interface designed for more occasional users. It has a different look to distinguish it, but it operates in much the same way as the view you use as an agency staff member. The Home Page The Home Page that the clients see upon login gives them a summary of the open jobs that they are team members of, and a list of new events and to do items that they need to respond to. This makes it easy for them to navigate quickly to the things you need them to do. The home page is similar to that of the Agency interface, but it contains only three areas: • The Jobs table lists the jobs that the user is a member of, and by clicking the job number, they can move directly to a specific job. • The To Do Today list contains all of the assignments that have been given by project managers to that user. Again the job number will take them to that job. • The What’s New table lists all new activities or changes to status of jobs that have occurred since the last login by the user. All pending approvals for estimates, schedules, images or documents will appear in this table until approval is given. Also like the Agency interface, pull down “Action” menus—analogous to the Manage menus, except they say “Action” —are used throughout the interface to offer commands that are specific to the elements in the associated table or list. On the Job list users can quickly add a new Job request, and on the What’s New list they can “go back in time” to see events over the past week or month. Clients: Review and Approvals Page 65 Clients: Review and Approvals The main system menu for the application lets the user quickly jump to the main areas of the system: • Home: Returns to the home page. • To Do: Displays a list of all current assignments that have been given to the user by the project manager. This list contains more detail than shown on the Home page. • Jobs: Displays a list of all current jobs. This list also contains more detail than shown on the Home page. • Standards: This area lets the user define standards and to upload images and documents that are to be used by the agency on all jobs for the client. • Logout: Logs the user out of the system. The Job Info Page The Job Info Page shows a summary of the attributes of the job along with the creative brief for the job. The menu on this page takes the user to the main elements that are to be reviewed by the client—estimates, schedules, images and documents—along with access to the list of team members and the job Message Board for communicating with the team. Each job has a set of information that can be entered by the user. On the Job Info page the user can enter a custom Client Job Number that is used at the client company to track the job. In many cases the user is the primary contact between the agency and the client, there are several places in the Infowit Client interface that allow the client user to forward on information to others in their organization. On the Job Info page, the Action menu on the Creative Brief allows users to e-mail or print the creative brief for review by others in their organization. Figure 5.7: The Client Job Info Page Page 66 Clients: Review and Approvals Clients: Review and Approvals Figure 5.7: The To Do List The To Do List If a client contact is given an assignment within a job, it shows up on their to do list. When they complete that task, they can click the Status link for that To Do list item to note that the task has been completed and it will disappear from their list. The change in status will show up on the project manager’s event notifications on the Agency side. Estimate/Schedule Review & Approval The Estimate and Schedule areas of the system are similar and provide the same displays and options. When you click on the menu item to go to these areas, the user will normally see a list of estimates or schedules for the job. By clicking on an estimate or schedule the details for that item will be displayed. As with the Creative Brief, there is an Action menu that allows the user to print or e-mail these items. For estimates there is also a link that lets them add a Purchase Order number to be associated with approved estimates. In general, Clients have access to all items in the job that are identified with a status of • “At Client” • “Client Approved” • “On Hold” or • “Cancelled” Within each job, the menu items for Estimates and Schedules take the user to the estimates and schedules that have been submitted for approval or have one of these other status values. If one of these items has the status “At Client” in the agency interface, the Client user will see a status of “Needs Approval,” and these items will appear on their Home page. Within the Estimate and Schedule pages either at the list of items or on the detail pages underneath them, the users can Clients: Review and Approvals Page 67 Clients: Review and Approvals Figure 5.8: Client Estimate click on the status link to change that item’s status from “Needs Approval” to “Approved” or “On Hold.” At the bottom of each page is a history list showing the person and date on which all changes to the status were made. Figure 5.9: Image Thumbnail review Page 68 Clients: Review and Approvals Clients: Review and Approvals Image/Document Review, Comment & Approval The displays for images and documents are essentially the same as for estimates and schedules with the following differences: • Images provide an intermediate display level allowing the user to see a group of thumbnail images at the same time. • Images and documents have their own Comment message boards to allow discussions of items among the agency and client users. The approval mechanisms and status levels are otherwise the same as estimates and schedules. Standards and Files Clients have many files and standards specifications for how the agency should develop work products. The Infowit Client interface allows the client to actually manage and maintain these files themselves. All information that is included in the documents and images can be included in all jobs associated with that client. New Job Requests Both on the main job list page as well as the home page, there are menu items that allow users to initiate a job request. Client users can fill out all the relevant information for the job request, and this information will flow directly into the Creative Brief for the new job. Figure 5.10: Client Files and Standards Clients: Review and Approvals Page 69 6. PROSPECTING: THE SALES PROCESS 6.1 Adding Prospects Adding new prospects to the system is performed within the Client area. To add a new prospect, click the “Client” tab and then click the “Add Prospect” submenu item. The information requested for the prospect is the same as for adding a new client as described in section 4.1. 6.2 Managing Managing Prospects in Creative Manager Once prospects are added you can begin to enter notes on conversations, e-mails, and other actions you take when interacting with contacts at the prospect or client company. The prospecting actions that are available are defined by your system configuration to match the needs of your agency. Some typical actions include • Initial Call • Follow-up Call • Send Brochure • Set meeting • Meeting Set Figure 6.1: Prospecting Summary Prospecting: The Sales Process Page 70 Prospecting: The Sales Process The possibilities are quite broad, but note that it is possible both to set an internal action to be performed as well as stating that that action has been completed. 6.3 Tracking Prospects Tracking prospects principally involves entering contacts with the organization that you are working with. Each contact with the prospect will include: • The agency contact • The action taken and date • Notes on the action • The next required action and date • Notes for the follow up The follow up notes will be included when the follow up action is taken and can be modified to specify the details of the action. Figure 6.2: Adding a prospecting action Prospecting: The Sales Process Page 71 Infowit Administration 7. INFOWIT ADMINISTRATION 7.1 Installation, Setup and Configuration Infowit Creative Manager is an Internet application and it is installed and is set up by Infowit Professional Services Group. You access Infowit Creative Manager from the Internet Explorer browser. Setting Up Because it is a Web-based database containing all the basic information about you, your clients, and your vendors, Infowit Creative Manager can take a few days to set up. If you play your cards right, you don’t have to do anything except supply an Infowit setup engineer with some basic information, preferably in a spreadsheet: • Clients: A list of all your clients including addresses, phone numbers, and major contacts. • Vendors: The same applies to your vendors. • Employees: Since they’re the folks who will be using the system, set up requires a list of all your employees and their contact information. • Job types: As creatives, the only thing we have in common are our differences, so Creative Manager requires a complete list of your job types (e.g., Web Site, brochure, etc.) so that every job in the system will be classified according to your logic. Creative Manager can, however, ship with built-in job types that you can add to later. • List of current jobs: Creative Manager should contain all your current jobs and their job or project numbers; if you want to start Infowit with older jobs, then you’ll need to supply those as well. The job list will begin with the earliest job number you supply to the set up engineer. • Billing categories: To get you on top of estimating and invoicing, Creative Manager needs to know the billing categories that you use (e.g., Design, Project Management) and any billing or task line items you include in those billing categories. As with job types, Creative Manager can be installed with pre-built billing categories. • Estimate samples: The set-up engineer requires copies of sample estimates so that he can format the system to generate perfectly identical estimates. • Schedule samples: To set up your custom scheduling software, the set-up engineer will need sample schedules from every job type. • Invoice samples: The same holds true for invoices. • Company locations: The set-up engineers will need the address and contact information for all your locations. • Company departments: If your company is divided into departments, supply a list of those departments and their employees. Page 72 Infowit Administration Infowit Administration The Set-Up Manual Every Creative Manager installation comes with its own set-up manual. Besides giving you a complete road map for setting up Creative Manager from scratch, it’s a useful document to refer to when putting together information for the set-up engineers. It’s no fun to read (it’s written by software types), but it’s also a great introduction for editing your set-up once it’s been accomplished. 7.2 The Admin Area Area The last tab in the Infowit Agency interface is the Admin Area, which provides Senior Managers and System Administrators access to Agency-wide reports, Employee management functions, and System Configuration settings. 7.3 Agency Reports There are a variety of reports that are available that span Clients, Vendors, and Jobs to give you a top-level view of what’s going on in the business. Most of these reports operate in a standard fashion: • After selecting a report, a query form is displayed allowing you to limit the scope of the report to just the data that interests you. If you leave a field blank, all values for that field will be included. If you include text, that text will be searched for within that field. In many cases, these reports may be exported to Microsoft Excel in comma-separated value format, but in all cases you can copy and paste the contents of the reports into any word processor, spreadsheet or other program that understands clipboard material from web browser tables. 7.4 • Specifications and Quotes: These reports provide cross-job searches for specifications and quotes for purchases using a variety of attributes including client, vendor, description keywords and • Job Reports: These reports provide summaries and lists of job status, purchase orders, invoices, and labor costs. • Finding Images and Documents: These reports provide a mechanism to search for particular items of interest including images and documents. …. • Financial Reports: These reports provide financial summaries of costs and income across jobs. • Time Reports: These reports provide information on the activities of your staff and include features such as sending out mass reminders to staff members who have not turned in timecards. The Users Area The users area allows you to create and deactivate user accounts from the system Adding Employees and Users Accessed by selecting Users under the Admin Tab and clicking on the Add Employee link, this page is broken up into five sections: 1. Primary employee information Infowit Administration Page 73 Infowit Administration 2. Human resources information 3. Additional contact information 4. Emergency contact information 5. System login details such as username and password All fields in bolded red are required. Managing Employees and Users Managing employees and users 7.5 The System Area The system area lets you configure all aspects of how your particular Infowit installation operates. Billing Categories This page is a directory of billing categories. Some come predefined, but the majority of the categories are defined the system administrator at during product setup. Each billing category consists of a set of tasks that can also be customized. To add a task, click the add button in the billing category’s title bar. To edit a task, simply click the edit button that appears on the task’s line. Editing a task affects all previous entries associated with that task, such as employee assignments. Job Types Job Types are the basic types of projects that your organization takes on. Your definition of Job Types reflects both how you run and how you track your business. Typically, a creative business may have a wide variety of specific projects that are performed, but usually there are logical groupings of these projects. The Job Types represent these groupings, and within each Job Type you can define any number of Estimate Templates to account for the variations of these. Time Estimate Templates Time Estimate templates are used to create estimates and schedules for variations of each job type. The pop-up window (accessed by selecting the add time estimate template option from the Time Estimate Templates Directory) offers two methods for creating a new time estimate template. You can either create one based on a particular job type by selecting the type from the dropdown and then a template to use as your model; or create one from scratch. Click the template button in the From Scratch section of the pop-up to create a template from scratch. Once you make a selection a new page will load listing the billing categories and their associated tasks. From this page you can alter Low Hour, High Hour, Duration, and Days From Job Start. Prospect Management Tools Prospecting for new business requires tracking contacts with Clients and Prospective clients. This section allows you to define the actions that are used in your organization for interacting with companies through the sales cycle. Page 74 Infowit Administration Infowit Administration Customizing Your Company Calendar The Calendar in Infowit has many purposes, and can be customized to use various colors for different types of events that can be put into the calendar. Industries and Segments Infowit comes with a default set of Industries and Industry Segments that span most of the businesses in existence. If your organization specializes in a specific set of industries, you may wish to change or expand this list to meet your unique needs. Departments This section allows you to define the departments within the Agency. Departments can be used in ways other than traditional departments in order to group users into functional teams that can be assigned departmental assignments. Note that departments are defined within company locations. Infowit Administration Page 75