1
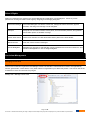
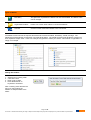
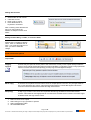
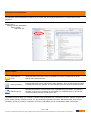
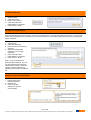
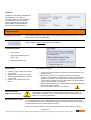
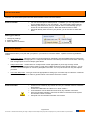
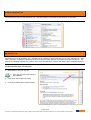
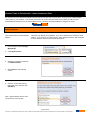
User’s Manual
Fall 2009
Texas Version
Page 1 of 42
No content or materials demonstrating the usage of eduphoria! SchoolObjects may be posted or displayed on any external website or public domain.
Forethought User’s Manual
Forethought is made up of two components: Curriculum Management and the Lesson Planner. This manual will cover
how to organize and enter curriculum; manage activities and resources; and how teachers use the lesson planner.
Table of Contents
Page #
Roles and Rights...…………………………………………………………………………….......
2
Curriculum Design ………………………………………………………………………………...
Managing Course Tree……..…………………………………………………………….
Managing Learning Standards…………………………………………………………...
Creating Groups & Learning Standards……………………………………….
Learning Standard Options……………………………………………………..
Standard Clarifications & Activities………………………………………………………
Creating and Adding Standard Clarifications & Activities……………………
Activity Management…………………………………………………………….
Reviewing Activities Submitted by Teachers…………………………………
2
2
7
8
11
14
14
16
16
Lesson Planner……………………………………………………………………………............
Types of Entries……………………………………………………………………………
Setup Planner……………………………………………………………………………...
Lesson Planner Components…………………………………………………………….
Editing Lesson Plans……………………………………………………………………...
Entry Options………………………………………………………………………………
Working with Learning Standards ………………………………………………………
Advanced Features……………………………………………………………………….
Shared Lesson Plans……………………………………………………………………..
Team Lesson Planners…………………………………………………………………...
My Activities………………………………………………………………………………..
19
19
20
23
24
25
27
28
29
29
31
Creating Tests in Forethought – Aware Customers only………………………………………
Editing Schedule…………………………………………………………………………..
Creating Tests …………………………………………………………………………….
33
33
34
Management Options & Reports…………………………………………………………………
Standard Decorators………………………………………………………………………
Lesson Checklists…………………………………………………………………………
Assigning Delegates………………………………………………………………………
Reports……………………………………………………………………………………..
40
40
40
41
42
Page 2 of 42
No content or materials demonstrating the usage of eduphoria! SchoolObjects may be posted or displayed on any external website or public domain.
Roles & Rights
Roles for Forethought are granted in the System Management application of SchoolObjects. Course by course
permissions can be given within Forethought by assigning and managing delegates.
Curriculum Manager
Curriculum Managers can edit the course tree, manage the entire curriculum, approve
activities, and assign and manage course delegates.
Principal
Principals can view their teachers’ lesson plans, view school team planners, and generate
school-wide reports on standard coverage.
Lesson Plan Viewer
Lesson Plan Viewers can view all teachers' lesson plans for the entire district.
Denied Access
This user cannot access Forethought.
Course Delegates
Delegates are assigned to edit selected courses' standards and curriculum resources. See
section in Management on how to assign delegates.
Curriculum Management
Managing Course Tree
Courses are created and organized in the Manage Course Tree interface. The tree allows courses to be organized by
schools, grade levels, content areas, or any other method of organization your district may desire. The Course Tree is the
foundation for which all curriculum entry begins.
Manage Tab > Manage Course Tree
Page 3 of 42
No content or materials demonstrating the usage of eduphoria! SchoolObjects may be posted or displayed on any external website or public domain.
Types of Entries
Root Entry
The global icon represents the district and cannot be deleted. The district name
can be changed.
Organization Folders
Folders can contain other folders or courses themselves.
Courses
Courses are the lowest denominator in the course tree.
The default course tree has the top level structured into school level folders, elementary, middle, and high. The
elementary level breaks the courses down into grade level folders. The middle and high levels divide the courses into
their respective subject areas. These can easily be reorganized to match your district. This method of organization is
simply one example.
Adding New Folders
1.
2.
3.
4.
Select Root or existing folder
Click New Folder
Enter name of folder
Press Return/Enter on
keyboard or click Save
Note: Pressing enter will leave the
entry box open making the
addition of multiple folders much
easier.
Page 4 of 42
No content or materials demonstrating the usage of eduphoria! SchoolObjects may be posted or displayed on any external website or public domain.
Adding New Courses
1.
2.
3.
4.
Select Folder to add courses
Click New Course
Enter name of course
Press Return/Enter on
keyboard or click Save
Note: Pressing enter will leave the
entry box open making the
addition of multiple courses much
easier.
Editing the Root Entry, a Folder, or a Course Name
Double-click on the title to edit the
name. Click on a different item to
save. You will be prompted to “be
sure” you want to make the
change.
Folder and Course Options
Top Toolbar
Copying
Courses
Courses may be copied to various parts of the course tree, but may not be copied directly beside the
original course. While forethought offers tremendous flexibility in organizing courses, using options like
mirrored courses should be used sparingly to keep long-term management simple.
Mirror Copy
A mirrored course places the exact same course in multiple places in the tree. Any changes made to
one course will impact any mirrors. This might be appropriate for courses like Algebra I where the
curriculum will be the same at the middle and high school levels.
Deep Copy
A deep copy creates a new course and duplicates all learning standards and associated TEKS
courses. This would be most appropriate for courses where a middle school course’s curriculum might
be different than the high school course.
1.
2.
3.
4.
Select a course to be copied
Select the type of copy operation to perform
Select a destination folder
Click the Paste button
Page 5 of 42
No content or materials demonstrating the usage of eduphoria! SchoolObjects may be posted or displayed on any external website or public domain.
Moving Courses
and Folders
To rearrange courses and folders, you can simply drag and drop it into another
folder. This will prompt you to confirm your action. You can also use the blue
arrows to shift courses and folders up and down in the tree.
Moving a folder will also move any other courses or folders within it. Moving a
course will keep all course content (standards and activities) with it as well.
Courses should only be deleted when absolutely necessary. This most often occurs initially when
experimenting with structure and design. Instead of deleting courses not taught, it may be easier to
simply hide them in case they are needed later.
Deleting
Courses
To delete a course simply select that course and click Delete. This will toggle the course to be
deleted when the course is next Published. To toggle the course to not be deleted, simply select the
course and click the delete button again. This is an extra safeguard to make sure you really do want
to delete that course.
The preferred method for making a course unavailable in the district scope and sequence is to hide
the course. This preserves all learning standards and activities if the course would need to become
active sometime in the future.
Hiding Courses
To hide a course, select the course to be hidden and click the Hide Course button. The course icon
will become gray indicating that the course is no longer visible. A course can become visible again by
selecting the course and click the Hide Course button again.
Publishing
As an extra safety mechanism for both the Course Tree and all individual courses, Forethought creates two copies of the
Course Tree. All work is conducted on the draft copy of the tree. All changes and edits occur on this copy thus leaving
the published copy unaffected. All teachers and curriculum editors use the published copy to find courses in the tree. To
finalize your changes and make edits public, you will need to publish the tree. This not only finalizes your changes, but it
also creates a future fall-back point for removing unwanted changes.
Discard Edits
This will remove all changes by restoring the three to the last published copy.
Publish Tree
This will write all changes to the published copy of the course tree. There is no way to
undo a publish, so be very careful when publishing. The Last Published date of the tree is
always displayed on the left side of the bottom toolbar.
Page 6 of 42
No content or materials demonstrating the usage of eduphoria! SchoolObjects may be posted or displayed on any external website or public domain.
Managing Learning Standards
The Manage Learning Standards tool allows you to create, edit, and organize standards for courses that have been
published.
Manage Tab >
Manage Learning Standards >
Select Course >
Standards Tab
Types of Entries
Organizational
Group
Organizational Groups place learning standards into groups or folders like six week
periods and instructional units.
Learning Standard
Learning Standards can be district and/or state objectives. They can also be place holders
for additional resources, activities, and documents linked in the Scope and Sequence tab.
Standard Group
Standard Groups bring a second layer to the organizational group folders. Any learning
standard using this icon will display an expandable and collapsible option in the teacher
curriculum pane and Scope and Sequence Tab.
Organizational groups allow you to divide a course's learning standards into a meaningful structure. Groups can be a time
frame, grading periods, instructional units, etc. By combining Organizational Groups, Standard Groups, and Learning
Standards, almost any structure of method of curriculum organization can be accommodated within Forethought.
Page 7 of 42
No content or materials demonstrating the usage of eduphoria! SchoolObjects may be posted or displayed on any external website or public domain.
Creating New Groups
1.
2.
3.
4.
Select Course
Click New Group
Enter name of group
Click Save OR press
Return/Enter on keyboard
5. Click Cancel to finish
Creating Learning Standards
Learning standards are stored in groups, as they cannot stand alone. Learning standards, like courses, do not become
active until you publish them. This allows you to work and update a course without impacting teachers by changing the
active curriculum.
1. Select Group
2. Click New Standard
3. Enter the text of the learning
standard
4. Select associated state
objective(s) on the right
(optional)
5. Click Save OR press
Return/Enter on keyboard
6. Click Cancel to finish
Note: If you are looking for a
particular state objective, you can
use the small text box above the
objective list to search. Enter any
number or piece of text to do a
partial search through the objective
list.
Editing Text of Learning Standards
1. Double-click on the
learning standard
2. Edit the text
3. Click on another
standard or group to
save changes
Page 8 of 42
No content or materials demonstrating the usage of eduphoria! SchoolObjects may be posted or displayed on any external website or public domain.
Standard Group & Decorators
1. Double-click on the learning
standard to change the
decorator icon.
2. Click on the radio button
(circle) to the left of the icon
for that decorator.
3. Click on another standard
or group to save.
Note: Colored standard decorators are enabled (as needed) in Forethought Options.
See manual section on Management Options.
This creates a collapsible sub-group of standards within a group to provide
for additional organization. All standards underneath a Standard Group
but above another Standard Group will be collapsed underneath.
This icon represents a regular learning standard.
Learning standard decorators enable the district to provide teachers with a
visual indicator for district-defined standards meanings. These are defined
in detail under Forethought Options by a Curriculum Manager.
Associating Standards to TEKS Objectives
1. Double-click on the
learning standard to
associate it to one or
more state objective.
2. Using the
associated state
courses, click in the
check boxes to
associate a standard to
state objectives. You
may select more than
one.
3. Click on another
standard or group to
save.
Note: If the correct standards do not appear, go the section on importing state standards
Page 9 of 42
No content or materials demonstrating the usage of eduphoria! SchoolObjects may be posted or displayed on any external website or public domain.
Moving Groups and Standards
Learning standards can be moved and copied within the same course or to another course. When a learning standard is
copied, a new standard is created of the same name with the same associations to state objectives. However any
associated activities will not be duplicated. Moving a standard within the same course or to another course will move its
activities as no duplication is required. When copying or moving a standard from one course to another, make sure the
target course has the same associated state courses as the standard being moved or copied.
Drag & Drop Method
Groups and Standards can
be moved to a different
location by a drag-and-drop
method. This is also an
easy way to reorder
standards. Standards
always appear immediately
below the standard they
were dragged onto.
Cut & Paste
Method
Use the cut and paste icon
to move standards to
different groups.
Copying Standards
1. Select standard(s)
2. Click copy
3. Select destination group or standard
4. Click paste
5. Copied standards will paste at the
bottom of the group or immediately
below a standard.
Note: Hold CTRL or Command(Mac)
key to select multiple standards to copy.
Make sure you don’t select the group
title and a standard at the same time
before you copy.
Page 10 of 42
No content or materials demonstrating the usage of eduphoria! SchoolObjects may be posted or displayed on any external website or public domain.
Deleting Standards and Groups
Caution should be used when deleting learning standards. If activities use the standard as their primary published activity,
they will no longer be accessible for teachers to view. However the author may still edit the activity. Deleted standards are
not actually removed until their course is published.
Delete
1.
2.
3.
4.
Select standard or group to delete
Click Delete
Standard will be marked with a red
Groups are simply removed, there is
no red X
5. Once course is published, standard
will be removed.
Restore a Deleted Standard
1.
2.
3.
4.
Select standard to restore
Click Delete
Red
will be removed
Groups cannot be restored in this way
Note: Hold CTRL key to select multiple
standards to delete. You must delete all
standards within a group folder it before it
can be deleted.
Learning Standard Options
Manage Tab >
Manage Learning Standards >
Select Course >
Options Tab
Page 11 of 42
No content or materials demonstrating the usage of eduphoria! SchoolObjects may be posted or displayed on any external website or public domain.
Selecting Associated Courses
1. To associate state
standards to a course,
check the box or boxes
of the course(s) that
apply. Multiple courses
can be checked during
this step.
2. A Search Box is
available for quicker
access to courses.
3. Click the box
“Select Courses”
to save selected
courses.
Note: To prevent duplicating existing standards, be sure to deselect any existing courses
before importing anything else. Remember to re-associate them after importing.
Importing Standards
Click Import Standards from
Courses. All selected associated
courses will be imported.
Remember, this could easily reimport existing standards if you are
not careful. See above.
Imported standards will appear in
appropriately named groups at the
bottom of the existing folder
structure.
Note: Importing standards will also
publish the course.
State Standard Display
Identifiers for associated
state standards are listed at
the end of a learning
standard. To include the
grade level in the standard
display, check this box.
Page 12 of 42
No content or materials demonstrating the usage of eduphoria! SchoolObjects may be posted or displayed on any external website or public domain.
Adding Standard Clarifications
Standard clarifications allow districts to attach supporting material for the Learning Standard. They are not used directly in
lesson plans but rather provide additional information to help clarify objectives. There can be one standard clarification for
each learning standard, and it appears at the top of the resources list in the lesson planner.
Standard Clarifications are used to provide
explanations of standards for teachers.
Click the button to add a Standard
Clarification to ALL learning standards in
this course.
Use this cautiously as created Standard
Clarification documents will have to be
deleted one by one. See the next section
on Standard Clarifications and Activities for
more information.
Curriculum Resources
This button will export a
spreadsheet view of curriculum
resources for this course. A
column for tested objectives,
number of standard clarifications,
and number of published
activities will be listed for each
learning standard.
Publishing a Single Course
Publishing a course works very much
like publishing the course tree. Two
copies of a course structure exist, and all
changes are made to the draft copy.
When you publish the course, it then
moves those changes to the published
public copy. Now teachers and
curriculum staff can see that structure
and attach resources to it.
As the course tree, the Publish and
Discard options are in the bottom right.
The last published is also displayed in
the bottom left.
Page 13 of 42
No content or materials demonstrating the usage of eduphoria! SchoolObjects may be posted or displayed on any external website or public domain.
Standard Clarifications & Activities
Standard Clarifications and Activities are resource documents connected to Learning Standards. These provide
additional information and resources for teachers as they are creating lesson plans. Standard clarifications are used to
provide explanations of standards for teachers or provide examples of ways to teach the standard. Activity documents
are generic documents designed to contain anything. While initially conceived to contain sample lessons, they are flexible
enough to present any kind of information.
All elements of an activity can be customized. Activities can have a unique title, contain multiple learning standards,
include text and web links in the body, and link to multiple file attachments. Activities are displayed according to the first
learning standard that they are associated to. This keeps the scope and sequence well organized. In addition, activities
can be created by teachers for publishing in the district activity bank to share with other teachers. Once activities are
ready to be shared, teachers can publish activities for review. Curriculum Managers can then review, edit and publish
activities to the district scope and sequence.
For curriculum staff, both Standard Clarifications and Activities are created in the Scope and Sequence tab.
Creating and Adding Standard Clarifications & Activities
Scope and Sequence Tab >
Select Course
Add Standard Clarification
1. Select standard in course
2. RIGHT-CLICK on standard
3. Choose Add a New Standard
Clarification
Page 14 of 42
No content or materials demonstrating the usage of eduphoria! SchoolObjects may be posted or displayed on any external website or public domain.
On the Standard Clarification document,
type text in the blank area. Text can also
be copied from documents and pasted in
this interface. Note all of the word
processing tools in the primary toolbar.
Add attachments by clicking the
paperclip icon
Don’t forget to Save!
Use these icons to close and
open the curriculum pane on the
right side of the screen.
Note: Graphics and images need to be
attached rather than copied and pasted
into the editing page.
Add Activity
1. Select standard in course
2. RIGHT-CLICK on
standard
3. Choose Add a New
Activity
Give the Activity a Title. Type text in
the blank area. Text can also be
copied from documents and pasted in
this interface. Note all of the word
processing tools in the primary toolbar.
Add attachments by clicking
the paperclip icon
Don’t forget to Save!
Note: Graphics and images need to be
attached rather than copied and pasted
into the editing page.
Page 15 of 42
No content or materials demonstrating the usage of eduphoria! SchoolObjects may be posted or displayed on any external website or public domain.
Publish Activity
1. To add this activity for teachers to
use, you must publish it.
2. Click Publish
3. Click Submit
Delete Activity
Deleting the activity will permanently delete it from Forethought.
Note: Teachers will not be able to access their activities that have been deleted.
Edit order of Activities
Use the arrows to change the order in the list
Activity Management
Manage Tab >
Forethought Options >
Activity Options
Select the option for Activities to require
curriculum administrator approval or for
automatic approval and publishing.
Activities can be published with the
author’s name or anonymously.
Reviewing Activities Submitted by Teachers
Teachers can create activities from their lesson plans. The activities are then submitted for review. (Creating and editing
activities is covered in the Forethought teacher guide.) Teachers can choose to have activities published anonymously or
have their name and email address available for other teachers to contact them with questions, comments or kudos.
Curriculum Administrators view the pending activities and can publish or return to the author. Each time an activity is
used in lesson plans, the Times Used number increases.
Page 16 of 42
No content or materials demonstrating the usage of eduphoria! SchoolObjects may be posted or displayed on any external website or public domain.
Manage Tab >
Approve Activities >
Pending Activities
The pending activities are
sorted by course. Click the
“carrot” to expand the course
to see the titles of the
submitted activities. Select
an activity to see its details.
Curriculum administrators can
edit the activity as needed
using the word processing
buttons.
More than one standard can be
connected to the activity. The
activity is connected/linked only to
the primary standard (or first in the
list) for organization purposes.
To add additional standards
to an activity, expand the
curriculum pane. Doubleclick on standards to add to
activity.
Page 17 of 42
No content or materials demonstrating the usage of eduphoria! SchoolObjects may be posted or displayed on any external website or public domain.
Right-click on a standard to:
1) Set as Primary Learning
Standard. Remember the
Primary Learning Standard is the
standard to which the activity is
linked.
OR
2) Remove standard from activity
Don’t forget to Save any changes made.
Click Publish to make the activity
available to all teachers
Click Return to send the activity
back to the author. The author
can now make adjustments and republish.
A comment box appears after publishing or
returning an activity to the author. These
comments will be included in an email to
the author.
A message board is available for the author and users of the activity. Comments, suggestions, and ideas
about the activities are good examples of how the discussion board can enhance the value of the curriculum
for teachers.
Page 18 of 42
No content or materials demonstrating the usage of eduphoria! SchoolObjects may be posted or displayed on any external website or public domain.
Forethought Teacher Lesson Planner
Planning for your
Schedule
Forethought is a customizable lesson planner where district curriculum is housed
and easily accessed by all teachers. The Forethought Lesson Planner allows you
to setup as many course schedules as you need. Each schedule contains course
entries and special entries, such as notes, planning period information, or sub
notes.
As a general rule, the fewer schedules and entries you maintain, the simpler the
product is to use. KEEP IT SIMPLE!
Types of Entries
You may add up to 12 entries in your schedule.
Course with Learning Standards
This is the typical schedule entry (prep) that allows you to access curriculum; enter
and track learning standards (i.e. TEKS); and find and add activities.
Course that Mirrors another Course
Use this only when repeating preps or courses, allowing for modifications.
Mirrored courses allow you to show the same content more than once in your
schedule. If something in a class needs to change for a day, you can edit that
day's mirrored course and it will no longer mirror for that day. It may, however,
be simpler to enter the course once and have special entries to indicate notes for
other classes.
Special Entry
A special entry can be any non-academic entry (it does not connect to any
curriculum or standards) or can be notes about another class. Examples might
include "Lunch", "Planning Period" or even a general "Notes" section.
Special Items to Consider
•
It is important to remember that you can change your schedule at any time without
impacting lessons already in your planner. Schedules in forethought are not set in
stone and should be altered to meet your preferences as you progress through the
year.
Do you teach the same subjects several times a day?
o If you teach several of the same subjects each day and the classes use the same curriculum (TEKS), it
might be beneficial to mirror the courses. If a class moves ahead or behind, a mirrored course can be
changed for a day to reflect new material.
o Another strategy might include adding one lesson entry for the course subject and make special entries
for the repeating courses, with just small modifications included. That would make your plans smaller on
the screen and when you print.
Page 19 of 42
No content or materials demonstrating the usage of eduphoria! SchoolObjects may be posted or displayed on any external website or public domain.
•
Is it important that your lesson planner reflect each type of day that you may have?
o If you have an occasional special day, such as an assembly or campus day, it may be best to just have a
single schedule type. Unless it dramatically impacts the order of your plans, keeping the number of
schedule types to a minimum will make planning easier over the year.
•
Do you have an A/B or other type of block schedule?
o If you have different structures for your teaching schedule, creating multiple schedules that reflect those
days will likely be your best option. However, some teachers find it easier to simply create one schedule
and leave an entry blank on the day that is not taught.
•
Do you work with a collaborative group of teachers?
o You can setup numerous teams to meet your group's planning needs. You could make a grade level
team, where all courses taught are in the team and each teacher focuses on a different subject. You
could also setup a team for a particular course, either in your building or across the district.
o It is even possible for a team planner to act as the only planner used by a group of teachers. Or team
planners allow copying content from the team to a personal planner.
•
Do you teach one semester courses?
o Your schedule should reflect your current teaching assignment. If you need to alter your schedule at a
semester, it will not impact the first semester's lessons.
o In fact, learning standards (TEKS) are tracked based on an instructional year, so it is advisable to remove
and add one semester courses at the start of a new semester. For example, if you teach Economics
during the first semester, you should remove it at the start of the second semester and add it again to
correctly track the learning standards taught.
Setup My Planner Wizard
Setup My Planner
Follow the steps in the wizard
to create your lesson planner
by creating a schedule with
courses. The directions on
the screen will help you
through the process of
creating a customized planner.
Enter the name of your
schedule.
Select “Add an Entry.”
Page 20 of 42
No content or materials demonstrating the usage of eduphoria! SchoolObjects may be posted or displayed on any external website or public domain.
Choose the type of entry you
want to add.
Course with Learning Standards
Adding a Course with Learning
Standards will allow you to select a
course from the District Course Tree.
Expand the school and grade level or
subject area until the appropriate course
is shown. Select the course and click
“Next.”
Edit the name of the entry.
This is a great place to add times, period numbers,
etc. to help organize the entries.
For Aware customers only: select the course from
your Master Schedule to connect test data of
students to your entries in Forethought. You can
select multiple classes to connect to an entry. For
example, if you teach three preps of math, check
all the math classes that use that course’s
curriculum.
A Course that Mirrors another
Course
After creating a course with learning
standards, then choose the course title
to mirror.
Page 21 of 42
No content or materials demonstrating the usage of eduphoria! SchoolObjects may be posted or displayed on any external website or public domain.
A Special Entry
Give a title and choose whether you
want to be able to type in the entry or
not.
Select an entry to edit the name, change the
order, or remove it from the schedule.
Repeat as needed for the number of entries in
your schedule.
Note: Removing an entry from your schedule does not
erase or modify information already in your lesson
planner. For example, deleting English I at the end of
a semester will not remove your lesson plans for that
semester.
Do not add another schedule
unless if you have block or A/B
scheduling. Creating more than
one schedule will make you
choose which schedule to use
for each day in your planner.
Complete the wizard by clicking “Begin Using Forethought”
To edit your schedule and
entries, select “Change My
Settings” and “My Schedules.”
Page 22 of 42
No content or materials demonstrating the usage of eduphoria! SchoolObjects may be posted or displayed on any external website or public domain.
Lesson Planner Components
1. Calendar: This will show you the current month and allow you to easily change between months using
the < >
buttons. Days with lesson plans will appear as bold. This allows you to easily keep track of which days you have and have
not planned. Clicking on any day will let you plan for that day. It is also possible to see what lesson you used a year ago.
Lesson plans are not deleted from year to year.
2. Planners List: This will be a list of all available planners. It will always start with your own personal planner (My
Lesson Planner) followed by any team or shared planners you may be able to view.
3. Planner Settings and Search Lesson Plans: Here you can search for lesson plans by keyword or by phrase. Planner
Options allow you to “Create a New Team.” In addition, “Change My Settings” will allow you to edit your schedule and
“Share your Planner” with other staff members.
4. Lesson Plan Content Area: Clicking an entry in the lesson plan area makes that entry active. You can then begin
planning for that particular course by using the toolbar options to customize your lesson content and by adding in learning
standards from the Curriculum Pane on the right.
5. Curriculum Pane - Learning Standards List: Selecting a course in the lesson planning area updates the learning
standards to reflect the selected course.
6. Curriculum Pane - Details and Resources: Selecting a learning standard displays 1) any linked resources; 2)
associated TEKS/TAKS and Knowledge & Skill Statements; 3) a graph of tested standard (Aware customers only); and 4)
the history of when that standard was previously used in a lesson plan.
Page 23 of 42
No content or materials demonstrating the usage of eduphoria! SchoolObjects may be posted or displayed on any external website or public domain.
Entering Lesson Plans
Click on an entry in the lesson plan
area to make it active. Then simply
type in the white space.
Primary Tool Bar
The Primary Tool Bar located at the top of the page includes various functions and word processing buttons. The
following section helps clarify a selection of buttons from this tool bar. Remember, hovering over a button opens a help
tip.
Use this feature to edit your schedule only for the day selected.
•
•
•
•
Change Today’s
Schedule
Save Plans
Re-add course entries
Notes for the Substitute Teacher
A New Special Entry
Delete Today’s Plans – use this to remove content and a
schedule for all entries on a calendar day.
Saving lesson plans frequently is important! They are not automatically saved in the day
view. The software will prompt you to save before moving to another day.
Print Options
There are numerous lesson plan printing
options including exporting to Word and
Excel.
Printing the Technology Checklist and
Checklist Report are also available here.
Green Arrows
Move forward or backward one day.
Page 24 of 42
No content or materials demonstrating the usage of eduphoria! SchoolObjects may be posted or displayed on any external website or public domain.
View Planner Options
View Week’s Plans
This view displays five days of lesson plans on one
screen. You have the ability to enter lesson plans on
this view, but you cannot add standards to a lesson.
More options available in week view appear later in this
document.
Note: Double-click on a day to return to Day View.
Plan by Course
This displays a week view of
only one course at a time.
Use the drop-down option to
toggle between your courses.
Make a Reservation
For Facilities and Events Customers only: Click here to make a reservation of a
room or inventory directly from your lesson plans.
Technology Used Today
Checklist
If enabled by your district, use this checklist to record usage of technology items
and software for the day.
Entry Options
Type lesson plans within the white space of
the entry.
URL’s will also become hyperlinked in this
space.
Don’t forget to Save!
Page 25 of 42
No content or materials demonstrating the usage of eduphoria! SchoolObjects may be posted or displayed on any external website or public domain.
Print Options
These print options are for
the entry only.
Copy Lesson Plan
This button copies the day’s entry to
another day.
Select the target date in the calendar.
Check the course(s) to copy the lesson
into. You can only copy to like courses.
The lesson content, learning standards
and attachments will now be in the
target lesson.
Add Lesson to my
Activities
Note: To copy a single lesson, there must already be a lesson structure
(schedule) in the target date. So, if you plan to copy a lesson from Monday to
Tuesday, click on Tuesday in the calendar and make sure that the lesson entry
exists.
This option will copy the entry to the list of activities in the “My Activities” Tab.
Teachers have the option of submitting this activity to curriculum administrators to
then publish to the resources in the curriculum pane.
Lesson Options
Set as Default Text for Entry: To edit the template text for an entry, create the new template in the editor. Then
select “Set as Default Text.” For every new day in your planner, the new template will appear only for that entry.
Remove from Day’s Plans: Remove this entry only from the day’s lesson plans, not the schedule itself.
Break Mirror from Course
Add Attachment
To edit a mirrored course for the day, click this option. Once the mirror has been
broken for a day, it will not copy anymore from the original course.
Browse for and attach documents (.doc, .pdf, .xls, etc.) to the lesson plan.
Page 26 of 42
No content or materials demonstrating the usage of eduphoria! SchoolObjects may be posted or displayed on any external website or public domain.
Working with Learning Standards
The Curriculum Pane on the far right of the page displays district curriculum. Use the plus and minus buttons to expand
and collapse different groups within the curriculum. Double-click on a standard to add it to your lesson plans.
When a learning standard is added to your lesson
and the lesson is saved, the standard appears with a
green check.
Remove Standard from Lesson
Right-click on the standard to remove it
from the lesson or copy the standard
text.
Selecting a standard will show details in
the bottom-right corner.
Resources
Single-click to preview. Double-click to view entire resource. The resource/activity can
then be printed or added to the lesson planner by clicking, “Use in Plans.” The resource
will append the current lesson plan entry, but it won’t replace any text already in the entry.
TEKS/TAKS
This tab displays associated TEKS (Knowledge and Skills statement and Student
Expectation), TAKS objective and Knowledge and Skill for selected standard.
Performance
For Aware Customers only: This shows a comparison graph of student performance on
the most recent TAKS and/or Benchmark test.
History
This tab displays all dates the standard has been used in lesson plans during the current
school year.
Page 27 of 42
No content or materials demonstrating the usage of eduphoria! SchoolObjects may be posted or displayed on any external website or public domain.
Checklists
If enabled by the district, checklists will
be available for every entry in a
schedule. Simply check the item(s) in
the checklist to note if you utilized
them during the lesson of that day.
These results can be tabulated for
principals and district personnel.
Advanced Features
Copying Lesson Plans
The Forethought lesson planner gives you the flexibility to copy individual lessons, a day's
lesson plans or even an entire week.
Plans must be in Week View to see the Copy Wizard.
Copy Wizard Options
•
Copy Content
•
Copy instructional days from
year to year
•
Shift lesson plans a day
Copy Content
Notes regarding copying:
1. Choose to copy content for an entire
day or week.
2. Select the day or week to be copied
3. Select the destination day or week to
copy content.
4. Confirm your selections and click
Finish.
•
•
•
•
Copy Instructional
Days from year to year
Shift Lesson Plans a Day
If no lesson structure exists for that date, the first schedule in your
list will be used.
Lessons of the same course will be copied in the order they
appear in the target date. Additional plans will not be automatically
entered. For example, if you have two U.S. History plans in the
source planner and only one in the target date, only the first will be
copied. The second will not be added.
Content will be added to any existing lessons (appended) that exist
in the target dates or weeks.
There is no "undo" when you copy lessons.
We strongly recommend that you do NOT copy the entire year. There is no
undo option! It is best to copy a couple weeks at a time by limiting the copy
down to 10 to 15 instructional days.
For occasions such as an inclement weather day or an unexpected event, lesson plans
can be shifted ahead one day. Shifting lesson plans will move all content up one day from
the day selected to the end of the instructional year.
Note: If any content on the last day of the instructional year exists, it will be removed.
Page 28 of 42
No content or materials demonstrating the usage of eduphoria! SchoolObjects may be posted or displayed on any external website or public domain.
Shared Lesson Plans
Teachers can share lesson plans with other staff members in their school and district.
Items to consider:
•
•
•
You can view and print a shared planner. In addition, you can copy lesson entries
from a shared planner to your own planner. You cannot edit a shared planner.
Selecting staff members to view your planner does not automatically give you
access to view their lesson planner. Both staff members have to share.
Principals already have access to your planner; you do not have to share with
them.
Sharing your Planner
1. Change My Settings
2. Share My Planner
3. Add or Remove a Teacher
Team Lesson Planners
Team Planners allow you to plan with your peers in your school or across the district. Options for team organizations
include:
•
Grade Level Team - This type of team is most appropriate for elementary and intermediate teachers where each
teacher in a grade level might plan for a subject and all teachers in the team pull content from the team. This may
even be appropriate for cross-campus grade levels.
•
Subject Area Team - A team based on a subject area is most appropriate for junior high and high school
teachers. An example might include creating a "High School Math" team that covers all math subjects. You do
not have to teach all subjects on a team to participate in the team. You can pull content from only the subjects
you teach.
•
Curriculum Map Team - This type of team is appropriate for setting up a curriculum map for reference. This does
not include detailed plans but rather a general outline of the district curriculum to follow.
Items to Consider
•
•
•
•
•
Teams can be created by any teacher and only one member needs to create the
team planner.
Teams are collaborative and there is no "Team Leader."
Team members can be added and removed by any member of the team.
Once the last team member is removed, the team is removed from the system
and all team content is erased!
Principals can view all team information and content.
Page 29 of 42
No content or materials demonstrating the usage of eduphoria! SchoolObjects may be posted or displayed on any external website or public domain.
Create a New Team
1. Give the team name a detailed and distinctive name.
2. Add Members
3. Add Course(s). You cannot edit the name of a course in a team
planner.
Note: Once the last team member is removed, the team is removed from the
system and all team content is erased.
When a team planner is selected under
“My Lesson Plans,” additional setting
options appear in the bottom left
corner.
Adding content to a Team Planner
1. Select the entry and use the “Check out and edit” icon to check it out. (Shown above)
2. The lesson becomes editable to add learning standards, attachments, etc.
3. Do not forget to save.
Note: If two team members check out the team planner entry at the same time, the last one to save wins! Be careful!
Copying from the team planner
Follow the same directions as copying an entry in your own planner.
Discussion
Board
Team planners include a discussion board for all members and principals with access to
the team planner.
Post new threads and reply as
needed. Note the option to email
when a new post is added.
Page 30 of 42
No content or materials demonstrating the usage of eduphoria! SchoolObjects may be posted or displayed on any external website or public domain.
Scope and Sequence Tab
All teachers have a Scope and Sequence Tab. The tab includes a course tree to view all levels of curriculum.
My Activities Tab
All teachers have a “My Activities” Tab. Activities can be created in a lesson plan entry or in the “My Activities” tab. After
editing, teachers can publish to the district scope and sequence (after approval from district curriculum managers). The
purpose of publishing activities is to create a richer scope and sequence complete with lesson plans created by teachers.
Create an Activity from a Lesson Plan
1. Write lesson in entry for any day
2. Click gear icon (Add this Lesson to
My Activities)
3. Click OK on the acceptance pop-up
4. Go to My Activities Tab to edit the activity
Page 31 of 42
No content or materials demonstrating the usage of eduphoria! SchoolObjects may be posted or displayed on any external website or public domain.
My Activities Tab > Select activity to edit
Don’t forget to Save
Click Publish when ready to send to district scope and sequence.
The activity may be automatically published or must be approved
first by a curriculum manager.
Activities can be created and
deleted directly from My Activities
tab.
Page 32 of 42
No content or materials demonstrating the usage of eduphoria! SchoolObjects may be posted or displayed on any external website or public domain.
Creating Tests in Forethought – Aware Customers Only
For schools who have both SchoolObjects:forethought and aware, this is a quick-entry, scoring tool to create multiplechoice tests for your students. The answer documents can be scanned the same way as CBA’s and Short-Cycle
Assessments and answers can be viewed electronically. However, the data will NOT be analyzed in Aware.
Editing Schedules
Link Lesson Plans to Courses/Class
Rosters
This step may already be completed. If so, move ahead to the “Creating a Test”
section. If not, this is a one-time process, and it will link the lesson plan schedule
to class rosters in order to print answer documents.
1. In Forethought, select Change
My Settings
2. Click My Schedules
3. Select the schedule to edit then
click Edit Schedule
4. Select Next on the following
screen
5. Select a course with learning
standards entry and then click
Edit Entry
Note: Special Entries will not have
connections to class rosters.
Page 33 of 42
No content or materials demonstrating the usage of eduphoria! SchoolObjects may be posted or displayed on any external website or public domain.
6. Check the checkbox of the
course that corresponds to the
entry.
More than one roster course can be
selected.
7. Repeat this process for each
entry in the schedule. When
finished, click “Next,” “Next,” and
“Continue Using forethought”
to get back to the lesson planner.
Creating a Test
BEFORE YOU MOVE FORWARD…
#1 - Did you link your courses to your schedule?
#2 - Any day that was activated (bold) prior to linking your courses will not have the “Attach a Test” option. You
MUST click on a new day to have the ability to create a test. For any future day, this option will continue to
appear.
1. Within an entry on the lesson
planner, click on the paper clip to
add an attachment.
2. Click on the plus next to Attach
a Test
Page 34 of 42
No content or materials demonstrating the usage of eduphoria! SchoolObjects may be posted or displayed on any external website or public domain.
3. To create a new test, click on the
“Browse” button.
4. In the pop-up window, select
“New Test.” You can also
choose an existing test from this
screen.
New Teacher Test Wizard
Enter the title and number of
questions for the test. Click “Next.”
Select the correct answer choices for
the questions.
Click “Finish.”
Note: This information can be
changed at a later time before
printing answer documents.
If you already have test questions, you can simply create an answer key (above), and bubble answer sheets can be
printed for each student.
OR
If you want to create a test and include the questions, use the following steps to write multiple-choice questions.
Page 35 of 42
No content or materials demonstrating the usage of eduphoria! SchoolObjects may be posted or displayed on any external website or public domain.
Toolbar Features
Delete – deletes the entire test
Add Question – adds a multiplechoice question to the test
Print – prints the actual test
document with questions
Arrow – moves questions up or
down
Use In Plans –moves the test into
the selected lesson plan as an
attachment once the test is
complete
Use alternating lettering –
uncheck to keep all answer
choices ABCD, ABCD, etc.
To edit a blank question, select the
question and a new interface will appear
below.
Save – saves selected question
Delete – deletes selected
question
Layout
Full-Width – (default) prints questions
across the entire page
Half-Width – prints each question on only
half of the page (2 columns on a sheet)
Preview Question – shows the
question with its answer choices
Black X – closes this question
Page 36 of 42
No content or materials demonstrating the usage of eduphoria! SchoolObjects may be posted or displayed on any external website or public domain.
Question Tab – text box to type the
question
Attach Image – uploads a digital
image for this question (i.e. map,
graph, reading passage in pdf
form, etc.)
Response Tab – text boxes to enter
the response choices
Note: Mark the correct answer by
selecting the radio button.
Attachment – uploads a digital
image for each response (i.e.
graph, image, etc.)
Note: These images will be printed on
the test
Once complete, select the “Use In
Plans” option. This will add the test
as an attachment in the lesson plan.
Make sure to click “Attach File.”
Once in the lesson plan, Right Click on the test file for
more options.
View Test – opens an editing
window to see all questions and
responses
View Test Results – shows
results once the tests have been
scanned
Print Test –prints the test
document with questions
Print Test Key – prints answer
key
Remove From Lesson – removes the test from the
lesson plan
Note: This does not delete the test from your test bank.
Page 37 of 42
No content or materials demonstrating the usage of eduphoria! SchoolObjects may be posted or displayed on any external website or public domain.
To Print Answer Documents for
each student, either
1) Double Click on the test file
OR
2) Right Click on the test file and
select “View Test”
THEN
“Print” & “Print Answer Documents”
The Answer Documents will print with
barcodes and student names. After
the test has been taken, these
documents can be scanned like any
other district or campus assessment.
Results are available immediately after
scanning.
In the window to edit the test, click on
the “Administrations” button. Right
Click on a test title for additional
options.
Print Answer Documents –
prints documents with barcodes
and student names that can be
scanned
View Results – see below
Delete Results – removes results
from the view
Page 38 of 42
No content or materials demonstrating the usage of eduphoria! SchoolObjects may be posted or displayed on any external website or public domain.
View Results
Students’ results and data will appear in a chart.
Export to Excel – transfers data to a spreadsheet
Page 39 of 42
No content or materials demonstrating the usage of eduphoria! SchoolObjects may be posted or displayed on any external website or public domain.
Management Options & Reports
Standard Decorators
Learning standard decorators enable the district to provide teachers with a visual indicator for district-defined standards
meaning. There are five different color options and any or all can be enabled.
Manage Tab >
Forethought Options >
Standard Decorators
Activate Decorator
1. Select a standard decorator
2. Check the Active checkbox
3. Give a name and
description (optional)
4. Click Update
Lesson Checklists
Lesson checklists enable teachers to select district-defined focus items in the planner for tracking purposes. Checklists are
organized into groups and are available for all teachers to track usage for every lesson plan entry.
Manage Tab >
Forethought Options >
Lesson Checklists
Page 40 of 42
No content or materials demonstrating the usage of eduphoria! SchoolObjects may be posted or displayed on any external website or public domain.
Create a Checklist
1.
2.
3.
4.
5.
6.
7.
Type a group title into the blank box.
Click Add Group
A new section below will appear
Type the first item in the box
Click Add Item
Continue for all items
Select an item to edit, move up, move
down, or remove
8. Don’t forget to SAVE
9. Create additional checklist groups as
needed
Checklist Usage
Print Usage report or see Reports Tab.
Assigning Delegates
Assigning delegates allows curriculum managers to choose staff members to edit selected courses' scope and sequences.
1. Create New Delegate
2. Complete the wizard entering
the name or email of the
delegate
3. If more than one user exists,
choose the correct user.
1. Select the delegate’s name
2. Click Add Courses
3. Using the course tree, check
the courses the delegate needs
to have rights to edit. You can
select more than one course at
this step.
4. Click Add Courses
5. Check the boxes for each
course
6. Click Set Rights
7. Check rights for delegate as
needed
8. Remove courses as needed
also
Use the Remove Delegate option to
remove the staff member from
editing courses.
Page 41 of 42
No content or materials demonstrating the usage of eduphoria! SchoolObjects may be posted or displayed on any external website or public domain.
Reports
Standard Coverage
This Report will show the teacher’s
name and dates the standards were
used in a lesson plan for a particular
course.
This report is available for Curriculum
Managers to view standard coverage for
all schools in the district. This report is
available for Principals and Lesson Plan
Viewers to view standard coverage for
their schools.
Lesson Status Report
This Report shows if teachers have
created lesson plans for a week. It
really only shows if they clicked on it.
Don’t be fooled by the green checks.
This report is available for Curriculum
Managers to view lesson status for all
schools in the district. This report is
available for Principals and Lesson Plan
Viewers to view lesson status for their
schools.
Checklist Report
This report shows how many times a
teacher has checked an item in all of the
checklists (including technology). It will
give a total number for the district or
school.
This report is available for Curriculum
Managers to view checklist coverage for
all schools in the district. This report is
available for Principals and Lesson Plan
Viewers to view checklist coverage for
their schools.
Page 42 of 42
No content or materials demonstrating the usage of eduphoria! SchoolObjects may be posted or displayed on any external website or public domain.