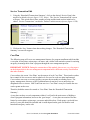
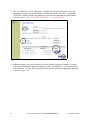
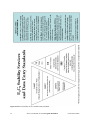
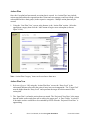
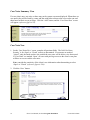
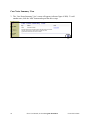
1
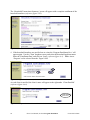
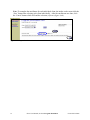
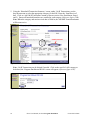
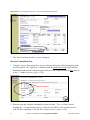
Section Four
E2C2 Program Enrollments
The E2C2 module of OPUS allows an intake worker to enroll clients into agency level programs
that provide energy education and case management services. Specific services can be allotted
to a household to measure energy efficiencies and case plans; goals and expectations can be
recorded, tracked and used for measurements and federal reporting requirements.
Program Enrollment
Program Enrollment New
Household Transaction Summary
Program Enrollment Search
I & R Transaction
Kit Components – New Transaction
Service Transactions
Service Transaction New
Services Transaction Edit
Case Plan
Case Plan New
Case Plan View
Status Assessment
E2C2 Stability Services and Data Entry Standards (Table)
Status Assessment New/Edit
Status Assessment View
Action Plan
Action Plan New
Action Plan View
Action Step
Action Step New
Action Step View
Case Worker Tickler System
Case Worker Tickler View
Case Notes Summary View
Case Notes New
Case Notes Summary View
56
E2C2 User Manual, Section 4 Program Enrollment
56
57
61
62
63
66
69
70
72
72
73
75
79
80
81
83
85
85
85
87
88
89
90
91
92
92
93
Created 05/23/2008
Program Enrollment
Once a household has been entered into the OPUS database, the HH is ready to receive services
in the E2C2 module.
The E2C2 module is customized with various services consisting of but not limited to: energy kit
components, case management, education depending on an agency’s level of services and
funding opportunities.
Note: The household must have a ‘Residence’ address in the database before I & R
Transactions kit components can be designated.
In the ‘Household View’ under ‘Address’ (reference figure 4-1), if the address is designated a
‘B’ the address is mailing and physical address. If the address is designated as ‘M’, it’s a
mailing address only and components can not be assigned to the HH.
Setup: Using the ‘Household View’ screen
1. To ensure a household has an active physical residence, once the household is enrolled into
OPUS, click on the ‘Residence – View’ in the Left Nav Bar. If the household is not in a
physical residence, under ‘Residence’ the ‘New’ link in the Left Nav Bar will be an active
link (in blue) (reference figure 4-1).
Figure 4-1: Household View. Left Nav Bar with ‘Residence’ links.
57
E2C2 User Manual, Section 4 Program Enrollment
Created 05/23/2008
2. Click on the ‘New’ link and the ‘Residence New’ screen will appear. Complete all required
and pertinent information then click the ‘Save’ button (reference figure 4-1B).
Figure 4-1B: Residence New screen
Program Enrollment New
Setup: Using the ‘Household View’ screen.
1. In the section titled, ‘Programs Enrolled’, click the ‘New Enrollment’ button. In this
example, the E2C2 program is already completed to indicate where it would be located
(reference figure 4-2).
Figure 4-2: Household View
58
E2C2 User Manual, Section 4 Program Enrollment
Created 05/23/2008
2. In the ‘Household View’ screen, under ‘Program Enrolled’, click on ‘Program Enrollment
New’ screen. Using the drop-down arrow, select the appropriate ‘Program’ and ‘Client’
name then click ‘Load’ (reference figure 4-2A).
Figure 4-2A: Program Enrollment New ‘Load’ screen
3. The window will flash and the ‘Enrollment Date’ will appear. Fill in the ‘Enrollment Date’
and click the ‘Enroll All’ button. Then click the ‘Save’ button (reference figure 4-2B).
Figure 4-2B: Program Enrollment New ‘Save’ screen
59
E2C2 User Manual, Section 4 Program Enrollment
Created 05/23/2008
The ‘Household Transactions Summary’ screen will appear with a complete enrollment of the
household members (reference figure 4-3C).
Figure 4-3C: Household Transactions Summary
4. If the household members are enrolled one at a time the ‘Program Enrollment New’ will
appear again. Use the ‘Client’ dropdown arrow and select the household applicant name
Enter the ‘Enrollment Date’ and click on ‘Load’ (reference figure 4-4). Note: A new
‘Program’ can be selected from the ‘Prgrm’ field.
Figure 4-4: Program Enrollment New, individual client
As each client is enrolled, the client’s name will appear to the right under ‘Client Enrolled’
(reference figure 4-4A).
Figure 4-4A: Program Enrollment New – Clients Enrolled screen.
60
E2C2 User Manual, Section 4 Program Enrollment
Created 05/23/2008
Note: To complete the enrollment for each individual client, the intake worker must click the
‘Save’ button after selecting each client individually. After the enrollments are done, click
the ‘Cancel’ button which will end the selection (reference figure 4-4A).
Figure 4-4B: Program Enrollment New. Save after each client screen.
61
E2C2 User Manual, Section 4 Program Enrollment
Created 05/23/2008
Household Transactions Summary
The ‘Household Transactions Summary’ screen will appear. The intake worker should review
the HH information to ensure accuracy for the program(s) and reconfirm accuracy in the
‘Household View’ screen (reference figure 4-5).
The ‘Household Transaction Summary’ screen provides an overview of ‘Information and
Referral’ (I & R Transactions) consisting of, but not limited to: kit components, energy
education, and weatherization services the household may be enrolled in. New enrollments
begin by enrolling the household or clients into services and transactions that they qualify for.
Figure 4-5: Program Enrollment New, additional HH client.
62
E2C2 User Manual, Section 4 Program Enrollment
Created 05/23/2008
Program Enrollment Search
Case managers/intake workers can locate a list of clients enrolled in a specific program.
1. Using the ‘Main Menu’, scroll the mouse over ‘Program’, to ‘Enrollment’, to ‘Search’
and click on ‘Search’ (reference figure 4-6). The ‘Program Enrollment Search’ screen
will appear.
Figure 4-6: Program Enrollment Search screen
2. Using the ‘Program’ drop-down menu, select the appropriate Program (reference
figure 4-6A). At least one field needs to be completed.
Figure 4-6A: Program Enrollment Search with APC chosen screen.
3. Click in an empty cell, the ‘Search’ button will become active (figure 4-6B). Note: A
maximum of 100 results will be returned. This is not recommended to be used for reporting
purposes.
Figure 4-6B: Program Enrollment Search with APC selected screen.
63
E2C2 User Manual, Section 4 Program Enrollment
Created 05/23/2008
I & R Transactions
1. Using the ‘Household Transaction Summary’ screen; under ‘I & R Transactions, use the
drop-down menu to select the appropriate category for the HH. Enter the ‘Start/Received’
date. Click on ‘Add I & R Transaction’ button (reference figure 4-7).
Figure 4-7: I & R Transactions category/date menu
2. The ‘Household Transaction Summary’ screen will appear. The intake worker should verify
the information is correct with this screen. If the I & R Transaction requires correction or
editing, click on the ‘Category’ title (reference figure 4-8) .
Figure 4-8: Household Transactions Summary with I & R Category/Date menu.
64
E2C2 User Manual, Section 4 Program Enrollment
Created 05/23/2008
3. The ‘Edit’ screen allows the intake worker to make the appropriate changes. Changes can
include the type of services by using the drop-down menu and the date can be manually
changed. Click the ‘Save’ button. If needed, the program can be deleted from the HH
information by clicking on the ‘Delete’ button (reference figure 4-9).
Drop-down menu
Figure 4-9: Program Enrollment IR Edit screen
4. Use the ‘Household View’ screen to add other transactions to an open enrollment. Click on
the ‘Programs Enrolled’ link to access ‘Household Transactions Summary’. Click on the
‘Category’ drop-down menu (reference figure 4-9A).
Figure 4-9A: Household View, Programs Enrolled to add I & R Transactions Categories.
65
E2C2 User Manual, Section 4 Program Enrollment
Created 05/23/2008
5. Using the ‘Household Transaction Summary’ screen; under ‘I & R Transactions, use the
drop-down menu to select the appropriate category for the HH. Enter the ‘Start/Received’
date. Click on ‘Add I & R Transaction’ button (reference section ‘New Enrollment; Steps 1
and 2). Ensure all household members are enrolled in each category (Reference figure 4-9B).
Note: When the category and start/received date is filled in, the Add I&R Transaction button
will become active.
I&R Transaction
Figure 4-9B: Household Transactions Summary, I & R Transactions/Category – add 2nd enrollment.
Note: I & R Transactions can be deleted if needed. Click on the specific I & R category to
be deleted, the ‘Program Enrollment IR Edit’ screen will appear (reference figure 4-9C).
Figure 4-9C: Program Enrollment IR Edit screen
66
E2C2 User Manual, Section 4 Program Enrollment
Created 05/23/2008
To enroll a HH in another program, return to ‘Program Enrollment New’ and repeat the
required steps. The ‘Household Transaction Summary’ screen displays multiple ‘Programs
Enrolled’ (reference figure 4-10).
Figure 4-10: Household View with two Programs.
Kit Components
1. Select the appropriate ‘Program Enrolled’ from the ‘Household View’ screen (reference
figure 4-11).
Figure 4-11: Household View – Programs Enrolled screen.
67
E2C2 User Manual, Section 4 Program Enrollment
Created 05/23/2008
2. Using the ‘Household Transactions Summary’ screen, click on the ‘New Transaction’ button
(figure 4-11A). The ‘WX Kit New’ screen will appear.
Figure 4-11A: Household Transactions Summary – New Transaction screen.
3. The “WX Kit New” screen allows the intake worker/user to enter the number of units of each
kit component, number of units installed and date received by the client. When complete
issuing the kit components, click the ‘Save’ button. The Household Transaction Summary
screen will re-appear (reference figure 4-11B).
Note: Every ‘New Transaction’ WX Kit provided to a household should be entered into the
database for tracking purposes.
Do to the size of the ‘WX Kit New’ screen; it is on the following page by itself to
demonstrate all the components and the ‘Save’ button.
68
E2C2 User Manual, Section 4 Program Enrollment
Created 05/23/2008
Figure 4-11B: WX Kit New
69
E2C2 User Manual, Section 4 Program Enrollment
Created 05/23/2008
3. The ‘Household Transactions Summary’ screen will re-appear with the WX Kit Components
displayed. Using this screen, the intake worker/user should confirm the information prior to
proceeding (reference figure 4-11C).
Figure 4-11C: Household Transaction Summary w/Kit Components screen.
Service Transactions
Service transactions are used to document how services were provided, whether the service was
in home visit by the case manager, office visit, via telephone, etc.
1. Using the ‘Housing Transactions Summary’ screen, under the ‘Service Transactions’ section,
using the drop-down menu, select the ‘Service Name’ and click the ‘New Transaction’
button. (reference figure 4-12A).
Level 3 Case
Management is not
always identified in the
‘Service Name’ which
is connected to the
APC. If this is not
available, contact your
OPUS Administrator
who works with the
specific program and
module.
Reference figure 4-12
drop-down menu.
70
E2C2 User Manual, Section 4 Program Enrollment
Created 05/23/2008
Figure 4-12: Service Transaction section – services selection drop-down menu
Figure 4-12A: Services Transactions – services selected, New Transaction screen.
2. The ‘Services Transaction New’ screen will appear.
Service Transaction New
1. Using the ‘Service Transaction New’ screen, select the clients that will be participating in the
service provided. The ‘Applicant” is identified with the round radio button ‘App’ and other
household members/clients who participate in the service are identified with the box checked
in the ‘C’ column (reference figure 4-12B).
Applicant identifiers
Figure 4-12B: Services Transaction New screen.
2. Enter the start date, end date, and number of units provided. The ‘# of Units’ should
normally be ‘1’ to represent one activity. In this case, the HH received on unit of service
with WX Kit components. Click the ‘Save’ button (reference figure 4-12B).
71
E2C2 User Manual, Section 4 Program Enrollment
Created 05/23/2008
3. The ‘Household Transactions Summary’ screen will re-appear showing ‘Kit Components’
and ‘Service Transactions’ information (reference figure 4-12C).
Figure 4-12C: Household Transactions Summary with services screen.
4. If a ‘Service Transaction’ has been previously activated, enter the amount to be allocated to
any of the grant(s) that are associated with the service at the bottom of the screen. The dollar
value needs to be allocated to the grants available and a zero balance needs to be displayed
before the information can be saved. (This function has not been activated at time of
rollout of this module.)
72
E2C2 User Manual, Section 4 Program Enrollment
Created 05/23/2008
Service Transaction Edit
1. Using the ‘Household Transactions Summary’, click on the desired ‘Service Name’ that
needs to be edited (reference figure 5-12C, above). The ‘Service Transaction Edit’ screen
will open. This screen allows dates, number of units and the intake worker initials to be
edited. ‘Service Transactions’ can also be ‘Deleted’ in this screen (reference figure 4-12D).
Figure 4-12D: Service Transaction Edit screen.
2. Click on the ‘Save’ button when done making changes. The ‘Household Transactions
Summary’ screen will reappear.
Case Plan
The following steps will cover case management features of a program enrollment which include
a case plan, action plans, action steps, case notes, and a tickler alert reminder system for assisting
an agency to manage their client’s progress through the case management process.
IMPORTANT NOTICE: During the construction of this module, there was a very clear aspect
on the design which is the case management component holds a different security classification
than other modules.
Case workers who create ‘Case Plans’ are the owners of each ‘Case Plan’. These intake workers
have control of who can access and to what level of access for each case plan implemented.
Case workers can create co-owners and they can pass the ownership to another person. The
agency management, directors or OPUS administrators do not have access unless they are
designated to be co-owners. OHCS staff can not view ‘Case Plans’ at any level unless the case
worker grants such access.
Therefore, hotlinks can not be created to ‘Case Plans’ from the ‘Household Transaction
Summary’.
A case plan can have several components within it’s self and is the main source of holding a
client’s program information, known as the “gate keeper”. A case plan can consist of but not
limited to: action plans, action steps, case notes and tickler alerts. Each agency can decide how
much of a case plan should be included and it could depend on the goals set forth for each
household an agency works with.
73
E2C2 User Manual, Section 4 Program Enrollment
Created 05/23/2008
Case Plan New
Setup:
1. Using the ‘Household Transaction Summary’ screen, click the ‘Program Enrollment
Summary’ button (reference figure 4-13).
Figure 4-13: Household Transactions Summary – Program Enrollment Summary screen
2. The ‘Program Enrollment Summary’ screen will appear. To initiate a case plan, click on the
‘New Case Plan’ button (reference figure 4-13A).
Figure 4-13A: Program Enrollment Summary – Case Plans screen
74
E2C2 User Manual, Section 4 Program Enrollment
Created 05/23/2008
3. The ‘Case Plan New’ screen will appear. Complete all required information. Select the
appropriate client(s) to be enrolled in the case plan and enter the entry date. Leaving the
‘Case Plan #’ blank will allow the database to create an auto-generated case plan number
(reference figure 4-14). Items with a red asterisk ‘*’ are required fields.
Figure 4-14: Case Plan New screen.
4. Additional agency case workers that are involved with the client can be added to a client’s
case plan by choosing the appropriate name(s) in the ‘Caseworker(s)’. Case workers can be
issued ‘Normal’ or ‘View only’ permissions to the file by selecting the appropriate privilege
(reference figure 4-14).
75
E2C2 User Manual, Section 4 Program Enrollment
Created 05/23/2008
Case Plan View
The ‘Case Plan View’ screen provides an overview of all the clients enrolled in the case plan, the
case workers assigned to work on it and their privilege level such as owner, normal or view only
access.
Case plans can be edited, closed or items added. To edit a case plan, click on ‘Edit Case
Plan’ button (reference figure 4-14A).
Figure 4-14A: Case Plan View screen.
The ‘Case Plan Edit’ screen will appear. Change or correct the appropriate information and
click ‘Save Changes’ button (reference figure 4-14B).
Figure 4-14B: Case Plan Edit screen.
76
E2C2 User Manual, Section 4 Program Enrollment
Created 05/23/2008
Action plans are a part of case plans. Action plans are steps in developing a plan that works
towards a specific goal for a household such as assisting the client(s) with classes, finding
employment, transportation, etc. Before an ‘Action Plan’ is developed it is important to
know where or what the household status is. A status assessment is needed and is an
important part of analyzing where to start with a client and where the goal completion would
end, giving a client or household a goal to work towards.
Action Plan(s) are located at the bottom of the ‘Case Plan View’. Using the drop-down
menu, an intake worker would choose the category appropriate for the client and/or
household composition. When the category is chosen, the case plan notes would build off
the specific category. The intake worker would document the plan and steps desired for a
client and/or household to complete their goal (reference figure 4-14C).
Developing an ‘Action Plan’ will be discussed later in this chapter.
Figure 4-14C: Case Plan View – Action Plan screen.
77
E2C2 User Manual, Section 4 Program Enrollment
Created 05/23/2008
To close a case plan, click on the ‘Close Case Plan’ button (reference figure 4-14C). The
‘Case Plan Close’ screen will appear. Complete the close date and click the ‘Close’ button
(reference figure 4-14D).
Figure 4-14D: Case Plan Close screen.
Using the ‘Case Plan View’ screen, to add case notes (reference figure 4-14E), click the
‘View/Add Case Notes’ button. The ‘Case Notes New’ screen will appear. Enter the date
and appropriate comments pertaining to the client(s) and what progress, if any, towards the
goal set.
Figure 4-14E: Case Plan View ‘View/Add Case Notes’ partial screen
NOTE: It is recommended to add the intake workers initials at the end of each comment(s)
annotated. This would help another case worker by knowing who created the comments for
current intake workers or previous intake workers having contact with the client(s) (reference
figure 4-14F).
Enter comments/actions/communications taken.
Closed by intake worker’s initials.
Figure 4-14F: Case Notes New screen.
78
E2C2 User Manual, Section 4 Program Enrollment
Created 05/23/2008
The ‘Case Plan View’ screen will re-appear. It is recommended the intake worker would
confirm the accuracy of the client’s information: active clients, programs enrolled, caseworker,
action plan, and the number of case notes (reference figure 4-14G).
Figure 4-14G: Case Plan View screen
Note: ‘Case Plans’, ‘Assessments’ and ‘Action Plans’ can not be deleted, only edited or
closed.
79
E2C2 User Manual, Section 4 Program Enrollment
Created 05/23/2008
Status Assessment
Clients are given an initial assessment as a part of a case plan to indicate their needs and to
develop a case plan. Clients are assessed by using a number of indicators from housing and food
access, energy, etc.
1. Using the ‘Household Transactions Summary’ or ‘Program Enrollment Summary’ screen, go
to the ‘Top Nav Bar’ and scroll the mouse over ‘Program’ then go to ‘Enrollment’ then scroll
down to and click on ‘Summary’. Another route to get to the assessments is using the ‘Left
Nav Bar, under ‘Enrollment’, click on ‘Program Summary’. The ‘Program Enrollment
Summary’ screen will appear. In the ‘Left Nav Bar’, under ‘Status Assessments’, click on
‘New/Update’ (reference figure 4-15).
Figure 4-15: Navigation Menus. Main Menu or Left Nav Bar screen.
The ‘Quick’ assessment is a condensed version of the ‘Comprehensive’ assessment and is good
to use as a screening tool to help decide whether a client’s needs can be served by either ‘Level
2’ or ‘Level 3’ case management services.
To decide which level a client(s) belongs to refer to the “E2C2 Stability Services and Data Entry
Standards” (reference figure 4-15A, next page).
80
E2C2 User Manual, Section 4 Program Enrollment
Created 05/23/2008
Figure 4-15A: E2C2 Stability Services and Data Entry Standards.
81
E2C2 User Manual, Section 4 Program Enrollment
Created 05/23/2008
Status Assessment New/Edit
2. The household is analyzed for an initial assessment that can be reviewed later for a
comparison of when the clients came into the program versus the assessment when clients
exit the program. The ‘Status Assessment New/Edit’ screen will appear. Complete all the
pertinent information either by manual entry or by using the drop-down menus.
Figure 4-15B is a ‘Quick’ assessment which is a condensed version of the ‘Comprehensive’
assessment. Click the ‘Save’ button when completed (reference figure 4-15B).
Figure 4-15B: Status Assessment New/Edit screen.
By clicking on ‘Change to Comprehensive’ link, there is a ‘Status Assessment New/Edit’
long version which captures more information.
3. The second assessment is a ‘Comprehensive’ assessment. Either assessment is good to use
as a screening tool to help decide whether a household’s needs can be served by either level
two or level three case management services (reference figure 4-15B). Click the ‘Save’
button when completed (reference figure 4-15C, next page).
82
E2C2 User Manual, Section 4 Program Enrollment
Created 05/23/2008
This screen shot indicates
every thing included on a
comprehensive
assessment. All screen
shots were captured to
show the ‘save’ button at
the bottom as well.
Figure 4-15C: Status Assessment New/Edit Comprehensive screen.
83
E2C2 User Manual, Section 4 Program Enrollment
Created 05/23/2008
Status Assessment View
5. The ‘Status Assessment View’ screen will appear after completion of each assessment
(reference figure 4-15D).
Figure 4-15D: Status Assessment View screen
6. At the bottom of the ‘Status Assessment View’ screen are two buttons.
1: ‘Status Assessment History Report’ which will provide a printable report that shows the
selected assessment indicators including any changes made since the initial assessment.
2: ‘Status Assessment Snapshot Report’, which allows the intake worker to enter a specific
date. The report will show the status of the client’s assessment as of the specific selected
date (reference figure 4-15D).
7. Before exiting a client from case management, the ‘Comprehensive Assessment’ must be
updated to reflect the status in each sub-category at the point of exiting.
84
E2C2 User Manual, Section 4 Program Enrollment
Created 05/23/2008
8. Using the ‘Left Nav Bar’, under ‘Enrollment’, click the ‘Program Summary’ link to return to
‘Program Enrollment Summary’, ‘Case Plan’ (reference figure 5-15D, previous page).
Under Case Plans, the intake worker can select a previously created case plan or select a new
case plan (reference figure 4-16).
Figure 4-16: Program Enrollment Summary – Case Plan screen.
85
E2C2 User Manual, Section 4 Program Enrollment
Created 05/23/2008
Action Plan
Once the Case plan has been started, an action plan is created. An ‘Action Plan’ may include
action steps that outline the expectations that a client and case manager would set to help a client
or household achieve their goal(s) in the respective categories. Multiple action plans may be
created.
1. Using the ‘Case Plan View’ screen, at the bottom, is the ‘Action Plan’ section. Select the
appropriate category then click the ‘Add’ button to begin a new action plan (reference
figure 4-16A).
Figure 4-16A: Case Plan View screen
Note: ‘Action Plan Category’ items can be used more than once.
Action Plan New
1. Reference figure 4-16B, using the ‘Action Plan New’ screen, the ‘Entry Level’ is the
assessment indicator selected at the point of entry into case management. The ‘Target Goal’
must be higher than the ‘Entry Level’ and represents the target for achievement for this
action plan.
2. The ‘Open Date’ is when the action plan was started. The ‘Projected Close Date’ is the target
date the intake worker and client sets to achieve the target goal. A ‘Date Tickler’ is selected
if the intake worker would like to be reminded by OPUS when the ‘Projected Close Date’ is
approaching.
86
E2C2 User Manual, Section 4 Program Enrollment
Created 05/23/2008
3. Select the client(s) who will be associated with the action plan then click the ‘Save’ button.
All fields marked with a red asterisk ‘*’ are required.
4. The intake worker would enter all the pertinent information. If the intake worker wants to
create a reminder, click on the box ‘Create Projected Completion Date Tickler’. Click on the
‘Save’ button when the information is completed.
Figure 4-16B: Action Plan New screen.
Note: Case workers can set an alert tickler for ‘Action Plans’. The ‘Action Plan New’ screen
has a check box to select if the case worker wants to be reminded about the ‘Projected Close
Date’.
87
E2C2 User Manual, Section 4 Program Enrollment
Created 05/23/2008
Action Plan View
The ‘Action Plan View’ screen will appear next. The ‘Action Plan View’ screen provides
several areas to work from. In this screen, the plan can be edited, built upon with action
steps, case notes viewed or created and then eventually closed upon completion. The next
section will provide procedures to create action steps to support an action plan (reference
figure 4-16C).
Figure 4-16C: Action Plan View screen.
Action Steps
1. ‘Action Steps’ support case plans. Using the ‘Case Plan View, click on the selected
‘Category’ link under the ‘Action Plan’ (reference figure 4-17).
Figure 4-17: Case Plan View – Action Plan – Action Category screen.
88
E2C2 User Manual, Section 4 Program Enrollment
Created 05/23/2008
Action Step New
2. The ‘Action Plan View’ screen will appear. In the ‘Action Step(s)’ category, click the ‘Add’
button (reference figure 4-17A).
Figure 4-17: Action Plan View screen.
3. The ‘Action Step New’ screen will appear. On the ‘Action Step New’ screen, fill in all
pertinent fields (reference figure 4-17A). All fields marked with a red ‘*’ are required.
Figure 4-17A: Action Step New screen.
89
E2C2 User Manual, Section 4 Program Enrollment
Created 05/23/2008
4. In the ‘Action Step New’ screen, the following explains the purpose of each field.
a) Roles further define what the action step is.
b) Responsibility defines what the client has agreed to do to complete the action step.
c) Support Services lists any services the agency may provide to assist the client in
achieving this action step.
d) Referral lists any referrals made to assist the client related to this action step.
e) Comments can be used to further explain the above information or to record information
that may be important to help the client be successful in this action.
f) The Action Step Status is used to identify this step as ‘Open’, meaning the client is
actively working on this step, or ‘Planned’, which means the step is planned for the
future.
Case workers can set an alert tickler for ‘Action Steps’. The ‘Action Step New’ screen has
two check boxes to select so that a case worker can be reminded to follow up on the
‘Projected End Date’ and/or ‘Follow-up Date’.
Action View
These steps are helpful if/when there are a series of steps that need to be completed
sequentially. Click the ‘Save’ button and the ‘Action Step View’ screen will appear
(reference figure 4-17B).
Figure 4-17B: Action Step View screen.
If more than one step is needed for the action plan, click the ‘Add’ button again on the
‘Action Plan View’ screen and repeat the steps listed above. Note: Each step should have its
own unique title.
90
E2C2 User Manual, Section 4 Program Enrollment
Created 05/23/2008
5. The ‘Action Step New’ screen will appear. Enter all the pertinent information. All fields
with the red asterisk ‘*’ are required. There is a check box for “Projected End Date’ and
‘Follow-up Date’. There is a check box to ‘Create Projected Completion Date Tickler’ for a
case worker to select if a reminder is desired (reference figure 4-17A, page 92).
6. At the bottom of the screen, ‘Case Notes’ can be added explaining specific
instructions/agreement to the action step by clicking the “View/Add Case Notes” button
(reference figure 4-17B). The ‘Case Notes Summary View’ will appear.
Case Worker Tickler System
Case worker ticklers can be created and reviewed, unchecked to be deactivated or deleted. To
create ticklers reference the sections: Action Plans’ and ‘Step Plans’ previously covered
(reference figure 4-18).
Figure 4-18: Action Step New screen – Create Tickler screen.
When the tickler has been implemented and a case worker logs into the OPUS System,
a message alert box will popup on the ‘Message of the Day’ screen to remind them of items in
the tickler list that need to be reviewed (reference figure 4-19).
Figure 4-19: Message of the day with message alert - Case worker tickler alert screen
91
E2C2 User Manual, Section 4 Program Enrollment
Created 05/23/2008
1. The intake worker/case worker would click the ‘OK’ button to close the screen and proceed
to the ‘Case Worker Tickler View’ screen for review. On the ‘Main Menu’, scroll the mouse
over the ‘Case Mgmt’, over ‘Case Worker’, down to and click on ‘View Ticklers’. The
‘Case Worker Tickler View’ screen will appear (reference figure 4-19A).
Figure 4-19A: Main Menu – View Tickler screen.
2. The ‘Case Worker Tickler View’ screen will appear. Click on the Case Plan # that you
want to review (reference figure 4-19B).
Figure 4-19B: Case Worker Tickler View – Case plan number screen.
3. Each “tickler” is a ‘Flag’ column followed by ‘Case Plan #’. The case worker would select
the ‘Case Plan #’ link (highlighted in a different color and underlined) to view the specific
plan. If the boxes are un-checked the reminders are deactivated.
4. Case Plans may deactivated individually or click the ‘UnCheck All’ button. To “Save” the
changes the intake worker would need to click on the ‘Update Flag(s)’ button. To remove a
tickler permanently, make sure the tickler is not checked and click on the ‘Delete Disabled
Ticklers’. An intake worker could start a new tickler using this screen by clicking the “New
Tickler” button (reference figure 4-19B).
92
E2C2 User Manual, Section 4 Program Enrollment
Created 05/23/2008
Case Notes Summary View
If a case plan is new, not active or there may not be current case notes displayed. When there are
case notes, they will be listed by owner and date with links to them so the case worker can read
them based on their access privilege. Click the “Add” button, and the ‘Case Notes New’ screen
will appear (reference figure 4-20).
Figure 4-20: Case Notes Summary View screen.
Case Notes New
1. On the ‘Case Notes New’ screen, complete all pertinent fields. The field ‘Set Notes
Security’ is for ‘Open’ or ‘Closed’ security as determined. If case notes are marked
“closed”, only the intake worker who created the case notes will be able to view that record.
If ‘Case Notes’ are marked ‘Open’, all users with privilege access to the client’s case plan
will have access to read the case notes.
Note: consider the sensitivity of the client’s case information when determining to select
‘Open’ or ‘Closed’ (reference figure 4-20A).
2. Click the ‘Save’ button.
Figure 4-20A: Case Notes New screen.
93
E2C2 User Manual, Section 4 Program Enrollment
Created 05/23/2008
Case Notes Summary View
3. The ‘Case Notes Summary View’ screen will appear (reference figure 4-20B). To add
another note, click the “Add” button and repeat the above steps.
Figure 4-20B: Case Notes Summary View screen.
94
E2C2 User Manual, Section 4 Program Enrollment
Created 05/23/2008