1
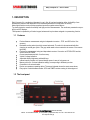
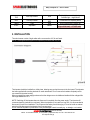
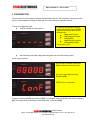
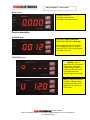
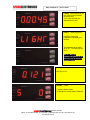
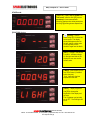
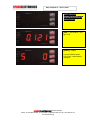
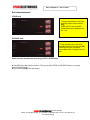
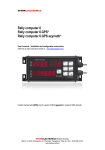
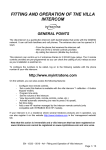
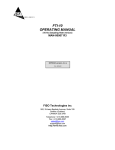
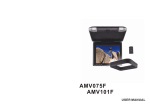
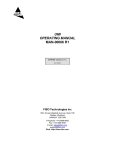
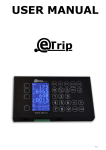
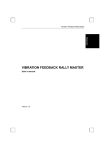
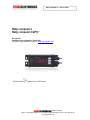
Rally computer 3 – User’s Guide
Rally computer 3
Rally computer 3.GPS *
User manual.
Installation and configuration instructions.
(with links to video instructions online at : www.rallycomputer.com )
* Content marked
applies only to 3.GPS version
SPARKELECTRONICS Robert Skierski,
Office: 01-424 Warszawa, Al. Prymasa Tysiąclecia 78a, tel / fax : 022 836-24-51
www.rajdowe-haldy.pl
Rally computer 3 – User’s Guide
1. DESCRIPTION
Rally Computer 3 is a professional tripmeter for use in flat, off-road and navigation rallies. Its flexibility of use
enables easy selection and adjustment of the measured parameters for the specifics of the rally.
Water-tight aluminium casin provides exceptional protection against external factors.
Top-class electronics ensures its reliability and high-precision measurements. The results are presented on superbright, red LED displays.
The tripmeter is operated by a 3-button keypad, where each key has been assigned a top measuring function.
1.1 Features
Precise distance measurement using two independent counters - TRIP and ODO with a 10m
accuracy.
Backward counting when the vehicle moves backwards. The switch is done automatically after
changing to reverse gear. (Note ! The grey cable needs to be connected to the sensor or the reverse
light bulb).
Precise time measurement using two independent counters. One works as STOPWATCH and the
second works as TIMER.
Current speed measured with 1 km/h accuracy.
Vehicle’s voltage indication.
Adjustable display brightness and backlit keys
Internal memory sustains a 10-second backup power in case of main power cut
Memory with up to 10 wheel calibration settings, corresponding to different tyre sizes
Connection to an external switch.
Device can operate as repeating device. The second tripmeter shows the exact same values.
Easy option to switch between modes. ODO and TIMER continue running in the background.
1.2 The front panel
SPARKELECTRONICS Robert Skierski,
Office: 01-424 Warszawa, Al. Prymasa Tysiąclecia 78a, tel / fax : 022 836-24-51
www.rajdowe-haldy.pl
Rally computer 3 – User’s Guide
TRIP
Short trip indicator
GPS
ODO
Total trip indicator
TIMER
Timer
REP
RUN
STOP
Stopwatch
MODE
Flashing light = searching for signal,
Constant light = signal found
Connected to the repeating device
Runs in background (display off)
4 lights off = DIST mode
4 lights flash briefly = STAGE mode
2. INSTALLATION
The main harness consist of eight cables with a cross-section of 0,34 mm2 each.
NOTE ! The diagram below applies to all tripmeters purchased after July 2012.
The tripmeter should be installed in a visible place, allowing easy and quick access to the front panel. The tripmeter
has been supplied with mounting brackets for easier attachment. Do not remove the brackets completely as this
can unseal the tripmeter housing.
When connecting the power supply make sure that the voltage source is reliable and stable with the voltage within
the range between 8 to 30 V.
NOTE ! Switching off the tripmeter does not disconnect it completely from the power supply. The tripmeter still
consumes electricity (reduced to a minimum). When the tripmeter is not used for a long time, it is recommended to
disconnect it from the car installation. This will prevent the battery from discharging. It is best to install an external
switch that fully disconnects the tripmeter from its power supply.
Do not install the tripmeter in places where it may be damaged or work incorrectly e.g. on airbaigs, or air outlets.
SPARKELECTRONICS Robert Skierski,
Office: 01-424 Warszawa, Al. Prymasa Tysiąclecia 78a, tel / fax : 022 836-24-51
www.rajdowe-haldy.pl
Rally computer 3 – User’s Guide
How to Start
Rally Computer 3 operates in two modes : DIST and STAGE which can be selected from the start screen using the
[F1] key. More on mode switching in the chapter: MEASUREMENTS.
1.
2.
DIST mode : short interval TRIPs, quick deletions while still having access to other functions
STAGE mode : to measure the total distance while still having access to other functions
Mode
Mode light
Purpose
DIST
Each light indicates
its basic function.
When you need to
measure or quickly
delete the TRIP route
STAGE
Each light indicates
its basic function.
All 4 lights flash
briefly.
when you need to
measure a
STOPWATCHED section
Operations
From the Start Screen,
press [F1] followed by
[OK] – the screen will
show DIST.
From the Start Screen,
press [F1] until STAGE
shows and then press
[OK]
Switching ON/OFF
After switching the power on the tripmeter :
- will display the start screen (only when if it was earlier switched off while not making measurements, or
when it is switched on for the first time)
- will continue previous measurments (only if it was earlier switched off while making measurements).
Turning off the tripmeter is available only from the start screen position. Press and hold the [F1] key for 12 sec.
While being turned off - after around 7 sec the display will briefly show the serial number and the program version.
If there is no need turning off the tripmeter from the start screen - while the ignition is switched off - the
yellow wire together with the red can be connected do DC supply.
SPARKELECTRONICS Robert Skierski,
Office: 01-424 Warszawa, Al. Prymasa Tysiąclecia 78a, tel / fax : 022 836-24-51
www.rajdowe-haldy.pl
Rally computer 3 – User’s Guide
3. CONFIGURATION
For best results it is recommended to configure the device before first use. The configuration menu gives you the
option to, choose between the Master or Slave type, km or miles and also to calibrate the wheels.
To enter the configuration menu :
reset the tripmeter from the keypad, or
To reset, put the tripmeter in the start
screen position (press and hold [CLR])
and then press the keys below in the
following order :
[CLR] press and hold
[F1] press and hold while
holding [CLR]
[OK] press and hold while
holding [CLR] and [F1]
The tripmeter is reset.
after switching on the power supply when the tripmeter was in the start screen position.
In both cases we will see:
After the reset, the display will show the
88888 and then the current CAL value.
At this point press [F1] three times
followed by [OK].
CONF wil show on the display.
To select a function press [F1] and confirm with [OK]. To change the value press [F1] and we confirm by pressing
[OK]. The change will be confirmed by a quick display blink. To exit press [CLR].
SPARKELECTRONICS Robert Skierski,
Office: 01-424 Warszawa, Al. Prymasa Tysiąclecia 78a, tel / fax : 022 836-24-51
www.rajdowe-haldy.pl
Rally computer 3 – User’s Guide
Available functions
1. Master/Slave setting
Type – when TYPE is displayed press
[F1] to select between :
a) Master – this mode will always
take control over the other device. It
will send data to the repeating
device)
b) Slave – in this mode the device
will work as “slave” to the other
device
c) Auto – will take control by default
with the default if equipped with
GPS. If not, it will awaits the signal
from the overriding device.
SPARKELECTRONICS Robert Skierski,
Office: 01-424 Warszawa, Al. Prymasa Tysiąclecia 78a, tel / fax : 022 836-24-51
www.rajdowe-haldy.pl
Rally computer 3 – User’s Guide
2. Units in which the measurement results are presented.
Units – the display shows UNIT – Select
between km or miles :
meter – metric system
imp - imperial or British system
3.
Pulses – The display shows IMPS – select between pulses and GPS or only with GPS
a) I-off – work using only GPS system – measurement starts when speed is greater than 5 km/h.
b) I-on – work using route pulses received from the vehicle and the GPS module – this measurement ensures
best accuracy.
Calibration value
The Cal value is the number of pulses generated by the vehicle over a distance of 1000m. The measurement can
be performed on any distance as long as the value entered is for the distance of 1000 m.
While measuring at the distance of 1000 m, the measured value can be directly recorded in the
tripmeter memory.
When the sample distance is different than 1000m, the value should be accordingly adjusted:
1000m / tested distance = A
number of pulses x A = number of pulses per 1000m
When measuring the number of pulses per one turn of the wheel we have to use the following formula:
1000m / wheel circumference (in meters) = A
number of pulses per one wheel spin x A = number of pulses per 1000m
SPARKELECTRONICS Robert Skierski,
Office: 01-424 Warszawa, Al. Prymasa Tysiąclecia 78a, tel / fax : 022 836-24-51
www.rajdowe-haldy.pl
Rally computer 3 – User’s Guide
The tripmeter can store up to 10 different CAL values representing different tyre sizes which can be quickly
selected during the rally. CAL values are recorded as numbers from 0 to 9.
CAL Value – measurement
While the tripmeter is in the starting position press simultaneously [OK] and [F1].
The display show 0.
Measurement starts automatically.
When ready to start the proper
measurement press [F1] to start a new
count. To stop the measurement press
[OK] and calculate the CAL value.
To enter the CAL Value press [OK].
Using [F1] enter the digit from 0 to 9 and
confirm with [OK]. The tripmeter blinks to
indicate a successful entry and exits to the
start screen.
Auto-calibration using inbuilt GPS module.
Only for Rally computer 3.GPS.
Press simultaneously [OK] and [F1]. Press and hold [F1] for 3 seconds to activate the auto-calibration. TRIP light
starts blinking.
NOTE !!!! If there is an insufficient amount of satellites the display will show --------- (minuses)
Also if the satellite amount is right (at least 7) but the speed is smaller than 20km/h, the display will show a blinking
symbol “0. With both conditions met the display does not blink and Cal value is calculated.
After travelling the distance of 1000 meters (as measured by the GPS without having to refer to the measured road
section) the pulses count stops. Press and hold [OK] to select and enter the CAL value.
SPARKELECTRONICS Robert Skierski,
Office: 01-424 Warszawa, Al. Prymasa Tysiąclecia 78a, tel / fax : 022 836-24-51
www.rajdowe-haldy.pl
Rally computer 3 – User’s Guide
How to insert the CAL value
From the start position press [OK] and
[CLR]. The display shows.
Use [F1] to select the first digit then press
[OK]. Repeat the process until all digits
are entered and confirm with [OK]
The value will blink and then the
underscore will appear. Now enter a
number (0 to 9) that will be assigned to the
CAL value.
Using [F1] select the digit from 0 to 9 and
confirm with [OK]. The isplay will blink
confirming that the value was entered and
the tripmeter will resume the starting
position.
How to select the CAL value
From the start position press and hold [F1]. The current mode will show briefly. Still holding [F1] keep pressing
[CLR] to review the programmed CAL values . The display shows first the CAL value and few second later the
assigned number. To confirm that selection, release [F1].
In case of selecting a CAL value equal to 0 or in case of not making any choice, the tripmeter will display
an error code: 21747.
SPARKELECTRONICS Robert Skierski,
Office: 01-424 Warszawa, Al. Prymasa Tysiąclecia 78a, tel / fax : 022 836-24-51
www.rajdowe-haldy.pl
Rally computer 3 – User’s Guide
Measurements
How to select operational modes
From the start position press [F1].
The display shows the mode name.
Press [F1] to select between DIST and
STAGE.
To confirm selected mode, press [OK].
TIMER activation
Once the mode is selected, the user is
prompted for the TIMER time. Use [F1] to
select the first digit and confirm with [OK].
Repeat until all digits are entered and
press and hold [OK].
To delete a value press [CLR] .
If TIMER is not needed, press [OK].
Press and hold [CLR] to exit to the start
screen.
NOTE ! The maximum time that can be
entered is 9h59m59 sec which
corresponds to : 95959.
SPARKELECTRONICS Robert Skierski,
Office: 01-424 Warszawa, Al. Prymasa Tysiąclecia 78a, tel / fax : 022 836-24-51
www.rajdowe-haldy.pl
Rally computer 3 – User’s Guide
Ready to start
The display is blinking.
The device is ready to start.
Press [F1] to start measurements
Function description
DISTANCE mode:
[F1] [TRIP] – deleting TRIP route –
After the start, [F1] acts as delete key.
When the displays shows other function,
the first [F1] pressing shows the TRIP
value (e.g. TRIP =12m). Press [F1] again
to cancel the value to 0
[FUNCTION] displays:
[TRACK] – course –
When using GPS, it shows the
route course. The display
shows the degree symbol on
the left, and the current value
on the right which is the
deviation angle from the North.
[VOLT] - voltage in the vehicle
U symbol – indicates voltage.
On the right-hand side of the
display the user can see the
current value.
SPARKELECTRONICS Robert Skierski,
Office: 01-424 Warszawa, Al. Prymasa Tysiąclecia 78a, tel / fax : 022 836-24-51
www.rajdowe-haldy.pl
Rally computer 3 – User’s Guide
[TIMER] - time remaining to the
next Time Control (if entered
before the start).
If not, it will show the time
elapsed from the start.
New! Click the words above to
edit and view
alternate
[LIGHT]
- display
brightness.
translations. Dismiss
Search
Use
[F1]fortoprofessional
change the Polish
translation of the display and
brightness
Google
the
keys.Translate for
Business:Translator Toolkit
Website Translator
Global Market Finder
Turnbrightness
off instant can
translation
The
be totally
About
GoogleThe RUN light will
set
to OFF.
TranslateMobilePrivacyHelpSe
be
on.
nd feedback
czas
pozostały
do kolejnego
NOTE !! When
the PKC –
gdy przed startem
tripmeter’s
brightness is OFF
wprowadziliśmy
czas
pomiędzy
press
any key to
restore
to
PKC. Jeśliintensity.
nie jest to czas od
medium
startu.
[ODO] – Total distance
ODO light is ON
[SPEED] - Speed.
S symbol indicates speed.
On the right the current speed is displayed.
SPARKELECTRONICS Robert Skierski,
Office: 01-424 Warszawa, Al. Prymasa Tysiąclecia 78a, tel / fax : 022 836-24-51
www.rajdowe-haldy.pl
Rally computer 3 – User’s Guide
STAGE mode:
[F1][STOP.] - start / stop STOPWATCH
Time count - after the start, [F1] acts as
start/stop for time measurements.
When the displays show other parameters,
the first [F1] pressing shows elapsed time.
[FUNCTION] displays:
[TRACK] – course –
When using GPS, it shows the
route course. The display
shows the degree symbol on
the left, and the current value
on the right which is the
deviation angle from the North.
[VOLT] - voltage in the vehicle
U symbol – indicates voltage.
On the right-hand side of the
display the user can see the
current value.
[TIMER] - time remaining to the
next Time Control (if entered
before the start).
If not, it will show the time
elapsed from the start.
[LIGHT] - display brightness.
Use [F1] to change the
brightness of the display and
the keys.
The brightness can be totally
set to OFF. The RUN light will
be on.
SPARKELECTRONICS Robert Skierski,
Office: 01-424 Warszawa, Al. Prymasa Tysiąclecia 78a, tel / fax : 022 836-24-51
www.rajdowe-haldy.pl
Rally computer 3 – User’s Guide
NOTE !! When the
tripmeter’s brightness is OFF
press any key to restore to
medium intensity.
[ODO] – Total distance – ODO
light is ON
[[SPEED] - Speed.
S symbol indicates speed.
On the right, current speed is
displayed.
SPARKELECTRONICS Robert Skierski,
Office: 01-424 Warszawa, Al. Prymasa Tysiąclecia 78a, tel / fax : 022 836-24-51
www.rajdowe-haldy.pl
Rally computer 3 – User’s Guide
End of measurements
STAGE mode
To finish measurements in this mode,
press [F1] and then press and hold
[OK].
TIMER and ODO are not deleted.
Intermediate screen is displayed with
the – sign.
DISTANCE mode
To finish measurements in this mode,
press [F1] and then press and hold [OK].
TIMER and ODO are not deleted.
Intermediate screen is displayed with the –
sign.
How to continue measurements when being in DIST or STAGE mode.
A. Using [F1] select the mode for next drive. The user can select STAGE or DISTANCE mode ( as in the chapter:
Selection of operational modes )
B. Press and hold [CLR] exit to start screen.
SPARKELECTRONICS Robert Skierski,
Office: 01-424 Warszawa, Al. Prymasa Tysiąclecia 78a, tel / fax : 022 836-24-51
www.rajdowe-haldy.pl
Rally computer 3 – User’s Guide
Technical and exploitation data:
Power supply 7-30V
Dimensions Hight57xWidth110xDepth32 mm
Current - max. 200 mA
SPARKELECTRONICS Robert Skierski,
Office: 01-424 Warszawa, Al. Prymasa Tysiąclecia 78a, tel / fax : 022 836-24-51
www.rajdowe-haldy.pl
Rally computer 3 – User’s Guide
Warranty
Warranty covers the period of 12 months from the date of sale of the device. The warranty remains valid only when
the product is used according to its purpose. The warranty remains valid only with the proof of sale.
Name and type: ………………………………………………..
Data of sale: …………………………………………..
Device number: ……………………………………..
SPARKELECTRONICS Robert Skierski,
Office: 01-424 Warszawa, Al. Prymasa Tysiąclecia 78a, tel / fax : 022 836-24-51
www.rajdowe-haldy.pl