1
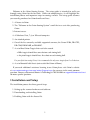
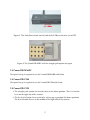
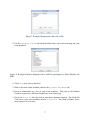
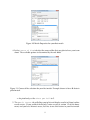
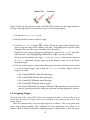
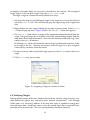
Setup and Walk Through Guide
Orion for Clubs
Orion at Home
Shooter’s Technology LLC
Copyright by Shooter’s Technology LLC, All Rights Reserved
Version 2.3.22
August 29, 2015
Welcome to the Orion Scoring System. The setup guide is intended to walk you
through using Orion for the first time. While not comprehensive, it will highlight the
installation process and important steps in running a match. This setup guide assumes
you recently purchased an Orion bundle and have:
1. A license to Orion.
2. The ”Welcome to the Orion Scoring System” email that was sent after purchasing
Orion.
3. Internet access.
4. A Windows Vista, 7, 8, or 10 based computer.
5. An attached printer.
6. One of the five currently available supported scanners; the Canon P-208, DR-C225,
DR-C240, DR-M160II, or DR-6010C.
7. A set of fired Orion Targets that need to be scored.
• Rifle targets should have one shot on each aiming bull.
• Air pistol targets should have five shots on each aiming bull.
For your first time using Orion, it is recommended to only score targets from 2 or 3 shooters.
8. A set of barcode label sheets (not needed for Orion at Home).
If you need additional assistance learning to use Orion please visit Orion’s website
at www.orionscoringsystem.com/orion/Support.aspx for answers to the most common
question. You may also contact Shooter’s Technology at 703-596-0099 or [email protected]
for more specific questions.
1 Installation and Setup
The installation process has three general steps.
1. Setting up the scanner hardware and software.
2. Downloading and installing Orion.
3. Enabling Orion with the license file.
1
Figure 1: The C225 Reference Book and Setup Disc that comes with the Canon
DR-C225 scanner. Similar items come with the Canon P-208, DR-C240, DR-M160II and
DR-6010C.
1.1 Setting up the Scanner Software and Hardware
Carefully unpack your Canon scanner from its shipping box. Inside the box you will
find the Reference Guide and Document Scanner Setup Disc, similar to the ones
shown in Figure 1. Sometimes the setup disk will be placed inside the reference guide
book. Your scanner may come with other disks as well as the Document Scanner
Setup Disc, however these other disks may be ignored, they are not needed for Orion.
The first section in the Reference Guide book is the Setup Guide. The Setup
Guide will take you step by step on how to install your scanner’s software and setup the
hardware. Please follow these steps carefully.
1.2 Downloading and installing Orion
Orion installation files are available by download only at www.orionscoringsystem.com
A user ID and password is required to download Orion. When you purchased Orion
you received this information in a separate email titled “Welcome to the Orion Scoring
System.” Your user ID is also your Orion license number and is always numeric (e.g.
1234). Your initial password is usually 6-10 random characters.
1. Open a web browser and go to www.orionscoringsystem.com.
2. Click on the Login link in the upper right hand corner.
3. Enter your username and password. This information is in the “Welcome to the
Orion Scoring System” email that was sent to you when you purchased Orion.
4. After you have logged in, you may enable the Result Center for you club, team, or
individual use. This is an optional but recommended step, especially for clubs and
teams.
(a) Click on Result Center Settings.
(b) Check the Enable Orion Result Center checkbox.
2
(c) Modify your teams website path if desired. Listed as Team Page, this will be
the URL you may give to the public to quickly find your team’s home page on
the Result Center.
(d) Fill in information about your team in the Team Description, Range Facilities,
and Contact Information fields. The information stored in these fields will
be seen by the public on your team’s home page.
(e) Click Save. The Result Center service will now be enabled for you team, and
you will have the option of uploading results to the Internet.
5. Click on the Software Downloads link.
6. Carefully review the End User License Agreement. When you are finished, click the
Accept button at the bottom of the page.
7. A list of the currently available versions of Orion will appear. Select the link for the
most recent production version at the top of the page.
8. Your browser may ask if you would like to Run or Save the file. Select Run.
9. Windows may prompt you with a message “Windows protected your PC.” If you
receive this message click on “More info” and then “Run anyway.”
10. When the installer runs, follow the onscreen instructions to complete the Orion installation.
1.2.1 Opening Orion
After installation Orion may be launched in one of two ways.
• Double click the Orion icon on the desktop.
• Clicking on the Window’s Start button, then, All Programs, then Orion, and
finally Orion Scoring System.
When opened, Orion displays the “Welcome Screen.” While initial nearly empty,
in time the Welcome Screen may be used to quickly create new matches, open recent
matches, and read up on important updates to Orion. For more information visit www.
orionscoringsystem.com/127
1.3 Enabling Orion with the License File
When opening Orion for the first time Orion the Welcome Screen will display an error
message, on the right hand side, saying your license file is empty. This is expected as you
first need to activate Orion by entering your license file. The easiest way to do so is to
enter the license download code provided to you in your “Welcome to the Orion Scoring
System” email.
3
1. Open your “Welcome to the Orion Scoring System” email. Locate the download
code near the bottom of this email. It will be a six to eight character code.
2. Open Orion if it is not already open. On the Welcome Screen click the Install
your new license link on the right hand side. If the Welcome Screen is already
closed, from the menu bar click on Help and then License.
3. Type in the download code from the Welcome email in the indicated box.
Figure 2: Entering your download code into the License Form.
4. Click the Download button. Orion will inform you when the license was successfully downloaded. After clicking OK, Orion will restart itself (only Orion will restart,
not your computer).
Orion is now ready to be used.
2 Setting Up Your Canon Scanner
Orion target paper is much heavier than traditional paper. To successfully scan Orion targets it is necessary to use your scanners “straight-path” option. The straight-path option
allows the targets to pass through the scanner without being bent or curled.
2.1 Canon P-208
The Auto-Start switch, on the back of the scanner, needs to be “OFF.”
2.2 Canon DR-6010C
• The straight path option tray, located in the back of the scanner, needs to be open.
• The the feed selection lever needs to be set to page separation (the down position).
The feed selection lever is on the left front side of the scanner.
4
Figure 3: The Auto-Start switch, on the back of the P-208, needs to be set to OFF.
Figure 4: The Canon DR-6010C with the straight path option tray open.
2.3 Canon DR-M160II
No special set up is required to use the Canon DR-M160II with Orion.
2.4 Canon DR-C240
No special set up is required to use the Canon DR-C240 with Orion.
2.5 Canon DR-C225
• The straight path ejection level needs to be in the down position. This is a circular
lever on the right side of the scanner.
• The the feed selection lever needs to be set to page separation (the down position).
The feed selection lever is in the middle of the right side of the scanner.
5
Figure 5: The Canon DR-C225 with the eject selection lever set to the straight path position.
3 Initializing your Orion Shooter Database
The Orion database is a tool to help coaches and shooters track and analyze shooter’s
performances. To begin using the database you must tell Orion what styles of shooting
your team is involved with and enter in team member information. To get started:
1. Open Orion if it is not already opened. If the Welcome Screen is up, close it by
clicking the X button in the upper right corner.
2. From Orion’s menu goto Database and then Database Properties.
3. On the Shooting Styles tab check one or more shooting styles your team participates in. It is generally best to check just the most common styles.
Figure 6: Example Database Properties for a club that participates in Three-Position Air
Rifle.
4. On the Memberships Fields tab check the organizational membership values
you want to manage for your team members. You may even add organizations to
allow you to track school IDs or club membership numbers.
6
Figure 7: Example Membership values for a club.
5. On the Category Fields tab check the field values you want to manage for your
team members.
Figure 8: Example Database Properties for a club that participates in Three-Position Air
Rifle.
6. Click Save once you are finished.
7. Back in the main Orion window, click on the Shooter Database tab.
8. Enter in information on a few of your team members. Each row in the Shooter
Database represents a different shooter you want to manage.
9. Check the Favorite box for each of your most common shooters. For Orion for
Club users every team member may be a Favorite. For Orion at Home users,
mark yourself as a favorite.
7
Figure 9: Example Shooter Database for a small team.
4 Conducting an Orion Match Training Session
Now that you have set up your scanner and your shooter database it is time to learn how
to score targets with Orion. The following set of instructions will take you through the
steps necessary to electronically score your first match with Orion.
4.1 Match Creation
While there is only one shooter database, each training session or competition is organized
into what Orion calls a “match.” A match file manages athletes, scores, and results.
1. From Orion’s menu click on File, then New Match, and finally Create New Local
Match. Note: A new match may also be created directly from the Welcome Screen.
The Match Properties dialogue box will appear. Match Properties lets you
set the applicable rule book, course of fire, and award categories.
2. Name the match “My First Match” at the top of the form.
3. In the rule book tab select the rule book that is applicable to your team. For example:
• Select National Three Position Air Rifle Council for a three position air rifle match.
• Select USA Shooting Three Position Rifle for a 50m or 50ft smallbore
rifle match.
• Select USA Shooting 10m Air Pistol for a 10m air pistol match.
• Select BB Gun for a 5m BB gun match.
The rule book selection helps determine the available courses of fire, available award
categories, and the scoring technology.
8
Figure 10: Match Properties for your first match
4. In the Course of Fire tab select the course of fire that you plan to have your team
shoot. The available options is determined by the rule book.
Figure 11: Course of fire selection for your first match. Example shown is for a 40 shot air
pistol match.
• Air pistol only, set the Shots per bull to 5.
5. The Result Center tab will allow you to list and display results in Orion’s online
result service. If you enabled the Result Center service in section 1.2 of this document, and you have Internet access, feel free to use this feature in your first match.
9
Simply check the List and Report Scores Online checkbox. The other fields
on this tab are optional, but will appear online to the public if you fill them in.
6. The Comp. Num. (Competitor Number) tab allows you to tell Orion how you
would like competitor numbers to be assigned to the shooters in your match. For
your first match, leave the default option that will have Orion automatically assign
sequential competitor numbers to your shooters.
7. The Sanctioning tab is used when you are conducting a match sanctioned by the
applicable governing body (e.g. CMP). Since this is simply a practice match just
leave the sanctioning checkbox unchecked.
8. In the Categories tab leave all the fields unchecked. Normally the Categories lets
you specify additional award lists.
9. Optionally save the properties as a “Match Favorite.” This lets you easily recreate
an identically structured match from the Welcome Screen at a later time.
(a) Click the Save as Favorites button.
(b) In the Save As dialogue box, give the file a unique and meaningful name, such
as “Daily Practice.”
(c) Once saved, the Match Favorite will appear in Orion’s Welcome Screen.
10. Click the Save button when ready.
Orion will verify the rule book and course of fire before creating the match. It is
important to double check this since once a match is created, these options may
not be changed. However, options under the Result Center, Sanctioning, and
Categories tab may be modified after the match is created.
11. With each new match Orion automatically adds each favorite shooter from your
Shooter Database. The shooters in the match are viewed in the Match Competitors
tab. Each row represents a different shooter or coach. You may add more shooters
to the match by typing in the shooter’s information in the last row.
Figure 12: Adding a shooter to an Orion match.
10
4.2 Preparing Targets
After the match is set up, the next step in the process is to prepare targets to be shot.
Without any additional information, it is impossible for Orion to know who shot which
targets. The most common way to convey this information is to use “barcode labels.”
For Orion at Home users, it is common to have only one competitor in the match. If
this is the case barcode labels are not needed. When there is only one competitor Orion
will automatically assign scaned targets to that competitor. Where avaliable fill in the
Position and Series bubbles, on the top right of the target, allowing Orion to read this
information when the target is scaned.
When using Orion Scorecards you may either use barcode labels or the athlete may fill
in his or her competitor number using the provided fill-in-the-bubble area.
Using barcode labels is not a requirement for Orion. An alternative method is to use namebased competitor numbers. Details of this method are beyond the scope of this introductory guide.
For more information visit www.orionscoringsystem.com/122
Barcode labels, are much as the name implies, small return-address size labels that
have a barcode printed on them. You may print barcode labels directly from Orion. Orion
will print a unique barcode label for each shooter in the match and for each target that
a shooter will fire in the match. For example, if you are shooting a 3x10 air rifle match,
Orion would print three labels per shooter. These three labels represent the targets for
prone, standing, and kneeling.
Barcode labels are encoded with two pieces of information. First, the shooter’s competitor number. This is why it is important to give each shooter a unique and numeric
competitor number. Second, the target number, one for each target the shooter will fire in
the match.
Follow the steps below to print and use barcode labels for your match.
1. Load your printer with blank barcode label sheets.
If you purchased an Orion bundle or targets from Shooter’s Technology barcode
labels were included with your purchase. These are found in a manila envelope.
2. Inside of Orion, click on the Match Competitors tab.
3. Select the shooter you want to print labels for by clicking on the far left column (the
column to the left of Last Name). The entire row will turn blue once selected.
Hint: You may select multiple shooters by holding down the control key.
4. Right click and select Print Labels.
5. Orion will display the Ok to Print box. In this window Orion will confirm the
number of labels it is about to print and ask which label to start printing at (a feature
to help conserve sheets of labels). Click OK when ready.
6. On the Print Dialogue screen make sure you have the correct printer selected
and click Print when ready.
Finally, apply the labels to the targets.
11
• Apply one barcode label on each target. Placing it over the Competitor Number box
or Competitor Number fill-in-the-bubble area.
Note, on the first line of the labels list the athltes name, competitor number, and
abbreviates the position and series. The second line lists the athlete’s relay (denoted
with an R), firing point (denoted with an FP, and team or organization.
• The position and series bubble may be left blank.
Figure 13: Place the barcode label in the upper right hand side of the target, over the
Competitor Number box or Competitor Number fill-in-the-bubble area.
4.3 Orienting Targets for Your Scanner
It is important to load the targets into your scanner with the correct orientation. The
correct orientation depends on your scanner.
• With the Canon DR-C225 the targets are loaded such that the bottom of the targets
are feed into the scanner first. The aiming bulls should face forward. That is to say,
if you are looking at the scanner from the front, the aiming bulls are visible and the
targets are right side up.
• With the Canon P-208, DR-C240, and DR-M160 the targets are loaded such that the
top of the targets are feed into the scanner first. The aiming bulls should face away.
That is to say, if you are looking at the scanner from the front or top, the aiming bulls
are not visible.
• With the Canon DR-6010C the targets are loaded such that the top of the targets are
feed into the scanner first. The aiming bulls are facing up. That is to say, if you are
looking at the scanner from the top, the aiming bulls are visible.
4.4 Scoring
To score targets Orion uses a technology known as “Auto-Score.” Auto-Score will perform
a number of steps on your behalf. It firsts communicates with your scanner to physically
scan the targets and creates a digital image for use inside of Orion. Orion reads the target
and assign it to the correct athlete (assuming barcode labels are in use). Finally Orion
scores the targets.
12
Canon C225
Incorrect
Figure 14: Gravity feed scanners, such as the DR-C225, need to have the targets loaded at
an angle. The target that is scanned first is always at the sharpest point.
1. Click on the Match Scoring tab.
2. Initially, load the scanner with one target.
. Orion will scan the target, load it into the pro3. Click the Auto-Score button
gram, assign the target to the shooter, and score. Depending on the speed of your
computer, this may take several seconds, please be patient.
Initially the new targets will appear highlighted in green in the Target list on the
left hand side. Green highlighting indicates these targets are not yet scored.
You may need to click the plus sign ([+]) next to Targets, then the plus sign next
to Relay 1, and finally the plus sign next to the shooter’s names to see the list of
imported targets.
4. Once the initial target is scored (turns from green to white), load the scanner with
a set of un-scored targets, and re-click the Auto-Score button. Repeat until all
targets are scored.
• The Canon DR-6010C holds about 40 targets.
• The Canon DR-M160 holds about 20 targets.
• The Canon DR-C240 holds about 20 targets.
• The Canon DR-C225 holds about 8 targets.
• The Canon P-208 holds 3 to 4 targets. With the P-208 sometimes it is necessary to
provide a gentle push on the targets to start them feeding through the scanner.
4.5 Assigning Targets
Follow the steps in this section ONLY if you are not using barcode labels, or Orion could not read a
barcode label on a target; if all targets were correctly assigned to their respective shooter these steps
may be skipped.
There are actually many ways to assign targets to an athlete. This set up guide only
covers two of those methods. For a complete list and explaination visit section 5.7 in
Orion’s full User Manual. Manually assigning targets, as listed below, is only necessary
13
to complete if barcode labels are not used as described in this manual. All unassigned
targets appear at the top of the target list on the Match Scoring tab.
To assign a target to a shooter manually follow these steps:
1. Select the first target by left clicking the target in the target tree view on the left hand
side of the Scoring tab. This will also bring up the target image on the right hand
side.
2. Right click on the same target to bring up the target’s pop-up menu. Select Assign
To from the pop-up menu. Figure 15 shows the Assign To form that appears.
3. The Assign To form shows an image of the competitor information fields from the
target. Using the image that is displayed select the corresponding shooter from the
drop down list of competitor names. Also select the correct position and stage. Once
correct select Next to continue.
By clicking Next Orion will record the current target’s information and move to the
next target in the list. Continue this process until all targets have been assigned.
Orion will let you know when this occurs.
4. If you are not sure about a particular target you may select Skip to move to the next
target.
5. Click Finish once you are done.
Figure 15: Assigning a Target to a shooter in Orion
4.6 Verifying Targets
Scoring oddities occure all the time. Shooters fire too many shots on a target, too few, have
shots outside the sighter area, and many other unusual circumstances. And although
Orion scores very accurately, oddities in the shot hole (such as significant tearing) may
cause obvious errors. An obvious error is when the scored shot is not a reasonable interpretation of the physical shot. I all cases scoring oddities should be corrected.
14
Orion will highlight in yellow any target with too many or too few shots. Hold the
mouse icon over the file name to see details of these problems.
1. Once a target has been scored (a score will appear next to the target’s image name)
select the target to view its image. The scored shots are highlighted in blue or red.
There is nothing significant about the red shot hole. It simply means it is the currently selected shot.
2. Un-scored shots may be added by double clicking near the center of the physical
shot hole
3. A miss can be added by holding down the control key and double clicking near the
center of the aiming bull.
4. Erroneous shots may be removed by holding down the shift key and double clicking
the mouse near the center of the shot.
5. If a shooter fired too many shots in a stage (excess hits) mark the extra shot by right
clicking near the shot hole and selecting Mark as Extra Shot. Depending on the
rule book Orion will nullify the marked shot then apply a penalty for the excess hit..
Figure 16: Editing a target
If Orion highlights a shooter’s name in red, this means the shooter has two targets
assigned with the same position and stage. For example two targets assigned as “Prone 1.” Simply select the target that is in error, right click the target, then select Assign To
and make the correction.
15
5 Results
The Match Result tabs allows you to view and print results. Orion offers two types of
results. The first is a series of traditional ranked list of shooters or teams. Second is an
individual score sheet for one shooter. The individual score sheet shows graphically the
ten shot group, coordinate details on each shot, and a statistical analysis of the group.
5.1 Ranked Results
To display a ranked list of result to the screen:
1. Select the Match Results tab.
2. Select the event from the Ranked Results drop down list. Click the Update
Results button to view the results on screen. Shooters will be ranked based on
the match’s selected rule book.
The list of events is based on the course of fire you selected as well as the categories
selected when you created the match. In this example you will see individual results
for aggregate and each position.
Figure 17: The Shot Group window is opened by double clicking one of the scores.
3. Double-click one of the results to bring up the Shot Group window.
4. To print the results, click the Print Results button.
5.2 Individual Score Sheets
Individual score sheets are a great training aid. Shooters and coaches can see all ten shots
fired in the series and how the shots relate to each other. The blue ellipse printed with
each group is the statistical analysis of the group, known as Shot Group Analysis. To print
an individual score sheet for a shooter:
1. Select the shooter’s name from the drop down list under Individual Score Sheet.
2. Click the Print Individual Results button.
16
5.3 Online results
If you choose to report your scores online (see Section 4.1) Orion will automatically send
your match results to the Result Center. By this point your match’s scores are already
viewable on the Internet.
1. From within Orion, click on Result Center, then on Your Match Page.
2. A web browser will open up and take you to your match’s scores online.
6 Other Common Tasks
This setup and walkthrough guide, as previously mentioned, is not meant to be comprehensive. The guide thus far has taken you through all the required steps to run an Orion
match. There are however a number of other common tasks you can perform with Orion.
The following sections will help you understand how to perform many of these tasks.
Each set of instructions assume you have created a match with Orion and have it open.
6.1 Creating a Team
Creating a team in Orion is a two step process. First you must create the team participant.
Second, you must add shooters, as team members, to the team.
1. Create the Team Participant
(a) Click on the Match Teams tab.
(b) Type in one or more team names, one per line.
2. Add shooters to the Team
(a) Click on the Match Competitors tab.
(b) In the row that represents the shooter you want to add to a team, select the
appropriate team in the Team column drop down list.
(c) Repeat for each team member.
6.2 Viewing Team Results
Team results are viewed in the same manner individual results are.
1. Click on the Match Results tab.
2. Select the team ranked result list to display by selecting Team - All in the Ranked
Results drop down list.
3. Display the results by clicking Update Results.
17
6.3 Adding Competitors to a Match from the Shooter Database
In general the Shooter Database tracks shooters that are either a direct member of your
team or club, or are shooters that participate at competitions on a regular basis. The idea
is to keep pertinent information about a competitor, such that when that competitor enters
a new match, all of his or her information is already known.
Shooters marked as a Favorite are always added to a matches when the match is
created. Shooters not marked as a Favorite may be added to a match manually from
the Shooter Database tab.
1. Select the Shooter Database tab.
2. Select one of more shooters from the Shooter Database to to add to the match. To
select a shooter click on the far left column, the column to the left of Last Name.
The entire row will be highlighted once selected.
Hint: You may select multiple shooters by holding down the control key.
3. Right click on the selected shooters.
4. Select Add Shooter to Match and then either
• As an individual shooter only.
• As a member of a specific team. Teams have to be created (see 6.1) before this
option is available.
6.4 Assigning a Coach to a Competitor or Team
With Orion, a “coach” is also a Competitor in a match. To assign a coach to a shooter or
team, the coach must first be added as a Competitor.
1. Add one of more coaches to the match by going to the Match Competitor tab and
adding them as you would a shooter.
2. In either the Match Competitors or Match Teams tab, select the coach from the
drop down list under the Coach column.
6.5 Tracking a Shooter’s Progress with Analysis
The Analysis tab in Orion lets you graphically track a shooter’s progress over time.
There are many metrics to choose from, including score, group size, and group center.
• To track a shooter within the Analysis tab, the shooter must be listed as a Favorite
in the Shooter Database.
• The Event Styles are derived from the type of shooting selected in the Shooter
Database. See Section 3, “Initializing your Orion Shooter Database.”
• Since Analysis graphically displays a shooter’s progress over time, it is most useful
only after a shooter has many scores in the system.
18
6.6 Understanding the Dashboard
The Orion Dashboard is a supplemental analysis tool for coaches. It is meant to give
coaches a snap-shot as to how your team is performing.
• Each shooter listed on the dashboard is a Favorite.
• The Event Styles are derived from the type of shooting selected in the Shooter
Database. See Section 3, “Initializing your Orion Shooter Database.”
• The presented data is calculated by scores fired in the past 60 days.
• Number of Shots is a count of shots fired in that position.
• Average Score is the shooter’s statistical average for that position.
• Score Trend is the number of points a shooter is improving (or digressing if the
trend is negative) on a points per month basis.
• Average Group Size is the shooter’s statistical average group size for that position. This is measured in mm2 .
• Group Trend is the improvement or digression in group size. Small groups are
better ergo if a shooter is improving his or her group trend will be negative. This is
measured in mm2 per month.
6.7 Preparing for Your First Competition
Orion is not difficult to use, but there is a learning curve. We recommend using Orion in
4 to 6 practice matches prior to using it in your first real competition. This will allow you
ample time to learn the ins and outs of the software and ask any questions you may have.
6.8 Finding Additional Help
To learn more about Orion:
• Visit www.orionscoringsystem.com/support for answers to the most common questions.
• Read the full Orion’s User Manual. The User Manual may be opened by going to
Help and then Orion User’s Manual.
• Contact support by calling 703-596-0099 or [email protected].
19