1
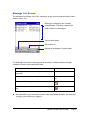
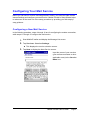
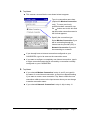
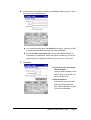
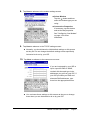
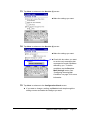
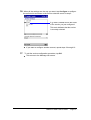
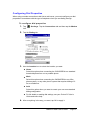
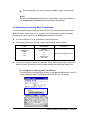
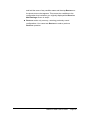
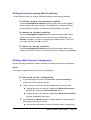
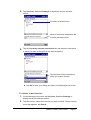
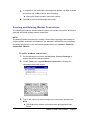
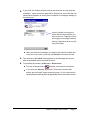
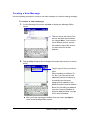
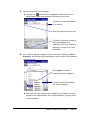
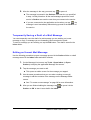
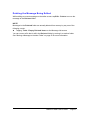
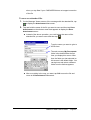
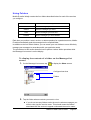
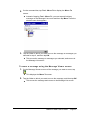
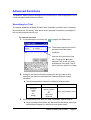
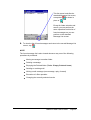
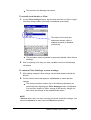
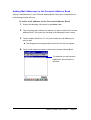
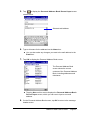
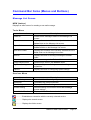
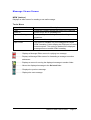
Mobile E-mailer (Version 1.0)
User's Guide
Trademarks
Microsoft, Windows, and Windows NT are either registered trademarks or trademarks of
Microsoft Corporation in the United States and/or other countries.
All other product and company names mentioned herein may be the trademarks of their
respective owners.
l
The contents of this document are subject to change without notice.
l
In no event shall CASIO COMPUTER CO., LTD. be liable to anyone for special, collateral,
incidental, or consequential damages in connection with or arising out of the purchase or use
of these materials.
Moreover, CASIO COMPUTER CO., LTD. shall not be liable for any claim
of any kind whatsoever against the use of these materials by any other party.
l
This manual and the software it describes are owned by CASIO COMPUTER CO., LTD. The
structure, organization, and code of the software are the valuable trade secrets of CASIO.
l
The operations described in this manual assume that you are already familiar with the basic
operation of Windows CE. See the documentation that comes with Windows CE for full
details on its operation.
l
Sample displays shown in this manual may differ somewhat from the displays actually
produced by the product.
Copyright Notice
No part of this publication may be reproduced, transmitted, transcribed, stored in a retrieval
system, or translated into any human or computer language, in any form or by any means,
without the express written permission of CASIO COMPUTER CO., LTD.
Copyright 2000 CASIO COMPUTER CO., LTD. All rights reserved.
Mobile E-mailer User's Guide
-Page 1 -
Contents
Getting Acquainted.........................................................................4
Starting Mobile E-mailer.......................................................................................4
Message List Screen............................................................................................5
Configuring Your Mail Service.......................................................6
Configuring a New Mail Service.........................................................................6
Configuring Dial Properties...............................................................................13
Configuring Your Modem...................................................................................14
Configuring Incoming Mail Conditions............................................................15
Editing Existing Incoming Mail Conditions......................................................19
Editing a Mail Service Configuration...............................................................19
Creating and Deleting Modem Connections..................................................22
Sending and Receiving Mail ........................................................25
Connecting to a Mail Server and Sending and Receiving Mail..................25
Creating a New Message...................................................................................28
Temporarily Saving a Draft of a Mail Message..............................................30
Editing an Unsent Mail Message......................................................................30
Deleting the Message Being Edited.................................................................31
Recalling an Address from the Contacts Database or Personal Address
Book.......................................................................................................................32
Recalling an Address from the Contacts Database................................................32
Recalling an Address from the Personal Address Book........................................35
Using Signatures.................................................................................................38
Viewing Received Mail Messages....................................................................39
Opening a Received Message............................................................................39
Using the Message Viewer Screen.....................................................................41
Opening a Mail Message that Includes HTML Formatting......................................41
Unread and Read Messages...............................................................................42
Saving a Mail Message as a Text File....................................................................42
Replying to a Message.......................................................................................43
Forwarding a Message to Another Address.........................................................44
Mobile E-mailer User's Guide
-Page 2 -
Working with Attached Files...............................................................................45
Attaching a File to an Outgoing Message.............................................................45
Working with Incoming Attachments....................................................................48
Using Folders.......................................................................................................50
Moving and Deleting Messages.......................................................................52
Moving a Message to Another Folder..................................................................52
Deleting Messages............................................................................................54
Advanced Functions.....................................................................55
Searching for Text...............................................................................................55
Using Filters for Incoming Messages...............................................................57
Assigning a Priority to a Filter..............................................................................60
Adding Mail Addresses to the Personal Address Book................................62
Adding Mail Addresses to the Contacts Database........................................66
Configuring Option Settings..............................................................................68
Command Bar Items (Menus and Buttons) ...................................70
Message List Screen..........................................................................................70
Message Viewer Screen....................................................................................71
Message Editor screen.......................................................................................72
Mobile E-mailer User's Guide
-Page 3 -
Getting Acquainted
Mobile E-mailer is an application that makes it possible for you to send and receive email with your Pocket PC. The following are some of the useful features and functions
available with Mobile E-mailer.
l
Search by addressee, subject, body text, etc.
l
Set up of up to 10 filters for grouping incoming e-mail according to subject, content,
etc.
l
Five signature blocks, allowing separate signatures for business and personal mail
l
Quick and easy input of e-mail addresses from the Contact database
NOTE
Mobile E-mailer supports e-mail with a POP3 mail server. Mobile E-mailer does not
support IMAP4.
Starting Mobile E-mailer
1.
Turn on your Pocket PC.
2.
Tap
- Programs - Mobile E-mailer.
l This starts Mobile E-mailer and displays the Message List screen.
Mobile E-mailer User's Guide
-Page 4 -
Message List Screen
The Message List shows a list of the messages in the currently selected folder (Inbox,
Outbox, Sent, etc.)
Messages contained in the currently
selected folder. This area is blank if the
folder contains no messages.
Current folder name
Sort sequence
Number of messages in current folder
The Message List screen is starting point for a number of different Mobile E-mailer
operations, like the ones described below.
When you want to do this:
Tap this:
Display an editor screen for creating a new message
(page 28)
New
View the contents of a message (page 39)
A message in the Message
List
Display a folder list (page 50)
Connect to your server to sent and receive mail (page
25)
l
Note that before you can send or receive mail using Mobile E-mailer, you must first
configure your mail service (page 6).
Mobile E-mailer User's Guide
-Page 5 -
Configuring Your Mail Service
Before you can send or receive mail using Mobile E-mailer, you must first make certain
Internet settings and configure your mail service. Mobile E-mailer’s Setup Wizard helps
to take some of the work out of the setup procedure by providing you with step-bystep guidance.
Configuring a New Mail Service
In the following procedure, steps 4 through 10 are for configuring the modem connection,
while steps 11 through 15 configure the mail service.
1.
Start Mobile E-mailer and display the Message List screen.
2.
Tap Services - Service Settings.
l This displays the service selection screen.
3.
Tap New to display the New Service screen.
Input the name of your services
(your mail account name or other
applicable name) in the Service
Name box.
Mobile E-mailer User's Guide
-Page 6 -
4.
Tap Next.
l This causes a screen like the one shown below to appear.
Type in a connection name here
(required for Modem Connection
only). To use a previously
specified modem connection, tap
the
button next to this box and
tap the modem connection name in
the list that appears.
Specify the connection type.
Select Modem Connection if you
will be connecting through an
Internet service provider (ISP) or
Network Connection if you will
be connecting to a network.
l If you already have an Internet connection configured on your
CASSIOPEIA, type in its name as the connection name.
l If you want to configure a completely new Internet connection, type in
a unique connection name that is not used by a connection currently
configured on your CASSIOPEIA.
5.
Tap Next.
l If you selected Modem Connection in step 4, and if you typed in
the name of a new Internet connection, a screen box appears asking
if you want to create a new connection. Tap Yes to create the new
connection or No to return to the input screen where you can change
to another connection name.
l If you selected Network Connection in step 4, skip to step 11.
Mobile E-mailer User's Guide
-Page 7 -
6.
On the screen that appears when you tap Next - Yes in step 5, type in
your user name and password.
l You should normally leave the Domain box empty, unless your ISP
or network administrator provides you such information.
l Check the Save password option if you want Mobile E-mailer to
remember your password. When this option is checked, you do not
need to input your password each time you log in to your server.
7.
Tap Next.
l Country Code, Area Code,
Phone number
Input the phone number of the
access point of your ISP you
plan to be dial in to.
l Dial Properties
If necessary, tap this button
and set the dial properties.
See "Dial Properties" on page
13 for more information.
Mobile E-mailer User's Guide
-Page 8 -
8.
Tap Next to advance to the modem settings screen
l Select Modem
Tap the
button and then
select the modem type you are
using.
l Connection Properties
If necessary, tap this button
and set the dial properties.
See "Configuring Your Modem"
on page 14 for more
information.
9.
Tap Next to advance to the TCP/IP settings screen.
l Normally, you should leave the initial default settings on this screen
as they are. Do not change the default settings unless specifically
instructed to do so by your ISP.
10. Tap Next to advance to the name server screen.
If you are instructed by your ISP to
input a specific DNS or WINS,
uncheck this box and type in the
addresses you get from your ISP. If
your ISP provides you DNS and
alternate DNS addresses, type
them into the appropriate boxes.
l You can leave these settings on this screen as they are or change
them when you are instructed to do so by your ISP.
Mobile E-mailer User's Guide
-Page 9 -
11. Tap Next to display the Service (1) screen, which starts configuration
of your mail service.
l POP 3 Host name
Type in the name of your POP3
server.
l User ID
Type in your mail server user
name.
l Password
Type in your mail server
password.
12. Tap Next to advance to the Service (2) screen.
l SMTP host name
If your ISP provided you with
different names for the POP3
host and the SMTP host, type
in the SMTP host name here.
l Return address
Use this box to specify a return
address. See the example
below.
Return address example
Actual Name: John Smith
User Name: john
POP Host Name: abcd.com
l Leaving this box blank automatically sets the return address to:
[email protected]
l John could specify a return address that includes his actual name by
inputting the following into this box: "John Smith"<[email protected]>
l If John wanted to specify that all replies should be routed to his office
address (which is: [email protected]), he would input the
following into this: [email protected]
Mobile E-mailer User's Guide
-Page 10 -
13. Tap Next to advance to the Service (3) screen.
l Make the settings you want.
14. Tap Next to advance to the Service (4) screen.
l Make the settings you want.
l Check this box when you want
to receive only messages that
correspond to certain conditions
defined by you. To define
conditions, tap the Receive
Mail Settings button. See
“Configuring Incoming Mail
Conditions” on page 15 for more
information.
15. Tap Next to advance to the Configuration Check screen.
l If you want to change a setting, tap Back to back step through the
setting screens and make the changes you want.
Mobile E-mailer User's Guide
-Page 11 -
16. When all the settings are the way you want, tap Configure to configure
the mail service and return to the service selection screen in step 2.
•
A mark is located next to the name
of the service you just configured.
This mark indicates that the service
is currently selected.
l If you want to configure another account, repeat steps 3 through 16.
17.
To exit the service configuration procedure, tap OK.
l This returns to the Message List screen.
Mobile E-mailer User's Guide
-Page 12 -
Configuring Dial Properties
When using a modem connection to dial into a mail server, you must configure your dial
properties in accordance with the type of telephone circuit you are dialing through.
To configure dial properties
1.
Tap
– Settings. Tap the Connections tab and then tap the Modem
icon.
2.
Tap the Dialing tab.
3.
Use the Location box to select the location you want.
l Home
Select this option when connecting the CASSIOPEIA to a standard
household phone line or to a portable phone.
l Work
Select this option when connecting the CASSIOPEIA to an office
phone system, or any other phone system that requires dialing of 0
for an outside line.
l Add
Select this option when you want to create your own non-standard
dialing configuration.
l For full details on making dial settings, see your Pocket PC User's
Guide and online help.
4.
After everything is the way you want, tap OK to apply it.
Mobile E-mailer User's Guide
-Page 13 -
NOTE
You can also set dial properties while configuring a new service or changing an
existing service. On the Phone Number screen that appears in step 7 of the
procedure under “Configuring a New Mail Service,” tap the Dial Properties
button to display the same screen as that in the above procedure. Make the
settings you want and then tap OK top continue with the new service
configuration procedure.
Configuring Your Modem
The required modem configuration depends on the modem you are using, the type of
telephone circuit to which you are connected, and the requirements of your ISP. Use the
following procedure to change the configuration of your modem.
To change the configuration of your modem
1.
On the Modem screen that appears in step 8 of the procedure under
“Configuring a New Mail Service,” tap the Connection Properties
button.
l This displays the Connection Properties screen.
2.
On the Port Settings tab, make the settings required to connect to your
ISP's access point. Set the Baud Rate to a value that is within the range
supported by your ISP's access point.
3.
The settings you can make with the Call Options tab depend on the
type of telephone circuit you are connecting through, and on the type of
modem you are using. For proper operation, some modems may require
input of a character string commands in the Extra dial-string modem
commands box.
Mobile E-mailer User's Guide
-Page 14 -
4.
After everything is the way you want, tap OK to apply your settings.
NOTE
Except for the Baud Rate setting, it is usually best to leave the settings on
the Connection Properties screen set to their initial defaults.
Configuring Incoming Mail Conditions
You can configure specific conditions that must be met by incoming messages before
Mobile E-mailer receives them. For example, you could specify that only messages
containing the word “urgent” in the Subject field should be received.
l
You can configure up to 10 conditions for each mail service.
l
The following shows the items for configuring incoming mail conditions.
Field
Subject
From
To
Cc
l
Condition
Content
contains
doesn’t contain
is
isn’t
begins with
ends with
Up to 50 characters of text
You can also assign a priority to conditions. When you connect to your mail server,
Mobile E-mailer checks each mail message starting with the highest priority first.
To configure incoming mail conditions
The start point of the following procedure is the Service (4) screen in step 14
of the procedure under “Configuring a New Mail Service,” on page 6.
Mobile E-mailer User's Guide
-Page 15 -
1.
On the Service (4) screen, tap the check box next to Pick up only
messages that satisfy conditions. so it is checked.
l This enables the Receive Mail Settings button.
2.
Tap the Receive Mail Settings button.
l This displays the Receive Mail Settings screen.
l Any conditions that you already have configured are listed on the
screen.
3.
Tap New to display a screen for configuring a new condition.
4.
Type in a name for the condition, and then tap OK.
l Use a name that lets you easily understand what the condition does.
l Tapping OK displays a condition configuration screen like the one
shown below.
Mobile E-mailer User's Guide
-Page 16 -
l Configure the condition you want, and then tap OK to return to the
Receive Mail Settings screen.
5.
Repeat steps 3 through 5 to configure other conditions, if you want.
l You can configure up to 10 conditions for each mail service.
l The conditions you configure are automatically assigned priorities,
with the newest condition receiving the highest priority.
6.
7.
Change the priorities of the conditions, if you want.
l
Tap and hold the name of the
condition whose priority you
want to change. On the
shortcut menu that appears,
tap Move Up to move the
condition to a higher priority,
or Move Down to move it to
a lower priority.
l
You can also use the
and
buttons below the text
keyboard to move the
currently selected condition
name up and down.
To save the configuration, tap OK.
l This returns to the Service (4) screen.
l Before you tap OK in step 7, you can close the Receive Mail
Settings screen without saving your configuration. To do so, tap
Mobile E-mailer User's Guide
-Page 17 -
and hold the name of any condition name and then tap Restore on
the shortcut menu that appears. This returns the conditions to the
configuration they had when you originally displayed the Receive
Mail Settings screen in step 2.
l Restore works only one way, restoring previously saved
configurations. You cannot use Restore to undo a previous
Restore operation.
Mobile E-mailer User's Guide
-Page 18 -
Editing Existing Incoming Mail Conditions
You can edit the content of, rename, and delete existing incoming mail conditions.
To edit the content of an existing condition
On the Incoming Mail Conditions screen, tap the name of the condition
whose content you want to change. This displays the condition definition
screen. Make the changes you want and then tap OK to save them.
To rename an existing condition
On the Incoming Mail Conditions screen, tap and hold the name of the
condition you want to rename. On the shortcut menu that appears, tap
Rename to display a screen for changing the condition name. Type in the
new name and then tap OK to save it.
To delete an existing condition
On the Incoming Mail Conditions screen, tap and hold the name of the
condition you want to delete. On the shortcut menu that appears, tap Delete.
Editing a Mail Service Configuration
Use the following procedures to edit or to delete an existing mail service configuration.
NOTE
You cannot rename an existing mail service configuration.
To edit a mail service configuration
1.
On the Message List screen, tap Services - Service Settings to
display the service selection screen.
2.
Tap the name of the service whose configuration you want to edit.
l Tapping the name of a service configured for Modem Connection
displays the access point Phone Number screen.
l Tapping the name of a service configured for Network Connection
displays its Service (1) screen.
3.
Use the Next and Back buttons to navigate between setting screens
and make the changes you want.
l Use the same procedures as those described under “Configuring a
Mobile E-mailer User's Guide
-Page 19 -
New Mail Service” on page 6 to edit the configuration of the mail
service.
4.
After making the changes you want, tap Next until you get to the
Configuration Check screen.
5.
When all the settings are the way you want, tap Configure to apply
them to the configuration.
l This returns to the service selection screen in step 1.
l Repeat steps 2 through 6 to edit other configurations, if you want.
6.
To exit the service configuration procedure, tap OK.
l This returns to the Message List screen.
To change the connection assigned to a mail service
Use the following procedure when you want to change the connection (a
particular Modem Connection or Network Connection) currently assigned for a
mail service.
1.
On the Message List screen Services menu, tap the name of the service
whose connection you want to change.
The currently selected service name
is the one with the
• mark next to it.
Mobile E-mailer User's Guide
-Page 20 -
2.
Tap Services - Service Settings to display the service selection
screen.
Currently selected service
Name of connection assigned to the
currently selected service.
3.
Tap the Currently selected connection box and select the connection
to which you want to change from the list that appears.
Tap the name of the connection to
which you want to change.
l Tap OK to save your setting and return to the Message List screen.
To delete a mail service
1.
On the Message List screen, tap Services - Service Settings to
display the service selection screen.
2.
Tap and hold the name of the service you want to delete. On the shortcut
menu that appears, tap Delete.
Mobile E-mailer User's Guide
-Page 21 -
3.
In response to the confirmation message that appears, tap Yes to delete
the mail service, or No to cancel without deleting.
l Note that a delete operation cannot be undone.
4.
Tap OK to return to the Message List screen.
Creating and Deleting Modem Connections
The following procedures describe how to create a new modem connection, and how to
duplicate and delete existing modem connections.
NOTE
The Mobile E-mailer procedures for creating a new modem connection and deleting an
existing modem connection are identical to the standard CASSIOPEIA new connection
and delete procedures on the screen that appears when you tap Start – Settings –
Connection –Modem.
To add a modem connection
1.
On the Message List screen, tap Services - Service Settings to
display the service selection screen.
2.
On the Tools menu, tap Add Modem Connection to display the
connection name input screen.
3.
Type in the name you want to assign to the connection and then tap
Next.
l This displays the modem connection name and password input
screen.
Mobile E-mailer User's Guide
-Page 22 -
4.
Perform steps 6 through 10 under “Configuring a New Mail Service” on
page 6.
5.
Tapping Next on the name server screen in step 10 displays the
Configuration Check screen.
l If you want to change a setting, tap Back to back step through the
setting screens and make the changes you want.
6.
When all the settings are the way you want, tap Configure to configure
the connection and return to the service selection screen.
To copy a modem connection
Use the following procedure when you want to copy an existing modem
connection and then modify the copied configuration to create a new modem
connection.
1.
On the Message List screen, tap Services - Service Settings to
display the service selection screen.
2.
Tap the Currently selected connection box. On the list that appears,
tap the name of the modem connection you want to copy.
3.
On the Tools menu, tap Copy Modem Connection.
l This creates a copy of the modem connection you selected in step 2
and displays an input screen like the one shown below.
Mobile E-mailer User's Guide
-Page 23 -
The default name of the connection
is the same name as the original
connection with the words “Copy
of” in front of it.
4.
Use the Next and Back buttons to navigate between setting screens
and make the changes you want.
5.
When you reach the Configuration Check screen, check the settings.
l If you want to change a setting, tap Back to back step through the
setting screens and make the changes you want.
6.
When all the settings are the way you want, tap Configure to configure
the connection and return to the service selection screen.
To delete a modem connection
1.
On the Message List screen, tap Services - Service Settings to
display the service selection screen.
2.
Tap the Currently selected connection box. On the list that appears,
tap the name of the modem connection you want to delete.
3.
On the Tools menu, tap Delete Modem Connection.
4.
In response to the confirmation message that appears, tap Yes to delete
the connection, or No to cancel without deleting.
Important!
Deleting the modem connection for a particular mail service will make it
impossible to use that mail service. To re-enable use of a mail service whose
modem connection you have deleted, you will have to perform the procedure
under “To change the connection assigned to a mail service” on page 20 to
change the connection (modem connection or network connection) for the mail
service.
Mobile E-mailer User's Guide
-Page 24 -
Sending and Receiving Mail
This section covers operations related to sending and receiving e-mail, including how to
create a new mail message, how to respond to mail, how to forward mail to another
addressee, and more.
Connecting to a Mail Server and Sending and Receiving
Mail
When you connect to your mail server, Mobile E-mailer normally sends all the mail
messages currently queued in the Outbox and picks up any mail messages waiting on
the server. You can change the Mobile E-mailer configuration to send and receive at the
same time with each connection, to send only, or to receive only. See “Configuring
Option Settings” on page 68 for more information.
To connect to a mail server
1.
If you have more than one mail service configured, tap the Services
menu and then select the service you want to use.
l You should also have the modem or mobile phone required by the
service connected to your CASSIOPEIA. See the Hardware Manual
for more information.
l The actual operation you need to perform to connect to the mail server
depends on the settings of the selected service and the Mobile Emailer option settings. See “Configuring Your Mail Service” on page 6
and “Configuring Option Settings” on page 68 for more information.
2.
On the Message List screen, tap
l
.
If the password for the mail
service you selected is not saved
with the setup, a screen will
appear at this point asking you to
input the password. Input the
correct password and then tap
Go.
Mobile E-mailer User's Guide
-Page 25 -
l
3.
The screen shown nearby
appears next if Modem
Connection is specified as the
connection type for the service
you selected in step 1. If there is
no connection password already
in the Password box, type in the
proper connection password. If
there is no connection password
already in the Password box,
type in the proper connection
password.
Tap Connect to start the connection procedure.
l
A status dialog box like the one
shown nearby remains on the
screen while the connection
procedure is in progress.
l
The icon on the command bar
changes from
to
when a
connection is established.
l
A status dialog box like the one
shown nearby indicates that
Mobile E-mailer is exchanging mail
with the mail server.
Mobile E-mailer User's Guide
-Page 26 -
4.
If you have the “Display subject list first and then pick up only selected
messages.” option turned on (page 68), a Subject List screen like the one
shown below appears to show you the subjects of messages waiting on
the mail server.
Use the Subject List screen to
select which mail messages you
want to pick up. Tapping a check
box toggles a message between
pick up (checked) and do not pick
up (unchecked).
l After you check the messages you want to pick up and uncheck the
ones you do not want to pick up, tap Receive to receive the mail.
5.
The contents of the Inbox folder appears on the Message List screen
after all applicable mail is sent and received.
6.
To terminate the modem, tap Service - Disconnect.
l The icon changes back to
when the connection is terminated.
l If you have the Service (3) screen’s “Disconnect service after
actions are performed” option turned on (page 11), the connection is
terminated automatically after all applicable mail is sent and received.
Mobile E-mailer User's Guide
-Page 27 -
Creating a New Message
Use the following procedure to create a new mail message or to edit an existing message.
To create a new message
1.
On the Message List screen, tap New to display the Message Editor
screen.
This box shows the name of the
service that was selected when
you tapped New. If you want to
use a different service, tap this
box and then select the service
you want from the list that
appears.
2.
Tap the Subj (Subject) field to display the header input screen as shown
below.
Tap the type of item you want to
input.
When inputting an address (To,
Cc, Bcc), you can use the mail
addresses stored in Contacts or
by selecting the nickname
assigned to an address in the
Mobile E-mailer Personal Address
Book. See "Recalling an Address
from the Contacts Database or
Personal Address Book" on page
32 for more information.
l After you finish inputting the header items you want, tap Input to
return to the Message Editor screen.
Mobile E-mailer User's Guide
-Page 28 -
3.
Input the body text of the message.
button next to the Service field switches to an
l Tapping the
abbreviated header and expands the body text input area.
Tap here to expand the header
to its full size.
Body text input starts from here.
Tap here if you want to attach a
file to the message. See
“Attaching a File to an Outgoing
Message” on page 45 for more
information.
4.
If you want to append a signature to the end of the message, tap Edit –
Signature. On the sub-menu that appears, tap the name of the signature
you want to use.
Select None to send the
message without a signature.
Tap the name of the signature
you want to append.
l Note that you must already have a signature on file before you can
append it to a mail message. See “Using Signatures” on page 38 for
more information.
Mobile E-mailer User's Guide
-Page 29 -
5.
After the message is the way you want, tap
to queue it.
l The message is queued in the Outbox of the service you specified
in step 1 of this procedure. All the mail messages queued in a mail
service’s Outbox are sent the next time you connect to the service.
l If you are connected to the applicable service when you tap
, the
message is sent immediately without being queued in the Outbox of
the service.
Temporarily Saving a Draft of a Mail Message
You can temporarily save the draft of a mail message you are working on (a new
message, a reply, or message you are forwarding) and come back to it later.
To save a message you are working on, tap the OK button. The draft is saved in the
Inbox folder.
Editing an Unsent Mail Message
Use the following procedure to open a message queued in the Outbox folder or a draft
message saved in the Inbox folder and edit it contents.
1.
On the Message List screen, tap Tools - Open Inbox (or Open
Outbox) to display the applicable Message List screen.
2.
Tap the message you want to edit.
l This opens an editor screen for the message you tapped.
3.
Use the same procedures that you use when creating a new mail
message to edit the contents of the message on the Message Editor
screen.
l See “To create a new message” on page 28 for more information.
4.
After you are finished editing the message, tap
to queue it in the
Outbox or OK to store it as a draft in the Inbox.
Mobile E-mailer User's Guide
-Page 30 -
Deleting the Message Being Edited
While editing an unsent message on the editor screen, tap Edit - Delete to move the
message to the Deleted folder.
NOTE
Messages in the Deleted folder are actually deleted from memory by any one of the
following events.
l Tapping Tools - Empty Deleted Items on the Message List screen
You can recover a file that is still in the Deleted folder by moving it to another folder.
See “Moving a Message to Another Folder” on page 52 for more information.
Mobile E-mailer User's Guide
-Page 31 -
Recalling an Address from the Contacts Database or
Personal Address Book
You can input an address into an outgoing e-mail message header by recalling it from the
Contacts database or the Mobile E-mailer Personal Address Book.
NOTE
l The “Contacts database” is the name of the file where data stored using the
Contacts mode or Mobile Address Book is stored. For information about using the
Contacts mode, see the “Pocket PC User's Guide” and CASSIOPEIA online help.
For information about using Mobile Address Book, see the documentation on the
CD-ROM that comes bundled with your CASSIOPEIA.
l
See “Adding Mail Addresses to the Personal Address Book” on page 62 for
information about registering nickname and mail address data in the Personal
Address Book.
Recalling an Address from the Contacts Database
You can use either of the following two methods to recall an address from the Contacts
database.
Name-based search (procedure below)
While inputting an address (To, Cc, Bcc) on the header input screen (page
28), type the first name or the first few characters of the first name of the
person to whom you want to send the message. This automatically recalls the
corresponding e-mail address from the Contacts database.
Manual search (page 34)
With this method, you display a list of e-mail addresses currently stored in the
Contacts database and manually select the one you want.
To recall a Contacts database address using name-based
search
1.
Tap To, Cc, or Bcc at the top of the header input screen.
l See step 2 of the procedure under “To create a new message on
page 28 for more information about the header input screen.
2.
In the input area, type in the first name or the first few letters of the first
name of the person whose e-mail address you want to recall. Next, drag
the stylus across the name or letters so they are highlighted.
Mobile E-mailer User's Guide
-Page 32 -
3.
Tap
.
l This displays a list of all names and mail addresses in the Contacts
database that match your highlighted input.
4.
Select the name and address of the person to whom you want to send the
message, and then tap OK.
l This returns to the header input screen, with the address you selected
in the input area.
NOTE
If there are no Contacts database matches for the characters you input, the
screen returns directly to the header input screen when you tap
in step 3.
Mobile E-mailer User's Guide
-Page 33 -
To recall a Contacts database address using manual search
1.
Tap To, Cc, or Bcc at the top of the header input screen.
l See step 2 of the procedure under “To create a new message on
page 28 for more information about the header input screen.
l With manual search, you will have a chance to specify the addressee
type (To, Cc, Bcc) later, so you can select any one of the three
options at this time.
2.
Tap
to display a list of Contacts database names and e-mail
addresses.
3.
Tap the name and address of a person to whom you want to send the
message and then tap a To, Cc, or Bcc on the command bar to specify
the addressee type.
l Note that you can also select multiple names and addresses on the
list.
These indicators show which
addresses you have selected
and the addressee type.
Instead of the command bar
buttons, you can also tap and
hold a name, and then select the
addressee type from the shortcut
menu that appears.
Command bar buttons
l To deselect an addressee, tap its name and address and then tap the
button for the same addressee type that is currently assigned to the
addressee. To deselect an addressee that is currently specified as a
To addressee, for example, select the name and address and then
tap To.
4.
After all the addressees are configured the way you want them, tap OK to
return to the header input screen.
l The header input screen now shows all of the To, Cc, and Bcc
addressees you selected using the above steps.
Mobile E-mailer User's Guide
-Page 34 -
Recalling an Address from the Personal Address Book
The Personal Address Book is a Mobile E-mailer function that lets you assign nicknames
to your often-used mail addresses for quick and easy recall whenever you need them.
Note that you must input addresses into the Personal Address Book and assign
nicknames to them before you can recall addresses for your e-mail messages. See
“Adding Mail Addresses to the Personal Address Book” on page 62 for more information.
You can use any of the following three methods to recall an address from the Personal
Address Book database.
Name-based search (procedure below)
While inputting an address (To, Cc, Bcc) on the header input screen (page
28), type the nickname or the first few characters of the nickname of the person
to whom you want to send the message. This automatically recalls the
corresponding e-mail address from the Personal Address Book.
Manual search (page 36)
With this method, you display a list of e-mail addresses currently stored in the
Personal Address Book and manually select the one you want.
Nickname menu selection (page 37)
This method lets you select an addressee from a menu of Personal Address
Book nicknames you can access from the header input screen.
To recall a Personal Address Book address using namebased search
1.
Tap To, Cc, or Bcc at the top of the header input screen.
l See step 2 of the procedure under “To create a new message on
page 28 for more information about the header input screen.
2.
In the input area, type in the first name or the first few letters of the first
name of the person whose e-mail address you want to recall. Next, drag
the stylus across the name or letters so they are highlighted.
3.
Tap
.
l This displays a list of all names and mail addresses in the Personal
Address Book that match your highlighted input.
4.
Select the name and address of the person to whom you want to send the
message, and then tap OK.
l This returns to the header input screen, with the address you selected
in the input area.
Mobile E-mailer User's Guide
-Page 35 -
N OTE
If there are no Personal Address Book matches for the characters you input,
the screen returns directly to the header input screen when you tap
in
step 3.
To recall a Personal Address Book address using manual
search
1.
Tap To, Cc, or Bcc at the top of the header input screen.
l See step 2 of the procedure under “To create a new message on
page 28 for more information about the header input screen.
l With manual search, you will have a chance to specify the addressee
type (To, Cc, Bcc) later, so you can select any one of the three
options at this time.
2.
Tap
to display a list of Personal Address Book names and e-mail
addresses.
3.
Tap the name and address of a person to whom you want to send the
message and then tap a To, Cc, or Bcc on the command bar to specify
the addressee type.
l Note that you can also select multiple names and addresses on the
list.
Instead of the command bar
buttons, you can also tap and
hold a name, and then select the
addressee type from the shortcut
menu that appears.
These indicators show which
addresses you have selected
and the addressee type.
Command bar buttons
l To deselect an addressee, tap its name and address and then tap the
button for the same addressee type that is currently assigned to the
addressee. To deselect an addressee that is currently specified as a
To addressee, for example, select the name and address and then
tap To.
Mobile E-mailer User's Guide
-Page 36 -
l The checkboxes at the left side of each line indicates whether or not
the nickname assigned to the address is displayed in the header input
screen nickname menu. See “Adding Mail Addresses to the Personal
Address Book” on page 62 for more information.
4.
After all the addressees are configured the way you want them, tap OK to
return to the header input screen.
l The header input screen now shows all of the To, Cc, and Bcc
addressees you selected using the above steps.
To recall an address using the nickname menu
1.
Tap To, Cc, or Bcc at the top of the header input screen.
l See step 2 of the procedure under “To create a new message on
page 28 for more information about the header input screen.
2.
Tap the
button next to
to display a menu of addressee
nicknames, and then tap the nickname whose address you want to recall.
l This recalls the address associated with the nickname and inputs it
into the header.
NOTE
l Tap Others when you want to recall an address whose nickname is
not included in the nickname menu. Doing so displays the list of
Personal Address Book names and e-mail addresses like the one
shown in step 3 under “To recall a Personal Address Book address
using manual search” on page 36. You can use the list to select a mail
address manually.
Mobile E-mailer User's Guide
-Page 37 -
l See “Adding Mail Addresses to the Personal Address Book” on page
62 for information about controlling the contents of the nickname menu.
Using Signatures
A “signature” is a block of preset text (your name and e-mail address, for example) that
is inserted at the end of an e-mail message. Mobile E-mailer lets you keep up to five
signatures on file and select the one you want at any time.
To create a signature
1.
On the Message List screen, tap Tools - Signature Settings to display
the Signature Settings screen.
Signature number
Signature name
Signature contents
2.
Tap a signature number to select the signature for input.
3.
Type in a name for the signature and then type in the text that you want
the signature to include.
l The names you assign to signatures are listed in the submenu that
appears when you tap Edit – Signature on the Message Editor
screen.
4.
Repeat steps 2 and 3 for other signatures, if you want.
5.
After everything is the way you want, tap OK to store it.
Mobile E-mailer User's Guide
-Page 38 -
NOTE
l You can also use the above procedure to edit an existing signature.
l See “To create a new message” on page 28 for information about
inserting a signature into a message.
Viewing Received Mail Messages
This section describes a number of different techniques you can use when viewing
received mail messages.
Opening a Received Message
The contents of the Inbox folder should appear automatically on the Message List
screen after you connect to your mail server and receive the mail that is waiting. To
change to the Inbox folder from another folder, tap Tools on the Message List screen
and then tap Open Inbox.
To open a mail message
1.
On the Message List screen, tap the message you want to open.
l This displays the Message Viewer screen.
This icon appears when there is
a file attached to the message.
Tap here to switch to a two-line
header, which expands message
body text area.
Message body text
Mobile E-mailer User's Guide
-Page 39 -
2.
If you want to view full details of a particular header field, tap the field
(Subj, From, To, Cc).
Tap the name of the field you
want to view.
Tapping a header field displays
the details of that field. Tapping
the Body field returns to the
Message Viewer screen.
Tapping this button returns to the
Message Viewer screen.
3.
To return to the Message List screen, tap OK on the Message Viewer
screen.
Mobile E-mailer User's Guide
-Page 40 -
Using the Message Viewer Screen
The following describes the operations you can perform while the Message Viewer
Screen is on the display.
l
The icon
in the upper right corner of the Message Viewer screen indicates that
the message has file attached to it. Tapping the icon opens the attached file. See
“To open an attached file” on page 48 for more information.
l
You can use the standard CASSIOPEIA copy-and-paste procedure to copy text
from a mail message and paste it into another message or any other application that
accepts text input.
l
The following describes the different operations that are available using command
bar buttons.
When you want to do this:
Tap this:
Display an editor screen for creating a new message (page 28)
New
Display an editor screen for creating a reply message (page 43)
Display an editor screen for creating a forwarded message (page
44)
Move the currently displayed message to another folder (page
53)
Move the currently displayed message to the Deleted folder
(page 54)
Scroll to the previous message
Scroll to the next message
Opening a Mail Message that Includes HTML Formatting
Opening a mail message that mixes plain text and HTML formatted text on the Message
Viewer screen displays the plain text part only. Use the following procedure to view the
HTML part of a message.
To view the HTML part of a message
On the Message Viewer screen, tap Tools – Open HTML.
l This starts Pocket Internet Explorer and displays the HTML part of
the message on the Message Viewer screen.
Mobile E-mailer User's Guide
-Page 41 -
Unread and Read Messages
Unread messages appear on the Message List screen in boldface.
Read messages are indicated by
normal text.
Boldface indicates unread
messages.
l Opening a message and displaying it on the Message Viewer screen
changes its status to “read.”
l You can use the following procedure to toggle the status of a particular
message between “read” and “unread.”
To change the read/unread status of a message
1.
On the Message List screen, tap and hold the message whose
read/unread status you want to change.
2.
On the shortcut menu that appears, tap Mark as Unread/Mark as Read.
l This toggles the current status of the message to the opposite status.
Saving a Mail Message as a Text File
You can save a mail message (header and body) as a text file, which you can
open using Pocket Word.
To save a mail message as a text file
1.
While the mail message you want to save is on the display, tap Tool Save As.
2.
On the screen that appears, type in a name for the file, select the folder
where you want to save it, and then tap OK to save.
Mobile E-mailer User's Guide
-Page 42 -
Replying to a Message
Use the following procedure to send a reply to an e-mail message you receive.
To reply to an e-mail message
1.
Display the Message Viewer screen of the message to which you want to
reply and then tap
to display the Reply screen shown below.
l You could also tap and hold the message to you want to reply on the
Inbox folder Message List screen, and then tap Reply on the
shortcut menu that appears.
Check this box when you want the
text of the original message to be
included inside your reply.
Use this box to specify the quote
character (the character that appears
to the left of each line of the original
message quoted in your reply).
Check this box if you want your
reply also to be sent to all the other
recipients, including To and Cc
recipients, of the original message.
2.
After everything is the way you want, tap OK to advance to the
Message Editor screen.
l Now you can write your message using the same procedures as you
do when creating a new message. See “To create a new message”
on page 28 for more information.
NOTE
You can set up Mobile E-mailer so it goes directly into the Message Editor
screen without displaying the Reply screen in step 1 of the above procedure.
See “Configuring Option Settings” on page 68 for more information.
Mobile E-mailer User's Guide
-Page 43 -
Forwarding a Message to Another Address
Use the following procedure when you want to forward a message you receive to
another address.
To forward a message to another address
1.
Display the Message Viewer screen of the message to which you want to
reply and then tap
to display the Forward screen shown below.
l You could also tap and hold the message to you want to reply on the
Inbox folder Message List screen, and then tap Forward on the
shortcut menu that appears.
Check this box when you want
the text of the original message to
be included inside your forward.
Use this box to specify the quote
character (the character that
appears to the left of each line of
the original message quoted in
your forward).
Check this box if you want all
files attached to the original
message to be included with
your forward.
2.
After everything is the way you want, tap OK to advance to the
Message Editor screen.
l Now you can write your message using the same procedures as you
do when creating a new message. See “To create a new message”
on page 28 for more information.
NOTE
You can set up Mobile E-mailer so it goes directly into the Message Editor
screen without displaying the Forward screen in step 1 of the above
procedure. See “Configuring Option Settings” on page 68 for more information.
Mobile E-mailer User's Guide
-Page 44 -
Working with Attached Files
This section explains how to attach files to an outgoing mail message and how to open a
file attached to an incoming mail message.
Attaching a File to an Outgoing Message
Use the following procedure to attach a file to an original message, a reply, or a
forwarded message.
To attach a file to an outgoing message
1.
Display the Message Editor screen for the message to which you want to
attach a file.
l See “Creating a New Message” on page 28 for information about the
Message Editor screen.
2.
Tap
to display the File Attachment screen.
Any other files currently
attached to the message are
shown here.
Mobile E-mailer User's Guide
-Page 45 -
3.
Tap
to display a menu of attachment file types (see below).
To attach this type of file:
Select this file type:
Image (jpg, jpeg, or gif)
Still Image
CASIO original movie format (cmf)
Movie
Pocket Word Document (psw)
Pocket Word
Pocket Excel Workbook (pxl)
Pocket Excel
Note (pwi)
Note
Sound (wav)
Voice
Any other
Others
l To attach a text (txt) file or some other file whose type is not shown in
the menu, tap Others.
4.
Tap the type that corresponds to the file you want to attach.
l This displays the Select Attachment screen shown below.
The main memory My
Documents folder is the default
folder the first time you display
this screen. After that, the folder
you last selected on this screen
is the default folder. You can tap
here and select a different folder
from the list that appears.
If you select Still Image as the
file type, you can tap this box
and select the file format (jpg,
jpeg, gif) from the list that
appears.
Attached file list, which shows
all the files in the currently
selected folder of the file type
you specify.
5.
On the list of files, tap the one you want to select.
l This returns to the File Attachment screen.
Mobile E-mailer User's Guide
-Page 46 -
6.
Repeat steps 3 through 4 to attach other files, if you want.
7.
When everything is the way you want, tap OK on the File Attachment
screen to return to the Message Editor screen.
8.
Now you can finish writing your message and send it.
To remove a file attached to an outgoing message
1.
Display the File Attachment screen for the message whose attached file
you want to remove.
2.
Tap and hold the name of the file you want to remove.
3.
On the shortcut menu that appears, tap Delete to remove the file.
NOTE
While the File Attachment screen is on the display, you can attach more
files and remove attached files. After doing so, you can restore the attached file
list to what it was when you first displayed the File Attachment screen.
To restore the attached file list
1.
After making changes in the attached file list, tap and hold anywhere inside
the attached file list.
2.
On the shortcut menu that appears, tap Restore to restore the attached
file list.
NOTE
The above operation restores the attached file list to what it was when you
first opened the File Attachment list.
Mobile E-mailer User's Guide
-Page 47 -
Working with Incoming Attachments
This section describes the things you can do with a file that you receive at an
attachment to an e-mail message.
To open an attached file
1.
Display the Message Viewer screen for the message whose attached file
you want to open.
l See “Opening a Received Message” on page 39 for information
about the Message Viewer screen.
2.
Tap
to display the Attachment List screen.
Attachments list
3.
Tap the name of the attached file you want to open.
l This starts the application associated with the file and opens the file.
NOTE
l Tapping a file that does not have an application associated with it
displays a message telling you that it cannot be opened.
l Tapping an attached file that is an executable (exe) file, causes a
confirmation message to appear, asking if you really want to run it.
l It is always best to tap No in response to the confirmation message if
you have any doubts at all about the origin of a file. Files obtained
via e-mail or over the Internet can contain viruses that can corrupt
your data and system.
l Tap Yes if you want to run the file. Note that nothing will happen
Mobile E-mailer User's Guide
-Page 48 -
when you tap Yes if your CASSIOPEIA does not support execution
of the file.
To save an attached file
1.
On the Message Viewer screen of the message with the attached file, tap
to display the Attachment List screen.
2.
Tap and hold the name of the file you want to save and then tap Save
Attachment on the shortcut menu that appears to display the Save
Attachment screen.
l Instead of the above operation, you could select the name of the
attached file you wan to save and then tap
.
Type the name you want to give to
the file here.
The main memory My Documents
folder is the default folder the first
time you display this screen. After
that, the folder you last selected on
this screen is the default folder. You
can tap here and select a different
folder from the list that appears.
l After everything is the way you want, tap OK to save the file and
return to the Attachment List screen.
Mobile E-mailer User's Guide
-Page 49 -
Using Folders
Mobile E-mailer initially creates the four folders described below for each of the services
you configure.
Folder Name
Description
Inbox
Stores messages you receive
Outbox
Queues messages you send
Sent
Deleted
Stores messages you have sent
Stores messages you have deleted
Each time you perform a send, receive, or delete operation for a particular service, Mobile
E-mailer automatically puts the message into the required folder.
In addition to the four default folders, you can create your own folders to more effectively
manage your messages in accordance with your particular needs.
The procedures in this section describe how to perform various folder operations while
the Message List screen is on the display.
To display the contents of a folder on the Message List
screen
1.
On the Message List screen, tap
to display the Show screen.
Configured services
Folders
2.
Tap the folder whose contents you want to view.
l If you do not see any folders under the service whose messages you
want to view, tap the service name. This should cause the folders
associated with the service to appear underneath the service name.
Mobile E-mailer User's Guide
-Page 50 -
l Tap OK to display the contents of the folder on the Message List
screen.
NOTE
You can switch between the Inbox, Outbox, and Sent folders of your
currently selected service by tapping the Message List screen Tools menu.
Next, select the name of the folder whose contents you want to view.
To create a new folder
NOTE
You can create a new folder directly below the service name (at the same level
as Inbox and Outbox), or inside of another folder.
1.
On the Message List screen, tap
2.
On the Show screen, tap the folder inside of which you want to create the
new folder.
to display the Show screen.
l To create a folder directly underneath the service name, tap the name
of the service here.
3.
Tap New to display the New Folder screen.
4.
Type in the name you want to assign to the folder and then tap OK.
l This returns to the Shows screen, which now shows your newly
created folder.
To rename a folder
1.
On the Message List screen, tap
2.
On the Show screen, tap the folder whose name you want to change.
3.
Tap Edit – Rename to display the Rename Folder screen.
4.
Type in the new name and then tap OK.
to display the Show screen.
l This changes the folder name and returns to the Show screen.
NOTE
You cannot rename the Inbox, Outbox, Sent, or Deleted folders.
Mobile E-mailer User's Guide
-Page 51 -
To delete a folder
1.
On the Message List screen, tap
2.
On the Show screen, tap the folder you want to delete.
3.
Tap Edit – Delete.
4.
In response to the confirmation message that appears, tap Yes to delete
the folder or No to cancel without deleting anything.
to display the Show screen.
l Deleting a folder also deletes all of its contents.
NOTE
You cannot delete the Inbox, Outbox, Sent, or Deleted folders.
Moving and Deleting Messages
Received messages are normally stored in the Inbox folder at first, but you can move a
message to another folder whenever you want.
NOTE
In addition to moving messages manually, you can also set up filters so Mobile E-mailer
routes incoming mail to particular folders automatically. See “Using Filters for Incoming
Messages” on page 57 for more information.
Moving a Message to Another Folder
You can perform a message move operation starting from either the Message List screen
or the Message Viewer screen. With the Message List screen, you can select multiple
messages and move them to the same folder with a single operation. With the Message
Viewer screen, you can move the currently displayed message.
To move messages using the Message List screen
1.
On the Message List screen, select the message or messages you want
to move.
l To select multiple messages, tap the Ctrll key on the on-screen
keyboard so it is highlighted. Now tapping a message name in the
message list toggles the message between being selected
(highlighted) and unselected (not highlighted). All the messages you
select in this step will be moved to the folder you specify in step 2.
Mobile E-mailer User's Guide
-Page 52 -
2.
On the command bar, tap Tool - Move To to display the Move To
screen.
l Instead of tapping Tool – Move To, you can tap and hold any
message on the Message List screen and then tap Move To on the
shortcut menu that appears.
3.
Tap the folder to which you want to move the message or messages you
selected in step 2, and then tap OK.
l This moves the message or messages you selected, and returns to
the Message List screen.
To move a message using the Message Viewer screen
1.
On the Message Viewer screen of the message you want to move, tap
.
l This displays the Move To screen.
2.
Tap the folder to which you want to move the message, and then tap OK.
l This moves the message and returns to the Message List screen.
Mobile E-mailer User's Guide
-Page 53 -
Deleting Messages
You can perform a message delete operation starting from either the Message List screen
or the Message Viewer screen. With the Message List screen, you can select multiple
messages and delete them with a single operation. With the Message Viewer screen,
you can delete the currently displayed message.
To delete messages using the Message List screen
1.
On the Message List screen, select the message or messages you want
to delete.
l To select multiple messages, tap the Ctrll key on the on-screen
keyboard so it is highlighted. Now tapping a message name in the
message list toggles the message between being selected
(highlighted) and unselected (not highlighted). All the messages you
select in this step will be deleted in step 2.
2.
On the command bar, tap Tool - Delete to delete the selected message
or messages.
l Instead of tapping Tool – Delete, you can tap and hold any
message on the Message List screen and then tap Delete on the
shortcut menu that appears.
l This moves the message or messages you selected to the Deleted
folder, and returns to the Message List screen.
To delete a message using the Message Viewer screen
On the Message Viewer screen of the message you want to delete, tap
.
l This moves the message to the Deleted folder and returns to the
Message List screen.
NOTE
Messages in the Deleted folder are actually deleted from memory by any one
of the following events.
l Tapping Tools - Empty Deleted Items on the Message List
screen
You can recover a file that is still in the Deleted folder by moving it to another
folder. See “Moving a Message to Another Folder” on page 52 for more
information.
Mobile E-mailer User's Guide
-Page 54 -
Advanced Functions
The Mobile E-mailer functions described in this section help to make management of your
e-mail messages easier and more efficient.
Searching for Text
The search capabilities of Mobile E-mailer make it possible to quickly locate a message
that contains text you specify. Note that a search operation searches the messages in
the currently selected service only.
To search for text
1.
On the Message List screen, tap
to display the Find screen.
These boxes specify the field to
be checked and the search
conditions.
Input the text you want to find
here. Tapping the
button
displays a list of text you have
searched for in the past. Tap on
text in the list to search for it again.
2.
Configure the search criteria by inputting the text you want to find,
specifying the field you want searched, and specifying the search
conditions.
l The following shows the items for configuring search criteria.
3.
Field
Condition
Content
Subject
From
To
Cc
Body
contains
doesn’t contain
is
isn’t
begins with
ends with
Up to 50 characters of text
When everything is the way you want, tap Find to start the search.
l All the messages that contain text that matches the search criteria you
defined above appear in a list like the one shown below.
Mobile E-mailer User's Guide
-Page 55 -
This list screen looks like the
standard Message List screen,
except that
is shown in
place of
.
Except for folder selection and
search, you can perform the
same operations on this list of
found messages as you can
perform on the standard
Message List screen.
4.
To clear the list of found messages and return to the normal Message List
screen, tap
.
NOTE
The found message list is also cleared whenever any one of the following
operations is performed.
l Moving a message to another folder
l Deleting a message
l Emptying the Deleted folder (Tools - Empty Deleted Items)
l Sending or receiving mail
l Writing a mail message (new message, reply, forward)
l Execution of a filter operation
l Changing the currently selected service
Mobile E-mailer User's Guide
-Page 56 -
Using Filters for Incoming Messages
You can configure filters that automatically route incoming mail messages to specific
folders in accordance with criteria defined by you. You can have up to 10 filters
configured for each service.
To configure a filter
NOTE
You must have a service configured before you can perform the following
procedure to configure a filter. See “Configuring a New Mail Service” on page
6 for more information.
1.
On the Message List screen, tap Services – Filter Settings to display
the Filter Settings screen.
Filter list. Any filters your already
have configured are listed here.
2.
Tap New to display the new filter input screen.
Mobile E-mailer User's Guide
-Page 57 -
3.
Type in the name you want to give to the filter and then tap OK to
advance to the filter editor screen.
Use this box to specify whether a
message has to meet both sets of
the filter criteria, or either of the sets
of criteria.
You can configure up to two sets of
criteria for each filter.
Tap here and select the destination
folder of a message that satisfies
the filter's criteria.
4.
Define the criteria for the filter, as described below.
Field to be checked
Check this box
to enable these
criteria.
Condition
Text
l The following shows the items for configuring filter criteria.
Field
Condition
Content
Subject
From
To
Cc
Body
contains
doesn’t contain
is
isn’t
begins with
ends with
Up to 50 characters of
text
l When a filter has two sets of criteria, you can use the box at the top
of the filter editor screen to specify either both of or either of.
Mobile E-mailer User's Guide
-Page 58 -
5.
Specify the name of the folder to which messages that satisfy the criteria
of the filter should be routed.
l Tapping the Move to folder box displays a folder selection screen
like the one shown below.
Select the destination folder and
then tap OK.
6.
After everything is the way you want, tap OK to return to the Filter
Settings screen.
7.
Repeat steps 2 through 6 to configure other filters, if you want.
l You can have up to 10 filters configured for each service. An alert
message appears on the screen of you try to configure more than 10
filters.
8.
After you are finished configuring all the filters you want, tap OK on the
Filter Settings screen.
l This returns to the Message List screen.
NOTE
To execute the filtering operation manually, display the Message List screen,
and then tap Tool – Perform Filtering. This causes the filter operation to be
performed on all messages in the currently selected service’s Inbox folder.
Mobile E-mailer User's Guide
-Page 59 -
Assigning a Priority to a Filter
When you have multiple filters configured, you can assign a priority that determines the
sequence that the filters are applied. The filter with priority 1 is checked first. If the
message satisfies the criteria of the first filter, it goes to the applicable folder without
further filtering. If it does not satisfy the criteria, the filter with priority 2 is checked. This
process is repeated until all the filters (1, 2, 3, and so on) are checked.
To change the priority of a filter
1.
On the Message List screen, tap Tool – Filter Settings to display the
Filter Settings screen.
2.
Tap the filter whose priority you want to change.
3.
Tap the
and
buttons below the text keyboard to move the
currently selected filter name up and down in the list.
l When everything is the way you want, tap OK to save your filters
and return to the Message List screen.
To rename a filter
1.
On the Message List screen, tap Tool – Filter Settings to display the
Filter Settings screen.
2.
Tap and hold the filter whose name you want to change, and then tap
Rename on the shortcut menu that appears.
l This displays the Rename screen.
3.
Type in the new name and then tap OK.
4.
After everything is the way you want, tap OK on the Filter Settings
screen.
l This changes the filter name and returns to the Message List screen.
To delete a filter
1.
On the Message List screen, tap Tool – Filter Settings to display the
Filter Settings screen.
2.
Tap and hold the filter you want to delete, and then tap Delete on the
shortcut menu that appears.
l This deletes the filter.
3.
After everything is the way you want, tap OK on the Filter Settings
screen.
Mobile E-mailer User's Guide
-Page 60 -
l This returns to the Message List screen.
To enable and disable a filter
1.
On the Filter Settings screen, tap the check box next to a filter to toggle
it between being enabled (checked) and disabled (unchecked).
The status of this check box
determines whether a filter is
enabled (checked) or disabled
(unchecked).
l This procedure makes it possible to temporarily disable a filter without
deleting it.
2.
After everything is the way you want, tap OK to return to the Message
List screen.
To restore Filter Settings screen settings
1.
After making changes in filter settings, tap and hold anywhere inside the
filter list.
2.
On the shortcut menu that appears, tap Restore to restore the filter
settings.
l The above procedure undoes any of the following operations you
performed since displaying the Filter Settings screen: configuration
of a new filter, deletion of a filter, change of filter priority, change of a
filter name, and change of filter enable/disable status.
NOTE
Restore works only one way, restoring previously saved filter settings. You
cannot use Restore to undo a previous Restore operation.
Mobile E-mailer User's Guide
-Page 61 -
Adding Mail Addresses to the Personal Address Book
Storing e-mail addresses in your Personal Address Book makes input of addresses into
mail messages quick and easy.
To add a mail address to the Personal Address Book
1.
Display the Message List screen for the Inbox folder.
2.
Tap a message that contains the address you want to add to the Personal
Address Book. This opens the message in the Message Viewer screen.
3.
Tap the header field (From, To, Cc) that contains the mail address you
want to add.
l This displays the message header screen for the filed you tapped.
4.
Tap the mail address you want to add to the Personal Address Book.
The address you tap becomes
highlighted, which shows it is
selected.
Mobile E-mailer User's Guide
-Page 62 -
5.
Tap
to display the Personal Address Book Record Input screen
shown below.
Selected mail address
6.
Type a nickname for the address into the Name box.
l You can also make any changes you want to the mail address in the
Email box.
7.
Tap OK to display the Personal Address Book screen.
The Personal Address Book
screen shows the current
contents of the Personal Address
Book, including addresses and
nicknames.
l Tapping New on this screen displays the Personal Address Book
Record Input screen, which you can use to input a new mail
address.
8.
On the Personal Address Book screen, tap OK to return to the message
header screen.
Mobile E-mailer User's Guide
-Page 63 -
NOTE
l You can also display the Personal Address Book screen from the
Message Editor Screen and input a new address. Use the procedure
under “To recall a Personal Address Book address using manual
search” (page 36) to display the Personal Address Book screen, and
then tap New.
l The check boxes to the left of each mail address nickname controls
whether the nickname assigned to the address is displayed in the
header input screen nickname menu. Tap a check box to toggle it
between being checked (include in the nickname menu) and
unchecked (do not include in the nickname menu.
l See “To recall an address using the nickname menu” on page 37 for
more information about using the nickname menu.
Mobile E-mailer User's Guide
-Page 64 -
To edit a Personal Address Book mail address
1.
Display the Personal Address Book screen.
2.
Display the Personal Address Book Record Input screen for the mail
address you want to edit.
3.
Make the changes you want and then tap OK to return to the Personal
Address Book screen.
4.
Repeat steps 2 and for other addresses, if you want.
5.
After everything is the way you want, tap OK on the Personal Address
Book screen to return to the message header screen.
To delete a Personal Address Book mail address
1.
Display the Personal Address Book screen.
2.
Tap and hold the mail address you want to delete, and then tap Delete
on the shortcut message that appears.
l This deletes the mail address
3.
Repeat step 2 to delete other addresses, if you want.
4.
After everything is the way you want, tap OK on the Personal Address
Book screen to return to the message header screen.
To restore Personal Address Book screen settings
1.
After making changes in the Personal Address Book, tap and hold
anywhere inside the address list.
2.
On the shortcut menu that appears, tap Restore to restore the Personal
Address Book settings.
l The above procedure undoes any of the following operations you
performed since displaying the Personal Address Book screen:
change of an address, deletion of an address, and change of
nickname menu display/do not display status.
NOTE
Restore works only one way, restoring previously saved Personal Address
Book settings. You cannot use Restore to undo a previous Restore
operation.
Mobile E-mailer User's Guide
-Page 65 -
Adding Mail Addresses to the Contacts Database
You can add addresses contained in message headers directly to the Contacts
database from Mobile E-mailer.
NOTE
Note that you can use the following procedure to add mail addresses and names only to
the Contacts database. You must use Contacts or Mobile Address Book to input data
for other fields.
To add a mail address to the Contacts database
1.
Display the Message List screen for the Inbox folder.
2.
Tap a message that contains the address you want to add to the
Contacts database. This opens the message in the Message Viewer
screen.
3.
Tap the header field (From, To, Cc) that contains the mail address you
want to add.
l This displays the message header screen for the filed you tapped.
The address you tap becomes
highlighted, which shows it is
selected.
Mobile E-mailer User's Guide
-Page 66 -
4.
Tap
to display a screen like the one shown below.
If the mail address you selected
in step 3 uses the format "user
name"<mail address>, the user
name part appears here.
Mail address you selected in
step 3.
l Tapping the box to the left of the mail address displays a list of
Contacts database e-mail address field names (Email, Email2, Email3).
Tap the one where you want to store the displayed address.
l Nothing appears in the mail address box if the address you select
uses a format that is not recognized by Mobile E-mailer. If this
happens, type in the address manually.
5.
Type entries into the Title, First, Middle, Last, and Suffix fields if you
want.
l When everything is the way you want, tap OK to store the input mail
address and name data into the Contacts database.
Mobile E-mailer User's Guide
-Page 67 -
Configuring Option Settings
Mobile E-mailer’s option settings let you configure mail send and receive operations to
suit your particular needs.
To configure option settings
1.
On the Message List screen, tap Tools – Options to display the
Connect tab of the Options screen.
l Connected:
To do this whenever you connect
to your mail server:
Tap Connected box
and select:
Send messages you have queued and
then pick up any mail waiting on the server
Send and Receive
Send messages you have queued without
picking up any messages
S e n d Only
Pick up messages waiting on the server
without sending messages you have
queued
Receive Only
l Received:
To do this when receiving mail:
Do this:
Receive all the messages in full
Uncheck the box next to
Display subject list first
and t hen pick up only
selected messages
Receive only a subject list from which you
can specify messages for full receipt
(page 27)
Check the box next to
Display subject list first
and t hen pick up only
selected messages
Mobile E-mailer User's Guide
-Page 68 -
Store all received messages in the Inbox
Filter messages automatically as they are
received and route them to applicable
folders (page 57)
Uncheck the box next to
Filter received
messages automatically
Check the box next to Filter
received messages
automatically
l Sent
To do this when sending mail:
Do this:
Move messages to the Deleted folder
after they are sent
Move messages to the S e n t folder after
they are sent
2.
Tap the Message tab.
To do this:
Do this:
Skip display of the Reply screen when
Uncheck the box next to
Display specified
dialog box for replay
and forward
your tap
(page 43) and the Forward
screen when you tap
(page 44)
Have the Reply screen displayed when
your tap
(page 43) and the Forward
screen displayed when you tap
44)
3.
Uncheck the box next to
Keep copy of sent mail
in Send folder
Check the box next to K e e p
copy of sent mail in
Send folder
(page
Check the box next to
Display specified
dialog box for replay
and forward
After everything is the way you want it, tap OK to return to the Message
List screen.
Mobile E-mailer User's Guide
-Page 69 -
Command Bar Items (Menus and Buttons)
Message List Screen
NEW (button)
Displays an editor screen for creating a new mail message.
Tools Menu
Command
Description
Select All
Selects all the messages listed on the Message List
screen.
Open Inbox
Displays the contents of the currently selected service’s
Inbox folder on the Message List screen.
Open Outbox
Displays the contents of the currently selected service’s
Outbox folder on the Message List screen.
Open Sent Folder
Displays the contents of the currently selected service’s
Sent folder on the Message List screen.
Move to
Displays a screen for moving a message to another
folder.
Delete
Moves a message to the Deleted folder.
Empty Deleted Items
Deletes all the items in the Deleted folder.
Signature Settings
Displays a Signature Settings screen for editing
signatures.
Options
Displays a screen for configuring option settings.
Services Menu
Command
Description
Service Settings
Starts the Wizard for configuring a service.
Disconnect
Terminates the current connection.
Filter Settings
Displays the Filter Settings screen.
Perform Filtering
Performs filtering in accordance with Filter Settings
screen settings.
About Mobile E-mailer
Displays Mobile E-mailer version information.
...............Establishes a connection with the currently selected service.
...............Displays the search screen.
...............Displays the folder screen
Mobile E-mailer User's Guide
-Page 70 -
Message Viewer Screen
NEW (button)
Displays an editor screen for creating a new mail message.
Tools Menu
Command
Description
Copy
Copies the currently selected text string to the clipboard.
Select All
Selects all the text in the Body field.
Signature Settings
Displays a Signature Settings screen for editing
signatures.
Save As
Save an e-mail message as a text file.
Open HTML
This option is available only for messages that contain
HTML formatting. Click to display the HTML part in Pocket
Internet explorer. This option is disabled if the displayed
message does not contain HTML formatting.
..............Displays a Message Editor screen for replying to a message.
..............Displays a Message Editor screen for forwarding a message to another
addressee.
..............Displays a screen for moving the displayed message to another folder.
..............Moves the displayed message to the Deleted folder.
..............Displays the previous message.
..............Displays the next message.
Mobile E-mailer User's Guide
-Page 71 -
Message Editor screen
NEW (button)
Closes the currently open message editor screen and opens an editor screen for creating
a new message.
Edit Menu
Command
Description
Cut
Cuts the currently selected text string to the clipboard.
Copy
Copies the currently selected text string to the clipboard.
Paste
Pastes the clipboard’s contents at the current cursor
position.
Clear
Deletes the currently selected text string.
Select All
Selects all the text in the Body field.
Delete
Moves the message you are currently editing to the
Deleted folder.
Signature
Displays a menu for selecting a signature for the message
you are currently editing.
Signature Settings
Displays a Signature Settings screen for editing
signatures.
..............Displays a screen for attaching a file to the message you are currently
editing.
........Queues the message you are currently editing in the Outbox.
Mobile E-mailer User's Guide
-Page 72 -