1
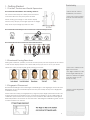
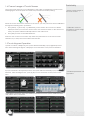
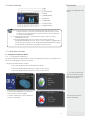
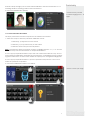
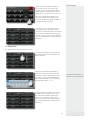
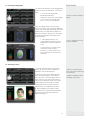
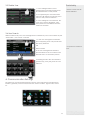
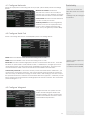
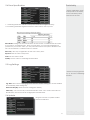
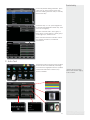
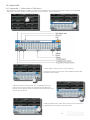
User Manual
Version 1.1
Date: November 2011
Table of contents
1
Getting started
3
1.1 Position, Posture and Facial Expressions
1.2 Enrolment Facing Directions . . . . .
1.3 Fingerprint Placements . . . . . . .
1.4 Correct usage of Touch Screen. . . .
1.5 Touch Keypad Operation . . . . . .
1.6 Main Interface . . . . . . . . . . .
1.7 Verification Modes . . . . . . . . .
1.7.1 Fingerprint Verification Mode . . .
1.7.2 Face Verification Mode . . . . .
1.7.3 Password Verification Mode . . .
.
.
.
.
.
.
.
.
.
.
.
.
.
.
.
.
.
.
.
.
.
.
.
.
.
.
.
.
.
.
.
.
.
.
.
.
.
.
.
.
.3
.3
.3
.4
.4
.5
.5
.5
.6
.7
2
Main Menu
8
3
User Management
9
3.1 Add User . . . . . .
3.1.1 Input User ID . . .
3.1.2 Input Name . . .
3.1.3 Enrol Fingerprint . .
3.1.4 Enrolling Face . .
3.1.5 Enrolling Password .
3.1.6 User Priviledges . .
3.2 Edit User. . . . . . .
3.3 Delete User . . . . .
3.4 User Search . . . . .
4
.
.
.
.
.
.
.
.
.
.
.
.
.
.
.
.
.
.
.
.
.
.
.
.
.
.
.
.
.
.
.
.
.
.
.
.
.
.
.
.
.
.
.
.
.
.
.
.
.
.
.
.
.
.
.
.
.
.
.
.
.
.
.
.
.
.
.
.
.
.
.
.
.
.
.
.
.
.
.
.
.
.
.
.
.
.
.
.
.
.
.
.
.
.
.
.
.
.
.
.
.
.
.
.
.
.
.
.
.
.
Communication Settings
.9
.9
10
11
11
12
12
12
13
13
13
4.1 Configure Networks . . . . . . . . . . . . . 14
4.2 Configure Serial Port . . . . . . . . . . . . 14
4.3 Configure Wiegand . . . . . . . . . . . . . 14
5
System Settings
5.1 Basic Parameter . . .
5.2 Inteface Parameter . .
5.3 Fingerprint Parameter .
5.4 Face Specification . .
5.5 Log Settings . . . . .
5.6 Update . . . . . . .
15
.
.
.
.
.
.
.
.
.
.
.
.
.
.
.
.
.
.
.
.
.
.
.
.
.
.
.
.
.
.
.
.
.
.
.
.
.
.
.
.
.
.
.
.
.
.
.
.
.
.
.
.
.
.
.
.
.
.
.
.
.
.
.
.
.
.
15
16
16
17
17
17
I-2
Table of contents...continue
6
Data Management
18
7
USB Drive Management
18
8
Keyboard Settings
18
9
Auto Test
19
10 Screen Calibrating
20
11 Scheduled Bell Settings
20
12 Access Control Settings
21
13 System Information
21
13.1 Record Capacity . . . . . . . . . . . . 21
13.2 Device Information . . . . . . . . . . . 21
14 Appendix
22
14.1 Intruction of Text Input . . . . . . . . . . 22
14.2 Rules for uploading photo. . . . . . . . . 23
I-2.1
Summary
1. Getting Started
1.1 Position, Posture and Facial Expressions
Recommended installation and standing distance:
* Please ensure correct
installation procedures.
For users 5-6 feet tall (1.5m-1.85m) we recommend
* Take note of the position,
posture and facial expressions.
users stand about 2 feet (0.5m) from the wall.
When viewing your image on the device display
window, step away if your image appears too bright.
Step closer if your image appears too dark.
Recommended Facial Expressions VS Non-Recommended Expressions:
Recommended Posture VS Non-Recommended Posture:
1.2 Enrolment Facing Directions
During the enrolment, position your head such way that your face appears in the center
of the device display window. The device will prompt you how to move your head.
Follow the voice prompts by first gently turning your head :
* Take note: variations are
slight movements
* The slight variations of the
head angles will help the
device to better recognize
your face when you attempt to verify.
1.3 Fingerprint Placement
Recommended fingers: The index finger, middle finger or the ring finger; the thumb and
little finger are not recommended (because they are usually clumsy on the fingerprint
collection screen).
Please enrol and verify your fingerprint by using the proper finger placement mode. We
shall not be held accountable for any consequences arising out of the degradation in
verification performance due to improper user operations. We shall reserve the right of
final interpretation and revision of this document. including the installation guide, access
control software user manual.
3
* Ensure correct fingerprint
placements.
Summary
1.4 Correct usage of Touch Screen
Touch the screen with one of your fingertips or the edge of a fingernail, as shown in the
following figure. A broad point of contact may lead to inaccurate pointing.
* Ensure correct usage of
the touch screen.
When the touch screen is less sensitive to the touch, you can perform a screen calibration
through the following menu operations.
1.
Press [Menu] -> [Auto Test] -> [Calibration] on the screen and a cross icon will be
displayed. After you touch the center of the cross at five locations on the screen correctly, the system will automatically returns to the main menu.
2.
Press [Exit] to return to the initial interface.
* Calibration is recommended for correct usage
of touch screen
Smear or dust on the touch screen may affect the performance of the touch screen.
Therefore, try to keep the screen clean and dust-free.
1.5 Touch Keypad Operation
1) Enter a number. Click[ID No], the system will automatically popup digital input interface. After entering the figures, click[OK]to save and return to the previous interface.
2) Input characters. Click [Name] button, the system will automatically popup text entry
interface, after entering the text, press [X] key to save and return to the previous interface.
3) Modified parameters. Click t the default parameters from the system, it will automatically switch other parameters.
4
* Detailed explanation: see
appendix 1.
Summary
1.6 Main Interface
* Ensure to familiarise main
menu.
1 - (8) Screen shortcut key and (9) Keypad shortcut key are one to one
correspondence. Users can customize the shortcut keys for each
function, the specific operation method refers to the introduction
on ‘8 keyboard definition’.
2 - (7) Showing Facial picture, it means the current device on facial
identification mode.
(7) Showing Fingerprint picture, it means the current device on
fingerprint identification mode. Users could change the identification
mode through operation to (5) Fingerprint/Facial identification switch
key (8) Screen shortcut key or (9) Keypad shortcut key
1.7 Verification Modes
1.7.1 Fingerprint Verification Mode
1.7.1.1 1: N Fingerprint Verification
Under the fingerprint authentication mode, the fingerprint that are used will be compared to the fingerprint data in the device.
1. Fingeprint authentication modes:
1. Press the [Fingerprint/Face identification switch]
2. Click the [fingerprint/Facial] short cut key on the screen.
3. Click the [fingerprint/Facial] short cut key on the screen.
* 1 : N - One to Many (the
system compares your fingerprint to all other fingerprints on the system.
2. Successful verification, see the interface on above picture (right)
3. Failure verification, see the interface
picture on the right
* Successful and unsuccessful verification
5
Summary
1.7.1.2 1: 1 Fingerprint Verification
1:1 Fingerprint Verification
The fingerprint that are used will be compared to the fingerprint which related to user
number in the device .This method is used when the user’s fingerprint identification is
difficult to process.
* 1 : 1 - One to One (the
system compares your
fingerprint to the user id entered before verification)
1.There are thress ways to inter the fingerprint authentication mode (as show left) :
1)Click the [1:1/1:G]on the screen.
2)Click the[1:1/1:G]s creen short cut key
3)Click the shortcut key corresponding to the key board.
Note: The last two kinds of methods could be available after the “1:1 / 1: G” was set to
shortcut keys. See the introduction to ‘Keyboard Definition’
2. In the popup keyboard interface, enter the user ID, and then click the “fingerprint”
icon (below), enter the 1:1 fingerprint patterns. If prompted to “nonregistered users!”
Indicating the number does not exist or the number of employees is not a registered
fingerprint.
1.7.2 Face Verification Mode
1:G Facial verification
Face recognition interface displays the current group number; the current group of
users can make directly face comparison. When making user authentication of other
groups, It must enter the group number or use the shortcut keys to select the group
number, and then make a comparison with human faces, the system is set to sync the
group as the current group.
1.The three ways to inter the 1 :G authentication mode (as show left) :
1. Click the [1:1/1:G] bottom on the screen (left 1)
2. Click the[1:1/1:G] shortcut key on the screen
3. Click the shortcut key which corresponding to the keyboard
Note : The last two kinds of methods could be available after the “1:1 / 1: G” was set to
as shortcut keys. See the introduction to ‘Keyboard Definition’
2.In the popup keyboard interface, enter the group number, and then click the “1: G”
icon (below right), enter the 1: G fingerprint patterns.
6
* Use 1:1 when it’s difficult
to recognise the face in
normal 1:N mode.
3.Please adopt the right pose to make facial verification. See the introduction on ‘1.1
standing situation ,standing position and countenance’
Summary
4: Successful identification (below)
* Password may contain
numbers ranging from 1 - 8
digits.
1.7.3 Password Verification Mode
The input password should be compared to the related user number .
1. There are 3 ways to inter the password verification mode:
1. Click the[1:1/1:G]bottom on the screen
2. Click the [1:1/1:G] shortcut key on the screen
3. Click the shortcut key from the keyboard.
Note : The latter two kinds of methods could be available after the “1:1 / 1: G” was set
to shortcut keys. See the introduction to ‘Keyboard Definition’
2. In the popup keyboard interface, input the user number and click the “key” icon to
enter password verification model (left 2) If prompted to “nonregistered users!” Indicating the number does not exist or the number of employees is not registered fingerprint
3. In the popup keyboard interface , input the password and press the “OK” icon to
make the password comparison
4. Successful verification interface ,see below
* Ensure correct pin usage
7
2. Main Menu
Summary
Staff has two kinds of privileges: users and administrators. Users can only use face, fingerprint or password authentication; administrator can enter the main menu to operate all
kinds of settings together with the “User” functions. In the initial interface, you can press
[MENU] key to enter the main menu, as shown below:
* Access main menu
* Endure to enrol administrator for security purposes
IIf the device does not have administrator, any person presses [MENU]
key
ey to be able to enter the menu operation; if an administrator is enrolled, it
will need administrator confirmation to enter the menu. For the safety sake, it is
recommended enrolling administrator for the first time of using.
Main menu has 10 sub-menus and three shortcut keys as shown below:
System Info
Date & Time
Add user
The main menu includes nine sub menus:
User: View personnel information, including ID No., name, fingerprint, face, cards, passwords, privilege and group of the unit and so on. Increase, edit or delete operation the
basic information.
Connection.: Set up communication parameters between the equipment and the PC,
including IP address, gateway, subnet mask, baud rate, device number, communications password etc..
System.: Set the system parameters, including basic parameters, interface parameters,
fingerprints, face and attendance parameters, to maximize meet user’s needs in the
functional, display and other areas.
Data: Manage the data in the device, such as delete attendance records, delete all
the data, clear administer privilege, clear publicity pictures and restore the factory settings.
USB: By USB, the user info and attendance data etc. can be imported to the accordingly software to manage the user info, or transfer to other fingerprint devices.
Keyboard: Customize the 6 shortcut keys; press the status button to display the corresponding state.
Auto Test: Automatically test the function of each module if it’s working, including the
screen, sensor, voice, face, keyboard and clock tests.
Bell: Set the time and ringing duration of the scheduled bell.
Access: Set the parameters of locks controlled and related access control device.
Calibration: When touchscreen response is not sensitive, enter the calibration interface
to adjust.
8
* Ensure to be familiar with
menu and functions.
3. User Management
Summary
Browse personnel information, including ID No., name, fingerprint, face, cards, passwords, privilege and group of the unit and so on. Increase, edit or delete the basic
information. In the main menu interface, press [User Management] to enter the usermanagement interface.
* If administrtor is enrolled,
option will only be available for administrtor.
1. Back to Menu
2. Query User
3. Add User
4. Scroll
5. User info list
6. Choose the letters
3.1 Add User
In the user management interface, press [Add] button to enter add user Interface as
shown below:
* Enrolment of users
•
User ID: Input employee’s
’ ID N
No. Th
The d
default
f lt di
digit
it iis 1
1~ 8
8.
•
Name: Enter a user name. 12 characters user names are supported by default.
•
Fingerprint: Enroll a user’s fingerprint and the device displays the number of enrolled
fingerprints. A user can enroll 10 fingerprints at maximum.
•
Password: Enroll a user’s password. The device supports 1-8 digit passwords by default.
•
Card: Enroll a user’s card
•
Face: Enroll a user’s face.
•
Group No.: Set the group that the user belongs to. Valid group No.: 1-24.
•
Users: Set the rights of a user. A user is set to ordinary user by default and can also
be set to administrator. Ordinary users are only granted the rights of face, fingerprint
or password verification, while administrators are granted access to the main menu
for various operations apart from having all the privileges granted to ordinary users.
* Options available for
when enrolling a user.
3.1.1 Input ID no.
The device allocate ID No automatically to employee, started from 1. If use the device
automatically allocation ID No, this section could be skipped.
1.In Add Users interface,press [ID
No.:1] button to enter the w ID No
Setting interface, see the left Image
1: Tips: You can modify the
ID No. at the first enrollment.
When the enrollment is
completed, the ID No. could
not be modified.
9
* Enter alternative user ID
Numbers
Summary
2.In the popup keyboard interface,
Input user’s ID No., then click “OK”
button, (If you are prompted “ID No.
already exists!” means the No. are already in use, then input the other no.)
Tips: The default ID No. digit is 1 to 9.
If need to extend the digit, please
contact our Business Representative or
presales technical support.
3. ID No. input is completed, see the
left Image 3. Press [Save] button to
save the current information and back
to the previous interface; press [User]
button not to save the current information, and directly back to the previous
interface.
3.1.2 Input name
Use keyboard to input employee’s name.
1:In Add Users interface, press [Name]
to enter the name input interface, see
the left Image 1.
2.In the popup keyboard interface,
enter user’s name and then click the
“X” button, see the left Image. For the
operation of the keyboard interface,
see “Keyboard Help”. Tips: The Device
default name digit is 1~ 12.
* Detailed explanation of
keyboard - see appendix 1
3. Name input is complete, see the left
Image3. Press [Save] button to save
the current information and back to
the previous interface; press [User]
button not to save the current information, and directly back to the previous
interface.
10
Summary
3.1.3 Enrolling a Fingerprint
1:In Add Users interface, press [Fingerprint]
button to enter the interface , see the Image
1. In the popup fingerprint
Enrollment interface,
follow the screen tips, press finger
on the sensor in the right way.
See “1.1 How to press finger”.
* Ensure correct placing of
finger.
Press one finger 3 times in the proper
way. If successes, the screen tips will show
up(see the left Image 3)and will automatically back to the Add Users interface. If
fail, the screen tips will show up and back
to fingerprint Enrollment interface and
redo the step 2.
1. Press [Fingerprint] to use
other fingers to backup and 10
fingerprints can be enrolled at
most.
* Up to 10 fingers per user
can be enrolled.
2. Press [Save] to save the info
and back to the previous
interface, or press [User] not to
save and back to the previous
interface.
3.1.4 Enrolling a Face
1. In Add Users interface, Press [Face]
button to enter the face enrollment
interface, see the left Image 1:
2. In the popup Face Enrollment interface (see left Image2), according to
the voice tips to a small range around
rotor, the rise , bow and other actions
aimed at the different parts of the face
all entering into the system, to make
verification more accurate. See the
iintroduction of “Verification posture” .
3. After enrolling successfully, screen
3
ttips will show up, and will automatically
go back to the Add Users interface
g
((see left Image 3).
11
* Ensure to follow instructions, and not to make big
moverments.
* Angles of diffirent facial
reading is very small.
Summary
3.1.5 Enrolling Password
1. In Add User interface, Press [Password] button to enter the password
settings interface, see the left Image 1.
2:In the popup keyboard interface,
input your password, then click “OK”
button, see the left Image 2. According to the screen tips to input your
password again, and then click “OK”
button to save.
Tip: Default password digits is 1-8
3. Password input is completed. Press
3
[Save] button to save the current information and back go to the previous inm
tterface; press [User] button not to save
tthe current information, and directly
back to the previous interface.
b
3.1.6 User privileges
1. In Add Users interface, press [User]
button, you can change the user
privilege to Administrators, see the left
Image1.
* Ensure correct procedure
of adding an administrator.
Note: Staff has two kinds of
privileges:users and administrators.
Users can only use face, fingerprint or
password authentication; administrator, owning the Users’ function and can
also enter the main menu to operate
all kinds of the settings.
a
2. After completion of editing, see the
2
lleft image. Press [Save] button to save
tthe current information and back to
tthe previous interface; press [User]
button not to save the current informab
ttion, and directly back to the previous
iinterface.
3.2 Edit User
Please select any user from the user list, then enter the interface of editing user .
The ID Number is not promised to modified ,and other operation the same as the
rogress of register user .It is Ok to re-enrol the fingerprint ,face , password ,also
modified the administration authority and the Group Number
12
Summary
3.3 Delete User
1. In the editing interface, Press
[Delete],than enter the Setting Group
Number interface as the picture.
* Ensure correct user ID
before deletion.
2. Press [Delete],the user information
has been all delete; Press [back], then
return to the previous interface.
3. In the editing the user interface, the
press of the name, fingerprint, face,
and password could delete the information as needed.
3.4 User Search
While enrolled many users ,the management could find any user as need faster by the
“ID Number” ,and “name” searches
1. In the user management interface,
press the[Query] then entry the ID Number Query interface
OR
* 2 Options to search for
uers.
Name Search
In the user management interface,
press first letter of the user name in the
letter list area “as the below picture.
2. Entering the ID in the new interface
(picture left), press [OK ],then the user
will show.
4. Communication Settings
The setting of communication between the PC and equipment is including the IP
address , gateway, subnet mask, baud rate, device number , signal code, and so
on.
13
4.1 Configure Networks
When the equipment connecting with PC by TCP/IP, please kindly check the settings
below :
Machine IP address: Default IP is
192.168.1.201, and it is ok to modify as
needed ; Do not set IP address as same IP
from PC that the device connected with.
Subnet mask: Default mask 255.255.255.0,
it is Ok to modify as needed.
Summary
* Note: Do not set IP address the same as connecting pc.
* Settings may be changed
as needed.
Gateway address: the Default gateway
address is 0.0.0.0, if the equipment and
PC is not in the identical network segment, set up the gateway address firstly.
4.2 Configure Serial Port
When connecting with the PC via RS232/485, please use settings below:
RS232: When the RS232 is used, ensure the setting is set to “ON”;
RS485: When the RS485 is used, ensure the setting is set to “ON”;
Baud rate: The rate at which fingerprint machine communicate with the PC , there are
five kinds of options 9600, 19,200, 38,400, 57,600, 1.15200 bit/sec, the high speed communication is faster ,and recommend for the RS232 communication ; The low speed
communication is stable, and recommended for the RS485 communication;
Connection password: To ensure the security of time and attendance databases , you
could set the connection password . The system default password is 0(if the password
does not exist), it is allowed to change to other values, after setting up, be sure to input
this password before the software communicate with the equipment , otherwise you will
fail to create connection between the fingerprint unit and PC software. The connection
password length is 1 ~ 6.
4.3 Configure Wiegand
Wiegand Format: The system has two
built-in formats Wiegand 26-bits and
Wiegand 34-bits, and also supports the
format customization function to meet
individualized requirements.
14
* Ensure correct option for
client needs.
* High Baud rate for RS232
* Low Baud rate for RS485
Failed ID: Refers to the value output by the system upon verification failure. The output
format is subject to the setting of “Wiegand Format”. The default value scope of Failed
ID is 0–65535.
Summary
Site Code: The site code is used for a customized Wiegand format. The site code is similar to the device ID, but the site code is customizable and can be duplicated among
different devices. The default value scope of the Site Code is 0–255.
Pulse Width: Refers to the width of the Wiegand pulse in microseconds. The default
value scope of the pulse width is 1–1000.
Pulse Interval: Refers to the interval of the Wiegand pulse in microseconds. The default
value scope of the pulse width is 1–10000.
Output: Refers to the contents output upon successful verification. You can select the
“User ID” or “Card Number” as the output.
5. System Settings
Client specific needs can be adjusted
in the system settings. The following settings are avaiailable to change:
interface parameter,
fingerprint
face ,
time and attendance
parameters
5.1 Basic Parameter
Date/Time: Setting the data and time of
the equipment.
Date Format: Setting the data format in
the original interface
Keyboard Beep: Setting the voice of
keyboard. If “ON”, there will be beep .If
“OFF, It will be not
Voice : Setting the equipment with
voice : If “ON”, there will be voice .If
“OFF, It will be not
Volume(%): Setting the volume of
the voice
Power key: Setting the power key
of equipment . While the “ON”, the
power key will be will be invalid.
While the “OFF”, the quipment will
be closed after pressed power key 3
seconds.
15
* Ensure correct settings as
per client specifications
Summary
5.2 Interface Parameter
* Personal and display settings
Language: To change and set the language.
Display Style: Setting the display of the Initial Interface. Two modes “Clock screen”
and “Full screen” as option.
Toolbar Style: The Style of the Initial Interface shortcuts. 2 styles :”Auto hide” and “Always Display” as option .
1. “Auto hide”: Status bar could show and hide by setting ;
2.“Always Display”, the status bar will show in the Initial Interface forever.
Default Verify Mode: Two default modes:
1. Fingerprint
2. Face
Pictures Delay: Setting a period about the change of the picture. (supporting 3-999
seconds)
Sleep Time: When device is not in operation, it will enter sleepmode (according to
settings). With a keystroke of fingerprint, the system will exit sleep mode.
5.3 Fingerprint Parameter
* Low threshold: slower
reading, more accurate
1: 1 matching threshold: User ID + FP (lower threshold for higher secu
security)
* High threshold: faster
reading, less accurate
1: N matching threshold: Higher threshold for this function, due to speed.
1:1 reorganization repeat times: while adopt the 1:1 or the Password.
The equipment will be Ok to repeated identification for the user after failed identification .eg: Unenrolled fingerprint ,and the fingerprint touch is not good.
Algorithm Version: There are two fingerprint algorithm version 9.0 and10.0 as option for
the customers. Please kindly notice: the fingerprint templates from algorithm version 9.0
and10.0 is incompatiable.
The fingerprint image display: There are tow options: Display forever and No display ,
Please kindly choose as you need so that the fingerprint image to show or not in the
display while enrolled or reorganization.
16
* Algorithms: V9 and V10
are not compatible, ensure
correct enrolment and
verification.
Summary
5.4 Face Specification
* Ensure verification mode
corresponds to the threshold as needed by client
and amount of staff.
1: 1 matching threshold: User ID + Face (lower threshold for higher se
security)
1: N matching threshold: Higher threshold for this function, due to speed.
Enrol Mode: Setting user enrol mode.There are two modes, combined Enrol and face.
If you choice “combined enrol” ,after you enrol face, you must enrol fingerprint or
password. If you choice “face”,you only need enrol face. This option is invalid for admin. The terminal set “combined enrol” to admin.
Enrol way : The way of registration for the new user by face .
Exposure: Set the value of Exposure.
Gain: Set the value of Gain.
Quality: Set the value for matching facial module
5.5 Log Settings
* Ensure to keep logs backup up, and not overflowing
the limit.
Log Alert: When the remaining
aining log is less than the number setting
setting, th
the device will alert
automatically( Valid setting:199).
ReCheck Time(M): Within the time setting(Unit: Minute)
Card Only: “Yes” means only card authentication is OK. “NO” means after card authentication, the user should do a fingerprint authentication.
5.6 Update
Using this function to update the firmware from USB drive.
17
6. Data Management
Summary
Delete Transactions: Delete all logs in the
device.
Delete All Data: Delete all data, including user information, fingerprints, face
and logs.
* Ensure correct function
be fore deleting data or
information.
Clear Administrator: Clear Administrator
privilege of all the admininistrator.
Delete Picture: Delete all the pictures
uploaded from USB.
Reset All Default Settings: Reset all the
Parameter to default settings.
Workcode: Reset all workcodes
7. USB Drive Management
Download Transactions: Download all
logs in the device to the USB drive.
Download User: Download all user information, fingerprint templates and Facial
templates to the USB drive.
Download User photos: Download registered user id photos
Upload User: Upload all user information,
fingerprint templates and Facial templates from USB drive to the device.
Upload Photo: Upload the JPG file
named by user ID from USB drive to the
device. When the user identify successfully, the picture appears.
Upload Picture: Upload the JPG file
which the name start with “ad_” from
USB drive to the device. These picture will
appear on the initial interface.
8. Keyboard setting
Define F1-F6 as shortcut key, such as
Time attendance status key, function
shortcut key etc. On the initial interface,
press the shortcut key, then go to the
selected function interface.
1. On the main interface, press [keyboard] button, then go into the keyboard setting interface.
18
* Ensure correct USB stick
are used, and test data
before transferring.
Summary
On the keyboard setting interface, press
“add” key to add a new shortcut key.
Press the existing shortcut entry to modify
the shortcut key.
3. Shortcut key: F1 - F5. (F6 is assigned to
be Facial and Fingerprint switch key, and
can’t be changed)
Function: Include status, Face group 1,
Face group 2, Face group 3, Face group
4, Face group 5, switch mode.
Status function includes checkin, checkout, breakin, breakout, overtimein,
overtimeout.
9. Auto Test
AutoTest function can test each module
in the device automatically, including
Touchscreen, Fingerprint sensor, speaker,
Facial authentication camera, keyboard, and RTC.
19
* Ensure Auto test have
deen done before siging
over to client.
10. Screen Calibrating
Summary
If
I the touchscreen is not sensitive, use
the
calibration function to adjust the
t
screen.
s
* For ease of use, do a
calibration when device is
strated up for the first time.
1.
1 Press[Menu] key, go into main interface.
f
2.
2 Press[Calibration] button, go into
touchscreen
calibration interface.
t
3.
3 Follow the prompt on the screen
and
click the centre of the mark on the
a
screen.
s
4.
4 If calibrating successfully, then the
system
will go back to the main inters
face
automatically. Or calibrate again.
f
11. Scheduled Bell Setting
1. On the main interface, press [bell]
button, go into scheduled bell setting
interface.
2. On the scheduled bell setting interface, press the entry, then start to
modify.
* Bell settings can be used
to notify staff when tea
time, lunchbreaks or any
breaks are allowed.
3. Modify the scheduled bell setting.
Time: the time when the bell
ring.
Ring: choose the sound which
the speaker sound.
Volume(%): the volume of the
sound.
Times: the times of the ring.
State: whether to use the
scheduled bell function.
20
12. Access Control Setting
Summary
Lock Delay(S): Time duration of lock
drive (Valid setting:1 - 10)
* Ensure correct door
delays time settings as per
client request.
DoorSensor Delay(S): Some segment
time which begin after door has been
opened(Valid setting:1 - 99)
DoorSensor Mode: there are three options: none( NONE),
normal open (NO),
normal close(NC) .
The none means the door Sensor
doesn’t apply, Normal Open is defined
that the door can be set to a Passage
Mode. Normal Close means that the
door is closed in the normal work condition.
Alarm Delay(S): The time after the device find the current DoorSensor mode
is different from the Setting, then begin
alarm (Valid setting:1 - 99)
13. System Information
System Information enables user to view
the memory status and the aditional
information of the device.
13.1 Record Capacity
“Records” shows the number of registered users, administrators and passwords of the device. The capacities of
fingerprint, registered fingerprints, attendance log, and existed records will be
displayed with figures as shown left.
13.2 Device Information
Users can examine terminal name, serial number, edition info, vendor, and
manufacture time of the device in
Device Information.
21
14. Appendix
14.1 Appendix 1 - Instruction of Text Input
This device supports Chinese , English, number and symbolic inputs. A text input interface will pop automatically
after click the places which need to input text, such as “Name” button as below:
1.Click “Name” button in the “Add” interface.
Microwave Man Manual Manage
2.Click keypad to input the text, the interrelated words will
be listed in the word list.
3.Directly select the words while the vocabulary what you
need occurs in the word list. The selected words will be displayed on the “Name” button synchronously. Repeat the 2 nd
step to input next text.
4.After inputting name, click “Exit” button to turn off the keypad interface, and return to superior menu.
22
14.2 Appendix 2 - Rule explanation of uploading publicity photos
1. The format of photos should be JPG format. Other formats are not supported.
2. The file name of the publicity photos should be ad_0 - ad_9. For example, ad_1.JPG is valid .
3. The file name will not be changed after be uploaded to the device. If user would like to change the photo, just upload the new photo with same file name to cover the former one.
4. Each photo can’t be over 20 K. Or it can’t be uploaded.
5. The photo’s resolution should be not bigger or smaller than 320(W)*210(H),
6. Publicity photos are limited to 10.
23