1
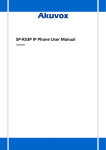
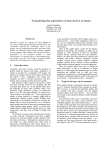
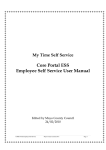
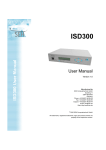
FOCUS Lite Hand Punch Version Getting Started Guide Contents Check contents ................................................................................................ 2 Software Installation......................................................................................... 2 Hand Punch Set Up ......................................................................................... 2 Date Format ................................................................................................. 3 PIN Numbers ................................................................................................ 3 Connect the Hand Punch to the PC ................................................................. 4 Serial Connection ......................................................................................... 4 Checking the Connection ............................................................................. 6 Using the Hand Punch ..................................................................................... 7 Add a Supervisor .......................................................................................... 7 Add a User ................................................................................................... 8 Add a Clocking ............................................................................................. 8 Template Management ................................................................................ 9 Setting up the Software .................................................................................. 10 Groups ....................................................................................................... 10 System Parameters .................................................................................... 10 Working Rules ............................................................................................ 13 Daily Rules.............................................................................................. 13 Work Schedules...................................................................................... 17 Timesheets ............................................................................................. 19 Weekly Rule............................................................................................ 21 User Access Rights .................................................................................... 22 Mounting the Hand Punch ............................................................................. 23 Getting Help ................................................................................................... 25 FOCUS Lite Hand Punch Version September 2007 Page 1 of 25 Check contents Hand Punch Terminal Power supply Wall Plate, Keys and Fixings Serial cable FOCUS Software on CD This Guide Software Installation You can install FOCUS on a single PC or on a File Server with a shared database and several Clients running the software. FOCUS is licensed by the number of concurrent users, so you could install even a single user system on a server and several client PCs, but only one PC would be able to run the software and access the database at a time. FOCUS uses the MSDE (Microsoft Desktop Engine) database which is free to licence and is provided on the FOCUS CD. Single PC, single User: To install on a single PC, make sure you are logged on to the PC as an Administrator. Insert the FOCUS CD in the drive and run the SETUP.EXE programme on the CD. Follow the on screen instructions. When the installer prompts, 'Do you wish to install MSDE?', reply Yes. The installer provides you with a desktop icon. Double click to run FOCUS. Multi User: We suggest you consult your IT Manager before installing this software in a multi-user environment. Place the CD in the drive on the File Server you wish to hold the shared database and follow the instructions for the Single PC above. Follow the same procedure on the Client PC(s) but when the installer prompts, 'Do you wish to install MSDE?', reply No. When you run FOCUS for the first time it will ask you where the database is located. You will need to enter Computername\FOCUS, where Computername is the Name or IP Address of the File Server PC. Hand Punch Set Up Note: While accessing the menu system on the Hand Punch it is liable to time out and revert to the normal display if you do not press keys within a certain time. FOCUS Lite Page 2 of 25 September 2007 Hand Punch Version Date Format The Hand Punch has several options for the Format it uses to display Dates. As shipped, it will be set to 'dd-mmm-yy' (e.g. 04-FEB-07). To change the Format: Apply power to the Hand Punch by plugging the power plug into the socket on the right hand side of the hand Punch (viewed from the rear). Wait till the display shows '- ENTER ID -' and the time and date. Press Clear Enter and keys simultaneously; Display shows 'ENTER PASSWORD' Press 2 Press No then Enter repeatedly until the display prompts: SET DATE FORMAT * NO YES #' Press Yes Press No Press Yes Press Clear until the display shows the format you want to select to get back to the Normal display. PIN Numbers Each User enrolled on the Hand Punch has a template of their hand stored in the machine along with their Personal Identification Number (PIN Number) which can be from 1 to 10 digits. To clock in, a User enters his/her PIN number and places their hand on the platen. PINs do not need to be secure as one User cannot use another User's PIN to clock (some companies place the list of PIN Numbers next to the Hand Punch so they can't be 'forgotten'). If you tell the Hand Punch how many digits to expect in the PIN numbers, your Users will not need to hit the Enter key after typing their PIN. If you do not set the PIN number length, each time a User enters their PIN they will need to press Enter. FOCUS Lite Hand Punch Version September 2007 Page 3 of 25 To set the PIN length, proceed as follows: Apply power to the Hand Punch and wait till the display shows '- ENTER ID -' and the time and date. Press Clear and Enter keys simultaneously; Display shows 'ENTER PASSWORD' 2 Press Press Press Enter then No until the display prompts 'SET ID LENGTH * NO YES #' Yes Type the Number of Digits in the PIN Number followed by Enter Display shows 'T&A MODE SET (y#)?:' Press No then Clear to get back to the Normal display. Connect the Hand Punch to the PC Before installing the Hand Punch at its final location we advise connecting it temporarily to the PC and carrying out some initial setting up and checking of the system as this is easier while the Hand Punch is next to the PC. Care must be taken when handling the Hand Punch as physical shocks may cause the alignment of the internal optics to be disturbed resulting in the machine needing re-calibrating. Serial Connection The Hand Punch is supplied with a 15 metre RS-232 cable. This has a 9 way D-Type socket to plug into a PC COMM port at one end and a 3 way screw terminal to plug into the Hand Punch at the other end. If your PC does not have a free COMM port you can use a USB to RS-232 converter, but please note that not all of these devices will be compatible with both the FOCUS software and the Hand Punch. The device we recommend is: Prolific USB- to-Serial Comm Port Plug the RS-232 cable into Hand Punch at the left hand side (viewed from the rear) in the connector marked RS232. Connect the mains power supply to the Hand Punch and turn on. The hand Punch will beep, run through an initialisation sequence and then show "Enter ID" and time and date. FOCUS Lite Page 4 of 25 September 2007 Hand Punch Version Run the FOCUS software, go to System | Connections (click on 'System' (top menu) then 'Connections' from the drop down list) and set up a Connection to the Hand Punch as follows: 1. 2. 3. 4. 5. 6. Click on (New) on the Connections Screen Enter a name for the Hand Punch (e.g. 'Hand Punch') and click 'OK' From the 'Hardware' Drop Down List select 'Hand Punch'. Set the 'Address' to 1. From the Drop Down List under the Connection Name, select 'Serial' In the 'Serial Connection Properties' enter the number of the Comm port (usually 2, 3 or 4 depending on your built in Comm port or how the USB converter installed. If in doubt, open your computer's Control Panel, go to 'System' and click the 'Hardware' tab, then click on the 'Device Manager' button. Your serial ports should be listed under 'Ports (COM & LPT). Your screen should look like this: Note: Controls that can be edited turn yellow in edit mode. 7. Click to Save the Connection. 8. Tick the 'Default Connection' tick box. FOCUS Lite Hand Punch Version September 2007 Page 5 of 25 Checking the Connection To check the connection, go to System | Clock Utilities. Make sure the connection you just set up is showing in the 'Clock' Drop Down List at the top of the screen. If not, select it and make sure you ticked the 'Default Connection' in the Connection Setup. Click the button. If all is well, the screen will populate with information stored in the Hand Punch, shown below: If not, check: The Connection is set up as shown above; You have used the correct Comm Port; The Serial Cable is connected correctly at the PC and Hand Punch ends. You can use the Clock Utilities screen to check communications with the Hand Punch at any time. From here you can set the Time and Date and the dates when the hand Punch will automatically adjust the time for BST and GMT changeover. FOCUS Lite Page 6 of 25 September 2007 Hand Punch Version Now that you have the PC and Hand Punch 'talking' to each other, and the Hand Punch is next to the PC, it's a good time to see how they interact when adding employees and clocking IN and OUT. Using the Hand Punch Add a Supervisor First, you need to add a Supervisor to the Hand Punch. A Supervisor is a User who can enrol other Users. Enrolment is the process whereby you let the Hand Punch read a new User's hand profile and allocate a PIN number to that profile (or template). Then, when the User wants to clock IN, he/she gives the Hand Punch their PIN number and the Hand Punch compares the User's hand with the stored template. The Supervisor will be able to clock in and OUT as a normal User. To add the FIRST Supervisor, on the Hand Punch: Press Clear Enter and together; Display should say 'ENTER PASSWORD' Press 4 then Enter Display says 'ADD EMPLOYEE * NO YES #' Press No Display says 'ADD SUPERVISOR * NO Press YES #' Yes Display says 'ID#?' Enter the PIN Number you want to use for this Supervisor, and press the Enter Key. This will be the same number the Supervisor will use if they clock IN and OUT on the Hand Punch as a User. The Hand Punch will then request the Supervisor to place his/her hand on the platen 3 times to build a template of the Supervisors hand geometry. Each time the hand is placed on the platen with the aid of LEDs which go out when the fingers are placed correctly. When the Supervisor has been enrolled, press the revert to the normal display. FOCUS Lite Hand Punch Version Clear button to September 2007 Page 7 of 25 Add a User Each User has to be enrolled on the Hand Punch as well as being registered with the FOCUS software. You can enrol a User on the Hand Punch first or the Software first. If you enrol at the Hand Punch first, when you download that User's first clocking, the software will not recognise the User but will set up a 'dummy' User Record which you can edit with the actual User details. At the Hand Punch: Press Clear and Enter simultaneously; Enter the Supervisor ID, present the hand to log in and press prompted to 'ENTER PASSWORD' 4 when Display shows 'ADD EMPLOYEE * NO YES #' Yes Press , enter the PIN Number for the new User and let the User present his/her hand 3 times to enrol. Press Clear to exit or continue enrolling further Users. Add a Clocking At the Hand Punch, enter the User's PIN number, whether the clocking is IN or OUT (don't use the BACK option) and place the hand on the platen when prompted. Within FOCUS, to Download clockings, click the button to take you to the Download Clockings screen and click the button. FOCUS Lite Page 8 of 25 September 2007 Hand Punch Version The grid will populate with any clockings from the Hand Punch showing the User PIN Number, terminal number (1), Date and Time of clocking and the type of clocking IN or OUT. Look at the Employee List on the left hand side of the screen which will presently be showing 2 empty Groups, 'All' and 'Payroll'. Place the mouse pointer over the list and right click and select 'Refresh', to update the Employee List and you will see the 'All' Group now has one new Employee. Click on the 'All' and you will see an employee has been added with the Name and Number set to the PIN Number from the Hand Punch (in the example below, 1001). Right click on the newly added Employee in the list and select Employee Details. You can now fill in and Save the correct Name, Payroll Number and Job Title for the employee that has been added. If you now right click the employee in the Employee List and select Timesheet and go to the current week by clicking the button, you will see the clocking you have just downloaded. Under 'Shift' at the right hand side you will see 'DEF' which stands for 'Default Shift' as no shift rules have been set up yet. Template Management Close the Clock Utilities screen if it is Open, and re-open System | Clock Utilities. Go to the Templates tab and you should see the Employee you added in the left column. Click (make sure your Hand Punch connection is showing in the 'Clock' box), which will populate the right hand column with the hand templates from the Hand Punch. This will match the PINs from the Hand Punch with the PINs in the FOCUS database. Now click . This saves any new templates from the Hand Punch to the Database. As you add new Users to the Hand Punch, repeat this process of reading the templates from the Hand Punch and saving them to the FOCUS database. That way, if your Hand Punch ever needs to be replaced, you can reload the new one with the templates from the old one. FOCUS Lite Hand Punch Version September 2007 Page 9 of 25 Setting up the Software Follow the procedure and examples following to set up the software. Throughout the process, further context sensitive information is available by clicking on the Help button. Groups On the Employee detail screen you may have noticed a tab named 'Groups'. Groups encompass 'Departments' and any other way you want to report on Employees. For instance, you could have a Group for First Aiders, Leavers, Drivers, etc. You can define as many Groups as you want, but each Employee can belong to no more than 5 Groups. The Payroll Group is pre-defined and does not take up any of the 5 allocations. Define your Groups now so that when you add your Employees you can put them in the correct groups. To set up your Groups, go to System | System Setup and open the Groups tab. You should see the 1 pre-defined 'Payroll' Group. Click New, type the new Group Name and then to save the Group name. Groupnames can be edited and deleted if you wish. While you are in the System Setup form you can set up the remaining System Parameters. System Parameters Click on the General tab in System Setup and you should see: FOCUS Lite Page 10 of 25 September 2007 Hand Punch Version Report Footer text: All the Reports you print out will have this text in the report Footer. Most people put their Company Name here. Hours Format: When FOCUS displays calculated hours worked, it can show them as hours and minutes (hh:mm format) or hours and decimal parts (hh.dd format). Choose the way you Company works from the drop down list. Start of Week: Timesheets display one week at a time starting with your 'Start of Week Day'. Most companies work from Monday, but you can start from whichever day you want. All the parameters on this screen can be changed at anytime, but if you change the Start of Week Date after you have started collecting clockings and calculating hours, you will need to recalculate all the timesheets to re-do the weekly calculations. It is therefore advisable to set this parameter only once. System Start Date: This is used, along with other factors, to decide if employees are absent. We recommend you set this to the date you start running the system. Sick Year Start Date: This is used for calculating the sick days booked in the current year. Initial Name in Employee List: Tick this box if you wish to abbreviate employees' first names to just their initial in the Employees List on the left hand side of the screen. Max Break: This is an important parameter that determines how FOCUS splits sets of clockings into shifts. Check that Max Break is currently set to 4 hours. If it is not, set it to 4 hours now. This means that if an employee clocks IN and OUT in the morning, and they clock IN again within 4 hours they will continue on the same shift. If they clock IN after 4 hours FOCUS will assign them to a new shift and their hours will appear on a separate line on the timesheet. This feature is useful to allow split shift working. If you made any changes on the General tab, press now. FOCUS Lite Hand Punch Version to save them September 2007 Page 11 of 25 Next, go to the Rates tab: The Timesheet calculates hours worked at up to 6 Rates, such as Basic, Overtime, Double Time etc.. If you don't need all 6 Rates for calculating hours worked, you can use them for Holidays and Sick. Then, when you book time for Holiday or Sick, you can put them in separate columns on the Timesheet. Use this screen to name the timesheet columns. In the example below, Rate 1 is called 'Basic', there are 3 overtime rates and we have Holiday and Sick columns. Click to Save the results. FOCUS Lite Page 12 of 25 September 2007 Hand Punch Version Working Rules Daily Rules: The next step is to set up some Daily Rules. A Daily Rule describes a shift pattern for one day. For example, you might have a shift where people start at 09:00, finish at 17:00, and have a one hour unpaid break for lunch between 12:00 and 14:00. We set these parameters, and potentially many others, into a Daily Rule and give it a name, such as 'Office 9 to 5'. The system then applies the Daily Rules to an employee's clocking times to work out hours to pay. Work Schedules: Because people often don't work the same shift every day of the week (Friday is often different), we need a way to tell the software what rule to apply on what day. We do this with a Work Schedule which lists the Daily Rule to apply for each day. Weekly Rules: Finally, some companies apply a Weekly Rule such as 'Employees have to work 38 hours at Basic before they can get Overtime'. This can be set up by programming a suitable Weekly Rule. Daily Rules As an example, set up the example 'Office 9 to 5' Daily Rule as follows: Go to Schedules | Daily Rules and click the fields on the General tab thus: FOCUS Lite Hand Punch Version to start a New Daily Rule. Edit September 2007 Page 13 of 25 Target Hours: Target Hours is the number of Hours the employee will normally work on this shift. If the employee's hours calculate to less than this number, they will be highlighted in red on the timesheet. You can decide at what level (number of hours) you want this highlighting to take place. 1st Day Receives Hours: If the shift spans midnight, you can decide which day the hours should be allocated to. E.g. if the shift is from 18:00 to 02:00 you probably want the hours to go to the first day. If the shift is 23:00 to 07:00 you may want them to go to the second day. The choice is yours. Auto Allocate: Auto Allocate allows you to programme a choice of Daily Rules to be worked by an Employee (see Help for more details). When you are setting the shift up, FOCUS sets the Auto Allocate time band to the Start Time plus and minus 2 hours, but you can fine tune this if you need to. Now look at the Overtime-1 tab: You have 8 bands of time during which you can define the rate of Pay. FOCUS has 6 Rates covering Basic and Overtime rates. FOCUS has preloaded the rates to pay Rate 1 between the normal Start and End times. You need to decide what you want this Daily Rule to do with any times worked before the normal Start and after the normal End of the shift. FOCUS Lite Page 14 of 25 September 2007 Hand Punch Version Your options are: Don't pay (i.e. Allocate the hours worked to Rate 0 which is unpaid); Pay after a minimum amount of time is worked; Pay at a different rate; Pay up to a maximum time worked. As an example, take a shift that normally starts at 09:00. If people clock IN at, say, 08:50, you don't necessarily want to pay an extra 10 minutes for the day. But if they are allowed to work overtime before the normal start time you do want to pay them. The rule may be that you pay up to one hour overtime at Rate 1, but they must work at least 30 minutes or they don't get paid. You would set the Overtime-1 tab up as below: In a similar way, you can set up the Overtime Rules for post-shift overtime. Update the rule to pay up to 2 hours post shift overtime at Rate 2, with a minimum of 1 hour worked. The screen should look like this: FOCUS Lite Hand Punch Version September 2007 Page 15 of 25 Overtime-2 Tab. Overtime-2 allows you to programme the Daily Rule to flow hours to a new Rate after a number of hours has been worked. So for instance you can make a rule where, after 8 hours at basic the next 2 hours are paid at Rate 2 and any more hours are paid at Rate 4, as below: Rounding FOCUS gives you 4 time bands for rounding IN times and 4 bands for rounding OUT times. Rounding, sometimes known as Quartering, gives a degree of latitude to an employees clocking before penalising late arrival or early departure. A typical IN rounding would be to allow 3 minutes lateness (Grace) before rounding to the next quarter hour (Increment). So if an FOCUS Lite Page 16 of 25 September 2007 Hand Punch Version employee clocked IN between 09:00 and 09:03, they would be paid from 09:00. If they arrive between 09:04 and 09:15 they will be paid from 09:15. Double deduct is where you not only round the time but also deduct the number of minutes late. So if an employee arrives at 09:06 the rounded IN time will be 09:21 (09:15 plus 6 minutes). You would normally expect to have different rounding for the first IN clocking to those in the rest of the day. Set up the Rounded IN band as follows: Break Band The figure below shows how you would set up an unpaid lunch break of duration 1 hour taken between midday and 2pm: Note: If employees are clocking for breaks you will need to pay attention to the rounding bands in operation at the break times. This completes the set up of a typical Daily Rule. Once you have set up and saved one rule you can use the rule. Duplicate, or Clone, to start a New Work Schedules Once you have a few Daily Rules defined, all you need to do is tell FOCUS which days to apply them to. This requires the creation of a Work Schedule. Click on Schedules | Work Schedule to open the Work Schedule screen. For the example below we have created 2 more Daily Rules, one called 'Office Fridays' and one called 'Office Weekends'. These can be 'cloned' from the FOCUS Lite Hand Punch Version September 2007 Page 17 of 25 first Office Daily Rule. Office Friday finishes at 16:00 and Office Weekends pays any hours worked at Rate 2. These are programmed into the Work Schedule by clicking on the cell and choosing the rule from the drop down list. You can see that the same shift is worked Monday to Thursday, and different hours apply for Friday. If the employee does not clock on one of the weekdays, where there is an entry in the first column, they will be marked as Absent. If they don't clock at the weekend they won't be marked as absent, but if they do come in the rules for 'Office Weekends' will be applied. Click on the Help button for further information on Work Schedules. When you set up an employee you need to tell FOCUS which shift rules to associate with them by selecting a Work Schedule on the Employee's Rules tab. Click the FOCUS Lite Page 18 of 25 button and select the Employee from the list. September 2007 Hand Punch Version Here we have picked the Office Work Schedule you just defined. You can leave the Weekly Rules set to Default (which applies no rules at the end of the week's calculations), or you can define the rules later. For now, we need the Work Schedule set to get FOCUS applying the Daily Rules properly. Timesheets Now, go to a timesheet for the Employee you have set up for a date a few weeks in the past. Click on the first 'In time' cell in the first day. You will see the edit Times window appear. Just enter the time 09:05 and Save it. FOCUS Lite Hand Punch Version September 2007 Page 19 of 25 Note the column headings for the 6 Rates are the ones you set up on the System | System Setup | Rates tab. The multiplying factors (x1.00 etc) are set for each individual employee. You will see the right hand column for day 1 says OFF1, which is the Daily Rule being applied for this day (from the Work Schedule). The time is Blue, meaning that it has been entered from the PC rather than a real clocking. The 'i' on the end of the time indicates an infringement, in this case the Employee arrived Late. Place the mouse pointer over the time and you will see the tool tip text shows the Rounded time (which will be used in calculating the hours) which is 09:15 based on the rule of 3 minutes Grace, 15 minutes Increment. The Blue text in the status window at the bottom of the timesheet gives further information. The hours calculated are displayed in Red indicating an exception. Hover over the hours and the status display tells you that the hours worked have not reached the Target Hours (as defined on the Daily Rule General tab). You can now fill in some more times and see how FOCUS builds the timesheet: Day 1: (Monday) shows 15 minutes deducted for the 5 minutes late arrival. Day 2: Shows a 'normal' pattern. No overtime has been paid pre or post shift. Day 3: 30 minutes overtime is paid pre-shift (Rate 1) and 1:10 post-shift (Rate 2) Day 4: The20 minutes extra break taken is deducted at Rate 1 Day 5: The Friday rules (Office Friday – OFF2) are applied as set up by the Work Schedule Day 6: Weekend rules applied (OFF3) FOCUS Lite Page 20 of 25 September 2007 Hand Punch Version Weekly Rule In the example above, the week's normal hours (34 Hours) have not been met due to the lateness on Monday and the extra long break taken on Thursday. The employee has only worked 33:55 yet the employee still gets overtime at Rate 2 by working. You can 'Claw Back' these higher rate hours if you desire with a Weekly Rule: Here, we require a Minimum of 34 hours worked at Rate 1. If this is not met, the system will take hours from higher rates, starting at Rate 4, until the minimum is met. We chose Rate 4 as it allows you to use 4 Rates (Basic plus 3 Overtime) and 2 Rates for Holiday and Sickness. Don't forget to programme the Weekly Rule into the Employee's form: Go back to the timesheet now and you should see: FOCUS Lite Hand Punch Version September 2007 Page 21 of 25 The Weekly Rules Applied row shows that 5 minutes has been taken from Rate 2 and added to rate 1 to make up the shortfall in Rate 1 hours. You can use this process to set up your Daily Rules and Work Schedules. Type times into the timesheet to satisfy yourself that the system will calculate as you wish once real clockings are collected. Tips: You can use a 'dummy' employee to set up and check shift rules. When checking hours calculated as in the above example, adjust one clocking at a time and check the results. Try setting pre-shift and post-shift overtime to pay at Rate 2 and Rate 3 if you have problem following the calculation when they are set to pay at the Rate 1. User Access Rights You can set up several FOCUS Users with rights to various features within the software and also access to a limited number of Groups. Thus, you can set up Supervisors to be responsible for maintaining data for their Group only. Go to System | User Setup and click for more information about setting up and changing passwords. Set yourself up first as an 'Administrtor'. This gives you access to all features and all Groups. Once you have set up any Users, each time you start FOCUS you will have to log on with a correct Password. If you forget or lose all passwords you can always gain entry with a top level code which can be obtained if you call technical support. FOCUS Lite Page 22 of 25 September 2007 Hand Punch Version Mounting the Hand Punch The recommended height for the Hand Punch platen is 40 inches (102 cm) from the finished floor. The Hand Punch should be out of the path of pedestrian and vehicular traffic in an area where it is not exposed to excessive airborne dust, direct sunlight, water, or chemicals. Please note that the operating temperature of the Hand Punch is 5°C to 40°. Mounting the Wall Plate For the following procedure protect the Hand Punch from the dust and debris generated during the wall plate installation process. Dust and debris surrounding the Hand Punch can drastically affect the terminal’s operation. 1. For a hollow wall, use the provided hardware to mount the wall plate. Use the two auger style fasteners for the upper two mounting holes. Use the toggle bolts for the three lower mounting holes. 2. For a solid wall, use expansion bolts to mount the wall plate. For all five mounting holes, drill a 1/4 inch diameter hole, 1/4 of an inch deeper than the length of the expansion anchor. Align the sleeves of the back plate with the pins of the wall plate and slide the Hand Punch to the left as shown above. FOCUS Lite Hand Punch Version September 2007 Page 23 of 25 Once the Hand Punch is attached to the wall plate the wiring connections to the Hand Punch can be made: Before closing the Hand Punch clear all dust and debris away from it. With the wall mount latch in the unlocked position, swing the body of the Hand Punch up and lock the latch into place with the key provided. Dust and debris surrounding the Hand Punch can drastically affect the terminal’s operation. It is important to ensure the Hand Punch is free from dust and debris before closing the terminal. Do not force the Hand Punch onto the wall mount latch when the latch is in the locked position. FOCUS Lite Page 24 of 25 September 2007 Hand Punch Version Getting Help Throughout the operation of the software, context sensitive help is available by clicking on the Help button at any time. A copy of the User Manual is included on the CD as a printable .pdf file. If you have taken out a Software Maintenance Contract with HR Industries, you can obtain telephone technical support and online support via the internet by calling 0115 937 5659 Information relating to the FOCUS Software, its use and Upgrading to the FOCUS Pro version is available on the website at www.datatime.co.uk FOCUS Lite Hand Punch Version September 2007 Page 25 of 25