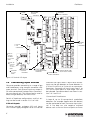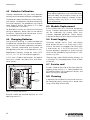
1
Gasmaster Installation, Operation and Maintenance Manual M07624 Issue 4 January 2007 The equipment described in this manual may have mains voltages applied to it. Ensure correct safety procedures are adopted before working on the equipment. The equipment described in this manual is designed for the detection of flammable and/or toxic gases. Detectors may be sited in hazardous areas. Ensure local safety procedures are adopted before carrying out any maintenance or calibration work. The equipment described in this manual may be connected to remote alarms and/or shutdown systems. Ensure that local operating procedures are adopted before carrying out any maintenance or calibration work. This product has been tested and found to comply with the European Directive 89/336/EEC and the EMC requirements of EN50270. It also complies with the Council Directive 73/23/EEC relating to electrical safety and the Low Voltage Directive. It conforms to the CE Marking Directive 93/68/EEC. GASMASTER MODEL Passed inspection by Date Tested for electrical safety by Date R C22.2 No.152 Caution : Read & understand manual before operating. Mount outside hazardous area. See manual for relay contact ratings. 2 Blacklands Way, Abingdon Business Park, Abingdon, Oxon, OX14 1DY, England Telephone: 01235 557700 Fax 01235 557749 www.crowcon.com The Canadian Standards Authority (CSA) have only assessed the combustible gas portion of this instrument for performance. Crowcon Detection Instruments Ltd 2 Blacklands Way, Abingdon OX14 1DY UK Tel. +44 (0)1235 557700 Fax. +44 (0)1235 557749 www.crowcon.com Email: [email protected] © Copyright Crowcon Detection Instruments Ltd 2005. All rights are reserved. No part of the document may be photocopied, reproduced, or translated to another language without the prior written consent of Crowcon Detection Instruments Ltd. Publication number: M07624 Fourth edition: January 2007 GasMaster Contents Contents Introduction . . . . . . . . . . . . . . . . . . . . . .1 4.6 Event logging . . . . . . . . . . . . . . . 34 1.1 About Gasmaster . . . . . . . . . . . . . 1 4.7 Service card. . . . . . . . . . . . . . . . . 34 1.2 About this manual . . . . . . . . . . . . 1 4.8 Cleaning . . . . . . . . . . . . . . . . . . . 34 II. Installation . . . . . . . . . . . . . . . . . . . . . . .2 Appendix A: Specifications . . . . . . . . . . . .35 I. 2.1 Before installation . . . . . . . . . . . . . 3 2.2 General . . . . . . . . . . . . . . . . . . . . . 3 2.3 Mounting . . . . . . . . . . . . . . . . . . . 4 2.4 Cabling requirements . . . . . . . . . . 4 Appendix B: Spare Parts and Accessories . .36 Appendix C: Display characters . . . . . . . . .37 Warranty Statement . . . . . . . . . . . . . . . . .38 2.5 Installing gas and fire detectors. . . 5 2.6 Installing output devices . . . . . . . . 5 Regional addresses . . . . . . . . . . . . . . . . . .39 2.7 Connecting mains power . . . . . . . 5 2.8 Connecting input devices . . . . . . . 6 2.9 Connecting output devices . . . . . 10 2.10 Applying power . . . . . . . . . . . . . 12 2.11 Battery back-up times . . . . . . . . . 12 2.12 Commissioning . . . . . . . . . . . . . . 13 III. Operation . . . . . . . . . . . . . . . . . . . . . .15 3.1 Gasmaster Operator Panel. . . . . . 15 3.2 Gasmaster start up sequence . . . 17 3.3 How to adjust display contrast . . 17 3.4 How to display Instrument serial number and system identity . . . . 17 3.5 Using the menu system. . . . . . . . 18 3.6 Inhibiting channels . . . . . . . . . . . 18 3.7 Using the Control Panel in Supervisor Mode . . . . . . . . . . . . . 19 3.8 In the event of an alarm . . . . . . . 20 3.9 In the event of a fault . . . . . . . . . 20 3.10 System Configuration . . . . . . . . . 20 IV. Maintenance . . . . . . . . . . . . . . . . . . . .33 4.1 Functional Testing . . . . . . . . . . . . 33 4.2 System Inhibit . . . . . . . . . . . . . . . 33 4.3 Detector Calibration . . . . . . . . . . 34 4.4 Changing Batteries . . . . . . . . . . . 34 4.5 Module Replacement . . . . . . . . . 34 i GasMaster Introduction I. Introduction 1.1 About Gasmaster Gasmaster is a gas and fire control panel, designed to monitor remote gas and fire detectors. Gasmaster can also monitor flame detectors as well as Crowcon's ESU product. The status of each input is displayed on a large, clear LCD display, and alarms or faults are indicated by clear LEDs and an integral sounder. Relay outputs are provided for alarms and faults, as well as dedicated outputs for audible visual alarms. An RS-485 Modbus output is provided for two-wire transfer of all data to industry-standard control systems. Gasmaster logs all alarm and fault events so that they can be investigated at a later stage using Gasmaster PC software. provides instructions for day-to-day operation of Gasmaster as well as detailed information on system configuration. Warning Regular maintenance of any safety system is essential, and failure to maintain the system according to these instructions could result in failures which could lead to harm to plant and/or personnel or even death. Details of the requirements for Gasmaster systems are provided in section 4. There are separate appendices for systems specification and spare parts identification. There are two versions of Gasmaster: I Gasmaster 1 - single channel unit for one gas detector, fire zone or ESU sampling device. I Gasmaster 4 - four channel unit for one to four gas detectors, fire zones or ESU sampling devices. Gasmaster 1 is identifiable from Gasmaster 4 by having only a single channel display (see figure 3.2, page 16) and a de-populated terminal PCB. All operating functions are identical to Gasmater 4. Gasmaster is designed for simple operation, and all day-to-day functions can be performed from the front panel. Please refer to section 3 for details on display operation. 1.2 About this manual The manual is divided into sections which detail procedures for installing, operating and maintaining Gasmaster. Gasmaster is a safety system and it is essential that all instructions are correctly followed. Details of the types of device that can be connected to Gasmaster are shown in section 2, along with typical connection diagrams. Section 3 1 Installation GasMaster II. Installation Please read this first Before commencing the installation and commisioning of your Gasmaster system, please read through the following information which will guide you through the whole process. The installation instructions contained in this section are for a pre-configured Gasmaster. For instructions on installing and commissioning gas and fire detectors, please follow the user manual instructions supplied with the detectors. Alternatively contact Crowcon for advice. To complete the installation of your Gasmaster system you will need to use the Operator panel and Menu. Full instructions can be found in section III. Operation, you are advised be familiarise yourself with the operator buttons on the front panel and the menu structure, see page 21. Some configuration steps may require you to enter Supervisor mode. Crowcon advises that personnel familiar with installing and commisioning gas and fire detection systems carry out this part. Warning: Gasmaster is not certified for use in hazardous areas, but may be connected to detectors and/or alarm devices which are installed in a hazardous area. Instructions for field devices must be closely observed when installing a Gasmaster system. 2.1 Before installation 2.2 General 2.3 Mounting 2.4 Cabling requirements 2.5 Installing gas and fire detectors 2.6 Installing output devices 2.7 Connecting mains power 2.8 Connecting input devices 2.8.1 Two wire devices 2.8.2 Three wire devices 2.8.3 Heat/smoke detectors If you have purchased a Gasmaster 1 2.8.4 Environmental Sampling Unit (ESU) Please follow the instructions in this section but ignore the reference to additional channels. 2.8.5 Flame detectors If you have purchased a non-configured Gasmaster 4 Please follow the installation instructions for a pre-configured Gasmaster 4. Additional information on setting-up your Gasmaster system can be found in section III. Operation. Step-by-step instructions The installation and commissioning of your Gasmaster system is presented in easy to follow instructions. A summary table of contents detailing a typical sequence of installation steps is shown below. Depending on your configuration some or part of each step may be omitted. 2.8.6 Remote inhibit and accept/ reset inputs 2.9 Connecting output devices 2.9.1 Audible visual alarms 2.9.2 Common relay connections 2.9.3 Channel relay connections 2.9.4 Analogue outputs 2.9.5 RS485 communications 2.10 Applying power 2.11 Battery back-up time/ power calculations 2.12 Commissioning 2.12.1 Zero adjustment and calibration 2.12.2 Testing fire channels 2.12.3 Testing ESU channels 2 GasMaster 2.1 Before installation Before carrying out any installation work, ensure that local regulations and site procedures are followed. Further advice is available from Crowcon if required. Gasmaster is intended for use in non hazardous areas. Gas and fire detectors may be mounted in potentially flammable atmospheres using appropriate barrier devices where necessary. Check the equipment to be installed is suitable for the area classification. Please refer to instrument installation manuals for information on location. Installation Front cover Display PCB Batteries Display PCB ribbon Chassis plate Crowcon recommends the installation of Gasmaster be carried out by people with experience of installing electrical equipment in potentially hazardous areas. 2.2 General This section describes how to get started with a Gasmaster 4 or Gasmaster 1 system that has been pre-configured for the detectors supplied. Figures 2.1, 2.2 and 2.5 show the internal structure of Gasmaster. See the Specification and Inspection Certificate provided with your system for full details of its configuration. Figure 2.1 shows the internal arrangement of a Gasmaster system. The front cover is removed by unscrewing the four screws and carefully disconnecting the two-pole sounder connector from the display PCB . The front cover should then be placed in a safe location. With the front cover removed the chassis plate is accessible which supports the display PCB and batteries . Below the chassis plate is the terminal PCB which contains all the input and output terminals and power terminals. The display PCB is connected to the terminal PCB via a 50-way ribbon connector, and is hinged on the left side so that it can be moved to provide access to the detector input terminals. Most terminals are accessible once the display PCB is moved and the batteries are removed, however if necessary the chassis plate can be removed for easier terminal access by carefully disconnecting the display PCB ribbon connector from the terminal PCB and unscrewing the four fixings . Care should be taken when re- Terminal PCB Gland knock outs Optional comms port Figure 2.1 Exploded view of Gasmaster fitting the display PCB so as not to damage the connector or ribbon cable. Six punched cable gland knock-outs are provided on the top and bottom of the enclosure. The knock-outs are suitable for M20, ½"NPT or PG13.5 cable glands. To remove Knock-outs, tap around the edge of the recessed flange using a small hammer and a screwdriver. The knocks outs should then come away from the enclosure. Knock-outs should be removed prior to mounting Gasmaster and great care must be taken to avoid damaging internal components. Power supply Gasmaster comes fitted with an auto-ranging power supply suitable for 100-240 V ac 50-60 Hz operation. This provides a nominal 24 V dc supply with a maximum power of 60 W. Alternatively Gasmaster can be powered from an external 24 V dc supply, a maximum 60 W supply is required. Gasmaster must never be connected to ac and dc supplies at the same time. 3 Installation GasMaster The Gasmaster power supply contains no user replaceable fuses. Short circuit protection Each detector input is short-circuit protected. Selfresetting ‘polyfuses’ are fitted to the 24 V power supply which will cut power in the event of a cabling fault, and automatically reset when the fault is corrected. Detectors with a maximum consumption of 500 mA may be connected. sounder connector from the display PCB. The cover should be placed in a secure location. It is recommended that Gasmaster is positioned by hand in the desired location, and a pencil used to mark the mounting hole positions. Gasmaster should be removed before drilling the mounting holes. 278 110 120 77 Circuit breaker The circuit breaker must comply with the relevant requirements of IEC60947-1 and IEC60947-3. The protective earth must not be disconnected even when the breaker is activated. 214 288 5 If the equipment is permanently connected to a mains supply then a dedicated circuit breaker must be included in the installation, to comply with EN 61010-1. The circuit breaker must be close to Gasmaster, in easy reach of the operator. It must be marked as the disconnecting device for the Gasmaster system, and the ON and OFF positions must be clearly marked. Mounting holes Figure 2.3 Dimensional view of Gasmaster with mounting holes shown 2.4 Cabling requirements Batteries Cabling to Gasmaster and detectors must be in accordance with the recognised standards of the appropriate authority in the country concerned, and must meet the electrical requirements of the detector. Explosion-proof (Exd) devices Battery connection diagram Crowcon recommends the use of steel wire armoured (SWA) cable. Suitable explosionproof glands must be used. Intrinsically Safe (I.S.) devices Figure 2.2 Gasmaster chassis plate with display PCB board and batteries. 2.3 Mounting All Gasmaster systems should be installed in a safe area. Consider location, cabling and earthing requirements. Figure 2.3 provides a dimensional view of Gasmaster. To access the mounting points, first remove the front cover by unscrewing the fixings labelled in figure 2.1. Carefully remove the 4 Crowcon recommends the use of twisted pair cable with overall screen and sheath. Suitable weatherproof glands must be used. I.S. devices must be used with a suitable Zener Barrier or Galvanic Isolator when used in a hazardous area. Fire detectors, Crowcon recommends the use of twisted-pair cable, screened with an overall protective sheath that is fireproof, for example, Pirelli FP200 or similar. A 1K8 end-of-line resistor must be fitted to the last detector on each conventional smoke or heat detector loop. GasMaster Installation Alternative cabling techniques, such as steel conduit, may be acceptable provided that appropriate standards are met. The minimum acceptable supply voltage measured at the detector and the maximum current drawn by that detector is different for each device. Please refer to the relevant Installation, Operating and Maintenance Instructions provided with each detector to calculate the maximum cable distances allowed for different cable types. The maximum cable distance allowed is dependent upon the installation, for example, whether Zener Barriers or Galvanic Isolators are required (for I.S. devices) or not. When calculating maximum cable distances for detectors, assume a minimum supply of 19 V and a sense resistance of 98 Ω (39 Ω for convential fire channels). Table 1: Typical cable characteristics c.s.a (mm2)* – For detectors, 4-20 mA outputs and RS-485 terminations: screened cable where the screen is connected to the SCR terminal on the appropriate terminal strip. 2.5 Installing gas and fire detectors Install gas and fire detectors as per instrument installation manuals, paying attention to location and cabling requirements. For ESU devices please refer to installation manual provided. 2.6 Installing output devices Gasmaster can drive 24 V dc audible visual alarms directly via the Audible Visual drive terminals on the terminal PCB. Relays are provided for switching additional outputs, and 24 V dc 200 mA auxiliary supplies are available adjacent to each block of relay terminals for switching low power devices. Section 2.9 provides detailed information on connections to output devices. Resistance (Ω per km) Cable Loop 0.5 (20) 39.0 78.0 1.0 (17) 18.1 36.2 1.5 (15) 12.1 24.2 2.5 (13) 8.0 16.0 *Approximate c.s.a. in awg given in brackets. Cable lengths should be calculated according to the equations defined in the detector instructions sheet and the cable and Gasmaster characteristics specified above. There are a number of suitable ways of terminating cables and glands to Gasmaster dependant on the cable and gland type: – Steel wire-armoured (SWA) cable and glands with electrical termination of the armour to the enclosure via the gland. 2.7 Connecting mains power Connect the external power supply using the two part screw terminals, refer to figures 2.4 and 2.5. Gasmaster must be earthed either at the power connector earth terminal (see Figure 2.4) or using the stud on top of the enclosure. Live Neutral E Earth N L L N E FIRE SINK SRCE CH1 CH2 FIRE SINK SRCE Figure 2.4 Mains connection terminals on terminal PCB – Screened cable with the screen terminated inside the enclosure via a metal tag attached to the gland. – Screened cable using an EMC gland where the screen is terminated to the enclosure via the gland. 5 Installation GasMaster MAINS INPUT CHANNEL INPUT TERMINALS COMMON RELAY TERMINALS CHANNEL RELAY TERMINALS DISPLAY PCB CONNECTOR LINK TO CHASSIS ON NON I.S.SYSTEM ONLY LINK TO CHASSIS ON I.S. SYSTEM ONLY EXTERNAL 24 V DC INPUT ANALOGUE OUTPUT TERMINALS RS-485 MODBUS COMMUNICATIONS TERMINALS AUDIBLE VISUAL ALARM TERMINALS REMOTE INHIBIT AND ACCEPT/RESET INPUTS Figure 2.5 Terminal PCB layout 2.8 Connecting input devices Gasmaster provides connectivity to a range of gas and fire detectors using two part connectors with screw terminals. Each channel input can accept 420 mA or conventional fire loop. Note: Gasmaster 1 has one channel only. This channel can be used to detect one gas detector, fire zone or ESU. Details of hardware configurations and link settings can be found in section 2.8.1 to 2.8.6. 4-20 mA Inputs Gasmaster provides analogue 4-20 mA inputs with a sensor supply voltage of 19 to 28 V dc and 6 measures the signal across a 98 Ω sense resistor. Inputs can be gas detectors or flame detectors in 4-20 mA 2-wire sink, or 3-wire sink or source configurations. Gasmaster will track inputs from 3 to 21.5 mA at which point an 'over-range' fault will be indicated. Connection details are shown in section 2.8.1 and 2.8.2. Conventional fire detectors A loop of up to 20 conventional smoke/heat detectors (for example Apollo series 60 devices) can be connected to each Gasmaster input channel. A fire loop can also comprise switched devices such as manual alarm call points or flame GasMaster detectors, and devices can be mixed on the same loop provided electrical characteristics are compatible and fire regulations allow. Switched devices require a 470 Ω series resistor. Each fire loop must be terminated with a 1K8 end-of-line resistor, which is monitored to provide indication of open circuit or short circuit faults. Connection details are shown in section 2.8.3. Environmental Sampling Unit (ESU) Each Gasmaster input can monitor a Crowcon Environmental Sampling Unit (ESU), which enables detection of flammable or toxic gases over a wide area using a sample draw technique. It is essential that the sampling device on the ESU is operating correctly, and Gasmaster provides this monitoring function to ensure a sample is being drawn. Gasmaster provides a 2-wire 24 V dc supply to the sampling device. Separate Gasmaster input channels are required to monitor the gas detector or detectors fitted to the ESU. Connection details are shown in section 2.8.4. Installation Detector Type Link Protection Link FIRE SINK SRCE 3 2 1 CHASSIS EARTH Detector SCR 0V SIG PWR – + Figure 2.6 Connections for 2 wire detector Figures 2.7 and 2.8 show typical wiring configurations for a 2 wire sink I.S.detector with Zener barrier or Galvanic Isolator. Set the link for the appropriate channel as shown in each diagram. 2.8.2 Three wire devices Figure 2.9 shows a typical wiring configuration for a 3 wire detector. Set the link for the appropriate channel to SINK for a current sink detector, or SRCE for a current source detector, the protection link should short 1&2, refer to figure 2.5. mV bridge pellistor detectors Some flammable gas detectors manufactured by Crowcon provide a mV bridge signal rather than a 4-20 mA signal. Typical examples are high operating temperature detectors and detectors which will be mounted in inaccessible areas. An Accessory Box is available to enable these type of detectors to be connected to Gasmaster. The Accessory Box contains 1 to 4 PCB's which convert the mV bridge signal from each detector to a 4-20 mA signal that can be monitored by Gasmaster. mV bridge detector cables will be terminated at the Accessory Box, which has a connector that simply plugs-in to Gasmaster. Accessory Box details are shown in Appendix B. Please contact Crowcon for specific wiring details for Crowcon detectors 2.8.1 Two wire devices Figure 2.6 shows a typical wiring configuration for a 2 wire current sink detector. Set the detector type link for the appropriate channel to SINK and the protection link to short 1&2, refer to figure 2.5. Detector Type Link FIRE SINK SRCE OR Protection Link FIRE SINK SRCE 3 2 1 CHASSIS EARTH – SIG + SCR 0V SIG PWR Figure 2.9 Connections for 3 wire detector 2.8.3 Heat/smoke detectors Conventional fire detectors for safe area use should be setup according to figure 2.10 and 2.11. Conventional fire detectors for hazardous area use should be setup according to figure 2.12. Figure 2.11 shows connections for manual alarm call points. 7 Installation GasMaster Detector Type Link HAZARDOUS AREA Protection Link FIRE SINK SRCE SAFE AREA 3 2 1 Gas Detector SCR 0V SIG PWR 8 7 2 1 Z722 + 4-20mA Current Sink I.S. Earth P&F Z722 Zener Barrier Crowcon Part Number: C03335 Figure 2.7 Typical connections for 2 wire I.S. detector with Zener barrier. Set channel link to SINK (see figure 2.5) and configuration to DET4-20 SINK (see Menu System Overview section, page 21 and 29. HAZARDOUS AREA Detector Type Link SAFE AREA FIRE SINK SRCE Protection Link 3 2 1 Detector – + 1 2 SCR 0V SIG PWR 11 12 13 14 – + 20-35 V dc supply Earth MTL 5041 Detector – + 3 1 SCR 0V SIG PWR 7 8 12 11 – + 20-35 V dc supply Earth Pepperl & Fuchs KFD2-CR-Ex1.30200 Figure 2.8 Typical connections for 2 wire I.S. detector with Galvanic Isolator. Set channel link to SRCE (see figure 2.5) and configuration to DET4-20 SRCE (see Menu System Overview section, page 21 and 29. 8 GasMaster Installation Detector Type Link Fire detector L1 OUT L1 IN L2 L1 OUT 2.8.5 Flame detectors Protection Link FIRE SINK SRCE Figure 2.14 shows a typical wiring configuration for a 4-20 mA 3 wire Flame detector. Set the detector type link appropriate for the type of flame detector, refer to figure 2.5. Do not set link to FIRE. 3 2 1 L1 IN SCR 0V SIG PWR L2 CHASSIS EARTH Detector Type Link Figure 2.10 Connections for smoke/heat detector FIRE SINK SRCE 4-20 mA Flame detector Detector Type Link Protection Link FIRE SINK SRCE Manual alarm call points 470R – SCR 0V SIG PWR Figure 2.11 Connections for manual alarm call points SIG PWR 2.8.6 Remote inhibit and accept/reset inputs Gasmaster has inputs for the connection of remote switches to inhibit alarm outputs or accept and reset alarms. Inputs are activated when pulled down to 0 V, the open circuit voltage is 5 V dc. 2.8.4 Environmental Sampling Unit (ESU) Figure 2.13 shows the wiring configuration for monitoring the ESU sampling device. Gas detectors fitted to the ESU should be cabled separately to the appropriate input channels on the Gasmaster or other control panel. For connections, details are shown on the instructions provided with the ESU. ESU sampling device terminal box Warning Crowcon strongly recommends that remote inhibit switches be key operated only, and that access to the key should be restricted to authorised personnel. A Gasmaster system that has been inhibited without other safety precautions being in place may not provide the protection for which it was designed. Steps should be taken to ensure that all appropriate personnel are aware when a Gasmaster system is inhibited. Protection Link FIRE SINK SRCE 3 2 1 CHASSIS EARTH SCR 0V – S + CHASSIS EARTH Figure 2.14 Connections for 4-20 mA 3 wire Flame detector Chassis earth Detector Type Link 3 2 1 0V SIG 470R Protection Link FIRE SINK SRCE SCR 3 2 1 + 1K8 OR SIG PWR Figure 2.13 Connections for ESU sampling device HAZARDOUS AREA SAFE AREA Detector Type Link Protection Link L1 L1 OUT IN OUT IN L2 L2 2 1 L1 L1 1K8 Z722 8 7 FIRE SINK SRCE 3 2 1 Figure 2.12 Connections for conventional fire detectors for hazardous area SCR 0V SIG PWR Smoke or Heat Detectors I.S. Earth P&F Z722 Zener Barrier Crowcon Part Number: C03335 9 Installation GasMaster Remote ACCEPT/RESET 2.9.2 Common relay connections Close the contact momentarily to accept alarms and cancel audible alarms. Close the contact again when the hazard is cleared to reset alarms. Double-Pole-Change-Over (DPCO) relays with contact rating of 250 V ac 8 A (non-inductive), 5 A (inductive) are provided for Alarm 1, Alarm 2 and Fault. Each relay can be set in its non-active state as energised (Fail safe) or de-energised. It is common practice to set the Fault relay as Fail Safe so in the event of power loss, the fault relay will change state. See figure 2.5 for Common Relay terminal location and figure 2.17 for contact definitions. Terminals are fitted adjacent to all relay blocks to provide 24 V dc 200 mA supplies for switching low power devices. Remote INHIBIT Closing the contact will inhibit alarms on all input channels. Channels will remain inhibited until the contact is opened; the Gasmaster will then return to its original state (any channels that have been set to inhibit using the Supervisor menu will remain inhibited). Figure 2.15 shows wiring configurations for remote inputs. AUDIBLE VISUAL Crowcon recommends screened cables for connecting remote switches. The screen should be terminated at the appropriate ‘SCR’ terminal. BEACON + A/R 0V 0V INH A/R 0V Figure 2.15 Connections for remote inhibit/accept/reset inputs SOUNDER 0V S1 S2 AV DRIVE INH REMOTE I/P 0V - Global Inhibit REMOTE I/P Remote Accept/Reset AV3 AV2 AV1 0V Loop all connections to a second audible visual alarm if required. 2.9 Connecting output devices 2.9.1 Audible visual alarms Figure 2.16 shows a typical wiring configuration for 24 V dc audible visual alarms. The Audible Visual drive output from Gasmaster is capable of providing up to 650 mA, which equates to two general purpose audible visual alarm devices. Figure 2.16 Connections for AV drive Common Alarm and Fault relay configurations can be set using the User Control Panel and Menu System. See section III. Operation on page 14 for details. NO C POLE 1 WARNING: After accounting for internal power consumption, the maximum power available for input and output devices is 48 W Contacts shown de-energised (non-inverted) NC 10 NC C POLE 2 Two separate sounder outputs are provided to activate on level 1 and level 2 alarms respectively (terminal AV2 becomes active on alarm level 1, AV3 becomes active on alarm level 2). Figure 2.16 shows connections to an audible visual alarm device that can produce different tones for level 1 and 2 alarms. If a single tone device is used, connections to the sounder should be made to terminals AV2 and 0 V only. Terminal AV1 is intended to drive a visual alarm and activates on a level 1 alarm. Contacts shown energised (inverted) NO Figure 2.17 Gasmaster contacts for all relays are identified on the terminal PCB. GasMaster ESU Channels If the ESU sampling device slows significantly causing reduced sample flow the Alarm 1 relay for that channel will activate. If the sampling device stops the Alarm 2 relay will activate. The Common Alarm relays will not activate if the sampling device slows or stops. If the cable to the sampling device is open or short-circuited the Common Fault relay will activate. 2.9.4 Analogue outputs Gasmaster provides an analogue output for each channel which can be set as either 4-20 mA or 1-5 V dc by fitting a link (see Figure 2.18). These signals can be used to drive PLC/DCS/SCADA systems or remote displays. 4-20 mA outputs are current source (resolution 0.1 mA) and can drive a maximum load of 700 Ω, 1-5 V outputs require a minimum load of 50 KΩ. Analogue outputs will function in the following way: 4-20 mA gas detectors: the output will track the input from 3 to 21.5 mA, the signal will drop to 0 mA if the input rises above 21.5 mA to signal a fault. A sensor signal that is greater than 110% of SCR 0V SIG SCR 0V SIG SCR 0V SIG J10 LK7 Link: 1-5V No Link: 4-20mA J11 0V SIG LK8 Link: 1-5V No Link: 4-20mA J12 SCR LK9 Link: 1-5V No Link: 4-20mA J13 Conventional fire channels will activate both Alarm 1 and Alarm 2 relays on the affected channel in the event of an alarm. The Common Alarm 2 relay only will activate. 4-20 mA flame detectors will activate two levels of alarm as per a gas detector. ESU channels: a signal of between 4 and 12 mA indicates the sampling device is operating correctly, 12-20 mA indicates a sampling device failure, 0 mA indicates a fault (open or short circuit). A 2 mA signal indicates that a channel is inhibited. OUT 1 Fire Channels Fire channels: a signal of between 4 and 12 mA indicates a 'no-fire' condition, 12-20 mA indicates a fire, 0mA indicates a fault (open or short circuit). A 2 mA signal indicates that a channel is inhibited. OUT 2 Channel Alarm thresholds and configurations can be set using the User Control Panel and Menu System. See section III. Operation on page 14 for details. range is designated by Gasmaster as a fault condition. The signal will be set to 2 mA to indicate when a channel is inhibited, and 0 mA when a channel is in fault. OUT 3 Gasmaster 4 provides Double-Pole-Change-Over (DPCO) relays for each channel. The relays provide a contact rating of 250 V ac 8 A (non-inductive), 5 A (inductive) for Alarm 1 and Alarm 2. Each relay can be set in its non-active state as energised (Fail safe) or de-energised. Refer to figure 2.5 for location of Channel Relay terminals and figure 2.17 for contact definitions. Terminals are fitted adjacent to all relay blocks to provide 24 V dc 200 mA supplies for switching low power devices. OUT 4 2.9.3 Channel relay connections Installation LK10 Link: 1-5V No Link: 4-20mA Figure 2.18 Gasmaster analogue output connection terminals 2.9.5 RS-485 communications Gasmaster can provide alarm and system information to PLC/DCS/SCADA systems via a twowire link using the Modbus RTU protocol (9600 baud, 8 data bits, no parity, 1 or 2 stop bits). Up to 16 Gasmaster systems can be 'multi-dropped' on a single two-wire link with a maximum cable length of 1 Km, two-core twisted pair cable is recommended. Single Gasmaster systems that are to communicate via the RS-485 link should have the RS485 TERM link made, which connects a terminating resistor. For multi-dropped systems the RS485 TERM link should be removed from all Gasmasters except the last unit on the line. A Modbus specification document is available from Crowcon on request. 11 Installation GasMaster 485A 485B SCR J14 The RS-485 terminals on Gasmaster systems ordered with the optional local communications connector will be used for terminating the connector leads. These leads must be removed if a remote RS-485 serial link is required. LK2 RS485 TERM Figure 2.19 Gasmaster RS-485 terminals 2.10 Applying power Before applying power ensure that any control or shutdown systems to which the Gasmaster is connected are inhibited. Once all field cables have been installed, the batteries can be connected as per the diagram attached to the chassis plate. (Refer to section 4.4.) Gasmaster will not power up until an external power supply is applied. Apply power to Gasmaster from either the AC or 24 V dc external supplies. Outputs are inhibited for a preset time after power-up, and the system will perform a start up sequence testing alarm indicators and the internal sounder. If after a settling period faults are reported, check the sensor connections again or refer to Faults Menu on page 20. When power is applied the green Power LED will illuminate and flash every 5 seconds to indicate that the system is operational. If the external supply fails, Gasmaster will continue to operate from its internal batteries and the Power LED will flash every second. The internal sounder will also beep once every 5 seconds. Gasmaster should display all channels being monitored. Allow sensors to settle before commencing calibration, refer to sensor instructions supplied with detectors for recommended settling times. Note: your Gasmaster is supplied pre-configured, refer to the Specification and Inspection Certificate provided with your system. If no channels are configured, Gasmaster will display the following screen: 12 No detectors! Please configure To configure your system go to page 25. 2.11 Battery back-up times Gasmaster is fitted with 1.2 Ah batteries to provide continued operation in the event of a power loss. Examples of typical back-up times are provided below for a system in a non-alarm state, relays set as de-energised and with the 4-20mA outputs unused (system current consumption without detectors is approximately 50mA): Gasmaster 1 with a toxic gas detector (2-wire): 21 hours Gasmaster 1 with an oxygen detector (2-wire): 16 hours Gasmaster 1 with a pellistor flammable gas detector: 9.5 hours Gasmaster 1 with an Infrared gas detector: 2.5 hours Gasmaster 4 with four toxic gas detectors (2-wire): 10 hours Gasmaster 4 with four oxygen detectors (2-wire): 4 hours Gasmaster 4 with four pellistor flammable gas detectors: 2 hours Gasmaster 4 with four Infrared gas detectors: 25 minutes Gasmaster incorporates protection to prevent the internal batteries being damaged by being deeply discharged. When operating from internal batteries, Gasmaster will display a "Warning - battery low" fault message when the battery voltage drops to 22 V. When the voltage drops to approximately 20 V, the batteries will be automatically disconnected. The batteries will only be re-connected when the external power supply is reinstated, and will take approximately 18 hours to fully re-charge. Note: The internal batteries may not be charged efficiently when Gasmaster is powered from an GasMaster external dc supply, and therefore the back-up function may not work if the external supply fails Please contact Crowcon for further advice. 2.12 Commissioning Note: it is strongly recommended that persons intending to commission a Gasmaster system first read and understand the Operating instructions provided in section III. Operation. When all field devices have been connected and powered-up, commissioning can commence. Gas detectors should be calibrated according to their instructions, fire detectors should be tested using appropriate tools. Alarms should be simulated and actions noted to ensure that the system operates as intended. All warning devices should be checked, and interfaces with auxiliary equipment should also be verified. The test and View menu's are provided for this purpose (see page 23 and 26). 2.12.1 Zero adjustment and calibration Calibration must be carried out separately on individual gas detectors on Gasmaster. Follow calibration instructions supplied with each detector. Ensure at all times the local legislation and codes of practice are complied with. Allow detectors to stabilise for at least one hour before commencing calibration. Refer to detector manual for more information. Gasmaster provides Zero and Calibration Wizards to enable you to carry out calibration easily. These are accessed through the Operator Display Panel and Menu System. Section III. Operation provides detailed information on the menu structure and operator buttons. Zero adjustment 1. From the normal operating display, press the Continue button to enter the menu system. 2. Use the Up and Down buttons as necessary to select Supervisor and press Continue . Installation 3. You will be asked to enter a password, press Continue . The default password is ZZZ (uppercase), use the Up and Down buttons to enter the first character of the password. Note: Double click the Up or Down button to move to the top or bottom of the alphabet list. To enter numbers or lower case characters, continue pressing the Up or Down button. When you have selected the correct character, press Continue , the cursor will move to the next character position. Continue entering the rest of the password. When you have finished press the Continue button twice. (See 3.7 in section III. Operation for details of entering text strings). 4. The Zero Wizard offers temporary Inhibit but you may wish to Inhibit all channels during the calibration process. How to set global inhibit: From the Supervisor menu, scroll down to Inhibit and press Continue . Select All and press Continue . Use the Up or Down button to set inhibit to INHIBIT=ON, press Continue to accept. Use the Back button to return to the Supervisor menu. The Inhibit icons will appear on the channel display. How to set channel inhibit: Channel inhibit can be selected from the Inhibit menu or within the Zero or Calibrate menu. Follow the instructions provided above, selecting the Channel #n (where n represents the channel number) in place of All. 5. From the Supervisor menu, use the Up and Down buttons to select Zero by pressing the Continue button. 6. Select the channel to apply zero. Press the Continue button to step through the Zero Wizard. 7. Press Continue when ‘…Only con- 13 Installation GasMaster tinue if in clean air!…’ is displayed, ensure the detector has been correctly zeroed first (i.e. 4 mA) Press Continue to apply Zero now. Gasmaster will display ‘Pass’ when zero is successful or ‘Fail’ if the detector zero is out of range. 8. Use the Continue button to Zero other channels or Back button to the Supervisor menu to continue calibration. Calibration 1. Follow points 1 to 3 above in Zero adjustment to enter Supervisor mode. 2. Before you commence calibration, ensure the channels are inhibited prior to applying gas. Channels can be inhibited globally or individually. 9. Ensure that all channel inhibits are removed after calibration is complete. 2.12.2 Testing fire channels To test smoke detectors, inhibit the relevant FIRE channel and use a smoke test aerosol to test each detector on a loop in turn. The channel display will indicate FirE when the detector activates. Each detector on a loop should be reset before testing the next to ensure that all detectors activate the alarm. Heat detectors can be tested with a heat-gun using the same method as described above. Follow the instructions given in step 4 in Zero Adjustment. Flame detectors can either provide a signal using contacts, or a 4-20 mA signal. 3. From Supervisor menu, scroll down and select Calibrate. A contact type detector will be connected as a conventional fire loop using 470 Ω series resistors and a 1K8 end of line resistor and will only indicate FIRE or FAULT. A 4-20 mA detector will be connected directly as a 4-20 input, and may have various alarm levels to indicate UV or IR activation (please refer to the instructions supplied with the device for details). Flame detectors require a UV or IR torch (depending on detector type) to simulate alarms. Inhibit the relevant channel, shine the torch at the detector and check that FirE is shown on the Gasmaster display. For 4-20 mA detectors, also check that the appropriate alarm level is displayed. 4. Select the channel to calibrate. Press the Continue button to step through the Calibrate Wizard. Ensure the channels are inhibited prior to applying gas. 5. The next wizard screen displays the default calibration gas concentration as 50% of range. If necessary this calibration figure must be adjusted to match the concentration of the calibration gas used. Adjust the value using the Up and Down buttons as necessary and press Continue . 6. When "Apply Gas" is displayed, apply gas to the detector and press Continue , allow readings to settle. 7. Press Continue when the reading on the appropriate channel is stable, and the detector has been calibrated according to its instructions. Gasmaster will display ‘Pass’ when successful or ‘Fail’ if the detector signal is out of range. 8. Calibration is complete when ‘Purge’ is displayed, remove the gas from the detector. 14 Use the Continue button to calibrate another channel or Back button to exit Supervisor mode and return to the main display. 2.12.3 Testing ESU channels To test a channel monitoring an ESU sampling device, inhibit the channel and manually slow the device, check that Alarm Level 1 is activated. Manually stop the device and check that Alarm Level 2 is activated. If the alarms do not activate the thresholds may need changing, refer to section 3.10 for details on how to change alarm levels. When commissioning is complete ensure that the system is left fully functional with no faults present and no channels inhibited. GasMaster Operation III. Operation Every Gasmaster system is pre-configured by Crowcon, please refer to the Specification and Inspection Certificate provided with the product for configuration details. This section describes the operation of pre-configured units, and includes procedures for altering settings. 3.1 Gasmaster Operator Panel The Operator Panel allows you to communicate with Gasmaster. Use it to monitor the status of all attached field devices, determine system settings and configuration of field devices. Figure 3.1 shows the Operator Panel and typical display under normal, non-alarm monitoring conditions. Power LED Message and channel reminde display area Up Back #1=CH4 #2=H2S #3=O2 #4=Fire Continue 1 0 0 LEL 2 Channel display area #3=H2S #4=FIRE In the event of an alarm, this message area will display the channels in alarm and their location. See section 3.8 for more information on alarm conditions. ALARM: #1=CH4 Warning LED Accept/ Reset Down #2=O2 Boiler room Alarm LED Fault LED #1=CH4 0 0 V/V 3 PPM Channel number 4 If more then one channel is in alarm, the alarm message will cycle through all messages. In the case of a fault (or warning), brief details of the fault will be displayed. See section 3.9 for more information on fault conditions. Detailed fault and warning messages can be found in section 3.10. FAULT: =30 Chan #3 over range.. Figure 3.1 Operator Display Panel and buttons Gasmaster Display The User display provides continuous readings for up to 4 field devices plus a display area for user messages and channel number summary. Gasmaster 1 provides display for one field device plus the message area. Message display area In normal, non-alarm condition, the message area displays the channel numbers and detector types, e.g. CH4 refers to methane detector, see following example. Note: User messages longer then sixteen characters are displayed as scrolling text. If fault and alarm conditions are present at the same time, alarm messages take priority. Channel display area Gasmaster 4 has a large clear display which shows all gas levels simultaneously. Gasmaster 1 has a display for one gas level only, see figure 3.2. The image below shows details of the channel display area and icons that are used on Gasmaster. The # symbol represents the channel number (i.e. #1 is channel 1). 15 Operation GasMaster state when the accept/reset button is pressed. The LED bar will flash again if a new alarm is triggered. Channel number Gas reading Fault 2 Warning Operator Panel Buttons PPB PPM Channel Inhibit 0 0 LEL 0 0 V/V Units Alarms Use the five operator buttons to respond to alarm conditions, examine the status of system settings, and configure Gasmaster. ACCEPT/RESET #1=CH4 1 0 0 LEL Press the Accept/Reset button to mute the internal sounder and external alarms. When alarm or fault conditions have cleared, press Accept/Reset again to reset the system. Double-click the Accept/Reset button to exit the menu system and return to message display. Figure 3.2 User display Gasmaster 1 UP and DOWN Display panel LEDs Use the Up and Down buttons to scroll through menu items. The LEDs on the Gasmaster Display Panel indicate the following: Press and hold the Up or Down button to move quickly through the menu items. Yellow Fault LED: Lights when any detector or system fault is detected (see page 20 for a list of fault messages). The fault LED operates with the common fault relay, and can be set as latched or non-latched dependant on the system configuration. Yellow Warning LED: Lights when a warning condition is present (see page 22 for a list of warning messages). The warning LED will automatically reset when the cause is cleared. Green Power LED: Is normally on when power is present, and will switch off briefly once every five seconds to indicate that the system is operational. The LED will flash on and off every second when Gasmaster is operating from its batteries due to power failure. Red Alarm Bar: Will flash when an alarm from any channel is triggered, and will remain in a steady 'on' 16 Double-click the Up or Down button to move directly to the top or bottom of the alpha-numeric characters when configuring text or entering the Supervisor password In Supervisor Mode (see section 3.7), use the Up and Down buttons to change values or settings. In normal, non-alarm conditions, press and hold the Up and Down buttons to adjust the message display area brightness. CONTINUE Use the Continue button to display available menus. The menu system can be accessed during normal channel monitoring, alarm or fault condition. Gasmaster has four standard menus plus one advanced menu. See figure 3.4 on page 21 for an overview of Gasmaster’s Menu System. The standard and advanced menus are as follows: GasMaster I Operation Faults Lists the fault conditions present GASMASTERII I Warnings Lists the warning conditions present = Software version number I View View current status of relays, outputs, detector inputs, power supply and configuration I Action Perform routine operations: tests of control panel or audio visual alarms I Supervisor Perform password protected supervisor functions: inhibit channels, calibration, testing and configuration Use the Continue button and the Up and Down buttons, to navigate through the menu system. Use the Continue button to select and action menu items, submenus and wizard menus. During editing and configuration of Gasmaster, use the Continue button to accept changes made to settings. BACK Use the Back button to exit the menu system or cancel actions. Double-click the Back button to cancel text edits or return to the main menu. 3.2 Gasmaster start up sequence At power up during Gasmaster installation, or when Gasmaster is restarted, Gasmaster will initialise the system by performing a self-test. The start up sequence is shown below: Display and AV test ...Gas detection you scrolling text #1=CH4 #2=O2 #3=H2S #4=FIRE 3.3 How to adjust display contrast To edit the display contrast press and hold the Up button to increase contrast, and Down to decrease contrast. The contrast level will be displayed. Menu contrast = +++++...... The menu display contrast is altered independently from the channel display area. Press the Continue button whilst still in the Menu Contrast screen, use the Up or Down button to choose Menu Display or Channel Display. Press Continue to select. Adjust the display contrast as described above. Press the Back button to finish. 3.4 How to display Instrument serial number and system identity The system identity and instrument serial number can be displayed during normal channel monitoring, alarm or fault conditions. To display the system identity and instrument serial number, press and hold the Back button. 17 Operation First the Local Service telephone number is displayed followed by the customer identity display. After 10 seconds the serial number will automatically be displayed on the next screen (for approximately 4 seconds). The Continue button can be used to advance to the next screen. Use the Back button to return to the previous screen. The display will return to the normal operating display when finished. 3.5 Using the menu system To enter the menu system press the Continue button. The menu system can be accessed during normal channel monitoring, alarm or fault condition. The message area will display the following screen: MENU: Faults Note: if the menu system has been accessed previously, the menu item displayed will be the last actioned menu item. For example, if you were using Supervisor mode the last time, the menu display will show this: MENU: GasMaster Menu wizards Wizards are an extension of the menu system to guide the user through a process such as calibration. A wizard menu will consist of selections, user prompts and display status conditions during the process. The Back button can be used to return to the previous screen or abort the wizard. The Down and Up buttons are used to alter a selection. The Continue button accepts the current selection and continues to the next step of the wizard. Wizards are available for Zero and Calibration menus in Supervisor menu. 3.6 Inhibiting channels Inputs can be temporarily inhibited so as not to cause alarms. This may be necessary when calibrating detectors, or when operations are carried out close to a sensor which may trigger an alarm (for example, soldering near a smoke detector). Input channels can be inhibited individually or all at once. The 'inhibit' option is available in the Supervisor Menu, see the Menu System Overview on page 20 for details on how to access this function. When inhibited Gasmaster will: I Display the 'inhibit' symbol on the channel display for each affected channel. I Illuminate the yellow 'Warning' LED. Supervisor Use the Up and Down buttons to scroll through the menu list. To exit the menu press and hold the Accept/Reset button or press Back button as many times as necessary. Menu display The top line of the message area displays the current menu level. Some menu levels have submenus and wizards that guide you through configuration. The lower line displays the menu item, value or setting. In the event of an alarm on an inhibited channel, Gasmaster will: I Illuminate the Alarm symbol on the channel display for the affected channel. I Illuminate the red alarm LED bar. I Display the alarm text message for the affected channel. Gasmaster will not: Use the Up and Down buttons to scroll through the menu list, press Continue to select the menu item. I Operate any relays associated with the affected channel. I Drive external audible visual alarms. Refer to figure 3.4 on page 21 for an overview of the menu system. I Activate the internal sounder. 18 GasMaster Operation If it is necessary to permanently disable a channel, enter Supervisor Mode and set the relevant detector Type to Unused (see page 29 section 3.10). The channel display will then blank, and the power supply will be removed from the detector. Warning Crowcon strongly recommends that remote inhibit switches be key operated only, and that access to the key should be restricted to authorised personnel. A Gasmaster system that has been inhibited without other safety precautions being in place may not provide the protection for which it was designed. Steps should be taken to ensure that all appropriate personnel are aware when a Gasmaster system is inhibited. 3.7 Using the Control Panel in Supervisor Mode Supervisor mode provides all the functions required for trained personnel to perform system installation and configuration of field devices. This area is a password protected to prevent mis-use or accidental changes. From the operator panel, you can select menu items and associated values to configure relays and field devices. All the menu items are explained in section 3.10, page 25. You can modify settings by: I Selecting values from a list I Editing numeric values I For convenience, after the first character has been entered, the next character will start from the same point in the alpha-numeric list. To enter ‘ZZZ’ use the Up and Down buttons to enter the first letter, then simply press Down then Continue, Down then Continue. When you have selected the correct character, press Continue , the cursor will move to the next character position. Continue entering the rest of the password. When you have finished press the Continue button twice. Note: When the Supervisor mode is active the Warning LED on the control panel will illuminate How to select values from a list 1. With the menu item selected use the Up and Down buttons to scroll through the available list items. When the value you require is displayed press the Continue button. For example, when configuring the Units of a channel, the possible settings are: none, FIRE, PPB, PPM, %LEL and %VOL, as you scroll through the list the unit symbol will appear on the display. Press Continue to make a selection. The menu screen will return to the next menu item in the list. Editing text strings How to enter Supervisor mode 1. Press the Continue the menu system. of the alphabet list. To enter numbers or lower case characters, continue pressing the Up or Down button. button to enter 2. Use the Up and Down buttons as necessary to select Supervisor and press Continue . 3. You will be asked to enter a password, press Continue . Use the Up and Down buttons to enter the first character of the password. The default password is ZZZ. Note: Double click the Up or Down button to move to the top or bottom How to edit values of parameters 1. With the menu item selected press the Continue button. Use the Up and Down buttons to change the parameter value. Press Continue to accept new value. The menu screen will return to the next menu item in the list. How to edit text string values 1. With the menu item selected press the Continue button. A flashing cursor will appear below the first character of 19 Operation the text string, you are now in edit mode. Use the Up and Down buttons to scroll through the character values. See Appendix D for more information Note: Double click the Up or Down button to move to the top or bottom of the alphabet list. To enter numbers or lower case characters, continue pressing the Up or Down button. When you have selected the correct character, press Continue , the cursor will move to the next character position. Note: The next character will start from the last one selected. If you are editing a current text string, press Continue to accept a character you wish to keep. To delete characters press the Back button, all characters will be deleted to the right of the cursor. GasMaster the detector in the channel display. Gasmaster provides low and high alarm levels, these levels are user configurable and can be set as rising or falling. Fire detectors Fire detectors in alarm will display FIRE in the channel display. There is only one level of alarm for fire channels. Environmental sampling Units (ESU) ESU sampling devices that have slowed or stopped will display ESU. Level 1 means slow, level 2 means stopped To mute the sounder Press the Accept/Reset button on the operator panel (or remote Accept/Reset switch if fitted). The Alarm LED will stop flashing, but remain lit. The channel display will show the gas reading. When alarm conditions have cleared, press the Accept/Reset button to clear any latched alarms. 2 If a text string is deleted in error, double-click the Back button to exit the menu item. The original text string will be retained. Continue entering the rest of the text string. To finish press the Continue button once more. 3.8 In the event of an alarm In the event of an alarm the message display area will display the channel in alarm and the detectors location (if this information has been pre-set in the configuration), the Alarm LED will flash, the internal sounder and any dedicated audible visual alarms will activate, and any external alarm apparatus connected through the channel relays will operate. If more then one channel goes into alarm, the display will cycle through the channels in alarm. Channel display area in the Figure 3.3 shows channel #2=CH4 (methane) in alarm condition. The gas reading will cycle back and forth between the channel type and the gas reading. 0 0 LEL Figure 3.3 Example system in alarm 3.9 In the event of a fault In the event of a fault the fault LED will illuminate and the internal sounder will activate. The message area will display FAULT: and fault ID number. The fault description will appear in the lower portion of the message area, messages longer then 16 characters will be scrolled across the screen. Pressing Accept/Reset will clear the fault message from the display. To display a list of all faults present, use the faults menu. A list of faults can be found in the menu system overview on page 20. Gas detectors 3.10 System Configuration The channel or channels in alarm will display an alarm symbol and flash alternately with the type of Your Gasmaster system is supplied pre-configured, however, you may wish to configure relay 20 GasMaster Operation and alarm settings to suit your requirements or adjust detector values, carry out calibration and other confidence checks. Your Gasmaster system can be configured using the Operator Panel and Menu System. You will find details of the menu structure and configuration options over the next few pages, refer to figure 3.4 for an overview of the menu structure. To edit your systems configuration you must enter the Supervisor mode which is password protected to prevent miss-use or accidental change. (Refer to section 3.7 for details on entering Supervisor mode.) For more information on testing your Gasmaster system, please go to the Maintenance section on page 32. Gasmaster PC software is available which enables full system configuration from a PC. An optional communications port is required if Gasmaster PC is to be used, contact Crowcon for details. 3.10.2 Re-configuring a channel Your Gasmaster system is supplied pre-configured, but you may require to re-configure when a detector is changed or a new detector is added. This section provides details on configuring channels, refer to page 29 ‘Channels #1 to #4’ from the Supervisor configuration menu. 3.10.3 Limitations If Gasmaster is used in a manner not specified in this manual, the protection provided may be impaired. 21 Operation GasMaster Menu system overview Over the next few pages you will find a detailed description of the menu system. Use figure 3.4 as an overall guide to locate menu items. Gasmaster has five standard menus: Faults, Warnings, View, Actions and Supervisor. Only the Supervisor menu allows you to configure Gasmaster. This section contains tables that list the menu items for each menu and the available values. See 3.7 Using the Control Panel in Supervisor Mode’ on page 17 for instructions on how to alter settings. Note: The display only shows two lines of information at a time. Use the Up and Down buttons to see additional menu items or values. Use Continue to select choices and Back to exit menu. Faults menu (lists faults present on the system) Menu Item Values (as shown on display) Description Fault codes No faults (end of list) No faults are present Faults Measurement system failure! Fatal fault, contact Crowcon. 1 or 2 Battery fail - shutting down! Input supply has failed and internal battery supply has dropped to 20 volts. System will shut down to prevent battery damage. 3 Warning - Battery low Input supply has failed and internal 4 battery supply has dropped to 22 volts. Relay power supply fail Power rail to the relays has failed and relays will no longer operate. Contact Crowcon 5 NVM hardware fail Fatal fault, contact Crowcon. 7 Loaded default settings System has returned to standard configuration settings. Re-configure using the Supervisor menu. 8 Common relay fail Coil fault detected. Contact Crowcon 9, 10, 11 Chan #1 relay fail Channel relay coil fault detected. Contact Crowcon.* 12 to 19 ESU #1 stalled! ESU sampling device has stopped.* 20 to 23 ESU #1 slow! ESU sampling device has slowed.* 24 to 27 Chan #1 over range Detector input signal is over 21.5 mA. Investigate cause at detector taking necessary precautions as high gas levels may be present.* 28 to 31 Chan #1 under range Detector input signal is under 3 mA. 32 to 35 Check detector.* If the 'Interpret 2 mA' command is set to Warning or Inhibit in the channel configuration, this fault message will display when the input signal drops below 1mA. * #1 denotes the channel number and therefore may read #2, #3 or #4 on Gasmaster. The fault codes are numbered to relate to a particular channel where appropriate (e.g. fault code 19 means there is a fault on Channel 4 Level 2 alarm relay). 22 GasMaster Operation Press CONTINUE Faults Warnings View Action Supervisor Warnings Menu Faults Menu List of faults present List of warnings present View: Relay com stat Alarm L1 common Alarm L2 common Fault common View: Relay chan stat Alarm L1 (Channels 1 to 4)* Alarm L2 (Channels 1 to 4)* View: Configuration: Relays common Alarm L1 common Alarm L2 common Common Fault Note: * Menu items are hidden for unused channels † Visible only for 4-20 mA Sink/SRC ‡ Visible only for Fire conv type View Menu Relay com stat Relay chan stat Output status Input status Supply status Configuration View: Configuration System Language AV drive Relay common Channels 1 to 4* View: Configuration: Channels 1 to 4* Type Name Location Units† Range† Zero suppression† Interpret 2 mA† Stab time Fire reset time‡ Alarm 1 (See Supervisor Alarm 2 configuration) Action Menu Supervisor Menu Display contrast Control panel Audio visual All Supervisor Menu options are password protected, see page 19 for details of this menu section. Supervisor: Test Relays common Channels 1 to 4* Supervisor: Configuration: Relay common Alarm L1 common Alarm L2 common Common Fault Supervisor: Configuration: Channels #1 to 4* Alarm 1 & Alarm 2 Direction On threshold Off threshold^ Relay type Relay drive Indication^ Password Inhibit Zero Calibrate Test Configure Supervisor: Configuration System Language AV drive Relay common Channels 1 to 4* Supervisor: Configuration: Channels #1 to 4* Type Name Location Units† Range† Zero suppression† Interpret 2 mA† Stab time Fire reset time‡ Alarm 1 Alarm 2 ^Not present for Alarm 2 Figure 3.4 Overview of Gasmaster Menu system 23 Operation GasMaster Warnings menu Menu Item (lists warnings present on the system) Values Description Codes (as shown on display) No warnings (end of list) No warnings are present. Warnings Supervisor mode System configurations may be changed. 1 Global inhibit All input channels are inhibited. 2 Testing audio visual alarm Audible visual outputs will be driven. 3 Service/calibration due Service or calibration interval has expired. 4 Common relay forced Common alarm or fault relays are being forced to their 'alarm' state. 5, 6, 7 Detector #1 stabilising Detector is currently in its stabilisation or reset period*, (see page 30). 8, 16, 24, 32 Detector #1 input low Detector input signal is between 1 and 3 mA.* 9, 17, 25, 33 Only applies when the 'Interpret 2 mA' command is set to Warning in the channel configuration. Detector #1 initiated inhibit A 2 mA inhibit signal has been received from a detector.* Only applies when the 'Interpret 2 mA' command is set to Inhibit in the channel configuration. 10, 18, 26, 34 Chan #1 inhibited Input channel is in an inhibit state* . 11, 19, 27, 35 Chan #1 input simulated Channel input is being forced in Test mode.* 12, 20, 28, 36 Chan #1 output forced Channel analogue output is being forced in Test mode.* 13, 21, 29, 37 Chan #1 relay forced Channel alarm relay is being forced in Test mode.* 14, 15, 22, 23 30, 31, 38, 39 * #1 denotes the channel number and therefore may read #2, #3 or #4 on Gasmaster. 24 GasMaster View menu Operation (shows system status and configuration, but does not allow changes to be made.) Menu Item Values Relay com stat Alarm L1 common Values = No alarm In alarm Alarm L2 common Values = No alarm In alarm Fault common Values = No alarm In alarm L1 = Level 1. L2 = Level 2 The 'values' show the current state of each relay (relays may be normally energised or de-energised dependant on configuration): 'No alarm' means the relay is in its normal state. 'In alarm' means the relay is in its alarm or fault state. Relay chan stat Alarm L1 #1 Values = No alarm In alarm #1 refers to the input channel, use the Down button to scroll to channels #2, #3, #4 if appropriate. L1 = Level 1. L2 = Level 2 (use the down key to view level 2). The 'values' show the current state of each relay (relays may be normally energised or de-energised dependant on configuration): 'No alarm' means the relay is in its normal state. 'In alarm' means the relay is in its alarm state. (as shown on display) Alarm L2 #1 Values = No alarm In alarm Description Output status Output #1 Values = 0.0 to 25.5 mA #1 refers to the input channel, use the Down button to scroll to channels #2, #3, #4 if appropriate. The 'values' show the current analogue output level for a channel. Input status Input #1 Values = 0.0 to 66.7 mA, #1 refers to the input channel, use the Down button to scroll to channels #2, #3, #4 if appropriate. The 'values' show the current signal input level for a channel. Supply status Supply Value = 19.8 to 40 V Indicates the DC supply level from either the internal PSU or an external DC supply. Configuration See table Supervisor menu : * #1 denotes the channel number and therefore may read #2, #3 or #4 on Gasmaster. 25 Operation GasMaster Actions menu (allows basic tests and adjustments.) Menu Item Values Audio visual Audio Visual: Test alarm? (as shown on display) Values = Testing beacon Testing alarm L1 Testing alarm L2 Control panel Description Drives Audible Visual alarm terminals to test external audible visual alarms Beacon output becomes active for 3 seconds, followed by; Sounder level 1 output becomes active for 3 seconds, followed by; Sounder level 2 output becomes active for 3 seconds, followed by; Test complete Outputs de-activate and display returns to the Audio Visual menu Control Panel: Start test? Press Continue to test LCD display, LED's and internal sounder for 3 seconds. Display returns to Control Panel menu Test complete Display contrast Display: Values = Menu contrast Alters the message display area contrast Channel contrast Use the Up and Down buttons to adjust the contrast of the LCD 26 GasMaster Operation Supervisor menu (allows system tests to be performed, and configurations to be changed. A pass word is required to enter this mode, see section 3.7 for details.) Menu Item Inhibit Zero Values (as shown on display) All Values = Inhibit off Inhibit on Inhibits all input channels when selected. Only whilst in Supervisor mode used for calibration and test Channels #1, #2, #3, #4 Values = Inhibit off Inhibit on Allows individual channels to be inhibited. NB: Inhibit persists on exit from Supervisor mode Zero Wizard Select channel Values = #1=name #2=name #3=name #4=name Use Down button to select the required channel to zero, then follow wizard instructions. Select channel Inhibit Values = Inhibit on Inhibit off Inhibit option will not be displayed if channels have already been set to inhibit using the menu shown above. User confirmation Only continue if in clean air! Reminds the user to check that the detector has been zeroed and is currently not seeing gas. Result Values = Pass Channel has correctly zeroed Fail Calibrate Description Input signal was out of acceptable range, re-zero the detector and check that its output current is 4 mA. Calibration Wizard Select channel Values = #1=name #2=name #3=name #4=name Cal #1 level Values = 25% - 100% of range Use Down button to select the required channel to calibrate, then follow wizard instructions. Refers to the calibration gas concentration Calibration is only possible with a gas concentration that is at least 25% of the full range of the sensor. Use the UP and Down buttons to enter the concentration of the calibration gas (e.g. 50% LEL,10 ppm etc.). Gasmaster will store the gas value entered so that it does not need to be adjusted next time the sensor is calibrated. Select channel Inhibit Values = Inhibit on Inhibit off Inhibit option will not be displayed if channels have already been set to inhibit using the Inhibit menu. User action Apply gas Apply gas and calibrate the detector. User confirmation Continue when reading is stable Press Continue when the detector has been calibrated and is providing the correct output signal. 27 Operation GasMaster Supervisor menu cont. Menu Item Calibrate Values (allows system tests to be performed, and configurations to be changed. A pass word is required to enter this mode, see section 3.7 for details.) (as shown on display) Calibration Wizard cont. Result Value = Pass Fail Test Use to simulate inputs and outputs for testing and commissioning purposes. Channel has correctly calibrated. Input signal was out of acceptable range, re-calibrate the detector and check that its output current is proportional to the gas level User action Purge gas Reminds the user to remove the calibration gas and re-expose the detector to clean air. Relay common Forces common level 1, 2 or Fault relays. L1 = Level 1. L2 = Level 2 The 'values' show the current state of each relay (relays may be normally energised or de-energised dependant on configuration): 'No alarm' or ‘No fault’ means the relay is in its normal state. 'In alarm' or ‘In fault’ means the relay is in its alarm or fault state. Use the Up and Down buttons to change the relay state, press Back to exit, the relay will return to its normal state Relay alarm L1 Alarm L1 common Values = No alarm In alarm Relay alarm L2 Alarm L2 common Values = No alarm In alarm Fault Fault common Values = No fault In fault Channel #1, #2, #3, #4 Sim Input #1 Values = 0.0 - 25.5 mA 0.0 - 66.7 mA for fire detectors Force output #1 Values = 0.0 - 25.5 mA 28 Description Use the Up and Down buttons to select the desired channel. The channel warning symbol will show. Channel alarm relays can be tested as described above. When selected, displays the input signal level for the selected channel (e.g. 4.1 mA). The channel warning symbol will show. Use the Up and Down buttons to force the input to the required level. The reading on the channel display will change accordingly and alarms will activate at the preset points. Use the Accept/Reset button to silence alarms if necessary. Press Back to exit, the input will return to its normal state. When selected, displays the analogue output signal level for the selected channel (e.g. 4.1 mA). The channel warning symbol will show. Use the Up and Down buttons to force the output to the required level. No alarms will be activated on Gasmaster. Use to test remote displays. Press Back to exit, the input will return to its normal state. GasMaster Operation Supervisor menu cont. Menu Item Values (allows system tests to be performed, and configurations to be changed. A pass word is required to enter this mode, see section 3.7 for details.) (as shown on display) Relay alarm L1 Values = No alarm In alarm Relay alarm L2 Values = No alarm In alarm Description Forces level 1, 2 relays for the selected channel. The channel warning symbol will show. Contact orientation will depend on whether the relay is configured as normally energised or de-energised. Press Back to exit, the relay will return to its normal state. Configure Use to change system settings Select from config sub menus below System ModBus addr Values = 1 to 254 Required for RS-485 digital communications only, any address in the range can be chosen. If multiple units are connected on an addressable loop to a 'Master' controller, each Gasmaster must have a different address. Serial comms Values = 9600, 8, N, 1 9600, 8, N, 2 Describes the required RS-485 communications parameters; Gasmaster is factory set to 2 stop bit. Identity Values = 16 character string Allows a system name to be entered which will be shown on the Gasmaster display when the appropriate mode is selected (see section 3.4). Use the Up and Down buttons to enter required alpha-numeric characters and press Continue to accept. Language AV drive Language Values = English (UK) configurable Beacon type Values = Latched Non-latched The default display language is English. A second language may be available depending on system configuration. Determines the operation of beacons connected to the 'AV1 Drive' terminal. Latched means that in an alarm state, the beacon will continue flashing when the Accept/Reset button is pressed, and will only stop flashing when the alarm is cleared and the Accept/Reset button is pressed again. Non-latched means that the beacon will continue flashing when the Accept/Reset button is pressed, but stop automatically when non-latching alarms have reset. Sounder type Values = Latched Non-latched Latch-accept Determines the operation of sounders connected to the 'AV2/3 Drive' terminals. Latched means that in an alarm state, the sounder will continue to operate when the Accept/Reset but ton is pressed, and will only stop sounding when the alarm is cleared and the Accept/Reset button is pressed again. Non-latched means that the sounder will continue to operate when the Accept/Reset button is pressed, but will silence automatically when the alarm has cleared. 29 Operation GasMaster Supervisor menu cont. Menu Item Values (allows system tests to be performed, and configurations to be changed. A pass word is required to enter this mode, see section 3.7 for details.) (as shown on display) AV drive cont. Relay common Latch-accept means that in an alarm condition the sounder will silence when the Accept/Reset button is pressed. Alarm L1 common Type Alarm 1 type Values = Latched Non-latched Latch-accept Drive Alarm 1 drive Values = De-energised Energised Determines the operation of the common alarm and fault relays. L1 = Level 1. L2 = Level 2 Latched means that in an alarm state, the relay will stay active when the Accept/Reset button is pressed, and will only reset when the alarm or fault has cleared and the Accept/Reset button is pressed again. Non-latched means that the relay will stay active when the Accept/Reset button is pressed, but will reset automatically when the alarm has cleared. Latch-accept means that in an alarm or fault condition the relay will reset when the Accept/Reset button is pressed. Alarm L2 common Type Alarm 2 type Values = Latched Non-latched Latch-accept Drive Alarm 2 drive Values = De-energised Energised Fault common Type Fault type Values = Latched Non-latched Drive Fault drive Values = De-energised Energised De-energised means that the relay coil is not energised in a non-alarm state (normally de-energised). Energised means that the relay coil is energised in a non-alarm state (normally energised or 'fail-safe') Channels #1 to #4 Press the Up and Down buttons to cycle through configuration for channels #2, #3 and #4. 30 Description Sets the input type for each channel, links on the terminal PCB must also be set to the appropriate positions (see section 2.8 for details). Config Channel #1 Type Values = Unused DET 4-20 SRCE DET 4-20 SINK FIRE 4-20 SRCE FIRE 4-20 SINK FIRE CONV ESU No detector connected 4-20mA current source gas detector 4-20mA current sink gas detector 4-20mA current source flame detector 4-20mA current sink flame detector Conventional smoke/heat or call points ESU sampling device GasMaster Operation Supervisor menu cont. Menu Item Values (allows system tests to be performed, and configurations to be changed. A pass word is required to enter this mode, see section 3.7 for details.) (as shown on display) Description Channels # 1 to #4 Cont. Name Values = 4 character string Location Values = 32 character string *Options will be shown for 4-20 mA input channels only *Options will be shown for 4-20 mA input channels only Detector name (e.g. CH4 for methane, O2 for oxygen, FIRE for smoke/heat detectors) Optional. Detector location or tag, will be shown on the message display if an alarm occurs (e.g. Boiler Room). Units* Values = None %LEL PPB PPM %VOL FIRE E.g. for an ESU channel For flammable channels Very low range toxic gas detectors General toxic gas detectors Oxygen or other high volume gases Flame or conventional smoke/heat detectors. Range* Values = 0 to 9999.9 Detector range (e.g. 100 for a flammable detector). Zero suppression (ZFS)* Values = Enabled Disabled Interpret 2mA* Values = Fault Warning Inhibit Applies suppression to the first 3% of scale to prevent small deviations from zero being displayed. If the Level 1 alarm for a channel is set below 8% of full scale, the level of suppression is reduced. Some gas detectors produce a 2 mA signal to indicate a certain state. This option determines how Gasmaster interprets a signal between 1 and 3 mA. Stab time Values = 0 to 120 seconds Inhibits the input for preset time after Gasmaster is powered-up to prevent false alarms while the sensor is settling. Fire reset time** Values = 0 to 30 seconds Time for which power is removed from smoke/heat detectors when the Accept/Reset button is pressed. Alarm L1 #1, #2, #3, #4 See submenu below ** Option will be shown for conventional fire channels only 31 Operation GasMaster Supervisor menu cont. Menu Item Values (allows system tests to be performed, and configurations to be changed. A pass word is required to enter this mode, see section 3.7 for details.) (as shown on display) Description Config channel Submenu: Alarm L1 #1 Level 1 alarm relay configuration for each channel Press the Up and Down buttons to cycle through configuration for channels #2,#3,#4 Direction Values = Rising Falling On threshold Values = 0.1 to Range (full scale) Rising alarms required where there is normally no gas. Falling alarms required where gas should normally be present (e.g. oxygen). Level at which the relay will activate. Off threshold Values = 0.1 to L1 On threshold (rising alarms) L1 threshold to full scale - 0.1 (Falling alarms Level at which the Level 1 relay will reset. Allows hysteresis for applications such as ventilation control where the fan should continue to run until the gas reaches a low level. Relay type Values = Latched Non-latched Latch accept Latched means that in an alarm state, the relay will stay active when the Accept/Reset button is pressed, and will only reset when the alarm or fault has cleared and the Accept/Reset key is pressed again. Non-latched means that the relay will stay active when the Accept/Reset key is pressed, but will reset automatically when the alarm has cleared. Latch-accept means that in an alarm condition the relay will reset when the Accept/Reset button is pressed. De-energised means that the relay coil is not energised in a non-alarm state (normally de-energised). Energised means that the relay coil is energised in a non-alarm state (normally energised or 'fail-safe') Visible means that an alarm will trigger the alarm LED bar, internal sounder, external audible visual alarms, and display the alarm message. Hidden means that an alarm will only cause the alarm icon in the channel display to show. No other audible or visual alarms will activate (used for ventilation control applications) Relay drive Values = De-energised Energised Indication Values = Visible Hidden A similar menu is available for Level 2 alarm relays, with the exception that the 'Off Threshold' and 'Indication' options are not available. Alarm L2 #1* Direction Threshold Relay type Relay drive * #1 denotes the channel number and therefore may read #2, #3 or #4 on Gasmaster. 32 GasMaster Maintenance IV.Maintenance It is essential that any safety system such as Gasmaster is routinely checked. Crowcon offer service contracts to ensure that this equipment is fully operational at all times. As a minimum, Crowcon recommend that systems are calibrated and tested on a sixmonthly basis. Sensors should be changed as advised in the detector manual. Note: a ‘calibration due’ warning message may be flagged six months after the last service*. The warning LED will light and the message will be shown in the Warnings Menu (see page 22). This message can be reset using Gasmaster PC, which also allows the period after which the message is displayed to be adjusted. *Or when the system was last powered-up. 4.1 Functional Testing Gasmaster allows you to test relays, force inputs into alarm state, and force analogue outputs to verify the correct operation of the Gasmaster system and its interfaces with external equipment. These functions are available in the Supervisor menu under Test. Please note that using this function will activate the appropriate relays, audible visual alarm drives and analogue outputs. Ensure necessary precautions are taken prior to using test functions. The options available in Test can be found in section 3.10, page 26, along with a description of each function. 4.2 System Inhibit Inputs can be temporarily inhibited so as not to cause alarms. This may be necessary when calibrating detectors, or when operations are carried out close to a sensor which may trigger an alarm (for example soldering near a smoke detector). Input channels can be inhibited individually or all at once. The 'inhibit' option is available in the Supervisor menu, see section 3.6 on page 17 and the Menu System Overview on page 20 in the Operation chapter for details of this function. If it is necessary to permanently disable a channel, enter Supervisor mode and set the relevant detec- tor Type to Unused (see page 29). The channel display will be no longer shown, and the power supply will be removed from the detector. Warning Crowcon strongly recommends that remote inhibit switches be key operated only, and that access to the key should be restricted to authorised personnel. A Gasmaster system that has been inhibited without other safety precautions being in place may not provide the protection for which it was designed. Steps should be taken to ensure that all appropriate personnel are aware when a Gasmaster system is inhibited. How to perform Inhibit 1. From the normal operating display, press the Continue button to enter the menu system. 2. Use the Up and Down buttons as necessary to select Supervisor and press Continue . 3. Enter the password (the default password is ZZZ), press Continue . See section 3.7 in Operation for details on entering Supervisor mode. 4. How to set global inhibit: From the Supervisor menu, scroll down to Inhibit and press Continue . Select All and press Continue . Use the Up or Down button to set inhibit to INHIBIT ON, press Continue to accept. Use the Back button to return to the Supervisor menu. The Inhibit icons will appear on the channel display. How to set channel inhibit: Channel inhibit can be selected from the Inhibit menu or within the Zero or Calibrate menu. Follow the instructions provided above, selecting the Channel #n (where n represents the channel number) in place of All. Ensure all inhibits are removed when maintenance activities are complete. 33 Maintenance GasMaster 4.3 Detector Calibration Crowcon recommends that you check detectors routinely to ensure correct calibration and operation. Gas detectors require recalibration at least every 3 to 6 months. Fire detectors should be tested with the same frequency. Site procedures may require more frequent testing. See section 2.12.1 page 12 for calibration instructions. For detailed instructions on the routine functional testing of detectors, please refer to the relevant Installation, Operating and Maintenance Instructions provided with each detector. 4.4 Changing Batteries Warning When replacing batteries, care should be taken to ensure cables are re-fitted as shown on the battery connection diagram. Incorrect fitment of battery cables may result in a fire and/or harm to personnel. 4.5 Module Replacement In the unlikely event of a Gasmaster component failure, Crowcon recommend that repair should not be undertaken by anyone other than Crowcon approved personnel. Please contact Crowcon for details of your nearest service centre. 4.6 Event logging During routine servicing, it is recommended that the power be isolated form Gasmaster temporarily to ensure that the back-up batteries are operational. Crowcon recommend that batteries are changed every two years, and replaced as a pair. Replacement batteries should be Yuasa UCEL Y1.2-12, 12 v 1.2 Ah C20 lead-acid type cells. Gasmaster records alarms, faults and display panel button activities in an Event Log. A maximum of 300 events are logged, after which data is over-written on a first-in-first-out basis. This function provides a record of all system activities which can be uploaded using Gasmaster PC software at any time. A 10 A fuse is fitted to the batteries, for replacement part number see Spare Parts and Accessories section. The event log is held in RAM (volatile memory), so in the event of a complete power failure all data will be lost. 4.7 Service card Batteries A card is fitted to the inside of the front cover for logging service activity. It is recommended that this card be filled in with the dates of services, and details of any parts replaced. 4.8 Cleaning Battery connection diagram Figure 4.1 Battery replacement Batteries should be checked regularly on units operating over 40ºC. 34 If required, the outside of the Gasmaster case can be cleaned by gently wiping with a damp cloth using a mild soap solution only. GasMaster Appendix A: Specifications Appendix A: Specifications Size Weight Enclosure material Ingress protection Power Battery back-up Operating temperature Humidity Input: Gas Fire Environmental Sampling Unit control Remote inhibit Remote reset Outputs: Relays Audible/visual alarm drive Analogue Digital communications Communications port Event logging1 Panel indication Approvals Gasmaster 1 288h x 278w x 110d (mm) 4.5 kg Back-box: Painted steel Front cover: fire-retardant ABS plastic. IP54 100-240 V ac 50-60 Hz 1.3 A or 20-30 V dc, 60 W max. 1.2 Ah batteries fitted internally -10ºC to + 50ºC (14 to 122ºF). 0 to 95% RH non-condensing One 2 or 3 wire 4-20 mA gas detector (sink or source). Adaptor for mV bridge type detectors available. Maximum detector current 500 mA. One loop of up to 20 conventional smoke/heat detectors or manual call points, or one flame detector (4-20 mA or digital contact signal). For use with one Crowcon ESU sampling device. Via normally open contact. Via normally open contact. Low alarm, High alarm, Fault. DPCO contacts rated at 250 V ac, 30 V dc 8 A (non-inductive load), 5 A (inductive load). 24 V dc 650 mA maximum drive (typically 2 devices max.) 4-20 mA (current source, max. loop resistance 700 Ω) or 1-5 V dc (min. load 50 KΩ). RS-485 Modbus RTU 9600 Baud 8 Data bits No parity 2 Stop bits Optional 3-way connector for PC configuration and event log upload Time-stamped log of up to 300 alarm, fault or system intervention activities. LCD back-lit display shows gas level (in ppb, ppm, % volume or % LEL units), and scrolling alphanumeric status indication. LEDs for Alarm, Fault, Power and Warning status indication. Integral 85 dB sounder. EN 50270 (EMC), EN 61010-1 (Low voltage directive) CSA standards C22.2 NO.152 and C22.2 No. 142 Gasmaster 4 288h x 278w x 110d (mm) 4.5 kg Back-box: Painted steel Front cover: fire-retardant ABS plastic. IP54 100-240 V ac 50-60 Hz 1.3 A or 20-30 V dc, 60 W max. 1.2 Ah batteries fitted internally -10ºC to + 50ºC (14 to 122ºF). 0 to 95% RH non-condensing One to four 2 or 3 wire 4-20 mA gas detectors (sink or source). Adaptor for mV bridge type detectors available. Maximum detector current 500 mA. One to four loops of up to 20 conventional smoke/heat detectors or manual call points, or one to four flame detectors (4-20 mA or digital contact signal). For use with one Crowcon ESU sampling device. Via normally open contact. Via normally open contact. Low alarm and High alarm per channel plus Common Low, High and Fault. DPCO contacts rated at 250 V ac, 30 V dc 8 A (non-inductive load), 5 A (inductive load). 24 V dc 650 mA maximum drive (typically 2 devices max.) 4-20 mA for each channel (current source, max. loop resistance 700 Ω) or 1-5 V dc (min. load 50 KΩ). RS-485 Modbus TRU 9600 Baud 8 Data bits No parity 2 Stop bits Optional 3-way connector for PC configuration and event log upload Time-stamped log of up to 300 alarm, fault or system intervention activities. LCD back-lit display shows gas level (in ppb, ppm, % volume or % LEL units) for all channels, and scrolling alphanumeric status indication. LEDs for Alarm, Fault, Power and Warning status indication Integral 85 dB sounder. EN 50270 (EMC), EN 61010-1 (Low voltage directive) CSA standards C22.2 NO.152 and C22.2 No. 142 1Event log access requires Gasmaster PC software and communication port. Event log data is held in non-volatile memory, data will be lost in the event of a complete system power failure. 35 Appendix B: Spare parts and Accessories GasMaster Appendix B: Spare Parts and Accessories Part No. Description Comment E01875 12V 1.2Ah battery 2 required E07534 Battery fuse assembly Assembly with fuse, fuse holder and loom M05897 Service card Replacement service cards, minimum quantity 10 M07624 Installation, Operation and maintenance manual S011790/2 Display PCB For all Gasmaster models S011713/2 Gasmaster 4 terminal PCB No links supplied, use links from old PCB S011714/2 Gasmaster 1 terminal PCB No links supplied, use links from old PCB E07109 Insulated Jumper links Spare links for PCB's, minimum order quantity 10 S011746 Power supply assembly Complete with wiring looms S011723 Sounder assembly Complete with wiring loom M04683 Sounder seal M05891 Gasmaster 4 display label For front cover M05906 Gasmaster 1 display label For front cover M05892 Domed Crowcon label For front cover of all models M05893 Domed Gasmaster label For front cover of Gasmaster 1 and 4 C01929 Communications Kit Includes Gasmaster PC software, connection lead and RS485/232 converter. E07635 Communications port 3-pin connector for fitment to Gasmaster to enable interface with the Communications Kit. Comes complete with wiring loom for connection to the RS-485 terminals. C01919 Accessory Enclosure For connecting one mV bridge type flammable gas detector to Gasmaster 1 or 4. Comes with the connector for Gasmaster. C01920 Accessory Enclosure For connecting two mV bridge type flammable gas detectors to Gasmaster 4. Comes with the connector for Gasmaster. C01921 Accessory Enclosure For connecting three mV bridge type flammable gas detectors to Gasmaster 4. Comes with the connector for Gasmaster. C01922 Accessory Enclosure For connecting four mV bridge type flammable gas detectors to Gasmaster 4. Comes with the connector for Gasmaster. E07636 Accessory enclosure connector Connector for fitment to Gasmaster to enable an Accessory Enclosure to be connected. Comes complete with wiring loom. S011750 Front cover assembly for Gasmaster 1 Complete with labels, sounder and seals S011555 Front cover assembly for Gasmaster 4 Complete with labels, sounder and seals M01861/2 Flush mounting brackets For mounting Gasmaster into a panel. 36 GasMaster Appendix C: Display characters Appendix C: Display characters Message display area characters Channel display characters When editing strings of text for passwords, detector location or system identity, the following characters are available: NB: The following characters represent those which can be shown on the channel display area to represent detector types. Group1: <space> ! Group2: #$%& Group3: *+,-./ Group4: 0123456789 Group5: :; The following characters cannot be closely represented: K, M, V, W, X 0 A K b5 1 B L V ?@ 2 C M W Group7: ABCDEFGHIJKLMN OPQRSTUVWXYZ 3 D N X Group8: _ 4 E O Y Group9: abcdefghijklmno pqrstuvwzyz 5 F P Z= 2 6 G=9 Q dash 7 H R underscore 8 I S=5 ? 9 J T blank For some string types the available characters may be restricted, only the applicable characters will be shown. For example the detector name (e.g. gas type) is restricted to groups 4 and 7 (numerals and upper case) only: b1 b6 b0 .dp Group6: Use the Up and Down buttons as described in section 3.7 to select the required characters. b7 U b3 b2 b4 single clicking or holding the Up button will advance forward through the available groups of characters: A B C D ... X Y Z 0 1 2 ... 7 8 9 A B C ... etc single clicking or holding the Down button will advance backwards through the available groups of characters: Z Y X W ... C B A 9 8 7 ... 2 1 0 Z Y X ... etc double clicking the Up button will jump forwards to the end of the current group then on to the start of the following one etc: Z 0 9 A Z ... double clicking the Down button will jump backwards to the start of the current group then on to the end of the following one etc: A 9 0 Z A ... 37 Warranty Statement GasMaster Warranty Statement This equipment leaves our factory fully tested and calibrated. If within the warranty period of one year from Despatch, the equipment is proved to be defective by reason of faulty workmanship or material, we undertake at our discretion either to repair or replace it free of charge, subject to the conditions below. Warranty Procedure To facilitate efficient processing of any claim, contact our customer support team on +44 (0)1235 557711 with the following information: Your contact name, phone number, fax number and email address. Description and quantity of goods being returned, including any accessories. Instrument serial number(s). Reason for return. Obtain a Returns form for identification and traceability purpose. This form may be downloaded from our website 'crowconsupport.com', along with a returns label, alternatively we can 'email' you a copy. Instruments will not be accepted for warranty without a Crowcon Returns Number ("CRN"). It is essential that the address label is securely attached to the outer packaging of the returned goods. The guarantee will be rendered invalid if the instrument is found to have been altered, modified, dismantled, or tampered with. The warranty does not cover misuse or abuse of the unit. Any warranty on batteries may be rendered invalid if the use of an unauthorized charger is proven. Nonrechargeable batteries are excluded from this warranty. Warranties on sensors assume normal usage, and will be rendered invalid if the sensors have been exposed to excessive concentrations of gas, extended periods of exposure to gas or have been exposed to 'poisons' that can damage the sensor, such as those emitted by aerosol sprays Warranty Disclaimer Crowcon accept no liability for consequential or indirect loss or damage howsoever arising (including any loss or damage arising out of the use of the instrument) and all liability in respect of any third party is expressly excluded. 38 This warranty does not cover the accuracy of the calibration of the unit or the cosmetic finish of the product. The unit must be maintained in accordance with the Operating and Maintenance Instructions. The warranty on replacement consumable items (such as sensors) supplied under warranty to replace faulty items, will be limited to the unexpired warranty of the original supplied item. Crowcon reserves the right to determine a reduced warranty period, or decline a warranty period for any sensor supplied for use in an environment or for an application known to carry risk of degradation or damage to the sensor. Our liability in respect of defective equipment shall be limited to the obligations set out in the guarantee and any extended warranty, condition or statement, express or implied statutory or otherwise as to the merchantable quality of our equipment or its fitness for any particular purpose is excluded except as prohibited by statute. This guarantee shall not affect a customer's statutory rights. Crowcon reserves the right to apply a handling and carriage charge whereby units returned as faulty, are found to require only normal calibration or servicing, which the customer then declines to proceed with. For warranty and technical support enquiries please contact: Customer Support Tel: +44 (0) 1235 557711 Fax: +44 (0) 1235 557722 Email: [email protected] GasMaster Regional addresses Regional addresses UK Office Crowcon Detection Instruments Ltd 2 Blacklands Way Abingdon Business Park Abingdon, Oxfordshire OX14 1DY Tel: +44 (0) 1235 557700 Fax: +44 (0) 1235 557749 Email: [email protected] Website: http://www.crowcon.com USA Office Crowcon Detection Instruments Ltd 21 Kenton Lands Road, Erlanger, Kentucky 41018-1845 USA Tel: +1 859 957 1039 or 1 800 5 CROWCON Fax: +1 859 957 1044 Email: [email protected] Website: http://www.crowcon.com Rotterdam Office Crowcon Detection Instruments Ltd Vlambloem 129 3068JG, Rotterdam Netherlands Tel: +31 10 421 1232 Fax: +31 10 421 0542 Email: [email protected] Website: http://www.crowcon.com Singapore Office Crowcon Detection Instruments Ltd Block 192 Pandan Loop #05-01 Pantech Industrial Complex Singapore 128381 Tel: +65 6745 2936 Fax: +65 6745 0467 Email: [email protected] Website: http://www.crowcon.com 39 Crowcon Detection Instruments Ltd 2 Blacklands Way Abingdon Business Park Abingdon, Oxfordshire OX14 1DY Tel: +44 (0) 1235 557700 Fax: +44 (0) 1235 557749 Email: [email protected] Website: http://www.crowcon.com