1
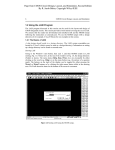
Lab 4 – User Manual
Red Team
April 29, 2013
Version 2
Table of Contents
Startup Screen (Dustin Patrick) ...................................................................................................2
Create Project...........................................................................................................................................3 Load Project..............................................................................................................................................3 Project Preview Screen (Scott Minter) ........................................................................................4
Results Screen (Brittany Johnson) ...............................................................................................5
Menu Bar (Erik Rogers)................................................................................................................5
Table of Figures
Figure 1. Startup Screen.................................................................................................................. 4
Figure 2. Create............................................................................................................................... 5
Figure 3. Load................................................................................................................................. 5
Figure 4. X to close......................................................................................................................... 6
Figure 5. Create Project .................................................................................................................. 7
Figure 6. Name ............................................................................................................................... 8
Figure 7. Location........................................................................................................................... 9
Figure 8. Document ...................................................................................................................... 10
Figure 9. After A Document Has Been Added ............................................................................. 11
Figure 10. Create New Project...................................................................................................... 12
Figure 11. Cancel New Project ..................................................................................................... 13
Figure 12. Project Preview Screen................................................................................................ 14
Figure 13. Top Results.................................................................................................................. 17
Figure 14. Word Count and Weighting ........................................................................................ 18 Figure 15. Recomposed Document............................................................................................... 18 Figure 16 Key Relationships......................................................................................................... 19 (This space intentionally left blank)
Startup Screen (Dustin Patrick) LASI is a tool for parsing up to five documents for important words and phrases based on
meta-analysis of all documents. The start-up screen is the first thing you see when you open the
program. It will load with a Windows 8 style window screen (Figure 1), where the window can
be moved by clicking anywhere that is not a button and dragging the screen to the desired
location. It has a minimalist design that contains a graphic banner containing the name of the
program and an image of a silhouette of a collie. The start-up screen only contains three buttons.
From this screen you can create a new project or load an existing project. Clicking on either the
Create button (Figure 2) or the Load button (Figure 3) will expand the start-up screen to allow
you to create a new project. In the current version of LASI the load project button does not have
any function . In future versions the user will be able to load saved LASI projects. There is also
an X button (Figure 4) at the top right corner of the application that terminates the program when
clicked. Figure 1. Start-up Screen
Figure 2. Create
Figure 3. Load
(Space intentionally left blank)
Figure 4. X to close
Create Project
The Create Project screen (Figure 5) will provide a text field to name your project, called
“Name” (Figure 6). Next, there is a browse button (Figure 7) to allow you to select the
destination folder for the project, called the “Location”. Finally, there is a text field connected to
a browse button called “Documents” (Figure 8) where you can find and add documents to the
project. A list of already added documents will be displayed on the right (Figure 9) of these
options. You can remove documents from this list. Once you add five documents, the
“Documents” field will be grayed out and you will no longer be able to add documents. If you
attempt to name a project the same name as another project, a message will be displayed that
indicates that you can not do that. If you attempt to use a location on your computer that has
already been created by another project, a message will display indicating that you can not do
that. If you leave any of the fields blank, or don’t select any documents, the application will point
out which fields need to be filled out before you can create a project. You can also select
“Create” (Figure 10) or “Cancel” (Figure 11), which are located below the Name, Location, and
Documents fields. Create will take you to the project preview screen. Cancel will return you to
the start-up screen. Figure 5. Create Project
(Space intentionally left blank)
Figure 6. Name
(Space intentionally left blank)
Figure 7. Location
(Space intentionally left blank)
Figure 8. Document
(Space intentionally left blank)
Figure 9. After A Document Has Been Added
(Space intentionally left blank)
Figure 10. Create New Project
(Space intentionally left blank)
Figure 11. Cancel New Project
Load Project
This feature has not yet been implemented. However, it will contain a similar text field
associated with a browse button that will allow you to browse your computer for a file created by
exporting the results of LASI analysis to a file.
(Space intentionally left blank)
Project Preview Screen (Scott Minter)
The project preview screen allows the user to preview the documents they have loaded
into a LASI project. A screen shot (Figure 12) has been provided so you may see where the
items being discussed here are located. The text of each document can be previewed by clicking
on the tab of the same name. If a document, or multiple documents up to five, need to be added
to the project you may add them by clicking the “+” button and selecting the document you wish
to add from your PC. Likewise, if documents need to be removed from the project you may
remove them by clicking the “-” button while the tab of the document you wish to remove is
selected. If you wish to go back to the previous screen you may do so by pressing the “<-”
button. If you are satisfied with the documents in the project and wish to start analysis pressing
the “I > Start” button will start analysis on the selected documents.
Figure 12. Project Preview Screen
In-Progress Screen (Erik Rogers)
Once you have clicked “I > Start” the Project Preview Screen will close, LASI will begin
analysis, and you will be redirected to the In-Progress Screen. The function of this screen is to
provide you with up-to-date information on how far along the analysis process LASI currently is.
The In-Progress screen consists of a Progress Bar, Moving Paw Prints, Minimize and Close
buttons, as well as a Proceed button.
Progress Bar
Located at the bottom of the screen, and spanning the entire width of the window, is the
Progress Bar. When LASI first beings analysis, this bar will be completely empty (representing
0% progress). As LASI crunches away, the bar will begin to fill. When the bar is filled
completely (representing 100% progress), analysis is complete and your results are ready to
view.
Just above the progress bar (off-centered to the left), text will be displayed in order to
keep you updated on the current state of analysis. When this display says “Complete”, analysis
is complete and your results are ready to view.
Moving Paw Prints
Along with the LASI logo comes a trail of animated paw prints. The moving paw prints
are there to show the user that LASI has not frozen and that analysis is still in progress.
Minimize Button
Located at the top right of the screen is the Minimize Button. This button, containing a
horizontal line segment that resembles a dash or underscore, will minimize the In-Progress
Screen. Minimizing the screen will compact and return it to your Windows’ task bar.
Close Button
Located at the top right of the screen is the Close Button. This button, containing an ‘x’
or a cross, will terminate the analysis and close LASI (including your current Project and all
Files associated with it). All unsaved changes or progress will be lost.
Proceed Button
When analysis is complete (the Progress Bar is full and the state status text reads
“Complete”) a button, containing the text “Proceed”, will appear just above the Progress Bar on
the right side of the screen. This button signifies that your results are ready to view. Use of this
button will terminate the In-Progress Screen and redirect you to the Results Screen.
Results Screen (Brittany Johnson)
The Results Screen contains four main tabs which will display the results from the
analysis in different ways. The first is the Top Results (Figure 13) tab which will contain the top
results for nouns identified as important in chart forms. The next tab is the Word Count and
Weighting tab (Figure 14). This will dislay the exhaustive list which composes the Top Results
tab, including the words and their respective weights. Then there is the Recomposted
Documents tab (Figure 15). This shows the relationships between words in the entire document.
Currently if you hover over a verb phrase and right click. It will display an option to view the
subjects or objects of that verb phrase if it has one. Figure 13. Top Results
Finally, there is the Key Relationships tab (Figure 16). This tab will display Subject/Object/Verb
relationships which analysis have shown to be important. Currently, the longer the document the
better the results will be in this tab.
(Space intentionally left blank)
Figure 14. Word Count and Weighting
Figure 15. Recomposed Document
Figure 16. Key Relationships
(Space intentionally left blank)
Menu Bar (Erik Rogers)
In the current version of LASI the only item in the menu which functions is the File > Exit
option. Below is a list of the menu features which will be implented in future version of LASI.
File |
| New
Use this selection to either create a new Project from scratch or to create a new
parsable File to add to your current project. You will be prompted to save your
Project or File. Once saved, you can use the Open feature to retrieve the Project
or File in the future.
| Open
Use this command to open a previously saved Project or parsable File. You will
be prompted to find the location of said Project or File.
| Add
Use this command to add a pre-existing, parsable File to your current Project.
You will be promoted to find the location of said File.
| Save Project As
Use this command to save your current Project to a specific file name or in a new
location.
| Save Project
Use this command to save your current Project
| Exit
Use this command to end your LASI session. If any unsaved changes have been
made to your current Project, you will be prompted to save them.