1
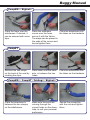
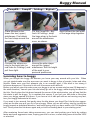
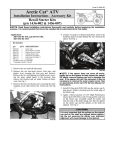
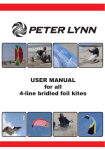
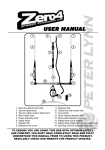
BUGGY
USER MANUAL
FOR:
Congratulations!
Thank you for purchasing a Peter Lynn product. This Peter Lynn product has been designed
by one of the world’s foremost designers of power-kites and buggy equipment and is constructed to give you many years of fun and joy.
You are now the proud owner of a Peter Lynn buggy, which has been designed for use on
land. Please read this manual carefully before using the buggy for the first time in order to
get the best result and to ensure the safety of yourself and others. Please keep this manual
together with your Peter Lynn buggy for future reference.
Traction kiting is a growing sports activity across the globe with product innovation and technical development evolving fast. To learn more about this exciting sport and about the complete
Peter Lynn product range, please visit www.peterlynn.com
1
2
3
4
6
Competition XR+
1. Backaxle
2. Sideframe (set of left & right, incl. 2x 10mm bolts & nuts)
3. Downtube (incl. 2x mushroom spacer)
4. Fork (incl. 10mm bolt & nut and 12mm bolt, nut & spacers)
5. Footpeg (2x)
6. Seat
7. Foam (2x) and sideframe covers (2x, incl. 4x tie-wrap)
8. Wheels (3x, incl. 2x 20mm rear bolts)
7
8
5
1
2
3
4
6
7
5
1b
1c
2
1a
3
4
7
6
8
Competition ST
1. Backaxle
2. Sideframe (set of left and right, incl. 2x 18mm bolts & nuts)
3. Downtube (incl. 2x mushroom spacer)
4. Fork (incl. 8mm bolt & nut and 12mm bolt, nut & spacers)
5. Footpeg (2x)
6. Seat
8. Wheels (3x, incl. 2x 12mm rear bolts)
5
1
2
3
4
6
Folding+
1. Sideframe assembly (set of left & right, incl. 2x 10mm bolts
& nuts) consisting of:
1a. Sideframe (front section)
1b. Sideframe (rear section)
1c. Rear tube
2. Upper sideframes (2x)
3. Downtube (incl. 2x mushroom spacer)
4. Fork (incl. 10mm bolt & nut and 12mm bolt, nut & spacers)
5. Footpeg (2x)
6. Seat
7. Foam (2x) and sideframe covers (2x, incl. 4x tie-wrap)
8. Wheels (3x, incl. 2x 20mm rear bolts)
Bigfoot+
1. Backaxle
2. Sideframe (set of left & right, incl. 2x 10mm bolts & nuts)
3. Kinked downtube (incl. 2x mushroom spacer)
4. Fork (incl. 10mm bolt & nut and 12mm bolt, nut & spacers)
5. Footpeg (2x)
6. Seat
7. Foam (2x) and sideframe covers (2x, incl. 4x tie-wrap)
8. Wheels (3x, incl. 2x 20mm rear bolts)
7
8
5
All buggies are supplied with:
• Set of tools to assemble and disassemble your buggy
• Instruction manual
• Stickers (different for each buggy)
Buggy Manual
Safety
CAUTION: Kite powered sports can be very dangerous and physically demanding. The user of
this product should understand that participating in kite powered sports may cause serious injury
or death and agrees to observe the safety precautions listed below:
Safe location and weather conditions:
• Do not fly kites near power lines, roads, airfields, railways etc.
• Do not fly kites on crowded beaches and certainly not over bystanders.
• Only use your buggy in areas where there is a lot of free space, where no other
people are present.
• Do not fly during lightning or stormy weather conditions or in offshore winds.
• Make sure there is a ‘clear’ downwind area at least three times the distance of your
flying line length.
• Make sure you use your buggy in areas where this kind of sporting activity is allowed.
Safe traction kiting:
• Traction kites are no toys, they should not be flown by inexperienced persons and
certainly not by children.
• Learn to fly kites with smaller models and start in light winds.
• Never use kites for paragliding or parachuting.
• Never use any type of kite or kite accessory for jumping off high places like hills or
cliffs, or any other manlifting activity.
• Do not use a kite that is too big considering your weight, experience and wind conditions. Ask for advice from an experienced user when in doubt.
• Never attach yourself permanently to the kite
Safe buggy riding:
• Learn to fly and control the kite completely before using it in a buggy or on a landboard.
• Always use fully protective gear when buggy riding, landboarding or snowkiting.
We strongly recommend the use of helmet, knee- and elbow pads, shoes that fully
cover your feet, and a set of impact shorts.
• Do not strap yourself to a buggy.
• Always make sure your buggy is in good condition, no parts are worn and bolts are
properly tightened.
We strongly recommend you to have a third party liability insurance that covers kite
flying and kite buggying.
This manual has been made as a guide for four different buggies. Please note that not
all steps in this manual may be relevant to your buggy. All steps are accompanied by
the buggy model name on top of each section. Only follow the steps which are relevant
to your buggy model.
Before you start assembling your buggy, please note the following:
Do not over tighten bolts - When overtightening bolts or nuts the thread could get
damaged making it impossible to take your buggy apart or re-assemble it next time.
Make sure bolts and nuts are free of sand - Sand can damage the thread of the bolts
and nuts or make it impossible to assemble or disassemble your buggy. When it is suddenly a lot more difficult to tighten a bolt or nut, do not continue by exerting more force.
Unscrew the bolt and check if the thread is free of sand or other dirt.
For the first time, assemble the buggy at home - Check if you fully understand the assembling procedure by making your first assembly at home, where you may have more
time and a clean area.
CompXR+ - CompST - Folding+ - Bigfoot+
Place the front wheel in
the front fork. Push the
bolt through one side of
the fork, one spacer and
into the bearing.
Push the bolt through the
wheel, through the spacer
and fork. Secure it with the
nut, but do not tighten it
fully yet.
Place the footpegs into the
tubes on both sides of the
fork, making sure the pin
clicks in place.
Place the mushroom
spacers in the downtube.
Place the downtube with
spacers in the fork, and
secure it with the bolt and
nut. Tighten the nut.
Now tighten the front
wheel.
Buggy Manual
CompXR+ - Bigfoot+
Place the foam over the
sideframes. If desired, it
can be secured with some
tape.
Place the sideframe
Place the sideframes into
covers over the foam,
the tubes on the backaxle.
secure it with the Velcro.
Tie-wraps can be placed in
the ends of the covers and
hence tighten them.
CompST
Remove the two straps
on the back of the seat by
undoing the clips.
Place them over the backaxle, in between the two
tubes.
Place the sideframes into
the tubes on the backaxle.
CompXR+ - CompST - Folding+ - Bigfoot+
Place the downtube in
between the two clamps
on the sideframes.
Make sure the bolts are
Secure the connection
running through the
with the nuts and tighten
correct holes on the down- them.
tube, to suit your personal
preference.
Folding+
Place the foam over
the upper sideframes. If
desired, it can be secured
with some tape.
Place the sideframe
Connect the two halves of
covers over the foam,
the rear tube together
secure it with the Velcro.
Tie-wraps can be placed in
the ends of the covers and
hence tighten them.
Place the front of the upper sideframes into the
tubes on the sideframes.
Hook the other ends of the
upper sideframes onto the
rear tube hook.
CompXR+ - CompST - Folding+ - Bigfoot+
Place the rear bolts
Screw the bolts with wheel Tighten the bolt properly
through the bearings in the into the end of the backax- using the wrench
buggy wheel.
le (or end of the sideframe provided.
for Folding+).
Buggy Manual
CompXR+ - CompST - Folding+ - Bigfoot+
Place the seat in between the two (upper)
sideframes. First attach
the front strap around the
downtube.
For the CompXR+, Bigfoot+ & Folding+, wrap
the large strap in the back
around the sideframes
once, as shown.
Connect the straps running to the back axle (or
rear tube for Folding+) and
pull them tight.
Secure the side straps
around the (upper)
sideframes. Set the height
of the seat to your
personal preference.
Now connect the two ends
of the large strap together.
Learning how to buggy
When you bought this buggy we assume you know your way around with your kite. When
you get started make sure the area were you want to buggy is free of people, holes and other
objects. Make sure your first attempts are in an average wind; if the wind is too strong it
becomes dangerous, if the wind is too soft it becomes more difficult.
Before you launch your kite make sure your buggy is set on a cross wind course (90 degrees to
the wind direction). Launch your kite and slowly go sit in the buggy, while staying focussed on
the kite. Gently steer the kite down towards the corner of the wind window, you will see that the
kite starts to pull the buggy. Try to maintain this course. If you feel your kite stalls or flies slow
steer your buggy upwind a bit more. If you have a lot of side pull and are not moving very fast,
turn your buggy downwind a bit more.
If you want to turn around, first gently steer the kite above your head. Don’t do this too aggressively as the kite may pull you out of your buggy. When you are still rolling, start by turning the
buggy towards a downwind direction, and keep turning until you have made a full 180 degrees
turn. Gently steer the kite down again and you will be heading back to your starting point.
After mastering these basic riding manoeuvres, you can start pushing your limits by making
faster and more aggressive turns, looping your kite in a turn, or start doing some tricks like 360’s
or wheelies!
Transporting your buggy
To transport your buggy from your car, house or whatever place to your favorite flying spot it’s
easiest to use the specially made ‘walk-of-shame’ line. This way you can pull your buggy while
using it to transport the rest of your gear.
When taking your buggy in a car, you will see that most of the time it’s sufficient to remove the
backaxle together with the back wheels. Just undo the bolts and nuts a bit that connect the downtube to the sidebars and undo the seat clips that go to the axle. This is the least time consuming
way. If this is not sufficient yet, just undo the bolts that connect the down-tube to the sidebars
completely and now it will fit even into the smallest car.
Maintenance
Frame
This buggy’s frame is made of durable stainless steel and almost doesn’t need any
maintenance. If your buggy is very dirty clean it with water and wipe it dry with a cloth.
After and before you use the buggy please check the frame for any damages.
Seat
The seat can be cleaned with water, or thrown in the washing machine if it’s really
dirty. Make sure it is completely dry before storing it. Also inspect your seat for wear
and tear and make sure you fix it or replace it in time.
Wheels
After use, you can hose down you wheels to clean them. The wheels ae not likely to
get damaged easily. Of course the tires can wear out or get punctured but this is easy
to fix or replace. If you think you can’t do it yourself just go to the nearest tire centre.
Always check your rims for damage. If they are damaged you have to replace them,
they can’t be fixed.
Bearings
Bearings make the difference between a smooth ride and a terrible ride.
Always check your bearings before a day of buggy driving. If they lock up it will spoil
your day and in the worst case melt away your rims. If the bearing does not spin
easily or if it has a lot of sideways movement replace it. Don’t forget there are also 2
bearings in your down-tube, they are not as sensitive to wear as the bearings in your
wheels but make sure you check them once in a while.
Warranty
This Peter Lynn buggy has been designed and built for all round traction kiting purposes. Being
made of first class materials, it has been thoroughly tested and approved by Peter Lynn
designers and testers. The buggy is warranted to be free of major defects in materials or
workmanship to the original purchaser for a period of six months. Damage as a result of
jumping, or due to crashes is not covered. Peter Lynn shall not be responsible for any costs,
losses, or damages incurred as a result of using this product.
Feel free to ask your Peter Lynn dealer for the Peter Lynn warranty statement.
In case you may find any problems with your new buggy, please contact your local dealer.
More information about Peter Lynn Products
There is a whole line up of parts and pieces available for your Peter Lynn buggy. Different
wheels, forks, axles, you name it. To find out what parts exactly are available for your buggy
please contact your local dealer. For more general information about Peter Lynn Products please
visit our website: www.peterlynn.com