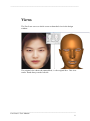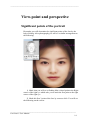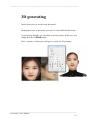
1
___________________________________________________________________________
FaceLaser 6.0
®
User’s Manual
Pantomat Ltd.
________________________________________________________________________
FaceLaser’s User Manual
1
___________________________________________________________________________
May 2011
Author’s copyright holder of the FaceLaser program is the Pantomat Ltd. © Pantomat
2002-2011.
Publishing copyright holder of the FaceLaser program is the Pantomat Ltd. © Pantomat
2011.
The base of the FaceLaser software is the patented procedure of Pantomat:
P0200767 - METHOD OF PRODUCING THREE-DIMENSION AL MODEL OF A
HUMAN HEAD ON THE BASIS OF A TWO-DIMENSIONAL PICTURE – HPO2002, PANTOMAT
Copying, merchandizing, public exhibiting or other commercial utilization of the
software without
licence is strictly prohibited.
The FaceLaser User’s Manual is under global author and publishing copyright.
© 2011 Pantomat
Copying, extraction or translation to another language is forbidden without the written
approval of the holder of this right.
Pantomat Ltd.
H-1143 Budapest, Zászlós utca 54.
Tel.: (+36 1) 246 1843
Web:
www.pantomat.com
E-mail:
[email protected]
THE PANTOMAT IN NO CASE IS RESPONSIBLE FOR THE DIRECT OR
INDIRECT
DAMAGES ARISING FROM THE USAGE OF FACELASER PROGRAM OR THE
FACELASER USER’S MANUAL.
The Pantomat and the FaceLaser are the registered trademarks of Pantomat Ltd.; the
Windows is the trademark of the Microsoft Inc.
The manual and illustrations were made using the OpenOffice.org Writer and the
FaceLaser programs.
________________________________________________________________________
FaceLaser’s User Manual
2
___________________________________________________________________________
Introductory
FaceLaser is the individual and patented product of Pantomat.
The program generates a 3-dimensional model from the human face.
________________________________________________________________________
FaceLaser’s User Manual
3
___________________________________________________________________________
About the manual
Chapter 1 introduces the FaceLaser working environment.
Chapter 2 leads you along the FaceLaser program highlighting some of its
features. In this chapter you get an outline about the theories and
procedures needed for the usage of FaceLaser, and you get to know the
logic of the 3D face-making.
Chapter 3 acquaints you with the user surface of the FaceLaser giving a
detailed description about the techniques you need during the use of tools
and the menu commands. We propose to accurately study over this chapter,
while the subject Chapter 4 and 5 assumes you have been familiarized with
all of the procedures described here.
Chapter 4 gives a detailed description about the FaceLaser Tools. It
introduces the tools, and it familiarizes you with usage the edit tools step by
step.
Chapter 5 treats the FaceLaser Menu. It familiarizes you with the menu
commands, and gives a detailed description about their use.
________________________________________________________________________
FaceLaser’s User Manual
4
___________________________________________________________________________
System requirements
Needed hardware
For running the FaceLaser need a normal Windows based computer.
Needed system software
The FaceLaser runs under the following system softwares:
Win2K, Win XP, Vista or Windows 7 operational system software.
________________________________________________________________________
FaceLaser’s User Manual
5
___________________________________________________________________________
Installing of the FaceLaser
Start the program.
Protection of FaceLaser
For the use of the FaceLaser you need a valid Serial Number.
________________________________________________________________________
FaceLaser’s User Manual
6
___________________________________________________________________________
1
FaceLaser workstation
This chapter introduces the FaceLaser working environment.
It helps in familiarizing you with the components of FaceLaser workstation
and understanding their task.
The FaceLaser program is designed to contain all tools, which are
necessary for preparing, editing and modifying the face.
When the program starts, the FaceLaser workstation appears on the screen
including the Design window.
Design window
The design window contains the face. You can move or enlarge the window
at any time within the whole working surface to make you able to work in
the most comfortable view.
________________________________________________________________________
FaceLaser’s User Manual
7
___________________________________________________________________________
Views
The FaceLaser serves a whole-screen or detached view in the design
window.
The original view shows the unmodified, i.e. the original face. This view
can be found always on the left side.
________________________________________________________________________
FaceLaser’s User Manual
8
___________________________________________________________________________
Menu bar
The above picture of the Menu bar shows the name the rolling menu of the
FaceLaser.
Selecting a menu the list of the respective menu command appears.
The menu commands are detailed later.
________________________________________________________________________
FaceLaser’s User Manual
9
___________________________________________________________________________
Use of the mouse
During the work in FaceLaser the face can be moved in the active window
by the help of the right button of the mouse, while by the help of the middle
button you can enlarge or reduce the picture.
Comment:
If you have a roller mouse, then the task of the middle button is executed by
the upward and downward movement of the roller.
________________________________________________________________________
FaceLaser’s User Manual
10
___________________________________________________________________________
2
FaceLaser logic
In this chapter you get an overview about the theories and procedures being
necessary for the usage of the FaceLaser.
You can find here the detailed description of the operations also, which
cannot be connected directly to any command.
On the next pages you can be familiarized with some important operations
of the work made by the FaceLaser.
It is very important to get to know the 8 phases of the work, which are the
following:
1. Step: Selection of Portrait
2. Step: Adjustment of View and perspective
3. Step: Editing, transformation
4. Step: 3D generation
5. Step: Selection of the Side Portrait
6. Step: Moving the 3D head to its place
7. Step: Editing, transformation
8. Step: 3D generation
________________________________________________________________________
FaceLaser’s User Manual
11
___________________________________________________________________________
Start the work
Selecting the portrait
The input data of the face model can originate from digital camera,
scanner or the Internet. The FaceLaser supports the best-known picture
formats, so it reads in the jpg, tiff, gif, bmp, png and pcx files.
After selecting the photo you must appoint the borders of the face in
the appearing window. This function is very important, if – for example
– you want to choose one face from a photo of a group.
You can also rotate or mirror the photo.
________________________________________________________________________
FaceLaser’s User Manual
12
___________________________________________________________________________
TempMan
The key of the operation and right usage of the FaceLaser is to understand
the role, function and task of the template head – shortly TempMan – in the
program.
One-sentence summary of operation of the program:
It makes 3D from 2D, i.e. it calculates the dimensional, i.e. the third, “z”
co-ordinate of the subsequent glass cube.
It is clear, that a photo contains only planar, i.e. 2D (x, y) co-ordinates. The
third co-ordinate is calculated by the FaceLaser on the basis of the
patented process of Pantomat.
Essential of the procedure:
The program operates a solid, i.e. compact dimensional 3D head
(called TempMan) in the background.
In the first step the FaceLaser searches for the camera adjustment
(position and angle); optic (angular field and focus), from where
the photo of the TempMan would be similar to the face to be
processed.
In the second step the FaceLaser modifies, continuously processes
and transforms the TempMan, until when the photo to be made
from the transformed TempMan from the camera position found
earlier will be the same as the original.
________________________________________________________________________
FaceLaser’s User Manual
13
___________________________________________________________________________
View-point and perspective
Significant points of the portrait
Hereunder you will determine the significant points of the face by the
help of dialog. After photography you will see a similar arrangement as
the following:
1) Mind, that you will see a flashing blue-colored point at the Right
corner of the right eye which asks you to mark the first point to the right
corner of the right eye.
2) Mark this first 3 point of the face by a mouse click. You will see
the following on the screen:
________________________________________________________________________
FaceLaser’s User Manual
14
___________________________________________________________________________
3) Mind that the flashing blue-colored point and the „bridge of the
nose” label asks the point of the bridge of the nose.
4) Mark these points of the face. Click on the face on the right side.
5) After then the software continuously asks for the significant
points.
Further on you can modify the significant points at any time.
It is not necessary to determine every point exactly. For example: on the
above picture the left ear is out of sight, so it is impossible to mark it, and it
is unnecessary. You can clear this point by Delete button.
________________________________________________________________________
FaceLaser’s User Manual
15
___________________________________________________________________________
TempMan modeling
For going to the next part of modeling, just simply push the Next>>
button.
Then you can notice that the view-point of the TempMan and the photo is
the same.
________________________________________________________________________
FaceLaser’s User Manual
16
___________________________________________________________________________
Editing and transformation
Significant profiles and lines of the
portrait
Hereunder you will determine the profiles and lines of the face by the help
of the dialog.
It is clear, and it can be seen on the figure also, that every face – so the
TempMan also – has such important and significant lines, which are
independent of the settings. Such are the lines of the blue-colored eye on
the right side of the figure, the eyebrow and the lips. But the lines of the
profiles and the nose are different in every view-point.
Your task is to draw the significant lines of the selected face (which are
listed in the dialogue) and the profile and nose contour of the TempMan.
________________________________________________________________________
FaceLaser’s User Manual
17
___________________________________________________________________________
The drawing and modifying procedures can be found in the next chapter.
Modifying and transformation of the
TempMan
After drawing the significant lines and curves you can simply push the
Next>> button.
________________________________________________________________________
FaceLaser’s User Manual
18
___________________________________________________________________________
3D generating
In this phase you can see the ready the model.
Pushing the button of the mouse you can see it from different directions.
If you find any mistake you can return to previous phase. In this case just
simply push the <<Back button.
Here’s a picture of what you could get as a result for 3D geometry:
________________________________________________________________________
FaceLaser’s User Manual
19
___________________________________________________________________________
3
FaceLaser operations
This chapter introduces the phases of the work executed by the help of the
FaceLaser by a simple, but complete example.
It answers to execute the functions described here in the following
sequence:
- Firstly you can select and read in a portrait
- You can mark the most important points of the face
- You can search for the camera position
- You can try out the different drawing methods
- You can get to know the model editing
- After then you can practice the face- beautifying and –evening
procedures
- Finally, you can save your work in order to use it later
________________________________________________________________________
FaceLaser’s User Manual
20
___________________________________________________________________________
This chapter introduces the FaceLaser working environment. It helps in
familiarizing you with the components of FaceLaser workstation and
understanding their task.
The FaceLaser program is designed to contain all tools, which are
necessary for preparing, editing and modifying the face.
When the program starts, the FaceLaser workstation opens a small window
where you can choose a picture from your computer to work with. When
you choose the right one, you can adjust some parameters on your picture
before you start to work with it in the Design Window.
You can rotate your picture left or right with 90 degrees and with two other
buttons you can rotate them a little, too (about 5 degrees). You can also flip
your picture horizontally or vertically. You can even make some notes for
your picture. If there is something that you don’t understand, you can click
on the question mark so the manual (this) will appear (maybe you read it
now because you just clicked on it). After you adjust your image perfectly
you will go to the Design Window.
Design Window
The design window contains your selected face and a smaller window in
the left upper corner of the window. You can move or enlarge the window
at any time within the whole working surface to make you able to work in
the most comfortable view.
________________________________________________________________________
FaceLaser’s User Manual
21
___________________________________________________________________________
For example, you are not satisfied with the size of your image, just click on
it with the left button and scroll with your mouse’s middle button.
Attention! If you click on a random part of your picture in this state, the
program will put a red point there so in order to continue properly, first you
will have to click on the smaller window’s Undo button.
If you dislike your picture’s new size you can reset it with the small
window’s Fit button.
You can make notes in this phase of your work, too just clicking on the
same note button.
Now if you’re finished with your picture’s size adjustment, you can start
selecting the given points in the small window by clicking on the right
areas of your picture. For example, if you can see in the small window that
the head’s right eye’s outer corner has a blue point means that you have to
click on your picture (the front side) to your face’s right eye’s outer corner.
It is just that simple.
After giving three points, all the other points will appear.
________________________________________________________________________
FaceLaser’s User Manual
22
___________________________________________________________________________
In this phase you have to fit all the other dots appear on your picture to the
picture’s right places.
If you’re done with this part, you can click on the Next button. After
clicking the Next button you will see the precomputed geometry on the
________________________________________________________________________
FaceLaser’s User Manual
23
___________________________________________________________________________
right side of FaceLaser’s window, your picture on the left side and an other
small window as seen bellow:
In this part you can modify your precomputed geometry’s geometry with
further settings just to make it more familiar with your picture. You can
skip this part after any step by clicking the Next button.
Now in the small window you can see the face’s right eyebrow highlighted
with blue. This means that you have to draw the line of the right eyebrow
on your picture. You can start the drawing by clicking with your left mouse
to the part of the picture where you would like to start the drawing. You
can finish the drawing part by clicking with your mouse’s right button.
When you do that the drawing’s next phase will come: in our case it will be
the left eyebrow. After it will come the right eye, then the left eye etc.
Whenever you think that you want to start this whole drawing part from the
beginning, just click on the Undo button. And don’t forget, you can always
skip this part!
But just before skipping, let me mention the available functions here.
First of all, you can always click the Save button (which looks like an old
floppy disk): it will open a new window so you can give a name of your
new file. With the next button you can create notes for your work (this
button looks like a notepad). You can zoom in and out with the next
buttons: for example if you want to zoom in, you click once on the Zoom In
button and then you highlight a part of your picture so that part will be fit to
the window. Zoom Out button works just like this. You can move your
picture with the Pan Button. Anyway if you feel that you’ve made your
picture’s new size wrong you can reset it with the Fit Button: it will fit your
picture to the window and will look like just when you entered this phase of
making your own 3D face.
________________________________________________________________________
FaceLaser’s User Manual
24
___________________________________________________________________________
For some help, you will have a button for this manual, and an other one for
some online videos to make your work easier. You have a button for some
info about our program (this button looks like an original letter “i”). The
next buttons are more interesting.
With the Color/BW button you can change your picture into a black-andwhite picture. At some pictures it makes this kind of work easier. If you
feel uncomfortable with this you can always change back to the color
version with the same button.
With Contrast/Brightness you can change the black-and-white picture’s
contrast and brightness: a smaller window will open where you can set
these parameters of your picture. If you want to apply the new settings, just
click the Set button. You can close this window by clicking the Close
button. And remember: if you prefer the color version of your picture, just
click Color/BW again.
With the Edge Drawing tool you can modify your picture: it makes your
picture more monochrome than just having colors black and white.
The most complex function lies under the Properties button: here you can
change the parameters of the curves. You can try to change all these
properties and see your geometry changing without worrying about making
it wrong, because you have a Default button so you can change it back to
the default setting whenever you want.
After finishing with this part of the face making, you can click the Next
button. Now you will see that your geometry is changed (depending on how
much you changed it in the previous part) and a texture is applied. You also
have a new small window for the new functions as seen bellow:
________________________________________________________________________
FaceLaser’s User Manual
25
___________________________________________________________________________
On the Size panel you can give the size of the laser cube (in the case that
you want to make a laser cube). You have the chance for giving a unique
value with choosing the Other parameter.
You can also give the resolution too in the Resolution part. The smaller the
dXY and dZ the bigger detail that you get (the default is the best value).
As at the previous part of making your own 3D face, you can do the same
things for Saving, Noting, Zooming in and out, and you can also move your
picture and even fit with the correct buttons.
You also have the Manual, Video and Info buttons, too.
With Color/BW now you will change the color of the 3D model and not the
picture’s color into black-and-white and then back to color.
With Delta Z you can give a new Z coordinate for your model so it will
look like it’s further or nearer.
Don’t forget, if you change your mind and you want to go back to the
previous part to make some other changes on the geometry, you can do that
with the Back button.
If you would like to save your results into a basic 3D model which can be
read by several 3D modeling programs, click the Export button. It will
create an .obj file for you.
If you want to finish your work, you can click the OK button. Here the
program will ask you whether you want to quit or not. If you would like to
do that, just click OK.
But if you want to try the newest function FaceLaser 6, click the Profile
button.
If you click the Profile button, a new window will be opened for you to
select your picture that is taken from your profile. In my case, I will select
the same picture because the right part of my picture is the profile picture.
Now here you can do the same flipping, rotating and moving etc. functions
that you could do when you opened your first picture. If you chose a wrong
picture, just click the Back button. But if you’re done with matching your
picture, click the Next button.
Here you will get to the part where you can rotate and move (and zoom)
your geometry for you to be easier the profile face making in the later steps.
________________________________________________________________________
FaceLaser’s User Manual
26
___________________________________________________________________________
For example: the beginning step can be seen bellow:
And from this you can move the geometry by clicking anywhere with the
mouse’s right button; you can zoom in and out by scrolling your mouse’s
wheel, and you can rotate it. If you left click into the geometry, you will
rotate your geometry differently than how you rotate it if you click outside
your geometry (it will be a Z-axis-rotate, the other click will be among X or
Y rotate). So you should get about the same result:
________________________________________________________________________
FaceLaser’s User Manual
27
___________________________________________________________________________
If you’re done with this, just click the Next button. Here we get to a new
part.
Here you can do the same things where you had to draw the eyebrows, eyes
etc. because this part is very familiar. Here you have to draw the
highlighted blue lines just at the eyebrow part. Remember, you can save
your work at any time in order to prevent any data loss.
At the ending of this part, you should get something like this:
Take notes of the green lines, those are drawn in this section. If you’re done
with this part, click the Next button. Your geometry will be changed, and
you will have a new part which will be similar to a previous one:
________________________________________________________________________
FaceLaser’s User Manual
28
___________________________________________________________________________
Here you can make the same settings just at a previous part of this tutorial:
you can change the Size and Resolution to make your results into the Laser
Cube. You can also change some other things like the size of the picture,
and some other things that were mentioned before. You can save your
results now with the Save button (the floppy disk), and export it too with
the Export button into a .obj file.
If you’re done with everything, just click the OK button. You can choose
here whether you want to quit from this program now, or not.
And that’s it, congratulations! You just made through the tutorial and made
your first own 3D face with FaceLaser 6!
________________________________________________________________________
FaceLaser’s User Manual
29
___________________________________________________________________________
4
Icons
In this chapter you get overview about icons of the FaceLaser and a
detailed description about the use of all control tools listed here.
For some command there is key-board combination also. Using them the
same result can be reached as by clicking on the tool.
The key-board combinations are listed in the Appendix also beyond the
description of the given tool.
At certain tools the description is accompanied by useful advices also.
This User’s Manual is not a workbook; even so it supposes that you have
acquired the knowledge of the previous chapters yet.
________________________________________________________________________
FaceLaser’s User Manual
30
___________________________________________________________________________
Open a new photo
Comment:
By the help of this tool you can start to process a new face.
When activating the toll the standard Open dialogue appears on the screen.
Here you can select the photo of the face to be processed.
The 99 per cent of the modern digital cameras use jpg or tif format, but in
that case, if you would like to process a photo of a format being different
from them, use a well-known picture viewer program and save the file in
jpg format.
After selecting the photo in the dialogue, if necessary, rotate or mirror the
picture by the help of the icons at the bottom of the window.
________________________________________________________________________
FaceLaser’s User Manual
31
___________________________________________________________________________
or
- rotate left or right:
With this buttons you can rotate your picture 90 degrees to the left, or with
the other to the right.
or
- rotate a little:
You can do with these buttons just the same as the other too but instead of
rotating that much (90 degrees) you rotate your picture about 3-5 degrees.
or
- flip:
These buttons allow you to flip your picture. With the first you can make
the horizontal flip and with the second one you can flip your picture
vertically.
- open manual:
Whenever you don’t have any idea about how to do something with
FaceLaser 6 or you don’t know how a function works, just click on this
question mark and you get to this manual immediately.
- video help:
If you can learn the work of something by watching a video, you can click
to the video icon instead of the question mark so you will get a video that
explains you how your FaceLaser 6 works.
- info:
If you click on the info button, you will get a small window with some
useful information about the program. For example the website of the
program, an e-mail address, etc.
________________________________________________________________________
FaceLaser’s User Manual
32
___________________________________________________________________________
Mark that part of the photo, which represents the face to be processed, and
push the Next>> button.
________________________________________________________________________
FaceLaser’s User Manual
33
___________________________________________________________________________
Open a FaceLaser file
You can open an existing face model by the help of this command.
After giving the Open command the Open dialogue window appears on the
screen.
It helps you in searching for the file, that you can see the small size photo
of the face on the right side of the dialogue. Select the holder containing the
file to be opened, and then select the file as usual in the Windows.
<<Back
In every dialog you can return the previous dialog.
Next>>
In every dialog you can go the following dialog.
Undo
In every dialog you can undo all the changes taken at the part.
________________________________________________________________________
FaceLaser’s User Manual
34
___________________________________________________________________________
Save the FaceLaser file
It saves the file with its all modifications. If you save the face at first
occasion, then the Save as… dialogue window appears on the screen.
Color/BW button
You can change the photo from colored into black-and-white and back.
After finishing black-and-white point clouds or colored 3D model.
- select:
With this button you can choose which side of the Design Window you
would like to be selected. If you want to work on the picture, which is on
the left side, you click the select button and select it. Otherwise, click on
the right side of the Design Window.
and
- zoom in and zoom out:
With these two buttons you can zoom in and out the selected part of the
Design Window.
________________________________________________________________________
FaceLaser’s User Manual
35
___________________________________________________________________________
- pan:
With pan button you can move the selected part of the Design Window.
- fit:
If you think that your work was easier before zooming/moving your object
(or picture), select the right side of the Design Window and click the Fit
Button. It will restore your selection to the default size.
Notes
The FaceLaser provides a possibility to order an arbitrary comment to the
model. The comment is the part of the file.
________________________________________________________________________
FaceLaser’s User Manual
36
___________________________________________________________________________
Brightness / Contrast
You can modify the sharpness, intensity of color and contrast ratio of the
photo.
For example, while the scratchiness of the hair is ensured by the gradient
picture of the black-and-white photo, it answers to set the right sharpness of
the picture before processing.
________________________________________________________________________
FaceLaser’s User Manual
37
___________________________________________________________________________
Pen
This is a drawing tool. It modifies the input photo.
Do not mix up with the Curve or Line drawing command.
It draws in black, white or grey color on the photo or a black-and-white
photo.
By its help you can retouch the picture. For example you can remove an
acne or a caruncle. You can optimize the old photos.
On the figure we made the lips more characteristic, and the nose smoother.
________________________________________________________________________
FaceLaser’s User Manual
38
___________________________________________________________________________
Parameter Settings
The command opens a dialogue window, where you can modify the
parameters of the face, the hair and other areas.
It is for the fine tuning of the program; essentially we propose it for power
users.
________________________________________________________________________
FaceLaser’s User Manual
39
___________________________________________________________________________
The blocks of area parameter consist of entries.
The figures show the cross-sectional change of the glass cube model modifying the
parameter.
I. Bulge
The bulge can be increased or decreased.
In case of larger, opulent hair it answers to increase it; and in case of bedded hair it
is better to decrease it.
II. Curvature
The curvature of the bulge can be modified.
III. Scratch deep
It modifies t he deepness of the scratch.
IV. Scratch smooth
It increases or decreases the texturedness and variousness of the scratch.
________________________________________________________________________
FaceLaser’s User Manual
40
___________________________________________________________________________
5
Menu commands
This chapter introduces the FaceLaser menus and menu commands.
The description assorts the menu commands on the basis of their position in
the menu. You can get to know the meaning and use of every menu
commands from their description, which is completed by examples, if
necessary. FaceLaser is a wizard like program, so it has few menus.
________________________________________________________________________
FaceLaser’s User Manual
41
___________________________________________________________________________
File menu
By the help of the commands of the File menu you can execute general data
saving and in-reading procedures. Such are for example: start a new work,
fill in and save files and exit from the FaceLaser.
New...
By the help of this menu command you can read in a new face, which will
be opened in a new window by the program. After then you can process it
by the help of the other tools.
________________________________________________________________________
FaceLaser’s User Manual
42
___________________________________________________________________________
Open...
By the help of this command you can open an existing work. The file
contains the 2D and 3D information of a face and the related settings.
After giving the Open command, the Open dialogue window will appear on
the screen, where photos make the fast selecting of the face be simpler.
Last faces
The FaceLaser notes the names of the models last opened, and in this menu
command you can choose from them. If you click on one of the names,
then the face opens supposed it is available yet.
Exit
It closes the opened work, and exits from the program.
________________________________________________________________________
FaceLaser’s User Manual
43
___________________________________________________________________________
About FaceLaser…
FaceLaser copyright information.
Pantomat on Web
www.pantomat.com
Mail to Pantomat
[email protected]
________________________________________________________________________
FaceLaser’s User Manual
44