1
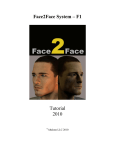
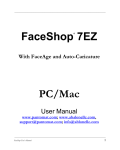
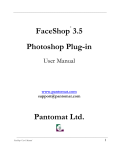
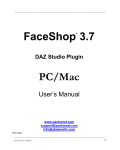
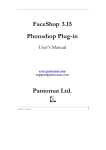
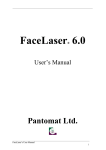
___________________________________________________________________________________________
FaceAge Photoshop
®
Plugin for Photoshop, Elements
User’s Manual
www.pantomat.com; www.abalonellc.com,
[email protected]; [email protected]
Pantomat Ltd/Abalone LLC.
_________________________________________________________________________________________
FaceShop User’s Manual
I
_________________________________________________________________________________________
First edition
June 2010
Author’s copyright holder of the FaceAge program is jointly Pantomat Ltd. © Pantomat 2009 and Abalone
LLC. ©AbaloneLLC 2010.
Publishing copyright holder of the FaceAge program is jointly the Pantomat Ltd. © Pantomat 2010 and
Abalone LLC, . ©AbaloneLLC 2010.
The base of the FaceAge software is the patented procedure by Pantomat:
P0200767 - METHOD OF PRODUCING THREE-DIMENSIONAL MODEL OF A HUMAN HEAD ON THE BASIS OF
A TWO-DIMENSIONAL PICTURE – HPO-2002, PANTOMAT, Lorant Szabo
Copying, merchandizing, public exhibiting or other commercial utilization of the software without licence is
strictly prohibited.
The FaceAge User’s Manual is under global author and publishing copyright.
© 2010 Pantomat/Abalone. This User’s Manual was written and edited by Laslo Vespremi, Abalone LLC.
Copying, extraction or translation to another language is forbidden without the written approval of the
holder of this right.
Pantomat Ltd.
Pantomat Ltd
H-1143 Bp., Zászlós utca 54
HungaryWeb:
www.pantomat.com
E-mail:
[email protected]
Abalone LLC
190 Arbor Lane,
Moss Beach CA 94038
USA
Web:
www.abalonellc.com
E-mail:
[email protected]
PANTOMAT LTD OR ABALONE LLC IS IN NO CASE RESPONSIBLE FOR THE DIRECT OR
INDIRECT DAMAGES ARISING FROM THE USAGE OF THE FACEAGE PROGRAM OR THE
FACEAGE USER’S MANUAL.
Pantomat, Abalone LLC and the FaceAge are the registered trademarks of Pantomat Ltd., Abalone LLC
Windows is the trademark of Microsoft.
_________________________________________________________________________________________
FaceAge User’s Manual
3
_________________________________________________________________________________________
The manual and illustrations were made using the Microsoft Word, Photoshop
and FaceAge programs.
For "How-to" videos pls. visit:
http://lib.store.yahoo.net/lib/yhst-48396527764316/FAPS.wmv
http://lib.store.yahoo.net/lib/yhst-48396527764316/second2.wmv
http://lib.store.yahoo.net/lib/yhst-48396527764316/third.wmv
For License key you can email to: [email protected]
Tech support: [email protected]
_________________________________________________________________________________________
4
FaceAgeUser’s Manual
_________________________________________________________________________________________
Introduction
Add age, weight to any face.
FaceAge is the individual and patented product of Pantomat and Abalone LLC. The program adds
age, weight, to 3D models and faces.
FaceAge works with Photoshop and Photoshop Elements
What Makes FaceAge Different from Other Aging Software?
In short - 3D. Aging is a 3D process that cannot be imitated by pushing pixels around. FaceAge uses
a 3D mesh that is altered twice: 1. To conform to the character of the photo and 2. To affect the
shape changes due to aging, such as the sagging of the cheeks, the changes in jawline, the recession of
eyes, etc. These are all genuine "shape" changes that make the aging (or reverse aging) realistic.
FaceAge also uses bumpmaps (another 3D process) to imitate wrinkles.
• This plug-in works directly inside Photoshop and Photoshop Elements • Easy "place-the-dots"
interface • Sliders to add/reduce age, weight • Video tutorial • 35-page manual
Splash screen of FaceAge PS
_________________________________________________________________________________________
FaceAge User’s Manual
5
_________________________________________________________________________________________
System requirements
Required hardware
FaceAge runs with the following minimal hardware:
A Windows-based personal computer or laptop with the following
minimal requirements:
Pentium 4 at least 1.3 GHz (2 GHz dual core or faster recommended)
Windows 2K (XP or Vista recommended)
1 GB RAM min (2GB recommended)
100MB free hard drive space for installation
(200 MB recommended)
OpenGL 1.3 compatible graphics card with at
least 128 MB RAM
(Hardware accelerated OpenGL 2.2, or higher, compatible
recommended with 512MB RAM)
Needed software
FaceAge runs under the following system softwares:
Windows Windows VISTA or W7 operating systems.
FaceAge PS plugin works with most Photoshop and Elements
versions.
To read pdf manuals Adobe Acrobat is recommended
To watch “How-to” videos Windows Media player is recommended
This is a 32-bit application.
_________________________________________________________________________________________
6
FaceAgeUser’s Manual
_________________________________________________________________________________________
1
FaceAge Installation
There is no installer for FaceAge Photoshop Plugin. Simply copy and paste the two files
(faceage and faceage.8fa) into the Photoshop “Filter” folder. This folder is often inside
the “Plugin Folder” in your Adobe Photoshop and Elements application.
Starting FaceAge
1. Launch Photoshop or Elements
2. Open a photo showing a human face
To work well with FaceAge, photos need to be taken from front.
Slightly turned heads may also work well.
Avoid photos that are profile or ¾ profile!!
3.
Select an area around the face as shown
_________________________________________________________________________________________
FaceAge User’s Manual
7
_________________________________________________________________________________________
4.
5.
Launch FaceAge from “Filters>Pantomat>FaceAge”
You will see the first screen as below
_________________________________________________________________________________________
8
FaceAgeUser’s Manual
_________________________________________________________________________________________
6.
Set the initial perimeters in the dialog. For example this woman is
female, maybe either 30 or 40 year old, and maybe 10% overweight.
_________________________________________________________________________________________
FaceAge User’s Manual
9
_________________________________________________________________________________________
7.
Next we will place the initial three dots as shown on the guide. One
dot for each outer eye corner and one for the chin.
8.
The program places automatically another 25 dots on screen. Our
task is to move these dots in place as shown in the guide.
_________________________________________________________________________________________
10
FaceAgeUser’s Manual
_________________________________________________________________________________________
IMPORTANT! Moving dots in place takes practice and will greatly affect the quality of our work.
Here are a few hints. Notice that the dots you are about to move light up blue in the guide.
Eyes: Try to place the dots inside the lids.
Nose: This is critical! The dots on the corner need to be aligned with the bottom of the nose and
slightly wider then the corner of the nose (see example below).
_________________________________________________________________________________________
FaceAge User’s Manual
11
_________________________________________________________________________________________
Of course if the head is turned up and slightly to the side as below, this needs to be taken into
consideration as well.
Ears. This can be tricky, too. In many cases you may not see one ear or maybe even have to guess
both like in this example. This takes a little thinking and practice. Normally the tips of the ears are
in line with the eyes. However, as a head is rotated down, these positions may change as shown
and the tip of the ear is ABOVE the eye level.
_________________________________________________________________________________________
12
FaceAgeUser’s Manual
_________________________________________________________________________________________
The opposite situation is where the head is rotated up (as looked at from below). Here the ears
shift in the opposite direction and are lower than the eye level (see below).
9.
Move the rest of the dots inside the face as shown. Notice how the
dot for the left ear appears inside the left eye.
f
_________________________________________________________________________________________
FaceAge User’s Manual
13
_________________________________________________________________________________________
10. When all the dots are in the right location click “Next”.
11. FaceAge will spend 20-40 seconds calculating the head’s position, the
new morph and the texture.
12. When finished, you will see the final screen as shown below.
13. You may rotate the head around (right mouse button)
_________________________________________________________________________________________
14
FaceAgeUser’s Manual
_________________________________________________________________________________________
14. Now it is time to slide the age button to the right, to 70.
15. If you like the results, click on the “Photoshop button
16. This will place the new head on the Clipboard, close FaceAge, and
takes you back into Photoshop
17. In Photoshop it is a good idea to create a new layer for the new head
_________________________________________________________________________________________
FaceAge User’s Manual
15
_________________________________________________________________________________________
18. Now you can paste the new head into this New Layer
19. Select the white area surrounding the head with the “Magic Wand”
tool. Hit delete to delete the white area.
20. Use the soft “Eraser” to clean up around the head.
_________________________________________________________________________________________
16
FaceAgeUser’s Manual
_________________________________________________________________________________________
_________________________________________________________________________________________
FaceAge User’s Manual
17