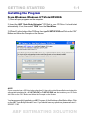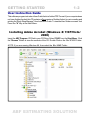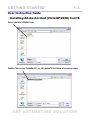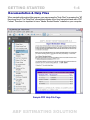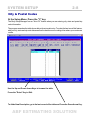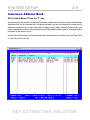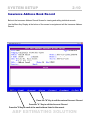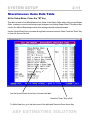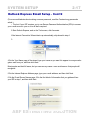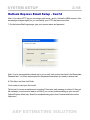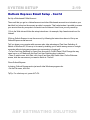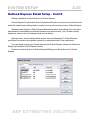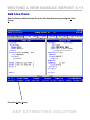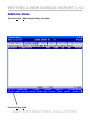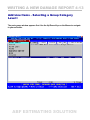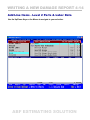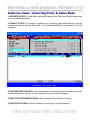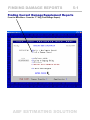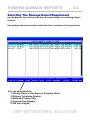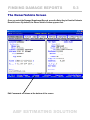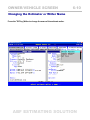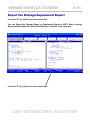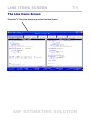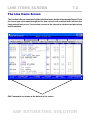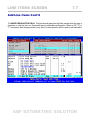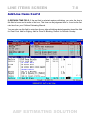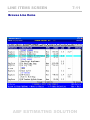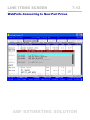
1
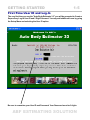
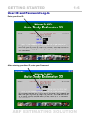
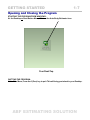
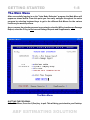
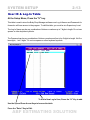
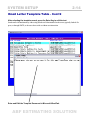
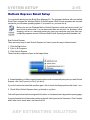
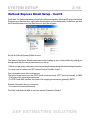
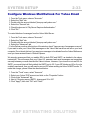
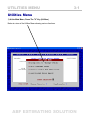
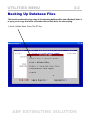
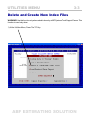
ABF SYSTEMS, INC.
Auto Body Estimator
Versions 33 & 35
Heavy Truck Collision
Estimator 35
Cycle-Est 1.0
User Instruction Guide
UPDATED: February 2013
ABF Systems, Inc.
www.abfsystems.com
1-800-247-0872 or 1-209-267-1162
GETTING STARTED
1-1
Installing the Program
From Windows Windows 8/7/Vista/XP/2000:
1) Close all open programs on the computer.
2) Insert the ABF "Auto Body Estimator" CD Disk in your CD Drive. It should start
automatically. If not, then select "RUN" from the Start Menu.
3) If Drive D: is the Letter of the CD Drive, then type D:\SETUP.EXE and Click on the "OK"
Button and follow the Prompts on the Screen.
NOTE:
If your computer has a CD Drive Letter other than D:, then click on the Browse Button and select the
appropriate Installation file -> E:/SETUP.EXE or F:/SETUP.EXE, etc. that matches your CD Drive
and Click on the "OK" Button and follow the Prompts on the Screen.
You have successfully Installed your ABF Program. At the Desktop or Start Button Menu, Click
on the ABF "Auto Body Estimator" Icon. If you should have any questions, please call us at 1209-267-1162
ABF ESTIMATING SOLUTION
GETTING STARTED
1-2
User Instruction Guide
This software program includes a User Guide that is in Adobe PDF Format. If your computer does
not have Adobe Acrobat, this CD contains a Free version of Adobe Acobat to use in reading and
printing the "Body Shop Manager" User Instruction Guide. To view theUser Guide on screen. Just
Press the "H" Key at the Main Menu.
Installing Adobe Acrobat (Windows 8/ 7/XP/Vista/
2000)
Insert the ABF Program CD Disk in your CD Drive. Select "RUN" from the Start Menu. Click
the "Browse" Button to view the contents of the CD. Double Click on the Wix XP2000 Folder.
NOTE: If you are running Windows 98, then select the Win 98ME Folder.
ABF ESTIMATING SOLUTION
GETTING STARTED
1-3
User Instruction Guide
Installing Adobe Acrobat (Vista/XP/2000) Cont'd.
Select the Win XP2000 Folder
Double Click on the "AdbeRdr707_en_US_distrib" File. Follow all screen prompts.
ABF ESTIMATING SOLUTION
GETTING STARTED
1-4
Documentation & Help Files
When navigating throughout the program, you may access the "Help Files" by pressing the "H"
Key at any menu. The "Help Files" are selected digests of the User Instructions and are in PDF
Format. Therefore it is important to have "Adobe Acrobat Reader" installed on your computer.
Sample PDF Help File Page
ABF ESTIMATING SOLUTION
GETTING STARTED
1-5
First-Time User ID and Log-In
The very first time you use the "Auto Body Estimator 3.3" you will be prompted to Create a
Supervisory Log-In User ID and 5 Digit Password. You may add additional users by going
the Setup Menu and selecting the User ID option.
Be sure to remember your User ID and Password. Your Password must be 5 digits.
ABF ESTIMATING SOLUTION
GETTING STARTED
1-6
User ID and Password Log-In
Enter your User ID.
After entering your User ID, enter your Password.
ABF ESTIMATING SOLUTION
GETTING STARTED
1-7
Opening and Closing the Program
STARTING THE PROGRAM FROM WINDOWS:
At the Desktop or Start Button Menu, Click on the Auto Body Estimator Icon.
Your DeskTop
QUITTING THE PROGRAM:
At the Main Menu, Press the 0 (Zero) key to quit. This will bring you to back to your Desktop.
ABF ESTIMATING SOLUTION
GETTING STARTED
1-8
The Main Menu
After successfully logging in on the "Auto Body Estimator" program, the Main Menu will
appear as shown below. From this point you can easily navigate throughout the entire
program by selecting keyboard keys to get to the different Sub Menus for the various
functions you want to perform.
As you can see, the selection process is very simple; select the W Key to write anew Damage
Report, select the F Key to find current Damage Reports and Supplements, etc.
The Main Menu
QUITTING THE PROGRAM:
At the Main Menu, Press the 0 (Zero) key to quit. This will bring you to back to your Desktop.
ABF ESTIMATING SOLUTION
GETTING STARTED
1-9
Limitations and Disclaimer of Warranties
SOFTWARE LIMITATIONS: ABF Systems does not warrant that the Software will be free of
errors or will meet your specific requirements. You assume complete responsibility for
decisions made or actions taken based upon information or results obtained using this
Software. Any statements made concerning the use of this Software are not to be construed
as either expressed or implied warranties.
SPECIFICALLY, NO WARRANTY OF MERCHANTABILITY, FITNESS FOR A PARTICULAR
PURPOSE OR ANY OTHER WARRANTY IS MADE OR TO BE IMPLIED WITH RESPECT
TO THIS SOFTWARE OR RELATED MATERIALS.
CUSTOMER and/or user acknowledges that is Software is available only on an “AS IS” basis.
IN NO EVENT WILL ABF SYSTEMS, OR ANYONE CONNECTED WITH IT, BE LIABLE FOR
ANY DAMAGES, DIRECT OR INDIRECT, ANTICIPATED, CONSEQUENTIAL OR COMPENSATORY, INCLUDING, WITHOUT LIMITATION, LOST PROFITS, FOR ANY REPRESENTATIONS, BREACHES OR DEFAULTS ARISING OUT OF THE USE OF THIS SOFTWARE. CUSTOMER AND/OR USER AGREES TO INDEMNIFY ABF SYSTEMS AND HOLD
IT HARMLESS AGAINST ALL CLAIMS AND DAMAGES, INCLUDING WITHOUT LIMITATION, REASONABLE ATTORNEY’S FEES ARISING OUT OF THE USE OF THIS SOFTWARE.
YOUR PURCHASE AND USE OF THIS SOFTWARE CONSTITUTES ACCEPTANCE OF
THE TERMS OF THIS DISCLAIMER.
MINIMUM SYSTEM HARDWARE REQUIREMENTS
?
IBM PC Compatible
?
Windows 8/7/Vista, XP, 2000
?
800 Megahertz Processor and at least 512 Megabytes of RAM
?
CD Rom Drive
?
Hard Drive with at least 30.0 Megabytes available
?
Windows Laser/Ink Jet Printer
Note: The "Body Shop Manager" Loves Fast Machines!
ABF ESTIMATING SOLUTION
SYSTEM SETUP
2-1
System Setup Menu
From the Main Menu - Press the "S" key for System Setup.
Use System Setup to setup and customize the software features the way you want to see
them.
ABF ESTIMATING SOLUTION
SYSTEM SETUP
2-2
Digital Image Folder/Path Setup
At the Setup Menu, Press the "D" key.
Setting the Path for Importing/Exporting Digital Images:
Use this set-up screen to list the drive and folder of your Digital Camera SD Card or Compact Flash
Card and 2 other drives/folders that you want to import from. When importing images into the Repair
Order, you will be prompted to select the drive and folder you have entered into this screen. This
program will not import directly from a digital camera, but instead, it will import from the camera SD
Card or CompactFlash from any USB Port.
Press the "I" Key to enter up to 3 different drives and folders to import digital images from.
Press the "E" Key to enter up to 3 different drives and folders toexport digital images to. For
example, a folder used to store digital images and / or store email photo attachments.
ABF ESTIMATING SOLUTION
SYSTEM SETUP
2-3
Digital Image Folder/Path Setup
ABF ESTIMATING SOLUTION
SYSTEM SETUP
2-4
Your Company Setup
At the Setup Menu, Press the "Y" key.
Entering Your Company Information:
Your company name is already burned into the program. You may enter and/or modify your business
address and phone number as it will appear on printed reports.
Enter your business address, license number, phone and fax numbers exactly the way you want it to
show on the repair order and invoice report printouts.
ABF ESTIMATING SOLUTION
SYSTEM SETUP
2-5
Nation/Tax Type Setup
At the Setup Menu, Press the "N" key:
At the Setup Menu, Press the "N" key.
Use this set-up screen to Select the Nation, State/Province and Tax Type for the location of
where this software is to be used.
The Repair Order will then reflect local taxation and business customs.
ABF ESTIMATING SOLUTION
SYSTEM SETUP
2-6
Printer Setup
At the Setup Menu, Press the "P" key.
The Body Shop Manager prints to the Windows Default Printer (Laser or Inkjet). The default
Windows Printer is the printer you specified in your Windows PrinterSetup.
Below is a sample screen of the Body Shop Manager Printer Setup.
ABF ESTIMATING SOLUTION
SYSTEM SETUP
2-7
Damage/Supplement Report Disclaimer Template
At the Setup Menu, Press the "E" key.
The Body Shop Manager program offers an option to write manually entered estimates from within the
program. You can modify or rewrite the Estimate Disclaimer wording that is printed out on the Estimate
form. Press the "E" Key for Edit. A line that reads 1a prints on the left half of the page and a line that
reads 1b is a continuation of line 1a and prints towards the remaining right side of the page.
Notice: The wording that comes with the program is a sample only and may or may not meet
applicable laws of your state or province. You and you alone are responsible for the legal wording of
this Estimate Disclaimer. For legal advice, you may want to seek the advice of an attorney.
ABF ESTIMATING SOLUTION
SYSTEM SETUP
2-8
City & Postal Codes
At the Setup Menu, Press the "C" key.
The Body Shop Manager has an "Auto-Fill" feature when you are entering city, state and postal zip
code information.
The program searches the table shown below for automatic entry. To make the best use of this feature,
add your city, state and zip code data as well as the data from surrounding cities where your customers
reside.
Use the Up and Down Arrow Keys to browse the table.
Press the "Enter" Key to Edit.
To Add a New Description, go to the last record of the table and Press the Down Arrow Key.
ABF ESTIMATING SOLUTION
SYSTEM SETUP
2-9
Insurance Address Book
At the Setup Menu, Press the "I" key.
It is important to keep a table of Insurance Companies, Independent Adjusters, Agents and Damage
Appraisers that you do business with. By having this table, you can use it both as a contact phone/
address book and as a tool to save entry time on Repair Orders. When creating a Repair Order, you
simply select the account from the Insurance Account Table and all address, phone, fax and email data
is entered by the press of a key.
Use the Up and Down Keys to browse through the Insurance Accounts Table. Press the "Enter" Key
to View the Account Record.
ABF ESTIMATING SOLUTION
SYSTEM SETUP
2-10
Insurance Address Book Record
Below is the Insurance Address Record Screen for viewing and editing individual records.
Use the Menu Key Display at the bottom of the screen to navigate and edit the Insurance Address
Record.
Press the "N" Key to edit the notes of Account Record.
Press the "A" Key to edit the Account Record.
Press the "E Key to email at the email address listed in this record.
ABF ESTIMATING SOLUTION
2-11
SYSTEM SETUP
Miscellaneous Items Data Table
At the Setup Menu, Press the "M" key.
This table is used to Add Miscellaneous Line Items to the Repair Order when writing a new Repair
Order, or when you need to add some unique charges to an existing Repair Order. This table is also
used by the Manual Estimating module when writing manually entered estimates.
Use the Up and Down Keys to browse through the Insurance Accounts Table. Press the "Enter" Key
to View the Account Record.
Use the Up and Down Arrow Keys to browse the table.
Press the "Enter" Key to Edit.
To Add a New Line, go to the last record of the table and Press the Down Arrow Key.
ABF ESTIMATING SOLUTION
2-13
SYSTEM SETUP
User ID & Log-In Table
At the Setup Menu, Press the "U" key.
This table is used to store the Body Shop Manager software user Log-In Names and Passwords for
those who will have access to the program. To edit this table, you must be at a Supervisory Level.
The Log-In Name may be any combination of letters or numbers up to 7 digits in length. Do not use
spaces or other keyboard symbols.
The Password can be any combination of letters or number and has to be 5 digits in length. Not 5 or
less digits, - but 5 digits. Do not use spaces or other keyboard symbols.
To Add a New Log-In User, Press the "A" Key to add.
Use the Up and Down Arrow Keys to browse the table.
Press the "Enter" Key to Edit.
ABF ESTIMATING SOLUTION
SYSTEM SETUP
2-14
Email Letter Template Table - Cont'd
After selecting the template record, press the Enter Key to edit the text.
Sends email with attachments by either using default mail client installed on the screen, typically Outlook Express, or through SMTP, as the user selects with or without user interaction.
Enter and Edit the Template Document in Microsoft WordPad.
ABF ESTIMATING SOLUTION
SYSTEM SETUP
2-15
Outlook Express Email Setup
You can email directly from the Body Shop Manager 2.0. The program interfaces with your default
Email Client software like Windows Mail or Outlook Express. Both of these programs are free and
included in your Windows operating system. If you haven't so, you must set up
Before you can use Windows Mail or Outlook Express to send and receive e-mail, you
need to set up an account. You can have more than one account—for business, online
shopping, and so on—and each person who uses your computer may have their own,
completely separate account. Windows Mail/Outlook Express gracefully handles it all.
Start Outlook Express
There are many ways to start Outlook Express, but here's a sure-fire way to find and start it.
1. Click the Start button.
2. Point to All Programs.
3. Click Outlook Express.
These first three steps are shown in the image below:
4. If asked whether you'd like to open this particular account automatically every time you start Outlook
Express, click Yes (if you do) or No (if you don't).
If you don't want to be asked this question again, click to check the Always perform this check... box.
5. Check When Outlook Express starts, go directly to my Inbox.
Outlook Express directs all incoming mail to the Inbox, so it makes sense to bypass this opening page.
If you don't see the list of folders and contacts on the left, click Layout on the View menu. Click Contacts
and Folder List to check them, and then click OK.
ABF ESTIMATING SOLUTION
SYSTEM SETUP
2-16
Outlook Express Email Setup - Cont'd
Quick start. You'll notice that when you use Outlook Express regularly, Windows XP will put the Outlook
Express icon on the Start menu (along with other programs you've used recently). In that case, just click
the Outlook Express icon in the Start menu to open the program.
Set Up an Outlook Express E-Mail Account
The Internet Connection Wizard makes short work of setting up your online mailbox by walking you
through each step for every e-mail account you set up.
1.Before you get going, make sure you know your email address along with the following information.
(You may need to contact your ISP, Internet Service Provider, to get it.)
First, information about the e-mail servers:
The type of e-mail server you use: POP3 (most e-mail accounts), HTTP (such as Hotmail), or IMAP
• The name of the incoming e-mail server
• For POP3 and IMAP servers, the name of the outgoing e-mail server (generally SMTP)
Second, information about your account:
• Your account name and password
Click Add, and then click Mail to open the Internet Connection Wizard.
ABF ESTIMATING SOLUTION
SYSTEM SETUP
2-17
Outlook Express Email Setup - Cont'd
(For some solid advice about making a secure password, read the Create strong passwords
article.)
• Find out if your ISP requires you to use Secure Password Authentication (SPA) to access
your e-mail account—yes or no is all that's required.
2.Start Outlook Express, and on the Tools menu, click Accounts.
If the Internet Connection Wizard starts up automatically, skip ahead to step 4.
3.
4.On the Your Name page of the wizard, type your name as you want it to appear to everyone who
gets e-mail from you, and then click Next.
Most people use their full name, but you can use any name—even a nickname—that people will
recognize.
5.On the Internet Explorer Address page, type your e-mail address, and then click Next.
6.On the E-mail Server Names page, fill in the first block of information that you gathered from
your ISP in step 1, and then click Next.
ABF ESTIMATING SOLUTION
SYSTEM SETUP
2-18
Outlook Express Email Setup - Cont'd
Note: If you chose HTTP as your incoming e-mail server—as for a Hotmail or MSN account—this
wizard page changes slightly so you can identify your HTTP mail service provider.
7. On the Internet Mail Logon page, type your account name and password.
Note: If you're concerned about break-ins to your e-mail, click to clear the check in the Remember
Password box. You'll then be prompted for the password each time you send or retrieve mail.
8. Click Next, and then click Finish.
You're ready to send your first e-mail!
TipUnsure if your new e-mail account is working? Send an e-mail message to a friend. If they get
the message, your account is ready to roll! But if you run into problems setting up your account,
Outlook Express offers help. Search for troubleshooting topics from Contents and Index on the
Help menu.
ABF ESTIMATING SOLUTION
SYSTEM SETUP
2-19
Outlook Express Email Setup - Cont'd
Set Up a Web-based E-Mail Account
The e-mail that you get in a Hotmail account and other Web-based accounts is not stored on your
hard disk, but is kept on the account-provider's computer. That's what makes it possible to access
your account from any computer in the world over the Internet. Here's how you set yourself up.
1.Go to the Web site and follow the setup instructions—for example, http://www.hotmail.com/ for
Hotmail.
2.Set up Outlook Express to use the account, by following the instructions above in Set up an
Outlook Express e-mail account.
TipIf you share your computer with someone else, take advantage of Fast User Switching. A
feature of Windows XP, it lives up to its name by enabling you to switch among users on a single
computer without closing any programs you are running or logging off.
• To turn Fast User Switching on, open User Accounts in Control Panel. Click Change the way
users log on or off. Make sure the Use Fast User Switching box is checked.
• Then, to switch users, click Start, click Log off and then click Switch User. On the Welcome
screen, click the user account you want to switch to. That's it!
Close Outlook Express
In closing, Outlook Express works just as all other Windows programs do.
• On the File menu, click Exit.
TipTip: For a fast way out, press ALT+F4.
ABF ESTIMATING SOLUTION
SYSTEM SETUP
2-20
Outlook Express Email Setup - Cont'd
Settings needed for an Email Account in Outlook Express
Outlook ExpressTo ensure that Outlook Express will be able to connect to your email account,
check the email account settings below, needed to set up new email accounts in Outlook Express.
Standard email settings in Outlook ExpressStandard email account settings are: user name
and password, email address (sometimes used as user name as well), "port" numbers (nearly
always the ones we use in the sample email account below).
Although rarely, some email providers require "secure authentication": Outlook Express
would then use a secure (encrypted) connection to authenticate itself to the email server.
If you are trying to setup your Hotmail account with Outlook Express, please see instead our
Setting Up Hotmail in Outlook Express tutorial.
Create a new email account in Outlook ExpressSetting up an Email Account in Outlook
Express
ABF ESTIMATING SOLUTION
SYSTEM SETUP
2-21
Vista Windows Mail Email Setup
If you are using Microsoft's Vista Operating System, here are the instructions to set up "Vista
Mail":
1. From the Start menu, click the E-mail Windows Mail icon.
Result: The Windows Mail program displays.
ABF ESTIMATING SOLUTION
SYSTEM SETUP
2-22
Vista Windows Mail Email Setup - Cont'd
Select E-mail Account, then click Next.2. Click Tools, then select Accounts.
3. In the Internet Accounts window, click Add.
Result: The types of accounts that can be added will open in a new window.
ABF ESTIMATING SOLUTION
SYSTEM SETUP
2-23
Vista Windows Mail Email Setup - Cont'd
4. Select E-mail Account, then click Next.
5. Enter Display name, then click Next.
ABF ESTIMATING SOLUTION
SYSTEM SETUP
2-24
Vista Windows Mail Email Setup - Cont'd
6. Enter E-mail address, then click Next.
7. a) Select POP3 from the drop down menu.
b) Enter the Incoming and Outgoing mail server locations.
Note: View Email and News Server Names to find your mail server names.
c) Click Next.
ABF ESTIMATING SOLUTION
SYSTEM SETUP
2-25
Vista Windows Mail Email Setup - Cont'd
8. a) Enter E-mail username.
b) Enter Password.
c) Select or deselect the Remember password box, depending on preferences.
d) Click Next.
9) Congratulations!
ABF ESTIMATING SOLUTION
SYSTEM SETUP
2-26
Vista Windows Mail Email Properties
1) Now Click on Tools.
2) Now Click on Accounts.
ABF ESTIMATING SOLUTION
SYSTEM SETUP
2-27
Vista Windows Mail Email Properties-Cont'd
3) Now click once on your new mail account in the main part of the window and then click
the "Properties" button.
4) The properties for this mail account will now appear in a new window. Now click on the
"Servers" tab.
ABF ESTIMATING SOLUTION
SYSTEM SETUP
2-28
Vista Windows Mail Email Properties-Cont'd
4) Click the box at the bottom of this window labeled "My server requires authentication".
Then click on the "Settings..." button to open the SMTP Auth properties.
5) Make sure that the "Use same settings as my incoming mail server" is checked, this will
grey out all other options on this window as shown below. When done click "OK" to close
this window.
ABF ESTIMATING SOLUTION
SYSTEM SETUP
2-29
Vista Windows Mail Email Properties-Cont'd
6) Set up your connection options.
7) Security Page. Refer to Vista Documentation for signing certificate.
ABF ESTIMATING SOLUTION
SYSTEM SETUP
2-30
Vista Windows Mail Email Properties-Cont'd
7) Set up your Advanced Options. Refer to your Email Provider for exact Outgoing and
Incoming mail Server Port Numbers.
Use the port number field to specify what port to use to establish a connection with the mail
server. The default port number for most SMTP/ESMTP mail servers is port 25, or 465 for
servers that require SSL.
ABF ESTIMATING SOLUTION
SYSTEM SETUP
2-31
Configure Windows Mail/Outlook For AOL Email
AOL uses the Internet Message Access Protocol (IMAP) protocol for incoming mail and Simple Mail
Transfer Protocol (SMTP) for outgoing mail. To configure Outlook Express to connect to an AOL email account, follow these steps.
Step 1: Add the AOL e-mail account
To add an AOL e-mail account in Outlook Express, follow these steps:
1.
Sign on to AOL.
2.
Start Outlook Express. If Outlook Express is not your default e-mail client, you may be prompted
to specify if you want to use Outlook Express as your default e-mail client. To select Outlook Express
as your default e-mail client, click OK.
3.
If you are prompted to type your name in the Display name box, click Cancel, and then click Yes
when you receive the following message:
The new Internet account has not been created yet. Are you sure you want to exit the wizard?
4.
In Outlook Express, click Accounts on the Tools menu.
5.
Click Add, and then click Mail.
6.
In the Display name box, type your name as you want it to appear on your outgoing e-mail
messages, and then click Next.
7.
In the E-mail address box, type your AOL e-mail alias. For example, type [email protected].
8.
Click Next.
9.
In the My incoming mail server is a list, click IMAP.
10. In the Incoming mail (POP3, IMAP, or HTTP) server box, type imap.aol.com.
11. In the Outgoing mail (SMTP) server box, type smtp.aol.com, and then click Next.
12. In the Account name box, type your AOL account name.
13. In the Password box, type your AOL account password.
14. If you want Outlook Express to save your password, leave the Remember password check box
selected.
15. Click Next, and then click Finish.
Step 2: Configure the AOL e-mail account
1.
When you return to the Internet Accounts dialog box after you complete the steps from the "Step
1: Add the AOL e-mail account" section, click the Mail tab.
Note If the Internet Accounts dialog box is not open, click Accounts on the Tools menu.
2.
On the Mail tab, click the AOL account that you added, and then click Properties.
3.
Click the Servers tab, and then click to select the My server requires authentication check box.
4.
Click Apply, and then click the Advanced tab.
5.
In the Outgoing mail (SMTP) box, type 587.
Note By default, the SMTP port number is 25.
6.
Click Apply, and then click the IMAP tab.
7.
Click to clear the Store special folders on IMAP server check box, click Apply, andclick OK.
8.
Click Apply, and then click OK.
9.
Click Close. If you receive the following message, click Yes:
ABF ESTIMATING SOLUTION
SYSTEM SETUP
2-32
Configure Windows Mail/Outlook For Yahoo Email
POP Yahoo! Mail Plus with Microsoft Outlook Express
Here's how to "POP" mail from Yahoo! Mail Plus into your Outlook Express:
1. From the Tools menu, choose "Accounts."
2. Select the "Mail" tab.
3. Click the "Add" button.
4. From the Add menu, click "Mail."
5. In the text box labeled Display Name, type your name and click "Next."
6. In the Email Address box, type your Yahoo! Mail address (be sure to include "@yahoo.com")
and click "Next."
7. Under "My incoming mail server is a…" select "POP3."
8. Type "plus.pop.mail.yahoo.com" in the Incoming Mail (POP3, IMAP, or HTTP) Server box.
9. Type "plus.smtp.mail.yahoo.com" in the Outgoing Mail (SMTP) Server box.
10. Click "Next."
11. In the Account Name box, type your Yahoo! Mail ID (your email address without the
"@yahoo.com").
12. In the Password box, type your Yahoo! Mail password.
13. If you want Outlook Express to remember your password, check the "Remember password"
box.
14. Do not check the boxes labeled "Log on using Secure…"
15. Click "Next."
16. Click "Finish."
17. Select 'plus.pop.mail.yahoo.com' under 'Account,' and click 'Properties.'
18. Click the “Servers” tab.
19. Under “Outgoing Mail Server” check the box next to “My server requires authentication”
20. Click the 'Advanced' tab.
21. Under “Outgoing mail Server (SMTP)”, check the box next to “This server requires a secure
connection (SSL). Enter port number “465” in the “Outgoing mail (SMTP)” field.
22. Under “Incoming mail (POP3)”, check the box next to “This server requires a secure connection (SSL)". The port number in the “Incoming mail (POP3)" field should automatically change from
110 to 995. If it doesn’t, make sure the port number is set to 995.
Troubleshooting instructions.
If you followed the above configuration steps, you should be all set. However, if you cannot send or
receive mail with your email client, try the following tips.
The Yahoo! Mail SMTP server requires authentication. Make sure you have enabled SMTP authentication. To turn this setting on:
ABF ESTIMATING SOLUTION
SYSTEM SETUP
2-33
Configure Windows Mail/Outlook For Yahoo Email
1. From the Tools menu, choose "Accounts."
2. Select the "Mail" tab.
3. Double-click the account labeled "plus.pop.mail.yahoo.com."
4. Select the "Servers" tab.
5. Check the box next to "My Server Requires Authentication."
6. Click "OK."
To control deletion of messages from the Yahoo! Mail Server:
1. From the Tools menu, choose "Accounts."
2. Select the "Mail" tab.
3. Double-click the account labeled "plus.pop.mail.yahoo.com."
4. Select the "Advanced" tab.
5. In the Delivery section at the bottom of the window, check "Leave a copy of messages on server"
if you want to save your Yahoo! Mail messages on the Yahoo! Mail server as well as on your local
computer. Do not check this box if you want your messages to be deleted from the Yahoo! Mail server
once you have received them in Outlook Express.
We strongly recommend that you enable SSL for both POP and SMTP, as detailed in the above
instructions. This will ensure that your Yahoo! ID, password and email messages are transmitted
securely between your mail client and the Yahoo! servers. However, if you choose to not use SSL for
SMTP, your email client will likely default the SMTP port to 25. If your ISP blocks port 25 or if you're
unable to send email, then you will need to use port 587 when sending via Yahoo!'s SMTP server. To
make this change, please follow the directions below:
1. From the "Tools" menu, select "Accounts"
2. Select your Yahoo! POP account and click on the "Properties" button
3. Click on the "Advanced" tab
4. Next to "Outgoing server (SMTP), change port 25 to 587
5. Click "Apply", then click "OK" and "Close"
ABF ESTIMATING SOLUTION
UTILITIES MENU
3-1
Utilities Menu
1) At the Main Menu, Press The "U" Key (Utilities)
Below is a view of the Utilities Menu showing various functions.
ABF ESTIMATING SOLUTION
UTILITIES MENU
3-2
Backing Up Database Files
This function makes a backup copy of all estimating database files into a Backup Folder. It
is up to you to copy that folder on another disk or flash drive for safe keeping.
1) At the Uti;lities Menu, Press The "B" Key.
ABF ESTIMATING SOLUTION
UTILITIES MENU
3-7
Backing Up Your Shop Data Files
Here are some basic steps for copying the program and database files using portable “Memory”
or “Flash” Drives. We will refer to your USB memory drive a “Flash Drive”
1) Use the Flash Drive that goes into the USB port. Put it in the USB Port of the Source Computer
that you want to copy data from.
2) From the source computer; Go to My Computer or Windows Explorer to view your Hard Drive.
Find the folder named BSM (Body Shop Manager). Highlight it with the mouse cursor. Press the
Control Key and hold it down. Then Press the C key once and let go (Control Key + “C” Key=Copy
Command). This is the COPY Command that stores the Folder into Temporary memory.
Now find the Drive that Your Flash Drive is in (with Windows Explorer) It will be Drive E, F, G, H, I
,J or K depending on your computer set up. Highlight that Flash Drive and then hold the Control
Key down and press the “V” Key. (Control Key+”V” Key=Paste Command). You will see that
Windows Creates an “BSM” Folder and copy the BSM Folder Sub-Folders and all File Contents
onto your Flash Drive.
3) Now take your Flash Drive from the Source Computer and insert it into a USB port on the arget
Computer.
4) Again, use My Computer and/or Windows Explorer to find the Flash Drive. It will be Drive E, F,
G, H, I ,J or K depending on your computer set up. Highlight the “BSM” Folder on that Flash Drive
and then hold the Control Key down and press the “C” Key.
5) Now find your Hard Drive (with Windows Explorer). Highlight the Hard Drive (example: Hard
Drive C)and then hold the Control Key down and press the “V” Key. . You will see that Windows
Creates an “BSM” Folder and copies the BSM Folder Sub-Folders and all File Contents from your
Flash Drive to the Hard Drive of your Target computer.
6) Start your ABF program from the Desktop Icon and when you get to the Main Menu Window,
Select “U” Key for Utilities and then the “P” Key to “Pack and Reindex” your files. Return to the
Main Menu and use the program.
ABF ESTIMATING SOLUTION
UTILITIES MENU
3-3
Delete and Create New Index Files
WARNING! Use this function only when asked to do so by a ABF Systems Tech Support Person. This
function is used only when
1) At the Uti;lities Menu, Press The "D" Key.
ABF ESTIMATING SOLUTION
UTILITIES MENU
3-4
Pack and ReIndex Files
1) At the Main Menu, Press The "U" Key (Utilities)
2) At the Utilities Sub Menu, Press the "P" Key (Pack)
ABF ESTIMATING SOLUTION
UTILITIES MENU
3-5
Reporting a Product Error By Email
It's easy to Report Product Errors by Email. Product errors consist of Software Glitches, Program
Crashes, Etc.
1) At the Main Menu, Press The "U" Key (Utilities)
2) At the Utilities Sub Menu, Press the "S" Key (Send Email)
ABF ESTIMATING SOLUTION
UTILITIES MENU
3-6
Reporting a Product Error By Email - Cont'd
3)After the "S" Key is pressed, the following Email Screen appears. Your Software Serial Number and
your business name (Licensed User) are automatically captured and inserted into the body of the
email. Also an error log is attached that may give us additional information in which to fix the problem.
ABF ESTIMATING SOLUTION
UTILITIES MENU
3-7
Backing Up Your Shop Data Files
Here are some basic steps for copying the program and database files using portable “Memory”
or “Flash” Drives. We will refer to your USB memory drive a “Flash Drive”
1) Use the Flash Drive that goes into the USB port. Put it in the USB Port of the Source Computer
that you want to copy data from.
2) From the source computer; Go to My Computer or Windows Explorer to view your Hard Drive.
Find the folder named BSM (Body Shop Manager). Highlight it with the mouse cursor. Press the
Control Key and hold it down. Then Press the C key once and let go (Control Key + “C” Key=Copy
Command). This is the COPY Command that stores the Folder into Temporary memory.
Now find the Drive that Your Flash Drive is in (with Windows Explorer) It will be Drive E, F, G, H, I
,J or K depending on your computer set up. Highlight that Flash Drive and then hold the Control
Key down and press the “V” Key. (Control Key+”V” Key=Paste Command). You will see that
Windows Creates an “BSM” Folder and copy the BSM Folder Sub-Folders and all File Contents
onto your Flash Drive.
3) Now take your Flash Drive from the Source Computer and insert it into a USB port on the arget
Computer.
4) Again, use My Computer and/or Windows Explorer to find the Flash Drive. It will be Drive E, F,
G, H, I ,J or K depending on your computer set up. Highlight the “BSM” Folder on that Flash Drive
and then hold the Control Key down and press the “C” Key.
5) Now find your Hard Drive (with Windows Explorer). Highlight the Hard Drive (example: Hard
Drive C)and then hold the Control Key down and press the “V” Key. . You will see that Windows
Creates an “BSM” Folder and copies the BSM Folder Sub-Folders and all File Contents from your
Flash Drive to the Hard Drive of your Target computer.
6) Start your ABF program from the Desktop Icon and when you get to the Main Menu Window,
Select “U” Key for Utilities and then the “P” Key to “Pack and Reindex” your files. Return to the
Main Menu and use the program.
ABF ESTIMATING SOLUTION
WRITING A NEW DAMAGE REPORT 4-1
Writing a New Damage Report
At the Main Menu, Press the W Key (Write) to write a new Damage Report.
Edit Commands are shown at the bottom of the screen.
ABF ESTIMATING SOLUTION
WRITING A NEW DAMAGE REPORT 4-2
Enter Vehicle Owner's Name
Enter the Vehicle Owner's Name or if it is owned by a business or company, then enter
the business contact persons first and last names.
ABF ESTIMATING SOLUTION
WRITING A NEW DAMAGE REPORT 4-3
Enter Vehicle Owner'sEnter Vehicle Owner Company
Name
If the by
vehicle
is owned by
company orthen
business,
enter
that here.
name here.
If the vehicle
is owned
a company
or abusiness,
enterthen
that
name
If theIf the
vehicle
is owned
an individual,
this field
blank.
vehicle
is owned
by anby
individual,
leave thisleave
field blank.
Company
Name
ABF ESTIMATING SOLUTION
WRITING A NEW DAMAGE REPORT 4-4
Enter Vehicle Owner Address
Enter the vehicle owner's address, city, stat/provence and zip postal code.
ABF ESTIMATING SOLUTION
WRITING A NEW DAMAGE REPORT 4-5
Enter Vehicle Owner's Phone NumbersAddress
Enter the vehicle owner's phone numbers. You can enter up to 3 different numbers with
Phone types: Res, Cel, Bus, etc.
ABF ESTIMATING SOLUTION
WRITING A NEW DAMAGE REPORT 4-6
Enter Vehicle Owner's Email Address
Be sure to get the vehicle owner's email address. This comes in handy to email the
estimate and pictures to him as well as exporting this information into ABF's Shop
Management Software.
ABF ESTIMATING SOLUTION
WRITING A NEW DAMAGE REPORT 4-7
Enter Vehicle Information
Now you can enter the vehicle data. It is a good habit to enter all of the data like vin,
production date, etc.
ABF ESTIMATING SOLUTION
WRITING A NEW DAMAGE REPORT 4-8
Select Estimate Writer's Name
Select the Estimate Writer's Name from this Window.
ABF ESTIMATING SOLUTION
WRITING A NEW DAMAGE REPORT 4-9
Select Rate Profile (and Insurance Company)
When you select the profile, you also select the insurance company which will automatically fill the insurance data screen. If you have special rates for a particular insurance company, the program will put them into the DamageReport.
NOTE: To automatically
ABF ESTIMATING SOLUTION
WRITING A NEW DAMAGE REPORT 4-10
Select Vehicle Profile
Pick one that best matches the vehicle you are estimating.
ABF ESTIMATING SOLUTION
WRITING A NEW DAMAGE REPORT 4-11
Add Line Items
Now it is time to Add Line Items. Go to the Line Item Screen by pressing the L Key
(Lines)
Press the L Key (Lines)
ABF ESTIMATING SOLUTION
WRITING A NEW DAMAGE REPORT 4-12
Add Line Items
Press the A Key (Add) to begin Adding Line Items.
Press the A Key (Add
ABF ESTIMATING SOLUTION
WRITING A NEW DAMAGE REPORT 4-13
Add Line Items - Selecting a Group Category
Level I
The parts group window appears first. Use the Up/Down Keys or the Mouse to navigate
to your selection.
ABF ESTIMATING SOLUTION
WRITING A NEW DAMAGE REPORT 4-14
Add Line Items - Level 2 Parts & Labor Data
Use the Up/Down Keys or the Mouse to navigate to your selection.
ABF ESTIMATING SOLUTION
WRITING A NEW DAMAGE REPORT 4-15
Add Line Items - Selecting Parts & Labor Data
1) OPERATION FIELD: The first field to edit is the Operation Field. Select one of the following codes
to for a operation description.
2) QUANTITY FIELD: The quantity is usually one. If you enter a value higher than one, it will not
increase the value of the Parts Price Field.. If you Press the ENTER Key, the default of 1 will be
assigned.
3) PART DESCRIPTION FIELD: The part description is automatically inserted into this field from the
Parts/Labor Selection Window. You can change it to be more exact if necessary.
4) PART TYPE DESIGNATION FIELD: When replacing Parts, select the Part Type.
5) PARTS PRICE FIELD: Enter the retail price of a part only if you are replacing it.
ABF ESTIMATING SOLUTION
FINDING DAMAGE REPORTS
5-1
Finding Current Damage/Supplement Reports
From the Main Menu - Press the "F" Key (Find Damage Report).
ABF ESTIMATING SOLUTION
FINDING DAMAGE REPORTS
5-2
Selecting The Damage Report/Supplement
Use the Mouse or Up and Down Arrow Keys to browse through current Damage Report
Records.
Damage Report Records are intially sorted by the Ower's Last Name or by Company Name.
You can also search by:
1) Vehicle Owner's Last Name or Company Name
2) Primary Telephone Number
3) Estimate Creation Date
4) License Plate Number
5) VIN (last 6 digits)
ABF ESTIMATING SOLUTION
FINDING DAMAGE REPORTS
5-3
The Owner/Vehicle Screen
Once you select the Damage/Supplement Record, press the Enter Key to View the Estimate
Record Screen. By default, the Owner/Vehicle Screen appears first.
Edit Commands are shown at the bottom of the screen.
ABF ESTIMATING SOLUTION
FINDING DAMAGE REPORTS
5-4
Deleting Damage/Supplement Reports
Use the mouse or Up and Down Keys to highlite the record you want to Delete. Then press
the Delete Key.
ABF ESTIMATING SOLUTION
OWNER/VEHICLE SCREEN
6-1
The Owner/Vehicle Screen
The Owner/Vehicle Screen is the main data screen for the Damage Report Record. The data
is organized into Tab Screens as shown below.
Edit Commands are shown at the bottom of the screen.
You can navigate to Other data screens (Line Items, Insurance, Notes, Images and Totals
Screeens) by pressing the keys listed at the top row (GOTO->).
ABF ESTIMATING SOLUTION
OWNER/VEHICLE SCREEN
6-2
Edit Owner/Customer Data
Press the "O"Key (Owner) to Edit Vehicle Owner.
Follow the prompts shown at the bottom of the screen.
ABF ESTIMATING SOLUTION
OWNER/VEHICLE SCREEN
6-3
Edit Vehicle Data
Follow the prompts shown at the bottom of the screen.
ABF ESTIMATING SOLUTION
OWNER/VEHICLE SCREEN
6-4
Send an Email To the Owner
Press the "M"Key (eMail) to send an email the vehicle owner. This option uses Microsoft
"Outlook Express" or Windows "Mail". Both come free with Windows Explorer.
Sends email with attachments by either using default mail client installed on the screen, typically Outlook
Express, or through SMTP, as the user selects with or without user interaction.
Use the Mouse or the Up/Down Arrow Keys to Scrow through the Templates of Pre-Canned
Email Subject and Message Contents. Or you can select a blank form and write your own.
ABF ESTIMATING SOLUTION
OWNER/VEHICLE SCREEN
6-5
Send an Email To the Owner - Cont'd
ABF ESTIMATING SOLUTION
OWNER/VEHICLE SCREEN
6-6
Locking The Damage Report
Press the "K"Key Loc<k> toLock the Damage Report.
Before you can create a Supplement, you must first Lock the Report. When you Lock a
Report, you can not longer make any constructive changesto the summary totals.
ABF ESTIMATING SOLUTION
OWNER/VEHICLE SCREEN
6-7
Creating a Supplement Report
Once the Damage Report has been Locked. Press the "S"Key <S>upplement to create a
New Supplement Record.
ABF ESTIMATING SOLUTION
OWNER/VEHICLE SCREEN
6-8
Printing the Damage/Supplement Report
Press the "P"Key <P>rint to print .
ABF ESTIMATING SOLUTION
OWNER/VEHICLE SCREEN
6-9
Creating PDF Files
Press the "F"Key <P>rint to cresate a PDF file . Yopu can create PDF files of the Damage
Report Estimate, Digital Images, Parts Order or Pricing Request and the Supplement
Report. /You can email these files as attachments to customers and adjusters.
ABF ESTIMATING SOLUTION
OWNER/VEHICLE SCREEN
6-10
Changing the Estimator or Writer Name
Press the "W"Key (Writer to change the name of the estimate writer.
ABF ESTIMATING SOLUTION
OWNER/VEHICLE SCREEN
6-11
Export the Damage/Supplement Report
Press the "X" key (eXport) to create export files.
You can Export the Damage Report or Supplement Report to ABF's Shop Invoicing
Management Software like "Body Shop Manager" soiftware. This command
Press the "X" key (eXport) to create export files.
ABF ESTIMATING SOLUTION
LINE ITEMS SCREEN
7-1
The Line Items Screen
Press the "L" Key (Line Items) to go to the Line Item Screen.
ABF ESTIMATING SOLUTION
LINE ITEMS SCREEN
7-2
The Line Items Screen
The Line Items Screen consists of all the individual repair details of the damage Report. From
the screen you can browse through the line item records, edit or delete them, add new line
items and add part prices. You can also connect to the internet to vobtaoin new part prices
and illustrations.
Edit Commands are shown at the bottom of the screen.
ABF ESTIMATING SOLUTION
LINE ITEMS SCREEN
7-3
Add Line Items
Press the "A" Key For Add Line Items
Line Items are the individual repair details of the Estimate. The "Program" Database is organized logically into Parts Groups with listings of parts and labor operation descriptions that pertain to that group. These groups are listed in order beginning from the front of the vehicle - to the
rear. The sequence is very similar to Collision Estimating Book sequence.
The GROUP SELECTION Window:
When the "A" Key is pressed, a Parts Group from the GROUP SELECTION Window will appear.
A Parts Group is a group of related parts that are the same as or similar to that found in your
Estimating Books (For example Hood Group includes parts listings such as Hood Panel, Hinges,
Lock, Insulator, Safety Catch, Prop Rod, Release Cable, etc.)
This Window pops up automatically and you use the he Up-Arrow and Down-Arrow Keys (or
Page-Up & Page-Down Keys) to scrow through the Parts Group Window. When you want to
Quit, just press the ESCAPE Key.
ABF ESTIMATING SOLUTION
LINE ITEMS SCREEN
7-4
Add Line Items Cont'd
To view the Parts/Labor Operation Descriptions of a Group, Press the ENTER Key and another
Window will appear showing the contents of that group:
The PARTS/LABOR SELECTION Window:
Once you have selected a Parts Group, the Parts/Labor Selection Window pops up automatically on the upper right hand side of your screen. Use the he Up-Arrow and Down-Arrow Keys
(or Page-Up & Page-Down Keys) to scrow through the Parts/Labor Selection Window. When
you want to Quit, just press the ESCAPE Key.
Once you have found the Part Description or Labor Operation you want, press the ENTER Key
for your selection. In this example the L/F FENDER Apron Assy part has been selected.
When you have selected a Part Description, a Line Item Record Editing Window appears at the
bottom of your screen. You will be prompted for selection
ABF ESTIMATING SOLUTION
LINE ITEMS SCREEN
7-5
Add Line Items Cont'd
1) OPERATION FIELD: The first field to edit is the Operation Field. Select one of the following
codes to for a operation description.
2) QUANTITY FIELD: The quantity is usually one. If you enter a value higher than one, it will not
increase the value of the Parts Price Field.. If you Press the ENTER Key, the default of 1 will be
assigned.
3) PART DESCRIPTION FIELD: The part description is automatically inserted into this field from
the Parts/Labor Selection Window. You can change it to be more exact if necessary.
4) PART TYPE DESIGNATION FIELD: When replacing Parts, select the Part Type.
5) PARTS PRICE FIELD: Enter the retail price of a part only if you are replacing it.
ABF ESTIMATING SOLUTION
LINE ITEMS SCREEN
7-6
Add Line Items Cont'd
6) LABOR TIME FIELD: This field is for Labor Operations only. You do not enter any refinishing
operations here. You must enter the labor time that you have estimated (judgement time) or flatrate time from your Collision Estimating Manual. This includes Mechanical and Structural/Frame
time. This field will accept only hours and tenths of an hour.
ABF ESTIMATING SOLUTION
LINE ITEMS SCREEN
7-7
Add Line Items Cont'd
7) LABOR DESIGNATION FIELD: This field should always be left blank except when the part or
operation on this line item is a Structural/Frame or a Mechanical Operation. When an "M", "S" or
"F" is selected, then the appropriate Hourly Rate for that operation will be used to calculate labor.
ABF ESTIMATING SOLUTION
LINE ITEMS SCREEN
7-8
Add Line Items Cont'd
8) REFINISH TIME FIELD: If the part that is selected requires refinishing, you enter the time in
this field in hours and in tenths of an hour. This time can be judgement time or it can be the flatrate time from your Collision Estimating Manual.
You may also use this field to enter time for any other refinishing related operation times like: Add
for Clear Coat. Add for Edging. Add for Prime & Blocking. Deduct for Refinish Overlap.
ABF ESTIMATING SOLUTION
LINE ITEMS SCREEN
7-11
Browse Line Items
ABF ESTIMATING SOLUTION
LINE ITEMS SCREEN
7-13
WebParts-Connecting to New Part Prices
ABF ESTIMATING SOLUTION
DIGITAL IMAGES SCREEN
10-3
Finding the Image Gallery Screen
Press the "G" Key (Images) from any screen within the Damage Report Record.
ABF ESTIMATING SOLUTION
DIGITAL IMAGES SCREEN
10-2
Importing Digital Images into the ABF Database
When Setting Up your software, be sure to go to Setup to define the Drive and Paths for
the USB memory card for easy importing of images.
ABF ESTIMATING SOLUTION
DIGITAL IMAGES SCREEN
10-4
Digital Image Gallery Screen
Below is the Image Screen. The smaller images on the right side are the collection of all
saved images that you can browse through. To browse up and down through the images,
press the B Key.
The enlarged image on the left side is the selected top image in the browse column.
Browse up and down through the images.
Select the Command Keys for different digital image functions
ABF ESTIMATING SOLUTION
10-5
DIGITAL IMAGES SCREEN
Browsing the Digital Image Gallery
Press the "B" Key (Browse) from the Images Screen to browse the images up and down.
To Delete an Image, press
the DELETE Key
Press the Escape Key to Exit
From the Images Screen
Select the Command Keys to navigate the images. Press the "C" Key to edit the image
caption.
ABF ESTIMATING SOLUTION
DIGITAL IMAGES SCREEN
10-6
Edit Image Caption
Press "B" Key for Browse. Select the Image and press the "C" Key (Caption) to edit the
caption for that particular image.
ABF ESTIMATING SOLUTION
DIGITAL IMAGES SCREEN
10-7
Importing Digital Images
At the Images Screen, press the "M" Key Import. Press the X Key or use the mouse to Click
and find your Source Folder.
Note: This function does not Import directly from your digital camera, but from your
camera's SD or memory card. You can also import from any valid Windows drive such as
hard drive, usb flash drives, etc.
At the Images Screen, press the "M" Key (Import).
Press the X Key or use the mouse to Click on the
Down Arrow to find your Source Folder.
The last image of the current Image gallery is
shown on the left. (Target Folder).
ABF ESTIMATING SOLUTION
DIGITAL IMAGES SCREEN
10-8
Selecting the Source Drive To Import Images
Use the Up/Down Arrow Keys or your Mouse to select the Drive and Source Folder for the
images you want to import.
ABF ESTIMATING SOLUTION
DIGITAL IMAGES SCREEN
10-9
Selecting Images To Import
Once you have selected a valid Source Drive & Folder, the following window and Browse
Screen appears showing images and files names.
Drive and Source Folder for the image you want to import.
ABF ESTIMATING SOLUTION
DIGITAL IMAGES SCREEN
10-10
Exporting Digital Images
At the Images Screen, press the "E" Key( Export). After that, the images in your Image
Gallery will appear on the left side of the screen as shown below. The target folder will
always be called FILEOUT. From the FILEOUT Folder, you can send them by email or copy
the images to another drive or folder.
Once you select the image you want to export,
they will appear on the right side of the screen
in the Target Folder area.
Use the Up/Down Arrow Keys or your Mouse to select the Drive and Source Folder for the
images you want to export.
ABF ESTIMATING SOLUTION
DIGITAL IMAGES SCREEN
10-11
Printing Digital Image Report
You can Print or Create PDF Files of the images in your Digital Images Gallery. Press the
P Key to Print or Press the F Key to create a PDF file.
ABF ESTIMATING SOLUTION
Get The Most Current
Part Prices With the
Auto Body Esimator 33
WebParts Link!
With just a click of a button, you’ll be linked to:
OEM. . . . . Aftermarket . . . . .and Used parts catalog pricing
and unlimited access to parts illustrations and the most up-todate part prices.
ABF’s exclusive WebParts Link automatically connects to parts
online catalogs for the vehicle you’re estimating. And you get
labor and paint times from our database. It couldn’t be easier.
NOTE: You must have access to the Internet. Preferably Cable
or DSL.
ABF Systems 1-800-247-0872
Mar. 15, 2011
Email: [email protected]
First - Add Your Line Items
1) Add The Line Item Estimate Details
First - Add all of the Line Items without part pricing . Once all of the Line Items are entered.
Then press the “Esc” key to close the Group and Labor Database Windows.
Parts Group Window
Parts and Labor Window
NOTE: When you are finished entering line items, press the Escape Key to close the Parts
Window - then press the Escape Key again to close the Parts Group Window.
ABF Systems 1-800-247-0872
Mar. 15, 2011
Email: [email protected]
Get Ready To Link To WebParts
2) Now Link To a Parts Catalog With WebParts!
Press the W Key
After all Line Items are Entered. No Press the “W” Key for Web-Parts pricing and parts illustrations.
After Adding Line Items, Press the “W” Key (Web-Parts) To Lookup Prices and
View Illustrations.
ABF Systems 1-800-247-0872
Mar. 15, 2011
Email: [email protected]
Select Choice of Parts Catalog
3) Use Your Mouse or Up/Down Arrow Keys.
After Pressing the “W” Key, a PopUp Window Appears Showing a List of Online Parts
Catalogs to Link To. Use your mouse or the Up/Down Arrow Keys to navigate to your selection choice.
Name of Web Site
CATEGORY CODES:
Oem = Original Equipment Manufacturer (New Factory Parts)
Alt = Alternative New Parts or Aftermarket New Parts (Non Oem)
LKQ = Like Kind & Quality (Used or Salvaged or Recycled)
ABF Systems 1-800-247-0872
Mar. 15, 2011
Email: [email protected]
Get Part Prices & Illustrations
4) Lookup The Part Prices You Need!
After Entering the Year Make and Model into the Online Parts Catalog, you will see a Parts
Group Listing on the Left Side of the screen. Use your mouse to select the group you are
looking for and Double Click it. Then Click on the parts you need and you will see the suggested list price.
Save the Items in the Shopping Cart. And If You Want, You Can Order From The Online Parts
Catalog.
ABF Systems 1-800-247-0872
Mar. 15, 2011
Email: [email protected]
Copy Parts Prices From Shopping Cart
5) Copy The Part Prices from the Shopping Cart.
Shopping Cart Contents you have selected for current prices. Type the prices from your Shopping Cart right into the Line Item Records below:
The Auto Body Estimator Line Items Window is Down-sized and ready to Enter Part Prices.
You can move this window or Hide it until you need it.
ABF Systems 1-800-247-0872
Mar. 15, 2011
Email: [email protected]
Part Price Entry Into Line Items
6) Enter The Prices Into Your Estimate!
Now enter the part prices from your printed Cart List into the Line Items. You’re done!
7) It’s Just That simple! Now Close the Internet
Connection.
ABF Systems • 11930 Colt Drive • Sutter Creek • California • 95685 • USA
ABF Systems 1-800-247-0872
Mar. 15, 2011
Email: [email protected]