1
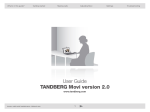
FieldView
Application
TANDBERG FieldView™ delivers the
most innovative solution in mobile video
collaboration.
Featuring integrated wireless LAN, high
resolution video and audio and the ability to
collaborate via instant on-screen annotation —
it’s the next best thing to having your experts
on the scene.
Its ability to access small spaces enables
productivity in areas previously inaccessible by
video, allowing organizations to address and
resolve issues instantly.
Recording capabilities enable device and PC
users to archive material for a later date or
collaborate over previously recorded material.
All content can also be extended to an officebased video meeting using a PC with the
FieldView application and H.239 dual stream
capabilities.
User Guide
The FieldView Application software is subject to the following
notices:
Free Software Foundation, Inc., 59 Temple Place, Suite 330,
Boston, MA 02111-1307 USA.
Copyright © 2004-2007 LibreStream Technologies Incorporated.
All rights reserved.
TANDBERG is a registered trademark of Tandberg ASA. All other
trademarks are the property of their respective owners.
A copy of the GNU Lesser General Public License is provided on
the product CD in the ‘licenses’ folder. In accordance with section
(4) of the GNU General Public License, copies of Live Networks
source code and Librestream modified Live Networks code will be
provided upon request from Librestream. To obtain the source
code on a CD, please send USD$10 for shipping and handling to:
Portions include software under the following terms:
Customer Services
Live Networks Inc.:
LibreStream Technologies Inc.
Patents Pending in Canada, the U.S. and other countries.
Copyright © 1996-2005, Live Networks, Inc. All rights reserved
This library is free software; you can redistribute it and/or modify
it under the terms of the GNU Lesser General Public License as
published by the Free Software Foundation; either version 2.1 of
the License, or (at your option) any later version. (See <http://
www.gnu.org/copyleft/lesser.html>.)
This library is distributed in the hope that it will be useful, but
WITHOUT ANY WARRANTY; without even the implied warranty
of MERCHANTABILITY or FITNESS FOR A PARTICULAR PURPOSE.
See the GNU Lesser General Public License for more details.
You should have received a copy of the GNU Lesser General
Public License along with this library; if not, write to the
200 - 55 Rothwell Road
Winnipeg, Manitoba
Canada R3P 2M5
THIS PRODUCT IS LICENSED UNDER THE MPEG-4 VISUAL
PATENT PORTFOLIO LICENSE FOR THE PERSONAL AND NONCOMMERCIAL USE OF A CONSUMER FOR (i) ENCODING VIDEO
IN COMPLIANCE WITH THE MPEG4-VISUAL STANDARD (“MPEG4 VIDEO”) AND/OR (ii) DECODING MPEG-4 VIDEO THAT WAS
ENCODED BY A CONSUMER ENGAGED IN A PERSONAL AND
NON-COMMERCIAL ACTIVITY AND/OR WAS OBTAINED FROM A
VIDEO PROVIDER LICENSED BY MPEG LA TO PROVIDE MPEG4VIDEO. NO LICENSE IS GRANTED OR SHALL BE IMPLIED FOR
ANY OTHER USE. ADDITIONAL INFORMATION INCLUDING THAT
About this document: All rights reserved. This document contains information that is proprietary
to TANDBERG. No part of this publication may be reproduced, stored in a retrieval system, or
transmitted, in any form, or by any means, electronically, mechanically, by photocopying, or
otherwise, without the prior written permission of TANDBERG. Nationally and internationally
recognized trademarks and trade names are the property of their respective holders and are hereby
acknowledged.
Copyright © 2007 TANDBERG
Contact information:
TANDBERG
Philip Pedersens vei 22, No-1366 Lysaker, Norway
Telephone: +47 67 125 125
Fax: +47 67 125 234
Video: +47 67 117777
E-mail: [email protected]
Support (North America only): +1 866 826 3237
TANDBERG FieldView Application User Manual
D14042.01 March 2007
Table of Contents
FieldView Application. . . . . . . . . . . . . . . . . . . . . . . . . . . . . . . . . . . . . . 1
About This Guide. . . . . . . . . . . . . . . . . . . . . . . . . . . . . . . . . . . . . . . . . 1
Installing the Software. . . . . . . . . . . . . . . . . . . . . . . . . . . . . . . . . . . . . 2
Starting the Application and Logging In. . . . . . . . . . . . . . . . . . . . . . . . 3
Activating the software. . . . . . . . . . . . . . . . . . . . . . . . . . . . . . . . . . . . . 3
Logging in. . . . . . . . . . . . . . . . . . . . . . . . . . . . . . . . . . . . . . . . . . . . . . 3
Information on the FieldView Application window . . . . . . . . . . . . . . . . . . 4
Exiting and Logging Out. . . . . . . . . . . . . . . . . . . . . . . . . . . . . . . . . . . . 4
Answering & Initiating Calls. . . . . . . . . . . . . . . . . . . . . . . . . . . . . . . . . 5
Answering an Incoming Call. . . . . . . . . . . . . . . . . . . . . . . . . . . . . . . . . 5
Starting a Call. . . . . . . . . . . . . . . . . . . . . . . . . . . . . . . . . . . . . . . . . . . 6
Ending a Call. . . . . . . . . . . . . . . . . . . . . . . . . . . . . . . . . . . . . . . . . . . . 7
How to Use the Call Window. . . . . . . . . . . . . . . . . . . . . . . . . . . . . . . . . 8
Starting and Stopping Live Video Streaming . . . . . . . . . . . . . . . . . . 8
Recording a video. . . . . . . . . . . . . . . . . . . . . . . . . . . . . . . . . . . . . 9
Playing a video. . . . . . . . . . . . . . . . . . . . . . . . . . . . . . . . . . . . . . . 9
Recording and playing a video annotation. . . . . . . . . . . . . . . . . . . . 9
Call Controls – Volume . . . . . . . . . . . . . . . . . . . . . . . . . . . . . . . . 10
Call Controls – Audio/Video Settings. . . . . . . . . . . . . . . . . . . . . . . 10
Call Controls – FieldView Controls. . . . . . . . . . . . . . . . . . . . . . . . . 11
Call Controls – Snapshots . . . . . . . . . . . . . . . . . . . . . . . . . . . . . . 12
Viewing Snapshot Images . . . . . . . . . . . . . . . . . . . . . . . . . . . . . . . . . 13
Information on the Image Viewer window . . . . . . . . . . . . . . . . . . . . . . 13
Administrative Tasks. . . . . . . . . . . . . . . . . . . . . . . . . . . . . . . . . . . . . . 14
Changing your password . . . . . . . . . . . . . . . . . . . . . . . . . . . . . . . . . . 14
Setting Up a New User. . . . . . . . . . . . . . . . . . . . . . . . . . . . . . . . . . . . 14
Adding a New Contact . . . . . . . . . . . . . . . . . . . . . . . . . . . . . . . . . . . . 15
Modifying Existing User information. . . . . . . . . . . . . . . . . . . . . . . . . . . 16
Modifying Existing Contacts . . . . . . . . . . . . . . . . . . . . . . . . . . . . . . . . 17
Checking your own User information: Personal Profiles . . . . . . . . . . . . . 18
Configuring Application Preferences . . . . . . . . . . . . . . . . . . . . . . . . . 19
Displaying the Preferences window . . . . . . . . . . . . . . . . . . . . . . . . . . . 19
Starting the FieldView Application automatically. . . . . . . . . . . . . . . . . . 19
Auto Login . . . . . . . . . . . . . . . . . . . . . . . . . . . . . . . . . . . . . . . . . . . . 19
View Defaults . . . . . . . . . . . . . . . . . . . . . . . . . . . . . . . . . . . . . . . . . . 19
Connection Status Defaults. . . . . . . . . . . . . . . . . . . . . . . . . . . . . . . . . 19
Default Video Options for Calls . . . . . . . . . . . . . . . . . . . . . . . . . . . . . . 20
Line Colors for Telestration (drawing on the screen) . . . . . . . . . . . . . . . 20
Snapshot Annotation. . . . . . . . . . . . . . . . . . . . . . . . . . . . . . . . . . . . . 20
Snapshot and Video Storage Location . . . . . . . . . . . . . . . . . . . . . . . . . 21
Setting Sounds. . . . . . . . . . . . . . . . . . . . . . . . . . . . . . . . . . . . . . . . . 21
Setting Ring Volume. . . . . . . . . . . . . . . . . . . . . . . . . . . . . . . . . . 21
Selecting Audio Devices. . . . . . . . . . . . . . . . . . . . . . . . . . . . . . . . . . . 22
Audio Devices . . . . . . . . . . . . . . . . . . . . . . . . . . . . . . . . . . . . . . 22
TANDBERG FieldView Application User Manual
D14042.01 March 2007
Media Configuration. . . . . . . . . . . . . . . . . . . . . . . . . . . . . . . . . . . . . . 22
Standard Video and Audio Configurations . . . . . . . . . . . . . . . . . . . 22
New Configuration window . . . . . . . . . . . . . . . . . . . . . . . . . . . 23
ii
TANDBERG FieldView Application User Manual
D14042.01 March 2007
FieldView Application
The FieldView system provides mobile real-time video conferencing for
locations that are usually not accessible with standard video conferencing
equipment. This includes locations such as test labs, health care facilities,
factory floors, service departments, remote suppliers, inspection areas,
customer facilities, and other remote work team locations.
The FieldView Application works with the FieldView Device. Using this system,
a FieldView Application user (often referred to as the Client in this manual)
communicates over a network with an Operator on FieldView Device at a
remote site, as shown.
Both the FieldView Operator and the
FieldView Application Client can:
•Converse just as they would on a cellular
telephone.
•View and listen to streaming audio/visual
output from the FieldView in real time.
•Capture and save snapshot images.
•Record and play back video.
•Adjust the controls on the FieldView
(e.g., Zoom, Focus, Lighting, etc.).
•Draw on the video image.
The FieldView system allows technical
experts and remote operators to jointly
view, consult, diagnose and resolve
issues by sending high-resolution video,
sound and still images through streaming
multimedia from the FieldView Device on
the scene to the FieldView Application on an office workstation.
About This Guide
This guide describes how to use the FieldView Application on a system that
has already been set up and configured. For network setup and configuration
information, please see the FieldView System Administration Manual. For
information on the FieldView Device, consult the FieldView Device User Guide.
TANDBERG FieldView Application User Manual
D14042.01 March 2007
Installing the Software
This software is meant to be installed on a PC with these minimum
requirements:
Operating System: Microsoft Windows XP or Windows 2000.
Processor speed: 1 GHz (1.5 GHz recommended).
Disk space: Up to 120 MB required (if Microsoft DirectX, Microsoft
.NET Framework, and the required Visual C++ runtime
components are not already installed).
Network:
Wired 10/100 Ethernet port. A wireless network
connection is not recommended for the FieldView
Application computer.
Video card:
DirectX v9.0c compatible video graphics card
Audio support:
For voice and audio support, the host computer must have
a microphone and speakers and/or headset and/or USB
speakerphone.
To install the software:
1.If you have previously installed the FieldView Application software and it is
currently running you should first exit it. Look for the FieldView Application
icon in the Windows Task Tray then right-click and select Exit.
2.Insert the CD into the computer. The installation process should start on its
own. If it does not:
a.Click the Start button on your Windows desktop, and select Run... to
open the Run dialog.
b.Type D:\FA\setup.exe and click OK to start the installation (use a drive
letter that matches your CD drive).
3.Follow the installation prompts. The installation puts icons on your desktop
for the FieldView Application software and the Image Viewer application and
a folder into your Start > Programs menu.
Depending on what has already been installed on your computer, first-time
setup may prompt you to install a number of utilities, such as the Microsoft
.NET Framework and Microsoft DirectX. Simply follow the prompts as they
appear, and re-boot the machine as required.
TANDBERG FieldView Application User Manual
D14042.01 March 2007
Starting the Application and Logging In
To start the FieldView Application, double-click the FieldView Application icon
on your desktop, or click the Start menu and select Programs > FieldView
Application > FieldView Application.
Activating the software
The first time you start the FieldView Application software, it will
display the Product Activation Wizard. You can run the software as
a demo version for up to seven days, but after that time you must
activate it.
Your activation key is printed on the installation CD sleeve. The first
group of characters is the License ID and the
second group of characters is the Key Code.
You must have an active internet connection to
activate the software automatically.
To activate the FieldView Application software:
1.Start the FieldView Application software.
2.In the Activation Wizard window, click I have
an Internet connection… and then click the
Next > button.
The Wizard displays the activation key fields.
3.In the first field, enter the License ID.
4.In the second field, enter the Key Code.
5.Click Next >.
The Activation Wizard verifies the activation
code.
6.When the activation is complete, click Finished.
License Activation Wizard
Logging in
When you start the application the TANDBERG splash screen appears, then the
login window.
If the FieldView Application has not been configured, use the default user
name and password.
•User Name: admin
•Password: admin
This is a built-in user name that is meant to allow a system administrator to
go in and set up user names and passwords. We strongly recommend that you
change the administrator password from the default admin the first time you
log in.
To login to the FieldView Application:
1.In the User Name and Password fields enter the user name and password
given to you by your system administrator.
2.Click Log In.
Once you are logged for the first time, we strongly recommend that you
change your password.
After you log in, the FieldView Application window appears. A FieldView
Application icon also appears in the task tray. You can close the FieldView
Application window, but the application stays running in the background so
that you can:
•Display the application quickly
•Accept incoming calls.
FieldView Application login window
TANDBERG FieldView Application User Manual
D14042.01 March 2007
Information on the FieldView Application window
Local Contacts displays a list of the
Clients and FieldView Devices that
have been set up with call information
(i.e., you can call them). These can be
FieldView Devices or other computers.
If you double click a FieldView Device
item, it starts a call. Computer items
cannot be called from the FieldView
Application (i.e. an FieldView Application
Client cannot call another FieldView
Application Client).
Local Users displays a list of users
who have been set up to use the
FieldView Application software on this
workstation. Note that this tab only
appears for Administrators.
History provides a list of recent calls.
Users can display this window and
double click a list item to call that
FieldView Device again.
Recordings displays a list of video
recordings saved on your computer.
Double-click on a recording in the list
to play it in the Call window. You can
also record a voice annotation for a
Connected and available to take calls.
recording.
The Name for the logged in user
Can make outgoing calls. Incoming
appears in the lower left corner of the
calls cause the FieldView Application
icon to flash for a few seconds in
window.
the task tray. You have the option of
Login status information appears in
the status line at the bottom of the
Can make outgoing calls but incoming
calls are blocked.
window. SIP: Registered means that
you have successfully registered with a
Name of the logged in user
SIP server and can make calls by URI
via that server. SIP: Not Registered
means that you are not registered with
a SIP server and can only make calls by
FieldView Application – Administrator
IP address.
and User views
Online status appears in the status
line at the bottom of the window. To
change the online status, click the icon,
and select one of the options shown in the example at right.
Toolbar buttons
provide shortcuts
to most features.
Hover your cursor
over top of a button
to see tool tip help.
Click to view a menu.
Exiting and Logging Out
To close the FieldView Application window, select File > Close. Note that this
does not log you out. The user who initially logs in to the FieldView Application
client stays logged in and the FieldView Application continues running.
To exit the application so that someone else can log in, you must click the
FieldView Application icon in the system tray and select Exit.
Exiting the application from the task tray.
TANDBERG FieldView Application User Manual
D14042.01 March 2007
Answering & Initiating Calls
Before you can answer or initiate a call, you must be logged into the FieldView
Application and be able to communicate with a network where there are other
users logged in on FieldView Devices.
Using the FieldView Application, the Client can call an Operator with a
FieldView Device, or can answer an incoming call from an Operator using a
FieldView Device.
If Connection Status is Online,
incoming calls cause this
Incoming Call window to appear.
Answering an Incoming Call
When a call comes in from a FieldView Operator, you will hear the ring you
have configured for incoming calls.
Your Connection Status appears in the bottom right corner of the application
window. If it is set to Online, an incoming call makes an Incoming Call window
appears in the middle of your screen, as shown at right.
•To answer and start the session, click Accept. To refuse the call, click
Decline.
•If your Connection Status is set to Do Not Disturb, incoming calls cause the
FieldView Application icon in the task tray to flash briefly. You can click the
icon to answer the call, or disregard it.
•To block all incoming calls, set your Connection Status to Offline.
Incoming call window – Online status.
If Connection Status is Do
Not Disturb, incoming calls
cause this icon to flash, and no
Incoming Call window appears.
Connection status
TANDBERG FieldView Application User Manual
D14042.01 March 2007
Starting a Call
To start a call from the FieldView Application:
1.Select a FieldView Device name on the Local Contacts
tab.
If you have previous calls listed in the History tab,
another option is to display the History tab and
highlight a previous call.
If the desired name does not appear in either the
Local Contacts or History tabs, it means that the user
has not been added to the Local Contacts tab. Contact
your system administrator.
2.Double click the name or previous call, or click the
Call button in the toolbar. You will hear the outgoing
“rings” or a busy signal just as you would on a
conventional phone.
3.When the user on the other end answers the call, two
things happen:
•A call window opens, as shown below, and
•The two of you can start talking, just as you would
on a telephone.
Highlight a name and
click the Call button.
Select a name from the Local Contacts tab and click the Call button.
Call window.
TANDBERG FieldView Application User Manual
D14042.01 March 2007
Ending a Call
To end a call:
•Click the telephone icon located in the lower right corner of the Call window,
•or click the X in the top right corner of the call window.
Click the telephone icon to end a call.
Clicking the X to close the window also
ends a call.
TANDBERG FieldView Application User Manual
D14042.01 March 2007
How to Use the Call Window
When the Call window first opens, video does not appear (unless you have the
default set to start streaming as soon as the call begins – see page 20). See
the following Figs for more information on the parts of this window.
Starting and Stopping Live Video Streaming
The video controls are in a control bar beneath the video area of the window.
The controls change depending on the state of the window. If video is not
streaming, the video area appears dark.
To start and stop video streaming:
•To start streaming, click the Play button .
•To pause the video, click the Pause button .
•To stop streaming, click the Stop button .
For more information on recording and playing videos, see page 9.
Name of the user you are
connected with.
Window and Call Controls. Click
each heading to view the options
associated with it. For example, click
Volume to view volume controls.
Current streaming status
and details
Video controls
Play : Click to start streaming from the
FieldView
Pause
: Click to pause the video stream.
Stop
: Click to stop the video stream.
Start Record
: Click to start recording a video.
Call control bar.
See details below.
End call (hang up)
Video window size controls
Capture still image (Snapshot)
Fit video to current window
Call timer
Erase telestration lines
Show/Hide video
recording telestration
TANDBERG FieldView Application User Manual
D14042.01 March 2007
Recording a video
The video recording controls are in a control bar beneath the video area of the
window.
•To start recording , start the video streaming and then click the Start
Recording button .
The FieldView Application displays the run time as it records the video.
•To stop recording, click the Stop Recording button .
Playing a video
The FieldView Application displays
video recordings in the Call window.
When playing a video, the Call
window displays additional options
for setting the telestration line
colors in the video recording.
To change these colors, see Call
Controls - FieldView Controls on
page 11.
To show or hide telestration lines,
click the Show/Hide Recorded
Telestration icon in the Call control
bar.
To play a video:
1.If a call is active, end it.
2.In the Recordings tab in the
FieldView Application window,
double-click the video you want
to play.
Videos are identified by the date
Video recording
telestration colors
and time at which they were
recorded.
The FieldView Application opens
the Call window and plays the video.
•To pause the video, click the Pause button .
•To start the video playing again, click the Play button
•To stop the video, click the Stop button .
Click to show or hide video
recording telestration
.
Recording and playing a video annotation
After you record a video, you can add a voice annotation to it from the
Recordings tab of the FieldView Application window.
To record a voice annotation for a video:
1.Right-click on a video name on the Recordings tab and then select
Annotation > Record… from the shortcut menu.
The Annotation dialog box opens and begins recording your annotation.
2.Click Stop when you are finished recording.
To play a video annotation:
•Right-click on the video name for which you want to play the annotation and
then select Annotation > Play from the shortcut menu.
TANDBERG FieldView Application User Manual
D14042.01 March 2007
Call Controls – Volume
Use the sliders and checkboxes to adjust the volume
for speakers and the gain of the voice microphone on
the host workstation.
Note that on some computers, the microphone
gain will be adjusted automatically to an optimal
level. If this is enabled, manual adjustments will be
overridden. Consult your computer’s manual or audio
driver release notes for information on enabling or
overriding this feature (known as Automatic Gain
Control or AGC).
The FieldView Device provides two audio channels—
one for voice communication and one for subject
audio. The voice channel is processed to minimize
echo and noise, and is intended to capture the
operator’s voice. The subject audio channel is
intended to capture the unprocessed sound coming
from the subject viewed by the FieldView Device. The
subject audio channel is time-synchronized with the
video channel displayed on the FieldView Device.
Use the Mute Voice and Mute Video checkboxes to
select which audio source you are hearing.
Use the Mute checkbox to mute all audio output.
Call Controls – Volume
Call Controls – Audio/Video Settings
This tab displays the Video and Audio settings
currently in use.
To change Audio/Video settings, select a preset
option from the drop-down list for the Configuration
field.
In addition to the From FieldView Device option
shown, the Configuration field includes all of the
option settings that have been set up as preset
Media Configurations. See page 22 for information on
adding and modifying these.
Call Controls – Audio/Video Settings
10
TANDBERG FieldView Application User Manual
D14042.01 March 2007
Call Controls – FieldView Controls
Use this tab to control settings on the FieldView Device that you are currently
in a call session with. Note that the Operator can also control these features
from the FieldView Device.
Focus
To focus automatically, select Auto Focus. To focus manually, clear Auto
Focus and adjust the focus with the slider.
Zoom
Use the slider to adjust FieldView Device zoom level or click the Zoom In
and Zoom Out icons on either side of the slider to select the minimum or
maximum zoom.
Illumination (front light on FieldView)
Click the light bulb button to toggle the FieldView Device’s front light on or off.
Telestration (drawing on the screen)
Telestration allows you to draw lines on the screen to illustrate a point or
highlight an object. Both the Client and the Operator can draw these lines, but
the lines appear in different colors to make it easier to tell who drew them.
The options in this area allow you to set colors for the telestration lines:
•Local color: Click the colored box next to this label to select a color from
a color palette. The color under the Live label determines the color for
telestration lines drawn by the FieldView Application user during a call.
The color under the Rec label determines the color drawn by the FieldView
Application user in a video recording.
•Remote color: Click the colored box next to this label to select a color
from a color palette. The color under the Live label determines the color for
telestration lines drawn by the FieldView Device operator during a call. The
color under the Rec label determines the color drawn by the operator in a
video recording.
•Erase lines: Click the Erase icon to erase all telestration lines. This can also
be done from the Call control bar in the lower right corner of the window.
11
TANDBERG FieldView Application User Manual
D14042.01 March 2007
Call Controls – Snapshots
The Call Control tab for Snapshots displays the snapshots taken during the
current call and saved snapshots from previous calls.
Capturing and saving Snapshots
1.Click the Snapshot button in the Control Bar in the lower right corner of the
window.
A thumbnail of the snapshot appears in the Snapshots tab and the
Annotation window appears, if your Call Window preferences are set to
Annotate when taken. (See page 20 for more information on setting this
option.)
2.In the Annotation window, enter a Title and Description for the snapshot.
3.Click OK.
Snapshots are automatically saved to a folder named with the current date.
To view, annotate, rename, or delete a snapshot, right-click the thumbnail and
select the desired menu option.
A quick way to view the full snapshot image is to double-click the thumbnail.
The Snapshot window provides several controls along the bottom which allow
you to:
•Save or edit an annotation
•Magnify (up to 500%) or shrink (down to 10%) the image
•Fit the image to the window, or show at original size.
Note: you cannot resize if the image is currently Fit to Window
Telestration lines
If there are currently telestration lines, these will be
captured as part of the image. If you need to save an
image without telestration lines, click the Eraser button in
the Control Bar before capturing the snapshot.
Select a folder
to display
thumbnails.
Double click an image to
display it in a large window.
Right-click to annotate,
rename, or delete the image.
Options for annotating or
magnifying the image.
12
Snapshot button
TANDBERG FieldView Application User Manual
D14042.01 March 2007
Viewing Snapshot Images
The Image Viewer application allows you to view, annotate, and manage
snapshots images saved on your computer.
To start the Image Viewer double-click on the Image Viewer icon on
your desktop or click the Start menu and select Programs > FieldView
Application > Image Viewer. If the FieldView Application software is
running, you can also open the Image Viewer from the Tools menu by selecting
Tools > Image Viewer.
Information on the Image Viewer window
Browse the Folder List to locate the snapshots you want to display.
Thumbnails show the snapshots in the selected folder.
In the Image area you can adjust the size of the image and add a text
annotation.
Select a folder to
display saved images.
Adjust the
image size
Select the thumbnail
of the image you want
to display
Enter an annotation
for the selected
image
To add an annotation:
1.Display the image that you want to annotate by selecting its thumbnail.
2.Enter an image Title and Description.
3.Click Save.
13
TANDBERG FieldView Application User Manual
D14042.01 March 2007
Administrative Tasks
When you add or modify users and contacts, the changes apply only to
the computer on which you are working. They are not reflected on other
computers or FieldView Devices at your facility.
Changing your password
To change your password, click the Change Password icon on the toolbar, or
select File > Change Password…
Setting Up a New User
Note: You must have Administrator privileges to be able to add, modify, or
delete any user information.
To set up a new user:
1.Log in with an Administrative user name.
2.Display the Local Users tab. This tab only appears if you are logged in as
administrator. It displays a list of users who have been set up to use the
system.
3.Create a new user profile by clicking the Create New icon on the toolbar,
pressing Ctrl+N or selecting Edit > New…
4.At the Identification tab, fill in the fields necessary for defining the user:
User Name
Use the name by which the user will be known on the
system. The user will enter this name during login.
Password
Enter the user’s password. Users can change their own
passwords once they log in.
First Name
Enter the user’s first name.
Last Name
Enter the user’s surname.
Administrator
If the user will need administrative access, click this
checkbox. If not, leave it blank. Only administrators can set
up new users.
URI
This is a Universal Resource Identifier that has been
registered for the user on a SIP Registrar. The FieldView
can initiate a call to a user using this URI.
The form of the URI can be <text>@<IP
address>, <text>@<DNS name>, or <SIPserver
account>@<SIPserver IP address>. The <IP address> can
be in dotted decimal notation or a resolvable DNS name.
14
Changing your password
Setting up new user login information
TANDBERG FieldView Application User Manual
D14042.01 March 2007
5.In the SIP Server tab, enter the SIP server information necessary for routing
calls through to the user. These fields are only required if you’re using a SIP
Registrar. If you’re not using SIP server, DO NOT fill in these fields. Consult
your site administrator for assistance with entering addresses. The fields
available on the SIP Server tab are:
Enable SIP
Registration
Check to enable the SIP Server fields. All calls will be routed
to the SIP server.
Address
Enter the IP address of the SIP server on which this user has
an account.
User Name
Enter the user name for this user, as it has been defined on
the SIP Registrar.
Password
Enter the SIP server password for Registrar authentication.
This is different from the user’s FieldView Application login
password.
Type
If your SIP server requires Digest authentication, select the
Digest checkbox.
Setting up new user routing information
6.Click OK to save the user’s profile.
Adding a New Contact
All users may add and modify their Personal contacts. However, only
administrators may create Shared contacts.
1.Display the Local Contacts tab and either click the Create a new contact
icon on the toolbar, press Ctrl+N, or select Edit > New.
2.In the New Contact window, add the contact information that will allow you
to call this user.
Name
This is the contact’s display name. It will be listed in the
Local Contacts list and appear in the Call window during a
call.
Address
Enter the URI for the contact.
Type
Select FD or Computer from the drop-down list. The Type
field identifies the type of contact that is being entered.
FieldView Devices are identified as FD and FieldView
Applications are identified as Computer. FieldView Devices
can call FieldView Applications and vice versa. FieldView
Applications cannot call another FieldView Application.
Group
Administrators can select Shared to have the contact
appear to all users. Personal contacts are only visible to
the user who created the contact.
3.Click OK.
The new name will now appear on the Local Contacts tab.
15
Setting up new user contact information
TANDBERG FieldView Application User Manual
D14042.01 March 2007
Modifying Existing User information
Modify button
To modify an existing user:
1.Login as an administrator and
highlight the User Name on the
Local Users tab.
2.Click the Modify icon on the
toolbar to open a Modify User
window where you may make any
changes necessary. You may also
select Edit > Modify…
Note: Any user with administrative
privileges can change the password
of any other user, except the user
‘admin.’ You must be logged in
‘admin’ to change that password.
Modifying an existing user
16
TANDBERG FieldView Application User Manual
D14042.01 March 2007
Modifying Existing Contacts
The list of Shared contacts shows
up for all FieldView Application
users. The list of Personal contacts
only shows up for the user who
defined them.
Note: Only administrators
will see the Group field in the
Modify Contact window. Only
administrators can modify Contacts
from the Shared group.
To modify an existing Contact:
1.Select the Contact name on the
Local Contacts tab.
2.Click the Modify icon on the
toolbar to open a Modify Contact
window where you may make
any changes necessary. You may
also select Edit > Modify…
Modifying an existing contact
17
TANDBERG FieldView Application User Manual
D14042.01 March 2007
Checking your own User information: Personal Profiles
Non-Administrator users cannot see the Local Users tab and therefore cannot
change any other user’s information. However they can view and change their
own user information by clicking the Personal Profiles icon on the taskbar,
or pressing Ctrl+M or by selecting File > My Profile… The My Profile window
shows the Local User information for the current user.
My Profile for the current user
18
TANDBERG FieldView Application User Manual
D14042.01 March 2007
Configuring Application Preferences
Use the Preferences window to customize the FieldView Application for your
environment.
Displaying the Preferences window
To display a tabbed FieldView Application Preferences window, click the
Preferences icon. You can also display this window by pressing Ctrl+P, or
selecting File > Preferences. See the figures to the right.
Starting the FieldView Application automatically
To set the FieldView Application to start automatically when Windows starts up,
open the Preferences window and display the Startup tab.
Click to place a checkmark in the Run at Windows startup? checkbox.
Note: Unless you also set up the Auto Login information, you will still be
prompted for a User Name and Password.
Auto Login
To automatically log in as a specific user when the FieldView Application starts,
open the Preferences window and display the Startup tab.
In the Auto Login area, select None or Local from the drop-down list for the
Service field.
•None is the default, and it means that users will be prompted to log in. Use
this option if more than one user uses this workstation.
•Local means that you will choose one of the local users to be automatically
logged in. Use this option if the workstation is intended for only one user.
When you select Local, the User Name and Password fields become active.
Enter the User Name and Password that apply to the user who will use this
workstation.
Startup options
View Defaults
To set the default view for the Local Contacts, Local Users, History, and
Recordings tabs, open the Preferences window and display the Connection
Window tab.
This Views section sets the default views as they appear when you start the
FieldView Application. You can change any view by selecting a View menu
option (Tiles, Small icons, Large icons, List, Details).
Note: Only administrators will see the Users View field.
Connection Status Defaults
To set the default starting Connection State, open the Preferences window and
display the Connection Window tab. Select the default state in the Connection
State field.
•Online: If you are connected to the network, you can make calls, and
incoming call notifications appear in a dialog on the middle of your screen.
•Do Not Disturb: If you are connected to the network, you can make
outgoing calls. Incoming calls cause the task tray icon to flash for a few
seconds, and you have the option of answering. No call notification appears
in the middle of your screen.
•Offline: If you are connected to the network, you can make outgoing calls,
but all incoming calls are blocked.
Note: You can change the current Connection status at any time by selecting
Connections > Status, or by clicking the Connection area in the bottom right
corner of the window. (See Online Status on page 4.) This does not alter the
default you have selected in the Connection Status field.
19
Setting defaults for views
TANDBERG FieldView Application User Manual
D14042.01 March 2007
Default Video Options for Calls
To set defaults for calls, open the Preferences window and display the Call
Window tab.
Video options:
•Start video on connection: Click this checkbox to automatically start
streaming video from the FieldView as soon as there’s a connection. If not
selected, the call will initially be audio only (like a phone call).
•Fit video to window: Click this checkbox to automatically adjust the video
image so that it fills the Call Window when the call starts.
•Configuration: A media configuration defines a set of video and audio
properties for a call. Use this field to select the default media configuration
to be used, as defined at the Media Configurations window (described
on page 22). To open the Media Configurations window, click the Media
Configurations icon on the toolbar, press Ctrl+C or select File > Media
Configurations.
Line Colors for Telestration (drawing on the screen)
To set the default telestration line colors – the lines that appear when someone
draws on the screen with a stylus – open the Preferences window and display
the Call Window tab. In the Telestration area you can set telestration colors for
live streams and video recording playback.
•Local color: Click the colored box next to this label to select a color from
a color palette. The color under the Live label determines the color for
telestration lines drawn by the FieldView Application user during a call.
The color under the Rec label determines the color drawn by the FieldView
Application user in a video recording.
•Remote color: Click the colored box next to this label to select a color
from a color palette. The color under the Live label determines the color for
telestration lines drawn by the FieldView operator during a call. The color
under the Rec label determines the color drawn by the operator in a video
recording.
•Select Show Recorded to display telestration lines when playing a video
recording.
Snapshot Annotation
To set the default snapshot annotation, open the Preferences window and
display the Call Window tab. In the Snapshots area:
•Annotate when taken: Select this checkbox to automatically display the
Annotation dialog box when you take a snapshot.
20
Setting video and telestration defaults
TANDBERG FieldView Application User Manual
D14042.01 March 2007
Snapshot and Video Storage Location
To set the default location for snapshot images and video
recordings saved during calls, open the Preferences window
and display the Paths tab. Click the ‘…’ button to browse and
select a different location on your hard drive or local network.
Setting Sounds
To test the ring tones and other sounds associated with the
call process, open the Preferences window and display the
Sounds tab.
•To test an existing sound, click the Play button (blue arrow)
that matches the ring tone or other sound.
•To select a different sound for a particular ring or other
signal, click the ‘…’ button to browse to a folder location to
select a sound file (.wav format). By default, the application
shows the folder where the built-in FieldView Application
sound files are stored. You can browse to a folder with
different sound files, if necessary.
Setting Ring Volume
To set the volume for incoming ring tones, open the
Preferences window and display the Sounds tab. Use the
sliders in the Incoming Ring Volume Range area to set
minimum and maximum volumes. Click the Play buttons
(blue arrows) to test current volume levels. When an incoming
ring tone is played, the volume will start at the minimum volume and gradually
ramp up to the maximum volume.
Defining where image snapshots and
videos will be stored
Click a blue arrow
button to test the
current setting.
Click a “…” button to
browse to a folder
to select a different
sound file.
Configuring sound options
21
TANDBERG FieldView Application User Manual
D14042.01 March 2007
Selecting Audio Devices
If your computer has more than one audio device installed, you can select
which speakers and microphone will be used. To select this, open the
Preferences window and display the Devices tab.
Audio Devices
For the Speakers, Microphone, and Ringer fields, the system provides
options based on what exists on your computer, i.e., if you have several
speakers, microphones and ringers installed, you can select the one you want
from the drop-down list.
If you only have one set of speakers, microphone, and ringer available, they
are automatically selected by default. Selecting Default for a device causes the
appropriate Windows default device (configured via the Control Panel) to be
used.
Devices tab allows you to select from the
audio devices available on your computer
Media Configuration
Standard Video and Audio Configurations
A Media Configuration defines a set of video and audio properties for a call.
To display the Media Configuration window, click the Media Configurations on
the toolbar, press Ctrl+C, or select File >
Media Configurations.
The FieldView Application comes
configured with three built-in settings
(Low, Medium, High), which cannot be
modified or deleted. However you can add
a new configuration or copy and rename
an existing configuration.
These names
Select an item from the Configuration list
are available
located on the left side of the window to
as options on
the Properties
view that configuration’s audio and video
window and on
details. The information is shown in the
the Call window.
Properties area on the right side of the
window.
Media Configurations window shows configuration details
22
The Properties
area shows
details of the
highlighted
Configuration.
TANDBERG FieldView Application User Manual
D14042.01 March 2007
Media Configuration buttons
Add
Adds a new media configuration. Clicking Add displays a blank New
Configuration window. You must configure all settings.
Copy
Copies an existing configuration. Highlight a configuration from the
list and then click Copy. This opens the New Configuration window
with the fields pre-configured with the copied settings. Name the
new configuration and adjust its settings as required.
Modify Modifies an existing configuration. Highlight a configuration from
the list and then click Modify. This opens the New Configuration
window for the specified configuration. Modify the settings as
desired. Note that you can only modify your custom Media
Configurations. You cannot modify the built-in configurations.
Delete
Deletes an existing configuration. Highlight a configuration from
the list and then click Delete to delete the configuration. Note that
you can only delete your custom Media Configurations. You cannot
delete the built-in configurations.
New Configuration window
This window allows you to enter or modify custom Media Configuration
settings. This section shows the tabs and fields available. Create and adjust
settings as necessary. Incorrect settings may result in poor performance.
Consult your site administrator for assistance with configuring the individual
settings.
Provide a unique name in
the Name field.
New Configuration window options
23
E-mail: [email protected]
Support (North America only): +1 866 826 3237