1
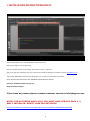
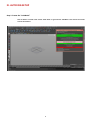
BZP PRO SMART SKINNER BIPED
Product Manual
www.bzppro.com
For customer service please contact BZP PRO at [email protected]
1
Table of Contents
I. INSTALLATION INSTRUCTIONS FOR PC ....................................................................................................................... 4
II. INSTALLATION INSTRUCTIONS FOR MAC .................................................................................................................. 5
III. AUTO RIG SETUP ...................................................................................................................................................... 5
Step 1: Create the “scaleNode” ................................................................................................................................ 6
Step 2: Create The “Sketch Skeleton” ...................................................................................................................... 7
Step 2 continued: Manipulating the Sketch Skeleton into Proper proportions .................................................... 8
Step 3: mirror skeleton to make it symmetrical (if desired) ................................................................................. 10
Step 4: finalize the skeleton.................................................................................................................................... 11
Step 5: create the leaf joints and translate red locators into proper position ..................................................... 12
Step 6: finalize skeleton .......................................................................................................................................... 13
Step 7: delete unwanted leaf joints and select all joints that are active for binding ........................................... 14
Step 8: bind mesh to skeleton and do the weighting .............................................................................................. 15
Step 9: create the control rig .................................................................................................................................. 21
Step 9 continued: make the control rig cartoony (Optional) ................................................................................ 22
Step 10: create facial GUI and hook up locator out to corresponding blendshape.............................................. 23
Step 10 continued: create facial GUI and hook up locator out to corresponding blendshape ............................ 24
IV. CONTROLLERS ........................................................................................................................................................ 28
2
3
I. INSTALLATION INSTRUCTIONS FOR PC
Step 1: Double Click on the .exe file (MAYA should not be open)
Step 2: Click “Agree” to user agreement.
Step 3: A window will pop up that states “Destination Folder.” Click enter.
Step 4: You will be prompted to enter the username and password that was emailed to you from [email protected].
Step 5: Open MAYA 2013 and enter the following 2 lines of code into your MAYA script editor:
NOTE: DO NOT COPY AND PASTE TEXT- MANUALLY ENTER IN SCRIPT EDITOR
loadPlugin “BZPPROsmartSkinnerPlugin.py”;
BZPproSmartSkinnerBiped;
If you have any issues please contact customer service at [email protected].
NOTE!: FOR AUTODESK MAYA 2014, YOU MUST HAVE SERVICE PACK 1, 2,
AND 3 INSTALLED- DIRECT LINK FOR AUTODESK
http://usa.autodesk.com/adsk/servlet/ps/dl/index?siteID=123112&id=2334435&linkID=9242259
4
II. INSTALLATION INSTRUCTIONS FOR MAC
Step 1: Double Click on the .dmg file (MAYA should not be open)- once opened click on the .pkg file
Step 2: Click “Agree” to user agreement.
Step 3: A window will pop up that states “Destination Folder.” Click enter.
Step 4: You will be prompted to enter the username and password that was emailed to you from [email protected].
Step 5: Open MAYA 2013 and enter the following 2 lines of code into your MAYA script editor:
NOTE: DO NOT COPY AND PASTE TEXT- MANUALLY ENTER IN SCRIPT EDITOR
loadPlugin “BZPPROsmartSkinnerPlugin.py”;
BZPproSmartSkinnerBiped;
If you have any issues please contact customer service at [email protected].
NOTE!: FOR AUTODESK MAYA 2014, YOU MUST HAVE SERVICE PACK 1, 2,
AND 3 INSTALLED- DIRECT LINK FOR AUTODESK
http://usa.autodesk.com/adsk/servlet/ps/dl/index?siteID=123112&id=2334435&linkID=9242259
5
III. AUTO RIG SETUP
Step 1: Create the “scaleNode”
Click on Button 1 which reads “Create Scale Node” to generate the scaleNode. This will set the overall
scale of the skeleton.
6
Step 2: Create The “Sketch Skeleton”
Click Button 2 “Execute sketch draft Skeleton” to generate the “Sketch Skeleton”
7
Step 2 continued: Manipulating the Sketch Skeleton into Proper proportions
1)
2)
3)
4)
The root joint is locked into the center of the screen.
Translate your model into the proper root location.
Use the unlocked channels to align your skeletal joints to fit your model.
Based on the joint you choose you will need to either scale, translate or rotate the joint. MAYA interface
will show you which attribute is unlocked.
The two images below give an example of a skeleton sketched out to two unique proportions.
8
The two images below give an example of a skeleton sketched out to two unique proportions.
9
Step 3: mirror skeleton to make it symmetrical (if desired)
1) Click on Button 3A to make joints symmetrical from left to right.
2) Click on Button 3B to make joints symmetrical from right to left
3) If you want an Asymmetrical character just leave sketch skeleton as is or adjust as desired.
10
Step 4: finalize the skeleton
Click on Button 4 “Create Final Skeleton” to lock your sketch skeleton into place. Your skeletal proportions
are now locked.
11
Step 5: create the leaf joints and translate red locators into proper position
1) Generate the “Leaf Twist Joints” by clicking on Button 5 “Create Leaf Joints”. “Leaf joints” will be
created for the arms, legs, chest and lats giving your Skeleton smooth deformation rotation when
twisting any of these parts.
2) Move the chest and lats joints into desired location by translating the red locators.
12
Step 6: finalize skeleton
Click on Button 6 “Finalize Leaf Joints” to lock in the leaf joint locations. Your skeleton is now complete.
13
Step 7: delete unwanted leaf joints and select all joints that are active for binding
1) Delete unwanted leaf joints by clicking on the corresponding pink buttons.
2) Convert your model to mobile by clicking on the pink Button that reads “Simplify for Mobile” This will
delete all twist joints.
3) Your remaining joints will automatically be selected for binding by clicking on Button 7 “Joint Selection for
Binding.”
4) To undo deletion of a joint click on “undo” in MAYA.
14
Step 8: bind mesh to skeleton and do the weighting
1) Click Skin Tab
2) In the drop down menu Click “Bind Skin”.
3) Another dropdown menu will appear: select “Smooth Bind”. Then select the following commands in
Smooth Bind Options
A) Bind to: “Selected Joints”
B) Bind Method: “Closest Distance”
C) Skinning Method “Classic Linear”
D) Normalize Weights: “Interactive”
E) You will determine your own Max influences and Dropoff rate to suit your modEL.
F) Once you fill in the parameters Click “Apply”.
CONGRATULATIONS YOU HAVE SUCCESSFULLY BOUND THE SKELETON!!!!
15
Step 8 Continued: bind mesh to skeleton and do the weighting
4) Next you will select on The GUI what media application you want your character for: Mobile game or
Film/Next Gen/TV
5) Click on Button 8A "Reference in bzpPROskinner.ma file". This will references in the BZP PRO Smart
Skinner control mesh.
16
Step 8 Continued: bind mesh to skeleton and do the weighting
6)
Once the smart skinner file is referenced into the scene it should be perfectly stretched and lined up
with the skeleton of your rig file. Scale up the "yellow" controllers so that the smart skinner mesh
encapsulates your character mesh.
17
The image below is the Skinner File scaled out to fit a biped character.
18
Step 8 Continued: bind mesh to skeleton and do the weighting
7) Once satisfied, select the skin clusters of your character and hit button 8B "Copy Skin Weights". That
will transfer the skin weighting of the smart skinner file to your character file with a skinning
completion rate of 85 to 95 percent.
19
Step 8 Continued: bind mesh to skeleton and do the weighting
8) Then, click on Button 8C "Un reference bzpPRO_skinner.ma file" to unreference the smart Skinner file
to return to a clean scene. Feel free at this point to do any "skinning" cleanup required to get the
desired aesthetic for the character.
20
Step 9: create the control rig
Click on Button 9 “Control Rig Creation” to generate your rig and controls.
21
Step 9 continued: make the control rig cartoony (Optional)
The cartoony function of the rig is optional. Simply press the “Cartoony Button” to allow squash and
stretch.
22
Step 10: create facial GUI and hook up locator out to corresponding blendshape
To make the facial GUI, hit Button 10 "Default Control GUI Creation" and it is automatically generated.
23
Step 10 continued: create facial GUI and hook up locator out to corresponding blendshape
1)
2)
3)
4)
5)
6)
7)
8)
Select the source mesh and duplicate it as many times as needed.
Name each mesh to corresponding name on the GUI.
Model each mesh to match it’s name in this example; smile left, smile right etc...
Shift select each mesh
Click on “Create Deformers”
In the dropdown window select “Blend shape”
Name the Blend Shape
Hit “Apply”
24
Step 10 continued: create facial GUI and hook up locator out to corresponding blendshape
9) Change your chain order, so skin cluster comes first.
25
Step 10 continued: create facial GUI and hook up locator out to corresponding blendshape
10) The “Skin Cluster” should be before blend shape node (Changing the blendShape order)
11) Connect the “output” of the blendshape node to the “input” of the Gui node. (Both nodes must be
connected in the “connection editor”)
12) Click on “Windows- General Editors- Connection Editor”
13) Select your blend shape node and hit the "Reload Left" button in the "Connection Editor".
14) Select the "facialGUI_valueHolder" under the "facialGraphicUserInterface" node and hit "Reload
Right."
15) Now that the two nodes are loaded in the "Connection Editor", connect the blend shape "weights"
such as "Smile Left" and "Smile Right" to the corresponding name in the "facialGUI_valueHolder".
26
Step 10 continued: create facial GUI and hook up locator out to corresponding blendshape
16) The GUI is now connected to the blendShape node. Translate the control in the GUI and you will see
the corresponding shape activated.
27
IV. CONTROLLERS
A) Spine
A.1. masterRoot: controls the overall orientation of the root of the rig
- Squash And Stretch X: attribute that handles scale of Root X
- Squash And Stretch Y: attribute that handles scale of Root Y
- Squash And Stretch Z: attribute that handles scale of Root Z
A.2. hipsController: translates and rotates the hips without altering the location of the upper body
- Squash And Stretch Mid X: attribute that handles scale of mid spine X
- Squash And Stretch Mid Y: attribute that handles scale of mid spine Y
- Squash And Stretch Mid Z: attribute that handles scale of mid spine Z
- Squash And Stretch Low X: attribute that handles scale of low spine X
- Squash And Stretch Low Y: attribute that handles scale of low spine Y
- Squash And Stretch Low Z: attribute that handles scale of low spine Z
A.3. waistController: rotates the bend at the waist
A.4. thoraxController: translates and rotates the upper torso without affecting the lower torso
- Squash And Stretch X: attribute that handles scale of thorax X
- Squash And Stretch Y: attribute that handles scale of thoraxY
- Squash And Stretch Z: attribute that handles scale of thorax Z
A.5. spineControl_3: rotates the heart area of the rig
A.6. left/ right ClavicleControl: translates the clavicle into place
-Auto Clavicle Blend Forward Backward: attribute that causes the clavicle to automatically follow the
corresponding hand control
28
Limbs Controls
B) Arms
B.1. left/ right HandControl: translation and rotation of the hand control
- Follow Head: hand control is oriented to the Head Control
- Follow Hips: Hand Control is oriented to the Hips
- Follow World: Hand Control is oriented to the Mass Node
- FK IK Blend: Blend between forward and inverse kinematics
- FK Visibility: turns on the Forward Kinematic controls
- Squash and Stretch: attribute that enables squash and stretch to affect the overall limb
B.2. left/ right Hand_Controller: rotates the hand for Forward Kinematics
- Finger Visibility: turns on the visibility of the fingers
- Squash And Stretch X: attribute that handles scale of foot ball X
- Squash And Stretch Y: attribute that handles scale of foot ball Y
- Squash And Stretch Z: attribute that handles scale of foot ball Z
B.3. left/ right ForeArm_Controller: rotates the forearm
B.4. left/ right Arm_Controller: rotates the arm
B.5. scaleMaster_left/right_ForeArmTwistTwo: translates rotates and scales the corresponded joint
B.6. scaleMaster_left/right_ForeArmTwistOne: translates rotates and scales the corresponded joint
B.7. left/rightArmScaleControl translates rotates and scales the corresponded joint
B.8. scaleMaster_left_ArmTwistFour translates rotates and scales the corresponded joint
B.9. scaleMaster_left/right_ArmTwistThree translates rotates and scales the corresponded joint
B.10. scaleMaster_left/right_ArmTwistTwo translates rotates and scales the corresponded joint
B.11. scaleMaster_left/right_ArmTwistOne translates rotates and scales the corresponded joint
B.12. left/rightArmAnchor: controls the orientation of the twist joints for the limb
B.13. left/rightArmPoleVectorControl: controls the translation of the IK for the corresponding limb
- End Joint Follow: matches the orientation of the end joint of the limb
- Root Follow: matches the orientation of the root control
NOTE - ALL FINGER CONTROLS ARE STANDARD FK WITH SQUASH AND STRETCH
29
C) Legs
C.1. left/ right Foot: translation and rotation of the hand control
- Root Follow: attribute when triggered the hand follows the root when translated
- World Follow: attribute when triggered the hand remains uninfluenced by the rest of the body
- Foot Tilt Raise: raises the foot with the toe pointed down via set driven key
- Toe Raise: rotates the toe upward
- Toe Rotate: rotates the toe 360 degrees
- Squash and Stretch: attribute that enables squash and stretch to affect the overall limb
C.2. left/ right BallControl: rotates the foot for footroll
- Bank Control: changes pivot location of the ball of the foot
- Squash And Stretch X: attribute that handles scale of foot ball X
- Squash And Stretch Y: attribute that handles scale of foot ball Y
- Squash And Stretch Z: attribute that handles scale of foot ball Z
C.3. left/ right AnkleControl: rotates the ankle of the foot
- Squash And Stretch Y: attribute that handles scale of ankle Y
- Squash And Stretch Z: attribute that handles scale of ankle Z
C.4. scaleMaster_left/right_ShinTwistTwo: translates rotates and scales the corresponded joint
C.5. scaleMaster_left/right_ShinTwistOne: translates rotates and scales the corresponded joint
C.6. left/rightLegScaleControl: translates rotates and scales the corresponded joint
C.7. scaleMaster_left_LegTwistFour: translates rotates and scales the corresponded joint
C.8. scaleMaster_left/right_LegTwistThree: translates rotates and scales the corresponded joint
C.9. scaleMaster_left/right_LegTwistTwo: translates rotates and scales the corresponded joint
C.10. scaleMaster_left/right_LegTwistOne: translates rotates and scales the corresponded joint
C.11. left/rightHipController: rotates the corresponding hip controller
C.12. left/rightLegAnchor: controls the orientation of the twist joints for the limb
C.13. left/rightLegPoleVectorControl: controls the translation of the IK for the corresponding limb
- End Joint Follow: matches the orientation of the end joint of the limb
- Root Follow: matches the orientation of the root control
30
D) Neck and Head
1. neckControl_1: rotates the corresponding neck joint
- Squash And Stretch X: attribute that handles scale of corresponding neck joint X
- Squash And Stretch Y: attribute that handles scale of corresponding neck joint Y
- Squash And Stretch Z: attribute that handles scale of corresponding neck joint Z
2. neckControl_2: rotates the corresponding neck joint
- Squash And Stretch X: attribute that handles scale of corresponding neck joint X
- Squash And Stretch Y: attribute that handles scale of corresponding neck joint Y
- Squash And Stretch Z: attribute that handles scale of corresponding neck joint Z
3. headController: rotates the head
- Head Follow: attribute that when activated locks the head to aiming in the direction of the root
- Squash And Stretch X: attribute that handles scale of head X
- Squash And Stretch Y: attribute that handles scale of head Y
- Squash And Stretch Z: attribute that handles scale of head Z
31
E) Mass Node
1. massNode: controls overall orientation and scale of the rig
32