1
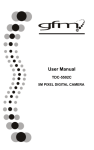
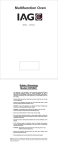
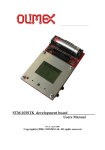
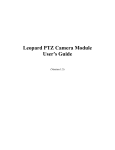
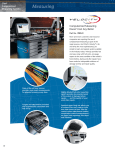
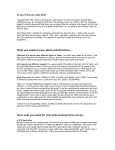
EZ-EYE User Guide – Setup,
Configuration, Usage
External Configuration -
The EZ-EYE unit has two external dip switches which control
the video mode and recording mode of the unit. These switches should be configured to the
desired settings prior to connecting and powering on the unit.
NTSC – PAL : This switch controls the video format the unit is displaying in. For North American
television sets the ‘NTSC’ mode is used. PAL mode is used primarily in European and African
sets. If the wrong video mode is used then you may experience poor video quality, loss of color,
off-center images or other similar video issues.
Full Stop – Overwrite : This switch controls the recording mode of the camera. When set to
‘Full Stop’, the unit will record until the memory is full then stop recording until it is cleared. The
unit will not record until the memory has been erased using the camera menu. When set to
‘Overwrite’, the camera will record constantly and when the memory is full it will overwrite the
oldest images with new ones.
Once the EZ-EYE unit has been configured using the dip switches , configuration must be done
within the camera menu. To access the menu, you must first connect the camera to a television
set using the provided RCA video cable. Simply run the cable from the Video Out port on the
back of the camera, to the yellow Video In port on your Television. After that, switch your
camera on. If you do not see an image from the camera then you may need to change the input
on your Television (Most commonly done using a ‘Input’, ‘Source’, or ‘TV/VCR’ button on your
remote control) until you do. See your TV’s user manual for more information on changing your
TV’s input.
Live View Display – The image that appears on the screen when the camera is
connected to your TV is the Live View. On this screen you can see exactly what the camera
sees. Across the top and bottom of the display are translucent bars which display information
about the system. Across the top the current date and time will be shown. The format that this
date and time appears in can be configured within the camera’s menu.
At the bottom of the screen you will see the recording bar. This will have the following items
displayed :
www.ezwatchstore.com
Recording Indicator – When the camera is recording, you will see a white circle on the bottom
left, with a rotating red section. This indicates that the camera is currently recording. If the
camera is not recording, then this icon will not appear.
Record Type Icon – This is an icon which can show you what type of recording the unit is set
to. If you see a finger pointing down, then the unit is currently recording using the ‘Manual
Record’ button. If you see a figure of a man, then the unit is currently in its Motion Detection
schedule. If you see an image of a clock, then the unit is currently running a Continuous
recording schedule. If none of those icons appear, then the system is not currently in any of its
schedules and not currently recording.
Resolution and Quality – This indicator will show you the resolution and quality that the unit is
set to record in. The resolution displayed will be either 640x480 or 320x240. Higher resolution
indicates better picture quality. No matter what the recording resolution is, the camera always
displays live video at 640x480 resolution. To the immediate right of the resolution is the quality
indicator, which indicates the quality of the video is LQ (Low) MQ (Medium) or HQ (High)
quality.
Recording Mode – The last icon that appears at the bottom is the recording mode icon. A small
rectangular icon indicates that the unit has memory built-in (This icon normally will not disappear
from the screen). To the right you will see either a series of arrows in a circle, or a percentage.
When you see the series of arrows in a circle, then the unit is in ‘overwrite’ mode. When you see
a percentage, the unit is in ‘Full Stop’ mode. The percentage displayed will slowly count down
the amount of free space until it reaches 0%. Once the unit is at 0% it will stop recording, and
cannot be started again until the recordings are deleted.
Camera Menu – The EZ-EYE camera menu is used to configure the recording features
and control the capabilities of the camera. To access the menu, simply press the ‘Menu’ button
on the back of the unit. You can navigate the menu by using the Up (Record) and down (Play)
buttons on the back of the unit, and use the + (Fast Forward) button to enter an option. Pressing
the Menu button will exit the menu or (If you are in one of the sub-menus) return to the previous
menu. While you are in the camera menu, the red light above the ‘Menu’ button on the back of
the unit will stay lit up.
SEARCH AND PLAY – This option is used to play back previously recorded clips. For
information on this menu option, see the ‘Playback’ section below.
SET DATE/TIME – This option is used to configure the date and time. It consists of three
options : Date format will affect how the camera shows the date. Year/Month/Day is default, but
Month/Day/Year and Day/Month/Year is also available. Set Date and Set Time are options
which allow you to set the current date and time, which is displayed on live video and on
recorded images.
www.ezwatchstore.com
SET MOTION DETECT – This option allows you to configure the sensitivity of the Motion
Detection of the unit. On the screen you will see a white bar with a red line through it – this bar
shows you how much ‘energy’ is on the screen. MD Energy represents how much motion is
being seen on the screen. More energy means more motion occurring over a larger part of the
screen. As energy is seen, the white bar will fill up with black, to indicate how much motion the
camera sees. When the energy is higher than the threshold (The red bar) the camera will begin
recording. Using the - / + or up/down buttons, you can adjust the threshold so that the camera
requires more motion or less motion to trigger. If the Threshold is too low, the camera may
trigger based on extremely small changes and may trigger when motion is not seen. If the
Threshold is too high, the camera may not trigger even though motion is occurring in front of the
camera. 10% is the default Threshold.
Manual Record – This option controls how the camera acts when it is manually told to record.
Video size can be set to either 640x480 or 320x240. Higher size improves quality, but
decreases your total recording time. Smaller size decreases quality, but allows you to record
longer amounts of time. Frame rate affects how many images are recorded every second –
larger frame rates are more smooth, more fluid, while smaller frame rates are more jerky and
have gaps in the motion. Larger frame rates will use up the camera’s memory much faster,
meaning less recording time. The minimum frame rate is 1 frame recorded every second. The
Maximum frame rate is 12 frames per second when set to 640x480, and 30 frames per second
when set to 320x240. Lastly, set the desired image quality. Once again, High quality uses up
the camera’s storage faster which means less time recorded. Lower quality provides longer
recording times by using less storage. Manual recording is always continuous and cannot detect
motion.
Schedule Record – This option allows you to record using a daily schedule. The schedule can
be set to either record constantly (Continuous) or record when motion is seen (Motion
Detection). Each can be scheduled separately, but if they overlap then Motion Detection
recording settings (Quality, Resolution, Framerate) will take precedence over continuous
settings whenever the camera sees motion.
Schedule Record -> Motion Record – The first option on this menu allows you to turn the
schedule on or off (Record : On/Off). Below that, you can enter the time to start recording, and
the time to end. If the time to start recording is after the time it ends, then it will record overnight.
The recording schedule is set using 24-hour time; 1:00pm corresponds to 13:00 and 10:00 PM
corresponds to 22:00. Below the scheduled time is the duration – once the camera sees motion
it will record for the entire duration specified. This can be set from 5 to 30 seconds (In
increments of 5 seconds). The unit will record the full duration, even if motion does not last the
entire time. Below the duration is the quality settings of the recording – these settings are
identical to the ones present in the ‘Manual Record’ section listed above.
www.ezwatchstore.com
Schedule Record -> Continue Record – This option allows you to enter a schedule for the
camera to record constantly and not based on motion. The settings are the same for entering in
the date, time, and quality as on the previous menu. Because the camera records constantly,
there is no ‘Duration’.
SD Card Options – This menu allows you to see how much of the camera’s internal memory is
being used, as well as the total amount of memory. Total Space is a listing of the maximum
amount of space on the camera. Typically this number is slightly lower than the actual maximum
because the camera’s software must use a small amount of space for its program. The number
below that one, Remain Space, indicates how much space is available. If you are recording on
‘Overwrite’ mode then this number is normally going to stay extremely low. If you are recording
on ‘Full Stop’ mode, then you must delete the recorded images before it reaches 0. If you do
not, the camera will not record anymore until the recordings are deleted. To delete all recorded
images, press ‘+’. It will ask you if you are sure, press + to confirm and delete everything or
press Menu to cancel. Once you press +, please give the unit up to 60 seconds to complete
erasing. Once it is finished, it will display ‘Format OK!’ on the screen.
System Status – This menu will allow you to view the current recording settings: Resolution,
Framerate, Quality, Schedule Start/Stop times and whether the schedule is enabled or not. It
also displays the internal version of the camera for troubleshooting purposes.
Factory Default – This option will reset all settings within the camera back to their default
values.
Recording – There are three ways to record an image.
The first way is to record manually, where the recording is started and stopped by pressing the
‘Rec’ button on the back of the unit. Manual recording will record everything in front of the
camera constantly – whether or not there’s any motion occurring in front of the unit. The quality
of the recording of manual recordings is configured within the ‘Manual Record’ section of the
Menu.
The second way is to record using a Motion Detection Schedule. When the schedule is turned
on, the camera will sense motion ‘energy’ (A measurement of how much motion is occurring on
the screen) and record whenever the energy reaches a specific Threshold. The sensitivity is set
within the ‘Set Motion Detect’ section of the camera menu, while the quality settings (Resolution,
Framerate, Quality) and scheduled time for recording is controlled within the ‘Schedule Record > Motion Record’ section of the menu.
The last way is to record using a constant, continuous schedule. Whenever the schedule is
turned on, the camera will record everything in front of it during the scheduled time. The quality
www.ezwatchstore.com
settings and scheduled time is controlled within the ‘Schedule Record -> Continue Record’
section of the camera menu.
Whenever the camera is recording, whether by motion, manual, or continuous the ‘Rec’ light on
the back of the unit will stay lit. When the camera is not recording (Either the schedules are off
and manual recording is off, or if it is on Motion Detection and not currently seeing any motion)
then the REC light will be off. Recording is always turned off when the camera is in the Menu
mode.
Recording precedence always follows this sequence: Continuous, Motion Detection, Manual.
What this means is that if the camera is in Continuous Schedule mode and Motion Detection
schedule mode, whenever the camera sees motion it will use the ‘Motion Detection’ settings
until the duration ends. When the camera is in EITHER mode and the Manual Record button is
pressed, it will use the Manual Record settings until the manual recording is turned off.
Playback – There are two ways to initiate playback. Manually, and through the Search
feature.
To manually begin playing back recordings, simply press the ‘Play’ button on the back of the
unit. The unit will immediately begin playing the oldest clip that it has recorded. You can then
use the fast forward and rewind buttons to You can use the Fast Forward and Rewind buttons to
control speeds in either direction. The unit will display the recording type (Motion, Continuous,
or Manual), video resolution, and quality at the bottom of the image. The date and time of the
recorded image will be displayed at the top of the screen.
If you do not wish to play from the beginning, you can search for a recording by going into the
Menu and selecting the ‘Search and Play’ option. This will bring up a new screen with a lot of
information on it.
Date allows you to select which day to begin playing back video from. Files shows you how
many recordings were taken on that day. You can adjust which day you play back using the
up/down buttons.
Below the date you will see a multi-colored bar. Each section of that bar corresponds to one of
the video recordings. The color of the section indicates what type of recording was taken – blue
sections are recordings that were taken using Manual Recording, red sections are recordings
that were taken by Motion Detection, and white sections are recordings that were taken by
Continuous Recording. To play a recording, use the + / - buttons to select the section you wish
to play, then hit ‘Menu’. Use the + / - buttions to select ‘Play’, and hit Menu once more. The
selected image will begin to play.
www.ezwatchstore.com
To exit playback and return to the ‘search’ screen, press the Stop (up) button. To exit the search
screen and return to the menu, press the ‘Menu’ button, select ‘Exit’, and hit Menu once more.
External Copy/Recording – To make a copy of video that was taken by the camera,
you must connect the camera to an external recorder. This is most commonly going to be a
VCR or Digital Video Recorder (DVR). Plug the camera into the VCR and switch your VCR and
TV input until you can see the camera image on the screen (See your VCR manual for
instructions on how to do this). Insert a blank tape, and press ‘Record’ on your VCR. Then play
back the recording you wish to make a copy of using the EZ-EYE unit. As the camera plays the
recording, the VCR will copy it onto tape. Once you are done, stop the VCR.
Power Operation – The camera is designed to operate using two power modes – Direct
power, and Battery Power. To operate the unit in Direct Power, connect the 12V DC power
supply (included) to a wall outlet. Then plug the other end into the camera. The Camera can be
on and recording indefinitely (so long as power is connected).
The other method is using 4x AA batteries. Using standard Alkaline batteries, the system can
run for a full 8 hours on battery power. Using Heavy Duty or lower quality batteries can severely
decrease battery life with these units. Alkaline or Lithium batteries are HIGHLY recommended.
NOTE – The unit cannot operate in both modes at once. If you connect power while the
batteries are present, the unit WILL continue to drain the batteries over time.
Quality Comparison – Image taken from ~5 feet from target.
640x 480 resolution, ‘High’ recording quality
: 320 x 240 resolution, ‘Low’ recording quality
www.ezwatchstore.com
Recording Times – All times based on constant recording. Recording times on Motion
Detection may vary depending on conditions.
High Resolution
1-Gig Unit
~7 Hours
2-Gig Unit
~ 14 Hours
4-Gig Unit
~ 28 Hours
8-Gig Unit
~56 Hours
640x480 HQ
Low Resolution
~28 Hours
~56 Hours
~112 Hours
~224 Hours
320x240 HQ
www.ezwatchstore.com