1
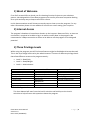
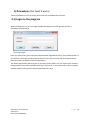
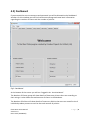
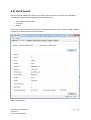
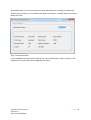
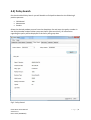
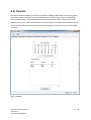
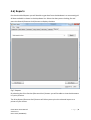
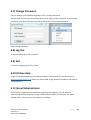
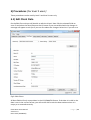
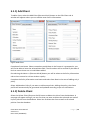
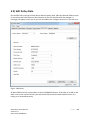
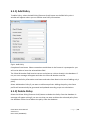
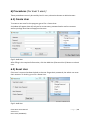
Creative Projects
Client Data
User Manual for
Octfest (Ltd)
Version 1.0
Client Data: User Manual
Version 1.0
Deon Smal (45409544)
Page |1
1) Word of Welcome
First of all we would like to thank you for choosing Creative Projects as your solutions
partner. We designed this Client Data program to be used by insurance companies looking
for a quick and easy way to keep track of their clients.
In this documentation we will show you step by step on how to use the program. For any
other information please visit our website or send us an e-mail stating your enquiries.
2) Internet Access
The program’s database is hosted on a domain on the internet. Because of this, an internet
connection is required to be able to log in as well as modify data in the program. We
recommend a 2 Mbps connection or faster to be able to use the program to its designed
potential.
3) Three Privilege Levels
While using the program you will find some features might be disabled and cannot be used.
This is due to privilege levels set by the administrators. There are 3 different privilege levels
that allow different access to the program namely:
•
•
•
Level 3 – Read Only
Level 2 – Read/Wright
Level 1 – Administrator
Level 3
View client information
View policy information
Pull reports
E-mails users
Level 2
Same as Level 3
Edit client information
Edit policy information
Add clients
Add policies
Delete clients
Delete policies
Level 1
Same as Level 2
Add program user
Reset program user
Change program user
Table1: Privilege Levels
This User Manual will start from the level 3 activities and build up to the Level 1
activities to help all users with questions about the program.
Client Data: User Manual
Version 1.0
Deon Smal (45409544)
Page |2
4) Procedures (For level 3 users)
These procedures are for all access levels and can be followed by all users.
4.1) Login to the program
When clicking the icon, a User Login window will appear that will prompt you for a
username and password.
Fig 1:User Login
Here you must enter your username and password supplied to you by your Administrator. If
you enter an incorrect password more than 3 times, your account will be locked and you
have to contact an administrator for assistance.
The Email Help button will send you to an email screen where you can report your account
being locked or any other problem with log in. Please fill in your Username in the username
textbox before clicking on the Email Help button for help.
Client Data: User Manual
Version 1.0
Deon Smal (45409544)
Page |3
4.2) Dashboard
If you entered the correct username and password you will be directed to the Dashboard
window. On this window you will find a welcome message and some basic information
regarding the number of clients and the number of policies.
Fig 2: Dashboard
At the bottom of the screen you will see “Logged In As: YourUserName”.
The Number of Clients group will show details of how many clients there are according to
their ratings. It also shows the total amount of clients in the database.
The Number of Policies will show details of how many Policies there are on record for the 3
individual product partners as well as the total amount of policies.
Client Data: User Manual
Version 1.0
Deon Smal (45409544)
Page |4
4.3) Client Search
On the next tab called Client Search you will be able to search for clients in the database
according to the following available in the drop down list:
•
•
•
Client Name and Surname
Client ID
RSA ID
Select one of these options and enter the corresponding value in the “Search String” textbox
and press the Search button (Shortcut Alt+S).
Fig 3: Client Search
Client Data: User Manual
Version 1.0
Deon Smal (45409544)
Page |5
All available data of the client will be retrieved and displayed. In clicking the More Info
(Shortcut Alt+I) button, a new window will appear showing all available policy information
about the client.
Fig 4: Policy Information
In the dropdown list all policies owned by the client will be shown. Select a policy in the
dropdown list to get information regarding the policy.
Client Data: User Manual
Version 1.0
Deon Smal (45409544)
Page |6
4.4) Policy Search
On the tab called Policy Search you will be able to find policies based on the following 3
product partners:
•
•
•
Old Mutual
Momentum
Sanlam
Select the desired product partner from the drop down list and enter the policy number in
the Policy Number textbox. When you press Search (Shortcut Alt+S), all information
regarding the policy will be displayed in the Policy Info group box.
Fig 5: Policy Search
Client Data: User Manual
Version 1.0
Deon Smal (45409544)
Page |7
4.5) Calendar
On the tab called Calendar you will find a calendar showing todays date as well as a group
box names Today’s Birthday’s. In the textbox you will find all clients that are celebrating
their birthdays today. The dropdown menu will contain these clients’ names and e-mail
addresses for you to select and send a mail to by clicking on the Send Email (Shortcut Alt+E).
A new window will open where you can type a message for the client to wish him a happy
birth day.
Fig 6: Calendar
Client Data: User Manual
Version 1.0
Deon Smal (45409544)
Page |8
4.6) Reports
On the tab called Reports you will be able to get data from the database in a structured grid.
All data available is shown in the drop down list. Select the data you are looking for and
press the Search (Shortcut Alt+S) button to display the data.
Fig 7: Reports
By selecting the Print Preview (Shortcut Alt+V) button you will be able to view the document
in a print preview.
The Print Report (Shortcut Alt+P) button will allow you to print the selected report on a
printer of your choice.
Client Data: User Manual
Version 1.0
Deon Smal (45409544)
Page |9
4.7) Change Password
You can change your password by going to File > Change Password.
You will have to enter your old password as well as supply a new password. Enter the new
password in the New Password test box as well as the Confirm Password field.
Fig 8: Change Password
4.8) Log Out
To log out please go to File > Log Out.
4.9) Exit
To exit the program go to File > Close.
4.10) Online Help
To get online documentation and help, go to Help > Online Help. This will direct you to
www.creativeprojects.co.za where you will be able to get contact information and help on
some questions.
4.11) Email Administrator
If you have an urgent matter or question regarding the program, you can email an
administrator directly by going to Help > Email Administrator. This will open the email
window where you can stare your enquiry or problem.
Client Data: User Manual
Version 1.0
Deon Smal (45409544)
P a g e | 10
5) Procedures (For level 2 users)
These procedures can be used by level 2 and level 1 users only
5.1) Edit Client Data
On the Edit Client tab you will be able to edit the clients’ data. Edit the selected fields as
seen fit and select the Save (Shortcut Alt+V) button if you are satisfied with the changes. A
message will appear to ask you if you are sure about the changes. Select Yes if you are sure.
Fig 9: Edit Clients
All Date fields will only accept dates in the YYYY/MM/DD format. If the date is invalid or the
date is not in the correct format, you will not be able to exit the date textbox unless it is
empty or re-entered correctly.
Client Data: User Manual
Version 1.0
Deon Smal (45409544)
P a g e | 11
5.1.1) Add Client
To add a client, select the Add Client (Shortcut Alt+A) button on the Edit Client tab. A
window will appear where you can add the new client’s information.
Fig 10: Add Client
Complete all text boxes. Please remember to add dates in the format it is prompted or you
will not be able to leave the selected date field. The ID number will be verified by the date of
birth to ensure there are no invalid data added.
On selecting the Next>>> (Shortcut Alt+N) button you will be taken to the Policy Information
tab as there cannot be a client without a policy.
Complete the Policy information text boxes and select Save Data in the case of adding only 1
policy.
Select Add Another Policy if you want to add more policies. Adding the policy, the clients
profile will automatically be generated and updated according to pre-set calculations.
5.1.2) Delete Client
Select the Delete Client (Shortcut Alt+D) button to delete the client from the database. A
message will appear asking if you are sure that you want to delete the selected user and all
his/her policies from the database. Select Yes to delete the client as well as all related
policies from the database
Client Data: User Manual
Version 1.0
Deon Smal (45409544)
P a g e | 12
5.2) Edit Policy Data
On the Edit Policy tab you will be able to edit the policy data. Edit the selected fields as seen
fit and select the Save (Shortcut Alt+V) button if you are satisfied with the changes. A
message will appear to ask you if you are sure about the changes. Select Yes if you are sure.
Fig 11: Edit Policy
All Date fields will only accept dates in the YYYY/MM/DD format. If the date is invalid or the
date is not in the correct format, you will not be able to exit the date textbox unless it is
empty or re-entered correctly.
Client Data: User Manual
Version 1.0
Deon Smal (45409544)
P a g e | 13
5.1.1) Add Policy
To add a Policy, select the Add Policy (Shortcut Alt+A) button on the Edit Policy tab. A
window will appear where you can add the new Policy information.
Fig 11: Add Policy
Complete all text boxes. Please remember to add dates in the format it is prompted or you
will not be able to leave the selected date field.
The Client ID Number field must be correct and relate to a client already in the database. If
not, an error message will appear and clear the Client ID Number text box.
Complete the Policy information text boxes and select Save Data in the case of adding only 1
policy.
Select Add Another Policy if you want to add more policies. Adding the policy, the clients
profile will automatically be generated and updated according to pre-set calculations.
5.1.2) Delete Policy
Select the Delete Policy (Shortcut Alt+D) button to delete the Policy from the database. A
message will appear asking if you are sure that you want to delete the selected policy from
the database. Select Yes to delete the policy from the database
Client Data: User Manual
Version 1.0
Deon Smal (45409544)
P a g e | 14
6) Procedures (For level 1 users)
These procedures can only be used by level 1 users, otherwise known as administrators.
6.1) Create User
To create a new user for the program, go to File > Create User.
A window will appear that will ask you for a username, password and e-mail to create as
well as privilege level that will apply to that user:
Fig 12: Add User
After filling in the required information, click the Add User (Shortcut Alt+U) Button to submit
user.
6.2) Reset User
If the user’s account has been locked or the user forgot their password, the admin can reset
their account. To do this, go to File > Reset User.
Fig 12: Add User
Client Data: User Manual
Version 1.0
Deon Smal (45409544)
P a g e | 15
Enter the username of the user to reset into the Username to reset text box. If you want to
change their password as well, select the checkbox end enter a new password for the user.
7) Afterword
This program was brought to you by Creative Projects. We hope you will enjoy using this
program. For any further assistance, please don’t hesitate to contact us or send us a email.
Website can be found at:
www.creativeprojects.co.za
Client Data: User Manual
Version 1.0
Deon Smal (45409544)
P a g e | 16