1
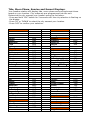
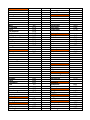
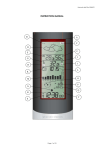
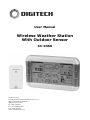
User Manual
Wireless Weather Station
With Outdoor Sensor
XC-0366
Distributed by:
TechBrands by Electus Distribution Pty. Ltd.
320 Victoria Rd, Rydalmere
NSW 2116 Australia
Ph: 1300 738 555
Int’l: +61 2 8832 3200
Fax: 1300 738 500
www.techbrands.com
Specifications:
Transmitter Frequency:
Transmitter Range:
Temperature Range:
Console Power:
Sensor Power:
Console Dimensions:
Sensor Dimensions:
433MHz
30m
-20°C - 70°C
2 x AA Battery (not included)
2 x AA Battery (not included)
220(W) x 141(H) x 36(D) mm
97(W) x 50(H) x 32(D) mm
Important:
- The weather forecast will only be ready 12 hours after the batteries are
inserted.
- The radio communication between the receiver and the transmitter will reach
a distance of 30m line of sight. Obstacles in the way, such as buildings, trees
and high power voltage lines can interfere with the transmission.
- Radio interferences created by computer screens, radios, or TV sets can in
some cases cut off the radio communication entirely. Please take this into
consideration when choosing standing or mounting locations.
- Please keep the transmitter indoors if the outdoor temperature reaches below
-20°C.
Instructions:
- Open the battery compartment on the weather station and insert 2 x AA
batteries, taking care to put them in the correct polarity. Close the battery
compartment.
- Open the battery compartment on the transmitter and insert 2 x AA batteries,
taking care to put them in the correct polarity. Close the battery
compartment.
Note: Ensure to install the batteries into the weather station and transmitter
within the same hour to ensure that they synchronise properly.
Setting the connection to the outdoor sensors:
Once the battery is inserted into the transmitter, by default the transmitter
supplied with your weather station will be on Channel 1. Set the channel of the
transmitter on the back of the sensor.
- Press the ‘CHANNEL’ on the weather station to select a channel (1 to 3). This
gives you the option of polling 3 outdoor sensors with each weather station.
- Press and hold the ‘CHANNEL’ button for 2 seconds to search for outdoor
sensors.
Setting the date/time:
While setting the unit, if no buttons are pressed within 8 seconds the display
will automatically switch back to normal clock mode.
- Press and hold the ‘MODE/SET’ button for 2 seconds until the year is flashing
on the screen.
- Press ‘UP’ or ‘DOWN’ to set the year.
- Press ‘MODE/SET’ and the month will be flashing on the screen.
- Press ‘UP’ or ‘DOWN’ to set the month.
- Press ‘MODE/SET’ and the date will be flashing.
- Press ‘UP’ or ‘DOWN’ to set the date.
- Press ‘MODE/SET’ to select the weekday. There are 7 languages for the
weekday: English, Italian, French, Dutch, Spanish, Danish and German. Press
‘UP’ or ‘DOWN’ to set the language.
- Press ‘MODE/SET’ and 12/24 will be flashing on the screen.
- Press ‘UP’ or ‘DOWN’ to select 12 or 24 hour mode.
- Press ‘MODE/SET’ and the “00” icon will start to flash on the screen to set the
time zone.
- Press ‘UP’ or ‘DOWN’ to set the time zone, ranging from -12 to +12.
- Press ‘MODE/SET’ and the hour will be flashing on the display.
- Press ‘UP or ‘DOWN’ to set the hour.
- Press ‘MODE/SET’ and the minute will be flashing on the display.
- Press ‘UP’ or ‘DOWN’ to set the minute.
- Press ‘MODE’SET’ to lock in the settings.
Setting the alarm:
While setting the unit, if no buttons are pressed within 8 seconds the display
will automatically switch back to normal clock mode.
- Press the ‘ALARM’ button to select the alarm you want to set.
- Press and hold the ‘ALARM’ button for 2 seconds until A1 appears and the
alarm hour is flashing on the display.
- Press ‘UP’ or ‘DOWN’ to set the A1 alarm hour.
- Press ‘ALARM’ and the alarm minute will be flashing on the display.
- Press ‘UP’ or ‘DOWN’ to set the A1 alarm minute.
- Press ‘ALARM’ and A2 will appear and the alarm hour will be flashing on the
display.
- Press ‘UP’ or ‘DOWN’ to set the A2 alarm hour.
- Press ‘ALARM’ and the alarm minute will be flashing on the screen.
- Press ‘UP’ or ‘DOWN’ to set the A2 alarm minute.
- Press ‘ALARM’ to lock in the setting.
- To stop the alarm, press ‘MODE/SET’ or ‘ALARM’
- To snooze the alarm, press ‘SNZ/LIGHT’
Note: When activated, the alarms will sound at the pre-set time every day for
2 minutes until de-activated. The alarm is a rising alarm, changing volume 4
times within the 2 minutes. To view the current alarm settings, press ‘ALARM’
to view the first alarm time (A1 will show next to the time). Press ‘ALARM’
again to view the second alarm time (A2 will show next to the time). Press
‘ALARM’ again to revert to the current time or the unit will automatically revert
in 8 seconds.
Snooze function:
- When the alarm comes on, press the ‘SNZ/LIGHT’ to activate the snooze
function. When the snooze function is on, the “Zz’ symbol will appear on the
display.
- The alarm will be snoozed by 5 minutes before coming on again.
- The snooze function can be interrupted by pressing ‘MODE/SET’ or ‘ALARM’ to
deactivate, or repeated up to 7 times by pressing the ‘SNZ/LIGHT’ button.
Activating and deactivating the alarm:
To activate or deactivate the alarms, press the ‘DOWN’ button:
- Press once: Alarm 1 activates
- Press twice: Alarm 2 activates
- Press three times: Both alarms are activated
- Press four times: Both alarms are deactivated
Temperature Trend Display:
After you insert the batteries, the weather station will measure the current
temperature. The trend display will show a neutral temperature course
(horizontal arrow). The further course of the trend display is determined as
follows:
- If after an hour the temperature is more than 1°C higher than the first value
measured, then a positive course is displayed (arrow pointing upwards).
- If after an hour the temperature is more than 1°C lower than the first value
measured, then a negative course is displayed (arrow pointing downwards).
- If the temperature does not change within the hour, then a neutral value is
displayed (horizontal arrow).
Relative Humidity Trend Display:
After you insert the batteries, the weather station will measure the current
relative humidity. The trend display will show a neutral relative humidity
course (horizontal arrow). The further course of the trend display is
determined as follows:
- If after an hour the relative humidity is more than 5% higher than the first
value measured, then a positive course is displayed (arrow pointing upwards).
- If after an hour the relative humidity is less than 5% higher than the first
value measured, then a negative course is displayed (arrow pointing
downwards).
- If the relative humidity does not change within the hour, then a neutral value
is displayed (horizontal arrow).
Maximum/Minimum Temperature and Relative Humidity:
- To toggle indoor/outdoor maximum/minimum temperatures and humidity
data, press the ‘MEMORY’ button:
Once to show the maximum temperature and humidity levels.
Twice to show the minimum temperature and humidity levels.
Three times to return to the current temperature and humidity levels.
- To reset the maximum and minimum temperature and humidity, press and
hold down the ‘MEMORY’ button for 2 seconds. This will reset all minimum
and maximum data recorded to the current displayed values.
Temperature Alert Setting:
You can program your weather station to sound an alert whenever the outdoor
temperature exceeds the upper or lower pre-set limit. The temperature alert
can be set for all remote channels. When setting the alert temperatures, the
display will change in increments of 1°C. The low temperature alert setting
must be at least 1°C below the high temperature alert setting.
- Press and hold the ‘ALERT’ button for 2 seconds until the outdoor
temperature is flashing.
- Press ‘CHANNEL’ to select the channel on which you would like to set the
alert.
- Press + or – to set your desired high temperature alert level.
- Press ‘ALERT’ to confirm your setting and the icon for low temperature limit
will be flashing on the display.
- Press + or – to set your desired low temperature alert.
Press ‘ALERT’ to confirm the setting.
Note: When the temperature reaches the high or low limit, there will be an
audible signal and the outdoor temperature will be flashing on the screen. As
long as the temperature exceeds the pre-set limit, the display will continue to
flash and the alert will sound every 60 seconds.
- To deactivate the temperature alert, press ‘ALERT’. The icon for high or low
alert symbols will stop flashing on the display.
Pressure Display Selection:
Press + to select either inHg (inches of mercury) or hPa (hectopascals). Note
that this reading is based on your local conditions and is not adjusted for sea
level.
Barometric Pressure History:
The bar graph on your weather station displays barometric pressure history for
the prior 12 hours. The column to the right shows the current pressure. Moving
to the left are the prior time periods, beginning with -1 hour, then -2 hours, -3
hours, -6 hours and -12 hours.
Weather Forecast:
The weather icon on the LCD display will indicate the predicted weather
condition for the next 12 hours. The forecast is based on temperature,
humidity and pressure data collected over the previous 12 hours. Barometric
pressure data must be accumulated by your weather station for 12 hours
before the weather forecast/weather icon function is operational. The station
uses five different symbols: Sunny, Partly Cloudy, Cloudy, Rainy & Stormy.
Weather Forecast Icon Setting:
Press and hold the ‘HIS’ button for 2 seconds until the weather forecasting icon
is flashing on the display. Use the + button to modify the 5 icons: Sunny,
Partly Cloudy, Cloudy, Rainy & Stormy. Press the ‘HIS’ button again to confirm
your setting and to end the setting procedure.
Tide, Moon Phase, Sunrise and Sunset Displays:
Your weather station will display tide, moon phase and sunrise/sunset times
based on your location. City codes are pre-programmed into the unit.
Determine the city nearest your location using the list below.
- Press and hold ‘LOC’ button for 2 seconds until the city selection is flashing on
the display.
- Press ‘UP’ or ‘DOWN’ to select the city nearest your location.
- Press ‘LOC’ to confirm your selection.
Australia
Adelaide
Brisbane
Canberra
Darwin
Hobart
Melbourne
Perth
Sydney
Germany
Aachen
Berlin
Düsseldorf
Dresden
Erfurt
Frankfurt
Flensburg
Freiburg
Hannover
Bremen
Hamburg
Rostock
Stralsund
Koeln
Kiel
Kassel
Leipzig
Muenchen
Magdeburg
Nuremburg
Regensburg
Stuttgart
Saarbruecken
Schwerin
Denmark
Alborg
Arhus
Copenhagen
Odense
Abbreviation
ADE
BNE
CBR
DRW
HBA
MEL
PER
SYD
AAH
BER
DUS
DRS
ERF
FRA
FLF
FRE
HAJ
BRE
HAM
RLG
HST
CGN
KEL
KSL
LEJ
MUC
MDB
NUE
REG
STR
SCN
SCH
AAL
AAR
CPH
ODE
New Zealand
Auckland
Christchurch
Wellington
Hungary
Budapest
Debrecen
Szeged
Abbreviation
AKL
CHC
WLG
BUD
DEB
SZE
Italy
Ancona
Bari
Bologna
Cagliari
Catane(catania)
Firenze(FLORENCE)
Foggia
Genova(GENOA)
Lecce
Messina
Milano
Napoli
Palermo
Parma
Perugia
Rome
Torino (TURIN)
Trieste
Venezia
Ventimiglia
Verona
AOI
BRI
BLQ
CAG
CTA
FLR
FOG
GOA
LEC
MES
MIL
NAP
PMO
PMF
PEG
ROM
TRN
TRS
VCE
VEN
VRN
Ireland
Dublin
DUB
Luxembourg
Luxembourg
LUX
Norway
Bergen
BGO
Spain
Alicante
Andorra
Badajoz
Barcelona
Bilbao
Cadix
Cordoba
Ibiza
La coruna
Leon
Las Palmas
Madrid
Malaga
Palma de mall orca
Salamanca
Seville
Valencia
Zaragossa
ALC
AND
BJZ
BCN
BIO
CDZ
COR
IBZ
LCG
LEN
LPA
MAD
AGP
PMI
SLM
SVQ
VLC
ZAZ
France
Besancon
Biarritz
Bordeaux
Brest
Cherbourg
Clermont ferrand
Lyon
Marseille
Monaco
BSC
BIQ
BOD
BES
CER
CFE
LYS
MRS
MCO
Metz
Nantes
Nice
Orleans
Paris
Perpignan
Lille
ETZ
NTE
NCE
ORL
PAR
PGF
LIT
Rouen
Strasbourg
Toulouse
URO
SXB
TLS
Finland
Helsinki
Tampere
Great Britain
Aberdeen
Belfast
Birmingham
HEL
TMP
ABZ
BFS
BHX
Oslo
Stavanger
OSL
SVG
Netherlands
Amsterdam
Arnhem
Einhoven
Enschede
Groningen
Den haag
Rotterdam
AMS
ARN
EIN
ENS
GRQ
HAA
RTM
Portugal
Evora
Coimbra
faro
Leiria
Lisbon
Porto
AVO
COI
FAO
LEI
LIS
OPO
Poland
Gdansk
Krakow
Poznan
Szczecin
Warsaw
GND
KRK
POZ
SZZ
WAW
Croatia
Split
Rijeka
Zagreb
Sweden
Gothenburg
Malmo
Stockholm
Slovakia
Bratislava
Kosice
Slovenia
Ljubljana
Maribor
SERBIA
Belgrade
Austria
Graz
Innsbruck
Linz
Salzburg
SPU
RJK
ZAG
GOT
MMA
STO
BRV
KSC
LJU
MBX
BEG
GRZ
INN
LNZ
SZG
Bristol
Edinburgh
Glasgow
London
Manchester
Plymouth
Russia
CHELYABINSK
IRKUTSK
Nizhny Novgorod
KHABAROVSK
KRASNOJARSK
SAMARA
KAZAN
Moscow
Novosibirsk
OMSK
PERM
Saint Petersburg
Rostov
SARATOV
Ekaterinburg
UFA
Ulan-Ude
Vladivostok
VOLGOGRAD
Voronezh
NOTE:
BRS
EDI
GLA
LON
MAN
PLH
CEK
IKT
GOJ
KHV
KJA
KUF
KZN
MOW
OVB
OMS
PEE
PIE
ROS
RTW
SVX
UFA
UUD
VVO
VOG
VOZ
Vienna
Belgium
Antwerp
Bruges
Bruxellex
Charleroi
Liege
Switzerland
Basel
Bern
Chur
Geneva
Locarno
Lucerne
St Moritz
St Gallen
Sion
Vaduz
Zuerich
Czech republic
Brno
Ostrava
Prague
VIE
ANR
BRG
BRU
CRL
LGG
EAP
BRN
CHR
GVA
LOC
LUC
MOR
SGL
SIR
VDZ
ZRH
BRQ
OSR
PRG
- When the LCD display becomes dimmer, please replace the batteries. The low
battery indicator of the transmitter will be displayed at the right side of the
LCD display.
- Ensure not to mix old and new batteries.
- Please dispose of used batteries in a responsible manner.
- Never attempt to open, modify or repair the weather station or the
transmitters in any way.
- Never get the weather station or the transmitters wet.