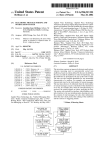
1
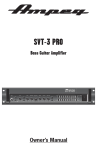
Instruction Manual
PC
Digital Forecast Weather Station
with wireless outdoor-transmitter,
rain sensor, anemometer and
PC-software
1
CONTENT
SECTION 1
1.0
1.1
1.2
1.3
1.4
1.5
1.6
1.7
SETTING UP METEOTIME WEATHER STATION
Must Read before Getting Started.
Introduction
Getting Start
Operation Instruction
Weather Status
Cities
Critical Weather Message in Short Form
Setup Manual in Short Form
SECTION 2
2.5
2.6
2.7
2.8
SETTING UP WIRELESS INDOOR/OUTDOOR MEASURING DEVICE FOR
WIND, RAIN, THERMOHYGROMETER AND THE ATOMSPHERE PRESSURE
Introduction
Features of Wireless In/Outdoor Measuring Devices
Installing your Weather Station
2.2.1
Setting up the Thermo-hygro sensors
2.2.2
Setting up the Rain Sensor
2.2.3
Setting up the Anemometer (wind sensor)
2.2.4
Setting Up the Main Unit
Buttons and Controls
Navigating between Different Modes
2.4.1
Pressure Mode
2.4.2
Temperature and Humidity Mode
2.4.3
Rain Mode
2.4.4
Wind Mode
Setting Pressure parameters during initial start-up
Indoor and Outdoor Temperature and Humidity
Wireless Outdoor Rain Guage
Wireless outdoor Anemometer (Wind Sensor)
3
4
5
6
LED Backlight Options
Linking the Weather Station to a Computer
Maintenance
Technical Specification
2.0
2.1
2.2
2.3
2.4
2
Your Professional Meteotime Weather Station consists of:
• 4-Day Weather information, and
• Wireless Indoor/Outdoor measuring device for Wind, Rain, Thermo-hygrometer and the
atmosphere pressure.
This package comes with
• Main Display Unit (Main Console)
• Wireless Wind-meter
• Wireless Rain-Guage
• Wireless Thermohygrometer
Key Features:
• Weather Status for today and coming three days for 470 cities
• Rain/Snow/Hail Probability for Today
• Wind Speed and Wind Direction for Today
• Five channel outdoor 433Mhz wireless Thermo-hygrometer
• Indoor Thermo-hygrometer
• Wireless Outdoor Wind speed and direction
• Wireless outdoor Rain Guage
• Sunrise and sunset display
• Moon phase
• History Record of wireless outdoor Temperature, Humidity, and atmosphere pressure
• Regional Day-time temperature and Night-time Temperature information.
Night-time temperature for the 4th day will not be displayed.
• Critical Weather Alert
• Radio-controlled Clock and Calendar
• Time-zone setting
• Blue Backlight
Section 1 will depict on setting up to display the 4-Day Weather information that broadcasted
via the stations for radio-controlled clocks HBG (located in Switzerland) and DCF (located in
Germany)
Section 2 will depict on setting up to display the measuring data from Wireless Indoor/Outdoor
device for Wind, Rain, Thermo-hygrometer and the atmosphere pressure.
Meade Instruments Europe GmbH
DE-46414 Rhede · Germany
3
Section 1
Setting Up
Meteotime Weather Station
4
1.0 MUST READ BEFORE GETTING START
Your Meteotime Weather Station is different to traditional weather stations which measure the
prevailing conditions only, the data of this weather station is based on the METEOTIME which
is worked out on a daily basis by highly professional meteorologists using state-of-art
instruments.
The Meteotime Weather Station is engineered in such a way that it is able to receive the coded
METEOTIME signal containing the weather information. The information is broadcasted via
the stations for radio-controlled clocks HBG (located in Switzerland) and DCF (located in
Germany). For this reason, your Meteotime Weather Station is also a radio-controlled clock
with all the known advantages, such as always showing the exact time, and automatic change to
daylight saving time in winter and in summer.
You are able to receive weather forecasts for 60 meteorological regions within Europe for up to
4 days in advance, and offer 2-day-advance forecasts for an additional 30 regions.
WHAT DOES IT TAKE TO GET GOOD RECEPTION?
Similar to wireless signals like the mobile phone network or Radio/TV broadcasts, it is possible
that the Meteotime Weather Stations do not receive signals all the time and everywhere. The
following are some tips you should follow by all means to make sure that your device works
properly:
The location for Meteotime Weather Station is very important. For this reason we have
equipped all of them with an innovation test function (the TEST button) which enables you test
the quality of reception in your environment and to place the device where the best conditions
prevail.
Try your reception by testing your Meteotime Weather Station as stated in the manual. To do
this, in the room you want to install the device, please turn on all the potential sources of
interference (for example, a TV set). Then put the Meteotime Weather Station in the place and
direction you want it to be, but always at least in one meter from the potential source of
interference.
Watch the symbol GOOD RECEPTION or BAD RECEPTION on the display. Once you have
found the right location for GOOD RECEPTION, you may leave the Meteotime Weather
Station there, it will collect its data by radio controlled signal. Within a few minutes time and
the date will appear. However, the transfer of the very large amount of data (forecast for all
regions and days) will take much longer. To completely receive all data will take up to 24 hours
from the time of the initial setup
5
POTENTIAL SOURCES OF INTERFERENCE
With all Meteotime Weather Stations, we should take measures to provide best possible radio
reception. HBG and DCF are long wave stations with a broad reach (for example, approximate
1500km for the DCF station). However, as with a long wave radio station, interference may
occur which is often caused by the following influences:
• In buildings with lots of concrete, metal parts, and the electrical equipment you may get
reception problems (for example, in shopping centers and at exhibitions).
• Electronic equipment such as TVs, computers, household machines, etc., or transformers,
power lines, radio transmitters, and trains are potential sources of interference.
• Atmospheric influences might affect the radio waves.
• The distance from the station, and also the geographic conditions (mountains, etc.) also
affect the reception. Due to their great distance from the station, areas like Southern Italy or
Northern Scandinavia are critical.
• So-called (dead-spots) which make reception impossible can appear everywhere
• There is less interference in rural area than in heavily built-up urban ones.
• On principle at night the sources of interference are less active, consequently reception is
better than during the day.
• Week batteries in the device will lower the quality of reception.
DATA TRANSFER
METEOTIME sends the data during precisely defined time slots in accordance with UTC.
(UTC, i.e. for Central Europe during the winter UTC+1, during the summer UTC+2; for Great
Britain and Portugal during the winter UTC, during the summer UTC+1)
Transmission times (UTC)
10:00 p.m. – 03:59 a.m.
04:00 a.m. – 09:59 a.m.
10:00 a.m. – 03:59 p.m.
04:00 p.m. – 06:59 p.m.
07:00 p.m. – 09:59 p.m.
Forecast for
the actual (new) day (TODAY)
the next day (TOMORROW)
the following day (the day after TOMORROW)
the day following this (Two days after TOMORROW)
the 30 additional regions
In the even that the reception during the above time slots is completely or at times interfered
with or has broken down, these forecasts, or parts of them, will be missing.
6
1.1 INTRODUCTION
The Meteotime Weather Station LCD display shows:
• Today Weather Information Window
• Tomorrow, One-day-after, and Two-day-after Weather Information
• Information Window which shows Time & Date, Sunrise & Sunset, Cities, and Critical
Weather Information Description.
Today Weather Information including Wind
Speed, Wind Direction, and the probability of
Rain/Snow/Hail, Day & Night Temperature, Day
& Night Weather Status
Information Window.
Tomorrow, One-day-after, and Two-Day-after
Weather Information including Day & Night
Temperature, Day & Night Weather Status
7
There are total 5 buttons at the Right side of main Unit for Setting up the Meteotime Weather
Section, namely:
8
SET
• Selected City
Time + Date
Sunrise + Sunset
• Each press of [SET] will display the selected City, Time + Date or Sunrise + Sunset
• Press and HOLD [SET] for 3 second to select your <1> Country, <2> Time Zone, <3>
Language, <4> Contrast of the LCD display
DAY / NIGHT
• Critical Whether Information
Time + Date
Day/Night Weather Status Change
• increasing the value during setting
• Chose one of the pre-selected cities
• decreasing the value during setting
• Chose one of the pre-selected cities
TEST √
• Find the place for the device which has a good reception
• Add the city into the list of your desired cities OR Remove the city out of the list of
desired Cities
• Edit your home town
9
1.2 GETTING STARTED
• Insert the 4 batteries for remote units, and then insert batteries for the main unit.
• The main unit will automatically scan for the radio-controlled clock signal and the
Meteotime Weather signal. “ SUCHE SIG. “ (means Search Signal) will show in the
INFORMATION WINDOW.
The time and date signal will be received in a few minutes. Since there is a large amount of
Weather information for all regions and days, the unit needs about 24 hours from the time of
the initial setup to complete the reception of all data
• After the time and date signal is being received successfully, the display shows “SELECT
COUNTRY” and then “FRANKFURT” as default city in the information window.
To change the Country and the City please see the information below.
• If the unit is able to receive the Meteotime signal successfully, the Meteotime icon
is
appeared in the second row of display. Otherwise, the Meteotime will be
.
means it successfully receives today’s
weather information. Otherwise, it will be
means it is able to
receive the Meteotime
weather signal.
Otherwise, it will be
means it
successfully
receives tomorrow
weather information.
Otherwise, it will
be
10
means it
successfully
receives weather
information of
one-day-after.
Otherwise, it will
be
means it
successfully
receives weather
information of
two-day-after.
Otherwise, it will
be
In the event the Meteotime icon change to
, that means there are potential sources of
interference on the unit. The sources of interference may come from the electronics equipment
such as TV-set, computers, household machines etc. It may also be due to lots of concrete,
metal parts and electrical equipment in the building. It may also be due to your living area if it
is very far away from the Radio-controlled clock tower.
By the first time you power up this product, the language default setting is in German
Language. In order to change it into another language such as English, Spanish, French, Italian,
Dutch, or Swedish, please follow the setup as below.
When you put in the batteries for the first time, wait until the Main Unit receives
• “ SUCHE SIG. “ (meaning in English is SEARCH SIGNAL); it will display in the
INFORMATION WINDOW
• After several second, “ LAND EINST” (meaning in English is COUNTRY) is shown in the
INFORMATION WINDOW
• Press [ SET ] and “ ZONE +00 H “ is shown in the INFORMATION WINDOW
• Now press [ SET ] again and the “ LANGUAGE “ will be shown in the INFORMATION
WINDOW, then press [
] or [
] to select your desired language. There are total seven
languages to select, namely German, English, Spanish, French, Italian, Dutch, Swedish
• Press [ SET ] two times to exit the setup.
If you skip the above-mentioned step, the INFORMATION WINDOW will show the default
city FRANKFURT.M. You can change to your desired city in the following steps.
• Press and Hold [ SET ] for 3 second,
is shown in the Information Window,
then press [
] or [
] key to select the country. For example, you have selected The
country name such as
means Germany
• Press [ SET ] key to confirm the Country (let’s said we select Germany right now), and then
the information window will show
.
• Then, press [
] or [
] key to go to your selected city, lets said ‘Frankfurt am Main’, and
the
will show in the information window.
• At least press [ SET ] to confirm your selected city.
11
1.3 OPERATION INSTRUCTION
You are able to use the TEST function to look for a better location
• Press TEST button, “ SCAN “ is shown in the Information Window.
• Pick the unit to find a good location.
•
flashing : The test is running and the Meteotime signal reception is good. You are able to
leave the device in this position.
flashing : The test is running and the Meteotime signal reception is poor. You need to
keep on looking for a better location.
• The test lasted for around 1 minute. You can restart the test with the [ TEST ] key at any
time, and also discontinue the test by press the TEST key.
SWITCH CITY <- -> SUNRISE & SUNSET TIME <- -> TIME & DATE
• After inserting the batteries, the weather station searches for the Radio controlled Time
signal as well as the MeteoTime signal. After it has successfully received the MeteoTime
signal, the display shows in the information window “Select Country”. After a few more
minutes, the information windows the default city “
”.
• You are able to press [ SET ] to switch from the display of the City to Sunrise & Sunset time
OR Time & Date for Frankfurt am Main.
[ SET ]
[ SET ]
SELECT THE COUNTRY AND CITY / CITIES
• Press and Hold [ SET ] for 3 second , in the information window,
is shown,
and then press [
] or [
] key to select the country. For example, you have selected the
country name such as
means Germany will be shown in the information window.
• Press [ SET ] key to confirm the Country (let’s said we select Germany right now), and then
the information window will show
.
• Then, press [ ] or [
] key to select the city, and the city name will be shown in the
information window such as
means the city ‘Frankfurt am Main’
12
• If the city ‘Frankfurt am Main’ is your selection, then press [ TEST √ ] key to confirm. A √
will be shown on top of your selected city, and it will be
and ‘Frankfurt
am Main’ will store into your personal memory list
• Then, you are able to press [
] or [ ] key to select more cities, and then press [ TEST √ ]
key to confirm. You are able to select maximum FIVE cities to display. If you want to add
more cities, then
will show in the Information Window.
OR
press [ SET ] KEY to quit, and
will shown at the information window.
REMARK: If you have skip the city selection in the first time you power up the unit, the product
will default select Frankfurt am Main as your selected city.
DISPLAY MORE CITIES INFORMATION
If you have selected more than one city, let said you have select Frankfurt am Main, Köln and
Münster in your desired city list, then you are able to press [
] or [
] key when the
Information Window shows the CITY NAME (Press SET until it displays the City Name).
[
/
]
[
/
]
When you selected the other city, the sunrise and sunset time, and weather information will be
of this selected city.
REMOVE YOUR SELECTED THE CITY / CITIES OUT OF MEMORY LIST
• Press and Hold [ SET ] for 3 second,
is shown in the Information Window,
then press [
] or [
] key to select the country. For example, you have selected The
country name such as
means Germany
• Press [ SET ] key to confirm the Country (let’s said we select Germany right now), and then
the information window will show
.
• Then, press [
] or [
] key to go to your selected city, lets said ‘Frankfurt am Main’, and
the
will show in the information window.
• Press [ TEST √ ] key to remove the √ , and this city is successful to remove out of your list
of preference cities you have selected.
• Then, you are able to press [
] or [
] key to select more cities, and then press [ TEST √ ]
key to remove your selected cities.
OR
Press [ SET ] KEY to quit, and
will shown at the information window. After 4
second, it will go to the City-Date-Time Mode.
13
PERSONALIZE A PLACE NAME
• Press and Hold [ SET ] for 3 second. In the information window,
is shown, and
then press [ ] or [
] key to select the country. Let’s said you have selected the country
Germany which is represented in
.
• Press [ SET ] key to confirm the Country (let’s said we select Germany right now), and then
the information window will show
.
• Then, press [
] or [
] key to select the city, and the city name will be shown in the
information window such as
means the city ‘Frankfurt am Main’, and
you would like to enter a new city which is near the region of Frankfurt am Main.
• Press the ‘MEM’ key ; a cursor flashes on the first position of the Information Window
Then following input commands then apply:
KEY
'
' or '
SET
Function
Selection of a letter
< 1 > Accept the selected letter and jumps to the next position.
OR
< 2 > If you have not entered any letter (in other words, if only the cursor is
flashing at the last position), confirm the entry with this key and your place
will also be included in the memory with immediate effect
TEST
One position back in the data entry process
** The place that you have selected to enter your own description will still exist under its own
name.
• Press [ SET ] key to confirm and exit
'
SET THE TIME ZONE, LANGUAGE and CONTRAST
• Press and Hold [ SET ] for 3 second,
is shown in the Information Window.
• Press [ SET ] again, then
is shown in the Information Window, press
[
] or [
] key to adjust the time zone.
• Press [ SET ] again, then the LANGUAGE will be shown in the Information Window, press
[
] or [
] key to select your desired language. There are total Seven Language for
selection, namely German, English, Spanish, French, Italiano, Dutch, Swedish
• Press [ SET ] again, then
is shown in the Information Window, press
[
] or [
] key to adjust the LCD contrast Level.
• Press [ SET ] again and
will shown at the information window. After 4 second, it
will go to the City-Date-Time Mode
Remark: If you do not have any selection into the Setup mode up to 60 seconds, it will
automatically exit the setup mode. The Information Window will show City / Sunrise & Sunset
Time / Time & Date.
14
SWITCH DAY WEATHER INFORMATION <- -> NIGHT WEATHER INFORMATION
The device is able to base on the SUNRISE time and SUNSET time to automatically switch to
DAY-WEATHER and NIGHT-WEATHER respectively. The unit is preset to show
DAY-WEATHER after sunrise time, and NIGHT-WEATHER after SUNSET time. The user can
press the [ DAY / NIGHT ] button to see the DAY-Weather (for 10-second period) if currently
show the NIGHT-WEATHER, or vice verse.
[ DAY / NIGHT ]
CRITICAL WEATHER INFORMATION
Meteotime Weather signal contains the Critical Weather Information such as Gust, Frozen Rain,
Heavy Snow, Thunder, Strong UV, Dense Fog, Bise, Mistral, etc. for today and coming three
days. A critical weather alert signal
will be turned on in case that day has critical weather
that the user must know.
15
Sometimes there are more than one critical weather information in the 4-days. Press
[ DAY / NIGHT ] key to read the critical weather information one by one. The special icon of
the day will be flashed when you read the Information.
[ DAY / NIGHT ]
[ DAY / NIGHT ]
[ DAY / NIGHT ]
flashing
DAY
NIGHT Weather status
• Press [ SET ] key to go back to the display of CITY <- -> SUNRISE & SUNSET TIME
<- -> TIME & DATE. If you would like to read the Weather Information in the information
window, then press [ DAY / NIGHT ] Key to display Day <- -> Night Weather information
and also the Critical Weather Information.
If no key is pressed, the critical weather information will be toggle to display, so as to make
sure you are aware of the critical weather details
16
1.4 WEATHER STATUS
Significance
Day
Night
Significance
Sunny (Clear
at night)
Heavy Rain
Light Cloudy
Frontal
Storms
Mostly
Cloudy
Heat Storms
Overcast
Sleet Showers
Stratus
Clouds
Snow
Showers
Fog
Sleet
Showers
Snow
Light Rain
17
Day
Night
1.5 CITIES
There are a total of 470 cities information included in memory.
The cities of the name with * will only have 2-day weather status.
CITY FULL NAME
CITY NAME
at Information
Window
ANDORRA LA VELLA*
ST PÖLTEN
BISCHOFSHOFEN
BREGENZ
EISENSTADT
GRAZ
INNSBRUCK
KITZBÜHEL
KLAGENFURT
LANDECK
LIENZ
LINZ
SALZBURG
SCHLADMING
VILLACH
WELS
WIEN
ZELTWEG
ZWETTL
ANTWERPEN
BRUGGE
BRUSSEL
CHARLEROI
GENT
LIEGE
NAMUR
VERVIERS
ST.GALLEN
AARAU
ADELBODEN
ALTDORF
BASEL
BELLINZONA
BERN
BIENNE
BRIG
CHUR
DAVOS
DELEMONT
AND.LA.VELL*
ST.PÖLTEN
BISCHOFSHO
BREGENZ
EISENSTADT
GRAZ
INNSBRUCK
KITZBÜHEL
KLAGENFURT
LANDECK
LIENZ
LINZ
SALZBURG
SCHLADMING
VILLACH
WELS
WIEN
ZELTWEG
ZWETTL
ANTWERPEN
BRUGGE
BRUSSEL
CHARLEROI
GENT
LIEGE
NAMUR
VERVIERS
ST.GALLEN
AARAU
ADELBODEN
ALTDORF
BASEL
BELLINZONA
BERN
BIENNE
BRIG
CHUR
DAVOS
DELEMONT
COUNTRY NAME
18
ANDORRA
AU/AUSTRIA
AU/AUSTRIA
AU/AUSTRIA
AU/AUSTRIA
AU/AUSTRIA
AU/AUSTRIA
AU/AUSTRIA
AU/AUSTRIA
AU/AUSTRIA
AU/AUSTRIA
AU/AUSTRIA
AU/AUSTRIA
AU/AUSTRIA
AU/AUSTRIA
AU/AUSTRIA
AU/AUSTRIA
AU/AUSTRIA
AU/AUSTRIA
B/BELGIUM
B/BELGIUM
B/BELGIUM
B/BELGIUM
B/BELGIUM
B/BELGIUM
B/BELGIUM
B/BELGIUM
CH/SUISSE
CH/SUISSE
CH/SUISSE
CH/SUISSE
CH/SUISSE
CH/SUISSE
CH/SUISSE
CH/SUISSE
CH/SUISSE
CH/SUISSE
CH/SUISSE
CH/SUISSE
REGION
70
50
48
48
49
46
47
48
46
47
46
26
48
48
46
26
49
46
50
6
6
6
6
6
6
6
13
35
32
33
35
45
38
32
32
34
36
36
11
CITY FULL NAME
CITY NAME
at Information
Window
FRAUENFELD
FRIBOURG
GENEVE
GLARUS
GRINDELWALD
INTERLAKEN
LA CHAUX-DE-FONDS
LAUSANNE
LIESTAL
LOCARNO
LUGANO
LUZERN
MARTIGNY
MONTREUX
NEUCHATEL
SAMEDAN*
SARNEN
SCHAFFHAUSEN
SCHWYZ
SION
SOLOTHURN
STANS
ZERMATT*
ZUG
ZÜRICH
BRNO
BUDEJOVICE
CHEB
DECIN
HAVLICKAV BROD
HRADEC/KRA
OLOMOUC
OSTRAVA
PLZEN
PRAHA
TEPLICE
AACHEN
AALEN
ANSBACH
AUGSBURG
BAD_TÖLZ
BAYREUTH
FRAUENFELD
FRIBOURG
GENEVE
GLARUS
GRINDELWLD
INTERLAKEN
LACHAUX-D.F
LAUSANNE
LIESTAL
LOCARNO
LUGANO
LUZERN
MARTIGNY
MONTREUX
NEUCHATEL
SAMEDAN*
SARNEN
SCHAFFHAUS.
SCHWYZ
SION
SOLOTHURN
STANS
ZERMATT*
ZUG
ZÜRICH
BRNO
BUDEJOVICE
CHEB
DECIN
HAVL_BROD
HRADEC/KRA
OLOMOUC
OSTRAVA
PLZEN
PRAHA
TEPLICE
AACHEN
AALEN
ANSBACH
AUGSBURG
BAD_TÖLZ
BAYREUTH
COUNTRY NAME
CH/SUISSE
CH/SUISSE
CH/SUISSE
CH/SUISSE
CH/SUISSE
CH/SUISSE
CH/SUISSE
CH/SUISSE
CH/SUISSE
CH/SUISSE
CH/SUISSE
CH/SUISSE
CH/SUISSE
CH/SUISSE
CH/SUISSE
CH/SUISSE
CH/SUISSE
CH/SUISSE
CH/SUISSE
CH/SUISSE
CH/SUISSE
CH/SUISSE
CH/SUISSE
CH/SUISSE
CH/SUISSE
CZ/CZ REP
CZ/CZ REP
CZ/CZ REP
CZ/CZ REP
CZ/CZ REP
CZ/CZ REP
CZ/CZ REP
CZ/CZ REP
CZ/CZ REP
CZ/CZ REP
CZ/CZ REP
D / GER
D / GER
D / GER
D / GER
D / GER
D / GER
19
REGION
32
31
31
35
33
33
11
31
45
38
38
32
34
31
31
86
35
32
35
34
32
35
88
32
32
50
50
50
51
50
50
50
50
50
50
51
14
59
28
25
48
28
CITY FULL NAME
CITY NAME
at Information
Window
BERCHTESGADEN
BERLIN
BIELEFELD
BITBURG
BORKUM
BREMEN
BREMERHAVEN
BURGHAUSEN
COTTBUS
CUXHAVEN
DONAUESCHINGEN
DORTMUND
DRESDEN
DUISBURG
DÜSSELDORF
EISENACH
EMDEN
ERFURT
ESSEN
FEHMARN
FLENSBURG
FRANKFURT AM MAIN
FRANKFURT a.d. ODER
FREIBURG
FREUDENSTADT
FRIEDRICHSHAFEN
FULDA
GARMISCH_PATENK.
GIESSEN
GÖRLITZ
GOSLAR
GÖTTINGEN
GREIFSWALD
HAGEN
HALLE
HAMBURG
HANNOVER
HEILBRONN
HILDESHEIM
HOF
INGOLSTADT
JENA
BERCHTESGA
BERLIN
BIELEFELD
BITBURG
BORKUM
BREMEN
BREMERHAVN
BURGHAUSEN
COTTBUS
CUXHAVEN
DONAUESCH.
DORTMUND
DRESDEN
DUISBURG
DÜSSELDORF
EISENACH
EMDEN
ERFURT
ESSEN
FEHMARN
FLENSBURG
FRANKFURT.M
FRANKFURT.O
FREIBURG
FREUDENST.
FRIEDRI.HFN
FULDA
GARMISCH_P
GIESSEN
GÖRLITZ
GOSLAR
GÖTTINGEN
GREIFSWALD
HAGEN
HALLE
HAMBURG
HANNOVER
HEILBRONN
HILDESHEIM
HOF
INGOLSTADT
JENA
COUNTRY NAME
20
D / GER
D / GER
D / GER
D / GER
D / GER
D / GER
D / GER
D / GER
D / GER
D / GER
D / GER
D / GER
D / GER
D / GER
D / GER
D / GER
D / GER
D / GER
D / GER
D / GER
D / GER
D / GER
D / GER
D / GER
D / GER
D / GER
D / GER
D / GER
D / GER
D / GER
D / GER
D / GER
D / GER
D / GER
D / GER
D / GER
D / GER
D / GER
D / GER
D / GER
D / GER
D / GER
REGION
48
52
14
13
19
22
19
26
29
19
57
14
29
14
14
30
19
30
14
24
24
12
52
45
57
26
37
48
37
29
22
37
24
13
29
19
22
59
22
30
25
30
CITY FULL NAME
CITY NAME
at Information
Window
KAISERSLAUTERN
KARLSRUHE
KASSEL
KEMPTEN
KIEL
KOBLENZ
KÖLN
KONSTANZ
LANDSHUT
LEIPZIG
LINDAU
LINGEN
LÖRRACH
LÜBECK
LÜNEBURG
MAGDEBURG
MAINZ
MANNHEIM
MÜNCHEN
MÜNSTER
NEUBRANDENBURG
NÜRNBERG
OFFENBURG
OLDENBURG
OSNABRÜCK
PASSAU
PFORZHEIM
PLAUEN
POTSDAM
REGENSBURG
ROSENHEIM
ROSTOCK
RÜGEN
SAARBRÜCKEN
SIEGEN
SIGMARINGEN
SPIEKEROOG
ST_PETER_ORDING
STUTTGART
SYLT
TRIER
TÜBINGEN
KAISERSLAU
KARLSRUHE
KASSEL
KEMPTEN
KIEL
KOBLENZ
KÖLN
KONSTANZ
LANDSHUT
LEIPZIG
LINDAU
LINGEN
LÖRRACH
LÜBECK
LÜNEBURG
MAGDEBURG
MAINZ
MANNHEIM
MÜNCHEN
MÜNSTER
NEUBR.BURG
NÜRNBERG
OFFENBURG
OLDENBURG
OSNABRÜCK
PASSAU
PFORZHEIM
PLAUEN
POTSDAM
REGENSBURG
ROSENHEIM
ROSTOCK
RÜGEN
SAARBRÜCKE
SIEGEN
SIGMARINGE
SPIEKEROOG
ST_PETER_O
STUTTGART
SYLT
TRIER
TÜBINGEN
COUNTRY NAME
D / GER
D / GER
D / GER
D / GER
D / GER
D / GER
D / GER
D / GER
D / GER
D / GER
D / GER
D / GER
D / GER
D / GER
D / GER
D / GER
D / GER
D / GER
D / GER
D / GER
D / GER
D / GER
D / GER
D / GER
D / GER
D / GER
D / GER
D / GER
D / GER
D / GER
D / GER
D / GER
D / GER
D / GER
D / GER
D / GER
D / GER
D / GER
D / GER
D / GER
D / GER
D / GER
21
REGION
12
12
37
26
24
13
14
32
25
29
48
14
45
24
22
22
12
12
26
14
52
28
45
22
14
25
59
30
52
25
26
24
24
13
13
26
19
19
59
19
13
59
CITY FULL NAME
CITY NAME
at Information
Window
ULM
VILLINGEN-SCHW.
WEIDEN
WERTHEIM
WILHELMSHAVEN
WUPPERTAL
WÜRZBURG
ZWICKAU
ALBORG
ARHUS
BORNHOLM
ESBJERG
HERNING
KØBENHAVN
NYKOPING
ODENSE
RONNE
SKAGEN
THYBORØN
BARCELONA*
BILBAO*
FIGUERES*
GIJON*
GIRONA*
IBIZA*
LLORET DE MAR*
MADRID*
MAHON*
PALMA DE MALLORCA*
SEVILLA*
VALENCIA*
VADUZ
AGEN
AJACCIO*
ALBI
ALENCON
ALES
AMIENS
ANGERS
ANGOULEME
ANNECY
AUCH
ULM
VILL.-SCHWE.
WEIDEN
WERTHEIM
WILHELMSHA
WUPPERTAL
WÜRZBURG
ZWICKAU
ALBORG
ARHUS
BORNHOLM
ESBJERG
HERNING
KØBENHAVN
NYKOPING
ODENSE
RONNE
SKAGEN
THYBORØN
BARCELONA*
BILBAO*
FIGUERES*
GIJON*
GIRONA*
IBIZA*
LLORET.D.MA*
MADRID*
MAHON*
PALMA-D.MA*
SEVILLA*
VALENCIA*
VADUZ
AGEN
AJACCIO*
ALBI
ALENCON
ALES
AMIENS
ANGERS
ANGOULEME
ANNECY
AUCH
COUNTRY NAME
22
D / GER
D / GER
D / GER
D / GER
D / GER
D / GER
D / GER
D / GER
DK/DENMARK
DK/DENMARK
DK/DENMARK
DK/DENMARK
DK/DENMARK
DK/DENMARK
DK/DENMARK
DK/DENMARK
DK/DENMARK
DK/DENMARK
DK/DENMARK
ES / SPAIN
ES / SPAIN
ES / SPAIN
ES / SPAIN
ES / SPAIN
ES / SPAIN
ES / SPAIN
ES / SPAIN
ES / SPAIN
ES / SPAIN
ES / SPAIN
ES / SPAIN
FL/LICHTEN
FRANCE
FRANCE
FRANCE
FRANCE
FRANCE
FRANCE
FRANCE
FRANCE
FRANCE
FRANCE
REGION
25
57
28
28
19
14
28
30
20
21
55
20
20
23
54
21
55
20
20
69
65
69
74
69
67
69
64
67
67
71
68
48
0
73
5
2
8
17
3
1
11
0
CITY FULL NAME
CITY NAME
at Information
Window
AURILLAC
AUXERRE
AVIGNON
BAR_LE_DUC
BASTIA*
BEAUVAIS
BELFORT
BESANCON
BEZIERS
BLOIS
BOBIGNY
BORDEAUX
BOULOGNE
BOURG_EN_B
BOURGES
BREST
BRIANCON
BRIVE LA GAILLARDE
CAEN
CAHORS
CANNES
CARCASSONN
CERGY_PONT
CHAMBERY
CHARTRES
CHAUMONT
CHERBOURG
CLERMON FERRAND
COLMAR
CRETEIL
DIGNE
DIJON
EPINAL
EVIAN
EVREUX
EVRY
FLORAC
FOIX
GAP
GRENOBLE
GUERET
LA ROCHELL
AURILLAC
AUXERRE
AVIGNON
BAR_LE_DUC
BASTIA*
BEAUVAIS
BELFORT
BESANCON
BEZIERS
BLOIS
BOBIGNY
BORDEAUX
BOULOGNE
BOURG_EN_B
BOURGES
BREST
BRIANCON
BRIVE-L-GA
CAEN
CAHORS
CANNES
CARCASSONN
CERGY_PONT
CHAMBERY
CHARTRES
CHAUMONT
CHERBOURG
CLERMON-FE
COLMAR
CRETEIL
DIGNE
DIJON
EPINAL
EVIAN
EVREUX
EVRY
FLORAC
FOIX
GAP
GRENOBLE
GUERET
LA ROCHELL
COUNTRY NAME
FRANCE
FRANCE
FRANCE
FRANCE
FRANCE
FRANCE
FRANCE
FRANCE
FRANCE
FRANCE
FRANCE
FRANCE
FRANCE
FRANCE
FRANCE
FRANCE
FRANCE
FRANCE
FRANCE
FRANCE
FRANCE
FRANCE
FRANCE
FRANCE
FRANCE
FRANCE
FRANCE
FRANCE
FRANCE
FRANCE
FRANCE
FRANCE
FRANCE
FRANCE
FRANCE
FRANCE
FRANCE
FRANCE
FRANCE
FRANCE
FRANCE
FRANCE
23
REGION
4
2
8
2
73
17
45
11
5
2
2
0
6
9
2
3
10
0
17
0
43
5
2
10
2
7
3
4
45
2
10
7
7
31
17
2
4
5
10
10
4
1
CITY FULL NAME
CITY NAME
at Information
Window
LA_ROCHE_S
LAON
LAVAL
LE HAVRE
LE MANS
LILLE
LIMOGES
LONS_LE_S
LORIENT
LYON
MACON
MARSEILLE
MELUN
MENDE
METZ
MILLAU
MONT_MARSAN
MONTAUBAN
MONTELIMAR
MONTLUCON
MONTPELLIER
MULHOUSE
NANCY
NANTERRE
NANTES
NEVERS
NICE
NIMES
NIORT
ORLEANS
PARIS
PAU
PERIGUEUX
PERPIGNAN
POITIERS
PRIVAS
PUY_VELAY
REIMS
RENNES
RODEZ
ROUEN
SEDAN
LA_ROCHE_S
LAON
LAVAL
LE HAVRE
LE MANS
LILLE
LIMOGES
LONS_LE_S
LORIENT
LYON
MACON
MARSEILLE
MELUN
MENDE
METZ
MILLAU
MONT_DE_MA
MONTAUBAN
MONTELIMAR
MONTLUCON
MONTPELLIE
MULHOUSE
NANCY
NANTERRE
NANTES
NEVERS
NICE
NIMES
NIORT
ORLEANS
PARIS
PAU
PERIGUEUX
PERPIGNAN
POITIERS
PRIVAS
PUY_EN_VEL
REIMS
RENNES
RODEZ
ROUEN
SEDAN
COUNTRY NAME
24
FRANCE
FRANCE
FRANCE
FRANCE
FRANCE
FRANCE
FRANCE
FRANCE
FRANCE
FRANCE
FRANCE
FRANCE
FRANCE
FRANCE
FRANCE
FRANCE
FRANCE
FRANCE
FRANCE
FRANCE
FRANCE
FRANCE
FRANCE
FRANCE
FRANCE
FRANCE
FRANCE
FRANCE
FRANCE
FRANCE
FRANCE
FRANCE
FRANCE
FRANCE
FRANCE
FRANCE
FRANCE
FRANCE
FRANCE
FRANCE
FRANCE
FRANCE
REGION
1
17
3
17
2
6
1
7
3
9
9
8
2
4
7
4
0
0
8
4
5
45
7
2
3
2
43
8
1
2
2
0
0
5
1
8
4
2
3
4
17
13
CITY FULL NAME
CITY NAME
at Information
Window
ST_BRIEUC
ST_FLOUR
ST_TROPEZ
ST-ETIENNE
STRASBOURG
TARBES
TOULON
TOULOUSE
TOURS
TROYES
VALENCE
VERSAILLES
VESOUL
BUDAPEST*
DEBRECEN*
GYÖR
MISKOLC*
PECS*
SIOFOK*
SZEGED*
SZOLNOK*
TATABANYA*
OSIJEK*
RIJEKA
SPLIT*
ZAGREB*
ALESSANDRIA
ANCONA*
AOSTA
BARI*
BERGAMO
BOLOGNA
BOLZANO
BRESCIA
CAGLIARI*
CATANIA*
COSENZA*
EDOLO
FIRENZE
FOGGIA*
GENOVA
LA SPEZIA
ST_BRIEUC
ST_FLOUR
ST_TROPEZ
ST-ETIENNE
STRASBOURG
TARBES
TOULON
TOULOUSE
TOURS
TROYES
VALENCE
VERSAILLES
VESOUL
BUDAPEST*
DEBRECEN*
GYÖR
MISKOLC*
PECS*
SIOFOK*
SZEGED*
SZOLNOK*
TATABANYA*
OSIJEK*
RIJEKA
SPLIT*
ZAGREB*
ALESSANDRI
ANCONA*
AOSTA
BARI*
BERGAMO
BOLOGNA
BOLZANO
BRESCIA
CAGLIARI*
CATANIA*
COSENZA*
EDOLO
FIRENZE
FOGGIA*
GENOVA
LA SPEZIA
COUNTRY NAME
FRANCE
FRANCE
FRANCE
FRANCE
FRANCE
FRANCE
FRANCE
FRANCE
FRANCE
FRANCE
FRANCE
FRANCE
FRANCE
H/HUNGARY
H/HUNGARY
H/HUNGARY
H/HUNGARY
H/HUNGARY
H/HUNGARY
H/HUNGARY
H/HUNGARY
H/HUNGARY
HR/CROATIA
HR/CROATIA
HR/CROATIA
HR/CROATIA
I / ITALY
I / ITALY
I / ITALY
I / ITALY
I / ITALY
I / ITALY
I / ITALY
I / ITALY
I / ITALY
I / ITALY
I / ITALY
I / ITALY
I / ITALY
I / ITALY
I / ITALY
I / ITALY
25
REGION
3
4
8
4
45
0
8
0
2
2
9
2
7
63
63
49
63
63
63
63
63
63
87
44
89
87
40
61
39
62
40
44
27
40
73
66
66
38
41
62
43
43
CITY FULL NAME
CITY NAME
at Information
Window
LECCE*
MERANO
MESSINA*
MILANO
NAPOLI*
PALERMO*
PARMA
PERUGIA
PESCARA*
PIACENZA
PISA
REGGIO CALABRIA*
RIMINI
ROMA
SAN_MARINO*
SAN_REMO
SASSARI*
SESTRIERE
SIENA
TORINO
TRENTO
TRIESTE
UDINE
VENEZIA
VERONA
CORK*
DUBLIN*
GALWAY*
LIMERICK*
LUXEMBOURG
MONACO
BERGEN*
DRAMMEN
FREDRIKSTADEN
OSLO
STAVANGER*
TØNSBERG
TRONDHEIM*
AMSTERDAM
ARNHEM
ASSEN
DEN HAAG
LECCE*
MERANO
MESSINA*
MILANO
NAPOLI*
PALERMO*
PARMA
PERUGIA
PESCARA*
PIACENZA
PISA
R.CALABRIA*
RIMINI
ROMA
SAN_MARIN*
SAN_REMO
SASSARI*
SESTRIERE
SIENA
TORINO
TRENTO
TRIESTE
UDINE
VENEZIA
VERONA
CORK*
DUBLIN*
GALWAY*
LIMERICK*
LUXEMBOURG
MONACO
BERGEN*
DRAMMEN
FREDRIKST.
OSLO
STAVANGER*
TØNSBERG
TRONDHEIM*
AMSTERDAM
ARNHEM
ASSEN
DEN HAAG
COUNTRY NAME
26
I / ITALY
I / ITALY
I / ITALY
I / ITALY
I / ITALY
I / ITALY
I / ITALY
I / ITALY
I / ITALY
I / ITALY
I / ITALY
I / ITALY
I / ITALY
I / ITALY
I / ITALY
I / ITALY
I / ITALY
I / ITALY
I / ITALY
I / ITALY
I / ITALY
I / ITALY
I / ITALY
I / ITALY
I / ITALY
IRELAND
IRELAND
IRELAND
IRELAND
LUX
MONACO
N / NORWAY
N / NORWAY
N / NORWAY
N / NORWAY
N / NORWAY
N / NORWAY
N / NORWAY
NL/NETHERL
NL/NETHERL
NL/NETHERL
NL/NETHERL
REGION
62
27
66
40
60
66
40
41
61
40
41
66
44
41
61
43
73
39
41
40
27
44
44
44
40
75
76
75
75
13
43
78
58
58
58
78
58
79
42
42
42
42
CITY FULL NAME
CITY NAME
at Information
Window
DEN HELDER
EINDHOVEN
GRONINGEN
HAARLEM
LEEUWARDEN
LELYSTAD
MAASTRICHT
MIDDELBURG
ROTTERDAM
S.HERTOGENBOSCH
TERNEUZEN
TEXEL
UTRECHT
ZWOLLE
LISBOA*
BIALYSTOK*
BIELSKO*
GDANSK*
KATOWICE*
KIELCE*
KRAKOW*
LODZ*
LUBLIN*
OLSZTYN*
POZNAN
RZESZOW*
SZCZECIN*
TORUN*
WALBRZYCH
WARSZAWA*
WROCLAW
ZAKOPANE*
BORAS
BORGHOLM
FALUN*
GÄVLE
GÖTEBORG
HALMSTAD
JÖNKÖPING
KALMAR
KARLSTAD
LINKÖPING
DEN HELDER
EINDHOVEN
GRONINGEN
HAARLEM
LEEUWARDEN
LELYSTAD
MAASTRICHT
MIDDELBURG
ROTTERDAM
S.HERTOGENB
TERNEUZEN
TEXEL
UTRECHT
ZWOLLE
LISBOA*
BIALYSTOK*
BIELSKO*
GDANSK*
KATOWICE*
KIELCE*
KRAKOW*
LODZ*
LUBLIN*
OLSZTYN*
POZNAN
RZESZOW*
SZCZECIN*
TORUN*
WALBRZYCH
WARSZAWA*
WROCLAW
ZAKOPANE*
BORAS
BORGHOLM
FALUN*
GÄVLE
GÖTEBORG
HALMSTAD
JÖNKÖPING
KALMAR
KARLSTAD
LINKÖPING
COUNTRY NAME
NL/NETHERL
NL/NETHERL
NL/NETHERL
NL/NETHERL
NL/NETHERL
NL/NETHERL
NL/NETHERL
NL/NETHERL
NL/NETHERL
NL/NETHERL
NL/NETHERL
NL/NETHERL
NL/NETHERL
NL/NETHERL
P/PORTUGAL
PL/POLAND
PL/POLAND
PL/POLAND
PL/POLAND
PL/POLAND
PL/POLAND
PL/POLAND
PL/POLAND
PL/POLAND
PL/POLAND
PL/POLAND
PL/POLAND
PL/POLAND
PL/POLAND
PL/POLAND
PL/POLAND
PL/POLAND
S/SWEDEN
S/SWEDEN
S/SWEDEN
S/SWEDEN
S/SWEDEN
S/SWEDEN
S/SWEDEN
S/SWEDEN
S/SWEDEN
S/SWEDEN
27
REGION
19
42
19
42
19
42
6
6
42
42
6
19
42
42
72
82
83
81
83
83
83
82
82
81
52
83
63
82
51
82
29
83
56
55
85
54
53
53
56
55
56
55
CITY FULL NAME
CITY NAME
at Information
Window
MALMÖ
ÖREBRO
ÖSTERSUND*
STOCKHOLM
SUNDSVALL*
UMEA*
UPPSALA
VÄSTERAS
VISBY
BRANSKA*
BRATISLAVA
KOSICE*
TRENCIN
LJUBLJANA
MARIBOR
NOVA GORIC
ABERDEEN*
BELFAST*
BIRMINGHAM
BLACKPOOL
BOURNEMOUT
BRIGHTON
BRISTOL
CAMBRIDGE
CARDIFF
DOVER
EDINBURGH*
EXETER
GLASGOW*
HOLYHEAD
IPSWICH
ISLE_OF_MAN*
JERSEY
KINGSTON
LEEDS
LEICESTER
LIVERPOOL
LONDON
MANCHESTER
MIDDLESBROUGH
NEWCASTLE
NORTHAMPTON
MALMÖ
ÖREBRO
ÖSTERSUND*
STOCKHOLM
SUNDSVALL*
UMEA*
UPPSALA
VÄSTERAS
VISBY
BRANSKA*
BRATISLAVA
KOSICE*
TRENCIN
LJUBLJANA
MARIBOR
NOVA GORIC
ABERDEEN*
BELFAST*
BIRMINGHAM
BLACKPOOL
BOURNEMOUT
BRIGHTON
BRISTOL
CAMBRIDGE
CARDIFF
DOVER
EDINBURGH*
EXETER
GLASGOW*
HOLYHEAD
IPSWICH
ISLE_O_MA*
JERSEY
KINGSTON
LEEDS
LEICESTER
LIVERPOOL
LONDON
MANCHESTER
MIDDLESBRO
NEWCASTLE
NORTHAMPTO
COUNTRY NAME
28
S/SWEDEN
S/SWEDEN
S/SWEDEN
S/SWEDEN
S/SWEDEN
S/SWEDEN
S/SWEDEN
S/SWEDEN
S/SWEDEN
SK/SLOVAKI
SK/SLOVAKI
SK/SLOVAKI
SK/SLOVAKI
SLOVENIA
SLOVENIA
SLOVENIA
UK
UK
UK
UK
UK
UK
UK
UK
UK
UK
UK
UK
UK
UK
UK
UK
UK
UK
UK
UK
UK
UK
UK
UK
UK
UK
REGION
23
56
85
54
80
84
54
54
55
63
49
63
49
46
46
44
77
76
16
16
18
18
15
18
15
18
77
15
77
15
18
77
3
18
16
16
16
18
16
16
16
18
CITY FULL NAME
CITY NAME
at Information
Window
NORWICH
NOTTINGHAM
OXFORD
PLYMOUTH
PORTSMOUTH
READING
SHEFFIELD
SOUTHAMPTON
ST_DAVIDS
SWANSEA
VATICANO
NORWICH
NOTTINGHAM
OXFORD
PLYMOUTH
PORTSMOUTH
READING
SHEFFIELD
SOUTHAMPTO
ST_DAVIDS
SWANSEA
VATICANO
COUNTRY NAME
UK
UK
UK
UK
UK
UK
UK
UK
UK
UK
V/VATICANO
29
REGION
18
16
18
15
18
18
16
18
15
15
41
30
CRITICAL WEATHER MESSAGE IN 10 LETTERS SHORT FORM
IN DIFFERENT LANGUAGES
ENGLISH
ENGLISH SHORT FORM IN
INFORMATION WINDOW
HEAVY WEATHER
HEAVY WEATHER DAY
HEAVY WEATHER NIGHT
STORM
STORM DAYTIME
STORM NIGHTTIME
STRONG GUST DAYTIME
STRONG GUST NIGHTTIME
FREEZING RAIN A.M.
FREEZING RAIN P.M.
FREEZING RAIN NIGHTTIME
FINE PARTICLES PM10
OZONE
IRRADIATION
FLOOD
DENSE FOG
HEAVY RAIN
HEAVY RAIN
HEAVY SNOWFALL
HEAVY THUNDERSTORM
STRONG UV
DENSE FOG DAYTIME
HEAVY RAIN DAYTIME
HEAVY RAIN DAYTIME
HEAVY SNOWFALL DAYTIME
THUNDERSTORM DAYTIME
DENSE FOG NIGHTTIME
HEAVY RAIN NIGHTTIME
HEAVY RAIN NIGHTTIME
HEAVY SNOWFALL NIGHT
THUNDERSTORM NIGHTTIME
FOEHN
BISE
MISTRAL
SCIROCCO
TRAMONTANA
HEAVY.WEATH.
HEAVY.WEATH.
HEAVY.WEATH.
STORM
DAY.STORM
NIGHT.STORM
DAY.GUST
NIGHT.GUST
FROZEN.RAIN
FROZEN.RAIN
FROZEN.RAIN
PARTICLES
OZONE
IRRATE
FLOOD
DENSE FOG
HEAVY RAIN
HEAVY RAIN
HEAVY SNOW
THUNDER
STRONG UV
DENSE FOG
RAIN
RAIN
HEAVY SNOW
THUNDER
DENSE FOG
HEAVY RAIN
HEAVY RAIN
HEAVY SNOW
THUNDER
FOEHN
BISE
MISTRAL
SCIROCCO
TRAMONTANA
31
GERMAN
GERMAN SHORT FORM IN
INFORMATION WINDOW
SCHWERES WETTER
SCHWERES WETTER TAG
SCHWERES WETTER NACHT
STURM
STURM AM TAGE
STURM NACHTS
AM TAG BÖIGER WIND
NACHTS BÖIGER WIND
EISREGEN VORMITTAGS
EISREGEN NACHMITTAGS
EISREGEN NACHTS
FEINSTAUB PM10
OZON
RADIOAKTIVE STRAHLUNG
HOCHWASSER
DICHTER NEBEL
STARKE REGENFÄLLE
STARKE NIEDERSCHLÄGE
STARKE SCHNEEFÄLLE
STARKE GEWITTER
STARKE UV-STRAHLUNG
TAGS DICHTER NEBEL
TAGS STARKER REGEN
TAGS STARKER NIEDERSCHL.
TAGS STARKE SCHNEEFÄLLE
TAGS STARKE GEWITTER
NACHTS DICHTER NEBEL
NACHTS STARKER REGEN
NACHTS STARK.NIEDERSCHL.
NACHTS STARK.SCHNEEFALL
NACHTS STARKE GEWITTER
FÖHN
BISE
MISTRAL
SCIROCCO
TRAMONTANA
UNWETTER
UNWETTER T
UNWETTER N
STURM
STURM.TAG
STURM.NACHT
WINDBÖE.T
WINDBÖE.N
EISREGEN
EISREGEN
EISREGEN
FEINSTAUB
OZON
RA. STRAHL.
HOCHWASSER
NEBEL
ST. REGEN
ST. NIEDERS.
ST. SCHNEE
ST.GEWITTER
ST. UV-STR.
NEBEL_T
REGEN_T
NIEDERS_T
ST.SCHNEE_T
GEWITTER_T
NEBEL_N
REGEN_N
NIEDERS_N
ST.SCHNEE_N
GEWITTER_N
FÖHN
BISE
MISTRAL
SCIROCCO
TRAMONTANA
32
DUTCH
(NIEDERLANDISCH)
DUTCH SHORT FORM IN
INFORMATION WINDOW
ZWAAR WEER
ZWAAR WEER OVERDAG
ZWAAR WEER'S NACHTS
STORM
STORM OVERDAG
STORM'S NACHTS
WINDSTOTEN OVERDAG
WINDSTOTEN'S NACHTS
IJZEL IN DE OCHTEND
IJZEL IN DE MIDDAG
IJZEL IN DE NACHT
FIJNE DEELTJES PM10
OZON
RADIOACTIEVE STRALING
HOOGWATER
DICHTE MIST
ZWARE REGEN
ZWARE NEERSLAG
ZWARE SNEEUWVAL
ZWARE ONWEERSBUIEN
STERKE UV STRALING
DICHTE MIST OVERDAG
ZWARE REGEN OVERDAG
ZWARE NEERSLAG OVERDAG
ZWARE SNEEUWVAL OVERDAG
ZWAAR ONWEER OVERDAG
DICHTE MIST'S NACHTS
ZWARE REGEN'S NACHTS
ZWARE NEERSLAG'S NACHTS
ZWARE SNEEUW‘S NACHTS
ZWAAR ONWEER'S NACHTS
FÖHN
BISE
MISTRAL
SCIROCCO
TRAMONTANA
ZWAAR WEER
ZW WEER_D
ZW WEER_N
STORM
STORM_D
STORM_N
WINDST_D
WINDST_N
IJZEL_O
IJZEL_M
IJZEL_N
FIJNSTOF
OZON
RAD ACT ST
HOOGWATER
D MIST
ZW REGEN
ZW REGEN
ZW SNEEUW
ZW ONWEER
ST UV STR
D MIST_O
ZW REGEN_O
ZW REGEN_O
ZW SNEEUW
ZW ONWEER
D MIST_N
ZW REGEN_N
ZW REGEN_N
ZW SNEEUW
ZW ONWEER
FÖHN
BISE
MISTRAL
SCIROCCO
TRAMONTANA
33
SPANISH
SPANISH SHORT FORM IN
INFORMATION WINDOW
AVISO METEOROLOGICO
AVISO METEOROLOGICO DIA
AVISO METEOROLOG. NOCHE
TEMPORAL
TEMPORAL DIA
TEMPORAL POR LA NOCHE
RACHAS FUERTES DIA
RACHAS FUERTES NOCHE
LLUVIA HELADA MANANA
LLUVIA HELADA TARDE
LLUVIA HELADA NOCHE
POLVO FINO PM10
OZONO
RADIACION RADIOACTIVA
INUNDACION
NIEBLA DENSA
LLUVIAS FUERTES
PRECIPITACIONES FUERTES
NEVADAS FUERTES
TORMENTAS FUERTES
RADIACION UV FUERTE
NIEBLA DENSA DIA
LLUVIA FUERTE DIA
PRECIPITAC. FUERTES DIA
NEVADAS FUERTES DIA
TORMENTA FUERTE DIA
NIEBLA DENSA NOCHE
LLUVIA FUERTE NOCHE
PRECIPIT. FUERTES NOCHE
NEVADA FUERTE NOCHE
TORMENTA FUERTE NOCHE
FOEHN
BISE
MISTRAL
SCIROCCO
TRAMONTANA
AVIS_METEO
AVIS.MET_D
AVIS.MET_N
TEMPORAL
TEMPORAL_D
TEMPORAL_N
RACHAS_F_D
RACHAS_F_N
LLUV.HEL_M
LLUV.HEL_T
LLUV.HEL_N
POLVO_FINO
OZONO
RADIA.RADIO
INUNDACION
NIEB_DENSA
LLUVIAS_F
PRECIPIT.FU
NEVAD.FUER
TORMENT_FU
RAD_UV-FUE
NIEB.DEN_D
LLUV.FUE_D
PRECIP.F_D
NEV.FUER_D
TORMEN.F_D
NIEB.DEN_N
LLUV.FUE_N
PRECIP.F_N
NEV.FUER_N
TORMEN.F_N
FOEHN
BISE
MISTRAL
SCIROCCO
TRAMONTANA
34
ITALIAN
ITALIAN SHORT FORM IN
INFORMATION WINDOW
CONDIZIONI DIFFICILI
CONDIZIONI DIFFICILI GIORNO
CONDIZIONI DIFFIC.NOTTE
TEMPESTA
TEMPESTA DIURNA
TEMPESTA NOTT.
FORTI RAFFICHE DIURNE
FORTI RAFFICHE NOTT.
PIOGGIA GELIDA MATT.
PIOGGIA GELIDA POMERID.
PIOGGIA GELIDA NOTT.
POLVERI FINI RESPIRAB.
OZONO
RADIOATTIVITA
INONDAZIONE
FITTA NEBBIA
FORTE PIOGGIA
FORTI PRECIPIT.
FORTE NEVICATA
FORTE TEMPORALE
FORTI IRRADIAZONI UV
FITTA NEBBIA DIURNA
FORTE PIOGGIA DIURNA
FORTI PRECIPITAZ. DIUR.
TEMPESTA DI NEVE DIURNA
FORTE TEMPORALE DIURNO
FITTA NEBBIA NOTT.
FORTE PIOGGIA NOTT.
FORTI PRECIPITAZ. NOTT.
FORTE NEVICATA NOTT.
FORTE TEMPORALE NOTT.
FOEHN
BISE
MISTRAL
SCIROCCO
TRAMONTANA
COND ESTR
COND EST G
COND EST N
TEMPESTA
TPS DIURNA
TPS NOTT.
RAFF.DIURN
RAFF.NOTT
NEVISCHIO
NEVISCHIO
NEVISCHIO
POLV.FINI
OZONO
RADIAZIONI
INONDAZ.
NEBBIA
PIOGGIA
PRECIP INT
NEVICATA
TEMPORALE
HIGH UV
NEBBIA DR
PIOGGIA DR
PRECIP INT
TPS NEVE D
TPR DIURNO
NEBBIA NOT
PIOGGIA N
TPR NOTT
NEVE INT
TPR NOTT
FOEHN
BISE
MAESTRALE
SCIROCCO
TRAMONTANA
35
FRENCH
FRENCH SHORT FORM IN
INFORMATION WINDOW
SWEDISH SHORT FORM IN
INFORMATION WINDOW
TEMPS LOURD
TEMPS LOURD JOUR
TEMPS LOURD NUIT
TEMPETE
TEMPETE JOUR
TEMPETE NUIT
RAFALES VIOLENTES JOUR
RAFALES VIOLENTES NUIT
PLUIE VERGLACANTE MATIN
PLUIE VERGLA.APRES-MIDI
PLUIE VERGLACANTE NUIT
POUSSIERE FINE PM10
OZONE
IRRADIATION
INONDATION
BROUILLARD EPAIS
FORTE PLUIE
FORTE PLUIE
FORTE CHUTE NEIGE
ORAGE VIOLENT
FORTE IRRADIATION UV
BROUILLARD EPAIS JOUR
FORTE PLUIE JOUR
FORTE PRECIPIT. JOUR
FORTE CHUTE NEIGE JOUR
ORAGE VIOLENT JOUR
BROUILLARD EPAIS NUIT
FORTE PLUIE NUIT
FORTE PLUIE NUIT
FORTE CHUTE NEIGE NUIT
ORAGE VIOLENT NUIT
FOEHN
BISE
MISTRAL
SCIROCCO
TRAMONTAGNE
TEMPS.LOURD
TEMPS.LOURD
TEMPS.LOURD
TEMPETE
TEMPETE
TEMPETE
VIOLENTES
VIOLENTES
PLUIE_VER
PLUIE_VER
PLUIE_VER
FINE_PM10
OZONE
IRRATE
INONDATION
BROUILLARD
FORTE.PLUIE
FORTE.PLUIE
FORTE.NEIGE
ORAGE VOIL.
FORTE UV
BROUILL_J
FORTE.PLU_J
FORTE.PRE_J
FORTE.NEIGE
ORAGE
BROUILL_N
FORTE.PLU_N
FORTE.PLU_N
FORTE.NEI_N
ORAGE_N
FOEHN
BISE
MISTRAL
SCIROCCO
TRAMONTAGN
KRIT. VÄDER
KRI. VÄD. D
KRI. VÄD. N
STORM
STORM D
STORM N
VINDBYAR D
VINDBYAR N
IS/REGN FM
IS/REGN EM
IS/REGN N
STOFT PM10
OZON
STRALNING
FLOD
TÄTDIMMA
KRAFT.REGN
KRAFT.REGN
KR. SNÖFALL
KRAFT.ASKV
HÖG UV STR
TÄTDIMMA D
KR.REGN D
KR.REGN D
KR. SNÖ D
ASKVÄDER
TÄTDIMMA N
KR. REGN N
KR. REGN N
KR. SNÖ N
ASKVÄDER
FÖHN
BISE
MISTRAL
SCIROCCO
TRAMONTANA
36
SETUP MANUL IN 10 LETTERS SHORT FORM IN DIFFERENT LANGUAGES
ENGLISH
ENGLISH SHORT FORM IN
INFORMATION WINDOW
SEARCH SIGNAL
SELECT CITY
SELECT COUNTRY
TIME ZONE
HOURS
RECEPTION TEST
CONTRAST.
MEMORY FULL
EXIT SETMODE
SEARCH SIG.
CITY
COUNTRY
ZONE
HR
SCAN
CONTRAST.
MEM.FULL
EXIT
GERMAN
GERMAN SHORT FORM IN
INFORMATION WINDOW
SUCHE SIGNAL
STADT EINSTELLEN
LAND EINSTELLEN
ZEITZONE
STUNDEN
EMPFANGSTEST
KONTRAST.
SPEICHER VOLL
EINSTELLUNG VORGENOMMEN
SUCHE SIG.
STADT.EINST.
LAND EINST.
ZONE
H
EMPF. TEST
KONTRAST.
SPEICHER_V
EINST. VORG.
DUTCH
(NIEDERLANDISCH)
DUTCH SHORT FORM IN
INFORMATION WINDOW
SIGNAAL ZOEKEN
STAD INSTELLEN
LAND INSTELLEN
TIJD ZONE
UREN
SIGNAAL TEST
DISPLAY CONTRAST.
GEHEUGEN VOL
INSTELLEN VERLATEN
SIGN ZKN
STAD INST
LAND INST
ZONE
HR
SIGN TEST
CONTRAST.
GEH VOL
INST VERL
37
SPANISH
SPANISH SHORT FORM IN
INFORMATION WINDOW
BUSCAR UNA SENAL
SELECCIONAR LA CIUDAD
SELECCIONAR EL PAIS
ZONA HORARIA
HORAS
PRUEBA DE RECEPCION
CONTRAST.
MEMORIA POR COMPLETO
AJUSTE REALIZADO
BUSCAR.SEN
SELEC.CIUD
SELEC.PAIS
ZONA
HR
PRUEB.REC
CONTRAST.
MEMO_COMP
AJUST.REAL
ITALIAN
ITALIAN SHORT FORM IN
INFORMATION WINDOW
RICERCA SEGNALE
SCELTA DELLA CITTA
SCELTA DEL PAESE
ZONA ORARIA
ORE
PROVA RICEZIONE
CONTRASTO
MEMORIA PIENA
REGOLAZIONE FATTA
SEARCH
S.CITTA'
S.PAESE
ZONA
HR
PROVA RX.
CONTRST.
MEM PIENA
SALVATO
FRENCH
FRENCH SHORT FORM IN
INFORMATION WINDOW
SWEDISH SHORT FORM IN
INFORMATION WINDOW
CHERCHE SIG
CHOIX DE LA VILLE
CHOIX DU PAYS
FUSEAU HORAIRE
HRS
TEST DE RECEPTION
CONTRASTE.
MEMOIRE PLEINE
REGLAGE EFFECTUE
CHERCHE.SIG
CHOIX_VILL
CHOIX_PAYS
FUSEAU
H
TEST_REC
CONTRASTE.
MEM PLEIN
REGLAGE.EFF
SÖK SIGNAL
VÄLJ STAD
VÄLJ LAND
ZONE
HR
MOTT. TEST
KONTRAST.
MEM. FULLT
EXIT SETM.
38
Section 2
Setting Up
Wireless Indoor/Outdoor measuring device
For
Wind, Rain,Thermo-hygrometer
and the atmosphere pressure
39
2.0 INTRODUCTION
MAIN UNIT
It measures indoor temperature and humidity, and displays weather data collected by the remote
weather sensors. It also provides indication of the indoor/outdoor temperature, pressure and
humidity trends, and moon phase.
The main console unit stores around 200 weather records without a computer connection. When
linked to a computer using the USB cable and software provided, the records from wireless
measuring devices can be displayed and saved onto the computer.
WIRELESS OUTDOOR MEASURING DEVICES
The remote weather sensors include a thermo-hygrometer, anemometer (wind sensor) and rain
sensor. All data collected by the sensors is transmitted to the main unit by wireless RF. The weather
station supports a maximum of 5 thermo-hygrometers, allowing 5 channels of temperature/humidity
display. Contents of the Wireless Outdoor Measuring Devices are listed as below.
Hardware Components
WIRELESS THERMO HYGRO
WIRELESS THERMO HYGRO
Fittings
• Thermo-Hygro Sensor
or
Rain Sensor:
• Funnel shaped Lid with
Battery Hatch
• Sensor Base
• Bucket See-saw
Mechanism
• Protective Screen
4 screws for
securing unit to
ground
Anemometer (Wind Sensor): 4 screws for
• Wind Cups
securing unit to
• Wind Vane
vertical surface
• Anemometer arm
• Anemometer base
Computer Software
40
2m (6ft) USB cable
2.1 FEATURES OF WIRELESS IN/OUTDOOR MEASURING DEVICES
PRESSURE
• Current or historical pressure (mBar/ hPa, mmHg or inHg)
• Altitude or sea level pressure adjustment for atmospheric pressure compensation
• Pressure trend indication
• Sea-level pressure history for the last 24 days
• Sea-level pressure history bar chart
MOON PHASE
• 12 steps of moon symbols
• Scans moon phase for year 2000 to 2099
• Moon phase history for the last or future 39 days
REMOTE TEMPERATE AND RELATIVE HUMIDITY, WITH TREND INDICATION
• Indoor and outdoor temperature and relative humidity display (ºC or ºF)
• Temperature and relative humidity trend indication
• Dew point display
• Max and Min memory for temperature and relative humidity
COMFORT LEVEL INDICATOR
• Analyzes current environmental conditions (Comfort, Wet and Dry)
RAINFALL MEASUREMENT
• Records rainfall amount for the last hour, last 24 hours, last day, last week and last month
(inch or mm).
• Daily rainfall alert if rainfall for the current day exceed pre-specified amount.
WIND
• Temperature at place of anemometer.
• Temperature adjusted to wind chill factor. (ºC or ºF)
• Wind direction compass display. Wind direction angles available as compass points or
bearings.
• Average wind speed and gust speed (mph, m/s, knots, and km/h)
• Daily Maximum wind speed and gust speed memory.
• Wind speed alert for average wind speed and wind gust speed.
MEMORY FUNCTIONS
• Stores 200 weather records (without a computer connection) with memory saving intervals
(1 hr default).
• USB port for connection to computer to allow upload of weather records.
41
2.2 INSTALLING YOUR WEATHER STATION
SETTING UP THE REMOTE WEATHER SENSORS
Before starting up the main console unit, setup all the remote sensors first.
When placing the sensors, make sure that they are within receiving range of the console unit.
Ideally they should be within the line of sight of the Main Unit. Transmission range may be
affected by trees, metal structures and electronic appliances. Test reception before permanently
mounting your weather station.
Also make sure that the sensors are easily accessible for cleaning and maintenance.
The remote sensors should be cleaned on a weekly basis, since dirt and debris will affect sensor
accuracy.
2.2.1 SETTING UP THE THERMO-HYGRO SENSOR(S)
1.
2.
3.
4.
Open the latch at the base of the thermo-hygro sensor.
Set the channel with a slide switch.
Insert 2 x UM-3 or “AA” size 1.5V batteries.
Use a pin to press the “RESET” key which is in the battery compartment of thermo-hygro
sensors.
5. Replace the latch and mount unit at desired location.
PLACEMENT TIPS:
• The thermo-hygro sensor should be in an area with free air circulation and sheltered from
direct sunlight and other extreme weather conditions. Place the unit in a shaded area, such as
under a roof.
• Use the wall mount and fittings provided if mounting the unit on a vertical surface.
• Avoid placing the sensor near sources of heat such as chimneys.
• Avoid any areas which collect and radiate heat in the sun, such as metal, brick or concrete
structures, paving, patios and decks.
• Ideally, place the sensor above natural surfaces such as a grassy lawn.
• The international standard height for measurements of air temperature is at 1.25m (4 ft)
above ground level.
42
2.2.2 SETTING UP THE RAIN SENSOR
1. Unlock the funnel-shaped top of the rain sensor by turning both knobs on the sides of the
rain sensor in an anti-clockwise direction.
2. Lift the top off the base and insert 2 x UM-3 or “AA” size 1.5V batteries into the battery
holder.
3. Replace the lid and secure into place by turning the knobs clockwise.
4. Place the rain sensor in a location such that precipitation can fall directly into the sensor,
ideally 2-3 ft above the ground.
It may be secured into place by using the four screws provided.
5. The sensor must be accurately level for optimum performance. To check if the sensor is
level, remove the lid and check if the ball bearing inside is at the midpoint of the leveler.
Additionally, a bubble level or carpenter’s level may be used.
6. Attach the protective screen onto the top of the lid. The screen will prevent any debris
entering the sensor.
PLACEMENT TIPS:
• The rain sensor should be placed in an open area away from walls, fences, trees and other
coverings which may either reduce the amount of rainfall into the sensor, deflect the entry of
wind-blown rain, or create extra precipitation runoff. Trees and rooftops may also be sources
of pollen and debris.
• To avoid rain shadow effects, place the sensor at a horizontal distance corresponding to two
to four times the height of any nearby obstruction.
• It is important that rain excess can flow freely away from the sensor. Make sure that water
does not collect at the base of the unit.
• The rainfall measurement mechanism utilizes a magnet, hence do not place any magnetic
objects around the proximity of the sensor.
2.2.3 SETTING UP THE ANEMOMETER (WIND SENSOR)
1.
2.
3.
4.
5.
Assemble the wind cups to the anemometer arm.
Attach the assembled anemometer to the base.
Insert 2 x UM-3 or “AA” size 1.5V batteries into the battery holder in the base.
Mount the anemometer onto a vertical surface, using the fittings provided.
To allow the main console unit to find the direction which the wind vane is oriented, the
following procedures are required:
i. Insert the batteries
ii. Point the wind vane towards the north. Use a compass or map if necessary.
iii. Use a pin to press the “SET” key which is in the battery compartment of the wind sensor.
Note: Above procedure must be repeated for changing battery.
The “SET” will toggle the direction between two mode:
1. Let the wind direction as manufacturer design. It will be as a default setting after
2. Set the current direction as NORTH.
43
PLACEMENT TIPS:
• Check that wind can travel freely around the anemometer and is not distorted by nearby
buildings, trees or other structures.
• For better results, place the anemometer at least 3m above local structures and obstacles. The
ground creates a frictional effect to wind flow and will attenuate readings.
• Aim for maximum exposure of the anemometer to the commonest wind directions in your
area.
• The official mounting location for anemometers is 10m (33 ft) above ground level in a clear
unobstructed location.
2.2.4 SETTING UP THE MAIN UNIT
You are highly recommended to connect the AC/DC adaptor. For the feature of the automatic
backlight control function, the AC/DC adaptor must be used.
PLACEMENT TIPS:
Make sure that the Main Unit is within receiving range of all remote sensors. Ideally sensors
should be within the line of sight of the console unit. Transmission range may be affected by
trees, metal structures and electronic appliances. Test reception before permanently mounting
your weather station.
The Main Unit measures indoor temperature, humidity, pressure and receives signals from all
remote sensors and radio-clock broadcasts. Avoid placing the console unit in the following areas:
• Direct sunlight and surfaces which radiate and emit heat.
• Near heating and ventilation devices, such as heating ducts or air conditioners.
• Areas with interference from wireless devices (such as cordless phones, radio headsets,
baby listening devices) and electronic appliances.
STARTING UP THE MAIN UNIT
Once the console unit is properly powered, the display will start showing some data and
weather parameters. Wait for a few minutes for the console to finish self-calibration and for the
sensor readings to show up.
If “---” is still displayed for the sensor reading(s), check the wireless transmission path and the
batteries for the corresponding sensor.
44
2.3 BUTTONS AND CONTROLS
There are total 7 buttons at the Right side of main Unit for setting up the Wireless In/Outdoor
Measuring Devices for Wind, Rain, Thermohygrometer, Pressure and Moon Phase, namely:
45
PLACEMENT TIPS:
• Check that wind can travel freely around the anemometer and is not distorted by nearby
buildings, trees or other structures.
• For better results, place the anemometer at least 3m above local structures and obstacles. The
ground creates a frictional effect to wind flow and will attenuate readings.
• Aim for maximum exposure of the anemometer to the commonest wind directions in your
area.
• The official mounting location for anemometers is 10m (33 ft) above ground level in a clear
unobstructed location.
2.2.4 SETTING UP THE MAIN UNIT
You are highly recommended to connect the AC/DC adaptor. For the feature of the automatic
backlight control function, the AC/DC adaptor must be used.
PLACEMENT TIPS:
Make sure that the Main Unit is within receiving range of all remote sensors. Ideally sensors
should be within the line of sight of the console unit. Transmission range may be affected by
trees, metal structures and electronic appliances. Test reception before permanently mounting
your weather station.
The Main Unit measures indoor temperature, humidity, pressure and receives signals from all
remote sensors and radio-clock broadcasts. Avoid placing the console unit in the following areas:
• Direct sunlight and surfaces which radiate and emit heat.
• Near heating and ventilation devices, such as heating ducts or air conditioners.
• Areas with interference from wireless devices (such as cordless phones, radio headsets,
baby listening devices) and electronic appliances.
STARTING UP THE MAIN UNIT
Once the console unit is properly powered, the display will start showing some data and
weather parameters. Wait for a few minutes for the console to finish self-calibration and for the
sensor readings to show up.
If “---” is still displayed for the sensor reading(s), check the wireless transmission path and the
batteries for the corresponding sensor.
46
2.3 BUTTONS AND CONTROLS
There are total 7 buttons at the Right side of main Unit for setting up the Wireless In/Outdoor
Measuring Devices for Wind, Rain, Thermohygrometer, Pressure and Moon Phase, namely:
47
2.4.3 RAIN MODE
• Precipitation amount for last hour, last 24 hour, yesterday, last week and last month
• Rainfall alert
2.4.4 WIND MODE
•
•
•
•
•
•
Wind Chill
Temperature at place of anemometer
Wind direction
Wind speed
Wind gust
Alert for wind speed and wind gust speed
CUSTOMIZING YOUR WEATHER STATION
To fully customize the weather station to your local settings and personal preferences, the
following settings are required. Please refer to the appropriate sections for detailed instructions
as below.
REQUIRED:
• Setting Pressure Parameters during Initial Start-Up (Pressure Mode)
OPTIONAL:
• Setting up the Temperature Alerts (Temperature and Humidity Mode)
• Setting up the Daily Rainfall Alerts (Rain Mode)
• Setting up the Wind Alerts (Winds Mode)
48
2.5 SETTING PRESSURE PARAMETERS DURING INITIAL START-UP
This part of the display indicates the current pressure, sea level pressure, and moon phase.
A number of historical statistics can also be viewed, such as the sea-level pressure values for
the last 24 hours, moon phase for the previous and next 39 days, as well as a pressure/
temperature/ humidity history bar-chart.
Pressure values may be displayed inHg, hPa/mBar or mmHg, and altitude values may be
displayed in meters or feet.
ACCESSING PRESSURE AND WEATHER FORECAST MODE
From the main console unit: [ ] or [ ]until the weather forecast icon
starts flashing.
SETTING PRESSURE PARAMETERS DURING INITIAL START-UP
During the initial start-up of the Main Unit, the pressure settings should be configured in
following steps.
1. Choose Pressure Units:
The unit icon “inHg” or “mmHg” or “hPa/mBar” should be flashing. [ ] or [ ] to select
pressure unit as inHg, hPa/mBar or mmHg
Press [ SET ] to confirm your selection.
2. Choose Altitude Units:
Press [ ] or [ ] to select altitude unit as feet or meters.
Press [ SET ] to confirm your selection.
3. Set Altitude:
[ ] or [ ]to adjust value. Press and hold either button for fast advance.
Press [ SET ] to confirm your selection.
4. Upon completion the display will be returned to Pressure and Weather Forecast Mode.
Note: After initial start-up the altitude cannot be adjusted immediately
VIEWING PRESSURE AND ALTITUDE DATA
In Pressure Mode, each press of [ SET ] rotates display between:
• Sea level pressure
• Local pressure
• Local altitude
SETTING THE SEA LEVEL PRESSURE
1. In Pressure Mode, press [ SET ] until the sea level pressure is displayed.
2. Press and hold [ SET ]. The Sea Level Pressure display should be flashing.
3. Set Sea Level Pressure:
[ ] or [ ] to adjust value. Press and hold either button for fast advance.
Press [ SET ] to confirm your selection.
4. Upon completion the display will be returned to Pressure Mode.
49
SETTING THE PRESSURE AND ALTITUDE UNITS
1. Set Local Pressure Units:
press [ SET ] until local pressure is displayed
Press and hold [ MEMORY ]
[ ] or [ ] to adjust value.
Press [ MEMORY ] to confirm your selection.
1. Set Altitude Units:
press [ SET ] until Altitude is displayed
Press and hold [ MEMORY ]
[ ] or [ ] to adjust value.
Press [ MEMORY ] to confirm your selection.
2. Set Sea-Level Pressure Units:
press [ SET ] until Sea-Level pressure is displayed
Press and hold [ MEMORY ]
[ ] or [ ] to adjust value.
Press [ MEMORY ] to confirm your selection.
VIEWING THE SEA LEVEL PRESSURE HISTORY
1. In all modes, pressing [ HISTORY ] will toggle the sea level pressure display.
2. When sea level pressure is displayed, press [ HISTORY ] repeatedly to view sea level
pressure data for each of the last 24 hours.
3. If no buttons are pressed for 5s, the display automatically show the current pressure.
VIEWING THE PRESSURE/ TEMPERATURE/ HUMIDITY BAR-CHARTS
The bar-chart on the display can be configured to display the history data for sea-level pressure,
temperature or humidity for channel 1.
In Pressure Mode, press and hold [ ALARM/CHART ] to toggle the bar-chart between:
• Sea-level pressure (“PRESSURE” should be displayed)
• Temperature (Thermometer icon and “CH1” should be displayed)
• Humidity (RH icon and “CH1” should be displayed)
50
VIEWING MOON PHASE HISTORY AND FORECAST
1. In Pressure Mode, press [ MEMORY ].
2. “+ 0 days” should be flashing.
3. View Moon Phase History / Forecast:
[ ] or [ ] to choose number of days forward (+ days) or backward (- days) from current
date. Press and hold either button for fast advance.
The corresponding moon phase will be shown.
4. To exit, press [ MEMORY].
Otherwise, if no buttons are pressed for 5s the display automatically returns to Pressure and
Weather Forecast Mode.
UNDERSTANDING THE MOON PHASE DIAGRAM
FULL
LAST
NEW
FIRST
2.6 INDOOR AND OUTDOOR TEMPERATURE AND HUMIDITY
The weather station supports up to 5 remote thermo-hygrometer sensors, each sensor
corresponding to a separate channel for the temperature and relative humidity display. The
temperature may be shown in degrees Celsius ºC or degrees Fahrenheit ºF. The trend (rising,
steady or falling) of all values is also indicated on the display.
The Main Unit uses the indoor temperature and humidity data to compute a comfort level rating
of Wet, Comfort or Dry.
A temperature alert function is available for each channel. It can be programmed to sound if the
channel temperature exceeds or falls below the pre-configured upper and lower limits.
Note: The temperature alerts have a 0.5 ºC hysteresis to prevent the alerts from sounding
constantly due to small fluctuations near the alert value. This means that after the temperature
reaches the alert value, it will have to fall below the alert value plus the hysteresis to deactivate
the alert.
51
ACCESSING TEMPERATURE AND HUMIDITY FROM DIFFERENT WIRELESS
OUTDOOR THERMOHYGROMETER
From the Main Unit: Press [ ] or [ ] until the IN icon on the upper right of the display
starts flashing.
VIEWING TEMPERATURE AND HUMIDITY DISPLAY FOR EACH CHANNEL
For Static Display:
In Temperature and Humidity Mode, each press of [ CHANNEL ] rotates display between
different channels.
For Cycling Display:
To enable automatic rotating between different channel displays, press and hold [ CHANNEL ],
until the
icon is displayed. Each valid channel will now be alternately displayed for 5s.
ROTATING BETWEEN TEMPERATURE AND DEW POINT DISPLAY
Each press of [ SET ] rotates temperature display between:
• Temperature and Relative Humidity
• Dew Point Temperature and Relative Humidity
SETTING UNITS FOR TEMPERATURE DISPLAY (ºC OR ºF)
Press and hold [ SET ] to convert units between degrees Celsius ºC and degrees Fahrenheit ºF.
ACTIVATING/DEACTIVATING THE TEMPERATURE ALERTS
1. In Temperature and Humidity Mode, each press of [ ALARM/CHART ] rotates channel
temperature display between:
• Current Temperature for corresponding channel
• Upper Temperature Alert (displays OFF if deactivated): icon displayed
• Lower Temperature Alert (displays OFF if deactivated): icon displayed
2. When the above alerts are displayed, Pressing [ ] or [ ] will activate/deactivate the
corresponding alert.
SETTING UP THE TEMPERATURE ALERTS
1. In Temperature and Humidity Mode, press [ ALARM/CHART ] to select alarm which you
wish to configure.
2. Press and hold [ ALARM/CHART ] until channel temperature, and [ ] or [ ] icon starts
flashing in the display.
3. Set Value for Temperature Alert:
Press [ ] or [ ] to adjust value. Press and hold either button for fast advance.
Press [ ALARM/CHART ] to confirm your selection.
4. Upon completion the display will be returned to the temperature alert selection screen.
52
DISABLING WHEN TEMPERATURE ALARMS ARE ACTIVATED
To Disable Temperature Alarm(s):
Press [ ALARM/CHART ] to disable the alarm (s).
VIEWING THE MAX/MIN CHANNEL TEMPERATURE AND HUMIDITY
Each press of [ MEMORY ] rotates channel temperature and humidity display between:
• Current temperature and humidity at remote sensor
• Minimum temperature and humidity at remote sensor
• Maximum temperature and humidity at remote sensor
RESETTING THE MAX/MIN CHANNEL TEMPERATURE AND HUMIDITY MEMORY
Press and hold [ MEMORY ] to clear memory for all channels.
REMOTE SENSOR STATUS
The wave icon above the current channel display shows the connection status of the
corresponding remote sensor:
ICON
STATUS
Searching for remote sensor signals
Corresponding remote sensor successfully linked
No signals received for more than 15 minutes
ACTIVATING MAIN CONSOLE UNIT TO SEARCH FOR ALL REMOTE SENSOR SIGNALS
The main console unit may be manually activated to search for signals from all remote sensors.
Press and hold [ ] to enforce a search.
53
2.7 WIRELESS OUTDOOR RAIN GAUGE
The Main Unit records the total amount of rainfall for the last hour, last 24 hours, yesterday, last
week and last month. The rainfall may be displayed in mm or inches.
A daily rainfall alert function is available which can be programmed to sound if the daily
rainfall exceeds a pre-configured limit.
ACCESSING RAIN GAUGE READING
From the main console unit: Press [ ] or [
flashing.
] until the RAIN icon on the display starts
VIEWING RAIN STATISTICS
Each press of [ SET ] or [ MEMORY ] rotates display between different rain statistics:
• Last hour
• Last 24 hour
• Yesterday
• Last week
• Last month
Tip: For an estimation of the rain rate, the Last Hour rainfall value can be understood as
“inch/hr” or “mm/hr”.
RESETTING THE RAINFALL STATISTICS MEMORY
Press and hold [ MEMORY ] to reset all rainfall statistics.
SETTING UNITS FOR RAIN DISPLAY (INCH OR MM)
Press and hold [ SET ] to convert units between mm and inches.
ACTIVATING/DEACTIVATING THE DAILY RAINFALL ALERT
1. Each press of [ ALARM/CHART ] rotates display between the current rainfall statistics and
the daily rainfall alert (“ALARM HI” will be displayed).
If the alert is deactivated, “OFF” will be shown, otherwise the rainfall alert value is shown.
2. When the rainfall alert is displayed, pressing [ ] or [ ] will activate/deactivate it.
SETTING UP THE DAILY RAINFALL ALERT
1. Press [ ALARM/CHART ] to display rainfall alert.
2. Press and hold [ ALARM/CHART ] until rainfall alert and “ALARM HI” starts flashing in
the display.
3. Set Value for Rainfall Alert:
Press [ ] or [ ] to adjust value. Press and hold either button for fast advance.
Press [ ALARM/CHART ] to confirm your selection.
4. Upon completion the display will be returned to the rainfall alert display.
DISABLING WHEN DAILY RAINFALL ALERT IS ACTIVATED
To Disable Rainfall Alert:
Press [ ALARM/CHART ] to disable the alert.
54
2.8 WIRELESS OUTDOOR ANEMOMETER (WIND SENSOR)
The wind direction is shown by an animated compass display. Its angle can be displayed as
compass points (i.e. NW) or in bearings from the north (i.e. 22.5º).
The upper left of the wind display can be set to indicate the temperature at the anemometer or
the temperature adjusted with a wind chill factor.
The lower left of the wind display indicates the average wind speed for the last 10 minutes, as
well as gust, wind speed alert and gust alert information. It can also show records of the
maximum values of wind speed and gust attained for the current day.
The wind speed and gust alert functions can be programmed to sound if the wind speed or gust
exceeds a pre-configured limit. The wind speed may be displayed in km/h, mph, m/s or knots.
Note: The wind speed alert has a 5 mph hysteresis and the wind gust speed alert has a 7 mph
hysteresis. The hysteresis is to prevent the alerts from sounding constantly due to small
fluctuations near the alert value. This means that after the wind speed reaches the alert value, it
will have to fall below the alert value plus the hysteresis to deactivate the alert.
ACCESSING WIND MODE
Press [ ] or [ ] until the WIND icon on the display starts flashing.
CONFIGURING WIND DISPLAY
Each press of [ SET ] rotates display between:
• Temperature with wind chill, wind direction in bearings
• Temperature with wind chill, wind direction in compass points
• Temperature at anemometer, wind direction in compass points
• Temperature at anemometer, wind direction in bearings
SETTING UNITS FOR WIND SPEED DISPLAY (KM/H , MPH, M/S OR KNOTS)
Press and hold [ SET ] to convert wind speed units between km/h, mph, m/s or knots.
VIEWING WIND STATISTICS
Each press of [ MEMORY ] rotates wind speed display between:
• Current wind speed
• Daily maximum wind speed (“DAILY MAX” is displayed)
• Gust speed (“GUST” is displayed)
• Daily maximum gust speed (“GUST DAILY MAX” is displayed)
RESETTING THE WIND STATISTICS MEMORY
Press and hold [ MEMORY ] to reset all wind statistics.
55
ACTIVATING/DEACTIVATING WIND ALERTS
1. Each press of [ ALARM/CHART ] rotates wind speed display between:
• Current wind speed
• Wind speed alert (“ALARM HI” displayed)
• Gust alert (“GUST ALARM HI” displayed)
If the alert is deactivated, “OFF” will be shown, otherwise the alert value is shown.
2. When a wind alert is displayed, pressing [ ] or [ ] will activate/deactivate it.
SETTING UP THE WIND ALERTS
1. Press [ ALARM/CHART ] to select alarm which you wish to configure.
2. Press and hold [ ALARM/CHART ] until alert and corresponding icon starts flashing in the
display.
3. Set Value for Alert:
Press [ ] or [ ] to adjust value. Press and hold either button for fast advance.
Press [ ALARM/CHART ] to confirm your selection.
4. Upon completion the display will be returned to the wind alert selection screen.
DISABLING WHEN WIND ALERT IS ACTIVATED
To Disable Wind Alert:
Press [ ALARM/CHART ] to disable the alert.
56
3 LED BACKLIGHT OPTIONS
The backlight of the Main Unit can be turned permanently on/off or automatically toggled
when environment lighting level is low. Use the light sensor switch at the back of the unit to
select lighting preferences.
57
For the automatic backlight function, the sensitivity of the light sensor can be adjusted to high
or low with the sensitivity switch also on the back of the Main Unit
Note: Main Unit must be powered with AC/DC adaptor for automatic backlight control
function
4 LINKING THE WEATHER STATION TO A COMPUTER
Data collected by the weather station can be displayed and recorded on a computer by
connecting the main console unit with the computer via USB.
Install the software provided with the weather according to the instructions on the software
manual.
Connect the Main Unit with the computer using the USB cable provided.
5 MAINTENANCE
CHANGING BATTERIES
If the low battery indicators light up, replace the batteries for the corresponding unit
immediately.
CHANGING BATTERIES FOR THE REMOTE SENSORS
1. Replace the batteries following the setup instructions for the corresponding sensor.
2. When the batteries are properly installed, the sensor will resume sending signals to the main
console unit.
To enforce a search immediately for all remote signals, press and hold [ ] located at the
back of the Main Unit.
CLEANING
The Main Unit and outer casings for the remote sensors can be cleaned with a damp cloth.
Small parts can be cleaned with a cotton tip or pipe-cleaner.
Never use any abrasive cleaning agents and solvents. Do not immerse any units with electronic
parts in water or under running water.
ANEMOMETER
• Check that the wind vane and wind cups can spin freely and are free from dirt, debris or spider webs.
RAIN GAUGE
Like all rain gauges, the rain sensor is prone to blockages due to its funnel shape. Checking and
cleaning the rain sensor from time to time will maintain the accuracy of rain measurements.
• Detach the protective screen and lid. Remove any dirt, leaves or debris by cleaning the items with
soapy water and a damp cloth. Clean small holes and parts with a cotton tips or pipe-cleaner.
• Look out for spiders or insects that might have crawled into the funnel.
• Also clean the swinging mechanism with a damp cloth.
58
TROUBLESHOOTING
“The display shows dashes “---” for weather parameter(s)”
The display will show “---” when the wireless link is lost with the remote sensor for the
following periods:
Thermo-hygro Sensor
– 15 minutes
Anemometer (Wind Sensor)
– 15 minutes
Rain Sensor
– 30 minutes
Check or replace the batteries for the corresponding sensor. Then press and hold [
the back of the Main Unit to enforce a search for all remote signals.
] located at
If the above does not solve the problem, check the wireless transmission path from the
corresponding sensor to the main console unit and change their locations if necessary.
Although wireless signals can pass through solid objects and walls, the sensor should ideally be
within the line of sight of the console unit.
The following may be the cause of reception problems:
• Distance between remote sensor and main console unit too long.
• Signal shielding materials such as metal surfaces, concrete walls or dense vegetation in the
path of transmission.
• Interferences from wireless devices (such as cordless phones, radio headsets, baby listening
devices) and electronic appliances.
PRECAUTIONS
This product is engineered to give you years of satisfactory service if you handle it carefully.
Here are a few precautions:
1. Do not immerse the unit in water.
2. Do not clean the unit with abrasive or corrosive materials. They may scratch the plastic parts
and corrode the electronic circuit.
3. Do not subject the unit to excessive force, shock, dust, temperature or humidity, which may
result in malfunction, shorter electronic life span, damaged battery and distorted parts.
4. Do not tamper with the unit's internal components. Doing so will invalidate the warranty on
the unit and may cause unnecessary damage. The unit contains no user-serviceable parts.
5. Only use fresh batteries as specified in the user's manual. Do not mix new and old batteries
as the old ones may leak.
6. Always read the user's manual thoroughly before operating the unit.
CAUTION
• The content of this manual is subject to change without further notice.
• Due to printing limitation, the displays shown in this manual may differ from the actual
display.
• The contents of this manual may not be reproduced without the permission of the
manufacturer.
59
6 Technical Specifications
Receiver (Supply=6.0V, Ta=23°C)
RF Transmission Frequency
RF Reception Range
Thermo-hygro Sensor
Wind Sensor, Rain Sensor
Barometric Pressure Range
(At sea level )
Altitude Compensation Range
Barometric Pressure resolution
Barometric Pressure accuracy
Outdoor Temperature Display Range
Indoor Temperature Display Range
Operating Temperature
Storage Temperature
Temperature accuracy
Temperature resolution
Humidity Display Range
Humidity accuracy
Humidity resolution
Receiving Cycle
Remote Thermo./Hygro.
Rain gauge
Wind sensor
Wind Direction Range
Wind Direction Accuracy
Wind Direction Resolution
Wind Direction Starting Threshold
Wind Speed Range
Wind Speed Accuracy
Wind Speed Starting Threshold
Wind/Gust Speed Disply Update Interval
Wind/Gust Sampling Interval
1h/24h/yesterday Rainfall Range
Last week/ last month Rainfall Range
Temperature Sensing Cycle (indoor)
Humidity Sensing Cycle (indoor)
and Sensor unit (Supply=3.0V, Ta=23°C)
434 MHz
100 meters Maximum (Line of Sight )
30 meters Maximum (Line of Sight)
500 hpa to 1100hpa ( 14.75 inHg to 32.44 inHg ),
( 374.5 mmHg to 823.8 mmHg )
-200m to +5000 m ( -657 ft to 16404 ft )
0.1 hpa ( 0.003 inHg, 0.08 mmHg )
+/- 5 hpa ( 0.015 inHg, 0.38 mmHg )
-40°C to 80°C ( -40°F to 176°F )
-9.9°C to 60°C ( 14.2°F to 140°F)
-5°C to 50°C ( 23°F to 122°F)
-20°C to 70°C( -4°F to 158°F)
+/- 1°C or +/- 2°F
0.1°C or 0.2°F
0% to 99%
+/-5% (within 25% - 80%)
1%
around 47s
183s
33s
16 positions
+/-11.25°
22.5°
3mph
0 to 199.9mph (199.9 Km/h, 173.7 Knots,
89.3 m/s)
+/- ( 2mph + 5% )
3mph
33 seconds
11 seconds
0.0 to 1999.9 mm ( 78.73 inch )
0 to 19999 mm ( 787.3 inch )
10s
10s
60
Hardware Requirement for running PC software
WeatherView
Operating System: Windows 98 se or above
Memory: Ram 32 M byte or more
Hard disk: 20 M byte free space or more
Optical Device: 2x CD-Rom drive
Power
Main unit
: use 4 pcs UM-3 or ”AA” 1.5V battery
: AC/DC adaptor 7.5V 200mA (centre +)
Remote Thermo.-Hygro unit : use 2 pcs UM-3 or “AA” 1.5V battery
Remote Anemometer unit
: use 2 pcs UM-3 or “AA” 1.5V battery
Remote Rain gauge unit
: use 2 pcs UM-3 or “AA” 1.5V battery
61
EC-DECLARATION OF CONFORMITY
Product : Bresser 4Cast PC Wheaterstation
This product contains the approved transmitter and complies with the essential
requirements of Article 3 of the R&TTE 1999/5/EC Directives, if used for its
intended use and that the following standard(s) has/have been applied:
Efficient use of radio frequency spectrum
(Article 3.2 of the R&TTE Directive)
applied standard(s)
EN 300 220-3:2000
Electromagnetic compatibility
(Article 3.1.b of the R&TTE Directive)
applied standard(s)
EN 301 489-1,3:2000
Low voltage directive
applied standard(s)
EN 60950-1:2001
Additional information:
The product is therefore conform with the Low Voltage Directive 73/23/EC,
the EMC Directive 89/336/EC and R&TTE Directive 1999/5/EC
(appendix II) and carries the respective CE marking.
R&TTE Compliant Countries :
All EU countries, Switzerland CH
And Norway N
62
63
ANL7002600_GB0808BRESSER
Meade Instruments Europe
GmbH & Co. KG
Gutenbergstr. 2 · DE-46414 Rhede
www.bresser.de · [email protected]
64