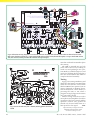
1
BALANCED MICROPHONE PREAMP Q Q Q Q Balanced Input Balanced and Unbalanced Outputs 3-Band Equaliser Ground Lift JUMPING SPIDER Simple novel fun project CHARGER FOR DEEP-CYCLE 12V BATTERIES – Part 1 A 16A, 3-step PIC controlled design $6.95 US $8.99 CAN JAN 2007 PRINTED IN THE UK Copyright Ó 2006, Wimborne Publishing Ltd (408 Wimborne Road East, Ferndown, Dorset, BH22 9ND, UK) and TechBites Interactive Inc., (PO Box 857, Madison, Alabama 35758, USA) All rights reserved. WARNING! The materials and works contained within EPE Online — which are made available by Wimborne Publishing Ltd and TechBites Interactive Inc — are copyrighted. You are permitted to make a backup copy of the downloaded file and one (1) hard copy of such materials and works for your personal use. International copyright laws, however, prohibit any further copying or reproduction of such materials and works, or any republication of any kind. TechBites Interactive Inc and Wimborne Publishing Ltd have used their best efforts in preparing these materials and works. However, TechBites Interactive Inc and Wimborne Publishing Ltd make no warranties of any kind, expressed or implied, with regard to the documentation or data contained herein, and specifically disclaim, without limitation, any implied warranties of merchantability and fitness for a particular purpose. Because of possible variances in the quality and condition of materials and workmanship used by readers, EPE Online, its publishers and agents disclaim any responsibility for the safe and proper functioning of reader-constructed projects based on or from information published in these materials and works. In no event shall TechBites Interactive Inc or Wimborne Publishing Ltd be responsible or liable for any loss of profit or any other commercial damages, including but not limited to special, incidental, consequential, or any other damages in connection with or arising out of furnishing, performance, or use of these materials and works. HB7 Stirling Engine Base measurements: 128 mm x 108 mm x 170 mm, 1 kg Base plate: beech - Working rpm: 2000 rpm/min. (the engine has a aluminium good cooling Cylinder) Bearing application: 10 high-class ball-bearings Material: screw, side parts all stainless steel Cylinder brass, Rest aluminium and stainless steel. Available as a kit £80.75 or built £84.99 www.mamodspares.co.uk HB9 Stirling engine Base measurements: 156 mm x 108 mm x 130 mm, 0,6 Kg Base plate: beech Working rpm: approx. 2,000 min Bearing application: 6 high-class ball-bearings Material of the engine: brass, aluminium, stainless steel running time: 30-45 min. Available as a kit £97.75 or built £101.99 www.mamodspares.co.uk HB10 Stirling Engine Base measurements: 156 mm x 108 mm x 130 mm, 0,6 Kg Base plate: beech Working rpm: approx. 2,000 rpm Bearing application: 6 high-class ball-bearings Material of the engine: brass, aluminium, stainless steel running time: 30-45 min Available as a kit £97.75 or built £101.99 www.mamodspares.co.uk HB11 Stirling Engine Base measurements: 156 mm x 108 mm x 130 mm, 0,7 Kg Base plate: beech Working rpm: 2000 - 2500 rpm/min,run Bearing application: 4 high-class ball-bearings Material: screw, side parts total stainless steel Cylinder brass Rest aluminium, stainless steel. Available as a kit £97.75 or built £101.99 www.mamodspares.co.uk HB12 Stirling Engine Base measurements: 156 mm x 108 mm x 130 mm, 1 Kg Base plate: beech Working rpm: 2000 - 2500 rpm/min,Bearing application: 6 high-class ball-bearings Material: screw, side parts total stainless steel Cylinder brass Rest aluminium, stainless steel. Available as a kit £136 or built £140.25 www.mamodspares.co.uk STEAM ENGINE KIT Everything in the kit enables you to build a fully functional model steam engine. The main material is brass and the finished machine demonstrates the principle of oscillation. The boiler, uses solid fuel tablets, and is quite safe. All critical parts (boiler, end caps, safety vent etc.) are ready finished to ensure success. The very detailed instruction booklet (25 pages) makes completion of this project possible in a step by step manner. Among the techniques experienced are silver soldering, folding, drilling, fitting and testing. £29.70 ref STEAMKIT Silver solder/flux pack £3.50 ref SSK www.mamodspares.co.uk HB14 Stirling Engine Base measurements: 156 mm x 108 mm x 150 mm, 1 kg Base plate: beech Working rpm: 2000 - 2500 rpm/min, . Incl. drive-pulley for external drives Bearing application: 10 high-class ball-bearings Material: screw, side parts total stainless steelCylinder brass Rest aluminium, stainless steel Available as a kit £140.25 or built £144.50 www.mamodspares.co.uk HB15 Stirling Engine Base measurements: 128 mm x 108 mm x 170 mm, 0,75 kg Base plate: beech Working rpm: 2000 rpm/min. (the engine has a aluminium good cooling Cylinder) Bearing application: 6 high-class ball-bearings Material: screw, side parts total stainless steel Cylinder brass Rest aluminium, stainless steel Available as a kit £97.75 or built £102 www.mamodspares.co.uk Solar evacuated tube panels (20 tube shown) These top-of-the-range solar panel heat collectors are suitable for heating domestic hot water, swimming pools etc - even in the winter! One unit is adequate for an average household (3-4people), and it is modular, so you can add more if required. A single panel is sufficient for a 200 litre cylinder, but you can fit 2 or more for high water usage, or for heating swimming pools or underfloor heating. Some types of renewable energy are only available in certain locations, however free solar heating is potentially available to almost every house in the UK! Every house should have one -really! And with an overall efficiency of almost 80%, they are much more efficient than electric photovoltaic solar panels (efficiency of 7-15%). Available in 10, 20 and 30 tube versions. 10 tube £199, 20 tube £369, 30 tube £549. Roof mounting kits (10/20 tubes) £12.50, 30 tube mounting kit £15 BENCH PSU 0-15V 0-2a Output and voltage are both smooth and can be regulated according to work, Input 230V, 21/2-number LCD display for voltage and current, Robust PC-grey housing Size 13x15x21cm, Weight 3,2kg £48 REF trans2 HB16 Stirling Engine Base measurements: 128 mm x 108 mm x 170 mm, 1 kg Base plate: beech Working rpm: 2000 rpm/min. (the engine has a aluminium good cooling Cylinder) Bearing application: 10 high-class ball-bearings Material: screw, side parts total stainless steel Cylinder brass Rest aluminium, stainless steel. Available as a kit £140.25 or built £144.50 2kW WIND TURBINE KIT The 2kW wind turbine is supplied as the following kit: turbine generator 48v three taper/ twisted fibreglass blades & hub 8m tower (four x 2m sections) guylines / anchors / tensioners / clamps foundation steel rectifier 2kW inverter heavy-duty pivot tower. £1,499 BULL GROUP LTD HB13 Stirling Engine Base measurements: 156 mm x 108 mm x 150 mm, 0,75 kg Base plate: beech Working rpm: 2000 - 2500 rpm/min, Bearing application: 6 high-class ball-bearings Material: screw, side parts total stainless steel Cylinder brass Available as a kit £97.75 or built £101.99 Solar Panels We stock a range of solar photovoltaic panels. These are polycrystalline panels made from wafers of silicon laminated between an impact-resistant transparent cover and an EVA rear mounting plate. They are constructed with a lightweight anodised aluminium frame which is predrilled for linking to other frames/roof mounting structure, and contain waterproof electrical terminal box on the rear. 5 watt panel £29 ref 5wnav 20 watt panel £99 ref 20wnav 60 watt panel £249 ref 60wnav. Suitable regulator for up to 60 watt panel £20 ref REGNAV UNIT D HENFIELD BUSINESS PARK HENFIELD SUSSEX BN5 9SL TERMS: C/ CARDS, CASH, PO, CHEQUE OR ONLINE ORDERING. PRICES PLUS VAT UK DELIVERY £5.50 TEL 0870 7707520 FAX 01273 491813 [email protected] NEW ELECTRONIC CONSTRUCTION KITS This 30 in 1 electronic kit includes an introduction to electrical and electronic technology. It provides conponents that can be used to make a variety of experiments including Timers and Burglar Alarms. Requires: 3 x AA batteries. £15.00 ref BET1803 AM/FM Radio This kit enables you to learn about electronics and also put this knowledge into practice so you can see and hear the effects. Includes manual with explanations about the components and the electronic principles. Req’s: 3 x AA batts. £13 ref BET1801 This 40 in 1 electronic kit includes an introduction to electrical and electronic technology. It provides conponents that can be used in making basic digital logic circuits, then progresses to using Integrated circuits to make and test a variety of digital circuits, including Flip Flops and Counters. Req’s: 4 x AA batteries. £17 ref BET1804 The 75 in 1 electronic kit includes an nintroduction to electrical and electronic technology. It provides conponents that can be used to make and test a wide variety of experiments including Water Sensors, Logic Circuits and Oscillators. The kit then progresses to the use of an intergrated circuit to produce digital voice and sound recording experiments such as Morning Call and Burglar Alarm. Requires: 3 x AA batteries. £20 ref BET1806 www.slips.co.uk ISSN 0262 3617 PROJECTS . . . THEORY . . . NEWS . . . COMMENT . . . POPULAR FEATURES . . . VOL. 36. No. 1 I N C O R P O R AT I N G E L E C T RO N I C S TO DAY I N T E R N A T I O N A L www.epemag.co.uk EPE Online: www.epemag.com JANUARY 2007 Projects and Circuits BALANCED MICROPHONE PREAMP by John Clarke Suitable for PA, Karaoke and many other applications 10 JUMPING SPIDER by Thomas Scarborough Easy-to-build fun project 22 HIGH EFFICIENCY POWER SUPPLY FOR 1W LUXEON STAR LEDS by Peter Smith Uses a pair of D cells and includes a brightness control 38 INGENUITY UNLIMITED – Sharing your ideas with others Short-Range Radio Control 50 CHARGER FOR DEEP - CYCLE 12V BATTERIES – PART 1 by John Clarke A 16A, 3-step PIC controlled design 52 Series and Features TECHNO TALK by Mark Nelson Lucky Strike? 17 PIC N’ MIX by Keith Anderson Implementing a software PLL for serious users of PICs – Part 1 20 PRACTICALLY SPEAKING by Robert Penfold Mounting circuit boards 26 C FOR PIC s – Part 3 by Mike Hibbett Cross-compiling a C program 28 CIRCUIT SURGERY By Ian Bell Understanding power MOSFETs 46 NET WORK – THE INTERNET PAGE surfed by Alan Winstanley Better Browsing 62 Regulars and Services Season’s Greetings to all our readers and advertisers © Wimborne Publishing Ltd 2006. Copyright in all drawings, photographs and articles published in EVERYDAY PRACTICAL ELECTRONICS is fully protected, and reproduction or imitations in whole or in part are expressly forbidden. EDITORIAL 7 NEWS – Barry Fox highlights technology’s leading edge Plus everyday news from the world of electronics 8 CD-ROMS FOR ELECTRONICS A wide range of CD-ROMs for hobbyists, students and engineers 34 READOUT John Becker addresses general points arising 64 DIRECT BOOK SERVICE A wide range of technical books available by mail order, plus more CD-ROMs 66 EPE PCB SERVICE PCBs for EPE projects 70 ADVERTISERS INDEX 72 Our February 2007 issue will be published on Thursday, 11 January 2007, see page 72 for details. Everyday Practical Electronics, January 2007 1 Quasar Electronics Limited PO Box 6935, Bishops Stortford CM23 4WP, United Kingdom Tel: 0870 246 1826 Fax: 0870 460 1045 E-mail: [email protected] Web: www.QuasarElectronics.com All prices INCLUDE 17.5% VAT. Postage & Packing Options (Up to 2Kg gross weight): UK Standard 3-7 Day Delivery - £3.95; UK Mainland Next Day Delivery - £8.95; Europe (EU) £6.95; Rest of World - £9.95 (up to 0.5Kg). !Order online for reduced price UK Postage! Payment: We accept all major credit/debit cards. Make cheques/PO’s payable to Quasar Electronics. Call now for our FREE CATALOGUE with details of over 300 kits, projects, modules and publications. Discounts for bulk quantities. Credit Card Sales Ho! Ho! Ho! Christmas 2006 is on it's way BUT DON'T PANIC!! We have some fantastic gift ideas for young (and older) enquiring minds Electronic Project Labs An electronics course in a box! All assume no previous knowledge and require NO solder. See website for full details Mechanical Motorised Wooden Kits Robot Sensor - £19.95 Order Code EPLR20KT Electronic Bell - £8.95 Order Code EAKEBKT Future engineers can learn about the operation of transmissions steered through gears or pulleys. Easy to build, no glue or soldering required. Electronic Motor - £8.95 Order Code EAKEMKT 30 in ONE - £15.95 Order Code EPL030KT Tyrannomech - £12.95 Order Code C21-601KT Digital Recording Laboratory - £29.95 Order Code EPLDRKT Solderless Electronic Project Kits Automech - £12.95 Order Code C21-605KT Festive Fun Electronic Project Kits 250 different educational electronic kits. Soldering is required. Generator - £8.95 Order Code EAKEGKT 130 in ONE - £37.95 Order Code EPL130KT Stegomech - £12.95 Order Code C21-602KT Coptermech - £12.95 Order Code C21-604KT Room Alarm - £4.95 Order Code EAKRAKT AM-FM Radio Kit - £6.95 Order Code ERKAFKT Musical LED Jingle Bells - £17.95 Order Code 1176KT Hand Held Metal Detector - £9.95 Order Code ELMDX7KT 300 in ONE - £59.95 Order Code EPL300KT Trainmech - £12.95 Order Code C21-606KT Short Wave Kit - £6.95 Order Code ERKSWKT Flashing LED Christmas Tree - £6.95 Order Code 4080KT 500 in ONE - £149.95 Order Code EPL500KT Crystal Radio Kit - £6.95 Order Code ERKCKT Metal Detector - £9.95 Order Code ELMDKT Hexapod Monster Robomech - £17.95 Order Code C21-883KT (soldering required) See our website for even more great gift ideas! Secure Online Ordering Facilities Ɣ Full Product Listing, Descriptions & Photos Ɣ Kit Documentation & Software Downloads Robot Kits These educational electronic robot kits make a great introduction to the exciting world of robotics and require NO soldering. See website for details Tools & Equipment Soldering Set - £9.95 Order Code SOL939 0-30V/0-3A Regulated Power Supply - £89.95 Order Code PSU676 Get Plugged In! Home and Leisure 4-ch Sequencer - £49.95 Order Code ELT298 Moon Walker - £34.95 Order Code 4015KT Hobby Tool Set - £17.95 Order Code HTK300 Hobby DMM - £5.95 Order Code MM006 12V 150W Power Inverter - £29.95 Order Code RPI530 Snow Machine - £99.95 Order Code ELT598 Hyper Peppy - £29.95 Order Code 4016KT 20 Piece Electronics Tool Set - Now £24.95 Order Code HTK368 Clamp Meter - £14.95 Order Code MC616 Metal Detector - £34.95 Order Code MDS920 Robotic Arm - £59.95 Order Code 4017KT 5” Illuminated Magnifier - £44.95 Order Code HTM015 Helping Hands - £6.95 Order Code HTS165 120mm Rechargeable Spotlight - £18.95 Order Code TOR260 Sumo Man - £59.95 Order Code 4019KT P!mot Advanced Robot - our most advanced robot to date (please see our website for full details) - £99.95 Order Code 4026KT 2x200W Car Booster Amplifier - £79.95 Order Code AMP022 20W Guitar Amplifier with Overdrive - £69.95 Order Code MUS033 Ultrasonic Distance Measurer - £24.95 Order Code UDM634 48W Digital Soldering Station - £59.95 Order Code SOL050 Deluxe Microscope Set - £26.95 Order Code SCI284 Multi-Band Radio Receiver - £24.95 Order Code RAD4997 Universal Battery Tester - £4.95 Order Code UBT393 3-12V 1.5A PSU - £19.95 Order Code PSU400 4 in 1 PC Link Telescope - Now £99.95 Order Code SCI293 Audio/Video Transmission System - £54.95 Order Code AVE125 Secure Online Ordering Facilities Ɣ Full Product Listing, Descriptions & Photos Ɣ Kit Documentation & Software Downloads EPE PROJECT PICs Programmed PICs for EPE Projects 12C508/9-£3.90; 16F627/8 - £4.90 16F84/71/ - £5.90 16F876/877/ 18Fxxxx - £10.00 All inc. VAT and Postage 1kV/500V Insulation Tester Super design. Regulated output and efficient circuit. Dual scale meter, compact case. Reads up to 200 Megohms. Kit includes wound ferrite transformer, drilled and punched case, meter scale, PCB & ALL components. (Needs PP3 battery). KIT 848...£32.95 DUAL OUTPUT TENS UNIT PIC PIPE DESCALER SIMPLE TO BUILD SWEPT FREQUENCY OUTPUT HIGH POWER AUDIO & VISUAL MONITORING An affordable circuit which sweeps the incoming water supply with varying frequency electromagnetic signals. May reduce scale formation, dissolve existing scale and improve the way salts in the water behave. Kit includes case PCB coupling coil and all components. High coil current ensures maximum effect. LED and piezo monitor. PIC WATER DESCALER 12V EPROM KIT 847 ... £63.95 Ultrasonic PEsT Scarers Two Ultrasonic PEsT Scarers. Kit 812 produces regular high level pulses of 32kHz. Kit 867 produces Random pulses and can work with an optional slave unit to give two separate ultrasound sources. Both kits need 9V supply. Kit 812 ... £14.81 psu . 3.99 Kit 867 ... £19.99 867Slave £12.51 MOSFET MKII Bench PSU 0-25V 2.5A Based on Mk1 design, with switching pre-regulator for high efficiency. Panel meters for A and V. Toroidal transformer. Variable Volts 0 - 25 AND Variable Current limit from 0 -2.5A Kit includes punched and labelled case. A classic and essential piece of test gear A safe low cost eraser for up to 4 EPROMS or other UV erasable windowed devices at a time in 20 minutes. Operates from a 12 Volt supply (400mA). Ideal for mobile work -and in educational applications where mains voltages are to be avoided. Safety interlock prevents contact with UV. PIC LCD DISPLAY DRIVER KIT 860.£19.99 PIC STEPPING MOTOR DRIVER PCB with components and PIC16F84 programmed with demonstration software to drive any 4 phase unipolar motor up to 24 Volts at 1 Amp. Kit includes 100 Step Hybrid Stepping Motor Full software source code supplied on disc. Use this project to develop your own applications. PCB allows ‘simple PIC programmer’ ‘SEND’ software to be used to reprogram chip. KIT 863.........£18.99 8 CHANNEL DATA LOGGER From Aug/Sept.’99 EPE. Featuring 8 analogue inputs and serial data transfer to PC. Magenta redesigned PCB - LCD plugs directly onto board. Use as Data Logger or as a test bed for developing other PIC16F877 projects. Kit includes lcd, programmed chip, PCB, Case, all parts and 8 x 256k EEPROMs KIT 877.........£49.95 SUPER PIC PROGRAMMER Magenta’s original parallel port programmer. Runs with downloaded WINDOWS 95 - XP software. Use standard Microchip .HEX files. Read/Prog/Verify wide range of 18,28,and 40 pin PICs. Including 16F84/876/877, 627/8, (Inc. ‘A’ versions) + 16xx OTPs. Kit 845 ... £64.95 68000 Trainer Kit 621.. 99.95 Stepping & DC Motors A range of motors for many applications: Visit our website for more details MD100 100 step Unipolar..... £9.99 MD200 200 step Unipolar..... £12.99 MD24 Type ‘23’ size 200 step..£22.95 A super walking programmable robot with eyes that sense obstacles and daylight. BrainiBorg comes with PC software CD (WIN95+ & XP) with illustrated construction details, and can be programmed to walk and respond to light and obstacles on any smooth surface. Kit includes all hardware, components, & 3 motor/gearboxes. Uses 4 AA batteries (not supplied). (Kit with CD Rom & Serial Lead) (As 912 but Built & Tested Circuit board) KIT 912 ... £29.99 KIT 913 ... £38.95 EPE PIC Toolkit 3 As in EPE Apr/May/Jun ‘03 and on PIC Resources CD Magenta Designed Toolkit 3 board with printed component layout, green solder mask, places for 8,18, 28 (wide and slim), and 40 pin PICs. and many Magenta extras. Also runs with WinPic800 prog. Software. 16 x 2 LCD, PIC chip all parts and sockets included. · Follow John Becker’s excellent ‘PIC tutorial 2’ series. 16F84 KIT 880 ... £34.99 (With Chip) (With 16F877 KIT 880 ... £39.99 Chip) OR - Built & Tested £49.99 & £55.99 EPE TEACH-IN 2004 COMPLETE 12 PART SERIES FROM NOV03 All parts to follow this Educational Electronics Course. Inc. Breadboard, and wire, as listed on p752 Nov 03’ KIT920..£29.99 Additional Parts as listed in ‘misc.’ Section (less RF modules, Lock, and Motor/g.box) KIT921.£12.99 Reprints £1.00 per part. KIT 862. £29.99 Power Supply £3.99 BAT DETECTORS ICEBREAKER Magenta’s Super Heterodyne Bat detectors. Our best selling kit 861 now includes a drilled case and front panel label. The MkIIb and digital MkIII are supplied built & ready to go Soft Zip Up Pouch for all 3....£5.99 KIT 861 .. £37.99 MkIIb .. £49.95 MkIII .. £89.95 All Prices Include VAT, Add £3.00 P&P per order, or £7.99 for next day. Chqs. P.O. & Most major cards accepted. See our Website for many more kits, products, & Secure On Line ordering. Mail Order Only. MAGENTA BRAINIBOT I & II · Full kit with ALL hardware and electronics. · As featured in EPE Feb ‘03 (KIT 910) · Seeks light, beeps, and avoids obstacles · Spins and reverses when ‘cornered’’ · Uses 8 pin PIC chip ALSO KIT 911 - As 910 PLUS programmable from PC serial port leads and software CD included. BrainiBorg ERASER KIT 866 .. £32.90 use. No ground effect - works in sea water. Detects Gold Silver, ferrous and non ferrous metals. Kit Includes Headphones, coil and all Hardware Latest Technology - Stable, Reliable, high performance IC with local feedback. (includes all parts & heatsink for stereo or mono) 16 Character x 2 Line dis- · Learn how to drive the display, pcb, programmed play and write your own PIC16F84, software disk and code. all components to experiment · Ideal development base for with standard intelligent al- meters, calculators, phanumeric displays. In- counters, timers --- just cludes full PIC source code waiting for your application which can be changed to · Top quality display with match your application. industry standard driver, data and instructions EPE MICROCHIP P.I. Treasure Hunter Stable Sensitive Pulse Induction detector. Easy to build and Short Circuit & Overheat Protected. Needs 8 to 18V supply. KIT 868 .. £22.95 PSU £3.99 KIT 790 ..... £29.90 Set of 4 Spare Electrodes £6.50 Wide band Low distortion 11W / channel Stereo 20W Mono. True (rms) Real Power KIT 914 ...... £11.90 An excellent kit for this project based on the EPE March’97 Design. Our Full Kit includes all components, hardware and an improved Magenta pcb. All hardware and electrodes are included. Designed for simple assembly and testing, providing a high level controlled dual output drive. Inc. 4 electrodes 20W Stereo Amp. EPE May ‘05 -- Magenta Stereo/Mono Module PIC Real Time In-Circuit Emulator With serial lead & software disk, PCB, Breadboard, PIC16F877, LCD, all components and patch leads. KIT910..£16.99 KIT911..£24.99 www.magenta2000.co.uk in EPE Mar’00 KIT 900..£34.99 · Featured Ideal for beginners & PSU £3.99 ICEbreaker uses PIC16F877 incircuit debugger functions. Tel: 01283 565435 experienced users. Windows (95 to XP) Software included Fax: 01283 546932 ELECTRONICS LTD 135 Hunter Street Burton on Trent Staffs DE14 2ST UK email: [email protected] 4000 Series 4000B £0.27 4001B £0.16 4002B £0.19 4008B £0.23 4009UB £0.23 4010B £0.23 4011B £0.16 4012B £0.16 4013B £0.18 4014B £0.30 4015B £0.27 4016B £0.20 4017B £0.20 4018B £0.29 4019B £0.25 4020B £0.25 4021B £0.31 4022B £0.32 4023B £0.23 4024B £0.22 4025B £0.20 4026B £0.67 4027B £0.21 4028B £0.21 4029B £0.38 4030B £0.17 4035B £0.31 4040B £0.19 4041B £0.31 4042B £0.19 4043B £0.35 4044B £0.35 4046B £0.35 4047B £0.24 4048B £0.34 4049B £0.29 4049UB £0.17 4050B £0.20 4051B £0.23 4052B £0.32 4053B £0.22 4054B £0.56 4055B £0.34 4060B £0.16 4063B £0.41 4066B £0.18 4067B £2.20 4068B £0.19 4069UB £0.17 4070B £0.15 4071B £0.20 4072B £0.18 4073B £0.17 4075B £0.17 4076B £0.30 4077B £0.28 4078B £0.30 4081B £0.16 4082B £0.21 4085B £0.28 4086B £0.33 4093B £0.16 4094B £0.29 4098B £0.22 4099B £0.35 4502B £0.32 4503B £0.40 4508B £1.40 4510B £0.45 4511B £0.30 4512B £0.27 4515B £0.99 4516B £0.44 4518B £0.26 4520B £0.34 4521B £0.62 4526B £0.40 4527B £0.40 4529B £0.44 4532B £0.24 4536B £1.00 4538B £0.40 4541B £0.33 4543B £0.47 4555B £0.32 4556B £0.40 4584B £0.27 4585B £0.47 4724B £0.94 40106B £0.19 40109B £0.58 40174B £0.46 40175B £0.41 74HC Series 74HC00 £0.16 74HC02 £0.17 74HC03 £0.21 74HC04 £0.14 74HC08 £0.16 74HC10 £0.21 74HC11 £0.21 74HC14 £0.18 74HC20 £0.28 74HC27 £0.16 74HC30 £0.22 74HC32 £0.14 74HC42 £0.36 74HC73 £0.40 74HC74 £0.15 74HC75 £0.31 74HC85 £0.23 74HC86 £0.21 74HC107 £0.40 74HC123 £0.33 74HC125 £0.26 74HC126 £0.46 74HC132 £0.26 74HC133 £0.34 74HC137 £0.30 74HC138 £0.26 74HC139 £0.31 74HC151 £0.33 74HC153 £0.30 74HC154 £0.94 74HC157 £0.22 74HC158 £0.23 74HC160 £0.64 74HC161 £0.27 74HC162 £0.45 74HC163 £0.26 74HC164 £0.23 74HC165 £0.21 74HC173 £0.38 74HC174 £0.27 74HC175 £0.35 74HC193 £0.39 74HC195 £0.32 74HC240 £0.32 74HC241 £0.37 74HC244 £0.40 74HC245 £0.34 74HC251 £0.30 74HC253 £0.25 74HC257 £0.25 74HC259 £0.29 74HC273 £0.32 74HC299 £0.61 74HC365 £0.28 74HC367 £0.38 74HC368 £0.29 74HC373 £0.35 74HC374 £0.34 74HC390 £0.52 74HC393 £0.36 74HC563 £0.56 74HC573 £0.27 74HC574 £0.30 74HC595 £0.27 74HC597 £0.22 74HC688 £0.46 74HC4002 £0.31 74HC4017 £0.36 74HC4020 £0.36 74HC4040 £0.29 74HC4049 £0.31 74HC4051 £0.50 74HC4052 £0.34 74HC4053 £0.22 74HC4060 £0.23 74HC4075 £0.27 74HC4078 £0.32 74HC4511 £0.64 74HC4514 £0.84 74HC4538 £0.41 74HC4543 £0.90 74LS Series 74LS00 £0.38 74LS01 £0.14 74LS02 £0.22 74LS03 £0.29 74LS04 £0.30 74LS05 £0.14 74LS08 £0.19 74LS09 £0.15 74LS10 £0.27 74LS11 £0.17 74LS12 £0.25 74LS14 £0.33 74LS15 £0.24 74LS20 £0.27 74LS21 £0.20 74LS26 £0.17 74LS27 £0.25 74LS30 £0.20 74LS32 £0.23 74LS37 £0.31 74LS38 £0.18 74LS40 £0.14 74LS51 £0.24 74LS73 £0.36 74LS75 £0.30 74LS83 £0.38 74LS85 £0.48 74LS86 £0.25 74LS92 £0.45 74LS93 £0.58 74LS107 £0.30 74LS109 £0.21 74LS112 £0.24 74LS113 £0.23 74LS114 £0.36 74LS122 £0.31 74LS123 £0.31 74LS125 £0.28 74LS126 £0.25 74LS132 £0.47 74LS133 £0.36 74LS136 £0.23 74LS138 £0.33 74LS139 £0.26 74LS145 £0.56 74LS148 £0.64 74LS151 £0.29 74LS153 £0.38 74LS156 £0.36 74LS157 £0.22 74LS158 £0.21 74LS160 £0.48 74LS161 £0.32 74LS162 £0.44 74LS163 £0.32 74LS164 £0.43 74LS165 £0.48 74LS173 £0.24 74LS174 £0.24 74LS175 £0.30 74LS190 £0.60 74LS191 £0.27 74LS192 £0.60 74LS193 £0.43 74LS195 £0.24 74LS221 £0.41 74LS240 £0.32 74LS241 £0.32 74LS243 £0.30 www.esr.co.uk 74LS244 £0.41 74LS245 £0.45 74LS247 £0.60 74LS251 £0.24 74LS257 £0.24 74LS258 £0.24 74LS266 £0.14 74LS273 £0.32 74LS279 £0.24 74LS283 £0.47 74LS365 £0.21 74LS367 £0.21 74LS368 £0.21 74LS373 £0.39 74LS374 £0.38 74LS378 £0.62 74LS390 £0.34 74LS393 £0.33 74LS395 £0.26 74 Series 7407 £0.40 Linear ICs AD524AD £23.04 AD548JN £2.48 AD590JH £5.28 AD595AQ £13.92 AD620AN £9.88 AD625JN £16.20 AD633JN £5.92 AD648JN £2.57 AD654JN £5.51 AD711JN £1.97 AD712JN £2.51 AD736JN £5.80 AD797AN £7.25 AD811N £5.50 AD812AN £6.32 AD820AN £3.41 AD822AN £5.20 AD829JN £6.41 AD830AN £5.44 AD847JN £5.95 AD9696KN £7.73 ADEL2020A £5.06 ADM222AH £3.55 ADM232AA £3.55 ADM485JN £2.97 ADM666AN £2.72 ADM690AN £5.13 ADM691AN £6.48 ADM695AN £6.48 ADM699AN £3.58 CA3046 £0.65 CA3130E £0.87 CA3140E £0.63 CA3240E £0.91 DG211CJ £1.25 DG411DJ £2.00 ICL7106CPL £2.21 ICL7107CPL £2.06 ICL7109CLP £5.76 ICL7611DCP £1.00 ICL7621 £0.84 ICL7660SCP £0.80 ICM7555 £0.41 ICM7556 £1.04 L165V £2.36 L272M £1.21 L293E £4.20 L297 £5.12 L298N £6.67 L4960 £2.81 L6219 £4.48 LF347N £0.46 LF351N £0.44 LF353N £0.40 LF356 £0.52 LM311N8 £0.17 LM319N14 £0.90 LM324 £0.20 LM335Z £1.12 LM339N £0.19 LM348N £0.36 LM35DZ £0.76 LM358N £0.13 LM380N £0.90 LM386 £0.45 LM392N £0.79 LM393N £0.21 LM1881 £2.90 LM2901N £0.15 LM2917N8 £1.98 LM3900N £0.72 LM3914 £1.97 LM3915 £2.24 LM13700 £1.35 LMC660CN £1.26 LMC6032IN £1.55 LP311N £0.74 LP324N £0.75 LP339N £0.75 LT1013CN8 £4.64 M34-1 £0.30 M34-2 £0.30 MAX202CPE £2.00 MAX208CN £6.99 MAX220CPE £5.06 MAX222CPE £5.06 MAX232CPE £1.30 MAX483CP £3.13 MAX485CP £2.04 MAX631ACP £4.99 MAX635ACP £4.99 MAX1232CP £2.80 MC1458N £0.27 MC1488 £0.40 MC1489 £0.35 MC3302 £0.56 MC4558P £0.40 MK484 £0.66 NE521N £6.39 NE555N £0.16 NE556N £0.24 NE565N £2.30 NE592 £0.62 10 06 NE5532N £0.48 NE5534N £0.54 NE5539N £4.35 OP07CN £0.80 OP27CN £2.33 OP90GP £2.91 OP97FP £1.84 OP113GP £3.44 OP176GP £2.09 OP177GP £2.18 OP200GP £5.60 OP213FP £5.20 OP275GP £2.57 OP282GP £2.27 OP283GP £5.20 OP290GP £4.28 OP297GP £4.64 OP400GP £11.81 OP495GP £8.69 RC4136 £1.00 SG3524N £0.82 SG3543 £6.88 SSM2141P £3.21 SSM2142P £6.16 SSM2143P £3.78 TBA120S £1.04 TBA800 £0.75 TBA810S £0.64 TBA820M £0.53 TDA1170S £4.80 TDA2004 £2.24 TDA2030AV £1.24 TDA2050V £2.51 TDA2611A £1.88 TDA2822A £0.79 TDA2653A £2.99 TED3718DP £5.03 TEA5115 £3.11 TL061CP £0.37 TL062CP £0.60 TL064CN £0.29 TL071CN £0.30 TL072CN £0.40 TL074CN £0.25 TL081 £0.28 TL082CN £0.32 TL084CN £0.37 TL7705ACP £0.82 TLC271 £0.63 TS272CN £0.57 TS274CN £0.50 TS555CN £0.40 TMP01FP £5.60 UA741CN £0.18 ULN2003A £0.38 ULN2004A £0.44 ULN2803A £0.42 ULN2804A £0.41 EPROM’s 24LC08BP £0.73 24LC16BP £0.69 24LC32AP £1.14 27128-200 £3.99 27256-200 £3.99 27C64A-15F £2.80 27C256B-15F£3.00 27C512-15F1£2.85 27C1001-15. £3.17 27C2001-15. £4.41 27C4001-10F£5.98 93C46N £0.33 RAM GM76C88. £3.60 A/D Converters Data Acquisition AD420AN £25.38 AD7528JN £11.42 AD7545AK £14.04 AD7828KN £20.33 DAC0800 £2.40 ICL7109CPL £7.75 uControllers AT89C2051 £6.38 PIC Series 12C508A04P £0.78 12C509A04P £0.83 16C54C04P £1.49 16C54BJW £7.60 16C56A-04P £1.63 16F84-04P £3.14 16F84-10P £3.76 16F627-04P £1.53 16F627-20IP £1.80 17F628-20IP £2.58 16F867-04SP £5.10 16F877-20P £5.79 Voltage Regulators 7805 £0.27 7806 £0.29 7808 £0.27 7812 £0.20 7815 £0.27 78L05 £0.22 78L06 £0.32 78L08 £0.22 78L12 £0.16 78L15 £0.26 78L24 £0.39 78S05 £0.53 78S12 £0.42 78S15 £0.32 7905 £0.23 7912 £0.24 7915 £0.22 7924 £0.38 79L05 £0.20 79L12 £0.26 79L15 £0.28 79L24 £0.30 ADM666AN £3.44 L200CV £1.67 L296 £4.42 L387A £2.72 LM2940CT5 £0.75 LM317LZ £0.25 LM317T £0.30 LM317K £2.28 LM323K £2.40 LM334Z £0.96 LM337T £0.64 LM338K £5.31 LM338T £1.10 LM723 £0.40 LP2950CZ5.0 £0.72 REF01CP £2.31 REF195GP £3.04 TL431CP £0.14 Diodes 1N914 £0.05 1N916 £0.05 1N4001 £0.05 1N4002 £0.05 1N4003 £0.03 1N4004 £0.04 1N4005 £0.04 1N4006 £0.04 1N4007 £0.03 1N4148 £0.03 1N4149 £0.07 1N5400 £0.08 1N5401 £0.08 1N5402 £0.08 1N5404 £0.09 1N5406 £0.10 1N5407 £0.10 1N5408 £0.10 6A05 £0.27 6A1 £0.30 6A2 £0.27 6A4 £0.28 6A6 £0.32 6A8 £0.30 6A10 £0.35 BA157 £0.07 BA158 £0.08 BA159 £0.13 BAT41 £0.12 BAT42 £0.07 BAT46 £0.12 BAT85 £0.09 BAV21 £0.07 BAW62 £0.07 BAX16 £0.05 BY127 £0.18 BY133 £0.10 OA47 £0.70 OA90 £0.33 OA91 £0.32 OA200 £0.56 UF4001 £0.08 UF4002 £0.08 UF4003 £0.09 UF4004 £0.08 UF4005 £0.10 UF4006 £0.10 UF4007 £0.14 Zeners 2.7 to 33V 500mW £0.06 1.3W £0.10 Bridge Rectifiers 1A 50V £0.35 1A 100V £0.32 1A 200V £0.39 1A 600V £0.40 1A 800V £0.43 1.5A 50V £0.19 1.5A 100V £0.11 1.5A 200V £0.19 1.5A 400V £0.20 1.5A 600V £0.24 1.5A 800V £0.26 1.5A 1kV £0.18 2A 100V £0.34 2A 200V £0.34 2A 400V £0.35 2A 800V £0.36 2A 1000V £0.45 3A 200V £0.34 3A 400V £0.40 3A 600V £0.33 3A 1000V £0.33 4A 100V £0.78 4A 200V £0.80 4A 400V £0.86 4A 600V £0.90 6A 100V £0.49 6A 200V £0.64 6A 400V £0.53 6A 600V £0.67 6A 800V £0.37 8A 100V £0.98 8A 200V £1.00 8A 400V £1.20 8A 600V £1.33 8A 1000V £1.05 25A 100V £1.47 25A 200V £1.54 25A 400V £1.98 25A 600V £1.82 35A 50V £1.67 35A 100V £1.57 35A 200V £1.80 35A 400V £1.44 35A 600V £1.90 35A 1000V £2.32 Always online! Our catalogue is available to view or download. Up to date with new products & prices Thyristors 2N5060 £0.19 2N5061 £0.19 BT151-500R £0.65 C106D1 £0.36 PO102AA £0.30 TIC106D £0.49 TIC116D £0.66 TIC126D £0.77 Triacs BT136-500 £0.58 BT136-600 £0.50 BT137-600 £0.58 BT139-500 £1.00 BT139-600 £1.20 BTA08-600B £0.84 BTA08-600BW£0.76 BTA08-600C £0.96 BTA08-600SW£0.93 BTA08-600TW£1.10 BTA12-600BW£0.92 BTA16-600CW £1.45 BTA16-600B £1.28 BTA26-600B £2.78 TIC206D £0.70 TIC206M £0.75 TIC226D £0.80 TIC226M £1.00 TIC246D £1.00 TIC246M £1.00 TIC236D £1.12 ZO105DA £0.53 Diac DB3, 32V £0.08 Transistors 2N2222A £0.16 2N2369A £0.51 2N2646 £1.02 2N2904A £0.35 2N2905A £0.30 2N2907A £0.28 2N3053 £0.38 2N3054 £0.85 2N3055 £0.58 2N3439 £0.62 2N3440 £0.50 2N3702 £0.09 2N3703 £0.10 2N3704 £0.11 2N3705 £0.08 2N3771 £1.44 2N3772 £1.72 2N3773 £2.30 2N3819 £0.27 2N3903 £0.11 2N3904 £0.05 2N3905 £0.10 2N3906 £0.05 2N4401 £0.08 2N4403 £0.09 2N5245 £0.80 2N5296 £0.57 2N5401 £0.12 2N5551 £0.07 2N6491 £1.58 2N7000 £0.19 2SB548 £0.30 AC127 £0.50 AC128 £0.76 AC187 £0.68 AC188 £0.97 ACY17 £4.84 AD149 £1.29 AD161 £0.73 AD162 £0.95 BC107 £0.15 BC107B £0.14 BC108 £0.13 BC108B £0.14 BC108C £0.18 BC109 £0.17 BC109C £0.16 BC114 £0.19 BC115 £0.41 BC118 £0.41 BC132 £0.36 BC134 £0.36 BC135 £0.36 BC140 £0.75 BC142 £0.50 BC143 £0.38 BC159 £0.17 BC160 £0.28 BC170B £0.16 BC171B £0.16 BC177 £0.15 BC178 £0.18 BC179 BC182B BC182L BC183L BC184 BC184L BC206B BC208 BC209A BC212L BC213L BC214 BC214L BC225 BC237B BC238B BC250A BC261B BC262B BC267B BC319C BC327 BC327-25 BC328 BC337-16 BC337-25 BC348B BC357 BC393 BC461 BC463 BC477 BC479 BC516 BC517 BC546B BC546C BC547A BC547B BC547C BC548A BC548B BC548C BC549B BC549C BC550C BC556A BC556B BC557A BC557B BC557C BC558A BC558B BC559A BC560A BC636 BC637 BC638 BC639 BC640 BCY72 BD124P BD131 BD132 BD135 BD136 BD137 BD138 BD139 BD140 BD150C BD201 BD202 BD232 BD237 BD238 BD240C BD245C BD246C BD283 BD284 BD400 BD437 BD438 BD442 BD534 BD535 BD581 BD597 BD646 BD648 BD650 BDX32 BDX34C BDX53C BDX54C BF180 BF182 £0.15 £0.09 £0.11 £0.09 £0.09 £0.12 £0.72 £0.72 £0.72 £0.09 £0.12 £0.08 £0.10 £0.15 £0.11 £0.11 £0.15 £0.30 £0.24 £0.30 £0.13 £0.08 £0.08 £0.09 £0.10 £0.07 £0.14 £0.25 £0.73 £0.41 £0.29 £0.52 £0.32 £0.21 £0.12 £0.06 £0.08 £0.09 £0.09 £0.10 £0.08 £0.09 £0.08 £0.09 £0.09 £0.11 £0.08 £0.10 £0.09 £0.09 £0.09 £0.08 £0.09 £0.08 £0.09 £0.10 £0.19 £0.21 £0.09 £0.13 £0.20 £6.86 £0.48 £0.46 £0.22 £0.21 £0.23 £0.19 £0.23 £0.14 £0.82 £0.40 £0.70 £0.50 £0.32 £0.44 £0.37 £1.10 £1.18 £0.61 £0.61 £0.79 £0.17 £0.22 £0.37 £0.47 £0.50 £0.62 £0.92 £0.52 £0.52 £0.53 £1.78 £0.45 £0.53 £0.50 £0.31 £0.31 BF245B £0.40 BF257 £0.33 BF259 £0.33 BF337 £0.40 BF422 £0.15 BF423 £0.15 BF459 £0.33 BF469 £0.36 BFX29 £0.29 BFX84 £0.31 BFX85 £0.33 BFX88 £0.27 BFY50 £0.30 BFY51 £0.22 BFY52 £0.24 BS107 £0.21 BS170 £0.15 BU208A £1.53 BU326A £1.40 BU500 £1.54 BU508A £1.40 BU508D £0.98 BU806 £1.06 BUT11A £0.57 BUT11AF £1.14 BUX84 £0.78 BUZ900P £5.60 BUZ905P £5.60 IRF530 £0.53 IRF540 £0.78 IRF630 £0.42 IRF640 £0.63 IRF730 £0.66 IRF740 £0.91 IRF830 £0.68 IRF840 £0.78 MJ2955 £0.90 MJ2501 £1.60 MJ3001 £1.84 MJ11015 £2.45 MJ11016 £2.78 MJE340 £0.33 MJE350 £0.32 MPSA05 £0.14 MPSA13 £0.09 MPSA42 £0.14 MPSA55 £0.13 MPSA56 £0.12 STW80NE-10£3.80 TIP29A £0.32 TIP29C £0.33 TIP30A £0.47 TIP30C £0.27 TIP31A £0.23 TIP31C £0.35 TIP32A £0.29 TIP32C £0.30 TIP33C £0.74 TIP41A £0.32 TIP41C £0.32 TIP42A £0.47 TIP42C £0.43 TIP50 £0.28 TIP110 £0.28 TIP120 £0.30 TIP121 £0.32 TIP122 £0.24 TIP125 £0.31 TIP126 £0.31 TIP127 £0.35 TIP132 £0.50 TIP137 £0.64 TIP141 £0.93 TIP142 £0.93 TIP147 £1.07 TIP2955 £0.46 TIP3055 £0.46 ZVN2106A £0.40 ZVN2110A £0.45 ZVN3306A £0.28 ZVN4206A £0.52 ZVN4210A £0.56 ZVN4306A £0.74 ZVN4310A £0.88 ZVP2106A £0.42 ZVP2110A £0.46 ZVP3306A £0.32 ZTX302 £0.17 ZTX450 £0.19 ZTX451 £0.19 ZTX453 £0.26 ZTX500 £0.16 ZTX502 £0.17 ZTX550 £0.22 ZTX551 £0.33 ZTX600 £0.33 ZTX600B £0.35 ZTX605 £0.36 ZTX651 ZTX653 ZTX689B ZTX690B ZTX705 ZTX750 ZTX751 ZTX753 ZTX789A ZTX790A ZTX851 ZTX853 ZTX951 ZTX1048A ZTX1051A ZTX1053A £0.33 £0.37 £0.40 £0.37 £0.39 £0.25 £0.34 £0.40 £0.41 £0.41 £0.50 £0.50 £0.54 £0.48 £0.46 £0.45 NEW ONLINE Transformers Large selection of mains & audio transformers. Fuses 20mm, 32mm Quick Blow & Time-lag Glass, Ceramic www.esr.co.uk Potty about Pots! We now carry in stock a wide range of positive position pots. With either with a centre click or 41 click positions. Log, Lin, Single or Dual gang. Quality Components No surplus or redundant stock. All from leading manufactures. Quality Service Sameday despatch on all stock items. Friendly helpful staff. Fast Delivery Nextday service for all orders at no extra charge. No Minimum Order Order what you need, no pack quantities or min order value. Quantity Discounts Available We offer discounts for all items subject to quantity required, phone, fax or email for a quote. We carry a large range of capacitors in stock, including: Ceramic Mini Disc, Dipped Ceramic Multilayer, Dipped & Boxed Polyester, Mylar Film, Polystyrene, Plastic Film, MKT Polyester, Tantalum Bead, Sub-miniature Radial, 105°C Radial, Low Leakage Radial, Non Polarised Radial & Axial, PCB Can Electrolytics, Polypropylene & Ceramic Trimmers and Tuning capacitors. Full technical details available. per 100 of one Resistors - Please State Value Required value only 1/8W Carbon Film 5% E12 Series 10W-1M0 £0.02 Each, £0.80 per 100 ¼W Carbon Film 5% E12 Series 1W-10M £0.02 Each, £0.60 per 100 ¼W Metal Film 1% E24 Series 10W-1M £0.04 Each, £1.72 per 100 ½W Carbon Film 5% E12 Series 1W-10M £0.02 Each, £0.95 per 100 2.5W Wirewound 5% E12 Series 0W1-220W £0.23 Each 1W, 2W, 5W, 20W, 25W & 50W also in stock - selected values only, contact sales dept. Preset Resistors - Please State Value Required Enclosed, 10mm Square Horz / Vert. 100W - 1M0 0.15W Skeleton, 10mm Dia. Horizontal. 100W - 1M0 0.1W Sub-min, 6mm Dia, Horizontal E3 200W-1M0 0.1W Multiturn, 10mm Square, Top Adjust. E3 100W-1M0 0.5W Multiturn, 19mm Long, End Adjust. E3 50W-1M0 0.5W Potentiometers - Please State Value Required Single Gang ¼” Shaft, 25mm Dia. 470W-2M2 Linear Single Gang ¼” Shaft, 25mm Dia. 4k7,10k,47k,100k,1M,2M2 Log Dual Gang¼” Shaft, 20mm Dia. 1k0-2M2 Linear Dual Gang¼” Shaft, 20mm Dia. 10k-470k Logarithmic Switched ¼” Shaft, 20mm Dia. 1k0-2M2 Linear Switched ¼” Shaft, 20mm Dia. 4k7-2M2 Logarithmic PCB Mount, Splined Shaft, 16mm Dia. 470W-1M0 Linear PCB Mount, Splined Shaft, 16mm Dia. 470W,4k7,100k,1M0 Log Dual PCB, Splined Shaft, 16mm Dia. 10k,50k100k,500k Lin Dual PCB, Splined Shaft, 16mm Dia. 10k,50k,100k,500k Log Tel: 0191 2514363 Fax: 0191 2522296 [email protected] Station Road Cullercoats Tyne & Wear NE30 4PQ £0.12 £0.09 £0.12 £0.81 £0.59 Each Each Each Each Each £0.56 Each £0.56 Each £1.54 Each £1.54 Each £1.92 Each £1.92 Each £0.48 Each £0.56 Each £1.05 Each £1.00 Each Prices Exclude Vat @17½%. UK Carriage £2.50 (less than 1kg) £5.50 greater than 1kg Cheques / Postal orders payable to ESR Electronic Components. PLEASE ADD CARRIAGE & VAT TO ALL ORDERS THE UK’s No.1 MAGAZINE FOR ELECTRONICS TECHNOLOGY & COMPUTER PROJECTS VOL. 36 No. 1 JANUARY 2007 Editorial Offices: EVERYDAY PRACTICAL ELECTRONICS EDITORIAL Wimborne Publishing Ltd., 408 Wimborne Road East, Ferndown, Dorset BH22 9ND Phone: (01202) 873872. Fax: (01202) 874562. Email: [email protected] Web Site: www.epemag.co.uk EPE Online (downloadable version of EPE): www.epemag.com EPE Online Shop: www.epemag.wimborne.co.uk/shopdoor.htm See notes on Readers’Technical Enquiries below – we regret technical enquiries cannot be answered over the telephone. Advertisement Offices: EVERYDAY PRACTICAL ELECTRONICS ADVERTISEMENTS 408 Wimborne Road East, Ferndown, Dorset BH22 9ND Phone: 01202 873872 Fax: 01202 874562 Email: [email protected] Power for the people Over the years we have reported on many developments of energy generation, from wind and wave power to nuclear fusion. As yet, only wind power seems to have ‘come of age’ and is now providing energy to the national grid. We first reported on experimental wave power systems back in the September ’78 issue of PE, so that seems to have taken an age to come to fruition. Similarly with nuclear fusion, which is perhaps the most exciting prospect and one that could provide all the world’s energy needs in the future, without most of the potential problems associated with the present nuclear reactors, waste disposal etc. Worldwide research and a great deal of collaboration has been lavished on fusion experients; the Joint European Torus (JET) project was set up in 1978 to construct and operate a fusion facility at Culham in Oxfordshire. (There is a facility for visitors and educational parties to view the project – see the JET website for details.) JET started operating in 1983 and was the first fusion facility to achieve significant production of controlled fusion power in 1991. As we go to press the ITER Agreement has been signed in France, this is a joint international research and development project to demonstrate the feasibility of fusion power. ITER will be built at Cadarache in the South of France as a joint venture between the European Union, Japan, China, India, Korea, Russia and the USA. (ITER originally stood for International Thermonuclear Experimental Reactor, but that title was dropped to avoid any negative connotations – ITER also means ‘the way’ in Latin.) The aim is to be able to deploy the first generation of fusion power plants to deliver power to the grid by 2050. The new facility will commence construction in 2008, with assembly of the ITER device itself scheduled to begin in 2011. The overall cost is estimated to be 10 billion Euros (about $12 billion US), a figure that seems low in comparison with the escalating cost of the 2012 London Olympics and the annual cost of electricity in the USA alone of $210 billion. Provided prolonged fusion can be achieved and the “sun can be contained in a box” – the problem being the construction of the ‘box’ – then the world may have most of its power requirements serviced by fusion in 100 years time. Let’s hope it is worth waiting for; of course, we may run out of oil before then, so we may also need the wind and waves to help! AVAILABILITY Copies of EPE are available on subscription anywhere in the world (see opposite) and from all UK newsagents (distributed by SEYMOUR). EPE can also be purchased from retail magazine outlets around the world. An Internet on-line version can be purchased and downloaded for just $15.99US (approx £9.00) per year available from www.epemag.com SUBSCRIPTIONS Subscriptions for delivery direct to any address in the UK: 6 months £18.75, 12 months £35.50, two years £66; Overseas: 6 months £21.75 standard air service or £30.75 express airmail, 12 months £41.50 standard air service or £59.50 express airmail, 24 months £78 standard air service or £114 express airmail. To subscribe from the USA or Canada call Express Mag toll free on 1877-363-1310 Online subscriptions, for downloading the magazine via the Internet, $15.99US (approx £9.00) for one year available from www.epemag.com. Cheques or bank drafts (in £ sterling only) payable to Everyday Practical Electronics and sent to EPE Subs. Dept., Wimborne Publishing Ltd. 408 Wimborne Road East, Ferndown, Dorset BH22 9ND. Tel: 01202 873872. Fax: 01202 874562. Email: [email protected]. Also via the Web at: http://www.epemag.wimborne.co.uk. Subscriptions start with the next available issue. We accept MasterCard, Amex, Diners Club, Maestro or Visa. (For past issues see the Back Issues page.) BINDERS Binders to hold one volume (12 issues) are available from the above address. These are finished in blue p.v.c., printed with the magazine logo in gold on the spine. Price £7.95 plus £3.50 p&p (for overseas readers the postage is £6.00 to everywhere except Australia and Papua New Guinea which cost £10.50). Normally sent within seven days but please allow 28 days for delivery – more for overseas. Payment in £ sterling only please. Visa, Amex, Diners Club, Maestro and MasterCard accepted. Send, fax or phone your card number, card expiry date and card security code (the last 3 digits on or just under the signature strip), with your name, address etc. Or order on our secure server via our UK web site. Overseas customers – your credit card will be charged by the card provider in your local currency at the existing exchange rate. Everyday Practical Electronics, January 2007 Editor: MIKE KENWARD Consulting Editors: DAVID BARRINGTON JOHN BECKER Business Manager: DAVID J. LEAVER Subscriptions: MARILYN GOLDBERG General Manager: FAY KEARN Editorial/Admin: (01202) 873872 Advertising Manager: STEWART KEARN (01202) 873872 On-Line Editor: ALAN WINSTANLEY EPE Online (Internet version) Editors: CLIVE (MAX) MAXFIELD and ALVIN BROWN READERS’ TECHNICAL ENQUIRIES E-mail: [email protected] We are unable to offer any advice on the use, purchase, repair or modification of commercial equipment or the incorporation or modification of designs published in the magazine. We regret that we cannot provide data or answer queries on articles or projects that are more than five years’ old. Letters requiring a personal reply must be accompanied by a stamped self-addressed envelope or a selfaddressed envelope and international reply coupons. We are not able to answer technical queries on the phone. PROJECTS AND CIRCUITS All reasonable precautions are taken to ensure that the advice and data given to readers is reliable. We cannot, however, guarantee it and we cannot accept legal responsibility for it. A number of projects and circuits published in EPE employ voltages than can be lethal. You should not build, test, modify or renovate any item of mains-powered equipment unless you fully understand the safety aspects involved and you use an RCD adaptor. COMPONENT SUPPLIES We do not supply electronic components or kits for building the projects featured, these can be supplied by advertisers. We advise readers to check that all parts are still available before commencing any project in a back-dated issue. ADVERTISEMENTS Although the proprietors and staff of EVERYDAY PRACTICAL ELECTRONICS take reasonable precautions to protect the interests of readers by ensuring as far as practicable that advertisements are bona fide, the magazine and its publishers cannot give any undertakings in respect of statements or claims made by advertisers, whether these advertisements are printed as part of the magazine, or in inserts. The Publishers regret that under no circumstances will the magazine accept liability for non-receipt of goods ordered, or for late delivery, or for faults in manufacture. TRANSMITTERS/BUGS/TELEPHONE EQUIPMENT We advise readers that certain items of radio transmitting and telephone equipment which may be advertised in our pages cannot be legally used in the UK. Readers should check the law before buying any transmitting or telephone equipment, as a fine, confiscation of equipment and/or imprisonment can result from illegal use or ownership. The laws vary from country to country; readers should check local laws. 7 News . . . A roundup of the latest Everyday News from the world of electronics HD Babel If you think the format war between Blu-ray and HD-DVD is confusing, Barry fox suggests you should spare a thought for the companies that must make the discs RODUCTION houses must cope with a chaos of different master tape forP mats before they can even think about adding interactive menus and pressing discs. This was the clear message to spring out of two conferences held in Barcelona by market analysts Understanding and Solutions. The first tackled the broad issue of Making HDTV Business Happen, and was strongly supported by the Blu-ray camp, and Sony in particular. The second event was the official conference of the DVD Forum, which likes to pretend that Blu-ray does not exist. Stephanie Holm, Head of Operations at National Geographic warned: “We are dealing with 17 HD standard production and master formats, and they need standards conversion. The average incremental cost for HD productions is 13% more than for SD.” Michael Becker, MD of Imagion, an authoring facility in Germany, reckons that mastering for blue laser discs takes between four and six times longer than for a conventional DVD. Andy Quested, Principal HD Technologist at the BBC, reckoned there were at least 20 production standards for HD programming. “The BBC has not yet seen a standards converter, either 60-50Hz or 50-60Hz, which it can recommend.” So the BBC shoots programmes like Planet Earth at 50 interlaced pictures a second. Richard Osborn, of Abbey Road Interactive puts the number even higher: “There are between 17 and 25 different standards depending on how you count them.” Abbey Road has Emergency Collection Now available at www.thebrandcollection.com is a range of innovative beauty, home and lifestyle products for all the family. These ‘genius products’ bring you advanced technology, substantiated performance promise and design credentials at affordable prices. For example, the World’s first iPod and Mobile Charger using regular batteries. Claimed to be destined to become a style icon thanks to its smart technology and mini dimensions, this pocket-size AA battery charger is designed to charge your iPod without needing a computer. It also charges mobile phones, providing up to three hours of extra talk time so you won’t be left stranded with a dead phone battery. 8 standardized on 23.976 frames per second for film material instead of 24fps. This odd number frame rate is derived from the US NTSC standard of 59.97 to avoid harmonic interference at 60Hz. Other companies are choosing 24 fps or 25 fps or 50i. Dieter Schlautmann, Head of New Media Development at Sonopress in Germany reminded that there are three standards for coding HDTV material, MPEG-2, MPEG-4 VC-1 and MPEG-4 H.264; and a wide range of Dolby and DTS audio standards. Will Morley MD of the De Luxe authoring studios in London, says: “It takes 45 hours to do two coding passes – then manual fixing, often 500 manual fixes – that’s 20 hours extra. An international disc needs 58 hours of quality assurance checking. If the checkers find a problem and fix it their reward is 58 more hours of QA.” All this – plus the extra cost of pressing – puts up the cost of authoring blue laser discs, to levels which only major companies can afford. Their chances of getting their money back are then jeopardised by the format war between Blu-ray and HDDVD. Consumers may just wait for the war to end before buying anything. The conference provided a good example of how the Hollywood studios seem to think that if they ignore this problem it will go away. During a relentlessly upbeat panel session several Hollywood studio executives and even Chairman Jim Bottoms repeatedly referred to blue laser as a ‘new format’, not ‘formats’. Later another panel chairman, Bill Foster, remarked that some disc producers found dealing with the AACS Licensing Authority, which controls the copy protection system used by both blue laser discs, as “a pain in the neck”. Laurent Villaume, President of French replicator QOL (Quantum Optical Laboratories), agreed wholeheartedly and reminded that the studios had made the use of AACS compulsory. “Every HD disc must use it. We have no choice and we have to pay a lot of money. The licence is very expensive. We have to pay $25,000 and then we have to buy the keys for the discs.” Masato Otsuka, Senior VP and Director of Memory-Tech’s R & D Centre and DVD Verification Laboratory in Tokyo, added “On top of the $25,000 to become a licensee, we have to buy an MKB group of keys for around $400. And then we have to pay $1500 each for the Content Certificate keys needed to code a disc. That’s $1500 for each disc. And if we need to re-make a disc, even if we only make a small change in the graphics, we have to buy a new CC for another $1500. It’s too much. We need to see a reduction.” The AACS-LA website is still, after more than two years, only under construction with the key information areas News and FAQ still ‘coming soon’. AACS-LA’s appointed spokesman has been unable or unwilling to say when the site will contain the promised information. Dyna-Brite Rescue is said to be more reliable than Superheroes, this advanced multifunction support device for car and home prepares you to deal with a range of emergencies, from a flat car battery to a power cut. Jump-start your car through the cigarette lighter, charge your mobile and much more with this all-in-one car charger, mobile phone charger, emergency siren/alarm, high power flashlight and am/fm radio with speakers. Portable and lightweight, it is claimed to offer peace of mind day and night for women, men and families at home and on the road. Battery-free Crank It Flashlight – the first weatherproof battery-free emergency torch is now available in the UK. Just 30 seconds of continuous cranking provides up to an hour of superbright light. Unbeatable in a range of emergency situations and badweather conditions because it never needs batteries or bulbs replaced, it’s shockproof and, if it falls in water, don’t despair because it floats. Fran O’Connor, Innovation Director said, “These are professional-standard emergency aids for everday living, and also first-class companions for travellers and outdoor pursuit enthusiasts. They fit with The Brand Collection ethos of providing proven, welltested gadgets that work brilliantly and last a long time – offering customers real value for money.” For all enquiries on these and other products please call 0207 350 2020 or log on at www.thebrandcollection.com. A pain in the neck Everyday Practical Electronics, January 2007 HYDRA VIDEO GAME DEVELOPER F you have ever thought about becoming a video game developer, now is your chance. Parallax Inc. a privately held company located in Rocklin, CA USA, has partnered with Nurve Networks LLC and Andre’ LaMothe, best-selling game development author, to release a new Propeller powered gaming product, the Hydra Game Console! With the Hydra you can develop games, graphics and media applications. For beginner to intermediate coders, you need only basic programming experience in any Basic or C-like language. All of the hardware and software you need is included. Additionally, the Hydra hardware is covered in detail with schematics, descriptions, dozens of games, demos, and tips allowing you to take full advantage of its resources, including its expansion port and 128K game card. The Hydra kit also comes with Game Programming for the Propeller Powered Hydra, Andre’ LaMothe’s latest book. This comprehensive book covers everything you need to know about game programming for the Propeller in Spin and assembly language. All aspects of the Propeller chip are introduced, from its architecture to using the Propeller Tool for programming. The Propeller chip was released by Parallax Inc. in April of this year. The chip, designed at the transistor level, uses a new custom-silicon design for simultaneous multi-processing. The Propeller is a 32-bit I CONTINUITY TESTER Extech Instruments, a supplier of test and measurement equipment for the industrial marketplace, has announced its new CT20 Continuity Tester Pro. This extremelyaffordable test product features the unique capability for single person operation of wire and cable continuity checking and identification, eliminating the need for someone to be at both ends of the wires under test. The Continuity Tester Pro is the perfect tool for electricians, cable TV and audio systems installers, alarm technicians, HVAC installers, auto repair technicians, handymen and DIY homeowners. The CT20 is a two-part system consisting of the master Continuity Tester/Transmitter and a unique two-lead, bicolour (red/green) architecture consisting of eight processors which run at 3·3V up to 80MHz. The Propeller is programmed in both a highlevel language, called Spin T, and lowlevel (assembly) language. The Hydra Game Console is available at www.parallax.com or by calling the Parallax Sales Department in the USA on 1-888-512-1024. Please mention EPE when responding. LED Remote Probe. The master Continuity Tester/Transmitter is used for local continuity testing and remote wiring identification. Using the Remote Probe allows for single-person remote continuity testing when identifying cables, verifying polarity or labelling long distance wire/cable runs where the other ends of the wires or cables are in a completely different area out of sight and sound. The bright pulsating LED is visible even in bright daylight areas. It flashes green when wiring is properly identified and flashes red when wiring is reversed. The master Continuity Tester/Transmitter features bright flashing LEDs and a loud pulsating beeper which can be heard over high background noise. This combination of the two parts allows a single user to identify up to three wires or cables at a time for correct labelling, with only one trip to the other end of the wire or cable location. Lightweight and pocketsized, both parts of the Continuity Tester Pro feature alligator clips to enable them to hang from the cable(s) under test. The UK distributor is Burn Technology Ltd, Dept EPE, Winfrith Technology Centre, Dorchester DT2 8DH. Tel: +44 (0) 1305 852 090 Fax +44 (0) 1929 463 214 sales (czburntec.com). Web: www.extechinstru ments.co.uk. RAPID TOOLS CATALOGUE Everyday Practical Electronics, January 2007 Rapid Electronics have sent us an excellent just-over-pocket-sized booklet of the tools the company can supply. What’s in it? Well, goodness, hard to say – practically everything it seems, all covered in over 170 pages, nicely presented in colour and with prices. We can only say – get a copy! Contact Rapid Electronics Ltd., Dept EPE, Severalls Lane, Colchester, Essex C04 5JS. Tel: 01206 751166. Fax: 01206 751188. Email: [email protected],uk. Web: www.rapidonline.com. Maplin’s Offers Maplin Electronics have sent a couple brochures highlighting their special offers – masses of them, too many to categorise, even though only 12 A4 pages are involved. Contact Maplin for your copy of their latest offers info, via tel: 0870 429 6000, web: www.maplin.co.uk, or visit one of their many nationwide stores. MERG AUTUMN JOURNAL The Model Electronic Railway Group (MERG) have sent us their Autumn Journal. What a whopper! The range of activities is ever increasing, as is their membership they tell us. We know many of you already belong to MERG, but if you are into model railways and don’t belong yet, you should! For more information contact John Ferguson, Secretary MERG, 5 Butts Lane, Danbury, Essex CM3 4NP. Tel: 01245 223888. Email: [email protected]. 9 Main Features • Balanced input for microphone • Balanced and unbalanced output • Level control • 3-band equaliser • Runs from battery, plugpack or phantom power • Battery indicator • Ground lift • Rugged diecast housing Balanced Microphone Preamp This Balanced Microphone Preamp comes with a 3-band equaliser and is suitable for Karaoke, public address or many other applications. It can run from a plugpack, its own internal 9V battery or phantom power. by JOHN CLARKE 10 W hether it is for karaoke, public address or for a band, a microphone connection to an amplifier is a basic requirement. This Balanced Microphone Preamplifier includes a 3band equaliser and can be used to drive a guitar amplifier, any stereo amplifier or provide an additional channel for a public address amplifier. Balanced microphones are desirable since they prevent the injection of hum and noise into the sound system. A balanced microphone has a 3-wire cable usually connected via XLR plugs and sockets. XLR pin 1 is the return or ground and the other two terminals (pins 2 & 3) are for the signals. The signals are in anti-phase; in other words when one line goes positive, the other line swings negative by the same amount. Any hum that is picked up along the lead is effectively cancelled because the same level of hum will be present in both signal lines. In control The 3-band equaliser (bass, mid and treble controls) is handy for enhancing a musical instrument so that it sounds natural when played through the microphone or to remove sibilance (the whistle sound from a voice, particularly when pronouncing the letter ‘s’) by reducing the treble level and boosting the mid range. Or the bass control can be reduced to suppress popping noises which occur when speakers hold the microphone too close. Everyday Practical Electronics, January 2007 Everyday Practical Electronics, January 2007 11 BALANCED MICROPHONE PREAMPLIFIER Fig.1: the circuit is based on two low-cost dual op amps: IC1a & IC2. IC1a functions as a balanced to unbalanced preamplifier, while IC1b functions as a noninverting amplifier with a gain of 46. IC2a, VR2, VR3 & VR4 make up the equaliser stage, while IC2b provides an out-of-phase signal for pin 3 of CON3 This provides a gain of 46 by virtue of the 100kΩ feedback resistor between pins 1 & 2 and the 2.2kΩ resistor to the half supply rail (Vcc/2). IC1b drives the following 3-band equaliser stage via a 2.2µF capacitor. Parts List – Balanced Microphone Preamp 1 PC board, code 599, available from the EPE PCB Service, size 102 x 84mm 1 metal diecast box, 119 x 94 x 57mm 1 front panel label, 112 x 88mm 2 SPST ultra-mini rocker switches (S1-S2) 1 momentary-contact pushbutton switch (S3) 1 PC-mount 9V battery holder 1 mono 6.35mm panel-mount jack socket (CON 2) 1 3-pin male XLR panel-mount connector (CON 3) 1 3-pin female XLR panel-mount connector (CON 1) 1 2.5mm PC-mount DC socket 1 PC-mount 10kΩ 16mm log potentiometer (VR1) 3 PC-mount 100kΩ 16mm linear potentiometers (VR2-VR4) 4 knobs to suit potentiometers 4 stick-on rubber feet 4 M3 tapped x 6mm Nylon spacers 12 M3 x 6mm screws 1 M3 x 10mm screws 1 M3 nut 3 M2.5 x 6mm screws 1 3mm eyelet crimp connector 12 PC stakes 1 200mm length green hookup wire 1 200mm length pink hookup wire 1 200mm length orange hookup wire 1 200mm length blue hookup wire 1 200mm length red hookup wire 1 200mm length purple hookup wire A level control is included to prevent overload and a ‘ground lift’ switch can reduce hum in some situations. Circuit details Let’s now have a look the circuit in Fig.1. It uses two low-cost op amp ICs, four potentiometers, an XLR socket and plug, a 6.35mm jack socket, several switches and a few other lowcost parts. Op amp IC1a functions as a balanced-to-unbalanced preamplifier with a modest gain. The balanced microphone signal is fed to pins 5 & 6 of IC1a via 22µF capacitors and 1kΩ resistors. Gain for the inverting input is set at 13.3 by the 3.3kΩ feedback 12 Semiconductors 2 TL072 dual op amps (IC1, IC2) 1 1N5819 Schottky diode (D1) 3 1N4004 diodes (D2-D4) 1 12V 1W Zener diode (ZD1) 1 5.6V 1W Zener diode (ZD2) 1 5mm red LED (LED1) 1 7812 +12V voltage regulator (REG1) EQ controls Capacitors 3 100µF 16V PC electrolytic 1 100µF 16V PC electrolytic (optional) 2 22µF 16V PC electrolytic 3 10µF 16V PC electrolytic 2 10µF 16V non-polarised (NP or BP) electrolytic 2 2.2µF 16V PC electrolytic 1 470nF MKT polyester 1 220nF MKT polyester 1 15nF MKT polyester 1 12nF MKT polyester 1 2.7nF MKT polyester 1 1.5nF MKT polyester 2 1nF MKT polyester 1 330pF ceramic 1 220pF ceramic 1 100pF ceramic 1 22pF ceramic Resistors (0.25W 1%) 2 100kΩ 2 3.3kΩ 2 18kΩ 1 2.2kΩ 2 12kΩ 5 1kΩ 6 10kΩ 1 220Ω 1 10kΩ (optional) 3 150Ω 2 1kΩ (optional) resistor from pin 7 to pin 6. Frequencies above 48kHz are rolled off by the 1nF capacitor across the 3.3kΩ feedback resistor. For the non-inverting input (pin 5), the input signal is attenuated by a factor of 0.77 due to the 3.3kΩ resistor connecting to Vcc/2. Overall gain for this signal path is therefore 0.77 × 4.3 or +3.3. Thus, the signal gain for both signal paths is the same. The 330pF capacitor between pin 2 and pin 3 of the XLR socket shunts high frequencies so that the Preamplifier does not detect radio frequencies. The output of IC1a is fed to the Level potentiometer, VR1, via a 2.2µF capacitor and then to pin 3 of op amp IC1b. The equaliser stage is based on op amp IC2a and potentiometers VR2, VR3 and VR4. These potentiometers and their associated resistors and capacitors are in the feedback path between pins 6 & 7. Each of the Bass (VR2), Midrange (VR3) and Treble (VR4) feedback networks are effectively in parallel and act more or less independently (ie, with modest interaction). When the tone pots are all centred, the gain over their respective frequency ranges is unity (–1) and therefore the overall frequency response is flat. Let’s now look at the Bass control in more detail. When we wind the wiper of VR2 fully clockwise towards the output of IC1b, the input resistance for IC2a now decreases to 18kΩ while the feedback resistance increases to 118kΩ. At the same time, the 15nF capacitor is completely in the feedback circuit across the 118kΩ resistance. Without this capacitance the gain would be –118kΩ/18kΩ or –6.5 (ie, +16dB boost). The addition of the capacitor forces the circuit to give this gain below 100Hz and this reduces towards –1 as the frequency increases. Conversely, when the pot’s wiper is wound towards IC2a (anti-clockwise), the gain without the capacitor is 18kΩ/118kΩ or –0.15 (ie, –16dB cut). The 15nF capacitor is now on the input side so the gain rapidly increases to –1 at frequencies above 100Hz. Maximum bass cut is below 100Hz. The Midrange section with VR3 works in a similar manner except that there is now a 12nF capacitor in series with the input. This combines with the 2.7nF capacitor across VR3 to give a bandpass filter. Finally, the Treble control (VR4) operates with only a 1.5nF capacitor in series with the wiper. As a result, this control produces a high frequency boost or cut at 10kHz. Response curves for the tone controls are shown in Fig.2. The 220pF capacitor across IC2a’s feedback path provides high frequency rolloff to prevent instability. Similarly, Everyday Practical Electronics, January 2007 the 1kΩ resistor at the inverting input acts as a stopper for RF signals to prevent radio pickup. IC2a’s output at pin 7 drives the unbalanced output at CON2 via a 10µF capacitor and 150Ω resistor. IC2a’s output also drives pin 2 of the XLR output socket CON3, again via a 10µF capacitor and 150Ω resistor. Also, IC2a’s output drives inverting amplifier IC2b. This has a gain of 11 to derive the out-of-phase signal for pin 3 of CON3. The remaining pin on the XLR plug is the ground pin (pin 1). This is either directly connected to ground via switch S2 or AC-coupled to ground via a 470nF capacitor. Opening the ground lift switch (S2) prevents a hum loop if the input is separately earthed. This is not likely to occur with a microphone but there may be separate grounds connected when the unit is used to convert a balanced line to an unbalanced output. Power supply Power for the circuit can come from a DC plugpack, internal 9V battery or via phantom power. Diode D4 provides reverse polarity protection for external DC power sources such as a plugpack. The DC supply rail is then filtered and applied to 3-terminal regulator REG1 to provide the +12V rail which is then fed to IC1 and IC2 via diode D2. The internal battery supply is fed to the op amps via Schottky diode D1. A Schottky diode has a lower voltage drop than a standard diode and this extends the battery life. Note that the negative return of the battery goes via the DC power socket. Hence, the battery is disconnected whenever a plug is inserted into the DC power socket (CON 4). Phantom power is delivered via pins 2 & 3 of the XLR plug and applied via two 1kΩ resistors to diode D3. Zener diode ZD1 regulates the voltage to 12V before it is applied to the rest of the circuit. This phantom power is usually produced from a source of either 48V with a 3.4kΩ impedance or from 24V with a 600Ω impedance. We can draw up to 7.5mA from each supply or 15mA in total at 12V. Diodes D1, D2 & D3 isolate each supply so that only one source can deliver power to the circuit. Essentially, where more than one supply is connected, it is the highest voltage source that powers the unit. Fig.2: this graph shows the responses generated by the bass, mid-range and treble controls. The maximum bass boost is 12dB at 100Hz, while maximum mid-range boost is about 9dB at 850Hz. The treble boost is limited to about 7dB at 11kHz The half-supply rail (Vcc/2) is obtained using two 10kΩ resistors connected in series across the power supply. The half supply point is decoupled using a 100µF capacitor to filter out any supply ripple. Switch S3, LED1, ZD2 and the series 220Ω resistor form a simple battery test indicator. If the voltage is 9V, the voltage across the 220Ω resistor will be 9V 15.1V 11.8V (the LED voltage drop) or 2.1V. As a result, a current of 9.5mA will flow through LED1 when S3 is closed. This will cause the LED to glow brightly. Everyday Practical Electronics, January 2007 As the battery voltage goes down, the current through the LED drops accordingly and so its brightness also decreases. For example, a battery voltage of 7.5V will only leave about 0.6V across the 220Ω resistor and so just 2.7mA will flow through the LED which will then be quite dim. Building it Most of the parts for the Balanced Microphone Preamplifier are mounted on a PC board coded 599 measuring 102 × 89mm. This is housed in a metal diecast box measuring 119 × Specification Sensitivity ................................................................. 6.8mV input for 1V output Signal Handling . .............................................. 2.3V RMS with equaliser set to flat response and 12V supply; 1.8V RMS at 9V supply Input Impedance ......................................................................................... 1kΩ Frequency Response . .............................................. –3dB at 30Hz and 19kHz Equaliser Response ........................................ +11dB and –11dB boost or cut at 100Hz; +9.6 and –10dB boost or cut at 1kHz; +7.4 and –8.4dB at 10kHz Signal-To-Noise Ratio ......................................... –80dB with respect to 1V out and 20Hz to 20kHz bandwidth; 185dB A-weighted Phase Difference at Balanced Outputs . ............ 180° at 1kHz; 160° at 20kHz Battery Current ............................................................................. 8.8mA at 9V 13 The diodes can be installed next, making sure that D1 is the 1N5819. Be careful not to mix up the two Zener diodes. ZD2 is the 5.1V Zener and may be marked 1N4732 or C5V1. ZD1 is the 12V device and will be labelled 1N4742 or C12V. Next, install the two ICs and the capacitors. Non-polarised capacitors can be installed either way around but standard electrolytics with negative lead markings must be placed in the PC board with the correct polarity. The DC socket and REG1 can now be installed, followed by the PC stakes. The four pots can then be mounted on the PC board. LED1 should be installed about 20mm above the PC board. It is later bent over to mount in a hole in the side of the case. Finally, complete the PC board by installing the 9V-battery holder using three M2.5 screws. Make sure the leads are soldered to the PC board. Drilling the box Returning to the box. The first job is to drill out the four corner mounting holes in the bottom of the case to 3mm. That done, attach the four 6mm tapped spacers to the underside of the PC board using M3 × 6mm screws. Note that the 6mm spacers must be nylon or insulated types to prevent the tracks on the PC board from shorting to the case. Next, mark out the positions for the pot shafts. The shaft centres are about 22mm above the outside base of the box. Drill the holes for the pot shafts, then use a rat-tail file to elongate the holes vertically. This will make it easier to insert the pots through the holes when the final assembly is inserted into the box. Fig.3: install the parts on the PC board as shown here. The components marked with an asterisk are optional and are installed only if you are using a phantom powered microphone or an externally powered microphone temporarily attached for testing the PC board fit. Position the PC board within the box and mark out the four corner mounting holes. Remove the PCB and put the box to one side. Install the three wire links first, then the resistors. Note that the resistors marked with an asterisk are only used if the microphone needs an external supply. Table 1 shows the resistor colour codes used in the circuit. It is wise to check each value with a digital multimeter, as the colours can be hard to recognise. 94 × 57mm. The diecast case serves to provide shielding for the audio circuitry and makes the unit extremely rugged – a necessary requirement for stage work. Fig.3 shows the PC board assembly details. Begin by checking the PC board for any shorts or breaks in the copper tracks. Check also that the PC board fits neatly into the case. If it doesn’t, file the corners and edges of the board so that it fits when seated on 6mm standoffs. These can be Table 1: Resistor Colour Codes 14 o o o o o o o o o o o No. 2 2 2 4 3 (optional) 2 1 7 1 3 Value 100kΩ 18kΩ 12kΩ 10kΩ 10kΩ 3.3kΩ 2.2kΩ 1kΩ 220Ω 150Ω 4-Band Code (1%) brown black yellow brown brown grey orange brown brown red orange brown brown black orange brown brown black orange brown orange orange red brown red red red brown brown black red brown red red brown brown brown green brown brown 5-Band Code (1%) brown black black orange brown brown grey black red brown brown red black red brown brown black black red brown brown black black red brown orange orange black brown brown red red black brown brown brown black black brown brown red red black black brown brown green black black brown Everyday Practical Electronics, January 2007 Table 2: Capacitor Codes Value μF Code EIA Code IEC Code 470nF 0.47µF 474 470n 220n 220nF 0.22µF 224 15nF 0.015µF 153 15n 12nF 0.012µF 123 12n 2n7 2.7nF 0.0027µF 272 1n5 1.5nF 0.0015µF 152 1n 1nF 0.001µF 102 330pF – 331 330p 220pF – 221 220p 100pF – 101 100p 22pF – 22 22p Now mark out and drill the mounting holes for the 6.35mm jack socket, the XLR connectors, the switches and the LED and DC socket. Use the photographs as a guide to the positioning of these holes. The switch cutout and XLR holes can be made by first drilling a series of holes around the outside perimeter, then knocking out the centrepiece and carefully filing to shape. The switches must be a snug fit so that they will be held correctly in position with the integral plastic retaining lugs. The XLR connectors are secured with M3 × 6mm screws that are tapped directly into the case. We used an M3 tap to make the thread and first drilled the hole out to 3/32” (2.4mm). If you use nuts instead of tapping the hole you will find it dif- The PC board is secured to the bottom of the case using machine screws, nuts and spacers. All external wiring to the board is terminated using PC stakes. Note the earth wire between the case and pin 1 and shield terminals of CON3 ficult to attach the lower nut unless it is glued in position first. Finally, drill a 3mm hole for the case earthing connection. Now fit the PC board and secure it with M3 × 6mm screws. That done, mount the remaining hardware and complete the wiring as shown in Fig.4. The wiring to the the XLR connectors and switches is easier to install if they are not attached to the box but remember to pass the leads through the holes in the case before soldering to the terminals. The connectors and Above: this view shows the location of the battery test switch (S3), the power socket (CON4) and the battery test indicator LED on the rear panel. Note that S3 should be a pushbutton switch, not a rocker type as shown here Right: this end of the case carries (from left to right) the 3pin male XLR socket (CON3), a 6.5mm jack socket (CON2), the Ground Lift switch (S2) and the Power switch (S1). The 3-pin female XLR socket mounts on the other end of the case Everyday Practical Electronics, January 2007 15 Fig.4: follow this wiring diagram to connect the external switches and sockets to the stakes on the PC board. Note that CON1 (balanced input) is a 3-pin female XLR socket, while CON3 (balanced output) is a 3-pin male XLR socket. The jack socket (CON2) provides the unbalanced signal output 599 switches can then be mounted in place after wiring. The LED is inserted into its hole in the side of the box by bending its leads over and pushing it into position. Make up a labelled paper or card panel (see heading photo) and glue it onto the lid and install the knobs to complete the final assembly. Testing Fig.5: this is the full-size (102 × 84mm) etching pattern for the PC board 16 Apply power using a 9V battery and check that the battery test LED lights when the test switch is closed. Note that this LED will not operate if you are using a plugpack or phantom power. Test for 9V (when a fresh battery is powering the unit) or 12V when a plugpack is supplying power between pins 4 & 8 of IC1 & IC2. Further testing can be done with a microphone and amplifier. Check the operation of the level control and the equaliser controls. The ground lift should only be used when there is a hum present in the signal. EPE Reproduced by arrangement with SILICON CHIP magazine 2006. www.siliconchip.com.au Everyday Practical Electronics, January 2007 T E C H N O - T A L K M A R K N E LS O N Lucky Strike? Exploiting lightning for practical research CCORDING to the song, ‘Thunderbolt and lightning’ are ‘very, very frightening’, although this didn’t worry visionary scientists like Franklin and Tesla. Nowadays most people have given up on the idea of stealing god’s thunder but are exploiting lightning strikes for highly practical research projects. Most films begin with an ‘establishing shot’ to put things in context, so I’ll ask you to bring to mind the illustrations you probably saw years ago of the American scientist Benjamin Franklin. For it was he who in June 1752 performed a famous experiment in which he successfully created electrical sparks from a key attached to the conducting string of a kite that was insulated from ground by a silk ribbon. A O’ lucky man Franklin was a twice-fortunate man, lucky once because he didn’t kill himself in an experiment we know to be highly dangerous (he was unaware). He was fortunate also in that his name became inextricably associated with this stunt, since the same experiment had been performed a month earlier in France at the behest of the naturalist Thomas-François Dalibard. Franklin was, of course, unaware of Dalibard’s work and developed his researches to a greater degree of perfection. The lightning conductor for protecting structures was his idea alone. Franklin set out and documented his findings in great detail, which is more than can be said of the ‘maverick genius’ Nikola Tesla, born in Serbia but a US resident for most of his life. Tesla’s works, which are still surrounded in mystery to some extent, took off in the 1880s after he was seized by the notion of transmitting electrical power on an industrial scale without using wires. His idea was to harness the immense power of lightning and distribute artificially-made lightning to consumers through the air. Doubtful sanity It’s at this time that a saying of Robert Frost comes to mind, namely that ‘A civilized society is one which tolerates eccentricity to the point of doubtful sanity’. In 1899 Tesla’s laboratory created a high-frequency AC generator more than 16 metres in diameter that generated 300,000 watts of power and produced artificial lightning bolts 40 metres long. So far, so good, but after this he aimed to supply homes with what he called ‘cosmic energy’, electrical forces from the Earth’s upper atmosphere that could be collected by spherical antennas on each roof. His experiments along these lines ceased in 1905, after which he transferred his attention to creating a ‘peace ray’ that would put an end to war by using ‘macroscopic particle beams’ that he termed ‘teleforce’. Practical purposes Harvesting the heavens has not been accomplished yet, although atmospheric electricity has thwarted many other projects. The wire antenna that the offshore radio station Laser 558 tried in 1984 was a case in point. The intention was for a helium balloon to hold the antenna vertical but this failed continually as a result of atmospheric electricity. Eventually the station opted for a conventional T-antenna slung between a pair of 100-foot masts. According to ‘The Weather Channel’, we know far more about what doesn’t work than what does when it comes to harnessing lightning. Their severe weather expert Dr Greg Forbes admits scientists have yet to determine what would be a practical method. ‘It is tough to get a single geographical spot that would be hit often enough to really generate electricity,’ he says, ‘and each bolt is so short in duration, you’d need an awful lot of them to get a useful amount of energy. It’s a neat experiment, but not realistic.’ Scientists are still studying lightning nevertheless. American space agency NASA believes that researching lightning will give it a better idea of how the atmosphere works as a whole. By characterizing the electrical behaviour of storms, NASA may advance the pursuit of more accurate forecasts, which has positive ramifications for emergency planning and preparedness. New Scientist magazine reported recently that scientists in the USA believe it may be possible to predict the volume of water stored in a storm cloud simply by recording the amount of lightning it produces. Studies involving satellites indicate that it’s the amount of ice inside a cloud that determines the number of lightning bolts produced. The next task is to correlate this figure with the volume of rainfall likely to follow. Unlucky strike There’s an old saying that lightning never strikes twice in the same spot. Were this the case, insurers would pay out far less money in compensation but the truth is that lightning strikes the easiest path to ground – whether it has been struck before or not. The Association of British Insurers has been looking at the frequency and severity of lightning in relation to climate change and has concluded that the overall number of lightning strikes per year will remain the same. Reassuring as this may or may not be, there are many organisations that need to know about the lightning of today – broadcasters, railway operators and electricity supply companies. This is why the EA Technology research centre at Everyday Practical Electronics, January 2007 Capenhurst, Cheshire, operates a dedicated lightning location system that enables subscribers to see the locality of lightning anywhere across the United Kingdom and the north-western coast of continental Europe on their PC screens. By logging particular trouble spots for lightning damage over a period of time users can refine the effectiveness of their protection systems, leading to better investment policy decisions in future. The mechanisms for providing this information are elegant in the extreme, not just for the advanced technology used but also in the ingenious way that the process alerts users only to harmful lightning. It achieves the latter by locating only cloud-to-ground strikes; its primary purpose is assessing, locating and predicting damage likely to have occurred. These cloud-to-ground strikes make up a third of all lightning strikes (the remaining two thirds occur within or between clouds). Natural waveguide Lightning strikes are detected by radio direction finding techniques at the extra low frequency (ELF) of 1.1kHz, at which frequency the earth’s surface and the ionosphere act together to create a ‘natural waveguide’ that propagates ground waves alone. Because there is no interfering sky wave at these operating frequencies, the bearings produced are more accurate than in conventional systems and the mainly horizontally polarised radiation from inter and intra-cloud strikes is not registered at all, unless it is very close to a direction finding station (within 30km). At ground stations across the country the analogue signals from the direction finding aerials are amplified, filtered and converted into a bearing and strength value. The data is then sent as a digital signal along permanent landlines to Capenhurst, where the strike is logged and its position triangulated. With data from several base stations to compare, spurious signals caused by local interference can be rejected and genuine thunderbolts triangulated anywhere in mainland Britain; often with an accuracy of less than one kilometre. Lightning fast! Each incident is plotted, and stored along with its time and other data, on the computer mapping system. Subscribers can watch the passage of an approaching storm live on their PCs. Each new strike appears on screen within seconds of occurrence. Indeed, it is possible to see a flash in the sky and watch the data arrive on the screen lightning fast, before hearing the clap of thunder! 17 Claw y our our FR way through catalog EE 410+ pag e ue from Austra Log on lia. to our www.ja websit ycarele e ctronic s.co.uk All pric /catalo es in £ gue Stg. Radar Speed Gun KC-5429 £29.00 + post & packing This Doppler radar gun reads speed in km/h or mph up to 250 km/h or 155 mph. It has a resolution of 1 km/h or 1 mph with an accuracy of 1%, and also has a hold switch so you can freeze the reading. There's a jiffy box to mount the electronics in, and the enclosure for the radar gun assembly is made from 2 x coffee tins or similar. Details included. Kit includes PCB and all specified components with clear English instructions. • Requires 12VDC power. Note: Products are dispatched from Australia, so local customs duty and taxes may apply. DC Relay Switch Magnetic Cartridge Pre-amp KC-5434 £4.50 + post & packing An extremely useful and versatile kit that enables you to use a tiny trigger current - as low as 400µA at 12V to switch up to 30A at 50VDC. It has an isolated input, and is suitable for a variety of triggering options. The kit includes PCB with overlay and all electronic components with clear English instructions. KC-5433 £11.75 + post & packing This kit is used to amplify the 3-4mV signals from a phono cartridge to line level, so you can use your turntable with the CD or tuner inputs on your Hi-Fi amplifier - most modern amps don't include a phono input any more. Dust off the old LP collection or use it to record your LPs on to CD. The design is suitable for 12" LPs, and also allows for RIAA equalisation of all the really old 78s. Please note that the input sensitivity of this design means it's only suitable for moving-magnet, not moving-coil cartridges. Kit includes PCB with overlay and all electronic components. • Requires 12VAC power Theremin Synthesiser MKII Galactic Voice Kit KC-5431 £13.25 + post & packing Be the envy of everyone at the next Interplanetary Conference for Evil Beings with this galactic voice simulator kit. Effect and depth controls allow you to vary the effect to simulate everything from the metallically-challenged C-3PO, to the hysterical ranting of Daleks hell-bent on exterminating anything not nailed down. The kit includes PCB with overlay, enclosure, speaker and all components. For those who really need to get out of the house a lot more. Take me to your leader. • Requires 9V battery KC-5426 £43.50 + post & packing By moving your hand between the metal antennae, create unusual sound effects! The Theremin MkII improves on its predecessor by allowing adjustments to the tonal quality by providing a better waveform. With a multitude of controls, this instrument's musical potential is only limited by the skill and imagination of its player. Kit includes stand, PCB with overlay, machined case with silkscreen printed lid, loudspeaker, pitch antennae, all specified electronic components and clear English instructions. Improved Model! Requires 9-12VDC wall adaptor (Maplin #UG01B £13.99) n the sed i As u ach Boys od Be hit ‘Go ’ ic class ibrations V Battery Zapper MKII Speedo Corrector MkII KC-5435 £14.50 + post & packing When you modify your gearbox, diff ratio or change to a large circumference tyre, it may result in an inaccurate speedometer. This kit alters the speedometer signal up or down from 0% to 99% of the original signal. With this improved model, the input set-up selection can be automatically selected and it also features an LED indicator to show when the input signal is being received. Kit supplied with PCB with overlay and all electronic components with clear English instructions. Improv e Model! d POST AND PACKING CHARGES: Cost Order Value Cost Order Value £200 - £499.99 £30 £20 - £49.99 £5 £40 £50 - £99.99 £10 £500+ £100 - £199.99 £20 Max weight 12lb (5kg). Heavier parcels POA. Minimum order £20. KC-5427 £29.00 + post & packing This kit attacks a common cause of failure in wet lead acid cell batteries: sulphation. The circuit produces short bursts of high level energy to reverse the damaging sulphation effect. This new improved unit features a battery health checker with LED indicator, new circuit protection against badly sulphated batteries, test points for a DMM and connection for a battery charger. Kit includes case with screen printed lid, PCB with overlay, all electronic components and clear English instructions. Suitable for 6, 12 and 24V batteries • Powered by the battery itself Improved Model! IR Romote Control Extender MKII KC-5432 £7.25 + post & packing Operate your DVD player or digital decoder using its remote control from another room. It picks up the signal from the remote control and sends it via a 2-wire cable to an infrared LED located close to the device. This improved model features fast data transfer, capable of transmitting Foxtel digital remote control signals using the Pace 400 series decoder. Kit supplied with case, screen printed front panel, PCB with overlay and all electronic components. Requires 9VDC wall adaptor (Maplin #GS74R Improv ed £10.99) Mo del! High Range Adjustable Temperature Switch for Cars KC-5376 £22.75 + post & packing This temperature switch can be set anywhere up to 1200°C, so it is extremely versatile. The relay can be used to trigger an extra thermo fan on an intercooler, a sensor near your turbo manifold to trigger water spray cooling, or a simple buzzer to indicate high temperature. The LCD displays the temperature constantly and can easily be dash mounted. Kit included PCB with overlay and all electronic components with clear English instructions. Jayca r Ele Celebr ctronics ates it s th 25 Y ear! Everyday Practical Electronics Feature Kits EPE had been publishing a series of popular kits by the acclaimed Silicon Chip Magazine Australia. These projects are brilliantly designed, ‘bullet proof’ and already tested down under. All Jaycar kits are supplied with specified board components, quality fibreglass tinned PCBs and have clear English instructions. Studio 350 High Power Amplifier Kit Delta Throttle Timer KC-5372 £55.95 + post & packing It delivers a whopping 350WRMS into 4 ohms, or 200WRMS into 8 ohms. Using eight 250V 200W plastic power transistors, It is super quiet, with a signal to noise ratio of -125dB(A) at full 8 ohm power. Harmonic distortion is just 0.002%, and frequency response is almost flat (less than -1dB) between 15Hz and 60kHz. Kit supplied in short form with PCB and electronic components. Kit requires heatsink and +/- 70V power supply (a suitable supply is described in the instructions). • As published in Everyday Practical Electronics October & November 2006 KC-5373 £7.95 + post & packing It will trigger a relay when the throttle is depressed or lifted quickly. There is a long list of uses for this kit, such as automatic transmission switching of economy to power modes, triggering electronic blow-off valves on quick throttle lifts and much more. It is completely adjustable, and uses the output of a standard throttle position sensor. Kit supplied with PCB and all electronic components. • As published in Everyday Practical Electronics November 2006 Recommended box UB3 HB-6013 £1.05 50MHz Frequency Meter Kit 2 Amp DC-DC Converter Kit Smart Card Reader and Programmer Kit KC-5369 £22.50 + post & packing This meter is autoranging and displays the frequency in either hertz, kilohertz or megahertz. Features compact size (130 x 67 x 44mm), 8 digit LCD, high and low resolution modes, 0.1Hz resolution up to 150Hz, 1Hz resolution maximum up to 150Hz and 10Hz resolution above 16MHz. Kit includes PCB, case with machined and silkscreened lid, pre-programmed PIC and all electronic components with clear English instructions. • As published in Everyday Practical Electronics September 2006 KC-5358 £13.75 + post & packing This kit will step-up 12V to between 13.8 and 24VDC. Use it to charge 12V sealed lead acid batteries (6.5Ah or larger), run your laptop and many other devices from a 12V supply. It uses an efficient switchmode design, features fuse and reverse polarity protection, and an LED power indicator. Kit includes PCB, all electronic components, and silkscreened front panel. • As published in Everyday Practical Electronics August 2006 KC-5361 £15.95 + post & packing Program both the microcontroller and EEPROM in the popular gold, silver and emerald wafer cards. Card used needs to conform to ISO-7816 standards, which includes ones sold by Jaycar. Powered by 9-12 VDC wall adaptor or a 9V battery. Instructions outline software requirements that are freely available on the internet. Kit supplied with PCB, wafer card socket and all electronic components. PCB measures: 141 x 101mm. • As published in Everyday Practical Electronics May 2006 Requires 9VDC wall adaptor (Maplin #GS74R £10.99). Requires 9-12VDC wall adaptor (Maplin #UG01B £13.99) Tiptronic Style Gear Indicator KC-5344 £20.30 + post & packing This display indicates up to 9 gears, neutral and reverse. The unit is calibrated in setup, so it will work with almost any vehicle. Using a PIC microcontroller, it calculates the gear via the engine RPM and speed. Gear indication is displayed on a 7 segment LED and it features an automatic dimmer for night driving. Supplied with case, pre-punched silkscreened front panel, PCB and all electronic components with clear English instructions. Hall effect sensor included! • As published in Everyday Practical Electronics January 2006 AC/DC Current Clamp Meter Kit for DMMs KC-5368 £8.75 + post & packing A great low cost alternative. It uses a simple hall effect sensor, an iron ring core and connects to your digital multimeter. It will measure AC and DC current and has a calibration dial to allow for any magnetising of the core. Kit supplied with PCB, clamp, case with silkscreened front panel and all electronic components. • As published in Everyday Practical Electronics January 2006 Jaycar cannot accept responsibility for the operation of this device, its related software, or its potential to be used in relation to illegal copying of smart cards in cable TV set top boxes. Audio Video Booster Kit KC-5350 £31.95 + post & packing This kit will boost your video and audio signals preserving them for the highest quality transmission to your projector or large screen TV. It boosts composite, S-Video, and stereo audio signals. Kit includes case with silkscreened and punched panels, PCB and all electronic components. • As published in Everyday Practical Electronics March 2006 Requires 9VAC wall adaptor (Maplin #GU09K £9.99). Log on to www.jaycarelectronics.co.uk/catalogue for your FREE catalogue! 0800 032 7241 410+ page Catalogue (Monday - Friday 09.00 to 17.30 GMT + 10 hours only). For those who want to write: 100 Silverwater Rd All Silverwater NSW 2128 Sydney AUSTRALIA prices in £ PIC N’ MIX KEITH ANDERSON Our periodic column for your PIC programming enlightenment Implementing a software PLL for serious users of PICs – Part One IC microprocessors can implement a phase-locked loop (PLL) that will lock to 50Hz or 60Hz AC power line frequencies. One practical program uses the analogue-to-digital converter (ADC) of the PIC to implement a linear phase locked-loop as described in text books, such as Chapters 2 and 5 of Phase Locked Loops by Roland E. Best. Although using a PLL might seem like using a sledge hammer to crack a walnut, this approach has many benefits. For example, all of the hard work is done almost for free within the PIC and the external hardware can be very simple, as shown in Fig.1. Further, it is not necessary for the PIC to see any high speed signals from the AC power source, and interference is easy to filter. P Input considerations The input is obviously the easy part. The AC voltage is assumed to be provided by a transformer and to be referenced to ground. In particular, it must not be decoupled by a series capacitor. The resistors, R1 and R2, set the DC voltage to about 2.5V, which is the middle of the range for the ADC in the PIC. This DC voltage is removed by the PLL algorithm. It need not and must not be blocked by a filter capacitor, and it need not be precise. It is useful to remember the following properties of the simple low pass RC filter. If the characteristic frequency is well above the frequency of interest, there will be little attenuation and little phase shift. If the characteristic frequency is well below the frequency of interest, the attenuation will be very close to 20dB per decade and the phase shift will be very close to 90 degrees. Within these limits, the attenuation and phase shift must be calculated from slightly more complicated equations and it is often easier to use a simulator or to build the circuit and test it. For this application, capacitor C1 is large, to place the characteristic frequency of the filter well below the power frequency and provide attenuation of about 30dB. The resistor values used in this application bend the rules for using the ADC of the PIC a little. Ideally, the resistance should be less than 10kΩ. This is essential for applications that measure absolute voltages. However, the PLL algorithm depends upon the differences between voltages, not their absolute values, and a little departure from the 10kΩ limit is unimportant. Without R3, C1 is able to squirt current into Vcc through the input protection circuit of the PIC. This could cause problems at 20 power on or power off and does cause problems if a simple programmer is used to program the PIC in circuit. Resistor R3 needs to be large to limit this current. As the circuit turns on, the voltage cannot be guaranteed to be above zero. For C1, a solid tantalum Fig.1. Example connections for using a PIC as a PLL capacitor would probably survive but a vided a recipe that leads to a surprisingly polyester capacitor is more reliable. simple program that works remarkably well. Input protection Further, the latest generation of PICs For most applications, the PIC provides provide the building blocks needed more or adequate internal input protection and external protection diodes are unnecessary. less for free. The strategy to be described The input is 24V AC, not 240V AC, the will not work in first generation devices series impedance is large to limit current, like the 16F84, but is easy to implement in and the filter capacitor is also large to supdevices as old as 16F876 and newer, more press high speed transients. If external economical, devices like 16F88 and diodes are needed then they should be 12F638. It is useful to notice that the more included as indicated by D1 and D2. modern 12F638 is quite a lot more ecoThe low leakage of economical diodes, nomical than the older 12F675, so it is such as the 1N4148, is probably more unimportant that the strategy won’t work in important than the low forward voltage a 12F675. and high speed of expensive Schottky The source code is available via the EPE diodes, such as BAT48 or, for surface downloads site (www.epemag.co.uk). To mount applications, BAT54. Most tests access the program, download the zipped were performed with no diodes, but the file and unzip it into a suitable folder. The circuit was also tested with BAT48 diodes source is in PllDemo.asm, and the hex is in to confirm that these do not cause unexPllDemo.hex. The source file accesses sevpected problems. eral Include files that define useful macros. The values chosen work well for an These are also provided in the zipped file. input of nominally 24V AC. For smaller The program was assembled and linked voltages greater than about 10V AC, the using MPASM from Microchip. It is resistor values and/or capacitor value can important to use a version modern be changed to produce less attenuation, and enough to recognize the 12F683. the circuit will continue to work well. For It is useful to describe the general stratevoltages under 10V AC, the phase shift gy first and then to address the details. might or might not become an issue, Locking depending upon the application. For voltA PLL is made from three building ages above 24V AC, the capacitor becomes blocks: a phase detector, a loop filter, and a large and expensive and it is probably betcontrolled oscillator. Each building block ter to use resistors to provide some of the can be made several different ways and a attenuation. thorough classification of PLLs resembles For demonstration, the circuit should be a catalogue of the insects in a tropical rain assembled on a prototype board. The layforest! out is not critical. This program implements what is generThe program ally described as a linear PLL, even though Phase-locked loops are not easy, so why it is not at all linear. bother? Although simpler approaches seem Some PLLs can lock in one cycle, but simple, they lead to surprisingly complicatare sensitive to noise and expect the input ed programs that provide disappointing to be a relatively clean digital signal. The performance. The reason that the PLL is so linear PLL can tolerate rather noisy anafamous is that clever mathematicians have logue input signals but needs several cycles done most of the hard work and have proto lock. Everyday Practical Electronics, January 2007 To implement a linear PLL within a microprocessor, the input is sampled regularly and converted to appropriate numbers by an ADC. The input must be sampled at least four times each cycle, not just two times as might be expected for simple digital processing of analogue signals. This program samples the input 16 times each cycle. The phase detector and the loop filter are implemented as appropriate computations within the microprocessor. A timer implements the controlled oscillator. Within the PIC, the phase detector is so simple that it merges with the ADC. The input is sampled 16 times each cycle; for half of the samples it is added to the input of the loop filter; and for the other half, it is subtracted. Mathematically, this multiplies the input by a square wave and the result is a number that is zero when the loop is locked, positive if the loop needs to run a bit faster and negative if it needs to run a bit slower. Filtering The loop filter is also simple. The equation to implement it is: NextVCOIn = (PreviousVCOIn + B × LatestPhaseDetectorOut) + (C × PreviousPhaseDetectorOut) Although this appears to need multiplications, B and C are both constants and can be chosen to be multiples of 2 or 3 so that they can be implemented as one or two shifts and adds. The VCO (voltage controlled oscillator) is a timer. Timer 1, TMR1 is a 16-bit timer and PLLs need precision, so this is the obvious choice. Further, TMR1 interacts with the Capture Compare PWM module, CCPR to trigger the ADC, so it will gather its samples very precisely, even though the PIC might be busy. The mathematical analysis is not easy, so Excel was used to simulate the strategy. From this, the optimum value for C is −0.75B. This need not be precise. As C moves towards −0.5B, the loop takes a little longer to lock and is a little more sensitive to disturbances. Beyond C = −0.5B the loop is unacceptably sluggish. For values beyond C = −0.3B, it finds the right frequency, but won’t correct a phase offset. The specific offset depends upon how the loop feels on the day, and is unpredictable. As C moves towards −0.8B, the loop works a little better, but beyond a critical limit near C = −0.85B it abruptly turns into an oscillator and stops working. The value for B depends upon the frequency at which the PIC runs and upon the magnitude of the input voltage. Neither is critical. For a 10MHz oscillator and the input adjusted to about 4V max and 1V min, the optimum value for B is about 32. As B approaches 16, the loop becomes sluggish. The behaviour is not linear. It works quite well with B = 18, but very poorly with B = 14. As B approaches 64, the loop mostly appears to work a little better, but also becomes more sensitive to disturbances. Beyond B = 64, the loop becomes increasingly more like an oscillator. The constants B and C must be of opposite signs, but B can be positive or negative. Changing the sign just changes the phase at which the loop locks by 180 degrees. The values NextVCOIn and PreviousVCOIn are just the relevant contents of the two-byte register formed from CCPRH and CCPRL. Strategy The strategy includes three significant departures from the strategy Best describes. To implement Best’s strategy exactly, three timers might be needed: one to sample the ADC, one to implement the voltage-controlled oscillator (VCO), and a third to implement application specific times. It is possible to use TMR1 for all of these, but this is not obvious. The change from a constant sample rate to one that is related to the VCO frequency is not trivial, and it is possible that there might have been no values of B and C that would produce a stable loop. Further, the corresponding mathematical analysis is not easy. Fortunately, suitable values do exist and it was possible to use Excel to discover them. The VCO is usually updated after each ADC sample. Unless the loop filter has a very long time constant, this causes substantial ripple at the VCO input, and corresponding variation of the VCO period. For this application, the samples are collected in a separate variable and the VCO is updated only at the end of each cycle. This also might have made the loop unstable. It didn’t. A subtle side effect of driving the ADC from the VCO is that the loop locks with the peak and zero crossing between samples, not at samples. For some applications, this might be a benefit, rather than a liability, but locking at the samples looks less peculiar. To achieve this, the phase detector strategy is: ignore one sample, add seven samples, ignore one sample, subtract seven samples. The loop locks with the ignored samples at the peaks of the ADC input. Because the input attenuator and filter introduces a phase shift of 90 degrees, this corresponds to the zero crossings of the AC input. Sampling 16 times each cycle gives 16 intervals within the cycle when application specific activities can be triggered. Activities can be triggered near zero crossings, near positive peaks or near negative peaks at will. TMR0 and TMR2 are available for applications that need other times. To be concluded next month. PLEASE TAKE NOTE PIC ‘N’ Mix (Dec ’06) Page 17, Fig.4. We regret that the wrong image was used. The correct one for the MBR partitions is shown below: Get your magazine “instantly” anywhere in the world – buy and download from the web. A one year subscription (12 issues) costs just $15.99 (US) www.epemag.com TAKE A LOOK, A FREE ISSUE IS AVAILABLE Everyday Practical Electronics, January 2007 21 Jumping Spider By THOMAS SCARBOROUGH Jump to it! Build this novel project and amuse your family and friends T HE Jumping Spider, at its core, is a small, self-contained unit that has no moving parts, with the one exception of a magnet which moves inside. It may be built almost as small as the constructor desires – or as large. The core of the author’s prototype (see photographs) was about the size of the tip of his little finger. This little unit jumps when a button is pressed. With this in mind, it may be inserted in a small plastic spider, to make it jump. More of this in a moment. The original ‘Jumping Spider’ is a perennial favourite in toy shops. It incorporates an inflatable pouch under a mammoth-sized spider. The inflatable pouch, in turn, is attached to a small hand-pump by means of a plastic pipe. When the hand-pump is pressed, air is forced down the pipe and into the pouch, and the spider jumps! The present project therefore represents the unveiling of the electronic version of the Jumping Spider. In concept Strange as it may seem, the simple design shown here took the author well over a year to develop. His first idea was as simple as launching a spider from a ‘launch pad’. An electromagnet was mounted under the launch pad, and a powerful magnet was mounted inside the spider. 22 When the electromagnet was energised, the spider should (in theory) have jumped. However, what the author did not reckon with was that the iron core of the electromagnet would attract the magnet, and this hampered early experiments. Fatal attraction The second idea was very similar to the first, with the one difference that it employed a core-less electromagnet. This worked very well – except that the spider now jumped in all directions, usually landing upside-down on the work bench, or on the floor! The third idea was to use a MOSFET H-bridge in conjunction with the electromagnet, to repel and attract the magnet with millisecond timing. When finally he had everything down to a fine art, the spider jumped from the launch pad and landed again on the same spot. However, this worked successfully only one out of every three times. The other two times, the spider again landed upside-down on the work bench, or on the floor. The fourth idea, which came close to the present one, was never realised. This was to run a magnet up and down a shaft – with the shaft running through the centre of the magnet. Unlike previous experiments, however, the electromagnet was now situated above the magnet. When the electromagnet was energised, the magnet would shoot up the shaft, and hit the electromagnet with a whack. Since the magnet would have momentum, it was predicted that both magnet and electromagnet should (or might) jump. This would, of course, eliminate the need for a ‘launch pad’. While still pondering this idea, the author’s eye fell upon a ball-point pen. He saw the ‘shaft’ at the centre (the ink refill), surrounded by a transparent plastic enclosure, and it occurred to him that the magnet would not need to run up and down a shaft, but it could move within the enclosure, and perform exactly the same function. Therefore, normally the magnet would drop to the bottom of the enclosure (see Fig.2) – but when the electromagnet was energised, it would jump up towards it. The very first prototype was a success, and this is shown in the ‘movie clip’ at: www.epemag.co.uk. Thus, when the electromagnet was energised, the magnet hit it with a whack, the momentum of the magnet caused the entire unit to defy gravity, and it jumped! All that remained was to glue a plastic spider in place. Everyday Practical Electronics, January 2007 Circuit details The full circuit diagram for the Jumping Spider is shown in Fig.1. The circuit is extremely simple. The ‘core’ of the Jumping Spider comprises the electromagnet and the magnet in a tube. The electromagnet requires considerable power to make the magnet jump with sufficient force to impel the spider, therefore a 10,000µF (0.01F) capacitor is used to provide the electric pulse (C1). Without C1, the unit’s batteries would need to be much larger than they are. Capacitor C1 must be rated 25V or higher. Fig.1: Jumping Spider circuit diagram. Pushswitch S1 must be mains rated and resistor R1 should be at least 10 watts or greater Every time the push-to-make pushbutton switch S1 is pressed, capacitor C1 is connected across S1 and the electromagnet L1, which energises the electromagnet for a fraction of a second. This hardly does much good to C1 – however, the raw power is needed, and the author tested the Jumping Spider a great many times without failure. As soon as S1 is released, C1 recharges through R1. Resistor R1 is slightly under-rated (10W instead of about 15W), but since this only conducts momentarily, and generates little heat, this is unlikely to cause a problem. This is assuming, of course, that S1 is only pressed momentarily, otherwise R1 could indeed overheat. Components R1 and C1 are selected to provide at least one jump every half second. R1 could be increased to 47W, which would reduce the ‘firing rate’ of the spider. Life-line Ideally, the ‘umbilical cord’ of the spider – that is, the wires between the circuit and the electromagnet – should be very flexible, while also being sufficiently rated. With a limited choice of wire, the author simply settled for extending the enamelled copper wire used for the electromagnet. This is not ideal, however, since enamelled copper wire is a little stiff. If possible, obtain thin, flexible wire with the same core diameter as the electromagnet. Note that wire from earphones may be very thin, and could burn out. A small mains rated push-tomake pushbutton switch for S1 should give long service, although this circuit will not treat it very kindly. The circuit uses an 18V supply, for which purpose two PP3 batteries are wired in series. Do NOT touch the leads of the capacitor when it is charged, since this could give a nasty shock. Fig.2: General breakdown of the electromagnet. The core of the coil is a cut down piece of matchstick, 4mm approx. length. The ‘housing’ for the coil and magnet was improvised from the plastic barrel of a 5mm jack plug Parts List – Jumping Spider 1 PC board, code 601, available from the EPE PCB Service, size 73 × 48mm 1 Mains rated pushbutton switch, push-to-make (S1) 1 plastic case to house PCB and batteries 2 9V (PP3 type) batteries, with snap-on clips (B1) 1 22W resistor, rated at 10W or greater (R1) 1 10,000m (0.01F) radial electrolytic capacitor, 25V or higher (C1) 1 neodymium magnet, 9mm dia. × 3mm (see text) 2 non-magnetic discs (see text) 1 matchstick (see text) 1 5mm jack plug for L1 ‘core unit’ enclosure (see text) 1 plastic spider Thin, flexible connecting wire, suitably rated for switch and electromagnet unit (see text); 0.224mm diameter (34/35s.w.g.) enamelled copper wire; superglue gel; six solder pins; solder etc. Core unit The author used a neodymium magThe electromagnet is custom made net with dimensions 9mm diameter and the general assembly details are by 3mm. Note that these are far more shown in Fig.2. As small as it is, this powerful than ordinary fridge magis easily manufactured. nets, which are not suitable. Next, a A rounded matchstick is used for the suitable enclosure was found to house core, cut to a length of 4mm. Cut two both the electromagnet and the mag‘end-stops’ for the electromagnet, from net. For this, the plastic housing (suitstiff, non-magnetic material. In the pro- ably cut) of a standard 5mm jack plug totype, two small discs were cut from was used, which was partly closed at copper sheet, each measuring 9mm in one end. The magnet was dropped diameter. These are glued to each end of the matchstick core with strong glue, e.g. superglue gel, to form a bobbin. Once the glue has thoroughly set, wind the electromagnet full to the edges of the endstops and matchstick assembly (the number of turns is not critical), using 0.224mm diameter Component parts that make up the electromagnet. Left (34/35s.w.g.) enam- to right: trimmed plastic barrel of a 5mm jack plug, coil elled copper wire. assembly and a 9mm diameter neodymium magnet Everyday Practical Electronics, January 2007 23 601 Fig.3: Printed circuit board assembly details and full-size copper foil master for the Jumping Spider into this housing, and the housing was then plugged with the electromagnet, L1, leaving about 5mm space for the magnet to jump inside the housing (see Fig.2). The polarity of the electromagnet is not important, and can be ascertained by trial and error when the circuit is finally soldered up. Neither the neodymium magnet nor electromagnet L1 need be the same size as the prototype, although their diameters should best match each other. In fact, the author would have preferred a larger diameter neodymium magnet, if he could have located one in his area. This would have given the unit a surer ‘footing’, and the magnet would, of course, have had greater momentum for a better jump. The thickness of the electromagnet may be the same 4mm. The magnet used, as small as it was, caused the ‘core unit’ to jump between two and three times its height on its own, and to jump its own height with a sizeable plastic spider in place. The spider should best jump from a hard surface. If it should jump askew, this is most likely due to lateral or rotary pressure from the ‘umbilical cord’, and a little twisting of the cord should cure this. Construction and use The trigger switch wired to the PCB. Note that the electroytic capacitor must be rated at 25V or greater 24 The printed circuit board component layout, off-board wiring details and full-size copper foil master are shown in Fig.3. This board is available from the EPE PCB Service, code 601. The printed circuit board (PCB) measures just 73mm x 48mm. None of the components requires special care. Solder in position R1, then C1, carefully noting the polarity of C1. Use robust, sheathed wire to attach switch S1 to the PCB. Then attach the battery clips, again carefully noting the polarity. A red lead from one clip is taken to +18V, a black lead from the other clip is taken to 0V, and the remaining red and black leads are joined together (i.e. the two 9V batteries will now be wired in series). Before permanently soldering the electromagnet to the PCB, attach it to the board with crocodile clips to ensure that it will be correctly wired up. If, on pressing S1, the spider jumps, it is correctly wired up. If not, reverse the leads to the electromagnet and test it again, then solder the leads to the PCB. The entire PCB, together with the batteries, is housed in a suitable case, with switch S1 being mounted on the case. All that remains is for the spider to be strategically placed, to surprise some hapless victim! With any luck, the electronic version of the Jumping Spider may supplant, in toy shops, the monster of a Jumping Spider with the inflatable pouch. If and when it does, you saw it first in EPE! EPE Everyday Practical Electronics, January 2007 PRACTICALLY SPEAKING Robert Penfold looks at the Techniques of Actually Doing It! HE previous ‘Practical’ article (Nov T ’06) covered the subject of building circuit boards. Having completed the circuit board, one could reasonably consider that the project was largely finished. In reality, unless the project has an exceptionally large and complex circuit board, it is unlikely that it will be much more than half finished. Once you have some experience at soldering it does not really take very long to complete most circuit boards. On the other hand, things such as the drilling and cutting of the case, the hard wiring, and making the final product look really neat tend to be quite time consuming. Before starting the cutting and drilling it is important to work things out carefully in advance and to double-check everything. While mistakes on circuit boards are best avoided, in most instances they can be corrected fairly easily and quickly. The same is not always true of the subsequent parts of construction, and having drilled a hole in the case there is no way of undrilling it. While it might be possible to save the day by covering the mistake with a small dummy panel, or something of this type, it is clearly much better to plan things properly and avoid silly mistakes in the first place. Mounting tension The circuit board must be fitted into the case securely, and there are several common methods of holding the board in place. The obvious one is to simply bolt it in place, but this is less straightforward than it might appear at first. It is clearly essential to have the underside of the board held clear of the case if it is of metal construction. The connections on the underside of the board would otherwise be short-circuited through the case. This makes it necessary to use some sort of spacer between the board and the case ( see Fig.1). Careful planning So exactly what is involved in turning a circuit board into a fully finished project? With the board complete, activity tends to be centred on the case for the unit. Some projects are designed specifically to fit into one particular case, and it could then be difficult to use any other type. For beginners at project construction it would be advisable to copy the original design as closely as possible and not try using a different type of enclosure. Many constructors prefer to ‘do their own thing’ with the mechanical side of construction. Fortunately, most project designs do not restrict the constructor to one case, and there should be no problem in choosing any case of a suitable size and general type. Try to avoid the classic beginners’ mistake of selecting a case that is too small and discovering rather late in the day that it is not possible to fit everything into it. There seems to be a natural tendency to underestimate the amount of space that everything will require. Spaced out In the case of a battery-powered project do not forget that this component will often require a fair amount of clear space within the case. Many types of case, but particularly the plastic variety, seem to come complete with all sorts of integral mouldings. These serve a variety of functions such as aiding the mounting of printed circuit boards, fitting the two halves of the case together properly, or providing the case with greater rigidity. One practical consequence of these mouldings is that they provide a sort of reverse Tardis effect. They effectively reduce the internal size of the case, perhaps making it impossible to accommodate a project that would otherwise fit the available space with ease. Internal mouldings are most likely to give problems with the larger components, and with the battery in particular. Practical experience suggests that if you buy a case that looks to be slightly too large it will actually fit the project almost perfectly. 26 Fig.1. Spacers are used over the mounting bolts so that the circuit board is held clear of the case. Spacers about six millimetres long are usually sufficient Testing, testing Ideally the circuit board should be checked prior to fitting it in the case. In general, it is much easier to check for errors and correct any that are found when the circuit board is not fitted in the case. If the finished project fails to work it may well be necessary to do a fair amount of dismantling and reconstruction in order to correct matters. Problems are far less likely to occur in the first place if the board has been fully tested before it is mounted in the case. If a problem should occur, you will know that it is unlikely to be due to anything amiss with the circuit board. Testing the circuit board of a mains powered project is not really a practical proposition for a beginner, but it is usually fairly straightforward with battery-powered circuits. It is basically just a matter of wiring the board to the battery, potentiometers, switches, etc. There is no need to make this wiring particularly neat, but it does have to be right. Crocodile clip leads are useful for making temporary connections without the need for any soldering. Obviously, with some projects there might be so many connections required that it would be impossible to justify the amount of time and effort involved in this type of testing. However, it is a practical proposition with most small and mediumsized projects. Less obviously, spacers are still required even when the case is made from plastic or some other insulating material. The reason for this is that the board has connections protruding on the underside, making it impossible for the board to fit flat against the case. Unless spacers are used it is inevitable that the board will become distorted as the mounting bolts are tightened. At best this will impose unnecessary stresses on both the board and the case, and at worst it will result in serious damage to the circuit board. A short metal spacer about 6mm long fitted over each mounting bolt will serve to keep the connections on the underside of the board clear of the case, and avoid placing unnecessary tension on the board. There are two types of spacer, which are the plain and threaded varieties. Both types work well in this context, but the threaded type is probably easier to use when dealing with larger boards that have several mounting bolts. With threaded spacers you can fix them all onto the mounting bolts, add the board, and then fit the fixing nuts. Using plain spacers it is necessary to hold the bolts and spacers in place while the board and fixing nuts are added. This can be a bit tricky, but the task can be made easier using Blu-Tack to help keep everything in place. Everyday Practical Electronics, January 2007 With either type, but especially with the threaded variety, it is essential that the mounting bolts in the case are drilled accurately. Any errors in their positioning will tend to place stresses on the case and circuit board, and in an extreme case it might not even be possible to fit the board in place properly. Problems of this type can usually be solved using a needle file to suitably elongate the mounting holes in the case. A little adjustment of this type will often be required in order to get things absolutely perfect, but anything other than minute errors are best avoided. with blank areas of the board where mounting holes could be drilled. This tends to render any mounting pillars of no practical value unless the board was specifically designed to fit the particular case you are using, and the layout of its mounting pillars. Where this applies, there should be no difficulty in using the built-in mounting facilities. Some mounting pillars have threaded metal inserts, but they are mostly of plastic construction and designed to take short self-tapping screws. The chances of the mounting pillars being of any use are quite Fig.3. Plastic cases often have guide-rails moulded into the interior. These small, but there is a permit boards to be fitted horizontally or vertically strong likelihood that they will make it difficult to accommodate everything inside the case. It is usually possible to remove them quite easily in cases where they are acting as major obstructions. The easiest way is to carefully drill them away, making sure that you do not drill too far into the case. Use a drill bit that is slightly larger in diameter than the mounting pillar. Guide lines Fig.2. Some stand-offs use mounting bolts at both ends (left), and are effectively just threaded spacers. Another type (right) is bolted to the case and the circuit board then clips in place A stand-off The main alternative to mounting bolts and spacers are the various types of plastic stand-off that are available. One type clips into holes of suitable diameter drilled in the case and the board. On the face of it, this is a very good way of handling things, making it very easy to fit and remove the circuit board. Matters are sometimes rather less satisfactory in practice. The mounting holes have to be drilled accurately and cleanly. It is otherwise likely that the stand-offs will not fit into the holes at all, or they will not lock reliably into place. Some stand-offs do not seem to provide a very reliable method of mounting however accurately the mounting holes are drilled. They are probably designed to be used in conjunction with mounting bolts rather than as the sole method of mounting the board. This is the method normally used with the motherboards in PCs, or with any very large boards. Snap-in stand-offs do not seem to work well with stripboard. The matrix of predrilled holes in stripboard makes it impossible to produce really neat mounting holes, which in turn more or less guarantees that the board will not snap into place reliably. Some spacers are designed for screw fixing to both the board and the case (Fig.2 – left). These are usually in the form of a plastic spacer with a threaded metal insert that takes (say) short M3 mounting bolts. This is really just a variation on a threaded spacer, and the latter could presumably be used in the same fashion. A further variation consists of a cross between screw fixing and snap-on standoffs. One end is fixed to the case using a short bolt, while the circuit board clips in place at the other end (Fig.2 – right). This type is probably the most popular, and works well provided the board will clip onto the stand-off securely. Pillar-to-post So far, we have been assuming that any built-in mounting pillars or guides are a nuisance rather than a help. On the face of it, using any built-in mounting pillars should make life easier by avoiding the need to buy any spacers or stand-offs. Unfortunately, matters are not as easy as that in practice. The positioning of the mounting pillars on the case is unlikely to conveniently match up with the mounting holes in the board. Furthermore, it is unlikely that the pillars will even match up Everyday Practical Electronics, January 2007 It is quite common for a plastic case to have moulded guide-rails that enable circuit boards to be fitted horizontally or vertically. These provide an extremely simple but effective means of mounting suitable circuit boards, since it is necessary to do nothing more than slide the board into place (see Fig.3). An advantage of this system is that it does not leave any unsightly mounting bolts showing on the exterior of the case. Provided it is cut accurately to the right size, the circuit board is normally held in place very securely. The obvious drawback of the guide-rail method is that it is unlikely that the board will just happen to be the right size. There is little chance of it slotting into place properly unless it has been specifically designed to fit the case. If you make your own printed circuit boards or are using stripboard, it might be possible to produce an oversize board that will fit into the guide-rails properly. It is just a matter of using a board of the correct size with blank areas at each end where it will fit into the guide-rails. There is a variation on the basic guiderail scheme of things that enables the board to be fitted perpendicular to the rails. This is achieved with the aid of plastic clips that are fitted to the board. Then the clips are slotted into the guide rails. As one might expect with a somewhat indirect method such as this, it provides less secure mounting than simply fitting a board straight into the rails. Its advantage is that it is normally possible to accommodate larger boards with this method. Anyway, these days it seems to be little used in practice. EPE 27 C for PICs A four part beginners guide to using the C programming language for PIC microcontrollers Part 3 – Cross-compiling a C program By Mike Hibbett I N Part 2 last month, we lifted the lid on the C compiler to see how it works, and how the build procedure differs from assembly language programming. While we do not have the space in this series to cover the basics of programming in C, what is very important is an understanding of how different the programming for an embedded environment is, and this month we take a look at those issues. Hosted development If you first learned C programming by writing programs that ran on a PC, you would have been doing what is known as ‘hosted development’ – the type of computer you compiled the program on is the type of computer that will ultimately run the program. Programs compiled to run on a PC will not run on an Apple Mac; the lowlevel CPU instructions are different between a PC and a Mac, just as they are between a Microchip PIC and an Atmel AVR microcontroller. If you want to run your program on another type of computer (or ‘platform’, as the hardware is referred to), you would have to copy your source files to that machine and compile your program using that machine’s C compiler. That, however, would be in an ideal situation; programs typically make use of features that are specific to a particular platform and will need some modifications to enable them to compile and run on a different one. One example is if your program makes use of the graphics features of the operating system. Microsoft and Apple handle graphics in different ways, and consequently require different function calls in software 28 to use them. The process of making a program work on a new platform is called ‘porting’. Programs that are well written and easy to re-compile on another platform are considered to be ‘portable’. When you write software for small embedded systems, the target platform (the machine that will ultimately run your code) is unlikely to be powerful enough to hold a C compiler or provide a nice user interface. Who wants to write software on a 16-button keypad and a two line LCD? (Although some of us have had to do so in the past!) Cross-compiling In cases like these we write our software on a user friendly system, such as a PC, using a cross-compiler. A cross-compiler is a program that takes our source code and produces machine code for the specific microcontroller we are interested in. The MCC18 program is a cross-compiler for the PIC18F family; it runs on a PC but generates PIC machine code. Cross-compiling C programs adds a host of new issues and problems to consider, which form the basis of this month’s article. New terms Before we get into that discussion, some readers have asked us to explain a couple of terms that were not included in the first month’s list of defined terms. The first is the word ‘embedded’, seen in phrases such as ‘embedded programming’ or ‘embedded system’. Embedded is a term used to describe a microcontroller or microprocessor system that is inside a device, usually controlling or monitoring that device. Embedded systems generally have a fixed purpose and have limited memory – they are designed with only the resources required to do that one task. The other confusing term – ‘real time system’ – is rather harder to define, and is generally split into two definitions: ‘soft real time’ and ‘hard real time’. Hard real time refers to how an embedded system must respond to incoming signals; the design will dictate a response time (for example, react to a request to move an aircraft rudder within 100ms) and should that response time be delayed, even for a few microseconds, then the system is considered to have failed – catastrophically. Soft real time systems may also have time constraints but they are constraints that are not so strict. For example, an ATM machine must return your cash and ATM card to you within 30s, but if it takes 50s sometimes, that is not a problem. A search for ‘definition: real time system’ on the internet will yield some heated debates on this subject! Header files Compilers such as the Microchip MCC18 program are designed to support a large number of physically different processors and in the PIC18F family of processors there are dozens of different variants. Although these all share the same core CPU they have different memory organisations and peripheral features. It is necessary for us to tell the C compiler about the device our program is ‘targeted’ at, and there are three steps that we must go through to do this. The first is to select the device type for which we will be compiling. Everyday Practical Electronics, January 2007 This is done when you first set up a new project, but you can change it at any time from the Configure menu option on the main menu bar. Next, we include a special system header file in any of our project source files that use peripheral features specific to the processor (like accessing PORT registers). This file is called p18cxxx. h, and should appear at the top of your source files like this: #include <p18cxxx.h> When the C compiler reads this file, it will use the processor type setting you defined in the previous step to open the header file specific to that processor. The final step is to include in your project the processor specific linker file. We discussed that step in last month’s article. The processor specific header file you include in each source file will contain definitions for all the processor peripheral registers and bit fields that can be used to make our program do useful things. It is worth finding the file and opening it up in the editor. As we will be using the PIC18F2550 in next month’s article, take a look inside the header file for that processor. Having installed the compiler, you will find it in the following location: C:\MCC18\h\p18f2550.h By way of an example, scroll down until you find the definition of PORTB. It looks like this: extern volatile near unsigned char PORTB; This line tells the C compiler that PORTB is an 8-bit variable that is volatile – i.e., likely to change outside of the program control. Look below though, and you will see another definition: extern volatile near union { struct { unsigned RB0:1; unsigned RB1:1; unsigned RB2:1; unsigned RB3:1; unsigned RB4:1; unsigned RB5:1; unsigned RB6:1; unsigned RB7:1; }; } PORTBbits; This structure provides a mechanism for accessing individual bits within the register, and enables you to write C code such as: if ( PORTBbits.RB0 == 1 ) printf(“RB0 is 1”); else printf(“RB0 is 0”); Understanding and recognising what is inside this file is very important, as it explains what names are given to the various internal registers inside your processor. Some are obvious but others, such as PORTBbits, are less so. You only include the processor header file in source files that need to access processor-specific features. It is considered good design practice to try to keep the code that accesses processor-specific features (the ‘low level’ code) in separate files, away from the main application code. This way your code will be easier to read and simpler to port to another processor or share with other people. This is probably a good time, while talking about include files, to mention the C pre-processor. When you compile a C source file there are actually two separate operations that occur. First, the preprocessor scans your source file and handles all the macros and pre-processor directives. Then, the C compiler itself is run on the output of the pre-processor to create your program .hex file. Pre-processor directives are the statements that begin with the # character. For example, when you add the line #include <stdlib.h> the pre-processor reads the contents of that file and inserts it into its temporary copy of your source file. Likewise, any constants, such as #define CLOCK_SPEED 4000000 will cause the pre-processor to replace any occurrence of the string CLOCK_SPEED with the string 4000000. There is a very important point to note here – the pre-processor is performing text substitution, and it is a very ‘dumb’ process; a process that will catch you out if you are not careful. For example, if you have defined this macro: Everyday Practical Electronics, January 2007 #define HIGH_CLOCK 4000000 + 40 you will not get the expected result if you later write in your code: if ( (HIGH_CLOCK / 10) > 100000 ) printf(“clock is fast”); The reason is that the pre-processor is doing a literal, text replacement. The result of the pre-processor expanding the word HIGH_CLOCK would generate code that looks like this: if ( (4000000 + 40/10) > 100000 ) printf(“fast”); As you can see, the divide by 10 is going to affect only the 40, not the complete value. Not what you expected! And the solution to this? Always put brackets around the right hand side of your #define statements. For the example above, do this: #define HIGH_CLOCK (4000000 + 40) Problems like that can take an age to find, often requiring that you look inside the .lst file created by the compiler. Better to remember the above rule! Variables When you define any variables in your program, for example using statements like char str[48]; int lp; the C compiler takes care of the allocation of memory space for you, and you will be unaware of where things are located in data memory – right until you run out of memory, at which point the compiler will halt and start issuing error messages. To monitor your memory use you can track the code and data utilisation by studying the .map file created by the compiler each time you build your code. At the start of this file is a table, with five columns. Each row is a different section of your program. Column four defines the type of memory – program (Flash) or data (RAM) – and column five is the count of how many bytes in that section. Just add them up to work out how much you have used. Do note that for some unknown 29 reason, column five is in hexadecimal. Microchip obviously think we programmers normally count in hex! Running out of data memory is not an uncommon problem, and in assembly language programming we deal with this by simply re-using RAM space. Several temporary variables are given the same RAM address and so long as we are careful that we have finished with one variable before the other is used, we can conserve our precious resources. In C we can do the same, but in a more elegant way. Let’s assume that you have a serial receive buffer that you decide you want to share with a map co-ordinate value. Using the ‘union’ declaration we can define a variable that can hold either a string or a coordinate (but never both at the same time!). An example looks like this: union { char rxbuff[16]; struct { long x; long y; } pos; } shared; This way, the memory allocated for the variable ‘shared’ can be used to hold either a sixteen byte string or a position variable consisting of two long values. This was not quite how the authors of the language intended the union declaration to be used, but then they probably didn’t anticipate the C language being applied to such limited microcontrollers! Using these kinds of tricks is risky though and it is better to avoid them if at all possible. Automatic variables Assembler programmers will be used to having to allocate memory precisely, specifying every absolute location for data variables. As we mentioned, the C programming language looks after memory allocation for you but it also goes one step further by providing temporary, local variables. These are called ‘automatic’ variables, and are the ones that you define inside the body of a function. For example: int myVal; void doStuff( void ) { int myVal2; ... } The variable myVal2 is defined inside a function, and will only exist while that function is being called. Once the function doStuff exits, the memory location for myVal2 is released, and is free to be used by another variable in another function. While this sounds very clever, the way it is done is rather simple. During the building of the program an area of memory called the ‘stack’ is reserved by the linker and temporary variables get created in this space. You can see or modify the amount of memory reserved for the stack in the linker file. Looking in the linker file 18f2420.lkr you will see the following line: STACK SIZE=0x100 RAM=gpr2 Table 1 Type char signed char unsigned char int unsigned int short unsigned short short long unsigned short long long unsigned long 30 Size 8 bits 8 bits 8 bits 16 bits 16 bits 16 bits 16 bits 24 bits 24 bits 32 bits 32 bits Minimum -128 -128 0 -32,768 0 -32,768 0 -8,388,608 0 -2,147,483,648 0 Maximum 127 127 255 32,767 65,535 32,767 65,535 8,388,607 16,777,215 2,147,483,647 4,294,967,295 This reserves 256 bytes of RAM in the gpr2 data area for use by the stack. When a function is entered, the space required for any local variables is reserved in the stack area, and released when the function exits. The exact location of the variables within the stack is unknown, and will vary depending on how many nested calls to other functions have occurred. The C compiler can handle this effortlessly and quite efficiently. By contrast, the variable myVal in the above code is defined outside of a function. It can be accessed by any code in any function, even in a different file in the project. Such variables are ‘static’ – their memory locations are fixed at build time, never change, and will not be re-used by the compiler. It may seem as though having all your variables inside functions would be the most efficient way to program, to make the most of your limited RAM. And to a certain extent that is true. Bear in mind, however, two things; automatic variables are not accessible outside of a function, and there is only a limited amount of space reserved for stack variables. If you have a large receive buffer for example, it would make sense to keep that outside of a function so that you can ‘share’ it between different parts of your program. Small temporary variables like loop counters and indexes should always be internal to the function. One of the strange aspects about the C language is that the size of the various data types is undefined, and depends on the processor. For the PIC18F family, the size of the data types and the range of values they can hold are shown in Table.1. Do bear in mind when choosing a data type to store a value, that the larger the data type, the more storage space it will take up and the more code will be required to access it. Data consisting of ‘unsigned char’ types are the most efficient because they are the same size as the processor’s data bus size. Types such as ‘int’, ‘long’ and ‘float’ are progressively larger and less efficient. Type ‘float’ is by far the worst and will cause large amounts of code to be included from the standard library, and will be slow to execute. Do try to avoid using floating point variables; most problems involving Everyday Practical Electronics, January 2007 fractions can be redesigned to work without them. Sometimes it is necessary for a C compiler to implement a special, nonstandard feature; something that is outside of the standard C syntax. The C compiler vendors have agreed on a common way to do this, by introducing the directive #pragma. This operates in a similar way to the #define directive, and it plays a very important role in the Microchip C compiler. Config registers The PIC configuration registers are stored and handled very differently to normal memory, and we use the #pragma directive to define the settings of individual bits within these registers. You can specify several settings on a single line, and you can have multiple lines. For example, to ensure the Watchdog is disabled and the high speed clock option is used, you add the lines Interrupts In the PIC18F family we have two interrupt routines (one for the high priority interrupt and another for low priority) and these have to be indicated in a special way to the compiler so that the register preservation and return from interrupt code will be generated, and to ensure that they appear in the correct location in the code memory. We tell the compiler that a function is an interrupt routine with the #pragma directive: #pragma interruptlow low_isr void low_isr(void) { /* handle the interrupt */ } or, for the high priority interrupt: #pragma interrupt high_isr void high_isr(void) { /* handle the interrupt */ } # p r a g m a c o n f i g W D T = O F F, OSC=HS or #pragma config WDT=OFF #pragma config OSC=HS to the beginning of your main source file. When the C compiler sees these lines it will set the config register values in the .hex file accordingly. To find out what the names of all the configuration bits are for your processor, look in the file PIC18Config-Settings-Addendum-51537f. pdf, which you will find in the C:\MCC18\doc directory. For the PIC18F2550 there are 38 different configuration settings and it is our recommendation that you explicitly set each and every one of them. You only have to do it once, you can put them in a header file on their own, and it is worth the effort to make sure that some ‘odd’ behaviour does not occur because you overlooked some obscure config setting. If you do not know what the setting means, ask on the EPE Chat Zone web forum (via www.epemag.co.uk) – you will very quickly get an answer! There are several other #pragma directives for handling other PIC specific nuances, and we will see more of them later. Note that the function must always have a return type of void and take no parameters. It’s an interrupt, so obviously there is nothing for it to pass data back to. You place normal C code in these routines; no need to save registers like you do with assembly interrupt routines. It is always a good idea to put as little code into interrupt routines as possible and let the main software do the processing, especially if your interrupt is a periodic timer. Having defined the interrupt functions, we need to make sure that they get called when an interrupt actually occurs. We do this by placing an assembly language GOTO statement at the appropriate interrupt vector location. You can do that like this: Everyday Practical Electronics, January 2007 #pragma code highv=0x08 void lowvi(void) { _asm GOTO high_isr _endasm } #pragma code lowv=0x18 void lowvi(void) { _asm GOTO low_isr _endasm } #pragma code The #pragma code highv=0x08 directive is telling the compiler ‘from this point on, place code at address 0x08 in flash’. The final #pragma code directive is telling the compiler ‘from this point on, place code in the normal code locations’. It’s best to locate this code at the beginning of your program’s main source file. You should also precede it with the prototypes for the two interrupt routines: void highisr(void); void lowisr(void); The names you give the functions are irrelevant, so you can take the example code above as a template and add it into your own programs. Adding this code does not cause interrupts to automatically start working – you are simply specifying the code that will run should interrupts occur. You will still need to enable individual interrupts and the global interrupt bit in your program, just as you would in assembly language. C library The C programming language defines a set of standard, useful utility functions – many of them very useful – that are supplied ‘for free’ with every compiler. It is very important that you know what these functions are, and what they do. Thousands of hours of effort have gone into creating them, and over the years they have been improved and simplified by hundreds of people. It makes great sense to use these rather than write your own. The list of standard functions supplied with the Microchip compiler is provided in the file MPLAB-C18Libraries_51297f.pdf, located in the doc sub-directory. Compiler vendors even supply the source code for these libraries, which you will find in the directory C:\MCC18\src\extended\stdclib. There are many ‘extra’ functions in the library that deal with accessing serial EEPROM, LCDs, CAN bus interfaces and advanced maths functions – all instantly available for the effort of adding a simple #include directive in your source files. 31 Those of you familiar with developing large programs in C may have noticed that the malloc function is missing from the standard library. It’s a mixed blessing, and for such small devices probably unnecessary anyway. When you have very limited amounts of RAM you almost certainly want to maintain full control over your memory, which is contrary to the way malloc is used. When looking through the list of library functions you may notice that there are a number of similar named functions, for example: putsUSART and putrsUSART These functions perform the same job, writing a string of characters out to the serial port. The reason for having two versions is to do with the way the PIC’s memory is organised. Variables in RAM and constant data in Flash occupy completely independent memory and crucially require different code to access them. A pointer to a string in Flash must be identified differently to a pointer to a string in RAM, and handled by a different routine. The way the different pointers are identified can be seen in the prototype to each function: void putsUSART( char *data ); here, the data parameter is a pointer to a string in RAM, whereas in void putrsUSART( const rom char *data ); the data parameter is a pointer to a string in ROM – Flash memory, in our case. The ‘const’ qualifier tells the compiler that this variable cannot be changed, which of course is true if it is in the program memory. This subtlety will trip you up from time to time; trying something like putsUSART(“Hello World”); will result in a compiler warning. A string literal – the ‘Hello World’ part of the call – will always be stored in Flash memory by the compiler. You need to use the putrsUSART function to display Flash-based strings. 32 The functions puts and printf take Flash-based strings, as you can see from their function prototypes in the library document. ‘And where do they print to?’ you might ask. By default, they ultimately call the function _usart_putc();, i.e., they will put the characters out over the USART. You can control the function that these routines ultimately call by changing a special variable, stdout, in your program. If you add the line stdout = _H_USER; in your program then rather than calling _usart_putc(), the routines will call _user_putc(). This is a routine that you must write yourself, and include in your program. You can now control where characters will be printed. If you have an LCD display, your _user_putc() routine would implement the code for writing a character to the LCD. We will see an example of this next month. Program size change An issue that often pops up, is why the size of a program can suddenly jump when a single line of code is added. Let’s take an example, a program that prints ‘Hello World’ to the serial port. The following is the main() function of a simple program to do this. void main(void) { puts(“Hello World”); } when compiled, that works out to be 666 bytes. Now let’s use the standard printf function instead: void main(void) { printf(“Hello World”); } the output is the same, but the program is now a staggering 4089 bytes! The reason for this is that printf is a very complex function that can provide many conversion facilities. The fact that we do not need them is irrelevant; they get pulled into our program when we reference printf. Now let’s add another call to printf: void main(void) { printf(“Hello World”); printf(“Hello World”); } Our program has grown in size, but only by a tiny amount. This is because the library function for printf has already been pulled into our project by the first call; subsequent references to printf will re-use the single printf sub-routine. The moral of the story is that if you do not need the conversion facilities of printf, use one of the simpler routines instead. Also, once the library functions have been included, they can be re-used without having any further massive increases in code size. Function printf is the main culprit for unnecessary code bloat, but there are other functions in the C library that are quite large. The trick is to watch how the size of your program grows, and if you find a sudden unacceptable jump in size, then consider re-writing the code to avoid using that function. If you typed in any of the examples above and tried to compile them, you would have been disappointed. You would have been greeted with a warning message, probably like call of function without prototype Hopefully, you remembered the reason for this: printf and puts are library functions, and like any other library you must include a header file that describes the function you wish to use. Annoyingly, the C library functions are defined across several library files, so you have to find the correct one and add the appropriate #include line in your source code. To find out which header file to use, simply look in the ‘libraries’ pdf file in the doc directory of the C compiler. A quick scan for printf reveals the function to be located in stdio.h, so you should add to the beginning of the source file the line #include <stdio.h> The program should now compile this point correctly. Everyday Practical Electronics, January 2007 Back to assembly Although C is a very efficient language, there will still be times when you want to write some parts of the code in assembler. Maybe a section of code that is called frequently and must be as quick as possible. There are two ways of doing this; the first is to simply write the assembly module in a separate assembly source file and link it into your program, and the other is to embed the assembly within your C code. We don’t have space this month to consider both options, so we will look at the simpler one – embedding. When we decide we want to write assembly language instructions we must provide a ‘marker’ in our source code file to tell the compiler to stop processing the file as C statements. We use two directives, one at the start and one at the end of our section of assembly: _asm bcf PIR1, 1, 0 ... _endasm Notice how we have to specify the full assembly instruction, including the ‘,0’ at the end to indicate the ACCESS mode bit. Further details on inline assembly can be found in the MPLAB-C18-Users-Guide document. Next month In next month’s concluding article we pull together everything we have covered by describing an example project – a USB-based LCD display for a PC using the PIC18F2550. It demonstrates how quickly a complex product can be put together by re-using standard software components written in C. Hopefully, it may even prove useful! NEWSAGENTS ORDER FORM Please reserve/deliver a copy of Everyday Practical Electronics for me each month Name and Address ............................................................................................................... ..................................................... Post Code ........................... Tel .................................... Everyday Practical Electronics is published on the second Thursday of each month and distributed S.O.R. by SEYMOUR Make sure of your copy each month – cut out or photocopy this form, fill it in and hand it to your newsagent Everyday Practical Electronics, January 2007 33 EPE IS PLEASED TO BE ABLE TO OFFER YOU THESE ELECTRONICS CD-ROMS ELECTRONICS PROJECTS Electronic Projects is split into two main sections: Building Electronic Projects contains comprehensive information about the components, tools and techniques used in developing projects from initial concept through to final circuit board production. Extensive use is made of video presentations showing soldering and construction techniques. The second section contains a set of ten projects for students to build, ranging from simple sensor circuits through to power amplifiers. A shareware version of Matrix’s CADPACK schematic capture, circuit simulation and p.c.b. design software is included. The projects on the CD-ROM are: Logic Probe; Light, Heat and Moisture Sensor; NE555 Timer; Egg Timer; Dice Machine; Bike Alarm; Stereo Mixer; Power Amplifier; Sound Activated Switch; Reaction Tester. Full parts lists, schematics and p.c.b. layouts are included on the CD-ROM. Logic Probe testing ELECTRONIC CIRCUITS & COMPONENTS V2.0 N2 VERSIO Circuit simulation screen Provides an introduction to the principles and application of the most common types of electronic components and shows how they are used to form complete circuits. The virtual laboratories, worked examples and pre-designed circuits allow students to learn, experiment and check their understanding. Version 2 has been considerably expanded in almost every area following a review of major syllabuses (GCSE, GNVQ, A level and HNC). It also contains both European and American circuit symbols. Sections include: Fundamentals: units & multiples, electricity, electric circuits, alternating circuits. Passive Components: resistors, capacitors, inductors, transformers. Semiconductors: diodes, transistors, op.amps, logic gates. Passive Circuits. Active Circuits. The Parts Gallery will help students to recognise common electronic components and their corresponding symbols in circuit diagrams. Included in the Institutional Versions are multiple choice questions, exam style questions, fault finding virtual laboratories and investigations/worksheets. ANALOGUE ELECTRONICS Analogue Electronics is a complete learning resource for this most difficult branch of electronics. The CD-ROM includes a host of virtual laboratories, animations, diagrams, photographs and text as well as a SPICE electronic circuit simulator with over 50 pre-designed circuits. Sections on the CD-ROM include: Fundamentals – Analogue Signals (5 sections),Transistors (4 sections), Waveshaping Circuits (6 sections). Op.Amps – 17 sections covering everything from Symbols and Signal Connections to Differentiators. Amplifiers – Single Stage Amplifiers (8 sections), Multi-stage Amplifiers (3 sections). Filters – Passive Filters (10 sections), Phase Shifting Networks (4 sections), Active Filters (6 sections). Oscillators – 6 sections from Positive Feedback to Crystal Oscillators. Systems – 12 sections from Audio Pre-Amplifiers to 8-Bit ADC plus a gallery showing representative p.c.b. photos. ELECTRONICS CAD PACK PCB Layout Electronics CADPACK allows users to design complex circuit schematics, to view circuit animations using a unique SPICEbased simulation tool, and to design printed circuit boards. CADPACK is made up of three separate software modules. (These are restricted versions of the full Labcenter software.) ISIS Lite which provides full schematic drawing features including full control of drawing appearance, automatic wire routing, and over 6,000 parts. PROSPICE Lite (integrated into ISIS Lite) which uses unique animation to show the operation of any circuit with mouse-operated switches, pots. etc. The animation is compiled using a full mixed mode SPICE simulator. ARES Lite PCB layout software allows professional quality PCBs to be designed and includes advanced features such as 16-layer boards, SMT components, and an autorouter operating on user generated Net Lists. ROBOTICS & MECHATRONICS Complimentary output stage DIGITAL ELECTRONICS V2.0 N2 VERSIO Virtual laboratory – Traffic Lights Digital Electronics builds on the knowledge of logic gates covered in Electronic Circuits & Components (opposite), and takes users through the subject of digital electronics up to the operation and architecture of microprocessors. The virtual laboratories allow users to operate many circuits on screen. Covers binary and hexadecimal numbering systems, ASCII, basic logic gates, monostable action and circuits, and bistables – including JK and D-type flip-flops. Multiple gate circuits, equivalent logic functions and specialised logic functions. Introduces sequential logic including clocks and clock circuitry, counters, binary coded decimal and shift registers. A/D and D/A converters, traffic light controllers, memories and microprocessors – architecture, bus systems and their arithmetic logic units. Sections on Boolean Logic and Venn diagrams, displays and chip types have been expanded in Version 2 and new sections include shift registers, digital fault finding, programmable logic controllers, and microcontrollers and microprocessors. The Institutional versions now also include several types of assessment for supervisors, including worksheets, multiple choice tests, fault finding exercises and examination questions. Filter synthesis Analogue Filters is a complete course in designing active and passive filters that makes use of highly interactive virtual laboratories and simulations to explain how filters are designed. It is split into five chapters: Revision which provides underpinning knowledge required for those who need to design filters. Filter Basics which is a course in terminology and filter characterization, important classes of filter, filter order, filter impedance and impedance matching, and effects of different filter types. Advanced Theory which covers the use of filter tables, mathematics behind filter design, and an explanation of the design of active filters. Passive Filter Design which includes an expert system and filter synthesis tool for the design of low-pass, high-pass, band-pass, and band-stop Bessel, Butterworth and Chebyshev ladder filters. Active Filter Design which includes an expert system and filter synthesis tool for the design of low-pass, high-pass, band-pass, and band-stop Bessel, Butterworth and Chebyshev ANALOGUE FILTERS PRICES Prices for each of the CD-ROMs above are: (Order form on third page) Case study of the Milford Instruments Spider Robotics and Mechatronics is designed to enable hobbyists/students with little previous experience of electronics to design and build electromechanical systems. The CD-ROM deals with all aspects of robotics from the control systems used, the transducers available, motors/actuators and the circuits to drive them. Case study material (including the NASA Mars Rover, the Milford Spider and the Furby) is used to show how practical robotic systems are designed. The result is a highly stimulating resource that will make learning, and building robotics and mechatronic systems easier. The Institutional versions have additional worksheets and multiple choice questions. ɀ Interactive Virtual Laboratories ɀ Little previous knowledge required ɀ Mathematics is kept to a minimum and all calculations are explained ɀ Clear circuit simulations Hobbyist/Student ...................................................£45 inc VAT Institutional (Schools/HE/FE/Industry)..............£99 plus VAT Institutional 10 user (Network Licence) ..........£249 plus VAT Site Licence........................................................£499 plus VAT (UK and EU customers add VAT at 17.5% to “plus VAT’’ prices) 34 Everyday Practical Electronics, January 2007 PICmicro TUTORIALS AND PROGRAMMING HARDWARE VERSION 3 PICmicro MCU DEVELOPMENT BOARD Suitable for use with the three software packages listed below. This flexible development board allows students to learn both how to program PICmicro microcontrollers as well as program a range of 8, 18, 28 and 40-pin devices from the 12, 16 and 18 series PICmicro ranges. For experienced programmers all programming software is included in the PPP utility that comes with the development board. For those who want to learn, choose one or all of the packages below to use with the Development Board. Makes it easier to develop PICmicro projects Supports low cost Flash-programmable PICmicro devices Fully featured integrated displays – 16 individual l.e.d.s, quad 7-segment display and alphanumeric l.c.d. display Supports PICmicro microcontrollers with A/D converters Fully protected expansion bus for project work USB programmable Can be powered by USB (no power supply required) SPE OFFCIAL FRE ER E FL OW ( COD hobb y E when ist/studen V2 t) you b Deve uy a lopm ent for a limite Board – d only time £158 including VAT and postage supplied with USB cable and programming software SOFTWARE Suitable for use with the Development Board shown above. ASSEMBLY FOR PICmicro V3 (Formerly PICtutor) Assembly for PICmicro microcontrollers V3.0 (previously known as PICtutor) by John Becker contains a complete course in programming the PIC16F84 PICmicro microcontroller from Arizona Microchip. It starts with fundamental concepts and extends up to complex programs including watchdog timers, interrupts and sleep modes. The CD makes use of the latest simulation techniques which provide a superb tool for learning: the Virtual PICmicro microcontroller. This is a simulation tool that allows users to write and execute MPASM assembler code for the PIC16F84 microcontroller on-screen. Using this you can actually see what happens inside the PICmicro MCU as each instruction is executed which enhances understanding. Comprehensive instruction through 45 tutorial sections Includes Vlab, a Virtual PICmicro microcontroller: a fully functioning simulator Tests, exercises and projects covering a wide range of PICmicro MCU applications Includes MPLAB assembler Visual representation of a PICmicro showing architecture and functions Expert system for code entry helps first time users Shows data flow and fetch execute cycle and has challenges (washing machine, lift, crossroads etc.) Imports MPASM files. ‘C’ FOR PICmicro VERSION 2 The C for PICmicro microcontrollers CDROM is designed for students and professionals who need to learn how to program embedded microcontrollers in C. The CD contains a course as well as all the software tools needed to create Hex code for a wide range of PICmicro devices – including a full C compiler for a wide range of PICmicro devices. Although the course focuses on the use of the PICmicro microcontrollers, this CDROM will provide a good grounding in C programming for any microcontroller. Complete course in C as well as C programming for PICmicro microcontrollers Highly interactive course Virtual C PICmicro improves understanding Includes a C compiler for a wide range of PICmicro devices Includes full Integrated Development Environment Includes MPLAB software Compatible with most PICmicro programmers Includes a compiler for all the PICmicro devices. FLOWCODE FOR PICmicro V2 Flowcode is a very high level language programming system for PICmicro microcontrollers based on flowcharts. Flowcode allows you to design and simulate complex robotics and control systems in a matter of minutes. Flowcode is a powerful language that uses macros to facilitate the control of complex devices like 7-segment displays, motor controllers and l.c.d. displays. The use of macros allows you to control these electronic devices without getting bogged down in understanding the programming involved. Flowcode produces MPASM code which is compatible with virtually all PICmicro programmers. When used in conjunction with the Version 2 development board this provides a seamless solution that allows you to program chips in minutes. Requires no programming experience Allows complex PICmicro applications to be designed quickly Uses international standard flow chart symbols (ISO5807) Full on-screen simulation allows debugging and speeds up the development process Facilitates learning via a full suite of demonstration tutorials Produces ASM code for a range of 18, 28 and 40-pin devices Professional versions include virtual systems (burglar alarm, buggy and maze, plus RS232, IrDa etc.). Minimum system requirements for these items: Pentium PC running Windows 98, NT, 2000, ME, XP; CD-ROM drive; 64MB RAM; 10MB hard disk space. PRICES Prices for each of the CD-ROMs above are: (Order form on next page) Hobbyist/Student Flowcode V2 Hobbyist/Student InstItutional (Schools/HE/FE/Industry) Flowcode Professional Institutional/Professional 10 user (Network Licence) Site Licence £45 inc VAT £57 inc VAT £99 plus VAT £99 plus VAT £300 plus VAT £599 plus VAT (UK and EU customers add VAT at 17.5% to “plus VAT’’ prices) Everyday Practical Electronics, January 2007 35 TEACH-IN 2000 – LEARN ELECTRONICS WITH EPE EPE ’s own Teach-In CD-ROM, contains the full 12-part Teach-In 2000 series by John Becker in PDF form plus the TeachIn interactive software (Win 95, 98, ME and above) covering all aspects of the series. We have also added Alan Winstanley’s highly acclaimed Basic Soldering Guide which is fully illustrated and which also includes Desoldering. The Teach-In series covers: Colour Codes and Resistors, Capacitors, Potentiometers, Sensor Resistors, Ohm’s Law, Diodes and L.E.D.s, Waveforms, Frequency and Time, Logic Gates, Binary and Hex Logic, Op.amps, Comparators, Mixers, Audio Sine wave relationship values and Sensor Amplifiers, Transistors, Transformers and Rectifiers, Voltage Regulation, Integration, Differentiation, 7-segment Displays, L.C.D.s, Digital-to-Analogue. Each part has an associated practical section and the series includes a simple PC interface (Win 95, 98, ME ONLY) so you can use your PC as a basic oscilloscope with the various circuits. A hands-on approach to electronics with numerous breadboard circuits to try out. FREE TWO BOOKLETS PLUS CD-ROM WITH TEACH-IN 2000 £12.45 including VAT and postage. Requires Adobe Acrobat (available free from the Internet – www.adobe.com/acrobat). FREE WITH EACH TEACH-IN CD-ROM – Understanding Active Components booklet, Indentifying Electronic Components booklet and The Best Of Circuit Surgery CDROM. PROJECT DESIGN WITH CROCODILE TECHNOLOGY NEW An Interactive Guide to Circuit Design An interactive CD-ROM to guide you through the process of circuit design. Choose from an extensive range of input, process and output modules, including CMOS Logic, Op-Amps, PIC/PICAXE, Remote Control Modules (IR and Radio), Transistors, Thyristors, Relays and much more. Click Data for a complete guide to the pin layouts of i.c.s, transistors etc. Click More Information Ove r 15 for detailed background information with many animated diagrams. Over 6 0 pages 00 ima Nearly all the circuits can be instantly simulated in Crocodile Technology* (not ges included on the CD-ROM) and you can customise the designs as required. WHAT’S INCLUDED Light Modules, Temperature Modules, Sound Modules, Moisture Modules, Switch Modules, Astables including 555, Remote Control (IR & Radio), Transistor Amplifiers, Thyristor, Relay, Op-Amp Modules, Logic Modules, 555 Timer, PIC/PICAXE, Output Devices, Transistor Drivers, Relay Motor Direction & Speed Control, 7 Segment Displays. Data sections with pinouts etc., Example Projects, Full Search Facility, Further Background Information and Animated Diagrams. Runs in Microsoft Internet Explorer *All circuits can be viewed, but can only be simulated if your computer has Crocodile Technoloy version 410 or later. A free trial version of Crocodile Technology can be downloaded from: www.crocodile-clips.com. Animated diagrams run without Crocodile Technology. Single User £39.00 inc. VAT. Multiple Educational Users (under 500 students) £59.00 plus VAT. Over 500 students £79.00 plus VAT. DIGITAL WORKS 3.0 Counter project Digital Works Version 3.0 is a graphical design tool that enables you to construct digital logic circuits and analyze their behaviour. It is so simple to use that it will take you less than 10 minutes to make your first digital design. It is so powerful that you will never outgrow its capability Software for simulating digital logic circuits Create your own macros – highly scalable Create your own circuits, components, and i.c.s Easy-to-use digital interface Animation brings circuits to life Vast library of logic macros and 74 series i.c.s with data sheets Powerful tool for designing and learning. Hobbyist/Student £45 inc. VAT. Institutional £99 plus VAT. Institutional 10 user £249 plus VAT. Site Licence £599 plus VAT. ELECTRONIC COMPONENTS PHOTOS A high quality selection of over 200 JPG images of electronic components. This selection of high resolution photos can be used to enhance projects and presentations or to help with training and educational material. They are royalty free for use in commercial or personal printed projects, and can also be used royalty free in books, catalogues, magazine articles as well as worldwide web pages (subject to restrictions – see licence for full details). Also contains a FREE 30-day evaluation of Paint Shop Pro 6 – Paint Shop Pro image editing tips and on-line help included! Price (UK and EU customers add VAT at 17·5% to “plus VAT’’ prices) £19.95 inc. VAT Minimum system requirements for these CD-ROMs: Pentium PC, CD-ROM drive, 32MB RAM, 10MB hard disk space. Windows 95/98/NT/2000/ME/XP, mouse, sound card, web browser. CD-ROM ORDER FORM Please send me: Electronic Projects Electronic Circuits & Components V2.0 Analogue Electronics Digital Electronics V2.0 Analogue Filters Electronics CAD Pack Robotics & Mechatronics Assembly for PICmicro V3 ‘C’ for PICmicro V2 Flowcode V2 for PICmicro Digital Works 3.0 ORDERING ALL PRICES INCLUDE UK POSTAGE Version required: Hobbyist/Student Institutional Institutional/Professional 10 user Site licence Student/Single User/Standard Version price includes postage to most countries in the world EU residents outside the UK add £5 for airmail postage per order PICmicro Development Board V3 (hardware) Teach-In 2000 + FREE BOOK Electronic Components Photos Project Design – Single User Project Design – Multiple User (under 500 students) Project Design – Multiple User (over 500 students) } Note: The software on each version is the same, only the licence for use varies. Full name: . . . . . . . . . . . . . . . . . . . . . . . . . . . . . . . . . . . . . . . . . . . . . . . . . . . . . . . . . . . . . . . . . . . . . . . . . Address: . . . . . . . . . . . . . . . . . . . . . . . . . . . . . . . . . . . . . . . . . . . . . . . . . . . . . . . . . . . . . . . . . . . . . . . . . . . . . . . . . . . . . . . . . . . . . . . . . . . . . . . .Post code: . . . . . . . . . . . . . . . . .Tel. No: . . . . . . . . . . . . . . . . . . . . . Signature: . . . . . . . . . . . . . . . . . . . . . . . . . . . . . . . . . . . . . . . . . . . . . . . . . . . . . . . . . . . . . . . . . . . . . . . . . . . I enclose cheque/PO in £ sterling payable to WIMBORNE PUBLISHING LTD for £ Please charge my Visa/Mastercard/Amex/Diners Club/Maestro: £ Valid From: . . . . . . . . . . . . . . . . . . . . .Card expiry date: . . . . . . . . . . . . . . . . . . . . . . . . . . . . . . Card No: . . . . . . . . . . . . . . . . . . . . . . . . . . . . . . . . . . . . . . . . . . . . . . . . . . . . Maestro Issue No. . . . . . . . . . Card Security Code . . . . . . . . . . (The last 3 digits on or just under the signature strip) 36 Institutional, Multiple User and Deluxe Versions – overseas readers add £5 to the basic price of each order for airmail postage (do not add VAT unless you live in an EU (European Union) country, then add 17½% VAT or provide your official VAT registration number). Send your order to: Direct Book Service Wimborne Publishing Ltd 408 Wimborne Road East Ferndown, Dorset BH22 9ND To order by phone ring 01202 873872. Fax: 01202 874562 Goods are normally sent within seven days E-mail: [email protected] Online shop: www.epemag.wimborne.co.uk/shopdoor.htm Everyday Practical Electronics, January 2007 High-efficiency power supply For 1W Luxeon Star LEDs Looking for a highly-efficient switchmode power supply to run a 1W Luxeon Star LED from batteries? This easy-to-build design lets you use a pair of 1.5V ‘D’ cells and includes brightness control to further extend the battery life. By PETER SMITH I N THE October ’06 issue we described a simple linear supply for driving Lumileds’ 1W Luxeon Star LEDs. Designed with low cost and simplicity in mind, it is ideal for experimentation as well as generalpurpose fixed lighting applications. The downside to this simplicity is 38 that it’s not very energy efficient. However, for portable and emergency lighting applications, efficiency is of paramount importance. In a low-efficiency lighting setup, much of the available energy is consumed by the power supply itself, where it’s dissipated as heat. Conversely, an efficient supply transfers the majority of the input power to the output, thereby maximising battery life. This high-efficiency switchmode design can drive a single 1W Luxeon Star for more than 20 hours (continuous use) from a pair of alkaline ‘D’ cells. It also includes a brightness control which, when set to the lower end of the scale, will extend useful battery life many times over. The PC board is the same size as two ‘D’ cells side-by-side, making it ideal for use in lanterns, emergency lights, beacons, etc. We envisage it being used anywhere that a portable, reliable and ultra-long-life light source is required. It can drive green, cyan, blue and royal blue as well as white 1W LED varieties. Everyday Practical Electronics, January 2007 Main Features • High efficiency (>85%) • Brightness control • 2 x ‘D’ cell powered • 20+ hours continuous use • Drives white, green & blue Stars Fig.1: when the switch closes, inductor current increases with time, storing energy in its magnetic field. Step-up DC-DC conversion The circuit is based around a MAX1676 step-up DC-DC converter IC. These devices were originally designed for use in mobile phones and the like. Our circuit requires a step-up converter in order to boost the battery voltage, typically between 2.4V to 2.8V, to the higher 3.3V (nominal) required by the LED. Step-up conversion also assures maximum LED brightness over the lifetime of the batteries. To understand how this works, let’s first look at a few of the basics. Fig.2: when the switch opens, the magnetic field collapses. The inductor’s energy is discharged into the capacitor and load via the diode. Boosting the battery voltage The basic components of a step-up converter consist of an inductor, transistor (switch) and diode – see Fig.1. When the switch closes, the input voltage is applied across the inductor. The current flow (i) ramps up with time (t) and energy is stored in the inductor’s magnetic field. When the switch opens (Fig.2), an instantaneous voltage appears across the inductor due to the collapsing magnetic field. This voltage is of the same polarity as the input voltage, so the diode conducts, transferring energy to the output. Fig.3 shows where these basic parts fit in our design. As you can see, most of the step-up circuitry is contained within the MAX1676. Q1 acts as the switch, with Q2 replacing the series diode. Q2 acts as a synchronous rectifier, eliminating forward voltage losses and therefore improving efficiency. Fig.3: this diagram shows the basic elements of the power supply. Most of the step-up circuitry is contained within the MAX1676 chip, including the switching transistor and rectifier Fig.4: On the bench, our prototype powered a Star for over 20 hours on ‘D’ size alkaline cells. Even at 0.6V/cell, the supply was still pumping out more than half a watt (about 160mA). Almost full power is delivered to the LED down to 1.8V. This means that you’ll get high brightness over the entire life of a set of rechargeables. Converter efficiency was measured at 90.1% with a 3.0V input, with a total circuit efficiency (input to output) of 85.5% Output control The MAX1676 converter uses a current-limited pulse-frequency modulation (PFM) technique to maintain output regulation. Essentially, the switch is driven with a minimum pulse width, variable-frequency signal (up to 500kHz), which increases as battery voltage decreases. For a detailed description of its operation, check out the Maxim datasheet, available from www.maxim-ic.com. When the battery voltage falls below about 1.8V, the output power decreases markedly due to the high input to output voltage differential (see Fig.4). For example, with only 0.5V per cell, a Everyday Practical Electronics, January 2007 step-up ratio of about 3.3:1 would be required to achieve full power. Assuming about 75% efficiency, this means that the supply would have to pull around 1.4A from the (already) flat batteries. And with increasing cell resistance, this simply wouldn’t be possible. 39 Fig.5: the complete circuit diagram for the power supply. Two CMOS 7555 ICs modulate LED brightness by controlling the step-up converter’s shutdown pin. As you can see, reducing output power towards the end of battery life is actually desirable, as it allows the supply to almost drain a pair of alkaline cells. This reduces wastage and provides a useful amount of light for much longer. Filament lamp circuits can’t hope to match this result. To prove the point, try your torch batteries with this supply when they’re almost knackered – you’ll be amazed at the brightness of the LED compared to the incandescent bulb! Circuit description The complete circuit diagram for the power supply appears in Fig.5. It consists of two main elements – the step-up converter (no surprises here) and two 7555 timers (IC1 & IC2). The timers are part of the brightness control circuit, which we’ll come back to in a moment. First, let’s complete the description of the step-up converter. In a standard application, the MAX1676 (IC3) requires very little external circuitry to form a complete step-up power supply. However, in order to regulate output current (rather than output voltage) for our LED load, we’ve added a few components to the feedback loop. Transistors Q2 & Q3 amplify the current sense voltage developed across the parallel 1Ω resistors. These two transistors are connected in a current mirror configuration, with Q2’s base and collector connected to IC3’s 1.3V reference output. Therefore, a known current flows through Q2. This is used to generate 175mV at the emitter of Q2 and by current mirror action, Q3 attempts to maintain the same voltage at its emitter. The MAX1676’s internal error amplifier compares the feedback voltage on pin 1 with a 1.3V reference. If it is less than 1.3V, the voltage at the output (pin 10) is increased, whereas if it is more, the voltage is decreased. This has the effect of increasing or decreasing the current through the Star LED. Q3’s collector controls the voltage on the feedback pin, acting much like a common base amplifier. When 40 Everyday Practical Electronics, January 2007 its emitter voltage equals 175mV (for 350mA through the LED), the collector will be at 1.3V and the loop is in regulation. Trimpot VR1 provides a means of adjusting the LED current to the desired 350mA, thus accommodating component tolerances. Zener diode ZD1 clamps the output to a maximum of 6V to protect IC3 should the LED fail or be inadvertently disconnected. The 5.6nF capacitor between the output and feedback pins ensures loop stability. Low-battery detection Both rechargeable (NiCad/NiMH) and alkaline battery types can be used with the power supply. Alkaline batteries are a good choice for intermittent use, as they have a low self-discharge rate. On the other hand, rechargeables work well for continuous use. Their lower internal resistance and relatively flat discharge curve provides a higher average level of light output over the discharge period compared to non-rechargeables. Unlike non-rechargeables, it’s important not to totally discharge NiCad and NiMH cells. Repeatedly doing so substantially reduces cell life. To help avoid this problem, the power supply includes low-battery indication. When the voltage on the MAX1676’s low-battery comparator input (pin 2) falls below an internal reference voltage (1.3V), the comparator’s output (pin 3) goes low. This switches on transistor Q4, illuminating the ‘Low Battery’ LED. A simple voltage divider connected to the comparator input sets the trip point to about 1.8V (0.9V per cell). When running on alkalines, the LED provides a useful indication of battery condition. Brightness control The brightness of an LED can be varied by varying the current through it. However, rather than varying the absolute level, Luxeon recommends pulse-width modulating (PWM) it instead. This results in a much more colour-uniform light output, right down to minimum brightness. To realise PWM control, it’s just a matter of switching the LED current on and off at a fixed frequency and varying the duty cycle (on/off time) to vary the brightness. By using a high enough Fig.6: this is the waveform across LED2 with VR1 at mid-position. A 180Hz PWM frequency ensures that the LED appears to be always on. Note that the waveform is not a perfect square wave due to the time constant of the output filter capacitor frequency, the switching effects are invisible due to the long persistence of the phosphors (in white LEDs) and the natural integration of the eye. On the power supply board, two 7555 CMOS timers (IC1 & IC2) form the core of the PWM circuitry. The first 7555 (IC1) is configured as a free-running oscillator. Its frequency of oscillation (about 180Hz) is set by the 680kΩ and 100Ω resistors and the 10nF capacitor on pins 2, 6 & 7. The 100Ω resistor in the capacitor’s discharge path is much smaller than the 680kΩ resistor in the charge path, resulting in a very narrow positive pulse from IC1’s output. This is used to trigger the second 7555 (IC2). IC2 is configured as a monostable, with the positive pulse width on the output (pin 3) made variable by 1MΩ trimpot VR1. Near the maximum pot setting, the positive pulse width is longer than the period of IC1. This is where transistor Q1 comes in – it is needed to discharge the 5.6nF timing capacitor, effectively retriggering IC2 and allowing a 100% duty cycle at the output. The fixed frequency, variable pulse width (PWM) output from IC2 is applied to the MAX1676’s shutdown pin. When this pin goes low, the chip stops switching and goes into low-power mode. Fig.6 shows the waveform Everyday Practical Electronics, January 2007 across LED2 at VR1’s mid position. As shown, this results in a 55% duty cycle or thereabouts. Power for the 7555 timers and associated circuitry is provided via Schottky diodes D2 & D3. By sourcing power from the output as well as the input sides of the circuit, we ensure that the signal level applied to the MAX1676 shutdown pin tracks the output voltage and remains valid under all conditions. This is a fairly complicated PWM circuit because it must operate down to 1V. Note also that we’ve used 7555 (CMOS) timers rather than 555 (NMOS) versions, which saves power and ensures low-voltage operation. Reverse battery protection Many circuits include a diode in series with the DC input for protection against accidental supply reversal. However, a series diode in this circuit would seriously compromise efficiency and running time. Therefore, we’ve settled for a reverse diode (D1) across the input terminals. A reversed supply will cause large current flow through D1 and, in the case of high-energy rechargeable cells, will quickly destroy it. In many cases, the diode will fail ‘short circuit’, protecting the expensive (and hard to replace!) step-up converter IC. 41 Fig.7: three SMD components go on the bottom side of the PC board and these must be mounted before anything else Fig.8: a close-up section of the bottom side of the board, showing just the area of interest for the SMD components. Note how IC3’s leads are positioned precisely in the centre of the rectangular pads You will need fine (0.5mm) solder and a temperature-controlled iron to solder in the SMD components. In addition, the job is made easier with the aid of SMT rework flux. Note: the ICs used in this project are static-sensitive. We recommend the use of a grounded anti-static wrist strap during board assembly. Fig.9: follow this diagram when assembling the top side. Don’t miss any of the links (there are 10 in all), and take care with the orientation of the ICs, diodes and electrolytic capacitors This is assuming, of course, that the batteries are only momentarily reversed. Leaving them connected for any length of time will cause heat damage to the board, or worse. If you’re concerned about this possibility, then install a 2A quick-blow fuse in series with the positive battery lead. SMD soldering gear Referring to the various photos and diagrams, you can see that the assembly includes three surface-mounted devices (SMDs) – the MAX1676 converter IC and two 100nF chip capacitors. The MAX1676 is supplied in a tiny ‘uMAX10’ package with 0.5mm lead spacing. Soldering this little device can be a challenge – even for 42 Bottom side assembly experienced constructors. It must be mounted first, before any of the through-hole components. The following items should be considered essential to the task: • Temperature-controlled soldering iron. • 0.8mm (or smaller) micro-chisel soldering iron tip. • 0.76mm desoldering braid (‘SolderWick’ size #00). • 0.5mm (or smaller) resin-cored solder. • Needle-nose tweezers. • Damp sponge for tip cleaning. • Small stiff brush & alcohol/cleaning solvent. • Magnifying glass and bright light for inspection. Begin by checking the PC board for defects. In particular, check for shorts between pads and tracks around IC3’s mounting site. The magnifying glass and bright light will come in handy here. Use your multimeter to verify isolation between any suspect tracks. Next, thoroughly clean the board with a lint-free tissue (or similar) moistened with alcohol or cleaning solvent. The rectangular IC pads must be pre-tinned and perfectly smooth (free of solder “lumps”). If you have SMT rework flux, apply a thin film to the mounting pads. Using needle-nose tweezers, grasp the MAX1676 by its ends and inspect it closely under a magnifying glass. Make sure that the leads are all perfectly formed, with equal spacing and alignment in the horizontal plane. In other words, they must all line up and make contact with their respective pads. Carefully adjust individual leads if necessary (you may need a second pair of tweezers). Place the device in position on the bottom side of the PCB, with pin 1 aligned as shown in Figs.7 & 8 (doublecheck this!). Now, using your magnifying glass, make sure that the device is perfectly aligned over the rectangular pads. This is very fiddly and requires patience and a steady hand! Next, clean your iron’s tip and apply a small quantity of solder to it. With your ‘third hand’, apply light Everyday Practical Electronics, January 2007 downward pressure on the MAX1676 to hold it in position. If the package moves (which it is liable to do), reposition it and start over again. Apply the tip to one of the IC’s corner mounting pads, touching both the pad and IC lead simultaneously. The solder should ‘blob’, tacking the chip in place. Check that the IC is still perfectly aligned over the rectangular pads. If it’s not, carefully remove it and try again. If you find that the package moves whenever you try to tack the first pin, then there is an alternative method. First, position the IC as described above and apply your iron to the track/pad just in front of the IC lead (don’t touch the lead). Next, feed a little solder to the tip, and it should flow along the track/pad and up over the lead. This method is more successful when additional flux is used. Now repeat the same procedure for the diagonal corner, effectively securing the IC in position. Check alignment again, as we’re about to make this position permanent! If you have SMT flux, apply it to all IC leads and the adjacent tinned copper areas. You can now solder the remaining eight leads. Apply heat to both the pad and lead simultaneously and feed a minimum amount of solder to the joint. Do not apply heat to any lead for more than two seconds! Despite your best efforts, you’re certain to get ‘blobs’ of solder and perhaps even solder bridges between adjacent pins. Don’t despair – this can be fixed! Again, if you have SMT flux, apply a minimum amount to all IC leads and This view shows the fully assembled PC board. Take care to ensure all parts are installed correctly adjacent PC board copper. Next, position a length of fine desoldering braid across the ICs leads and heat with a freshly tinned iron. You will probably find that it’s easier to heat two or three leads at once. The idea is to remove all of the solder blobs and bridges, leaving bright and wellformed solder fillets between leads and pads. As before, do not apply heat to any lead for more than two seconds and allow about 20 seconds between applications for the IC to cool! Once you’ve done that, remove all flux with the cleaning fluid and brush and inspect the result under a magnifying glass. Redo any joints as necessary. Once you’re happy with your work, use a multimeter to make sure that there are no shorts between adjacent Table 2: Capacitor Codes Value μF Code EIA Code 100nF 0.1µF 104 10nF 0.01µF 103 5.6nF 0.0056µF 562 IEC Code 100n 10n 5n6 Table 1: Resistor Colour Codes o o o o o o o o o o o o o o o No. 1 2 1 1 1 1 1 1 2 1 1 2 2 1 Value 680kΩ 160kΩ 100kΩ 62kΩ 47kΩ 27kΩ 6.8kΩ 3kΩ 470Ω 270Ω 200Ω 100Ω 1Ω 10Ω 5W Everyday Practical Electronics, January 2007 4-Band Code (1%) blue grey yellow brown brown blue yellow brown brown black yellow brown blue red orange brown yellow violet orange brown red violet orange brown blue grey red brown orange black red brown yellow violet brown brown red violet brown brown red black brown brown brown black brown brown brown black gold gold not applicable 5-Band Code (1%) blue grey black orange brown brown blue black orange brown brown black black orange brown blue red black red brown yellow violet black red brown red violet black red brown blue grey black brown brown orange black black brown brown yellow violet black black brown red violet black black brown red black black black brown brown black black black brown brown black black silver brown not applicable 43 Parts List 1 PC board, code 600, 68mm x 62mm. Available from the EPE PCB Service 1 L8 ferrite toroid, 16 x 10 x 6mm (L1) 2 2-way 2.54mm terminal blocks (CON1, CON2) 1 3-way 2.54mm SIL header (JP1) 1 jumper shunt 2 8-pin IC sockets 1 2 x ‘D’ cell holder 1 SPST power switch to suit (2A contacts) (S1) 1 300mm length (approx.) 1mm enamelled copper wire 4 M3 x 10mm tapped nylon spacers 4 M3 x 6mm pan head screws Semiconductors 2 7555 CMOS timers (IC1, IC2) 1 MAX1676EUB step-up DC-DC converter (IC3) 1 1N5404 3A diode (D1) 2 BAT46 Schottky diodes (D2, D3) 2 PN200 pnp transistors (Q1, Q4) 2 2N3904 npn transistors (Q2, Q3) 1 3mm high-intensity red LED (LED1) 1 1W Luxeon Star LED (white, green, cyan, blue or royal blue) (LED2) Capacitors 2 100µF 50V low-ESR PC electrolytic 1 100µF 16V PC electrolytic 3 100nF 50V monolithic ceramic 2 100nF 50V SMD chip (0805 size) 3 10nF 63V MKT polyester 2 5.6nF 63V MKT polyester Resistors (0.25W, 1%) 1 680kΩ 1 6.8kΩ 2 160kΩ 1 3kΩ 1 100kΩ 2 470Ω 1 62kΩ 1 270Ω 1 47kΩ 1 200Ω 1 27kΩ 2 100Ω 2 1Ω 0.25W 5% 1 10Ω 5W 5% (for testing) Trimpots 1 1MΩ miniature horizontal trimpot (VR1) 1 5kΩ miniature horizontal trimpot (VR2) Miscellaneous Hot melt glue or neutral cure silicone sealant 44 Fig.10: the full-size PC board pattern. Check your board carefully for etching defects before installing any of the parts 600 pads and tracks. This step is very important; a hairline solder bridge can be difficult to spot by eye! Before moving on to the top side of the board, solder the two 100nF chip capacitors in place (see Figs. 7 & 8) and install the insulated wire link. The link can be fashioned from a length of 0.7mm tinned copper wire insulated with heatshrink tubing or similar. You’ll need to form a gentle bend into the link so that it doesn’t obscure the holes for the capacitor leads. Trim the link ends flush with the surface on the top side of the board. Top side assembly Now for the top side assembly. First, fit an M3 × 10mm tapped Nylon spacer to each corner of the PC board. This will help to protect the SMD parts while you’re installing the remaining parts. Using the overlay diagram as a guide (Fig.9), begin by installing all the wire links using 0.7mm tinned copper wire. Note that some of them go underneath components (IC1 & IC2, for example), so they must be installed first! Next, install all of the 0.25W resistors, followed by diodes D2, D3 and ZD1. Be sure to align the cathode (banded) ends as shown. All remaining parts can now be installed in order of height, leaving the large 100µF capacitors and inductor L1 until last. Be careful not to mix up the two different transistor types. Winding the inductor The inductor (L1) must be handwound. To do this, wind 6.5 turns of 1.0mm enamelled copper wire onto the specified ferrite toroid. The wire must be wound as tightly as possible and spaced evenly over the core area (see Fig.9 and the photos). The start and finish should be spaced about one turn apart. Trim and bend the wire ends to get a neat fit into the PC board holes. That done, use a sharp blade to scrape the enamel insulation off the wire ends. The ends can then be tinned and the completed assembly slipped into position and soldered in place. You can now permanently fix the inductor to the PC board using a few blobs of hot-melt glue or neutral cure (non-acetic) silicone sealant. Finally, install the two 100µF electrolytic capacitors. Note that they go in opposite ways around, so be sure to align the positive leads as indicated on the overlay diagram. Test and calibration Don’t be tempted to hook up your Star LED just yet! First, the supply must be checked for correct operation and the output current set. To do this, first connect a 10Ω 5W resistor directly across the output terminals. Next, hook up your battery holder’s flying leads to the input terminals, making sure that you have them the right way around. Use the overlay diagram (Fig.9) to determine the correct polarity. Note that the leads to the battery holder should be kept as short as possible. We’d also recommend replacing the light duty leads (supplied prewired on most holders) with heavyduty multi-strand cable. The next step is to install a jumper shunt on pins 2-3 of JP1 to disable brightness control and to set VR2 to its centre position. Now hold your breath and plug in a pair of fresh alkaline batteries. Measure the voltage drop across the 10Ω resistor. If the supply is working properly, your meter should read near 3.5V. If it is much lower (say, around 2.3V), then the step-up converter is not doing its job. Assuming all is well, adjust VR2 to get 3.5V across the resistor. Everyday Practical Electronics, January 2007 LED mounting the lower forward voltage of the latter The Luxeon Star’s emitter and col- varieties (2.3V min. versus 2.8V). With limating optics are factory-mounted maximum input voltage, the output of on an aluminium-cored PC board. In the supply could exceed a red/amber most cases, no additional heatsinking LED’s forward voltage, with the result is required. However, a small heatsink being loss of regulation and probable reduces junction temperature and damage to the LED. therefore ensures maximum LED life. LED hook-up Just about any small aluminium heat Wire up your Star LED with light to sink with a flat surface large enough to accommodate the Star’s 25mm medium-duty multi-strand cable. Try footprint can be pressed into service. to keep the cable length under 150mm For example, an old 486 PC processor or so. A small copper ‘dot’ near one of heatsink would probably be ideal. A the corner pads indicates the anode (+) side of the LED. light smear of heatsink compound Next, disconnect the 10Ω ‘test’ between the mating surfaces will aid resistor and replace it with the LED heat transfer. leads. That done, you can power up We’ve not provided any specific mounting details here, as they will and measure the voltage drop across depend entirely on your application. the paralleled 1Ω resistors. These are Keep in mind that the heatsink surface situated next to the output connector must be completely flat so as not to (see Fig.9). If necessary, readjust VR2 distort the LED’s PC board when the to get a reading of 175mV. As described mounting screws are tightened. You earlier, this sets the LED current at full ewart of reading-DEC05.qxp 29/11/2006 Page 1 power to 350mA. should also provide strain relief for 11:32 By the way, you must not stare dithe connecting wires. Note that this supply is suitable for rectly into the LED beam at close range, use with white, green or blue stars but as it is (according to Luxeon) bright NOT red or amber. This is because of enough to damage your eyesight! Note: the current calibration procedure described above should only be performed after installing a fresh set of alkaline batteries. If you’re using a DC power supply instead of batteries, set the input voltage to 2.80V (never exceed 3.0V!) Brightness control To use the brightness control function, move the jumper shunt to the alternate position (JP1, pins 1-2 shorted). By rotating VR1, it should now be possible to vary the LED intensity all the way from dim to maximum brightness. If required, VR1 can be mounted away from the PC board. Keep the wire length as short as possible (say, no more than about 50mm) and twist the three connecting wires tightly together. If you’re using a plastic case, then the metal body of the pot will probably need to be connected to battery negative to reduce the effects of noise pickup. EPE Reproduced by arrangement with SILICON CHIP magazine 2006. www.siliconchip.com.au PLEASE ENSURE YOU TELEPHONE TO CHECK AVAILABILITY OF EQUIPMENT BEFORE ORDERING OR CALLING. SPECIAL OFFERS OSCILLOSCOPES TEKTRONIX 2247A 4 Channel 100MHz Counter/Timer/ Voltmeter . . . . . . . . . . . . . . . . . . . . . . . . .£275 TEKTRONIX 2335 Dual Trace 100MHz Delay Sweep . . .£125 TEKTRONIX 485 Dual Trace 350MHz Delay Sweep . . . .£300 IWATSU SS5711 4 Channel 100MHz Delay Sweep . . . .£150 PHILIPS 3065 2+1 Channel 100MHz Dual TB/Delay – Autoset £200 PHILIPS 3055 2+1 Channel 60MHz Dual TB/Delay – Autoset £150 PHILIPS PM3217 Dual Trace 50MHz Delay Sweep . . . . .£125 KIKUSUI COS6100 5 Trace 100MHz Delay . . . . . . . . . . .£150 TEKTRONIX 475A Dual Trace 250MHz Delay Sweep . . .£175 TEKTRONIX 475 Dual Trace 200MHz Delay Sweep . . . .£150 TEKTRONIX 465B Dual Trace 100MHz Delay Sweep . . .£125 TEKTRONIX 465 Dual Trace 100MHz Delay Sweep . . . . .£95 PHILIPS PM3209 Dual Trace 40MHz Delay . . . . . . . . . . .£125 PHILIPS PM3215 Dual Trace 50MHz . . . . . . . . . . . . . . . . .£75 KENWOOD CS4035 Dual Trace 40MHz . . . . . . . . . . . . . .£50 PANASONIC VP5564A Dual Trace 40MHz . . . . . . . . . . . .£50 HITACHI V525 Dual Trace 50MHz Cusors . . . . . . . . . . . . .£95 HITACHI V523 Dual Trace 50MHz Delay . . . . . . . . . . . . . .£80 HITACHI V425 Dual Trace 40MHz Cursors . . . . . . . . . . . . .£75 HITACHI V422 Dual Trace 40MHz . . . . . . . . . . . . . . . . . . .£60 HITACHI V223 Dual Trace 20MHz Delay . . . . . . . . . . . . . .£60 HITACHI V222 Dual Trace 20MHz . . . . . . . . . . . . . . . . . . .£50 HITACHI V212 Dual Trace 20MHz . . . . . . . . . . . . . . . . . . .£50 FARNELL DTV12-14 Dual Trace 12MHz . . . . . . . . . . . . . .£40 STORAGE PHILIPS PM3320 Dual Trace 200MHz 250Ms/S . . . . . . .£300 LECROY 9400 Dual Trace 125MHz . . . . . . . . . . . . . . . . .£325 TEKTRONIX 468 Dual Trace 100MHz Delay Sweep Digital Storage . . . . . . . . . . . . . . . . . . . . . . . . . . . . . . . . . . . . . . .£200 VELLEMAN HPS5 1MHz 5MHz Sampling. Handheld Unused £60 ANALYSERS ADVANTEST R3265A 100Hz-8GHz . . . . . . . . . . . . . . . . . .£4500 TEKTRONIX 492P 50kHz-21GHz . . . . . . . . . . . . . . . . . . . .£2250 HP8560A 50Hz-2.9GHz Built In Tracking Gen . . . . . . . . . .£3250 HP 8560A 50Hz-2.9GHz . . . . . . . . . . . . . . . . . . . . . . . . . . .£2950 HP 8569A 10MHz-22GHz . . . . . . . . . . . . . . . . . . . . . . . . . . .£950 HP 8565A 10MHz-22GHz . . . . . . . . . . . . . . . . . . . . . . . . . . .£750 HP 853A with 8559A 100kHz-21GHz . . . . . . . . . . . . . . . .£1100 HP 182T with 8559A 100kHz-21GHz . . . . . . . . . . . . . . . . . .£750 HP182T with 8558B 100kHz-1500MHz . . . . . . . . . . . . . . . .£600 HP 182T with 8557A 10kHz-350MHz . . . . . . . . . . . . .£300-£400 HP 140T with 8555A 10MHz-18GHz . . . . . . . . . . . . . . . . . .£500 ADVANTEST TR4131 10kHz-3.5GHz . . . . . . . . . . . . . . . . . .£950 WAYNE KERR SSA1000A 150kHz-1GHz . . . . . . . . . . . . . .£950 MARCONI 2382 200Hz-400MHz High Resolution . . . . . . .£1250 MARCONI 2370 30Hz-110MHz . . . . . . . . . . . . . . . . . . . . . .£500 HP 8754A Network Analyser 4-1300MHz . . . . . . . . . . . . . . .£500 MARCONI 6500A Amplitude Analyser with head . . . . . . . . .£750 HP 334A DIstortion Analyser 5Hz-600kHz . . . . . . . . . . . . . .£100 SIGNAL GENERATORS HP 8350B Sweeper with 83592B 10MHz-20GHz . . . . . . .£1500 HP 8350A Sweeper with 83592A 10MHz-20GHz . . . . . . .£1250 HP 8350B Main Frame Only . . . . . . . . . . . . . . . . . . . . . . . . .£125 HP 83525B RF Plug-in for 8350 0.01-8.4GHz . . . . . . . . . . .£500 HP 83590A RF Plug-in for 8350 2-20GHz . . . . . . . . . . . . . .£800 HP 8660C Sig Gen 1.3GHz . . . . . . . . . . . . . . . . . . . . . . . . . .£450 HP 8660C Sig Gen 2.6GHz . . . . . . . . . . . . . . . . . . . . . . . . . .£750 HP 86603A RF Plug-in for 8660C 1-2600MHz . . . . . . . . . .£....... HP86631B Axillary Section for 8660C . . . . . . . . . . . . . . . . .£....... HP86632B Modulation Section for 8660C . . . . . . . . . . . . . .£....... MARCONI 2017 0.01-124MHz Low Phase Noise . . . . . . . .£500 MARCONI 2019 Synthesised AM/FM 80kHz-1040MHz . . .£325 FLUKE 6060B AM/FM Syn Sig Gen 10kHz-1050MMHz . . .£300 LEADER LSG221B Sig Gen 25-950MHz . . . . . . . . . . . . . . .£200 HP 8656B Synthesised 0.1-990MHz . . . . . . . . . . . . . . . . . . .£500 HP 8656A Synthesised 0.1-990MHz . . . . . . . . . . . . . . . . . . .£400 HP 8640A AM/FM 500kHz-512MHz . . . . . . . . . . . . . . . . . . .£150 HP 8620C Sweep Osc with 86290B 2-18.6GHz . . . . . . . . .£500 HP8620C Sweep Osc with 86222B 0.01-2.4GHz . . . . . . . .£400 HP8620C/B/A with any of the following plug-ins . . . . .£150-£200 HP 86220A Plug in 10-1300MHz HP 86230B Plug in 1.5-4GHz HP 86235A Plug in 1.7-4.3GHz HP 86240A Plug in 2-8.5GHz HP 86240C Plug in 3-6-8.6GHz HP 86245A Plug in 5.9-12.4GHz HP86250B Plug in 8-12.4GHz HP 86250D Plug in 8-12.4GHz HP 86260A Plug in 12.4-18GHz MARCONI TF2015 AM/FM 10-520MHz . . . . . . . . . . . . . . . . .£95 MARCONI TF2016 AM/FM 10kHz-120MHz . . . . . . . . . . . . . .£95 PHILIPS PM5328 100kHz-180MHz with 200MHz Freq Counter IEEE . . . . . . . . . . . . . . . . . . . . . . .£225 PANASONIC VP8117A AM/FM 100kHz-110MHz FM 0-100kHz Digital Display etc. Unused . . . . . . . . . . . . .£225 STEWART of READING 17A King Street, Mortimer, Near Reading RG7 3RS Telephone: (0118) 933 1111. Fax: (0118) 933 2375 www.stewart-of-reading.co.uk Open 9am-5.00pm Monday to Friday (other times by arrangement) Everyday Practical Electronics, January 2007 HP 8165A Programmable Signal Source 1MHz-50MHz (Pulse/ Function) . . . . . . . . . . . . . . . . . . . .£325 HP 3325A Synthesised Function Gen 21MHz . . . . . . . . .£350 HP 3312A Function Gen 0.1Hz-13MHz AM/FM Sleep/Tri/Burst etc. . . . . . . . . . . . . . . . . . . . . . . . . . . . . . .£200 WAVETEK 21 Stabilised Function Gen 11MHz . . . . . . . .£225 WAVETEK 23 Synthesised Function Gen 12MHz . . . . . .£275 EXACT 529 AM/FM Function Gen 20MHz . . . . . . . . . . . .£150 ANALOGUE 2030 Synthesised Multi Function Waveform £250 THANDER TG503 Pulse/Function Gen 5MHz . . . . . . . . .£195 THANDER TG502 Sweep/Function Gen 5MHz . . . . . . . .£195 KRON-HITE 5200A Sweep Func Gen 0.00003Hz-3MHz .£150 HP 3310B Info as 3310A + etc. . . . . . . . . . . . . . . . . . . . .£120 HP 3310A Func Gen 0.005Hz-5MHz Sine/Sq/Tri/Ramp/Pulse .£80 PHILIPS PM5132 Function Gen 0.1Hz-2MHz . . . . . . . . . . . . . .£95 PHILIPS PM5131 Function Gen 0.1Hz-2MHz . . . . . . . . . . . . . .£75 FEEDBACK FG601 Func Gen 0.001Hz-1MHz . . . . . . . . . . . . .£60 HP 8112A Pulse Gen 50MHz . . . . . . . . . . . . . . . . . . . . . . . . . . .£750 HP 8111A Pulse Generator 20MHz . . . . . . . . . . . . . . . . . . . . . .£400 LYONS PG73N Pulse Gen 20MHz . . . . . . . . . . . . . . . . . . . . . . . .£50 LEADER LAG120B Sine/Sq Audio Generator 10Hz-1MHz . . .£60 FARNELL LFM4 Sine/Sq Osc. 10Hz-1MHz Low Distortion, TTL Output, Amplitutde Meter . . . . . . . . . . . . . . . . . . . . . . . . . . . .£60 GOULD J3B Sine/Sq Osc 10Hz-100kHz Low Distortion . .£50-£75 FARNELL LF1 Sine/Sq Oscillator 10Hz-1MHz . . . . . . . . . . . . . .£50 MARCONI SANDERS 6055C Signal Source 850-2000MHz .£125 MARCONI SANDERS 6055B Signal Source 850-2150MHz .£125 MARCONI SANDERS 6056B Signal Source 2-4GHz . . . . . . .£125 MARCONI SANDERS 6057B Signal Source 4.5-8.5GHz . . . .£125 MARCONI SANDERS 6059A Signal Source 12-18GHz . . . . .£125 MARCONI SANDERS 6070A Signal Source 400-1200MHz .£125 FLUKE 6011A Synthesised 11MHz . . . . . . . . . . . . . . . . . . . . . .£125 PHILIPS 5514V Colour Bar Generator Video . . . . . . . . . . . . . .£195 BLACK STAR ORION Colour Bar Gen . . . . . . . . . . . . . . . . . . . .£50 BLACK STAR ORION Later Version Metal Case . . . . . . . . . . . .£75 FREQUENCY COUNTERS/TIMERS EIP 371 Source Locking Microwave Counter 10Hz-18GHz . . .£325 EIP 331 Autohet Microwave Counter 825MHz-18GHz . . . . . . .£195 HP 5386A Counter 10Hz-3GHz . . . . . . . . . . . . . . . . . . . . . . . . .£350 FEEDBACK SC230 Counter 1.3GHz . . . . . . . . . . . . . . . . . . . . .£75 RACAL 9916 Counter 10Hz-520MHz . . . . . . . . . . . . . . . . . . . . .£75 RACAL 9906 Universal Counter 200MHz . . . . . . . . . . . . . . . . . .£95 RACAL 9904 Counter Timer 50MHz . . . . . . . . . . . . . . . . . . . . . .£50 RACAL 1991 Counter/Timer 160MHz 9 digit . . . . . . . . . . . . . .£195 MARCONI 2431A Frequency Meter 200MHz . . . . . . . . . . . . . . .£50 MARCONI 2437 Counter/Timer 100MHz . . . . . . . . . . . . . . . . . .£75 HP 5340A Automet Microwave Counter 10Hz-18GHz . . . . . . .£250 HP 5316A Universal Counter 0-100MHz HPIB . . . . . . . . . . . . . .£95 THANDAR TF810 Frequency Counter 5Hz-200MHz Battery . .£60 THANDAR TF200 Frequency Meter 10Hz-200MHz 8 digit . . . .£40 BLACK STAR Meteor 100 Counter 5Hz-100MHz . . . . . . . . . . .£50 BLACK STAR 1325 Counter Timer 1300MHz . . . . . . . . . . . . .£150 BECKMAN UC10A Universal Counter 120MHz . . . . . . . . . . . . .£60 LEADER LDC9043 Digital Counter 100MHz . . . . . . . . . . . . . .£125 DIGITAL MULTIMETERS ETC SOLARTRON 7150 6½ digit True RMS IEEE . . . . . . . . . . . . . . £75 SOLARTRON 7150Plus As Above + Temp Measurement . . . £100 DATRON 1065 5½ digit Autocal AC/DC Resistance IEEE . . . . £95 FLUKE 77 3½ digit Handheld . . . . . . . . . . . . . . . . . . . . . . . . . . £35 FLUKE 77 Series 2 3½ digit Handheld . . . . . . . . . . . . . . . . . . £45 FLUKE 8060A 4½ digit True RMS Handheld . . . . . . . . . . . . . . £75 BECKMAN HD110 3½ digit Handheld in Carry Case . . . . . . . £30 TTI 1905A 5½ digit Bench. . . . . . . . . . . . . . . . . . . . . . . . . . . . . £60 SOLARTRON 7045 4½ digit Bench . . . . . . . . . . . . . . . . . . . . . £30 AVO DA116 3½ digit with Batteries & Leads . . . . . . . . . . . . . . £20 AVO 8 Mk6 in Ever Ready Case with Leads etc. . . . . . . . . . . . £75 AVO 8 Mk5 with Leads etc . . . . . . . . . . . . . . . . . . . . . . . . . . . . £50 RACAL 9301A True RMS RF Millivoltmeter . . . . . . . . . . . . . . £125 RACAL 9300 True RMS Millivoltmeter 5Hz-20MHz usable to 60MHz . . . . . . . . . . . . . . . . . . . . . . . . . . . . . . . . . . . . £30 RACAL 9300B as 9300. . . . . . . . . . . . . . . . . . . . . . . . . . . . . . . £45 GOODWILL GVT427 Dual Chan AC Millivoltmeter 10mV in 12 ranges 10Hz-1MHz Unused . . . . . . . . . . . . . . . . . . . . . . . . . £75 KENWOOD VT176 Dual Chan Millivoltmeter . . . . . . . . . . . . . . £40 POWER SUPPLIES FARNELL XA35.2T 0-35V 0-2A Twice Digital. . . . . . . . . . . . . . £95 FARNELL LT30-2 0-30V 0-2A Twice. . . . . . . . . . . . . . . . . . . . £110 FARNELL B30/20 30V 20A Variable No Meters . . . . . . . . . . . £110 FARNELL B30/10 30V 10A Variable No Meters . . . . . . . . . . . . £55 FARNELL LT30-1 0-30V 0-1A Twice. . . . . . . . . . . . . . . . . . . . . £75 FARNELL L30.2 0-30V 0-2A. . . . . . . . . . . . . . . . . . . . . . . . . . . £55 FARNELL L30.1 0-30V 0-1A. . . . . . . . . . . . . . . . . . . . . . . . . . . £40 FARNELL E350 0-350V 0-200mA . . . . . . . . . . . . . . . . . . . . . £125 FARNELL D30-2T 0-30V 0-2A Twice Digital. . . . . . . . . . . . . . . £95 THURLBY PL330 0-32V 0-3A Digital (Kenwood badged) . . . . £75 THURLBY TS3021S 0-30V 0-2A LCD . . . . . . . . . . . . . . . . . . . £65 THURLBY PL320 0-30V 0-2A Digital . . . . . . . . . . . . . . . . . . . . £55 TAKASAGO GMO35-3 0-35V 0-3A 2 Meters . . . . . . . . . . . . . . £45 TAKASAGO TMO35-2 0-35V 0-2A 2 Meters . . . . . . . . . . . . . . £35 ISOLATING TRANSFORMER - Yellow - 500VA with 13Amp Socket . . . . . . . . . . . . . . . . . . . . . . . . . . . . . . . . . . . . . . £35 Used Equipment – GUARANTEED. Manuals supplied This is a VERY SMALL SAMPLE OF STOCK. SAE or Telephone for lists. Please check availability before ordering. CARRIAGE all units £16. VAT to be added to Total of Goods and Carriage 45 Regular Clinic Circuit Surger y Ian Bell Understanding power MOSFETs ECENTLY, Individual posted a few R questions about MOSFET drivers on the EPE Chat Zone (access via www.epemag.co.uk). “Can anyone tell me what’s the purpose of MOSFET driver ICs? Why and how are they used? And why can’t we use the MOSFET’s without their drivers? I mean, by triggering the gate with a continuous voltage? But what does bootstrap operation mean? And also high side and low side?”. We will start with a look at power MOSFET devices and then at the need for driver circuits and some forms they take (such as high side and low side). Power MOSFETs To understand power MOSFETs and their driver circuits it is useful to first know a little bit about how MOSFETs are constructed and operate. The power MOSFET, like other MOSFETs, is basically a voltage controlled device, that is the gate-source voltage controls the drain current. Fig.1 shows the two full power MOSFET symbols that includes the parasitic diode which is an intrinsic part of the MOSFET’s structure. This diode is quite often not included in schematics, the basic MOSFET symbols being used instead. Conduction between source and drain in an ordinary MOSFET takes place in a narrow channel region under the gate (as shown in Fig.2). The term lateral MOSFET is used to describe this structure of the standard low power MOSFET, as the current flows entirely through a horizontal plane. The basic operation of the N-channel MOSFET (as shown in Fig.2) is as follows. If we apply zero, low or negative gate-source voltage, the device is off because the N-P-N regions act as two back-to-back diodes. Only a very small leakage current can therefore flow from drain to source (or vice versa). Here, N and P refer to the type of chemical used to ‘dope’ pure silicon to create an interesting semiconductor behaviour. N-type silicon has more electrons free to take part in conduction than in pure silicon. P-type has fewer electrons, but these gaps can he regarded as mobile ‘holes’ which act like positively charged versions of the electrons in the N region. Thus both P and N-type silicon conduct Fig.1. Power MOSFET symbols showing a parasitic diode to some extent. Placing an N region next to a P region creates a PN junction, also known as a diode junction, through which current will usually flow in only one direction. If we apply a positive gate-source voltage the electrostatic attraction of this gate voltage will pull (negatively charged) elec- Fig.2. Simplified cross-section of a Lateral MOSFET used for low power applications 46 trons from the nearby silicon to the P-type region just under the gate. If sufficient electrons accumulate here there will eventually be an excess of electrons so the area just under the gate will behave as if it is N-type silicon. At this point there will have been created an N-type channel connecting the N-type drain and source regions, thus we have an NN-N path from source to drain, rather than the N-P-N back-to-back diodes previously described. Conduction can now take place from source to drain. The transistor is on and the gate-source voltage at which this occurs is called the threshold voltage. Physical structure The approach to the physical structure of the MOSFET device shown in Fig.2 cannot readily be extended to produce high power devices – the cross-sectional area of the conducting region simply cannot be made big enough (to make the on-resistance, RDSon, small) without using an unreasonably large area of silicon. Furthermore, the large gate area would make such a device very slow due to the high capacitance of a very large gate area. The structure of a basic power MOSFET is shown in Fig.3. The channel is still horizontal under the gate, but it is much shorter than in the conventional MOSFET, and the current flow between channel and drain is vertical. The short channel means a low on resistance, a property required by power devices. The actual structures of real power MOSFETs are more complex than those shown in Fig.3 (and a variety of other structures, including ‘trenches’, are used). Fig.3. Simplified DMOS Power MOSFET structure Everyday Practical Electronics, January 2007 The vertical nature of power MOSFETs means that they can readily be repeatedly wired in parallel connection to increase current handling capacity. Some power devices have over 20,000 parallel transistor cells. MOSFETs work happily in parallel because they do not suffer from current hogging and thermal runaway like bipolar transistors. Device types The variety of device structures and parallel layout plans of power MOSFETs lead to a variety of commercial brand names such as DMOS, VMOS, TMOS, HEXFET, TrenchFET and PowerTrench. The power MOSFET market can probably be divided into the ‘heavy duty’ area – dealing with very high voltages and currents, and the ‘high efficiency’ area at low voltages and moderate currents, where devices are typically targeted at applications such as the switch mode power supplies in portable systems like laptops. For heavy duty use, MOSFETs capable of handling 1000V drain-source voltage or drain-source currents of over 150A are available. In terms of choosing a device to use, first understand that the various names given to power MOSFETs relate to each company’s promotion of their technology, and that all the devices are basically power MOSFETs. Identify your key need – high efficiency, high speed, high voltage, high current, etc, and then select a device optimised for this that meets all your other requirements in terms of voltages, currents, power and speed. Manufacturers’ web sites often have ‘product selection’ systems that allow you to input or set the specification you need; then you get a list of devices that match that. Once you have selected a likely device, have a good look at the datasheet, which will usually be available as a PDF download. MOSFET drivers Now we have covered the MOSFETs, let’s look at the drivers. The term MOSFET driver usually refers to switched control of the MOSFET, where it is switched between fully on and fully off, by switching the gate-source voltage between 0V and some voltage well above the threshold. Use of voltages well above threshold ensures saturated operation, in which the on-resistance (RDSon) voltage drop across the device, and power dissipation are minimised. We can consider the device to be either in the off state, where little or no power is dissipated, or the on state, where power dissipation depends on RDSon and the drain source current. Of course, there are circuits, such as audio power amplifiers, in which MOSFETs are driven by a continuous gate voltage rather than switched. Typically in these circuits the MOSFETs will be embedded in bias and feedback circuits rather than having a simple forward connection from driver to gate. Our discussion of drivers here is limited to switching circuits. In order for power MOSFETs to switch quickly and efficiently, sufficient current must be available to quickly charge or discharge the gate capacitance of the device. The driver circuit’s source resistance and the resistance of the wiring both inside and outside the device cause the gate voltage to follow an RC charging curve, so the MOSFET will spend some time in between being fully on and fully off. During this time the device may dissipate a lot of power, a problem referred to as switching losses. The drive circuit therefore must be able to supply enough transient current to charge the gate capacitance at the required rate. In some cases this current may be quite substantial, particularly for large very high power devices, or where paralleled MOSFETs are being used. The effective capacitive of the MOSFET gate and hence the drive current required is increased by the Miller effect. The Miller effect occurs when a capacitor is connected to produce negative feedback in an amplifier – the gate-drain capacitance in this case. The capacitance is multiplied by a factor related to the amplifier gain to get effective capacitance. The dynamic capacitance of a power MOSFET gate during switching is complex and can be difficult to analyse. Basically, all this means is that driving the gate is probably harder than it first looks, hence the need for good driver circuits. Source current Many low-power circuit outputs, such as those of logic gates and microcontrollers simply cannot deliver enough current to drive the gate of a power MOSFET correctly. A power MOSFET driver is therefore a power amplifier that accepts a low-power input from a microcontroller (e.g. PIC) or other circuit and delivers the required highcurrent gate drive to the MOSFET. Gate drivers may be implemented as dedicated ICs, discrete transistors, or transformers. The circuits can be quite complex, particularly for high-side drivers (see later) and bridges, so the use of dedicated ICs can save a lot of effort. At first, the complexity of drivers may seem unnecessary, but seemingly small imperfections in the control of devices switching very large currents or high voltages can have significant consequences. Power MOSFET threshold voltages are typically 4V, but in order to fully turn on many of these devices for use at their full current rating, drive voltages of 10V or more may be needed. In some cases the driver circuit will translate the voltage levels in the control circuit (3V logic) to those required by the gate (10V) as well providing the high current drive – level shifters. As well as being too slow, it is also possible for power MOSFET circuits to switch too fast, or put more accurately, for voltage or currents within the circuit to change too fast. Very fast current and voltage changes can damage devices and also cause more interference radiation than slower switching. Careful design of the driver circuit may be required to get the switching behaviour correct, particularly in high speed and very high power applications. If we require that the load is grounded, or we are using a bridge circuit, then we need a high-side switch. N-channel devices are often preferred because the inherently higher conductivity of N-type silicon leads to higher performance devices. High-side switching is, however, often easier with P-channel devices. N-channel low-side switching is illustrated in Fig.4. The drive circuit has to switch the gate between 0V (off) and Vg (on). The power supply voltage for the driver (VDR) will usually be greater than or equal to Vg, but may be much less than the load power supply voltage (VL). The value of Vg required to fully turn on the MOSFET is typically 10V to 15V, but devices designed to switch at lower voltages are available. A P-channel device used as a high-side switch is shown in Fig.5. Note that the gate voltage is switched from VL (off) to VL-Vg (on). Fig.6 shows another high-side switch, in this case using an N-channel MOSFET and therefore requiring a gate voltage higher than the load supply voltage by Vg volts to switch the transistor on. High-side switches in circuits with high load voltages have to switch the MOSFET gate between two voltages that can be much larger than the supply voltage of the controller and drive circuits. When using Fig.4. Low-side drive using an N-channel MOSFET Fig.5. High-side drive using a P-channel MOSFET Configurations There are a number of different configurations in which power MOSFETs are used and these may require different types of driver. With a single transistor we can employ N-channel or P-channel devices, and we can use low-side switching, where the MOSFET is grounded, or high-side switching where the MOSFET is connected to the load power supply voltage. Everyday Practical Electronics, January 2007 Fig.6. High-side drive using an N-channel MOSFET 47 N-channel high-side drivers, one of these voltages will also be greater than the load supply voltage. For example, a controller and driver circuit working from a 15V supply might have to switch the MOSFET’s gate between 500V and 512V. Special techniques are required to do this and there are a number of methods available. Boostrap high-side drivers charge a capacitor using a low voltage supply and switch the capacitor to the gate-source of the MOSFET to turn it on. This approach cannot hold the transistor on indefinitely as the bootstrap capacitor has to be recharged periodically (while the high-side MOSFET is off). Charge-pump high-side drivers use voltage multiplier circuits to generate the high gate voltage – they can be inefficient and slow, but do allow indefinite high-side on time. A pulse transformer can be used to couple the control signal to the high-side gate, this is potentially simple and low-cost, but can be quite difficult to get right in practice. A floating power supply can be used for the highside drive circuit with switching controlled via an optoisolator. This is an expensive option as a separate supply is required for each high-side MOSFET used. This is not an exhaustive list of techniques and each has a number of variations on the basic idea. Intrinsic diode The intrinsic diode shown in Fig.1 can be used as a ‘freewheeling’ diode when switch- ing inductive loads – a freewheeling diode conducts the current produced by an inductor from its stored energy when an applied voltage is removed, preventing excessive voltages from occurring in the circuit. However, in applications requiring high frequency switching, the intrinsic diode does not have high enough performance and an external diode must be used. Take care when reading power MOSFET schematics to check whether an external or internal diode is depicted. In addition to possible freewheeling diodes, other components may be required in a snubber circuit. The function of a snubber is to protect the MOSFET from excessive voltages, currents, or rates of change of voltage or current that may otherwise damage the device. ByVac Electronics Control hardware using simple text commands BV4107 BV4106 BV4102 BV4108 BV4103 BV305 *** All controlled with 2 wire serial bus *** Making complex tasks simple: Using a two letter text command, control LCD displays, Analogue to digital converters, motors, keypads, LED matrix displays. All products work by serial connection. This is just a small selection visit the web site for hints tips Connect using a PC RS232 or Microcontroller UART and free software LCD Display Scrolling Text Backlight and contrast control £22.90 Binary to text display Much more... Control any compatible LCD LCD Controller Up to 4 lines by 20 characters £11.00 Scrolling text Much more... Dot Matrix 8 x 8 Bi Colour Red/Green Brightness control User defined bit patterns £14.95 Switch on ‘splash screen’ 4 x Analogue to digital A/D Control 4 x digital input or output £11.00 Pulse width modulation Trigger control 4 x 4 matrix keypad controller Keypad Control 16 key buffer £11.00 Row, column configurable Additional digital input 8052—89S8252 based Microcontroller No programmer needed Includes Tiny BASIC £14.95 KIT £+4.50 RBT On board power supply MONEY BACK GUARANTEE If you are not completely satisfied, return the goods within 30 days for a full refund. Purchase Options: On-Line at www.byvac.co.uk • Telephone 07905 734 348 • email [email protected] • Cheque or Postal Order to: ByVac, PO BOX 4049, Penistone, SHEFFIELD, S36 6WP Post and packing UK £2.50 World Wide £3.50 www.byvac.co.uk 48 Everyday Practical Electronics, January 2007 Learn About Microcontrollers Experimenting with 18F PICs This book introduces the latest 18F series of PIC Microcontrollers. We start with simple programmes to drive the LEDs, write text to the LCD and create a real time clock. We experiment with the various oscillator modes, the watchdog and the sleep mode. We use the analogue to digital converter as a voltmeter and experiment with the serial port. Finally we study the operation and control of stepper motors. Book Experimenting with 18F PICs . . . . . .£ 25.00 AUX145-SM Stepper motor controller. . . . .£ 49.00 5 volt 7.5 degree stepper motor. . . . . . . . . .£ 4.50 (Postage. UK ~ £8, Europe ~ £12, Rest ~ £20) You need to own or update to our P901 PIC Training System before purchasing the above. Experimenting with Visual C PIC Training & Development System The best place to start learning about microcontrollers is the PIC16F84 with its simple easy to understand internal structure. Then continue on using the more sophisticated PIC16F877 family. At the heart of our system are two real books which lie open on your desk while you use your computer to type in the programme and control the hardware. Start with four simple programmes. Run the simulator to see how they work.Test them with real hardware. Follow on with a little theory..... Our PIC training course consists of our PIC programmer module, a 298 page book teaching the fundamentals of PIC programming in assembly language, a 274 page book introducing the C programming language for PICs, and a suite of programmes to run on a PC. The module is an advanced design using a PIC16F870 to handle the timing, programming and switching requirements. Two ZIF sockets allow most 18, 28 and 40 pin PICs to be programmed. The plugboard is wired with a 5 volt supply. The programming is performed at 5 volts, verified with 2 volts or 3 volts applied and verified again with 5.5 volts applied to ensure the PIC is programmed correctly over its full operating voltage. UK orders include a plugtop power supply. P901 PIC Training System comprising..... Universal 16C, 16F and 18F PIC programmer module + Book Experimenting with PIC Microcontrollers + Book Experimenting with PIC C + PIC assembler and C compiler software suite + PIC16F84, PIC16F870, PIC16F88 test PICs. . . £159.00 (Postage & insurance UK £10, Europe £18, Rest of world £25) Optional book Exp with 18F PICs + PIC18F2525. . . . . . . £ 30.00 (Additional postage UK £0, Europe £3, Rest of world £5) Our new training system for complete beginners teaching Windows programming and simple PC interfacing. The book starts with details of how to build a latching serial port using a PIC18F2525. We use this port as our interface to our PC. As we work through the book we wire simple circuits into the plugboard of the latching serial port and write Windows programmes in Visual C to operate our circuits. We start by flashing LEDs, build a dice machine and an IC tester. We use the PC to write messages to a liquid crystal display. We learn to draw graphs on our PC screen. Then we build a digital to analogue converter, an analogue to digital converter, an audio oscilloscope, and a waveform analyser. Windows programming has never been so easy or so exciting. Book + built and tested latching serial port + CD.... £88 plus postage. See our web site for full details. Ordering Information Our PIC programmer module connects to the serial port of your PC (COM1 or COM2). Our PIC programming software will operate within Windows 98, XP, NT, 2000 etc. The new Visual C training system will require Windows XP, NT, 2000 etc. Telephone with Visa, Mastercard or Switch, or send cheque/PO. All prices include VAT if applicable. Experimenting with PIC Microcontrollers This book introduces PIC assembly language programming using the PIC16F84, and is the best way to get started for anyone who is new to PIC programming. We begin with four easy experiments. The first is explained over ten and a half pages assuming no starting knowledge of PICs. Then having gained some practical experience we study the basic principles of PIC programming, learn about the 8 bit timer, how to drive the LCD, create a real time clock, experiment with the watchdog timer, sleep mode, beeps and music, including a rendition of Beethoven's Fur Elise. Finally there are two projects, using the PIC16F84 as a sinewave generator and investigating using the PIC16F88 (from the PIC16F877 family) to monitor the power taken by domestic appliances. In 24 experiments, 2 projects and 56 exercises we go from absolute beginner to experienced engineer level. Experimenting with PIC C The second book starts with an easy to understand explanation of how to write PIC programmes in C. The first few programmes are written for a PIC16F84 then we see how to use the PIC16F627 and PIC16F877 families. We study how to create programme loops, we experiment with the IF statement, use the 8 bit and 16 bit timers, write text, integer, and floating point variables to the LCD, use the keypad to enter numbers, create a siren sound, experiment with the PICs USART....... Web site:- www.brunningsoftware.co.uk White LED and Motors Our PIC training system uses a very practical approach. Towards the end of the PIC C book circuits need to be built on the plugboard. The 5 volt supply which is already wired to the plugboard has a current limit setting which ensures that even the most severe wiring errors will not be a fire hazard and are very unlikely to damage PICs or other ICs. We use a PIC16F627 as a freezer thaw monitor, as a step up switching regulator to drive 3 ultra bright white LEDs, and to control the speed of a DC motor with maximum torque still available. A kit of parts can be purchased (£30) to build the circuits using the white LEDs and the two motors. See our web site for details. Mail order address: 138 The Street, Little Clacton, Clacton-on-sea, Essex, CO16 9LS. Tel 01255 862308 Readers’ Circuits Ingenuity Unlimited -BASED WIN A PICO PC WORTH £586 torage OSCILLOSCOPE ual Channel S Our regular round-up of readers’ own circuits. We pay between £10 and D 5GS/s £50 for all material pubOscilloscope m u r t c e p lished, depending on length S z H M 50 Analyser and technical merit. We’re looking for novel applications and circuit designs, not simply mechani Multimeter ter cal, electrical or software ideas. Ideas must be the reader’s own work Frequency Me . e c a f r e t n I and must not have been published or submitted for publication else B US l e v o n a e where. The circuits shown have NOT been proven by us. Ingenuity v a h If you ch i h w a e is open to ALL abilities, but items for consideration in this Unlimited d i t i u c r i c to column should be typed or word-processed, with a brief circuit would be of use en a description (between 100 and 500 words maximum) and include a full other readers th urs. circuit diagram showing all component values. Please draw all circuit o y e b ope could based oscillosc C P g a schematics as clearly as possible. Send your circuit ideas to: y n i g d o r l a o n w h a c e e Pico T gy will b , Pico Technolo s IU Ingenuity Unlimited, Wimborne Publishing Ltd., 408 Wimborne Road h t t s n e o b m e 2 h t 1 r y o r f e Ev scilloscope o e g a r o t s l a t p i o g i c d ogger/S e East, Ferndown, Dorset BH22 9ND. (We do not accept submissions PicoScope 3205 a DrDAQ Data L n o i t i d d a n I . n o the runner up. for IU via email.) Your ideas could earn you some cash and a prize! submissi be presented to worth £59 will Short-Range Radio Control – Budget Versatile Mini RC HE circuits in Fig.1 and Fig.2 repreT sents a 25kHz radio control transmitter and receiver – with a modest 10cm range. The circuit is all but completely immune to interference, and both transmitter and receiver may easily be encapsulated in polyester resin – however, make sure that the resin does not infiltrate S1 or VR1. Despite its short range, the circuit could be particularly well suited to specific applications. For instance, it would be well suited as a secret door lock, or could be employed as a model train detector. In the latter case, the transmitter would be mounted on the train, and the receiver under the track. It could conceivably be used as a car anti-theft device, with the transmitter being plugged into the cigarette lighter socket to enable the car’s electric system. Transmitter IC1 is a simple low-current 7555 CMOS astable oscillator, transmitting at about 25kHz. A 100µH inductor generates the required electromagnetic waves. Capacitor C3 limits the output current. The receiver uses tuned circuit C4 and L2 to give preference to the transmitter frequency. While the receiver’s selectivity is not high, the tuned circuit succeeds in excluding unwanted electromagnetic fields. IC2 serves as a simple preamplifier (strictly, it is a comparator, with convenient internal biasing). IC3 serves as a monostable timer, to switch e.g. a 12V solenoid or relay. TR1 will switch up to 36W, but will require an appropriate heatsink if it is to carry more than about 10W. The receiver is unusually stable, due to the tuned circuit being isolated from the supply rails, and to the fact that VR1 provides a perfectly balanced potential at 50 IC3’s trigger input. IC3 itself is, of course, a highly stable device. Virtually any power MOSFET may be used for TR1. The values of R3 and C6 determine the period of the timer, in this case about three seconds. The transmitter draws about 35mA when S1 is pressed. Although this is a significant current drain, S1 will only need to be pressed momentarily. The receiver has no switch, since it would presumably be continually on stand-by. It draws about 10mA without load, and would therefore ideally require a small plug-pack power supply. To set up the receiver, multiturn preset VR1 is adjusted to the very point of switching TR1, and is then turned back perhaps one full turn so as to preclude spurious triggering. Thomas Scarborough, Cape Town, South Africa Fig.1. Short-Range Radio Control Transmitter Fig.2. Receiver circuit for the 25kHz Short-Range Radio Control Everyday Practical Electronics, January 2007 Paltronix Limited www.paltronix.com Microcontroller Development Tools PICmicro Starter Pack now with ICD—still £99 PICmicro BASIC, C and Pascal Compilers—from £59.50 • High-quality development board • • • • Easy to use with user-friendly IDE. • Features simulator and mikroICD with on-board USB programmer and built-in I/O devices. Supports 8, 14, 18, 20, 28 and 40pin PICs in 10F, 12F, 16F and 18F families. Now features mikroICD in-circuit debugger. Supplied with PIC16F877A. The new EasyPIC4 development board now supports even more PICs including 8, 14, 18, 20, 28 and 40-pin devices from the 10F, 12F, 16F and 18F families. With its on-board USB programmer, mikroICD incircuit debugger and useful I/O devices, the EasyPIC4 must be the best-value development board on the market. Our Starter Pack includes the EasyPIC4 board, USB cable, 16x2 LCD, 128x64 GLCD, DS1820 temperature sensor and a starter’s guide with example programs in assembly language, BASIC, C and Pascal. in-circuit debugger. • Plentiful ready-written routines and example programs. • 30% discount for customers purchasing EasyPIC4/BIGPIC4 development boards. MikroElektronika’s popular mikroBASIC, mikroC and mikroPascal compilers now include the mikroICD in-circuit debugger for use with the EasyPIC4 and BIGPIC4 development boards—programs can now be executed on a target PIC with variable values, special function registers, memory and EEPROM viewed on the PC screen. Great value at £85 each for mikroBASIC/mikroPascal and £145 for mikroC, or when bought with an EasyPIC4/BIGPIC4 only £59.50 each for mikroBASIC/mikroPascal, and £101.50 for mikroC. We also stock development tools for 8051, ARM, AVR, dsPIC, PICmicro, PSoC and other devices—please see our website for details Educational Products PICmicro Microcontroller Training System—£99 Digital Logic Training System—£99 • Ideal for learning about and experi- • Teaches both assembly language menting with digital logic devices. programming and interfacing. Based on the popular PIC16F877A. • Built-in logic and pulse switches, • • Includes USB programmer. • Features built-in I/O devices and solderless breadboard. • • Supplied with tutorial and program examples. The PICmicro Microcontroller Training System is an ideal platform for students and hobbyists alike to learn about PIC microcontrollers. The experiment board features a range of built-in I/O devices and a solderless breadboard on which experiments may be conducted. Circuits are connected using the provided jumper wires. A USB programmer is also supplied and connects to the experiment board to program the PIC. Also included are a mains power adapter, 16x2 character LCD, connecting leads and a tutorial with example programs. LEDs, 7-segment displays, piezo speaker, pulse generator, logic probe and solderless breadboard. Supplied with useful range of ICs, jumper wire and mains adapter. The Digital Logic Training System makes learning about digital logic and experimenting with discrete logic ICs easy. The experiment board features a range of built-in I/O devices and a solderless breadboard on which experiments may be conducted. Circuits are connected using the provided jumper wires and the system includes features such as a power supply, pulse generator and logic probe. Also included is a mains power adapter, selection of ICs and a tutorial with example circuits. We also stock other trainers, circuit labs and solderless breadboards—please see our website for details Robots and Accessories Robo-BOX 3.0 Robot Kit—£99 Test Equipment PoScope USB Oscilloscope/Logic Analyser—only £99 • Low-cost PC-based instrument • Complete robot kit including con• • troller, programming software and all mechanical parts. Build different robot configurations from one kit, including wheel-based and track-based. Program intelligence to follow light, detect collisions and trace lines. Learn about, experiment and have fun with robotics with Robo-BOX 3.0—an incredibly easy-to-build yet adaptable and expandable robot. Various wheel-based and track-based robots can be built from the standard kit including light-following, collision-detecting and linetracing models. Programming is carried out in graphical Logo. A range of low-cost options allow for easy expansion and the development of more sophisticated robots. We also stock similar robot kits based on PICmicro, 8051 and 68HC11 microcontrollers. Tel: 0845 226 9451 • • PoScope has to be one of the best-value pieces of test equipment available and features a dual channel oscilloscope (100Hz to 200kHz sample rate), 16 channel logic analyser (1kHz to 8MHz sample rate), and 8-channel pattern generator (1kHz to 1MHz). What makes the PoScope really useful to those working with microcontrollers is its ability to decode serial communications including RS-232, I2C, SPI and 1-wire. Priced at only £99, the PoScope comes with a USB cable, logic analyser test lead set, two oscilloscope probes and software. Fax: 0845 226 9452 All prices exclude UK delivery (£5 standard/£10 next-day) and VAT. featuring oscilloscope, spectrum analyser, logic analyser, pattern generator, and chart recorder. Decodes serial buses including UART, SPI, I2C and 1-wire. Supplied with logic analyser test lead set, two oscilloscope probes, USB cable and software. Email: [email protected] Major credit and debit cards accepted. Secure online ordering. Pt.1: By JOHN CLARKE A charger for deep-cycle 12V batteries If deep-cycle batteries are not properly charged, they will never be able to deliver their full capacity and their life will be greatly reduced. You can’t use a generalpurpose 12V car battery charger. This 3-step charger is specially designed for deep-cycle batteries and will charge at up to 16.6A. D eep-cycle batteries are expensive and are designed for a long life. If properly charged and looked after, they should last 10 years or more. Their chemistry is quite different from that of car batteries and if you use a charger intended for car batteries, you will definitely not get their maximum capacity. 52 Furthermore, if deep-cycle batteries are consistently under-charged, they will have a short life. By comparison, car batteries are seldom charged above 70% of their capacity but they are designed for ‘shallow’ discharge. If they are subjected to frequent deep discharge, they will have a very short life. Deep-cycle battery manufacturers specify that their batteries should be charged up to a fixed value called the ‘cyclic voltage’. Once the battery is charged to this level, the voltage must be reduced to the ‘float’ voltage and then it can be left permanently connected to the charger. Continuous charging at the cyclic voltage will damage the battery. The cyclic voltage is usually different for each type of lead-acid battery. For example, standard lead-acid batteries should be charged to 14.2V and floated at 13.4V, while Gel-Cell (Sealed Lead Acid) batteries should be charged to 14.1V and 13.3V respectively. These voltages are for a battery temperature of 20°C. At higher temperatures, the voltages must be reduced and the amount of compensation is also dependent on battery chemistry. Typically, lead- Everyday Practical Electronics, January 2007 acid batteries require a temperature compensation of 120mV/°C while Gel-Cell batteries require 125mV/°C compensation. Clearly, a low-cost charger has no means for setting the required cyclic voltage and nor can it provide the float voltage setting or temperature compensation for these voltages. This charger provides a 3-step charge cycle comprising an initial bulk charge, an absorption phase and then a float charge. A separate equalisation charge mode is available after the absorption phase, if required. Equalisation is important for deep-cycle batteries and should be run three to four times a year. Our charger includes an LCD that shows charging mode and temperature plus battery voltage and charging current. The display can be set to show the battery amp-hour (Ah) setting, battery type and whether equalisation has been selected. Fig.1: this graph shows the battery voltage during charging. There are three steps to the charging cycle: an initial bulk charge, an absorption phase and then a float charge. An optional equalisation charge phase is also available for deep-cycle batteries Battery capacity A charger must not supply too much charging current to the battery. The optimal charging current is related to the capacity of the battery and its internal chemistry. Our charger sets the initial charge to 25% of the battery’s amp-hour (Ah) capacity. For example, for a 40Ah battery, the initial charging current will be 10A. For higher capacity batteries, the charging current will be limited to 16.6A, the maximum that the charger can deliver. During the initial charging phase, the display shows BULK on the top line, while the second line shows the temperature, voltage and current. For example, the display might show 26 Deg C, 14.2V and 15.0A. The °C reading is measured by an external temperature probe, normally placed on the battery case. The voltage and current readings are the battery terminal voltage and the charging current, respectively. During bulk charge, battery voltage will gradually rise from an initial 12V (or whatever the initial no-load voltage is) towards the cyclic voltage. The battery voltage is continuously monitored and the charger detects when it reaches the cyclic voltage threshold. The cyclic voltage is the value selected for the particular battery type and is compensated with respect to temperature. Fig.2: the battery current during charging. The charging current is maintained at 25% of Ah during the bulk charge and then tapers off during the absorption phase. It is then fixed at 5% of Ah during the (optional) equalisation process. When the battery reaches the float voltage, a small charging current maintains it at this level When the battery reaches the cyclic voltage, the charger switches over to the absorption phase. This is shown as ABSORPTION on the display, while the second line continues to show temperature, voltage and current. During this phase, the cyclic voltage is maintained by adjusting the current. The initial stages of the absorption phase maintain the charging current at a similar value to that during the bulk charge. However, as time goes on, the current will be reduced so as to maintain the constant cyclic voltage across the battery. This reduction in current is an indication of battery charge so that when the current falls to around 2% of charge, the battery can be considered to be around 90% charged. At this point, the charger switches to float or equalisation. Equalisation sets the current to 5% of the battery Ah capacity and charges Everyday Practical Electronics, January 2007 for another three hours. Equalisation breaks down sulphation on the plates and thus extends the life of the battery. It also makes sure that each cell within the battery is fully charged, to equalise the cells. During this phase, the display shows EQUALISATION and also shows the temperature, voltage and current. The battery voltage is likely to rise above 16V during this phase and this will cause the display to show --.-V. The maximum battery voltage is restricted to the setting of the overvoltage limit. Equalisation should be run only a few times per year since it will reduce battery capacity if used too often. Float charge Finally, the charger switches to float and the display shows FLOAT. This takes place at a lower voltage to 53 Main Features • Suitable for 12V lead-acid batteries • LCD shows charging phase and settings • Temperature, voltage and current metering • 3-step charging • Optional equalisation phase • Battery temperature compensation • 16.6A charge capacity • Initial trickle charge when battery voltage is low • 4 preset battery chemistry settings • 2 adjustable specific battery settings (can be set for 6V batteries) • Correction for voltage drop across battery leads • Wide battery capacity range (4 to 250Ah) in 18 steps that of the absorption phase and is temperature compensated. The battery is then left connected to the charger to further increase the charge by a few percent and also to prevent self-discharge. The entire charging process is shown in the accompanying graphs (Fig.1 & Fig.2). Fig.1 shows the battery voltage during charging while Fig.2 shows the battery current. As shown in Fig.2, the charging current is maintained at 25% of Ah during the bulk charge and then tapers off during the absorption phase. It is then fixed at 5% of Ah during the (optional) equalisation process. Subsequently, the current normally drops to near zero immediately after absorption (or equalisation) and then the battery drops to its float voltage level. This may take some considerable time. When the battery reaches the float voltage, a small charging current maintains it at this level. Note that Gel-Cell (SLA) and AGM batteries can accept a higher charge rate than the 25% of Ah delivered by the charger. To achieve this, the Ah setting on the charger can be increased to a value that is about 1.6 times the actual Ah of the battery. For example, for a 40Ah battery 54 you can use the 60Ah setting. This will increase the current to about 40% of Ah during bulk charge. In addition, the point at which the charger switches from the absorption phase to float charge will increase by the same proportion – ie, from 2% to about 3% – but should be of no consequence. The equalisation current will also be increased by a factor of 1.6. As a result, if equalisation is selected, the Ah reading should be set to the correct value. Note that there is no point in increasing the Ah setting for batteries that are above 40Ah in capacity because the charger can only deliver a maximum of 16.6A, as noted earlier. Safeguards There are various safeguards incorporated into the charger to prevent possible damage to the battery. First, at the beginning of bulk charge, the battery voltage is checked to see if it is above 10.5V. If it is below 10.5V, the charging current is limited to 2% of the selected Ah value, until it rises to a level where it is safe to apply 25% of Ah current. Note that there is a facility to charge a 6V battery and the equivalent safety threshold is then 5.2V. Second, the duration of the absorption phase is not just set by a timer, as in some commercial designs. A timer on its own would not prevent the absorption phase re-running for the duration again should the battery be recharged before it has been discharged. Excessive recharging at the cyclic voltage will cause grid corrosion in the battery, leading to reduced battery life. So as well as timeout, our charger incorporates a low current detection set at 2% of the battery Ah, at which point float charge is initiated. This feature means that if the battery is recharged before it is discharged, the bulk charge and absorption phase will be short and float charge will happen almost immediately. In addition, equalisation will not occur unless it is selected manually. As a further precaution, if the battery temperature rises above 40°C, equalisation will not occur after the absorption phase, even if it is selected. Similarly, if the battery temperature rises above 40°C during equalisation, the charger will switch over to float mode. Finally, if the battery voltage rises above the over-voltage setting, the charger will switch off and show BATTERY ? on the display. User settings When the charger is switched on, the display prompts the user to select the battery settings: Ah, battery type and whether equalisation is required. Selecting Ah (battery capacity) sets the correct charge rate. The display shows BATTERY AMP HOUR on the first line and <200Ah>, for example, on the second line. At this stage, the charger is not delivering current and the desired battery Ah is set using the “<” and “>” switches. The second battery setting is the battery type and should also be selected or checked by pressing the set switch again. The display now shows BATTERY TYPE on the first line and <LEAD ACID>, for example, on the second line. The battery type can be selected using the “<” and “>” switches to change the settings. For example, the Gel-Cell, AGM, Calcium/Lead, Specific #1 or Specific #2 batteries could also be selected. The third battery setting is for equalisation. Pressing the set switch will have the display show EQUALISATION on the first line and <OFF> on the second line. Pressing either the “<” or “>” switch will change this to <ON>. Equalisation will then occur after the absorption phase. Charging Charging will not begin until the start switch is pressed. If the battery is not connected, the charger will not place any voltage on the battery clips. This prevents any sparking at the terminals when connecting the battery while the charger is switched on. Note that after charging has started, the switches become locked so that the settings cannot be changed. This feature will prevent any tampering with the settings during charging. The set switch will only operate if it is pressed before 25% of Ah current is reached. If the switch is pressed during this time, charging will cease. Charging can then be restarted with the start switch. A jumper can be removed from within the charger for automatic starting when power is applied. Automatic starting is a useful feature in the event that the charger is only ever used on one particular battery. Should the battery settings require changing, the set switch can be pressed as soon as power Everyday Practical Electronics, January 2007 Fig.3: the block diagram of the charger. The power transformer feeds 18V AC to bridge rectifier BR1 and the resulting unfiltered DC is fed via a power controller circuit to the battery via fuse F2. The power controller is controlled by a PIC microcontroller (IC5), in conjunction with IC3, IC4 and IC1b is applied to bring up the battery settings on the display. Again, this will prevent charging until the start switch is pressed. Another jumper must be removed from within the charger in order make changes to the Specific #1 and Specific #2 battery parameters. This prevents tampering with the parameters. Should the battery clips be removed from the battery terminals during bulk charging, the charger will either go to the absorption phase or charging will stop and the display will show BATTERY ?. The charger will then need to be switched off and on again using the mains switch to initiate the original charging phase. Fail-safe protection has been incorporated for battery temperature compensation. If the temperature probe is not connected or has gone open circuit, then the battery temperature is assumed to be 40°C. This reduces the cyclic and float voltages to prevent damage to the battery, even in high ambient temperatures. The display also shows two dashes (--) in place of the temperature reading, to indicate a fault in the temperature reading. Finally, the circuit is protected against reverse battery connection by a 20A fuse. Charger protection A 3A slow-blow fuse protects against failures in the mains transformer and the charger circuit, while the above mentioned 20A fuse protects against output short circuits. Fan cooling for the heatsink is provided, with a thermostat cutting in and switching the fan on when the temperature rises above 50°C. If this cooling system fails, a second thermal cutout set at 70°C shuts down the charger. Over-voltage and over-current limiting are also provided, via the circuit itself and via software control. The Everyday Practical Electronics, January 2007 software is arranged to switch off the charger if the output goes above 16V during normal charging (except during equalisation) or the charging current rises above 20A. An over-current fault will cause the display to show <OFF>. The over-voltage and over-current thresholds are set using trimpots, to 17V and 18A respectively. Voltage sensing When charging a battery, it can be difficult to obtain an accurate reading of the voltage right at the battery Reserve Capacity Some battery manufacturers use the term reserve capacity (RC) to specify battery capacity and this is distinct from the more readily understood amp-hour (Ah) rating of the battery. The two specifications are not directly interchangeable. The Ah capacity refers to the current that can be supplied over time (in hours) and is usually specified over a 20-hour period. So a 100Ah battery should supply 5A for 20 hours, by which time the battery voltage will be down to 10.5V. At higher currents, the capacity will be less than 100Ah due to increased losses within the battery. Reserve capacity (RC) is specified in minutes. It specifies how many minutes the fully-charged battery can deliver 25A before the voltage drops to 10.5V. For example, a battery with an RC of 90 will supply 25A for 90 minutes (1.5 hours). This can be converted to Ah by multiplying RC (in this case 90) by the current (25A) and then dividing by 60 to convert from minutes to hours. Thus a battery with an RC of 90 has a capacity of 37.5Ah. In practice, the Ah capacity would be considerably higher if measured at the 20-hour rate. 55 56 Everyday Practical Electronics, January 2007 Fig.4: the power section of the 3-Step Battery Charger. The output from the bridge rectifier (BR1) supplies the power controller which consists of transistors Q1-Q5. This circuit is controlled by op amp IC1b, in turn controlled by IC2a, IC2b and microcontroller IC5 (see Fig.5) 7 Constructional Project terminals. This is because there will be a voltage drop along the leads due to the current flow. Some battery chargers overcome this problem with separate voltage sensing leads but unless the leads are moulded together, they can be a nuisance and become tangled. For our battery charger, we use a pseudo remote sensing technique to do away with the need to have separate sensing leads. This method calculates the voltage drop produced by the charging current and subtracts this from the voltage measured inside the charger (it assumes a certain resistance in the battery leads and the current sensing resistor). The result is a very close approximation of the true voltage at the battery terminals. Specific battery parameters As mentioned, the Specific #1 and Specific #2 battery selections can be adjusted to suit particular battery types. The parameters that can be altered are the cyclic voltage, the float voltage and the temperature compensation. The cyclic voltage and float voltages can be obtained from the manufacturer and must be specified at 20°C (68°F). In order to change these parameters, jumper JP2 must be removed from inside the charger. When this is done and power is applied, the charger function will be off and the display will show SPECIFIC #1 on the first line and then 14.3V CYCLIC 20 Deg C on the second line. This is the initial cyclic voltage set for the Specific #1 battery at 20°C. You can then change the cyclic voltage using the “<” and “>” switches in 100mV steps over a range from 0.0V to 15.7V. Note that this range also allows charging a 6V battery. Pressing the set switch will cause the display to show the float voltage for the Specific #1 battery type. This will initially be 13.3V and can be set in 100mV steps over a range of 0.0V to 15.7V. Pressing the set switch again will show the temperature compensation value for the Specific #1 battery. Initially, the display will show 136mV/ Deg C. This can be changed in 1mV steps from 0mV/°C to 163mV/°C using the “<” and “>” switches. Pressing the set switch again will show the cyclic and float voltages and the temperature compensation value for the Specific #2 battery. Adjusting these is the same as changing the Specific #1 settings. When adjustments are Temperature Compensation The temperature compensation required by manufacturers is usually shown as a graph of voltage versus temperature. You need to convert this to mV/°C. To do this, take the difference between the voltages at two different temperatures and divide by the temperature difference. For example, a battery graph may show the cyclic voltage at 110°C to be 15V and at 40°C it may be 14.2V. So (14.2 115)/50 is 116mV/°C. Some graphs of battery characteristics show the float temperature complete, JP2 can be replaced inside the charger for normal operation. Block diagram Fig.3 shows the block diagram of the charger. The power transformer feeds 18V AC to bridge rectifier BR1 and the resulting unfiltered DC is fed via a power controller to the battery via fuse F2. Should the battery be connected the wrong way around (reverse polarity), bridge rectifier BR2 will conduct and blow the 20A fuse (F2). The power controller section is itself controlled by a PIC microcontroller (IC5), in conjunction with IC3, IC4 and IC1. Circuit description The circuit for the 3-Step Battery Charger is split into two sections – Fig.4 (Power) and Fig.5 (Control). This is a linear design rather than switchmode. We opted for this approach in order to use more readily available components and to simplify construction, without the need for specialised high-frequency transformer assemblies, coils and high-frequency capacitors. A linear circuit is not as efficient as a switchmode design but it is easier to build and is more rugged. Also, much of the heat generated by the charger is due to losses in the main bridge rectifier and this would be much the same, regardless of whether we had used a switchmode or a linear design. Looking at Fig.4 (Power) first, the power transformer is a 300VA toroidal type feeding 18V AC to the bridge rectifier, which then supplies the power controller which comprises transistors Q1 to Q5, connected as a Everyday Practical Electronics, January 2007 compensation to be slightly different to the cyclic compensation. In this case, the compensation will need to be a compromise between the two values. Note that it may be possible to obtain a better value, that is closer to the requirements for both voltages, if the graph is interpreted over a smaller temperature range, consistent with the temperature conditions under which you would expect to be using the charger. compound emitter follower. Q1 is a power Darlington and it drives the commoned bases of four TIP3055 NPN power transistors (Q2 to Q5). These power transistors each have 0.1Ω emitter resistors to help equalise the load current. In operation, the emitters of transistors Q2 to Q5 ‘follow’ the voltage applied to the base of Q1 (hence the term ‘compound emitter follower’). Adjusting the base voltage on Q1 controls charging so that the higher the voltage on Q1’s base, the more the power transistors conduct and the greater the current into the battery. The 220nF capacitor between the base and collector of Q1 prevents bursts of oscillation that would otherwise occur as the transistors begin to conduct on each cycle of the pulsed DC voltage from the bridge rectifier. Op amp IC1b supplies the base current to Q1 via a 3.3kΩ limiting resistor. This amplifier has a gain of 6.6 to multiply the control voltage range at pin 5 from 0-5V to 0-33V. The 30V supply to IC1b and its limited output swing does restrict the range to more like 0-28V but this is more than enough to fully drive the output transistors. The 1µF capacitor across the 5.6kΩ feedback resistor provides roll-off above 28Hz to prevent op amp IC1b from oscillating. A 70°C thermostatic switch, TH2, provides over-temperature protection. This is mounted on the main heatsink and when it closes (when the temperature exceeds 70°C), it shunts base drive from IC1b to ground and this stops the charger from supplying current to the battery. 57 58 Everyday Practical Electronics, January 2007 Fig.5: the control section is based on PIC microcontroller IC5. It works in conjunction with IC3, a 4051 analogue 1-of-8 selector which monitors the battery voltage, current and temperature (via Sensor 1). IC4 converts the selected analogue data from IC3 into 8-bit serial data which is then processed by the microcontroller. The microcontroller produces the control signal for IC1b, drives the LCD module and processes the inputs from switches S1 to S4 Note that IC1b’s output is prevented from being directly shorted by a 3.3kΩ current limiting resistor. Current monitoring The charging current flow is measured by amplifying the voltage produced across a 0.005Ω resistor (R1) using IC1a which has a gain of 44. Filtering is included at the input and across the feedback path for IC1a, to convert the pulsating charge current to an average value. Hence, the 10μF capacitor at pin 3 filters the current by rolling off signal above 16Hz, while the 10μF capacitor across the 43kΩ feedback resistor rolls off frequencies above 0.37Hz. IC1a’s output is applied to pin 2 of the over-current comparator, IC2a, via a voltage divider comprising two 22kΩ resistors and a 100µF filter capacitor. The non-inverting input, pin 3, is connected to trimpot VR2. VR2 is adjusted so that IC2a’s output goes low when the charge current goes above 18A. When IC2a’s output goes low, it pulls pin 5 of IC1b low. This causes pin 7 of IC1b to also go low, removing the drive to Q1 and to the battery. Over-voltage protection The battery voltage is monitored at point A on the circuit – ie, at the junction of the four 0.1Ω resistors (for Q2-Q5) – and fed via a voltage divider to pin 6 of comparator IC2b. This is compared to a reference voltage on pin 5, from the wiper of trimpot VR1. This is set so that IC2b’s output goes low when the battery voltage goes above 17V. The low output of IC2b will shut down the drive to Q1, as before. Note that IC2a and IC2b are comparators with open-collector outputs. When their outputs are off, they do not affect the drive to pin 5 of IC1b. Note also that when the output of IC2a or IC2b goes low to stop the drive to Q1 (via IC1b), the over-current or over-voltage condition will cease. As a result, the relevant comparator output will go open circuit again to restore the drive to Q1’s base. If the fault still exists, drive will again be removed and so this cycle will continue – ie, the charger will cycle on and off at a slow rate. Zener diode ZD3 provides a 5.1V reference supply for trimpots VR1 and VR2 and this is further reduced by a 3.3kΩ resistor so that each trimpot has a nominal 0-3V range. Everyday Practical Electronics, January 2007 Specification Bulk Charge: constant current charge at 25% of Ah. Absorption Phase: constant voltage charge at cyclic voltage until current drops to 2% of Ah or timeout of 2.5 hours (which ever comes first). Float Charge: constant voltage charge at float voltage. Equalisation: optional after absorption phase. Constant current at 5% of Ah for three hours. Equalisation switched off if temperature rises above 40°C. Battery Ah Settings: 4, 8, 12, 16, 22, 24, 30, 40, 60, 80, 90, 100, 125, 150, 175, 200, 225 and 250Ah. Battery Type: Lead-Acid, Gel-Cell (Sealed Lead Acid or SLA), AGM (Absorbed Glass Mat) and Calcium Lead, plus adjustable settings with Specific #1 and Specific #2 battery selection. Lead Acid Parameters @ 20°C: cyclic 14.2V, float 13.4V, compensation 120mV/°C. Gel-Cell Parameters @ 20°C: cyclic 14.1V, float 13.3V, compensation 125mV/°C. AGM Parameters @ 20°C: cyclic 14.4V, float 13.3V, compensation 136mV °C. Calcium/Lead Parameters @ 20°C: cyclic 15.0V, float 13.8V, compensation 120mV/°C. Adjustable parameters (Specific #1 and #2): cyclic 0.0V to 15.7V in 100mV steps, float 0.0V to 15.7V in 100mV steps, compensation 0mV/°C to 163mV/°C in 1mV steps (changed with JP2 out). Low Battery Voltage Detection: 10.5V for 12V battery (5.2V for 6V battery). Low Battery Charge Current: 2% of Ah. Temperature Compensation: operates from 110°C to 99°C (voltage fixed at 110°C setting for temperatures below this). Open Circuit Temperature Probe Default: compensates assuming 40°C. Display shows (--). Temperature Measurement: display shows from –9°C to 99°C in 2°C steps. Temperatures below –9°C show as a LO. Temperatures above 99°C shown as (--). Display refreshes reading every 0.2 seconds. Voltage Measurement: from 0-16.0V with 100mV resolution. Display shows --.-V above 16V. Display refreshed every 0.2 seconds. Current Measurement: from 0-25.5A with 100mA resolution. Display readings refreshed approximately every 1 second. Fan Cut In Temperature: 50°C. Fan Cut Out Temperature: ~40°C. Over-Temperature Cutout: 70°C. Hardware Over-Voltage Limit: adjustable. Hardware Over-Current Limit: adjustable. Software Monitored Over Voltage Limit: 16V at charger output (not operational during equalisation). Software Monitored Over Current Limit: 20A. 59 Constructional Project Reproduced by arrangement with SILICON CHIP magazine 2006. www.siliconchip.com.au This is the view inside the prototype. Most of the parts are mounted on three PC boards: a power board, a control board and a display board which mounts vertically behind the front panel. The assembly details are in Pt.2, next month. DC supply rails The 25V supply for IC2 and the fan is derived from the rectified output of BR1 via diode D1. This rail is filtered using a 2200µF 50V capacitor. Diodes D2 and D3 form a voltage doubler which is fed from the AC input of the bridge rectifier via a 22µF capacitor. The voltage across the following 220µF capacitor is then limited to 30V by seriesconnected Zener diodes ZD1 & ZD2 and a 10Ω resistor. Note that the two Zener diodes are rated at 5W because the peak current through them is too high for 1W devices. The 10Ω resistor in series with the Zener diodes is included to reduce the peak current. Why use a Zener diode shunt rather than an adjustable 3-terminal regulator (such as an LM317) to obtain the 30V rail? Because the wide range of transformer loading means that an LM317 could not do the job. 60 By the way, the reason we need a 30V supply for IC1 is so that IC1b can drive the base of Q1 above the 25V peak voltage of the unfiltered DC supplying the power transistors. The heatsink cooling fan is powered from the 25V supply rail via a 56Ω 5W resistor when ever the 50°C thermostat switch is closed. The 56Ω resistor reduces the fan supply to around 12V when the fan is running. Control circuit Fig.5 shows the Control circuit which comprises IC3, IC4, PIC microcontroller IC5, the LCD module and associated components. IC3 is a 4051 one-of-eight analogue switch. In our circuit, we use only three of the eight inputs. One selects the battery voltage at pin 2, the second selects the current signal at pin 1 and the third takes the temperature signal at pin 13. The voltage input comes from the positive battery terminal via 22kΩ and 10kΩ resistors which divide by a factor of 0.31. Voltages above 5V at pin 2 are clamped using D4, while voltages below 0V are clamped using D5. The latter is required to protect IC3 against reverse battery connection. The current signal comes directly from the output of IC1a (see Fig.4) via a 10kΩ series resistor. Battery temperature is measured using an LM335 (Sensor 1). This provides an output that is a nominal 10mV/°C. The offset voltage at 0°C is typically 2.73V. Trimpot VR3 divides the Sensor 1 output so the voltage can be set to vary by 9.8mV/°C. This adjustment is required to cater for individual variations in the output of these devices. The temperature, voltage and current signals to IC3 are selected by using the B and C inputs at pins 10 and 9, respectively. When the B and C inputs are set to 0V, the temperature signal (pin 13) is selected. When B is low and C is high, the current signal Everyday Practical Electronics, January 2007 E (pin 1) is selected and when B and C are both high, the voltage signal (pin 2) is selected. The selected signal is fed to IC4, an 8bit analogue-to-digital (A/D) converter. IC4 produces serial data at its pin 6 output and this is fed to the RA4 input (pin 3) of PIC microcontroller IC5. The RA2 and RA3 lines from IC5 drive the clock and chip select inputs on IC4. IC5’s internal oscillator runs at 4MHz. This gives a timebase accuracy of about 2%, which is more than adequate for this application. LCD and pushbuttons The LCD module is driven from the RB4 to RB7 outputs of IC5, while control over the display is provided by driving the Register Select (RS) and Enable (E) inputs at pins 4 and 6 respectively. The RB4 to RB7 data lines also connect to switches S1 to S4. When a switch is closed and its data line is high, it can pull the RA6 input (pin 15) high. Diodes D7 to D9 are included to prevent the data lines from being shorted should more than one switch be pressed at a time. The RB0 and RB2 inputs provide the jumper options (JP1 and JP2). Normally, these inputs are pulled high via internal pull-up resistors and pulled low if the relevant jumper is installed. JP1 is removed for auto start and JP2 is removed for the parameter change. In response to its stored software, IC5 produces a pulse-width modulation (PWM) output at pin 9. This swings between 0V and 5V at about 4kHz, with a duty cycle ranging from 100% (fully high at 5V) through to zero (fully low at 0V). By filtering this waveform, the resulting output will be a DC voltage To advertise your company in EPE Magazine Please contact Stewart Kearn Tel: 01202 873872 Email: [email protected] which can be varied in steps of around 5mV (ie, 10-bit resolution). The filtering is provided by a 10kΩ resistor and 1µF capacitor and this becomes the control voltage fed to IC1b on the Power circuit of Fig.4. The Control circuit runs from a 5V supply derived from an LM317 adjustable regulator (REG1). It is fed from the +25V rail via a 330Ω resistor which reduces power dissipation in the regulator. Trimpot VR4 is set so that the output voltage is as close to 5V as possible. This calibrates the voltage and current readings measured by IC3. The chassis and circuit ground are connected together via a 470nF capacitor (see Fig.4.), included to shunt any noise signals present on the supply. Next month, we will give the full parts list, assembly details and setting-up procedure. EPE SELL TO HOBBYISTS SCHOOLS COLLEGES AND UNIVERSITIES through our 'Technology, Hobbies and Education Store' There are huge educational budgets to be spent and accessing buyers has always been difficult. We can now get you directly to the people who influence the purchase, teachers and lecturers through our 'techno store'. As they use our educational software, they will find your site. Visit eptsoft.com and try it now! software. Installed in thousands of secondary schools, colleges and university departments worldwide as an integral part of all our download Educational Software and accessed by thousands of students, teachers, lecturers every day. We have long used integrated web browsers to promote our software, now you can add your own products. Link your business website and begin selling to hobbyists and education for just £20.83 + VAT per month, see eptsoft.com for details. Principles V9.2 Home Study Pack software Principles V9.2! our top selling package for maths, computing, ICT, physics, CDT, electronics, electrical, mechanics, engineering, PICs, model railways, amateur radio, motor vehicle maintenance. GCSE, A-Level, HNC HND and Degree. Download and fully installed for less than 20p a day, you only pay for as long as you need it! www.eptsoft.com Everyday Practical Electronics, January 2007 eptsoft limited, Glebe House, School Lane, East Keal, Spilsby, Lincolnshire. PE23 4AU Tel: 01790 754037 email [email protected] 61 Surfing The Internet Net Work Alan Winstanley A smaller iconbar contains major functions including printing and tools, access to a new phishing filter, pop-up blocker and add-ons or In the early 1990s the worldwide web was a minor application as plug-ins, such as the Skype Add-On. far as Internet usage was concerned. Mainstream usage focused on Occasionally it is desirable to print off a web page, but how many Usenet, File Transfer Protocol (FTP) or sending plain text Email via a times have you wasted paper because the right-hand edge of the printDOS-based program. The first freely downloadable web browser was ing had been cropped? One of the new browser’s most worthwhile NCSA ‘Mosaic’ which was spun out of the National Center for improvements relates to the printing of web pages. At last, IE7 reflows Supercomputing Applications in 1993 (see www.ncsa.uiuc. and fits the web page to the paper, and the Print Preview function shows edu/News/MosaicHistory/). Web sites were few and far between. the likely results beforehand, another welcome feature that helps avoid The Mosaic browser evolved into a commercial product called wasting a second page that contains just one or two lines of text. Netscape Navigator, and the green dinosaur mascot nicknamed It would be true to say that Microsoft has worked on tightening up Mozilla was created. After realising that the Internet was looming security, in that the browser now errs ruthlessly on the side of caution on the horizon, Microsoft released Internet Explorer Version 1. It when accessing web sites. The volume of ‘Are you sure?’ pop-up fitted on a floppy disk and then ‘browser wars’ erupted as Netscape warnings generated by IE7 seem to imply a high state of nervous and Microsoft slugged it out. paranoia. Windows XP users will The ensuing battle is neatly recall the XP SP2 update and the summarised at arrival of the yellow-coloured warning bar that pops up to prehttp://en.wikipedia.org/wiki/ vent downloads of e.g. executable Browser_wars. files. This is a welcome feature in This month’s Net Work intromany ways as it prevents neoduces the latest incarnation of phyte users from sleepwalking Microsoft’s web browser into fetching a virus program or (Version 7, or IE7 for short) that similar onto their system. is currently being foisted onto Internet Explorer 7 offers more Windows users via the Windows of the same, with stricter checkAutomatic Update feature. It can ing of secure certificates and also be downloaded from over-cautious warnings that are www.microsoft.com/windows intended to put surfers off comie/. Note that Microsoft will pletely from visiting web sites authenticate the user’s Windows that the browsers thinks are inseXP installation first and then a cure. Owners of shopping cart major download will commence. systems will be unimpressed with The update routine has persome of the recommendations formed flawlessly so far when implemented on the author’s Internet Explorer 7 incorporates tabbed browsing and printer- generated by IE7 that advise customers not to proceed to a particdesktop machines and laptops. friendly features ular secure server. The browser’s general aesthetics have been improved. A narrower toolbar allows more space for the Cruel blow web page to display, but I find myself casting around in search of Some of the security settings in IE7 may prove to be a real nuiRefresh and Stop icons, that are now placed discretely over to the right. sance for savvy and seasoned Internet users. They can be tweaked in A glassy-style Forward and Back button is prominent on the left. Tools/ Internet Options / Security/ and click the Custom level… but- Better browsing? Keeping tabs on your surfing Several new benefits of IE7 include tabbed browsing (inspired by rival Firefox) which allows multiple sites to be opened, each with a tab at the top. Type the URL into the address box then press ALT + Enter to open that site in a new tab. The tabs can be re-ordered with drag and drop: click a tab to switch between open sites. This can take some getting used to because many Windows users are accustomed to clicking buttons along the bottom of their screen to switch between open windows or applications. Tab browsing is also useful for opening web sites in the background while viewing other sites. When multiple web sites are open, a ‘Quick tabs’ button allows you to view a page of thumbnails instead of clicking between tabs, if preferred. The ‘Favorites Center’ shows some cosmetic improvements to Favorites but this remains a missed opportunity for a radical overhaul. The same system of dragging and dropping to Favorite folders remains. Trying to organise many hundreds of Favorites remains a chore – as does searching for one. I suggest DzSoft’s Favorites Search downloadable for free from www.dzsoft.com. It is rather slow in use but is an invaluable tool for power users. 62 ton. It is fair to say that hardly any of the settings will be meaningful to most users though: these are expert settings requiring you to know your .NET from your XAML and your Activex. The cruellest blow, though, is that IE7’s default settings makes our own Downloads page inaccessible: the ‘tree’ display no longer works and it is uncertain whether the problem can be cured, despite adjusting the browser settings for IFRAMES and hopping to other domains (the FTP site). There may be other issues with some web sites but so far IE7 seems to render web sites as expected (a tribute to the web site source code as much as the browser). Only one major problem has been noted by the writer: the IE7 update disabled the WS_FTP file transfer program due to a conflict with the file psapi.dll. This is cured by renaming it to ‘old’ – easy once you know how but it wasted many hours of time. Most users will fetch IE7 and use it without any problems: the tabbed browsing and printer friendliness are a boon. Other browsers to check out are Firefox (www.mozilla.org) and Opera V9 (www.opera.com). You can contact me with your feedback at [email protected]. Everyday Practical Electronics, January 2007 New PIC Products from Forest Electronics Low Cost Development Boards, New Programmer, Lite version of our C Compiler A range of New PIC development boards priced from just £4.00 ! We have a range of 5 new PIC project boards - all available as bare PCB’s or as pre-built boards with components. They all have space for the PIC microcontroller, (from 8 to 40 pins). Support circuitry includes the 5V power regulator, decoupling components, reset circuitry and a crystal oscillator. Included are basic I/O components including, LEDs, pushbuttons, and a piezo buzzer plus RS232 drivers and DB9F serial connectors. All boards have a large circuit prototyping areas for your designs. The boards all feature a compatible 6 pin in circuit programming connector. The most comprehensive board (lower left) offers a ZIF socket and breadboard area, plus LCD connection which is ideal for experimental and educational users. Ideal for use with WIZ-C Lite (below). See www.fored.co.uk for further details Serial+ Programmer (Right). New programmer handles 12C, 12F, 16C, 16F,18F devices from 8 to 40 pins includes In Circuit Serial Programming connector and In Circuit Debugger function. Fully built and tested at just £35.00 WIZ-C Lite – complete ANSI C Compiler for the PIC together with RAD front end Lighting fast C development at an affordable price N WIZ-C is more than a C Compiler for the PIC – it is a complete development environment with rapid access to library components with point and click set up. N Ideal for beginners, includes full tutorial manuals and an introductory manual to the C language. N Syntax highlighting editor. N Full ANSI C Compiler N Large libraries included for displays, ports, data transfer, keypads, graphics, bootloader and C standard functions. N Extensive simulation capabilities, very rapid program execution, includes simulation of LCD, LED’ switches, I2C, RS232 terminals etc. Inspect C variables in C format N Logic analyser can display waveforms of PIC pins and internal registers simplifying debugging. N Includes assembler to allow you to develop assembler projects in their own right, or as part of C projects N LITE version supports the most popular PIC devices – academic users may choose these types. N UK written and supported. N LITE Version available for only £35.00 We accept major credit cards and Switch. Order securely from our site www.fored.co.uk or contact us by phone or fax on 01590-681511. email [email protected]. Forest Electronic Developments, 12 Buldowne Walk, Sway, Lymington Hampshire. SO41 6DU www.fored.co.uk [email protected] READOUT Email: [email protected] John Becker addresses some of the general points readers have raised. Have you anything interesting to say? Drop us a line! All letters quoted here have previously been replied to directly. Spelling Differences Dear EPE, I downloaded the Online November 2006 issue and it is great. I especially applaud your decision to run the C for PICs tutorial. C has become a universal language. I got my first EPE issue when the C versus BASIC debate was just starting. Also, I am anxious to digest the multimedia card ideas in the PIC N’ Mix column and give it a try. The PIC has become a universal workhorse too and the MMC addition should expand its versatility. Speaking of the PIC, last year I was visiting my daughter in Chandler, Arizona when I discovered that the MicroChip factory was only a few blocks from her apartment. It is a huge complex! It looks like an automobile factory. Next time I’m there I hope to get a look inside. On a negative note, your publication is riddled with spelling errors. Your spell checker should have caught the errors in formula, color and center, to mention a few! Marlowe Cassetti, Penrose, CO, USA via email Editor Mike replied to Marlowe: Thanks for this. You should, however, realise that EPE is an English publication and thus we spell the English way – these are not errors. Although we are not immune from errors as the spelling mistake in my November Editorial proves! Quick Brake Dear EPE, I was attracted to the Quick Brake article in the Nov ‘06 edition. Since the emphasis is on the time taken to indicate that the vehicle is about to stop, perhaps things could be further improved by using a solid state device rather than a relay. From my experience as an engineer, I would expect that a relay, able to switch reliably the stop lamps’ current, would need approximately 20ms to 30ms to operate (and longer to turn off due to the dampling effect of D2, though this does not matter). P.G. Diestler, retired engineer, Middleton, Manchester Editor Mike replied that the relay could be replaced by a solid state relay, provided one is used that will switch the 64 WIN AN ATLAS LCR ANALYSER WORTH £79 An Atlas LCR Passive Component Analyser, kindly donated by Peak Electronic Design Ltd., will be awarded to the author of the Letter Of The Month each month. The Atlas LCR automatically measures inductance from 1µH to 10H, capacitance from 1pF to 10,000µF and resistance from 1Ω to 2MΩ with a basic accuracy of 1%. www.peakelec.co.uk ᗂ LETTER OF THE MONTH ᗂ Moving Message Display Dear EPE, I was interested and amused to see your Giant LED Message Display (Nov ‘06). In the early 80’s I disembowelled a discarded mains powered desk calculator (they were chunky in those days), and built into it a Z80 microcomputer with 2K EPROM and 2K RAM. What’s the connection, do I hear you ask? I replaced the keypad with 16 hex digits and four function keys, but in place of the display I built an array of red LEDs, 32 columns of 8, and used machine code to multiplex/drive them using a timer and interrupts, updating two columns at a time. The array was made from individual LEDs, hand wired (there was a lot of debugging before it all worked!), and at 10p per LED cost a lot at 1980 values. 35-dot displays were available, but cost a fortune. The display was planned to be big enough to show four hex digits for address and another two for data, and I wrote a machine code monitor program that booted in the EPROM. I had a UV tube for making PCBs, so I could erase the EPROM, and I contemplated making a crude programmer to get the contents into it, but fortunately there was a proper programmer where I worked so I was able to use that. The monitor was written in machine code, and could use the display and keypad to read and write data to memory; inspect and change Z80 internal registers; execute, break and single step code. I had an external connector to access the Z80 bus and made hardware adapters for various things, including a mains interface which could use code to time triac firing pulses on three mains outputs. This was used to run Christmas tree lights to chase, fade, and blend well before dedicated devices were on the brake light current. This would indeed speed up the switching time. PIC 10F Dear EPE, I read with great interest Mike Hibbett’s Smart Dust article in the September EPE. I have been using, actually playing with, these chips for about a year. Mike covers the topic very well, market. All my programs were written in machine code by hand and entered by keypad, though I did have a backup battery to save the CMOS RAM contents between sessions! I can still remember the Z80 op codes: C3 – jump to absolute address, C9 – return from subroutine. Back to the point. I can tell you the most hypnotic thing you can show on last month’s Message Display: waves. I had a program which set the lower half of the display on. I then introduced a random disturbance to the current level of the left-most column, and allowed that to propagate across the display to the right, but then having reached the rightmost column reflect back and interfere with the incoming waves. After a while the input disturbance was reduced to nil and the propagation allowed to settle before starting up again. Absolutely fascinating! What goes around comes around. I’ve never got into programming PICs, but give me a Z80 and I’ll rule the world. PS: I remember from years back, I think in the pages of PE, a Creed for Electronic Engineers. It began ‘I believe in the planar technology...’, but I can’t track it down and can no longer remember the rest. Any ideas? Ken Wood, via email Ken, that’s a fascinating reminiscence. I agree that it was a real challenge ‘way back then’ to be creative, and wasn’t it fun? (But so it is now with PICs!) No reason why people shouldn’t write their own routines to create a similar display to yours on my mine. I shan’t offer guidance, but put it forward to readers as a challenge! I did a quick browse through www.google.com for links to various phrases you use in you PS, but failed to find any. I wonder if any reader can help? but I think there are a few points that should be added. The PIC10Fs are ‘Baseline’ MCUs with a 12-bit instruction word, as contrasted to the 14-bit word of ‘Midrange’ MCUs like the 16F628 and 688. Therefore most non-Microsoft programmers, including, I presume, TK3 will not program them. Microsoft offers versions of their inexpensive PICkit1 and PICkit2 Everyday Practical Electronics, January 2007 programmers that program them nicely (I have both). There was a very attractive development board for these chips called Littlebits, which interfaced to the PICkit1 and provided two 10F206s with jumpers to LEDs, etc, as well as a ‘clamshell’ programming socket. Unfortunately, it is no longer available. However, it is not necessary to test program the MCUs in circuit, unless you use the 8-pin DIP versions. Clamshell programming sockets are manufactured by Wells-CTi, although they are expensive. As Mike mentions, the limited code and RAM space of these PICs presents challenges. To me, the 512K code space of a 206 is just an interesting problem in efficient coding, but the 24-byte RAM space is a real problem. Use of look-up tables in code space helps a lot. Some of the applications Mike mentions seem ambitious, some very realistic. I have found these MCUs well-suited to translation of IR remote signals to other carrier frequencies, and, within limits, to other codings. Finally, for the loss of one RAM location and for a few pennies more, the 10F222 provides real A/D. Ed Grens, via email Mike Hibbett replied to Ed: I agree, the limited code space of the 10F makes for an interesting challenge. With regard to programming the parts, I use the free winpic800 software and a simple programming interface called parprog, the design of which is available free on the internet. Your suggestion that some of my design ideas are ambitious has set me a challenge for the winter nights – I’ll report back next year! Mike Hibbett, via email Solder Flow Dear EPE, Any ideas on how to stop or restrict solder flowing too much around an area? I need to produce good looking solder joints (for model car racing, and I’m very particular!), I’ve been soldering for years – thousands of joints on self-designed and built brass chassis, but I need to know of anything available which stops solder taking to steel/brass, i.e. paint on something and it will restrict the solder to only the bare metal plus acid flux areas. Any ideas? Rick Mather, via email Rick addressed his question to On-line Editor Alan, who replied: What you need is some ‘solder resist’. It’s actually seen in electronics as the green coating on commercial PCBs. They paint over everything except the copper pads, to prevent excess solder from being applied. A pen dispenser version may be available from your supplier, e.g www.intertronics.co.uk/products/tec250 8.htm, though I haven’t tried it and can’t vouch for performance. I have never used acid flux so I don’t know if it’s acid proof. In welding, they use a weld spatter spray on surrounding areas so that particles of molten metal can be released, maybe dabbing some of that on with a Q-tip might work too. Alan Winstanley Solder Quantity Alan, who is well versed in soldering techniques (see our main web page via www.epemag.co.uk, click button Resources, Soldering Guide), also received a question from Xinkang: Thanks for your nice articles on the web about soldering, they are very helpful. I am new to this and want to do a nice job. I went through them, but am still not clear about how much solder I should use for any soldering job. Could you provide me with some more pictures on good and bad soldering jobs as a comparison? Xinkang, via email Unfortunately, the only photos I have are the ones already on the web site. How much solder you apply depends on how big the joint is, and the diameter (gauge) of the solder wire. For a small PCB joint, you might use as little as 2mm or 3mm. The main thing is to get sufficient and complete coverage of the connection, noting that it is wasteful to use excessive solder. Alan Winstanley Other Micros Reader Joeyla recently posted a question on our Chat Zone (access via www.epemag.co.uk) that I felt worth repeating here: I’ve just started using the TI MSP430F1232 micro as part of an Embedded Systems Design course I’m doing. Lots more devices in the MSP430 range. It is a really good 16-bit micro, lots of peripherals, easy to program in C, designed for low power and lots of source code from TI. I think a micro like this would be very easy for beginners to get to grips with, and with all the source code and application notes available, ideal for a lot of EPE projects, or are we stuck with the PIC for everything indefinitely with EPE? I replied on site that the simplest answer to Joeyla’s question is that we shall stay with the PIC as the principle microcontroller we support. There are too many readers who have already invested in equipment, software and knowledge for us to ‘change horses’ now. That’s not to say that you won’t periodically see other micros being used, and if there is a particularly good design that justifies the use of another micro and we feel that enough readers will have the equipment to handle it, we’d publish it. But another consideration is that of supplying programmed micros. There are lots of readers who program their own, but there are also readers who want to build the design but do not wish to, or cannot, program their own micro. Magenta thus offer a service for supplying preprogrammed PICs to readers at a reasonable Everyday Practical Electronics, January 2007 price. They have indicated that they can also supply some other types of preprogrammed micros and we may publish designs using these in the future. For myself, I have never had an idea for a design using a micro which I could not implement using a PIC and so would not feel justified in investing time, money and energy in learning and using another device. I did offer to learn about Atmel’s AVRs some years back, but insufficient readers seemed interested, so I didn’t. We actually had a similar discussion on the CZ some time ago, and whilst there were others who felt differently, by and large the majority felt as I do. EPE has been involved with PICs for maybe 12 years, and that’s a lot of investment time for us and loyal readers. Soldering Chromed Steel Dear EPE, I’ve found your website useful regarding Alan’s solder info, but still have a question. Is it possible to solder chrome plated steel furniture with typical plumber’s solder and a propane torch? Philip Davson, via email Alan replied to Philip: I haven’t tried it, but in principle, you would need a separate acid flux with the solder alloy, and the chrome plating will be destroyed in the process. Also, the finished joint would not be very strong or loadbearing (unlike e.g. welding), it would eventually snap. With light-duty steel fabrication, it is more common to use a brazing torch and brazing rods to attain the higher temperatures needed. This is the next stage up from soldering – http://en.wikipedia.org/wiki/ Brazing. Note that a propane torch cannot heat sufficiently for brazing. I have tried my hand at brazing a broken piece of chassis of my supposedly indestructible and precious Hayter lawnmower. I tried brazing the piece back into place thinking it would be as easy as soldering – nothing was further from the truth! Just trying to clamp the pieces together to resist 800ºF was impossible, the firebrick I had placed underneath it was glowing red hot, and then as I got into my stride (brandishing a brazing torch) the lawnmower started to melt... It is not at all easy to get it right. The heat is terrifically high compared to soldering, the process is very aggressive and it is very hard to make the non-ferrous brazing alloys flow neatly. Small brazing torches can be sourced from local DIY stores for about £16.00 plus the gas cylinders (an acetylene propane mix). Different grades of brazing rods are used depending on the material being brazed. Generally though, I don’t like the sound of trying to solder together tubular steel furniture. If it’s a one-off repair you need doing, in my view it is a job best left to an experienced engineering shop or e.g. a garage or bodyshop with a brazing torch who could do it for next to nothing. Alan Winstanley 65 DIRECT BOOK SERVICE NOTE: ALL PRICES INCLUDE UK POSTAGE FREE Two booklets and a Circuit Surgery CD-ROM with Teach-In 2000 CD-ROM Circuits and Design A BEGINNER’S GUIDE TO TTL DIGITAL ICs R. A. Penfold This book first covers the basics of simple logic circuits in general, and then progresses to specific TTL logic integrated circuits. The devices covered include gates, oscillators, timers, flip/flops, dividers, and decoder circuits. Some practical circuits are used to illustrate the use of TTL devices in the “real world’’. 142 pages EPE TEACH-IN 2000 CD-ROM The whole of the 12-part Teach-In 2000 series by John Becker (published in EPE Nov ’99 to Oct 2000) is now available on CD-ROM. Plus the Teach-In 2000 interactive software (Win 95, 98, ME and above) covering all aspects of the series and Alan Winstanley’s Basic Soldering Guide (including illustrations and Desoldering). Teach-In 2000 covers all the basic principles of electronics from Ohm’s Law to Displays, including Op.Amps, Logic Gates etc. Each part has its own section on the interactive software where you can also change component values in the various on-screen demonstration circuits. The series gives a hands-on approach to electronics with numerous breadboard circuits to try out, plus a simple computer interface (Win 95, 98, ME only) which allows a PC to be used as a basic oscilloscope. ONLY £12.45 including VAT and p&p Order code Teach-In CD-ROM Order code BP332 £5.45 PRACTICAL ELECTRONICS CALCULATIONS AND FORMULAE F. A. Wilson, C.G.I.A., C.Eng., F.I.E.E., F.I.E.R.E., F.B.I.M. Bridges the gap between complicated technical theory, and “cut-and-tried’’ methods which may bring success in design but leave the experimenter unfulfilled. A strong practical bias – tedious and higher mathematics have been avoided where possible and many tables have been included. The book is divided into six basic sections: Units and Constants, Direct-Current Circuits, Passive Components, Alternating-Current Circuits, Networks and Theorems, Measurements. Order code BP53 256 pages £5.49 MICROCONTROLLER COOKBOOK Mike James The practical solutions to real problems shown in this cookbook provide the basis to make PIC and 8051 devices really work. Capabilities of the variants are examined, and ways to enhance these are shown. A survey of common interface devices, and a description of programming models, lead on to a section on development techniques. The cookbook offers an introduction that will allow any user, novice or experienced, to make the most of microcontrollers. Order code NE26 240 pages £23.99 Computing & Robotics WINDOWS XP EXPLAINED N. Kantaris and P. R. M. Oliver If you want to know what to do next when confronted with Microsoft’s Windows XP screen, then this book is for you. It applies to both the Professional and Home editions. The book was written with the non-expert, busy person in mind. It explains what hardware requirements you need in order to run Windows XP successfully, and gives an overview of the Windows XP environment. The book explains: How to manipulate Windows, and how to use the Control Panel to add or change your printer, and control your display; How to control information using WordPad, Notepad and Paint, and how to use the Clipboard facility to transfer information between Windows applications; How to be in control of your filing system using Windows Explorer and My Computer; How to control printers, fonts, characters, multimedia and images, and how to add hardware and software to your system; How to configure your system to communicate with the outside world, and use Outlook Express for all your email requirements; How to use the Windows Media Player 8 to play your CDs, burn CDs with your favourite tracks, use the Radio Tuner, transfer your videos to your PC, and how to use the Sound Recorder and Movie Maker; How to use the System Tools to restore your system to a previously working state, using Microsoft’s Website to update your Windows set-up, how to clean up, defragment and scan your hard disk, and how to backup and restore your data; How to successfully transfer text from those old but cherished MS-DOS programs. 268 pages Order code BP514 £7.99 INTRODUCING ROBOTICS WITH LEGO MINDSTORMS Robert Penfold Shows the reader how to build a variety of increasingly sophisticated computer controlled robots using the brilliant Lego Mindstorms Robotic Invention System (RIS). Initially covers fundamental building techniques and mechanics needed to construct strong and efficient robots using the various “click-together’’ components supplied in the basic RIS kit. Explains in simple terms how the “brain’’ of the robot may be programmed on screen using a PC and “zapped’’ to the robot over an infra-red link. Also, shows how a more sophisticated Windows programming language such as Visual BASIC may be used to control the robots. Detailed building and programming instructions provided, including numerous step-by-step photographs. 288 pages – large format Order code BP901 £14.99 MORE ADVANCED ROBOTICS WITH LEGO MINDSTORMS – Robert Penfold Covers the Vision Command System Shows the reader how to extend the capabilities of the brilliant Lego Mindstorms Robotic Invention System (RIS) by using Lego’s own accessories and some simple home constructed units. You will be able to build robots that can provide you with ‘waiter service’ when you clap your hands, perform tricks, ‘see’ and avoid objects by using ‘bats radar’, or accurately follow a line marked on 66 the floor. Learn to use additional types of sensors including rotation, light, temperature, sound and ultrasonic and also explore the possibilities provided by using an additional (third) motor. For the less experienced, RCX code programs accompany most of the featured robots. However, the more adventurous reader is also shown how to write programs using Microsoft’s VisualBASIC running with the ActiveX control (Spirit.OCX) that is provided with the RIS kit. Detailed building instructions are provided for the featured robots, including numerous step-by-step photographs. The designs include rover vehicles, a virtual pet, a robot arm, an ‘intelligent’ sweet dispenser and a colour conscious robot that will try to grab objects of a specific colour. 298 pages Order code BP902 £14.99 THE PIC MICROCONTROLLER YOUR PERSONAL INTRODUCTORY COURSE – THIRD EDITION John Morton Discover the potential of the PIC microcontroller through graded projects – this book could revolutionise your electronics construction work! A uniquely concise and practical guide to getting up and running with the PIC Microcontroller. The PIC is one of the most popular of the microcontrollers that are transforming electronic project work and product design. Assuming no prior knowledge of microcontrollers and introducing the PICs capabilities through simple projects, this book is ideal for use in schools and colleges. It is the ideal introduction for students, teachers, technicians and electronics enthusiasts. The step-by-step explanations make it ideal for self-study too: this is not a reference book – you start work with the PIC straight away. The revised third edition covers the popular reprogrammable Flash PICs: 16F54/16F84 as well as the 12F508 and 12F675. 270 pages Order code NE36 £18.99 The books listed have been selected by Everyday Practical Electronics editorial staff as being of special interest to everyone involved in electronics and computing. They are supplied by mail order direct to your door. Full ordering details are given on the last book page. FOR A FURTHER SELECTION OF BOOKS SEE THE NEXT TWO ISSUES OF EPE All prices include UK postage EASY PC CASE MODDING R.A Penfold Why not turn that anonymous grey tower, that is the heart of your computer system, into a source of visual wonderment and fascination. To start, you need to change the case or some case panels for ones that are transparent. This will then allow the inside of your computer and it’s working parts to be clearly visible. There are now numerous accessories that are relatively inexpensive and freely available, for those wishing to customise their PC with added colour and light. Cables and fans can be made to glow, interior lights can be added, and it can all be seen to good effect through the transparent case. Exterior lighting and many other attractive accessories may also be fitted. This, in essence, is case modding or PC Customising as it is sometimes called and this book provides all the practical details you need for using the main types of case modding components including:- Electro luminescent (EL) ‘go-faster’ stripes: Internal lighting units: Fancy EL panels: Data cables with built-in lighting: Data cables that glow with the aid of ‘black’ light from an ultraviolet (UV) tube: Digital display panels: LED case and heatsink fans: Coloured power supply covers. 192 pages Order code BP542 £8.99 NEWNES PC TROUBLESHOOTING POCKET BOOK – SECOND EDITION Howard Anderson, Mike Tooley All the essential data for PC fault-finding and upgrading. This book provides a concise and compact reference that describes, in a clear and straightforward manner, the principles and practice of fault-finding and upgrading PCs and peripherals. The book is aimed at anyone who is involved with the installation, configuration, maintenance, upgrading, repair or support of PC systems. It also provides nontechnical users with sufficient background information, charts and checklists to enable the diagnosis of faults and help to carry out simple modifications and repairs. In order to reflect rapid changes in computer technology (both hardware and software) this new edition has been completely revised and rewritten. 256 pages Order code NE41 £19.99 INTRODUCTION TO MICROPROCESSORS AND MICROCONTROLLERS – SECOND EDITION John Crisp If you are, or soon will be, involved in the use of microprocessors and microcontrollers, this practical introduction is essential reading. This book provides a thoroughly readable introduction to microprocessors and micrcontrollers. Assuming no previous knowledge of the subject, nor a technical or mathematical background. It is suitable for students, technicians, engineers and hobbyists, and covers the full range of modern micros. After a thorough introduction to the subject, ideas are developed progressively in a well-structured format. All technical terms are carefully introduced and subjects which have proved difficult, for example 2’s complement, are clearly explained. John Crisp covers the complete range of microprocessors from the popular 4-bit and 8-bit designs to today’s super-fast 32-bit and 64-bit versions that power PCs and engine management systems etc. NEWNES INTERFACING COMPANION Tony Fischer-Cripps A uniquely concise and practical guide to the hardware, applications and design issues involved in computer interfacing and the use of transducers and instrumentation. Newnes Interfacing Companion presents the essential information needed to design a PC-based interfacing system from the selection of suitable transducers, to collection of data, and the appropriate signal processing and conditioning. Contents: Part 1 – Transducers; Measurement systems; Temperature; Light; Position and motion; Force, pressure and flow. Part 2 – Interfacing; Number systems; Computer architecture; Assembly language; Interfacing; A to D and D to A conversions; Data communications; Programmable logic controllers; Data acquisition project. Part 3 – Signal processing; Transfer function; Active filters; Instrumentation amplifier; Noise; Digital signal processing. 222 pages 295 pages Order code NE31 £21.99 Order code NE38 £26.99 Everyday Practical Electronics, January 2007 Testing, Theory and Reference THE AMATEUR SCIENTIST CD-R OM CD-ROM The complete collection of The Amateur Scientist articles from Scientific American magazine. Over 1,000 classic science projects from a renowned source of winning projects. All projects are rated for cost, difficulty and possible hazards. Plus over 1,000 pages of helpful science techniques that never appeared in Scientific American. Exciting science projects in: Astronomy; Earth Science; Biology; Physics; Chemistry; Weather . . . and much more! The most complete resource ever assembled for hobbyists, and professionals looking for novel solutions to research problems. Includes extensive Science Software Library with even more science tools. Suitable for Mac, Windows, Linux or UNIX. 32MB RAM minimum, Netscape 4.0 or higher or Internet Explorer 4.0 or higher. Over 1,000 projects £19.95 Order code AS1 CD-ROM BEBOP BYTES BACK (and the Beboputer Computer CD-R Simulator) CD-ROM OM Clive (Max) Maxfield and Alvin Brown This follow-on to Bebop to the Boolean Boogie is a multimedia extravaganza of information about how computers work. It picks up where “Bebop I’’ left off, guiding you through the fascinating world of computer design . . . and you’ll have a few chuckles, if not belly laughs, along the way. In addition to over 200 megabytes of mega-cool multimedia, the CD-ROM contains a virtual microcomputer, simulating the motherboard and standard computer peripherals in an extremely realistic manner. In addition to a wealth of technical information, myriad nuggets of trivia, and hundreds of carefully drawn illustrations, the CD-ROM contains a set of lab experiments for the virtual microcomputer that let you recreate the experiences of early computer pioneers. If you’re the slightest bit interested in the inner workings of computers, then don’t dare to miss this! Over 800 pages in Adobe Acrobat format Order code BEB2 CD-ROM £21.95 GETTING THE MOST FROM YOUR MULTIMETER R. A. Penfold This book is primarily aimed at beginners and those of limited experience of electronics. Chapter 1 covers the basics of analogue and digital multimeters, discussing the relative merits and the limitations of the two types. In Chapter 2 various methods of component checking are described, including tests for transistors, thyristors, resistors, capacitors and diodes. Circuit testing is covered in Chapter 3, with subjects such as voltage, current and continuity checks being discussed. In the main little or no previous knowledge or experience is assumed. Using these simple component and circuit testing techniques the reader should be able to confidently tackle servicing of most electronic projects. Order code BP239 96 pages £5.49 OSCILLOSCOPES – FIFTH EDITION Ian Hickman Oscilloscopes are essential tools for checking circuit operation and diagnosing faults, and an enormous range of models are available. This handy guide to oscilloscopes is essential reading for anyone who has to use a ’scope for their work or hobby; electronics designers, technicians, anyone in industry involved in test and measurement, electronics enthusiasts . . . Ian Hickman’s review of all the latest types of ’scope currently available will prove especially useful for anyone planning to buy – or even build – an oscilloscope. The contents include a description of the basic oscillscope; Advanced realtime oscilloscope; Accessories; Using oscilloscopes; Sampling oscilloscopes; Digital storage oscilloscopes; Oscilloscopes for special purposes; How oscillocopes work (1): the CRT; How oscilloscopes work (2): circuitry; How oscilloscopes work (3): storage CRTs; plus a listing of Oscilloscope manufacturers and suppliers. Order code NE37 288 pages £22.99 PRACTICAL ELECTRONIC FAULT FINDING AND TROUBLESHOOTING Robin Pain To be a real fault finder, you must be able to get a feel for what is going on in the circuit you are examining. In this book Robin Pain explains the basic techniques needed to be a fault finder. Simple circuit examples are used to illustrate principles and concepts fundamental to the process of fault finding. This is not a book of theory, it is a book of practical tips, hints and rules of thumb, all of which will equip the reader to tackle any job. You may be an engineer or technician in search of information and guidance, a college student, a hobbyist building a project from a magazine, or simply a keen self-taught amateur who is interested in electronic fault finding but finds books on the subject too mathematical or specialised. The fundamental principles of analogue and digital fault finding are described (although, of course, there is no such thing as a “digital fault” – all faults are by nature analogue). This book is written entirely for a fault finder using only the basic fault-finding equipment: a digital multimeter and an oscilloscope. The treatment is non-mathematical (apart from Ohm’s law) and all jargon is strictly avoided. Order code NE22 274 pages £25.99 ELECTRONIC TEST EQUIPMENT HANDBOOK Steve Money In most applications of electronics, test instruments are essential for checking the performance of a system or for diagnosing faults in operation, and so it is important for engineers, technicians, students and hobbyists to understand how the basic test instruments work and how they can be used. The principles of operation of the various types of test instrument are explained in simple terms with a minimum of mathematical analysis. The book covers analogue and digital meters, bridges, oscilloscopes, signal generators, counters, timers and frequency measurement. The practical uses of these instruments are also examined. 206 pages £9.95 Order code PC109 DIGITAL GATES AND FLIP-FLOPS Ian R. Sinclair This book, intended for enthusiasts, students and technicians, seeks to establish a firm foundation in digital electronics by treating the topics of gates and flip-flops thoroughly and from the beginning. Topics such as Boolean algebra and Karnaugh mapping are explainend, demonstrated and used extensively, and more attention is paid to the subject of synchronous counters than to the simple but less important ripple counters. No background other than a basic knowledge of electronics is assumed, and the more theoretical topics are explained from the beginning, as also are many working practices. The book concludes with an explanation of microprocessor techniques as applied to digital logic. 200 pages £9.95 Order code PC106 UNDERSTANDING ELECTRONIC CONTROL SYSTEMS Owen Bishop Owen Bishop has produced a concise, readable text to introduce a wide range of students, technicians and professionals to an important area of electronics. Control is a highly mathematical subject, but here maths is kept to a minimum, with flow charts to illustrate principles and techniques instead of equations. Cutting edge topics such as microcontrollers, neural networks and fuzzy control are all here, making this an ideal refresher course for those working in Industry. Basic principles, control algorithms and hardwired control systems are also fully covered so the resulting book is a comprehensive text and well suited to college courses or background reading for university students. The text is supported by questions under the headings Keeping Up and Test Your Knowledge so that the reader can develop a sound understanding and the ability to apply the techniques they are learning. 228 pages £20.99 Order code NE35 HOW ELECTRONIC THINGS WORK – AND WHAT TO DO WHEN THEY DON’T Robert Goodman You never again have to be flummoxed, flustered or taken for a ride by a piece of electronics equipment. With this fully illustrated, simple-to-use guide, you will get a grasp on the workings of the electronic world that surrounds you – and even learn to make your own repairs. You don’t need any technical experience. This book gives you: Clear explanations of how things work, written in everyday language. Easy-to-follow, illustrated instructions on using test equipment to diagnose problems. Guidelines to help you decide for or against professional repair. Tips on protecting your expensive equipment from lightning and other electrical damage. Lubrication and maintenance suggestions. Covers: colour TVs, VCRs, radios, PCs, CD players, printers, telephones, monitors, camcorders, satellite dishes, and much more! 394 pages £21.99 Order code MGH3 VINTAGE RADIOS – COLLECTING ɀ SERVICING ɀ RESTORING Tony Thompson The essential guide to collecting, repairing and restoring vintage valve radios. These receivers are becoming ever more popular as collectibles, this is a good thing because it means that a very large piece of technological history is being reclaimed when at one time many thought it lost forever. If you look around, you will find plenty of valve radio sets just waiting for a loving restoration. They may not yet be the most highly prized, and they are unlikely to be in top condition, but they can be yours and, if you develop the skills outlined in this book, you will possess radio receivers to be proud of. The book covers radio history, styling, faultfinding, chassis and cabinet restoration, types of set. Order code TT1 124 pages spiral bound £13.50 All prices include UK P&P Everyday Practical Electronics, January 2007 67 Project Building ELECTRONIC PROJECT BUILDING FOR BEGINNERS R. A. Penfold This book is for complete beginners to electronic project building. It provides a complete introduction to the practical side of this fascinating hobby, including the following topics: Component identification, and buying the right parts; resistor colour codes, capacitor value markings, etc; advice on buying the right tools for the job; soldering; making easy work of the hard wiring; construction methods, including stripboard, custom printed circuit boards, plain matrix boards, surface mount boards and wire-wrapping; finishing off, and adding panel labels; getting “problem’’ projects to work, including simple methods of fault-finding. In fact everything you need to know in order to get started in this absorbing and creative hobby. 135 pages Order code BP392 £5.49 BUILDING VALVE AMPLIFIERS Morgan Jones The practical guide to building, modifying, fault-finding and repairing valve amplifiers. A hands-on approach to valve electronics – classic and modern – with a minimum of theory. Planning, fault-finding, and testing are each illustrated by step-by-step examples. A unique hands-on guide for anyone working with valve (tube in USA) audio equipment – as an electronics experimenter, audiophile or audio engineer. Particular attention has been paid to answering questions commonly asked by newcomers to the world of the vacuum tube, whether audio enthusiasts tackling their first build, or more experienced amplifier designers seeking to learn the ropes of working with valves. The practical side of this book is reinforced by numerous clear illustrations throughout. 368 pages Order code NE40 ELECTRONIC PROJECTS FOR EXPERIMENTERS R. A. Penfold Many electronic hobbyists who have been pursuing their hobby for a number of years seem to suffer from the dreaded “seen it all before’’ syndrome. This book is fairly and squarely aimed at sufferers of this complaint, plus any other electronics enthusiasts who yearn to try something a bit different. The subjects covered include:- Magnetic field detector, Basic Hall effect compass, Hall effect audio isolator, Voice scrambler/descrambler, Bat detector, Bat style echo location, Noise cancelling, LED stroboscope, Infra-red “torch’’, Electronic breeze detector, Class D power amplifier, Strain gauge amplifier, Super hearing aid. 138 pages Order code BP371 £5.45 STARTING ELECTRONICS, THIRD EDITION KEITH BRINDLEY A punchy practical introduction to self-build electronics. The ideal starting point for home experimenters, technicians and students who want to develop the real hands-on skills of electronics construction. A highly practical introduction for hobbyists, students, and technicians. Keith Brindley introduces readers to the functions of the main component types, their uses, and the basic principles of building and designing electronic circuits. Breadboarding layouts make this very much a ready-torun book for the experimenter, and the use of multimeter, but not oscilloscopes, and readily available, inexpensive components makes the practical work achievable in a home or school setting as well as a fully equiped lab. 288 pages PRACTICAL FIBRE-OPTIC PROJECTS R. A. Penfold While fibre-optic cables may have potential advantages over ordinary electric cables, for the electronics enthusiast it is probably their novelty value that makes them worthy of exploration. Fibre-optic cables provide an innovative interesting alternative to electric cables, but in most cases they also represent a practical approach to the problem. This book provides a number of tried and tested circuits for projects that utilize fibreoptic cables. The projects include:- Simple audio links, F.M. audio link, P.W.M. audio links, Simple d.c. links, P.W.M. d.c. link, P.W.M. motor speed control, RS232C data links, MIDI link, Loop alarms, R.P.M. meter. All the components used in these designs are readily available, none of them require the constructor to take out a second mortgage. 132 pages Order code BP374 £5.45 Order code NE42 £10.99 VIDEO PROJECTS FOR THE ELECTRONICS CONSTRUCTOR R. A. Penfold Written by highly respected author R. A. Penfold, this book contains a collection of electronic projects specially designed for video enthusiasts. All the projects can be simply constructed, and most are suitable for the newcomer to project construction, as they are assembled on stripboard. There are faders, wipers and effects units which will add sparkle and originality to your video recordings, an audio mixer and noise reducer to enhance your soundtracks and a basic computer control interface. Also, there’s a useful selection on basic video production techniques to get you started. Circuits include: video enhancer, improved video enhancer, video fader, horizontal wiper, improved video wiper, negative video unit, fade to grey unit, black and white keyer, vertical wiper, audio mixer, stereo headphone amplifier, dynamic noise reducer, automatic fader, pushbutton fader, computer control interface, 12 volt mains power supply. 124 pages Order code PC115 £5.45 £21.99 Theory and Reference BOOK ORDERING DETAILS THE EMERGENCE OF BROADCASTING IN BRITAIN Brian Hennessy The beginning of any great enterprise should be recorded for posterity. Few knew that the Children’s Hour “Uncles”, Arthur, Jeff and Caractacus, were also the engineers who struggled by day to develop technical equipment – and would soon become Assistant Controller, Station Director and Organiser of Programmes for the BBC. This is a very human account, from the dawn of radio to the attainment of a Royal Charter in the late 1920s. It tells of the struggles and frustrations of engineers in developing innovative equipment and of the great John Reith who battled with everyone to bring the BBC from a staff of four up to a Corporation of several hundred. Brian Hennessy’s book also describes the devlopment of broadcasting equipment, the search for premises and looming bankruptcy before ending with the emergence of a firmly established Chartered Corporation – the BBC. Meticulous research over many years, over a hundred photographs, plans and diagrams as well as interviews with many of those who were there at the time, make this a valuable and original work for those involved in media studies, for radio enthusiasts or simply for those interested in radio and the fascinating story of the emergence of broadcasting. Order code EBB 436 pages £26.00 All prices include UK postage. For postage to Europe (air) and the rest of the world (surface) please add £2 per book. For the rest of the world airmail add £3 per book. CD-ROM prices include VAT and/or postage to anywhere in the world. Send a PO, cheque, international money order (£ sterling only) made payable to Direct Book Service or card details, Visa, Mastercard, Amex, Diners Club or Maestro to: DIRECT BOOK SERVICE, WIMBORNE PUBLISHING LTD., 408 WIMBORNE ROAD EAST, FERNDOWN, DORSET BH22 9ND. Books are normally sent within seven days of receipt of order, but please allow 28 days for delivery – more for overseas orders. Please check price and availability (see latest issue of Everyday Practical Electronics) before ordering from old lists. For a further selection of books see the next two issues of EPE. Tel 01202 873872 Fax 01202 874562. Email: [email protected] Order from our online shop at: www.epemag.co.uk BOOK ORDER FORM Full name: ............................................................................................................................................... Address: .................................................................................................................................................. ................................................................................................................................................................. COIL DESIGN AND CONSTRUCTIONAL MANUAL B. B. Babani A complete book for the home constructor on “how to make’’ RF, IF, audio and power coils, chokes and transformers. Practically every possible type is discussed and calculations necessary are given and explained in detail. Although this book is now twenty years old, with the exception of toroids and pulse transformers little has changed in coil design since it was written. 96 pages Order code BP160 £4.49 PRACTICAL ELECTRONIC FILTERS Owen Bishop This book deals with the subject in a non-mathematical way. It reviews the main types of filter, explaining in simple terms how each type works and how it is used. The book also presents a dozen filter-based projects with applications in and around the home or in the constructor’s workshop. These include a number of audio projects such as a rythm sequencer and a multi-voiced electronic organ. Concluding the book is a practical step-by-step guide to designing simple filters for a wide range of purposes, with circuit diagrams and worked examples. 188 pages 68 Order code BP299 ................................................................................................................................................................. .............................................. Post code: ........................... Telephone No: ............................................. Signature: ................................................................................................................................................ អ I enclose cheque/PO payable to DIRECT BOOK SERVICE for £ ................................................... អ Please charge my card £ ...................................................... Card expiry date.................................. Card Number ............................................................................... Maestro Issue No................................ Card Security Code ......................................... (the last three digits on or just under the signature strip) Please send book order codes: .............................................................................................................. ................................................................................................................................................................. Please continue on separate sheet of paper if necessary If you do not wish to cut your magazine, send a letter or copy of this form £5.49 Everyday Practical Electronics, January 2007 SHERWOOD ELECTRONICS Buy 10 x £1 Special Packs and choose another one FREE SP1 SP2 SP3 SP5 SP6 SP7 SP8 SP9 SP10 SP11 SP12 SP18 SP20 SP23 SP24 SP25 SP26 SP28 SP29 SP33 SP34 SP36 SP37 SP38 SP39 SP40 SP41 SP42 SP47 SP49 SP101 SP102 SP103 SP104 SP105 SP109 SP112 SP115 SP116 SP118 SP124 SP126 SP130 SP131 SP133 SP134 15 x 5mm Red LEDs 12 x 5mm Green LEDs 12 x 5mm Yellow LEDs 25 x 5mm 1 part LED clips 15 x 3mm Red LEDs 12 x 3mm Green LEDs 10 x 3mm Yellow LEDs 25 x 3mm 1 part LED clips 100 x 1N4148 diodes 30 x 1N4001 diodes 30 x 1N4002 diodes 20 x BC182 transistors 20 x BC184 transistors 20 x BC549 transistors 4 x CMOS 4001 4 x 555 timers 4 x 741 Op.Amps 4 x CMOS 4011 3 x CMOS 4013 4 x CMOS 4081 20 x 1N914 diodes 25 x 10/25V radial elect. caps. 12 x 100/35V radial elect. caps. 15 x 47/25V radial elect caps 10 x 470/16V radial elect. caps. 15 x BC237 transistors 20 x Mixed transistors 200 x Mixed 0·25W C.F. resistors 5 x Min. PB switches 4 x 5 metres stranded core wire 8 Metres 22SWG solder 20 x 8-pin DIL sockets 15 x 14-pin DIL sockets 15 x 16-pin DIL sockets 4 x 74LS00 15 x BC557 transistors 4 x CMOS 4093 3 x 10mm Red LEDs 3 x 10mm Green LEDs 2 x CMOS 4047 20 x Assorted ceramic disc caps 6 x Battery clips – 3 ea. PP3 + PP9 100 x Mixed 0·5W C.F. resistors 2 x TL071 Op.Amps 20 x 1N4004 diodes 15 x 1N4007 diodes RESISTOR PACKS – C.Film 5 each value – total 365 0·25W 10 each value – total 730 0·25W 1000 popular values 0·25W 5 each value-total 345 0·5W 10 each value-total 690 0·5W 1000 popular values 0·5W £3.40 £4.65 £6.60 £4.30 £6.95 £8.95 SP144 SP146 SP147 SP151 SP152 SP153 SP154 SP156 SP160 SP161 SP164 SP165 SP166 SP167 SP168 SP171 SP172 SP173 SP174 SP175 SP177 SP178 SP181 SP182 SP183 SP187 SP189 SP192 SP195 SP197 SP198 SP199 SP200 5 x Miniature slide switches 3 x BFY50 transistors 4 x W005 1·5A bridge rectifiers 20 x 2·2/63V radial elect. caps. 3 x W04 1·5A bridge rectifiers 2 x CMOS 4017 5 Pairs min. crocodile clips (Red & Black) 5 Pairs min.crocodile clips (assorted colours) 10 x 2N3704 transistors 5 x Stripboard 9 strips x 25 holes 4 x 8mm Red LEDs 4 x 8mm Green LEDs 4 x 8mm Yellow LEDs 15 x BC548 transistors 3 x Stripboard, 14 strips x 27 holes 10 x 2N3904 transistors 10 x 2N3906 transistors 2 x C106D thyristors 2 x LF351 Op.Amps 20 x 1N4003 diodes 5 x BC107 transistors 5 x BC108 transistors 8 Metres 18SWG solder 4 x Standard slide switches 10 x 220/25V radial elect. caps 20 x 22/25V radial elect. caps 20 x 1/63V radial elect. caps. 10 x 1A 20mm quick blow fuses 10 x 2A 20mm quick blow fuses 5 x Phono plugs – asstd colours 20 x 4·7/63V radial elect. caps. 20 x BC547 transistors 15 x BC239 transistors 4 x 5 metres solid core wire 3 x CMOS 4066 3 x 10mm Yellow LEDs 6 x 20 pin DIL sockets 5 x 24 pin DIL sockets 5 x 2·5mm mono jack plugs 5 x 2·5mm mono jack sockets 2 0 0 7 Catalogue available £1 inc. P&P or FREE with first order. P&P £1.75 per order. NO VAT Cheques and Postal Orders to: Sherwood Electronics, 7 Williamson St., Mansfield, Notts. NG19 6TD. BatteryPlanet .co.uk UK Battery Specialist Brand new secure online shop Trade & Bulk Enquiries Welcome! Zinc Chloride Batteries Memorex AA Zinc Chloride (4pk) Memorex AAA Zinc Chloride (4pk) Memorex C Zinc Chloride (2pk) Memorex D Zinc Chloride (2pk) Memorex 9v Zinc Chloride (1pk) Panasonic Special Power AA (4pk) Panasonic Special Power AAA (4pk) Panasonic Special Power C (2pk) Panasonic Special Power D (2pk) Panasonic Special Power 9v (1pk) £0.49 £0.49 £0.59 £0.59 £0.59 £0.79 £0.79 £0.79 £0.79 £0.79 Alkaline Batteries Memorex AA Alkaline (4pk) Memorex AAA Alkaline (4pk) Memorex C Alkaline (2pk) Memorex D Alkaline (2pk) Memorex 9v Alkaline (1pk) Panasonic Xtreme AA (4pk) Panasonic Xtreme AAA (4pk) Panasonic Xtreme C (2pk) Panasonic Xtreme D (2pk) Panasonic Xtreme 9v (1pk) £0.99 £0.99 £1.29 £1.29 £1.29 £1.49 £1.49 £1.49 £1.49 £1.49 Lithium/Camera Batteries Mitsubishi 6v Lithium 2CR5 (1pk) Mitsubishi 3v Lithium CR2 (1pk) Mitsubishi 3v Lithium CR123A (1pk) Mitsubishi 6v Lithium CR-P2 (1pk) Energizer Ultimate Lithium AA (2pk) Energizer Ultimate Lithium AA (4pk) Energizer Ultimate Lithium AAA (2pk) Energizer Ultimate Lithium AAA (4pk) £0.99 £0.99 £0.99 £0.99 £3.99 £5.99 £3.99 £5.99 Zinc Air Hearing Aid Batteries Rayovac 1.5v 10AE (Yellow) (6pk) Rayovac 1.5v 13AE (Orange) (6pk) Rayovac 1.5v 312AE (Brown) (6pk) Rayovac 1.5v 675AE (Blue) (6pk) £2.99 £2.99 £2.99 £2.99 16 Field Street Cannock Staffs. WS11 5QP Tel: 0845 166 2314 Fax: 0845 166 2315 [email protected] GP NiMh Rechargeable Batteries GP NiMh 600mAh AAA (4pk) GP NiMh 750mAh AAA (4pk) GP NiMh 800mAh AAA (4pk) GP NiMh 850mAh AAA (4pk) GP NiMh 1300mAh AA (4pk) GP NiMh 2100mAh AA (4pk) GP NiMh 2500mAh AA (4pk) GP NiMh 2600mAh AA (4pk) GP NiMh 2200mAh C (2pk) GP NiMh 2200mAh D (2pk) GP NiMh 170mAh PP3 (1pk) £2.49 £3.29 £3.69 £3.99 £2.99 £3.99 £6.49 £6.99 £3.99 £3.99 £3.99 Lithium Coin Cells CR1216 CR1616 CR2016 CR2025 CR2032 CR2430 £0.69 £0.69 £0.77 £0.77 £0.77 £0.95 Alkaline Button Cells LR41/L736/AG3 LR43/L1142/AG12 LR44/L1154/AG13 LR48/L754/AG5 LR54/L1131/AG10 LR60/L621/AG1 Other Button/Coin Cells available £0.19 £0.19 £0.19 £0.19 £0.19 £0.19 Call£ Other Batteries & Accessories Battery Boxes (Switched/Unswitched) Battery Holders (PP3/Flying Leads) Battery Snaps (PP3/PP9) Battery Connectors (PP3/PP9/PCB) Tagged/PCB Batteries Call£ Call£ Call£ Call£ Call£ GP Chargers also available (USmart, Smart2, Quick2 & Universal) Call£ All prices include Vat @ 17.5% UK P&P for batteries £1.00 for 1st item, then additional £0.25 per item. Except C/D Cells, £1.50 for 1st item, then additional £0.50 per item. Bulk orders please call to arrange carriage. UK P&P for Battery Chargers is £2.95 each Please allow upto 14 days for delivery. www.epemag.co.uk RP3 RP7 RP10 RP4 RP8 RP11 SP135 SP136 SP137 SP138 SP140 SP142 SP143 www. Everyday Practical Electronics, January 2007 69 PCB SERVICE Printed circuit boards for most recent EPE constructional projects are available from the PCB Service, see list. These are fabricated in glass fibre, and are fully drilled and roller tinned. All prices include VAT and postage and packing. Add £1 per board for airmail outside of Europe. Remittances should be sent to The PCB Service, Everyday Practical Electronics, Wimborne Publishing Ltd., 408 Wimborne Road East, Ferndown, Dorset BH22 9ND. Tel: 01202 873872; Fax 01202 874562; Email: [email protected]. On-line Shop: www.epemag. wimborne.co.uk/shopdoor.htm. Cheques should be crossed and made payable to Everyday Practical Electronics (Payment in £ sterling only). NOTE: While 95% of our boards are held in stock and are dispatched within seven days of receipt of order, please allow a maximum of 28 days for delivery – overseas readers allow extra if ordered by surface mail. Back numbers or photocopies of articles are available if required – see the Back Issues page for details. We do not supply kits or components for our projects. Please check price and availability in the latest issue. A large number of older boards are listed on our website. Boards can only be supplied on a payment with order basis. PROJECT TITLE Order Code LF/VLF Converter – Fixed Capacitor Board – Mixer/Oscillator Board – Buffer Amplifier – Q-Multiplier – Tuning Capacitor Board Back-To-Basics 4 – Doorchime – Electronic Dice Cybervox Multi-Clap Switch JUL ’05 Audio System – Preamplifier – Mic. Supply Board – Power Amp Pain Monitor MotorAmp Back-To-Basics 5 – Kitchen Timer – Room Thermometer AUG ‘05 All-Band Radio – Full Version – Mini Version Multicore Cable Tester – Main – Active Back-To-Basics 6 – Daily Reminder – Whistle Switch Model Railway Signal Control Snooker/Darts Scoreboard SEPT ’05 Photic Phone – Transmitter – Receiver Back-To-Basics 7 – Parking Radar – Telephone Switch Haloween Howler PIC-Based USB Interface OCT ’05 Cost 508 509 510 511 406 512 513 514 515 £5.71 £5.86 £5.23 £5.23 £4.28 £6.34 £6.02 £6.82 £6.66 516 517 518 519 520 521 522 £6.02 £5.23 £6.02 £7.14 £7.45 £5.87 £6.02 523 524 525 526 527 528 529 530 £5.71 £5.23 £6.19 £5.55 £6.19 £5.87 £6.19 £8.72 531 pair 532 533 534 535 536 } £6.98 £5.71 £5.55 £6.02 £6.19 PIC Chromatone NOV ’05 Back-To-Basics 8 – Noughts and Crosses Enigma – Weather Vane Repeater Multi-Function R/C Switch Speed Camera Watch Mk2 537 538 539 540 541 £6.82 £6.66 £6.18 £5.87 £6.35 Solid-State Valve Power Supply Vehicle Frost Box Mk2 Propeller Monitor Solid-State Hammond DEC ’05 542 543 544 545 £6.35 £5.71 £6.02 £6.18 PIC Ambilux Sunset Switch Current Clamp Adaptor for Multimeters Tiptronic-Style Gear Indicator – Micro Board – Display Board – Hall Speed Board JAN ’06 546 547 548 £5.71 £6.98 £5.39 Keypad Alarm 3-Way Active Crossover Jazzy Heart Status Monitor– Transmitter – Reciever FEB ’06 Power Up Video/Audio Booster (double-sided) Telescope Interface MAR ’06 557 558 559 £6.82 £12.00 £6.50 ‘Smart’ Slave Flash Programmable Continuity Tester APR ‘06 560 561 £6.18 £5.87 PortaPAL – Microphone Board – Auxilary Board – Main Board – Charger Board Omni Pendulum APR ‘06 562 563 564 565 566 £6.18 £5.87 £8.56 £6.66 £6.34 Smart Card Reader/Programmer LED Lighting For Your Car (set of 15 boards) Digital Reaction Timer MAY ’06 567 568 569 £7.61 £14.75 £7.13 70 549 550 551 } per set 552 553 554 555 pair 556 } PROJECT TITLE Poor Man’s Metal Locator Digital Instrument Display for Cars – Micro Board – Display Board Widgy Box Phone Ring & Test JUN ’06 Sudoku Unit PC Power Monitor Order Code Cost 570 £5.71 } 571 pair 572 573 574 £7.29 £6.82 JUL ’06 575 576 £6.66 £6.50 Home Theatre Sound Level Checker Adjustable DC-DC Converter For Cars Telephone Dialler For Buglar Alarms High Intensity Torch AUG ’06 577 578 579 580 £6.66 £6.50 £6.97 £5.39 Low Cost 50MHz Frequency Meter Version 1 Version 2 Version 3 Smart Mixture Display for your Car Water Level Gauge – Sensor – Display SEP ’06 581 582 583 584 585 pair 586 £6.66 £6.66 £6.66 £6.50 Fridge Door-Open Alarm Linear Supply For 1W Star LEDs (Pair) Through-Glass Alarm OCT ’06 587 588a & b 589 £5.71 £6.50 £7.61 Quick Brake Studio 350 Power Amplifier Micropower Battery Protector Giant LED Message Display – Master – Slave NOV ’06 590 591 592 594 595 £6.50 £9.51 £5.71 £5.55 £6.50 Lapel Microphone Adaptor DEC ’06 RGB To Component Video Converter (double sided) USB Power Injector Mind Trainer 593 596 597 598 £6.18 £12.69 £5.87 £6.50 Balanced Microphone Preamp JAN ’07 High-Efficiency Power Supply for 1W Star LEDs Jumping Spider 599 600 601 £6.82 £6.19 £5.71 } £7.77 £6.98 EPE SOFTWARE All software programs for EPE Projects marked with an asterisk, and others previously published, can be downloaded free from our Downloads site, accessible via our home page at: www.epemag.co.uk. PCB MASTERS PCB masters for boards published from the March ‘06 issue onwards can also be downloaded from our UK website (www.epemag.co.uk); go to the “Downloads” section. EPE PRINTED CIRCUIT BOARD SERVICE Order Code Project Quantity Price ..................................................................................... Name ........................................................................... Address ....................................................................... .............................................................................. Tel. No. ......................................................................... £7.61 £6.02 £9.20 £6.02 £7.61 I enclose payment of £................ (cheque/PO in £ sterling only) to: Everyday Practical Electronics MasterCard, Amex, Diners Club, Visa or Switch/Maestro Card No ................................................................................ Valid From ....................... Expiry Date ............................... Card Security Code ............... Maestro Issue No ........... (The last 3 digits on or just under the signature strip) Signature .............................................................................. NOTE: You can also order p.c.b.s by phone, Fax, Email or via our Web site on a secure server: http://www.epemag.wimborne.co.uk/shopdoor.htm Everyday Practical Electronics, January 2007 CLASSIFIED ADVERTISEMENTS Everyday Practical Electronics reaches more UK readers than any other UK monthly hobby electronics magazine, our sales figures prove it. We have been the leading monthly magazine in this market for the last twenty-two years. If you want your advertisements to be seen by the largest readership at the most economical price our classified and semi-display pages offer the best value. The prepaid rate for semi-display space is £10 (+VAT) per single column centimetre (minimum 2·5cm). The prepaid rate for classified adverts is 40p (+VAT) per word (minimum 12 words). All cheques, postal orders, etc., to be made payable to Everyday Practical Electronics. VAT must be added. Advertisements, together with remittance, should be sent to Everyday Practical Electronics Advertisements, 408 Wimborne Road East, Ferndown, Dorset BH22 9ND. Phone: 01202 873872. Fax: 01202 874562. Email: [email protected]. For rates and information on display and classified advertising please contact our Advertisement Manager, Stewart Kearn as above. Miscellaneous VALVES AND ALLIED COMPONENTS IN STOCK. Phone for free list. Valves, books and magazines wanted. Geoff Davies (Radio), tel. 01788 574774. WANTED OLD HALF INCH FERRITE RODS. Must be half inch in diameter and be six inches long or more, will pay good money for the rods. Contact Peter Tankard on 0114 2316321 between 9am and 10pm. BTEC ELECTRONICS TECHNICIAN TRAINING FOR ½ PRICE VALVE CLEARANCE catalogue send £1.00 in 1st or 2nd class stamps FOR COMBINED VALVE & COMPONENT CLEARANCE list send £1.50 in 1st or 2nd class stamps. W. Burcher, 676 Foxhall Road, Ipswich, Suffolk, IP3 8NQ. Tel: 01473 272218. NATIONAL ELECTRONICS VCE ADVANCED ICT HNC AND HND ELECTRONICS FOUNDATION DEGREES NVQ ENGINEERING AND IT DESIGN AND TECHNOLOGY LONDON ELECTRONICS COLLEGE 20 PENYWERN ROAD EARLS COURT, LONDON SW5 9SU TEL: (020) 7373 8721 www.lec.org.uk N.R. BARDWELL Ltd – est 1948 Electronic Component Supplies LED’s, Semis, IC’s Resistors, Caps, etc send 44p for lists. 1000’s bargains at our secure site: www.bardwells.co.uk 288, Abbeydale Rd. Sheffield. S7 1FL 0845 166 2329 (local rate) KITS, TOOLS, COMPONENTS. S.A.E. catalogue SIR-KIT ELECTRONICS, 52 Severn Road, Clacton, CO15 3RB. www.geocities.com/sirkituk CPS Solar Solar panels, solar cells, and many more alternative energy products for battery charging etc, please visit our website for further info or call HEROS technology Ltd www.herostechnology.co.uk ,QWURGXFLQJ 0RGXODU &RQFHSW IRU PLFURFRQWUROOHUV 6XLWDEOH IRU 'HYHORSHUV 3UHSURGXFWLRQ (GXFDWLRQDO DQG +REE\ DSSOLFDWLRQV Tel: 0870 765 2334. www.solarpanelsonline.co.uk Ɣ:LQ3,&86%IXOOVSHHGSURJUDPPHU Ɣ&38PLFURFRQWUROOHUPRGXOHV Ɣ3HULSKHUDOPRGXOHVIRUDOOPLFURFRQWUROOHUV SAFFRON ELECTRONICS LTD Suppliers of High Quality Electronic Components Resistors, Caps, Batteries, Chargers, Semiconductors, LED’s, IC’s, PCB’s, Switches, Solder, Cable, Wire, Etc. Online Catalogue and Shop available at Get your magazine “instantly” anywhere in the world – buy and download from the web. TAKE A LOOK, A FREE ISSUE IS AVAILABLE www.SaffronElectronics.co.uk 16 Field Street, Cannock, Staffs. WS11 5QP Telephone: 0845 166 2314 (local rate) A one year subscription (12 issues) costs just $15.99 (US) BOWOOD ELECTRONICS LTD Suppliers of Electronic Components Place a secure order on our website or call our sales line All major credit cards accepted Web: www.bowood-electronics.co.uk Unit 1, McGregor’s Way, Turnoaks Business Park, Chesterfield, S40 2WB. Sales: 01246 200222 Send 60p stamp for catalogue Interesting electronics Www.astik.net Electronic plans that work, Keyloggers, and other stuff Your own complete eCommerce 24/7 site for only £10 per week! Domain, secure hosting, emails, shopping basket, etc, included. details: www.eConcept.co.uk Everyday Practical Electronics, January 2007 71 Europe’s Largest Surplus Store 20,000,000 Items on line NOW ! New items added daily Established for over 25 years, UK company Display Electronics prides itself on offering a massive range of electronic and associated electro-mechanical equipment and parts to the Hobbyist, Educational and Industrial user. Many current and obsolete hard to get parts are available from our vast stocks, which include: W e Worl Ship 6,000,000 Semiconductors dwid e 5,000 Power Supplies 25,000 Electric Motors Sur 10,000 Connectors Wanplus ted 100,000 Relays & Contactors 2000 Rack Cabinets & Accessories 4000 Items of Test Equipment 5000 Hard Disk Drives NEXT MONTH PIC DIGITAL GEIGER COUNTER A PIC controlled digital Geiger counter with LCD readout and a USB interface to upload data to a PC. Radiation measurements are date/time stamped by an internal realtime clock. PROGRAMMABLE ROBOT Features full manoeuvrability – forward, reverse, turn and stop, with pulse-width modulation for speed control. It also sports bump-and-respond, random motion, programmable sound, light sensing (16 levels) and EEPROM byte-wise addressing. COURTESY LIGHT DELAY Give your car that luxury feel by extending the time that your interior lights remain on once the car doors have closed. For that extra touch of class, the lights fade to darkness at the end of the time period. FEBRUARY ’07 ISSUE ON SALE JAN 11 www.distel.co.uk Display Electronics 29 / 35 Osborne Road Thornton Heath Surrey UK CR7 8PD Telephone [44] 020 8653 3333 Fax [44] 020 8653 8888 Rechargeable Batteries With Solder Tags NIMH NICAD AA 2000mAh ......................£2.82 C 4Ah ...................................£4.70 D 9Ah ...................................£7.60 PP3 150mAh ..................... £4.95 AA 650mAh ...................... £1.41 C 2.5Ah ...............................£3.60 D 4Ah ...................................£4.95 Instrument case with edge connector and screw terminals Size 112mm x 52mm x 105mm tall This box consists of a cream base with a PCB slot, a cover plate to protect your circuit, a black lid with a 12 way edge connector and 12 screw terminals built in (8mm pitch) and 2 screws to hold the lid on. The cream bases have minor marks from dust and handling price £2.00 + VAT(=£2.35) for a sample or £44.00+VAT (=£51.70) for a box of 44. 866 battery pack originally intended to be used with an orbitel mobile telephone it contains 10 1·6Ah sub C batteries (42 x 22 dia. the size usually used in cordless screwdrivers etc.) the pack is new and unused and can be broken open quite easily £7.46 + VAT = £8.77 Please add £1.66 + VAT = £1.95 postage & packing per order JPG Electronics Shaws Row, Old Road, Chesterfield, S40 2RB. Tel 01246 211202 Fax 01246 550959 www.JPGElectronics.com Mastercard/Visa/Switch Callers welcome 9.30 a.m. to 5.30 p.m. Monday to Saturday ADVERTISERS INDEX AUDON ELECTRONICS . . . . . . . . . . . . . . . . . . . . . . . . . . . .48 BETA-LAYOUT . . . . . . . . . . . . . . . . . . . . . . . . . . . . . . . . . . .69 BRUNNING SOFTWARE . . . . . . . . . . . . . . . . . . . . . . . . . . .49 BULL GROUP . . . . . . . . . . . . . . . . . . . . . . . . . . . . . .Cover (ii) BYVAC . . . . . . . . . . . . . . . . . . . . . . . . . . . . . . . . . . . . . . . . .48 DISPLAY ELECTRONICS . . . . . . . . . . . . . . . . . . . . . . . . . 72 EASYSYNC . . . . . . . . . . . . . . . . . . . . . . . . . . . . . . . . . . . . .25 EPT SOFTWARE . . . . . . . . . . . . . . . . . . . . . . . . . . . . . . . . .61 ESR ELECTRONIC COMPONENTS . . . . . . . . . . . . . . . . . . .6 FOREST . . . . . . . . . . . . . . . . . . . . . . . . . . . . . . . . . . . . . . . .63 JAYCAR ELECTRONICS . . . . . . . . . . . . . . . . . . . . . . . . .18/19 JPG ELECTRONICS . . . . . . . . . . . . . . . . . . . . . . . . . . . . . .72 LABCENTER . . . . . . . . . . . . . . . . . . . . . . . . . . . . . . .Cover (iv) LASER . . . . . . . . . . . . . . . . . . . . . . . . . . . . . . . . . . . . . . . . .61 MAGENTA ELECTRONICS . . . . . . . . . . . . . . . . . . . . . . . . . .5 MIKROELEKTRONIKA . . . . . . . . . . . . . . . . . . . . . . .Cover (iii) MILFORD INSTRUMENTS . . . . . . . . . . . . . . . . . . . . . . . . . . .4 NURVE NETWORKS LLC . . . . . . . . . . . . . . . . . . . . . . . . . .69 PALTRONIX . . . . . . . . . . . . . . . . . . . . . . . . . . . . . . . . . . . . . .51 PEAK ELECTRONIC DESIGN . . . . . . . . . . . . . . . . . . . . . . .37 PICO TECHNOLOGY . . . . . . . . . . . . . . . . . . . . . . . . . . . . . .33 QUASAR ELECTRONICS . . . . . . . . . . . . . . . . . . . . . . . . . .2/3 SAFFRON ELECTRONICS . . . . . . . . . . . . . . . . . . . . . . . . .69 SCANTOOL . . . . . . . . . . . . . . . . . . . . . . . . . . . . . . . . . . . . .48 SHERWOOD ELECTRONICS . . . . . . . . . . . . . . . . . . . . . . .69 STEWART OF READING . . . . . . . . . . . . . . . . . . . . . . . . . . .45 ADVERTISEMENT OFFICES: 408 WIMBORNE ROAD EAST, FERNDOWN, DORSET BH22 9ND PHONE: 01202 873872 FAX: 01202 874562 EMAIL: [email protected] For Editorial address and phone numbers see page 7 Everyday Practical Electronics, ISSN 0262 3617 is published monthly (12 times per year) by Wimborne Publishing Ltd., USA agent USACAN Media Dist. Srv. Corp. at 26 Power Dam Way Suite S1-S3, Plattsburgh, NY 12901. Periodicals postage paid at Plattsburgh, NY and at additional mailing Offices. POSTMASTER: Send address changes to Everyday Practical Electronics, c/o Express Mag., PO Box 2769, Plattsburgh, NY, USA 12901-0239. Published on approximately the second Thursday of each month by Wimborne Publishing Ltd., 408 Wimborne Road East, Ferndown, Dorset BH22 9ND. Printed in England by Apple Web Offset Ltd., Warrington, WA1 4RW. Distributed by Seymour, 86 Newman St., London W1T 3EX. Subscriptions INLAND: £18.75 (6 months); £35.50 (12 months); £66 (2 years). OVERSEAS: Standard air service, £21.75 (6 months); £41.50 (12 months); £78 (2 years). Express airmail, £30.75 (6 months); £59.50 (12 months); £114 (2 years). Payments payable to “Everyday Practical Electronics’’, Subs Dept, Wimborne Publishing Ltd. Email: [email protected]. EVERYDAY PRACTICAL ELECTRONICS is sold subject to the following conditions, namely that it shall not, without the written consent of the Publishers first having been given, be lent, resold, hired out or otherwise disposed of by way of Trade at more than the recommended selling price shown on the cover, and that it shall not be lent, resold, hired out or otherwise disposed of in a mutilated condition or in any unauthorised cover by way of Trade or affixed to or as part of any publication or advertising, literary or pictorial matter whatsoever. mikroElektronika DEVELOPMENT TOOLS | COMPILERS | BOOKS EasyPIC4 Development Board mikroBasic, mikroPascal and mikroC compilers with on-board USB 2.0 programmer and mikroICD Supporting an impressive quantity of microcontrollers, easy to use IDE, hundreds of ‘ready to use’ functions and many integrated tools makes MikroElektronika compilers one of the best choices on market today. Beside mikroICD mikroElektronika compilers offer statistical module, simulator, generating Bitmap for graphic screens, 7 segments converter tool, ASCII, Export Code to HTML, communication tool for SD/MMC , UDP (Ethernet), USB , EEPROM editor, management of the programming modes etc.. Each compiler has many routines and examples like reading/writing on MMC, SD, CF cards, EEPROM, FLASH, writing to alphanumeric and graphic LCD, manipulation of push-buttons, 4x4 keyboards, PS/2 keyboards, generation of signals and sounds, character string manipulation, mathematical calculations , manipulation of communications I2C / SPI / RS232 / CAN / USB / RS485 / OneWire, Manchester coding management, logical/numerical conversion, PWM signals, interrupts, etc… The CD-ROM contains many ready-written and tested programs for use with our development boards. CAN-1 Board - Interface CAN via MCP2551 $18.00 USD CAN-2 Board - Make CAN network with SPI interface $21.00 USD RS485 Board - Connect devices into RS-485 network $17.00 USD Serial Ethernet - Make ethernet network with SPI Interface (ENC28J60) $28.00 USD 3 in1 EasyPIC4 development board: Following in the tradition of the EasyPIC3 as one of the best PIC development systems on the market, the EasyPIC4 has more DEVELOPMENT new features for the same price. The system supports 8, 14, 18, 20, 28 and 40 pin PIC microcontrollers (it comes with a PIC16F877A). The ultra fast mikroICD (In-circuit Debugger) enables very efficient debugging and faster prototype development. Many ready made examples guarantee successful use of the system. EasyPIC4 is fully optimized for fast prototype development. It allows the PIC microcontroller to be interfaced with external circuits to a broad range of peripheral devices, allowing the user to concentrate on just the software. On a silkscreen there are labels beside every component. These marks describe connections to the microcontroller, operation modes, and some other useful notes. As a result, the need for additional schematics is minimized, because all the information required is already on the board. SYSTEM CF Board - Easy way to use Compact flash in your design $18.00 USD MMC/SD Board - Easy way to use MMC and SD cards in your design $18.00 USD EEPROM Board - Serial EEPROM board via I2C interface $9.00 USD RTC Board - PCF8583 RTC with battery backup $16.00 USD HARDWARE ICD ON-BOARD USB 2.0 ON-BOARD PROGRAMMER HIGH PERFORMANCE DEVELOPMENT BOARD 3 in 1 Development System : Development Board + USB 2.0 onboard programmer + In Circuit Debugger mikroICD is a highly effective tool for Real-Time debugging on a hardware level. The ICD debugger enables you to execute a mikroC/mikroPascal/mikroBasic program on a host PIC microcontroller and view variable values, Special Function Registers (SFR), memory and EEPROM as the program is running. ADC Board - 12-bit analogto-digital converter(ADC) with 4 inputs $22.00 USD On-board USB 2.0 PICFlash programmer – an ultra fast USB 2.0 programmer for fast MCU programming. Continuing its tradition as the fastest PIC programmer on the market, the new PICFlash with mikroICD now supports more PIC MCUs giving the developer a wider choice of PIC MCU for further prototype development. Price with discount: Regular price: mikroBasic(PIC) mikroPascal(PIC) mikroC(PIC) $149.00 USD Buy one of our compilers with $149.00 USD one of our PIC development $249.00 USD boards at up to 30% discount. mikroBasic(AVR) mikroPascal(AVR) $149.00 USD Buy one of our compilers with mikroBasic(AVR) (-30%) $149.00 USD one of our AVR development mikroPascal(AVR) (-30%) boards at up to 30% discount mikroBasic(PIC) (-30%) mikroPascal(PIC) (-30%) mikroC(PIC) (-30%) $99.00 USD $99.00 USD $175.00 USD $99.00 USD $99.00 USD mikroBasic(dsPIC) $149.00 USD Buy one of our compilers with mikroBasic(dsPIC) (-30%) $99.00 USD mikroPascal(dsPIC) $249.00 USD one of our dsPIC development mikroPascal(dsPIC) (-20%)$199.00 USD $175.00 USD mikroC(dsPIC) $249.00 USD boards at up to 30% discount. mikroC(dsPIC) (-30%) BIGPIC4 Development Board with on-board USB 2.0 programmer and mikroICD Following in the tradition of its predecessor, the BIGPIC3 as one of the best best 80-pin PIC development systems on the market, BIGPIC4 continues tradition with more new features for same price. System supports the latest 64 and 80pin PIC microcontrollers (it is delivered with PIC18F8520 working at 40MHz). Many ready made examples guarantee successful use of the system. BIGPIC4 has many features that makes your development easy. Ultra fast on-board programmer and mikroICD (In-circuit Debugger) enables very efficient debugging and faster prototype developing. Examples in C, BASIC and Pascal language are provided with the board. BIGPIC4 Development System ................... $132.00 USD EasydsPIC3 Development Board with on-board USB 2.0 programmer System supports 18, 28 and 40 pin microcontrollers (it comes with dsPIC30F4013 general purpose microcontroller with internal 12 bit ADC). EasydsPIC3 has many features that make your development easy. Many ready made examples in C, BASIC and PASCAL language guarantee successful use of the system. On-board USB 2.0 programmer allow you faster prototype developing. EasydsPIC3 Development System ............. $119.00 USD dsPICPRO2 Development Board DAC Board - 12-bit digitalto-analog converter(DAC) with SPI $18.00 USD with on-board USB 2.0 programmer System supports dsPIC microcontrollers in 64 and 80 pin packages. It is delivered with dsPIC30F6014A microcontroller. The dsPICPRO2 development system is a full-featured development board for Microchip dsPIC MCU. dsPICPRO2 board allows microcontroller to be interfaced with external circuits and a broad range of peripheral devices. This development board has an on-board USB 2.0 programmer and integrated connectors for SD/CF memory cards, 2 x RS232 port, RS485, CAN board, DAC etc.. Keypad 4x4 Board - Add keypad to your application $9.00 USD Accel. Board - Accel. is an electronic device that will measure acceleration forces $16.00 USD dsPICPRO2 Development System .............. $239.00 USD Examples in C, BASIC and Pascal language: Printing text on LCD, LED blinking on PORTB, MMC/SD/CF card read and write example, USB communication, 4x4 Keypad example, PS2 keyboard example, software SPI/I2C/RS232 communications, AD conversion example Seven segment digit example, Timer 0 and Timer 1 time measuring, Measuring temperature with DS1820 and displaying on LCD, Graphic LCD example, examples for SPI communication, examples for CAN communication, examples for Sound generation, sending and receiving data over Ethernet, Interrupt upon PORTB state change, Detection of button pressed on port and many more... EasyAVR4 Development Board with on-board USB 2.0 programmer System supports 8, 20, 28 and 40 pin microcontrollers (it comes with ATMEGA16). Each jumper, element and pin is clearly marked on the board. It is possible to test most of the industrial needs on the system: temperature controllers, counters, timers etc. EasyAVR4 is easy to use Atmel AVR development system. On-board USB 2.0 programmer makes your development easy. Examples in BASIC and Pascal language are provided with the board. EasyAVR4 Development System ................ $114.00 USD PICFlash programmer – an ultra fast USB 2.0 programmer for PIC microcontrollers. Continuing its tradition as one of the fastest PIC programmer on the market, the new PICFlash with mikroICD now supports more PIC MCUs giving the developer a wider choice of PIC MCU for further prototype development mikroICD debugger enables you to execute mikroC / mikroPascal / mikroBasic program on a host PIC microcontroller and view variable values, Special Function Registers (SFR), memory and EEPROM as the program is running.................$89.00 USD - All of our products are shipped in special protective boxes. - On-line secure ordering provides a fast and safe way to buy our products. EasyARM Development Board with on-board USB 2.0 programmer EasyARM board comes with Philips LPC2214 microcontroller. Each jumper, element and pin is clearly marked on the board. It is possible to test most of the industrial needs on the system: temperature controllers, counters, timers etc. EasyARM has many features that make your development easy. One of them is on-board USB 2.0 programmer with automatic switch between ‘run’ and ‘programming’ mode. Examples in C language are provided with the board. EasyARM Development System ................. $149.00 USD Package contains: EasyPIC4 development system, USB cable, Serial cable, User’s manual, MikroICD manual, CD with software, drivers and examples in C, BASIC and Pascal language. Note: LCD, DS1820 temp sensor and GLCD are optional. Easy8051A Development Board with on-board USB 2.0 programmer System is compatible with 14, 16, 20 and 40 pin microcontrollers (it comes with AT89S8252). USB 2.0 Programmer is supplied from the system and the programming can be EasyPIC4 Development System ................................ $119.00 USD done without taking the microcontroller out. Many industrial Optional: applications can be tested on the system : temperature con2x16 LCD and DS1820 temperature sensor ............. $15.00 USD trollers, counters.. Easy8051A development system is a Graphic LCD 128x64 dots .......................................... $17.00 USD full-featured development board for 8051 microcontrollers. It was designed to allow students or engineers to easily exercise and explore the capabilities of the 8051 microcontrollers. Please visit our web page for more info http://www.mikroe.com Easy8051A Development System ............... $114.00 USD Find your distributor: http://www.mikroe.com/en/distributors/ S O F T W A R E A N D H A R D W A R E S O L U T I O N S F O R E M B E D D E D W O R L D