1
Cisco PGW 2200 Softswitch Release 9.8
Software Installation and Configuration
Guide
November 2008
Americas Headquarters
Cisco Systems, Inc.
170 West Tasman Drive
San Jose, CA 95134-1706
USA
http://www.cisco.com
Tel: 408 526-4000
800 553-NETS (6387)
Fax: 408 527-0883
Text Part Number: OL-18083-01
THE SPECIFICATIONS AND INFORMATION REGARDING THE PRODUCTS IN THIS MANUAL ARE SUBJECT TO CHANGE WITHOUT NOTICE. ALL
STATEMENTS, INFORMATION, AND RECOMMENDATIONS IN THIS MANUAL ARE BELIEVED TO BE ACCURATE BUT ARE PRESENTED WITHOUT
WARRANTY OF ANY KIND, EXPRESS OR IMPLIED. USERS MUST TAKE FULL RESPONSIBILITY FOR THEIR APPLICATION OF ANY PRODUCTS.
THE SOFTWARE LICENSE AND LIMITED WARRANTY FOR THE ACCOMPANYING PRODUCT ARE SET FORTH IN THE INFORMATION PACKET THAT
SHIPPED WITH THE PRODUCT AND ARE INCORPORATED HEREIN BY THIS REFERENCE. IF YOU ARE UNABLE TO LOCATE THE SOFTWARE LICENSE
OR LIMITED WARRANTY, CONTACT YOUR CISCO REPRESENTATIVE FOR A COPY.
The Cisco implementation of TCP header compression is an adaptation of a program developed by the University of California, Berkeley (UCB) as part of UCB’s public
domain version of the UNIX operating system. All rights reserved. Copyright © 1981, Regents of the University of California.
NOTWITHSTANDING ANY OTHER WARRANTY HEREIN, ALL DOCUMENT FILES AND SOFTWARE OF THESE SUPPLIERS ARE PROVIDED “AS IS” WITH
ALL FAULTS. CISCO AND THE ABOVE-NAMED SUPPLIERS DISCLAIM ALL WARRANTIES, EXPRESSED OR IMPLIED, INCLUDING, WITHOUT
LIMITATION, THOSE OF MERCHANTABILITY, FITNESS FOR A PARTICULAR PURPOSE AND NONINFRINGEMENT OR ARISING FROM A COURSE OF
DEALING, USAGE, OR TRADE PRACTICE.
IN NO EVENT SHALL CISCO OR ITS SUPPLIERS BE LIABLE FOR ANY INDIRECT, SPECIAL, CONSEQUENTIAL, OR INCIDENTAL DAMAGES, INCLUDING,
WITHOUT LIMITATION, LOST PROFITS OR LOSS OR DAMAGE TO DATA ARISING OUT OF THE USE OR INABILITY TO USE THIS MANUAL, EVEN IF CISCO
OR ITS SUPPLIERS HAVE BEEN ADVISED OF THE POSSIBILITY OF SUCH DAMAGES.
CCDE, CCENT, Cisco Eos, Cisco HealthPresence, the Cisco logo, Cisco Lumin, Cisco Nexus, Cisco StadiumVision, Cisco TelePresence, Cisco WebEx, DCE, and Welcome
to the Human Network are trademarks; Changing the Way We Work, Live, Play, and Learn and Cisco Store are service marks; and Access Registrar, Aironet, AsyncOS,
Bringing the Meeting To You, Catalyst, CCDA, CCDP, CCIE, CCIP, CCNA, CCNP, CCSP, CCVP, Cisco, the Cisco Certified Internetwork Expert logo, Cisco IOS,
Cisco Press, Cisco Systems, Cisco Systems Capital, the Cisco Systems logo, Cisco Unity, Collaboration Without Limitation, EtherFast, EtherSwitch, Event Center, Fast Step,
Follow Me Browsing, FormShare, GigaDrive, HomeLink, Internet Quotient, IOS, iPhone, iQuick Study, IronPort, the IronPort logo, LightStream, Linksys, MediaTone,
MeetingPlace, MeetingPlace Chime Sound, MGX, Networkers, Networking Academy, Network Registrar, PCNow, PIX, PowerPanels, ProConnect, ScriptShare, SenderBase,
SMARTnet, Spectrum Expert, StackWise, The Fastest Way to Increase Your Internet Quotient, TransPath, WebEx, and the WebEx logo are registered trademarks of
Cisco Systems, Inc. and/or its affiliates in the United States and certain other countries.
All other trademarks mentioned in this document or website are the property of their respective owners. The use of the word partner does not imply a partnership relationship
between Cisco and any other company. (0812R)
Any Internet Protocol (IP) addresses used in this document are not intended to be actual addresses. Any examples, command display output, and figures included in the
document are shown for illustrative purposes only. Any use of actual IP addresses in illustrative content is unintentional and coincidental.
Cisco PGW 2200 Softswitch Release 9.8 Software Installation and Configuration Guide
© <year> Cisco Systems, Inc. All rights reserved.
Customer Order Number:
CONTENTS
Preface
ix
Document Objectives
Audience
ix
ix
Related Documentation
ix
Obtaining Documentation and Submitting a Service Request
Document Change History
x
x
Preparing for Sun Solaris Operating System and Cisco PGW 2200 Softswitch Software
Installation 1-1
Supported Platforms and Cisco Products
1-1
Solaris 10, Cisco PGW 2200 Softswitch Software Release 9.8 and Higher Software Release
Preinstallation Checklists 1-1
Required Software Media 1-2
Minimum System Requirements 1-2
Required Site-Specific Information 1-3
Required Machine-Specific Information 1-3
Required Tasks 1-3
Installing the Sun Solaris 10 Operating System
Supported Platforms
Supported Disk Drives
2-1
2-1
2-1
Before You Start 2-2
Cautions, Notes, and Tips
2-2
Loading the Sun Solaris 10 Operating System 2-2
Devices on Supported Platforms 2-3
Installing the Sun Solaris 10 Operating System for Sparc-based Platforms 2-3
Installing the Sun Solaris 10 Operating System for Opteron-based Platforms 2-13
Configuring Your Host 2-50
Platform-Specific Installation Procedures 2-62
Loading the Sun Solaris 10 Operating Environment 2-72
Installing the Sparc-based Solaris 10 Patches Package (CSCOh022) 2-73
Installing the Opteron-based Solaris 10 Patches Package (CSCOh032) 2-75
Installing the Solstice DiskSuite (CSCOh023) 2-77
Rebooting from the Mirrored (Secondary) Disk on Sparc-based Platforms 2-85
Rebooting from the Mirrored (Secondary) Disk on Opteron-based Platforms 2-87
Cisco PGW 2200 Softswitch Release 9.8 Software Installation and Configuration Guide
OL-18083-01
iii
Contents
Removing the Solstice DiskSuite 2-88
Installing the Log and Spool File Systems (CSCOh024) 2-89
Uninstalling the Log and Spool File System 2-97
Installing Cisco BAMS Archive Partition (CSCOh027) 2-98
Installing the Sparc-based Communications and Alarm Software Package (CSCOh026) 2-103
Installing the Opteron-based Communications Software Package (CSCOh036) 2-118
Installing the Verification Test Suite Script Package (CSCOh021) 2-129
Using the SunVTS Test Package 2-131
Normal Unit Test 2-131
Running a Test in Brief Mode 2-135
Running a Test in Full Mode 2-136
vts_script Execution Times 2-136
Removing the VTS Package (CSCOh021) 2-137
Configuring Lights-Out Management (LOM) or the Integrated Lights Out Manager (ILOM) 2-138
Configuring LOM on Sun Fire V40z Platform 2-138
Configuring ILOM on Sun Fire X4600 Platform 2-141
Configuring ILOM on Sun Netra X4200 M2 Platform 2-143
Installing the Cisco PGW 2200 Softswitch Software Release 9.8 and Higher
Before You Start 3-1
Cautions, Notes, and Tips
3-1
3-2
Installing the Cisco PGW 2200 Softswitch Software Release 9.8 and Higher Releases 3-3
Installing Cisco PGW 2200 Softswitch Software on a Simplex System 3-3
Installing the Cisco Security Package (CSCOh020) 3-12
Enabling Sudo 3-15
Installing the License File 3-15
Installing the License File if the Cisco PGW 2200 Softswitch is NOT Running 3-16
Installing the License File if the Cisco PGW 2200 Softswitch is Running 3-16
Installing on a Fault Tolerant System 3-17
Configuring the Cisco PGW 2200 Softswitch Software
4-1
Quick Guide to Configuring the Cisco PGW 2200 Softswitch Software
Before You Start 4-2
Software Directory Structure
4-1
4-3
Initial Cisco PGW 2200 Softswitch Software Configuration 4-4
Parameters Required for Initial Setup 4-7
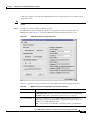
Using the Cisco MGC Environment Configuration Tool 4-8
Configuring Groups and Users 4-11
Verifying the mgcgrp Group 4-11
Adding a User with Full MML Privileges
4-11
Cisco PGW 2200 Softswitch Release 9.8 Software Installation and Configuration Guide
iv
OL-18083-01
Contents
Adding a User with Minimal MML Privileges
4-12
Configuring SNMP Support Resources 4-13
Migrating the SNMP Configuration to a More Secure Environment (for Cisco PGW 2200 Softswitch
Release 9.3(2) or Later) 4-14
Basic Tasks 4-14
Before You Run the config-snmp Utility 4-14
Running the config-snmp Utility 4-15
Adding an SNMP Community Entry 4-17
Deleting an SNMP COMMUNITY 4-19
Adding a Trap Destination 4-20
Deleting a Trap Destination 4-22
Activating the New Settings 4-23
Verifying the SNMP Configuration Migration 4-24
Configuring the Execution Environment 4-25
Changing XECfgParm.dat File Parameters 4-26
Changing XECfgParm.dat File Parameters in a Running Fault Tolerant System
Configuring Basic System Information 4-28
Specifying IP Addresses 4-30
Configuring Engine Parameters 4-32
Setting the Call Cutoff Timer 4-34
Enabling Call Screening 4-34
Configuring Call Detail Record File Output 4-35
Configuring the Clearing Location and Default Location Parameters 4-36
Configuring Switchover 4-39
Initializing the Provisioning Object Manager 4-41
Configuring SCP Queries 4-42
Before You Start 4-43
Modifying trigger.dat file parameters with provisioning commands
Configuring the trigger.dat File Attributes 4-43
Configuring the Translation Type Attribute 4-44
Sample trigger.dat File 4-45
4-27
4-43
Initializing the Call Screening Database 4-82
.odbc.ini File Information 4-83
Setting Up Replication 4-83
Network Requirements 4-84
Initializing Database Replication 4-85
Verifying Database Replication 4-86
Troubleshooting the Main Memory Database Replication 4-87
Displaying the Main Memory Database Replication Status 4-87
Cisco PGW 2200 Softswitch Release 9.8 Software Installation and Configuration Guide
OL-18083-01
v
Contents
Verifying Database Synchronization 4-87
Synchronizing Databases 4-88
Checking for Installation Errors 4-88
Reinstalling CSCOga002 4-89
Configuring Cisco ITP-Ls
4-89
Configuring Disk Monitor During Initial Software Configuration
Configuring the Data Dumper
4-89
4-90
Configuring the Data Dumper to Support Cisco BAMS
4-92
Migrating to Solaris 10 and Cisco PGW 2200 Softswitch Software Release 9.8
Conditions for Migration
Cautions and Notes
5-1
5-1
5-2
Required Software
5-3
License Installation
5-3
Recording System Data
Migration Overview
5-3
5-4
Migration from Release 9.5 or 9.6 to Release 9.8 without Platform Changes 5-5
Migrating the Second Cisco PGW 2200 Softswitch Software to Release 9.8 5-5
Backing Up the Cisco PGW 2200 Softswitch Configuration Files 5-5
Installing Sun Solaris 10 5-8
Loading the Sun Solaris 10 Operating Environment Packages 5-8
Restoring Data Files 5-9
Installing and Verifying the Cisco PGW 2200 Softswitch Software 5-9
Migrating the First Cisco PGW 2200 Softswitch Software to Release 9.8 5-10
Backing Up the Cisco PGW 2200 Softswitch Configuration Files 5-11
Installing Sun Solaris 10 5-13
Loading the Sun Solaris 10 Operating Environment Packages 5-14
Restoring Data Files 5-14
Installing and Verifying the Cisco PGW 2200 Softswitch Software 5-15
Transferring Additional Configuration Files 5-16
Migration from Release 9.7 to Release 9.8 without Platform Changes
5-20
Upgrading Lively from Sparc-based Platforms to Opteron-based Platforms
Before You Start 5-21
Live Upgrade Procedure 5-22
Falling Back Overview
5-21
5-26
Falling Back to the Cisco PGW 2200 Softswitch Software Release 9.7 without Platform Changes
5-26
Falling Back to Solaris 8 and Cisco PGW 2200 Softswitch Release 9.5 or 9.6 5-27
Falling Back to Solaris 8 If Hard Drives Were Replaced During the Upgrade 5-27
Cisco PGW 2200 Softswitch Release 9.8 Software Installation and Configuration Guide
vi
OL-18083-01
Contents
Falling Back to Solaris 8 on the Second Disk Drive 5-28
Restoring the Original Cisco PGW 2200 Softswitch Software
5-32
Falling Back to Previous Cisco PGW 2200 Softswitch Software Releases with Platform Changes
Replacing Hard Disks on an Existing Solaris 10 Platform 5-33
Backup Procedure 5-34
Hard Disk Replacement Procedure 5-34
Loading the Solaris 10 Operating System 5-35
Loading the Sun Solaris 10 Operating Environment Packages
Installing the Cisco PGW 2200 Softswitch 5-35
Restoring the System 5-35
Configuring the Local Area Network Switch
LAN Switch Overview
5-32
5-35
6-1
6-1
Catalyst 2900 XL Series
6-2
Catalyst 5500 and 5000 Series
6-2
XECfgParm.dat File Parameters
A-1
Understanding the XECfgParm.dat File Format A-1
Cisco PGW 2200 Softswitch XECfgParm.dat Files A-1
Facility Names A-1
Special Parameters A-2
Cisco PGW 2200 Softswitch 9.x XECfgParm.dat File Parameter Definitions
Client/Server and Secure Connectivity Relationships
A-2
B-1
Client/Server and Secure Connectivity Relationships B-1
Secure Connectivity Among Cisco PGW 2200 Softswitch Applications B-1
Secure Connectivity Between Cisco PGW 2200 Softswitch Application Platforms B-2
Secure Connectivity Between Cisco BAMS Application Platforms B-2
Secure Connectivity Between Cisco BAMS and Cisco PGW 2200 Softswitch Application
Platforms B-3
HP OpenView Sample SNMP Configuration
C-1
Configuring the Cisco PGW 2200 Softswitch to Send Alarms to HP OpenView
Formatting Trap Messages
Sample Installation Scripts
C-1
C-3
D-1
Sample Output from install.sh
D-1
Updated Configuration File Sample
Sample Configured snmpd.cnf File
D-11
D-13
Sample Configured XECfgParm.dat Files for Cisco PGW 2200 Softswitch Release 9.8(1)
D-16
Cisco PGW 2200 Softswitch Release 9.8 Software Installation and Configuration Guide
OL-18083-01
vii
Contents
Sample Configured XECfgParm.dat Files for Cisco PGW 2200 Softswitch Release 9.7(3)
D-27
Sample Configured XECfgParm.dat Files for Cisco PGW 2200 Softswitch Release 9.6(1)
D-37
Sample Uninstall Scripts
E-1
Removing a Cisco PGW 2200 Softswitch Software Version: Sample Output for uninstall.sh
Sample LAN Configurations
E-1
F-1
Sample Configuration for Cisco Catalyst 5500 A F-1
Sample Configuration for Cisco Catalyst 5500 A RSM
F-7
Sample Configuration for Cisco Catalyst 5500 B F-8
Sample Configuration for Cisco Catalyst 5500 B RSM
F-15
Cisco PGW 2200 Softswitch Release 9.8 Software Installation and Configuration Guide
viii
OL-18083-01
Preface
This preface describes the objectives of this document and explains how to find additional information
on related products and services. It contains the following sections:
•
Document Objectives, page ix
•
Audience, page ix
•
Related Documentation, page ix
•
Obtaining Documentation and Submitting a Service Request, page x
•
Document Change History, page x
Document Objectives
This guide describes the steps necessary to install and configure the Sun Solaris 10 operating system,
and the Cisco PGW 2200 Softswitch software Release 9.8.
Note
This guide does not cover media gateway (MGW) or Cisco PGW 2200 Softswitch hardware installation.
For instructions on installing these components, see the Cisco PGW 2200 Softswitch Hardware
Installation Guide.
Audience
The audience for this document is network operators and administrators. This audience is assumed to
have experience in telecommunications networks, protocols, and equipment, and a familiarity with data
communications networks, protocols, and equipment.
Related Documentation
This document contains information that is related to Cisco PGW 2200 Softswitch software installation
and configuration. For additional information on those subjects, see the documents at this URL:
http://www.cisco.com/en/US/products/hw/vcallcon/ps2027/tsd_products_support_series_home.html
You can also find the Cisco PGW 2200 Softswitch Documentation Map at the following URL:
Cisco PGW 2200 Softswitch Release 9.8 Software Installation and Configuration Guide
OL-18083-01
ix
Preface
http://www.cisco.com/en/US/products/hw/vcallcon/ps2027/products_documentation_roadmaps_list.ht
ml
Other useful reference publications include
•
Overviews of the related telephony solutions—Describe the Cisco telephony solutions with which
the Cisco PGW 2200 Softswitch node is associated
•
Provisioning guides for the related telephony solutions—Describe the provisioning steps for the
Cisco telephony solutions with which the Cisco PGW 2200 Softswitch node is associated
•
Solution gateway installation and configuration guides—Describe the steps for installing and
configuring the media gateway for a particular Cisco telephony solution
•
Cisco IP Transfer Point - LinkExtender—Describes the Cisco IP Transfer Point - LinkExtender
(Cisco IPT-L, formerly known as the Cisco Signaling Link Terminal or Cisco SLT) and provides
configuration information
Obtaining Documentation and Submitting a Service Request
For information on obtaining documentation, submitting a service request, and gathering additional
information, see the monthly What’s New in Cisco Product Documentation, which also lists all new and
revised Cisco technical documentation at
http://www.cisco.com/en/US/docs/general/whatsnew/whatsnew.html
Subscribe to the What’s New in Cisco Product Documentation as a Really Simple Syndication (RSS) feed
and set content to be delivered directly to your desktop using a reader application. The RSS feeds are a free
service and Cisco currently supports RSS version 2.0.
Document Change History
Release Number
Document Number
Change Date
Change Summary
9.8(1)
OL-18083-01
November 2008
Initial release
Cisco PGW 2200 Softswitch Release 9.8 Software Installation and Configuration Guide
x
OL-18083-01
CH A P T E R
1
Preparing for Sun Solaris Operating System and
Cisco PGW 2200 Softswitch Software
Installation
This chapter provides checklists describing the required and optional components, software media, and
information you must have on hand before installing the Sun Solaris operating system and the
Cisco PGW 2200 Softswitch software:
•
Note
Cisco PGW 2200 Softswitch Release 9.8 and up, which requires the Sun Solaris Operating System
10
The entire installation procedure takes approximately 2 hours to complete.
Supported Platforms and Cisco Products
The following Cisco products are supported by this software:
•
Cisco PGW 2200 Softswitch
•
Cisco Billing and Measurements Server (BAMS)
•
Cisco H.323 Signaling Interface (HSI)
The platforms that are supported for these products are identified in the Cisco PGW 2200 Softswitch
Hardware Installation Guide (Release 7 & 9).
Solaris 10, Cisco PGW 2200 Softswitch Software Release 9.8
and Higher Software Release Preinstallation Checklists
Table 1-1 through Table 1-4 list the required and optional tasks, information, and software media for
installing the Solaris 10 operating system and the Cisco PGW 2200 Softswitch software Release 9.8 and
higher.
Before installing the Sun Solaris operating system, Solaris patches, and alarm card software, ensure that
you collect the information and complete tasks listed in the following tables.
Cisco PGW 2200 Softswitch Release 9.8 Software Installation and Configuration Guide
OL-18083-01
1-1
Chapter 1 Preparing for Sun Solaris Operating System and Cisco PGW 2200 Softswitch Software Installation
Solaris 10, Cisco PGW 2200 Softswitch Software Release 9.8 and Higher Software Release Preinstallation Checklists
Note
The target machine must have a terminal connected to the console port by means of a serial cable.
Required Software Media
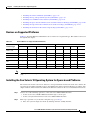
Gather all of the appropriate software media listed in Table 1-1. For more information, see the
appropriate Sun documentation that shipped with your system.
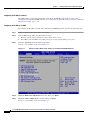
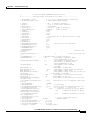
Table 1-1
Solaris 10 Required Media Checklist
Media
Version
The following CD-ROM disks are ordered from Cisco:
•
Cisco Solaris 10 Operating System Jumpstart Disk
This disk installs the Sun Solaris 10 Operating System,
configured specifically to support the
Cisco PGW 2200 Softswitch software. There are two versions of
this disk, one for each of the supported platform types:
– Cisco Solaris 10 Operating System Jumpstart Disk for
06/06
Sparc-based platforms
– Cisco Solaris 10 Operating System Jumpstart Disk for
01/06
Opteron-based platforms
•
Cisco Solaris 10 Operating Environment CD
3.0(6)
This disk contains the following packages:
– CSCOh020 (MGC Security package)
– CSCOh021 (Verification Test Suite scripts)
– CSCOh022 (Solaris 10 patches for Sparc-based platforms)
– CSCOh023 (DiskSuite installation scripts)
– CSCOh024 (Log/Spool installation for Sparc-based
platforms)
– CSCOh026 (Xterm, ftp, ntp, and alarm software installation
for Sparc-based platforms)
– CSCOh032 (Solaris 10 patches for Opteron-based platforms)
– CSCOh036 (Xterm, ftp, and ntp installation for
Opteron-based platforms)
Minimum System Requirements
Refer to the Cisco PGW 2200 Softswitch Hardware Installation Guide (Release 7 & 9) for the host
minimum hardware requirements. Before using the minimum hardware configuration, consult your
Cisco representative to determine the hardware that gives you the best performance results based on your
network configuration, proposed traffic, and desired processing power.
Cisco PGW 2200 Softswitch Release 9.8 Software Installation and Configuration Guide
1-2
OL-18083-01
Chapter 1
Preparing for Sun Solaris Operating System and Cisco PGW 2200 Softswitch Software Installation
Solaris 10, Cisco PGW 2200 Softswitch Software Release 9.8 and Higher Software Release Preinstallation
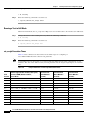
Required Site-Specific Information
Your system site administrator can provide the required site-specific information in Table 1-2. Use the
Notes column in this table to record the information. Several steps in the installation procedure in
Chapter 2, “Installing the Sun Solaris 10 Operating System” require you to provide this information.
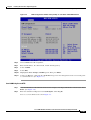
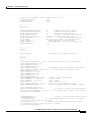
Table 1-2
Site-Specific Information
Required Information
Notes
Subnet Mask
(Example: 255.255.255.0)
Default router
(Example: 111.11.xxx.1)
DNS server
NTP server IP address
Time zone
(Example: United States (Eastern))
Root password
(Assigned by your system site
administrator)
Required Machine-Specific Information
Your system site administrator can provide the information called for in Table 1-3 as it applies to your
target Sun Netra machine. Use the Notes column in this table to record the information. Several steps in
the installation procedure require you to provide this information.
Table 1-3
Machine-Specific Checklist
Information
Notes
Host name of target machine
IP address of target machine
Default router IP address
Additional Ethernet IP address
Subnet address for each additional Ethernet IP address
Netmask address for each additional Ethernet IP address
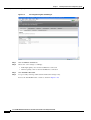
Required Tasks
Before you begin installing the Solaris 10 operating system, perform the tasks listed in Table 1-4.
Cisco PGW 2200 Softswitch Release 9.8 Software Installation and Configuration Guide
OL-18083-01
1-3
Chapter 1 Preparing for Sun Solaris Operating System and Cisco PGW 2200 Softswitch Software Installation
Solaris 10, Cisco PGW 2200 Softswitch Software Release 9.8 and Higher Software Release Preinstallation Checklists
Table 1-4
Check
Tasks Checklist
Tasks
Make sure that the target machine is connected to a terminal by a serial cable inserted into
the console port.
Have your company's internal support and Cisco support contact information readily
available so you can get help with the installation if needed. If you have questions or need
assistance, see the “Obtaining Documentation and Submitting a Service Request” section
on page x.
Cisco PGW 2200 Softswitch Release 9.8 Software Installation and Configuration Guide
1-4
OL-18083-01
CH A P T E R
2
Installing the Sun Solaris 10 Operating System
This chapter provides instructions for installing the packages that create the Sun Solaris 10 operating
system and its operating environment on the Sun Netra and Sun Fire platforms. The following sections
contain these instructions.
Note
Note
In the following procedures, your responses to prompts sometimes depend on the disk drive size or other
particulars of your system. These are pointed out as you follow the procedures.
•
Supported Platforms, page 2-1
•
Supported Disk Drives, page 2-1
•
Before You Start, page 2-2
•
Loading the Sun Solaris 10 Operating System, page 2-2
•
Loading the Sun Solaris 10 Operating Environment, page 2-72
For procedures on migrating to Solaris 10 and Cisco PGW 2200 Softswitch software Release 9.8, see
Chapter 5, “Migrating to Solaris 10 and Cisco PGW 2200 Softswitch Software Release 9.8.”
Supported Platforms
This document describes the specific steps necessary for installing the Sun Solaris 10 operating system
and the operating environment on the Sun Netra and Sun Fire platforms. Two platform types are used:
Sparc-based and Opteron-based. The platforms that are supported for these products are identified in the
Cisco PGW 2200 Softswitch Hardware Installation Guide (Release 7 & 9).
Supported Disk Drives
The following disk drives are supported:
•
73 GB
•
146 GB
Cisco PGW 2200 Softswitch Release 9.8 Software Installation and Configuration Guide
OL-18083-01
2-1
Chapter 2
Installing the Sun Solaris 10 Operating System
Before You Start
Before You Start
Be sure to read the following cautions, notes, and tips before installing the Sun Solaris 10 operating
system and the operating environment.
Cautions, Notes, and Tips
Note
The procedures in this chapter require a working knowledge of the system administration procedures for
the Sun Solaris (UNIX) operating system.
Note
Be sure to have the required information listed in Chapter 1, “Preparing for Sun Solaris Operating
System and Cisco PGW 2200 Softswitch Software Installation,” before you begin the installation
process.
Note
Allow at least 2 hours downtime for the installation of the Cisco PGW 2200 Softswitch software
environment.
Note
The text in the screens displayed throughout this document might differ slightly from the text displayed
on your console. The screen displays are for reference only and should be treated as examples.
Note
Most of the steps in the installation process ask you to press F2 to continue. However, F2 does not apply
to all console types. If it does not apply on your system, you should press Esc-2 instead.
Tip
During the installation process, monitor system output frequently for error messages and correct any
error conditions before continuing with the installation.
Loading the Sun Solaris 10 Operating System
This section provides the following instructions for loading the Sun Solaris 10 operating system:
•
Devices on Supported Platforms, page 2-3
•
Installing the Sun Solaris 10 Operating System for Sparc-based Platforms, page 2-3
•
Installing the Sun Solaris 10 Operating System for Opteron-based Platforms, page 2-13
•
Configuring Your Host, page 2-50
•
Platform-Specific Installation Procedures, page 2-62
•
Installing the Sparc-based Solaris 10 Patches Package (CSCOh022), page 2-73
•
Installing the Opteron-based Solaris 10 Patches Package (CSCOh032), page 2-75
Cisco PGW 2200 Softswitch Release 9.8 Software Installation and Configuration Guide
2-2
OL-18083-01
Chapter 2
Installing the Sun Solaris 10 Operating System
Loading the Sun Solaris 10 Operating System
•
Installing the Solstice DiskSuite (CSCOh023), page 2-77
•
Installing the Log and Spool File Systems (CSCOh024), page 2-89
•
Installing Cisco BAMS Archive Partition (CSCOh027), page 2-98
•
Installing the Sparc-based Communications and Alarm Software Package (CSCOh026), page 2-103
•
Installing the Opteron-based Communications Software Package (CSCOh036), page 2-118
•
Installing the Verification Test Suite Script Package (CSCOh021), page 2-129
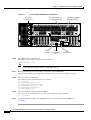
Devices on Supported Platforms
Table 2-1 shows the Ethernet and disk drive device names for each platform type. This table is referenced
throughout this chapter.
Table 2-1
Device Names on Supported Host Platforms
Ethernet Interfaces
Disk Drives
Platform Type
First
Second
Third
Fourth
First
Second
Third
Fourth
Sun Fire V210 /
Netra 210
bge0
bge1
bge2
bge3
c1t0d0
c1t1d0
—
—
Netra 240
bge0
bge1
bge21
bge31
c1t0d0
c1t1d0
—
—
Sun Fire V40z
bge0
bge1
ce0
c1t0d0
c1t1d0
—
—
Sun Fire X4600
e1000g0
e1000g1
e1000g2
e1000g3
c3t0d0
c3t1d0
—
—
Sun Fire X4600
M2
e1000g0
e1000g1
e1000g2
e1000g3
c3t0d0
c3t1d0
—
—
Netra 440
ce0
ce1
—
—
c1t0d0
c1t1d0
c1t2d01
c1t3d01
nge1
e1000g0
e1000g1
c3t0d0
c3t1d0
—
—
Netra X4200 M2 nge0
1. This device is not used currently.
Note
If your platform has multiple disk drives, install the Solaris 10 Operating System on the first disk drive
only.
Installing the Sun Solaris 10 Operating System for Sparc-based Platforms
The instructions in this section were written to correspond with the instructions in the Cisco Solaris 10
Operating System Jumpstart Disk for Sparc-based Platforms. Other Solaris installations are similar, with
slight variations. These instructions will note the differences between the sets of installation instructions.
Step 1
Step 2
Choose one of the following options to connect the Cisco PGW 2200 Softswitch:
•
Connect to the Cisco PGW 2200 Softswitch through a console port.
•
Connect a keyboard and monitor to the Cisco PGW 2200 Softswitch.
This step is optional—if you decide to skip this step, go to Step 3.
a.
Place the system in single-user mode by shutting down the standby machine.
Cisco PGW 2200 Softswitch Release 9.8 Software Installation and Configuration Guide
OL-18083-01
2-3
Chapter 2
Installing the Sun Solaris 10 Operating System
Loading the Sun Solaris 10 Operating System
b.
When the machine prompts for a password, type either ^ -d to proceed with normal startup, or the
root password for system maintenance.
Step 3
Load the appropriate version of the CD-ROM labeled Cisco Solaris 10 Operating System Jumpstart Disk
for Sparc-based Platforms into the CD-ROM drive.
Step 4
If the system is currently running, log in as root.
Step 5
Bring the system to the ok prompt by entering the following command:
# init 0
Note
If you are prompted to select a language before booting from the CD, go to the ok prompt by
sending a break on the console port. On Sun Sparc-based platforms, the key sequence <cr>#.
gets you to the system controller prompt.
From the system controller prompt, use the break -y command to break out of the operating
system and console -f command to return to the console display. You should see the ok prompt.
Step 6
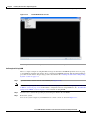
Boot the system from the CD-ROM drive by entering the appropriate command:
ok boot cdrom - install
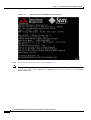
Information similar to the following is displayed:
ok boot cdrom - install
SC Alert: Host System has Reset
Probing system devices
Probing memory
Probing I/O buses
Sun Fire V210, No Keyboard
Copyright 2005 Sun Microsystems, Inc. All rights reserved.
OpenBoot 4.18.5, 2048 MB memory installed, Serial #52030991.
Ethernet address 0:3:ba:19:ee:f, Host ID: 8319ee0f.
Initializing
Initializing
Initializing
Initializing
Initializing
Initializing
1MB
1MB
1MB
1MB
1MB
1MB
of
of
of
of
of
of
memory
memory
memory
memory
memory
memory
at
at
at
at
at
at
addr
addr
addr
addr
addr
addr
Rebooting with command: boot cdrom - install
Boot device: /pci@1e,600000/ide@d/cdrom@0,0:f
103feec000
103fee0000
103f002000
103e002000
1000000000
0
File and args: - install
SunOS Release 5.10 Version Generic_118833-17 64-bit
Copyright 1983-2005 Sun Microsystems, Inc. All rights reserved.
Use is subject to license terms.
Hardware watchdog enabled
Configuring devices.
Using RPC Bootparams for network configuration information.
Attempting to configure interface bge3...
Skipped interface bge3
Attempting to configure interface bge2...
Skipped interface bge2
Attempting to configure interface bge1...
Skipped interface bge1
Attempting to configure interface bge0...
Cisco PGW 2200 Softswitch Release 9.8 Software Installation and Configuration Guide
2-4
OL-18083-01
Chapter 2
Installing the Sun Solaris 10 Operating System
Loading the Sun Solaris 10 Operating System
Skipped interface bge0
Beginning system identification...
Searching for configuration file(s)...
Search complete.
Discovering additional network configuration...
Completing system identification...
Starting remote procedure call (RPC) services: done.
System identification complete.
Starting Solaris installation program...
Searching for JumpStart directory...
<<< using cdrom install_config >>>
Checking rules.ok file...
Using profile: any_machine
Using finish script: any_finish
Executing JumpStart preinstall phase...
Searching for SolStart directory...
Checking rules.ok file...
Using begin script: install_begin
Using finish script: patch_finish
Executing SolStart preinstall phase...
Executing begin script "install_begin"...
Begin script install_begin execution completed.
Processing profile
- Selecting cluster
- Selecting package
- Selecting package
- Selecting package
- Selecting package
- Selecting package
- Selecting package
- Selecting package
- Selecting package
- Selecting package
- Selecting package
- Selecting package
- Selecting package
- Selecting package
- Selecting package
- Selecting package
- Selecting package
- Selecting package
- Selecting package
- Selecting package
- Selecting package
- Selecting package
- Selecting package
- Selecting package
- Selecting package
- Selecting package
- Selecting package
- Selecting package
- Selecting package
- Selecting package
- Selecting package
- Selecting package
- Selecting package
- Selecting package
- Selecting package
- Selecting package
- Selecting package
- Selecting package
- Selecting package
(SUNWCrnet)
(SUNWadmc)
(SUNWadmfw)
(SUNWcpc)
(SUNWcpcu)
(SUNWcstl)
(SUNWless)
(SUNWlur)
(SUNWluu)
(SUNWmkcd)
(SUNWmipu)
(SUNWmipr)
(SUNWocf)
(SUNWocfr)
(SUNWspnego)
(SUNWter)
(SUNWtnfc)
(SUNWucbt)
(SUNWvld)
(SUNWvldu)
(SUNWzsh)
(SUNWsacom)
(SUNWroute)
(SUNWxwfnt)
(SUNWxwdv)
(SUNWctpls)
(SUNWgssdh)
(SUNWm64cf)
(SUNWj5rt)
(SUNWxwplt)
(SUNWxwplr)
(SUNWdtcor)
(SUNWxwice)
(SUNWxwrtl)
(SUNWlibC)
(SUNWmfrun)
(SUNWi15rf)
(SUNWmdu)
(SUNWadmfr)
Cisco PGW 2200 Softswitch Release 9.8 Software Installation and Configuration Guide
OL-18083-01
2-5
Chapter 2
Installing the Sun Solaris 10 Operating System
Loading the Sun Solaris 10 Operating System
-
Selecting
Selecting
Selecting
Selecting
Selecting
Selecting
Selecting
Selecting
Selecting
Selecting
Selecting
Selecting
Selecting
Selecting
Selecting
Selecting
Selecting
Selecting
Selecting
Selecting
Selecting
Selecting
Selecting
Selecting
Selecting
Selecting
Selecting
Selecting
Selecting
Selecting
Selecting
Selecting
Selecting
Selecting
Selecting
Selecting
Selecting
Selecting
Selecting
Selecting
Selecting
Selecting
Selecting
Selecting
Selecting
Selecting
Selecting
Selecting
Selecting
Selecting
Selecting
Selecting
Selecting
Selecting
Selecting
Selecting
Selecting
Selecting
Selecting
Selecting
Selecting
Selecting
Selecting
Selecting
package
package
package
package
package
package
package
package
package
package
package
package
package
package
package
package
package
package
package
package
package
package
package
package
package
package
package
package
package
package
package
package
package
package
package
package
package
package
package
package
package
package
package
package
package
package
package
package
package
package
package
package
package
package
package
package
package
package
package
package
package
package
package
package
(SUNWrsg)
(SUNWsadmi)
(SUNWsasnm)
(SUNWmibii)
(SUNWxi18n)
(SUNWtoo)
(SUNWsprot)
(SUNWbip)
(SUNWbind)
(SUNWbindr)
(SUNWgzip)
(SUNWzip)
(SUNWbash)
(SUNWtcsh)
(SUNWgss)
(SUNWgssc)
(SUNWgssk)
(SUNWqos)
(SUNWqosu)
(SUNWmdb)
(SUNWmdbr)
(SUNWmdbdm)
(SUNWnfsckr)
(SUNWnfscr)
(SUNWnfscu)
(SUNWifp)
(SUNWged)
(SUNW1394)
(SUNWqfed)
(SUNWaccr)
(SUNWaccu)
(SUNWus)
(SUNWrsgk)
(SUNWzebrar)
(SUNWzebrau)
(SUNWeurf)
(SUNWgcmn)
(SUNWeuodf)
(SUNWxwacx)
(SUNWpoolr)
(SUNWpool)
(SUNWluzone)
(SUNWzoner)
(SUNWzoneu)
(SUNWbtool)
(SUNWdtrc)
(SUNWdtrp)
(SUNWfss)
(SUNWinst)
(SUNWipc)
(SUNWqus)
(SUNWqusu)
(SUNWrcmdc)
(SUNWdtdmr)
(SUNWtltk)
(SUNWtnetc)
(SUNWtnfd)
(SUNWtnetd)
(SUNWtnetr)
(SUNWsshcu)
(SUNWsshdr)
(SUNWsshdu)
(SUNWsshr)
(SUNWsshu)
Cisco PGW 2200 Softswitch Release 9.8 Software Installation and Configuration Guide
2-6
OL-18083-01
Chapter 2
Installing the Sun Solaris 10 Operating System
Loading the Sun Solaris 10 Operating System
-
Selecting package (SUNWpd)
Selecting package (SUNWced)
Selecting package (SUNWcart200)
Selecting package (SUNWkvmt200)
Selecting package (SUNWust1)
Selecting package (SUNWatfsr)
Selecting package (SUNWatfsu)
Selecting package (SUNWrcmdr)
Selecting package (SUNWrcmds)
Selecting package (SUNWxcu4)
Selecting package (SUNWefc)
Selecting package (SUNWglmr)
Selecting package (SUNWi2cr)
Selecting package (SUNWpstl)
Selecting package (SUNWbart)
Selecting package (SUNWpiclu)
Selecting package (SUNWpiclr)
Selecting package (SUNWopensslr)
Selecting package (SUNWopenssl-commands)
Selecting all disks
Configuring boot device
Using disk (c1t0d0) for "rootdisk"
Configuring / (c1t0d0s0)
Configuring /var (c1t0d0s1)
Configuring swap (c1t0d0s3)
Configuring (c1t0d0s4)
Configuring (c1t0d0s6)
Configuring /opt (c1t0d0s5)
Deselecting unmodified disk (c1t1d0)
Verifying disk configuration
- WARNING: Changing the system's default boot device in the EEPROM
Verifying space allocation
- Total software size:
376.86 Mbytes
Preparing system for Solaris install
Configuring disk (c1t0d0)
- Creating Solaris disk label (VTOC)
Creating and checking UFS file systems
- Creating / (c1t0d0s0)
- Creating /var (c1t0d0s1)
- Creating /opt (c1t0d0s5)
Beginning Solaris software installation
Starting software installation
SUNWcsu..........................done.
SUNWcsr..........................done.
SUNWcsl..........................done.
SUNWcnetr........................done.
SUNWckr..........................done.
SUNWkvm.u........................done.
SUNWcar.u........................done.
SUNWcakr.u.......................done.
SUNWxwice........................done.
SUNWcsd..........................done.
SUNWxwrtl........................done.
SUNWzlib.........................done.
SUNWbzip.........................done.
SUNWlibmsr.......................done.
363.07
359.22
347.35
347.23
337.09
335.16
334.65
315.55
315.27
315.01
314.87
314.62
314.36
311.13
Mbytes
Mbytes
Mbytes
Mbytes
Mbytes
Mbytes
Mbytes
Mbytes
Mbytes
Mbytes
Mbytes
Mbytes
Mbytes
Mbytes
remaining.
remaining.
remaining.
remaining.
remaining.
remaining.
remaining.
remaining.
remaining.
remaining.
remaining.
remaining.
remaining.
remaining.
Cisco PGW 2200 Softswitch Release 9.8 Software Installation and Configuration Guide
OL-18083-01
2-7
Chapter 2
Installing the Sun Solaris 10 Operating System
Loading the Sun Solaris 10 Operating System
SUNWlibms........................done.
SUNWxwfnt........................done.
SUNWxwdv.........................done.
SUNWxwplr........................done.
SUNWperl584core..................done.
SUNWperl584usr...................done.
SUNWesu..........................done.
SUNWcpp..........................done.
SUNWdtcor........................done.
SUNWxwplt........................done.
SUNWlibC.........................done.
SUNWctpls........................done.
SUNWmfrun........................done.
SUNWtcsh.........................done.
SUNWtecla........................done.
SUNWter..........................done.
SUNWgcmn.........................done.
SUNWpr...........................done.
SUNWtls..........................done.
SUNWdtdmr........................done.
SUNWtltk.........................done.
SUNWkrbr.........................done.
SUNWkrbu.........................done.
SUNWtnetc........................done.
SUNWtnetd........................done.
SUNWtnetr........................done.
SUNWtnfc.........................done.
SUNWtnfd.........................done.
SUNWtoo..........................done.
SUNWucbt.........................done.
SUNWudaplr.......................done.
SUNWudaplu.......................done.
SUNWib...........................done.
SUNWipoib........................done.
SUNWtavor........................done.
SUNWudapltu......................done.
SUNWudapltr......................done.
SUNWaudd.........................done.
SUNWusb..........................done.
SUNWusbs.........................done.
SUNWuedg.........................done.
SUNWugen.........................done.
SUNWuksp.........................done.
SUNWopenssl-libraries............done.
SUNWwbsup........................done.
SUNWinstall-patch-utils-root.....done.
SUNWswmt.........................done.
SUNWuprl.........................done.
SUNWj5rt.........................done.
SUNWocfr.........................done.
SUNWocf..........................done.
SUNWxi18n........................done.
SUNWvld..........................done.
SUNWvldu.........................done.
SUNWnfscr........................done.
SUNWnfsckr.......................done.
SUNWnfscu........................done.
SUNWgzip.........................done.
SUNWgssc.........................done.
SUNWgss..........................done.
SUNWbip..........................done.
SUNWrcmdc........................done.
SUNWrcmds........................done.
SUNWproduct-registry-root........done.
311.09
299.39
299.34
299.28
293.83
272.69
270.73
270.63
270.60
249.87
244.13
244.05
234.11
233.72
233.09
231.47
231.44
230.35
222.76
222.73
219.66
219.58
217.09
216.92
216.84
216.79
216.29
216.20
215.12
215.09
215.06
214.81
213.14
213.00
212.20
211.75
211.50
210.84
209.47
209.39
209.21
209.15
209.07
202.10
201.74
201.71
201.00
200.94
118.41
118.34
117.76
116.78
116.73
116.68
116.53
115.12
114.83
114.73
114.68
114.31
114.12
113.25
112.95
112.93
Mbytes
Mbytes
Mbytes
Mbytes
Mbytes
Mbytes
Mbytes
Mbytes
Mbytes
Mbytes
Mbytes
Mbytes
Mbytes
Mbytes
Mbytes
Mbytes
Mbytes
Mbytes
Mbytes
Mbytes
Mbytes
Mbytes
Mbytes
Mbytes
Mbytes
Mbytes
Mbytes
Mbytes
Mbytes
Mbytes
Mbytes
Mbytes
Mbytes
Mbytes
Mbytes
Mbytes
Mbytes
Mbytes
Mbytes
Mbytes
Mbytes
Mbytes
Mbytes
Mbytes
Mbytes
Mbytes
Mbytes
Mbytes
Mbytes
Mbytes
Mbytes
Mbytes
Mbytes
Mbytes
Mbytes
Mbytes
Mbytes
Mbytes
Mbytes
Mbytes
Mbytes
Mbytes
Mbytes
Mbytes
remaining.
remaining.
remaining.
remaining.
remaining.
remaining.
remaining.
remaining.
remaining.
remaining.
remaining.
remaining.
remaining.
remaining.
remaining.
remaining.
remaining.
remaining.
remaining.
remaining.
remaining.
remaining.
remaining.
remaining.
remaining.
remaining.
remaining.
remaining.
remaining.
remaining.
remaining.
remaining.
remaining.
remaining.
remaining.
remaining.
remaining.
remaining.
remaining.
remaining.
remaining.
remaining.
remaining.
remaining.
remaining.
remaining.
remaining.
remaining.
remaining.
remaining.
remaining.
remaining.
remaining.
remaining.
remaining.
remaining.
remaining.
remaining.
remaining.
remaining.
remaining.
remaining.
remaining.
remaining.
Cisco PGW 2200 Softswitch Release 9.8 Software Installation and Configuration Guide
2-8
OL-18083-01
Chapter 2
Installing the Sun Solaris 10 Operating System
Loading the Sun Solaris 10 Operating System
SUNWwsr2.........................done.
SUNWlxml.........................done.
SUNWlexpt........................done.
SUNWxge..........................done.
SUNWxcu4.........................done.
SUNWxwacx........................done.
SUNWsprot........................done.
SUNWzfskr........................done.
SUNWzfsr.........................done.
SUNWsmapi........................done.
SUNWzfsu.........................done.
SUNWrsg..........................done.
SUNWgssdh........................done.
SUNWgssk.........................done.
SUNWeurf.........................done.
SUNWi15rf........................done.
SUNWnisr.........................done.
SUNWnisu.........................done.
SUNWzebrar.......................done.
SUNWzebrau.......................done.
SUNWcpcu.........................done.
SUNWfmdr.........................done.
SUNWfmd..........................done.
SUNWcslr.........................done.
SUNWidnl.........................done.
SUNWmdb..........................done.
SUNWzip..........................done.
SUNWmdbr.........................done.
SUNWpiclu........................done.
SUNWzoner........................done.
SUNWmdr..........................done.
SUNWmdu..........................done.
SUNWadmc.........................done.
SUNWadmfr........................done.
SUNWadmfw........................done.
SUNWadmlib-sysid.................done.
SUNWadmr.........................done.
SUNWadmap........................done.
SUNWlur..........................done.
SUNWluu..........................done.
SUNWluzone.......................done.
SUNWpoolr........................done.
SUNWpool.........................done.
SUNWzoneu........................done.
SUNWluxop........................done.
SUNWses..........................done.
SUNWssad.........................done.
SUNWifp..........................done.
SUNWzsh..........................done.
SUNW1394.........................done.
SUNWinst.........................done.
SUNWintgige......................done.
SUNWipc..........................done.
SUNWipfr.........................done.
SUNWipfu.........................done.
SUNWipged........................done.
SUNWced.u........................done.
SUNWcpc.u........................done.
SUNWbash.........................done.
SUNWaccr.........................done.
SUNWaccu.........................done.
SUNWefc.u........................done.
SUNWiscsir.......................done.
SUNWiscsiu.......................done.
112.59
109.19
108.61
108.08
106.87
106.69
105.21
104.39
103.43
102.80
101.29
101.16
100.84
100.60
96.30
96.16
96.02
93.70
93.63
91.44
90.90
90.84
86.92
72.42
71.86
66.94
66.75
63.97
60.17
60.11
57.74
57.04
55.16
55.14
54.43
54.17
54.09
53.21
51.67
50.48
50.11
50.08
49.24
48.61
47.86
47.76
47.45
47.17
44.04
43.27
42.77
42.51
42.45
42.31
41.04
40.54
39.90
39.84
39.11
39.01
38.64
38.36
37.68
37.12
Mbytes
Mbytes
Mbytes
Mbytes
Mbytes
Mbytes
Mbytes
Mbytes
Mbytes
Mbytes
Mbytes
Mbytes
Mbytes
Mbytes
Mbytes
Mbytes
Mbytes
Mbytes
Mbytes
Mbytes
Mbytes
Mbytes
Mbytes
Mbytes
Mbytes
Mbytes
Mbytes
Mbytes
Mbytes
Mbytes
Mbytes
Mbytes
Mbytes
Mbytes
Mbytes
Mbytes
Mbytes
Mbytes
Mbytes
Mbytes
Mbytes
Mbytes
Mbytes
Mbytes
Mbytes
Mbytes
Mbytes
Mbytes
Mbytes
Mbytes
Mbytes
Mbytes
Mbytes
Mbytes
Mbytes
Mbytes
Mbytes
Mbytes
Mbytes
Mbytes
Mbytes
Mbytes
Mbytes
Mbytes
remaining.
remaining.
remaining.
remaining.
remaining.
remaining.
remaining.
remaining.
remaining.
remaining.
remaining.
remaining.
remaining.
remaining.
remaining.
remaining.
remaining.
remaining.
remaining.
remaining.
remaining.
remaining.
remaining.
remaining.
remaining.
remaining.
remaining.
remaining.
remaining.
remaining.
remaining.
remaining.
remaining.
remaining.
remaining.
remaining.
remaining.
remaining.
remaining.
remaining.
remaining.
remaining.
remaining.
remaining.
remaining.
remaining.
remaining.
remaining.
remaining.
remaining.
remaining.
remaining.
remaining.
remaining.
remaining.
remaining.
remaining.
remaining.
remaining.
remaining.
remaining.
remaining.
remaining.
remaining.
Cisco PGW 2200 Softswitch Release 9.8 Software Installation and Configuration Guide
OL-18083-01
2-9
Chapter 2
Installing the Sun Solaris 10 Operating System
Loading the Sun Solaris 10 Operating System
SUNWglmr.u.......................done.
SUNWi2cr.u.......................done.
SUNWloc..........................done.
SUNWpstl.u.......................done.
SUNWus.u.........................done.
SUNWbtool........................done.
SUNWjfca.........................done.
SUNWjfcau........................done.
SUNWjss..........................done.
SUNWkey..........................done.
SUNWatfsr........................done.
SUNWatfsu........................done.
SUNWbart.........................done.
SUNWbindr........................done.
SUNWbind.........................done.
SUNWless.........................done.
SUNWcfcl.........................done.
SUNWcfclr........................done.
SUNWcfpl.........................done.
SUNWcfplr........................done.
SUNWlibsasl......................done.
SUNWchxge........................done.
SUNWlldap........................done.
SUNWluxopr.......................done.
SUNWm64cf........................done.
SUNWcstl.........................done.
SUNWmdbdm........................done.
SUNWmibii........................done.
SUNWsasnm........................done.
SUNWsadmi........................done.
SUNWsacom........................done.
SUNWmipr.........................done.
SUNWmipu.........................done.
SUNWmkcd.........................done.
SUNWdtrc.........................done.
SUNWdtrp.........................done.
SUNWfctl.........................done.
SUNWemlxs........................done.
SUNWemlxu........................done.
SUNWerid.........................done.
SUNWeuodf........................done.
SUNWfchbar.......................done.
SUNWfchba........................done.
SUNWfcip.........................done.
SUNWfcmdb........................done.
SUNWfcp..........................done.
SUNWfcprt........................done.
SUNWfcsm.........................done.
SUNWopenssl-commands.............done.
SUNWopensslr.....................done.
SUNWpd...........................done.
SUNWfss..........................done.
SUNWpiclr........................done.
SUNWpkgcmdsr.....................done.
SUNWpkgcmdsu.....................done.
SUNWged..........................done.
SUNWqfed.........................done.
SUNWqlc..........................done.
SUNWqlcu.........................done.
SUNWqos..........................done.
SUNWqosu.........................done.
SUNWqus..........................done.
SUNWqusu.........................done.
SUNWrcmdr........................done.
37.04
36.85
36.34
36.21
36.16
34.83
33.98
33.90
29.54
29.16
29.09
28.81
28.76
28.71
25.60
25.44
25.30
25.28
24.92
24.87
24.28
24.04
23.84
23.17
23.11
22.96
22.90
22.78
21.91
20.91
20.61
20.53
20.25
18.95
16.86
16.41
15.97
13.19
12.50
12.35
12.23
12.20
10.63
10.44
10.24
9.95
9.88
9.73
9.35
9.30
8.64
8.53
8.50
8.46
5.72
5.47
5.25
4.05
4.00
3.83
3.71
3.48
3.45
3.37
Mbytes
Mbytes
Mbytes
Mbytes
Mbytes
Mbytes
Mbytes
Mbytes
Mbytes
Mbytes
Mbytes
Mbytes
Mbytes
Mbytes
Mbytes
Mbytes
Mbytes
Mbytes
Mbytes
Mbytes
Mbytes
Mbytes
Mbytes
Mbytes
Mbytes
Mbytes
Mbytes
Mbytes
Mbytes
Mbytes
Mbytes
Mbytes
Mbytes
Mbytes
Mbytes
Mbytes
Mbytes
Mbytes
Mbytes
Mbytes
Mbytes
Mbytes
Mbytes
Mbytes
Mbytes
Mbytes
Mbytes
Mbytes
Mbytes
Mbytes
Mbytes
Mbytes
Mbytes
Mbytes
Mbytes
Mbytes
Mbytes
Mbytes
Mbytes
Mbytes
Mbytes
Mbytes
Mbytes
Mbytes
remaining.
remaining.
remaining.
remaining.
remaining.
remaining.
remaining.
remaining.
remaining.
remaining.
remaining.
remaining.
remaining.
remaining.
remaining.
remaining.
remaining.
remaining.
remaining.
remaining.
remaining.
remaining.
remaining.
remaining.
remaining.
remaining.
remaining.
remaining.
remaining.
remaining.
remaining.
remaining.
remaining.
remaining.
remaining.
remaining.
remaining.
remaining.
remaining.
remaining.
remaining.
remaining.
remaining.
remaining.
remaining.
remaining.
remaining.
remaining.
remaining.
remaining.
remaining.
remaining.
remaining.
remaining.
remaining.
remaining.
remaining.
remaining.
remaining.
remaining.
remaining.
remaining.
remaining.
remaining.
Cisco PGW 2200 Softswitch Release 9.8 Software Installation and Configuration Guide
2-10
OL-18083-01
Chapter 2
Installing the Sun Solaris 10 Operating System
Loading the Sun Solaris 10 Operating System
SUNWrge..........................done.
SUNWroute........................done.
SUNWrpcib........................done.
SUNWrsgk.........................done.
SUNWsolnm........................done.
SUNWsshcu........................done.
SUNWsshdr........................done.
SUNWsshdu........................done.
SUNWspnego.......................done.
SUNWsshr.........................done.
SUNWsshu.........................done.
3.26
2.94
2.79
2.72
2.70
2.27
2.20
1.79
1.68
1.57
1.00
Mbytes
Mbytes
Mbytes
Mbytes
Mbytes
Mbytes
Mbytes
Mbytes
Mbytes
Mbytes
Mbytes
remaining.
remaining.
remaining.
remaining.
remaining.
remaining.
remaining.
remaining.
remaining.
remaining.
remaining.
Completed software installation
Solaris 10 software installation succeeded
Customizing system files
- Mount points table (/etc/vfstab)
- Unselected disk mount points (/var/sadm/system/data/vfstab.unselected)
- Network host addresses (/etc/hosts)
- Network host addresses (/etc/hosts)
- Environment variables (/etc/default/init)
Cleaning devices
Customizing system devices
- Physical devices (/devices)
- Logical devices (/dev)
Installing boot information
- Installing boot blocks (c1t0d0s0)
- Updating system firmware for automatic rebooting
Installation log location
- /a/var/sadm/system/logs/install_log (before reboot)
- /var/sadm/system/logs/install_log (after reboot)
Installation complete
Executing SolStart postinstall phase...
Executing finish script "patch_finish"...
Finish script patch_finish execution completed.
Executing JumpStart postinstall phase...
Executing finish script "any_finish"...
any_finish started with SI_CONFIG_DIR = /tmp/install_config
any_finish completed
Finish script any_finish execution completed.
The begin script log 'begin.log'
is located in /var/sadm/system/logs after reboot.
The finish script log 'finish.log'
is located in /var/sadm/system/logs after reboot.
syncing file systems... done
rebooting...
SC Alert: Host System has Reset
Probing system devices
Probing memory
Probing I/O buses
Cisco PGW 2200 Softswitch Release 9.8 Software Installation and Configuration Guide
OL-18083-01
2-11
Chapter 2
Installing the Sun Solaris 10 Operating System
Loading the Sun Solaris 10 Operating System
Sun Fire V210, No Keyboard
Copyright 2005 Sun Microsystems, Inc. All rights reserved.
OpenBoot 4.18.5, 2048 MB memory installed, Serial #52030991.
Ethernet address 0:3:ba:19:ee:f, Host ID: 8319ee0f.
Initializing
Initializing
Initializing
Initializing
Initializing
Initializing
1MB
1MB
15MB
16MB
992MB
1024MB
of
of
of
of
of
of
memory
memory
memory
memory
memory
memory
at
at
at
at
at
at
addr
addr
addr
addr
addr
addr
103feec000
103fee0000
103f002000
103e002000
1000000000
0
Rebooting with command: boot
Boot device: /pci@1c,600000/scsi@2/disk@0,0:a
File and args:
SunOS Release 5.10 Version Generic_118833-17 64-bit
Copyright 1983-2005 Sun Microsystems, Inc. All rights reserved.
Use is subject to license terms.
Hardware watchdog enabled
Hostname: vtghost
Configuring devices.
Loading smf(5) service descriptions:
2/85
3/85
1/85
...
84/85
85/85
checking ufs filesystems
/dev/rdsk/c1t0d0s5: is logging.
Creating new rsa public/private host key pair
Creating new dsa public/private host key pair
This system is configured with NFS version 4, which uses a domain
name that is automatically derived from the system's name services.
The derived domain name is sufficient for most configurations. In a
few cases, mounts that cross different domains might cause files to
be owned by "nobody" due to the lack of a common domain name.
Do you need to override the system's default NFS version 4 domain
name (yes/no) ? [no] :
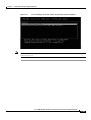
Step 7
Enter no to continue the reconfiguration process and press Enter.
The system displays information similar to the following:
For more information about how the NFS version 4 default domain
name is derived and its impact, refer to the man pages for nfs(4)
and nfsmapid(1m), and the System Administration Guide: Network
Services.
vtghost console login:
This completes the installation of the Sun Solaris 10 operating system. Proceed to the “Configuring Your
Host” section on page 2-50.
Cisco PGW 2200 Softswitch Release 9.8 Software Installation and Configuration Guide
2-12
OL-18083-01
Chapter 2
Installing the Sun Solaris 10 Operating System
Loading the Sun Solaris 10 Operating System
Installing the Sun Solaris 10 Operating System for Opteron-based Platforms
The instructions in this section were written to correspond with the instructions in the Cisco Solaris 10
Operating System Startup Disk for Opteron-based Platforms. Other Solaris installations are similar, with
slight variations. These instructions will note the differences between the sets of installation instructions.
Step 1
Note
Step 2
Choose one of the following options to connect the Cisco PGW 2200 Softswitch:
•
Connect to the Cisco PGW 2200 Softswitch through a console port.
•
Connect a keyboard and monitor to the Cisco PGW 2200 Softswitch.
Cisco recommends that you connect to the Cisco PGW 2200 Softswitch using a keyboard and monitor.
If you choose to connect through the console port, you need to ensure that Console Redirection is
enabled as instructed in Step 6.
Follow these steps to connect to the target system through a serial port:
a.
Log in to the SP (Service Processor) as an Administrator:
login: root
password: changeme
b.
Type the following command to start the ILOM Service Processor (SP) GUI:
start /SP/console
Step 3
This step is optional—if you decide to skip this, go to Step 4.
a.
Place the system in single-user mode by shutting down the standby machine.
b.
When the machine prompts for a password, type either ^ -d to proceed with normal startup, or the
root password for system maintenance.
Step 4
Load the appropriate version of the CD-ROM labeled Cisco Solaris 10 Operating Software Startup Disk
for Opteron-based Platforms into the CD-ROM drive.
Step 5
If the system is currently running, log in as root.
Step 6
Boot the system from the CD-ROM drive by entering the appropriate command:
# reboot
Note
You may be prompted during the reboot to enter Ctrl-B or Ctrl-C to open configuration tools for your
hardware. You do not need to open any of these tools to complete this installation.
Perform the following steps once the reboot starts:
a.
Press the F2 key to open the Setup menu. The Setup menu opens after the self-tests have been
completed.
b.
Go to the BOOT setup information.
c.
Ensure that the CD-ROM is the first bootable device in the list.
d.
Choose the Advanced menu from the category selections at the top of the screen.
e.
If you connected to the Cisco PGW 2200 Softswitch using the console port, ensure Console
Redirection is set to enable or always.
Cisco PGW 2200 Softswitch Release 9.8 Software Installation and Configuration Guide
OL-18083-01
2-13
Chapter 2
Installing the Sun Solaris 10 Operating System
Loading the Sun Solaris 10 Operating System
f.
Save your changes and exit the Setup menu.
Information similar to the following is displayed:
SSC Alert: Host System has Reset
screen not found.
keyboard not found.
Keyboard not present.
Caution
Using ttya for input and output.
Ensure that the selected display device is set to the corresponding console device. If you use a monitor,
choose solaris. If you use serial console, select solaris ttya.
SunFire V40z, No Keyboard
Copyright 1998-2004 Sun Microsystems, Inc. All rights reserved.
OpenBoot 4.13.0, 8192 MB memory installed, Serial #58524225.
Ethernet address 0:3:ba:7d:2:41, Host ID: 837d0241.
Rebooting with command: boot cdrom - install
Boot device: /pci@1e,600000/ide@d/cdrom@0,0:f File and args: - install
SunOS Release 5.10 Version Generic 64-bit
Copyright 1983-2005 Sun Microsystems, Inc. All rights reserved.
Use is subject to license terms.
Hardware watchdog enabled
Configuring devices.
Using RPC Bootparams for network configuration information.
Attempting to configure interface ce2...
Skipped interface ce2
Attempting to configure interface ce1...
Skipped interface ce1
Attempting to configure interface ce0...
Skipped interface ce0
Beginning system identification...
Searching for configuration file(s)...
Search complete.
Discovering additional network configuration...
Completing system identification...
Starting remote procedure call (RPC) services: done.
System identification complete.
Starting Solaris installation program...
Searching for JumpStart directory...
<<< using cdrom install_config >>>
not found
Checking rules.ok file...
Using profile: any_machine
Using finish script: any_finish
Executing JumpStart preinstall phase...
Searching for SolStart directory...
Checking rules.ok file...
Executing profile begin script...
Completed profile begin script.
Processing profile
- Selecting cluster (SUNWCreq)
- Deselecting cluster (SUNWCudf)
- Deselecting cluster (SUNWCbs)
- Deselecting cluster (SUNWCnfss)
- Deselecting cluster (SUNWCsndm)
- Deselecting cluster (SUNWCpcmc)
- Deselecting cluster (SUNWCpicl)
- Selecting cluster (SUNWCacc)
Cisco PGW 2200 Softswitch Release 9.8 Software Installation and Configuration Guide
2-14
OL-18083-01
Chapter 2
Installing the Sun Solaris 10 Operating System
Loading the Sun Solaris 10 Operating System
-
Selecting cluster (SUNWCssh)
Selecting cluster (SUNWCpool)
Selecting cluster (SUNWCvld)
Selecting cluster (SUNWCfwshl)
Selecting cluster (SUNWClu)
Selecting cluster (SUNWCcpc)
Selecting cluster (SUNWCsea)
Selecting cluster (SUNWCstl)
Selecting cluster (SUNWCmip)
Selecting cluster (SUNWCqos)
Selecting cluster (SUNWCzone)
Selecting cluster (SUNWCzebra)
Deselecting package (SUNWauda)
Deselecting package (SUNWad810)
Deselecting package (SUNWvia823x)
Deselecting package (SUNWcnsu)
Deselecting package (SUNWtnamd)
Deselecting package (SUNWtnamr)
Deselecting package (SUNWrcmdr)
Deselecting package (SUNWrcmds)
Deselecting package (SUNWtftp)
Deselecting package (SUNWtftpr)
Deselecting package (SUNWcnsr)
Deselecting package (SUNWatfsr)
Deselecting package (SUNWatfsu)
Deselecting package (SUNWftpr)
Deselecting package (SUNWftpu)
Deselecting package (SUNWipmi)
Deselecting package (SUNWxsvc)
Deselecting package (SUNWflexruntime)
Deselecting package (SUNWxwmod)
Selecting package (SUNWadmc)
Selecting package (SUNWadmfr)
Selecting package (SUNWadmfw)
Selecting package (SUNWdtdmr)
Selecting package (SUNWxwfnt)
Selecting package (SUNWzip)
Selecting package (SUNWless)
Selecting package (SUNWeurf)
Selecting package (SUNWj5rt)
Selecting package (SUNWxwacx)
Selecting package (SUNWxwice)
Selecting package (SUNWxwplr)
Selecting package (SUNWxwrtl)
Selecting package (SUNWxwplt)
Selecting package (SUNWxi18n)
Selecting package (SUNWtltk)
Selecting package (SUNWeuodf)
Selecting package (SUNWocf)
Selecting package (SUNWocfr)
Selecting package (SUNWbtool)
Selecting package (SUNWsprot)
Selecting package (SUNWmdbdm)
Selecting package (SUNWmkcd)
Selecting package (SUNWspnego)
Selecting package (SUNWtnfc)
Selecting package (SUNWtnfd)
Selecting package (SUNWbind)
Selecting package (SUNWbindr)
Selecting package (SUNWctpls)
Selecting package (SUNWfss)
Selecting package (SUNWgcmn)
Selecting package (SUNWgssdh)
Selecting package (SUNWgssk)
Cisco PGW 2200 Softswitch Release 9.8 Software Installation and Configuration Guide
OL-18083-01
2-15
Chapter 2
Installing the Sun Solaris 10 Operating System
Loading the Sun Solaris 10 Operating System
-
Selecting package (SUNWinst)
Selecting package (SUNWi15rf)
Selecting package (SUNWipc)
Selecting package (SUNWmdbr)
Selecting package (SUNWmfrun)
Selecting package (SUNWrsg)
Selecting package (SUNWrsgk)
Selecting package (SUNWter)
Selecting package (SUNWtoo)
Selecting package (SUNW1394)
Selecting all disks
Configuring boot device
Using disk (c1t0d0) for "rootdisk"
Deleting Solaris fdisk partition (c1t0d0)
Deleting Solaris fdisk partition (c1t1d0)
Creating "all" Solaris fdisk partition (c1t0d0)
Creating "all" Solaris fdisk partition (c1t1d0)
Configuring / (c1t0d0s0)
Configuring /var (c1t0d0s1)
Configuring swap (c1t0d0s3)
Configuring (c1t0d0s4)
Configuring (c1t0d0s6)
Configuring /opt (c1t0d0s5)
Deselecting unmodified disk (c1t1d0)
Verifying disk configuration
Verifying space allocation
- Total software size:
420.10 Mbytes
You may need to eject the CD or select a different
boot device after reboot to avoid repeating the
installation process.
Configuring disk (c1t0d0)
- Creating Fdisk partition table
Fdisk partition table for disk c1t0d0 (input file for fdisk(1M))
type: 130 active: 128 offset: 16065
size: 143347995
type: 100 active: 0
offset: 0
size: 0
type: 100 active: 0
offset: 0
size: 0
type: 100 active: 0
offset: 0
size: 0
- Creating Solaris disk label (VTOC)
Creating and checking UFS file systems
- Creating / (c1t0d0s0)
Warning: 1474 sector(s) in last cylinder unallocated
/dev/rdsk/c1t0d0s0:4096574 sectors in 667 cylinders of 48 tracks, 128 sectors
2000.3MB in 42 cyl groups (16 c/g, 48.00MB/g, 11648 i/g)
super-block backups (for fsck -F ufs -o b=#) at:
32, 98464, 196896, 295328, 393760, 492192, 590624, 689056, 787488, 885920,
3149856, 3248288, 3346720, 3445152, 3543584, 3642016, 3740448, 3838880,
3937312, 4035744
- Creating /var (c1t0d0s1)
Warning: 4866 sector(s) in last cylinder unallocated
/dev/rdsk/c1t0d0s1:10249470 sectors in 1669 cylinders of 48 tracks, 128 sectors
5004.6MB in 105 cyl groups (16 c/g, 48.00MB/g, 5824 i/g)
super-block backups (for fsck -F ufs -o b=#) at:
32, 98464, 196896, 295328, 393760, 492192, 590624, 689056, 787488, 885920,
9342880, 9441312, 9539744, 9638176, 9736608, 9835040, 9933472, 10031904,
10130336, 10228768
- Creating /opt (c1t0d0s5)
Cisco PGW 2200 Softswitch Release 9.8 Software Installation and Configuration Guide
2-16
OL-18083-01
Chapter 2
Installing the Sun Solaris 10 Operating System
Loading the Sun Solaris 10 Operating System
Warning: 1062 sector(s) in last cylinder unallocated
/dev/rdsk/c1t0d0s5:116599770 sectors in 18978 cylinders of 48 tracks, 128 sectors
56933.5MB in 1187 cyl groups (16 c/g, 48.00MB/g, 5824 i/g)
super-block backups (for fsck -F ufs -o b=#) at:
32, 98464, 196896, 295328, 393760, 492192, 590624, 689056, 787488, 885920,
Initializing cylinder groups:
.......................
super-block backups for last 10 cylinder groups at:
115707040, 115805472, 115903904, 116002336, 116100768, 116199200, 116297632,
116396064, 116494496, 116592928
Beginning Solaris software installation
23303 blocks
Installation of <SUNWcsu> was successful.
5043 blocks
Installation of <SUNWcsr> was successful.
21985 blocks
Installation of <SUNWcsl> was successful.
75 blocks
Installation of <SUNWcnetr> was successful.
43978 blocks
Installation of <SUNWckr> was successful.
30 blocks
Installation of <SUNWkvm> was successful.
Installation of <SUNWcar> was successful.
Installation of <SUNWcakr> was successful.
7 blocks
add c devices/pseudo/arp@0:arp (44, 0) 0666 root sys
add link /dev/arp=../devices/pseudo/arp@0:arp
add c devices/pseudo/clone@0:ibd (11, 170) 0666 root sys
add link /dev/ibd=../devices/pseudo/clone@0:ibd
add c devices/pseudo/icmp@0:icmp (5, 0) 0666 root sys
add link /dev/icmp=../devices/pseudo/icmp@0:icmp
add c devices/pseudo/icmp@0:icmp (5, 0) 0666 root sys
add link /dev/rawip=../devices/pseudo/icmp@0:icmp
add c devices/pseudo/icmp6@0:icmp6 (140, 1) 0666 root sys
add link /dev/icmp6=../devices/pseudo/icmp6@0:icmp6
add c devices/pseudo/icmp6@0:icmp6 (140, 1) 0666 root sys
add link /dev/rawip6=../devices/pseudo/icmp6@0:icmp6
add c devices/pseudo/ip@0:ip (3, 0) 0666 root sys
add link /dev/ip=../devices/pseudo/ip@0:ip
add c devices/pseudo/ip6@0:ip6 (139, 1) 0666 root sys
add link /dev/ip6=../devices/pseudo/ip6@0:ip6
add c devices/pseudo/rts@0:rts (43, 0) 0666 root sys
add link /dev/rts=../devices/pseudo/rts@0:rts
add c devices/pseudo/tcp@0:tcp (42, 2) 0666 root sys
add link /dev/tcp=../devices/pseudo/tcp@0:tcp
add c devices/pseudo/tcp6@0:tcp6 (142, 3) 0666 root sys
add link /dev/tcp6=../devices/pseudo/tcp6@0:tcp6
add c devices/pseudo/udp@0:udp (41, 0) 0666 root sys
add link /dev/udp=../devices/pseudo/udp@0:udp
add c devices/pseudo/udp6@0:udp6 (141, 1) 0666 root sys
add link /dev/udp6=../devices/pseudo/udp6@0:udp6
add c devices/pseudo/ipsecah@0:ipsecah (137, 1) 0666 root sys
add link /dev/ipsecah=../devices/pseudo/ipsecah@0:ipsecah
add c devices/pseudo/ipsecesp@0:ipsecesp (138, 1) 0666 root sys
Cisco PGW 2200 Softswitch Release 9.8 Software Installation and Configuration Guide
OL-18083-01
2-17
Chapter 2
Installing the Sun Solaris 10 Operating System
Loading the Sun Solaris 10 Operating System
add
add
add
add
add
add
add
add
add
add
add
add
add
add
add
add
add
add
add
add
add
add
add
add
add
add
add
add
add
add
add
add
add
add
add
add
add
add
add
add
add
add
add
add
add
add
add
add
add
add
link /dev/ipsecesp=../devices/pseudo/ipsecesp@0:ipsecesp
c devices/pseudo/keysock@0:keysock (136, 0) 0666 root sys
link /dev/keysock=../devices/pseudo/keysock@0:keysock
c devices/pseudo/cn@0:console (0, 0) 0620 root tty
link /dev/console=../devices/pseudo/cn@0:console
c devices/pseudo/cn@0:syscon (0, 0) 0620 root tty
link /dev/syscon=../devices/pseudo/cn@0:syscon
c devices/pseudo/cn@0:systty (0, 0) 0620 root tty
link /dev/systty=../devices/pseudo/cn@0:systty
c devices/pseudo/devinfo@0:devinfo (88, 0) 0640 root sys
c devices/pseudo/ksyms@0:ksyms (72, 0) 0666 root sys
link /dev/ksyms=../devices/pseudo/ksyms@0:ksyms
c devices/pseudo/log@0:conslog (21, 0) 0666 root sys
link /dev/conslog=../devices/pseudo/log@0:conslog
c devices/pseudo/log@0:log (21, 5) 0640 root sys
link /dev/log=../devices/pseudo/log@0:log
c devices/pseudo/mm@0:mem (13, 0) 0640 root sys
link /dev/mem=../devices/pseudo/mm@0:mem
c devices/pseudo/mm@0:kmem (13, 1) 0640 root sys
link /dev/kmem=../devices/pseudo/mm@0:kmem
c devices/pseudo/mm@0:null (13, 2) 0666 root sys
link /dev/null=../devices/pseudo/mm@0:null
c devices/pseudo/mm@0:allkmem (13, 3) 0600 root sys
link /dev/allkmem=../devices/pseudo/mm@0:allkmem
c devices/pseudo/mm@0:zero (13, 12) 0666 root sys
link /dev/zero=../devices/pseudo/mm@0:zero
c devices/pseudo/openeepr@0:openprom (6, 0) 0640 root sys
link /dev/openprom=../devices/pseudo/openeepr@0:openprom
c devices/pseudo/sad@0:admin (12, 1) 0666 root sys
link /dev/sad/admin=../../devices/pseudo/sad@0:admin
c devices/pseudo/sad@0:user (12, 0) 0666 root sys
link /dev/sad/user=../../devices/pseudo/sad@0:user
c devices/pseudo/sy@0:tty (22, 0) 0666 root tty
link /dev/tty=../devices/pseudo/sy@0:tty
c devices/pseudo/sysevent@0:sysevent (152, 0) 0600 root sys
link /dev/sysevent=../devices/pseudo/sysevent@0:sysevent
c devices/pseudo/sysmsg@0:msglog (97, 1) 0600 root sys
link /dev/msglog=../devices/pseudo/sysmsg@0:msglog
c devices/pseudo/sysmsg@0:sysmsg (97, 0) 0600 root sys
link /dev/sysmsg=../devices/pseudo/sysmsg@0:sysmsg
c devices/pseudo/tl@0:ticots (105, 0) 0666 root sys
link /dev/ticots=../devices/pseudo/tl@0:ticots
c devices/pseudo/tl@0:ticotsord (105, 1) 0666 root sys
link /dev/ticotsord=../devices/pseudo/tl@0:ticotsord
c devices/pseudo/tl@0:ticlts (105, 2) 0666 root sys
link /dev/ticlts=../devices/pseudo/tl@0:ticlts
c devices/pseudo/wc@0:wscons (15, 0) 0600 root sys
link /dev/wscons=../devices/pseudo/wc@0:wscons
c devices/pseudo/conskbd@0:kbd (103, 0) 0666 root sys
link /dev/kbd=../devices/pseudo/conskbd@0:kbd
Installation of <SUNWcsd> was successful.
422 blocks
Installation of <SUNWzlib> was successful.
3826 blocks
Installation of <SUNWlibmsr> was successful.
Installation of <SUNWlibms> was successful.
5495 blocks
Installation of <SUNWlxml> was successful.
Cisco PGW 2200 Softswitch Release 9.8 Software Installation and Configuration Guide
2-18
OL-18083-01
Chapter 2
Installing the Sun Solaris 10 Operating System
Loading the Sun Solaris 10 Operating System
Installation of <SUNWxwrtl> was successful.
Installation of <SUNWbzip> was successful.
22155 blocks
Installation of <SUNWxwfnt> was successful.
440 blocks
Installation of <SUNWxwice> was successful.
63 blocks
Installation of <SUNWxwdv> was successful.
3 blocks
Installation of <SUNWxwplr> was successful.
8688 blocks
Installation of <SUNWperl584core> was successful.
39013 blocks
Installation of <SUNWperl584usr> was successful.
3641 blocks
Installation of <SUNWesu> was successful.
118 blocks
Installation of <SUNWcpp> was successful.
Installation of <SUNWdtcor> was successful.
31656 blocks
Installation of <SUNWxwplt> was successful.
1019 blocks
Installation of <SUNWlexpt> was successful.
Installation of <SUNWgcmn> was successful.
116 blocks
Installation of <SUNWctpls> was successful.
18841 blocks
Installation of <SUNWmfrun> was successful.
260 blocks
Installation of <SUNWxwacx> was successful.
3 blocks
Installation of <SUNWsshdr> was successful.
390 blocks
Installation of <SUNWadmlib-sysid> was successful.
27 blocks
Installation of <SUNWadmr> was successful.
3755 blocks
Installation of <SUNWadmap> was successful.
Installation of <SUNWgssc> was successful.
554 blocks
Installation of <SUNWgss> was successful.
11613 blocks
Cisco PGW 2200 Softswitch Release 9.8 Software Installation and Configuration Guide
OL-18083-01
2-19
Chapter 2
Installing the Sun Solaris 10 Operating System
Loading the Sun Solaris 10 Operating System
Installation of <SUNWopenssl-libraries> was successful.
687 blocks
Installation of <SUNWsshcu> was successful.
694 blocks
Installation of <SUNWsshdu> was successful.
Installation of <SUNWdtdmr> was successful.
6063 blocks
Installation of <SUNWtltk> was successful.
134 blocks
Installation of <SUNWgzip> was successful.
173 blocks
Installation of <SUNWsshr> was successful.
970 blocks
Installation of <SUNWsshu> was successful.
11214 blocks
Installation of <SUNWlibC> was successful.
151975 blocks
Installation of <SUNWj5rt> was successful.
580 blocks
Installation of <SUNWwbsup> was successful.
Installation of <SUNWinstall-patch-utils-root> was successful.
Installation of <SUNWswmt> was successful.
5206 blocks
Installation of <SUNWmdr> was successful.
1139 blocks
Installation of <SUNWmdu> was successful.
2937 blocks
Installation of <SUNWadmc> was successful.
4275 blocks
Installation of <SUNWnfsckr> was successful.
89 blocks
Installation of <SUNWnfscr> was successful.
426 blocks
Installation of <SUNWnfscu> was successful.
8 blocks
Installation of <SUNWkrbr> was successful.
3840 blocks
Installation of <SUNWkrbu> was successful.
259 blocks
Installation of <SUNWbip> was successful.
237 blocks
Cisco PGW 2200 Softswitch Release 9.8 Software Installation and Configuration Guide
2-20
OL-18083-01
Chapter 2
Installing the Sun Solaris 10 Operating System
Loading the Sun Solaris 10 Operating System
Installation of <SUNWtnetc> was successful.
1498 blocks
Installation of <SUNWrcmdc> was successful.
4857 blocks
Reboot client to install driver.
Installation of <SUNWib> was successful.
2431 blocks
Reboot client to install driver.
Installation of <SUNWtavor> was successful.
599 blocks
Installation of <SUNWtcsh> was successful.
1085 blocks
Installation of <SUNWtecla> was successful.
1978 blocks
Installation of <SUNWter> was successful.
1975 blocks
Installation of <SUNWpr> was successful.
10669 blocks
Installation of <SUNWtls> was successful.
90 blocks
Installation of <SUNWtnetd> was successful.
Installation of <SUNWtnetr> was successful.
1039 blocks
Installation of <SUNWtnfc> was successful.
97 blocks
Installation of <SUNWtnfd> was successful.
1784 blocks
Installation of <SUNWtoo> was successful.
Installation of <SUNWucbt> was successful.
Installation of <SUNWudaplr> was successful.
382 blocks
Installation of <SUNWudaplu> was successful.
256 blocks
Installation of <SUNWipoib> was successful.
680 blocks
Installation of <SUNWudapltu> was successful.
559 blocks
Reboot client to install driver.
Installation of <SUNWudapltr> was successful.
Installation of <SUNWocfr> was successful.
974 blocks
Installation of <SUNWocf> was successful.
1580 blocks
Cisco PGW 2200 Softswitch Release 9.8 Software Installation and Configuration Guide
OL-18083-01
2-21
Chapter 2
Installing the Sun Solaris 10 Operating System
Loading the Sun Solaris 10 Operating System
Reboot client to install
Reboot client to install
Reboot client to install
Reboot client to install
Reboot client to install
Reboot client to install
Reboot client to install
Reboot client to install
Reboot client to install
Removing empty OWconfig
driver.
driver.
driver.
driver.
driver.
driver.
driver.
driver.
driver.
Installation of <SUNWos86r> was successful.
Installation of <SUNWrmodr> was successful.
Reboot client to install driver.
Installation of <CADP160> was successful.
1069 blocks
Reboot client to install driver.
Installation of <SUNWaudd> was successful.
3863 blocks
Reboot client to install driver.
Reboot client to install driver.
Reboot client to install driver.
Reboot client to install driver.
Reboot client to install driver.
Reboot client to install driver.
Reboot client to install driver.
Reboot client to install driver.
Reboot client to install driver.
Reboot client to install driver.
Installation of <SUNWusb> was successful.
138 blocks
Installation of <SUNWusbs> was successful.
465 blocks
Reboot client to install driver.
Installation of <SUNWuedg> was successful.
732 blocks
Modifying /a/kernel/drv/sd.conf
Reboot client to install driver.
Installation of <HPFC> was successful.
66 blocks
Installation of <NCRos86r> was successful.
151 blocks
Reboot client to install driver.
Installation of <SUNWugen> was successful.
379 blocks
Reboot client to install driver.
Installation of <SK98sol> was successful.
679 blocks
Reboot client to install driver.
Installation of <SKfp> was successful.
8309 blocks
Installation of <SUNWeurf> was successful.
Cisco PGW 2200 Softswitch Release 9.8 Software Installation and Configuration Guide
2-22
OL-18083-01
Chapter 2
Installing the Sun Solaris 10 Operating System
Loading the Sun Solaris 10 Operating System
2429 blocks
Reboot client to install driver.
Installation of <SUNW1394> was successful.
1423 blocks
Installation of <SUNWxi18n> was successful.
95 blocks
Installation of <SUNWvld> was successful.
40 blocks
Installation of <SUNWvldu> was successful.
1198 blocks
Installation of <SUNWbash> was successful.
Installation of <SUNWproduct-registry-root> was successful.
817 blocks
registry conversion not required
Installation of <SUNWwsr2> was successful.
158 blocks
Reboot client to install driver.
Installation of <SUNWaac> was successful.
3 blocks
Installation of <SUNWaccr> was successful.
511 blocks
Installation of <SUNWaccu> was successful.
Installation of <SUNWgrub> was successful.
Installation of <SUNWadmfr> was successful.
1167 blocks
Installation of <SUNWadmfw> was successful.
80 blocks
Installation of <SUNWi15rf> was successful.
Reboot client to install driver.
Installation of <SUNWadp> was successful.
Installation of <SUNWradpu320> was successful.
1216 blocks
Reboot client to install driver.
Installation of <SUNWadpu320> was successful.
136 blocks
Reboot client to install driver.
Installation of <SUNWamr> was successful.
2519 blocks
Installation of <SUNWsprot> was successful.
190 blocks
Installation of <SUNWrsg> was successful.
453 blocks
Installation of <SUNWgssdh> was successful.
Cisco PGW 2200 Softswitch Release 9.8 Software Installation and Configuration Guide
OL-18083-01
2-23
Chapter 2
Installing the Sun Solaris 10 Operating System
Loading the Sun Solaris 10 Operating System
671 blocks
Installation of <SUNWgssk> was successful.
1251 blocks
Reboot client to install driver.
Installation of <SUNWxge> was successful.
2194 blocks
Installation of <SUNWbtool> was successful.
24616 blocks
Installation of <SUNWcslr> was successful.
1022 blocks
Installation of <SUNWidnl> was successful.
1830 blocks
Installation of <SUNWinst> was successful.
596 blocks
Reboot client to install driver.
Installation of <SUNWintgige> was successful.
41 blocks
Installation of <SUNWipc> was successful.
119 blocks
Installation of <SUNWipfr> was successful.
3499 blocks
Installation of <SUNWipfu> was successful.
6407 blocks
/a/etc/lu/synclist
Installing /a/etc/default/lu
Installation of <SUNWlur> was successful.
3495 blocks
Installation of <SUNWluu> was successful.
Reboot client to install driver.
Installation of <SUNWiscsir> was successful.
Installation of <SUNWiscsiu> was successful.
790 blocks
Installation of <SUNWloc> was successful.
83 blocks
Installation of <SUNWnisr> was successful.
3891 blocks
Installation of <SUNWnisu> was successful.
45 blocks
Installation of <SUNWzebrar> was successful.
4056 blocks
Installation of <SUNWzebrau> was successful.
267 blocks
Installation of <SUNWzip> was successful.
9 blocks
Cisco PGW 2200 Softswitch Release 9.8 Software Installation and Configuration Guide
2-24
OL-18083-01
Chapter 2
Installing the Sun Solaris 10 Operating System
Loading the Sun Solaris 10 Operating System
Installation of <SUNWzoner> was successful.
606 blocks
Installation of <SUNWluzone> was successful.
Installation of <SUNWpoolr> was successful.
1366 blocks
Installation of <SUNWpool> was successful.
878 blocks
Installation of <SUNWzoneu> was successful.
4985 blocks
Installation of <SUNWzsh> was successful.
Reboot client to install driver.
Installation of <SYMhisl> was successful.
72 blocks
Installation of <SUNWcpc> was successful.
Installation of <SUNWbindr> was successful.
4546 blocks
Installation of <SUNWbind> was successful.
Installation of <SUNWbipr> was successful.
Reboot client to install driver.
Installation of <SUNWcadp> was successful.
955 blocks
Reboot client to install driver.
Installation of <SUNWced> was successful.
161 blocks
Installation of <SUNWcfcl> was successful.
Installation of <SUNWcfclr> was successful.
253 blocks
Installation of <SUNWluxop> was successful.
594 blocks
Installation of <SUNWcfpl> was successful.
2 blocks
Installation of <SUNWcfplr> was successful.
3979 blocks
Installation of <SUNWjss> was successful.
918 blocks
Installation of <SUNWcpcu> was successful.
29 blocks
Reboot client to install driver.
Installation of <SUNWcqhpc> was successful.
215 blocks
Installation of <SUNWkey> was successful.
128 blocks
Cisco PGW 2200 Softswitch Release 9.8 Software Installation and Configuration Guide
OL-18083-01
2-25
Chapter 2
Installing the Sun Solaris 10 Operating System
Loading the Sun Solaris 10 Operating System
Installation of <SUNWeuodf> was successful.
231 blocks
Installation of <SUNWless> was successful.
184 blocks
Installation of <SUNWcstl> was successful.
928 blocks
Installation of <SUNWlibsasl> was successful.
314 blocks
Installation of <SUNWlldap> was successful.
228 blocks
Reboot client to install driver.
Installation of <SUNWlsimega> was successful.
10159 blocks
Installation of <SUNWmdb> was successful.
29 blocks
Installation of <SUNWmdbdm> was successful.
6853 blocks
Installation of <SUNWmdbr> was successful.
3972 blocks
Installation of <SUNWdtrc> was successful.
1313 blocks
Installation of <SUNWdtrp> was successful.
1227 blocks
Reboot client to install driver.
Installation of <SUNWfctl> was successful.
3552 blocks
Reboot client to install driver.
Installation of <SUNWemlxs> was successful.
2568 blocks
Installation of <SUNWemlxu> was successful.
174 blocks
Installation of <SUNWmibii> was successful.
1332 blocks
Installation of <SUNWsasnm> was successful.
1106 blocks
Installation of <SUNWsadmi> was successful.
328 blocks
Installation of <SUNWsacom> was successful.
40 blocks
Installation of <SUNWmipr> was successful.
468 blocks
Installation of <SUNWmipu> was successful.
844 blocks
Cisco PGW 2200 Softswitch Release 9.8 Software Installation and Configuration Guide
2-26
OL-18083-01
Chapter 2
Installing the Sun Solaris 10 Operating System
Loading the Sun Solaris 10 Operating System
Installation of <SUNWmkcd> was successful.
Modifying /a/etc/hba.conf
Installation of <SUNWfchbar> was successful.
3366 blocks
Installation of <SUNWfchba> was successful.
537 blocks
Reboot client to install driver.
Installation of <SUNWfcip> was successful.
312 blocks
Installation of <SUNWfcmdb> was successful.
803 blocks
Reboot client to install driver.
Installation of <SUNWfcp> was successful.
79 blocks
Installation of <SUNWfcprt> was successful.
361 blocks
Reboot client to install driver.
Installation of <SUNWfcsm> was successful.
3020 blocks
Installation of <SUNWfmd> was successful.
197 blocks
Installation of <SUNWfss> was successful.
275 blocks
Reboot client to install driver.
Installation of <SUNWnge> was successful.
1 blocks
Installation of <SUNWpkgcmdsr> was successful.
4530 blocks
Installation of <SUNWpkgcmdsu> was successful.
1509 blocks
Reboot client to install driver.
Installation of <SUNWpsdcr> was successful.
Installation of <SUNWsolnm> was successful.
590 blocks
Reboot client to install driver.
Installation of <SUNWpsdir> was successful.
3866 blocks
Reboot client to install driver.
Installation of <SUNWqlc> was successful.
387 blocks
Installation of <SUNWqos> was successful.
136 blocks
Installation of <SUNWqosu> was successful.
2 blocks
Installation of <SUNWrmodu> was successful.
Cisco PGW 2200 Softswitch Release 9.8 Software Installation and Configuration Guide
OL-18083-01
2-27
Chapter 2
Installing the Sun Solaris 10 Operating System
Loading the Sun Solaris 10 Operating System
497 blocks
Installation of <SUNWroute> was successful.
271 blocks
Reboot client to install driver.
Installation of <SUNWrpcib> was successful.
145 blocks
Installation of <SUNWrsgk> was successful.
89 blocks
Reboot client to install driver.
Installation of <SUNWrtls> was successful.
125 blocks
Installation of <SUNWspnego> was successful.
Solaris 10 software installation succeeded
Solaris 10 packages fully installed
SUNWcsu
SUNWcsr
SUNWcsl
SUNWcnetr
SUNWckr
SUNWkvm
SUNWcar
SUNWcakr
SUNWcsd
SUNWzlib
SUNWlibmsr
SUNWlibms
SUNWlxml
SUNWxwrtl
SUNWbzip
SUNWxwfnt
SUNWxwice
SUNWxwdv
SUNWxwplr
SUNWperl584core
SUNWperl584usr
SUNWesu
SUNWcpp
SUNWdtcor
SUNWxwplt
SUNWlexpt
SUNWgcmn
SUNWctpls
SUNWmfrun
SUNWxwacx
SUNWsshdr
SUNWadmlib-sysid
SUNWadmr
SUNWadmap
SUNWgssc
SUNWgss
SUNWopenssl-libraries
SUNWsshcu
SUNWsshdu
SUNWdtdmr
SUNWtltk
SUNWgzip
SUNWsshr
Cisco PGW 2200 Softswitch Release 9.8 Software Installation and Configuration Guide
2-28
OL-18083-01
Chapter 2
Installing the Sun Solaris 10 Operating System
Loading the Sun Solaris 10 Operating System
SUNWsshu
SUNWlibC
SUNWj5rt
SUNWwbsup
SUNWinstall-patch-utils-root
SUNWswmt
SUNWmdr
SUNWmdu
SUNWadmc
SUNWnfsckr
SUNWnfscr
SUNWnfscu
SUNWkrbr
SUNWkrbu
SUNWbip
SUNWtnetc
SUNWrcmdc
SUNWib
SUNWtavor
SUNWtcsh
SUNWtecla
SUNWter
SUNWpr
SUNWtls
SUNWtnetd
SUNWtnetr
SUNWtnfc
SUNWtnfd
SUNWtoo
SUNWucbt
SUNWudaplr
SUNWudaplu
SUNWipoib
SUNWudapltu
SUNWudapltr
SUNWocfr
SUNWocf
SUNWos86r
SUNWrmodr
CADP160
SUNWaudd
SUNWusb
SUNWusbs
SUNWuedg
HPFC
NCRos86r
SUNWugen
SK98sol
SKfp
SUNWeurf
SUNW1394
SUNWxi18n
SUNWvld
SUNWvldu
SUNWbash
SUNWproduct-registry-root
SUNWwsr2
SUNWaac
SUNWaccr
SUNWaccu
SUNWgrub
SUNWadmfr
SUNWadmfw
SUNWi15rf
Cisco PGW 2200 Softswitch Release 9.8 Software Installation and Configuration Guide
OL-18083-01
2-29
Chapter 2
Installing the Sun Solaris 10 Operating System
Loading the Sun Solaris 10 Operating System
SUNWadp
SUNWradpu320
SUNWadpu320
SUNWamr
SUNWsprot
SUNWrsg
SUNWgssdh
SUNWgssk
SUNWxge
SUNWbtool
SUNWcslr
SUNWidnl
SUNWinst
SUNWintgige
SUNWipc
SUNWipfr
SUNWipfu
SUNWlur
SUNWluu
SUNWiscsir
SUNWiscsiu
SUNWloc
SUNWnisr
SUNWnisu
SUNWzebrar
SUNWzebrau
SUNWzip
SUNWzoner
SUNWluzone
SUNWpoolr
SUNWpool
SUNWzoneu
SUNWzsh
SYMhisl
SUNWcpc
SUNWbindr
SUNWbind
SUNWbipr
SUNWcadp
SUNWced
SUNWcfcl
SUNWcfclr
SUNWluxop
SUNWcfpl
SUNWcfplr
SUNWjss
SUNWcpcu
SUNWcqhpc
SUNWkey
SUNWeuodf
SUNWless
SUNWcstl
SUNWlibsasl
SUNWlldap
SUNWlsimega
SUNWmdb
SUNWmdbdm
SUNWmdbr
SUNWdtrc
SUNWdtrp
SUNWfctl
SUNWemlxs
SUNWemlxu
SUNWmibii
Cisco PGW 2200 Softswitch Release 9.8 Software Installation and Configuration Guide
2-30
OL-18083-01
Chapter 2
Installing the Sun Solaris 10 Operating System
Loading the Sun Solaris 10 Operating System
SUNWsasnm
SUNWsadmi
SUNWsacom
SUNWmipr
SUNWmipu
SUNWmkcd
SUNWfchbar
SUNWfchba
SUNWfcip
SUNWfcmdb
SUNWfcp
SUNWfcprt
SUNWfcsm
SUNWfmd
SUNWfss
SUNWnge
SUNWpkgcmdsr
SUNWpkgcmdsu
SUNWpsdcr
SUNWsolnm
SUNWpsdir
SUNWqlc
SUNWqos
SUNWqosu
SUNWrmodu
SUNWroute
SUNWrpcib
SUNWrsgk
SUNWrtls
SUNWspnego
Customizing system files
- Mount points table (/etc/vfstab)
fd/dev/fdfd- no /proc-/procproc- no /dev/dsk/c1t0d0s3--swap-no/dev/dsk/c1t0d0s0/dev/rdsk/c1t0d0s0/ufs1no/dev/dsk/c1t0d0s1/dev/rdsk/c1t0d0s1/varufs1no/dev/dsk/c1t0d0s5/dev/rdsk/c1t0d0s5/optufs2yes/devices-/devicesdevfs-noctfs- /system/contractctfs-noobjfs-/system/objectobjfs-noswap- /tmptmpfs- yes - Network host addresses (/etc/hosts)
- Network host addresses (/etc/hosts)
- Environment variables (/etc/default/init)
Cleaning devices
Customizing system devices
- Physical devices (/devices)
- Logical devices (/dev)
Installing boot information
- Updating boot environment configuration file
- Installing boot blocks (c1t0d0)
Executing profile begin script...
Cisco PGW 2200 Softswitch Release 9.8 Software Installation and Configuration Guide
OL-18083-01
2-31
Chapter 2
Installing the Sun Solaris 10 Operating System
Loading the Sun Solaris 10 Operating System
Completed profile begin script.
Processing profile
- Selecting cluster (SUNWCreq)
- Deselecting cluster (SUNWCudf)
- Deselecting cluster (SUNWCbs)
- Deselecting cluster (SUNWCnfss)
- Deselecting cluster (SUNWCsndm)
- Deselecting cluster (SUNWCpcmc)
- Deselecting cluster (SUNWCpicl)
- Selecting cluster (SUNWCacc)
- Selecting cluster (SUNWCssh)
- Selecting cluster (SUNWCpool)
- Selecting cluster (SUNWCvld)
- Selecting cluster (SUNWCfwshl)
- Selecting cluster (SUNWClu)
- Selecting cluster (SUNWCcpc)
- Selecting cluster (SUNWCsea)
- Selecting cluster (SUNWCstl)
- Selecting cluster (SUNWCmip)
- Selecting cluster (SUNWCqos)
- Selecting cluster (SUNWCzone)
- Selecting cluster (SUNWCzebra)
- Deselecting package (SUNWauda)
- Deselecting package (SUNWad810)
- Deselecting package (SUNWvia823x)
- Deselecting package (SUNWcnsu)
- Deselecting package (SUNWtnamd)
- Deselecting package (SUNWtnamr)
- Deselecting package (SUNWrcmdr)
- Deselecting package (SUNWrcmds)
- Deselecting package (SUNWtftp)
- Deselecting package (SUNWtftpr)
- Deselecting package (SUNWcnsr)
- Deselecting package (SUNWatfsr)
- Deselecting package (SUNWatfsu)
- Deselecting package (SUNWftpr)
- Deselecting package (SUNWftpu)
- Deselecting package (SUNWipmi)
- Deselecting package (SUNWxsvc)
- Deselecting package (SUNWflexruntime)
- Deselecting package (SUNWxwmod)
- Selecting package (SUNWadmc)
- Selecting package (SUNWadmfr)
- Selecting package (SUNWadmfw)
- Selecting package (SUNWdtdmr)
- Selecting package (SUNWxwfnt)
- Selecting package (SUNWzip)
- Selecting package (SUNWless)
- Selecting package (SUNWeurf)
- Selecting package (SUNWj5rt)
- Selecting package (SUNWxwacx)
- Selecting package (SUNWxwice)
- Selecting package (SUNWxwplr)
- Selecting package (SUNWxwrtl)
- Selecting package (SUNWxwplt)
- Selecting package (SUNWxi18n)
- Selecting package (SUNWtltk)
- Selecting package (SUNWeuodf)
- Selecting package (SUNWocf)
- Selecting package (SUNWocfr)
- Selecting package (SUNWbtool)
- Selecting package (SUNWsprot)
- Selecting package (SUNWmdbdm)
Cisco PGW 2200 Softswitch Release 9.8 Software Installation and Configuration Guide
2-32
OL-18083-01
Chapter 2
Installing the Sun Solaris 10 Operating System
Loading the Sun Solaris 10 Operating System
-
Selecting package (SUNWmkcd)
Selecting package (SUNWspnego)
Selecting package (SUNWtnfc)
Selecting package (SUNWtnfd)
Selecting package (SUNWbind)
Selecting package (SUNWbindr)
Selecting package (SUNWctpls)
Selecting package (SUNWfss)
Selecting package (SUNWgcmn)
Selecting package (SUNWgssdh)
Selecting package (SUNWgssk)
Selecting package (SUNWinst)
Selecting package (SUNWi15rf)
Selecting package (SUNWipc)
Selecting package (SUNWmdbr)
Selecting package (SUNWmfrun)
Selecting package (SUNWrsg)
Selecting package (SUNWrsgk)
Selecting package (SUNWter)
Selecting package (SUNWtoo)
Selecting package (SUNW1394)
Selecting all disks
Configuring boot device
Using disk (c1t0d0) for "rootdisk"
Deleting Solaris fdisk partition (c1t0d0)
Deleting Solaris fdisk partition (c1t1d0)
Creating "all" Solaris fdisk partition (c1t0d0)
Creating "all" Solaris fdisk partition (c1t1d0)
Configuring / (c1t0d0s0)
Configuring /var (c1t0d0s1)
Configuring swap (c1t0d0s3)
Configuring (c1t0d0s4)
Configuring (c1t0d0s6)
Configuring /opt (c1t0d0s5)
Deselecting unmodified disk (c1t1d0)
Verifying disk configuration
Verifying space allocation
- Total software size:
420.10 Mbytes
You may need to eject the CD or select a different
boot device after reboot to avoid repeating the
installation process.
Configuring disk (c1t0d0)
- Creating Fdisk partition table
Fdisk partition table for disk c1t0d0 (input file for fdisk(1M))
type: 130 active: 128 offset: 16065
size: 143347995
type: 100 active: 0
offset: 0
size: 0
type: 100 active: 0
offset: 0
size: 0
type: 100 active: 0
offset: 0
size: 0
- Creating Solaris disk label (VTOC)
Creating and checking UFS file systems
- Creating / (c1t0d0s0)
Warning: 1474 sector(s) in last cylinder unallocated
/dev/rdsk/c1t0d0s0:4096574 sectors in 667 cylinders of 48 tracks, 128 sectors
2000.3MB in 42 cyl groups (16 c/g, 48.00MB/g, 11648 i/g)
super-block backups (for fsck -F ufs -o b=#) at:
32, 98464, 196896, 295328, 393760, 492192, 590624, 689056, 787488, 885920,
Cisco PGW 2200 Softswitch Release 9.8 Software Installation and Configuration Guide
OL-18083-01
2-33
Chapter 2
Installing the Sun Solaris 10 Operating System
Loading the Sun Solaris 10 Operating System
3149856, 3248288, 3346720, 3445152, 3543584, 3642016, 3740448, 3838880,
3937312, 4035744
- Creating /var (c1t0d0s1)
Warning: 4866 sector(s) in last cylinder unallocated
/dev/rdsk/c1t0d0s1:10249470 sectors in 1669 cylinders of 48 tracks, 128 sectors
5004.6MB in 105 cyl groups (16 c/g, 48.00MB/g, 5824 i/g)
super-block backups (for fsck -F ufs -o b=#) at:
32, 98464, 196896, 295328, 393760, 492192, 590624, 689056, 787488, 885920,
9342880, 9441312, 9539744, 9638176, 9736608, 9835040, 9933472, 10031904,
10130336, 10228768
- Creating /opt (c1t0d0s5)
Warning: 1062 sector(s) in last cylinder unallocated
/dev/rdsk/c1t0d0s5:116599770 sectors in 18978 cylinders of 48 tracks, 128 sectors
56933.5MB in 1187 cyl groups (16 c/g, 48.00MB/g, 5824 i/g)
super-block backups (for fsck -F ufs -o b=#) at:
32, 98464, 196896, 295328, 393760, 492192, 590624, 689056, 787488, 885920,
Initializing cylinder groups:
.......................
super-block backups for last 10 cylinder groups at:
115707040, 115805472, 115903904, 116002336, 116100768, 116199200, 116297632,
116396064, 116494496, 116592928
Beginning Solaris software installation
23303 blocks
Installation of <SUNWcsu> was successful.
5043 blocks
Installation of <SUNWcsr> was successful.
21985 blocks
Installation of <SUNWcsl> was successful.
75 blocks
Installation of <SUNWcnetr> was successful.
43978 blocks
Installation of <SUNWckr> was successful.
30 blocks
Installation of <SUNWkvm> was successful.
Installation of <SUNWcar> was successful.
Installation of <SUNWcakr> was successful.
7 blocks
add c devices/pseudo/arp@0:arp (44, 0) 0666 root sys
add link /dev/arp=../devices/pseudo/arp@0:arp
add c devices/pseudo/clone@0:ibd (11, 170) 0666 root sys
add link /dev/ibd=../devices/pseudo/clone@0:ibd
add c devices/pseudo/icmp@0:icmp (5, 0) 0666 root sys
add link /dev/icmp=../devices/pseudo/icmp@0:icmp
add c devices/pseudo/icmp@0:icmp (5, 0) 0666 root sys
add link /dev/rawip=../devices/pseudo/icmp@0:icmp
add c devices/pseudo/icmp6@0:icmp6 (140, 1) 0666 root sys
add link /dev/icmp6=../devices/pseudo/icmp6@0:icmp6
add c devices/pseudo/icmp6@0:icmp6 (140, 1) 0666 root sys
add link /dev/rawip6=../devices/pseudo/icmp6@0:icmp6
add c devices/pseudo/ip@0:ip (3, 0) 0666 root sys
add link /dev/ip=../devices/pseudo/ip@0:ip
add c devices/pseudo/ip6@0:ip6 (139, 1) 0666 root sys
add link /dev/ip6=../devices/pseudo/ip6@0:ip6
add c devices/pseudo/rts@0:rts (43, 0) 0666 root sys
add link /dev/rts=../devices/pseudo/rts@0:rts
Cisco PGW 2200 Softswitch Release 9.8 Software Installation and Configuration Guide
2-34
OL-18083-01
Chapter 2
Installing the Sun Solaris 10 Operating System
Loading the Sun Solaris 10 Operating System
add
add
add
add
add
add
add
add
add
add
add
add
add
add
add
add
add
add
add
add
add
add
add
add
add
add
add
add
add
add
add
add
add
add
add
add
add
add
add
add
add
add
add
add
add
add
add
add
add
add
add
add
add
add
add
add
add
add
add
add
add
c devices/pseudo/tcp@0:tcp (42, 2) 0666 root sys
link /dev/tcp=../devices/pseudo/tcp@0:tcp
c devices/pseudo/tcp6@0:tcp6 (142, 3) 0666 root sys
link /dev/tcp6=../devices/pseudo/tcp6@0:tcp6
c devices/pseudo/udp@0:udp (41, 0) 0666 root sys
link /dev/udp=../devices/pseudo/udp@0:udp
c devices/pseudo/udp6@0:udp6 (141, 1) 0666 root sys
link /dev/udp6=../devices/pseudo/udp6@0:udp6
c devices/pseudo/ipsecah@0:ipsecah (137, 1) 0666 root sys
link /dev/ipsecah=../devices/pseudo/ipsecah@0:ipsecah
c devices/pseudo/ipsecesp@0:ipsecesp (138, 1) 0666 root sys
link /dev/ipsecesp=../devices/pseudo/ipsecesp@0:ipsecesp
c devices/pseudo/keysock@0:keysock (136, 0) 0666 root sys
link /dev/keysock=../devices/pseudo/keysock@0:keysock
c devices/pseudo/cn@0:console (0, 0) 0620 root tty
link /dev/console=../devices/pseudo/cn@0:console
c devices/pseudo/cn@0:syscon (0, 0) 0620 root tty
link /dev/syscon=../devices/pseudo/cn@0:syscon
c devices/pseudo/cn@0:systty (0, 0) 0620 root tty
link /dev/systty=../devices/pseudo/cn@0:systty
c devices/pseudo/devinfo@0:devinfo (88, 0) 0640 root sys
c devices/pseudo/ksyms@0:ksyms (72, 0) 0666 root sys
link /dev/ksyms=../devices/pseudo/ksyms@0:ksyms
c devices/pseudo/log@0:conslog (21, 0) 0666 root sys
link /dev/conslog=../devices/pseudo/log@0:conslog
c devices/pseudo/log@0:log (21, 5) 0640 root sys
link /dev/log=../devices/pseudo/log@0:log
c devices/pseudo/mm@0:mem (13, 0) 0640 root sys
link /dev/mem=../devices/pseudo/mm@0:mem
c devices/pseudo/mm@0:kmem (13, 1) 0640 root sys
link /dev/kmem=../devices/pseudo/mm@0:kmem
c devices/pseudo/mm@0:null (13, 2) 0666 root sys
link /dev/null=../devices/pseudo/mm@0:null
c devices/pseudo/mm@0:allkmem (13, 3) 0600 root sys
link /dev/allkmem=../devices/pseudo/mm@0:allkmem
c devices/pseudo/mm@0:zero (13, 12) 0666 root sys
link /dev/zero=../devices/pseudo/mm@0:zero
c devices/pseudo/openeepr@0:openprom (6, 0) 0640 root sys
link /dev/openprom=../devices/pseudo/openeepr@0:openprom
c devices/pseudo/sad@0:admin (12, 1) 0666 root sys
link /dev/sad/admin=../../devices/pseudo/sad@0:admin
c devices/pseudo/sad@0:user (12, 0) 0666 root sys
link /dev/sad/user=../../devices/pseudo/sad@0:user
c devices/pseudo/sy@0:tty (22, 0) 0666 root tty
link /dev/tty=../devices/pseudo/sy@0:tty
c devices/pseudo/sysevent@0:sysevent (152, 0) 0600 root sys
link /dev/sysevent=../devices/pseudo/sysevent@0:sysevent
c devices/pseudo/sysmsg@0:msglog (97, 1) 0600 root sys
link /dev/msglog=../devices/pseudo/sysmsg@0:msglog
c devices/pseudo/sysmsg@0:sysmsg (97, 0) 0600 root sys
link /dev/sysmsg=../devices/pseudo/sysmsg@0:sysmsg
c devices/pseudo/tl@0:ticots (105, 0) 0666 root sys
link /dev/ticots=../devices/pseudo/tl@0:ticots
c devices/pseudo/tl@0:ticotsord (105, 1) 0666 root sys
link /dev/ticotsord=../devices/pseudo/tl@0:ticotsord
c devices/pseudo/tl@0:ticlts (105, 2) 0666 root sys
link /dev/ticlts=../devices/pseudo/tl@0:ticlts
c devices/pseudo/wc@0:wscons (15, 0) 0600 root sys
link /dev/wscons=../devices/pseudo/wc@0:wscons
c devices/pseudo/conskbd@0:kbd (103, 0) 0666 root sys
link /dev/kbd=../devices/pseudo/conskbd@0:kbd
Installation of <SUNWcsd> was successful.
422 blocks
Cisco PGW 2200 Softswitch Release 9.8 Software Installation and Configuration Guide
OL-18083-01
2-35
Chapter 2
Installing the Sun Solaris 10 Operating System
Loading the Sun Solaris 10 Operating System
Installation of <SUNWzlib> was successful.
3826 blocks
Installation of <SUNWlibmsr> was successful.
Installation of <SUNWlibms> was successful.
5495 blocks
Installation of <SUNWlxml> was successful.
Installation of <SUNWxwrtl> was successful.
Installation of <SUNWbzip> was successful.
22155 blocks
Installation of <SUNWxwfnt> was successful.
440 blocks
Installation of <SUNWxwice> was successful.
63 blocks
Installation of <SUNWxwdv> was successful.
3 blocks
Installation of <SUNWxwplr> was successful.
8688 blocks
Installation of <SUNWperl584core> was successful.
39013 blocks
Installation of <SUNWperl584usr> was successful.
3641 blocks
Installation of <SUNWesu> was successful.
118 blocks
Installation of <SUNWcpp> was successful.
Installation of <SUNWdtcor> was successful.
31656 blocks
Installation of <SUNWxwplt> was successful.
1019 blocks
Installation of <SUNWlexpt> was successful.
Installation of <SUNWgcmn> was successful.
116 blocks
Installation of <SUNWctpls> was successful.
18841 blocks
Installation of <SUNWmfrun> was successful.
260 blocks
Installation of <SUNWxwacx> was successful.
3 blocks
Installation of <SUNWsshdr> was successful.
390 blocks
Installation of <SUNWadmlib-sysid> was successful.
27 blocks
Cisco PGW 2200 Softswitch Release 9.8 Software Installation and Configuration Guide
2-36
OL-18083-01
Chapter 2
Installing the Sun Solaris 10 Operating System
Loading the Sun Solaris 10 Operating System
Installation of <SUNWadmr> was successful.
3755 blocks
Installation of <SUNWadmap> was successful.
Installation of <SUNWgssc> was successful.
554 blocks
Installation of <SUNWgss> was successful.
11613 blocks
Installation of <SUNWopenssl-libraries> was successful.
687 blocks
Installation of <SUNWsshcu> was successful.
694 blocks
Installation of <SUNWsshdu> was successful.
Installation of <SUNWdtdmr> was successful.
6063 blocks
Installation of <SUNWtltk> was successful.
134 blocks
Installation of <SUNWgzip> was successful.
173 blocks
Installation of <SUNWsshr> was successful.
970 blocks
Installation of <SUNWsshu> was successful.
11214 blocks
Installation of <SUNWlibC> was successful.
151975 blocks
Installation of <SUNWj5rt> was successful.
580 blocks
Installation of <SUNWwbsup> was successful.
Installation of <SUNWinstall-patch-utils-root> was successful.
Installation of <SUNWswmt> was successful.
5206 blocks
Installation of <SUNWmdr> was successful.
1139 blocks
Installation of <SUNWmdu> was successful.
2937 blocks
Installation of <SUNWadmc> was successful.
4275 blocks
Installation of <SUNWnfsckr> was successful.
89 blocks
Installation of <SUNWnfscr> was successful.
426 blocks
Installation of <SUNWnfscu> was successful.
Cisco PGW 2200 Softswitch Release 9.8 Software Installation and Configuration Guide
OL-18083-01
2-37
Chapter 2
Installing the Sun Solaris 10 Operating System
Loading the Sun Solaris 10 Operating System
8 blocks
Installation of <SUNWkrbr> was successful.
3840 blocks
Installation of <SUNWkrbu> was successful.
259 blocks
Installation of <SUNWbip> was successful.
237 blocks
Installation of <SUNWtnetc> was successful.
1498 blocks
Installation of <SUNWrcmdc> was successful.
4857 blocks
Reboot client to install driver.
Installation of <SUNWib> was successful.
2431 blocks
Reboot client to install driver.
Installation of <SUNWtavor> was successful.
599 blocks
Installation of <SUNWtcsh> was successful.
1085 blocks
Installation of <SUNWtecla> was successful.
1978 blocks
Installation of <SUNWter> was successful.
1975 blocks
Installation of <SUNWpr> was successful.
10669 blocks
Installation of <SUNWtls> was successful.
90 blocks
Installation of <SUNWtnetd> was successful.
Installation of <SUNWtnetr> was successful.
1039 blocks
Installation of <SUNWtnfc> was successful.
97 blocks
Installation of <SUNWtnfd> was successful.
1784 blocks
Installation of <SUNWtoo> was successful.
Installation of <SUNWucbt> was successful.
Installation of <SUNWudaplr> was successful.
382 blocks
Installation of <SUNWudaplu> was successful.
256 blocks
Installation of <SUNWipoib> was successful.
680 blocks
Cisco PGW 2200 Softswitch Release 9.8 Software Installation and Configuration Guide
2-38
OL-18083-01
Chapter 2
Installing the Sun Solaris 10 Operating System
Loading the Sun Solaris 10 Operating System
Installation of <SUNWudapltu> was successful.
559 blocks
Reboot client to install driver.
Installation of <SUNWudapltr> was successful.
Installation of <SUNWocfr> was successful.
974 blocks
Installation of <SUNWocf> was successful.
1580 blocks
Reboot client to install driver.
Reboot client to install driver.
Reboot client to install driver.
Reboot client to install driver.
Reboot client to install driver.
Reboot client to install driver.
Reboot client to install driver.
Reboot client to install driver.
Reboot client to install driver.
Removing empty OWconfig
Installation of <SUNWos86r> was successful.
Installation of <SUNWrmodr> was successful.
Reboot client to install driver.
Installation of <CADP160> was successful.
1069 blocks
Reboot client to install driver.
Installation of <SUNWaudd> was successful.
3863 blocks
Reboot client to install driver.
Reboot client to install driver.
Reboot client to install driver.
Reboot client to install driver.
Reboot client to install driver.
Reboot client to install driver.
Reboot client to install driver.
Reboot client to install driver.
Reboot client to install driver.
Reboot client to install driver.
Installation of <SUNWusb> was successful.
138 blocks
Installation of <SUNWusbs> was successful.
465 blocks
Reboot client to install driver.
Installation of <SUNWuedg> was successful.
732 blocks
Modifying /a/kernel/drv/sd.conf
Reboot client to install driver.
Installation of <HPFC> was successful.
66 blocks
Installation of <NCRos86r> was successful.
151 blocks
Reboot client to install driver.
Installation of <SUNWugen> was successful.
Cisco PGW 2200 Softswitch Release 9.8 Software Installation and Configuration Guide
OL-18083-01
2-39
Chapter 2
Installing the Sun Solaris 10 Operating System
Loading the Sun Solaris 10 Operating System
379 blocks
Reboot client to install driver.
Installation of <SK98sol> was successful.
679 blocks
Reboot client to install driver.
Installation of <SKfp> was successful.
8309 blocks
Installation of <SUNWeurf> was successful.
2429 blocks
Reboot client to install driver.
Installation of <SUNW1394> was successful.
1423 blocks
Installation of <SUNWxi18n> was successful.
95 blocks
Installation of <SUNWvld> was successful.
40 blocks
Installation of <SUNWvldu> was successful.
1198 blocks
Installation of <SUNWbash> was successful.
Installation of <SUNWproduct-registry-root> was successful.
817 blocks
registry conversion not required
Installation of <SUNWwsr2> was successful.
158 blocks
Reboot client to install driver.
Installation of <SUNWaac> was successful.
3 blocks
Installation of <SUNWaccr> was successful.
511 blocks
Installation of <SUNWaccu> was successful.
Installation of <SUNWgrub> was successful.
Installation of <SUNWadmfr> was successful.
1167 blocks
Installation of <SUNWadmfw> was successful.
80 blocks
Installation of <SUNWi15rf> was successful.
Reboot client to install driver.
Installation of <SUNWadp> was successful.
Installation of <SUNWradpu320> was successful.
1216 blocks
Reboot client to install driver.
Installation of <SUNWadpu320> was successful.
136 blocks
Reboot client to install driver.
Cisco PGW 2200 Softswitch Release 9.8 Software Installation and Configuration Guide
2-40
OL-18083-01
Chapter 2
Installing the Sun Solaris 10 Operating System
Loading the Sun Solaris 10 Operating System
Installation of <SUNWamr> was successful.
2519 blocks
Installation of <SUNWsprot> was successful.
190 blocks
Installation of <SUNWrsg> was successful.
453 blocks
Installation of <SUNWgssdh> was successful.
671 blocks
Installation of <SUNWgssk> was successful.
1251 blocks
Reboot client to install driver.
Installation of <SUNWxge> was successful.
2194 blocks
Installation of <SUNWbtool> was successful.
24616 blocks
Installation of <SUNWcslr> was successful.
1022 blocks
Installation of <SUNWidnl> was successful.
1830 blocks
Installation of <SUNWinst> was successful.
596 blocks
Reboot client to install driver.
Installation of <SUNWintgige> was successful.
41 blocks
Installation of <SUNWipc> was successful.
119 blocks
Installation of <SUNWipfr> was successful.
3499 blocks
Installation of <SUNWipfu> was successful.
6407 blocks
/a/etc/lu/synclist
Installing /a/etc/default/lu
Installation of <SUNWlur> was successful.
3495 blocks
Installation of <SUNWluu> was successful.
Reboot client to install driver.
Installation of <SUNWiscsir> was successful.
Installation of <SUNWiscsiu> was successful.
790 blocks
Installation of <SUNWloc> was successful.
83 blocks
Installation of <SUNWnisr> was successful.
3891 blocks
Cisco PGW 2200 Softswitch Release 9.8 Software Installation and Configuration Guide
OL-18083-01
2-41
Chapter 2
Installing the Sun Solaris 10 Operating System
Loading the Sun Solaris 10 Operating System
Installation of <SUNWnisu> was successful.
45 blocks
Installation of <SUNWzebrar> was successful.
4056 blocks
Installation of <SUNWzebrau> was successful.
267 blocks
Installation of <SUNWzip> was successful.
9 blocks
Installation of <SUNWzoner> was successful.
606 blocks
Installation of <SUNWluzone> was successful.
Installation of <SUNWpoolr> was successful.
1366 blocks
Installation of <SUNWpool> was successful.
878 blocks
Installation of <SUNWzoneu> was successful.
4985 blocks
Installation of <SUNWzsh> was successful.
Reboot client to install driver.
Installation of <SYMhisl> was successful.
72 blocks
Installation of <SUNWcpc> was successful.
Installation of <SUNWbindr> was successful.
4546 blocks
Installation of <SUNWbind> was successful.
Installation of <SUNWbipr> was successful.
Reboot client to install driver.
Installation of <SUNWcadp> was successful.
955 blocks
Reboot client to install driver.
Installation of <SUNWced> was successful.
161 blocks
Installation of <SUNWcfcl> was successful.
Installation of <SUNWcfclr> was successful.
253 blocks
Installation of <SUNWluxop> was successful.
594 blocks
Installation of <SUNWcfpl> was successful.
2 blocks
Installation of <SUNWcfplr> was successful.
3979 blocks
Installation of <SUNWjss> was successful.
Cisco PGW 2200 Softswitch Release 9.8 Software Installation and Configuration Guide
2-42
OL-18083-01
Chapter 2
Installing the Sun Solaris 10 Operating System
Loading the Sun Solaris 10 Operating System
918 blocks
Installation of <SUNWcpcu> was successful.
29 blocks
Reboot client to install driver.
Installation of <SUNWcqhpc> was successful.
215 blocks
Installation of <SUNWkey> was successful.
128 blocks
Installation of <SUNWeuodf> was successful.
231 blocks
Installation of <SUNWless> was successful.
184 blocks
Installation of <SUNWcstl> was successful.
928 blocks
Installation of <SUNWlibsasl> was successful.
314 blocks
Installation of <SUNWlldap> was successful.
228 blocks
Reboot client to install driver.
Installation of <SUNWlsimega> was successful.
10159 blocks
Installation of <SUNWmdb> was successful.
29 blocks
Installation of <SUNWmdbdm> was successful.
6853 blocks
Installation of <SUNWmdbr> was successful.
3972 blocks
Installation of <SUNWdtrc> was successful.
1313 blocks
Installation of <SUNWdtrp> was successful.
1227 blocks
Reboot client to install driver.
Installation of <SUNWfctl> was successful.
3552 blocks
Reboot client to install driver.
Installation of <SUNWemlxs> was successful.
2568 blocks
Installation of <SUNWemlxu> was successful.
174 blocks
Installation of <SUNWmibii> was successful.
1332 blocks
Installation of <SUNWsasnm> was successful.
1106 blocks
Installation of <SUNWsadmi> was successful.
Cisco PGW 2200 Softswitch Release 9.8 Software Installation and Configuration Guide
OL-18083-01
2-43
Chapter 2
Installing the Sun Solaris 10 Operating System
Loading the Sun Solaris 10 Operating System
328 blocks
Installation of <SUNWsacom> was successful.
40 blocks
Installation of <SUNWmipr> was successful.
468 blocks
Installation of <SUNWmipu> was successful.
844 blocks
Installation of <SUNWmkcd> was successful.
Modifying /a/etc/hba.conf
Installation of <SUNWfchbar> was successful.
3366 blocks
Installation of <SUNWfchba> was successful.
537 blocks
Reboot client to install driver.
Installation of <SUNWfcip> was successful.
312 blocks
Installation of <SUNWfcmdb> was successful.
803 blocks
Reboot client to install driver.
Installation of <SUNWfcp> was successful.
79 blocks
Installation of <SUNWfcprt> was successful.
361 blocks
Reboot client to install driver.
Installation of <SUNWfcsm> was successful.
3020 blocks
Installation of <SUNWfmd> was successful.
197 blocks
Installation of <SUNWfss> was successful.
275 blocks
Reboot client to install driver.
Installation of <SUNWnge> was successful.
1 blocks
Installation of <SUNWpkgcmdsr> was successful.
4530 blocks
Installation of <SUNWpkgcmdsu> was successful.
1509 blocks
Reboot client to install driver.
Installation of <SUNWpsdcr> was successful.
Installation of <SUNWsolnm> was successful.
590 blocks
Reboot client to install driver.
Installation of <SUNWpsdir> was successful.
3866 blocks
Reboot client to install driver.
Cisco PGW 2200 Softswitch Release 9.8 Software Installation and Configuration Guide
2-44
OL-18083-01
Chapter 2
Installing the Sun Solaris 10 Operating System
Loading the Sun Solaris 10 Operating System
Installation of <SUNWqlc> was successful.
387 blocks
Installation of <SUNWqos> was successful.
136 blocks
Installation of <SUNWqosu> was successful.
2 blocks
Installation of <SUNWrmodu> was successful.
497 blocks
Installation of <SUNWroute> was successful.
271 blocks
Reboot client to install driver.
Installation of <SUNWrpcib> was successful.
145 blocks
Installation of <SUNWrsgk> was successful.
89 blocks
Reboot client to install driver.
Installation of <SUNWrtls> was successful.
125 blocks
Installation of <SUNWspnego> was successful.
Solaris 10 software installation succeeded
Solaris 10 packages fully installed
SUNWcsu
SUNWcsr
SUNWcsl
SUNWcnetr
SUNWckr
SUNWkvm
SUNWcar
SUNWcakr
SUNWcsd
SUNWzlib
SUNWlibmsr
SUNWlibms
SUNWlxml
SUNWxwrtl
SUNWbzip
SUNWxwfnt
SUNWxwice
SUNWxwdv
SUNWxwplr
SUNWperl584core
SUNWperl584usr
SUNWesu
SUNWcpp
SUNWdtcor
SUNWxwplt
SUNWlexpt
SUNWgcmn
SUNWctpls
SUNWmfrun
SUNWxwacx
SUNWsshdr
SUNWadmlib-sysid
Cisco PGW 2200 Softswitch Release 9.8 Software Installation and Configuration Guide
OL-18083-01
2-45
Chapter 2
Installing the Sun Solaris 10 Operating System
Loading the Sun Solaris 10 Operating System
SUNWadmr
SUNWadmap
SUNWgssc
SUNWgss
SUNWopenssl-libraries
SUNWsshcu
SUNWsshdu
SUNWdtdmr
SUNWtltk
SUNWgzip
SUNWsshr
SUNWsshu
SUNWlibC
SUNWj5rt
SUNWwbsup
SUNWinstall-patch-utils-root
SUNWswmt
SUNWmdr
SUNWmdu
SUNWadmc
SUNWnfsckr
SUNWnfscr
SUNWnfscu
SUNWkrbr
SUNWkrbu
SUNWbip
SUNWtnetc
SUNWrcmdc
SUNWib
SUNWtavor
SUNWtcsh
SUNWtecla
SUNWter
SUNWpr
SUNWtls
SUNWtnetd
SUNWtnetr
SUNWtnfc
SUNWtnfd
SUNWtoo
SUNWucbt
SUNWudaplr
SUNWudaplu
SUNWipoib
SUNWudapltu
SUNWudapltr
SUNWocfr
SUNWocf
SUNWos86r
SUNWrmodr
CADP160
SUNWaudd
SUNWusb
SUNWusbs
SUNWuedg
HPFC
NCRos86r
SUNWugen
SK98sol
SKfp
SUNWeurf
SUNW1394
SUNWxi18n
SUNWvld
Cisco PGW 2200 Softswitch Release 9.8 Software Installation and Configuration Guide
2-46
OL-18083-01
Chapter 2
Installing the Sun Solaris 10 Operating System
Loading the Sun Solaris 10 Operating System
SUNWvldu
SUNWbash
SUNWproduct-registry-root
SUNWwsr2
SUNWaac
SUNWaccr
SUNWaccu
SUNWgrub
SUNWadmfr
SUNWadmfw
SUNWi15rf
SUNWadp
SUNWradpu320
SUNWadpu320
SUNWamr
SUNWsprot
SUNWrsg
SUNWgssdh
SUNWgssk
SUNWxge
SUNWbtool
SUNWcslr
SUNWidnl
SUNWinst
SUNWintgige
SUNWipc
SUNWipfr
SUNWipfu
SUNWlur
SUNWluu
SUNWiscsir
SUNWiscsiu
SUNWloc
SUNWnisr
SUNWnisu
SUNWzebrar
SUNWzebrau
SUNWzip
SUNWzoner
SUNWluzone
SUNWpoolr
SUNWpool
SUNWzoneu
SUNWzsh
SYMhisl
SUNWcpc
SUNWbindr
SUNWbind
SUNWbipr
SUNWcadp
SUNWced
SUNWcfcl
SUNWcfclr
SUNWluxop
SUNWcfpl
SUNWcfplr
SUNWjss
SUNWcpcu
SUNWcqhpc
SUNWkey
SUNWeuodf
SUNWless
SUNWcstl
SUNWlibsasl
Cisco PGW 2200 Softswitch Release 9.8 Software Installation and Configuration Guide
OL-18083-01
2-47
Chapter 2
Installing the Sun Solaris 10 Operating System
Loading the Sun Solaris 10 Operating System
SUNWlldap
SUNWlsimega
SUNWmdb
SUNWmdbdm
SUNWmdbr
SUNWdtrc
SUNWdtrp
SUNWfctl
SUNWemlxs
SUNWemlxu
SUNWmibii
SUNWsasnm
SUNWsadmi
SUNWsacom
SUNWmipr
SUNWmipu
SUNWmkcd
SUNWfchbar
SUNWfchba
SUNWfcip
SUNWfcmdb
SUNWfcp
SUNWfcprt
SUNWfcsm
SUNWfmd
SUNWfss
SUNWnge
SUNWpkgcmdsr
SUNWpkgcmdsu
SUNWpsdcr
SUNWsolnm
SUNWpsdir
SUNWqlc
SUNWqos
SUNWqosu
SUNWrmodu
SUNWroute
SUNWrpcib
SUNWrsgk
SUNWrtls
SUNWspnego
Customizing system files
- Mount points table (/etc/vfstab)
fd/dev/fdfd- no /proc-/procproc- no /dev/dsk/c1t0d0s3--swap-no/dev/dsk/c1t0d0s0/dev/rdsk/c1t0d0s0/ufs1no/dev/dsk/c1t0d0s1/dev/rdsk/c1t0d0s1/varufs1no/dev/dsk/c1t0d0s5/dev/rdsk/c1t0d0s5/optufs2yes/devices-/devicesdevfs-noctfs- /system/contractctfs-noobjfs-/system/objectobjfs-noswap- /tmptmpfs- yes - Network host addresses (/etc/hosts)
- Network host addresses (/etc/hosts)
- Environment variables (/etc/default/init)
Cleaning devices
Customizing system devices
- Physical devices (/devices)
- Logical devices (/dev)
Cisco PGW 2200 Softswitch Release 9.8 Software Installation and Configuration Guide
2-48
OL-18083-01
Chapter 2
Installing the Sun Solaris 10 Operating System
Loading the Sun Solaris 10 Operating System
Installing boot information
- Updating boot environment configuration file
- Installing boot blocks (c1t0d0)
Installation complete
Executing SolStart postinstall phase...
Executing finish script "patch_finish"...
Finish script patch_finish execution completed.
Executing JumpStart postinstall phase...
all finished
Finish script any_finish execution completed.
The begin script log 'begin.log'
is located in /var/sadm/system/logs after reboot.
The finish script log 'finish.log'
is located in /var/sadm/system/logs after reboot.
Note
You may be prompted during the reboot to enter Ctrl-B or Ctrl-C to open configuration tools for your
hardware. You do not need to open any of these tools to complete this installation.
Caution
The CD is automatically ejected from the CD-ROM drive prior to rebooting to ensure that the host is
rebooted from the newly installed operating system. Do not reinsert the CD into the CD-ROM drive at
this time.
syncing file systems... done
rebooting...
Resetting ...
Note
You can select your terminal type from the picklist or the default terminal type (from the serial
port). Cisco recommends that you use the default terminal while you are installing software.
screen not found.
Can't open input device.
Keyboard not present. Using ttya for input and output.
SunFire V40z, No Keyboard
OpenBoot 3.23, 4096 MB memory installed, Serial #12797485.
Ethernet address 8:0:20:c3:46:2d, Host ID: 80c3462d.
Rebooting with command: boot
Boot device: /pci@1f,4000/scsi@3/disk@0,0:a File and args:
SunOS Release 5.10 Version Generic 64-bit
Copyright 1983-2005 Sun Microsystems, Inc. All rights reserved.
Use is subject to license terms.
Hostname: va-host
Configuring devices.
Loading smf(5) service descriptions: 67/67
checking ufs filesystems
/dev/rdsk/c0t0d0s5: is logging.
Creating new rsa public/private host key pair
Creating new dsa public/private host key pair
Configuring network interface addresses: ce0 hme0 hme1
Cisco PGW 2200 Softswitch Release 9.8 Software Installation and Configuration Guide
OL-18083-01
2-49
Chapter 2
Installing the Sun Solaris 10 Operating System
Loading the Sun Solaris 10 Operating System
This system is configured with NFS version 4, which uses a domain
name that is automatically derived from the system's name services.
The derived domain name is sufficient for most configurations. In a
few cases, mounts that cross different domains might cause files to
be owned by "nobody" due to the lack of a common domain name.
Do you need to override the system's default NFS version 4 domain
name (yes/no) ? [no] :
Step 7
Enter no to continue the reconfiguration process and press Enter.
The system displays information similar to the following:
For more information about how the NFS version 4 default domain
name is derived and its impact, refer to the man pages for nfs(4)
and nfsmapid(1m), and the System Administration Guide: Network
Services.
vtghost console login:
This completes the installation of the Sun Solaris 10 operating system. Proceed to the “Configuring Your
Host” section on page 2-50.
Configuring Your Host
Step 1
If you are already logged in to your host platform, proceed to Step 2. Otherwise log in as root and use
the default password, vtghost. The system displays something similar to the following:
Sep 8 01:15:08 vtghost login: ROOT LOGIN /dev/console
Sun Microsystems Inc.
SunOS 5.10
Generic January 2005.
#
Step 2
Reconfigure the system by entering the sys-unconfig command and pressing Enter.
A screen similar to the following is displayed:
WARNING
This program will unconfigure your system. It will cause it
to revert to a "blank" system - it will not have a name or know
about other systems or networks.
This program will also halt the system.
Do you want to continue (y/n) ?
Step 3
Enter y to continue the reconfiguration process and press Enter.
The system displays information similar to the following:
svc.startd: The system is coming down. Please wait.
svc.startd: 57 system services are now being stopped.
Sep 8 01:22:21 vtghost rpcbind: rpcbind terminating on signal.
svc.startd: The system is down.
syncing file systems... done
Program terminated
{1} ok
Cisco PGW 2200 Softswitch Release 9.8 Software Installation and Configuration Guide
2-50
OL-18083-01
Chapter 2
Installing the Sun Solaris 10 Operating System
Loading the Sun Solaris 10 Operating System
Step 4
Note
Reboot your system using the method identified for your platform type:
•
Sparc-based platforms—Enter the boot command and press Enter to reboot the system.
•
Opteron-based platforms—Press any key to reboot the system.
If you are installing Solaris 10 on an Opteron-based platform, you might be prompted during the reboot
to enter Ctrl-B or Ctrl-C to open configuration tools for your hardware. You do not need to open any of
these tools to complete this installation.
The system displays information similar to the following:
SC Alert: Host System has Reset
Probing system devices
Probing memory
Probing I/O buses
Sun Fire V210, No Keyboard
Copyright 2005 Sun Microsystems, Inc. All rights reserved.
OpenBoot 4.18.5, 2048 MB memory installed, Serial #52030991.
Ethernet address 0:3:ba:19:ee:f, Host ID: 8319ee0f.
Initializing
1MB of memory at addr
103feec000
Initializing
1MB of memory at addr
103fee0000
Initializing
15MB of memory at addr
103f002000
Initializing
16MB of memory at addr
103e002000
Initializing
992MB of memory at addr
1000000000
Initializing 1024MB of memory at addr
0
Rebooting with command: boot
Boot device: /pci@1c,600000/scsi@2/disk@0,0:a File and args:
SunOS Release 5.10 Version Generic_118833-17 64-bit
Copyright 1983-2005 Sun Microsystems, Inc. All rights reserved.
Use is subject to license terms.
Hardware watchdog enabled
Hostname: unknown
Configuring devices.
checking ufs filesystems
/dev/rdsk/c1t0d0s5: is logging.
Step 5
If you are installing on a Sparc-based platform, you must select your terminal type when a screen similar
to the following is displayed:
What
1)
2)
3)
4)
5)
6)
7)
8)
9)
10)
11)
12)
13)
13)
Type
type of terminal are you using?
ANSI Standard CRT
DEC VT52
DEC VT100
Heathkit 19
Lear Siegler ADM31
PC Console
Sun Command Tool
Sun Workstation
Televideo 910
Televideo 925
Wyse Model 50
X Terminal Emulator (xterms)
CDE Terminal Emulator (dtterm)
Other
the number of your choice and press Return:
Cisco PGW 2200 Softswitch Release 9.8 Software Installation and Configuration Guide
OL-18083-01
2-51
Chapter 2
Installing the Sun Solaris 10 Operating System
Loading the Sun Solaris 10 Operating System
Note
On Opteron-based platforms, you can select a terminal type from the picklist, or the default
terminal type (from the serial port) is used. We recommend that you use the default terminal
while you are installing software.
Enter the number that corresponds to the terminal you are using and press Enter. For example, if you
are using an X terminal emulator, type 12 and press Enter.
The system displays information similar to the following:
Creating new rsa public/private host key pair
Creating new dsa public/private host key pair
Configuring network interface addresses: bge0 bge1 bge2 bge3.
Text similar to the following is displayed:
in.rdisc: No interfaces up
- Network Connectivity -------------------------------------------------------Specify Yes if the system is connected to the network by one of the Solaris
or vendor network/communication Ethernet cards that are supported on the
Solaris CD. Refer to your hardware documentation for the current list of
supported cards.
Specify No if the system is connected to a network/communication card that
is not supported on the Solaris CD, and follow the instructions listed under
Help.
Networked
--------[X] Yes
[ ] No
------------------------------------------------------------------------------ESC-2_Continue
ESC-6_Help
Step 6
Use the arrow keys to navigate, and press the spacebar to make your selection. Verify that Yes is selected,
and press ESC-2 to continue.
Text similar to the following is displayed:
- Configure Multiple Network Interfaces --------------------------------------Multiple network interfaces have been detected on this system.
of the network interfaces you want to configure.
Specify all
Note: You must choose at least one interface to configure.
Network interfaces
-----------------[ ] bge0
[ ] bge1
[ ] bge2
[ ] bge3
------------------------------------------------------------------------------ESC-2_Continue
ESC-6_Help
Cisco PGW 2200 Softswitch Release 9.8 Software Installation and Configuration Guide
2-52
OL-18083-01
Chapter 2
Installing the Sun Solaris 10 Operating System
Loading the Sun Solaris 10 Operating System
Note
Caution
Step 7
This screen may show a different interface, depending on the platform and PCI card that are
installed. For details, see Table 2-1 on page 2-3 (“Device Names on Supported Host Platforms”).
The interface configuration prompts do not provide an option to return to a previous step or exit interface
configuration. If you enter an incorrect value, power down the Cisco PGW 2200 Softswitch, power up
the Cisco PGW 2200 Softswitch, and return to Step 4.
Select the interface(s) you want to configure and press ESC-2 to continue.
If you chose to configure a single interface, proceed to Step 9.
If you chose to configure multiple interfaces, proceed to Step 8.
Step 8
Text similar to the following is displayed:
- Primary Network Interface --------------------------------------------------On this screen you must specify which of the following network adapters is
the system's primary network interface. Usually the correct choice is the
lowest number. However, do not guess; ask your system administrator if
you're not sure.
> To make a selection, use the arrow keys to highlight the option and
press Return to mark it [X].
Primary network interface
---------------[ ] bge0
[ ] bge1
[ ] bge2
[ ] bge3
------------------------------------------------------------------------------ESC-2_Continue
ESC-6_Help
Select your primary network interface and press ESC-2 to continue.
Step 9
Text similar to the following is displayed:
- DHCP for bge0 ----------------------------------------------------------------Specify whether or not this network interface should use DHCP to configure
itself. Choose Yes if DHCP is to be used, or No if the network interface is
to be configured manually.
NOTE: DHCP support will not be enabled, if selected, until after the system
reboots.
Use DHCP for bge0
---------------[ ] Yes
[X] No
------------------------------------------------------------------------------ESC-2_Continue
ESC-6_Help
Step 10
Verify that No is selected and press ESC-2 to continue.
Cisco PGW 2200 Softswitch Release 9.8 Software Installation and Configuration Guide
OL-18083-01
2-53
Chapter 2
Installing the Sun Solaris 10 Operating System
Loading the Sun Solaris 10 Operating System
Text similar to the following is displayed:
- Host Name for bge0 ----------------------------------------------------------Enter the host name which identifies this system on the network. The name
must be unique within your domain; creating a duplicate host name will cause
problems on the network after you install Solaris.
A host name must be at least two characters; it can contain letters, digits,
and minus signs (-).
Host name for bge0:
------------------------------------------------------------------------------ESC-2_Continue
ESC-6_Help
Caution
Step 11
If you are configuring your system with multiple interfaces, remember that each interface must have a
unique name. Using the same name for multiple interfaces causes the installation script to enter a loop,
forcing you to reboot your system.
Type the host name of the target Netra machine, and press ESC-2 to continue.
Note
For machine-specific information such as host name, see your notes in “Preparing for Sun
Solaris Operating System and Cisco PGW 2200 Softswitch Software Installation” Table 1-3,
“Machine-Specific Checklist” if you used the checklist to note the host name.
Text similar to the following is displayed:
- IP Address for bge0 ----------------------------------------------------------Enter the Internet Protocol (IP) address for this network interface.
must be unique and follow your site's address conventions, or a
system/network failure could result.
It
IP addresses contain four sets of numbers separated by periods (for example
129.200.9.1).
IP address:
-------------------------------------------------------------------------------ESC-2_Continue
ESC-6_Help
Step 12
Enter the IP address of this interface in dotted decimal format and press ESC-2 to continue.
Note
See “Machine-Specific Checklist” in Table 1-3 if you used the checklist to record the IP address.
Text similar to the following is displayed:
- Subnet for bge0 -------------------------------------------------------------On this screen you must specify whether this system is part of a subnet. If
you specify incorrectly, the system will have problems communicating on the
network after you reboot.
> To make a selection, use the arrow keys to highlight the option and
press Return to mark it [X].
Cisco PGW 2200 Softswitch Release 9.8 Software Installation and Configuration Guide
2-54
OL-18083-01
Chapter 2
Installing the Sun Solaris 10 Operating System
Loading the Sun Solaris 10 Operating System
System part of a subnet
----------------------[X] Yes
[ ] No
------------------------------------------------------------------------------ESC-2_Continue
ESC-6_Help
Note
If you need to modify your IP addresses after you have installed Sun Solaris 10, there are three
files you need to update, instead of the two files required in previous releases of Sun Solaris
operating system software. The following files must be edited to in order to modify the IP
address for an interface:
/etc/inet/hosts
/etc/hostname.inf_name
/etc/inet/ipnodes
Where inf_name is the name of the interface, such as bge1.
Step 13
Verify that Yes is selected (use the arrow keys to move the cursor to Yes and press the spacebar to select
it). Press ESC-2 to continue.
A screen similar to the following is displayed:
- Netmask for bge0 ------------------------------------------------------------On this screen you must specify the netmask of your subnet. A default
netmask is shown; do not accept the default unless you are sure it is
correct for your subnet. A netmask must contain four sets of numbers
separated by periods (for example 255.255.255.0).
Netmask:
---------------------------------------------------------------------------------ESC-2_Continue
ESC-6_Help
Step 14
Enter the site-specific Subnet Mask for the subnet (see “Site-Specific Information” in Table 1-2, if you
recorded the information provided by your site administrator in this table). Press ESC-2 to continue.
Text similar to the following is displayed:
- IPv6 for bge0 ----------------------------------------------------------------Specify whether or not you want to enable IPv6, the next generation Internet
Protocol, on this network interface. Enabling IPv6 will have no effect if
this machine is not on a network that provides IPv6 service. IPv4 service
will not be affected if IPv6 is enabled.
> To make a selection, use the arrow keys to highlight the option and
press Return to mark it [X].
Enable IPv6 for bge0
------------------[ ] Yes
[X] No
Cisco PGW 2200 Softswitch Release 9.8 Software Installation and Configuration Guide
OL-18083-01
2-55
Chapter 2
Installing the Sun Solaris 10 Operating System
Loading the Sun Solaris 10 Operating System
------------------------------------------------------------------------------ESC-2_Continue
ESC-6_Help
Note
Step 15
The system takes approximately 30 seconds to process this selection. A countdown appears in the
display after you activate your choice.
Verify that No is selected and press ESC-2 to continue.
Text similar to the following is displayed:
- Set the Default Route for bge0 ----------------------------------------------To specify the default route, you can let the software try to detect one
upon reboot, you can specify the IP address of the router, or you can choose
None. Choose None if you do not have a router on your subnet.
> To make a selection, use the arrow keys to select your choice and press
Return to mark it [X].
Default Route for bge0
-------------------------[ ] Detect one upon reboot
[X] Specify one
[ ] None
------------------------------------------------------------------------------ESC-2_Continue
ESC-6_Help
Step 16
Verify that Specify one is selected and press ESC-2 to continue.
Text similar to the following is displayed:
- Default Route IP Address for bge0 -------------------------------------------Enter the IP address of the default route. This entry will be placed in the
/etc/defaultrouter file and will be the default route after you reboot
(example 129.146.89.225).
Router IP Address for bge0
------------------------------------------------------------------------------ESC_Continue
ESC-6_Help
Step 17
Enter the Router IP address of this interface in dotted decimal format and press ESC-2 to continue.
Note
See “Solaris 10 Required Media Checklist” in Table 1-2 if you used the checklist to record the
router IP address.
Text similar to the following is displayed:
- Confirm Information for bge0 ------------------------------------------------> Confirm the following information. If it is correct, press F2;
to change any information, press F4.
Cisco PGW 2200 Softswitch Release 9.8 Software Installation and Configuration Guide
2-56
OL-18083-01
Chapter 2
Installing the Sun Solaris 10 Operating System
Loading the Sun Solaris 10 Operating System
Primary network interface: Yes
Use DHCP: No
Host name: va-host
IP address: 10.74.49.153
System part of a subnet: Yes
Netmask: 255.255.255.224
Enable IPv6: No
Default Route: Specify one
Router IP Address: 10.74.49.129
------------------------------------------------------------------------------ESC-2_Continue
ESC-4_Change
ESC-6_Help
Step 18
Note
Confirm the information displayed. Press ESC-2 to accept the information and continue, or press ESC-4
to go back and make changes.
The system takes approximately 30 seconds to process this selection. A countdown appears in the
display after you activate your choice.
If you chose to configure a single interface, proceed to Step 20.
If you chose to configure multiple interfaces, proceed to Step 19.
Step 19
Repeat steps 9 through 18 for your next interface. These steps should be repeated until all of your
interfaces are configured.
Step 20
Text similar to the following is displayed:
- Configure Security Policy: -------------------------------------------------Specify Yes if the system will use the Kerberos security mechanism.
Specify No if this system will use standard UNIX security.
Configure Kerberos Security
--------------------------[ ] Yes
[X] No
------------------------------------------------------------------------------ESC-2_Continue
ESC-6_Help
Step 21
Verify that No is selected and press ESC-2 to continue.
Text similar to the following is displayed:
- Confirm Information > Confirm the following information. If it is correct, press F2;
to change any information, press F4.
Configure Kerberos Security: No
------------------------------------------------------------------------------ESC-2_Continue
ESC-4_Change
ESC-6_Help
Step 22
Confirm your previous answer of No and press ESC-2 to continue.
Text similar to the following is displayed:
Cisco PGW 2200 Softswitch Release 9.8 Software Installation and Configuration Guide
OL-18083-01
2-57
Chapter 2
Installing the Sun Solaris 10 Operating System
Loading the Sun Solaris 10 Operating System
- Name Service ---------------------------------------------------------------On this screen you must provide name service information. Select the name
service that will be used by this system, or None if your system will either
not use a name service at all, or if it will use a name service not listed
here.
> To make a selection, use the arrow keys to highlight the option
and press Return to mark it [X].
Name service
-----------[ ] NIS+
[ ] NIS
[ ] DNS
[ ] LDAP
[X] None
------------------------------------------------------------------------------ESC-2_Continue
ESC-6_Help
Step 23
Use the arrow keys to move the cursor to None and press the spacebar to select it. Press ESC-2 to
continue. Text similar to the following is displayed:
- DNS Search List ------------------------------------------------------------On this screen you can enter a list of domains that will be searched when a
DNS query is made. If you do not enter any domains, DNS will only search
the DNS domain chosen for this system. The domains entered, when
concatenated, may not be longer than 250 characters.
Search
Search
Search
Search
Search
Search
domain: yourdomain.com
domain:
domain:
domain:
domain:
domain:
------------------------------------------------------------------------------ESC-2_Continue
ESC-6_Help
Step 24
Enter the names of the search domains for this system and press ESC-2 to continue.
Note
See “Machine-Specific Checklist”, Table 1-3, if you used the checklist to record the names of
the search domains.
Text similar to the following is displayed:
- Confirm Information --------------------------------------------------------> Confirm the following information. If it is correct, press F2;
to change any information, press F4.
Cisco PGW 2200 Softswitch Release 9.8 Software Installation and Configuration Guide
2-58
OL-18083-01
Chapter 2
Installing the Sun Solaris 10 Operating System
Loading the Sun Solaris 10 Operating System
Name service: NONE
Domain name:
Server address(es):
Search domain(s): yourdomain.com
------------------------------------------------------------------------------ESC-2_Continue
ESC-4_Change
ESC-6_Help
Step 25
Confirm your previous answers and press ESC-2 to continue.
Text similar to the following is displayed:
- Time Zone ------------------------------------------------------------------On this screen you must specify your default time zone. You can specify a
time zone in three ways: select one of the continents or oceans from the
list, select other - offset from GMT, or other - specify time zone file.
> To make a selection, use the arrow keys to highlight the option and
press Return to mark it [X].
Continents and Oceans
--------------------------------------[ ] Africa
x
[ ] Americas
x
[ ] Antarctica
x
[ ] Arctic Ocean
x
[ ] Asia
x
[ ] Atlantic Ocean
x
[ ] Australia
x
[ ] Europe
v
[ ] Indian Ocean
------------------------------------------------------------------------------ESC-2_Continue
ESC-6_Help
Step 26
Select the time zone where the system is located.
Note
a.
The following two steps show how to set the time zone. The example shows United States
Eastern time.
Use the arrow keys to move the cursor to Americas and press the spacebar to select it, then press
ESC-2 to continue.
Text similar to the following is displayed:
- Country or Region ------------------------------------------------------> To make a selection, use the arrow keys to highlight the option and
press Return to mark it [X].
x
x
x
x
x
x
Countries and Regions
-------------------------[ ] United States
[ ] Anguilla
[ ] Antigua & Barbuda
[ ] Argentina
[ ] Aruba
[ ] Bahamas
[ ] Barbados
Cisco PGW 2200 Softswitch Release 9.8 Software Installation and Configuration Guide
OL-18083-01
2-59
Chapter 2
Installing the Sun Solaris 10 Operating System
Loading the Sun Solaris 10 Operating System
x
x
x
x
x
v
[
[
[
[
[
[
]
]
]
]
]
]
Belize
Bolivia
Brazil
Canada
Cayman Islands
Chile
press Return to mark it [X].
------------------------------------------------------------------------------ESC-2_Continue
ESC-6_Help
b.
Use the arrow keys to move the cursor to United States and press the spacebar to select it, then press
ESC-2 to continue.
Text similar to the following is displayed:
- Time Zone ------------------------------------------------------------------> To make a selection, use the arrow keys to highlight the option and
press Return to mark it [X].
x
x
x
x
x
x
x
x
x
x
x
v
Time zones
-------------------------------------------------------[ ] Eastern Time
[ ] Eastern Time - Michigan - most locations
[ ] Eastern Time - Kentucky - Louisville area
[ ] Eastern Time - Kentucky - Wayne County
[ ] Eastern Standard Time - Indiana - most locations
[ ] Eastern Standard Time - Indiana - Crawford County
[ ] Eastern Standard Time - Indiana - Starke County
[ ] Eastern Standard Time - Indiana - Switzerland County
[ ] Central Time
[ ] Central Time - Michigan - Wisconsin border
[ ] Central Time - North Dakota - Oliver County
[ ] Mountain Time
[ ] Mountain Time - south Idaho & east Oregon
------------------------------------------------------------------------------ESC-2_Continue
ESC-6_Help
c.
Use the arrow keys to move the cursor to your time zone (in this example, “Eastern Time” is
selected) and press the space bar to select it. Press ESC-2 to continue.
Text similar to the following is displayed:
- Date and Time --------------------------------------------------------------> Accept the default date and time or enter
new values.
Date and time: 2008-09-08 02:58
Year
Month
Day
Hour
Minute
(4 digits)
(1-12)
(1-31)
(0-23)
(0-59)
:
:
:
:
:
2008
09
08
02
58
------------------------------------------------------------------------------ESC-2_Continue
ESC-6_Help
Step 27
Enter the correct date and time and press ESC-2 to continue.
Text similar to the following is displayed:
Cisco PGW 2200 Softswitch Release 9.8 Software Installation and Configuration Guide
2-60
OL-18083-01
Chapter 2
Installing the Sun Solaris 10 Operating System
Loading the Sun Solaris 10 Operating System
- Confirm Information --------------------------------------------------------> Confirm the following information. If it is correct, press F2;
to change any information, press F4.
Time zone: Eastern Time
(US/Eastern)
Date and time: 2008-09-08 02:58:00
------------------------------------------------------------------------------ESC-2_Continue
ESC-4_Change
ESC-6_Help
Step 28
Verify the information and press ESC-2 to continue.
Text similar to the following might be displayed:
This system is configured with NFS version 4, which uses a domain
name that is automatically derived from the system's name services.
The derived domain name is sufficient for most configurations. In a
few cases, mounts that cross different domains might cause files to
be owned by "nobody" due to the lack of a common domain name.
Do you need to override the system's default NFS version 4 domain
name (yes/no) ? [no] :
Step 29
Enter no to continue the reconfiguration process and press Enter.
Text similar to the following is displayed:
For more information about how the NFS version 4 default domain
name is derived and its impact, see the man pages for nfs(4)
and nfsmapid(1m), and the System Administration Guide: Network
Services.
rebooting system due to change(s) in /etc/default/init
syncing file systems... done
rebooting...
SC Alert: Host System has Reset
Probing system devices
Probing memory
Probing I/O buses
Note
On Opteron-based platforms, you can select a terminal type from the picklist, or the default
terminal type (serial port). We recommend that you use the default terminal type while you are
installing software.
Sun Fire V210, No Keyboard
Copyright 2005 Sun Microsystems, Inc. All rights reserved.
OpenBoot 4.18.5, 2048 MB memory installed, Serial #52030991.
Ethernet address 0:3:ba:19:ee:f, Host ID: 8319ee0f.
Initializing
Initializing
Initializing
Initializing
1MB
1MB
15MB
16MB
of
of
of
of
memory
memory
memory
memory
at
at
at
at
addr
addr
addr
addr
103feec000
103fee0000
103f002000
103e002000
Cisco PGW 2200 Softswitch Release 9.8 Software Installation and Configuration Guide
OL-18083-01
2-61
Chapter 2
Installing the Sun Solaris 10 Operating System
Loading the Sun Solaris 10 Operating System
Initializing
Initializing
992MB of memory at addr
1024MB of memory at addr
1000000000
0
Rebooting with command: boot
Boot device: /pci@1c,600000/scsi@2/disk@0,0:a File and args:
SunOS Release 5.10 Version Generic_118833-17 64-bit
Copyright 1983-2005 Sun Microsystems, Inc. All rights reserved.
Use is subject to license terms.
Hardware watchdog enabled
Hostname: bge0
checking ufs filesystems
/dev/rdsk/c1t0d0s5: is logging.
bge0 console login: root
Sep 8 03:00:15 bge0 login: ROOT LOGIN /dev/console
Step 30
If you want to enable root access to the Cisco PGW 2200 Softswitch via telnet, follow these steps:
a.
Edit the /etc/default/login file, and make the following changes:
– Comment out the line starting with “CONSOLE=” by inserting a “#” in front of this line.
– Add the line “svcadm enable telnet” if you want to enable telnet.
– Add the line “svcadm enable rlogin” if you want to enable remote login.
b.
Step 31
Save your changes to this file.
If you want to enable root access to the Cisco PGW 2200 Softswitch via SSH, follow these steps:
a.
Edit the /etc/ssh/sshd_config file and change the value of the PermitRootLogin parameter from no
to yes.
b.
Save your changes to this file.
c.
Identify the process ID of the sshd process by entering the following command:
ps -ef | grep ssh
d.
Restart the sshd process and activate your changes by entering the following command:
kill -l process_id
Where process_id is the ssh process ID number identified in the previous step.
You have completed configuring your host. Proceed to the “Platform-Specific Installation Procedures”
section on page 2-62.
Platform-Specific Installation Procedures
Complete the following steps to install files specific to your Cisco platform:
Step 1
Log in as root and use the default password, vtghost. The system displays something similar to the
following:
Sep 8 03:05:15 bge0 login: ROOT LOGIN /dev/console
Last login: Mon Sep 8 03:00:22 on console
Sun Microsystems Inc.
SunOS 5.10
Generic January 2005
Step 2
Reinsert the CD into the CD-ROM drive.
Cisco PGW 2200 Softswitch Release 9.8 Software Installation and Configuration Guide
2-62
OL-18083-01
Chapter 2
Installing the Sun Solaris 10 Operating System
Loading the Sun Solaris 10 Operating System
Step 3
Mount the CD-ROM in the cdrom directory by entering the following command:
# mount -F hsfs -o ro /dev/dsk/devname /cdrom
Where devname is the device name for the primary CD-ROM drive. The following device names are
valid:
Step 4
Step 5
•
c0t0d0s0—Device name for primary CD-ROM on a Sparc-based platform.
•
c0t0d0p0—Device name for primary CD-ROM on an Opteron-based platform.
Run the core_finish script by entering the appropriate command:
•
For Sparc-based platforms: ./cdrom/core_finish/core_finish.sh
•
For Opteron-based platforms: ./cdrom/core_finish/core_finish.sh
Enter the name of your host and press Enter as prompted.
Note
Entering the name of your host at this time does not set the UNIX host name value. The value
you enter here is used to set up a crash directory: /var/hostname/crash
The system returns a response similar to the following:
Start installation of core extra packages
Adding <SUNWvts>
Processing package instance <SUNWvts> from </opt/xtrapkgs>
SunVTS Framework(sparc) 6.2,REV=2006.05.04.11.52
Using </opt> as the package base directory.
## Processing package information.
## Processing system information.
Installing SunVTS Framework as <SUNWvts>
## Installing part 1 of 1.
/opt/SUNWvts/README
/opt/SUNWvts/bin/.platform_table
/opt/SUNWvts/bin/.sunvts_release
/opt/SUNWvts/bin/.sunvts_sec
/opt/SUNWvts/bin/.sunvts_sec_gss
/opt/SUNWvts/bin/.version
...
/opt/SUNWvts/lib/sparcv9/libvtsutil.so <symbolic link>
/opt/SUNWvts/lib/sparcv9/libvtsutil.so.1
[ verifying class <none> ]
Copyright 2006 Sun Microsystems, Inc. All rights reserved.
Use is subject to license terms.
Installation of <SUNWvts> was successful.
Adding <SUNWvtsr>
Processing package instance <SUNWvtsr> from </opt/xtrapkgs>
SunVTS Framework (Root)(sparc) 6.2,REV=2006.05.04.11.52
Using </> as the package base directory.
## Processing package information.
## Processing system information.
2 package pathnames are already properly installed.
Cisco PGW 2200 Softswitch Release 9.8 Software Installation and Configuration Guide
OL-18083-01
2-63
Chapter 2
Installing the Sun Solaris 10 Operating System
Loading the Sun Solaris 10 Operating System
Installing SunVTS Framework (Root) as <SUNWvtsr>
## Installing part 1 of 1.
/etc/opt/SUNWvts/sunvts.conf.example
[ verifying class <none> ]
Copyright 2006 Sun Microsystems, Inc.
Use is subject to license terms.
All rights reserved.
Installation of <SUNWvtsr> was successful.
Adding <SUNWvtsts>
Processing package instance <SUNWvtsts> from </opt/xtrapkgs>
SunVTS for Tests(sparc) 6.2,REV=2006.05.04.11.52
Using </opt> as the package base directory.
## Processing package information.
## Processing system information.
14 package pathnames are already properly installed.
Installing SunVTS for Tests as <SUNWvtsts>
## Installing part 1 of 1.
/opt/SUNWvts/bin/bios.bin <symbolic link>
/opt/SUNWvts/bin/cmos.bin <symbolic link>
/opt/SUNWvts/bin/env6test
/opt/SUNWvts/bin/hsclbtest
/opt/SUNWvts/bin/i2c2test
/opt/SUNWvts/bin/nalmtest
...
/opt/SUNWvts/lib/probe/sparcv9/vmemtest_probe.so
/opt/SUNWvts/lib/probe/ssptest_probe.so
/opt/SUNWvts/lib/probe/sunlink_probe.so
[ verifying class <none> ]
Copyright 2006 Sun Microsystems, Inc. All rights reserved.
Use is subject to license terms.
Installation of <SUNWvtsts> was successful.
Adding <SUNWexplo>
Processing package instance <SUNWexplo> from </opt/xtrapkgs>
Sun(TM) Explorer Data Collector(all) 5.5,REV=2006.07.14.01.46
## Executing checkinstall script.
Copyright 1996-2006 Sun Microsystems, Inc.
All rights reserved.
Using </opt> as the package base directory.
## Processing package information.
## Processing system information.
Installing Sun(TM) Explorer Data Collector as <SUNWexplo>
## Executing preinstall script.
## Installing part 1 of 1.
/opt/SUNWexplo/LICENSEREADME/LICENSE.txt
/opt/SUNWexplo/LICENSEREADME/THIRDPARTYLICENSEREADME.txt
/opt/SUNWexplo/LICENSEREADME/gzip-1.2.4a.tar.gz
/opt/SUNWexplo/bin/capture.sparc
...
/opt/SUNWexplo/tools/var
/opt/SUNWexplo/tools/vtsst
Cisco PGW 2200 Softswitch Release 9.8 Software Installation and Configuration Guide
2-64
OL-18083-01
Chapter 2
Installing the Sun Solaris 10 Operating System
Loading the Sun Solaris 10 Operating System
/opt/SUNWexplo/tools/vxfs
/opt/SUNWexplo/tools/vxvm
[ verifying class <none> ]
## Executing postinstall script.
/usr/bin/catman is not available for use
Please run: catman -w -M /opt/SUNWexplo/man manually
Installation of <SUNWexplo> was successful.
Adding <SUNWexplu>
Processing package instance <SUNWexplu> from </opt/xtrapkgs>
Sun(TM) Explorer Data Collector Config Files(all) 5.5,REV=2006.07.14.01.46
## Executing checkinstall script.
Copyright 1996-2006 Sun Microsystems, Inc.
All rights reserved.
Using </> as the package base directory.
## Processing package information.
## Processing system information.
2 package pathnames are already properly installed.
Installing Sun(TM) Explorer Data Collector Config Files as <SUNWexplu>
## Installing part 1 of 1.
/etc/opt/SUNWexplo/LICENSEREADME/LICENSE.txt
/etc/opt/SUNWexplo/t3files.txt
[ verifying class <none> ]
Modifying /etc/opt/SUNWexplo/1280input.txt
Modifying /etc/opt/SUNWexplo/alominput.txt
Modifying /etc/opt/SUNWexplo/b1600input.txt
Modifying /etc/opt/SUNWexplo/b1600switchinput.txt
Modifying /etc/opt/SUNWexplo/ilominput.txt
Modifying /etc/opt/SUNWexplo/indyinput.txt
Modifying /etc/opt/SUNWexplo/ipmiinput.txt
Modifying /etc/opt/SUNWexplo/saninput.txt
Modifying /etc/opt/SUNWexplo/scinput.txt
Modifying /etc/opt/SUNWexplo/se3kinput.txt
Modifying /etc/opt/SUNWexplo/se6320input.txt
Modifying /etc/opt/SUNWexplo/se6920input.txt
Modifying /etc/opt/SUNWexplo/srscinput.txt
Modifying /etc/opt/SUNWexplo/t3input.txt
[ verifying class <build> ]
## Executing postinstall script.
Installation of <SUNWexplu> was successful.
Adding <SUNWpsr>
Processing package instance <SUNWpsr> from </opt/xtrapkgs>
Solaris Print - LP Server, (root)(sparc) 13.1,REV=2005.01.21.15.53
Using </> as the package base directory.
## Processing system information.
11 package pathnames are already properly installed.
Installing Solaris Print - LP Server, (root) as <SUNWpsr>
## Executing preinstall script.
Copyright 2005 Sun Microsystems, Inc.
Use is subject to license terms.
## Installing part 1 of 1.
19 blocks
[ verifying class <renameold> ]
[ verifying class <preserve> ]
[ verifying class <manifest> ]
All rights reserved.
Cisco PGW 2200 Softswitch Release 9.8 Software Installation and Configuration Guide
OL-18083-01
2-65
Chapter 2
Installing the Sun Solaris 10 Operating System
Loading the Sun Solaris 10 Operating System
## Executing postinstall script.
Installation of <SUNWpsr> was successful.
Adding <SUNWpcr>
Processing package instance <SUNWpcr> from </opt/xtrapkgs>
Solaris Print - Client, (root)(sparc) 13.1,REV=2005.01.21.15.53
Using </> as the package base directory.
## Processing package information.
## Processing system information.
10 package pathnames are already properly installed.
Installing Solaris Print - Client, (root) as <SUNWpcr>
## Installing part 1 of 1.
Copyright 2005 Sun Microsystems, Inc.
Use is subject to license terms.
2 blocks
[ verifying class <preserve> ]
[ verifying class <manifest> ]
## Executing postinstall script.
All rights reserved.
Installation of <SUNWpcr> was successful.
Adding <SUNWpcu>
Processing package instance <SUNWpcu> from </opt/xtrapkgs>
Solaris Print - Client, (usr)(sparc) 13.1,REV=2005.01.21.15.53
Using </> as the package base directory.
## Processing package information.
## Processing system information.
4 package pathnames are already properly installed.
Installing Solaris Print - Client, (usr) as <SUNWpcu>
## Installing part 1 of 1.
Copyright 2005 Sun Microsystems, Inc.
Use is subject to license terms.
541 blocks
All rights reserved.
Installation of <SUNWpcu> was successful.
Adding <SUNWpsu>
Processing package instance <SUNWpsu> from </opt/xtrapkgs>
Solaris Print - LP Server, (usr)(sparc) 13.1,REV=2005.01.21.15.53
Using </> as the package base directory.
## Processing package information.
## Processing system information.
12 package pathnames are already properly installed.
Installing Solaris Print - LP Server, (usr) as <SUNWpsu>
## Installing part 1 of 1.
Copyright 2005 Sun Microsystems, Inc.
Use is subject to license terms.
3090 blocks
All rights reserved.
Installation of <SUNWpsu> was successful.
Adding <SFWsudo>
Processing package instance <SFWsudo> from </opt/xtrapkgs>
Cisco PGW 2200 Softswitch Release 9.8 Software Installation and Configuration Guide
2-66
OL-18083-01
Chapter 2
Installing the Sun Solaris 10 Operating System
Loading the Sun Solaris 10 Operating System
Sudo - superuser do(sparc) 1.6.8.5,REV=2006.03.26.16.30
Using </opt> as the package base directory.
## Processing package information.
## Processing system information.
Installing Sudo - superuser do as <SFWsudo>
## Installing part 1 of 1.
/opt/sfw/READMEs/README.SFWsudo
/opt/sfw/bin/sudo
/opt/sfw/etc/sudoers
/opt/sfw/man/man1m/sudo.1m
/opt/sfw/man/man1m/visudo.1m
/opt/sfw/man/man4/sudoers.4
/opt/sfw/sbin/visudo
[ verifying class <none> ]
Sudo is distributed under the following ISC-style license:
Copyright (c) 1994-1996,1998-2004 Todd C. Miller <[email protected]>
Permission to use, copy, modify, and distribute this software for any
purpose with or without fee is hereby granted, provided that the above
copyright notice and this permission notice appear in all copies.
THE SOFTWARE IS PROVIDED "AS IS" AND THE AUTHOR DISCLAIMS ALL WARRANTIES
WITH REGARD TO THIS SOFTWARE INCLUDING ALL IMPLIED WARRANTIES OF
MERCHANTABILITY AND FITNESS. IN NO EVENT SHALL THE AUTHOR BE LIABLE FOR
ANY SPECIAL, DIRECT, INDIRECT, OR CONSEQUENTIAL DAMAGES OR ANY DAMAGES
WHATSOEVER RESULTING FROM LOSS OF USE, DATA OR PROFITS, WHETHER IN AN
ACTION OF CONTRACT, NEGLIGENCE OR OTHER TORTIOUS ACTION, ARISING OUT OF
OR IN CONNECTION WITH THE USE OR PERFORMANCE OF THIS SOFTWARE.
Sponsored in part by the Defense Advanced Research Projects
Agency (DARPA) and Air Force Research Laboratory, Air Force
Materiel Command, USAF, under agreement number F39502-99-1-0512.
Additionally, err.c, lsearch.c, fnmatch.c, getcwd.c, snprintf.c, strcasecmp.c,
fnmatch.h, err.h, and fnmatch.3 bear the following UCB license:
Copyright (c) 1987, 1989, 1990, 1991, 1993, 1994
The Regents of the University of California. All rights reserved.
Redistribution and use in source and binary forms, with or without
modification, are permitted provided that the following conditions
are met:
1. Redistributions of source code must retain the above copyright
notice, this list of conditions and the following disclaimer.
2. Redistributions in binary form must reproduce the above copyright
notice, this list of conditions and the following disclaimer in the
documentation and/or other materials provided with the distribution.
3. Neither the name of the University nor the names of its contributors
may be used to endorse or promote products derived from this software
without specific prior written permission.
THIS SOFTWARE IS PROVIDED BY THE REGENTS AND CONTRIBUTORS ``AS IS'' AND
ANY EXPRESS OR IMPLIED WARRANTIES, INCLUDING, BUT NOT LIMITED TO, THE
IMPLIED WARRANTIES OF MERCHANTABILITY AND FITNESS FOR A PARTICULAR PURPOSE
ARE DISCLAIMED. IN NO EVENT SHALL THE REGENTS OR CONTRIBUTORS BE LIABLE
FOR ANY DIRECT, INDIRECT, INCIDENTAL, SPECIAL, EXEMPLARY, OR CONSEQUENTIAL
DAMAGES (INCLUDING, BUT NOT LIMITED TO, PROCUREMENT OF SUBSTITUTE GOODS
OR SERVICES; LOSS OF USE, DATA, OR PROFITS; OR BUSINESS INTERRUPTION)
HOWEVER CAUSED AND ON ANY THEORY OF LIABILITY, WHETHER IN CONTRACT, STRICT
LIABILITY, OR TORT (INCLUDING NEGLIGENCE OR OTHERWISE) ARISING IN ANY WAY
OUT OF THE USE OF THIS SOFTWARE, EVEN IF ADVISED OF THE POSSIBILITY OF
Cisco PGW 2200 Softswitch Release 9.8 Software Installation and Configuration Guide
OL-18083-01
2-67
Chapter 2
Installing the Sun Solaris 10 Operating System
Loading the Sun Solaris 10 Operating System
SUCH DAMAGE.
YOU MUST OBSERVE ANY AUTHORS' CONDITIONS WITH RESPECT TO
INDIVIDUAL COMPONENTS PROVIDED WITHIN THIS CODE. SUPPORT
FOR THE TECHNOLOGIES AND DOCUMENTATION IS NOT PROVIDED
BY SUN MICROSYSTEMS, INC.
THE TECHNOLOGIES AND DOCUMENTATION ARE PROVIDED "AS IS" WITHOUT TECHNICAL
SUPPORT OR WARRANTY OF ANY KIND, EITHER EXPRESS OR IMPLIED, INCLUDING, BUT NOT
LIMITED TO, THE IMPLIED WARRANTIES OF MERCHANTABILITY, FITNESS FOR A
PARTICULAR PURPOSE, OR NON-INFRINGEMENT.
Installation of <SFWsudo> was successful.
SUNW,Sun-Fire-V210 does not need LOM packages
Validating patches...
Loading patches installed on the system...
Done!
Loading patches requested to install.
Done!
Checking patches that you specified for installation.
Done!
Approved patches will be installed in this order:
123526-01
Checking installed patches...
Verifying sufficient filesystem capacity (dry run method)...
Installing patch packages...
Patch 123526-01 has been successfully installed.
See /var/sadm/patch/123526-01/log for details
Patch packages installed:
SUNWcslr
Validating patches...
Loading patches installed on the system...
Done!
Loading patches requested to install.
Done!
Checking patches that you specified for installation.
Done!
Approved patches will be installed in this order:
Cisco PGW 2200 Softswitch Release 9.8 Software Installation and Configuration Guide
2-68
OL-18083-01
Chapter 2
Installing the Sun Solaris 10 Operating System
Loading the Sun Solaris 10 Operating System
119963-08
Checking installed patches...
Verifying sufficient filesystem capacity (dry run method)...
Installing patch packages...
Patch 119963-08 has been successfully installed.
See /var/sadm/patch/119963-08/log for details
Patch packages installed:
SUNWlibC
Validating patches...
Loading patches installed on the system...
Done!
Loading patches requested to install.
Done!
The following requested patches have packages not installed on the system
Package SUNWarc from directory SUNWarc in patch 119578-30 is not installed on the system.
Changes for package SUNWarc will not be applied to the system.
Package SUNWhea from directory SUNWhea in patch 119578-30 is not installed on the system.
Changes for package SUNWhea will not be applied to the system.
Package FJSVfmd from directory FJSVfmd in patch 119578-30 is not installed on the system.
Changes for package FJSVfmd will not be applied to the system.
Checking patches that you specified for installation.
Done!
Approved patches will be installed in this order:
119578-30
Checking installed patches...
Executing prepatch script...
Temporarily disabling fmd(1M)
Verifying sufficient filesystem capacity (dry run method)...
Installing patch packages...
Patch 119578-30 has been successfully installed.
See /var/sadm/patch/119578-30/log for details
Executing postpatch script...
Re-enabling fmd(1M)
Patch packages installed:
SUNWckr
SUNWcsl
SUNWcsu
SUNWfmd
Validating patches...
Loading patches installed on the system...
Done!
Loading patches requested to install.
Cisco PGW 2200 Softswitch Release 9.8 Software Installation and Configuration Guide
OL-18083-01
2-69
Chapter 2
Installing the Sun Solaris 10 Operating System
Loading the Sun Solaris 10 Operating System
Done!
The following requested patches have packages not installed on the system
Package SUNWarc from directory SUNWarc in patch 118833-36 is not installed on the system.
Changes for package SUNWarc will not be applied to the system.
Package SUNWarcr from directory SUNWarcr in patch 118833-36 is not installed on the
system. Changes for package SUNWarcr will not be applied to the system.
...
Package FJSVpiclu from directory FJSVpiclu in patch 118833-36 is not installed on the
system. Changes for package FJSVpiclu will not be applied to the system.
Checking patches that you specified for installation.
Done!
Approved patches will be installed in this order:
118833-36
Executing prePatch script...
Checking installed patches...
Executing prepatch script...
Disabling kernel module unloading ...
Verifying sufficient filesystem capacity (dry run method)...
Installing patch packages...
Patch 118833-36 has been successfully installed.
See /var/sadm/patch/118833-36/log for details
Executing postpatch script...
Patch packages installed:
SUNW1394
SUNWatfsr
SUNWatfsu
SUNWaudd
SUNWbart
SUNWbtool
SUNWcakr
SUNWcar
SUNWckr
SUNWcnetr
SUNWcpcu
SUNWcsd
SUNWcsl
SUNWcslr
SUNWcsr
SUNWcsu
SUNWdtrc
SUNWdtrp
SUNWefc
SUNWesu
SUNWib
SUNWintgige
SUNWipfr
SUNWipfu
SUNWipoib
SUNWkey
SUNWkrbr
SUNWkrbu
SUNWkvm
SUNWmdb
Cisco PGW 2200 Softswitch Release 9.8 Software Installation and Configuration Guide
2-70
OL-18083-01
Chapter 2
Installing the Sun Solaris 10 Operating System
Loading the Sun Solaris 10 Operating System
SUNWmdbr
SUNWmdr
SUNWmdu
SUNWnfsckr
SUNWnfscr
SUNWnfscu
SUNWnisu
SUNWopenssl-commands
SUNWopenssl-libraries
SUNWpcu
SUNWpd
SUNWpiclu
SUNWpsu
SUNWqos
SUNWrcmdc
SUNWroute
SUNWrpcib
SUNWsacom
SUNWses
SUNWsmapi
SUNWssad
SUNWtavor
SUNWtoo
SUNWudapltr
SUNWudapltu
SUNWuedg
SUNWugen
SUNWuksp
SUNWuprl
SUNWusb
SUNWusbs
SUNWwbsup
SUNWxcu4
SUNWxge
Completed installation of core extra packages
Start core hardening
Changing EEPROM settings..
Enable recording of failed login attempts
Dump content: kernel pages
Dump device: /dev/dsk/c1t0d0s3 (swap)
Savecore directory: /var/crash/sh-jingan
Savecore enabled: yes
Completed core hardening
CORE CD installation completed
Ejecting CORE CD...
Rebooting ..
Step 6
If you are installing on a Sparc-based platform, perform the following steps. Otherwise, proceed to
Step 7.
a.
Change to the root directory by entering the following command and pressing Enter:
# cd /
b.
Unmount the cdrom directory from the CD-ROM drive by entering the following command and
pressing Enter:
# umount /cdrom
c.
Eject the CD from the CD-ROM by entering the following command and pressing Enter:
# eject /dev/dsk/c0t0d0s0
Cisco PGW 2200 Softswitch Release 9.8 Software Installation and Configuration Guide
OL-18083-01
2-71
Chapter 2
Installing the Sun Solaris 10 Operating System
Loading the Sun Solaris 10 Operating Environment
Step 7
Remove the CD from the CD-ROM drive.
This completes the installation of platform-specific data. Proceed to the “Loading the Sun Solaris 10
Operating Environment” section on page 2-72.
Loading the Sun Solaris 10 Operating Environment
This section contains the procedures used to load the software packages that create the Sun Solaris 10
operating environment on your host platforms. Table 2-2 lists the order in which the software packages
should loaded onto your system, broken down by platform type.
The currently deployed Solaris 10 patch set is release 3.0(6) which is available on Cisco.com.
•
For Sparc-based platforms, go to
http://www.cisco.com/cgi-bin/tablebuild.pl/mgc-sol10-sparc
•
For Opteron-based platforms, go to
http://www.cisco.com/cgi-bin/tablebuild.pl/mgc-sol10-opteron
Table 2-2
Sun Solaris 10 Operating Environment Package Installation Order
Products
Cisco
Cisco PGW 2200 Softswitch HSI
Cisco
BAMS
X
X
X
X
X
—
Sparc-based Platforms
Opteron-based Platforms
Installing the Sparc-based Solaris 10 Installing the Opteron-based Solaris
Patches Package (CSCOh022)
10 Patches Package (CSCOh032)
Configuring Disk Drives—One of
the following:
•
Systems with 36 GB, 73 GB, and
146 GB disk drives—Installing
the Solstice DiskSuite
(CSCOh023)
Configuring Disk Drives—One of
the following:
•
Systems with 36 GB, 73 GB, or
146 GB disk drives—Installing
the Solstice DiskSuite
(CSCOh023)
X
—
—
•
Systems with 18 GB disk
drives—Installing the Log and
Spool File Systems
(CSCOh024)
—
—
X
•
Cisco BAMS
platforms—Installing Cisco
BAMS Archive Partition
(CSCOh027)
X
X
X
Installing the Sparc-based
Communications and Alarm
Software Package (CSCOh026)
X
X
X
Installing the Verification Test Suite Installing the Verification Test Suite
Script Package (CSCOh021)
Script Package (CSCOh021)
Installing the Opteron-based
Communications Software Package
(CSCOh036)
Cisco PGW 2200 Softswitch Release 9.8 Software Installation and Configuration Guide
2-72
OL-18083-01
Chapter 2
Installing the Sun Solaris 10 Operating System
Loading the Sun Solaris 10 Operating Environment
Installing the Sparc-based Solaris 10 Patches Package (CSCOh022)
To install the Sparc-based Solaris 10 Operating System Patches package (CSCOh022):
Step 1
If you are using the CD-ROM, load the Cisco Solaris 10 Operating Environment CD into the CD-ROM
drive. Enter the following command
# pkgadd -d /cdrom/cdrom0/CSCOh022.pkg
Text similar to the following is displayed:
The following packages are available:
1 CSCOh022
Media Gateway Controller Solaris 10 Patch Cluster
(sparc) 3.0(6)
Select package(s) you wish to process (or 'all' to process
all packages). (default: all) [?,??,q]:
Note
Step 2
You can also download the Sparc-based Solaris 10 operating system patches package
(CSCOh022) from Cisco.com. For example, download the CSCOh022 package to the /opt/SW
folder on the Sparc-based platform and use the command, pkgadd -d /opt/SW/CSCOh022.pkg.
Press Enter to select the default value. Text similar to the following is displayed:
Processing package instance <CSCOh022> from </var/tmp/CSCOh022.pkg>
Media Gateway Controller Solaris 10 Patch Cluster(sparc) 3.0(6)
Cisco Systems, Inc.
## Executing checkinstall script.
CSCOh022 checkinstall log file at /var/tmp/CSCOh022.checkinstall.log
Platform is SUNW,Sun-Fire-V210
Using </opt/sun_install> as the package base directory.
## Processing package information.
## Processing system information.
1 package pathname is already properly installed.
## Verifying disk space requirements.
## Checking for conflicts with packages already installed.
The following files are already installed on the system and are being
used by another package:
* /opt/sun_install <attribute change only>
* - conflict with a file which does not belong to any package.
Do you want to install these conflicting files [y,n,?,q]
Step 3
Type y and press Enter to continue. Text similar to the following is displayed:
## Checking for setuid/setgid programs.
This package contains scripts which will be executed with super-user
permission during the process of installing this package.
Do you want to continue with the installation of <CSCOh022> [y,n,?]
Step 4
Type y and press Enter to continue. Text similar to the following is displayed:
Installing Media Gateway Controller Solaris 10 Patch Cluster as <CSCOh0022>
Cisco PGW 2200 Softswitch Release 9.8 Software Installation and Configuration Guide
OL-18083-01
2-73
Chapter 2
Installing the Sun Solaris 10 Operating System
Loading the Sun Solaris 10 Operating Environment
The system lists the patches that it will install. This list will vary over time. A screen similar to the
following is displayed:
….
!!
!!
!!
!!
You must now change directories to /opt/sun_install and
run the installPatches.sh script as root.
Installation of <CSCOh022> was successful.
Step 5
Change directory to /opt/sun_install and run the installPatches script by entering the following
commands:
# cd /opt/sun_install
# ./installPatches.sh
Note
During the installation of the Solaris 10 patch cluster, some patches might fail with return codes
2, 8, or 35. This is normal and does not indicate a problem with the installation. The following
is an explanation of these error codes:
2—Attempting to apply a patch that is already applied.
8—Attempting to patch a package that is not installed.
35—A later version of the patch has already been installed.
Text similar to the following is displayed:
You are running as root - Good...
*** InstallPatches10 begins Wed Sep 10 01:16:25 EDT 2008 ***
VERSION='3.0(6)'
Platform is SUNW,Sun-Fire-V210
Install Solaris 10 patches from set 1 ...
Changed to /var/tmp directory
Now installing each patch from the patch cluster. There are a large
number of these patches, and the install could take an hour or longer
to complete. Please be patient. You can follow the progress of the
install in the following log: /opt/sun_install/installPatches10.log
At least one patch failed to install. This may or may
not indicate a problem. Please look at the log file
after the rest of the patches are applied
Install Solaris 10 patches from set 2 ...
Changed to /var/tmp directory
*** InstallPatches10 ends Wed Sep 10 01:34:40 EDT 2008 ***
*************************************************
*
It is necessary to reboot this machine
*
*
for these patches to be incorporated
*
*
the operating system. Enter the following
*
*
command and press Enter: reboot -- -r
*
*************************************************
Step 6
Type the following command and press Enter to reboot the target machine.
#reboot -- -r
Cisco PGW 2200 Softswitch Release 9.8 Software Installation and Configuration Guide
2-74
OL-18083-01
Chapter 2
Installing the Sun Solaris 10 Operating System
Loading the Sun Solaris 10 Operating Environment
Note
If you used the CD-ROM drive to load the Solaris 10 patch cluster, eject the CD prior to
rebooting.
This completes the procedures for installing the Solaris 10 patches for Sparc-based platforms. Go to
Table 2-2 on page 2-72 if you want to continue with the list for package installation. If you have
questions or need assistance, see the “Obtaining Documentation and Submitting a Service Request”
section on page x.
Installing the Opteron-based Solaris 10 Patches Package (CSCOh032)
Note
If you install CSCOh032 release 3.0(6) on top of release 3.0(5), run the CSCOh032 installation script
once and reboot the system. See the following installation procedure.
If you do NOT install CSCOh032 release 3.0(6) on top of release 3.0(5), you need to run the CSCOh032
installation script twice. First run the CSCOh032 installation script, then reboot the system. Then run
the CSCOh032 installation script again and reboot the system. After the second reboot is complete, use
the uname -a command to verify the patch level. If the patch level is 127128-11, CSCOh032 is
successfully installed.
To install the Opteron-based Solaris 10 Operating System Patches package (CSCOh032):
Step 1
If you are using the CD-ROM, load the Cisco Solaris 10 Operating Environment CD into the CD-ROM
drive. Enter the following command:
# pkgadd -d /cdrom/cdrom0/CSCOh032.pkg
Text similar to the following is displayed:
The following packages are available:
1 CSCOh032
Media Gateway Controller Solaris 10 Patch Cluster
(i386) 3.0(6)
Select package(s) you wish to process (or 'all' to process
all packages). (default: all) [?,??,q]:
Note
Step 2
You can also download the Opteron-based Solaris 10 operating system patches package
(CSCOh032) from Cisco.com. For example, download the CSCOh032 package to the /opt/SW
folder on the Opteron-based platform and use the command, pkgadd -d
/opt/SW/CSCOh032.pkg.
Press Enter to select the default value. Text similar to the following is displayed:
Processing package instance <CSCOh032> from </var/tmp/CSCOh032.pkg>
Media Gateway Controller PGW Specific Solaris 10 packages(i386) 3.0(6)
Cisco Systems, Inc.
## Executing checkinstall script.
CSCOh032 checkinstall log file at /var/tmp/CSCOh032.checkinstall.log
Platform is i86pc
This machine is running Solaris 5.10
Cisco PGW 2200 Softswitch Release 9.8 Software Installation and Configuration Guide
OL-18083-01
2-75
Chapter 2
Installing the Sun Solaris 10 Operating System
Loading the Sun Solaris 10 Operating Environment
Using </opt/sun_install> as the package base directory.
## Processing package information.
## Processing system information.
10 package pathnames are already properly installed.
## Verifying disk space requirements.
## Checking for conflicts with packages already installed.
## Checking for setuid/setgid programs.
This package contains scripts which will be executed with super-user
permission during the process of installing this package.
Do you want to continue with the installation of <CSCOh032> [y,n,?]
Step 3
Type y and press Enter to continue. Text similar to the following is displayed:
Installing Media Gateway Controller Solaris 10 Patch Cluster as <CSCOh0032>
The system lists the patches that it will install. This list varies over time. Text similar to the following is
displayed:
….
!!
!!
!!
!!
You must now change directories to /opt/sun_install and
run the installPatches.sh script as root.
Installation of <CSCOh032> was successful.
Step 4
Change directory to /opt/sun_install and run the installPatches script by entering the following
commands:
# cd /opt/sun_install
# ./installPatches.sh
Note
During the installation of the Solaris 10 patch cluster, some patches might fail with return codes
1, 2, 8, and 35. This is normal and does not indicate a problem with the installation. The
following is an explanation of these error codes:
1—The patch has been installed before.
2—Attempting to apply a patch that is already applied.
8—Attempting to patch a package that is not installed.
35—A later version of the patch has already been installed.
Text similar to the following is displayed:
You are running as root - Good...
*** InstallPatches10 begins Tue Jul
8 11:14:25 GMT+8 2008 ***
VERSION='3.0(6)'
Platform is i86pc
Install Solaris 10 patches from set 1 ...
Changed to /var/tmp directory
Now installing each patch from the patch cluster. There are a large
number of these patches, and the install could take an hour or longer
to complete. Please be patient. You can follow the progress of the
install in the following log: /opt/sun_install/installPatches10.log
At least one patch failed to install. This may or may
Cisco PGW 2200 Softswitch Release 9.8 Software Installation and Configuration Guide
2-76
OL-18083-01
Chapter 2
Installing the Sun Solaris 10 Operating System
Loading the Sun Solaris 10 Operating Environment
not indicate a problem. Please look at the log file
after the rest of the patches are applied
Install Solaris 10 patches from set 2 ...
Changed to /var/tmp directory
*** InstallPatches10 ends Tue Jul 8 11:14:41 GMT+8 2008 ***
*************************************************
*
It is necessary to reboot this machine
*
*
for these patches to be incorporated
*
*
the operating system. Enter the following
*
*
command and press Enter: reboot -- -r
*
*************************************************
Step 5
Type the following command and press Enter to reboot the target machine.
#reboot -- -r
Note
If you used the CD-ROM drive to load the Solaris 10 patch cluster, eject the CD prior to
rebooting.
Note
If you have installed the Solaris DiskSuite package (CSCOh023) on your system, the messages
below are displayed during system boot. They are normal Solaris DiskSuite startup messages
and do not indicate any problem with your system.
WARNING force load of misc /md-trans failed
WARNING force load of misc /md-raid failed
WARNING force load of misc /md-hotspares failed
WARNING force load of misc /md-sp failed
This completes the procedures for installing the Solaris 10 patches for Opteron-based platforms. Go to
Table 2-2 on page 2-72 if you want to continue with the list for package installation. If you have
questions or need assistance, see the “Obtaining Documentation and Submitting a Service Request”
section on page x.
Installing the Solstice DiskSuite (CSCOh023)
The Sun Solstice DiskSuite program enables you to use the second disk drive as a mirror of the first to
increase the availability of the system.You can install the DiskSuite program by running the scripts
described below. The machine reboots several times during the installation process. The scripts minimize
the possibility of running the scripts in the wrong order. However, you should ensure that the program
is properly installed and take reasonable precautions to run the scripts correctly.
Note
You must log in as root to run the following DiskSuite installation script.
Note
For Sun Fire X4600 and Sun Netra X4200 M2 platforms, do not change the default hard disk boot order
in the BIOS settings. If the primary disk is changed from the default of c3t0d0, the DiskSuite installation
fails.
Cisco PGW 2200 Softswitch Release 9.8 Software Installation and Configuration Guide
OL-18083-01
2-77
Chapter 2
Installing the Sun Solaris 10 Operating System
Loading the Sun Solaris 10 Operating Environment
Step 1
Load the Cisco Solaris 10 Operating Environment CD into the CD-ROM drive. Enter the following
command to install the DiskSuite installation scripts:
# pkgadd -d /cdrom/cdrom0/CSCOh023.pkg
Text similar to the following is displayed.
The following packages are available:
1 CSCOh023
Media Gateway Controller Solaris 10 DiskSuite
(sparc,i386) 3.0(6)
Select package(s) you wish to process (or 'all' to process
all packages). (default: all) [?,??,q]:
Note
Step 2
You can also download the Solaris 10 DiskSuite package (CSCOh023) from Cisco.com. For
example, download the CSCOh023 package to the /opt/SW folder on the platform and use the
command, pkgadd -d /opt/SW/CSCOh023.pkg. Make sure you downloads the platform-specific
package for your platform (Sparc-based or Opteron-based).
Press Enter to accept the default answer all. Text similar to the following is displayed:
Processing package instance <CSCOh023> from </var/tmp/CSCOh023.pkg>
Media Gateway Controller Solaris 10 DiskSuite(sparc,i386) 3.0(6)
Cisco Systems, Inc.
## Executing checkinstall script.
CSCOh023 checkinstall log file at /var/tmp/CSCOh023.checkinstall.log
Platform is SUNW,Sun-Fire-V210
This machine is running Solaris 5.10
Using </opt/sun_install> as the package base directory.
## Processing package information.
## Processing system information.
2 package pathnames are already properly installed.
## Verifying disk space requirements.
## Checking for conflicts with packages already installed.
## Checking for setuid/setgid programs.
This package contains scripts which will be executed with super-user
permission during the process of installing this package.
Do you want to continue with the installation of <CSCOh023> [y,n,?]
Step 3
Enter y and press Enter to continue with the installation.
Installing Media Gateway Controller Solaris 10 DiskSuite as <CSCOh023>
## Executing preinstall script.
No PGW software found - this package can be installed
## Installing part 1 of 1.
/opt/sun_install/DiskSuite/admin.file
/opt/sun_install/DiskSuite/install_disksuite_1.sh
/opt/sun_install/DiskSuite/install_disksuite_2.sh
/opt/sun_install/DiskSuite/query_2nd_disk.cmd
/opt/sun_install/DiskSuite/rm_disksuite_1.sh
/opt/sun_install/DiskSuite/rm_disksuite_2.sh
[ verifying class <none> ]
## Executing postinstall script.
!!
!!
You must now change directories to
Cisco PGW 2200 Softswitch Release 9.8 Software Installation and Configuration Guide
2-78
OL-18083-01
Chapter 2
Installing the Sun Solaris 10 Operating System
Loading the Sun Solaris 10 Operating Environment
!!
!!
!!
/opt/sun_install/DiskSuite and run the
install_disksuite_1.sh script as root.
Installation of <CSCOh023> was successful.
Step 4
Change directories. Enter the following command:
cd
Step 5
/opt/sun_install/DiskSuite
Run the first script. Enter the following command:
./install_disksuite_1.sh
Text similar to the following is displayed:
You are running as root - Good...
Output will be logged in /opt/sun_install/DiskSuite/DiskSuite_1.log
This script installs Disk Suite on an PGW system.
It assumes that Solaris 10 is installed and the disks
are correctly formatted and ready to go.
**** IMPORTANT NOTE ****
In order to install DiskSuite, you MUST HAVE allocated
an unassigned, 15-30Mb disk partition in disk slice 4
of your primary disk. IF THIS PARTITION DOES NOT EXIST
YOUR DISKSUITE INSTALLATION WILL FAIL, and IT MAY
CORRUPT YOUR DISK!
I will now run a command which will show you the
current disk partitions. You can see the number of
sectors allocated in the column marked Sector Count
If you do not see a line which shows that partition 4
is allocated DO NOT CONTINUE WITH THIS INSTALLATION!
You can see the number of sectors allocated in the
column marked Sector Count. Sectors may vary in size
from 512 bytes to 4096 bytes and perhaps even larger
Warning: Current Disk has mounted partitions.
/dev/dsk/c1t0d0s0
/dev/dsk/c1t0d0s1
/dev/dsk/c1t0d0s3
/dev/dsk/c1t0d0s5
is
is
is
is
currently
currently
currently
currently
mounted
mounted
used by
mounted
on /. Please see umount(1M).
on /var. Please see umount(1M).
swap. Please see swap(1M).
on /opt. Please see umount(1M).
Using Disk Controller c1
If this is not the correct controller, please
exit this script and contact tech support
Here is your current disk partition setup. Look
for partition 4
* /dev/dsk/c1t0d0s0 partition map
*
* Dimensions:
*
512 bytes/sector
*
424 sectors/track
*
24 tracks/cylinder
*
10176 sectors/cylinder
*
14089 cylinders
Cisco PGW 2200 Softswitch Release 9.8 Software Installation and Configuration Guide
OL-18083-01
2-79
Chapter 2
Installing the Sun Solaris 10 Operating System
Loading the Sun Solaris 10 Operating Environment
*
14087 accessible cylinders
*
* Flags:
*
1: unmountable
* 10: read-only
*
*
First
Sector
Last
* Partition Tag Flags
Sector
Count
Sector
0
2
00
8201856
4100928 12302783
1
7
00
12302784 10247232 22550015
2
5
00
0 143349312 143349311
3
3
01
0
8201856
8201855
4
0
00
22550016
50880 22600895
5
0
00
22600896 116647488 139248383
6
0
00 139248384
4100928 143349311
Mount Directory
/
/var
/opt
Do you want to continue? (y/n) [N]
Step 6
Type y and press Enter to continue the installation. Text similar to the following is displayed:
Searching for disks...done
AVAILABLE DISK SELECTIONS:
0. c1t0d0 <SUN72G cyl 14087 alt 2 hd 24 sec 424>
/pci@1c,600000/scsi@2/sd@0,0
1. c1t1d0 <SUN72G cyl 14087 alt 2 hd 24 sec 424>
/pci@1c,600000/scsi@2/sd@1,0
Specify disk (enter its number): selecting c1t0d0
[disk formatted]
Warning: Current Disk has mounted partitions.
/dev/dsk/c1t0d0s0 is currently mounted on /. Please see umount(1M).
/dev/dsk/c1t0d0s1 is currently mounted on /var. Please see umount(1M).
/dev/dsk/c1t0d0s3 is currently used by swap. Please see swap(1M).
/dev/dsk/c1t0d0s5 is currently mounted on /opt. Please see umount(1M).
FORMAT MENU:
disk
type
partition
current
format
repair
label
analyze
defect
backup
verify
save
inquiry
volname
!<cmd>
quit
format>
-
select a disk
select (define) a disk type
select (define) a partition table
describe the current disk
format and analyze the disk
repair a defective sector
write label to the disk
surface analysis
defect list management
search for backup labels
read and display labels
save new disk/partition definitions
show vendor, product and revision
set 8-character volume name
execute <cmd>, then return
PARTITION MENU:
0
- change `0' partition
1
- change `1' partition
2
- change `2' partition
3
- change `3' partition
4
- change `4' partition
5
- change `5' partition
Cisco PGW 2200 Softswitch Release 9.8 Software Installation and Configuration Guide
2-80
OL-18083-01
Chapter 2
Installing the Sun Solaris 10 Operating System
Loading the Sun Solaris 10 Operating Environment
6
7
select modify name
print label !<cmd> quit
partition> Enter
partition>
change `6' partition
change `7' partition
select a predefined table
modify a predefined partition table
name the current table
display the current table
write partition map and label to the disk
execute <cmd>, then return
table name (remember quotes):
FORMAT MENU:
disk
- select a disk
type
- select (define) a disk type
partition - select (define) a partition table
current
- describe the current disk
format
- format and analyze the disk
fdisk
- run the fdisk program
repair
- repair a defective sector
label
- write label to the disk
analyze
- surface analysis
defect
- defect list management
backup
- search for backup labels
verify
- read and display labels
save
- save new disk/partition definitions
inquiry
- show vendor, product and revision
volname
- set 8-character volume name
!<cmd>
- execute <cmd>, then return
quit
format> Saving new disk and partition definitions
Enter file name["./format.dat"]: format> Searching for disks...done
AVAILABLE DISK SELECTIONS:
0. c1t0d0 <SUN72G cyl 14087 alt 2 hd 24 sec 424>
/pci@1c,600000/scsi@2/sd@0,0
1. c1t1d0 <SUN72G cyl 14087 alt 2 hd 24 sec 424>
/pci@1c,600000/scsi@2/sd@1,0
Specify disk (enter its number): selecting c1t1d0
[disk formatted]
FORMAT MENU:
disk
type
partition
current
format
fdisk
repair
label
analyze
defect
backup
verify
save
inquiry
volname
!<cmd>
quit
format>
-
select a disk
select (define) a disk type
select (define) a partition table
describe the current disk
format and analyze the disk
run the fdisk program
repair a defective sector
write label to the disk
surface analysis
defect list management
search for backup labels
read and display labels
save new disk/partition definitions
show vendor, product and revision
set 8-character volume name
execute <cmd>, then return
PARTITION MENU:
Cisco PGW 2200 Softswitch Release 9.8 Software Installation and Configuration Guide
OL-18083-01
2-81
Chapter 2
Installing the Sun Solaris 10 Operating System
Loading the Sun Solaris 10 Operating Environment
0
- change `0' partition
1
- change `1' partition
2
- change `2' partition
3
- change `3' partition
4
- change `4' partition
5
- change `5' partition
6
- change `6' partition
7
- change `7' partition
select - select a predefined table
modify - modify a predefined partition table
name
- name the current table
print - display the current table
label - write partition map and label to the disk
!<cmd> - execute <cmd>, then return
quit
partition>
0. CISCO
1. original
Specify table (enter its number)[1]:
partition> Current partition table (CISCO):
Total disk cylinders available: 14087 + 2 (reserved cylinders)
Part
Tag
0
root
1
var
2
backup
3
swap
4 unassigned
5 unassigned
6 unassigned
7 unassigned
Flag
wm
wm
wm
wu
wm
wm
wm
wm
Cylinders
806 - 1208
1209 - 2215
0 - 14086
0 805
2216 - 2220
2221 - 13683
13684 - 14086
0
Size
1.96GB
4.89GB
68.35GB
3.91GB
24.84MB
55.62GB
1.96GB
0
Blocks
(403/0/0)
4100928
(1007/0/0)
10247232
(14087/0/0) 143349312
(806/0/0)
8201856
(5/0/0)
50880
(11463/0/0) 116647488
(403/0/0)
4100928
(0/0/0)
0
partition> Ready to label disk, continue?
partition>
FORMAT MENU:
disk
- select a disk
type
- select (define) a disk type
partition - select (define) a partition table
current
- describe the current disk
format
- format and analyze the disk
fdisk
- run the fdisk program
repair
- repair a defective sector
label
- write label to the disk
analyze
- surface analysis
defect
- defect list management
backup
- search for backup labels
verify
- read and display labels
save
- save new disk/partition definitions
inquiry
- show vendor, product and revision
volname
- set 8-character volume name
!<cmd>
- execute <cmd>, then return
quit
format> Finished disk partitioning...
metadb: waiting on /etc/lvm/lock
d1: Concat/Stripe is setup
d2: Concat/Stripe is setup
d4: Concat/Stripe is setup
d5: Concat/Stripe is setup
d7: Concat/Stripe is setup
d8: Concat/Stripe is setup
d10: Concat/Stripe is setup
d11: Concat/Stripe is setup
d13: Concat/Stripe is setup
d14: Concat/Stripe is setup
Cisco PGW 2200 Softswitch Release 9.8 Software Installation and Configuration Guide
2-82
OL-18083-01
Chapter 2
Installing the Sun Solaris 10 Operating System
Loading the Sun Solaris 10 Operating Environment
d3: Mirror is setup
d6: Mirror is setup
d9: Mirror is setup
d12: Mirror is setup
d15: Mirror is setup
The machine will now reboot.
Wait for the system to come up. Then log in as root,
cd /opt/sun_install/DiskSuite and continue by
executing the script install_disksuite_2.sh
Press the ENTER key to continue:
Step 7
Press Enter to reboot your system.
Step 8
Once the system has completed its reboot, log in as root and change directories to
/opt/sun_install/DiskSuite. Enter the following command:
cd /opt/sun_install/DiskSuite
Step 9
Run the second script. Enter the following command:
./install_disksuite_2.sh
Text similar to the following is displayed:
You are running as root - Good...
Output will be logged in /opt/sun_install/DiskSuite/DiskSuite_2.log
This is part 2 of the script that installs
Disk Suite on an PGW system.
It assumes that Solaris 10 is installed
You should have already run install_disksuite_1.sh
which installs and configures the disks
This script attaches the second disk and starts
the disk replication process
Do you want to continue? (y/n) [N] y
Step 10
Type y and press Enter to continue the installation. Text similar to the following is displayed:
/dev/dsk/c1t0d0s0 is part of SVM volume stripe:d1. Please see metaclear(1M).
/dev/dsk/c1t0d0s1 is part of SVM volume stripe:d4. Please see metaclear(1M).
/dev/dsk/c1t0d0s3 is part of SVM volume stripe:d7. Please see metaclear(1M).
/dev/dsk/c1t0d0s4 contains an SVM mdb. Please see metadb(1M).
/dev/dsk/c1t0d0s5 is part of SVM volume stripe:d10. Please see metaclear(1M).
/dev/dsk/c1t0d0s6 is part of SVM volume stripe:d13. Please see metaclear(1M).
/dev/dsk/c1t1d0s0 is part of SVM volume stripe:d2. Please see metaclear(1M).
/dev/dsk/c1t1d0s1 is part of SVM volume stripe:d5. Please see metaclear(1M).
/dev/dsk/c1t1d0s3 is part of SVM volume stripe:d8. Please see metaclear(1M).
/dev/dsk/c1t1d0s4 contains an SVM mdb. Please see metadb(1M).
/dev/dsk/c1t1d0s5 is part of SVM volume stripe:d11. Please see metaclear(1M).
/dev/dsk/c1t1d0s6 is part of SVM volume stripe:d14. Please see metaclear(1M).
d3: submirror d2 is attached
d6: submirror d5 is attached
d9: submirror d8 is attached
d12: submirror d11 is attached
d15: submirror d14 is attached
Disk Suite is now configured and will start to
Cisco PGW 2200 Softswitch Release 9.8 Software Installation and Configuration Guide
OL-18083-01
2-83
Chapter 2
Installing the Sun Solaris 10 Operating System
Loading the Sun Solaris 10 Operating Environment
mirror to the second disk. It will take some
time for the disk to be completely mirrored.
Depending on the size of the disk, it may take
up to several hours
The system will repeatedly execute the command:
/usr/sbin/metastat |grep done
When there is no output from this command, the replication
will be complete and this script will terminate
At that time, it will be safe to reboot the machine
Resync in progress: 0 % done Resync in progress: 0 % done
% done Resync in progress: 0 % done Resync in progress: 0
Resync in progress: 0 % done Resync in progress: 0 % done
% done Resync in progress: 2 % done Resync in progress: 0
Resync in progress: 0 % done Resync in progress: 1 % done
% done Resync in progress: 4 % done Resync in progress: 1
Resync in progress: 0
% done
Resync in progress: 0
% done
Resync in progress: 1
% done
Note
The system continues to issue these re-synchronization messages until the replication is
complete. Once the replication is complete, the system returns a prompt.
Note
This portion of the installation is time-intensive. The amount of time required to complete the
replication is dependent upon the size of the disk drives in your host. It may take several hours.
Resync in progress: 94 % done
Resync in progress: 96 % done
Resync in progress: 98 % done
The Disk Suite installation is now complete
Press the ENTER key to continue:
Step 11
Press Enter to continue the installation. Text similar to the following is displayed:
The following procedure should be used to add an
alias in the boot rom so you can boot off of the
secondary disk if necessary
Get the information from the system on the second disk
# prtconf -vp |grep pci |grep disk1
NOTE: disk1 is a system maintained standard for the system's
second hard disk. If the prtconf command returns this
information, it can be used to boot the second disk
without any additional changes
To create an alias name other than disk1 for the second
boot disk in the NVRAM, use the information from the
prtconf command (above)
# eeprom nvramrc='devalias backup_root /pci@1f,0/pci@1/scsi@8/disk@1,0'
Check the alias
eeprom |grep nvramrc
#use-nvramrc?=true
Cisco PGW 2200 Softswitch Release 9.8 Software Installation and Configuration Guide
2-84
OL-18083-01
Chapter 2
Installing the Sun Solaris 10 Operating System
Loading the Sun Solaris 10 Operating Environment
nvramrc=devalias backup_root /pci@1f,0/pci@1/scsi@8/disk@1,0
Then bring the machine down to the boot prompt
# /usr/sbin/shutdown -g0 -y -i0
.... system shuts down....
ok boot backup_root
The machine should reboot from the second disk. The following
text will be found in the boot output. This ensures that the
machine was working from the second drive:
a) Executing last command: boot backup_root
b) Boot device: /pci@1f,0/pci@1/scsi@8/disk@1,0 File and args:
The boot device listed should match the output from the
nvramrc= output from above
Step 12
If you want to set up your system to be able to reboot from the second disk, proceed to the “Rebooting
from the Mirrored (Secondary) Disk on Sparc-based Platforms” section on page 2-85 or the “Rebooting
from the Mirrored (Secondary) Disk on Opteron-based Platforms” section on page 2-87. Otherwise,
proceed to Step 15.
Step 13
Type the following command and press Enter to reboot your system.
#/usr/sbin/shutdown -g0 -y -i6
The DiskSuite installation is now complete. If you want to configure your system to reboot from the
mirrored disk, go to the “Rebooting from the Mirrored (Secondary) Disk on Sparc-based Platforms”
section on page 2-85 or the “Rebooting from the Mirrored (Secondary) Disk on Opteron-based
Platforms” section on page 2-87. If you want to return to the list for package installation, go to Table 2-2
on page 2-72.
Rebooting from the Mirrored (Secondary) Disk on Sparc-based Platforms
Caution
Rebooting from the mirrored (secondary) disk is normally done only after a catastrophic failure of the
primary disk.
Perform the following procedure to add an alias in the boot ROM so you can boot from the secondary
disk, if necessary.
Step 1
Get the information from the system on the second disk that you will boot from. Type the following
command and press Enter:
# prtconf -vp | grep pci | grep disk1
Text similar to the following is displayed:
disk1: ‘/pci@1f,0/pc1@1/scsi@8/disk1,0’
Cisco PGW 2200 Softswitch Release 9.8 Software Installation and Configuration Guide
OL-18083-01
2-85
Chapter 2
Installing the Sun Solaris 10 Operating System
Loading the Sun Solaris 10 Operating Environment
Disk1 is a system-maintained standard for the system's second hard disk.
Note
a.
If the prtconf command returns the above information, you can use it to boot the second disk
without any additional changes. Proceed to Step 4.
b.
If you do not wish to use the above default information, create an alias name other than disk1 for
the second boot disk in the NVRAM by using the information from the prtconf command (above).
# eeprom nvramrc='devalias backup_root /pci@1f,0/pci@1/scsi@8/disk@1,0'
Step 2
Check the alias you created by typing the following commands and pressing Enter:
eeprom |grep nvramrc
Text similar to the following is displayed:
use-nvramrc?=true
nvramrc=devalias backup_root /pci@1f,0/pci@1/scsi@8/disk@1,0
Note
Step 3
In the steps that follow, wherever you see “disk1” replace it with the alias you configured above.
Before shutting down the system, check the progress of the mirroring to make sure that replication is
complete. Type the following the command to check the progress of the mirroring. An Okay response
means that disk mirroring is complete.
/usr/sbin/metastat
Warning
Step 4
DO NOT REBOOT until the replication is complete and the mirrors are in the Okay state.
When the replication is complete, bring the machine down to the boot prompt. Type the following
command and press Enter:
# /usr/sbin/shutdown -g0 -y -i0
Text similar to the following is displayed:
The system is coming down. Please wait.
System services are now being stopped.
.
.
.
The system is down.
.
.
.
Program terminated
ok
Step 5
In OK mode, enter the following command and press Enter:
ok boot disk1
Text similar to the following is displayed:
Res
LOM event: +0h5m53s host resetting
.
.
Cisco PGW 2200 Softswitch Release 9.8 Software Installation and Configuration Guide
2-86
OL-18083-01
Chapter 2
Installing the Sun Solaris 10 Operating System
Loading the Sun Solaris 10 Operating Environment
.
Executing last command: boot disk1
Boot device: /pci@1f,0/pci@1/scsi@8/disk@1,0 File and args:
SunOS Release 5.10 Version Generic_108528-13 64-bit
Copyright 1983-2004 Sun Microsystems, Inc. All rights reserved.
The machine should reboot from the second disk.
Step 6
Verify that the following text is displayed in the boot output (see the output in Step 4, above). This
ensures that the machine was working from the second drive:
Executing last command: boot disk1
Boot device: /pci@1f,0/pci@1/scsi@8/disk@1,0 File and args:
Note
If you have installed the Solaris DiskSuite package (CSCOh023) on your system, the messages
below are displayed during system boot. They are normal Solaris DiskSuite startup messages
and do not indicate any problem with your system.
WARNING force load of misc /md-trans failed
WARNING force load of misc /md-raid failed
WARNING force load of misc /md-hotspares failed
WARNING force load of misc /md-sp failed
Step 7
The boot device listed should match the output from the "nvramrc=" line in Step 2.
This completes the procedures for rebooting from the mirrored (secondary) disk on Sparc-based
platforms. If you want to return to the list for package installation, go to Table 2-2 on page 2-72.
Rebooting from the Mirrored (Secondary) Disk on Opteron-based Platforms
Caution
Rebooting from the mirrored (secondary) disk is normally done only after a catastrophic failure of the
primary disk.
Perform the following procedure to reboot from the mirrored (secondary) disk on Opteron-based
platforms.
Step 1
Check the file /boot/grub/menu.lst to make sure that the section for alternate boot exists in the file.
That section is similar to the following:
title alternate boot
root (hd1,0,a)
kernel /platform/i86pc/multiboot
module /platform/i86pc/boot_archive
Step 2
Before shutting down the system, check the progress of the mirroring to make sure that replication is
complete. Type the following the command to check the progress of the mirroring. An Okay response
means that disk mirroring is complete. At the end of the system output, you see two devices whose Reloc
are shown as Yes.
/usr/sbin/metastat
Text similar to the following is displayed:
Cisco PGW 2200 Softswitch Release 9.8 Software Installation and Configuration Guide
OL-18083-01
2-87
Chapter 2
Installing the Sun Solaris 10 Operating System
Loading the Sun Solaris 10 Operating Environment
d12: Mirror
Submirror 0: d10
State: Okay
Submirror 1: d11
State: Okay
Pass: 1
Read option: roundrobin (default)
Write option: parallel (default)
Size: 116599770 blocks (55 GB)
...
d14: Submirror of d15
State: Okay
Size: 4096575 blocks (2.0 GB)
Stripe 0:
Device
Start Block Dbase
c3t3d0s6
0
No
State Reloc Hot Spare
Okay
Yes
Device Relocation Information:
Device
Reloc Device ID
c3t3d0
Yes
id1,sd@n500000e01861aae0
c3t2d0
Yes
id1,sd@n500000e01860a690
Warning
Step 3
DO NOT REBOOT until the replication is complete and the mirrors are in the Okay state.
When the replication is complete, bring the machine down to the boot prompt. Type the following
command and press Enter:
# /usr/sbin/shutdown -g0 -y -i6
Text similar to the following is displayed:
Shutdown started.
Thu Aug 14 12:18:21 CDT 2008
Changing to init state 6 - please wait
Broadcast Message from root (pts/1) on sh-agrove Thu Aug 14 12:18:21...
THE SYSTEM sh-agrove IS BEING SHUT DOWN NOW ! ! !
Log off now or risk your files being damaged
Step 4
Choose alternate boot in the GRUB menu and press Enter.
This completes the procedures for rebooting from the mirrored (secondary) disk on Opteron-based
platforms. If you want to return to the list for package installation, go to Table 2-2 on page 2-72.
Removing the Solstice DiskSuite
Note
This section applies to the Cisco PGW 2200 Softswitch Host running either the
Cisco PGW 2200 Softswitch or HSI software. You must remove Cisco PGW 2200 Softswitch, HSI, or
BAMS software before you remove the DiskSuite. The following procedure works only from platforms
that have been mirrored by use of the procedure provided in the “Installing the Solstice DiskSuite
(CSCOh023)” section on page 2-77.
Cisco PGW 2200 Softswitch Release 9.8 Software Installation and Configuration Guide
2-88
OL-18083-01
Chapter 2
Installing the Sun Solaris 10 Operating System
Loading the Sun Solaris 10 Operating Environment
This procedure un-mirrors the disk partitions and removes the DiskSuite application from the platform.
Use this procedure if a system has DiskSuite installed and you no longer wish to use CSCOh024 to
configure the second disk for the log and spool directories.
If the platform is configured with customer-specific information, be sure to back up this information
before the partitions are un-mirrored and DiskSuite is removed. Consult the appropriate document,
depending on the software installed.
Step 1
Log in as root. Use the metastat command to verify that the state of all the mirrors is Okay.
Step 2
Type the following commands to run the script and press Enter:
cd /opt/sun_install/DiskSuite
./rm_disksuite_1.sh
The ./rm_disksuite_1.sh command detaches the mirrored disks and restores the original disk partition
file in /etc/vfstab. The machine reboots after detaching the mirrored disks and restoring the original disk
partition file.
Step 3
Log in as root and change directory to /opt/sun_install/DiskSuite. Enter the following command:
cd /opt/sun_install/DiskSuite
Step 4
Run the script ./rm_disksuite_2.sh:
./rm_disksuite_2.sh
This script clears the disk mirrors and removes the DiskSuite software packages from the system.
Step 5
Enter the following command and press Enter to remove the package, CSCOh023:
pkgrm CSCOh023
Text similar to the following is displayed:
The following package is currently installed:
CSCOh023 Media Gateway Controller Solaris 10 DiskSuite
(sparc,i386) 3.0(6)
Do you want to remove this package? [y,n,?,q] y
...
Removal of <CSCOh023> was successful.
This completes the DiskSuite removal.
Installing the Log and Spool File Systems (CSCOh024)
Note
This section applies to a Cisco PGW 2200 Softswitch host with 18-GB disk drives running the
Cisco PGW 2200 Softswitch software.
Note
If the DiskSuite software is installed and configured, you must first follow the procedure in the
“Removing the Solstice DiskSuite” section on page 2-88 to remove the DiskSuite software before
configuring the second disk to be used for the log and spool file systems.
Cisco PGW 2200 Softswitch Release 9.8 Software Installation and Configuration Guide
OL-18083-01
2-89
Chapter 2
Installing the Sun Solaris 10 Operating System
Loading the Sun Solaris 10 Operating Environment
To determine whether DiskSuite is installed and configured, run the /usr/sbin/metastat command. If the
command is found and it displays the status of mirrors, it indicates that DiskSuite is installed and
configured.
Note
For the device names for each platform type, see Table 2-1 on page 2-3 (Device Names on Supported
Host Platforms).
This procedure enables you to move the log and spool file system to the second disk drive to increase
the capacity for log, alarm, measurement, and CDR files. This improves the performance of the host. If
CSCOh024 is not installed, your system continues to store log and spool files on the first disk drive. The
second disk is defined into two partitions:
•
The first partition is the log partition and uses about 30 percent of the disk.
•
The second partition is the spool partition that uses 50percent of the disk.
Table 2-3 and Table 2-4 shows sample partition tables for disks 1 and 2 for a Netra t 1400 with 18-GB
disk drives.
Table 2-3
18-GB Disk 1 Partition Table (Cisco PGW 2200 Softswitch with Log and Spool
Package)
Cisco PGW 2200 Softswitch Host
Slice No.
Slice Name
Slice Size (GB)
0
/
1.00
1
/var
1.40
2
0.00
3
0.00
4
0.00
5
/opt
12.00
6
swap
2.00
7
Note
0.00
On disk drives larger than 18 GB, the swap space is 4 GB.
Table 2-4
18-GB Disk 2 Partition Table (Cisco PGW 2200 Softswitch with Log and Spool
Package)
Cisco PGW 2200 Softswitch Host
Slice No.
Slice Name
Slice Size (GB)
0
/
1.00
1
swap
2.00
2
0.00
3
/opt/CiscoMGC/var/log
5.70
4
/opt/CiscoMGC/var/spool
9.00
Cisco PGW 2200 Softswitch Release 9.8 Software Installation and Configuration Guide
2-90
OL-18083-01
Chapter 2
Installing the Sun Solaris 10 Operating System
Loading the Sun Solaris 10 Operating Environment
Table 2-4
Step 1
18-GB Disk 2 Partition Table (Cisco PGW 2200 Softswitch with Log and Spool
Package) (continued)
5
0.00
6
0.00
7
0.00
Load the Cisco Solaris 10 Operating Environment CD into the CD-ROM drive. From the /var/tmp
directory of the target machine, install the Log And Spool Software by entering the following command:
# cd /var/tmp
# pkgadd -d /cdrom/cdrom0/CSCOh024.pkg
Text similar to the following is displayed:
The following packages are available:
1 CSCOh024
Media Gateway Controller Log and Spool package
(sparc) 3.0(6)
Select package(s) you wish to process (or 'all' to process
all packages). (default: all) [?,??,q]:
Note
Step 2
You can also download the Sparc-based log and spool package (CSCOh024) from Cisco.com.
For example, download the CSCOh024 package to the /opt/SW folder on the Sparc-based
platform and use the command, pkgadd -d /opt/SW/CSCOh024.pkg.
Press Enter to accept the default answer all. Text similar to the following is displayed:
Processing package instance <CSCOh024 from </var/tmp/CSCOh024.pkg
Media Gateway Controller Log and Spool package(sparc) 3.0(6)
Cisco Systems, Inc.
## Executing checkinstall script.
CSCOh024 checkinstall log file at /var/tmp/CSCOh024.checkinstall.log
Platform is SUNW,Ultra-80
This machine is running Solaris 5.10
The selected base directory </opt/sun_install> must exist before
installation is attempted.
Do you want this directory created now [y,n,?,q] y
Step 3
Answer y and press Enter to create the directory. Text similar to the following is displayed:
Using </opt/sun_install> as the package base directory.
## Processing package information.
## Processing system information.
1 package pathname is already properly installed.
## Verifying disk space requirements.
## Checking for conflicts with packages already installed.
The following files are already installed on the system and are being
used by another package:
* /opt/sun_install <attribute change only>
* - conflict with a file which does not belong to any package.
Do you want to install these conflicting files [y,n,?,q]
Cisco PGW 2200 Softswitch Release 9.8 Software Installation and Configuration Guide
OL-18083-01
2-91
Chapter 2
Installing the Sun Solaris 10 Operating System
Loading the Sun Solaris 10 Operating Environment
Step 4
Answer y and press Enter to install the files. Text similar to the following is displayed:
## Checking for setuid/setgid programs.
This package contains scripts which will be executed with super-user
permission during the process of installing this package.
Do you want to continue with the installation of <CSCOh024> [y,n,?]
Step 5
Type y and press Enter to continue. Text similar to the following is displayed:
Installing Media Gateway Controller Log and Spool package as <CSCOh024>
## Executing preinstall script.
Platform is SUNW,Ultra-80
This is a known platform
NOTICE: Architecture checks passed
## Installing part 1 of 1.
/opt/sun_install/format_log_spool_start.cmd
/opt/sun_install/install_log_spool
/opt/sun_install/query_2nd_disk.cmd
[ verifying class <none> ]
## Executing postinstall script.
!!
!!
!!
!!
Step 6
You must now change directories to /opt/sun_install/Log_Spool and
run the ./install_log_spool script as root.
Change directory to /opt/sun_install/Log_Spool and run the install_log_spool script.
Note
You must first shut down the Cisco PGW 2200 Softswitch before running the install_log_spool
script.
# cd /opt/sun_install/Log_Spool
# ./install_log_spool
Text similar to the following is displayed:
Platform is SUNW,Ultra-80
Searching for disks...done
FORMAT MENU:
disk
type
partition
current
format
repair
label
analyze
defect
backup
verify
save
volname
!<cmd>
quit
format> disk
-
select a disk
select (define) a disk type
select (define) a partition table
describe the current disk
format and analyze the disk
repair a defective sector
write label to the disk
surface analysis
defect list management
search for backup labels
read and display labels
save new disk/partition definitions
set 8-character volume name
execute <cmd>, then return
Cisco PGW 2200 Softswitch Release 9.8 Software Installation and Configuration Guide
2-92
OL-18083-01
Chapter 2
Installing the Sun Solaris 10 Operating System
Loading the Sun Solaris 10 Operating Environment
AVAILABLE DISK SELECTIONS:
0. c0t0d0 <SUN36G cyl 24620 alt 2 hd 27 sec 107>
/pci@1f,4000/scsi@3/sd@0,0
1. c0t1d0 <SUN36G cyl 24620 alt 2 hd 27 sec 107>
/pci@1f,4000/scsi@3/sd@1,0
Specify disk (enter its number): 1
selecting c0t1d0
[disk formatted]
format> current
Current Disk = c0t1d0
<SUN36G cyl 24620 alt 2 hd 27 sec 107>
/pci@1f,4000/scsi@3/sd@1,0
format> q
2nd Disk device is:
Disk type is:
Number of Cylinders :
c0t1d0
SUN36G
24620
Enter absolute path of the desired mount point for the
log directory or press enter to accept
the default [/opt/CiscoMGC/var/log]:
Step 7
Press Enter to accept the default mount point for the log directory or change it if you plan on installing
the Cisco PGW 2200 Softswitch software in a different location.
A screen similar to the following is displayed:
Log directory mount point is /opt/CiscoMGC/var/log
Enter absolute path of the desired mount point for the
spool directory or press enter to accept
the default [/opt/CiscoMGC/var/spool]:
Step 8
Press Enter to accept the default mount point for the spool directory or change it if you plan on installing
the Cisco PGW 2200 Softswitch software in a different location.
A screen similar to the following is displayed:
Spool directory mount point is /opt/CiscoMGC/var/spool
Number of cylinders for log partition: 9848
Start: 0
Start: 9847
Number of cylinders for spool partition: 14772
Start: 9848
Start: 24619
Build partition table for c0t1d0 ...
Searching for disks...done
selecting c0t1d0
[disk formatted]
FORMAT MENU:
disk
type
partition
current
format
repair
label
-
select a disk
select (define) a disk type
select (define) a partition table
describe the current disk
format and analyze the disk
repair a defective sector
write label to the disk
Cisco PGW 2200 Softswitch Release 9.8 Software Installation and Configuration Guide
OL-18083-01
2-93
Chapter 2
Installing the Sun Solaris 10 Operating System
Loading the Sun Solaris 10 Operating Environment
analyze
defect
backup
verify
save
inquiry
volname
!<cmd>
quit
format> p
PARTITION MENU:
0
1
2
3
4
5
6
7
select modify name
print label !<cmd> quit
partition> 0
Part
Tag
0
root
-
surface analysis
defect list management
search for backup labels
read and display labels
save new disk/partition definitions
show vendor, product and revision
set 8-character volume name
execute <cmd>, then return
change `0' partition
change `1' partition
change `2' partition
change `3' partition
change `4' partition
change `5' partition
change `6' partition
change `7' partition
select a predefined table
modify a predefined partition table
name the current table
display the current table
write partition map and label to the disk
execute <cmd>, then return
Flag
wm
Cylinders
0 725
Size
1.00GB
Blocks
(726/0/0)
2097414
Enter partition id tag[root]: unassigned
Enter partition permission flags[wm]: wm
Enter new starting cyl[0]: 0
Enter partition size[2097414b, 726c, 1024.13mb, 1.00gb]: 0c
partition> 1
Part
Tag
Flag
Cylinders
Size
Blocks
1
swap
wu
726 - 3629
4.00GB
(2904/0/0)
8389656
Enter partition id tag[swap]: unassigned
Enter partition permission flags[wu]: wm
Enter new starting cyl[726]: 0
Enter partition size[8389656b, 2904c, 4096.51mb, 4.00gb]: 0c
partition> 3
Part
Tag
Flag
Cylinders
Size
Blocks
3 unassigned
wm
0
0
(0/0/0)
Enter partition id tag[unassigned]: unassigned
Enter partition permission flags[wm]: wm
Enter new starting cyl[0]: 0
Enter partition size[0b, 0c, 0.00mb, 0.00gb]: 0c
partition> 4
Part
Tag
Flag
Cylinders
Size
4 unassigned
wm
3630 - 23156
26.90GB
0
Blocks
(19527/0/0) 56413503
Enter partition id tag[unassigned]: unassigned
Enter partition permission flags[wm]: wm
Enter new starting cyl[3630]: 0
Enter partition size[56413503b, 19527c, 27545.66mb, 26.90gb]: 0c
partition> 5
Part
Tag
Flag
Cylinders
Size
Blocks
5
var
wm
23157 - 23882
1.00GB
(726/0/0)
2097414
Cisco PGW 2200 Softswitch Release 9.8 Software Installation and Configuration Guide
2-94
OL-18083-01
Chapter 2
Installing the Sun Solaris 10 Operating System
Loading the Sun Solaris 10 Operating Environment
Enter partition id tag[var]: unassigned
Enter partition permission flags[wm]: wm
Enter new starting cyl[23157]: 0
Enter partition size[2097414b, 726c, 1024.13mb, 1.00gb]: 0c
partition> 6
Part
Tag
Flag
Cylinders
Size
Blocks
6
usr
wm
23883 - 24608
1.00GB
(726/0/0)
2097414
Enter partition id tag[usr]: unassigned
Enter partition permission flags[wm]: wm
Enter new starting cyl[23883]: 0
Enter partition size[2097414b, 726c, 1024.13mb, 1.00gb]: 0c
partition> 7
Part
Tag
Flag
Cylinders
Size
Blocks
7 unassigned
wm
24609 - 24619
15.52MB
(11/0/0)
31779
Enter partition id tag[unassigned]: unassigned
Enter partition permission flags[wm]: wm
Enter new starting cyl[24609]: 0
Enter partition size[31779b, 11c, 15.52mb, 0.02gb]: 0c
partition> 2
Part
Tag
Flag
Cylinders
Size
Blocks
2
backup
wm
0 - 24619
33.92GB
(24620/0/0) 71127180
Enter partition id tag[backup]: unassigned
Enter partition permission flags[wm]: wm
Enter new starting cyl[0]: 0
Enter partition size[71127180b, 24620c, 34730.07mb, 33.92gb]: 24620c
partition> 3
Part
Tag
Flag
Cylinders
Size
Blocks
3 unassigned
wm
0
0
(0/0/0)
0
Enter partition id tag[unassigned]: unassigned
Enter partition permission flags[wm]: wm
Enter new starting cyl[0]: 0
Enter partition size[0b, 0c, 0.00mb, 0.00gb]: 9848c
partition> 4
Part
Tag
Flag
Cylinders
Size
4 unassigned
wm
0
0
0
Blocks
(0/0/0)
Enter partition id tag[unassigned]: unassigned
Enter partition permission flags[wm]: wm
Enter new starting cyl[0]: 9848
Enter partition size[0b, 0c, 0.00mb, 0.00gb]: 14772c
partition> p
Current partition table (unnamed):
Total disk cylinders available: 24620 + 2 (reserved cylinders)
Part
Tag
0 unassigned
1 unassigned
2 unassigned
3 unassigned
4 unassigned
5 unassigned
6 unassigned
7 unassigned
Flag
wm
wm
wm
wm
wm
wm
wm
wm
Cylinders
0
0
0 - 24619
0 - 9847
9848 - 24619
0
0
0
Size
0
0
33.92GB
13.57GB
20.35GB
0
0
0
Blocks
(0/0/0)
0
(0/0/0)
0
(24620/0/0) 71127180
(9848/0/0) 28450872
(14772/0/0) 42676308
(0/0/0)
0
(0/0/0)
0
(0/0/0)
0
partition> l
partition> q
FORMAT MENU:
Cisco PGW 2200 Softswitch Release 9.8 Software Installation and Configuration Guide
OL-18083-01
2-95
Chapter 2
Installing the Sun Solaris 10 Operating System
Loading the Sun Solaris 10 Operating Environment
disk
type
partition
current
format
repair
label
analyze
defect
backup
verify
save
inquiry
volname
!<cmd>
quit
format> q
-
select a disk
select (define) a disk type
select (define) a partition table
describe the current disk
format and analyze the disk
repair a defective sector
write label to the disk
surface analysis
defect list management
search for backup labels
read and display labels
save new disk/partition definitions
show vendor, product and revision
set 8-character volume name
execute <cmd>, then return
unknown disk type, assuming the speed is 10000 rpm
Build log filesystem at /dev/rdsk/c0t1d0s3 ...
mkfs -F ufs /dev/rdsk/c0t1d0s3 28450872 107 27 8192 1024 251 1 166 8192 t 0 -1 8 107
Cylinder groups must have a multiple of 16 cylinders with the given parameters
Rounded cgsize up to 256
/dev/rdsk/c0t1d0s3:
28450872 sectors in 9848 cylinders of 27 tracks, 107 sectors
13892.0MB in 308 cyl groups (32 c/g, 45.14MB/g, 5632 i/g)
super-block backups (for fsck -F ufs -o b=#) at:
32, 92592, 185152, 277712, 370272, 462832, 555392, 647952, 740512, 833072,
.
.
.
Build spool filesystem at /dev/rdsk/c0t1d0s4 ...
mkfs -F ufs /dev/rdsk/c0t1d0s4 42676308 107 27 8192 1024 251 1 166 8192 t 0 -1 8 107
Cylinder groups must have a multiple of 16 cylinders with the given parameters
Rounded cgsize up to 256
/dev/rdsk/c0t1d0s4:
42676308 sectors in 14772 cylinders of 27 tracks, 107 sectors
20838.0MB in 462 cyl groups (32 c/g, 45.14MB/g, 5632 i/g)
super-block backups (for fsck -F ufs -o b=#) at:
32, 92592, 185152, 277712, 370272, 462832, 555392, 647952, 740512, 833072,
.
.
.
Remove any existing entry in /etc/vfstab for c0t1d0s3 or c0t1d0s4
Adding entries to /etc/vfstab
Mounting /opt/CiscoMGC/var/log
Mounting /opt/CiscoMGC/var/spool
Success!!!
This completes the installation of the Log and Spool File system. Go to Table 2-2 on page 2-72 if you
want to continue with the list for package installation.
Cisco PGW 2200 Softswitch Release 9.8 Software Installation and Configuration Guide
2-96
OL-18083-01
Chapter 2
Installing the Sun Solaris 10 Operating System
Loading the Sun Solaris 10 Operating Environment
Uninstalling the Log and Spool File System
Use the following procedure if you need to remove the Log and Spool File system from the second disk.
Contact Cisco TAC if you need assistance (see the “Obtaining Documentation and Submitting a Service
Request” section in the Preface).
Note
Step 1
You must be logged in as root to uninstall CSCOh024.
Type the following command at the # prompt and press Enter:
cd /opt/sun_install/Log_Spool/
./uninstall_log_spool
Text similar to the following is displayed:
You are running as root - Good...
*** WARNING! LOG FILES WILL NOT BE SAVED ***
Uninstalling this package typically means that the log &
spool directories will be on the same disk as the rest of
the software so there is less space available for those
files. We will not save any existing log or spool files.
*** WARNING! LOG FILES WILL NOT BE SAVED ***
However, they are not being deleted - the log files will
still exist on the second (unmounted) disk drive
It is possible to manually mount that disk and recover
log files if necessary.
If you want to save log files before running this
script, then exit and do so now
Do you want to continue? (y/n) [N] y
Step 2
Type y and press Enter to remove CSCOh024. Text similar to the following is displayed:
Unmount /opt/CiscoMGC/var/log
Unmount /opt/CiscoMGC/var/spool
Update /etc/vfstab
Remove old files...
The Log/Spool software has been removed from the system
Now you can remove the package with the command:
pkgrm CSCOh024
Done!
Step 3
Type the following command and press Enter to continue the removal of CSCOh024.
pkgrm CSCOh024
Step 4
Reboot your machine with the -r option. Type the following command and press Enter:
# reboot -- –r
Cisco PGW 2200 Softswitch Release 9.8 Software Installation and Configuration Guide
OL-18083-01
2-97
Chapter 2
Installing the Sun Solaris 10 Operating System
Loading the Sun Solaris 10 Operating Environment
Note
If you have installed the Solaris DiskSuite package (CSCOh023) on your system, the messages
below are displayed during system boot. They are normal Solaris DiskSuite startup messages
and do not indicate any problem with your system.
WARNING force load of misc /md-trans failed
WARNING force load of misc /md-raid failed
WARNING force load of misc /md-hotspares failed
WARNING force load of misc /md-sp failed
This completes the removal of the Log and Spool File system from the second disk.
Installing Cisco BAMS Archive Partition (CSCOh027)
The Cisco BAMS application cannot use the Solstice DiskSuite to configure the local disk drives. Use
the procedure below to create an archive partition on the disk drives for Cisco BAMS systems.
Note
Step 1
You must log in as root to run the following installation script.
Load the Cisco Solaris 10 Operating Environment CD into the CD-ROM drive. Enter the following
command to install the Cisco BAMS disk configuration scripts:
pkgadd -d /cdrom/cdrom0/CSCOh027.pkg
Text similar to the following is displayed.
The following packages are available:
1 CSCOh027
Media Gateway Controller BAMS Archive Partition Package
(sparc) 3.0(6)
Select package(s) you wish to process (or 'all' to process
all packages). (default: all) [?,??,q]:
Note
Step 2
You can also download the Sparc-based Cisco BAMS archive partition package (CSCOh027)
from Cisco.com. For example, download the CSCOh027 package to the /opt/SW folder on the
Sparc-based platform and use the command, pkgadd -d /opt/SW/CSCOh027.pkg.
Press Enter to accept the default answer all.
Text similar to the following is displayed:
Processing package instance <CSCOh027> from </var/tmp/CSCOh027.pkg>
Media Gateway Controller BAMS Archive Partition Package(sparc) 3.0(6)
Cisco Systems, Inc.
## Executing checkinstall script.
CSCOh027 checkinstall log file at /var/tmp/CSCOh027.checkinstall.log
Platform is SUNW,Sun-Fire-V210
This machine is running Solaris 5.10
Cisco PGW 2200 Softswitch Release 9.8 Software Installation and Configuration Guide
2-98
OL-18083-01
Chapter 2
Installing the Sun Solaris 10 Operating System
Loading the Sun Solaris 10 Operating Environment
The selected base directory </opt/sun_install> must exist before
installation is attempted.
Do you want this directory created now [y,n,?,q]
Step 3
Answer y and press Enter to create the directory.
Text similar to the following is displayed:
Using </opt/sun_install> as the package base directory.
## Processing package information.
## Processing system information.
1 package pathname is already properly installed.
## Verifying disk space requirements.
## Checking for conflicts with packages already installed.
The following files are already installed on the system and are being
used by another package:
* /opt/sun_install <attribute change only>
* - conflict with a file which does not belong to any package.
Do you want to install these conflicting files [y,n,?,q] y
Step 4
Answer y and press Enter to install the files.
Text similar to the following is displayed:
## Checking for setuid/setgid programs.
This package contains scripts which will be executed with super-user
permission during the process of installing this package.
Do you want to continue with the installation of <CSCOh027> [y,n,?]
Step 5
Type y and press Enter to continue the installation.
Text similar to the following is displayed:
Installing Media Gateway Controller BAMS Archive Partition Package as <CSCOh027>
## Installing part 1 of 1.
[ verifying class <none> ]
## Executing postinstall script.
!!
!!
!!
!!
!!
You must now change directories to
/opt/sun_install/BAMS_archive and run the
./install_BAMS_archive script as root.
Installation of <CSCOh027> was successful.
Step 6
Change directories. Enter the following command:
cd
Step 7
/opt/sun_install/BAMS_archive
Run the first script. Enter the following command:
./install_BAMS_archive.sh
Text similar to the following is displayed:
Output will be logged in
/opt/sun_install/BAMS_archive/install_BAMS_archive.log
Cisco PGW 2200 Softswitch Release 9.8 Software Installation and Configuration Guide
OL-18083-01
2-99
Chapter 2
Installing the Sun Solaris 10 Operating System
Loading the Sun Solaris 10 Operating Environment
The second hard drive will be reformatted by this script,
all data on this drive will be lost
Do you want to continue with formatting? (y or n)
Installation started on Wed Jul 9 20:54:33 EDT 2008
Platform is SUNW,Sun-Fire-V210
Searching for disks...done
FORMAT MENU:
disk
type
partition
current
format
fdisk
repair
label
analyze
defect
backup
verify
volname
!<cmd>
quit
format> disk
-
select a disk
select (define) a disk type
select (define) a partition table
describe the current disk
format and analyze the disk
run the fdisk program
repair a defective sector
write label to the disk
surface analysis
defect list management
search for backup labels
read and display labels
set 8-character volume name
execute <cmd>, then return
AVAILABLE DISK SELECTIONS:
0. c1t0d0 <SUN72G cyl 14087 alt 2 hd 24 sec 424>
/pci@1c,600000/scsi@2/sd@0,0
1. c1t1d0 <SUN72G cyl 14087 alt 2 hd 24 sec 424>
/pci@1c,600000/scsi@2/sd@1,0
Specify disk (enter its number): 1
selecting c1t1d0
[disk formatted]
format> current
Current Disk = c1t1d0
<SUN72G cyl 14087 alt 2 hd 24 sec 424>
/pci@1c,600000/scsi@2/sd@1,0
format> q
2nd Disk device is:
Disk type is:
Number of Cylinders :
c1t1d0
SUN72G
14087
ARCHIVE directory mount point is /opt/CiscoBAMS/CDR/archive
Number of cylinders for archive partition:
14087
Building format log temp files...
Build partition table for c1t1d0 ...
Searching for disks...done
selecting c1t1d0
[disk formatted]
Cisco PGW 2200 Softswitch Release 9.8 Software Installation and Configuration Guide
2-100
OL-18083-01
Chapter 2
Installing the Sun Solaris 10 Operating System
Loading the Sun Solaris 10 Operating Environment
FORMAT MENU:
disk
type
partition
current
format
repair
label
analyze
defect
backup
verify
save
inquiry
volname
!<cmd>
quit
format> p
PARTITION MENU:
0
1
2
3
4
5
6
7
select modify name
print label !<cmd> quit
partition> 0
Part
Tag
0
root
-
select a disk
select (define) a disk type
select (define) a partition table
describe the current disk
format and analyze the disk
repair a defective sector
write label to the disk
surface analysis
defect list management
search for backup labels
read and display labels
save new disk/partition definitions
show vendor, product and revision
set 8-character volume name
execute <cmd>, then return
change `0' partition
change `1' partition
change `2' partition
change `3' partition
change `4' partition
change `5' partition
change `6' partition
change `7' partition
select a predefined table
modify a predefined partition table
name the current table
display the current table
write partition map and label to the disk
execute <cmd>, then return
Flag
wm
Cylinders
806 - 1208
Size
1.96GB
Blocks
(403/0/0)
4100928
Enter partition id tag[root]: unassigned
Enter partition permission flags[wm]: wm
Enter new starting cyl[806]: 0
Enter partition size[4100928b, 403c, 402e, 2002.41mb, 1.96gb]: 0c
partition> 1
Part
Tag
Flag
Cylinders
Size
Blocks
1
var
wm
1209 - 2215
4.89GB
(1007/0/0)
10247232
Enter partition id tag[var]: unassigned
Enter partition permission flags[wm]: wm
Enter new starting cyl[1209]: 0
Enter partition size[10247232b, 1007c, 1006e, 5003.53mb, 4.89gb]: 0c
partition> 3
Part
Tag
Flag
Cylinders
Size
Blocks
3
swap
wu
0 805
3.91GB
(806/0/0)
8201856
Enter partition id tag[swap]: unassigned
Enter partition permission flags[wu]: wm
Enter new starting cyl[0]: 0
Enter partition size[8201856b, 806c, 805e, 4004.81mb, 3.91gb]: 0c
partition> 4
Part
Tag
Flag
Cylinders
Size
Blocks
4 unassigned
wm
2216 - 2220
24.84MB
(5/0/0)
50880
Cisco PGW 2200 Softswitch Release 9.8 Software Installation and Configuration Guide
OL-18083-01
2-101
Chapter 2
Installing the Sun Solaris 10 Operating System
Loading the Sun Solaris 10 Operating Environment
Enter partition id tag[unassigned]: unassigned
Enter partition permission flags[wm]: wm
Enter new starting cyl[2216]: 0
Enter partition size[50880b, 5c, 4e, 24.84mb, 0.02gb]: 0c
partition> 5
Part
Tag
Flag
Cylinders
Size
Blocks
5 unassigned
wm
2221 - 13683
55.62GB
(11463/0/0) 116647488
Enter partition id tag[unassigned]: unassigned
Enter partition permission flags[wm]: wm
Enter new starting cyl[2221]: 0
Enter partition size[116647488b, 11463c, 11462e, 56956.78mb, 55.62gb]: 0c
partition> 6
Part
Tag
Flag
Cylinders
Size
Blocks
6 unassigned
wm
13684 - 14086
1.96GB
(403/0/0)
4100928
Enter partition id tag[unassigned]: unassigned
Enter partition permission flags[wm]: wm
Enter new starting cyl[13684]: 0
Enter partition size[4100928b, 403c, 402e, 2002.41mb, 1.96gb]: 0c
partition> 7
Part
Tag
Flag
Cylinders
Size
Blocks
7 unassigned
wm
0
0
(0/0/0)
Enter partition id tag[unassigned]: unassigned
Enter partition permission flags[wm]: wm
Enter new starting cyl[0]: 0
Enter partition size[0b, 0c, 0e, 0.00mb, 0.00gb]: 0c
partition> 2
Part
Tag
Flag
Cylinders
Size
2
backup
wm
0 - 14086
68.35GB
0
Blocks
(14087/0/0) 143349312
Enter partition id tag[backup]: backup
Enter partition permission flags[wm]: wm
Enter new starting cyl[0]:
Enter partition size[143349312b, 14087c, 14086e, 69994.78mb, 68.35gb]: 14087c
partition> 0
Part
Tag
Flag
Cylinders
Size
Blocks
0 unassigned
wm
0
0
(0/0/0)
0
Enter partition id tag[unassigned]: unassigned
Enter partition permission flags[wm]: wm
Enter new starting cyl[0]:
Enter partition size[0b, 0c, 0e, 0.00mb, 0.00gb]: 14087c
partition> p
Current partition table (unnamed):
Total disk cylinders available: 14087 + 2 (reserved cylinders)
Part
Tag
0 unassigned
1 unassigned
2
backup
3 unassigned
4 unassigned
5 unassigned
6 unassigned
7 unassigned
Flag
wm
wm
wm
wm
wm
wm
wm
wm
Cylinders
0 - 14086
0
0 - 14086
0
0
0
0
0
Size
68.35GB
0
68.35GB
0
0
0
0
0
Blocks
(14087/0/0) 143349312
(0/0/0)
0
(14087/0/0) 143349312
(0/0/0)
0
(0/0/0)
0
(0/0/0)
0
(0/0/0)
0
(0/0/0)
0
partition> l
partition> q
FORMAT MENU:
Cisco PGW 2200 Softswitch Release 9.8 Software Installation and Configuration Guide
2-102
OL-18083-01
Chapter 2
Installing the Sun Solaris 10 Operating System
Loading the Sun Solaris 10 Operating Environment
disk
type
partition
current
format
repair
label
analyze
defect
backup
verify
save
inquiry
volname
!<cmd>
quit
format> q
-
select a disk
select (define) a disk type
select (define) a partition table
describe the current disk
format and analyze the disk
repair a defective sector
write label to the disk
surface analysis
defect list management
search for backup labels
read and display labels
save new disk/partition definitions
show vendor, product and revision
set 8-character volume name
execute <cmd>, then return
Build archive filesystem at /dev/rdsk/c1t1d0s0 ...
Remove any existing entry in /etc/vfstab for c1t1d0
Adding entries to /etc/vfstab
Mounting /opt/CiscoBAMS/CDR/archive
Success!!!
The Cisco BAMS archive partition installation is now complete. If you want to return to the list for
package installation, go to Table 2-2 on page 2-72.
Installing the Sparc-based Communications and Alarm Software Package
(CSCOh026)
This package installs xterm, ntp, and ftp communications software on your host. It also installs the
Lights Out Management (LOM) alarm software package if you are installing Solaris 10 on one of the
following platforms:
•
Sun Fire V120
•
Netra 120
•
Netra t 1120/1125
•
Netra t 1400/1405
•
Netra 20
If you are installing Solaris 10 on a Sun Fire V210, Netra 210, Netra 240 or Netra 440 platform, there
are no separate alarm software packages to install because the alarm software is installed automatically.
This software, ALOM, is integrated within the Solaris 10 operating system. Therefore, previous SUN
LOM alarm packages like SUNWlomm (on Sun Fire V120) and SUNWtsalm (on Netra 112X) do not
exist on these platforms. For additional information regarding lights-out alarms on the Sun Fire V210,
Netra 210, Netra 240 and Netra 440, see the SUN ALOM Guide at
http://www.sun.com/servers/alom.html.
Cisco PGW 2200 Softswitch Release 9.8 Software Installation and Configuration Guide
OL-18083-01
2-103
Chapter 2
Installing the Sun Solaris 10 Operating System
Loading the Sun Solaris 10 Operating Environment
Note
The installation of this package does not automatically enable ftp communications on your host. If you
are installing this software on a Cisco BAMS system or if your host requires that the ftp communications
be enabled, you can find instructions for enabling ftp in Step 5 of this procedure.
To install the communications and alarm software on your hosts, perform the following steps:
Step 1
Load the Cisco Solaris 10 Operating Environment CD into the CD-ROM drive. Install this package by
entering the following command at the # prompt:
#
pkgadd -d /cdrom/cdrom0/CSCOh026.pkg
Text similar to the following is displayed along with copyright and trademark information:
The following packages are available:
1 CSCOh026
Media Gateway Controller PGW Specific Solaris 10 packages
(sparc) 3.0(6)
Select package(s) you wish to process (or 'all' to process
all packages). (default: all) [?,??,q]:
Note
Step 2
You can also download the Sparc-based communications and alarm software package
(CSCOh026) from Cisco.com. For example, download the CSCOh026 package to the /opt/SW
folder on the Sparc-based platform and use the command, pkgadd -d /opt/SW/CSCOh026.pkg.
Press Enter to accept the default answer of all and install all the packages. Text similar to the following
is displayed:
Processing package instance <CSCOh026> from </var/tmp/CSCOh026.pkg>
Media Gateway Controller PGW Specific Solaris 10 packages(sparc) 3.0(6)
Cisco Systems, Inc.
## Executing checkinstall script.
CSCOh026 checkinstall log file at /var/tmp/CSCOh026.checkinstall.log
Platform is SUNW,Sun-Fire-V210
This machine is running Solaris 5.10
Using </opt/sun_install> as the package base directory.
## Processing package information.
## Processing system information.
2 package pathnames are already properly installed.
## Verifying disk space requirements.
## Checking for conflicts with packages already installed.
## Checking for setuid/setgid programs.
This package contains scripts which will be executed with super-user
permission during the process of installing this package.
Do you want to continue with the installation of <CSCOh026> [y,n,?]
Step 3
Type y and press Enter to continue the installation. Text similar to the following is displayed:
Installing Media Gateway Controller PGW Specific Solaris 10 packages as <CSCOh026>
## Installing part 1 of 1.
/opt/sun_install/SolPkg/137324-01.zip
/opt/sun_install/SolPkg <implied directory>
/opt/sun_install/SolPkg/LOM20.tar.gz
/opt/sun_install/SolPkg/SUNWftpr.tar.gz
/opt/sun_install/SolPkg/SUNWftpu.tar.gz
Cisco PGW 2200 Softswitch Release 9.8 Software Installation and Configuration Guide
2-104
OL-18083-01
Chapter 2
Installing the Sun Solaris 10 Operating System
Loading the Sun Solaris 10 Operating Environment
/opt/sun_install/SolPkg/SUNWnfsckr.tar.gz
/opt/sun_install/SolPkg/SUNWnfscr.tar.gz
/opt/sun_install/SolPkg/SUNWnfscu.tar.gz
/opt/sun_install/SolPkg/SUNWnfsskr.tar.gz
/opt/sun_install/SolPkg/SUNWnfssr.tar.gz
/opt/sun_install/SolPkg/SUNWnfssu.tar.gz
/opt/sun_install/SolPkg/SUNWtftp.tar.gz
/opt/sun_install/SolPkg/SUNWtftpr.tar.gz
/opt/sun_install/SolPkg/SUNWvts.tar.gz
/opt/sun_install/SolPkg/SUNWvtsmn.tar.gz
/opt/sun_install/SolPkg/SUNWvtsr.tar.gz
/opt/sun_install/SolPkg/SUNWvtsts.tar.gz
/opt/sun_install/SolPkg/SUNWxwopt.tar.gz
/opt/sun_install/SolPkg/autoinspkg
/opt/sun_install/SolPkg/autoremovevts
/opt/sun_install/SolPkg/configNtp.sh
/opt/sun_install/SolPkg/gunzip
/opt/sun_install/SolPkg/install_SolPkg.sh
/opt/sun_install/SolPkg/ntp_Sparc.tar.gz
/opt/sun_install/SolPkg/uninstall_SolPkg.sh
[ verifying class <none> ]
## Executing postinstall script.
!!
!! You must now change directories to
!! /opt/sun_install/SolPkg and run the
!! ./install_SolPkg.sh script as root.
!!
Installation of <CSCOh026> was successful.
Step 4
Enter the following commands to change directories and execute the installation script.
cd /opt/sun_install/SolPkg
./install_SolPkg.sh
Text similar to the following is displayed:
Note
The following command output is truncated. These lists vary over time.
You are running as root - Good...
x ./SUNWxwopt, 0 bytes, 0 tape blocks
x ./SUNWxwopt/archive, 0 bytes, 0 tape blocks
x ./SUNWxwopt/archive/none.bz2, 625965 bytes, 1223 tape blocks
x ./SUNWxwopt/install, 0 bytes, 0 tape blocks
x ./SUNWxwopt/install/copyright, 93 bytes, 1 tape blocks
x ./SUNWxwopt/install/depend, 344 bytes, 1 tape blocks
x ./SUNWxwopt/install/i.none, 2245 bytes, 5 tape blocks
x ./SUNWxwopt/pkginfo, 473 bytes, 1 tape blocks
x ./SUNWxwopt/pkgmap, 4506 bytes, 9 tape blocks
x ./SUNWxwopt/reloc, 0 bytes, 0 tape blocks
x ./SUNWxwopt/reloc/openwin, 0 bytes, 0 tape blocks
x ./SUNWxwopt/reloc/openwin/bin, 0 bytes, 0 tape blocks
x ./SUNWxwopt/reloc/openwin/lib, 0 bytes, 0 tape blocks
x ./SUNWxwopt/reloc/openwin/lib/app-defaults, 0 bytes, 0 tape blocks
x ./SUNWxwopt/reloc/openwin/lib/X11, 0 bytes, 0 tape blocks
x ./SUNWxwopt/reloc/openwin/lib/X11/twm, 0 bytes, 0 tape blocks
x ./SUNWxwopt/reloc/openwin/lib/X11/xdm, 0 bytes, 0 tape blocks
spawn pkgadd -d . SUNWxwopt
Processing package instance <SUNWxwopt> from </tmp>
Cisco PGW 2200 Softswitch Release 9.8 Software Installation and Configuration Guide
OL-18083-01
2-105
Chapter 2
Installing the Sun Solaris 10 Operating System
Loading the Sun Solaris 10 Operating Environment
X Window System Optional Clients(sparc) 6.6.2.7400,REV=0.2004.12.15
Copyright 2005 Sun Microsystems, Inc. All rights reserved.
Use is subject to license terms.
Using </usr> as the package base directory.
## Processing package information.
## Processing system information.
6 package pathnames are already properly installed.
## Verifying package dependencies.
## Verifying disk space requirements.
## Checking for conflicts with packages already installed.
## Checking for setuid/setgid programs.
This package contains scripts which will be executed with super-user
permission during the process of installing this package.
Do you want to continue with the installation of <SUNWxwopt> [y,n,?] y
Installing X Window System Optional Clients as <SUNWxwopt>
## Installing part 1 of 1.
3379 blocks
Installation of <SUNWxwopt> was successful.
x ./SUNWftpr, 0 bytes, 0 tape blocks
x ./SUNWftpr/install, 0 bytes, 0 tape blocks
x ./SUNWftpr/install/copyright, 93 bytes, 1 tape blocks
x ./SUNWftpr/install/depend, 1036 bytes, 3 tape blocks
x ./SUNWftpr/install/i.ftpaccess, 2849 bytes, 6 tape blocks
x ./SUNWftpr/install/i.ftpusers, 1506 bytes, 3 tape blocks
x ./SUNWftpr/install/i.manifest, 1503 bytes, 3 tape blocks
x ./SUNWftpr/install/i.preserve, 186 bytes, 1 tape blocks
x ./SUNWftpr/install/r.manifest, 1044 bytes, 3 tape blocks
x ./SUNWftpr/pkginfo, 452 bytes, 1 tape blocks
x ./SUNWftpr/pkgmap, 982 bytes, 2 tape blocks
x ./SUNWftpr/reloc, 0 bytes, 0 tape blocks
x ./SUNWftpr/reloc/etc, 0 bytes, 0 tape blocks
x ./SUNWftpr/reloc/etc/ftpd, 0 bytes, 0 tape blocks
x ./SUNWftpr/reloc/etc/ftpd/ftpaccess, 1518 bytes, 3 tape blocks
x ./SUNWftpr/reloc/etc/ftpd/ftpconversions, 946 bytes, 2 tape blocks
x ./SUNWftpr/reloc/etc/ftpd/ftpgroups, 104 bytes, 1 tape blocks
x ./SUNWftpr/reloc/etc/ftpd/ftphosts, 108 bytes, 1 tape blocks
x ./SUNWftpr/reloc/etc/ftpd/ftpservers, 114 bytes, 1 tape blocks
x ./SUNWftpr/reloc/etc/ftpd/ftpusers, 198 bytes, 1 tape blocks
x ./SUNWftpr/reloc/var, 0 bytes, 0 tape blocks
x ./SUNWftpr/reloc/var/svc, 0 bytes, 0 tape blocks
x ./SUNWftpr/reloc/var/svc/manifest, 0 bytes, 0 tape blocks
x ./SUNWftpr/reloc/var/svc/manifest/network, 0 bytes, 0 tape blocks
x ./SUNWftpr/reloc/var/svc/manifest/network/ftp.xml, 1779 bytes, 4 tape blocks
spawn pkgadd -d . SUNWftpr
Processing package instance <SUNWftpr> from </tmp>
FTP Server, (Root)(sparc) 11.10.0,REV=2005.01.21.15.53
Copyright 2005 Sun Microsystems, Inc. All rights reserved.
Use is subject to license terms.
Using </> as the package base directory.
## Processing package information.
## Processing system information.
5 package pathnames are already properly installed.
## Verifying package dependencies.
## Verifying disk space requirements.
## Checking for conflicts with packages already installed.
## Checking for setuid/setgid programs.
Cisco PGW 2200 Softswitch Release 9.8 Software Installation and Configuration Guide
2-106
OL-18083-01
Chapter 2
Installing the Sun Solaris 10 Operating System
Loading the Sun Solaris 10 Operating Environment
This package contains scripts which will be executed with super-user
permission during the process of installing this package.
Do you want to continue with the installation of <SUNWftpr> [y,n,?] y
Installing FTP Server, (Root) as <SUNWftpr>
## Installing part 1 of 1.
[ verifying class <none> ]
[ verifying class <preserve> ]
[ verifying class <ftpaccess> ]
[ verifying class <ftpusers> ]
y
[ verifying class <manifest> ]
Installation of <SUNWftpr> was successful.
x ./SUNWftpu, 0 bytes, 0 tape blocks
x ./SUNWftpu/archive, 0 bytes, 0 tape blocks
x ./SUNWftpu/archive/none.bz2, 119958 bytes, 235 tape blocks
x ./SUNWftpu/install, 0 bytes, 0 tape blocks
x ./SUNWftpu/install/copyright, 8644 bytes, 17 tape blocks
x ./SUNWftpu/install/depend, 1130 bytes, 3 tape blocks
x ./SUNWftpu/install/i.none, 2245 bytes, 5 tape blocks
x ./SUNWftpu/pkginfo, 495 bytes, 1 tape blocks
x ./SUNWftpu/pkgmap, 673 bytes, 2 tape blocks
x ./SUNWftpu/reloc, 0 bytes, 0 tape blocks
x ./SUNWftpu/reloc/usr, 0 bytes, 0 tape blocks
x ./SUNWftpu/reloc/usr/sbin, 0 bytes, 0 tape blocks
spawn pkgadd -d . SUNWftpu
Processing package instance <SUNWftpu> from </tmp>
FTP Server, (Usr)(sparc) 11.10.0,REV=2005.01.21.15.53
Copyright 2001-2003 Sun Microsystems, Inc. All rights reserved.
Use is subject to license terms.
Copyright (c) 1999,2000,2001 WU-FTPD Development Group.
All rights reserved.
WU-FTPD SOFTWARE LICENSE
Use, modification, or redistribution (including distribution of any modified
or derived work) in any form, or on any medium, is permitted only if all the
following conditions are met:
1. Redistributions qualify as "freeware" or "Open Source Software" under
the following terms:
a. Redistributions are made at no charge beyond the reasonable cost
of materials and delivery. Where redistribution of this software
is as part of a larger package or combined work, this restriction
applies only to the costs of materials and delivery of this
software, not to any other costs associated with the larger package
or combined work.
b. Redistributions are accompanied by a copy of the Source Code or by
an irrevocable offer to provide a copy of the Source Code for up
to three years at the cost of materials and delivery. Such
redistributions must allow further use, modification, and
redistribution of the Source Code under substantially the same
terms as this license. For the purposes of redistribution "Source
Code" means all files included in the original distribution,
Cisco PGW 2200 Softswitch Release 9.8 Software Installation and Configuration Guide
OL-18083-01
2-107
Chapter 2
Installing the Sun Solaris 10 Operating System
Loading the Sun Solaris 10 Operating Environment
including all modifications or additions, on a medium and in a
form allowing fully working executable programs to be produced.
2. Redistributions of Source Code must retain the copyright notices as
they appear in each Source Code file and the COPYRIGHT file, these
license terms, and the disclaimer/limitation of liability set forth as
paragraph 6 below.
3. Redistributions in binary form must reproduce the Copyright Notice,
these license terms, and the disclaimer/limitation of liability set
forth as paragraph 6 below, in the documentation and/or other materials
provided with the distribution. For the purposes of binary distribution
the "Copyright Notice" refers to the following language:
Copyright (c) 1999,2000 WU-FTPD Development Group.
All rights reserved.
Portions Copyright (c) 1980, 1985, 1988, 1989, 1990, 1991, 1993, 1994
The Regents of the University of California.
Portions Copyright (c) 1993, 1994 Washington University in Saint Louis.
Portions Copyright (c) 1996, 1998 Berkeley Software Design, Inc.
Portions Copyright (c) 1983, 1995, 1996, 1997 Eric P. Allman.
Portions Copyright (c) 1998 Sendmail, Inc.
Portions Copyright (c) 1989 Massachusetts Institute of Technology.
Portions Copyright (c) 1997 Stan Barber.
Portions Copyright (c) 1997 Kent Landfield.
Portions Copyright (c) 1991, 1992, 1993, 1994, 1995, 1996, 1997
Free Software Foundation, Inc.
Use and distribution of this software and its source code are
governed by the terms and conditions of the WU-FTPD Software
License ("LICENSE").
If you did not receive a copy of the license, it may be
obtained online at http://www.wu-ftpd.org/license.html
4. All advertising materials mentioning features or use of this software
must display the following acknowledgement: "This product includes
software developed by the WU-FTPD Development Group, the Washington
University at Saint Louis, Berkeley Software Design, Inc., and their
contributors."
5. Neither the name of the WU-FTPD Development Group, nor the names of any
copyright holders, nor the names of any contributors may be used to
endorse or promote products derived from this software without specific
prior written permission. The names "wuftpd" and "wu-ftpd" are
trademarks of the WU-FTPD Development Group and the Washington
University at Saint Louis.
6. Disclaimer/Limitation of Liability:
THIS SOFTWARE IS PROVIDED BY THE WU-FTPD DEVELOPMENT GROUP, THE
COPYRIGHT HOLDERS, AND CONTRIBUTORS, "AS IS" AND ANY EXPRESS OR IMPLIED
WARRANTIES, INCLUDING, BUT NOT LIMITED TO, THE IMPLIED WARRANTIES OF
MERCHANTABILITY AND FITNESS FOR A PARTICULAR PURPOSE ARE DISCLAIMED. IN
NO EVENT SHALL THE WU-FTPD DEVELOPMENT GROUP, THE COPYRIGHT HOLDERS, OR
CONTRIBUTORS, BE LIABLE FOR ANY DIRECT, INDIRECT, INCIDENTAL, SPECIAL,
EXEMPLARY, OR CONSEQUENTIAL DAMAGES (INCLUDING, BUT NOT LIMITED TO,
PROCUREMENT OF SUBSTITUTE GOODS OR SERVICES; LOSS OF USE, DATA, OR
PROFITS; OR BUSINESS INTERRUPTION) HOWEVER CAUSED AND ON ANY THEORY OF
LIABILITY, WHETHER IN CONTRACT, STRICT LIABILITY, OR TORT (INCLUDING
NEGLIGENCE OR OTHERWISE) ARISING IN ANY WAY OUT OF THE USE OF THIS
SOFTWARE, EVEN IF ADVISED OF THE POSSIBILITY OF SUCH DAMAGES.
Cisco PGW 2200 Softswitch Release 9.8 Software Installation and Configuration Guide
2-108
OL-18083-01
Chapter 2
Installing the Sun Solaris 10 Operating System
Loading the Sun Solaris 10 Operating Environment
7. USE, MODIFICATION, OR REDISTRIBUTION, OF THIS SOFTWARE IMPLIES
ACCEPTANCE OF ALL TERMS AND CONDITIONS OF THIS LICENSE.
$Id: LICENSE,v 1.4 2000/07/01 17:42:15 wuftpd Exp $
Copyright (c) 1993, 1994
All rights reserved.
Washington University in Saint Louis
Redistribution and use in source and binary forms, with or without
modification, are permitted provided that the following conditions are
met: 1. Redistributions of source code must retain the above copyright
notice, this list of conditions and the following disclaimer. 2.
Redistributions in binary form must reproduce the above copyright notice,
this list of conditions and the following disclaimer in the documentation
and/or other materials provided with the distribution. 3. All advertising
materials mentioning features or use of this software must display the
following acknowledgement: This product includes software developed by the
Washington University in Saint Louis and its contributors. 4. Neither the
name of the University nor the names of its contributors may be used to
endorse or promote products derived from this software without specific
prior written permission.
THIS SOFTWARE IS PROVIDED BY WASHINGTON UNIVERSITY AND CONTRIBUTORS
``AS IS'' AND ANY EXPRESS OR IMPLIED WARRANTIES, INCLUDING, BUT NOT
LIMITED TO, THE IMPLIED WARRANTIES OF MERCHANTABILITY AND FITNESS FOR
A PARTICULAR PURPOSE ARE DISCLAIMED. IN NO EVENT SHALL WASHINGTON
UNIVERSITY OR CONTRIBUTORS BE LIABLE FOR ANY DIRECT, INDIRECT,
INCIDENTAL, SPECIAL, EXEMPLARY, OR CONSEQUENTIAL DAMAGES (INCLUDING,
BUT NOT LIMITED TO, PROCUREMENT OF SUBSTITUTE GOODS OR SERVICES;
LOSS OF USE, DATA, OR PROFITS; OR BUSINESS INTERRUPTION) HOWEVER
CAUSED AND ON ANY THEORY OF LIABILITY, WHETHER IN CONTRACT, STRICT
LIABILITY, OR TORT (INCLUDING NEGLIGENCE OR OTHERWISE) ARISING IN
ANY WAY OUT OF THE USE OF THIS SOFTWARE, EVEN IF ADVISED OF THE
POSSIBILITY OF SUCH DAMAGE.
Copyright (c) 1980, 1983, 1985, 1988, 1989, 1990 Regents of the University of
California. All rights reserved.
Redistribution and use in source and binary forms, with or without
modification, are permitted provided that the following conditions
are met:
1. Redistributions of source code must retain the above copyright
notice, this list of conditions and the following disclaimer.
2. Redistributions in binary form must reproduce the above copyright
notice, this list of conditions and the following disclaimer in the
documentation and/or other materials provided with the distribution.
3. All advertising materials mentioning features or use of this software
must display the following acknowledgement:
This product includes software developed by the University of
California, Berkeley and its contributors.
4. Neither the name of the University nor the names of its contributors
may be used to endorse or promote products derived from this software
without specific prior written permission.
THIS SOFTWARE IS PROVIDED BY THE REGENTS AND CONTRIBUTORS ``AS IS'' AND
ANY EXPRESS OR IMPLIED WARRANTIES, INCLUDING, BUT NOT LIMITED TO, THE
IMPLIED WARRANTIES OF MERCHANTABILITY AND FITNESS FOR A PARTICULAR PURPOSE
ARE DISCLAIMED. IN NO EVENT SHALL THE REGENTS OR CONTRIBUTORS BE LIABLE
FOR ANY DIRECT, INDIRECT, INCIDENTAL, SPECIAL, EXEMPLARY, OR CONSEQUENTIAL
DAMAGES (INCLUDING, BUT NOT LIMITED TO, PROCUREMENT OF SUBSTITUTE GOODS
OR SERVICES; LOSS OF USE, DATA, OR PROFITS; OR BUSINESS INTERRUPTION)
HOWEVER CAUSED AND ON ANY THEORY OF LIABILITY, WHETHER IN CONTRACT, STRICT
Cisco PGW 2200 Softswitch Release 9.8 Software Installation and Configuration Guide
OL-18083-01
2-109
Chapter 2
Installing the Sun Solaris 10 Operating System
Loading the Sun Solaris 10 Operating Environment
LIABILITY, OR TORT (INCLUDING NEGLIGENCE OR OTHERWISE) ARISING IN ANY WAY
OUT OF THE USE OF THIS SOFTWARE, EVEN IF ADVISED OF THE POSSIBILITY OF
SUCH DAMAGE.
Using </> as the package base directory.
## Processing package information.
## Processing system information.
2 package pathnames are already properly installed.
## Verifying package dependencies.
## Verifying disk space requirements.
## Checking for conflicts with packages already installed.
## Checking for setuid/setgid programs.
This package contains scripts which will be executed with super-user
permission during the process of installing this package.
Do you want to continue with the installation of <SUNWftpu> [y,n,?]
Installing FTP Server, (Usr) as <SUNWftpu>
## Installing part 1 of 1.
577 blocks
Installation of <SUNWftpu> was successful.
spawn pkgrm SUNWvtsmn
The following package is currently installed:
SUNWvtsmn SunVTS Man Pages
(sparc) 6.4,REV=2007.07.05.12.46
Do you want to remove this package? [y,n,?,q] y
## Removing installed package instance <SUNWvtsmn>
## Verifying package <SUNWvtsmn> dependencies in global zone
## Processing package information.
## Removing pathnames in class <none>
/opt/SUNWvts/man/man1m/vtsui.1m
/opt/SUNWvts/man/man1m/vtstty.1m
/opt/SUNWvts/man/man1m/vtsprobe.1m
/opt/SUNWvts/man/man1m/vtsk.1m
/opt/SUNWvts/man/man1m/vts_cmd.1m
/opt/SUNWvts/man/man1m/sunvts.1m
...
/opt/SUNWvts/lib/locale/C <shared pathname not removed>
/opt/SUNWvts/lib/locale <shared pathname not removed>
/opt/SUNWvts/lib <shared pathname not removed>
/opt/SUNWvts <shared pathname not removed>
## Updating system information.
Removal of <SUNWvtsmn> was successful.
spawn pkgrm SUNWvtsr
The following package is currently installed:
SUNWvtsr SunVTS Framework (Root)
(sparc) 6.4,REV=2007.07.05.10.00
Do you want to remove this package? [y,n,?,q] y
## Verifying package <SUNWvtsr> dependencies in global zone
## Processing package information.
## Removing pathnames in class <none>
/etc/opt/SUNWvts/sunvts.conf.example
/etc/opt/SUNWvts
Cisco PGW 2200 Softswitch Release 9.8 Software Installation and Configuration Guide
2-110
OL-18083-01
Chapter 2
Installing the Sun Solaris 10 Operating System
Loading the Sun Solaris 10 Operating Environment
/etc/opt <shared pathname not removed>
/etc <shared pathname not removed>
## Updating system information.
Removal of <SUNWvtsr> was successful.
spawn pkgrm SUNWvtsts
The following package is currently installed:
SUNWvtsts SunVTS for Tests
(sparc) 6.4,REV=2007.07.05.12.46
Do you want to remove this package? [y,n,?,q] y
## Removing installed package instance <SUNWvtsts>
## Verifying package <SUNWvtsts> dependencies in global zone
## Processing package information.
## Removing pathnames in class <none>
/opt/SUNWvts/lib/sparcv9 <shared pathname not removed>
/opt/SUNWvts/lib/probe/sunlink_probe.so
/opt/SUNWvts/lib/probe/ssptest_probe.so
/opt/SUNWvts/lib/probe/sparcv9/xnetlbtest_probe.so
/opt/SUNWvts/lib/probe/sparcv9/vmemtest_probe.so
...
/opt/SUNWvts/bin/cmos.bin
/opt/SUNWvts/bin/bios.bin
/opt/SUNWvts/bin <shared pathname not removed>
/opt/SUNWvts <shared pathname not removed>
## Updating system information.
Removal of <SUNWvtsts> was successful.
spawn pkgrm SUNWvts
The following package is currently installed:
SUNWvts SunVTS Framework
(sparc) 6.4,REV=2007.07.05.10.00
Do you want to remove this package? [y,n,?,q] y
## Removing installed package instance <SUNWvts>
## Verifying package <SUNWvts> dependencies in global zone
## Processing package information.
## Removing pathnames in class <none>
/opt/SUNWvts/lib/sparcv9/libvtsutil.so.1
/opt/SUNWvts/lib/sparcv9/libvtsutil.so
/opt/SUNWvts/lib/sparcv9/libvtsthm.so.1
...
/opt/SUNWvts/bin
/opt/SUNWvts/README
/opt/SUNWvts
## Updating system information.
Removal of <SUNWvts> was successful.
x SUNWvts, 0 bytes, 0 tape blocks
x SUNWvts/archive, 0 bytes, 0 tape blocks
x SUNWvts/archive/none.bz2, 877058 bytes, 1714 tape blocks
x SUNWvts/install, 0 bytes, 0 tape blocks
x SUNWvts/install/checkinstall, 971 bytes, 2 tape blocks
x SUNWvts/install/copyright, 93 bytes, 1 tape blocks
...
Cisco PGW 2200 Softswitch Release 9.8 Software Installation and Configuration Guide
OL-18083-01
2-111
Chapter 2
Installing the Sun Solaris 10 Operating System
Loading the Sun Solaris 10 Operating Environment
x SUNWvts/reloc/sunwvts/lib/locale/c/LC_MESSAGES, 0 bytes, 0 tape blocks
x SUNWvts/reloc/sunwvts/lib/sparcv9, 0 bytes, 0 tape blocks
spawn pkgadd -d . SUNWvts
Processing package instance <SUNWvts> from </tmp>
SunVTS Framework(sparc) 6.4,REV=2007.07.05.10.00
Copyright 2007 Sun Microsystems, Inc. All rights reserved.
Use is subject to license terms.
## Executing checkinstall script.
Using </opt> as the package base directory.
## Processing package information.
## Processing system information.
## Verifying package dependencies.
## Verifying disk space requirements.
## Checking for conflicts with packages already installed.
## Checking for setuid/setgid programs.
This package contains scripts which will be executed with super-user
permission during the process of installing this package.
Do you want to continue with the installation of <SUNWvts> [y,n,?] y
Installing SunVTS Framework as <SUNWvts>
## Installing part 1 of 1.
8132 blocks
Installation of <SUNWvts> was successful.
x SUNWvtsts, 0 bytes, 0 tape blocks
x SUNWvtsts/archive, 0 bytes, 0 tape blocks
x SUNWvtsts/archive/none.bz2, 9661272 bytes, 18870 tape blocks
x SUNWvtsts/install, 0 bytes, 0 tape blocks
x SUNWvtsts/install/checkinstall, 1199 bytes, 3 tape blocks
...
x SUNWvtsts/reloc/sunwvts/lib/probe, 0 bytes, 0 tape blocks
x SUNWvtsts/reloc/sunwvts/lib/probe/sparcv9, 0 bytes, 0 tape blocks
spawn pkgadd -d . SUNWvtsts
Processing package instance <SUNWvtsts> from </tmp>
SunVTS for Tests(sparc) 6.4,REV=2007.07.05.12.46
Copyright 2007 Sun Microsystems, Inc. All rights reserved.
Use is subject to license terms.
## Executing checkinstall script.
Using </opt> as the package base directory.
## Processing package information.
## Processing system information.
14 package pathnames are already properly installed.
## Verifying package dependencies.
## Verifying disk space requirements.
## Checking for conflicts with packages already installed.
## Checking for setuid/setgid programs.
This package contains scripts which will be executed with super-user
permission during the process of installing this package.
Do you want to continue with the installation of <SUNWvtsts> [y,n,?] y
Installing SunVTS for Tests as <SUNWvtsts>
Cisco PGW 2200 Softswitch Release 9.8 Software Installation and Configuration Guide
2-112
OL-18083-01
Chapter 2
Installing the Sun Solaris 10 Operating System
Loading the Sun Solaris 10 Operating Environment
## Installing part 1 of 1.
y
y
y
94197 blocks
Installation of <SUNWvtsts> was successful.
x SUNWvtsr, 0 bytes, 0 tape blocks
x SUNWvtsr/archive, 0 bytes, 0 tape blocks
x SUNWvtsr/archive/none.bz2, 1280 bytes, 3 tape blocks
x SUNWvtsr/install, 0 bytes, 0 tape blocks
x SUNWvtsr/install/copyright, 93 bytes, 1 tape blocks
x SUNWvtsr/install/depend, 848 bytes, 2 tape blocks
x SUNWvtsr/install/i.none, 2245 bytes, 5 tape blocks
x SUNWvtsr/pkginfo, 563 bytes, 2 tape blocks
x SUNWvtsr/pkgmap, 279 bytes, 1 tape blocks
x SUNWvtsr/reloc, 0 bytes, 0 tape blocks
x SUNWvtsr/reloc/etc, 0 bytes, 0 tape blocks
x SUNWvtsr/reloc/etc/opt, 0 bytes, 0 tape blocks
x SUNWvtsr/reloc/etc/opt/sunwvts, 0 bytes, 0 tape blocks
spawn pkgadd -d . SUNWvtsr
Processing package instance <SUNWvtsr> from </tmp>
SunVTS Framework (Root)(sparc) 6.4,REV=2007.07.05.10.00
Copyright 2007 Sun Microsystems, Inc. All rights reserved.
Use is subject to license terms.
Using </> as the package base directory.
## Processing package information.
## Processing system information.
2 package pathnames are already properly installed.
## Verifying package dependencies.
## Verifying disk space requirements.
## Checking for conflicts with packages already installed.
## Checking for setuid/setgid programs.
This package contains scripts which will be executed with super-user
permission during the process of installing this package.
Do you want to continue with the installation of <SUNWvtsr> [y,n,?] y
Installing SunVTS Framework (Root) as <SUNWvtsr>
## Installing part 1 of 1.
6 blocks
Installation of <SUNWvtsr> was successful.
x SUNWvtsmn, 0 bytes, 0 tape blocks
x SUNWvtsmn/archive, 0 bytes, 0 tape blocks
...
x SUNWvtsmn/reloc/sunwvts/lib/locale/c/help/user_guide/shared/chars, 0 bytes, 0 tape
blocks
x SUNWvtsmn/reloc/sunwvts/man, 0 bytes, 0 tape blocks
x SUNWvtsmn/reloc/sunwvts/man/man1m, 0 bytes, 0 tape blocks
spawn pkgadd -d . SUNWvtsmn
Processing package instance <SUNWvtsmn> from </tmp>
SunVTS Man Pages(sparc) 6.4,REV=2007.07.05.12.46
Copyright 2007 Sun Microsystems, Inc. All rights reserved.
Use is subject to license terms.
Using </opt> as the package base directory.
Cisco PGW 2200 Softswitch Release 9.8 Software Installation and Configuration Guide
OL-18083-01
2-113
Chapter 2
Installing the Sun Solaris 10 Operating System
Loading the Sun Solaris 10 Operating Environment
## Processing package information.
## Processing system information.
5 package pathnames are already properly installed.
## Verifying package dependencies.
WARNING:
The <SUNWdoc> package "Documentation Tools " is a
prerequisite package and should be installed.
Do you want to continue with the installation of <SUNWvtsmn> [y,n,?] y
## Verifying disk space requirements.
## Checking for conflicts with packages already installed.
## Checking for setuid/setgid programs.
This package contains scripts which will be executed with super-user
permission during the process of installing this package.
Do you want to continue with the installation of <SUNWvtsmn> [y,n,?] y
Installing SunVTS Man Pages as <SUNWvtsmn>
## Installing part 1 of 1.
9419 blocks
Installation of <SUNWvtsmn> was successful.
y
y
Archive: 137324-01.zip
creating: 137324-01/
creating: 137324-01/SUNWvts/
inflating: 137324-01/SUNWvts/pkgmap
...
inflating: 137324-01/.diPatch
inflating: 137324-01/patchinfo
inflating: 137324-01/prepatch
inflating: 137324-01/README.137324-01
inflating: 137324-01/LEGAL_LICENSE.TXT
Validating patches...
Loading patches installed on the system...
Done!
Loading patches requested to install.
Done!
Checking patches that you specified for installation.
Done!
Approved patches will be installed in this order:
137324-01
Checking installed patches...
Executing prepatch script...
Verifying sufficient filesystem capacity (dry run method)...
Installing patch packages...
Patch 137324-01 has been successfully installed.
See /var/sadm/patch/137324-01/log for details
Cisco PGW 2200 Softswitch Release 9.8 Software Installation and Configuration Guide
2-114
OL-18083-01
Chapter 2
Installing the Sun Solaris 10 Operating System
Loading the Sun Solaris 10 Operating Environment
Patch packages installed:
SUNWvts
SUNWvtsts
Installation of patch 137324-01 successful
x SUNWnfsckr, 0 bytes, 0 tape blocks
x SUNWnfsckr/archive, 0 bytes, 0 tape blocks
...
x SUNWnfsckr/reloc/kernel/misc, 0 bytes, 0 tape blocks
x SUNWnfsckr/reloc/kernel/misc/sparcv9, 0 bytes, 0 tape blocks
spawn pkgadd -d . SUNWnfsckr
Processing package instance <SUNWnfsckr> from </tmp>
Network File System (NFS) client kernel support (Root)(sparc) 11.10.0,REV=2005.01.21.15.53
Copyright 2007 Sun Microsystems, Inc. All rights reserved.
Use is subject to license terms.
Using </> as the package base directory.
## Processing package information.
## Processing system information.
7 package pathnames are already properly installed.
## Verifying package dependencies.
## Verifying disk space requirements.
## Checking for conflicts with packages already installed.
## Checking for setuid/setgid programs.
This package contains scripts which will be executed with super-user
permission during the process of installing this package.
Do you want to continue with the installation of <SUNWnfsckr> [y,n,?] y
Installing Network File System (NFS) client kernel support (Root) as <SUNWnfsckr>
## Installing part 1 of 1.
2762 blocks
Installation of <SUNWnfsckr> was successful.
x SUNWnfscr, 0 bytes, 0 tape blocks
x SUNWnfscr/archive, 0 bytes, 0 tape blocks
x SUNWnfscr/archive/none.bz2, 23793 bytes, 47 tape blocks
x SUNWnfscr/install, 0 bytes, 0 tape blocks
x SUNWnfscr/install/copyright, 93 bytes, 1 tape blocks
x SUNWnfscr/reloc/var/svc/manifest/network/nfs/nlockmgr.xml, 2204 bytes, 5 tape blocks
x SUNWnfscr/reloc/var/svc/manifest/network/nfs/status.xml, 2023 bytes, 4 tape blocks
spawn pkgadd -d . SUNWnfscr
Processing package instance <SUNWnfscr> from </tmp>
Network File System (NFS) client support (Root)(sparc) 11.10.0,REV=2005.01.21.15.53
Copyright 2007 Sun Microsystems, Inc. All rights reserved.
Use is subject to license terms.
Using </> as the package base directory.
## Processing package information.
## Processing system information.
11 package pathnames are already properly installed.
## Verifying package dependencies.
## Verifying disk space requirements.
## Checking for conflicts with packages already installed.
## Checking for setuid/setgid programs.
This package contains scripts which will be executed with super-user
permission during the process of installing this package.
Cisco PGW 2200 Softswitch Release 9.8 Software Installation and Configuration Guide
OL-18083-01
2-115
Chapter 2
Installing the Sun Solaris 10 Operating System
Loading the Sun Solaris 10 Operating Environment
Do you want to continue with the installation of <SUNWnfscr> [y,n,?] y
Installing Network File System (NFS) client support (Root) as <SUNWnfscr>
## Installing part 1 of 1.
109 blocks
[ verifying class <nfssecconf> ]
[ verifying class <defnfs> ]
y
y
y
[ verifying class <manifest> ]
## Executing postinstall script.
Installation of <SUNWnfscr> was successful.
x SUNWnfscu, 0 bytes, 0 tape blocks
x SUNWnfscu/archive, 0 bytes, 0 tape blocks
x SUNWnfscu/archive/none.bz2, 158114 bytes, 309 tape blocks
x SUNWnfscu/install, 0 bytes, 0 tape blocks
...
x SUNWnfscu/reloc/usr/lib/fs/nfs, 0 bytes, 0 tape blocks
x SUNWnfscu/reloc/usr/lib/nfs, 0 bytes, 0 tape blocks
spawn pkgadd -d . SUNWnfscu
Processing package instance <SUNWnfscu> from </tmp>
Network File System (NFS) client support (Usr)(sparc) 11.10.0,REV=2005.01.21.15.53
Copyright 2007 Sun Microsystems, Inc. All rights reserved.
Use is subject to license terms.
Using </> as the package base directory.
## Processing package information.
## Processing system information.
5 package pathnames are already properly installed.
## Verifying package dependencies.
## Verifying disk space requirements.
## Checking for conflicts with packages already installed.
## Checking for setuid/setgid programs.
This package contains scripts which will be executed with super-user
permission during the process of installing this package.
Do you want to continue with the installation of <SUNWnfscu> [y,n,?] y
Installing Network File System (NFS) client support (Usr) as <SUNWnfscu>
## Installing part 1 of 1.
1026 blocks
## Executing postinstall script.
Installation of <SUNWnfscu> was successful.
x SUNWnfsskr, 0 bytes, 0 tape blocks
x SUNWnfsskr/archive, 0 bytes, 0 tape blocks
x SUNWnfsskr/archive/none.bz2, 206990 bytes, 405 tape blocks
x SUNWnfsskr/install, 0 bytes, 0 tape blocks
x SUNWnfsskr/install/copyright, 93 bytes, 1 tape blocks
x SUNWnfsskr/install/depend, 1036 bytes, 3 tape blocks
...
x SUNWnfsskr/reloc/kernel/misc/sparcv9, 0 bytes, 0 tape blocks
spawn pkgadd -d . SUNWnfsskr
Cisco PGW 2200 Softswitch Release 9.8 Software Installation and Configuration Guide
2-116
OL-18083-01
Chapter 2
Installing the Sun Solaris 10 Operating System
Loading the Sun Solaris 10 Operating Environment
Processing package instance <SUNWnfsskr> from </tmp>
Network File System (NFS) server kernel support (Root)(sparc) 11.10.0,REV=2005.01.21.15.53
Copyright 2007 Sun Microsystems, Inc. All rights reserved.
Use is subject to license terms.
Using </> as the package base directory.
## Processing package information.
## Processing system information.
3 package pathnames are already properly installed.
## Verifying package dependencies.
## Verifying disk space requirements.
## Checking for conflicts with packages already installed.
## Checking for setuid/setgid programs.
This package contains scripts which will be executed with super-user
...
Processing package instance <SUNWtftp> from </tmp>
Trivial File Transfer Server(sparc) 11.10.0,REV=2005.01.21.15.53
Copyright 2007 Sun Microsystems, Inc. All rights reserved.
...
Trivial File Transfer Server (Root)(sparc) 11.10.0,REV=2005.01.21.15.53
Copyright 2005 Sun Microsystems, Inc. All rights reserved.
NTP, (Root)(sparc) 11.10.0,REV=2005.01.21.15.53
Copyright 2005 Sun Microsystems, Inc. All rights reserved.
NTP, (Usr)(sparc) 11.10.0,REV=2005.01.21.15.53
Copyright 2005 Sun Microsystems, Inc. All rights reserved.
...
Installation of <SUNWntpu> was successful.
Enter the IP address of NTP server:
Step 5
Type the IP address for the NTP server used for your network and press Enter. Text similar to the
following is displayed:
NTP is configured and enabled. You can manually change the configuration by modifying
/etc/inet/ntp.conf and disable NTP by run 'svcadm enable ntp'
At any time, you may uninstall the software installed
by this package with the following commands:
cd /opt/sun_install/SolPkg
./uninstall_SolPkg.sh
which will uninstall all the solaris software
installed with this package
NTP software is installed and configured. System reboot is required to activate it. Do you
want to reboot now?[yes|no]
Step 6
You must reboot your system for the changes to take effect. Type yes and press Enter.
Step 7
If you require ftp access to your Cisco PGW 2200 Softswitch by Cisco BAMS or some other product,
type the following command and press Enter:
svcadm enable ftp
Cisco PGW 2200 Softswitch Release 9.8 Software Installation and Configuration Guide
OL-18083-01
2-117
Chapter 2
Installing the Sun Solaris 10 Operating System
Loading the Sun Solaris 10 Operating Environment
Note
If you need to disable the ftp communications software, use the svcadm disable ftp command.
If you need to determine the status of the ftp communications software, use the svcs -a | grep
ftp command.
The communications and alarm software installation is now complete. Go to Table 2-2 on page 2-72 if
you want to continue with the list for package installation.
Installing the Opteron-based Communications Software Package (CSCOh036)
Installing this package adds xterm, ntp, and ftp communications software on your host. To install the
communication software on your hosts, perform the following steps:
Note
The installation of this package does not automatically enable ftp communications on your host. If you
are installing this software on a Cisco BAMS system or if your host requires that the ftp communications
be enabled, you can find instructions for enabling ftp in Step 7 of this procedure.
Step 1
Load the Cisco Solaris 10 Operating Environment CD into the CD-ROM drive. Install this package by
entering the following command at the # prompt.
#
pkgadd -d /cdrom/cdrom0/CSCOh036.pkg
Text similar to the following is displayed along with copyright and trademark information:
The following packages are available:
1 CSCOh036
Media Gateway Controller PGW Specific Solaris 10 packages
(i386) 3.0(6)
Select package(s) you wish to process (or 'all' to process
all packages). (default: all) [?,??,q]:
Note
Step 2
You can also download the Opteron-based Solaris 10 communications software package
(CSCOh036) from Cisco.com. For example, download the CSCOh036 package to the /opt/SW
folder on the Opteron-based platform and use the command, pkgadd -d
/opt/SW/CSCOh036.pkg.
Press Enter to accept the default answer of all and install all the packages. Text similar to the following
is displayed:
Processing package instance <CSCOh036> from </var/tmp/CSCOh036.pkg>
Media Gateway Controller PGW Specific Solaris 10 packages(i386) 3.0(6)
Cisco Systems, Inc.
## Executing checkinstall script.
CSCOh036 checkinstall log file at /var/tmp/CSCOh036.checkinstall.log
Platform is i86pc
This machine is running Solaris 5.10
Using </opt/sun_install> as the package base directory.
## Processing package information.
## Processing system information.
2 package pathnames are already properly installed.
Cisco PGW 2200 Softswitch Release 9.8 Software Installation and Configuration Guide
2-118
OL-18083-01
Chapter 2
Installing the Sun Solaris 10 Operating System
Loading the Sun Solaris 10 Operating Environment
## Verifying disk space requirements.
## Checking for conflicts with packages already installed.
## Checking for setuid/setgid programs.
This package contains scripts which will be executed with super-user
permission during the process of installing this package.
Do you want to continue with the installation of <CSCOh036> [y,n,?]
Step 3
Type y and press Enter to continue the installation. Text similar to the following is displayed:
Installing Media Gateway Controller PGW Specific Solaris 10 packages as <CSCOh036>
## Installing part 1 of 1.
/opt/sun_install/SolPkg/install_SolPkg.sh
[ verifying class <none> ]
## Executing postinstall script.
!!
!! You must now change directories to
!! /opt/sun_install/SolPkg and run the
!! ./install_SolPkg.sh script as root.
!!
Installation of <CSCOh036> was successful.
Step 4
Enter the following commands to change directories and execute the installation script:
cd /opt/sun_install/SolPkg
./install_SolPkg.sh
Text similar to the following is displayed:
Note
Ellipsis is used in the system output to indicate the omission of the patch lists that it will install.
These lists vary over time.
You are running as root - Good...
x /usr/local, 0 bytes, 0 tape blocks
x /usr/local/bin, 0 bytes, 0 tape blocks
x /usr/local/bin/expect, 213936 bytes, 418 tape blocks
x /usr/local/lib, 0 bytes, 0 tape blocks
x /usr/local/lib/libtcl8.4.so, 999804 bytes, 1953 tape blocks
x /usr/local/lib/tcl8.4, 0 bytes, 0 tape blocks
x /usr/local/lib/tcl8.4/auto.tcl, 20911 bytes, 41 tape blocks
x /usr/local/lib/tcl8.4/history.tcl, 9030 bytes, 18 tape blocks
x /usr/local/lib/tcl8.4/init.tcl, 23714 bytes, 47 tape blocks
x /usr/local/lib/tcl8.4/ldAix, 2856 bytes, 6 tape blocks
x /usr/local/lib/tcl8.4/ldAout.tcl, 6802 bytes, 14 tape blocks
...
x ./SUNWxwopt/pkgmap, 4502 bytes, 9 tape blocks
x ./SUNWxwopt/reloc, 0 bytes, 0 tape blocks
x ./SUNWxwopt/reloc/openwin, 0 bytes, 0 tape blocks
x ./SUNWxwopt/reloc/openwin/bin, 0 bytes, 0 tape blocks
x ./SUNWxwopt/reloc/openwin/lib, 0 bytes, 0 tape blocks
x ./SUNWxwopt/reloc/openwin/lib/app-defaults, 0 bytes, 0 tape blocks
x ./SUNWxwopt/reloc/openwin/lib/X11, 0 bytes, 0 tape blocks
x ./SUNWxwopt/reloc/openwin/lib/X11/twm, 0 bytes, 0 tape blocks
x ./SUNWxwopt/reloc/openwin/lib/X11/xdm, 0 bytes, 0 tape blocks
spawn pkgadd -d . SUNWxwopt
Processing package instance <SUNWxwopt> from </tmp>
Cisco PGW 2200 Softswitch Release 9.8 Software Installation and Configuration Guide
OL-18083-01
2-119
Chapter 2
Installing the Sun Solaris 10 Operating System
Loading the Sun Solaris 10 Operating Environment
X Window System Optional Clients(i386) 6.6.2.7400,REV=0.2004.12.15
Copyright 2005 Sun Microsystems, Inc. All rights reserved.
Use is subject to license terms.
Using </usr> as the package base directory.
## Processing package information.
## Processing system information.
6 package pathnames are already properly installed.
## Verifying package dependencies.
## Verifying disk space requirements.
## Checking for conflicts with packages already installed.
## Checking for setuid/setgid programs.
This package contains scripts which will be executed with super-user
permission during the process of installing this package.
Do you want to continue with the installation of <SUNWxwopt> [y,n,?] y
Installing X Window System Optional Clients as <SUNWxwopt>
## Installing part 1 of 1.
2958 blocks
Installation of <SUNWxwopt> was successful.
x ./SUNWftpr, 0 bytes, 0 tape blocks
x ./SUNWftpr/install, 0 bytes, 0 tape blocks
x ./SUNWftpr/install/copyright, 93 bytes, 1 tape blocks
x ./SUNWftpr/install/depend, 1036 bytes, 3 tape blocks
x ./SUNWftpr/install/i.ftpaccess, 2849 bytes, 6 tape blocks
x ./SUNWftpr/install/i.ftpusers, 1506 bytes, 3 tape blocks
x ./SUNWftpr/install/i.manifest, 1503 bytes, 3 tape blocks
x ./SUNWftpr/install/i.preserve, 186 bytes, 1 tape blocks
x ./SUNWftpr/install/r.manifest, 1363 bytes, 3 tape blocks
x ./SUNWftpr/pkginfo, 706 bytes, 2 tape blocks
x ./SUNWftpr/pkgmap, 982 bytes, 2 tape blocks
x ./SUNWftpr/reloc, 0 bytes, 0 tape blocks
x ./SUNWftpr/reloc/etc, 0 bytes, 0 tape blocks
x ./SUNWftpr/reloc/etc/ftpd, 0 bytes, 0 tape blocks
x ./SUNWftpr/reloc/etc/ftpd/ftpaccess, 1518 bytes, 3 tape blocks
x ./SUNWftpr/reloc/etc/ftpd/ftpconversions, 946 bytes, 2 tape blocks
x ./SUNWftpr/reloc/etc/ftpd/ftpgroups, 104 bytes, 1 tape blocks
x ./SUNWftpr/reloc/etc/ftpd/ftphosts, 108 bytes, 1 tape blocks
x ./SUNWftpr/reloc/etc/ftpd/ftpservers, 114 bytes, 1 tape blocks
x ./SUNWftpr/reloc/etc/ftpd/ftpusers, 198 bytes, 1 tape blocks
x ./SUNWftpr/reloc/var, 0 bytes, 0 tape blocks
x ./SUNWftpr/reloc/var/svc, 0 bytes, 0 tape blocks
x ./SUNWftpr/reloc/var/svc/manifest, 0 bytes, 0 tape blocks
x ./SUNWftpr/reloc/var/svc/manifest/network, 0 bytes, 0 tape blocks
x ./SUNWftpr/reloc/var/svc/manifest/network/ftp.xml, 1779 bytes, 4 tape blocks
spawn pkgadd -d . SUNWftpr
Processing package instance <SUNWftpr> from </tmp>
FTP Server, (Root)(i386) 11.10.0,REV=2005.01.21.16.34
Copyright 2005 Sun Microsystems, Inc. All rights reserved.
Use is subject to license terms.
This appears to be an attempt to install the same architecture and
version of a package which is already installed. This installation
will attempt to overwrite this package.
Using </> as the package base directory.
## Processing package information.
## Processing system information.
Cisco PGW 2200 Softswitch Release 9.8 Software Installation and Configuration Guide
2-120
OL-18083-01
Chapter 2
Installing the Sun Solaris 10 Operating System
Loading the Sun Solaris 10 Operating Environment
##
##
##
##
7 package pathnames are already properly installed.
Verifying package dependencies.
Verifying disk space requirements.
Checking for conflicts with packages already installed.
Checking for setuid/setgid programs.
This package contains scripts which will be executed with super-user
permission during the process of installing this package.
Do you want to continue with the installation of <SUNWftpr> [y,n,?] y
Installing FTP Server, (Root) as <SUNWftpr>
## Installing part 1 of 1.
[ verifying class <none> ]
[ verifying class <preserve> ]
[ verifying class <ftpaccess> ]
[ verifying class <ftpusers> ]
[ verifying class <manifest> ]
Installation of <SUNWftpr> was successful.
y
y
y
x ./SUNWftpu, 0 bytes, 0 tape blocks
x ./SUNWftpu/archive, 0 bytes, 0 tape blocks
x ./SUNWftpu/archive/none.bz2, 98668 bytes, 193 tape blocks
x ./SUNWftpu/install, 0 bytes, 0 tape blocks
x ./SUNWftpu/install/copyright, 8644 bytes, 17 tape blocks
x ./SUNWftpu/install/depend, 1130 bytes, 3 tape blocks
x ./SUNWftpu/install/i.none, 2245 bytes, 5 tape blocks
x ./SUNWftpu/pkginfo, 630 bytes, 2 tape blocks
x ./SUNWftpu/pkgmap, 671 bytes, 2 tape blocks
x ./SUNWftpu/reloc, 0 bytes, 0 tape blocks
x ./SUNWftpu/reloc/usr, 0 bytes, 0 tape blocks
x ./SUNWftpu/reloc/usr/sbin, 0 bytes, 0 tape blocks
spawn pkgadd -d . SUNWftpu
Processing package instance <SUNWftpu> from </tmp>
FTP Server, (Usr)(i386) 11.10.0,REV=2005.01.21.16.34
Copyright 2001-2003 Sun Microsystems, Inc. All rights reserved.
Use is subject to license terms.
Copyright (c) 1999,2000,2001 WU-FTPD Development Group.
All rights reserved.
WU-FTPD SOFTWARE LICENSE
Use, modification, or redistribution (including distribution of any modified
or derived work) in any form, or on any medium, is permitted only if all the
following conditions are met:
1. Redistributions qualify as "freeware" or "Open Source Software" under
the following terms:
a. Redistributions are made at no charge beyond the reasonable cost
of materials and delivery. Where redistribution of this software
is as part of a larger package or combined work, this restriction
applies only to the costs of materials and delivery of this
software, not to any other costs associated with the larger package
or combined work.
b. Redistributions are accompanied by a copy of the Source Code or by
Cisco PGW 2200 Softswitch Release 9.8 Software Installation and Configuration Guide
OL-18083-01
2-121
Chapter 2
Installing the Sun Solaris 10 Operating System
Loading the Sun Solaris 10 Operating Environment
an irrevocable offer to provide a copy of the Source Code for up
to three years at the cost of materials and delivery. Such
redistributions must allow further use, modification, and
redistribution of the Source Code under substantially the same
terms as this license. For the purposes of redistribution "Source
Code" means all files included in the original distribution,
including all modifications or additions, on a medium and in a
form allowing fully working executable programs to be produced.
2. Redistributions of Source Code must retain the copyright notices as
they appear in each Source Code file and the COPYRIGHT file, these
license terms, and the disclaimer/limitation of liability set forth as
paragraph 6 below.
3. Redistributions in binary form must reproduce the Copyright Notice,
these license terms, and the disclaimer/limitation of liability set
forth as paragraph 6 below, in the documentation and/or other materials
provided with the distribution. For the purposes of binary distribution
the "Copyright Notice" refers to the following language:
Copyright (c) 1999,2000 WU-FTPD Development Group.
All rights reserved.
Portions Copyright (c) 1980, 1985, 1988, 1989, 1990, 1991, 1993, 1994
The Regents of the University of California.
Portions Copyright (c) 1993, 1994 Washington University in Saint Louis.
Portions Copyright (c) 1996, 1998 Berkeley Software Design, Inc.
Portions Copyright (c) 1983, 1995, 1996, 1997 Eric P. Allman.
Portions Copyright (c) 1998 Sendmail, Inc.
Portions Copyright (c) 1989 Massachusetts Institute of Technology.
Portions Copyright (c) 1997 Stan Barber.
Portions Copyright (c) 1997 Kent Landfield.
Portions Copyright (c) 1991, 1992, 1993, 1994, 1995, 1996, 1997
Free Software Foundation, Inc.
Use and distribution of this software and its source code are
governed by the terms and conditions of the WU-FTPD Software
License ("LICENSE").
If you did not receive a copy of the license, it may be
obtained online at http://www.wu-ftpd.org/license.html
4. All advertising materials mentioning features or use of this software
must display the following acknowledgement: "This product includes
software developed by the WU-FTPD Development Group, the Washington
University at Saint Louis, Berkeley Software Design, Inc., and their
contributors."
5. Neither the name of the WU-FTPD Development Group, nor the names of any
copyright holders, nor the names of any contributors may be used to
endorse or promote products derived from this software without specific
prior written permission. The names "wuftpd" and "wu-ftpd" are
trademarks of the WU-FTPD Development Group and the Washington
University at Saint Louis.
6. Disclaimer/Limitation of Liability:
THIS SOFTWARE IS PROVIDED BY THE WU-FTPD DEVELOPMENT GROUP, THE
COPYRIGHT HOLDERS, AND CONTRIBUTORS, "AS IS" AND ANY EXPRESS OR IMPLIED
WARRANTIES, INCLUDING, BUT NOT LIMITED TO, THE IMPLIED WARRANTIES OF
MERCHANTABILITY AND FITNESS FOR A PARTICULAR PURPOSE ARE DISCLAIMED. IN
NO EVENT SHALL THE WU-FTPD DEVELOPMENT GROUP, THE COPYRIGHT HOLDERS, OR
CONTRIBUTORS, BE LIABLE FOR ANY DIRECT, INDIRECT, INCIDENTAL, SPECIAL,
EXEMPLARY, OR CONSEQUENTIAL DAMAGES (INCLUDING, BUT NOT LIMITED TO,
Cisco PGW 2200 Softswitch Release 9.8 Software Installation and Configuration Guide
2-122
OL-18083-01
Chapter 2
Installing the Sun Solaris 10 Operating System
Loading the Sun Solaris 10 Operating Environment
PROCUREMENT OF SUBSTITUTE GOODS OR SERVICES; LOSS OF USE, DATA, OR
PROFITS; OR BUSINESS INTERRUPTION) HOWEVER CAUSED AND ON ANY THEORY OF
LIABILITY, WHETHER IN CONTRACT, STRICT LIABILITY, OR TORT (INCLUDING
NEGLIGENCE OR OTHERWISE) ARISING IN ANY WAY OUT OF THE USE OF THIS
SOFTWARE, EVEN IF ADVISED OF THE POSSIBILITY OF SUCH DAMAGES.
7. USE, MODIFICATION, OR REDISTRIBUTION, OF THIS SOFTWARE IMPLIES
ACCEPTANCE OF ALL TERMS AND CONDITIONS OF THIS LICENSE.
$Id: LICENSE,v 1.4 2000/07/01 17:42:15 wuftpd Exp $
Copyright (c) 1993, 1994
All rights reserved.
Washington University in Saint Louis
Redistribution and use in source and binary forms, with or without
modification, are permitted provided that the following conditions are
met: 1. Redistributions of source code must retain the above copyright
notice, this list of conditions and the following disclaimer. 2.
Redistributions in binary form must reproduce the above copyright notice,
this list of conditions and the following disclaimer in the documentation
and/or other materials provided with the distribution. 3. All advertising
materials mentioning features or use of this software must display the
following acknowledgement: This product includes software developed by the
Washington University in Saint Louis and its contributors. 4. Neither the
name of the University nor the names of its contributors may be used to
endorse or promote products derived from this software without specific
prior written permission.
THIS SOFTWARE IS PROVIDED BY WASHINGTON UNIVERSITY AND CONTRIBUTORS
``AS IS'' AND ANY EXPRESS OR IMPLIED WARRANTIES, INCLUDING, BUT NOT
LIMITED TO, THE IMPLIED WARRANTIES OF MERCHANTABILITY AND FITNESS FOR
A PARTICULAR PURPOSE ARE DISCLAIMED. IN NO EVENT SHALL WASHINGTON
UNIVERSITY OR CONTRIBUTORS BE LIABLE FOR ANY DIRECT, INDIRECT,
INCIDENTAL, SPECIAL, EXEMPLARY, OR CONSEQUENTIAL DAMAGES (INCLUDING,
BUT NOT LIMITED TO, PROCUREMENT OF SUBSTITUTE GOODS OR SERVICES;
LOSS OF USE, DATA, OR PROFITS; OR BUSINESS INTERRUPTION) HOWEVER
CAUSED AND ON ANY THEORY OF LIABILITY, WHETHER IN CONTRACT, STRICT
LIABILITY, OR TORT (INCLUDING NEGLIGENCE OR OTHERWISE) ARISING IN
ANY WAY OUT OF THE USE OF THIS SOFTWARE, EVEN IF ADVISED OF THE
POSSIBILITY OF SUCH DAMAGE.
Copyright (c) 1980, 1983, 1985, 1988, 1989, 1990 Regents of the University of
California. All rights reserved.
Redistribution and use in source and binary forms, with or without
modification, are permitted provided that the following conditions
are met:
1. Redistributions of source code must retain the above copyright
notice, this list of conditions and the following disclaimer.
2. Redistributions in binary form must reproduce the above copyright
notice, this list of conditions and the following disclaimer in the
documentation and/or other materials provided with the distribution.
3. All advertising materials mentioning features or use of this software
must display the following acknowledgement:
This product includes software developed by the University of
California, Berkeley and its contributors.
4. Neither the name of the University nor the names of its contributors
may be used to endorse or promote products derived from this software
without specific prior written permission.
THIS SOFTWARE IS PROVIDED BY THE REGENTS AND CONTRIBUTORS ``AS IS'' AND
ANY EXPRESS OR IMPLIED WARRANTIES, INCLUDING, BUT NOT LIMITED TO, THE
Cisco PGW 2200 Softswitch Release 9.8 Software Installation and Configuration Guide
OL-18083-01
2-123
Chapter 2
Installing the Sun Solaris 10 Operating System
Loading the Sun Solaris 10 Operating Environment
IMPLIED WARRANTIES OF MERCHANTABILITY AND FITNESS FOR A PARTICULAR PURPOSE
ARE DISCLAIMED. IN NO EVENT SHALL THE REGENTS OR CONTRIBUTORS BE LIABLE
FOR ANY DIRECT, INDIRECT, INCIDENTAL, SPECIAL, EXEMPLARY, OR CONSEQUENTIAL
DAMAGES (INCLUDING, BUT NOT LIMITED TO, PROCUREMENT OF SUBSTITUTE GOODS
OR SERVICES; LOSS OF USE, DATA, OR PROFITS; OR BUSINESS INTERRUPTION)
HOWEVER CAUSED AND ON ANY THEORY OF LIABILITY, WHETHER IN CONTRACT, STRICT
LIABILITY, OR TORT (INCLUDING NEGLIGENCE OR OTHERWISE) ARISING IN ANY WAY
OUT OF THE USE OF THIS SOFTWARE, EVEN IF ADVISED OF THE POSSIBILITY OF
SUCH DAMAGE.
Using </> as the package base directory.
## Processing package information.
## Processing system information.
2 package pathnames are already properly installed.
## Verifying package dependencies.
## Verifying disk space requirements.
## Checking for conflicts with packages already installed.
## Checking for setuid/setgid programs.
This package contains scripts which will be executed with super-user
permission during the process of installing this package.
Do you want to continue with the installation of <SUNWftpu> [y,n,?]
Installing FTP Server, (Usr) as <SUNWftpu>
## Installing part 1 of 1.
500 blocks
Installation of <SUNWftpu> was successful.
spawn pkgrm SUNWvtsmn
The following package is currently installed:
SUNWvtsmn SunVTS man pages
(i386) 6.4,REV=2007.07.05.13.25
Do you want to remove this package? [y,n,?,q] y
## Removing installed package instance <SUNWvtsmn>
## Verifying package <SUNWvtsmn> dependencies in global zone
## Processing package information.
## Removing pathnames in class <none>
/opt/SUNWvts/man/man1m/vtsui.1m
/opt/SUNWvts/man/man1m/vtstty.1m
/opt/SUNWvts/man/man1m/vtsprobe.1m
/opt/SUNWvts/man/man1m/vtsk.1m
/opt/SUNWvts/man/man1m/vts_cmd.1m
...
opt/SUNWvts/lib/locale/C <shared pathname not removed>
/opt/SUNWvts/lib/locale <shared pathname not removed>
/opt/SUNWvts/lib <shared pathname not removed>
/opt/SUNWvts <shared pathname not removed>
## Updating system information.
Removal of <SUNWvtsmn> was successful.
spawn pkgrm SUNWvtsr
The following package is currently installed:
SUNWvtsr SunVTS Framework (Root)
(i386) 6.4,REV=2007.07.05.10.11
Do you want to remove this package? [y,n,?,q] y
## Removing installed package instance <SUNWvtsr>
Cisco PGW 2200 Softswitch Release 9.8 Software Installation and Configuration Guide
2-124
OL-18083-01
Chapter 2
Installing the Sun Solaris 10 Operating System
Loading the Sun Solaris 10 Operating Environment
## Verifying package <SUNWvtsr> dependencies in global zone
## Processing package information.
## Removing pathnames in class <none>
/etc/opt/SUNWvts/sunvts.conf.example
/etc/opt/SUNWvts/lib/conf
/etc/opt/SUNWvts/lib
/etc/opt/SUNWvts
/etc/opt <shared pathname not removed>
/etc <shared pathname not removed>
## Updating system information.
Removal of <SUNWvtsr> was successful.
spawn pkgrm SUNWvtsts
The following package is currently installed:
SUNWvtsts SunVTS for Tests
(i386) 6.4,REV=2007.07.05.13.25
Do you want to remove this package? [y,n,?,q] y
## Removing installed package instance <SUNWvtsts>
## Verifying package <SUNWvtsts> dependencies in global zone
## Processing package information.
## Removing pathnames in class <none>
/opt/SUNWvts/lib/probe/xnetlbtest_probe.so
/opt/SUNWvts/lib/probe/vmemtest_probe.so
...
/opt/SUNWvts/bin/.customtest
/opt/SUNWvts/bin <shared pathname not removed>
/opt/SUNWvts <shared pathname not removed>
## Updating system information.
Removal of <SUNWvtsts> was successful.
spawn pkgrm SUNWvts
The following package is currently installed:
SUNWvts SunVTS Framework
(i386) 6.4,REV=2007.07.05.10.11
Do you want to remove this package? [y,n,?,q] y
## Removing installed package instance <SUNWvts>
## Verifying package <SUNWvts> dependencies in global zone
## Processing package information.
## Removing pathnames in class <none>
/opt/SUNWvts/lib/probe/64
/opt/SUNWvts/lib/probe
/opt/SUNWvts/lib/locale/C/help/help_s10.html
/opt/SUNWvts/lib/locale/C/help/help.html
/opt/SUNWvts/lib/locale/C/help/Copyright.libxml2
...
/opt/SUNWvts/README.64
/opt/SUNWvts/README
/opt/SUNWvts
## Updating system information.
Removal of <SUNWvts> was successful.
x SUNWvts, 0 bytes, 0 tape blocks
x SUNWvts/archive, 0 bytes, 0 tape blocks
x SUNWvts/archive/none.bz2, 1176648 bytes, 2299 tape blocks
Cisco PGW 2200 Softswitch Release 9.8 Software Installation and Configuration Guide
OL-18083-01
2-125
Chapter 2
Installing the Sun Solaris 10 Operating System
Loading the Sun Solaris 10 Operating Environment
x SUNWvts/install, 0 bytes, 0 tape blocks
x SUNWvts/install/checkinstall, 971 bytes, 2 tape blocks
x SUNWvts/install/copyright, 93 bytes, 1 tape blocks
x SUNWvts/install/depend, 849 bytes, 2 tape blocks
x SUNWvts/install/i.none, 2245 bytes, 5 tape blocks
x SUNWvts/pkginfo, 546 bytes, 2 tape blocks
x SUNWvts/pkgmap, 6639 bytes, 13 tape blocks
x SUNWvts/reloc, 0 bytes, 0 tape blocks
x SUNWvts/reloc/sunwvts, 0 bytes, 0 tape blocks
x SUNWvts/reloc/sunwvts/bin, 0 bytes, 0 tape blocks
x SUNWvts/reloc/sunwvts/bin/64, 0 bytes, 0 tape blocks
x SUNWvts/reloc/sunwvts/bin/pm, 0 bytes, 0 tape blocks
x SUNWvts/reloc/sunwvts/lib, 0 bytes, 0 tape blocks
x SUNWvts/reloc/sunwvts/lib/64, 0 bytes, 0 tape blocks
x SUNWvts/reloc/sunwvts/lib/conf, 0 bytes, 0 tape blocks
x SUNWvts/reloc/sunwvts/lib/locale, 0 bytes, 0 tape blocks
x SUNWvts/reloc/sunwvts/lib/locale/c, 0 bytes, 0 tape blocks
x SUNWvts/reloc/sunwvts/lib/locale/c/help, 0 bytes, 0 tape blocks
x SUNWvts/reloc/sunwvts/lib/locale/c/LC_MESSAGES, 0 bytes, 0 tape blocks
spawn pkgadd -d . SUNWvts
Processing package instance <SUNWvts> from </tmp>
SunVTS Framework(i386) 6.4,REV=2007.07.05.10.11
Copyright 2007 Sun Microsystems, Inc. All rights reserved.
Use is subject to license terms.
## Executing checkinstall script.
Using </opt> as the package base directory.
## Processing package information.
## Processing system information.
## Verifying package dependencies.
## Verifying disk space requirements.
## Checking for conflicts with packages already installed.
## Checking for setuid/setgid programs.
This package contains scripts which will be executed with super-user
permission during the process of installing this package.
Do you want to continue with the installation of <SUNWvts> [y,n,?] y
Installing SunVTS Framework as <SUNWvts>
## Installing part 1 of 1.
9650 blocks
Installation of <SUNWvts> was successful.
...
Processing package instance <SUNWvtsts> from </tmp>
SunVTS for Tests(i386) 6.4,REV=2007.07.05.13.25
Copyright 2007 Sun Microsystems, Inc. All rights reserved.
...
Installation of <SUNWvtsts> was successful.
...
SunVTS Framework (Root)(i386) 6.4,REV=2007.07.05.10.11
Copyright 2007 Sun Microsystems, Inc. All rights reserved.
...
Cisco PGW 2200 Softswitch Release 9.8 Software Installation and Configuration Guide
2-126
OL-18083-01
Chapter 2
Installing the Sun Solaris 10 Operating System
Loading the Sun Solaris 10 Operating Environment
Installation of <SUNWvtsr> was successful.
...
SunVTS man pages(i386) 6.4,REV=2007.07.05.13.25
Copyright 2007 Sun Microsystems, Inc. All rights reserved.
...
Installation of <SUNWvtsmn> was successful.
y
y
Archive: 137325-01.zip
creating: 137325-01/
creating: 137325-01/SUNWvts/
inflating: 137325-01/SUNWvts/pkgmap
inflating: 137325-01/SUNWvts/pkginfo
creating: 137325-01/SUNWvts/reloc/
creating: 137325-01/SUNWvts/reloc/SUNWvts/
inflating: 137325-01/SUNWvts/reloc/SUNWvts/README
inflating: 137325-01/SUNWvts/reloc/SUNWvts/README.64
...
Patch 137325-01 has been successfully installed.
See /var/sadm/patch/137325-01/log for details
Patch packages installed:
SUNWvts
SUNWvtsts
Installation of patch 137325-01 successful
...
Network File System (NFS) client kernel support (Root)(i386) 11.10.0,REV=2005.01.21.16.34
Copyright 2007 Sun Microsystems, Inc. All rights reserved.
...
Installation of <SUNWnfscr> was successful.
...
Network File System (NFS) client support (Usr)(i386) 11.10.0,REV=2005.01.21.16.34
Copyright 2007 Sun Microsystems, Inc. All rights reserved.
...
Installation of <SUNWnfscu> was successful.
...
Network File System (NFS) server kernel support (Root)(i386) 11.10.0,REV=2005.01.21.16.34
Copyright 2007 Sun Microsystems, Inc. All rights reserved.
...
Installation of <SUNWnfsskr> was successful.
...
Network File System (NFS) server support (Root)(i386) 11.10.0,REV=2005.01.21.16.34
Cisco PGW 2200 Softswitch Release 9.8 Software Installation and Configuration Guide
OL-18083-01
2-127
Chapter 2
Installing the Sun Solaris 10 Operating System
Loading the Sun Solaris 10 Operating Environment
Copyright 2007 Sun Microsystems, Inc.
All rights reserved.
...
Installation of <SUNWnfssr> was successful.
...
Network File System (NFS) server support (Usr)(i386) 11.10.0,REV=2005.01.21.16.34
Copyright 2007 Sun Microsystems, Inc. All rights reserved.
...
Installation of <SUNWnfssu> was successful.
...
Trivial File Transfer Server(i386) 11.10.0,REV=2005.01.21.16.34
Copyright 2007 Sun Microsystems, Inc. All rights reserved.
...
Installation of <SUNWtftp> was successful.
...
Trivial File Transfer Server (Root)(i386) 11.10.0,REV=2005.01.21.16.34
Copyright 2005 Sun Microsystems, Inc. All rights reserved.
...
Installation of <SUNWtftpr> was successful.
...
NTP, (Root)(i386) 11.10.0,REV=2005.01.21.16.34
Copyright 2005 Sun Microsystems, Inc. All rights reserved.
...
Installation of <SUNWntpr> was successful.
...
NTP, (Usr)(i386) 11.10.0,REV=2005.01.21.16.34
Copyright 2005 Sun Microsystems, Inc. All rights reserved.
...
Installation of <SUNWntpu> was successful.
Enter the IP address of NTP server:
Step 5
Enter the IP address for the NTP server used for your network and press Enter: Text similar to the
following is displayed:
NTP is configured and enabled. You can manually change the configuration by modifying
/etc/inet/ntp.conf and disable NTP by run 'svcadm enable ntp'
At any time, you may uninstall the software installed
by this package with the following commands:
cd /opt/sun_install/SolPkg
./uninstall_SolPkg.sh
which will uninstall all the solaris software
Cisco PGW 2200 Softswitch Release 9.8 Software Installation and Configuration Guide
2-128
OL-18083-01
Chapter 2
Installing the Sun Solaris 10 Operating System
Loading the Sun Solaris 10 Operating Environment
installed with this package
NTP software is installed and configured. System reboot is required to activate it. Do you
want to reboot now?[yes|no]
Step 6
You must reboot your system for the changes to take effect. Type yes and press Enter:
Step 7
If you require ftp access to your Cisco PGW 2200 Softswitch by Cisco BAMS or some other product,
type the following command and press Enter:
svcadm enable ftp
Note
If you need to disable the ftp communications software, use the svcadm disable ftp command.
If you need to determine the status of the ftp communications software, use the svcs -a | grep
ftp command.
The communications software installation is now complete. Go to Table 2-2 on page 2-72 if you want to
continue with the list for package installation.
Installing the Verification Test Suite Script Package (CSCOh021)
The Verification Test Suite (VTS) provides an optional script designed to test configured Sun Solaris 10
platforms used for Cisco PGW 2200 Softswitch, BAMS, and HSI products. VTS test instructions
support the following interface cards:
•
Sun GigaSwift Ethernet PCI card (order number X1150A)
•
Sun 10/100BT Ethernet PCI card (order number X1033)
•
Sun Quad Fast Ethernet PCI card (order number X1034A)
Perform all testing with a console log file enabled to capture everything entered at the console input and
displayed on the console output. One way to accomplish this is through a terminal server connected to
the console port of your platform. You can use the xterm program with the -l –lf <logfile> command line
option to create the console log file.
For each target system in the test below, you should archive the console log file along with the VTS log
file created with other records.
Note
This VTS package is not supported by the Sun Fire X4600, the Sun Fire X4600 M2, or the Sun Netra
X4200 M2 platform.
To install the VTS script package:
Step 1
Place the Cisco Solaris 10 Operating Environment CD in the CD-ROM drive of the target system.
Step 2
Type the following commands to install the VTS script package and press Enter:
# cd /cdrom/cdrom0
# pkgadd –d CSCOh021.pkg
Text similar to the following is displayed:
The following packages are available:
Cisco PGW 2200 Softswitch Release 9.8 Software Installation and Configuration Guide
OL-18083-01
2-129
Chapter 2
Installing the Sun Solaris 10 Operating System
Loading the Sun Solaris 10 Operating Environment
1
CSCOh021
Media Gateway Controller Solaris 10 test for SPARC/Opteron
(sparc,i386) 3.0(6)
Select package(s) you wish to process (or 'all' to process
all packages). (default: all) [?,??,q]:
Note
Step 3
You can also download the VTS script package (CSCOh021) from Cisco.com. For example,
download the CSCOh021 package to the /opt/SW folder on the platform and use the command,
pkgadd -d /opt/SW/CSCOh021.pkg. Make sure you downloads the platform-specific package for
your platform (Sparc-based or Opteron-based).
Press Enter to select all packages. Text similar to the following is displayed:
Processing package instance <CSCOh021> from </var/tmp/CSCOh021.pkg>
Media Gateway Controller Solaris 10 test for SPARC/Opteron(sparc,i386) 3.0(6)
Cisco Systems, Inc.
## Executing checkinstall script.
CSCOh021 checkinstall log file at /var/tmp/CSCOh021.checkinstall.log
Platform is SUNW,Sun-Fire-V210
This machine is running Solaris 5.10
Using </opt/sun_install> as the package base directory.
## Processing package information.
## Processing system information.
2 package pathnames are already properly installed.
## Verifying disk space requirements.
## Checking for conflicts with packages already installed.
## Checking for setuid/setgid programs.
This package contains scripts which will be executed with super-user
permission during the process of installing this package.
Do you want to continue with the installation of <CSCOh021> [y,n,?]
Step 4
Answer y and press Enter to continue with the installation. Text similar to the following is displayed:
Installing Media Gateway Controller Solaris 10 test for SPARC/Opteron as <CSCOh021>
## Installing part 1 of 1.
/opt/sun_install/VTSadmin.file
/opt/sun_install/vts/vts_script
/opt/sun_install/vts <implied directory>
/opt/sun_install/vts/vts_script6
[ verifying class <none> ]
## Executing postinstall script.
!!
!!
!!
!!
You must now change directories to /opt/sun_install/vts and
run the ./vts_script script as root.
Installation of <CSCOh021> was successful.
#
This completes the VTS installation. If you have questions or need assistance, see the “Obtaining
Documentation and Submitting a Service Request” section on page x.
Cisco PGW 2200 Softswitch Release 9.8 Software Installation and Configuration Guide
2-130
OL-18083-01
Chapter 2
Installing the Sun Solaris 10 Operating System
Loading the Sun Solaris 10 Operating Environment
Using the SunVTS Test Package
Use the SunVTS program to test the following:
•
CPUs
•
Memory
•
Ethernet cards
Note
In order for you to fully test the Ethernet ports, all Ethernet ports must be configured with
valid IP addresses and connected to an Ethernet network with at least one other machine on
the network.
•
Hard disks
•
CD-ROM drive
Note
•
In order for you to pass the DVD/CD drive test, a disk must be in the DVD/CD drive.
LOM hardware
Normal Unit Test
The normal unit test must be successfully run on each target system before it is shipped to the customer.
A normal unit test checks 20 percent of each disk surface. To run a normal unit test, use the following
procedure.
Caution
Step 1
Do not run this test while the application is running because it could adversely affect the application
performance.
Change directories to the following directory:
# cd /opt/sun_install/vts
Step 2
Enter the following command to start the test:
# ./vts_script
Text similar to the following is displayed:
You are running as root - Good...
Platform is i86pc
OS version is 5.10
Platform type is i386
VTS 64-bit binary path is /opt/SUNWvts/bin/64
OS is 64-bits
checking for VTS packages
Check to see if VTS is already installed
package SUNWvts found
package SUNWvtsr found
package SUNWvtsts found
Check to see if XML is already installed
package SUNWlxml found
VTS version: 6.4,REV=2007.07.05.10.11
Cisco PGW 2200 Softswitch Release 9.8 Software Installation and Configuration Guide
OL-18083-01
2-131
Chapter 2
Installing the Sun Solaris 10 Operating System
Loading the Sun Solaris 10 Operating Environment
Checking to see if rpcbind is running
starting rpc services rpcbind
giving rpcbind a chance to start
Checking to see if vtsk is running
starting vtsk
giving vtsk a chance to start
VTS probe output:
Processor(s)
CPU(cputest)
CPU Test
FPU(fputest)
Floating Point Unit Test
dtlb(dtlbtest)
Data TLB Test
l1cache(l1dcachetest)
Level 1 Cache Test
l2sram(l2sramtest)
External Cache Test
system(systest)
System Configuration= Sun Microsystems
Memory size= 8064 Megabytes
Memory
kmem(vmemtest)
Total Swap: 10392MB
mem(pmemtest)
Memory Size:8064MB
mem(ramtest)
Total Physical Memory : 8064MB
BMC-Logical-Group
BMC(bmcenvironment)
BMC Enviornment test looks good
SCSI-Devices(mpt0)
c0t2d0(disktest)
Capacity: 68.36GB
Controller: mpt0
Vendor: FUJITSU
SUN Id: MAY2073RCSUN72G
Firmware Rev: 0401
Serial Number: 0605S0157P
Device Kind :disk
c0t3d0(disktest)
Capacity: 68.36GB
Controller: mpt0
Vendor: FUJITSU
SUN Id: MAY2073RCSUN72G
Firmware Rev: 0401
Serial Number: 0605S0132W
Device Kind :disk
IDE-Devices(ata0)
c3t0d0(cddvdtest)
Controller: ata0
Bus
iobus(iobustest)
platform = SUN
i86pc
Network
e1000g0(nettest)
Host_Name:
Host Address: 10.74.49.119
Host ID: 18089793
Domain Name:
e1000g1(nettest)
Host_Name:
Cisco PGW 2200 Softswitch Release 9.8 Software Installation and Configuration Guide
2-132
OL-18083-01
Chapter 2
Installing the Sun Solaris 10 Operating System
Loading the Sun Solaris 10 Operating Environment
Host Address: 10.0.49.119
Host ID: 18089793
Domain Name:
e1000g2(nettest)
Host_Name:
Host Address: 172.16.101.119
Host ID: 18089793
Domain Name:
e1000g3(netlbtest)
Port Address: Unknown
Host ID: 18089793
Comm.Ports
asy0(serialtest)
Port a -- asy0 /dev/term/a : /devices/ ... :a
USB-Devices
kbd(usbtest)
Device information: USB Keyboard
Unknown platform.
Assuming only one CPU installed
Number of hard disks:
Hard disks:
2
Number of LOM or TSALARM devices:
LOM or TSALARM devices:
Number of SSP devices:
ALOM (SSP) devices:
0
0
Number of NALM devices:
NALM devices:
0
Number of configured network interfaces:
Configured network interfaces:
e1000g0
e1000g1
e1000g2
Number of unconfigured network interfaces:
Unconfigured network interfaces:
e1000g3
3
1
Total number of network interfaces: 4
Number of DVD/CD drives :
DVD/CD drives :
c3t0d0
1
Number of (virtual) CPUs :
2
Note: Dual core CPUs count as two virtual CPUs
(virtual) CPUs :
CPU
normal test
Level 1 Data Cache Test all ...
Floating Point Unit Test all ...
System Test ...
Cisco PGW 2200 Softswitch Release 9.8 Software Installation and Configuration Guide
OL-18083-01
2-133
Chapter 2
Installing the Sun Solaris 10 Operating System
Loading the Sun Solaris 10 Operating Environment
Central Processor Unit Test all ...
Level 1 Data Cache Test all done
System Test done
Central Processor Unit Test all done
Floating Point Unit Test all done
Physical Memory Test ( 8064MB) ...
Physical Memory Test done
Network Test e1000g0 ...
Network Test e1000g1 ...
Network Test e1000g2 ...
Network Loobpack Test e1000g3 ...
DVD/CD Test c3t0d0 ...
Hard Disk Test c0t3d0 20% ...
Hard Disk Test c0t2d0 20% ...
Network Test e1000g0 done
Network Test e1000g1 done
Network Test e1000g2 done
Network Loopback Test e1000g3 done
DVD/CD Test c3t0d0 done
Hard Disk Test c0t3d0 done
Hard Disk Test c0t2d0 done
stopping vtsk
stopping rpcbind
**************************************
************* RESULTS ****************
**************************************
normal test
Number of hard disks:
Hard disks:
c0t2d0
c0t3d0
2
Number of configured network interfaces:
Configured network interfaces:
e1000g0
e1000g1
e1000g2
Number of unconfigured network interfaces:
Unconfigured network interfaces:
3
1
Cisco PGW 2200 Softswitch Release 9.8 Software Installation and Configuration Guide
2-134
OL-18083-01
Chapter 2
Installing the Sun Solaris 10 Operating System
Loading the Sun Solaris 10 Operating Environment
e1000g3
Total number of network interfaces: 4
Number of DVD/CD drives :
CD-ROM/DVD drives :
c3t0d0
1
Number of LOM or TSALARM devices:
LOM or TSALARM devices:
Number of SSP devices:
ALOM devices:
0
0
Number of NALM devices:
NALM devices:
0
Number of (virtual) CPUs :
2
Note: Dual core CPUs count as two virtual CPUs
(virtual) CPUs :
CPU
Amount of physical memory :
8064MB
Amount of swap memory
10392MB
:
number of fatal errors :
number of errors
:
0
0
********** Fatal Errors **************
******* end of Fatal Errors **********
************* Errors *****************
********** end of Errors *************
PPPPPP
AA
SSSSSS
PP PP A A SS
PPPPPP AAAAAA SSSSSS
PP
AA AA
SS
PP
AA AA SSSSSS
Note
Step 3
SSSSSS
SS
SSSSSS
SS
SSSSSS
See Table 2-5 for the approximate amount of time the test will take on the different platforms
supported.
Once the test completes, examine the console output and the file /opt/sun_install/vts_script.log. Verify
that the unit passed the test and that the proper number of hard disks and Ethernet interfaces were
detected.
Running a Test in Brief Mode
When run in brief mode, the vts_script tests 1 percent of each disk surface. To run the test in brief mode:
Step 1
Change directories to the /var/tmp directory. Enter the following command:
Cisco PGW 2200 Softswitch Release 9.8 Software Installation and Configuration Guide
OL-18083-01
2-135
Chapter 2
Installing the Sun Solaris 10 Operating System
Loading the Sun Solaris 10 Operating Environment
# cd /var/tmp
Step 2
Enter the following command to start the test:
# /opt/sun_install/vts_script brief
Running a Test in Full Mode
When run in full mode, the vts_script tests 100 percent of each disk surface. To run the test in full mode:
Step 1
Change directories to the /var/tmp directory. Enter the following command:
# cd /var/tmp
Step 2
Enter the following command to start the test:
# /opt/sun_install/vts_script full
vts_script Execution Times
Table 2-5 lists estimated execution times for the VTS scripts on a sampling of
Cisco PGW 2200 Softswitch software host platforms.
Note
Actual VTS script execution time on your host platforms differs based on the configuration of your
hardware. The size of the disks used in your host platforms has the largest single impact on execution
time.
Table 2-5
Sample Estimates of VTS Script Execution Times
Platform Type, Number of CPUs, CPU speed,
VTS
Amount of RAM, Number of Disks,
Version Size of Disks
Brief Mode
Execution Time
(Hours:Minutes:
Seconds)
Normal Mode
Execution Time
(Hours:Minutes:
Seconds)
Full Mode
Execution Time
(Hours:Minutes:
Seconds)
4.3
Netra t1 10x, 1, 360 MHz, 64 MB, 2, 9 GB
0:5:02
0:8:19
0:36:26
4.3
Netra t 112x, 1, 296 MHz, 2 GB, 1, 9 GB
0:5:42
0:10:23
0:40:31
4.3
Netra t 112x, 2, 440 MHz, 2 GB, 2, 18 GB
0:3.55
0:11:05
0:51:44
6.0
Netra t 140x, 4, 440 MHz, 4 GB, 2, 18 GB
0:7:00
0:42:00
3:10:00
4.3
Netra t 140x, 4, 440 MHz, 4 GB, 4, 18 GB
0:5:23
0:15:03
0:65:40
5.1
Netra 120, 1, 440 MHz, 2 GB, 2, 36 GB
0:06:09
1:16:35
Estimate unavailable
6.0
SunFire V120, 1, 648 MHz, 4 GB, 2, 73 GB 0:08:00
0:49:00
2:56:00
5.1
Netra 20, 4, 900 MHz, 4 GB, 2, 73 GB
0:09:36
2:31:00
Estimate unavailable
5.1
SunFire V210, 1, 1340 MHz, 2 GB, 2, 73 GB 0:00:00
0:00:00
0:00:00
6.0
Netra 240, 2, 1280MHz, 4GB, 2, 146 GB
0:10:00
2:32:00
12:29:00
6.0
SunFire V40z, 4, 2192 MHz, 16 GB, 2, 73GB 0:09:00
2:30:00
12:28:00
Cisco PGW 2200 Softswitch Release 9.8 Software Installation and Configuration Guide
2-136
OL-18083-01
Chapter 2
Installing the Sun Solaris 10 Operating System
Loading the Sun Solaris 10 Operating Environment
Table 2-5
Sample Estimates of VTS Script Execution Times (continued)
Platform Type, Number of CPUs, CPU speed,
VTS
Amount of RAM, Number of Disks,
Version Size of Disks
Brief Mode
Execution Time
(Hours:Minutes:
Seconds)
Normal Mode
Execution Time
(Hours:Minutes:
Seconds)
Full Mode
Execution Time
(Hours:Minutes:
Seconds)
6.0
Netra 440, 4, 1281 MHz, 8 GB, 4, 146 GB
0:11:00
2:32:00
12:30:00
6.0
SunFire X4600, 8, 2613 MHz, 16 GB, 4, 73
GB
—
—
—
6.4
Netra X4200 M2, 2 dual-core CPUs, 2192
MHz, 16GB, 2, 146GB
—
—
—
6.4
SunFire X4600 M2, 8, 2613 MHz, 16 GB, 4, —
73GB
—
—
Removing the VTS Package (CSCOh021)
Use the following procedure to remove the VTS script package from the target system after all tests are
complete, all the log files are archived, and the SunVTS software is uninstalled.
Step 1
Type the following command to remove the VTS script package and press Enter:
# pkgrm CSCOh021
Text similar to the following is displayed:
The following package is currently installed:
CSCOh021 Media Gateway Controller Solaris 10 test for SPARC/Opteron
(sparc,i386) 3.0(6)
Do you want to remove this package? [y,n,?,q] y
Step 2
Type y and press Enter to remove this package. Text similar to the following is displayed:
## Removing installed package instance <CSCOh021>
This package contains scripts which will be executed with super-user
permission during the process of removing this package.
Do you want to continue with the removal of this package [y,n,?,q]
Step 3
Answer y and press Enter to continue with the installation. Text similar to the following is displayed:
## Verifying package <CSCOh021> dependencies in global zone
## Processing package information.
## Executing preremove script.
## Removing pathnames in class <none>
/var/tmp <shared pathname not removed>
/opt/sun_install/vts/vts_script6
/opt/sun_install/vts/vts_script
/opt/sun_install/VTSadmin.file
/opt/sun_install <shared pathname not removed>
## Updating system information.
Removal of <CSCOh021> was successful.
Cisco PGW 2200 Softswitch Release 9.8 Software Installation and Configuration Guide
OL-18083-01
2-137
Chapter 2
Installing the Sun Solaris 10 Operating System
Loading the Sun Solaris 10 Operating Environment
This completes the Sparc-based Solaris 10 Patch cluster installation procedures.
For Cisco PGW 2200 Softswitch Hosts: The Cisco PGW 2200 Softswitch software can now be loaded.
For Cisco HSI: The Cisco HSI software can now be loaded.
For Cisco BAMS: The BAMS software can now be loaded.
Configuring Lights-Out Management (LOM) or the Integrated Lights Out
Manager (ILOM)
The LOM and the ILOM are developed by Sun Microsystems for different hardware platforms. They are
dedicated systems of hardware and supporting software that allows you manage the Sun servers
remotely. See Sun Microsystems documentation for more information.
This section describes the following configuration procedures for the LOM or the ILOM on different
platforms:
•
Configuring LOM on Sun Fire V40z Platform, page 2-138
•
Configuring ILOM on Sun Fire X4600 Platform, page 2-141
•
Configuring ILOM on Sun Netra X4200 M2 Platform, page 2-143
Configuring LOM on Sun Fire V40z Platform
Configuring the Service Processor
See the section “Configuring the Service Processor” in Chapter 2 of the Sun Microsystems document,
Sun FireTM V20z and Sun FireTM V40z Servers--Installation Guide. Follow the steps in “Assigning Static
SP Network Settings” in this section.
You can find this document on the Sun Microsystems web site at the following URL,
http://docs.sun.com.
Logging in Service Processor Using Secure HTTP
Follow the following procedure to log in SP using secure HTTP. The procedure is based on the Sun
Microsystems document, Sun FireTM V20z and Sun FireTM V40z Servers--Installation Guide.
You can find this document on the Sun Microsystems web site at the following URL,
http://docs.sun.com.
Step 1
Enter the IP address of the SP in the browser. For example, enter https://10.10.10.1 in the browser. Press
Enter.
A window similar to the one in Figure 2-1 is displayed when you log in the SP LOM using secure HTTP
for the first time.
Cisco PGW 2200 Softswitch Release 9.8 Software Installation and Configuration Guide
2-138
OL-18083-01
Chapter 2
Installing the Sun Solaris 10 Operating System
Loading the Sun Solaris 10 Operating Environment
Figure 2-1
Step 2
System Agreement
Accept the agreement in the Figure 2-1. A window similar to the one in Figure 2-2 is displayed.
Figure 2-2
Create Initial Manager-level User
Step 3
Enter the user ID and password and confirm the password.
The default user ID/password is admin/admin.
Step 4
Click the check mark button. A window similar to the one in Figure 2-3 is displayed.
Cisco PGW 2200 Softswitch Release 9.8 Software Installation and Configuration Guide
OL-18083-01
2-139
Chapter 2
Installing the Sun Solaris 10 Operating System
Loading the Sun Solaris 10 Operating Environment
Figure 2-3
Step 5
Warning Message Window
Check the check box and click Yes on the warning message window.
A window similar to the one in Figure 2-4 is displayed.
Figure 2-4
LOM Screen
This completes the LOM configuration on Sun Fire V40z platform.
Cisco PGW 2200 Softswitch Release 9.8 Software Installation and Configuration Guide
2-140
OL-18083-01
Chapter 2
Installing the Sun Solaris 10 Operating System
Loading the Sun Solaris 10 Operating Environment
Configuring ILOM on Sun Fire X4600 Platform
Configuring the Static IP Address Using the Command Line Interface (CLI)
There are several options to connect to the ILOM. Use the following procedure to establish the
connection to the ILOM using a serial connection. The following procedure is based on the Sun
Microsystems document, Integrated Lights Out Manager (ILOM) Administration Guide, For ILOM
1.1.1.
For other connection options, see the Sun Microsystems document, Sun Fire X4600 and Sun Fire X4600
M2 Server Operating System Installation Guide. You can find these two documents on Sun
Microsystems web site at the following URL,
http://docs.sun.com.
Note
This procedure assumes that you have already completed the hardware setup and have applied standby
power to your server.
Step 1
Verify that your terminal, laptop, or terminal server is operational.
Step 2
Configure the terminal device or the terminal emulation software running on a laptop or a PC to the
following settings:
Step 3
•
8N1: eight data bits, no parity, one stop bit
•
9600 baud
•
Disable hardware flow control (CTS/RTS)
•
Disable software flow control (XON/XOFF)
Connect a serial cable from the RJ-45 SERIAL MGT port on the server back panel to a terminal device.
See Figure 2-5.
Cisco PGW 2200 Softswitch Release 9.8 Software Installation and Configuration Guide
OL-18083-01
2-141
Chapter 2
Installing the Sun Solaris 10 Operating System
Loading the Sun Solaris 10 Operating Environment
Figure 2-5
Sun Fire X4600/X4600 M2 Server Back Panel
10/100 Ethernet port
for net management
10/100/1000 Gigabit
Ethernet ports (4)
271772
AC power
connectors (4)
Video
connector
Step 4
Serial
management
port
USB
connectors (2)
Press Enter on the terminal device.
The login prompt similar to the following is displayed.
SUNSP0003BA84D777 login:
Note
SUNSP is the prefix which is the same for all SPs. 0003BA84D777 is the Ethernet MAC address
of the particular SP. Each SP has a unique MAC address.
Step 5
Enter the default user name root. Enter the default password changeme.
The following default command prompt is displayed when you have successfully logged in.
->
Step 6
Enter the following commands.
The addresses in the commands below are examples.
cd /SP/network
set pendingipaddress=10.10.10.1
set pendingipnetmask=255.255.255.0
set pendingipgateway=10.10.10.254
set pendingipdiscovery=static
set commitpending=true
Step 7
Enter the following command and press Enter.
You can see if the configuration in Step 1 has taken effect using this command.
show /SP/network
Step 8
Connect the Ethernet cable to the 10/100 Ethernet port on the back panel of X4600 server.
See Figure 2-5.
Cisco PGW 2200 Softswitch Release 9.8 Software Installation and Configuration Guide
2-142
OL-18083-01
Chapter 2
Installing the Sun Solaris 10 Operating System
Loading the Sun Solaris 10 Operating Environment
Start ILOM Using Secure HTTP
Follow the following steps to start the ILOM using secure HTTP. These steps are based on Chapter 4,
“Using the WebGUI”, of the Sun Microsystems document, Integrated Lights Out Manager (ILOM)
Administration Guide, For ILOM 1.1.1.
You can find this document on Sun Microsystems web site at the following URL,
http://docs.sun.com.
Step 1
Enter the IP address of the SP in the browser. For example, enter https://10.10.10.1 in the browser. Press
Enter.
A window similar to Figure 2-6 is displayed.
Figure 2-6
Step 2
Integrated Lights Out Manager
Enter the default user ID/password: root/changeme. Click Log In.
This completes the ILOM configuration on Sun Fire X4600 platform.
Configuring ILOM on Sun Netra X4200 M2 Platform
In order to use ILOM on the Sun Netra X4200 M2 platform, you must configure the IP address for the
SP first. You can use one of the following two methods to configure the IP address:
•
Configuring the IP Address with CLI, page 2-144
•
Configuring the IP Address in BIOS, page 2-144
Cisco PGW 2200 Softswitch Release 9.8 Software Installation and Configuration Guide
OL-18083-01
2-143
Chapter 2
Installing the Sun Solaris 10 Operating System
Loading the Sun Solaris 10 Operating Environment
Configuring the IP Address with CLI
The SP IP address configuration with CLI on Sun Netra X4200 M2 platform is the same as the
configuration on Sun Fire X4600 platform. See Configuring the Static IP Address Using the Command
Line Interface (CLI), page 2-141.
Configuring the IP Address in BIOS
To configure the IP address for SP on the Sun Netra X4200 M2 platform, perform the following steps:
Step 1
Connect a monitor and a keyboard to the Sun box.
Step 2
Start the BIOS setup utility by following these steps:
Step 3
a.
Boot the system and pay attention to the prompts on the screen.
b.
Press F2 to enter the BIOS setup utility when you see the prompt telling you to do so.
Click the Advanced tab in the BIOS setup utility.
You see a screen similar to the one in Figure 2-7.
Figure 2-7
Advanced Tab in BIOS Setup Utility on Sun Netra X4200 M2 Platform
Step 4
Highlight IPMI 2.0 Configuration in the list. Then press Enter.
Step 5
Highlight LAN Configuration in the list. Then press Enter.
You see a screen similar to the one in Figure 2-8.
Cisco PGW 2200 Softswitch Release 9.8 Software Installation and Configuration Guide
2-144
OL-18083-01
Chapter 2
Installing the Sun Solaris 10 Operating System
Loading the Sun Solaris 10 Operating Environment
Figure 2-8
LAN Configuration in BIOS Setup Utility on Sun Netra X4200 M2 Platform
Step 6
Choose Static in the IP Assignment.
Step 7
Enter the IP address, the subnet mask, and the default gateway.
Step 8
Select Commit.
Step 9
Select Exit.
Step 10
Highlight the Save Changes and Exit option. Then press Enter.
Step 11
Connect an Ethernet cable from the 10/100 Ethernet port for net management on the server back panel
to a terminal device. (See Figure 2-5.)
Start ILOM Using Secure HTTP
Step 1
Enter the IP address of the SP in the browser. For example, enter https://10.10.10.1 in the browser. Press
Enter. (See Figure 2-6.)
Step 2
Enter the default user ID/password: root/changeme. Click Log In.
You see a screen similar to the one in Figure 2-9.
Cisco PGW 2200 Softswitch Release 9.8 Software Installation and Configuration Guide
OL-18083-01
2-145
Chapter 2
Installing the Sun Solaris 10 Operating System
Loading the Sun Solaris 10 Operating Environment
Figure 2-9
Sun Integrated Lights Out Manager
Step 3
Click the Remote Control tab.
Step 4
Choose the color settings accordingly:
•
16-bit high-quality color for the fast Ethernet connection
•
8-bit low-quality color for the normal Ethernet connection
Step 5
Click Launch redirection.
Step 6
Accept security warnings and hostname mismatch warnings if any.
You see the Sun ILOM remote console as shown in Figure 2-10.
Cisco PGW 2200 Softswitch Release 9.8 Software Installation and Configuration Guide
2-146
OL-18083-01
Chapter 2
Installing the Sun Solaris 10 Operating System
Loading the Sun Solaris 10 Operating Environment
Figure 2-10
Sun ILOM Remote Console
This completes the ILOM configuration on the Sun Netra X4200 M2 platform.
An Example of Using ILOM
Here is a simple example of using ILOM to manage the Sun Netra X4200 M2 platform. You are going
to use ILOM to install the Sun Solaris 10 on a Sun Netra X4200 M2 platform. The detailed installation
procedure for Sun Solaris 10 operating system is described in the “Loading the Sun Solaris 10 Operating
System” section on page 2-2.
Step 1
Note
Open the remote control console of the ILOM. (See Figure 2-10.)
See the “Configuring the IP Address with CLI” section on page 2-144 or the “Configuring the IP Address
in BIOS” section on page 2-144 for IP address configuration before using ILOM. See the “Start ILOM
Using Secure HTTP” section on page 2-145 for details on using ILOM.
Step 2
Insert the Cisco Solaris 10 Operating System Jumpstart Disk in the CD-ROM.
Step 3
Reboot the system.
You see the system output on your ILOM remote control console as shown in Figure 2-11.
Cisco PGW 2200 Softswitch Release 9.8 Software Installation and Configuration Guide
OL-18083-01
2-147
Chapter 2
Installing the Sun Solaris 10 Operating System
Loading the Sun Solaris 10 Operating Environment
Figure 2-11
Step 4
Note
System Output on ILOM Remote Control Console
Choose the desired console device as shown in Figure 2-12.
If you see the system output from a monitor directly connected to the Sun Netra X4200 M2 platform or
from a remote control console of ILOM, choose Solaris. If you are using a serial console, choose Solaris
Serial Console ttya.
Cisco PGW 2200 Softswitch Release 9.8 Software Installation and Configuration Guide
2-148
OL-18083-01
Chapter 2
Installing the Sun Solaris 10 Operating System
Loading the Sun Solaris 10 Operating Environment
Figure 2-12
Note
Console Settings of the Sun Solaris 10 Operating System Installation
See detailed system output of the installation in the “Loading the Sun Solaris 10 Operating System”
section on page 2-2.
Cisco PGW 2200 Softswitch Release 9.8 Software Installation and Configuration Guide
OL-18083-01
2-149
Chapter 2
Installing the Sun Solaris 10 Operating System
Loading the Sun Solaris 10 Operating Environment
Cisco PGW 2200 Softswitch Release 9.8 Software Installation and Configuration Guide
2-150
OL-18083-01
CH A P T E R
3
Installing the Cisco PGW 2200 Softswitch
Software Release 9.8 and Higher
This chapter describes how to install Cisco PGW 2200 Softswitch and later releases of the
Cisco PGW 2200 Softswitch software.
This chapter contains the following sections:
Note
•
Before You Start, page 3-1
•
Installing the Cisco PGW 2200 Softswitch Software Release 9.8 and Higher Releases, page 3-3
For information on provisioning the Cisco PGW 2200 Softswitch software, see the following document:
Cisco PGW 2200 Softswitch Release 9.8 Provisioning Guide.
Before You Start
Before you start, perform the following steps:
1.
Review the hardware and software requirements found in the document Release Notes for
Cisco PGW 2200 Softswitch Release 9.8(1).
2.
Have your company's internal support and Cisco support contact information readily available so
you can get help with the installation if needed. (If you have questions or need assistance, see the
“Obtaining Documentation and Submitting a Service Request” section on page x.)
3.
Ensure that you have access to the console port on your Cisco PGW 2200 Softswitch host.
4.
Before you begin installing the Cisco PGW 2200 Softswitch software, make sure that the Sun
operating system is properly installed. Table 3-1 provides the location of the installation procedure
you might require.
Cisco PGW 2200 Softswitch Release 9.8 Software Installation and Configuration Guide
OL-18083-01
3-1
Chapter 3
Installing the Cisco PGW 2200 Softswitch Software Release 9.8 and Higher
Before You Start
Table 3-1
Installation Overview and Reference Sections
Condition
Action
The Sun Solaris 10 operating system is not yet
installed, you must first install it.
Start with Chapter 2, “Installing the Sun Solaris
10 Operating System.”
Follow the procedures found in the “Installing the
The Sun Solaris 10 operating system is already
Cisco PGW 2200 Softswitch Software Release
installed and you are installing the
Cisco PGW 2200 Softswitch software for the first 9.8 and Higher Releases” section on page 3-3.
time.
The Sun Solaris 10 operating system is already
installed and you are upgrading a pre-release
version of the Cisco PGW 2200 Softswitch
software Release 9.8.
You must reinstall Sun Solaris 10. Start with
Chapter 2, “Installing the Sun Solaris 10
Operating System.”
Cautions, Notes, and Tips
Caution
To prevent the system from running out of disk space during installation and to avoid removal of data
files and databases to compensate, you must first verify that there is enough hard disk space to support
your intended installation. To get free space, you can delete the following files:
- Unnecessary log files (platform*.log)
- User-generated trace files (*.btr)
- Call detail record (CDR) files (.bin or .csv)
- Old *.tar files
- User-generated toolkit files (in the /var/cust_specific/toolkit directory)
Caution
Be sure to follow the Cisco PGW 2200 Softswitch software installation sequence listed in “Installing the
Cisco PGW 2200 Softswitch Software Release 9.8 and Higher Releases” section on page 3-3.
Note
If you modify any file in the /etc directory, you must reboot the Solaris 10 operating system for the
changes to take effect.
Note
Monitor system output frequently for error messages during the installation process and correct any error
conditions before continuing with the installation.
Tip
Allow for at least 2 hours to install the Sun Solaris 10 operating system and approximately 1 hour to
install the Cisco PGW 2200 Softswitch software.
Cisco PGW 2200 Softswitch Release 9.8 Software Installation and Configuration Guide
3-2
OL-18083-01
Chapter 3
Installing the Cisco PGW 2200 Softswitch Software Release 9.8 and Higher
Installing the Cisco PGW 2200 Softswitch Software Release 9.8 and Higher Releases
Installing the Cisco PGW 2200 Softswitch Software Release 9.8
and Higher Releases
Note
Before you begin this procedure, the Solaris 10 operating system and Solaris 10 operating environment
should be already installed on your system.
Note
Remove /usr/ucb from the path environment variable before the initial installation of the
Cisco PGW 2200 Softswitch software. However, if /usr/ucb is needed, make sure that it is located in the
path variable in the user profile after /usr/sbin.
Note
In order for you to enable the SIP Improved Failover Support feature, both Cisco PGW 2200 Softswitch
systems must be in the same Virtual LANs (VLANs). A trunk line between the two switches must be
connected and configured for the SIP Improved Failover Support feature to work. However, if SIP
Improved Failover Support is not required on your system, then the trunk line is not mandatory.
Installing Cisco PGW 2200 Softswitch Software on a Simplex System
To install the Cisco PGW 2200 Softswitch software, complete the following steps:
Step 1
Log in as root.
Step 2
Load the Cisco PGW 2200 Softswitch software CD into the CD-ROM drive.
Step 3
Enter the following commands:
# cd /cdrom/cdrom0
# ./install.sh
The following prompt is displayed:
Use supplied admin file for unattended install? [n] [y,n,?,q]
Step 4
Enter y to perform an unattended installation. If you answer n, you must answer prompts and press Enter
for each package that is installed.
The following prompt is displayed:
Base directory for Toolkit (default /opt/Toolkit) [?,q]
Step 5
Press Enter to accept the default directory for the Toolkit.
Text similar to the following is displayed:
##########################################################################################
# The CSCOgu000 utilities package must be installed prior to other components
#
# but has not been detected on your system. This package contains all required system
#
# parameters necessary for installing the rest of your software. If you do not install #
# this package, the installation script will exit.
#
##########################################################################################
Would you like to install it now? [y] [y,n,?,q]
Cisco PGW 2200 Softswitch Release 9.8 Software Installation and Configuration Guide
OL-18083-01
3-3
Chapter 3 Installing the Cisco PGW 2200 Softswitch Software Release 9.8 and Higher
Installing the Cisco PGW 2200 Softswitch Software Release 9.8 and Higher Releases
Step 6
Enter y to install the CSCOgu000 utilities package on this host.
Step 7
The system begins to display various configuration settings for the Cisco PGW 2200 Softswitch
software. We recommend that you accept the default values (by pressing Enter). You can, however,
specify a different user ID and a group ID. If the ID you specify already exists on the system, the existing
ID is reused, or you are prompted to enter another ID. The configuration settings are as follows:
Base directory for CiscoMGC (default /opt/CiscoMGC) [?,q]
Enter CiscoMGC user name [mgcusr]
Enter CiscoMGC UID [20000]
Enter CiscoMGC group name [mgcgrp]
Enter CiscoMGC GID [20000]
WARNING: setting mode of </etc/init.d/inetinit> to default mode (644)
[mgcgrp] group added
[mgcusr] user added
Modifying /etc/init.d/inetinit
Caution
No validation is performed on the IDs you enter. If you enter an invalid ID, the utilities
package does not add any accounts.
The system returns the following message, stating that the CSCOgu000 utilities package was
successfully installed:
Installation of <CSCOgu000> was successful.
Step 8
If the system indicates that you need to reboot after installing the utilities package, proceed to Step 8a.
Otherwise, proceed to Step 9.
Note
a.
Rebooting may take approximately 5 minutes.
Enter the command displayed on the screen and press Enter.
# shutdown -y -g0 -i6
Note
If the command shown on the screen does not work, you can enter the /usr/sbin/reboot
command to reboot the system.
Note
If you have installed the Solaris DiskSuite package (CSCOh023) on your system, the messages
below are displayed during system boot. They are normal Solaris DiskSuite startup messages
and do not indicate any problem with your system.
WARNING force load of misc /md-trans failed
WARNING force load of misc /md-raid failed
WARNING force load of misc /md-hotspares failed
WARNING force load of misc /md-sp failed
b.
After the reboot finishes, restart install.sh to install the remaining packages. To restart install.sh,
enter the following commands at the # prompt and press Enter:
# cd /cdrom/cdrom0
# ./install.sh
The following prompt is displayed:
Cisco PGW 2200 Softswitch Release 9.8 Software Installation and Configuration Guide
3-4
OL-18083-01
Chapter 3
Installing the Cisco PGW 2200 Softswitch Software Release 9.8 and Higher
Installing the Cisco PGW 2200 Softswitch Software Release 9.8 and Higher Releases
Use supplied admin file for unattended install? [n] [y,n,?,q]
c.
Note
Enter y and press Enter.
This procedure can take approximately 1 hour to complete.
Text similar to the following is displayed, showing the packages that were installed:
Installation of <CSCOga000> was successful.
WARNING: setting mode of </opt/CiscoMGC/.sw_config> to default mode (755)
WARNING: setting mode of </var/spool/cron/crontabs/mgcusr> to default mode (644)
Uncompressing EISUP
Uncompressing ISDNBRI
Uncompressing ISDNIP
Uncompressing ISDNL3
Uncompressing IUA
Uncompressing LI
Uncompressing LMAgent
Uncompressing LogServerd
Uncompressing M3UA
Uncompressing MEGACO
Uncompressing MGCP
Uncompressing QBE_V5
Uncompressing QBE_V6
Uncompressing RA
Uncompressing SIP
Uncompressing SS7
Uncompressing SUA
Uncompressing TCAP
Uncompressing almM
Uncompressing amDmpr
Uncompressing cdrDmpr
Uncompressing cfgM
Installing chk_inv
Installing cisco
Uncompressing diskmonitor
Uncompressing engine.no_smartalloc
Uncompressing engine.smartalloc
Uncompressing foverd
Uncompressing ioChanMgr
Uncompressing lmbase
Installing lmgrd
Uncompressing lmreport
Installing lmutil
Uncompressing measMgr
Uncompressing mmBldCfg
Uncompressing mmSAgt
Uncompressing mmdbd
Uncompressing mml
Uncompressing pom
Uncompressing procM
Uncompressing replicator
Uncompressing sagt
Installing libACE.so
Installing libLMAgt.so
Installing libbtsUtil.so
Installing libcmg.so
Installing libconvutil.so
Installing libcxn.so
Installing libda.so
Installing libeng.so
Cisco PGW 2200 Softswitch Release 9.8 Software Installation and Configuration Guide
OL-18083-01
3-5
Chapter 3 Installing the Cisco PGW 2200 Softswitch Software Release 9.8 and Higher
Installing the Cisco PGW 2200 Softswitch Software Release 9.8 and Higher Releases
Installing libengif.so
Installing libhelp.so
Installing libinf.so
Installing libmmdb.so
Installing libpem.so
Installing libpolbase.so
Installing libpolcomp.so
Installing libpolfiles.so
Installing libpolnuman.so
Installing libpolroute.so
Installing libpom.so
Installing libpxe.so
Installing libpxelog.so
Installing libqbe.so
Installing libqbe_v6.so
Installing librds.so
Installing librmg.so
Installing librudp.so
Installing libsa.so
Installing libstlport.so.1
Installing libtcpServer.so
Installing libxe.so
Installing libxml2.so.2
Updating parameters for CiscoMGC
Updating parameters for SW_Layout.cfg
Updating parameters for helpCommands.xsd
Updating parameters for mmlCommands.xml
Updating parameters for mmlLICommands.xml
Updating parameters for licserver
Updating parameters for log_rotate.sh
Updating parameters for reload_lics.sh
Updating parameters for startAudit.sh
Updating parameters for diagdata
Updating parameters for .create_liusr
Updating parameters for .cshrc
Updating parameters for .delete_liusr
Updating parameters for .dump-prov
Updating parameters for .master.cks
Updating parameters for .perf_setup
Updating parameters for backup.sh
Updating parameters for config-db
Updating parameters for config-lib
Updating parameters for config-snmp
Updating parameters for db-bulkcp
Updating parameters for init.tcl
Updating parameters for mgcbackup
Updating parameters for mgcrestore
Updating parameters for reload_lics.mml
Updating parameters for restore.sh
Updating parameters for rmsem.sh
Updating parameters for startAudit.mml
Updating parameters for startLogServer
Installation of <CSCOga001> was successful.
Modifying /etc/syslog.conf
Updating parameters for .odbc.ini
Updating parameters for backupDb.sh
Updating parameters for liveUpgrade.sh
Updating parameters for restoreDb.sh
Set TOS for timesten replicator
Untarring TimesTen image in /opt/ttdb-install
Preparing to install TimesTen in /opt on sh-jingan
Executing TimesTen installation script...
Cisco PGW 2200 Softswitch Release 9.8 Software Installation and Configuration Guide
3-6
OL-18083-01
Chapter 3
Installing the Cisco PGW 2200 Softswitch Software Release 9.8 and Higher
Installing the Cisco PGW 2200 Softswitch Software Release 9.8 and Higher Releases
NOTE: Each TimesTen installation is identified by a unique instance name.
The instance name must be a non-null alphanumeric string, not longer
than 255 characters.
Instance name will be 'tt60'.
Please select a product :
[1] Oracle TimesTen In-Memory Database
[2] Oracle TimesTen In-Memory Database with Cache Connect to Oracle
Of the three components:
[1] Client/Server and Data Manager
[2] Data Manager Only
[3] Client Only
Installing into /opt/TimesTen/tt60 ...
Creating /opt/TimesTen/tt60 ...
Uncompressing ...
The TimesTen Demo applications can take up to 64 Mbytes of disk space.
Depending on how your system is configured, you may not want to create the
DemoDataStore directory in the default location,
/var/TimesTen/tt60/DemoDataStore
WARNING: It is advised that you do not install the DemoDataStore directory
onto a networked drive. Please see the TimesTen install guide for
more info.
Creating /var/TimesTen/tt60/DemoDataStore ...
NOTE: All installations that replicate to each other must use the same daemon
port number that is set at installation time. The daemon port number can
be verified by running 'ttVersion'.
The default port number is 16001.
The daemon will run on the default port number (16001).
Processing /opt/TimesTen/tt60/PERL/perl.tar ...
System logging appears to be configured correctly.
(TimesTen syslog messages should be recorded in the file '/var/adm/messages')
Installing server components ...
Starting the daemon ...
The tt60 daemon has started successfully.
Installing client components ...
Creating new /var/TimesTen/sys.ttconnect.ini
Extracting 3rd party tools ...
Creating /opt/TimesTen/tt60/doc ...
End of TimesTen installation.
TimesTen installation script returned status 0
Program complete
Restoring default schema.
Sun Microsystems Inc.
SunOS 5.10
Generic January 2005
Cisco PGW 2200 Softswitch Release 9.8 Software Installation and Configuration Guide
OL-18083-01
3-7
Chapter 3 Installing the Cisco PGW 2200 Softswitch Software Release 9.8 and Higher
Installing the Cisco PGW 2200 Softswitch Software Release 9.8 and Higher Releases
Copyright (c) 1996-2006, Oracle. All rights reserved.
Type ? or "help" for help, type "exit" to quit ttIsql.
All commands must end with a semicolon character.
IInstallation of <CSCOga002> was successful.
WARNING: setting mode of </etc/srconf> to default mode (755)
Updating parameters for critagt.cnf
Updating parameters for startcia.sh
Updating inittab...
INITTAB is backed up now...
INITTAB has been updated...
Restarting critagt
Stopping critagt now ...
Stopping critagt...
Done.
Stopping snmpdm...
Done.
Stopping brassagt...
Done.
Stopping brassd...
Done.
Stopping logagt...
Done.
Stopping fsagt...
Done.
Stopping hostagt...
Done.
Stopping mib2agt...
Done.
Reinitializing CIAgent
Upgraded version of critagt is now running.
Restore of CIAGENT complete.
Done.
Installation of <CSCOga003> was successful.
Installing /opt/Toolkit/Packages/Packages.tar.gz
Installing /opt/Toolkit/bytecode/XECfg/XECfg.tar.gz
Installing /opt/Toolkit/bytecode/am/am.tar.gz
Installing /opt/Toolkit/bytecode/cdr/cdr.tar.gz
Installing /opt/Toolkit/bytecode/log/Viewer.tar.gz
Installing /opt/Toolkit/bytecode/toolbar/toolbar.tar.gz
Installing /opt/Toolkit/bytecode/tv/tv.tar.gz
Installing /opt/Toolkit/tcl/tcl.tar.gz
Updating parameters for MGC_Setup
Updating parameters for MGC_Toolkit
Updating parameters for init.tcl
Updating parameters for toolbar.sh
Updating parameters for toslaveside
Setting VERSION=9.8(1) in version.dat
Installation of <CSCOga004> was successful.
Installing /opt/CiscoMGC/lib/perl5/5.00503.tar.gz
Installing /opt/tibrv/tibco.tar.gz
Cisco PGW 2200 Softswitch Release 9.8 Software Installation and Configuration Guide
3-8
OL-18083-01
Chapter 3
Installing the Cisco PGW 2200 Softswitch Software Release 9.8 and Higher
Installing the Cisco PGW 2200 Softswitch Software Release 9.8 and Higher Releases
Updating
Updating
Updating
Updating
parameters
parameters
parameters
parameters
for
for
for
for
tibco.cfg
tib4pgw.sh
tibAdapter.pl
tibsimulator.pl
Installation of <CSCOga006> was successful.
Installing ca
Uncompressing callver
Installing get_trc.sh
Installing sim
Uncompressing simWriter
Uncompressing siptool
Installing sp
Installation of <CSCOgt001> was successful.
WARNING: setting mode of </usr/kernel/strmod/amd64> to default mode (755)
OS is 64-bits
sctpmod not loaded
loading sctpmod
Installation of <CSCOgd004> was successful.
Installing migrate_cpp_4_5
Installing migrate_cpp_5_6
Installing migrate_cpp_DB
Updating parameters for XECfgParm.dat
Updating parameters for trigger.dat
Updating parameters for di
Updating parameters for mgcTTmigrate
Updating parameters for migrate
Updating parameters for migrateTKGFile
Installing /opt/CiscoMGC/etc/CONFIG_LIB/migrate_mod.tar.gz
Installing /opt/CiscoMGC/etc/migrate/migrate_scr.tar.gz
Installing new .dat files in /opt/CiscoMGC/etc
Installation of <CSCOgc001> was successful.
Miscellaneous Protocols
####################################
##
01
##
02
##
####################################
## BTNUP_BTNR167 ## IETF_SIP
##
## BTNUP_IUP
##
##
## DPNSS_BTNR188 ##
##
####################################
SS7 Protocl Family
#########################
##
10
##
#########################
## ANSISS7_2K
##
## ANSISS7_92
##
## ANSISS7_C2
##
## ANSISS7_C3
##
## ANSISS7_E1
##
## ANSISS7_STANDARD
##
## GR317
##
#########################
PRI Protocol Family
######################
##
20
##
######################
## ATT_41459
##
## ATT_41459_C2
##
## BELL_1268
##
## BELL_1268_C2
##
## ETS_300_102
##
## ETS_300_102_C2 ##
## ETS_300_172
##
######################
Q761 Version 1 Protocol Family
##########################################################################################
##
30
##
31
##
32
##
33
##
##########################################################################################
## ETS_300_121
## Q761_BASE
## Q761_GERMAN
## Q761_SINGAPORE
##
## ETS_300_356
## Q761_BELG
## Q761_INDIA
## Q761_SINGAPORE_C2 ##
## HONGKONG
## Q761_BELG_97VER ## Q761_KOREAN
## Q761_TAIWAN
##
Cisco PGW 2200 Softswitch Release 9.8 Software Installation and Configuration Guide
OL-18083-01
3-9
Chapter 3 Installing the Cisco PGW 2200 Softswitch Software Release 9.8 and Higher
Installing the Cisco PGW 2200 Softswitch Software Release 9.8 and Higher Releases
## ISUPV1_POLI
## Q761_CHILE
## Q761_NEWZEALAND ## Q761_THAILAND
##
## Q761_ARGENTINA
## Q761_CHINA
## Q761_97VER_BASE ## Q761_MALAYSIAN
##
## Q761_ARGENTINA_C2 ## Q761_CHINA_C2
## Q761_PERU
## Q761_99VER_BASE
##
## Q761_AUSTRL
## Q761_DANISH
## Q761_PORTUGAL
##Q761_99VER_AUSTRL_C3 ##
## Q761_AUSTRL_C2
##
##
##
##
##########################################################################################
Q761 Version 2 Protocol Family
Q761 Version 3 Protocol Family
###################################################################### ###################
##
40
##
41
##
42
## ##
50
##
###################################################################### ###################
## ISUPV2_32DIG
## ISUPV2_JAPAN
## ISUPV2_VIETNAM
## ## ISUPV3
##
## ISUPV2_AUSTRIAN
## ISUPV2_JAPAN_C2
## ISUPV2_AUSTRIAN_C2 ## ## ISUPV3_UK
##
## ISUPV2_CZECH
## ISUPV2_NORWEGIAN
##
## ## ISUPV3_UK_C2 ##
## ISUPV2_DUTCH
## ISUPV2_POLISH
##
## ## ISUPV3_UK_C3 ##
## ISUPV2_FINNISH96 ## ISUPV2_SPANISH
##
## ## ISUPV3_UK_C4 ##
## ISUPV2_FRENCH
## ISUPV2_SPANISH_C2 ##
## ##
##
## ISUPV2_GERMAN
## ISUPV2_SWISS
##
## ##
##
## ISUPV2_ISRAEL
## ISUPV2_SWISS_C2
##
## ##
##
###################################################################### ###################
Q721 Protocol Family
#######################
##
60
##
#######################
## Q721_BASE
##
## Q721_BRAZILIAN
##
## Q721_CHINA
##
## Q721_FRENCH
##
## Q721_PHILLIPINE ##
##
##
##
##
##
##
#######################
Q767 Protocol Family
##########################################
##
70
##
71
##
##########################################
## Q767_AUSTRALIA ## Q767_MEXICAN
##
## Q767_BASE
## Q767_NIGERIAN
##
## Q767_BRAZIL
## Q767_RUSS
##
## Q767_COLOMBIA
## Q767_SINGAPORE ##
## Q767_GUATEMALA ## Q767_SPAN
##
## Q767_INDONESIA ## Q767_SWED
##
## Q767_ITAL
## Q767_TURKISH
##
## Q767_ITAL_C2
##
##
##########################################
Q931 Protocol Family
######################
##
80
##
######################
## Q931
##
## Q931_AUSTRALIA ##
## Q931_SINGAPORE ##
######################
Would you like to add a protocol set to your system? [y] [y,n,?,q]
Step 9
Note
Select y to add a protocol set.
The protocols that you select are specific to your system requirements. These should be decided prior to
installation.
The following prompt is displayed:
Please insert a two digit package identifier and type <enter>
If you choose to add all protocols to your system, type "all": <package identifier>
Step 10
You can do either of the following:
a.
Enter all and press Enter to add all of the protocols to your system. If you do, more disk space is
used and the installation process takes more time. Proceed to Step 12.
Cisco PGW 2200 Softswitch Release 9.8 Software Installation and Configuration Guide
3-10
OL-18083-01
Chapter 3
Installing the Cisco PGW 2200 Softswitch Software Release 9.8 and Higher
Installing the Cisco PGW 2200 Softswitch Software Release 9.8 and Higher Releases
b.
Select the specific protocol(s) you need from the tables (instead of selecting all) and enter the
protocol identifier(s).
The following prompt is displayed:
Would you like to add another protocol set to your system? [y] [y,n,?,q]
Step 11
Select one of the following options:
a.
If you select y, you are prompted by the system to enter another protocol identifier (see Step 10).
b.
If you select n, the system begins installing the protocols you specify, resulting in text similar to the
following for each protocol group:
Uncompressing
Uncompressing
Uncompressing
Uncompressing
Uncompressing
Uncompressing
Uncompressing
Uncompressing
Uncompressing
Uncompressing
Uncompressing
Uncompressing
Uncompressing
Uncompressing
ISUPV2_AUSTRIAN.mdo
ISUPV2_AUSTRIAN.so
ISUPV2_CZECH.mdo
ISUPV2_CZECH.so
ISUPV2_DUTCH.mdo
ISUPV2_DUTCH.so
ISUPV2_FINNISH96.mdo
ISUPV2_FINNISH96.so
ISUPV2_FRENCH.mdo
ISUPV2_FRENCH.so
ISUPV2_GERMAN.mdo
ISUPV2_GERMAN.so
ISUPV2_ISRAEL.mdo
ISUPV2_ISRAEL.so
Installation of <CSCO40000> was successful.
Once the all of your selected protocol groups have been installed, the system displays text similar to the
following:
Beginning Check of System Performance Requirements
Number of CPUs in system 2
Memory size: 2048 Megabytes
The sparcv9 processor operates at 1336 MHz,
Swap is total: 76384k bytes allocated + 13744k reserved = 90128k used, 5635696k available
Please Verify that you have over 4000000K Available swap
The tt60 daemon has stopped successfully.
Installation completed Wed Sep 24 03:52:32 EDT 2008
Installation log can be found in /var/adm/MGC_install.log
Note
During the Cisco PGW 2200 Softswitch software installation, you may see a warning similar to
the following one in the system output:
Optimal Performance of this Software Requires 2.048 Gb of Memory!!
Ignore this warning because it is caused by an error in the install.sh script.
Step 12
Enter eject and press Enter to open the CD-ROM drive door after the installation is completed. Remove
the Cisco PGW 2200 Softswitch software CD from the tray.
Step 13
(Optional) Perform the procedure in the “Installing the Cisco Security Package (CSCOh020)” section on
page 3-12 to install the Cisco Security Package.
This completes installation of the Cisco PGW 2200 Softswitch software on a simplex host system. If you
have a fault-tolerant system, proceed to the “Installing on a Fault Tolerant System” section on page 3-17.
Otherwise, proceed to the next step.
Cisco PGW 2200 Softswitch Release 9.8 Software Installation and Configuration Guide
OL-18083-01
3-11
Chapter 3 Installing the Cisco PGW 2200 Softswitch Software Release 9.8 and Higher
Installing the Cisco PGW 2200 Softswitch Software Release 9.8 and Higher Releases
Step 14
Note
You can now begin configuring your Cisco PGW 2200 Softswitch software in the “Using the Cisco
MGC Environment Configuration Tool” section on page 4-8.
During installation of the Cisco PGW 2200 Softswitch software, the system is automatically installed,
using a standard performance profile satisfactory for both nailed and switched solutions.
See the Cisco PGW 2200 Softswitch Release 9.8 Provisioning Guide for information on provisioning the
Cisco PGW 2200 Softswitch software on a simplex system.
If you have questions or need assistance, see the “Obtaining Documentation and Submitting a Service
Request” section on page x.
Installing the Cisco Security Package (CSCOh020)
Perform the following procedure to install the Cisco Security package (CSCOh020):
Step 1
If you are using the CD-ROM, load the Cisco Solaris 10 Operating Environment CD into the CD-ROM
drive. Enter the following command:
# pkgadd -d /cdrom/cdrom0/CSCOh020.pkg
Text similar to the following is displayed:
The following packages are available:
1 CSCOh020
Media Gateway Controller Security package compatible with Solaris 10
(sparc, i386) 3.0(6)
Select package(s) you wish to process (or 'all' to process
all packages). (default: all) [?,??,q]:
Note
Step 2
You can also download the Cisco Security package (CSCOh020) from Cisco.com. For example,
download the CSCOh020 package to the /opt/SW folder on the platform and use the command,
pkgadd -d /opt/SW/CSCOh020.pkg. Make sure you downloads the platform-specific package for
your platform (Sparc-based or Opteron-based).
Press Enter to select the default value. Text similar to the following is displayed:
Processing package instance <CSCOh020> from </var/tmp/CSCOh020.pkg>
Media Gateway Controller Security package compatible with Solaris 10(sparc, i386) 3.0(6)
This appears to be an attempt to install the same architecture and
version of a package which is already installed. This installation
will attempt to overwrite this package.
Cisco Systems, Inc.
## Executing checkinstall script.
CSCOh020 checkinstall log file at /var/tmp/CSCOh020.checkinstall.log
Platform is i86pc
This machine is running Solaris 5.10
Using </opt/sun_install> as the package base directory.
## Processing package information.
## Processing system information.
Cisco PGW 2200 Softswitch Release 9.8 Software Installation and Configuration Guide
3-12
OL-18083-01
Chapter 3
Installing the Cisco PGW 2200 Softswitch Software Release 9.8 and Higher
Installing the Cisco PGW 2200 Softswitch Software Release 9.8 and Higher Releases
4 package pathnames are already properly installed.
## Verifying disk space requirements.
## Checking for conflicts with packages already installed.
## Checking for setuid/setgid programs.
This package contains scripts which will be executed with super-user
permission during the process of installing this package.
Do you want to continue with the installation of <CSCOh020> [y,n,?]
Step 3
Enter y and press Enter to continue. Text similar to the following is displayed:
Installing Media Gateway Controller Security package compatible with Solaris 10 as
<CSCOh020>
## Executing preinstall script.
Cisco MGC software or an adjunct was found.
## Installing part 1 of 1.
[ verifying class <none> ]
## Executing postinstall script.
You must now run the install security script
Log in as root
cd /opt/sun_install
and run the command:
./CiscoSec.sh install /tmp/security.log
The machine will have to be rebooted
after the script is run
Installation of <CSCOh020> was successful.
Step 4
Change directory to /opt/sun_install and run the install script by entering the following commands:
# cd /opt/sun_install
# ./CiscoSec.sh install /tmp/security.log
Text similar to the following is displayed:
Output will be logged in
install
You are running as root - Good...
Operating System: SunOS 5.10
For security reasons, root access from outside the console
is disabled by default.
Do you want to allow remote root logins? (y/n) [N]
Step 5
If you want to allow remote users to log in as root, perform the following steps. If you do not want to
allow remote users to log in as root, enter n and press Enter, then proceed to Step 6.
a.
Type y and press Enter.
Text similar to the following is displayed:
Allowing remote (ie. non-console) root logins
may pose a serious security risk.
Are you sure you want to allow remote root logins? (y/n) [N]
b.
Type y and press Enter to continue.
Cisco PGW 2200 Softswitch Release 9.8 Software Installation and Configuration Guide
OL-18083-01
3-13
Chapter 3 Installing the Cisco PGW 2200 Softswitch Software Release 9.8 and Higher
Installing the Cisco PGW 2200 Softswitch Software Release 9.8 and Higher Releases
Text similar to the following is displayed:
For security reasons, ftp access is disabled by default.
Do you want to allow ftp access? (y/n) [N]
Step 6
If you want to allow ftp access, perform the following steps. If you do not want to allow ftp access, enter
n and press Enter, then proceed to Step 7.
a.
Type y and press Enter.
Text similar to the following is displayed:
Allowing ftp access may pose a serious security risk.
Are you sure you want to allow ftp access? (y/n) [N]
b.
Type y and press Enter to continue.
Text similar to the following is displayed:
For security reasons, telnet access is disabled by default.
Do you want to allow telnet access? (y/n) [N]
Step 7
If you want to allow telnet access, perform the following steps. If you do not want to allow telnet access,
enter n and press Enter, then proceed to Step 8.
a.
Type y and press Enter.
Text similar to the following is displayed:
Allowing telnet access may pose a serious security risk.
Are you sure you want to allow telnet access? (y/n) [N]
b.
Type y and press Enter to continue.
Text similar to the following is displayed:
For security reasons, the sudo command is disabled by default.
Do you want to enable sudo? (y/n) [N]
Step 8
If you want to enable Sudo, perform the following steps. If you do not want to enable Sudo, enter n and
press Enter, then proceed to Step 9.
a.
Type y and press Enter.
Text similar to the following is displayed:
Enabling sudo may pose a serious security risk.
Are you sure you want to enable sudo? (y/n) [N]
b.
Type y and press Enter to continue.
Text similar to the following is displayed:
The user will still need to edit the sudoers file
to allow specific users to run the command
Note
To complete enabling Sudo, you must also complete the “Enabling Sudo” section after installing
the Cisco Security Package.
**************************************************
**************************************************
**
**
** NOTE!! The machine must be REBOOTED in order **
**
for these changes to take effect
**
**
**
**************************************************
Cisco PGW 2200 Softswitch Release 9.8 Software Installation and Configuration Guide
3-14
OL-18083-01
Chapter 3
Installing the Cisco PGW 2200 Softswitch Software Release 9.8 and Higher
Installing the Cisco PGW 2200 Softswitch Software Release 9.8 and Higher Releases
**************************************************
Do you want to reboot the machine now? (y/n) [N]
Step 9
Enter y and press Enter to reboot the system and reset your security settings.
Step 10
Enter eject and press Enter to open the CD-ROM drive door once the system has completed the reboot.
Remove the Cisco PGW 2200 Softswitch software CD from the tray.
This completes installation of the Cisco Security package on a simplex host system. If you have a
fault-tolerant system, proceed to the “Installing on a Fault Tolerant System” section on page 3-17.
Otherwise, proceed to the next step.
Note
Step 11
If the installation of this package returns an error code of 1 for any of the associated files, you can ignore
the error. Those files have encountered an error, but the installation is correct.
You can now begin configuring your Cisco PGW 2200 Softswitch software in the “Using the Cisco
MGC Environment Configuration Tool” section on page 4-8.
Enabling Sudo
The Sudo application allows you to run programs with the security privileges of another user such as the
superuser. Follow these steps to enable Sudo on the Cisco PGW 2200 Softswitch:
Step 1
Enter ln -s /opt/sfw/bin/sudo /usr/bin/sudo and press Enter.
Step 2
Enter ln -s /opt/sfw/etc/sudoers /etc/sudoers and press Enter.
Note
You must also have enabled sudo in step 8 of the Installing the Cisco Security Package (CSCOh020)
section.
If you need to make further changes to the sudo policy, edit the policy in /etc/sudoers.
Installing the License File
To manage licenses, Cisco PGW 2200 Softswitch provides license files that are stored in a directory
where Cisco PGW 2200 Softswitch obtains the required license information.
Cisco PGW 2200 Softswitch uses the license file to enforce the capacity and features available. For more
information about License features on the Cisco PGW 2200 Softswitch, see the Licensing Features for
the PGW 2200 at:
http://www.cisco.com/en/US/docs/voice_ip_comm/pgw/9/feature/module/9.7_3_/FlexLM.html
Note
You must install the license file on both the active and the standby Cisco PGW 2200 Softswitch for it to
function properly.
Cisco PGW 2200 Softswitch Release 9.8 Software Installation and Configuration Guide
OL-18083-01
3-15
Chapter 3 Installing the Cisco PGW 2200 Softswitch Software Release 9.8 and Higher
Installing the Cisco PGW 2200 Softswitch Software Release 9.8 and Higher Releases
Installing the License File if the Cisco PGW 2200 Softswitch is NOT Running
If the Cisco PGW 2200 Softswitch is not in a running state, perform the following steps.
Step 1
Save the license file (.lic) to a temporary directory on your hard disk.
Step 2
Copy the license file to the /opt/CiscoMGC/license directory of the Cisco PGW 2200 Softswitch.
Licenses are cumulative, so there can be multiple license files of the same type.
Step 3
Log in as root.
Step 4
Enter the following command to start the Cisco PGW 2200 Softswitch:
# /etc/init.d/CiscoMGC start
The license file loads automatically.
Installing the License File if the Cisco PGW 2200 Softswitch is Running
If the Cisco PGW 2200 Softswitch is in a running state, perform the following steps.
Step 1
Save the license file (.lic) to a temporary directory on your hard disk.
Step 2
Copy the license file(s) to the /opt/CiscoMGC/license directory of the Cisco PGW 2200 Softswitch.
Licenses are cumulative, so there can be multiple license files of the same type.
Step 3
Log in as mgcusr.
Tip
For more information about managing MML users, see Using the Cisco MGC Environment
Configuration Tool, page 4-8.
Step 4
Go to the /opt/CiscoMGC/bin directory of the Cisco PGW 2200 Softswitch.
Step 5
Run the reload_lics.sh script.
The following is a sample out put from the script:
Copyright © 1998-2002, Cisco Systems, Inc.
MGC-01 - Media Gateway Controller 2006-05-18 08:07:37.051 EDT M COMPLD
''LMAgent:
-----------------------------------------------------------------PGW License 9.7 permanent
-----------------------------------------------------------------Interface Name Entitled Provisioned
SS7Interface
Y
Y
PRIInterface
Y
N
PBXInterface
Y
N
INAPInterface
Y
N
LIInterface
Y
N/A
-----------------------------------------------------------------Configure TDM Ports Entitled Provisioned Available
Call Control
1500
1384
116
-----------------------------------------------------------------Run Time License
Entitled
SIP
1500
H323
1500
------------------------------------------------------------------''
Cisco PGW 2200 Softswitch Release 9.8 Software Installation and Configuration Guide
3-16
OL-18083-01
Chapter 3
Installing the Cisco PGW 2200 Softswitch Software Release 9.8 and Higher
Installing the Cisco PGW 2200 Softswitch Software Release 9.8 and Higher Releases
Installing on a Fault Tolerant System
Caution
To ensure the successful installation of a fault tolerant configuration, you must provision the software
for the active Cisco PGW 2200 Softswitch host after Step 10 of the “Installing the Cisco Security
Package (CSCOh020)” section on page 3-12, before proceeding to Step 1, below. See the
Cisco PGW 2200 Softswitch Release 9.8 Provisioning Guide for information about the following:
- Provisioning the active Cisco PGW 2200 Softswitch host
- Procedures for converting the active Cisco PGW 2200 Softswitch host to the standby host
Only one active provisioning session is permitted, and provisioning is permitted only on the active
Cisco PGW 2200 Softswitch host.
Exit the provisioning session on the active host and continue to Step 1, below. If the software is not
provisioned after it is installed on the active Cisco PGW 2200 Softswitch host, the standby host is not
synchronized with the active host. As a result, a forced switchover might cause the switchover to fail.
To install the Cisco PGW 2200 Softswitch software on a fault-tolerant system (one with two
Cisco PGW 2200 Softswitch hosts and Cisco SS7 interfaces), complete the following steps.
Note
The MGC_install.log and the MGC_pkgerrors.log are stored in the /var/adm directory.
Step 1
Continuing from Step 10 of the “Installing the Cisco Security Package (CSCOh020)” section on
page 3-12, exit server 1.
Step 2
Log on to server 2 as root and go to the # prompt.
Step 3
Load the Cisco PGW 2200 Softswitch software CD into the server 2 CD-ROM drive.
Step 4
Follow the instructions in Step 3 through Step 12 of the “Installing Cisco PGW 2200 Softswitch
Software on a Simplex System” section on page 3-3.
Step 5
Follow the instructions in Step 1 through Step 10 of the “Installing the Cisco Security Package
(CSCOh020)” section on page 3-12.
Step 6
Install the license using the instructions in the “Installing the License File” section on page 3-15.
Step 7
Configure the execution environment parameters and database replication for fault tolerant systems
described in Appendix A, “XECfgParm.dat File Parameters.”
This completes the installation of the Cisco PGW 2200 Softswitch software. Continue to the “Using the
Cisco MGC Environment Configuration Tool” section on page 4-8 to configure groups and users. If you
have questions or need assistance, see the “Obtaining Documentation and Submitting a Service Request”
section on page x.
Cisco PGW 2200 Softswitch Release 9.8 Software Installation and Configuration Guide
OL-18083-01
3-17
Chapter 3 Installing the Cisco PGW 2200 Softswitch Software Release 9.8 and Higher
Installing the Cisco PGW 2200 Softswitch Software Release 9.8 and Higher Releases
Note
Always check cisco.com (http://www.cisco.com/kobayashi/sw-center/sw-voice.shtml) to ensure that you
have the latest required patch version released by Cisco on your system, CD, or file system (if
downloaded previously from cisco.com).
Cisco PGW 2200 Softswitch Release 9.8 Software Installation and Configuration Guide
3-18
OL-18083-01
CH A P T E R
4
Configuring the Cisco PGW 2200 Softswitch
Software
This chapter describes how to configure Release 9.8 of the Cisco PGW 2200 Softswitch software.
Quick Guide to Configuring the Cisco PGW 2200 Softswitch
Software
Note
The Cisco PGW 2200 Softswitch software files and processes are located in the /opt/CiscoMGC
directory.
The following table provides an overview of the Cisco PGW 2200 Softswitch software configuration.
Table 4-1
Quick Guide to Configuring the Cisco PGW 2200 Softswitch Software
Task
Detailed Procedures
Before You Start
on page 4-2
Initial Cisco PGW 2200 Softswitch Software Configuration
on page 4-4
– Using the Cisco MGC Environment Configuration Tool
Using the Cisco MGC Environment Configuration Tool
on page 4-8
on page 4-8
– Verifying the mgcgrp Group
on page 4-11
– Adding a User with Full MML Privileges
on page 4-11
– Adding a User with Minimal MML Privileges
on page 4-12
Configuring SNMP Support Resources
– Migrating the SNMP Configuration to a More Secure
on page 4-13
on page 4-14
Environment (for Cisco PGW 2200 Softswitch Release
9.3(2) or Later)
Cisco PGW 2200 Softswitch Release 9.8 Software Installation and Configuration Guide
OL-18083-01
4-1
Chapter 4
Configuring the Cisco PGW 2200 Softswitch Software
Before You Start
Table 4-1
Quick Guide to Configuring the Cisco PGW 2200 Softswitch Software (continued)
Task
Detailed Procedures
Configuring the Execution Environment
on page 4-25
– Changing XECfgParm.dat File Parameters
on page 4-26
– Changing XECfgParm.dat File Parameters in a Running
on page 4-27
Fault Tolerant System
– Configuring Basic System Information
on page 4-28
– Specifying IP Addresses
on page 4-30
– Configuring Engine Parameters
on page 4-32
– Enabling Call Screening
on page 4-34
– Configuring Call Detail Record File Output
on page 4-35
– Configuring the Clearing Location and Default
on page 4-36
Location Parameters
– Configuring Switchover
on page 4-39
– Initializing the Provisioning Object Manager
on page 4-41
Configuring SCP Queries
on page 4-42
– Before You Start
on page 4-43
– Configuring the trigger.dat File Attributes
on page 4-43
Initializing the Call Screening Database
on page 4-82
– .odbc.ini File Information
on page 4-83
– Setting Up Replication
on page 4-83
– Verifying Database Replication
on page 4-86
– Troubleshooting the Main Memory Database
on page 4-87
Replication
Note
Configuring Cisco ITP-Ls
on page 4-89
Configuring Disk Monitor During Initial Software Configuration
on page 4-89
Configuring the Data Dumper
on page 4-90
Configuring the Data Dumper to Support Cisco BAMS
on page 4-92
For further information on configuring the Cisco PGW 2200 Softswitch software, see the
Cisco PGW 2200 Softswitch Release 9.8 Provisioning Guide.
Before You Start
Before you start, verify the following:
Cisco PGW 2200 Softswitch Release 9.8 Software Installation and Configuration Guide
4-2
OL-18083-01
Chapter 4
Configuring the Cisco PGW 2200 Softswitch Software
Before You Start
Caution
•
Have your company's internal support and Cisco support contact information readily available so
you can get help with the installation if needed. (If you have questions or need assistance, see the
“Obtaining Documentation and Submitting a Service Request” section on page x of the Cisco
support contact information.)
•
Ensure that you have access to the console port on your Cisco PGW 2200 Softswitch host.
The Cisco PGW 2200 Softswitch software is case-sensitive. Ensure that you enter parameter names
correctly, or the maximum number of configurations will not be modified.
Software Directory Structure
Table 4-2 shows the Cisco PGW 2200 Softswitch software directory structure.
Caution
Do not edit any .dat files (except for the XECfgParm.dat and trigger.dat files). Use MML or the GUI
provisioning tool to make changes to your configuration. In addition, only make changes to the call
screening database by using MML or the GUI provisioning tool.
Table 4-2
Software Directory Structure
Directory
Contents
/etc/init.d
Control scripts, including scripts used to stop and start the
software.
/opt/CiscoMGC
Root location of base software installation.
/opt/CiscoMGC/bin
Stores executable Cisco PGW 2200 Softswitch system
files.
/opt/CiscoMGC/license
Cisco PGW 2200 Softswitch license files.
/opt/CiscoMGC/local
User accounts home directory.
/opt/CiscoMGC/etc
Contains active configuration data files and the
configuration library.
/opt/CiscoMGC/etc/CONFIG_LIB
Library of all configuration data files.
/opt/CiscoMGC/etc/CONFIG_LIB/new
The initial startup configuration supplied with a new
installation of the software.
/opt/CiscoMGC/etc/active_link
The active running configuration that has been committed
or deployed.
/opt/CiscoMGC/etc/prov_link
The latest provisioned configuration that has not yet been
committed or deployed.
/opt/CiscoMGC/etc/cust_specific
Location of configurations that have been exported using
the prov-exp MML command.
/opt/CiscoMGC/lib
System software libraries of *.so object files (including
protocol and system libraries).
/opt/CiscoMGC/snmp
SNMP support directory. MIBs are named *.my and are in
ASN.1 syntax.
Cisco PGW 2200 Softswitch Release 9.8 Software Installation and Configuration Guide
OL-18083-01
4-3
Chapter 4
Configuring the Cisco PGW 2200 Softswitch Software
Initial Cisco PGW 2200 Softswitch Software Configuration
Table 4-2
Software Directory Structure (continued)
Directory
Contents
/opt/CiscoMGC/var
Contains the log, spool, trace, and Coredump file
directories.
/opt/CiscoMGC/var/log
Default platform informational and error logs.
/opt/CiscoMGC/var/spool
Spool files for CDRs and measurements.
/opt/CiscoMGC/var/trace
Location of trace files created by using the sta-trc MML
command.
/opt/SW
Cisco PGW 2200 Softswitch software patch files.
Note
This directory is not created by the default
Cisco PGW 2200 Softswitch installation, but is
recommended for storing
Cisco PGW 2200 Softswitch patch files.
/opt/TimesTen
Call screening database files. Do not edit the database.
/opt/Toolkit
The Toolkit application files.
/opt/sun_install
Contains the scripts used to install Solaris patches.
Initial Cisco PGW 2200 Softswitch Software Configuration
The following required configuration parameters in the XECfgParm.dat file (see Table 4-3) are critical
to bringing up the system. For a complete list of the parameters found in the XECfgParm.dat file and
how they are used by the Cisco PGW 2200 Softswitch, see Appendix A, “XECfgParm.dat File
Parameters.”
Note
The XECfgParm.dat file must be provisioned with the installation of every system. The file consists of
set of parameters that are necessary to bring up the system. This set of required parameters is configured
via the MGC Environment Configuration Tool.
When you exit the MGC Environment Configuration Tool, the slave file is sent via FTP to the appropriate
system.
During initial Cisco PGW 2200 Softswitch configuration, we recommend that you put an initial
configuration on the active host, otherwise both the active and standby hosts will remain in the stopped
state. Do not start the standby host if the active host is not yet provisioned.
When the initial configuration on the active host is deployed, you must change the pom.dataSync
parameter to true in the XECfgParm.dat file in the standby host. After setting this parameter to true, you
can start the Cisco PGW 2200 Softswitch software on the standby host. As the
Cisco PGW 2200 Softswitch software comes up, the data on the standby host is synchronized with the
data on the active host. Initiate switchover to bring the active host to the standby state.
To accommodate failover conditions where the current active host can become the standby host, you
must also set the pom.dataSync parameter to true on the current active host.
When upgrading the Cisco PGW 2200 Softswitch software: You must set the pom.dataSync parameter
to false on the current active host in order to preserve configuration files.
Cisco PGW 2200 Softswitch Release 9.8 Software Installation and Configuration Guide
4-4
OL-18083-01
Chapter 4
Configuring the Cisco PGW 2200 Softswitch Software
Initial Cisco PGW 2200 Softswitch Software Configuration
Table 4-3 shows the Cisco PGW 2200 Softswitch configuration parameters.
Table 4-3
Configuration Parameters
Parameter
Description
*.CPUTimerInterval
Samples the frequency of CPU utilization.
Prior to Release 9.4(1), this parameter must be set to 0
during the initial configuration of any platform with a
single CPU (including Sun Netra t 100/105, Sun
Netra V 120, and Sun Netra 120).
Default: 3000 msec (3 seconds)
Note
During the startup of the
Cisco PGW 2200 Softswitch software, this
parameter will be set automatically to tune the
system for optimal performance.
For Release 9.4(1) and later, this parameter is set
automatically when you specify a
Cisco PGW 2200 Softswitch type in the
engine.SysVirtualSwitch parameter. Any attempt to
modify this parameter is overwritten.
*.desiredPlatformState
Specifies the operating mode of the
Cisco PGW 2200 Softswitch.
*.IP_Addr1 through IP_Addr4
Specify the IP addresses being used by the system.
Note that *.IP_AddrLocalA, and *.IP_AddrLocal2 are
the same as *.IP_Addr1, and *.IP_Addr2, respectively.
*.IP_AddrLocalA and
*.IP_AddrLocalB
The local IP addresses of the
Cisco PGW 2200 Softswitch. These addresses should
match the value of *.IP_AddrLocalA and
*.IP_AddrLocalB.
*.IP_AddrPeerA and
*.IP_AddrPeerB
The IP address of Cisco PGW 2200 Softswitch peers
used for failover.
*.MGC_CDR_NODE_ID
The Cisco PGW 2200 Softswitch System ID used for
Call Data Records (CDRs).
*.ownTranspathId
Contains a unique number that identifies the
Cisco PGW 2200 Softswitch’s virtual switch controller
within the ASN (Auxiliary Signaling Network).
Default: 01
*.peerTranspathId
Contains a unique number that identifies a peer virtual
switch controller within the ASN (Auxiliary Signaling
Network).
Default: 02
*.platformId
Identifies the Cisco PGW 2200 Softswitch platform.
The default value 1 applies to Fault Tolerant mode and
Standalone mode.
Default: 1
Cisco PGW 2200 Softswitch Release 9.8 Software Installation and Configuration Guide
OL-18083-01
4-5
Chapter 4
Configuring the Cisco PGW 2200 Softswitch Software
Initial Cisco PGW 2200 Softswitch Software Configuration
Table 4-3
Configuration Parameters (continued)
Parameter
Description
*.SysConnectDataAccess
Controls whether data access is enabled or disabled (if
the engine attempts to connect to the MMDB or to call
screening database at startup).
Values:
•
true = connect to MMDB or call screening
database
•
false = do not connect to MMDB or call screening
database
Default: false
Note
*.TCAP.avgInvokePerDialog
This parameter must be set to true in calling
scenarios where Euro-LNP, A Number
Screening, or other features requiring real time
database access are required. Otherwise, it can
remain false for an increase in the available
system memory usable for call processing.
Specifies the maximum number of outgoing Invoke
messages per dialog.
Values: 1-10
Default: 1
*.TCAP.maxSsnNum
Specifies the maximum number of local Subsystem
Numbers (SSNs) supported by the
Cisco PGW 2200 Softswitch.
Values: 1-10
Default: 1
*.transpathId
A unique number that identifies each virtual switch
controller within the ASN (Auxiliary Signaling
Network).
Default: 01
*.Virtual_IP_Addr1 through
*.Virtual_IP_Addr2
Specify virtual IP addresses for the
Cisco PGW 2200 Softswitch that are used for SIP
Failover Support.
Cisco PGW 2200 Softswitch Release 9.8 Software Installation and Configuration Guide
4-6
OL-18083-01
Chapter 4
Configuring the Cisco PGW 2200 Softswitch Software
Initial Cisco PGW 2200 Softswitch Software Configuration
Table 4-3
Configuration Parameters (continued)
Parameter
Description
engine.SysVirtualSwitch
Indicates whether the Cisco PGW 2200 Softswitch host
functions as a signaling controller or a virtual switch
controller.
Values:
•
0—Signaling controller (nailed trunks, no auditing
is initiated)
•
1—Virtual switch controller (switched trunks)
Default: 0
Note
During the startup of the
Cisco PGW 2200 Softswitch software, this
parameter is be set automatically to tune the
system for optimal performance.
Note
For Release 9.4(1) and later, the values of the
parameters listed below are automatically set
based on the Cisco PGW 2200 Softswitch type
you select, to maximize performance for that
configuration. Any attempt to change the values
of these parameters is overwritten.
engine.SysMdlMemoryReduction
engine.CALL_MEM_BLOCK_SIZE
engine.CALL_MEM_CHUNK_SIZE
*.CPUTimerInterval
*.numberOfThreads
pom.dataSync
Indicates that the Provisioning Object Manager (POM)
should synchronize the provisioning data at startup.
Values:
•
True— POM does not synchronize provisioning
data at startup.
•
False— POM synchronizes provisioning data at
startup.
Default: False
Parameters Required for Initial Setup
The following table lists the parameter values that must be defined during the initial installation.
Note
These parameters are located at the top of the XECfgParm.dat file, thus making it easier to find the
parameters required for initial setup.
Cisco PGW 2200 Softswitch Release 9.8 Software Installation and Configuration Guide
OL-18083-01
4-7
Chapter 4
Configuring the Cisco PGW 2200 Softswitch Software
Initial Cisco PGW 2200 Softswitch Software Configuration
Table 4-4
Item
Note
Parameters Required for Initial Setup
Parameter Name
Default Value
Changed Values
1
*.platformId
1
2, if slave
2
*.transpathId
01
02, if standby
3
*.ownTranspathId
01
02, if standby
4
*.peerTranspathId
02
01, if standby
5
*.MGC_CDR_NODE_ID
MGC-CDR-NO System Id for Call Data Records
(CDRs)
DE-STRING
6
*.desiredPlatformState
Standalone
Master,slave,standalone
7
*.SysConnectDataAccess
False
True
8
*.IP_AddrLocalA
0.0.0.0
Ifconfig(bge0)
9
*.IP_AddrLocalB
0.0.0.0
Ifconfig(bge1)
10
*.IP_AddrPeerA
0.0.0.0
Slave(ifconfig(bge0))
11
*.IP_AddrPeerB
0.0.0.0
Slave(ifconfig(bge1))
12
*.IP_Addr1
0.0.0.0
Ifconfig(bge0)
13
*.IP_Addr2
0.0.0.0
Ifconfig(bge1)
14
*.IP_Addr3
0.0.0.0
Ifconfig(bge2)
15
*.IP_Addr4
0.0.0.0
Ifconfig(bge3)
16
StPort
0
7000, if Master or 7001 if Slave
17
Engine.SysVirtualSwitch
0
1 for Switched solution
18
Foverd.ipLocalPortA (con 1)
0
1051, if Master or 1052 if Slave
19
Foverd.ipPeerPortA (con 1)
0
1052, if Master or 1051 if Slave
20
Foverd.ipLocalPortA (con 2)
0
1053, if Master or 1054 if Slave
21
Foverd.ipPeerPortA (con 2)
0
1054, if Master or 1053 if Slave
22
Pom.dataSync
False
True if Master or Slave, both sides
23
Diskmonitor.OptFileSys
<blank>
../var/log
24
NumberOfThreads
0
Determined based on the number of
CPUs in the
Cisco PGW 2200 Softswitch
For an example of an updated configuration file, see the “Updated Configuration File Sample” section
on page D-11.
Using the Cisco MGC Environment Configuration Tool
You must configure the basic parameters required to bring the system to an operational mode. Follow
these steps to use the MGC Environment Configuration Tool XECfg program:
Step 1
Log in as mgcusr, enter the following at the command prompt, and press Enter:
% MGC_Setup
Cisco PGW 2200 Softswitch Release 9.8 Software Installation and Configuration Guide
4-8
OL-18083-01
Chapter 4
Configuring the Cisco PGW 2200 Softswitch Software
Initial Cisco PGW 2200 Softswitch Software Configuration
A dialog box displays, warning that the MGC Environment Configuration Tool is for initial system
configuration only.
Note
Step 2
To run the MGC Environment Configuration Tool in detail mode, enter the command MGC_Setup
-detail.
Click Yes to continue running the XECfg program.
The MGC Environment Configuration Tool screen expands to provide information from the
XECfgParm.dat file. Figure 4-1 shows the MGC Environment Configuration Tool screen.
Figure 4-1
MGC Environment Configuration Tool
Table 4-5 explains the startup parameters listed in the MGC Environment Configuration Tool.
Table 4-5
MGC Environment Configuration Tool Startup Parameters
Field
Usage
MGC Type
Indicates whether the Cisco PGW 2200 Softswitch connection type.
SWITCHED-MGC specifies a dynamic connection such as a trunk group;
NAILED-UP specifies a permanent connection such as a sigpath.
Operational Mode
Indicates the whether the Cisco PGW 2200 Softswitch is operating as a
stand-alone system or in a fault-tolerant configuration with an active and
standby Cisco PGW 2200 Softswitch.
Note
If you select Active/Standby, you must provide a peer IP address.
Cisco PGW 2200 Softswitch Release 9.8 Software Installation and Configuration Guide
OL-18083-01
4-9
Chapter 4
Configuring the Cisco PGW 2200 Softswitch Software
Initial Cisco PGW 2200 Softswitch Software Configuration
Table 4-5
Step 3
Note
MGC Environment Configuration Tool Startup Parameters (continued)
Field
Usage
Call Screening
Indicates whether call screening is enabled or disabled on the
Cisco PGW 2200 Softswitch. This setting is optional.
CLLI Code
The CLLI code identifying the site where the Cisco PGW 2200 Softswitch is
located. This setting is optional.
Local IP Address 1
The primary IP address of the Cisco PGW 2200 Softswitch.
Peer IP Address 1
The IP address of the peer Cisco PGW 2200 Softswitch. A peer IP address is
required for a fault tolerant (Active/Standby) system.
Virtual IP Address 1
Additional virtual IP address for the Cisco PGW 2200 Softswitch. Virtual IP
addresses can improve failover for SIP connections in the event of a hardware
failure.
Virtual IP Address 2
Additional virtual IP address for the Cisco PGW 2200 Softswitch. Virtual IP
addresses can improve failover for SIP connections in the event of a hardware
failure.
Virtual IP Addr1 for
Improved SIP
Failover Support
Setting 0.0.0.0 to both will disable the improved SIP failover support.
Configuring only one will cause the switchover, if the physical interface where
it present fails. Must be from *.IP_Addr1 subnet.
Virtual IP Addr2 for
Improved SIP
Failover Support
Setting 0.0.0.0 to both will disable the improved SIP failover support.
Configuring only one will cause the switchover, if the physical interface where
it present fails. Must be from *.IP_Addr2 subnet.
Click the Commit button after you have finished setting the parameters.
The required parameters are the MGC type and its operating mode. There are no default parameters
defined when you bring up the XECfg program.
The Cisco PGW 2200 Softswitch performs the following actions after you commit the new parameters:
•
The XECfg program backs up the current XECfgParm.dat file into the XECfgParm.dat.xyz file,
where xyz represents the file version number. The version numbers range from 0 to 19.
•
If the operating mode is stand-alone, the Cisco PGW 2200 Softswitch updates the XECfgParm.dat
file with new parameters.
•
If the operating mode is fault-tolerant, the Cisco PGW 2200 Softswitch updates the XECfgParm.dat
file and generates the XECfgParm.data.slave file based on the XECfgParm.dat file.
Note
•
The Cisco PGW 2200 Softswitch comments out old parameters and inserts the new parameters. The
Cisco PGW 2200 Softswitch inserts a history line to note updated parameters.
•
The Cisco PGW 2200 Softswitch moves required parameters to the top of the file for convenience.
Note
Step 4
There is no backup for the XECfgParm.dat.slave file.
You can use the comment line to record the file history.
Click Exit to exit the application.
Cisco PGW 2200 Softswitch Release 9.8 Software Installation and Configuration Guide
4-10
OL-18083-01
Chapter 4
Configuring the Cisco PGW 2200 Softswitch Software
Configuring Groups and Users
If you set the Operational Mode to Active/Standby, the XECfg program displays a prompt that allows
you to transfer the XECfgParm.dat.slave file to a remote machine when you exit the application. To
transfer the file to a remote machine, enter the FTP password. Otherwise, exit the application.
Configuring Groups and Users
You must set up groups and users for the Cisco PGW 2200 Softswitch software on each host server. A
user must be a member of the “mgcgrp” group to use certain Cisco PGW 2200 Softswitch software
functions, such as Man-Machine Language (MML). (MML is an interface that enables you to
communicate with the Cisco PGW 2200 Softswitch. Users with full MML privileges have monitor and
control access; users with minimal MML privileges have only monitor access. For more information on
MML, see the Cisco PGW 2200 Softswitch Release 9.8 Provisioning Guide and the
Cisco PGW 2200 Softswitch Release 9 MML Command Reference.)
Verifying the mgcgrp Group
To verify the mgcgrp group, complete the following steps:
Step 1
Log in to the Cisco PGW 2200 Softswitch host as root.
Step 2
Change to the /etc directory.
Step 3
Edit the group file to verify the entry for the mgcgrp group. The file should contain the following line:
mgcgrp::20000:
Step 4
Save and close the group file.
Step 5
Edit the passwd file to verify the entry for the mgcusr user. The file should contain the following line:
mgcusr:x:20000:20000::/opt/CiscoMGC/local:/bin/csh
If the file does not contain the line, add it.
Step 6
Save and close the password file.
This completes the procedure for verifying the mgcgrp group.
Adding a User with Full MML Privileges
To add a user with full MML privileges, complete the following steps.
Caution
If your user’s home directory differs from /opt/CiscoMGC/local, you must perform Step 6 through
Step 7 before using MML.
Step 1
Log in to the Cisco PGW 2200 Softswitch host as root.
Step 2
Enter the following command:
Cisco PGW 2200 Softswitch Release 9.8 Software Installation and Configuration Guide
OL-18083-01
4-11
Chapter 4
Configuring the Cisco PGW 2200 Softswitch Software
Configuring Groups and Users
# useradd -u UID -g mgcgrp -d /opt/CiscoMGC/local -s /bin/csh -m username
UID is a user ID that is an integer from 0 through 2147483647 (excluding the numbers 0, 1, 2, 3, 4, 5,
9, 37, 71, 60001, 60002, and 65534, because they are used by the operating system).
Step 3
Add the new username to the mgcgrp group in the group file:
mgcgrp::20000:username
Note
Step 4
The group file is a comma-separated list of user names. If you add more than one user, use
commas (with no spaces) to separate one name in the list from another.
Enter the following command and press Enter:
# passwd username
Step 5
Type the user’s password and press Enter twice when prompted.
Step 6
Log in to the Cisco PGW 2200 Softswitch as the new user.
Step 7
Enter the following command and press Enter:
% mml
The MML interface launches. To exit MML, type quit and press Enter.
This completes the procedure for adding a user with full MML privileges.
Adding a User with Minimal MML Privileges
To add a user with full MML privileges, complete the following steps.
Step 1
Log in to the Cisco PGW 2200 Softswitch host as root.
Step 2
Add a group with minimal MML privileges using the following command:
# groupadd minmml
Step 3
Prepare the .cshrc file for the group with minimal MML privileges using the following commands:
# mkdir /opt/CiscoMGC/local/minmml
# cp /opt/CiscoMGC/local/.cshrc /opt/CiscoMGC/local/minmml/.cshrc
# chgrp minmml /opt/CiscoMGC/local/minmml/.cshrc
Step 4
Add a user to the group with minimal MML privileges using the following command:
# useradd -g minmml -d /opt/CiscoMGC/local/minmml -s /bin/csh -m username
Step 5
Change the password for the newly added user using the following command.
# passwd username
Step 6
Type the user’s password and press Enter twice when prompted.
Step 7
Log in to the Cisco PGW 2200 Softswitch as the new user.
Step 8
Enter the following command and press Enter to verify the new user’s access privileges:
% mml
Cisco PGW 2200 Softswitch Release 9.8 Software Installation and Configuration Guide
4-12
OL-18083-01
Chapter 4
Configuring the Cisco PGW 2200 Softswitch Software
Configuring SNMP Support Resources
Text similar to the following is displayed:
Copyright ? 1998-2002, Cisco Systems, Inc.
User has minimal access privileges
sh-passat mml>
To exit MML, type quit and press Enter.
This completes the procedure for adding a user with minimal MML privileges.
The group and user configuration is now complete. Continue to the “Configuring SNMP Support
Resources” section on page 4-13. If you have questions or need assistance, see the “Obtaining
Documentation and Submitting a Service Request” section on page x.
Configuring SNMP Support Resources
The Cisco PGW 2200 Softswitch software includes a Simple Network Management Protocol (SNMP)
agent subsystem that provides an alarm management interface on the Cisco PGW 2200 Softswitch. It
uses SNMP to report events, or traps (such as alarms), to your SNMP Manager and to provide access to
the Cisco PGW 2200 Softswitch Management Information Base (MIB).
Note
SNMP MIB measurements are only valid on the active node. They are not replicated on the standby node.
The SNMP agent subsystem reports the following event categories to your SNMP Manager:
1.
Communications
2.
Quality of Service
3.
Processing
4.
Equipment
5.
Environment
In a fault tolerant configuration, the SNMP agent subsystem runs on both the active and standby
machines.
Note
If your system is running Cisco PGW 2200 Softswitch software Release 9.3(2) or later, go to the
“Migrating the SNMP Configuration to a More Secure Environment (for Cisco PGW 2200 Softswitch
Release 9.3(2) or Later)” section on page 4-14 for SNMP configuration procedures.
Note
For a sample snmpd.cnf file, see the “Sample Configured snmpd.cnf File” section on page D-13.
Note
Use the config-snmp utility to configure SNMP community names and trap destinations.
Cisco PGW 2200 Softswitch Release 9.8 Software Installation and Configuration Guide
OL-18083-01
4-13
Chapter 4
Configuring the Cisco PGW 2200 Softswitch Software
Configuring SNMP Support Resources
Note
SNMP managers such as the Cisco Media Gateway Controller Node Manager (Cisco MNM) or HP
OpenView can be used to receive traps.
Note
The config-snmp utility is case-sensitive. It will accept “name1” and “NAME1” as two different entries.
Migrating the SNMP Configuration to a More Secure Environment (for
Cisco PGW 2200 Softswitch Release 9.3(2) or Later)
If your system is running Cisco PGW 2200 Softswitch software version 9.3(2) or later, Cisco
recommends that you migrate the SNMP configuration to a more secure environment by running the
config-snmp utility. Use the config-snmp utility to perform the following:
•
Modify the snmpd.cnf file to automatically migrate old configuration files to a secure environment.
•
Facilitate the addition or deletion of the community string and trap destination.
Note
There is no limit to the number of community strings that can be added to the configuration.
Note
The config-snmp script only allows you to add or delete an entry to your snmpd.cnf file.
Basic Tasks
The following is an overview of the major tasks you must perform to get the SNMP security provided
by the config-snmp utility:
1.
Run config-snmp utility. See the “Running the config-snmp Utility” section on page 4-15.
2.
Add a new snmpCommunityEntry. See the “Adding an SNMP Community Entry” section on
page 4-17
3.
Make sure that the new snmpCommunityEntry string is recognized and can communicate with your
Cisco PGW 2200 Softswitch hosts. See the “Activating the New Settings” section on page 4-23.
4.
Delete the old entry that you were using. See the “Deleting an SNMP COMMUNITY” section on
page 4-19.
Before You Run the config-snmp Utility
Note
If you have completed a first-time installation of the Cisco PGW 2200 Softswitch software with Release
9.8 and its associated patches, copy the snmpd.cnf.tmpl to snmpd.cnf before your run the config-snmp
utility. Users who have upgraded to Release 9.8 from a previous release do not have to perform this
procedure. To copy the snmpd.cnf.tmpl to the snmp.cnf, perform the following steps:
1. Log in as root and enter the following commands:
cd /opt/CiscoMGC/snmp
cp snmpd.cnf.tmpl snmpd.cnf
Cisco PGW 2200 Softswitch Release 9.8 Software Installation and Configuration Guide
4-14
OL-18083-01
Chapter 4
Configuring the Cisco PGW 2200 Softswitch Software
Configuring SNMP Support Resources
2. Enter the following commands to restart the snmp daemon:
ps -ef |grep snmpdm
The system will display the process ID for the snmp daemon. Restart the daemon using the
following command:
kill -9 snmpdm_pid
Where snmpdm_pid is the process ID for the snmp daemon.
Note that the first instance of ReadAndNotifyToAll in the snmpCommunityEntry will be the only
CommunityName used in the Trap.
For example, if your snmpd.cnf file has the following snmpCommunityEntry, you will find only the
CommunityName of Iron1 in the Trap.
#Entry type: snmpCommunityEntry
#Format: snmpCommunityIndex (text)
#
snmpCommunityName (text)
#
snmpCommunitySecurityName (text)
#
snmpCommunityContextEngineID (octetString)
#
snmpCommunityContextName (text)
#
snmpCommunityTransportTag (text)
#
snmpCommunityStorageType (nonVolatile, permanent, readOnly)
snmpCommunityEntry Iron1 ron1 ReadAndNotifyToAll localSnmpID - - nonVolatile
snmpCommunityEntry Iron2 ron2 ReadWriteAll localSnmpID - - nonVolatile
snmpCommunityEntry Iron3 ron3 ReadAndNotifyToAll localSnmpID - - nonVolatile
snmpCommunityEntry admin WBnAGZ54 PGWInternalSignal localSnmpID - localAccess \
nonVolatile
snmpCommunityEntry readonly public ReadAndNotifyToAll localSnmpID - - \
nonVolatile
Running the config-snmp Utility
Perform the following steps to run the config-snmp utility:
Step 1
Make sure your system has the latest Cisco PGW 2200 Softswitch patches on both Host A and Host B.
See the Release Notes for Cisco PGW 2200 Softswitch Release 9.8(1) for the patches’ installation
procedures.
Step 2
On Host A, log in as root user.
Step 3
Check whether the snmpdm or critagt process is running.
Note
If snmpdm or critagt are not running, call Cisco TAC or contact your Field Engineer for
assistance.
Enter one of the following commands and press Enter:
a.
To check snmpdm:
# ps -ef |grep snmpdm
If the snmpdm process is running, text similar to the following is displayed:
root 12098 27888 0
Jun 16 ?
0:00 /opt/CiscoMGC/snmp/snmpdm -tcplocal -d
Cisco PGW 2200 Softswitch Release 9.8 Software Installation and Configuration Guide
OL-18083-01
4-15
Chapter 4
Configuring the Cisco PGW 2200 Softswitch Software
Configuring SNMP Support Resources
b.
To check critagt:
# ps -ef |grep critagt
If the critagt process is running, text similar to the following is displayed:
root 27888
1 0
May 19 ?
0:15 /opt/CiscoMGC/snmp/critagt -d
Step 4
To start the config-snmp utility, enter the following commands and press Enter:
# cd /opt/CiscoMGC/local
# config-snmp
The following screen is displayed:
Migrating snmpd.cnf into a more secure setting...
===================
1.
2.
3.
4.
5.
6.
SNMPD Configuration Main Menu
===================
View Configuration Entries
Add an SNMP Community
Delete an SNMP Community
Add a Trap Destination
Delete a Trap Destination
Activate the New Settings
Enter a selection (1 through 6) or 'q' to quit:
Step 5
To view the configuration entries, enter 1 and press Enter.
The Entries Menu is displayed and you are prompted to make a selection:
=================== Entries Menu ===================
1. sysDescr
2. sysObjectID
3. sysLocation
4. sysContact
5. sysName
6. snmpEnableAuthenTraps
7. MAX_THREADS
8. MAX_PDU_TIME
9. MAX_OUTPUT_WAITING
10. MAX_SUBAGENTS
11. subagent
12. snmpCommunityEntry
13. snmpEngineBoots
14. snmpEngineID
15. SNMP_ENGINE_ID_SRC
16. usmUserEntry
17. vacmSecurityToGroupEntry
18. vacmAccessEntry
19. vacmViewTreeFamilyEntry
20. snmpNotifyEntry
21. snmpTargetAddrEntry
22. snmpTargetParamsEntry
23. snmpNotifyFilterProfileEntry
24. snmpNotifyFilterEntry
25. httpUserNameEntry
Enter a selection (1 through 25) or 'q' to quit to Main Menu:
Step 6
Enter your selection number (1 through 25) to view your configuration entries.
Cisco PGW 2200 Softswitch Release 9.8 Software Installation and Configuration Guide
4-16
OL-18083-01
Chapter 4
Configuring the Cisco PGW 2200 Softswitch Software
Configuring SNMP Support Resources
Adding an SNMP Community Entry
Continuing from Step 6, above (of the section Running the config-snmp Utility):
Step 1
Enter 12 to select snmpCommunityEntry and view the entries:
Text similar to the following and the SNMPD Configuration Main Menu are displayed.
#Entry type: snmpCommunityEntry
#Format: snmpCommunityIndex (text)
#
snmpCommunityName (text)
#
snmpCommunitySecurityName (text)
#
snmpCommunityContextEngineID (octetString)
#
snmpCommunityContextName (text)
#
snmpCommunityTransportTag (text)
#
snmpCommunityStorageType (nonVolatile, permanent, readOnly)
snmpCommunityEntry IT555 T555 ReadWriteAll localSnmpID - - nonVolatile
snmpCommunityEntry Ijammmy jammmy ReadAndNotifyToAll localSnmpID - nonVolatile
snmpCommunityEntry admin za8RQzBg PGWInternalSignal localSnmpID - localAccess
nonVolatile
===================
1.
2.
3.
4.
5.
6.
SNMPD Configuration Main Menu
===================
View Configuration Entries
Add an SNMP Community
Delete an SNMP Community
Add a Trap Destination
Delete a Trap Destination
Activate the New Settings
Enter a selection (1 through 6) or 'q' to quit:
Step 2
You are prompted to make a selection. Enter 2 to add an SNMP Community.
The Add CommunityString Menu is displayed and you are asked if you would like to proceed with
adding a community string:
=================== Add CommunityString Menu ===================
SnmpCommunityName CommunitySecurityName
cisco cisco
public ReadAndNotifyToAll
-- Where:
CommunitySecurityName SecurityModel Read Write Notification
ReadOnly snmpv1 ApplicationsView - ApplicationsView
ReadOnly snmpv2c ApplicationsView - ApplicationsView
ReadOnly usm ApplicationsView - ApplicationsView
NotifyOnly snmpv1 - - ApplicationsView
NotifyOnly snmpv2c - - ApplicationsView
NotifyOnly usm - - ApplicationsView
ReadWriteAll snmpv1 ApplicationsView ApplicationsView ReadWriteAll snmpv2c ApplicationsView ApplicationsView ReadWriteAll usm ApplicationsView ApplicationsView ReadWriteNotify snmpv1 ApplicationsView ApplicationsView ApplicationsView
ReadWriteNotify snmpv2c ApplicationsView ApplicationsView ApplicationsView
ReadWriteNotify usm ApplicationsView ApplicationsView ApplicationsView
ReadAndNotifyToAll snmpv1 ApplicationsView - ApplicationsView
ReadAndNotifyToAll snmpv2c ApplicationsView - ApplicationsView
Cisco PGW 2200 Softswitch Release 9.8 Software Installation and Configuration Guide
OL-18083-01
4-17
Chapter 4
Configuring the Cisco PGW 2200 Softswitch Software
Configuring SNMP Support Resources
ReadAndNotifyToAll usm ApplicationsView - ApplicationsView
CiscoInternalSignal snmpv1 All All All
CiscoInternalSignal snmpv2c All All All
CiscoInternalSignal usm All All All
Would you like to proceed with the Add [n]/[y]?
Step 3
Enter y to proceed (if you enter n to cancel the addition, you return to the SNMPD Configuration Main
Menu).
The following text is displayed, prompting you to enter an snmpCommunityName.
Enter snmpCommunityName:
Note
Step 4
The snmpCommunityName should be at least three characters in length. The
snmpCommunityName can contain numeric characters, but should begin with an alpha
character.
Enter an snmpCommunityName (the following name is an example):
comname1
Text similar to the following is displayed:
Enter CommunitySecurityName (ReadAndNotifyToAll or ReadWriteAll):
Step 5
Enter a community security name (the following security name entry is an example):
ReadAndNotifyToAll
Note
The CommunitySecurityName (ReadAndNotifyToAll or ReadWriteAll) is case sensitive.
Text similar to the following text is displayed:
snmpCommunityName: comname1 is about to be added.
snmpCommunity Name [y]/[n]?
Step 6
Are you sure that you want to add this
Enter y to add the snmpCommunityName (if you enter n to cancel the addition, you return to the
SNMPD Configuration Main Menu):
Text similar to the following is displayed:
Adding snmpCommunity:
snmpCommunityEntry Icomname1 comname1 ReadAndNotifyToAll localSnmpID - - nonVolatile
===================
1.
2.
3.
4.
5.
6.
SNMPD Configuration Main Menu
===================
View Configuration Entries
Add an SNMP Community
Delete an SNMP Community
Add a Trap Destination
Delete a Trap Destination
Activate the New Settings
Enter a selection (1 through 6) or 'q' to quit:
Step 7
Enter a selection number, 1 through 6.
Cisco PGW 2200 Softswitch Release 9.8 Software Installation and Configuration Guide
4-18
OL-18083-01
Chapter 4
Configuring the Cisco PGW 2200 Softswitch Software
Configuring SNMP Support Resources
For steps on how to execute the selections from the SNMPD Configuration Main Menu, see the following
sections:
•
Adding an SNMP Community Entry, page 4-17
•
Deleting an SNMP COMMUNITY, page 4-19
•
Adding a Trap Destination, page 4-20
•
Deleting a Trap Destination, page 4-22
•
Activating the New Settings, page 4-23
•
Verifying the SNMP Configuration Migration, page 4-24
Note
To complete the migration of the SNMP configuration to a more secure environment, see the
“Activating the New Settings” section on page 4-23.
The procedure for adding an SNMP Community Entry is now complete.
From the SNMPD Configuration Main Menu, choose option 6 (Activate the New Settings) to commit
the changes, or select other options (1 through 5) to add or delete a community name or trap.
Deleting an SNMP COMMUNITY
From the SNMPD Configuration Main Menu:
Step 1
If you select 3 (Delete an SNMP Community) from the SNMPD Configuration Main Menu, the delete
CommunityString Menu is displayed:
Note
The SNMP Community Names listed in the following display are examples.
===================
Delete CommunityString Menu ===================
SnmpCommunityName
CommunitySecurityName
comname1
T555
jammmy
ReadAndNotifyToAll
ReadWriteAll
ReadAndNotifyToAll
-- Where:
CommunitySecurityName
SecurityModel
Read
Write
Notification
ReadWriteAll
ReadWriteAll
ReadAndNotifyToAll
ReadAndNotifyToAll
snmpv1
snmpv2c
snmpv1
snmpv2c
AllMibObjects
AllMibObjects
AllMibObjects
AllMibObjects
AllMibObjects
AllMibObjects
-
AllMibObjects
AllMibObjects
Would you like to proceed with the Delete
Step 2
[n]/[y]?
Enter y to delete SNMP Community (if you enter n to cancel the deletion, you return to the SNMPD
Configuration Main Menu):
Text similar to the following is displayed:
Cisco PGW 2200 Softswitch Release 9.8 Software Installation and Configuration Guide
OL-18083-01
4-19
Chapter 4
Configuring the Cisco PGW 2200 Softswitch Software
Configuring SNMP Support Resources
Enter snmpCommunityName:
Step 3
Enter an SnmpCommunityName. Select an SnmpCommunityName from the list that is displayed in
Step 1. The SnmpCommunityName T555, is an example:
T555
Text similar to the following is displayed:
snmpCommunityName: T555 is about to be deleted.
snmpCommunity Name [y]/[n]?
Step 4
Are you sure that you want to delete this
Enter y to confirm the deletion (if you enter n to cancel the deletion, you return to the SNMPD
Configuration Main Menu).
Text similar to the following is displayed and you are returned to the SNMPD Configuration Main Menu:
Deleting snmpCommunity= T555
===================
1.
2.
3.
4.
5.
6.
SNMPD Configuration Main Menu
===================
View Configuration Entries
Add an SNMP Community
Delete an SNMP Community
Add a Trap Destination
Delete a Trap Destination
Activate the New Settings
Enter a selection (1 through 6) or 'q' to quit:
Step 5
Enter your selection. For detailed procedures for your selection, refer to the following list:
•
Adding an SNMP Community Entry, page 4-17
•
Deleting an SNMP COMMUNITY, page 4-19
•
Adding a Trap Destination, page 4-20
•
Deleting a Trap Destination, page 4-22
•
Activating the New Settings, page 4-23
•
Verifying the SNMP Configuration Migration, page 4-24
The procedure for deleting an SNMP Community Entry is now complete. Proceed to the selection you
entered in the SNMPD Configuration Main Menu.
Adding a Trap Destination
From the SNMPD Configuration Main Menu:
Step 1
Select option 4 (Add a Trap Destination) from the SNMPD Configuration Main Menu and press Enter
to add a Trap Destination.
The Add Trap Menu is displayed:
Note
The IP Address (Target Address) listed below is an example of existing Trap entries.
Cisco PGW 2200 Softswitch Release 9.8 Software Installation and Configuration Guide
4-20
OL-18083-01
Chapter 4
Configuring the Cisco PGW 2200 Softswitch Software
Configuring SNMP Support Resources
=================== Add Trap Menu
===================
1. TargetAddress: 6.6.6.6:0 , TargetAddrParams: v1ExampleParams , IP Mask:
255.255.255.255:0
Would you like to proceed with the Add
Step 2
[n]/[y]?
Enter y to add a Trap Destination (if you enter n to cancel the addition, you return to the SNMPD
Configuration Main Menu).
Text similar to the following is displayed:
Enter IP Address (x.x.x.x):
Step 3
Enter the IP address listed in Step 1:
7.7.7.7
Text similar to the following is displayed:
Enter Trap Type (v1 or v2c):
Step 4
Enter the Trap Type based on your SNMP manager. The following entry is an example:
v1
Text similar to the following is displayed:
'snmpTargetAddrEntry 483 snmpUDPDomain 7.7.7.7:0 100 3 TrapSink v1ExampleParams
nonVolatile 255.255.255.255:0 2048
' is about to be added. Are you sure that you want to add this Trap Entry [n]/[y]?
Step 5
Enter y to add a Trap Destination (if you enter n to cancel the addition, you return to the SNMPD
Configuration Main Menu).
Text confirming the addition of the Trap Destination is displayed, followed by the SNMPD
Configuration Main Menu:
Adding Trap: snmpTargetAddrEntry 483 snmpUDPDomain 7.7.7.7:0 100 3 TrapSink
v1ExampleParams nonVolatile 255.255.255.255:0 2048
===================
1.
2.
3.
4.
5.
6.
SNMPD Configuration Main Menu
===================
View Configuration Entries
Add an SNMP Community
Delete an SNMP Community
Add a Trap Destination
Delete a Trap Destination
Activate the New Settings
Enter a selection (1 through 6) or 'q' to quit:
ENTER YOUR SELECTION.
Step 6
Enter your selection. For detailed procedures for your selection, go to the section listed below:
•
Adding an SNMP Community Entry, page 4-17
•
Deleting an SNMP COMMUNITY, page 4-19
•
Adding a Trap Destination, page 4-20
•
Deleting a Trap Destination, page 4-22
•
Activating the New Settings, page 4-23
Cisco PGW 2200 Softswitch Release 9.8 Software Installation and Configuration Guide
OL-18083-01
4-21
Chapter 4
Configuring the Cisco PGW 2200 Softswitch Software
Configuring SNMP Support Resources
Verifying the SNMP Configuration Migration, page 4-24
•
The procedure for adding a Trap Destination is now complete. Proceed to the selection you entered in
the SNMPD Configuration Main Menu.
Deleting a Trap Destination
From the SNMPD Configuration Main Menu:
Step 1
To delete a Trap Destination, enter 5 (Delete a Trap Destination):
Text similar to the following is displayed:
=================== Delete Trap Menu
1.
IP
2.
IP
===================
TargetAddress: 7.7.7.7:0 , TargetAddrParams: v1ExampleParams ,
Mask: 255.255.255.255:0
TargetAddress: 6.6.6.6:0 , TargetAddrParams: v1ExampleParams ,
Mask: 255.255.255.255:0
Would you like to proceed with the Delete
Step 2
[n]/[y]?
Enter y to delete a Trap Destination (if you enter n to cancel the deletion, you return to the SNMPD
Configuration Main Menu):
Text similar to the following is displayed:
Enter a selection (1 through 2):
Note
Step 3
The Target Addresses (1 through 2) shown above are examples only.
Enter 1 to select the TargetAddress to be deleted:
Text similar to the following is displayed:
Trap is about to be deleted.
[n]/[y]?
Step 4
Are you sure that you want to delete this Trap Entry
Enter y to confirm the deletion (if you enter n to cancel the deletion, you return to the SNMPD
Configuration Main Menu).
Text confirming the deleted Trap Entry is displayed and you are returned to the SNMPD Configuration
Main Menu. Note that 483 (below) is an internal Trap snmpTargetAddrName.
Deleting Trap snmpTargetAddrName = 483
===================
1.
2.
3.
4.
5.
6.
SNMPD Configuration Main Menu
===================
View Configuration Entries
Add an SNMP Community
Delete an SNMP Community
Add a Trap Destination
Delete a Trap Destination
Activate the New Settings
Enter a selection (1 through 6) or 'q' to quit:
Cisco PGW 2200 Softswitch Release 9.8 Software Installation and Configuration Guide
4-22
OL-18083-01
Chapter 4
Configuring the Cisco PGW 2200 Softswitch Software
Configuring SNMP Support Resources
Step 5
Enter your selection. For detailed procedures for your selection, refer to the following list:
•
Adding an SNMP Community Entry, page 4-17
•
Deleting an SNMP COMMUNITY, page 4-19
•
Adding a Trap Destination, page 4-20
•
Deleting a Trap Destination, page 4-22
•
Activating the New Settings, page 4-23
•
Verifying the SNMP Configuration Migration, page 4-24
The procedures for deleting a Trap Destination is now complete. Proceed to the selection you entered in
the SNMPD Configuration Main Menu.
Activating the New Settings
From the SNMPD Configuration Main Menu:
Step 1
Enter 6 to activate the new settings:
6
Text similar to the following is displayed:
Backing up the current snmpd.cnf to snmpd.cnf.backup.
snmpd.cnf.backup already exists. Do you want to overwrite the file
Note
Step 2
[y]/[n]?
If you choose n, your backup file will not be updated.
Enter y to activate the new settings.
y
Are you sure you would like to Activate the New Settings
Note
[y]/[n]?
If you choose y, your SNMPD.dat file will be updated and you will be exited from the utility.
If you choose n, your SNMPD.dat file will not be updated and you will be exited from the utility.
Step 3
Enter y to activate the new settings (if you enter n to cancel the activation, you return to the SNMPD
Configuration Main Menu).
Text similar to the following is displayed:
snmpd.cnf file has been updated.
The procedure for activating the new settings is now complete and you are exited from the config-snmp
utility. Proceed to the following section, “Verifying the SNMP Configuration Migration”.
Cisco PGW 2200 Softswitch Release 9.8 Software Installation and Configuration Guide
OL-18083-01
4-23
Chapter 4
Configuring the Cisco PGW 2200 Softswitch Software
Configuring SNMP Support Resources
Verifying the SNMP Configuration Migration
Perform the following steps to verify that your changes were applied by running the config-snmp utility:
Step 1
To start the config-snmp utility, type the following command and press Enter:
# config-snmp
Text similar to the following is displayed:
Migrating snmpd.cnf into a more secure setting...
When the SNMPD Configuration Main Menu is displayed, you are prompted to make a selection:
===================
1.
2.
3.
4.
5.
6.
SNMPD Configuration Main Menu
===================
View Configuration Entries
Add an SNMP Community
Delete an SNMP Community
Add a Trap Destination
Delete a Trap Destination
Activate the New Settings
Enter a selection (1 through 6) or 'q' to quit: 1
Step 2
Enter 1 to view the configuration entries.
The Entries Menu is displayed and you are prompted to make a selection:
===================
Entries Menu
===================
1. sysDescr
2. sysObjectID
3. sysLocation
4. sysContact
5. sysName
6. snmpEnableAuthenTraps
7. MAX_THREADS
8. MAX_PDU_TIME
9. MAX_OUTPUT_WAITING
10. MAX_SUBAGENTS
11. subagent
12. snmpCommunityEntry
13. communityEntry
14. snmpEngineBoots
15. usmUserEntry
16. vacmAccessEntry
17. vacmSecurityToGroupEntry
18. vacmViewTreeFamilyEntry
19. snmpNotifyEntry
20. snmpTargetAddrEntry
21. snmpTargetParamsEntry
22. snmpNotifyFilterProfileEntry
23. snmpNotifyFilterEntry
24. httpUserNameEntry
Enter a selection (1 through 24) or 'q' to quit to Main Menu:
a.
If you select 12 from the SNMPD Configuration Main Menu, the snmpCommunityEntry is
displayed, showing the changes you made:
Note
The following entries are examples only.
Cisco PGW 2200 Softswitch Release 9.8 Software Installation and Configuration Guide
4-24
OL-18083-01
Chapter 4
Configuring the Cisco PGW 2200 Softswitch Software
Configuring the Execution Environment
#Entry type: snmpCommunityEntry
#Format: snmpCommunityIndex (text)
#
snmpCommunityName (text)
#
snmpCommunitySecurityName (text)
#
snmpCommunityContextEngineID (octetString)
#
snmpCommunityContextName (text)
#
snmpCommunityTransportTag (text)
#
snmpCommunityStorageType (nonVolatile, permanent, readOnly)
snmpCommunityEntry Icomname1 comname1 ReadWriteAll localSnmpID - - nonVolatile
snmpCommunityEntry Ijammmy jammmy ReadAndNotifyToAll localSnmpID - nonVolatile
snmpCommunityEntry admin VD6FZbov PGWInternalSignal localSnmpID - localAccess
nonVolatile
b.
If you select 20 from the SNMPD Configuration Main Menu, the Trap Destination information is
displayed, showing the changes you made:
Note
The following entries are examples only.
#Entry type: snmpTargetAddrEntry
#Format: snmpTargetAddrName (text)
#
snmpTargetAddrTDomain (snmpUDPDomain, snmpIPXDomain, etc.)
#
snmpTargetAddrTAddress (transport address,i.e. 192.147.142.254:0)
#
snmpTargetAddrTimeout (integer)
#
snmpTargetAddrRetryCount (integer)
#
snmpTargetAddrTagList (text)
#
snmpTargetAddrParams (text)
#
snmpTargetAddrStorageType (nonVolatile, permanent, readOnly)
#
snmpTargetAddrTMask (transport mask, i.e. 255.255.255.255:0)
#
snmpTargetAddrMMS (integer)
snmpTargetAddrEntry 531 snmpUDPDomain 6.6.6.6:0 100 3 TrapSink
v1ExampleParams
nonVolatile 255.255.255.255:0 2048
snmpTargetAddrEntry local snmpUDPDomain 127.0.0.1:0 100 3 localAccess nonVolatile 255.255.255.255:0 2048
The SNMP support resource configuration is now complete. Continue to the “Configuring the Execution
Environment” section on page 4-25 to configure the execution environment. If you have questions or
need assistance, see the “Obtaining Documentation and Submitting a Service Request” section on
page x.
Configuring the Execution Environment
This section provides instructions for configuring the Cisco PGW 2200 Softswitch software execution
environment and contains the following topics:
•
Configuring Basic System Information, page 4-28
•
Specifying IP Addresses, page 4-30
•
Configuring Engine Parameters, page 4-32
•
Enabling Call Screening, page 4-34
•
Configuring Call Detail Record File Output, page 4-35
•
Configuring the Clearing Location and Default Location Parameters, page 4-36
•
Configuring Switchover, page 4-39
Cisco PGW 2200 Softswitch Release 9.8 Software Installation and Configuration Guide
OL-18083-01
4-25
Chapter 4
Configuring the Cisco PGW 2200 Softswitch Software
Configuring the Execution Environment
•
Initializing the Provisioning Object Manager, page 4-41
The configuration data file, or XECfgParm.dat file (located in /opt/CiscoMGC/etc/XECfgParm.dat),
lists all the components in the Cisco PGW 2200 Softswitch software and defines how it operates. You
must edit the execution environment parameters in the XECfgParm.dat file to initialize and configure the
Cisco PGW 2200 Softswitch software application. For a complete list of the parameters found in the
XECfgParm.dat file and how they are used by the Cisco PGW 2200 Softswitch, see Appendix A,
“XECfgParm.dat File Parameters.”
For samples of configured XECfgParm.dat files, see the “Sample Configured XECfgParm.dat Files for
Cisco PGW 2200 Softswitch Release 9.8(1)” section on page D-16.
Caution
To ensure that your system works as intended, edit only the XECfgParm.dat file parameters which
are listed below, and remember that all parameters are case-sensitive.
Do not modify the processes.dat file. This XECfgParm.dat file should remain unmodified, as delivered
with the Cisco PGW 2200 Softswitch software. If this file is modified, procM may core dump when you
start the Cisco PGW 2200 Softswitch software.
Changing XECfgParm.dat File Parameters
For a complete list of the parameters found in the XECfgParm.dat file and how they are used by the
Cisco PGW 2200 Softswitch, see Appendix A, “XECfgParm.dat File Parameters.”
If you have a fault tolerant system with two Cisco PGW 2200 Softswitch hosts, the XECfgParm.dat files
are different for each host. For examples of these XECfgParm.dat files, see the “Sample Configured
XECfgParm.dat Files for Cisco PGW 2200 Softswitch Release 9.8(1)” section on page D-16.
To change the XECfgParm.dat file parameters, perform the following steps:
Step 1
Log in as root and go to the # prompt.
Step 2
If the Cisco PGW 2200 Softswitch software is running, enter the following command:
# /etc/init.d/CiscoMGC stop
Wait until the system returns the following response:
Signalling procM to shut down
...shutdown complete
Step 3
Change to the /opt/CiscoMGC/etc directory, which contains the XECfgParm.dat file used by your
system.
Step 4
Open the XECfgParm.dat file with any text editor, such as vi.
Step 5
Save your changes and close the editor.
Step 6
Restart the Cisco PGW 2200 Softswitch software by entering the following command:
# /etc/init.d/CiscoMGC start
Cisco PGW 2200 Softswitch Release 9.8 Software Installation and Configuration Guide
4-26
OL-18083-01
Chapter 4
Configuring the Cisco PGW 2200 Softswitch Software
Configuring the Execution Environment
Note
Do not restart the software yet if you need to configure SCP queries or initialize the call
screening database. Complete the instructions in the appropriate sections of this chapter before
restarting the software.
Continue to “Changing XECfgParm.dat File Parameters in a Running Fault Tolerant System” to change
parameters without call interruption. Continue to the “Configuring SCP Queries” section on page 4-42
to configure Service Control Point (SCP) queries using transaction capabilities application part (TCAP).
If you have questions or need assistance, see the “Obtaining Documentation and Submitting a Service
Request” section on page x.
Changing XECfgParm.dat File Parameters in a Running Fault Tolerant System
To change parameters in a running fault tolerant system without call interruption, perform the following
steps:
Step 1
Log in to the active host (Host X) and make your changes. See “Changing XECfgParm.dat File
Parameters” section on page 4-26 for more specific instructions.
Step 2
Log in to the standby host (Host Y) as root and stop the Cisco PGW 2200 Softswitch software by
entering the following command:
# /etc/init.d/CiscoMGC stop
Step 3
Restart the Cisco PGW 2200 Softswitch software on the standby box (Host Y) by entering the following
command:
# /etc/init.d/CiscoMGC start
Step 4
Perform switchover on the active host (Host X). Log in to the active host (Host X) and stop the
Cisco PGW 2200 Softswitch software by entering the following command:
# /etc/init.d/CiscoMGC stop
Stopping the software on Host X causes switchover to the standby, Host Y. Host Y becomes active and
takes over call processing.
Tip
Step 5
If Host Y does not take over call processing after switchover, restart the software on Host X to take over
the calls. Check the parameters you changed on Host Y and make sure you have the correct values.
Restart the Cisco PGW 2200 Softswitch software on the now standby host, Host X, by entering the
following command:
# /etc/init.d/CiscoMGC start
Step 6
On Host Y, the currently active host, enter the following MML command to switch call processing from
Host Y to the newly changed Host X. Host X becomes active:
mml> SW-OVER::CONFIRM
Cisco PGW 2200 Softswitch Release 9.8 Software Installation and Configuration Guide
OL-18083-01
4-27
Chapter 4
Configuring the Cisco PGW 2200 Softswitch Software
Configuring the Execution Environment
Tip
If Host X does not take over call processing after switchover, restart the software on Host Y to take over
the calls. Check the parameters you changed on Host X and make sure you have the correct values.
Configuring Basic System Information
Note
For a complete list of the parameters found in the XECfgParm.dat file and how they are used by the Cisco
Cisco PGW 2200 Softswitch, see Appendix A, “XECfgParm.dat File Parameters.”
To configure basic system information required for your system to function, modify the following
parameters in the first section of the XECfgParm.dat file:
Parameter
Modification
*.desiredPlatformState
To determine the desired platform state at initialization, enter one of
the following values:
•
master—If you have two (active and standby)
Cisco PGW 2200 Softswitch hosts, and you are editing the file
on the active host
•
slave—If you have two (active and standby)
Cisco PGW 2200 Softswitch hosts, and you are editing the file
on the standby host
•
standalone—If you have a simplex system
Note
*.numberOfThreads
The value used is site specific. For example, use the values
master and slave if you have two (active and standby)
Cisco PGW 2200 Softswitch hosts. Enter standalone if you
have a single-host system.
Prior to Release 9.4(1), the number of threads generated by
multithreaded processes such as the engine and the log master, is
specified by entering one of the following values:
•
0—Single CPU (default)
•
1—Two CPUs
•
2—Four CPUs
Note
If you have a multi-CPU system, the
engine.SysGeneratedCode parameter must be left as
true (the default).
For Release 9.4(1) and up, this parameter is set automatically when
you specify a Cisco PGW 2200 Softswitch type in the
engine.SysVirtualSwitch parameter. Any attempt to modify this
parameter is overwritten.
Cisco PGW 2200 Softswitch Release 9.8 Software Installation and Configuration Guide
4-28
OL-18083-01
Chapter 4
Configuring the Cisco PGW 2200 Softswitch Software
Configuring the Execution Environment
Parameter
Modification
*.ownTranspathId
To identify the local Cisco PGW 2200 Softswitch host in a fault
tolerant system, enter the same value that you used for
*.transpathID.
If you have two Cisco PGW 2200 Softswitch hosts in a fault
tolerant system, enter this value in the *.peerTranspathID
field in the XECfgParm.dat file on the second host server. If
you have a simplex system, leave this value blank.
Note
*.peerTranspathId
To identify the peer Cisco PGW 2200 Softswitch host in a fault
tolerant system, enter any one- or two-digit integer. The IDs must
be unique in an active and standby pair.
If you have two Cisco PGW 2200 Softswitch hosts in a fault
tolerant system, enter the same value that you used for
*.transpathID in the XECfgParm.dat file of the second host
server in this field. If you have a simplex system, leave it
blank.
Note
*.sipModeSelectionControl
Sets SIP processing mode on the Cisco PGW 2200 Softswitch.
Values:
•
1 (B2BUA/optional mode)—SIP-to-SIP calls are processed in
B2BUA mode. You can select proxy mode later using a dial
plan (A/B analysis).
•
2 (Fixed Proxy Mode)—SIP-to-SIP calls are processed in proxy
mode only.
Default: 2
Note
*.stPort
In order to use H.248 Protocol—Phase 2 Feature on Release
9.8(1), you must set this parameter to 1.
Port number used between peer components or processes.
Enter any unused port number (for example, 7000). If your
configuration uses a Cisco ITP-L, enter the port number on the
Cisco ITP-L.
Note
If you have two Cisco PGW 2200 Softswitch hosts in a
failover configuration, enter a different number for this
value in the XECfgParm.dat file on the secondary host (for
example, 7001).
Note
On a new configuration, we recommend that this parameter
be set to 0. This value allows the Cisco ITP-L port to be
defined using the PEERPORT parameter of the
SESSIONSET.
Note
SESSIONSET reads the port value that is defined.
However, if an *.stPort value other than 0 is defined in
XECfgParm.dat (for example, *.stPort=7001), the
SESSIONSET value gets overridden by the value in
XECfgParm.dat.
Cisco PGW 2200 Softswitch Release 9.8 Software Installation and Configuration Guide
OL-18083-01
4-29
Chapter 4
Configuring the Cisco PGW 2200 Softswitch Software
Configuring the Execution Environment
Parameter
Modification
*.transpathId
To identify the local Cisco PGW 2200 Softswitch host in a fault
tolerant system, enter any one- or two-digit integer.
If you have two Cisco PGW 2200 Softswitch hosts in a fault
tolerant system, this number must be different in the
XECfgParm.dat file for each host.
Note
CustSpecificINAPHandling
Controls INAP (Intelligent Network Application Protocol)
behavior, including advertised application context.
Values:
•
tinap
•
finap
•
rinap
•
sinap
Default: Null
To enable network transfer and DTMF transfer services, set this
parameter to sinap. The following new CS2 application context is
populated in the dialogue body of the INAP message:
itu-t(0) recommendation(0) q(17) q1228(1228) cs2(2) ac(3)
id-ac-cs2-ssf-scfGenericAC(4) urn:oid:0.0.17.1228.2.3.4
engine.SysVirtualSwitch
To indicate whether the Cisco PGW 2200 Softswitch host functions
as a signaling controller or a virtual switch controller, enter one of
the following values:
•
0—Signaling controller (nailed trunks, no auditing is initiated)
•
1—Virtual switch controller (switched trunks)
Note
During the startup of the Cisco PGW 2200 Softswitch
software, this parameter is be set automatically to tune the
system for optimal performance.
Note
For Release 9.4(1) and up, the values of the parameters
listed below are automatically set based on the
Cisco PGW 2200 Softswitch type you select, to maximize
performance for that configuration. Any attempt to change
the values of these parameters is overwritten.
engine.SysMdlMemoryReduction
engine.CALL_MEM_BLOCK_SIZE
engine.CALL_MEM_CHUNK_SIZE
*.CPUTimerInterval
*.numberOfThreads
Specifying IP Addresses
To specify IP addresses, modify the following parameters in the first section of the XECfgParm.dat file:
Cisco PGW 2200 Softswitch Release 9.8 Software Installation and Configuration Guide
4-30
OL-18083-01
Chapter 4
Configuring the Cisco PGW 2200 Softswitch Software
Configuring the Execution Environment
Note
If there are two Ethernet interfaces defined on the Cisco PGW 2200 Softswitch, it is mandatory to have
these on distinct subnets.
For example, consider the following configuration:
*.IP_AddrLocalA = 172.22.119.108
*.IP_AddrLocalB = 172.22.119.54
This is not a valid combination because they are on the same subnet. The following example illustrates
a valid combination:
*.IP_AddrLocalA = 172.22.119.108
*.IP_AddrLocalB = 172.22.120.54
In this example, the subnet mask is 255.255.255.0 (or 255.255.255.128).
If the two Ethernet interfaces are on the same subnet, then one of them must be physically disconnected
from the existing subnet and then connected to a different subnet. The new IP address must be
appropriately configured on the system. Refer to the manual pages for the UNIX command ifconfig for
more information.
Parameter
Modification
*.IP_AddrLocalA
Enter the first local IP address; used for checkpointing and
switchover heartbeats.
*.IP_AddrPeerA
Caution
This address is the same value as *.IP_Addr1, and
is the bge0 interface.
Caution
No other machine on the network should have
*.IP_AddrLocalA set to 0.0.0.0.
Enter the first corresponding peer IP address; used for
checkpointing and switchover heartbeats.
Note
*.IP_AddrLocalB
Enter the second local IP address; used for checkpointing and
switchover heartbeats. This is the address of the bge1
interface.
Note
*.IP_AddrPeerB
If you have two Cisco PGW 2200 Softswitch hosts in
a fault tolerant configuration, this value is set to the IP
address of the second host.
If your configuration does not use a secondary
Ethernet adapter, leave this address set to the default
value, 0.0.0.0.
Enter the second corresponding peer IP address; used for
checkpointing and switchover heartbeats. This is the address
of the bge1 interface on the second host.
Note
If your configuration does not use a secondary
Ethernet adapter, leave this address set to the default
value, 0.0.0.0.
Cisco PGW 2200 Softswitch Release 9.8 Software Installation and Configuration Guide
OL-18083-01
4-31
Chapter 4
Configuring the Cisco PGW 2200 Softswitch Software
Configuring the Execution Environment
Parameter
Modification
*.IP_Addr1
Enter the IP address of the bge0 interface.
*.IP_Addr2
Enter the IP address of the bge1 interface (if configured).
*.IP_Addr3
Enter the IP address of the bge2 interface (if configured).
*.IP_Addr4
Enter the IP address of the bge3 interface (if configured).
*.Virtual_IP_Addr1
Enter a virtual IP addresses for the
Cisco PGW 2200 Softswitch used for SIP Failover Support
(optional).
*.Virtual_IP_Addr2
Enter a virtual IP addresses for the
Cisco PGW 2200 Softswitch used for SIP Failover Support
(optional).
Configuring Engine Parameters
For the engine to run correctly, you must modify the following parameters in the Engine section of the
XECfgParm.dat file:
Parameter
Modification
engine.CALL_MEM_BLOCK_SIZE
Block of memory allocated per call.
Used by MDL.
Set automatically based on the type of
Cisco PGW 2200 Softswitch selected in
engine.SysVirtualSwitch. Any attempt to modify this value
is overwritten.
engine.CALL_MEM_CHUNK_SIZE
Memory chunks allocated from the block of memory
designated with engine.CALL_MEM_BLOCK_SIZE.
Set automatically based on the type of
Cisco PGW 2200 Softswitch selected in
engine.SysVirtualSwitch. Any attempt to modify this value
is overwritten.
engine.SendHardwareBlock
To enable the Cisco PGW 2200 Softswitch to send
hardware-oriented blocking messages for any blocks that
originate from the media gateways:
•
true—Sends hardware-oriented blocking messages for
any blocks that originate from the media gateways.
•
false—Sends only maintenance-oriented blocking
messages for all blocking cases (default).
Note
The parameter is automatically added to the
XECfgParm.dat file during the patch installation.
Cisco PGW 2200 Softswitch Release 9.8 Software Installation and Configuration Guide
4-32
OL-18083-01
Chapter 4
Configuring the Cisco PGW 2200 Softswitch Software
Configuring the Execution Environment
Parameter
Modification
engine.SysCdrCollection
Designates the format of CDRs.
Values:
•
true—Invalid for Release 7.4 and above.
•
false—Generates binary format CDRs (default)
Default: false
Note
Do not change this value. Setting this to a value of
true for Release 7.4 and higher is not valid and may
have deleterious effects on the system.
engine.SysGRSTimerInterval
To specify the interval between blocks of Circuit Group
Reset (GRS) messages when the engine.SysGRSBlockSize
parameter is used, set to the value required (in milliseconds).
engine.SysGRSBlockSize
Used for flow control of all automatically generated GRS,
CGB, and CGU messages which are generated by the
Cisco PGW 2200 Softswitch during run time. Typically
produced due to propagation of service state changes such as
MGCP endpoints changing availability. Specifies the
interval, in milliseconds, between blocks of GRS parameters
when the engine.SysGRSBlockSize parameter is used. The
timer interval runs from the start of sending the first GRS
message in each block to the first message in the next block.
This parameter operates independently for each SS7 route
(each OPC/DPC pair).
Value: Any integer
Default: 0
Example: 1000
engine.SysGeneratedCode
To determine whether compiled or interpreted code is used,
enter one of the following values:
•
true—System uses compiled code (default).
•
false—System uses interpreted code (used only for
engineering and debugging).
Note
*.SysConnectDataAccess
Compiled code runs faster than interpreted code.
Typically, this value should be true. If your
configuration uses multiple CPUs, this value must be
true.
This parameter controls if data access is enabled or disabled
and if the engine attempts to connect to the MMDB at
startup.
Set this parameter to true for calling scenarios where
European LNP, A-number screening, or other features
requiring real-time database access are used.
If you do not need real-time database access, set this
parameter to false to increase the available system memory
that can be used for call processing.
Cisco PGW 2200 Softswitch Release 9.8 Software Installation and Configuration Guide
OL-18083-01
4-33
Chapter 4
Configuring the Cisco PGW 2200 Softswitch Software
Configuring the Execution Environment
Setting the Call Cutoff Timer
The Cisco PGW 2200 Softswitch call cutoff timer is disabled by default. To set the call cutoff timer,
modify the following parameter in the XECfgParm.dat file:
Parameter
Modification
*.CallCutoffTimer
Provides a global system-wide timer, which is started when a
call is answered and runs for the pre-configured time. When
it expires the call is released in both directions and the call is
cleared. This parameter is not dynamically reconfigurable.
You must restart your system.
Valid values:
•
Hours: 0 (default), 1–48 (using hour as the unit)
•
Minutes: 0, 1–2880 (using minute as the unit)
•
Seconds: 0, 1–1728000 (using second as the unit)
Default: 0—Disables the timer.
You can override this value using the first data word
of the CALL_CUTOFF_TIMER result type.
Note
Enabling Call Screening
To initialize the database that stores call screening information, modify the following parameter in the
Engine section of the XECfgParm.dat file:
Parameter
Modification
*.SysConnectDataAccess
Controls whether data access is enabled or disabled (whether
the engine attempts to connect to the MMDB at startup.
Values:
•
true = connect to MMDB
•
false = do not connect to MMDB
Default: false
Note
In calling scenarios where Euro-LNP, A Number
Screening, or other features requiring real time
database access are required, this parameter must be
set to true. Otherwise, it can remain false for an
increase in the available system memory usable for
call processing.
Note
This parameter replaces the SysScreeningCheck
parameter.
Cisco PGW 2200 Softswitch Release 9.8 Software Installation and Configuration Guide
4-34
OL-18083-01
Chapter 4
Configuring the Cisco PGW 2200 Softswitch Software
Configuring the Execution Environment
Configuring Call Detail Record File Output
To configure call detail record (CDR) file output, modify the following parameters in the Data Dumper
and Engine sections of the XECfgParm.dat file:
Parameter
Modification
engine.CDRencodingFormat To specify the call detail record (CDR) file encoding format, enter one
of the following values:
engine.CDRmessageTypes
•
AnsiCDB—North American (default)
•
ItuCDB—European
•
CustCDB—Custom
To specify the Call Detail Blocks (CDBs are the accounting records
written at various points in a call) that are generated during a call,
enter one of the following sets of values (each number represents a
point in a call):
•
1010, 1020, 1030, 1040, 1050, 1060, 1070, 1080—These are
considered the “event-based” set of values. Use this event-based
list when you want to receive all CDR records at predefined
points in the call. Although each of these CDBs can be specified
independently, Cisco suggests that you use the event-based set as
a "package" of CDBs for full accounting purposes.
Note
The event-based setting is required when operating the
Cisco PGW 2200 Softswitch in conjunction with the
BAMS adjunct.
•
1060, 1110—Use this value if you want end-of-call
summary-type records only.
•
1071—Use this set of values for BAMS measurements.
See the “Detailed CDB Description” section in the
Cisco PGW 2200 Softswitch Release 9 Billing Interface Guide for
details on each CDB.
engine.CDRtimeStamp
Specifies the time stamp unit in seconds or milliseconds.
To specify the CDR file time-stamp unit, enter one of the following
values:
•
S—Seconds.
•
M—Milliseconds (default). Use this parameter if your
configuration uses TCAP or if you want the millisecond
granularity in all of your CDR records.
Note
The M setting is mandatory when operating the
Cisco PGW 2200 Softswitch in conjunction with the
Cisco BAMS adjunct. The default is M in
Cisco PGW 2200 Softswitch Release 9.8(1).
Cisco PGW 2200 Softswitch Release 9.8 Software Installation and Configuration Guide
OL-18083-01
4-35
Chapter 4
Configuring the Cisco PGW 2200 Softswitch Software
Configuring the Execution Environment
Configuring the Clearing Location and Default Location Parameters
The ClearingLocation and DefaultLocation parameters are used to determine a call’s location value. If
you require a value other than the default to be sent to the switch, use these parameters to override the
Clearing Location and Default Location fields in the Call Context. For example, if you need to define a
customer-specific default location for your system, set this value in the DefaultLocation parameter,
which overrides the default location specified in the protocol type definition.
Cisco PGW 2200 Softswitch Release 9.8 Software Installation and Configuration Guide
4-36
OL-18083-01
Chapter 4
Configuring the Cisco PGW 2200 Softswitch Software
Configuring the Execution Environment
Parameter
Modification
ClearingLocation
This property overrides the Clearing Location field in Call Context.
Change this value if you need a value other than the default to be sent
to the switch. Valid values are:
•
0—The Cisco PGW 2200 Softswitch software uses the default
Clearing Location in Call Context.
•
1—The Cisco PGW 2200 Softswitch software overrides the
Clearing Location in Call Context with LOCATION_USER
•
2—The Cisco PGW 2200 Softswitch software overrides the
Clearing Location in Call Context with LOCATION_
PRIVATE_LOCAL
•
3—The Cisco PGW 2200 Softswitch software overrides the
Clearing Location in Call Context with LOCATION_
PUBLIC_LOCAL
•
4—The Cisco PGW 2200 Softswitch software overrides the
Clearing Location in Call Context with LOCATION_TRANSIT
•
5—The Cisco PGW 2200 Softswitch software overrides the
Clearing Location in Call Context with LOCATION_
PUBLIC_REMOTE
•
6—The Cisco PGW 2200 Softswitch software overrides the
Clearing Location in Call Context with LOCATION_
PRIVATE_REMOTE
•
7—The Cisco PGW 2200 Softswitch software overrides the
Clearing Location in Call Context with LOCATION_
INTERNATIONAL
•
8—The Cisco PGW 2200 Softswitch software overrides the
Clearing Location in Call Context with LOCATION_
INTERWORKING
•
9—The Cisco PGW 2200 Softswitch software overrides the
Clearing Location in Call Context with LOCATION_
LOCAL_INTERFACE
•
10—The Cisco PGW 2200 Softswitch software overrides the
Clearing Location in Call Context with LOCATION_
LOCAL_LOCAL
•
11—The Cisco PGW 2200 Softswitch software overrides the
Clearing Location in Call Context with LOCATION_
LOCAL_REMOTE
•
12—The Cisco PGW 2200 Softswitch software overrides the
Clearing Location in Call Context with LOCATION_
PACKET_MANAGER
•
13—The Cisco PGW 2200 Softswitch software overrides the
Clearing Location in Call Context with LOCATION_
UNKNOWN
Cisco PGW 2200 Softswitch Release 9.8 Software Installation and Configuration Guide
OL-18083-01
4-37
Chapter 4
Configuring the Cisco PGW 2200 Softswitch Software
Configuring the Execution Environment
Parameter
Modification
DefaultLocation
This property overrides the Default Location field in Call Context.
Change this value if you need to define a customer-specific default
location for your system that can differ from the default location set in
the type definition of the protocol. Valid values are:
•
0—The Cisco PGW 2200 Softswitch software uses the Default
Location in Call Context
•
1—The Cisco PGW 2200 Softswitch software overrides the
Default Location in Call Context with LOCATION_USER
•
2—The Cisco PGW 2200 Softswitch software overrides the
Default Location in Call Context with LOCATION_
PRIVATE_LOCAL
•
3—The Cisco PGW 2200 Softswitch software overrides the
Default Location in Call Context with LOCATION_
PUBLIC_LOCAL
•
4—The Cisco PGW 2200 Softswitch software overrides the
Default Location in Call Context with LOCATION_TRANSIT
•
5—The Cisco PGW 2200 Softswitch software overrides the
Default Location in Call Context with LOCATION_
PUBLIC_REMOTE
•
6—The Cisco PGW 2200 Softswitch software overrides the
Default Location in Call Context with LOCATION_
PRIVATE_REMOTE
•
7—The Cisco PGW 2200 Softswitch software overrides the
Default Location in Call Context with LOCATION_
INTERNATIONAL
•
8—The Cisco PGW 2200 Softswitch software overrides the
Default Location in Call Context with LOCATION_
INTERWORKING
•
9—The Cisco PGW 2200 Softswitch software overrides the
Default Location in Call Context with LOCATION_
LOCAL_INTERFACE
•
10—The Cisco PGW 2200 Softswitch software overrides the
Default Location in Call Context with LOCATION_
LOCAL_LOCAL
•
11—The Cisco PGW 2200 Softswitch software overrides the
Default Location in Call Context with LOCATION_
LOCAL_REMOTE
•
12—The Cisco PGW 2200 Softswitch software overrides the
Default Location in Call Context with LOCATION_
PACKET_MANAGER
•
13—The Cisco PGW 2200 Softswitch software overrides the
Default Location in Call Context with LOCATION_ UNKNOWN
Cisco PGW 2200 Softswitch Release 9.8 Software Installation and Configuration Guide
4-38
OL-18083-01
Chapter 4
Configuring the Cisco PGW 2200 Softswitch Software
Configuring the Execution Environment
Configuring Switchover
To configure switchover, modify the following parameters in the foverd section of the XECfgParm.dat
file.
:
Parameter
Modification
foverd.conn1Type
To set the connection type for connection number 1, enter serial or
socket.
Typically, set this value to socket.
Note
foverd.ipLocalPortA
To define the local port number used for IP communication, enter
a unique number, keeping the following in mind:
•
Typically, if Type is socket, set this value to 1051.
•
If you have two Cisco PGW 2200 Softswitch hosts in a fault
tolerant configuration, enter the foverd.ipLocalPortA value in
the foverd.ipPeerPortA field in the XECfgParm.dat file on the
secondary host.
Caution
foverd.ipPeerPortA
To define the peer port number used for IP communication, enter a
unique number, keeping the following in mind:
•
Typically, if Type is socket, set this value to 1052.
•
If you have two Cisco PGW 2200 Softswitch hosts in a
switchover configuration, enter the foverd.ipPeerPortA value
in the foverd.ipLocalPortA field in the XECfgParm.dat file on
the secondary host.
Caution
foverd.conn2Type
The value of foverd.ipLocalPortA must be unique for
every host on the network. Otherwise, active and
standby hosts cannot communicate properly. In the
instance discussed here, no other machine on the
network can have foverd.ipLocalPortA set to 1051. If
that happens, the active and standby hosts cannot
perform proper switchover.
The value of foverd.ipPeerPortA must be unique for
every host on the network. Otherwise, active and
standby hosts cannot communicate properly. In the
instance discussed here, no other machine on the
network can have foverd.ipPeerPortA set to 1052. If that
happens, the active and standby hosts cannot perform
proper switchover.
To set the connection type for connection number 2, enter serial or
socket.
Note
Typically, set this value to socket.
Cisco PGW 2200 Softswitch Release 9.8 Software Installation and Configuration Guide
OL-18083-01
4-39
Chapter 4
Configuring the Cisco PGW 2200 Softswitch Software
Configuring the Execution Environment
Parameter
Modification
foverd.ipLocalPortB
To define the secondary local port number used for IP
communication, enter a unique number, keeping the following in
mind:
•
Typically, if Type is socket, set this value to 1053.
•
If you have two Cisco PGW 2200 Softswitch hosts in a
switchover configuration, enter this value in the
foverd.ipPeerPortB field in the XECfgParm.dat file on the
secondary host.
Caution
foverd.ipPeerPortB
To define the secondary local port number used for IP
communication, enter a unique number, keeping the following in
mind:
•
Typically, if Type is socket, set this value to 1054.
•
If you have two Cisco PGW 2200 Softswitch hosts in a
switchover configuration, enter this value in the
foverd.ipLocalPortB field in the XECfgParm.dat file on the
secondary host.
Caution
foverd.conn3Type
The value of foverd.ipPeerPortB must be unique for
every host on the network. Otherwise, master and slave
hosts cannot communicate properly. In the instance
discussed here, no other machine on the network can
have foverd.ipPeerPortB set to 1054. If that happens, the
master and slave hosts cannot perform proper
switchover.
To set the connection type for connection number 3, enter serial or
socket.
Note
foverd.conn3Addr
The value of foverd.ipLocalPortB must be unique for
every host on the network. Otherwise, active and
standby hosts cannot communicate properly. In the
instance discussed here, no other machine on the
network can have foverd.ipLocalPortB set to 1053. If
that happens, the active and standby hosts cannot
perform proper switchover.
Typically, set this value to serial.
To specify the address of the peer system, enter a location; for
example, /dev/term/a.
If your configuration does not use connection number 3, enter
/dev/null (default).
Note
If your configuration uses an 8-port connector as a serial
connection for switchover, you must modify the read-write
permissions for the connection.
Cisco PGW 2200 Softswitch Release 9.8 Software Installation and Configuration Guide
4-40
OL-18083-01
Chapter 4
Configuring the Cisco PGW 2200 Softswitch Software
Configuring the Execution Environment
Parameter
Modification
foverd.abswitchPort
To specify the port used for communication with the A/B switch,
enter a location; for example, /dev/term/a.
Note
foverd.heartbeatInterval
If your configuration does not use an A/B switch, use the
default value (/dev/null).
Specifies the maximum time in milliseconds between heartbeat
messages from the peer switchover daemon. This interval defines
the frequency with which the switchover daemon exchanges
heartbeat messages with its peer.
Default: 1000 milliseconds (1 second).
Note
For more information on switchover, see the Cisco PGW 2200 Softswitch Release 9 Operations,
Maintenance, and Troubleshooting Guide.
Initializing the Provisioning Object Manager
To configure the Provisioning Object Manager (POM), modify the following parameters in the POM
section of the XECfgParm.dat file:
Cisco PGW 2200 Softswitch Release 9.8 Software Installation and Configuration Guide
OL-18083-01
4-41
Chapter 4
Configuring the Cisco PGW 2200 Softswitch Software
Configuring SCP Queries
Parameter
Modification
pom.dataSync
Used in a fault tolerant system to indicate that the POM should
synchronize the provisioning data at startup.
•
If you have a standalone system, set this value to false.
•
If you have a fault tolerant system, set this value to true.
Caution
Note
If pom.dataSync is set to true for a fault tolerant system,
you must ensure that you are running the same version of
the Cisco PGW 2200 Softswitch software on both active
and standby machines. Otherwise, the wrong version of
your data files may be copied to the other machine.
When the initial Cisco PGW 2200 Softswitch configuration
on the active host is deployed, you must change the
pom.dataSync parameter to true in the XECfgParm.dat file
in the standby host. After setting this parameter to true, you
can start the Cisco PGW 2200 Softswitch software on the
standby host. As the Cisco PGW 2200 Softswitch software
comes up, the data on the standby host is synchronized with
the data on the active host and the active host goes into the
standby state.
To accommodate failover conditions where the current
active host can become the standby host, you must also set
the pom.dataSync parameter to true on the current active
host.
pom.port
Used in a fault tolerant configuration to indicate the port number
that the POM uses to communicate with its peer. Enter any integer
from 4001 through 4050, or default.
Note
This is a platform-specific value and depends on your
system installation. You should modify this value only if the
default port (4001) is being used by another process or
application.
Configuring SCP Queries
The SCP translates routing information for the Advanced Intelligent Network (AIN) database queries
over TCAP. This section provides instructions for selecting the type of translation you use to enable SCP
database queries. If your site or network requires changes, you can enable SCP queries using the
prov-ed:inservice command or by manually editing the parameters in the trigger.dat file. The trigger.dat
file (located in /opt/CiscoMGC/etc) contains the message-sending table that contains translation values.
This section contains the following topics:
•
Before You Start, page 4-43
Cisco PGW 2200 Softswitch Release 9.8 Software Installation and Configuration Guide
4-42
OL-18083-01
Chapter 4
Configuring the Cisco PGW 2200 Softswitch Software
Configuring SCP Queries
Warning
Note
•
Configuring the trigger.dat File Attributes, page 4-43
•
Sample trigger.dat File, page 4-45
Do not edit trigger.dat file parameters that are not listed below, and remember that all parameters are
case-sensitive. Otherwise, your system might not work as intended.
The following Bellcore Standards are supported for US 800 toll-free services:
IN/1 Toll Free Service support: GR-1428
AIN 0.1 Toll Free Service support: GR-2902
Before You Start
If you are changing an ANSI query and you need a different Translation Type, you need to know the
Translationtype value from the Global Title Translation tables on the Signal Transfer Point (STP). Get
this value from the administrator of your STP.
Modifying trigger.dat file parameters with provisioning commands
You can use the prov-ed:inservice command to modify the trigger.dat properties without editing the file
directly. The command allows you to modify the service key, global title or subsystem number, global
title format, or message sending name.
mml> prov-ed:inservice:name=”ansi-ain-800-npa”,skortcv=4,gtorssn=”ROUTEBYGT”,
gtformat=”GTTT”,msname=”ansi-ain-800-npa”
For more information about the prov-ed:inservice command, refer to the Cisco PGW 2200 Softswitch
Release 9 MML Command Reference.
Configuring the trigger.dat File Attributes
Note
Caution
The trigger.dat file is not overwritten during software installation. All changes to the trigger.dat file are
contained in a file called trigger.template that is installed with the new software. If you modify the
trigger.dat file after installing a new software release, you need to view the trigger.template file and copy
any changes in that file to your trigger.dat file.
Improper editing of the trigger.dat file can cause service interruption and prevent the
Cisco PGW 2200 Softswitch from correctly performing SCP database queries.
You can configure the following Cisco PGW 2200 Softswitch trigger.dat file attributes to perform a
Transaction Capabilities Application Part (TCAP) query:
•
Translation Type
Cisco PGW 2200 Softswitch Release 9.8 Software Installation and Configuration Guide
OL-18083-01
4-43
Chapter 4
Configuring the Cisco PGW 2200 Softswitch Software
Configuring SCP Queries
Configuring the Translation Type Attribute
Perform the following steps to configure the Translation Type (translationType) attribute:
Step 1
Back up the trigger.dat file.
Step 2
Determine the Trigger Number that you need to edit. You can get this information from your network
administrator.
Step 3
Navigate to directory /opt/CiscoMGC/etc.
Step 4
Open the trigger definition file in an ASCII text editor and search for the string $TriggerTable.
Step 5
Starting after the $TriggerTable line, count the number of rows equal to the TriggerType beginning from
the number 1.
Do not count any row that is blank or that begins with a pound sign (#).
Note
Step 6
When you find your row, note down the second number in that row. This number is the index to the
$MessageSending table.
Caution
Step 7
You must verify that column 2 is equal to 2 or 3 before changing Translation Type. If column
2 is not equal to 2 or 3, this is not an ANSI trigger and Translation Type is not used.
Edit the file as follows:
a.
In the $MessageSending table, select translationType, in column 5 (see Table 4-6).
b.
In the table for your translation type, change the value for translationType to a value from 0 through
255. You can get this information from your network administrator.
Step 8
Save your changes and close the editor.
Step 9
For your changes to take effect you must reboot the Cisco PGW 2200 Softswitch by entering the
following command:
# /etc/init.d/CiscoMGC start
Note
If you have installed the Solaris DiskSuite package (CSCOh023) on your system, the messages
below are displayed during system boot-up. They are normal Solaris DiskSuite start-up
messages and do not indicate any problem with your system.
WARNING force load of misc /md-trans failed
WARNING force load of misc /md-raid failed
WARNING force load of misc /md-hotspares failed
WARNING force load of misc /md-sp failed
Cisco PGW 2200 Softswitch Release 9.8 Software Installation and Configuration Guide
4-44
OL-18083-01
Chapter 4
Configuring the Cisco PGW 2200 Softswitch Software
Configuring SCP Queries
F15
F16
OS10
F14
OS9
F13
OS8
F12
OS7
F11
OS6
F10
OS5
F9
OS4
F8
OS3
F7
tcapBodyType
msg
F6
OS1
F5
translationType
F4
asn1Encoding
F3
stpScpGroupIndex
F2
tcapType
F1
$MessageSending Table Values
OS2
Table 4-6
# MS 1: Customer 1 LNP
2
0
6
0
255
1
1
0
0
0
0
0
0
0
0
0
0
255
1
2
0
0
0
0
0
0
0
0
0
0
0
1
3
0
0
0
0
0
0
0
0
0
255
1
4
0
0
0
0
0
0
0
0
0
1
4
0
0
0
0
0
0
0
0
0
4
0
0
0
0
0
0
0
0
0
# MS 2: Generic LNP
2
0
6
# MS 3: Genesys 800
1
1
1
# MS 4: ANSI AIN 800 NPA
2
0
6
0
# MS 5: ANSI AIN 800 NPA-NXX
2
0
6
0
255
# MS 6: ANSI AIN 800 NPA-NXX-XXX
2
0
6
0
255
1
# MS 7: ANSI AIN 800 Termination information
2
0
5
0
255
1
5
0
0
0
0
0
0
0
0
0
254
2
6
0
0
0
0
0
0
0
0
0
0
0
0
0
0
0
0
0
# MS 8: ANSI PRE AIN 800
3
0
6
0
# MS 9: ANSI PRE AIN 800 Termination information
3
0
5
0
254
2
7
0
Sample trigger.dat File
#--//******************************************************************************
#--//*
*
#--//* Default Table.trigger
*
#--//*
*
#--//******************************************************************************
# "$Id: Table.trigger,v 1.25 2000/05/30 14:52:20 rjeffers Exp $";
# "Copyright (c) 2004, 2005 by Cisco Systems, Inc.."
# 41647269616E204B696E6773746F6E
#############
$TriggerTable
#############
# All fields are pointers to records of other types
#
# F1
F2
F3
F4
F5
F6
F7
F8
F9
F10 F11
# MA
IN
RR1 RR2 RR3 RR4 RR5 RR6 RR7 RR8 RR9
F12
RR10
#---------------------------------------------------------# TT 1: Customer 1 LNP
#---------------------------------------------------------1
1
1
2
0
0
0
0
0
0
0
0
Cisco PGW 2200 Softswitch Release 9.8 Software Installation and Configuration Guide
OL-18083-01
4-45
Chapter 4
Configuring the Cisco PGW 2200 Softswitch Software
Configuring SCP Queries
#---------------------------------------------------------# TT 2: Generic LNP
#---------------------------------------------------------2
2
1
3
0
0
0
0
0
0
0
0
#---------------------------------------------------------# TT 3: Genesys 800
#---------------------------------------------------------3
3
10
4
5
0
0
0
0
0
0
0
#---------------------------------------------------------# TT 4: ANSI AIN 800 NPA
#---------------------------------------------------------4
4
10
6
7
0
0
0
0
0
0
0
#---------------------------------------------------------# TT 5: ANSI AIN 800 NPA-NXX
#---------------------------------------------------------4
5
10
6
7
0
0
0
0
0
0
0
#---------------------------------------------------------# TT 6: ANSI AIN 800 NPA-NXX-XXXX
#---------------------------------------------------------4
6
10
6
7
0
0
0
0
0
0
0
#---------------------------------------------------------# TT 7: ANSI AIN 800 Termination Information
#---------------------------------------------------------5
7
10
0
0
0
0
0
0
0
0
0
#---------------------------------------------------------# TT 8: ANSI PRE AIN AIN 800
#---------------------------------------------------------4
8
10
8
9
0
0
0
0
0
0
0
#---------------------------------------------------------# TT 9: ANSI PRE AIN 800 Termination Information
#---------------------------------------------------------5
9
10
0
0
0
0
0
0
0
0
0
#---------------------------------------------------------# TT 10: ANSI PRE AIN AIN 800 SSN
#---------------------------------------------------------4
10
10
11
9
0
0
0
0
0
0
0
#---------------------------------------------------------# TT 11: ANSI PRE AIN 800 Termination Information SSN
#---------------------------------------------------------5
11
10
0
0
0
0
0
0
0
0
0
#---------------------------------------------------------# TT 12: CS1/INAP Based CLI Screening
#---------------------------------------------------------6
12
15
12
13
14
0
0
0
0
0
0
#---------------------------------------------------------# TT 13: Specialized Resource Report for CS1/INAP Based CLI Screening
#---------------------------------------------------------0
13
15
12
0
0
0
0
0
0
0
0
#---------------------------------------------------------# TT 14: INAP Free Phone Service (Service Key = 0)
#----------------------------------------------------------
Cisco PGW 2200 Softswitch Release 9.8 Software Installation and Configuration Guide
4-46
OL-18083-01
Chapter 4
Configuring the Cisco PGW 2200 Softswitch Software
Configuring SCP Queries
7
14
10
16
0
0
0
0
0
0
0
0
#---------------------------------------------------------# TT 15: INAP LNP Service (Service Key = 1)
#---------------------------------------------------------7
15
10
16
0
0
0
0
0
0
0
0
#---------------------------------------------------------# TT 16: INAP Carrier Pre-Selection Service (Service Key =2)
#---------------------------------------------------------7
16
10
16
0
0
0
0
0
0
0
0
#---------------------------------------------------------# TT 17: INAP LNP for Norway
#---------------------------------------------------------8
17
17
18
0
0
0
0
0
0
0
0
#---------------------------------------------------------# TT 18: INAP Prepaid Services InitialDP
#---------------------------------------------------------9
18
19
20
24
28
0
0
0
0
0
0
#---------------------------------------------------------# TT 19: INAP Prepaid Services ApplyChargingReport(Approaching Time Period Expiry)
#---------------------------------------------------------10
19
19
21
0
0
0
0
0
0
0
0
#---------------------------------------------------------# TT 20: INAP Prepaid Services EventReportBCSM
#---------------------------------------------------------11
20
19
22
23
0
0
0
0
0
0
0
#---------------------------------------------------------# TT 21: INAP Prepaid Services ApplyChargingReport (Time Period Expired)
#---------------------------------------------------------11
21
19
22
0
0
0
0
0
0
0
0
#---------------------------------------------------------# TT 22: INAP Prepaid Services ApplyChargingReport (Final End)
#---------------------------------------------------------11
22
0
0
0
0
0
0
0
0
0
0
#---------------------------------------------------------# TT 23: INAP LNP for Portugal
#---------------------------------------------------------12
23
25
26
27
0
0
0
0
0
0
0
#---------------------------------------------------------# TT24 : INAP CS1 Initial DP
#---------------------------------------------------------13
24
29
30
31
33
32
0
0
0
0
0
#---------------------------------------------------------# TT25 : INAP CS1 Event Report (EventReportBCSM)
#---------------------------------------------------------14
26
0
0
0
0
0
0
0
0
0
0
#---------------------------------------------------------# TT26 : INAP CS1 DisconnectForwardConnection(re-trigger to restore original trigger)
#---------------------------------------------------------0
27
29
34
0
0
0
0
0
0
0
0
#---------------------------------------------------------# TT27 : INAP CS1 Final_End(Apply ChargingReport)
Cisco PGW 2200 Softswitch Release 9.8 Software Installation and Configuration Guide
OL-18083-01
4-47
Chapter 4
Configuring the Cisco PGW 2200 Softswitch Software
Configuring SCP Queries
#---------------------------------------------------------14
25
0
0
0
0
0
0
0
0
0
0
#---------------------------------------------------------# TT28 : INAP CS1 Post temp-connection handling
#---------------------------------------------------------15
0
0
0
0
0
0
0
0
0
0
0
#---------------------------------------------------------# TT 29 : INAP CS2 Initial DP
#---------------------------------------------------------13
29
29
30
31
33
32
36
37
38
39
0
#---------------------------------------------------------# TT 30: ANSI PRE AIN CNAM
#---------------------------------------------------------4
30
41
40
0
0
0
41
0
0
0
0
##############
$MessageAction
##############
#
# F1
F2
F3
F4
# ACT1 REQ ACT2 REQ
F5
F6
ACT3 REQ
F7
F8
ACT4 REQ
F9
F10
ACT5 REQ
#------------------------------------------------# MA 1: Customer 1 LNP
#------------------------------------------------1
1
3
0
0
0
0
0
0
0
#------------------------------------------------# MA 2: Generic LNP
#------------------------------------------------1
1
2
1
3
0
0
0
0
0
#------------------------------------------------# MA 3: Genesys 800
#------------------------------------------------1
1
3
0
0
0
0
0
0
0
#------------------------------------------------# MA 4: ANSI AIN 800 / ANSI PRE AIN 800 /ANSI PRE AIN CNAM
#------------------------------------------------1
1
3
0
0
0
0
0
0
0
#------------------------------------------------# MA 5: ANSI AIN 800 Termination Information / PRE AIN 800 Termination Information
#------------------------------------------------4
1
0
0
0
0
0
0
0
0
#------------------------------------------------# MA 6: CS1/INAP Based CLI Screening InitialDP Query
#------------------------------------------------3
0
0
0
0
0
0
0
0
0
#------------------------------------------------# MA 7: INAP Free Phone, LNP & Carrier Pre-Selection Services
#------------------------------------------------3
0
0
0
0
0
0
0
0
0
#------------------------------------------------# MA 8: INAP LNP for Norway
#-------------------------------------------------
Cisco PGW 2200 Softswitch Release 9.8 Software Installation and Configuration Guide
4-48
OL-18083-01
Chapter 4
Configuring the Cisco PGW 2200 Softswitch Software
Configuring SCP Queries
3
0
0
0
0
0
0
0
0
0
#------------------------------------------------# MA 9: INAP Prepaid Services InitialDP
#------------------------------------------------3
0
0
0
0
0
0
0
0
0
#-------------------------------------------------------# MA 10: INAP Prepaid Services ApplyChargingReport
#-------------------------------------------------------0
0
0
0
0
0
0
0
0
0
#---------------------------------------------------# MA 11: INAP Prepaid Services EventReportBCSM
#---------------------------------------------------0
0
0
0
0
0
0
0
0
0
#------------------------------------------------# MA 12: INAP LNP for Portugal
#------------------------------------------------3
0
0
0
0
0
0
0
0
0
#------------------------------------------------# MA 13: INAP CS1 Copy STP_SCP_INdex_From_Signal_Data
#------------------------------------------------3
0
0
0
0
0
0
0
0
0
#------------------------------------------------# MA 14: INAP CS1 Reinstate Previous trigger
#------------------------------------------------5
0
0
0
0
0
0
0
0
0
#------------------------------------------------# MA 15: INAP CS1 Reinstate Previous trigger
#------------------------------------------------6
0
0
0
0
0
0
0
0
0
#------------------------------------------------# MA 16: INAP CS1 Provoke SCP Abort
#------------------------------------------------7
0
0
0
0
0
0
0
0
0
###################
$MessageSendingName
###################
#
# Name
c1-lnp
generic-lnp
genesys-800
ansi-ain-800-npa
ansi-ain-800-npa-nxx
ansi-ain-800-npanxxx
ansi-ain-800-ti
ansi-pre-ain-800
ansi-pre-ain-800-ti
ansi-pre-ain-800-ssn
ansi-pre-ain-800-ts
cs1-inap-cli-initdp
cs1i-nap-cli-srr
inap-freephon-initdp
inap-lnp-initdp
inap-precarr-initdp
Index
1
2
3
4
5
6
7
8
9
10
11
12
13
14
15
16
Cisco PGW 2200 Softswitch Release 9.8 Software Installation and Configuration Guide
OL-18083-01
4-49
Chapter 4
Configuring the Cisco PGW 2200 Softswitch Software
Configuring SCP Queries
inap-lnp-norway
inap-pp-initdp
inap-pp-charge-atexp
inap-pp-bcsm
inap-pp-charge-texp
inap-pp-charge-final
inap-lnp-portugal
inap-cs1-initdp
inap-cs1-dummy-25
inap-cs1-dummy-26
inap-cs1-dummy-27
inap-cs1-dummy-28
inap-cs2-initdp
ansi-pre-ain-cnam
17
18
19
20
21
22
23
24
25
26
27
28
29
30
###############
$MessageSending
###############
#
# F1
F2
F3
F4
F10 F11 F12 F13 F14 F15 F16
# tcapType stpScpGroupIndex msg asn1Encoding
OS4 OS5 OS6 OS7 OS8 OS9 OS10
F5
F6
F7
translationType tcapBodyType OS1
F8
F9
OS2
OS3
#--------------------------------------------------------------------------------------------------------------------------# MS 1: Customer 1 LNP
#--------------------------------------------------------------------------------------------------------------------------2
0
6
0
255
1
1
0
0
0
0
0
0
0
0
0
#--------------------------------------------------------------------------------------------------------------------------# MS 2: Generic LNP
#--------------------------------------------------------------------------------------------------------------------------2
0
6
0
255
1
2
0
0
0
0
0
0
0
0
0
#--------------------------------------------------------------------------------------------------------------------------# MS 3: Genesys 800
#--------------------------------------------------------------------------------------------------------------------------1
1
1
0
0
1
3
0
0
0
0
0
0
0
0
0
#--------------------------------------------------------------------------------------------------------------------------# MS 4: ANSI AIN 800 NPA
#--------------------------------------------------------------------------------------------------------------------------2
0
6
0
255
1
4
0
0
0
0
0
0
0
0
0
#--------------------------------------------------------------------------------------------------------------------------# MS 5: ANSI AIN 800 NPA-NXX
#--------------------------------------------------------------------------------------------------------------------------2
0
6
0
255
1
4
0
0
0
0
0
0
0
0
0
Cisco PGW 2200 Softswitch Release 9.8 Software Installation and Configuration Guide
4-50
OL-18083-01
Chapter 4
Configuring the Cisco PGW 2200 Softswitch Software
Configuring SCP Queries
#--------------------------------------------------------------------------------------------------------------------------# MS 6: ANSI AIN 800 NPA-NXX-XXX
#--------------------------------------------------------------------------------------------------------------------------2
0
6
0
255
1
4
0
0
0
0
0
0
0
0
0
#--------------------------------------------------------------------------------------------------------------------------# MS 7: ANSI AIN 800 Termination information
#--------------------------------------------------------------------------------------------------------------------------2
0
5
0
255
1
5
0
0
0
0
0
0
0
0
0
#--------------------------------------------------------------------------------------------------------------------------# MS 8: ANSI PRE AIN 800
#--------------------------------------------------------------------------------------------------------------------------3
0
6
0
254
2
6
0
0
0
0
0
0
0
0
0
#--------------------------------------------------------------------------------------------------------------------------# MS 9: ANSI PRE AIN 800 Termination information
#--------------------------------------------------------------------------------------------------------------------------3
0
5
0
254
2
7
0
0
0
0
0
0
0
0
0
#--------------------------------------------------------------------------------------------------------------------------# MS 10: ANSI PRE AIN 800 SSN (Same as MS 8 but with SSN stuff)
#--------------------------------------------------------------------------------------------------------------------------3
0
6
0
254
2
6
0
0
0
0
0
0
0
0
0
#--------------------------------------------------------------------------------------------------------------------------# MS 11: ANSI PRE AIN 800 Termination information (Same as MS 9 but with SSN stuff)
#--------------------------------------------------------------------------------------------------------------------------3
0
5
0
254
2
7
0
0
0
0
0
0
0
0
0
#--------------------------------------------------------------------------------------------------------------------------# MS 12: CS1/INAP Based CLI Screening InitialDP Query
#--------------------------------------------------------------------------------------------------------------------------1
0
1
0
200
1
8
0
0
0
0
0
0
0
0
0
#--------------------------------------------------------------------------------------------------------------------------# MS 13: CS1/INAP Based CLI Screening SpecializedResourceReport
#--------------------------------------------------------------------------------------------------------------------------1
0
2
0
200
1
9
0
0
0
0
0
0
0
0
0
Cisco PGW 2200 Softswitch Release 9.8 Software Installation and Configuration Guide
OL-18083-01
4-51
Chapter 4
Configuring the Cisco PGW 2200 Softswitch Software
Configuring SCP Queries
#--------------------------------------------------------------------------------------------------------------------------# MS 14: INAP InitialDP Query, Free Phone Service
#--------------------------------------------------------------------------------------------------------------------------1
0
1
0
0
1
110
0
0
0
0
0
0
0
0
0
#--------------------------------------------------------------------------------------------------------------------------# MS 15: INAP InitialDP Query, LNP Service
#--------------------------------------------------------------------------------------------------------------------------1
0
1
0
0
1
110
0
0
0
0
0
0
0
0
0
#--------------------------------------------------------------------------------------------------------------------------# MS 16: INAP InitialDP Query, Carrier Pre-Selection Service
#--------------------------------------------------------------------------------------------------------------------------1
0
1
0
0
1
110
0
0
0
0
0
0
0
0
0
#--------------------------------------------------------------------------------------------------------------------------# MS 17: INAP LNP for Norway
#--------------------------------------------------------------------------------------------------------------------------1
0
1
0
0
1
111
0
0
0
0
0
0
0
0
0
#--------------------------------------------------------------------------------------------------------------------------# MS 18: INAP Prepaid Services InitialDP
#--------------------------------------------------------------------------------------------------------------------------1
0
1
0
0
1
12
0
0
0
0
0
0
0
0
0
#--------------------------------------------------------------------------------------------------------------------------# MS 19: INAP Prepaid Services ApplyChargingReport (Approaching Time Period Expiry)
#--------------------------------------------------------------------------------------------------------------------------1
0
2
0
0
3
13
0
0
0
0
0
0
0
0
0
#--------------------------------------------------------------------------------------------------------------------------# MS 20: INAP Prepaid Services EventReportBCSM
#--------------------------------------------------------------------------------------------------------------------------1
0
2
0
0
1
14
0
0
0
0
0
0
0
0
0
#--------------------------------------------------------------------------------------------------------------------------# MS 21: INAP Prepaid Services ApplyChargingReport (Time Period Expired)
#--------------------------------------------------------------------------------------------------------------------------1
0
2
0
0
3
13
0
0
0
0
0
0
0
0
0
Cisco PGW 2200 Softswitch Release 9.8 Software Installation and Configuration Guide
4-52
OL-18083-01
Chapter 4
Configuring the Cisco PGW 2200 Softswitch Software
Configuring SCP Queries
#--------------------------------------------------------------------------------------------------------------------------# MS 22: INAP Prepaid Services ApplyChargingReport (Final End)
#--------------------------------------------------------------------------------------------------------------------------1
0
3
0
0
3
13
0
0
0
0
0
0
0
0
0
#--------------------------------------------------------------------------------------------------------------------------# MS 23: INAP LNP for Portugal
#--------------------------------------------------------------------------------------------------------------------------1
0
1
0
0
1
15
0
0
0
0
0
0
0
0
0
#--------------------------------------------------------------------------------------------------------------------------# MS 24: INAP CS1 InitialDP
#--------------------------------------------------------------------------------------------------------------------------1
0
1
0
0
1
16
0
0
0
0
0
0
0
0
0
#--------------------------------------------------------------------------------------------------------------------------# MS 25: INAP CS1 Final end (ApplyChargingReport,)
#--------------------------------------------------------------------------------------------------------------------------1
0
2
0
0
3
18
0
0
0
0
0
0
0
0
0
#--------------------------------------------------------------------------------------------------------------------------# MS 26: INAP CS1 Continue, event report (EventReportBCSM)
#--------------------------------------------------------------------------------------------------------------------------1
0
2
0
0
1
17
0
0
0
0
0
0
0
0
0
#--------------------------------------------------------------------------------------------------------------------------# MS 27: INAP CS1 (Dummy entry only to permit Message reception operation data access)
#--------------------------------------------------------------------------------------------------------------------------1
0
2
0
0
1
0
0
0
0
0
0
0
0
0
0
#--------------------------------------------------------------------------------------------------------------------------# MS 28: INAP CS1 (Dummy entry only to permit Message reception operation data access)
#--------------------------------------------------------------------------------------------------------------------------1
0
2
0
0
1
0
0
0
0
0
0
0
0
0
0
#--------------------------------------------------------------------------------------------------------------------------# MS 29: INAP CS2 InitialDP
#--------------------------------------------------------------------------------------------------------------------------1
0
1
0
0
1
16
0
0
0
0
0
0
0
0
0
Cisco PGW 2200 Softswitch Release 9.8 Software Installation and Configuration Guide
OL-18083-01
4-53
Chapter 4
Configuring the Cisco PGW 2200 Softswitch Software
Configuring SCP Queries
#--------------------------------------------------------------------------------# MS 30 : ANSI PRE AIN CNAM
# tcapType=PRE AIN, msg=query with permission , asn1Encoding=asn1_definite,
# tcapBodyType=sequence, OS= 19
#--------------------------------------------------------------------------------3
0
6
0
5
2
19 0
0
0
0
0
0
0
0
#################
$OperationSending
#################
#
# F1
F2
F7
# componentType opClass
PS
F3
opCodeFamily
F4
F5
0
F6
opCodeSpecifier opCodeFlag correlationRequired
#-------------------------------------------------------------------------------------------# OS 1: Customer 1 LNP
#-------------------------------------------------------------------------------------------6
1
100
3
4
0
1
#-------------------------------------------------------------------------------------------# OS 2: Generic LNP
#-------------------------------------------------------------------------------------------6
1
100
3
4
0
2
#-------------------------------------------------------------------------------------------# OS 3: Genesys 800
#-------------------------------------------------------------------------------------------1
1
0
0
1
0
3
#-------------------------------------------------------------------------------------------# OS 4: ANSI AIN 800
#-------------------------------------------------------------------------------------------6
1
100
3
4
0
4
#-------------------------------------------------------------------------------------------# OS 5: ANSI AIN 800 Termination Information
Should have
correlationRequired = 1
#-------------------------------------------------------------------------------------------6
1
103
4
4
0
5
#-------------------------------------------------------------------------------------------# OS 6: ANSI PRE AIN 800
Cisco PGW 2200 Softswitch Release 9.8 Software Installation and Configuration Guide
4-54
OL-18083-01
Chapter 4
Configuring the Cisco PGW 2200 Softswitch Software
Configuring SCP Queries
#-------------------------------------------------------------------------------------------6
1
3
1
3
0
6
#-------------------------------------------------------------------------------------------# OS 7: ANSI PRE AIN 800 Termination Information
#-------------------------------------------------------------------------------------------2
1
0
0
0
0
7
#-------------------------------------------------------------------------------------------# OS 8: CS1/INAP Based CLI Screening InitialDP Query
#-------------------------------------------------------------------------------------------1
1
0
0
1
0
8
#-------------------------------------------------------------------------------------------# OS 9: CS1/INAP Based CLI Screening SpecializedResourceReport
#-------------------------------------------------------------------------------------------1
1
0
49
1
1
0
#-------------------------------------------------------------------------------------------# OS 10: INAP Free Phone, LNP & Carrier Pre-Selection Services InitialDP Query
#-------------------------------------------------------------------------------------------1
1
0
0
1
0
9
#-------------------------------------------------------------------------------------------# OS 11: INAP LNP for Norway
#-------------------------------------------------------------------------------------------1
1
0
0
1
0
10
#-------------------------------------------------------------------------------------------# OS 12: INAP Prepaid Services InitialDP
#-------------------------------------------------------------------------------------------1
2
0
0
1
0
11
#-------------------------------------------------------------------------------------------# OS 13: INAP Prepaid Services ApplyChargingReport
#-------------------------------------------------------------------------------------------1
2
0
36
1
0
12
#-------------------------------------------------------------------------------------------# OS 14: INAP Prepaid Services EventReportBCSM
Cisco PGW 2200 Softswitch Release 9.8 Software Installation and Configuration Guide
OL-18083-01
4-55
Chapter 4
Configuring the Cisco PGW 2200 Softswitch Software
Configuring SCP Queries
#-------------------------------------------------------------------------------------------1
2
0
24
1
0
13
#-------------------------------------------------------------------------------------------# OS 15: INAP LNP for Portugal
#-------------------------------------------------------------------------------------------1
1
0
0
1
0
14
#-------------------------------------------------------------------------------------------# OS 16: INAP CS1 InitialDP
#-------------------------------------------------------------------------------------------# componentType opClass
opCodeFamily opCodeSpecifier opCodeFlag correlationRequired
PS
1
2
0
0
1
0
15
#-------------------------------------------------------------------------------------------# OS 17: INAP CS1 EventReportBCSM
#-------------------------------------------------------------------------------------------1
2
0
24
1
0
16
#-------------------------------------------------------------------------------------------# OS 18: INAP CS1 ApplyChargingReport
#-------------------------------------------------------------------------------------------1
2
0
36
1
0
17
#-------------------------------------------------------------------------------------------# OS 19: ANSI PRE AIN CNAM
# componentType=invoke last, opClass=success and fail report, opFamily=parameter
# opSpecifier=1 for PRE AIN, opFlag=1.local/3.national/4 private, ps=18
#-------------------------------------------------------------------------------------------6
1
129
1
3
0
18
#--------------------------------------------------------------------------------------------
#################
$ParameterSending
#################
#
# F1
F2
F3
F4
F5
F6
F7
F8
F9
F10 F11 F12
F19 F20 F21 F22 F23 F24 F25 F26 F27 F28 F29 F30
# PA1 REQ PA2 REQ PA3 REQ PA4 REQ PA5 REQ PA6 REQ
PA10 REQ PA11 REQ PA12 REQ PA13 REQ PA14 REQ PA15 REQ
F13
F14
F15
F16
F17
F18
PA7
REQ
PA8
REQ
PA9
REQ
#----------------------------------------------------------------------------------------------------------------------------------------------------
Cisco PGW 2200 Softswitch Release 9.8 Software Installation and Configuration Guide
4-56
OL-18083-01
Chapter 4
Configuring the Cisco PGW 2200 Softswitch Software
Configuring SCP Queries
# PS 1: Customer 1 LNP
#---------------------------------------------------------------------------------------------------------------------------------------------------100 1
101 1
102 1
0
0
0
0
0
0
0
0
0
0
0
0
0
0
0
0
0
0
0
0
0
0
0
0
#---------------------------------------------------------------------------------------------------------------------------------------------------# PS 2: Generic LNP
#---------------------------------------------------------------------------------------------------------------------------------------------------100 1
101 1
102 1
103 1
0
0
0
0
0
0
0
0
0
0
0
0
0
0
0
0
0
0
0
0
0
0
#---------------------------------------------------------------------------------------------------------------------------------------------------# PS 3: Genesys 800
#---------------------------------------------------------------------------------------------------------------------------------------------------200 1
201 1
202 1
0
0
0
0
0
0
0
0
0
0
0
0
0
0
0
0
0
0
0
0
0
0
0
0
#---------------------------------------------------------------------------------------------------------------------------------------------------# PS 4: ANSI AIN 800 (All types)
#---------------------------------------------------------------------------------------------------------------------------------------------------100 1
101 1
102 1
103 1
104 1
109 0
110 0
111 0
112 0
113 0
0
0
0
0
0
0
0
0
0
0
#---------------------------------------------------------------------------------------------------------------------------------------------------# PS 5: ANSI AIN 800 Termination Information
#---------------------------------------------------------------------------------------------------------------------------------------------------105 1
106 1
107 0
108 0
0
0
0
0
0
0
0
0
0
0
0
0
0
0
0
0
0
0
0
0
0
0
#---------------------------------------------------------------------------------------------------------------------------------------------------# PS 6: ANSI PRE AIN 800
#---------------------------------------------------------------------------------------------------------------------------------------------------17
1
2
1
16
0
0
0
0
0
0
0
0
0
0
0
0
0
0
0
0
0
0
0
0
0
0
0
0
0
#---------------------------------------------------------------------------------------------------------------------------------------------------# PS 7: ANSI PRE AIN 800 Termination Information
#---------------------------------------------------------------------------------------------------------------------------------------------------21
1
20
1
22
0
0
0
0
0
0
0
0
0
0
0
0
0
0
0
0
0
0
0
0
0
0
0
0
0
#---------------------------------------------------------------------------------------------------------------------------------------------------# PS 8: CS1/INAP Based CLI Screening
#---------------------------------------------------------------------------------------------------------------------------------------------------200 1
201 1
202 1
208 1
0
0
0
0
0
0
0
0
0
0
0
0
0
0
0
0
0
0
0
0
0
0
#----------------------------------------------------------------------------------------------------------------------------------------------------
Cisco PGW 2200 Softswitch Release 9.8 Software Installation and Configuration Guide
OL-18083-01
4-57
Chapter 4
Configuring the Cisco PGW 2200 Softswitch Software
Configuring SCP Queries
# PS 9: INAP Free Phone, LNP & Carrier Pre-Selection Services
#---------------------------------------------------------------------------------------------------------------------------------------------------200 1
201 1
202 1
0
0
0
0
0
0
0
0
0
0
0
0
0
0
0
0
0
0
0
0
0
0
0
0
#---------------------------------------------------------------------------------------------------------------------------------------------------# PS 10: INAP LNP for Norway
#---------------------------------------------------------------------------------------------------------------------------------------------------200 1
201 1
202 1
0
0
0
0
0
0
0
0
0
0
0
0
0
0
0
0
0
0
0
0
0
0
0
0
#---------------------------------------------------------------------------------------------------------------------------------------------------# PS 11: INAP Prepaid Services InitialDP
#---------------------------------------------------------------------------------------------------------------------------------------------------200 1
201 1
202 1
0
0
0
0
0
0
0
0
0
0
0
0
0
0
0
0
0
0
0
0
0
0
0
0
#---------------------------------------------------------------------------------------------------------------------------------------------------# PS 12: INAP Prepaid Services ApplyChargingReport
#---------------------------------------------------------------------------------------------------------------------------------------------------214 1
0
0
0
0
0
0
0
0
0
0
0
0
0
0
0
0
0
0
0
0
0
0
0
0
0
0
0
0
#---------------------------------------------------------------------------------------------------------------------------------------------------# PS 13: INAP Prepaid Services EventReportBCSM
#---------------------------------------------------------------------------------------------------------------------------------------------------217 1
0
0
0
0
0
0
0
0
0
0
0
0
0
0
0
0
0
0
0
0
0
0
0
0
0
0
0
0
#---------------------------------------------------------------------------------------------------------------------------------------------------# PS 14: INAP LNP for Portugal
#---------------------------------------------------------------------------------------------------------------------------------------------------200 1
201 1
202 1
0
0
0
0
0
0
0
0
0
0
0
0
0
0
0
0
0
0
0
0
0
0
0
0
#---------------------------------------------------------------------------------------------------------------------------------------------------# PS 15: INAP CS1 InitialDP
#---------------------------------------------------------------------------------------------------------------------------------------------------200 1
201 1
202 0
208 0
206 0
224 0
219 0
217 0
220 0
221 0
0
0
0
0
0
0
0
0
0
0
#---------------------------------------------------------------------------------------------------------------------------------------------------# PS 16: INAP CS1 EventReportBCSM
#---------------------------------------------------------------------------------------------------------------------------------------------------217 1
0
0
0
0
0
0
0
0
0
0
0
0
0
0
0
0
0
0
0
0
0
0
0
0
0
0
0
0
#----------------------------------------------------------------------------------------------------------------------------------------------------
Cisco PGW 2200 Softswitch Release 9.8 Software Installation and Configuration Guide
4-58
OL-18083-01
Chapter 4
Configuring the Cisco PGW 2200 Softswitch Software
Configuring SCP Queries
# PS 17: INAP CS1 ApplyChargingReport
#---------------------------------------------------------------------------------------------------------------------------------------------------214 1
0
0
0
0
0
0
0
0
0
0
0
0
0
0
0
0
0
0
0
0
0
0
0
0
0
0
0
0
#---------------------------------------------------------------------------------------------------------------------------------------------------# PS 18: ANSI PRE AIN CNAM
# 23=generic name, 17=service key
#---------------------------------------------------------------------------------------------------------------------------------------------------23 1
17 1
0 0
0 0
0 0
0 0
0
0
0
0
0
0
0
0
0
0
0
0
0
0
0
0
0
0
#################
$ReceivedResponse
#################
# All fields are pointers to records of other types
#
# F1
F2
# MR
RA
#-------------------------------------------------------------------------------------------------# RR 1: Customer 1 LNP / Generic LNP Default
#-------------------------------------------------------------------------------------------------0
1
#-------------------------------------------------------------------------------------------------# RR 2: Customer 1 LNP 1st expected
#-------------------------------------------------------------------------------------------------1
2
#-------------------------------------------------------------------------------------------------# RR 3: Generic LNP 1st expected
#-------------------------------------------------------------------------------------------------1
3
#-------------------------------------------------------------------------------------------------# RR 4: Genesys 800 1st expected (Result)
#-------------------------------------------------------------------------------------------------2
6
#-------------------------------------------------------------------------------------------------# RR 5: Genesys 800 2st expected (Error)
#-------------------------------------------------------------------------------------------------3
4
#-------------------------------------------------------------------------------------------------# RR 6: ANSI AIN 800 With termination status notification
#-------------------------------------------------------------------------------------------------4
5
Cisco PGW 2200 Softswitch Release 9.8 Software Installation and Configuration Guide
OL-18083-01
4-59
Chapter 4
Configuring the Cisco PGW 2200 Softswitch Software
Configuring SCP Queries
#-------------------------------------------------------------------------------------------------# RR 7: ANSI AIN 800
#-------------------------------------------------------------------------------------------------5
6
#-------------------------------------------------------------------------------------------------# RR 8: ANSI PRE AIN 800 With termination status notification
#-------------------------------------------------------------------------------------------------6
7
#-------------------------------------------------------------------------------------------------# RR 9: ANSI PRE AIN 800
#-------------------------------------------------------------------------------------------------7
8
#-------------------------------------------------------------------------------------------------# RR 10: ANSI AIN 800 / PRE AIN 800 Default
#-------------------------------------------------------------------------------------------------0
9
#-------------------------------------------------------------------------------------------------# RR 11: ANSI PRE AIN 800 With termination status notification SSN
#-------------------------------------------------------------------------------------------------6
10
#-------------------------------------------------------------------------------------------------# RR 12: CS1/INAP Based CLI Screening, Expected Response 1, End: Connect
#-------------------------------------------------------------------------------------------------8
11
#-------------------------------------------------------------------------------------------------# RR 13: CS1/INAP Based CLI Screening, Expected Response 2, End: ConnectToResource,
PlayAnnouncement
#-------------------------------------------------------------------------------------------------9
13
#-------------------------------------------------------------------------------------------------# RR 14: CS1/INAP Based CLI Screening, Expected Response 3, Conintue: ConnectToResource,
PlayAnnouncement
#-------------------------------------------------------------------------------------------------10
12
#-------------------------------------------------------------------------------------------------# RR 15: CS1/INAP Based CLI Screening, Expected Response 3, Conintue: ConnectToResource,
PlayAnnouncement
Cisco PGW 2200 Softswitch Release 9.8 Software Installation and Configuration Guide
4-60
OL-18083-01
Chapter 4
Configuring the Cisco PGW 2200 Softswitch Software
Configuring SCP Queries
#-------------------------------------------------------------------------------------------------0
13
#-------------------------------------------------------------------------------------------------# RR 16: INAP Free Phone, LNP & Carrier Pre-Selection Services, Expected Response 1, End:
Connect
#-------------------------------------------------------------------------------------------------11
14
#-------------------------------------------------------------------------------------------------# RR 17: INAP LNP for Norway, Unexpected Response (default action)
#-------------------------------------------------------------------------------------------------0
15
#-------------------------------------------------------------------------------------------------# RR 18: INAP LNP for Norway, Expected Response (End, Connect)
#-------------------------------------------------------------------------------------------------12
16
#-------------------------------------------------------------------------------------------------# RR 19: INAP Prepaid Services, Unexpected Response (default action)
#-------------------------------------------------------------------------------------------------0
17
#-------------------------------------------------------------------------------------------------# RR 20: INAP Prepaid Services, Expected Response (Continue, Connect)
#-------------------------------------------------------------------------------------------------13
18
#-------------------------------------------------------------------------------------------------# RR 21: INAP Prepaid Services, Expected Response (Continue, ApplyCharging)
#-------------------------------------------------------------------------------------------------14
18
#-------------------------------------------------------------------------------------------------# RR 22: INAP Prepaid Services, Expected Response (Continue, ReleaseCall)
#-------------------------------------------------------------------------------------------------15
18
#-------------------------------------------------------------------------------------------------# RR 23: INAP Prepaid Services, Expected Response (Continue, Connect)
#-------------------------------------------------------------------------------------------------16
18
#--------------------------------------------------------------------------------------------------
Cisco PGW 2200 Softswitch Release 9.8 Software Installation and Configuration Guide
OL-18083-01
4-61
Chapter 4
Configuring the Cisco PGW 2200 Softswitch Software
Configuring SCP Queries
# RR 24: INAP Prepaid Services, Expected Response (Continue, FurnishChargeInformation,
ReleaseCall)
#-------------------------------------------------------------------------------------------------17
18
#-------------------------------------------------------------------------------------------------# RR 25: INAP LNP for Portugal, Unexpected Response (default action)
#-------------------------------------------------------------------------------------------------0
19
#-------------------------------------------------------------------------------------------------# RR 26: INAP LNP for Portugal, Expected Response (Continue, Continue)
#-------------------------------------------------------------------------------------------------18
20
#-------------------------------------------------------------------------------------------------# RR 27: INAP LNP for Portugal, Expected Response (Continue, Connect)
#-------------------------------------------------------------------------------------------------19
21
#-------------------------------------------------------------------------------------------------# RR 28: INAP-Based Prepaid Services, Expected Response (End, Connect)
#-------------------------------------------------------------------------------------------------20
18
#-------------------------------------------------------------------------------------------------# RR 29: INAP CS1, Unexpected Response (default action)
#-------------------------------------------------------------------------------------------------0
22
#-------------------------------------------------------------------------------------------------# RR 30: INAP CS1, Expected Response (Continue, Connect, ApplyCharging,
SendChargingInformation,RequestReportBCSMEvent, FurnishCharging)
#-------------------------------------------------------------------------------------------------# MR
RA
21
23
#-------------------------------------------------------------------------------------------------# RR 31: INAP CS1, Expected Response (Continue, CollectInformation +
RequestReportBCSMEvent)
#-------------------------------------------------------------------------------------------------22
23
#-------------------------------------------------------------------------------------------------# RR 32: INAP CS1, Expected Response (Continue, ReleaseCall)
#-------------------------------------------------------------------------------------------------23
26
Cisco PGW 2200 Softswitch Release 9.8 Software Installation and Configuration Guide
4-62
OL-18083-01
Chapter 4
Configuring the Cisco PGW 2200 Softswitch Software
Configuring SCP Queries
#-------------------------------------------------------------------------------------------------# RR 33: INAP CS1, Expected Response (Continue, RequestReportBCSMEvent,
EstablishTemporaryConnection)
#-------------------------------------------------------------------------------------------------24
24
#-------------------------------------------------------------------------------------------------# RR 34: INAP CS1, Expected Response (Continue, DisconnectForwardConnection)
#-------------------------------------------------------------------------------------------------25
25
#-------------------------------------------------------------------------------------------------# RR 35: INAP CS1, Expected Response (Continue, CallGap - not treated, just ignore)
#-------------------------------------------------------------------------------------------------0
27
#-------------------------------------------------------------------------------------------------# RR 36: INAP CS2, Expected Response (DL, SL, MCS,DFCwithArg,RRBE, ML, CWA)
#-------------------------------------------------------------------------------------------------26
28
#-------------------------------------------------------------------------------------------------# RR 37: INAP CS2, Expected Response (CTR,PA,RRBE,CWA)
#-------------------------------------------------------------------------------------------------27
29
#-------------------------------------------------------------------------------------------------# RR 38: INAP CS2, Expected Response (DFCwithArg, ML, CTR, PA, CWA, RRBE)
#-------------------------------------------------------------------------------------------------28
30
#-------------------------------------------------------------------------------------------------# RR 39: INAP CS2, Expected Response (CWA,RRBE,CON,CTR,PA)
#-------------------------------------------------------------------------------------------------29
31
#----------------------------------------------------------------------------------------# RR 40: ANSI PRE AIN CNAM Response expected, Take the same action as AIN
#----------------------------------------------------------------------------------------30
32
#----------------------------------------------------------------------------------------# RR 41: ANSI PRE AIN CNAM Response unexpected
#----------------------------------------------------------------------------------------0
32
#################
$MessageReceiving
#################
Cisco PGW 2200 Softswitch Release 9.8 Software Installation and Configuration Guide
OL-18083-01
4-63
Chapter 4
Configuring the Cisco PGW 2200 Softswitch Software
Configuring SCP Queries
#
# F1
F2
F3
F19 F20 F21
# MSG OR1 REQ
REQ OR10 REQ
F4
F5
F6
F7
F8
F9
F10
F11
F12
F13
F14
F15
F16
F17
F18
OR2
REQ
OR3
REQ
OR4
REQ
OR5
REQ
OR6
REQ
OR7
REQ
OR8
REQ
OR9
#----------------------------------------------------------------------------------------------------# MR 1: Customer 1 LNP / Generic LNP
#----------------------------------------------------------------------------------------------------8
1
1
0
0
0
0
0
0
0
0
0
0
0
0
0
0
0
0
0
0
#----------------------------------------------------------------------------------------------------# MR 2: Genesys 800 (Result)
#----------------------------------------------------------------------------------------------------3
2
1
0
0
0
0
0
0
0
0
0
0
0
0
0
0
0
0
0
0
#----------------------------------------------------------------------------------------------------# MR 3: Genesys 800 (Error)
#----------------------------------------------------------------------------------------------------3
3
1
0
0
0
0
0
0
0
0
0
0
0
0
0
0
0
0
0
0
#----------------------------------------------------------------------------------------------------# MR 4: ANSI AIN 800 with termination status notification
#----------------------------------------------------------------------------------------------------8
4
1
5
1
0
0
0
0
0
0
0
0
0
0
0
0
0
0
0
0
#----------------------------------------------------------------------------------------------------# MR 5: ANSI AIN 800
#----------------------------------------------------------------------------------------------------8
4
1
0
0
0
0
0
0
0
0
0
0
0
0
0
0
0
0
0
0
#----------------------------------------------------------------------------------------------------# MR 6: ANSI PRE AIN 800 with termination status notification
#----------------------------------------------------------------------------------------------------8
6
1
7
1
0
0
0
0
0
0
0
0
0
0
0
0
0
0
0
0
#----------------------------------------------------------------------------------------------------# MR 7: ANSI PRE AIN 800
#----------------------------------------------------------------------------------------------------8
6
1
0
0
0
0
0
0
0
0
0
0
0
0
0
0
0
0
0
0
#-----------------------------------------------------------------------------------------------------
Cisco PGW 2200 Softswitch Release 9.8 Software Installation and Configuration Guide
4-64
OL-18083-01
Chapter 4
Configuring the Cisco PGW 2200 Softswitch Software
Configuring SCP Queries
# MR 8: CS1/INAP Based CLI Screening, End Message w/ Connect
#----------------------------------------------------------------------------------------------------3
8
1
0
0
0
0
0
0
0
0
0
0
0
0
0
0
0
0
0
0
#----------------------------------------------------------------------------------------------------# MR 9: CS1/INAP Based CLI Screening, End Message w/ ConnectToResource, PlayAnnouncment
#----------------------------------------------------------------------------------------------------3
9
1
10
1
0
0
0
0
0
0
0
0
0
0
0
0
0
0
0
0
#----------------------------------------------------------------------------------------------------# MR 10: CS1/INAP Based CLI Screening, Continue Message w/ ConnectToResource,
PlayAnnouncment
#----------------------------------------------------------------------------------------------------2
9
1
10
1
0
0
0
0
0
0
0
0
0
0
0
0
0
0
0
0
#----------------------------------------------------------------------------------------------------# MR 11: INAP Free Phone, LNP & Carrier Pre-Selection Services, End Message w/ Connect
#----------------------------------------------------------------------------------------------------3
11
1
0
0
0
0
0
0
0
0
0
0
0
0
0
0
0
0
0
0
#----------------------------------------------------------------------------------------------------# MR 12: INAP LNP for Norway, Expected Response (End, Connect)
#----------------------------------------------------------------------------------------------------3
12
1
0
0
0
0
0
0
0
0
0
0
0
0
0
0
0
0
0
0
#----------------------------------------------------------------------------------------------------# MR 13: INAP Prepaid Services, Expected Response (Continue, Connect, ApplyCharging,
RequestReportBCSMEvent, FurnishCharging)
#----------------------------------------------------------------------------------------------------2
13
1
14
1
15
1
16
1
0
0
0
0
0
0
0
0
0
0
0
0
#----------------------------------------------------------------------------------------------------# MR 14: INAP Prepaid Services, Expected Response (Continue, ApplyCharging)
#----------------------------------------------------------------------------------------------------2
14
1
0
0
0
0
0
0
0
0
0
0
0
0
0
0
0
0
0
0
#----------------------------------------------------------------------------------------------------# MR 15: INAP Prepaid Services, Expected Response (Continue, ReleaseCall)
#----------------------------------------------------------------------------------------------------2
17
1
0
0
0
0
0
0
0
0
0
0
0
0
0
0
0
0
0
0
Cisco PGW 2200 Softswitch Release 9.8 Software Installation and Configuration Guide
OL-18083-01
4-65
Chapter 4
Configuring the Cisco PGW 2200 Softswitch Software
Configuring SCP Queries
#----------------------------------------------------------------------------------------------------# MR 16: INAP Prepaid Services, Expected Response (Continue, Connect)
#----------------------------------------------------------------------------------------------------2
13
1
0
0
0
0
0
0
0
0
0
0
0
0
0
0
0
0
0
0
#----------------------------------------------------------------------------------------------------# MR 17: INAP Prepaid Services, Expected Response (Continue, ReleaseCall,
FurnishChargeInformation)
#----------------------------------------------------------------------------------------------------2
17
1
16
0
0
0
0
0
0
0
0
0
0
0
0
0
0
0
0
0
#----------------------------------------------------------------------------------------------------# MR 18: INAP LNP for Portugal, Expected Response(Continue, Continue)
#----------------------------------------------------------------------------------------------------2
18
1
0
0
0
0
0
0
0
0
0
0
0
0
0
0
0
0
0
0
#----------------------------------------------------------------------------------------------------# MR 19: INAP LNP for Portugal, Expected Response(Continue, Connect)
#----------------------------------------------------------------------------------------------------2
19
1
0
0
0
0
0
0
0
0
0
0
0
0
0
0
0
0
0
0
#----------------------------------------------------------------------------------------------------# MR 20: INAP-Based Prepaid Services, Expected Response (End, Connect)
#----------------------------------------------------------------------------------------------------3
13
1
16
0
0
0
0
0
0
0
0
0
0
0
0
0
0
0
0
0
#----------------------------------------------------------------------------------------------------# MR 21: INAP CS1 , Expected Response (Continue, Connect, ApplyCharging,
SendChargingInformation,RequestReportBCSMEvent, FurnishCharging)
#----------------------------------------------------------------------------------------------------4
20
0
21
0
22
0
23
0
24
0
0
0
0
0
0
0
0
0
0
0
#----------------------------------------------------------------------------------------------------# MR 22: INAP CS1 , Expected Response (Continue, CollectInformation +
RequestReportBCSMEvent)
#----------------------------------------------------------------------------------------------------4
26
1
27
0
0
0
0
0
0
0
0
0
0
0
0
0
0
0
0
0
#----------------------------------------------------------------------------------------------------# MR 23: INAP CS1 , Expected Response (Continue, ReleaseCall or Continue and optional
RequestReportBCSMEvent)
Cisco PGW 2200 Softswitch Release 9.8 Software Installation and Configuration Guide
4-66
OL-18083-01
Chapter 4
Configuring the Cisco PGW 2200 Softswitch Software
Configuring SCP Queries
#----------------------------------------------------------------------------------------------------4
25
0
30
0
27
0
0
0
0
0
0
0
0
0
0
0
0
0
0
0
#----------------------------------------------------------------------------------------------------# MR 24: INAP CS1 , Expected Response (RRBE, ETC, FCI)
#----------------------------------------------------------------------------------------------------4
23
0
28
1
24
0
0
0
0
0
0
0
0
0
0
0
0
0
0
0
#----------------------------------------------------------------------------------------------------# MR 25: INAP CS1 , Expected Response (DFC, CONNECT, RRBE, FCI)
#----------------------------------------------------------------------------------------------------4
29
0
20
0
23
0
24
0
0
0
0
0
0
0
0
0
0
0
0
0
#----------------------------------------------------------------------------------------------------# MR 26: INAP CS2 , Expected Response (DL, SL, MCS,DFCwithArg,RRBE, ML, CWA)
#----------------------------------------------------------------------------------------------------4
32
0
35
0
33
0
38
0
23
0
34
0
31
0
0
0
0
0
0
0
#----------------------------------------------------------------------------------------------------# MR 27: INAP CS2 , Expected Response (CTR,PA,RRBE,CWA)
#----------------------------------------------------------------------------------------------------4
37
0
36
0
23
0
31
0
0
0
0
0
0
0
0
0
0
0
0
0
#----------------------------------------------------------------------------------------------------# MR 28: INAP CS2 , Expected Response (DFCwithArg, ML, CTR, PA, CWA, RRBE)
#----------------------------------------------------------------------------------------------------4
38
0
34
0
37
0
36
0
31
0
23
0
0
0
0
0
0
0
0
0
#----------------------------------------------------------------------------------------------------# MR 29: INAP CS2 , Expected Response (CWA,RRBE,CON,CTR,PA)
#----------------------------------------------------------------------------------------------------4
31
0
23
0
20
0
37
0
36
0
0
0
0
0
0
0
0
0
0
0
# 4
23
1
20
0
37
0
36
0
0
0
0
0
0
0
0
0
0
0
0
0
#----------------------------------------------------------------------------------------------------# MR 30: ANSI PRE AIN CNAM , msg=response
#----------------------------------------------------------------------------------------------------8
39
0
0
0
0
0
0
0
0
0
0
0
0
0
0
0
0
0
0
0
Cisco PGW 2200 Softswitch Release 9.8 Software Installation and Configuration Guide
OL-18083-01
4-67
Chapter 4
Configuring the Cisco PGW 2200 Softswitch Software
Configuring SCP Queries
###################
$OperationReceiving
###################
#
# F1
F2
# componentType opClass
F3
F4
F5
F6
opCodeFamily opCodeSpecifier opCodeFlag PR
#---------------------------------------------------------------------# OR 1: Customer 1 LNP / Generic LNP
#---------------------------------------------------------------------6
1
101
1
4
1
#---------------------------------------------------------------------# OR 2: Genesys 800 (Result)
#---------------------------------------------------------------------1
1
0
20
1
2
#---------------------------------------------------------------------# OR 3: Genesys 800 (Error)
#---------------------------------------------------------------------3
1
0
0
1
3
#---------------------------------------------------------------------# OR 4: ANSI AIN 800
#---------------------------------------------------------------------6
1
101
1
4
4
#---------------------------------------------------------------------# OR 5: ANSI AIN 800 Request for status notification
#---------------------------------------------------------------------6
1
103
5
4
5
#---------------------------------------------------------------------# OR 6: ANSI PRE AIN 800
#---------------------------------------------------------------------6
1
4
1
3
6
#---------------------------------------------------------------------# OR 7: ANSI PRE AIN 800 Request for status notification
#---------------------------------------------------------------------6
1
6
1
4
7
#---------------------------------------------------------------------# OR 8: CS1/INAP Based CLI Screening Connect Operation
#---------------------------------------------------------------------1
1
0
20
1
8
#---------------------------------------------------------------------# OR 9: CS1/INAP Based CLI Screening ConnectToResource Operation
#---------------------------------------------------------------------1
1
0
19
1
0
#---------------------------------------------------------------------# OR 10: CS1/INAP Based CLI Screening PlayAnouncement Operation
#---------------------------------------------------------------------1
1
0
47
1
9
#---------------------------------------------------------------------# OR 11: INAP Free Phone, LNP & Carrier Pre-Selection Services Connect Operation
#---------------------------------------------------------------------1
1
0
20
1
10
#---------------------------------------------------------------------# OR 12: INAP LNP for Norway, Expected Response (Connect)
Cisco PGW 2200 Softswitch Release 9.8 Software Installation and Configuration Guide
4-68
OL-18083-01
Chapter 4
Configuring the Cisco PGW 2200 Softswitch Software
Configuring SCP Queries
#---------------------------------------------------------------------1
1
0
20
1
11
#---------------------------------------------------------------------# OR 13: INAP Prepaid Services, Expected Response (Connect)
#---------------------------------------------------------------------1
2
0
20
1
12
#---------------------------------------------------------------------# OR 14: INAP Prepaid Services, Expected Response (ApplyCharging)
#---------------------------------------------------------------------1
2
0
35
1
13
#---------------------------------------------------------------------# OR 15: INAP Prepaid Services, Expected Response (RequestReportBCSMEvent)
#---------------------------------------------------------------------1
2
0
23
1
14
#---------------------------------------------------------------------# OR 16: INAP Prepaid Services, Expected Response (FurnishCharging)
#---------------------------------------------------------------------1
2
0
34
1
15
#---------------------------------------------------------------------# OR 17: INAP Prepaid Services, Expected Response (ReleaseCall)
#---------------------------------------------------------------------1
2
0
22
1
16
#---------------------------------------------------------------------# OR 18: INAP LNP for Portugal, Expected Response (Continue)
#---------------------------------------------------------------------1
1
0
31
1
17
#---------------------------------------------------------------------# OR 19: INAP LNP for Portugal, Expected Response (Connect)
#---------------------------------------------------------------------1
1
0
20
1
18
#---------------------------------------------------------------------# OR 20: INAP CS1 , Expected Response (Connect)
#---------------------------------------------------------------------# componentType opClass
opCodeFamily opCodeSpecifier opCodeFlag PR
1
2
0
20
1
19
#---------------------------------------------------------------------# OR 21: INAP CS1 , Expected Response (ApplyCharging)
#---------------------------------------------------------------------1
2
0
35
1
20
#---------------------------------------------------------------------# OR 22: INAP CS1 , Expected Response (SendChargingInformation)
#---------------------------------------------------------------------1
2
0
46
1
21
#---------------------------------------------------------------------# OR 23: INAP CS1 , Expected Response (RequestReportBCSMEvent)
#---------------------------------------------------------------------1
2
0
23
1
22
#---------------------------------------------------------------------# OR 24: INAP CS1, Expected Response (FurnishCharging)
#---------------------------------------------------------------------1
2
0
34
1
23
Cisco PGW 2200 Softswitch Release 9.8 Software Installation and Configuration Guide
OL-18083-01
4-69
Chapter 4
Configuring the Cisco PGW 2200 Softswitch Software
Configuring SCP Queries
#---------------------------------------------------------------------# OR 25: INAP CS1, Expected Response (ReleaseCall)
#---------------------------------------------------------------------1
2
0
22
1
24
#---------------------------------------------------------------------# OR 26: INAP CS1, Expected Response (CollectInformation)
#---------------------------------------------------------------------1
2
0
27
1
0
#---------------------------------------------------------------------# OR 27: INAP CS1, Expected Response (RequestReportBCSMEvents)
#---------------------------------------------------------------------1
2
0
23
1
25
#---------------------------------------------------------------------# OR 28: INAP CS1, Expected Response (EstablishTemporaryConnection)
#---------------------------------------------------------------------1
2
0
17
1
26
#---------------------------------------------------------------------# OR 29: INAP CS1, Expected Response (DisconnectForwardConnection)
#---------------------------------------------------------------------1
2
0
18
1
0
#---------------------------------------------------------------------# OR 30: INAP CS1, Expected Response (Continue operation)
#---------------------------------------------------------------------# componentType opClass
opCodeFamily opCodeSpecifier opCodeFlag PR
1
2
0
31
1
0
#---------------------------------------------------------------------# OR 31: INAP CS2, Expected Response (ContinueWithArgument operation)
#---------------------------------------------------------------------# componentType opClass
opCodeFamily opCodeSpecifier opCodeFlag PR
1
2
0
88
1
27
#---------------------------------------------------------------------# OR 32: INAP CS2, Expected Response (DisconnectLeg operation)
#---------------------------------------------------------------------# componentType opClass
opCodeFamily opCodeSpecifier opCodeFlag PR
1
2
0
90
1
28
#---------------------------------------------------------------------# OR 33: INAP CS2, Expected Response (MergeCallSegments operation)
#---------------------------------------------------------------------# componentType opClass
opCodeFamily opCodeSpecifier opCodeFlag PR
1
2
0
91
1
29
#---------------------------------------------------------------------# OR 34: INAP CS2, Expected Response (MoveLeg operation)
#---------------------------------------------------------------------# componentType opClass
opCodeFamily opCodeSpecifier opCodeFlag PR
1
2
0
93
1
30
#---------------------------------------------------------------------# OR 35: INAP CS2, Expected Response (SplitLeg operation)
#---------------------------------------------------------------------# componentType opClass
opCodeFamily opCodeSpecifier opCodeFlag PR
1
2
0
95
1
31
#---------------------------------------------------------------------# OR 36: INAP CS2, Expected Response (PlayAnnouncement operation)
#----------------------------------------------------------------------
Cisco PGW 2200 Softswitch Release 9.8 Software Installation and Configuration Guide
4-70
OL-18083-01
Chapter 4
Configuring the Cisco PGW 2200 Softswitch Software
Configuring SCP Queries
# componentType opClass
1
2
opCodeFamily opCodeSpecifier opCodeFlag PR
0
47
1
32
#---------------------------------------------------------------------# OR 37: INAP CS2, Expected Response (ConnectToResource operation)
#---------------------------------------------------------------------# componentType opClass
opCodeFamily opCodeSpecifier opCodeFlag PR
1
2
0
19
1
33
#---------------------------------------------------------------------# OR 38: INAP CS2, Expected Response (DFC With Argument operation)
#---------------------------------------------------------------------# componentType opClass
opCodeFamily opCodeSpecifier opCodeFlag PR
1
2
0
86
1
34
#---------------------------------------------------------------------# OR 39: ANSI PRE AIN CNAM
# componentType=Return result(last), opClass=2:only failure report
# opFamily=network management, opSpecifier=spec acg, opFlag=3:national
#---------------------------------------------------------------------2
2
7
1
3
35
###################
$ParameterReceiving
###################
#
# F1
F2
F3
F4
F5
F6
F19 F20 F21 F22 F23 F24
F37 F38 F39 F40 F41 F42
# PA1 REQ ACT PA2 REQ ACT
PA7 REQ ACT PA8 REQ ACT
PA13 REQ ACT PA14 REQ ACT
F7
F25
F43
PA3
PA9
PA15
F8
F26
F44
REQ
REQ
REQ
F9
F10 F11 F12 F13
F27 F28 F29 F30 F31
F45
ACT PA4 REQ ACT PA5
ACT PA10 REQ ACT PA11
ACT
F14 F15 F16
F32 F33 F34
F17
F35
F18
F36
REQ ACT PA6 REQ
REQ ACT PA12 REQ
ACT
ACT
#-----------------------------------------------------------------------------------------------------------------------------------------------------------------------------------------------------------------------------# PR 1: Customer 1 LNP / Generic LNP
#-----------------------------------------------------------------------------------------------------------------------------------------------------------------------------------------------------------------------------102 1
1
0
0
0
0
0
0
0
0
0
0
0
0
0
0
0
0
0
0
0
0
0
0
0
0
0
0
0
0
0
0
0
0
0
0
0
0
0
0
0
0
0
0
#-----------------------------------------------------------------------------------------------------------------------------------------------------------------------------------------------------------------------------# PR 2: Genesys 800 (Result)
#-----------------------------------------------------------------------------------------------------------------------------------------------------------------------------------------------------------------------------205 1
1
206 1
1
204 1
3
0
0
0
0
0
0
0
0
0
0
0
0
0
0
0
0
0
0
0
0
0
0
0
0
0
0
0
0
0
0
0
0
0
0
0
0
#-----------------------------------------------------------------------------------------------------------------------------------------------------------------------------------------------------------------------------# PR 3: Genesys 800 (Error)
#------------------------------------------------------------------------------------------------------------------------------------------------------------------------------------------------------------------------------
Cisco PGW 2200 Softswitch Release 9.8 Software Installation and Configuration Guide
OL-18083-01
4-71
Chapter 4
Configuring the Cisco PGW 2200 Softswitch Software
Configuring SCP Queries
205
0
0
1
0
0
1
0
0
206
0
0
1
0
0
1
0
0
204
0
0
1
0
0
3
0
0
0
0
0
0
0
0
0
0
0
0
0
0
0
0
0
0
0
0
#-----------------------------------------------------------------------------------------------------------------------------------------------------------------------------------------------------------------------------# PR 4: ANSI AIN 800 Result
#-----------------------------------------------------------------------------------------------------------------------------------------------------------------------------------------------------------------------------102 1
1
110 0
2
113 0
2
114 1
2
115 1
2
0
0
0
0
0
0
0
0
0
0
0
0
0
0
0
0
0
0
0
0
0
0
0
0
0
0
0
0
0
0
#-----------------------------------------------------------------------------------------------------------------------------------------------------------------------------------------------------------------------------# PR 5: ANSI AIN 800 Status request
#-----------------------------------------------------------------------------------------------------------------------------------------------------------------------------------------------------------------------------105 1
4
0
0
0
0
0
0
0
0
0
0
0
0
0
0
0
0
0
0
0
0
0
0
0
0
0
0
0
0
0
0
0
0
0
0
0
0
0
0
0
0
0
0
#-----------------------------------------------------------------------------------------------------------------------------------------------------------------------------------------------------------------------------# PR 6: ANSI PRE AIN 800 Result
#-----------------------------------------------------------------------------------------------------------------------------------------------------------------------------------------------------------------------------8
0
2
4
1
1
18
0
2
0
0
0
0
0
0
0
0
0
0
0
0
0
0
0
0
0
0
0
0
0
0
0
0
0
0
0
0
0
0
0
0
0
0
0
0
#-----------------------------------------------------------------------------------------------------------------------------------------------------------------------------------------------------------------------------# PR 7: ANSI PRE AIN 800 Status request
#-----------------------------------------------------------------------------------------------------------------------------------------------------------------------------------------------------------------------------20
1
4
0
0
0
0
0
0
0
0
0
0
0
0
0
0
0
0
0
0
0
0
0
0
0
0
0
0
0
0
0
0
0
0
0
0
0
0
0
0
0
0
0
0
#-----------------------------------------------------------------------------------------------------------------------------------------------------------------------------------------------------------------------------# PR 8: CS1/INAP Based CLI Screening Connect Prameters
#-----------------------------------------------------------------------------------------------------------------------------------------------------------------------------------------------------------------------------205 1
1
208 0
1
210 0
1
0
0
0
0
0
0
0
0
0
0
0
0
0
0
0
0
0
0
0
0
0
0
0
0
0
0
0
0
0
0
0
0
0
0
0
0
#-----------------------------------------------------------------------------------------------------------------------------------------------------------------------------------------------------------------------------# PR 9: CS1/INAP Based CLI Screening PlayAnnouncement Prameters
Cisco PGW 2200 Softswitch Release 9.8 Software Installation and Configuration Guide
4-72
OL-18083-01
Chapter 4
Configuring the Cisco PGW 2200 Softswitch Software
Configuring SCP Queries
#-----------------------------------------------------------------------------------------------------------------------------------------------------------------------------------------------------------------------------209 0
0
0
0
0
0
0
0
0
0
0
0
0
0
0
0
0
0
0
0
0
0
0
0
0
0
0
0
0
0
0
0
0
0
0
0
0
0
0
0
0
0
0
0
#-----------------------------------------------------------------------------------------------------------------------------------------------------------------------------------------------------------------------------# PR 10: INAP Free Phone, LNP & Carrier Pre-Selection Services Connect Prameters
#-----------------------------------------------------------------------------------------------------------------------------------------------------------------------------------------------------------------------------205 1
1
0
0
0
0
0
0
0
0
0
0
0
0
0
0
0
0
0
0
0
0
0
0
0
0
0
0
0
0
0
0
0
0
0
0
0
0
0
0
0
0
0
0
#-----------------------------------------------------------------------------------------------------------------------------------------------------------------------------------------------------------------------------# PR 11: INAP LNP for Norway Connect Parameters
#-----------------------------------------------------------------------------------------------------------------------------------------------------------------------------------------------------------------------------205 1
1
0
0
0
0
0
0
0
0
0
0
0
0
0
0
0
0
0
0
0
0
0
0
0
0
0
0
0
0
0
0
0
0
0
0
0
0
0
0
0
0
0
0
#-----------------------------------------------------------------------------------------------------------------------------------------------------------------------------------------------------------------------------# PR 12: INAP Prepaid Services Connect Parameters
#-----------------------------------------------------------------------------------------------------------------------------------------------------------------------------------------------------------------------------205 1
1
202 0
1
0
0
0
0
0
0
0
0
0
0
0
0
0
0
0
0
0
0
0
0
0
0
0
0
0
0
0
0
0
0
0
0
0
0
0
0
0
0
0
#-----------------------------------------------------------------------------------------------------------------------------------------------------------------------------------------------------------------------------# PR 13: INAP Prepaid Services ApplyCharging Parameters
#-----------------------------------------------------------------------------------------------------------------------------------------------------------------------------------------------------------------------------211 1
1
212 0
1
213 0
1
0
0
0
0
0
0
0
0
0
0
0
0
0
0
0
0
0
0
0
0
0
0
0
0
0
0
0
0
0
0
0
0
0
0
0
0
#-----------------------------------------------------------------------------------------------------------------------------------------------------------------------------------------------------------------------------# PR 14: INAP Prepaid Services RequestReportBCSMEvent Parameters
#-----------------------------------------------------------------------------------------------------------------------------------------------------------------------------------------------------------------------------216 1
1
0
0
0
0
0
0
0
0
0
0
0
0
0
0
0
0
0
0
0
0
0
0
0
0
0
0
0
0
0
0
0
0
0
0
0
0
0
0
0
0
0
0
Cisco PGW 2200 Softswitch Release 9.8 Software Installation and Configuration Guide
OL-18083-01
4-73
Chapter 4
Configuring the Cisco PGW 2200 Softswitch Software
Configuring SCP Queries
#-----------------------------------------------------------------------------------------------------------------------------------------------------------------------------------------------------------------------------# PR 15: INAP Prepaid Services FurnishCharging Parameters
#-----------------------------------------------------------------------------------------------------------------------------------------------------------------------------------------------------------------------------215 1
1
0
0
0
0
0
0
0
0
0
0
0
0
0
0
0
0
0
0
0
0
0
0
0
0
0
0
0
0
0
0
0
0
0
0
0
0
0
0
0
0
0
0
#-----------------------------------------------------------------------------------------------------------------------------------------------------------------------------------------------------------------------------# PR 16: INAP Prepaid Services ReleaseCall Parameters
#-----------------------------------------------------------------------------------------------------------------------------------------------------------------------------------------------------------------------------218 1
1
0
0
0
0
0
0
0
0
0
0
0
0
0
0
0
0
0
0
0
0
0
0
0
0
0
0
0
0
0
0
0
0
0
0
0
0
0
0
0
0
0
0
#-----------------------------------------------------------------------------------------------------------------------------------------------------------------------------------------------------------------------------# PR 17: INAP LNP for Portugal Continue Parameters
#-----------------------------------------------------------------------------------------------------------------------------------------------------------------------------------------------------------------------------0
1
1
0
0
0
0
0
0
0
0
0
0
0
0
0
0
0
0
0
0
0
0
0
0
0
0
0
0
0
0
0
0
0
0
0
0
0
0
0
0
0
0
0
0
#-----------------------------------------------------------------------------------------------------------------------------------------------------------------------------------------------------------------------------# PR 18: INAP LNP for Portugal Connect Parameters
#-----------------------------------------------------------------------------------------------------------------------------------------------------------------------------------------------------------------------------205 1
1
210 1
1
0
0
0
0
0
0
0
0
0
0
0
0
0
0
0
0
0
0
0
0
0
0
0
0
0
0
0
0
0
0
0
0
0
0
0
0
0
0
0
#-----------------------------------------------------------------------------------------------------------------------------------------------------------------------------------------------------------------------------# PR 19: INAP CS1 Connect Parameters
#-----------------------------------------------------------------------------------------------------------------------------------------------------------------------------------------------------------------------------205 1
1
225 0
2
206 0
1
220 0
1
221 0
1
207 0
1
210 0
1
208 0
1
243
0
1
244
0
1
0
0
0
0
0
0
0
0
0
0
0
0
0
0
0
#-----------------------------------------------------------------------------------------------------------------------------------------------------------------------------------------------------------------------------# PR 20: INAP CS1 ApplyCharging Parameters
#------------------------------------------------------------------------------------------------------------------------------------------------------------------------------------------------------------------------------
Cisco PGW 2200 Softswitch Release 9.8 Software Installation and Configuration Guide
4-74
OL-18083-01
Chapter 4
Configuring the Cisco PGW 2200 Softswitch Software
Configuring SCP Queries
211
0
0
1
0
0
1
0
0
212
0
0
0
0
0
1
0
0
213
0
0
0
0
0
1
0
0
0
0
0
0
0
0
0
0
0
0
0
0
0
0
0
0
0
0
#-----------------------------------------------------------------------------------------------------------------------------------------------------------------------------------------------------------------------------# PR 21: INAP CS1 SendChargingInformation Parameters
#-----------------------------------------------------------------------------------------------------------------------------------------------------------------------------------------------------------------------------222 1
1
226 0
0
0
0
0
0
0
0
0
0
0
0
0
0
0
0
0
0
0
0
0
0
0
0
0
0
0
0
0
0
0
0
0
0
0
0
0
0
0
0
0
#-----------------------------------------------------------------------------------------------------------------------------------------------------------------------------------------------------------------------------# PR 22: INAP CS1 RequestReportBCSMEvent Parameters
#-----------------------------------------------------------------------------------------------------------------------------------------------------------------------------------------------------------------------------216 1
1
0
0
0
0
0
0
0
0
0
0
0
0
0
0
0
0
0
0
0
0
0
0
0
0
0
0
0
0
0
0
0
0
0
0
0
0
0
0
0
0
0
0
#-----------------------------------------------------------------------------------------------------------------------------------------------------------------------------------------------------------------------------# PR 23: INAP CS1 FurnishCharging Parameters
#-----------------------------------------------------------------------------------------------------------------------------------------------------------------------------------------------------------------------------215 1
1
0
0
0
0
0
0
0
0
0
0
0
0
0
0
0
0
0
0
0
0
0
0
0
0
0
0
0
0
0
0
0
0
0
0
0
0
0
0
0
0
0
0
#-----------------------------------------------------------------------------------------------------------------------------------------------------------------------------------------------------------------------------# PR 24: INAP CS1 ReleaseCall Parameters
#-----------------------------------------------------------------------------------------------------------------------------------------------------------------------------------------------------------------------------218 1
1
245 0
1
246 0
1
0
0
0
0
0
0
0
0
0
0
0
0
0
0
0
0
0
0
0
0
0
0
0
0
0
0
0
0
0
0
0
0
0
0
0
0
#-----------------------------------------------------------------------------------------------------------------------------------------------------------------------------------------------------------------------------# PR 25: INAP CS1 RequestReportBCSMEvent Parameters
#-----------------------------------------------------------------------------------------------------------------------------------------------------------------------------------------------------------------------------216 1
1
247 0
1
0
0
0
0
0
0
0
0
0
0
0
0
0
0
0
0
0
0
0
0
0
0
0
0
0
0
0
0
0
0
0
0
0
0
0
0
0
0
0
#-----------------------------------------------------------------------------------------------------------------------------------------------------------------------------------------------------------------------------# PR 26: INAP CS1 Etc(Establish temporary connection) , Parameter
Cisco PGW 2200 Softswitch Release 9.8 Software Installation and Configuration Guide
OL-18083-01
4-75
Chapter 4
Configuring the Cisco PGW 2200 Softswitch Software
Configuring SCP Queries
#
ParameterAssistingSSPIPRoutingAddress, ServiceInteractionIndicators,
ItuAsn1EtcLegIDElem,ItuAsn1EtcCallSegmentIDElem,ItuAsn1EtcCarrierElem
#-----------------------------------------------------------------------------------------------------------------------------------------------------------------------------------------------------------------------------223 1
1
207
0
1
253 0
1
254 0
1
229 0
1
0
0
0
0
0
0
0
0
0
0
0
0
0
0
0
0
0
0
0
0
0
0
0
0
0
0
0
0
0
0
#-----------------------------------------------------------------------------------------------------------------------------------------------------------------------------------------------------------------------------# PR 27: INAP CS2 ContinueWithArgument parameters(ItuAsn1CwaLegIDElem)
#-----------------------------------------------------------------------------------------------------------------------------------------------------------------------------------------------------------------------------236 1
1
0
0
0
0
0
0
0
0
0
0
0
0
0
0
0
0
0
0
0
0
0
0
0
0
0
0
0
0
0
0
0
0
0
0
0
0
0
0
0
0
0
0
#-----------------------------------------------------------------------------------------------------------------------------------------------------------------------------------------------------------------------------# PR 28: INAP CS2 DisconnectLeg
Parameters(ItuAsn1DlLegToBeReleasedElem/ITU_ASN1_DL_LEG_TO_BE_RELEASED,
ItuAsn1DlCauseElem/ITU_ASN1_DL_CAUSE)
#-----------------------------------------------------------------------------------------------------------------------------------------------------------------------------------------------------------------------------234 1
1
235
0
1
0
0
0
0
0
0
0
0
0
0
0
0
0
0
0
0
0
0
0
0
0
0
0
0
0
0
0
0
0
0
0
0
0
0
0
0
0
0
0
#-----------------------------------------------------------------------------------------------------------------------------------------------------------------------------------------------------------------------------# PR 29: INAP CS2 MergeCallSegments Parameters(SourceCallSegment, TargetCallSegment)
#-----------------------------------------------------------------------------------------------------------------------------------------------------------------------------------------------------------------------------237 1
1
238
0
1
0
0
0
0
0
0
0
0
0
0
0
0
0
0
0
0
0
0
0
0
0
0
0
0
0
0
0
0
0
0
0
0
0
0
0
0
0
0
0
#-----------------------------------------------------------------------------------------------------------------------------------------------------------------------------------------------------------------------------# PR 30: INAP CS2 MoveLeg Parameters(CallSegmentId, LegId)
#-----------------------------------------------------------------------------------------------------------------------------------------------------------------------------------------------------------------------------241 1
1
242
0
1
0
0
0
0
0
0
0
0
0
0
0
0
0
0
0
0
0
0
0
0
0
0
0
0
0
0
0
0
0
0
0
0
0
0
0
0
0
0
0
#-----------------------------------------------------------------------------------------------------------------------------------------------------------------------------------------------------------------------------# PR 31: INAP CS2 SplitLeg Parameters(CallSegmentId ,LegId)
#------------------------------------------------------------------------------------------------------------------------------------------------------------------------------------------------------------------------------
Cisco PGW 2200 Softswitch Release 9.8 Software Installation and Configuration Guide
4-76
OL-18083-01
Chapter 4
Configuring the Cisco PGW 2200 Softswitch Software
Configuring SCP Queries
239
0
0
1
0
0
1
0
0
240
0
0
0
0
0
1
0
0
0
0
0
0
0
0
0
0
0
0
0
0
0
0
0
0
0
0
0
0
0
0
0
0
0
0
0
#-----------------------------------------------------------------------------------------------------------------------------------------------------------------------------------------------------------------------------# PR 32: INAP CS1 PlayAnnouncement(InformationToSend, RequestAnnouncementComplete, LegId
CallSegmentId)
#-----------------------------------------------------------------------------------------------------------------------------------------------------------------------------------------------------------------------------248 1
1
249
0
1
263
0
1
264
0
1
250 0
1
0
0
0
0
0
0
0
0
0
0
0
0
0
0
0
0
0
0
0
0
0
0
0
0
0
0
0
0
0
0
#-----------------------------------------------------------------------------------------------------------------------------------------------------------------------------------------------------------------------------# PR 33: INAP CS1 ConnectToResource Parameters(serviceInteractionIndicator,
ResourceAddress, )
#-----------------------------------------------------------------------------------------------------------------------------------------------------------------------------------------------------------------------------233 0
1
257
0
1
258
0
1
259 0
1
260 0
1
261 0
1
262
0
1
0
0
0
0
0
0
0
0
0
0
0
0
0
0
0
0
0
0
0
0
0
0
0
0
#-----------------------------------------------------------------------------------------------------------------------------------------------------------------------------------------------------------------------------# PR 34: INAP CS1 DFC With Argument Parameters(dfc legId or DFC callsegment id, party to
disconnect)
#-----------------------------------------------------------------------------------------------------------------------------------------------------------------------------------------------------------------------------255 0
1
256 0
1
0
0
0
0
0
0
0
0
0
0
0
0
0
0
0
0
0
0
0
0
0
0
0
0
0
0
0
0
0
0
0
0
0
0
0
0
0
0
0
#----------------------------------------------------------------------------------------# PR 35: ANSI PRE AIN CNAM Result
# 23=GenericName(copy to CC), 8=carrier, 4=routing number, 18=billing indicators
#----------------------------------------------------------------------------------------23 0
2
8 0
2
4 0
1
18
0
2
0
0
0
0
0
0
0
0
0
0
0
0
0
0
0
0
0
0
0
0
0
0
0
0
0
0
0
0
0
0
0
0
0
###############
$ResponseAction
###############
#
# F1
F2
F3
# ACT1 REQ DAT
F4
F5
ACT2 REQ
F6
DAT
F7
F8
ACT3 REQ
F9
DAT
F10 F11
ACT4 REQ
F12
DAT
F13 F14
ACT5 REQ
F15
DAT
#-------------------------------------------------------------------------# RA 1: Customer 1 LNP Default & Generic LNP Default
#-------------------------------------------------------------------------4
1
2
0
0
0
0
0
0
0
0
0
0
0
0
#-------------------------------------------------------------------------# RA 2: Customer 1 LNP 1st Expected
Cisco PGW 2200 Softswitch Release 9.8 Software Installation and Configuration Guide
OL-18083-01
4-77
Chapter 4
Configuring the Cisco PGW 2200 Softswitch Software
Configuring SCP Queries
#-------------------------------------------------------------------------4
1
2
0
0
0
0
0
0
0
0
0
0
0
0
#-------------------------------------------------------------------------# RA 3: Generic LNP 1st Expected
#-------------------------------------------------------------------------1
1
0
4
1
2
0
0
0
0
0
0
0
0
0
#-------------------------------------------------------------------------# RA 4: Genesys (Error)
#-------------------------------------------------------------------------0
0
0
0
0
0
0
0
0
0
0
0
0
0
0
#-------------------------------------------------------------------------# RA 5: ANSI AIN 800 with termination status notification
#-------------------------------------------------------------------------2
0
1
4
1
3
0
0
0
0
0
0
0
0
0
#-------------------------------------------------------------------------# RA 6: Genesys & ANSI AIN AIN 800
#-------------------------------------------------------------------------4
1
3
0
0
0
0
0
0
0
0
0
0
0
0
#-------------------------------------------------------------------------# RA 7: ANSI PRE AIN 800 with termination status notification
#-------------------------------------------------------------------------2
0
4
4
1
3
0
0
0
0
0
0
0
0
0
#-------------------------------------------------------------------------# RA 8: ANSI PRE AIN 800
#-------------------------------------------------------------------------4
1
3
0
0
0
0
0
0
0
0
0
0
0
0
#-------------------------------------------------------------------------# RA 9: 800 Default
#-------------------------------------------------------------------------4
1
3
0
0
0
0
0
0
0
0
0
0
0
0
#-------------------------------------------------------------------------# RA 10: ANSI PRE AIN 800 with termination status notification SSN
#-------------------------------------------------------------------------2
0
5
4
1
3
0
0
0
0
0
0
0
0
0
#-------------------------------------------------------------------------# RA 11: CS1/INAP Based CLI Screening, Connect reponse actions
#-------------------------------------------------------------------------4
1
6
0
0
0
0
0
0
0
0
0
0
0
0
#-------------------------------------------------------------------------# RA 12: CS1/INAP Based CLI Screening, Continue PlayAnnouncement reponse actions
#-------------------------------------------------------------------------7
1
7
7
1
8
6
1
9
6
1
10
6
1
11
#-------------------------------------------------------------------------# RA 13: CS1/INAP Based CLI Screening, End PlayAnnouncement reponse actions
#-------------------------------------------------------------------------4
1
12 0
0
0
0
0
0
0
0
0
0
0
0
#-------------------------------------------------------------------------# RA 14: INAP Free Phone, LNP & Carrier Pre-Selection Services, Connect reponse actions
#-------------------------------------------------------------------------4
1
13
0
0
0
0
0
0
0
0
0
0
0
0
#--------------------------------------------------------------------------
Cisco PGW 2200 Softswitch Release 9.8 Software Installation and Configuration Guide
4-78
OL-18083-01
Chapter 4
Configuring the Cisco PGW 2200 Softswitch Software
Configuring SCP Queries
# RA 15: INAP LNP for Norway, Unexpected Response
#-------------------------------------------------------------------------4
1
14
0
0
0
0
0
0
0
0
0
0
0
0
#-------------------------------------------------------------------------# RA 16: INAP LNP for Norway, Expected Response
#-------------------------------------------------------------------------4
1
15
0
0
0
0
0
0
0
0
0
0
0
0
#-------------------------------------------------------------------------# RA 17: INAP Prepaid Services, Unexpected Response
#-------------------------------------------------------------------------4
1
14
8
0
0
0
0
0
0
0
0
0
0
0
#-------------------------------------------------------------------------# RA 18: INAP Prepaid Services, Expected Response
#-------------------------------------------------------------------------4
1
16
0
0
0
0
0
0
0
0
0
0
0
0
#-------------------------------------------------------------------------# RA 19: INAP LNP for Portugal, Unexpected Response
#-------------------------------------------------------------------------4
1
14
0
0
0
0
0
0
0
0
0
0
0
0
#-------------------------------------------------------------------------# RA 20: INAP LNP for Portugal, Expected Response
#-------------------------------------------------------------------------4
1
17
0
0
0
0
0
0
0
0
0
0
0
0
#-------------------------------------------------------------------------# RA 21: INAP LNP for Portugal, Expected Response
#-------------------------------------------------------------------------4
1
18
0
0
0
0
0
0
0
0
0
0
0
0
#-------------------------------------------------------------------------# RA 22: INAP CS1, Unexpected Response
#-------------------------------------------------------------------------4
1
19
8
0
0
0
0
0
0
0
0
0
0
0
#-------------------------------------------------------------------------# RA 23: INAP CS1, Expected Response
#-------------------------------------------------------------------------4
1
20
0
0
0
0
0
0
0
0
0
0
0
0
#-------------------------------------------------------------------------# RA 24: INAP CS1, Expected Response(Continue,EstablishTempConnection, re-trigger)
#-------------------------------------------------------------------------4
1
20
2
1
21
0
0
0
0
0
0
0
0
0
#-------------------------------------------------------------------------# RA 25: INAP CS1, Expected Response(Continue,DisconnectForwardConnection, re-trigger)
#-------------------------------------------------------------------------4
1
20
0
0
0
0
0
0
0
0
0
0
0
0
#-------------------------------------------------------------------------# RA 26: INAP CS1, Expected Response (In Release)
#-------------------------------------------------------------------------4
1
20
0
0
0
0
0
0
0
0
0
0
0
0
#-------------------------------------------------------------------------# RA 27: INAP CS1, Expected Response (No action - ignoring call gap response )
#-------------------------------------------------------------------------0
0
0
0
0
0
0
0
0
0
0
0
0
0
0
Cisco PGW 2200 Softswitch Release 9.8 Software Installation and Configuration Guide
OL-18083-01
4-79
Chapter 4
Configuring the Cisco PGW 2200 Softswitch Software
Configuring SCP Queries
#-------------------------------------------------------------------------# RA 28: INAP CS2, Expected Response(DL, SL, MCS,DFCwithArg,RRBE, ML, CWA)
#-------------------------------------------------------------------------4
1
20
0
0
0
0
0
0
0
0
0
0
0
0
#-------------------------------------------------------------------------# RA 29: INAP CS2, Expected Response(CTR,PA,RRBE,CWA)
#-------------------------------------------------------------------------4
1
20
0
0
0
0
0
0
0
0
0
0
0
0
#-------------------------------------------------------------------------# RA 30: INAP CS2, Expected Response(DFCwithArg, ML, CTR, PA, CWA, RRBE)
#-------------------------------------------------------------------------4
1
20
0
0
0
0
0
0
0
0
0
0
0
0
#-------------------------------------------------------------------------# RA 31: INAP CS2, Expected Response(RRBE,CON,CTR,PA)
#-------------------------------------------------------------------------4
1
20
0
0
0
0
0
0
0
0
0
0
0
0
#-------------------------------------------------------------------------# RA 32: CNAM ( send action to LCM )
#-------------------------------------------------------------------------4
1
23
0
0
0
0
0
0
0
0
0
0
0
0
###########
$ActionData
###########
#
# F1
F2
F3
F4
F5
#----------------------# AD 1: ANSI AIN 800 Data for RESULT_ACTION_RE_TRIGGER_VIA_LCM (to send termination
information)
# Trg Pic
Null Null Null
#-------------------------7
13
0
0
0
# AD 2: ANSI LNP Data for RESULT_ACTION_SEND_ACTION_TO_LCM
# Act Null Null Null NULL
#-------------------------1
0
0
0
0
# AD 3: ANSI AIN / PRE AIN 800 Data for RESULT_ACTION_SEND_ACTION_TO_LCM
# Act Null Null Null NULL
#-------------------------2
0
0
0
0
# AD 4: ANSI PRE AIN 800 Data for RESULT_ACTION_RE_TRIGGER_VIA_LCM (to send termination
information)
# Trg Pic
Null Null Null
#-------------------------9
13
0
0
0
# AD 5: ANSI PRE AIN 800 Data for RESULT_ACTION_RE_TRIGGER_VIA_LCM (to send termination
information) SSN
# Trg Pic
Null Null Null
#-------------------------11
13
0
0
0
# AD 6: CS1/INAP Based CLI Screeing Data for RESULT_ACTION_SEND_ACTION_TO_LCM information
# Act Null Null Null Null
Cisco PGW 2200 Softswitch Release 9.8 Software Installation and Configuration Guide
4-80
OL-18083-01
Chapter 4
Configuring the Cisco PGW 2200 Softswitch Software
Configuring SCP Queries
#-------------------------3
0
0
0
0
# AD 7: CS1/INAP Based CLI Screeing Data for RESULT_ACTION_RE_TRIGGER_VIA_LCM_COND
information
# Cond Param Val Trg Pic
#-------------------------2
209
1
13
10
# AD 8: CS1/INAP Based CLI Screeing Data for RESULT_ACTION_RE_TRIGGER_VIA_LCM_COND
information
# Cond Param Trg Pic Null
#-------------------------0
209
13
10
0
# AD 9: CS1/INAP Based CLI Screeing Data for RESULT_ACTION_SEND_ACTION_TO_LCM_COND
information
# Cond Param Val Act Null
#-------------------------2
209
1
4
0
# AD 11: CS1/INAP Based CLI Screeing Data for RESULT_ACTION_SEND_ACTION_TO_LCM_COND
information
# Cond Param Act Null Null
#-------------------------0
209
4
0
0
# AD 11: CS1/INAP Based CLI Screeing Data for RESULT_ACTION_SEND_ACTION_TO_LCM_COND
information
# Cond Param Val Act Null
#-------------------------2
209
0
5
0
# AD 12: CS1/INAP Based CLI Screeing Data for RESULT_ACTION_SEND_ACTION_TO_LCM information
# Act Null Null Null Null
#-------------------------5
0
0
0
0
# AD 13: INAP Free Phone, LNP & Carrier Pre-Selection Services Data for
RESULT_ACTION_SEND_ACTION_TO_LCM information
# Act Null Null Null Null
#-------------------------3
0
0
0
0
# AD 14: INAP LNP for Norway Data for RESULT_ACTION_SEND_ACTION_TO_LCM information
(IN_RELEASE)
# Act Null Null Null Null
#-------------------------5
0
0
0
0
# AD 15: INAP LNP for Norway Data for RESULT_ACTION_SEND_ACTION_TO_LCM information
(IN_ROUTE)
# Act Null Null Null Null
#-------------------------3
0
0
0
0
# AD 16: INAP Prepaid Services Data for RESULT_ACTION_SEND_ACTION_TO_LCM information
(IN_PREPAID)
# Act Null Null Null Null
#-------------------------6
0
0
0
0
# AD 17: INAP LNP for Portugal Data for RESULT_ACTION_SEND_ACTION_TO_LCM information
(IN_NONE)
Cisco PGW 2200 Softswitch Release 9.8 Software Installation and Configuration Guide
OL-18083-01
4-81
Chapter 4
Configuring the Cisco PGW 2200 Softswitch Software
Initializing the Call Screening Database
# Act Null Null Null Null
#-------------------------0
0
0
0
0
# AD 18: INAP LNP for Portugal Data for RESULT_ACTION_SEND_ACTION_TO_LCM information
(IN_ROUTE)
# Act Null Null Null Null
#-------------------------3
0
0
0
0
# AD 19: INAP CS1 Data for RESULT_ACTION_SEND_ACTION_TO_LCM information (IN_RELEASE)
# Act Null Null Null Null
#-------------------------5
0
0
0
0
# AD 20: INAP CS1 Data for RESULT_ACTION_SEND_ACTION_TO_LCM information (IN_INAP CS1)
# Act Null Null Null Null
#-------------------------7
0
0
0
0
# AD 21: INAP CS1 Data for RESULT_ACTION_RE_TRIGGER_VIA_LCM(Trigger26,PIC-Now)
# Act Null Null Null Null
#-------------------------26
10
0
0
0
# AD 22: INAP CS1 Data for RESULT_ACTION_RE_TRIGGER_VIA_LCM(Trigger24,PIC-Now)
# Act Null Null Null Null
#-------------------------24
10
0
0
0
# AD 23: ANSI PRE AIN CNAM Data for RESULT_ACTION_SEND_ACTION_TO_LCM information
(IN_CNAM)
# Act Null Null Null Null
#-------------------------30
0
0
0
0
This completes the SCP configuration. Continue to the next section to initialize the call-screening
database. If you have questions or need assistance, see the “Obtaining Documentation and Submitting a
Service Request” section on page x.
Initializing the Call Screening Database
This section contains the following topics:
Caution
•
.odbc.ini File Information, page 4-83
•
Setting Up Replication, page 4-83
•
Troubleshooting the Main Memory Database Replication, page 4-87
Cisco does not support the direct use of TimesTen commands (files found in /opt/TimesTen/32/bin).
Incorrect use of these commands can cause database corruption.
During installation, the installation script (install.sh) installs and initializes the Main Memory Database
(MMDB) that the Cisco PGW 2200 Softswitch can use for the following:
•
Store call-screening information for calling- and called-number analysis
Cisco PGW 2200 Softswitch Release 9.8 Software Installation and Configuration Guide
4-82
OL-18083-01
Chapter 4
Configuring the Cisco PGW 2200 Softswitch Software
Initializing the Call Screening Database
•
Ported Numbers
•
Number Termination
•
Multiple Dial Plan
•
Advice of Charge II
You might want to perform white and black list screening to include or exclude calls from certain
numbers. You can provision white lists that specify allowed A-numbers (calling numbers) or B-numbers
(called numbers). Black lists block specified A-numbers (calling numbers) or B-numbers (called
numbers). For more details, see the Cisco PGW 2200 Softswitch Release 9.8 Dial Plan Guide.
The call screening database is stored in the /opt/TimesTen/datastore directory. The database name is
howdydb. The maximum database size, 256 MB, is specified in the .odbc.ini file shown in the .odbc.ini
File Information section, below.
Caution
Do not change the database name.
.odbc.ini File Information
The .odbc.ini file specifies the location of the database storage. Unless you installed the software to other
than the default directory, the .odbc.ini file is located in the /opt/CiscoMGC/local directory. The
following is an example of an .odbc.ini file:
[ODBC Data Sources]
howdydb=TimesTen 4.1 Driver
[howdydb]
Driver=/opt/TimesTen4.1/32/lib/libtten.so
DataStore= /opt/TimesTen4.1/datastore/howdydb
DurableCommits=0
ExclAccess=0
ThreadSafe=1
WaitForConnect=0
Size=256
[ODBC]
Trace=0
TraceFile=
Installdir=/opt/TimesTen4.1/32
Setting Up Replication
If you have two Cisco PGW 2200 Softswitch hosts in a fault tolerant system, you must set up database
replication between the two hosts. During replication, any updates applied to the database on one host
are replicated on the other. Data is transferred real time and does not require committing or deploying a
configuration.
Replication copies data changes to either database after the initial setup. If you have data in one database
and want to retain it, go to the host that has the data that you want to retain (usually this is the active
host), then follow the procedures below, “Initializing Database Replication” section on page 4-85.
Note
Before you can initialize the databases, you must install the Cisco PGW 2200 Softswitch software on
both machines.
Cisco PGW 2200 Softswitch Release 9.8 Software Installation and Configuration Guide
OL-18083-01
4-83
Chapter 4
Configuring the Cisco PGW 2200 Softswitch Software
Initializing the Call Screening Database
Network Requirements
In most replication schemes, you need to identify the name of the host machine on which your data store
resides. The operating system translates this host name to an IP address. This section describes how to
configure your host names to ensure they use the correct IP addresses.
Identifying data store hosts (UNIX and VxWorks)
If your Unix or VxWorks host has a single IP address and hostname, you can use the host name returned
by the hostname command on UNIX or the hostname() call on VxWorks. If a host contains multiple
network interfaces (with different IP addresses), TimesTen replication tries to connect to the IP address
in the same order as returned by the gethostbyname() call on UNIX or the hostGetByName() call on
VxWorks. It will try to connect using the first address; if a connection cannot be established, it tries the
remaining addresses in order until a connection is established. TimesTen replication uses this same
sequence each time it establishes a new connection to a host. If a connection to a host fails on one IP
address, TimesTen replication attempts to re-connect (or fall back) to another IP address for the host in
the same manner described above.
There are two basic ways you can configure a host to use multiple IP addresses on UNIX platforms: DNS
or /etc/hosts files. On VxWorks platforms you use the hostAdd() call. For example, the following entry
in the /etc/hosts file on a UNIX platform describes a server named Machine1 with two Ethernet IP
addresses:
10.10.98.102 Machine1
192.168.1.102 Machine1
To specify the same configuration for DNS, your entry in the domain zone file would look like:
Machine1 IN A 10.10.98.102
IN A 192.168.1.102
In either case, you only need to specify Machine1 as the hostname in your replication scheme and
replication will use the first available IP address when establishing a connection. In an environment in
which multiple IP addresses are used, you can also assign multiple host names to a single IP address in
order to restrict a replication connection to a specific IP address. For example, you might have an entry
in your /etc/hosts file that looks like:
10.10.98.102 Machine1
192.168.1.102 Machine1 RepMachine1
Or a DNS zone file that looks like:
Machine1 IN A 10.10.98.102
IN A 192.168.1.102
RepMachine1 IN A 192.168.1.102
Should you want to restrict replication connections to IP address 192.169.1.102 for this host, you can
specify RepMachine1 as the hostname in your replication scheme. (Another option is to simply specify
the IP address as the hostname in the CREATE REPLICATION statement used to configure your
replication scheme.)
The following are example hosts files from an active Cisco PGW 2200 Softswitch host and an associated
peer Cisco PGW 2200 Softswitch host:
Active Cisco PGW 2200 Softswitch Host /etc/hosts
27.0.0.1 localhost
192.168.11.1 UK-A-Netra1125-1 loghost
192.168.12.1 UK-A-Netra1125-1.hme1
Cisco PGW 2200 Softswitch Release 9.8 Software Installation and Configuration Guide
4-84
OL-18083-01
Chapter 4
Configuring the Cisco PGW 2200 Softswitch Software
Initializing the Call Screening Database
192.168.11.2 UK-A-Netra1125-2
192.168.12.2 UK-A-Netra1125-2.hme1 UK-A-Netra1125-2 <----- Peer PGW hostname
Peer Cisco PGW 2200 Softswitch Host /etc/hosts
127.0.0.1 localhost
192.168.11.2 UK-A-Netra1125-2 loghost
192.168.12.2 UK-A-Netra1125-2.hme1
192.168.11.1 UK-A-Netra1125-1 1
92.168.12.1 UK-A-Netra1125-1.hme1 UK-A-Netra1125-1 <----- Peer PGW hostname
Initializing Database Replication
To set up the initial replication, perform the following steps:
Step 1
Log in to the active host as mgcusr and enter the following command:
% setup_replication.sh standbyhost active
Where standbyhost is the name (not IP address) of your standby host. In the example below, the active
host is hostx and the standby host is hosty.
Caution
Note
Do not use IP addresses when setting up database replication. If you do, replication will fail.
If the machine on which the Cisco PGW 2200 Softswitch software is installed has several different
names, make sure the argument that you supply to the setup_replication.sh script matches the output of
the Unix command hostname.
Example 4-1
Initializing Database Replication on the Active Host
hostx% setup_replication.sh hosty active
Setting up replication to node
Adding cisco.whitelist_a
Adding cisco.blacklist_a
Adding cisco.whitelist_b
Adding cisco.blacklist_b
Adding cisco.portednumbers
Adding cisco.numberterm
RAM Residence Policy
:
RAM Residence Grace (Secs)
:
Manually Loaded In Ram
:
Purge Logs for Data Store
:
Logging Enabled
:
Replication Manually Started
:
Step 2
hosty for DSN howdydb
inUse
0
False
True
True
True
Log in to the standby host as the root user and stop the Cisco PGW 2200 Softswitch software by entering
the following UNIX command:
# /etc/init.d/CiscoMGC stop
Step 3
Log back in to the standby host as mgcusr.
Step 4
At the standby host, enter the following command:
% setup_replication.sh activehost standby
Cisco PGW 2200 Softswitch Release 9.8 Software Installation and Configuration Guide
OL-18083-01
4-85
Chapter 4
Configuring the Cisco PGW 2200 Softswitch Software
Initializing the Call Screening Database
where activehost is the name (not IP address) of your active host. In the example below, the active host
is hostx and the standby host is hosty.
Caution
Do not use IP addresses when setting up database replication. If you do, replication will fail.
Example 4-2
Initializing Database Replication on the Standby Host
Configuring replication for DSN=howdydb
Restoring file /opt/TimesTen4.1/datastore/howdydb.ds0 from backup
Restoring file /opt/TimesTen4.1/datastore/howdydb.log0 from backup
RAM Residence Policy
:inUse
Manually Loaded In Ram
:False
Replication Agent Policy
:manual
Replication Manually Started
:True
Oracle Agent Policy
:manual
Oracle Agent Manually Started
:False
Replication setup completed.
Note
Step 5
If the replication setup on the standby host fails, you must run delete_replication.sh on both active and
standby hosts. Then change the value of the TTREPPORT variable from 2890 to 2891 in the
setup_replication.sh script on both active and standby hosts and save your changes. Perform the whole
procedure again.
Start the both active and standby Cisco PGW 2200 Softswitch as root:
# /etc/init.d/CiscoMGC start
Proceed to “Verifying Database Replication”.
Verifying Database Replication
To verify that replication is working, perform the following steps:
Step 1
Log in to the active host and start an MML session by entering mml.
Step 2
Add a test entry into the B white list database using the numan-add MML command. For example:
mml> numan-add:bwhite:custgrpid="S018",svcname="testsvc",cli="9998"
Text similar to the following is displayed:
M
Step 3
VSC-01 - Media Gateway Controller 2000-08-30 11:31:25
COMPLD
"bwhite"
;
Delete the test entry using the numan-dlt MML command.
mml> numan-add:bwhite:custgrpid="S018",svcname="testsvc",cli="9998"
Step 4
Log in to the standby host and start an MML session by entering mml.
Cisco PGW 2200 Softswitch Release 9.8 Software Installation and Configuration Guide
4-86
OL-18083-01
Chapter 4
Configuring the Cisco PGW 2200 Softswitch Software
Initializing the Call Screening Database
Step 5
Enter the numan-rtrv MML command to verify that the entry you added in Step 4 was replicated to the
database on the standby host. For example:
mml> numan-rtrv:bwhite:custgrpid="S018",svcname="testsvc",cli="9998"
Text similar to the following is displayed:
M
VSC-01 - Media Gateway Controller 2000-08-30 11:33:52
RTRV
"session=test:bwhite"
/* The cli :9998: exists.
*/
;
Troubleshooting the Main Memory Database Replication
If you have problems during replication, try stopping and restarting the replication as follows:
Step 1
Stop the replication by entering:
# /etc/init.d/ttreplic stop
Step 2
Restart the replication by entering:
# /etc/init.d/ttreplic start
Displaying the Main Memory Database Replication Status
The script replication_status.sh displays the status of the MMDB replication, if it is configured.
Run the script by typing the following command:
% ./replication_status.sh
The output shows the following replication status:
Peer name
---------------HOWDYDB
Last Msg Sent
-------------
Note
Host name
Port
------------------------ -----VA-DEALE
Auto
Last Msg Recv
-------------
Latency
-------1.00
TPS
-------1
State Proto
------- ----Start
5
RecordsPS
---------1
Logs
---1
If the value for Last Msg Recv is more than a few seconds, or Logs is more than 1, then this indicates
that replication is not occurring.
Verifying Database Synchronization
The script db_count.sh provides the number of records configured in each of the database tables. This
is useful for checking whether two machines have the same database data configured in them.
Run the script by typing the following command:
Cisco PGW 2200 Softswitch Release 9.8 Software Installation and Configuration Guide
OL-18083-01
4-87
Chapter 4
Configuring the Cisco PGW 2200 Softswitch Software
Initializing the Call Screening Database
% ./db_count.sh
The output shows the rows counted in each database table:
Counting the rows in each database table.
CISCO.ANNOUNCEMENT < 0 >
CISCO.A_CHARGE_ORIGIN < 0 >
CISCO.A_NUMBERDIALPLANSELECTION < 0 >
CISCO.BLACKLIST_A < 0 >
CISCO.BLACKLIST_B < 0 >
CISCO.CBBOOKINGINFO < 0 >
CISCO.CBMONITORINGINFO < 0 >
CISCO.CLIIPADDRESS < 0 >
CISCO.CLIPREFIX < 0 >
CISCO.FULLNUMBERTRANSLATION < 0 >
CISCO.H323IDDIVFROM < 0 >
CISCO.LIENTRIES < 0 >
CISCO.NUMBERTERM < 0 >
CISCO.PORTEDNUMBERS < 0 >
CISCO.SCRIPT < 0 >
CISCO.WHITELIST_A < 0 >
CISCO.WHITELIST_B < 0 >
Synchronizing Databases
If you have data in the databases in the active and standby hosts, but both databases are out of sync or
do not match, re-synchronize both databases by following the steps listed below. Otherwise, contact
Cisco TAC for assistance in merging the databases.
Assuming the active host is the "better" database, do the following on the standby host:
Step 1
Log in as root.
Step 2
Stop the Cisco PGW 2200 Softswitch software by entering the following command:
# /etc/init.d/CiscoMGC stop
Step 3
Stop MMDB replication by entering the following command:
# /etc/init.d/ttreplic stop
Step 4
Copy the active host database to the standby host database by entering the following command as
mgcusr:
% setup_replication <active host> standby
Step 5
Start the Cisco PGW 2200 Softswitch by entering the following command:
# /etc/init.d/CiscoMGC start
Checking for Installation Errors
If you still have problems, retry the commands listed in the “Verifying Database Replication” section on
page 4-86. If your output differs from the example in that section, or if you suspect problems or errors
in the database installation, try the following:
Step 1
Ensure that the database is installed in the /opt/TimesTen directory.
Cisco PGW 2200 Softswitch Release 9.8 Software Installation and Configuration Guide
4-88
OL-18083-01
Chapter 4
Configuring the Cisco PGW 2200 Softswitch Software
Configuring Cisco ITP-Ls
Step 2
Check the log file for installation errors. (The log file is in the directory /var/adm/MGC_install.log.)
Reinstalling CSCOga002
If you experience database errors such as an incorrect timestamp after completing the “Checking for
Installation Errors” section on page 4-88, you need to reinstall the CSCOga002 package, which contains
the Cisco PGW 2200 Softswitch database components. Follow these steps to reinstall the CSCOga002
package:
Step 1
Remove the CSCOga002 package as root using the pkgrm command. To remove the package file, enter
the following command:
# pkgrm CSCOga002
Step 2
Reinstall the package using the pkgadd command by entering the following command:
# pkgadd -d CSCOga002.pkg
This completes the CSCOga002 package installation. If you have questions or need assistance, see the
“Obtaining Documentation and Submitting a Service Request” section on page x. If you do not need to
install or remove patches, proceed to configure your Cisco ITP-Ls.
Configuring Cisco ITP-Ls
Note
For configuration information, refer to the document Cisco IP Transfer Point - LinkExtender and the
Release Notes for Cisco PGW 2200 Softswitch Release 9.8(1).
Configuring Disk Monitor During Initial Software Configuration
The setting of the disk monitor parameters in the XECfgParm.dat file typically occurs while you are
performing the initial configuration procedures for your Cisco PGW 2200 Softswitch software. To
configure the disk monitor settings in the XECfgParm.dat file during initial software configuration,
perform the following steps:
Step 1
While configuring your settings in the XECfgParm.dat file, find the disk monitor parameters in the file
(they are near the end of the file).
Step 2
To change the number of days to preserve logged data before trimming is initiated, modify the value of
the diskmonitor.Limit parameter. The default value is 7.
Step 3
To change the list of optional file systems that are checked by the disk monitor script, modify the value
of the diskmonitor.OptFileSys parameter.
Note
Files in optional directories are not trimmed by disk monitor.
Cisco PGW 2200 Softswitch Release 9.8 Software Installation and Configuration Guide
OL-18083-01
4-89
Chapter 4
Configuring the Cisco PGW 2200 Softswitch Software
Configuring the Data Dumper
Step 4
To change the percentage of disk usage at which alarming and disk trimming is initiated, modify the
value of the diskmonitor.Threshold parameter. The default value is 80.
Step 5
To change the number of days that finished CDR files are kept in the log directory, modify the value of
the diskmonitor.CdrRmFinished parameter. The default value is 0, which means that finished CDRs are
immediately sent to the spool directory.
Step 6
If you want to change what action is taken once the number of days threshold set in the diskmonitor.Limit
parameter is reached, change the value of the diskmonitor.SoftLimit parameter. If this parameter is set
to true, disk monitor decrements the value in the diskmonitor.Limit parameter one day at a time (that is,
from 7 down to 6 then down to 5 and so on), until the utilization level drops below the threshold. If this
parameter is set to false, disk monitor exits and the system generates a DISK alarm. The default value is
true.
Step 7
To change the number of days that core dump files are kept in the log directory, modify the value of the
diskmonitor.CoreRmDays parameter. The default value is 1, which means that core dump files are kept
for one day before disk monitor removes them automatically.
Step 8
You can control the maximum number of configurations that can be stored in the configuration library
using the diskmonitor.CfgRmDirs parameter. The valid values are the range of integers from 3 through
64. The default value is 64. This parameter is not present in the XECfgParm.dat file initially. If you want
to modify the value, you must enter the parameter manually into the file.
Step 9
Note
If you want to ensure the proper functioning of the prov-sync MML command, set this
parameter to a value between 50 and 60.
Note
Entering a value outside of the range of valid values (3 through 64) disables monitoring of the
number of entries stored in the configuration library.
Save your changes.
This completes the procedures for configuring disk space monitoring. If you have questions or need
assistance, see the “Obtaining Documentation and Submitting a Service Request” section on page x.
Configuring the Data Dumper
The data dumper is a Cisco PGW 2200 Softswitch software function that controls the destinations for
active and archived log files for CDRs, measurements, and alarms, and controls when the active files are
archived. The data dumper runs automatically and works correctly with a default configuration.
However, you can customize the dumper settings by editing the dmprSink.dat file.
The following is an example of the contents of the dmprSink.dat file:
“callDetail” bin “cdr” “../var/log” “../var/spool” 1000 0 15
“measReport” csv “meas” “../var/log” “../var/spool” 500 0 15
“almState” csv “alm” “../var/log” “../var/spool” 500 0 15
Table 4-7 lists the fields that can be modified depending on your needs.
Cisco PGW 2200 Softswitch Release 9.8 Software Installation and Configuration Guide
4-90
OL-18083-01
Chapter 4
Configuring the Cisco PGW 2200 Softswitch Software
Configuring the Data Dumper
Table 4-7
Dumper Sink Log File Parameters
Field Name
Default Value
Description
maxRecs
1000
The maximum number of records a file can contain before it is flushed
or moved to the spool area. If this value is set to 0, the number of
records is unlimited. You can improve system performance by
increasing the value of this record to a larger value, such as 50000.
This results in fewer log record files being generated during periods
of high call volume.
maxSize
0
The maximum size of the file in bytes before it is moved to the spool
area. If this value is set to 0, the size of the file is limited only by the
disk space available.
maxTime
15
The maximum time, in minutes, the file is allowed to remain open,
before it is flushed or moved to the spool area. If there is no data in
the file, it will not be flushed when the time limit expires. If this value
is set to 0, there is no time limit.
Note
Caution
One or more of the above fields must be set to a value other
than zero (0) for each record in the dmprSink.dat file.
Do not modify or change any of the following log file configuration values.
recordFormat csv
The translation of the records being placed in the capture file. Valid
values are csv (comma-separated values) or bin (binary).
logDirectory
/var/log
The directory where the current dumper logs reside.
logSpoolDir
/var/spool
The directory to which historic logs are copied after being closed.
To configure the dmprSink.dat file fields, use the following procedure:
Step 1
Log into a Cisco PGW 2200 Softswitch as root if you are not already logged in.
Step 2
Change to the /opt/CiscoMGC/etc directory by entering the following UNIX command:
# cd /opt/CiscoMGC/etc
Step 3
Use a text editor, such as vi, to open and edit the dmprSink.dat file fields you want to change.
Note
If you are going to use the Cisco BAMS to collect CDRs, proceed to the “Configuring the Data
Dumper to Support Cisco BAMS” section on page 4-92, for information on how to configure the
data dumper to support Cisco BAMS.
Step 4
Save your changes and exit the text editor.
Step 5
Change to the /opt/CiscoMGC/etc/CONFIG_LIB/new directory by entering the following UNIX
command:
# cd /opt/CiscoMGC/etc/CONFIG_LIB/new
Step 6
Stop and start the standby host.
Step 7
Perform sw-over on the active host.
Cisco PGW 2200 Softswitch Release 9.8 Software Installation and Configuration Guide
OL-18083-01
4-91
Chapter 4
Configuring the Cisco PGW 2200 Softswitch Software
Configuring the Data Dumper to Support Cisco BAMS
Step 8
Stop and start the newly-standby host (formerly active host).
Step 9
Repeat Step 3 and Step 4 for the version of dmprSink.dat stored in this directory.
Step 10
Change to the /opt/CiscoMGC/etc/active_link directory by entering the following UNIX command:
# cd /opt/CiscoMGC/etc/active_link/
Step 11
Repeat Step 3 and Step 4 for the version of dmprSink.dat stored in this directory.
Step 12
Repeat Step 1 through Step 10 on this second Cisco PGW 2200 Softswitch if your system is equipped
with a second Cisco PGW 2200 Softswitch.
This completes the procedures for configuring the data dumper. If your system uses BAMS, continue to
the “Configuring the Data Dumper to Support Cisco BAMS” section on page 4-92. If you have questions
or need assistance, see the “Obtaining Documentation and Submitting a Service Request” section on
page x.
Configuring the Data Dumper to Support Cisco BAMS
If your system will use Cisco BAMS to retrieve CDRs from the Cisco PGW 2200 Softswitch, perform
the following procedure to configure the data dumper to support Cisco BAMS:
Step 1
Log into a Cisco PGW 2200 Softswitch as root if you are not already logged in.
Step 2
Change to the /opt/CiscoMGC/etc directory by entering the following UNIX command:
# cd /opt/CiscoMGC/etc
Step 3
Use a text editor, such as vi, to open and edit the dmprSink.dat file fields you want to change.
Step 4
Save your changes and exit the text editor.
Step 5
Change to the /opt/CiscoMGC/etc/CONFIG_LIB/new directory by entering the following UNIX
command:
# cd /opt/CiscoMGC/etc/CONFIG_LIB/new
Step 6
Stop and start the standby host.
Step 7
Perform sw-over on the active host.
Step 8
Stop and start the newly-standby host (formerly active host).
Step 9
Repeat Step 3 and Step 4 for the version of dmprSink.dat stored in this directory.
Step 10
Change to the /opt/CiscoMGC/etc/active_link directory by entering the following UNIX command:
# cd /opt/CiscoMGC/etc/active_link/
Step 11
Repeat Step 3 and Step 4 for the version of dmprSink.dat stored in this directory.
Step 12
Repeat Step 1 through Step 10 on this second Cisco PGW 2200 Softswitch if your system is equipped
with a second Cisco PGW 2200 Softswitch.
This completes the procedures for configuring the data dumper to support BAMS. If you have questions
or need assistance, see the “Obtaining Documentation and Submitting a Service Request” section on
page x.
Cisco PGW 2200 Softswitch Release 9.8 Software Installation and Configuration Guide
4-92
OL-18083-01
CH A P T E R
5
Migrating to Solaris 10 and
Cisco PGW 2200 Softswitch Software
Release 9.8
This chapter describes how to migrate your Cisco PGW 2200 Softswitch to the Solaris 10 operating
system and Cisco PGW 2200 Softswitch software Release 9.8.
This chapter contains the following information:
•
Conditions for Migration, page 5-1
•
Cautions and Notes, page 5-2
•
Required Software, page 5-3
•
License Installation, page 5-3
•
Recording System Data, page 5-3
•
Migration Overview, page 5-4
– Migration from Release 9.5 or 9.6 to Release 9.8 without Platform Changes, page 5-5
– Migration from Release 9.7 to Release 9.8 without Platform Changes, page 5-20
– Upgrading Lively from Sparc-based Platforms to Opteron-based Platforms, page 5-21
•
Falling Back Overview, page 5-26
– Falling Back to Previous Cisco PGW 2200 Softswitch Software Releases with Platform
Changes, page 5-32
– Falling Back to Solaris 8 and Cisco PGW 2200 Softswitch Release 9.5 or 9.6, page 5-27
– Replacing Hard Disks on an Existing Solaris 10 Platform, page 5-33
Conditions for Migration
Your hardware and software environment must meet the following conditions before you can use the
procedures provided below to migrate your software to Solaris 10:
•
Note
Your system must have at least two disks.
If you plan to replace the Cisco PGW 2200 Softswitch hard disks during the upgrade, ensure that you
have two replacement disks.
Cisco PGW 2200 Softswitch Release 9.8 Software Installation and Configuration Guide
OL-18083-01
5-1
Chapter 5
Migrating to Solaris 10 and Cisco PGW 2200 Softswitch Software Release 9.8
Cautions and Notes
•
The disks in the system must be at least 18 GB in size.
•
You (or the person doing the upgrade) must be an experienced Solaris system administrator. You
must be familiar with system administration tasks such as mounting file systems and running tar to
save and restore files.
Use Table 5-1 to determine the appropriate steps to upgrade your system.
Table 5-1
Solaris 10 and Cisco PGW 2200 Softswitch Release 9.8 Migration Conditions
Condition
Action
If you are upgrading the disk drive but not
upgrading the software...
Follow the procedure in the “Replacing Hard Disks
on an Existing Solaris 10 Platform” section on
page 5-33.
If you are migrating from Solaris 8 to Solaris 10... You must install the Sun Solaris 10 Operating
System and Cisco PGW 2200 Softswitch software
Release 9.8 on your Cisco PGW 2200 Softswitch
platform.
If you are migrating from the old
See Table 5-2 to determine the migration
Cisco PGW 2200 Softswitch software releases to procedure.
Release 9.8(1)
Cautions and Notes
Before starting the upgrade, consider the following cautions and notes:
Caution
Before starting the upgrade, make sure the Cisco PGW 2200 Softswitch software is shut down, and the
system administrator is logged in as root.
Caution
Always start the migration or upgrade from the standby Cisco PGW 2200 Softswitch host.
Caution
Resolve any major alarms on the Cisco PGW 2200 Softswitch before proceeding with the upgrade or
migration.
Caution
Do not make any provisioning changes to the Cisco PGW 2200 Softswitch during the upgrade to the
Cisco PGW 2200 Softswitch software Release 9.8.
Caution
When upgrading a redundant system, verify that the pom.dataSync parameter (located in
/opt/CiscoMGC/etc/XECfgParm.dat) is set to false on both Cisco PGW 2200 Softswitch hosts in order
to maintain calls and preserve your configuration.
Cisco PGW 2200 Softswitch Release 9.8 Software Installation and Configuration Guide
5-2
OL-18083-01
Chapter 5
Migrating to Solaris 10 and Cisco PGW 2200 Softswitch Software Release 9.8
Required Software
Note
The Cisco PGW 2200 Softswitch supports a live upgrade from the Sparc-based platforms to the
Opteron-based platforms. There is no service outrage during the upgrade. For detailed procedure of this
live upgrade, see the “Upgrading Lively from Sparc-based Platforms to Opteron-based Platforms”
section on page 5-21.
Required Software
You must have the following software:
•
Cisco Solaris 10 Operating System Jumpstart Disk. There are two versions of this disk, one for each
of the supported platform types. If your host platform is a Sun Opteron-based platform, use the
Cisco Solaris 10 Operating System Jumpstart Disk for Opteron-based Platforms. Otherwise, use the
Cisco Solaris 10 Operating System Jumpstart Disk for Sparc-based Platforms.
•
Cisco Solaris 10 Operating Environment CD. The latest version of the version is available at:
– http://www.cisco.com/cgi-bin/tablebuild.pl/mgc-sol10-sparc (Sparc platform)
– http://www.cisco.com/cgi-bin/tablebuild.pl/mgc-sol10-opteron (Opteron platform)
•
Cisco Installation CD, which includes the new release of the Cisco PGW 2200 Softswitch software.
The latest version is available at:
– http://www.cisco.com/cgi-bin/tablebuild.pl/mgc-973-sparc (Sparc platform)
– http://www.cisco.com/cgi-bin/tablebuild.pl/mgc-973-opteron (Opteron platform)
License Installation
Before you begin installation, obtain and install a Cisco PGW 2200 Softswitch license file using the
instructions provided in “Installing the License File, page 3-15”.
Recording System Data
When you upgrade to Sun Solaris 10, you must reenter various elements of your system data, because
the installation overwrites your existing system data. To ensure that you have all of your system data,
record the contents of the following files:
•
/etc/default
•
/etc/defaultrouter
•
Hostname files for each interface (such as /etc/hostname.hme0 or /etc/hostname.bge0)
•
/etc/hosts.equiv
•
/etc/group
•
/etc/nsswitch.conf
•
/etc/passwd
•
/etc/resolv.conf
•
/etc/shadow
Cisco PGW 2200 Softswitch Release 9.8 Software Installation and Configuration Guide
OL-18083-01
5-3
Chapter 5
Migrating to Solaris 10 and Cisco PGW 2200 Softswitch Software Release 9.8
Migration Overview
Note
•
/etc/inet/hosts
•
/etc/inet/netmasks
•
/etc/inet/ntp.conf
You may have already recorded some of this information based on the “Required Site-Specific
Information” section on page 1-3 and the “Required Machine-Specific Information” section on page 1-3.
Migration Overview
In order to migrate to Release 9.8 of the Cisco PGW 2200 Softswitch software, you need to install the
software on both the active and standby Cisco PGW 2200 Softswitch hosts.
During the migration procedure, you must set each host to both active and standby. For clarity, the
Cisco PGW 2200 Softswitches are labeled PGW 1 and PGW 2. PGW host 1 is the host that is active at
the beginning of the procedure, and PGW host 2 is the host that is set to standby at the beginning of the
procedure.
Figure 5-1
Cisco PGW 2200 Softswitch Host Labeling
1
Active
PGW host
2
Standby
PGW host
Cisco ITP-L
PSTN
STP
Bearer
traffic
V
Voice
Gateway
QoS
packet
network
82142
STP
Cisco PGW 2200 Softswitch supports both Sparc-based and Opteron-based platforms on Release 9.7(3).
Prior to Release 9.7(3), only Sparc-based platforms are supported. In order to migrate to Release 9.8(1),
you need find out the old Cisco PGW 2200 Softswitch software version, the old Sun platform, and the
target Sun platform you are going to use.
See the Cisco PGW 2200 Softswitch Hardware Installation Guide (Release 7 & 9) to find out supported
Sun platforms for Cisco PGW 2200 Softswitch software Release 9.8.
Table 5-2 shows migration procedures to Cisco PGW 2200 Softswitch Release 9.8 across different
platforms. The target platforms are listed in the first column. You can find the migration procedure based
on your target platform and your existing Cisco PGW 2200 Softswitch platform.
Cisco PGW 2200 Softswitch Release 9.8 Software Installation and Configuration Guide
5-4
OL-18083-01
Chapter 5
Migrating to Solaris 10 and Cisco PGW 2200 Softswitch Software Release 9.8
Migration from Release 9.5 or 9.6 to Release 9.8 without Platform Changes
Table 5-2
Migration Procedures to Release 9.8 Across Different Platforms
Target Release 9.8
From Release 9.5 or 9.6
From Release 9.7
Sparc-based
Sparc-based
Opteron-based
Migration from Release 9.7 to
Release 9.8 without Platform
Changes, page 5-20
—
Sparc-based
Migration from Release 9.5 or
9.6 to Release 9.8 without
Platform Changes, page 5-5
Upgrading Lively from
Sparc-based Platforms to
Opteron-based Platforms, page
5-21
Migration from Release 9.7 to
Release 9.8 without Platform
Changes, page 5-20
Opteron-based
Upgrading Lively from
Sparc-based Platforms to
Opteron-based Platforms, page
5-21
Migration from Release 9.5 or 9.6 to Release 9.8 without Platform
Changes
Migrating the Second Cisco PGW 2200 Softswitch Software to Release 9.8
Use the steps in the following sections to upgrade PGW 2 to Cisco PGW 2200 Softswitch Release 9.8.
Note
If you want to use two new disk drives to install the Cisco PGW 2200 Softswitch software, complete the
“Installing Sun Solaris 10” and “Loading the Sun Solaris 10 Operating Environment Packages” sections
before you begin this procedure.
Backing Up the Cisco PGW 2200 Softswitch Configuration Files
Before you begin the migration to the new version of the Cisco PGW 2200 Softswitch software, you
need to back up your current system files. This section describes the following backup procedures:
•
Create a remote backup of the current Cisco PGW 2200 Softswitch configuration using the
mgcbackup utility. These backup files are used to revert to the original version of the
Cisco PGW 2200 Softswitch software if a problem occurs during migration.
•
Create an MGC.tar archive file of the current Cisco PGW 2200 Softswitch settings.
Follow these steps to back up the Cisco PGW 2200 Softswitch configuration files on PGW host 2:
Step 1
Note
Verify that the pom.dataSync variable is set to False on the active and standby
Cisco PGW 2200 Softswitch hosts. To view or modify the pom.datasync variable, use an editor such as
vi to edit /opt/CiscoMGC/etc/XECfgParm.dat.
If you modify the pom.dataSync variable, restart the active and standby Cisco PGW 2200 Softswitch
hosts sequentially to ensure that the changes take effect.
Step 2
Log in to the PGW host 2 as mgcusr.
Step 3
Enter the following command to stop the Cisco PGW 2200 Softswitch.
Cisco PGW 2200 Softswitch Release 9.8 Software Installation and Configuration Guide
OL-18083-01
5-5
Chapter 5 Migrating to Solaris 10 and Cisco PGW 2200 Softswitch Software Release 9.8
Migration from Release 9.5 or 9.6 to Release 9.8 without Platform Changes
% sudo /etc/init.d/CiscoMGC stop
Step 4
Follow these steps to back up the system:
a.
Local Tape Backup—Using the mgcbackup utility, back up the system to the local tape drive.
% /opt/CiscoMGC/local/mgcbackup –d /dev/rmt/0
b.
Remote File Server Backup—Type the following commands to use the mgcbackup utility to back
up the system to local directory.
% mkdir /var/tmp/upgrade
% cd /var/tmp/upgrade
% /opt/CiscoMGC/local/mgcbackup –d /var/tmp/upgrade
Note
The backup file is stored in the specified directory path in the following format:
mgc_<hostname>_<yyyymmdd>_<hhmmss>_backup
Where:
• hostname is the name of the Cisco PGW 2200 Softswitch host, such as MGC-01.
• yyyymmdd is the date the backup file is created, in a year-month-day format, such as
20011130.
• hhmmss is the time the backup file is created, in an hour-minute-second format, such as
115923.
c.
Type the following command to list the files in your backup directory. Verify that the backup was
successful.
% /opt/CiscoMGC/local/mgcbackup -l
Caution
Step 5
You must now move the backup file to a remote file server using the ftp program so it can be
recovered if you need to revert to the previous version of Solaris or
Cisco PGW 2200 Softswitch software. You are responsible for providing the mechanism and
storage location.
Stop MMDB database replication on PGW hosts 1 and 2:
% ./delete_replication.sh
Step 6
Follow these steps to back up the MMDB on the PGW host 2:
a.
Log in to the PGW host 2 as mgcusr.
b.
Create the export.ttdb file:
% /opt/CiscoMGC/local/backupDb.sh /opt/CiscoMGC/etc/export.ttdb
c.
Create the migrate.ttdb file:
% ttMigrate -c DSN=howdydb /opt/CiscoMGC/etc/migrate.ttdb
d.
Remove the existing version of the MMDB file:
% rm -f /opt/CiscoMGC/etc/version.ttdb
e.
Determine the version of the version.ttdb file:
Cisco PGW 2200 Softswitch Release 9.8 Software Installation and Configuration Guide
5-6
OL-18083-01
Chapter 5
Migrating to Solaris 10 and Cisco PGW 2200 Softswitch Software Release 9.8
Migration from Release 9.5 or 9.6 to Release 9.8 without Platform Changes
% /opt/TimesTen/32/bin/ttVersion presenter
The Cisco PGW 2200 Softswitch displays output similar to the following example:
[ output = "TimesTen Release x.y.z build time ... ]
f.
Replace the TimesTen database Release x.y.z with the new version:
% echo xyz >/opt/CiscoMGC/etc/version.ttdb
g.
Ensure that the version.ttdb, migrate.ttdb, and export.ttdb files are present:
% cd /opt/CiscoMGC/etc
% ls *.ttdb
Step 7
Log in to the PGW host 2 as root.
Step 8
Save the Cisco PGW 2200 Softswitch configuration data:
# cp /opt/CiscoMGC/snmp/snmpd.cnf /opt/CiscoMGC/dialPlan
Note
Step 9
If you are using Cisco MNM, save the snmpd.cnf file (located in /opt/CiscoMGC/snmp) before the
migration starts.
Move to the CiscoMGC directory:
# cd /opt/CiscoMGC
Step 10
Back up the current Cisco PGW 2200 Softswitch files:
# tar cvf /var/tmp/upgrade/MGC.tar ./etc ./dialPlan
# cp ./local/ttbackup.tar /var/tmp/upgrade/ttbackup.tar
Step 11
Verify that configuration files were successfully backed up. The
mgc_<hostname>_<yyyymmdd>_<hhmmss>_backup file, ttbackup.tar, and MGC.tar files must be present.
# cd /var/tmp/upgrade
# ls
Step 12
Caution
At this point, you have saved all the required data in tar files in /var/tmp/upgrade. Follow these steps to
move these files to a blank tape or remote machine so that you can recover them after installing
Solaris 10.
You are responsible for providing the backup mechanism and storage location.
a.
Local tape drive—Enter the following commands to store the files on a local tape drive:
# cd /var/tmp/upgrade
# tar cvf /dev/rmt/0 MGC.tar ttbackup.tar mgc_MGC-01_20011130_115923_backup.tar
b.
Note
Step 13
Remote file server—Using the ftp utility, transfer the MGC.tar and ttbackup.tar files from the
/var/tmp/upgrade directory to a remote file server.
Use the binary mode of ftp to transfer the MGC.tar and ttbackup.tar files.
Verify that the files are successfully transferred to the remote file server before continuing.
Cisco PGW 2200 Softswitch Release 9.8 Software Installation and Configuration Guide
OL-18083-01
5-7
Chapter 5 Migrating to Solaris 10 and Cisco PGW 2200 Softswitch Software Release 9.8
Migration from Release 9.5 or 9.6 to Release 9.8 without Platform Changes
At this point, the Cisco PGW 2200 Softswitch configuration data has been saved in MGC.tar files on a
tape or remote file server. The file backup is now complete. Proceed to “Installing Sun Solaris 10”.
Installing Sun Solaris 10
Follow these steps to install Sun Solaris 10 on PGW host 2.
Note
If you want to use two new disk drives to install the Cisco PGW 2200 Softswitch software Release 9.8,
you can use the original disk drives to revert to the previous Cisco PGW 2200 Softswitch software
version if there is a problem during the upgrade procedure. For instructions on how to revert to the
previous Cisco PGW 2200 Softswitch software version, see the “Falling Back to Solaris 8 and
Cisco PGW 2200 Softswitch Release 9.5 or 9.6” section on page 5-27.
Note
If you are upgrading from the primary disk, use Veritas Volume Manager to use the second disk for
Solaris 8 fallback. For further information, refer to
http://www.sun.com/products-n-solutions/hardware/docs/Software/Storage_Software/VERITAS_Volu
me_Manager/index.html.
Step 1
Shut down PGW host 2:
# init 0
Step 2
Wait for the system to return to the boot prompt and load the Cisco Solaris 10 Operating System Startup
CD in the CD-ROM drive.
Note
Step 3
If you are replacing the disk drives, power off the system and label, and remove the existing
disks, using proper anti-static procedures. Install the new disk drives in the same slots the
original disk drives were located. Finally, power up the system. For more information, see the
Sun System Manual for your platform.
Install the Sun Solaris 10 operating system using the procedures in the “Loading the Sun Solaris 10
Operating System” section on page 2-2.
Caution
Do not format or modify the second disk drive. Unless you replaced the disk drives in Step 2,
the second disk contains the original Solaris 8 system if you are using Veritas Volume
Manager. The second disk is used as a fallback in case of a failure in the Solaris 10 upgrade.
Loading the Sun Solaris 10 Operating Environment Packages
Before you install the Cisco PGW 2200 Softswitch software, load the Sun Solaris 10 Operating
Environment packages using the steps in the “Loading the Sun Solaris 10 Operating Environment”
section.
Cisco PGW 2200 Softswitch Release 9.8 Software Installation and Configuration Guide
5-8
OL-18083-01
Chapter 5
Migrating to Solaris 10 and Cisco PGW 2200 Softswitch Software Release 9.8
Migration from Release 9.5 or 9.6 to Release 9.8 without Platform Changes
Caution
Do not load Solstice DiskSuite (CSCOh023) if you are using Veritas Volume Manager to use the second
disk for Solaris 8 fallback. For more information about Veritas Volume Manager, refer to
http://www.sun.com/products-n-solutions/hardware/docs/Software/Storage_Software/VERITAS_Volu
me_Manager/index.html.
Restoring Data Files
Follow these instructions to restore the Cisco PGW 2200 Softswitch configuration files (MGC.tar) on
PGW host 2:
Step 1
Log in as root and move the Cisco PGW 2200 Softswitch configuration files to the /tmp directory.
# cd /var/tmp
Step 2
Create a mount point.
# mkdir saved
# cd /var/tmp/saved
Step 3
Store the data files:
a.
Local tape drive—Store the files on a local tape drive.
# tar xvf /dev/rmt/0
b.
Note
Remote file server—Using the ftp utility, transfer the MGC.tar and ttbackup.tar files from the
remote file server to the /tmp/saved directory.
Use the binary mode of ftp to transfer the MGC.tar and ttbackup.tar files.
Step 4
Verify that the files successfully transfer to the remote file server before continuing.
Step 5
Create an MGC directory and extract Cisco PGW 2200 Softswitch data files:
#
#
#
#
#
#
#
#
cd /opt
mkdir CiscoMGC
# Create MGC directory
cd /opt/CiscoMGC
mkdir snmp
# Create snmp directory
cp /var/tmp/saved/MGC.tar MGC.tar
tar xvf MGC.tar
# Extract MGC data files
mkdir local
# Create snmp directory
cp /var/tmp/saved/ttbackup.tar ./local/ttbackup.tar
Step 6
Verify that the etc and dialPlan directories are present.
Step 7
If you saved the snmpd.cnf file, copy the file to the /opt/CiscoMGC/snmp directory:
# cp /opt/CiscoMGC/dialPlan/snmpd.cnf /opt/CiscoMGC/snmp
Step 8
Enter the following command to reboot the Cisco PGW 2200 Softswitch:
# init 6
Installing and Verifying the Cisco PGW 2200 Softswitch Software
Follow these steps to install the Cisco PGW 2200 Softswitch software on PGW host 2:
Cisco PGW 2200 Softswitch Release 9.8 Software Installation and Configuration Guide
OL-18083-01
5-9
Chapter 5 Migrating to Solaris 10 and Cisco PGW 2200 Softswitch Software Release 9.8
Migration from Release 9.5 or 9.6 to Release 9.8 without Platform Changes
Step 1
Install the Cisco PGW 2200 Softswitch software using the instructions in the “Installing the
Cisco PGW 2200 Softswitch Software Release 9.8 and Higher Releases” section on page 3-3.
Step 2
When the installation is complete, perform the following steps on PGW host 2:
Step 3
Log into PGW host 2 as mgcusr.
Step 4
Enter the following command to start the Cisco PGW 2200 Softswitch software on PGW host 2:
% sudo /etc/init.d/CiscoMGC start
Step 5
If you are migrating from the Sparc platform to the Opteron platform, start a provisioning session and
regenerate the .bin files:
mml> prov-sta
mml> prov-cpy
Caution
Step 6
Complete this step only if you are migrating from the Sparc platform to the Opteron platform.
Verify that the migration to the Cisco PGW 2200 Softswitch software Release 9.8 is complete and that
all protocols are operational:
mml>
mml>
mml>
mml>
mml>
Step 7
rtrv-ne
rtrv-tc:all
rtrv-dest:all
rtrv-c7lnk:all
rtrv-iplnk:all
Enter the following command on the standby host to verify that call replication is occurring between
PGW hosts 1 and 2:
mml> rtrv-tc:all
----------rtrv-tt-database-------# numan-rtrv:cliprefix:clisetname="1111",cliprefix="1"
# numan-rtrv:announcement:annId=1,gwtype="AS5400"
# numan-rtrv:porttbl:digitstring="100034"
Step 8
Note
You have now upgraded the PGW host 2 to the Release 9.8 software. Promote PGW host 2 to active:
This step sets PGW host 1 to standby.
mml> sw-over::confirm
Step 9
When the switchover is complete, verify that PGW host 2 is processing calls.
mml> rtrv-tc:all
Note
If the call replication fails, or if new active host is not processing calls, see the
Cisco PGW 2200 Softswitch Release 9 Operations, Maintenance, and Troubleshooting Guide.
Migrating the First Cisco PGW 2200 Softswitch Software to Release 9.8
Use the steps in the following sections to upgrade PGW 1 to Cisco PGW 2200 Softswitch Release 9.8.
Cisco PGW 2200 Softswitch Release 9.8 Software Installation and Configuration Guide
5-10
OL-18083-01
Chapter 5
Migrating to Solaris 10 and Cisco PGW 2200 Softswitch Software Release 9.8
Migration from Release 9.5 or 9.6 to Release 9.8 without Platform Changes
Note
If you want to use two new disks drives to install the Cisco PGW 2200 Softswitch software Release 9.8,
complete the “Installing Sun Solaris 10” and “Loading the Sun Solaris 10 Operating Environment
Packages” sections before you begin this procedure.
Backing Up the Cisco PGW 2200 Softswitch Configuration Files
Before you begin the migration to the new version of the Cisco PGW 2200 Softswitch software, you
need to back up your current system files. This section describes the following backup procedures:
•
Create a remote backup of the current Cisco PGW 2200 Softswitch configuration using the
mgcbackup utility. You can use these backup files to revert to the original version of the
Cisco PGW 2200 Softswitch software if there is a problem during migration.
•
Create an MGC.tar archive of the current Cisco PGW 2200 Softswitch settings.
Follow these steps to back up the configuration files on PGW host 1:
Step 1
Note
Verify that the pom.dataSync variable is set to False on both Cisco PGW 2200 Softswitch hosts. To edit
the pom.datasync variable, use an editor such as vi to edit /opt/CiscoMGC/etc/XECfgParm.dat.
If you modify the pom.dataSync variable, restart the active and standby Cisco PGW 2200 Softswitch
hosts sequentially to ensure that the changes take effect.
Step 2
Log in to the PGW host 1 as mgcusr.
Step 3
Enter the following command to stop the Cisco PGW 2200 Softswitch.
% sudo /etc/init.d/CiscoMGC stop
Step 4
Follow these steps to back up the system:
a.
Local Tape Backup—Using the mgcbackup utility, back up the system to the local tape drive.
% /opt/CiscoMGC/local/mgcbackup –d /dev/rmt/0
b.
Remote File Server Backup—Enter following commands to use the mgcbackup utility to back up
the system to local directory.
% mkdir /var/tmp/upgrade
% cd /var/tmp/upgrade
% /opt/CiscoMGC/local/mgcbackup –d /var/tmp/upgrade
Note
The backup file is stored in the specified directory path in the following format:
mgc_<hostname>_<yyyymmdd>_<hhmmss>_backup
Where:
• hostname is the name of the Cisco PGW 2200 Softswitch host, such as MGC-01.
• yyyymmdd is the date the backup file is created, in a year-month-day format, such as 20011130.
• hhmmss is the time the backup file is created, in an hour-minute-second format, such as
115923.
c.
Verify that the backup was successful by listing the files in your backup directory:
Cisco PGW 2200 Softswitch Release 9.8 Software Installation and Configuration Guide
OL-18083-01
5-11
Chapter 5 Migrating to Solaris 10 and Cisco PGW 2200 Softswitch Software Release 9.8
Migration from Release 9.5 or 9.6 to Release 9.8 without Platform Changes
% /opt/CiscoMGC/local/mgcbackup -l
Caution
Step 5
You must now move the backup file to a remote file server using the ftp program so it can be
recovered if you need to revert the Cisco PGW 2200 Softswitch to the previous version of
Solaris or Cisco PGW 2200 Softswitch software. You are responsible for providing the
mechanism and storage location.
Stop TimesTen database replication on PGW hosts 1 and 2:
% ./delete_replication.sh
Step 6
Follow these steps to back up the MMDB on the PGW host 1:
a.
Log in to the PGW host 1 as mgcusr.
b.
Create the export.ttdb file:
% /opt/CiscoMGC/local/backupDb.sh /opt/CiscoMGC/etc/export.ttdb
c.
Create the migrate.ttdb file:
% ttMigrate -c DSN=howdydb /opt/CiscoMGC/etc/migrate.ttdb
d.
Remove the existing version of the MMDB file:
% rm -f /opt/CiscoMGC/etc/version.ttdb
e.
Determine the version of the version.ttdb file:
% /opt/TimesTen/32/bin/ttVersion presenter
The Cisco PGW 2200 Softswitch displays output similar to the following example:
[ output = "TimesTen Release x.y.z build time ... ]
f.
Replace the TimesTen database Release x.y.z with the new version:
% echo xyz >/opt/CiscoMGC/etc/version.ttdb
g.
Ensure that the version.ttdb, migrate.ttdb, and export.ttdb files are present:
% cd /opt/CiscoMGC/etc
% ls *.ttdb
Step 7
Log in to PGW 1 as root.
Step 8
Save the Cisco PGW 2200 Softswitch configuration data:
# cp /opt/CiscoMGC/snmp/snmpd.cnf /opt/CiscoMGC/dialPlan
Note
Step 9
If you are using Cisco MNM, save the snmpd.cnf file (located in /opt/CiscoMGC/snmp) before the
migration starts.
Move to the CiscoMGC directory:
# cd /opt/CiscoMGC
Step 10
Back up the current Cisco PGW 2200 Softswitch configuration files:
# tar cvf /var/tmp/upgrade/MGC.tar ./etc ./dialPlan
# cp ./local/ttbackup.tar /var/tmp/upgrade/ttbackup.tar
Cisco PGW 2200 Softswitch Release 9.8 Software Installation and Configuration Guide
5-12
OL-18083-01
Chapter 5
Migrating to Solaris 10 and Cisco PGW 2200 Softswitch Software Release 9.8
Migration from Release 9.5 or 9.6 to Release 9.8 without Platform Changes
Step 11
Verify that configuration files were successfully backed up. The
mgc_<hostname>_<yyyymmdd>_<hhmmss>_backup file and the MGC.tar file must be present.
# cd /var/tmp/upgrade
# ls
Step 12
Caution
At this point, you have saved all the required data in tar files in /var/tmp/upgrade. Follow these steps to
move these files to a blank tape or remote machine so that you can recover them after installing
Solaris 10.
You are responsible for providing the backup mechanism and storage location.
a.
Local tape drive—Enter the following commands to store the files on a local tape drive:
# cd /var/tmp/upgrade
# tar cvf /dev/rmt/0 MGC.tar ttbackup.tar mgc_MGC-01_20011130_115923_backup.tar
b.
Note
Step 13
Remote file server—Using the ftp utility, transfer the MGC.tar and ttbackup.tar files from the
/var/tmp/upgrade directory to a remote file server.
Use the binary mode of ftp to transfer the MGC.tar and ttbackup.tar files.
Verify that the files are successfully transferred to the remote file server before continuing.
At this point, the Cisco PGW 2200 Softswitch configuration data have been saved in MGC.tar files on a
tape or remote file server. The file backup is now complete. Proceed to Installing Sun Solaris 10.
Installing Sun Solaris 10
Follow these steps to install Sun Solaris 10 on PGW host 1:
Note
If you want to use two new hard disks to install the Cisco PGW 2200 Softswitch software Release 9.8,
you can use the original hard disks to revert to the previous Cisco PGW 2200 Softswitch software
version if there is a problem during the upgrade procedure. For instructions on how to revert to the
previous Cisco PGW 2200 Softswitch software version, refer to Falling Back to Solaris 8 and
Cisco PGW 2200 Softswitch Release 9.5 or 9.6.
Note
If you are upgrading from the primary disk, you need use Veritas Volume Manager to use the second disk
for Solaris 8 fallback. For further information, refer to
http://www.sun.com/products-n-solutions/hardware/docs/Software/Storage_Software/VERITAS_Volu
me_Manager/index.html.
Step 1
Shut down PGW host 1:
# init 0
Cisco PGW 2200 Softswitch Release 9.8 Software Installation and Configuration Guide
OL-18083-01
5-13
Chapter 5 Migrating to Solaris 10 and Cisco PGW 2200 Softswitch Software Release 9.8
Migration from Release 9.5 or 9.6 to Release 9.8 without Platform Changes
Step 2
Wait for the system to return to the boot prompt then load the Cisco Solaris 10 Operating System Startup
CD in the CD-ROM drive.
If you are replacing the hard disks, power off the system, label, and remove the existing disks
using proper anti-static procedures. Install the new disk drives in the same slots the original disk
drives were located. Finally, power up the system. See the Sun System Manual for your platform.
Note
Step 3
Install the Sun Solaris 10 operating system using the procedures in “Loading the Sun Solaris 10
Operating System” section on page 2-2.
Caution
Do not format or modify the second disk drive. Unless the disk drives were replaced in Step 2,
the second disk contains the original Solaris 8 system if you are Veritas Volume Manager. The
second disk is used as a fallback in case of a failure in the Solaris 10 upgrade.
Loading the Sun Solaris 10 Operating Environment Packages
Before you install the Cisco PGW 2200 Softswitch software, load the Sun Solaris 10 Operating
Environment packages using the steps in the “Loading the Sun Solaris 10 Operating Environment”
section on page 2-72.
Caution
Do not load Solstice DiskSuite (CSCOh023) if you are using Veritas Volume Manager to use the second
disk for Solaris 8 fallback. For more information about Veritas Volume Manager, refer to
http://www.sun.com/products-n-solutions/hardware/docs/Software/Storage_Software/VERITAS_Volu
me_Manager/index.html.
Restoring Data Files
Follow these instructions to restore the Cisco PGW 2200 Softswitch configuration files (MGC.tar) on
PGW host 1:
Step 1
Log in as root and move the Cisco PGW 2200 Softswitch configuration files to the /tmp directory.
# cd /var/tmp
Step 2
Create a mount point.
# mkdir saved
# cd /var/tmp/saved
Step 3
Store the data files:
a.
Local tape drive: Store the files on a local tape drive.
# tar xvf /dev/rmt/0
b.
Note
Remote file server—Using the ftp utility, transfer the MGC.tar and ttbackup.tar files from the
remote file server to the /tmp/saved directory.
Use the binary mode of ftp to transfer the MGC.tar and ttbackup.tar files.
Cisco PGW 2200 Softswitch Release 9.8 Software Installation and Configuration Guide
5-14
OL-18083-01
Chapter 5
Migrating to Solaris 10 and Cisco PGW 2200 Softswitch Software Release 9.8
Migration from Release 9.5 or 9.6 to Release 9.8 without Platform Changes
Step 4
Verify that the files successfully transfer to the remote file server before continuing.
Step 5
Create an CiscoMGC directory and extract Cisco PGW 2200 Softswitch data files:
#
#
#
#
#
#
#
#
cd /opt
mkdir CiscoMGC
# Create MGC directory
cd /opt/CiscoMGC
mkdir snmp
# Create snmp directory
cp /var/tmp/saved/MGC.tar MGC.tar
tar xvf MGC.tar
# Extract MGC data files
mkdir local
# Create snmp directory
cp /var/tmp/saved/ttbackup.tar ./local/ttbackup.tar
Step 6
Verify that the etc and dialPlan directories are present.
Step 7
If you saved the snmpd.cnf file, copy the file to the /opt/CiscoMGC/snmp directory:
# cp /opt/CiscoMGC/dialPlan/snmpd.cnf /opt/CiscoMGC/snmp
Step 8
Enter the following command to reboot the Cisco PGW 2200 Softswitch:
# init 6
Installing and Verifying the Cisco PGW 2200 Softswitch Software
Follow these steps to install the Cisco PGW 2200 Softswitch software on PGW host 1:
Step 1
Install the Cisco PGW 2200 Softswitch software using the instructions in Installing the
Cisco PGW 2200 Softswitch Software Release 9.8 and Higher Releases.
Step 2
Set the value of pom.dataSync to true on PGW hosts 1 and 2. To update the pom.dataSync value, use an
editor such as vi to edit the XECfgParm.dat in the /opt/CiscoMGC/etc/ directory.
Step 3
Log in to PGW host 1 as mgcusr.
Step 4
Enter the following command to start the Cisco PGW 2200 Softswitch software on PGW host 1:
% sudo /etc/init.d/CiscoMGC start
Step 5
Wait for PGW host 1 to come up fully as standby host.
Step 6
When the Cisco PGW 2200 Softswitch software starts, it updates the following files to function with the
Cisco PGW 2200 Softswitch software Release 9.8:
Step 7
•
Data files in the /opt/CiscoMGC/etc directory
•
Data files in the /opt/CiscoMGC/etc/CONFIG_LIB/CFG_config-name directory specified by the
/opt/CiscoMGC/etc/active_link file
Enter the following command on PGW host 1 to restart TimesTen database replication:
% /opt/CiscoMGC/local/setup_replication.sh peerHost active
Step 8
Enter the following command on PGW host 2 to stop the Cisco PGW 2200 Softswitch software:
% init 0
Step 9
Enter the following command on PGW host 2:
% /opt/CiscoMGC/local/setup_replication.sh peerHost standby
Step 10
Verify that the migration to the Release 9.8 software is complete and that all protocols are operational:
mml> rtrv-ne
mml> rtrv-tc:all
mml> rtrv-dest:all
Cisco PGW 2200 Softswitch Release 9.8 Software Installation and Configuration Guide
OL-18083-01
5-15
Chapter 5 Migrating to Solaris 10 and Cisco PGW 2200 Softswitch Software Release 9.8
Migration from Release 9.5 or 9.6 to Release 9.8 without Platform Changes
mml> rtrv-c7lnk:all
mml> rtrv-iplnk:all
Step 11
Enter the following command on the standby host to verify that call replication is occurring between
PGW hosts 1 and 2:
mml> rtrv-tc:all
Text similar to the following is displayed:
----------rtrv-tt-database-------# numan-rtrv:cliprefix:clisetname="1111",cliprefix="1"
# numan-rtrv:announcement:annId=1,gwtype="AS5400"
# numan-rtrv:porttbl:digitstring="100034"
Step 12
You have now completed upgrading PGW host 1 to the Release 9.8 software. Enter the following
command to promote PGW host 1 to active:
mml> sw-over::confirm
Step 13
When the switchover is complete, enter the following command to verify that PGW host 1 is processing
calls.
mml> rtrv-tc:all
Note
Step 14
If the call replication fails, or if new Active Host is not processing calls, see the
Cisco PGW 2200 Softswitch Release 9 Operations, Maintenance, and Troubleshooting Guide.
Restart PGW host 2 in order to ensure that the changes to the pom.dataSync variable take effect.
Transferring Additional Configuration Files
If you need to transfer additional configuration files, follow these steps, using the config-lib tool:
Step 1
Set the pom.dataSync variable to False on both Cisco PGW 2200 Softswitch hosts. To view or modify
the pom.dataSync variable, use an editor such as vi to edit /opt/CiscoMGC/etc/XECfgParm.dat.
Step 2
Restart the active and standby Cisco PGW 2200 Softswitch hosts sequentially to ensure that the changes
to the pom.dataSync variable take effect.
Step 3
Complete the following steps to migrate the files to PGW host 2:
a.
Log in to PGW host 2 as root.
b.
Enter the following command to stop the Cisco PGW 2200 Softswitch software on PGW host 2:
# /etc/init.d/CiscoMGC stop
c.
Run the config-lib application:
# config-lib
d.
At the configuration file library main menu, enter 3 and press Enter.
The Configuration File Library Main Menu
1. List Configuration Versions in Library
2. Save Production to a new Library Version
3. Copy Library Version to Production
Cisco PGW 2200 Softswitch Release 9.8 Software Installation and Configuration Guide
5-16
OL-18083-01
Chapter 5
Migrating to Solaris 10 and Cisco PGW 2200 Softswitch Software Release 9.8
Migration from Release 9.5 or 9.6 to Release 9.8 without Platform Changes
4. Remove Configuration Library Version
Enter Selection or 'q' to quit> 3
e.
The menu lists available configuration files.
Configuration Versions
1. sip-upgrade-0131-3
2. sip-upgrade-0131
3. sip-upgrade-0131-2
4. sip-upgrade-0130
***Current Production Version = sip-upgrade-0131-3
Enter Selection to Copy or 'q' to go back>
f.
Enter the number of the configuration you want to migrate and press Enter.
In this example, enter 2 to migrate the sip-upgrade-0131 configuration.
Text similar to the following is displayed:
Enter Selection to Copy or 'q' to go back> 2
***Start checking if migration is needed...
starting migration ...
Note
Command output is truncated. Config-lib lists the related files as they are migrated to
Release 9.8.
***finish checking migration...
This operation will copy the selected version of each configuration file
from the LIBRARY to the PRODUCTION area.
Do you want to overwrite the production files (y/n)?
g.
At the prompt, enter y and press Enter to copy the files to the production area.
Do you want to overwrite the production files (y/n)? y
removing data files in Production Area....
Copying data files of selected version to the data Production Area....
Completed copy
h.
Enter q to exit config-lib.
The Configuration File Library Main Menu
1. List Configuration Versions in Library
2. Save Production to a new Library Version
3. Copy Library Version to Production
4. Remove Configuration Library Version
Enter Selection or 'q' to quit> q
Quit
Step 4
Perform the following steps on PGW host 2 when the file transfer is complete:
a.
Enter the following command to start the Cisco PGW 2200 Softswitch software:
# /etc/init.d/CiscoMGC start
b.
Verify that all protocols are operational:
mml>
mml>
mml>
mml>
rtrv-ne
rtrv-tc:all
rtrv-dest:all
rtrv-c7lnk:all
Cisco PGW 2200 Softswitch Release 9.8 Software Installation and Configuration Guide
OL-18083-01
5-17
Chapter 5 Migrating to Solaris 10 and Cisco PGW 2200 Softswitch Software Release 9.8
Migration from Release 9.5 or 9.6 to Release 9.8 without Platform Changes
mml> rtrv-iplnk:all
c.
Enter the following command on the standby host to verify that call replication is occurring between
the active and standby Cisco PGW 2200 Softswitch hosts:
mml> rtrv-tc:all
Step 5
Promote PGW host 2 to active:
mml> sw-over::confirm
Step 6
When the switchover is complete, verify that PGW host 2 is processing calls:
mml> rtrv-tc:all
Note
Step 7
If the call replication fails, or if the new Active Host is not processing calls, see the
Cisco PGW 2200 Softswitch Release 9 Operations, Maintenance, and Troubleshooting Guide.
Complete the following steps to migrate the files to PGW host 1:
a.
Log in to PGW host 1 as root.
b.
Enter the following command to stop the Cisco PGW 2200 Softswitch software on PGW host 1:
# /etc/init.d/CiscoMGC stop
c.
Enter the following command on PGW host 1:
# config-lib
d.
At the configuration file library main menu, type 3.
The Configuration File Library Main Menu
1. List Configuration Versions in Library
2. Save Production to a new Library Version
3. Copy Library Version to Production
4. Remove Configuration Library Version
Enter Selection or 'q' to quit> 3
e.
The menu lists available configuration files.
Configuration Versions
1. sip-upgrade-0131-3
2. sip-upgrade-0131
3. sip-upgrade-0131-2
4. sip-upgrade-0130
***Current Production Version = sip-upgrade-0131-3
Enter Selection to Copy or 'q' to go back>
f.
Enter the number of the configuration you want to migrate.
Enter Selection to Copy or 'q' to go back> 2
***Start checking if migration is needed...
starting migration ...
Note
Command output is truncated. Config-lib lists the related files as they are migrated to Release
9.8.
Cisco PGW 2200 Softswitch Release 9.8 Software Installation and Configuration Guide
5-18
OL-18083-01
Chapter 5
Migrating to Solaris 10 and Cisco PGW 2200 Softswitch Software Release 9.8
Migration from Release 9.5 or 9.6 to Release 9.8 without Platform Changes
migration completed successfully
***finish checking migration...
This operation will copy the selected version of each configuration file
from the LIBRARY to the PRODUCTION area.
Do you want to overwrite the production files (y/n)?
g.
Enter y and press Enter to copy the files to the production area.
Do you want to overwrite the production files (y/n)? y
removing data files in Production Area....
Copying data files of selected version to the data Production Area....
Completed copy
h.
Enter q to exit config-lib.
The Configuration File Library Main Menu
1. List Configuration Versions in Library
2. Save Production to a new Library Version
3. Copy Library Version to Production
4. Remove Configuration Library Version
Enter Selection or 'q' to quit> q
Quit
Step 8
Perform the following steps when the file transfer is complete:
a.
Set the value of pom.dataSync to true on PGW hosts 1 and 2. To update the pom.dataSync value,
use an editor such as vi to edit the XECfgParm.dat in the /opt/CiscoMGC/etc/ directory.
b.
Log in to PGW host 1 as root.
a.
Enter the following command to start the Cisco PGW 2200 Softswitch software on PGW host 1:
# /etc/init.d/CiscoMGC start
b.
Wait for PGW host 1 to come up fully as standby host.
c.
Stop the Cisco PGW 2200 Softswitch software on PGW host 2:
# init 0
d.
Set PGW host 2 to standby:
# /opt/CiscoMGC/local/setup_replication.sh peerHost standby
Step 9
Verify that all protocols are operational:
mml>
mml>
mml>
mml>
mml>
Step 10
rtrv-ne
rtrv-tc:all
rtrv-dest:all
rtrv-c7lnk:all
rtrv-iplnk:all
Enter the following command on the standby host to verify that call replication is occurring between
PGW hosts 1 and 2:
mml> rtrv-tc:all
Step 11
Promote PGW host 1 to active:
mml> sw-over::confirm
Step 12
When the switchover is complete, verify that PGW host 1 is processing calls.
mml> rtrv-tc:all
Cisco PGW 2200 Softswitch Release 9.8 Software Installation and Configuration Guide
OL-18083-01
5-19
Chapter 5
Migration from Release 9.7 to Release 9.8 without Platform Changes
Note
Step 13
Migrating to Solaris 10 and Cisco PGW 2200 Softswitch Software Release 9.8
If the call replication fails, or if new Active Host is not processing calls, refer to the
Cisco PGW 2200 Softswitch Release 9 Operations, Maintenance, and Troubleshooting Guide.
Restart PGW host 2 in order to ensure that the changes to the pom.dataSync variable take effect.
Migration from Release 9.7 to Release 9.8 without Platform
Changes
Perform the following procedure to migrate from Cisco PGW 2200 Softswitch Release 9.7 to
Release 9.8 without platform changes:
Step 1
Log in the Cisco PGW 2200 Softswitch as mgcusr.
Step 2
Enter the following command to stop the Cisco PGW 2200 Softswitch software:
% sudo /etc/init.d/CiscoMGC stop
Step 3
Delete the replication between the active and standby pair of the Cisco PGW 2200 Softswitches.
% ./delete_replication.sh
Step 4
Back up the .odbc.ini file manually using the following command:
% cp /opt/CiscoMGC/local/.odbc.ini /opt/CiscoMGC/etc/.odbc.ini.ttdb
Step 5
Locate the active configuration using the following commands:
% cd /opt/CiscoMGC/etc
% cd active_link
% pwd
The text similar to the following is displayed:
/opt/CiscoMGC/etc/CONFIG_LIB/CFG_Sip
Step 6
Back up the active configuration using the following commands:
% cd /opt/CiscoMGC/etc/CONFIG_LIB
% tar cvf CFG_backup973.tar ./CFG_Sip
Step 7
Back the snmp folder using the following command:
% cd /opt/CiscoMGC
% tar cvf SNMP_backup973.tar ./snmp
Step 8
Back the dial plan configurations using the following commands:
% cd /opt/CiscoMGC
% tar cvf DP_backup973.tar ./dialPlan
Step 9
Log in again as root and uninstall the Cisco PGW 2200 Softswitch software. See the “Removing a
Cisco PGW 2200 Softswitch Software Version: Sample Output for uninstall.sh” section on page E-1.
Cisco PGW 2200 Softswitch Release 9.8 Software Installation and Configuration Guide
5-20
OL-18083-01
Chapter 5
Migrating to Solaris 10 and Cisco PGW 2200 Softswitch Software Release 9.8
Upgrading Lively from Sparc-based Platforms to Opteron-based Platforms
Answer y to the question, “Is the uninstall being done in order to upgrade to a new version of
the software?”, at the beginning of the uninstallation procedure.
Note
Step 10
Install the Cisco PGW 2200 Softswitch software Release 9.8 as described in the “Installing the
Cisco PGW 2200 Softswitch Software Release 9.8 and Higher Releases” section on page 3-3
Step 11
Start the Cisco PGW 2200 Softswitch software:
% sudo /etc/init.d/CiscoMGC start
Upgrading Lively from Sparc-based Platforms to Opteron-based
Platforms
The Cisco PGW 2200 Softswitch supports a live upgrade from Sparc-based platforms to Opteron-based
platforms. There is no service outrage during the upgrade. The service and data on the Sparc-based
platforms are transferred seamlessly to the Opteron-based platforms.
Before You Start
Before you do the live upgrade from the old Sparc-based platforms to the new Opteron-based platforms,
make sure you have full access to the following platforms:
•
the old Sparc-based active Cisco PGW 2200 Softswitch (referred to as PGW 1)
•
the old Sparc-based standby Cisco PGW 2200 Softswitch (referred to as PGW 2)
•
A pair of new Opteron-based hardware platforms for Cisco PGW 2200 Softswitch (referred to as
PGW 3 and PGW 4)
Verify if the two scripts, liveUpgrade.sh and mgcTTmigrate (Sparc-based platform scripts), are in the
/opt/CiscoMGC/local directory on PGW 1 and 2. If you cannot find them, you can download them from
the Cisco website.
To download the mgcTTmigrate script, go to
http://www.cisco.com/cgi-bin/Software/Tablebuild/doftp.pl?ftpfile=/cisco/voice/mgc/9.7.3/opteron/mg
cTTmigrate_opteron.tar.
To download the liveUpgrade.sh script, see Table 5-3.
Table 5-3
Links to the liveUpgrade.sh Script for Different Software Releases
Software
Releases
Links to the liveUpgrade.sh Script
9.5(2)
http://www.cisco.com/cgi-bin/tablebuild.pl/mgc-952
9.6(1)
http://www.cisco.com/cgi-bin/tablebuild.pl/mgc-961
9.7(3)
http://www.cisco.com/cgi-bin/tablebuild.pl/mgc-973-sparc (Sparc)
http://www.cisco.com/cgi-bin/tablebuild.pl/mgc-973-opteron (Opteron)
Cisco PGW 2200 Softswitch Release 9.8 Software Installation and Configuration Guide
OL-18083-01
5-21
Chapter 5 Migrating to Solaris 10 and Cisco PGW 2200 Softswitch Software Release 9.8
Upgrading Lively from Sparc-based Platforms to Opteron-based Platforms
Note
No provisioning is allowed during the live upgrade. Before performing the live upgrade, you must stop
all the MML provisioning sessions and quit from the MML interface on the old Sparc-based active and
standby pair of Cisco PGW 2200 Softswitches. Provisioning is allowed only when the new pair of
Cisco PGW 2200 Softswitches on Opteron-based platforms are running normally as an active and
standby pair. To view the status of the Cisco PGW 2200 Softswitch, use the MML command “rtrv-ne”.
Live Upgrade Procedure
This section describes the live upgrade procedure from Sparc-based platforms to Opteron-based
platforms.
First, you migrate PGW 2 to PGW 4. When the migration is complete, PGW 4 can serve as a replacement
of PGW 2. You stop PGW 2 and do a switchover from PGW 1 to PGW 4. When the switchover is
complete, you migrate PGW 1 to PGW 3. Finally you enable the MMDB database replication between
PGW 3 and PGW 4.
Perform the following steps to do the live upgrade:
Step 1
Step 2
Verify that the pom.dataSync variable is set to False on both PGW 1 and PGW 2. To view or modify the
pom.dataSync variable, use an editor such as vi to edit /opt/CiscoMGC/etc/XECfgParm.dat.
Note
You must set pom.dataSync to false on the active and standby pair of
Cisco PGW 2200 Softswitches before you perform the live upgrade.
Note
If you modify the pom.dataSync variable, make sure you save the file,
/opt/CiscoMGC/etc/XECfgParm.dat. You don’t have to restart the Cisco PGW 2200 Softswitch
after the modification of this variable.
On PGW 2, log in as root. Then run the following script under /opt/CiscoMGC/local.
# cd /opt/CiscoMGC/local
# ./liveUpgrade.sh export
Text similar to the following is displayed:
You are running as root - Good...
Stopping TimesTen database replication on sh-hox
Stopped TimesTen database replication successfully
Backing up the Main Memory Database (MMDB) on sh-hox
Back up the Main Memory Database (MMDB) successfully
All configuration files were exported successfully in /var/tmp/upgrade/
please ftp them to your file server
Step 3
Back up the odbc.ini file using the following command:
# cp /opt/CiscoMGC/local/.odbc.ini /var/tmp/upgrade/
Note
Step 3 is only required when PGW 2’s software version is Cisco PGW 2200 Softswitch
Release 9.7.
Cisco PGW 2200 Softswitch Release 9.8 Software Installation and Configuration Guide
5-22
OL-18083-01
Chapter 5
Migrating to Solaris 10 and Cisco PGW 2200 Softswitch Software Release 9.8
Upgrading Lively from Sparc-based Platforms to Opteron-based Platforms
Step 4
Use ftp utility to transfer MGC.tar, ttbackup.tar, and .odbc.ini which are generated in Step 2 and Step 3
from /var/tmp/upgrade directory to the remote file server.
Note
Use the binary mode of ftp to transfer the three files, MGC.tar, ttbackup.tar, and .odbc.ini.
Step 5
Verify that the files are successfully transferred to the remote file server before continuing.
Step 6
Install the Sun Solaris 10 operating system on PGW 4 using the procedure in the “Loading the Sun
Solaris 10 Operating System” section on page 2-2.
Step 7
Install the Sun Solaris 10 operating environment packages on PGW 4 using the steps in the “Loading
the Sun Solaris 10 Operating Environment” section on page 2-72.
Step 8
On PGW 4, log in as root.
Step 9
Use the following commands to create the saved directory under /var/tmp.
# cd /var/tmp
# mkdir saved
# cd /var/tmp/saved
Step 10
Use the ftp utility to transfer the three files, MGC.tar, ttbackup.tar, and .obdc.ini from the remote file
server to the current directory /var/tmp/saved on PGW 4.
Step 11
Verify that the files are successfully transferred from the remote file server before continuing.
Step 12
Download the liveUpgrade.sh and mgcTTmigrate scripts (Opteron-based platform scripts) from the
Cisco website. Then put them under /var/tmp/saved. (See “Before You Start” section on page 5-21.)
Step 13
Use the following commands to change the file permissions of the two scripts, liveUpgrade.sh and
mgcTTmigrate.
# chmod 777 liveUpgrade.sh
# chmod 777 mgcTTmigrate
Step 14
On PGW 4, run the following script.
# ./liveUpgrade.sh import
Text similar to the following is displayed:
You are running as root - Good...
make sure PGW configuration files has been fetched from your file server
and already placed in /var/tmp/saved directory
Would you like to continue? [y] [y,n,?,q]
Step 15
Enter y and press Enter to continue.
Text similar to the following is displayed:
remove bin files due to bin format incompatibility between Opteron and Sparc platform
removed /opt/CiscoMGC/dialPlan/*.bin
removed /opt/CiscoMGC/etc/*.bin
removed /opt/CiscoMGC/etc/active_link/*.bin
removed /opt/CiscoMGC/etc/*.ttdb
Finished import configuration files. Please go ahead to install PGW software
Step 16
Install the Cisco PGW 2200 Softswitch software Release 9.7(3) on PGW 4 using the steps in Chapter 3,
“Installing the Cisco PGW 2200 Softswitch Software Release 9.8 and Higher.”
Step 17
Restore the .odbc.ini file using the following command on PGW 4:
# cp /var/tmp/saved/.odbc.ini /opt/CiscoMGC/local/
Cisco PGW 2200 Softswitch Release 9.8 Software Installation and Configuration Guide
OL-18083-01
5-23
Chapter 5 Migrating to Solaris 10 and Cisco PGW 2200 Softswitch Software Release 9.8
Upgrading Lively from Sparc-based Platforms to Opteron-based Platforms
Step 18
Use the following commands to move to the /opt/CiscoMGC/local directory and start the TimesTen
database.
# cd /opt/CiscoMGC/local
# /etc/init.d/tt start
Text similar to the following is displayed:
The tt60 daemon has started successfully.
Step 19
Change the login to mgcusr using the following command:
# su - mgcusr
Step 20
Run db_count.sh script to verify that the TimesTen database is empty.
% ./db_count.sh
Text similar to the following is displayed:
Counting the rows in each database table.
CISCO.ANNOUNCEMENT < 0 >
CISCO.A_CHARGE_ORIGIN < 0 >
CISCO.A_NUMBERDIALPLANSELECTION < 0 >
CISCO.BLACKLIST_A < 0 >
CISCO.BLACKLIST_B < 0 >
CISCO.CBBOOKINGINFO < 0 >
CISCO.CBMONITORINGINFO < 0 >
CISCO.CLIIPADDRESS < 0 >
CISCO.CLIPREFIX < 0 >
CISCO.FULLNUMBERTRANSLATION < 0 >
CISCO.H323IDDIVFROM < 0 >
CISCO.LIENTRIES < 0 >
CISCO.NUMBERTERM < 0 >
CISCO.PORTEDNUMBERS < 0 >
CISCO.SCRIPT < 0 >
CISCO.WHITELIST_A < 0 >
CISCO.WHITELIST_B < 0 >
Step 21
Import the database files from the ttbackup.tar using the following command:
% ./mgcTTmigrate import /var/tmp/saved/ttbackup.tar
Step 22
Verify the MMDB database is successfully imported from the configuration backup file using the
following script.
% ./db_count.sh
Text similar to the following is displayed:
Counting the rows in each database table.
CISCO.ANNOUNCEMENT < 1001 >
CISCO.A_CHARGE_ORIGIN < 1001 >
CISCO.A_NUMBERDIALPLANSELECTION < 6 >
CISCO.BLACKLIST_A < 1001 >
CISCO.BLACKLIST_B < 1002 >
CISCO.CBBOOKINGINFO < 0 >
CISCO.CBMONITORINGINFO < 0 >
CISCO.CLIIPADDRESS < 1000 >
CISCO.CLIPREFIX < 9 >
CISCO.FULLNUMBERTRANSLATION < 0 >
CISCO.H323IDDIVFROM < 1002 >
CISCO.LIENTRIES < 0 >
CISCO.NUMBERTERM < 0 >
CISCO.PORTEDNUMBERS < 10005 >
CISCO.SCRIPT < 1000 >
Cisco PGW 2200 Softswitch Release 9.8 Software Installation and Configuration Guide
5-24
OL-18083-01
Chapter 5
Migrating to Solaris 10 and Cisco PGW 2200 Softswitch Software Release 9.8
Upgrading Lively from Sparc-based Platforms to Opteron-based Platforms
CISCO.WHITELIST_A < 1001 >
CISCO.WHITELIST_B < 1001 >
Step 23
Log in PGW 2 as root and stop PGW 2 using the following command:
# /etc/init.d/CiscoMGC stop
Step 24
Remove PGW 2 from the current network environment and replace it with PGW 4.
Step 25
Configure the required network parameters on PGW 4 to make PGW 4 a replacement of PGW 2.
For example, the IP address on PGW 4 should be the same with PGW 2.
Step 26
Log in PGW 4 as root and start the Cisco PGW 2200 Softswitch software using the following command:
# /etc/init.d/CiscoMGC start
Note
Step 27
Before you start the Cisco PGW 2200 Softswitch software, make sure that you have installed the
license file in the /opt/CiscoMGC/license directory. See Step 1 and 2 in the “Installing the
License File if the Cisco PGW 2200 Softswitch is NOT Running” section on page 3-16 for more
information.
Use the following commands to change the login to mgcusr on PGW 4 and verify the migration from
PGW 2 to PGW 4 is complete.
# su - mgcusr
% mml
mml> rtrv-ne
mml> rtrv-softw:all
mml> rtrv-alms:
mml> rtrv-ne-health:all
Note
Step 28
When you view the alarms, you can find the alarm, “POM-01: 2008-07-27 21:15:09.910
CST,ALM=\''PEER LINK A FAILURE\'',SEV=MN”. The Cisco PGW 2200 Softswitch raises
this alarm because no provisioning is synchronized between PGW 1 and 4 when the PGW 1 and
4 are on different hardware platforms. You can ignore this alarm during the live upgrade. It
disappears after the live upgrade is complete. When you view the network element health with
the rtrv-ne-health:all command on both PGW 1 and 4, verify the values in the Current in progress
calls field on the two platforms are same or close.
Log in PGW 1 as mgcusr and switch over from PGW 1 to PGW 4 using the following command:
% mml
mml> sw-over::confirm
Step 29
Repeat Step 1 to Step 27 to migrate PGW 1 to PGW 3 in the same way you did for PGW 2.
Step 30
Set up the database replication between PGW 3 and PGW 4 following the procedures described in
“Setting Up Replication” section on page 4-83.
Step 31
Remove the platform.dat file on both PGW 3 and PGW 4 using the following commands:
% cd /opt/CiscoMGC/local
% rm -f platform.dat
This completes the procedure for the live upgrade from Sparc-based platforms to Opteron-based
platforms.
Cisco PGW 2200 Softswitch Release 9.8 Software Installation and Configuration Guide
OL-18083-01
5-25
Chapter 5
Migrating to Solaris 10 and Cisco PGW 2200 Softswitch Software Release 9.8
Falling Back Overview
Falling Back Overview
Cisco PGW 2200 Softswitch supports both Sparc-based and Opteron-based platforms on Release 9.7(3)
and 9.8(1). Prior to Release 9.7(3), only Sparc-based platforms are supported. In order to fall back to a
previous release, you need to find out the current Sun platform you are using, the previous
Cisco PGW 2200 Softswitch software version to fall back to, and the target Sun platform to fall back to.
See the Cisco PGW 2200 Softswitch Hardware Installation Guide (Release 7 & 9) to find out supported
Sun platforms for Cisco PGW 2200 Softswitch software Release 9.5(2), 9.6(1), and 9.7(3).
Table 5-4 shows fallback procedures from Cisco PGW 2200 Softswitch Release 9.8 to previous releases
across different platforms. The fallback platforms are listed in the first column. You can find the fallback
procedure based on your fallback platform and your existing Cisco PGW 2200 Softswitch platform.
Table 5-4
Fallback Procedures from Release 9.8 to Previous Releases Across Different Platforms
From Release 9.8
To Release 9.5 or 9.6
To Release 9.7
Sparc-based
Sparc-based
Opteron-based
Falling Back to Solaris 8 and
Cisco PGW 2200 Softswitch
Release 9.5 or 9.6, page 5-27
Falling Back to the
Cisco PGW 2200 Softswitch
Software Release 9.7 without
Platform Changes, page 5-26
Falling Back to Previous
Cisco PGW 2200 Softswitch
Software Releases with Platform
Changes, page 5-32
Falling Back to Previous
Cisco PGW 2200 Softswitch
Software Releases with Platform
Changes, page 5-32
Falling Back to Previous
Cisco PGW 2200 Softswitch
Software Releases with Platform
Changes, page 5-32
Falling Back to the
Cisco PGW 2200 Softswitch
Software Release 9.7 without
Platform Changes, page 5-26
Sparc-based
Opteron-based
Falling Back to the Cisco PGW 2200 Softswitch Software
Release 9.7 without Platform Changes
Perform the following procedure to fall back to the Cisco PGW 2200 Softswitch software Release 9.7(3)
without platform changes.
Step 1
Log in the Cisco PGW 2200 Softswitch as root.
Step 2
Uninstall the Cisco PGW 2200 Softswitch Release 9.8(1). See the “Removing a
Cisco PGW 2200 Softswitch Software Version: Sample Output for uninstall.sh” section on page E-1.
Note
Step 3
Answer n to the question, "Is the uninstall being done in order to upgrade to a new version of
the software?", at the beginning of the uninstallation procedure.
Install Cisco PGW 2200 Softswitch software Release 9.7(3).
See Chapter 3, “Installing Cisco MCG Software Release 9.7 and Higher”, in the Cisco Media Gateway
Controller Software Installation and Configuration (Release 9.7).
Cisco PGW 2200 Softswitch Release 9.8 Software Installation and Configuration Guide
5-26
OL-18083-01
Chapter 5
Migrating to Solaris 10 and Cisco PGW 2200 Softswitch Software Release 9.8
Falling Back to Solaris 8 and Cisco PGW 2200 Softswitch Release 9.5 or 9.6
Step 4
Restore the configuration using the following commands:
% cd /opt/CiscoMGC/etc/CONFIG_LIB/
% tar xvf CFG_backup973.tar
Step 5
Restore the snmp folder using the following command:
% cd /opt/CiscoMGC
% tar xvf SNMP_backup973.tar
Step 6
Restore the dial plan configurations using the following commands:
% tar xvf DP_backup973.tar
Step 7
Use config-lib command to migrate the configurations.
For details on the config-lib command usage, see “Transferring Additional Configuration Files” section
on page 5-16.
Falling Back to Solaris 8 and Cisco PGW 2200 Softswitch
Release 9.5 or 9.6
If you encounter problems during migration to Solaris 10, follow these steps to revert to Solaris 8:
•
If you had hard disk drives with Cisco PGW 2200 Softswitch Release 9.5(2) or 9.6(1) installed, see
the “Backup Procedure” section on page 5-34 and the “Hard Disk Replacement Procedure” section
on page 5-34.
•
If you replaced disk drives during the migration to Solaris 10, refer to the “Falling Back to Solaris
8 If Hard Drives Were Replaced During the Upgrade” section on page 5-27.
•
If you did not replace disk drives during migration but used Veritas Volume Manager to mirror disk
drives, refer to the “Falling Back to Solaris 8 on the Second Disk Drive” section on page 5-28.
•
If you cannot use the previous options to restore Solaris 8, you need to restore the original
Cisco PGW 2200 Softswitch configuration. For further instructions, see the “Restoring the Original
Cisco PGW 2200 Softswitch Software” section on page 5-32.
Falling Back to Solaris 8 If Hard Drives Were Replaced During the Upgrade
If you replaced disk drives during the migration to Solaris 10 and need to revert to Solaris 8, perform the
following procedure:
Step 1
Stop the operating system and power down the platform:
# /usr/sbin/shutdown –g0 -i5
Step 2
Remove the new disk drives and install the original disk drives in their original locations using proper
anti-static procedures. See the Sun System manual for your platform.
Step 3
Power up the system.
Cisco PGW 2200 Softswitch Release 9.8 Software Installation and Configuration Guide
OL-18083-01
5-27
Chapter 5 Migrating to Solaris 10 and Cisco PGW 2200 Softswitch Software Release 9.8
Falling Back to Solaris 8 and Cisco PGW 2200 Softswitch Release 9.5 or 9.6
Falling Back to Solaris 8 on the Second Disk Drive
If the upgrade is not successful, you can fall back to Solaris 8:
Step 1
Stop the operating system.
# init 0
Step 2
From the ok prompt, boot the secondary boot disk.
ok boot disk1
Step 3
Log in as mgcusr and verify that the system boots Solaris 8 and the Cisco PGW 2200 Softswitch
software starts properly.
a.
Enter the following command to verify the operating system version.
% uname –r
Text similar to the following is displayed:
5.8
Note
b.
“5.8” indicates that the system is running the Solaris 8 operating system.
Start the MML command interface and use the following command to see if the software starts
properly.
mml> rtrv-ne
Step 4
Verify that the correct version of the Cisco PGW 2200 Softswitch software is running.
Step 5
Log in again as root and start vxdiskadm.
# vxdiskadm
Text similar to the following is displayed:
Volume Manager Support Operations
Menu: VolumeManager/Disk
1
2
3
4
5
6
7
8
9
10
11
12
13
list
Add or initialize one or more disks
Encapsulate one or more disks
Remove a disk
Remove a disk for replacement
Replace a failed or removed disk
Mirror volumes on a disk
Move volumes from a disk
Enable access to (import) a disk group
Remove access to (deport) a disk group
Enable (online) a disk device
Disable (offline) a disk device
Mark a disk as a spare for a disk group
Turn off the spare flag on a disk
List disk information
?
??
q
Display help about menu
Display help about the menuing system
Exit from menus
Select an operation to perform
Cisco PGW 2200 Softswitch Release 9.8 Software Installation and Configuration Guide
5-28
OL-18083-01
Chapter 5
Migrating to Solaris 10 and Cisco PGW 2200 Softswitch Software Release 9.8
Falling Back to Solaris 8 and Cisco PGW 2200 Softswitch Release 9.5 or 9.6
Step 6
Enter 4 to remove a disk for replacement.
Remove a disk for replacement
Menu: VolumeManager/Disk/RemoveForReplace
Use this menu operation to remove a physical disk from a disk
group, while retaining the disk name. This changes the state
for the disk name to a "removed" disk. If there are any
initialized disks that are not part of a disk group, you will be
given the option of using one of these disks as a replacement.
Step 7
Enter list to list all disks:
Enter disk name [<disk>,list,q,?] list
Disk group: rootdg
Step 8
DM NAME
DEVICE
TYPE
PRIVLEN
PUBLEN
STATE
dm rootdiska
dm rootdiskb
c0t1d0s2
sliced
4711
NODEVICE
35363560 -
Enter rootdiska at the following prompt:
Enter disk name [<disk>,list,q,?] rootdiska
The following volumes will lose mirrors as a result of this
operation:
opt rootvol swapvol usr var
No data on these volumes will be lost.
The requested operation is to remove disk rootdiska from disk group
rootdg. The disk name will be kept, along with any volumes using
the disk, allowing replacement of the disk.
Select "Replace a failed or removed disk" from the main menu
when you wish to replace the disk.
Step 9
Enter y and press Enter at the prompt to continue:
Continue with operation? [y,n,q,?] (default: y)
Removal of disk rootdiska completed successfully.
Step 10
Enter n at the prompt and then q to quit vxdiskadm:
Remove another disk? [y,n,q,?] (default: n) n
Volume Manager Support Operations
Menu: VolumeManager/Disk
1
2
3
4
5
6
7
8
9
10
11
12
Add or initialize one or more disks
Encapsulate one or more disks
Remove a disk
Remove a disk for replacement
Replace a failed or removed disk
Mirror volumes on a disk
Move volumes from a disk
Enable access to (import) a disk group
Remove access to (deport) a disk group
Enable (online) a disk device
Disable (offline) a disk device
Mark a disk as a spare for a disk group
Cisco PGW 2200 Softswitch Release 9.8 Software Installation and Configuration Guide
OL-18083-01
5-29
Chapter 5 Migrating to Solaris 10 and Cisco PGW 2200 Softswitch Software Release 9.8
Falling Back to Solaris 8 and Cisco PGW 2200 Softswitch Release 9.5 or 9.6
13
list
Turn off the spare flag on a disk
List disk information
?
??
q
Display help about menu
Display help about the menuing system
Exit from menus
Select an operation to perform: q
Goodbye.
Step 11
Use the vxdisk command to verify that rootdiska is removed.
# vxdisk list
Step 12
Shut down and boot from disk1.
# init 0
ok boot disk1
Step 13
Log in as root and run vxdiskadm.
# vxdiskadm
Step 14
Enter 5 to replace a failed disk.
Replace a failed or removed disk
Menu: VolumeManager/Disk/ReplaceDisk
Use this menu operation to specify a replacement disk for a disk
that you removed with the "Remove a disk for replacement" menu
operation, or that failed during use. You will be prompted for
a disk name to replace and a disk device to use as a replacement.
You can choose an uninitialized disk, in which case the disk will
be initialized, or you can choose a disk that you have already
initialized using the Add or initialize a disk menu operation.
Step 15
Enter list at the following prompt:
Select a removed or failed disk [<disk>,list,q,?] list
Disk group: rootdg
Step 16
DM NAME
DEVICE
TYPE
PRIVLEN
PUBLEN
STATE
dm rootdiska
-
-
-
-
REMOVED
Enter rootdiska at the following prompt:
Select a removed or failed disk [<disk>,list,q,?] rootdiska
Step 17
Enter list at the following prompt:
Select disk device to initialize [<address>,list,q,?] list
DEVICE
c0t0d0
c0t1d0
DISK
rootdiskb
GROUP
rootdg
STATUS
error
online
Type c0t0d0 to select disk device to initialize
The following disk device has a valid VTOC, but does not appear to have
been initialized for the Volume Manager. If there is data on the disk
that should NOT be destroyed you should encapsulate the existing disk
partitions as volumes instead of adding the disk as a new disk.
Cisco PGW 2200 Softswitch Release 9.8 Software Installation and Configuration Guide
5-30
OL-18083-01
Chapter 5
Migrating to Solaris 10 and Cisco PGW 2200 Softswitch Software Release 9.8
Falling Back to Solaris 8 and Cisco PGW 2200 Softswitch Release 9.5 or 9.6
Output format: [Device_Name]
c0t0d0
Step 18
To initialize the disk instead of encapsulating, enter y and press Enter.
Note
To encapsulate the disk, enter n and press Enter.
Instead of encapsulating, initialize? [y,n,q,?] (default: n) y
The requested operation is to initialize disk device c0t0d0 and
to then use that device to replace the removed or failed disk
rootdiska in disk group rootdg.
Step 19
Enter y and press Enter to continue.
Type Y at the following prompt:
Continue with operation? [y,n,q,?] (default: y) y
Replacement of disk rootdiska in group rootdg with disk device
c0t0d0 completed successfully.
This will begin recovery of the disk and the mirrors will re-synchronize automatically.
Step 20
Enter n and press Enter when asked to replace the disk.
Replace another disk? [y,n,q,?] (default: n) n
Volume Manager Support Operations
Menu: VolumeManager/Disk
Step 21
1
2
3
4
5
6
7
8
9
10
11
12
13
list
Add or initialize one or more disks
Encapsulate one or more disks
Remove a disk
Remove a disk for replacement
Replace a failed or removed disk
Mirror volumes on a disk
Move volumes from a disk
Enable access to (import) a disk group
Remove access to (deport) a disk group
Enable (online) a disk device
Disable (offline) a disk device
Mark a disk as a spare for a disk group
Turn off the spare flag on a disk
List disk information
?
??
q
Display help about menu
Display help about the menuing system
Exit from menus
Enter q and press Enter to quit.
Select an operation to perform: q
Goodbye.
Note
Allow enough time to let both disks synchronize. Depending on the system, this can take 5 to 6
hours.
Cisco PGW 2200 Softswitch Release 9.8 Software Installation and Configuration Guide
OL-18083-01
5-31
Chapter 5 Migrating to Solaris 10 and Cisco PGW 2200 Softswitch Software Release 9.8
Falling Back to Previous Cisco PGW 2200 Softswitch Software Releases with Platform Changes
Step 22
Use the vxprint command to make sure disk0 is remirrored to disk1. When this is complete, shut down
the platform and boot.
# vxprint –ht
# init 0
ok boot
Step 23
Repeat Step 3 to verify that the correct software is running.
Restoring the Original Cisco PGW 2200 Softswitch Software
If you cannot use the previous procedures to revert to Solaris 8, follow these steps to restore the original
Cisco PGW 2200 Softswitch software configuration:
Step 1
Install Solaris 8 Operating System using the procedures in the “Sun Solaris 8 Operating System
Installation” chapter.
Step 2
Install the original Cisco PGW 2200 Softswitch Software using the procedures in the “Installing the
Cisco MGC Software 9.2(x) and Higher Releases” section.
Step 3
Restore the data files using the procedures in “Restoring the System” section.
Falling Back to Previous Cisco PGW 2200 Softswitch Software
Releases with Platform Changes
If you need to fall back to previous Cisco PGW 2200 Softswitch software releases with platform
changes, use the following procedure.
Step 1
Verify that the pom.dataSync variable is set to False on the active and standby pair of
Cisco PGW 2200 Softswitches. To view or modify the pom.dataSync variable, use an editor such as vi
to edit /opt/CiscoMGC/etc/XECfgParm.dat.
Note
You must set pom.dataSync to false on the active and standby pair of
Cisco PGW 2200 Softswitches before you perform the fallback.
Note
If you modify the pom.dataSync variable, make sure you save the file,
/opt/CiscoMGC/etc/XECfgParm.dat. You don’t have to restart the Cisco PGW 2200 Softswitch
after the modification of this variable.
Step 2
Log in the standby Cisco PGW 2200 Softswitch as root.
Step 3
Stop the Cisco PGW 2200 Softswitch software using the following command:
Cisco PGW 2200 Softswitch Release 9.8 Software Installation and Configuration Guide
5-32
OL-18083-01
Chapter 5
Migrating to Solaris 10 and Cisco PGW 2200 Softswitch Software Release 9.8
Replacing Hard Disks on an Existing Solaris 10 Platform
# /etc/init.d/CiscoMGC stop
Step 4
Remove the platform from the current network environment and replace it with the old version
Cisco PGW 2200 Softswitch.
Step 5
Log in the old version Cisco PGW 2200 Softswitch as root.
Step 6
Configure the required network parameters on PGW 4 to make PGW 4 a replacement of PGW 2.
Step 7
Start the old version Cisco PGW 2200 Softswitch software using the following command:
# /etc/init.d/CiscoMGC start
Step 8
Use the following commands to change the login to mgcusr on the old version platform and verify that
the Cisco PGW 2200 Softswitch software started successfully.
# su - mgcusr
% mml
mml> rtrv-ne
mml> rtrv-softw:all
mml> rtrv-alms:
mml> rtrv-ne-health:all
Note
Step 9
When you view the alarms, you can find the alarm, “POM-01: 2008-07-27 21:15:09.910
CST,ALM=\''PEER LINK A FAILURE\'',SEV=MN”. The Cisco PGW 2200 raises this alarm
because no provisioning is synchronized between new version active
Cisco PGW 2200 Softswitch and old version one when the two Cisco PGW 2200 Softswitches
are on different hardware platforms. You can ignore this alarm during the fallback. It disappears
after the fallback is complete.
Log in the Cisco PGW 2200 Softswitch as mgcusr and switch over from new version
Cisco PGW 2200 Softswitch to the old version platform using the following command:
% mml
mml> sw-over::confirm
Step 10
Repeat Step 2 to Step 9 to fall back the new version Cisco PGW 2200 Softswitch to the old version
platform.
Step 11
Verify that the pom.dataSync variable is set to True on the active and standby pair of old version
Cisco PGW 2200 Softswitches.
This completes the procedure for falling back to previous Cisco PGW 2200 Softswitch software releases
with platform changes.
Replacing Hard Disks on an Existing Solaris 10 Platform
If you need to replace the hard disks on an existing Cisco PGW 2200 Softswitch system running the
Solaris 10 operating system and Cisco PGW 2200 Softswitch software Release 9.8, use the steps in the
following sections.
Cisco PGW 2200 Softswitch Release 9.8 Software Installation and Configuration Guide
OL-18083-01
5-33
Chapter 5
Migrating to Solaris 10 and Cisco PGW 2200 Softswitch Software Release 9.8
Replacing Hard Disks on an Existing Solaris 10 Platform
Backup Procedure
Before restoring the mgcbackup file, you must install the same Cisco PGW 2200 Softswitch software
release and the patch level that was originally on the platform. Follow these steps to back up the system:
Step 1
Log in as root and enter the following command to stop the Cisco PGW 2200 Softswitch application:
# /etc/init.d/CiscoMGC stop
Step 2
Complete one of the following steps to back up the system:
•
Local Tape Backup—Using the mgcbackup utility, back up the system to the local tape drive.
# /opt/CiscoMGC/local/mgcbackup –d /dev/rmt/0
•
Remote File Server Backup—Using the mgcbackup utility, back up the system to the local
directory. Use the mgcbackup utility to list the filename of the last backup and use ftp to transfer the
file to a remote file system.
# /opt/CiscoMGC/local/mgcbackup –d /var/tmp/upgrade
The backup file is stored in the specified directory path in the following format:
mgc_<hostname>_<yyyymmdd>_<hhmmss>_backup.tar
Note
Where:
• hostname is the name of the Cisco PGW 2200 Softswitch host, such as MGC-01.
• yyyymmdd is the date the backup file is created, in a year-month-day format, such as 20011130.
• hhmmss is the time the backup file is created, in an hour-minute-second format, such as 115923.
•
Enter the following command to list the files in your backup directory. Verify that the backup was
successful.
# /opt/CiscoMGC/local/mgcbackup -l
Caution
Step 3
You must now move the backup file to a remote file server using the ftp program so that you
can recover it if you need to return the Cisco PGW 2200 Softswitch to the previous version of
Solaris or Cisco PGW 2200 Softswitch software. You are responsible for providing the
mechanism and storage location.
Enter the following command to stop the operating system and power down the platform:
# /usr/sbin/shutdown –g0 –i5
The system backup is now complete.
Hard Disk Replacement Procedure
Follow these steps to replace the hard disk.
Cisco PGW 2200 Softswitch Release 9.8 Software Installation and Configuration Guide
5-34
OL-18083-01
Chapter 5
Migrating to Solaris 10 and Cisco PGW 2200 Softswitch Software Release 9.8
Replacing Hard Disks on an Existing Solaris 10 Platform
Caution
Be sure to follow the appropriate anti-static procedures when performing this procedure.
Step 1
Label the hard disks with their current locations and remove them from the system. See the Sun System
manual for your platform for the proper procedure.
Step 2
Install the new hard disks in the same slots as the existing hard disks. See the Sun System manual for
your platform for the proper procedure.
Loading the Solaris 10 Operating System
Power on the platform and follow the procedures in Chapter 2, “Installing the Sun Solaris 10 Operating
System,” to install the Solaris 10 operating system.
Loading the Sun Solaris 10 Operating Environment Packages
Before you install the Cisco PGW 2200 Softswitch software, you need to load the Sun Solaris 10
Operating Environment packages. To load the environment packages, complete the steps in the section
Loading the Sun Solaris 10 Operating Environment.
Installing the Cisco PGW 2200 Softswitch
Install the same release and patch levels of Cisco PGW 2200 Softswitch software that were originally
on the host, using the procedures provided in the Chapter 3, “Installing the Cisco PGW 2200 Softswitch
Software Release 9.8 and Higher.”
Restoring the System
Step 1
Complete one of the following steps to restore the system:
a.
Local Tape Backup—Using the mgcrestore utility, enter the following command to restore the
system from the local tape drive:
# /opt/CiscoMGC/local/mgcrestore –d /dev/rmt/0
b.
Remote File Server Backup—Using the ftp program, retrieve the file created in Step 2b. of the
“Backup Procedure” section on page 5-34, and place it in the /opt/CiscoMGC/var/log directory.
Using the mgcrestore utility, restore the system.
# /opt/CiscoMGC/local/mgcrestore -d /var/tmp/upgrade -f filename
where filename is the filename created in Step 2b. of the section “Backup Procedure” section on
page 5-34.
Step 2
Enter the following command to start the Cisco PGW 2200 Softswitch software:
# /etc/init.d/CiscoMGC start
Cisco PGW 2200 Softswitch Release 9.8 Software Installation and Configuration Guide
OL-18083-01
5-35
Chapter 5
Migrating to Solaris 10 and Cisco PGW 2200 Softswitch Software Release 9.8
Replacing Hard Disks on an Existing Solaris 10 Platform
The hard disk replacement on an existing platform running the Solaris 10 operating system and
Cisco PGW 2200 Softswitch software Release 9.8 is now complete.
Cisco PGW 2200 Softswitch Release 9.8 Software Installation and Configuration Guide
5-36
OL-18083-01
CH A P T E R
6
Configuring the Local Area Network Switch
This chapter provides a brief overview of the local area network (LAN) switches (Cisco Catalyst Switch
family) in your solution. The LAN switch connects the Cisco PGW 2200 Softswitch hosts to the media
gateways (MGWs) or to the Cisco IP Transfer Point LinkExtender (ITP-L). A LAN switch is not
provided with the Cisco PGW 2200 Softswitch.
LAN Switch Overview
The LAN switch is used in the Cisco PGW 2200 Softswitch node to extend virtual LANs (VLANs)
across platforms through backbone Ethernet connections, when necessary.
Figure 6-1 illustrates an example of a fault-tolerant control signaling network using dual Cisco Catalyst
LAN switches.
Note
Make sure that the duplex on the Cisco catalyst port is correctly configured and that there is no duplex
mismatch between the switch and the Cisco PGW 2200 Softswitch network interface card (NIC).
Otherwise, some SS7 messages, although received at the Cisco PGW 2200 Softswitch NIC, might be
ignored by the Cisco PGW 2200 Softswitch call processing engine.
Figure 6-1
Sample Configuration of a Duplex LAN Switch
Cisco
PGW 2200
Softswitch
(active)
Cisco ITP-Ls
5500
Cisco
PGW 2200
Softswitch
(standby)
205461
5500
Cisco PGW 2200 Softswitch Release 9.8 Software Installation and Configuration Guide
OL-18083-01
6-1
Chapter 6
Configuring the Local Area Network Switch
Catalyst 2900 XL Series
Catalyst 2900 XL Series
See the following web sites for hardware and software documentation for the Catalyst 2900 XL series:
http://www.cisco.com/warp/public/cc/pd/si/casi/ca2900xl/prodlit/index.shtml
http://www.cisco.com/univercd/cc/td/doc/product/lan/c2900xl/index.htm
Catalyst 5500 and 5000 Series
See the following web sites for hardware and software documentation for the Catalyst 5500 series (5500,
5509, and 5505) and Catalyst 5000 series (5000 and 5002) switches:
http://www.cisco.com/warp/public/cc/pd/si/casi/ca5000/prodlit/lanem_ds.htm
http://www.cisco.com/univercd/cc/td/doc/product/lan/cat5000/index.htm
Note
For information about the correct Cisco IOS software version, see Release Notes for the
Cisco PGW 2200 Softswitch Release 9.8.
For information on the image that your switch supports, see the documentation that came with your
switch.
If you have questions or need assistance, see the “Obtaining Documentation and Submitting a Service
Request” section on page x of the Preface.
Cisco PGW 2200 Softswitch Release 9.8 Software Installation and Configuration Guide
6-2
OL-18083-01
A P P E N D I X
A
XECfgParm.dat File Parameters
This appendix describes the parameters found in the XECfgParm.dat file for the
Cisco PGW 2200 Softswitch software Release 9.x and how they are used by the media gateway
controller (MGC).
Understanding the XECfgParm.dat File Format
The XECfgParm.dat file contains system-wide as well as system tuning parameters. All fields in this file
are written in the parm = value format. It supports a hash mark (#) in the first column to denote the entire
line as a comment.
Parameters are prefixed with a quantifier to specify the domain of the parameter. An asterisk (*)
preceding the parameter indicates that the parameter setting should be used by the entire system. A
component name limits the scope to the specified component.
XECfgParm.dat parameters are arranged syntactically as follows:
facilityName.parameterName = parameterValue
Cisco PGW 2200 Softswitch XECfgParm.dat Files
Facility Names
The following facility names are valid:
•
almM—Alarm Manager
•
amDmpr—Alarm/Measurement Dumper
•
cdrDmpr—CDR Dumper
•
cfgM—Configuration Manager
•
engine—Call processing engine
•
foverd—Failover Daemon
•
H.248—H.248
•
ioChanCtl—Controls all channel controllers
•
ioChanMgr—I/O Channel Managers
•
ISDNBRI—ISDN BRI
Cisco PGW 2200 Softswitch Release 9.8 Software Installation and Configuration Guide
OL-18083-01
A-1
Appendix A
XECfgParm.dat File Parameters
Understanding the XECfgParm.dat File Format
•
IUA—IUA Parameters
•
logger—Log Server
•
M3UA—M3UA Parameters
•
measM—Measurement Manager
•
mmdb—Main Memory Data Base Process
•
MML—MML
•
mmSAgt—Measurement Manager SNMP Agent
•
OPERSAGT—Operational SNMP Agent
•
pom—Provisioning Object Manager
•
procM—Process Manager
•
product—Network Element
•
PROVSAGT—Provisioning SNMP Agent
•
RadiusAccounting—Radius Accounting Parameters
•
replicator—Replicator
•
SIP—SIP
•
SUA—SUA Parameters
•
TCAP—TCAP Capabilities
If no match is found for a facility-specific parameter, the file is searched for a match on the default
facility.
Special Parameters
•
callver—Call verification utility
•
diskmonitor—Disk monitor shell script
•
XE—Execution environment
Cisco PGW 2200 Softswitch 9.x XECfgParm.dat File Parameter Definitions
The XECfgParm.dat file configuration parameters for the Cisco PGW 2200 Softswitch software release
9.x are presented alphabetically in Table A-1.
Caution
This list of parameters is provided as a reference. Do not edit any parameters unless they are listed in
the following table or unless you have been instructed to do so by Cisco technical support; otherwise,
your system might not work as intended.
Cisco PGW 2200 Softswitch Release 9.8 Software Installation and Configuration Guide
A-2
OL-18083-01
Appendix A
XECfgParm.dat File Parameters
Understanding the XECfgParm.dat File Format
Table A-1
Cisco PGW 2200 Softswitch 9.x XECfgParm.dat File Configuration Parameters
Configuration Parameter
Definition
*.actiononchargetableaccessfailure
Allows you to specify the action to take when there is a
failure to access the meter pulse tariff table.
Default: 0
Valid values are: 0 (Continue Call) and 1 (Release Call).
*.autonomous
Enables a process, for example the engine, to be started
without the system.
Default: false
Note
*.chargingmode
Do not change this value.
Allows you to specify the charging mode for non-Intelligent
Network (IN) calls which determines the treatment of
received Metered Pulse Messages (MPMs).
Default: 1
Valid values are: 1 (AddOnCharge), 2 (ReplaceCharge), and
3 (FreeOfCharge).
*.chargingtarifftype
Allows you to specify which type of tariff table (Meter Pulse
or Tariff-Rate/Scale-Factor) is to be accessed in the absence
of a tariff table identifier in the charge result.
Default: 1
Valid values are: 0 (tariff-rate/scale-factor) (default) and 1
(meter pulse).
*.chkPtPort
Port number used between peer components or processes for
check-pointing.
Value: Any unused port number.
Default: 2001
Leave this value as the default.
Note
If you have two Cisco PGW 2200 Softswitch hosts
in an active/standby configuration, both fields in the
XECfgParm.dat files should contain the same value.
Cisco PGW 2200 Softswitch Release 9.8 Software Installation and Configuration Guide
OL-18083-01
A-3
Appendix A
XECfgParm.dat File Parameters
Understanding the XECfgParm.dat File Format
Table A-1
Cisco PGW 2200 Softswitch 9.x XECfgParm.dat File Configuration Parameters
Configuration Parameter
Definition
*.ClearingLocation
Specifies whether to override the default location field in the
call context for any call, regardless of which network device
released the call. This enables you to define a default
location in Release messages for any call, which can differ
from the default location set in the type definition of the
protocol.
This property has precedence over the value set in
the *.DefaultLocation parameter.
Note
Values:
•
0—Normal mapping behavior, the existing Clearing
Location value from the Call Context data is used.
•
1—LOCATION_USER
•
2—LOCATION_ PRIVATE_LOCAL
•
3—LOCATION_ PUBLIC_LOCAL
•
4—LOCATION_TRANSIT
•
5—LOCATION_ PUBLIC_REMOTE
•
6—LOCATION_ PRIVATE_REMOTE
•
7—LOCATION_ INTERNATIONAL
•
8—LOCATION_ INTERWORKING
•
9—LOCATION_ LOCAL_INTERFACE
•
10—LOCATION_ LOCAL_LOCAL
•
11—LOCATION_ LOCAL_REMOTE
•
12—LOCATION_ PACKET_MANAGER
•
13—LOCATION_ UNKNOWN
Default: 0 (Normal mapping behavior)
Note
*.CPUTimerInterval
Option 13 may not be valid for all solutions.
Samples the frequency of CPU utilization.
This parameter is set automatically when you specify a
Cisco MGC type in the engine.SysVirtualSwitch parameter.
Any attempt to modify this parameter is overwritten.
Default: 3000 msec (3 seconds)
Note
During the startup of the
Cisco PGW 2200 Softswitch software, this
parameter will be set automatically to tune the
system for optimal performance.
Cisco PGW 2200 Softswitch Release 9.8 Software Installation and Configuration Guide
A-4
OL-18083-01
Appendix A
XECfgParm.dat File Parameters
Understanding the XECfgParm.dat File Format
Table A-1
Cisco PGW 2200 Softswitch 9.x XECfgParm.dat File Configuration Parameters
Configuration Parameter
Definition
*.CustSpecificINAPHandling
Controls INAP (Intelligent Network Application Protocol)
behavior, including advertised application context.
Values:
•
tinap
•
finap
•
rinap
•
sinap
Default: Null
To enable network transfer and DTMF transfer services, set
this parameter to sinap. The following new CS2 application
context is populated in the dialogue body of the INAP
message:
itu-t(0) recommendation(0) q(17) q1228(1228) cs2(2) ac(3)
id-ac-cs2-ssf-scfGenericAC(4) urn:oid:0.0.17.1228.2.3.4
*.dataDir
Location of the data directory.
Default: ../var
Note
*.dataSourceName
Do not change this value.
Used by the MMDB to obtain the data source name for the
ODBC connection.
Default: howdydb
Note
*.debugLevel
Do not change this value.
Determines level of debugging detail if debugging is
initiated.
Default: high
Note
Do not change this value.
Cisco PGW 2200 Softswitch Release 9.8 Software Installation and Configuration Guide
OL-18083-01
A-5
Appendix A
XECfgParm.dat File Parameters
Understanding the XECfgParm.dat File Format
Table A-1
Cisco PGW 2200 Softswitch 9.x XECfgParm.dat File Configuration Parameters
Configuration Parameter
Definition
*.DefaultLocation
Specifies whether to override the default location field in the
call context data for calls released by the
Cisco PGW 2200 Softswitch. This enables you to define a
default location in Release messages for calls released by the
Cisco PGW 2200 Softswitch, which can differ from the
default location set in the type definition of the protocol.
If the call is not released by the
Cisco PGW 2200 Softswitch, this property has no
impact.
Note
Values:
•
0—Normal protocol-defined default location value in
the Call Context data is used.
•
1—LOCATION_USER
•
2—LOCATION_ PRIVATE_LOCAL
•
3—LOCATION_ PUBLIC_LOCAL
•
4—LOCATION_TRANSIT
•
5—LOCATION_ PUBLIC_REMOTE
•
6—LOCATION_ PRIVATE_REMOTE
•
7—LOCATION_ INTERNATIONAL
•
8—LOCATION_ INTERWORKING
•
9—LOCATION_ LOCAL_INTERFACE
•
10—LOCATION_ LOCAL_LOCAL
•
11—LOCATION_ LOCAL_REMOTE
•
12—LOCATION_ PACKET_MANAGER
•
13—LOCATION_ UNKNOWN
Default: 0 (Normal protocol-defined default value)
Option 13 may not be valid for all solutions.
Note
*.desiredPlatformState
Determines the desired platform state.
Values:
•
master, if you have two (active and standby)
Cisco PGW 2200 Softswitch hosts
•
slave, if you have two (active and standby)
Cisco PGW 2200 Softswitch hosts
•
standalone, if you have a single-host system
Default: none
Note
The value used is site specific. For example, use the
values master and slave if you have two (active and
standby) Cisco PGW 2200 Softswitch hosts. Enter
standalone if you have a single-host system.
Cisco PGW 2200 Softswitch Release 9.8 Software Installation and Configuration Guide
A-6
OL-18083-01
Appendix A
XECfgParm.dat File Parameters
Understanding the XECfgParm.dat File Format
Table A-1
Cisco PGW 2200 Softswitch 9.x XECfgParm.dat File Configuration Parameters
Configuration Parameter
Definition
*.DisableCCBSoverTunneledQSIG
Specifies the protocol used to deliver Call Back Services
messages over the network.
Valid Values:
•
0—Callback Services are enabled using QSIG
•
1—Callback Services are enabled using the QBE
interface
Default Value: 0
*.disableMeas
Disables the collection of measurement data.
Values:
•
true—Disables data collection
•
false—Data is collected
Default: false
*.disablemultiplecdrs
Allows you to disable the multiple CDRs per call (for
example, multiple occurrences of Answer and Release CDB
messages) for situations where the downstream billing
system does not support this feature.
Default: 1
Valid values are 0 (multi CDRs enabled) and 1 (multi CDRs
disabled).
*.eventTrace
Used by developers only to trace events at the application
level.
*.FastConnect
Allows LCM messages to pass through.
Values:
•
0—Passes all signals to LCM.
•
1—Disables signal to LCM for “CallProceeding”
received from NAS.
•
2—Disables signal to LCM for “CallProceeding” or
“Progress” received from NAS.
•
3—Disables signal to LCM for “Call Proceeding”,
“Progress,” or “Alerting” received from NAS.
Cisco PGW 2200 Softswitch Release 9.8 Software Installation and Configuration Guide
OL-18083-01
A-7
Appendix A
XECfgParm.dat File Parameters
Understanding the XECfgParm.dat File Format
Table A-1
Cisco PGW 2200 Softswitch 9.x XECfgParm.dat File Configuration Parameters
Configuration Parameter
Definition
*.GWClearChannelAlgorithm
Allows the use of the clear channel 64K unrestricted data
transfer between gateways. Different gateways support
different codecs. There is a command to see all the codecs
supported on the gateway, including the clear channel codec.
For example on VISM, the command is dspcodecparams.
The Cisco PGW 2200 Softswitch passes any string that is
defined on it. The following is what the command shows on
VISM:
Codec Codec String Period (ms) Preference Type
1 - G.711u PCMU 10 8 0
2 - G.711a PCMA 10 7 8
3 - G.726-32K G726-32 10 5 2
4 - G.729a G729a 10 2 96
5 - G.729ab G729ab 10 1 96
6 - clr chan CCD 10 9 96
7 - G.726-16K G726-16 10 3 96
8 - G.726-24K G726-24 10 4 96
9 - G.726-40K G726-40 10 6 96
11 - G.723.1- G723H 30 10 96
12 - G.723.1a G723AH 30 11 96
13 - G.723.1- G723L 30 12 96
14 - G.723.1a G723AL 30 13 96
Values: null or the valid codec string
Default: null
*.homeDirRoot
Location of the home directory.
Default: /opt/CiscoMGC
Note
*.ioChanMgr.IPCTimer
Do not change this value.
Specifies the frequency at which the queue is scanned for
RSIP messages. When this parameter is left at its default
value (0), the system uses a base parameter value. You can
modify this parameter if a problem occurs.
Valid values: Any integer
Default value: 0
*.IP_Addr1
IP address of interface 1; used for signaling.
*.IP_Addr2
IP address of interface 2; used for signaling.
*.IP_Addr3
IP address of interface 3 (if installed); used for signaling.
*.IP_Addr4
IP address of interface 4 (if installed); used for signaling.
*.ipAddrLocalA
First local IP address; used for checkpointing and failover
heartbeats if you have active/standby
Cisco PGW 2200 Softswitch hosts.
Note
This is typically the same value as *.IP_Addr1.
Cisco PGW 2200 Softswitch Release 9.8 Software Installation and Configuration Guide
A-8
OL-18083-01
Appendix A
XECfgParm.dat File Parameters
Understanding the XECfgParm.dat File Format
Table A-1
Cisco PGW 2200 Softswitch 9.x XECfgParm.dat File Configuration Parameters
Configuration Parameter
Definition
*.ipAddrLocalB
Second local IP address; used for checkpointing and failover
heartbeats if you have active/standby
Cisco PGW 2200 Softswitch hosts.
Note
*.ipAddrPeerA
If your configuration does not use an external card,
leave this setting as the default value: 0.0.0.0.
First corresponding peer IP address; used for checkpointing
and failover heartbeats.
Note
*.ipAddrPeerB
If you have two Cisco PGW 2200 Softswitch hosts
in an active/standby configuration, this value is the
IP address of the second host.
Second corresponding peer IP address; used for
checkpointing and failover heartbeats.
Note
If your configuration does not use an external card,
leave this setting as the default value, 0.0.0.0.
*.IP_NextHop1
*.IP_NextHop2
*.IP_NextHop3
*.IP_NextHop4
*.IP_NextHop5
*.IP_NextHop6
*.IP_NextHop7
*.IP_NextHop8
Specifies the IP addresses of up to eight next hop counters.
These IP addresses are used when the next hop router IP
addresses on the Cisco PGW 2200 Softswitch hosts do not
match.
*.IUA.maxNasExtNodes
Specifies the maximum number of external nodes that can be
defined with an ISDN signaling type of IUA. This number
also represents the maximum number of IUA associations
that can be provisioned.
Default: 0.0.0.0
Valid values: An IP address expressed in dotted decimal
notation.
Valid value: 256
Note
*.IUA.maxNasPathsPerExtNode
Do not change this value.
Specifies the maximum number of NAS signaling services
that can be assigned to each external node with an ISDN
signaling type of IUA.
Valid value: 112
Note
*.IUA.maxNasPaths
Do not change this value.
Specifies the maximum number of IUA signaling services
that can be provisioned.
Valid value:1500
Note
Do not change this value.
Cisco PGW 2200 Softswitch Release 9.8 Software Installation and Configuration Guide
OL-18083-01
A-9
Appendix A
XECfgParm.dat File Parameters
Understanding the XECfgParm.dat File Format
Table A-1
Cisco PGW 2200 Softswitch 9.x XECfgParm.dat File Configuration Parameters
Configuration Parameter
Definition
*.LISupport
Enables Cisco PGW 2200 Softswitch to be used for Lawful
Intercept.
Set this parameter to true to enable
Cisco PGW 2200 Softswitch support for Lawful
Intercept.
Note
Default: false
*.logDirectory
Location of the active and rotated log files.
Default: ../var/log
Make sure the log file has write permission for the
LogServer.
Note
*.logFileNamePrefix
Combined with the .log extension, defines the filename for
log files.
Default: platform
Example: engine
This setting can also redirect process messages from
the default log file to a specified log file. For
example, engine.logFileNamePrefix = engine
instructs the log server to redirect messages from the
engine process to the dedicated engine.log file. This
functions with or without *.logDirectory.
Note
*.logMsgDrop
Controls whether the log server drops debug-level messages
when the UNIX domain socket used for log server
communication is full.
Values:
•
true—Debug messages are dropped.
•
false—Debug messages are not dropped.
Default: true
Caution
If you set this parameter to false for the engine
and the engine logging level is Debug, the system
can fail at high call rates.
Cisco PGW 2200 Softswitch Release 9.8 Software Installation and Configuration Guide
A-10
OL-18083-01
Appendix A
XECfgParm.dat File Parameters
Understanding the XECfgParm.dat File Format
Table A-1
Cisco PGW 2200 Softswitch 9.x XECfgParm.dat File Configuration Parameters
Configuration Parameter
Definition
*.logPrio
Defines the initial default logging level used by logging
clients when sending messages to the logging server. Use the
set-log MML command to change logging levels after
installation. You can specify different logging levels for each
process. For example, engine.logPrio = Info
This setting is the only way to modify the logging
level of the current MML process. The set-log
command does not affect current MML process
logging levels.
Note
This parameter provides debug level LogPrio support in
XECfgParm.dat for individual channel controllers. You can
use the following to turn on IOCC logging:
•
H248.logPrio = Debug
•
SS7.logPrio = Debug
•
EISUP.logPrio = Debug
•
MGCP.logPrio = Debug
•
ISDNIP.logPrio = Debug
•
ISDNL3.logPrio = Debug
•
SIP.logPrio
•
TALI.logPrio = Debug
•
TCAP.logPrio = Debug
Caution
= Debug
Be sure to use the actual process name, not the
MML name, of the channel controller. Note that
the IOCC name is case-sensitive.
Values:
•
Debug—Used only for detailed debugging messages.
Logging at this priority is not recommended during
production because this causes a large volume of
messages to be logged, which degrades system
performance and can cause failover problems.
•
Trace—These messages capture protocol traffic. This
priority is used for debugging.
•
Info—These messages indicate an operation that is
proceeding as expected.
•
Warning—These messages indicate a problem exists
that does not prevent the system from operating. This is
the normal, default logging level for production.
•
Error—These messages indicate an unexpected error
that is recoverable but degrades performance.
Cisco PGW 2200 Softswitch Release 9.8 Software Installation and Configuration Guide
OL-18083-01
A-11
Appendix A
XECfgParm.dat File Parameters
Understanding the XECfgParm.dat File Format
Table A-1
Cisco PGW 2200 Softswitch 9.x XECfgParm.dat File Configuration Parameters
Configuration Parameter
*.logPrio (continued)
Definition
•
Note
*.LongCallTime
Critical—These messages indicate errors so severe that
a process cannot continue operating.
Do not change this value unless you are debugging.
Used to generate ongoing Call Data Block (CDB) 1060.
CDB 1060 (on-going call event) indicates a long call in
progress.
Default: 21600000 milliseconds (6 hours)
Minimum value required: 60000 milliseconds (60 seconds)
Note
Typically, you should leave the value 21600000
milliseconds (6 hours) as the default. You can change
it, if necessary, based on billing requirements.
If you enter a value less than the required minimum
of 60000 milliseconds, it defaults to 6 hours.
*.M3UA.maxSigServices
Defines the maximum number of Message Transfer Part
(MTP) Level 3 User Application (M3UA) signaling services.
It also defines the maximum number of M3UA routing keys.
Value: 1536
Note
*.M3UA.maxOPCs
Do not change this value.
Defines the maximum number of M3UA originating point
codes (OPCs).
Value: 64
Note
*.M3UA.maxRoutesPerOpcDpc
Do not change this value.
Defines the maximum number of M3UA routes per
OPC/destination point code (DPC) pair.
Value: 2
Note
*.M3UA.maxSgp
Do not change this value.
Defines the maximum number of M3UA SS7 signaling
gateway processes.
Value: 96
Note
*.maxLinksPerSessionSet
Do not change this value.
Sets the maximum number of SS7 links contained in a
session set. This is based on the maximum number of SS7
links in a Cisco ITP-L.
Value: 4
Default: 4
Note
Do not change this value.
Cisco PGW 2200 Softswitch Release 9.8 Software Installation and Configuration Guide
A-12
OL-18083-01
Appendix A
XECfgParm.dat File Parameters
Understanding the XECfgParm.dat File Format
Table A-1
Cisco PGW 2200 Softswitch 9.x XECfgParm.dat File Configuration Parameters
Configuration Parameter
Definition
*.maxLocationLabels
Specifies the maximum number of location labels that can be
provisioned.
(Added in Release 9.6(1)
Valid value: 3000
Note
*.maxNumDChansPerPort
Do not change this value.
Specifies the maximum number of D-channels that can be
provisioned per IP address or port.
Valid values: Any integer (1 to 2000)
Default value: 2000
*.maxnumRLMports
Used during provisioning to verify that the limit on the
number of unique ports for RLM links is not exceeded.
Value: 8
Default: 8
*.MgcpBehavior
Due to Media Gateway Control Protocol (MGCP) gateway
differences in return codes, the Cisco PGW 2200 Softswitch
MGCP behavior must be configured to the appropriate value
in order to properly interface with the gateway.
Value range: Integer
•
0—No action.
– Do not use this value for switched solutions.
– Do not change this value for nailed solutions.
•
1—Value for non-IOS-based MGCP gateways such as
VISM.
•
2—Value for IOS-based gateways such as AS5300,
AS5400, and AS5350s.
Default: 0
Cisco PGW 2200 Softswitch Release 9.8 Software Installation and Configuration Guide
OL-18083-01
A-13
Appendix A
XECfgParm.dat File Parameters
Understanding the XECfgParm.dat File Format
Table A-1
Cisco PGW 2200 Softswitch 9.x XECfgParm.dat File Configuration Parameters
Configuration Parameter
Definition
*.MMLManualBlockingCic
Allows the Cisco PGW 2200 Softswitch to manually block
channels that do not respond to Release, Restart, or
Disconnect messages.
This feature was introduced in Release 9.6(1).
Values:
•
0 = The MML_Manual_BLOCK capability is disabled.
•
1 = The MML_Manual_BLOCK capability is enabled.
If the Cisco PGW 2200 Softswitch does not receive
acknowledgement (ACK) of Release and Restart
messages or a Disconnect message from the remote SS7
gateway, the Cisco PGW 2200 Softswitch performs the
following actions:
– Manually blocks the CIC (Circuit Identification
Code)
– Sends a BLO message to the remote SS7 gateway
– Releases the call
Default: 0
*.numberOfThreads
This parameter is set automatically when you specify a
Cisco MGC type in the engine.SysVirtualSwitch parameter.
Any attempt to modify this parameter is overwritten.
Values:
•
0—single CPU
•
1—two CPUs
•
2—four CPUs
Default: 0
*.OverdecadicDigitsSupported
Note
If you have a multi-CPU system (1 or 2), you must
set engine.SysGeneratedCode to true.
Note
During the startup of the
Cisco PGW 2200 Softswitch software, this
parameter will be set automatically to tune the
system for optimal performance.
This parameter controls the method of loading dial plan
tables and instructs the system whether to expect
overdecadic (base 16) or regular decadic (base 10) digits in
dial plans, routing, and other digit streams.
Correct setting of this parameter depends on local network
interconnect agreements and the expected data format.
Enter true to use overdecadic digits (0-F).
Cisco PGW 2200 Softswitch Release 9.8 Software Installation and Configuration Guide
A-14
OL-18083-01
Appendix A
XECfgParm.dat File Parameters
Understanding the XECfgParm.dat File Format
Table A-1
Cisco PGW 2200 Softswitch 9.x XECfgParm.dat File Configuration Parameters
Configuration Parameter
Definition
*.OwnClli
Common language location identifier; used for circuit query
validation when circuit queries are supported.
Value: Alphanumeric string, up to 11 characters.
Default: TTTT-SS-BB-XXX
Example: 1111-22-33-444
*.PartialCliPnoIdentity
Contains a 3-digit integer representing the PNO Identity
field of the partial CLI parameter.
Valid values: 0 (default) through 999
*.PartialCliSwitchNumber
Contains a 3-digit integer representing the Switch Number
field of the partial CLI parameter.
Valid values: 0 (default) through 999
*.PartialCliTypeOfSwitch
Contains a 2-digit integer representing the Type of Switch
field of the partial CLI parameter.
Valid values: 0 (default) through 99
*.platformId
Enables the signaling controller to run more than one
instance of the Cisco PGW 2200 Softswitch software
concurrently.
Default: 1
Note
*.popDataSync
Do not change this value.
Specify true if master/slave mode is being used.
Cisco PGW 2200 Softswitch Release 9.8 Software Installation and Configuration Guide
OL-18083-01
A-15
Appendix A
XECfgParm.dat File Parameters
Understanding the XECfgParm.dat File Format
Table A-1
Cisco PGW 2200 Softswitch 9.x XECfgParm.dat File Configuration Parameters
Configuration Parameter
Definition
*.RedirectingATree
Used to control A-number screening/analysis via A-digit
tree. This parameter allows the analysis system to use the
A-Digit tree for mapping to the BLACKLIST function on the
Redirecting CLI value. It uses the A-Digit tree to allow for
black screening on the redirecting number parameter
included in the Initial Address Message (IAM).
Currently, when the parameter MDLANumberScreening is
set to 1 in the XECfgParm.dat file, screening is done on the
redirecting number. This works when screening individual
numbers but does not allow block ranges to be screened, as
is the case when using DialPlan Screening in the Digit Tree
functions.
Use an editor such as vi to manually add the
*.RedirectingATree parameter to the XECfgParm.dat file in
the following file locations and set its value:
/opt/CiscoMGC/etc/XECfgParm.dat
/opt/CiscoMGC/etc/CONFIG_LIB/new/XECfgParm.dat
Valid values:
•
0—Default. Indicates the Calling Party Number
(CGPN) that will be used for A-number
screening/analysis via A-digit tree.
•
1—Indicates that the Redirecting Number should be
used for A-number screening/analysis via A-digit tree if
the incoming signaling message contains both the CPN
and Redirecting Number or just the Redirecting
Number.
Note
*.SelectTermCustGrpId
This property is only effective when BLACKLIST is
provisioned. If Screening is data filled and this
property is set to 1, then Redirecting Number is used
for screening. However, if result types other than
BLACKLIST/SCREENING are encountered when
Redirecting Number is used during A-number Tree
Analysis, an alarm RedirectingNbrFail
(informational alarm) is generated.
Applies only to Nailed Solutions. If this parameter is not
defined, it defaults to False.
If this parameter is set to True and CUSTGRPID of the
Originating Leg SigPath is 0000, then you must select
CUSTGRPID of the Terminating Leg SigPath.
If this parameter is set to False, you should always select
CUSTGRPID of the Originating Leg SigPath.
Default: False
Cisco PGW 2200 Softswitch Release 9.8 Software Installation and Configuration Guide
A-16
OL-18083-01
Appendix A
XECfgParm.dat File Parameters
Understanding the XECfgParm.dat File Format
Table A-1
Cisco PGW 2200 Softswitch 9.x XECfgParm.dat File Configuration Parameters
Configuration Parameter
Definition
*.sipFailover
Specifies whether the Cisco PGW 2200 Softswitch hosts,
when connected with a session interrupt protocol (SIP)
network, should perform an automatic switchover when a
LAN interface fails.
Default: false
Valid values: true or false
*.sipRoutingMode
Defines the routing mode of Cisco PGW 2200 Softswitch,
strict router or loose router.
Valid Values:
•
0 = Strict Router
•
1 = Loose Router
Default: 0
*.sm_meas_baseaddr
Indicates the memory size of the base address.
Default: 3400
Note
*.stPort
Do not change this value.
Port number used between peer components or processes.
Enter any unused port number (for example, 7000). If your
configuration uses a Cisco SLT, enter the port number on the
Cisco SLT.
*.SUA.maxSigServices
Note
If you have two Cisco PGW 2200 Softswitch hosts
in a failover configuration, enter a different number
for this value in the XECfgParm.dat file on the
secondary host (for example, 7001).
Note
On a new configuration, we recommend that this
parameter be set to 0. This value allows the
Cisco ITP-L port to be defined using the PEERPORT
parameter of the SESSIONSET.
Note
SESSIONSET reads the port value that is defined.
However, if an *.stPort value other than 0 is defined
in XECfgParm.dat (for example, *.stPort=7001),
the SESSIONSET value gets overridden by the value
in XECfgParm.dat.
Defines the maximum number of Signaling Connection
Control Part (SCCP) User Application (SUA) signaling
services. It also defines the maximum number of SUA
routing keys.
Value: 256
Note
Do not change this value.
Cisco PGW 2200 Softswitch Release 9.8 Software Installation and Configuration Guide
OL-18083-01
A-17
Appendix A
XECfgParm.dat File Parameters
Understanding the XECfgParm.dat File Format
Table A-1
Cisco PGW 2200 Softswitch 9.x XECfgParm.dat File Configuration Parameters
Configuration Parameter
Definition
*.SUA.maxOPCs
Defines the maximum number of SUA OPCs.
Value: 64
Do not change this value.
Note
*.SUA.maxRoutesPerOpcApcSsn
Defines the maximum number of SUA routes per OPC,
adjacent point code (APC), and subsystem number (SSN)
set.
Value: 2
Do not change this value.
Note
*.SUA.maxSgp
Defines the maximum number of SUA SS7 signaling
gateway processes.
Values: 8
Do not change this value.
Note
*.SyscheckpointEnabled
Enables or disables checkpointing.
Values:
•
false—Disables checkpointing. Calls are not preserved
during a switchover, and status messages are not sent to
the replicator (default).
•
true—Enables checkpointing. Calls that are in the
talking state are preserved and survive a control
switchover. All status checkpointing information is sent
to the replicator on the active side.
Default: false
If you have two Cisco PGW 2200 Softswitch hosts
in a failover configuration, enter true. If you have a
standalone configuration, enter false.
Note
*.SysConnectDataAccess
Controls whether data access is enabled or disabled (if the
engine attempts to connect to the MMDB or to call screening
database at startup).
Values:
•
true—Connect to MMDB or call screening database.
•
false—Do not connect to MMDB or call screening
database.
Default: false
Note
This parameter must be set to true in calling
scenarios where Euro-LNP, A Number Screening, or
other features requiring real time database access are
required. Otherwise, it can remain false for an
increase in the available system memory usable for
call processing.
Cisco PGW 2200 Softswitch Release 9.8 Software Installation and Configuration Guide
A-18
OL-18083-01
Appendix A
XECfgParm.dat File Parameters
Understanding the XECfgParm.dat File Format
Table A-1
Cisco PGW 2200 Softswitch 9.x XECfgParm.dat File Configuration Parameters
Configuration Parameter
Definition
*.tablesFile
Location of the database directories.
Default: ../etc/tables.dat
Note
*.tempDir
Do not change this value.
Location of the temporary files.
Default: /tmp
Note
*.tibcoSupport
Do not change this value.
Determines whether or not the system supports a TIBCO
maintenance interface.
Default: disable
Valid values: enable or disable
*.transpathId
Identifies the local Cisco PGW 2200 Softswitch host in a
redundant configuration. The IDs must be unique in an
active and standby pair.
Value: Any integer up to 2 digits.
Default (for the active host): 01
Note
*.Virtual_IP_Addr1
If you have two Cisco PGW 2200 Softswitch hosts
in a failover configuration, the number for each host
must be different in the XECfgParm.dat file.
Specifies a virtual IP address for a LAN interface. This IP
address must be within the subset of the IP address defined
for *.IP_Addr1.
Default: 0.0.0.0
Valid values: An IP address expressed in dotted decimal
notation.
*.Virtual_IP_Addr2
Specifies a virtual IP address for a LAN interface. This IP
address must be within the subset of the IP address defined
for *.IP_Addr2.
Default: 0.0.0.0
Valid values: An IP address expressed in dotted decimal
notation.
Cisco PGW 2200 Softswitch Release 9.8 Software Installation and Configuration Guide
OL-18083-01
A-19
Appendix A
XECfgParm.dat File Parameters
Understanding the XECfgParm.dat File Format
Table A-1
Cisco PGW 2200 Softswitch 9.x XECfgParm.dat File Configuration Parameters
Configuration Parameter
Definition
*.VSCNetworkPlacement
Determines Cisco PGW 2200 Softswitch placement (AT or
IXC) and bias routing accordingly.
Values:
•
Nanp_AT
•
Nanp_IXC
•
NULL
•
0
Default: NULL
Note
*.CallCutoffTimer
If you do not set this property, all calls will route
according to called number or some other criteria,
not Carrier ID.
Provides a global system-wide timer, which is started when
a call is answered and runs for the pre-configured time.
When it expires the call is released in both directions and the
call is cleared. This parameter is not dynamically
reconfigurable. You must restart your system.
Valid values:
•
Hours: 0 (default), 1–48 (using hour as the unit)
•
Minutes: 0, 1–2880 (using minute as the unit)
•
Seconds: 0, 1–1728000 (using second as the unit)
Default: 0—Disables the timer.
Note
*.CallCutoffTimerUnits
You can override this value using the first data word
of the CALL_CUTOFF_TIMER result type.
Defines the unit of measurement used for the global
system-wide timer.
Valid values:
cfgM.recovDbFile
•
0 (hours) (default)
•
1 (minute)
•
2 (seconds)
Storage location of the configuration manager recovery
information.
Default: ../var/cfgMRecovery
Note
Do not change this value.
Cisco PGW 2200 Softswitch Release 9.8 Software Installation and Configuration Guide
A-20
OL-18083-01
Appendix A
XECfgParm.dat File Parameters
Understanding the XECfgParm.dat File Format
Table A-1
Cisco PGW 2200 Softswitch 9.x XECfgParm.dat File Configuration Parameters
Configuration Parameter
Definition
diskmonitor.CdrRmFinished
Specifies the number of days to keep finished CDR files. The
default value is 0, which means that if the Cisco BAMS is
polling the Cisco PGW 2200 Softswitch, CDR.bin files
remain in a user-configurable directory until they are renamed
by the Cisco BAMS (using format CDR_timestamp.finished)
and/or the disk monitor trims the file from user-configurable
directory.
Value: 0 or non-zero integer indicates days to delay before
being deleted.
Default: 0
diskmonitor.CfgRmDirs
Specifies the maximum number of configurations that can be
stored in the configuration library. This parameter must be
manually added to the XECfgParm.dat file to activate the
disk monitor enhancement shell script. This feature allows
you to manipulate and disable the deletion of configuration
directories through XECfgParm.dat. Old configuration
directories are removed in reverse order when the indicated
limit is reached.
Default: 64
If the XECfgParm.dat file is not updated, a default value of
64 is used for the number of allowable directories. If a
default of 64 is used, the Cisco PGW 2200 Softswitch will
maintain up to 64 configurations in its
/opt/CiscoMGC/etc/CONFIG_LIB directory.
Entering a value of 0 disables monitoring of the number of
entries stored in the configuration library.To change the
value of this parameter, you may need to add it manually to
the XECfgParm.dat file.
The deletion of configuration directories can be disabled by
setting the diskmonitor.CfgRmDirs parameter to a value less
than or equal to 2, or greater than 64.
You can also reduce the number of allowable saved
configurations by setting the parameter to a value between 3
and 64.
Note
diskmonitor.CoreRmDays
A default value in the range of 50 to 60 should be
used to allow the disk monitor script to work
properly when using the MML command prov-sync.
Specifies how many days to keep core dump files before disk
monitor removes them automatically.
Default: 1
Cisco PGW 2200 Softswitch Release 9.8 Software Installation and Configuration Guide
OL-18083-01
A-21
Appendix A
XECfgParm.dat File Parameters
Understanding the XECfgParm.dat File Format
Table A-1
Cisco PGW 2200 Softswitch 9.x XECfgParm.dat File Configuration Parameters
Configuration Parameter
Definition
diskmonitor.DailyStartTime
Specifies the time that the disk monitor is run each day to
remove files that are older than the value set in
diskmonitor.MaxKeepDays. The time is in 24-hour format
and is based on the time set in the operating system.
Default: 04:15
diskmonitor.Limit
Age of the files, in days, that can be deleted when disk
trimming is initiated.
Default: 7
Note
diskmonitor.MaxKeepDays
Do not change this value.
Maximum number of days to preserve logged data regardless
of the percentage of disk usage. The value of this parameter
is checked once daily at the time specified in
diskmonitor.DailyStartTime. The default value, 0, disables
this function.
Default: 0
diskmonitor.OptFileSys
List of optional file systems to monitor. Allows for optional
user-configurable file systems to be monitored. This utility
monitors the /opt file system for threshold crossing. Using this
parameter, you can monitor additional file systems (disk slices)
by setting parameter to the preferred directory, such as /tmp,
/usr or /var. The messages associated with this parameter are
sent to the platform.log file. To retrieve these messages, you
must scan the platform.log file for messages using the following
format: Filesystem file_system_name has exceeded num
percent full. For example:
Filesystem /var has exceeded 80 percent full
These files are not trimmed by disk monitor.
Default: (blank)
Cisco PGW 2200 Softswitch Release 9.8 Software Installation and Configuration Guide
A-22
OL-18083-01
Appendix A
XECfgParm.dat File Parameters
Understanding the XECfgParm.dat File Format
Table A-1
Cisco PGW 2200 Softswitch 9.x XECfgParm.dat File Configuration Parameters
Configuration Parameter
Definition
diskmonitor.PreserveLogs
Specifies, along with diskmonitor.SoftLimit, whether
platform log data should be preserved or deleted once the
disk usage percentage set in diskmonitor.Threshold is
reached.
Note
Alarm, CDR, and measurement log (under
/var/spool) files are not affected by the settings of
this parameter.
To ensure that logged data can be deleted, this parameter is
set to false. The setting for diskmonitor.SoftLimit has no
impact.
To ensure that logged data is preserved, this parameter is set
to true, and diskmonitor.SoftLimit is set to false.
Default: False
Caution
diskmonitor.SoftLimit
If this function is activated and the DISK alarm is
raised, you must delete the non-required files to
bring the disk utilization below the threshold.
Otherwise, you run the risk of filling the disk and
stopping the Cisco PGW 2200 Softswitch.
Specifies the action to be taken once the number of days
threshold set in the diskmonitor.Limit parameter is reached.
Works with diskmonitor. Threshold to prevent the disk from
filling up and stopping the Cisco PGW 2200 Softswitch.
If this parameter is set to true, disk monitor deletes files day
by day until the utilization level drops below the threshold.
If this parameter is set to false, disk monitor closes and the
system generates a DISK alarm. The files can then be deleted
manually.
This parameter also works with diskmonitor.PreserveLogs to
specify whether logs are preserved when the disk usage
percentage set in diskmonitor.Threshold is reached. Refer to
the description of the diskmonitor.PreserveLogs parameter
for more information.
Default: False
Caution
If this parameter is set to false and the DISK
alarm is raised, you must delete the non-required
files to bring the disk utilization below the
threshold. Otherwise, you run the risk of filling
the disk and stopping the
Cisco PGW 2200 Softswitch.
Cisco PGW 2200 Softswitch Release 9.8 Software Installation and Configuration Guide
OL-18083-01
A-23
Appendix A
XECfgParm.dat File Parameters
Understanding the XECfgParm.dat File Format
Table A-1
Cisco PGW 2200 Softswitch 9.x XECfgParm.dat File Configuration Parameters
Configuration Parameter
Definition
diskmonitor.Threshold
Erases old log files to free disk space. The threshold is the
percent the disk is full before trimming starts. Only /var/log
and /var/spool are monitored by default; the disk monitor
function is local to these two directories by default.
Disk related alarms are generated only when disk monitor is
running and the disk cannot be trimmed back to the threshold
level according to the parameter settings in XECfgParm.dat.
If the disk is 86% full and disk monitor successfully trims
back to 80%, no alarm is generated.
Value: Any integer from 1 to 100 (percent of threshold).
Default: 80
cdrDmpr.callDetail
Specifies that CDR files may be automatically converted
from binary format to ASCII, comma-delimited format.
Default: /opt/CiscoMGC/local/cdbscript.sh
Optional: /opt/CiscoMGC/bin/converter (if binary CDR
files need to be converted to ASCII)
The default CDR file format has changed from an
ASCII format in Release 4 to a binary format in
Release 7. The ASCII file has a .csv extension.
Note
For more information on generating and viewing
CDR files, see the Cisco PGW 2200 Softswitch
Release 9 Operations, Maintenance, and
Troubleshooting Guide.
dmpr.openCDR
Specifies whether the standard data dumper should write out
CDR files.
Values:
•
true—Standard data dumper opens a CDR file and log
the call data blocks (CDB).
•
false—Standard data dumper does not open a CDR file
and does not log CDBs.
Default: true
Note
engine.AuditTimerInterval
The default format for CDR files has been changed
since release 4 from an ASCII format to a binary
format. Use the dmpr.callDetail parameter to
convert the files to an ASCII format, if necessary.
Time interval in milliseconds between two batches of audits.
Value: Any positive integer.
Default: 500
Note
This is a platform-specific value and depends on
your system installation. No auditing is available for
nailed trunks.
Cisco PGW 2200 Softswitch Release 9.8 Software Installation and Configuration Guide
A-24
OL-18083-01
Appendix A
XECfgParm.dat File Parameters
Understanding the XECfgParm.dat File Format
Table A-1
Cisco PGW 2200 Softswitch 9.x XECfgParm.dat File Configuration Parameters
Configuration Parameter
Definition
engine.CallLimitingControl
Allows enabling or disabling the call limiting capability on
the Cisco PGW 2200 Softswitch.
(added in Release 9.6(1)
Valid values:
engine.CALL_MEM_BLOCK_SIZE
•
0—Call limiting off (default)
•
1—Call limiting on
Block of memory allocated per call.
Used by MDL.
Set automatically based on the type of
Cisco PGW 2200 Softswitch selected in
engine.SysVirtualSwitch. Any attempt to modify this value
is overwritten.
engine.CALL_MEM_CHUNK_SIZE
Memory chunks allocated from the block of memory
designated with engine.CALL_MEM_BLOCK_SIZE.
Set automatically based on the type of
Cisco PGW 2200 Softswitch selected in
engine.SysVirtualSwitch. Any attempt to modify this value
is overwritten.
engine.CDRencodingFormat
Specifies the CDR file encoding format.
Values:
•
AnsiCDB—North American
•
ItuCDB—European
•
CustCDB—Custom
Default: AnsiCDB
Cisco PGW 2200 Softswitch Release 9.8 Software Installation and Configuration Guide
OL-18083-01
A-25
Appendix A
XECfgParm.dat File Parameters
Understanding the XECfgParm.dat File Format
Table A-1
Cisco PGW 2200 Softswitch 9.x XECfgParm.dat File Configuration Parameters
Configuration Parameter
Definition
engine.CDRmessageTypes
To specify the Call Detail Blocks (CDBs are the accounting
records written at various points in a call) that are generated
during a call, enter one of the following sets of values (each
number represents a point in a call):
•
Note
1010, 1020, 1030, 1040, 1050, 1060, 1070,
1080—These are considered the “event-based” set of
values. Use this event-based list when you want to
receive all CDR records at predefined points in the call.
Although each of these CDBs can be specified
independently, Cisco suggests that you use the
event-based set as a package of CDBs for full
accounting purposes.
The event-based setting is required when operating
the Cisco PGW 2200 Softswitch in conjunction with
the BAMS adjunct.
•
1060, 1110—Use this value if you want end-of-call
summary-type records only.
•
1071—Use this set of values for BAMS measurements.
Refer to the chapter “Detailed CDB Description” in the
Cisco PGW 2200 Softswitch Software Release 9 Billing
Interface Guide for details on each CDB.
engine.CDRtimeStamp
Specifies the time stamp unit in seconds or milliseconds.
To specify the CDR file time-stamp unit, enter one of the
following values:
•
S—Seconds (default).
•
M—Milliseconds. Use this parameter if your
configuration uses TCAP or if you want the millisecond
granularity in all of your CDR records.
Note
engine.CircuitReservation
The M setting is mandatory when operating the
Cisco PGW 2200 Softswitch in conjunction with the
BAMS adjunct.
Enables or disables the circuit reservation feature.
Values: True, False
Default: False
engine.CMMdlFile
Location of call processing libraries.
Default: ../lib/cc
Note
Do not change this value.
Cisco PGW 2200 Softswitch Release 9.8 Software Installation and Configuration Guide
A-26
OL-18083-01
Appendix A
XECfgParm.dat File Parameters
Understanding the XECfgParm.dat File Format
Table A-1
Cisco PGW 2200 Softswitch 9.x XECfgParm.dat File Configuration Parameters
Configuration Parameter
Definition
engine.RelINAPCallsAfterSwOver
Defines the treatment of INAP calls in answer state after
platform switchover. This parameter is used for calls that
require INAP interaction even after the answer state.
Currently, this parameter is used only for Prepaid INAP
calls.
Values:
•
True (Release all the INAP calls after switchover)
•
False (Do not release INAP calls after switchover)
Default: True
If the value of this parameter is set to true, the
Cisco PGW 2200 Softswitch releases all calls
immediately. If the value is set to False, the
Cisco PGW 2200 Softswitch does not take any
action for the INAP prepaid calls and these calls are
treated like any normal POTS call.
Note
engine.LCMMdlFile
Location of call processing libraries.
Default: ../lib/lcm
Do not change this value.
Note
engine.MaxAuditCics
Number of circuit identification codes (CICs) that can be
audited at a specified interval.
Values:
•
24—North America (T1)
•
32—Europe (E1)
Default: 32
Note
engine.mdoDir
Do not change this value.
Location of call processing libraries.
Default: ../lib/
Note
engine.SendHardwareBlock
Do not change this value.
To enable the Cisco PGW 2200 Softswitch to send
hardware-oriented blocking messages for any blocks that
originate from the media gateways:
•
true—Sends hardware-oriented blocking messages for
any blocks that originate from the media gateways.
•
false—Sends only maintenance-oriented blocking
messages for all blocking cases (default).
Note
The parameter is automatically added to the
XECfgParm.dat file during the patch installation.
Cisco PGW 2200 Softswitch Release 9.8 Software Installation and Configuration Guide
OL-18083-01
A-27
Appendix A
XECfgParm.dat File Parameters
Understanding the XECfgParm.dat File Format
Table A-1
Cisco PGW 2200 Softswitch 9.x XECfgParm.dat File Configuration Parameters
Configuration Parameter
Definition
engine.ShortDurationCallPeriod
Allows you to specify the period used to determine a short
duration call. Calls with a duration less than the specified
value are recorded as a short duration call in the CDR.
Default: 0
Valid values are: 0–30. A setting of 0 indicates that this
parameter is disabled. Short duration calls are not recorded
in the CDR when this parameter is disabled.
engine.StartUpAuditEnabled
Audit is automatically invoked at
Cisco PGW 2200 Softswitch startup.
When the value is set to true the
Cisco PGW 2200 Softswitch automatically starts audit
when it comes up as the active host. This does not apply to
the standby host.
Default: false
engine.SysCdrCollection
Designates the format of CDRs.
Values:
•
true—Invalid for Release 7.4 and above.
•
false—Generates binary format CDRs (default)
Default: false
Do not change this value. Setting this to a value of
true for Release 7.4 and higher is not valid and may
have deleterious effects on the system.
Note
engine.SysCLIval
Enables or disables Calling Line Identity (CLI) validation
processing on calls.
Values:
•
true— Enables CLI validation
•
false—Disables CLI validation
Default: false
engine.SysGeneratedCode
Determines whether compiled or interpreted code is used.
Values:
•
true—System uses compiled code.
•
false—System uses interpreted code.
Default: true
Note
Compiled code runs faster than interpreted code.
Typically, this value should be true. If your
configuration uses multiple CPUs, this value must be
true.
Cisco PGW 2200 Softswitch Release 9.8 Software Installation and Configuration Guide
A-28
OL-18083-01
Appendix A
XECfgParm.dat File Parameters
Understanding the XECfgParm.dat File Format
Table A-1
Cisco PGW 2200 Softswitch 9.x XECfgParm.dat File Configuration Parameters
Configuration Parameter
Definition
engine.SysGSMTimerInterval
Allows group service messages (GSMs—used to advertise
the state of circuits) to be sent at a periodic rate from the SS7
side of the network to the IP side of the network.
Valid values: 1000–30000
Default for up to Release 9.2(2): 30000
Default for Release 9.3(1) and later: 10000
engine.SysGRSBlockSize
Used for flow control of all automatically generated GRS,
CGB, and CGU messages which are generated by the
Cisco PGW 2200 Softswitch during run time. Typically
produced due to propagation of service state changes such as
MGCP endpoints changing availability. Specifies the
interval, in milliseconds, between blocks of GRS parameters
when the engine.SysGRSBlockSize parameter is used. The
timer interval runs from the start of sending the first GRS
message in each block to the first message in the next block.
This parameter operates independently for each SS7 route
(each OPC/DPC pair).
Value: Any integer
Default: 0
Example: 1000
engine.SysMaxOverlap
Maximum number of digits required before a call is
considered complete; used in overlap signaling.
Default: 28
Note
Do not change this value.
Cisco PGW 2200 Softswitch Release 9.8 Software Installation and Configuration Guide
OL-18083-01
A-29
Appendix A
XECfgParm.dat File Parameters
Understanding the XECfgParm.dat File Format
Table A-1
Cisco PGW 2200 Softswitch 9.x XECfgParm.dat File Configuration Parameters
Configuration Parameter
Definition
engine.SysMdlMemoryReduction
Controls use of MDL memory reductions.
Prior to Release 9.4(1):values:
•
0—MDL memory reductions not used (maximum
performance)
•
1—MDL memory reduction improvements used
Default: 0
engine.SysMinOverlap
Note
For performance-critical configurations, use the
default value. For memory-critical configurations,
set this value to 1.
Note
Setting this parameter to 1 enables the memory
reduction algorithm which increases the number of
concurrent (sustained) calls possible with the
platform at the expense of call throughput
performance.
Note
During the startup of the
Cisco PGW 2200 Softswitch software, this
parameter will be set automatically to tune the
system for optimal performance.
Note
Release 9.4(1) and later: This parameter is set
automatically based on the type of Cisco MGC
selected in engine.SysVirtualSwitch. Any attempt to
modify this value is overwritten.
Minimum number of digits required before a call is
considered valid; used in overlap signaling.
Default: 0
Do not change this value.
Note
engine.SysPropagateChanAvail
In a classic signaling controller configuration, propagates
service messages between channels in the event of a channel
failure.
Values:
•
true—Messages propagated
•
false—Messages not propagated (default)
Note
engine.SysSGCPRetryCount
Do not change this value.
Maximum number of simple gateway control protocol
(SGCP) retry messages after a failure.
Default: 3
Note
Do not change this value.
Cisco PGW 2200 Softswitch Release 9.8 Software Installation and Configuration Guide
A-30
OL-18083-01
Appendix A
XECfgParm.dat File Parameters
Understanding the XECfgParm.dat File Format
Table A-1
Cisco PGW 2200 Softswitch 9.x XECfgParm.dat File Configuration Parameters
Configuration Parameter
Definition
engine.SysSGCPREtryTimerInterval
The interval between SGCP message transmissions, in
milliseconds.
Default: 1000
Do not change this value.
Note
engine.SysTraceLevel
A debugging tool that allows for different levels of engine
tracing.
Default: 3
Do not change this value.
Note
engine.SysVirtualSwitch
Indicates whether the Cisco PGW 2200 Softswitch host
functions as a signaling controller or a virtual switch
controller.
Values:
•
0—Signaling controller (nailed trunks, no auditing is
initiated)
•
1—Virtual switch controller (switched trunks)
Default: 0
Note
During the startup of the
Cisco PGW 2200 Softswitch software, this
parameter is be set automatically to tune the system
for optimal performance.
Note
For Release 9.4(1) and later, the values of the
parameters listed below are automatically set based
on the Cisco MGC type you select, to maximize
performance for that configuration. Any attempt to
change the values of these parameters is overwritten.
engine.SysMdlMemoryReduction
engine.CALL_MEM_BLOCK_SIZE
engine.CALL_MEM_CHUNK_SIZE
*.CPUTimerInterval
*.numberOfThreads
engine.VersionTimeoutValue
Defines the timeout interval in number of milliseconds for
version messages sent to the media gateway. This delay
determines how long the Cisco PGW 2200 Softswitch waits
for a response from the media gateway during the exchange
of features prior to the audit.
Value: Any integer.
Default: 10000
Cisco PGW 2200 Softswitch Release 9.8 Software Installation and Configuration Guide
OL-18083-01
A-31
Appendix A
XECfgParm.dat File Parameters
Understanding the XECfgParm.dat File Format
Table A-1
Cisco PGW 2200 Softswitch 9.x XECfgParm.dat File Configuration Parameters
Configuration Parameter
Definition
foverd.abswitchPort
Port used for communication with the A/B switch.
Value: /dev/term/x
Example: /dev/term/b
If your configuration does not use an A/B switch, use
the default value (/dev/null).
Note
foverd.abswitchTestInterval
Time interval in milliseconds between attempts to verify that
an A/B switch is present.
Default: 30000
This parameter applies only if your configuration
uses an A/B switch.
Note
foverd.ackTimeout
Maximum time, in milliseconds, that the failover daemon
will wait for an ACK or NOACK message to be received
from the peer failover daemon. For each message the failover
daemon sends, the peer failover daemon sends an ACK or
NOACK message to indicate that the peer is still
functioning.
Default: 1000 milliseconds (1 second).
You can change the default value to a value more
appropriate for your system installation.
Note
foverd.commRetryInterval
Time interval in milliseconds between attempts to open a
connection.
Connection types include:
•
Connection to the peer failover daemon
•
Connection to the A/B switch
•
Connection to the ARU
Default: 30000 milliseconds (30 seconds).
You can change the default value to a value more
suited to your system installation.
Note
foverd.conn1Type
Sets the connection type for connection number 1.
Values:
•
Serial
•
Socket
Typically, set this value to socket.
Note
foverd.conn2Type
Sets the connection type for connection number 2.
Values:
•
Serial
•
Socket
Note
Typically, set this value to socket.
Cisco PGW 2200 Softswitch Release 9.8 Software Installation and Configuration Guide
A-32
OL-18083-01
Appendix A
XECfgParm.dat File Parameters
Understanding the XECfgParm.dat File Format
Table A-1
Cisco PGW 2200 Softswitch 9.x XECfgParm.dat File Configuration Parameters
Configuration Parameter
Definition
foverd.conn3Addr
Specifies the address of the peer system.
Example: /dev/term/b
If your configuration does not use connection number 3,
enter /dev/null (default).
If your configuration uses an 8-port connector as a
serial connection for failover, you must modify the
read-write permissions for the connection. For more
information, see the Release Notes for the Cisco
Cisco PGW 2200 Softswitch Release 9.8.
Note
foverd.conn3Type
Sets the connection type for connection number 3.
Values:
•
serial
•
socket
Note
foverd.delayTimeout
Typically, set this value to serial.
Maximum time in milliseconds that the failover daemon can
delay at startup before sending messages to its peer. This is
also the delay offset that is added when the two failover
daemons become too closely synchronized.
Default: 1000 milliseconds (1 second)
foverd.forceShutTimeout
Maximum time in milliseconds that the failover daemon
waits before forcefully shutting down the platform.
Default: 1000 milliseconds (1 second)
foverd.graceShutTimeout
Maximum time in milliseconds that the failover daemon
waits before gracefully shutting down the process manager,
which shuts down the processes it controls.
Default: 6000 milliseconds (6 seconds)
foverd.heartbeatInterval
Maximum time in milliseconds between heartbeat messages
from the peer failover daemon. This interval defines the
frequency that the failover daemon exchanges heartbeat
messages with its peer.
Default: 1000 milliseconds (1 second).
foverd.ipLocalPortA
Port number used for IP communication.
Default: 0
Note
If you have two Cisco PGW 2200 Softswitch hosts
in a failover configuration, enter this value for the
foverd.ipPeerPortA field in the XECfgParm.dat file
on the secondary host.
Cisco PGW 2200 Softswitch Release 9.8 Software Installation and Configuration Guide
OL-18083-01
A-33
Appendix A
XECfgParm.dat File Parameters
Understanding the XECfgParm.dat File Format
Table A-1
Cisco PGW 2200 Softswitch 9.x XECfgParm.dat File Configuration Parameters
Configuration Parameter
Definition
foverd.ipLocalPortB
Port number used for IP communication.
Default: 0
Note
foverd.ipPeerPortA
If you have two Cisco PGW 2200 Softswitch hosts
in a fault-tolerant configuration, enter this value for
the foverd.ipPeerPortB field in the XECfgParm.dat
file on the secondary host.
Port number used for IP communication.
Default: 0
Note
foverd.ipPeerPortB
If you have two Cisco PGW 2200 Softswitch hosts
in a fault-tolerant configuration, enter this value for
the foverd.ipLocalPortA field in the XECfgParm.dat
file on the secondary host.
Port number used for IP communication.
Default: 0
Note
foverd.peerCommTimeout
If you have two Cisco PGW 2200 Softswitch hosts
in a fault-tolerant configuration, enter this value for
the foverd.ipLocalPortB field in the XECfgParm.dat
file on the secondary host.
Maximum time in milliseconds without communication with
the remote system. At the expiration of this period, the
remote system is assumed to be unavailable and an automatic
switchover is performed.
Default: 3000 milliseconds (3 seconds)
Note
foverd.statusRptInterval
A time out value that is too small can cause a false
failover, resulting in possible service interruptions.
Time interval in milliseconds that governs the frequency
with which the failover daemon logs statistics on the
different connections and any failures it encountered
exchanging messages with its peer. Logs are created in the
log directory.
Default: 600000 milliseconds (10 minutes)
foverd.transitionTimeout
Maximum time in milliseconds allowed for transitions
between different states of the failover daemon. This timeout
determines how long the system waits for a graceful
transition to a new state before forcing the transition. If a
timeout occurs, the system is restarted.
Default: 10000 milliseconds (10 seconds).
Cisco PGW 2200 Softswitch Release 9.8 Software Installation and Configuration Guide
A-34
OL-18083-01
Appendix A
XECfgParm.dat File Parameters
Understanding the XECfgParm.dat File Format
Table A-1
Cisco PGW 2200 Softswitch 9.x XECfgParm.dat File Configuration Parameters
Configuration Parameter
Definition
GWNetworkContinuity
For network continuity test on VISM.
Valid values:
1—Network continuity is present/requested.
0—Network continuity is present/requested.
Default: 0 (Currently this property only applies to VISM
GWs.)
This property should have value = 1 when the VISM
GW property is switched on.
Note
ioChanCtl.DPNSSTestFrames
Enables DPNSS to generate test frames.
Values:
•
true—If DPNSS is running, test frames are generated.
•
false—Test frames are not generated.
Default: true
Note
Do not change this value.
ioChanMgr.alarmTimer
This parameter is obsolete and should be set to 0.
ioChanMgr.evtTimer
Frequency, in milliseconds, at which the queue is scanned
for messages.
Default: 100
Note
Do not change this value.
ioChanMgr.hbTimer
This parameter is reserved for future use.
ioChanMgr.IPCsendThreshold
Specifies the maximum number of RSIPs that can be sent
from the queue during a period defined by the IPCTimer
XECfgParam.dat parameter. When this parameter is left at
its default value (0), the system uses a base value. You can
modify the value if a problem occurs.
Valid values: Any integer
Default value: 0
ioChanMgr.resumeAckTimer
Amount of time the Cisco PGW 2200 Softswitch waits to
get a MGMT_RESUME_ACK_RSP message from a
gateway, after sending a MGMT_RESUME_REQ message
fro a BSM session set.
Values are 1 or 2 seconds.
Default: 1
ioChanMgr.sendThreshold
Maximum number of events sent from the queue at one time.
Default: 10
Note
Do not change this value.
Cisco PGW 2200 Softswitch Release 9.8 Software Installation and Configuration Guide
OL-18083-01
A-35
Appendix A
XECfgParm.dat File Parameters
Understanding the XECfgParm.dat File Format
Table A-1
Cisco PGW 2200 Softswitch 9.x XECfgParm.dat File Configuration Parameters
Configuration Parameter
Definition
ioChanMgr.sessionPauseTimer
Amount of time the Cisco PGW 2200 Softswitch waits for a
BSM session set to recover from failure before declaring the
session set failure.
Values: 1–10 seconds.
Default: 8
ioChanMgr.statDiscardThreshold
Size of the control queue that triggers discarding of all
queued stat events.
Default: 40
Do not change this value.
Note
ioChanMgr.statTimer
Frequency, in milliseconds, at which measurements are
collected in the Transpath Input/Output System (TIOS).
Default: 30000 milliseconds
Do not change this value.
Note
ioChanMgr.trace
Creates unit test tracing of line and channel state machines.
Generates a considerable amount of information to the log.
Set to a value only when you are debugging a particular
problem with line or channel service state problems.
Values:
•
0 x 0—Default
•
0 x 1—Trace
Note
localMID
Do not change this value.
This property is included in the H.248 message from
Cisco PGW 2200 Softswitch to gateway. It can be an IP
address in the format of X.X.X.X, or it can be a domain
name.
Values: String (up to 127 characters)
Default: 0.0.0.0
Note
logger.daemonAddr
The MgcHeaderAddrType property contains related
information.
Specifies the name of the local socket used by the log server
daemon. The daemon listens for connections on this address,
and client programs attempt to connect to the daemon at this
address.
Default: ../var/log/lsd_addr
Note
If this setting is missing from the XECfgParm.dat
file, the log server daemon does not run.
Cisco PGW 2200 Softswitch Release 9.8 Software Installation and Configuration Guide
A-36
OL-18083-01
Appendix A
XECfgParm.dat File Parameters
Understanding the XECfgParm.dat File Format
Table A-1
Cisco PGW 2200 Softswitch 9.x XECfgParm.dat File Configuration Parameters
Configuration Parameter
Definition
logger.fileRotateInterval
Triggers a file rotation based on the time elapsed since the
previous rotation.
Default: 1440 minutes (24 hours)
Note
logger.fileRotateSize
This timer is reset after any rotation occurs,
regardless of the cause or trigger of the rotation.
Triggers a file rotation based on the size of the active file. A
file rotation triggered by this parameter also resets the
logger.fileRotateInterval timer.
Default: 100MB
Note
logger.numThreads
The file size can grow larger than this parameter
indicates due to the verbosity of the logging levels
currently in effect.
Determines whether the PXE logger should run in a separate
thread from the rest of the application. A value of 0 runs the
logger synchronously with the application; a value of 1 runs
the logger in a separate thread.
Value: 0/1 (Values less than 0 get reset to 0; values greater
than 1 get reset to 1.)
Default: 0
maximumActionsInTransaction
Sets the maximum number of actions in one H.248
Transaction.
Value: Any integer
Default: 64
maxNumH248Links
Defines the maximum number of H.248 links that the
Cisco PGW 2200 Softswitch supports.
Values: Any integer
Default: 1000
MDLANumberScreening
Invokes the standard A-number screening on the number in
the calling number parameter, regardless of whether the call
is redirected or not.
Setting the MDLANumberScreening parameter to its default
value 0 (zero) in the XECfgParm.dat file defaults all
screening actions exclusively to the original calling party
number (A-number). No screening is done on the number in
the redirecting number parameter.
Default value: 0 (zero)
Note
To invoke the redirecting number screening feature,
set the value to 1 in the XEConfigParm.dat file
during initial Cisco PGW 2200 Softswitch software
configuration.
Cisco PGW 2200 Softswitch Release 9.8 Software Installation and Configuration Guide
OL-18083-01
A-37
Appendix A
XECfgParm.dat File Parameters
Understanding the XECfgParm.dat File Format
Table A-1
Cisco PGW 2200 Softswitch 9.x XECfgParm.dat File Configuration Parameters
Configuration Parameter
Definition
MgcHeaderAddrType
Sets the Cisco PGW 2200 Softswitch H.248 local MID
address type.
Values:
•
1 = IP address
•
2 = Domain name
Default: 1
The localMID property contains related information.
MML.chg-cfg
Timeout value for the chg-cfg MML command in
milliseconds; overrides MML.timeout.
Default: 10000 milliseconds
Note
MML.snd
Do not change this value. This MML command is
obsolete.
Timeout value for the snd MML command in milliseconds;
overrides MML.timeout.
Default: 600000 milliseconds
Note
MML.startPM
Do not change this value.
Timeout value for the startPM MML command in
milliseconds; overrides MML.timeout.
Default: /etc/init.d/CiscoMGC start
Note
MML.stopPM
Do not change this value.
Timeout value for the stopPM MML command in
milliseconds; overrides MML.timeout.
Default: /etc/init.d/CiscoMGC stop
Note
MML.timeout
Do not change this value.
Timeout for MML commands, in milliseconds.
Default: 10000 milliseconds
Note
MML.vld-cic
Do not change this value.
Timeout value for the vld-cic MML command in
milliseconds; overrides MML.timeout.
Default: 25000 milliseconds
Note
Do not change this value.
Cisco PGW 2200 Softswitch Release 9.8 Software Installation and Configuration Guide
A-38
OL-18083-01
Appendix A
XECfgParm.dat File Parameters
Understanding the XECfgParm.dat File Format
Table A-1
Cisco PGW 2200 Softswitch 9.x XECfgParm.dat File Configuration Parameters
Configuration Parameter
Definition
pom.dataSync
Indicates that the Provisioning Object Manager (POM)
should synchronize the provisioning data at startup.
Values:
•
true—POM is enabled, data is synchronized.
•
false—POM is disabled, no data synchronization
(default).
Note
If you have two Cisco PGW 2200 Softswitch hosts
in a failover configuration, set this value to true. If
you have a standalone Cisco PGW 2200 Softswitch,
set this value to false.
Note
When the initial Cisco PGW 2200 Softswitch
configuration on the active host is deployed, you
must change the pom.dataSync parameter to true in
the XECfgParm.dat file on the standby host. After
setting this parameter to true, you can start the
Cisco PGW 2200 Softswitch software on the
standby host. As the Cisco PGW 2200 Softswitch
software comes up, the data on the standby host is
synchronized with the data on the active host and the
active host goes into the standby state.
To accommodate failover conditions where the
current active host can become the standby host, you
must also set the pom.dataSync parameter to true on
the current active host.
Note
pom.port
If you are trying to maintain calls during an upgrade
of a redundant system and you want to preserve your
configuration, verify that the pom.dataSync
parameter is set to false in
/opt/CiscoMGC/etc/XECfgParm.dat.
Indicates the port number the POM uses to communicate
with its peer in a fault-tolerant configuration.
Value: Any integer from 4001 to 4050
Default: 4001 or default
Note
procM.almDwellInterval
This is a platform-specific value and depends on
your system installation. You should only modify
this value if the default port (4001) is being used by
another process or application.
Seconds that the process manager must wait before clearing
an alarm.
Default: 15 seconds
Note
Do not change this value.
Cisco PGW 2200 Softswitch Release 9.8 Software Installation and Configuration Guide
OL-18083-01
A-39
Appendix A
XECfgParm.dat File Parameters
Understanding the XECfgParm.dat File Format
Table A-1
Cisco PGW 2200 Softswitch 9.x XECfgParm.dat File Configuration Parameters
Configuration Parameter
Definition
procM.logDBFile
Specifies the location of the log level storage.
Default: ../var/procMLogTable
procM.minCheckHealthInterval
Seconds at which a process can generate heartbeats.
Default: 10 seconds
Note
procM.minCheckHealthTimeout
Do not change this value.
Seconds at which a timeout can occur.
Default: 20 seconds
Note
procM.minKillGracePeriod
Do not change this value.
Seconds that the process manager must wait before killing a
process after a heartbeat timeout.
Default: 5 seconds
Note
procM.recovDbFile
Do not change this value.
Storage location of the process manager persistent
information.
Default: ../var/procMRecovery
Note
procM.servFmt
Do not change this value.
Format of the process manager temporary files.
Default: PM_%d_%d_input
Note
procM.servicesDir
Do not change this value.
Location of the process manager temporary files.
Default: ../var
Note
Do not change this value.
procMprocHealthDfltAlmCat
This parameter is no longer used.
product.time
Software time stamp.
Note
product.vendor
Software vendor name.
Note
product.version
Do not change this value.
Software release version number.
Note
RadiusAccounting.output
Do not change this value.
Do not change this value.
Enables the RADIUS server feature.
Default: Off
RadiusAccounting.numberPort
The number of local port to communicate with RADIUS
server.
Value: Any integer from 10 to 99.
Default: 20
Cisco PGW 2200 Softswitch Release 9.8 Software Installation and Configuration Guide
A-40
OL-18083-01
Appendix A
XECfgParm.dat File Parameters
Understanding the XECfgParm.dat File Format
Table A-1
Cisco PGW 2200 Softswitch 9.x XECfgParm.dat File Configuration Parameters
Configuration Parameter
Definition
RadiusAccounting.smSize
The size of shared memory in MB.
Value: Any integer from 1 to 199.
Default: 30
replicator.portCommChannelRecv
Communication port for the replicator.
Default: 2974
Note
replicator.portCommChannelSend
Do not change this value.
Communication port for the replicator.
Default: 2972
Note
replicator.portDataChannelRecv
Do not change this value.
Communication port for the replicator.
Default: 2970
Note
replicator.portDataChannelSend
Do not change this value.
Communication port for the replicator.
Default: 2968
Note
replicator.reconnectInterval
Do not change this value.
Defines the reconnect interval in number of seconds for the
replicator during a switchover.
Value: Any integer
Default: 15 seconds
Note
Set this value to 0 for a standalone
Cisco PGW 2200 Softswitch.
For geographically separated Cisco PGW 2200 Softswitch
pairs (Geographic Separation of Active and Standby
Cisco PGW 2200 Softswitch Hosts), the following
replicator timer values are recommended:
•
On one Cisco PGW 2200 Softswitch,
replicator.reconnectInterval—15 seconds
•
On the other Cisco PGW 2200 Softswitch,
replicator.reconnectInterval—20 seconds
If the timer settings are the same on both
Cisco PGW 2200 Softswitches, the additional latency
between the separated Cisco PGW 2200 Softswitches may
cause a problem in which the replicator links are continually
reconnecting and then immediately disconnecting. The timer
change prevents this problem.
Cisco PGW 2200 Softswitch Release 9.8 Software Installation and Configuration Guide
OL-18083-01
A-41
Appendix A
XECfgParm.dat File Parameters
Understanding the XECfgParm.dat File Format
Table A-1
Cisco PGW 2200 Softswitch 9.x XECfgParm.dat File Configuration Parameters
Configuration Parameter
Definition
SIP.Conn_Idle_Period
Defines the length of time (in seconds) that a TCP
connection can remain idle before the
Cisco PGW 2200 Softswitch closes the connection. A value
of 0 means that the Cisco PGW 2200 Softswitch does not
close idle TCP connections.
Value: Integer
Default: 43200
The Cisco PGW 2200 Softswitch can reuse existing
TCP connections.
Note
SIP.ConnLocalMsgQueueSize
Defines the maximum size of the
Cisco PGW 2200 Softswitch’s outgoing message queue.
Value: Integer
Default: 1500
The SIP.ConnLocalMsgQueueSize value is
dependent on Cisco PGW 2200 Softswitch’s
hardware and network environment.
Note
SIP.dns_query_timer
(Added in Release 9.8(1))
The amount of time in seconds before a
Cisco PGW 2200 Softswitch DNS NAPTR query times out.
Valid values: 1–30
Default: 5
SIP.MaxConnection
Note
Do not add this property to the Xecfgparm.dat file
unless you need to modify the default value. If the
parameter is not present in the Xecfgparm.dat file,
the Cisco PGW 2200 Softswitch uses the default
value. We recommend that you contact Cisco support
before modifying this property.
Note
If the DNS NAPTR query times out, the
Cisco PGW 2200 Softswitch sends a UDP SRV
query, TCP SRV query, and an A query
simultaneously to determine the IP address and port
number of the destination host. The
Cisco PGW 2200 Softswitch processes the query
results in the following order:
1.
UDP SRV query
2.
TCP SRV query
3.
A query
Defines the maximum number of incoming and outgoing
TCP connections that the Cisco PGW 2200 Softswitch can
support simultaneously.
Value: 1-1999
Default: 50
Cisco PGW 2200 Softswitch Release 9.8 Software Installation and Configuration Guide
A-42
OL-18083-01
Appendix A
XECfgParm.dat File Parameters
Understanding the XECfgParm.dat File Format
Table A-1
Cisco PGW 2200 Softswitch 9.x XECfgParm.dat File Configuration Parameters
Configuration Parameter
Definition
SIP.naptr_record_locate
Specifies the type of query the Cisco PGW 2200 Softswitch
uses to determine the preferred transport protocol of a
remote proxy. The Cisco PGW 2200 Softswitch uses the
query result for outgoing SIP trunk groups with the
siptransportmode property set to Dynamic.
(Added in Release 9.8(1))
Valid values:
•
0 = The Cisco PGW 2200 Softswitch uses UDP
transport and a UDP SRV query to determine the remote
IP address.
•
1 = The Cisco PGW 2200 Softswitch uses a DNS
NAPTR query to determine the preferred transport
protocol and a DNS SRV query to determine the remote
IP address.
Default: 1
SIP.transaction_based_dns_query
(Added in Release 9.8(1))
Specifies when the Cisco PGW 2200 Softswitch sends DNS
requests for transport protocol information.
Note
Do not add this property to the Xecfgparm.dat file
unless you need to modify the default value. If the
parameter is not present in the Xecfgparm.dat file,
the Cisco PGW 2200 Softswitch uses the default
value. We recommend that you contact Cisco support
before modifying this property.
Valid values:
•
0 = The Cisco PGW 2200 Softswitch uses DNS NAPTR
and DNS SRV queries for the first SIP message in a call
dialog only. The Cisco PGW 2200 Softswitch uses a
DNS A query for mid-call SIP messages. This setting
provides backwards compatibility for Release 9.7.
•
1 = The Cisco PGW 2200 Softswitch uses DNS NAPTR
and DNS SRV queries for all SIP messages. This setting
provides RFC 3263 compatibility.
Default: 0
Cisco PGW 2200 Softswitch Release 9.8 Software Installation and Configuration Guide
OL-18083-01
A-43
Appendix A
XECfgParm.dat File Parameters
Understanding the XECfgParm.dat File Format
Table A-1
Cisco PGW 2200 Softswitch 9.x XECfgParm.dat File Configuration Parameters
Configuration Parameter
Definition
SIP.TransportProtocol
Defines the transport protocol used to complete calls. The
Cisco PGW 2200 Softswitch can only set up new calls using
one protocol at a time.
(Obsolete in Release 9.8(1), used for
software migration only)
Values:
•
TCP
•
UDP
Default: UDP
sipModeSelectionControl
Note
If you modify the SIP.TransportProtocol variable,
the Cisco PGW 2200 Softswitch maintains active
calls using both TCP and UDP.
Note
If you modify the SIP.TransportProtocol variable
and the user transfers an active call that is using the
previous transport protocol, the
Cisco PGW 2200 Softswitch sends an INVITE using
the new transport protocol.
Note
Cisco PGW 2200 Softswitch performance in TCP
mode can be up to 5% less than performance in UDP
mode due to the additional processing needed to
maintain TCP connections.
Note
TCP transport for SIP Phase II (Release 9.8(1))
eliminates the SIP.TransportProtocol that was
introduced in TCP Transport for SIP Phase I
(Release 9.7(3)) and replaces it with the
siptransportmode trunk group property.
Provides improved mid-call and redirection services for
SIP-to-SIP calls.
Values:
•
1—Optional mode: Processes SIP-to-SIP calls using a
Back to Back User Agent (B2BUA). You can override
Optional mode by selecting Fixed Proxy mode in the
dial plan.
•
2— Fixed Proxy mode: The
Cisco PGW 2200 Softswitch processes all SIP-to-SIP
calls in proxy mode.
Default: 2
Cisco PGW 2200 Softswitch Release 9.8 Software Installation and Configuration Guide
A-44
OL-18083-01
Appendix A
XECfgParm.dat File Parameters
Understanding the XECfgParm.dat File Format
Table A-1
Cisco PGW 2200 Softswitch 9.x XECfgParm.dat File Configuration Parameters
Configuration Parameter
Definition
SipToIsupInterworkingInd
Only applicable with SIP to ISUP (or ISUP to SIP) calls.
When the Cisco PGW 2200 Softswitch receives a SIP
message with encapsulated ISUP (SIP-T, SIP-GTD), it sets
the FCI/BCI parameter in the generated ISUP message so
that all interworking-related bits have the same values as
their counterparts in the encapsulated ISUP.
If usable encapsulated ISUP is not present in the SIP
message, the Cisco PGW 2200 Softswitch sets the
Interworking Indicator bit of the FCI/BCI parameter to no
interworking; the ISDN User Part Indicator to ISUP used all
the way and the Originating Access indicator to Originating
access non-ISDN.
Service providers can set the Cisco PGW 2200 Softswitch
property SipToIsupInterworkingInd to 1, which signals in
the FCI/BCI parameter in the generated ISUP message that
interworking has been encountered and ISUP is not used all
the way when encapsulated ISUP is not present in SIP
message.
Values:
•
0—No interworking encountered
•
1—Interworking encountered
Default Value:
Note
0
If the property is absent from the XECfgParm.dat
file, Cisco PGW 2200 Softswitch assumes a default
value of 0.
Protocol Family: Applicable to all ANSI, Q.761 and Q.767
ISUP variants.
SIP.udp2tcp_byte_xover
(Added in Release 9.8(1))
Determines the SIP message size (in bytes) above which the
Cisco PGW 2200 Softswitch switches to TCP transport.
This property applies to outgoing SIP traffic only.
Valid values: Integer
•
0 = The Cisco PGW 2200 Softswitch does not switch
from UDP to TCP regardless of the SIP message size.
•
1–10000 = The Cisco PGW 2200 Softswitch switches to
TCP transport for messages above the specified size (in
bytes).
Note
This property overrides the siptransportmode
parameter.
Default: 0
Cisco PGW 2200 Softswitch Release 9.8 Software Installation and Configuration Guide
OL-18083-01
A-45
Appendix A
XECfgParm.dat File Parameters
Understanding the XECfgParm.dat File Format
Table A-1
Cisco PGW 2200 Softswitch 9.x XECfgParm.dat File Configuration Parameters
Configuration Parameter
Definition
TCAP.avgInvokePerDialog
Sets the average number of Invokes for a TCAP dialog. A
single dialog does not necessarily correspond to a single
Invoke. The number of Invokes depends on the call flow for
the TCAP dialog.
Values: 1-10
Default: 1
TCAP.maxSsnNum
Defines the maximum number of local subsystem numbers
allowed by the Cisco PGW 2200 Softswitch for the entire
TCAP IOCC subsystem.
Value: Any integer from 1 to 10.
Default: 10
XE.CallNumberToWriteIntoTracefile
Defines how many call buffers the
Cisco PGW 2200 Softswitch records in the trace file.
Values: Any integer greater than 1.
Default: 200
Cisco PGW 2200 Softswitch Release 9.8 Software Installation and Configuration Guide
A-46
OL-18083-01
A P P E N D I X
B
Client/Server and Secure Connectivity
Relationships
This appendix describes the client/server and secure connectivity relationships used among the different
applications of the Cisco PGW 2200 Softswitch, Cisco BAMS, and Cisco HSI.
Client/Server and Secure Connectivity Relationships
The following figures show the client/server and secure connectivity relationships used among the
different applications of the Cisco PGW 2200 Softswitch, Cisco BAMS, and Cisco HSI.
In a network containing Cisco PGW 2200 Softswitch platforms and Cisco BAMS platforms, the
Cisco PGW 2200 Softswitch platform is considered to be a server system to Cisco BAMS. The
Cisco BAMS platform is a client of the Cisco PGW 2200 Softswitch platform. This means that in the
current, non-secure interface environment, to transfer files from the Cisco PGW 2200 Softswitch to
Cisco BAMS, the Cisco BAMS system invokes the FTP program which talks to an FTP daemon process
on the Cisco PGW 2200 Softswitch platform.
The following table explains the letters and acronyms used in these figures:
Table B-1
Letters and Acronyms
Acronym/
Abbreviation
Description
C
Client
S
Server
SCP
Secure Copy
SFTP
Secure File Transfer
SSH
Secure Shell
Secure Connectivity Among Cisco PGW 2200 Softswitch Applications
Figure B-1 illustrates the client/server relationship and the secure connectivity used among the different
application types of the Cisco PGW 2200 Softswitch and its network management elements. Note that
Cisco VSPT has SSH and SFTP interfaces to Cisco HSI.
Cisco PGW 2200 Softswitch Release 9.8 Software Installation and Configuration Guide
OL-18083-01
B-1
Appendix B
Client/Server and Secure Connectivity Relationships
Client/Server and Secure Connectivity Relationships
Note
For simplicity, redundant platforms are not shown in this figure. The secure connectivity among the
different application types and the redundant platforms is the same.
Figure B-1
Secure Connections Among Cisco PGW 2200 Softswitch and Other Devices
C
Cisco VSPT
C
C
SSH
SSH & SFTP
SSH & SFTP
S
S
SFTP
Cisco PGW 2200
S
Softswitch
S
Cisco HSI
S
C
S
Cisco BAMS
Cisco MNM
C
C
SSH & SFTP
S
SSH & SFTP
205451
C
SSH
Secure Connectivity Between Cisco PGW 2200 Softswitch Application Platforms
Figure B-2 illustrates the client/server relationship and the secure connectivity used between two
Cisco PGW 2200 Softswitch application platforms operating as a redundant pair.
Secure Connections between Two Cisco PGW 2200 Softswitches
C
Cisco PGW 2200
Softswitch
S
SCP
SCP
S
C
Cisco PGW 2200
Softswitch
205452
Figure B-2
Secure Connectivity Between Cisco BAMS Application Platforms
Figure B-3 illustrates the client/server relationship and the secure connectivity used between two Cisco
BAMS application platforms operating as a redundant pair.
Cisco PGW 2200 Softswitch Release 9.8 Software Installation and Configuration Guide
B-2
OL-18083-01
Appendix B
Client/Server and Secure Connectivity Relationships
Client/Server and Secure Connectivity Relationships
Secure Connections between Cisco BAMS Platforms
SFTP
C
Cisco BAMS
S
Cisco BAMS
SFTP
S
C
205453
Figure B-3
Secure Connectivity Between Cisco BAMS and Cisco PGW 2200 Softswitch Application Platforms
Figure B-4 illustrates the client/server relationship and the secure connectivity used when one redundant
Cisco BAMS pair controls multiple Cisco PGW 2200 Softswitch application platforms.
For simplicity, the redundant Cisco PGW 2200 Softswitch application platforms are not shown. The
secure connectivity between the redundant Cisco BAMS pair and the redundant
Cisco PGW 2200 Softswitch application platforms is the same.
Figure B-4
Secure Connections between Cisco PGW 2200 Softswitch and Cisco BAMS
Cisco PGW 2200
Softswitch
Cisco PGW 2200
Softswitch
S
S
S
SFTP
Cisco PGW 2200
Softswitch
S
SFTP
S
SFTP
S
SFTP
SFTP
SFTP
C
C
C
C
Cisco BAMS
S
SFTP
SFTP
C
C
C
S
Cisco BAMS
C
205454
Note
Cisco PGW 2200 Softswitch Release 9.8 Software Installation and Configuration Guide
OL-18083-01
B-3
Appendix B
Client/Server and Secure Connectivity Relationships
Client/Server and Secure Connectivity Relationships
Cisco PGW 2200 Softswitch Release 9.8 Software Installation and Configuration Guide
B-4
OL-18083-01
A P P E N D I X
C
HP OpenView Sample SNMP Configuration
Configuring the Cisco PGW 2200 Softswitch to Send Alarms to
HP OpenView
This sample configuration sets up a Cisco PGW 2200 Softswitch to send alarms to HP OpenView.
Step 1
Load the following MIBs in HP OpenView, in the order shown below. To load MIBs, select the Options
menu, and choose Load/Unload MIBs: SNMP.
MIB
Location
CISCO-SMI.my
/opt/TransPath/snmp
tp.my
/opt/TransPath/snmp
measurement.my
/opt/TransPath/snmp
v3-tgt.my
/opt/TransPath/snmp
SNMP-FRAMEWORK-MIB.my
ftp://ftp.cisco.com/pub/mibs/v2/
SNMP-NOTIFICATION-MIB.my
ftp://ftp.cisco.com/pub/mibs/v2/
Note
You must also install the generic HP OpenView MIB files SNMP-FRAMEWORK and
SNMP-NOTIFICATION. These files are available from your HP OpenView installation
medium.
Step 2
Open the MIB browser and select the Tools menu, then choose SNMP MIB Browser.
Step 3
Under Name or IP Address, enter the name or IP address of the Cisco PGW 2200 Softswitch you are
configuring.
Step 4
Under Community Name, enter public.
Step 5
Navigate to the SNMP target address table by double-clicking snmpV2 | snmpModules |
snmpTargetMIB | snmpTargetObjects | snmpTargetAddrTable | snmpTargetAddrEntry.
Step 6
Select the MIB object snmpTargetAddrRowStatus (see table below).
Step 7
Click Start Query. Two values should appear at the bottom of the window, 49: active and 50: active.
Step 8
Under MIB Instance, enter 51 (see table below).
Step 9
Under SNMP Set Value, enter 5 (see table below).
Cisco PGW 2200 Softswitch Release 9.8 Software Installation and Configuration Guide
OL-18083-01
C-1
Appendix C
HP OpenView Sample SNMP Configuration
Configuring the Cisco PGW 2200 Softswitch to Send Alarms to HP OpenView
Step 10
Click Set. You should see a dialog box indicating that the values are entered successfully.
Step 11
Continue this process until all the MIB object IDs in the table below have the correct MIB instance and
SNMP set values.
Select MIB Object ID
MIB Instance
SNMP Set Value
snmpTargetAddrRowStatus
51
5
snmpTargetAddrRowStatus
52
5
snmpTargetAddrTDomain
52
.1.3.6.1.6.1.1
snmpTargetAddrTDomain
52
.1.3.6.1.6.1.1
snmpTargetAddrTAddress
51
Hex representation of NMS
IP (see note below)
snmpTargetAddrTAddress
52
Hex representation of NMS
IP (see note below)
snmpTargetAddrTimeout
51
100
smnpTargetAddrTimeout
52
100
snmpTargetAddrRetryCount
51
3
snmpTargetAddrRetryCount
52
3
snmpTargetAddrTagList
51
Manager1
snmpTargetAddrTagList
52
Manager1
snmpTargetAddrParams
51
v1ExampleParams
snmpTargetAddrParams
52
v2cExampleParams
snmpTargetAddrStorageType
51
3
snmpTargetAddrStorageType
52
3
snmpTargetAddrRowStatus
51
1
snmpTargetAddrRowStatus
52
1
Note
When you are configuring snmpTargetAddrTAddress, the address of the network management station
running HP OpenView must be entered. This SNMP field is a generic six-byte field designed to
accommodate IP and non-IP SNMP implementations. Since the Cisco PGW 2200 Softswitch supports
only SNMP over IP, this field always contains the IP address of the network management system. The
IP address, however, must be converted into a six-byte hexadecimal value. This is done by converting
the IP address to hexadecimal notation, then appending two bytes of zeros as padding. For example, if
the IP address of the HP OpenView station is 172.24.236.241, the value entered for
snmpTargetAddrTAddress is AC 18 EC F1 00 00.
Tip
You can verify the settings by selecting each MIB object ID and clicking Start Query. When you do
this for snmpTargetAddrRowStatus, it should show four entries set to active.
Step 12
Navigate to the snmpNotify table by clicking Up Tree four times to return to the snmpModules part of
the MIB. Then navigate down the tree by double-clicking snmpNotificationMIB | snmpNotifyObjects
| snmpNotifyTable | snmpNotifyEntry.
Step 13
As before, associate the correct MIB instance and SNMP set values with the MIB object IDs.
Cisco PGW 2200 Softswitch Release 9.8 Software Installation and Configuration Guide
C-2
OL-18083-01
Appendix C
HP OpenView Sample SNMP Configuration
Formatting Trap Messages
Tip
Select MIB Object ID
MIB Instance
SNMP Set Value
snmpNotifyRowStatus
50
5
snmpNotifyTag
50
Manager1
snmpNotifyStorageType
50
3
snmpNotifyRowStatus
50
1
You can verify the settings by selecting each MIB OID and clicking Start Query. When you do this
for snmpNotifyRowStatus, it should show four entries set to active. When you have verified the
settings, you can close the MIB browser window.
Step 14
Click Close.
Step 15
At this point, HP OpenView should start receiving alarms from the Cisco PGW 2200 Softswitch. You
can verify this by, for example, performing a set-sc-state MML command to take a signaling channel
out of service.
Formatting Trap Messages
When HP OpenView receives the traps from the Cisco PGW 2200 Softswitch, HP OpenView does not
automatically interpret the trap and display it in a useful manner. The trap is sent with basic information
indicating the alarm category, description, and severity. Because many failures require extra detail for
troubleshooting, you should refer to the log file on the Cisco PGW 2200 Softswitch for complete alarm
information and for determining root causes.
You can, however, configure HP OpenView to format the traps into a more readily understandable format
by following the steps below:
Step 1
Open the Event Configuration window by selecting Options | Event Configuration from the
HP OpenView menu.
Step 2
Under Enterprise Name, select TransPath. The five alarm types should be displayed under Event
Identification.
Step 3
Double-click one of the event names under Event Identification; for example, commAlarm.
Step 4
Under Event Log Message, enter the message that you want logged to the HP OpenView log file when
HP OpenView receives this alarm. You can use variables from the following table in your message to
provide specific information about the alarm.
Variable Definition
Explanation
$1
tpAlarmId
Alarm identification
$2
tpAlarmCatId
Alarm category identification number
$3
tpAlarmCatName
Alarm category name
$4
tpAlarmCatDesc
Alarm category description
Cisco PGW 2200 Softswitch Release 9.8 Software Installation and Configuration Guide
OL-18083-01
C-3
Appendix C
HP OpenView Sample SNMP Configuration
Formatting Trap Messages
$5
tpAlarmSet
Alarm set/not set.
2 means the alarm is being set.
1 means the alarm is being cleared
$6
tpAlarmNotify
Alarm notified/not notified
$7
tpAlarmSeverity
Alarm severity
$8
tpAlarmReported
Alarm reported
$9
tpComponentId
Component identification number. This number
consists of two parts, the component type and
component instance.
The most significant 2 bytes signify the component
type.
The least significant 2 bytes are the sequential
instance of the type.
$10
tpComponentType
Component type identification number
$11
tpCompMMLName Short notation of the component name. It is also the
MML name that can be used in the MML session.
$12
tpCompDesc
Component description
$13
tpCompParentId
Component parent identification
$14
tpAlarmTime
Time the alarm occurred
Following is an example of an event log message string:
SC2200: ID#: $13 Name: $12 Set: $10 MMLname: $4
Severity: $8 CompID: $6 CompType: $5 CatID: $14
ParentID: $2 AlarmReported: $7
CatDesc: $11 CompDesc: $3
AlarmNotify: $9 AlarmTime: $1
Following is another example showing more simple formatting:
MGC $7 alarm $5 -- $12: $4
Step 5
Click OK to set your message.
Step 6
Repeat the procedure for each event name.
Step 7
From the Event Configuration window, select File | Save.
Step 8
Close the window.
Step 9
Verify that alarms are being received and formatted correctly by generating an alarm on the
Cisco PGW 2200 Softswitch (for instance, take a signaling channel out of service to see if you get an
alarm).
Cisco PGW 2200 Softswitch Release 9.8 Software Installation and Configuration Guide
C-4
OL-18083-01
A P P E N D I X
D
Sample Installation Scripts
This appendix contains sample outputs from the following:
•
Sample Output from install.sh, page D-1
•
Updated Configuration File Sample, page D-11
•
Sample Configured snmpd.cnf File, page D-13
•
Sample Configured XECfgParm.dat Files for Cisco PGW 2200 Softswitch Release 9.8(1), page
D-16
•
Sample Configured XECfgParm.dat Files for Cisco PGW 2200 Softswitch Release 9.7(3), page
D-27
•
Sample Configured XECfgParm.dat Files for Cisco PGW 2200 Softswitch Release 9.6(1), page
D-37
Sample Output from install.sh
Following is a sample output from the install script.
Note
For Software Release 7.4(10) and later, the install.log is renamed as MGC-install.log and stored in the
/var/adm directory. In addition, the pkgerrors.log is renamed to MGC_pkgerrors.log and moved to the
/var/adm directory.
# cd /cdrom/cdrom0
# ./install.sh
Use supplied admin file for unattended install? [n] [y,n,?,q] y
Base directory for Toolkit (default /opt/Toolkit) [?,q]
##########################################################################################
# The CSCOgu000 utilities package must be installed prior to other components
#
# but has not been detected on your system. This package contains all required system
#
# parameters necessary for installing the rest of your software. If you do not install #
# this package, the installation script will exit.
#
##########################################################################################
Would you like to install it now? [y] [y,n,?,q] y
Base directory for CiscoMGC (default /opt/CiscoMGC) [?,q]
Enter CiscoMGC user name [mgcusr]
Cisco PGW 2200 Softswitch Release 9.8 Software Installation and Configuration Guide
OL-18083-01
D-1
Appendix D
Sample Installation Scripts
Sample Output from install.sh
Enter CiscoMGC UID [20000]
Enter CiscoMGC group name [mgcgrp]
Enter CiscoMGC GID [20000]
[mgcgrp] group added
[mgcusr] user added
Modifying /etc/init.d/inetinit
Installation of <CSCOgu000> was successful.
(c)1998 Cisco Systems, Inc. All Rights Reserved.
Unpublished -- rights reserved under the copyright
laws of the United States.
RESTRICTED RIGHTS LEGEND
Use, duplication, or disclosure by the Government
is subject to restrictions as set forth in subparagraph
(c)(1)(ii) of the Rights in Technical Data and Computer
Software clause at DFARS 252.227-7013 or subparagraphs
(c)(1) and (2) of Commercial Computer Software -Restricted Rights at 48 CFR 52.227-19, as applicable.
Cisco Systems, Inc.
13615 Dulles Technology Drive
Herndon, VA 20171
Installation of <CSCOga000> was successful.
WARNING: setting mode of </opt/CiscoMGC/.sw_config> to default mode (755)
WARNING: setting mode of </var/spool/cron/crontabs/mgcusr> to default mode (644)
Uncompressing EISUP
Uncompressing ISDNBRI
Uncompressing ISDNIP
Uncompressing ISDNL3
Uncompressing IUA
Uncompressing LI
Uncompressing LogServerd
Uncompressing M3UA
Uncompressing MGCP
Uncompressing QBE_V5
Uncompressing QBE_V6
Uncompressing SIP
Uncompressing SS7
Uncompressing SUA
Uncompressing TCAP
Uncompressing almM
Uncompressing amDmpr
Uncompressing cdrDmpr
Uncompressing cfgM
Installing chk_inv
Uncompressing diskmonitor
Uncompressing engine.no_smartalloc
Uncompressing engine.smartalloc
Uncompressing foverd
Uncompressing ioChanMgr
Uncompressing measMgr
Uncompressing mmBldCfg
Uncompressing mmSAgt
Uncompressing mmdbd
Uncompressing mml
Uncompressing pom
Uncompressing procM
Uncompressing replicator
Uncompressing sagt
Cisco PGW 2200 Softswitch Release 9.8 Software Installation and Configuration Guide
D-2
OL-18083-01
Appendix D
Sample Installation Scripts
Sample Output from install.sh
Installing libACE.so
Installing libbtsUtil.so
Installing libcmg.so
Installing libconvutil.so
Installing libcxn.so
Installing libda.so
Installing libeng.so
Installing libengif.so
Installing libhelp.so
Installing libinf.so
Installing libmmdb.so
Installing libpem.so
Installing libpolbase.so
Installing libpolcomp.so
Installing libpolfiles.so
Installing libpolnuman.so
Installing libpolroute.so
Installing libpom.so
Installing libpxe.so
Installing libpxelog.so
Installing libqbe.so
Installing libqbe_v6.so
Installing librds.so
Installing librmg.so
Installing librudp.so
Installing libsa.so
Installing libstlport.so.1
Installing libtcpServer.so
Installing libxe.so
Installing libxml2.so.2
Updating parameters for CiscoMGC
Updating parameters for SW_Layout.cfg
Updating parameters for helpCommands.xsd
Updating parameters for mmlCommands.xml
Updating parameters for mmlLICommands.xml
Updating parameters for log_rotate.sh
Updating parameters for startAudit.sh
Updating parameters for diagdata
Updating parameters for .create_liusr
Updating parameters for .cshrc
Updating parameters for .delete_liusr
Updating parameters for .dump-prov
Updating parameters for .master.cks
Updating parameters for .perf_setup
Updating parameters for backup.sh
Updating parameters for config-lib
Updating parameters for config-snmp
Updating parameters for init.tcl
Updating parameters for mgcbackup
Updating parameters for mgcrestore
Updating parameters for restore.sh
Updating parameters for rmsem.sh
Updating parameters for startAudit.mml
Updating parameters for startLogServer
Installation of <CSCOga001> was successful.
Modifying /etc/syslog.conf
Updating parameters for .odbc.ini
Updating parameters for backupDb.sh
Updating parameters for restoreDb.sh
Set TOS for timesten replicator
Untarring TimesTen image in /opt/ttdb-install
Cisco PGW 2200 Softswitch Release 9.8 Software Installation and Configuration Guide
OL-18083-01
D-3
Appendix D
Sample Installation Scripts
Sample Output from install.sh
Preparing to install TimesTen in /opt on va-redskins
Executing TimesTen installation script...
NOTE: Each TimesTen installation is identified by a unique instance name.
The instance name must be a non-null alphanumeric string, not longer
than 255 characters.
Instance name will be 'tt60'.
Please select a product :
[1] Oracle TimesTen In-Memory Database
[2] Cache Connect to Oracle
Of the three components:
[1] Client/Server and Data Manager
[2] Data Manager Only
[3] Client Only
Installing into /opt/TimesTen/tt60 ...
Creating /opt/TimesTen/tt60 ...
Uncompressing ...
The TimesTen Demo applications can take up to 64 Mbytes of disk space.
Depending on how your system is configured, you may not want to create the
DemoDataStore directory in the default location,/var/TimesTen/tt60/DemoDataStore
WARNING: It is advised that you do not install the DemoDataStore directory
onto a networked drive. Please see the TimesTen install guide for
more info.
Creating /var/TimesTen/tt60/DemoDataStore ...
NOTE: All installations that replicate to each other must use the same daemon
port number that is set at installation time. The daemon port number can
be verified by running 'ttVersion'.
The default port number is 16001.
The daemon will run on the default port number (16001).
Processing /opt/TimesTen/tt60/PERL/perl.tar ...
System logging appears to be configured correctly.
(TimesTen syslog messages should be recorded in the file '/var/adm/messages')
Installing server components ...
Starting the daemon ...
The tt60 daemon has started successfully.
Installing client components ...
Creating new /var/TimesTen/sys.ttconnect.ini
Extracting 3rd party tools ...
Creating /opt/TimesTen/tt60/doc ...
End of TimesTen installation.
TimesTen installation script returned status 0
Program complete
Restoring default schema.
Sun Microsystems Inc.SunOS 5.10GenericJanuary 2005
Copyright (c) 1996-2005, Oracle. All rights reserved.
Cisco PGW 2200 Softswitch Release 9.8 Software Installation and Configuration Guide
D-4
OL-18083-01
Appendix D
Sample Installation Scripts
Sample Output from install.sh
Installation of <CSCOga002> was successful.
Updating parameters for critagt.cnf
Updating parameters for startcia.sh
Updating inittab
Installation of <CSCOga003> was successful.
Installing /opt/Toolkit/Packages/Packages.tar.gz
Installing /opt/Toolkit/bytecode/XECfg/XECfg.tar.gz
Installing /opt/Toolkit/bytecode/am/am.tar.gz
Installing /opt/Toolkit/bytecode/cdr/cdr.tar.gz
Installing /opt/Toolkit/bytecode/log/Viewer.tar.gz
Installing /opt/Toolkit/bytecode/toolbar/toolbar.tar.gz
Installing /opt/Toolkit/bytecode/tv/tv.tar.gz
Installing /opt/Toolkit/tcl/tcl.tar.gz
Updating parameters for MGC_Setup
Updating parameters for MGC_Toolkit
Updating parameters for init.tcl
Updating parameters for toolbar.sh
Updating parameters for toslaveside
Setting VERSION=9.7(1.13)T in version.dat
Installation of <CSCOga004> was successful.
Installing /opt/CiscoMGC/lib/perl5/5.00503.tar.gz
Installing /opt/tibrv/tibco.tar.gz
Updating parameters for tibco.cfg
Updating parameters for tib4pgw.sh
Updating parameters for tibAdapter.pl
Updating parameters for tibsimulator.pl
Installation of <CSCOga006> was successful.
Installing ca
Uncompressing callver
Installing get_trc.sh
Installing sim
Uncompressing simWriter
Uncompressing siptool
Installing sp
Installation of <CSCOgt001> was successful.
Installing migrate_cpp_4_5
Installing migrate_cpp_5_6
Installing migrate_cpp_DB
Updating parameters for XECfgParm.dat
Updating parameters for trigger.dat
Updating parameters for di
Updating parameters for migrate
Updating parameters for migrateTKGFile
Installing /opt/CiscoMGC/etc/CONFIG_LIB/migrate_mod.tar.gz
Installing /opt/CiscoMGC/etc/migrate/migrate_scr.tar.gz
Installing new .dat files in /opt/CiscoMGC/etc
Installation of <CSCOgc001> was successful.
Miscellaneous Protocols
####################################
##
01
##
02
##
####################################
## BTNUP_BTNR167 ## IETF_SIP
##
Cisco PGW 2200 Softswitch Release 9.8 Software Installation and Configuration Guide
OL-18083-01
D-5
Appendix D
Sample Installation Scripts
Sample Output from install.sh
## BTNUP_IUP
##
##
## DPNSS_BTNR188 ##
##
####################################
SS7 Protocl Family
#########################
##
10
##
#########################
## ANSISS7_2K
##
## ANSISS7_92
##
## ANSISS7_C2
##
## ANSISS7_C3
##
## ANSISS7_E1
##
## ANSISS7_STANDARD
##
## GR317
##
#########################
PRI Protocol Family
######################
##
20
##
######################
## ATT_41459
##
## ATT_41459_C2
##
## BELL_1268
##
## BELL_1268_C2
##
## ETS_300_102
##
## ETS_300_102_C2 ##
## ETS_300_172
##
######################
Q761 Version 1 Protocol Family
##########################################################################################
##
30
##
31
##
32
##
33
##
##########################################################################################
## ETS_300_121
## Q761_BASE
## Q761_GERMAN
## Q761_SINGAPORE
##
## ETS_300_356
## Q761_BELG
## Q761_INDIA
## Q761_SINGAPORE_C2 ##
## HONGKONG
## Q761_BELG_97VER ## Q761_KOREAN
## Q761_TAIWAN
##
## ISUPV1_POLI
## Q761_CHILE
## Q761_NEWZEALAND ## Q761_THAILAND
##
## Q761_ARGENTINA
## Q761_CHINA
## Q761_97VER_BASE ## Q761_MALAYSIAN
##
## Q761_ARGENTINA_C2 ## Q761_CHINA_C2
## Q761_PERU
## Q761_99VER_BASE
##
## Q761_AUSTRL
## Q761_DANISH
## Q761_PORTUGAL
##Q761_99VER_AUSTRL_C3 ##
## Q761_AUSTRL_C2
##
##
##
##
##########################################################################################
Q761 Version 2 Protocol Family
Q761 Version 3 Protocol Family
###################################################################### ###################
##
40
##
41
##
42
## ##
50
##
###################################################################### ###################
## ISUPV2_32DIG
## ISUPV2_JAPAN
## ISUPV2_VIETNAM
## ## ISUPV3
##
## ISUPV2_AUSTRIAN
## ISUPV2_JAPAN_C2
## ISUPV2_AUSTRIAN_C2 ## ## ISUPV3_UK
##
## ISUPV2_CZECH
## ISUPV2_NORWEGIAN
##
## ## ISUPV3_UK_C2 ##
## ISUPV2_DUTCH
## ISUPV2_POLISH
##
## ## ISUPV3_UK_C3 ##
## ISUPV2_FINNISH96 ## ISUPV2_SPANISH
##
## ## ISUPV3_UK_C4 ##
## ISUPV2_FRENCH
## ISUPV2_SPANISH_C2 ##
## ##
##
## ISUPV2_GERMAN
## ISUPV2_SWISS
##
## ##
##
## ISUPV2_ISRAEL
## ISUPV2_SWISS_C2
##
## ##
##
###################################################################### ###################
Q721 Protocol Family
#######################
##
60
##
#######################
## Q721_BASE
##
## Q721_BRAZILIAN
##
## Q721_CHINA
##
## Q721_FRENCH
##
## Q721_PHILLIPINE ##
##
##
##
##
##
##
#######################
Q767 Protocol Family
##########################################
##
70
##
71
##
##########################################
## Q767_AUSTRALIA ## Q767_MEXICAN
##
## Q767_BASE
## Q767_NIGERIAN
##
## Q767_BRAZIL
## Q767_RUSS
##
## Q767_COLOMBIA
## Q767_SINGAPORE ##
## Q767_GUATEMALA ## Q767_SPAN
##
## Q767_INDONESIA ## Q767_SWED
##
## Q767_ITAL
## Q767_TURKISH
##
## Q767_ITAL_C2
##
##
##########################################
Q931 Protocol Family
######################
##
80
##
######################
## Q931
##
Cisco PGW 2200 Softswitch Release 9.8 Software Installation and Configuration Guide
D-6
OL-18083-01
Appendix D
Sample Installation Scripts
Sample Output from install.sh
## Q931_AUSTRALIA ##
## Q931_SINGAPORE ##
######################
Would you like to add a protocol set to your system? [y] [y,n,?,q] y
SNMP Research Critical Application Subagent Version 16.2.0.35
@(#)Copyright 1992-2008 SNMP Research, Incorporated
SNMP Research MIB2 Subagent Version 16.2.0.35
@(#)Copyright 1992-2008 SNMP Research, Incorporated
SNMP Research Host Resources Subagent Version 16.2.0.35
@(#)Copyright 1992-2008 SNMP Research, Incorporated
hostagt: GetSNMPPort: no snmp entry in /etc/services
at line 118 in file getport.c
hostagt: snmp port is 161 from #define SNMP_PORT
at line 123 in file getport.c
SNMP Research File System Monitor Subagent Version 16.2.0.35
@(#)Copyright 1992-2008 SNMP Research, Incorporated
SNMP Research BRASS Server/Subagent Version 16.2.0.35
Copyright 1989-2008 SNMP Research, Inc.
SNMP Research Log File Monitor Subagent Version 16.2.0.35
@(#)Copyright 1992-2008 SNMP Research, Incorporated
y
Please insert a two digit package identifier and type <enter>
If you choose to add all protocols to your system, type "all": all
Uncompressing ANSISS7_STANDARD_SIPI.mdo
Uncompressing ANSISS7_STANDARD_SIPI.so
Uncompressing ASP_NotRealProtocol.mdo
Uncompressing ASP_NotRealProtocol.so
Uncompressing CALLVER.mdo
Uncompressing CALLVER.so
Uncompressing CALLVER_GENERIC_ANALYSIS.mdo
Uncompressing CALLVER_GENERIC_ANALYSIS.so
Uncompressing CALLVER_LCM.mdo
Uncompressing CDR_MAN.mdo
Uncompressing CDR_MAN.so
Uncompressing CONNECTION_PLANE_MANAGER.mdo
Uncompressing CONNECTION_PLANE_MANAGER.so
Uncompressing EISUP.mdo
Uncompressing EISUP.so
Uncompressing ETS_300_172_SLAVE.mdo
Uncompressing ETS_300_172_SLAVE.so
Uncompressing GENERIC_ANALYSIS.mdo
Uncompressing GENERIC_ANALYSIS.so
Uncompressing IN_TRIGGER.mdo
Uncompressing IN_TRIGGER.so
Uncompressing ISUPV2_FINNISH96_SIPI.mdo
Uncompressing ISUPV2_FINNISH96_SIPI.so
Uncompressing ISUPV2_GERMAN_SIPI.mdo
Uncompressing ISUPV2_GERMAN_SIPI.so
Uncompressing ISUPV3_UK_SIPI.mdo
Uncompressing ISUPV3_UK_SIPI.so
Uncompressing LEG_CONTROLLER.mdo
Uncompressing LEG_CONTROLLER.so
Uncompressing LEG_CONTROLLER_H248V2.mdo
Uncompressing LEG_CONTROLLER_H248V2.so
Uncompressing LEG_CONTROLLER_MGCP.mdo
Uncompressing LEG_CONTROLLER_MGCP.so
Uncompressing Q761_97VER_RUSS_SIPI.mdo
Uncompressing Q761_97VER_RUSS_SIPI.so
Uncompressing Q761_99VER_BASE_SIPI.mdo
Uncompressing Q761_99VER_BASE_SIPI.so
Uncompressing cc.mdo
Uncompressing cc.so
Uncompressing dummy.mdo
Cisco PGW 2200 Softswitch Release 9.8 Software Installation and Configuration Guide
OL-18083-01
D-7
Appendix D
Sample Installation Scripts
Sample Output from install.sh
Uncompressing dummy.so
Uncompressing lcm.mdo
Uncompressing lcm.so
Installation of <CSCO00000> was successful.
Uncompressing BTNUP_BTNR167.mdo
Uncompressing BTNUP_BTNR167.so
Uncompressing BTNUP_IUP.mdo
Uncompressing BTNUP_IUP.so
Uncompressing DPNSS_BTNR188.mdo
Uncompressing DPNSS_BTNR188.so
Uncompressing QBE.mdo
Uncompressing QBE.so
Installation of <CSCO01000> was successful.
Uncompressing IETF_SIP.mdo
Uncompressing IETF_SIP.so
Installation of <CSCO02000> was successful.
Uncompressing ANSISS7_2K.mdo
Uncompressing ANSISS7_2K.so
Uncompressing ANSISS7_92.mdo
Uncompressing ANSISS7_92.so
Uncompressing ANSISS7_C2.mdo
Uncompressing ANSISS7_C2.so
Uncompressing ANSISS7_C3.mdo
Uncompressing ANSISS7_C3.so
Uncompressing ANSISS7_E1.mdo
Uncompressing ANSISS7_E1.so
Uncompressing ANSISS7_STANDARD.mdo
Uncompressing ANSISS7_STANDARD.so
Uncompressing GR317.mdo
Uncompressing GR317.so
Installation of <CSCO10000> was successful.
Uncompressing ATT_41459.mdo
Uncompressing ATT_41459.so
Uncompressing ATT_41459_C2.mdo
Uncompressing ATT_41459_C2.so
Uncompressing BELL_1268.mdo
Uncompressing BELL_1268.so
Uncompressing BELL_1268_C2.mdo
Uncompressing BELL_1268_C2.so
Uncompressing ETS_300_102.mdo
Uncompressing ETS_300_102.so
Uncompressing ETS_300_102_C2.mdo
Uncompressing ETS_300_102_C2.so
Uncompressing ETS_300_172.mdo
Uncompressing ETS_300_172.so
Installation of <CSCO20000> was successful.
Uncompressing ETS_300_121.mdo
Uncompressing ETS_300_121.so
Uncompressing ETS_300_356.mdo
Uncompressing ETS_300_356.so
Uncompressing HONGKONG.mdo
Uncompressing HONGKONG.so
Uncompressing ISUPV1_POLI.mdo
Uncompressing ISUPV1_POLI.so
Uncompressing Q761_ARGENTINA.mdo
Uncompressing Q761_ARGENTINA.so
Uncompressing Q761_ARGENTINA_C2.mdo
Uncompressing Q761_ARGENTINA_C2.so
Uncompressing Q761_AUSTRL.mdo
Cisco PGW 2200 Softswitch Release 9.8 Software Installation and Configuration Guide
D-8
OL-18083-01
Appendix D
Sample Installation Scripts
Sample Output from install.sh
Uncompressing Q761_AUSTRL.so
Uncompressing Q761_AUSTRL_C2.mdo
Uncompressing Q761_AUSTRL_C2.so
Installation of <CSCO30000> was successful.
Uncompressing Q761_BASE.mdo
Uncompressing Q761_BASE.so
Uncompressing Q761_BELG.mdo
Uncompressing Q761_BELG.so
Uncompressing Q761_BELG_97VER.mdo
Uncompressing Q761_BELG_97VER.so
Uncompressing Q761_CHILE.mdo
Uncompressing Q761_CHILE.so
Uncompressing Q761_CHINA.mdo
Uncompressing Q761_CHINA.so
Uncompressing Q761_CHINA_C2.mdo
Uncompressing Q761_CHINA_C2.so
Uncompressing Q761_DANISH.mdo
Uncompressing Q761_DANISH.so
Installation of <CSCO31000> was successful.
Uncompressing Q761_97VER_BASE.mdo
Uncompressing Q761_97VER_BASE.so
Uncompressing Q761_97VER_RUSS.mdo
Uncompressing Q761_97VER_RUSS.so
Uncompressing Q761_97VER_RUSS_C2.mdo
Uncompressing Q761_97VER_RUSS_C2.so
Uncompressing Q761_GERMAN.mdo
Uncompressing Q761_GERMAN.so
Uncompressing Q761_INDIA.mdo
Uncompressing Q761_INDIA.so
Uncompressing Q761_KOREAN.mdo
Uncompressing Q761_KOREAN.so
Uncompressing Q761_NEWZEALAND.mdo
Uncompressing Q761_NEWZEALAND.so
Uncompressing Q761_PERU.mdo
Uncompressing Q761_PERU.so
Uncompressing Q761_PORTUGAL.mdo
Uncompressing Q761_PORTUGAL.so
Installation of <CSCO32000> was successful.
Uncompressing Q761_99VER_AUSTRL_C3.mdo
Uncompressing Q761_99VER_AUSTRL_C3.so
Uncompressing Q761_99VER_BASE.mdo
Uncompressing Q761_99VER_BASE.so
Uncompressing Q761_MALAYSIAN.mdo
Uncompressing Q761_MALAYSIAN.so
Uncompressing Q761_SINGAPORE.mdo
Uncompressing Q761_SINGAPORE.so
Uncompressing Q761_SINGAPORE_C2.mdo
Uncompressing Q761_SINGAPORE_C2.so
Uncompressing Q761_TAIWAN.mdo
Uncompressing Q761_TAIWAN.so
Uncompressing Q761_THAILAND.mdo
Uncompressing Q761_THAILAND.so
Installation of <CSCO33000> was successful.
Uncompressing ISUPV2_AUSTRIAN.mdo
Uncompressing ISUPV2_AUSTRIAN.so
Uncompressing ISUPV2_CZECH.mdo
Uncompressing ISUPV2_CZECH.so
Uncompressing ISUPV2_DUTCH.mdo
Uncompressing ISUPV2_DUTCH.so
Uncompressing ISUPV2_FINNISH96.mdo
Cisco PGW 2200 Softswitch Release 9.8 Software Installation and Configuration Guide
OL-18083-01
D-9
Appendix D
Sample Installation Scripts
Sample Output from install.sh
Uncompressing
Uncompressing
Uncompressing
Uncompressing
Uncompressing
Uncompressing
Uncompressing
ISUPV2_FINNISH96.so
ISUPV2_FRENCH.mdo
ISUPV2_FRENCH.so
ISUPV2_GERMAN.mdo
ISUPV2_GERMAN.so
ISUPV2_ISRAEL.mdo
ISUPV2_ISRAEL.so
Installation of <CSCO40000> was successful.
Uncompressing ISUPV2_JAPAN.mdo
Uncompressing ISUPV2_JAPAN.so
Uncompressing ISUPV2_JAPAN_C2.mdo
Uncompressing ISUPV2_JAPAN_C2.so
Uncompressing ISUPV2_NORWEGIAN.mdo
Uncompressing ISUPV2_NORWEGIAN.so
Uncompressing ISUPV2_POLISH.mdo
Uncompressing ISUPV2_POLISH.so
Uncompressing ISUPV2_SPANISH.mdo
Uncompressing ISUPV2_SPANISH.so
Uncompressing ISUPV2_SPANISH_C2.mdo
Uncompressing ISUPV2_SPANISH_C2.so
Uncompressing ISUPV2_SWISS.mdo
Uncompressing ISUPV2_SWISS.so
Uncompressing ISUPV2_SWISS_C2.mdo
Uncompressing ISUPV2_SWISS_C2.so
Installation of <CSCO41000> was successful.
Uncompressing ISUPV2_AUSTRIAN_C2.mdo
Uncompressing ISUPV2_AUSTRIAN_C2.so
Uncompressing ISUPV2_VIETNAM.mdo
Uncompressing ISUPV2_VIETNAM.so
Installation of <CSCO42000> was successful.
Uncompressing ISUPV3.mdo
Uncompressing ISUPV3.so
Uncompressing ISUPV3_FRENCH.mdo
Uncompressing ISUPV3_FRENCH.so
Uncompressing ISUPV3_UK.mdo
Uncompressing ISUPV3_UK.so
Uncompressing ISUPV3_UK_C2.mdo
Uncompressing ISUPV3_UK_C2.so
Uncompressing ISUPV3_UK_C3.mdo
Uncompressing ISUPV3_UK_C3.so
Uncompressing ISUPV3_UK_C4.mdo
Uncompressing ISUPV3_UK_C4.so
Installation of <CSCO50000> was successful.
Uncompressing Q721_BASE.mdo
Uncompressing Q721_BASE.so
Uncompressing Q721_BRAZILIAN.mdo
Uncompressing Q721_BRAZILIAN.so
Uncompressing Q721_BRAZILIAN_C2.mdo
Uncompressing Q721_BRAZILIAN_C2.so
Uncompressing Q721_CHINA.mdo
Uncompressing Q721_CHINA.so
Uncompressing Q721_FRENCH.mdo
Uncompressing Q721_FRENCH.so
Uncompressing Q721_PHILLIPINE.mdo
Uncompressing Q721_PHILLIPINE.so
Installation of <CSCO60000> was successful.
Uncompressing Q767_AUSTRALIA.mdo
Uncompressing Q767_AUSTRALIA.so
Uncompressing Q767_BASE.mdo
Cisco PGW 2200 Softswitch Release 9.8 Software Installation and Configuration Guide
D-10
OL-18083-01
Appendix D
Sample Installation Scripts
Updated Configuration File Sample
Uncompressing
Uncompressing
Uncompressing
Uncompressing
Uncompressing
Uncompressing
Uncompressing
Uncompressing
Uncompressing
Uncompressing
Uncompressing
Uncompressing
Uncompressing
Uncompressing
Uncompressing
Q767_BASE.so
Q767_BRAZIL.mdo
Q767_BRAZIL.so
Q767_BRAZIL_C2.mdo
Q767_BRAZIL_C2.so
Q767_COLOMBIA.mdo
Q767_COLOMBIA.so
Q767_GUATEMALA.mdo
Q767_GUATEMALA.so
Q767_INDONESIA.mdo
Q767_INDONESIA.so
Q767_ITAL.mdo
Q767_ITAL.so
Q767_ITAL_C2.mdo
Q767_ITAL_C2.so
Installation of <CSCO70000> was successful.
Uncompressing Q767_MEXICAN.mdo
Uncompressing Q767_MEXICAN.so
Uncompressing Q767_NIGERIAN.mdo
Uncompressing Q767_NIGERIAN.so
Uncompressing Q767_RUSS.mdo
Uncompressing Q767_RUSS.so
Uncompressing Q767_RUSS_C2.mdo
Uncompressing Q767_RUSS_C2.so
Uncompressing Q767_SINGAPORE.mdo
Uncompressing Q767_SINGAPORE.so
Uncompressing Q767_SPAN.mdo
Uncompressing Q767_SPAN.so
Uncompressing Q767_SWED.mdo
Uncompressing Q767_SWED.so
Uncompressing Q767_TURKISH.mdo
Uncompressing Q767_TURKISH.so
Installation of <CSCO71000> was successful.
Uncompressing Q931.mdo
Uncompressing Q931.so
Uncompressing Q931_AUSTRALIA.mdo
Uncompressing Q931_AUSTRALIA.so
Uncompressing Q931_SINGAPORE.mdo
Uncompressing Q931_SINGAPORE.so
Installation of <CSCO80000> was successful.
Beginning Check of System Performance Requirements
Number of CPUs in system 2
Memory size: 2048 Megabytes
The sparcv9 processor operates at 1336 MHz,
Swap is total: 76384k bytes allocated + 13744k reserved = 90128k used, 5635696k available
Please Verify that you have over 4000000K Available swap
The tt60 daemon has stopped successfully.
Installation completed Wed Sep 24 03:52:32 EDT 2008
Installation log can be found in /var/adm/MGC_install.log
bash-3.00#
Updated Configuration File Sample
Following is an example of an updated configuration file. This file is located in /opt/CiscoMGC/etc/.
Cisco PGW 2200 Softswitch Release 9.8 Software Installation and Configuration Guide
OL-18083-01
D-11
Appendix D
Sample Installation Scripts
Updated Configuration File Sample
#---------------- MGC Environment Configuration Tool Usage -------------------#
REQUIRED STARTUP PARAMETERS
#
DO NOT MOVE THESE PARAMETERS BEYOND THIS BOX
*.platformId =
1
*.transpathId =
01
# Transpath Id for ASN
*.ownTranspathId =
01
*.peerTranspathId =
02
*.MGC_CDR_NODE_ID =
MGC-CDR-NODE-STRING
# System Id for CDR
*.desiredPlatformState =
standalone
*.virtualFaultTolerant =
false
# avoid prov-dply/sync on FT mode in egw
##### *.SysConnectDataAccess =
true
# true, establish conn. to Data Access
Subsystem
##### Last modified by mgcusr using MGC Setup Tool: Wed Sep 24 08:22:22 GMT 2008
*.SysConnectDataAccess = false
# true, establish conn. to Data Access Subsystem
*.GWClearChannelAlgorithm =
null
# clear channel algorithm
*.SipToIsupInterworkingInd =
0
# 0= No Interworking Encountered
# 1= Interworking Encountered
*.AlarmOnActive = false
# true, raise an alarm when pgw is active
##### *.ipAddrLocalA =
0.0.0.0
# Should be same as *.IP_Addr1
##### Last modified by mgcusr using MGC Setup Tool: Wed Sep 24 08:22:22 GMT 2008
*.ipAddrLocalA = 10.74.49.153
# Should be same as *.IP_Addr1
##### *.ipAddrLocalB =
0.0.0.0
##### Last modified by mgcusr using MGC Setup Tool: Wed Sep 24 08:22:22 GMT 2008
*.ipAddrLocalB = 10.0.49.153
*.ipAddrPeerA =
0.0.0.0
# Failover peer's address
*.ipAddrPeerB =
0.0.0.0
##### *.IP_Addr1 =
0.0.0.0
# Address of interface on motherboard
##### Last modified by mgcusr using MGC Setup Tool: Wed Sep 24 08:22:22 GMT 2008
*.IP_Addr1 = 10.74.49.153
# Address of interface on motherboard
##### *.IP_Addr2 =
0.0.0.0
##### Last modified by mgcusr using MGC Setup Tool: Wed Sep 24 08:22:22 GMT 2008
*.IP_Addr2 = 10.0.49.153
*.IP_Addr3 =
0.0.0.0
*.IP_Addr4 =
0.0.0.0
# These are Next Hop (router) IP Addresses
# They should be used when the Next Hop address(es)
# are different on the two MGC hosts
*.IP_NextHop1 =
0.0.0.0
*.IP_NextHop2 =
0.0.0.0
*.IP_NextHop3 =
0.0.0.0
*.IP_NextHop4 =
0.0.0.0
*.IP_NextHop5 =
0.0.0.0
*.IP_NextHop6 =
0.0.0.0
*.IP_NextHop7 =
0.0.0.0
*.IP_NextHop8 =
0.0.0.0
*.netmaskPeerB = 255.255.255.255
*.netmaskPeerA = 255.255.255.255
*.netmaskLocalB = 255.255.255.255
*.netmaskLocalA = 255.255.255.255
*.Peer_NextHop1 = 0.0.0.0
*.Peer_NextHop2 = 0.0.0.0
*.Peer_NextHop3 = 0.0.0.0
*.Peer_NextHop4 = 0.0.0.0
*.Peer_NextHop5 = 0.0.0.0
*.Peer_NextHop6 = 0.0.0.0
*.Peer_NextHop7 = 0.0.0.0
*.Peer_NextHop8 = 0.0.0.0
################################################################
Cisco PGW 2200 Softswitch Release 9.8 Software Installation and Configuration Guide
D-12
OL-18083-01
Appendix D
Sample Installation Scripts
Sample Configured snmpd.cnf File
# Improved SIP Failover Support. Setting 0.0.0.0 to both will disable
# the SIP Improved failover support Feature. Configuring only one will
# cause the switchover, if the physical interface where it present fails.
#
*.Virtual_IP_Addr1 =
0.0.0.0
# Must be from *.IP_Addr1 Subnet.
*.Virtual_IP_Addr2 =
0.0.0.0
# Must be from *.IP_Addr2 Subnet.
################################################################
*.geoSeparation =
false
# Geographical separated? or not.
# To disable sip failover, you have to set both Virtual_IP_Addr* to 0.0.0.0.
# Set *.sipFailover=false does not always mean sip failover is disabled.
#
*.sipFailover
=
false
# Failover if SIP Service fails.
*.stPort =
0
engine.SysVirtualSwitch =
1
# 0=Nailed-Up, 1=Switched-MGC, 2=Switched-JCS
##### Last modified by mgcusr using MGC Setup Tool: Wed Sep 24 08:22:22 GMT 2008
engine.SysVirtualSwitch = 1
# 0=Nailed-Up, 1=Switched-MGC, 2=Switched-JCS
pom.dataSync =
false # don't synch slave data with master
foverd.ipLocalPortA =0
foverd.ipPeerPortA =0
foverd.ipLocalPortB =0
foverd.ipPeerPortB =0
##### *.numberOfThreads = 2
##### Last modified by mgcusr using MGC Setup Tool: Wed Sep 24 08:22:22 GMT 2008
##### *.numberOfThreads = 2
##### Last modified by mgcusr using MGC Setup Tool: Wed Oct 22 07:22:03 GMT 2008
*.numberOfThreads = 1
Sample Configured snmpd.cnf File
The following shows a sample snmpd.cnf file.
Note
This sample configuration enables both snmpv1 and snmpv2 traps. Therefore, you will see two coldStart
traps when the software is initialized—one for version1 and one for version 2.
# Entry type: sysDescr
# Entry format: octetString
sysDescr "SNMPv3 agent from Cisco Systems, Inc."
# Entry type: sysObjectID
# Entry format: OID
sysObjectID transpath
# Entry type: sysLocation
# Entry format: octetString
sysLocation "Herndon, Virginia"
# Entry type: sysContact
# Entry format: octetString
sysContact "Cisco Systems, Inc.
+1 703 484 3000"
# Entry type: sysName
# Entry format: octetString
sysName "NSSU - MGC"
# Entry type: snmpEnableAuthenTraps
Cisco PGW 2200 Softswitch Release 9.8 Software Installation and Configuration Guide
OL-18083-01
D-13
Appendix D
Sample Installation Scripts
Sample Configured snmpd.cnf File
# Entry format: integer
snmpEnableAuthenTraps 1
# Entry type: MAX_THREADS
# Entry format: integer
MAX_THREADS 25
# Entry type: MAX_PDU_TIME
# Entry format: integer
MAX_PDU_TIME 80000
# Entry type: MAX_OUTPUT_WAITING
# Entry format: integer
MAX_OUTPUT_WAITING 65536
# Entry type: MAX_SUBAGENTS
# Entry format: integer
MAX_SUBAGENTS 15
# Entry type: subagent
# Entry format: octetString
#Entry type: snmpCommunityEntry
#Format: snmpCommunityIndex (text)
#
snmpCommunityName (text)
#
snmpCommunitySecurityName (text)
#
snmpCommunityContextEngineID (octetString)
#
snmpCommunityContextName (text)
#
snmpCommunityTransportTag (text)
#
snmpCommunityStorageType (nonVolatile, permanent, readOnly)
snmpCommunityEntry admin mgcusr mgcusr localSnmpID - - nonVolatile
snmpCommunityEntry readonly public public localSnmpID - - nonVolatile
snmpCommunityEntry user private private localSnmpID - - nonVolatile
# Entry type: communityEntry
# Entry format: srCommunityAuthSnmpID
#
srCommunityName
#
srCommunityGroupName
#
srCommunityContextSnmpID
#
srCommunityContextName
#
srCommunityTransportLabel
#
srCommunityMemoryType
(snmpID)
(textOctetString)
(textOctetString)
(snmpID)
(textOctetString)
(textOctetString)
(integer)
# Entry type: snmpEngineBoots
# Entry format: integer
snmpEngineBoots 3
#Entry type: usmUserEntry
#Format: usmUserEngineID (octetString)
#
usmUserName (text)
#
usmUserAuthProtocol (OID)
#
usmUserPrivProtocol (OID)
#
usmUserStorageType (nonVolatile, permanent, readOnly)
#
usmTargetTag (text)
#
AuthKey (octetString)
#
PrivKey (octetString)
#Entry type: vacmAccessEntry
#Format: vacmGroupName (text)
#
vacmAccessContextPrefix
#
vacmAccessSecurityModel
#
vacmAccessSecurityLevel
(text)
(snmpv1, snmpv2c, snmpv2s, usm, http)
(noAuthNoPriv, authNoPriv, authPriv)
Cisco PGW 2200 Softswitch Release 9.8 Software Installation and Configuration Guide
D-14
OL-18083-01
Appendix D
Sample Installation Scripts
Sample Configured snmpd.cnf File
#
vacmAccessContextMatch (exact, prefix)
#
vacmAccessReadViewName (text)
#
vacmAccessWriteViewName (text)
#
vacmAccessNotifyViewName (text)
#
vacmAccessStorageType (nonVolatile, permanent, readOnly)
vacmAccessEntry User - snmpv1 noAuthNoPriv exact All RemoteWrite All \
nonVolatile
vacmAccessEntry User - snmpv2c noAuthNoPriv exact All RemoteWrite All \
nonVolatile
vacmAccessEntry Guest - snmpv1 noAuthNoPriv exact All - All nonVolatile
vacmAccessEntry Guest - snmpv2c noAuthNoPriv exact All - All nonVolatile
vacmAccessEntry SuperUser - snmpv1 noAuthNoPriv exact All Write All \
nonVolatile
vacmAccessEntry SuperUser - snmpv2c noAuthNoPriv exact All Write All \
nonVolatile
#Entry type: vacmSecurityToGroupEntry
#Format: vacmSecurityModel (snmpv1, snmpv2c, snmpv2s, usm, http)
#
vacmSecurityName (text)
#
vacmGroupName (text)
#
vacmSecurityToGroupStorageType (nonVolatile, permanent, readOnly)
vacmSecurityToGroupEntry snmpv1 mgcusr SuperUser nonVolatile
vacmSecurityToGroupEntry snmpv1 public Guest nonVolatile
vacmSecurityToGroupEntry snmpv1 private User nonVolatile
vacmSecurityToGroupEntry snmpv2c mgcusr SuperUser nonVolatile
vacmSecurityToGroupEntry snmpv2c public Guest nonVolatile
vacmSecurityToGroupEntry snmpv2c private User nonVolatile
#Entry type: vacmViewTreeFamilyEntry
#Format: vacmViewTreeFamilyViewName (text)
#
vacmViewTreeFamilySubtree (OID)
#
vacmViewTreeFamilyMask (octetString)
#
vacmViewTreeFamilyType (included, excluded)
#
vacmViewTreeFamilyStorageType (nonVolatile, permanent, readOnly)
vacmViewTreeFamilyEntry All iso - included nonVolatile
vacmViewTreeFamilyEntry All 0.0 - included nonVolatile
vacmViewTreeFamilyEntry All hrSWRunEntry.0.2147483647 ff:df excluded \
nonVolatile
vacmViewTreeFamilyEntry All hrSWRunPerfEntry.0.2147483647 ff:df excluded \
nonVolatile
vacmViewTreeFamilyEntry Write iso - included nonVolatile
vacmViewTreeFamilyEntry Write mib_2 - excluded nonVolatile
vacmViewTreeFamilyEntry RemoteWrite iso - included nonVolatile
vacmViewTreeFamilyEntry RemoteWrite mib_2 - excluded nonVolatile
vacmViewTreeFamilyEntry RemoteWrite critAppProcEntry.0.1 ff:f7 excluded \
nonVolatile
vacmViewTreeFamilyEntry RemoteWrite critAppProcEntry.0.2 ff:f7 excluded \
nonVolatile
vacmViewTreeFamilyEntry RemoteWrite critAppProcEntry.0.3 ff:f7 excluded \
nonVolatile
vacmViewTreeFamilyEntry RemoteWrite critAppProcEntry.0.4 ff:f7 excluded \
nonVolatile
#Entry type: snmpNotifyEntry
#Format: snmpNotifyName (text)
#
snmpNotifyTag (text)
#
snmpNotifyType (trap(1), inform(2))
#
snmpNotifyStorageType (nonVolatile, permanent, readOnly)
snmpNotifyEntry 32 TrapSink trap nonVolatile
#Entry type: snmpTargetAddrEntry
#Format: snmpTargetAddrName (text)
#
snmpTargetAddrTDomain (snmpUDPDomain, snmpIPXDomain, etc.)
#
snmpTargetAddrTAddress (transport address,i.e. 192.147.142.254:0)
Cisco PGW 2200 Softswitch Release 9.8 Software Installation and Configuration Guide
OL-18083-01
D-15
Appendix D
Sample Installation Scripts
Sample Configured XECfgParm.dat Files for Cisco PGW 2200 Softswitch Release 9.8(1)
#
snmpTargetAddrTimeout (integer)
#
snmpTargetAddrRetryCount (integer)
#
snmpTargetAddrTagList (text)
#
snmpTargetAddrParams (text)
#
snmpTargetAddrStorageType (nonVolatile, permanent, readOnly)
#
snmpTargetAddrTMask (transport mask, i.e. 255.255.255.255:0)
#
snmpTargetAddrMMS (integer)
snmpTargetAddrEntry 34 snmpUDPDomain 127.0.0.1:0 100 3 TrapSink \
v2cExampleParams nonVolatile 255.255.255.255:0 2048
#Entry type: snmpTargetParamsEntry
#Format: snmpTargetParamsName (text)
#
snmpTargetParamsMPModel (integer)
#
snmpTargetParamsSecurityModel (snmpv1, snmpv2c, snmpv2s, usm)
#
snmpTargetParamsSecurityName (text)
#
snmpTargetParamsSecurityLevel (noAuthNoPriv,authNoPriv,authPriv)
#
snmpTargetParamsStorageType (nonVolatile, permanent, readOnly)
snmpTargetParamsEntry v1ExampleParams 0 snmpv1 public noAuthNoPriv \
nonVolatile
snmpTargetParamsEntry v2cExampleParams 1 snmpv2c public noAuthNoPriv \
nonVolatile
#Entry type: snmpNotifyFilterProfileEntry
#Format: snmpTargetParamsName (text)
#
snmpNotifyFilterProfileName (text)
#
snmpNotifyFilterProfileStorageType (nonVolatile,permanent,readOnly)
#Entry type: snmpNotifyFilterEntry
#Format: snmpNotifyFilterProfileName (text)
#
snmpNotifyFilterSubtree (OID)
#
snmpNotifyFilterMask (octetString)
#
snmpNotifyFilterType (included, excluded)
#
snmpNotifyFilterStorageType (nonVolatile, permanent, readOnly)
#Entry type: httpUserNameEntry
#Format: httpUserName (text)
#
httpUserGroupName (text)
#
httpUserTransportLabel (text)
#
httpUserStorageType (nonVolatile, permanent, readOnly)
#
Password (octetString)
Sample Configured XECfgParm.dat Files for
Cisco PGW 2200 Softswitch Release 9.8(1)
The following sample XECfgParm.dat files for Cisco PGW 2200 Softswitch Release 9.8(1) are located
in the /opt/CiscoMGC/etc directory.
#
#
#
#
#
#
#
#
#
#
#
#
File: XECfgParm.dat
Copyright (c) 1997-2008 by Cisco Systems, Inc.
Purpose:
This file contains configuration parameters that may be accessed by
XE application programs at run-time.
All lines beginning with a '#' are comments and WILL NOT BE READ BY
PROGRAMS. Thus application overrides of the default parameter values
can be easily added and removed by removing/added a '#'.
Cisco PGW 2200 Softswitch Release 9.8 Software Installation and Configuration Guide
D-16
OL-18083-01
Appendix D
Sample Installation Scripts
Sample Configured XECfgParm.dat Files for Cisco PGW 2200 Softswitch Release 9.8(1)
# Copyright (c) 1997-2008 by Cisco Systems, Inc.
#-----------------------------------------------------------------------------# Default parameter values have a facility name of "*" and
# will be used if no match is found on a specific facility name
#-----------------------------------------------------------------------------# Specific Facility names are as follows:
#
# logger
- Log Server
# foverd
- Failover Daemon
# MML
- MML
# procM
- Process Manager
# cdrDmpr
- CDR Dumper
# cfgM
- Configuration Manager
# engine
- call processing engine
# ioChanMgr - I/O Channel Managers
# pom
- Provisioning Object Manager
# measM
- Measurement Manager
# OPERSAGT - Operational SNMP Agent
# PROVSAGT - Provisioning SNMP Agent
# mmSAgt
- Measurement Manager SNMP Agent
# almM
- Alarm Manager
# replicator- Replicator
# mmdb
- TimesTen Main Memory Data Base Process
# amDmpr
- Alarm / Measurement Dumper
# ioChanCtl - controls all channel controllers
# SIP
- SIP IOCC's global configureation
#
#----Special Paremeter Section---# callver
- call verification utility
# diskmonitor - disk monitor shell script
# XE
- Execution Environment
#
#-----------------------------------------------------------------------------#---------------- MGC Environment Configuration Tool Usage -------------------#
REQUIRED STARTUP PARAMETERS
#
DO NOT MOVE THESE PARAMETERS BEYOND THIS BOX
*.platformId =
1
*.transpathId =
01
# Transpath Id for ASN
*.ownTranspathId =
01
*.peerTranspathId =
02
*.MGC_CDR_NODE_ID =
MGC-CDR-NODE-STRING
# System Id for CDR
*.desiredPlatformState =
standalone
*.virtualFaultTolerant =
false
# avoid prov-dply/sync on FT mode in egw
*.SysConnectDataAccess =
true
# true, establish conn. to Data Access Subsystem
*.GWClearChannelAlgorithm =
null
# clear channel algorithm
*.SipToIsupInterworkingInd =
0
# 0= No Interworking Encountered
# 1= Interworking Encountered
*.AlarmOnActive = false
# true, raise an alarm when pgw is active
*.ipAddrLocalA =
*.IP_Addr1
*.ipAddrLocalB =
*.ipAddrPeerA =
*.ipAddrPeerB =
*.IP_Addr1 =
motherboard
*.IP_Addr2 =
*.IP_Addr3 =
*.IP_Addr4 =
10.0.49.43
#
0.0.0.0
0.0.0.0
0.0.0.0
0.0.0.0
10.0.49.43
# Should be same as
# Failover peer's address
#
0.0.0.0
# Address of interface on
0.0.0.0
0.0.0.0
0.0.0.0
# These are Next Hop (router) IP Addresses
# They should be used when the Next Hop address(es)
Cisco PGW 2200 Softswitch Release 9.8 Software Installation and Configuration Guide
OL-18083-01
D-17
Appendix D
Sample Installation Scripts
Sample Configured XECfgParm.dat Files for Cisco PGW 2200 Softswitch Release 9.8(1)
# are different on the two MGC hosts
*.IP_NextHop1 =
0.0.0.0
*.IP_NextHop2 =
0.0.0.0
*.IP_NextHop3 =
0.0.0.0
*.IP_NextHop4 =
0.0.0.0
*.IP_NextHop5 =
0.0.0.0
*.IP_NextHop6 =
0.0.0.0
*.IP_NextHop7 =
0.0.0.0
*.IP_NextHop8 =
0.0.0.0
*.netmaskPeerB = 255.255.255.255
*.netmaskPeerA = 255.255.255.255
*.netmaskLocalB = 255.255.255.255
*.netmaskLocalA = 255.255.255.255
*.Peer_NextHop1 = 0.0.0.0
*.Peer_NextHop2 = 0.0.0.0
*.Peer_NextHop3 = 0.0.0.0
*.Peer_NextHop4 = 0.0.0.0
*.Peer_NextHop5 = 0.0.0.0
*.Peer_NextHop6 = 0.0.0.0
*.Peer_NextHop7 = 0.0.0.0
*.Peer_NextHop8 = 0.0.0.0
################################################################
# Improved SIP Failover Support. Setting 0.0.0.0 to both will disable
# the SIP Improved failover support Feature. Configuring only one will
# cause the switchover, if the physical interface where it present fails.
#
*.Virtual_IP_Addr1 = 10.0.242.220 #
0.0.0.0
# Must be from *.IP_Addr1
Subnet.
*.Virtual_IP_Addr2 =
0.0.0.0
# Must be from *.IP_Addr2 Subnet.
################################################################
*.geoSeparation =
false
# Geographical separated? or not.
# To disable sip failover, you have to set both Virtual_IP_Addr* to 0.0.0.0.
# Set *.sipFailover=false does not always mean sip failover is disabled.
#
*.sipFailover
=
false
# Failover if SIP Service fails.
*.stPort =
0
engine.SysVirtualSwitch =
1 # =
0
# 0=Nailed-Up, 1=Switched-MGC,
2=Switched-JCS
pom.dataSync =
false # don't synch slave data with master
foverd.ipLocalPortA =0
foverd.ipPeerPortA =0
foverd.ipLocalPortB =0
foverd.ipPeerPortB =0
*.numberOfThreads = 2
#############################
# Sub System component version
*.subSysCompVer = 12.a
#############################
#-----------------# CVT Parameters
#-----------------#*.OwnClli = TTTT-SS-BB-XXX
#*.OwnClli = 1-22-33-444
#
REQUIRED STARTUP PARAMETERS
Cisco PGW 2200 Softswitch Release 9.8 Software Installation and Configuration Guide
D-18
OL-18083-01
Appendix D
Sample Installation Scripts
Sample Configured XECfgParm.dat Files for Cisco PGW 2200 Softswitch Release 9.8(1)
#
DO NOT MOVE THESE PARAMETERS BEYOND THIS BOX
#---------------- MGC Environment Configuration Tool Usage -------------------*.disableMeas =false
*.sm_meas_baseaddr = 40960
# T ==> Don't accumulate meas in shared mem
*.tempDir =
/tmp
# temporary directory
*.dataDir =
../var # volatile data directory
*.homeDirRoot =
/opt/CiscoMGC
*.logDirectory =
../var/log
# NEW log directory
*.logFileNamePrefix =
platform
# NEW log prefix
*.logPrio
=
Error
*.logMsgDrop =
true
*.eventTrace =
false
*.debugLevel =
high
*.tablesFile =
../etc/tables.dat # tables that can be loaded
*.autonomous
=
false
*.runAsDaemon =
true
*.chkPtPort =
2001
*.maxNumLinks =
32
*.maxLinksPerSessionSet =
4
# max links per SS7 sessionSet
*.maxNumDChansPerIOCC =
504
*.maxNumDChansPerPort =
2000
*.maxNumMGCPLinks =
1000
*.maxNumSIPLinks =
4
*.maxNumPril3IOCCs = 3
*.maxTrueOPCs =
6
# max true OPCs per MGC
*.maxCapOPCsPerTrueOPC =8 # max cap OPCs per true OPC
*.maxNumRLMPorts = 8
# Maximum number of unique RLM ports
IUA.maxExtNodes =
256
# max number of External Nodes
# with ISDNSIGTYPE of IUA
IUA.maxSigPathsPerExtNode =
112
# max number of SIGPATHs that can
# be assigned an External Node
# with ISDNSIGTYPE of IUA
IUA.maxSigPaths =
1500
# max number of IUA SIGPATHs
# per MGC
M3UA.maxSgp = 96
# Max number of M3UA SGPs
M3UA.maxSigServices =
1536
# Max number of M3UA signalling services
M3UA.maxOPCs =
64
# Max number of M3UA OPCs
M3UA.maxRoutesPerOpcDpc =
2
# Max number of M3UA routes per OPC/DPC pair
SUA.maxSgp = 8
# Max number of SUA SGPs
SUA.maxSigServices =
256
# Max number of SUA signalling services
SUA.maxOPCs =
64
# Max number of SUA OPCs
SUA.maxRoutesPerOpcApcSSN =
2
# Max number of SUA routes per OPC/APC pair
and remote SSN
*.AllLinksFailCausesFailover =
false
# Should loss of all C7/M3UA/SUA links cause
failover
*.AllISDNLinksFailCausesFailover = false
# Should loss of all ISDN/IUA/RLM links cause
failover
*.dataSourceName =
howdydb
*.dataCommitTime =
10
# in millisecs
*.OverdecadicDigitsSupported =
false
# keep it here for migration purpose only
*.DataBaseAccessError =
0
# 0 = Continue, 1 = Reject call
*.VirtualMemTimerInterval = 2000 # sampling frequency of virtual memory
*.MemAddressTimerInterval =1500 # sampling frequency of memory address space of processes
*.CallRateTimerInterval = 1000 # sampling frequency of the call rate computations
*.CPUTimerInterval = 3000
*.CallCutoffTimer =0 # call cutoff timer
*.CallCutoffTimerUnits =0 # 0 = Hours, 1 = Minutes, 2 = Seconds
*.tibcoSupport =
disable
#disable/enable
*.PartialCliTypeOfSwitch = 0
#0 to 99
*.PartialCliPnoIdentity = 0
#0 to 999
*.PartialCliSwitchNumber = 0
#0 to 999
*.LISupport = disable
# disable/enable
Cisco PGW 2200 Softswitch Release 9.8 Software Installation and Configuration Guide
OL-18083-01
D-19
Appendix D
Sample Installation Scripts
Sample Configured XECfgParm.dat Files for Cisco PGW 2200 Softswitch Release 9.8(1)
*.PNPopulate = disable
# disable/enable
*.maxLocationLabels = 3000
# 0 to 3000
*.DisableCCBSoverTunneledQSIG = 0 # 0 = Enable, 1 = Disable
*.analysisCapabilityLevel = 0
# 0 = existing analysis behaviour, 1 = Longest-matching
capability enabled
*.FaxUpspeedCodecPreference = null # attempt passthrough if T.38 fax fails
*.MMLManualBlockingCic = 0
# 0 = not MML_Manual_BLOCK the cic when no RestartAck
received, 1 = MML_Manual_BLOCK the cic enabled
*.CallReleaseGuardTimer = 0 # call release guard timer
#-----------------------------------------------------------------------# TCAP Capabilities
#-----------------------------------------------------------------------TCAP.maxSsnNum = 10 # max number of local SSNs PGW supports, range [1..10]
TCAP.avgInvokePerDialog = 1 # max number of outgoing Invokes involved in one Dialog, range
[1..10]
#-----------------------------------------------------------------------# Log Server logfile locations
#-----------------------------------------------------------------------# daemonAddr is socket port for logger daemon
logger.daemonAddr = ../var/lsd_addr
# NEW logfile rotation size max in Megabytes
logger.fileRotateSize = 100
# NEW logfile rotation interval in minutes (24 hrs default)
logger.fileRotateInterval = 1440
# numThreads can be 0 or 1, if 1 then logger client runs in its
# own thread
logger.numThreads = 0
#------------------------------------------------------------------------# Facility specific parameters
#
The remainder of this file pertains to parameters and parameter overrides
#
for individual facilitites.
#
# LogPrio and autonomous are changed for debug testing only. Otherwise
# everyone should use the defaults above (except MML, see below.)
#------------------------------------------------------------------------# Usage of these debug parameters could cause the system to use up
# space more rapidly than normal. If the DISK alarm is activated because
# of this activity, certain files in /opt/CiscoMGC/var/spool will be erased.
#
#
#
#
#
#
#
#
#
#
#
#
#
#
#
#
To set the logging level for a particular process, the exact case-sensitive
unix filename of the process must be used. Only the logging level of
actively or passively managed processes can be set.
Valid values for logPrio are Debug, Trace, Info, Warning, Error, and Critical
almM.logPrio =
amDmpr.logPrio =
cdrDmpr.logPrio =
cfgM.logPrio =
EISUP.logPrio =
ioChanMgr.logPrio =
ISDNIP.logPrio =
ISDNL3.logPrio =
ISDNBRI.logPrio =
IUA.logPrio =
Debug
Debug
Debug
Debug
Debug
Debug
Debug
Debug
Debug
Debug
Cisco PGW 2200 Softswitch Release 9.8 Software Installation and Configuration Guide
D-20
OL-18083-01
Appendix D
Sample Installation Scripts
Sample Configured XECfgParm.dat Files for Cisco PGW 2200 Softswitch Release 9.8(1)
# engine.logPrio =
Debug
# foverd.logPrio =
Debug
# M3UA.logPrio =
Debug
# measMgr.logPrio =
Debug
# MGCP.logPrio =
Debug
# H248.logPrio =
Debug
# mmdbd.logPrio =
Debug
# mmSAgt.logPrio =
Debug
# pom.logPrio =
Debug
# procM.logPrio =
Debug
# replicator.logPrio =
Debug
# sagt.logPrio =
Debug
# SIP.logPrio =
Debug
# SS7.logPrio =
Debug
# SUA.logPrio =
Debug
# TALI.logPrio =
Debug
# TCAP.logPrio =
Debug
# RA.logPrio =
Debug
# QBE_V5.logPrio =
Debug
# QBE_V6.logPrio =
Debug
QBE-IOCC.debugFlag
=
0
# Specialized "autonomous" flags for debug, fault isolation
# engine.autonomous =
true
# cfgM.autonomous =
true
Talk2.autonomous
=
false
#-------------# procM
#-------------procM.minCheckHealthInterval =
procM.minCheckHealthTimeout =
procM.minKillGracePeriod =
procM.almDwellInterval =
procM.procHealthDfltAlmCat =
procM.servicesDir =
procM.servFmt
=
procM.recovDbFile =
procM.logDBFile
=
procM.runAsDaemon =
10
# smallest check health interval
20
# smallest check health timeout
5
# smallest kill grace period
15
# seconds to wait before clearing alarm
pmDefault # default alarm category for PM
../var
# location of PM temporary FIFOs
PM_%d_%d_input # format of PM temporary FIFOs
../var/procMRecovery # PM recovery info
../var/procMLogTable # log info for recovery only
true
#------------# cfgM
#------------cfgM.recovDbFile
=
../var/cfgMRecovery
# CfgM recovery info
#------------# Engine
#------------engine.SysPropagateChanAvail = false
# auto-blocking of C7 cics and ISDN sigPaths
engine.SysGeneratedCode = true
engine.SysGRSTimerInterval = 0
engine.SysGRSBlockSize = 0
engine.SysSGCPRetryCount = 3
# max number of SGCP retry messages after failure
engine.SysSGCPRetryTimerInterval = 1000
# interval between retransmission (msec)
engine.SysCLIval = false
engine.SysToneDetect = false
engine.SysNumTrans = false
engine.SysMinOverlap = 0
Cisco PGW 2200 Softswitch Release 9.8 Software Installation and Configuration Guide
OL-18083-01
D-21
Appendix D
Sample Installation Scripts
Sample Configured XECfgParm.dat Files for Cisco PGW 2200 Softswitch Release 9.8(1)
engine.SysMaxOverlap = 28
engine.SysGSMTimerInterval = 10000
engine.LCMMdlFile = ../lib/lcm
engine.CCMdlFile = ../lib/cc
engine.mdoDir = ../lib/
engine.VersionTimeoutValue = 10000
engine.MDLANumberScreening = 0
#
#
#
#
#
#
GSM to be sent (milliseconds)
LSI call model
call context
where .mdo files live
Interval for version messages (msec)
use calling party number for a number screening
engine.SysMdlMemoryReduction = 1
engine.CircuitReservation = false# Do/Don't use circuit reservation feature
engine.CallBackDBCleanUpTimer = 3600000
# Call Back DB clean up timer in mini seconds
(min:600000 to max:10800000 )
engine.SendHardwareBlock = false
# false=PGW will only send maintenance blocks
*.MaxNumTGAdvances = 1# Limit on num Trunk Group Advance actions
*.RedirectingATree = 0
*.ClearingLocation = 0
# 0 = Normal mapping behaviour, LCM will not override
the Clearing Location field in Call Context
*.DefaultLocation = 0
# 0 = Normal protocol defined default value, LCM will
not override the Default Location field in Call Context
*.detailedCallEventCapture = 1
*.SelectTermCustGrpId = 0
# 1= Select Terminating SigPath CustGrpId if Originating
SigPath CustGrpId is 0000.
# 0= Always select Originating SigPath CustGrpId
*.GlareReattemptCauseValue = 44
# used for re-attempt by GW in Nailed configurations.
*.DerivedInterworkingFCIBCIEnable = 0 # 1 = Set FCI/BCI values when interworking with
R2/T1CAS/ISDN/H323 V2
*.sipModeSelectionControl =
2 # = 2
# 1 - B2BUA mode, allow later selection of
proxy mode via the dialplan, 2 - Fixed Proxy mode, always work in proxy mode.
*.sipRoutingMode = 0 # 0 - strict-router, 1 - loose-router.
#The following two lines are call based memory allocator settings.
#set these to 0 to disable call-based memory allocator
#This setting is memory efficient, but performance suffers.
#set these to 110000 for maximum performance. Memory usage increases.
engine.CALL_MEM_BLOCK_SIZE = 65536
engine.CALL_MEM_CHUNK_SIZE = 56
# engine.SysTraceLevel = 3
*.LongCallTime = 21600000
def)
# used to configure OnGoingCallTime in ms (6hrs
engine.CDRencodingFormat = AnsiCDB
engine.CDRtimeStamp = M
engine.CDRmessageTypes
= "1010,1020,1030,1040,1050,1060,1070"
engine.VersionTimeoutValue = 10000
engine.StartUpAuditEnabled = false
# audit invoked at engine startup?
engine.FaultRecoveryAuditTimer = 15000 # milliseconds
engine.CustSpecificINAPHandling = null
engine.DisableMultipleCDRs = 1
# 0=enable, 1=disable
engine.ChargingTariffType = 0
# 0=tariff-rate/scale-factor, 1=meter pulse
engine.ChargingMode = 1
# 1=AddOnCharge, 2=ReplaceCharge, 3=FreeOfCharge
engine.ShortDurationCallPeriod = 0
# 0=feature disabled
engine.ActionOnChargeTableAccessFailure = 0
# 0=continue call, 1=release call
engine.CallLimitingControl = 0
# 0 = Call limiting off, 1 = Call limiting on
#The following parameter is to set the call number, these calls will write their buffer
into trace file. default value: 200
engine.CallNumberToWriteIntoTracefile = 200
#---------------------# CDR dumper (cdrDmpr)
Cisco PGW 2200 Softswitch Release 9.8 Software Installation and Configuration Guide
D-22
OL-18083-01
Appendix D
Sample Installation Scripts
Sample Configured XECfgParm.dat Files for Cisco PGW 2200 Softswitch Release 9.8(1)
#---------------------cdrDmpr.openCDR
= true
cdrDmpr.seqFile
= ../var/.cdr.seq
#-----------------------------------# Alarms/Measurements dumper (amDmpr)
#-----------------------------------#------------# ioChanMgr
#------------# Internal debug - only use this for low-level IOS debug
# This is bitmapped hex value:
#
1 - Managed Object tracing
#
2 - Simulation of streams devices from /dev to ../dev for
#
unit testing.
ioChanMgr.trace =
0x0
# These timers are in millisecs
# NOTE: alarms are sent autonomously as they occur, alarmTimer is outdated
# and should be set to zero. If IPCTimer is 0, then hard-coded value will be
# used. Only for problems with the hard-code should this value be changed.
ioChanMgr.alarmTimer =
0
ioChanMgr.statTimer =
30000
ioChanMgr.IPCTimer =
0
#Channel manager parameters for IPC flow control.
# evtTimer(msec.) - Frequency at which the queue is scanned for Msgs.
# hbTimer(msec.) - Heart-beat timer, Not yet implemented.
# statDiscardThreshold - Size of Control Queue that triggers discarding
#
all the queued stat events.
# sendThreshold - Max. Number of Events from the Queue sent at a time.
# IPCsendThreshold - Max. Number of RSIPs from the Queue sent at a time.
ioChanMgr.evtTimer =
100
ioChanMgr.hbTimer =
1000
ioChanMgr.statDiscardThreshold =
40
ioChanMgr.sendThreshold =
10
ioChanMgr.IPCsendThreshold =
0
#Channel manager parameters for SCC switchover on MGX
# Both sessionPauseTimer and resumeAckTimer are in seconds.
ioChanMgr.sessionPauseTimer =
8
ioChanMgr.resumeAckTimer =
1
# Channel manager parameter for amount of time that PDUs are held back
# in IOCC after recovery of SS7 sigserv, before forwarding to engine
ioChanMgr.IDUHoldTimer = 500
#----------# ioChanCtl
#----------ioChanCtl.DPNSSTestFrames = true
ioChanCtl.xgcpMultiThread = true
ioChanCtl.ituIsNewZealand = false
properties
# enable threading for the IP receive loop in MGCP
# for New Zealand MTP3 set appropriate ITU
#----------# SIP
#----------SIP.maxConnection = 200
# Maximum TCP connextions supported by PGW
simultaneourly
SIP.connIdlePeriod = 43200
# How long one TCP connection coulbe be stay in idle
state in second. 0 means PGW never close idle connection
Cisco PGW 2200 Softswitch Release 9.8 Software Installation and Configuration Guide
OL-18083-01
D-23
Appendix D
Sample Installation Scripts
Sample Configured XECfgParm.dat Files for Cisco PGW 2200 Softswitch Release 9.8(1)
SIP.connLocalMsgQueueSize = 1500
# Maximum number of local outgoing messsages per TCP
connection queue
SIP.udp2tcp_byte_xover = 0 # message size to control whether switch from UDP to TCP
SIP.naptr_record_locate = 1 # whether to perform natpr dns query
SIP.transportProtocol = udp # obsolete value, keep here to data migration
#----------# measM
#----------#
# Currently we assume 8000 XEMeas objects fit into 8 Mb of shared memory.
#
measM.sm_seg_size = 32
# size of shared memory in MB (default is 32)
measM.loadBalanceFactor = 20 # num of measmgr distribution points every 5 minutes
measM.port = default
# port to sync dynamic meas thresholds
#---------# almM
#---------# almM.runAsDaemon =
false
#------------# MML - since this is started and stopped by user, it
#
has the following unique requirements for logging.
#
- to alter logging levels, the logPrio parameter
#
must be changed here, then the MML process
#
started to pick up the change. The set-log
#
command does not affect any MML processes
#
#
- Currently MML must ALWAYS have autonomous=true
#------------MML.logPrio = Info
log
MML.logFileNamePrefix = mml
# causes Info and above messages to be written to the
# causes MML messages to be diverted to mml.log
MML.autonomous = true
MML.runAsDaemon = false
MML.timeout=10000
# in milliseconds
#
(note: current XE supports 1-second
resolution)
#
# individual timeout values for MML commands:
# format is: MML.<verb> = time
# (verb all lowercase)
MML.chg-cfg = 10000
MML.startPM = /etc/init.d/CiscoMGC start
MML.stopPM = /etc/init.d/CiscoMGC stop
MML.vld-cic = 25000
MML.snd = 600000
MML.enhancedHelpCompletion = true
#---------# XE
#---------#----------# foverd
#----------# NOTE: addresses below must be configured for the target system
#
- connTypes can be "socket", "serial", or "fifo"
Cisco PGW 2200 Softswitch Release 9.8 Software Installation and Configuration Guide
D-24
OL-18083-01
Appendix D
Sample Installation Scripts
Sample Configured XECfgParm.dat Files for Cisco PGW 2200 Softswitch Release 9.8(1)
# connection 1 parameters
foverd.conn1Type = socket
# connection 2 parameters
foverd.conn2Type = socket
# connection 3 parameters
foverd.conn3Type =
foverd.conn3Addr =
serial
/dev/null
foverd.heartbeatInterval = 1000
foverd.ackTimeout =
1000
foverd.abswitchTestInterval = 30000
foverd.graceShutTimeout = 6000
foverd.forceShutTimeout = 1000
foverd.commRetryInterval = 30000
foverd.statusRptInterval = 600000
foverd.peerCommTimeout =
3000
foverd.delayTimeout =
1000
foverd.transitionTimeout = 10000
foverd.abswitchPort =
/dev/null
foverd.peerReestablishTimeout = 50000
foverd.garpInterval = 0
# 0: disable foverd function of sending garp periodically
# positive number : enable garp function
# ----------------------------------------------------#foverd.runAsDaemon =
false
# ----------------------------------------------------#foverd.logPrio
=
Info
#----------------# Network Element
#----------------product.vendor = "Cisco Systems, Inc."
product.version = "9.8(1)"
product.time = "....."
#---------------------------------# POM - Provisioning Object Manager
#---------------------------------pom.port
= default
pom.respTimeout = 1200000
#---------------------------------# Replicator
#---------------------------------replicator.portDataChannelSend = 2968
replicator.portDataChannelRecv = 2970
replicator.portCommChannelSend = 2972
replicator.portCommChannelRecv = 2974
replicator.reconnectInterval = 15
replicator.numberReadThreads = 1
# use port 4001 when set to default
# default respTimeout 20 minutes,
# optional thread (0=no threads,1=one thread)
#----------------# Audit properties
#----------------engine.AuditTimerInterval = 1000
engine.MaxAuditCics = 32
#----------------# INAP prepaid properties
#-----------------
Cisco PGW 2200 Softswitch Release 9.8 Software Installation and Configuration Guide
OL-18083-01
D-25
Appendix D
Sample Installation Scripts
Sample Configured XECfgParm.dat Files for Cisco PGW 2200 Softswitch Release 9.8(1)
engine.RelINAPCallsAfterSwOver = true
#---------------------------------# Disk Monitor Parameters
#---------------------------------diskmonitor.Limit
= 7
# Minimum number of days to preserve (Trimming only
occurs when threshold is exceeded. )
diskmonitor.Threshold = 80
# percentage full threshold
diskmonitor.SoftLimit = false
# set to true to allow override of preserve limit,
setting it to false does not affect log file removal, see also PreserveLogs setting.
diskmonitor.CdrRmFinished = 0
# remove "finished" cdrs after X days (0 = immediate)
diskmonitor.OptFileSys =
# list of optional filesystems to monitor (no trimming)
diskmonitor.CoreRmDays = 1 # number of days to keep the core files
diskmonitor.CfgRmDirs = 64
# remove old config directories if more than X exist (0
= disable)
diskmonitor.logPrio = Info
diskmonitor.logFileNamePrefix = diskmonitor # causes log messages to be diverted to
diskmonitor.log
diskmonitor.TimerInterval = 60 # number of seconds before starting next task
#
# The next two parameters defines when old files should be removed.
# This task is run daily at dailyStartTime.
# Only core, log, cdr, alarm and measurements files are removed by this task.
#
diskmonitor.MaxKeepDays = 0 # maximum number of days to preserve files. use 0 to keep
forever.
diskmonitor.DailyStartTime = 04:15 # daily cleaning time (local time)
diskmonitor.PreserveLogs = false # if true and softlimit = false, log files will not be
removed even if threshold is crossed. Setting SoftLimit = true negates this setting
diskmonitor.PreserveCDRs = false # if true and softlimit = false, CDR files will not be
removed even if threshold is crossed. Setting SoftLimit = true negates this setting
#-------------------------------# call verification utility Parameters
#-------------------------------callver.SaveArea = ../etc/cust_specific/toolkit
#-------------------------------# ISDNBRI
#-------------------------------ISDNBRI.tcpPingPort = 0
# if port=0, it will disable ISDNBRI's tcp ping function.
# default value is 0.
# tcpPing will be enabled when set a valid port value,
# suggest value is 2430
#-------------------------------# Radius Accounting Parameters
#-------------------------------RadiusAccounting.output = off
# on/off
RadiusAccounting.numberPort = 20
# The number of local port to communicate with
radius server. The range is between 10 to 99. Default value is 20.
RadiusAccounting.smSize = 30
# size of shared memory in MB. The range is between
20 to 199. Default value is 30.
#-------------------------------# H.248
#-------------------------------H248.maxNumH248Links =
1000
H248.maximumActionsInTransaction = 64 # Used to set maximum number of actions in one
Transaction
Cisco PGW 2200 Softswitch Release 9.8 Software Installation and Configuration Guide
D-26
OL-18083-01
Appendix D
Sample Installation Scripts
Sample Configured XECfgParm.dat Files for Cisco PGW 2200 Softswitch Release 9.7(3)
H248.localMID = 0.0.0.0
# MGC Message Identifier. IP address or domain name
H248.MgcHeaderAddrType = 1
# MGC H.248 Message header type. 1=IP
Address,2=Domain Name
#-----------------------------------------------------------------------------# End of XE Configuration Parameter File
#-----------------------------------------------------------------------------MML.rtrv-callinfo = 30000
Sample Configured XECfgParm.dat Files for
Cisco PGW 2200 Softswitch Release 9.7(3)
The following sample XECfgParm.dat files for Cisco PGW 2200 Softswitch Release 9.7(3) are located
in the /opt/CiscoMGC/etc directory.
# File: XECfgParm.dat
# Copyright (c) 1997-2007 by Cisco Systems, Inc.
#
# Purpose:
#
# This file contains configuration parameters that may be accessed by
# XE application programs at run-time.
#
# All lines beginning with a '#' are comments and WILL NOT BE READ BY
# PROGRAMS. Thus application overrides of the default parameter values
# can be easily added and removed by removing/added a '#'.
#
# Copyright (c) 1997-2007 by Cisco Systems, Inc.
#-----------------------------------------------------------------------------# Default parameter values have a facility name of "*" and
# will be used if no match is found on a specific facility name
#-----------------------------------------------------------------------------# Specific Facility names are as follows:
#
# logger
- Log Server
# foverd
- Failover Daemon
# MML
- MML
# procM
- Process Manager
# cdrDmpr
- CDR Dumper
# cfgM
- Configuration Manager
# engine
- call processing engine
# ioChanMgr - I/O Channel Managers
# pom
- Provisioning Object Manager
# measM
- Measurement Manager
# OPERSAGT - Operational SNMP Agent
# PROVSAGT - Provisioning SNMP Agent
# mmSAgt
- Measurement Manager SNMP Agent
# almM
- Alarm Manager
# replicator- Replicator
# mmdb
- TimesTen Main Memory Data Base Process
# amDmpr
- Alarm / Measurement Dumper
# ioChanCtl - controls all channel controllers
#
#----Special Paremeter Section---# callver
- call verification utility
# diskmonitor - disk monitor shell script
# XE
- Execution Environment
#
#------------------------------------------------------------------------------
Cisco PGW 2200 Softswitch Release 9.8 Software Installation and Configuration Guide
OL-18083-01
D-27
Appendix D
Sample Installation Scripts
Sample Configured XECfgParm.dat Files for Cisco PGW 2200 Softswitch Release 9.7(3)
#---------------- MGC Environment Configuration Tool Usage -------------------#
REQUIRED STARTUP PARAMETERS
#
DO NOT MOVE THESE PARAMETERS BEYOND THIS BOX
*.platformId =
1
*.transpathId = 01
# MIGRATED
*.ownTranspathId = 01
# MIGRATED
*.peerTranspathId = 02
# MIGRATED
*.MGC_CDR_NODE_ID = MGC-CDR-NODE-STRING
# MIGRATED
*.desiredPlatformState = master
# MIGRATED
*.virtualFaultTolerant =
false
# avoid prov-dply/sync on FT mode in egw
*.SysConnectDataAccess = true
# MIGRATED
*.GWClearChannelAlgorithm = null
# MIGRATED
*.SipToIsupInterworkingInd = 0
# MIGRATED
# 1= Interworking Encountered
*.ipAddrLocalA = 10.0.49.116
# MIGRATED
*.ipAddrLocalB = 0.0.0.0
# MIGRATED
*.ipAddrPeerA = 10.0.49.119
# MIGRATED
*.ipAddrPeerB = 0.0.0.0
# MIGRATED
*.IP_Addr1
*.IP_Addr2
*.IP_Addr3
*.IP_Addr4
=
=
=
=
10.0.49.116
# MIGRATED
0.0.0.0
# MIGRATED
0.0.0.0
# MIGRATED
0.0.0.0
# MIGRATED
# These are Next Hop (router) IP Addresses
# They should be used when the Next Hop address(es)
# are different on the two MGC hosts
*.IP_NextHop1 = 0.0.0.0
# MIGRATED
*.IP_NextHop2 = 0.0.0.0
# MIGRATED
*.IP_NextHop3 = 0.0.0.0
# MIGRATED
*.IP_NextHop4 = 0.0.0.0
# MIGRATED
*.IP_NextHop5 = 0.0.0.0
# MIGRATED
*.IP_NextHop6 = 0.0.0.0
# MIGRATED
*.IP_NextHop7 = 0.0.0.0
# MIGRATED
*.IP_NextHop8 = 0.0.0.0
# MIGRATED
*.netmaskPeerB = 255.255.255.255
*.netmaskPeerA = 255.255.255.255
*.netmaskLocalB = 255.255.255.255
*.netmaskLocalA = 255.255.255.255
*.Peer_NextHop1 = 0.0.0.0
*.Peer_NextHop2 = 0.0.0.0
*.Peer_NextHop3 = 0.0.0.0
*.Peer_NextHop4 = 0.0.0.0
*.Peer_NextHop5 = 0.0.0.0
*.Peer_NextHop6 = 0.0.0.0
*.Peer_NextHop7 = 0.0.0.0
*.Peer_NextHop8 = 0.0.0.0
################################################################
# Improved SIP Failover Support. Setting 0.0.0.0 to both will disable
# the SIP Improved failover support Feature. Configuring only one will
# cause the switchover, if the physical interface where it present fails.
#
*.Virtual_IP_Addr1 = 0.0.0.0
# MIGRATED
*.Virtual_IP_Addr2 = 0.0.0.0
# MIGRATED
################################################################
*.geoSeparation = false
# MIGRATED
# To disable sip failover, you have to set both Virtual_IP_Addr* to 0.0.0.0.
Cisco PGW 2200 Softswitch Release 9.8 Software Installation and Configuration Guide
D-28
OL-18083-01
Appendix D
Sample Installation Scripts
Sample Configured XECfgParm.dat Files for Cisco PGW 2200 Softswitch Release 9.7(3)
# Set *.sipFailover = true
# MIGRATED
#
*.sipFailover = true
# MIGRATED
*.stPort = 0
# MIGRATED
engine.SysVirtualSwitch = 1
# MIGRATED
pom.dataSync = true
# MIGRATED
foverd.ipLocalPortA = 1051
# MIGRATED
foverd.ipPeerPortA = 1052
# MIGRATED
foverd.ipLocalPortB = 1053
# MIGRATED
foverd.ipPeerPortB = 1054
# MIGRATED
*.numberOfThreads = 2
#############################
# Sub System component version
*.subSysCompVer = 11.a
#############################
#-----------------# CVT Parameters
#-----------------#*.OwnClli = TTTT-SS-BB-XXX
#*.OwnClli = 1-22-33-444
#
REQUIRED STARTUP PARAMETERS
#
DO NOT MOVE THESE PARAMETERS BEYOND THIS BOX
#---------------- MGC Environment Configuration Tool Usage -------------------*.disableMeas = false
# MIGRATED
*.sm_meas_baseaddr = 40960
*.tempDir =
/tmp
# temporary directory
*.dataDir =
../var # volatile data directory
*.homeDirRoot =
/opt/CiscoMGC
*.logDirectory = ../var/log
# MIGRATED
*.logFileNamePrefix = platform
# MIGRATED
*.logPrio = Error
# MIGRATED
*.logMsgDrop =
true
*.eventTrace =
false
*.debugLevel =
high
*.tablesFile =
../etc/tables.dat # tables that can be loaded
*.autonomous
=
false
*.runAsDaemon =
true
*.chkPtPort = 2001
# MIGRATED
*.maxNumLinks = 32
# MIGRATED
*.maxLinksPerSessionSet = 4
# MIGRATED
*.maxNumDChansPerIOCC = 504
# MIGRATED
*.maxNumDChansPerPort = 1000
# MIGRATED
*.maxNumMGCPLinks = 1000
# MIGRATED
*.maxNumSIPLinks =
4
*.maxNumPril3IOCCs = 3
# MIGRATED
*.maxTrueOPCs =
6
# max true OPCs per MGC
*.maxCapOPCsPerTrueOPC =8 # max cap OPCs per true OPC
*.maxNumRLMPorts = 8
# MIGRATED
IUA.maxExtNodes =
256
# max number of External Nodes
# with ISDNSIGTYPE of IUA
IUA.maxSigPathsPerExtNode =
112
# max number of SIGPATHs that can
# be assigned an External Node
# with ISDNSIGTYPE of IUA
IUA.maxSigPaths =
1500
# max number of IUA SIGPATHs
# per MGC
M3UA.maxSgp = 96
# Max number of M3UA SGPs
M3UA.maxSigServices =
1536
# Max number of M3UA signalling services
Cisco PGW 2200 Softswitch Release 9.8 Software Installation and Configuration Guide
OL-18083-01
D-29
Appendix D
Sample Installation Scripts
Sample Configured XECfgParm.dat Files for Cisco PGW 2200 Softswitch Release 9.7(3)
M3UA.maxOPCs =
64
# Max number of M3UA OPCs
M3UA.maxRoutesPerOpcDpc =
2
# Max number of M3UA routes per OPC/DPC pair
SUA.maxSgp = 8
# Max number of SUA SGPs
SUA.maxSigServices =
256
# Max number of SUA signalling services
SUA.maxOPCs =
64
# Max number of SUA OPCs
SUA.maxRoutesPerOpcApcSSN =
2
# Max number of SUA routes per OPC/APC pair
and remote SSN
*.AllLinksFailCausesFailover = false
# MIGRATED
*.AllISDNLinksFailCausesFailover = false
# MIGRATED
*.dataSourceName = howdydb
# MIGRATED
*.dataCommitTime = 10
# MIGRATED
*.OverdecadicDigitsSupported = false
# MIGRATED
*.DataBaseAccessError = 0
# MIGRATED
*.VirtualMemTimerInterval = 2000 # sampling frequency of virtual memory
*.MemAddressTimerInterval =1500 # sampling frequency of memory address space of processes
*.CallRateTimerInterval = 1000 # sampling frequency of the call rate computations
*.CPUTimerInterval = 3000
*.CallCutoffTimer = 0
# MIGRATED
*.tibcoSupport = disable
# MIGRATED
*.PartialCliTypeOfSwitch = 0
# MIGRATED
*.PartialCliPnoIdentity = 0
# MIGRATED
*.PartialCliSwitchNumber = 0
# MIGRATED
*.LISupport = enable
# MIGRATED
*.PNPopulate = disable
# MIGRATED
*.maxLocationLabels = 3000
# MIGRATED
*.DisableCCBSoverTunneledQSIG = 0 # 0 = Enable, 1 = Disable
*.analysisCapabilityLevel = 0
# MIGRATED
*.FaxUpspeedCodecPreference = null
# MIGRATED
*.MMLManualBlockingCic = 0
# MIGRATED
*.CallReleaseGuardTimer = 0
# MIGRATED
TCAP.maxSsnNum = 10 # max number of local SSN PGW supports, range [1..10]
#-----------------------------------------------------------------------# Log Server logfile locations
#-----------------------------------------------------------------------# daemonAddr is socket port for logger daemon
logger.daemonAddr = ../var/lsd_addr
# NEW logfile rotation size max in Megabytes
logger.fileRotateSize = 100
# NEW logfile rotation interval in minutes (24 hrs default)
logger.fileRotateInterval = 1440
# numThreads can be 0 or 1, if 1 then logger client runs in its
# own thread
logger.numThreads = 0
#------------------------------------------------------------------------# Facility specific parameters
#
The remainder of this file pertains to parameters and parameter overrides
#
for individual facilitites.
#
# LogPrio and autonomous are changed for debug testing only. Otherwise
# everyone should use the defaults above (except MML, see below.)
#------------------------------------------------------------------------# Usage of these debug parameters could cause the system to use up
# space more rapidly than normal. If the DISK alarm is activated because
# of this activity, certain files in /opt/CiscoMGC/var/spool will be erased.
# To set the logging level for a particular process, the exact case-sensitive
Cisco PGW 2200 Softswitch Release 9.8 Software Installation and Configuration Guide
D-30
OL-18083-01
Appendix D
Sample Installation Scripts
Sample Configured XECfgParm.dat Files for Cisco PGW 2200 Softswitch Release 9.7(3)
#
#
#
#
#
#
#
#
#
unix filename of the process must be used. Only the logging level of
actively or passively managed processes can be set.
Valid values for logPrio are Debug, Trace, Info, Warning, Error, and Critical
almM.logPrio =
Debug
amDmpr.logPrio =
Debug
cdrDmpr.logPrio =
Debug
cfgM.logPrio =
Debug
EISUP.logPrio =
Debug
# ioChanMgr.logPrio =
Debug
# ISDNIP.logPrio =
Debug
# ISDNL3.logPrio =
Debug
# ISDNBRI.logPrio =
Debug
# IUA.logPrio =
Debug
engine.logPrio =
Debug
# foverd.logPrio =
Debug
# M3UA.logPrio =
Debug
# measMgr.logPrio =
Debug
# MGCP.logPrio =
Debug
# H248.logPrio =
Debug
# mmdbd.logPrio =
Debug
# mmSAgt.logPrio =
Debug
# pom.logPrio =
Debug
# procM.logPrio =
Debug
# replicator.logPrio =
Debug
# sagt.logPrio =
Debug
# SIP.logPrio =
Debug
# SS7.logPrio =
Debug
# SUA.logPrio =
Debug
# TALI.logPrio =
Debug
# TCAP.logPrio =
Debug
# RA.logPrio =
Debug
# QBE_V5.logPrio =
Debug
# QBE_V6.logPrio =
Debug
QBE-IOCC.debugFlag = 0
# MIGRATED
# Specialized "autonomous" flags for debug, fault isolation
# engine.autonomous =
true
# cfgM.autonomous =
true
Talk2.autonomous
=
false
#-------------# procM
#-------------procM.minCheckHealthInterval =
procM.minCheckHealthTimeout =
procM.minKillGracePeriod =
procM.almDwellInterval =
procM.procHealthDfltAlmCat =
procM.servicesDir =
procM.servFmt
=
procM.recovDbFile =
procM.logDBFile
=
procM.runAsDaemon =
10
# smallest check health interval
20
# smallest check health timeout
5
# smallest kill grace period
15
# seconds to wait before clearing alarm
pmDefault # default alarm category for PM
../var
# location of PM temporary FIFOs
PM_%d_%d_input # format of PM temporary FIFOs
../var/procMRecovery # PM recovery info
../var/procMLogTable # log info for recovery only
true
#------------# cfgM
#------------cfgM.recovDbFile
=
../var/cfgMRecovery
# CfgM recovery info
Cisco PGW 2200 Softswitch Release 9.8 Software Installation and Configuration Guide
OL-18083-01
D-31
Appendix D
Sample Installation Scripts
Sample Configured XECfgParm.dat Files for Cisco PGW 2200 Softswitch Release 9.7(3)
#------------# Engine
#------------engine.SysPropagateChanAvail = false
# MIGRATED
engine.SysGeneratedCode = true
engine.SysGRSTimerInterval = 0
# MIGRATED
engine.SysGRSBlockSize = 0
# MIGRATED
engine.SysSGCPRetryCount = 3
# max number of SGCP retry messages after failure
engine.SysSGCPRetryTimerInterval = 1000
# interval between retransmission (msec)
engine.SysCLIval = false
engine.SysToneDetect = false
engine.SysNumTrans = false
engine.SysMinOverlap = 0
engine.SysMaxOverlap = 28
engine.SysGSMTimerInterval = 10000
# MIGRATED
engine.LCMMdlFile = ../lib/lcm
# LSI call model
engine.CCMdlFile = ../lib/cc
# call context
engine.mdoDir = ../lib/
# where .mdo files live
engine.VersionTimeoutValue = 10000
# Interval for version messages (msec)
engine.MDLANumberScreening = 0
# MIGRATED
engine.SysMdlMemoryReduction = 1
engine.CircuitReservation = false
# MIGRATED
engine.CallBackDBCleanUpTimer = 3600000
# MIGRATED
engine.SendHardwareBlock = false
# MIGRATED
*.MaxNumTGAdvances = 1
# MIGRATED
*.RedirectingATree = 0
*.ClearingLocation = 0
# MIGRATED
*.DefaultLocation = 0
# MIGRATED
*.detailedCallEventCapture = 1
# MIGRATED
*.SelectTermCustGrpId = 0
# MIGRATED
# 0= Always select Originating SigPath CustGrpId
*.GlareReattemptCauseValue = 44
# MIGRATED
*.DerivedInterworkingFCIBCIEnable = 0
# MIGRATED
*.sipModeSelectionControl = 2
# 1 - B2BUA mode, allow later selection of proxy mode
via the dialplan, 2 - Fixed Proxy mode, always work in proxy mode.
#The following two lines are call based memory allocator settings.
#set these to 0 to disable call-based memory allocator
#This setting is memory efficient, but performance suffers.
#set these to 110000 for maximum performance. Memory usage increases.
engine.CALL_MEM_BLOCK_SIZE = 65536
engine.CALL_MEM_CHUNK_SIZE = 4096
# engine.SysTraceLevel = 3
*.LongCallTime = 21600000
def)
# used to configure OnGoingCallTime in ms (6hrs
engine.CDRencodingFormat = ItuCDB
# MIGRATED
engine.CDRtimeStamp = S
# MIGRATED
engine.CDRmessageTypes = "1010,1020,1030,1040,1050,1060,1070"
# MIGRATED
engine.VersionTimeoutValue = 10000
engine.StartUpAuditEnabled = false
# MIGRATED
engine.FaultRecoveryAuditTimer = 15000
# MIGRATED
engine.CustSpecificINAPHandling = null
# MIGRATED
engine.DisableMultipleCDRs = 1
# MIGRATED
engine.ChargingTariffType = 0
# MIGRATED
Cisco PGW 2200 Softswitch Release 9.8 Software Installation and Configuration Guide
D-32
OL-18083-01
Appendix D
Sample Installation Scripts
Sample Configured XECfgParm.dat Files for Cisco PGW 2200 Softswitch Release 9.7(3)
engine.ChargingMode = 1
# MIGRATED
engine.ShortDurationCallPeriod = 0
# MIGRATED
engine.ActionOnChargeTableAccessFailure = 0
# MIGRATED
engine.CallLimitingControl = 0
# MIGRATED
#---------------------# CDR dumper (cdrDmpr)
#---------------------cdrDmpr.openCDR
= true
cdrDmpr.seqFile
= ../var/.cdr.seq
#-----------------------------------# Alarms/Measurements dumper (amDmpr)
#-----------------------------------#------------# ioChanMgr
#------------# Internal debug - only use this for low-level IOS debug
# This is bitmapped hex value:
#
1 - Managed Object tracing
#
2 - Simulation of streams devices from /dev to ../dev for
#
unit testing.
ioChanMgr.trace =
0x0
# These timers are in millisecs
# NOTE: alarms are sent autonomously as they occur, alarmTimer is outdated
# and should be set to zero. If IPCTimer is 0, then hard-coded value will be
# used. Only for problems with the hard-code should this value be changed.
ioChanMgr.alarmTimer =
0
ioChanMgr.statTimer =
30000
ioChanMgr.IPCTimer = 0
# MIGRATED
#Channel manager parameters for IPC flow control.
# evtTimer(msec.) - Frequency at which the queue is scanned for Msgs.
# hbTimer(msec.) - Heart-beat timer, Not yet implemented.
# statDiscardThreshold - Size of Control Queue that triggers discarding
#
all the queued stat events.
# sendThreshold - Max. Number of Events from the Queue sent at a time.
# IPCsendThreshold - Max. Number of RSIPs from the Queue sent at a time.
ioChanMgr.evtTimer =
100
ioChanMgr.hbTimer =
1000
ioChanMgr.statDiscardThreshold =
40
ioChanMgr.sendThreshold =
10
ioChanMgr.IPCsendThreshold = 0
# MIGRATED
#Channel manager parameters for SCC switchover on MGX
# Both sessionPauseTimer and resumeAckTimer are in seconds.
ioChanMgr.sessionPauseTimer = 8
# MIGRATED
ioChanMgr.resumeAckTimer = 1
# MIGRATED
# Channel manager parameter for amount of time that PDUs are held back
# in IOCC after recovery of SS7 sigserv, before forwarding to engine
ioChanMgr.IDUHoldTimer = 500
#----------# ioChanCtl
#----------ioChanCtl.DPNSSTestFrames = true
ioChanCtl.xgcpMultiThread = true
ioChanCtl.ituIsNewZealand = false
properties
# enable threading for the IP receive loop in MGCP
# for New Zealand MTP3 set appropriate ITU
#-----------
Cisco PGW 2200 Softswitch Release 9.8 Software Installation and Configuration Guide
OL-18083-01
D-33
Appendix D
Sample Installation Scripts
Sample Configured XECfgParm.dat Files for Cisco PGW 2200 Softswitch Release 9.7(3)
# measM
#----------#
# Currently we assume 8000 XEMeas objects fit into 8 Mb of shared memory.
#
measM.sm_seg_size = 32
# size of shared memory in MB (default is 32)
measM.loadBalanceFactor = 20 # num of measmgr distribution points every 5 minutes
measM.port = default
# port to sync dynamic meas thresholds
#---------# almM
#---------# almM.runAsDaemon =
false
#------------# MML - since this is started and stopped by user, it
#
has the following unique requirements for logging.
#
- to alter logging levels, the logPrio parameter
#
must be changed here, then the MML process
#
started to pick up the change. The set-log
#
command does not affect any MML processes
#
#
- Currently MML must ALWAYS have autonomous=true
#------------MML.logPrio = Info
log
MML.logFileNamePrefix = mml
# causes Info and above messages to be written to the
# causes MML messages to be diverted to mml.log
MML.autonomous = true
MML.runAsDaemon = false
MML.timeout = 10000
# MIGRATED
#
(note: current XE supports 1-second
resolution)
#
# individual timeout values for MML commands:
# format is: MML.<verb> = time
# (verb all lowercase)
MML.chg-cfg = 10000
MML.startPM = /etc/init.d/CiscoMGC start
MML.stopPM = /etc/init.d/CiscoMGC stop
MML.vld-cic = 25000
MML.snd = 600000
MML.enhancedHelpCompletion = true
# MIGRATED
#---------# XE
#---------#----------# foverd
#----------# NOTE: addresses below must be configured for the target system
#
- connTypes can be "socket", "serial", or "fifo"
# connection 1 parameters
foverd.conn1Type = socket
# MIGRATED
# connection 2 parameters
foverd.conn2Type = socket
# MIGRATED
# connection 3 parameters
Cisco PGW 2200 Softswitch Release 9.8 Software Installation and Configuration Guide
D-34
OL-18083-01
Appendix D
Sample Installation Scripts
Sample Configured XECfgParm.dat Files for Cisco PGW 2200 Softswitch Release 9.7(3)
foverd.conn3Type =
foverd.conn3Addr =
serial
/dev/null
foverd.heartbeatInterval = 1000
foverd.ackTimeout =
1000
foverd.abswitchTestInterval = 30000
foverd.graceShutTimeout = 6000
foverd.forceShutTimeout = 1000
foverd.commRetryInterval = 30000
foverd.statusRptInterval = 600000
foverd.peerCommTimeout =
3000
foverd.delayTimeout =
1000
foverd.transitionTimeout = 10000
foverd.abswitchPort = /dev/null
# MIGRATED
foverd.peerReestablishTimeout = 50000
foverd.garpInterval = 0
# MIGRATED
# positive number : enable garp function
# ----------------------------------------------------#foverd.runAsDaemon =
false
# ----------------------------------------------------#foverd.logPrio
=
Info
#----------------# Network Element
#----------------product.vendor = "Cisco Systems, Inc."
product.version = "9.7(3)"
product.time = "....."
#---------------------------------# POM - Provisioning Object Manager
#---------------------------------pom.port
= default
# use port 4001 when set to default
pom.respTimeout = 1200000
# MIGRATED
#---------------------------------# Replicator
#---------------------------------replicator.portDataChannelSend = 2968
replicator.portDataChannelRecv = 2970
replicator.portCommChannelSend = 2972
replicator.portCommChannelRecv = 2974
replicator.reconnectInterval = 15
replicator.numberReadThreads = 1
#
#
#
#
MIGRATED
MIGRATED
MIGRATED
MIGRATED
# optional thread (0=no threads,1=one thread)
#----------------# Audit properties
#----------------engine.AuditTimerInterval = 1000
# MIGRATED
engine.MaxAuditCics = 32
# MIGRATED
#----------------# INAP prepaid properties
#----------------engine.RelINAPCallsAfterSwOver = true
# MIGRATED
#---------------------------------# Disk Monitor Parameters
#----------------------------------
Cisco PGW 2200 Softswitch Release 9.8 Software Installation and Configuration Guide
OL-18083-01
D-35
Appendix D
Sample Installation Scripts
Sample Configured XECfgParm.dat Files for Cisco PGW 2200 Softswitch Release 9.7(3)
diskmonitor.Limit = 7
# MIGRATED
diskmonitor.Threshold = 80
# MIGRATED
diskmonitor.SoftLimit = false
# MIGRATED
diskmonitor.CdrRmFinished = 0
# MIGRATED
diskmonitor.OptFileSys =
# list of optional filesystems to monitor (no trimming)
diskmonitor.CoreRmDays = 1
# MIGRATED
diskmonitor.CfgRmDirs = 64
# MIGRATED
diskmonitor.logPrio = Info
diskmonitor.logFileNamePrefix = diskmonitor # causes log messages to be diverted to
diskmonitor.log
diskmonitor.TimerInterval = 60 # number of seconds before starting next task
#
# The next two parameters defines when old files should be removed.
# This task is run daily at dailyStartTime.
# Only core, log, cdr, alarm and measurements files are removed by this task.
#
diskmonitor.MaxKeepDays = 0 # maximum number of days to preserve files. use 0 to keep
forever.
diskmonitor.DailyStartTime = 04:15 # daily cleaning time (local time)
diskmonitor.PreserveLogs = false # if true and softlimit = false, log files will not be
removed even if threshold is crossed. Setting SoftLimit = true negates this setting
diskmonitor.PreserveCDRs = false
# MIGRATED
#-------------------------------# call verification utility Parameters
#-------------------------------callver.SaveArea = ../etc/cust_specific/toolkit
#-------------------------------# ISDNBRI
#-------------------------------ISDNBRI.tcpPingPort = 0
# MIGRATED
# default value is 0.
# tcpPing will be enabled when set a valid port value,
# suggest value is 2430
#-------------------------------# Radius Accounting Parameters
#-------------------------------RadiusAccounting.output = off
# on/off
RadiusAccounting.numberPort = 20
# The number of local port to communicate with
radius server. The range is between 10 to 99. Default value is 20.
RadiusAccounting.smSize = 30
# size of shared memory in MB. The range is between
20 to 199. Default value is 30.
#-------------------------------# H.248
#-------------------------------H248.maxNumH248Links =
1000
H248.maximumActionsInTransaction = 64 # Used to set maximum number of actions in one
Transaction
H248.localMID =
[CISCO.COM] # Used in message from PGW to GW
#-----------------------------------------------------------------------------# End of XE Configuration Parameter File
#-----------------------------------------------------------------------------*.CallCutoffTimerUnits = 0 # This property specifies how the callcutofftime property is
calculated.
# If the value is set to,
0: callcutofftime property is measured in hours;
1: callcutofftime property is measured in minutes;
2: callcutofftime property is measured in seconds.
Cisco PGW 2200 Softswitch Release 9.8 Software Installation and Configuration Guide
D-36
OL-18083-01
Appendix D
Sample Installation Scripts
Sample Configured XECfgParm.dat Files for Cisco PGW 2200 Softswitch Release 9.6(1)
# Default value: 0
Sample Configured XECfgParm.dat Files for
Cisco PGW 2200 Softswitch Release 9.6(1)
The following sample XECfgParm.dat files for Cisco PGW 2200 Softswitch Release 9.6(1) are located
in the /opt/CiscoMGC/etc directory.
# File: XECfgParm.dat
#
# Purpose:
#
# This file contains configuration parameters that may be accessed by
# XE application programs at run-time.
#
# All lines beginning with a '#' are comments and WILL NOT BE READ BY
# PROGRAMS. Thus application overrides of the default parameter values
# can be easily added and removed by removing/added a '#'.
#
#-----------------------------------------------------------------------------# Default parameter values have a facility name of "*" and
# will be used if no match is found on a specific facility name
#-----------------------------------------------------------------------------# Specific Facility names are as follows:
#
# logger
- Log Server
# foverd
- Failover Daemon
# MML
- MML
# procM
- Process Manager
# cdrDmpr
- CDR Dumper
# cfgM
- Configuration Manager
# engine
- call processing engine
# ioChanMgr - I/O Channel Managers
# pom
- Provisioning Object Manager
# measM
- Measurement Manager
# OPERSAGT - Operational SNMP Agent
# PROVSAGT - Provisioning SNMP Agent
# mmSAgt
- Measurement Manager SNMP Agent
# almM
- Alarm Manager
# replicator- Replicator
# mmdb
- TimesTen Main Memory Data Base Process
# amDmpr
- Alarm / Measurement Dumper
# ioChanCtl - controls all channel controllers
#
#----Special Paremeter Section---# callver
- call verification utility
# diskmonitor - disk monitor shell script
# XE
- Execution Environment
#
#-----------------------------------------------------------------------------#---------------- MGC Environment Configuration Tool Usage -------------------#
REQUIRED STARTUP PARAMETERS
#
DO NOT MOVE THESE PARAMETERS BEYOND THIS BOX
*.platformId =
1
*.transpathId =
01
# Transpath Id for ASN
*.ownTranspathId =
01
*.peerTranspathId =
02
*.MGC_CDR_NODE_ID =
BUTTERFLY-HENDRIX-NODE
# System Id for CDR
Cisco PGW 2200 Softswitch Release 9.8 Software Installation and Configuration Guide
OL-18083-01
D-37
Appendix D
Sample Installation Scripts
Sample Configured XECfgParm.dat Files for Cisco PGW 2200 Softswitch Release 9.6(1)
*.desiredPlatformState =
*.virtualFaultTolerant =
*.SysConnectDataAccess =
Subsystem
*.GWClearChannelAlgorithm =
*.SipToIsupInterworkingInd =
*.ipAddrLocalA = 10.0.1.160
*.ipAddrLocalB = 10.128.1.5
*.ipAddrPeerA = 10.0.1.161
*.ipAddrPeerB = 10.128.1.6
*.IP_Addr1
*.IP_Addr2
*.IP_Addr3
*.IP_Addr4
=
=
=
=
master
false
true
null
0
# avoid prov-dply/sync on FT mode in egw
# true, establish conn. to Data Access
# clear channel algorithm
# 0= No Interworking Encountered
# 1= Interworking Encountered
# MIGRATED
# MIGRATED
# MIGRATED
# MIGRATED
10.0.1.160
# MIGRATED
10.128.1.5
# MIGRATED
10.82.82.11
# MIGRATED
0.0.0.0
# MIGRATED
# These are Next Hop (router) IP Addresses
# They should be used when the Next Hop address(es)
# are different on the two MGC hosts
*.IP_NextHop1 =
0.0.0.0
*.IP_NextHop2 =
0.0.0.0
*.IP_NextHop3 =
0.0.0.0
*.IP_NextHop4 =
0.0.0.0
*.IP_NextHop5 =
0.0.0.0
*.IP_NextHop6 =
0.0.0.0
*.IP_NextHop7 =
0.0.0.0
*.IP_NextHop8 =
0.0.0.0
################################################################
# Improved SIP Failover Support. Setting 0.0.0.0 to both will disable
# the SIP Improved failover support Feature. Configuring only one will
# cause the switchover, if the physical interface where it present fails.
#
*.Virtual_IP_Addr1 =
0.0.0.0
# Must be from *.IP_Addr1 Subnet.
*.Virtual_IP_Addr2 =
0.0.0.0
# Must be from *.IP_Addr2 Subnet.
################################################################
*.geoSeparation =
*.sipFailover
=
false
false
# Geographical separated? or not.
# Failover if SIP Service fails.
*.stPort = 7001
# MIGRATED
engine.SysVirtualSwitch = 0
# MIGRATED
pom.dataSync = true
# MIGRATED
foverd.ipLocalPortA = 1052
# MIGRATED
foverd.ipPeerPortA = 1051
# MIGRATED
foverd.ipLocalPortB = 1054
# MIGRATED
foverd.ipPeerPortB = 1053
# MIGRATED
*.numberOfThreads = 1
#############################
# Sub System component version
*.subSysCompVer = 10.a
#############################
#-----------------# CVT Parameters
#-----------------#*.OwnClli = TTTT-SS-BB-XXX
#*.OwnClli = 1-22-33-444
#
REQUIRED STARTUP PARAMETERS
Cisco PGW 2200 Softswitch Release 9.8 Software Installation and Configuration Guide
D-38
OL-18083-01
Appendix D
Sample Installation Scripts
Sample Configured XECfgParm.dat Files for Cisco PGW 2200 Softswitch Release 9.6(1)
#
DO NOT MOVE THESE PARAMETERS BEYOND THIS BOX
#---------------- MGC Environment Configuration Tool Usage -------------------*.disableMeas = false
*.sm_meas_baseaddr = 3400
# T ==> Don't accumulate meas in shared mem
# shared memory based address
*.tempDir =
*.dataDir =
*.homeDirRoot =
*.logDirectory =
*.logFileNamePrefix =
*.logPrio
=
*.logMsgDrop =
*.eventTrace =
*.debugLevel =
*.tablesFile =
*.autonomous
=
*.runAsDaemon =
*.chkPtPort =
*.maxNumLinks =
*.maxLinksPerSessionSet =
*.maxNumDChansPerIOCC =
*.maxNumDChansPerPort =
*.maxNumMGCPLinks =
*.maxNumSIPLinks =
*.maxTrueOPCs =
per MGC
*.maxCapOPCsPerTrueOPC =
OPC
*.maxNumRLMPorts = 8
IUA.maxExtNodes =
/tmp
# temporary directory
../var # volatile data directory
/opt/CiscoMGC
../var/log
# NEW log directory
platform
# NEW log prefix
Debug
true
false
high
../etc/tables.dat # tables that can be loaded
false
true
2001
32
4
# max links per SS7 sessionSet
504
2000
1000
4
6
# maxtrue OPCs
IUA.maxSigPathsPerExtNode =
IUA.maxSigPaths =
8
# max cap OPCs per true
# Maximum number of unique RLM ports
256
# max number of External Nodes
# with ISDNSIGTYPE of IUA
112
# max number of SIGPATHs that can
# be assigned an External Node
# with ISDNSIGTYPE of IUA
1500
# max number of IUA SIGPATHs
# per MGC
# Max number of M3UA SGPs
1536
# Max number of M3UA signalling services
64
# Max number of M3UA OPCs
2
# Max number of M3UA routes per OPC/DPC pair
# Max number of SUA SGPs
256
# Max number of SUA signalling services
64
# Max number of SUA OPCs
2
# Max number of SUA routes per OPC/APC pair
M3UA.maxSgp = 96
M3UA.maxSigServices =
M3UA.maxOPCs =
M3UA.maxRoutesPerOpcDpc =
SUA.maxSgp = 8
SUA.maxSigServices =
SUA.maxOPCs =
SUA.maxRoutesPerOpcApcSSN =
and remote SSN
*.AllLinksFailCausesFailover =
false
# Should loss of all C7/M3UA/SUA links cause
failover
*.dataSourceName =
howdydb
*.dataCommitTime =
10
# in millisecs
*.OverdecadicDigitsSupported =
false
# keep it here for migration purpose only
*.DataBaseAccessError =
0
# 0 = Continue, 1 = Reject call
*.VirtualMemTimerInterval =
2000
# sampling frequency of virtual memory
*.MemAddressTimerInterval =
1500
# sampling frequency of memory
address space of processes
*.CallRateTimerInterval =
1000
# sampling frequency of the call
rate computations
*.CPUTimerInterval = 3000
*.CallCutoffTimer =
0 # call cutoff timer (hours)
*.tibcoSupport =
disable
#disable/enable
*.PartialCliTypeOfSwitch = 0
#0 to 99
*.PartialCliPnoIdentity = 0
#0 to 999
*.PartialCliSwitchNumber = 0
#0 to 999
*.LISupport = disable
# disable/enable
Cisco PGW 2200 Softswitch Release 9.8 Software Installation and Configuration Guide
OL-18083-01
D-39
Appendix D
Sample Installation Scripts
Sample Configured XECfgParm.dat Files for Cisco PGW 2200 Softswitch Release 9.6(1)
*.maxLocationLabels = 3000
# 0 to 3000
#-----------------------------------------------------------------------# Log Server logfile locations
#-----------------------------------------------------------------------# daemonAddr is socket port for logger daemon
logger.daemonAddr = ../var/lsd_addr
# NEW logfile rotation size max in Megabytes
logger.fileRotateSize = 100
# NEW logfile rotation interval in minutes (24 hrs default)
logger.fileRotateInterval = 1440
# numThreads can be 0 or 1, if 1 then logger client runs in its
# own thread
logger.numThreads = 0
#------------------------------------------------------------------------# Facility specific parameters
#
The remainder of this file pertains to parameters and parameter overrides
#
for individual facilitites.
#
# LogPrio and autonomous are changed for debug testing only. Otherwise
# everyone should use the defaults above (except MML, see below.)
#------------------------------------------------------------------------# Usage of these debug parameters could cause the system to use up
# space more rapidly than normal. If the DISK alarm is activated because
# of this activity, certain files in /opt/CiscoMGC/var/spool will be erased.
# To set the logging level for a particular process, the exact case-sensitive
# unix filename of the process must be used. Only the logging level of
# actively or passively managed processes can be set.
#
# Valid values for logPrio are Debug, Trace, Info, Warning, Error, and Critical
#
# almM.logPrio =
Debug
# amDmpr.logPrio =
Debug
# cdrDmpr.logPrio =
Debug
# cfgM.logPrio =
Debug
# EISUP.logPrio =
Debug
# ioChanMgr.logPrio =
Debug
# ISDNIP.logPrio =
Debug
# ISDNL3.logPrio =
Debug
# ISDNBRI.logPrio =
Debug
# IUA.logPrio =
Debug
# engine.logPrio =
Debug
# foverd.logPrio =
Debug
# M3UA.logPrio =
Debug
# measMgr.logPrio =
Debug
# MGCP.logPrio =
Debug
# mmdbd.logPrio =
Debug
# mmSAgt.logPrio =
Debug
# pom.logPrio =
Debug
# procM.logPrio =
Debug
# replicator.logPrio =
Debug
# sagt.logPrio =
Debug
# SIP.logPrio =
Debug
# SS7.logPrio =
Debug
# SUA.logPrio =
Debug
# TALI.logPrio =
Debug
# TCAP.logPrio =
Debug
QBE-IOCC.debugFlag
=
0
Cisco PGW 2200 Softswitch Release 9.8 Software Installation and Configuration Guide
D-40
OL-18083-01
Appendix D
Sample Installation Scripts
Sample Configured XECfgParm.dat Files for Cisco PGW 2200 Softswitch Release 9.6(1)
# Specialized "autonomous" flags for debug, fault isolation
# engine.autonomous =
true
# cfgM.autonomous =
true
Talk2.autonomous
=
false
#-------------# procM
#-------------procM.minCheckHealthInterval =
procM.minCheckHealthTimeout =
procM.minKillGracePeriod =
procM.almDwellInterval =
procM.procHealthDfltAlmCat =
procM.servicesDir =
procM.servFmt
=
procM.recovDbFile =
procM.logDBFile
=
procM.runAsDaemon =
10
# smallest check health interval
20
# smallest check health timeout
5
# smallest kill grace period
15
# seconds to wait before clearingalarm
pmDefault # default alarm category for PM
../var
# location of PM temporary FIFOs
PM_%d_%d_input # format of PM temporary FIFOs
../var/procMRecovery # PM recovery info
../var/procMLogTable # log info for recovery only
true
#------------# cfgM
#------------cfgM.recovDbFile
=
../var/cfgMRecovery
# CfgM recovery info
#------------# Engine
#------------engine.SysPropagateChanAvail = false
#
engine.SysGeneratedCode = true
engine.SysGRSTimerInterval = 0
engine.SysGRSBlockSize = 0
engine.SysSGCPRetryCount = 3
#
engine.SysSGCPRetryTimerInterval = 1000
engine.SysCLIval = false
engine.SysToneDetect = false
engine.SysNumTrans = false
engine.SysMinOverlap = 0
engine.SysMaxOverlap = 28
engine.SysGSMTimerInterval = 10000
#
engine.LCMMdlFile = ../lib/lcm
#
engine.CCMdlFile = ../lib/cc
#
engine.mdoDir = ../lib/
#
engine.VersionTimeoutValue = 10000
#
engine.MDLANumberScreening = 0
#
engine.SysMdlMemoryReduction = 1
engine.CircuitReservation = false
engine.CallBackDBCleanUpTimer = 3600000
(min:600000 to max:10800000 )
auto-blocking of C7 cics and ISDN sigPaths
max number of SGCP retry messages after failure
# interval between retransmission (msec)
GSM to be sent (milliseconds)
LSI call model
call context
where .mdo files live
Interval for version messages (msec)
use calling party number for a number screening
# Do/Don't use circuit reservation feature
# Call Back DB clean up timer in mini seconds
*.MaxNumTGAdvances = 1
# Limit on num Trunk Group Advance actions
*.RedirectingATree = 0
*.ClearingLocation = 0
# 0 = Normal mapping behaviour, LCM will not override
the Clearing Location field in Call Context
*.DefaultLocation = 0
# 0 = Normal protocol defined default value, LCM will
not override the Default Location field in Call Context
*.detailedCallEventCapture = 1
Cisco PGW 2200 Softswitch Release 9.8 Software Installation and Configuration Guide
OL-18083-01
D-41
Appendix D
Sample Installation Scripts
Sample Configured XECfgParm.dat Files for Cisco PGW 2200 Softswitch Release 9.6(1)
*.SelectTermCustGrpId = 0
SigPath CustGrpId is 0000.
# 1= Select Terminating SigPath CustGrpId if Originating
# 0= Always select Originating SigPath CustGrpId
*.GlareReattemptCauseValue = 44
# used for re-attempt by GW in Nailed configurations.
*.DerivedInterworkingFCIBCIEnable = 0 # 1 = Set FCI/BCI values when interworking with
R2/T1CAS/ISDN/H323 V2
#The following two lines are call based memory allocator settings.
#set these to 0 to disable call-based memory allocator
#This setting is memory efficient, but performance suffers.
#set these to 110000 for maximum performance. Memory usage increases.
engine.CALL_MEM_BLOCK_SIZE = 0
engine.CALL_MEM_CHUNK_SIZE = 0
# engine.SysTraceLevel = 3
*.LongCallTime = 21600000
def)
# used to configure OnGoingCallTime in ms (6hrs
engine.CDRencodingFormat = AnsiCDB
engine.CDRtimeStamp = S
engine.CDRmessageTypes
= "1010,1020,1030,1040,1050,1060,1070,1210,1260"
engine.VersionTimeoutValue = 10000
engine.StartUpAuditEnabled = false
# audit invoked at engine startup?
engine.FaultRecoveryAuditTimer = 15000 # milliseconds
engine.CustSpecificINAPHandling = null
engine.DisableMultipleCDRs = 1
# 0=enable, 1=disable
engine.ChargingTariffType = 0
# 0=tariff-rate/scale-factor, 1=meter pulse
engine.ChargingMode = 1
# 1=AddOnCharge, 2=ReplaceCharge, 3=FreeOfCharge
engine.ShortDurationCallPeriod = 0
# 0=feature disabled
engine.ActionOnChargeTableAccessFailure = 0
# 0=continue call, 1=releasecall
engine.CallLimitingControl = 0
# 0 = Call limiting off, 1 = Call limiting on
#---------------------# CDR dumper (cdrDmpr)
#---------------------cdrDmpr.openCDR
= true
cdrDmpr.seqFile
= ../var/.cdr.seq
#-----------------------------------# Alarms/Measurements dumper (amDmpr)
#-----------------------------------#------------# ioChanMgr
#------------# Internal debug - only use this for low-level IOS debug
# This is bitmapped hex value:
#
1 - Managed Object tracing
#
2 - Simulation of streams devices from /dev to ../dev for
#
unit testing.
ioChanMgr.trace =
0x0
# These timers are in millisecs
# NOTE: alarms are sent autonomously as they occur, alarmTimer is outdated
# and should be set to zero. If IPCTimer is 0, then hard-coded value will be
# used. Only for problems with the hard-code should this value be changed.
ioChanMgr.alarmTimer =
0
ioChanMgr.statTimer =
30000
ioChanMgr.IPCTimer =
0
#Channel manager parameters for IPC flow control.
Cisco PGW 2200 Softswitch Release 9.8 Software Installation and Configuration Guide
D-42
OL-18083-01
Appendix D
Sample Installation Scripts
Sample Configured XECfgParm.dat Files for Cisco PGW 2200 Softswitch Release 9.6(1)
# evtTimer(msec.) - Frequency at which the queue is scanned for Msgs.
# hbTimer(msec.) - Heart-beat timer, Not yet implemented.
# statDiscardThreshold - Size of Control Queue that triggers discarding
#
all the queued stat events.
# sendThreshold - Max. Number of Events from the Queue sent at a time.
# IPCsendThreshold - Max. Number of RSIPs from the Queue sent at a time.
ioChanMgr.evtTimer =
100
ioChanMgr.hbTimer =
1000
ioChanMgr.statDiscardThreshold =
40
ioChanMgr.sendThreshold =
10
ioChanMgr.IPCsendThreshold =
0
#Channel manager parameters for SCC switchover on MGX
# Both sessionPauseTimer and resumeAckTimer are in seconds.
ioChanMgr.sessionPauseTimer =
8
ioChanMgr.resumeAckTimer =
1
#----------# ioChanCtl
#----------ioChanCtl.DPNSSTestFrames = true
ioChanCtl.xgcpMultiThread = true
ioChanCtl.ituIsNewZealand = false
properties
# enable threading for the IP receive loop in MGCP
# for New Zealand MTP3 set appropriate ITU
#----------# measM
#----------#
# Currently we assume 8000 XEMeas objects fit into 8 Mb of shared memory.
#
measM.sm_seg_size = 32
# size of shared memory in MB (default is 32)
measM.loadBalanceFactor = 20 # num of measmgr distribution points every 5 minutes
measM.port = default
# port to sync dynamic meas thresholds
#---------# almM
#---------# almM.runAsDaemon =
false
#------------# MML - since this is started and stopped by user, it
#
has the following unique requirements for logging.
#
- to alter logging levels, the logPrio parameter
#
must be changed here, then the MML process
#
started to pick up the change. The set-log
#
command does not affect any MML processes
#
#
- Currently MML must ALWAYS have autonomous=true
#------------MML.logPrio = Info
log
MML.logFileNamePrefix = mml
# causes Info and above messages to be written to the
# causes MML messages to be diverted to mml.log
MML.autonomous = true
MML.runAsDaemon = false
MML.timeout=10000
# in milliseconds
#
(note: current XE supports 1-second
resolution)
#
# individual timeout values for MML commands:
# format is: MML.<verb> = time
Cisco PGW 2200 Softswitch Release 9.8 Software Installation and Configuration Guide
OL-18083-01
D-43
Appendix D
Sample Installation Scripts
Sample Configured XECfgParm.dat Files for Cisco PGW 2200 Softswitch Release 9.6(1)
# (verb all lowercase)
MML.chg-cfg =
10000
MML.startPM =
/etc/init.d/CiscoMGC start
MML.stopPM =
/etc/init.d/CiscoMGC stop
MML.vld-cic =
25000
MML.snd =
600000
MML.enhancedHelpCompletion = true
#---------# XE
#---------#----------# foverd
#----------# NOTE: addresses below must be configured for the target system
#
- connTypes can be "socket", "serial", or "fifo"
# connection 1 parameters
foverd.conn1Type = socket
# connection 2 parameters
foverd.conn2Type = socket
# connection 3 parameters
foverd.conn3Type =
foverd.conn3Addr =
serial
/dev/null
foverd.heartbeatInterval = 1000
foverd.ackTimeout =
1000
foverd.abswitchTestInterval = 30000
foverd.graceShutTimeout = 6000
foverd.forceShutTimeout = 1000
foverd.commRetryInterval = 30000
foverd.statusRptInterval = 600000
foverd.peerCommTimeout =
3000
foverd.delayTimeout =
1000
foverd.transitionTimeout = 10000
foverd.abswitchPort =
/dev/null
foverd.peerReestablishTimeout = 50000
# ----------------------------------------------------#foverd.runAsDaemon =
false
# ----------------------------------------------------#foverd.logPrio
=
Info
#----------------# Network Element
#----------------product.vendor = "Cisco Systems, Inc."
product.version = "9.6(1)"
product.time = "....."
#---------------------------------# POM - Provisioning Object Manager
#---------------------------------pom.port
= default
# use port 4001 when set to default
#---------------------------------# Replicator
#---------------------------------replicator.portDataChannelSend = 2968
Cisco PGW 2200 Softswitch Release 9.8 Software Installation and Configuration Guide
D-44
OL-18083-01
Appendix D
Sample Installation Scripts
Sample Configured XECfgParm.dat Files for Cisco PGW 2200 Softswitch Release 9.6(1)
replicator.portDataChannelRecv
replicator.portCommChannelSend
replicator.portCommChannelRecv
replicator.reconnectInterval =
replicator.numberReadThreads =
= 2970
= 2972
= 2974
15
1
# optional thread (0=no threads,1=one thread)
#----------------# Audit properties
#----------------engine.AuditTimerInterval = 1000
engine.MaxAuditCics = 32
#----------------# INAP prepaid properties
#----------------engine.RelINAPCallsAfterSwOver = true
#---------------------------------# Disk Monitor Parameters
#---------------------------------diskmonitor.Limit
= 7
#
occurs when threshold is exceeded.
diskmonitor.Threshold = 80
#
diskmonitor.SoftLimit = false
#
diskmonitor.CdrRmFinished = 0
#
diskmonitor.OptFileSys =
#
diskmonitor.CoreRmDays = 1
#
diskmonitor.CfgRmDirs = 64
#
= disable)
Minimum number of days to preserve (Trimming only
There is no maximum number of days topreserve.)
percentage full threshold
set to true to allow override of preserve limit
remove "finished" cdrs after X days (0 = immediate)
list of optional filesystems to monitor (notrimming)
number of days to keep the core files
remove old config directories if more than X exist (0
#-------------------------------# call verification utility Parameters
#-------------------------------callver.SaveArea = ../etc/cust_specific/toolkit
#-----------------------------------------------------------------------------# End of XE Configuration Parameter File
#-----------------------------------------------------------------------------*.Peer_NextHop7=0.0.0.0
*.Peer_NextHop8=0.0.0.0
*.netmaskLocalA=255.255.255.255
*.netmaskLocalB=255.255.255.255
*.netmaskPeerA=255.255.255.255
*.netmaskPeerB=255.255.255.255
*.Peer_NextHop1=0.0.0.0
*.Peer_NextHop2=0.0.0.0
*.Peer_NextHop3=0.0.0.0
*.Peer_NextHop4=0.0.0.0
*.Peer_NextHop5=0.0.0.0
*.CallCutoffTimerUnits=0
*.Peer_NextHop6=0.0.0.0
*.PNPopulate = disable
foverd.garpInterval = 0
engine.SendHardwareBlock = false
*.maxNumPril3IOCCs = 3
*.FaxUpspeedCodecPreference = null
ISDNBRI.tcpPingPort = 0
*.MMLManualBlockingCic = 0
*.analysisCapabilityLevel = 0
Cisco PGW 2200 Softswitch Release 9.8 Software Installation and Configuration Guide
OL-18083-01
D-45
Appendix D
Sample Installation Scripts
Sample Configured XECfgParm.dat Files for Cisco PGW 2200 Softswitch Release 9.6(1)
MML.rtrv-callinfo = 30000
*.AllISDNLinksFailCausesFailover = false
diskmonitor.PreserveCDRs = false
pom.respTimeout = 1200000
*.AlarmOnActive = false
bash-2.03$
Cisco PGW 2200 Softswitch Release 9.8 Software Installation and Configuration Guide
D-46
OL-18083-01
A P P E N D I X
E
Sample Uninstall Scripts
This appendix contains sample outputs from the following section, Removing a
Cisco PGW 2200 Softswitch Software Version: Sample Output for uninstall.sh, page E-1.
Removing a Cisco PGW 2200 Softswitch Software Version:
Sample Output for uninstall.sh
You must stop running the Cisco PGW 2200 Softswitch software and quit all the MML sessions before
you uninstall the Cisco PGW 2200 Softswitch software.
The following is a sample output from the uninstall script.
# cd /cdrom/cdrom0
# ./uninstall.sh
########################################################################################
# READ CAREFULLY BEFORE PROCEEDING!!!
#
# This uninstall will allow the user to return to the last good installation by
#
# answering "NO" to the following question. You MAY NOT install an arbitrary earlier #
# version of the software without experiencing fatal install problems. If you do
#
# return to the last good install prior to the current install, you will lose any
#
# provisioning work you may have performed on the current software install.
#
########################################################################################
Note
Answer y to the following question if this uninstallation is for a software upgrade; answer n if
the uninstallation is to fall back or back out to the previous software version.
Is the uninstall being done in order to upgrade to a new version of the
software? [y] [y,n,?,q] y
Use supplied admin file for unattended removal? [n] [y,n,?,q] y
Removal of <CSCOgt001> was successful.
sctpmod not loaded
Removal of <CSCOgd004> was successful.
Removing /opt/CiscoMGC/etc/migrate/migrate.dat
Removing /opt/CiscoMGC/etc/migrate/migrate_4_5
Removing /opt/CiscoMGC/etc/migrate/migrate_5_6
Removing /opt/CiscoMGC/etc/migrate/migrate_6_7
Removing /opt/CiscoMGC/etc/migrate/migrate_7.0001_7.0002
Removing /opt/CiscoMGC/etc/migrate/migrate_7.0001_7.1
Removing /opt/CiscoMGC/etc/migrate/migrate_7.0002_7.1
Removing /opt/CiscoMGC/etc/migrate/migrate_7.0003_7.1
Cisco PGW 2200 Softswitch Release 9.8 Software Installation and Configuration Guide
OL-18083-01
E-1
Appendix E
Sample Uninstall Scripts
Removing a Cisco PGW 2200 Softswitch Software Version: Sample Output for uninstall.sh
Removing /opt/CiscoMGC/etc/migrate/migrate_7.0004_7.1
Removing /opt/CiscoMGC/etc/migrate/migrate_7.0005_7.1006
Removing /opt/CiscoMGC/etc/migrate/migrate_7.0_7.0001
Removing /opt/CiscoMGC/etc/migrate/migrate_7.1001_7.1002
Removing /opt/CiscoMGC/etc/migrate/migrate_7.1002_7.1003
Removing /opt/CiscoMGC/etc/migrate/migrate_7.1003_7.1004
Removing /opt/CiscoMGC/etc/migrate/migrate_7.1004_7.1005
Removing /opt/CiscoMGC/etc/migrate/migrate_7.1005_7.1006
Removing /opt/CiscoMGC/etc/migrate/migrate_7.1006_8.0
Removing /opt/CiscoMGC/etc/migrate/migrate_7.1006_8.0.sql
Removing /opt/CiscoMGC/etc/migrate/migrate_7.1007_7.1008
Removing /opt/CiscoMGC/etc/migrate/migrate_7.1008_8.0
Removing /opt/CiscoMGC/etc/migrate/migrate_7.1008_8.0.sql
Removing /opt/CiscoMGC/etc/migrate/migrate_7.1009_8.0
Removing /opt/CiscoMGC/etc/migrate/migrate_7.1009_8.0.sql
Removing /opt/CiscoMGC/etc/migrate/migrate_7.1010_8.0001
Removing /opt/CiscoMGC/etc/migrate/migrate_7.1010_8.0001.sql
Removing /opt/CiscoMGC/etc/migrate/migrate_7.1_7.1001
Removing /opt/CiscoMGC/etc/migrate/migrate_7.1_7.1001.sql
Removing /opt/CiscoMGC/etc/migrate/migrate_8.0001_9.0
Removing /opt/CiscoMGC/etc/migrate/migrate_8.0001_9.0001
Removing /opt/CiscoMGC/etc/migrate/migrate_8.0_9.0
Removing /opt/CiscoMGC/etc/migrate/migrate_9.0001_9.0002
Removing /opt/CiscoMGC/etc/migrate/migrate_9.0002_9.0003
Removing /opt/CiscoMGC/etc/migrate/migrate_9.0003_9.1
Removing /opt/CiscoMGC/etc/migrate/migrate_9.0003_9.1.sql
Removing /opt/CiscoMGC/etc/migrate/migrate_9.0_9.0001
Removing /opt/CiscoMGC/etc/migrate/migrate_9.1001_9.1002
Removing /opt/CiscoMGC/etc/migrate/migrate_9.1002_9.2
Removing /opt/CiscoMGC/etc/migrate/migrate_9.1_9.1001
Removing /opt/CiscoMGC/etc/migrate/migrate_9.1_9.1002
Removing /opt/CiscoMGC/etc/migrate/migrate_9.2001_9.2002
Removing /opt/CiscoMGC/etc/migrate/migrate_9.2002_9.2003
Removing /opt/CiscoMGC/etc/migrate/migrate_9.2003_9.3
Removing /opt/CiscoMGC/etc/migrate/migrate_9.2_9.2001
Removing /opt/CiscoMGC/etc/migrate/migrate_9.3001_9.4001
Removing /opt/CiscoMGC/etc/migrate/migrate_9.3001_9.4001.sql
Removing /opt/CiscoMGC/etc/migrate/migrate_9.3_9.3001
Removing /opt/CiscoMGC/etc/migrate/migrate_9.4001_9.5001
Removing /opt/CiscoMGC/etc/migrate/migrate_9.4001_9.5001.sql
Removing /opt/CiscoMGC/etc/migrate/migrate_9.5001_9.5002
Removing /opt/CiscoMGC/etc/migrate/migrate_9.5002_9.6001
Removing /opt/CiscoMGC/etc/migrate/migrate_9.5002_9.6001.sql
Removing /opt/CiscoMGC/etc/migrate/migrate_9.6001_9.7001
Removing /opt/CiscoMGC/etc/migrate/migrate_9.7001_9.7002
Removing /opt/CiscoMGC/etc/migrate/migrate_9.7001_9.7002.sql
Removing /opt/CiscoMGC/etc/migrate/migrate_9.7002_9.7003
Removing /opt/CiscoMGC/etc/migrate/migrate_9.7002_9.7003.sql
Removing /opt/CiscoMGC/etc/migrate/migrate_9.7003_9.8001
Removing /opt/CiscoMGC/etc/migrate/migrate_9.7003_9.8001.sql
Removing /opt/CiscoMGC/etc/migrate/migrate_XECfgParm
Removing /opt/CiscoMGC/etc/migrate/migrate_db_to_91.sh
Uninstalling /opt/CiscoMGC/etc/migrate/migrate_scr.tar.gz
Removing /opt/CiscoMGC/etc/CONFIG_LIB/4.0_to_5.0/
Removing /opt/CiscoMGC/etc/CONFIG_LIB/4.0_to_5.0/components.mod
Removing /opt/CiscoMGC/etc/CONFIG_LIB/4.0_to_5.0/dependencies.mod
Removing /opt/CiscoMGC/etc/CONFIG_LIB/4.0_to_5.0/processes.mod
Removing /opt/CiscoMGC/etc/CONFIG_LIB/4.0_to_5.0/propLookUp.mod
Removing /opt/CiscoMGC/etc/CONFIG_LIB/4.0_to_5.0/services.mod
Removing /opt/CiscoMGC/etc/CONFIG_LIB/5.0_to_6.0/
Removing /opt/CiscoMGC/etc/CONFIG_LIB/5.0_to_6.0/alarmCats.mod
Removing /opt/CiscoMGC/etc/CONFIG_LIB/5.0_to_6.0/compTypes.mod
Removing /opt/CiscoMGC/etc/CONFIG_LIB/5.0_to_6.0/components.mod
Removing /opt/CiscoMGC/etc/CONFIG_LIB/5.0_to_6.0/propSet.mod
Cisco PGW 2200 Softswitch Release 9.8 Software Installation and Configuration Guide
E-2
OL-18083-01
Appendix E
Sample Uninstall Scripts
Removing a Cisco PGW 2200 Softswitch Software Version: Sample Output for uninstall.sh
Removing
Removing
Removing
Removing
Removing
Removing
Removing
Removing
Removing
Removing
Removing
Removing
Removing
Removing
Removing
Removing
Removing
Removing
Removing
Removing
Removing
Removing
Removing
Removing
Removing
Removing
Removing
Removing
Removing
Removing
Removing
Removing
Removing
Removing
Removing
Removing
Removing
Removing
Removing
Removing
Removing
Removing
Removing
Removing
Removing
Removing
Removing
Removing
Removing
Removing
Removing
Removing
Removing
Removing
Removing
Removing
Removing
Removing
Removing
Removing
Removing
Removing
Removing
Removing
/opt/CiscoMGC/etc/CONFIG_LIB/5.0_to_6.0/properties.mod
/opt/CiscoMGC/etc/CONFIG_LIB/5.0_to_6.0/services.mod
/opt/CiscoMGC/etc/CONFIG_LIB/6.0_to_7.0/
/opt/CiscoMGC/etc/CONFIG_LIB/6.0_to_7.0/alarmCats.mod
/opt/CiscoMGC/etc/CONFIG_LIB/6.0_to_7.0/compTypes.mod
/opt/CiscoMGC/etc/CONFIG_LIB/6.0_to_7.0/components.mod
/opt/CiscoMGC/etc/CONFIG_LIB/6.0_to_7.0/dependencies.mod
/opt/CiscoMGC/etc/CONFIG_LIB/6.0_to_7.0/measCats.mod
/opt/CiscoMGC/etc/CONFIG_LIB/6.0_to_7.0/processes.mod
/opt/CiscoMGC/etc/CONFIG_LIB/6.0_to_7.0/properties.mod
/opt/CiscoMGC/etc/CONFIG_LIB/6.0_to_7.0/services.mod
/opt/CiscoMGC/etc/CONFIG_LIB/7.0001_to_7.0002/
/opt/CiscoMGC/etc/CONFIG_LIB/7.0001_to_7.0002/processes.mod
/opt/CiscoMGC/etc/CONFIG_LIB/7.0001_to_7.0002/properties.mod
/opt/CiscoMGC/etc/CONFIG_LIB/7.0001_to_7.0002/services.mod
/opt/CiscoMGC/etc/CONFIG_LIB/7.0001_to_7.1/
/opt/CiscoMGC/etc/CONFIG_LIB/7.0001_to_7.1/compTypes.mod
/opt/CiscoMGC/etc/CONFIG_LIB/7.0001_to_7.1/components.mod
/opt/CiscoMGC/etc/CONFIG_LIB/7.0001_to_7.1/properties.mod
/opt/CiscoMGC/etc/CONFIG_LIB/7.0001_to_7.1/services.mod
/opt/CiscoMGC/etc/CONFIG_LIB/7.0002_to_7.1/
/opt/CiscoMGC/etc/CONFIG_LIB/7.0002_to_7.1/components.mod
/opt/CiscoMGC/etc/CONFIG_LIB/7.0002_to_7.1/properties.mod
/opt/CiscoMGC/etc/CONFIG_LIB/7.0002_to_7.1/services.mod
/opt/CiscoMGC/etc/CONFIG_LIB/7.0003_to_7.1/
/opt/CiscoMGC/etc/CONFIG_LIB/7.0003_to_7.1/components.mod
/opt/CiscoMGC/etc/CONFIG_LIB/7.0003_to_7.1/properties.mod
/opt/CiscoMGC/etc/CONFIG_LIB/7.0003_to_7.1/services.mod
/opt/CiscoMGC/etc/CONFIG_LIB/7.0004_to_7.1/
/opt/CiscoMGC/etc/CONFIG_LIB/7.0004_to_7.1/components.mod
/opt/CiscoMGC/etc/CONFIG_LIB/7.0004_to_7.1/properties.mod
/opt/CiscoMGC/etc/CONFIG_LIB/7.0004_to_7.1/services.mod
/opt/CiscoMGC/etc/CONFIG_LIB/7.0005_to_7.1006/
/opt/CiscoMGC/etc/CONFIG_LIB/7.0005_to_7.1006/components.mod
/opt/CiscoMGC/etc/CONFIG_LIB/7.0005_to_7.1006/dependencies.mod
/opt/CiscoMGC/etc/CONFIG_LIB/7.0005_to_7.1006/procGroups.mod
/opt/CiscoMGC/etc/CONFIG_LIB/7.0005_to_7.1006/processes.mod
/opt/CiscoMGC/etc/CONFIG_LIB/7.0005_to_7.1006/properties.mod
/opt/CiscoMGC/etc/CONFIG_LIB/7.0_to_7.0001/
/opt/CiscoMGC/etc/CONFIG_LIB/7.0_to_7.0001/alarmCats.mod
/opt/CiscoMGC/etc/CONFIG_LIB/7.0_to_7.0001/compTypes.mod
/opt/CiscoMGC/etc/CONFIG_LIB/7.0_to_7.0001/components.mod
/opt/CiscoMGC/etc/CONFIG_LIB/7.0_to_7.0001/properties.mod
/opt/CiscoMGC/etc/CONFIG_LIB/7.0_to_7.0001/services.mod
/opt/CiscoMGC/etc/CONFIG_LIB/7.0_to_7.1/
/opt/CiscoMGC/etc/CONFIG_LIB/7.1001_to_7.1002/
/opt/CiscoMGC/etc/CONFIG_LIB/7.1001_to_7.1002/components.mod
/opt/CiscoMGC/etc/CONFIG_LIB/7.1001_to_7.1002/processes.mod
/opt/CiscoMGC/etc/CONFIG_LIB/7.1002_to_7.1003/
/opt/CiscoMGC/etc/CONFIG_LIB/7.1002_to_7.1003/components.mod
/opt/CiscoMGC/etc/CONFIG_LIB/7.1003_to_7.1004/
/opt/CiscoMGC/etc/CONFIG_LIB/7.1003_to_7.1004/dependencies.mod
/opt/CiscoMGC/etc/CONFIG_LIB/7.1003_to_7.1004/properties.mod
/opt/CiscoMGC/etc/CONFIG_LIB/7.1003_to_7.1004/services.mod
/opt/CiscoMGC/etc/CONFIG_LIB/7.1004_to_7.1005/
/opt/CiscoMGC/etc/CONFIG_LIB/7.1004_to_7.1005/processes.mod
/opt/CiscoMGC/etc/CONFIG_LIB/7.1004_to_7.1005/properties.mod
/opt/CiscoMGC/etc/CONFIG_LIB/7.1005_to_7.1006/
/opt/CiscoMGC/etc/CONFIG_LIB/7.1005_to_7.1006/properties.mod
/opt/CiscoMGC/etc/CONFIG_LIB/7.1006_to_8.0/
/opt/CiscoMGC/etc/CONFIG_LIB/7.1006_to_8.0/properties.mod
/opt/CiscoMGC/etc/CONFIG_LIB/7.1006_to_8.0/services.mod
/opt/CiscoMGC/etc/CONFIG_LIB/7.1007_to_7.1008/
/opt/CiscoMGC/etc/CONFIG_LIB/7.1007_to_7.1008/properties.mod
Cisco PGW 2200 Softswitch Release 9.8 Software Installation and Configuration Guide
OL-18083-01
E-3
Appendix E
Sample Uninstall Scripts
Removing a Cisco PGW 2200 Softswitch Software Version: Sample Output for uninstall.sh
Removing
Removing
Removing
Removing
Removing
Removing
Removing
Removing
Removing
Removing
Removing
Removing
Removing
Removing
Removing
Removing
Removing
Removing
Removing
Removing
Removing
Removing
Removing
Removing
Removing
Removing
Removing
Removing
Removing
Removing
Removing
Removing
Removing
Removing
Removing
Removing
Removing
Removing
Removing
Removing
Removing
Removing
Removing
Removing
Removing
Removing
Removing
Removing
Removing
Removing
Removing
Removing
Removing
Removing
Removing
Removing
Removing
Removing
Removing
Removing
Removing
Removing
Removing
Removing
/opt/CiscoMGC/etc/CONFIG_LIB/7.1008_to_8.0/
/opt/CiscoMGC/etc/CONFIG_LIB/7.1008_to_8.0/properties.mod
/opt/CiscoMGC/etc/CONFIG_LIB/7.1009_to_8.0/
/opt/CiscoMGC/etc/CONFIG_LIB/7.1009_to_8.0/properties.mod
/opt/CiscoMGC/etc/CONFIG_LIB/7.1010_to_8.0001/
/opt/CiscoMGC/etc/CONFIG_LIB/7.1010_to_8.0001/components.mod
/opt/CiscoMGC/etc/CONFIG_LIB/7.1010_to_8.0001/processes.mod
/opt/CiscoMGC/etc/CONFIG_LIB/7.1010_to_8.0001/properties.mod
/opt/CiscoMGC/etc/CONFIG_LIB/7.1_to_7.1001/
/opt/CiscoMGC/etc/CONFIG_LIB/7.1_to_7.1001/components.mod
/opt/CiscoMGC/etc/CONFIG_LIB/7.1_to_7.1001/dependencies.mod
/opt/CiscoMGC/etc/CONFIG_LIB/7.1_to_7.1001/procGroups.mod
/opt/CiscoMGC/etc/CONFIG_LIB/7.1_to_7.1001/processes.mod
/opt/CiscoMGC/etc/CONFIG_LIB/7.1_to_7.1001/properties.mod
/opt/CiscoMGC/etc/CONFIG_LIB/7.2_to_9.1/
/opt/CiscoMGC/etc/CONFIG_LIB/7.2_to_9.1/properties.mod
/opt/CiscoMGC/etc/CONFIG_LIB/8.0001_to_9.0/
/opt/CiscoMGC/etc/CONFIG_LIB/8.0001_to_9.0/components.mod
/opt/CiscoMGC/etc/CONFIG_LIB/8.0001_to_9.0/properties.mod
/opt/CiscoMGC/etc/CONFIG_LIB/8.0001_to_9.0001/
/opt/CiscoMGC/etc/CONFIG_LIB/8.0001_to_9.0001/components.mod
/opt/CiscoMGC/etc/CONFIG_LIB/8.0001_to_9.0001/properties.mod
/opt/CiscoMGC/etc/CONFIG_LIB/8.0_to_9.0/
/opt/CiscoMGC/etc/CONFIG_LIB/8.0_to_9.0/properties.mod
/opt/CiscoMGC/etc/CONFIG_LIB/8.0_to_9.0/components.mod
/opt/CiscoMGC/etc/CONFIG_LIB/9.0001_to_9.0002/
/opt/CiscoMGC/etc/CONFIG_LIB/9.0001_to_9.0002/properties.mod
/opt/CiscoMGC/etc/CONFIG_LIB/9.0002_to_9.0003/
/opt/CiscoMGC/etc/CONFIG_LIB/9.0002_to_9.0003/properties.mod
/opt/CiscoMGC/etc/CONFIG_LIB/9.0003_to_9.1/
/opt/CiscoMGC/etc/CONFIG_LIB/9.0003_to_9.1/properties.mod
/opt/CiscoMGC/etc/CONFIG_LIB/9.0003_to_9.1/accRespCat.mod
/opt/CiscoMGC/etc/CONFIG_LIB/9.0_to_9.0001/
/opt/CiscoMGC/etc/CONFIG_LIB/9.0_to_9.0001/properties.mod
/opt/CiscoMGC/etc/CONFIG_LIB/9.1001_to_9.1002/
/opt/CiscoMGC/etc/CONFIG_LIB/9.1001_to_9.1002/properties.mod
/opt/CiscoMGC/etc/CONFIG_LIB/9.1002_to_9.2/
/opt/CiscoMGC/etc/CONFIG_LIB/9.1002_to_9.2/properties.mod
/opt/CiscoMGC/etc/CONFIG_LIB/9.1_to_9.1001/
/opt/CiscoMGC/etc/CONFIG_LIB/9.1_to_9.1001/properties.mod
/opt/CiscoMGC/etc/CONFIG_LIB/9.1_to_9.1002/
/opt/CiscoMGC/etc/CONFIG_LIB/9.1_to_9.1002/properties.mod
/opt/CiscoMGC/etc/CONFIG_LIB/9.2001_to_9.2002/
/opt/CiscoMGC/etc/CONFIG_LIB/9.2001_to_9.2002/properties.mod
/opt/CiscoMGC/etc/CONFIG_LIB/9.2002_to_9.2003/
/opt/CiscoMGC/etc/CONFIG_LIB/9.2002_to_9.2003/properties.mod
/opt/CiscoMGC/etc/CONFIG_LIB/9.2003_to_9.3/
/opt/CiscoMGC/etc/CONFIG_LIB/9.2003_to_9.3/properties.mod
/opt/CiscoMGC/etc/CONFIG_LIB/9.2_to_9.2001/
/opt/CiscoMGC/etc/CONFIG_LIB/9.3001_to_9.4001/
/opt/CiscoMGC/etc/CONFIG_LIB/9.3001_to_9.4001/components.mod
/opt/CiscoMGC/etc/CONFIG_LIB/9.3001_to_9.4001/properties.mod
/opt/CiscoMGC/etc/CONFIG_LIB/9.3_to_9.3001/
/opt/CiscoMGC/etc/CONFIG_LIB/9.3_to_9.3001/properties.mod
/opt/CiscoMGC/etc/CONFIG_LIB/9.4001_to_9.5001/
/opt/CiscoMGC/etc/CONFIG_LIB/9.4001_to_9.5001/components.mod
/opt/CiscoMGC/etc/CONFIG_LIB/9.4001_to_9.5001/properties.mod
/opt/CiscoMGC/etc/CONFIG_LIB/9.5001_to_9.5002/
/opt/CiscoMGC/etc/CONFIG_LIB/9.5001_to_9.5002/components.mod
/opt/CiscoMGC/etc/CONFIG_LIB/9.5001_to_9.5002/properties.mod
/opt/CiscoMGC/etc/CONFIG_LIB/9.5002_to_9.6001/
/opt/CiscoMGC/etc/CONFIG_LIB/9.5002_to_9.6001/services.mod
/opt/CiscoMGC/etc/CONFIG_LIB/9.5002_to_9.6001/components.mod
/opt/CiscoMGC/etc/CONFIG_LIB/9.5002_to_9.6001/properties.mod
Cisco PGW 2200 Softswitch Release 9.8 Software Installation and Configuration Guide
E-4
OL-18083-01
Appendix E
Sample Uninstall Scripts
Removing a Cisco PGW 2200 Softswitch Software Version: Sample Output for uninstall.sh
Removing /opt/CiscoMGC/etc/CONFIG_LIB/9.6001_to_9.7001/
Removing /opt/CiscoMGC/etc/CONFIG_LIB/9.6001_to_9.7001/properties.mod
Removing /opt/CiscoMGC/etc/CONFIG_LIB/9.7001_to_9.7002/
Removing /opt/CiscoMGC/etc/CONFIG_LIB/9.7001_to_9.7002/properties.mod
Removing /opt/CiscoMGC/etc/CONFIG_LIB/9.7002_to_9.7003/
Removing /opt/CiscoMGC/etc/CONFIG_LIB/9.7002_to_9.7003/properties.mod
Removing /opt/CiscoMGC/etc/CONFIG_LIB/9.7002_to_9.7003/components.mod
Removing /opt/CiscoMGC/etc/CONFIG_LIB/9.7002_to_9.7003/dependencies.mod
Removing /opt/CiscoMGC/etc/CONFIG_LIB/9.7002_to_9.7003/processes.mod
Removing /opt/CiscoMGC/etc/CONFIG_LIB/9.7002_to_9.7003/services.mod
Removing /opt/CiscoMGC/etc/CONFIG_LIB/9.7002_to_9.7003/dmprSink.mod
Removing /opt/CiscoMGC/etc/CONFIG_LIB/9.7003_to_9.8/
Removing /opt/CiscoMGC/etc/CONFIG_LIB/9.7003_to_9.8001/
Removing /opt/CiscoMGC/etc/CONFIG_LIB/9.7003_to_9.8001/properties.mod
Uninstalling /opt/CiscoMGC/etc/CONFIG_LIB/migrate_mod.tar.gz
Removal of <CSCOgc001> was successful.
Uninstalling /opt/tibrv/tibco.tar.gz
Uninstalling /opt/CiscoMGC/lib/perl5/5.00503.tar.gz
Removal of <CSCOga006> was successful.
Uninstalling /opt/Toolkit/tcl/tcl.tar.gz
Uninstalling /opt/Toolkit/bytecode/tv/tv.tar.gz
Uninstalling /opt/Toolkit/bytecode/toolbar/toolbar.tar.gz
Uninstalling /opt/Toolkit/bytecode/log/Viewer.tar.gz
Uninstalling /opt/Toolkit/bytecode/cdr/cdr.tar.gz
Uninstalling /opt/Toolkit/bytecode/am/am.tar.gz
Uninstalling /opt/Toolkit/bytecode/XECfg/XECfg.tar.gz
Uninstalling /opt/Toolkit/Packages/Packages.tar.gz
Removal of <CSCOga004> was successful.
Killed
Removal of <CSCOga003> was successful.
/opt/CiscoMGC/etc/CONFIG_LIB/INSTALL-9.8.1/install_status
Sun Microsystems Inc.
SunOS 5.10
Generic January 2005
Exporting database contents for DSN=howdydb into /opt/CiscoMGC/etc/export.ttdb
Backup started ...
Backup complete
Successful backup, uninstall continuing
Creating ttMigrate file
Sun Microsystems Inc.
SunOS 5.10
Generic January 2005
Saving table CISCO.ANNOUNCEMENT
Saving rows...
0/0 rows saved.
Table successfully saved.
Saving table CISCO.A_CHARGE_ORIGIN
Saving rows...
0/0 rows saved.
Table successfully saved.
Saving table CISCO.A_NUMBERDIALPLANSELECTION
Saving rows...
0/0 rows saved.
Table successfully saved.
Saving table CISCO.BLACKLIST_A
Saving rows...
0/0 rows saved.
Table successfully saved.
Saving table CISCO.BLACKLIST_B
Cisco PGW 2200 Softswitch Release 9.8 Software Installation and Configuration Guide
OL-18083-01
E-5
Appendix E
Sample Uninstall Scripts
Removing a Cisco PGW 2200 Softswitch Software Version: Sample Output for uninstall.sh
Saving rows...
0/0 rows saved.
Table successfully saved.
Saving table CISCO.CBBOOKINGINFO
Saving index CISCO.CBBOOKINGINFO_IDX1
Saving rows...
0/0 rows saved.
Table successfully saved.
Saving table CISCO.CBMONITORINGINFO
Saving index CISCO.CBMONITORINGINFO_IDX1
Saving rows...
0/0 rows saved.
Table successfully saved.
Saving table CISCO.CLIIPADDRESS
Saving rows...
0/0 rows saved.
Table successfully saved.
Saving table CISCO.CLIPREFIX
Saving index CISCO.CLIPREFIX_IDX1
Saving rows...
0/0 rows saved.
Table successfully saved.
Saving table CISCO.CMDGROUP
Saving rows...
191/191 rows saved.
Table successfully saved.
Saving table CISCO.DESTTRANS
Saving rows...
0/0 rows saved.
Table successfully saved.
Saving table CISCO.FULLNUMBERTRANSLATION
Saving rows...
0/0 rows saved.
Table successfully saved.
Saving table CISCO.H323IDDIVFROM
Saving rows...
0/0 rows saved.
Table successfully saved.
Saving table CISCO.LIENTRIES
Saving index CISCO.LIENTRIES_IDX1
Saving index CISCO.LIENTRIES_IDX2
Saving rows...
0/0 rows saved.
Table successfully saved.
Saving table CISCO.NAMEDINPUTPARAMS
Saving index CISCO.NAMEDINIDX1
Saving rows...
608/608 rows saved.
Table successfully saved.
Saving table CISCO.NAMEDOUTPUTPARAMS
Saving index CISCO.NAMEDOUTIDX1
Saving rows...
260/260 rows saved.
Cisco PGW 2200 Softswitch Release 9.8 Software Installation and Configuration Guide
E-6
OL-18083-01
Appendix E
Sample Uninstall Scripts
Removing a Cisco PGW 2200 Softswitch Software Version: Sample Output for uninstall.sh
Table successfully saved.
Saving table CISCO.NAMEDSQL
Saving index CISCO.NAMEDSQLIX1
Saving rows...
150/150 rows saved.
Table successfully saved.
Saving table CISCO.NUMBERTERM
Saving index CISCO.NUMBERTERM_IDX1
Saving rows...
0/0 rows saved.
Table successfully saved.
Saving table CISCO.PORTEDNUMBERS
Saving index CISCO.PORTEDNUMBERS_TREE_IDX
Saving rows...
0/0 rows saved.
Table successfully saved.
Saving table CISCO.ROUTESELECTION
Saving rows...
0/0 rows saved.
Table successfully saved.
Saving table CISCO.SCHEMA_VERSION
Saving rows...
6/6 rows saved.
Table successfully saved.
Saving table CISCO.SCRIPT
Saving rows...
0/0 rows saved.
Table successfully saved.
Saving table CISCO.SOURCEBLACK
Saving rows...
0/0 rows saved.
Table successfully saved.
Saving table CISCO.WHITELIST_A
Saving rows...
0/0 rows saved.
Table successfully saved.
Saving table CISCO.WHITELIST_B
Saving rows...
0/0 rows saved.
Table successfully saved.
Successful ttMigrate, uninstall continuing
Stopping TimesTen...
The tt60 daemon has stopped successfully.
Removing directories and files...
Modifying /etc/syslog.conf
Removal of <CSCOga002> was successful.
Removal of <CSCOga001> was successful.
Removal of <CSCOga000> was successful.
Modifying /etc/init.d/inetinit
Removal of <CSCOgu000> was successful.
Cisco PGW 2200 Softswitch Release 9.8 Software Installation and Configuration Guide
OL-18083-01
E-7
Appendix E
Sample Uninstall Scripts
Removing a Cisco PGW 2200 Softswitch Software Version: Sample Output for uninstall.sh
Removal of <CSCO00000> was successful.
Removal of <CSCO01000> was successful.
Removal of <CSCO02000> was successful.
Removal of <CSCO10000> was successful.
Removal of <CSCO20000> was successful.
Removal of <CSCO30000> was successful.
Removal of <CSCO31000> was successful.
Removal of <CSCO32000> was successful.
Removal of <CSCO33000> was successful.
Removal of <CSCO40000> was successful.
Removal of <CSCO41000> was successful.
Removal of <CSCO42000> was successful.
Removal of <CSCO50000> was successful.
Removal of <CSCO60000> was successful.
Removal of <CSCO70000> was successful.
Removal of <CSCO71000> was successful.
Removal of <CSCO80000> was successful.
Uninstallation log can be found in /var/adm/MGC_uninstall.log
Cisco PGW 2200 Softswitch Release 9.8 Software Installation and Configuration Guide
E-8
OL-18083-01
A P P E N D I X
F
Sample LAN Configurations
This appendix contains sample configurations for two LAN switches, Cisco Catalyst 5500 A and Cisco
Catalyst 5500 B, and the route switch modules.
Sample Configuration for Cisco Catalyst 5500 A
To view the current configuration of the Cisco Catalyst 5500 A, type the following command in
privileged mode, and press Enter:
Catalyst_5513A (enable) show config
Output similar to the following appears:
begin
!
#version 4.5(1)
!
set password $1$l30o$QUt/nAlYZH/WFmDoJqWAW0
set enablepass $1$tTCB$rbEX8KRDTtpVG9gsy7jc61
set prompt Catalyst_5513A
set length 24 default
set logout 20
set banner motd ^C^C
!
#system
set system baud 9600
set system modem disable
set system name Catalyst_5513A
set system location Lab1
set system contact Jim Smith 913 555-7998
!
#snmp
set snmp community read-only
public
set snmp community read-write
private
set snmp community read-write-all public
set snmp rmon disable
set snmp trap enable module
set snmp trap enable chassis
set snmp trap enable bridge
set snmp trap enable repeater
set snmp trap enable vtp
set snmp trap enable auth
set snmp trap enable ippermit
set snmp trap enable vmps
set snmp trap enable entity
Cisco PGW 2200 Softswitch Release 9.8 Software Installation and Configuration Guide
OL-18083-01
F-1
Appendix F
Sample LAN Configurations
Sample Configuration for Cisco Catalyst 5500 A
set
set
set
set
set
set
!
#ip
set
snmp
snmp
snmp
snmp
snmp
snmp
trap enable
trap enable
trap enable
extendedrmon
extendedrmon
extendedrmon
config
stpx
syslog
vlanmode disable
vlanagent disable
enable
interface sc0 3 172.25.66.122 255.255.255.192 172.25.66.127
set interface sc0 up
set interface sl0 0.0.0.0 0.0.0.0
set interface sl0 up
set arp agingtime 1200
set ip redirect
enable
set ip unreachable
enable
set ip fragmentation enable
set ip route 0.0.0.0
172.25.66.124 1
set ip alias default
0.0.0.0
!
#Command alias
!
#vmps
set vmps server retry 3
set vmps server reconfirminterval 60
set vmps tftpserver 0.0.0.0 vmps-config-database.1
set vmps state disable
!
#dns
set ip dns disable
!
#tacacs+
set tacacs attempts 3
set tacacs directedrequest disable
set tacacs timeout 5
!
#authentication
set authentication login tacacs disable console
set authentication login tacacs disable telnet
set authentication enable tacacs disable console
set authentication enable tacacs disable telnet
set authentication login local enable console
set authentication login local enable telnet
set authentication enable local enable console
set authentication enable local enable telnet
!
#bridge
set bridge ipx snaptoether
8023raw
set bridge ipx 8022toether
8023
set bridge ipx 8023rawtofddi snap
!
#vtp
set vtp domain vsc3000
set vtp mode transparent
set vtp v2 disable
set vtp pruneeligible 2-1000
clear vtp pruneeligible 1001-1005
set vlan 1 name default type ethernet mtu 1500 said 100001 state active
set vlan 2 name green type ethernet mtu 1500 said 100002 state active
set vlan 3 name blue type ethernet mtu 1500 said 100003 state active
set vlan 4 name red type ethernet mtu 1500 said 100004 state active
set vlan 1002 name fddi-default type fddi mtu 1500 said 101002 state active
set vlan 1004 name fddinet-default type fddinet mtu 1500 said 101004 state activ
Cisco PGW 2200 Softswitch Release 9.8 Software Installation and Configuration Guide
F-2
OL-18083-01
Appendix F
Sample LAN Configurations
Sample Configuration for Cisco Catalyst 5500 A
e bridge 0x0 stp ieee
set vlan 1005 name trnet-default type trbrf mtu 1500 said 101005 state active br
idge 0x0 stp ibm
set vlan 1003 name token-ring-default type trcrf mtu 1500 said 101003 state acti
ve parent 0 ring 0x0 mode srb aremaxhop 7 stemaxhop 7
set interface sc0 3 172.25.66.122 255.255.255.192 172.25.66.127
!
#spantree
#uplinkfast groups
set spantree uplinkfast enable rate 15 all-protocols off
#backbonefast
set spantree backbonefast disable
set spantree enable all
#vlan 1
set spantree fwddelay 4
1
set spantree hello
1
1
set spantree maxage
20
1
set spantree priority 1000 1
#vlan 2
set spantree fwddelay 4
2
set spantree hello
1
2
set spantree maxage
20
2
set spantree priority 1000 2
#vlan 3
set spantree fwddelay 4
3
set spantree hello
1
3
set spantree maxage
20
3
set spantree priority 1000 3
#vlan 4
set spantree fwddelay 4
4
set spantree hello
1
4
set spantree maxage
20
4
set spantree priority 1000 4
#vlan 1003
set spantree fwddelay 15
1003
set spantree hello
2
1003
set spantree maxage
20
1003
set spantree priority 49152 1003
set spantree portstate 1003 block 0
set spantree portcost 1003 62
set spantree portpri 1003 4
set spantree portfast 1003 disable
#vlan 1005
set spantree fwddelay 15
1005
set spantree hello
2
1005
set spantree maxage
20
1005
set spantree priority 49152 1005
set spantree multicast-address 1005 ieee
!
#cgmp
set cgmp disable
set cgmp leave disable
!
#syslog
set logging console enable
set logging server disable
set logging level cdp 2 default
set logging level mcast 2 default
set logging level dtp 5 default
set logging level dvlan 2 default
set logging level earl 2 default
set logging level fddi 2 default
set logging level ip 2 default
Cisco PGW 2200 Softswitch Release 9.8 Software Installation and Configuration Guide
OL-18083-01
F-3
Appendix F
Sample LAN Configurations
Sample Configuration for Cisco Catalyst 5500 A
set logging level pruning 2 default
set logging level snmp 2 default
set logging level spantree 2 default
set logging level sys 5 default
set logging level tac 2 default
set logging level tcp 2 default
set logging level telnet 2 default
set logging level tftp 2 default
set logging level vtp 2 default
set logging level vmps 2 default
set logging level kernel 2 default
set logging level filesys 2 default
set logging level drip 2 default
set logging level pagp 5 default
set logging level mgmt 5 default
set logging level mls 5 default
set logging level protfilt 2 default
set logging level security 2 default
set logging server facility LOCAL7
set logging server severity 4
set logging buffer 500
set logging timestamp disable
!
#ntp
set ntp broadcastclient disable
set ntp broadcastdelay 3000
set ntp client disable
clear timezone
set summertime disable
!
#set boot command
set boot config-register 0x2
set boot system flash bootflash:RTSYNC_cat5000-sup3_4-5-1.bin
set boot system flash bootflash:RTSYNC_cat5000-sup3.4-4-1.bin
set boot system flash bootflash:cat5000-sup3.4-3-1a.bin
!
#permit list
set ip permit disable
!
#drip
set tokenring reduction enable
set tokenring distrib-crf disable
!
#igmp
set igmp disable
!
#protocolfilter
set protocolfilter disable
!
#mls
set mls enable
set mls flow destination
set mls agingtime 256
set mls agingtime fast 0 0
set mls nde disable
!
#standby ports
set standbyports enable
!
#module 1 : 2-port 10/100BaseTX Supervisor
set module name
1
set vlan 1
1/1-2
set port channel 1/1-2 off
Cisco PGW 2200 Softswitch Release 9.8 Software Installation and Configuration Guide
F-4
OL-18083-01
Appendix F
Sample LAN Configurations
Sample Configuration for Cisco Catalyst 5500 A
set port enable
1/1-2
set port level
1/1-2 normal
set port speed
1/1-2 100
set port duplex
1/1-2 full
set port trap
1/1-2 disable
set port name
1/1-2
set port security
1/1-2 disable
set port broadcast 1/1-2 100%
set port membership 1/1-2 static
set port protocol 1/1-2 ip on
set port protocol 1/1-2 ipx auto
set cdp enable
1/1-2
set cdp interval 1/1-2 60
set trunk 1/1 on isl 1-1005
set trunk 1/2 on isl 1-1005
set spantree portfast
1/1-2 disable
set spantree portcost
1/1-2 3019
set spantree portpri
1/1-2 32
set spantree portvlanpri 1/1 0
set spantree portvlanpri 1/2 0
set spantree portvlancost 1/1 cost 3018
set spantree portvlancost 1/2 cost 3018
!
#module 2 : 2-port 10/100BaseTX Supervisor
set module name
2
set vlan 1
2/1-2
set port channel 2/1-2 off
set port enable
2/1-2
set port level
2/1-2 normal
set port speed
2/1-2 100
set port duplex
2/1-2 full
set port trap
2/1-2 disable
set port name
2/1-2
set port security
2/1-2 disable
set port broadcast 2/1-2 100%
set port membership 2/1-2 static
set port protocol 2/1-2 ip on
set port protocol 2/1-2 ipx auto
set cdp enable
2/1-2
set cdp interval 2/1-2 60
set trunk 2/1 desirable isl 1-1005
set trunk 2/2 desirable isl 1-1005
set spantree portfast
2/1-2 disable
set spantree portcost
2/1-2 3019
set spantree portpri
2/1-2 32
set spantree portvlanpri 2/1 0
set spantree portvlanpri 2/2 0
set spantree portvlancost 2/1 cost 3018
set spantree portvlancost 2/2 cost 3018
!
#module 3 : 24-port 10BaseT Ethernet
set module name
3
set module enable 3
set vlan 1
3/19-20,3/22-24
set vlan 2
3/1-18
set vlan 3
3/21
set port enable
3/1-24
set port level
3/1-24 normal
set port duplex
3/1-24 half
set port trap
3/1-24 disable
set port name
3/1-24
set port security
3/1-24 disable
set port broadcast 3/1-24 0
set port membership 3/1-24 static
Cisco PGW 2200 Softswitch Release 9.8 Software Installation and Configuration Guide
OL-18083-01
F-5
Appendix F
Sample LAN Configurations
Sample Configuration for Cisco Catalyst 5500 A
set port protocol 3/1-24 ip on
set port protocol 3/1-24 ipx auto
set cdp enable
3/1-24
set cdp interval 3/1-24 60
set spantree portfast
3/1-24 enable
set spantree portcost
3/1-24 3100
set spantree portpri
3/1-24 32
!
#module 4 : 12-port 10/100BaseTX Ethernet
set module name
4
set module enable 4
set vlan 2
4/1-2
set vlan 3
4/7-8
set vlan 4
4/3-6
set port channel 4/1-4 off
set port channel 4/5-8 off
set port channel 4/9-12 off
set port enable
4/1-12
set port level
4/1-12 normal
set port speed
4/1-12 auto
set port trap
4/1-12 disable
set port name
4/1-12
set port security
4/1-12 disable
set port broadcast 4/1-12 0
set port membership 4/1-12 static
set port protocol 4/1-12 ip on
set port protocol 4/1-12 ipx auto
set cdp enable
4/1-12
set cdp interval 4/1-12 60
set trunk 4/1 auto isl 1-1005
set trunk 4/2 auto isl 1-1005
set trunk 4/3 auto isl 1-1005
set trunk 4/4 auto isl 1-1005
set trunk 4/5 auto isl 1-1005
set trunk 4/6 auto isl 1-1005
set trunk 4/7 auto isl 1-1005
set trunk 4/8 auto isl 1-1005
set trunk 4/9 auto isl 1-1005
set trunk 4/10 auto isl 1-1005
set trunk 4/11 off isl 1-1005
set trunk 4/12 off isl 1-1005
set spantree portfast
4/1-12 enable
set spantree portcost
4/5-8, 4/11-12 3019
set spantree portcost
4/1-4, 4/9-10 3100
set spantree portpri
4/1-12 32
set spantree portvlanpri 4/1 0
set spantree portvlanpri 4/2 0
set spantree portvlanpri 4/3 0
set spantree portvlanpri 4/4 0
set spantree portvlanpri 4/5 0
set spantree portvlanpri 4/6 0
set spantree portvlanpri 4/7 0
set spantree portvlanpri 4/8 0
set spantree portvlanpri 4/9 0
set spantree portvlanpri 4/10 0
set spantree portvlanpri 4/11 0
set spantree portvlanpri 4/12 0
set spantree portvlancost 4/1 cost 3099
set spantree portvlancost 4/2 cost 3099
set spantree portvlancost 4/3 cost 3099
set spantree portvlancost 4/4 cost 3099
set spantree portvlancost 4/5 cost 3018
set spantree portvlancost 4/6 cost 3018
set spantree portvlancost 4/7 cost 3018
Cisco PGW 2200 Softswitch Release 9.8 Software Installation and Configuration Guide
F-6
OL-18083-01
Appendix F
Sample LAN Configurations
Sample Configuration for Cisco Catalyst 5500 A
set spantree portvlancost 4/8 cost 3018
set spantree portvlancost 4/9 cost 3099
set spantree portvlancost 4/10 cost 3099
set spantree portvlancost 4/11 cost 3018
set spantree portvlancost 4/12 cost 3018
!
#module 5 empty
!
#module 6 empty
!
#module 7 empty
!
#module 8 empty
!
#module 9 empty
!
#module 10 empty
!
#module 11 empty
!
#module 12 : 1-port Route Switch
set module name
12
set port level
12/1 normal
set port trap
12/1 disable
set port name
12/1
set cdp enable
12/1
set cdp interval 12/1 60
set trunk 12/1 on isl 1-1005
set spantree portcost
12/1 3005
set spantree portpri
12/1 15
set spantree portvlanpri 12/1 160
set spantree portvlancost 12/1 cost 3004 4-8,11-15
!
#module 13 empty
!
#switch port analyzer
set span 2 3/23 both inpkts disable
!set span enable
!
#cam
set cam agingtime 1-4,1003,1005 300
end
Sample Configuration for Cisco Catalyst 5500 A RSM
To view the current configuration of the Cisco Catalyst 5500 A RSM, access the RSM interface, type the
following command in privileged mode, and press Enter:
Catalyst_5513A_RSM#show run
Output similar to the following appears:
Building configuration...
Current configuration:
!
version 11.3
service timestamps debug uptime
service timestamps log uptime
no service password-encryption
!
Cisco PGW 2200 Softswitch Release 9.8 Software Installation and Configuration Guide
OL-18083-01
F-7
Appendix F
Sample LAN Configurations
Sample Configuration for Cisco Catalyst 5500 B
hostname Catalyst_5513A_RSM
!
enable password cisco
!
no ip domain-lookup
!
!
!
interface Vlan2
ip address 209.165.200.224 255.255.255.224
no ip redirects
standby 2 timers 1 3
standby 2 priority 110
standby 2 preempt
standby 2 authentication VSC3000
standby 2 ip 172.25.66.60
!
interface Vlan3
ip address 209.165.200.224 255.255.255.224
no ip redirects
standby 3 timers 1 3
standby 3 priority 110
standby 3 preempt
standby 3 authentication VSC3000
standby 3 ip 209.165.200.224
!
interface Vlan4
ip address 209.165.200.224 255.255.255.224
no ip redirects
standby 4 timers 1 3
standby 4 priority 110
standby 4 preempt
standby 4 authentication VSC3000
standby 4 ip 209.165.200.224
!
router eigrp 1
network 209.165.200.224
!
ip classless
!
snmp-server community public RO
snmp-server community private RW
snmp-server chassis-id public
snmp-server enable traps snmp
snmp-server enable traps appn alert
snmp-server enable traps config
snmp-server enable traps entity
snmp-server enable traps rtr
!
line con 0
line aux 0
line vty 0 4
password cisco
login
!
end
Sample Configuration for Cisco Catalyst 5500 B
To view the current configuration of the Cisco Catalyst 5500 B, type the following command in
privileged mode, and press Enter:
Cisco PGW 2200 Softswitch Release 9.8 Software Installation and Configuration Guide
F-8
OL-18083-01
Appendix F
Sample LAN Configurations
Sample Configuration for Cisco Catalyst 5500 B
Catalyst_5513B (enable) show config
Output similar to the following appears:
begin
!
#version 4.5(1)
!
set password $1$7OtT$J/rAZe2CANYvHW72ZMtI10
set enablepass $1$0o8Z$xbxAzs4LlepsklB6Ju7VY.
set prompt Catalyst_5513B
set length 24 default
set logout 20
set banner motd ^C^C
!
#system
set system baud 9600
set system modem disable
set system name Catalyst_5513B
set system location Lab1
set system contact John Smith 913 555-7998
!
#snmp
set snmp community read-only
public
set snmp community read-write
private
set snmp community read-write-all public
set snmp rmon disable
set snmp trap disable module
set snmp trap disable chassis
set snmp trap disable bridge
set snmp trap disable repeater
set snmp trap disable vtp
set snmp trap disable auth
set snmp trap disable ippermit
set snmp trap disable vmps
set snmp trap disable entity
set snmp trap disable config
set snmp trap disable stpx
set snmp trap disable syslog
set snmp extendedrmon vlanmode disable
set snmp extendedrmon vlanagent disable
set snmp extendedrmon enable
!
#ip
set interface sc0 3 209.165.200.224 255.255.255.224
set interface sc0 up
set interface sl0 0.0.0.0 0.0.0.0
set interface sl0 up
set arp agingtime 1200
set ip redirect
enable
set ip unreachable
enable
set ip fragmentation enable
set ip route 0.0.0.0 209.165.200.224
set ip alias default
0.0.0.0
!
#Command alias
!
#vmps
set vmps server retry 3
set vmps server reconfirminterval 60
set vmps tftpserver 0.0.0.0 vmps-config-database.1
set vmps state disable
Cisco PGW 2200 Softswitch Release 9.8 Software Installation and Configuration Guide
OL-18083-01
F-9
Appendix F
Sample LAN Configurations
Sample Configuration for Cisco Catalyst 5500 B
!
#dns
set ip dns disable
!
#tacacs+
set tacacs attempts 3
set tacacs directedrequest disable
set tacacs timeout 5
!
#authentication
set authentication login tacacs disable console
set authentication login tacacs disable telnet
set authentication enable tacacs disable console
set authentication enable tacacs disable telnet
set authentication login local enable console
set authentication login local enable telnet
set authentication enable local enable console
set authentication enable local enable telnet
!
#bridge
set bridge ipx snaptoether
8023raw
set bridge ipx 8022toether
8023
set bridge ipx 8023rawtofddi snap
!
#vtp
set vtp domain vsc3000
set vtp mode transparent
set vtp v2 disable
set vtp pruneeligible 2-1000
clear vtp pruneeligible 1001-1005
set vlan 1 name default type ethernet mtu 1500 said 100001 state active
set vlan 2 name green type ethernet mtu 1500 said 100002 state active
set vlan 3 name blue type ethernet mtu 1500 said 100003 state active
set vlan 4 name red type ethernet mtu 1500 said 100004 state active
set vlan 1002 name fddi-default type fddi mtu 1500 said 101002 state active
set vlan 1004 name fddinet-default type fddinet mtu 1500 said 101004 state active bridge
0x0 stp ieee
set vlan 1005 name trnet-default type trbrf mtu 1500 said 101005 state active bridge 0x0
stp ibm
set vlan 1003 name token-ring-default type trcrf mtu 1500 said 101003 state active parent
0 ring 0x0 mode srb aremaxhop 7 stemaxhop 7
set interface sc0 3 209.165.200.224 255.255.255.224 209.165.200.224
!
#spantree
#uplinkfast groups
set spantree uplinkfast disable
#backbonefast
set spantree backbonefast disable
set spantree enable all
#vlan 1
set spantree fwddelay 4 1
set spantree hello
2
1
set spantree maxage
20
1
set spantree priority 2000 1
#vlan 2
set spantree fwddelay 4 2
set spantree hello
2
2
set spantree maxage
20
2
set spantree priority 2000 2
#vlan 3
set spantree fwddelay 4 3
set spantree hello
2
3
Cisco PGW 2200 Softswitch Release 9.8 Software Installation and Configuration Guide
F-10
OL-18083-01
Appendix F
Sample LAN Configurations
Sample Configuration for Cisco Catalyst 5500 B
set spantree maxage
20
3
set spantree priority 2000 3
#vlan 4
set spantree fwddelay 4 4
set spantree hello
2
4
set spantree maxage
20
4
set spantree priority 2000 4
#vlan 1003
set spantree fwddelay 15
1003
set spantree hello
2
1003
set spantree maxage
20
1003
set spantree priority 32768 1003
set spantree portstate 1003 block 0
set spantree portcost 1003 62
set spantree portpri 1003 4
set spantree portfast 1003 disable
#vlan 1005
set spantree fwddelay 15
1005
set spantree hello
2
1005
set spantree maxage
20
1005
set spantree priority 32768 1005
set spantree multicast-address 1005 ieee
!
#cgmp
set cgmp disable
set cgmp leave disable
!
#syslog
set logging console enable
set logging server disable
set logging level cdp 2 default
set logging level mcast 2 default
set logging level dtp 5 default
set logging level dvlan 2 default
set logging level earl 2 default
set logging level fddi 2 default
set logging level ip 2 default
set logging level pruning 2 default
set logging level snmp 2 default
set logging level spantree 2 default
set logging level sys 5 default
set logging level tac 2 default
set logging level tcp 2 default
set logging level telnet 2 default
set logging level tftp 2 default
set logging level vtp 2 default
set logging level vmps 2 default
set logging level kernel 2 default
set logging level filesys 2 default
set logging level drip 2 default
set logging level pagp 5 default
set logging level mgmt 5 default
set logging level mls 5 default
set logging level protfilt 2 default
set logging level security 2 default
set logging server facility LOCAL7
set logging server severity 4
set logging buffer 500
set logging timestamp disable
!
#ntp
set ntp broadcastclient disable
set ntp broadcastdelay 3000
set ntp client disable
Cisco PGW 2200 Softswitch Release 9.8 Software Installation and Configuration Guide
OL-18083-01
F-11
Appendix F
Sample LAN Configurations
Sample Configuration for Cisco Catalyst 5500 B
clear timezone
set summertime disable
!
#set boot command
set boot config-register 0x2
set boot system flash bootflash:cat5000-sup3.4-5-1.bin
!
#permit list
set ip permit disable
!
#drip
set tokenring reduction enable
set tokenring distrib-crf disable
!
#igmp
set igmp disable
!
#protocolfilter
set protocolfilter disable
!
#mls
set mls enable
set mls flow destination
set mls agingtime 256
set mls agingtime fast 0 0
set mls nde disable
!
#standby ports
set standbyports enable
!
#module 1 : 2-port 10/100BaseTX Supervisor
set module name
1
set vlan 1
1/1-2
set port channel 1/1-2 off
set port enable
1/1-2
set port level
1/1-2 normal
set port speed
1/1-2 100
set port duplex
1/1-2 full
set port trap
1/1-2 disable
set port name
1/1-2
set port security
1/1-2 disable
set port broadcast 1/1-2 100%
set port membership 1/1-2 static
set port protocol 1/1-2 ip on
set port protocol 1/1-2 ipx auto
set cdp enable
1/1-2
set cdp interval 1/1-2 60
set trunk 1/1 on isl 1-1005
set trunk 1/2 on isl 1-1005
set spantree portfast
1/1-2 disable
set spantree portcost
1/1-2 3019
set spantree portpri
1/1-2 32
set spantree portvlanpri 1/1 0
set spantree portvlanpri 1/2 0
set spantree portvlancost 1/1 cost 3018
set spantree portvlancost 1/2 cost 3018
!
#module 2 : 2-port 10/100BaseTX Supervisor
set module name
2
set vlan 1
2/1-2
set port channel 2/1-2 off
set port enable
2/1-2
set port level
2/1-2 normal
set port speed
2/1-2 100
Cisco PGW 2200 Softswitch Release 9.8 Software Installation and Configuration Guide
F-12
OL-18083-01
Appendix F
Sample LAN Configurations
Sample Configuration for Cisco Catalyst 5500 B
set port duplex
2/1-2 full
set port trap
2/1-2 disable
set port name
2/1-2
set port security
2/1-2 disable
set port broadcast 2/1-2 100%
set port membership 2/1-2 static
set port protocol 2/1-2 ip on
set port protocol 2/1-2 ipx auto
set cdp enable
2/1-2
set cdp interval 2/1-2 60
set trunk 2/1 desirable isl 1-1005
set trunk 2/2 desirable isl 1-1005
set spantree portfast
2/1-2 disable
set spantree portcost
2/1-2 3019
set spantree portpri
2/1-2 32
set spantree portvlanpri 2/1 0
set spantree portvlanpri 2/2 0
set spantree portvlancost 2/1 cost 3018
set spantree portvlancost 2/2 cost 3018
!
#module 3 : 24-port 10BaseT Ethernet
set module name
3
set module enable 3
set vlan 1
3/20-24
set vlan 2
3/17
set vlan 3
3/1-16,3/19
set port enable
3/1-24
set port level
3/1-24 normal
set port duplex
3/1-24 half
set port trap
3/1-24 disable
set port name
3/1-24
set port security
3/1-24 disable
set port broadcast 3/1-24 0
set port membership 3/1-24 static
set port protocol 3/1-24 ip on
set port protocol 3/1-24 ipx auto
set cdp enable
3/1-24
set cdp interval 3/1-24 60
set spantree portfast
3/1-24 enable
set spantree portcost
3/1-24 3100
set spantree portpri
3/1-24 32
!
#module 4 : 12-port 10/100BaseTX Ethernet
set module name
4
set module enable 4
set vlan 2
4/1-2
set vlan 3
4/7-8
set vlan 4
4/3-6
set port channel 4/1-4 off
set port channel 4/5-8 off
set port channel 4/9-12 off
set port enable
4/1-12
set port level
4/1-12 normal
set port speed
4/1-10 auto
set port speed
4/11-12 100
set port duplex
4/11-12 full
set port trap
4/1-12 disable
set port name
4/1-12
set port security
4/1-12 disable
set port broadcast 4/1-12 0
set port membership 4/1-12 static
set port protocol 4/1-12 ip on
set port protocol 4/1-12 ipx auto
set cdp enable
4/1-12
Cisco PGW 2200 Softswitch Release 9.8 Software Installation and Configuration Guide
OL-18083-01
F-13
Appendix F
Sample LAN Configurations
Sample Configuration for Cisco Catalyst 5500 B
set cdp interval 4/1-12 60
set trunk 4/1 auto isl 1-1005
set trunk 4/2 auto isl 1-1005
set trunk 4/3 auto isl 1-1005
set trunk 4/4 auto isl 1-1005
set trunk 4/5 auto isl 1-1005
set trunk 4/6 auto isl 1-1005
set trunk 4/7 auto isl 1-1005
set trunk 4/8 auto isl 1-1005
set trunk 4/9 auto isl 1-1005
set trunk 4/10 auto isl 1-1005
set trunk 4/11 desirable isl 1-1005
set trunk 4/12 desirable isl 1-1005
set spantree portfast
4/1-12 enable
set spantree portcost
4/1,4/6-7,4/11-12 3019
set spantree portcost
4/2-5,4/8-10 3100
set spantree portpri
4/1-12 32
set spantree portvlanpri 4/1 0
set spantree portvlanpri 4/2 0
set spantree portvlanpri 4/3 0
set spantree portvlanpri 4/4 0
set spantree portvlanpri 4/5 0
set spantree portvlanpri 4/6 0
set spantree portvlanpri 4/7 0
set spantree portvlanpri 4/8 0
set spantree portvlanpri 4/9 0
set spantree portvlanpri 4/10 0
set spantree portvlanpri 4/11 0
set spantree portvlanpri 4/12 0
set spantree portvlancost 4/1 cost 3018
set spantree portvlancost 4/2 cost 3099
set spantree portvlancost 4/3 cost 3099
set spantree portvlancost 4/4 cost 3099
set spantree portvlancost 4/5 cost 3099
set spantree portvlancost 4/6 cost 3018
set spantree portvlancost 4/7 cost 3018
set spantree portvlancost 4/8 cost 3099
set spantree portvlancost 4/9 cost 3099
set spantree portvlancost 4/10 cost 3099
set spantree portvlancost 4/11 cost 3018
set spantree portvlancost 4/12 cost 3018
!
#module 5 empty
!
#module 6 empty
!
#module 7 empty
!
#module 8 empty
!
#module 9 empty
!
#module 10 empty
!
#module 11 empty
!
#module 12 : 1-port Route Switch
set module name
12
set port level
12/1 normal
set port trap
12/1 disable
set port name
12/1
set cdp enable
12/1
set cdp interval 12/1 60
set trunk 12/1 on isl 1-1005
Cisco PGW 2200 Softswitch Release 9.8 Software Installation and Configuration Guide
F-14
OL-18083-01
Appendix F
Sample LAN Configurations
Sample Configuration for Cisco Catalyst 5500 B
set spantree portcost
12/1 3005
set spantree portpri
12/1 15
set spantree portvlanpri 12/1 160
set spantree portvlancost 12/1 cost 3004 4-8,11-15
!
#module 13 empty
!
#switch port analyzer
!set span 1 1/1 both inpkts disable
set span disable
!
#cam
set cam agingtime 1-4,1003,1005 300
end
Sample Configuration for Cisco Catalyst 5500 B RSM
To view the current configuration of the Cisco Catalyst 5500 B RSM, access the RSM interface, type the
following command in privileged mode, and press Enter:
Catalyst_5513B_RSM#show run
Output similar to the following appears:
Building configuration...
Current configuration:
!
version 11.3
service timestamps debug uptime
service timestamps log uptime
no service password-encryption
!
hostname Catalyst_5513B_RSM
!
enable password cisco
!
no ip domain-lookup
!
!
!
interface Vlan2
ip address 209.165.200.224 255.255.255.224
no ip redirects
standby 2 timers 1 3
standby 2 preempt
standby 2 authentication VSC3000
standby 2 ip 172.25.66.60
!
interface Vlan3
ip address 209.165.200.224 255.255.255.224
no ip redirects
standby 3 timers 1 3
standby 3 preempt
standby 3 authentication vsc3000
standby 3 ip 209.165.200.224
!
interface Vlan4
ip address 209.165.200.224 255.255.255.224
no ip redirects
standby 4 timers 1 3
Cisco PGW 2200 Softswitch Release 9.8 Software Installation and Configuration Guide
OL-18083-01
F-15
Appendix F
Sample LAN Configurations
Sample Configuration for Cisco Catalyst 5500 B
standby 4 preempt
standby 4 authentication VSC3000
standby 4 ip 209.165.200.224
!
router eigrp 1
network 209.165.200.224
!
ip classless
!
snmp-server community public RO
snmp-server community private RW
snmp-server chassis-id public
snmp-server enable traps snmp
snmp-server enable traps appn alert
snmp-server enable traps config
snmp-server enable traps entity
snmp-server enable traps rtr
!
line con 0
line aux 0
line vty 0 4
password cisco
login
!
end
Cisco PGW 2200 Softswitch Release 9.8 Software Installation and Configuration Guide
F-16
OL-18083-01