1
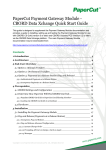
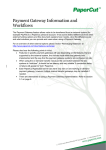
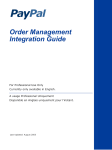
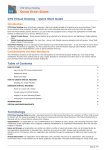
PaperCut Payment Gateway Module RBS WorldPay Quick Start Guide
This guide is designed to supplement the Payment Gateway Module documentation and provides a
guide to installing, setting up and testing the Payment Gateway Module for use with RBS WorldPay’s
Business Gateway Plus service. The main Payment Gateway Module documentation may be
downloaded from:
http://www.papercut.com/anonftp/pub/pcng/ext/payment-gateway/PaymentGatewayModule.pdf
Business Gateway Plus is a “hosted pay page” service by RBS WorldPay capable of processing many
different card types and currencies.
IMPORTANT: Before installing the payment gateway you should have a registered and active
WorldPay account with Business Gateway Plus service activated. RBS WorldPay can assist with these
tasks. The login information will be required during setup.
Setup and testing should take around 30 minutes. No system level restart is required although the
PaperCut application server will be restarted during the install process. If other administrators are
using the PaperCut administration interface at this time it may be advisable to warn them of the
pending restart.
This document is written assuming the reader has good server administration skills and is
experienced with general PaperCut administration.
Contents
1
Configuring Business Gateway Plus ................................................................................................ 2
2
Installing the Payment Gateway Module........................................................................................ 4
3
Firewall Configuration ..................................................................................................................... 5
4
Testing ............................................................................................................................................. 6
5
Security ........................................................................................................................................... 8
6
Go-Live ............................................................................................................................................ 9
7
Advanced Customization .............................................................................................................. 10
8
7.1
Hosted payment page receipt............................................................................................... 10
7.2
Preferred Merchant Code ..................................................................................................... 10
Troubleshooting ............................................................................................................................ 11
PaperCut - Payment Gateway Module - RBS WorldPay Quick Start Guide
1 Configuring Business Gateway Plus
The first stage of configuration is to set up RBS WorldPay to notify PaperCut when a transaction has
taken place. This can be done via the web interface for Business Gateway Plus as follows:
1. Navigate to www.rbsworldpay.com/admin in a web browser.
2. Select Business Gateway – Formerly WorldPay and click GO .
3. Click the link named Production Merchant Interface .
4. Log into the merchant interface with the details supplied by RBS WorldPay.
5. Click Installations in the left menu.
6. Click the Integration Setup : TEST icon next to the installation that will be used for PaperCut
payments. If you do not yet have an installation listed for this purpose contact RBS WorldPay for
assistance with creating one.
7. Take note of the Installation ID .
8. The option Customer description (for payment pages) is the description users will see in the
payment pages (i.e. what the user is paying for). Enter a suitable description, such as “Credit for
print account”.
9. The option Payment Response URL is the URL to which RBS WorldPay will report transactions.
Enter a URL like:
https://papercut.myorg.edu:9192/rpc/gateway/rbs-worldpay/transaction
where papercut.myorg.edu is a hostname that can be resolved from the internet. ‘3.
Firewall Configuration’ has more information about ensuring that this address is accessible by
RBS WorldPay and addresses firewall considerations.
10. Enable the checkbox titled Payment Response enabled? .
11. The option Payment Response failure email address is used to report transactions that could
not be reported (e.g. the Payment Response URL was not accessible, or some kind of error
occurred when sending information). Enter the email address that will be used to report these
failures. Transaction failures may need to be manually investigated, reconciled and/or refunded.
12. Enable the checkbox titled Attach HTTP(s) Payment Message to the failure email? .
13. The option Payment Response password is a shared secret between PaperCut and RBS
WorldPay. It is used to prevent unauthorized transactions being reported to the Payment
Response URL. Choose a password and take note of it – it will be required when configuring the
payment gateway module. We recommend using a random string of 8 or more characters.
Enter the same password again in the Confirm box.
Copyright © 2014 PaperCut Software International Pty. Ltd., All Rights Reserved
2 of 11
PaperCut - Payment Gateway Module - RBS WorldPay Quick Start Guide
14. Click Save Changes , and ensure that the settings were saved correctly.
Copyright © 2014 PaperCut Software International Pty. Ltd., All Rights Reserved
3 of 11
PaperCut - Payment Gateway Module - RBS WorldPay Quick Start Guide
2 Installing the Payment Gateway Module
1. The Payment Gateway Module will function during the 40 day trial period. After this time the
module must be licensed. If you have been supplied with a new license take the time to install it
now. The license install procedure is documented in the PaperCut user manual chapter
Licensing and Support.
2. Download the Payment Gateway Module from the PaperCut website at:
http://www.papercut.com/anonftp/pub/pcng/ext/payment-gateway/pcngpayment-gateway-module.exe
3. Run the installer and install into the same directory as PaperCut. For PaperCut NG this is
normally at:
C:\Program Files\PaperCut NG\
4. Open the file at:
[app-path]\server\lib-ext\ext-payment-gateway-rbs-worldpay.properties
in a text editor such as Notepad.
5. Locate the option rbs-worldpay.enabled=N and change the N to a Y. This will enable the
RBS WorldPay module.
6. Locate the option rbs-worldpay.installation-id and enter the installation id (the id of
the installation configured in ’1. Configuring Business Gateway Plus’).
7. Ensure that rbs-worldpay.test-mode is set to Y. This will ensure that no money changes
hands during the initial test transactions.
8. Locate the line rbs-worldpay.currency and enter the 3 digit ISO currency code for your local
currency. This must be the same currency being used within PaperCut. The currency must also
have been enabled in your Business Gateway Plus account by RBS WorldPay.
9. Configure other options in this file as discussed in the General Configuration Options section of
the Payment Gateway Module documentation, or by referring to the comments in the file itself.
Options include limits on the amount to transfer, access groups and custom error messages.
You may like to enable a group restriction to limit access to administrators until configuration is
complete.
10. Save the file and exit the text editor.
11. Restart the PaperCut Application Server service via Control Panel -> Administrative Tools ->
Services and wait 30 seconds.
12. Check at the end of the log file at [app-path]\server\logs\server.log to see if there are
any obvious error messages that would indicate something is wrong.
Copyright © 2014 PaperCut Software International Pty. Ltd., All Rights Reserved
4 of 11
PaperCut - Payment Gateway Module - RBS WorldPay Quick Start Guide
3 Firewall Configuration
The RBS WorldPay server communicates with the PaperCut server via HTTPS on port 9192. You will
need to ensure that RBS WorldPay’s servers are able to contact the PaperCut server on the
hostname used for the Payment Response URL setting configured in ’1. Configuring Business
Gateway Plus’. This will usually involve the following network changes:
1. Set up a public DNS entry to ensure that the PaperCut server is publicly accessible via a friendly
name (e.g. papercut.myorg.edu). This will be the same name used for the Payment
Response URL in ’1. Configuring Business Gateway Plus’.
2. Set up external firewall rules allowing traffic from the RBS WorldPay server IP address range to
the PaperCut server on port 9191. Common methods include adding a “TCP Open” entry to your
firewall and/or using port forwarding.
It is important that the firewall policy only applies to external hosts. Internal hosts will always
require access to the PaperCut server.
During testing it may be appropriate to allow access from any host then lock down access to the
RBS WorldPay servers once their address range has been determined. Once a test transaction
has been made the RBS WorldPay server IP address(es) can be found in the payment gateway
event log file (located at [app-path]/server/logs/payment-gateway/event.log).
At the time of writing this address range was: 155.136.68.0/255.
3. Accessing the following URL in a web browser will display a simple confirmation page containing
the current time, and can be used to test external access:
https://papercut.myorg.edu:9192/rpc/gateway/rbs-worldpay/check
(where papercut.myorg.edu is the externally accessible hostname of your PaperCut server).
Copyright © 2014 PaperCut Software International Pty. Ltd., All Rights Reserved
5 of 11
PaperCut - Payment Gateway Module - RBS WorldPay Quick Start Guide
4 Testing
The Payment Gateway Module for RBS WorldPay is now ready for testing. This test will involve
performing a test transaction with a real credit card. The test payment pages will run through the
transaction as if it were a real one, but no money will change hands.
4. Log into the PaperCut user web interface at http://papercut:9191/user
5. A new link called Add Credit should appear in the left menu. Click this link.
6. Select an amount to add and press Add Value .
7. You should now be redirected to the RBS WorldPay hosted payment pages for payment. First
you should see a message indicating that you will be redirected to the test site.
Click Redirect to TEST . If you do not see this message, do not continue (test mode may not be
active). Check the installation settings in the merchant interface to ensure that the installation is
in TEST mode.
8. Continue to enter the payment details for a real credit card.
Copyright © 2014 PaperCut Software International Pty. Ltd., All Rights Reserved
6 of 11
PaperCut - Payment Gateway Module - RBS WorldPay Quick Start Guide
You should see a message at the top of the page reading TEST MODE – this is not a live
transaction . If you do not see this message, do not continue (test mode may not be active).
Check the installation settings in the merchant interface to ensure that the installation is in
TEST mode.
9. After completing the payment details and pressing Make Payment you should see a receipt
page with a success message and some reference numbers. You should also receive an email
receipt shortly. Note that the default receipt page does not contain a link back to the PaperCut
web interface. For information about adding a link back to PaperCut via a customized receipt
page see ‘7. Advanced Customization’.
Copyright © 2014 PaperCut Software International Pty. Ltd., All Rights Reserved
7 of 11
PaperCut - Payment Gateway Module - RBS WorldPay Quick Start Guide
5 Security
Transaction details are sent from RBS WorldPay to PaperCut via an HTTPS POST (to the ‘Payment
Response URL’). This request includes the configured shared secret (‘Payment Response password’).
Because the POST request is sent “out of band” (i.e. not along with the user), users are not exposed
to the shared secret.
While these transaction requests do not contain full card numbers, they may contain other
information considered to be private, such as the billing address or email address. One important
point to note is that RBS WorldPay does not require a trusted certificate when submitting
transaction details over HTTPS. This is why the default, self-signed certificate used in PaperCut can
be used to accept transactions from RBS WorldPay over HTTPS. This does however mean that the
transaction POSTs are open to man-in-the-middle or hostname spoofing attacks. That is, if an
attacker can intercept traffic to the ‘Payment Response URL’ they will have access to the contents.
In most environments this is not a likely scenario.
In addition to firewall configuration limiting access to the transaction POST URL (mentioned in ‘3.
Firewall Configuration’) there is an application level setting to restrict access to an IP address or
range. This option is available via the config file (ext-payment-gateway-rbsworldpay.properties) and is titled ‘rbs-worldpay.postback-allowed-ip’. Care should be
taken to ensure that legitimate requests are not blocked, as this would result in users having their
card charged but no value added to their account.
Copyright © 2014 PaperCut Software International Pty. Ltd., All Rights Reserved
8 of 11
PaperCut - Payment Gateway Module - RBS WorldPay Quick Start Guide
6 Go-Live
Your payment gateway module integration with RBS WorldPay is now complete, and the payment
pages can now be put into ‘live’ mode.
RBS WorldPay require filling out a web form and may need to test the integration before it can go
live. To set this process in motion:
1. Log into the RBS WorldPay merchant web interface and select Installations from the left menu.
2. Click the tick icon in the Request Activation column next to the installation id that will be used
for the PaperCut hosted payment pages.
3. The next page is a form should be a form requesting information about testing your ‘website’.
The activation process is, unfortunately, designed for a ‘web shop’ style integration, and doesn’t
take into account an integration such as this where the interface is password protected and not
necessarily available over the internet. We recommend filling out the form and making this
clear in the notes field, if only to provide notification that you intend to take the installation live.
Then follow up with your contact at RBS WorldPay and/or [email protected] to let
them know that you’d like to activate an installation that isn’t a web shop.
After RBS WorldPay has confirmed that the installation is live, the PaperCut payment gateway
module can be configured to submit ‘live’ transactions:
1. Edit the config file ‘ext-payment-gateway-rbs-worldpay.properties’ again and set the
value of the option ‘rbs-worldpay.test-mode’ to ‘N’.
2. If a group restriction was enabled in ‘2. Installing the Payment Gateway Module’ it can now be
removed or altered to allow access to end-users.
The system is now available for end users to make payments. You may like to perform a test as a
user with a real credit card to ensure that the system is working as expected.
Copyright © 2014 PaperCut Software International Pty. Ltd., All Rights Reserved
9 of 11
PaperCut - Payment Gateway Module - RBS WorldPay Quick Start Guide
7 Advanced Customization
7.1 Hosted payment page receipt
The default receipt page displayed to the user after entering their payment details does not contain
a link back to the PaperCut web interface. It is however possible to customize the payment pages
(including the receipt page) via the RBS WorldPay merchant web interface (click Edit Payment
Pages at the bottom of the Installations page).
For details about editing payment pages consult the documentation from RBS WorldPay. Once you
are ready to customize the receipt page you may create a link back to the PaperCut user web
interface by using the ‘MC_return-url’ custom parameter. This link will send the user back to the
‘ Add Value ’ page and display a confirmation or error message according to the result of the
transaction.
The custom parameter may be used to create a link in the custom receipt page as follows:
<a href="<WPDISPLAY ITEM='MC_return-url'">return</a>
The default message displayed may also be replaced by specifying a message using the ‘message’
parameter, for example to provide more details about a special error condition:
<a href="<WPDISPLAY ITEM='MC_return-url'>&message=Optional%20message.">
return
</a>
7.2 Preferred Merchant Code
RBS WorldPay assigns a merchant code from an available list at the time of payment. To elect a
preferred merchant code to use, open the payment gateway configuration file at:
[app-path]\server\lib-ext\ext-payment-gateway-rbs-worldpay.properties
Specify a preferred merchant code via the rbs-worldpay.merchant-code configuration item.
Note: The merchant code specified indicates a preference for this code. RBS WorldPay does not
guarantee it will be used.
Copyright © 2014 PaperCut Software International Pty. Ltd., All Rights Reserved
10 of 11
PaperCut - Payment Gateway Module - RBS WorldPay Quick Start Guide
8 Troubleshooting
Administrators may find information in the following log files useful when trying to troubleshoot
setup/configuration problems or issues reported by end-users.
Payment Gateway Transaction Log:
[app-path]\server\logs\payment-gateway\transaction.log
This log contains a list of successful transactions in tab-delimited form.
Payment Gateway Event Log:
[app-path]\server\logs\payment-gateway\event.log
This log contains payment gateway specific error messages and events.
Application Log:
[app-path]\server\logs\server.log
This log contains general application specific error messages and events.
Please feel free to contact the PaperCut Software Development Team via [email protected] if
you require assistance.
Copyright © 2014 PaperCut Software International Pty. Ltd., All Rights Reserved
11 of 11