Download PaperCut Dell MFP Embedded Manual


Transcript
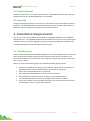
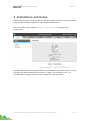
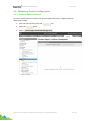
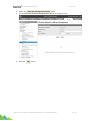
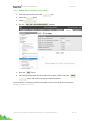
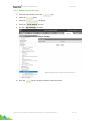
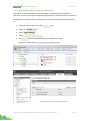
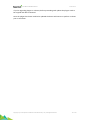
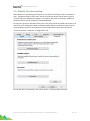
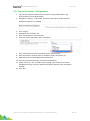
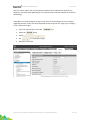
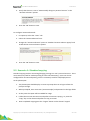
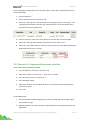
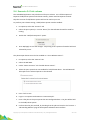
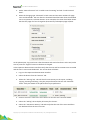
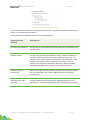
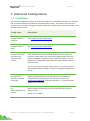
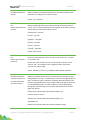
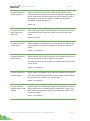
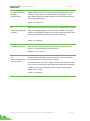
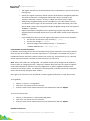
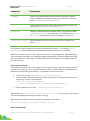
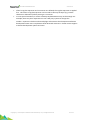
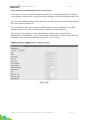
PaperCut Dell MFP Embedded Manual Important: The PaperCut Dell MFP Embedded Application is currently released under an Early Access Program. Please read below before installing in a production environment. Contents 1 Early Access Program ........................................................................................................ 4 2 Overview ........................................................................................................................... 6 3 4 2.1 Consistency ................................................................................................................ 6 2.2 Integration ................................................................................................................. 6 2.3 Rate of development ................................................................................................. 6 2.4 Vendor Neutral .......................................................................................................... 7 2.5 Security ...................................................................................................................... 7 Installation Requirements ................................................................................................ 7 3.1 Requirements ............................................................................................................ 7 3.2 Device Compatibility .................................................................................................. 8 3.3 Other devices............................................................................................................. 8 Installation and Setup ....................................................................................................... 9 4.1 Mandatory Device Configuration ............................................................................ 10 4.1.1 Create a digital certificate ............................................................................... 10 4.1.2 Enable Secure Sockets Layer (SSL) ................................................................... 12 4.1.3 Enable Plug-in Settings .................................................................................... 13 4.1.4 Deploying plugin-ins (Dell C5765dn only). ...................................................... 14 4.2 Disable Print Accounting ......................................................................................... 16 4.3 Optional Device Configuration ................................................................................ 17 4.3.1 Enable swipe card support .............................................................................. 17 4.3.2 Change the administrator password ............................................................... 17 4.4 Card Reader support ............................................................................................... 17 4.5 PaperCut Server Configuration ................................................................................ 18 4.5.1 4.6 5 Verifying device creation ................................................................................. 19 Additional Network Security (optional)................................................................... 21 Post-install testing .......................................................................................................... 22 Copyright © 2015 PaperCut Software International Pty. Ltd., All Rights Reserved. | Dell MFP Embedded Manual 6 7 2015-09-02 5.1 Test Preparation ...................................................................................................... 22 5.2 Scenario 1: Standard copying .................................................................................. 23 5.3 Scenario 2: Copying with account selection ............................................................ 24 5.4 Scenario 3: Print release .......................................................................................... 26 5.5 Scenario 4: Scanning and faxing .............................................................................. 27 Configuration .................................................................................................................. 30 6.1 Device Function ....................................................................................................... 30 6.2 Authentication Methods ......................................................................................... 30 Advanced Configuration ................................................................................................. 32 7.1 Config Editor ............................................................................................................ 32 7.2 Setting an explicit PaperCut Server Network Address ............................................ 39 7.3 Configuring Swipe Card Readers ............................................................................. 39 7.4 Customizing the Header Logo.................................................................................. 43 7.5 Customizing the Header Colors ............................................................................... 43 8 Uninstalling ..................................................................................................................... 44 9 Known Limitations .......................................................................................................... 45 10 9.1 Zero-Stop ................................................................................................................. 45 9.2 Card reader and USB ports ...................................................................................... 45 9.3 Use of card reader after returning the device from sleep mode. ........................... 45 FAQ & Troubleshooting .................................................................................................. 46 Copyright © 2015 PaperCut Software International Pty. Ltd., All Rights Reserved. 2 of 50 | Dell MFP Embedded Manual 2015-09-02 This manual covers the PaperCut MF Dell MFP embedded setup. For general PaperCut MF documentation, please see the PaperCut MF manual. Copyright © 2015 PaperCut Software International Pty. Ltd., All Rights Reserved. 3 of 50 | Dell MFP Embedded Manual 2015-09-02 1 Early Access Program The PaperCut Embedded software for Dell MFP Multi-Function Devices is being released under an early access program. It has been extensively tested by PaperCut and there is a high level of confidence in its quality and readiness for general customer release. However, it is impossible for us to test all possible scenarios that will occur across our very large customer base and we seek the assistance of our customers and partners to help ensure a high quality rollout. In the first instance we are asking customers to: Be aware that some issues may exist in the software Work with PaperCut to quickly address issues if they occur PaperCut require any customers installing the software into production during this period to complete the early access form below and return the form to [email protected]. During the early access period, you should check the following PaperCut Knowledge Base article discussing any known issues both before installation, and periodically thereafter: http://www.papercut.com/kb/Main/KnownIssuesDellMFP Copyright © 2015 PaperCut Software International Pty. Ltd., All Rights Reserved. 4 of 50 | Dell MFP Embedded Manual 2015-09-02 PaperCut Early Access Program PaperCut Software makes available first-release software to selected customers under an Early Access Program. Early access testing forms an important part of PaperCut’s quality assurance procedures, by providing an opportunity to validate software and hardware behavior in real-world computing environments early in the product lifecycle. By participating in the Early Access Program you’ll gain: Early access to emerging technologies. Ability to influence the software’s future development direction. Direct access to PaperCut’s key developers for support and assistance. As an Early Access Tester you should be willing to: Share your in-the-field experiences with the PaperCut development team. Be willing to install patches or hotfixes when/if problems are encountered. Be generally accepting of the occasional software bug! The “real world” type of bugs that often slip past an artificial lab test environment. To gain access to the Early Access Program, please complete this form, sign and return a scanned copy to [email protected] . Technology/Feature of Interest: PaperCut MF Dell MFP Embedded Organization Name: Country & State: First Name: Last Name: Position: Email: Phone: Contact Hours: I acknowledge that by participating in the PaperCut Early Access Program I will be running first-release or possibly immature software. Sign: ………………………………………………… Date: …………………………. Name (print): ……………………………………………. Copyright © 2015 PaperCut Software International Pty. Ltd., All Rights Reserved. 5 of 50 | Dell MFP Embedded Manual 2015-09-02 2 Overview This manual provides an overview of the installation, configuration and operation of PaperCut’s embedded software MFP (Multi-Function Printer) solutions. Today’s MFPs are smarter – they have touch screens and offer the ability to run applications directly on the device. The goal of PaperCut Software’s embedded MFP solution is to leverage these smart devices and to provide walk-up copier users with the same set of rich application features provided in the print control area. These include: Secure access to device functions End user authentication including integration with single sign-on environments Monitoring of photocopying, scanning and faxing (quotas, charging, allocation and logging) Allocation of copying, scanning and faxing to accounts/departments/costcenters/projects Release jobs from a hold/release queue (Secure & Find Me Printing) Group based access control: Limit access to color copying, the device as a whole, or to selected user groups Self-associate swipe cards with domain user accounts directly at the device Streamlined interface throughout Self-association and print release are possible as part of the device login Account invoice and comment options are supported Customizability of print release and account selection screens Logo, messages and colors are customizable Highlights of the embedded solution include: 2.1 Consistency The embedded solutions are developed in-house by the PaperCut Software development team. This ensures that the copier interface is consistent with the workstation print interface, meaning users only have to learn one system. 2.2 Integration PaperCut is a single integrated solution where print, internet and copier control are all managed in the one system. Users have a single account and administrators have the same level of reporting and administration for all services. The embedded solution interacts with the PaperCut server using a Service Oriented Architecture (SOA) and web services based protocols. 2.3 Rate of development PaperCut is developed under a release-often policy where new features are made available to users as soon as they are complete. Unlike hardware based solutions, new versions can be delivered to users as regularly as software updates. Copyright © 2015 PaperCut Software International Pty. Ltd., All Rights Reserved. 6 of 50 | Dell MFP Embedded Manual 2015-09-02 2.4 Vendor Neutral PaperCut remains true to its vendor neutral stance. All embedded solutions are equal and support all server OS’s including Windows, Linux and Mac. 2.5 Security A large percentage of PaperCut’s user base is in educational environments where security is important. All embedded solutions are developed with security in mind. Where security objectives cannot be satisfied, the deficiencies are fully disclosed. 3 Installation Requirements This section covers the installation of the PaperCut embedded application for compatible Dell MFP devices. The embedded application will enable access control, secure printing and “Find-Me” printing, and allow logging of copying, scanning and faxing (for information on tracking network printing see the PaperCut user manual). 3.1 Requirements Before installing the PaperCut Embedded Application on to the Dell MFP device, ensure that basic monitoring of network printing has been setup up and tested for this device. The device would show up in the printer list in the PaperCut web interface and have a few print jobs in its print history. After that, ensure the following points are checked off before getting started: PaperCut is installed and running on your network. Please see the ‘Introduction -> Quick Start Guide’ section of the PaperCut user manual for assistance. Ensure that your Dell MFP device is supported. Ensure that the Dell MFP device is connected to the network. Have available the network name or IP address of the Dell MFP device. It is recommended that the device be configured with a static IP address. Verify that firewalls or other network restrictions do not prevent the device access to the PaperCut server on ports 9191 and 9193. Copyright © 2015 PaperCut Software International Pty. Ltd., All Rights Reserved. 7 of 50 | Dell MFP Embedded Manual 2015-09-02 3.2 Device Compatibility The PaperCut embedded application for the Dell MFP supports the following model: Dell Color Multifunction Printer C7765dn Dell Color Multifunction Printer C5765dn 3.3 Other devices PaperCut also supports a range of Dell devices running the LeSF platform. The manual for those devices is available here: PaperCut MF – Dell Embedded.pdf Copyright © 2015 PaperCut Software International Pty. Ltd., All Rights Reserved. 8 of 50 | Dell MFP Embedded Manual 2015-09-02 4 Installation and Setup The following installation steps are based on the Dell C7765dn interface. The administration web interface and steps may differ for your model or model version. Access the device’s web interface at http://<device-url> and login as the administrator. The default administrator username and password is detailed in the device manuals. At time of writing, the default administrator username is “admin” and password “1111”. It is recommended to change the administrator password as soon as possible. Copyright © 2015 PaperCut Software International Pty. Ltd., All Rights Reserved. 9 of 50 | Dell MFP Embedded Manual 2015-09-02 4.1 Mandatory Device Configuration 4.1.1 Create a digital certificate For secure communications between the device and PaperCut server, a digital certificate needs to be created. 1. From the web interface, select the Properties tab. 2. Select the Security group. 3. Select Machine Digital Certificate Management . Copyright © 2015 PaperCut Software International Pty. Ltd., All Rights Reserved. 10 of 50 | Dell MFP Embedded Manual 2015-09-02 4. Select the Create New Self Signed Certificate button. 5. You can leave the certificate settings at their default, or change to taste. 6. Press the Apply button. Copyright © 2015 PaperCut Software International Pty. Ltd., All Rights Reserved. 11 of 50 | Dell MFP Embedded Manual 2015-09-02 4.1.2 Enable Secure Sockets Layer (SSL) 1. From the web interface, select the Properties tab. 2. Select the Security group. 3. Select SSL / TLS Settings . 4. Tick the HTTP – SSL / TLS Communication checkbox. 5. Press the Apply button. 6. The settings will be saved and the machine will request a reboot. Press the Reboot Machine button, and confirm you want to reboot the device. Once the device is rebooted, you will only be able to connect to the device via the secure https://<device-url>. Copyright © 2015 PaperCut Software International Pty. Ltd., All Rights Reserved. 12 of 50 | Dell MFP Embedded Manual 2015-09-02 4.1.3 Enable Plug-in Settings 1. From the web interface, select the Properties tab. 2. Select the Security group. 3. Select the Plug-in Settings sub-group. 4. Select the Plug-in Settings list item. 5. Tick the Plug-in Settings checkbox. 6. Press the Apply button. You will be asked to reboot the device. Copyright © 2015 PaperCut Software International Pty. Ltd., All Rights Reserved. 13 of 50 | Dell MFP Embedded Manual 2015-09-02 4.1.4 Deploying plugin-ins (Dell C5765dn only). The solution requires embedded component plugins to be deployed to the device for operation. These are normally automatically deployed as part of device creation in PaperCut. C5765dn requires that the plugins be deployed by the administrator via the administration UI. 1. From the web interface, select the Properties tab. 2. Select the Security group. 3. Select Plug-in Settings . 4. Select List of Embedded Plug-ins . 5. Use Upload button to upload each plugin JAR file located under: [PaperCut Install Location]\providers\hardware\dell Copyright © 2015 PaperCut Software International Pty. Ltd., All Rights Reserved. 14 of 50 | Dell MFP Embedded Manual 2015-09-02 If you’re upgrading plugins on a device, before proceeding with update the plugins need to be stopped and device rebooted. Once the plugins have been installed or updated the device will instruct to perform a reboot prior to activation. Copyright © 2015 PaperCut Software International Pty. Ltd., All Rights Reserved. 15 of 50 | Dell MFP Embedded Manual 2015-09-02 4.2 Disable Print Accounting When PaperCut is monitoring print queues, it has control of what print jobs are allowed to print. If PaperCut allows a job to print, we do not want the device to deny the print job or track printing twice (duplicate charging). This requires that print accounting is disabled in the printer driver and on the device, as described below. Set up a print queue for the MFP on the print server using vendor provided print drivers. The driver has to be configured to allow unauthenticated printing. For Windows, right-click the corresponding printer icon in the Printers section of Windows Control Panel and select “Printer Properties”. Select the “Configuration” tab: On this tab, select “Accounting”, then select “None” in the drop down and save. Copyright © 2015 PaperCut Software International Pty. Ltd., All Rights Reserved. 16 of 50 | Dell MFP Embedded Manual 2015-09-02 4.3 Optional Device Configuration 4.3.1 Enable swipe card support To enable swipe card readers with the device: 1. From the web interface, select the Properties tab. 2. Select the Security group. 3. Select the Smart Card Settings sub-group. 4. Select the General list item. 5. Set Smart Card to Enabled . 6. Press the Apply button. 4.3.2 Change the administrator password 1. From the web interface, select the Properties tab. 2. Select the Security group. 3. Select System Administrator Settings . 4. Enter a new password in the Administrator’s Passcode and Retype Administrator’s Passcode fields. 5. Press the Apply button. 4.4 Card Reader support PaperCut supports using swipe cards for authentication at the copier. This is often more convenient than entering a username and password, or ID and PIN to log in. PaperCut on the Dell MFP supports the following USB card readers: RFIDeas PcProx Plus (RDR-7081AKU and related models) RFIDeas Air ID (RDR-7581AKU and related models) RFIDeas Playback (RDR-7585AKU and related models) RFIDeas MS3-00m1aku Mag reader Magtek Mini Keyboard emulating swipe reader (21040110 and related models) OmniKey 5427 Elatec TWN3/TWN4 (Dell A06 firmware or later required) Please ensure swipe card support is enabled as per the setup instructions in section 4.3.1 above. Copyright © 2015 PaperCut Software International Pty. Ltd., All Rights Reserved. 17 of 50 | Dell MFP Embedded Manual 2015-09-02 4.5 PaperCut Server Configuration 1. Log in to the PaperCut administration interface using a web browser (e.g. http://papercut-server:9191/admin ). 2. Navigate to “Options -> Advanced” and ensure the option “Enable external hardware integration” is enabled. 3. 4. 5. 6. Press “Apply”. Navigate to the “Devices” tab. Click “Create Device” in the left pane. From the “Type” drop down, select “Dell MFP”. 7. 8. 9. 10. 11. Enter a descriptive name for the device under “Device name”. Enter the device’s network name or IP address under “Hostname / IP”. Optionally enter location/department information. Enter the device administrator username and password. Under “Function”, tick “Track & control copying” and “Enable print release”. (Enabling both copy and print release functionality allows for post-installation testing). 12. Click “OK”. Copyright © 2015 PaperCut Software International Pty. Ltd., All Rights Reserved. 18 of 50 | Dell MFP Embedded Manual 2015-09-02 4.5.1 Verifying device creation The device summary screen will now display with a section titled “Device status”. The device will take up to two minutes to initialize and install plugins, and will automatically reboot one or more times during the process. Various status messages will be displayed as initialization progresses. Once complete, the device status will show “Started – Waiting for user to login”: Before proceeding with testing, ensure the device has started successfully and no warnings or errors are shown on the device status. Installation process requires the device to be not in use, please ensure the device status shows up as “Ready” in the status tab of the device administrative interface. The device may be in use due to the presence of a person in front of the sensor, use of the device panel or during execution of jobs. Please note that additional configuration settings need to be applied to the device after the first reboot. The MFP screen may temporarily show an error message until the install process resumes, completes, and reboots the device one more time. It’s therefore advised to wait before using the device until the device status in PaperCut reflects that it has started, with no further setup activities to do. Once the device is successfully created in PaperCut, the device screen should change to display the PaperCut login screen: Copyright © 2015 PaperCut Software International Pty. Ltd., All Rights Reserved. 19 of 50 | Dell MFP Embedded Manual 2015-09-02 This first screen reflects the currently allowed authentication methods for the device in PaperCut, and will change depending on the authentication methods selected on the device details page. If the MFP is not showing PaperCut login screen and is instead showing an error message suggesting that the screen cannot be displayed please verify that the “Login Type” setting is set to “Customized Login”. 1. From the web interface, select the Properties tab. 2. Select the Security group. 3. Select Authentication Configuration 4. Set Login Type to “Customized Login” 5. Reboot as instructed Copyright © 2015 PaperCut Software International Pty. Ltd., All Rights Reserved. 20 of 50 | Dell MFP Embedded Manual 2015-09-02 4.6 Additional Network Security (optional) The MFP communicates with the PaperCut server over the network (e.g. to authenticate users or release print jobs). To provide an additional level of security, PaperCut may be configured to only allow device connections from a restricted range of network addresses. This ensures that only approved devices are connected to the PaperCut servers By default PaperCut will allow device connections from any network address. To restrict to a subset of IP addresses or subnets: 1. Logon to the PaperCut administration web interface at http://<papercutserver>:9191/admin 2. Go to the “OptionsAdvanced” tab and find the “Security” section. 3. In the “Allowed device IP addresses” field enter a comma-separated list of device IP addresses or subnets (in the format <ip-address>/<subnet-mask>). 4. Press the “Apply” button. Copyright © 2015 PaperCut Software International Pty. Ltd., All Rights Reserved. 21 of 50 | Dell MFP Embedded Manual 2015-09-02 5 Post-install testing After completing installation and basic configuration it is recommended to perform some testing of the common usage scenarios. This is important for two reasons: 1. To ensure that the embedded application is working as expected. 2. To familiarize yourself with the features and functionality of PaperCut and the embedded application. This section outlines four test scenarios that are applicable for most organizations. Please complete all the test scenarios relevant for your site. 5.1 Test Preparation To complete these tests it is recommended you use two test users so each can be configured differently. These users are: ‘testusersimple’ – Used to perform basic copier monitoring and control and to perform print release tests. ‘testuseradvanced’ – Used to perform copier monitoring and control with the account selection enabled (i.e. to charge copying to accounts/departments/costcenters/etc.). If you have existing users that can be used for these tests, then they can be used instead. To setup these users in PaperCut: 1. Create the ‘testusersimple’ and ‘testuseradvanced’ users in your Active Directory or LDAP directory. 2. Log into the PaperCut’s admin web interface 3. Go to the “Options->User/Group sync” page and press “Synchronize Now”. 4. Once the sync is complete, the users will be added to PaperCut. The next step is to configure the users. To configure ‘testusersimple’: 1. In PaperCut, select the “Users” tab 2. Select the ‘testusersimple’ user. 3. Set the user’s balance to $50.00 and verify the account is set to “Restricted”. Copyright © 2015 PaperCut Software International Pty. Ltd., All Rights Reserved. 22 of 50 | Dell MFP Embedded Manual 2015-09-02 4. Verify that this user is set to “Automatically charge to personal account” in the “Account selection” options. 5. Press the “OK” button to save. To configure ‘testuseradvanced’: 1. In PaperCut, select the “Users” tab 2. Select the ‘testuseradvanced’ user. 3. Change the “Account Selection” option to “Standard account selection popup” and enable all the account selection options. 4. Press the “OK” button to save. 5.2 Scenario 1: Standard copying Standard copying involves monitoring/charging printing to a user’s personal account. This is most commonly used for student printing or basic staff monitoring. Users can also be configured for unrestricted printing, which is commonly used for staff/employee use. At the photocopier: 1. The photocopier should display a screen to prompt the user to login. Follow the prompts to login. 2. When prompted, enter username (‘testusersimple’) and password in the login fields. 3. At this point the copier will be enabled for usage. 4. Follow the onscreen instructions and perform some test copying, i.e. press the “Copy” key on the device and perform a copy as normal. 5. Once completed copying press the “Logout” button on the device’s keypad. Copyright © 2015 PaperCut Software International Pty. Ltd., All Rights Reserved. 23 of 50 | Dell MFP Embedded Manual 2015-09-02 Back in the PaperCut application verify that the copier activity was recorded and the user’s account deducted. 1. Log into PaperCut. 2. Select the device from the “Devices” tab. 3. Select the “Job Log” tab. This will list all recent copying activity on the copier. The copying just performed as the test user should be listed. Verify the details of the copy job that was just performed. 4. Click on the user’s name in the user column to view the user’s account details 5. Select the “Job Log” tab to display all print/copy activity for the user. 6. Select the “Transaction History” tab and verify that the cost of the photocopying was deducted from the user’s account. 5.3 Scenario 2: Copying with account selection Firstly a test account should be created: 1. Log into PaperCut, select the “Accounts” tab. 2. Select the “Create a new account…” action link on the left. 3. Enter an account name “Test Account 1”. 4. Enter PIN/Code “2233”. 5. Select the “Security” tab and allow all users to access that account by adding the “[All Users]” group. 6. Press “OK”. At the photocopier: 1. The photocopier should be displaying a screen to prompt the user to login. Follow the prompts to login. 2. When prompted, enter the username, ‘testuseradvanced’, and the password in the login fields. Copyright © 2015 PaperCut Software International Pty. Ltd., All Rights Reserved. 24 of 50 | Dell MFP Embedded Manual 2015-09-02 3. You will now be presented with the Account Selection page: You may select your account from a list, by search or by an account code/PIN. From the list, select the “Test Account 1” created earlier. 4. At this point the copier will be enabled for usage. Follow the onscreen instructions and perform some test copying. I.e. press the “Copy” key on the device and perform a copy as normal. 5. Once completed copying press “Logout” button. Note: The account selection workflow can vary according to the user options selected. For example a user configured to see the Advanced Account Selection popup may see an additional dialog asking for comment and invoice information. At the device level, you may also configure whether you wish to see the Account Summary screen or not. Back in the PaperCut application verify that the copier activity was recorded and the user’s account deducted. 1. Log into PaperCut 2. Select the device from the “Devices” tab 3. Select the “Job Log” tab. This will list all recent copying activity on the copier. The copying just performed as the test user should be listed. 4. Verify the details of the job (i.e. that the job was charged to the selected account). 5. In the log details, click on the “Charged To” account name to view the account’s details. 6. Selecting the “Job Log” tab will display all print/copy activity for the account, and will show the test photocopying that was performed. Copyright © 2015 PaperCut Software International Pty. Ltd., All Rights Reserved. 25 of 50 | Dell MFP Embedded Manual 2015-09-02 5.4 Scenario 3: Print release The embedded application may also be used for print release. For a full description of PaperCut hold/release queues and release stations, please read the PaperCut manual. Skip this scenario if hold/release queues will not be used at your site. To perform print release testing, a hold/release queue must be enabled: 1. In PaperCut, select the “Printers” tab. 2. Select the print queue (i.e. not the ‘device’) for the Dell MFP that will be used for testing. 3. Enable the “Hold/release queue” option. 4. Press OK/Apply to save the changes. All printing to this queue will now be held until released by a user. The photocopier device must also be enabled as a “Print Release Station”: 1. In PaperCut, select the “Devices” tab. 2. Select the Dell MFP. 3. Under “Device Function” tick “Enable release station”. 4. Select the print queue that was enabled for hold/release above. The Dell MFP will allow jobs on the selected queues to be released. 5. Press “OK” to save. 6. Login to a computer workstation as ‘testusersimple’. 7. Print a few jobs to the print queue that was configured above. The jobs will be held in the hold/release queue. 8. Confirm that the jobs are held, by checking that the jobs are listed in the “Printers -> Jobs Pending Release” page of the PaperCut administration interface. Copyright © 2015 PaperCut Software International Pty. Ltd., All Rights Reserved. 26 of 50 | Dell MFP Embedded Manual 2015-09-02 9. Confirm that the username is ‘testusersimple’. At the device: 1. Log into the device as “testusersimple” as described above. 2. Upon successful login you will be presented with the Held Print Jobs page: 3. Select “Print All” to release all jobs. The jobs will begin to print to the destination printer. (The “Print All” button will not appear if there are no jobs to print) 4. Once completed press the “Logout” button on the device keypad. 5.5 Scenario 4: Scanning and faxing The Dell MFP can also scan documents and send them by email. If a phone line is attached, they can send faxes. You can enable tracking scanning and faxing. Users can be prevented from scanning or faxing when they are out of credit. To enable tracking of scans and faxes: 1. In PaperCut, select the “Devices” tab. 2. Select the MFP device. Copyright © 2015 PaperCut Software International Pty. Ltd., All Rights Reserved. 27 of 50 | Dell MFP Embedded Manual 2015-09-02 3. Under “Device function” tick “Track & control scanning” and tick “Track & control faxes”. 4. Select the charging type “advanced” in both cases and set some numbers for page costs and thresholds. The cost after the threshold should be lower than the standard cost as it represents a volume discount. As an example, the screen shot below shows that the first page of a fax is charged at $0.20 and any subsequent page at $0.10. At the photocopier, log in and scan a few documents and send a few faxes. At the end, make sure to press the “Logout” button on the device’s keypad. In the PaperCut administration interface verify that the scan and fax activities were recorded and the user’s account was deducted. This can be done as follows: 1. Log in to the PaperCut administration interface. 2. Select the device from the “Devices” tab. 3. Select the “Job Log” tab. This will list all recent activity on the copier, including copying, scanning and faxing. The jobs just performed as the test user should be listed. Verify the details of the jobs that were just performed. 4. Click on the user’s name in the user column to view the user’s account details. 5. Select the “Job log” tab to display all activity for the user. 6. Select the “Transaction History” tab and verify that the cost of the scans and faxes was deducted from the user’s account. Copyright © 2015 PaperCut Software International Pty. Ltd., All Rights Reserved. 28 of 50 | Dell MFP Embedded Manual Copyright © 2015 PaperCut Software International Pty. Ltd., All Rights Reserved. 2015-09-02 29 of 50 | Dell MFP Embedded Manual 2015-09-02 6 Configuration After completing the Installation section and registering the device with PaperCut, it will have been configured with reasonable default settings that are suitable for most environments. This section covers how to change those default settings. All the following settings are available via the device’s ‘Summary’ tab in the PaperCut administration interface. 6.1 Device Function The device function setting defines which functions will be available on the device and how it will be used. Not all function settings are supported on all devices. Each device function is discussed in the following table. Device Function Description Track & control copying The device will track walk-up off-the-glass copying. Track & control scanning The device will track scanning such as scan-to-email or scan-to-file. Track & control faxing The device will track the sending of faxes. Enable release station The device will act as a print release station. 6.2 Authentication Methods PaperCut supports a number of different ways to authenticate users who walk-up to the devices to perform copying. The default authentication method is username and password authentication. The available authentication methods can be modified in the ‘External Device Settings -> Authentication methods’ section. Copyright © 2015 PaperCut Software International Pty. Ltd., All Rights Reserved. 30 of 50 | Dell MFP Embedded Manual 2015-09-02 Authentication methods available for a device Not all authentication methods are supported on all devices. A grayed-out option indicates that the option is not supported on this device. Each authentication method is discussed in the following table. Authentication Method Description Username and password The user may use their domain/network username and password to log into the device. Identity number The user may log in with their identity number. Identity numbers are convenient when usernames are long or cumbersome to enter. For example, rather than entering a username like ‘john.smith.001’, it may be more convenient to enter an employee ID of ‘1234’. See the PaperCut user manual for information about user identity numbers, including importing identity numbers from an external source. Identity number -> Require PIN When a user logs in with their identity number, they must also provide their associated PIN. This provides additional security for identity number logins. Anonymous (No login required) Specifies that this device should always automatically log in as the specified user. This option overrides all other authentication methods Description of authentication methods Copyright © 2015 PaperCut Software International Pty. Ltd., All Rights Reserved. 31 of 50 | Dell MFP Embedded Manual 2015-09-02 7 Advanced Configuration 7.1 Config Editor The common configuration options for a device in PaperCut are available on the device’s “Summary” tab, and are discussed in more detail in the Configuration section. This section covers the more advanced or less common configuration options which are available via the “Advanced Config” tab in the device details screen. Config name Description ext-device.card-noconverter See Configuring Swipe Card Readers. ext-device.card-noregex See Configuring Swipe Card Readers. ext-device.card-selfassociation.usesecondary-cardnumber Select whether user self-association should occupy the primary or secondary card number. This overrides the global setting unless the keyword "GLOBAL" is specified. This is useful when there is a mix of different non-configurable card readers that read different numbers from an ID card. Set to "Y" to use the secondary card number, "N" to use the primary card number. Default: "GLOBAL" to defer to the global configuration setting. ext-device.selfassociation-allowedcard-regex Specify a regular expression that limits which card numbers are accepted for associating swipe cards with user accounts. See Authentication Methods for details. Defaults to “.*” (dot-star) which includes all card numbers. extdevice.dell.release.sh ow-cost Specify whether to show the job cost for each print job in the job release screen. Values: Y, N. Default: Y Copyright © 2015 PaperCut Software International Pty. Ltd., All Rights Reserved. 32 of 50 | Dell MFP Embedded Manual ext-device.dell.showrelease 2015-09-02 Specify whether to include Print Release in the login workflow when the device is configured as a release station. Values: Y, N. Default: Y extdevice.dell.release.list -format Allows configuring the format of the job listing on the print release screen. This is a customisable format string that can be built up using a combination of well-known tokens such as: %document% - job title %user% - job user %pages% - job pages %time% - job time %cost% - job cost %client% - job client Default: %document% extdevice.dell.accounts.i nitial-tab Set the account selection screen to start on the “from List”, “Search” or “by Code” tab. If you have many shared accounts you may wish to set this to the “Search” tab. An example of this is legal firms who use shared accounts for matter codes. Values: DEFAULT (“from List”), SEARCH, CODE. Default: DEFAULT ext-device.dell.limitreference.paper-size ext-device.dell.limitreference.duplex PaperCut will deny device access to restricted users who do not have enough balance to copy. To determine if a user has enough balance to copy, a reference copy is required. By default PaperCut checks if the user has enough balance to copy a single sided Letter (North America) or A4 (worldwide) page. In some situations it may be desirable to change the reference copy, such as when the device allows smaller page sizes like A5. Default for ext-device.dell.limit-reference.paper-size in North America: Letter Default for ext-device.dell.limit-reference.paper-size worldwide: A4 Default for ext-device.dell.limit-reference.duplex: N (No) Copyright © 2015 PaperCut Software International Pty. Ltd., All Rights Reserved. 33 of 50 | Dell MFP Embedded Manual ext-device.dell.forcedevice-login-tries 2015-09-02 Allows to specify and control the number of administrative login attempts performed by the server while installing and configuring the device. Occasionally, the MFP may be busy and not allow any logins, this setting controls the retry behaviour before the operation is considered as failed and given up. Default: 10 ext-device.dell.forcedevice-login-triessleep-secs Controls the wait period in seconds between any administrative login retry attempts, used in conjunction with ‘force-device-login-tries’ setting. Default: 5 seconds ext-device.dell.forceinstall-reboot Specify whether to force the device to be rebooted at the end of the install sequence, even when no changes are deemed as requiring a reboot. Values: Y, N. Default: N ext-device.dell.forceinstall-services Specify whether to force the registration of all custom services on the device each time the device is started from PaperCut. This will perform the install regardless of the detected service versions on the device. Values: Y, N. Default: N ext-device.dell.forceuninstall-plugins Specify whether embedded plugins should be deleted from the device if the device is removed from PaperCut. If the plugins are not deleted they will be left on the device in a stopped state. Values: Y, N. Default: Y ext-device.dell.setauthentication-modeenabled Specify whether to automatically configure the login type used by the device (under Security > Authentication Configuration > Login Type). When PaperCut manages the device, the configuration will be set to “Customized Login”. Values: Y, N. Default: Y Copyright © 2015 PaperCut Software International Pty. Ltd., All Rights Reserved. 34 of 50 | Dell MFP Embedded Manual ext-device.dell.forceconfigureauthentication 2015-09-02 Specify whether to force the configuration of the login type used by the device (under Security > Authentication Configuration > Login Type). When PaperCut manages the device, the configuration will be set to “Customized Login”. Values: Y, N. Default: N extdevice.dell.integration .enabled Specify whether integration with the device is enabled. When enabled, PaperCut embedded plugins and services are installed to the target device, and managed by PaperCut. This option allows the device to be temporarily decoupled from PaperCut without deleting it. Values: Y, N. Default: Y ext-device.dell.locale Enter the locale (language setting) for display on the device in the form xx or xx_XX (if different from the server). Examples: “fr” or “pt_PT”. extdevice.dell.email.pers onalized-sender Controls whether all logins on the device have their e-mail address pre-populated from the PaperCut user details. This will determine the “from” address inside e-mail related functions. If set to N, the e-mail address will not be pre-populated automatically, enabling it to be set by individual users each time. Otherwise the address value is fixed. Values: Y, N. Default: Y Copyright © 2015 PaperCut Software International Pty. Ltd., All Rights Reserved. 35 of 50 | Dell MFP Embedded Manual extdevice.dell.ui.initialscreen 2015-09-02 Specify an initial destination screen after unlocking the device. By default the “Services Home” screen is displayed. Values: extdevice.dell.ui.headertext-color allservice Services Home screen (Default) copy Copy screen copy_easy Simple Copy screen box Extended Folder screen scan_mbox Scan To Folder screen scan_email Scan To Email screen scan_pc Scan To PC screen scan_url Store & Send Link screen scan_media Store to USB screen fax Fax screen fax_easy Simple FAX screen ifax Internet FAX screen sfax Server FAX screen jobmem Stored Programming screen jobflow Job Flow Sheets screen web1-10 Web Application 1-10 cstm1-9 Custom Service 1-9 Customizes header color, see section 7.4 Copyright © 2015 PaperCut Software International Pty. Ltd., All Rights Reserved. 36 of 50 | Dell MFP Embedded Manual 2015-09-02 extdevice.dell.ui.headercolor Customizes header text color, see section 7.5 extdevice.dell.ui.connecti on-check-timeoutmillis Set the time in milliseconds, a connection check should wait for a response from the PaperCut server. extdevice.dell.plugin.logapp-server-frequency Defines how often an embedded plugin log events are sent to the server (and saved). Default: 5000 If set to a positive number the log events are pushed to the server (the value defines how frequently – by buffering as many events as defined by this value before sending over). If set to zero the remote logging is disabled. If set to 1 then every log event is immediately sent to the server as it occurs (imposing a performance penalty) Default: 0. Example: 10. extdevice.dell.plugin.logsyslog-server Defines whether embedded plugin remote logging to syslog server is activated. If set to a valid hostname or an IP address and there is a syslog service running (UDP port 514) then all logging events will be sent there. extdevice.dell.plugin.logfile-max-number Defines maximum number of embedded plugin log files to keep. This affects both the log files saved locally on the device and those sent remotely to the server if “ext-device.dell.plugin.log-app-serverfrequency” is set. Default: 10 Copyright © 2015 PaperCut Software International Pty. Ltd., All Rights Reserved. 37 of 50 | Dell MFP Embedded Manual 2015-09-02 extDefines the duration of time in milliseconds that any card swipe data is device.dell.plugin.card retained for. Increase on slower performing device/card reader -hold-time-millis combinations to ensure card swipes are always detected. Do not adjust unless experiencing issues. Restart the device after changing this setting. Default: Configured automatically by the Application Server depending on the platform version. extDefines the duration of time in milliseconds that determines how device.dell.plugin.card often the card reader is polled for card data. Do not adjust unless -poll-time-millis experiencing issues. Restart the device after changing this setting. Default: Configured automatically by the Application Server depending on the platform version. Copyright © 2015 PaperCut Software International Pty. Ltd., All Rights Reserved. 38 of 50 | Dell MFP Embedded Manual 2015-09-02 7.2 Setting an explicit PaperCut Server Network Address The copier connects to the PaperCut server to validate user credentials, display print jobs for release, etc. The device makes inbound network connections to the PaperCut server using a network address of the PaperCut server. By default PaperCut will use the server’s IP address (if the server has multiple IPs (i.e. multi-homed) then PaperCut will select one of them), but on some networks this address may not be publicly accessible from other parts of the network. If the PaperCut server has a “public” IP address or DNS name then this can be used instead, which allows the copiers to use the “public” network address instead of the IP address that PaperCut detects. To do this: Login to PaperCut Go to the "Options" tab. Select "Config Editor (advanced)", from the action links on the left. Find the "system.network-address" setting. Enter the public network address for the PaperCut server. Press the "Update" button next to the setting and confirm the setting is updated. When connecting devices to a PaperCut site server, you can configure the sites’ “Network address used by devices”: Login to PaperCut Go to the “Sites” tab. Select the site to edit. Change the “Network address used by devices”. Save the site details. To have either of these changes take effect immediately, restart the PaperCut Application Server service (i.e. on Windows use: Control Panel->Admin Tools->Services). 7.3 Configuring Swipe Card Readers Swipe cards contain numbers used to identify users according to the card number configured in the User Details screen under “Card/Identity” number. Some readers report information in addition to the number encoded on the card, such as checksums. PaperCut can treat these cases in three ways: Card Number Needs No Conversion A typical case is the checksum being reported after the card number, separated by an equals sign, such as 5235092385=8. PaperCut can handle this case by default; it will extract the number before the equal sign as the card number: 5235092385. Regular Expression Filters For some cases, a “regular expression” may be required that will filter the card number from the complete string of characters reported by the card reader. Documentation on regular expressions can be found on the Internet, e.g. at www.regular-expressions.info. Copyright © 2015 PaperCut Software International Pty. Ltd., All Rights Reserved. 39 of 50 | Dell MFP Embedded Manual o o o o o 2015-09-02 The regular expression must be fashioned so the card number is returned as the first match group. Usually one regular expression will be used for all the devices managed by PaperCut. This must be entered in “Config editor (advanced)” which is located on the “Options” tab under “Actions”. The key is called “ext-device.card-no-regex”. Additionally, the global setting can be overridden on a per-device basis: The key “ext-device.card-no-regex” can also be found on the “Advanced Config” tab in the device details screen. This setting will override the global setting unless the keyword “GLOBAL” is specified. PaperCut developers will gladly assist in producing a regular expression when supplied with a few sample outputs from your card reader. Please contact PaperCut support. If you would like to write your own regular expressions, here are some examples: Use the first 10 characters (any character): (.{10}) Use the first 19 digits: (\d{19}) Extract the digits from between the two “=” characters in “123453=292929=1221”: \d*=(\d*)=\d* Card Number Format Converters In addition to extracting parts of the card numbers using regular expressions, converting numbers from one format to another is a common requirement. For example a card reader may report in hexadecimal format, while the number stored in the source (e.g. Active Directory) is in a decimal format. PaperCut includes a number of inbuilt converters to assist here. Note: Many card readers are configurable - the number format can be changed at the hardware level via utility or configuration tools. PaperCut’s software-level converters are there to support card readers that don’t offer this level of configuration, or where a global software-level conversion is a better choice. For example it may be quicker to do the conversion in PaperCut rather than manually reprogram 100+ readers! Like regex’s, the convertors may be defined on either a global (all devices) or a per-device basis. To set globally: Options -> Actions -> Config Editor Search for “ext-device.card-no-converter” Enter the name of the required converter (see table below) and click Update To set at the device level: Devices -> [select device] -> Advanced Config Editor Search for “ext-device.card-no-converter” Enter the name of the required converter (see table below) and click Update Standard Converters Copyright © 2015 PaperCut Software International Pty. Ltd., All Rights Reserved. 40 of 50 | Dell MFP Embedded Manual 2015-09-02 Convertor Description hex2dec Convert a hexadecimal (base 16) encoded card number to decimal format. Hexadecimal numbers usually contain 0-9 and A-F. This will convert “946EBD28” to “2490285352”. dec2hex Convert a decimal encoded card number to hexadecimal format. This will convert “2490285352” to “946EBD28”. ascii-enc Unpack an ASCII encoded card number string. E.g. given the number “3934364542443238”, the ASCII code “39” is converted to 9, “34” > 4, “45” -> E, with the entire number resulting in “946EBD28”. javascript:<path> Advanced: Define a custom conversion function in JavaScript (see below) It is possible to chain or pipeline converters by delimiting with a pipe (|). For example, asciienc|hex2dec will first unpack the encoded ASCII number then convert it to a decimal. Tip: Not sure which converter to use? Often trial and error is a good approach. After presenting a card, the number will appear in an application logger message with conversions applied (assuming the card is unknown to the system). Try different converters and inspect the resulting numbers in the application log. Using custom JavaScript If the inbuilt converter functions are unable to meet requirements, it is possible to define your own function using JavaScript. This is an advanced exercise and it is expected that any implementer be familiar with programming and JavaScript. To implement your own converter: 1. Create a file text file [app-path]/server/custom/card.js 2. Define a single JavaScript function in this file called “convert” It should accept and return a single string. Here is a trivial example: function convert(cardNumber) { return cardNumber.substring(3,10).toLowerCase(); } 3. Enter a converter in the form: javascript:custom/card.js Tip: Check the file [install-path]/server/log/server.log when testing. Any scripting errors will be displayed as warning messages in the log. Tip: A Javascript script may also be included in the pipeline. For example ascii-enc|hex2dec|javascript:custom/card.js Other advanced notes Copyright © 2015 PaperCut Software International Pty. Ltd., All Rights Reserved. 41 of 50 | Dell MFP Embedded Manual 2015-09-02 If both a regular expression and a converter are defined, the regular expression is applied first. This means a regular expression can be used to clean up the input (e.g. remove checksum or delimiters) before passing to a converter. In some special situations, a custom JavaScript implementation may not be enough. For example, there may be a requirement to use a 3rd party system to decrypt the number. PaperCut includes an advanced plugin architecture that the PaperCut Software development team uses to implement these advanced converters. Please contact support to discuss development options and costs. Copyright © 2015 PaperCut Software International Pty. Ltd., All Rights Reserved. 42 of 50 | Dell MFP Embedded Manual 2015-09-02 7.4 Customizing the Header Logo The embedded application displays a logo in the top left corner of the device screen. This logo can be replaced with your organization’s own logo image. The image must be saved as a PNG file with the filename “logo.png” and be 42 pixels high. Save the image on the PaperCut application server at the location: [PaperCut Install Location]\server\custom\web\device\dell\ You will need to create these folders if not present. The embedded application will fetch the logo image from this location if present. After copying your logo into position, verify it correctly appears in the embedded application. 7.5 Customizing the Header Colors The header colors are defined in the “Advanced Config” tab in the device details screen, see Config Editor. The options to change are: ext-device.dell.header.color – the background color (type DEFAULT for the default setting of dark green) ext-device.dell.header.textcolor – the text color (type DEFAULT for the default setting of white) The colors are specified using the hexadecimal web/HTML notation (#RRGGBB) where “RR” is the red component, “GG” is the green component and “BB” is the blue component. Copyright © 2015 PaperCut Software International Pty. Ltd., All Rights Reserved. 43 of 50 | Dell MFP Embedded Manual 2015-09-02 8 Uninstalling To remove the PaperCut embedded application from the device, simply delete the device from the Application Server. The PaperCut plugins will be automatically removed and the device restored to a pristine state. The device may reboot one or more times during the process. Note: Deletion of the components from the device requires an administrative login in to the device. The login is attempted multiple times during this process but it’s possible that all logins are denied and the uninstallation of the plugins and services from the device is aborted. Please ensure that the device doesn’t report itself as in use in the “Status” tab of its administrative interface before proceeding. It is possible to remove all components from the device without deleting it from PaperCut by use of an advanced configuration key ‘ext-device.dell.integration.enabled’. Refer to section 7.1. Copyright © 2015 PaperCut Software International Pty. Ltd., All Rights Reserved. 44 of 50 | Dell MFP Embedded Manual 2015-09-02 9 Known Limitations 9.1 Zero-Stop The zero stop capability prevents users from overrunning their available credit when using a device. Limited zero stop capabilities are available in the form of Job Limiting. Job Limiting is based on specifying the maximum allowed page counts for each device function accessible to the user. PaperCut calculates a user’s job limits at the time of login, factoring in the user's current balance and costs assigned to each MFP function. This calculation is based on configurable assumptions regarding paper size and simplex or duplex job types; irrespective of the actual attributes of a job. It is therefore possible for a restricted user to go in to a negative balance if they perform scan, fax or copy jobs that are more expensive than the assumed costs (e.g. the paper size is larger). These assumptions (or limit reference options) can be adjusted via the following configuration keys (see section 7.1 for more information): ext-device.dell.limit-reference.paper-size ext-device.dell.limit-reference.duplex The restricted user may also go into negative balance by performing different job types. E.g. a mix of color/BW copies, scans, etc. 9.2 Card reader and USB ports When one of the supported USB card readers is used on the device, and the card setting in the web administration tool is enabled (Security > Smart Card Settings > General), then the card reader cannot be unplugged without disabling the above setting first. If the card reader is unplugged, the device will treat it as an error, and register a fault. In general, if the device is equipped with back USB ports, it’s recommended to plug in any card readers to these ports and leave the front port for USB media. 9.3 Use of card reader after returning the device from sleep mode. When the device resumes from sleep mode and the power was cut to the USB ports the card reader may be inoperable for a few seconds as the device fully wakes. The login screen may show up before the card reader has fully become ready. Swiping during this time may not work. It is possible to tell when this occurs if the card reader beep function is configured on the device and the reader did not beep. Copyright © 2015 PaperCut Software International Pty. Ltd., All Rights Reserved. 45 of 50 | Dell MFP Embedded Manual 2015-09-02 10 FAQ & Troubleshooting What is the IP address of my PaperCut Server? Use operating system command-line tools such as ipconfig or ifconfig to determine this. The device setup in the PaperCut server doesn’t complete. The error message shown is “device is currently in use, unable to initiate exclusive lock on the device” The device setup process requires an administrative login to connect and lock the device temporarily, in order to complete its configuration. The error indicates that the setup process was unable exclusively to lock the device at this time. The device may be already in use by someone at the device or busy processing another job. The built-in movement sensor may have detected a person in front of the device. If this has occurred during device setup, you can restart and resume the setup once the device is ready again, by hitting ‘Apply’ on the ‘Device Details’ page in PaperCut. The embedded application shows “Connecting to server…” This indicates that the embedded application is unable to connect to the PaperCut server over the network. The embedded application will continually try to connect to the server, so if there is a temporary network outage it will start working once the connection is available again. Common causes of this problem are: The PaperCut application server is not running. There are firewalls or network routing configuration that is stopping the network connection from being established. Check firewalls on the PaperCut server or with your network administrator. There is a network outage that is stopping the connection being established. Try accessing the web interface of the Dell MFP to check that a network connection can be established. The PaperCut server name or IP was not set correctly. The embedded application shows “Incomplete configuration: the card reader is not enabled on this device” This indicates a discrepancy between the PaperCut carder reader configuration and that on the device. The card reader might be enabled as an authentication option in PaperCut, but not enabled under Security > Smart Card Settings > General > Smart Card. Copyright © 2015 PaperCut Software International Pty. Ltd., All Rights Reserved. 46 of 50 | Dell MFP Embedded Manual 2015-09-02 The embedded application shows “Incomplete configuration: unable to communicate with the device” This indicates that the device is not allowing the embedded application to talk to it. This is caused if the login type option is not set to “Customized Login” under Security > Authentication Configuration > Login Type. The install process performed by PaperCut automatically tries to configure this setting, this message may display intermittently while the setup process is still running, always confirm using the “Device Status” window on the Device Details page that the setup and configuration has completed before using the device. Print jobs released on the MFP do not print, the device beeps and aborts the jobs. The MFP job log may list the job status as “Aborted(016-757)”. Please ensure that the printing option is set as “Unlocked” under Properties > Security > Authentication Configuration > Next > Service Access. Confirm that the printer driver has the accounting option switched off. See section 4.2 Jobs performed on the MFP are not tracked in PaperCut? Have you enabled device job logging? Confirm that the appropriate job type is being tracked within PaperCut on the device details page. Why would a card reader not work? Not all card readers are supported. See Configuring Swipe Card Readers and Card Reader support. Card readers need to be a USB HID type device (keyboard emulating) and configured to emit a terminating keystroke (newline). Ensure the card reader being used sends a newline by connecting it to a PC and performing some swipes with notepad started. Magnetic swipe readers that read multiple tracks of data from magnetic cards may result in slow or unreliable reads due to a large number of keystrokes being output by the card read, they can usually be reconfigured to output just the track of interest (e.g Track 2). I have thousands of accounts representing my clients. Will the system handle this? Yes. We have designed the system to handle thousands of Shared Accounts. Users with many accounts will also be presented with some “power options” to help them find accounts including keywords based search. Copyright © 2015 PaperCut Software International Pty. Ltd., All Rights Reserved. 47 of 50 | Dell MFP Embedded Manual 2015-09-02 Copier functions are enabled when the user is out of credit. A user with no access or credit normally has certain device functions disabled. For example, a user without credit may have copying and faxing disabled, while still being allowed to scan. Access to some MFP functions may be allowed even if the user has no credit and the function has a cost assigned in PaperCut. This can happen if the access to any given MFP function is set to “unlocked” inside MFP configuration interface, thus overriding access control provided by PaperCut. This can be set by logging-in to web administrative interface and visiting Security > Authentication Configuration > Service Access and ensuring that every desired function that should have strict controls managed by PaperCut is set to “Locked”. Copyright © 2015 PaperCut Software International Pty. Ltd., All Rights Reserved. 48 of 50 | Dell MFP Embedded Manual 2015-09-02 How is user’s email address populated on the device? If the user’s record in PaperCut has an email address associated with it, when a user is scanning to email, the “from” address will be pre-populated with this value. This address is set automatically when the user logs on. Using current user’s email as the “to” address can also be easily done by using the “Add me” button available in the native application interfaces. If the addresses are not being pre-populated for a user, first check the user details in PaperCut to ensure an email address is set. I’m receiving the error: Started (with errors)… System is Locked. This error may present in the Device’s Status if you have not enabled the Embedded Plugins. See step: 4.1.3 Enable Plug-in Settings How do I access embedded logs? On C7765dn, the embedded plugin logs can be downloaded from the device’s web administration tool: 1. 2. 3. 4. Login to the device admin tool by navigating the browser to the IP/hostname of the device. Select Security > Plug-in Settings > List of Embedded Plug-ins. Click the “Set” button. The logs can be downloaded by accessing the authentication plugin UI On C5765dn the facility to download the logs is not available and only remote logging is possible from the embedded plugins. Remote logging can incrementally send log events from the device to either the Application Server or an third party syslog server. Logging to the application server can be enabled via ext-device.dell.plugin.log-app-server-frequency advanced configuration key. Copyright © 2015 PaperCut Software International Pty. Ltd., All Rights Reserved. 49 of 50 | Dell MFP Embedded Manual 2015-09-02 By setting the value to a positive number, the logs will be automatically saved under [PaperCut Install Location]\server\tmp\device-<id>-<name> folder (where <id> and <name> are internal device identifier and device name respectively). See config editor 7.1. Copyright © 2015 PaperCut Software International Pty. Ltd., All Rights Reserved. 50 of 50