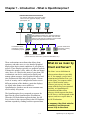
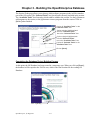
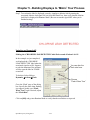
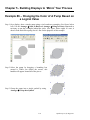
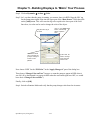
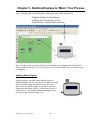
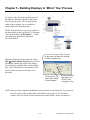
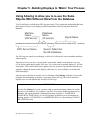
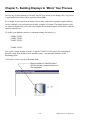
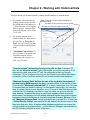
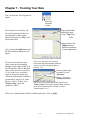
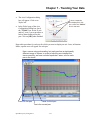
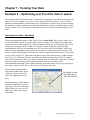
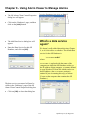
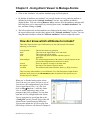
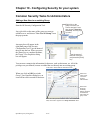
1
Training Manual D5091 June, 2007 Bristol OpenEnterprise OpenEnterprise for Beginners Remote Automation Solutions www.EmersonProcess.com/Remote Welcome to OpenEnterprise for Beginners This manual is the first real exposure most readers will have to the OpenEnterprise product, and we recognize that first impressions count. We have tried hard to provide a basic introduction, suitable for anyone with basic knowledge of SCADA or process control. However, OpenEnterprise is a powerful, flexible product, and as a result there’s a lot to learn – and this manual is just the beginning. As OpenEnterprise has expanded into newer and wider markets more of our customers have become interested in a ‘do it yourself’ approach to setting up their systems. Because of this, the need arose for a more user-friendly manual that explains how to set up the basic features of OpenEnterprise, with special emphasis on examples. The result is this manual - OpenEnterprise for Beginners. We recommend you work though the manual, and set up each of the examples. On the OpenEnterprise CD we have included some example loads (programs) for Bristol RTUs. If you don’t have your own RTU loads, you can use these. Initially, most of the SCADA systems we sold were configured primarily by our own in-house system engineers, as well as experienced third-party system integrators with a high level of technical expertise. For these customers we developed a very detailed set of reference manuals, which can be found on the OpenEnterprise CD. After you have completed the examples in this manual, we recommend you use these reference guides as you design and implement your system. You will also find that the product itself includes a comprehensive online help system – we recommend you use it regularly. Thank you for buying OpenEnterprise. All of us at Emerson who have worked on this product are proud of it, and would like to hear any feedback you may have, good or bad. We try hard to incorporate improvements into each new release, and many of those improvements and new features arise out of suggestions from our existing customers. Please email or call me with any suggestions or comments you may have, either on this manual, or on the product. Steve Hill SCADA Program Manager Emerson Process Management Tel: +1 (860) 945-2501 Email: [email protected] Contacting the OpenEnterprise Support Team Telephone support for OpenEnterprise users is available Monday through Friday from 8AM to 4:30PM (Eastern U.S.) excluding holidays and scheduled factory shutdowns at the following number: 1-860-945-3865 You can e-mail the OpenEnterprise Support Team at: [email protected] D5091 - OpenEnterprise (OE) for Beginners Table of Contents Why OE for Beginners?................................................................................................................... i Contacting the OpenEnterprise Support Group ............................................................................... i Chapter 1 - Introduction - What is OpenEnterprise (OE)?................................................... 1-1 How does the Database work?............................................................................................... 1-3 Learning the Real Database ‘Lingo’ (Attributes, Records, and Objects) ........................ 1-3 What sorts of things are saved in the OE database? ........................................................ 1-5 How does data get from the Controller Network into the OE database?............................... 1-6 Alarm Data Collection ..................................................................................................... 1-7 Poll List Collection .......................................................................................................... 1-7 Report by Exception (RBE) ............................................................................................. 1-8 Array and Archive Collection via Open BSI Converter .................................................. 1-8 How do we view the contents of the OE Database? .............................................................. 1-9 Where can I get more information? ....................................................................................... 1-9 Chapter 2- Configuring Controllers to Work with OE.......................................................... 2-1 Preparing Your Control Strategy Files to work with OE....................................................... 2-1 Identifying Which Signals in the Control Strategy File Should be Collected by OE...... 2-2 Preparing an ACCOL Load to work with OE........................................................................ 2-4 Specifying an Alarm Signal in ACCOL Workbench....................................................... 2-4 Specifying a Global Signal in ACCOL Workbench ........................................................ 2-5 Specifying an RBE Signal in an ACCOL Load............................................................... 2-6 Saving, Compiling and Downloading the ACCOL Load ................................................ 2-6 Preparing a ControlWave Project to work with OE............................................................... 2-7 Specifying an Alarm Variable in a ControlWave Project................................................ 2-7 Specifying a Global Variable in a ControlWave Project ................................................. 2-8 Making Sure You Have the Correct Resource Settings in ControlWave Designer......... 2-9 Compiling and Downloading the ControlWave Project .................................................. 2-9 Chapter 3- Building the OpenEnterprise Database................................................................ 3-1 Things you have to do before you start building the OE Database… ................................... 3-1 Your hardware must have been set up ............................................................................. 3-1 Backup Your OpenEnterprise Server (UPGRADES / RE-BUILDS ONLY).................. 3-1 Install Open BSI and configure the Open BSI Network.................................................. 3-2 Verify that communications are possible to RTUs via DataView................................... 3-2 Install OpenEnterprise Server software on the Server Computer.......................................... 3-2 How is the database built? ..................................................................................................... 3-3 Starting the Database Project Builder .............................................................................. 3-3 Using Database Project Builder ....................................................................................... 3-4 Specifying File Locations ................................................................................................ 3-4 i Allowing ‘Open’ Access to Database Tables During System Configuration.................. 3-5 Including the Default Security Groups ............................................................................ 3-6 During Configuration, You are the SYSTEM User......................................................... 3-7 Verifying that the Time Zone is Correct.......................................................................... 3-8 Choosing How You Will Communicate with the Controllers ......................................... 3-9 Confirming Your Choices and Building the Database Tables....................................... 3-10 Adding Signal/Variable/Tag Names to the Database Tables......................................... 3-11 Creating Poll Lists for Data Collection.......................................................................... 3-12 Estimating the Maximum Database Size ....................................................................... 3-12 Configuring Historical Data Collection ......................................................................... 3-13 Configuring an OpenEnterprise Session........................................................................ 3-16 Completing the Database Project Building Process....................................................... 3-17 Chapter 4 – Using Database Explorer to Find Data............................................................... 4-1 What is the Database Explorer?............................................................................................. 4-1 Before You Begin .................................................................................................................. 4-2 Starting Database Explorer .................................................................................................... 4-2 Identifying the Name and Location of Your Database .......................................................... 4-2 Using the Add Database to Hierarchy Dialog Box................................................................ 4-3 Establishing a Connection with the Database........................................................................ 4-4 Viewing the Overall Structure of the Database ..................................................................... 4-5 Viewing Databases, Tables, Views, and Attributes............................................................... 4-6 Database Tree Control Window............................................................................................. 4-7 Database Detail Window / Table Detail Window................................................................ 4-8 Attribute Detail Window........................................................................................................ 4-9 Searching the Database for A Particular Table.................................................................... 4-11 Searching the Database for A Particular Attribute (Column Name) ................................... 4-11 Searching the Database for A Primary Key Attribute ......................................................... 4-12 Searching the Database for ‘Owned’ Tables ....................................................................... 4-12 Viewing the Contents of the Database Using the Database Object Viewer ........................ 4-13 Starting the Database Object Viewer............................................................................. 4-13 Viewing Data By Constructing Simple Queries ............................................................ 4-13 Identifying the Table You Want to Query ............................................................... 4-14 Specifying the Attributes You Want to Examine ................................................... 4-15 Specifying Conditions to Limit the Amount of Data Returned By Your Query ..... 4-16 Run the Query and View the Results....................................................................... 4-19 Applying Filtering Criteria to Your Query .............................................................. 4-21 Saving the Criteria Used For Your Query in A DBX File....................................... 4-23 Opening An Existing DBX File........................................................................................... 4-23 Adding ‘Live’ Data to Third-Party Applications by Dragging DDE Tags.................... 4-24 Example - Adding An Analog Value To A Spreadsheet Using DDE ........................... 4-25 Chapter 5 – Building Displays to ‘Mimic’ Your Process ....................................................... 5-1 What is the OpenEnterprise Graphics Software?................................................................... 5-1 Before You Begin .................................................................................................................. 5-3 Starting the OE Graphics package ......................................................................................... 5-4 Opening a Display.................................................................................................................. 5-4 A Quick Look at the Drawing Tools...................................................................................... 5-6 Choosing Colors............................................................................................................... 5-6 Drawing A Straight Line.................................................................................................. 5-7 ii Selecting Objects on Displays ......................................................................................... 5-7 Drawing A Box ................................................................................................................ 5-8 Drawing An Ellipse or A Circle....................................................................................... 5-9 Saving A Display ................................................................................................................... 5-9 Switching Between Configure Mode and Runtime Mode................................................... 5-10 Examples of Creating Various Display Objects .................................................................. 5-11 Example #1 - Creating A Text Label on A Display....................................................... 5-12 Example #2 - Displaying A Numerical Value From the Database (Process Point)....... 5-14 Example #3 - Displaying the changing level of liquid in a tank.................................... 5-18 Example #4 - Creating A Sliding Setpoint Control With Which the Operator Can Update a Value in the Database & RTU .............................................................................. 5-25 Example #5 – Displaying A Message Based on A Logical Value in the Database....... 5-31 Example #6 – Changing the Color of A Pump Based on a Logical Value.................... 5-34 Example #7 - Creating a System Overview Display ..................................................... 5-38 What Now? .......................................................................................................................... 5-41 Saving Your Own Symbols in the Symbol Library, and Updating Objects through Share Keywords ....................................................................................................................... 5-42 Using Aliasing to allow you to re-use the Same Objects With Different Data From the .... Database......................................................................................................................... 5-45 Tips For Planning Your Human-Machine Interface (HMI) System.............................. 5-52 Chapter 6 – Working with Historical Data ............................................................................. 6-1 What is Historical Data? ........................................................................................................ 6-1 What is Historical Data Used For? ........................................................................................ 6-1 How Does the Historian Work?............................................................................................. 6-2 Historical Data is Stored Temporarily in Log Files......................................................... 6-2 Historical Data is Stored Permanently in Archive Files .................................................. 6-3 How is the Historian Configured? ......................................................................................... 6-4 Defining a Logging Group............................................................................................... 6-4 Choosing the Source Table: ............................................................................................. 6-5 Figuring out how often you want to log the data ............................................................. 6-5 Assigning individual records to the logging group (optional) ......................................... 6-6 Choosing Columns to be logged and calculations to be performed (if any).................... 6-6 Choosing Columns For Logging................................................................................ 6-6 Decide what calculations (if any) you want to perform on the logged data .............. 6-7 Specifying characteristics of the log file and archive files .............................................. 6-9 Specifying the Source of Data for a Log File ................................................................ 6-10 Determining the Buffer Size and Number of Buffers to be stored in the Log File........ 6-10 Deciding When to Generate An Archive File................................................................ 6-11 Example #1 – Logging 1-minute data for a few signals ...................................................... 6-12 Example #2 – Logging Status Values by Exception............................................................ 6-32 Example #3 - Logging Hourly and Daily Flow Calculations, and using Timed Archives.. 6-39 Example #4 – Using the Archive File Tool ......................................................................... 6-51 iii Chapter 7 – Trending Your Data ............................................................................................. 7-1 What are Trends? ................................................................................................................... 7-1 Example 1 – Trending a Real-time data value....................................................................... 7-4 Example 2 – Making Some Basic Modifications to the Trend You Just Made................... 7-11 Example 3 – Trending a Historical Data Value ................................................................... 7-22 Example 4 – Having a Trace Change Color when data is questionable .............................. 7-30 Example 5 - Working with Multiple Pens in the Same Trend............................................. 7-34 Example 6 – Optimizing your Trend for data or speed ....................................................... 7-38 Chapter 8 – Using Alarm Viewer to Manage Alarms ............................................................ 8-1 What are the different types of alarms? ................................................................................. 8-1 Analog Alarms ................................................................................................................. 8-1 Logical Alarms..................................................................................................................8-3 Change of State Alarms ................................................................................................... 8-4 Example 1 - Starting the Alarm Viewer and Viewing All Incoming Alarms.........................8-5 Example 2 - Acknowledging Alarms..................................................................................... 8-8 Example 3- Changing the Attributes Displayed in the Alarm Viewer ................................. 8-10 Example 4 - Viewing the Alarm/Event History.....................................................................8-12 Chapter 9 - Using OE Desktop ................................................................................................. 9-1 What is OE Desktop?............................................................................................................. 9-1 Example 1 - Specifying a Display that appears when you start the Desktop ........................ 9-2 Example 2 - Adding an Alarm View to the Desktop ............................................................. 9-6 Example 3 - Creating an OE Desktop that Includes Menu Items for Displays ................... 9-10 Chapter 10 - Configuring Security for your System............................................................. 10-1 Why Establish a Security Policy? ........................................................................................ 10-1 What are Users and Groups?................................................................................................ 10-1 Creating Users and Groups .................................................................................................. 10-5 Starting the Security Configuration Tool............................................................................. 10-5 Creating Groups ............................................................................................................. 10-6 Choosing Application Tokens for a User or Group ..................................................... 10-12 Choosing Token Groups .............................................................................................. 10-14 Choosing File Tokens, OPC Tokens, and Custom Tokens.......................................... 10-15 Modifying a Group ............................................................................................................ 10-15 Creating Users.................................................................................................................... 10-16 Modifying a User ............................................................................................................... 10-17 Creating a user outside of a group ..................................................................................... 10-18 Assigning a User to an existing Group .............................................................................. 10-18 Dividing the Database up Into Access areas (OPTIONAL) .............................................. 10-20 Assigning Objects (Data) To Particular Access areas ....................................................... 10-22 Allow Users Access to Particular Access areas:................................................................ 10-23 Configuring Security for Tables and Views ...................................................................... 10-24 Common Security Tasks for Users .................................................................................... 10-26 Logging Onto the System ............................................................................................ 10-26 Logging Off the System............................................................................................... 10-26 Changing Your Password ............................................................................................ 10-26 Common Security Tasks for Administrators ............................................................... 10-27 Adding a New User to an existing Group.............................................................. 10-27 Removing a User.................................................................................................... 10-28 iv Disabling a User's Account.................................................................................... 10-29 Removing the Lock-out of a user........................................................................... 10-29 Resetting a User's Password if they forget the one they chose .............................. 10-30 Other Security Issues ................................................................................................... 10-31 Security in ControlWave Controllers..................................................................... 10-31 Security in Network 3000-series Controllers......................................................... 10-31 Open BSI Security ................................................................................................. 10-32 Network Infrastructure (UDP and TCP Sockets)................................................... 10-32 Windows™ Security .............................................................................................. 10-32 Virus Protection for Your Workstations ................................................................ 10-32 Firewall Software For Your Networks .................................................................. 10-33 Physical Security.................................................................................................... 10-33 Networked Surveillance of Remote Sites using ControlWave .............................. 10-33 Maintain Current Backups ..................................................................................... 10-33 Human Factors ....................................................................................................... 10-33 Chapter 11 – Creating Reports............................................................................................... 11-1 What are Reports?.......................................................................................................... 11-1 Before You Begin .......................................................................................................... 11-1 Step 1. - Create a Report Template................................................................................ 11-3 Step 2. - Create a Report from the Template in the Previous Step .............................. 11-14 Step 3. – Test the Report.............................................................................................. 11-19 Step 4 - Create a Timed Schedule for the Report ...................................................... 11-20 Step 5. – Choose Who Will Receive the Report (Recipients) ..................................... 11-24 Step 6. – Specify the Format of the Report.................................................................. 11-28 Appendix A – Learning SQL A-1 v BLANK PAGE Chapter 1 - Introduction - What is OpenEnterprise? Chapter 1 - Introduction - What is OpenEnterprise (OE)? OpenEnterprise, often abbreviated as OE, is Bristol’s primary Supervisory Control and Data Acquisition (SCADA) software package. It is used primarily in the water, waste water and natural gas industries. It also includes an integrated human machine interface HMI to provide data to plant operators, via graphical displays (mimics), trends, alarm summaries, and web pages. OE The name OpenEnterprise is derived from two of the principal philosophies behind the product. Too many buzzwords! What is it really? It is ‘open’ in that its individual components utilize industry-standard architectures, languages, and protocols (SQL, ODBC, OPC, TCP/IP, DDE, etc.), making it extremely flexible, particularly with respect to communicating with third-party hardware and software products. OpenEnterprise provides a powerful database that has been optimized for process control, plus a rich collection of different software programs that allow you to view, manage, manipulate, and export the data residing in the database. The ‘enterprise’ part of the name applies because it is designed to provide data to other parts of your business enterprise. Client workstations, called OpenEnterprise Workstations are personal computers (PCs) that communicate with the OpenEnterprise Server. OpenEnterprise for Beginners The OpenEnterprise Database resides on a computer called the OpenEnterprise Server. The OE Database is the central storage location for all real-time data collected from your process control network, and all historical data you are currently using for trends, reports, etc., plus all of the configuration data for the system itself. The OE Server uses Open BSI software, (another Bristol product) which allows communication with a network of Bristol remote process controllers. An OPC Server is also provided for communications with thirdparty devices. 1-1 Chapter 1 - Introduction - What is OpenEnterprise? OPENENTERPRISE WORKSTATIONS For operator interaction with system (HMI). Users can view graphical displays, trends, print reports, etc. OPENENTERPRISE SERVERS (OE Database resides here, Open BSI software and RDI 3000 for communication with controller network.) OPC Server included for export of data to third-party applications and devices. ControlWave-series controller(s) running ControlWave projects Network 3000 series controller(s) running ACCOL loads Inputs from field instrumentation (contact closures, flow meters, pressure transmitters, etc.) These workstations run software that allows plant operators, and other users, to view detailed graphical displays that depict current conditions of your plant or process. These displays typically use graphical symbols of things like pumps, valves, tanks, etc. that can change color, move, etc. based on the status of your plant. The workstations can also be configured to display and manage alarm messages, show graphical trends of realtime and historical data, and to print reports. Various levels of security can be configured to limit access to different portions of the database, particular displays, etc. Many other features are available in OpenEnterprise, but these are the most common ones used on nearly all systems. The OpenEnterprise Server responds to requests for data from the client OpenEnterprise Workstations. When the OE Workstation requests the data, the OE Server looks for the requested data in the OE Database, and then responds by sending back the requested data. 1-2 What do we mean by Client and Server? The client / server definitions in software mirror those in your daily life. If, for example, you go into a restaurant and sit down to eat, you are the client. You request certain types of food from the waiter / waitress (your server) who then returns with the food you requested. Similarly, an OpenEnterprise Workstation includes client software, which requests data from the OE Server, which responds to the requests, and serves up the data, at the OE Workstation. In summary, the client asks for something, and the server serves it up to the client. OpenEnterprise for Beginners Chapter 1 - Introduction - What is OpenEnterprise? How does the Database work? A cell of the table. This particular table has 36 cells. We’ve been using the term ‘Database’ a lot, but we never really said what a database is. A database, in its simplest form, is really just a bunch of tables that have some pre-defined interrelationship. When we say tables we’re referring to a grid of rows and columns, like in a spreadsheet program. Column 1 Column 2 Column 3 Column 4 Column 5 Column 6 Column 7 Column 8 Colum Row1 Row 2 Row 3 Row 4 The intersection of a row and column is called a cell, and contained within the cell is a single piece of data called a value. It could be a numerical value, a string of text, a Boolean ON/OFF value, etc. When we talk about the interrelationships between tables, we mean that certain information in one table, references other data in yet another table. These complex interactions between tables are part of the database design, also known as the schema. OpenEnterprise contains a schema specially designed to handle the information gathered from complex industrial processes. Learning the Real Database ‘Lingo’ (Attributes, Records, and Objects) Each box in the table, can hold one OBJECT. This particular table can hold 36 objects. The people who write database programs use a whole different set of terminology when they refer to the structure of tables in a database. Instead of referring to the name of a particular column, or a heading, they call the column name an attribute. Attributes are characteristics, or qualities associated with something. OpenEnterprise for Beginners Attribute 1 Attribute 2 Attribute 3 Attribute 4 Attribute 5 Attribute 6 Attribute 7 Attribute 8 Attribute 9 Record 1 Record 2 Record 3 Record 4 1-3 Chapter 1 - Introduction - What is OpenEnterprise? Instead of calling the row of a table a row, they call it a record. That makes sense, because a record implies something that is recorded or kept for a certain period of time. Another word used to refer to a record is object. A simple table from the OE Database, called dvi_schedule is shown, below. (NOTE: The first row shown, isn’t actually part of the table, it’s the names of the attributes in the table.) The attributes are called ‘scheduleid’, ‘maxinterval’, ‘mininterval’, ‘offset’, and ‘disable’. Currently, the table has three records, each of which has those five attributes. +------------+------------------------+-------------+--------+---------+ | scheduleid | maxinterval | mininterval | offset | disable | +------------+------------------------+-------------+--------+---------+ | 1 | '01-JAN-0001 00:00:05' | NULL | NULL | NULL | | 254 | '01-JAN-0001 00:00:05' | NULL | NULL | NULL | | 2 | '01-JAN-0001 01:00:00' | NULL | NULL | NULL | +------------+------------------------+-------------+--------+---------+ Whenever a particular attribute of a record is not defined, or has no value, it is labeled NULL. For example, if we had a record describing a person, and that person had no middle name then the middlename attribute would be set to NULL. Please Remember… A DATABASE is just a big collection of tables. An ATTRIBUTE is just the name (heading) of a column in one of the tables. A RECORD is just a row of a table. Another word for this is OBJECT. A single piece of data in the database is a VALUE for a particular attribute of a particular record. If no value has been assigned, the value is “NULL”. 1-4 OpenEnterprise for Beginners Chapter 1 - Introduction - What is OpenEnterprise? What sorts of things are saved in the OE database? All the configuration data for the OE Server, as well as all of the real-time and historical data collected from the network of process controllers, is kept in the OE Database. What do we mean by “Real Time Data” and “Historical Data”? Real time data describes conditions occurring right now, i.e. the current state of your process or plant. Granted, there is a slight delay (usually measured in a few seconds or less) between the time when the data is sent by process instruments (flow meters, level switches, etc.) and when it is actually inserted in the OE Database, but this is usually inconsequential. The data reflects current operating conditions, and you can act on it, to change those conditions. Conversely, historical data refers to things that happened some time in the past. It is data that was collected at some previous time, such as last week, last month, etc. Generally, historical data is used to help identify trends in system operation, and also to generate reports required by regulatory agencies, such as the Environmental Protection Agency (EPA) etc. In summary, ‘real time data’ means data from right now, and ‘historical data’ means data from some time in the past…. The data in the OE Database is stored in hundreds of different tables, most of which we’re never going to look at, because they perform various internal housekeeping tasks. We are, however, going to list some of the tables that you’re likely to make use of, as you configure your OE system. You don’t have to memorize these now, we’re just listing them so that you get a feel for the sorts of things that get stored in the OE Database, and so you might recognize the names later, when you have to use them. The Most Frequently Used Tables in OpenEnterprise Table Name(s) Realanalog Digital Nw3000device What is this used for? This table includes all the analog signal data collected from your process controllers. It includes the signal’s name, the signal value, etc. Examples of the data stored in the Realanalog table would include pressure readings, temperature readings, flow readings, etc. This table includes all the logical signal data collected from your process controllers. It includes the signal’s name, the signal value, etc. Examples of the data stored in the Digital table would be valve OPENED/CLOSED positions, switch ON/OFF statuses, pump RUN/STOPPED statuses, etc. This table contains information about the individual controllers in the OpenEnterprise for Beginners 1-5 Chapter 1 - Introduction - What is OpenEnterprise? Nw3000polllist Dvi_schedule Users Oelogdata, Oelogcolumn, Oelogcontrol, Loghistory network. This table defines lists of signals to be collected from controllers. This table defines the scan time classes used in poll list collection. We’ll discuss that subject later in this document. This table lists all of the persons designated as valid users of the system, and records information about them, and what they are allowed to do in the system. These tables are used in the definition of the OE Historian. The OE Historian allows data collected into the OE Database to be saved and reused later in trends and reports. How does data get from the Controller Network into the OE database? Data from your network of remote process controllers is collected and stored in the OE Database. The actual communication between the Bristol controllers and the OE Database is handled by Open BSI and a communications driver program called RDI3000. (RDI3000 stands for Remote Device Interface 3000 -- 3000 refers to Bristol Network 3000-series controllers. Our ControlWave-series of controllers can also communicate via this method.) There are five (5) methods by which data goes from the Bristol controllers into the OE Database. They are: • • • • • Alarm Data Collection Poll List Collection RBE Collection Array Collection via Open BSI Converter Archive Collection via Open BSI Converter In addition, RTUs and PLCs manufactured by other vendors can communicate with the OE Database using vendor-supplied OPC server software and custom communication drivers. (We’re not going to cover this subject in this book.) 1-6 OpenEnterprise for Beginners Chapter 1 - Introduction - What is OpenEnterprise? Alarm Data Collection Alarms are generated in a controller when a particular signal goes outside a pre-defined range, or changes state into an alarm state. Some typical alarm conditions might be that a liquid level is too high, or a temperature is too low, or that a pump has failed to start. We’ll talk, in detail, about alarm concepts in another chapter. At this point, all you really need to know is that an alarm is a message that is telling the operator that something happened, which could potentially be serious. An alarm means something just happened and needs attention. For example, the controller detected that a pump failed, or a pressure signal is too high…. OpenEnterprise displays these alarms on the OE Workstations. In addition, OE can be configured to send alarms via e-mail, and to cell phones and pagers. Poll List Collection Most people are familiar with the term polling in connection with elections. Every two years, for example, your town might have an election for mayor, and people go to the polls to vote. That’s similar to the type of polling we’re discussing here. In the Poll List data collection mechanism, OpenEnterprise sends out requests for data from the controllers according to a pre-defined schedule. For example, collect a certain type of data every two hours. All signals collected as part of the same scheduled collection are said to be in the same scan time class. For example, if hourly flow totals must be collected, an hourly scan time class can be defined, and all hourly flow totals collected as part of that scan time class. The signals included in a particular scan time class are automatically placed into structures called poll lists, by the OE Poll List Builder. If you had other signals that you wanted collected every minute, you would create a 1-minute scan time class, etc. OpenEnterprise for Beginners 1-7 Poll List Collection operates on a schedule. For example, collect all the flow total signals every hour, collect all the logical signals every minute, etc. It doesn’t matter if there hasn’t been any change, Poll List Collection will just collect the values anyway. Chapter 1 - Introduction - What is OpenEnterprise? Report by Exception (RBE) Report by exception (abbreviated RBE) causes a signal to be collected only on exception, in other words, you only collect the signal when it changes. RBE is different from poll list collection because in poll list collection, signals are collected whether or not they have changed. In RBE, if a signal doesn’t change, it isn’t collected. For logical signals that would mean that a signal is only collected when it changes state from ON to OFF (or OFF to ON). For analog signals, that would mean that a signal would only be collected if its value changes significantly from its previous value. The determination of whether or not a change is significant is determined by a value called the deadband. The deadband is a range above and below the signal’s value, and must be configured for every signal. RBE says, “Check to see if the data is different from the last time we collected it. If it hasn’t changed, don’t bother collecting it” Value: SAME CHANGED SAME SAME SAME CHANGED SAME SAME Collect it?: ; ; If it hasn’t changed more than the value defined by that range, since the last time it was collected, any change is considered insignificant, and the signal isn’t collected. RBE is a useful method of data collection because it reduces the amount of data that has to be collected, while also allowing data to be displayed more rapidly than would be possible via Polled List collection. Array and Archive Collection via Open BSI Converter The Open BSI Harvester utility, can collect array data, and archive data, directly from the controllers, and store it in files on the OE Server computer. A related utility, called the Open BSI Converter can insert the data from these files directly into tables of the OE Database. 1-8 OpenEnterprise for Beginners Chapter 1 - Introduction - What is OpenEnterprise? How do we view the contents of the OE Database? The main method for viewing the contents of the OE Database is the Database Explorer. Database Explorer is a program that runs on the OE Server or OE Workstation. Database Explorer lets you examine the structure of the database. It also includes a feature called the Database Object Viewer that lets you search through the contents of the OE Database, view portions of particular tables, etc. For information on how Database Explorer works, please refer to Chapter 4. Understanding how to use the Database Explorer is one of the best ways to get the most out of your OE system. Database Explorer Where can I get more information? Now that you’ve finished this chapter, you should have a pretty good idea about what OpenEnterprise (OE) is, and what sort of information is stored in the OE Database. You should also be at least somewhat familiar with the terminology we use when talking about the database. We also hope you understand the concept of client and server. • • • • • • • For information on actually installing OpenEnterprise software, please see the OpenEnterprise Installation Guide portion of the OpenEnterprise Reference Guide (document# D5092). For information on particular features of OpenEnterprise, see the online help files. For information on configuring your controllers so data will be collected by OE, see Chapter 3. For information on the Database Explorer program, see Chapter 4. For information on alarm concepts in Network 3000 controllers, see An Introduction to ACCOL (document# D4056). For information on alarm concepts in ControlWave controllers, see the Alarm Configuration section of the ControlWave Designer Programmer’s Handbook (document# D5125). For information on how Report By Exception (RBE) works, see the RBE section of the ACCOL II Reference Manual (document# D4044) and the online help file in ControlWave Designer. For advanced software developers requiring detailed technical information on RBE , see Appendix D of the Network 3000 Communications Application Programmer’s Reference (document# D4052). OpenEnterprise for Beginners 1-9 Chapter 2 – Configuring Controllers to Work with OE Chapter 2- Configuring Controllers to Work with OE Preparing Your Control Strategy Files to work with OE For this chapter, we will assume that data collected about your plant or process comes from the network of Bristol remote process controllers or RTUs. If you are using another brand of controller, you will need to consult other documentation beyond this manual. What’s the difference between the term ‘RTU’ and Remote Process Controller? Bristol controllers are either from the Network 3000-series (that includes the DPC 3330, DPC 3335, RTU 3305, or RTU 3310), or the ControlWave series that includes the ControlWave, ControlWave MICRO, and ControlWave LP, among others. The controllers execute a pre-defined program called a control strategy which is responsible for reading data in from process instrumentation (flow meters, pressure transmitters, etc.), performing calculations based on the data collected, and sending out commands to instrumentation (switches, valves, etc.) For Network 3000-series controllers, the control strategy is written in a language called ACCOL II, using a program called ACCOL Workbench. If you study the theory of control systems there are slight differences between these terms, but for our purposes, they all mean the same thing. RTU is just an abbreviation for the term Remote Terminal Unit, which is basically the same thing as a Remote Process Controller. Sometimes people will just use the term Remote. You might also hear people say DPC (Distributed Process Controller.) You may even hear someone say Node, which is a reference to the fact that a controller can serve as part of a network. All of these terms refer to a smallcomputerized device located at a remote site that collects data from instrumentation, and performs control operations based on the data it collects. Network 3000 series Controller The resulting file, which is downloaded into the controller, is referred to as the ACCOL load. The primary structure for storing an individual data value (pump status, flow reading, etc.) in the ACCOL load is called an ACCOL signal. OpenEnterprise for Beginners 2-1 Chapter 2 – Configuring Controllers to Work with OE For ControlWave-series controllers, the control strategy is written in any one of five (5) IEC 61131-3 languages, using a program called ControlWave Designer (IEC 61131-3 is an international standard for process control programming languages). ControlWave series Controller The resulting file, called a ControlWave project, is downloaded into the ControlWave controller. The primary structure for storing a data value (temperature reading, valve position, etc.) in the ControlWave project is called a variable, and is equivalent to a ‘signal’ in a 33xx controller. NOTE: When you are actually working with OE, no distinction is made between the name signal and the name variable; they are all referred to as signals. Some other manufacturers use the word ‘tag’ to refer to the same thing. These three words; tag, signal and variable are often used interchangeably What’s downloading mean? Downloading means transferring programs and / or data from one device to another. In the case, we’re downloading a file from the computer to the controller. TIP - Adopt a Consistent Naming Convention When you’re coming up with names for ACCOL signals or ControlWave variables, it will make life a lot easier if you use a consistent naming convention that describes the data held in the signals. The reason is that if you use consistent names, it will help you if you ever need to use SQL commands. (SQL commands aren’t required when you’re first setting up OpenEnterprise, but many advanced users like to use them). It is also useful if you are establishing rules for historical templates in the Database Project Builder. A consistent naming convention will also help you with a subject called aliasing which we won’t talk about until Chapter 5. Furthermore, it also helps you remember what the signals do! 2-2 OpenEnterprise for Beginners Chapter 2 – Configuring Controllers to Work with OE Identifying Which Signals in the Control Strategy File Should be Collected by OE For a signal in an ACCOL load or a variable in a ControlWave project to be collected and stored in the OE Database, it must fall into one of three categories: ! Alarms - any signal or variable configured as an alarm is automatically collected when it enters an alarm state, or returns to a normal state. Normally these signals are those for which it is important that the operators are alerted when pre-determined conditions (like a maximum tank level) are exceeded. • Globals - a global signal or global variable can be collected at a predefined rate via Polled List collection. The OE server will simply collect these signals at a fixed rate (e.g., once per minute). The server must ask for these signals. • RBE - a report by exception (RBE) signal will be sent from the controller to the server whenever it changes by more than a pre-configured amount, called the ‘deadband’. We talked a little bit about the different methods of data collection back in Chapter 1. In the first part of this chapter, we’re going to highlight the steps within ACCOL Workbench or ControlWave Designer that need to be performed to identify data to be collected by OpenEnterprise. IMPORTANT This section is NOT going to tell you everything you need to know when using ACCOL Workbench or ControlWave Designer; it just highlights the parts which are related to whether or not a signal or variable will get collected into the OE Database. It doesn’t give detailed instructions. If you need help using ACCOL Workbench, see the ACCOL Workbench User Manual (document# D4051). If you need help using ControlWave Designer, see the Getting Started with ControlWave Designer Manual (document# D5085). OpenEnterprise for Beginners 2-3 Chapter 2 – Configuring Controllers to Work with OE Preparing an ACCOL Load to work with OE As mentioned, earlier, for any ACCOL signal to be collected into the OE Database, it must be designated as one of the following: 1) A alarm signal -or2) A global signal -or3) An RBE signal Specifying an Alarm Signal in ACCOL Workbench The “Type” you select must be either ‘Analog Alarm’ or ‘Logical Alarm’ • On the ‘General’ page of the Signal Properties dialog box for the signal, you must choose either ‘Logical Alarm’ or ‘Analog Alarm’ as the signal’s “Type”. 2-4 OpenEnterprise for Beginners Chapter 2 – Configuring Controllers to Work with OE Choose “Alarm Enable” • On the ‘Settings’ page of the Signal Properties dialog box for the signal, you must choose “Alarm Enable”. • For analog alarm signals, you must also specify at least one alarm limit. You should also specify an alarm deadband. Click on the [Alarm Limits] button to begin this configuration. For analog alarm signals, you must specify one or more alarm limits here. Specifying a Global Signal in ACCOL Workbench To make this a global signal, the “Mark as Global” box must be selected. • On the ‘Settings’ page of the Signal Properties dialog box for the signal, you must select the “Mark as Global” box. OpenEnterprise for Beginners 2-5 Chapter 2 – Configuring Controllers to Work with OE Specifying an RBE Signal in an ACCOL Load • On the ‘Settings’ page of the Signal Properties dialog box for the signal, you must select the “Report By Exception” box. • If this is an analog signal, you must enter a deadband. Do not leave the deadband field blank, or you could overload your communications network! • You must configure the RBE Module. This is discussed in the RBE section of the ACCOL II Reference Manual (document# D4044). Select “Report By Exception” to identify this as an RBE signal. If this is an analog signal, you MUST specify an RBE deadband here. Saving, Compiling and Downloading the ACCOL Load • When you have finished editing in ACCOL Workbench, you must save the ACCOL source file, by clicking on File Æ Save, or by clicking on the ‘Save’ icon. • You must then build the ACCOL load (*.ACL) file from the ACCOL source file using the ‘Build’ command in ACCOL Workbench. Click on Actions Æ Build or click on the ‘Build’ icon. • When the ACCOL load has been built successfully, without errors, you must download it into the Network 3000 controller, using the Open BSI Downloader. The Downloader is accessible from within ACCOL Workbench, by clicking on Actions Æ Download or by clicking on the ‘Download’ icon. For full instructions on downloading, see Chapter 7 of the Open BSI Utilities Manual (document# D5081). WARNING! Test Before Downloading You should always test your control strategy (ACCOL load or ControlWave project) before using it in a ‘live’ running plant or process. This is especially true when you’re first learning things. We strongly recommend you do this using a controller that is currently disconnected from the process, or for which manual overrides are ready and staffed should something go wrong. This is really important, because if you download an untested control strategy, you could potentially lose control of your plant or process, due to a programming logic error, and you could damage your equipment, or even worse, hurt somebody! So if you want to avoid flooding something, blowing something up, or dealing with personal injury lawyers, ALWAYS test before you download to a ‘live’ RTU connected to a plant! 2-6 OpenEnterprise for Beginners Chapter 2 – Configuring Controllers to Work with OE Preparing a ControlWave Project to work with OE As mentioned, earlier, for any variable in a ControlWave project to be collected into the OE Database, it must be designated as one of the following: 1) An alarm variable 2) A global variable 3) An RBE variable (Requires ControlWave firmware 04.40 or newer.) Specifying an Alarm Variable in a ControlWave Project • In your ControlWave Designer project, each variable which you want to serve as an alarm must have its own alarm function block configured. The alarm function blocks available are: ALARM_ANALOG, ALARM_STATE, ALARM_LOGICAL_ON and ALARM_LOGICAL_OFF. • Descriptions on how to configure these function blocks are included in the ControlWave Designer online help, and in the ControlWave Designer Programmer’s Handbook (document# D5125). • An alarm condition can only be detected at the time its Alarm function block is executed. • Check the ‘OPC’ box for each variable you want to be collected by OpenEnterprise. The alarm variable must be marked for “OPC” collection, as well within the worksheet. This is discussed in the section Specifying a Global Variable in a ControlWave Project. OpenEnterprise for Beginners 2-7 Chapter 2 – Configuring Controllers to Work with OE Specifying a Global Variable in a ControlWave Project Global variables in ControlWave Designer are variables that may be accessed by all the program organization units (POUs) in the project. (If you don’t know what a POU is, you probably need to review the documentation accompanying ControlWave Designer.) In your ControlWave Designer project, we recommend that the only variables you designate as global should be I/O variables. Configure your I/O variables in the ControlWave Designer’s I/O Configurator first. A global variable is identified by ‘VAR_GLOBAL’ in its “Usage” field. • Variables in ControlWave Designer are designated as global if they are defined within a global worksheet, with the VAR_GLOBAL “Usage”. • The variables must be marked for “OPC” collection, as well. Any variable which is to appear in the OE Database must also have “OPC” selected. Specifying an RBE variable in a ControlWave Project To designate a variable for RBE collection in a ControlWave project, you must run the Variable Extension Wizard, in ControlWave Designer, and check the “RBE” check box for each variable you want collected via RBE. For non-BOOL variables (REAL, INT, etc.), you would also specify a deadband. The resulting _RBE.INI file will be downloaded to the ControlWave with the bootproject. You must also configure the RBE function block, and configure appropriate RBE system variables depending upon whether RBE is running on a serial or IP port. For details on all these subjects, please see the online help in ControlWave Designer. 2-8 OpenEnterprise for Beginners Chapter 2 – Configuring Controllers to Work with OE Making Sure You Have the Correct Resource Settings in ControlWave Designer Any variable in your ControlWave project which you want to be included in the OE Database, must have its OPC parameter check box set, as described in the Specifying a Global Variable in a ControlWave Project section. In addition, you must specify, in the Resource Settings dialog box, which OPC variables will be collected. • Generally, you should choose “Marked variables” so that only those variables which you have explicitly marked for OPC collection, will be included in the OE Database. • If you want all global variables to be part of the OE Database, choose “All global variables” which automatically marks all global variables for OPC collection. Select the “Marked variables” option Compiling and Downloading the ControlWave Project • You must then compile the ControlWave project. Click on Build Æ Make or click on the ‘Make’ icon. • When the ControlWave project has been compiled successfully, you must download it into the ControlWave controller. (Please heed the warning about downloading on page 2-6.) For details on performing a download into the ControlWave, see the Downloading section of the ControlWave Designer Programmer’s Handbook (document# D5125). OpenEnterprise for Beginners 2-9 BLANK PAGE Chapter 3 - Building the OpenEnterprise Database Chapter 3- Building the OpenEnterprise Database Things you have to do before you start building the OE Database… Okay, we know that you’re just itching to get started, but first, there are some things that MUST be done, before you start: Your hardware must have been set up We’re going to assume, at this point, that you’ve set up all your hardware. By that, we mean that: • The OE Server computer has been set up, powered on, and is ready to go. See the documentation accompanying the server hardware for help on doing this. • All the necessary communication cables linking the OE Server, and controllers, must have been connected. • The controller network has been set up, powered on. See the Bristol controller hardware manuals, and the Open BSI software manuals (see below) for information on this. As mentioned elsewhere, we recommend you use test hardware (not live hardware) for initial development. • Optionally, OE Workstations can also be set up at this time. Otherwise, they can be added later (We recommend building the system with a single workstation, and adding others later.) • Each controller must be running a control strategy file which has been prepared for use with OE. This was discussed in Chapter 2. NOTE: Hardware setup is beyond the scope of this manual. Backup Your OpenEnterprise Server (UPGRADES / RE-BUILDS ONLY) Your OpenEnterprise Server should be backed up. That means all files should be copied to backup media (CD, tape, disk) or to another computer. This ensures that you can restore the system in the event of a failure during the database creation process. OpenEnterprise for Beginners 3-1 Chapter 3 - Building the OpenEnterprise Database Install Open BSI and configure the Open BSI Network Bristol’s Open Bristol System Interface, called Open BSI, is the communications software which runs on the OE Server, and allows communications between the OE Server, and the network of Bristol remote process controllers. If this is an all-new system, or you are upgrading to a new version of Open BSI as part of your OpenEnterprise upgrade, you need to install Open BSI on the OE Server computer, and define the network of controllers within the Open BSI software. This is outside the scope of this document, but you can find instructions on how to do this in the Open BSI Utilities Manual (document# D5081). Verify that communications are possible to RTUs via DataView Use the Open BSI DataView program to verify that data can be collected from RTUs in the network. See Chapter 8 of the Open BSI Utilities Manual (D5081) for help on doing this. Install OpenEnterprise Server software on the Server Computer Follow the instructions in the OpenEnterprise Installation Guide portion of the OpenEnterprise Reference Guide for information on how to install OpenEnterprise Server software. At the end of the installation process, you are given the option of starting the Database Project Builder. Instructions on using the Database Project Builder follow. 3-2 OpenEnterprise for Beginners Chapter 3 - Building the OpenEnterprise Database How is the database built? It may seem kind of funny to talk about building the OE Database, because it makes it sound like a physical thing like a house. Although you can’t physically touch the OE Database, it does in fact have a defined structure. The way in which the OE Database is put together is also similar to building a house, in that, you have to follow a particular order of construction. Any house that has an underground basement, for example, must have a foundation built, first, before other floors are constructed. In the same way, the tables of a database must be created before you attempt to put data values in them. Just like a house must be built properly and periodic maintenance must be performed, to keep it safe for occupancy, the database must be built and maintained properly. Back in Chapter 1, we explained that the OE Database consists of a large collection of tables which have various inter-relationships defined. We also said that the running OE Database contains real-time data, historical data, and all the OE Server configuration data. In this chapter, we’re going to use a tool called the Database Project Builder to create these tables and set it up to hold all this data. The Database Project Builder allows us to: • Create all the tables that make up the OE Database • Configure real-time data collection from controllers/RTUs • Configure basic historical data collection and perform initial configuration of historical data • Configure the default security accounts • Configure which programs run when the OE Server is started Starting the Database Project Builder If not started already, Open BSI must be running. If it isn’t, click on Start Æ Programs Æ OpenBSI Tools Æ NetView. Confirm that communications are functioning. By default, the Database Project Builder starts automatically following OpenEnterprise installation (see the OpenEnterprise Installation Guide for more information.) It may also be started by clicking as follows: Start ÆPrograms ÆOpenEnterprise Æ Administrative Tools Æ Database Project Builder OpenEnterprise for Beginners 3-3 Chapter 3 - Building the OpenEnterprise Database Using Database Project Builder When the Database Project Builder starts, click on [Next>] to proceed beyond the Welcome screen. This will take you to the File Locations screen. This is a list of steps to be performed by the Database Project Builder. When a step is completed, it appears in italics. Click on [Next>] Specifying File Locations The File Locations page specifies where OpenEnterprise will store various types of files on the OE Server. Generally, we recommend you accept the default file locations presented. If you want to change them, however, click on the […] button to browse to a new location. When you’ve finished on this page, click on [Next>]. This is where the “live” running OE Database will reside. You can browse to select a different folder by clicking on these buttons. Historical files (log files and archive files) are stored in these folders. When finished on this page, click on [Next>]. 3-4 OpenEnterprise for Beginners Chapter 3 - Building the OpenEnterprise Database NOTE: If one or more of the folders specified on this page doesn’t exist, you will be prompted to confirm whether you want to have Database Project Builder create it. Click on [Yes] to do so. Allowing ‘Open’ Access to Database Tables During System Configuration Normally, users only need access to certain OpenEnterprise Database tables, and are prevented from accessing other tables. This would be referred to as “Secure” database privileges. While you’re in the process of building your OE system, we recommend you choose “Open” for the Database Privileges. This will simplify your configuration activities. We recommend you choose the default of “Open” while you’re building your system. Click on [Next>] to proceed to the next screen. Click on [Next>] to go to the next screen. OpenEnterprise for Beginners 3-5 Chapter 3 - Building the OpenEnterprise Database Including the Default Security Groups Security Groups are discussed in detail in Chapter 10. We recommend you leave the “Include the standard Security Groups” box checked, and click on the [Next>] button. We recommend you include the standard security groups. Click on [Next>] to proceed to the next screen. A prompt will appear, notifying you that a default user called SYSTEM has been created. That user has a default password of SYSTEM. Click on [OK]. A user is someone who has access to OpenEnterprise Server software. 3-6 OpenEnterprise for Beginners Chapter 3 - Building the OpenEnterprise Database During Configuration, You are the SYSTEM User In the “Added Users” box on the Users page, you will see the name SYSTEM. This is the SYSTEM user that was just added automatically. (The SYSTEM user has full privileges; while you’re configuring your system, you will be the SYSTEM user.) The SYSTEM user is added automatically. Click on [Next>] to proceed to the next page. Although you can optionally add additional users here, we recommend you click on [Next>] and add users later, as described in Chapter 10. OpenEnterprise for Beginners 3-7 Chapter 3 - Building the OpenEnterprise Database Verifying that the Time Zone is Correct You should always make sure your OpenEnterprise Server computer is configured with the correct time zone for your geographical area. Having the correct time zone is particularly important for historical data management. By default, the time zone is set to match the Windows™ time zone for your computer. Make sure this represents the correct time zone for your geographical area. Click on [Next>] If the correct time zone is selected, click on [Next>]. Why does OpenEnterprise use Greenwich Mean Time (GMT)? Greenwich Mean Time (GMT), also known as Coordinated Universal Time (UTC), or military Zulu (Z) time, is an internationally recognized time standard. Because GMT or UTC is used worldwide, you can have OpenEnterprise collecting data from different parts of the world (for example, via satellite links) and the data will always be stored in the OE Database at the correct time from wherever it originated. This is made possible because the entire planet shares the same GMT time. Similarly, users from around the globe can view the same data, and have timestamps (for trends or alarms, for example) corrected to their own local time. 3-8 OpenEnterprise for Beginners Chapter 3 - Building the OpenEnterprise Database Choosing How You Will Communicate with the Controllers Now, you must select the proper device driver. If you are using Bristol controllers, choose ‘Network 3000 and ControlWave Driver’. Now, click on [Next>]. If you are using Bristol controllers, the Network 3000 and ControlWave driver must be selected. Click on [Next>] What is a Device Driver? A device driver is simply a program which helps something communicate. In the case of the Network 3000 and ControlWave driver, it’s a program that allows communication between OE and Bristol controllers. OpenEnterprise for Beginners 3-9 Chapter 3 - Building the OpenEnterprise Database Confirming Your Choices and Building the Database Tables This page shows a list of the defaults and selections you have made so far. You can use the scroll bar to bring additional entries into view. If there are any entries you’d like to modify, click on the [<Back] key until you reach the desired page; otherwise click on [Next>]. This is a summary of the choices made so far. Click on [Next>] to create an initial database. An initial version of the OE Database, containing the configuration information chosen so far is now created. When all of the listed actions are marked as ‘Done’, and the ‘Build Completed Successfully’ message is displayed, click on [Next>]. Click on [Next>] when the Status for all actions shows as ‘Done’. 3-10 OpenEnterprise for Beginners Chapter 3 - Building the OpenEnterprise Database Adding Signal/Variable/Tag Names to the Database Tables Although we’ve created an initial version of the OE Database, many of its tables are empty. We need to include information about the signals/variables from your controllers/RTUs. If your network of controllers is configured and communicating, you can now import this information. To do this, click on the “Import Signal Data” box, and then click on the [Import…] button. Click on “Import Signal Data” then click on the [Import...] button. Depending upon whether Open BSI is running, you may be prompted to select, for OpenEnterprise, the NETDEF file used for your network of controllers. The Database Project Builder will start a separate program called the Database Builder program (DBB). DBB collects all signals that are alarms, RBE signals, or have been marked as global signals, and includes their names in the OE Database. This process may take several minutes depending upon how many signals need to be collected, and the speed of your network. OpenEnterprise for Beginners 3-11 Chapter 3 - Building the OpenEnterprise Database Creating Poll Lists for Data Collection Templates (also known as poll lists) allow groups of signals to be collected at certain specified rates. After DBB finishes, you will be prompted whether or not you want to build templates for data collection. Click on [Yes]. Click on [Yes]. The Poll List Builder runs automatically. Estimating the Maximum Database Size Based on the number of signals inserted by the Database Builder (DBB), OpenEnterprise will attempt to estimate the size of various database tables. If you know the maximum number of signals will be larger than the estimate, enter revised numbers in the fields provided. Click on [Next>]. Click on [Next>]. 3-12 OpenEnterprise for Beginners Chapter 3 - Building the OpenEnterprise Database Configuring Historical Data Collection IMPORTANT: For a full discussion of the concepts of historical data collection, please refer to Chapter 6. On the Historical Data page, you have the option of configuring historical data collection for selected signals you’ve added to your OE Database. A series of templates are provided to support some of the most common collection schemes. If you want to configure historical collection using these templates now, click on the [Add] button. If none of the templates meet your needs, you could create your own templates, however, that is beyond the scope of this manual. To configure historical data, click on [Add] OpenEnterprise for Beginners 3-13 Chapter 3 - Building the OpenEnterprise Database Another alternative is that you can pause the configuration and set up the historical system on your own using the Historical Configuration Tool, by choosing the [Advanced] button. See Chapter 6 for details on using this tool. If none of the templates meet your needs, you can optionally start the Historical Configuration Tool, and define the historical parameters manually. Click on [Next>] You also have the option of not configuring the Historian now, because you can configure it later using the Historical Configuration Tool. If you want to do that, click on [Next>]. Choose the desired historical collection template. If you did choose [Add], the Historical Template dialog box will appear. You can now select from one of several pre-defined historical collection templates which determine how frequently the historical data is collected, and what calculations are performed on the data. When you choose a particular template, a description of the operations it performs appears in the “Template Details” box. Once you’ve chosen a template, you must establish some filtering criteria for which signals you want 3-14 OpenEnterprise for Beginners Chapter 3 - Building the OpenEnterprise Database collected and stored; otherwise, NO signals will be collected and stored by the Historian. To add a rule, specify the portion of the “Base”, “Extension”, and/or “Attribute” that represents the signals you want to collect. For example, if you only want this historical template applied to signals that have a base name beginning with PUMP, enter PUMP* in the “Base” field. Then, optionally assign a name for the rule, and click on [Add]. You can repeat this entire process to configure additional templates and rules for them. For the concept of rules to work effectively, you must have established a consistent signal naming convention. When you’ve finished configuring the historical system, click on [Next>]. Click on [Next>] OpenEnterprise for Beginners 3-15 Chapter 3 - Building the OpenEnterprise Database Configuring an OpenEnterprise Session The Session page lets you configure an OpenEnterprise session. When you’ve made your selections, click on [Next>]. What is an OpenEnterprise ‘Session’? The ‘heart’ of OpenEnterprise software is the OE Database running on the OpenEnterprise Server computer. In order for the OE Database to function properly, however, there are other programs that need to be running as well. For example, the communication driver you selected, earlier, must be running. You might have other programs you want to run too, such as the Reporting package. Any software you want to run together with the OE Database can be grouped together in an OE Session. A session is a collection of programs that run concurrently; when you start the session, all the programs grouped together in that session are started automatically. You can choose a different name from the default, if desired. If you choose this, you must start the session manually. This option causes the session to be started automatically whenever Windows is started. This creates a shortcut in the Windows startup folder. This creates a shortcut on the Windows desktop. When checked, will cause the session to start immediately after you exit the Database Project Wizard. Click on [Next>] 3-16 OpenEnterprise for Beginners Chapter 3 - Building the OpenEnterprise Database The Session Tasks page allows you to choose which software programs (tasks) will be started as part of the OE session. The “Selected Tasks” box lists all tasks currently included in the session. The “Available Tasks” box lists tasks which could be added to the session. Use the [>] button to add programs to the session, or the [<] button to remove programs from the session. Click on [Next>] when finished. Copies all “Available Tasks” to the “Selected Tasks” box. Copies a single highlighted task from the “Available Tasks” box to the “Selected Tasks” box. Copies a single highlighted task from the “Selected Tasks” box to the “Available Tasks” box. Copies all “Selected Tasks” to the “Available Tasks” box. Click on [Next>]. Completing the Database Project Building Process At this point, the OE Database has been created in a temporary area. When you click on [Next>], the database will be copied to the \DATA area, which is the final location for the working OE Database. Click on [Next>]. OpenEnterprise for Beginners 3-17 Chapter 3 - Building the OpenEnterprise Database The OE Database is now complete. Click on [Finish] to exit the Database Project Builder. Click on [Finish]. If you accepted the default settings when creating the OE session, the OE session will be started automatically. Look for a blue icon with a green checkmark through it in the taskbar, and double-click on it to view the status of the session. Congratulations! You’ve now got an OE Database and an OE Session up and running! To verify that communications are operating properly, you can now connect to the OE Database using the Database Explorer. We’ll cover all of that in Chapter 4. 3-18 OpenEnterprise for Beginners Chapter 4 - Using Database Explorer to Find data Chapter 4 – Using Database Explorer to Find Data What is the Database Explorer? Well, we’ve talked about building the database; now let’s talk about how to find out what’s in the database. Database Explorer is a tool that runs on the OE Workstation and OE Server. Typically, you would use the Database Explorer during system configuration and debugging activities. It allows you to: • Examine the hierarchical structure of the OE Database; including tables, attributes and something we haven’t talked about much yet, called views. • View the contents of the OE Database using the integrated Database Object Viewer. The contents include all of the actual data objects in the database, e.g. signals, configuration data, etc. • Establish “live data points” by dragging OPC Tags from the database onto a graphical mimic display (created with the OE Graphics package). This allows real-time process data (or any other information contained in the database) to be included on displays for viewing by operators at the OE Workstation. This is an essential part of the display-building process, and is discussed in Chapter 5. • Establish links to external spreadsheet programs such as Microsoft® Excel using drag and drop DDE links. To perform these functions, you must first start the Database Explorer, then add the database to the hierarchy (if it isn’t already visible), and then establish a connection with the database. Then you will be able to examine various parts of the database, and call up actual data using the Database Object Viewer. OpenEnterprise for Beginners 4-1 Chapter 4 - Using Database Explorer to find data Before You Begin Before you attempt to start Database Explorer, the following must be done: • Your OE Database must have been created, and must be running. See Chapter 3 for information on this. • You must know the service name of the OE Database (or the IP address and name, if it resides on another computer). Consult your site-specific documentation for details. If you don’t know what a service is, don’t worry, we’re going to explain that. • You must have successfully logged on to your OE Workstation, with sufficient security privileges to access the OE Database. Consult your site-specific documentation for details. NOTE: Security will be discussed in detail in Chapter 10. Starting Database Explorer To start Database Explorer, click on: Start Æ Programs Æ OpenEnterprise Æ Database Explorer If this is the first time you are using the Database Explorer with this particular OE Database, you must explicitly identify for Database Explorer the name and (if located on a computer other than the current one) the location of the Database. See Identifying the Name and Location of Your Database. A connection must then be requested with the OE Database. See Establishing a Connection with the Database. Tree Hierarchy Identifying the Name and Location of Your Database If this is the first time you are using Database Explorer with a particular OE Database, you must add the database to the tree hierarchy of databases accessible to Database Explorer. To do so, click on the ‘Add Database’ icon, shown above, or click on File Æ Add Database. The Add Database to Hierarchy dialog box will appear. 4-2 OpenEnterprise for Beginners Chapter 4 - Using Database Explorer to Find data Using the Add Database to Hierarchy Dialog Box The Add Database to Hierarchy dialog box allows you to specify, for Database Explorer, the name of your OE Database. In addition, if the OE Database resides on a PC other than the current one, you must also specify its location. The combination of the database name and location is called the service. What is a ‘Service’? Enter the name of the Database, or its address and name if it resides on a computer other than the current one. A service is a unique address used to identify a particular program running on a particular computer in a TCP/IP network. The default service for the OE Database is: ‘servername:rtrdb1’ where: In the Add Database to Hierarchy dialog box, enter the OE database name, for example ‘rtrdb1’. If the database resides on a different computer than the one you are currently using, the name of the database must be preceded by the IP address of the other server, for example: ‘120.0.210.10:mydatabase’. You may also use an alias for the IP address, for example if the text ‘MYSERVER’ has been defined in your HOSTS file as being equivalent to an IP address of ’125.45.2.8’, you could enter either ‘MYSERVER:rtrdb1’ -or- you could enter ‘125.45.2.8:rtrdb1’. To connect with this database, choose the “Connect Database” option. Click on [OK] to exit the dialog box. The database will be added to the tree hierarchy. OpenEnterprise for Beginners 4-3 servername: is replaced with the name of the computer on which the OE Database resides, or the IP address of that computer, or a name defined in your Windows™ Hosts file which resolves to that IP address. (servername: can be omitted if you are running this copy of Database Explorer on the computer that contains the OE Database.) rtrdb1 is the default name for the OE Database, which must resolve to an IP socket number. (By default, OE uses IP socket 11101 in your Windows™ Services file. You can change this, if necessary.) If this all confuses you, think of the Internet as a neighborhood full of apartment buildings, and programs as people living in the buildings. The server name is the equivalent to the address for their apartment building and the IP socket is equivalent to their apartment number. Chapter 4 - Using Database Explorer to find data The database icon will be surrounded by a RED box with a diagonal line through it, until an actual connection is established. Tree Hierarchy Establishing a Connection with the Database Once a database has been identified for Database Explorer by adding it to the tree hierarchy, a connection with the Database must be established so that the Database structure can be accessed. NOTE Before attempting to establish a connection with a Database, the Database must be running. If it is NOT running, you must explicitly start it. In addition, you must have logged in with security access for this particular Database, or data you wish to view must be accessible to the ‘PUBLIC’ user. To establish a connection, click on the icon for the database in the tree hierarchy, then press the right mouse button, and choose “Connect” from the pop-up menu. Initially, the database will be shown surrounded by an orange box, indicating that a connection has not yet been made. The amount of time required to make the connection varies depending upon the size of the database, and the bandwidth of your connection. When the icon for the database is surrounded by a GREEN box, the connection has been successfully established. 4-4 OpenEnterprise for Beginners Chapter 4 - Using Database Explorer to Find data IMPORTANT Once a connection has been successfully established, Database Explorer will issue a query to the database to obtain details on its internal structure. This structural information is retained until the database is disconnected. Whenever a re-connection is made, the query will be issued again to update the structural detail information. If, while connected, the database structure is altered by some external tool (such as the SQL Client) queries to the database may NOT be successful, depending upon how the database was changed. Should this occur, you should disconnect, and then re-connect so a new query can be initiated. What if I wasn’t able to connect? Any of the following items could prevent a successful connection: • The OE Database isn’t running. (You can’t connect to it if it isn’t running.) • Communications are faulty, or you didn’t specify the correct service. (You should verify that you can actually communicate with the OE Server computer. Try pinging it using the DOS ping command. • Firewall software (a type of security software) is running, that has prevented the connection with the IP socket. (The IP socket for the OE Database must be accessible. By default, this socket is 11101. Check your Windows™ Services file to verify the correct socket, and notify your System Administrator that the OE socket must be accessible through the firewall.) Viewing the Overall Structure of the Database Once Database Explorer has successfully established a connection with the database, the internal structure of the database can be examined. OpenEnterprise for Beginners 4-5 Chapter 4 - Using Database Explorer to find data Viewing Databases, Tables, Views, and Attributes Each database consists of a series of named tables. Associated with each table are a collection of attributes (remember, attributes are just the column names of the table). By default, the standard tables in OpenEnterprise have a suffix of ‘_table’ at the end of their names, for example, the ‘alarmsummary_table’. Database Explorer also allows you to look at views. Views are essentially a restricted look into some portion of a table or set of tables. Views do not have the suffix ‘_table’. Views are sometimes used for security purposes because they restrict which parts of a table (or tables) a user can access or change, and for convenience reasons, because they prevent you being overloaded with more information than you really need to see. Database Explorer’s main screen is divided into 3 separate windows, each of which displays different information about the connected database. If the icon for the database is a red box with a diagonal line through it, there has never been a connection to this database. If the icon for the database is a red box with no diagonal line, the connection has been lost, possibly due to the database being shut down. Database Detail Window -orthe Table Detail Window Click on ‘+’ to see tables in this database If the icon for the database is a green box, a connection is active. Database Tree Control Window 4-6 Attribute Detail Window OpenEnterprise for Beginners Chapter 4 - Using Database Explorer to Find data Database Tree Control Window This window occupies the left-hand side of the screen. It displays all of the databases in the hierarchy. If the database is currently connected, it will be displayed with a small GREEN box around it. If the database is NOT currently connected, it will be displayed with a small RED box around it, with a diagonal line through the center. If the database is connected, and Database Explorer is currently performing a query to obtain detailed information about the database, a small AMBER (dark orange-yellow) box will appear. If you click on the ‘+’ icon associated with the database, a list of the tables and views which make up that particular database will be displayed. Tables which make up this database Use scroll bar to bring additional table names into view OpenEnterprise for Beginners 4-7 Chapter 4 - Using Database Explorer to find data Database Detail Window / Table Detail Window The Database Detail Window and Table Detail Window alternately occupy the upper-right hand corner of the Database Explorer’s main screen. Which of the two windows is visible depends upon selections made in the Database Tree Control Window: The Database Detail Window displays the names of all databases whenever ‘All Databases’ has been selected in the Database Tree Control Window. The format of the window can vary; see Changing the Appearance of Detail Windows. When ‘All Databases’ is selected in the Tree Control Window, all of the databases will appear in the Database Detail Window The Table Detail Window displays the names of the tables associated with whatever database has been selected in the Database Tree Control Window. The format of the window can vary; see Changing the Appearance of Detail Windows. When database named ‘scada-web:rtrdb1’ is selected in the Database Tree Control Window, the tables associated with ‘scada-web:rtrdb1’ are shown in the Table Detail Window. Use scroll bar to bring more table names into view 4-8 OpenEnterprise for Beginners Chapter 4 - Using Database Explorer to Find data Attribute Detail Window The Attribute Detail Window occupies the lower right hand corner of the Database Explorer main screen. It displays the attributes (i.e. column names) of the tables that have been selected in the Database Tree Control Window. The format of the window can vary; see Changing the Appearance of Detail Windows. Clicking on a table in the Database Tree Control Window causes a list of all the attributes (columns) belonging to that table to be displayed in the Attribute Detail Window. Use the scroll bars to bring more attributes, or more details about the attributes into view Double-clicking on certain tables or views will launch the Database Object Viewer, which will query the database to retrieve data from that table or view. Clicking once on a table name will display a list of attributes for the particular table. Doubleclicking on certain tables will launch the Database Object Viewer, along with a pre-defined DBX file to query the database for data from that particular table. OpenEnterprise for Beginners 4-9 Chapter 4 - Using Database Explorer to find data Changing the Appearance of Detail Windows The Database Detail, Table Detail, and Attribute Detail windows can be modified to appear in one of four presentation modes: Large icons, small icons, lists, or detail. To change the mode, click within the window you want to change, then click on “View” in the menu bar, and choose “Large Icons”, “Small Icons”, “List” or “Detail” from the pop-up menu. Alternatively, you can choose the mode from the icons in the menu bar. Large Icons In this mode, only a few large icons are visible at any one time. Small Icons In this mode, many more icons are visible. They are shown, in left-to-right (across) order. List This mode is similar to small icons, except the icons appear in lists from top-to-bottom. Detail In this mode, more detailed information is presented for each item, including information on its location and function in the database. 4-10 OpenEnterprise for Beginners Chapter 4 - Using Database Explorer to Find data Searching the Database for A Particular Table A particular OE database can be made up of hundreds of different tables. Sometimes, you may not remember where a particular table is located in the hierarchy of the database, or even its exact name - - to solve this problem, you can use the Search For Table dialog box. To search through the tree hierarchy for a particular table, click on the database’s icon in the hierarchy presented in the Database Tree Control Window, then press the right mouse button. Choose “Search For Table” from the pop-up menu, and the Search for Table dialog box will appear. Enter the table name you are looking for (or enter the first few characters of its name followed by a wildcard ‘*’ character) then click on the [OK] push button. Tables and views with the specified name (or matching the partial name and wildcard) will be listed in the Table Detail Window. If you double-click on a listed table, its location in the hierarchy will be displayed in the Database Tree Control Window, and the attributes (columns) associated with the table will be displayed in the Attribute Detail Window. Searching the Database for A Particular Attribute (Column Name) A database can include hundreds of different tables, and a particular table can include hundreds of different attributes (which we’ve said before, are column names). Sometimes, you may not remember which table holds a particular attribute, and you might not remember the exact name of the attribute - - to solve this problem, you can use the Search for Attribute dialog box. To search through the tree hierarchy for a particular attribute, click on the database’s icon in the hierarchy presented in the Database Tree Control Window, then press the right mouse button. Choose “Search For Attribute” from the pop-up menu, and the Search for Attribute dialog box will appear. Enter the attribute name you are looking for (or enter the first few characters of its name followed by a wildcard ‘*’ character) then click on the [OK] push button. OpenEnterprise for Beginners 4-11 Chapter 4 - Using Database Explorer to find data Tables with the specified attribute (or matching the partial name and wildcard) will be listed in the Table Detail Window. If you double-click on a listed table, its location in the hierarchy will be displayed in the Database Tree Control Window, and the attributes associated with the table will be displayed in the Attribute Detail Window. Searching the Database for A Primary Key Attribute A primary key attribute is simply an attribute that is used as an index (or part of an index) for manipulating information in a table, because it is unique for each record (row). A primary key might include multiple attributes. For example, a timestamp attribute and a name attribute might be combined to form the primary key. To search through the tree hierarchy for a particular primary key attribute, click on the database’s icon in the hierarchy presented in the Database Tree Control Window, then press the right mouse button. Choose “Search For Primary Key Attribute” from the popup menu, and the Search for Primary Key Attribute dialog box will appear. Enter the attribute name you are looking for (or enter the first few characters of its name followed by a wildcard ‘*’ character) then click on the [OK] push button. Tables with the specified primary key attribute (or matching the partial name and wildcard) will be listed in the Table Detail Window. If you double-click on a listed table, its location in the hierarchy will be displayed in the Database Tree Control Window, and the attributes associated with the table will be displayed in the Attribute Detail Window. Searching the Database for ‘Owned’ Tables An ‘owned’ table is a table in which the ‘Owner’ attribute has been set to the name of a particular user. When you choose “Search for Owned Tables” all tables for which the ‘Owner’ attribute matches the name of the currently logged on user will be listed. 4-12 OpenEnterprise for Beginners Chapter 4 - Using Database Explorer to Find data Viewing the Contents of the Database Using the Database Object Viewer You can use the Database Object Viewer to: • Examine the data residing in the database tables by requesting data that meets certain userspecified criteria. (This is called querying the database for information.) • Configure real-time process points in graphical displays using OPC Tags. • Configure real-time data links to third-party packages such as Microsoft® Excel using DDE Links. Starting the Database Object Viewer Once the Database Explorer has been started, and a successful connection has been made to your running database, you can start the Database Object Viewer by clicking on the icon shown above, -or- by double-clicking on certain Table names in the Database Explorer tree control window, or- by clicking on: View Æ Database Object Viewer The Database Object Viewer will appear, with the ‘Tables’ page displayed first. You can now proceed to query the database for data. Viewing Data By Constructing Simple Queries The Database Object Viewer provides various options for querying the database. In this section, we will cover the simplest approach that will yield useful information for most users. Examples of queries using more detailed criteria will be covered in the next section: OpenEnterprise for Beginners 4-13 Chapter 4 - Using Database Explorer to find data xxxxxxxxxxxxxxxxxxxxxxxxxxxxxxxxxxxxxxxxxxxxxxxxxxxxxxxxxxxxxxxxxxxxxx The simple approach to querying the database involves: • • • • Identifying the table you want to request data from using the ‘Tables’ page. Identifying the attributes you want to request data from using the ‘Attributes’ page. Specifying any limiting conditions using the ‘Conditions’ page. Running the query and looking for our results on the ‘Objects’ page. If you have trouble remembering this sequence, just remember T-A-C-O which is the first letter of each of the Database Object Viewer pages you need to use. Identifying the Table You Want to Query The ‘Tables’ page of the Database Object Viewer allows you to select which table (or tables) you want to examine. 4-14 OpenEnterprise for Beginners Chapter 4 - Using Database Explorer to Find data NOTE Even though the Database Object Viewer allows you to select multiple tables, we recommend that when you are first learning how to use the Database Object Viewer, you choose only one table to be searched at any one time. Choosing multiple tables introduces certain complexities into the query that may result in problems for the novice user. Click on the name of the table or view you want to request data from in the “Available Tables” list box, then click on the [Add] push button. The table name will be added to the “Selected Tables” list box. You can now click on the ‘Attributes’ page to continue defining your query. Click on the name of the table (or view) you want to retrieve data from, in the Available Tables list box. Then click on the [Add] push button, and the name of the table will appear in the Selected Tables list box. If you change your mind and want to remove a table from the Selected Tables list box, click on its name, then click on the [Remove] push button. Specifying the Attributes You Want to Examine The ‘Attributes’ page of the Database Object Viewer allows you to specify which attributes (columns) from the previously selected table, you want to examine. OpenEnterprise for Beginners 4-15 Chapter 4 - Using Database Explorer to find data Click on the name of the attributes you want to examine in the “Available Attributes” list box, then click on the [Add] push button. The attribute name will be added to the “Selected Attributes” list box. Click on the name of the attribute you want to examine, in the Available Attributes list box. Then click on the [Add] push button, and the name of the Attribute will appear in the Selected Attributes list box. If you change your mind and want to remove an attribute from the Selected Attributes list box, click on its name, then click on the [Remove] push button. To remove all attributes, use the [Remove All] push button. You can now click on the ‘Conditions’ page to continue defining your query. Specifying Conditions to Limit the Amount of Data Returned By Your Query The ‘Conditions’ page of the Database Object Viewer allows you to make your query more specific, and thereby limit the amount of data returned. For example, if you specified in the ‘Attributes’ page that you wanted to see the names and values of entries in the realanalog table, you could receive thousands of responses depending upon the number of objects (such as ACCOL signals) in your database. This may be much more data than you want, and it also could put an unnecessary burden on communications as the server attempts to fulfill the request for massive amounts of data. The ‘Conditions’ page, however, lets you tailor the request by entering more specific criteria, thereby making the resulting data more usable for you, and more manageable for the communications system. 4-16 OpenEnterprise for Beginners Chapter 4 - Using Database Explorer to Find data Click on the attribute you want to specify a condition for, then click on the [Add] push button. Then specify a condition for that attribute, and click on the [Update] push button. Click on the name of the attribute you want to specify a condition for in the “Available Attributes” list box, then click on the [Add] push button. The attribute name will be added to the “Condition” line below the push buttons; enter an equation specifying the condition you want to apply. Here are some examples of conditions. NOTE: You must leave a single space on each side of an arithmetic operator ( = , <, >): value < 500 manualinhibit = TRUE units = ‘MGD’ extension = ‘INPUT’ name LIKE ‘%PUMP%’ OpenEnterprise for Beginners 4-17 Chapter 4 - Using Database Explorer to find data When finished entering the condition, click on the [Update] push button. The specified condition will be displayed in the “Conditions” list box, and the “Condition” line will be cleared so that you can specify any additional conditions. NOTE: When you enter multiple conditions, all conditions must be satisfied.1 To edit a condition, click on it, then click on the [Edit] push button, then make any changes in the Condition box. If you want to change any of the conditions you have entered, click on the condition in the “Conditions” list box, then click on the [Edit] push button, and edit the condition line as desired, then click on the [Update] push button. When you have finished specifying any conditions you would like to apply, you can run your query. 1 Essentially, when expressed as boolean logic, the conditions are all ANDed together. 4-18 OpenEnterprise for Beginners Chapter 4 - Using Database Explorer to Find data Run the Query and View the Results If you want the results of this query to be regularly refreshed as data changes in the database, click on the ‘Active Query’ icon, shown at left, or click on Options Æ Active Query. NOTE: If you do not do this, data in the query will not be updated as it changes. To run the query, click on the ‘Run Query’ icon or click on Query Æ Apply. If you did NOT specify any conditions This message will only appear if you didn’t specify any conditions; it is meant to warn you that the on the ‘Conditions’ page, by default, results of the query may be a large amount of data. you will receive a warning message (the warning is intended to remind you that your query could potentially result in a very large amount of data being collected, what we call the KILLER QUERY…). You can ignore the message and click on [Yes] if you are unconcerned about the size of the query, or click on [No] to revise the query, before running it. NOTE: These warning messages may be suppressed by checking the “Auto run without conditions” item on the ‘Conditions’ page. OpenEnterprise for Beginners 4-19 Chapter 4 - Using Database Explorer to find data The results of the query can be viewed on the ‘Objects’ page; normally, running the query will switch to the ‘Objects’ page automatically. If this is an active query, they will be updated periodically as new data comes in. Total Number of objects Database name Number of objects removed since Number of objects Number of objects query issued changed since added since query issued query issued 4-20 OpenEnterprise for Beginners Chapter 4 - Using Database Explorer to Find data Applying Filtering Criteria to Your Query The ‘Filters’ page allows you filter the list of available attributes shown on the ‘Attributes’ page. A description of the various filtering criteria is included below. Items that are checked are included in the list of ‘Available Attributes’. String Attributes in the table that store string data, such as signal names, operator names, descriptors, etc. Bool Attributes in the table that store TRUE/FALSE data such as logical signal values, the values of manual, control and alarm inhibit/enable flags, etc. Integer Attributes in the table that store integer data such as counts, ID numbers, etc. Real Attributes in the table that store floating-point data such as analog signal values. Time/Date Attributes in the table that store date and time information such as timestamps. Primary Key Attributes in the table that are part of the primary key for the table and uniquely identify the objects within the table. Foreign Key Attributes in the table that are used as part of another table’s primary key, and are used to reference those objects from this table. OpenEnterprise for Beginners 4-21 Chapter 4 - Using Database Explorer to find data Not Key Attributes in the table that are NOT part of any key. Nullable Attributes in the table that can hold a NULL value. Not Nullable Attributes in the table that can NEVER hold a NULL value. Persistent Attributes in the table that are saved to disk when the server is shut down. Not Persistent Attributes that are never saved to disk. Hidden Attributes in the table that, by default, are not visible to the user. NOTE: This is not a security feature, just a convenience. These attributes are typically of little interest to most users. Not Hidden Attributes in the table that, by default, are available to the user. To choose all criteria (i.e. no attributes excluded) click on the [Set All] push button. To exclude all criteria (typically done to de-select everything, and then select only a few criteria) click on the [Clear All] push button. 4-22 OpenEnterprise for Beginners Chapter 4 - Using Database Explorer to Find data Saving the Criteria Used For Your Query in A DBX File Once you have finished creating your query, you can save the query criteria, so that you can run it again in the future. To do this, click on the ‘Save As’ icon, or click on File Æ Save As. Standard Windows™ Save dialog boxes will appear in which you can specify a path and filename for your database query. The file extension for database queries is (.DBX). DBX files are a way to save your queries, and re-use them later… Subsequent changes can be saved by clicking on the ‘Save’ icon, or by clicking on File Æ Save. NOTE: If you save your DBX file in the default directory, with the same name as the table or view from which you queried data, the query can later be recalled by double-clicking on the table name in the Database Tree Control Window. DBX files can be recalled into the Database Object Viewer to re-initiate a query, and may also be used by other OE components. Opening An Existing DBX File If you have previously saved the criteria for a query in a DBX file, you can open it by clicking on the ‘Open Query’ icon, or by clicking on File Æ Open, and selecting the DBX file from the dialog box. If you saved your DBX file in the default directory, with the same name as the table or view for which you issued your query, you can recall the DBX file by double-clicking on the table name in the Database Tree Control window. OpenEnterprise for Beginners 4-23 Chapter 4 - Using Database Explorer to find data Adding ‘Live’ Data to Third-Party Applications by Dragging DDE Tags Another use of the Database Object Viewer is to establish ‘live’ dynamic data exchange (DDE) links between OpenEnterprise and a third-party DDE compliant package, such as Microsoft® Excel. This allows the creation of spreadsheets containing ‘live’ data, which will update as it changes in the database. Before You Begin Before you can add live data to a spreadsheet, you must have already: • • • • • started the third-party application, e.g. Microsoft® Excel, and created a spreadsheet. installed and started up the Polyhedra DDE Server. (See the OpenEnterprise Reference Guide (document# D5092) for instructions on how to do this.) started the OE Database started the Database Explorer and established a connection with your running database. (See pages 4-2 through 4-4.) read through and become familiar with how to create and run a query of your database. (See pages 4-13 through 4-19 for details.) An example illustrating this process is included, below: 4-24 OpenEnterprise for Beginners Chapter 4 - Using Database Explorer to Find data Example - Adding An Analog Value To A Spreadsheet Using DDE The Brighton Hills tank farm has a series of tanks that hold liquids. They use Network 3000series controllers to monitor the tank levels, and they want to display the tank levels (in FEET) in a spreadsheet for the operator. Step 1. - Start creating your query by selecting the Table containing the data: On the ‘Tables’ page of the Database Object Viewer, there are numerous tables listed. In this case, we want to select the table containing analog data values; called ‘realanalog’. Click on the [Add] push button. Step 2. - Choose the Attributes included in your query: On the ‘Attributes’ page of the Database Object Viewer, click on the ‘Name’ attribute in the “Available Attributes” list box, then click on the [Add] push button. Repeat this process for the ‘Value’ and ‘Units’ attributes. OpenEnterprise for Beginners 4-25 Chapter 4 - Using Database Explorer to find data Step 3. - Specify Conditions of the query: On the ‘Conditions’ page of the Database Object Viewer, we only want tank levels, which we know are in units of FEET, so we will put a condition on our query that units must equal ‘FEET’. To do this, click on ‘units’ in the “Available Attributes” list box, then click on the [Add] push button. The word ‘units’ will appear in the “Condition” line, add the following text to the line: = ‘FEET’ Now, click on the [Update] push button, and the condition you made will appear in the “Conditions” box above. Step 4. - Run the query: Click on the ‘Active Query’ icon, and then run the query by clicking on Query Æ Apply, or just click on the ‘Run Query’ icon. The results of the query (analog signal values which have units of ‘FEET’) will appear on the ‘Objects’ page of the Database Object Viewer. 4-26 OpenEnterprise for Beginners Chapter 4 - Using Database Explorer to Find data Step 5. - Leave the ‘Objects’ page of the Database Object Viewer on the screen, and open up your spreadsheet (if not already open) Keep the ‘Objects’ page of the Database Object Viewer (which contains your analog values) visible on the screen. Now call up the spreadsheet you want to add ‘live’ data to in Excel. Step 6. - Change the Default Tag Format in the Database Object Viewer to DDE The Database Object Viewer is most frequently used to export OPC tags, therefore, that is the default export tag format it uses. To export DDE links, you must change the export format to DDE. Click on: Options Æ Tag Format Æ DDE. Step 7. - Drag the data from the Database Object Viewer to the Appropriate Cell in the Spreadsheet Drag the value from the Database Object Viewer window to the cell in the spreadsheet where you would like the data to be displayed. This establishes the DDE link. Repeat, as necessary, to bring additional data into the spreadsheet. Drag the value from the Database Object Viewer to the appropriate cell in the spreadsheet OpenEnterprise for Beginners 4-27 Chapter 4 - Using Database Explorer to find data NOTE: If a message similar to the one shown below is displayed, it means that the Polyhedra DDE Server did not start. If the Polyhedra DDE Server has been installed, you can start it by clicking on Start Æ Programs Æ Polyhedra Æ DDE. If the Polyhedra DDE Server was never installed, you must install it according to instructions in the OpenEnterprise Reference Guide (document# D5092). Some advanced topics which we won’t cover here • The Database Object Viewer includes a ‘Joins’ page which allows you to query multiple tables to find data intersections. Don’t try it! It’s not for beginners, and could crash your system. • The Database Object Viewer includes an ‘SQL’ page which lets you edit SQL queries on the database. If you’re interested in this, review the appendix on SQL at the end of this manual. • The OE Menus feature allows you to take DBX files you create in Database Object Viewer, and tie them into menus, that allow you to pass parameters between OE components, and edit the database. This is a very powerful feature for customizing your system, but is beyond the scope of this manual. Please see the OE Menus section of the OE Reference Guide (document# D5092) if you need information on this. 4-28 OpenEnterprise for Beginners Chapter 5 - Building Displays to ‘Mimic’ Your Process Chapter 5 – Building Displays to ‘Mimic’ Your Process What is the OpenEnterprise Graphics Software? The OpenEnterprise Graphics software (also called OEGraphics or GraphicsView) is a specially licensed version of the Iconics GraphWorX32 software, which has been specifically modified to support additional functionality. It is used to build and view graphical displays, sometimes known as mimic displays, which allow operators to monitor their plant or process from the OE Workstation. The entire collection of displays used by the operator is referred to as the human-machine interface (HMI) or graphical user interface (GUI). Data is collected from the plant or process via instrumentation devices (e.g. flow meters, electrical contacts, pressure transmitters) and transmitted to RTUs. Data from the RTUs is then sent to the OE Database, where it can be extracted for use on displays. OpenEnterprise for Beginners 5-1 Chapter 5 - Building Displays to ‘Mimic’ Your Process Displays consist of a mixture of static and dynamic objects. These objects are drawn to resemble specific parts of the plant or process such as pumps, valves, compressors, tanks, etc. Static objects do not change, and are not connected to the OE Database. Dynamic objects, however, are linked to ‘live’ realtime process data in the OE Database through the use of OPC Tags. This is an OPC Tag The dynamic objects can be configured to change color, size, or flash based on how the real-time data changes. For example, an analog value might flash when it has entered an alarm state, or a pump might turn green when it is running and yellow when it is undergoing maintenance. Besides allowing an operator to monitor the plant or process, displays can be configured to help the operator control the process by allowing data entry of setpoints, by allowing the operator to start and stop devices depicted on the display such as pumps, motorized valves, etc. In each case, these actions are possible by sending commands from the display down to the OE Database, and then on to the controller network. Objects which are to be used on multiple displays can be saved as symbols in the symbol library. They can then be easily imported into any new display which is created. Symbols and displays can also use a technique called aliasing which allows symbols and even entire displays to be re-used with different entries from the database, depending upon which alias (name) is currently selected. What is an OPC Tag? OPC stands for Object-linking and embedding for Process Control, an industry standard that was developed by the OPC Foundation, to allow a standard method of communication between different process control devices and software. An OPC tag identifies a piece of information (normally a signal value or attribute) using the conventions of the OPC standard. Within OpenEnterprise this allows data from the OE Database to be accessed by displays or trends, or software by other vendors. This chapter presents an overview of the display building process, including: • instructions for starting the OE Graphics software, opening a display, changing from ‘configure’ to ‘runtime’ mode, saving the display, etc. • step-by-step examples for creating various display objects. Various features of OE Graphics are highlighted as part of the examples. 5-2 OpenEnterprise for Beginners Chapter 5 - Building Displays to ‘Mimic’ Your Process • instructions for working with symbols, setting up aliasing of individual symbols, saving them in the symbol library, and re-using them on other displays. • suggestions for designing your entire human-machine interface (HMI) system. IMPORTANT This chapter is NOT intended to be a comprehensive reference to all features and functions of the OE Graphics package. If you need information on a particular feature not covered here, please refer to the GraphWorX32 User Manual. Before You Begin Before you attempt to build displays, the following must have been done: • You must have installed the OE Graphics package on your workstation. This process is briefly covered in the OpenEnterprise Installation Guide portion of the OpenEnterprise Reference Guide (document# D5092). • Your OE Database must have been created and must be running. • You must be able to connect to the OE Database using Database Explorer, and issue a query of the OE Database (This was discussed in Chapter 4.) • You must have successfully logged on to your OpenEnterprise Workstation, with sufficient security privileges to access the OE Database. Consult your site-specific documentation for details. • You must be familiar with the details of the underlying plant or process which will be depicted on the displays, and also must know which tables and attributes of the OE Database contain the data you want to include on the display. OpenEnterprise for Beginners 5-3 Chapter 5 - Building Displays to ‘Mimic’ Your Process Starting the OE Graphics package By default, the startup sequence for the OE Graphics package is to click on Start Æ Programs Æ OpenEnterprise Æ Workstation. This sequence may have been modified, however, when OE Graphics was initially installed. If you cannot find OpenEnterprise Graphics, look for GraphWorX32, and start it, instead. After the splash screen has appeared, the screen should appear as shown, below, with an all-new empty display open. Opening a Display Once OE Graphics is running, you can choose to create an all-new display, or you can open an existing display. 5-4 OpenEnterprise for Beginners Chapter 5 - Building Displays to ‘Mimic’ Your Process Opening An All-New Display When you first start OE Graphics, an all-new empty display is opened automatically, and the screen will appear as shown on the previous page. If you already have other displays open, however, and want to create an all-new display, you can do so by clicking on the icon shown above, or by clicking on File Æ New. An empty display will now be opened, and you can begin to add graphic elements to it. Opening An Existing Display To open a display which has already been created, click on the Open icon, shown above, or click on File Æ Open. The standard Windows™ Open dialog box will appear. Use the controls to locate the directory containing your displays. The recommended directory for storing OpenEnterprise displays is \OEStore\ Displays so you might want to look there first. When you find the display you want to open, double-click on the name of the display file (must end in ‘.GDF’), -or- click once on its name, then click on the [Open] button, and the display will appear on the screen. Using the Example Displays If you can’t locate any displays, the OpenEnterprise Software CD comes with a selection of example displays, which you may use as a starting point for creating your own displays. The example displays are located in the \Examples\Workstation sub-directories on your OpenEnterprise Software CD. OpenEnterprise for Beginners 5-5 Chapter 5 - Building Displays to ‘Mimic’ Your Process A Quick Look at the Drawing Tools This section will briefly discuss the most commonly used drawing tools. For more detailed information, please see the GraphWorX32 User Manual. Choosing Colors One of the first things you will want to do when you open up a display is to set the background color of the display. To do this, click on Format Æ Background Color. The Color Palette will appear. Click on the color of your choice for the background, then click on the [OK] push button. Click on the color you want to select, then click on the [OK] push button. The “Format” pull down menu also has selections for setting the line color, line style, display properties, etc. For more details, see the GraphWorX32 User Manual. 5-6 OpenEnterprise for Beginners Chapter 5 - Building Displays to ‘Mimic’ Your Process Drawing A Straight Line To draw a straight line, click on the ‘Straight Line’ icon, then click in the display where you want the line to begin, and drag the mouse until you reach the desired endpoint, then release the mouse. To change the line color, you must use FormatÆ Line Color, and select the color from the color palette. Then click where you want to start the line, and drag the mouse to where you want to finish the line. To draw a straight line, first click on the ‘Straight line’ icon To move the line after it is finished, select it and drag it to the desired location. Selecting Objects on Displays To select an object on a display just click on it. A group of eight edit handles will appear around the object. (The picture at right shows a pump symbol surrounded by edit handles.) You can click and drag on these handles to resize the object in various directions. To move the object, just click on the object (not the handles) and hold down the left mouse key while you move the object to the desired new position. Drag bounding box to select multiple objects Edit handle To select more than one object, drag the mouse to form a bounding box around the objects you want to select, then release the mouse button and all the complete objects in the box will be selected. If a display contains many objects close together, and you are unable to select the right one, you can select any object on the display, and repeatedly press the [Tab] key. As you keep pressing the [Tab] key, a bounding box will move through each of the objects on the display, allowing you to eventually select the desired object. OpenEnterprise for Beginners 5-7 Chapter 5 - Building Displays to ‘Mimic’ Your Process Drawing A Box To draw a box, click on the ‘Rectangle/Square’ icon, then click in the location in the display where you want to draw the box, and drag the mouse until the box is the desired size, then release the mouse. To draw a square, follow the same procedure, except hold down the [Shift] key while you are dragging the mouse. If you want to re-size the box, you can drag on the handles which appear around its edge when it is selected. To move the box after it is finished, select it, and drag it to the desired location. If you want to change the fill color of the box, select the box, then click on the desired color in the color palette. If you want to turn on/off the fill color, you can click on Format Æ Toggle Fill (or just click on the ‘Fill/Unfill’ icon). To draw a box, first click on the ‘Rectangle/Square’ icon. Next, click where you want to draw the box, and drag the mouse until the box is at the desired size. 5-8 OpenEnterprise for Beginners Chapter 5 - Building Displays to ‘Mimic’ Your Process Drawing An Ellipse or A Circle To draw an ellipse or circle, click on the ‘Ellipse/Circle’ icon, then click in the location in the display where you want to draw the ellipse, and drag the mouse until the box is the desired size, then release the mouse. To draw a circle, follow the same procedure, except hold down the [Shift] key while you are dragging the mouse. If you want to re-size the ellipse/circle, you can drag on the handles which appear when it is selected. To move the ellipse/circle after it is finished, select it, and drag it to the desired location. If you want to change the fill color of the ellipse/circle, select it, then click on the desired color in the color palette. If you want to turn on/off the fill color, you can click on Format Æ Toggle Fill (or just click on the ‘Fill/Unfill’ icon). To draw an ellipse or circle, first click on the ‘Ellipse/ Circle’ icon. Next, click where you want to draw the ellipse, and drag the mouse until it is at the desired size. For information on the other drawing tools, see the GraphWorX32 User Manual. Saving A Display To save a display, click on the ‘Save’ icon, shown above, or click on File Æ Save. The Save or Save As dialog box will appear. It is recommended that you save your displays in the directory: \OE Store\ Displays OpenEnterprise for Beginners 5-9 Chapter 5 - Building Displays to ‘Mimic’ Your Process Switching Between Configure Mode and Runtime Mode Configure Mode is used to build your displays, add dynamic data, etc. Live data is NOT visible in Configure Mode. Configure Mode is for building NOTE: In order to make changes to your display, or to the display. You can’t see any live add ‘live’ data to your display, the OE Graphics data in Configure Mode. package must be in ‘Configure’ mode - - if you are in ‘Runtime’ mode, click on the ‘Configure’ menu bar Runtime Mode is for running / item to return to ‘Configure’. If there is no ‘Configure’ viewing the display with live data. item but you see a ‘Runtime’ item, you are already in ‘Configure’ mode. If you see ‘Runtime’ here, you are in currently in Configure Mode. Clicking on ‘Runtime’ will switch you into Runtime Mode. If you see ‘Configure’ here you are currently in Runtime Mode. Clicking on ‘Configure’ will switch you into Configure Mode. 5-10 OpenEnterprise for Beginners Chapter 5 - Building Displays to ‘Mimic’ Your Process Examples of Creating Various Display Objects The examples which follow should generally be performed in consecutive order, since most examples build on the information presented in the previous examples. Each of the examples assume you have successfully connected to your running Database via Database Explorer, and that you understand how to query the database for information using the Database Object Viewer. If you are unsure about how to do these things, please review Chapter 4. The examples also assume you have already started the OE Graphics package, that you have opened up a display, that you know how to save it, and how to switch back and forth between ‘Configure’ mode and ‘Runtime’ mode. These subjects are discussed earlier in this chapter. OpenEnterprise for Beginners 5-11 Chapter 5 - Building Displays to ‘Mimic’ Your Process Example #1 - Creating A Text Label on A Display Bold Underline Font size Italicize 3 While selected, you can change the appearance of Click on the ‘Text’ icon the text with these controls. Font type 1 2 Click where you want to place the text, and start typing Step 1. Either click the ‘Text’ icon (shown at right), -or- click on Draw Æ Text. Step 2. Click on the location in the display where you want to add the text label, and start typing. Step 3. To change the font, size, or style of the label, select it, and use the controls at the top of the screen. 5-12 OpenEnterprise for Beginners Chapter 5 - Building Displays to ‘Mimic’ Your Process Making Changes To An Existing Text Label If you want to change the text label you’ve just created, you must right click on it, and choose “Property Inspector” from the popup menu. (You could also have chosen Edit Æ Text to edit the text directly on the screen, but the Property Inspector provides more options.) You should experiment with the Property Inspector dialog box to see the various options for representing text. Use this list box to change the edge around the text. You can have a raised edge, a sunken edge, etc. Click here to call up the Font dialog box to change the font styles of the text Call up a pallette to select a different background color for the data If desired, you can edit the text directly in this field OpenEnterprise for Beginners 5-13 Chapter 5 - Building Displays to ‘Mimic’ Your Process Example #2 - Displaying A Numerical Value From the Database (Process Point) 2 1 Construct a query using the Database Object Viewer. Open a display in the OpenEnterprise Graphics package 7 Switch to “Runtime” mode Click on the approximate location where you would like the data to appear. The Property Inspector dialog box will pop-up. 4 6 5 Click and drag the value from the Database Object Viewer into the “Data Source” field in the Property Inspector dialog box. This is called dragging an OPC Tag. 3 Click on the [OK] push button. Click on the Process Point icon. Step 1. Using the Database Object Viewer, construct an active query of the database which calls up the signal data you are interested in from the ‘realanalog’ table. Leave the window open. (If you’re not sure how to do this, please read Chapter 4). Step 2. Open a display in the OE Graphics package, and move it side-by-side with the Database Object Viewer window, so that both windows are in view. Step 3. Either click on the process point icon, -orclick on Dynamics Æ Intrinsics Æ Process Point. 5-14 OpenEnterprise for Beginners Chapter 5 - Building Displays to ‘Mimic’ Your Process Step 4. Click on the approximate location in the display where you want the data to appear (you can adjust the location later, if necessary.) The Property Inspector dialog box will pop-up. Step 5. Drag whichever value you want to display from the Database Object Viewer window into the “Data Source” field in the Property Inspector dialog box. This is called dragging an OPC Tag. OPC Tag Step 6. Click on the [OK] push button to save the process point. The process point will appear as a series of question marks ‘?????’ surrounded by drag handles. The drag handles can be used to manually re-size the text. The color red indicates that this object in the display contains ‘live’ data. NOTE: The OPC tag is now visible within the display if you move the cursor over the process point. OpenEnterprise for Beginners 5-15 Chapter 5 - Building Displays to ‘Mimic’ Your Process Step 7. Switch to ‘Runtime’ mode to view the active data on the display, by clicking on “Runtime” in the menu bar. The live data value should appear on the display, and should match that in the active query of the Database Object Viewer. In ‘Runtime’ mode, the data value in the active query of the Database Object Viewer, and the value of the process point should be the same. Variations on Example #2 • Making changes to an existing Process Point: If you want to change the process point, you just created, you can recall the Property Inspector dialog box to the screen and make changes. To do this, right click on the process point in ‘Configure’ mode, and select “Property Inspector” from the pop-up menu. • Displaying non-numerical data in the Process Point: There is no restriction on the type of attribute you drag into the Property Inspector dialog box. While the example described using a numerical value using the ‘Value’ attribute, you could have dragged the ‘Units’ or ‘Name’ attribute into the “Data Source” field. • Making the Process Point changeable by the Operator: If you want the process point to be Select this to changeable by the operator, for example, to enter make operator setpoint levels, simply select “Data Entry” as part of entry possible the “Point Type” in the PPT/DE page of the Property Inspector dialog box. In ‘Runtime’ mode, the operator can enter new values into this process point which are copied to the database, and down into the RTU. 5-16 OpenEnterprise for Beginners Chapter 5 - Building Displays to ‘Mimic’ Your Process • Changing Background & Foreground Colors of the Process Point, Changing the Font: The ‘Text’ page of the Property Inspector dialog box includes various fields for changing the style of how the text appears. You should experiment with this to see a style you prefer. Use this list box to change the edge around the text. You can have a raised edge, a sunken edge, etc. Click here to call up the Font dialog box to change the font styles of the text Call up a pallette to select a different background color for the data Common Mistakes Which Occur When Creating Process Points • Dragging data without first clicking the ‘Process Point’ icon, and clicking in the display If you do this, you will be dragging just the text for the OPC tag onto your display, which is useless by itself. Click on the tag in the display, and press the [Delete] key, then start again. • Dragging the wrong OPC tag This is the most common error when creating a process point. Depending upon which attribute (column) you drag from, you might see data in the wrong format (e.g. text instead of numerical data) or you might be dragging from a row above or below the one you want. If the displayed value does NOT match the value displayed in the active query, you can just delete the current tag in the "Data Source" field, and drag in the correct one. Alternatively, just click on the value in the display, press the [Delete] key, and start again. • Forgetting to use an active query If you forgot to click on the ‘Active Query’ icon (shown at right) before running your query, the query will only be updated if you manually run the query again, and consequently, the data on your display WILL NOT change when you go into ‘Runtime’ mode. Click on the ‘Active Query’ icon and re-run the query. If this does NOT fix the problem, verify that your connection to the database is functioning. OpenEnterprise for Beginners 5-17 Chapter 5 - Building Displays to ‘Mimic’ Your Process Example #3 - Displaying the changing level of liquid in a tank NOTE: The tank we are drawing in this example is a simple box; you can be much more elaborate in your tank design if you desire. In addition, you may wish to check the symbol library to see if there is a tank symbol already made that you want to use. 2 1 Open a display in the OpenEnterprise Graphics package 3 Click on the box icon, and create a box. Construct a query using the Database Object Viewer. 10 6 Switch to “Runtime” mode Click on: Dynamics->Actions->Size 8 9 7 Drag the appropriate tank level value from the Database Object Viewer into the “Data Source” field in the Property Inspector 5 4 Change the background color from the palette Choose the direction in which the inner box will change size. Specify the range and click on [OK] Create a second box inside the first box. The second box represents the liquid in the tank. Step 1. Using the Database Object Viewer, construct an active query of the database which calls up the tank level signal data you are interested in from the ‘realanalog’ table. Leave the window open. (If you’re not sure how to do this, please read Chapter 4). Step 2. Open a display in the OE Graphics package, and move it side-by-side with the Database Object Viewer window, so that both windows are in view. Step 3. Click on the box icon, then move the cursor to the location where you want to add the tank. Click and drag until you have created a box which represents the tank. 5-18 OpenEnterprise for Beginners Chapter 5 - Building Displays to ‘Mimic’ Your Process First, click on the box icon Next, click and drag the cursor until a box is created Color palette Step 4. Change the background color of the tank to black by clicking on black in the color palette while the tank is selected. Alternatively, you can right click on the tank and change both the "Fill Color" and the "Line Color" to black, separately. Step 5. Using the same method described in steps 3 and 4, create another slightly smaller box with a blue color which will represent the liquid in the tank, and drag it just inside the first box, so all of its edges appear inside the first box. Outer box represents the tank itself Inner box represents the liquid in the tank OpenEnterprise for Beginners 5-19 Chapter 5 - Building Displays to ‘Mimic’ Your Process Step 6. With the smaller blue box selected, click on Dynamics Æ Actions Æ Size and the Property Inspector dialog box will appear. Step 7. Drag the appropriate tank level value from the Database Object Viewer into the “Data Source” field of the Property Inspector dialog box. Step 8. Choose the direction in which the inner box changes size to depict the liquid level. Step 9. Click on the “Range Override” check box, and enter values for “Low” and “High” which correspond to the minimum and maximum tank levels to be displayed. Then click on the [OK] push button. OPC tag dragged in from Database Object Viewer Choose the direction in which the size changes Define range for tank level Step 10.Switch to ‘Runtime’ mode to view the active data on the display, by clicking on “Runtime” in the menu bar. The inner box representing the liquid should change size as the value changes in the active query of the Database Object Viewer. 5-20 OpenEnterprise for Beginners Chapter 5 - Building Displays to ‘Mimic’ Your Process Variations on Example #3 Making more realistic looking objects using the drawing tools: The tank we just drew consisted of two boxes - one for the tank, and one for the liquid in the tank If you want to make a more realistic looking tank for this example, you can use the drawing tools provided in the toolbar. In fact, it is a good idea to experiment with the drawing tools to see what sorts of objects you can create. Select an existing object on the screen Draw a straight line Draw a box Draw an ellipse (hold down [Shift] to make a circle) Draw a curve Draw a multi-line segmented object Type text labels Fill an enclosed object with the currently selected color The straight line and curve tools operate similarly to the box tool; just click on their icons in the toolbar, then click within the display and drag the cursor until the tool draws the line or curve as you want it. The ellipse tool also operates similarly, however, if you want to create a circle, hold down the [Shift] key while using the ellipse tool. One thing to remember when using the multi-line segmented tool is that to exit that tool, you must double-click the mouse on the endpoint where you want to stop drawing lines; otherwise it will continue to try to draw more line segments. For more information on using these tools, see the GraphWorX32 User Manual. Making changes and corrections to objects: To make changes to the non-dynamic parts of the object, just click on them in ‘Configure’ mode, and make changes using the drawing tools, etc. To make changes in the dynamic properties (i.e. sizing based on an analog value) right-click on the object in ‘Configure’ mode, and make any necessary changes in the Property Inspector. If the dynamic properties are too difficult to change in this way, you can select the object by clicking on it until you see red handles, then, from the menu bar, click on EditÆDelete Selected Dynamics. You can also do this by right-clicking on the object, and choosing “Delete Dynamics” from the pop-up menu. Now re-create the dynamics as you want them. OpenEnterprise for Beginners 5-21 Chapter 5 - Building Displays to ‘Mimic’ Your Process Using Irregularly Shaped Borders: You can use the drawing tools to create an irregularly shaped object for your tank (for example, a cut-away view) which will be re-sized based on a real-time value in the database. To do this, create the irregular (but enclosed) object with the segmented line tool, then duplicate it by depressing the [Ctrl]+[D] keys. Now you have two objects; change one object’s fill color to be lightly colored (to show the liquid level) and the other object’s fill color to be darker colored (to represent the background). Align the objects by dragging the cursor around them both to select them, then click on ArrangeÆAlignÆBoth Centers. If necessary, use the “Bring to Front” and “Send to Back” options to make sure the lighter colored object is on top. Make two identical objects. The lighter colored one will change size based on the analog value; the darker colored one does not change. Use the cursor to select both objects, then align them using the “Align” feature so that they appear as one single object; with the lighter colored object on top. 5-22 OpenEnterprise for Beginners Chapter 5 - Building Displays to ‘Mimic’ Your Process Now, click on DynamicsÆActionsÆSize and the Property Inspector dialog box will appear. Use the exact same methods you used before when you were making the tank using boxes. The only difference is, this time, make sure you select the “Clip” option as shown in the figure, below: When creating irregularly shaped dynamic objects, be sure to select the “Clip” option. If you forget to use clipping, the entire dynamic object will be scaled, and the result will look wrong for this type of object. The figure on the left, below, shows the results of scaling an irregular dynamic object (wrong method), and the figure on the right shows the results of clipping the irregular dynamic object (correct method). Dynamic object is scaled instead of clipped (WRONG) OpenEnterprise for Beginners Dynamic object is correctly clipped 5-23 Chapter 5 - Building Displays to ‘Mimic’ Your Process Using A Pre-Drawn Object From the Symbol Library If you are having trouble drawing a satisfactory tank, you can always look in the symbol library to see if there is one you would prefer to use. Click on the ‘Symbol Library’ icon, shown at left, and the Symbol Library will be opened. Click on the category of symbols you want to look at, and the available symbols in that category will appear. When you see a symbol you want to use, drag it from the symbol library into your display. Click on the category you want to choose from, and its associated symbols will be displayed Next, drag the symbol you want into your display 5-24 OpenEnterprise for Beginners Chapter 5 - Building Displays to ‘Mimic’ Your Process Example #4 - Creating A Sliding Setpoint Control With Which the Operator Can Update a Value in the Database & RTU NOTE: Beginning with this example, we assume that you are familiar enough with the general display building process to know that you must run a query with the Database Object Viewer, leave it active while you call up your display, drag it into the data source field of the Property Inspector, etc. These items will no longer be listed as steps in the example, because their inclusion is implied. In addition, by this example, we assume that you are familiar with use of the drawing tools, and how to make use of the topics in the previous examples such as creating a process point, making an object change size based on an analog value, etc. Suppose your controller includes logic which allows an operator to adjust a setpoint for a tank level; the operator alters the setpoint causing other logic controlling input and output valves to the tank to open or close in order for the tank level to reach the setpoint. There are many ways to incorporate this operator setpoint within a display. You could, for example, create a data entry process point (see Making the Process Point changeable by the Operator on page 5-21) in which the operator manually enters a new setpoint. Another approach, which is the subject of this example, is to create a sliding setpoint control, which the operator drags on the screen to dynamically change the setpoint; as the value changes, it is updated in the database, and copied down to the RTU. Step 1. Start out by creating a tank liquid level graphic which re-sizes based on the tank level value. In this case, just show the level as a dark colored bar, on top of an identically sized lighter colored object. (The light colored bar underneath does not change - - only make the dark colored object dynamic.) It would also be a good idea to display the tank level as a process point just below the graphical representation on the display. OpenEnterprise for Beginners 5-25 This bar will be used to represent the tank level. The level will also be displayed below as a process point. Chapter 5 - Building Displays to ‘Mimic’ Your Process If you’re unsure how to create this graphic, please review Example #3 beginning on page 5-18. If you’re unsure how to create a process point, please review Example #2 beginning on page 5-14. Step 2. Using the segmented line tool, draw a triangular pointer, which will be used as the setpoint slider. Segmented (You can draw the pointer on line tool another part of the display, and drag it over later; it doesn’t have to Fill tool be right next to the bar representing the tank level yet; eventually however, the tip of the pointer should be next to the bar representing the tank level.) Color palette Double-click when you have finished enclosing the pointer (to exit the segmented line tool) then, with the pointer still selected, choose a color for the pointer from the color palette, and click on the fill tool to set the new fill color. Use the segmented line tool to create a triangular pointer. Then choose a color for it from the color palette, and click on the fill icon to set the new color. Step 3. Create a process point next to the triangular pointer (created in Step 2). This process point should use the value of whichever signal is your setpoint signal. Do NOT make it a data entry point; just make it a normal process point which displays the value of the setpoint signal. 5-26 OpenEnterprise for Beginners Chapter 5 - Building Displays to ‘Mimic’ Your Process Step 4. Select both the triangular pointer and the process point next to it, then group them together as a single object by clicking on ArrangeÆGroup into Symbol. Select both the triangular pointer, and the process point you created in the last step, and group them together as a single object. Step 5. Now that the process point and triangular pointer are grouped together as a single object, you should move them next to the bottom edge of the tank level graphic. Now we can add dynamic capability to them. To do this, click on Dynamics Æ Actions Æ Location / Slider. The Property Inspector dialog box will appear. OpenEnterprise for Beginners Now that the triangular pointer and the process point have been grouped together, choose the Location/Slider menu option. 5-27 Chapter 5 - Building Displays to ‘Mimic’ Your Process Step 6. Complete entries in the Property Inspector dialog box as follows: • Drag the value representing the setpoint signal into the “Data Source” field. (This is the same signal value you used for the process point in step 3.) • Choose the “Slider” option. • Determine how you want data to be updated at the RTU by the setpoint control. We recommend you choose “Tracking” because this will cause the change to be written only when the operator releases the mouse at the desired setpoint. If you choose “Continuous” the data will continually be written to the RTU as you move the mouse; this can impose a burden on your system communications if you are using radios, for example, because OpenEnterprise will initiate a new communication transaction for each incremental move of the mouse. If you choose “Detent” you can specify an incremental value after which data will be written to the RTU, mouse changes which are less than that increment will not be sent to the RTU. • Enter the lowest and highest possible values for the setpoint signal. • Click on the [Set Limits] push button, and define the limits for the sliding setpoint control (See step 7). OPC tag for the setpoint signal (must be dragged in from Database Object Viewer) You must click on [Set Limits] to specify how the sliding pointer will move. Choose “Slider” Specify the range of values for the setpoint signal. These selections determine when the RTU receives the new setpoint. ‘Tracking’ is the recommended method. 5-28 OpenEnterprise for Beginners Chapter 5 - Building Displays to ‘Mimic’ Your Process Step 7. Drag the setpoint control from the bottom of the tank level graphic to the top (this represents the full range of movement for the control). Then press the [Esc] key and you will return to the Property Inspector dialog box. Click on [OK]. When you reach the upper limit, press the [Esc] key. Drag the setpoint control along its full range of movement. In this case, that would be from the bottom up to the top of the level graphic. Step 8. Go to ‘Runtime’ mode, and test the setpoint control. Drag it with the mouse and watch the value of the setpoint process point change. If your RTU logic was active, and controlling a process, this would cause valves to open/close etc. in order to raise or lower the liquid level in the tank (as displayed by the tank level graphic) in order to meet the new operator setpoint. Drag the setpoint control, and watch the setpoint change. If your control logic in the RTU is active, the level value would also change as valves are opened/closed to change the tank level until it reaches the operator’s setpoint. OpenEnterprise for Beginners 5-29 Chapter 5 - Building Displays to ‘Mimic’ Your Process Variations on Example #4 Making the setpoint visible as a second graphic next to the tank level graphic: In the example we just completed, the setpoint is manipulated by moving the setpoint control next to the level, but the change in the level is not immediately reflected, since it depends on changes in the RTU and the process. You could create a second bar graphic representing the setpoint value next to the level graphic. When you move the setpoint control in runtime mode, the setpoint bar should move along with it. As you drag the setpoint control, the setpoint graphic bar will change size as you move the control. 5-30 OpenEnterprise for Beginners Chapter 5 - Building Displays to ‘Mimic’ Your Process Example #5 – Displaying A Message Based on A Logical Value in the Database Step 1. On a display, use the text tool to enter the text label you want to present. For example, let’s say that in the event of a chlorine leak detection, you want to display in large red letters “CHLORINE LEAK DETECTED”. (For help on using the text tool, see Example #1 - Creating A Text Label on A Display) Step 2. Select the text by clicking on it; it will be surrounded by edit handles. OpenEnterprise for Beginners 5-31 Chapter 5 - Building Displays to ‘Mimic’ Your Process Step 3. Now that the text is selected click as follows: DynamicsÆActionsÆHide/Disable The Property Inspector dialog box will appear. Step 4. On the ‘Hide’ page of the Property Inspector dialog box, drag in the OPC tag from the Database Object Viewer, and place it in the “Data Source” field. Choose “Hide/Disable when False” because when the Chlorine Leak signal is OFF, we don’t want to display the ‘CHLORINE LEAK DETECTED’ message; we only want to display it when the Chlorine Leak signal is ON (True). Click on [OK]. Drag in the OPC tag which specifies the value of the “Chlorine Leak” signal Choose which state will cause the text label to be hidden. In this case we don’t want to display the “Chlorine Leak“ label unless the associated signal is ON (true), so when it is false, hide the label. 5-32 OpenEnterprise for Beginners Chapter 5 - Building Displays to ‘Mimic’ Your Process Step 5. To test that the label is displayed correctly, simulate a chlorine leak by turning the associated chlorine leak signal ON via Open BSI DataView, then verify that the chlorine leak label is displayed in Runtime Mode. (Be sure to turn the signal OFF when you’re finished testing.) Variation on Example #5 Making the ‘CHLORINE LEAK DETECTED’ label flash on and off when it is ON. In the example we just completed, we displayed the ‘CHLORINE LEAK DETECTED’ label when the associated signal was ON. Suppose, to grab the attention of the operator, we also want the label to FLASH on and off. You can alter the flash rate here. To do this click as follows: DynamicsÆActionsÆFlash Choose “Flash When True” Go to the ‘Flash’ page of the dialog box. Specify the state when flashing is to appear (in this case “Flash When True”) and if desired, adjust the “Flash Rate”. Click on [OK] and go into Runtime Mode to verify that the text flashes as expected. OpenEnterprise for Beginners 5-33 Chapter 5 - Building Displays to ‘Mimic’ Your Process Example #6 – Changing the Color of A Pump Based on a Logical Value Step 1. On a display, draw a simple pump using a circle and two rectangles. (See figure, below left). Use the Arrange Æ Send to Back and Arrange Æ Bring to Front commands as necessary to put the rectangles behind the circle. (See figure, below right). It’s true, it doesn’t look much like a pump, but it’s fine for the purposes of this example. Step 2. Select the pump by dragging a bounding box around it. When you release the mouse, edit handles will appear around all of the pieces. Step 3. Group the pump into a single symbol by using Arrange Æ Group into Symbol 5-34 OpenEnterprise for Beginners Chapter 5 - Building Displays to ‘Mimic’ Your Process Step 4. Click on Dynamics Æ Actions Æ Color Step 5.Let’s say that when the pump is running, you want to show it in RED. Drag the OPC tag for the pump status signal value into the upper part of the “Data Source” field, then click on the [Add] button. This will cause the tag to be copied to the lower part of the field. Once here, its value can be used to change the color of the object. Drag the OPC tag in as usual Choose the NEW color you want the pump to change to from the color pallette. Click on the [Add] button, and the tag will be copied to here. In this case, we want to change color when the value is ON. Now choose ‘RED’ for the “Fill Color” in the “Apply Change to” part of the dialog box. Then choose “Change Color on True” because we want the pump to appear in RED when it was ON. (If we had wanted it to appear in RED when the associated signal was OFF, we would have chose “Change Color on False”). Finally, click on [OK]. Step 6. Switch to Runtime Mode and verify that the pump changes color based on its status. OpenEnterprise for Beginners 5-35 Chapter 5 - Building Displays to ‘Mimic’ Your Process Variations on Example #6 Showing ‘RUNNING’ or ‘STOPPED’ next to the pump, based on its status In the example we just completed, all we do is show that the pump is running by changing the pump’s color. What if your operator is color blind? In a real world example, you probably would also want to show a label ‘RUNNING’ next to it, and a ‘STOPPED’ label next to it when it was stopped. This ensures there is no confusion about what a particular color indicates. (You could do that using the techniques described in Example #5 – Displaying A Message Based on A Logical Value in the Database) Allowing the Operator to Call Up Another Display by clicking on the pump symbol IMPORTANT: Be sure you save your current display before you try this. By default, the left mouse button is used when clicking. Select the pump we have already configured to change color. Choose Choose Dyamics Æ Actions Æ Pick to “Load Display” call up the Property Inspector dialog box. From the ‘Pick’ page of the dialog box, choose “Load Display” from the Actions” list box, then use the [Browse] key to locate/specify the display you want to have loaded when the operator clicks on the pump. Click Specify the display on [OK] when finished, then test it in to be loaded Runtime Mode. 5-36 OpenEnterprise for Beginners Chapter 5 - Building Displays to ‘Mimic’ Your Process Allowing the Operator to START/STOP the pump by clicking on the pump symbol If you want the operator to be able to START/STOP the pump from your display, you could create dedicated START and STOP labels. If your system uses the same signal for both starting and stopping a pump (like an ON/OFF switch), you could configure the pump symbol to be an ON/OFF switch. NOTE: In this case, the pump’s color is still tied to the pump status signal, but you click on the pump to START/STOP it. (The START/STOP signal is different from the status signal.) To do this, select the pump we have already configured to change color, and click on Dynamics Æ Actions Æ Pick. Click on the ‘Pick’ page of the dialog box, and choose ‘Toggle Value’ for the “Action” and drag in the start/stop value OPC tag from the Database Object Viewer. Specify 0 as the “Toggle Value1” state (STOP pump) and 1 as the “Toggle Value2” state. Choose ‘Toggle Value’ Drag in the start/stop pump OPC tag Specify ‘0’ for START PUMP and ‘1’ for STOP PUMP In Runtime Mode, the operator can now start/stop the pump by clicking on the pump symbol. There are variations to this example, as well. For example, instead of clicking on the pump symbol, we could have created [Start] and [Stop] push buttons for the operator to click on using Dynamics Æ Instrinsics Æ Pushbutton. Try that as an exercise. OpenEnterprise for Beginners 5-37 Chapter 5 - Building Displays to ‘Mimic’ Your Process Example 7 - Creating a System Overview Display Most plant operators create an Overview display that they leave up on the screen when not looking at other displays. Typically the Overview display consists of a photograph of their plant, or a map of their system. Links are added to various parts of the picture or map that the operator can click on to bring up a display corresponding to that geographic area of the plant. Step 1. - Get a photo or map which you can use for your Overview display. There are several ways you can do this. • Take a picture of your plant or process with a digital camera. • Scan a picture or map of your plant or process. • Draw the map or picture yourself using the drawing tools. • Download a map from an Internet mapping site. (Your local state government or chamber of commerce may also have one available.) Talbot Brown Hill Top Valley Center NMSCGC Control Center Bielen Mitchell Garrett Franktown Elf’s Peak Louville Gillette Griffeth Town State Route 9 Crystal Lake Johnson Corners Masonville Cliff Rock LongView Lake View Rolling Forest State Park Hunte Town Route 103 The resulting graphic should have an extension such as TIF, GIF, BMP, or JPG. 5-38 OpenEnterprise for Beginners Chapter 5 - Building Displays to ‘Mimic’ Your Process Step 2. - Import the photo or map into OE Graphics • In ‘Configure’ mode, open an empty OE Graphics display by clicking on File Æ New. • Click on Draw Æ Import Æ Image and browse to the photo or map file created in Step 1, and click [Open]. The photo or map file will be brought into OE Graphics. Step 3. - Add labels, logos, etc. (OPTIONAL) • Click on Draw Æ Text (or click on the icon, shown at right) to add text labels, to the map or photo. See Example 1, earlier in this chapter, for help on doing this. • You could even draw or import other items like your company’s logo. You could add buttons, process points, anything that appears on any other display. NMSCGC Northeast Midwest Southern Consolidated Gas Company (NMSCGC) Brown Hill Top Valley Center Bielenville Mitchell Garrett Elf’s Peak Louville Griffeth Town State Route 9 Crystal Lake Johnson Corners Gillette Cliff Rock Lake View Long Rohrmanton Masonville Rolling Forest State Park OpenEnterprise for Beginners Franktown I-325 NMSCGC Control Center Talbot Hunte Town Route 103 5-39 Chapter 5 - Building Displays to ‘Mimic’ Your Process Step 4. - Add Links to Call Up Other Displays (This step is similar to one of the variations discussed in Example 6.) Using the drawing tools, create objects (you could use buttons, or little boxes or circles or whatever) that users would click on to load a display, and position them where you want the user to click. Typically this would be on the map location or photo location which corresponds to the display you want to load. For this particular example, we’ve added little boxes to be used as links. NMSCGC Northeast Midwest Southern Consolidated Gas Company (NMSCGC) Brown Hill Top Valley Center NMSCGC Control Center Bielenville Mitchell Garrett IMPORTANT: Be sure you save your current display before you try this. • Select one of the objects (little boxes) you just created. • Choose Dyamics Æ Actions Æ Pick to call up the Property Inspector dialog box. Crystal Lake Johnson Corners Franktown Elf’s Peak Louville Griffeth Town State Route 9 Talbot I-325 • Long Rohrmanton Gillette Masonville Cliff Rock Lake View Rolling Forest State Park Hunte Town Route 103 By default, the left mouse button is used when clicking. Choose “Load Display” • From the ‘Pick’ page of the dialog box, choose “Load Display” from the Actions” list box, then use the [Browse] key and “Browse Files” to locate / specify the display you want to Specify the display have loaded when the operator clicks to be loaded on that particular link in the Overview display. • Click on [OK] when finished, then test it in Runtime Mode. Clicking on the little box should bring up the specified display. Repeat this process for each additional link. 5-40 OpenEnterprise for Beginners Chapter 5 - Building Displays to ‘Mimic’ Your Process What Now? Well, we’ve really only scratched the surface on the subject of display building. There are numerous other dynamics / actions you can configure. The best way to learn about them is to experiment. Try things out, play with the example displays, and when necessary, review the online help and the GraphWorX32 manual. Before you do this though, there are three more important topics that need to be covered. They are important because they can save you hours of time and effort if you understand them, and use them when building the actual displays for your system. These topics are covered in the following sections: • • • Saving Your Own Symbols in the Symbol Library, and Updating Objects Through Share Keywords Using Aliasing to allow you to re-use the Same Objects with Different Data From the Database Tips for Planning Your Human Machine Interface (HMI) System OpenEnterprise for Beginners 5-41 Chapter 5 - Building Displays to ‘Mimic’ Your Process Saving Your Own Symbols in the Symbol Library, and Updating Objects through Share Keywords Earlier in this chapter, we described how to retrieve pre-defined symbols from the symbol library. What if you want to create your own symbols? Let’s say you have defined a symbol that is good enough that you want to re-use it. For example, suppose you have created a symbol for a water tank, and you want to use it throughout your displays. You can save it in the symbol library. Saving objects as symbols in the symbol library Let’s say your display uses some simple shapes to represent a meter. Step 1. Select the entire object. Step 2. Group the object into a symbol by clicking on: Arrange Æ Group Into Symbol Step 3. Right-click on the object and choose “Property Inspector” from the pop-up menu. Assign a “Share Keyword” in the Property Inspector. A share keyword is just a name, but it has an important function if you make subsequent changes to the symbol. Step 4. The Symbol Library is divided up into a tree of folders. Each folder has one or more category pages; the category pages contain individual symbols. If desired, create a folder and category page of your own by clicking on the “Categories” folder, and clicking on File Æ Add Æ Subdirectory and then File Æ Add Æ Category. Alternatively, you can use existing folders and category pages. IMPORTANT: You should always assign a “Share Keyword” to any object you intend to re-use. In complex objects, you may even want to define a “Share Keyword” for each piece of the object. 5-42 Assign a share keyword name here. OpenEnterprise for Beginners Chapter 5 - Building Displays to ‘Mimic’ Your Process Step 5. Drag the symbol into the desired category page and symbol sub-directory. Drag the symbol into the desired category and sub-directory of the symbol library. Now you can proceed to use the symbol in various displays, by dragging it out of the symbol library, when needed. (See Using a Pre-Drawn Object from the Symbol Library which was part of Example 4.) Updating Shared Objects Suppose you have used the symbol multiple times on multiple displays, but now, you decide, for whatever reason, that you want to change the symbol’s line style to use thicker lines (as shown at right). If you had to manually change each individual symbol, it could result in hours of work. Because, you assigned a share keyword, however, you only need to make the change once. OpenEnterprise for Beginners 5-43 Chapter 5 - Building Displays to ‘Mimic’ Your Process To do this, right-click on the symbol in one of the displays, and choose the line width option from the pop-up menu. (We’re choosing line width for this example, but we could have chosen other items from the menu.) NOTE: You should never ungroup a symbol, or the shared object name will be lost. To edit parts of the symbol choose “Edit Symbol” - - in this case those parts should have had shared keywords defined. When the change has been completed, choose Edit Æ Update Shared Objects and you will be prompted to identify the scope of the change (current display, multiple files), and if multiple files, select which files are to be updated. Also, specify if there are parts of the object to be preserved. Choose the scope of the change, in this case, we want the change to affect multiple files. Click here to specify the file(s) to be changed. Choose parts of the object you DON’T want changed, if any. NOTE: Once you have completed updating the shared objects in your display(s), if you can save the new version of the symbol in the symbol library by saving it as if it was a new symbol. (The old version will still remain in the symbol library, unless you delete it.) 5-44 OpenEnterprise for Beginners Chapter 5 - Building Displays to ‘Mimic’ Your Process Using Aliasing to allow you to re-use the Same Objects With Different Data From the Database You’ll recall that we talked about OPC tags previously. They contain the information that links the dynamic objects in your displays with the actual data values driving them in the OE Database. Machine Name (OE Server) Database Name (IP socket) Signal Name BristolBabcock.BristolOPCServer\"oent1:rtrdb1"."realanalog"."name:char:RPC4:TANK8.LEVEL."."value:float" OPC Server Name Source Table from the OE Database The OPC tags are stored in your display, to allow it to reference the correct database attributes when required. Suppose, however, you have a system with 8 water tanks, which are identical in every way, except for the signal names in their OPC tags. You could create 8 separate displays (1 for each water tank). That would be difficult to support, however, because if you decided later that you wanted to change the layout of the displays, add items, etc., you would have to do that on 8 different displays. An easier way to do that, is to make use of a technique called aliasing. Aliasing is a powerful technique for substituting, at runtime, certain parts of the OPC tag. This allows objects or displays to be re-used dynamically for different OPC tags. IMPORTANT In order for aliasing to be used, you must adopt a consistent naming scheme for similar objects in your database. For example, if you have 24 separate, identical pumps in your database, the signals should be consistent from pump to pump, i.e. PUMP1.RUN, PUMP2.RUN, PUMP3.RUN, etc. for all 24 pumps. If instead, you are inconsistent in naming signals i.e. PUMP.RUN.1, and PMPNUM3.RUN, etc., then aliasing CANNOT BE USED effectively. OpenEnterprise for Beginners 5-45 Chapter 5 - Building Displays to ‘Mimic’ Your Process The first step in using aliasing is to modify the OPC tags stored in your display files. Any part of a signal name which varies can be replaced with an alias. For example, if your system has 8 identical water tanks, rather than creating 8 separate displays, one for each tank, you could create one display to handle all of them. That single display would use aliases to dynamically call in the correct signal data from the database for whichever tank the operator wanted to see. To do this, your database must use a consistent naming convention, e.g. TANK1.LEVEL. TANK2.LEVEL. TANK3.LEVEL. : : TANK8.LEVEL Now create a simple display for tank 1, using the TANK1.LEVEL signal. All text displayed should be taken from attributes in the database (name, value and units attributes in the Realanalog table.) Verify that it works correctly in Runtime Mode. Simple display for Tank Number 1 (All text shown comes directly from the database) 5-46 OpenEnterprise for Beginners Chapter 5 - Building Displays to ‘Mimic’ Your Process Now, go to Configure Mode, and use the Edit Æ Replace command to change the OPC tags in the display to include an alias. Instead of TANK1, we want to use TANK<<tanknum>> where tanknum is an alias that gets replaced with a value of 1 to 8, depending upon which tank we want to look at. (IMPORTANT: Aliases are case-sensitive, i.e. Tanknum, TANKNUM, and tanknum would all be considered different aliases.) Click on [OK], and execute the changes for all objects in the display. We want to replace all the TANK1 occurrences in this display with TANK<<tanknum>> OpenEnterprise for Beginners 5-47 Chapter 5 - Building Displays to ‘Mimic’ Your Process Next, add a button to the display which will allow the operator to select which tank should be displayed. To do this, choose Dynamics Æ Instrinsics Æ Pushbutton. Enter a label for the button here On the ‘Button’ page of the Property Inspector, enter the label ‘Choose Tank Number’. Choose ‘Alias Dialog’ Then, click on [Set Aliases] On the ‘Pick’ page of the Property Inspector, choose ‘Alias Dialog’ for the “Action”, then click on the [Set Aliases] push button. 5-48 OpenEnterprise for Beginners Chapter 5 - Building Displays to ‘Mimic’ Your Process In the Set Aliases dialog box, use the [Aliases] button to select the alias ‘tanknum’ (which should be the only one currently defined. ‘tanknum’ will be copied into the “Alias Name” field. Then enter the number ‘1’ in the “Alias Definition” field, and click on the [Add] button. The pair ‘tanknum’ and ‘1’ will be copied into the center box of the dialog box. Now enter ‘2’ in the “Alias Definition” field, and click on [Add]. Repeat this process until all 8 tanks have alias definitions which go with ‘tanknum’. Use the [Aliases] button to choose among the aliases for the display (tanknum should be the only one currently defined) Enter a value for the alias (for example, ‘1’ for tank1) in the “Alias Definition“ field, and click on the [Add] button. Then repeat that for every other tank. Click on [OK] and exit the Property Inspector as usual. Go into Runtime Mode. OpenEnterprise for Beginners 5-49 Chapter 5 - Building Displays to ‘Mimic’ Your Process In Runtime Mode, a pushbutton now appears called ‘Choose Tank Number’. When the operator clicks on the push button, the Set New Alias Values dialog box appears. The operator chooses the desired tank number from the list box (or just enters the number), and it will be substituted in place of ‘tanknum’ in the OPC tags for this display. As a result, any of the 8 different tanks can be selected and displayed from this one display. When the operator clicks on this button, a dialog box appears which allows selection of the desired tank number. 5-50 OpenEnterprise for Beginners Chapter 5 - Building Displays to ‘Mimic’ Your Process Other Uses of Aliasing: • Saving aliases as part of symbols When we created symbols before, we didn’t include dynamic information with them, because we were using different signals with the symbol each time we re-used it. Aliasing allows us to store dynamic OPC tag information when creating symbols for the symbol library to minimize the amount of typing when entering dynamic information. With this technique, you don’t have to keep dragging tags from the Database Object Viewer for each use of the symbol because you do it once, and then use an alias in the tag which allows you to select it when re-using the symbol. For example, once we defined aliases for it, we could have grouped our entire tank and its associated dynamics together as a symbol with a shared object name, and saved it in the symbol library. Then we could have re-used it on other displays, and simply inserted the desired alias information when placing the symbol by using Dyamics Æ Edit Local Aliases. (NOTE: Dynamics Æ Edit Local Aliases makes the choice of aliases ahead-of-time, and permanently sets them for a particular display. In this case, no pushbutton for setting aliases is needed by the operator, because the operator does not make the choice, the choice was made when the symbol was placed within the display.) Drag the symbol in from the symbol library, and right-click on it; choose Dyamics-->Edit Local Aliases • Now delete <<tanknum>> here, and enter the alias value you want to use for this particular display, e.g. 1. Using aliases to pass data between OpenEnterprise Components Another powerful use of aliases is to allow data to be passed between OpenEnterprise components. Users can create customized trends, displays, etc. that can be activated through one OE component, and then data can be passed in using aliases, and the aliases dynamically filled in from columns of a Database Object Viewer query. See the 'OE Menus' section of the OE Reference Guide (document# D5092) for more information. OpenEnterprise for Beginners 5-51 Chapter 5 - Building Displays to ‘Mimic’ Your Process Tips For Planning Your Human-Machine Interface (HMI) System So far, we have discussed the ‘mechanics’ of how to create a particular display. The examples presented some basic techniques, and if you needed to do something not described in the examples, you referred to the GraphWorX32 User Guide to find out how to do it. Once you are familiar with how to create a display, you may be tempted to rush forward and start generating all of the displays for your particular system - - before you do this, though, we strongly recommend you spend some time planning your human-machine interface (HMI) system. The goal of a human-machine interface is to provide your operators with the information they need in a clear, understandable format. Operators should not have to hunt for information during a critical situation; displays should be organized such that an operator can access the information he or she needs with a minimal number of mouse clicks. Don’t make displays too complicated for the user! Displays should be designed to be clear, and easy to use. Displays should not be overloaded with information; it is better to create a larger number of logically thought-out displays than to try to cram lots of information on a few displays, and then force the operator to sort out what is important. …Don’t make displays too complicated for the user! Displays should be designed to be clear, and easy to use. Displays should not be overloaded with information With these thoughts in mind, here is a recommended approach for creating your HMI system: 5-52 OpenEnterprise for Beginners Chapter 5 - Building Displays to ‘Mimic’ Your Process Step 1 Plan out your display hierarchy The way your different displays fit together as part of your system is called the display hierarchy. Generally, at the top of the display hierarchy is some sort of startup or welcome screen. It might include a map of your system, or a menu screen. Welcome to the Bristolvillle Water Treatment Facility Main Menu Current Alarms Display System Status Display FILTERS Overview Display Filter #1 Display Filter #2 Display Communications Status Display PUMPS Overview Display Filter #3 Display Pump #1 Display Pump #2 Display Pump #3 Display A series of overview displays generally make up the next level of your hierarchy. You might want to have one or more overviews of your process, an alarm overview display, a communications status display, etc. The next level of displays typically correspond to functional or geographical sections of your process. For example, if your system has 34 compressor stations, you might need to have a detailed display for each compressor station. If the compressor stations are all identical, you may be able to use a single display with aliases, which allow the operator to select the desired station, thereby reducing the amount of disk space used by the displays. …If it takes more than 2 or 3 mouse clicks to reach the information you need, you should re-think your display hierarchy. Your system might include additional displays for more detailed information for each station such as alarms, trends, communications, etc. You might want to embed certain displays within other displays, for example, a small display for starting or stopping a pump, or a ‘faceplate’ display for entering setpoints. OpenEnterprise for Beginners 5-53 Chapter 5 - Building Displays to ‘Mimic’ Your Process Whichever way you choose to setup your hierarchy, it should follow a logical, consistent format. Operators should easily be able to navigate from one display to another, and to go up and down through the different levels of the hierarchy. If it takes more than 2 or 3 mouse clicks to reach the information you need, you should re-think your display hierarchy. You should also consider what sort of display properties you want to set. For example, what size will your displays be? Will they appear in multiple windows, side-by-side, or will each new display called up fill the entire window? Will the displays be scaleable? All of these, and other properties of the displays, should be determined and set as preferences in the Display Properties dialog box before the displays are built, otherwise they will have to be set individually for each display. Step 2 Adopt a consistent method for navigation throughout the display hierarchy Each and every display should include a toolbar or menu object with links to other displays in the system. Although the display links in it will vary from display to display, you should include this object in the same place on every display, so operators know how to get to it quickly. Step 3 Determine what objects you will need on your displays The display building process will be much easier if you use a consistent library of objects for all your displays. You might, for example, determine that you will need three different pump symbols, two types of valve symbols, and one type of liquid tank, and that you want all of your process points to follow a particular format. These symbols, when you have built them (as part of a later step in the process) can be saved in a library, and re-used on all of your displays. Be sure to check and see what symbols are already available in your symbol library - - it may include most of the objects you need. 5-54 OpenEnterprise for Beginners Chapter 5 - Building Displays to ‘Mimic’ Your Process Step 4 Establish a common signal naming convention for your database, and an aliasing convention for your displays As we discussed earlier in this manual, aliasing is a powerful method which allows you to re-use objects, symbols, and displays, multiple times. In order for it to be used properly, however, your database must use a signal naming convention which includes common portions which can be used for aliasing. You can then define a strict aliasing convention which must be followed when building your displays. In your database, therefore, if you have 50 identical compressor stations, each with its own set of signals from 50 different RTUs, make sure the signals’ names follow the same format in each RTU. For example, if you use signals like COMPRS8.POWER.STRT in one RTU, do NOT use COMPRESS.START.PWR5 in another. Use the same signal name format in each RTU. Similarly, if you intend to define aliases for the station number, pump number, and tank number, make sure they are used consistently from display to display: i.e. if you use: station<<station-number>> OpenEnterprise for Beginners 5-55 Chapter 5 - Building Displays to ‘Mimic’ Your Process on one display, don’t use: station<<stationnum>> on another display. Use aliases consistently from display to display. Step 5 Build a few of your more complex objects for testing purposes Create some of your more complex objects, to verify that they work as expected. Setup aliases and verify that they work correctly. Be sure when saving symbols to use the shared object name, as discussed earlier in this manual. Step 6. Build your display hierarchy using a framework of empty displays Build empty displays (without objects or data) for your entire display hierarchy. Make sure each display includes the toolbar or menu object used for navigation purposes. Test to make sure that the navigation functions work correctly throughout the display hierarchy. Put a few objects on the displays for demonstration purposes. Step 7 Review your design with the users of the system, and revise, as necessary Now that you have a basic framework of displays, together with some demo objects, you should show the system to the people who will use it. This is a very important step. You may find, for example, that the operators need additional information on certain displays, or that they need to have multiple displays open to perform certain tasks. Perhaps your hierarchy is too cumbersome, or requires too many mouse clicks to locate certain displays. Revise the system, as necessary, to accommodate your user’s concerns. 5-56 Show the displays to the people who will actually be using them…. Make sure the displays are organized in a way that people can easily find the information they need… Change things if necessary… OpenEnterprise for Beginners Chapter 5 - Building Displays to ‘Mimic’ Your Process Step 8 Build all of the objects for your system Create all of the objects needed for your system (pumps, valves, tanks, compressors, analog setpoints, faceplates, etc.) and set up aliases for them according to the previously established convention. Save the objects in the symbol library with shared object names. Step 9 Build the Displays Finally, you should build the displays using the objects from the symbol library. Each display should be included in the proper place of the previously defined hierarchy. Step 10 Test Your HMI System and Revise as Necessary Test each of your displays, and verify that they function as expected. Make any necessary corrections. OpenEnterprise for Beginners 5-57 BLANK PAGE Chapter 6 - Working with Historical Data Chapter 6 – Working with Historical Data What is Historical Data? The OE Database, by its very nature, is constantly being updated with the latest available data values from signals in the RTUs. Data from a particular instant in time, however, is only maintained in memory for a short period of time (usually, no longer than a few seconds, depending upon how fast data is collected in your system). This is because when a new value is collected, it automatically overwrites the previous value in the database. Unlike ‘live’ real-time data, which is continuously being updated as your process variables change, historical data is not updated; it reflects past conditions, from minutes, hours, days, weeks, or months in the past. Although this is ideal for operators viewing the current state of process variables in your system, most users need to retain certain data for a longer period of time (hours, weeks, months, etc.) This data is referred to as historical data and it is saved using the OpenEnterprise Historian. What is Historical Data Used For? Historical data is typically used in printed reports or spreadsheets. Often, records of certain variables such as flow, temperature, etc. must be maintained for months or even years to fulfill particular plant management or regulatory requirements. Government agencies may require detailed records using historical data, or historical data may be used to generate bills for customers. What does ODBC-compliant mean? ODBC is an industry-standard for databases. It stands for Open Database Connectivity, which means that data can be shared between different databases and applications. ODBC compliant refers to applications which follow this industry standard. Because the OE database supports a 32-bit ODBC data access, data can be directly extracted from it by any ODBC compliant application, such as Microsoft® Excel or Access, or you can use the data in the OpenEnterprise Report Configuration Tool (See Chapter 11). Historical data is also frequently incorporated into graphical trends to allow a graphical representation of data from a given period of time. (Trends are a big enough subject that we’re going to discuss them in Chapter 7.) OpenEnterprise for Beginners 6-1 Chapter 6 - Working with Historical Data How Does the Historian Work? The Historian is actually an extension of the OE Database; it is simply another set of user defined tables and columns which hold data extracted from specified OE Database tables at either specified intervals, or based on specific events. In some cases the actual data value is stored; this is referred to as raw data. In other cases, calculations are performed on value(s) before storage is performed, for example minimum, maximum, average, etc; this is referred to as compressed data because only the calculated result is stored, not the values used to generate the calculated result. Differences between Raw and Compressed Data • Raw data is data that is unchanged from the way it was at the RTU. No calculations have been performed on it. • Compressed data is the result of some sort of calculation on the raw data, such as minimum, maximum, average, etc. It is called ‘compressed’ because only the result of the calculation is stored, NOT the individual raw samples used to make the calculation. NOTE: It is possible to keep both the compressed and original raw values on the system, though this consumes more disk space. Historical Data is Stored Temporarily in Log Files The historical data is stored in files on the OE Server called log files. (Sometimes they’re referred to as history files or historical files, but it’s all the same thing – files that store historical data.) Log files are ‘active’ meaning that the system continues to deposit more historical data in them. Depositing data in log files is called logging the data. Log files are defined during Historical system configuration to be a fixed size. Before they become full of data, the data in them gets saved into another file called an archive file. Then the oldest data in the log file is overwritten when new data comes in. Because of this, they are only used for temporary, short-term storage. 6-2 Storing historical data in a file is called ‘logging’ the data. The files containing the data are called log files. Log files are for temporary short-term storage. OpenEnterprise for Beginners Chapter 6 - Working with Historical Data Historical Data is Stored Permanently in Archive Files As we said, when the log file fills up, its oldest data gets overwritten. “Wait!” you say, "I can’t have my data overwritten!" Don’t worry, that’s where archive files (that we mentioned before) come into play. When you configure the historical system, you specify the size of the log file, and you also say at what percentage of the log file size you want an archive file generated. That way, you don’t lose data when the log file fills up, because the data gets copied to an archive file. Archive files are very similar to log files, except they are closed to accepting new data, and they don’t get overwritten. A certain number of archive files are kept on-line; that is, they are available to be queried for data from OE tools, such as Trend windows. All other archive files are off-line; they are inaccessible, and cannot be queried for data. That’s not a problem, though, because if, for some reason, you need to retrieve some data in an off-line archive file, you can easily make it on-line using the Archive File Tool. (We’ll talk more about the Archive File Tool, later in this chapter.) "Okay", you say, "Why don’t I keep all of the archive files on-line?" Well… you can’t do that, because on-line archive files consume lots of memory, especially if people are viewing them. If you try to keep too many of them on-line at the same time, you will exhaust system memory, and system performance will suffer, until the point that the system won’t work at all. Please don’t confuse archive files in OE with archive files in the RTU – The term ‘archive file’ in the context of OpenEnterprise, refers to historical data storage at the OE Server computer. Most Bristol RTUs also can store historical data locally in structures which also happen to be called ‘archive files’. They are different, even though they serve a similar purpose - - storing historical data. • Data from log files is copied into archive files for permanent storage. • Archive files can only be queried for data if they are online. Only a certain number of archive files can be on-line. • The Archive File Tool can bring archive files on-line, and take them off-line as needed. • Don’t keep too many archive files on-line, or system performance may suffer. In addition, since archive files are permanent, and don’t get overwritten, new ones are regularly being generated. Because of that, over time, the hard disk on the OE Server can get filled up with off-line archive files. To avoid that from happening, you should periodically back-up those offline archive files to another place. The Archive File Tool, that we mentioned earlier, can automatically copy the off-line archive files to another hard disk or server to prevent the server disk from filling up. If you don't have another server, you could back up the off-line archive files onto storage media (tape, CD, etc.) and then delete those archive files from the OE Server. OpenEnterprise for Beginners 6-3 Chapter 6 - Working with Historical Data Comparing Log Files and Archive Files Log Files… Archive Files… • Contain raw and compressed • Contain raw and compressed historical historical data, which came from data, which was copied in from log files. realtime data values. • Are a fixed size; when they become • Are a fixed size, but data is never full, the oldest data is overwritten overwritten. It is maintained in the archive with the new data. file • Can receive additional raw and • Are closed. They CANNOT receive compressed historical data. additional data. • Can be queried at any time. • Can only be queried if the archive file is currently ONLINE. How is the Historian Configured? Configuring the Historian is one of the most difficult concepts in OpenEnterprise to understand. For one thing, while real-time data collection is always dealing with what’s happening right now, historical requires you to deal with the issues of both time and space, i.e. in this case, how much time should I keep certain data, and how much space do I need to store the data? The Historian is configured using the Historical Configuration Tool in the OE Toolbox. Configuration involves setting several parameters which interact to identify what gets logged, and when the logging occurs. As with most things in OpenEnterprise, this interaction is governed by entries in database tables. We’re going to oversimplify this a little bit, but the main tasks you need to perform when configuring the Historian are described, below. We’ll talk about them in general terms first and later, we’ll provide you with some specific examples. • • • Defining a Logging Group Choosing Columns to Be Logged and Calculations to be performed (if any) Specifying Characteristics of the Log File and Archive Files Defining a Logging Group • A logging group defines what data you want to log, and how often you want to log it. 6-4 A logging group defines what data you want to log, and how often you want to log it. OpenEnterprise for Beginners Chapter 6 - Working with Historical Data • A particular logging group can only log data from a single table. The table containing the data you want to log is called the source table. • You can define as many different logging groups as you need. Each and every logging group must have a unique logging group id number, however, to differentiate it from all the other logging groups in the system. • Logging groups are configured by making entries into the oelogcontrol table using the Historical Configuration Tool. Because of this, logging groups are sometimes referred to as logcontrols. • If you don’t want to log all the records from a particular table, you need to assign only the records you want to log to this logging group. Choosing the Source Table: The Historian can save data from almost any table in the OE Database. The table containing the data you want is referred to as the source table. Most users will be saving data from only two tables: Realanalog_Table – this table includes all of the analog signals collected from your RTUs. This would include things like flows, temperatures, and pressures that have been collected from process variables. Digital_Table – this table includes all of the logical signals collected from your RTUs. This would include ON/OFF statuses of pumps, OPENED/CLOSED statuses of valves, all collected from process variables. The source table is usually going to be either 'Realanalog_table' or 'Digital_table'. Most people don't need to log anything from any other table. Figuring out how often you want to log the data Logging data at a pre-set rate – Generally, people choose to log data at a particular rate. The type of data you want to log often dictates how frequently you want to log it. If you have critical flow or pressure information, you might want to log a reading every minute, for a total of 60 samples per hour. If you are looking at levels of water in a tank, which don’t change often, maybe you only want to log the level once an hour, for a total of 24 samples in a day. Think carefully about what your system requirements are, because this will affect the size of your log files, and the rate you consume disk space. Logging data on ‘exception’ - You may also have certain data that you only want to log when a certain event occurs. For example, you might only want to log data when the value of a particular signal changes. In that case, there needs to be some sort of trigger, which says, OpenEnterprise for Beginners 6-5 Chapter 6 - Working with Historical Data ‘log this data now’. This is similar to the Report By Exception (RBE) data collection, used in real-time data collection, except here the concept is being applied to historical logging. Assigning individual records to the logging group (optional) By default, all records of the source table will be logged. Depending upon the size of the source table, that may require you to create a very large log file. The Realanalog_table, for example, might contain thousands of different signals, but maybe you only want to log data for a few hundred. If that’s the case, it would waste considerable disk space to log all the signals in the table. You’ll need to identify which signals you want to log. If this is so, then you have to use a technique called userenable logging. In userenable logging, a logging group will only log records (in this case rows of signal data) from records which have been specifically assigned to that logging group via the dataset attribute in the source table. The assignment of records to a logging group is performed in the Historical Configuration Tool. Choosing Columns to be logged and calculations to be performed (if any) • Most any table you log data from contains many columns (attributes) which you don’t need to log. You should decide which columns contain the data that is worth logging. • Choosing to log only the columns you need saves memory and disk space. • Columns are chosen by making entries in the oelogcolumn table, using the Historical Configuration Tool. • Calculations can be performed on the raw data, such as averages, minimums, maximums, etc. The new calculated data is called compressed data. Choosing Columns For Logging Assuming you’re logging signal data, you’ll usually want to log things like the signal’s value, its questionable data status, the timestamp of the reading, etc. We recommend you also log the daylight savings time offset dstoffset if you’re in a region which uses daylight savings time; otherwise, you can end up with problems in third-party software that depends 6-6 OpenEnterprise for Beginners Chapter 6 - Working with Historical Data on timestamps. You don’t need to log the signal name, because that will be automatically logged and used to organize the data in the Logging Group. (We’ll talk about that later in the examples.) Decide what calculations (if any) you want to perform on the logged data If you just want to save raw data samples, you don’t need to perform calculations. But if you want to calculate things like averages, minimum values, etc., that means you will be saving compressed data, which we mentioned earlier. Again, the sorts of data compression you perform are dictated by the requirements of your particular system. Table 6-1 - Calculations that can be performed Type of calculation Description 0 = None Raw unprocessed sample from the source table. First non-NULL input value is chosen from samples Last non-NULL input value is chosen from samples Maximum input value is chosen from samples Minimum input value is chosen from samples Each sample is multiplied by the number of seconds it was in the source table. The resulting weighted samples are added together, and divided by the total number of seconds of all the samples. 4 = First value 5 = Last value 6 = Maximum value 7 = Minimum value 8 = Average value (time-weighted) 11 = Integral 12 = logical AND Estimated area bounded by input values. Used for calculating totals, e.g. total flow. Logical AND applied to input values Data Type required in source table column any Example input(s) Result stored for example calculation: 23.47 23.47 any 38.1, 50.6, 33.7, 48.1 38.1 any 38.1, 50.6, 33.7, 48.1 48.1 INTEGER, REAL or DATETIME INTEGER, REAL or DATETIME INTEGER or REAL 38.1, 50.6, 33.7, 48.1 50.6 38.1, 50.6, 33.7, 48.1 33.7 38.1 (for 58 seconds), 50.6 (for 62 seconds, 33.7 (for 59 seconds), 48.1 (for 61 seconds) (38.1 x 58) + (50.6 x 62) + (33.7 x 59) + (48.1 x 61) (58 + 62 + 59 + 61) = 42.78916 INTEGER or REAL INTEGER or BOOL 38.1 (for 58 seconds), 50.6 (for 62 seconds, 33.7 (for 59 seconds), 48.1 (for 61 seconds Example 1: 1, 1, 1, 1, 0 NOTE: The time weighted average is more accurate than a straight average of summing the samples and dividing by the total. (38.1 x 58) + (50.6 x 62) + (33.7 x 59) + (48.1 x 61) = 10269.4 0 Example 2: 13 = logical OR Logical OR applied to input values INTEGER or BOOL 1, 1, 1, 1, 1 Example 1: 1, 1, 1, 1, 0 1 1 Example 2: 14 = ON count The number of times a boolean switched to ON. OpenEnterprise for Beginners 1, 1, 1, 1, 1 ON, OFF, ON BOOL 6-7 1 2 Chapter 6 - Working with Historical Data Type of calculation Description Data Type required in source table column BOOL 15 = ON percent Percentage time a BOOLEAN was ON. 16 = duration Duration of time a nonNULL value was in the source table Any 20 = occurrence time Time at which the value of the sourcecolumn attribute was logged in this compression period Any 6-8 Example input(s) Result stored for example calculation: ON (60 seconds), OFF (60 seconds), ON, (60 seconds), OFF (60 seconds) 5.1 (60 seconds), 3.2 (60 seconds), 2.8 (60 seconds), NULL (60 seconds) 50 180 OpenEnterprise for Beginners Chapter 6 - Working with Historical Data Specifying characteristics of the log file and archive files What’s memory? • Historical data is initially transferred from the real time source table and stored in an predefined area of memory called the log buffer. You need to specify the size of the log buffer, during configuration. (NOTE: buffer is just another word for memory) • When the log buffer becomes full, data in the log buffer is automatically copied to the log file on the OE Server hard disk. The size of the log file is some multiple of the log buffer size. • The log file is a fixed size, as new data is logged, the oldest data is overwritten. To prevent a loss of data, therefore, data is copied from the log file (temporary storage) to the archive file (permanent storage). • Configuration of the log buffer, log file, and archive file is performed by making entries in the oelogdata table, via the Historical Configuration Tool. As the OpenEnterprise Server computer runs its program(s), the CPU (central processing unit) of the computer executes each instruction in the programs. These instructions, and the data associated with them, are read from, and/or written to, physical locations within computer chips in the computer. These physical locations are referred to as memory. They are similar to memory you might have in your personal computer at home. Each memory location also has a numerical identifier called an address. The address is used internally to locate data stored in memory. The amount of memory in your computer varies depending upon the purchased memory options. Information in memory is stored as a series of 0's and 1's; each '0' or '1' is referred to as a bit. These bits are grouped together into chunks of 8, 16 or 32, which are called bytes. Each byte can hold a character of data. A group of 1024 bytes is referred to as 1 kilobyte or 1k. 1024K is referred to as a Megabyte or 1MB. RAM (Random Access Memory) only provides temporary storage. The data stored in RAM is destroyed if the power fails on the OE Server. That’s not true with data on the hard disk, but don’t confuse RAM memory with the hard disk; they are different things. In OpenEnterprise, real-time data is stored in memory, and historical data is stored on the hard disk. OpenEnterprise for Beginners 6-9 Chapter 6 - Working with Historical Data Specifying the Source of Data for a Log File The source of the data going into the log file is defined by one of the logging groups you have defined. You must provide the id number of the logging group. You must also identify whether the data you are storing is raw samples, or if you are storing calculated data. Determining the Buffer Size and Number of Buffers to be stored in the Log File • • The log buffer holds only a limited amount of logged data, for a limited period of time, usually less than an hour, depending upon how fast you’re logging data. The log buffer data is periodically copied to the log file. What’s the difference between RAM memory and the hard disk? A hard disk is a long-term storage medium for data. Although, like memory, a hard disk stores data, it differs from RAM memory in several respects: • Hard disks normally do NOT lose data in the event of a power failure. They allow long-term storage of data. If RAM memory loses power, the data disappears. • To retrieve and use data on the hard disk, it has to be copied into memory; that means using data from the hard disk takes longer than data in RAM, because data in RAM is, by definition, already in memory. • Computers are generally built with several orders of magnitude more hard disk space, than memory. You must make the buffer larger than the maximum amount of data you’re going to save in a particular snapshot of time. 6-10 OpenEnterprise for Beginners Chapter 6 - Working with Historical Data Deciding When to Generate An Archive File The figure, below shows an example of the relationship between log buffers, log files, and archive files in a typical system. Log files are fixed in size. As the contents of the log buffer are copied into the log file, they overwrite the oldest data in the log file. To prevent a loss of this data, you need to specify an archive file to permanently store it. LOG BUFFER (in memory) contents is regularly copied to the log file, overwriting oldest data in the log file. LOG FILE (on hard disk) Size is some multiple of the buffer size. When LOG FILE is some percentage full, (typically 70-90%), that amount of data is copied all at once into an ARCHIVE FILE, for long-term storage. ARCHIVE FILE(S) In addition, you need to choose at what percentage of a full log file, that you will generate the archive file. Archive files must always be smaller than the log file, otherwise, the system would be attempting to save the entire log file at the same time it is receiving a new log buffer of data. We recommend that you perform the archiving at from 70 to 90% of a full log file. Alternatively, the Historical Configuration Tool lets you specify that archive files be generated at a particular time of day, week, etc. These are called timed archives. Enough talk… let’s show some examples!!! OpenEnterprise for Beginners 6-11 Chapter 6 - Working with Historical Data Example #1 – Logging 1-minute data for a few signals Let’s say we have three flow meters connected to our controller, and we want to log the current flow readings, every minute. Let’s also say, since we want to keep this example somewhat simple, for illustration purposes, that we want to log only the three flow signals associated with those flow meters. Step 1. - Start the OE Toolbox To start the OE Toolbox, click as follows: StartÆProgramsÆOpenEnterpriseÆToolbox Step 2. - Start the Historical Configuration Tool To start the Historical Configuration Tool, double-click on the ‘Historian’ icon in the OE Toolbox window. The Historical Configuration dialog box will appear. NOTE: If you do not see the ‘Historian’ icon, you may have not logged on with sufficient security privileges. Click on SecurityÆLogin and log on with appropriate security privileges. (Ask your System Manager for help if you are unable to do this.) 6-12 OpenEnterprise for Beginners Chapter 6 - Working with Historical Data Step 3. - Create A Logging Group Now, we have to create a logging group. To add a new logging group, click on the [Add] push button in the Historical Configuration dialog box. The Logging Group page will appear. Click on [Add] to create a new logging group. OpenEnterprise for Beginners 6-13 REMINDER: A logging group defines what data you want to log, and how often you want to log it. Chapter 6 - Working with Historical Data Logging Group Page The Logging Group page allows you to select the name of the table in the Database from which data will be logged as well as specify how much data will be logged. This lets you select a table in the Database. Typically, users collecting signal data will want to select either: ‘realanalog’ or ‘digital’ as the source table. Here we chose ‘realanalog’ because it contains the signals we want to log. If you are collecting signal data, you should choose ‘name’ since the signal name is a unique identifier for each signal, and is used as the primary key (index) for the table. The Logging Group page basically configures the oelogcontrol table in the OE Database. Every logging group must have a unique ID number. You cannot advance to the next page without completing this field. You can optionally enter a meaningful description here. These fields identify internal database tables which will store the historical data This enables/disables logging for this Logging Group. When logging signal data, this would be the number of signals to be logged. To log every object (signal, for example) in the source table, choose, Log All Objects. Otherwise, leave it blank. 6-14 Most applications don’t require the Advanced features. When finished, click here to go to the next page OpenEnterprise for Beginners Chapter 6 - Working with Historical Data Let’s talk about the various fields on the Logging Group page: Source Table Use this list box to select the name of the table in the Database from which you would like to log historical data. If you are collecting signal data, you would typically want to choose either ‘realanalog’ or ‘digital’ as the source table (we’ve chosen ‘realanalog’ because that’s where the flow data we want to collect would reside.) Once you have defined a particular logging group, you CANNOT change its associated “Source Table”. NOTE: This field will omit the suffix ‘_table’ from any source table names that happen to end in ‘_table’. Group ID This is an integer that uniquely identifies the number of this logging group, so we don’t get it mixed up with any other logging groups we define. In general, your first logging group should have a “Group ID” of 1, the second logging group should have a “Group ID” of 2, etc. This entry CANNOT be changed once this logging group is fully configured. For this example, we will choose a “Group ID” of 4. Description You can optionally enter a textual description of this logging group here. Name Column This is the name of a column in the source table which uniquely identifies the data in the table. Anytime you want to collect signal data from ‘realanalog’ or ‘digital’ you should always choose ‘name’ as the “Name Column” (which we’ve done here) because that column is used to hold signal names, which are unique throughout the table. The name serves as a primary key or index for the rest of the data in the table. For this example, we need to specify ‘name’ because that will allow us to use the signal names from the realanalog_table for organizing the data. Raw Data Table is a read-only field provided for informational purposes. It identifies the table that will be used when queries are made to the tables containing raw historical data. Compressed Data Table is a read-only field provided for informational purposes. It identifies the table that will be used when queries are made to the tables containing compressed historical data. Estimated Number of Objects to Log This is the number of records (rows) in the source table that will be logged. When collecting signal data, this would refer to the number of signals in the source table to be logged. By estimating this number, the Historian can determine how much disk space to allocate for historical storage. Since we want to size our system for 300 signals, we enter 300 here. NOTE: Although you must provide an estimated number of objects in order to fully configure the Historian, it will compensate, if you OpenEnterprise for Beginners 6-15 Chapter 6 - Working with Historical Data underestimate the number of objects, by generating archive files at a faster rate. Enabled When checked, activates logging for this logging group. Because certain characteristics of a logging group CANNOT be modified once they have been initially specified, it is sometimes easier to disable the logging group (by de-selecting the “Enabled” check box) and simply create a new logging group. Log All Objects If checked, all objects (rows) in the source table will be logged. If you are logging signals, checking this means that ALL signals in the designated table will be logged. If left unchecked, only those rows that have the “Group ID” of this logging group in their “Dataset” column will be logged. NOTE: If this option is NOT selected, objects must be selected individually on the Logging Group - Select Objects page. That’s what we’ll do for purposes of this example. [Advanced] This calls up the Historical Advanced Settings dialog box. (We’re not going to use it in this example, but we’ve included an explanation of it below, in case someday you want to experiment with it.) The Historical Advanced Settings dialog box should only be used by those experienced in database configuration. It contains three fields that allow particular columns of the source table to be singled out, and configures the Historian to alter the normal logging based on the data in those columns. “Enable Column” identifies a column in the source table which holds a boolean (true/false) value which enables/disables logging for the current row. For example, if collecting signal data, the ‘ReadControlInhibit’ field could be specified here to disable collection for any signal that is currently control inhibited. “Timestamp Column” identifies a column in the source table that holds a date/time value. This allows a timestamp to be associated with each 6-16 OpenEnterprise for Beginners Chapter 6 - Working with Historical Data historical sample. By default, all timestamps saved in the historical system reflect the time the data was saved. This feature, however, allows some other timestamp to be associated with the saved data. “Rate Column” identifies a column in the source table that holds an integer value. This value will be used as a special collection rate for this particular row, instead of the collection rate configured for the dataset (discussed later). For example, if you are collecting signal data, you might want to collect certain signals faster than normal based on changing conditions in your process.1 When finished in the Historical Advanced Settings dialog box, click on the [OK] push button. When finished with the Logging Group page, click on the [Next >] push button. The Logging Group - Select Fields page will appear. 1 The tables for signal data do NOT support this feature by default; if you want to use this feature, you will need to customize the signal extensions table to include an additional column for this purpose. OpenEnterprise for Beginners 6-17 Chapter 6 - Working with Historical Data Logging Group - Select Fields Page The Logging Group Select Fields page specifies which of the columns (fields) in the source table should be logged, as well as which compression options, if any, should be applied to the raw data before it is logged. We’re not doing any compression for this example, though, so we just have to select which columns we want, and the ‘Raw’ option. Choose which columns from the source table should be logged, by clicking on the column name, and then clicking on the [>>] push button. The Logging Group – Select Fields page allows you to select which columns of the source table you want to log. For each of the selected columns of a given type, specify whatever data compression options which are to be performed. We just want ‘raw’ for this example. To de-select a column name, click on the [<<] button. Click here to proceed to the next page 6-18 OpenEnterprise for Beginners Chapter 6 - Working with Historical Data Available Fields The “Available Fields” list box shows the names of all columns in the source table. To specify that data from a particular column should be logged, click on the column name, then click on the [>>] push button; the column name will be removed from the “Available Fields” list and then appear in the “Fields to be Logged” box. Which “Fields to be Logged” box it appears in depends upon the data type of the field. For example, analog data (signal values) would appear under ‘Analog Fields’; whereas status bits like questionable data would appear under ‘Boolean fields’. Fields to Be Logged The three “Fields to be Logged” boxes show which of the columns selected from the “Available Fields” box are to be logged by the Historian. They also specify which calculations (compression options) if any, should be applied to the logged data. For this example, we’re only using the ‘raw’ data. For an explanation of the various compression options, see Table 6-1 on page 6-7. To add a particular column name to the “Fields to be Logged” box, click on its name in the “Available Fields” box, then click on the [>>] push button. To remove a particular column name from the “Fields to be Logged” box, click on its name in the “Fields to be Logged” box, then click on the [<<] push button. NOTE: When you first come to this page, you may see the ‘AccessArea’ field in the “Fields to be Logged” box; ‘AccessArea relates to security issues that are beyond the scope of this chapter, therefore, we decided not to log that field. We just want to log the following fields:: ‘timestamp’, ‘currentdstoffset’, ‘value’ and ‘questionable’. I understand why you’d want to log timestamp, value, and questionable, but why do we need to log the daylight savings time offset? OpenEnterprise stores all historical data internally with GMT timestamps. The OpenEnterprise software that displays this data (trends, reports, etc.) knows how to correct this to a local time including DST offsets. However, if you are using your own or third party software to access this data, you may need to know if daylight savings time was in effect at the time the data was saved. How come we aren’t choosing to log the signal ‘name’ column? We could, but basically we’d be wasting space by logging the same signal names over and over. The signal name will already be logged once with the data, because back when we defined the logging group we chose ‘name’ as the namecolumn by which all this data gets stored. OpenEnterprise for Beginners 6-19 Chapter 6 - Working with Historical Data Text/Date Fields Any source table column name selected from the “Available Fields” list box which stores timestamps, or textual data will appear in this box. The compression options available for Text and Date fields include Raw, First, Last, Duration, Occurrence Times and Indexing. To select a particular compression option, go to the line that holds the desired column name, then click on the cell underneath the desired compression option. (The option is selected when it appears ‘checked’.) Because textual data can vary in length, you must supply an estimated string length for textual data in the “Length” column. This allows proper sizing of tables in the database, and allocation of disk space. Since we’re using a date field ‘timestamp’ instead of a text field, we don’t need to do that. Analog Fields Any source table column name selected from the “Available Fields” list box which stores analog data will appear in this box. The compression options are Raw, First, Last, Maximum (Max), Minimum (Min), Average (Avg), Integral, Duration, Occurrence Times and Indexing. To select a particular compression option, go to the line which holds the desired column name, then click on the cell underneath the desired compression option. (The option is selected when it appears ‘checked’.) For this example, we aren’t doing any compression, just using the ‘Raw’ choice. Boolean Fields Any source table column name selected from the “Available Fields” list box which stores boolean data will appear in this box. The compression options are Raw, First, Last, AND, OR, Count, Percent, Occurrence Times and Duration. To select a particular compression option, go to the line which holds the desired column name, then click on the cell underneath the desired compression option. (The option is selected when it appears ‘checked’.) For this example, we aren’t using any Boolean fields. When finished with the Logging Group - Select Fields page, click on the [Next >] push button. The Logging Group - Name Fields page will appear. 6-20 OpenEnterprise for Beginners Chapter 6 - Working with Historical Data Logging Group - Name Fields Page The Logging Group Name Fields page displays each of the source table columns selected on the Logging Group - Select Fields page, along with any selected compression options for each column, and a default name for the destination column that will hold the logged data. The main purpose of this page is to allow renaming of the destination columns. Any new column names you define here will be used when SQL or ODBC compliant programs access the data held by the Historian. Each destination column name must be unique for a given destination table.2 By default, if a duplication conflict could cause two destination columns to have the same default name, a prefix will automatically be added, such as ‘object’. To change the destination column name, type a new name in the “Data Access Column”. The destination column in the historical logging table can be renamed, by typing a new name here. Click here to go to the next page. 2 This is because the name is part of the primary key for the table. OpenEnterprise for Beginners 6-21 Chapter 6 - Working with Historical Data When finished with the Logging Group - Name Fields page, click on the [Next >] push button. Step 4. - Define the Dataset Logging Group - Define Datasets Page A Dataset is nothing more than a set of data collected from a particular logging group. There are one or more datasets associated with each logging group. REMINDER – A ‘dataset’ is just a collection of data from a particular logging group. Each dataset will contain the same set of data objects (normally signals), but the compression will be different. For example, one may contain raw values (samples), another may contain 15 minute averages and totals, etc. Click here to add a new dataset. Click on the [Add] push button, and the Dataset Configuration dialog box will appear. 6-22 OpenEnterprise for Beginners Chapter 6 - Working with Historical Data OpenEnterprise Historical Configuration Dialog Box – Dataset Configuration This allows you to create or modify the dataset. You can move from one page of the dialog box, to the other, by clicking on the tabs near the top of the dialog box. “Maximum Unsaved Data” must always be greater than the polling rate. Since, for this example, the polling rate is 60 seconds, we’re fine with 30 minutes. We are taking raw samples, from the real-time database, every minute We want the log file to have at least 24 hours of data in it. Move between pages of the dialog box by clicking on the tabs. We want the log buffer to be copied into the log file at least every 30 minutes. Use the [Browse] button, if necessary, to specify the path where log files will be stored. Fed From Dataset This is a read-only field. If it shows the word ‘Raw’ (which is the case for this example) it means that the data comes directly from the source table. If, instead, a textual description appears in this field, or a description showing the rate, start time, and period appears, it means that the current dataset you are configuring receives data from this other dataset. Description This is used to enter an optional textual description of this dataset. If this dataset will be used as the source for another dataset, the description entered here will appear in the “Fed From Dataset” field in the Dataset Configuration dialog box when you configure the other dataset. Collect Data When Triggered By Column When selected, this indicates that data should be collected based on a change in the value in the specified column. This is called logging by exception. This function is only available in a raw dataset, but we’re not going to use it in this example, anyway. NOTE: This setting CANNOT be modified once the dataset has been saved. OpenEnterprise for Beginners 6-23 Chapter 6 - Working with Historical Data Collect Data by Polling Every When selected, this indicates the rate at which data should be collected from the source table of this logging group (or from another dataset if the “Fed From Dataset” field is NOT ‘Raw’.) The units can be Seconds, Minutes, Hours, Days, Weeks, Months, or Years. The Historian will convert the specified units into a format of either seconds or months, since that is how the Historian computes time internally. NOTE: This setting CANNOT be modified once the dataset has been saved. Starting From This indicates a time (which must be from the past) at which polling began for this dataset. If NOT selected, polling will begin immediately upon completion of dataset definition. This is used to define the offset at which storage will occur, e.g. 10 minutes past the hour. Unless you specify a date, it is stored in the database, as an offset from the beginning of 12:00 midnight on January 1, 2001 Greenwich Mean Time (GMT). That particular date is Day 0 in the OE historical system; time is measured internally from that date forward. Keep For At Least This determines (in conjunction with the “Maximum Unsaved Data” field) the amount of data to be stored in the log file. This setting CANNOT be modified once the dataset has been saved. NOTE: When polled collection is used, this is measured in time units (seconds, minutes, hours, days, weeks, months, or years). If triggered collection is used, this is expressed in generations of saved data. Recommendations: • • • • For 1-minute samples, the log file should hold 24 hours worth of data. For compressed hourly data (1 hour averages, for example), the log file should hold one week’s worth of data. For compressed daily data (daily averages, totals, etc.), the log file should hold one month’s worth of data. Log file size should be kept to 100 megabytes or less. (You can examine the resulting log files to see how large they are.) 6-24 OpenEnterprise for Beginners Chapter 6 - Working with Historical Data Maximum Unsaved Data This specifies how much data the user is willing to lose (worst case) due to a system failure. It essentially defines the size of the logging buffer in active memory that holds data prior to its being written to disk in a log file, or permanently stored in an archive file. If there is a power failure, any data in the logging buffer is lost. You have to have some unsaved data… When you see the "Maximum Unsaved Data" field, it's tempting to say: "I don't want to have any unsaved data." The reality is, you have to have some unsaved data. If the "Maximum Unsaved Data" value is too small, system performance will suffer. You should typically set it to at least 10 times the collection rate, for example, if the collection rate is 60 seconds, maximum unsaved data should be 10 minutes. Anything more frequent will adversely affect system performance. NOTE: When polled collection is used, this is measured in time units (seconds, minutes, hours, days, weeks, months, or years). If triggered collection is used, this is expressed in generations. NOTE: Once the dataset has been saved, this setting can only be modified via SQL statements. SOME NOTES ABOUT LOGGING BUFFER SIZE: The buffer size must always be more than the maximum amount of data you are going to save at one snapshot in time. For example, if you’re saving 1-minute data, the buffer size must be at least large enough to hold a minute’s worth of data. Actually, though, you should multiply this number by the number of snapshots of data you want to retain in memory, for example 30 minutes for 1-minute data. If you make your buffer size too small (smaller than the amount needed to hold a single snapshot of data) you will receive an error message in the DB.TXT file, and historical collection for that logging group will not work. Log Directory This specifies the directory path in which log files will be stored. To change the directory, use the [Browse] push button. NOTE: Once the dataset has been saved, this setting can only be modified via SQL statements. IMPORTANT: The log data is filled in a cyclical manner; therefore, data is only maintained in the log file until such time as it is overwritten by new data coming in. The only way to retain such data for a longer period of time is to configure the archive mechanism. OpenEnterprise for Beginners 6-25 Chapter 6 - Working with Historical Data Now we have to configure archiving, so click on the ‘Archive Configuration’ tab to bring up that page of the dialog box. OpenEnterprise Historical Configuration Dialog Box – Archive Configuration There are two different ways to configure archive files. In this example, we’re going to cover archive files created when the log file reaches a certain specified size. The other way to create an archive file is on a pre-defined schedule. Specify the path where archive files will be stored. Use the [...] button, if necessary, This means we are going to create an archive whenever the log file is 75% full. Click on [OK] when finished This is the number of archive files kept on-line, in memory. In this example, each archive file includes 75% of a log file worth of data (or 0.75 x 24 hours, i.e. approximately 18 hours of data.) If we keep 15 of them on-line, that means we have 15 x 18 or 270 hours of data on-line (about 11 days worth of data). Timed Archive ID, Description, Timed Archives are archives that are configured to occur according to a Start Time, Repeat regular schedule. (We’re going to cover Timed Archives in a different Interval, [Add], example, so we won’t talk about them here.) [Delete], [Modify] Archive Directories Online Archives Offline Archives This specifies the directory path in which on-line OpenEnterprise Archive files will be stored. To specify the directory path you can either type it in directly or use the [Browse] push button. NOTE: Once the dataset has been saved, this setting can only be modified via SQL statements. As specified by the “Maximum Online Archives” field, OpenEnterprise can only maintain a limited number of archive files for a dataset on-line, in memory, at any one time. When that number is exceeded, the oldest online archive is made off-line, and is moved to the “Offline Archives” 6-26 OpenEnterprise for Beginners Chapter 6 - Working with Historical Data directory. (It can be brought on-line again, if needed, using the Archive File Tool.) To specify this directory path you can either type it in directly or use the [Browse] push button. Auto Archive When selected, this causes OpenEnterprise to create an Archive file, automatically, whenever the criteria specified by “Archive When” are met. Archive When This specifies a maximum percentage of un-archived data. When this percentage is exceeded, an Archive file will automatically be generated. Suppose, for example, the “Keep For At Least” value is set to 1 day, and the maximum percentage of un-archived data, i.e. “Archive When” is set to 25 percent, i.e. 6 hours. This would mean that when 75 percent of a day is complete, an Archive file would be generated. In other words, every 18 hours, an archive file will be generated. Automatically Online Archives This specifies the number of archives that the system will automatically maintain on-line. This number differs from the “Maximum Online Archives” number, because it does not encompass previously off-line archives brought on-line manually using the Archive File Tool. Maximum Online Archives Archive files provide permanent storage, but must be on-line in order to be accessible to the database. This value specifies the default maximum number of Archive files which should be kept accessible to the database (including both those kept on-line automatically, as well as others that have been brought on-line using the Archive File Tool.) (NOTE: Once an Archive is no-longer on-line, it can be manually restored to make it accessible again.) Archive Cataloguing When checked, this stores index information about archive files. We recommend you check this, because it helps in archive file management, and makes it easier to retrieve archive files later, in the Archive File Tool. When finished with this dialog box, click on the [OK] push button. Then click on the [Next >] push button to go to the next page. OpenEnterprise for Beginners 6-27 Chapter 6 - Working with Historical Data The Logging Group – Define Datasets page will re-appear, with the new dataset shown in a tree structure. Click on [Next>]. The dataset has been added to a tree structure. Click on [Next>] On the next page, you can optionally rename the internal table used for holding this dataset. Change the name, if desired, then click on [Next>]. Here, you can optionally enter a new name for the internal table used for holding this dataset. Click on [Next>] 6-28 OpenEnterprise for Beginners Chapter 6 - Working with Historical Data Logging Group - Select Objects Page (NOT applicable in all cases) Remember, way back at the beginning of this example, we said that we only wanted to log data for certain signals? We indicated that by not checking the “Log All Objects” option on the Logging Group dialog box (see page 6-14.) Now it’s time to actually identify which signals we do want to log. That’s the purpose of the Logging Group - Select Objects page. Objects list box Click here to bring additional signals into the box. OpenEnterprise for Beginners Instead of logging data for all objects (in this case, signals), we only log data for selected objects. 6-29 Click here to go to the next page Chapter 6 - Working with Historical Data Browse Objects The “Browse Objects” area is optional. It allows the number of objects displayed in the Objects list box, below it, to be reduced, by entering one or more filter strings for particular columns. When a filter string is entered, the Objects list box can be refreshed by clicking on the [Refresh] push button. For example, if collecting signal data, and only those signals beginning with the word, ‘PUMP’ should be logged, enter PUMP* in the name field of the “Browse Objects” area. [Refresh] This push button refreshes the Objects list box, below it, based on filter strings entered in the “Browse Objects” area. You should also use this push button after removing objects from the “Logged Objects” list box, so they will re-appear in the Objects list box. Options This push button calls up the Options dialog box. It allows the user to make selection easier by restricting the number of objects displayed in the Objects list box, by entering a number in the “Retrieve x Objects” field. If “Prompt for Filter Before Querying Database” is selected, the Objects list box will be empty when the Logging Group - Select Objects page is initially called up. [Next] This push button allows the next set of objects in the database to be brought into the objects list box (based on any filters set) thereby allowing selections of objects for logging to be made. Logged Objects This list box displays only those objects that have been specifically selected for logging. To add an object to this list box, click on its name in the Object list box, then click on the [>>] push button. To remove an object from this list box, click on its name in the “Logged Objects” list box, then click on the [<<] push button. Then click on the [Refresh] button to refresh the “Objects” list box. [Show All Objects] This push button allows all objects currently marked for logging to be displayed, even if the object is not among those currently in view in the 6-30 OpenEnterprise for Beginners Chapter 6 - Working with Historical Data Objects list box. When finished with this page, click on the [Next >] push button to go to the next page. Logging Group - Summary Page Okay. We’re almost done! The Logging Group Summary Page displays all of the configuration choices you have made for this logging group, and its associated dataset(s). Among the most important information you will find on the Summary Page is the number of bytes required to store all of the historical data you want to retain. This is important to know since the amount of available space on your OpenEnterprise Server’s hard disk must be larger than this amount, and have room to spare for running programs, etc. NOTE: Certain items CANNOT be changed after you save them; thereby requiring you to recreate the entire logging group in order to fix problems. It is recommended, therefore, that you review information on the Logging Group Summary Page carefully, since this is your final opportunity to make changes, before saving all information to the database. If there are items you want to change, click on the [< Back] push button, and continue using the [< Back] push button on earlier pages until you reach the items you want to change. If there are no items you want to change, click on the [Finish] push button, and changes will be written to the database. Wow!!!! We’re done! Woo hooo!! OpenEnterprise for Beginners 6-31 Chapter 6 - Working with Historical Data Example 2 – Logging Status Values by Exception Let’s say you have many logical signals in your database. They change values as pumps start and stop, valves open and close, etc. If you wanted to keep a history of their value changes, you could log them every minute, but it’s probably the case that they don’t change that frequently, so you’d be logging the same value over and over most of the time. A more efficient way to log this information is to use logging by exception that we mentioned earlier. NOTE: We're skipping the steps about starting the Historical Configuration Tool, and clicking on [Add] to add a new Logging Group because we're assuming you're familiar with them. If you don't remember those, please go back to page 6-12 and review those steps. Step 1. – Create a Logging Group In the first page of the Logging Group dialog box, you must specify: • The OE Database table from which the data will be logged must be specified in the "Table" field. (Since we want to log changes to logical signals, this must be the 'digital_table'. • You must choose which column (attribute) in the table will be used to organize the data and specify it in the "Name" field. (In database terminology, this is sometimes referred to as the primary key). Because we are logging signal data, we always want to choose 'Name' as the column, because, that has the signal name. • An ID number to uniquely identify this Logging Group must be entered in the "Group ID" field. • You can optionally enter text describing what's in this Logging Group, in the "Description" field. (It's a good idea to do this because it helps you differentiate between the different Logging Groups.) • We need to specify the approximate number of objects to be logged. In this case that's 500 signals. • We only want to log selected signals, so do NOT check "Log All Objects". If we wanted to log every signal in this table, we would have checked it, however. • We also want to check the "Enable" box to enable logging for this group. 6-32 OpenEnterprise for Beginners Chapter 6 - Working with Historical Data First, we need to identify the table in the OE Database, that we’re collecting data from. In this case, it’s ‘digital_table’. The ID identifies this Logging Group. It must be unique within the system. This textual description is optional. Number of objects to log would be the number of signals you want to log, in this case. This must be checked, or else logging would be disabled. We also need to choose which column of the source table will serve as the primary key for all the logged data. Any time we log signal data, we always choose ‘name’ for this, so that data will be organized based on the signal name. Click on [Next>] to continue defining this Logging Group. Click on [Next>] to go to the next page of the dialog box. Step 2. - Choose the Columns You Want to Log Choose the columns (attributes) you want to log on the Logging Group - Select Fields page. For the logical signals we want to log the readvalue field (i.e. the last value read from the controller), the inhibit bits (alarminhibit, controlinhibit, manualinhibit), and the questionable data bit (questionable). Choose the fields you want to log Click on [Next>] when you're ready to proceed to the next page. Click here when finished. OpenEnterprise for Beginners 6-33 Chapter 6 - Working with Historical Data How come we didn't log the timestamp? The Historian automatically logs the time at which signal data is placed into the Historian from the realanalog_table and digital_table. "Hold on!" you say "How come back in the earlier example, we did choose to log the timestamp?" Good question. The timestamp attribute reflects the time the data arrived from the RTU, and was placed into the realanalog_table or digital_table. We chose to log it in the earlier example, because in that example, it could have been different from the time at which data was placed in the Historian, because data was being put into the Historian at a fixed rate. For example, say you're collecting real-time values into the realanalog _table every minute, and then every 15 minutes, you're collecting the value and putting it into the Historian. The time automatically stored by the Historian will only change every 15 minutes, i.e. the time it does its historical storage, but the timestamp in the realanalog_table is changing every minute. That's why we saved the timestamp in the earlier example. In this example, however, we're doing something a little different. We're collecting by exception (i.e. when something changes). So as soon as something changes in the digital_table, it will be copied into the Historian. The timestamp in the digital_table, therefore, is the same as the Historian's own time of storage, which is automatically logged. Since there's no difference, we don't need to collect the timestamp. Still confused? Don't worry about it. We're getting into some pretty arcane material here, and most people don't need such precision in their historical data, since they're more concerned with hourly and daily averages. ============================================================ How come you’re using the “readvalue” column instead of the “value” column? It’s really just a matter of choice. The “readvalue” column and the “value” columns are usually the same; “readvalue” contains the last value read from the RTU; the “value” column contains the last value read from the RTU or written by the operator. The difference only occurs when the operator has changed the signal’s value, and the changed value hasn’t yet been read back from the RTU, either because the change wasn’t accepted (manually inhibited signal at RTU) or communications were interrupted. 6-34 OpenEnterprise for Beginners Chapter 6 - Working with Historical Data Step 3. Rename Columns (OPTIONAL) If desired, you can rename fields If desired, you can specify new names for columns in the log file. When finished, click on [Next>]. Click on [Next>] when finished. Step 4. - Define the Dataset Click on [Add] Click on [Add] to add a new dataset. In the OpenEnterprise Historical Configuration dialog box select the "Collect Data When Triggered" button, and choose "By Column" and 'Readvalue'. This means that data will only be collected when the 'Readvalue' column for a signal changes. OpenEnterprise for Beginners 6-35 Chapter 6 - Working with Historical Data Because data, therefore, isn't being logged at a fixed rate, we measure the amount of data in generations. One change of a signal is considered to be one generation. Choose “Collect Data When Triggered” since we’re logging by exception. Check the “By Column” box, and choose ‘Readvalue’ as the column which triggers logging, if it changes. When logging by exception instead of time, generations of changes are saved. For example, 5 changes to a signal would require 5 generations. Specify the log file folder where the log file will be generated. Specify the location where the log file will be stored on disk. When you're finished with this page, click on the 'Archive Configuration' tab. In the Archive Configuration page, specify the drive and directory that will hold the archive files. Check "Auto Archive" and specify a percentage of how full the log file should be, before you generate an archive file. Specify the location where archive files should be saved. Check “Auto Archive” and specify when the archive file should be generated, based on the log file size. Check the “Maximum Online Archives” box and specify how many archive files you want to keep accessible. Specify how many archives you want on-line (accessible by the user.) Also, make sure "Archive Cataloging" is checked - - this aides in archive file management. Select “Archive Cataloging” Click on [OK] when finished. Click on [OK] when finished. 6-36 OpenEnterprise for Beginners Chapter 6 - Working with Historical Data Click on [Next>] The Dataset is now defined. Click on [Next>] in the Logging Group - Define Datasets dialog box. Step 5. - Rename the Internal Table Used to Hold This Dataset (Optional) On this page, you have the option of renaming the internal table used to hold this data. If desired, rename the view, here. Rename the view, if desired, and click on [Next>]. Click on [Next>] when finished. OpenEnterprise for Beginners 6-37 Chapter 6 - Working with Historical Data Step 6. - Choose the Objects (Signals) You Want to Log Select the signals you want to log, and click on the [>>] button to mark them for logging. Because we didn't select "Log All Objects" back on page 6-33, we now have to choose which signals you want to log. Select the signals, and click on the [>>] button to mark them for logging. Click on [Next 100] to bring additional signals into the window, and repeat the process. When you're finished, click on [Next>]. Click here to bring more signals into view. Click on [Next>] when finished. Click on [Finish] and you’re done. Now click on [Finish] on the Logging Group - Summary page, and you're done. The only real difference between this example and Example 1, is that we logged signals only when they changed, i.e. logging on exception based on a trigger (the readvalue column.) The fact that they were logical signals instead of analog signals only makes a difference in the choice of the source table. 6-38 OpenEnterprise for Beginners Chapter 6 - Working with Historical Data Example 3 - Logging Hourly and Daily Flow Calculations, and using Timed Archives NOTE: This example is heavily based on Example 1, so you're going to notice some repetition. Again, we're skipping the initial steps related to starting the Historical Configuration Tool. If you don't remember those, please go back to page 6-12 and review those steps. Let's say that instead of just saving 1-minute samples of data that we want to do some calculations on the data. If we have signals that represent flow rates through a pipeline, maybe we want to know what time of day the minimum and maximum flow rates occurred. Maybe we also want to know the average flow rate for an hour, or for the whole day. This type of data can be obtained using the compression options we talked about way back in the beginning of the chapter (See Table 6-1 on page 6-7.) Step 1. - Create a Logging Group To start out, fill in the first page of the Logging Group dialog box the same way as before. The only change we made was increasing the number of objects from 500 to 1000. (We didn't do that for any particular reason, other than to show you that it can be some other number than 500 – it is set to however many signals you want to log.) Enter a textual description of this Logging Group Choose a unique Logging Group number Choose ‘name’ since we’re logging signal data Choose the ‘realanalog’ table When logging signal data this is the number of signals you want to log This must be enabled Click on [Next>] when finished OpenEnterprise for Beginners 6-39 Chapter 6 - Working with Historical Data Step 2. - Choose the Columns you Want to Log and Specify Compression Options As in the previous examples, we choose the columns which we want to log. The big difference, though, is that in this example, we're going to specify some compression options. Remember, in this context, 'compression' doesn't mean file compression. It just means to save the results of calculations on data, not all of the original data. We want to save the minimum, maximum, and average flow values for the signals in this Logging Group. Therefore, we need to check the "Max", "Min" and "Avg" boxes for the 'Value' field. We also want to know the time that the minimum and maximum occurred, so we check the 'Occurrence Times' option as well. Choose a field you want to log, then click on the [>>] button. Repeat for each additional field you want to log. Choose ‘Max’, ‘Min’ and ‘Avg’ compression options for the Value field, as well as the ‘Occurrence Times’ option. Click on [Next>] when finished. 6-40 OpenEnterprise for Beginners Chapter 6 - Working with Historical Data Step 3. - Rename Columns in the Log File (OPTIONAL) Rename the columns which will be used in the log file (if desired) If desired, you can rename the columns that will be used in the Log File. Click on [Next>] when finished. Click on [Next>] when finished. Step 4. - Define the Dataset for 1-minute Data Click on [Add] to add a new dataset. Click on [Add] The Historical Configuration dialog box will appear. OpenEnterprise for Beginners 6-41 Chapter 6 - Working with Historical Data • We want to collect the data by polling, and we need to specify the polling rate at '60 seconds' or '1 minutes' because we are logging data every minute, and we start it from the current time and date. • We want to keep an entire day of 1-minute data in the Log File, so "Keep for at least" must be '1 days' or '24 hours' or '1440 minutes' or '86400 seconds'. (The choice of units is up to you, they all equal 1 day). • "Maximum Unsaved Data" should be set to 1 hour or so. That means, the log buffer contents (which are in RAM memory, and so could be lost in a power failure) will be emptied into the Log File on disk, every hour. We’re collecting the data every minute, so choose ‘60 seconds’ (or ‘1 minutes’) here. Enter a textual description here For minute data you can just choose the current time. For 1-minute data we want to keep an entire day’s worth We want to write the log buffer’s contents to disk every hour. Specify the location where the log file will be stored. When you're finished on the 'Dataset Configuration' page, click on the 'Archive Configuration' page. 6-42 OpenEnterprise for Beginners Chapter 6 - Working with Historical Data On the Archive Configuration page, start by specifying the location where archive files will be stored, then specify how many you want to keep online, etc. Fill in these fields first: Specify the location where archive files, and off-line archive files, will be stored. Specify how many of these archive files you want to keep online and accessible. Specify the maximum number you want to allow to be online simultaneously. Now, click on the [Add] button to call up the Create New Timed Archive dialog box. Now, we said we're going to use Timed Archives in this example, so click on the [Add] button to add a new timed archive. In the Create new Timed Archive dialog box, we need to specify the "Start Time" for the archive. Think of the start time as the beginning point from which future archive files will be scheduled for creation. The “Start Time” must be in the past. Specify how frequently archive files are generated. Specify an offset from the starting time, at which the archive file is generated. Click on [OK] when finished. We chose midnight of the current day as the "Start Time". We recommend your starting time always be in the past. OpenEnterprise for Beginners 6-43 Chapter 6 - Working with Historical Data The "Repeat Interval" is the period of time, as measured from the "Start Time" at which future archive files will be created. For example, if my "Start Time" is January 1, 2005 at 12:00 AM, and the "Repeat Interval" is 'Daily', then the next time an archive file would be created would be at 12:00 AM on January 2, 2005. Sometimes, if your system has a great deal of activity on the hour, because of polling or report generation, etc., you may want to schedule the Archive File generation to occur at some offset into the interval. For example, if you specify an offset of 5 minutes, that means that the system won't generate the Archive File until 5 minutes after the scheduled interval time. In this case, that would be 12:05 AM, instead of 12:00 AM. The Timed Archive is now defined. When finished defining the timed archive, click on [OK]. Then click on [OK] again to exit the dialog box. Click on [OK]. Step 5. - Define the Dataset for the Hourly Data We now have defined a dataset for the raw 1minute samples. Now, we need to define two more datasets - one for the hourly data, and one for the daily data. Each of these additional datasets will be 'fed from' the raw 1-minute samples dataset. Select the raw dataset, and click on [Add]. Select the raw dataset you just finished, and click on [Add]. 6-44 OpenEnterprise for Beginners Chapter 6 - Working with Historical Data This new dataset gets its data from the 1-minute samples dataset we defined earlier. • We want to collect the data by polling, and we need to specify the polling rate at '60 minutes' or '1 hours' because we are logging data every hour. The start time must be in the past, so we chose '12:01 AM'. • We want to keep an entire month's worth of 1-hour data in the Log File, so "Keep for at least" is set to '32 days' or some variation of that using different units. • "Maximum Unsaved Data" is set to 12 hours. That means, the log buffer contents will be emptied into the Log File on disk, every 12 hours. Data is coming from the samples dataset we defined earlier. We want to save a month’s worth of data. We want to collect the data every hour. "Keep for at least" defines the size of your log file on disk. If we enter '32 days' as the "Keep for at least" value, that means our log file can hold up to 32 days worth of data, and on the 33rd day, the oldest day in the Log File gets overwritten. (If you configure archiving, you don't have to worry about data being overwritten, since it would be archived in an archive file before that happens.) "Maximum Unsaved Data" defines the size of the log buffer (the amount of log data kept in RAM memory) that hasn't yet been written to the log file on disk. If you set your "Maximum Unsaved Data" to 12 hours, that means up to 12 hours of unsaved data can reside in memory. In other words, twice a day, you save the data. If a power failure occurs, therefore, up to 12 hours of data from the log buffer could be lost. It's tempting to set this to a very low value, so as not to lose any data, however, be aware that doing so could have negative effects on system performance, and prevent you from adding additional signals during future system expansion (since the buffer size is fixed and cannot be changed). Because of this, the “Maximum Unsaved Data” should typically be set to at least 5 to 10 times the “Collect Data by Polling” rate specified for this dataset, and should never be less than twice that rate. (Note: A feature called database persistence can reduce the amount of data lost in power failures – see the Session Manager documentation in the OE Reference Manual for more information.) OpenEnterprise for Beginners 6-45 Chapter 6 - Working with Historical Data On the 'Archive Configuration' page, enter parameters defining how many archive files you want online for this dataset, and where you want to store them. Now, click on the [Add] button to add a new timed archive for this dataset. Click on [Add] to define the Timed Archive. Location of Archive files. Number of on-line Archive Files (accessible to the user.) This time we want to specify that the hourly data gets archived on a weekly basis. Specify a "Start Time" in the past, and a "Repeat Interval" of 'Weekly'. We want to generate an archive file of the hourly flow data every week. We specify that we want the Archive File generated at 12:15AM every Sunday. Click on [OK] when finished. Then, click on [OK] again to exit the OpenEnterprise Historical Configuration dialog box. The hourly dataset is now complete. The flow data will be stored in the archive file every Sunday at 12:15 AM. (NOTE 10 minute offset.) 6-46 OpenEnterprise for Beginners Chapter 6 - Working with Historical Data Step 6. - Define the Dataset for the Daily Data Click on the raw dataset, then click on [Add]. We need to add the last dataset for the daily data. Again, this dataset will be 'fed from' the raw 1-minute samples dataset. (Don't feed it from the hourly dataset.) Select the raw dataset, and click on [Add]. This daily dataset gets its data from the 1-minute samples dataset we defined earlier, (not the hourly dataset). • We want to collect the data by polling, and we need to specify the polling rate at '24 hours' or '1 days' or '86400 seconds' because we are logging data once every hour. The start time must be in the past, so we chose '12:15 AM'. • We want to keep an entire year's worth of daily data in the log file, so "Keep for at least" is set to '1 years'. • "Maximum Unsaved Data" is set to 5 days. That means, the log buffer contents will be emptied into the Log File on disk, every 5 days. OpenEnterprise for Beginners Data is coming from the samples dataset we defined earlier. We want to save a year’s worth of daily data. We want to collect the data every day. 6-47 Chapter 6 - Working with Historical Data Once again, on the 'Archive Configuration' page, enter parameters defining how many archive files you want online for this dataset, and where you want to store them. Now, click on the [Add] button to add another new timed archive. Click on [Add] to define the Timed Archive. Location of Archive files. Number of on-line Archive Files (accessible to the user.) This time we want to specify that the daily data gets archived on a weekly basis. Specify a "Start Time" in the past, and a "Repeat Interval" of 'Weekly'. We want to generate an archive file of the daily flow data every week. We specify that we want the Archive File generated at 12:45AM every Sunday (12:15 plus a 30 minute offset.) Click on [OK] when finished. Then, click on [OK] again to exit the OpenEnterprise Historical Configuration dialog box. The daily dataset is now complete. 6-48 The flow data will be stored in the archive file every Sunday at 12:45 AM. (NOTE 30 minute offset.) OpenEnterprise for Beginners Chapter 6 - Working with Historical Data Your datasets for 1-minute, 1-hour, and 1-day data are now complete. Click on [Next>]. Now that your datasets are complete, click on [Next>]. Step 7. - Rename the Internal Tables Used to Hold These Datasets (Optional) On this page, you have the option of renaming the internal tables used to hold this data. (Later on, when you actually want to query the historical data, you'll need to know the names of these tables.) Rename the view, if desired, and click on [Next>]. Click on [Next>] when finished. OpenEnterprise for Beginners 6-49 Chapter 6 - Working with Historical Data Step 8. - Choose the Objects (Signals) You Want to Log Select the signals you want to log, and click on the [>>] button to mark them for logging. Because we didn't select "Log All Objects" back on page 639, we now have to choose the flow signals we want to log. Select the signals, and click on the [>>] button to mark them for logging. Click on [Next 100] to bring additional signals into the window, and repeat the process. When you're finished, click on [Next>]. Click on [Next>] when finished. Click here to bring more signals into view. Click on [Finish] and you’re done. Now click on [Finish] on the Logging Group - Summary page, and you're done. 6-50 OpenEnterprise for Beginners Chapter 6 - Working with Historical Data Example 4 – Using the Archive File Tool3 We've talked a lot about archive files. We explained earlier that because log files are periodically overwritten with new data, data from the log files gets copied to archive files for permanent long-term storage. We also said that a certain number of archive files are maintained online (so they can be accessible for queries), and that if an archive file is off-line it is inaccessible. Therefore, if you have a particular offline archive file containing data you need to view, you will need to bring it online again. How do we keep track of all these archive files? How do we bring old ones online, or take other ones offline? You guessed it - we use the Archive File Tool. Before You Begin Obviously, in order to make use of the Archive File Tool, you need to have some archive files. They could either be online in your Archive Files directory, in an offline archive files directory, or you might have them on some other computer or storage media. NOTE: If you have archive files you saved previously on CD-ROM, or some other storage media, their Windows™ file attributes MUST be set to read-write after you restore them, or else they cannot be read by the Archive File Tool. Starting the Archive File Tool From the OE Toolbox, double-click on the 'Archive Files' icon. Double-click on the ‘Archive Files’ icon. 3 In order for the Archive File Tool to run properly, another program called OEArchiveFileManager.exe must be running. Normally this would be started automatically by the Session Manager. Session Manager configuration is outside the scope of this manual. See the Online Help for details. If Session Manager hasn't been configured yet, you can start it manually from the /OpenEnterprise /BIN folder. OpenEnterprise for Beginners 6-51 Chapter 6 - Working with Historical Data When the Archive File Tool appears, you can see a list of all Archive Files known to the system, both online and offline. This list is called the Archive Catalog. The files are organized in a tree structure. Logging groups for particular table(s) are displayed, and then a list of datasets associated with each Logging group is shown. The source table(s) from which the data was originally collected. The datasets for each Logging Group. Any online Archive Files for each dataset will be listed. If a particular dataset does not show an Archive File, it could be that archiving has not been configured, or that logging has not been underway long enough for an Archive File to be generated. The Logging Group Numbers Click on the '+' sign to view branches of the Archive File tree. The archive files are named based on the date range they encompass. Use the ‘+’ to expand the tree and see a list of archive files. You can find out more information about a particular Archive File by selecting it, and clicking on the [Properties] button. Archive files preceded by a red X are currently offline. Archive files preceded by a blue checkmark are currently online. If the blue checkmark for an online archive file has a small 'A' underneath it that means that this particular archive file was brought online automatically. Archive files marked with a red X are currently offline, and inaccessible. Archive files marked with a blue check mark, are online. If the online archive file has a small ‘A’ below it, that means that it was brought online automatically by the system. 6-52 OpenEnterprise for Beginners Chapter 6 - Working with Historical Data Bringing an Offline Archive File Online First, choose the Archive File you want to bring online. In the Archive Catalog, Offline archive file names are preceded with a red X. In the Archive File Tool, click on the name of the Archive File that you want to bring online, then click on the [Bring Online] button. Then click on the [Bring Online] button. A message box will appear, asking you to confirm that you want to bring this Archive File online. Click on [Yes]. The Online Properties dialog box will appear. Click on [Yes]. The source table. The Logging Group number. The Online Properties dialog box displays various information about this Archive File, including the source table from which the data originated, the Logging Group number, the name of the Archive File, and its associated dataset (0s = raw samples, 3600s = hourly, etc.) Choose how long you want to keep this Archive File online. You can choose how long you want this Archive File to remain online. If you choose "Indefinitely" it will remain online until you manually take it offline. If you choose "For" you can specify that the Archive File should remain online for a certain number or hours and minutes. Click on [OK]. If you choose "Until", you can specify a date and time at which the Archive File will be taken offline by the system; it will remain online until that moment. OpenEnterprise for Beginners 6-53 Chapter 6 - Working with Historical Data Click on [OK] and the Archive File will be brought online. Restoring Offline Archive File(s) from Backup Media or a different Server If you have Archive Files that are currently not visible in the Archive Catalog tree, you will need to add them in. First, copy them to the Online Archives folder (archdirectory in oelogdata) you specified during historical configuration. If you are copying the files from a CD-ROM they will typically be read-only, even after you restore them to Online Archives folder the server. If this is the case, you must change their file attribute to read-write before you try to add them into the Archive Catalog. How do I change the file attribute for the Archive Files to Read-Write? In Windows™ Explorer, go to the location on the server where you have restored the Archive Files, and select the files. Right-click on the files and choose "Properties" from the pop-up menu. Deselect the 'Read-only' box and click on [OK]. Once you have copied them to the Online Archive folder, and adjusted the file attribute, as necessary, you need to add them into the Archive Catalog. Click on [Add Archives] To do this, click on the [Add Archives] button in the Archive File Tool. The Archive File Import dialog box will appear. The Archive File Import dialog box will show a list of all archive files in the Online Archive folder, which do not currently exist in the Archive Catalog tree. 6-54 OpenEnterprise for Beginners Chapter 6 - Working with Historical Data If you want the file(s) brought online automatically once they are added to the catalog, make sure you select the "Keep files online after they are imported" box. Select the file you want to add into the Archive Catalog. You can now add the files into the catalog by selecting the file(s) you want to add, and clicking on [OK]. Any files you selected will be added to the Archive Catalog tree. If you didn't specify that they should be kept online after import, you should proceed to bring them online, when you need them. (See Bringing an Offline Archive File Online earlier in this chapter, for details.) Click on [OK]. Interpreting What the Archive Filenames Mean In the Archive Catalog, the archive filenames are organized in the tree, and have timestamps written out, for example, March, instead of 03. When the archive files are stored on disk, however, they have more complicated names. An example is explained below: 1_0s_20000212233428_12345_0.arch g rt yyyyMMddHHmmSS time x where: g is the historical group rt is the collection rate yyyy is the year MM is the month dd is the day of the month HH is the hours that time is the number of seconds in the archive file x is an incremental count (continued) OpenEnterprise for Beginners 6-55 Chapter 6 - Working with Historical Data Interpreting What the Archive Filenames Mean (continued) The timestamp (yyyyMMddHHmmSS) is the start time of the archive file, i.e. no data should appear before this date. The time (number of seconds in the archive file) along with the timestamp will determine the bounding region of time that the archive file maintains. The incremental count (x) should increase by a value of one after each archive. If an archive file is generated and the database crashes, restarting the database may start it with an older 'realtime.dat'. This may have an older count and therefore you will find duplicate counts for the same file. Taking an Online Archive File Offline First, select the file you want to make offline. Because of memory limitations, you shouldn't keep more archive files online than you think you will need. Online archive file names are preceded with a blue checkmark. In the Archive File Tool, click on the name of the Archive File that you want to take offline, then click on the [Take Offline] button. The file will be taken offline, and will now appear with a red X preceding its name. Then, click on [Take Offline]. 6-56 OpenEnterprise for Beginners Chapter 6 - Working with Historical Data Setting Up Automatic Backup of Offline Archive Files As your system continually generates archive files of old log data, you consume more and more hard disk space. Eventually, your disk will fill up with archive files. Some people prevent this by periodically copying the offline archive files to CD-ROM, and then deleting them. An alternative way to back up the offline archive files is to periodically copy them to a different computer. You can do this manually, or you can automate this process using the Archive File Tool. Click on [Add]. To do this, go to the 'Backup' page of the Archive File Tool, and click on [Add]. Specify a name and description. Specify a name and description for your backup scheme, and choose when you want the files transferred to the backup machine. (You can specify that you want them sent as soon as they are created, as soon as they are offline, or at some predetermined time of day. Then, click on [Add]. Choose when you want your archive files transferred to the other computer. Click on [Add] to specify the location of the other computer or folder. Now choose the logging group, and the dataset (samples = '0s', hourly = '3600s', daily = '86400s', etc.) from which these archive files were generated. Also, you must select the folder containing the offline archive files, and the destination on the other machine to which you want to transfer the archive files. OpenEnterprise for Beginners 6-57 Chapter 6 - Working with Historical Data When finished, click on [OK] and continue to click on [OK] until you return to the 'Backup' page of the tool. Choose the Logging Group that has the archive files you want backed up on another computer. Specify which dataset you want backed up. Select the folder containing the archive files you want backed up. Specify the destination for the files, i.e.where they will be backed up (name and folder on other computer.) You can then exit the Archive File Tool, if you are finished with your configuration activities. Click on [OK] when finished. What can I do with all this historical data? So you've saved and archived tons and tons of historical data. What's it good for? Well, most customers like to create trends of certain variables from their historical data. If you want to do that, we have a whole chapter (Chapter 7) which talks about creating trends. Customers also like to generate reports based on their historical data. You can use the Report Tool, to generate reports from data stored in the OpenEnterprise Database. See Chapter 11 for information on using the Report Tool. Alternatively, you can use any third-party ODBC compatible reporting package to generate reports. Finally, if you’re comfortable working with SQL, and you just want to view the historical data, you can query the raw or compressed table from which the original data came. Depending upon the specifications of your query, the system will automatically access the online Archive files, if that's where the data you requested resides. See Appendix A for details on using SQL. 6-58 OpenEnterprise for Beginners Chapter 7 - Trending Your Data Chapter 7 – Trending Your Data What are Trends? We hear and read about trends all the time in the news, for example, prices of some commodity are going down, or the inflation rate is going up. When you think about it, all of these things are just measurements of some variable over a period of time. That’s basically what a trend is in OpenEnterprise. It’s a graphical representation of one or more variables (signals), over a given period of time. Trends can include real-time data, historical data, or both real-time and historical data. You might trend things like the amount of natural gas distributed through a particular pipeline, or the amount of electricity used by a certain device. The choice of what you trend is entirely up to you, and you can trend just about any data from the OE Database. Each signal displayed in a trend has its own dedicated trend pen. When you define the trend pen, you specify various characteristics of how the data from that pen will be displayed, including the color, what sort of symbol will be used to depict a sample of data, etc. The line that the pen draws on the screen for a particular trended signal is called the trace. If you are including multiple signals (pens) in this particular trend, you will want to make sure that the traces differ in appearance; otherwise you won’t be able to tell the OpenEnterprise for Beginners Why do we use the term ‘pen’ when we talk about trends? We say a trend pen because the pen you define draws a representation of the signal values on the screen, just as if you had drawn a chart on a piece of paper. In fact, the concept of pens is actually borrowed from the analog chart recorder market. Chart recorders are mechanical devices in which paper rotates past one or more ink pens, which change their position, based on the value of a particular value. Although chart recorders are still in use, in recent years, electronic devices have replaced many of them. If you’re too young to have seen a chart recorder, you might be have seen seismographs on television or the movies, which measure the force of earthquakes, or polygraphs, which measure blood pressure, perspiration etc in an attempt to detect someone lying. All of these devices operate on the same basic principle, a strip of paper or a round chart moving through a mechanical device, with some pens recording data on it. The main difference is that in OpenEnterprise, the data is trended on your computer’s screen, instead of on a paper chart. 7-1 Chapter 7 - Trending Your Data different traces apart. To tell the different traces in the trend apart, the Trend Viewer will automatically use a different color for each trace. We’ll talk more about this later. Trends are drawn on a grid. The X-axis is a horizontal line with marks evenly spaced along it. Each mark represents some moment of time. The distance between two adjacent marks could represent a minute, an hour, etc. The grid also has a Y-axis, which is a vertical line corresponding to the range of values which will be displayed for the trend, or a particular trace within the trend. A particular trend may show more than one set of X and Y axes. This is recommended if you are showing more than one variable in the same trend, and the variables don’t share the same range of values. Each set of axes would correspond to a particular trace. Y-axis shows the range of values for the variable Grid The X-axis is horizontal. It represents the time range for the trend. The Y-axis is vertical. It represents the range of values of the process variable. The plural of axis is ‘axes’, so we say X and Y axes. Trace for a particular variable X-axis shows the time scale Details pane: shows information on the variable being displayed. 7-2 OpenEnterprise for Beginners Chapter 7 - Trending Your Data Now, let’s look at some examples. Please follow them in order because the later examples build on information introduced in the earlier ones. Before You Begin these Examples: • To perform any of the following examples, you must be logged on at an OpenEnterprise Workstation, which is currently connected to a running OE Database. • You must be familiar with how to use Database Explorer, and the Database Object Viewer. For information on these, see Chapter 4 of this manual. • In addition, you must know the name of the signal(s) you want to trend. • Your OE historical system must have been configured if you want to trend historical data, and it must have been running long enough for some data to have been collected that you can trend. In addition, you must know which historical groups contain the data you want to trend. (See Chapter 6 for information on historical configuration.) OpenEnterprise for Beginners 7-3 Chapter 7 - Trending Your Data Example 1 – Trending a Real-time data value On the OE workstation, start the OE Trend Viewer by clicking as shown, below: Start Æ Programs Æ OpenEnterprise Æ Views Æ Trends Something called the Trend View Container will appear. (It’s called a container because it will hold the trend information.) Start Database Explorer and connect to your running OE Database, then start the Database Object Viewer, and query the data that you’re interested in trending. (If you’re unsure how to use Database Explorer, and the Database Object Viewer, please review the examples in Chapter 4 of this book.) Locate the “Value” attribute for one of the signals you want to display, and drag it from the Database Object Viewer, and drop it into the Trend grid. A real-time trend is automatically configured. Drag the value from the Database Object Viewer, and drop it into the grid of the OE Trend View. 7-4 OpenEnterprise for Beginners Chapter 7 - Trending Your Data You’ve now defined a real-time trend pen. As real-time values are collected for that signal, they will be displayed, and gradually, you will see a graph line appear, starting from the right hand side of the window. If desired, you could drag the value(s) for additional signals in, and each will have its own pen in this trend. We recommend you don't try to have more than 3 or 4 pens on a single trend, though, because too many pens will make it confusing for the user. You can add additional pens to this trend by the same method. We recommend, though, that you don't try to have more than 3 or 4 pens in the same trend, or else the trend will be confusing for the user. OpenEnterprise for Beginners 7-5 Chapter 7 - Trending Your Data Before we go on to another example, Let’s notice a few things about the Trend Viewer: For one thing, you should see that the most recent value for the signal would also be displayed on the line for that pen in the Detail pane. If you have multiple pens in the trend (in this case we don’t) you can match up the information in the Detail pane with the trace by its color. Each Trace has its Own Color… Each pen in the trend has a line of information in the Detail pane. The color shown at the left side of a line in the Detail pane matches the color of the trace for its corresponding variable. Another thing to notice is that prior to when we dragged the value in, the Y-axis was a scale from 0 to 100, representing 0 to 100 percent. 7-6 OpenEnterprise for Beginners Chapter 7 - Trending Your Data Now that we have an actual signal in there, the scale has been redrawn to show the range between the highest and lowest values that have been collected into the Trend window. This is called auto-scaling, because the X-axis is automatically changing based on the actual values coming in the window. In fact, the scale will continue to be redrawn if values go above or below those values received thus far. Actually, the Y-axis actually goes from slightly below the lowest value yet received, to slightly above the highest value yet received. This area above and below the signal value range is called the deadband. Auto scaling can be turned off. Remember that we did the simplest possible trend by just dragging and dropping a signal into the trend. We’ll talk about this more, later. OpenEnterprise for Beginners 7-7 If auto-scaling is ON, the Y-axis changes based on the values coming in… The Y-axis is re-drawn to show only the range of values coming in for the trend pen. This is called auto-scaling. For example, if the values being collected for the variable being trended are currently ranging between 72 and 95, then the Yaxis will show a scale from slightly below 72 to slightly above 95. Chapter 7 - Trending Your Data Another thing you might have noticed about the trend is that as new data comes in, the Detail pane is continually being updated with the latest value received, i.e. the value at the far right of the X-axis. The reason you’re getting the latest value is that the Marker Bar sits at the far right of the X-axis when you first open the trend. The Marker Bar is a vertical bar that chooses from where, along the trace, the data being presented in the Detail pane should originate. Marker Bar can be moved to any point along the trace by double-clicking Use the Marker Bar to find out a Value along the Trace… To find out the value of the signal at any given point along the trace, double click on that point of the trace, or drag the marker bar to the point of interest, and the value at that point will be displayed in the Detail pane. You can move the Marker Bar to any point along the trace by simply doubleclicking on that point in the trace, or just dragging the Marker Bar. The Marker Bar will move to the new location, and the Detail pane will be updated with the value of the trace(s) at that point in time. The timestamp and value shown in the Detail pane are the timestamp and value at the location of the Marker Bar. 7-8 OpenEnterprise for Beginners Chapter 7 - Trending Your Data Another thing you should know about trends is that you can enlarge the view of a part of the Graph pane to see more detail. This is called zooming. You can zoom in at a certain pre-defined percentage by right-clicking in the middle of the Graph pane, and choosing from the percent zoom options shown on the pop-up menu. Alternatively, you can choose the “Custom…” choice to specify your own percentage of zoom. Zooming lets you enlarge parts of the trend… If you aren’t sure what percentage of zooming to use, try the “Zoom In” or “Zoom Out” options. They allow you to incrementally zoom in or out, without specifying a percentage. You can set your These are pre-defined own zoom percentage zoom levels. “Zoom In” and using “Custom...” “Zoom Out” are good if you’re not sure how much you want to zoom. Dragging a box in the Graph pane to enlarge a particular area is is called ‘rubber-band zooming’. There’s also a technique called ‘rubberband zooming’ where you click and drag the area of the Graph pane you want to enlarge. When you release the mouse button, the zoom is activated. OpenEnterprise for Beginners 7-9 Chapter 7 - Trending Your Data Once you’ve set a zoom level, you can always go back to the ‘un-zoomed’ state by right-clicking in the Graph pane, and choosing “Zoom Undo” to undo the last zoom, or “Zoom Undo Full” to undo all of your zooming. Trend configurations can be saved in a TVD file for re-use at a later time. You should save your trend, because we’re going to use it some more in Example 2. Trend configurations can be saved in a file by using the FileÆ Save As command. This is helpful because it lets you pre-configure trends, and recall them at a later time. Trend files have *.TVD file extensions. Once you have configured a trend and saved it in a TVD file, you can: • Re-open that TVD file, at any time, in the Trend Viewer, using the File Æ Open command. • Save it under a different name, and then re-use it as a starting point (or template) when creating other trends. • Embed the trend within an OE Graphics display. (This is beyond the scope of this chapter.) • Load the trend into an OE Desktop file, or tie it to a menu item using the OE Menu Editor. (Details on how to do this are outside the scope of this chapter.) 7-10 OpenEnterprise for Beginners Chapter 7 - Trending Your Data Example 2 – Making Some Basic Modifications to the Trend You Just Made This example assumes you created the trend discussed in Example 1 and that you saved it (or at least didn’t close it without saving), and that it is open for modification. If there’s something about the trend you don’t like, it’s usually pretty easy to change. Double-clicking on the line for a pen in the Detail pane (or rightclicking and choosing “Modify Pen” from the pop-up menu) will call up the Pen Configuration dialog box, which lets you change configuration for that pen, only. (NOTE: Depending upon how your system was configured, you may need to click on the “Configure” item in the menu bar, to go into Configure Mode, if the person who set up the Trend didn’t allow Runtime Configuration.) In Configure Mode, the Configure menu bar item will be replaced with a menu bar item called ‘Runtime’; this is similar to Configure / Runtime modes used in OE Graphics View; when you see ‘Runtime’ you’re in Configure Mode, and when you see ‘Configure’ you’re in Runtime Mode. You should also know that we could have configured the Real-Time trend in Example 1 from Configure Mode, instead of dragging and dropping in Runtime Mode. OpenEnterprise for Beginners 7-11 Chapter 7 - Trending Your Data Specifying what should appear in the Detail Pane for an individual Pen Right-click on the pen you want to modify in the Detail pane, and choose “Modify Pen” from the pop-up menu. In this case, we only have one pen. The Pen Configuration dialog box will appear. The only field filled in at this point is the “Data Source” field. It was filled in automatically in Example 1, when we dragged a value from the Database Object Viewer into the Graph pane of the Trend Viewer. (Actually, we could have dragged the value directly to this field, if we had had the Pen Configuration dialog box open.) TREND22.CDR This is the signal which is being trended by this pen. The entry can either be typed in manually, filled automatically by dragging in from the Database Object Viewer, or chosen by clicking the [...] button to select the signal via the Historical Data Access (HDA) Server. Select this to have the Trend System fill in the “Device”, “Status”, “Name”, “Description” and “Units” fields by extracting them from attributes of the “Data Source” signal which are already defined in the OE Database. The other fields on the ‘Data’ page (“Device”, “Status”, “Name”, “Description” and “Units”) are not important to the operation of the trend itself, but are used to fill the Detail pane with information about this particular pen. You could fill them in yourself, by dragging entries from the Database Object Viewer directly into a field. It’s much easier, though, to check the “AutoPopulate with Signal Data” box, to have the Trend Viewer automatically fill in the fields. The Trend Viewer does this by looking in the OE Database and extracting attributes for the signal named in the “Data Source” field. When you check the “Auto-Populate with Signal Data” box, you will be prompted to confirm that you want to do that, since anything you typed in those fields, yourself will be overwritten. 7-12 OpenEnterprise for Beginners Chapter 7 - Trending Your Data Click on [Yes] and the fields will be filled in with attributes from the OE Database for that signal. TREND24.CDR When this is checked fields are filled in automatically if the data exists in the OE Database for the signal named in “Data Source”. Setting Ranges for a single Pen, and Disabling Auto-Scaling for the Common YAxis Earlier in this chapter, we talked about auto-scaling which is a feature in which the Y-axis of the trend is set dynamically based on values coming in for the signal being trended. TREND30.CDR To change the range for the Y-axis, you can enter the lowest and highest values for the signal in directly, or you can use the Database Object Viewer to drag in signals from the OE Database which will hold the minimum or maximum value. If desired, we can turn auto-scaling off and, instead, have the Y-axis scale set based on a defined range for the signal. This range would typically be the lowest and highest possible values for the signal. To set the range for the Y-axis, click on the ‘Ranges’ tab of the Pen Configuration dialog box, and enter a range using the “Minimum” and “Maximum” fields. Alternatively, you could drag in signals using the Database Object Viewer, the value of which will serve as the values for the fields. Once you click on [OK] to exit the dialog box, you might expect that the scale would appear differently in the Graph pane. That’s not the case, however, because auto-scaling is still active. OpenEnterprise for Beginners 7-13 Chapter 7 - Trending Your Data Some trend configuration settings affect just a single pen, while others apply to all pens in the trend. There are even some things that may be set in two places (once for the entire Trend, and once for an individual pen). Settings that apply to all pens in the trend are called common because they are shared in common. Some trend configuration settings affect just a single pen, while others apply to all pens in the trend. So, if auto-scaling is still active, do we need to change it for the individual pen, or for the entire trend? Good question. Auto-scaling applies to the Y-axis, so it depends on which Y-axis you want to disable auto-scaling. There are even some things that may be set in two places (once for the entire Trend, and once for an individual pen). Settings that apply to all pens in the trend are called common because they are shared in common. At this point, you’re probably saying “Wait! How can there be more than one Y-axis?” That’s a good question. The OE Trend control allows you to optionally have both a common Y-axis, which is shared by every pen in the trend, and also to optionally display an individual Y-axis for each pen in the trend. This may sound confusing to you, but, if you have multiple pens in your trend, and each signal has a different range you really might want to display a separate Y-axis for each one, so you can see the actual range for each signal. • Settings that apply only to the current pen are set in the Pen Configuration dialog box. • Settings that apply to all pens in the trend, i.e. common settings, are set in the OE Trend Client Control Properties dialog box. • If a particular setting appears in both of these places, the pen setting typically overrides the common setting for that pen. Now, we only have one pen in this particular trend, and while we could have set it so that it had an individual Y-axis displayed for the pen, in addition to the common Y-axis, we didn’t do that. So we just need to turn off auto-scaling for the common Y-axis. Any changes to common settings for the trend are done in the OE Trend Client Control dialog box. To bring up the OE Trend Control Client dialog box you need to switch to Configure Mode, by clicking on the “Configure” item in the menu bar. 7-14 OpenEnterprise for Beginners Chapter 7 - Trending Your Data You must then call up the OE Trend Client Control Properties dialog box by right-clicking in the Graph pane, and choosing “Properties” from the pop-up menu. In Configure Mode, right-click in the middle of the Graph pane, and choose “Properties” from the pop-up menu. Click on the ‘Graph’ tab The ‘General’ page of the OE Trend Client Control Properties dialog box will appear. Click on the ‘Graph’ tab. OpenEnterprise for Beginners 7-15 Chapter 7 - Trending Your Data Click on the [Axis...] button. From the ‘Graph’ page of the OE Trend Client Control Properties dialog box, the [Axis…] button. In the Axis Configuration dialog box, de-select the “Autoscale” box. Since you’re here, we also recommend that unless you have a specific need for it, you de-select the “Independent Scaling” option as well, since it can be confusing to the user, if they don’t know what it’s used for. Then click on [OK] and click on [OK] again to exit the OE Trend Client Control Properties dialog box. De-select the “Autoscale” option. De-select the “Independent Scaling” option. Then, click on [OK]. Now, if you return to Runtime Mode (by clicking on “Runtime” in the menu bar) auto-scaling will be disabled for the Common Y-axis. 7-16 What is “Independent Scaling” and why shouldn’t I use it unless I know what I’m doing? If “Independent Scaling” is selected, each pen trace is automatically stretched (or crunched) so that its highest value appears just under the top value for the common axis, and its lowest value appears just above the bottom value for the common axis. When this is done, the common axis is misleading (you can’t figure out a value based on the Common Axis in this case) and the Graph pane is useful only to show the relative relationship of multiple pens. You'd also need to activate individual axes for each pen to see actual values. "Independent Scaling” is useful if you want to display two or more pens with very different magnitudes of values on the same trend. For example, it allows a flow signal with a range of 0 to 10,000 GPM and a pressure signal with a range of 0 to 10 PSI to be put on the same trend, and you can see meaningful values for both. OpenEnterprise for Beginners Chapter 7 - Trending Your Data Changing the Appearance of the Trace for a Particular Pen If desired, you can choose a different color for a pen’s trace, a different line style or thickness, etc. To do this, you need to go to the ‘Styles’ page of the Pen Configuration dialog box. If you’re already in the OE Trend Client Control Properties dialog box, you can call up the Pen Configuration dialog box by going to the ‘Pens’ page, selecting the pen you want to set alarm limits for, and clicking on the [Modify] button. Otherwise, call up the Pen Configuration dialog box by the method we discussed on page 7-11. Select the pen you want to change, then click on the [Modify] button. Click on the [Styles...] button When the Pen Configuration dialog box is opened, click on the ‘Styles’ tab and the ‘Styles’ page will be displayed. Next, click on the [Styles…] button. OpenEnterprise for Beginners 7-17 Chapter 7 - Trending Your Data “Visible” should remain checked. If you de-select this, the pen will be hidden (not visible in the Graph pane). Usually, you’ll want to leave the “Plot Style” at ‘Line’. You can set the “Width” to be from 1 to 6 points in size. Anything other than 1 requires a solid line style. “Style” lets you change the pen trace from a solid line to a dashed line. Other choices are also available. Click here to call up a color palette for changing the color of this pen’s trace. If desired, each data point along the trace can appear as some symbol. There are several symbols to choose from. We suggest you experiment with the various options in the Styles dialog box and see how your choices look in “Runtime” mode. For example, the figure, below, shows a trace where a 'diamond' was chosen as the "Marker Style". 7-18 Note: If the "Width" is greater than 1, the "Styles" choice is automatically set to 'Solid' and can't be changed. OpenEnterprise for Beginners Chapter 7 - Trending Your Data Modifying the Color of a Trace if its Value goes past a pre-defined limit If the value of the signal being trended passes a pre-defined limit, it is sometimes useful to have that portion of the trace drawn in a different color, to draw attention to the situation. The predefined limit could be an alarm limit defined for the signal in the RTU, but it doesn't have to be. It could be some other arbitrary limit that has been defined. To configure this, go to the ‘Limits’ page of the Pen Configuration dialog box. On the ‘Limits’ page of the Pen Configuration dialog box, you can specify up to six different limits and corresponding trace colors, for a pen. (Again, these could correspond to actual alarm limits defined in the RTU, or they could be other limits you define.) Then,click on the [Modify] button. First, select the limit you want to define. To specify a limit, click on the type of limit you want to define (“Hi” for example), then click on the [Modify] button. The Limit Configuration dialog box will appear. You can type in a limit directly, drag a value from a signal in from the OE Database using the Database Object Viewer, or click on the […] to specify a historical value using the HDA Server Tag Browser. Now, click on the [Line Styles…] button to choose the color for the pen when its value exceeds this limit. In the Line Styles dialog box, click on the “Color” box to bring up a palette, and select the color you want the trace to be drawn in, when this particular limit is exceeded. You can also, for example, have the trace drawn in a different style (thicker point size, different style) while exceeding the limit, by modifying the “Width” and “Plot Style” settings. Click on [OK] repeatedly until you have exited all the way out of the dialog boxes. Go to “Runtime” mode, and when the trace exceeds that limit, it should appear in the selected color and style. OpenEnterprise for Beginners 7-19 You can enter in a value directly, drag one in from a signal in the OE Database using the Database Object Viewer, or you can click on [...] to access the HDA Server Tag Browser and bring in a historical value for the limit. Click here to call up a color palette from which you can select the color you want the trace to be when this limit is exceeded. You can have other aspects of the trace appearance change when the limit is exceeded, such as the point size of the trace width or the style. Chapter 7 - Trending Your Data Do I have to set all these styles and parameters for every single pen in my trend? No. Remember, we could just drag in the value, like we did in Example 1. These are just ways you can change the appearance of the trend pen. If you find setting these styles to be tedious, and you want all the pens in the trend to have the same characteristics (except for the color, of course), you can configure the 'Default Pen'. (See below) Using the Default Pen to Set Characteristics for Pens You may have noticed the 'Default Pen' in the Pen dialog boxes earlier in this example. The default pen is special. It can't actually trend data; it's just a mechanism where you can set default characteristics for any new pens you add to this Trend. Just go into the 'Pens' page, select the 'Default Pen' (just like any other pen), and set your defaults. Then, when you add any more pens to this trend, they will be based on the characteristics you defined for the default pen. The default pen doesn't trend any data. It's an optional feature that lets you set default characteristics (styles, for example) for all subsequent pens used in this trend. To set default characteristics for all subsequent pens in a trend, select the <Default> pen and then choose [Modify] to set the characteristics. 7-20 OpenEnterprise for Beginners Chapter 7 - Trending Your Data Setting Pens to Trend Historical Data by Default If desired, you can specify that all new pens should trend historical data by default. This would allow you to drag a historical pen into the graph pane, just like the real-time pens we discussed earlier. To have pens display historical data, by default, check this. To do this, select the default pen, and click on the [Modify] button. In the Pen Configuration dialog box, check the "Convert Realtime Data Sources to Historical" box, and click on [OK]. From now on, when you drag a value into the graph pane from the Database Object Viewer, you will be prompted to confirm whether you want it to display as historical data. Click on [Yes] if you want to trend historical data. Click on [Yes] if you want to trend historical data. In order for the pen to display the historical data, you need to identify for it, which dataset should be chosen (for example, 1-minute, hourly, daily, etc.) This is chosen via the "Sample Rate" list box. You also need to choose the one type of data to be trended by this pen, for example, the average, minimum, maximum, etc. From the “Sample Rate” list box, select the dataset containing the data you are interested in. Then, from the various types of data logged in that dataset, choose the one type of data you want to trend. OpenEnterprise for Beginners 7-21 Chapter 7 - Trending Your Data Example 3 – Trending a Historical Data Value On the OE workstation, start the OE Trend Viewer by clicking as shown, below: Start Æ Programs Æ OpenEnterprise Æ Views Æ Trends The Trend View Container will appear. Go into Configure Mode by clicking on the ‘Configure’ menu bar item. Click on Configure NOTE: We're repeating a few things here, since we know some of you skipped over Example 1 and 2. You really should read those, because they'll be useful to you later. 7-22 OpenEnterprise for Beginners Chapter 7 - Trending Your Data • Right-click in the center of the container, and click on “Properties” when it pops up. Right-click in the middle of the grid, and choose “Properties” from the pop-up menu. The OE Trend Client Control Properties dialog box will appear. Click on the ‘Pens’ tab to go to the ‘Pens’ page, then click on the [Add…] button. Click on [Add...] to add a new trend pen. OpenEnterprise for Beginners 7-23 Chapter 7 - Trending Your Data The Pen Configuration dialog box will appear. If you check the “Auto Populate with Signal Data” box, the Trend Viewer will attempt to fill in the “Device”, “Status”, “Name”, “Description”, and “Units” fields with corresponding entries from the OE Database, based on the “Data Source”. (These fields are not essential for the trend to work, they are simply used to provide useful information in the Detail pane during Runtime. You will also be prompted to confirm that you want to use this feature, as it overwrites anything you typed in directly into those fields.) The “Data Source” field is the most important field. In Example 1, when we dragged the real-time value (OPC tag) from the Database Object Viewer into the trend grid, we were essentially filling in this field dynamically. We could have actually dragged that value right into the “Data Source” field. The “Data Source” for a pen can either be a real-time OPC tag value (dragged in from the Database Object Viewer), or a historical tag from the Historical Data Access (HDA) Tag Browser. Since for this example, we want to trend historical data, we need to access the Historical Data Access (HDA) Tag Browser. To do this, click on the [...] button next to the “Data Source” field. For this example, however, we want to trend historical values. To do this we need to activate the Historical Data Access (HDA) Tag Browser. To do this, click on the […] button next to the “Data Source” field. Expand the tree Use the scroll bar to locate the signal you want to trend. 7-24 OpenEnterprise for Beginners Chapter 7 - Trending Your Data Here’s the signal we want to trend. Once you’re in the Tag Browser, use the scroll bar to locate the signal you want to trend. Double-click on the signal to expand its branch of the tree. This is its Historical Group Number Locate the rate for the data you want to trend, and double-click on it. Double-click on the rate which identifies the data you want to trend. In this case, we choose samples ‘0s’. In this case, we chose ‘0s’ which is the raw sample data, but we could have chosen ‘3600s’ for hourly data, or ‘86400s’ for daily data. Once you choose the rate you want to trend, by double-clicking on it, the right-side of the Tag Browser will display the attributes which have been logged at that rate. In this case that’s just the ‘Value’ and ‘Questionable’ attributes. We will want to trend the ‘Value’ attribute, since that’s what has the actual signal value, so select the ‘Value’ attribute. Now, click on the ‘Exit Tag Browser’ button. Exit Tag Browser button The Tag Browser will close, and the selected attribute will be copied automatically into the “Data Source” field of the Pen Configuration dialog box. Click on [OK] to exit the Pen Configuration dialog box, then click on “Runtime” to view your trend. Historical sample data will begin to appear on the screen. OpenEnterprise for Beginners 7-25 Chapter 7 - Trending Your Data Variations on Example #3 - Changing the Time Range for Displayed Data In all of the examples we've done so far, we've been starting the trend from the current workstation time. We did that for the Real-time trends, and we did that when we were looking at historical samples. Usually, we were only showing about an hour of data on the screen. Let's say though, that you've saved a week's worth of historical data, and instead of seeing the historical samples for the last hour, you want to see the historical samples from 4 days ago. How do you do that? You would have to adjust the starting time of the trend, and check that the period and viewable time range are correct. 7-26 OpenEnterprise for Beginners Chapter 7 - Trending Your Data There are three things that determine the time range of the data you can see on the Trend: The period specifies the total length of time encompassed by the trend. For example, if you want to trend the last 7 days of data, then your period is 7 days. NOTE: You could have different periods defined for different pens in the trend. The viewable time range determines how much of the period can be displayed on the screen in the trend, at any one time. For example, you might want to show 1 day worth of data on the screen at any one time. If the viewable time range is less than the specified period that means that the entire trend can't be displayed all at once, so a scroll bar will be added at the bottom of the trend so you can scroll to the data you want to see. The start time specifies the earliest time for which data will be displayed. The system takes the start time and searches the OE Database for the data closest to that start time and then retrieves it into the trend. By default, the start time is calculated by taking the current workstation time, and subtracting the amount of time represented by the period. Alternatively, you can override this default and specify the start time yourself. To specify the period for the Common X-axis (total length of time encompassed by this trend): • Call up the OE Trend Control Properties dialog box, and go to the X-Axis portion of the 'Ranges’ page. • Specify the total period (length) of time you want to be reflected in this trend, using any combination of the “Period days”, “hours”, “minutes” and “seconds” fields. For example, if you want to trend 8 and one half-hours worth of data, enter 8 in the “hours” field and 30 in the “minutes” field. The period comes into effect when you have exited the dialog box and entered Runtime Mode. OpenEnterprise for Beginners 7-27 Specify the period for the common X-axis here. Chapter 7 - Trending Your Data To specify the period for an individual pen (total length of time for this pen): • Call up the Pen Configuration dialog box, for When specifying the period for a pen, the selected pen, and go to the X-Axis it must be relative to the current workstation portion of the ‘Ranges’ page. time. • Select the “Override Global Time Settings” box, and the "Use time period relative to Current Workstation time" box. • Specify the total period (length) of time you want to be reflected in this trend, using any combination of the “Period days”, “hours”, “minutes” and “seconds” fields. For example, if you want to trend three days and eight hours worth of data, enter 8 in the “hours” field and 3 in the “days” field. Don't try to trend too much data… Before we go on, there is one warning we want to pass along when setting the period for a trend. Don't try to trend too much data in one trend. As a general guide, you should never try to display more trend data points than there are pixels across your screen. For example, if your screen resolution is 1024 x 768, that means no more than 1024 data points can possibly appear horizontally on the screen. For example, if you are trying to see 1-minute data for the last 90 days, that's 1440 data points x 90 days which equals 129,600 samples. That’s a lot of data to try to fit onto one screen, and can really slow down your system performance, and use up lots of communication bandwidth as all the data is requested. If you really want to display that much data you have two alternatives. 1) Use Performance Mode, which was added in OpenEnterprise 2.7. In Performance Mode, the trend will change the resolution of data requested from the server as you zoom in and out. This will speed up the rate at which the trend is drawn, and reduce the network bandwidth required to request the data. See Example 6 for details on using Performance Mode. 2) Set the viewable time range to a few hours and then use the double-arrow buttons on the ends of the scroll bar to bring additional hours of data into view. You won’t be able to see all the data at once, but this will save on system resources, by not requesting the data until it needs to be displayed. 7-28 OpenEnterprise for Beginners Chapter 7 - Trending Your Data To specify the Viewable Time Range (amount of period visible on screen at any one time): • Call up the OE Trend Control Properties dialog box, and go to the ‘Data’ page. • Specify the total range of time you want to be visible (viewable) on the screen, at any one time, using any combination of the “Range days”, “hours”, “minutes” and “seconds” fields. For example, if you want two hours of data to be visible at any one time, enter 2 in the “hours” field. If the trend's period (see above) encompasses more than 2 hours, the scroll bar must be used to bring additional data into view. Typically, users set the range to be the same as the period. To specify the Start Time: Go to the 'Ranges' page of the Pen Configuration dialog box. If the you want the start time to be calculated based on the current workstation time: (i.e. the period is subtracted from the current workstation time to calculate the start time) • Type in the hours and minutes for the start time directly, or use the control to select the time. Type in the date directly, or use the control to bring up the calendar, then select the date from the calendar. Check "User Current Workstation Time" (for the common X-axis) -or- • Check "Use time period relative to Current Workstation time" (for the individual pen's X-axis) If you want to specify a different start time, further in the past than that calculated above: • Leave the "Use time period relative to Current Workstation time" box de-selected, and select the "Override Global Time Settings" box. • Once you have defined the period of time, choose the starting time for the trend in the “Start” field. You can type in the hours and minutes directly or use the control to select them. If you are specifying a different date, you can type it in directly or click on the control to bring up a calendar for you to choose the correct date. OpenEnterprise for Beginners 7-29 Chapter 7 - Trending Your Data Example 4 – Having a Trace Change Color when data is questionable This example assumes you are pretty familiar with modifying pens (see Example 2) and using the HDA Tag Browser (see Example 3). If data being collected is marked questionable (i.e. there is doubt about it being good data) you may want the trace for that data to indicate the questionable status somehow. Let's say we want to have a trace appear in yellow if its value is questionable. To do that, we need to use the Expression Editor. Click on the [Styles...] button First, select the desired pen, and call up the Pen Configuration dialog box. Then, from the 'Styles' page of the Pen Configuration dialog box, click on the [Styles…] button. Click on the “Expression” button then click on the [...] button. In the ‘Styles’ page, select the "Expression" button, then click on the […] button to call up the Expression Editor. 7-30 OpenEnterprise for Beginners Chapter 7 - Trending Your Data Because we want to have the trace change based on the questionable value of this signal, we need to use the HDA Tag Browser to load the proper OE Database attribute into the “Tag” field. Now, in the Expression Editor, we need to specify the OE Database attribute for the 'Questionable' status of this signal. To do this, click on the […] button to call up the HDA Tag Browser. Here’s the signal we want to trend. Once you’re in the Tag Browser, navigate through the tree and use the scroll bar to locate the signal you want to trend. Doubleclick on the signal to expand its branch of the tree. This is its Historical Group Number Locate the rate for the data you want to trend, and double-click on it. Double-click on the rate which identifies the data you want to trend. In this case, we choose samples ‘0s’. Once you choose the rate you want to trend, by double-clicking on it, the right-side of the Tag Browser will display the attributes which have been logged at that rate. We will want to trend use the 'Questionable' attribute in our expression, so select that one. (NOTE: If we had other attributes, we could have used them too, but this example is using 'Questionable' because that's when we want to have the trace turn yellow. It should be apparent that this is a pretty powerful feature.) OpenEnterprise for Beginners 7-31 Chapter 7 - Trending Your Data Now, click on the ‘Exit Tag Browser’ button. Exit Tag Browser button The questionable attribute is now in the “Tag” field. The Tag Browser will close, and the selected attribute (in this case 'Questionable') will be copied automatically into the “Tag” field Expression Editor. of the Now, click on the [Add] button to add the conditions of your expression. Now, click on the [Add] button and the Edit Condition dialog box will appear. We want to have the trace turn yellow when the 'Questionable' attribute for this signal is TRUE. In the OE Database, logical / Boolean values which are true are stored as 1.0. So, in this case, we need to create an expression which says "When the Questionable' attribute is greater than or equal to 1.0, make the trace yellow". Yellow is the "Return value" when that condition is TRUE. We want to have the trace change color when that ‘Questionable’ attribute is true (i.e. when it is greater than or equal to 1.0). Choose ‘greater than or equal to’ for the “Operator”. Choose ‘1.0’ for the “Comparison value”. Call up the color palette and select yellow for the “Return value” since that’s what we want the trace to be when ‘Questionable’ is TRUE’ i.e. when ‘Questionable’ is >=1. When you've finished with the Edit Condition dialog box, click, on [OK]. 7-32 OpenEnterprise for Beginners Chapter 7 - Trending Your Data Your expression is now complete. Now, whenever that expression is TRUE, the trace color will change to yellow. Otherwise it will be the color specified by "Default Return Value". After specifying the condition, you can click on [OK] to exit the Expression Editor. Then continue to click on [OK] until you exit all the dialog boxes, and are ready to go into Runtime Mode. Click on [OK] to exit the Expression Editor. If the value of the signal is Questionable, you will see the trace change color. Trace changes color now, if the ‘Questionable’ attribute for this signal is TRUE. OpenEnterprise for Beginners 7-33 Chapter 7 - Trending Your Data Example 5 - Working with Multiple Pens in the Same Trend We mentioned, before, that you could have multiple pens in the same trend. Let's go over, briefly, a few things you should be aware of when working with multiple pens. Click on the [Add] button to add an additional pen. Adding Pens To add a second, third, fourth, etc. pen to an existing trend, simply click on the [Add…] button on the 'Pens' page of the OE Trend Client Control Properties dialog box, and then proceed to define the pen, as you would any other pen. Distinguishing One Pen From Another Each pen (trace) is displayed in a different color. To tell which pen is which, find the corresponding color in the Detail pane. Also, remember that the signal value(s) displayed in the Detail pane reflects the value at the current location of the Marker bar. (See page 7-8.) Color at beginning of line in Detail pane matches color of its associated pen trace Detail pane 7-34 OpenEnterprise for Beginners Chapter 7 - Trending Your Data Showing Multiple Axes when Working with Multiple Pens When you have multiple pens on the same trend, you have to decide what sort of scale(s) you need on the X and Y-axes. If, for example, you are trending three real-time values in the same trend, but they all have widely different ranges of values, it might make sense to hide the Common Y-axis and instead, show three separate Y-axes, one for each pen in the trend. Similarly, if you are comparing two signals that are coming from different time periods, you might want different X-axes for each signal trace. Showing / Hiding the Common Y-axis (or Common X-axis) • • To show or hide the Common Y-axis or Common X-axis, call up the OE Trend Control Properties dialog box, and go to the ‘Graph’ page. Click on the [Grid] button to call up the Grid Configuration dialog box. In the 'Grid Settings' section, check the "X-axis Visible" and/or "Y-axis Visible" box to show the common axis, or de-select it to hide the common axis. Click on [OK] when finished. Click on the [Grid] button To show the axis for a pen, check the box. To hide the axis for a pen, uncheck the box. This calls up a color palette to let you change the color of the axis. While you're in this dialog box, we should also note that you can click on the "Color" box to change the color of the common axes. OpenEnterprise for Beginners 7-35 Chapter 7 - Trending Your Data To show a separate Axis for Each Pen To display a separate axis for a pen, you first have to enable multiple axes. To do this: • Call up the OE Trend Control Properties dialog box, and go to the ‘Graph’ page. • Check the “Show Multiple X-Axis” and “Show Multiple Y-Axis” boxes. If you’re going to have multiple X and Y axes on your trend, these boxes must be checked, first. Click on the pen you want to modify, then click on the [Modify...] button. • Now, click on the 'Pens' tab, and select the pen for which you want to enable the axis, and choose [Modify] to call up the Pen Configuration dialog box. Click on the [Axis...] button. • In the Pen Configuration dialog box, click on the 'Styles' tab, then click on the [Axis…] button. 7-36 OpenEnterprise for Beginners Chapter 7 - Trending Your Data • • The Axis Configuration dialog box will appear. Click on its 'Styles' tab. To have a separate axis displayed for this pen, check the “Visible” box for that axis. In the 'Styles' page of the Axis Configuration dialog box check the "Visible" box for the X-axis and/or Y-axis if you want either or both of them displayed for this pen. Click on [OK] when finished. Repeat this procedure for each pen for which you want to display an axis. Later, in Runtime Mode, separate axes will appear for each pen. Here, we are using auto-scaling, but each pen has a significantly different range of values. In order to help the user interpret the traces correctly, we have included separate Y-axes, one for each pen in the trend. Y-axis for first pen OpenEnterprise for Beginners Y-axis for third pen Y-axis for second pen 7-37 Chapter 7 - Trending Your Data Example 6 – Optimizing your Trend for data or speed We mentioned back in Example 3 that you shouldn’t try to display more data that can actually fit on the screen. For example, if you have a screen that is 1024 pixels wide (i.e. 1024 x 768) the absolute maximum number of data samples you could display would be 1024. In practical terms, the number of samples would be much less than that because you also would need space to show the axes, labels, etc., but for purposes of this discussion, let’s assume you could actually use all 1024. Optimization for Data – Data Mode The default optimization mode for the Trend Viewer is Data Mode. Here’s how it works: Let’s say you had 90 days worth of 1-minute data, and you wanted to try to display all of that on the screen at one time. That would be 24 x 60 x 90 samples of data, or 129,600 samples. That’s a lot of data to try to display within a width of 1024 pixels. If that’s what you request, though, OpenEnterprise will try to accommodate you. OE will collect all 129,600 samples, which may take some time, depending upon the speed of your network, and then, because it only has 1024 pixels in which to display them, it will take the 129,600 samples and divide them by 1024, which gives a value of about 127. That means each pixel on the screen will represent 1 random sample out of every 127 collected. That also means that you collected and processed 128,576 samples that can’t be used because there’s no where to display them. It used up processing time, it slowed down the speed at which the trend could be displayed, and it also used up a lot of communications bandwidth. That’s kind of wasteful, and it also doesn’t really do you any good, since only a fraction of the data (1 out of every 127 samples) gets used. The advantage to Data Mode is that you have all the data. If you wanted to export it to Excel or some other application it’s all there. By default, trends are optimized for data (Data Mode). The disadvantage of Data Mode is that some trends may be slow in coming up. Also, lots of data gets collected that you won’t ever be able to see, unless you zoom in sufficiently. 7-38 OpenEnterprise for Beginners Chapter 7 - Trending Your Data Optimization for Speed and Efficiency – Performance Mode To choose ‘Performance Mode’ click here, then click on the [Advanced] button to configure the associated settings. As an alternative to Data Mode, you can opt to use Performance Mode. Performance Mode limits the amount of data collected for the trend to only what can actually be displayed. Trends optimized for Performance Mode can be displayed on the screen much faster because they don’t have to collect as much data, and consequently, they don’t use as much communication bandwidth. You have two options to choose from in Performance Mode. This number represents the width of the current trend in pixels. If you choose the “Pixels Per Sample” option, with a number greater than 1, this means an individual sample will be spread out over multiple pixels. If you choose the “Samples Per Pixel” option, this is the number of samples that will be displayed at that pixel width location. This is the maximum number of pixels that can be displayed on the screen at any one time, based on these settings and the number of pixels of the X-axis. If you choose “Pixels Per Sample” you are specifying the width of each sample. For example, if the X-axis width is 900 pixels, and you choose ‘1’ pixels per sample, then you can have up to 900 samples displayed on the screen at any one time. If however, you chose ‘3’ pixels per sample, then each sample would be 3 pixels wide, and you could only display a maximum of 300 samples on the screen at any one time. Using “Pixels per Sample” results in the lowest resolution type of trend, i.e. it displays the least amount of data, and so will be the fastest to be displayed. OpenEnterprise for Beginners 7-39 Chapter 7 - Trending Your Data If you choose “Samples Per Pixel” you are specifying the number of samples to be represented at each pixel position. For example, if the X-axis is 700 pixels, and you choose ‘1’ sample per pixel, the trend will collect 700 samples, and display each one at a particular pixel position on the X-axis. If you choose a number greater than 1, say ‘5’ samples per pixel, the trend will try to display 5 samples at each pixel position along the 700 pixels of the X-axis, that’s 3500 samples. You might ask, how can it display 5 samples at one pixel position? Well, the first of the 5 samples is plotted, and then the remaining 4 samples will be shown at their appropriate Y-axis positions, though with the same X-axis position. In other words, there will be a vertical line of pixels at each pixel position, and the points along that line represent the 5 samples. This should give you a good start… Well, that should be enough trend examples to get you started. Don't be afraid to experiment with different trend and plot styles - be creative, if you want to. Once you get good at creating trends, someone is going to come along and say something like “Gee… that’s a nice trend, but can you change the color of the marker bar?" or “Can you change the way the label looks for that axis?" There are a lot of things like that that you can change. We really can’t give detailed examples for all of them, because it’s just beyond the scope of a book like this. If you need to know more, please consult the online help, or see the ‘OE Trend View’ section of the OE Reference Guide (document# D5092). 7-40 OpenEnterprise for Beginners Chapter 8 - Using Alarm Viewer to Manage Alarms Chapter 8 – Using Alarm Viewer to Manage Alarms We talked about alarms a little back in Chapter 1. An alarm is a message that gets generated when a particular signal’s value exceeds a predefined range (i.e. it goes too high or too low), or when a particular signal changes to an alarm state (i.e. a pump fails, a valve opens, etc.) Alarms are collected and sent to the OE Server computer, but in order for you to see them on the OE Workstation, you need to use the OE Alarm Viewer (sometimes referred to as the Alarm Client). An alarm means something just happened and needs attention. For example, the controller detected that a pump failed, or a pressure signal is too high…. When using Bristol hardware, we recommend that alarms be generated at the controller (RTU). If you are using third-party devices that don't support remote alarm generation, or if you need to define other special types of alarms, the OpenEnterprise Database can generate local alarms. Local alarm configuration is handled via the Alarm Condition Tool item in the OE Toolbox. We won't cover local alarm configuration in this manual, however, it is covered in the Alarm Condition Tool section of the OpenEnterprise Reference Guide. It might be useful, at this point, to go over the different types of alarms: What are the different types of alarms? There are three basic types of alarms: Analog Alarms These alarms are generated when an analog signal or variable’s value exceeds a pre-defined alarm limit. A return-to-normal message is generated when the signal or variable’s value returns to within the pre-defined limit. There are four different alarm limits that can be configured in Bristol controllers: low-low, low, high, and high-high. OpenEnterprise for Beginners 8-1 Analog alarms are used for variables that measure things like: • • • • flows temperatures pressures equipment run times. Chapter 8 - Using Alarm Viewer to Manage Alarms Deadbands can be established around the analog alarm limits so that the value can fluctuate slightly near the alarm limit without constantly going into and out of an alarm state, and thereby flooding the system with repetitive alarms. Example - alarm limits and deadbands Let’s say we have a tank full of water which must be maintained at a certain temperature range. A temperature transmitter is mounted on the tank to measure the current temperature of the water, and it has been decided that the water temperature should be kept between 40.00 C and 70.00 Celsius. Any temperature reading outside of that range indicates an alarm condition. The figure, below, shows a plot of the value of the variable measuring Celsius temperature in the tank, as it fluctuates over time. Four alarm limits and two deadbands have been defined. What are deadbands? We strongly recommend that you define deadbands around your alarm limits. Two deadbands are supported, one is applied to the high and high-high alarm limits, and one is applied to the low and low-low alarm limits. Deadbands are ranges above a low limit, or below a high limit, in which a return-to-normal message will NOT be sent, even though a process variable has returned inside the range defined by the alarm limits. This is to prevent the system from being flooded with alarm messages if a process variable is fluctuating slightly around the alarm limit. Without a deadband defined, every time the process variable enters or leaves the normal range, a return-to-normal or alarm message would be generated, thereby flooding the system with repetitive alarms, even though the process variable has changed very little. Deadbands are especially important on systems using radios or satellite links, because repetitive alarms would consume communications bandwidth. Starting from the left of the graph, the value of the variable increases until it reaches 70.00 C, the high alarm limit (see Item 1). At this point a high alarm message is generated, and the variable is considered to be in a ‘high alarm’ state. The value of the variable continues to increase. When it passes the highhigh alarm limit of 90.00 C a ‘high-high’ alarm message is generated (see Item 2). At this point, the variable is considered to be in a high-high alarm state. The value of the variable then starts to decrease. Although the value passes below 90.00C, it is still 8-2 OpenEnterprise for Beginners Chapter 8 - Using Alarm Viewer to Manage Alarms considered to be in a ‘high-high’ alarm state because there is a 10.00 high deadband in effect (deadbands are shown as shaded areas on the graph.) When the variable value falls lower than 80.00 C point (90.00 C high alarm limit minus the high deadband of 10.00 C) the variable is no longer in a ‘high-high’ alarm state (See Item 3). It is still however in a ‘high’ alarm state. As the value of the variable decreases below 70.00 C, it remains in a ‘high’ alarm state until its value falls below 60.00 C (70.00 C alarm limit, minus a 10.00 C high deadband). (See Item 4). At this point, the variable is in its normal range, and a ‘return-to-normal’ alarm message is sent. Then, however, the value of the variable continues to drop. When it reaches 40.00 C, a ‘Low Alarm’ message is generated (See Item 5). The variable remains in a ‘Low Alarm’ state until the variable value drops to 20.00 C. (See Item 6). This causes a ‘Low Low Alarm’ message to be generated. The variable remains in a ‘Low-Low Alarm’ state until the variable rises above 30.00 C, (20.00 C low-low alarm limit plus low deadband of 10.00 C). (See Item 7). The variable is still in a ‘Low Alarm’ state, however. Once the variable rises above 50.00 C (40.00 C low alarm limit + low deadband of 10.00 C), it has left the low-alarm state, and a ‘return to normal’ alarm message is sent (See Item 8). As long as the variable remains in the normal range (between 40.0 and 70.00 C), no more alarm messages will be generated. Logical Alarms Logical alarms are a much easier concept to understand because there are no limits or deadbands involved. These alarms are only generated when a Boolean variable or logical signal enters its 'in-alarm' state. A return-to-normal message is generated when the variable returns to its opposite (non-alarm) state. Logical alarms are used for variables that report things like… • • The user chooses which state is the 'in alarm' state when they configure the alarm. Either the alarm is generated when the signal or variable becomes TRUE, or the alarm is generated when the alarm becomes FALSE. • valves OPENING or CLOSING pumps STARTING or STOPPING switches, relays, or electrical contacts A typical example for a logical alarm would be an electrical switch which turns ON in the event of a compressor power failure. When the switch turns ON, we want to generate an alarm. When the power is restored, the switch turns OFF and a return-to-normal message will be generated. OpenEnterprise for Beginners 8-3 Chapter 8 - Using Alarm Viewer to Manage Alarms Change of State Alarms Change of state alarms are similar to logical alarms in that they are used with logical signals or Boolean variables. The difference is, that they only enter an alarm state when they change. A change of state from either ON-to-OFF (TRUEto-FALSE) or OFF-to-ON (FALSE-to-TRUE) causes an alarm to be generated. You might want to use a change-of-state alarm if you had a critical process, and you always wanted to know when the process started and when it stopped. An everyday, realworld example of a change-of-state alarm is the bell you hear when you open and close the door at the entrance of a store or shop. The storekeeper has that bell so that they know whenever the door is opened or closed. Change-of-state alarms… • are generated whenever the logical state of the variable changes. • return to normal only occurs when the alarm has been acknowledged by the operator. Because there is no ‘normal’ state for these alarms, a return-to-normal message is only generated when the alarm has been acknowledged by the operator. Where can I get more information on configuring alarms? For Network 3000 users, a general discussion of alarm concepts is included in An Introduction to ACCOL (document# D4056). Information on configuring those alarms in ACCOL Workbench is included in the ACCOL Workbench User Manual (document# D4051). For ControlWave users, see the ControlWave Designer Programmer’s Handbook (document# D5125). Also see the ControlWave Designer online help for the individual alarm function blocks. You should also review the alarm configuration information in the OpenEnterprise Reference Guide. Of particular interest is the Alarm Condition Tool section, which describes how to configure local alarms. 8-4 OpenEnterprise for Beginners Chapter 8 - Using Alarm Viewer to Manage Alarms Example 1 - Starting the Alarm Viewer and Viewing All Incoming Alarms On the OE workstation, start the OE Alarm Viewer by clicking as shown, below: Start Æ Programs Æ OpenEnterprise Æ Views Æ Alarms Something called the OE Alarm View Container will appear. It’s called a container because it doesn’t include the alarm view information in it yet. • The first thing you need to do is go into Configure Mode by clicking on the ‘Configure’ button. NOTE: The Configure menu bar item will be replaced with a menu bar item called ‘Runtime’; this is similar to Configure / Runtime modes used in OE Graphics; when you see ‘Runtime’ you’re in Configure Mode, and when you see ‘Configure’ you’re in Runtime Mode. • Right-click in the center of the container, and click on “Properties” when it pops up. OpenEnterprise for Beginners This menu bar item allows you to toggle between ‘Configure’ mode and ‘Runtime’ mode. Currently, ‘Configure’ mode is Active. Right-click within the window, to bring up the pop-up menu, and click on “Properties” to activate the OE Alarm Client Control Properties dialog box. 8-5 Chapter 8 - Using Alarm Viewer to Manage Alarms • The OE Alarm Client Control Properties dialog box will appear. • Click on the ‘Databases’ page, and then click on the [Add] button. • The Add Data Service dialog box will appear. • Enter the Data Service for this OE Database, and click on [OK]. From the ‘Databases’ tab, click on [Add...] What’s a data service again? We haven’t really talked about this since Chapter 4, so it’s fair to have a refresher. The default data service for the OE Database is: ‘servername:rtrdb1’ where: servername: is replaced with the name of the computer on which the OE Database resides, or the IP address of that computer, or a name defined in your Windows™ Hosts file which resolves to that IP address. (the servername: portion is omitted if you are running this copy of Alarm Viewer on the computer that contains the OE Database.) The data service you entered will now be visible in the ‘Databases’ page of the OE Alarm Client Control Properties dialog box. • Click on [OK] to close that dialog box 8-6 OpenEnterprise for Beginners Chapter 8 - Using Alarm Viewer to Manage Alarms • Now, click on the “Runtime” item in the menu bar, and alarms should be displayed in the window. You now have a realtime alarm view. Number of active alarms Number of alarms which haven’t returned to normal (Uncleared) Number of unacknowledged alarms Number of acknowleged alarms If you need to return to ‘Configure’ mode, click here I don’t see any alarms. What did I do wrong? Maybe nothing. There might not be any alarms. Remember that alarms only appear if something changed down in the RTU to generate them. You can verify whether or not alarms exist by using Database Explorer to examine the AlarmSummary table. All current alarms displayed in the Alarm Viewer come from that table. There are a few other reasons why you might not see alarms: 1) Did you forget to specify the OE Database containing the alarms in the ‘Databases’ page of the OE Alarm Client Control Properties dialog box? If you don’t specify the OE Database, you won’t see any alarms. 2) Are you still in Configure Mode? In order to see alarms you must be in Runtime Mode. You can tell you’re in Runtime mode if it says ‘Configure’ in the menu bar of the Alarm Viewer. 3) Are the alarms you expect to see being filtered out? If you, or someone else, have changed the filtering criteria for the alarms, the alarms you expect to see might not be displayed. The concept of alarm filtering is outside the scope of this manual; for more information, please see the OE Alarm View section of the OpenEnterprise Reference Manual (document# D5092). OpenEnterprise for Beginners 8-7 Chapter 8 - Using Alarm Viewer to Manage Alarms Example 2 - Acknowledging Alarms This example assumes you have the Alarm Viewer up, and it currently has active alarms in it. (See Example 1 for help on setting up the Alarm View). To acknowledge an alarm: • Right-click on the alarm that you want to acknowledge. • Choose “Acknowledge” from the pop-up menu. • If the alarm has also returned to normal, it will be removed from the Alarm View. Right-click on the alarm you want to acknowledge, then click on “Acknowledge” in the pop-up menu. To acknowledge ALL the alarms in this Alarm Viewer: • Right-click on one of the alarms that you want to acknowledge. • Choose “Acknowledge All” from the pop-up menu. • You will be prompted to confirm that you want to acknowledge all alarms. Click on “Yes” and all alarms in this Alarm Viewer (either visible, or which you can scroll to) will be acknowledged. Any alarms that have also returned to normal (cleared) will be removed from the Alarm Viewer. 8-8 OpenEnterprise for Beginners Chapter 8 - Using Alarm Viewer to Manage Alarms What is the difference between an alarm being ‘cleared’ and an alarm being ‘acknowledged’? These are two very different things. If an alarm is cleared, it means that the condition that caused the alarm no longer exists. For example, if the alarm was generated because a temperature went too high, but then the temperature returned to the normal range, then the alarm is cleared. Just because an alarm has cleared though, doesn’t mean that the alarm will be removed from the Alarm View. That’s where the concept of alarm acknowledgement comes in. In order for an alarm to be removed from the Alarm View, it must have been cleared and it must have been acknowledged. Acknowledgement means that the operator must have recognized the existence of the alarm. This is required because you don’t want an alarm condition occurring, then returning to normal, without anyone knowing about it, because it could mean something serious is occurring in your plant or process. (NOTE: If desired, the system can be configured to automatically acknowledge alarms of lesser importance, without operator intervention.) All my alarms have the wrong timestamp on them. What’s wrong? Check the OE Alarm Client Properties dialog box ‘Time Zone’ page. Make sure you have selected the correct time zone. OpenEnterprise for Beginners 8-9 Chapter 8 - Using Alarm Viewer to Manage Alarms Example 3- Changing the Attributes Displayed in the Alarm Viewer This example assumes you have the Alarm Viewer up, and it currently has active alarms in it. (See Example 1 for help on setting up the Alarm View). The information displayed as part of the alarm message in the Alarm Viewer comes directly from columns (attributes) in a table from the OE Database. By default, all attributes from the Alarmsummary table are included in the alarm message. You can change this, so that only those attributes you are interested in are displayed. By default, all attributes are selected. You can click on [Remove All] to deselect them all, and then add back only those which you are interested in. The order in which attributes are displayed on the alarm line is determined based on their order in this list. If you want to change the order, just drag the attribute to the desired position in the list. Select any attribute(s) you want to have displayed in the Alarm Viewer from the “Available Attributes” list box, then click on [Add] and they will appear in the “Selected Attributes” list box. • If you are in Runtime Mode, you need to go into Configure Mode by clicking on the ‘Configure’ button. • Right-click in the center of the container, and click on “Properties” when it pops up. • The OE Alarm Client Control Properties dialog box will appear. 8-10 OpenEnterprise for Beginners Chapter 8 - Using Alarm Viewer to Manage Alarms • Click on the ‘Attributes’ tab, and the Attributes page will be displayed. • By default, all attributes are included. You can tell whether or not a particular attribute is included by looking at the “Selected Attributes” list box. Any attribute included is displayed there. You can click on [Remove All] to remove all of the attributes, and then add back only those you’re interested in by selecting them in the “Available Attributes” list box, and then clicking on [Add]. • The left-to-right order in which attributes are displayed in the Alarm Viewer corresponds to the top-to-bottom order in which they appear in the “Selected Attributes” list box. You can drag individual attributes within the “Selected Attributes” list box to adjust this order. How do I know which attributes to include? That really depends on the type of information you want. Most people will want the following, as a minimum: occurencetime name value units acknowledged cleared description condition The time the alarm was generated. The name of the signal which went ‘into alarm’. The current value of the signal. The engineering units associated with that signal (if applicable). The acknowledgement state of the alarm (i.e. has the operator or the system acknowledged that the alarm has occurred). If true, the signal is no longer in an alarm state. Descriptive text about the signal in Alarm. The condition (limit) that caused the alarm (e.g. High, LowLow) There are many other attributes you could include. For a full description of what all these attributes mean, please see the alarmsummary table description in the OpenEnterprise Schema Reference Manual. When you’ve finished setting up the Alarm Viewer the way you want it, be sure to save it! You can save the configuration of your Alarm Viewer in an Alarm View (*.AC) file. Just click on File Æ Save As… while the Alarm View is visible, and enter a name, when prompted, then click on [Save]. You can then open that AC file configuration in the Alarm Viewer at any time by specifying that as the “Config File” on the ‘General’ page of the OE Alarm Client Control Properties dialog box. You can also include the AC file as part of an OE Desktop, which we will discuss in Chapter 9. OpenEnterprise for Beginners Enter a file name here 8-11 Chapter 8 - Using Alarm Viewer to Manage Alarms Example 4 - Viewing the Alarm/Event History IMPORTANT: If you have already configured a Realtime Alarm View in the previous examples, we recommend that you save that AC file and open up a new Alarm View file or else your previous configuration will be erased by what you do in Example 4. So far, as we’ve been using the Alarm Viewer, we’ve been looking at all current alarms (i.e. alarms that either have not cleared, have not been acknowledged, or both). It’s possible, though to look at the history of the alarms. That is, we can look back at older alarms that have already been both acknowledged and cleared, as well as a journal of important system events. This information is stored in the eventhistory table. • Click on the ‘General’ tab of the OE Alarm Client Control Properties dialog box, and select the “Historical” option. • To view the alarm and event history, configure the Alarm View as described in Example 1 (specify the ‘Database’, etc.) • When you click on [OK] and go into ‘Runtime’ mode, no current alarms will be displayed; instead the alarm/event history will appear. 8-12 Choose “Historical” first, before doing any other configuration. OpenEnterprise for Beginners Chapter 8 - Using Alarm Viewer to Manage Alarms What other things can I do with the Alarm Viewer? We’ve really only scratched the surface. There are lots of other features associated with the Alarm Viewer. You can: • • • Customize the colors in which alarms appear. Filter out alarms, so that only alarms that meet certain criteria are displayed. Associate particular displays with alarms, so operators can quickly call up displays associated with an alarm condition. For more information on these subjects, see the OE Alarm View section of the OpenEnterprise Reference Manual (document# D5092). OpenEnterprise for Beginners 8-13 Chapter 9 - Using OE Desktop Chapter 9 - Using OE Desktop What is OE Desktop? OE Desktop is an application that allows you to pre-configure the “look-and-feel” of your OpenEnterprise Workstation. It lets you organize the screen so users can easily find the information they need. OE Desktop controls several different things including: Why do you call it a ‘Desktop’? Nothing mysterious here. We use the term desktop, because just as a physical desk has different items on it (pieces of paper, books, an appointment calendar, etc.) the computer screen can have different windows on it which contain various items (process displays, alarm views, trend views etc.) Just think of the OE Desktop as a way to organize the different items appearing on the screen. • The types of OpenEnterprise components which will appear in windows on the screen (displays, alarm views, trends, etc.) • The size, location, and number of windows on the screen. • The interaction of different OE components (for example, allowing pop-up menu items on displays, to call up an alarm window or a trend). Why use OE Desktop? The advantage of using OE Desktop is that it allows you to customize the appearance of the OE Workstation screen, thereby making it easier to use. Operators can have a menu of just the displays, trends, etc. that they need to see, eliminating the need for them to search through a lot of extraneous information. The OE Desktop application saves all user desktop settings in an OE Desktop File. An OE Desktop file allows you to pre-configure the “lookand-feel” of your OpenEnterprise Workstation. An OE Desktop file has the extension (*.OED). Although you can have any number of OED files on your workstation, each of which can hold several different windows of information, only one OED file can be active and running at any one time on a workstation’s monitor. NOTE: Beginning with OpenEnterprise Version 2.50, if you have multiple monitors attached to the same OE Workstation, you can run a different OED file on each monitor. Also, beginning with OpenEnterprise 2.53, each user can have their own OED file, which is automatically loaded when they log into OpenEnterprise. Before You Begin Before you start creating an OE Desktop file, you should have at least 2 or 3 OE Displays (created with OE Graphics in Chapter 5) and an alarm view window (created in Chapter 8). OpenEnterprise for Beginners 9-1 Chapter 9 - Using OE Desktop Hopefully, you have some from when you went through those chapters. If not, you can use the sample displays included on the OpenEnterprise CD-ROM. Otherwise, it doesn’t make sense to create an OE Desktop, yet, because you wouldn’t have anything to put on it. Example 1 - Specifying a Display that appears when you start the Desktop Often, people want to have some sort of graphical display start as soon as they open an OE Desktop file. • Start OE Desktop by clicking as follows: Start Æ Programs Æ OpenEnterprise Æ DeskTop The OE Desktop program will open, but it will be empty. • Click on the ‘New Window’ icon (or click on Desktop Æ New), and the New dialog box will appear. Click on the ‘New Window’ icon (or use Desktop -> New) and the New dialog box will appear. You can optionally enter a name for this window, here Here you choose which type of OE component you want to have loaded into this window. 9-2 OpenEnterprise for Beginners Chapter 9 - Using OE Desktop • In the ‘New’ dialog box, select the type of OE component you want to load into the window. (For this example, we’re going to choose ‘Bristol OpenEnterprise Display’ but you could choose any of the OE components listed.) • We can optionally enter a name that will appear in the title bar of the window in the “Window Name” field. It’s actually useful to give it a name, because we can make use of that name in a later example. We're going to call it 'Main Display'. • Click on [OK]. You now have an empty OE Desktop that’s configured to hold a Display. We now have an empty window on our desktop which is configured to hold a ‘Bristol OpenEnterprise Display’. The name ‘Main Display’ comes from entering that text in the “Window Name” field of the ‘New’ dialog box. Click on File -> Open to specify the display you want to have loaded into this window. Choose the display you want to load in the window and click on [Open]. • Now, we want to load a display into the window. We’re going to use an Overview Display created back in Chapter 5. (If you didn’t create that display, use a different one.) Click on File Æ Open then choose the display and click on [Open]. OpenEnterprise for Beginners 9-3 Chapter 9 - Using OE Desktop The display you selected, in this case Overview.gdf, will be loaded into the window. • You should adjust the window, now, so the display appears exactly as you want it. You can do this by dragging the window to the desired location within the desktop, maximizing the desktop, etc. Now that you have the display loaded into the ‘Main Display’ window, you should adjust the window so it appears exactly as you want it to look. You can maximize the OE Desktop so it fills all the available screen space, if desired. You can maximize the window, so it fills the entire OE Desktop, by clicking here. (This is useful because it fills the part of the desktop not occupied by docked windows.) You can use the horizontal and vertical scroll bars to adjust which parts of the display are visible. Saving the OE Desktop File When you’ve finished editing the OE Desktop File, and everything is sized the way you want it, you can save it. • OE Desktop - Saving the desktop.cdr OEDESKTOPNEW-2.GIF Click on Desktop Æ Save Desktop As… and enter a name for the desktop file, then click on [Save] and the desktop file will be saved. OE Desktop files are saved with the file extension (*.OED). 9-4 OpenEnterprise for Beginners Chapter 9 - Using OE Desktop We recommend you create a folder called ‘OESTORE’, and that you create separate sub-folders within it for storing OE Desktop files, displays, trends, alarms, etc. NOTE: Although you could call these folders whatever you wish, we recommend ‘OESTORE’, because that is the standard folder name used by our engineers for this purpose. So what do we do with this desktop file now? If you completed the last example, you now have an OE Desktop file containing a single display. That window is NOT limited to just holding that one display. Here are some things you can do with it: • If you have pick points within that display, or customized menu items (which we will cover in Example 3) you can call up other displays into that same window, or create new windows for other OE components. • You can add other OE components to that OE Desktop file. This allows you to configure a whole screen full of items for the user (displays, alarms, etc.) We’ll talk about that in Example 2. OpenEnterprise for Beginners 9-5 Chapter 9 - Using OE Desktop Example 2 - Adding an Alarm View to the Desktop NOTE: In order to do this example, we assume you’ve already completed Example 1, and have saved an OE Desktop file. We also assume that you have an Alarm View (*.AC) file already created (See Chapter 8). Now we want to add another OE component window to our existing OE Desktop file. In this case we’re going to add an Alarm View, but we could use any of the supported OE components (another display window, a trend window, etc.) Opening Up an Existing Desktop File • To start, open up the OE Desktop file created previously by clicking on: Desktop Æ Open Desktop… and select the *.OED desktop file you created earlier. -or - you can click on: Desktop Æ Recent Desktops and select from the desktops shown in the pop-up menu. Open a new window to hold the new OE component • Why are we opening up a second desktop via Desktop Æ New? To open the new window click on: Desktop Æ New We’re not really. It may be a little confusing, but we’re actually just opening up a new window within the same Desktop. The ‘New’ dialog box will appear. 9-6 OpenEnterprise for Beginners Chapter 9 - Using OE Desktop Choose the type of component and the type of window In the ‘New’ dialog box, complete the fields as described, below: • Choose the type of OE component you want to bring into the window. In this case, we are choosing ‘OE Alarm View’. • Choose the type of window: ‘MDI Child’, ‘Docked’ or ‘Floating’. Choose ‘Docked’. • Optionally enter a name for the window in the “Window Name” field. Here we’re using the name ‘Alarm Window’ but you could choose any name you want. • You can enlarge the dialog box to specify additional characteristics of the window by clicking on [More>>] but we’re just doing a basic desktop so we won’t do that for this example. • Click on [OK] to create the window. Different types of windows… The term MDI is a Microsoft® term for multiple-document interface. A MDI child window is a window that can’t be moved outside of another window. The other window is called the parent window. For our purposes, the parent window is the OE Desktop. When a ship comes into port, and is tied up to the pier, it is attached to the pier with ropes, i.e. docked, so it doesn’t move around. A docked window means the window is attached to a particular side of the desktop; it doesn’t move and can’t be dragged to other areas of the screen. Going back to our ship analogy, just as a ship that isn’t tied up to the pier can float by itself, and can be towed around the harbor, or even out to sea, a floating window can be dragged around the screen, even outside the confines of the OE Desktop. A floating window will always appear on top of any MDI or docked windows. Choose the type of OE component you want to occupy the new window. Choose the window type ‘MDI Child’, ‘Docked’ or ‘Floating’. For this example, we’re going to choose ‘Docked’. Optionally, enter a name for the window here. OpenEnterprise for Beginners 9-7 Click here if you want to specify additional characteristics for the window. Chapter 9 - Using OE Desktop Open a file of that component type in the new Window Now you have a new empty window on your OE Desktop. This window is configured exclusively for holding the type of OE component you specified. (If you try to include an OE component of a different type, you’ll get an error.) A new window is created. We named it ‘Alarm Window’ but you could have entered any name you wanted. It is ‘docked’ to the bottom of the OE Desktop, and is currently empty. • Click on File Æ Open from the menu bar, to include a file, of the component type previously specified, in the new window you created. In our case, we said this would be an ‘OE Alarm View’ window, so we need to insert a previously saved Alarm View file (*.AC). Choose the file you want to open, then click on [OK]. Make sure you are opening a file of the correct type. In this case, it must be an OE Alarm View (*.AC) 9-8 OpenEnterprise for Beginners Chapter 9 - Using OE Desktop The file you select will be opened within the new window. Our Overview.gdf display is maximized in the ‘Main Display’ window. We can see other parts of it by moving the scroll bars. • The ‘docked’ Alarm Window now includes actual alarm data Click on Desktop Æ Save Desktop to save your modified OE Desktop file. You now have an OE Desktop file with a main window for holding displays called 'Main Display', and an alarm window for displaying your current alarms called 'Alarm Window'. If desired, you could add some additional windows for more components (trends, for example), however, remember that although there is no fixed limit on the number of windows within the desktop (other than available memory) adding too many windows may overwhelm the user. OpenEnterprise for Beginners 9-9 Chapter 9 - Using OE Desktop Example 3 - Creating an OE Desktop that Includes Menu Items for Displays Suppose you have several displays, and you want to create menu items for accessing the displays within the desktop. That way, the operator can easily select which displays they want to see. To do this, start OE Desktop (if it's not currently running) by clicking as follows: Start Æ Programs Æ OpenEnterprise Æ DeskTop Now, open up the desktop file we created earlier, in Example 2, by choosing Desktop Æ Recent Desktops, and selecting the filename. You now have the desktop we created earlier. NOTE: You don't have to use that desktop, it's just easier to build on the previous example. Now, we need to start making menu items. Click as follows: Desktop Æ Customize 9-10 OpenEnterprise for Beginners Chapter 9 - Using OE Desktop The OE Desktop Properties dialog box will appear. In the ‘Menu’ page, click on the [New…] button. This list shows the menu items which appear in the menu bar of the OE Desktop. (If an item isn’t checked, it isn’t currently visible). We want to add a new menu bar item called ‘Displays’ so click on [New] The New Menu Item dialog box will appear. Type the name ‘Displays’ in the “Name” field. (This defines the name that will appear in the menu bar of the OE Desktop). Now click on the [Configure…] button. OpenEnterprise for Beginners 9-11 Enter the name ‘Displays’ then click on [Configure...] Chapter 9 - Using OE Desktop The OE Menu Editor will be called up. Right-click on the Menu folder icon. In the Menu Editor, right-click on the ‘Menu’ icon, and a pop-up menu will appear. You have some choices about what you want to do: • If you want to have the user be able to perform something from this menu item, such as call up a display directly, choose ‘New Command’. The user would call up the display by clicking on Displays Æ display name. • If you want to have the menu item call up another part of the menu (called a group) which contains your display choose ‘New Group’. The user would call up the display by clicking on Displays Æ group name Æ display name. • If you want to insert a separator line between menu items, choose ‘New Separator’. Choose ‘New Command’ For purposes of this example, we’re going to choose ‘New Command’ first. Type in ‘System Overview’ here. When we do so, a new menu item will appear in the menu hierarchy, called ‘New Command’. • Type in the words ‘System Overview’ since we want our first display to be the Overview display. 9-12 OpenEnterprise for Beginners Chapter 9 - Using OE Desktop • In the Command “Target” list box, choose ‘Bristol OpenEnterprise Display’. • Choose ‘Load File’ in the “Action” list box. • In the 'Window' portion of the dialog box, enter the name of the window into which you want to load this display. Since 'Main Display' is the only window we have configured to hold OpenEnterprise displays, that's the name we enter. (NOTE: We chose the name 'Main Display' in an earlier example on page 9-3). • You can optionally enter a title for the display, which will appear in the title bar of its desktop window by clicking on the [Caption] button, and entering the title there. First, choose ‘Bristol OpenEnterprise Display’ in the “Target” list box. Specify here the window into which you want this display loaded. Since we only have one window in our OE Desktop for displays (called ‘Main Display’) that’s the one we specify. Next, choose ‘Load File’ in the “Action” list box. Optionally, you can call up the Caption dialog box and enter a name that will appear in the title bar of the window for this display. Finally, click on the [Configure] button. • When you have finished completing these fields, click on the [Configure] button. The Load file dialog box will appear. • Specify the path and file name of the display you want to be activated by this menu selection. (Alternatively, you can use the […] button to locate the desired display, and select it in the Open File dialog box.) OpenEnterprise for Beginners 9-13 Use this button to navigate to the desired file, via the Open File dialog box. Chapter 9 - Using OE Desktop • Click on [OK] when you’ve finished. Congratulations! You’ve just created your first menu item. Now you’ve got a menu item for calling up the Overview display. Let’s say that you also have three more displays that relate to water filtration units, called filter1, filter2, and filter3. If you want to have menu items at the top of the menu hierarchy for each of the filters, you could create them exactly as we did for the Overview display, just specifying a different file to be loaded. Now the OE Desktop has a ‘Displays’ menu bar item, with ‘System Overview’ as the menu choice. Alternatively, you could do what we’re about to describe next, which is to add a name in the menu (in this case ‘Filter Displays’) to group those menu items together. If you’ve already exited the Menu Editor, call it up again by choosing the ‘Displays’ item in the menu page of the OE Desktop Properties dialog box, then click on the [Edit] button. First, we’re going to create a separator in our menu. To do this, right-click on the ‘Menu’ icon, and choose “New Separator” from the pop-up menu. (This is optional, you don’t really have to have separators in your menus.) What’s a Separator? A separator is just a gray line that divides up selections in the menu. In fact, the picture at right, which describes how to create a separator, actually happens to have a separator in it, (between the “New Separator” and “Copy” menu items). Now, we need to add a new group to our menu (a new group is nothing more than just a name for another part of the menu.) Choose ‘New Group’ Click on the ‘Menu’ icon, again, and choose “New Group” from the pop-up menu. The name ‘New Group’ will now appear in the menu. Backspace over that, and enter the word ‘Filter Displays’ since we want to group together the filter displays for our plant. Type in ‘Filter Displays’ The ‘Filter Displays’ menu item will call up another menu (a list of the filter displays) 9-14 OpenEnterprise for Beginners Chapter 9 - Using OE Desktop Now you need to add a separate ‘New Command’ for each of the filter displays in the group, and configure them similarly as you did the Overview display: • You must specify a name in place of the ‘New Command’. • In the Command “Target” list box, choose ‘Bristol OpenEnterprise Display’. Now you need to add a ‘New Command’ under the Filter Displays for each of the filter displays. Now, you have three new menu items one for each of the three filter displays. Again, we want to load our display into our display window that is called ‘Main Display’. You can optionally specify a title for the window here. • Choose ‘Load File’ in the “Action” list box, and use the [Configure] button to specify the actual display file. When you’ve finished for each of the three filter displays, your OE Desktop menu for the Filter Displays will now be complete. You can use the same process for adding other menu items to the OE Desktop. NOTE: We’ve used displays, but you could have used the same basic method to load trend files, alarm files, etc. Note the separator added earlier Now the user can call up any of the filter displays from the menu items we created. • Save the desktop file using Desktop Æ Save Desktop As... OpenEnterprise for Beginners 9-15 Chapter 9 - Using OE Desktop Can I use this OE Menu Editor in other places? Yes. Although we’ve been talking about the OE Menu editor with respect to loading displays in the OE Desktop, it is possible to use it to configure menu items that pass parameters between different OE components, that call other OE programs, and that call up third-party Windows applications. For more details, see the OE Menus section of the OE Reference Manual (document# D5092). 9-16 OpenEnterprise for Beginners Chapter 10 - Configuring Security for your system Chapter 10 - Configuring Security for your System Why Establish a Security Policy? A properly implemented security policy can help protect your system from accidental changes or deletions to configuration tables or other critical areas of the database. We strongly recommend, therefore, that every System Administrator establish a security policy for all users of OpenEnterprise Server and OpenEnterprise Workstation(s). NOTE: If this is an all-new OpenEnterprise system, you probably want to wait until the system is fully configured, and ready to go into service, before you implement the security policy. Otherwise, certain configuration activities will be rather cumbersome, because the person configuring the system would regularly need to sign into the system. OpenEnterprise Security configuration is divided up into two major parts, each of which has various steps: • Use the Security Configuration Tool to create users and groups at the OpenEnterprise Workstation. Assign each user a username and default password (which they will change). Also, specify access privileges for particular OpenEnterprise components for each user or group of users using tokens (which we'll talk about later). • Defining table and view access for users and groups at the OpenEnterprise Server. What are Users and Groups? Users A user is any person who will be able to log on at an OpenEnterprise Workstation. Before you do any configuration, you need to think about your staff, and make a list of all the potential users of your system. Each user will have a name (called the Username) and a password which they must type in, whenever they log on at an OpenEnterprise Workstation, using the OpenEnterprise Login Client. NOTE: In addition to the users you define, every system also has two special users already created called SYSTEM and PUBLIC. We'll talk about them more later. OpenEnterprise for Beginners 10-1 Chapter 10 - Configuring Security for your system Choosing Usernames and Passwords: Usernames A username is just a name that is used in OpenEnterprise to refer to this OE user. The name must be unique within the system. For example, if we have a person named Robert Johnson, his username could be BOB. If we had a Robert Johnson and a Robert Jones, each would need different usernames, so one could be BOB, and the other could be ROBERT, or you could use their last names (JOHNSON and JONES). Passwords Each username must be associated with a password. A password is just a combination of letters and/or numbers that a user must enter each time they log into an OpenEnterprise Workstation. The System Administrator can institute rules like ' a password has to be at least 8 characters' or ' a user has to change their password every 60 days'. We'll talk more about those rules later when we get to the 'Accounts' page of the Group / User Properties dialog box. When choosing passwords you want to try to choose something that you can remember easily, but is not easy for someone else to guess. According to experts, the best passwords are mixtures of letters and numbers rather than words that can be found in the dictionary. Make sure it's something you can remember, though. If a user forgets their password, the System Administrator will need to issue a new one for them. Why do we say 'Log in' or 'Sign On' anyway? Both 'Log in' or 'Sign On' refer to a person typing in their Username and Password to gain access to some part of the system. We say 'Log in' or 'Sign On' because OpenEnterprise records the fact that a particular person signed in (or attempted to sign in) on a particular OE Workstation. Similarly, when a person logs off, or signs off, it records that fact as well. Groups Once you know who all your users are, we recommend you organize the users into different categories called groups. For example, you might create a group of users called OPERATORS which refers to all the people who are plant operators. You might also create another group called ADMINISTRATORS who are the plant managers. 10-2 OpenEnterprise for Beginners Chapter 10 - Configuring Security for your system Some examples of possible groups appear below (You can name the groups whatever you want): • ADMINISTRATORS - Every system should have a System Administrator who has full access to the entire system. Administrators are typically also responsible for security configuration. Only someone with administrative responsibilities for the entire system should be able to configure security, because they would know who should have privilege to access particular portions of the system. You might have more than one System Administrator, but, in general, you want to limit this to a small number of people. • ENGINEERS - You might have engineers who are responsible for programming the system, modifying the Database, configuring displays, and trends. They would typically be given access to the entire system except for security configuration tables, which are reserved for the System Administrator. • OPERATORS - Operators would typically be the largest group of people using your SCADA system. They monitor processes in your plant, view displays and trends, acknowledge alarms, and take actions, as necessary, to ensure things are running smoothly. You might want to prevent them from deleting files or making major changes to the configuration, which are reserved for the engineers. • VISITORS - You might have other people who need access to the system, but you want to significantly limit what they can do. For example, you might have operator trainees, who are still learning their job. Or you may occasionally have visitors to your facility for whom you have to demonstrate the SCADA system, and you want to allow them to call up a few displays, but you don't want them to be able to change anything. These people would have very restricted access. IMPORTANT: The Database Project Builder offers a set of standard Group (including some of those shown above), all pre-configured. You may want to consider using them instead of creating groups on your own. OpenEnterprise for Beginners 10-3 Chapter 10 - Configuring Security for your system Everyone is a member of the DEFAULT group. No matter what other groups a user is assigned to, they remain a member of the DEFAULT group. IMPORTANT: In addition to any groups of users you create, there is also a special group called DEFAULT. Every user is automatically part of the DEFAULT group, and cannot be removed from the DEFAULT group. Because everyone is part of the DEFAULT group, you need to make sure that the DEFAULT group has the fewest privileges of any of the groups. Also, privileges granted in the DEFAULT group, are available for everybody, and can't be taken away even when people are assigned to different groups, because they still remain in the DEFAULT group. If this confuses you, pretend you work for a big company with hundreds of employees (maybe you really do). Let's say everyone in the company might have a badge to let them enter the building (that's the DEFAULT). In addition, certain employees might have special keys that let them enter special areas of the building, i.e. they are members of other groups besides the DEFAULT group. No matter what group they may be in, everyone also has the privileges of the DEFAULT GROUP, because every other group is a sub-set of the DEFAULT GROUP. ADMINISTRATORS GROUP ENGINEERS GROUP DEFAULT GROUP OPERATORS GROUP 10-4 OpenEnterprise for Beginners Chapter 10 - Configuring Security for your system Creating Users and Groups First, let's do a little planning. Make a list of the people who use our SCADA system, and choose a single word username for each person. Full Name: Robert Johnson James MacDonald Thomas Nguyen Vijay Patel Donna Rodriguez Andrew Smith Frederick Winchell Username: BOB JIM TOM VIJAY DONNA ANDY FRED Job Description: SCADA System Manager Operator - 3rd Shift Operator - Weekends Weekend Shift Engineer Operator - 2nd Shift Operator - 1st Shift Weekday Shift Engineer You can see from the table, above, that we have a staff of seven, so we'll need to create seven users. Of those seven users, we have: • • • One manager two engineers four operators Using groups makes it easy to specify privileges for multiple users. Otherwise, you'd have to specify privileges for each user individually…. Although not required, to simplify configuration, we're going to assign these users to groups. We're going to have an ADMINISTRATORS group for the one manager, an ENGINEERS group for the two engineers and an OPERATORS group for the four operators. Why use groups? Each Operator is going to need access to the same sets of things. The same is true of the Engineers. Finally, the manager is going to be in a special group that allows access to the security configuration tool. Defining groups makes it easier to set or modify privileges for more than one person at a time. Now, let's proceed to actually create these groups and users. To do this, we need to use the Security Configuration Tool in the OE Toolbox. Starting the Security Configuration Tool First, open the OE Toolbox by clicking on Start Æ Programs Æ OpenEnterprise Æ Toolbox OpenEnterprise for Beginners 10-5 Chapter 10 - Configuring Security for your system Double-click on the ‘Security Config’ icon Within the OE Toolbox, double-click on the 'Security Config' icon, and the Security Configuration tool will start. Creating Groups To start creating a new group, rightclick on the ‘Groups’ icon and choose ‘New Group’ from the pop-up menu. To define a group, right-click on the 'Groups' icon in the left pane tree of the Security Configuration tool. The word 'New Group' will appear. Type a name for the new group. (In this case we will choose the name 'ADMINISTRATORS' since that is the first group we want to create. NOTE: You might already have a group called ‘ADMINISTRATORS’ since that is one of the default security groups created by the Database Project Builder. If so, you can choose a different name. When finished, press the [Enter] key.) Type a name for the new group in the box that appears in the other window pane. 10-6 OpenEnterprise for Beginners Chapter 10 - Configuring Security for your system The 'Properties' page of the Group Properties / User Properties dialog box will appear with the name 'ADMINISTRATORS' in the title bar. This is the name of the Group. These fields don’t apply when defining groups. You can add additional text about the group in these fields. (Optional) Checking this prevents a user in this group from changing their password. If “Change Password At Next Logon” is checked, this CANNOT be checked. These fields don’t apply when defining groups. ACCESSAREA refers to areas of the OpenEnterprise Database. We won’t cover this right now. Checking this prevents a user in this group from logging on or changing their password. This invokes the Security Group Privileges Tool If desired, you can have a particular OED file (OE Desktop) loaded whenever users in this group log onto a workstation. To do this, select the “Login” box, then use the [...] button to browse to the OED file you want to have loaded on login. When checked, forces users in this group to change their password the next time they log on. If “User Cannot Change Password” is checked, this CANNOT be checked. If desired, you can have a particular OED file (OE Desktop) loaded whenever users in this group log OFF a workstation. To do this, select the “Logout” box, then use the [...] button to browse to the OED file you want to have loaded on logout. Checking this prevents a user in this group from logging on or changing their password. (Lockouts are normally NOT done this way; they are done by the system in response to repeated incorrect passwords.) There are many different options on the 'Properties' page. We say options, because they are all optional. It's your own choice whether you make any of these selections. The figure, above, gives short explanations of them; for more detailed descriptions, see the Online Help or the OE Reference Guide (document# D5092). All the settings on the 'Properties' page are optional. You can set them as desired. Since we said we're making the ADMINISTRATORS group (who are presumably going to be very responsible individuals) we don't really need to force ADMINISTRATORS users to do anything such as change their passwords when they log on. If you're defining the OPERATORS group, you might want to choose some of these items. Let's look at some of the other tabs in the Group / User Properties dialog box. The security configuration information stored for particular groups and users is referred to as an account. The 'Accounts' page lets you specify rules and restrictions on users who log into the OpenEnterprise Workstation. OpenEnterprise for Beginners 10-7 Chapter 10 - Configuring Security for your system On the 'Accounts' page of the Security Configuration Tool you can configure various restrictions for a group or a user, for example: • You can force users to change their passwords on a regular basis by setting an expiration time for the password. • You can specify that passwords must be a certain length to be valid. • You can specify the users should be locked out if they have a certain number of failed login attempts. • You can have a user logged out automatically if there is no activity (database reads or writes) for a specfied period of time. When checked, if their password has expired, a user attempting to log in will be allowed in using the old password, but will then be forced to change their password before they can do anything else. If you want a user to change their password, periodically, check “Expires In” and specify the number of days you want the password to be valid. When this number of days expires, the user will be forced to change their password. This is optional. You can specify the minimum and maximum number of characters required to make a valid password. This is a limit on the amount of time a user will be locked out of their account if they fail on successive login attempts. This is the maximum number of failed login attempts allowed before lockout. If a user cannot provide the correct username / password combination, after this number of login attempts, they will be prevented from logging on, even if they then have the correct password. After being locked out, they cannot get back in unless the System Administrator allows it, or “Lock Out Duration” has been configured, and has expired. When checked, if their password expires, a user will be unable to use tools such as the OE Toolbox or SQL Client to access the OE Database. If “Expires In” is checked, the “Expiry Warning”can be checked to force the system to issue a warning prompt to the user that their password will expire within a specified number of days. This way, they know they need to change it soon. “Minimum Age” is useful if you want to have users change their passwords on a regular basis, but you don’t want them to change them too often. For example, if you want a user to change their password every 30 days, you wouldn’t want them changing it back to their original password after a few days, so you would set a value of say 21 days, to force them to use their new password for at least 3 weeks. Check this to log off a user automatically after the specified period of time. Check this to log off a user automatically after the specified period of inactivity. Normally, automatic log out applies to the entire workstation, logging off all users. If there are multiple connections to the OE Database active, for example, a program extracting report data, as well as a user viewing trends, you can check this box so that automatic log out only applies to the particular connection meeting the log out criteria. 10-8 OpenEnterprise for Beginners Chapter 10 - Configuring Security for your system Why bother having all these rules about passwords and accounts? Good question. Which rules you establish is entirely up to you. You certainly don't have to force people to change their passwords regularly or specify that passwords have to expire. If you don't choose "Expires In" that user's password will never need to be changed. Similarly, if you want people to be able to use a simple 1-character password, you can let them do that by not specifying a "Minimum Length". You don't have to log people out if there is no operator activity. The idea behind these (and other items on the 'Accounts' page) is to increase the security of your system. Having people change passwords regularly, having people use passwords that aren't easy to guess, and logging people out if there is no activity is to make it more difficult for an unauthorized person to gain access to your SCADA system. Changing passwords frequently might make it difficult for a potential intruder to figure out a password, or if they did, it wouldn't last long. Having longer passwords makes them harder for a potential intruder to guess. Logging someone out after a period of inactivity helps prevent someone from sitting down at the Workstation and gaining access while the real Operator has gone out for lunch. There are tradeoffs to all of these things. For example, if one of your Operators forgets their password, and after a certain number of guesses, gets locked out, they're not going to be able to get back into the system without help from a System Administrator (maybe that's you!) If a System Administrator isn't available to help them, your plant might be operating without a human operator - and that's not good. If you force users to choose a long password, it might be more likely that they'll forget it, which, again, means the System Administrator gets called in. The bottom line is, that you need to look at your system, and consider which of these restrictions makes sense for your SCADA system staff, and the security needed by your organization. OpenEnterprise for Beginners 10-9 Chapter 10 - Configuring Security for your system Now, let's go to the 'Access area' page of the Group / User Properties dialog box. What's an access area? The OpenEnterprise Database can be divided up into logical pieces called access areas. When the OE Database is initially built, there is only one access area, named 'ALL' and the entire database resides in the 'ALL' area. If desired, additional access areas can be defined, and different objects (e.g. signals) in the OE Database can be assigned to those access areas. Once this is done, users will be unable to see data outside of the areas to which they have been granted access. If this concept sounds confusing, don't worry about it right now. It's enough for you to know that access areas exist, and that we're going to allow the 'ADMINISTRATORS' group access to the 'ALL' access area. Since we haven’t set up any other accessareas, just leave this ‘as is’. The ADMINISTRATORS group has access to the ‘ALL’ accessarea. For now, just leave the 'Access area' unchanged. We'll talk more about this concept later in the chapter. 10-10 OpenEnterprise for Beginners Chapter 10 - Configuring Security for your system All the remaining pages of the Group / User Properties dialog box deal with tokens so we better talk a little about them. Tokens give you privileges to access certain OpenEnterprise components. If you don't have the proper token to access a particular OpenEnterprise component, you are denied permission to use it. What are Tokens? Tokens are like tickets or passes that grant you certain privileges. Possessing a token gives you permission to do something. In the real world, for example, you might, purchase subway tokens that give you permission to ride on a subway train. You present the token when you want to board the train, and you are allowed to get on board. If you don't have the right token, the conductor won't let you get on board the train. Tokens in OpenEnterprise operate similarly. Every component of OpenEnterprise has certain tokens associated with it. In order for a user (a person) or a group of users to make use of that OpenEnterprise component, they are required to possess the appropriate token, otherwise they are denied access. A user or group is presented with a particular token by placing that token in that user (or group's) include list. A user or group is denied the use of a particular token by placing that token in that user's exclude list. (NOTE: Not including a token is the same as excluding it, so you usually don't have to explicitly exclude a token; just don't include it. A token group is simply a bundle of several tokens. Usually a token group includes all the tokens associated with a particular OpenEnterprise component. Therefore, if you want to give a user or group access to all of the tokens associated with a particular OpenEnterprise component, give them the token group associated with that component. (You can also create user-defined token groups that contain tokens from more than one OpenEnterprise component. That is beyond the scope of this manual.) There are different categories of tokens, that's why they're on different pages of the Group / Users. We'll talk about each of them as we go to each page. OpenEnterprise for Beginners 10-11 Chapter 10 - Configuring Security for your system Choosing Application Tokens for a User or Group NOTE: When we're creating the 'ADMINISTRATORS' group, we can skip this page and go directly to 'Token Groups'. Since you're going to create other groups as well, though, we'll describe how it works. Select the application token(s) you want to award to this group or user from the “Available Tokens” list, then click on [Include>>] to put them on the “Include List”. Select the application token(s) you want to deny from this group or user from the “Available Tokens” list, then click on [Exclude>>] to put them on the “Exclude List”. Application tokens are tokens associated with one of the OpenEnterprise tools, such as the Trend Viewer, the Alarm Viewer, etc. Each of these tools has several tokens. If you deny access to a particular item, it will either be 'grayed out' on the menu for that tool, or it won't appear at all. So, for example, if you choose to prevent all Operators from silencing alarms, and put the 'Silence' and 'Silence All' tokens on the OPERATORS Exclude List, those options will be unavailable to operators when they are logged on and using the Alarm Viewer. • To grant a user or group access to a particular item, choose the token from the "Available Tokens" field, then click on the [Include>>] button, and the token for that item will be added to the "Include List" for this user or group. 10-12 OpenEnterprise for Beginners Chapter 10 - Configuring Security for your system • To explicitly deny a user or group access to a particular item, choose the token from the "Available Tokens" field, then click on the [Exclude>>] button, and the token for that item will be added to the "Exclude List" for this user or group. IMPORTANT: As we said before, everyone belongs to the DEFAULT group. Initially, the DEFAULT group also has all tokens included. This means that when the system is first set up, everyone has access to everything. Make sure you examine the DEFAULT group, and remove any token that you don't want everyone to have. How do I know which application tokens to choose? Good question. If you can't figure out what a given token allows by looking at its name, you can look it up in the 'Security Configuration Tool' section of the OpenEnterprise Reference Guide (document# D5092). In general, Administrators and Engineers would have all tokens (which can be chosen via Token Groups), instead of individual Application Tokens. Operators would generally have the following sorts of application tokens: Alarm Client: OE Desktop: OE Graphics: Notes Client: Trend Client: Acknowledge, Acknowledge All Change a Windows File, Close Windows, Exit Desktop, Move Menu or Toolbar, Open OE Alarm Banner, Open OE Alarm Client, Open OE Alarm Printer, Open OE Control Display, Open OE Graphic View, Open OE Notes Client, Open OE Trend View, Exit Application GenTray AutoStart, GenTray Autostop, Menu: Display Back/Forward, Menu: File Open, Menu: Help Functions, Menu: Zoom Functions, Pick: Display Back/Forward, Pick: Launch Application, Pick: Load Display, Pick: Popup Window, Pick: Run Script, Start Application, Tab Load Display Forward, New Note, View Zoom In, Zoom Out, Zoom Out Full, Zoom to 100%, Zoom to 150%, Zoom to 25%, Zoom to 250%, Zoom to 50%, Zoom to 75%, Zoom to Custom, Zoom Undo Again, the choice is up to you. Make sure, however, that you have your staff try to do their various jobs using their assigned tokens, and check that they are able to do everything they need to do. OpenEnterprise for Beginners 10-13 Chapter 10 - Configuring Security for your system Choosing Token Groups As we said before, a token group is nothing more than a bundle of several tokens. The 'Token Group' page lets you award several tokens at the same time, rather than choosing them individually from the 'Application Token' page. In general, ADMINISTRATORS and ENGINEERS would have all of the token groups in their "Include List" while OPERATORS would have none. Select the token group(s) you want to award to this group or user from the “Available Tokens” list, then click on [Include>>] to put them on the “Include List”. Select the token group(s) you want to deny from this group or user from the “Available Tokens” list, then click on [Exclude>>] to put them on the “Exclude List”. 10-14 OpenEnterprise for Beginners Chapter 10 - Configuring Security for your system Choosing File Tokens, OPC Tokens, and Custom Tokens File tokens can be used to restrict access to certain files. OPC tokens can be used to prevent data values from certain OPC tags from being displayed, trended, etc. Custom tokens can be used to restrict access to user-defined menu items in OpenEnterprise components. We recommend you place all these tokens on the "Include List" unless you have a specific reason not to. For more information on these subjects, please consult the 'Security Configuration Tool' section of the OpenEnterprise Reference Guide (document# D5092). Repeat this process for each group you want to define. If you need to change any of the token choices or other settings, just double-click on the name for that group, and make your modifications. When you're finished defining groups, you can assign users to them… Modifying a Group To modify a group, just double-click on the icon for the group, or right-click on the icon for the group, and choose "Properties" from the pop-up menu. Make your modifications in the Group / User Properties dialog box and click on [OK] to exit. . OpenEnterprise for Beginners 10-15 Chapter 10 - Configuring Security for your system Creating Users Now that we've created our groups, creating users is easy. Just right-click on the name of the group you want to add the user to, and choose "New User in Group" from the pop-up menu. An empty box will appear in the right-hand pane of the Security Configuration Tool. Type the name of the user into the box. When you press the [Enter] key to complete the name, the Group / User Properties dialog box will appear. Right-click on the group into which you want to assign the user, then choose “New User in Group” from the popup menu. Type the name of the user in the box, and press the [Enter] key. You can now customize the information for that user, such as their name, etc. All of the privileges are pre-defined, because we added the user directly into the group we defined earlier. Enter text in these fields to describe the user. When you click on [OK] to exit the Group / User Properties dialog box, an icon will have been created for that user. Select this ONLY if this user is the System Administrator. Repeat this for each additional user. For our fictitious plant staff, that means we would create FRED and VIJAY in the Engineers group, and TOM, JIM, ANDY and DONNA in the OPERATORS group. Notice that the group is already defined, because we added the user under the group name. Enter the initial password for the user in the “Password” field, then enter it again in the “Verify Password” field. 10-16 OpenEnterprise for Beginners Chapter 10 - Configuring Security for your system Modifying a User To modify the information for a user, you can double-click on a user's icon to recall the Group / User Properties dialog box. Alternatively, you can right-click on the user's icon, and choose "Properties" from the pop-up menu. Make your modifications in the Group / User Properties dialog box and click on [OK] to exit. You can give a user special privileges, that other people in their group don't have just by modifying that user alone. If a particular user needs to have a special privilege, that no one else in the group has, you can add it. Just open up the Group / User Properties dialog box for that user by double-clicking on its name in the right-hand pane of the Security Configuration Tool, and add the appropriate token(s) to the "Include List" for that user. If a particular privilege is granted to a group, you CANNOT revoke that privilege for individual member(s) of the group. A user that is a member of a group, cannot have a privilege taken away, if that privilege was given to him or her, via the group. To take away such a privilege, it would either have to be taken away from the entire group, or that user would have to be removed from the group. If the privilege comes from the DEFAULT group, it CANNOT be taken away, unless it is taken away from the DEFAULT group, since users CANNOT be removed from the DEFAULT group. What if I don't know which group to put a particular user in? As we said, earlier, creating groups is optional. If you aren't sure which group to put a user in, you can just create them separately, and they'll belong to the DEFAULT group until you assign them to a group. OpenEnterprise for Beginners 10-17 Chapter 10 - Configuring Security for your system Creating a user outside of a group To create a user, but not assign them to a particular group, just right-click on the 'Users' icon in the left pane of the Security Configuration Tool and choose 'New User' from the pop-up menu. Right-click on the ‘Users’ icon, then choose “New User” from the pop-up menu. An empty box will appear in the right-hand pane of the Security Configuration Tool. Type the name of the user into the box. When you press the [Enter] key to complete the name, the Group / User Properties dialog box will appear. Define the user as explained earlier. Assigning a User to an existing Group There are two ways to assign a user to an existing group: Method 1: One way is to call up the Group / User Properties dialog box for that user (either by double-clicking on the icon for that user, or right-clicking on it and choosing "Properties" from the pop-up menu), and then select the group for that user. The group is selected through the "Parent Group" list box on the Properties page. Click on [OK] and the user will be moved to that group. 10-18 Assign this user to a group using the “Parent Group” list box. OpenEnterprise for Beginners Chapter 10 - Configuring Security for your system Method 2: Drag the icon for that user over to their new group. Another way is to select the icon for that user from the right pane of the Security Configuration Tool window, and drag it over onto the icon for the group, within the left pane of the window. Two Special Users - SYSTEM and PUBLIC You've probably noticed that in addition to the users you created, there are two other users - SYSTEM and PUBLIC. You should remember SYSTEM, because when you used the SQL Client (way back in Chapter 2) you had to log in as SYSTEM. SYSTEM is the default user when you are configuring OpenEnterprise. While you are performing configuration tasks, you need access to basically everything, so, by default SYSTEM has access to everything. PUBLIC is a user who has very limited access - just the access you would give a visitor to your facility. For example, they might be able to view tables, but they cannot edit or delete them. Don't give PUBLIC access to anything that you wouldn't everyone to see. When you have finished system configuration, i.e. you're all done, you should edit the file POLY.CFG on the OpenEnterprise Server, and change the default user from SYSTEM to PUBLIC. OpenEnterprise for Beginners 10-19 Chapter 10 - Configuring Security for your system Dividing the Database up Into Access areas (OPTIONAL) Earlier in this chapter, we talked, briefly about access areas. Access areas restrict user access to certain objects (data) in the OE Database A particular object can reside in only one access area. Generally, plant managers want to create access areas based on geographical locations. For example, you might have a large SCADA system that covers an entire Metropolitan area. As part of the system, you might have a Control Center that is responsible for everything, as well as local stations that control only their local area. You could come up with some other scheme for the access areas not based on geography; it's completely up to you how you do it. When first created, the OpenEnterprise Database has only one access area. By default, that access area is called ‘ALL’. All parts of the Database which utilize access areas initially reside in the ‘ALL’ area. Let's say, for example, we have a SCADA system with one main control center in the city of Centerville and an operator sub-station in each of the two neighboring towns of Weston and Laraby. The operators in Centerville need to be able to see everything in Centerville, as well as everything in Weston and Laraby. The operators in Weston need to see their own data only. The operators in Laraby need to see the data in Laraby, as well as the data in Weston. We can create an access area for each of these geographical locations. The access areas will be called CENTERVILLE, LARABY, and WESTON. Right-click on the “AccessArea” item in the tree, and choose “New AccessArea” from the pop -up menu. To start, right-click on the "AccessArea" item in the tree in the Security Configuration Tool, and choose "New AccessArea" from the pop-up menu. 10-20 OpenEnterprise for Beginners Chapter 10 - Configuring Security for your system A box will appear in the right pane of the tool. Type the name of the new access area in the box, and press the [Enter] key. In this instance, we are typing in 'CENTERVILLE'. Enter the name of the Access Area in the box, and press the [Enter] key. After pressing the [Enter] key, the Access Area Enter a textual description of Properties dialog box will appear. You can optionally this Access area, then click on enter a description of the access area. Click on [OK] [OK]. and the access area will be created, and added to the tree. Continue to add new access areas for each access area you want to create. When you're finished, the access areas will all appear in the tree in the Security Configuration tool. The Access Areas now appear in the tree. OpenEnterprise Database NOTE: At this point, all we have done is define names of new Access areas in the OpenEnterprise Database; they do NOT have anything in them yet. The contents of the Database still reside ONLY in the ‘ALL’ area. We will actually assign different parts of the database to the new Access areas next. ‘ALL’ ‘CENTERVILLE’ ‘LARABY’ ‘WESTON’ OpenEnterprise for Beginners 10-21 Chapter 10 - Configuring Security for your system Assigning Objects (Data) To Particular Access areas Critical elements of the database should be placed in restricted Access areas, to prevent unauthorized users from inadvertently or deliberately changing data. By default, all parts of the database that can be part of Access areas reside in the 'ALL' access area. To perform these assignments, we need to start the SQL Client. (For information on SQL, please see Appendix A.) The format for moving objects from the ‘ALL’ access area to another access area is as follows: update tablename set accessarea = 'accessarea_name' commit; where tablename is the name of a table in the database. accessarea_name is the access area where this object will reside. You can also choose to assign only certain portions of an object to a particular access area, for example, you can put certain entries of a table in one access area, and other entries in another access area. Such a statement would appear as follows: update tablename set accessarea = 'accessarea' where condition where condition specifies some attribute related to the object, and the value that attribute should have in order to assign corresponding parts of tablename to accessarea. NOTE: There are hundreds of different tables in the database, each of which includes one or more attributes. For more information, see the OpenEnterprise Schema Reference Manual. Examples: Continuing with our previous example, we are going to assign the realanalog table which holds live ACCOL analog signal data to the 'Centerville' access area, except for certain signals (with an ACCOL basename of DEMO) which will be used in the 'Laraby' access area. The statements below, when included in the OBJECT SECURITY section of the CUSTOM_SECURITY.SQL file, will accomplish these changes. update realanalog set accessarea = 'CENTERVILLE'; update realanalog set accessarea = 'LARABY' where basename = 'DEMO'; commit; 10-22 OpenEnterprise for Beginners Chapter 10 - Configuring Security for your system This process must be repeated for each object you want to move. There are hundreds of tables containing objects; which objects you move is up to you. Allow Users Access to Particular Access areas: Users do NOT automatically have access to particular access areas. Access to any particular access area must be specifically granted to each user. In the Security Configuration Tool, right-click on the user's icon, and choose "Properties" from the pop-up menu. From the 'Properties' page, click on the 'Access Areas' tab. Don't get fooled by the "Accessarea" field on the 'Properties' page! On the 'Access Areas' page, select the accessarea to which you want to grant access from the "Available Accessareas" field, and then click on the [Add] button. That accessarea will be added to the "Associated" list for this user. To grant this user access to additional access areas, repeat the process of selecting the accessarea, and choosing [Add]. Now some of you are thinking… "Hey I know what to do. I'll just use the "Accessarea" field on the 'Properties' page of the dialog box, right?" Wrong - that's not what that's for. That field is to assign a particular user to an accessarea; NOT to grant them access to that accessarea. Choose the accessarea you want this user to be able to access, and click on [Add]. OpenEnterprise for Beginners 10-23 Chapter 10 - Configuring Security for your system Configuring Security for Tables and Views Except for what we've just done related to access areas, most of what we've done thus far deals with security restrictions imposed on users of an OpenEnterprise Workstation. But what about people (or programs) connecting to the OpenEnterprise Server? We haven't really dealt with that yet. All your users and groups need access to tables in the OpenEnterprise Database; otherwise even though they can run various configuration tools, they're not going to be able to actually change anything in the OpenEnterprise Database. The Security Group Privileges tool lets you grant access to tables in OpenEnterprise. The Security Group Privileges tool is accessible from the OE Toolbox. (It can also be started from the [Configure Group Privileges] button of the Group Properties dialog box.) OE Systems Double-click on ‘Security Group Privileges’. Group Names To grant privileges, click on an item, and choose either ‘RO’ (Read only) or ‘RW’ (Read Write). Click on the ‘+’ sign to assign privileges to individual tables of an OE system. Here OE historical tables are shown. The top line of the Security Group Privileges tool displays the names of all the security groups defined in your system. Along the left edge are the names of the various OpenEnterprise systems (Historical, Alarms, etc.) to which you can grant table privileges. If you don’t want to grant a group privileges to all the tables for a particular OE system, click on ‘+’ to display individual tables, and grant privileges only on specific tables. 10-24 OpenEnterprise for Beginners Chapter 10 - Configuring Security for your system Find the box intersecting the OE system, and the group, and click on it to grant a privilege. There are two privileges that can be allowed, ‘RO’ (Read Only), or ‘RW’ (Read Write). If neither of these are specified, the default is ‘None’, i.e. no privileges. After you have granted privileges, as desired, click on [OK] to exit the tool. What’s the difference between ‘RO’ and ‘RW’ and how do I know what to assign to which groups? Read-Only ‘RO’ privileges mean just that; members of that group can only read data from those tables and views; they are prohibited from changing data in them. Read Write ‘RW’ privileges allow data to be read and changed. As a rule of thumb, Administrators usually would be granted RW access to everything. You might want to grant ‘Engineers’ similar privileges. Operators might only need ‘RW’ access to certain tables that contain data that they need to change. For a full description of what all the tables are used for, see the OpenEnterprise Schema Reference Manual. OpenEnterprise for Beginners 10-25 Chapter 10 - Configuring Security for your system Common Security Tasks for Users Logging Onto the System From the OE Desktop menu bar, click on Security Æ Login to call up the OE Login Client. (NOTE: If the OE Desktop hasn't been configured yet, you can click on Start Æ Programs Æ OpenEnterprise Æ Login.) Enter your "Username" and "Password" and click on [OK]. NOTE: If this icon doesn’t have a green box around it, you can’t log in, because the Database is unavailable. The name of the user currently logged on at this workstation always appears in the status bar in the lower right corner of the OE Desktop window. Verify that your username appears in that location. Logging Off the System To log off the system, call up the OpenEnterprise Login Client, and click on the [Log out] button. Alternatively, if you are in an OE Desktop window, you can click on Security Æ Logout. Changing Your Password Click on “Log out” To change your password, call up the OpenEnterprise Login Client, and click on the [Change Password] button. In the dialog box that appears, enter your current password in the "Old Password" field, and enter the new password you have chosen in both the "New Password" and "Confirmation" fields, and click on [OK]. Click on [Change Password] Enter your current pasword here. NOTE: If you are unable to change your password due to insufficient security privileges, contact your Administrator. Enter the new password in both of these fields Click on [OK] to exit. 10-26 OpenEnterprise for Beginners Chapter 10 - Configuring Security for your system Common Security Tasks for Administrators Adding a New User to an existing Group Start the OE Security Configuration Tool. Just right-click on the name of the group you want to add the user to, and choose "New User in Group" from the pop-up menu. An empty box will appear in the right-hand pane of the Security Configuration Tool. Type the name of the user into the box. When you press the [Enter] key to complete the name, the Group / User Properties dialog box will appear. Right-click on the group into which you want to assign the user, then choose “New User in Group” from the popup menu. Type the name of the user in the box, and press the [Enter] key. You can now customize the information for that user, such as their name, etc. All of the privileges are pre-defined, because we added the user directly into an existing group. Enter text in these fields to describe the user. When you click on [OK] to exit the Group / User Properties dialog box, an icon will have been created for that user. Select this ONLY if this user is the System Administrator. Notice that the group is already defined, because we added the user under the group name. Enter the initial password for the user in the “Password” field, then enter it again in the “Verify Password” field. OpenEnterprise for Beginners 10-27 Chapter 10 - Configuring Security for your system Removing a User To permanently remove a user from your system, first start the Security Configuration Tool. Right-click on the icon for the user you want to remove, and choose "Delete" from the pop-up menu. You will be prompted to confirm the deletion. Click on [Yes] and the user will be removed from the system. Right-click on the name of the user, and choose “Delete” from the popup menu. Sometimes you can't delete a user… Let's say one of your Operators named ANDY quits his job and goes to work for another company, so you decide you want to delete ANDY from the system. You try to delete the user, according to the example above, but the system doesn't allow it. Why? Well, the OpenEnterprise Server maintains records about who performs certain actions in the system. For example, if ANDY acknowledged several alarms, and those alarms have not been cleared entirely from the OpenEnterprise Database, you will NOT be allowed to delete ANDY, since the database still needs to identify who he is. If this comes up, we suggest you disable the user's account (see next section). That way, their name remains in the system for record-keeping purposes, but they are unable to log in and do anything. 10-28 OpenEnterprise for Beginners Chapter 10 - Configuring Security for your system Disabling a User's Account If a user is going away on vacation, or will be away for an extended period, you can disable their account. While the account is disabled, this user will not be able to log into the system. Select “Account Disabled” to temporarily de-activate this user’s account. De-select it to re-enable this user’s account. To do this, start the Security Configuration Tool and call up the Group / User Properties page for this user, by double-clicking on the icon for this user. Select the "Account Disabled" box, and click on [OK]. Later, to re-activate the account, simply de-select this box and click on [OK]. Removing the Lock-out of a user Users can be locked out of the system if you configured automatic lockout based a number of failed login attempts. Lockouts can be configured to turn off automatically after a certain number of minutes; or they can be set so that only a System Administrator with Security Administration privileges can remove the lockout. OpenEnterprise for Beginners De-select this box to allow the user to use their account again. 10-29 Chapter 10 - Configuring Security for your system To remove the lockout, first, call up the Group / User Properties dialog box for this user, by double-clicking on the user's icon in the Security Configuration Tool. Next, de-select the "Account Lockout" box in the 'Properties' page of the Group / User Properties dialog box for this user. Finally, click on [OK] and the account will be re-activated. Resetting a User's Password if they forget the one they chose Enter a temporary password in the “Password” and “Verify Passord” fields. Check this to force the user to change their password the next time they log on. Call up the Group / User Properties dialog box for this user, by doubleclicking on the user's icon in the Security Configuration Tool. Enter a temporary password, such as 'PASSWORD', in the "Password" and "Verify Password" fields. Select the "Change password at next logon" box. Click on [OK] to exit the Security Configuration Tool. Give the user the temporary password, and instruct them to log on, and change their password, when prompted to do so. 10-30 OpenEnterprise for Beginners Chapter 10 - Configuring Security for your system Other Security Issues The most secure SCADA system would be self-contained, i.e. it would have no connections to the outside Internet. In addition, it would be isolated from other network activities in your organization, for example, the process control network would not be on the same network as the billing department. If, however, your organization chooses to share networks, or include connections to the outside world, security should be of paramount concern. Security in ControlWave Controllers The Security page of the Flash Configuration Utility allows usernames and passwords to be created for ControlWave-series users, and for user privileges to be defined. See the 'Security' section of the ControlWave Designer Programmer's Handbook (document# D5125) for details. If you are using the Point-to-Point (PPP) Internet Protocol, via the ControlWave-series controller’s serial ports, you should consider using either the PAP or CHAP security protocols. CHAP is considered more secure than PAP, because it uses encryption. For information on these protocols, see the ‘Security Protocols’ section of the ControlWave Designer Programmer's Handbook (document# D5125) for details. Also once ControlWave-series controllers are configured and running, you should remove the ‘RUN / REMOTE / LOCAL’ keys from the controllers, and put them in a safe place. Otherwise, someone could accidentally or deliberately change the operating mode of the controller. Security in Network 3000-series Controllers The running ACCOL load file incorporates six different levels of security access (1 to 6), as well as security level 0, which indicates no access. Operators possessing a particular security level have on-line access to any system function or structure with a security level less than or equal to their own. For example, an operator who signs on to an RTU with the security level of 3 will only have access to those system functions which accept security levels 1 through 3; functions which require security levels of 4 or above will be inaccessible. If you use IP_Client / IP_Server modules to send signal list or array data between one or more Network 3000 controllers, you may want to set up restrictions on which arrays or lists are accessible for read or read/write access. See the sections on 'IP_Client' and 'IP_Server' in the ACCOL II Reference Manual (document# D4044) for details. OpenEnterprise for Beginners 10-31 Chapter 10 - Configuring Security for your system Open BSI Security Open BSI facilitates communication between OpenEnterprise, and a network of Bristol controllers (ControlWave or Network 3000-series). Open BSI security should therefore be configured. For information on configuring security for your Open BSI network, please see Chapter 6 of the Open BSI Utilities Manual (document# D5081). That chapter also includes information on granting proxy access to the network, from remote Open BSI Workstations, which can have security implications. Network Infrastructure (UDP and TCP Sockets) While this is generally more concerned with network traffic issues, UDP and TCP sockets throughout an IP network must match for each controller and Open BSI Workstation. It is recommended that these numbers be changed from their default values, for greater security. For information on setting these at the Open BSI level, see the Open BSI Utilities Manual (document# D5081). For information on setting these in your ControlWave controller, please see the ‘IP Parameters’ section of the ControlWave Designer Programmer's Handbook (document# D5125). Windows™ Security If appropriate for your system security, you may want to configure additional security through Microsoft® Windows™. See your Microsoft® documentation for details. Also, computer security experts widely recommend that you keep your operating system up-todate. Make sure, for example, if new Service Packs are released by Microsoft® to address Windows™ security issues, that you apply them to your system. Virus Protection for Your Workstations Each workstation should be equipped with Virus Protection software, and you should subscribe to a regular update service for this software, so the virus protection remains current as 'new' viruses become a threat. Virus protection is particularly important if the workstation has any connection to outside networks, or even to other departments via company intra-network(s). 10-32 OpenEnterprise for Beginners Chapter 10 - Configuring Security for your system Firewall Software For Your Networks If your process control network is connected to the World-Wide Web, you are strongly urged to purchase and configure commercially available firewall software, to provide some level of protection against external intrusion from ‘hackers’. Physical Security Consider issues related to the physical security of your workstations, and the nature of your operation. Are the workstations in a 'high traffic' area? Are they in a room which can be locked up to prevent unauthorized access? Are the environmental conditions in the room poor? (Excessive dust, humidity, etc.) Networked Surveillance of Remote Sites using ControlWave If surveillance cameras are part of your physical security scheme, you should be aware that ControlWave-series controllers have successfully been used as part of surveillance schemes. Using third-party security cameras and software, captured images can be uploaded to the controller, and stored in FLASH memory. Customers can download the images via File Transfer Protocol (FTP). See the ControlWave Security Vision Application User's Guide (document# D5126) for more information. Maintain Current Backups This is valuable not only for security issues, but for any type of disaster recovery. System Administrators should back up all necessary files on a regular basis, and store the backup media (tapes, CDs, zip-disks) in a safe, secure location, preferably off-site. Human Factors This may seem basic, but the downfall of security is often the human factor. No matter how well you configure your security system, please remember the following: • • • • • Don't post your passwords right next to the workstation. Don't write passwords down where unauthorized persons can read them. Don't keep using default, published passwords. Don't keep using old passwords known by former employees. Don't use simple passwords that are easy for an intruder to figure out (like your name, or the name of the company). OpenEnterprise for Beginners 10-33 BLANK PAGE Chapter 11 – Creating Reports Chapter 11 – Creating Reports What are Reports? Sometimes, historical data must be provided to plant managers or to third parties to fulfill various management, or regulatory requirements. The raw, historical data, however, isn’t really in an accessible format for a third party. It needs to be organized in such a way that it is easy to understand. To do this, we use reports. Reports are just tabular presentations of historical data that can be printed, e-mailed, or stored in files. Before You Begin In order to run reports, the Report Scheduler software must be configured to start as part of your OpenEnterprise session. See the Session Manager documentation in the OE Reference Guide, for details on starting programs from the Session Manager. What is a “plug-in”? How are Reports Created? In OpenEnterprise, reports are created using the Report Configuration Tool, and a special OpenEnterprise plugin that works with Microsoft® Excel. There are six major tasks that need to be completed when creating a report. A “plug-in” is simply a piece of software that has been created specifically to work with another more complex software package. It’s added in to support some additional feature. In this particular case, a plug-in to Microsoft® Excel allows it to receive historical data from OpenEnterprise. 1. Create a Report Template A report template defines where the data will come from, and how the data is organized on the report. The report template can be re-used for multiple reports that follow that same organization. The remaining steps can be completed in any order: 2. Create the Report The report itself, must be created using the report template you created in Step 1. 3. Test the Report It’s important to verify that you actually can retrieve data and generate the report file, so we recommend you test the report before proceeding. OpenEnterprise for Beginners 11-1 Chapter 11 – Creating Reports 4. Define a Schedule for when the Report Should be Generated The schedule determines the time of day the report is printed, or sent. In addition, it is possible to generate reports based on operator request (on-demand), or based on the value change of an OPC tag, but we won’t cover those topics in this manual. 5. Specify the recipients of the report The recipients are basically the destinations where the report is sent, for example, e-mail addresses, server locations, or an FTP server. 6. Specify the format of the report The format is the end product of how the report is presented. For example, you might want it printed on a printer, or transformed into a particular file type such as CSV, HTML, or PDF, among others. Together, these various steps allow you to create a wide variety of reports. 11-2 OpenEnterprise for Beginners Chapter 11 – Creating Reports Step 1 - Create a Report Template Report Templates define the layout of the report, and what data goes into it. Double-click on the ‘Reporting’ icon in the OpenEnterprise Toolbox. Double-click on the ‘Reporting’ icon. The Report Configuration Tool will appear. Right click on the Templates icon and choose ‘New Report Template’ from the pop-up menu -or- click on Edit Æ New Template from the menu bar. Right-click on ‘Templates’ and choose “New Report Template from the pop-up menu. Alternatively, choose Edit New Template from the menu bar. OpenEnterprise for Beginners 11-3 Chapter 11 – Creating Reports Template Configuration – General On this page, enter a name for the report template in the “Name” field. You can optionally specify a more detailed description of what the template does in the “Description” field. Enter a name for the report template. You can optionally add a description also. Then click on [Create]. Now click on [Create] and Microsoft® Excel will be started automatically. In addition, the OpenEnterprise plug-in will be added to the menu bar in Excel. Before you can begin working with the ‘plug-in’, several report properties must be defined, first. 11-4 OpenEnterprise for Beginners Chapter 11 – Creating Reports Report Properties – Data Service This page lets you define the default name of the Data Service for your OpenEnterprise Server (if you don’t know what a service is, please refer to Chapter 4.) If you are using redundant OpenEnterprise Servers, you must specify the data service for each one. You can do this by listing the server names, separated by commas, e.g. SERVER_A:rtrdb1, SERVER_B:rtrdb1. NOTE: You can override the default data service when making individual queries if your report will include data from multiple OE Servers. (This is discussed later in this chapter.) You should click on [Test Connection] to verify that the Reporting package can access the OE Database. When finished, click on [Next>]. This is the data service for your OE Server. Click on [Test Connection] to verify that the Report package can communicate with the database. Then click on [Next>]. OpenEnterprise for Beginners 11-5 Chapter 11 – Creating Reports Report Properties – Report Period This page defines the time window (starting and ending time) for the data you want to appear in your report. By default, the choice is data from today, but you could choose data from yesterday, last month, last year, etc. (This also assumes that the data you want to choose actually is stored somewhere in your OE Database; obviously you can’t put data on your report that doesn’t exist.) Also, by default, days run from midnight to midnight. Some applications, however, may consider a day to be when the first working shift starts say 8AM one day to 8AM the next day. Some natural gas companies use the concept of a ‘gas day’ that might run from 6AM to 6AM. If you want to have your reports reflect these sorts of time shifts, you can specify an “Offset from midnight” of 8 hours, or 6 hours, or whenever you consider that your work day begins. Feel free to play with the different controls on this page to get the exact period of time from which you want data for the report. You can see how the changes you make will affect things by looking at the “If this report were run on” and “The report would contain data from” fields at the bottom of the page. When you’ve got the time window defined the way you want it, click on [Next>]. This page defines the date/time window from which you want data for this report. Based on the choices you make for the ‘Report Period’ the actual timeframe to be used for the report will be calculated and displayed here. Click on [Next>] when finished. 11-6 OpenEnterprise for Beginners Chapter 11 – Creating Reports Report Properties – Event Logging A log may be maintained of all events that occur as part of generating this report. This page lets you specify that the Report package will maintain a log of events that occur regarding how it is operating, etc. We suggest you “Enable Logging” and choose a folder where the log should be stored, since this log file can be helpful if you’re trying to debug problems, such as “Why didn’t my report run?” etc. Click on [Finish] to complete the report properties. Click on [Finish] to go into Excel, and begin configuring the report template. In Excel, click on the cell where you want to display the data for the report, then click on OpenEnterprise Æ Import History Æ New Query… Click here to access the OpenEnterprise ‘plug-in’ in Excel OpenEnterprise for Beginners 11-7 Chapter 11 – Creating Reports Each query must have a name. You can use the default, or choose a name, then click on [Next>]. Now you need to create a query for the OE Database for data that you want to appear on your report. Depending upon the size and complexity of your report, it may include multiple queries. Each query, therefore, must be identified by a unique name. For our first query, we are using the default name of ‘Query1’ but you could assign a different name to it if desired. After a name is chosen, click on [Next>]. For each query, you have the option of overriding the selection you made earlier for the data service. You can also test the connection to the database from this page. Click on [Next>] to continue. Although you specified the default data service for this report, you are given the option of overriding the default and using a different data service in a query. (You might want to do this if this report will contain data from more than one OE Server.) If you do specify a different data service, you should verify that you can communicate with it by clicking on the [Test Connection] button. Click on [Next>] to proceed. 11-8 OpenEnterprise for Beginners Chapter 11 – Creating Reports Choose the Historical Data Set that includes the data you want to include on the report, then click on [Select]. Finally, click on [Next>]. Now we come down to selecting the actual historical data we want to include on the report. If you remember from Chapter 6, historical data is grouped into data sets. Click on the data set that contains the data you want to display in this query, and click on the [Select] button, then click on [Next>]. If you don’t want all signals/variables to be part of this query, click on “Named signals only” and then click on [Add Signals]. On the Create New Query – Signal Selector page, you can choose to either query all signals/variables in this dataset, or you choose only to query certain signals. Generally, you would only want certain signals. Click on “Named signals only”, and then click on [Add Signals]. OpenEnterprise for Beginners 11-9 Chapter 11 – Creating Reports First, choose search criteria for the signals you want to include on the report, then click on [Find Signals]. The Signal Browse dialog box will appear. Enter some search criteria in the fields at the top of the page, and click on [Find Signals]. Signals/variables meeting that criteria will be displayed. Select the signals you want to appear on the report, and click on [Add Signals]. When you have selected all the signals, click on [Close]. Next, the signals meeting the specified criteria will be displayed in this window. Choose the ones you want to add to the report, and click on [Add Signals]. To exit this dialog box, click on [Close]. The signals you selected will now appear in the window. Click on [Next>]. Click on [Next>]. 11-10 OpenEnterprise for Beginners Chapter 11 – Creating Reports The Create New Query – Query Period page allows you to optionally override the period of time from which data should come for this report. This might be necessary in certain situations where you might not have enough data to properly test the report, so you want to specify a different time window. This page gives you the option of specifying a different time window for the data that will appear in this query. To accept the default time window you defined earlier in the Report Properties, just click on [Next>]. If you want to change the time frame, click on “Override default report period”, and change the time frame as desired. To continue, click on [Next>]. Click on [Next>], On the Create New Query – Data Transform page, you choose which columns from the historical tables you want to include in the report. Typically, you would choose ‘Value’ (the actual value of the signal), but you may choose others as well. For each of the “Available columns” you want to include on the report, click on [>] to add it to the “Display columns” window. Most users should leave this at ‘timestamp’. Choose each column you want to display in the report, and click on [>] for it. If you are displaying several different columns, you can use the [Up] and [Down] buttons to move through them. Timestamp rounding allows the timestamp to be rounded to the nearest unit of measure (second, minute, etc.) After you’ve chosen which columns to display, click on [Next>]. OpenEnterprise for Beginners 11-11 Chapter 11 – Creating Reports The other items included on this page allow you to specify how you want to use timestamps. Normally, the “Transform timestamp” would just be the ‘Timestamp’ column, though if you have other timestamps saved in the database, because you’re doing a more advanced historical system, you can select that different timestamp column. You can also specify how timestamp values are rounded. When you’re finished with your column selection and timestamp settings, click on [Next>]. On the Create New Query – Output page, you can optionally change the location of the cell where data will be displayed by clicking on the […] button. You can also choose whether or not you want to display column headers or signal names over the data in the report. After making your format selections, click on [Finish]. You can optionally change the way items appear. Object names would be the signal names. Leave this checked if you want the signal name to be included on the report. Column headers are the column (attribute) from the database. Leave this checked if you want that on the report. Click on [Finish]. Click on [Yes]. You will be prompted as to whether you want to run the historical query right now. Click on [Yes]. 11-12 OpenEnterprise for Beginners Chapter 11 – Creating Reports The queried data will now be displayed within Excel. column headers The report template now includes actual historical data in its columns. object names (signal names) NOTE: You can add additional information to the report template, but don’t try to change the actual data/timestamps/headers that come from the database, since any changes you make will be overwritten when the report is generated. We can however, add additional information in unused cells of the report such as a title and station names. We’ve added a Title to the top and included names for each station Okay, now you’ve completed your report template. Save the Excel file by clicking on File Æ Save As or by clicking on the ‘Save’ icon. OpenEnterprise for Beginners 11-13 Chapter 11 – Creating Reports You could just print the Excel file and call the resulting printout a report, since it has real data in it, but it’s really just a report template. To have a fully configured and useful report, you’ll want it to be generated automatically at a particular time, and you might want to automatically send copies to people. You might want to print it, or you might only want to save a copy of it in a file. The remaining steps of report configuration allow you to set up these features. Step 2 - Create a Report from the Template in the previous step Okay. Now you’ve got a report template. Let’s create an actual report from the template. To do this, click on Edit Æ New Report, or rightclick on ‘The Configured Reports’ in the Report Configuration Tool, and choose “New Report” from the pop-up menu. Report Configuration – General On this page, enter a “Name” for the report, and then optionally enter a “Description” for the report. First, enter a name for the report and optionally enter a description. Next, choose the template you created in Step 1, then click on [Next>]. In the ‘Report Template’ section of the page, click on the name of the template you created in Step 1. Some processing will occur, and then that name will appear in the “Selected Template” field. Click on [Next>] to proceed. 11-14 OpenEnterprise for Beginners Chapter 11 – Creating Reports Report Configuration – Alias Values Aliases can be used to allow the same report to be re-used with different signals that are chosen based on the aliases. This is a fairly advanced topic, so we’re not going to cover it here. Just leave the defaults ‘as is’ and click on [Next>]. Click on [Next>]. Report Configuration – Publishing Specify the path and folder where you want reports to be generated in the “Directory” field, or use the [Browse] button to locate it. Now, click on [Next>]. Specify the folder where you want reports generated. Click on [Next>]. OpenEnterprise for Beginners 11-15 Chapter 11 – Creating Reports Report Configuration – Formats At this point, we haven’t defined any formats, so just click on [Next>]. Click on [Next>]. Report Configuration – Schedule Once again, we don’t have any schedules configured yet, so just click on [Next>]. Click on [Next>]. 11-16 OpenEnterprise for Beginners Chapter 11 – Creating Reports Report Configuration – Credentials On this page, you should choose ‘SYSTEM’ as the “Named User” and then click on [Next>]. You should choose SYSTEM. Click on [Next>]. OpenEnterprise for Beginners 11-17 Chapter 11 – Creating Reports Report Configuration – Alarm Conditions Optionally, you can specify that an alarm will be generated if a problem occurs with the report. You can also specify that you want an alarm generated when the report runs successfully. Make any choices as desired, then click on [Finish]. Okay – now you’ve created your report. It’s time to test it. You can optionally choose to have alarms generated if there are problems with the report generation process. 11-18 OpenEnterprise for Beginners Chapter 11 – Creating Reports Step 3. – Test the Report Right-click on your report, and choose “Test Report”. Now that you’ve created a report template, and a report based on that template, it’s a good idea to test that the report is actually able to connect to the database, retrieve data, and be included in the report file. To test the report, right-click on the report name, and choose “Test Report” from the pop-up menu. The Test Report dialog box will appear. Click on [Test] and the testing will begin. Messages describing the process of the test will appear. When the test is complete, click on [Close]. Click on [Test] to begin the testing. Status messages will appear telling you the progress of the testing. When the testing is complete, click on [Close]. To see what the report looks like, go to the directory you specified on the Report Configuration – Publishing page, and review the report to see that it looks the way you expect it should. If it does, continue on to Step 4. If it doesn’t, you should verify that the template is configured the way you want it, and that you can successfully connect to the database. OpenEnterprise for Beginners 11-19 Chapter 11 – Creating Reports Step 4 Create a Timed Schedule for the Report Now it’s time to define when the report should actually be generated. Although it’s possible to have it generated ‘On Demand’ i.e. the operator requests the report when they need it, or based on the value of an OPC tag, typically, reports are generated on a timed schedule, so that’s what we’ll discuss now. Right-click on ‘Schedules’ and choose “New Report Schedule” or choose Edit -> New Schedule from the menu bar. First, let’s create a schedule. Click on EditÆ New Schedule or right-click on ‘Schedules’ and choose “New Report Schedule” from the pop-up menu. Schedule Configuration – General On this page, specify a “Name” for the schedule, and, if desired, enter a “Description” for the schedule.You can have a report generated immediately, i.e. on-demand, or based on a value of an OPC tag. Generally, though, you’re going to want to generate reports at a particular time of day. For this example, choose “Timed” to have the report generated at a specific time of day. Now, click on [Next>]. First, choose a “Name” for the schedule, and optionally enter a “Description”. Then choose “Timed” and finally, click on [Next>]. 11-20 OpenEnterprise for Beginners Chapter 11 – Creating Reports Schedule Configuration – Type On this page, specify exactly when you want the report to be generated. Choose the time, and then the interval, at which the report generation should be repeated. (The summary area of the page will report the resulting schedule based on your choices so you can verify that you created the schedule correctly based on your needs.) When finished, click on [Next>]. Specify the time you want the report to be generated and then specify how frequently you want it to be repeated. In this example, the report is scheduled to run daily, at 11:55 PM. Click on [Next>]. OpenEnterprise for Beginners 11-21 Chapter 11 – Creating Reports Schedule Configuration - Reports On this page, you are actually associating a report with the schedule you are creating. The “Available Reports” window displays a list of all the reports that have been created. Click on the name of the report you want to associate with this schedule, then click on [>] and the report will be added to the “Selected Reports” field. Click on [Next>] to proceed to the next page. Click on the report you created, earlier, in the “Available Reports” field, then click on [>] and it will be moved to the “Selected Reports” field. Click on [Next>] when finished. 11-22 OpenEnterprise for Beginners Chapter 11 – Creating Reports Schedule Configuration – Alarm Conditions Optionally, you can specify that you want alarms to be generated based on the success or failure of the Report. If so, select those options. Now, click on [Finish] and your report schedule is complete. You can optionally choose to generate alarms based on the whether the report runs or does not run successfully. Click on [Finish] when done. OpenEnterprise for Beginners 11-23 Chapter 11 – Creating Reports Step 5. – Choose Who Will Receive the Report (Recipients) Now you have to decide where reports will be sent. For example, you might want to e-mail copies of a report to the accounting department so they can bill customers. Or you might want to have a report stored on a hard disk somewhere, so you can retrieve it later, if needed. Recipients are essentially the destination of the report. This could be an e-mail address, a file server location, or an FTP server. To do this, you need to define the recipients for the report. Click on Edit Æ New Recipient or right-click on “Recipients” and choose “New Report Recipient” from the menu bar. Right-click on ‘Recipients’ and choose “New Report Recipient” or choose Edit --> New Recipient from the menu bar. Recipient Configuration – General Decide whether the report will be sent as an e-mail message, or as a file stored on a drive or FTP server. Here we are choosing “Email”. Enter a “Name” for the recipient, and optionally include a “Description”. Now specify a “Name” for the recipient, and choose a “Delivery Type” that specifies how the report will be sent (e-mail, file copy, etc.) Click on [Next>] when finished. Click on [Next>] when finished. 11-24 OpenEnterprise for Beginners Chapter 11 – Creating Reports Report Configuration – Settings On this page, you specify the destination e-mail address, server location, or FTP server details for this report recipient. Here, we are choosing the e-mail address. You can test that the e-mail address is valid by clicking on [Test]. If the recipient is an e-mail address, enter the address here. You should also click on [Test] to verify that it is a valid address. When you have entered the address, click on [Next>]. OpenEnterprise for Beginners 11-25 Chapter 11 – Creating Reports If you had chosen “File Copy” instead of “E-mail” you would need to specify the location on a computer where you want to store the report. Similarly, if you had chosen “FTP Copy”, you would need to specify details on the FTP server that would hold the report. (Not shown) Use the [Browse] button to specify the destination on the server for this report. Click on [Next>] when finished. 11-26 OpenEnterprise for Beginners Chapter 11 – Creating Reports Recipient Configuration – Alarm Conditions Optionally, you can specify that an alarm will be generated if a problem occurs with the report. You can also specify that you want an alarm generated when the report runs successfully. Make any choices as desired then click on [Finish]. You’ve now defined your recipient. Repeat this process if you have other recipients to define. You can optionally choose to have alarms generated if there are problems with the report generation process. Click on [Finish] to complete defining the recipient. OpenEnterprise for Beginners 11-27 Chapter 11 – Creating Reports Step 6. – Specify the Format of the Report We’re almost done. The last thing we have to do is specify the file format of the report. The configuration of the format varies depending upon which format you choose. Either right-click on ‘Formats’ and choose “New Report Format” from the pop-up menu, or click on Edit --> New Format from the menu bar. Format Configuration – General The figure, below, shows the configuration of a printer. Create a “Name” for the format, and optionally enter a “Description” for the format. If you choose ‘Printer’ as the format “Type”, you will need to specify the network “Destination” for the printer. Use the [Browse...] button to locate it, if necessary. 11-28 OpenEnterprise for Beginners Chapter 11 – Creating Reports The figure, below, shows that for a format “Type” other than printer, a file is generated, so you will need to specify a “Destination” path and “File Name” format. For any format “Type” other than ‘Printer’, you will need to specify a “File Name”. You can type a name in directly, or click on the [Format] button to choose items that will be used to make up the filename, such as the date and time. Create a “Name” for the format, and optionally enter a “Description” for the format. If you choose a format other than ‘Printer’ as the format “Type”, you will need to specify the “Destination” path for the resulting file.. Use the [Browse...] button to locate it, if necessary. Click on [Next>] when finished. OpenEnterprise for Beginners 11-29 Chapter 11 – Creating Reports Format Configuration – Purging This page allows you to specify that older reports be deleted. Just click on [Next>] to proceed. Purging can be used to remove old reports from the system. We won’t cover this here, so just click on [Next>]. 11-30 OpenEnterprise for Beginners Chapter 11 – Creating Reports Format Configuration – Recipients On this page, choose from the recipients you defined, earlier, in Step 5, and click on [>] or [>>] to select them. Then click on [Next>]. Click on the recipient that you want to receive this format of report, then click on [>] to select it. Alternatively, to select all the recipients, click on [>>]. Click on [Next>] when finished. OpenEnterprise for Beginners 11-31 Chapter 11 – Creating Reports Format Configuration – Alarm Conditions Finally, just as before, you have the option of generating alarms if there are problems with the report. Make your choices and then click on [Finish]. You can optionally choose to have alarms generated if there are problems with the report generation process. Click on [Finish] to complete the format configuration. Congratulations! You’ve now created a report, it’s got a schedule and you’ve defined where the report will be sent. In addition, since you’ve created the report in pieces, i.e. the report template, the formats, the recipients, etc., you can quickly create additional reports. These individual pieces serve as building blocks which will simplify any other reports you create. 11-32 OpenEnterprise for Beginners Appendix A - Learning SQL (A Crash Course for OE Users) Do I really need to learn SQL to use OE? Chapter 2 - SQL Commands - A Crash Course for OE Users Probably not. Earlier versions of OpenEnterprise required that even the most basic system configuration be performed using SQL commands. Now OpenEnterprise has many userfriendly configuration tools, available through the OE Toolbox, that simplify configuration, and don’t require you to use SQL. Because of this you don’t really need to learn SQL. (A little secret you might want to know, though, is that most of what these configuration tools are doing behind the scenes, transparently to you, is to generate SQL statements to query the database. Therefore, it might aid your understanding of the system if you knew a little SQL.) SQL statements can often allow you to obtain data very quickly, that might take many mouse clicks through a configuration tool. Also, there are certain advanced configurations, that a ‘power user’ might want to do, that can only be done via SQL. If you’re not planning to do any of those, you really don’t need it. If you are, you probably ought to read this appendix. SQL queries follow a certain pre-defined structure, thus the name ‘structured query language’ (SQL). It is important to create the queries properly, in order to perform the desired action successfully. If you type something in the wrong order, or misspell the command, or put a semicolon in the wrong place, your SQL entry won’t be correct, and you won’t achieve the desired result. There are dozens of different SQL commands, and before you’re done configuring the more advanced features of OE, you’re going to use several, but we’re going to concentrate on just seven of them, because they are the ones you are most likely going to use, when working with OpenEnterprise. Also, we’re only going to deal with the basic usage of these seven commands. Sometimes there are more complicated options that you can use with these commands, but we don’t really need to get into those options here, so don’t worry about them right now. What is SQL? SQL stands for structured query language. Sometimes people will say the word ‘sequel’ instead of SQL. They both refer to the same thing. SQL is an industry-standard method for communicating with a database. Query is essentially another word for question or request. To make a structured query means to generate a formatted request for information from the database. The structured part is important. In order to get useful information back, you must carefully construct the query according to a predefined set of rules. In order to enter actual SQL commands, we use a program at the OE Server called the SQL Client. While you’re still learning SQL, don’t use a LIVE system!!! Because SQL is a programming language, it doesn’t include some of the protections built into other parts of OpenEnterprise. Always be careful when entering SQL commands, and don’t use them on an OE system which is connected to a real plant or process unless you are sure of what you are doing. Otherwise this crash course could really end up in a crash! OpenEnterprise for Beginners A-1 Appendix A - Learning SQL (A Crash Course for OE Users) Starting the SQL Client To start the SQL Client, click on: Start Æ Programs Æ OpenEnterprise Æ SQL Client NOTE: Every SQL Client command begins with the command name, and ends with a semicolon ‘;’. If you leave out the semicolon, the SQL Client will interpret anything you type after that as also being part of the command. When you’re finished with a command, you would press the [Enter] key on your keyboard. “Help! The SQL Client shut itself down just a few seconds after I started it!!!” If the SQL Client closed shortly after when you opened it, then check to see that your database is running. If it's not, then the SQL Client can’t connect to it, and so it closes down. You need to start the OE Database in order to use the SQL Client. If your system has the Session Manager configured to start OE, you should start it using the Session Manager. If you don’t know what the Session Manager is, you can start the OE Database, by clicking on: Start Æ Programs Æ OpenEnterprise Æ Database Æ Database A-2 OpenEnterprise for Beginners Appendix A - Learning SQL (A Crash Course for OE Users) LOGIN command Because you don’t want unauthorized persons connecting to the OE Database, and extracting your company’s data, the OE Database is protected by a security system. To gain access to the database, users must supply a valid username and password. The basic syntax of the LOGIN command is: LOGIN username where is replaced with the name of a valid OE user (a user is just a person who has been given permission to use OE, or some part of it.). Once the username is entered, the user will be prompted to enter a password. username The username Enter the password in answer to the prompt In the picture shown, at right, we show a login command being entered in the SQL Client. In this picture, the username is SYSTEM, and the password hasn’t been entered yet. The SYSTEM user is defined for every OE Server. NOTE: Both the username and password are case sensitive. That means that capitalization (UPPERCASE and lowercase) are important. The words Fred, FRED, and fReD would all be considered different users. We recommend, therefore, that you either choose all UPPERCASE or all lowercase when entering usernames and passwords, or you could get confused later. OpenEnterprise for Beginners A-3 Appendix A - Learning SQL (A Crash Course for OE Users) SELECT command The SELECT command is a great way to view various columns (attributes) of a table. What’s nice about it is you can look search for various items in a table, which meet some specified criteria. For example, if you want to look at all the signals in the realanalog table which currently are in an alarm state, you could do that. The basic syntax of the SELECT command is: SELECT search_item(s) FROM table_name; There is also an extended version which looks like this: SELECT search_item(s) FROM table_name WHERE condition; where search_item(s) is replaced with the name of the attribute or attributes (columns) you want to view from the table. If searching for more than one attribute, separate them with commas. If you enter the wildcard character ‘*’ for search_items(s), all attributes in the table will be included in the search. NOTE: Exercise caution when using the ‘*’, because if you enter that, there are no limits on the amount of data you’re requesting from the table. If it’s a really large table, you could crash your system. table_name is replaced with name of a table within the OE Database. We talked about some of the commonly used table names earlier in this appendix. WHERE condition (optional) is used to specify some sort of criteria to limit the number of records (rows) displayed. Typically, you would enter an expression here, like WHERE value < 20. Here are some examples. A-4 OpenEnterprise for Beginners Appendix A - Learning SQL (A Crash Course for OE Users) Example 1: Suppose we want to know the name of every signal in the analog portion of the OE Database which is currently in an alarm state. We would enter the command: SQL> select name,value from realanalog where inalarm=TRUE; The SELECT command These are attributes (the name and value columns) that we want to be displayed from the table This is the name of the table from which we are requesting data We only want to see the records where this criteria is met. We only want to see those signals for which the Inalarm attribute (column) is currently TRUE. Here are the results of our query. There are 3 signals in the Realanalog table that are currently in an alarm state. We can see the names of these signals, and their values, because that’s what we asked to see. So now we know that when we issued that query, there were 3 signals in alarm within the Realanalog table. OpenEnterprise for Beginners A-5 Appendix A - Learning SQL (A Crash Course for OE Users) Example 2: Say we only wanted to see the names of signals in the Realanalog table, and we didn’t care about their value, or whether they were in an alarm state. We could have entered a simpler command, that specifies only one attribute, and no WHERE condition option. SQL> select name from realanalog; Our result would be a list of all the signal names (stored in the ‘name’ attribute column) of the realanalog table. +-------------------------+ | name | +-------------------------+ | 'TANKS:#RCNT.002.' | | 'TANKS:#RCNT.003.' | | 'TANKS:#RCNT.004.' | | 'TANKS:#RCNT.005.' | | 'TANKS:#RCNT.006.' | | 'TANKS:#RCNT.007.' | | 'TANKS:M1.TEMP.1' | | 'TANKS:M1.TEMP.2' | : : : : : : : : we’re not showing all the results because it would go on for 3 pages. | 'TANKS:SYS.CHARGE.TIME' | | 'TANKS:TANK.LIQUID.LEV' | +-------------------------+ Query Done: 203 records selected SQL> Pretty easy huh? But maybe you’re saying at this point, “Well that’s fine, but I’m just learning this stuff. How am I supposed to know about all these different attribute names for the columns, and which ones to use?” Good point. Some of this comes from practice. You’ll probably find that, over time, you’ll know that certain attributes are interesting to you, and others you don’t have to remember. You also could have looked in the OpenEnterprise Schema Reference Manual and read about the Realanalog table, and with a little study, and page-turning, you would have found all the different attributes for that table. A-6 OpenEnterprise for Beginners Appendix A - Learning SQL (A Crash Course for OE Users) Say you don’t want to do that, though, because you don’t have a manual nearby, you could do what we do in Example 3. Example 3: If you know that the data you are looking for is in a particular table, but you can’t remember the name of the attribute, you could look in another table, called the Attributes table. Yep, that’s right, there’s a table that shows the names of all the attributes in all the other tables: SQL> select name from attributes where table_name='realanalog'; +---------------------------+ | name | +---------------------------+ | 'name' | | 'devicename' | | 'regionname' | | 'datumaddress' | | 'scheduleid' | | 'status' | | 'disable' | | 'timestamp' | | 'forcepoll' | | 'forcewrite' | | 'private' | | 'timestampdstoffset' | | 'description' | | 'plantarea' | | 'accessarea' | | 'calloutarea' | | 'display' | | 'calloutdisplay' | | 'questionable' | | 'acknowledged' | | 'cleared' | | 'suppressiongroup' | | 'manualinhibit' | | 'controlinhibit' | | 'alarminhibit' | | 'currentalarmprecedence' | | 'printer' | | 'updatemask' | | 'changemask' | | 'readchangemask' | | 'readtrigger' | | 'dataset' | | 'lastdataset' | | 'timezone' | | 'dstoffset' | | 'hasnotes' | | 'totalnotes' | | 'base' | | 'extension' | | 'attribute' | | 'occurrencetime' | | 'resetalarmstatistics' | | 'occurrencetimedstoffset' | | 'currentdstoffset' | | 'writeoverride' | | 'locked' | | 'locker' | | 'currentlocker' | | 'inalarm' | | 'value' | OpenEnterprise for Beginners A-7 Appendix A - Learning SQL (A Crash Course for OE Users) | 'readvalue' | | 'units' | | 'lowlimit' | | 'highlimit' | +---------------------------+ Query Done: 54 records selected SQL> Example 4: Finally, let’s use a wildcard. If we want to look at the entire table called ‘dvi_schedule’ we could enter: SQL> select * from dvi_schedule; +------------+------------------------+-------------+--------+---------+ | scheduleid | maxinterval | mininterval | offset | disable | +------------+------------------------+-------------+--------+---------+ | 1 | '01-JAN-0001 00:00:10' | NULL | NULL | NULL | | 254 | '01-JAN-0001 00:00:00' | NULL | NULL | NULL | +------------+------------------------+-------------+--------+---------+ Query Done: 2 records selected It’s a small table, and we didn’t know what the attribute names in it were, so we just used the wildcard character ‘*’ where we normally would have listed the attributes. Just as we did for Realanalog though, we could have requested the names of the columns from the attributes table: SQL> select name from attributes where table_name='dvi_schedule'; +---------------+ | name | +---------------+ | 'scheduleid' | | 'maxinterval' | | 'mininterval' | | 'offset' | | 'disable' | +---------------+ Query Done: 5 records selected SQL> See, you got the five names of the columns that appeared when we requested the whole table. Be careful, though, about using wildcards on extremely large tables. Typically, this would be in OE historical tables such as raw1, which can contain tens of millions of records. For example, if A-8 OpenEnterprise for Beginners Appendix A - Learning SQL (A Crash Course for OE Users) you use a wildcard, without any WHERE condition, on one of these tables you could run into a nasty condition called - - THE KILLER QUERY! Beware the killer query, especially when using wildcards ‘*’ without a WHERE condition The tables we’ve been using so far in these examples are pretty small. If however, we had a historical table with millions of pieces of data, we shouldn’t try to bring back every attribute from that table by using a wildcard ‘*’ without some limiting condition. Why? Because we have to be very careful about exhausting all our memory with a KILLER QUERY! A killer query is a query that brings back so many records from the OE Database, that you run out of memory. As one of our OE Support Engineers says, “Your system ends up in a smoking heap! And that’s not good a good thing.” If you are using Database Explorer, you will receive a warning if you request data without any limiting conditions, but in the SQL Client, or certain third-party packages, such as Microsoft® Excel, you don’t receive any warning. For advanced users, there is a special database parameter, called: query_max_intermediate_record_count=number located in the POLY.CFG file, that you can set to prevent killer queries from doing any damage. This parameter is like a safety valve that basically cuts off the query after a certain number of records. Specify a number which represents the largest query you want to allow, and this parameter will prevent the query from returning more records than that number. If you’re not sure what number to use, experiment a little bit, before the system is active with live equipment. Try 10,000 to start, and adjust the number up or down, slightly, depending upon your results. 1 OpenEnterprise for Beginners A-9 Appendix A - Learning SQL (A Crash Course for OE Users) INSERT command The INSERT command puts information into the OE Database. The basic syntax of the INSERT command is: INSERT INTO table_name (attribute(s)) VALUES (value(s)); where table_name is replaced with name of a table within the OE Database, into which you want to insert data. attributes(s) is replaced with the name of the attribute or attributes (columns) into which you want to insert data. The number of attribute(s) must match the number of value(s). value(s) is replaced with the actual data you want to insert in the table. The number of attribute(s) must match the number of value(s). If you’re inserting more than one attribute at a time, separate the attributes with commas, and separate the values, with commas. For example, let’s say we have a table called accessareaconfig. (Access areas are a feature of OE Database security which is discussed elsewhere.) The accessareaconfig table has two attributes called ‘accessarea’ and ‘description’, and currently has two accessareas defined, called ‘ALL’ and ‘operators’. The table is shown, below: +------------------+-----------------------------------+ | accessarea | description | +------------------+-----------------------------------+ | 'ALL' | 'Default Access Area' | | 'operators' | 'Signals for operator use' | +------------------+-----------------------------------+ To insert a new access area called ‘Administration’ with a description of ‘Signals for Administrators only’ into the accessarea config table, enter the following: SQL> insert into accessareaconfig (accessarea,description) values ('Administration', 'Signals for Administrators only'); A-10 OpenEnterprise for Beginners Appendix A - Learning SQL (A Crash Course for OE Users) To take a closer look at this command, see the figure, below. This is the table into which data will be inserted The INSERT command These are the names of the attributes (columns) into which the data will be inserted This is the actual data which will be inserted in the table It’s important to note that the number of attributes (columns) into which you are inserting, must match the amount of data you are putting in. So if you are inserting data into two columns, you must have two items of data to put into those two columns. NOTE: The data is isn’t actually entered in the database until you enter one additional command, which we will talk about later. It is called the COMMIT command: SQL> commit; Once the COMMIT command has been run, the table will be updated. If you look at the table, now, it will appear as shown, below: +------------------+-----------------------------------+ | accessarea | description | +------------------+-----------------------------------+ | 'ALL' | 'Default Access Area' | | 'operators' | 'Signals for operator use' | | 'Administration' | 'Signals for Administrators only' | +------------------+-----------------------------------+ OpenEnterprise for Beginners A-11 Appendix A - Learning SQL (A Crash Course for OE Users) UPDATE command The UPDATE command lets you change information for records that are already in the OE Database. The basic syntax of the UPDATE command is: UPDATE table_name SET attribute=expression; There is also an extended version which looks like this: UPDATE table_name SET attribute=expression WHERE condition; where table_name is replaced with name of a table within the OE Database. attribute= expression specifies that attribute attribute is being set to the value of expression expression. For example, if the attribute is ‘value’ and the expression is ‘5.0’ then ‘value=5.0’ would go here. WHERE condition (optional) is used to specify some sort of criteria to limit the number of records (rows) affected by the command. Example: Below, we’re showing the ‘name’ and ‘description’ attributes for two signals from the table called ‘Signal_Table’: +------------------------+-------------+ | name | description | +------------------------+-------------+ | 'RPC5:M1.PRES.IN' | '' | | 'RPC5:M1.TEMP.IN' | '' | As you can see, the description column doesn’t have any useful information in it. We can use the UPDATE command to assign descriptive information for these signals. update signal_table set description ='MOTOR1 PRESSURE' where name ='RPC5:M1.PRES.IN'; A-12 OpenEnterprise for Beginners Appendix A - Learning SQL (A Crash Course for OE Users) update signal_table set description ='MOTOR1 TEMPERATURE' where name ='RPC5:M1.TEMP.IN'; commit; Again, let’s take a close-up look at this command: The name of the table you want to update The column in the table which contains the items you want to update This tells you which criteria you use for determining which records to update What this command says, is to go to the table called ‘signal_table’, find the records which have those signal names (‘RPC5:M1.PRES.IN’ and ‘RPC5:M1.TEMP.IN), and change the contents of their ‘description’ fields to say ‘MOTOR1 PRESSURE’ and ‘MOTOR1 TEMPERATURE’, respectively. Again, the actual updating doesn’t occur until the ‘commit;’ statement is executed. After running these statements, those attributes of the table will now look like this: +------------------------+----------------------------+ | name | description | +------------------------+----------------------------+ | 'RPC5:M1.PRES.IN' | 'MOTOR1 PRESSURE' | | 'RPC5:M1.TEMP.IN' | 'MOTOR1 TEMPERATURE' | You should be careful when you’re doing UPDATE commands. For example, what would happen if we ran these commands again, but we left out the WHERE portion? update signal_table set description ='MOTOR1 PRESSURE’; update signal_table set description ='MOTOR1 TEMPERATURE’; commit; Think about it, we’re saying go to the signal_table, and set the description attribute to ‘MOTOR1 PRESSURE’, but we haven’t limited it to any particular signal name, so ALL of the description attributes for the entire table ‘signal_table’ will be set to ‘MOTOR1 PRESSURE’. Then, since we have a second UPDATE statement, which also sets the description attribute, ALL the description attributes would then be set to ‘MOTOR1 TEMPERATURE’. After you enter COMMIT and both statements are run, the entire table will look similar to this: OpenEnterprise for Beginners A-13 Appendix A - Learning SQL (A Crash Course for OE Users) +------------------------+----------------------------+ | name | description | +------------------------+----------------------------+ | 'RPC5:M1.PRES.IN' | 'MOTOR1 TEMPERATURE' | | 'RPC5:M1.TEMP.IN' | 'MOTOR1 TEMPERATURE' | | 'RPC5:M1.DP.IN' | 'MOTOR1 TEMPERATURE' | | 'RPC5:M1.DAILY.FLOW' | 'MOTOR1 TEMPERATURE' | | 'RPC5:M1.HOURLY.FLOW' | 'MOTOR1 TEMPERATURE' | | 'RPC5:M2'PRES.IN’ | 'MOTOR1 TEMPERATURE' | | 'RPC5:M2.TEMP.IN' | 'MOTOR1 TEMPERATURE' | | 'RPC5:M2.DP.IN' | 'MOTOR1 TEMPERATURE' | : : and it would continue on throughout the entire table. As you can see, you have to be careful when using the UPDATE command. DELETE command As you might expect, the DELETE command removes records from the OE Database. Be careful when using the DELETE command! Use extreme caution when using the DELETE command. You are actually deleting records from the OE Database. Make sure you enter the command correctly, or you could accidentally delete an entire table, instead of certain records in the table. The basic syntax of the DELETE command is: DELETE FROM table_name WHERE condition; where table_name is replaced with name of a table within the OE Database. table_name is replaced with name of a table within the OE Database. WHERE is used to specify some sort of criteria to limit the A-14 OpenEnterprise for Beginners Appendix A - Learning SQL (A Crash Course for OE Users) condition (optional) number of records (rows) deleted. Typically, you would enter an expression here, like WHERE value < 20. Example - Deleting a Signal So for example, if you have a signal called RPC5:M1.TEMP.IN in the database, as shown in the portion of the database, below: +------------------------+----------------------------+ | name | description | +------------------------+----------------------------+ | 'RPC5:M1.PRES.IN' | 'MOTOR1 PRESSURE' | | 'RPC5:M1.TEMP.IN' | 'MOTOR1 TEMPERATURE' | | 'RPC5:M1.DP.IN' | 'MOTOR1 DIFF PRESSURE' | delete from realanalog_table where name=’RPC5:M1.TEMP.IN; commit; would completely remove the signal RPC5:M1.TEMP.IN from the realanalog_table. Obviously, you want to be very careful using this command. +------------------------+----------------------------+ | name | description | +------------------------+----------------------------+ | 'RPC5:M1.PRES.IN' | 'MOTOR1 PRESSURE' | | 'RPC5:M1.DP.IN' | 'MOTOR1 DIFF PRESSURE' | Be really careful. If you omit the ‘FROM’ portion of the command, and the ‘WHERE’ portion, you can obliterate the entire table. Don’t do that!!! Always specify a FROM and a WHERE. Example - Using LIKE and the Wildcard in your DELETE Command You can also use wildcards in the DELETE command (or the INSERT, UPDATE, or SELECT commands, for that matter). They are used with a modifier called LIKE. In SQL, the wildcard symbol ‘%’ (not the ‘*’ we used earlier) means that a particular portion of an expression can be anything. For example, if you have an expression that says WHERE description LIKE ‘MOTOR%’ OpenEnterprise for Beginners A-15 Appendix A - Learning SQL (A Crash Course for OE Users) that means the description must begin with ‘MOTOR’ but the %’ can be replaced with anything else. So MOTOR1, MOTOR2, or even MOTOR HOME would all be okay. For example, say we want to delete all the signals from a table that have names starting with the word ‘SYSTEM’. We can use: delete from realanalog_table where name LIKE 'SYSTEM:%'; commit; COMMIT command We’ve already used the COMMIT command in several of our examples, but we didn’t really talk about what it does. Any SQL command which actually changes the database (i.e. it is writing to the database, not just reading information) won’t actually be executed, until a COMMIT command is run. This is actually useful because you can enter several different commands that you all want performed sequentially, and they won’t be executed until the COMMIT is issued. So, in other words, if you are using the UPDATE, INSERT, or DELETE commands, they won’t be executed until a COMMIT is entered, because they all change the contents of the OE Database. The advantage of COMMIT is that if you make a big mistake, and you haven’t typed commit yet, you can exit out of the SQL Client, ending the session, without any of the erroneous commands being executed, because you didn’t issue the COMMIT. (You can also type in the command ROLLBACK to have the same effect, without ending the session.) NOTE: The SELECT command doesn’t need a COMMIT, because it just reads data from the OE Database; it doesn’t change the data, add new data, or remove data. EXIT command The EXIT command is pretty straightforward. It lets you shut down the SQL Client, thereby ending your current session with the OE Database. The OE Database itself is still running, you just aren’t communicating with it through the SQL Client. A-16 OpenEnterprise for Beginners Appendix A - Learning SQL (A Crash Course for OE Users) INCLUDE Command, and SQL Script Files - What Are They? Hopefully, after reviewing these examples, you can see that SQL is a pretty powerful language, and a great way to extract information from the OE Database. These examples have covered the basic stuff, that you will need to know. Why do they call them SCRIPTS? If you actually tried out the commands with a real OE Database, you might have noticed that typing in all these commands can be tedious. For that reason, we strongly recommend you make use of SQL script files, wherever possible. When movie or TV directors create a new movie or television program, they have actors who recite lines of dialogue on a cue from the director, that were written ahead of time. These lines of dialogue are called a script. Similarly, in SQL, script files contain a collection of commands that are written ahead of time, by the SQL programmer. The script files are executed ‘on cue’ when an INCLUDE command calls the script file. OpenEnterprise for Beginners A-17 Appendix A - Learning SQL (A Crash Course for OE Users) SQL script files are simply text files which include sequences of SQL commands. For example, we could have typed some of our SQL commands into a text file in a text editor (such as Notepad). Here we used some of our UPDATE commands, and saved them in a file named ‘mytestfile.SQL’: update signal_table set description ='MOTOR1 PRESSURE' where name ='RPC5:M1.PRES.IN'; update signal_table set description ='MOTOR1 TEMPERATURE' where name ='RPC5:M1.TEMP.IN'; commit; mytestfile.SQL Then, in the SQL Client, you can run this file, just as if you were typing it in, by including it, using the INCLUDE command. SQL>include mytestfile; This will have the exact same result as if you entered it manually in the SQL client. What are the advantages of using SQL files instead of typing commands in directly? There are several reasons why SQL files are more useful than just typing commands in directly: • In an SQL file, you can easily correct mistakes, because you’re using a text editor. It also gives you the opportunity to check things over carefully, before you actually run the file. • You have all the advantages of the text editor, for example, you can ‘Cut’ and ‘Paste’, ‘Find’ and ‘Replace’, etc. That allows you to generate large amounts of SQL statements quickly, because you can re-use text from earlier statements. • Perhaps the biggest advantage in using SQL script files is that you have a record of what commands were performed. This allows you to go back and identify problems, if it turns out you have a configuration error in the OE Database. It also allows you to re-issue those commands at some time in the future, if you need to re-build some part of your OE system. A-18 OpenEnterprise for Beginners Appendix A - Learning SQL (A Crash Course for OE Users) Custom SQL Files Can be Very Useful… Now that we’ve sold you on the idea of using script files (we hope, anyway), we want to strongly recommend that when you do, you only call those script files from within the Bristol Custom Files. The Bristol Custom Files are a set of SQL script files which are used on all customer projects. They are used for setting up various OE features such as the historical system, the security system, etc. So if you have SQL statements you want to perform on a particular part of the OE system, find the appropriate custom file, and call your SQL script file, from within that file. This ensures that if need to see which SQL commands were executed on the OE Database, you can find the file. If you don’t include a reference in the custom file, you might not remember the name of your own script file, and then you’re out of luck. REMEMBER: If you’re creating your own scripts, call them from within the Bristol Custom Files. The details of the custom files are beyond the scope of this manual; however, if you used the Database Project Builder, discussed in Chapter 3, to build the database, these custom files were created for you automatically. A special batch file called OERebuild.CMD can be used to rebuild your database to its initial state using these custom files. You should only use this, though, if you’ve kept the custom files up to date with your latest changes, otherwise, the rebuild would overwrite all changes made since the initial custom SQL files were generated. Where can I get more information? Now that you’ve finished this appendix, you should have at least a minimal understanding of what SQL is used for. • If you’re really interested in Structured Query Language (SQL) you might want to look at the Polyhedra SQL Reference Manual. In addition, since SQL is an industry standard, there are numerous books available. Just stroll down the ‘Computers’ aisle of your local bookstore, and you’ll likely find several books on SQL. • If you’re really curious about all the different tables in OpenEnterprise, you can find information in the OE Schema Reference Manual. • If you want to learn about Database Explorer, which is the other main method for looking at the contents of the OE Database, please go to Chapter 4. OpenEnterprise for Beginners A-19 OpenEnterprise for Beginners A-1 Training Manual D5091 June, 2007 Bristol OpenEnterprise Emerson Process Management Bristol, Inc. 1100 Buckingham Street Watertown, CT 06795 Phone: +1 (860) 945-2262 Fax: +1 (860) 945-2525 www.EmersonProcess.com/Bristol Emerson Electric Canada, Ltd. Bristol Canada 6338 Viscount Rd. Mississauga, Ont. L4V 1H3 Canada Phone: 905-362-0880 Fax: 905-362-0882 www.EmersonProcess.com/Bristol Emerson Process Management BBI, S.A. de C.V. Homero No. 1343, 3er Piso Col. Morales Polanco 11540 Mexico, D.F. Mexico Phone: (52-55)-52-81-81-12 Fax: (52-55)-52-81-81-09 www.EmersonProcess.com/Bristol Emerson Process Management Bristol Babcock, Ltd. Blackpole Road Worcester, WR3 8YB United Kingdom Phone: +44 1905 856950 Fax: +44 1905 856969 www.EmersonProcess.com/Bristol Emerson Process Management Bristol, Inc. 22 Portofino Crescent, Grand Canals Bunbury, Western Australia 6230 Mail to: PO Box 1987 (zip 6231) Phone: +61 (8) 9725-2355 Fax: +61 (8) 8 9725-2955 www.EmersonProcess.com/Bristol NOTICE “Remote Automation Solutions (“RAS”), division of Emerson Process Management shall not be liable for technical or editorial errors in this manual or omissions from this manual. RAS MAKES NO WARRANTIES, EXPRESSED OR IMPLIED, INCLUDING THE IMPLIED WARRANTIES OF MERCHANTABILITY AND FITNESS FOR A PARTICULAR PURPOSE WITH RESPECT TO THIS MANUAL AND, IN NO EVENT SHALL RAS BE LIABLE FOR ANY INCIDENTAL, PUNITIVE, SPECIAL OR CONSEQUENTIAL DAMAGES INCLUDING, BUT NOT LIMITED TO, LOSS OF PRODUCTION, LOSS OF PROFITS, LOSS OF REVENUE OR USE AND COSTS INCURRED INCLUDING WITHOUT LIMITATION FOR CAPITAL, FUEL AND POWER, AND CLAIMS OF THIRD PARTIES. Bristol, Inc., Bristol Babcock Ltd, Bristol Canada, BBI SA de CV and the Flow Computer Division are wholly owned subsidiaries of Emerson Electric Co. doing business as Remote Automation Solutions (“RAS”), a division of Emerson Process Management. FloBoss, ROCLINK, Bristol, Bristol Babcock, ControlWave, TeleFlow and Helicoid are trademarks of RAS. AMS, PlantWeb and the PlantWeb logo are marks of Emerson Electric Co. The Emerson logo is a trademark and service mark of the Emerson Electric Co. All other trademarks are property of their respective owners. The contents of this publication are presented for informational purposes only. While every effort has been made to ensure informational accuracy, they are not to be construed as warranties or guarantees, express or implied, regarding the products or services described herein or their use or applicability. RAS reserves the right to modify or improve the designs or specifications of such products at any time without notice. All sales are governed by RAS’ terms and conditions which are available upon request. © 2007 Remote Automation Solutions, division of Emerson Process Management. All rights reserved.