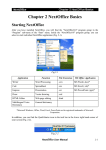
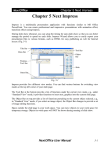
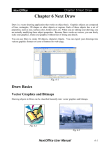
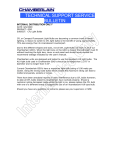
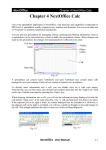
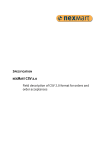
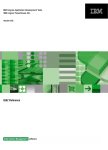
1
NextOffice
Chapter 12 NextOffice IntelliForm
Chapter 12 NextOffice IntelliForm
SME Business Scenarios
Many SME today still use spreadsheets to track their valuable business data, such as order
details. Although database technologies for PC and small work group have been existing in the
IT industry for a long time, they are never very popular in (small) SME companies.
On one side, database technologies provide certain advantages, such as:
• Better management of business data/information.
• Better scalability which can be extended easily along with the growth of business.
• Business data analysis flexibility.
On the other side, the trade-offs are:
Database is technically too complicated for non-IT users and therefore usually requires
someone to act as a Database Administrator.
• Customizing of database applications usually involves professional programmers and is
quite expensive to a SME company.
•
Most SME are already too busy with activities that generate direct revenues. Information
technologies, such as database, which even though may in long run improve their overall
productivity, are not in their top priority lists in short and medium terms.
Solutions for small SME are better to be conceptually simple and easy to be managed because
additional head count, like DBA, may not be justifiable.
In SME offices, the most common front office applications are Word Processing, Spreadsheet,
Email, and the most common back office applications are AR and AP related applications
because these functions tie to SME's direct cash flow.
Today, many SME are still spending a lot of time in preparing documents by copy-and-paste data
from one document to another. For example, an invoice and a “delivery note” have many
information (such as customer name, address, order items, etc.) in common but, without an
integrated application, an office worker may have to copy (or re-type) the information from an
invoice in order to generate the delivery note. Any type of automation towards this direction will
significantly improve the productivity of SME.
In addition, if the SME have to somehow select and filter information from invoices to perform
some sort of data analysis (such as to evaluate the credit line of customer), it will be very painful
without some sort of automation.
IntelliForm is therefore developed with the above rationale in mind and is targeted to improve
productivity for SME.
NextOffice User Manual
12-1
NextOffice
Chapter 12 NextOffice IntelliForm
IntelliForm Structure
IntelliForm models the SME data using spreadsheets. Even though NextOffice has a very
sophisticated architecture that supports various database systems (e.g. MySQL, Firebird), we
have not adopted a database approach to build IntelliForm because a database approach is not
easily manageable for most SME office workers.
Taking the Account Receivable functions as an example:
•
The pre-sales process will involve submission of product information/catalogs, issuing of
quotations, negotiations with the customers, exchanging correspondences and finally a sales
engagement realized by a purchase order.
•
During the fulfillment process, a delivery note is issued together with the service/goods
shipped. Then followed by an invoice, and maybe an official receipt or statement on
payment received.
In IntelliForm, we model the Invoice database by a spreadsheet.
The invoice spreadsheet contains information to fully/partially generate the following
documents:
•
•
•
•
•
•
Invoice (Fig.12-1)
Packing List
Delivery Note (Fig.12-2)
Certificate Of Origin
Shipping Note
Official Receipt
Fig.12-1
Fig.12-2
Through NextOffice automation, what a SME office user has to do is to:
12-2
NextOffice User Manual
NextOffice
•
Chapter 12 NextOffice IntelliForm
Select a record by picking an entry in the Invoice spreadsheet (Fig.12-3)
Fig. 12-4
Fig. 12-3
•
Click on “IntelliForm” icon (Fig. 12-4) on the Tool Bar to pop-up a dialog.
•
Select the desired document in the pop-up dialog. (Fig. 12-5)
Fig. 12-5
IntelliForm will then automatically generate the required document. Data is extracted from the
Invoice spreadsheet and merged with a document or template (e.g, if you select to generate an
invoice, the data will be merged with the “Invoice” template). User can edit the template using
Writer and then save the template.
The most significantly benefit to SME users may be in statistical analysis. Account Receivables
usually come from fulfilled orders and are dependent on the credit terms of the orders. Without
an efficient AR management system, SME will not be able to track AR efficiently if the number
of orders increases. When Receivables are not tracked correctly and efficiently, it is a potential
risk in cash flow management.
NextOffice User Manual
12-3
NextOffice
Chapter 12 NextOffice IntelliForm
In our Invoice IntelliForm, intelligence is built into the Invoice spreadsheet, a SME user can
easily generate the following reports by simply clicking a few buttons:
•
•
•
•
•
•
AR Overdue Summary Report (Fig. 12-6)
AR (7 Days) Overdue Report
AR (14 Days) Overdue Report (Fig. 12-7)
AR (30 Days) Overdue Report
AR (60 Days) Overdue Report
AR (90 Days) Overdue Report
Fig. 12-6
Fig. 12-7
IntelliForm automatically handles the complex calculation involved in the background.
Customization on IntelliForm
Every IntelliForm requires certain customizations, including:
1.
Personal data customization
2.
Template layout customization (e.g. adding company logo).
3.
Spreadsheet data customization
Personal Data Customization
During the installation of NextOffice, you will be prompted to enter your personal detail.
However, you may have chosen to skip this step. When using IntelliForm, your personal detail is
required because they will be part of the information shown on the output documents and
reports.
The steps to customize your personal information are:
12-4
NextOffice User Manual
NextOffice
Chapter 12 NextOffice IntelliForm
•
In NextOffice, select menu “Tool” → “Option” → “NextOffice” → “User Data”.
•
In the pop-up “User Information” dialog box (Fig. 12-8) , fill in your personal detail.
Fig. 12-8
Fields
Description
Company
Your company name to be shown on the headers of the templates and
reports.
Name/Surname
Your name to be shown in letter templates.
Address
Your company address to be shown on the headers of the templates and
reports.
Country
Your country name (part of the company address) to be shown on the
templates and reports.
Title
Your title to be shown in letter templates.
Office Phone
Number
Your phone number to be shown on the headers of the templates and
reports.
Fax Number
Your fax number to be shown on the headers of the templates and reports
Email Address
Your email address to be shown on the headers of the templates and
reports
NextOffice User Manual
12-5
NextOffice
Chapter 12 NextOffice IntelliForm
Template Layout Customization
IntelliForm comes with more than 30 template documents. In most cases, each of the template is
for a single purpose. For example, the “Invoice” template is for generating the invoice only; the
“Delivery Note” template is for generating the “Delivery Note” only. The “Report” template is
an exception, it is for all report generation.
IntelliForm templates are stored under your Windows personal folder, under the sub-folder name
“NextOffice9.0\user\templates”. For example, if your Windows is in “C:” drive and your user
name is
“Demo”, the template documents will be found in “C:\Documents and
Settings\demo\Application Data\NextOffice9.0\user\templates” (Fig. 12-9)
The steps to customize a template's layout are:
•
Select menu “File”→ “Open”
•
In the “Open File” dialog box, pick your desired template. (Fig. 12-10)
Fig. 12-9
•
Fig. 12-10
The selected template will then be loaded for
editing. (Fig. 12-11). You can change its layout as if
you were working on a text document. For example,
you can replace the logo in the top left corner with
your company logo.
Fig. 12-11
12-6
NextOffice User Manual
NextOffice
•
Chapter 12 NextOffice IntelliForm
After you have made the change, select menu “File” → “Save” to save your changes to the
template document.
You can verify your changes re-loading the template document:
•
Select menu “File”→ “Open” and pick the template document which you have just changed.
•
Confirm the changes are done. If not, repeat the procedures stated in “Template Layout
Customization” and make sure you save the change.
User Fields Customization
Every template in IntelliForm may carry two types of fields:
–
Sender Fields (which are defined in menu “Tool” → “Options” → “NextOffice” → “User
Data”)
–
User Defined Fields
You need to setup the data linkage between the fields and your data source. In IntelliForm, data
sources are your spreadsheets.
Inserting Sender Fields
For example, if you would like to insert your office number into a template document, what you
have to do is to insert the sender field named “Office Number” in the right position in your
document. This is done by the following steps:
•
Open your template document for editing
•
Position your cursor to the location where you would like to insert the “Office Number”.
•
Select menu “Insert” → “Fields” → “Others” to
bring up the “Insert Field” dialog box.
•
In the “Insert Field” dialog box (Fig. 12-12), select
the “Document” tab, under “Field Type”, select
“Sender” and under “Select” list, pick “Office
Phone”.
•
Finally, select the “Insert” button to insert the
selected field into the cursor position.
Fig. 12-12
NextOffice User Manual
12-7
NextOffice
Chapter 12 NextOffice IntelliForm
User Defined Fields Customization
Taking the “Delivery Note” as an example, we would like to merge the customer's detail, such as
the company name, into the Delivery Note document. The customer detail is defined in the
“Invoice” spreadsheet. The following user-defined fields are defined by NextOffice in our
templates:
Field Name in
Templates
InvoiceNbr
Corresponding
Fields Names
in IntelliForm
Invoice No.
Description
Invoice number in the “Invoice” spreadsheet
InvoiceDate
Date
Invoice date in the “Invoice” spreadsheet
PONbr
PO No.
Purchase Order number in the “Invoice” spreadsheet
PODate
PO date
Purchase Order date in the “Invoice” spreadsheet
OrderDate
Sales Order No. Order issue date in the “Invoice” spreadsheet
CustomerName
Company Name Company name in the “Invoice” spreadsheet or
“Vendor” spreadsheet
Address1
Address 1
Address line 1 in the “Invoice” or “Vendor” or
“Contact” spreadsheet
Address2
Address 2
Address line 2 in the “Invoice” or “Vendor” or
“Contact” spreadsheet
Address3
Address 3
Address line 3 in the “Invoice” or “Vendor” or
“Contact” spreadsheet
Address4
Address 4
Address line 4 in the “Invoice” or “Vendor” or
“Contact” spreadsheet
CustomerContact
Contact Person
Contact person name in the “Invoice” spreadsheet
CustomerTelephone
Tel. No.
Contact person phone number in the “Invoice”
spreadsheet
CustomerFax
Fax No.
Contact person fax number in the “Invoice”
spreadsheet
SupplierNbr
Supplier No.
Supplier number assigned by the order issuer in the
“Invoice” spreadsheet
ShippedBy
Shipped By
Specify the shipment method in the “Invoice”
spreadsheet
ShipFrom
From
Specify the originating port in the “Invoice”
spreadsheet
12-8
NextOffice User Manual
NextOffice
Field Name in
Templates
Chapter 12 NextOffice IntelliForm
Corresponding
Fields Names
in IntelliForm
Description
ShipTo
To
Specify the destination port in the “Invoice” spreadsheet
ShipOn
N/A
PaymentTerm
Payment Term
Payment term in the “Invoice” spreadsheet
DueDate
Due Date
Invoice due date in the “Invoice” spreadsheet
ItemNbr
Item No. 1
The item number, if any, assigned by the order issuer.
Item1
Item 1
For multiple item order, the 1st item description in the
“Invoice” spreadsheet.
Qty1
Quantity 1
For multiple item order, the quantity description of the
1st item in the “Invoice” spreadsheet.
UnitPrice1
Unit Price 1
For multiple item order, the unit price description of the
1st item in the “Invoice” spreadsheet.
Amount1
"Amount 1
For multiple item order, the amount description for the
1st item in the “Invoice” spreadsheet.
DeliveryNbr
N/A
Delivery note number in the “Invoice” spreadsheet
DeliveryDate
N/A
Delivery date, if any, in the “Invoice” spreadsheet
DeliveryMethod
N/A
Delivery method, if any, in the “Invoice” spreadsheet
DeliveryTo
N/A
Delivery address, if any, in the “Invoice” spreadsheet
ShipCondition
N/A
ShippingMark
N/A
Total
Total
Total amount in dollar for the order.
PaymentReceived Payment
Received
A “Y” indicates payment received for the order.
LCNbr
L/C number, if any, in the “Invoice” spreadsheet.
LC No.
LCDate
LC Date
L/C date, if any, in the “Invoice” spreadsheet.
LCBank
Issuing Bank
L/C issuing bank, if any, in the Invoice spreadsheet.
You have to insert user defined fields into the right positions in the “Delivery Note” and setup
the linkage between the “Delivery Note” and the “Invoice” spreadsheet. The linkage setup is
quite complicated and requires programming skill. Fortunately, this “field - data” linkage had
already setup in IntelliForm. What you have to do is to insert only the user-defined fields.
NextOffice User Manual
12-9
Chapter 12 NextOffice IntelliForm
NextOffice
This is done by the following procedure (taking Invoice Number as an example):
•
Open your template document for editing.
•
Position your cursor to the location where you would like to insert the “Invoice Number”.
•
Select menu “Insert” → “Fields” → “Others” to bring up the “Insert Field” dialog.
•
In the “Insert Field” dialog box, select the “Variables” tab, under “Field Type”, select “User
Defined” and under “Select” list, pick “InvoiceNbr”. (Fig. 12-13)
Fig. 12-13
•
Finally, select the “Insert” button to insert the selected field into the cursor position.
Spreadsheet Customization
The intelligence of IntelliForm had built into the spreadsheet. Therefore, if you would like to
deploy IntelliFom, you must plot you existing data to the IntelliForm spreadsheet. Currently, we
have created 4 different spreadsheets:
•
•
•
•
AR Processing – Invoice Spreadsheet
AP Processing – Vendor Payable Spreadsheet
Inventory Tracking – Inventory Movement Spreadsheet
Customer Correspondences Handling – Contact Spreadsheet
12-10
NextOffice User Manual
NextOffice
Chapter 12 NextOffice IntelliForm
The column names of each spreadsheet must remain unchanged. The positions of the column are
better to remain unchanged. The names and positions are crucial to the data linkage setup
between the spreadsheets and the template documents.
Take Invoice spreadsheet as an example. If you would like to create everything from scratch :
•
Select menu “File” → “New” → “Templates”.
•
In the pop-up dialog, select “Intelliform” (Fig. 12-14, 12-15) catalog and then pick the
template (in this example, it should be “Invoice”).
•
A copy of the document derived from your selected template will be created.
Fig. 12-14
Fig. 12-15
•
Delete data starting from row 2 downwards.
•
Select menu to save the newly create spreadsheet in a different name.
•
Now you can enter your data starting from Row 2.
If you would like to migrate your existing data to an IntelliForm spreadsheet, the steps are:
•
Select menu “File” → “New” → “Templates”.
•
In the pop-up dialog, select “Intelliform” (Fig. 12-14) catalog and then pick the template (in
this example, it should be “Invoice”).
•
A copy of the document derived from your selected template will be created for editing.
•
Select menu to save the newly create spreadsheet in a different name.
•
Open your existing spreadsheet containing live data, cut-and-paste column by column into
the newly create IntelliForm spreadsheet. You have to carefully to fill in information that
are required by IntelliForm spreadsheet but that do not exist in your existing spreadsheet.
NextOffice User Manual
12-11
NextOffice
Chapter 12 NextOffice IntelliForm
Operating IntelliForm
The following sections describe the procedures to use IntelliForm spreadsheet to generate
template documents and reports.
Account Receivable Processing – Invoice Spreadsheet
1.
Open your order spreadsheet. You will see the “IntelliForm” icon being loaded
automatically into your Tool Bar.
2.
If you want to generate documents pertaining to only a single order record, highlight that
record and click the “IntelliForm” icon (Fig. 12-16) . If you would like to generate reports,
simply press the “IntelliForm” icon.
3.
A “Select Form” dialog box (Fig. 12-17) will be popped up, pick you choice and press
<Next> button to continue. The required document or report will be generated. You can
further touch up on the output document before printing or distribution.
Fig. 12-16
Fig. 12-17
The following documents are available in the Invoice spreadsheet:
•
•
•
•
•
•
•
Certificate of Origin
Delivery Note
Invoice with LC Details
Invoice without LC Details
Official Receipt
Packing List
Shipping Advise
12-12
NextOffice User Manual
NextOffice
Chapter 12 NextOffice IntelliForm
The following reports are available in the Invoice spreadsheet:
•
•
•
•
•
•
AR (7 Days) Overdue Report
AR (14 Days) Overdue Report (Fig. 12-18)
AR (30 Days) Overdue Report
AR (60 Days) Overdue Report
AR (90 Days) Overdue Report
AR All Overdue Report (Fig. 12-19)
Fig. 12-18
Fig. 12-19
AP Processing – Vendor Payable Spreadsheet
1.
Open your “Vendor Payable” spreadsheet. You will see the “IntelliForm” icon being loaded
automatically into your Tool Bar.
2.
If you would like to generate reports, simply click the “IntelliForm” icon.
Fig. 12-20
Fig. 12-21
NextOffice User Manual
12-13
NextOffice
Chapter 12 NextOffice IntelliForm
3.
A “Select Form” dialog box (Fig. 12-21) will be popped up, pick you choice and press
<Next> button to continue. The required document or report will be generated. You can
further touch up on the output report before printing or distribution.
The following reports are available in the “Vendor Payable” spreadsheet:
•
•
•
•
•
•
•
•
Cash Out Flow Report
AP (7 Days) Settlement Report
AP (14 Days) Settlement Report
AP (30 Days) Settlement Report
AP (60 Days) Settlement Report
AP (90 Days) Settlement Report
AP All Settlement Report (Fig. 12-22)
AP All Settlement Report by Job ID (Fig. 12-23)
Fig. 12-22
Fig. 12-23
Customer Correspondence Handling – Contact Spreadsheet
1.
Open your “Contact” spreadsheet. You will see the “IntelliForm” icon being loaded
automatically into your tool bar.
2.
If you would like to generate template documents, simply click the “IntelliForm” icon. (Fig.
12-24)
Fig. 12-24
Fig. 12-25
12-14
NextOffice User Manual
NextOffice
3.
Chapter 12 NextOffice IntelliForm
A “Select Form” dialog box (Fig. 12-25) will be popped up, pick you choice and press
<Next> button to continue. The required documents will be generated. You can further
touch up on the output document before printing or distribution.
The following documents are available in the order spreadsheet:
•
•
•
•
•
•
•
•
•
•
•
Follow-up on Proposal
2nd Follow-up on Proposal
Reply to Product Inquiry (Sample 1) (Fig. 12-26)
Reply to Product Inquiry (Sample 2)
Confirmation of Meeting Minutes
Confirmation of Contract
Thank you for inquiry here is the catalog
Rejection of Counter Proposal (Fig. 12-27)
Rejection of Proposal
Request to Contract for Reference
Request to Consider Our Bid Proposal
Fig. 12-26
Fig. 12-27
NextOffice User Manual
12-15
NextOffice
Chapter 12 NextOffice IntelliForm
Human Resource Handling – Employee Spreadsheet
1.
Open your “Employee” spreadsheet. You will see the “IntelliForm” icon being loaded
automatically into your tool bar.
2.
If you would like to generate template documents, simply press the “IntelliForm” icon. (Fig.
12-28)
Fig. 12-28
Fig. 12-29
3.
A “Select Form” dialog box (Fig. 12-29) will be popped up, pick you choice and press
<Next> button to continue. The required documents will be generated. You can further
touch-up on the output document before printing or distribution.
The following documents are available in the order spreadsheet:
•
•
•
•
•
Employment Letter (Fig. 12-30)
Promotion Notification
Employee Invention Agreement
Employee Non-compete Agreement (Fig. 12-31)
Request Employee to Attend Seminar
Fig. 12-30
12-16
Fig. 12-31
NextOffice User Manual