1
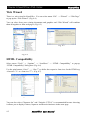
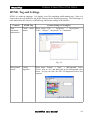
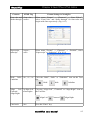
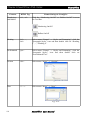
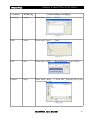
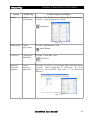
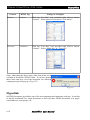
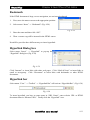
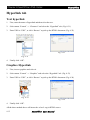
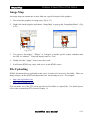
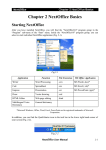
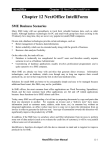
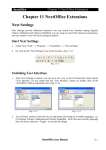
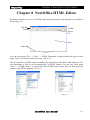
NextOffice
Chapter 8 NextOffice HTML Editor
Chapter 8 NextOffice HTML Editor
NextOffice includes an easy to use HTML editor with user interface and functions very similar to
Writer. (Fig. 8-1)
Title bar
Toolbar
Menu
Object
bar
Page
Status bar
Fig. 8-1
You can select menu “File” → “New” → “HTML Document” to open a blank web page or select
menu “Open” to load an existing web page. (Fig. 8-2)
The user interface in HTML editor resembles very much that of the Writer. But when you save
your document, it will be saved automatically as HTML format. You can also select menu
“View” → “HTML Source” to switch your file to HTML source mode. You can then make any
changes using HTML language. (Fig. 8-3)
Fig. 8-3
Fig. 8-2
NextOffice User Manual
8-1
NextOffice
Chapter 8 NextOffice HTML Editor
Web Wizard
There is a web wizard in NextOffice. You can select menu “File” → “Wizard” → “Web Page”
to pop-up the “Web Wizard”. (Fig. 8-4)
You can select from your existing documents and graphics and “Web Wizard” will combine
them all together to form web pages. (Fig. 8-5)
Fig. 8-5
Fig. 8-4
HTML Compatibility
Select menu “Tools” → “Options” → “Load/Save” → “HTML Compatibility” to pop-up
“HTML Compatibility” dialog box. (Fig. 8-6)
Use the spin buttons “Size 1”, ..., “Size 7” to define the respective font sizes for the HTML tag
<font size="1"> to <font size="7">. (Fig. 8-7)
Fig. 8-7
Fig. 8-6
You can also select “Character Set” and “Unicode (UTF-8)” is recommended because choosing
it allows you to display Chinese, Japanese and Korean characters in the same page.
8-2
NextOffice User Manual
NextOffice
Chapter 8 NextOffice HTML Editor
HTML Tag and Settings
HTML is a mark-up language. It is simply a text file containing small markup tags. Since it is
restricted by the tag definition, not all the formats can be displayed properly. The following is a
table which lists the reference of HTML tags and format settings in NextOffice:
Contents
Title,
Document
information
HTML Tag
Format Settings in NextOffice
<title>, <meta Select menu “File” → “Properties” → “Description” →
name>
“Title”, “Subject”, “Keywords” or “Comments”.
Fig. 8-8
Background
colour
<body
bgcolor>
Select menu “Format” → “Page” → “Background”, select
“Color” next to “As” and then pick up the background color
below. Or you can click “No Fill” if background color is not
required.
Fig. 8-9
NextOffice User Manual
8-3
NextOffice
Chapter 8 NextOffice HTML Editor
Contents
HTML Tag
Background
graphics
<body
background>
Format Settings in NextOffice
Select menu “Format” →
“Page” → “Background”,
select “Graphic” next to “As”
and then click on “Browse” to
pick up background graphics
file.
Fig. 8-10
Color
hyperlink
of <body
link/vlink>
Select menu “Format” → “Styles and Formatting” to pop-up
“Styles and Formatting” dialog box. Click the “Character
Styles” icon, and then select “Internet Link” or “Visited
Internet Link”. Right-click and choose “Modify”.
Fig. 8-11
Font type and <font face>,
size
<font size>
Select menu “Format” → “Character” → “Font”, select
“Font” and “Size” for font type and size respectively.
Fig. 8-12
8-4
NextOffice User Manual
NextOffice
Contents
Chapter 8 NextOffice HTML Editor
HTML Tag
Font color and <font color>,
Strike through <strike>
Format Settings in NextOffice
Select menu “Format” → “Character” → “Font Effects”,
select “Font Color” and “Strike through” for font color and
single strike line respectively. (Fig. 8-13)
Fig. 8-13
Superscript,
subscript
<super>,
<sub>
Select menu “Format” → “Character” → “Position”, select
“Superscript” or “Subscript”. (Fig. 8-14)
Fig. 8-14
Bold, Italic, <b>, <i>, <u> Click the “Bold”, “Italic” or “Underline” icon on the Tool
Underline
Bar.
Bold
Align
Left, <p align=left/
center/right>
Centered,
Align Right
<br>
Underline
Click the “Align Left”, “Centered” or “Align Right” icon on
the Tool Bar.
Align Left
Line break
Italic
Centered
Align Right
Press the “Enter” key.
NextOffice User Manual
8-5
NextOffice
Chapter 8 NextOffice HTML Editor
Contents
Numberings
and Bullets
HTML Tag
<ol>, <ul>
Format Settings in NextOffice
Click the “Numbering On/Off” or “Bullets On/Off” icon on
the Tool Bar.
Numbering On/Off
Bullets On/Off
Heading
<h1>, ...,
<h6>
Select menu “Format” → “Styles and Formatting”, click the
“Paragraph Styles” icon and then double click on “Heading
1”, ..., “Heading 6”.
Preformatted
<pre>
Select menu “Format” → “Styles and Formatting”, click the
“Paragraph Styles” icon and then double click on
“Preformatted Text”.
Section
<div>
Select menu “Insert” → “Section”.
Fig. 8-15
Note
<!-- -->
Select menu “Insert” → “Note”.
Fig. 8-16
8-6
NextOffice User Manual
NextOffice
Contents
JavaScript
Chapter 8 NextOffice HTML Editor
HTML Tag
<script>
Format Settings in NextOffice
Select menu “Insert” → “Script”.
Fig. 8-17
Table
<table>
Select menu “Insert” → “Table”.
Fig. 8-18
Line
<hr>
Select menu “Insert” → “Horizontal Ruler”, select “Plain”.
Fig. 8-19
Graphics
<img>
Select menu “Insert” → “From File”, and then pick up the
required graphics file.
Fig. 8-20
NextOffice User Manual
8-7
NextOffice
Chapter 8 NextOffice HTML Editor
Contents
Applet
HTML Tag
<applet>
Format Settings in NextOffice
Select menu “Insert” → “Object” → “Applet”.
Fig. 8-21
Form Items
You can make use of the “Controls” tool bar to insert form item. To activate the “Control” tool
bar, click the arrow next to the “Control” icon on the tool bar. (Fig. 8-22)
Fig. 8-22
8-8
NextOffice User Manual
NextOffice
Content
Button
Chapter 8 NextOffice HTML Editor
HTML Tag
Format Settings in NextOffice
<input
type=button>
Click the “Push Button” icon, and then right click and choose
“Control”. Enter display text in “Label”.
Push Button
Fig. 8-23
Radio Button
Check box
Input box,
Password
input box
<input
type=radio>
Click the “Option Button” icon.
<input type=
checkbox>
Click the “Check Box” icon.
<input
type=text/
password>
Click the “Text Box” icon and then right click and choose
“Control”. Select “Single-line” as “Text type”. If it is an
input box for password, then enter “*” in “Password
character”.
Option Button
Check Box
Fig. 8-24
NextOffice User Manual
8-9
NextOffice
Chapter 8 NextOffice HTML Editor
Contents
List box
HTML Tag
<select>
Settings in NextOffice
Click the “List Box” icon, and then right click to choose
“Control”. Enter options for list box in “List entries”.
Fig. 8-25
Text area
<textarea>
Click the “Text Box” icon and then right click to choose
“Control”. Select “Multi-line” in “Text type”.
Fig. 8-26
Notes: Other than the above items, other form items are not
available in NextOffice HTML Editor. If you have inserted
those items and have saved the document, the following
warning message will pop up. (Fig. 8-27)
Fig. 8-27
Hyperlink
In HTML document, hyperlink is one of the most important and commonly used tags. It can help
to link the bookmarks in a single document, or link with other HTML documents, web pages,
email addresses, newsgroups, etc.
8-10
NextOffice User Manual
NextOffice
Chapter 8 NextOffice HTML Editor
Bookmark
If the HTML document is large, to ease navigation, we can insert bookmark.
1.
First, move the mouse cursor to the appropriate position.
2.
Select menu “Insert” → “Bookmark” (Fig. 8-28)
3.
Enter the name and then click “OK”.
4.
Then <a name> tag will be inserted in the HTML source.
Fig. 8-28
NextOffice provides three different ways to insert hyperlink:
Hyperlink Dialog box
Select menu “Insert” → “Hyperlink” to pop-up the
“Hyperlink” dialog box (Fig. 8-29)
Fig. 8-29
Click “Internet” to insert links with other web pages. Click “Mail & News” to insert links to
email or newsgroup. Click “Document” to insert links with bookmarks or other HTML
documents.
Hyperlink bar
Select menu “View” → “Toolbar” → “Hyperlink Bar” will activate “Hyperlink Bar”. (Fig. 8-30)
Fig. 8-30
To insert hyperlink, you have to enter name in “URL Name”, enter website URL or HTML
document name in “Internet URLs”. Finally click the “Hyperlink” icon.
NextOffice User Manual
8-11
NextOffice
Chapter 8 NextOffice HTML Editor
Hyperlink tab
Text hyperlink
1.
First, enter the name of hyperlink and then select the text.
2.
Select menu “Format” → “Character” and select the “Hyperlink” tab. (Fig. 8-31)
3.
Enter URL in “URL”, or click “Browse” to pick up the HTML document. (Fig. 8-32)
Fig. 8-32
Fig. 8-31
4.
Finally click “OK”.
Graphics Hyperlink
1.
First, insert a graphics and select it.
2.
Select menu “Format” → “Graphics” and select the “Hyperlink” tab. (Fig. 8-33)
3.
Enter URL in “URL”, or click “Browse” to pick up the HTML document. (Fig. 8-34)
Fig. 8-33
Fig. 8-34
4.
Finally click “OK”.
All the three method above will insert the <a href> tag in HTML source.
8-12
NextOffice User Manual
NextOffice
Chapter 8 NextOffice HTML Editor
Image Map
An image map can contain one or more links on a specified region of the graphics.
1.
First select the graphics for image map. (Fig. 8-35)
2.
Right click on the graphics and choose “ImageMap” to pop-up the “ImageMap Editor”. (Fig.
8-36)
Fig. 8-36
Fig. 8-35
3.
You can use “Rectangle”, “Ellipse” or “Polygon” to define specific region, and then enter
the URL in “Address”. Enter the display name in “Text”.
4.
Finally click the “Apply” icon to store the record.
5.
It will insert HTML tag <map> and <area> in the HTML source.
File Uploading
HTML documents have to uploaded on the server in order to be browse by the public. There are
many websites on the WWW which provides free web hosting services. For example:
•
•
http://www.geocities.com
http://www.fortunecity.com
You can make use of the FTP client provided in NextOffice to upload file. For details please
refer to the section about FTP client in Chapter 11.
NextOffice User Manual
8-13