1
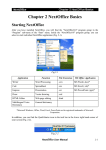
NextOffice
Chapter 5 Next Impress
Chapter 5 Next Impress
Impress is a multimedia presentation application with functions similar to MS Office
PowerPoint. You can create professional and impressive presentations with animation effect,
transition effects using Impress.
During slide show rehearsal, you can setup the timing for auto-slide show so that you can better
manage the period to spend on each slide. Impress Wizard allows you to easily export your
presentation files to various formats, such as HTML for easy publishing on web for Internet
access. (Fig. 5-1)
Title Bar
Tool Bar
Menu Bar
Object
Bar
Floating
Tool Bar
Slide
Status Bar
Fig. 5-1
Impress provides five different view modes. You can find various buttons for switching view
modes at the top left corner of your slide page.
The Tool Bar at the bottom provide a list of functions under the current view mode, e.g., under
“Standard View” mode, it provides functions to insert text, graphics into the current slide page.
The Object Bar on top provides a list of functions pertaining to the current object selected, e.g.,
in “Standard View” mode, if you select an image object, the Object Bar changes to provide a set
of image editing functions.
Space outside the slide page is your work space. You can move objects to your work space for
temporary storage. Objects in work space will NOT be shown during running of slide show.
NextOffice User Manual
5-1
NextOffice
Chapter 5 Next Impress
Creating New Presentation using Wizards
Presentation Wizard
When you start a new presentation document, Impress Wizard will take over to guide you step by
step to create an outline structure for your presentation.
1.
If Wizard does not show up, you can select menu “File” → “Wizards” → ”Presentation” to
start it. (Fig. 5-2)
Fig. 5-2
2.
In the first page (Fig. 5-3), you can select to create a blank presentation or use an existing
template. If you want to use an existing template, pick an appropriate one from the template
list, such as “New Product”, and press <OK> to continue. (Fig. 5-4)
Fig. 5-3
3.
Fig. 5-4
In the second page, you have the options to choose your presentation background style. The
background style that you select will be applied to every slide in your presentation. The style
includes any font style, color, etc. Of course, you can customize the setting for individual
slide afterward. In this page, you can also select the output media for your presentation, such
as transparency, screen or paper and size of your page. Border settings will change
according to your selection. Then press <OK> to continue. (Fig. 5-5)
Fig. 5-5
5-2
Fig. 5-6
NextOffice User Manual
NextOffice
Chapter 5 Next Impress
4.
In the third page, you can setup the transition effect and transition speed. If you have select
transparency or paper as output media, transition effect and speed will not be applicable. If
you have checked “Preview” check box, you can preview the result of your setting in the
preview window. Then select the transition mode, “manual” means that you will be making
the slide transition manually, select “automatic” if you want to make the transition automatic
according to your time setting. Then press <OK> to continue. (Fig. 5-6)
5.
In the forth page, enter basic information of your presentation. These information will
appear in the first slide of your presentation. Then press <OK> to continue. (Fig. 5-7)
Fig. 5-7
Fig. 5-8
6.
In the fifth page and also the last page, you can check your previous selection including all
slides (if any) selected. You can choose to delete any of the selected slides. If you want to
exclude any slide, simply un-check the check box besides the slide description. If you check
on the “merge” check box, a summary slide containing all the titles of every slide will be
created. Finally, press <OK> to complete the slide creation. (Fig. 5-8)
7.
Now you can proceed to edit the content of each slide, save it, print it and run the slide
show.
Create a New Presentation from Scratch
Other than using Impress Wizard to create presentation from an existing presentation templates,
you may also create a blank new presentation from scratch.
1.
Select menu “File” → “New” → “Presentation”, a blank new presentation will be created.
(If Presentation Wizard shows up, you can check the “Do not display this dialog next time”
check box, next time when you create a new presentation, the Presentation Wizard will be
bypassed). (Fig. 5-9)
2.
Select menu “Format” → “Change Page Layout” to open the “Page Layout” dialog box (Fig.
5-10). If the previous step activates Wizard, select “blank Presentation”, press <OK> will
automatically open the “Page Layout” dialog box.
NextOffice User Manual
5-3
NextOffice
Chapter 5 Next Impress
Fig. 5-9
Fig. 5-10
3.
Pick your desired layout and press <OK>. Different slide layout provides different place
holders. Click on “Image Place holder” to open the “Open File” dialog box and pick the
image to be inserted. Click on the “Text Place holder” to enter text at the position. Click on
the “Title Place holder” to enter title. If necessary, select menu “Slide Show” → “Effects” to
add in special effects such as “Move along curve” effect.
4.
To edit the contents of another slide, repeat the above procedures.
Insert New Slide
Follow the above procedure to prepare your slide page by page. To insert a new slide:
1.
In the lower part of your document window, there is a tab marked “Page X”, such as “Page
1”, right click on it to bring up a dialog box. (Fig. 5-11)
2.
In the pop-up dialog box, select “Insert Slide” to insert a new slide page. Pick the page style
you want and press <OK> to continue. (Fig. 5-12)
Fig. 5-12
Fig. 5-11
Delete Slide Page / Change Layout
In Step 2 above, you can also select to delete your slide page or rename your slide page.
5-4
NextOffice User Manual
NextOffice
Chapter 5 Next Impress
Inserting Graphics and Text
Inserting Graphics
If you already have an image place holder in your slide page, simply click on it to pop-up the
“Open File” dialog box and pick your image file. You may choose to preview your image first
(Fig. 5-14)。
Alternatively, you can use menu “Insert” → “Graphics”. If you want special effect, select menu
“Slide show” → “Effect” to add special effect, such as “Melting” effect.
Fig. 5-14
Fig. 5-13
Inserting Text
If you already have a text place holder in your slide page, simply click on it and enter your text.
(Fig. 5-15) If needed, select menu “Slide Show” → “Effect” to apply special effects to your text
object, such as “Emerge from left”.
Fig. 5-16
Fig. 5-15
If there is no text place holder, you can select the “Text” icon on the bottom Tool Bar (Fig. 5-16)
and select the text type and then drag it into your slide page.
NextOffice User Manual
5-5
NextOffice
Chapter 5 Next Impress
Text Fontwork Effect
You can set different fontwork effects to your text objects. Click on the “Gallery” icon in the
Tool Bar to open the gallery and pick “Fontwork” theme. Select your desired effect and drag it
into the slide page and overwrite the text content. (Fig. 5-17)
Fig. 5-17
Text 3D Effect
You can set different text 3D effect. First select the text, right click on it to bring up a menu and
select “3D Effect” (Fig. 5-18). In the pop-up dialog box, select your desired effect. (Fig. 5-19)
Fig. 5-19
Fig. 5-18
5-6
NextOffice User Manual
NextOffice
Chapter 5 Next Impress
Use Bullets
If you are using Impress Wizard to create your presentation, bullets will be inserted automatically
into your documents whenever a list of paragraphs is expected. What you need to do is to click
on the text place holder, enter your text and press <Enter> to jump to next paragraph.
You can change the default bullet settings: select the paragraphs which you want to change and
then select menu “Format” → “Numbering/Bullets” (Fig. 5-20). In the “Numbering/Bullets”
dialog box, select “Bullets” and pick your desired bullet pattern (Fig. 5-21).
Fig. 5-20
Fig. 5-21
If you want to insert some special bullets, you can select “Customize” tab. Under the “Number”
column, select “Graphics” → “From File”. You can then pick any bullets defined in your gallery.
(Fig. 5-22, Fig. 5-23)
Fig. 5-22
Fig. 5-23
NextOffice User Manual
5-7
NextOffice
Chapter 5 Next Impress
Setup Paragraph Spacing
You can adjust paragraph spacing. First, select the paragraphs to be adjusted and then press the
“Decrease Spacing” or “Increase Spacing” icon on the Object Bar. (Fig. 5-25). You can also
apply indentation to your paragraphs by pressing the “Increase Indent” or “Decrease Indent”
icons.
Fig. 5-24
Fig. 5-25
Insert Special Fields
Select menu “Insert”→ “Fields” to insert special fields such as “Page Number”, “Date”, etc into
your slide page. (Fig. 5-26, Fig. 5-27)
Fig. 5-27
Fig. 5-26
Insert Geometric Object
Click on the “Rectangle” or “Ellipse” icon in the bottom Tool Bar to select your desired
geometric object and drag it into your slide. (Fig. 5-28, Fig. 5-29)
Fig. 5-28
Fig. 5-29
5-8
NextOffice User Manual
NextOffice
Chapter 5 Next Impress
Different Types of Presentation View Mode
On the upper left hand corner of your slide page is a number of tab for switching to different
view modes. (Fig. 5-30):
Fig. 5-30
Standard View Mode
In “Standard View” mode you can edit your
slide page, such as add text and images. The
Object Bar on top will change to provide
different functions as you select different type
of objects. (Fig. 5-31)
Fig. 5-31
Outline View Mode
”Outline View” mode shows the overall
outline of your presentation. You can easily
examine the overall structure of your
presentation in this mode. (Fig. 5-32)
Fig. 5-32
NextOffice User Manual
5-9
NextOffice
Chapter 5 Next Impress
Slide View Mode
In “Slide View” mode, you can have an overview of your whole presentation. You can insert or
delete slide page. You can also hide or show any slide by first selecting the slide and then
clicking on the “Show/Hide Slide” icon on the Object Bar. (Fig. 5-33)
Fig. 5-33
In the Object Bar, you can setup:
1.
Different slide transition modes.
2.
Transition Speed.
3.
If automatic transition is selected, you
can set the desired transition time. (Fig.
5-34)
Fig. 5-34
Notes View Mode
In “Notes View” mode, you can insert notes
underneath the slide page for use while
running your slide show. When printing the
presentation, whether to print out these
notes is up to you.。(Fig. 5-35)
Fig. 5-35
5-10
NextOffice User Manual
NextOffice
Chapter 5 Next Impress
Handout View Mode
In “Handout View” mode, you can print out
the slides as handout for distribution to
your audience. (Fig. 5-36)
Fig. 5-36
Setting Slide Transition
You can customize different slide transition mechanism to make your presentation more
interesting.
1.
Select menu “View” → “Slide Sorter” to enter the “Slide View” mode.
2.
In the Object Bar, select different transition effect, such as rehearse timing, hide/show slide.
If you need more function, select menu “Slide show” → “Slide Transition” (Fig. 5-37).
3.
The “Slide Transition” pane appears on the right, you can have more choices, such as speed,
sound, etc. (Fig. 5-38)
4.
Select desired effect in the “Apply to Selected slides” list box. If you would like to preview
the chosen effect, click on the <Play> button. (Fig. 5-39)
NextOffice User Manual
5-11
Chapter 5 Next Impress
NextOffice
Customizing Animation
You can select to apply different animation effects for various objects, such as text, images,
graphics, etc in your presentation. For example, you can make the title appear “Fly in”.
1.
Select “View” → “Normal” or click on the “Normal” tab on the top left hand corner of the
slide page.
2.
Select menu “Slide show” →”Custom Animation” (Fig. 5-40).
3.
Then select the object and press the “Add” button under the “Custom Animation” pane. (Fig.
5-41)
4.
If you would like to preview the chosen effect, click on the <Play> button.
5-12
NextOffice User Manual
NextOffice
Chapter 5 Next Impress
Customize Presentation for Different Types of Audiences
The same presentation sometimes can be used for different types of audiences, e.g., if you are
doing a presentation on new technologies, you may use the same presentation for management,
salesmen, technicians by varying the level of technical detail covered.
1. Select menu “Slide Show” → “Custom Slide Show”. (Fig. 5-42)
2.
In the “Custom Slide Show” dialog, select <New> button. (Fig. 5-43)
3.
Enter the name for the customized presentation, then pick the slides from the “Existing
Slides” list box to be included in your customized presentation, press <OK> to confirm.
4.
If you want to playback a customized slide show, select menu “Slide Show” → “Custom
Slide Show”, pick your desired slide show from the list box below and press the <Start>
button.
Editing a Presentation
Create Presentation Templates
Business presentation usually has to follow certain company standards, such as company logo
on top. The quickest way to stick to these standard is to use templates.
1.
First create your presentation, select “File” → “New” to open a new presentation.
2.
Select menu “View” → “Master” → “Slide Master”. Then load an image, such as company
logo into your document, re-size it to the right size and position it in the right place. (Fig. 544)
3.
Select menu “File” → “Template” → “Save”.(Fig. 5-45)
NextOffice User Manual
5-13
Chapter 5 Next Impress
4.
NextOffice
In the “Document Templates” dialog box, enter a new name for the template and then press
<OK> to confirm.
Apply different presentation backgrounds
You can use different backgrounds in the same presentation. Steps are:
1.
First open your presentation to select the slide to be changed.
2.
Select menu “Format” → “Styles” → “Slide Design”. (Fig. 5-46)
3.
Press the <Load> button, select “presentation backgrounds” from the “Catalogs” list box
on the left, then select the desired background from the right. Press <OK> to apply the
selected background for the current slide. (Fig. 5-47)
4.
If you want to select other backgrounds, repeat the above steps . (Fig. 5-48)
5-14
NextOffice User Manual
NextOffice
Chapter 5 Next Impress
Fig. 5-48
Inserting Slides from Another Presentation
Steps are:
1.
First, open the presentation which you want to select slides to be inserted to another
presentation and switch it “Slide View” mode.
2.
Select the desired slides. (Fig. 5-49) and press your mouse right button to bring up a menu,
select “Copy” option.
3.
Then open the presentation which you would like to insert selected slides to. Switch it to
“Slide View” Mode.
4.
Position your cursor to where you would like to insert the selected slides. Press your mouse
right button to bring up a menu, select “Paste” option. (Fig. 5-50)
Fig. 5-49
Fig. 5-50
NextOffice User Manual
5-15
NextOffice
Chapter 5 Next Impress
Editing Outline Style
You can through editing the presentation page styles to change the look and feel of your
presentation in several simple steps. For example, you can change the typefaces, font sizes of
“Outline 1”. Steps are:
1.
First open your presentation. (Fig. 5-51)
2.
Select menu “Format” → “Style” → “Catalog” → “Outline 1” → “Modify”. (Fig. 5-52)
Fig. 5-51
3.
Fig. 5-52
Press <OK> to confirm.
Edit Templates
You can change the outlook of any style, e.g., change the typeface of your heading to Arial 44pt.
Select menu “Format” → “Style” → “Catalogs”. In the “Page Styles” dialog box, select the
desired style, such as “Heading 1”, then press <Modify> to bring up the “Style” dialog. (Fig. 553)
Fig. 5-53
In the “Style” dialog box, you can change the typeface, font size, font style, effects and character
spacing, etc.
5-16
NextOffice User Manual
NextOffice
Chapter 5 Next Impress
Setup Animation Effects Show Time
You can change the animation effects in a slide page. First, select an animation
object and then menu “Slide show” → “Animation”. In the “Animation” dialog
box, set the showing times for different animation objects. (Fig. 5-54)
Fig. 5-54
Setup Interaction Effects
You can change the interaction effects in a slide
page. First, select the object and then menu “Slides
show” → “Interaction”. In the “Interaction” dialog
box, set different interaction effects, e.g. “Exit
Presentation” upon clicking the mouse on the object.
(Fig. 5-55)
Fig. 5-55
Print Presentation
1.
Select menu “File” → “Print”, select your target printer to output your presentation. (Fig. 556)
2.
Press <Others> more additional settings, such as printing the contents as hand-outs.(Fig. 5-5
7)
Fig. 5-56
Fig. 5-57
NextOffice User Manual
5-17
Chapter 5 Next Impress
NextOffice
Use Writer Document as Outline
You can send the outline headings of a Writer document to a presentation. Simply open the
Writer document and then select menu “File” → “Send” → “Outline to Presentation” (Fig. 5-58)
Fig. 5-58
5-18
NextOffice User Manual