1
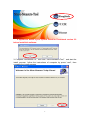
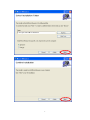
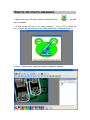
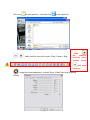
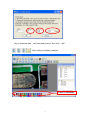
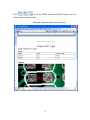
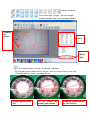
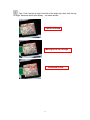
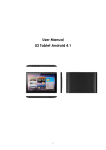
Digital Micro-measure Camera
User Manual
Digital Micro-measure camera is a slim type handy tool.
It can easily use in different fields:
1. Skin inspection
2. Hair inspection
3. Industrial inspection: PCB, Material…
4. Education purpose
5. Print Industrial
6. Textile industrial
7. Biological inspection
8. Jewel & Stamp (Collections) inspection
9. Others
digital micro-measure camera is designed for PC solution
with friendly user interface. The special AP software:
Micro-Measure-Tool can support you to have picture, record
video and do micro-measure work with ease.
How to install software
1. Insert CD ROM
2. System will auto come out the interface as bellowing,
“Micro-Measure-Tool” to start Micro-Measurement Tool program.
Click
3. Click “APP FOR WIN XP,VISTA, WIN7” or “APP FOR WIN8 SERIES” to
start installation
4. Interface shows language Selection : please click “English” (or “Chinese”
for Chinese)
1
It appears as below if your system asked for Framework version 2.0
before install this software.
3. Complete Framework 2.0,then click“Micro-Measure-Tool” and start the
install process,follow the instructions of computer by press “next”, then
complete the install process.
2
3
4
How to do micro-measure
1. Make sure driver has well installed, double click icon
Micro-Measure
on desk
top of computer.
2. If microscope did not in its ready condition ( link to PC & ready for
use ) ,System will remind you to get ready before use ( as below shown ):
3. Plug – in Microscope, real time display in operation window :
5
4. The instructions of function options :
,open operation system, Choose image resolution from CIF ~ 2M,
Click
depend on image quality need. (Default at VGA mode 640 x 480 )
Click SNAP icon
to take pictures as below shown
Double –click
and open file
6
Open file
and see
the photo
Click icon
to open pictures,and click icon
to save pictures
Video function: from left to right : Play ( Pause ) ,Stop .
Click
the
preview
function stop,
system show
and start
measure.
image fine tune parameters , include Zoom ,Video Proc Amp & Special
Effects.
7
Magnifier
Calibration functions.
Click
② Click
,Show as below
, start calibration make sure certain accuracy.
Measured data
by pixel NO.
Real
measure
distance
8
Key-in measure data,unit (mm) and pixel no. then click “OK”.
Color setting of display character
Color of Character
9
Click
to file by WORD format or EXCEL format, you can
direct e-mail out by Outlook.
Example : Measure data under Word file.
10
measure functions:
From left to right : Length , Set-Line Length.
Square, polygon, ring , oval.(as below shown)
Drawing
by
mouse
data
Delete
data
Arc measurement : include : Arc length , diameter.
Fix the start point & end point on the arc, then fit in the curve by fine tune
( Through mouse ) curve.(as below shown)
Select 2 points in the
Arc
Fit in Curve by
moving your mouse.
11
Complete measurement
by click left key
Left : Point to point distance , Right : Point to line distance.
Tips: start :keep press the mouse right key and ended by lease key.
Notes :When
measure line
to point , be
sure to fix
line first or it
cause fail.
Left : Measure the distance between parallel lines . Right : angle of
two lines.
Tips : Find a base line by mouse and move to another line by moving
mouse. Measure results will show on screen.(as below shown)
Select 2 points on
Try to match
Distance found
12
Tips : Find 2 points at right & left side of the angle top, then click the top
of angle. Measure result wills display.(as below shown)
2 points selected
Moving to the top of angle
Confirmed & click
13
Q&A
Q Why pre-view disable?
A 1 No driver installed.
2 LED did not on ( Lighting );
3 Re-boot Camera。
Q Ill measure accuracy?
A 1 Re-calibration
2 Fine-tune focus
Q How to un-install software?
A Depart the micro-measure camera from PC.
1 Find the program file in system,click “un-install”。
2[Start]>[Program]>[Digi-microscope]>[Uninstall]
[Start]>[Program]>[Micro-Measure]>[Uninstall]
Q Micro-measure Software un-work?
A 1 Check the connection is workable .
2 Check the software and re-start the program.
14