1
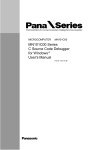
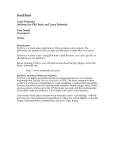
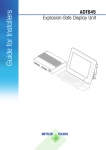
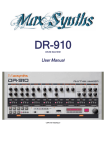
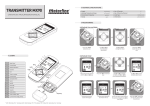
Institute of Technology, Sligo Stanley – Computer Controlled RC Car User Manual Marina Andricic S00052864 BSc in Web Development Year: 2007/2008 Supervisor: Paul Powell Stanley – Computer Controlled RC Car TABLE OF CONTENTS STANLEY – COMPUTER CONTROLLED RC CAR .................................................0 TABLE OF CONTENTS .......................................................................................................1 APPLICATION OVERVIEW .................................................................................................2 HARDWARE .....................................................................................................................2 REQUIREMENTS: ........................................................................................................... 2 Must have ................................................................................................................ 2 Not essential:........................................................................................................... 3 CONNECTING THE CAR.....................................................................................................3 REQUIREMENTS: ............................................................................................................... 3 CONNECTING THE CAR ....................................................................................................... 3 CONNECTING THE CAMERA .............................................................................................6 REQUIREMENTS: ............................................................................................................... 6 CONNECTING THE CAMERA ................................................................................................. 6 INSTALATION ...................................................................................................................7 USING THE APPLICATION .................................................................................................7 START THE APPLICATION ..................................................................................................... 7 CONTROL THE CAR ON THE SCREEN ....................................................................................... 9 CONTROL THE CAR ON THE SCREEN ....................................................................................... 9 FOLLOW THE PATH .......................................................................................................... 10 SET THE SPEED ....................................................................................................... 11 DRAW THE PATH.................................................................................................... 11 CONTROL IN DARK .......................................................................................................... 12 USB Webcam ......................................................................................................... 12 IP Webcam ............................................................................................................ 14 CONTROL IN DARK ADVANCE ............................................................................................. 15 USB Webcam ......................................................................................................... 15 IP Webcam ............................................................................................................ 16 CONTROL THE STANLEY WITH CAMERA ................................................................................. 17 SPY IN DARK .................................................................................................................. 19 CAR SPY ....................................................................................................................... 19 1 Stanley – Computer Controlled RC Car APPLICATION OVERVIEW Stanley is RC Car that can be controlled by computer. It is divided into two parts: with Camera, and without camera. If Stanley don’t have camera, following operations can be performed: Control the Stanley by the Keyboard Control the Stanley by the mouse Control the Stanley by the buttons on the screen Draw the path on the screen and Stanley will follow that path If Stanley have camera, following operations can be performed: Give the direction to Stanley by light object (e.g. hand lamp or laser pointer) and Stanley will move in given direction Walk with a light object (e.g. hand lamp or laser pointer) and Stanley will follow Move the specific object and Stanley will follow. HARDWARE Requirements: Must have RC Car – with digital controller NOTE* Chip RC Cars usually have digital controller that uses switches for controlling left/right/forward/backward movements. Computer PhidgetInterfaceKit 0/0/4 See “Connecting the Car” for instruction 2 Stanley – Computer Controlled RC Car Not essential: USB Webcam IP Webcam If Webcam is power wired it will need to be made into wireless See “Connecting the Camera” for instruction. Hand lamp or Laser pointer CONNECTING THE CAR Requirements: RC Car PhidgetInterfaceKit Wires Soldering Iron Solder NOTE* If user is a child it will need adult supervision to connect the car Connecting the Car 3 Stanley – Computer Controlled RC Car 1. Identify the points A Controler uses swithches for controling direction of the car, under each switch are two points (ground and active); by presing the button (forward/left/right/backward) on controler switches on the board are pushed, both points will be tached by the switch, and that closes circuit, which give the direction to the Car 2. Solder the wires Next step is to solder wires on each of those points. Each pair of the points shoud have diferent wire colour, one colour for one direction. Remember which colour is for which direction. Connect wires to the Phidget Interface Kit Board. Phidget Interface Kit Board have 4 Relay Outputs. Each relay has 3 connections: #C (# = number from 0-3) - Common or Ground, NO Normally Open, NC - Normally Closed. 4 Stanley – Computer Controlled RC Car (Graph 1- Phidget Interface Board) Screw the oposit side of the wires (grouped by the color of the wire) to each Relay on the Phidget Interface, one wires to #C and other to NO. Directions: 0C and NO - For Forward direction. 1C and NO - For Back direction. 2C and NO - For Left direction. 3C and NO - For Right direction. Test the car by the runing the application . See “Using the application” for mor information on how to start the application Close the controller and attach the PhidgetInterface board to the controller 5 Stanley – Computer Controlled RC Car CONNECTING THE CAMERA Requirements: 4 AA chargeable batteries at 1.5V each with capacity rating over 2000mAh Battery holder Power connector that mach the size of camera connector on the AC power supply Wires Soldering Iron Solder Connecting the Camera Solder the wires to the power connector On the camera where power connector is, it is a symbol that shows the positive and negative terminals for the power connector. By soldering the wires to the power connector, it is important to kip in mind which wire will be used for which terminal. Connect the other side of the wires to the battery holder Place the batteries in battery holder Connect the power connector into Camera (Image1- Connect the camera) 6 Stanley – Computer Controlled RC Car INSTALATION 1. Download the application to your computer. 2. Extract the MSRS folder into your C:/ drive 3. To start the application a. Open the command prompt b. Write Line: cd /d "MSRS\Stanley" bin\dsshost /p:50000 /m:"Stanley\RemoteCar.manifest.xml" USING THE APPLICATION 1. Turn on the Car 2. Turn on the Controller 3. Connect the PhidgetInterface USB cable into USB port on your computer. 4. To Start The Application – Write line in command prompt cd /d "MSRS\Stanley" bin\dsshost /p:50000 /m:"Stanley\RemoteCar.manifest.xml" Start the application Requirements RC Car PhidgetInterfaceKit 7 Stanley – Computer Controlled RC Car 1. Use Keyboard arrow keys to control the Stanley a. Forward arrow = Move Forward b. Back arrow = Move Back c. Left arrow = Turn the first wills left d. Right arrow = Turn the first wills right e. Left arrow + Forward arrow = Move Forward-Left f. Right arrow + Forward arrow = Move Forward-Right g. Left arrow + Back arrow = Move Back-Left h. Right arrow + Back arrow = Move Back-Right Stanley moves in specific direction as long as key is pressed. Select any button to get into more fun with the Stanley NOTE* if you don’t own the webcam, you can use only three parts of the application: Control the Car on Screen, Control Car with Mouse and Draw the Path. 8 Stanley – Computer Controlled RC Car Control the Car on the Screen Requirements RC Car PhidgetInterfaceKit 1. Click the Arrows button in what direction you want Stanley to move. 2. Hold the button as long you want Stanley to move a. Forward arrow = Move Forward b. Back arrow = Move Back c. Left – Up arrow = Move Forward-Left d. Right – Up arrow = Move Forward-Right e. Left – Down arrow = Move Back-Left f. Right – Down arrow = Move Back-Right Control the Car on the Screen Requirements RC Car PhidgetInterfaceKit 9 Stanley – Computer Controlled RC Car 1. Place the mouse arrow inside of the “Mouse Area” 2. Press Right mouse button to Enable “Mouse Area” 3. Move the mouse in the direction you want Stanley to go 4. Press Right mouse button to Disable “Mouse Area” DISABLE “Mouse Area” means that Application want capture any mouse movements. ENABLE “Mouse Area” means that Application will capture mouse movements. NOTE* Stanley will take direction only from the movements that are made inside of the mouse area, if mouse arrow is out of that area, Stanley will stop. Follow the Path Requirements RC Car PhidgetInterfaceKit RC Car speed depends on the current battery charge. To ensure that Car follows the path accurately it is important to set right speed for the car: 10 Stanley – Computer Controlled RC Car SET THE SPEED 1. Place Stanley on the starting position 2. Set the Slider 3. Press the Test button If Stanley didn’t reach the middle line, slider needs to be moved up, otherwise, slider need to be moved down. Continue with adjusting the speed until you got Stanley to stop just in front of the line. DRAW THE PATH 11 Stanley – Computer Controlled RC Car 1. Place Stanley on starting position 2. Click inside of the Drawing area on the places where you would like Stanley to go. 3. As you click, application will connect the points, and path will be created 4. Press Start Button Control in Dark Requirements RC Car PhidgetInterfaceKit USB Webcam or IP Webcam Laser Pointer or Hand Lamp 1. Select the Camera Type USB Webcam 1. Point the camera to the clear area where is note to much light 2. Press the Test button to test if camera capture any light that shouldn’t be captured 12 NOTE* If there are red lines inside of Camera View, that means that camera see some light 3. Continue placing the camera until you find clear area 4. Press Start button 5. In camera field of view make following Hand Gestures to control Stanley = Move Forward = Move Back = Move Forward-Left = Move Forward-Right = Move Back-Left = Move Back-Right 6. Stanley will move in specific direction and then Stop 7. Make new gestures when Stanley Stops Stanley – Computer Controlled RC Car IP Webcam 1. Select the IP address of the camera 2. Point the camera to the clear area where is note to much light 3. Press the Test button to test if camera capture any light that shouldn’t be captured NOTE* If there are red lines inside of Camera View, that means that camera see some light 4. Continue placing the camera until you find clear area 5. Press Start button 6. In camera field of view make following Hand Gestures to control Stanley = Move Forward = Move Back = Move Forward-Left = Move Forward-Right = Move Back-Left = Move Back-Right 8. Stanley will move in specific direction and then Stop 9. Make new gestures when Stanley Stops 14 Stanley – Computer Controlled RC Car Control in Dark Advance Requirements RC Car PhidgetInterfaceKit USB Webcam or IP Webcam Laser Pointer or Hand Lamp 1. Select the Camera Type USB Webcam 2. Point the camera to the clear area where is note to much light 3. Press the Test button to test if camera capture any light that shouldn’t be captured NOTE* If there are red lines inside of Camera View, that means that camera see some light 4. Continue placing the camera until you find clear area 5. Press Start button 6. In camera field of view make following Hand Gestures to control Stanley 15 Stanley – Computer Controlled RC Car = Move Forward = Move Back = Move Forward-Left = Move Forward-Right = Move Back-Left = Move Back-Right 7. To Stop the Stanley make following gestures Or IP Webcam 1. Select the IP address of the camera 2. Point the camera to the clear area where is note to much light 3. Press the Test button to test if camera capture any light that shouldn’t be captured NOTE* If there are red lines inside of Camera View, that means that camera see some light 4. Continue placing the camera until you find clear area 5. Press Start button 16 Stanley – Computer Controlled RC Car 6. In camera field of view make following Hand Gestures to control Stanley = Move Forward = Move Back = Move Forward-Left = Move Forward-Right = Move Back-Left = Move Back-Right To Stop the Stanley make following gestures Or Control the Stanley with camera Requirements RC Car PhidgetInterfaceKit IP Webcam 17 Stanley – Computer Controlled RC Car 1. Select the IP address of Camera 2. Click the Camera Start button to open the camera 3. Click the Arrows button in what direction you want Stanley to move. 4. Hold the button as long you want Stanley to move a. Forward arrow = Move Forward b. Back arrow = Move Back c. Left – Up arrow = Move Forward-Left d. Right - Up arrow = Move Forward-Right e. Left – Down arrow = Move Back-Left f. Right - Down arrow = Move Back-Right 18 Stanley – Computer Controlled RC Car Spy in Dark Requirements RC Car PhidgetInterfaceKit IP Webcam Laser Pointer or Hand Lamp 1. Place the Camera on the top of the Stanley, pointing forward 2. Select the IP address of Camera 3. Click the Camera Start button to open the camera 4. Turn on laser pointer or hand lamp 5. Start to move in front of the Stanley 6. Stanley will follow the light 7. Move out of the camera view to let Stanley to search for you Car Spy Requirements RC Car PhidgetInterfaceKit 19 Stanley – Computer Controlled RC Car IP Webcam Object to follow 1. Place the Camera on the top of the Stanley, pointing forward 2. Select the IP address of Camera 3. Click the Camera Start button to open the camera 4. Place the object in camera field view 5. Move color bars until you get camera too see just your object NOTE* Inside of the Camera View just your object should have rectangle around object. 6. Start to move in front of the Stanley 7. Stanley will follow the object 8. Move out of the camera view to let Stanley to search for you 20