1
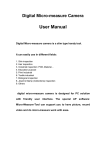
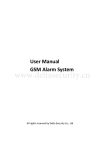
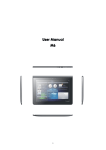
Intra-oral Camera
User’s Manual
Thanks for having this home care intra-oral camera! This
product is a PC solution device and so friendly in user interface. It
can help users taking still photo, recording live-view video and
simple pre-view.
CONTENTS
Specification--------------------------------------------------------------3
Notes before use--------------------------------------------------------3
Product description----------------------------------------------------4
How to install system--------------------------------------------------5
Driver Free Mode--------------------------------------------------5
Enhanced mode ( need driver )-------------------------------7
A. Process of driver installation-----------------------7
B. Description of driver
------------------------------11
How to un-install this software------------------------------------19
2
Specification
Image Sensor
Controller
Lens
Focus Range
Snap Shot
Digital Zoom
Video Capture Resolution
Light Source
Frame Rate
Brightness Control
Magnification Ratio
Power Supply
Interface
Operation System
Driver Language
System Requirement
CD disk
Dimension
Color CMOS Sensor
High Speed DSP( Driver Free available )
Lens , M7
10mm ~ 30mm(Fixed Focus)
Software and Hardware
5X Sequence Mode
0.3M
In-built White Light LED x4
30 f/s Under 600 LUX Brightness ( 1.3M )
Manual adjustment , Auto W/B by software
2X ~ 6X ( Auto )
USB Port ( 5V DC )
USB 2.0
Win XP , Vista , Win 7 32 bit and 64 bit.
English, Chinese, German, Italy, Spain, Portugal,
Japan
Pentium Computer with 700M Hz & Above ,
20M HD Space CD ROM Driver,
64MB RAM , Direct X VGA Card
Driver
202 mm ( L ) X 35 mm ( R )
Notes before use : IMPORTANT !
1.
2.
3.
Avoid touching lens and LED area to keep optical system clean.
Do not try to de-assembly the intra-oral camera , it might cause
Damage and disable water-proof function.
Keep apart from wet especially metal parts.
3
Product Description
USB Interface
ZOOM
SNAP
Lens & LED
4
How to use this intra-oral camera
Driver free mode(
(Plug & play)
)
NOTE :If your OS is VISTA or WIN 7 standard version, it is important
for you to make sure the pre-view program “Micro-Measure Camera “ is
ready before run “ Driver Free” function. We prepare it also inside our CD
ROM , You can install the driver and get it ready before use.
1.Plug-in the USB port of Intra-Oral Camera into Computer USB port.
2. Find USB Video item in “ My Computer “.
5
3.Take pictures
6
Enhanced Mode ( Driver need )
A.
.Process of software installation
⑴ Insert CD ROM, system will auto come out the interface as bellowing:
NOTE:
:If auto run takes times or unable : Please open the file of CD
ROM & run“Autorun.exe”
7
⑵ Click “INSTALL” to start installation
NOTE:
:System will remind you to plug in the USB port of Intra-oral
camera by below wizard。
。If you forget to connect the USB port.
OK
8
(3)Follow the indicators and select “next” &
process.
“Install” to complete this
NOTE : Appear interface below, Click ”Continue Anyway”
9
( 4 ) Following the user guide by steps, and completed by click
“Finish“.Computer will restart and get ready .
10
B. Description Of driver
1. Direct Click
icon on desk top of computer, or following the
selections as followings :
11
2. How to save the recording file
Click ”File”—> “Set capture file Folder…”, The save file could be assign.
3.Options
(1) Click“Option”—>“Video
Capture filter…”
(2) Find sheet “General
Setting” can fine tune
the parameters of
image.
12
(3) Click “General Setting ”
A. Click“Horizontal Flip”
Original
Horizontal Flip
13
B. Click “Vertical Flip”
Original
Vertical Flip
C. Color Filter (Black White,Sepia,Sea blue,Grass green)
Original
Black White Filter
14
Sepia Filter
Sea blue Filter
Grass green Filter
E. Click“scale”
scaler
15
4.Image resolution
Select “Option”—>“Video Capture Filter”, The Properties showed below :
5,Out put size selection
Find“Capture”item—>“Still Capture Size”, The max resolution is 20M , by
interpolation.
16
6.Video Recording
Find“Capture”item—>“Start Capture”-> Start recording
How to stop recording : Find“Capture”—>“Stop Capture”
17
7.Sanp through Hardware
(1)Press bottom ”SNAP” to take a photo ,Computer will show a route to file
this picture. Or you can assign the file route as below.
(2)We provide digital zoom function : Please press zoom by sequence to
make X1 to X5 zoom effect
18
How to un-install software
Caution : USB port has to well connected when un-installing.
1.Click “Start”—>”All Programs”—>”Micro-Measure Camera”—>“Uninstall”
2 Start un-installation by select “Remove”and “Next” to complete
un-installation.。
19
3. Computer shows“Remove all installed features?Select & Click it“.
4.Complete all un-installation ,Click“Yes” and restart PC.
20