1
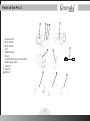
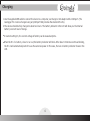
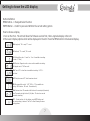
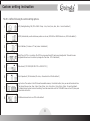
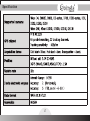
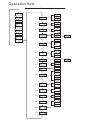
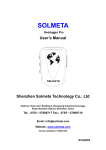
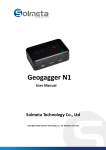
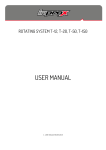
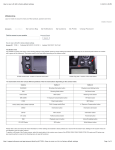
R
GEOTAGGER Pro 2
User Manual (V1.0)
Solmeta Technology Co., Ltd
Solmeta Technology Co., Ltd. All Rights Reserved
R
Contents
Safety Information........................................................................................................ 1
Introduction................................................................................................................. 2
Part of the Pro 2............................................................................................................ 3
Charging...................................................................................................................... 4
Packing list..................................................................... .............................................. 5
Turning the Pro 2 on and off....................................................................................... ......6
Getting to know the LCD display....................................................................................... 7
Custom setting instruction............................................................................................. 8
How to use with Nikon camera.........................................................................................10
GPS data logger............................................................................................................ 13
Wireless remote control..................................................................................................14
Timer release....................................................................................................... 14
Compass calibration.......................................................................................................15
Magnetic declination adjustment..................................................................................... 16
Specification.................................................................................................................17
Warranty......................................................................................................................19
R
Safety Information
Do not disassemble
Touching the product’s internal parts could result in injury. In the event of malfunction, the products should be repaired only by a
qualified technician. Any unauthorized disassembly or modification may void the unit’s warranty.
Keep the GPS unit dry
Do not immerse in or expose to water or handle with wet hands. Exposing the GPS unit to water could result fire or electric shock.
Do not subject to high temperatures
The GPS unit can be damaged by exposure to fire or high temperatures. Do not leave the unit in areas subject to extremely high
temperatures. Failure to observe this precaution could result in damage to the casing or internal circuitry, and could potentially
cause a fire.
Keep out of reach of children
Failure to observe this precaution could result in injury.
1
R
Introduction
The Geotagger Pro 2 is a brand-new GPS unit specially designed for Nikon photographer who enjoys geotagged photos.
It is not only a GPS unit but also can be used as a wireless remote and timer release.
Moreover, it can also be independent used as a GPS track logger which provides Real Time geographic coordinates
logging. Easy to use!
Compared with Geotagger Pro, it has the following features:
A brand new appearance: The brand-new appearance looks more beautiful, creditable, comfortable and professional.
Improved LCD screen: The improved LCD is FSTN. The FSTN LCD is much clear than normal STN LCD. The display is
high-contrast and can be viewed even under the strong sunshine.
Wireless Shutter Remoter: The Pro 2 is built-in 2.4 GHz wireless receiver, which can receive the commands of focus
and shutter release from 2.4GHz Wireless Shutter Remote (Supplied as a accessory of Pro 2 ).
2 GB flash memory: The Pro 2 is built-in a 2 GB memory which can record up to 4,900,000 positions. The flash memory
can be easily read by the computer via USB connection. No software needed. The log file can be directly copied and
deleted.
High accuracy time: Pro 2 can provide a high accuracy time. The error is within 0.1 sec. The accuracy time is based on
a very precision pulse which is output from the GPS chipset. To get the high accuracy time, the Pro 2 need to capture the
GPS signal more than 10 sec. If there is a “TIM” icon shown on the LCD, it means the current time is the high accuracy
time.
Timer release: When the camera is connecting with Pro2, the camera is equipped to take photographs automatically at
preset intervals. The interval can be set via custom setting.
2
R
Parts of the Pro 2
4
①
②
③
④
⑤
⑥
⑦
⑧
⑨
⑩
11
Power switch
Enter button
Menu button
LCD
USB terminal
Mount
2.4GHz Wireless remote control
USB charge cable
Cable-D
Cable-E
Cable-F
1
2
6
9
5
3
8
7
10
3
11
R
Charging
1.Use the supplied USB cable to connect the device to a computer, car charger or AC adaptor with a USB port. (The
Geotagger Pro 2 can be charged using any USB port that provides the standard 5 volts).
2.The device should be fully charged in about two hours. The battery indicator in the LCD will show you the internal
battery’s current level of charge.
●
In custom setting 16, the current voltage of battery can be viewed anytime.
●
When the Pro 2's battery close to run out,the battery indicator will blink. After about 10 minutes continue blinking,
the Pro 2 will automatically switch to use the camera’s power. In this case, there is no battery indicator shows in the
LCD.
4
R
Packing list
Confirm that the package contains the following items:
□ Geotagger Pro 2 GPS unit
□ Data cable (selected by the user, only one data cable in the standard package)
●Cable-D for ten-pin remote terminals (D4, D800, D300 and so on)
●Cable-E for Nikon D90
●Cable-F for accessory terminals (D5000, D7000 and so on)
□ USB cable
□ Wireless shutter remote
□ Manual
□ Protection sleeve
5
R
Turning the Pro 2 on and off
Press the power switch for 2 seconds to turn the Pro 2 on.
Press the power switch for 3 seconds and confirm with the ENTER button to turn the Pro 2 off.
Working mode
The Pro 2 offers three working modes. They are normal working mode, auto working mode and clock working mode.
Normal working mode: The pro 2 is completely powered on and the GPS continue to capture the GPS signal.
Clock working mode: The Pro 2 runs as a clock, the accuracy of the clock can be adjusted by the GPS. In the most of the
time, the GPS is power off. However, you can get the GPS to work intermittently by custom setting. You can set “how
often will GPS work? And how long will it last?”. (For the working mode setting, refer to custom setting 11 on page 9.)
Auto working mode: The pro 2 is powered on or off following the attached camera ‘s on or off. In the working mode, the
Pro 2 works with a “wake up “ and “ sleep” working mode which can be custom set by user. (For the working mode
setting, refer to custom setting 12 on page 9.)
When the Pro 2 is on, to start or change the working mode, just press the power switch, the LCD will show as a flash
display, then press Menu button to the desired working mode. Then press Enter button to confirm.
6
R
Getting to know the LCD display
Button Definition
MENU Button -> Change & Select function
ENTER Button -> Confirm your select & Enter the current setting option
How to choose a display
1.Turn on the Pro 2. The LCD will show the firmware version first, then Longitude display in the LCD.
2.There are 9 display options which will be displayed in the LCD. Press the MENU button to the desired display.
LON: Longitude, “W”= -west, “E”= -east
LAT: Latitude, “S”= -south, “N”= -north
ALT: Altitude (the unit of “meter” or “feet “is available via setting.
M-meter, FT-feet)
DIR: Direction (Magnetic north or true north is available via setting.
MN-Magnetic north, TN-True north)
TIM: Time (UTC or local time is available via setting. U-UTC, Llocal time )
DAT: Date (time zone=UTC, date format can be set)
SPE: Move speed (the unit of “kM”, “MIL” or “N” is available via
setting. KM-Kilometer, MIL-mile, N-nautical mile)
GRA: Electronic level. The number at left is the unit’s current pitch (elevation)
data. The number at right is the roll (tilt) data. (The level zero can be
corrected via setting)
SET?: Custom setting. In this display, press ENTER button and
the custom setting is entered. The Pro 2 offers following16 custom
setting options.
7
R
Custom setting instruction
The Pro 2 offers following16 custom setting options.
1
LED ( Backlight setting, ON, OFF or DELAY . Delay : 1min, 2min, 3min, 4min, 5min. 1 min is the default )
2
LOCK (Automatically use the last known position or not use, LOCK-USE or UNLOCK-do not use, LOCK is the default )
3
Unit of altitude ( M-meter or FT- feet, meter is the default )
4
Word Time (U-UTC or L-Local time. The UTC time is received from GPS, and can not be adjusted. The local time can
be adjusted to meet user’s local time by change the Time Zone . UTC is the default )
5
Date format ( YYYY.MM.DD,DD.MM.YYYY or MM.DD.YYYY, )
6
Unit of speed unit ( KM-kilometer, MIL-mile, or N-nautical mile. KM is the default )
7
Log function. The number in the LCD shows the available memory. Press Enter button, then you can set the interval time.
The interval time are 1sec, 5sec, 10sec, 15sec, 30sec, 1min, 2min, 5min, 10min, 20min, 30min. 10 sec is the default.
To disable the log function is also in the setting. Press the menu button until the “ DISABLE” shown in the LCD, then press
Enter button to confirm.
8
2.4GHz wireless control on or off. On is the default
8
9
Wireless channel choice. The channel is from 00 to 15. 00 is the default.
10
Timer release. You need to set start time first, then set start date, end time, end date and interval time.
“T” means interval time.
Clock working mode setting.
In clock working mode, you can set - “FRE” means how often will GPS work ?. 1h, 2h, 4h, 8h, 24h, 48h, and 96h are available.
1 h is the default. “CON” means how long will GPS work? 1min, 3min, and 5min are available. 1min is the default.
11
12
Auto working mode setting, you can set - “FRE” means how often will GPS work ?. 10min, 15min, 30min, 60min, and 90min are available.
10min is the default. “CON” means how long will GPS work? 1min, 3min, and 5min are available. 1min is the default.
13
Compass calibration (refer to page 15)
14
Your prefered direction show in LCD. Magnetic north or true north. MN- Magnetic North (default), TN-True North.
Magnetic declination can be adjusted in this setting. ( refer to page16)
15
Level zero correction
16
Current battery voltage info
9
R
How to use with Nikon camera
1.Connect the Pro 2 to a Compatible DSLR Camera, check the connection
1.Turn off the camera
2.The Pro 2 is equipped with a mount that fits the camera accessory shoe. Slide the Pro 2 onto the camera accessory
shoe. Then connect it to your camera via the data cable.
3.Turn the Pro and the camera on, if the Pro is properly connected, a blinking GPS icon will be displayed in the camera’s
control panel. If there is no GPS icon, check the connection.
Caution!
The 10-pin cable extending to the 11:00
position when viewed from the front.
2.Capture the GPS satellites signal
When you turn on the Pro 2, you can see a blinking GPS icon in the LCD, a blinking GPS icon indicates that the Pro 2 is
searching for a satellite signal. After a while, the GPS icon will be steady, this means that the GPS signal on the Pro 2
is fixed. The LCD will now display related information, such as latitude, longitude, time, compass heading.
10
3.Take photos and the GPS data will be recorded in the photographs
1.Once the GPS signal on the Pro 2 is fixed, you can see a steady GPS icon displayed in the camera’s control panel. It
means the Pro 2 is ready to provide the GPS data to the camera.
2.Take photos as normal, the GPS and heading (direction) data will be recorded in the metadata of the photograph. ( If
the heading data is not accurate, it is necessary to perform a compass calibration, please refer to the calibration
instruction )
3.To view the GPS data recorded with each photograph, press the button on the camera and display the photographs
full frame. The photo info display will contain a page listing GPS and heading data for the current photograph.
4.Following with each shutter release, there will be a group of data recorded in the internal flash memory. The data in
the file is specially marked begin as a *Flash*” to indicate.
Tips
1.If a photo is taken when the Pro 2 is off or it has not yet obtained GPS lock, the image will be recorded normally but
without any GPS data.
11
2.If you wish to take geotagged photos in situations where the GPS signal is lost after it was acquired, such as when
going indoors to continue shooting, the Pro 2’ s “lock” function, which is enabled by default, will reuse the last known
position for subsequent image.
3.In our earlier version, the Pro is able to output the last one GPS information stored in the memory as soon as you turn
it on and before it acquires new GPS signal. However, we got feedback that those” previous” GPS data might cause a
little bit trouble and lead to incorrect locations. In order to avoid this, Solmeta improved the “lock” function. Only
when the Pro 2 device is kept on (or the device is in AUTO working mode) and you are into a place where there is no
GPS signal, the Pro2 is able to provide the last GPS information. As soon as you turn off the Pro, the GPS data stored in
Memory is invalid. If the GPS data is the “Lock “ data, a “LOC” icon will be displayed in the LCD to indicate.
4.Auto working mode is very useful for photographers.
In the working mode, the pro 2 is powered on or off following the attached camera ‘s on or off.
When you turn off the camera, the Pro 2 also will be turned off. However, the Pro 2 offers a special working mode,
which can make the GPS to work intermittently for a very quick hot start in your photographic day. In the custom
setting, you can set “how often will GPS work? And how long will it last?”. (refer to custom setting 12 on page 9.)
12
R
GPS data logger
The Pro 2 can be used as a data logger. The logger function is default with interval 10sec. The interval can be set via
custom setting. For the interval setting, please refer to custom setting 7 in page 8
When the pro 2 is GPS fixed, the GPS data will be automatically recorded in the flash memory. Along with GPS data
recorded each time, a “MEM” icon will flash one time in the LCD to indicate the record.
The flash memory can be easily read by the computer via the USB connection. Just like a “U flash driver”. No software
needed.
The log data are stored directly as txt file with name of the form “ S120501.txt” . It means the log data is recorded on
1st, May, 2012. The file is generated per days and named after that date recorded. The file can be opened and read
directly by any ASCII editor.
The file system only supports FAT16 format.
Current Pro 2 (Ver1.0) only supports Windows Operation System.
The file Provides common GPS sentence. Such as $GPRMC, $PTNTHPR, $GPVTG, $GPGGA, $GPGSA, and $GPGLL.
Especially, when the Pro 2 mounted on the camera’s hot shoe, there will be a group of data recorded as per the shutter
release. The data is specially marked begin as a “*Flash*” to indicate.
13
R
Wireless remote control
The Pro 2 is built-in 2.4 GHz wireless receiver, which can receive the commands of focus and shutter release from 2.4GHz
Wireless Shutter Remote (Supplied as a accessory of Pro 2 ). The function is default.
Enter to custom setting 8, you can activate or disable the function. Enter to custom setting 9, you can choose the
wireless channel.
1.Choose the channel in the Pro 2 is same with the channel in the wireless shutter remote. The channel can be chosen
from 00 to 15. The default is 00.
2.A “F” icon will show on the LCD when the Pro 2 receive the focus command.
3.A “R” icon will show on the LCD when the Pro 2 receive the shutter release command.
Timer release
The Pro 2 supports Interval Timer Photography, same as the function which with Nikon high-end camera, such as
D800.However, the Pro 2 can provide a more reliable timer release since the time on the Pro 2 is sync with GPS.
Enter to custom setting 10, you can use the function as the steps below.
1.Set the Start time and the Start date.
2.Set the End time and End date. The End time and the End date must be later than the Start date and the Start time.
3.Set the interval time.
14
R
Compass calibration
IMPORTANT: Before using the Geotagger Pro2, you must do the calibration. Repeat these procedures each time you
move the Pro and camera more than 100 miles or you are using the different cameras.
Why calibrate?
The compass in the Pro is sensitive to nearby magnetic objects that could cause measuring error. To compensate for this
error it is sometime necessary to perform a calibration. (If the compass is accurate, there is no need to perform the
calibration)
How to calibrate?
Mount the Pro2 onto the camera’s hot shoe, with the data cable connected, and then turn the Pro2 and the camera on.
Press MENU button and choose the custom setting. Then choose the custom setting 13 which is the calibration. Press the
Enter button, the LCD will show as
, then you can perform as below.
1.Hold the camera and the Pro2 in your hand, rotate the devices slowly around X- axis , Y- axis, and Z- axis. Do the
rotation twice in each axis. Please try to do the rotation as a constant speed and each rotation takes about 5-10
seconds.
2.After the rotation in each of the three axis, press the Enter button again to complete the calibration.
15
R
Magnetic declination adjustment
The Pro 2 offers magnetic declination adjustment if necessary.
Turn on the Pro 2, enter to custom setting. The custom setting 14 is the “magnetic declination adjustment”. With the LCD
shown the direction as “TN”
, press the Enter button, the LCD will flash shown. The flash shown LCD
means that you can do the magnetic declination adjustment.
With the flashing LCD, point the Pro 2 to the True North (you should find the True North in your location with help of map
or others). Then press the Enter button again, the LCD will shown as
been adjusted.
16
. The magnetic declination has
R
Specification
17
18
R
Warranty
●Solmeta
Technology Co., Limited guarantees its product from manufacturing defects and workmanship for a period of
two-year from the date of original purchase. During the two-year warranty, Solmeta Technology will repair or replace
the product free of charge. Please keep your original invoice as proof of purchase.
●Customers
who have products covered under the warranty are required to contact Solmeta Technology by e-mail
([email protected]) for troubleshooting issues before returning the product.
●Customers
●Charges
●The
are responsible for shipping and insurance charges for returning the product to Solmeta Technology.
will be imposed for repairing product, which is out of warranty coverage or invalid
warranty.
guarantee is not valid if defect is due to damage caused by incorrect use, poor maintenance or if persons not
authorized by Solmeta Technology have carried out alterations or repairs.
●For
the device to be used correctly, the user should strictly adhere to all instructions included in the user guide and
should abstain from any actions or uses that are described as undesired or which are warned against in the user guide.
Information in this document is subject to change without notice. Solmeta Technology reserves the right to
change or improve their products and to make changes in the content without obligation to notify any person
or organization of such changes or improvements.
19
Shenzhen Solmeta Technology Company
Add: Room 327, Building 5, Zhong Xing Industrial Town,
Chuang Ye Road, Nan Shan district, Shenzhen,
518054,China
Tel: 0086-755-26969187
Fax: 0086-755-26969187
E-Mail: [email protected]
Web: www.solmeta.com
Operation flow
Menu to choose,Enter to set and back to menu
1
Main display
Enter
LED setting
Enter
Lock setting
Menu
2
Menu
Enter
3
Menu
Enter
4
Menu
Menu
Enter
Enter
5
Menu
Enter
6
Menu
Enter
7
Menu
Menu
Enter
8
Menu
9
Enter
Menu
Enter
10
Menu
Enter
11
Clock working mode
Menu
Enter
12
Auto working mode
Menu
Enter
13
Compass calibration
Menu
14
Enter
Menu
Enter
15
Level zero correction
Menu
16
Current battery voltage