1
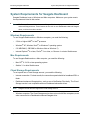
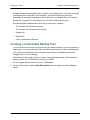
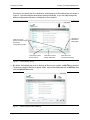
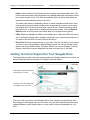
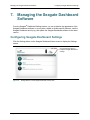
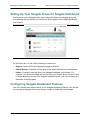
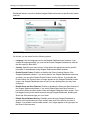
Seagate Dashboard User Guide
Seagate Dashboard User Guide
© 2013 Seagate Technology LLC. All rights reserved. Seagate, Seagate Technology, the Wave
logo, and FreeAgent are trademarks or registered trademarks of Seagate Technology LLC, or one
of its affiliates. All other trademarks or registered trademarks are the property of their respective
owners. When referring to hard drive capacity, one gigabyte, or GB, equals one billion bytes and one
terabyte, or TB, equals one thousand billion bytes when referring to hard drive capacity. In addition,
some of the listed capacity is used for formatting and other functions, and thus will not be available
for data storage. Quantitative usage examples for various applications are for illustrative purposes.
Actual quantities will vary based on various factors including file size, file format, features, and
application software. Seagate reserves the right to change, without notice, product offerings or
specifications.
Seagate Technology LLC
10200 S. De Anza Boulevard
Cupertino, CA 95014 U.S.A
Contents
1. Introducing Seagate Dashboard . . . . . . . . . . . . . . . . . . . . . . . . . . . . 5
Seagate Dashboard Features . . . . . . . . . . . . . . . . . . . . . . . . . . . . . . . . . . . .
Protecting Your Data (Windows Only) . . . . . . . . . . . . . . . . . . . . . . . . . . .
Sharing Your Pictures and Videos . . . . . . . . . . . . . . . . . . . . . . . . . . . . . .
Downloading and Saving Your Pictures . . . . . . . . . . . . . . . . . . . . . . . . .
Controlling Settings for Your Seagate Drive . . . . . . . . . . . . . . . . . . . . . .
5
5
6
6
6
Getting Started With Seagate Dashboard . . . . . . . . . . . . . . . . . . . . . . . . . . . 6
About the Seagate Dashboard Icon . . . . . . . . . . . . . . . . . . . . . . . . . . . . 7
System Requirements for Seagate Dashboard . . . . . . . . . . . . . . . . . . . . . . .
Windows Requirements . . . . . . . . . . . . . . . . . . . . . . . . . . . . . . . . . . . . . .
Mac Requirements . . . . . . . . . . . . . . . . . . . . . . . . . . . . . . . . . . . . . . . . .
Cloud Storage Requirements . . . . . . . . . . . . . . . . . . . . . . . . . . . . . . . . .
8
8
8
8
2. Protecting Your Data . . . . . . . . . . . . . . . . . . . . . . . . . . . . . . . . . . . . . . 9
Activating the Default Backup Plan . . . . . . . . . . . . . . . . . . . . . . . . . . . . . . . . 9
Creating a Customized Backup Plan . . . . . . . . . . . . . . . . . . . . . . . . . . . . . . 10
Restoring Files from Backup . . . . . . . . . . . . . . . . . . . . . . . . . . . . . . . . . . . . 14
3. Sharing Your Pictures and Videos . . . . . . . . . . . . . . . . . . . . . . . . . 17
How Picture and Video Sharing Works . . . . . . . . . . . . . . . . . . . . . . . . . . . . 17
Example: Uploading Pictures to Facebook . . . . . . . . . . . . . . . . . . . . . . . . . 17
4. Saving Your Online Pictures with Seagate Dashboard . . . . . . . . . 21
How Picture Saving Works . . . . . . . . . . . . . . . . . . . . . . . . . . . . . . . . . . . . . 21
Example: Downloading Pictures from Facebook . . . . . . . . . . . . . . . . . . . . . 21
5. Using Cloud Storage . . . . . . . . . . . . . . . . . . . . . . . . . . . . . . . . . . . . . 23
About Cloud Storage . . . . . . . . . . . . . . . . . . . . . . . . . . . . . . . . . . . . . . . . . . 23
Setting up a Cloud Storage Account . . . . . . . . . . . . . . . . . . . . . . . . . . . . . . 23
Signing Into Your Cloud Storage Account . . . . . . . . . . . . . . . . . . . . . . . . . . 25
Managing Your Cloud Storage Account from Seagate Dashboard . . . . . . . 25
Using the Cloud Storage Web Portal . . . . . . . . . . . . . . . . . . . . . . . . . . . . . . 26
6. Managing Your Seagate Drives with Seagate Dashboard . . . . . . . 29
Seagate Dashboard User Guide
3
Viewing Information About Your Drive . . . . . . . . . . . . . . . . . . . . . . . . . . . . . 29
Adjusting Drive Settings . . . . . . . . . . . . . . . . . . . . . . . . . . . . . . . . . . . . . . . 30
Getting Technical Support for Your Seagate Drive . . . . . . . . . . . . . . . . . . . 31
7. Managing the Seagate Dashboard Software . . . . . . . . . . . . . . . . . 33
Configuring Seagate Dashboard Settings . . . . . . . . . . . . . . . . . . . . . . . . . . 33
Setting Up Your Seagate Drives for Seagate Dashboard . . . . . . . . . . . . . . 34
Configuring Seagate Dashboard Features . . . . . . . . . . . . . . . . . . . . . . . . . 34
Viewing the Seagate Dashboard Log . . . . . . . . . . . . . . . . . . . . . . . . . . . . . 36
Updating the Seagate Dashboard Software . . . . . . . . . . . . . . . . . . . . . . . . 37
Seagate Dashboard User Guide
4
Introducing Seagate Dashboard
Seagate Dashboard Features
1. Introducing Seagate Dashboard
Seagate® Dashboard is a powerful, yet easy-to-use utility for backing up your data and
sharing and saving media on your social media networks.
This chapter describes the features of Seagate Dashboard, how to get started using the
program, and the system requirements for the Windows® and Mac® versions of the program.
Seagate Dashboard Features
Seagate Dashboard includes the following features:
•
Data protection (Windows only): Back up your data continuously or on a schedule,
either to a Dashboard-enhanced Seagate drive or to an online Cloud Storage account.
•
Picture and video sharing: Use Seagate Dashboard to upload your pictures and videos
to popular social networking services such as Facebook, Flickr®, and YouTube.
•
Picture saving: Set up Seagate Dashboard to download and save pictures posted on
your social media accounts to your Seagate drive.
•
Seagate drive management: Control settings for your Seagate drive, including the
power-save feature and LED settings.
Protecting Your Data (Windows Only)
With Seagate Dashboard’s Protect feature, you can start backing up your system with a
single click, or you can customize the feature to back up your data according to a set
schedule.
You can specify which files or directories get backed up and where the backed-up files are
saved, either to a Dashboard-enhanced Seagate drive, or to the online Seagate Cloud
Storage Service Powered by Nero. If you need to restore a file from a backup drive, you can
select from multiple historical versions of the file.
See “Protecting Your Data” on page 9 for information on how to use the Protect feature.
Seagate Cloud Storage Service Powered by Nero
Included with your Seagate drive is a free subscription to the Seagate Cloud Storage Service
Powered by Nero.
Note:
Seagate Central does not support cloud storage.
Cloud Storage is a secure, reliable place to store your backed-up data online. The free
subscription includes one year of service and four gigabytes of secure online storage. You
can optionally upgrade your online storage capacity to as much as 100 gigabytes.
Seagate Dashboard User Guide
5
Introducing Seagate Dashboard
Getting Started With Seagate Dashboard
See “Using Cloud Storage” on page 23 for more information.
Note:
The Protect feature and Cloud Storage service are only available on the Windows version of
Seagate Dashboard. For Mac systems, Seagate recommends that you back up your system
using Apple Time Machine.
Sharing Your Pictures and Videos
Seagate Dashboard provides a convenient way to upload your pictures and videos to popular
social networking services such as Facebook, Flickr, and YouTube.
You simply choose the social networking service where want to upload the pictures and
videos, log in, select the files to upload, and enter album details. Seagate Dashboard
automatically uploads the files and creates the album.
See “Sharing Your Pictures and Videos” on page 17 for information on how to use the Share
feature.
Downloading and Saving Your Pictures
Seagate Dashboard’s Save feature can check your Facebook or Flickr accounts for new
pictures you’ve uploaded and automatically download them to your computer at home. This is
a convenient way to preserve the pictures you’ve posted online, so they don’t get deleted
accidentally.
See “Saving Your Online Pictures with Seagate Dashboard” on page 21 for information on
how to use the Save feature.
Controlling Settings for Your Seagate Drive
Using Seagate Dashboard, you can easily adjust settings and features on your Seagate
drives. You can control the power save feature on your drive, turn the LEDs on the drive on or
off, perform a diagnostic test, and link directly to the Seagate technical support page for your
drive.
See “Managing Your Seagate Drives with Seagate Dashboard” on page 29 for more
information.
Getting Started With Seagate Dashboard
After you install the Seagate Dashboard software, you can launch the Seagate Dashboard
user interface to set up and use the program’s features.
On Windows systems, do one of the following:
Seagate Dashboard User Guide
6
Introducing Seagate Dashboard
•
Double-click the Seagate Dashboard icon on your desktop.
Figure 1:
•
Getting Started With Seagate Dashboard
Seagate Dashboard Desktop Icon
Right-click the Seagate Dashboard icon in the system tray, and select Open Seagate
Dashboard from the menu.
Seagate Dashboard Icon
Figure 2:
•
Seagate Dashboard Icon in the Windows System Tray
From the list of programs on the Start menu, select Seagate Dashboard > Seagate
Dashboard.
On Mac systems, launch Seagate Dashboard from the Applications folder. For easy access,
you can add the Seagate Dashboard icon to the Dock. You can configure settings for
Seagate Dashboard by clicking the System Preferences icon.
About the Seagate Dashboard Icon
The Seagate Dashboard icon (shown in Figure 2 above), located in the taskbar notification
area on your computer desktop, indicates that the Seagate Dashboard agent is running in the
background and protecting your data.
The Seagate Dashboard icon can be one of the following colors:
Green
The Seagate Dashboard agent and Seagate drive are operating normally.
Yellow
There is a minor issue with the Seagate Dashboard software, such as a
backup failing to complete. Check the Seagate Dashboard log for details.
See “Viewing the Seagate Dashboard Log” on page 36.
Red
There may be a mechanical issue with the Seagate drive. Check to see if
the drive is working properly. If it isn’t, contact Seagate Technical Support.
See “Getting Technical Support for Your Seagate Drive” on page 31
By default, the Seagate Dashboard agent starts running when you start your computer. To
disable the Seagate Dashboard agent, right-click the Seagate Dashboard icon and select
Quit from the menu. If you do not want the Seagate Dashboard agent to start running when
your computer starts, right-click the Seagate Dashboard icon and remove the checkmark
next to Launch on Startup.
Note that if you disable the Seagate Dashboard agent, any scheduled backups or automatic
file downloads that you’ve configured in Seagate Dashboard will not take place.
Seagate Dashboard User Guide
7
Introducing Seagate Dashboard
System Requirements for Seagate Dashboard
System Requirements for Seagate Dashboard
Seagate Dashboard runs on Windows and Mac computers. Make sure your system meets
the requirements listed in this section.
Note:
The Protect, Share, and Save features of Seagate Dashboard only work with Dashboardenhanced Seagate drives. These features do not work on non-Dashboard-enhanced Seagate
drives, or drives from other vendors.
Windows Requirements
To use Seagate Dashboard on a Windows computer, you need the following:
•
2 GHz or higher AMD® or Intel® processor
•
Windows® XP, Windows Vista®, or Windows 7 operating system
•
512 MB RAM (1 GB RAM for Windows Vista or Windows 7)
•
Internet Explorer® 6 or later, Firefox® 2.x or later, or Chrome 4.x or later Web browser
Mac Requirements
To use Seagate Dashboard on a Mac computer, you need the following:
•
Mac OS® X 10.6.8 or later operating system
•
Safari® 3.1 or later Web browser
Cloud Storage Requirements
To set up and use a Cloud Storage account, you need the following:
•
Internet connection. For best results, the connection speed should be broadband DSL or
faster.
•
Dashboard-enhanced Seagate drive, such as one of the Backup Plus family. The Cloud
Storage service is not compatible with non-Dashboard-enhanced drives.
Note:
•
Seagate Central does not support the Cloud Storage service.
Windows computer. The Cloud Storage service does not work with Mac computers, even
when connected to a Dashboard-enhanced Seagate drive.
Seagate Dashboard User Guide
8
Protecting Your Data
Activating the Default Backup Plan
2. Protecting Your Data
Seagate® Dashboard includes a robust and flexible data backup feature. You can start
backing up your system with a single click, or you can customize the feature to back up your
data according to a set schedule and save it to a Dashboard-enhanced Seagate backup drive
or to Cloud Storage.
If you need to restore a file from a backup drive, you can select from multiple historical
versions of the file. (Only a single version of the file is saved to Cloud Storage.)
Note:
The Protect feature is only available on the Windows version of Seagate Dashboard. For Mac
computers, Seagate recommends that you back up your system using Apple Time Machine.
Activating the Default Backup Plan
The Default Backup plan is the simplest way to start backing up your data. When you activate
the default backup plan, Seagate Dashboard automatically backs up your files to your
Seagate drive, then keeps running in the background, continuously backing up new and
changed files. No additional configuration is required for the default backup plan beyond
activating it.
To activate the default backup plan, do the following:
1. On the Seagate Dashboard Home screen, click Protect.
2. On the Protect screen, click the Protect Now button.
Figure 3:
Seagate Dashboard Protect Screen
Seagate Dashboard User Guide
9
Protecting Your Data
Creating a Customized Backup Plan
Seagate Dashboard starts backing up your data to your Seagate drive. If you have more than
one Seagate drive connected to your computer, your data is backed up to the drive
designated as the default backup drive. See “Setting Up Your Seagate Drives for Seagate
Dashboard” on page 34 for information on how to set the default backup drive.
Note that Seagate Dashboard does not back up certain files, including:
•
The contents of the Windows directory
•
The contents of the Program Files directory
•
System files
•
Hidden files
•
Files on detachable USB drives
Creating a Customized Backup Plan
If you would like to have more control over how your data is backed up, you can customize a
backup plan. You can specify which files or directories get backed up, when the backup plan
runs, and where the backed-up files should be saved, either to a Dashboard-enhanced
Seagate drive or to Cloud Storage.
The following is an example of how to create a customized backup plan. In this example, a
directory called Coins is backed up every day at 10:00pm.
1. On the Seagate Dashboard Home screen, click Protect.
2. On the Protect screen, click the New Backup Plan button to display the Custom Backup
screen.
Seagate Dashboard User Guide
10
Protecting Your Data
Creating a Customized Backup Plan
From here, you specify the files, destination, and frequency for the backup plan, as shown in
Figure 4. You can configure each backup setting individually, or you can step through the
backup configuration process by clicking the < and > buttons.
Click here to
activate the
backup plan
Click the > and <
buttons to step through
the backup
configuration process
Click here to select
files to back up
Figure 4:
Click here to set the
backup destination
Click here to set
the backup frequency
Custom Backup Screen
3. By default, the backup plan is set to back up all files on your system, so All Files is selected.
To back up a specific directory or group of files, remove the checkmark next to All Files, then
click the Select Files button.
Figure 5:
Selecting Types of Files to Back Up
Seagate Dashboard User Guide
11
Protecting Your Data
Creating a Customized Backup Plan
4. Navigate to the directory or files you want to back up and place a checkmark next to each
one. When you are done, click the > button to move to the next backup configuration screen.
Figure 6:
Selecting Specific Files to Back Up
5. Place a checkmark next to the drive(s) where you want the files to be backed up. If you have
created a Cloud Storage account, it appears on this screen as a destination option. See
“Using Cloud Storage” on page 23 for information about setting up a Cloud Storage account.
Figure 7:
Selecting a Backup Destination
Make sure there is enough room on the destination drive for the files you want to back up.
Click the > button to move to the next screen.
Seagate Dashboard User Guide
12
Protecting Your Data
Creating a Customized Backup Plan
6. Indicate how often the files should be backed up.
Figure 8:
Selecting How Often to Execute a Backup Plan
You can select from the following options:
•
Snapshot: Executes the backup plan only once.
•
Monthly: Executes the backup plan a specific day of each month, at a specific time.
•
Weekly: Executes the backup plan a specific day of each week, at a specific time.
•
Daily: Executes the backup plan at a specific time each day.
•
Continuous: Constantly monitors the selected files and directories and backs up any
new or changed files.
7. Click the green checkmark to activate the backup plan.
Seagate Dashboard User Guide
13
Protecting Your Data
Restoring Files from Backup
8. After you create a backup plan, Seagate Dashboard shows its status on the Protect screen,
Figure 9:
Seagate Dashboard Protect Status Screen
On this screen, you can click the Pause button to temporarily stop the backup plan, the Pencil
button to edit the backup plan settings, or the X button to delete the backup plan. If you
choose to delete a backup plan, Seagate Dashboard gives you the option to delete the files
from the backup drive, or leave them in place.
Restoring Files from Backup
You can easily restore data backed up by Seagate Dashboard to your system if necessary.
Seagate Dashboard saves multiple versions of each file it backs up to the Seagate drive, so
you can restore the most recent version or a previous version.
To restore a file from a backup, do the following:
1. On the Seagate Dashboard Home screen, click Protect.
2. On the Protect screen, click Restore Files.
Seagate Dashboard User Guide
14
Protecting Your Data
Restoring Files from Backup
3. Seagate Dashboard displays a list of the currently active Backup plans. Click Find Backups
to display the of the backups saved on your drive, then select the backup plan that saved the
file you want to restore.
Figure 10:
Selecting a Backup Plan for Restoring a File
4. Click the > button to list the backups saved by the selected backup plan.
Figure 11:
Selecting a Previous Backup
5. Select a backup that contains the file you want to restore.
If the file was saved on a Backup Plus drive, Seagate Dashboard maintains multiple versions
of the file, so you can select the most recent version or a previous version. If the file was
saved to Cloud Storage, only the most recent version is available to restore.
Seagate Dashboard User Guide
15
Protecting Your Data
Restoring Files from Backup
6. Click the > button, and select the location on your system where you want to restore the file.
By default, Seagate Dashboard will save the restored files in their original location on your
system.
Figure 12:
Selecting the Destination for the Restored File
7. Click the green checkmark to restore the file from the backup to the selected location.
Seagate Dashboard User Guide
16
Sharing Your Pictures and Videos
How Picture and Video Sharing Works
3. Sharing Your Pictures and Videos
Seagate® Dashboard provides an easy way to upload your pictures and videos from your
local system to popular social networking services such as Facebook, Flickr, and YouTube.
How Picture and Video Sharing Works
On the Seagate Dashboard Share screen, you choose the social networking service where
want to upload the pictures and videos, log in, select the files to upload, then enter details
about the destination Facebook album, Flickr photo set, or YouTube video channel. Once you
have made your choices, Seagate Dashboard uploads the files to the social media service,
and you can view them online.
Example: Uploading Pictures to Facebook
Here is an example of how to use Seagate Dashboard to upload a set of pictures into a new
album in Facebook. This example uploads some pictures of coins into a new album on
Facebook called “Coins”.
The upload procedure is similar for uploading pictures to Flickr and videos to YouTube.
1. On the Seagate Dashboard Home screen, click Share.
2. On the Share screen, click the Facebook icon.
3. The first time you access Facebook from Seagate Dashboard, you are prompted to log in to
your account. Enter your login information. Once you do this, Seagate Dashboard saves your
login information so you do not have to enter it again for that social networking service.
4. Also the first time you use Seagate Dashboard to access Facebook, you are prompted to
allow the Seagate Dashboard app to post on your behalf. Granting this permission is
necessary for the Share and Save functions to work properly. Click Allow to grant this
permission to the app.
Once you grant this permission to the Seagate Dashboard app, you do not need to grant it
again. If you later want to remove the permission from the Seagate app, you can do so from
the App Settings screen in Facebook.
5. Seagate Dashboard then displays a selection screen listing files and folders that you can
upload. Seagate Dashboard shows only the picture and video files (.jpg, gif, avi, mov, and so
Seagate Dashboard User Guide
17
Sharing Your Pictures and Videos
Example: Uploading Pictures to Facebook
on) in each folder. You can filter the display by entering text in the Search field. For example,
entering jpg in the Search field shows only those files in the folder with jpg in the file name.
Place a checkmark next to the files
and folders you want to upload
Enter text here to show only
files with this text in the name
Figure 13:
Seagate Dashboard File Selection Screen
6. Place a checkmark next to the files and folders you want to upload. If you place a checkmark
next to a folder, it selects all of the files in the folder. Once you are done selecting files to
upload, click the > button to continue.
7. On the album selection screen, select the album where you want to upload the pictures. You
can select an existing album, or you can enter the name and description for a new album.
Figure 14:
Seagate Dashboard Album Selection Screen
Seagate Dashboard User Guide
18
Sharing Your Pictures and Videos
Note:
Example: Uploading Pictures to Facebook
Videos uploaded to Facebook are always placed in the My Videos folder, regardless of the
destination album you specify in the Album selection screen.
8. When you are finished, click the green checkmark to start the upload. Once the upload is
finished, you can log into your Facebook page and view the pictures in the album.
Figure 15:
Picture Album Uploaded to Facebook Using Seagate Dashboard
Seagate Dashboard User Guide
19
Sharing Your Pictures and Videos
Seagate Dashboard User Guide
Example: Uploading Pictures to Facebook
20
Saving Your Online Pictures with Seagate Dashboard
How Picture Saving Works
4. Saving Your Online Pictures with
Seagate Dashboard
The Save feature of Seagate® Dashboard lets you download and save pictures from your
social media accounts. This is a convenient way to preserve and protect the pictures you’ve
posted online, so they don’t get deleted accidentally.
How Picture Saving Works
When you enable the Save feature, Seagate Dashboard checks your Facebook or Flickr
accounts for pictures, and gives you the option to download them to your local system.
From Seagate Dashboard, you can log into your Facebook or Flickr account and download
the pictures manually, or you can enable the Seagate Dashboard Auto Save feature, which
causes Seagate Dashboard to periodically scan your social media accounts for new pictures,
and automatically download them to your local system if it finds any. For example, when you
take a picture with your smartphone and upload it to Facebook, Seagate Dashboard can
automatically download the picture from Facebook to your computer at home.
Example: Downloading Pictures from Facebook
Here is an example of how to set up Seagate Dashboard to download pictures posted on a
Facebook account. The procedure is similar for downloading pictures from a Flickr account.
1. On the Seagate Dashboard Home screen, click Save.
2. On the Save screen, click the Facebook icon.
3. The first time you access Facebook from Seagate Dashboard, you are prompted to log in to
your account. Enter your login information. Once you do this, Seagate Dashboard saves it so
you do not have to enter it again for that social networking service.
4. Also the first time you use Seagate Dashboard to access Facebook, you are prompted to
allow the Seagate Dashboard app to post on your behalf. Granting this permission is
necessary for the Share and Save functions to work properly. Click Allow to grant this
permission to the app.
Once you grant this permission to the Seagate Dashboard app, you do not need to grant it
again. If you later want to remove the permission from the Seagate app, you can do so from
the App Settings screen in Facebook.
Seagate Dashboard User Guide
21
Saving Your Online Pictures with Seagate Dashboard
Example: Downloading Pictures from Facebook
5. On the Save screen, Seagate Dashboard shows the number of new pictures that have been
posted in your account. “New” pictures are those that Seagate Dashboard has found in your
account but hasn’t already downloaded. Click the Facebook icon to download them.
Click here to download the files to
your system
Click here to set where the
downloaded pictures are saved.
Click here to open the
directory where the pictures
are saved
Figure 16:
Seagate Dashboard Save Screen
6. Seagate Dashboard downloads the files to a directory on your local system. Click My Online
Documents to set the location of the download directory.
7. Click the magnifying glass button to explore the download directory. Seagate Dashboard
saves the pictures in a subdirectory that corresponds to the name of the album in Facebook.
Seagate Dashboard User Guide
22
Using Cloud Storage
About Cloud Storage
5. Using Cloud Storage
This chapter explains how to set up and manage your Cloud Storage account so you can use
it as a destination for your data backups. You can manage your Cloud Storage account from
within Seagate® Dashboard, or you can log into your account using a Web browser.
Note:
The Cloud Storage service is only available in the Windows® version of Seagate Dashboard.
About Cloud Storage
The Seagate Cloud Storage Service Powered by Nero is a secure, reliable place to store your
backed-up data online. When you purchased your Seagate Backup Plus drive, you received
a free 1-year subscription to the Cloud Storage service, along with 4 gigabytes of free
storage. You can easily increase the amount of available storage, and extend your
subscription beyond the initial year.
Note:
Seagate Central does not support the Cloud Storage service.
When setting up a backup plan with the Protect feature, you can specify Cloud Storage as the
destination for the data backups; then when Seagate Dashboard executes the backup plan, it
will automatically upload your data files to your Cloud Storage account.
See “Protecting Your Data” on page 9 for information on how to create a backup plan.
Setting up a Cloud Storage Account
To start backing up your files to Cloud Storage, you must first create a Cloud Storage
account. To create a Cloud Storage account, do the following:
1. Connect your Dashboard-enhanced Seagate drive to your computer.
Seagate Dashboard User Guide
23
Using Cloud Storage
Setting up a Cloud Storage Account
2. On the Seagate Dashboard Home screen, click the Cloud Storage icon at the top of the
screen.
Click here to set up your
Cloud Storage account
Figure 17:
Cloud Storage Icon on the Seagate Dashboard Home Screen
3. Click the Create a new account link to display the account sign-up page.
Figure 18:
Cloud Storage Account Creation Screen
4. Fill in the fields on the page, and select your Dashboard-enhanced drive from the list box.
5. Click the green checkmark to create your Cloud Storage account.
Seagate Dashboard User Guide
24
Using Cloud Storage
Signing Into Your Cloud Storage Account
Signing Into Your Cloud Storage Account
To use Cloud Storage as a destination for data backups, you must be signed into your Cloud
Storage account. To sign in to your account, click the Cloud Storage icon on the Seagate
Dashboard Home screen, then enter your e-mail address and Cloud Storage account
password.
After you sign into your account, you remain signed in as long as Seagate Dashboard is
running on your system. You do not need to sign in again unless Seagate Dashboard stops
running for some reason, such as a system restart.
Managing Your Cloud Storage Account from Seagate
Dashboard
If you are signed into your Cloud Storage account, you can show information about your
account, change your password, and upgrade the amount of available storage.
To do this, go to the Seagate Dashboard Home screen, and click the Cloud Storage icon to
display the Cloud Settings screen. The Info tab displays information about your Cloud
Storage account, including the amount of storage you have available and when your
subscription will expire.
Figure 19:
Displaying Cloud Storage Account Information
Seagate Dashboard User Guide
25
Using Cloud Storage
Using the Cloud Storage Web Portal
Click the Manage Tab to display additional settings.
Figure 20:
Displaying Cloud Storage Account Settings
On this tab, you can select from the following options:
•
Information: Shows your Cloud Storage account information.
•
Change passwords: Lets you change the password for your Cloud Storage account.
•
Upgrade: Shows options for increasing the amount of storage in your Cloud Storage
account.
Using the Cloud Storage Web Portal
You can also access the files you’ve saved in Cloud Storage from a Web browser. Using the
Cloud Storage Web Portal, you can view and download files you’ve backed up, modify
account settings, and upgrade your storage capacity.
To open the Cloud Storage Web Portal, do one of the following:
•
Click the Cloud Storage icon at the top of the Seagate Dashboard screen, then click the
Open Web Portal link on the Info tab.
or
Seagate Dashboard User Guide
26
Using Cloud Storage
•
Using the Cloud Storage Web Portal
Open a browser and go to http://cloudstorage.seagate.com, then log in with your Cloud
Storage account username and password.
Figure 21:
Cloud Storage Web Portal
The following options are available on the Cloud Storage Web Portal:
•
Home: Lists the folders and files you’ve backed up to Cloud Storage. Click a folder to
view its contents. Click the name of file to view, open, or download it. You can also select
one or more files and delete them.
•
Search: Locates files stored in your Cloud Storage account. Enter text in the search box
to find files that have that text in the file name.
•
Account: Lets you modify the contact information and password for your Cloud Storage
account.
•
Upgrade: Provides details about how to increase the amount of storage in your account
and extend your subscription to the service.
Seagate Dashboard User Guide
27
Using Cloud Storage
Seagate Dashboard User Guide
Using the Cloud Storage Web Portal
28
Managing Your Seagate Drives with Seagate Dashboard
Viewing Information About Your Drive
6. Managing Your Seagate Drives
with Seagate Dashboard
Seagate® Dashboard makes it easy to adjust settings and features on your Seagate drives.
Using Seagate Dashboard, you can control the power save feature on your drive, turn the
LEDs on the drive on or off, perform a diagnostic test, and access technical support for your
drive.
Viewing Information About Your Drive
At the top of the Seagate Dashboard window, there is an icon for each Seagate drive
connected to your system. When you place your cursor over the drive icon, Seagate
Dashboard displays a bar below the icon indicating how full the drive is. Click the drive icon to
display information about the drive.
Hover over the icon to identify the drive and
show the capacity indicator bar
Figure 22:
Click the icon to display
drive information
Seagate Drive Icon on the Seagate Dashboard Home Screen
If you have more than one Seagate drive connected to your system, Seagate Dashboard
displays an icon for each of them. Hover over an icon to identify the drive.
When you click on the drive icon, Seagate Dashboard displays information about the drive,
including the drive model, serial number, firmware version, drive letter, file system type, and
amount of free space on the drive. A pie chart shows the amount of space used and available
Seagate Dashboard User Guide
29
Managing Your Seagate Drives with Seagate Dashboard
Adjusting Drive Settings
on the drive. You can click the magnifying glass button to open a new window and explore the
contents of the drive.
Click here to explore the drive
Figure 23:
Drive Info Tab
Adjusting Drive Settings
Click the Manage tab to adjust settings for your Seagate drive. From this tab, you can specify
settings for the drive’s power save feature, enable or disable the drive’s LEDs, and perform a
diagnostic test on the drive.
Figure 24:
Drive Manage Tab
From this tab, you can select from the following options:
Seagate Dashboard User Guide
30
Managing Your Seagate Drives with Seagate Dashboard
•
Getting Technical Support for Your Seagate Drive
Power: Sets the amount of time before the drive’s power save feature takes effect. The
power save feature places the Seagate drive in a standby mode after it has been inactive
for a certain amount of time. The drive automatically returns to active mode whenever
someone accesses folders and files on the drive.
The power save feature is disabled by default on newer Seagate external drives, since
most operating systems already include power saving features. However, as an option,
the Seagate drive can be set to sleep after a period of time. Select an inactivity period
from the list box, or select Never to disable the power save feature. Click the Reset to
Default button to set the power save feature back to its original inactivity period.
•
LEDs: Enables or disables the LEDs on the Seagate drive. When the LEDs on the drive
are lit, it indicates that the drive is properly connected to your system and powered on. If
you want to turn the LEDs off, select Off from the list box.
•
Drive Test: Performs a diagnostic test on your drive. Click the Test button if you suspect
your drive is not working properly. Seagate Dashboard will run the test and then report
whether the drive passed or failed. If the drive fails the test, contact Seagate Technical
Support. Note that running the diagnostic test does not modify any of your data.
Getting Technical Support for Your Seagate Drive
The Support tab provides a link to the support page on the Seagate web site for your drive, as
well as worldwide contact information for Seagate Technical Support.
Click here get technical information
and reviews for your drive
Click here to go to the support page
on seagate.com for your drive
Figure 25:
Drive Support Tab
Click one of the icons shown on the Support tab to open a browser window and go to the
drive’s page on the Seagate web site. From there, you can find troubleshooting information,
updated software, product specifications, reviews, and the latest documentation for your
drive.
Seagate Dashboard User Guide
31
Managing Your Seagate Drives with Seagate Dashboard
Getting Technical Support for Your Seagate Drive
If you cannot find the information you are looking for on the Seagate web site, or if you want
to contact Seagate Technical Support directly, select your region from the list box at the
bottom of the screen. Seagate Dashboard displays links for opening a support case, as well
as phone numbers and hours for contacting Seagate Technical Support from your region.
Seagate Dashboard User Guide
32
Managing the Seagate Dashboard Software
Configuring Seagate Dashboard Settings
7. Managing the Seagate Dashboard
Software
From the Seagate® Dashboard Settings screen, you can customize the appearance of the
Seagate Dashboard software on your system, enable or disable specific features, view the
Seagate Dashboard activity log, and update the Seagate Dashboard software to the latest
version.
Configuring Seagate Dashboard Settings
Click the Settings button on the Seagate Dashboard Home screen to display the Settings
screen.
Click the Settings button to
configure Seagate Dashboard
settings
Figure 26:
Settings Button on the Seagate Dashboard Home Screen
Seagate Dashboard User Guide
33
Managing the Seagate Dashboard Software
Setting Up Your Seagate Drives for Seagate Dashboard
Setting Up Your Seagate Drives for Seagate Dashboard
The Drives tab on the Settings screen shows information about your Seagate drives and
Cloud Storage account and lets you set how the drives appear in the Seagate Dashboard
user interface.
Figure 27:
Seagate Dashboard Drives Tab
On the Drives tab, you can click the following for each drive:
•
Register: Opens the Product Registration page for the drive.
•
Default Backup: If selected, sets the drive as the default destination for backup plans.
•
Hidden: If checked, hides the drive in the Seagate Dashboard user interface. For
example, if you check the Hidden box for one of the your Seagate drives, the drive’s icon
no longer appears at the top of the Seagate Dashboard screen, and it is not shown as a
destination for backup plans.
Configuring Seagate Dashboard Features
Click the Features tab to adjust settings for the Seagate Dashboard software. From this tab,
you can specify language and country settings, enable or disable individual Seagate
Seagate Dashboard User Guide
34
Managing the Seagate Dashboard Software
Configuring Seagate Dashboard Features
Dashboard features, as well as disable Seagate Dashboard access to specific social media
networks.
Figure 28:
Seagate Dashboard Features Tab
On this tab, you can select from the following options:
•
Language: Sets the language used in the Seagate Dashboard user interface. If you
change the language setting, you must exit and restart Seagate Dashboard in order for
the new setting to take effect.
•
Country: Specifies your home country, which allows the appropriate country-specific
information to be displayed during Seagate Dashboard software updates.
•
Enable Protect Feature: Enables or disables the Protect (backup) feature of the
Seagate Dashboard software. If you do not want to use Seagate Dashboard to back up
your data, you can select Disable Protect Feature from the list box. If you disable the
Protect feature, the Protect button no longer appears on the Seagate Dashboard Home
screen, and Seagate Dashboard does not carry out any backup plans you may have
configured.
•
Enable Share and Save Features: Enables or disables the Share and Save features of
the Seagate Dashboard software. If you select Disable Share and Save Features, it
removes the Share and Save buttons from the Seagate Dashboard Home screen. If you
had logged into any social media accounts through Seagate Dashboard, disabling the
Share and Save features logs you out of them.
•
Disable Social Network Service: Disables access through Seagate Dashboard to
specific social media networks. Place a check mark next to the service you want to
disable. If you disable a social media network, it no longer appears as a login option on
the Share or Save screens.
Seagate Dashboard User Guide
35
Managing the Seagate Dashboard Software
Viewing the Seagate Dashboard Log
Viewing the Seagate Dashboard Log
Whenever Seagate Dashboard completes an operation, such as executing a backup plan, or
transferring files to or from your social media networks, it records information in its log. Click
the Log tab to display the contents of the Seagate Dashboard log.
Figure 29:
Seagate Dashboard Log Tab
In the Seagate Dashboard log, you can see when files were backed up, whether the backup
plan completed successfully, and how much data was backed up. If Seagate Dashboard
shares or saves media from your social media networks, information about when the files
were transferred appears in the log.
Seagate Dashboard User Guide
36
Managing the Seagate Dashboard Software
Updating the Seagate Dashboard Software
Updating the Seagate Dashboard Software
From time to time, Seagate updates the Seagate Dashboard software. Click the Updates tab
to check for updated Seagate Dashboard software and download and install it.
Figure 30:
Seagate Dashboard Updates Tab
The Updates tab shows the version of Seagate Dashboard software that is currently running
on your system and checks to see if a more recent version is available. If there is an update
available, click the Download and install button to install it.
Seagate Dashboard User Guide
37
Index
default backup drive 34
diagnostic test 31
A
drive settings 6, 29–32
Apple Time Machine 9
F
auto save 21
Facebook 17, 21
B
Flickr 17, 21
backing up data 9–16
H
continuously 13
Hidden box 34
selecting files 11
I
setting destination 12
icon colors 7
setting frequency 13
installing software updates 37
snapshot 13
L
backup plan
language setting 35
customizing 10
launching the program 6
default 9
LEDs 31
deleting 14
M
disabling 35
Mac 8
pausing 14
Microsoft Windows 6, 8
Backup Plus drives 5, 14, 15, 23
monthly back up 13
disabling LEDs 31
P
hiding in Seagate Dashboard 34
picture albums 18
performing diagnostic tests 31
power save feature 31
C
product features 5
Cloud Storage service 5, 23–27
product registration 34
account management 25
R
account sign-in 25
restoring data from backup 14
available space 25
S
creating an account 23
saving online pictures 6, 21–22
requirements 8
auto save feature 21
search function 27
disabling the feature 35
setting as backup destination 10
Seagate Dashboard
subscription 5, 23
agent 7
upgrading available storage 26
granting access to app 17, 21
Web access 26
launching 6
continuous backup 13
settings 33–37
D
software update 37
daily back up 13
systray icon colors 7
data protection 5, 9–16
viewing the log 36
disabling 35
Seagate Dashboard User Guide
sharing pictures and videos 6, 17–19
38
disabling the feature 35
T
supported file types 17
Technical Support 31
social networking services 6
disabling access from Seagate Dashboard 35
U
uploading files 17
supported Seagate drives 5
W
system requirements 8
weekly back up 13
Mac 8
Y
Microsoft Windows 8
YouTube 17
Seagate Dashboard User Guide
39