1
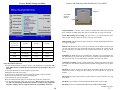
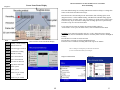
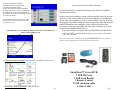
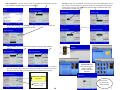
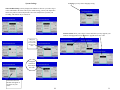
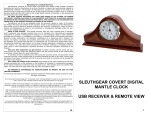
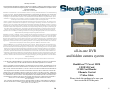
Warranty Information
The manufacturer warrants their products to be free from defects in material or workmanship for a period
of one year from the date of the original purpose. The limited warranty stated above is subject to these
terms and conditions.
TERMS AND CONDITIONS
Limitation on Warranties: All merchandise carries a one (1) Year Manufacturer’s Limited Warranty
on parts and labor. SELLER MAKES NO WARRANTY, EXPRESSED OR IMPLIED, INCLUDING ANY
WARRANTY OR FITNESS FOR ANY PARTICULAR PURPOSE OR MERCHANTABILITY. No agent,
employee or representative of Seller’s are authorized to bind the Seller to any affirmation, representation, or warranty, oral or written, unless by separate written instrument designed by Seller,
which by its terms state that it is included as part of this agreement.
Claims: Receipt of goods shall be deemed acceptance of the goods received. All claims for defective goods or revocation of acceptances, for shortages, for delays, or failures in shipment or
delivery, or for any cause shall be deemed waived and released by the Buyer unless it is made in
writing within (7) days after receipt of goods. All claims must state specifically and in reasonable
detail the nature of all objections, and must be accompanied by delivery receipt or photocopy of
the sales order or packing slip. Any delivery not placed in dispute in a timely manner shall be
paid for by the Buyer and all uncontested amounts due shall be paid by the Buyer with terms
specified. As a condition to making a claim for missing or damaged goods sent, the Customer is
responsible for initiating and pursuing with the carrier.
Limitation on Seller’s Liability: Seller’s liability will be limited to replacement or repair of defective
goods upon receipt of goods in a timely manner per paragraph two herein. In no event will Seller
be liable for consequential or special damages or for transportation, installation, removal, adjustment or other expenses or losses which may arise in connection with the use or installation of the
goods; late delivery, failure to deliver or from any other cause. Not withstanding the terms of this
Agreement, if there should arise any liability of Seller, such liability shall be limited to an amount
equal to one-half (1/2) the costs of the goods or $250.00, whichever is less.
Returned Material: In no case will the seller give a refund. Seller will accept most goods for exchange or credit, at the Seller’s discretion within 30 days of purchase date. In no case are goods
to be returned without first obtaining Seller’s permission. Only unused goods as currently manufactured, in original unopened packaging and which has been paid for by Buyer in accordance
with Seller’s payment terms will be considered for exchange or credit upon receipt of proof of
purchase. Special ordered items and obsolete items cannot be returned for credit. Material accepted for credit will be subject to a 15% restocking charge for service and handling. Seller will
not be obliged to replace any product that has been abused, improperly installed or otherwise
misused. Items must be returned in their original packaging, securely packed to reach the Seller
without damage.
all-in-one DVR
and hidden camera system
Governing Law: This agreement shall be governed by the laws of the State of Tennessee.
IT IS THE USER’S RESPONSIBILITY TO ENSURE THAT THIS EQUIPMENT IS USED IN ACCORDANCE
WITH THE LAW(S) OF THE JURISDICTION IN WHICH THIS EQUIPMENT IS UTILIZED.
DO NOT ATTEMPT TO RETURN PRODUCT TO ORIGINAL MANUFACTURER, AS THIS PRODUCT HAS
BEEN MODIFIED AND IS NO LONGER SUBJECT TO ORIGINAL MANUFACTURER’S WARRANTY. IN
THE CASE OF A DEFECTIVE PRODUCT, CONTACT PLACE OF PURCHASE FOR RETURN PROCEDURE.
THIS EQUIPMENT HAS BEEN TESTED AND HAS BEEN FOUND TO BE IN COMPLIANCE WITH THE
LIMITS FOR A CLASS B DIGITAL DEVICE, PURSUANT TO PART 15 OF THE FCC RULES. THESE LIMITS ARE DESIGNED TO PROVIDE REASONABLE PROTECTIONS AGAINST HARMFUL INTERFERENCE
IN A RESIDENTIAL INSTALLATION. THIS EQUIPMENT USES, GENERATES AND CAN RADIATE RADIO FREQUENCY ENERGY AND IF NOT INSTALLED AND USED IN ACCORDANCE WITH INSTRUCTIONS, MAY CAUSE HARMFUL INTERFERENCE TO RADIO COMMUNICATIONS.
Part 15 Low Power:
ANY CHANGES OR MODIFICATIONS TO THIS EQUIPMENT WITHOUT THE EXPRESS AUTHORIZATION OF THE MANUFACTURER COULD VOID THE USER’S AUTHORITY TO OPERATE THIS EQUIPMENT. (RULE 15.21 OF THE FCC)
16
SleuthGear™ Covert HVR
1 2GB SD Card
1 USB Card Reader
1 Remote Control
1 Video Cable
Please check the package to be sure you
have received all of the parts
1
Trouble Shooting
&
FAQ
Congratulations and Thank You
for purchasing the SleuthGear™ Camera!
SleuthGear™ HVR system is an all-in-one DVR and hidden camera. All you need
to do is plug it in, set the time and date, insert an SD card and the system will begin
to record when it detects any motion. The SleuthGear™ HVR system has many advanced features and functions but the best feature is already preset for your quick
set up.
Quick Set up Guide
For your convenience the unit is set at the factory for setting most commonly
used making your set up fast and easy. To see what the factory setting are go to
page 10.
1. Take out the SleuthGear™ and plug it in to any available wall outlet.
2. Facing the back of the unit locate the Video-Out Jack (See Diagram 1 on page
3) Using the included Video Cable plug cable into the Video-Out Jack. Connect
the other end of the Video Cable to a Television input.
3. Change the video input or auxiliary on your TV. The input select button is usually located on the TV’s remote control or on the front panel of the TV itself,
however, some TV’s may require you to select the video input from the on-screen
menu. Therefore, consult the owner’s manual for the for specific instructions.
4. When you have a picture on your Television; using the included HVR remote
press the Menu button to enter menu screen.
5. Set up Time and Date Go to system settings press ok select date/time, select
adjust date time put in correct time and date press ok then press esc button. Back
to main menu. Press esc once more to be back at video image
Have you inserted the micro SD card into the Large SD card adapter?
Did you put the SD card in the unit before powering on your
Sleuth Gear unit?
Did you know the unit is set to record motion as one of its default
settings?
Have you downloaded the lasted version of the K-lite codec pack
from www.free-codecs.com?
Make sure you have downloaded the full version.
Do you know how to access the video files on your SD card?
Did you know you can press the play button on the remote control to
play the recorded files back on your Television?
Do you have the proper input selected on your TV to display the
Video from the HVR system?
Having trouble with the unit?
Have you tried restoring the unit to its factory default settings?
This can be done under System Settings in the Sleuth Gear menu.
Have you tried another SD card?
6. Find the SD slot see above diagram put in the SD card and your unit is ready to
record video
7. Set unit in desired location for video surveillance and your finished.
If you wish to change factory default setting you would need to go through the
entire menu and pick your desired selections. See Advanced Features instructions to change default settings beginning on page 5
2
15
Features and Functions of the SleuthGear™ Covert HVR
Factory Default Setting and Menu
Diagram 1
SD CARD
SLOT IN
BACK
Video Resolution: real-time video 30 FPS at 720x480 and 320x240 this will also
show available recording storage time left on your SD card. See page 10 for details
Frame Rate Settings for recording you may record 1, 2,3,5,15,30 FPS user selectable. Use this setting to gain more memory. See page 10 for details
SD card capacity (Times are
1280 x 720
@ 30fps
720 x 480
@ 30fps
320 X 240
@ 30fps
2GB
1.20 hours
4.00
8.26
4GB
2.39 hours
7.99
16.52
8GB
4.77 hours
15.98
33.04
16GB
9.54 hours
31.97
66.08
32GB
19.08 hours
63.94
132.16
Motion Setting This allows three motion sensitivity settings, High, Medium and Low,
see page 10 for details
Approximate)
Motion Area this allows user to select up 150 motion areas. Example if you have pets
you will only choose the area of the frame that the pet would not be viewed. Say the
pet was waist high you would choose only to detect motion waist up. See page 10 for
details
Scheduling the HVR unit may be programmed to schedule event recording this feature allows the user to select time, day of week to recorder any motion detected or you
may select time, day of week and recorder continually. See page 5 for details
Safety Precautions and Notes
Use only the included power supply to operate your SleuthGear™ system (AC: 120
Volt, 60 Hz ONLY, if outside the US and Canada a special adaptor may be required).
To avoid electrical shock, do not attempt to open the unit.
Opening the unit Voids the warranty
To prevent fire or shock hazard, do not expose this product to rain or moisture.
Do not operate near bath tub, sink, or swimming pool.
Avoid operation in moist environments.
Do not overload electrical outlets or extension cords as this may result in fire
or electric shock, this unit works only on 120 Volt . Power surges or over voltage
(i.e. 220 Volt) will damage the unit and void the warranty. A surge suppressor
and other adaptors may be required and are the responsibility of the user.
14
Continuous recording you may record continuously without using motion this function would use more memory then the motion activation setting please refer to Capacity chart
Playback on your TV by using the RCA output or Windows Media player using the
enclosed card reader or using your SD reader slot on your computer, see page 7 for
deatials
File Search from unit push play back see quick search or list all to find files, see page
7 for details
File Review you will have a folder named HVR in that folder is files by date
File Name is saved as YEAR/MONTH/DAY/HOUR/MINUTE/SECOND
Continued on page 4
3
Frequently asked Questions
Continued Features and Functions of the SleuthGear™ Covert HVR
Storage: the unit is set to default to overwrite video when card is full using the first in
first out rule: you may change the overwrite function by choosing Full Stop from the
storage menu. You may also delete all files from the delete all functions this action
will reformate your SD Card, see page 7 for details
Recording length, the unit will record 15 min, 30 min or 1 hour clips when motion is
activated for each motion occurrence, if the occurrence is more then 15min, 30 minutes or 1 hour the unit will start a new video upon detection of motion. After motion is
triggered and no motion continues the unit will stop recording, see page 10 for details
Q. Why is there a small time gap between the recordings file?
Ans. If the “storage” is set to over write there may be a time gap between the recordings
when the old files are deleted.
Q. When I change the time of a scheduled recording it does not change why?
Ans. Before you can change a recording time you must first reset it to “From 00:00 to
00:00” then you will be able to change it.
System Setting Menu
Q. What player software should I use to playback the recording files?
Time and Date Stamp you may display time and date to show on your video clip. It
will be embedded in the actual video by the default setting; you may also adjust date
format, the position of the stamp and the color of the stamp before you start your recording. This feature may be turned off. See page 8 for details
Ans. You can use popular MPEG-4 player, i.e. Windows Media Player, VLC etc.
Windows Media player is the most popular to play back the video, you will need to
download the “K-lite” Codec for WMP, this can be found online at www.free-codecs.com
or you may search for the download.
Language you may choose language setting. See page 9 for details
Q. How long can date/time last without outer power supply?
External Trigger this feature is inactive for this application please note do not change
setting from disable if change unit will not work properly
Ans. RTC battery can last for 3 months without power supply (including battery power supply)
Screen Icons/ Status Display the HVR unit will display icons to show your settings
this can be turned on or off user selectable see page 8 for details
Factory Default menu this setting list the factory default here you may reset at anytime back to factory default. See page 14 for screen shot of default settings.
Software Status shows your software version and where you may upgrade your software when upgrades become available, see page 9 for details
Remote Control Functions Diagram 2
4
13
Advanced Features for the SleuthGear™ Covert HVR
Event Scheduling
Screen Icons/Status Display
Diagram3
The Units default setting for recording is Motion activated for all days, To change this
feature of the remote and follow these steps.
Point the remote at the unit and press the menu button, this will bring up the menu
(diagram 4 below) . Select Schedule Setting. The Menu for Schedule setting appears
(diagram 5 below) You may select “All” for each day or use the arrows on the remote
to scroll to any day on the menu to change that recording options for a particular day.
The unit is set up on a 24 hour clock GMT.
To set motion for an entire day change the motion schedule setting to
“From 00:00 to 23:59” press ok on the remote, scroll to finish and select finish.
Icon
Function
None
Standby / Not Recording
MD
Motion Detection
Trig
External trigger activated
Cont.
Continuous recording
Turn on off the screen Icons/Status Display
Examples to set motion for Tuesday only for 1/2 a day, change the time as shown:
12:00 to 23:59, this will schedule the motion to work only from 12 noon to midnight on
Tuesday.
From 00:00 to 23:59 will record for 24 hours
From 00:00 to 12:00 will record from midnight till noon
Events in red are Continuous recording and events in green are Motion
Note: To change a recording time you must first erase the time
(to erase “From 00:00 to 00:00”), then change it:
Manu Manual recording
D1
720 x 480 resolution
CIF
320 x 240 resolution
OW
Overwrite on SD card
FS
Stop when card is full
Diagram 4 Main Menu
Diagram 5
NTSC Video system
PAL
Video system
1fps
Frame rate per second
Up To
30fps
Frame rate per second
12
5
To set for Continuous recording:
In the menu press ok to bring up the
All> Motion Schedule Setting,
scroll to No and press ok, then continuous
recording will come up on the screen scroll to
ok and press ok, scroll to finish and press ok.
This will set up continuous recordings for what
ever times you choose.
How to use the enclosed SD card reader
Be sure SleuthGear™ is turned off and remove the SD (Secure Digital)
card from the card slot.
Remove the card by pushing in on the card once and the card will eject out
of the slot. After removing the card from the SleuthGear™ insert the card
directly into your computer if you have an SD readable card slot. If not use
the supplied card reader, simply insert the card into the reader and insert the
reader USB end into your computer. If your USB slots are not easily
accessible, use the provided USB cable. The Video will show up on your
computer using Window Media Player.
If you have trouble viewing the video on WMP down load the “K-lite
codec for WMP” it can be found @ http://www.free-codecs.com/download/
To continuous record for 24 hours set “From
00:00 to 23:59” do this for any selected day
you choose or “All”
Other functions of your SleuthGear Hidden Camera Set can be found in the
Menu / System Setting Screen
K_lite_codec_pack.htm
Note: Do not remove the secure digital card from SleuthGear™ the or the computer
while it is in use. Doing this will cause data on the card to be lost
To turn off or turn on the lights on the board Press the LED button on the remote
SleuthGear™ Covert HVR
1 2GB SD Card
1 USB Card Reader
1 Remote Control
1 USB extension cable
1 Video Cable
To turn off or on the beep sounds press BZ on the remote
6
11
Video Resolution: real-time video 30 FPS at 720x480 and 320x240 this will also
show available recording storage time on your SD card
Frame Rate Settings for recording you may record 1, 2,3,5,15,30 FPS user
selectable. Use this setting to gain more memory.
Storage: the unit is set to default to overwrite video when card is full using the first in
first out rule: you may change the overwrite function by choosing Full Stop from the
storage menu. You may also delete all files from the delete all functions this action
will reformate your SD Card.
Format you SD Card
Motion Setting This allows three motion sensitivity settings, High, Medium
and Low
Motion Area this allows user to select up 150 motion areas. Example if you have
pets you will only choose the area of the frame that the pet would not be viewed.
Say the pet was waist high you would choose only to detect motion waist up.
File Search from
unit Only push play
back see quick
search or list all to
find files
Yellow area = Motion
active here
TIP: You can
also use the SD
card to playback
White area = motion
not active here
10
7
Language you may choose language setting.
System Settings
Time and Date Stamp you may display time and date to show on your video clip. It
will be embedded in the actual video by the default setting; you may also adjust date
format, the position of the stamp and the color of the stamp before you start your
recording. This feature may be turned off.
Software Status shows your software version and where you may upgrade your
software when upgrades become available to upgrade select Yes or No
Change the
Color of the
time and date
stamp on the
video
Change the
Position of
the stamp on
the video
Choose how the time
and date will appear or
not appear on your
video
8
9