1
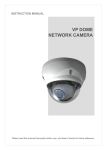
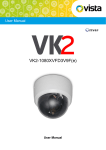
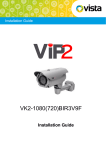
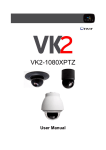
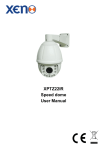
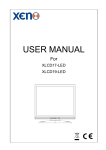
COPYRIGHT
COPYRIGHT © 2012, NORBAIN LTD. ALL RIGHTS RESERVED.
THIS DOCUMENT MAY NOT BE COPIED IN WHOLE OR IN PART OR OTHERWISE REPRODUCED WITHOUT
PRIOR WRITTEN CONSENT FROM NORBAIN LTD EXCEPT WHERE SPECIFICALLY PERMITTED UNDER
INTERNATIONAL COPYRIGHT AND US LAW.
DOCUMENT NUMBER/REVISION: SABRE UG 7 AUGUST 2012 11:16 AM
DISCLAIMER
THE INFORMATION IN THIS DOCUMENT IS SUBJECT TO CHANGE WITHOUT NOTICE. NORBAIN LTD.
ASSUMES NO RESPONSIBILITY FOR INACCURACIES OR OMISSIONS AND SPECIFICALLY DISCLAIMS ANY
LIABILITIES, LOSSES, OR RISKS, PERSONAL OR OTHERWISE, INCURRED CONSEQUENTLY, DIRECTLY OR
INDIRECTLY, OF THE USE OR APPLICATION OF ANY OF THE CONTENTS OF THIS DOCUMENT.
FOR THE
LATEST DOCUMENTATION, CONTACT YOUR LOCAL SUPPLIER OR VISIT US ONLINE AT WWW.VISTACCTV.COM.
TRADEMARKS AND
PATENTS
NORBAIN LTD AND THE NORBAIN LTD MONOGRAM ARE REGISTERED TRADEMARKS OF NORBAIN LTD.
GRAPHICA SABRE AND LOGO ARE REGISTERED TRADEMARKS OF NORBAIN LTD.
OTHER TRADE NAMES USED IN THIS DOCUMENT MAY BE TRADEMARKS OR REGISTERED TRADEMARKS
OF THE MANUFACTURERS OR VENDORS OF THE RESPECTIVE PRODUCTS
Customer Support
For assistance in installing, operating, maintaining and troubleshooting this product refer to this document and any
other documentation provided. If you still have questions, please contact Norbain Technical Support and Sales:
Norbain SD Ltd, 210 Wharfedale Road, IQ Winnersh, Wokingham, Berkshire RG41 5TP, England.
UK: +44 (0) 118 912 5000
Note: You should be at the equipment and ready with details before calling Technical Support.
RoHS Announcement
All lead-free products offered by the company comply with the requirements of the European law
on the Restriction of Hazardous Substances (RoHS) directive, which means our manufacture
processes and products are strictly “lead-free” and without the hazardous substances cited in the
directive
The crossed-out wheeled bin mark symbolizes that within the European Union the product must
be collected separately at the product’s end-of-life. This applies to your product and any
peripherals marked with this symbol. Do not dispose of these products as unsorted municipal
waste
CE Mark
This apparatus is manufactured to comply with the radio interference. A Declaration of
Conformity in accordance with the following EU standards has been made. The manufacturer
declares that the product supplied with this document is compliant the provisions of the EMC
Directive 2004/108/ EC, the CE Marking Directive 93/68 EEC and all associated amendments.
NORBAIN SD LTD reserves the right to make changes to the product and specification of the product from time to
time without prior notice.
2 of 41
Table of Contents
Customer Support ................................................................................................................. 2
About This Guide ..............................................................................5
Safety Terms .............................................................................................................................. 5
CE Compliance Statement......................................................................................................... 5
1 Getting Started .............................................................................6
Introduction ................................................................................................................................ 6
Uninterruptable Power Supply (UPS) system ............................................................................ 6
Setting up Graphica Sabre on a Private Network ...................................................................... 6
Setting up Graphica Sabre on an Existing LAN ......................................................................... 7
2 Working with Live Video ................................................................9
Graphica Sabre Users ............................................................................................................... 9
Graphica Sabre Menu................................................................................................................ 9
Adding Cameras to the System ................................................................................................. 10
Controlling Screen Layout.......................................................................................................... 10
Starting Video............................................................................................................................. 11
Stopping Video........................................................................................................................... 12
Taking a Snapshot of Live Video................................................................................................ 12
Working with PTZ Cameras ....................................................................................................... 13
Using a USB Joystick to Control Live Video .......................................................................... 13
Working with Outputs ................................................................................................................. 14
The Alarm Stack......................................................................................................................... 14
Working with the Audit Trail ....................................................................................................... 15
3 Working with Recorded Video ........................................................16
Recordings Overview................................................................................................................. 16
Playing Back Recorded Video ................................................................................................... 16
Taking Snapshots of Recorded Video ........................................................................................ 18
Deleting Recordings................................................................................................................... 19
Exporting Recorded Video ......................................................................................................... 20
4 Configuring Graphica Sabre ..........................................................21
Configuration Overview.............................................................................................................. 21
Using Vista SmartManager ........................................................................................................ 21
Adding and Editing Devices ....................................................................................................... 22
Manually Adding Devices ...................................................................................................... 26
Editing Devices .......................................................................................................................... 27
Deleting Devices ........................................................................................................................ 28
Configuring System Settings...................................................................................................... 29
Maintaining Aspect Ratio ....................................................................................................... 29
Displaying Camera Name Overlays ...................................................................................... 29
Reconnecting Video .............................................................................................................. 30
Changing User Passwords .................................................................................................... 30
Setting the Screen Timeout ................................................................................................... 30
3 of 41
Event-Driven Video................................................................................................................ 31
Reordering Views .................................................................................................................. 31
Additional Utilities....................................................................................................................... 32
Network Settings ................................................................................................................... 32
Language Support ................................................................................................................. 32
Setting the Time..................................................................................................................... 33
Vista SmartManager .............................................................................................................. 33
Remote Support .................................................................................................................... 33
Upgrading Graphica Sabre.................................................................................................... 33
Backing up/Restoring Configuration ...................................................................................... 33
5 Accessing Graphica Sabre using a Web Browser..............................34
Overview of Remote Access...................................................................................................... 34
Prerequisites .............................................................................................................................. 34
Using Remote Access................................................................................................................ 34
Viewing Live Video ................................................................................................................ 35
Viewing Recorded Video ....................................................................................................... 36
Changing Pane Layout .......................................................................................................... 36
Appendix A – Using eclipse2 Cameras ............................................... 37
Viewing eclipse2 Cameras ......................................................................................................... 37
Index .............................................................................................. 39
4 of 41
About This Guide
Graphica Sabre consists of an NVR, keyboard and mouse. It can be used as part of a standalone
system, or as part of a larger surveillance suite.
The system also requires a network switch and a monitor with appropriate cables. These are not
supplied as part of the system.
Safety Terms
These terms may appear in this manual:
Table 1 Safety terms
Caution
Cautions identify conditions or practices that may result in below optimum
system performance
Warning
Warnings identify conditions or practices that could result in equipment
damage or serious personal injury.
CE Compliance Statement
WARNING
This is a Class A product. In a domestic environment this product may cause radio interference
in which case the user may be required to take adequate measures.
Safety Terms
5 of 41
1
Getting Started
This chapter covers the following:
•
Introduction
•
Setting up Graphica Sabre on a Private Network
•
Setting up Graphica Sabre on an Existing LAN
Introduction
Graphica Sabre can be used as part of a standalone system, or as part of a larger surveillance suite.
The simplest way is to set it up on a private network.
If you wish to use Graphica Sabre as part of a larger surveillance system, you can integrate it into an
existing LAN.
Before starting to use Graphica Sabre, you must consider which of these scenarios applies to you.
Instructions for both scenarios are detailed below.
Uninterruptable Power Supply (UPS) system
Caution: Before setting up Graphica Sabre, we strongly recommend that a UPS system is installed to
prevent system corruption due to power loss. This should be of a type that shuts down the
operating system automatically if the utility power does not resume before the UPS power fails.
Setting up Graphica Sabre on a Private Network
This section details how to set up Graphica Sabre on a private network.
Note: Before setting up Graphica Sabre, the cameras you are using must be configured for use with
Graphica Sabre. Graphica Sabre is configured with a default IP address of 192.168.30.5.
1
Connect each camera to the switch and power on.
•
2
If you are using VIP2 IP cameras, please be aware that these cameras are all configured with
the same IP address of 192.168.30.220. You must change this for each camera before
connecting them to Graphica Sabre.
Attach the monitor, keyboard, mouse, network switch and power supply to Graphica Sabre as
shown in Figure 1. Power up Graphica Sabre and the monitor.
Introduction
6 of 41
+
+
+
HDMI port
Power
Supply
(not used)
Monitor Network connection
(switch)
Mouse
Keyboard
Figure 1 The rear of Graphica Sabre
Warning: Graphica Sabre MUST be installed in a vertical orientation using the stand provided.
Failure to do this invalidates the warranty.
Note: Please note that the SD card reader on the side of Graphica Sabre has been deactivated.
3
You have now set up Graphica Sabre on a private network.
A
Network Switch
B
C
Graphica Sabre
D
Default IP address: 192.168.30.5
Default subnet mask: 255.255.0.0
Figure 2 Setting up Graphica Sabre on a private network
4
Next, you need to discover and add cameras. For further information, see “Adding and Editing
Devices” on page 22.
Setting up Graphica Sabre on an Existing LAN
To add Graphica Sabre to an existing LAN:
1
First, determine the addressing scheme that Graphica Sabre and the cameras will use.
2
Connect each camera to the switch and power on.
3
Configure the cameras as detailed in their setup instructions (shipped with the cameras). You may
require another, separate PC to do this. The cameras’ IP addresses must match that of your
existing LAN. You must carry out this step before using Graphica Sabre to access them.
Caution: Failure to correctly configure the cameras may mean that they cannot be accessed by
Graphica Sabre.
4
Attach the monitor, keyboard, mouse, network switch and power supply to Graphica Sabre as
shown in Figure 1.
5
Power up the network switch and the monitor.
6
Finally, power on Graphica Sabre.
Setting up Graphica Sabre on an Existing LAN
7 of 41
7
Because Graphica Sabre and the Windows server are on different subnets, they cannot
communicate. You must change the IP address of Graphica Sabre so that it is on the same subnet
as the existing LAN, as follows:
a. Press the Windows button on your keyboard and select Network Settings.
b. Enter the administrator password. The default password is password.
Figure 3 Configuring a static IP address
c. Select Use the following IP address and enter an IP address, subnet mask, and default gateway
information appropriate for use with the existing LAN. Next click OK to apply the static IP
addressing and close the TCP/IP properties dialog.
8
Graphica Sabre is now on the same subnet as the existing LAN.
A
Network Switch
B
Existing LAN
C
D
Graphica Sabre
Figure 4 Adding Graphica Sabre to an existing LAN
9
Graphica Sabre automatically reboots to apply the changes.
10 You are now ready to start using Graphica Sabre. First, you need to discover and add cameras to
the system. For further information, see “Adding and Editing Devices” on page 22.
Setting up Graphica Sabre on an Existing LAN
8 of 41
2
Working with Live Video
This chapter contains the following information:
•
Graphica Sabre Users
•
Graphica Sabre Menu
•
Adding Cameras to the System
•
Controlling Screen Layout
•
Starting Video
•
Stopping Video
•
Taking a Snapshot of Live Video
•
Working with PTZ Cameras
•
The Alarm Stack
•
Working with the Audit Trail
Graphica Sabre Users
When you open Graphica Sabre, three local user options are presented:
•
Administrator — The Administrator user has full access and control of Graphica Sabre.
•
Manager — The Manager user can view live and recorded video and perform local configuration.
He cannot add, remove or edit devices or change network settings.
•
Viewer — The Viewer user can only view live video and change the local configuration.
Note: A fourth user is available – WebUser. This user is used to log in remotely from another PC. See
Chapter 5, "Accessing Graphica Sabre using a Web Browser".
The default password for all users is password.
Note: One local user and one web user can be logged in to Graphica Sabre at the same time. It is not
possible to have more than one web user logged in simultaneously. If you are logged in as a
web user, you must click Logout to allow other users to access Graphica Sabre remotely.
Graphica Sabre Menu
The Graphica Sabre menu is hidden during normal operation. To reveal it, click the screen. Note that
no cursor is shown until after the initial interaction. If no interaction is made with the menu items, the
menu is automatically hidden.
Graphica Sabre initially opens with four video display areas known as "video panes", or just "panes".
To start using Graphica Sabre, you must first add video sources. Please see “Adding and Editing
Devices” on page 22.
Graphica Sabre Users
9 of 41
Adding Cameras to the System
To add cameras to Graphica Sabre, you must use the Add Device Wizard. For details of how to do this,
please see “Adding and Editing Devices” on page 22.
Controlling Screen Layout
To control the screen layout used by Graphica Sabre:
1
If the menu is not showing, click the screen anywhere to reveal it.
2
Select Layouts.
Figure 5 Controlling screen layout
3
Select the layout you require. Note that the layout options presented vary depending on the type of
monitor you have (widescreen/standard monitor). Graphica Sabre immediately switches to that
layout. Note that reducing the number of visible video panes automatically stops video playing in
the panes which are no longer displayed.
Note: Double-click a video pane to display it in Single layout, and double-click again to return to
the previous layout.
Note: Video within a video display area normally stretches to fill the full area. This can change the
aspect ratio and the video proportions and might not be acceptable in all circumstances. To
maintain correct proportions, you must change the aspect ratio option. See “Maintaining
Aspect Ratio” on page 29.
Adding Cameras to the System
10 of 41
Starting Video
To display live video in a Graphica Sabre pane:
1
Ensure that you have added at least one video source for Graphica Sabre to display (see “Adding
and Editing Devices” on page 22).
2
If the menu is not showing, click the screen anywhere to reveal it.
3
Select Cameras from the camera menu as shown in Figure 6.
Figure 6 Displaying live video in a video pane
4
Select the pane where you want to display video. A border appears around that pane to indicate
that it is the active pane.
5
Select a camera to display video from that device in the selected pane. Use the up and down
arrows to scroll through the list of cameras. Video from that camera is displayed.
Note: If the video source is not available, the video pane will appear completely black. You can specify
that Graphica Sabre should attempt to display the video source device at all times until video is
stopped. See “Reconnecting Video” on page 30. This means that Graphica Sabre will
occasionally attempt to reconnect to absent devices. The message "Connecting..." will be seen
when attempting to re-establish a connection. If Graphica Sabre is shut down and then
restarted, video source devices that were being displayed at shutdown time will be automatically
started.
If you are using an eclipse2 camera, please see Appendix A, "Using eclipse2 Cameras" for more
information.
Starting Video
11 of 41
Stopping Video
To stop video displaying in a Graphica Sabre video pane:
1
Select the pane displaying video you want to stop.
Figure 7 Stopping video in a Graphica Sabre pane
2
Select Cameras, then Stop Video.
Taking a Snapshot of Live Video
Graphica Sabre allows you to capture snapshots of live video displaying in a video pane. These are
stored on the PC’s hard drive as .jpeg images, ready to be transferred onto a removable device.
Figure 8 Saving snapshots to a removable device
To take a snapshot of live video:
1
Select the pane playing the video you want to take a snapshot of.
2
Click the Snapshots button. Repeat this for each snapshot you require. The number shown
increments accordingly.
3
Insert a removable device into the front of Graphica Sabre.
4
Graphica Sabre detects the new device; select the drive name to copy all snapshots onto the
removable device.
Stopping Video
12 of 41
Working with PTZ Cameras
Note: Before you can use Graphica Sabre to control a PTZ camera, you must have first enabled PTZ
functionality on the camera. For information on how to do this, “Adding and Editing Devices” on
page 22.
You can use a USB joystick to control live video from PTZ cameras. Please see “Using a USB Joystick
to Control Live Video”, below.
To control a PTZ camera using the mouse:
1
Display the PTZ camera in a video pane as described in “Starting Video” on page 11.
Figure 9 Using PTZ controls
2
Click the PTZ button. The button turns green to show the PTZ control is active, faint crosshairs
appear in the pane and PTZ controls appear in the video pane.
•
To zoom in on the video, press
.
•
To zoom out, press
•
To pan and tilt the camera, click the screen and move the mouse in the required direction.
•
To move to a PTZ preset position which has been set on the camera, press Preset and select
the required preset from the list which appears.
.
Note: You can also use the mouse wheel to zoom in and out.
Using a USB Joystick to Control Live Video
Once you have enabled PTZ functionality, (see “Adding and Editing Devices” on page 22), you can use
a standard HID analogue joystick to control PTZ video.
Single Stick Joysticks
Activate the PTZ control
Press button 1
Zoom in/out
Press button 1 and move the stick forwards or backwards
Pan the camera
Move the stick in the direction you want to pan the camera
Deactivate the PTZ control
Press button 2
Dual Stick Joysticks
Activate the PTZ control
Press button 1
Zoom in/out
Move stick 2 forward or backwards
Pan the camera
Move stick 1 in the direction you want to pan the camera
Deactivate the PTZ control
Press button 2
Working with PTZ Cameras
13 of 41
Working with Outputs
Some of your surveillance cameras may contain outputs. These may have been configured to carry out
an action when a button is pressed on screen — such as raising or lowering a barrier, opening or
closing a door, etc.
To control one of these outputs:
1
If not already viewing video, select a video pane, then a camera to view live video.
2
Click Outputs.
Figure 10 Working with outputs
3
A list of available outputs is displayed on screen.
4
Click On to activate the required output, and Off to deactivate it (if required).
The Alarm Stack
The alarm stack displays any triggered alarms in your site. These may be from triggers you have set
up, or from motion events.
For example, you may have set up motion detect recordings for some of your cameras (see “Adding
and Editing Devices” on page 22 for information on setting up recordings).
When motion is detected on a camera which has motion detect recording enabled, an alarm appears in
the alarm stack on screen. To view these alarm details, select Alarms from the on-screen menu.
Subsequent motion detected on this camera increments the number shown for this alarm.
A second alarm appears in the stack if motion is detected on a second camera on which you have
enabled motion detect recording.
Note: Other types of alarm may appear in the alarm stack. These are mainly to do with NVR status, for
example, disk space warnings.
If you have set up a recording on a camera, and this recording stops suddenly, an alarm is displayed in
the alarm stack. If you have speakers, an audible alarm is also output to alert you.
Working with Outputs
14 of 41
Working with the Audit Trail
The audit trail provides a comprehensive list of events that have occurred since Graphica Sabre was
installed. Some examples of event information are:
•
Alarms (acknowledgement, closed).
•
Users (added, deleted, edited etc.).
•
Devices (added, updated, deleted, disconnected etc.).
This list is not comprehensive – many other types of event are also monitored.
To export a list of audit information:
1
Attach a removable storage device to one of the USB ports on the front of Graphica Sabre.
2
Click the screen to activate the menu, then select Audit Export.
Figure 11 Exporting audit information
3
Follow the steps in the Export Wizard.
Working with the Audit Trail
15 of 41
3
Working with Recorded Video
This chapter contains information on the following:
•
Recordings Overview
•
Playing Back Recorded Video
•
Taking Snapshots of Recorded Video
•
Exporting Recorded Video
Recordings Overview
Devices which have recording(s) associated with them are shown with a green arrow in the device list
(Figure 12).
Figure 12 Cameras with associated recordings
To set up a recording on a camera, see “Adding and Editing Devices” on page 22. Recordings can be
continuous or triggered by a motion detect event.
Playing Back Recorded Video
To play back a recording made by a camera in the list, click the green triangle beside the camera
name. A green triangle appears in the bottom right of the video pane, indicating that this is recorded
footage.
Video playback starts 10 minutes before the end of the recording. This value is non-configurable.
Caution: If the recording is less than 10 minutes long, no video is displayed. Use the timeline to locate
the recording and play it back manually.
Recordings Overview
16 of 41
Figure 13 Starting playback from a camera
A timeline appears below the video panes. This allows you to navigate through the recording. A red
vertical line on the timeline indicates the current point in the recording.Table 2 explains the different
colours used on the timeline:
Table 2 Timeline colours
Colour
Meaning
Blue
Default colour of available footage (continuous recordings or pre-alarm
recording)
Grey
Indicates a gap in footage
Yellow
Post-alarm footage
The default pre- and post-alarm value is 5 minutes. This is non-configurable.
The timeline controls are as follows:
Export video. Choose Evidential Export for court evidence, or Windows Media format.
Zoom in on the timeline to view the time in more detail.
Zoom out on the timeline to view the time in less detail.
Jump to a specific time in the recording.
Move backwards through video. Click once to move backwards at double normal speed,
twice for 4 times, and three times for 8 times normal speed. Pressing this button when the
Pause button is depressed steps back through the recording’s I-frames.
Play video forwards at normal speed.
Playing Back Recorded Video
17 of 41
Pause video. Use in conjunction with the backwards and forwards buttons to step through
the recording’s I-frames.
Move forwards through video. Click once to move forwards at double normal speed, twice
for 4 times, and three times for 8 times normal speed. Pressing this button when the
Pause button is depressed steps forward through the recording’s I-frames.
Use the right and left arrows to scroll through the timeline.
Taking Snapshots of Recorded Video
The procedure for taking snapshots of recorded video is identical to that for live video. See “Taking a
Snapshot of Live Video” on page 12.
Taking Snapshots of Recorded Video
18 of 41
Deleting Recordings
To delete recordings associated with a device:
1
Select Delete Device from the Configure menu.
Figure 14 Delete device option
2
A list of all cameras and encoders in your system appears in the main window.
Figure 15 Deleting recordings associated with a device
3
If a device has recordings associated with it, the Delete Recordings button is available. Select the
device whose recordings you want to delete from the list and select Delete Recordings.
Note: Only recordings for that device are deleted; the device itself remains in the system unless you
select Delete Device.
Deleting Recordings
19 of 41
Exporting Recorded Video
It may be necessary to extract a portion of recorded footage for playback in a player application.
Graphica Sabre can export video in Evidential Integrity format for court evidence, or Windows Media
format for use with ASF-compatible media players. Exporting video is made easy by the Export Wizard.
Note: You must be logged in as administrator to export video.
Note: By default, five minutes on either side of the currently playing video are selected for export; for
example, if you are currently viewing video from 10:00pm then the default times will be 09:55pm
and 10:05pm. The smallest period of footage that you can export is 1:59 minutes — for
example, if you select 10:00 for the start time, and 10:01 as the end time, the exported footage
will run from 10:00:00 to 10:01:59.
To export video:
1
Attach a removable storage device to one of the USB ports on the front of Graphica Sabre, or insert
a writable disk into the optical drive.
2
Display the recording you want to export in a video pane. (See “Playing Back Recorded Video” on
page 16).
3
Click the pane displaying the recording.
4
On the timeline, click
to open the Export Wizard.
Figure 16 Graphica Sabre’s Export Wizard
5
Select the start and end times of the export period you require. In Figure 16, video between 13:49
and 13:54 will be exported. The maximum length of video you can export is one hour.
6
Select the export type:
•
Evidential export — this is in Evidential Integrity format and can only be played back using
Graphica Player. Evidential exports contain a watermark to show that it has not been tampered
with and is suitable for courtroom situations. Graphica Player is automatically exported when
you select Evidential export. If you do not require this, click “Include Player” to deselect it.
Note: If you select Evidential export when saving to optical disk, the recording opens automatically
in Graphica Player when you insert the disk into a PC. If saving to USB drive, the recording
and Graphica Player installer are saved; you must install the Player application manually
before playing back the recording.
•
Windows Media export — this is in .asf format and can be played back using ASF-compatible
players, for example, Windows Media Player or VLC Media Player.
7
Select a destination for the exported video. All available connected external USB drives are listed,
(for example, pen drives, external optical drives).
8
Select Next to export the video.
Exporting Recorded Video
20 of 41
4
Configuring Graphica Sabre
This chapter contains information on the following:
•
Configuration Overview
•
Adding and Editing Devices
•
Deleting Devices
•
Configuring System Settings
•
Additional Utilities
Configuration Overview
Graphica Sabre requires very little configuration, but before you can start to use it, you must add
devices that you want to monitor to the Graphica Sabre system. You can also create recording
schedules and specify how video appears on the screen.
Using Vista SmartManager
If you are using Vista cameras, please use the Vista SmartManager utility to change the cameras’ IP
addresses before adding them to Graphica Sabre. Details are given below.
1
Connect the camera to the network and power up.
2
Press the Windows key and select the SmartManager utility.
3
The main window is displayed. After a short while any devices connected to the network are
displayed in the list.
Figure 17 List of devices discovered by SmartManager
4
Select a camera on the list and right-click Assign IP:
Configuration Overview
21 of 41
Figure 18 Assigning an IP address
5
Enter the required IP address.
6
Click OK. The device’s IP address is now changed. Ensure the PC is on the same network to gain
connection.
The connection status of each device on the network is indicated by the following icons:
Available to connect the network device
Unavailable to connect the network device
Connectable to the network device with fixed security (User
ID/Password)
Loading the setting after connecting the network device
Note: For more information, refer to the SmartManger User's Manual.
Adding and Editing Devices
1
Select Add Device from the Configure menu.
2
The Add Device wizard appears. Select Next
3
The first time you use the wizard, no devices are listed. Select Find Devices to display a list of all
devices discovered on the network.
to move to the next screen.
Adding and Editing Devices
22 of 41
Figure 19 Discovering devices on the network
Note: If a device is not discovered automatically, it may not support the required discovery protocols.
Devices that cannot be auto-discovered must be added manually. See “Manually Adding
Devices” on page 26. If you are adding an eclipse2 fisheye camera, please see Appendix A,
"Using eclipse2 Cameras".
4
Scroll down the list of devices to the one you want to add, then select Next. It may take some time
for all devices to be found.
5
If prompted, select the required codec and network transport and select Next.
6
Enter a name for the device. If this device requires a user name and password, enter this here, then
select Add Device.
Note: Please check your camera documentation for full details of default user names and
passwords.
7
If web configuration is available for your device, select Launch Web Configuration to access the
device’s web configuration pages. This provides access to camera-specific configuration options
via a web browser.
Note: If you minimise the browser when configuring a device, use Alt-Tab to bring the browser to the
front again.
8
When finished with the web configuration pages, or if you do not need to use the web pages, select
Next.
9
To change the camera name, scroll to the name you want to change.
Figure 20 Changing camera name
Adding and Editing Devices
23 of 41
10 Select the name as shown in Figure 20, enter the new name, then select Change, then Next.
11 To hide this camera so it is not visible in the list of displayed cameras, click Hide.
12 If your device has a PTZ unit attached, select the required device and select Enabled. Scroll
through the list of PTZ types and enter a PTZ address. Select Change, then Next.
Figure 21 Configuring a PTZ unit
13 If the camera you are setting up has triggers, you can now name and enable/disable them.
Figure 22 Setting up triggers
14 If the camera you are setting up has outputs, you can now rename them.
Adding and Editing Devices
24 of 41
Figure 23 Renaming outputs
15 Select the camera that you want to record from and click Recording Type to select the type of
recording you require.
Figure 24 Setting up recordings
Note: Selecting Motion detect enables motion detection on the camera. This is required if you want to
view live video when a motion detect event occurs. For more information, see “Event-Driven
Video” on page 31. Motion detect may not be available for all devices. Please note that five
minutes of video are recorded prior to the motion event, and five after. This value is
non-configurable.
Caution: Please exercise caution when setting up motion detect recording. Failure to do so may result
in large volumes of alarms which may lead to undesired system behaviour, for example the
timeline may take longer to process, and may not display all events correctly.
16 To set a loop time for the recording, select Loop Time then select a value from the list. This is the
number of days that are recorded before the oldest recording data starts to be overwritten (this is
known as reaping). The default number of days is 31, however, reaping may begin before this if disk
space is becoming critical.
Note: If recording stops suddenly for any reason, an alarm appears in the alarm stack, and an audible
alarm is output (if speakers are available).
Adding and Editing Devices
25 of 41
Manually Adding Devices
If a device cannot be auto-discovered by Graphica Sabre, you need to add it manually using the Add
Device Wizard.
1
Select Add Device from the Configure menu.
2
The Add Device wizard appears. Select Next
to move to the next screen.
Figure 25 Manually adding a device
3
Manually Add Device is selected. Select Next to move to the next screen.
4
Select the type of device you are adding, then select Next.
5
Enter the IP address of the device, and select Next.
6
If required, select the required codec and network transport and select Next. Please ensure that
these settings match those used on the camera.
7
Enter a name for the device. If required, enter the user name and password, then select Add
Device, then select Next.
Note: Please check your camera documentation for full details of default user names and
passwords.
8
If web configuration is available for your device, select Launch Web Configuration to access the
device’s web configuration pages. This provides access to camera-specific configuration options
via a web browser.
Note: If you minimise the browser when configuring a device, use Alt-Tab to bring the browser to the
front again.
9
When finished with the web configuration pages, or if you do not need to use the web pages, select
Next.
10 To change the camera name, scroll to the name you want to change. To hide this camera so it is
not visible in the list, click Hide. Click Next.
11 If your device has a PTZ unit attached, select the required device and select Enabled. Scroll
through the PTZ types and enter a PTZ address. Select Change, then Next.
12 If the camera you are setting up has triggers and/or outputs, you can now rename them. You can
also enable/disable triggers.
13 Select the camera that you want to record from and select the type of recording.
Note: Selecting Motion detect enables motion detection on the camera. This is required if you want to
view live video when a motion detect event occurs. For more information, see “Event-Driven
Video” on page 31. Please note that five minutes of video are recorded prior to the motion
event, and five after. This value is non-configurable.
Caution: We do not recommend that you use motion detect on PTZ cameras.
Note: Motion detect may not be available for all devices.
Adding and Editing Devices
26 of 41
Note: If recording stops suddenly for any reason, an alarm appears in the alarm stack, and an audible
alarm is output (if speakers are available).
Editing Devices
To edit a device you have added:
1
Select Edit Device from the Configure menu.
Figure 26 Edit device option
2
Select the device you want to edit from the list of devices that is displayed.
3
Edit the device settings as required.
Note: You can change the recording type from continuous to motion detect, or vice versa. This should
take effect immediately. In the unlikely event that the recording type does not appear to change
in the timeline, you should restart Graphica Sabre to force the change to take effect.
Editing Devices
27 of 41
Deleting Devices
To delete a device from Graphica Sabre:
1
Select Delete Device from the Configure menu.
2
A list of all cameras and encoders known to Graphica Sabre appears in the main window.
Figure 27 Deleting a device
3
Select the device you require in the list and click Delete Device.
Note: If the device you have selected for deletion has recordings associated with it, you are given the
option to delete those recordings first before deleting the device.
Note: When deleting a device such as an IP encoder, all associated sub-devices related to that device
are also deleted, e.g. triggers,outputs, etc.
Deleting Devices
28 of 41
Configuring System Settings
Maintaining Aspect Ratio
Video within a video display area normally stretches to fill the full area. This can change the aspect ratio
and the video proportions and might not be acceptable in all circumstances. To maintain correct
proportions, you must change the aspect ratio option.
Figure 28 Maintaining the aspect ratio
Displaying Camera Name Overlays
To display the name of a camera being displayed in a Graphica Sabre pane, select Video Overlay, as
shown in Figure 29.
Figure 29 Displaying camera name overlays
Configuring System Settings
29 of 41
Reconnecting Video
To specify that Graphica Sabre should attempt to reconnect video from cameras which have become
unavailable, select Reconnect Video, as shown in Figure 30.
Figure 30 Specifying that video should be reconnected
Changing User Passwords
To change user passwords, you must be logged in as the Administrator user.
1
Select Settings, then Passwords as shown in Figure 31.
Figure 31 Changing user passwords
2
Select the required user, then enter and confirm the new password.
3
Click Done when finished.
Setting the Screen Timeout
To specify how long Graphica Sabre remains active on screen before a password is required to
reactivate it:
1
Select Settings, then Passwords as shown in Figure 31.
2
Set the Screen lock time to the required value, then click Set.
Note: If you enter 0 for the Screen lock time, the screen will never lock.
3
Click Done.
Configuring System Settings
30 of 41
Event-Driven Video
To view live video when a motion detect event occurs, select Event Driven Video, as shown in
Figure 32:
Figure 32 Setting up event driven video
You are prompted to enable or disable event driven video, and to specify for how long you want live
video to continue to be displayed.
Note: You must have specified that recording should begin when a motion detect event occurs.
Reordering Views
This option ensures that when the video pane layout changes, the video panes are reordered to display
as many as possible in the new layout. See Figure 33 for an example — here the layout changes from
nine to four panes, but video which was displayed in pane 8 now shows in pane 3. Note that reducing
the number of visible video panes automatically stops video playing in the panes which are no longer
displayed.
Figure 33 Reordering views
Configuring System Settings
31 of 41
Additional Utilities
Several additional utilities are available by pressing the Windows key on the keyboard. These are
detailed below.
Note: You may be asked for a password to access some of the options. Enter the administrator’s
password to continue.
Figure 34 Additional utilities
Note: If the password lock changes focus when you are running a support utility, use Alt-Tab to get
back to the support utility.
Note: To remove the list of utilities from the screen, press the Windows key again.
Network Settings
To access the Windows Network Connections dialog, press the Windows button on your keyboard.
This dialog allows you to determine or view your IP address, add or configure a network, etc. Select
Network Settings from the list which appears on screen, then enter the administrator password. For
more information, please see page 8.
Note: Use this option if you need to change the HTTP port on Graphica Sabre.
Language Support
The following language displays are currently available on Graphica Sabre.
•
English
•
German
•
Spanish
•
French
•
Portuguese
Additional languages will be available in the future. To select a language:
1
Press the Windows button on your keyboard.
2
Select Language Settings and choose the language you require.
3
Press Set.
Additional Utilities
32 of 41
Setting the Time
To set the time used by Graphica Sabre:
1
Press the Windows button on your keyboard.
2
Select Time Settings, and specify the required time.
Caution: We recommend that you set the time for Graphica Sabre immediately after startup. Do not
set the time if there are active recordings as this may affect recorder function. You must
remove any recording jobs and recordings currently stored on Graphica Sabre prior to
altering the system clock.
Vista SmartManager
This is used to assign the IP addresses of Vista VIP2 cameras. Please see “Using Vista
SmartManager” on page 21 for more information.
Remote Support
If you have been advised by Technical Support to enable remote support (TeamViewer), press the
Windows button on your keyboard, and select Remote Support. Enter the administrator password and
follow the on-screen instructions.
Upgrading Graphica Sabre
To upgrade to a later version of Graphica Sabre software:
1
Attach a removable storage device containing the upgrade software to one of the USB ports on the
front of Graphica Sabre.
2
Press the Windows button on your keyboard.
3
Select Upgrade Graphica Sabre and follow the on-screen instructions.
Backing up/Restoring Configuration
You can back up current configuration, or download (restore) saved configuration onto Graphica Sabre.
This includes:
•
Device details
•
Recording setup (but not actual recordings)
•
Passwords
•
Settings (remote actions, reordering views etc)
•
IP address settings
To back up existing configuration:
1
Attach a removable storage device to one of the USB ports on the front of Graphica Sabre.
2
Press the Windows button on your keyboard.
3
Select Backup/Restore and follow the on-screen instructions.
To restore a saved configuration,
1
Attach a removable storage device containing the saved configuration to one of the USB ports on
the front of Graphica Sabre.
2
Press the Windows button on your keyboard.
3
Select Backup/Restore and follow the on-screen instructions.
Additional Utilities
33 of 41
5
Accessing Graphica Sabre using a Web
Browser
This chapter contains information on the following:
•
Overview of Remote Access
•
Prerequisites
•
Using Remote Access
Overview of Remote Access
It is possible to remotely access Graphica Sabre from a web browser. Remote viewing allows you to:
•
View live video
•
View and navigate through recordings
•
Select a screen layout
Note: It is not possible to export recorded video using remote access.
Prerequisites
To access Graphica Sabre remotely from a web browser, you must:
•
Have access to a Windows PC with Internet Explorer 8 or above.
Note: This PC must have Microsoft Silverlight 3 or above installed. (Follow this link on the second
PC to install Silverlight 3 or above:
http://www.microsoft.com/getsilverlight/get-started/install/default.aspx)
Note: If you are using a version of Internet Explorer later than version 8, you may need to press the
IE Compatibility View button on the browser to view Graphica Sabre remotely.
Figure 35 IE9 Compatibility View button
•
Ensure Graphica Sabre is running.
•
Make a note of Graphica Sabre’s IP address. The port number used is 80.
•
Have already added cameras and specified recording schedules, if required. (The remote interface
does not provide a mechanism to add, edit or remove cameras or adjust recording schedules.)
Using Remote Access
To view Graphica Sabre remotely using the Windows PC, enter the IP address of Graphica Sabre into
a web browser.
For example: the Graphica Sabre PC is running on a LAN with IP address 192.168.30.5. To view
Graphica Sabre from another PC on the same LAN, enter http://192.168.30.5 into the address
bar of Internet Explorer on the second computer.
If required, you can adjust the stream quality and network bandwidth on this login page, to provide
improved remote viewing:
Overview of Remote Access
34 of 41
Figure 36 Adjusting stream quality and bandwidth
For the user name, enter webuser. The default password is password. Click Login.
We recommend that you change the default password as soon as possible. Please see “Graphica
Sabre Users” on page 9.
Note: When you have finished using remote access, click Logout. This allows other users to access
Graphica Sabre remotely.
Figure 37 Viewing live video remotely
If this is the first time a remote access request has been made, then the first connection will take longer
than subsequent requests. The pane on the left allows access to Cameras (live video), Recordings,
Views (screen layouts) and Controls (for navigating around recordings and accessing PTZ
functionality).
Viewing Live Video
To view a live stream, click Cameras in the pane on the left. Click on the tree elements under Cameras
until an encoder endpoint is shown. Drag this endpoint to an unoccupied view pane. The live video will
take a short while to be shown. Once finished, click Controls and select Disconnect.
If you are using a PTZ camera, you can control it as follows:
1
Drag and drop the camera into a video pane.
2
Select the video pane.
3
Click Controls, then use the PTZ navigation buttons to control the camera.
Using Remote Access
35 of 41
Viewing Recorded Video
To view a recording, click Recordings in the pane on the left. Click on the tree elements until an
encoder endpoint is shown. Drag this from the Site Explorer to an unoccupied pane. The recorded
video will take a short while to be shown. Once finished, click Controls and select Disconnect.
•
To move around a recording, select the pane playing the recording, then click Controls in the pane
on the left.
•
Use the controls to move forwards and backwards in the recording, and to pause it.
•
To go to a particular time in a recording, click Go to Time and select the required options.
Figure 38 Controlling a recording in remote view
Changing Pane Layout
To change the layout of the panes on screen, click Views in the pane on the left and select the required
display.
Note: Any changes made using the remote viewer are not mirrored in the actual Graphica Sabre
application.
Using Remote Access
36 of 41
A
Using eclipse2 Cameras
eclipse2 “fisheye” cameras provide multiple 360 degree images, all supporting full PTZ on live or
playback images. They can be mounted directly to ceilings, walls or inverted onto a table or floor.
Several display options are available when using eclipse2 cameras with Graphica Sabre. This appendix
explains how to access these options and how to use them to best effect.
Note: When adding eclipse2 fisheye cameras to Graphica Sabre, please note that these are
auto-discovered only if the default name is used. If you have changed the name, you must add
them manually.
Viewing eclipse2 Cameras
The following information applies to both live and recorded video.
1
Drag and drop the eclipse2 camera onto a video pane in Graphica Sabre. Right-click and select
Dewarping. Figure 39 provides an example of how the initial view might look.
Figure 39 Initial view of an eclipse2 camera
2
Click the fisheye options button as shown to access dewarping settings for the camera.
Note: Click Dewarping again to disable dewarping.
View Type
Virtual — Virtual projection allows you to move the camera around in a way similar to a PTZ camera.
Panorama 360 — Displays a long thin strip of the image.
Panorama 2x 180 — Displays two long thin strips of the image, one on top of the other.
Orientation
Select the option that best suits your camera mounting. These options vary according to the View Type
selected.
Viewing eclipse2 Cameras
37 of 41
Projection
These options dictate how the camera view is mapped onto a flat plane or a spherical view.
We recommend that you experiment with the settings to achieve the required view.
Viewing eclipse2 Cameras
38 of 41
Index
H
hiding cameras 24
HTTP port, changing 32
I
A
accessing onscreen menu 9
adding devices 22
manually 26
admin user 9
aspect ratio, maintaining 29
audible alarm 25, 27
B
back panel 6
bandwidth
for remote access 34
C
camera name, specifying 23, 26
cameras
adding 22
eclipse2 37
hiding 24
overlays 29
changing
IP addresses 8
changing HTTP port 32
changing passwords 9
codec, specifying 23, 26
compatibility
IE 9 34
configuring
network transport 23, 26
PTZ cameras 24
D
default password 9
deleting devices 28
devices
adding 22
deleting 28
discovering 23
editing 22, 27
dewarp settings 37
displaying video 11
E
eclipse2 cameras 37
editing devices 22, 27
event-driven video 31
Export Wizard 20
exporting recordings 20
F
fisheye cameras 37
footage, exporting 20
IE compatibility 34
I-frames 17
Internet Explorer, compatibility 34
IP addresses, changing 8
troubleshooting 27
remote access
network bandwidth 34
stream quality 34
remote access, using web
browser 34
remote support 33
removing screen timeout 30
reordering views 31
S
network settings, specifying 32
network transport, specifying 23, 26
schedules, setting up 25, 26
screen layout, controlling 10
screen timeout 30
server web port, changing 32
setting the time 33
setting up
camera name 23, 26
network transport 23, 26
on existing LAN 7
on private network 6
recording schedules 25, 26
SmartManager 21
snapshots
live video 12
of recorded video 18
software, upgrading 33
specifying
codec 23, 26
network settings 32
starting video 11
static IP addresses, configuring 8
stopping video 12
stream quality for remote access 34
support for Team Viewer 33
system users 9
O
T
J
joysticks, controlling PTZ 13
L
launching web configuration
pages 23, 26
layout 10
live video, taking snapshots 12
loop time, for recording 25
M
maintaining aspect ratio 29
manager user 9
manually adding devices 26
menu, accessing 9
N
onscreen menu, accessing 9
overlays, displaying 29
P
passwords
changing 9
default 9
playing back recordings 16
post-alarm value 17
power loss 6
pre-alarm value 17
private network, setting up 6
PTZ cameras
configuring 24
working with 13
R
rear view 6
recordings 25, 26
and setting time 33
exporting 20
loop time 25
playing back 16
schedules 25, 26
setting up 25
snapshots 18
timeline 17
Team Viewer support 33
time, setting 33
timeline 17
timeout
removing 30
screen 30
troubleshooting
recordings 27
U
upgrading software 33
UPS 6
USB joysticks, controlling PTZ 13
users 9
administrator 9
manager 9
viewer 9
webuser 9, 35
V
video
displaying 11
stopping 12
viewing remotely 34
viewer user 9
viewing motion events 31
39 of 41
views, reordering 31
Vista SmartManager 21
W
web browsers, remote access 34
web configuration pages,
launching 23, 26
webuser user 9, 35
40 of 41
41 of 41