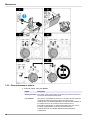
1
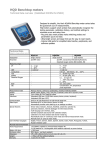
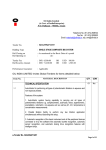
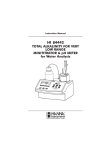
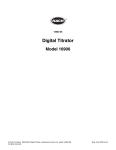
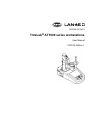
DOC022.52.93074
TitraLab® AT1000 series workstations
User Manual
12/2014, Edition 1
Table of Contents
Section 1 Specifications .................................................................................................................... 3
Section 2 General information ......................................................................................................... 5
2.1 Safety information........................................................................................................................ 5
2.1.1 Use of hazard information................................................................................................... 5
2.1.2 Precautionary labels............................................................................................................ 5
2.1.3 Certification......................................................................................................................... 6
2.2 Product overview.......................................................................................................................... 6
2.3 Instrument connections................................................................................................................ 7
2.4 Product components.................................................................................................................... 8
Section 3 Installation ........................................................................................................................ 11
3.1
3.2
3.3
3.4
3.5
3.6
3.7
3.8
Installation guidelines................................................................................................................. 11
Connect to AC power................................................................................................................. 11
Install the syringe....................................................................................................................... 11
Install the sensor storage tubes................................................................................................. 13
Install the stir bar and the beaker............................................................................................... 13
Prepare the tubes....................................................................................................................... 13
Connect the tubes...................................................................................................................... 13
Install the sensor........................................................................................................................ 14
3.8.1 Install the legacy adapter.................................................................................................. 14
3.8.2 Connect the sensor........................................................................................................... 14
3.9 Install the titrant and the reagent................................................................................................ 15
3.10 Tidy the work area.................................................................................................................... 16
3.11 Install accessories.................................................................................................................... 16
3.11.1 Install an external pump.................................................................................................. 16
3.11.2 Install an external propellor............................................................................................. 17
3.11.3 Install PC software.......................................................................................................... 17
Section 4 User interface and navigation ......................................................................................19
4.1 Keypad....................................................................................................................................... 19
Section 5 Startup ............................................................................................................................... 21
5.1 Configure the instrument............................................................................................................ 21
5.1.1 Change the application settings........................................................................................ 21
5.2 Install the applications................................................................................................................ 28
5.3 Prepare the instrument for measurement.................................................................................. 29
Section 6 Standard operations ...................................................................................................... 31
6.1 Get a sample measurement....................................................................................................... 31
6.2 Manage the data log.................................................................................................................. 32
6.3 Calibration.................................................................................................................................. 32
6.3.1 Calibrate the sensor.......................................................................................................... 32
6.3.2 Calibrate the titrant............................................................................................................ 33
6.4 Purge.......................................................................................................................................... 33
Section 7 Maintenance ..................................................................................................................... 35
7.1
7.2
7.3
7.4
7.5
7.6
Maintenance schedule............................................................................................................... 35
Clean the instrument.................................................................................................................. 35
Clean the sensor........................................................................................................................ 35
Replace desiccant cartridge contents........................................................................................ 36
Replace syringe electro-valve block........................................................................................... 36
Maintenance menu..................................................................................................................... 37
7.6.1 Syringe activation.............................................................................................................. 37
7.6.2 Pump activation................................................................................................................. 37
7.6.3 Syringe replacement......................................................................................................... 37
1
Table of Contents
7.6.4 Pump cassette replacement.............................................................................................. 37
7.6.5 Other maintenance options............................................................................................... 38
7.7 Storage and transportation......................................................................................................... 39
7.7.1 Prepare the instrument for short-term storage.................................................................. 39
7.7.2 Prepare the instrument for long-term storage................................................................... 39
7.7.3 Prepare the instrument for shipment................................................................................. 39
Section 8 Troubleshooting ..............................................................................................................41
Section 9 Replacement parts and accessories .......................................................................... 43
2
Section 1
Specifications
Specifications are subject to change without notice.
Specification
Details
Dimensions (W x D x H)
22 x 40 x 36 cm (8.7 x 15.7 x 14.2 in.)
Weight
4 kg (8.8 lb)
Power requirements
100–240 VAC, 50/60 Hz
Altitude
2,000 m (6,562 ft) maximum
Operating temperature
15 to 35 °C (59 to 95 °F)
Relative humidity
20 to 80%, non-condensing
Storage temperature
–5 to 40 °C (23 to 104 °F)
Installation category
II
Pollution degree
2
Certifications
Safety IEC/EN 61010-1; EMC IEC/EN 61326-1
Warranty
1 year (EU: 2 years)
3
Specifications
4
Section 2
General information
In no event will the manufacturer be liable for direct, indirect, special, incidental or
consequential damages resulting from any defect or omission in this manual. The
manufacturer reserves the right to make changes in this manual and the products it
describes at any time, without notice or obligation. Revised editions are found on the
manufacturer’s website.
2.1 Safety information
NOTICE
The manufacturer is not responsible for any damages due to misapplication or misuse of this
product including, without limitation, direct, incidental and consequential damages, and disclaims
such damages to the full extent permitted under applicable law. The user is solely responsible to
identify critical application risks and install appropriate mechanisms to protect processes during a
possible equipment malfunction.
Please read this entire manual before unpacking, setting up or operating this equipment.
Pay attention to all danger and caution statements. Failure to do so could result in serious
injury to the operator or damage to the equipment.
Make sure that the protection provided by this equipment is not impaired. Do not use or
install this equipment in any manner other than that specified in this manual.
2.1.1 Use of hazard information
DANGER
Indicates a potentially or imminently hazardous situation which, if not avoided, will result in death
or serious injury.
WARNING
Indicates a potentially or imminently hazardous situation which, if not avoided, could result in
death or serious injury.
CAUTION
Indicates a potentially hazardous situation that may result in minor or moderate injury.
NOTICE
Indicates a situation which, if not avoided, may cause damage to the instrument. Information that
requires special emphasis.
2.1.2 Precautionary labels
Read all labels and tags attached to the instrument. Personal injury or damage to the
instrument could occur if not observed. A symbol on the instrument is referenced in the
manual with a precautionary statement.
This symbol, if noted on the instrument, references the instruction manual for operation and/or safety information.
This symbol indicates that a risk of electrical shock and/or electrocution exists.
5
General information
This symbol indicates the presence of devices sensitive to Electro-static Discharge (ESD) and indicates that care
must be taken to prevent damage with the equipment.
Electrical equipment marked with this symbol may not be disposed of in European public disposal systems after
12 August of 2005. In conformity with European local and national regulations (EU Directive 2002/96/EC), European
electrical equipment users must now return old or end-of-life equipment to the Producer for disposal at no charge to
the user.
2.1.3 Certification
Canadian Radio Interference-Causing Equipment Regulation, IECS-003, Class A:
Supporting test records reside with the manufacturer.
This Class A digital apparatus meets all requirements of the Canadian InterferenceCausing Equipment Regulations.
Cet appareil numérique de classe A répond à toutes les exigences de la réglementation
canadienne sur les équipements provoquant des interférences.
FCC Part 15, Class "A" Limits
Supporting test records reside with the manufacturer. The device complies with Part 15 of
the FCC Rules. Operation is subject to the following conditions:
1. The equipment may not cause harmful interference.
2. The equipment must accept any interference received, including interference that
may cause undesired operation.
Changes or modifications to this equipment not expressly approved by the party
responsible for compliance could void the user's authority to operate the equipment. This
equipment has been tested and found to comply with the limits for a Class A digital
device, pursuant to Part 15 of the FCC rules. These limits are designed to provide
reasonable protection against harmful interference when the equipment is operated in a
commercial environment. This equipment generates, uses and can radiate radio
frequency energy and, if not installed and used in accordance with the instruction manual,
may cause harmful interference to radio communications. Operation of this equipment in
a residential area is likely to cause harmful interference, in which case the user will be
required to correct the interference at their expense. The following techniques can be
used to reduce interference problems:
1. Disconnect the equipment from its power source to verify that it is or is not the source
of the interference.
2. If the equipment is connected to the same outlet as the device experiencing
interference, connect the equipment to a different outlet.
3. Move the equipment away from the device receiving the interference.
4. Reposition the receiving antenna for the device receiving the interference.
5. Try combinations of the above.
2.2 Product overview
The instrument operates with digital and analog sensors. Measurement applications are
installed on the instrument to automate the measurement process. Instructions show on
the display when user intervention is required. Refer to Figure 1 for product features.
6
General information
Figure 1 Product overview
1 Keypad
6 Beaker
11 Sensor holder
2 Display
7 Syringe protection cover
12 Pump 2 input/output
3 Sensor storage tubes
8 Syringe input/output
13 Pump 1 input/output
4 USB port
9 Tube clips
14 Pump access cover
5 Tube holder
10 Syringe
Note: Depending on the model, there will be 1 or 2 syringes and syringe input/output ports, and 0,
1 or 2 pumps. Refer to Table 1.
Table 1 Instrument configurations
Model
Syringes
Pumps
AT1102
1
0
AT1112
1
1
AT1122
1
2
AT1222
2
2
2.3 Instrument connections
Figure 2 shows the connections on the rear panel of the instrument. Use the USB port on
the side of the instrument for the USB applications key supplied with the instrument. Use
7
General information
the USB port on the rear of the instrument to connect to a printer, mouse, keyboard or a
USB hub.
Figure 2 Instrument connections
1 24 V external power supply port
4 External pump port
7 USB port
2 Sensor 1 port
5 External propeller port
8 Ethernet port
3 Sensor 2 port
6 Serial port
2.4 Product components
Make sure that all components have been received. Refer to the packing list in the box. If
any items are missing or damaged, contact the manufacturer or a sales representative
immediately.
Figure 3 Contents of the instrument box
1 Instrument
2 Tube
1
8
holder1
3 Sensor storage tubes (3x)
4 Power supply
1 for each syringe position available on the instrument
5 Power cord
General information
Figure 4 Contents of the application box
1 Beakers (10 x 50 mL and 10 x 150 mL)
7 Syringe holding ring5
2 Tube with anti-diffusion tip2
8 Syringe (refer to Table 1 on page 7 for quantity)
3 Conical adapters (2x)
9 USB applications key
4 Magnetic stir bars (10x)
10 Glass bottles6
5 Legacy sensor adapter3
11 Bottle caps (2 x GL45 and 1 x GL25)
6
Sensor4
5
1 for each syringe
If necessary for the application
Not in all application kits
Not in all application kits
Type and quantity depends on application
2
6
3
4
12 Empty desiccant cartridges (3x)
9
General information
10
Section 3
Installation
CAUTION
Multiple hazards. Only qualified personnel must conduct the tasks described in this
section of the document.
The instrument is available in different configurations (refer to Table 1 on page 7). This
manual supplies instructions for the installation of an instrument with one syringe and one
pump. Adjust the installation procedure as applicable to accommodate the number of
syringes and pumps in the instrument.
3.1 Installation guidelines
•
•
•
•
•
•
•
This instrument is for indoor use only.
The power supply connector on the rear panel must be easily accessible so the
power can be disconnected quickly in case of emergency.
Keep the instrument away from temperature extremes, including heaters, direct
sunlight and other heat sources.
Put the instrument on a stable and level surface in a well ventilated place.
Make sure that there is at least 15 cm (6 in.) of space on all sides of the instrument to
prevent electrical parts from overheating.
Do not operate or keep the instrument in dusty, damp or wet locations.
Always keep the surface of the instrument and all accessories dry and clean.
3.2 Connect to AC power
DANGER
Electrocution hazard. If this equipment is used outdoors or in potentially wet locations, a
Ground Fault Circuit Interrupt (GFCI/GFI) device must be used for connecting the
equipment to its main power source.
CAUTION
Electrical shock and fire hazards. Make sure that the supplied cord and non‐locking plug
meet the applicable country code requirements.
WARNING
Fire hazard. Use only the power supply that is specified for this instrument.
1. Connect the power cord to the power supply.
2. Connect the power supply to the instrument. Refer to Figure 2 on page 8.
3. Connect the power cord to an electrical outlet.
3.3 Install the syringe
Before syringe installation, set the instrument power to on. Push the power button on the
front of the instrument. Make sure that the startup sequence shows on the display. The
syringe holder lowers to its operating position.
Note: Ignore any warning messages related to missing applications that show on the display.
The sensor holder has two positions: one over the magnetic stirrer and the second at
180° to the right. Move the sensor holder away from the instrument to the second
position.
11
Installation
Refer to the illustrated steps that follow.
To install a second syringe, do steps 5 through 7 again.
12
Installation
3.4 Install the sensor storage tubes
Put the three sensor storage tubes into the holder that is on the side of the instrument.
Refer to Figure 1 on page 7. Keep the sensor in a storage tube when not in use.
3.5 Install the stir bar and the beaker
Add the stir bar to the beaker, and then attach the beaker to the sensor holder. Refer to
the illustrated steps that follow.
3.6 Prepare the tubes
Remove any bends in the end of the tubes. Refer to the illustrated steps that follow.
3.7 Connect the tubes
Arrow symbols identify the inlet and outlet ports for the syringe and the pump
connections. The “up” arrow is the outlet port. The “down” arrow is the inlet port. Turn the
tube connectors on the inlet and outlet ports of the syringe and pump until they click.
The syringe outlet tube has a blue ring on it. If anti-diffusion tips are necessary, remove
the pre-installed outlet tube from the syringe and install the tube from the application kit
with the pre-installed anti-diffusion tip.
Push the outlet tubes into the tube holder slots so that they are correctly attached.
13
Installation
Refer to the illustrated steps that follow.
3.8 Install the sensor
3.8.1 Install the legacy adapter
Go to Connect the sensor on page 14 if no legacy adapter is included in the application
kit.
1. Connect the measuring, reference and temperature sensors to the legacy adapter.
2. Connect the legacy adapter cable to a sensor socket on the rear panel of the
instrument. Refer to Figure 5.
Figure 5 Install the legacy adapter
1 Temperature sensor
2 Reference sensor
3 Measuring sensor
3.8.2 Connect the sensor
Use a conical adapter to hold the sensor tightly in the sensor holder.
Connect the sensor to an available sensor port on the rear of the instrument. After the
sensor is connected, make sure that the sensor icon shows in the banner at the top of the
display. Refer to the illustrated steps that follow.
14
Installation
3.9 Install the titrant and the reagent
CAUTION
Chemical exposure hazard. Obey laboratory safety procedures and wear all of the
personal protective equipment appropriate to the chemicals that are handled. Refer to the
current safety data sheets (MSDS/SDS) for safety protocols.
Loosen the tube connector on the bottle cap.
Fill a desiccant cartridge with an applicable desiccant. Put the desiccant cartridge into the
adapter on the titrant bottle cap.
Push the inlet tube through the connector. Make sure that the end of the tube is at the
bottom of the bottle. Tighten the connector on the bottle cap.
Refer to the "Application Note" on the USB applications key to identify the correct pump
to connect to the reagent bottle. Refer to the illustrated steps that follow.
15
Installation
3.10 Tidy the work area
Attach the tubes to the instrument with the clips on the electrovalve and the sensor
holder. Refer to the illustrated steps that follow.
3.11 Install accessories
3.11.1 Install an external pump
This accessory (Item no. LZE142) is used to remove unwanted sample from the beaker.
16
Installation
1.
2.
3.
4.
Remove any bends in the end of the tube from the inlet port on the pump.
Push the tube into a tube holder slot so it is correctly attached.
Make sure that the end of the tube is near the bottom of the beaker.
Make sure that the tube from the outlet port of the pump is installed in an applicable
container.
5. Connect the pump to the external pump port on the rear of the instrument (refer to
Figure 2 on page 8).
3.11.2 Install an external propellor
This accessory (Item no. LZE143) is used as an alternative to the standard magnetic stir
bar, for more viscous samples.
1. Install the propellor into an available slot on the sensor holder.
2. Make sure that the end of the propellor is near the bottom of the beaker.
3. Connect the propeller to the external propeller port on the rear of the instrument (refer
to Figure 2 on page 8).
3.11.3 Install PC software
®
The optional PC software connects with the TitraLab workstation through an Ethernet
network. The software can be used to:
•
•
•
•
•
•
®
Control a TitraLab workstation to start and stop analyses
Control a sample changer to start and stop analyses
Control a balance for accurate sample weighing
Show run-time data directly from the workstation
Manage data stored locally or on a server (search, compare, delete, print, etc.)
Export data to files for use in other software applications
Full product documentation and on-line help is available with the software.
Refer to Figure 6 for a typical PC setup that includes connections to a balance, printer,
®
TitraLab workstation and sample changer.
Figure 6 Typical setup that can be used with the PC software
®
1 Balance for weighing the sample
4 TitraLab workstation
2 Printer
5 Sample changer
3 Computer with PC software installed
17
Installation
18
Section 4
User interface and navigation
4.1 Keypad
Figure 7 shows the keypad and gives the key functions.
Figure 7 Keypad
1 Power
4 Navigation keys
2 Printer
5 Home
3 Selection keys
Key
Description
Power
Sets the instrument power to on or off. Push the key for 2 seconds to set the power to off.
Printer
Sends data to an attached printer. The printer key only operates if a printer is connected to the
instrument.
Selection keys
(contextual)
Shows the measurement options, selection and confirmation options. Use this key to exit the current
menu display or open sub-menus. Available options show on the display above each key.
Navigation keys
Scrolls through menus and data, enter numbers and letters, enter checkbox settings and set options
for the syringe and the pump.
Home
Goes to the main menu.
19
User interface and navigation
20
Section 5
Startup
CAUTION
Chemical exposure hazard. Obey laboratory safety procedures and wear all of the
personal protective equipment appropriate to the chemicals that are handled. Refer to the
current safety data sheets (MSDS/SDS) for safety protocols.
CAUTION
Personal injury hazard. Never use the instrument without the syringe cover installed.
5.1 Configure the instrument
1. From the main menu, select
Settings.
2. Select an option, then push Select.
Option
Description
Applications
Exports, changes (refer to Change the application settings on page 21),
removes and makes copies of application data. Make sure that the
duplication function does not make more than five applications for each
syringe installed.
Operators
Adds, changes and removes operators.
Date + Time
Sets the instrument date and time.
Brightness
Sets the brightness of the display.
Sounds
Sets the sound options.
Language
Sets the language.
Network
Give a name to the instrument. This name is used to connect the
instrument to a PC. Restart the instrument if the name is changed.
Legacy settings
Specify the sensor data when the legacy adapter is used.
Info
Shows information about the instrument and the attached hardware.
Restore Defaults Sets the instrument to the default configuration.
Options
Sets the application parameters view to expert mode (refer to Change the
application settings on page 21). When the instrument is set to off, sets
the syringe to empty into the titrant bottle. Changes the temperature
display unit. Prints the measurement and derivative curves if a printer is
connected.
Note: When the instrument is set to on, the application parameters view is
always set to basic mode. Changes made to application data with the
instrument in expert mode are kept.
3. Push Back.
5.1.1 Change the application settings
NOTICE
The applications installed on the instrument have been pre-defined to optimize the measurement
process. Changing these default application parameters will have an effect on the measurement
process and measurement results. Only qualified personnel should change these parameters or
use the instrument in expert mode.
Note: The parameters available for change will vary depending on the instrument configuration and
the application being edited.
21
Startup
1.
2.
3.
4.
From the main menu, select
Settings.
Select Applications followed by Edit.
Choose an application to change from the installed list and then push Edit.
Push the arrow keys to scroll through the application parameters. The Edit key is only
available when a parameter can be changed.
Note: Push the left and right arrow keys to go to the previous or next parameter group.
5. Push Edit to change the parameter. Enter the new details or select from a list.
Note: A description of the selected parameter is shown on the bottom of the display.
Refer to the following tables for the parameters that can be changed in basic and expert
mode.
Note: The parameters marked with an "x" are available for change.
Table 2 Application parameters
Parameter
Description
Name
Application name
Advisable syringe
Recommended syringe for the application
Basic mode
Expert mode
x
x
Table 3 Sample parameters
Parameter
Description
Basic mode
Expert mode
Name
Sample name
x
x
Amount
Sample amount
x
x
Unit
Sample unit
Minimum amount
Minimum accepted sample amount
x
x
Maximum amount
Maximum accepted sample amount
x
x
Resolution
Number of decimals to show
x
x
Table 4 QC parameters
Parameter
Description
Name
QC name
Basic mode
Expert mode
x
x
Table 5 Blank parameters
Parameter
Description
Description
Blank description
Basic mode
Expert mode
x
x
Table 6 Probe parameters
Parameter
Description
Type
Type of measurement probe
Part of name
Part of the name used to identify matching electrodes if the
preferred electrode is not connected
Recommended probe
Recommended probe for the application
Calibration frequency
Recommended frequency to calibrate the probe
Stability criterion
The recommended value is shown in the related application note
x
Maximum stability time
Maximum time to wait for the measurement to become stable
x
Stirring speed
Stirring speed during the calibration
22
Basic
mode
Expert mode
x
x
x
x
x
Startup
Table 6 Probe parameters (continued)
Parameter
Description
Basic
mode
Minimum slope
For pH probes, the minimum accepted slope value for the
calibration
x
Maximum slope
For pH probes, the maximum accepted slope value for the
calibration
x
Minimum offset
For pH probes, the minimum accepted offset value for the
calibration
x
Maximum offset
For pH probes, the maximum accepted offset value for the
calibration
x
Maximum temperature
variation
Maximum accepted temperature variation value for the
calibration
Buffer set
For pH probes, define the buffer set to be used for calibration
Working mode
Specify if the probe is to be used in imposed voltage (AC or DC)
x
Imposed current
Set the value of the imposed current
x
Imposed voltage
Set the value of the imposed voltage
x
Probe settling time
Time to wait for the measurement to become stable before a
titration starts
x
Calibration mode
Set the calibration mode
x
Standard
For conductivity probes, define the standard to be used for
calibration
Minimum cell constant
For conductivity probes, the minimum accepted cell constant for
the calibration
x
Maximum cell constant
For conductivity probes, the maximum accepted cell constant for
the calibration
x
Temperature compensation
For conductivity probes, set the temperature compensation
method
x
x
x
Expert mode
x
x
Table 7 Titrant parameters
Parameter
Description
Name
Titrant name
x
Titrant concentration
Nominal titrant concentration
x
Resolution
Number of decimals to show
x
Unit
Titrant unit
x
Real concentration
Actual concentration of the titrant that is used in measurement
calculation
Resolution
Number of decimals to show
Location7
The syringe connected to the titrant bottle
x
x
Calibration frequency
Recommended frequency to calibrate the titrant
x
x
Stirring speed
Stirring speed during the titration
x
x
Predose
Volume of titrant added at the start of the calibration
7
Basic
mode
x
Expert mode
x
x
x
Can only be changed if more than one syringe is installed.
23
Startup
Table 7 Titrant parameters (continued)
Parameter
Description
Delay
Stirring time before the calibration starts
Basic
mode
Expert mode
x
Maximum volume stop point The calibration stops when this volume is reached
x
Ordinate stop point
The calibration stops when this ordinate is reached
x
Stop on last EQP
The calibration stops when the last equivalent point is found
x
Minimum ordinate
Reserved for technical support
x
Maximum ordinate
Reserved for technical support
x
Minimum stability time
Minimum time after an incremental addition
x
Maximum stability time
Maximum time after an incremental addition
x
Stability criterion
Stability criterion after the increment addition
x
Minimum increment size
Minimum increment volume
x
Maximum increment size
Maximum increment volume
x
Maximum abscissa
Reserved for technical support
x
Derivative filter
Reserved for technical support
x
Curve filter
Reserved for technical support
x
Curvature filter
Reserved for technical support
x
Detection threshold
Reserved for technical support
x
Linearity threshold
Reserved for technical support
x
Curvature sign
Reserved for technical support
x
EQP minimum ordinate
Minimum value for the equivalence point
x
EQP maximum ordinate
Maximum value for the equivalence point
x
EQP 1 minimum ordinate
Minimum value for the equivalence point
x
EQP 1 maximum ordinate
Maximum value for the equivalence point
x
Titrant volume calculation
Volume calculation mode for multiple EQPs
x
Maximum resolution
Maximum number of decimals to show for the titer
x
R1 limit check
Specify if the sample result is checked to be within the accepted
boundaries
x
Minimum titer
Minimum value of the actual titer
x
Maximum titer
Maximum value of the actual titer
x
Result 1 EQP index
Index of the equivalent point used to calculate the result
x
Standard name
Define the standard to be used for calibration
x
Standard amount
Quantity of standard to be used for calibration
x
Unit
Unit for the standard
x
Minimum amount
Minimum amount of standard to be used for calibration
x
Maximum amount
Minimum amount of standard to be used for calibration
x
Concentration
Concentration value of the standard
Unit
Concentration value unit
24
x
x
x
Startup
Table 7 Titrant parameters (continued)
Parameter
Description
Basic
mode
Expert mode
Resolution
Number of decimals to show for the concentration value of the
standard
x
Standard equivalents
Number of exchanged equivalents of the standard
x
Titrant equivalents
Number of exchanged equivalents of the titrant
x
Molar weight
Molar weight of the standard
x
Table 8 Leveling parameters
Parameter
Description
Basic mode
Expert mode
Active
Specify if the method should be used during the analysis
x
x
Time
Time the pump is active
x
x
Table 9 Sample preparation and addition parameters
Parameter
Description
Basic mode
Expert mode
Active
Specify if the method should be used during the analysis
x
x
Message
Information shown during the analysis
Reagent
Name of the reagent to add
x
x
Pump ID
The pump connected to the reagent bottle
Time
Time the method is active
x
x
Stirring speed
Stirring speed while the method is active
x
x
x
Table 10 Titration parameters
Parameter
Description
Basic mode Expert mode
Active
Specify if the method should be used during the analysis
x
x
Stirring speed
Stirring speed during the titration
x
x
Measured parameter
Parameter measured by the probe
Predose
Volume of titrant added at the start of the titration
x
x
Delay
Stirring time before the titration starts
x
x
Addition mode
Specify how the titrant is added
x
Minimum ordinate
Reserved for technical support
x
Maximum ordinate
Reserved for technical support
x
Maximum volume stop point
The titration stops when this volume is reached
x
Ordinate stop point
The titration stops when this ordinate is reached
x
Stop on last EQP
The titration stops when the last equivalent point is found
x
Minimum angle
Reserved for technical support
x
Maximum angle
Reserved for technical support
x
Minimum stability time
Minimum time after an incremental addition
x
Maximum stability time
Maximum time after an incremental addition
x
Stability criterion
Stability criterion after the increment addition
x
25
Startup
Table 10 Titration parameters (continued)
Parameter
Description
Basic mode Expert mode
Minimum increment size
Minimum increment volume when the working mode is dynamic
x
Maximum increment size
Maximum increment volume when the working mode is dynamic
x
Increment size
Size of the increment when the working mode is monotonic
x
Equivalence point #1
Set the ordinate for equivalence point 1
x
Equivalence point #2
Set the ordinate for equivalence point 2
x
Titrant volume calculation
Define the titrant volume calculation mode for multiple
equivalence points
x
Back titration mode
Define the mode of the excess titrant addition
x
Excess volume
Define the volume of excess titrant to add
Resolution
Number of decimals to show for the volume of excess titrant
Excess volume unit
Excess volume unit
Titrant name
Name of the excess titrant
x
Titrant concentration
Concentration of the excess titrant
x
Resolution
Number of decimals to show for the concentration of excess
titrant
x
Titrant concentration unit
Titrant concentration unit
x
x
x
x
Real concentration of excess Actual concentration of the excess titrant
x
Excess equivalents
Number of exchanged equivalents of the excess titrant
x
Sample equivalents
Number of exchanged equivalents of the sample
x
Titrant equivalents
Number of exchanged equivalents of the titrant
x
Maximum abscissa
Reserved for technical support
x
Derivative filter
Number of points to use when calculating the derivative
x
Curve filter
Reserved for technical support
x
Curvature filter
Reserved for technical support
x
Detection threshold
Reserved for technical support
x
Linearity threshold
Reserved for technical support
x
Curvature sign
Reserved for technical support
x
EQP minimum ordinate
Minimum value for the equivalence point
x
EQP maximum ordinate
Maximum value for the equivalence point
x
EQP 1 minimum ordinate
Minimum value for the equivalence point
x
EQP 1 maximum ordinate
Maximum value for the equivalence point
x
Result 1 (R1) name
Result name
x
x
R1 maximum resolution
Maximum number of decimals to show for the result
x
x
R1 hide
Specify if the result is shown or not shown on the display
x
x
R1 limit check
Specify if the sample result is checked to be within the accepted
boundaries
R1 minimum
Minimum accepted result value
x
x
R1 maximum
Maximum accepted result value
x
x
26
x
Startup
Table 10 Titration parameters (continued)
Parameter
Description
Basic mode Expert mode
R1 QC minimum
Minimum accepted QC result value
x
x
R1 QC maximum
Maximum accepted QC result value
x
x
R1 unit
Result unit
x
R1 EQP index
Index of the equivalent point used to calculate the result
x
R1 molar weight
Molar weight of the analyte used to calculate the result
x
R1 sample equivalent
Number of exchanged equivalents of the sample
x
R1 titrants equivalent
Number of exchanged equivalents of the titrant
x
Result 2 (R2) name
Result name
x
x
R2 maximum resolution
Maximum number of decimals to show for the result
x
x
R2 hide
Specify if the result is shown or not shown on the display
x
x
R2 limit check
Specify if the sample result is checked to be within the accepted
boundaries
x
x
R2 minimum
Minimum accepted result value
x
x
R2 maximum
Maximum accepted result value
x
x
R2 QC minimum
Minimum accepted QC result value
x
x
R2 QC maximum
Maximum accepted QC result value
x
x
R2 equation
The equation used to calculate the result
R2 unit
Result unit
x
R2 user value
Specify the value that can be used in the equation computation
x
R2 EQP index
Index of the equivalent point used to calculate the result
x
R2 molar weight
Molar weight of the analyte used to calculate the result
x
R2 sample equivalent
Number of exchanged equivalents of the sample
x
R2 titrants equivalent
Number of exchanged equivalents of the titrant
x
Result 3 (R3) name
Result name
x
x
R3 maximum resolution
Maximum number of decimals to show for the result
x
x
R3 hide
Specify if the result is shown or not shown on the display
x
x
R3 limit check
Specify if the sample result is checked to be within the accepted
boundaries
x
x
R3 minimum
Minimum accepted result value
x
x
R3 maximum
Maximum accepted result value
x
x
R3 QC minimum
Minimum accepted QC result value
x
x
R3 QC maximum
Maximum accepted QC result value
x
x
R3 equation
The equation used to calculate the result
R3 unit
Result unit
x
x
R3 user value
Specify the value that can be used in the equation computation
Result 4 (R4) name
Result name
x
x
R4 maximum resolution
Maximum number of decimals to show for the result
x
x
R4 hide
Specify if the result is shown or not shown on the display
x
x
x
27
Startup
Table 10 Titration parameters (continued)
Parameter
Description
Basic mode Expert mode
R4 limit check
Specify if the sample result is checked to be within the accepted
boundaries
x
x
R4 minimum
Minimum accepted result value
x
x
R4 maximum
Maximum accepted result value
x
x
R4 QC minimum
Minimum accepted QC result value
x
x
R4 QC maximum
Maximum accepted QC result value
x
x
R4 equation
The equation used to calculate the result
R4 unit
Result unit
x
x
R4 user value
Specify the value that can be used in the equation computation
Result 5 (R5) name
Result name
x
x
R5 maximum resolution
Maximum number of decimals to show for the result
x
x
R5 hide
Specify if the result is shown or not shown on the display
x
x
R5 limit check
Specify if the sample result is checked to be within the accepted
boundaries
x
x
R5 minimum
Minimum accepted result value
x
x
R5 maximum
Maximum accepted result value
x
x
R5 QC minimum
Minimum accepted QC result value
x
x
R5 QC maximum
Maximum accepted QC result value
x
x
R5 equation
The equation used to calculate the result
R5 unit
Result unit
x
x
R5 user value
Specify the value that can be used in the equation computation
x
x
5.2 Install the applications
Use the supplied USB key to install the applications. The instrument can install a
maximum of five applications for each syringe installed. For two syringes, the installed
applications shown on the top line of the display refer to syringe one and the installed
applications shown on the second line refer to syringe two. If any errors occur during
installation, refer to Troubleshooting on page 41.
1. Push Home to go to the main menu.
2. Connect the USB key to the USB port on the side of the instrument. The applications
on the USB key show on the display.
3. Push the arrow keys to highlight and select an application to install. Push the left or
right arrow key to select it. Do this step again to select additional applications to
install.
4. Push Import to install the selected applications.
5. Push OK to complete the installation. The installed applications show on the main
menu.
Note: To install more applications, push Home to go to the main menu, then remove the USB
key and reconnect it.
28
Startup
5.3 Prepare the instrument for measurement
1. From the main menu, select
Purge, then push Start. All attached devices are
listed.
2. Select All elements to purge all the attached devices, or select one device to purge.
Push Select. Air is removed from the device and filled with liquid from the bottle.
3. Push OK when the operation has completed.
4. Make sure that there are no air bubbles in the device. Do step 2 again if there are any
air bubbles.
5. Select the next device to purge if individual devices are being selected.
6. Push Exit when all the tubes are filled with reagent and the device has no air
bubbles.
Note: If a few small air bubbles can be seen on the inner wall and/or piston of the syringe, they
can be left without effecting system performance.
29
Startup
30
Section 6
Standard operations
CAUTION
Multiple hazards. Only qualified personnel must conduct the tasks described in this
section of the document.
CAUTION
Chemical exposure hazard. Obey laboratory safety procedures and wear all of the
personal protective equipment appropriate to the chemicals that are handled. Refer to the
current safety data sheets (MSDS/SDS) for safety protocols.
CAUTION
Personal injury hazard. Never use the instrument without the syringe protection cover in place.
CAUTION
Chemical exposure hazard. Never remove the stir bar from the beaker before the end of a titration.
6.1 Get a sample measurement
Use this option to get sample measurements with one of the installed applications.
1. From the main menu, select the measurement application, then push Start.
Application information shows on the display.
2. Read the related "Application Note" from the USB applications key for more
instructions.
3. If necessary, select an icon for more information or to change some data.
4. Fill a beaker with the recommended sample amount that shows on the display. If
necessary, add sufficient deionized water to make sure the sensor is correctly
installed in the sample.
5. Carefully put a magnetic stir bar into the beaker. Make sure there is no liquid spill.
6. Attach the beaker to the sensor holder.
7. Make sure that the icon at the bottom of the display
is highlighted. Do the
instructions that show on the display adjacent to this icon. Refer to Connect the
sensor on page 14 to make sure that the tubes and sensor are correctly aligned.
8. Push Start to start the measurement. Measurement data shows on the display.
9. If the default stirring speed needs to be adjusted, push the up and down arrow keys
to increase or decrease the speed.
10. If the options are available during the measurement procedure, push Skip to ignore
the current step or push Stop to abort the measurement.
11. When the measurement is complete, push the arrow keys to see the different
measurement views.
31
Standard operations
12. Push Next for the options that follow:
Option
Description
Replicate
sample
Use this option to start the same titration on the same sample. This is used
to study the repeatability by successively analyzing several parts of the
same sample. At the end of each measurement, a window shows the
average value, the standard deviation and the relative standard deviation.
New sample
Use this option to start the same titration on a new sample. No standard
deviation or relative standard deviation measurements will be done.
13. Push Exit to go back to the main menu.
6.2 Manage the data log
To select data to view, delete or export, specify data filters
1. From the main menu, select
Data log.
2. Select an option, then push Select.
Option
Description
View data log
Views measurement data. Select individual lines of data to view more
content.
Export data log Exports measurement data from the system to an external device. Preview
data selection before it is exported. Make sure that an external device is
connected to the instrument (e.g., a USB key, external hard drive, etc.).
Delete data log Removes measurement data from the system. Previews data selection
before it is removed.
3. Specify the data extraction parameters. Push the left and right arrow keys to make a
selection. Push the up and down arrow keys to select an option.
Option
Description
Result type
Sets the type of result available.
Application
Sets the available applications.
Date
Sets the date range.
Operator
Sets the available operators.
6.3 Calibration
6.3.1 Calibrate the sensor
1. From the main menu, select
Calibration, then push Electrode calibration.
2. If more than one sensor is installed, push the arrow keys to highlight the sensor to
calibrate, then push Select.
3. If more than one application includes calibration parameters for the sensor, push the
arrow keys to choose the application, then push Select. Application information
shows on the display.
4. If necessary, select an icon for more information or to change some data.
5. Do the instructions that show on the display, then push Start to start the calibration.
Calibration data shows on the display.
6. If the default stirring speed needs to be adjusted, push the up and down arrow keys
to increase or decrease the speed.
7. When the calibration is complete, push the arrow keys to see the different
measurement views.
32
Standard operations
8. Push Yes to continue with the next calibration buffer solution.
9. When the calibration is complete, push Yes to accept the calibration or No to reject.
10. Push Exit to go back to the main menu.
6.3.2 Calibrate the titrant
1. From the main menu, select
Calibration, then push Titrant calibration. Related
information shows on the display.
2. If necessary, select an icon for more information or to change some data.
3. Do the instructions that show on the display, then push Start to start the calibration.
Calibration data shows on the display.
4. If the default stirring speed needs to be adjusted, push the up and down arrow keys
to increase or decrease the speed.
5. When the calibration is complete, push the arrow keys to see the different
measurement views.
6. Push Continue to continue with the calibration.
7. When the calibration is complete, push Yes to accept the calibration or No to reject.
8. Push Exit to go back to the main menu.
6.4 Purge
Use this procedure to remove air bubbles from the system. Refer to Prepare the
instrument for measurement on page 29 for instructions.
33
Standard operations
34
Section 7
Maintenance
CAUTION
Multiple hazards. Only qualified personnel must conduct the tasks described in this
section of the document.
NOTICE
Do not disassemble the instrument for maintenance. If the internal components must be cleaned
or repaired, contact the manufacturer.
7.1 Maintenance schedule
Table 11 shows the recommended schedule of maintenance tasks. Facility requirements
and operating conditions may increase the frequency of some tasks.
Table 11 Maintenance schedule
Task
1 day 7 days 12 months
Clean the instrument on page 35.
x
Clean the sensor on page 35.
x
Replace desiccant cartridge contents on page 36.
x
Replace the syringe. Refer to Syringe replacement on page 37.
x
Replace syringe electro-valve block. Refer to Replace syringe electro-valve block on page 36.
x
Examine the syringe connections and inlet and outlet tubes for leaks and damage. Replace as
necessary. Refer to Replacement parts and accessories on page 43 for part numbers.
x
Replace the pump cassettes. Refer to Pump cassette replacement on page 37.
x
Examine the pump connections and inlet and outlet tubes for leaks and damage. Replace as
necessary. Refer to Replacement parts and accessories on page 43 for part numbers.
x
Examine the bottle caps and connections for leaks and damage. Replace as necessary. Refer
to Replacement parts and accessories on page 43 for part numbers.
x
7.2 Clean the instrument
NOTICE
Never use flammable or corrosive solvents to clean any part of the instrument. Use of these
solvents can degrade the environmental protection of the instrument and may void the warranty.
Clean the exterior surface with a moist cloth or with a mixture of water and mild detergent.
Dry with a soft cloth.
7.3 Clean the sensor
PtPt sensors have a cleaning procedure included in the software (refer to Other
maintenance options on page 38). Use this option to clean a PtPt sensor. Use a beaker
with a magnetic stir bar for all the cleaning liquids. Attach the beaker to the sensor holder.
Obey the instructions on the display.
For other sensors, obey the cleaning instructions given in the documentation supplied
with the sensor.
35
Maintenance
7.4 Replace desiccant cartridge contents
It is recommended to replace the desiccant cartridge contents weekly, but this will vary
depending on the humidity of the laboratory. A humidity indicator, such as color changing
silica gel crystal, can be used to show when replacement is necessary.
7.5 Replace syringe electro-valve block
DANGER
Electrocution hazard. Remove power from the instrument before this procedure is started.
NOTICE
It is recommended that this procedure is only done by a qualified service engineer.
Refer to the illustrated steps that follow.
36
Maintenance
7.6 Maintenance menu
Select
Maintenance from the main menu.
7.6.1 Syringe activation
Do a check of the syringe. Make sure the syringe fills and empties correctly.
1. From the maintenance menu, push Syringe activation.
Option
Description
Fill
Fills the syringe with titrant solution. The process stops automatically when
the syringe is full.
Empty to bottle
Discards the contents of the syringe into the titrant bottle.
Empty to beaker Discards the contents of the syringe into the beaker. Make sure that the
tube from the outlet port of the syringe is inside the beaker.
Stop
Stops the operation.
2. If a second syringe is installed, push Toggle to change to the second syringe.
7.6.2 Pump activation
This option only applies to instruments with pumps installed. Do a check of the pump.
Make sure the pump fills and empties correctly.
1. From the maintenance menu, push Pump activation.
Option Description
Start
Starts the pump. The reagent is pumped through the tubes into the beaker. Make
sure that the tube from the outlet port of the pump is in the beaker.
Stop
Stops the operation.
2. If more than one pump is installed, push Toggle to change to another pump.
7.6.3 Syringe replacement
To replace the syringe, select Syringe replacement from the maintenance menu. Obey
the instructions on the display. Refer to Install the syringe on page 11.
7.6.4 Pump cassette replacement
DANGER
Electrocution hazard. Remove power from the instrument before this procedure is started.
This option only applies to instruments with pumps installed.
To replace the pump cassette, refer to the illustrated steps that follow and obey the
instructions on the display.
37
Maintenance
7.6.5 Other maintenance options
1. Select an option, then push Select.
Option
Description
Stirring activation Do a check of the magnetic stirrer. Push the up and down arrow keys to
increase or decrease the stirring speed.
Live measure
38
This option is not available for all sensors. The option shows continuous
measurement data with connected sensors to quickly check
measurements. The installed applications and the automatic additions to
the sample are set to off. Continuous measurements are not
temperature compensated, so measurement differences may occur in
the same sample between continuous measurements and
measurements that use installed applications with temperature
compensation.
Maintenance
Option
Description
Maintenance
summary
See the number of days remaining for maintenance tasks. After doing a
task, push Reset to set the number of days remaining to the default
value.
Maintenance
schedule
See the list of maintenance tasks. Push Edit to change the default
value.
Reagent
replacement
Use this option to replace the reagents. Obey the instructions on the
display.
7.7 Storage and transportation
7.7.1 Prepare the instrument for short-term storage
1. Push the power button for 2 seconds to set the power to off. The contents of the
syringe drain back into the titrant bottle.
2. Drain the used beakers, then clean the beakers with deionized water.
3. Rinse the sensor with deionized water. Put the sensor in a storage tube that contains
a storage solution. Refer to the sensor documentation for storage instructions.
7.7.2 Prepare the instrument for long-term storage
1. Push the power button for 2 seconds to set the power to off. The contents of the
syringe drain back into the titrant bottle.
2. Drain the used beakers, then clean the beakers with deionized water.
3. Remove the tubes from the titrant bottles and the reagent bottles. Seal the bottles
with the original bottle caps.
4. Flush the syringe and pump tubes with deionized water or an applicable cleaning
solution.
5. Rinse the sensor with deionized water. Put the sensor in a storage tube that holds a
storage solution. Refer to the sensor documentation for storage instructions.
7.7.3 Prepare the instrument for shipment
1. Refer to Prepare the instrument for long-term storage on page 39.
2. Put the instrument and the necessary accessories in a package with all the packaging
materials.
3. Ship the instrument at a temperature –5 to 40 °C (23 to 104 °F) and relative humidity
up to 80%.
4. Make sure that the storage location for the instrument does not have dust,
condensation or chemical evaporation.
39
Maintenance
40
Section 8
Troubleshooting
Refer to the following table for common problem messages or symptoms and possible
causes.
Error/Warning
Description
Stop requested
The operator has pushed the stop button
Measurement unstable
The measurement is unstable
Measurement out of range
The measurement is out of range
Temperature out of range
The temperature measurement is out of range
Slope out of range
The calibration slope is outside accepted limits
Offset out of range
The calibration offset is outside accepted limits
Cell constant out of range
The calibration value of the cell constant is outside accepted limits
Equiv. point not found
The titration fails to determine the equivalence point
Out of range
The computed result is outside accepted limits
Electrode calibration has expired
The Calibration date has expired
Titrant calibration has expired
The Calibration date has expired
Maximum number of applications is reached
The maximum number of applications per line has been reached
Requires at least one titrant that cannot be installed The application is not compatible with applications already installed as
it uses a different titration
Requires too many titrants for this instrument model The instrument hardware configuration is not compatible with this
configuration
application
Buffer unstable
The value of the buffer is unstable
The connected electrode(s) cannot be calibrated or
there is no application that contains calibration
parameters!
The type of sensor cannot be calibrated (e.g., PtPt, ORP, etc.) or there
is no installed application that contains calibration parameters
Standard unstable
The standard is unstable
Same buffer
The buffer has already been used
Calibration solution already used
The calibration solution has already been used
No titrant information
System failure. Contact technical support
No measure received
System failure. Contact technical support
Burette fails to deliver
The syringe cannot be emptied
Burette fails to fill
The syringe cannot be filled
Burette failed to read delivered volume
System failure. Contact technical support
41
Troubleshooting
42
Section 9
Replacement parts and accessories
WARNING
Personal injury hazard. Use of non-approved parts may cause personal injury, damage to
the instrument or equipment malfunction. The replacement parts in this section are
approved by the manufacturer.
Note: Product and Article numbers may vary for some selling regions. Contact the appropriate
distributor or refer to the company website for contact information.
Table 12 Replacement parts and accessories
Description
Item no.
Syringe 2.5 mL, glass
LZE100
Syringe 5 mL, glass
LZE101
Syringe 10 mL, glass
LZE102
Syringe 25 mL, glass
LZE103
O-ring for 2.5 mL syringe
LZE104
O-ring for 5 mL syringe
LZE105
O-ring for 10 mL syringe
LZE106
O-ring for 25 mL syringe
LZE107
Set of beakers 50 mL (10x)
LZE108
Set of beakers 150 mL (10x)
LZE109
Delivery tubing with anti-diffusion tip
LZE112
Set of tubes (2x) for syringe, suction & delivery
LZE114
Set of tubes (2x) for pump, suction & delivery
LZE115
Bottle stopper GL25
LZE116
Bottle stopper GL45
LZE117
Bottle stopper S40
LZE118
Glass bottle, 1L
LZE119
Desiccant tube empty with cotton
LZE120
Desiccant tube filled with molecular sieve
LZE121
Conical adapter NS14.5/23
LZE122
Tube fitting (2x)
LZE124
Spare pump cassette
LZE125
USB key for water applications
LZE128
USB key for biogas applications
LZE129
USB key for amperometric titrations applications
LZE130
USB key for food and beverage applications
LZE131
USB key for petrochemical applications
LZE133
USB key for general chemistry and other applications
LZE134
USB key for plating applications
LZE135
®
Magnetic stir bar, Teflon , 20 x 6 mm (10x)
LZE136
Set of accessories, 10 mL syringe
LZE137
Set of accessories, 5 mL syringe
LZE138
43
Replacement parts and accessories
Table 12 Replacement parts and accessories (continued)
Description
Item no.
Set of accessories, 25 mL syringe
LZE139
Tube holder, 4 positions
LZE141
Sample leveling pump
LZE142
Propeller stirrer, 70 mm shaft
LZE143
Power supply (without power cable)
LZE144
RS-232 adapter cable
LZE145
Syringe protection cover
LZE156
Electro-valve block and connector
LZE165
Conical adapter, large cut (for 7.5 mm diameter)
LZE182
Thermo-Drucker USB printer
LQV161.99.10000
Table 13 Electrodes and electrode accessories
Description
Item no.
MTC301, platinum combined electrode, 1 m cable
MTC30101
MTC306, silver combined electrode, 1 m cable
MTC30601
MTC695, Pt-Pt electrode, 1 m cable
MTC69501
PHC705, pH probe, red rod, glass, general purpose, standard
PHC70501
PHC725, pH probe, glass
PHC72501
PHC805, pH probe, glass, general purpose
PHC80501
CDC401 conductivity probe, standard, 1 m cable
CDC40101
ISECa calcium combined selective
LZW9660C.97.002
Legacy adapter
LZV662
OPT300 photocolorimetric probe
E71T001
PTM450, NP photocolorimetric titration module, without power
X61T005
Power adapter 115/230V/12Vdc, jack 2.1 mm, for use with the PTM450 titration module
A66B014
pHG311-9 pH electrode, pH 0-14, FX
E11M004
pHG201-8 pH electrode, glass
E11M006
REF251 reference electrode, red rod, double junction, banana
E21M001
CL114 cable FX/COAX/1m/BNC
A94L114
REF361 reference electrode, Ag/AgCl, reverse sleeve, FX
E21M003
Adaptor BNC male to banana
LZE184
REF451 reference electrode, calomel, double junction, FX
E21M005
ISE25Cu-9 ion selective, copper, FX
E41M006
CL111 cable FX/COAX/1m/banana
A94L111
44
HACH COMPANY World Headquarters
P.O. Box 389, Loveland, CO 80539-0389 U.S.A.
Tel. (970) 669-3050
(800) 227-4224 (U.S.A. only)
Fax (970) 669-2932
[email protected]
www.hach.com
©
HACH LANGE GMBH
Willstätterstraße 11
D-40549 Düsseldorf, Germany
Tel. +49 (0) 2 11 52 88-320
Fax +49 (0) 2 11 52 88-210
[email protected]
www.hach-lange.de
HACH LANGE Sàrl
6, route de Compois
1222 Vésenaz
SWITZERLAND
Tel. +41 22 594 6400
Fax +41 22 594 6499
Hach Company/Hach Lange GmbH, 2014. All rights reserved. Printed in Germany.