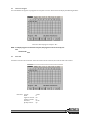
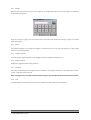
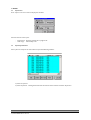
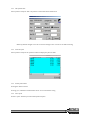
1
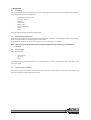
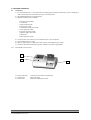
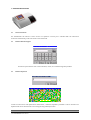
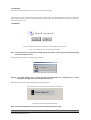
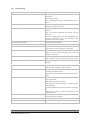
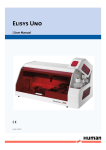
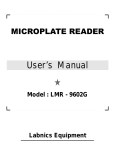
HR HS | User Manual | Cat.-No. 16670/1 R L M No. 1 2 3 i DATE / Rev. 01/2007-02 02/2007-03 03/2008-04 REVISION DESCRIPTION First edition Correction of typing errors Addition of Calculation Mode Chapter 5 ii 1 INTRODUCTION This manual is considered as a part of the instrument; it has to be at the operator’s hand as well as at the maintenance operator’s availability. For accurate installation, use and maintenance, please read the following instructions carefully. In order to avoid instrument or personal damages, carefully read the ”GENERAL SAFETY WARNINGS”, describing the suitable operating procedures. In case of breakdowns or any troubles with the instrument, apply to the local Technical Service. 2 USER WARRANTY HUMAN warrants that instruments sold by one of its authorised representatives shall be free of any defect in material or workmanship, provided that this warranty shall apply only to defects which become apparent within one year from the date of delivery of the new instrument to the purchaser. The HUMAN representative shall replace or repair any defective item at no charge, except for transportation expenses to the point of repair. This warranty excludes the HUMAN representative from liability to replace any item considered as expendable in the course of normal usage, e.g.: lamps, valves, syringes, glassware, fuses, diskettes, tubing etc. The HUMAN representative shall be relieved of any liability under this warranty if the product is not used in accordance with the manufacturer's instructions, altered in any way not specified by HUMAN, not regularly maintained, used with equipment not approved by HUMAN or used for purposes for which it was not designed. HUMAN shall be relieved of any obligation under this warranty, unless a completed installation / warranty registration form is received by HUMAN within 15 days of installation of this product. This warranty does not apply to damages incurred in shipment of goods. Any damage so incurred shall be re-ported to the freight carrier for settlement or claim. 3 INTENDED USE OF THE INSTRUMENT [IVD] The instrument has to be used for the expected purposes and in perfect technical conditions, by qualified personnel, in working conditions and maintenance operations as described in this manual, according to the GENERAL SAFETY WARNINGS. This manual contains instructions for professional qualified operators. 4 GENERAL SAFETY WARNINGS Use only chemical reagents and accessories specified and supplied by HUMAN and/or mentioned in this manual. Place the product so that it has proper ventilation. The instrument should be installed on a stationary flat working surface, free from vibrations. Do not operate in area with excessive dust. Work at room temperature and humidity, according to the specifications listed in this manual. Do not operate this instrument with covers and panels removed. Only use the power cord specified for this product, with the grounding conductor of the power cord connected to earth ground. Use only the fuse type and rating specified by the manufacturer for this instrument, use of fuses with improper ratings may pose electrical and fire hazards. To avoid fire or shock hazard, observe all ratings and markings on the instrument. Do not power the instrument in potentially explosive environment or at risk of fire. Prior to cleaning and/or maintaining the instrument, switch off the instrument and remove the power cord. For cleaning use only materials specified in this manual, otherwise parts may become damaged. It is recommended always to wear protective apparel and eye protection while using this instrument. Respective warning symbols, if appearing in this manual, should be carefully considered. I 5 DISPOSAL MANAGEMENT CONCEPT The currently valid local regulations governing disposal must be observed. It is in the responsibility of the user to arrange proper disposal of the individual components. All parts which may comprise potentially infectious materials have to be disinfected by suitable validated procedures (autoclaving, chemical treatment) prior to disposal. Applicable local regulations for disposal have to be carefully observed. The Instruments and electronic accessories (without batteries, power packs etc.) must be disposed of according to the regulations for the disposal of electronic components. Batteries, power packs and similar power source have to be dismounted from electric/electronic parts and disposed off in accordance with applicable local regulations. 6 INSTRUMENT DISINFECTION Analytical instruments for in vitro diagnostic involve the handling of human samples and controls which should be considered at least potentially infectious. Therefore every part and accessory of the respective instrument which may have come into contact with such samples must equally be considered as potentially infectious. Before doing any servicing on the instrument it is very important to thoroughly disinfect all possibly contaminated parts. Before the instrument is removed from the laboratory for disposal or servicing, it must be decontaminated/disinfected. Decontamination/disinfection should be performed by a authorised well-trained personnel, observing all necessary safety precautions. Instruments to be returned have to be accompanied by a disinfection certificate completed by the responsible laboratory manager. If a disinfection certificate is not supplied, the returning laboratory will be responsible for charges resulting from non-acceptance of the instrument by the servicing centre, or from authority’s interventions. 7 NOTICE Every effort has been made to avoid errors in text and diagrams, however, HUMAN GmbH assumes no responsibility for any errors which may appear in this publication. It is the policy of HUMAN GmbH to improve products as new techniques and components become available. HUMAN GmbH therefore has to reserve the right to change specifications if necessary in the course of such improvements. II NOTICE Analytical instruments for in vitro diagnostic application involve the handling of human samples and controls which should be considered at least potentially infectious. Therefore every part and accessory of the respective instrument which may have come into contact with such samples must equally be considered as potentially infectious. BIOHAZARD The „BIOHAZARD“ warning label must be affixed to instrument prior to first use with biological material ! Servicing Note: Before doing any servicing on the instrument it is very important to thoroughly disinfect all possibly contaminated parts. Before the instrument is removed from the laboratory for disposal or servicing, it must be decontaminated. Decontamination should be performed by authorised well-trained personnel only, observing all necessary safety precautions. Instruments to be returned have to be accompanied by a decontamination certificate completed by the responsible laboratory manager. If a decontamination certificate is not supplied, the returning laboratory will be responsible for charges resulting from non-acceptance of the instrument by the servicing centre, or from authority’s interventions. HUMAN Gesellschaft für Biochemica und Diagnostica mbH | Max-Planck-Ring 21 · 65205 Wiesbaden · Germany | Tel.: +49 61 22/99 88-0 · Fax: +49 61 22/99 88-100 | e-Mail: [email protected] · www.human.de a b C 1 2 3 4 5 6 INSTALLATION 3 1.1 Unpacking 3 1.2 Environmental Requirements 3 1.3 Electrical Setup 3 1.4 External Printer Connection 3 FUNCTIONAL DESCRIPTION 4 2.1 Introduction 2.1.1 HumaReader HS Front view 2.1.2 HumaReader HS rear view 4 4 5 2.2 Technical Specifications 5 OPERATION INSTRUCTIONS 6 3.1 Touch Panel & Pen 6 3.2 Software Number Keypad 6 3.3 Software Keyboard 6 OPERATION 7 4.1 Power on 7 4.2 Main menu 7 Program 8 5.1 Mode setting 5.1.1 ABS mode 5.1.2 Cut-off mode 5.1.3 Calculation mode 8 8 8 8 5.2 Edit Program 10 5.3 Create program 12 5.4 Delete program 12 5.5 Standard 13 RUNNING THE TESTS 14 6.1 Plate Parameter Settings 14 6.2 Select Test Program 15 6.3 Mark well 6.3.1 Sample 6.3.2 Blank 6.3.3 Negative controls 6.3.4 Positive controls 6.3.5 Standard 6.3.6 Clear 15 16 16 16 16 16 16 6.4 Select All 17 6.5 Clear All 17 6.6 Test 17 6.7 Results 18 6.8 Calculation Results 19 6.9 Printing 19 6.10 Storing Test Results 19 REPORT 20 7.1 Report form 20 7.2 Report By Patient list 7.2.1 Edit patient data 7.2.2 Preview report 7.2.3 Delete patient data 7.2.4 Print report 20 21 21 21 21 7.3 Print By Program list 7.3.1 Preview report 7.3.2 Delete program 7.3.3 Print report 7.3.4 Printing multiple records 22 22 22 22 23 Communication 24 8.1 Communication with PC 24 9 SYSTEM SETTINGS 25 10 INFORMATION MANAGEMENT 27 11 SYSTEM LOG 28 12 POWER OFF 28 13 INSTRUMENT SERVICE 29 13.1 Maintenance 29 13.2 Cleaning The Instrument 29 13.3 Replacing parts 13.3.1 Changing fuses 13.3.2 Changing the lamp 29 29 29 13.4 Troubleshooting 30 7 8 2/30 HumaReader HS User Manual 1 INSTALLATION 1.1 Unpacking Unpack the HumaReader HS carefully and check for any damage that may have been caused during transportation. The package should contain the following: - HumaReader HS instrument Operator’s manual Panel pen Power cable Printer cable RS-232 serial cable Lamp Fuses Keep the original package for future transportation 1.2 Environmental Requirements Locate the HumaReader HS to avoid exposure to excessive dust, vibrations, strong magnetic fields, direct sunlight, drafts, excessive moisture or large temperature fluctuations. Leave sufficient clearance (10 cm) at both sides of the unit for adequate air circulation. Note: The instrument can be operated within an ambient temperature range of 10°-40°C and humidity of 20%-85%. 1.3 Electrical Setup Power requirements - 110- 250 VAC 50- 60 Hz 80 W Connect the supplied power cable to the rear of the instrument as shown. Plug the other end of the power cable into an AC outlet. 1.4 External Printer Connection With both the instrument and the external printer off, connect the parallel cable to the rear of the instrument. Plug the other end of the parallel cable into the printer. 3/30 2 FUNCTIONAL DESCRIPTION 2.1 Introduction 1) The HumaReader HS is a microprocessor-controlled, general-purpose photometer system designed to read and calculate the results of ELISA assays in microtiter plate. 2) All HUMAN Methods are preprogrammed 3) Multiple calculations are available: 4) 5) 6) 7) 2.1.1 Absorbance mode (ABS) Cut-off mode Single standard mode Point to point mode % absorbance multi-point mode Linear regression mode Exponent regression mode Logarithm regression mode Cubic Spline Power regression mode The instrument can evaluate up to 12 different tests in one microplate. Test reading time is 5s / plate. Memory: 200 programs, 1,000 patient data records and 10,000 sample records. Features a department database, operator database and system log database. HumaReader HS Front view 2 1 3 1) Power pilot lamp: 2) Touch panel: 3) Plastic cover: 4/30 HumaReader HS User Manual Lit when the instrument is powered on Display program Plate carrier, Microplate inside 2.1.2 HumaReader HS rear view 7) 8) 3) 6) 5) 1) 2) 1) 2) 3) 4) 5) 6) 7) 8) 2.2 4) Power switch Power socket Hinge Fuses Hinge RS-232 interface PRINTER interface PSTN connector Technical Specifications Weight: 10kg Overall dimensions: 450mm (L) x 330mm (W) ×140mm (H) Power: 110-250VAC; 50-60Hz Fuses: 250V/3.15A Work environment: temperature 10°C...40°C; humidity 20%-85% Storage environment: -20°C...50°C Lamp: OSRAM64607, 8V/50W Standard wavelengths: 405, 450, 492, 630nm (substitute filters from 340-700nm available ) Abs range: 0-3.500A Measurement range: 0-2.000A Accuracy: 0-2.0A: ±1.0% or ±0.007A Precision: 0-2.0A: ±0.5% or ±0.005A Linearity: ±2.0% or ± 0.007A Reading speed: Continuous mode < 5s, step by step mode < 15s Warm-up time: 1 minute CPU: Embedded RISC CPU Memory: 200 tests, 1,000 patient data records and 10,000 sample records Interface: RS-232C serial interface, parallel printer interface Display: 5.7″ LCD display (320×240 discernibility,256 gray scale) Input: Touch panel and pen, external mouse (special order) 5/30 3 OPERATION INSTRUCTIONS 3.1 Touch Panel & Pen The HumaReader HS features a touch screen. For operation a touch pen is included with the instrument accessories. Alternatively, an RS-232 mouse can be connected. 3.2 Software Number Keypad In order to input numbers such as concentrations, names, etc a software keypad is provided. 3.3 Software Keyboard In order to enter names and alphanumeric information, a software keyboard is provided. It can be used like a PC keyboard and can be moved on the screen using the drag and drop function. 6/30 HumaReader HS User Manual 4 OPERATION 4.1 Power on After being switched on the instrument performs a self-check and loads the stored data into the working memory. An error report will be displayed if the instrument does not pass the self-check. 4.2 Main menu After the self-check, the main menu is displayed. 7/30 5 Program By pressing the “program ” icon, a list of the preprogrammed HUMAN tests will be displayed: 5.1 Mode setting The HumaReader HS supports 10 calculation modes: 5.1.1 ABS mode Only the absorbance will be calculated and printed. 5.1.2 Cut-off mode Cut-off formula, Cov = X ∗ NC + Y ∗ PC + Fac NC: PC: Cov: X, Y, Fac: is the mean of the negative controls, is the mean of the positive controls, is the cutoff absorbance. are coefficients that have any positive and negative numerical value (including 0 and 1) Example: Cut-Off = NC + 0.1 x PC; X=1 Y=0.1 Fac=0. In regular cutoff mode, the HumaReader HS indicates that the sample is positive if the sample OD/Cov>1. 5.1.3 Calculation mode 1) Single standard mode:: A single calibrator material of known concentration is used so that concentrations of unknown samples may be Abs Conc. calculated according to Beer’s Law. 8/30 HumaReader HS User Manual 2) Point-to-point mode: 2-8 standards can be set. The resulting calibrator curve is a series of lines connecting the calibrator points, which may be entered in ascending or descending order of absorbance. Abs Abs Conc. Conc. 3) %ABS: 2-8 standards can be set. The highest absorbance standard will be assigned a value of 100, and each sample and standard is reported as a percent of the absorbance of the highest calibrator. The resulting calibrator curve is a series of lines connecting the calibrator points, which may be entered in ascending or descending order of absorbance. 4) Linear regression mode: 2-8 standards can be set. This is a multi-point standard mode that calculates a best-fit linear equation based upon the standard points. Equation: Y = kX + b. It is used when the absorbance and the concentration are linear. 5) Exponent regression mode: 2-8 standards can be set. bX Equation: Y = ke ; This is used when the natural log of the absorbance is plotted against the concentration. 6) Logarithm regression mode: 2-8 standards can be set. Equation: ; Equation: Y = kLnX + b ; This is used when the natural log of the concentration is plotted against the absorbance 7) Power regression mode: 2-8 standards can be set. b Equation: Y = kX ; This is used when the natural log of the absorbance is plotted against the natural log of the concentration. 8) Cubic Spline 9/30 5.2 Edit Program Select an existing program . Press the “Edit” button to display the following window: - Program: If the name exists, it should not be replaced or changed. Full name: For inputting the full name of the program, optional. Reagent: For inputting the reagent name, optional. Wavelength and second wavelength: Select the appropriate options. Calibration mode: Select from the list. Double sample: If checked, samples will be pipetted into two consecutive wells, and the mean absorbance reading of the two wells will be used to calculate a single concentration. Blank: This field is used to enter the out-of-range value for the blank absorbance. If the blank absorbance is out of range, system will display: "blank abs is out of range.“ Press the >> button to continue to the next windows, or press the << button to return to the previous window, Pressing the “cancel” button will exit the program configuration window. 1) Standard mode settings window: - Standard Number: Unit: - Double standard: - Standard conc: 10/30 HumaReader HS User Manual Up to 8 can be selected. Units can be selected from the list. If the required units are not included additional units can be entered in the Information menu. If selected, standards will be pipetted into two consecutive wells, the mean absorbance reading of the two wells will be used to calculate a single concentration. Standard concentration can be entered into the list using the software keypad. 2) Cut-off mode settings window: - Cut-off formula parameter: Cov=X*N+Y*P+Fac. Math list: +, -, *, /, %, (, ). Control: NC, NC, NC1, NC2, NC3, NC4, NC5, NCx, PC, PC1, PC2, PC3, PC4, PC5, PCx, CR, CR1, CR2, CR3, CR4, CR5, CRx, BLK. Logic list: >, <, <=, >=, AND, OR, = =. Type: Cut-off, Val1, Val2, Val3, Val4, Val5, Val6, Val7, Val8, and Val9. Note: NC (PC, CR ): Represents NCi and PCi when it acts as the range, other represents mean value (NCx, PCx and CRx) NCx, PCx and CRx: mean value of Nci, PCi and CRi. “*” can not be omitted, such as 1.2*NCx. The “( )” can not include the “AND, OR” Invalid input: 0.12<NC<0.4 Valid input: NC>0.12, NC<0.4 “NC” and “PC” should not be used with “OR” and “AND” “NC1<PC1 AND PC2<NCx” is permitted. - Range of negative and positive: if absorbance of the negative control or positive control is out of range, the HumaReader HS calculates using min. or max. absorbance. Double controls: if selected, controls will be pipetted into two consecutive wells, the mean absorbance reading of both wells will be used to calculate a single concentration. 11/30 3) Positive and negative settings window: Qualitative mode: With this option regular COV or reverse COV, or none can be selected. - - Regular COV: Samples with values higher than the positive cutoff are labeled as positive. Samples with values lower than the negative cutoff are labeled as negative. Any samples with values falling between the negative cutoff and the positive cutoff are labeled as equivocal. Reverse COV: Samples with values lower than the positive cutoff are labeled as positive. Sample with values higher than the negative cutoff are labeled as negative. None: if selected, negative / positive will not be determined. Normal range: values from the package insert can be input. Pressing the “Finished” button returns to the program list window. 5.3 Create program Pressing the “new” button opens a new program window into which the name, parameters etc. can be input (see Edit Program). If the program name exists the system will warn:“program exists.” 5.4 Delete program After selecting a program from the program list, pressing the “delete” button will display the following window: Press the “Yes” button to delete program. Press “No” to cancel. 12/30 HumaReader HS User Manual 5.5 Standard The standard test results and curve are stored by the system. The operator can review and print the results. After selecting one program from program list,. Press the “standard” button and the system will display the standard concentration and absorbance: Pressing the “curve” button will display the standard curve: Press the “print” button to print the standard curve. Note: Old standards will be deleted if the program settings are modified. (Wavelength, calculation mode, standard number, standard concentration etc.) 13/30 6 RUNNING THE TESTS 6.1 Plate Parameter Settings Press the “test” icon in the main menu to open this window: - Plate direction: Select the direction: A-H or 1-12. Test mode: Continuous mode (5 seconds) or step mode (15 seconds) can be selected. Mixer settings: Mixer speed: Select fast, normal, slow or none. Mixer time: Select 1-60 seconds. Press the “Ok” button to continue to the next window: 14/30 HumaReader HS User Manual 6.2 Select Test Program The HumaReader HS supports 12 programs for one plate. Press the “New” button to display the following window: Select the desired program and press “OK”. NOTE: If multiple programs are tested on one plate, the programs must be set one by one: STD: standard CLR: clear 6.3 Mark well Each well’s function can be selected. Select the function of the well first, then click the well to be marked. mark label: sample: blank: negative controls: positive controls: standard: Quality Control: 1–999 B NC PC S1–S8 QC 15/30 6.3.1 Sample Click the well to be tested to mark it. If the sample no. is changed, that well must be clicked again. The following window will be displayed: Input the sample no. again. If the no. already exists, the system will display the message: “sample no. already exists, input again.” 6.3.2 Blank The blank well option or no in different program. A blank well can be set for only one program at a time. Blank values are saved automatically. 6.3.3 Negative controls You must set one negative control in each program unless the negative control factor is 0. 6.3.4 Positive controls Displays the negative control setting. (Section) 6.3.5 Standard This option is valid only when a program needs a standard. If the program already has a standard value, it can be used or a new value can be entered. Note: If a program sets a standard and the test results are good, new standard values will overwrite the old values. 6.3.6 Clear If marked wells are to be deleted, press the “clear” button, then click on the wells to be deleted. 16/30 HumaReader HS User Manual 6.4 Select All Sample wells can be selected using this button. Press the “select all” button to display this window: To limit the selection, input the start number: (1-999) and start well (column number and line number) and press the “Ok” button. All of the wells in this range will be marked as samples. With this option, all selected programs and wells will be overwritten. 6.5 Clear All Pressing the “Clear all” button 6.6 Test To begin testing the plate, press the “start” button: Press the “stop” button to stop testing. 17/30 6.7 Results The test results will be displayed as below: The absorbance results will be displayed in columns 1-6, pressing the 7-12>> button will display the absorbance results for columns 7-12. In field A1 in the picture above 001 represents the sample number and 0.040 is the absorbance result. Note: If absorbance results are > 3.500A the instrument will display 3.500* (and calculate with 3.500); if the absorbance is < 0.000A, the instrument will display 0.000* (and calculate with 0.000). The well result can be modified by clicking on the well which opens the window below: Input the absorbance value and press “Ok”. Note: Changing the standard or control absorbance will affect all of the results in the selected program! 18/30 HumaReader HS User Manual 6.8 Calculation Results Press the “Result” button in the absorbance results window to display the calibration results: The values and negative/positive symbol will be displayed for each well. If the values in any wells is <0.0 , the well will be flagged with “*”. 6.9 Printing Note: QTA: QLA: quantitative analysis qualitative analysis Press the “Print” button in the testing window; the HumaReader HS will print all test results. 6.10 Storing Test Results Press the “cancel” button in the absorbance window. The instrument will automatically store the test results in the history database. 19/30 7 REPORT 7.1 Report form Press “report” in the main menu to display this window: Select the format of the report: 7.2 Report form: Report by patient list or program list. Date range: Select today or all. Report By Patient list Select “patient” and press the “Ok” button to open the following window: 1) Select one patient 2) Select all patients: Clicking the diamond in the first line of the title bar will select all patients. 20/30 HumaReader HS User Manual 7.2.1 Edit patient data Select a patient and press “Edit”. The patient’s information will be shown thus: Make any desired changes. Press “Ok” to save the changes. Press “cancel” to exit without saving. 7.2.2 Preview report Select a patient and press the “preview” button to display the patient‘s data: 7.2.3 Delete patient data Pressing the “delete” button Pressing “yes”, will delete all marked data. Press “no” to exit without saving. 7.2.4 Print report Press the “print” button to print all marked patient reports. 21/30 7.3 Print By Program list Select “program” and press “Ok” to display the program list window: Press “Print” to print all of the results for the selected program. 7.3.1 Preview report Select a program and press the “preview” button to display the following window: 7.3.2 Delete program Press the “delete” button and confirm with “yes”. All marked programs and test data will be deleted. 7.3.3 Print report Press the “print” button to print the standard curves and test data for all marked tests. 22/30 HumaReader HS User Manual 7.3.4 Printing multiple records The HumaReader HS supports the printing of multiple records; you can quickly print all negative or positive patient data for any given day. Press the “gather” button to open this window: Input the date, select a program and results from the list and press “OK”. All corresponding patient records will be displayed in the window. Press the “print” button to print all selected data. 23/30 8 Communication 8.1 Communication with PC The HumaReader HS can be connected to a PC to send data to the PC. With the HumaReader HS software, you can store patient lists, monitor curves, print reports and collect QC data. 1) Start the HumaReader HS and PC and connect the serial serial cable to the HumaReader HS serial port. Plug the other end into the COM 1 port of the PC. 2) Press the “Pc” button in in communication window to open the following window: 3) Run the PC software and open the data send menu to receive the data. 4) After data transmission is complete, press the “Cancel” button to return to the main menu. 24/30 HumaReader HS User Manual 9 SYSTEM SETTINGS Press the “System” button in the main menu to open the settings window: 1) 2) 3) 4) Serial No.: Hospital: Date and time: Printer: Displays the instrument serial number. Enter the hospital name in this field. Date format is year/month/day, time in 24-hour format The HumaReader HS supports 5 printer series: the Canon BJC 250 series, HP DJ 340/400 series HP LJ 5L/6L series, Epson LQ series, Epson Stylus series. Select the correct series from the list: Note: If the printer is not on the compatible list or is incorrectly selected, it may not function properly. 5) Contrast adjust: press the button to increase the contrast and the button to decrease. The new settings will be saved automatically. 6) Sound: Turn the speaker on or off. 7) Touch panel calibration: To calibrate the touch panel press the “touch panel” button to open the calibration window: 25/30 Tap the cross center with the touchscreen pen. Wait one second and the cross moves to next position automatically. Tap the cross with pen. Repeat this proceedure 5 times. When the process is complete the system will display the following window: Note: If the cross doesn’t move after tapping it, try again. Tap anywhere on the screen within 10 seconds to save the new settings. The system will return to the settings window. 26/30 HumaReader HS User Manual 10 INFORMATION MANAGEMENT Press the “information” button in the main menu to open this window: The HumaReader HS has an operator database and a department database. Operators and department can be added to or deleted from either database. The HumaReader HS can store 100 records in each of these two databases. Select operator or department. In this example the operator database has been selected: 1) Add record: Press the “add” button to input the operator name into the field: Press “Ok” to add the operator’s name to the list. If the operator’s name already exists, the system will display this warning: Select a different operator name. If database is full, the system will report, “operator’s records is over”. 2) Delete record: Select an operator in the operator list and press the “Delete” button: Press “Yes” to delete; press “No” to cancel. 27/30 11 SYSTEM LOG Press the “event log” button in the main menu to view the history log: The event log contains the date, time, type and status of each event. The HumaReader HS can store a maximum of 2500 events. The most recent even will be listed first. Pressing “Clear” will delete all event records. Press “Cancel” to return to the main menu. 12 POWER OFF Press the “Power off” button in main menu to shut down the instrument: Press “Yes” confirm or “no” to exit to the main menu. Note: If the instrument is not shut down normally through the software, results and parameters edited during the session willl not be saved. During shutdown the system will display this window: Warning: The power should not be switched off while the HumaReader HS is shutting down. A power interruption during shutdown may damage the instrument. When the data has been saved the following message will appear: The power can now be switched off safely. Note: Leave the HumaReader HS off for at least 30 seconds before turning it on again. 28/30 HumaReader HS User Manual 13 INSTRUMENT SERVICE 13.1 Maintenance The HumaReader HS is designed to be a maintenance-free instrument. To insure optimum trouble free performance, however, the instrument should be kept dry and operated in an area free from excessive dust. 13.2 Cleaning The Instrument - Keep the working environment clean. Use a slightly damp soft cloth to remove dirt or spills. For decontamination, 70% isopropanol is recommended. Use a soft cloth to remove dirt or spills from the LCD screen. Note: The use of chemicals or abrasive cleaners is not recommended. 13.3 Replacing parts 13.3.1 Changing fuses 1) Disconnect the power cord from the mains supply before replacing fuses. 2) Open the fuse box to the left of the power socket to change a fuse. Fuse specification: 250V/3.15A 3) Reconnect the power cord and turn the instrument on. Notice: Use only a fuse with the same rating for replacement. 13.3.2 Changing the lamp 1) Turn the instrument off and open the instrument cover by unscrewing the screw on the front of the instrument. 2) Remove the four screws fastening the optical assembly cover. Remove the cover. 3) Lift up the lamp with the terminal socket. Pull the terminal socket from the lamp contacts. 4) Refit the terminal socket to the contacts of the new lamp (OSRAM64607:8V/50W). Replace the terminal socket with the new lamp. 5) Close the optical assembly cover. Replace the screws. 6) Close the instrument cover, replacing the retaining screw. Switch the HumaReader HS on. 29/30 13.4 Troubleshooting Symptom Causes and Remedies HumaReader HS cannot be switched on Check power supply cord Check fuses Check power voltage Turn HumaReader HS off for 30 seconds and turn it back on. Lamp does not light Check lamp voltage Check lamp, replace if necessary RAM check error Turn the HumaReader HS off for 30 seconds and turn it back on. First, turn on the HumaReader HS, second, turn the printer on. If there is a cable connect error, turn HumaReader HS off, open instrument cover, and reconnect cable between the two circuit boards. Lamp intensity is too high Filters improperly installed. Lamp intensity is too low Lamp is bad, replace. Motor does not work Motor is bad Open the cover of the instrument, check motor. Chopper wheel moves too fast Chopper driver motor error Open the cover of the instrument and check the chopper driver motor. Filter does not return to zero position Filter wheel error. Open the cover of the instrument and check the sensor. Plate does not return to rest position The plate may may not be mounted correctly. Check it. Plate does not move Driver motor problem. Open the cover and check the driver motor. Open COM port error Maybe use serial mouse. Turn the HumaReader HS off. Disconnect the mouse from instrument and turn it on again. Printer does not work Problem with printer power supply. Check connections. Make sure the printer is turned on. Check that the correct printer type is selected in the printer settings. Turn the HumaReader HS on first, then turn the printer on. Make sure the printer is correctly connected to the HumaReader HS. Print is faint or incomplete Clean the printer head and/or change the ink cartridge. (See the printer user manual.) Paper jam See the printer user manual Other printer error See the printer user manual 30/30 HumaReader HS User Manual HUMAN Gesellschaft für Biochemica und Diagnostica mbH | Max-Planck-Ring 21 · 65205 Wiesbaden · Germany | Tel.: +49 61 22/99 88-0 · Fax: +49 61 22/99 88-100 | e-Mail: [email protected] · www.human.de 03/2008-04