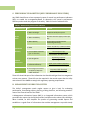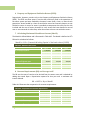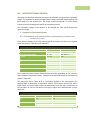
1
Disclaimer
The findings, interpretations, and conclusions expressed in this work are those
of the writer and do not necessarily reflect the views of the World Bank. The
information in this work is not intended to serve as legal advice. The World Bank
does not guarantee the accuracy of the data included in this work and accepts
no responsibility for any consequences of the use of such data.
These manuals may be reproduced in full or in part for non-profit purposes
without prior permission provided proper credit is given to the publisher, The
World Bank Office Manila.
The World Bank Office Manila
23rd Floor, The Taipan Place
F. Ortigas Jr. Road, Ortigas Center
1605 Pasig City, Metro Manila, Philippines
Manila, Philippines
February 2012
Cover Design: The images on the cover were derived from two photographs courtesy of
the DILG. The inset photo with a girl is from "The Innocent" by Mr. Jason Cardente. The
boy filling water bottles is from "Water for Drinking" by Mr. Dan Ong. Some elements in
the originals may have been altered for purposes of the design.
Foreword
Purpose of this Manual
This RURAL WATER SUPPLY OPERATION AND MAINTENANCE MANUAL is the third of
three related volumes prepared for the use of prospective and actual owners, operators,
managements, technical staff, consultants, government planners and contractors of
small Level III and Level II water supply systems1 in the Philippines.
Its purpose is to introduce the institutional models available and the legal requirements
that apply to small scale water supply utilities; the operational and maintenance
principles and issues relating to water supply; and the management principles and good
practices that must be adopted in order to attain viability and sustainability in the small
water supply utility business. Hopefully, this Manual will facilitate the work of the
professional managers and staff engaged in running the water enterprise by putting in
their hands a ready resource reference for their everyday use. For those who are new or
less exposed to the demands of the small water supply utility business – including those
who sit as board members of community based organizations and cooperatives as well
as those in local governments and NGOs who have joined the efforts to ensure safe
water for the communities they serve – hopefully it will be an aid in understanding the
institutional, operational, financial, and management issues involved, and thus enable
them to participate more effectively in advancing the objectives of the water sector.
Overall, the local and international partners who cooperated in making these Manuals
possible hope that they will help the participants in the rural water supply sector to
understand better the nature of the water supply business, its responsibilities to the
stakeholders, and the role of the government agencies and regulatory bodies that seek
to help them operate sustainably while protecting the consumers.
On the Use of the Manual
This RURAL WATER SUPPLY OPERATION AND MAINTENANCE MANUAL and the
companion volumes in the series can at best serve as a general reference and guide. As
they refer to the information, recommendations, and guidelines contained in them,
readers are urged to consider them always in relation to their own specific requirements,
adapting and applying them within the context of their actual situation.
Even as they refer to this Manual for information, its users are advised to consult with
qualified professionals – whether in the private sector, in the local governments, or in
the regulatory and developmental agencies concerned with the water sector – who
1
A few of the topics covered may also be relevant to Level I systems, which consist of a single well or
pump serving a limited number of beneficiaries at source. However, it was felt unnecessary to focus on
Level I systems requirements in this work as the design, engineering, operational and maintenance
requirements of Level I systems – as well as the organizational and training support – are adequately
provided by the relevant government agencies and supported by non-government agencies.
i
have had actual experience in the construction, management, operation, maintenance,
and servicing of water supply systems and utilities – including those other professionals
who can help them in the financial, legal and other aspects of their small water supply
business.
Manual Organization
The three volumes in this series of RURAL WATER SUPPLY MANUALS are as follows:
Volume I: DESIGN MANUAL. – Its purpose is to introduce and give the reader the key
design concepts in the design of waterworks facilities. For non-technical readers who
are involved in the management and operation of small water supply systems, rather
than in their actual design and construction, the text of Volume I will be useful in
understanding and in making decisions that would enable them to avail more usefully of
the services of the technical consultants and contractors they must deal with.
Volume II: CONSTRUCTION SUPERVISION MANUAL. – This volume presents the
considerations, requirements, and procedures involved in supervising a waterworks
project. How these are implemented should be clear to one who supervises, inspects,
or manages such a project. For this reason, the details of implementation are covered in
the chapters on Pipeline and Pumping Facilities Installation, Concrete and Reservoir
Construction, Water Sources, Metal Works, and Painting.
Volume III: OPERATION AND MAINTENANCE MANUAL. – This volume focuses on the
small water system as a public utility, and answers the question “What are the
requirements to effectively manage and sustainably operate a small utility?” It covers
the institutional and legal requirements of setting up a water supply business, the
demands of ensuring water safety through proper treatment, the nature and
requirements of operating and maintaining the water distribution system, and its
administration, commercial, financial, and social aspects.
ii
Acknowledgements
Deep appreciation is extended to the following for the cooperation and support given during the
pilot activities and preparation of the Manuals:
Department of Interior and Local Government
Hon. Jesse M. Robredo, Secretary
Hon. Austere A. Panadero, Undersecretary
Ms. Fe Crisilla M. Banluta, Project Manager
Mr. John M Castaneda, Director, OPDS
Ms. Rolyn Q. Zambales, Assistant Director, OPDS
Senior Staff of the WSSU
National Water Resources Board
Mr. Vicente S. Paragas, Executive Director
Atty. Nathaniel C. Santos, Deputy Executive Director
Mr. Jorge M. Estioko, Division Chief
Senior staff of NWRB
Local Water Utilities Administration
Mr. Salvador C. Ner, Acting Administrator
Mr. Edgardo C. Demayo, Acting Manager, WD Development Department
Mr. Ernesto de Vera, Manager, Project Planning Division
Mr. Angelito C. Bernardo, Manager, Project Monitoring & Evaluation Division
Department of Public Works and Highways
Hon. Rogelio L. Singson, Secretary
Mr. Ernesto S. Gregorio, Jr., Project Director, PMO-RWS/CARP
Mr. Virgilio G. Gacusana, Assistant Director, PMO-RWS/CARP
Mr. Dindo S. Taberna, Technical Coordinator, PMO-RWS/CARP
Department of Health
Hon. Enrique T. Ona, Secretary of Health
Mr. Joselito M. Riego de Dios, Chief Health Program Officer
Engr. Ma. Sonabel S. Anarna, Supervising Health Program Officer
National Anti-Poverty Commission
Hon. Jose Eliseo M. Rocamora, Secretary
Hon. Patrocinio Jude H. Esguerra, Undersecretary
Ms. Cynthia A. Ambe, Senior Technical Officer III
iii
The project team also acknowledges Engr. Ramon L. dela Torre, Engr. Yolanda Mingoa, Mr.
Victoriano Y. Liu, Jr., Mr. Simplicio C. Belisario, Jr., Mr. Nasser Sinarimbo, and Ms. Mariles R.
Navarro for their collaboration and unfailing support.
For the professional advice and their comments and inputs in enhancing the Manuals, the team
also extends its gratitude to the following: Ms. Elizabeth L. Kleemeier, Senior Water &
Sanitation Specialist, TWIWA, World Bank (WB); Ms. Ly Thi Dieu Vu, Consultant, EASVS, WB; Mr.
Shyam KC, Disaster Risk Management Specialist, EASIN, WB; Mr. Alexander V. Danilenko,
Senior Water Supply and Sanitation Engineer, WSP, WB; and Mr. Virendra Kumar Agarwal,
Consultant, WB.
The team would also like to express profound thanks to the WB Country Management Unit and
fellow EASPS colleagues for their encouragement, invaluable support and commitment: Mr.
Motoo Konishi, Country Director, Mr. Bert Hofman, former Country Director; Mr. N. Vijay
Jagannathan, Sector Manager, Infrastructure Unit, Sustainable Development Department, East
Asia and Pacific Region (EASIN); Mr. Sudipto Sarkar, Practice Leader for Water, EASIN; and Mr.
Mark C. Woodward, Sustainable Development Leader, Philippines.
Finally, acknowledgements are extended to the Water Partnership Program (WPP), which made
funds available for the development and publication of these Manuals.
These Manuals were prepared under the guidance of Mr. Christopher C. Ancheta, Task Team
Leader, World Bank. The Project Team was composed of the following: Engr. Antonio R. de
Vera, Lead Consultant, Mr. Gil S. Garcia, Mr. Jerome Vincent J. Liu, Mr. IoanNikhos Gil S.
Garcia, Ms. Abegyl N. Albano, Ms. Demilour R. Ignacio, and Ms. Jeannette Ann R. Wiget.
iv
Acronyms & Abbreviations
Government and Other Organizations
ASTM
American Standard for Testing
Materials
DPWH
Department of Public Works &
Highways
AWS
American Welding Society
LWUA
AWWA
American Water Works
Association
Local Water Utilities
Administration
NIOSH
National Institute for
Occupational Safety and Health
(United States)
NSO
National Statistics Office
NWRB
National Water Resources Board
(formerly NWRC)
NWRC
National Water Resources Council
BIR
Bureau of Internal Revenue
CDA
Cooperative Development
Authority
DAR
(ARISP)
Department of Agrarian Reform,
Agrarian Reform Infrastructure
Support Program
DILG
Department of Interior & Local
Government
SEC
Securities & Exchange
Commission
DOH
Department of Health
WHO
World Health Organization
Technical & Operational Terms, Units of Measure
AC
alternating current
D or diam diameter
ADD
average daily demand
dm
decimeter
AL
allowable leakage
Elev
elevation
BOD
Biological Oxygen Demand
EV
equivalent volume
CAPEX
capital expenditure
F/A
Force/Area
CBO
Community-Based Organization
g
grams
cc
cubic centimeter
G.I. pipe
Galvanized iron pipe
CIP
cast iron pipe
GPM
gallons per minute
cm
centimeter
HGL
hydraulic grade line
COD
chemical oxygen demand
hm
hectometer
CPC
Certificate of Public Conveyance
HP
horsepower
CT
Contact Time
HTH
High-Test Hypochlorite
cumecs
cubic meters per second
IDHL
dam
dekameter
Immediately Dangerous to Life
and Health
Dep
depreciation expenses
kg
kilograms
kgf
kilogram force
v
km
kilometer
Opex
operational expenses
kPa
kilopascals
Pa
Pascal
KPIs
key performance indicators
PE pipe
polyethylene pipe
LGUs
Local Government Units
PEER
lm
linear meter
property and equipment entitled
to return
lpcd
liters per capita per day
PNS
Philippine National Standards
lps
liters per second
PNSDW
Philippine National Standards for
Drinking Water
m
meter
psi
pounds per square inch
m
2
square meter
m3
cubic meter
m3/d
cubics meter per day
MaxNI
maximum allowable net income
MDD
maximum day demand
mg/l
milligrams per liter
mm
millimeter
mld
million liters per day
mm/hr
PVC pipe polyvinyl chloride pipe
PWL
pumping water level
ROI
return on investment
RR
revenue requirements
RWSA
Rural Water & Sanitation
Association
SCBA
self-contained breathing
apparatus
millimeters per hour
SMAW
shielded metal arc welding
MOA
Memorandum of Agreement
SSWP
Small-Scale Water Provider
N/m2
Newtons per square meter
SWL
static water level
NGO
Non-Government Organization
TDH
total dynamic head
NPSH
net positive suction head
TDS
total dissolved solids
NPSHa
net positive suction head available
VC
volume container
NPSHr
net positive suction head
requirement
VIM
variation in mass
Wc
container
NRW
non-revenue water
Wcm
container + material
NTU
Nephelometric turbidity unit
WHP
water horsepower
O&M
operation and maintenance
WL
water level
OD
outside diameter
vi
Table of Contents
Chapter 1 Institutional and Regulatory Requirements ............................................... 1.1
A.
Institutional Models ......................................................................................................... 1.1
B.
Institutional Requirements............................................................................................... 1.2
C.
Ownership Issues.............................................................................................................. 1.4
D.
Regulatory Requirements ................................................................................................. 1.5
E.
Institutional Problems and Practical Solutions................................................................. 1.9
Chapter 2 Operational Mathematics.......................................................................... 2.1
A.
Introduction ...................................................................................................................... 2.1
B.
Measures of Length .......................................................................................................... 2.1
C.
Measures of Volume ........................................................................................................ 2.3
D.
Pressure/Head .................................................................................................................. 2.6
E.
Flow Measurements ......................................................................................................... 2.8
F.
Electrical Calculations ....................................................................................................... 2.9
Chapter 3 Disinfection ............................................................................................... 3.1
A.
General ............................................................................................................................. 3.1
B.
Chlorine Disinfection (Chlorination) ................................................................................. 3.1
C.
Determinants of Chlorine Effectiveness ........................................................................... 3.1
D.
Terminology and Definitions ............................................................................................ 3.2
E.
Chlorine Dosage and Demand .......................................................................................... 3.3
F.
Chlorine/Chlorine Compounds Used in Disinfection ........................................................ 3.4
G.
Chlorine Dosages .............................................................................................................. 3.5
H.
Measuring Chlorine Residual............................................................................................ 3.8
I.
Equipment Used in Chlorination .................................................................................... 3.10
J.
Effectiveness of Chlorination.......................................................................................... 3.12
Chapter 4 General Operation and Maintenance ........................................................ 4.1
A.
Basic O&M Concepts ........................................................................................................ 4.1
B.
Why Maintenance ............................................................................................................ 4.1
C.
Water Quality ................................................................................................................... 4.2
D.
Field Tools ......................................................................................................................... 4.3
E.
Other Operational Considerations ................................................................................... 4.3
F.
Records and Reports ........................................................................................................ 4.4
vii
Chapter 5 Supply Source and Disinfection Facilities ................................................... 5.1
A.
Wells ................................................................................................................................. 5.1
B.
Infiltration Galleries .......................................................................................................... 5.2
C.
Springs .............................................................................................................................. 5.4
D.
Pumps in General ............................................................................................................. 5.7
E.
Centrifugal Pumps ............................................................................................................ 5.9
F.
Submersible Pumps ........................................................................................................ 5.13
G.
Positive Displacement Pump .......................................................................................... 5.14
H.
Jet Pumps ....................................................................................................................... 5.17
I.
Other Causes of Pump Failures ...................................................................................... 5.19
J.
Pumpset Performance Testing ....................................................................................... 5.20
K.
Guidelines for Performance Test .................................................................................... 5.21
L.
Maintenance of Pump Station and Surroundings .......................................................... 5.22
M. Electric Motor Routine Maintenance ............................................................................. 5.22
N.
Diesel Engine Maintenance ............................................................................................ 5.23
O.
O&M of Slow Sand Filter ................................................................................................ 5.24
P.
Chlorinator Operation and Routine Maintenance ......................................................... 5.30
Chapter 6 Distribution System ................................................................................... 6.1
A.
Introduction ...................................................................................................................... 6.1
B.
Distribution Pipelines ....................................................................................................... 6.1
C.
Reservoirs ......................................................................................................................... 6.9
D.
Service Connections ....................................................................................................... 6.14
E.
Valves and Public Faucets............................................................................................... 6.15
F.
Hydrants ......................................................................................................................... 6.18
G.
Reducing NRW ................................................................................................................ 6.18
Chapter 7 Chlorine Safety .......................................................................................... 7.1
A.
Hazards of Chlorine .......................................................................................................... 7.1
B.
Working Safely around Chlorine Gas ................................................................................ 7.3
C.
Leak Detection and Control .............................................................................................. 7.5
D.
Repair and Maintenance .................................................................................................. 7.5
E.
First Aid ............................................................................................................................. 7.8
Chapter 8 Administration........................................................................................... 8.1
A.
viii
General ............................................................................................................................. 8.1
B.
Delineation of Board and Management Functions .......................................................... 8.1
C.
Policy Formulation ............................................................................................................ 8.2
D.
First Things First................................................................................................................ 8.3
E.
Staff Training .................................................................................................................... 8.8
F.
Operational Focus ............................................................................................................ 8.8
G.
Performance Parameters (Key Performance Indicators) ............................................... 8.10
H.
Management Information System ................................................................................. 8.10
I.
Audits.............................................................................................................................. 8.11
J.
Business Planning ........................................................................................................... 8.11
K.
Documents ..................................................................................................................... 8.13
L.
Public Relations .............................................................................................................. 8.13
M. Public Consultation ......................................................................................................... 8.15
Chapter 9 Commercial Operations ............................................................................. 9.1
A.
General ............................................................................................................................. 9.1
B.
Service Connection Applications ...................................................................................... 9.1
C.
Classification of Water Customers ................................................................................... 9.3
D.
Billing and Collection ........................................................................................................ 9.5
E.
Customer Complaints ..................................................................................................... 9.10
F.
Dealing with Delinquent Accounts ................................................................................. 9.11
G.
Management Reports..................................................................................................... 9.12
H.
Low Collection Efficiency ................................................................................................ 9.13
I.
Block Census ................................................................................................................... 9.13
J.
Use of Booster Pumps by Customers ............................................................................. 9.14
Chapter 10 Financial Aspects ................................................................................... 10.1
A.
Budget Preparation ........................................................................................................ 10.1
B.
Tariffs .............................................................................................................................. 10.6
C.
Tarrif Setting Methodologies.......................................................................................... 10.7
D.
Financial Systems & Controls ......................................................................................... 10.9
E.
Obtaining Loan Financing ............................................................................................. 10.11
Annexes.....................................................................................................................A.1
Table of Annexes ...................................................................................................................... A.1
References............................................................................................................... A.23
ix
List of Tables
Table 2.1: Metric Units of Length ................................................................................................. 2.2
Table 2.2: English Units of Length ................................................................................................ 2.2
Table 2.3: Converting Between Metric and English Units of Length ............................................ 2.2
Table 2.4: Metric Units of Volume ............................................................................................... 2.5
Table 3.1: Percentage of Available Chlorine ................................................................................ 3.5
Table 3.2: Chlorination Guidelines ............................................................................................. 3.13
Table 4.1: Practical Solutions to Common O & M Problems ........................................................ 4.5
Table 5.1: Common Spring Box Failures and their Remedies....................................................... 5.6
Table 5.2: Steps for Manually Stopping Pump Operation ........................................................... 5.9
Table 5.3: Steps in Operating Centrifugal Pumps ....................................................................... 5.11
Table 5.4: Common Troubles in Operating Centrifugal Pumps and their Remedies ................. 5.12
Table 5.5: Common Troubles in Operating Submersible Pumps and their Remedies ............... 5.15
Table 5.6: Troubleshooting Jet Pump Problems......................................................................... 5.19
Table 6.1: Optimum Meter Replacement Cycle (years) ............................................................. 6.22
Table 7.1: Toxic Effects of Chlorine .............................................................................................. 7.1
Table 7.2: Chlorine Exposure Limits ............................................................................................. 7.2
Table 8.1: Minimum Key Performance Indicators ...................................................................... 8.10
Table 10.1: Items Included in the Cash Flow .............................................................................. 10.9
x
List of Figures
Figure 2.1: Rectangular Prism....................................................................................................... 2.4
Figure 2.2: Volume of a Cylinder .................................................................................................. 2.5
Figure 2.3: Pressure ...................................................................................................................... 2.6
Figure 3.1: Chlorine Comparator .................................................................................................. 3.8
Figure 3.2: A Hypochlorinator in Action ..................................................................................... 3.10
Figure 3.3: Drip-Type Chlorinator ............................................................................................... 3.11
Figure 5.1: Details of an Infiltration Gallery ................................................................................. 5.3
Figure 5.2: Spring Box Site Plan and Design ................................................................................. 5.5
Figure 5.3: Centrifugal Pump Details .......................................................................................... 5.10
Figure 5.4: Details of a Submersible Pump ................................................................................ 5.13
Figure 5.5: Positive Displacement Pump .................................................................................... 5.16
Figure 5.6: Details of an Installed Jet Pump ............................................................................... 5.18
Figure 5.7: Sample Curves for a Centrifugal Pump..................................................................... 5.21
Figure 5.8: Elements of a Slow Sand Filter ................................................................................. 5.25
Figure 5.9: Details of Sand Filters ............................................................................................... 5.28
Figure 6.1: GI Pipe Repairs ........................................................................................................... 6.6
Figure 6.2: PE/PB Pipe Repairs ..................................................................................................... 6.8
xi
xii
Chapter 1
Institutional and Regulatory Requirements
This Chapter describes the institutional requirements that a small-scale water provider
(SSWP)1 must meet and the steps it must take to legalize its existence and operations.
It must be clearly understood that the business of selling water is by nature a public
utility, and under Philippine law the SSWP is considered a public utility enfranchised and
regulated as such.2
A. INSTITUTIONAL MODELS
In general, there are three types of institutional models that SSWPs can adopt in setting
up a Level II or Level III water utility system3:
•
Community-Based Organization (CBO): CBOs include the Rural Water &
Sanitation Associations (RWSAs) and Water Cooperatives, including
Homeowners Associations, which are organized to provide water service to
their members and are responsible for the operation and management
(O&M) of the water system.
•
Local Enterprise: This model includes water supply businesses operated
generally by small private entrepreneurs, examples of which are water
truckers, carriers or vendors, and other private individuals who provide
water services at times and in places that main water utilities are unable
serve. (Some examples of larger private water service enterprises that may
still be classified, as SSWPs are those operated by private developers.) These
are businesses run with profit as the main consideration. They obtain water
from nearby water utilities or from their own source.
•
LGU-Model: Some LGUs establish, own, and/or operate their own water
utilities. These utilities are a part of the LGU organizational hierarchy.
The sector benchmarking experience is that among the various water utility
management models, the LGU Model has generally fallen short of expectations. Among
the many reasons for this failure, the most prevalent is that a water system will find it
difficult to operate within a political environment and fiscal restrictions that apply to
government entities. The LGUs had been tasked to provide the basic water and
1
A utility with less than 5,000 connections. Can be a community-based model, privately owned, a water
district, or an LGU-run system.
2
“Enfranchised…regulated”. The law encourages public utilities, giving a franchise (right, privileges and
protection) so that they can operate sustainably and deliver essential services. However, the law also
ensures that the utility businesses do not overcharge consumers, and that the services they provide meet
the applicable standards of quality and public safety (in the case of water, potability and health).
3
Water Districts are basically formed for Level III systems in semi-urban or urban areas.
Chapter 1: Institutional and Regulatory Requirements
Page 1.1
sanitation services by the Local Government Code, but nowhere is it written that the
LGUs have to provide these services directly. LGUs can create water districts or CBOs or
contract out or partner with the private sector for these services. The LGU Model should
only be adopted as a last recourse when all the other options are not possible or viable.
B. INSTITUTIONAL REQUIREMENTS
At the outset, the organizers, LGUs, and community members will need to choose
whether to set up a RWSA, Cooperative or another type of organization to operate their
water system. This choice will be based on their own perception of needs, their
relationships and capabilities, their desired level of participation, and preferences. The
following sections describe some of the options and considerations in making their
choice.
1. Rural Water and Sanitation Associations
The Rural Waterworks and Sanitation Association (RWSA) is a non-stock, non-profit
association organized and registered with the Local Water Utilities Administration
(LWUA) in accordance with the provisions of EO 577. As an entity designed for the
single purpose of establishing and/or operating a small-scale water system, the RWSA is
relatively simple and easy to organize. It enjoys the advantages of technical,
organizational and financial support from LWUA.
In applying for LWUA registration, the RWSA needs to submit to the LWUA the following
documents in two (2) copies each:
•
Articles of Incorporation
•
By-laws
•
Minutes of Organizational meeting
•
Minutes of First Board Meeting
•
Feasibility Study, if available
•
Certificate of Availability of loan funds if funding is to be provided by other
agencies.
More complete information about these and other requirements can be obtained from
the LWUA website at LWUA.gov.ph.
Note that the Barangay Water and Sanitation Association (BAWASA), which is also a CBO,
is similar to the RWSA in many respects and could be used in lieu of a RWSA, particularly
if the SSWP is confined within a single barangay.
2. Cooperatives
Cooperatives may be chosen by organizers and member-beneficiaries who want greater
flexibility in their organization’s scope, and who are willing to participate closely in its
Page 1.2
Chapter 1: Institutional and Regulatory Requirements
affairs. While a cooperative may be set up initially just to set up a water system for their
needs, it may also be expanded into a vehicle to address other needs that they may
have.
Among the advantages that they may expect from the cooperative model, as provided
in the Cooperative Code of the Philippines (RA 6938), are the following:
•
Coops are tax-free up to a certain limit;
•
Coop members have shares and can literally sell their shares or even the
entire system to a willing private operator;
•
Coops can declare dividends based on members’ shares.
The cooperative law prescribes very clear-cut steps for the cooperative organizers and
members:
First: At least 15 members are needed to organize a cooperative.
Second: The cooperative by-laws, which state the rules and regulations
governing the operation of the cooperative, must be drafted.
Third: The Articles of Cooperation must be drafted. Mandatory contents of the
articles of cooperation are the following: (a) the name of the cooperative, which
must include the word “cooperative”; (b) the purpose or purposes and scope of
business of the cooperative; (c) the term of existence of cooperative; (d) the area
of operation and the postal addresses of the registrant-cooperators; (e) the
common bond of membership; (f) the names of the directors who shall manage
the cooperative; (g) the amount of share capital; (h) the names and residences of
its contributors, and (i) the type of cooperative, whether it is primary, secondary
or tertiary.
Fourth: Bonds must be secured for the accountable officers, usually the
Treasurer and the Manager. The amounts are to be decided upon by the Board
of Directors based on the initial net worth of the cooperative, which includes the
paid-up capital, membership fees, and other assets of the cooperative at the
time of registration.
The following documents are needed for registration purposes.
•
Four (4) copies each of the Economic Survey, Articles of Cooperation and ByLaws duly notarized;
•
Bonds of accountable officers (any directors, officers and employees)
handling funds, securities, of properties in behalf of the cooperative;
•
Sworn statement of the treasurer duly notarized showing that at least 25% of
the authorized share capital has been subscribed, and at least 25% of the
total subscription has been paid. The paid-up capital must not be less than
Ph₱ 2,000.00.
Chapter 1: Institutional and Regulatory Requirements
Page 1.3
It is important to note that no member may own more than
20% of the subscribed share capital and that each share must
not be less than Ph₱1.00.
Additional information is available at the CDA website at:
http://www.cda.gov.ph
3. LGU Model
Should the LGU decide to operate its own system, the following options can be adopted:
1. Form an LGU Corporation: The LGU can form an LGU corporation which will
own the facility, have its own governing boards and operate like any
government owned corporation.
2. Form a water supply unit under the Economic Enterprise Office. This
structure assumes that this Office had already been created by an
appropriate ordinance to house all revenue generating units of the LGU like
markets, slaughter house, fish landing, transport terminals, etc.
3. Place the WSS unit under either the Municipal Engineer or Planning Office.
The models so enumerated above are ranked according to their viability and
sustainability potentials.
A water supply system must be in control of its water revenues so it can do its
programming, budgeting and monitoring functions effectively. Unless the water supply
operations and accounts are ring-fenced, the system will not be self-liquidating or even
viable.
Ring-fencing often denotes that funds set aside for an activity will not be spent on
anything else, and that revenues generated by those activities are invested back.
Ring Fencing is a legal or financial arrangement of separating the activities, assets and
liabilities, revenues and costs, and so on, generated by the water supply business from
the other businesses of the LGU. Ring fencing includes the separation of financial
accounts through the use of a subsidiary accounting system. For more details on the
ring-fencing process, please refer to the manual, “A Guide to Ring-Fencing of Local
Government Run Utilities”, prepared by the IBRD-WSP and PPIAF, or the Toolbox Kit of
the DILG or the NWRB’s list of Accredited Technical Service Providers.
C. OWNERSHIP ISSUES
A major issue that an SSWP must tackle from the start is who owns the system,
particularly, the physical assets and land. Ownership is very crucial to minimizing
Page 1.4
Chapter 1: Institutional and Regulatory Requirements
political interference and ensuring independence in operating and management
decisions, particularly in the timely collection of water service fees.
The officers of the SSWP must ensure that they obtain proper documentary proof/s of
ownership. This is especially critical if majority of the funds used to build the system
come from grants or contributions from the local government unit (LGU) or from some
other funding channeled through the LGU.
Ownership can be manifested in various ways, such as:
•
Deed of Donation (or Transfer)
•
Memorandum of Agreement
•
Proof of Purchase
Without documented proof of ownership of the system (land assets and facilities), an
adverse turn in political power could result in an adverse LGU administration making
claims on or taking over the RWSA’s assets. Moreover, the utility may find it difficult to
borrow without documents showing ownership of the assets.
It is however possible for SSWPs to operators of water utilities that they do not own.
Usually, these are owned by LGUs. An SSWP engaged by an LGU for this purpose must
have a Memorandum of Agreement (MOA) or a formal contract4 with the LGU
specifying the period of the contract, the duties and obligations of each party, and what
would constitute default in operations.
D. REGULATORY REQUIREMENTS
SSWPs are legal entities that must be formally incorporated and registered in order to
exist legally. They operate within particular areas, and thus are subject to the local laws
and ordinances that apply in those areas. They use an important national resource
whose use must be managed by the State, and thus they must obtain the right to use
such resource and comply with the purpose and manner of its use. The Level II/III
systems they operate are water utilities; hence their costs of services as well as the
quality of their product (water) are subject to regulation.
In view of these considerations, the State has established a Regulatory Framework for
the operation of water utilities like SSWPs.
1. Regulatory Framework
The regulatory framework that applies to SSWPs has three interrelated components:
•
Legal Framework – the set of laws and regulations that prescribe the
registration requirements, regulatory procedures, licenses and contracts that
define how the SSWP entity should be established and operate to comply
4
Under the Local Government Code of 1991 (RA 7160), an LGU may enter into a concession, management
or lease contract with an operator of its facility.
Chapter 1: Institutional and Regulatory Requirements
Page 1.5
with the applicable legal parameters. This framework defines what is to be
regulated, who should be regulated, and who will regulate.
•
Institutional Framework – composed of the regulatory bodies tasked with
administering the regulatory laws. At present, the national economic
regulatory agency is the National Water Resources Board (NWRB).
•
Regulatory Practices – the rules, guidelines, and procedures in the
application and issuance of the required licenses and permits, and the
monitoring and enforcement practices adopted by the regulatory bodies to
carry out their responsibilities.
The regulatory framework and its components are designed not just for the benefit of
the consumers but also to provide a supportive climate by which the utility itself can
operate and render its services viably while meeting the health and quality standards of
the water they supply. It is essential for SSWPs to operate within the ambit of the law
to protect the investments made and ensure continuity of their operations.
Failure to comply with regulations opens the
operators/owners to legal actions either by the regulatory
bodies, LGUs, or other affected parties.
Within the current Regulatory Framework described above, there are four types of
registrations, licenses and permits that an SSWP must obtain to legalize its operations.
These include:
1. Business registration;
2. The local licenses and permits to operate;
3. License or franchise to engage in the business of selling water, which is a
public utility. The right to engage in the business of selling water is
conditioned on its adherence to the health and quality standards for potable
water, and thus may be suspended or revoked if these standards are not
met;
4. Water Right/Permit (in case of raw water abstraction).
The small water service utility needs to acquire legal status by registering formally, as
well as obtain the business licenses and permits necessary to operate. Failure to do so
opens it to the risk of being slapped a huge fine, or being issued a Cease and Desist
Order, or expropriation.
2. Business Registration
Without formal registration, the water service provider will not be able to deal legally
with government and financing institutions. Government will not provide its services,
issue permits, or transact with non-registered entities, and banks and other financing
Page 1.6
Chapter 1: Institutional and Regulatory Requirements
institutions do not lend to illegal or unregistered operators. Neither will it be able to
obtain from the Bureau of Internal Revenue (BIR) the official receipts and Tax
Information Number (TIN) which are essential in doing business.
Thus, in deciding which institutional setup to adopt, the SSWP should consider the
registering authority for that model. A cooperative must be registered with the CDA. A
RWSA must be registered with the LWUA, or with the Securities and Exchange
Commission (SEC) as a non-profit organization.
3. Local Business Permits, Licenses and Clearances
A utility will operate within the locality of its franchise area. Thus, it must comply with
the local laws or ordinances that apply within that locality. These invariably include
business permits5, location and other municipal clearances, and barangay clearance.
Since requirements may vary from one LGU to another, the organizers or management
of the SSWP must look into these requirements and be sure it is able to comply with
them.
4. Certificate of Public Conveyance (CPC)
After registering and securing its business permit, an SSWP can operate within the
territory of an LGU. The next step would be to secure clearance on its franchise area and
the water tariff from the NWRB or LWUA. Being engaged in the business of selling
water, the operator must secure a franchise to operate as a public utility. Such franchise
is issued in the form of a Certificate of Public Conveyance (CPC)6 from the NWRB or a
Certificate of Registration from the LWUA7. LWUA registration is effectively also a CPC,
and does not require further application for a CPC from NWRB. Nonetheless, the SSWP
must apply for a Water Right with the NWRB and comply with its annual reporting
requirements.
To process an application for a CPC and issue approval of a tariff proposal, the NWRB
will require the following documents to be submitted:
1. Registration (with SEC, LWUA or CDA);
2. Articles of Incorporation and By-laws;
3. Water Permit, if the utility has its own source;
4. Plan of the water distribution system;
5. Plan, elevation and cross sectional views of reservoir and pump house;
6. Certificate of potability;
7. Business Plan for 5 years; and
5
Sometimes referred to as “Mayor’s Permit” or “Business License”.
Certificate of Public Conveyance is a permit allowing the utility (permittee) to operate a water system for
a certain period in a given area.
7
For RWSAs only.
6
Chapter 1: Institutional and Regulatory Requirements
Page 1.7
8. Service levels agreed with consumers commensurate with proposed rates
The NWRB has the authority to set rules on maximum return on investments for all
SSWPs. It should be noted that the current policy of the national government is to set
tariffs on the basis of cost recovery. SSWPs are allowed to have a maximum of 12%
return on assets.
Once it has obtained its CPC, the SSWP is required to submit an Annual Report to the
NWRB. The Annual Report is a compilation of data pertaining to a water utility operator.
It depicts the financial condition and other information that will be used in the regular
monitoring of the utility’s performance. The Annual Report is a formal and legal
document that must be audited by an external auditor, and whose accuracy and
completeness the operator must swear to before a notary public.
5. Water Right/Permit
Any system extracting water directly from its source (groundwater or surface water)
needs to secure a water right from the NWRB. This water right is important to establish
the legal right of the abstractor and prevent any legal or water rights conflicts that may
arise in the future. In entertaining an application for water right, the NWRB usually
requires the submission of data regarding the place of abstraction, method and volume
of abstraction, and purpose.
The NWRB website at www.nwrb.gov.ph provides full information on how to secure this
right.
6. Water Quality Regulation
Any system needs to be able to prove that the quality of water it supplies meets certain
minimum health requirements or standards set by the country’s health authorities. The
Philippine National Standards for Drinking Water (PNSDW) requires chemical and
physical tests to be conducted once a year, and micro-biological tests to be conducted
monthly or quarterly, with the number of test samples dependent on the served
population. The monitoring protocol usually calls for test results to be submitted to the
regulatory office, as required, and for the test results to be posted in conspicuous places
within the Utility’s office.
The posting of test results is intended to protect both the consumers and the system
itself, and to inform the consumers and the regulatory agency that the water conforms
to health and water quality standards. The regularity and frequency of monitoring and
information updates help to head off possible outbreaks of diseases that may be
attributed to the system’s water quality. They are meant to trigger timely interventions
by the health authorities and corrective measures on the part of the SSWP, and to give
customers the information they need to protect themselves and their families against
water-related health problems.
Page 1.8
Chapter 1: Institutional and Regulatory Requirements
E. INSTITUTIONAL PROBLEMS AND PRACTICAL SOLUTIONS
1. Political Interference
The management and human resource capabilities of the SSWP should be strengthened
for it to be operationally autonomous. The LGU and other institutions concerned with
the water sector can assist in the formation of the community based organization (CBO),
provide or finance the initial assets, extend technical assistance, and create linkages
between the SSWP and financial institutions.
Quite often, it is expedient, desirable – and even necessary for the LGU to help organize
the water service organization and support the acquisition of its assets. However, the
operations of the SSWP should be independent of the LGU. To the extent possible,
operating subsidies from the LGU should not be sought. The SSWP should have clear
contracts, deeds of sale and/or donations, and the ownership documents of the assets
of the Utility.
2. Lack of Management Skills
The SSWP’s management and policy-making capabilities should be enhanced through
management skills training being offered by the Department of Interior & Local
Government (DILG) or LWUA. Study tours to main utilities or any nearby, successful
SSWP which has expanded and been operating for some time would also be very useful.
The success of any organization depends on the capabilities
and commitment of the people running it.
3. Lack of Cooperation among the Management Team Members
Usually the cause is a lack of understanding of the various roles and responsibilities. If
possible, these roles/responsibilities should be set in writing during the organizational
or early phases of the SSWP. If these are not properly understood, a reorientation,
coupled with events designed to build team effort, should be conducted.
4. Lack of Support and Cooperation of the Member-Users
The members/beneficiaries should be oriented on their roles and responsibilities in
relation to the services of the SSWP. At the same time, the SSWP management should
engage them and listen to their views on issues affecting them. These can be done
through general assembly’s or consultation meetings that the SSWP or those assisting it
could initiate. It is important for the SSWP management to be responsive to the views
of its members. When existing policies are not responsive to the members’ needs,
efforts should be taken to craft more responsive, more effective ones.
Chapter 1: Institutional and Regulatory Requirements
Page 1.9
5. No Full-Time or Operational Staff
If the system really needs full-time staff, then they should be compensated for their
time through allowances or salaries. Their compensation can be included in the tariff
calculations.
6. No Organizational Records and Minutes of Meetings
The concerned staff or officers should be fully trained to carry out their essential tasks
and functions. The utility should buy or acquire a filing cabinet in which it can keep all its
records. If it has no office, it should arrange to keep the filing cabinet in the house of
one of the officers. Upon election of new officers, the filing cabinet and its contents
should be transferred to the new officer responsible for custody of the files.
7. No Management Information System in Place
Professional support in the development and installation of a simple and effective
management information system should be sought from national agencies, NGOs or
nearby utilities.
Page 1.10
Chapter 1: Institutional and Regulatory Requirements
Chapter 2
Operational Mathematics
This Chapter provides a reference and guide to the basic mathematics needed for
operational purposes of the Utility.
A. INTRODUCTION
The two main systems of measurement are the metric and the English systems. The
metric system is also called the International Standard (SI) system. It has been accepted
officially by practically all countries (a notable exception is the United States) and is used
by all international scientific institutions and the United Nations. However, not all
countries who have accepted it have been able to take the steps needed to fully convert
from their previous system to the metric.
This Manual will use the metric system primarily. It must be considered, however, that
much of the calibration of equipment in use in the water industry, as well as references,
information, and standards (of which the US is a leading source) use measurements
based on the English system. Thus, it is important to know both systems, and to be able
to convert the measurements of one system to the other.
The metric system is a decimal system based on 10, in which the higher- or lower-value
units of measure are scaled by raising or reducing by a factor of 10. The basic measures
of time, expressed in seconds, minutes, hours, days, months, and years, are common to
both systems. However, decades (10 years), centuries (100 years), and millennia (1000)
are graduated values that use the decimal or metric scale.
This Chapter introduces the important units of measure that are frequently used in the
establishment and operation of SSWP facilities. It also presents conversion tables and
gives samples of how to convert from the English to the metric system.
B. MEASURES OF LENGTH
Length is a measurement of the distance from one point to another, and is the basis
also for measuring area and dimension.
1. Metric Units of Length
In the metric system, the basic unit is the Meter. Graduated multiples or fractions of
the meter are designated by prefixes as shown in Table 2.1 below. The higher values are
on the left, and the lower values are on the right:
Chapter 2: Operational Mathematics
Page 2.1
Table 2.1: Metric Units of Length
SI Prefix
Unit
Multiplier
Symbol
kilo
hecto
deka
meter
deci
centi
milli
decimeter
centimeter
millimeter
kilometer
hectometer
dekameter
1,000
100
10
1
0.1
0.01
0.001
km
hm
dam
m
dm
cm
mm
2. English Units of Length
In the English system, length is expressed in inches, feet, yards and miles. The useful
common units and their relationships are as follows:
Table 2.2: English Units of Length
inch (in) foot (ft) yard (yd) mile (mi)
1 foot
12 in
1 foot
1 yard
36 in
3 ft
1 yard
5,280 ft
1,760 yd
1 mile
1 mile
3. Converting Between Metric and English Units of Length
The conversion chart that follows gives the basic equivalents of the metric and the
English units of length, to make conversions easy.
Basic Conversions:
Table 2.3: Converting Between Metric and English Units of Length
millimeters centimeters
1 inch
25.40 mm
1 foot
30.48 cm
0.3048 m
1 yard
91.44 cm
0.9144 m
1 meter
1 kilometer
kilometers
2.540 cm
1 mile
Page 2.2
meters
1609 m
1.609 km
miles
inches
feet
yards
39.37 in
3.281 ft
1.094 yd
3281 ft
1094 yd
0.6214 mi
Chapter 2: Operational Mathematics
Examples:
Example 1: Pipes delivered had diameters of 4 and 6 inches. What are the
diameters in mm?
Since 1 in = 25.4 mm, a 4-in pipe would be:
4
× 25.4
ℎ ℎ
= 101.6
100
.
A 6-in pipe would be:
6
× 25.4
= 152.4
,
150
Example 2: The 10 pipes delivered were 20 ft each in length. What is the total
length in meters?
Since there are 3.281 ft in one meter:
10
× 20
ℎ = 200
÷ 3.281
= 60.96
C. MEASURES OF VOLUME
Volume can be defined as the amount of space occupied by an object, or conversely, the
amount of space available to accommodate materials. For SSWPs, volume
measurements of containers and water are important.
In the case of solids and the internal space (capacity) of containers, the common basic
unit is the cubic meter (m3). In the case of liquids like water, it is the liter (l). One liter is
equal to 1,000 cubic centimeters (cm3) and 1,000 liters is equivalent to one kiloliter (kl)
or 1 cubic meter (m3).
In conventional and water industry use, large volumes of water are expressed in terms
of cubic meters – in other words, in terms of the capacity (volume) of the containers
they would fill. (It is easier to measure the 3 dimensions of a container, than it is to
measure uncontained water.) Since 1 kl of water, in standard testing conditions, is
equal to one cubic meter (m3), it is common to use cubic meters to refer to larger
volumes of water, although in many instances thousands and millions of liters are the
more impressive expressions used.
1. Volume of Containers
The measurement of volume for simple box-like containers (rectangular prisms) involves
the measurement of three dimensions, namely length, width, and height.
Chapter 2: Operational Mathematics
Page 2.3
Figure 2.1: Rectangular Prism
= ×
×ℎ
Where:
=
=
=
ℎ=ℎ
ℎ
ℎ
ℎ
Example:
Find the volume of a rectangular prism that is 10 m tall
and has a base that measures 4 m by 5 m.
Solution:
= ×
×ℎ=5
×4
× 10
=
In liters,
200
×
1,000
= 200,000
1
In the case of cylindrical containers, which are common in the water business, the
calculation of internal volume involves measuring the radius and applying the formula:
=
Where:
=
= 3.1416
=
=1 2
ℎ=ℎ ℎ
Page 2.4
Chapter 2: Operational Mathematics
Figure 2.2: Volume of a Cylinder
Example:
Find the volume of a cylindrical reservoir with a radius of 7 m and a height of
12 m.
Solution:
=
ℎ = 3.1416 × 7
× 12
= 1,847.2608
1,807,206.8
Note that the illustrations seem to indicate external dimensions. In the case of
containers, the measurements should be of the internal dimensions. Where precision of
internal capacity is an issue but the container does not allow direct internal
measurement, simply measure the outside dimensions but deduct the thickness of the
container walls to obtain the exact internal dimensions.
2. Metric Units of Volume for Water
Table 2.4: Metric Units of Volume
Prefix
kilo
Unit
kiloliter
Multiplier
1,000
Symbol
kl
hecto
deka
Not widely used in
the water industry,
except hectoliter in
Australia.
(1 hl = 100 l)
Chapter 2: Operational Mathematics
deci
centi
milli
deciliter
centiliter
milliliter
1
0.1
0.01
0.001
l or L
dl
cl
ml
liter
Page 2.5
D. PRESSURE/HEAD
Pressure is defined as force per unit area. It is usually more convenient to use pressure
rather than force to describe the influences of fluids. The standard unit for pressure in
the English system is pounds per square inch (psi) while in the metric system it is the
Pascal (Pa), which is a Newton per square meter (N/m2).
Pressure gauges in the Philippines are usually scaled in psi or N/cm2 or bars. Just
remember that one bar or 14.7 psi = 10.1 N/cm2. So if a pressure gauge reads 22 N/cm2,
it is equivalent to 14.7 x 22/10.1 = 32 psi.
For an object sitting on a surface, the force pressing on the surface is the weight of the
object, but in different orientations it might have a different area in contact with the
surface and therefore exerts a different pressure.
Figure 2.3: Pressure
Note that bar refers to atmospheric pressure, which is equivalent to 14.7 psi. This
means that under standard measurement conditions, a column of air with one square
inch area, sitting on the Earth's surface and extending to space - weighs 14.7 pounds.
One bar is 100,000 Pa, and for most practical purposes can be considered equivalent to
one atmosphere8 .
1. Converting Head to Pressure
Head and pressure are used almost interchangeably with respect to water systems.
Since pressure gauges often are calibrated in psi or bar, it may be necessary to convert
to head in meters or in feet
•
Converting head in feet to pressure in psi:
Feet of head can be converted to pressure - psi - by the expression:
= .
8
1 Bar = 0.9869 atm
Page 2.6
Chapter 2: Operational Mathematics
Where:
=
ℎ=ℎ
=
∗
ℎ
(
)
( )
ℎ
, ℎ
1
Example:
The pressure gauge on the discharge pipe from the reservoir reads 30 psi. How
high is the water level from the gauge level?
Answer:
ℎ = ⁄0.434
1
×
= 21
3.28
= 0.434ℎ, ℎ
⁄0.434 = 69.
ℎ = 30
Useful to remember:
.
•
Converting head in meters to pressure in bar:
Meters of head can be converted to pressure-bars - by the expression:
= .
Where:
=
ℎ=ℎ
(
)
( )
2. Converting Pressure to Head
•
Converting pressure in psi to head in feet:
= .
Where:
=
ℎ=ℎ
•
(
( )
)
Converting pressure in bar to head in meters:
=
.
/
Where:
=
ℎ=ℎ
(
)
( )
Chapter 2: Operational Mathematics
Page 2.7
•
Converting pressure in kg/cm2 to head in meters:
=
/
Where:
=
ℎ=ℎ
(
⁄
)
( )
Example: Determining Pressure Gauge Accuracy
The pressure gauge beside the elevated reservoir reads 40 psi. But the operator
doubts the accuracy of the pressure gauge. How can he determine the accuracy of
the gauge?
To convert psi to head in feet the formula is ℎ = 2.31 ,therefore the height of the
water level should be ℎ = 2.31 × 40 = 92.4
The operator has to measure the height of the water level in the reservoir from the
gauge level. If the measured height is not 92.4 ft (or 28.2 meters), then the gauge
accuracy is in question.
E. FLOW MEASUREMENTS
For liquids, various units are used depending upon the application and industry, but
might include gallons per minute (gpm), liters per second (lps), or, when describing river
flows, cumecs (cubic meters per second) or even million liters per day (mld).
Perhaps the simplest way to measure volumetric flow is to measure how long it takes to
fill a known volume container. A simple example is using a container of known volume,
filled by a fluid. The stopwatch is started when the flow starts, and stopped when the
container starts to overflow. The volume divided by the time gives the flow. This
method can be employed for measuring the flow of well sources.
To convert gpm to lps, divide gpm by 15.852.
Example:
A pump is rated at 200 gpm. Convert to lps:
=
Page 2.8
15.852
=
200
= 12.6
15.852
Chapter 2: Operational Mathematics
F. ELECTRICAL CALCULATIONS
1. kW and hp
Horsepower (hp) is a unit of work originally established to measure the amount of
energy required to raise coal out of a coal mine. One horsepower is equivalent to 33,000
foot-pounds of work performed in one minute. This is equivalent to lifting 454 kg, 101
meters in ten minutes9. It was estimated then that one hp was equivalent to the amount
of work a strong horse could perform.
Pumps are rated according to their hp capacity. Pump hp is a function of its head and
flow capacity. (Refer to Volume I, Design Manual Chapter 14).
One hp is equal to 746 watts or 0.746 kW. Given the pump hp, multiply hp by 746 to get
watts.
2. Power, Voltage and Current
The relationships among Power, Current and Voltage are shown in the following three
expressions:
=
×
= ×
=
=
ℎ
ℎ
)
Where:
(
=
=
=
( )
( )
( )
Example:
A 700-watt, 220-volt electric iron is to be used.
What should be the minimum amp rating of an electric power extension cord, if one
has to be used?
=
=
700
220
= 3.2
3. Energy and Power
The amount of energy used (or supplied) depends on the power and the amount of time
it is used:
=
9
×
Or 454 kg, 10 m in one minute or 45 kg, 10 m in 6 minutes
Chapter 2: Operational Mathematics
Page 2.9
The standard unit for energy is the joule (J), but a J is a very small amount of energy for
mains electricity. For utility use, electrical energy in kilowatt-hours (kWh) is used.
1 kWh is the energy used by a 1 kW power equipment when it is switched on for 1 hour:
1 kWh = 1 kW × 1 hour
Examples:
A 100 W (0.1 kW) bulb switched on for 8 hours uses 0.1 × 8 = 0.8
A 3 hp motor used for 12 hours uses 3 ℎ × 0.746
Page 2.10
⁄ℎ × 12 ℎ
ℎ
= 27
ℎ
Chapter 2: Operational Mathematics
Chapter 3
Disinfection
This Chapter details the procedures for using chlorine safely as a disinfectant and the
methods of calculating the chlorine dosages required in the water system.
A. GENERAL
Disinfection is necessary to ensure that drinking water is free from disease-causing
microorganisms. Water disinfection means the removal, deactivation or killing of
pathogenic 10 microorganisms. Disinfection is often universally employed by water
distribution systems, even when water at the source is deemed already potable – as a
precautionary measure to control the spread of waterborne diseases. In Level III
Systems, this precaution is particularly important because of the risk of contamination
due to breaks and other types of seepages anywhere throughout the extensive pipe
network, and the magnified impact of this risk due to the number of users.
B. CHLORINE DISINFECTION (CHLORINATION)
Chlorination is the process of adding the element chlorine to water to make it safe for
human consumption as drinking water. Chlorine (and its compounds) is the most widely
used disinfectant for water systems because of its effectiveness, cheap cost and
availability.
Chlorination has the advantage of oxidizing bacteria and virus even after the point of
application due to its residual action. Hence any bacteria introduced to the system after
the point of chlorination can still be eliminated by the residual chlorine in the water.
C. DETERMINANTS OF CHLORINE EFFECTIVENESS
1. Contact Time (CT) & Dosage – Contact time refers to the period of time
allowed for the disinfectant to react with the microorganisms that may be in
the water. Dosage refers to the amount of chlorine infused in relation to the
volume of the water being treated.
2. The Type of Microorganism – Chlorine is quite effective in destroying the
most significant pathogenic organisms that are dangerous to humans and are
commonly borne in water. Different pathogens and parasites, however,
have different levels of resistance to it. Thus, the dosages, the CT, and other
conditions of the water that intensify or inhibit the oxidizing action of
chlorine such as temperature and pH (acidity or alkalinity) need to be
10
Disease-causing microorganisms, such as bacteria, fungi, and viruses
Chapter 3: Disinfection
Page 3.1
considered in order to be sure that the harmful organisms and undesirable
substances are eliminated.
3. Characteristics of the Source Water – The nature of the water that requires
treatment influences the disinfection. Materials in the water, for example,
iron, manganese, hydrogen sulfide and nitrates often react with disinfectants,
effectively increasing the chlorine demand. Turbidity of the water also
reduces the effectiveness of disinfection.
4. Usually, the tests on the water from a new source are the basis for
prescribing the dosage and CT needed to eliminate the harmful and
undesirable substances. Additional tests on the water at source need to be
conducted when there are indications that the source water characteristics
have changed. The possibility of contaminants (whether pathogens or
minerals that change its acidity or turbidity) in the path of the water or in the
proximity of the spring box or reservoir need to be checked.
5. Temperature of Water – Higher temperatures usually increase the speed of
reactions and of disinfection.
D. TERMINOLOGY AND DEFINITIONS
1. Available Chlorine Content – is amount of chlorine in a chlorine compound,
which determines its potential disinfecting power.
2. Chlorine Demand – is the total amount of chlorine needed to oxidize all the
materials in the water that react with chlorine within a given period. After all
the reactions within that period are completed, the pathogens and
undesirable organic substances, as well as the soluble iron, manganese and
hydrogen sulfides are deemed to have been destroyed, neutralized, or
eliminated. Chlorine demand is the difference between the amount of
chlorine added to water and the amount of residual (remaining) chlorine at
the end of a specific contact period. If no residual chlorine is detected, it
means that the chlorine demand was so great it exhausted the chlorine; thus
the chlorine infused into the water (dosage) was insufficient.
3. Chlorine Residual – is the total amount of chlorine (combined and free
available chlorine) remaining in water at the end of a specific contact period
following the infusion of chlorine. The chlorine residual is an important
indicator of safe water because as long as the residual chlorine is present in
the water, disinfection is a continuing process.
4. Dosage of Chlorine – is the quantity of chlorine applied to a specific quantity
of water. Dosage is expressed in milligrams per liter (mg/l) of chlorine.
5. Dosage Rate – is the amount of chlorine applied per unit time. It is usually in
grams/day or kg/day.
Page 3.2
Chapter 3: Disinfection
6. Superchlorination – this means applying chlorine at very much higher than
the usual dosages. If a system design or requirements do not allow adequate
contact time for the normal dosages of chlorine to eliminate the pathogens
and undesirable substances in the water, superchlorination could be resorted
to. Superchlorination provides a chlorine residual of 3.0-5.0 mg/l, which is 10
times the recommended minimum breakpoint chlorine concentration 11 .
Retention time for superchlorination is approximately 5 minutes.
7. Dechlorination – removes excessive levels of chlorine from the water.
Dechlorination is considered a necessary phase after superchlorination in
order to remove the odor, taste and the other objectionable traces of excess
chlorine in the water. Dechlorination commonly involves the use of an
activated carbon filter.
8. Shock Chlorination (dosage of 200 mg/l for 3-4 hrs) is recommended
whenever a well, reservoir or pipeline is new, repaired, or found to be
contaminated. This treatment introduces high levels of chlorine to the water.
Unlike superchlorination, shock chlorination is a "one time only" occurrence,
and chlorine is depleted as water flows or is flushed through the system. If
bacteriological problems persists following shock chlorination, the source of
the contamination of the system should be determined and eliminated.
E. CHLORINE DOSAGE AND DEMAND
1. Relationship of Chlorine Dosage, Demand and Residual
When chlorine is added to water, some of it is used up immediately by the water and
the substances that are in it. This is known as the chlorine demand of the water. There
must be sufficient chlorine left to kill bacteria and viruses not just at the reservoir but
even in the distribution system.
=
+
Even if the chlorine demand of a particular source does not change much over the years,
it is still good to be vigilant to prevent any serious outbreaks of diseases. An increase in
organic matter in the water source will increase chlorine demand. And this means
measuring the chlorine demand and residual almost every day to determine the
accurate chlorine dosage to be used.
2. Determining Chlorine Demand
There are two ways of determining the chlorine dosage.
11
Breakpoint chlorination uses the continual addition of chlorine to the l water to the point where
chlorine demand is met and all ammonia is oxidized, so that only free chlorine remains.
Chapter 3: Disinfection
Page 3.3
Method 1:
1. Dose the water supply with an arbitrary amount, say 1mg/l;
2. Wait for 30 minutes and measure the chlorine residual.
3. If residual is zero or less than 0.2 mg/l, increase the dosage until the right
residual is obtained.
4. If residual is more than 0.5 mg/l, then the dosage can be reduced.
Method 2:
Use a 1% chlorine solution12 to conduct the following procedures:
1. Prepare a 1% chlorine solution, the quantity depending upon type of
chlorine used (see Table 3.1 below);
2. Take 3 or 4 non-metallic containers of known volume (e.g. 20 liter
buckets);
3. Fill the containers with some of the water to be treated and check the pH
of the water;
4. Add to each bucket a progressively greater dose of 1% solution with a
measuring device:
•
•
•
•
1st container: 1 ml
2nd container: 1.5 ml
3rd container: 2 ml
4th container: 2.5 ml
5. Wait 30 minutes. (This is essential as this is the minimum contact time for
the chlorine to react. If the pH of the water is high, this minimum time
will increase);
6. Measure the free chlorine residual in each bucket;
7. Choose the sample which shows a free residual chlorine level between
0.2 mg/l and 0.5mg/l;
8. Extrapolate the 1% dose to the volume of water to be treated;
9. Check chlorine demand at several water distribution points and adjust if
required.
F. CHLORINE/CHLORINE COMPOUNDS USED IN DISINFECTION
1. Chlorine – Chlorine is a poisonous yellow-green gas with a penetrating,
pungent odor. It is extracted from chlorides through oxidation and
electrolysis. In water, chloride (chlorine compounds) hydrolyses to form
12
A 1% chlorine solution contains 10 grams active chlorine per liter
Page 3.4
Chapter 3: Disinfection
hypochlorous acid and the hypochlorite ion (free available residual chlorine),
which are very toxic to bacteria.
2. Bleaching Powder or Chloride of Lime – Bleaching powder or calcium
hypochlorite is a yellow white solid which has a strong smell of chlorine. It is
not highly soluble in water, and is preferably used in soft to medium-hard
water. Bleaching powder loses strength rapidly whenever it is exposed to
moist air so that it should be kept in closed containers.
3. High-Test Hypochlorite (HTH) – It is a more stable and stronger compound
than bleaching powder.
4. Sodium Hypochlorite (NaOCl) – This is a highly corrosive, slightly yellow
liquid. It is used extensively in many industries as a disinfectant, deodorizer,
bleach, and to neutralize certain undesirable chemicals and compounds used
or formed in productions processes. For households, it is supplied as the
common households bleach.
Table 3.1 shows the percent available chlorine of various chlorine compounds.
Table 3.1: Percentage of Available Chlorine
Available Chlorine
Quantity to Make a Liter of 1%
Chlorine Solution
100%
-
Calcium Hypochlorite
70 – 74%
14 grams
Bleaching powder
34 – 37%
30 grams
Sodium Hypochlorite (HTH)
12 – 15%
80 grams
Material
Chlorine gas
G. CHLORINE DOSAGES
The commonly used dosages for various disinfection requirements are as follows:
1. For disinfection of water supplies:
•
•
Dosage:
0.5 – 2.0 mg/l
Contact Time: 20 – 30 minutes
2. For disinfection of newly constructed/repaired wells, storage tanks, pipelines,
spring box, etc.:
•
•
or
•
•
Dosage:
50 mg/l
Contact Time: 24 hours
Dosage:
300 mg/l
Contact Time: 1 hour
Chapter 3: Disinfection
Page 3.5
3. Sample Calculations:
The examples on the following pages illustrate the mathematical methods applied in
arriving at the disinfection dosages and rates of dosage using chlorine gas and some of
the typical chlorine compounds used by water systems in the Philippines.
Example: Calculation of Dosage
Given:
Water Consumption: 10,000 liters per day (lpd)
Required Residual : 0.3 mg/l
Chlorine Demand: 0.5 mg/l
Required:
Dosage in mg/l
Dosage rate in gm/day
Using Chlorine gas
Using Bleaching powder
Analysis:
= ℎ
= 0.5 + 0.3 = 0.8
+ ℎ
/
Using Chlorine Gas:
ℎ
= 100%
=
=
×
0.8
/
× 10,000
100%
= 8,000
⁄
=
/
Using Bleaching Powder:
ℎ
= 35%
=
=
Page 3.6
0.8
/
× 10,000
0.35
×
= 22,857
⁄
=
.
/
Chapter 3: Disinfection
Example: Dosage for Disinfection of Well
Given:
Well Diameter = 0.3 m
Static Water level = 6 m
Total Well Depth = 50 m
Required:
Amount of HTH required
Disinfection Specifications:
Dosage = 50 mg/l
Contact time = 24 hrs
Analysis:
1. Calculate water volume in well
=
× 0.15 × (50 − 6) = 3.11
= 3,110
2. Determine amount of chlorine compound using HTH (70% chlorine)
=
=
50
×
ℎ
⁄ × 3,110
= 222,142
0.70
=
Example: Reservoir Disinfection
Given:
Diameter = 4 m
Height = 3 m
Required:
Amount of Sodium Hypochlorite Needed
Disinfection Specifications:
Contact time = 1 hour
Dosage = 300 mg/l
Analysis:
=
× 2 × 3 = 37.70
= 37,700
ℎ
= 15%
⁄ × 37,000
300
=
= 75,398
0.15
Chapter 3: Disinfection
= 75.4
Page 3.7
H. MEASURING CHLORINE RESIDUAL
1. What Is Chlorine Residual
The word "residual" means "remainder" or "that which is left", and as the name
suggests the chlorine residual test is used to measure the amount of chlorine remaining
in the water at a certain point of time when the test is made. When chlorine cannot be
detected within the distribution system, it means that it has reacted more or less
completely with the water and the impurities in the water. At this point, there is no
more free chlorine to act effectively as a disinfectant.
Three types of chlorine residuals can be measured:
•
Free chlorine: which kills microorganisms most effectively;
•
Combined chlorine: formed when free chlorine reacts with other chemicals
in water, forming other types of chlorine-based compounds;
•
Total chlorine: the sum of free and combined chlorine.
Free chlorine is very unstable and is prone to be reduced quickly, especially in warm
countries. Sunlight and the stirring of the water will cause free chlorine to react with the
water and other matter, and thus disappear more quickly. For this reason, chlorine
should be tested on site. Do not take the water sample to the laboratory for testing, as
the results could be misleading.
Figure 3.1: Chlorine Comparator
AppChem LR Color Comparator
Page 3.8
Chapter 3: Disinfection
2. Using a Chlorine Comparator
Measuring chlorine residual on site is done with a device known as a chlorine
comparator, using a chemical known as DPD. Figure 3.1 shows a simple Chlorine
Comparator. The comparator uses a reagent which reacts with the chlorine to give the
water a reddish color. A color chart is then used to compare the color of the mixture to
different colors with given pH values.
The general procedures in measuring the free chlorine residual using a comparator is as
follows13:
1. Fill a viewing tube with 5 ml sample water and place this tube in the top left
opening of the comparator;
2. Fill a second viewing tube with 5-ml sample water;
3. Add the contents of one DPD Free Chlorine Reagent sachet to the second
tube and swirl to mix;
4. Place the second tube in the top right opening of the comparator;
5. Hold comparator up to a light source (sky, window or lamp) and look through
the opening in front;
6. Rotate the color disc until the colors in the 2 openings match;
7. Read the mg/l free chlorine in the scale window. (This reading must be done
within one minute after adding the powder reagent);
8. If the free chlorine residual is lower than 0.1 mg/l, proceed with the total
chlorine residual test using the same procedures as above but with the Total
Chlorine Reagent sachet;
9. If the total chlorine level is higher than free chlorine, it is obvious that
combined chlorine is present. In that case you need to add more chlorine or
increase dosage.
Chlorine residuals in water of greater than 0.7 mg/l can already be tasted. Unless
otherwise indicated for health reasons, it is best to keep residuals below this level to
avoid taste issues and to reduce chemical costs.
3. Measuring Acidity Level (pH) of the Water
It is useful to take the pH (acidity value) while measuring chlorine levels since chlorine
works effectively at neutral pH (between 6.5 and 8.5). At a pH value of 6.5 and below,
water is considered acidic and beyond 8.5 is considered alkaline. Some chlorine
comparators allow the measurement of pH using a tablet reagent known as phenol red.
13
Keep in mind that different models of comparators may require particular procedures. Refer to the
manual of the unit that you will use. The unit’s supplier, too, should be able to give you the most
applicable information.
Chapter 3: Disinfection
Page 3.9
I. EQUIPMENT USED IN CHLORINATION
For continuous chlorination in smaller systems, hypochlorinators are generally used;
however, chlorinators are considered more economical when the supply source is
greater than 8 lps, but sometimes may be used in smaller systems as well. Anticipated
pumping periods and chlorine demand (based on the chlorine residual test) determine
whether a hypochlorinator or chlorinator should be used in each situation.
In rural areas, the use of chlorine gas is to be avoided
whenever possible due to operational requirements and safety
reasons. Instead, chlorine compounds and hypochlorinators
are recommended.
1. Hypochlorinator
The hypochlorinator is a pump used to add hyphochlorite solutions to water at a
manually adjustable feeding rate. As in the setup shown in Figure 3.2, the pump draws
the hypochlorite solution from a container and transfers it into the water being treated.
Due to the corrosiveness of the hyphochlorite solutions, the critical parts of the pump
are made of chemically resistant plastic and synthetic rubber.
Figure 3.2: A Hypochlorinator in Action
Photo courtesy of Water Solution Partners Inc.
Hypochlorinators should not be placed or kept in the same room as other equipment
like the switchboard, other types of pumps, meters, tools, and the like because of the
Page 3.10
Chapter 3: Disinfection
corrosiveness of the solutions. In any case, wherever the hypochlorinator is placed,
adequate floor drains should be provided to carry away wastewater, spillage, sludge,
and wash-down water.
Figure 3.3: Drip-Type Chlorinator
NWRC RWS Volume III, Operation and Maintenance Manual
2. Drip-Type Chlorinator
A drip-type chlorinator can be used for disinfecting small reservoirs, wells and cisterns.
To make a simple drip type chlorinator, refer to Figure 3.3 and follow these steps:
Chapter 3: Disinfection
Page 3.11
1. Use a plastic water container of about 6-18 liters volume capacity with a
spout. The spout of the container will act as the outlet for the chlorine
solution.
2. Cut open the bottom of the container to provide a solution inlet and to be
able to access the inside of the container.
3. Guided by Figure 3.3, prepare the needed supplies like the tubing, hose,
rubber stopper, and sieve, and prepare the chlorine feed equipment that will
fit inside the container as follows:
•
Choose or cut out a piece of polystyrene (e.g., Styrofoam) or wood to act
as the float.
•
In the center of the float, place a rubber stopper or cork and pass a piece
of hard tubing through it. The tubing should be long enough to extend
beyond the rubber stopper and below the float.
•
Make a small hole in the tubing below the float to act as the inlet for the
chlorine solution, which will fill the container.
4. Fill the container with the chlorine compound and fill with water until the
float reaches the top. Then cover the top of the container.
5. To control the flow, use a small clamp. Place the clamp around the hose and
tighten it to clamp off all flow during installation. Loosen the clamp to get the
flow rate desired.
6. Install the container over the facility to be disinfected. The rubber outlet
hose should reach into the water.
J. EFFECTIVENESS OF CHLORINATION
Generally, chlorination without filtration or other pre-treatment is effective and
adequate only under the following conditions:
1. The degree of bacteriological pollution of the water is moderate, reasonably
uniform, and not imbedded in suspended solids, for example, within the
bodies of worms;
2. The turbidity and color of the water do not exceed 5-10 units;
3. The content of iron or manganese or both do not exceed 0.3 mg/L; and
4. Taste- or odor-producing substances are absent or do not require chlorine
doses that inevitably produce a chlorine taste in the treated water.
There is a contact period of at least 20 minutes between the point of chlorination and
the first service connection supplied with the water. In cases where water is pumped
directly from the source (e.g. well) into the distribution system, chlorine may be applied
Page 3.12
Chapter 3: Disinfection
directly into the pressure main, provided this minimum contact time of 20 minutes is
met.
Table 3.2: Chlorination Guidelines
1. Chlorine solutions lose strength while standing or when exposed to air or
sunlight. Make fresh solutions frequently to maintain the necessary
residual.
2. Maintain a free chlorine residual of 0.3 mg/l after 30 minutes contact time.
Residual chlorine should be measured every day.
3. Once the chlorine dosage is increased to meet greater demand, do not
decrease it unless the raw water quality improves.
4. When there is a risk of cholera or an outbreak has already occurred,
maintain the chlorine residuals as follows:
•
Distribution system: 0.5mg/l
•
Tanker trucks at filling point: 2 mg/l
Chapter 3: Disinfection
Page 3.13
Page 3.14
Chapter 3: Disinfection
Chapter 4
General Operation and Maintenance
This Chapter presents the general concepts and practices that must be adopted for
effective Operation and Maintenance (O&M). The O&M specifics for the supply sources,
transmission and treatment facilities will be covered in Chapter 5 while the distribution
facilities (storage, pipelines, connections, valves) will be covered in detail in Chapter 6.
A. BASIC O&M CONCEPTS
Operation refers to the procedures and activities involved in the actual delivery of
services, for instance pumping, treatment, transmission and distribution of drinking
water. On the other hand, Maintenance refers to the activities aimed at keeping
existing facilities (physical assets) in serviceable condition, for instance painting of steel
reservoirs, and repair of leaking pipes and worn out pumps.
O&M aims to provide continuous and sustainable water supply services with the
perspective that
1. The useful life of the water supply facilities needs to be extended and their
service quality enhanced;
2. The health of the population must be maintained;
3. The quality of the environment must be preserved and protected; and
4. The marginalized should be benefitted.
There are undesirable consequences of poor O&M:
1. Intermittent water supply due to wastage and depletion;
2. Poor water quality due to inadequate treatment and contamination;
3. Deterioration of pipes, equipment, and service;
4. Increased cost of maintenance; and
5. Failure to secure consumers' acceptance when tariff increases are needed to
sustain viability.
B. WHY MAINTENANCE
Maintenance of the facilities is essential in preventing component failure, extending the
useful life of the facilities, and minimizing disruptions in services. Good maintenance
involves the following:
1. Quick repair/replacement of any failed component;
2. Up-to-date training of maintenance personnel;
Chapter 4: General Operation and Maintenance
Page 4.1
3. Adequate inventory of parts and tools needed for repairs;
4. Efficient mobilization practices in emergencies; and
5. Valve exercising (single most important form of preventive maintenance for
reliability of service).
There are two general types of maintenance: Preventive and Reactive (or Repair)
maintenance.
1. Preventive Maintenance
Preventive or routine maintenance involves tasks and activities carried out according to
pre-established schedules to ensure the quality and reliability of operating facilities. It is
based on rational considerations such as the manufacturer's recommendations for
servicing equipment, industry standards and practices (which are based on collective
experience), and the SSWP’s own experience on the performance, durability, and
reliability of the different equipment and their parts and components. Once established,
these schedules need to be kept and the results recorded.
2. Unscheduled Maintenance
Unscheduled maintenance (also called Emergency or Repair maintenance) is a reactive
intervention forced on the Utility when equipment, components, or parts either break
down or malfunction. The activities and tasks are unplanned and generally unexpected,
thus taking the nature of emergencies. They tend to be disruptive, inefficient, and often
costly – not only to undertake but also in terms of lost revenues and goodwill. These
occur most frequently when preventive maintenance has been poor or inadequate,
after accidents and natural force majeure events, and when aging facilities are kept in
service without replacement beyond their useful life.
All unscheduled maintenance situations need to be analyzed and the causes of the
malfunction or breakage recorded. These records are important as they help in deciding
whether part or all of a network or plant should be upgraded or replaced, and serve as a
guide in future procurement decisions (for instance, sourcing of new equipment and of
parts and supplies), as well as in related management decisions (e.g., inventory lists and
levels).
C. WATER QUALITY
The sole product of the Utility is water and it is mandatory for this product to meet at
least the minimum standards specified by the PNSDW14 . The SSWP utility is required to
have a sample of its water tested by an accredited DOH laboratory for bacteriological
presence at least once a month. Should a sample test positive for coli forms, the Utility
must immediately have a re-sampling done and, without waiting for the results, take the
14
Philippine National Standards for Drinking Water
Page 4.2
Chapter 4: General Operation and Maintenance
actions needed to determine the possible source of contamination in order to eliminate
the cause.
Where the sampling method indicates that customers are at risk of using unsafe water,
the SSWP itself must take measures to warn its customers to take the necessary
precautionary measures, such as boiling their drinking water before using, until there is
assurance that the risk has been eliminated.
In case of a second positive testing, the SSWP should consider suspension of operations
until the problem is solved, and if this is not possible, it should reinforce its advisory to
all customers to boil their drinking water until they receive notice that the problem is
solved.
The SSWP’s responsibility for safe water makes it imperative to eliminate harmful
organisms by some means, of which the standard is treatment with chlorine, as
thoroughly discussed in Chapter 3. As part of its routine water quality maintenance
procedures, the SSWP should routinely, on a daily basis, take readings of chlorine
residuals at different distribution points using a chlorine comparator.
D. FIELD TOOLS
The Utility should have all the necessary and proper field tools for operational and
maintenance work. The cost of these tools should be considered an investment that will
improve maintenance work and minimize downtime.
Every SSWP must have the following maintenance tools:
•
•
•
•
•
•
•
Ratchet threader
Adjustable wrenches
Pipe wrenches
Pipe threader
Pipe cutter
Shovels
Crowbars
•
•
•
•
•
•
•
Mattock (Piko) and Shovels
Crowbar
Screwdrivers
Pliers
Open Wrenches
Saws and hammers
Bench Vise
E. OTHER OPERATIONAL CONSIDERATIONS
1. Monitoring
1. Operators must monitor readings on gauges and respond to alarms and
warning signals. Failure to heed these could result in otherwise minor
problems escalating into major problems.
2. Operators must be trained to respond instantly to emergencies, and should
be given the means to communicate without delay, so they can call out
repairs and inform supervisory personnel.
Chapter 4: General Operation and Maintenance
Page 4.3
3. Whenever practical, well output and discharge pressures ideally should be
recorded daily. If a flow meter is not available, the method given in Chapter 2
can be used to measure flows from the well.
2. Emergency Provisions
To minimize the failure of operations during emergencies, the following should be
observed:
1. Reservoirs should never go below half full before the pumps are restarted. If
the operator knows the schedule of a power outage, he must ensure that the
reservoir is full by the time the power is out. For power outages or calamity
repairs that could last for more than a day, the operator should limit or
ration the supply of water by valve throttling.
2. Fuel (if used by the system) should always be on stock for at least 2 days of
operational needs.
3. The Utility should have an Emergency Plan, clearly designating the
emergency team members, their specific functions, and a backup office or
meeting place.
4. The Utility should have the contact numbers of those who can assist during
emergencies (nearby utilities, private deep well owners, well drillers, pump
suppliers, water tankers, treatment equipment suppliers, power suppliers,
government agencies, etc). The personnel designated to respond to
emergencies should have these numbers.
5. After a calamity, the operator must conduct a field survey to determine
damaged facilities and the extent of leakage, and to conduct emergency
repairs.
3. Common Problems and General Solutions
Table 4.1 presents some useful and practical solutions to address O&M problems.
F. RECORDS AND REPORTS
An effective maintenance program starts with the collection, proper filing, and
safekeeping of the Utility’s records. For the O&M function, the following records are
particularly important and, as a minimum, should be kept and available:
1. All pamphlets/manuals of pumping equipment, including pump curves;
2. As-built plans of the system or plans and engineering drawings;
3. Capital expenditure disbursements;
4. Water meter data such as type, when installed, and serial number; and
5. Well design, logs and results of pumping tests.
Page 4.4
Chapter 4: General Operation and Maintenance
Table 4.1: Practical Solutions to Common O & M Problems
Common O&M Problems
Technical
Practical Solution
Lack of skills in preventive
maintenance and repair work
Provide hands-on O&M skills training
for the System Operator/Caretaker
No available tools and spare
parts
Set aside funds for tools and spare
parts, otherwise rent
No full time System Operator or
Caretaker to undertake repairs
Hire full time System Operator/
Caretaker to undertake the repair
No available expert in the community
for emergency repairs or source
problems
Anticipate problems & network
With other utilities or government
agencies who can provide
these services when needed
Lack of funds for O&M or
system upgrading
Review tariff levels, improve
collections and look for funds
from LGUs or banks or use
supplier credits
Lack of funds for repair and
maintenance
Set aside budget exclusively for
repair and maintenance
Financial
A simple records management system should be set up for the following purposes:
1. Clear, systematic filing of records;
2. Provide easy access by the personnel concerned with O&M;
3. Protect the records from being lost/not returned, or misfiled, or damaged;
4. Update those that need to be updated, like maps; and
5. Dispose of records that are outdated and not needed.
Chapter 4: General Operation and Maintenance
Page 4.5
RECORDS ARE MEANT TO BE USED
Records are not simply materials that are filed away and forgotten, but an active
reference source that both the O&M personnel and the Utility’s management as a
whole need in order to keep the Utility operating at peak performance levels.
Records are
•
Essential to an effective maintenance program;
•
Required to comply with certain water quality regulations; and
•
Necessary for planning purposes.
For these reasons, a good, user-friendly filing system that is both understandable
to users and allows easy access but good control of the filed records is essential.
Page 4.6
Chapter 4: General Operation and Maintenance
Chapter 5
Supply Source and Disinfection Facilities
This Chapter covers the basic concepts and procedures for proper O&M of water
sources and the equipment used at these sources to prepare the water for distribution.
It covers O&M of wells, infiltration galleries, springs and their pumps, motors and
chlorinators. A section on the O&M aspects of slow sand filters is also included.
A. WELLS
A properly designed and constructed well can give many years of trouble-free service.
Good O&M seeks to avert well failures, which are usually indicated by reduced (if not
complete loss of) pump discharge, or deterioration in the quality of the water.
Good O&M actually begins even before a well is put into operation. Before actually
operating a well, the SSWP must determine/obtain the following information which will
guide its well operating and O&M procedures:
•
Safe pumping level
•
Pump curves
•
Well design
•
Location of discharge line shut-off valve and pressure gauge.
1. Pumping Tests
Pumping tests are carried out to determine the safe pumping yield, which establishes
how much groundwater can be taken from a well, and what effects pumping will have
on the aquifer and neighboring well supplies. It is one of the design parameters for
selecting the pump to be used.
The pumping tests are usually done by well drilling contractors who are knowledgeable
and who possess the required tools and equipment for the tests.15 It is rare for an SSWP
to conduct this test itself. However, should this become necessary, the general
procedure for conducting such a test is illustrated in Annex A-IV.
Once the safe pumping level is established, it should be compared with the design pump
curves of the equipment to be used. This will guide the operational parameters for
pumping water from the well.
15
The importance and vital nature of the work of professional well drillers is underscored by the NWRB,
which imposes standards for their activities, regulating and requiring them to register with it.
Chapter 5: Supply Source and Disinfection Facilities
Page 5.1
2. Major Causes of Deteriorating Well Performance:
At the outset, in designing and constructing a well, care should be taken to prevent the
major causes of eventual well deterioration. Following are five of the main causes of
deterioration in well performance. Consider that the first four of these major causes of
well deterioration are greatly influenced by the care taken in constructing the well.
1. Well yield reduction due to incrustation and growth of iron bacteria;
2. Plugging of well screen due to build up of fine particles;
3. Sand pumping;
4. Structural collapse of the well casing and screen; and
5. Condition of the pump.
3. Prevention and Remedial Measures:
a. Prevention and Treatment of Iron Bacteria:
1. Care should be taken to avoid introducing iron bacteria into the well
during drilling and repair work. For this purpose, equipment and
materials (drill rods, filter pack) should be chlorinated prior to drilling or
repair;
2. Chemical treatment (application of strong oxidizing agent such as
chlorine and chlorine compounds) to clear contaminating bacteria; and
3. Physical treatment (jetting, air or surge block surging, air lift pumping) to
clear blockages.
b. Prevention and Treatment of Physical Plugging
1. Thorough development of a well by
•
•
Treatment using polyphosphate compounds; and
Proper well design (filter pack, screen placement, slot selection
and sampling of well cutting).
2. Treatment of Incrustation
•
•
Treatment with acid (hydrochloric, sulfamic, hydro-acetic);
Wire brushing
B. INFILTRATION GALLERIES
An infiltration gallery is a horizontal well which is used to collect naturally filtered water.
It consists of a main collection sump and perforated pipe water collectors, which are
surrounded by a blanket of sand and gravel (Figure 5.1).
Page 5.2
Chapter 5: Supply Source and Disinfection Facilities
Figure 5.1: Details of an Infiltration Gallery
NWRC RWS Volume III, Operation and Maintenance Manual
Chapter 5: Supply Source and Disinfection Facilities
Page 5.3
1. Operation
Water enters the perforated pipe collectors and then flows by gravity to the main
collection sump or well. From this sump or well, water is pumped out to the
distribution system.
2. Common Causes & Corrective Measures for Infiltration Gallery Failure
1. Clogging of the Filter Bed – The clogging of the filter blanket surrounding the
collector pipes is indicated by the lowering of the water level in the main
sump/well while pumping at the normal rate. This clogging is due to the
deposition of fine silt on the filter blanket.
The clogging material usually can be dislodged by surging, using compressed
air or a force pump. If these methods will not work, the only remedy is to dig
up and clean the sand/gravel blanket.
2. Poor Quality of Water Yield – The most probable cause of the deterioration
in water quality is a defective filter bed, which allows contaminants to pass
through. The water yield may be rendered safe again either by repairing the
filter bed or by continuous chlorination.
C. SPRINGS
If a natural spring is the source of the SSWP’s water, the area should be enclosed with a
fence to prevent animals from contaminating the water and polluting the surrounding
area.
1. The Spring Box
To enhance the spring’s utility as a source, as well as to protect it from erosion, it should
be provided with a spring box, which is a concrete structure that serves three purposes:
1. Protect the water source from contamination;
2. Collect the water; and
3. Allow sediments to settle to the bottom of the box instead of being carried
with the water.
Figure 5.2 on the following page shows a spring box. In its construction, care must be
taken to avoid or uproot surrounding trees whose roots could eventually damage the
concrete spring box. The design should include a drain pipe and valve that will allow it to
be drained easily for maintenance.
O&M of a well-designed and constructed spring box is relatively simple and can be done
fast. A poorly designed or constructed box makes O&M a costly, time consuming effort.
Page 5.4
Chapter 5: Supply Source and Disinfection Facilities
Figure 5.2: Spring Box Site Plan and Design
NWRC RWS Volume III, Operation and Maintenance Manual
2. Common Spring Box Failures and Remedies
Table 5.1 lists the common causes of failure in the spring box and its surroundings with
suggestions for their remedies.
Chapter 5: Supply Source and Disinfection Facilities
Page 5.5
Table 5.1: Common Spring Box Failures and their Remedies
Defect
Remedy
1. Crack or leak.
2. Damaged overflow and screen
vents.
3. Clogging of drainage canal.
4. Dilapidated fence.
5. Reduction of spring discharge due
to clogging
1. Plug crack or leak with Portland
cement mortar.
2. Replace damaged screen with a
new one.
3. Clean drainage canal from all
obstruction and check its slope.
4. Replace all worn-out posts and
repair fence.
5. Clean the “eye” of the spring.
NWRC RWS Volume III, Operation and Maintenance Manual
3. Maintenance of Spring Boxes
1. While properly installed spring boxes require little maintenance, it is
recommended that the water quality be checked before one is put into use.
Water quality should also be checked at least once a year, and more often if
needed.
2. The uphill diversion ditch should be inspected to ensure that it is not eroding
and that it is adequately diverting surface runoff away from the spring box.
3. For hillside collection boxes, the uphill wall should be periodically inspected
to ensure that it is not eroding and its structural integrity is maintained.
4. The animal fence should always be kept in good repair. If animals are allowed
to get close to the spring, they could contaminate the water and ground
surrounding the spring, and cause the compacting of soil, which in turn could
lead to decreased flow rates.
5. The cover should be checked frequently to ensure that (a) it is in place and
watertight (b)water is not seeping out from the sides or from underneath the
spring box, and (c) the screening is in place on the overflow pipe.
REPAIRING A SPRING BOX
When the concrete sides of the spring box show damage, take the following steps:
1. Drain the spring box. If it was originally constructed with a drain pipe and
valve, you will have no difficulty draining the water and repairing it. If the
box does not have a drain pipe or if the leaks are below the water level of
the drain pipe, you must siphon the water out. If the volume of water is too
great for a water hose to siphon the water out, you will have to use a water
pump.
2. Mix an appropriate amount of water and concrete. Trowel the concrete
onto the spring box's cracks and damaged areas on both the inside and
outside of the box.
Page 5.6
Chapter 5: Supply Source and Disinfection Facilities
3. Attend to the spring box to keep water from damaging the newly laid
concrete, which usually takes 5 to 6 hours to cure. If you had to siphon the
water out, make sure that the hose does not clog or stop siphoning, or that
the pump does not stop working.
6. Once a year, the system should be disinfected and the sediment removed
from the spring box.
REMOVING SEDIMENT AND DISINFECTING A SPRINGBOX
1. Open the valve on the outlet pipe, allowing the spring box to drain.
2. Remove any accumulated sediment from the box and wash the interior
walls with a chlorine solution. The solution for washing the spring box
should be mixed at a ratio of 10 L water with 0.2 L chlorine bleach.
Caution: Chlorine and chlorine compounds irritate the eyes and skin. Wear
protective clothing and equipment such as gloves and safety glasses when
dealing with chlorine.
3. After the spring box has been cleaned, 100 mg/l chlorine should be added
directly to the water in the spring box, followed by a second application
after 12 hours these consecutive applications should provide for adequate
disinfection. If possible, water samples should be analyzed periodically for
contamination.
D. PUMPS IN GENERAL
1. Manufacturer’s Recommendations
Pump manufacturers always provide a manual for the operation and maintenance of
their pumps. The instructions in these manuals, including the recommended
maintenance schedule, should be followed. The instructions include greasing, oil
inspection, checking of voltage at power source, adjustments and repairs.
If during inspection a defect is found, it should be repaired immediately. The operator
should pay attention even to small defects, and not wait for them to worsen, as these
could cause other parts or units to fail, resulting in larger damage and more costly
repairs.
2. Pump Station Data
Every pump station must have complete data as shown in Form 5.1.
Chapter 5: Supply Source and Disinfection Facilities
Page 5.7
Form 5.1: Pump Station Data
PUMP STATION NO.
Location
Date
A. SOURCE DATA
B. PUMP DATA
Well Casing Diameter
Well Depth:
Well SWL:
Specific Capacity:
Water Quality:
Year Drilled:
Driller:
Remarks:
Type:
Brand Model:
No. of Stages:
Pump Setting:
Column Assembly Size:
Discharge Head Size:
Supplier:
Remarks:
C. MOTOR DRIVE DATA
D. CHLORINATOR
Type:
Brand/Model:
Rated HP @ rpm:
Volts/Amperes:
Hollow Shaft Diameter:
Year Installed:
Remarks:
Type of Booster:
Booster Rated HP:
Chlorinator Brand:
Model/Series:
Year Installed:
Remarks:
3. Pump Log
A pump log should be maintained to record the daily pressure and flow readings of the
pump. The time of the day when these readings are made should also be reflected.
Form 5.2 shows a format of a Daily Operation Log.
The schedule for operating and stopping the well pumps should relate the pump
capacity to the data on daily water demand and the water levels of the reservoirs.
Form 5.2: Daily Operation Log
Date Time Time
Pressure
Start Stopped Reading
16
Flow Reading
Start Final
Cl Usage
Initial Final
KW Reading16
Initial Final
Remarks
Fuel consumption columns may be added if generators and diesel engines are used.
Page 5.8
Chapter 5: Supply Source and Disinfection Facilities
4. Pump Operations
It is simple to operate the intake pumps used for water wells or surface water. They are
automatically started by the low level pressure and shut down by the high level pressure
switches installed in the water storage or receiving tank. These pumps may set for
manual operation by turning the control switch mounted on the pump base from the
“Auto” to “Manual” setting, and using the start/stop buttons for the pump motor.
However, care must be observed in stopping pump operation.
Table 5.2: Steps for Manually Stopping Pump Operation
1. Gradually turn the discharge valve until it is only about 1/4 open. Do not
close the valve suddenly, as sudden shut-off could create back pressure and
flow surges.
2. Use the “Stop” push button to stop the motor.
3. Totally close the discharge gate valve to prevent possible back flow.
5. Pump Trouble Checklist
The manufacturer or supplier of the pump always provides the pump design curve
which is the basic reference for evaluating actual performance. In addition to the
comparison of actual performance against the design curve, the operator should be
alert to the following indications of pump problems:
1.
2.
3.
4.
5.
6.
7.
Excessive heating of the motor;
Change in the bearing noise level;
Change in the pattern of oil consumption of the motor;
Excessive vibration;
Change in amperage or voltage load;
Cavitation noise or other unusual noise; and
Presence of cracks or uneven settlement of the pad or ground around the
pump.
E. CENTRIFUGAL PUMPS
A typical centrifugal pump and its component parts are shown in Figure 5.3 on the
following page.
1. Operation
To operate a centrifugal pump, certain procedures need to be followed, which are
found in the manual supplied by the manufacturer. They generally involve the steps
outlined in Table 5.3.
Chapter 5: Supply Source and Disinfection Facilities
Page 5.9
Figure 5.3: Centrifugal Pump Details
NWRC RWS Volume I, Design Manual
Page 5.10
Chapter 5: Supply Source and Disinfection Facilities
Table 5.3: Steps in Operating Centrifugal Pumps
1. Before starting the motor, make sure that the discharge gate valve is
closed.
2. If the pump is not self-priming or has defective suction line or foot valve,
add priming water. Priming displaces the air in the suction line or drop
pipe of the pump with water. Refer to Figure 5.3 for details of a centrifugal
pump.
3. Allow the pressure to build up, and then slowly open the discharge valve.
Doing this slowly avoid water hammer, which could destroy the pipes and
valves.
4. Start the pump motor.
5. After the pressure has built up, slowly open the discharge gate valve. In
case the pump has been primed with water, waste the water pumped
during the first 1-2 minutes by opening the drain valve.
6. Make a routine check for faults in the operation of the system (abnormal
noise, vibration, heat, and odor).
2. Maintenance & Repair
Bearings, gears and other pump moving parts should be lubricated on the regular
schedules, using the lubricants recommended by the supplier. The following are specific
actions to remedy centrifugal pump problems.
a. Low Pump Efficiency
If the pump performance tests reveal that the pump is operating at significantly lowered
efficiencies, the pump should be pulled out, inspected and repaired or reconditioned.
This work is best referred for servicing to the manufacturer or a pump repair specialist.
b. Packing Adjustment
The water flowing through the stuffing box should be maintained at a level just enough
to prevent overheating. The gland nuts should be loosened or tightened one-quarter
turn only to allow the packing to equalize against the pressure.
c. Checking and Adjusting Misaligned Head Shaft
Pump vibrations could indicate a misalignment of the head shaft. This can be checked
by the following procedure:
1. Remove the motor dust cover, motor head nut and key, and take out the
motor drive flange.
2. Check if the head shaft is concentric with the motor hollow shaft bore.
3. If needed, adjust by using shims.
3. Other Common Problems
Other common problems and their remedies are summarized in Table 5.4 on the
following page.
Chapter 5: Supply Source and Disinfection Facilities
Page 5.11
Blown fuse or open circuit breaker.
Motor or starting switch out of order.
Likely Cause of Trouble
Remedy
Break in wiring.
Stuffing box may be binding or tightly packed
Scale or sand in the impeller.
Pump lost first priming.
Pump repeatedly loses priming due to leaky drop
pipe or suction pipe.
No water at source due to overpumping
Collapse of well casing or screens
Tighten mounting.
Reduce pumping rate.
Repair air leaks.
Reduce pumping rate or deepen the well.
Replace with new one. If diameter of old casing is large, insert new
casing inside the damaged casing. Consult driller.
Surging or acid treatment. Consult driller.
Do pumping test or deepen the well.
Pull the drop pipe from the well & seal leak/s.
Surging or acid treatment. Consult driller.
Open the pump and clean/replace impellers.
Clean foot valve.
Tighten or replace defective parts.
Replace fuse or reset circuit breaker.
Inspect /repair. Refer to equipment supplier or experienced mechanic
or electrician.
Repair circuit wires.
Check packing by manually rotating shaft.
Loosen packing nut just enough to allow a slow seepage of water and
free the shaft.
Open pump and remove scale by acid treatment and/or sand.
Repeat priming. Follow manufacturer’s priming instructions.
Pull out drop pipe and seal the leaks.
Table 5.4: Common Troubles in Operating Centrifugal Pumps and their Remedies
Trouble
Pump Motor
fails to start
Pump runs but
delivers only a
small amount of
water
Noisy Pump
Clogging of well screens
Well not yielding enough water.
Air leaks in suction pipe.
Incrustation or partial clogging of well screens.
Impeller is worn out or lugged with scale or trash.
Foot valve may be obstructed.
Bearing or other working parts of pumps are loose
or need to be replaced
Pump motor is loosely mounted.
Low water level in well.
Presence of air in suction line.
NWRC: RWS O & M Manual, Vol III
Chapter 5: Supply Source and Disinfection Facilities
Page 5.12
Pump runs but
delivers no
water
Table 5.4: Common Troubles in Operating Centrifugal Pumps and their Remedies
F. SUBMERSIBLE PUMPS
1. Operation
Submersible pumps may be operated manually with a switch located above ground level
or automatically with a pressure switch, electrodes or float control devices. (Refer to
Figure 5.4)
Submersible pumps should always be operated below the water level. The pump should
be installed higher than the well screen to prevent pump break suction which will lead
to a burned pump motor.
Figure 5.4: Details of a Submersible Pump
NWRC RWS Volume III, Operation and Maintenance Manual
Chapter 5: Supply Source and Disinfection Facilities
Page 5.13
2. Maintenance & Repair
To begin a maintenance job analysis, the assigned person needs the following
information:
•
•
•
•
•
•
•
•
Pump motor unit size and type;
Static and pumping water level of the well;
Size of drop pipe;
Pump setting;
Discharge pressure required;
Capacity pumped;
Line voltage; and
Operating Manual
3. Common Troubles of Submersible Pumps and Their Remedies
Table 5.5 summarizes the common problems of submersible pumps and their remedies.
G. POSITIVE DISPLACEMENT PUMP
Positive displacement pumps are either reciprocating or rotary types (Figure 5.5) A
positive displacement pump causes a fluid to move by trapping a fixed amount of it then
forcing (displacing) that trapped volume into the discharge pipe. The, flow is directly
related to RPM and pressure by the restriction of the flow in the discharge line. Once
the system pressure is set, any change in flow will result in a change in pressure. These
changes in flow can occur from certain conditions in the pump inlet line, the pump itself,
the pump drive or in the pump discharge line.
1. Pump Inlet Problems
The inlet conditions are often among the first items to investigate when a system loses
pressure. Many things can cause cavitation or starvation and result in a gradual loss or
fluctuation of system pressure.
Problems in other inlet accessories can also contribute to losing system pressure.
Clogged filters are a prime target. These should be inspected and cleaned regularly. All
fittings and hoses should be periodically inspected for air leaks as this will also
contribute to a loss in system pressure.
2. Pump Drive Problems
Changes in the RPM of the pump’s drive may contribute to a loss of system pressure. A
proper and secure drive for the pump is needed to maintain a consistent flow and the
required system pressure. Replace belts on a regular schedule to maintain maximum HP.
Worn or slipping belts, the wrong pulley sizes for the pump and/or motor, and an
undersized drive can alter the desired pump output and directly affect the system’s
pressure.
Page 5.14
Chapter 5: Supply Source and Disinfection Facilities
Table 5.5: Common Troubles in Operating Submersible Pumps and their Remedies
Trouble
Pump motor
fails to start
Pump runs but
delivers little
or no water
Pressure valve
fails to shut
Likely Causes
Remedies
Motor Overload
Overloaded contacts close automatically. Check
cause of overload.
Low voltage
Check voltage.
Blown fuse, broken
or loose connections
Check fuses, relays, electric condensers and all
electrical connections.
Motor control box
not in proper
position
Ensure box is in right position.
Damaged cable
installation
Locate and repair the damaged cable.
Cable, splice or
motor windings may
be grounded or wet.
Check the ground by using an ohmmeter. If
grounded, pull out the unit and inspect cable
and splice. Cut the unit loose from the cable and
check each part separately using an ohmmeter.
Pump stuck by
corrosion or abrasive
Pull out pump, examine and remove foreign
matter.
Pump not
submerged
Lower the unit into the well or replace by a
smaller capacity pump
Discharge pipe may
be leaking
Examine discharge line by pulling out one joint
at a time.
Check valve may be
clogged or corroded
Pull out pump and clean or replace check valve
Pump badly wornout by sand or
abrasive
Replace pump. Clean well thoroughly of
abrasive before putting the new unit in.
Strainers or
impellers clogged
with sand or scale
Pull out pump unit and remove the scale/sand.
Scaled or corroded
discharge pipe
Replace pipe.
Switch may be
defective or out of
adjustment
Adjust or replace pressure switch.
Discharge pipe may
be leaking
Raise unit one pipe joint at a time until leak is
found. Repair leaks.
NWRC RWS Volume III, Operation and Maintenance Manual
Chapter 5: Supply Source and Disinfection Facilities
Page 5.15
Figure 5.5: Positive Displacement Pump
3. Main Pump Problems
Changes within the pump can also affect system pressure. Good pump maintenance is
an essential element in maintaining consistent flow and system pressure. Regular
servicing of the V-Packings [seals] and valves will assure good sealing and seating
surfaces within the pump and optimum performance. Pump maintenance should be
established specifically for each system as liquid, temperature, operating cycles and
system accessories all affect the wear on a system. With a pressure gauge at the pump,
Page 5.16
Chapter 5: Supply Source and Disinfection Facilities
it is easy to see when the system pressure drops or fluctuates. This is the time to do
maintenance. Do not wait until the pump leaks externally or quits running completely to
do maintenance. Excessive and expensive damage may occur.
4. Discharge Line Problems
This is a primary place to investigate when the system begins to lose pressure. Most
often, worn nozzles are at the source of a system pressure loss and too often
adjustments are made in the regulating and relief valves to compensate for this nozzle
wear. This can put unnecessary stress on the pump. If there is no pressure gauge in the
system, you may exceed the pressure limit of the pump when making adjustments.
Always replace nozzles as a first step to correct a pressure loss. If the nozzle does not
restore the system pressure to the original setting, then proceed to other inlet, pump or
discharge conditions.
Internal seats, pistons and o-rings can wear and reduce the ability of the device to hold
the set system pressure. Worn check valves can cause a device to cycle and give erratic
pressure readings. System accessories should be checked when pump maintenance is
performed.
It is best to establish a complete maintenance routine for the entire system that
includes the pump, filters, hoses, connections, valves and nozzles. Regular maintenance
is far less expensive and time consuming than major overhauls or replacement.
H. JET PUMPS
1. Operation
Jet pumps can be operated manually, or automatically with a pressure switch,
electrodes or a float control switch.
a. Operating the Non-Self-Priming Jet Pump:
1. Initially inspect the assembly. Make sure that the power supply to the
motor is off;
2. Check lubrication. Make sure that the pump rotates fully by manually
turning the shaft. (For more details, refer to the pump manual);
3. Remove pressure gauge bushing and prime pump with clean water.
Never start the motor until the pump has been filled with water;
4. Replace pressure gauge bushing and close the discharge gate valve;
5. Start the pump motor. Note build-up of pressure in the pressure gauge.
Open the discharge valve slowly;
6. If discharge pressure is lost and fails to build up again after a short time,
the system still contains air. Stop the pump motor and repeat operating
procedures starting from item #3. It may be necessary to repeat the
procedure several times until the system is completely filled with water.
b. Operating the Self-Priming Pump
1. Routinely inspect the assembly. Make sure power supply to motor is off;
Chapter 5: Supply Source and Disinfection Facilities
Page 5.17
2. Check lubrication. Make sure that the pump rotates fully by manually
turning the shaft;
3. Start the pump motor.
Figure 5.6: Details of an Installed Jet Pump
NWRC RWS Volume I, Design Manual
Page 5.18
Chapter 5: Supply Source and Disinfection Facilities
2. Maintenance of Jet Pumps
The manufacturer or equipment supplier always provides the client with the Operation
and Maintenance manual upon purchase of their product. Refer to this manual for the
proper operation and maintenance of your pump.
Table 5.4 for centrifugal pumps may be also used as a guide for troubleshooting
operational problems of jet pumps. Additional troubleshooting information for jet pump
problems is presented in Table 5.6.
Table 5.6: Troubleshooting Jet Pump Problems
Problem
Likely Causes of Trouble
Pump runs but delivers
only a small amount of
water
Nozzle – diffuser or jet may be partially
plugged with scale or trash.
Remove and clean
Pressure regulator for jet may be set
too low for existing water level.
Set regulator for higher
pressure.
Jet pressure regulator is set too low.
Set regulator for higher
pressure.
Jet nozzle is plugged with scale or
trash.
Remove and clean jet.
Water level in well has dropped too
low.
Reduce pumping rate; lower
jet or find a new source.
Pump fails to pump up
to full pressure and
shut off.
Remedy
NWRC RWS Volume III, Operation and Maintenance Manual
I. OTHER CAUSES OF PUMP FAILURES
1. Overpumping
Overpumping means more water is pumped than the capacity of the well. Overpumping
will lower the water level in the well, consequently reducing the discharge, and in the
case of submersible pumps, damage the pump motors. It will also result in sand
clogging the well screen.
Overpumping problems can be avoided by reducing the pump discharge or increasing
the well capacity (rehabilitating or deepening the well). The safe pumping level should
first be determined from the well driller or from the well drilling records.
2. Corroded Well Casing
A well casing is used to prevent the collapse of the hole and entrance of undesirable
water into the well. Corrosion is caused by the direct reaction between the water and
casing material.
Chapter 5: Supply Source and Disinfection Facilities
Page 5.19
The problem of corroded well casing can only be solved by drilling a new well or
inserting a smaller diameter casing inside the corroded one. In such a case, it is
necessary to consult with an experienced driller.
3. Incrustation or Clogging of Well Screens
Incrustation or clogging of the well screen may be caused by direct deposition of
suspended fine sand, formation and deposition of calcium carbonate, and deposition of
slimy matter resulting from the biological activity of bacteria.
Incrustations caused by the deposition of suspended matter and/or scale can be
corrected by surging or by muriatic acid treatment. Clogging due to bacteria can be
corrected by chlorination. This procedure must be referred to an experienced driller.
4. Cavitation
Cavitation is one of the most serious operational problems with centrifugal pumps.
When it happens, cavities or bubbles of vapor form in the liquid. The bubbles collapse
against the impeller, making a sound as though there were rocks in the pump. If left
uncorrected, cavitation will seriously damage the pump. Cavitation develops when
normal pump operating conditions are exceeded. The results are noise, vibration,
impeller erosion, and reduction in total head and efficiency.
TYPICAL CAUSES OF CAVITATION
1. The pump is operating with too great a suction lift.
2. A suction inlet is not sufficiently submerged.
3. The impeller vane is traveling at higher revolutions per minutes (rpm) than the
liquid.
4. Suction is restricted (Note: Do not throttle the suction of a centrifugal pump.
5. The specific pump speed is too high for the operating conditions.
6. The liquid temperature is too high for the suction conditions.
J. PUMPSET PERFORMANCE TESTING
Pumps are always supplied with pump curves data when newly purchased. The pump
curve shows the pump efficiency at its operating conditions. In the example in Figure 5.7,
note that the head curve for a radial flow pump is relatively flat and that the head
decreases gradually as the flow increases. Note also that the brake horsepower
increases gradually over the flow range with the maximum normally at the point of
maximum flow. The three pump characteristics shown in the graph are:
•
Head Capacity
•
Power Capacity
•
Efficiency Capacity
Page 5.20
Chapter 5: Supply Source and Disinfection Facilities
As the pump ages or is affected by operating problems, its efficiency will drop causing
reduced pump capacity and higher operating cost. This loss of pump capacity can be
determined by a pumpset performance testing.
Figure 5.7: Sample Curves for a Centrifugal Pump
Periodic checking of the pumpset (pump and motor) will disclose deterioration of
operation before any serious problems develop. A performance check should be carried
out every year or as often as required, especially when the pump is subjected to severe
conditions such as corrosion, sand pumping, abrasion or cavitation.
K. GUIDELINES FOR PERFORMANCE TEST
1. The test should be carried out at the pump’s normal operating conditions
and at 2 points above and below this condition.
2. Shut-off and fully-open discharge valve positions should also be checked (do
not exceed 3 seconds for shut off).
3. Test data are recorded and compared with the previously obtained ratings or
original pump curve points.
The pump station normally has 2 devices for measuring flow measurement: one uses
the orifice equipped by-pass and table values; and the other uses the flow meter which
is read directly. If there is no flow meter or orifice device in the by-pass pipe, flow
measurements can still be made using volumetric measurements or horizontal flow
measurements. Refer to Annex B for an explanation of the horizontal flow method.
1. Test Procedure Using an Electric Motor as Prime Mover
1. Close the distribution discharge valve and half open the by-pass valve;
2. Start operating the pumpset and let it run for about 5 minutes for water level
to stabilize;
Chapter 5: Supply Source and Disinfection Facilities
Page 5.21
3. Manipulate the discharge valve to the following settings while taking
pressure and flow measurements:
•
•
•
•
Operating pressure
Operating pressure less 10 psi
Operating pressure plus 10 psi
Operating pressure plus 20 psi;
4. Shut off pressure (do not exceed 3 seconds for this setting).
2. Analysis of Pumpset Testing Results
1. Reduced Head Curve, Pump Efficiency and bhp – Reduction on all 3 curves is
brought about by worn impellers. Ample clearance should be provided to
prevent impeller abrasion by sand. Impeller abrasions will result in reduced
water yield. In such a case, the pump should be pulled out and repaired.
2. Reduced Head Curve and Pump Efficiency at Constant bhp – Accumulated
mineral deposits in bowl wall, eyes and at impeller shrouds cause restrictions
and inflow turbulence resulting in a reduced Q versus TDH curve and reduced
pump efficiency. In this case, the pump should be pulled out for cleaning.
L. MAINTENANCE OF PUMP STATION AND SURROUNDINGS
The operator should at all times maintain the cleanliness of the pump station and its
surroundings not only for aesthetic reasons but also for sanitary reasons. Water users
usually associate the quality of the water with the condition and cleanliness of the
facilities. If these are in poor condition, the water quality will be subject to doubt.
The pump station and the surroundings should be periodically cleaned. Rubbish should
be disposed off, the dust swept out. The pump house should be kept in good repair and,
when needed, painted. Ideally, trees and plants should be planted in the premises.
M. ELECTRIC MOTOR ROUTINE MAINTENANCE
The most important items for good maintenance of an electric motor, aside from
checking for bearing wear, are regular use, and keeping it warm (from operation), clean,
and dry. Moisture is an enemy of insulation along with oil and dust. Every motor should
be operated for 5-6 hours at least every week. The longest useful life of a motor is
obtained from a unit which is never shut down and cooled off, especially in a humid
climate. Listed below are some maintenance tips.
•
Every Day:
1. Check temperature of motor housing with hand.
2. Check lubrication reservoir level.
3. Check air vents for blockage.
4. Check external wiring for frayed insulation or loose connections.
Page 5.22
Chapter 5: Supply Source and Disinfection Facilities
•
•
•
5. Check voltage and current at each leg of the three phases.
Every Month:
1. Check motor housing temperature.
2. Check shaft alignment.
3. Check input horsepower under load.
Every Year:
1. Vacuum all dust out of windings and motor case.
2. Drain lubricant, flush out oil reservoir with kerosene, and replace with
factory- approved lubricant.
Every Three Years:
1. Examine winding insulation for damage.
2. Clean oil connectors and contact points with fine emery cloth.
3. Inspect shaft and bearings for scour, wear or damage.
4. Check input horsepower under load.
N. DIESEL ENGINE MAINTENANCE
In almost all cases, diesel engine prime movers are designed as standby units, these
must be given proper care to prolong their life and for their efficient operation. In the
absence of the equipment operating manual, listed below are suggested preventive
maintenance practices.
•
•
•
•
Every Third Day:
Operate the diesel engine at about 1,000 rpm for at least 5 minutes or until
warm. This would allow the lubricant and coolant to circulate around the
engine.
Every 8 hours Operation:
Check coolant level, sump oil level, oil reservoirs, for oil, water or fuel leaks
and clean oil bath cleaner.
Every 200 hours of Operation:
1. Drain and renew engine lubricating oil.
2. Renew lubricating oil canisters.
3. Check tension of drive belt
4. Clean fuel water trap.
5. Lubricate dynamo rear brush.
6. Clean air filter element.
Every 400 hours of Operation:
1. Renew fuel and air filter elements.
2. Check hoses and clips.
3. Clean lift pumps sediment chamber.
Chapter 5: Supply Source and Disinfection Facilities
Page 5.23
•
Every 2,400 Hours of Operation:
1. Check and adjust valve clearances.
2. Service injector units.
O. O&M OF SLOW SAND FILTER
Slow sand filtration is a system of water purification which, since the beginning of the
nineteenth century, has been proven to be effective under widely different
circumstances. It is simple, inexpensive and reliable and is still used for purifying the
water supplies in many cities and municipalities in both developed and developing
countries.
Slow sand filtration combines within itself most of the purification functions that occur
in nature such as settlement, straining, filtration, chemical change and to some extent,
storage, resulting in an effluent with a high degree of quality. It is also efficient in the
removal and/or inactivation of organisms because of “Biological Filtration”.
1. Elements of a Slow Sand Filter
The various elements that make up a slow sand filter are shown in Figure 5.8 and
described below. These details should provide sufficient background for their
construction, proper operation, and maintenance.
1. Filter Box – is a concrete, open-topped structure which houses the
supernatant water reservoir, filter bed and the underdrainage system. It is
usually rectangular in shape with a depth from 2.5 to 4.0 meters and built
wholly or partly below ground.
2. Supernatant Water Reservoir – is an upward extension of the walls of the
filter box from the sand-bed surface, the principal function of which is to
maintain a constant head of water above the filter medium. In practice, a
head of between 1.0 M and 1.5 M is usually selected.
3. Filter Bed – is a bed of sand, usually graded. It should be composed of hard
and desirable grains preferably rounded and free from silt, clay, loam and
organic matter. Ideally, the effective diameter of the sand lies within 0.3 –
0.5 mm.
4. Under-drainage System – consists of a false floor of porous concrete or
perforated pipes, surrounded and covered with graded gravel to support the
sand bed and prevent fine grains from being carried into the drainage pipes.
5. Filter Controls – A system of control valves used to regulate the flow of
water through the bed. Figure 5.8 presents two methods of controlling water
flow rate.
Page 5.24
Chapter 5: Supply Source and Disinfection Facilities
Figure 5.8: Elements of a Slow Sand Filter
NWRC RWS Volume I, Design Manual
Chapter 5: Supply Source and Disinfection Facilities
Page 5.25
2. Starting-Up a Newly Constructed/Cleaned Slow Sand Filter
1. Introduce water at the bottom of the filter through the outlet chamber. The
purpose of adding water from the bottom is to get rid of all entrained air in
the sand pores and the underdrainage system which may cause air binding.
Continue until the water begins to show on the filter surface;
2. Level the top of the sand by raking;
3. Resume adding water through the outlet chamber until the water level is at
least 10 cm above the sand bed. The purpose of raising water up to this level
is to protect the sand surface from being scoured out of level when water is
introduced from above;
4. Open inlet valve and start feeding water slowly from the top until the
maximum water level in the supernatant water reservoir is reached;
5. Open the outlet valve and let the effluent run to waste until the filter gives
clear water;
6. Start operating the filter.
3. Ripening the Filter
When first constructed or just after cleaning, the slimy layer on the sand bed does not
yet exist. Building up this slimy layer is a slow process called “ripening” and entails
running the filter continuously and without interruption discharging filtered water to
waste for at least one or two weeks.
As ripening proceeds, there will be a slight increase in the bed resistance. The organisms
build up and the forming slimy layer will gradually become visible. These are signs that
ripening is proceeding well, but only after comparative chemical and bacteriological
analyses of raw and treated water may the waste valve be closed and the effluent be
directed to the distribution system. In case water supply distribution is interrupted for a
long period, filtration should be continued with the effluent discharging to waste. Any
shutdown for an extended period must be followed by further ripening if the quality of
the effluent is to be maintained.
4. General Operating Procedure
The operation of the filter is determined by the filtration rate, which is controlled at the
effluent outlet by a regulating valve. Initially, this valve is partially closed. As the run
continues, this valve must be checked and opened fractionally to compensate for the
choking of the filter and to maintain a constant filtration rate. In case the valve is
already fully opened and yet the design flow rate is still unattainable, the filter
operation should be stopped and the filter cleaned.
Inflow is likewise adjusted by means of a simple manually operated valve so that the
level of water in the supernatant reservoir remains constant. The valve will need
Page 5.26
Chapter 5: Supply Source and Disinfection Facilities
periodic checking in order not to waste raw water through excessive delivery or to avoid
diminishing output through a dropping water level over the filter bed.
5. Filter Cleaning
Filter cleaning will be necessary when the top 1-2 cm of the filter bed becomes choked.
If a gate valve is used for effluent control, the indicator of a choked filter bed is the
continued reduction of the effluent flow rate even when the valve is fully open. If the
floating orifice is used for effluent control, a choked bed will be apparent when the
orifice drops significantly (near the level of the mount of the guide) due to the reduction
of water level in the outlet chamber. Choking usually takes place after one or two
months of continuous filter operation depending on the turbidity of raw water treated.
The filter bed is cleaned as follows:
1. Close the raw water inlet valve and allow the water level in the supernatant
water reservoir to drop to the filter bed surface;
2. Close the outlet valve and open the drain valve. Allow the water level to drop
further to at least 10 cm below the filter bed surface;
3. As soon as the biological layer is dry enough to handle, immediately scrape
off the upper 25 to 50 mm layer of the filter bed using flat square-bladed
shovels. If cleaning is delayed, scavenging birds will pollute the filter surface
and disturb the sand;
4. After removing the scrapings, smooth the bed to a level surface. Also, inspect
for the presence of mud ball cracks in the sand which may result in
channeling, which would cause the deterioration of effluent quality.
The newly cleaned filter bed may now be put back into operation following the
procedure outlined for start-up of newly cleaned filters, including a re-ripening
process.
The re-ripening period will depend on the degree of disturbance or the amount
of the remaining bacteria in the bed. The quicker the filter bed is cleaned, the
less will be the disturbance and the shorter the period of re-ripening.
6. Re-sanding
Re-sanding becomes necessary when the depth of the sand bed drops to its minimum
designed level (usually about 0.6 – 0.8 m above the supporting gravel, depending on the
grain size of the filter sand). This depth is usually indicated by a marker set in the
structure during the original construction. Re-sanding may be done completely or by a
“throwing-over” procedure described below.
Chapter 5: Supply Source and Disinfection Facilities
Page 5.27
a. Complete Re-sanding
In this method, the upper 0.3-0.5 meter layer of the sand bed is scraped before new
clean sand is added. It should be emphasized that it is necessary to scrape the said layer
to avoid fouling and to reduce the greater resistance in the filter due to the raw water
impurities and some products of biochemical degradation which may have penetrated
the sand bed to this depth. After scraping, add new clean sand up to a level shown in
Figure 5.9 and place back the old sand that was scraped off the top. The old sand will
reduce the number of days needed for ripening the filter.
Figure 5.9: Details of Sand Filters
NWRC RWS Volume III, Operation and Maintenance Manual
b. “Throwing Over” Re-sanding
This is carried out in strips. The old filter sand is moved to one side, then the new clean
sand is added, and finally the old filter sand is replaced on top of the clean sand. This is
Page 5.28
Chapter 5: Supply Source and Disinfection Facilities
to retain the active material found in the old filter sand so that the re-sanded filter will
become operational with a minimum re-ripening time. The procedure is as follows:
1. With a flat square-nosed shovel, scrape 50-100 mm of the upper layer of
sand bed. Place the scrapings in a box for cleaning;
2. Divide the whole length or width of filter into strips;
3. With a flat square-nosed shovel, scrape 0.3 – 0.5 meter of the upper layer of
the first strip and stack it to one side;
4. Fill the excavated trench with the new clean sand and scrape 0.3 – 0.5 meter
of the adjacent or second strip and place it on top of the first strip;
5. Fill the second strip with new sand and scrape 0.3 – 0.5 meter of the adjacent
or third strip and place it on top of the second strip;
6. When the whole bed has been re-sanded, use the material scraped from the
first strip to cover the new sand in the last strip;
7. Operate the filter as described in sub-section 2.
7. Washing Filter Sand
In areas where sand is expensive or difficult to obtain, surface scrapings or used sand
should be recycled. Scrapings should be washed immediately to remove organic matter. .
Filter sand may be washed manually or mechanically:
a. Manual Washing
1. Transfer the scrapings to a box;
2. Fill the box with clean water;
3. Stir the sand in the box with a spade or shovel vigorously enough to
separate the sand particles from the impurities;
4. Transfer the sand into the second box and add clear water. Stir the
contents of the box to separate the organic matter from sand particles;
5. Repeat the above procedure until the wastewater is fairly clear;
6. Store the sand.
b. Mechanical Washing
A machine called the ejector type, mechanical sand washing machine is used for this
purpose. The machine consists of a cylindrical drum with conical bottom and stirrers.
The used sand is fed at the top and at the same time, clean water is injected under
pressure at the bottom of the drum. The impurities are removed in the overflow while
the clean sand is discharged at the bottom of the drum. The stirrers inside the drum aid
in dislodging undesirable substances from the sand particles.
Chapter 5: Supply Source and Disinfection Facilities
Page 5.29
P. CHLORINATOR OPERATION AND ROUTINE MAINTENANCE
1. Hypochlorinator
1. Read the Instructions provided in the manufacturer’s Manual.
2. For maintenance purposes, it is essential to clean the strainers and tubings as
often as necessary or at least twice monthly. If the tubings are not cleaned,
the chlorine granules can re-solidify and cause blockages.
2. Gas Chlorinator
For operating and maintenance, carefully read the Instructions provided in the
manufacturer’s Manual. Generally start-up is as follows:
1. Turn on water supply to the ejector;
2. Open the chlorine cylinder valve not more than ½ turn then close
immediately. Check for leaks. A smell of chlorine gas indicates a leak in the
set-up. To confirm, dip a cotton or piece of cloth in ammonia solution and
expose it near the leakage. Ammonia vapor reacts with chlorine gas to form
white fumes;
3. If leak is confirmed, allow the chlorine gas to dissipate from the air before
undertaking any repair;
4. After the repair, repeat steps #2 and #3 until no more leak is detected;
5. Set the feed rate at the computed or desired chlorine dose level.
6. Chlorinator Shutdown:
i.
When pressure in cylinder reaches zero or flow drops as indicated by
flow tube, close cylinder valve;
ii. If valve does not close tightly, open and reclose lightly several times
until it closes properly;
iii. Do not use over-size wrench to force valve closed;
iv. Leave chlorinator operating with ejector water on for a few minutes
after closing the cylinder valve, to exhaust Cl2 from chlorinator before
disconnecting it;
v. Replace outlet cap and protective bonnet immediately after
disconnecting the chlorinator;
vi. Do not leave chlorinator or chlorine lines open to the atmosphere for
any extended period. If they are reconnected to a new cylinder, cap
the open ends to prevent moisture from the air from entering and
causing corrosion.
Page 5.30
Chapter 5: Supply Source and Disinfection Facilities
7. Chlorine Leaks
i.
A chlorine gas leak usually is first detected by smell. If you smell
chlorine, move to safety and keep others away from the area, get
help, and put on a gas mask before trying to pinpoint the leak.
ii. Large leaks show as escaping green gas or liquid, with frost from the
atmosphere forming around the leak.
iii. Small leaks can be located by spraying ammonium hydroxide (aqua
ammonia) vapor from a plastic squeeze bottle, or by passing a cloth
soaked in the ammonia solution. Ammonia vapor reacts with chlorine
gas to form white fumes.
3. Routine Maintenance
1. Strainer: Clean the strainer in the ejector water supply line every six months.
2. O-Rings: O-rings showing the first sign of damage or brittleness should be
replaced. Faulty O-rings result in vacuum leakage. O-rings should be routinely
inspected whenever an opportunity presents itself in the course of repairs or
maintenance of other parts.
3. Vacuum Regulator Valve and Ejector: Clean the vacuum regulator and
ejector throat and nozzle at least once a year. The need for cleaning may be
indicated by insufficient ejector vacuum, resulting in lowered maximum
capacity of the feeder.
4. Hose Lines. Inspect all hose lines at least weekly for cracks or weak spots
that develop with aging. Faulty lines should be replaced. Use only hoses
supplied by the manufacturers of chlorine equipment. Never use ordinary
rubber hoses except for a very short period in an emergency situation.
Rubber used for chlorine service is a special type.
Chapter 5: Supply Source and Disinfection Facilities
Page 5.31
Page 5.32
Chapter 5: Supply Source and Disinfection Facilities
Chapter 6
Distribution System
This Chapter discusses the proper operation and maintenance of the various
components of a water distribution system.
A. INTRODUCTION
The O&M of a water distribution system is directed at the following general objectives:
•
To ensure adequate pressure in the system 24/7;
•
To minimize non-revenue water (NRW);
•
To ensure that the water delivered is potable.
The distribution system consists of four components, whose O&M requirements are
based on their unique characteristics as well as their function and contribution to the
total system. They are:
1. Distribution pipelines
2. Storage tanks or reservoirs
3. Service connections or standpipes
4. Valves and other appurtenances
B. DISTRIBUTION PIPELINES
Distribution pipelines must be able to convey quality water reliably and efficiently to the
consumers and keep it from being contaminated along the way.
1. Sound Operation Practices
Properly constructed, pipelines can provide years of trouble-free operations. However,
sound operation practices need to be observed, both to ensure water quality and to
prevent the deterioration of pipeline efficiency. Sound operation practice can be
summarized as follows:
1. Always maintain positive line pressure. Negative pressure could result in
backflow from private storage and the intrusion of foreign water/matter that
may pollute or contaminate the system.
2. Always open and shut off valves gradually. Abruptly opening or shutting off a
valve can cause sudden surges, changes in water velocity, and reversals of
flow that might produce water hammer effects that could stir up sediments,
making the water dirty, and damage valves and weaken the pipe joints.
Chapter 6: Distribution System
Page 6.1
3. Implement an appropriate flushing program to clear sediments from the
system. Such a program should institute the regular, periodic flushing of the
pipes, as well as prescribe the maintenance measures for those sections of
the system that are more prone to sediment build-up, such as dead-end
pipes and low sections. These sediment-prone sections should be preidentified and, if needed, provided with additional blow-offs and hydrants to
facilitate flushing and disinfection.
2. Preparation for Repairs
Regardless of their construction and the best operational and maintenance practices,
pipes are subject to the aging process, to accidents, and to other adverse factors
including force majeure. Thus, the SSWP should accept the fact that pipeline leaks and
breakages can and will happen, and be prepared to handle them. Since water main
breaks need to be repaired with as little delay as possible, it is important to have
contingency plans in place, and for the SSWP personnel are trained to work with
minimal delay based on the plans.
The following tasks should be done in advance in order to eliminate delays in getting the
needed repair work started:
1. Post the phone numbers of key maintenance personnel conspicuously in the
pumping station or office.
2. Keep the following items available and ready for use at all times: valve keys,
hand tools, digging tools, pavement breakers, trench-shoring material, a
portable centrifugal pump, floodlights, an emergency chlorinator, and
calcium hypochlorite.
3. Keep a stock of split-sleeve and mechanical-joint repair fittings in sizes that
fit critical mains.
4. Make advance arrangements with the municipal engineer’s office, DPWH, or
an outside contractor for the use of equipment that may be needed but are
not normally owned by the SSWP. Keep an inventory of the type of
equipment that is available at these sources whether for borrowing or
renting. The contact details of the persons in charge of the equipment at
these sources should also be posted conspicuously at the pumping station.
3. Locating Water Mains
The exact location of pipes can be determined by referring to records or as-built plans of
the water supply system. In cases where records are inadequate or lost, underground
pipes might be pinpointed
•
By asking old residents who witnessed their installation;
•
By using pipe locators;
•
By trial excavation.
Page 6.2
Chapter 6: Distribution System
Plan of the Distribution Facilities
Ideally, the SSWP should have a clear, detailed plan of its distribution facilities, as
well as information about the appurtenances like valves. If a pipeline problem is
reported, the first thing to do is to ascertain the exact location of the main
involved.
Without a plan of the distribution facilities, the repair crew will have to take the
extra step of locating the main where the problem has occurred, before it can
start the repairs.
a. Locating Pipes with Pipe Locators
The position of water mains can easily be pinpointed with the use of a pipe locator. A
small water utility, however, is unlikely to own this very expensive piece of equipment.
It may have to rent one, unless it can be borrowed from a government agency that has
one.
b. Locating Pipelines by Trial Excavation
1. In the vicinity of the reported problem, select a primary reference point
that you can use to establish the position of the problem pipeline. An
exposed pipe section, a gate valve, or gate valve box would be a good
primary reference point;
2. Where there is no exposed pipe section, select any point on the north or
east side of the road and make an excavation. In the Philippines, water
mains are usually installed at the north or east side of the road;
3. If a water main is not found at the first point excavated, try again at
another point on the north or east side of the road within the same
vicinity. Continue the trial and error process until a water main is located;
4. Using the water main just located as reference point, select a second
point 50 to 100 meters from it and make another excavation;
5. Once a second excavation point reveals the water main, draw an
imaginary line connecting the successful excavation points 1 and 2. The
connection of the two points is the exact position of the buried pipe;
6. Repeat the above process using the identified points as reference until all
pipelines are pinpointed.
4. Cleaning Pipelines
Water going through the pipelines may sometimes carry sand, sediments, and organic
and other objectionable matter. When water velocity is low, these tend to get deposited
and build up inside the pipes. The built-up deposits decrease the carrying capacity of
Chapter 6: Distribution System
Page 6.3
the pipes and increase internal friction, making the pipelines less efficient. Less water
can be delivered per given time, pumping costs increase, and the added and uneven
pressure within the pipelines increases the likelihood of breaks and leaks. These effects
are complicated when magnesium and calcium salts are present in the water (hard
water), as their precipitation results in scaling inside the pipes. Likewise, when organic
matter is present in the deposits, bacteria proliferate, causing undesirable odors, and an
off-taste and color in the delivered water.
The method for removing solids which are not cemented to the inside surface of pipes is
to flush with water at high velocity. Annual flushing is generally sufficient to maintain
the pipelines clean. (But note that different water and pipe materials may need a
different schedule.) Dead end pipes should be flushed and disinfected at least once a
year. Furthermore, whenever mains are opened for repair, they should also be flushed
and disinfected.
The flushing procedure is as follows:
1. Isolate the water mains to be cleaned by closing the appropriate control
valves;
2. Empty the water mains by opening the blow-off valve or other temporary
outlet at the lower end of the pipeline. In some cases, to expedite the
emptying of water mains without pumping, compressed air may be
introduced at the highest point of the isolated system;
3. Inject water at high-induced velocity (1.0 meter per second or higher) until
the objectionable materials are expelled;
4. As needed, disinfect the pipelines. After disinfection, flush the pipeline with
clean water until the chlorine-odor is hardly detectable;
5. Put pipelines back to operation.
Conditions That Require Frequent Flushing
When recurring complaints about water quality are received despite regular
flushing, the SSWP should investigate the possibility that stagnant water in deadend lines may be the cause. It should determine and eliminate conditions that
make repeated flushing necessary, among them: (a) a dead end or low point in the
main that allows sediment to accumulate; and (b) insufficient chlorination, which
enables slime organisms to grow inside the pipes.
5. Repairing Pipe Leaks
Leaks in water mains should be fixed as soon as they are detected. Once the leak is
pinpointed, the water in the isolated main must be removed (see items #1 and #2 of
Page 6.4
Chapter 6: Distribution System
flushing procedure above). The repair job then consists of sealing the leaks and/or
replacing the defective pipe section. The different methods of fixing leaks are as follows:
a. Using Epoxy (for Small Leaks)
1. Dry the surface of the area to be repaired;
2. File the surface to make it rough, and slightly enlarge the crack or hole;
3. Apply the epoxy, forcing some of it into the crack or hole to produce a
seal;
4. Normally, the epoxy will set in 2 to 4 hours before the pipe can be
disinfected and put back into service, However, be sure to check the
directions for use of the epoxy as some types may require more or less
time.
b. Using Sleeve Type Coupling /Repair Clamps
Put a split sleeve/repair clamp around the leak opening.
c. Using Strips from the Inner Tube (“Interior”) of a Rubber Tire
In emergency work when no other repair materials are available, cut a discarded
inner tube of a rubber tire into strips and wind the strong, flexible rubber strips
tightly around the pipe to cover the leak and its surrounding surfaces.
d. After the Leak Is Repaired
1. Open the control valve to allow water to flow into the repaired section;
2. Observe carefully to verify if the leak is completely sealed;
3. After sealing, backfill the excavation and restore the surface to its former
condition;
4. Apply the disinfection procedures.
6. Replacing Damaged Sections of Pipelines
When the damage in a certain section of a water main is extensive, repair may involve
cutting off and replacing the damaged section. The procedures for repairs are as
follows:
a. For Galvanized Iron (G.I.) Pipes
1. Isolate the defective section by closing appropriate control valves;
Chapter 6: Distribution System
Page 6.5
Figure 6.1: GI Pipe Repairs
NWRC RWS Volume III, Operation and Maintenance Manual
2. Excavate the water main;
3. Determine the exact location of the leak;
4. Cut the defective portion of the water main;
Page 6.6
Chapter 6: Distribution System
5. If a nipple of appropriate length is not available, prepare a substitute
nipple using a short pipe of the same kind, diameter and length as the cut
off defective pipe;
6. Thread the ends of pipe to be joined;
7. Install G.I. coupling and union parts;
8. Assemble them as shown in Figure 6.1;
9. Open the control valve to allow water to flow into the repaired section.
Observe carefully if the repaired section is not leaking;
10. If there is no more leak, backfill the excavation and restore the surface to
its former condition;
11. Disinfect the repaired section.
b. For Polyvinyl Chloride (PVC) Pipes
1. Isolate the defective section by closing the appropriate control valves.
2. Excavate the water main;
3. Pinpoint the leak;
4. Measure and cut the defective portion of the pipeline. The length of the
pipe cut should have an equivalent commercially available threaded
nipple;
5. Install the PVC socket and adaptor union;
6. Join the two cut portions of the water main with the nipple in between.
(In case PVC threaded nipple is not available, use the equivalent G.I.
threaded nipple);
7. Open the control valve to allow water to flow into the repaired section
and observe if it is not leaking;
8. If there is no more leak, backfill the excavation and restore the surface to
its former condition;
9. Disinfect the repaired section.
c. For Polybutylene (PB) and Polyethylene (PE) Pipes
1. Isolate the defective section by closing the appropriate valves and
excavate main;
2. Cut the defective portion of the water main;
3. Check if the two separate ends of the cut can be pulled together to be
joined. (This is usually possible because PB and PE pipes are laid in
serpentine fashion as shown in Figure 6.2.) Otherwise, a small
connecting section must be inserted;
4. Join the 2 separated ends. For PB, use the flaring method. For PE pipes,
use the butt-welding method;
5. Open the control valve to allow water to flow and observe for leaks;
Chapter 6: Distribution System
Page 6.7
6. Backfill and restore surface to its former condition;
7. Disinfect the repaired section.
Figure 6.2: PE/PB Pipe Repairs
NWRC RWS Volume III, Operation and Maintenance Manual
7. Disinfecting Pipelines after Repairs
After a repair job, it is essential to disinfect the repaired sections of the water
distribution system with chlorine or chlorine containing compounds. Refer to Chapter 3
for complete disinfection procedures.
Page 6.8
Chapter 6: Distribution System
C. RESERVOIRS
1. Operation
Water for distribution is pumped from the water source to the system’s water tank or
reservoir, from which it is delivered to the consumers through the pipelines. The
reservoir is designed, based on the requirements of the system, to distribute the water
by gravity or by pumping.
2. Cleaning
The quality of water coming from the reservoir must be maintained within the
standards for potable water. To ensure the quality of the water supply, the reservoir
must be cleaned and disinfected periodically. Failure to apply this routine will result in
the accumulation of solids and proliferation of bacteria in the tank, making the water
unsafe for drinking.
Cleaning is usually done once a year, but it always must be done whenever the water in
the reservoir contains an appreciable amount of dirt.
Important Safety Precautions
When cleaning reservoirs, workers must work in pairs – one to go down and the
other to keep watch over the one inside the reservoir. Proper ventilation must be
ensured at all times during the cleaning or repair operations.
a. Checking Sediment Levels
1. Reduce the water level down to 15-20 cm above the bottom of the tank;
2. Stir up the water;
3. If the bottom appears to be clean and sediments are either minimal or
not present, cleaning is not needed.
b. Cleaning
1. When the check confirms that an appreciable amount of sediments has
accumulated in the reservoir, cleaning should proceed;
2. Brush the walls, column, ladders, and other parts of the reservoir to
remove adhering dirt particles and algae, if any;
3. Open the drain valve to drain the remaining water to waste. While
draining, agitate the water to keep the dirt particles from settling, and
sweep the sediments in the water towards the outlet;
4. Disinfect the tank by any of the following methods:
•
Fill the tank with 50-mg/l chlorine solutions and allow the solution
to stand for 24 hours before draining it to waste;
•
Alternatively, mix bleaching powder and water in a pail or bucket
to form a thin paste. Using a brush, apply the thin paste forcefully
Chapter 6: Distribution System
Page 6.9
on the interior surfaces of the reservoir. Allow one hour to pass
before rinsing the tank with clean water;
5. Put the tank back into operation after rinsing it with clean water.
Important Precaution on Chlorine
During the work of disinfection (which includes the task of rinsing of the reservoir
to remove the bleach), the working men must be wear breathing apparatus and
full protective clothing. The SSWP should equip them with these.
In case the bleaching powder solution accidentally gets into contact with the eyes,
immediately wash eyes with copious amounts of clean water. After the
disinfection job, all men involved in the work must shower or wash their entire
bodies thoroughly.
3. General Precautions
1. Storage facilities tend to attract children who like to play around the facilities,
climb the ladders, and play on top of concrete roof, oblivious of the serious
hazards involved. All gates, access hatches and manholes of reservoirs should
be locked. Never leave a storage facility for even a few minutes without
locking all access openings.
2. Vandals are known to intentionally damage storage facilities. Utilities should
keep watch against vandalism to protect the stored water and the public
from health hazards. If a covered storage facility is found to have been forced
open, it must be assumed that the water has been contaminated. Therefore
the reservoir should be drained to waste and disinfected before being refilled
with new water. All fences should be maintained in good condition. Do not
allow any materials to be staked out on fences, as these could aid trespassers
to climb over.
3. Keep reservoir roof ladders and walkways free of dirt, debris and grease to
prevent slipping and contamination.
4. Never enter a closed reservoir alone without someone standing by to help if
you get in trouble.
5. Keep alert for cracks/leaks in the reservoir and repair these at once.
6. Never store unchlorinated water in a reservoir for more than 72 hours.
7. The foundations of concrete reservoirs and elevated steel tanks are subject
to differential settlement when the soil beneath one part of the foundation
compresses more than the soil at another part. A differential of only 1- 2 cm
can cause large stresses in the reservoir wall or legs. When differential
settlement is discovered, corrective measures are urgent. These require the
services of a soil engineer and special equipment.
Page 6.10
Chapter 6: Distribution System
4. Detecting and Repairing Leaks in Steel Tanks
Reservoirs made of steel are usually installed above ground, making it possible to
visually detect any leaks. Leaks in steel tanks can be repaired as follows:
1. Small leaks may be sealed with epoxy or by welding.
2. Larger leaks may require covering the damaged section with a steel plate
larger than the hole, and welding it to the tank to seal the leak.
5. Detecting and Repairing Leaks in Concrete Reservoirs
Leaks in concrete reservoirs can be repaired with cement mortar. Concrete reservoirs
may be elevated or installed at ground level. If the concrete reservoir is elevated, leaks
can be detected visually. If it is at ground level, leaks can be detected by either of these
methods:
•
Marking the Water Level in the Reservoir – Close the discharge pipe control
valve. Fill the tank with water up to a certain level and mark the water level.
After one or two days, check the water level. If there is an appreciable
decrease in water level, the tank has leaks. During the entire process, the
outlet control valve should be closed.
•
Checking the Discharge in the Underdrains – If the tank has underdrains,
observe the discharge in them. An appreciable discharge indicates leaks in
the tank.
6. Maintenance of Reservoir Appurtenances
a. Monthly Maintenance Tasks
1. Lubricate float control pulleys.
2. Inspect float for leaks.
3. Check level indicator for free operation.
4. Sweep roof, catwalks and ladder landings.
b.
Manholes
Manholes should always be covered and locked to keep out foreign materials
that could contaminate the water supply and also to prevent accidents.
c. Overflow Pipe and Air Vents
1. Covered reservoirs or tanks should be vented to allow the passage of air
to and from the reservoir as the water level changes. Use fine screens on
the vents to prevent the entrance of animals and insects, and keep the
screens in good repair.
Chapter 6: Distribution System
Page 6.11
2. Keep access manhole covers in place to prevent accidents and
contamination.
3. Slope the ground away from the reservoir in all directions to prevent
surface water from flowing towards it.
4. Leaks in the cover or walls that allow surface water or shallow
groundwater to seep in are dangerous. Repair leaks at once.
7. Repairing Leaks in Reservoirs
a. Repairs Using Cement Mortar
1. Drain the reservoir;
2. Using a cold chisel, make a cut on the reservoir leak with the following
dimensions: Width 19-25 mm and depth 19-25 mm;
3. Prepare a stiff cement mortar paste by mixing 1 part of Portland cement,
2 parts of fine sand and sufficient water;
4. Clean and wet the holes cut in the reservoir and apply the cement mortar
paste. Allow the mortar to set for 24-28 hours;
5. Disinfect the tank;
6. Rinse the tank with clean water;
7. Put the repaired tank back into operation.
b. Repairs Using Proprietary Fast-Setting Cements
There are a number of proprietary fast-setting hydraulic cements specially formulated
to quickly stop leaks and the seepage of moisture through holes or cracks in concrete or
masonry walls. The most widely available in the Philippines is the “Waterplug” brand.
Some other brands are “Quickrete”, “Parson Quick Plug”, and “Dry Lok Fast Plug.” These
are generally based on Portland cement, but have ingredients that make the compound
expand as it sets. Most of these proprietary blends are supplied as a dry powder to be
mixed with clean water, and set within 3 to 15 minutes depending on the brand.
These formulations are durable and can be expected to last for the life of the concrete
structure being repaired. They do not contain toxic elements, are highly impervious to
water, and thus are suitable for use with potable water systems.
Application Procedure:
1. Open up the crack or hole by making a cut along the damaged area using
a cold chisel. This will make it possible for the compound to form a plug.
As the compound sets, it expands to complete the seal;
2. Before applying the compound, brush away all loose particles;
Page 6.12
Chapter 6: Distribution System
3. Mix the compound in accordance with the manufacturer’s directions,
which usually results in a paste of sticky consistency. The compound is
hydraulic cement that begins to bind once it comes into contact with
water. Once the water is mixed in, the paste must be used within
minutes;
4. Apply the paste and force it into the crack. Start from any edge;
5. When sealing leaks beneath the water level in an undrained reservoir,
use a trowel or your hand with a glove. Hold the mixture in place for 3 to
5 minutes or until no water passes through the leak;
6. Keep the repaired leak damp for 15 or more minutes (see directions).
c. Repairs Using Epoxy
Epoxy is an adhesive sealant available commercially in plastic packs of 15 grams or more.
It consists of two components: A (Resin) and B (Hardener). Epoxy is generally used in
repairing small leaks. Repairing a reservoir using this compound requires the following
steps:
1. Drain the reservoir;
2. Dry and clean the surface to be repaired. In the case of steel tanks,
roughen the surface to ensure good adhesion. In the case of concrete
surfaces, clean out all loose particles;
3. Squeeze equal amounts of component A (Resin) and B (Hardener) on a
suitable palette, and mix thoroughly;
4. Apply the mixture immediately to the leak;
5. Allow 2 to 4 hours for the epoxy to set. (Check instructions on the
package if more or less setting time is needed);
6. Put the reservoir back to operation.
d. Repairs on Steel Tanks Using Electric or Acetylene Welding
1. Drain the reservoir;
2. Dry the surface to be repaired;
3. Weld the hole or break directly if small. If the leak is large, cut a metal
plate with size lightly greater than the hole and then weld it in place;
4. Clean and smoothen the welded surface;
5. Paint the repaired area;
6. Disinfect the reservoir;
7. Put the reservoir back into operation.
Chapter 6: Distribution System
Page 6.13
8. Painting of Reservoirs
Painting is necessary to prevent corrosion and to prolong the life of steel tanks used as
water reservoirs. Painting is recommended at least once every five years, after the
annual cleaning and inspection of the reservoir. The procedure is as follows:
1. Dry, clean and smooth all surfaces to be painted. Remove all dirt, scale and
rust by scraping or fine brushing. Remove oil/grease by using an appropriate
solvent;
2. Paint the surfaces of the reservoir with a lead-free, food-grade coating
material. Usually this is a polyurethane elastomeric paint or a high gloss
epoxy coating;
3. Make sure that the paint to be used is free from any substance deleterious to
human health, and that it will not impart taste or odor to the water;
4. After the paint has cured, disinfect the reservoir;
5. Put the reservoir back to operation.
D. SERVICE CONNECTIONS
In general, domestic meters should be taken out of service every 5 to 7 years and
completely overhauled. The systematic inspection and replacement of consumption
meters is an important aspect of routine maintenance. Records should be kept on the
condition of meters to guide future procurement and enable the Utility to take
measures against water loss.
Representative pothole checking of service connections within 5 years of service (avoid
leaks due to deterioration) should also be done.
1. Inspection of Water Meters
1. Clean all water meter parts thoroughly;
2. Make sure the gear train runs freely;
3. Check the action of the disc in the chamber;
4. Remember that friction is just as detrimental to correct registration (reading)
as slippage;
5. Store meters away from heat;
6. Use a calibrated meter as a standard of comparison for tolerances and
clearances;
7. After every repair, retest the meter for accuracy;
8. If necessary, call the manufacturer for advice.
Page 6.14
Chapter 6: Distribution System
2. Types of Water Meter Testing
1. Meter Shop Test – pull out meter and send it to testing laboratories/shops
for testing/recalibration (equipment and service available usually at large
utilities).
2. Volumetric Method (no dismantling) – using a container with known volume,
a variance of +/- 4% should be pulled out for recalibration)
3. Using a Calibrated Test Meter – the meter should be put in series with a
calibrated meter. In principle, readings should be the same. Record the
difference; +/- 4% off should be re-calibrated.
3. Water Meter Testing (If a test bench is available)
1. Install/fix water meter on test bench;
2. Open supply valve, close end valve and inspect for leaks;
3. Record the initial reading;
4. Open end valve, run the test and close end valve at desired volume.
5. Record the final reading;
6. Compute meter accuracy;
7. Identify Over/Under registering meters;
8. Calibrate by adjusting regulator or rheostat (+/-);
9. Re-test the water meter;
10. Seal the water meter cover and regulator plug.
E. VALVES AND PUBLIC FAUCETS
Valves and public faucets are flow control devices in the water distribution system. Their
useful life depends to a large extent on the manner they are operated and maintained.
Valves installed in a small water supply system may be manual or automatic. The valves
commonly used are the manual type. Globe, gate, angle and blow-off valves are
manually operated, while check, air vacuum, foot and float valves regulate the flow of
water automatically.
Prior to system operation, all manually operated valves should be located and data
recorded on the direction of opening and number of turns to either close or open each
one.
The operability of air release valves, special valves and other appurtenances with
mechanical components must be checked twice a year.
Chapter 6: Distribution System
Page 6.15
1. Valve Operation
1. Valves operated manually should be opened all the way, then closed onequarter turn of the hand wheel to prevent the valve from sticking in the open
position;
2. Valves should be opened and closed slowly at an even rate to reduce the risk
of water hammer;
3. Unless otherwise indicated, valves are opened by turning the hand wheel or
key counterclockwise; and
4. Always consult the manufacturer’s instructions for operating a specific type
of valve. It is good practice to operate (exercise) valves periodically (or at
least 2 times a year).
a. To check whether a valve is operational or not:
1. First close the valve completely and then open it completely;
2. Back off on the valve about one turn to avoid locking it in an open
position; and
3. If the valve does not operate properly, repair or replace at once.
b. Things to check:
1. Ensure that the valve boxes are not full of mud or debris, or become
buried;
2. Inspect the valves for leaks around the valve stem;
3. Ensure that the valve handles are intact;
4. Ensure that each valve can be fully opened and fully closed;
5. Record the inspection date, whether the valve is right- or left-handed,
and whether it is normally open or normally closed;
6. Record any needed repairs or replacements.
2. Common Causes of Failure and Their Remedies
a. Corrosion
If valves are not operated or lubricated for a long time, they may become inoperable
due to corrosion. If the corrosion damage is not extensive, the valve may be made
operable again by pouring kerosene or dilute lubricating oil down the valve key to
lubricate the joint between the stem and packing. However, if the valve is still
inoperable after this procedure, it should be replaced.
Page 6.16
Chapter 6: Distribution System
b. Closing the Valve Too Tightly
Closing the valve too tightly may damage the valve washer, the valve seat, or the
threads of the valve stem, causing the water to leak. To solve this problem, it is
suggested to put markers showing the direction of opening and closing and to close the
valve just tight enough to stop the flow of water.
c. Worn-Out Washer or Loose Packing
Worn-out washers or loose packing should be replaced to prevent the loss of water.
d. Cavitation
Cavitation results when a valve is left partially closed or open for a long period. Leaving
a valve partially closed or open will cause a partial vacuum or void in the downstream
side that may eventually be filled with low-pressure vapors from water. When these
vapor pockets collapse, a mechanical shock (cavitation) is created, this may produce
cavities. After some time, the valve will be destroyed and even the pipelines may be
affected. Cavitation can be avoided by keeping the valves fully closed or fully opened at
all times.
e. Water Hammer
Water hammer is caused by sudden closing of valves. When the flow of water is
suddenly stopped, enormous pressure is created which may damage the pipe or valves.
This problem can be prevented by closing the valve slowly.
3. Repair of Globe Valves, Public Faucets and Other Related Valves
a. Tools Needed:
1. Flat jawed or monkey wrench (large enough to fit the packing nut of the
valve/faucet)
2. Rubber sheet or soft cloth (to protect the finish of the faucet or packing
nut)
3. Screw driver
4. Faucet seat dresser.
b. Materials Needed:
1. New faucet washer or valve seat and disc
2. Lubricated candle wick for stem packing
3. Waterproof grease
4. Washer screws.
Chapter 6: Distribution System
Page 6.17
c. Procedure:
1. Familiarize yourself with the different parts of the faucet or valve;
2. Examine and find out the location of the leak. If water is coming out from
the mouth or outlets, the trouble is due to a damaged washer or
damaged seat or both. If water is coming out from around the stem when
the valve is open, the stem packing is defective;
3. Close the control valve to cut off water supply to the defective
valve/faucet;
4. Open the packing nut with a wrench. Place a piece of rubber sheet or
cloth over the wrench jaws to avoid marring the valve/faucet finish;
5. Repair the defective valve/faucet;
6. Replace the handle and tighten the handle screw;
7. Turn on water supply and observe for leaks.
F. HYDRANTS
Fire hydrants are mainly used for fire protection. Other uses include flushing water
mains and sewers, and filling tank trucks for street washing and tree spraying. Hydrants
may also be used as a temporary water source for construction jobs.
Hydrants should be inspected and tested by water utility personnel accompanied by a
fire department representative. Hydrants can usually be maintained by replacing all
worn parts and seats through the top of the hydrant. The operator is generally
responsible for ensuring that the proper tools are used. Each year, the hydrant should
be tested to ensure that the joints and fittings are tight.
G. REDUCING NRW
Non-revenue water (NRW) is water that has been produced but does not result in
revenues for the Utility. NRW may be due to “real losses” (as a result of leaks and
wastage, sometimes called “physical losses”) or “apparent losses” (for example through
theft or metering inaccuracies). High levels of NRW are detrimental to the financial
viability of water utilities, as well to the quality of water itself. NRW is typically
measured as the volume of water "lost" as a share of net water produced.
1. Analyzing NRW Level
The percentage NRW can be determined by the formula:
( )−
(%) =
( )
Page 6.18
(
)
× 100
Chapter 6: Distribution System
If NRW for a new system is more than 10%, or for an old system more than 25%, the
Utility can benefit from an NRW reduction program.
To accurately determine NRW, reliable and functional meters must be installed at all
sources and service connections.
2. Better to Prevent than to Cure
For water supply pipelines, always remember that “an ounce of prevention is worth a
pound of cure”. If, in the first place, the facilities were not constructed properly, there is
probably very little that can be done to reduce NRW. Therefore for pipeline installation,
all materials should pass quality control/testing and should undergo pressure tests prior
to backfilling.
Many leaks emanate from service connections joints. When installing service
connections do not skimp on Teflon tape on threaded joints and inspect for leakage
before backfilling.
3. Benefits of NRW Reduction
•
Financial gains from increased water sales or reduced water production,
including possibly the delay of costly capacity expansion;
•
Reduced operational cost which will result in a lower tariff;
•
Increased firefighting capability due to increased pressure;
•
More consumers can be served, or longer operational hours;
•
Easier to sell increased tariffs; and
•
Reduced risk of contamination.
Leakage reduction may also be an opportunity to improve relations with the public and
employees. A leak detection program can be made highly visible so that water
conservation can be at the forefront in people’s awareness. The reduction of
commercial losses, while politically and socially challenging, can also improve relations
with the public, since some consumers may be reluctant to pay their water bills knowing
that many others use services without being billed or being underbilled.
4. Sources of NRW
NRW can be analyzed on whether they are physical or actual losses or losses due to
commercial policies or deficiencies.
a. Physical Losses
•
Leaks/breaks
•
Illegal connections
•
Water usage by utility (flushing, etc.)
Chapter 6: Distribution System
Page 6.19
b. Commercial Losses
•
•
•
Non-metered connections
Under-registration of meters
Poor collection performance
5. NRW Reduction Approaches
A number of approaches have been used successfully by some of the major water utility
companies. These can be adopted by the SSWPs to control their NRW ratios.
1. Isolation of zones and the continuous measurement and analysis of inflows
to determine areas with high NRW.
2. Programs to improve the reliability of customer metering and reading.
3. Hydraulic analysis of the distribution system to determine calculated versus
actual pressures. (This requires updated system maps.)
4. Analysis of maintenance records to determine what repairs have been done,
where, and their frequency. This may lead to decisions to replace rather
than repair some pipelines. (For this reason, it is important to inculcate
among field personnel the value of clear, reliable reports, and to have a good
user-friendly repository of records.)
5. Leak detection programs. While there should be a continuing program of
leak detection, periodic high-visibility campaigns involving the public have
also been found to be effective.
6. Modulation of pressure in the pipelines. Higher pressures will naturally
increase the rate of leakages.
7. Strengthening the procurement and stock management of critical and oftenused repair and maintenance materials, so that these will always be available
when needed. While many repairs can be done with readily available
substitute materials, temporary stop-gap solutions cannot be relied upon to
fix long term and recurring problems.
8. Continuous management attention: The reduction of NRW should be
considered by management and the board as a continuing oversight concern.
6. NRW Survey
When NRW is analyzed to have increased, due likely to pipeline leaks, an NRW survey
should be carried out to pinpoint the problem. The steps are as follows:
1. Divide the entire distribution system into zones;
2. Isolate the different zones by closing or installing appropriate control valves.
Observe the water consumption rate in each zone and compare with billed
consumption. Determine the zones with abnormally high NRW;
3. Divide the pinpointed zones, which consume a large quantity of water into
sub-zones. The water inflow can be measured using zone and sub-zone
meters;
Page 6.20
Chapter 6: Distribution System
4. Isolate these different sub-zones and study their respective NRW;
5. Select the sub-zones(s) with unusually high water consumption rates. Subdivide further and measure their water consumption rate;
6. Repeat the above process until the locations of leak(s) are pinpointed.
7. Location of Leaks
Leaks in water mains cause the loss of good water, and at the same time increase the
risk of contaminants in the ground entering the piping system. These leaks may be due
to ruptures or disintegration of pipes and pipe joints, usually caused by corrosion,
vibrations from vehicular traffic, stresses generated by expansion and contraction, or
ground movements.
a. Locating Leaks by Direct Observation
This method is the simplest and most applicable leak detection technique for use in
small water supply systems. This requires being alert to the following signs of leaks:
1. Appearance of wet spots at early dawn during dry season;
2. Greening of patches of ground in areas where plants generally could
hardly grow;
3. A soft wet spot in the ground during dry season;
4. Abnormal drops in pressure.
The consumers can help detect leaks if they are made aware of these indicators. If they
look at the Utility’s water service in a positive light, and consider it to be to their benefit,
there is no reason why they would not go out of their way to inform the operator if they
notice any of these signs.
b. Finding the Exact Location of Leaks in Pipelines
After finding the approximate location of leaks in the water distribution system, their
exact location can be determined by using a sounding rod. Leaks in water pipes usually
make sound – small leaks make more noise than large ones. The sounding rod is a
pointed metal rod used to relay to the observer the sound caused by leaks in buried
pipes. The procedure involves the following:
1. Push the sounding rod into the ground until its end touches the buried
pipe. Be careful not to push it too hard in order not to destroy a PVC
water main when its point strikes the pipe;
2. Put your ear to the exposed end of the rod and listen for the sound. If the
sound is too faint, a hearing aid such as a stethoscope would be helpful;
3. Push the rod into the ground against the same pipe at a different location.
If the sound is louder, they you are getting closer to the leak. If the
sound is fainter, it means you are moving away from the location of the
leak.
Chapter 6: Distribution System
Page 6.21
8. Illegal Connections
Illegal connections can be detected by any of the following methods:
a. Block Census
The block census is described in Chapter 6, which deals with the management aspects of
the Utility. Key in the information to be obtained in a block census is where those who
are not connected to the system are getting their water. If their source cannot be
determined, the dwelling unit is considered suspect.
b. Reward system
Offering rewards to those who can pinpoint illegal connections has been known to be
effective. The reward can be a portion of the collectibles.
c. Monitoring Consumption
A high NRW within a sub-zone without any leaks indicates the presence of illegal
connections. Any customer whose consumption drops to a small percentage of his
average consumption without any adequate cause should be suspect.
The Board should come up with a policy on penalties for those caught with illegal
connections, which would be the basis of management action.
d. Optimum Meter Replacement Cycle
Every utility must have a meter replacement program. Depending on the tariff and type
of meters used, Table 6.1 illustrates the viability of replacing meters or calibrating same.
Table 6.1: Optimum Meter Replacement Cycle (years)
Average Tariff Pesos/m3
Meter Losses
8.00
10.00
12.00
3%
8
6
4.5
5%
4
3
2.5
10%
2
1.5
1
Table 6.1 was derived based on present value analysis at 12% cost of money and at an
average consumption of 30 m3 per month. The table shows that at ₱10 per m3, if the
meters are registering a 5% loss, a replacement cycle of 3 years would enable the Utility
to pay for the cost of the replacement meters.
Page 6.22
Chapter 6: Distribution System
Chapter 7
Chlorine Safety
This Chapter introduces the reader to the hazards of using chlorine gas, which is
essential for the treatment of raw water, and provides guidelines and practices that
must be adopted to prevent chlorine related accidents and injuries.17 The use of
chlorine as a gas is not recommended for the smaller utilities because of the safety
issues and the fairly complicated facilities required. Instead, the smaller utilities should
use chlorine compounds. In this Chapter, the discussion is based on the use of chlorine
as a gas. The considerations and precautions regarding its use in gaseous form apply
even when the chemical is used as a compound whether in liquid or powdered form.
A. HAZARDS OF CHLORINE
Above all, keep in mind that chlorine gas was used in World War I as a poison gas
weapon, and that it killed, maimed, or caused permanent injuries to many soldiers.
1. Human Safety and Health
In both its liquid and gaseous form, chlorine is classified as a poisonous or toxic
substance. When it gets into contact with moist body surfaces such as the eyes, nose,
throat, lungs, and wet skin it reacts with the moisture, forming harmful acids that can
cause severe damage to these organs and even be fatal.
Repeated exposure to chlorine does not produce an immunity or tolerance. Long-term
exposure even to low concentrations of chlorine may cause a gradual decrease in lung
efficiency. A single exposure to a high concentration can cause permanent lung damage.
Table 7.1 presents the toxic effects of chlorine at different levels of concentration.
Table 7.1: Toxic Effects of Chlorine
Concentration Effects
1 – 3 mg/l
May cause mild irritation of the eyes, nose, and throat
Burning in eyes, nose, and throat; may cause headache,
3 – 5 mg/l
watering eyes, sneezing, coughing, breathing difficulty, bloody nose, and
blood-tinged sputum
5 – 15 mg/l
Severe irritation of the eyes, nose, and respiratory tract
Immediate breathing difficulty resulting in pulmonary edema (fluid
30 – 60 mg/l
buildup in lungs), possibly causing suffocation and death
430 mg/l
Lethal after 30 minutes
Workers Compensation Board of British Columbia – Chlorine Safe Work Practices, 2006
17
Adapted from “Chorine Safe Work Practices” published by the Workers Compensation Board of British
Columbia (Canada).
Chapter 7: Chlorine Safety
Page 7.1
Table 7.2 presents the human exposure limits to chlorine.
Table 7.2: Chlorine Exposure Limits
Exposure level
0.5 mg/l
1.0 mg/l
10 mg/l
Exposure Limit
Maximum allowable concentration averaged over an
Eight-hour period
Maximum allowable short-term exposure (15 minutes)
IDLH “Immediately Dangerous to Life and Health” (as
published by the United States National Institute for
Occupational Safety and Health)
Workers Compensation Board of British Columbia – Chlorine Safe Work Practices, 2006
Note: The IDHL (“Immediately Dangerous to Life and Health”) exposure level is the
point at which a person without appropriate respiratory and skin protection could be
fatally injured or could suffer irreversible or incapacitating health effects.
2. Fire and Chemical Reactions
1. Chlorine will not burn by itself, but will support combustion when it comes
into contact with many combustible materials, including acetylene, kerosene,
most hydrocarbons like solvents, greases and oils, finely divided metals and
organic matter, and materials containing potassium and phosphorous. It can
explode when it reacts with high concentrations of ammonia or hydrogen
peroxide (“agua oxigenada”).
Never store acetylene, solvents, and the other materials enumerated above in
the same building or area as chlorine.
2. In both gas and liquid forms, chlorine reacts with almost all chemicals,
usually releasing heat. At high temperatures, chlorine reacts vigorously with
most metals. For instance, a chlorine reaction can cause stainless steel to
catch fire or melt.
3. Reaction to Water
Chlorine reacts with water or moisture in the air to form highly corrosive acids. Every
precaution must be taken to keep chlorine and chlorine equipment moisture-free.
Never use water on a chlorine leak. Moist chlorine is more corrosive than dry
chlorine and the leak will worsen rapidly if water is applied to it.
Page 7.2
Chapter 7: Chlorine Safety
B. WORKING SAFELY AROUND CHLORINE GAS
1. General
Any water utility that uses chlorine should have written procedures for its chlorine
system operation. Even the use of powdered chlorine should have written procedures.
Before starting any chlorination process, take the following precautions:
1. If a faucet with good flowing water is not available close by, make ready a 5gallon container of fresh water, but make sure it is away from the chlorine
cylinder or storage area. This is to ensure that if the chlorine accidentally
comes in contact with your eyes or skin, you can flush the affected areas with
copious amounts of fresh water for at least 10-15 minutes.
2. Flush the chlorine out. Do not just soak the affected surface. If you get some
of the chlorine solution in your eyes, flush it out and immediately see your
doctor.
3. Wear the prescribed safety clothing and equipment, specifically:
•
Goggles to protect your eyes from contact with the chlorine in any form.
•
Rubber gloves and rubber boots certified for use around the chemical to
protect your hands and feet.
•
Waterproof suit, coveralls or a full-length apron.
2. Housekeeping/Chlorine Storage
1. Use signs to clearly identify all areas where chlorine is used or stored. Only
qualified personnel should be permitted to enter these areas.
2. Do not store materials that may react violently with chlorine in the same
room as chlorine. Put up visible warning signs prohibiting persons from
taking these materials where the chlorine is stored.
3. Do not store chlorine near busy roadways or where vehicles operate.
Chlorine reacts with carbon monoxide to produce phosgene, an extremely
poisonous gas.
4. Store chlorine cylinders and containers in a cool, dry, and relatively isolated
area, protected from weather and extreme temperatures.
•
When storing cylinders and containers outside, shield them from direct
sunlight.
•
When storing chlorine containers inside, store the containers in a wellventilated building, away from any heat sources.
5. Use cylinders and containers on a “FIRST-IN, FIRST-OUT” basis.
6. Clearly tag or mark empty cylinders and separate them from full cylinders.
Chapter 7: Chlorine Safety
Page 7.3
7. Determine the most appropriate location for emergency equipment.
Emergency equipment and a faucet should be available in a readily accessible
location, but not inside the chlorine room because a worker (and emergency
response staff) trying to use the emergency equipment or faucet during a
chlorine leak risks further exposure.
8. Store cylinders upright and secure them against tipping over and rough
handling. Cylinders will discharge vapor when upright and discharge liquid
when upside-down. Since chlorine gas tends to sink, provision should be
made for low-placed ventilation near the floor that allows it to dissipate
outward, as well as high-placed ventilation that allows the chlorine mist (the
gas mixed with air) which tends to go upward, also to dissipate.
3. Handling Chlorine Cylinders
1. Handle containers with care while moving or storing them. Do not drop or
allow containers to strike objects.
2. Use new gaskets as recommended by the chlorine supplier each time a
cylinder or container is connected.
3. Follow the chlorine supplier’s recommended disposal procedures for leaking
containers. Do not modify, alter, or repair containers and valves. Only the
supplier should carry out these tasks.
4. Ensure that cylinders have valve protection hoods in place when not
connected to a system.
5. Do not lift a cylinder by its valve protection hood. The hood is not designed
to carry the weight of a cylinder.
6. If possible, open valves by applying a steady force to a 200 mm (8 in) wrench,
without applying an impact force and without using an extension on the
wrench. If this does not work, apply a light impact force by smacking the
wrench with the heel of your hand.
7. Do not use a wrench longer than 200 mm (8 in) to open or close valves. To
prevent valve damage that could cause leaks do not use tools such as pipe
wrenches or hammers. Valves on cylinders are designed to deliver full
volume after one complete counterclockwise turn. Valves may be damaged if
turned beyond this point. Immediately return containers with damaged or
inoperable (but not leaking) valves to the supplier.
8. If the valve is very difficult to open, loosen the packing nut slightly. Tighten
the packing nut after the valve is opened or closed.
Page 7.4
Chapter 7: Chlorine Safety
C. LEAK DETECTION AND CONTROL
It is important to follow the right procedures in replacing an empty cylinder with a new
one. Nonetheless, after the new cylinder has been installed, it is essential to ensure
that there is no leak in the new hook up.
1. Detecting Leaks
Chlorine leaks can be determined by soaking a rag on the end of a stick in aqua
ammonia (ammonium hydroxide, not pure ammonia) and holding it next to the pipes,
cylinder or dosing equipment. (A plastic squeeze bottle containing the aqua ammonia
can also be used.) A white cloud will show the location of the leak.
This test is safe because ammonium hydroxide (ammonia dissolved in water or moist
air) is used rather than pure ammonia. Chlorine reacts readily with ammonium
hydroxide to form ammonium chloride, a relatively harmless compound. This reaction
forms a visible white cloud, indicating a chlorine leak. The ammonia test is useful for
pinpointing the exact location of a leak.
2. What to Do If a Leak Is Indicated After Installing a New Cylinder
1. Wear a respirator and immediately close the main cylinder valve;
2. As long as the monitor reads less than 10 mg/l, the cylinder hookup
procedure may be repeated;
3. Open (and close) the main cylinder valve and repeat the ammonia test;
4. If a leak is still indicated, make a third and final attempt to get a good seal
using a new lead washer;
5. If the leak cannot be corrected after three attempts, remove the cylinder
from service and contact the supplier. Ensure that there is no leak from this
cylinder with the main valve closed. A different cylinder must be connected
to the chlorination system;
6. Leave the chlorine room and remain nearby to restrict access to the room or
provide other assistance, as directed.
D. REPAIR AND MAINTENANCE
Employers, in this case the water utility, are responsible for training and providing
written operational, preventive maintenance and emergency procedures to any person
who works on a chlorine system. Employers, in consultation with equipment
manufacturers or suppliers, must ensure that all equipment are inspected regularly and
replaced when necessary.
The utility’s management must make these written procedures readily available to all
workers required to work on the chlorine system. Workers should not only understand
Chapter 7: Chlorine Safety
Page 7.5
but be thoroughly familiar with these procedures before carrying out repairs or
maintenance on the chlorine system.
Only qualified workers must supervise the cleaning and repair of chlorine systems. All
assigned workers must be familiar with all the hazards and adhere to the safeguards
necessary to perform the work safely.
1. Cylinder Repair Kit
Ideally, a chlorine container repair kit should be available on-site. If a container repair kit
is not available, the utility’s response team must be aware of the nearest readily
available kit. There are three types of repair kits (A, B, and C), each with materials
specific to the type and size of the chlorine container. The “A” kit is for the 68 kg (150 lb)
cylinder commonly used by the smaller utilities.
The following may be used as a lubricating pipe dope for threaded joints:
•
Linseed oil with graphite or white lead
•
Freshly mixed glycerin
•
Teflon tape
2. Hazard Recognition
Written procedures for the repair or maintenance of chlorine systems must consider the
following hazards and include procedures that will help workers avoid these hazards.
1. Moisture – Chlorine reacts with moisture to form corrosive acids. Every
precaution must be taken to keep chlorine and chlorine equipment free of
moisture, including the following steps:
•
Close pipes, lines, valves, and containers tightly when not in use to keep
moisture out of the system;
•
Before starting repair, take the measures needed to prevent chlorine
coming into contact with any residual material that may drip from the
equipment when pipes or lines are being dismantled.
2. Foreign Material – Pipes, lines, and fittings must have all cutting oils, grease,
and other foreign material removed from them before use. Trichloroethylene
or other recommended chlorinated solvents may be used; however take
special precautions because these solvents can produce serious health
effects. Never use hydrocarbon or alcohol solvents for cleaning because they
can react violently with chlorine
3. Heat – Because iron and steel will ignite in chlorine at about 230°C (450–
500°F), all welding or burning must only be done after the chlorine
equipment are completely emptied and purged with dry air.
Page 7.6
Chapter 7: Chlorine Safety
3. Personal Protective Equipment
Controlling exposure requires strict attention to the chlorine exposure limits (see Table
7.2). Appropriate eye, skin, and respiratory protection are essential. Workers must be
familiar with their use and understand the equipment limitations or capacities.
a. Basic Protection
When chlorine gas is in the air, safety glasses and face shields will not protect the eyes
and respiratory passages. Workers in an area where the concentration of chlorine may
cause mild to moderate irritation must wear eye protection with a tight seal around the
eyes as well as a respirator that prevents inhaling the gas. If a full face respirator is not
available, a half-face respirator and vapor-tight chemical goggles should be worn.
b. Skin Protection
Emergency response workers who are engaged in controlling a serious chlorine leak
must have access to full-body protective suits.
c. Full-face Respirators
Full-face respirators, either with cartridges or canisters, may be used only if the chlorine
concentration is determined to be below 10mg/l.
•
With Cartridges – A worker must wear a full-face respirator fitted with acid
gas cartridges during any hazardous work where there is a chance of a
chlorine leak. Full-face respirators are also appropriate for leak control where
tests show the chlorine concentration to be less than 10 mg/l. Workers
required to use a respirator must be clean-shaven where the respirator seals
with the face to ensure a proper fit.
•
With Canisters – Although cartridges are preferable, a worker may use a fullface respirator fitted with an air-purifying canister for leak control and repair
or maintenance procedures in chlorine concentrations less than 10 mg/l.
Canisters with an indicator window must be replaced when the material in the
window has changed color. Canisters without an indicator window must be
replaced after each use. In either case, canisters must never be used beyond the
expiration date stamped on the label.
d. Self-contained Breathing Apparatus (SCBA)
A worker must use an SCBA when a chlorine leak is suspected and the airborne chlorine
concentration is unknown or is measured at more than 10 mg/l. This means that an
IDLH situation prevails in the area. A worker wearing an SCBA must not enter a
contaminated atmosphere until a second, qualified person is present, also equipped
with an SCBA, and ready to perform a rescue.
SCBA air cylinders should be refilled every six months or after each use, whichever
comes first. Cylinders must have a hydrostatic test at least every five years. Since
Chapter 7: Chlorine Safety
Page 7.7
workers rely on this equipment in IDLH conditions, it is
essential that maintenance and inspections be carried
out according to the manufacturer’s instructions.
e. Person-check Radio or Telephone
Employers must establish a check system to ensure
the continued well-being of workers who are working
alone or at an isolated worksite. Where visual checks
are not possible, the check system may require a radio
or telephone. Workers who will need to use such a
system must be trained in emergency procedures.
f. Emergency equipment
Emergency equipment includes eyewash and shower
facilities, first aid kits, and container repair kits.
Workers must have immediate access to each of these
items and must know how to use them in case of
emergency.
E. FIRST AID
SCBA. Workers Compensation
Board of British Columbia –
Chlorine Safe Work Practices,
2006
When someone is injured in a chlorine-related incident, first aid can help reduce the
impact of their injuries and prevent further injuries from occurring. The following steps
apply to any situation in which someone is injured:
1. Do not panic.
2. Ensure that there is no more danger to yourself or the victim.
3. Using appropriate safety gear, remove the victim from the contaminated area.
4. Send for medical help.
1. Chlorine Inhalation
A person who has inhaled chlorine may be unconscious, and may have difficulty
breathing or may have stopped breathing completely. Follow these steps when treating
a victim of chlorine inhalation:
1. Assess the victim’s breathing. If breathing has stopped, begin artificial
respiration and continue until the victim resumes breathing. Pocket masks
are recommended for artificial respiration, although the mouth-to-mouth
method may also be used;
2. If the victim is having difficulty breathing (for example, gasping or coughing),
place the victim in the most comfortable position, usually semi-sitting;
Page 7.8
Chapter 7: Chlorine Safety
3. If an oxygen therapy unit and trained personnel are available, administer
oxygen at a 10-litre flow;
4. Ensure that the victim is transported to hospital in case the victim suffers a
delayed reaction in the form of pulmonary edema. Any physical exertion,
excitement, or apprehension increases the chance and severity of a delayed
reaction. Keep the victim warm and completely at rest. Reassure the victim
while waiting for assistance and transportation to hospital.
2. Skin Contact
Skin contact with chlorine can result in severe burns. Before attempting to flush a
victim’s contaminated skin, make sure the victim is breathing properly. Follow these
steps:
1. Assess the victim’s breathing. If breathing has stopped, begin artificial
respiration and continue until the victim resumes breathing. Pocket masks
are recommended for artificial respiration, although the mouth-to-mouth
method may also be used. If the victim is having difficulty breathing (for
example, gasping or coughing), place the victim in the most comfortable
position, usually semi-sitting;
2. As soon as the victim resumes breathing, flush the victim’s contaminated skin
and clothing with large amounts of water for 30 minutes. Remove all
contaminated clothing while flushing. Continue flushing until all traces of
chlorine have been removed;
3. Dress obvious burns with sterile gauze and bandage them loosely. Apply
insulated cold packs to help reduce pain;
4. Get the victim to hospital.
Take Note:
1. Do not attempt to neutralize the chlorine with other chemicals.
2. Do not apply salves, ointments, or medications unless prescribed by a
doctor.
3. Skin contact with liquid chlorine coming straight out of a cylinder can
result in frostbite.
3. Eye Contact
Eye contact with chlorine (liquid or gas) for even a short period can cause permanent
disability. Flushing must begin within 10 seconds. Follow these steps:
1. Flush the eyes immediately with large amounts of running water (preferably
lukewarm) for 30 minutes. Hold the eyelids forcibly apart to ensure full
flushing of the chlorine from the eyes and eyelids;
Chapter 7: Chlorine Safety
Page 7.9
2. After flushing has removed all traces of chlorine, cover both eyes with
moistened sterile gauze pads and bandage, enough to keep light out;
3. Apply insulated cold packs to help reduce pain;
4. Get the victim to hospital.
4. Unconscious Patients
1. As soon as an unconscious victim of chlorine inhalation resumes breathing,
place the person in the drainage position (lying on one side, so fluids can
drain from the mouth and airways). Never give an unconscious patient
anything by mouth;
2. Keeping the victim in the same position, flush the victim’s contaminated skin
and clothing with large amounts of water for 30 minutes;
3. Remove all contaminated clothing while flushing. Continue flushing until all
traces of chlorine have been removed;
4. Dress obvious burns with sterile gauze and bandage them loosely. Apply
insulated cold packs to help reduce pain;
5. Get the victim to hospital.
Page 7.10
Chapter 7: Chlorine Safety
Chapter 8
Administration
This Chapter presents certain rules and practices that should be adopted by a SSWP to
achieve efficiency and effectiveness as it carries out its administrative, management and
operating functions.
A. GENERAL
Regardless of the service level of any utility, the most important factor for its success is
the quality of the people who manage and operate it. They need, however, to work
within a clear, supportive administrative system that channels their capabilities and
enables them to fulfill their unique functions within the organization.
All SSWP organizations are made up of a Board of Directors, a system manager, and the
operating staff. The Board establishes policies and regulations to carry out the business
affairs of the Utility, while the management and operating staff, headed by the manager,
handle the day-to-day operations.
B. DELINEATION OF BOARD AND MANAGEMENT FUNCTIONS
The Board of Directors is the policy setting and legislative body of the SSWP. The
operational staff, headed by the Manager (whose title may be General Manager,
President, Systems Head, Superintendent, etc.), constitutes the Utility’s executive arm.
1. Board Functions
While all powers and authority of the SSWP are vested in its Board, its specific and
proper functions are the following:
1. To enact policies and rules for the SSWP;
2. To set the overall goals and objectives of the organization;
3. To approve budgets, plans, major contracts, and undertakings; and
4. To evaluate the performance of the SSWP and its management.
The Board should limit itself to fulfilling these functions, using Board meetings as their
venue. These Board meetings are recommended not to exceed two in a month.
Holding meetings too frequently would force management to spend an excessive
amount of time on preparing for and attending them, thereby undermining
management performance.
Chapter 8: Administration
Page 8.1
2. Management Functions
The Manager, on the other hand is responsible for the following functions:
1. Implementing the policies and rules set by the Board;
2. Fulfilling the goals and objectives of the SSWP;
3. Preparing effective plans and recommendations for Board approval;
4. Making accurate and timely reports to keep the Board updated on the
SSWP’s performance in relation to fulfilling its goals and objectives.
Most of these functions he fulfills not directly but through the management team and
the operating staff. As such, leadership, decision-making, communication, staff
development, and problem solving are the focus of his day-to-day activities. Being in
charge of the day-to-day operations of the SSWP, it is the manager’s responsibility to
ensure the success and sustainability of the public utility.
While the Board may not interfere in the way the manager runs day-to-day operations,
the manager must answer to the Board for results.
C. POLICY FORMULATION
1. What Are Policies?
A policy is a committed guideline. It is a principle that guides the performance of certain
activities leading to the attainment the Utility’s goals. It may be a broad statement of
general guidelines, or a specific set of procedures detailing how certain tasks (e.g.,
handling of the Utility’s funds) must be done.
Whether they are broad or specific statements, policies are best communicated and
implemented in written directives or resolutions. Written rules provide a ready
reference for the management and staff, and make it possible to ascertain whether they
are being followed or not, and to hold the persons concerned accountable.
Verbal policies are not effective, as they have a way of being misinterpreted. As time
passes, even the initiators themselves sometimes get lost as to their original intent or
interpretation.
In general, policies may be classified into three types as to their origin:
1. Originated policy – This type of policy comes from the Board. It is designed
to provide guidelines to management in the operation of the system.
2. Appealed policy – This type of policy arises when problems of operation at
the lower level cannot be properly or consistently handled. Management
therefore “appeals” to the Board for guidelines.
Page 8.2
Chapter 8: Administration
3. Imposed policy – This type of policy is set to comply with existing laws,
government regulations, court rulings and the like. Social practices and public
influence may result in imposed policies.
Some of the important areas that should be covered by written SSWP policies are
outlined in the box with the caption “IMPORTANT SSWP POLICY AREAS” on the
following page.
2. Policy Review
In any progressive undertaking, policies need to evolve in response to changing
conditions and needs. Thus, aside from periodic reviews to evaluate how effectively
established policies contribute to the achievement of goals, there may be changes in
national policies, laws and ordinances, as well as in economic conditions, that may
dictate the adjustment, amendment, or formulation of new policies.
In reviewing a policy, the first step is to consider the spirit, intent, wisdom and fairness
of a policy, and then its relevance. The way the policy is being implemented should also
be reviewed. The intention of even the best-conceived policy may be negated due to
the manner in which it is implemented. The Board should not hesitate to review, restate,
amend, or even reverse existing policies if it believes that by doing so, the best interest
of both the Utility and the public will be served.
D. FIRST THINGS FIRST
Upon the incorporation of the Utility, the Board (or governing body) should have their
organization meeting to decide on key policy matters and actions to get the business on
track.
They have to immediately address at least 7 policy and action areas:
1. Getting an Adviser
2. Organizational Structure
3. Operating Budget
4. Tariff level
5. Staff Recruitment
6. Applications for House Connection
7. Utility Rules & Regulations
In a major review of policies, these same policy and action areas should be considered
as well. Note that some of the items outlined above apply particularly to Level III
Systems. For Level II Systems, the non-applicable items can be disregarded.
Chapter 8: Administration
Page 8.3
IMPORTANT SSWP POLICY AREAS
1. By-Laws: Establish internal guidelines for the Board itself; e.g., how often and
where to meet, establishment of a quorum, board elections, etc.
2. Utility Rules and Regulations: Establish policies and procedures for dealing
with the public.
3. Personnel Rules/Regulations: These policies seek to ensure proper code of
conduct among the staff.
4. Staffing Patterns/Remunerations: Establish guidelines on the number and
qualifications and remuneration of staff to be hired.
5. Hiring: These policies set guidelines and checks on the hiring of new staff. As
a rule, all requirements for additional staff must be cleared with the Board,
usually through the proposed plantilla which, once approved, can then be
already implemented without further clearance. However, specific Board
approval must be obtained before the actual appointment of higher level
staff.
6. Tariff Formulation: Establish guidelines on tariff formulation. Tariff strategy
must enable the Utility to operate sustainably and effectively in relation to its
purpose of supplying water. It must consider the requirements to obtain
approval from NWRB, and often, the measures needed to gain acceptance by
the public.
7. Budgets: Establish guidelines on budget formulation, timetable and content.
8. Delegation of Authority: Establish guidelines on what decisions are to be
delegated and to whom.
9. Example: Delegated Transactional Amount: “Any capital disbursements which
are not in the capital budget or which are greater than ₱ XXXXX need specific
Board approval. Those in the budget and do not exceed the stated ceiling can
be decided by management.”
10. Matters Requiring Board Action: Establish guidelines on what need to be
submitted for Board clearance before management can act on it.
11. Example: Matters needing Board Approval/Clearance: Any undertaking
which will bind the SSWP for over a 3-month period must be cleared with the
Board. This means major construction contracts, loans and MOAs with
government or NGOs which will bind the SSWP for an undertaking greater
than 3 months will need Board clearance.
12. Public Faucets: Policies should define the accountability for collections and
establish the manner by which the utility shall collect fees and exact
responsibility from the persons concerned.
13. Example: Caretaker for Public Faucets:
Each public faucet shall be
registered to a caretaker who will be billed on a weekly (or daily) basis. If the
caretaker is not a staff of the SSWP, a contract shall be drawn specifying the
Page 8.4
Chapter 8: Administration
obligations of both parties.
14. New Connections and Disconnections: Establish guidelines on the
requirements for new connections, how much to be charged; as well as when
to disconnect.
15. Example: Connection policy: All connection costs are to be borne by the
customer. This is translated in the connection rules/regulations and amount
of connection fees.
16. Delinquent Accounts: Set guidelines for handling delinquent accounts,
including when a delinquent account is to written off as bad debts. It is futile
to maintain long standing debts as active as they will only distort the financial
figures. However records should still be kept and diligent attempts made to
collect these accounts as if they were not written off.
17. Dealing with Illegal Connections: The penalty should include penal and
financial impositions based on provisions of prevailing laws.
18. Goal Setting: Normally, these establish annual and intermediate goals (e.g.,
semi-annual, quarterly) for the SSWP. Goals can be set based on the number
of people to be served or number of connections and on the target
performance parameters outlined in Section G of this chapter.
19. Performance Standards: The Board should define performance standards for
the SSWP that management should attain, and monitor results against these
standards at least on a quarterly basis.
20. Funding Sources: Board policies should be established on where to get funds
for meter replacement or expansion projects or emergency repairs if the
SSWP does not have those funds.
21. Use of Booster Pumps by Customers: The use of booster pumps by individual
customers on their connections worsens the pressure conditions in part or
through the entire system. It could likewise cause negative pressures in the
lines that would induce infiltration of non-potable water as well as other
problems for the system.
The Board should institute a policy banning the use of booster pumps without
a specific permit from the SSWP. Boosters strictly may only be permitted
when the customer constructs a cistern to collect the normal flow of water
from the SSWP system. The inlet tube of the booster then sucks water only
from the cistern. The policy should emphasize that:
a. the official permit document must be obtained from the Board,
b. the SSWP may conduct unscheduled inspections of the booster setup, and
c. a heavy fine and/or disconnection will be imposed for the unauthorized
installation or modified operation of a booster.
Chapter 8: Administration
Page 8.5
1. Getting an Adviser
Very often, community-based boards of SSWPs lack formal business experience and are
not familiar with the multifarious requirements of running a small water utility. For this
reason, it is usually essential to engage expert advice to guide the Board and
management during the organizational stages of the Utility. Advisers can be drawn
from the LGU or national agencies like the DILG, LWUA, CDA and DPWH or from NGOs.
Very useful operational manuals can also be obtained from the DILG.
2. Organizational Structure
The starting structure need not be complicated. For an SSWP with about 10 public
faucets or 200 connections, the only personnel initially required are the manager, one
system operator and one bookkeeper. These 3 key people, once appointed by the Board,
should be given the responsibility of conducting the operations. The manager, in
consultation with his initial staff, should select and appoint any additional operational
staff when they become necessary. Board approval, however, must be obtained for the
number and qualifications of staff to be hired.
It is important to note that at the level of a 3-staff utility, the manager should carry out
a weekly sampling audit of the customer ledger cards and check the daily cash position
report, as the minimum level of check and balance.
3. Operating Budget/Tariff levels
Tariff design should have a sound basis and its effects on the viability of the utility
business should be carefully considered. It should never be set in an arbitrary manner.
A wrong tariff design at the outset will be very difficult to remedy, especially if the initial
tariffs were set at an arbitrary low level. It is for this reason that community meetings
and consultations are very important at the proposal stage of the utility.
Refer to Chapter 8 for a comprehensive discussion on tariff design.
4. Staff Recruitment
There are two basic questions that need to be asked in selecting operational staff:
1. Does the person know what and how to do the tasks required in the job?
2. Is he/she willing to do the job under the current situation and remuneration?
a. Job Description
A Job Description for each of the jobs being filled is an essential tool for the recruiter
and the Utility itself. A job description details the education/training and experience
required, and describes the tasks involved in the job. Annex C through Annex E show
examples of the job descriptions of the three operational staff needed to start up the
system. As the system grows, more staff can be recruited and the job descriptions
streamlined or specialized.
Page 8.6
Chapter 8: Administration
b. Job Interview
Once the basic information submitted in an application form indicates that the person
may be considered for the job, an interview should be conducted with the following
objectives:
1. Validate the person’s ability and experience to do the job;
2. Determine willingness to do the job;
3. Determine attitude to work in the group and attain utility objectives.
c. Other Considerations
In many cases, no applicants with the necessary experience and education are available.
An assessment of the general aptitude of the applicant, which indicates how easily they
can learn on the job, as well as attitude and willingness to learn, may have to be the
deciding factors. In such a case, emphasis should be on the multi-tasking requirements
of the job. In an SSWP, the operator will have to double as the plumber and meter
reader while the bookkeeper will need to do the billing and collection too. Job exposure
and training will have to make up for deficiencies.
d. Probation Period
Any appointment should initially be provisional or probationary. This provides an
observation and evaluation period during which the applicant’s fitness for the job can be
more fully appreciated. All staff should be made to undergo a probationary period,
usually 6 months to one year, to be set at the discretion of the Board.
5. Applications for Connection
For Level III systems, providing a service connection and service implies a contract
between two parties. Hence a prospective consumer must first sign an
APPLICATION/SERVICE CONTRACT with the SSWP before the SSWP provides the house
connection. This is to ensure that both the SSWP and the consumer are protected and
have recourse to legal action in case of a breach of contract.
Refer to Chapter 9 for a detailed explanation and a sample Application/Service Contract
form.
6. Utility Rules and Regulations
Even a Level II system needs to have basic operational rules such as how much to
charge; how to determine volume usage; how to manage the service; and how to collect
fees from consumers. Level III SSWPs must have Utility Rules and Regulations, or a
Customers’ handbook, which should have the following basic contents:
1. Requirements in Applying for Service Connection;
2. Responsibilities of the Consumer;
3. Tariff levels;
Chapter 8: Administration
Page 8.7
4. Payment of Bills;
5. Fees for Other Services (reconnection, meter testing, etc);
6. Rule Infractions and Penalties.
After the rules have been decided, it would be best to have them in printed in a manual
for easy dissemination to customers. This can help prevent future misunderstanding or
conflicts. Some of the contents, such as tariff levels and penalties, will need Board
resolutions or policies before management can implement them. All customers must be
issued a copy of this Rules and Regulations manual.
E. STAFF TRAINING
Government agencies like the LWUA, CDA, DILG, NWRB and even some water districts
and NGOs provide training and institutional development programs to assist water
utilities. Even Level II utilities should seek to avail of these programs.
Among the most useful general areas of training are policy formulation, problem solving,
preparation of resolutions, how to conduct meetings, business planning, and tariff
setting.
On more specialized topics, the bookkeeper is trained on records keeping and the
preparation of financial reports, and the System Operator on repairs and maintenance
of the water system.
One of the important functions of the recommended Adviser is to provide hands-on
training/on-the-job coaching for the different tasks required in O&M.
Observation visits to other nearby utilities are extremely helpful. These will give insights
on the what, why and how to of the various tasks.
Annex F provides an outline of Staff Development/Training subjects to guide the SSWP
in prioritizing and selecting the types of trainings that could be given to the different
levels of personnel.
F. OPERATIONAL FOCUS
1.
Delivering Water Service 24/7
To ensure reliable service, the thrust in the maintenance of facilities should be, as much
as possible, preventive. However, the SSWP should plan ahead and have ready
responses for emergencies. The aim is to enable it, ideally, to provide continuous
service even during emergencies. Where this is not possible, such preparation should
seek to limit the duration of interrupted service.
Page 8.8
Chapter 8: Administration
2. Importance of Collection Efficiency
Cash inflows are essential to enable the water utility to operate in a reliable and
predictable manner. Thus, tariff levels are generally set to cover normal operation and
maintenance costs, as well as to provide surplus funds to cover emergency
requirements. However, regardless of how well designed the tariff structure may be, if
bills are not collected, or are not collected on time, the Utility will experience cash
shortages that could compromise service levels. Unfortunately, the resulting poor
service often leads customers to delay or even stop payments, which leads to further
deterioration of services. This cycle, if not arrested on time, will eventually lead to the
system becoming non-operational or even being abandoned.
3. Preserving the Health of the Community
The sole product of the Utility is water and it is imperative for this product to meet the
specified standards of the PNDSW. As a minimum, the Utility should have a sample
tested in an accredited DOH laboratory for bacteriological presence at least once a
month. Should a sample test positive for coli forms, a re-sampling should be done
immediately, while the Utility, without waiting for the results, should simultaneously
search for the possible source of contamination. A second positive test should cause the
SSWP to consider suspension of operations (or advise all customers to boil their drinking
water) until the problem is solved.
It is, therefore, essential to follow the procedures for chlorine water treatment to
eradicate harmful organisms. Chlorine residuals should be taken at different distribution
points with the use of a chlorine comparator on a daily basis. Refer to Chapter 3 for
more details.
4. Reducing Non-Revenue Water (NRW)
Non-revenue water (NRW) represents water that is produced but does not bring
revenues for the SSWP. It is the sum of the water lost to physical leaks, illegal
connections, unauthorized withdrawals, unmetered connections and metering errors.
The NRW should be kept as low as is practical, technically and economically, in order to
reduce operation cost, keep tariff levels low, and conserve water.
How low should NRW be? For a new system, the NRW should be kept to less than 10%.
For older systems with NRW greater than 25%, the SSWP should bring the NRW down to
20% or below. However, the cost of the efforts to reduce NRW should be guided by the
principle of “not spending ₱2 in order to earn ₱1”.
For further details, refer to Chapter 6.
Chapter 8: Administration
Page 8.9
G. PERFORMANCE PARAMETERS (KEY PERFORMANCE INDICATORS)
Any SSWP should have at least a quarterly report of certain key performance indicators
(KPIs) to enable the management/Board to determine the system’s performance
efficiency and to track the progress of the utility. Table 8.1 lists the minimum KPIs.
Table 8.1: Minimum Key Performance Indicators
Key Result Areas
Service
Levels
KPIs
Formula
1. Water Coverage
People served by the system
2. Water availability
Duration of water supply in hours per
day
3. Water Quality
Percentage of samples passing
bacteriological testing
−
4. NRW
Operational
Efficiency
(₱)
(
5. Cost of Water Produced
(per m3 of water)
)
6. Operating Ratio
Financial
Performance
7. Collection Efficiency
Customer
Service
8. Percentage of Customer
Complaints/ Requests
(C&R) Resolved
&
&
These KPIs should be part of the information the Board should get from its management
at least every quarter. These KPIs are also required in the annual report that the Utility
must submit to the NWRB to comply with regulatory reporting requirements.
H. MANAGEMENT INFORMATION SYSTEM
The Utility’s management needs regular reports to give it basis for evaluating
performance, formulating policies, planning, making decisions, and informing memberusers of the financial status of the SSWP.
A Management Information System (MIS) is an integrated information system, which
prescribes the reports that should be provided, and when and to whom they should go.
When installed, an MIS simplifies the process of generating needed reports and
establishes a regular flow of information that enables management to provide timely
Page 8.10
Chapter 8: Administration
and informed responses to the requirements of the business. It is recommended that an
adviser be tapped to assist the SSWP in the formulation of an MIS to address its needs.
The development of an MIS requires the following:
1. Determining what information is needed at the Board and management
levels, and the format and frequency of the reports;
2. Determining how the data/information should be obtained;
3. Determining the person (or organizational unit) responsible for the obtaining
the data and preparing the report; and
4. Determining where the records will be kept and those responsible for
updating the files.
In large systems, the MIS is typically computer based. The collection, processing, data
storage, generation of reports and even their dissemination is programmed and
generally done electronically. Thus, the MIS can be set up to provide the most up-todate information on SSWP’s performance.
Refer to Annex G for a suggested monthly Form for the O&M information required by
the SSWP Board and management. This form is intended to help the SSWP determine
the priority data to be gathered. It will facilitate reporting to various stakeholders, make
the monitoring of operations easier, and generate a recorded history of the SSWP.
I. AUDITS
All organizations, including utilities, conduct routine audits (and, as needed, special
audits) to identify opportunities for improvement. Audits can be performed on an inhouse basis (by the Audit or Finance Committee), or by outside experts. Audits can
address various aspects of a utility’s operations. The results can serve as a guide for
improvement strategies.
The scope and purpose of audits may vary. The common ones for a water utility are:
1. Technical audit — a review of a utility’s technical operations (treatment
plants, water sources, pumping, storage, distribution, fire protection);
2. Financial audit — a review of a utility’s financial condition;
3. Management audit — a review of utility management’s practices (labor
practices, customer service, billing, metering, regulatory compliance);
4. Operations audit — a comprehensive audit involving all operational aspects.
J. BUSINESS PLANNING
A 3- to 5-year Business Plan is essential if the SSWP plans to expand its services. The
Business Plan serves to provide direction, and makes it possible to track the progress of
the undertaking. It is a requirement for a loan or application for funding, if the
Chapter 8: Administration
Page 8.11
expansion program requires outside funding. The Business Plan must be presented and
approved in the general assembly for approval. Approval of the business plan will
necessarily include approval of the tariff required within the planning period.
1. Purposes of Business Plans
Business Plans are prepared for different purposes. Typical uses and their specific
requirements are as follows:
1. Borrowing: A summary page will have to be included detailing the specific
request as well as the collaterals that can be offered. These can be in the
form of real assets, locked-in deposits and the likes. A feasibility study will
likewise be required by the lender to determine project viability. For nonproject specific loans, such as a program loan, lenders will have to scrutinize
the Utility’s financial statements.
2. Budget Approval: After the Board has approved the 5-year plan,
management must provide a detailed cash flow for the year in review.
Attached to this will be the details or schedules for each budget account. If
there are changes in the organizational structure or manning requirements,
the new organizational chart and related information must be provided for
Board approval.
3. Tariff Adjustment Approval: For the required tariff approval from NWRB,
some specific documents may be necessary to indicate compliance with legal
requirements. Among these are the Proof of Posting and minutes of the
Public Hearings conducted for the purpose of any tariff adjustment.
2. Contents of Business Plans
Basically, the business plan for a water utility will address the following major issues:
1. How many more stand posts or private connections will the utility add over
the planning period;
2. Where will it get its water supply;
3. What are the additional facilities required;
4. How much investments will be needed to support the expansion process;
5. How the undertaking will be funded;
6. What would be the projected operational cost; and
7. What would be the water tariff that would enable the utility to operate and
at the same time recover the investments and/or pay off any borrowings?
While this manual will not tackle the detailed mechanics of preparing such a plan, there
are a number of support agencies that can assist the SSWP in preparing it. The NWRB
has a list of experts who can provide business planning assistance. The Return on
Page 8.12
Chapter 8: Administration
Investment (ROI) methodology for tariff design discussed in Chapter 8 already
incorporates the elements of a business plan.
Annex H Lists the basic contents of a Business Plan.
K. DOCUMENTS
There are number of records pertaining to different aspects of the Utility’s business that
have to be kept and made secure.
1. Technical Aspects
Prior to system operation, the management should have the following documents
properly filed:
1. Inventory of assets by type and cost;
2. As-built plans or drawings detailing the system including well design, well
logs and well test data;
3. Log book of defects and repairs made; and
4. Performance Graphs of pumps and pump manuals
Management should determine who should secure, validate and update these
documents. These documents are critical for assessing system efficiency, for tariff
adjustments, and for securing loans.
2. Commercial/Financial Aspects
Any business will need to keep track of who their customers are and whether the
business is earning or losing. While it may not be the main purpose of some SSWPs to
earn profits, profits are necessary to be able to expand or rehabilitate the system at
some future time and for securing external loans.
The basic financial records that should be kept and secured are the customer ledger
cards, bankbooks, billing and collection data, and the financial statements.
L. PUBLIC RELATIONS
Public acceptance and support are a major concern of the Board and management. The
SSWP primarily serves the public (or its members) and is funded through water
revenues. To prosper and grow, it must have the support and build the goodwill of the
stakeholders in the community, namely, its members and the LGU officials.
In all their dealings and exposures to the public, all persons identified with the Utility,
including its Board members, management, and staff must project and maintain an
image of professionalism and public responsibility. In the Philippine social setting, the
image of helpfulness, fairness, friendliness, respect – as well as competence, are
appreciated and rewarded with acceptance, trust and overall public support. The Board
Chapter 8: Administration
Page 8.13
and management should define policies and take the necessary steps to secure this
support.
Some of the measures that could help the Utility build a good public image are:
1. By Board Members
1. Taking the lead by setting personal examples, such as listening to suggestions
and complaints directly brought to their attention and referring these to
management for action;
2. Defining policies to guide the Utility’s management and staff in properly
dealing with its customers;
3. Being publicly visible and identified with the Utility, for instance, by attending
public forums and participating in public affairs events, and disseminating
information about the Utility.
2. By Management
1. Ensuring that the staff adheres to the Utility’s public relations policies in
carrying out their jobs, especially when they deal directly with the public.
But this includes training the staff on how to deal with problematic situations
involving customers, in which the Utility’s legitimate interests need to be
protected or its actions enforced;
2. Thoroughly training the staff about policies, procedures, and the rationale for
these, and updating the staff whenever changes take place or new
information must be given to the public;
3. Establishing rapport with LGUs, including barangay officials, and ensuring
they are properly oriented on the requirements of a reliable water service;
4. Acting immediately on complaints and suggestions, resolving these, and
giving feedback to the concerned customers about the actions taken;
5. Regularly developing materials for dissemination to the public, particularly
those that could be distributed by the board and by management itself at
public meetings and gatherings;
6. Managing water service problems, particularly risks to public health, to
ensure that the public is properly informed on measures they should take to
protect their family’s health; and early warning of anticipated service
interruptions to enable customers to prepare for them. When unforeseen
problems occur, clear, frequent updates on what is being done, and the
progress of the repair or mitigation work, are needed to reassure the public
and secure their appreciation of the Utility’s efforts.
Page 8.14
Chapter 8: Administration
3. By the Entire Utility’s Personnel
1. Take responsibility for knowing the Utility’s basic policies, operational
procedures, history and organization; the value of its function of supplying
safe, potable water to the community; and the community’s responsibilities
in ensuring that the Utility is both viable and sustainable;
2. Conducting themselves properly at all times, by acquiring the good habits of
being respectful, accommodating of complaints and suggestions, being on
time for appointments and keeping schedules, and observing respectable
grooming practices and decent attire;
3. Maintaining clean, orderly office premises, and when doing field work
observing respect for public and private property and seeing to it that work
areas are left clean after a job is done.
M. PUBLIC CONSULTATION
Public consultation, as in public hearings or in general assembly meetings, is necessary
to secure public support for any important undertaking that affects or might affect their
interests. For the SSWP, they are essential for the following:
1. Formation of a community-based organization (CBO);
2. Expansion projects, particularly those requiring a tariff adjustment;
3. Tariff adjustments in general.
1. Nature of Public Consultation
Public consultation involves engaging people in dialogue – a two-way flow of
information and ideas between two parties or groups, in this case the project proponent
and the stakeholders. The public consultation dialogue gives the stakeholders and the
concerned members of the community the opportunity to express their views and
concerns. In turn, it enables the proponents to manage expectations, present
information, try to resolve issues, and detect potential conflicts. The purpose of public
consultation is to create an informed public that understands the tradeoffs between
project benefits on the one hand, and the costs and disadvantages on the other. An
informed public is better able to participate in the project, as beneficiaries, stakeholders,
contributors, partners, and advocates.
Before holding a public consultation, it is important to determine
1. Who the stakeholders are;
2. The other concerned persons who should be invited to participate in the
dialogue; and
3. The approach to be used in conducting the public consultation.
Chapter 8: Administration
Page 8.15
2. The Stakeholders and Other Participants
The choice of participants for direct consultation must be made on a fair and equitable
basis. Meaningful public consultation requires the participation of people who represent
a range of legitimate interests, including
1. Those who will be directly or indirectly affected, whether positively or
negatively;
2. Members of the most vulnerable groups;
3. Persons who might have an interest or feel that they are affected;
4. Those who support or oppose the changes that the project will create;
5. Persons whose opposition could be detrimental to the success of the project;
and
6. Persons whose cooperation, expertise, or influence would help the project
succeed.
3. Approaches to Public Consultation
Aside from the direct discussions that take place during general assemblies and public
meetings, there are a number of approaches to support or carry out public consultation.
The main ones can be characterized as:
1. Disseminating Information – This may be done by distributing printed
materials, volunteers going house-to-house or to small groups to distribute
printed material and explain the proposed undertaking, displays, or “open
house”. In this approach, it is essential to provide a mechanism by which the
stakeholders and other interested parties can express their responses to the
information given.
2. Soliciting Inputs – This can be done by surveys interviews, focus group
discussions (FGD), or public hearings.
3. Getting Consensus18 – This can be done through an advisory panel, which
interviews all the parties, tries to synthesize their positions, and proposes
18
“Consensus” is different from majority rule. Consensus literally means that the “sense” held in common
by the stakeholders is that the proposal is in the best interest of all (positive consensus) and should be
approved, or not in the best interest of all (negative consensus) and should be disapproved. Even when
some members of the group are opposed to the consensus (positive or negative), they may decide to
support it because it serves the best interests of the entire body. In the case of majority rule, a vote is
taken and the majority decision prevails, regardless of whether it will redound to the good of the entire
body or not. A majority vote on a contentious issue usually cannot be peaceably enforced unless a large
part of the losing minority (losing faction) accepts that it is in the best interest of the group to accept the
majority vote’s results. In which case, acceptance converts the decision into a consensus that can
proceed with less contradiction.
Page 8.16
Chapter 8: Administration
compromise solutions to enable the proposal to push through.
consensus building techniques may also be employed.
Other
4. Arbitration – This employs a party or group that is acceptable to the
contending parties, and is trusted to render a wise and fair decision. It is in a
sense a “consensus”, but not about the contentious issues themselves, but
rather a consensus that the best way to resolve the issue is to entrust the
decision to a mutually chosen arbiter. While the parties agree beforehand
to abide by the arbiter’s decision, it remains part of the arbiter’s job is to
convince the parties to accept the proposed solution.
In some public consultations, a combination of these approaches may be used at
different stages of the overall dialogue, until the informed public can come to a final
decision – usually a consensus – on the matter proposed.
Chapter 8: Administration
Page 8.17
Page 8.18
Chapter 8: Administration
Chapter 9
Commercial Operations
This Chapter presents key guidelines and practices that SSWPs need to adopt in order to
ensure sound commercial operations.
A. GENERAL
Commercial Operations pertain to the systems and procedures in dealing with
customers and their bills. These systems and procedures touch on the following aspects
of the water Utility’s business:
1. Service Connection Applications
2. Customer Classification
3. Billing and Collection
4. Customer Complaints
5. Dealing with Delinquent Accounts
6. Management Reports
7. Improving Collection Efficiency
8. Block Census
9. Use of Booster Pumps by Customers.
B. SERVICE CONNECTION APPLICATIONS
1. Service Contracts
a. Level II Systems
For level II systems, every customer goes to the public tap to get their water. The
following practices are recommended:
1. The SSWP should ensure that all public taps are metered and that a
Caretaker is assigned for each tap.
2. The Caretakers are responsible for controlling the water dispensed from
the tap under their care and for collecting the fees based on number of
containers drawn by each consumer. The Utility then bills each Caretaker
and collects the payments from him/her based on the consumption
registered on their assigned tap’s meter.
3. The billing/collection from the Caretakers should be done on a daily basis.
Chapter 9: Commercial Operations
Page 9.1
4. For Caretakers who are not employees of the Utility, a service contract
between them and the Utility might be necessary. (The Level III service
contract could be used with some modifications for this purpose.)
b. Level III Systems
1. For Level III systems, the Utility provides the water directly to each
customer through a metered connection, and bills them on a periodic
basis (usually monthly).
2. The provision of a service connection and water supply service implies a
contract between two parties. Hence all prospective consumers must
sign an Application/Service Contract with the SSWP before the SSWP
provides them with the house connection. The Application/Service
Contract establishes enforceable contractual obligations between the
SSWP and the customer, so either can take legal action in case of any
breach of contract. (Refer to Annex I for a basic Application/Contract of
Service form.)
3. It is highly recommended that the customer should not be made to pay
for the water meter19. The logic is that the SSWP should own the water
meter, and thus can install it outside the consumer’s property line. If the
meter is owned by the consumer, the SSWP may have difficulty reading it,
making repairs, or pulling it out if it is defective – if the owner places it
inside the residence or for any reason takes possession of the meter. The
Utility, however, could charge a token amount for monthly maintenance
of the meter.
4. Where practicable, the meters are placed in clusters for easy repair.
5. The Contract should specify the connection fees to be paid. It is
recommended that an advance deposit of 2 months be included in the
connection fee to guarantee payments of delinquent bills.
6. If a customer cannot pay outright for the connections, it would be a wise
move if the SSWP will allow installment payments, provided a down
payment is made. It would be up to management to recommend the
policy for this, given the fund availability of the SSWP, the volume of
pending applications and other factors.
2. Customer Briefing
It is good practice to educate the customers on the mutual obligations between
themselves and their water system, and the importance of complying with these
obligations in order to ensure a reliable, sustainable, predictable supply of potable
water. For Level II systems, meetings with the community, as well as appropriate
19
If necessary, a customer can pay a meter guaranty deposit.
Page 9.2
Chapter 9: Commercial Operations
billboards in the tap area could be used. For Level III systems, every time a new house
connection is made and prior to activation, the customer should be given a briefing,
even for a few minutes on the roles and responsibilities of both the SSWP and the
customer. The rules of the utility can be explained and questions clarified.
Such briefings and information also serve as a public relations tool for the SSWP.
3. Assignment of Customer Account Numbers
For Level II systems, the only account numbers needed are those assigned to each public
faucet.
For Level III systems, an account number is permanently issued to identify each service
connection, before it is installed. The account number identifies each connection as to
location, consumer class and customer number. An account number basically consists of
8 digits (000-00-000) with the following code:
First two digits Zone number
Third digit
Meter reading book number
Fourth digit
Consumer classification code
Fifth digit
Meter size code
Last 3 digits
Concessionaire account number
C. CLASSIFICATION OF WATER CUSTOMERS
Level II systems have only one category of consumers, so that customers do not have to
be classified.
Generally, Level III water customers or users drawing water from the SSWP are
categorized into 3 major types or classes for purposes of billing:
1. Residential (Domestic) and Government
2. Commercial/Industrial
3. Bulk/Wholesale.
These classifications are important because Level III tariffs are different for each
category. In general, Commercial/Industrial users are billed 2 times the rate and Bulk
connections 3 times the rate of Domestic users.
1. Residential/Domestic
Persons and establishments drawing water from the SSWP for their day-to-day needs
are classified under this category. They are charged the lowest rate. Normally, their
water usage includes cooking, washing, bathing, drinking and any other domestic use to
sustain everyday life.
Chapter 9: Commercial Operations
Page 9.3
Government offices and buildings are likewise classified under this category because
they perform public services and the consumption is only in connection with the
performance of their duties.
2. Commercial/Industrial
Persons and establishments drawing water from the system for use directly or indirectly
either to promote their trade or business or to produce a saleable product are classified
under the Commercial/Industrial category and should be charged accordingly. Included
in this classification are sari-sari stores, groceries, malls, contractors, bakeries, gasoline
stations, water filling stations, barbershops, beauty shops, restaurants and other
businesses.
3. Bulk/Wholesale
Persons and establishments drawing water from the system for resale without
transforming it into a new product are classified under the Bulk/Wholesale category.
Included under this category are those providing water to carriers and to houses that
are not connected directly to the system.
4. Implementation
a. Issues in Classification
When a water consumer falls distinctly under any of the above categories, classification
for billing purposes becomes easy. However in some instances, a consumer may fall inbetween two categories. For example, given a residential house with a small sari-sari
store or carinderia, how should the connection be classified? It is usual to consider the
principal purpose of the water. Somehow the SSWP would have to devise some
objective means of weighing the obvious mixed use in order to decide the classification.
Questions also arise about whether a small sari-sari store should be billed the same
commercial rate as a grocery, or if a small carinderia should be treated the same as a
large one or a restaurant. The determination of the appropriate billing rate could be
subjective if the decision were in the hands of a single person alone. Obviously, some
more general guidelines must be adopted.
b. Sub-Classifications
Some SSWPs have tried to solve these quandaries by setting sub-classifications. For
instance, defining Commercial A and B users, with Commercial A users being billed only
150% of the domestic rate, while applying to Commercial B users the full 200% of
residential rates. The Board has to define these sub-categories and give guidelines for
their application through an appropriate resolution.
Page 9.4
Chapter 9: Commercial Operations
c. Caution on Special Treatment
1. It is never good practice to give free water to the Board members and
staff of the SSWP. Such benefits are easily subject to abuse and are
bound to be used against the SSWP during tariff adjustment requests.
2. Except for emergencies, the SSWP should be very strict about the
granting the use of free water. If it gives in to one request, it can expect
to soon be flooded with similar requests.
D. BILLING AND COLLECTION
1. Level II Practices
To the extent practicable, the billing and collection of Level II faucets should be done on
a daily basis. Each metered public faucet should be assigned to a Caretaker who will sell
water to the users on a volumetric method, e.g., containers or drums with known
standard volume capacities. At the end of the day, the meters are read by the Utility’s
Collector and the Caretaker is billed on the basis of the cubic meters of water dispensed.
The daily reading, billing and collection will help avert delinquency in payment by the
Caretakers. If a Caretaker is unable to pay, the specific public faucet assigned to
him/her is disconnected until a dialogue with the concerned users leads to an
agreement regarding the arrears, and a new caretaker is appointed.
2. Level III Practices
a. Master List of Customers
In order to keep track of existing account numbers and control the number of customers
in each Meter Reading Book, a Master List of service connections should be prepared
and grouped according to areas (or zones).
Concessionaires in each meter reading book will be numbered consecutively from
number 001 taking into consideration potential concessionaires within the area
including vacant lots, which will be reserved with a corresponding account number.
b. Meter Reading
Service activities are best grouped to achieve a system in which meters within an area
can be read within a day. (The number of meters that can be read in a day should be
determined.) A group of areas lumped together, which could be read in 5 to 10 days,
could be grouped into a billing zone.
The water meters are read on a monthly schedule. The area assignments of meter
readers are rotated monthly, if possible, so that no meter reader will be making two
consecutive readings of any meter.
Aside from reading the meters, the meter reader should take note of and report service
defects, complaints from customers, and any infraction of utility rules.
Chapter 9: Commercial Operations
Page 9.5
c. Billing
Form 9.1: Daily Billing Report
Date
Account
No.
Customer
Bill no.
Consumption
m3
Amount
Metered
Unmetered
Penalty
Others
1. Water bills are prepared not later than the day before the next meter
reading. Water bills prepared for the concessionaires belonging to a zone
should be checked for completeness against the total number of
connections shown in the master list of service connections. Any
discrepancy should be investigated and rectified.
2. Completed water bills are forwarded to the manager, then to the bill
deliverers (or meter readers) at the end of the day for distribution.
Form 9.2: Customer Ledger Card
Name
Account No
Address
Date Installed
Date Disconnected
Date Reopened
Date
Bill #
Others
Particulars
Meter
reading
Usage
m3
Billings
Collections
& Others
Balance
3. A Daily Billing Report is prepared for all bills prepared for the day. This is
to ensure a reporting mode, which will be very useful for analyzing
collection efficiency, sales breakdown and billing efficiency. Form 9.1
shows a sample of a Daily Billing Report. This will serve as reference in
the recording in the Customer Ledger Cards. Refer to Form 9.2 for a
template of a customer ledger card.
4. A billing statement or Statement of Account should include the Due Date
for the payment and a Notice to the customer that a penalty will apply
for late payments. An example of such a billing statement is shown in
Form 9.3.
Page 9.6
Chapter 9: Commercial Operations
Form 9.3: Sample Format of a Billing Statement
Account Name:
Address:
CUSTOMER’S COPY
STATEMENT OF ACCOUNT
No.xxxxxx
Account No:
Meter No:
Billing Period:
Reading Date:
Due Date:
Present Reading:
Previous Reading:
Consumption (m3):
DETAILS OF CHARGES
Current Charges
Expanded VAT (EVAT)
Other Charges
Previous Unpaid Amount
TOTAL AMOUNT DUE
IMPORTANT REMINDERS:
1. 10% Penalty Charge will be imposed on payment made after due date.
2. Please bring your billing statement to avoid any delay during payment.
3. No field collector assigned. Please pay your water bills at SSWP Office.
4. Please report immediately the next time you have not received your bill 3 days after
meter reading.
3. Payments from Customers
1. As a rule, customers should pay only at the SSWP office where official
receipts shall be issued. There should be no collectors from the SSWP going
to individual customers.
2. Customer ledger cards should be maintained (either manually or
electronically) and regularly updated. Customers cannot be expected to keep
records of their payments for long and there is no reason for the Utility to
have incomplete or un-updated records. As soon as payments are received,
they must be recorded in the customer’s ledger cards. Whenever a whole
booklet of receipts is used up, a routine check comparing the stub entries to
the ledger entries should be conducted.
3. Collection of water bills in the office is scheduled on specific dates during the
month. The Due Date is indicated on the copies of the water bills for the
customer’s information and as reference for the imposition of the penalty
charge.
Chapter 9: Commercial Operations
Page 9.7
4. The bill should indicate the Penalty Charge for bills not paid on time. This will
be added to and collected together with the amount of the outstanding bill.
5. An Official Receipt is issued when payment is made.
6. All daily collections are tallied with the official receipts issued and are kept in
a steel safe during the night. A Daily Collection Summary is then made as
shown in Form 9.4. The collections are then deposited in the bank on the
morning of the next banking day.
Form 9.4: Daily Collection Summary
Date
Account
No.
Customer
Amount
Collected
Current
Account Credited
Arrears
Current
Previous
4. Disconnections
1. The SSWP should set a reasonable but clear deadline for all customers to pay
their dues. At the end of the deadline, the service should be disconnected,
unless the debt is paid immediately. To prevent abuse and avoid setting
precedents, no exceptions should be allowed. Charge a reasonable amount
for re-connection. Be firm but fair.
2. A customer should be given sufficient notice before actual disconnection.
3. If payment after the due date has not yet been made, a second notice (the
first notice is the original Bill itself) clearly marked “Disconnection Notice”, is
sent. Such notice shall inform the customer of the deadline for payment, the
penalties or interests to be paid, manner of payment, and the fee for
reconnection. Refer to Form 9.5 for a sample Disconnection Notice.
4. If payment is still not yet received after the Disconnection Notice deadline, a
Disconnection Job Order is issued by the Bookkeeper to the one in charge of
disconnections. This person goes to the consumer abode and presents the
Disconnection Order. If payment is not immediately paid, the disconnection
proceeds.
Page 9.8
Chapter 9: Commercial Operations
Form 9.5: Sample Disconnection Notice
DISCONNECTION NOTICE
Account Name:
Address:
Account No:
Meter No:
Dear Customer:
Our records show that your water bill in the amount of __________ due on __________ is
two (2) months overdue. We are giving you seven (7) days up to __________ to settle
your account with us. Failure to settle payment will force us to disconnect our services
without further notice. You will be charged a ten percent (10%) penalty upon settlement
and a reconnection fee of xxx Pesos (Pxxx.00).
Please disregard this notice if payment has been made and we thank you for your
payment.
Sincerely,
NOTE:
PLEASE PAY YOUR WATER BILL ONLY AT THE SSWP OFFICE. WE DO NOT HAVE ANY FIELD
COLLECTORS. ANY PAYMENT MADE TO OUR FIELD PERSONNEL IS AT YOUR OWN RISK.
ONLY PAYMENTS WITH OFFICIAL RECEIPTSISSUED BY OUR OFFICE SHALL BE HONORED.
The process should be clearly defined through a Board resolution that should be
disseminated to the staff and all users. As such, when the conditions for disconnection
take place, it shall be implemented automatically by the operating staff concerned,
without any specific order or intervention by the Manager. The Manager should not be
involved in the disconnection process for two reasons:
1. He should be able to rightfully claim that he had no prior knowledge of the
incident and that the staff are only guided by policy and standard office
procedures;
2. In case a reconnection has to be made immediately, he can give the order
without countermanding an earlier order to disconnect.
5. Billing Adjustments
1. If for some reason, a billing adjustment needs to be made on a customer’s
bill, the Bookkeeper makes the initial recommendation stating the reasons
for the adjustments. The Manager reviews it, and upon approval, the
Bookkeeper prepares a Billing Adjustment Memo (Form 9.6) on which the
Manager must indicate his approval.
2. Upon receipt of the approved Billing Adjustment memo, the Bookkeeper
notes the corresponding adjustment in the Customer Ledger Card. The
adjustment is then reflected either in a new or the next billing statement.
Chapter 9: Commercial Operations
Page 9.9
Form 9.6: Billing Adjustment Memo
BILLING ADJUSTMENT MEMO
Memo No.
Concessionaire:
Date:
Account No:
Bill No:
Reason:
Consumption
As Billed
Should be
Prepared by:
Increase
(Decrease)
Journal Entries
Account
Amount
Title
No.
Debit
Credit
Approved:
E. CUSTOMER COMPLAINTS
As a rule, every customer’s complaint should be attended to as quickly as possible.
1. There are several ways by which the SSWP can receive complaints from its
customers. These can be made directly to the Meter Reader, or the customer
can call or report directly to the office. These complaints must be recorded,
classified as to their nature and date received, and resolved or acted upon.
The report for each complaint should also indicate the dates for subsequent
monitoring.
2. If a service complaint is made to the Meter Reader, the Meter Reader should
conduct a preliminary investigation and, whenever possible, correct the
defect immediately. If the defect needs further corrections or repairs, this
should be noted in a Service Request form, which should be carried when
reading meters. The Meter Reader should log the Service Request in the
Customer Complaint Logbook upon return to the office and convert it into a
Maintenance Order. This order will be used as a basis for responding to the
defect.
Page 9.10
Chapter 9: Commercial Operations
3. If the service complaint is made at the office, the complaint is recorded in the
Complaint Logbook and used as a basis for further action. All service requests
carried by the Meter Readers should also be noted in this Logbook.
F. DEALING WITH DELINQUENT ACCOUNTS
1. If the SSWP is consistently firm in implementing its disconnection policies,
fewer problems will arise in dealing with delinquent accounts. For all intents
and purposes and depending on Board policies, delinquent accounts are
those with arrears greater than 2 months. Two months is a benchmark
because the consumer gets to use water for a month without any bills, 15
days due date upon billing and another 7 – 15 days due date for a
disconnection notice.
2. When the customer subsequently applies for reconnection, the reconnection
fee plus the arrears should be collected before reconnection.
3. If for some reasons the number of delinquent accounts grows, the SSWP
should take the following steps:
•
Ensure that the accounts have all been disconnected. Review delinquent
accounts that have not been disconnected if they have been issued the
appropriate collection notices.
•
If yes, disconnect immediately. If not, issue the appropriate notices.
•
If the customer has another connection (different account number), add
the debt to the second account after disconnecting the delinquent
account.
4. Prepare an Ageing of the Accounts Receivables. This means classifying the
accounts as to age of receivables, say 2-6 months “A”; greater than 6 months
to one year “B”; and accounts greater than one year “C”.
•
Starting with the “A” accounts, the SSWP should assign a representative
to discuss the account with the customer and attempt to find ways and
means to settle the debt. Those accounts greater than 6 months (“B” and
“C” accounts) should be given to a collection agent, if available. If efforts
are unsuccessful, then these should be written off as bad debts and no
longer be included as part of Accounts Receivables. A Board resolution
should be made to classify these accounts as bad debts with
management justifying why each is no longer collectible. However the
records should be kept and efforts still exerted to collect as if the
accounts were not written off.
Chapter 9: Commercial Operations
Page 9.11
•
Before the account is written off, the advance deposit20 made by the
customer upon application for service is credited to his account and the
arrears settled (plus or minus). If the customer applies for reconnection,
he shall be made to pay for the reconnection fee, the balance, if any, of
his earlier debt (less his earlier advance deposit) and 2 months average
consumption again.
G. MANAGEMENT REPORTS
1. Commercial/Operational Information
As part of the Management Information System (MIS) of the SSWP, the following
commercial operational information should be summarized and reported on a monthly
basis:
1. Report on Billing and Collection. Refer to Form 9.1 and Form 9.4 for sample
source documents;
2. Production and Per Capita Consumption. The per capita consumption can be
obtained from the total domestic consumption divided by the number of
domestic persons served (no. of domestic connections x average family size).
Production is from the production records;
3. New Connections Applications. Number filed and number of active
connections per category;
4. Complaints. Number and nature of complaints and average resolution time.
2. Billing and Collections
The billing and collection system should be able to summarize every month the
following information:
Total Billings &Collections by Type of Connections
Total Number of Connections
Collections on Current Billings and Arrears
Cubic meters Billed
Average Consumption per Domestic Connection
Connections with Arrears of More than 1 Month
The report format contained in Annex G can be utilized for this purpose.
20
2 months of average bill is highly recommended.
Page 9.12
Chapter 9: Commercial Operations
H. LOW COLLECTION EFFICIENCY
Under normal conditions, low collection efficiency in Level III services can be remedied
by strict enforcement of the policies on billing, collection, penalty, disconnection, illegal
connections/pilferages, etc.
If the member users find it difficult to pay water bills due to their low income, the SSWP,
through their CBO should encourage member users to undertake viable economic
activities to supplement their income. If majority of the users are consuming below the
minimum volume, then the SSWP could study reducing the minimum volume.
Another way is to provide incentive for on-time payment.
If the SSWP is part of a CBO, the CBO might agree to have a lending program where
members could apply for a loan to settle their bills.
If the community has difficulty making payments on time due to seasonal or unusual
income streams, then the SSWP could study the possibility of billing earlier than a
month.
I. BLOCK CENSUS
A block census is important for Level III systems. The census is merely a survey of the
current and potential customers within the SSWP’s service area. To do this it is
necessary to have a map of the service area showing the location of the houses.
Enumerators used for this purpose are trained on the survey objectives and the
questioning procedures. Where advantageous, barangay or school assistance may be
secured.
Steps for doing the block survey are the following:
1. Indicate on the map the existing system showing the pipelines, reservoirs
and source/s.
2. Divide the entire area into blocks and number each block so it can easily be
located in the field.
3. Divide each block so that each block can be covered by an enumerator within
1-2 weeks.
4. Assign enumerators to their respective zones.
5. Use a questionnaire to secure data per dwelling unit. Such as the number of
persons, estimate of daily consumption, payments made for electricity,
current source of water and payments made.
6. During the census taking, the enumerator should make a survey of the nonconnected residents and their present source of supply.
7. After the field survey is completed, the information gathered must be
consolidated.
Chapter 9: Commercial Operations
Page 9.13
J. USE OF BOOSTER PUMPS BY CUSTOMERS
The use of booster pumps by individual customers on their connections worsens the
pressure conditions in parts or throughout the entire system. It could likewise cause
negative pressures in the lines that would induce infiltration of non-potable water as
well as other problems for the system.
1. The Board should institute a policy banning the use of booster pumps
without a specific permit from the SSWP.
2. Boosters strictly may only be permitted when the customer constructs a
cistern to collect the normal flow of water from the SSWP system. The inlet
tube of the booster then sucks water only from the cistern.
3. The policy should emphasize:
•
That the official permit document must be obtained from the Board;
•
That the SSWP may conduct unscheduled inspections of the booster
setup at any time; and
•
That a heavy fine and/or disconnection will be imposed for the
unauthorized installation or modified operation of a booster.
Page 9.14
Chapter 9: Commercial Operations
Chapter 10
Financial Aspects
This Chapter presents the unique financial aspects of an SSWP, especially those
elements that play an important role in the effective management of a utility and to a
large extent determine its viability and sustainability. These key financial elements
include the tariff-setting considerations and methodologies, and the financial
management and control system, including the reporting requirements.
This Chapter is organized into three main topics:
1. Budget Preparation
2. Tariff Setting Methodologies
3. Financial Systems and Controls.
A. BUDGET PREPARATION
1. Nature of the Budget
NOTE ON THE SSWP ACCOUNTING SYSTEM
As in all businesses, the Accounting System is an important component of the
SSWP’s overall Financial System. Its preparation, however, is better left to a
qualified accountant who can design the system according to the specific
requirements of the SSWP. Nonetheless, the SSWP management and its
consultant should consider three important guidelines in working out its
accounting design:
1. As a strict policy, all collected funds should first be deposited in the SSWP’s
bank account. All disbursements should then be sourced from this
account. This ensures clear, proper accounting and security for the funds.
2. The Accounting System should mesh with the overall requirements of the
Financial Systems and Controls discussed in this Chapter, as well as with
the commercial operations described in Chapter 9.
3. The Accounting System should similarly mesh with and be able to generate
the data needed to support the SSWP’s Management Information System
(MIS).
See Annex J for a Conceptual Framework for a Level III system.
A Budget is merely a plan expressed in quantitative (monetary) terms. Its preparation
involves setting targets for the revenues and expenditures of the Utility. Being a
simulation of how the financial inflows, outflows and other accounts will behave as it
Chapter 10: Financial Aspects
Page 10.1
implements its plan within the budget period; it also involves the analysis of trends and
anticipated changes within business categories, such as operations and capital
expenditures. The adoption of a relatively detailed annual budget is a key element in
improving the Utility’s effectiveness.
The budget is prepared by management, usually during the last quarter of the year, and
should be approved by the Board before being endorsed to the stakeholders or general
assembly and to the regulatory bodies like NWRB, CDA or LWUA.
The basic components of a Budget are:
1. Statement of Objectives
2. Operation and Maintenance Budget
3. Capital Expenditure Budget; and
4. Financial Statements, including the Cash Flow and Income Statement
2. Statement of Objectives
For an on-going business, the first step in any budgeting process is generally an analysis
of the current year’s actual expenditures as compared with the approved budget, and
the presentation of objectives and goals for the coming calendar year. The deviations
between the actual estimated21 disbursements and budgeted amounts for the current
year have to be explained, and related to the Utility’s performance in terms of the
current year’s objectives.
1. These analyses need to be presented to the Board, which needs to
appreciate and evaluate whether the objectives set for the following year are
the right ones, are worth the budgetary outlays proposed, and are realistic in
the sense that they can be supported by the revenues to be realized by the
business. In other words, management should state the reasons (objectives)
for having a budget.
2. Depending on management’s presentation and the Board’s appreciation of
the budgetary proposal, the Board may request management to make the
modifications it deems necessary, or approve the budgetary plan outright.
3. It generally takes a minimum of 2 to 3 Board meetings before the Board
approves the budget.
3. Operation and Maintenance Budget
The O&M cost is the total estimated cost required to manage, operate and maintain the
water supply system. The projection of the O&M Budget usually is fairly straightforward,
unless major deteriorations of the facilities have created expectations of unpredictable
21
Called actual estimated because the presentation could be made in Oct or Nov while the figures will
cover up to December.
Page 10.2
Chapter 10: Financial Aspects
cost levels, or serious local or global events are expected to cause large spikes in the
prices of some essential supplies. Otherwise, it is projected from the results of past
operations and adjusted to fit the current or projected prices and costs.
a. Nature of O&M Costs
It is important to realize that in a well-managed water utility, there are only two major
groups of expenditures:
1. Capital Outlay/Investment, the costs of which are determined at the initial
stages of the business, or when it expands, upgrades, or replaces the physical
facilities for water supply and distribution. The annual costs are then
composed of the depreciation of the major facilities, the financial costs
incurred in their acquisition and installation, and actual Capex 22
disbursements during the year.
1. Operation and Maintenance, which involves practically all the activities of
the business whose focus is basically to employ its physical facilities to
distribute the water 24/7, reliably and efficiently, and to ensure that these
physical facilities remain capable of continuing to distribute the water 24/7,
reliably and efficiently.
From this it will be clear that the O&M cost is one of the two major components
considered in determining the initial water tariff of the system and the necessary
adjustments in tariff that may be dictated by external factors and as the system expands
in the succeeding years of operation.
b. Revenues Needed to Support O&M Costs
From the foregoing discussion, it becomes very clear also that SSWPs need to collect
water revenues continually and promptly in order to reliably operate and maintain the
water distribution facilities. In too many instances, insufficiency of funds is at the root of
poor SSWP maintenance.
c. Need to Educate Users
Each member user should be made to realize the importance of a well-supported O&M
on the reliability of their water system. They should be educated on what the O&M
budget comprises and why a collection is made for the Utility’s O&M.
d. O&M Cost Items
Following is a list and description of what are generally included as O&M cost items:
1. Salary/wages refers to the gross personal services expenses;
2. Power costs and related expenses refer to the total electricity and fuel, oil,
and lubricants incurred in the operation;
22
Capital expenditures
Chapter 10: Financial Aspects
Page 10.3
3. Maintenance expenses refer to the repairs and maintenance costs of
facilities, exclusive of salaries and wages of SSWP staff who undertook the
repairs and maintenance;
4. Permits/Regulatory fees are expenses incurred in obtaining or updating
business permits, licenses and payments for regulatory fees;
5. Board costs are expenses incurred during Board meetings as well as board
per Diems, if any;
6. Operation capex are disbursements made which do not enhance the physical
distribution system but are necessary in improving the office environment,
work efficiency, or security, examples of which are fax equipment, light
fixtures, housekeeping equipment, vault and filing cabinets, and computers;
7. Miscellaneous costs refer to other maintenance and operating expenses like
representation expenses excluding depreciation, interest and other bank
charges. Capital Expenditure (Capex) Budget.
The annual capex budget summarizes the cost of the projects that the SSWP will
implement during the budget year. These are cost items that involve large amounts, like
pipelines, reservoir, connections, source development, major repairs or expansion of
the network. The amount is determined based on the project plans and the estimates of
their cost.
4. Cash Flow Statement
The Cash Flow Statement is a plan showing the sources and levels of cash revenues that
will be realized, and the cash disbursements planned during the budget year. This
document is essential in matching and timing the expenditures with the cash that will be
available. It prevents fund shortfalls at the time critical items are scheduled to be
purchased. When a cash shortfall is foreseen, the budget planners (management) can
adjust spending priorities, delaying the purchase of non-critical items and, when needed,
obtain additional funds from external sources. Serious prolonged cash deficiencies that
are foreseen should trigger the consideration of tariff adjustments.
•
The Cash Flow Statement is based on the cash method of accounting rather than
on the accrual method. (See Footnote 24 for a brief explanation.)
Form 10.1 shows a format of a quarterly Cash Flow Statement.
Page 10.4
Chapter 10: Financial Aspects
Form 10.1: Sample Cash Flow Statement
1st Q
2nd Q
3rd Q
4th Q
Total
Collection %
Receipts
Sales Collections23
Penalties
Customer Deposits
Loans
Connection Fees
Others
Total Receipts
Disbursements
Operations
Vouchers payable
Staff advances
Loan debt Service
Customers Deposit Refunds
Others
Capex
Total Disbursements
Net Receipts (Disbursement)
Cash Balance, Beginning
Cash balance, End
5. Income Statement
While the Cash Flow Statement may indicate cash sufficiency during the budget period,
it does not show that the Utility is earning a profit. The statement designed to
determine profitability is the Income Statement, which uses the accrual method of
accounting24.
23
Requires a support table showing the types of connections and average revenue/type of connections.
In the accrual method, earned revenue is recognized as income for the time period in which it was
earned, even if it will only be collected (encashed) at some future time period. In the cash method, even
if the income has been earned, as long as it is not received as cash, it is not reflected in the cash flow
statement.
24
Chapter 10: Financial Aspects
Page 10.5
Form 10.2 shows a format of a Comparative Income Statement.
Form 10.2: Format of a Comparative Income Statement
This year
Last year
Variance
Operating Revenues
Less: Operating Expenses
Operation Expense
Maintenance expenses
Depreciation
Total Operating Expense
Operating Income
Other Income
Total Income
Less: Misc Income Deductions
Net Income before Interest
and Taxes
Less: Interest Charges
Taxes
Net Income (Loss)
6. Budget Monitoring and Control
Management must monitor the level of expenditures against the budget on a monthly
basis in order to control overruns that could lead to unexpected fund shortfalls.
Monitoring the budgeted expenditures enables management to take cost reduction
measures, make decisions on budget realignments, and consider the need for a
supplemental budget if it is forecast that the approved budget for essential
expenditures will be exceeded.
B. TARIFFS
Tariffs are the life blood of a small water utility business. Tariffs set by the regulators
are basically its only source of the revenues it needs to support its capital investments,
operations and maintenance. They define the contributions that the SSWP may demand
from the users of the water distribution system, as their share in the cost of its
construction and upkeep.
Page 10.6
Chapter 10: Financial Aspects
1. Tariff-Setting Requirements
Tariff setting should NOT be done in a poorly considered, arbitrary manner. A deficient
tariff level, once set, will be very difficult to remedy; and an excessive level would be
unsustainable for the users, be subject to complaints, and tend to result in delays of
payment and bad debts.
For this reason, the practice is for the water tariff to be fixed by the Utility in
consultation with the users, considering basically the capacity of the users to pay and
costs of the O&M, as well as other relevant factors.
In the public consultations, the users and the Utility itself should see tariffs as
instruments for recovering the cost of providing adequate water service to customers
and must reflect not only the fixed costs of the supply system but also its operating
expense and long-term sustainability. Tariff rates must satisfy the following
requirements.
1. Adequacy: The revenues generated from a water rate schedule must be
sufficient to meet the revenue requirements of the Utility. The rates should
be able to promote the Utility’s financial viability and growth.
2. Public Service: The tariffs must be set at a reasonable level that reflects the
Utility’s role as a public utility providing a public service.
3. Equitable and Socialized Pricing: The tariffs must equitably distribute the
cost of the service to all classifications and sizes of connections. Their
structure should define a relatively low fixed rate for some minimum level of
consumption to benefit the low income users, and higher rates for those who
use greater quantities of water.
4. Affordability Level: The rates must be kept affordable to the low income
group (LIG). For this reason, the minimum charge for a ½” residential
connection should, as a rule of thumb, not exceed 5% of the average income
of the LIG within the service area.
5. Water Conservation: The rates must encourage the wide water usage
needed to attain economies of scale, but must also discourage unreasonable
and wasteful usage of water.
6. Enforceability: The rates must be fair, reasonable and transparent. They
should be justifiable and acceptable to the consumers.
C. TARRIF SETTING METHODOLOGIES
Two nationally accepted tariff methodologies are presented here, the Return on
Investment (ROI) Method adopted by the NWRB, and the Cash Flow Needs Method
utilized by the LWUA/Water Districts. There are many similarities between the two
methods such as the use of quantity blocks of consumption and meeting the financial
requirements of the utility.
Chapter 10: Financial Aspects
Page 10.7
1. NWRB’S Return on Investment (ROI) Methodology
The NWRB uses this tariff methodology. While designed for Level III systems, it can be
adopted for use even by Level II systems. Water systems registered with NWRB should
use this method in formulating water tariffs.
It must be taken into account that in Level III systems, the individual connections
are metered, while in Level II systems, the reckoning of water use is different.
Level II consumers are billed by container, based on the known volume of the
containers they bring to the public faucet. (e.g., A carboy is usually 5 gallons, a
drum is 55 gallons, and a pail (timba) may be 3-gallon, 5-gallon, or larger size.)
The Caretaker, however, is billed by the Utility by the cubic meters of water
reflected in the faucet’s meter.
a. Guidelines:
The following are guidelines for the NWRB ROI method:
1. Time Span: The methodology results in a 5-year tariff level;
2. A Business Plan with detailed projected OPEX and CAPEX must be able to
justify tariff levels for a 5-year period;
3. Service Levels: Tariff is computed based on agreed service levels;
4. Key Performance Indicators (KPIs) should provide a basis for projections;
5. An Excel-based tariff model is used;
6. Calculation of an average ROI to reduce price shocks within the 5-year period
and to reduce administrative workloads;
7. Need for public hearings and publication.
It would be best to get the NWRB Tariff Methodology Manual with their Excel model CD.
This can be obtained from the NWRB at a minimal cost. Contact information for the
NWRB is available on their website (http://www.nwrb.gov.ph/contact.htm).
b. Tariff Design Process
The NWRB’s tariff design process is illustrated in more detail in Annex K.
c. Legal Requisites
The proposed rates are subject to public hearing or consultation prior to approval. After
approval by the NWRB, the approved rates must be posted within 7 days in a
conspicuous place within the SSWP office and other public areas within the community.
Page 10.8
Chapter 10: Financial Aspects
2. The “Cash Flow Needs” Methodology
This method is being used by water districts whose tariffs have to follow the guidelines
of the Local Water Utilities Administration (LWUA). This method may not be applicable
for those registered with the NWRB.
The difference between the ROI method and this method is the enumeration of the
items which can be included in the cash flow (Table 10.1) which incidentally is
equivalent to the revenue requirement per year.
Table 10.1: Items Included in the Cash Flow
Cash Flow Expense Items
ROI Method
O &M
- same -
Debt Service
- n/a -
Reserves (2-5% of revenue)
- n/a -
Taxes
- same -
Other Adm Expenses
- same -
Capex
- n/a -
- n/a -
Net Income
This method also requires projections of the following:
1. Number and type of connections; estimated volume sold and population to
be served;
2. Production capacity, NRW, water supply shortage/surplus;
3. Required investments; and
4. O & M expenses to be incurred.
The projected consumptions are then converted into equivalent volume units similar to
the ROI method. Cash flow projections for 5 years are made with the “cash flow needs”
as the revenue requirements. The annual average tariff is then calculated by getting the
revenue requirements divided by the volume sold.
For more details, readers are advised to log on to LWUA’s website at www.lwua.gov.ph
and access their primer on Water Rates and Related Practices.
D. FINANCIAL SYSTEMS & CONTROLS
1. Cash Security
There are several instances wherein the utility can receive cash. These are from
collections, donations or sales of assets. It is very important for the utility to have a
Chapter 10: Financial Aspects
Page 10.9
procedure for each instance to ensure that the cash obtained is documented and
secured.
As an example for office collections, based on the copies of the Official Receipts, the
cashier prepares the Cash Collection Summary and compares collections with the
Summary at the end of each day. Collections are then kept in a steel vault. The
collections are then deposited the next day with a copy of the deposit slip. The
deposited amount is recorded in the Daily Cash Position Report.
2. Disbursement Procedures
All utilities must maintain disbursement procedures to keep track of the expenses and
accountability purposes. There are different purposes for the disbursements and the
utility must ensure that their disbursement procedures cover the following purposes:
1. Payrolls
2. Operational expenses like chemicals, fuel, rentals
3. Capital Expenditures
4. Debt service
5. New connections
6. Maintenance expenditures
7. Emergency procurement
3. Asset Register
This is a list of assets currently owned by the Utility. The Register has 3 uses:
1. It documents the list of the assets owned by the utility;
2. It guides the utility in the computation of its depreciation expense; and
3. It gives the regulatory office or a lender an idea of the Utility’s size and assets
owned.
A format of an asset register is shown in Annex K. The SSWP should develop a procedure
for updating the asset register.
4. Donated Assets
The manager should receive all donated assets. He must ensure that the donation
includes the documents of the donation or title aside from the asset. Unless the
accompanying documents indicate the value of the asset, a value must be assigned to it
for inclusion in the Asset Register and for depreciation purposes.
The bookkeeper prepares the corresponding journal voucher and lists the asset in the
Asset Register. The asset, if transportable is then consigned to a designated or
accountable person or to stockyard for safekeeping.
Page 10.10
Chapter 10: Financial Aspects
E. OBTAINING LOAN FINANCING
Sources of commercial funds are available and it is to the Utility’s advantage to be able
to access these when the need arises. To be able to do this, the Utility must have both
the credibility and capacity to service the loan. The Utility is then termed creditworthy.
A Utility is considered creditworthy when its financial performance and management
meet the tests that reasonable lenders adopt in assessing loan applications. The Utility
must be able to show a history of sound financial and operational management, usually
evidenced by several years of acceptable audited financial statements.
Other factors that affect creditworthiness are management capacity and governance or
accountability of the institutions and customer demographics. Utilities applying for
credit must present financial projections to confirm that sufficient revenue will be
generated to cover relevant costs, including routine operation and maintenance costs,
renewal and replacement of assets, and system expansion and debt service. In
developed markets, utilities can receive a credit rating indicating their level of
creditworthiness and the level of risk involved in lending to it. The rating affects the cost
of borrowing—utilities with strong credit ratings can borrow at lower interest rates,
while those with less borrowing experience or poorer financial performance will have to
pay higher rates. They may further be required to obtain a guarantee from the
municipality or owners, or they may not be able to borrow on the market.
Chapter 10: Financial Aspects
Page 10.11
Page 10.12
Chapter 10: Financial Aspects
Annexes
TABLE OF ANNEXES
Annex A 24-Hr Constant Rate Pumping Test Procedure .............................................A.2
A-I Required Tools and Equipment ........................................................................................ A.2
A-II Terminologies ................................................................................................................... A.2
A-III Discharge Measurements ................................................................................................. A.2
A-IV Procedure ......................................................................................................................... A.3
Annex B Measuring Flow from a Horizontal Pipe .......................................................A.4
Annex C Sample Job Description: System Operator ...................................................A.5
Annex D Sample Job Description: Bookkeeper...........................................................A.6
Annex E Sample Job Description: Manager ................................................................A.7
Annex F Staff Development & Training ......................................................................A.8
F-I Basic Knowledge (for all staff) .......................................................................................... A.8
F-II Requirements for Supervisors .......................................................................................... A.8
F-III Basic Operator Requirements .......................................................................................... A.8
F-IV Training Options ............................................................................................................... A.8
Annex G Monthly Operational Report .......................................................................A.9
Annex H Business Plan Contents .............................................................................. A.12
H-I Utility Profile:.................................................................................................................. A.12
H-II Business Plan Details ...................................................................................................... A.12
H-III Cash Flow........................................................................................................................ A.12
Annex I Sample Application/Service Contract .......................................................... A.13
Annex J Conceptual Framework for an Accounting System ...................................... A.15
J-I
Basic Features ................................................................................................................. A.15
Annex K Tariff Design – ROI Method ........................................................................ A.16
K-I Determining Revenue Requirements ............................................................................. A.16
K-II Rate Structuring Process ................................................................................................ A.21
References............................................................................................................... A.23
A.
Annexes
Page A.1
Annex A
24-Hr Constant Rate Pumping Test Procedure
A pump test consists of pumping a well at a certain rate and recording the drawdown
(decline) of water level in the pumping well and in nearby observation wells over a
certain time period. The responses of the water levels at and near the pumping well
reflect the aquifer's ability to transmit water to the well. The response allows hydro
geologists to determine the aquifer's characteristics. Water levels will drop less in more
permeable aquifers than in aquifers of lower permeability. Ideally, water levels should
be measured at predetermined time intervals at the pumping well and nearby
observation wells.
A-I
REQUIRED TOOLS AND EQUIPMENT
•
Pumping unit (submersible pump with a capacity greater than the yield
requirement by at least 20%)
•
Water level indicator
•
Stopwatch
•
Containers for volumetric measurement of discharge
A-II
TERMINOLOGIES
Static Water level – The vertical distance from ground level (or known measuring point)
to the water surface in the well when there is no pumping.
Pumping Water Level – The vertical distance from ground level (or known measuring
point) to the water surface in the well during pumping.
Drawdown – The difference between the pumping water level and the static water level.
Well Yield – The volume of water per unit time that could be pumped from the well as
determined by the pumping test.
A-III DISCHARGE MEASUREMENTS
Discharge measurements are usually measured by a flow meter. If there is no device to
measure the flow, then volumetric measurements will be resorted to.
The volumetric method consists of noting down the time required to fill a container
(bucket or a drum). Better results are obtained with a larger container. For more
accurate results, several trial measurements should be done and the average of these
trials taken.
Page A.2
Annexes
A-IV PROCEDURE
1. Prior to starting the pump, measure and record the static water level.
2. After starting the pump, measure the corresponding water levels. Discharge
should be greater than the required yield and should be maintained at a
constant rate during the entire duration of the test for 24 hours.
Measurement intervals should be as follows:
Time from start of pumping
(min)
Time intervals between
measurements (min)
0 – 15
0.5 – 1
10 – 15
1
15 – 60
5
60 – 300
30
300 – end of test
60
3. Simultaneous with the water level measurements, take measurements of
discharge.
4. Monitor nearby wells to determine effects during pumping.
5. Right after the end of the pumping test, measure the water level recovery.
6. Plot data obtained from the test on a semi-logarithmic paper showing the
time in the abscissa (x axis) and the drawdown in the ordinate axis (y axis).
Annexes
Page A.3
Annex B
Measuring Flow from a Horizontal Pipe
The following describes the procedure for measuring pipe flow from a horizontal pipe.
There are 2 conditions for this procedure to be used successfully:
•
The pipe must be flowing full
•
The pipe must be horizontal.
Procedure:
1. Measure the pipe distance to the
ground (drop or y in meters). The
pipe must be parallel to the
ground.
2. With water flowing from the pipe,
measure the horizontal distance from pipe nozzle to the point where the
water falls to the ground (carry distance or x in meters).
3. Apply the formula:
=
0.001739
⁄
Where:
d = pipe diameter in mm
x = carry distance in meters
y = drop in meters
Q = lps
Example:
Find the flow in a 62.7 mm (2 ½ inch) pipe flowing full where the drop is 0.50 m
and the carry is 0.824 meters.
Solution:
0.001739 × (62.7) × 0.824
=
= 7.9
(0.50) ⁄
Page A.4
Annexes
Annex C
Sample Job Description:
System Operator
Job Title: System Operator
Job Summary:
Under general supervision. Operates and maintains operational facilities.
Maintains chlorine levels and water quality test results. Performs scheduled
maintenance tasks and emergency repairs.
Typical Duties:
1. Maintains reservoir levels and system pressures;
2. Identifies and corrects (or cause to be corrected) malfunctioning pumps,
controls, motors as well as pipe leakages;
3. Connects customers;
4. Reads meters;
5. Does preventive maintenance on all facilities;
6. Maintains operating records;
7. Performs other duties as may be assigned from time to time.
Ability To:
Trouble shoot simple mechanical and electrical malfunctions; Calculate chlorine
dosages and flows; do plumbing work; lead and train subordinates.
Minimum Qualifications:
At least college level (or vocational school graduate) and 5 years experience as a
plumber or mechanic or machinist.
Annexes
Page A.5
Annex D
Sample Job Description: Bookkeeper
Job Title: Bookkeeper
Job Summary:
Under general supervision. Maintains complete financial books relative to receipts
and disbursements for all utility functions; calculate water bills, Receives cash
from customers and maintains billing and collection records.
Typical Duties:
1. Calculates payrolls, customer bills;
2. Maintains uniform system of utility expenditures and income accounts;
prepares periodic summaries; maintains balance sheet accounts;
3. Receives cash utility accounts and receipts same;
4. Reconciles daily transactions to cash received;
5. Transfers fund receipts to bank (or to System head) and secures receipts
thereof;
6. Other duties that may be assigned from time to time.
Ability to:
Maintain double entry system of bookkeeping, perform financial computation and
deal amiably with the public.
Minimum Qualifications:
Bachelor’s degree in Commerce or related field plus at least 1 year experience in
similar functions.
Page A.6
Annexes
Annex E
Sample Job Description: Manager
Job Title: Manager
Job Summary:
Directs the operating staff in accomplishing their functions; makes policy proposal
to Board; participates in public hearings/assemblies; liaisons with LGU and other
government officials.
Typical Duties:
1. Establishes office goals and objectives;
2. Ensures utility records are well maintained;
3. Prepares studies for Board consideration;
4. Makes presentations in public consultations and in other assemblies,
public offices, financing institutions;
5. Ensures that the daily collections are secured and maintains daily log
thereof;
6. Prepares reports to assemblies and Board;
7. Trains subordinates
Ability to:
Effectively supervise and evaluate personnel and performance, prepare reports
for various stakeholders; operate system facilities
Minimum Qualifications:
Bachelor’s degree in a utility related course with at least 2 years in a supervisory
position.
Annexes
Page A.7
Annex F
Staff Development & Training
F-I
BASIC KNOWLEDGE (FOR ALL STAFF)
1.
2.
3.
4.
5.
F-II
1.
2.
3.
4.
5.
Utility Mission
Structure/Function
Utility Rules/regulations
Personnel Rules
Basic Public Relations
REQUIREMENTS FOR SUPERVISORS
Roles and Functions of Supervisors
Interpersonal Relationship
Problem Solving
Budgeting process
Systems and procedures of the Utility
F-III BASIC OPERATOR REQUIREMENTS
1.
2.
3.
4.
5.
6.
7.
8.
9.
Utility Mathematics
Pressure and Head Loss
Chlorination
Basic Plumbing
Maintenance Practices
Types of Valves. Pipes, Meters
Pump Characteristics
Troubleshooting
Basic Electricity
F-IV TRAINING OPTIONS
•
•
•
•
•
•
Formal Training Programs
(LWUA, DILG, Water Districts, Professional organizations, etc)
One on one with an advisor or expert
On the Job Training (OJT) in own or other utilities
Structured Observation Tours
Vocational Schools or Short Term Courses
Page A.8
Annexes
Annex G
Monthly Operational Report
For the month ending __________
1.0
WATER COVERAGE DATA
Connections
Type of
Connection
No.
a) Total metered (functioning)
b) Total metered (defective)
c) Total unmetered
TOTALS
d) Domestic
e) Commercial
f) Standposts
g) Bulk
h)
%
2.0
Population
Served(No.)
No.
i)
j)
(1.0 ) × 100
=
WATER AVAILABILITY DATA
Hrs Available/day
24
> 18 to < 24
> 12 to 18
> 4 to 12
<4
Total
Ave hrs (1)
24
21
15
8
2
Est’d Connections (2)
=
3.0
(3)
(2)
(3) = (1) x (2)
= ________ℎ
FINANCIAL DATA (PHP)
3.1
a)
b)
c)
d)
e)
3.2
a)
b)
c)
Billings
Current metered
Non-metered
Penalty charges
Billing adjustments
Others
TOTALS
Collections
Current accounts
Arrears (current year)
Arrears (prior years)
TOTALS
3.3
Annexes
This Month
= 100 × (3.2 + 3.2 )
⁄3.1
= 100 × 3.2
Year-to-date (YTD)
⁄3.1
=%
=%
Page A.9
4.0
FINANCIAL DATA
This Month
YTD
4.1 Revenues
a) Operating
b) Non-operating
TOTALS
4.2 Expenses
a) Salaries and wages
b) Pumping costs
c) Chemical costs
d) Maintenance
e) Other O&M
TOTALS
f) Depreciation + Interest
4.3 Operating Ratio25
WATER PRODUCTION DATA (m3)
5.0
5.1
Water Sources
Wells
Springs
Surface
Number
Total Capacity m3
5.2
This Month
Year to Date
5.3
a)
b)
c)
d)
e)
f)
Water Production
Pumped
Gravity
TOTALS
Accounted Water Used
Metered Billed
Unmetered Billed
Total Billed (5.3a + 5.3b)
Estimated Emergency Uses
Water Maintenance
Total Accounted (5.3c+5.3d+5.3e)
5.4
Total Production Cost =
4.2 Total
5.2 Total
Operating Revenue/Billed Volume (4.1/5.3) =
5.5
25
=
4.2 Total / 4.1 Total
Page A.10
Annexes
6.0
WATER USE ASSESSMENT
This Month
a)
YTD
Domestic consumption (house
connections + standpipes) m3
Average per capita consumption
Revenue Producing Water (%)
(5.3c x 100)
Accounted-for water (%)
[5.3f x 100]/5.2 Totals
b)
c)
d)
7.0
WATER QUALITY BACTERIOLOGICAL
a)
b)
c)
d)
8.0
Required no. of samples
Total Samples taken
No. of Negative Results
Percentage Negative
_____________
_____________
_____________
_____________
MISCELLANEOUS DATA
8.1
Employees
a) Total
b) Total Employee / 000 Connections:
9.0
____________
____________
CUSTOMER SERVICE
a)
b)
c)
d)
e)
f)
g)
h)
Connection Requests this month
Feasible connection request
Connection Request backlog
Connections made this month
% connections made (9d / 9b+c ) x 100
No. of Customer Request/Complaints
Complaint & Request Backlog
Requests/Complaints Resolved
i)
%
Annexes
___________
___________
___________
___________
___________
___________
___________
___________
=
Page A.11
Annex H
Business Plan Contents
H-I
UTILITY PROFILE:
1. General information: This is used to give some information on the utility to
the reader.
2. Asset Register: This is a list of assets currently owned by the utility.
H-II
BUSINESS PLAN DETAILS
1. Target Service Levels: This is to present the existing service levels of the
utility and the performance targets or planned service level targets within
the 5 year period. Service levels pertain to area coverage, water quality,
continuity of supply, pressure and sewerage services, if any.
2. Demand/ Supply Projections: This contains an estimate of the projected
demand as well as how the utility will be able to meet such demand. Any
project needed to meet the demand and distribution requirements should
either be presented in the list of projects or in the capex account in the cash
flow.
3. Capital Projects: This lists the major projects of the utility and the funding
source for each project. In case of presenting such project/s to a proposed
funder, the feasibility study for the project may be attached for reference.
H-III CASH FLOW
1. Proposed Tariff Structure: There should be the calculations showing how the
proposed tariff structure was derived.
2. Projected Key Performance Indicators: This gives the utility targets as well as
providing a monitoring tool or a benchmark for the utility to determine its
progress or performance.
3. Projected Financial Statements: This pertains to the projected Income
Statement and Balance Sheets.
Page A.12
Annexes
Annex I
Sample Application/Service Contract26
The undersigned hereinafter referred to as APPLICANT hereby applies for a water service
connection, size XX located at ______________ from SSWP, herein referred to as the UTILITY
and agrees to the following:
1. The applicant will pay the Utility the sum of PHP______ as service application fee
and the sum of PHP_______ representing two months non-interest bearing
guarantee deposit or the aggregate sum of PHP_____.
2. The applicant will, when water becomes available, purchase from the Utility all its
water needs in the premises as described in paragraph 3, as hereinafter provided,
and will pay therefore the monthly rates to be determined from time to time in
accordance with the Rules and Regulations of the Utility and in accordance with
provision of all laws, however, applicant agrees that the connection will not be
made until all charges are paid and the application is accepted or approved.
3. The applicant will cause his premises to be installed with pipe in accordance with
the specifications approved by the Utility.
4. The applicant binds to pay the monthly bills promptly and failure to pay the bills
within 15 days after the due date, without the need of demand, the utility will be
entitled to disconnect the service in which case, the latter will not be held liable for
damages.
5. The utility shall not be liable for failure to supply water to said premises under any
cause or condition.
6. The applicant will grant the utility the necessary rights and easement to construct,
operate, replace and repair and perpetually maintain the facilities within the
property owned by the applicant, its line of pipes for the distribution of water and
will execute and deliver instrument/s which the utility shall consider necessary for
the purpose. All pipes, meters or equipment of the utility installed on the property
of the applicant shall, at all times be the sole property of the utility giving the latter
the right of access to the property of the applicant to operate, maintain, repair or
relocate. On this regard, the applicant is accountable for the water meter.
7. The applicant will not be allowed to take water before the meter and will assume
responsibility for all water that passes through the meter.
26
Adapted from the consumer contracts of SIG in Sta. Cruz, Davao
Annexes
Page A.13
8. The applicants bind to follow the provisions found in paragraphs C and D, Section 32
of PD 678, quoted as follows:
“C. Prohibits any persons, firm, or corporation from vending, selling or otherwise,
and disposing of water for public purposes within the service area of the utility
without permission from the utility where the facilities of the utility are available to
provide such service or fixed terms and conditions by permit for such sale or
disposition of water.
“D. Safeguard and protect the use of water. For this purpose, any person who:
Installs any water connection without the previous authority from the utility
established under this case; tampers water meter or uses jumpers or other devices
whereby water is stolen; steals or pilfers water or water meter; or knowingly
possesses stolen or pilfered water or water meters, shall upon conviction be
punished by prison correctional, in its minimum period or a fine ranging from Two
Thousand Pesos (P2,000.00) to Six Thousand Pesos (P6,000.00) or both.”
9. Violation by the applicant of any of these mentioned in paragraph 8 hereof, will
justify disconnection of the water service by the utility in the same manner as
provided in paragraph 4 hereof stated above;
10. That in case of reconnection arising from disconnection, due to any of the causes
stated in paragraphs 4 and 8, the latter paragraph being in relation to paragraph 9
hereof, applicant binds himself to pay reconnection fee and guarantee consumption
deposit that may be fixed from time to time by the Utility.
11. The acceptance of this application by the Company will constitute an agreement
between the Utility and the applicant.
Done in ________________, this _____ day of __________.
Conforme:
______________________________
(Building Owner)
______________________________
APPLICANT
Accepted by:
______________________________
(SSWP)
Page A.14
Annexes
Annex J
Conceptual Framework for an Accounting System
J-I
BASIC FEATURES
1. Accrual Accounting
Under this method, all expenses shall be recognized when incurred. All
expenses shall be recognized when incurred and not necessarily as disbursed.
2. One Fund Concept
Regardless of where the funds come from, the system should adopt a one
fund system.
3. Chart of Accounts and Account Codes
A coding structure and a new chart of accounts with a three-digit account
numbering system shall be adopted.
4. Books of Accounts
The Books of Accounts are as follows:
a. Journals
•
•
•
•
Cash Receipts Journal
Cash Disbursement Journal
Check disbursement Journal
General Journal
b. Ledgers
•
•
General Ledger
Subsidiary ledgers, where applicable
c. Cashbooks
•
•
Cash in Bank
Cash advances
5. Financial Statements
The following financial statements shall be generated:
•
•
•
Annexes
Balance Sheet
Income statement
Cash flow statement
Page A.15
Annex K
Tariff Design – ROI Method
In this method, there are 2 general steps required. The first is to determine the average
tariff and the next step is to design the rate structure. The average tariff is determined
by the Revenue Requirements (RR) divided by the volume sold on an annual basis.
=
+
+
Where: OPEX = operational expenses + 2 months working capital
Dep = depreciation expense
MaxNI = Maximum Net Income which is 12%
K-I
DETERMINING REVENUE REQUIREMENTS
The following are the specific steps to arrive at the Revenue Requirements. While some
of the box illustrations cover only 3 years for clearer illustrations, the reader is advised
to cover a 5 year period.
1. Service Levels
Tariffs are based on levels of service established in consultation with the customers
or the community. The first page of the tariff proposal will set these goals as shown
below:
Table AK.1: Service Levels
SERVICES
No. of Connections
Area of Coverage
Supply Continuity1 (no. of hrs.)
Average1 Pressure
Water2 Quality
EXISTING
1
2
Years
3
4
5
Note: 1 Average supply hours/pressure pertains to at least 80% of connections
2 Pertains to physical/chemical parameters that consistently are above the PNDWS
2. Demand/Supply Projections
Projections have to be made on the number of connections. It will be necessary to
project the new connections that can be attained during the next 5 years broken
down by customer category.
Once the demand for water has been determined, the next step is to check whether
the utility has enough water to serve them.
Table AK.2 shows the items to be filled up. Table AK.2 ensures that the utility matches
the demand with the supply requirements. Steps are the following:
Page A.16
Annexes
Table AK.2: Demand/Supply Projections
DEMAND
YEAR:
0
1
2
3
4
5
0
1
2
3
4
5
New Connections
Total Connections
Ave. Person/Connection
Pop Served
Ave Consumption/Conn/month
Vol Sold/Year
SUPPLY
Installed Production Capacity
Percent (%) NRW
Production Requirements (m3/yr)
Bulk Water Purchase (m3/year)
WD Production (m3/year)
Water Surplus/Shortage/Year
If there is a water supply shortage, the utility can do any of the following options:
•
Limit growth of connections
•
Ration water
•
Reduce non-revenue water
•
Increase its production capacity, i.e., new source, bulk supply
3. Capital Expenditures
If the utility has to spend money to improve its source capacity the disbursements are
called capital expenditures. The utility has to determine the projects to be done and
determine the cost estimates for each one.
A list of projects and the total costs (Table AK.3) is an output of this step.
Table AK.3: Major Capital Projects
Project Name / Funding Source
Annexes
Major Components
Cost
Page A.17
4. Determine OPEX
Once the demand and supply have been established, operating expenses to support
them will now have to be calculated. Items that can be classified under Opex are the
following:
•
Personnel: cost of salaries, allowances and other benefits
•
Management Fees: These are costs incurred when some services are
outsourced like consultancies, accounting, collections, etc and are covered by
a contract.
•
Power: Electric bills or fuel costs
•
Chemicals: For chlorine and other chemical costs
•
Bulk Water Purchases:
•
Repairs and Maintenance:
condition
•
Bad debts: These represent accounts which can no longer be collected.
Normally, this should not be more than 2% of water revenues.
•
Annual Water Charge: This is NWRB’s fees based on the water permit.
•
Regulatory Costs: These are costs paid to regulatory agencies for the
necessary licenses, permits and other regulatory charges.
•
Meeting Costs: These are costs incurred during Board meetings and for Board
per diems
•
Gen Admin Costs: All other expenses related to the operation of the utility
not included in the other categories.
•
Depreciation: This is the depreciation expense for all assets whether entitled
to return or not.
•
Taxes: Includes franchise, value-added and any other tax except income tax.
Costs to procure bulk water
Costs incurred to keep the assets in good
5. Calculating Depreciation Expense
To get the depreciation expense, it is necessary to have an Asset Register (Table AK.4)
and a list of Projects detailed under section C above. The Asset Register can give us the
depreciation expense and net book value for the current assets listed in it while the
table of Proposed Projects can give us the depreciation expense for the proposed
projects.
Page A.18
Annexes
Annexes
Total Property and
Equipment
Land
Deepwell/Pumphouses
Deepwells
Pump and Motor
Motor Controls
Pumphouse
Booster Station
Pumphouse
Pump and motor
Motor Controls
Reservoir
Concrete Reservoir
Steel Tank
Impounding Structure/Dam
Treatment Plant
Structure
Equipment/Controls
Pipelines
Steel Pipes
PVC/PE pipes
Service Connections
Valves/flow meter
Fire Hydrants
Building/Improvements
Office Furniture/fixtures
Office Equipment
Vehicles
Tools/Equipment
Chlorinating Equipment
Inventory
Table AK.4: Asset Register
No.
a
10
40
30
7
30
20
40
10
5
5
40
15
40
30
50
40
20
20
15
8
7
40
Life
b
Year
Acquired
c
Expired
Life
d
Acquired
Cost
e
Dep Exp
f=e/b
Acc Dep
g=f x d
Net Book Value
h=e-g
Table AK.4: Asset Register
Page A.19
6. Property and Equipment Entitled to Return (PEER).
Depreciation, however, pertains only to the Property and Equipment Entitled to Return
(PEER). The PEER are those assets in service that are directly used in the operations of
the water system and were funded by the owner’s own funds, a loan, or internal cash
generation. Assets funded by a loan are entitled to return but interests thereon are not
entitled to return. A return on assets is provided to compensate the utility for the risks
involved and the cost of money invested. As such, assets that have donated or turned
over or are recovered via other ways other than water sales are not entitled to return.
7. Calculating Maximum Allowable net Income (MaxNI)
The MaxNI is defined below and is illustrated in Table AK.5. The MaxNI is defined as 12%
ROI and is calculated as follows:
= 0.12 × (2
ℎ
+
)
Table AK.5: Maximum Net Income
Year 1
Beg: Property/Equipment
New Investments
Total Assets Entitled to Return
Less: Accumulated Depreciation
Net Book Value
Add: working capital
2 months average cash opex
Total Capital Entitled to Return
Max Rate of Return
MaxNI
Year 2
Year 3
2,000,000
1,000,000
3,000,000
(200,000)
2,800,000
3,000,000
200,000
3,200,000
(250,000)
2,950,000
3,200,000
400,000
3,600,000
(300,000)
3,300,000
240,000
3,040,000
0.12
364,800
250,000
3,200,000
0.12
384,000
260,000
3,560,000
0.12
427,200
8. Revenue Requirements (RR) and Average tariff
The RR are the costs of service to be derived from the water rates and is obtained by
adding the annual Opex + Depreciation expense for that year and a maximum net
income allowed.
=
+
+
Table AK.6 illustrates the computation for revenue requirements.
Table AK.6: Computation for Revenue Requirements
Year 1
Max Net Income
Opex
Depreciation Expense
Revenue Requirements
Volume Sold, m3
Required Average Tariff/m3
Page A.20
364,800
1,440,000
480,000
2,284,800
180,000
12.69
Year 2
384,000
1,500,000
600,000
2,484,000
200,000
12.42
Year 3
427,200
1,560,000
600,000
2,587,200
220,000
11.76
Annexes
K-II
RATE STRUCTURING PROCESS
The water rate structure comprises two parts: the minimum charge and the commodity
charge. The minimum (or service) charge covers a volume assumed to be enough for the
basic needs of a low income user. The charge should not exceed 5 % of the family
income of the low income group within the community served.
The commodity charge is the amount to be charged per cubic meter beyond the
minimum charge.
1. Compute for Equivalent Volume
=
ℎ
×
ℎ
×
To be able to compute for the EV, Quantity Blocks and meter size factor are required.
These are shown in Table AK.7 and Table AK.8.
Table AK.7: Quantity Blocks
Quantity Blocks
Residential
Service Block (min charge)
2nd Block
3rd Block
4th Block
5th Block
Commercial/Industrial
Service Block
2nd Block
3rd Block
Range in m3
Factor
0 – 10
11 – 20
21 - 30
31 – 40
Over 40
Base factor = 1
1.25
1.50
1.75
2.00
0 – 25
26 – 1000
Over 1000
Base factor = 2
2.5
3.0
The incremental factor may be determined by the utility depending on the interval it
wants between the quantity blocks. Examples of incremental factors (3rd column) are
shown in Table AK.7.
The meter size factor (Table AK.8) is a multiplier applied to the consumption of a
quantity block to determine its equivalent volume. These factors assume that with a
higher meter size come higher initial and maintenance cost and more convenience to
the consumer so that the consumers must pay a higher rate commensurate to their
meter size.
Table AK.8: Meter Size Factor
Meter Size
1/2 “
¾”
1”
2”
Annexes
Residential
1.0
1.6
3.2
20
Commercial/Industrial
2.0
3.2
6.4
40
Page A.21
2. Determine Cost per Equivalent Volume
=
3. Determine Tariff Rate
Compute the tariff rate for the quantity block of each consumer category by multiplying
cost per EV x incremental factor.
Page A.22
Annexes
References
1.
Asian Development Bank. (n.d.). Public Consultation and Information Disclosure.
ADB.
2.
Cortez, M., Orda, E., Elvas, L., Mendoza, A. M., & Salas, S. M. (2010). Guide to
Ring-Fencing of Local Government-Run Water Utilities. World Bank Water and
Sanitation Program (WSP) and Public-Private Infrastructure Advisory Facility
(PPIAF).
3.
Department of Public Works and Highways. (1991). Water Supply Manual.
Bureau of Research and Standards, DPWH.
4.
Department of the Interior and Local Government, NJS Consultants, CEST, Inc., &
TEST Consultants, Inc. (2007). Upgrading Guidelines: Rural Water Supply and
Sanitation Project Phase V. DILG.
5.
Hart, W. (2003). Protective Structures For Springs: Spring Box Design,
Construction and Maintenance. School of Forest Resources & Environmental
Science, Michigan Technological University.
6.
Local Water Utilities Administration. (1994). Manual on Water Rates & Related
Practices. LWUA.
7.
Local Water Utilities Administration. (n.d.). Commercial Practices Manual for
Water Districts (Vol. II). LWUA.
8.
National Water Resources Board, Asian Development Bank, & IDP Consult, Inc.
(2005). Primer on Water Tariff Setting and Regulation. NWRB, & ADB.
9.
National Water Resources Board, Asian Development Bank, & IDP Consult, Inc.
(2005). Tariff Model for Private Water Utilities Regulated by the National Water
Resources Board: User’s Manual. NWRB, & ADB.
10.
National Water Resources Council. (1979, March). Rural Water Supply: Design
Manual, Volume 1. NWRC.
11.
National Water Resources Council. (1980). Rural Water Supply: Construction and
Installation Manual (Vol. II). NWRC.
12.
National Water Resources Council. (1981). Rural Water Supply: Operation and
Maintenance Manual (Vol. III). NWRC.
13.
US Army Corps of Engineers, Afghanistan Engineer District. (2009). AED Design
Requirements: Chlorinators. US Army Corps of Engineers, Afghanistan Engineer
District.
14.
Workers’ Compensation Board of British Columbia. (2002, 2006). Chlorine Safe
Work Practices. WorkSafeBC.
References
Page A.23
15.
World Health Organization. (1994). Operation and Maintenance of Urban Water
Supply and Sanitation Systems: A Guide for Managers. WHO.
Page A.24
References