1
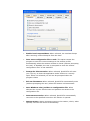
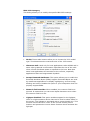
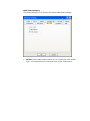
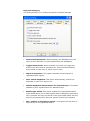
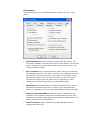
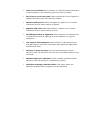
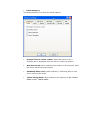
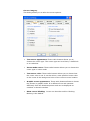
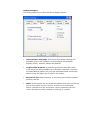
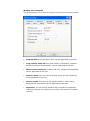
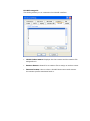
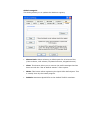
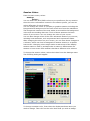
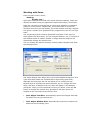
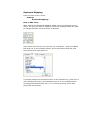
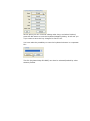
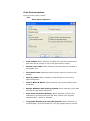
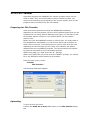
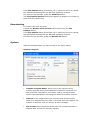
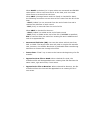
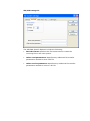
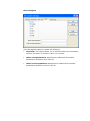
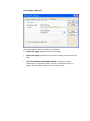
Quick3270 User's Guide Version 3.80 – July 2006 74, rue Verte 34980 Saint-Gély-du-Fesc – France Phone: +33 675 369 257 Fax: +33 499 639 876 Email: [email protected] http://www.dn-computing.com ™ TABLE OF CONTENTS 1. GETTING STARTED 3 2. QUICK3270 SESSIONS 3 Starting Sessions 4 Creating and Saving a Profile 5 Working with Layouts 5 Session Options Terminal Settings Session Colors Working with Fonts Keyboard Mapping Print Screen options Thai Option 3. 3270 FILE TRANSFER 6 6 20 22 23 25 26 27 Preparing for File Transfer 27 Uploading 27 Downloading 28 Options 28 4. HOST GRAPHICS 34 Getting Started This chapter is intended to get you started using Quick3270. It provides the basic information required to start a 3270 or 5250 terminal session. It also describes your basic work environment and shows you how to customize your toolbar. Quick3270 Sessions This chapter explains how Quick3270 sessions are created. It explains how to save a session, with all its settings, as a profile that can be used in future sessions. It also describes how you can customize your session environment by creating custom poppads, color schemes and associating these with specific profiles. Creating a Configuration To configure a session: 1. From the main menu, select: Session Session Configuration… The Session settings panel appears 2. Select the type of host/interface. The choices are: MS-SNA Server for connections to an S/390 system over Microsoft Host Integration Server (Formerly MS-SNA Server) TN3270 for connections to an S/390 system over Telnet TN5250 for connections to an AS/400 system over Telnet Read trace file replay of a previously recorded session log 3. Set the Session Parameters. Enter the session specific parameters Click OK when you are done. Starting Sessions You can use the methods described below to start sessions: Select an already-configured session icon from the Explorer or from the Start menu. Start from an existing session window. Specify a session profile name in the Run window. Start multiple sessions. Starting from a Session Window Use the following methods to start from an existing session window: Starting Another Session Using the Same Profile Select Run the Same from the File menu. Another session starts, using the same profile. Starting Another Session Using a Different Profile 1. 2. 3. 4. Select Run Other from the File menu. The Open Session File window appears. Double-click the desired session profile in the File Name list. Select OK. Starting a Different Type of Session from a Session Window 1. Select Open from the File menu. 2. Specify the desired workstation profile and then select OK. The current session ends and then another session starts, using the selected profile. You can use an alternate method to opening a session: Drag and drop the selected session file onto a Quick3270 session window. Starting a Session Profile from the Run Command Line To start the session: Select Start and then Run. Type the following command in the Command Line field and then select OK. For example: C:\PROGRAM FILES\Quick3270\QUICK3270.EXE C:\PROGRAM FILES\QUICK3270\MY.ECF where MY.ECF is the Session profile stored in the C:\PROGRAM FILES\QUICK3270\ directory. Starting Multiple Sessions You can use an already configured layout icon from the Explorer or from the Start menu to to start two or more Session profiles at the same time (Display and Printer. If you created an icon for your layout file, you can start multiple session profiles just by selecting the icon. Creating and Saving a Profile You should create a profile for each session that connects to a different host or requires different session options. To create and save a profile: 1 Open a new session using the New Session Command in the File menu or by clicking the New Session button in the toolbar. In the Open New Session dialog box enter the IP address or host name you wish to associate with the new profile, then click on the Config button. 2 Customize the session to your preferences. For example, size the Quick3270 window and select the options you want from any category available for the terminal type you have selected. 3 To save a new profile, select the Save As button. A dialog box appears. You can save a profil as the default profile. Use the Save as default Session Command in the File menu. After then, all session started without a session configuration file on the commande line will use this default setting. Working with Layouts Layouts allow you to open one or more windows in a prearranged position on your screen. Desktop layouts are especially useful for running multiple sessions. For example, you may consistently work with three display sessions and one printer session. In addition, you may have a KeyPad open for each display session. If saved in a layout, the session windows and the KeyPads will always appear exactly as you like them. Using a desktop layout involves the following two tasks: First, create the layout by defining how windows will appear on your screen. Second, open the layout. The layout positions the windows as defined. Creating a layout Open sessions that you may want to run concurrently. Set the size and position of the windows. Using the Settings menu commands, set your session preferences. From the File menu, choose Save Layout. Type a new layout filename, or scroll through the Filename list and select an alternate layout file. (We suggest that you use the .QLT extension.) 6. Choose OK, then follow the prompts to add an icon for the layout-file to the Folder if you want to. This icon allows you to start several host sessions by clicking a single icon. 1. 2. 3. 4. 5. Opening a layout If you have a session open: 1. Choose Open Layout from from the File menu. 2. Select a desktop layout filename. 3. Choose OK. Session Options Quick3270 allows you to set each option independently for each terminal session. This lets you customize each session and save the options to a profile. Terminal Settings 1. From the main menu, select: Settings Terminal… The Terminal settings panel appears. The panel is subdivised into the following categories: Preferences Category This dialog allows you to change the connection preferences. Enable host beep attribute: When selected, the emulator beeps after receiving a sound beep bit from the host. Auto-save configuration file on exit: This option causes the program to save the current settings to the session profile automatically when the session window is closed (without prompting the user). If disabled, the user is prompted to save the session configuration file if it was modified. Prompt for disconnection: When selected, Quick3270 will warn you if you try to close the application and a session is currently open. When not selected you will not be prompted when the program closes Exit on disconnect: When selected, Quick3270 automatically exits (without prompting the user) when the session is disconnected. Save Windows size/position to configuration file: When selected the current window size and position are saved to the configuration file. Autoconnect session: When selected, Quick3270 automatically connects to the specified host when the session is opened. Startup macro: Assign a startup macro to the session, which, when opened, executes the macro automatically. IBM 3270 Category This dialog allows you to modify the specific IBM 3270 settings Model: These radio buttons allow you to choose the 3270 model type. This determines the maximum size of the 3270 screen. Character Cell: Used only for host applications under GDDM and in some other graphical environments. Specifies the size of the cells when a fixed coordinate space is reported to the host. Note that some host applications are sensitive to the cell size, especially applications that use Programmed Symbols. Accept Extented Attributes: This option allows you to enable the Extended Attribute Bytes (EABs) support. Extended Bytes are used by mainframe applications to display highlighting, reverse image, blinking and colors. Disable this option if your hostsystem does not properly support EABs. Numeric field override: When enabled, the numeric field bit is ignored. It means that you can enter alpha characters even when the numeric field bit is set. Lightpen Enabled: This option enables support for the lightpen, which is a light-sensitive device that can be used to select fields on the screen. The lightpen is emulated with a mouse double-clic. This function moves the 3270 cursor to the current mouse pointer location and presses the Cursor Select function which emulates the light pen Accept Program Symbols: Enables loadable symbols support. Loadable symbols, also called graphic symbol sets, are sets of symbols that are treated as small, individual bitmaps. Loadable symbols can appear in the graphics layer or the text layer. In the text layer, they are referred to as Program Symbols and are used as custom text. .Enable Host Graphics (3179G): This option enables support of host graphic display. Quick3270 supports host graphics by emulating the 3179G terminal. BIND specifies display size: When selected, the terminal display size in the BIND message will overwrite the user selected screen size (Model). This option should usually not be selected but can be usefull to bypass wrong VTAM terminal definitions. IBM 5250 Category This dialog allows you to modify the specific IBM 5250 settings Model: These radio buttons allow you to choose the 5250 model type. This determines the maximum size of the 5250 screen. Keyboard Category This dialog allows you to modify the specific keyboard settings Destructive Backspace: When selected, the BackSpace key will wipe out the character you just typed before the BackSpace Toggle insert mode: When selected, the insert key toggle the Insert mode like most PC programs do. If not selected (default), Insert Mode is reset only on action key or reset. Input in uppercase: This option translate all input letters in uppercase when typing. Auto unlock Keyboard: This option automatically unlocks the keyboard in case of an input error. Disable keyboard repeat feature for function keys: This option disables to auto-repeat feature for Attention keys. Enable type ahead: This option enables the Type Ahead feature. Type ahead allows you to keep typing after an Attention generating key is pressed. All keys are stored in the type ahead buffer and the keys are processed when the host system unlocks the keyboard Max. number of characters stored : This option sets the size (in keystrokes) of the typeahead buffer. Edit Category This dialog allows you to modify the specific settings for cut / copy / paste Field oriented: Select this option to paste field information. The first field is pasted to the first field in the current session, the second field is pasted to the second field in the current session, and so on until the buffer is empty. Row oriented: Row oriented means to paste rows of text that end with carriage returns or line feeds. The first row is pasted to the first input field in the current session; the second row is pasted to the second input field, and so on until the buffer is empty. If a row of copied text is larger than the input field it is pasted into, extra characters are truncated (unless you select Word Wrap). Word wrap: Select Word Wrap to cause information which would have been truncated at the end of a field (or the selected paste area) to be pasted to the next input field instead of being truncated. Paste to protected fields: Select this option to paste from the Clipboard to the selected area of the host destination screen field, regardless of whether these fields are protected or unprotected. You cannot paste over a protected field. Field Truncation: When selected, any data that falls onto an unprotected field is lost. Clear to end of field: When selected, if a field is partially filled after a paste operation, the remaining part of the field is cleared. Move cursor to end on paste: When selected the cursor location is updated and follows the last character pasted. Replace with spaces: Select this option to replace cut or cleared characters with an equal number of spaces. Replace with nulls: Select this option to replace cut or cleared characters with an equal number of nulls. Add bitmap format to clipboard: When selected, the selected text is copied as text and as a Bitmap into the clipboard on copy/cut operations. Use Tabs as field separator: When selected, Tab characters are inserted between each field. This allows easy pasting in application like Microsoft Excel. Advance to next Tab stop: Used on paste operations. When selected, each Tab character will move the next paste location to the next field. Replace with space character: Used on paste operations. When selected, each Tab character is replaced by a space. Selection rectangle remains visible: This option keeps the selection rectangle after completing an edit operation. Telnet Category This dialog allows you to tailor the telnet options. Prompt if server closes socket: When this option is set a message box is displayed when the server closes the session. Auto-Reconnect: When selected, the session is reconnected, when the server disconnects the session SendKeep-Alive every: When selected, a TCP Keep-Alive is sent every minut to the server. Telnet Timing-Mark: When selected, the response to DO TIMING MARK is WILL TIMING MARK. Cursor Category This dialog allows you to tailor the cursor options. Text cursor appearance: These radio buttons allows you to choose the cursor type. The cursor type can be a block, a half block or an underline. Insert mode cursor: These radio buttons allows you to choose the cursor type in insert mode Text cursor color: These radio buttons allows you to choose how the cursor color is set. It can be either a user specified cursor color or the invert of the background color of the current cursor location. Graphic cursor appearance: These radio buttons allows to choose the pointer in graphic mode. It is different from and operates differently from the Windows pointer and can be displayed as crosshair or boxed crosshair Show cursor blinking: Cursor can be either solid or blinking. Blinking is the default. Display Category This dialog allows you to tailor the some display options. User Interface language: This combo box allows choosing the language for the user interface. Five languages are available: English, French, German, Italian and Spanish. Large toolbar buttons: By default, Quick3270 uses fairly small icons which are easily readable up to 800x600 resolution. However, at 1024x768 and higher, the icons get somewhat small. Select this option to use the larger set of icons in the toolbar Recent file list: When selection, a list of the most recently opened profiles is stored. Ruler: These options let you enable the display of a ruler and choose one of three styles for the rule-line. A Rule Line is a horizontal and/or vertical line in the row and/or column containing the text cursor and aids you when reading or referring to a screen. Window Title categorie This dialog allows you to tailor the name for the current session window. Program name: The program name can be appended to the title Long session name ID: The word Session, followed by a sessionID that is assigned automatically, can be appended to the title. Short session name ID: A session-ID only, assigned automatically, can be appended to the title. Session name: You can enter a session name, up to 8 characters, to be appended to the title. Session profil: The name of the session profile (*.ECF) that is assigned with this session can be appended to the title. Separator: You can specify whether there should be a separatorcharacter between the elements of the title, and what the character must be. HLLAPI categorie This dialog allows you to customize the HLLAPI interface. HLLAPI short name: Displays the short name and the session file assigned to it. Browse button: Search for a session file to assign to a short name. Remove button: Use to select a HLLAPI short name and remove the session profile associated with it. Global categorie This dialog allows you to update the Windows registry: Sheme Path: Allows selecting a default path for all scheme files (Color scheme, GUI scheme, Keyboard scheme, Keypad scheme). Clear: This button allow you to remove the profile settings that has been set with the "Set as default session" menu option. Write: This button allow registering the Quick3270 OLE objects. This is usually done by the install program. Default: Associates Quick3270 as the default TN3270 emulator. Session Colors From the main menu, select: Settings Colors… You can tailor the 3270/5250 colors to your preference for any session. Since the color information is saved in the session profile, you can set colors differently for each session. You can change the colors in a display or graphics session including the foreground and background of the text colors sent from the mainframe. The foreground consists of the text within an area while the background is the area surrounding that text. Think of these areas as the basic colors of your screen. You can change the color of your cursor. You can also change colors of the more advanced areas of your screen, including host attributes, such as protected and unprotected fields. After changing the colors on your screen, you can save those changes to a scheme, which can then be assigned to another session or a specific host screen. Changing colors might make certain areas of the display session easier to read or perhaps make it easier to differentiate one session or host screen from another that has a different color scheme. To change the session colors, select the Colors from the Settings menu The following dialog will appear. To change a session color, first select the display attribute name you wish to change. Then click on the color block that you wish to assign. You can select a display attribute name from the Host monitor or the Host list (Selection combo box). The Default button resets all colors back to their default values. Working with Fonts From the main menu, select: Settings Display font… Quick3270 requires fonts that have equal character spacing. These are called Fixed-Pitch fonts (as opposed to Proportional fonts). Fixed-Pitch fonts are required so that the text on the screen appears in consistent positions on the screen. Additionally, since Quick3270 is a terminal emulator and not a word processor, the main window must be a specific size given a certain font. Quick3270 fully supports the use of True Type fonts. The windowing system used by Quick3270 operates in two ways. In Auto Adjust Font Size mode, you can drag the bottom, top, or corners of the window frame to make it smaller or larger and the program will dynamically change the window size. You can change the session fonts by choosing Select Display Font from the Settings menu. The Select Display Font dialog box will list all available bitmap and True Type fonts that match the characteristics required by Quick3270. Although the Font Style list box will allow you to modify the font, Regular style is normally the preferred style. As you change the Font, Style, and Size, a sample of the new font will appear in the Sample group box. Once you have selected the font you desire, press the OK button to change the session font. Quick3270 will then resize the window to the size required by the new font. Auto Adjust Font Size: Automatically selects the largest font that fits within the current window size Auto Adjust Window Size: Automatically selects the window size based on the font being used. Keyboard Mapping From the main menu, select: Settings Keyboard Mapping… How to Edit a Key After starting the Keyboard Mapping dialog (from the Settingss menu), select the key you want to modify such as this example where we want to change the Enter key from Enter to Newline. Then select the function you want the key to perform, using the tabbed Edit area list. In the example below, we’ve selected the Edit tab, and then selected list item New line. To actually assign the selected function to the selected key, press one or more assignment keys in the assignment area. In the example below, we assign the Normal Enter key (i.e. no shift keys held), which was previously set to Enter: At this point you can continue editing other keys, and when finished, press the Ok button to exit the Keyboard Mapping dialog. It will ask you if you want to save the key changes for future use. You have also the possibility to save the keyboard scheme in a separate file: This file (Keyboard Map File KMF) can then be selected/loaded by other session profiles. Print Screen options From the main menu, select: File Print Screen Options… Print header: When selected, a header line with the system time and date will be printed on top of the print screen output. Include user name: When selected, the user name is included in the header line. Document name: Specifies the document name to include in the header. Send to printer: When selected, send the data to the current specvified printer. Print in Black & White: When selected, ignores the display color attributes. Bypass Windows GDI printing system: When selected, print data are sent as raw ASCII characters. Send Form Feed after printing: When selected, a Form Feed character is sent after the print job. Only usefull if the “Bypass Windows GDI…” option is selected. On graphic display print only the graphics: When selected, on mixed display (Text and Graphics), only the graphic part is printed. Print to File: When selected, send the print data to disk file. Append file: When selected, print job will be added to the end of specified filename. If the file does not exist, one will be created. File Name: The file name to print to. Thai Option These options are only available for Quick3270 Thai Edition. From the main menu, select: View Composed mode: When selected the Thai characters are autocomposed in this mode. Space alignment: When selectec two consecutive spaces cause column realignment. The realignment occurs whenever composing routine finds two consecutive spaces. If all fields have at least two trailing spaces, then all fields of all records will be properly aligned. 3270 File Transfer Quick3270 supports the IND$FILE file transfer program which can be used on CMS, TSO, and CICS systems. When transferring files, you must not be executing any program on the remote system since a host program will be invoked to do the file transfer. Preparing for File Transfer Send and receive procedures using the IND$FILE are different depending on the host system you are using. Because Quick3270 can be configured to run using several different host types, you will have to set file transfer options unique to your system before you can send or receive a file. Before you can use IND$FILE to send or receive files, you must make a few preparations. Afterwards, you can choose either the procedure to send a file to the host, or the procedure to receive a file from the host depending on the host type you are using. File transfers are always initiated from the workstation program. You cannot start a file transfer by typing a command at your host system prompt. When using CMS, you must be at the "R;" prompt. When using TSO/CICS you must be at the "READY" prompt. You cannot be in any SPF panel when starting a file transfer. From the main menu, select: Transfer File Transfer… The following dialog will appear. Uploading To send a file to the host: 1 Select the Send file to host radio button in the File transfer dialog box. 2 The File transfer dialog box allows you to select the PC file to upload, the destination filename and the IBM host operating systems. 3 To start the file transfer, press the Send File button. The File Transfer Monitor dialog box appears to display the number of bytes that are transferring. Downloading To receive a file from the host: 1 Select the Receive file from host radio button from the File transfer dialog. 2 The File transfer dialog box allows you to select the PC file to upload, the destination filename and the IBM host operating systems. 3 To start the file transfer, press the Receive file button. Options With the Settings button you have access to the option dialog General categorie Transfer Program Name: Allows You to can change the file transfer program name from IND$FILE to whatever command you wish executed. This feature is primarily used to execute another system command before executing the actual file transfer program. Timeout: is the length of time (in seconds) that the Quick3270 waits for a response from the host. If the host does not respond, file transfer is canceled, and you receive an error message. File format: Either select ASCII and CRLF for an ASCII transfer or deselect both of them for a binary transfer. When ASCII is checked, PC 1-byte codes are converted into EBCDIC codes when a file is sent from the PC to the host, and vice versa when files are received from the host. When CRLF (Carriage Return and Line Feed) is checked for Send, the following conversion occurs when a file is sent from the PC to the host: - CRLF (x'0D0A') is not removed from the end of each line and is used as the delimiter of each record - EOF (x'1A') is removed from the end of a file When CRLF is checked for Receive: - CRLF (x'0D0A') is added at the end of each record - EOF (x'1A') is added at the end of the file. If APPEND is specified, EOF is removed from the end of an existing file and is added at the end of an appended file. Structured field size (KB): You can also select a block size from 2Kb to 32Kb. The larger block size will yield in a higher file transfer rate, however, the smaller block size is preferable when transferring data from a remote site through slow links. Issue Clear: "Clear" key is sent to the host at the beginning of a file transfer. Append to Host File on Send: When checked for Send, the transferred file will be appended to an existing host file that has the same name, type and mode, if one exists. Append to Pc File on Receive: When selected for Receive, the file trensferred from the host will be appended to an existing Pc file if one exists. VM/CMS categorie The VM/CMS Specific Options include the following: Record format: Specifies the file format used to create the receiving file on the host system. Other send parameters: Specifies any additional file transfer parameters needed to send a PC file Other receive prameters: Specifies any additional file transfer parameters needed to receive a PC file MVS/TSO categorie The MVS/TSO Specific Options include the following: Record format: Specifies the file format used to create the receiving file on the host system. Block size: The size of the blocks of data in a new data set on your TSO volume Space allocation: This is valid only for MVS/TSO, and when APPEND is not checked for Send. You can specify how new host files are to be created - the allocation amounts, the allocation units, and the block size, as follows: Space: Specifies the number of tracks or cylinders that you want to assign to this file transfer Increment: Specifies the amount of additional storage that the filetransfer function is to assign when the number of tracks or cylinders specified in the Space box is not enough to transfer a whole file. Tracks: Specifies that the host-file allocation is in tracks. Cylinders: Specifies that the host-file allocation is in cylinders. Blocks: Specifies that the host-file allocation is in blocks. Other send parameters: Specifies any additional file transfer parameters needed to send a PC file Other receive prameters: Specifies any additional file transfer parameters needed to receive a PC file CICS categorie The CICS Specific Options include the following: Host FILE: This option allows you to specifies where the mainframe stores a file before it is send or after it is received. Other send parameters: Specifies any additional file transfer parameters needed to send a PC file Other receive prameters: Specifies any additional file transfer parameters needed to receive a PC file Code Pages categorie The CICS Specific Options include the following: DOS code page: Specifies the PC code page. Host code page: Specifies the character display code used by the host Use user defined tranbslation table: If selected, allows customizing a translation-table. Click the Customize button to display the translation tables for send and receive. Host Graphics Quick3270 fully supports host graphics by emulating the IBM 3179G Color Graphics Display Station. The system supports most of the vector graphics commands and Program-Symbol-Sets. Each terminal session can perform independent vector graphics. Quick3270 host graphics emulation gives you true graphics terminal emulation. To enable Host Graphic support select: Settings Terminal… IBM 3270 Enable Host Graphics Graphics Terminal Emulation has the capability of displaying all the primitives as an IBM graphics terminal, such as the 3179G, would. Primitives such as lines, ellipses, arcs, patterns, and loadable symbols are all rendered correctly and scaled to fit within the terminal window on your display screen. This is important since certain mainframe graphics applications will perform properly only on terminals having certain display characteristics. Using this program your display can appear as an IBM 3179G, a 3192G, a 3472G, or a 3270PCG. The window dimensions for the terminal emulation session might not be the same as configured for the display (3179G, or 3472G). If the dimensions deviate significantly from the proportions of the configured display resolution, the image may appear stretched or compressed as it is sized to fit the terminal window. Accept Program Symbols: If selected Quick3270 supports Loadable symbols Loadable symbols, also called graphic symbol sets, are sets of symbols up to 32x32 pixels in size that are treated as small, individual bitmaps. There are different uses of loadable symbols. They can appear in the graphics layer or the text layer. In the graphics layer, they are commonly referred to as Graphics Symbol Sets and can be used as markers, fill patterns, or custom text. In the text layer, they are referred to as Program Symbols and are used as custom text. In either case, the symbol sets are created on a mainframe host graphics application and then downloaded to the graphics terminal. The application then selects a symbol or group of symbols to display on the text or graphics layer.