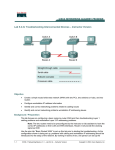
1
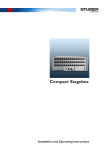
December 2012 Page 1 AKG Wireless Systems HiQnetⓇ Remote Control and Setup This guide helps you to get started quickly with setting up and remote control of your AKG wireless system with the PC software Harman System ArchitectTM, the AKG Wireless iPhoneⓇ App and Soundcraft Vi consoles VM2 feature based on Harman HiQnetⓇ protocol using the HUB4000 Q. If you have further questions check out the FAQs and manuals which can be found online at http://www.akg.com/hiqnet. If you need further help please send an email to [email protected]. HUB4000 Q – Quickstart Guide December 2012 Page 2 Basic information By connecting an AKG wireless system with the HUB4000 Q to a HiQnet network you are able to REMOTE CONTROL and SETUP your wireless system from a computer with Harman System ArchitectTM, your iPhone/iPod/iPad with the AKG Wireless iPhone App or Soundcraft Vi mixing console using VM2. The Harman System Architect PC software enables you to setup and configure your wireless system quick and easily. Frequency Management can be done with a single click with AKG‘s 1 Click Setup. System Architect also allows full customization of the user interface for your needs. The AKG Wireless iPhone App can monitor and control your wireless system from your Apple iPhoneⓇ or iPodⓇ touch directly on stage via WLAN/Wi-Fi. Checking the radio signal on stage was never easier as with the AKG Wireless App. With the VM2 feature of Soundcraft Vi mixing consoles, you can monitor your AKG wireless systems directly form Vi Vistonics user interface. For connecting AKG wireless devices to a HiQnet network you need a HUB4000 Q. The HUB4000 Q is a HiQnet network interface. You can connect up to 8 AKG wireless devices like DSR700, SR4000, SR4500, SST4 or SST4500 IEM to a HUB4000 Q and remote control them with Harman System Architect and AKG Wireless iPhone App. HUB4000 Q – Quickstart Guide December 2012 Page 3 Quick Start Guide 1. Step – Prepare Hardware è Connect the power supplies of the HUB4000 Q(s) è Connect the power supplies of your wireless devices è Connect the AKG devices (DSR700, SR4000/4500, SST4…) ‘data’ connectors with one of the 8 HUB4000 Q ‘AKG network devices’ connectors (8 connectors for 8 slots). Use the RJ 11 cables which are included at the HUB4000 Q package. à you can connect up to 8 AKG devices to a HUB4000 Q è It is strongly recommended to use an Ethernet DHCP router in your HiQnet network. If you connect a DHCP network router (which has a built in DHCP server for automatic IP address management in your ethernet network) setting up the system is much more easier and faster because you don‘t have to care about IP addresses (that‘s done by the DHCP server inside your DHCP router). è Connect the Ethernet connector at the HUB4000 Q with the HiQnet ethernet LAN (Local Area Network), e.g. if you have connected a DHCP router, with one of the LAN ports of the DHCP router. Depending on which monitoring (System Architect, VM2 or Wireless iPhone App) you want use connect one or multiple of the following with the HUB4000 Q: è Connect your Computer which should run Harman System Architect with the HiQnet LAN, e.g. if you have connected a DHCP router/switch, with one of the LAN ports of the DHCP router. è Connect a Vi console (with VM2) ethernet port with the HiQnet LAN è Connect a WLAN (Wireless Local Area Network) router to the HiQnet LAN if you want to use the AKG Wireless iPhone App 2. Step – Perform Firmware Update - Harman System Architect HUB4000 Q – Quickstart Guide December 2012 Page 4 Please update the software inside the AKG HUB4000 Q: è Download the latest version of Harman System Architect from http://hiqnet.harmanpro.com/downloads.php è Install System Architect è Start System Architect è Start up/power on your wireless system è Start up/power on your HUB4000 Qs è Now the network address negotiation starts. The HUB4000 Qs try to get IP addresses. At first startup the network address negotiation can take some minutes. o If your HUB4000 Qs icons show up at the Venue View then maybe a firmware update of your HUB4000 Q(s) is requested by System Architect. è Proceed by updating all of your HUB4000 Q(s) firmware. o If your HUB4000 Q icons don’t show up your network is configured wrong. è Check out the FAQs (page 13) which describe how to setup and configure your network and/or HUB4000 Qs properly. Create a Master Control Panel: è Select all HUB4000 Q icons at Venue View. è Right click on one of the selected HUB4000 Q icons. è Select from the Context Menu ‘Create Master Control Panel’ – ‘AKG HUB4000 Q’. Then a Master Control Panel for all the selected HUB4000 Qs is created. è The Master Control Panel is able to control all AKG devices of all HUB4000 Qs from a single panel. Please update the software of your wireless devices: è At the Master Control Panel choose ‘Menu / Tools / Firmware Update‘ è Update all wireless devices to the latest firmware version Go to step 3 & 4 - Start working. HUB4000 Q – Quickstart Guide December 2012 Page 5 3. AKG Wireless iPhone App è With the AKG Wireless iPhone App you can monitor your wireless system from an Apple iPhone or iPod touch or iPad è The App is an unique tool for monitoring the radio connection of the wireless system on stage è Download the latest version of the AKG Wireless iPhone App from Apple iTunes App Store: http://itunes.apple.com/at/app/akgwireless/id362476960?mt=8 è Setup a WLAN (Wireless Local Area Network) at your WLAN router which is connected to your HiQnet network (and your HUB4000 Qs) è Be sure to hide the WLAN and to setup a password for entering the WLAN. This avoids misusage! è Connect your iPhone/iPod/iPad touch to your WLAN at iPhone settings è Start your AKG Wireless iPhone App è Check out the online FAQs (page 13) for further questions HUB4000 Q – Quickstart Guide December 2012 Page 6 è Device List: Browse through your wireless systems with the Device List. Each list item represents a single wireless channel like one channel of one DSR700 è Device Stripe: Check details of each wireless channel within the Device Stripe like audio and radio levelmeters, name and radio frequency, and battery lifetime. è RF Monitor: Flip your iPhone/iPod touch to landscape view and you get a full featured RF Monitor/Rehearsal tool for the RF link of your wireless device. You can check the radio link and the radio coverage directly on stage from your iPhone with the RF Monitor. HUB4000 Q – Quickstart Guide December 2012 Page 7 5. Step – Harman System Architect - With the PC software Harman System Architect you have a tool to setup, configure and monitor your wireless system. You can customize and build your own panels/user interfaces for your wireless systems. - If you have more than one HUB4000 Q then it is recommended to build a Master Control Panel. This enables you to build a large wireless system and control all wireless devices from a single panel, even if there are multiple HUB4000 Qs connected to the HiQnet network. How to build a Master Control Panel? o Select all HUB4000 Q icons at Venue View which should be added to the Master Control Panel. o Right click on one of the selected HUB4000 Q icons. o Select from the Context Menu ‘Create Master Control Panel’ – ‘AKG HUB4000 Q’. è Then a Master Control Panel for all the selected HUB4000 Qs is created. The Master Control Panel is able to control all AKG devices of all HUB4000 Qs from a single panel. - Overview over Product Panel/Master Control Panel è You can open a Product Panel of a single HUB4000 Q by double clicking on the HUB4000 Q icon at the Venue View è Or if you have multiple HUB4000 Qs it is recommended to build a Master Control Panel (see above). You can open a Master Control Panel by selecting the Device tab in the ribbon, and clicking in the Launch/Manage button in the Master Panel section. Overview over frequency management Configure offline devices Setup HT/PT and SPR 4 Perform environment scan Setup entire system with a single click Check RF link, rehearsal graph Stripe represents one AKG device Switch between HUBs - AKG Devices – Stripes Stripes are representing AKG Devices like the the stationary receiver DSR700 (of the digital wireless microphone system DMS700), SR 4500 (of the wireless HUB4000 Q – Quickstart Guide December 2012 Page 8 microphone system WMS 4500) or the stationary transmitter SST4 (of the In Ear Monitoring system IVM 4). A lot of parameters of the AKG Devices can be controlled and monitored directly at the Stripe. Supported devices and their Stripes: Information menu DSR700 stripe Set name Frequency preset Frequency Battery meter Channel 1 Audio levelmeter Radio frequency levelmeter SR 4x00 stripe Set name of AKG device Channel 2 Battery rest play time Radio frequency levelmeter Set squelch level Audio levelmeter Mute the device SST4 stripe Information menu Set RF power Compressor and limiter meters Audio input meter Audio input gain slider Set audio effects Stereo/Mono/Dual mode HUB4000 Q – Quickstart Guide December 2012 - Page 9 Setup of Frequency Management – 1 Click Setup With 1 Click Setup the entire wireless system Frequency Management can be done with ONE SINGLE CLICK. 1 Click Setup calculates INTERMODULATION FREE frequencies on the fly for all wireless devices of all Frequency Bands. It is easy to use and find up to 40 frequencies in a 30 MHz Band. Simply click the START button at the 1 Click Setup panel and your entire wireless system will be setup. HUB4000 Q – Quickstart Guide December 2012 - Page 10 Environment Scan With the environment scan you can scan the Radio Frequency (RF) environment. The Frequency Graph gives a great graphically overview of the RF environment. The Auto Scan performs a very fast environment scan (7 seconds for 30 MHz) with all available scan devices. The Loop Scan performs a looped scan with user defined scan devices. The Frequency Graph shows all AKG Devices in a graphical way together with the environment scan data, the intermodulation products and you can save, open and print the environment scan data. Environment scan data Device marker represents an AKG device Zoom in and out - Check Radio Frequency Link – RF Monitor With the RF Monitor you can monitor the Radio Frequency (RF) Link over time. The RF Monitor shows the RF levels of both antannas over time and the Mic Mute state. HUB4000 Q – Quickstart Guide December 2012 Page 11 With pushing the mute button of the Mic while checking the RF distribution on the stage you can set locators/time markers. Set locators with HT/PT mute button HUB4000 Q – Quickstart Guide December 2012 - Page 12 Build a large Monitor Panel – Convert To Custom Each Product Panel or Master Control Panel can be converted to custom. That means that the Panel is converted into a Custom Control Panel and can be fully customized there. To Convert to Custom simply right click at the Panels header and choose from the opening context menu ‘Convert to Custom’. At a Custom Control Panel you can change the size, color, location of all controls or add controls of other brands products (Crown, dbx, JBL, BSS). If you want to have a large Monitor Panel for your entire wireless system where you can monitor all parameters at once, simply convert the Master Control Panel to Custom and you’ll get a Monitor Panel with all wireless devices on one panel on one page (see screenshot). Master Control Panel which was converted to custom - Add Offline Devices As System Architect can be configured offline and offline settings cen be send down to an online system. You can also add offline devices to a Venue View. Open Device Manager an choose Add Offline Devices. At the grid you can configure offline AKG Devices. You can also load AKG Device files to empty Stripes at the Product Panel. HUB4000 Q – Quickstart Guide December 2012 Page 13 FAQ - Frequently Asked Questions FAQ 1: How do I setup my HUB4000 Q(s) and my wireless system together with System Architect/AKG Wireless iPhone App? See Quick Start Guide steps 1 - 3 and FAQs. FAQ 2-1: System Architect starts up and no HUB4000Q is detected! If the HUB4000 Q is not showing up at HiQnet Explorer, System Architect has no network connection to the HUB4000 Q. Possible reasons: - The HUB is physically not connected to the HiQnet network à check your ethernet/network cables and check if your router and/or switches are powered on à If you connect the HUB4000 Q directly to your PC than you have to use a crossover network cable - The HUB4000 Q is not powered on à check the power connection of the HUB4000 Q - The HUB4000 Q has no or wrong IP address/subnet settings à See FAQ 3 FAQ 2-2: AKG Wireless iPhone App shows no list entries/devices at it‘s main list screen! à See FAQ 2-1 FAQ 2-3: Soundcraft Vi console VM2 shows no list entries/devices at it‘s HiQnet list screen! à See FAQ 2-1 FAQ 2-4: What are the minimum requirements for a PC running System Architect? - Windows 7, Windows Vista, Windows XP SP2, Windows 2000 SP4 or Windows 2003 Server SP1, Windows 7 - Only 32 bit Windows operating systems are supported - Processor - 2 GHz (Dual Core) - RAM - 2 GB - Screen Resolution - 1024x768 - 200 MB Hard Drive space available HUB4000 Q – Quickstart Guide December 2012 Page 14 FAQ 3: My HUB4000 Q has wrong network settings! - Open Network Troubleshooter at System Architects – Ribbon/Tools/Network/Network Troubleshooter – and follow the instructions. - If the Network Troubleshooter doesn’t help open Readdress Devices at System Architects – Ribbon/Tools/Network/Readdress Devices - The Readdress Devices panel is opened. There you can configure your devices network settings. - If all of your HUB4000 Qs are powered on and connected to the HiQnet network and no HUB4000 Q is shown in the list at the Readdress Devices panel, your HUB4000 Q has no network connection to System Architect (detection of devices needs up to 60 seconds). - Please follow these steps: o On the right side of the HUB4000 Q, behind the AKG logo, a DIP switch can be found which changes the IP address negotiation. Set the DIP switch to the following setting: ON DIP 1, 4: ON - DIP 2, 3: OFF o Power cycle the HUB4000 Q (Switch the Power OFF and ON) o Wait till the 8 slot LEDs went from the left and right side to the middle and back again periodically. o Set the DIP switch to the following setting: ON DIP 1, 2, 3, 4: OFF o - Now the HUB4000 Q starts first with trying to find an IP address with DHCP. If the HUB4000 Q doesn’t get an IP address over DHCP (if no DHCP server is connected to your HiQnet network) the HUB4000 Q tries to get an IP address with AutoIP (IP range 169.254.1.1 to 169.254.254.255 with a subnet mask 255.255.0.0) à The data LED is blinking periodically every second. à All slot LEDs are off. à The address negotiation can take up to 5 minutes. Now the HUB4000 Q should have a valid IP address à The data LED is showing the network traffic (it should blink non periodically and very fast) à The slot LEDs are ON if a AKG Device is connected HUB4000 Q – Quickstart Guide December 2012 - Page 15 If the HUB4000 Q has a valid IP address, the Readdress Network panel should show up a new entry with your HUB4000 Q because System Architect has now a network connection to the HUB4000 Q o If the new entry has also entries at columns ‘Type’ and a ‘Description’ the network is configured right (see following picture). o You can now start working with System Architect/AKG Wireless iPhone App, VM2, HUB4000 Q and the AKG wireless system. o If the new entry has NO entries at columns ‘Type’ and a ‘Description’ the IP address and subnet settings of the HUB4000 Q are wrong. Please follow the next steps: - Double click on the list entry or click the Configure Button at the bottom of the Readdress Devices panel: - The Configure Device Dialog is opened. At this example the Device has the IP address 169.2.1.52 and is in the subnet 255.255.0.0. The computer has in this example the IP address 192.168.1.1 and the subnet 255.255.255.0. That means that the device has the wrong IP address and subnet. - See FAQ 6-1 - Now you can check the Use DHCP checkbox if you want to use a DHCP server for getting a valid IP address and subnet from the DHCP server - Configure your PC operating system for retrieving automatically an IP address and subnet – See FAQ 14 - Or you type in a static IP address and subnet by hand, for example IP address 192.168.1.10 and subnet 255.255.255.0. See FAQ 6-2. HUB4000 Q – Quickstart Guide December 2012 Page 16 - Click OK and your HUB4000 Q should have now the right IP address and subnet. The PC and the HUB4000 Q should be now in the same subnet and should have valid and unique IP addresses - Now the HUB4000 Q should show up at Readdress Devices panel. The HUB4000 Q is now configured right and should show up also at the HiQnet Explorer and can be used at the Venue View Please also refer to System Architect Online help for further information on how to set-up a HiQnetTM network. Chapter ‘Troubleshooting’ – Section ‘Missing Devices’ FAQ 4: If my HUB4000 Q is shown at Venue View, System Architect asks me to perform a firmware update of my HUB4000 Q. If you have downloaded a new version of System Architect and start System Architect and a HUB4000 Q is detected you have to perform a firmware update. Mixed configurations of an old HUB4000 Q firmware together with the newest System Architect versoin are not supported. It is recommended to use always the latest version of System Architect which also includes the latest versions of HUB4000 Q firmware. Please download the latest version of System Architect from http://hiqnet.harmanpro.com/downloads.php FAQ 5: What is the IP address range of the HUB4000 Qs AutoIP? The IP range for the Auto IP function of the HUB4000 Q is 169.254.1.1 to 169.254.254.255 with a subnet mask 255.255.0.0. HUB4000 Q – Quickstart Guide December 2012 Page 17 FAQ 6-1: What IP address is used by the HUB4000 Q? The IP address negotiation of the HUB4000 Q depends on the DIP switch setting of the HUB4000 Q. Also see FAQ 6-2, 6-3, 6-4, 6-5. DIP switch settings: On the right side of the HUB4000 Q, behind the AKG logo, a DIP switch can be found which changes the IP address negotiation. DIP switch changes take only effect after the HUB is power cycled. It is recommended to use the default DIP switch setting (all switches OFF). This setting uses the stored IP address setting. Configuration 1: ON DIP 1, 2, 3, 4: OFF Default, recommended configuration: - Use stored settings – Uses System Architect settings At shipping – first start up: DHCP & AutoIP Configuration 2: ON DIP 1, 2: ON - DIP 3, 4: OFF - DHCP & AutoIP – Overrules System Architect setting Configuration 3: ON DIP 1, 2, 3: ON - DIP 4: OFF - DHCP only – Overrules System Architect settings Configuration 4: ON DIP 1, 2, 4: ON -DIP 3: OFF - AutoIP only – Overrules System Architect settings HUB4000 Q – Quickstart Guide December 2012 Page 18 FAQ 6-2: What IP address and subnet should i choose? Normally the PC with System Architect, Wireless iPhone app or Vi console with VM2 are supposed to operate in the same HiQnet LAN (Local area network) as the AKG HUB4000 Qs. This means that the IP address of the PC, iPhone or Vi consoles must in the same subnet as the HUB4000 Qs IP addresses. So for proper operation all subnets of all devices in the HiQnet LAN must be the same. It is strongly recommended to use an Ethernet DHCP router in your HiQnet network. If you connect a DHCP network router (which has a built in DHCP server for automatic IP address management in your ethernet network) setting up the system is much more easier and faster because you don‘t have to care about IP addresses (that‘s done by the DHCP server inside your DHCP router). Note: It is possible to operate several HUB4000 Qs throughout several subnets from a single System Architect. This needs advanced network configuration and is only recommended for advanced users. Please contact [email protected] for further assistance. IP address: Each device in a LAN must have a unique IP address Subnet: The subnet defines the digits of the IP address which are unique in a subnet EXAMPLE: If the subnet is 255.255.255.0 The first 9 digits of all IP addresses in the subnet have to have the same numbers. They define the subnet. Only the last 3 digits of the IP addresses are allowed to be different. Devices with IP addresses like 192.168.0.1, 192.168.0.123, 192.168.0.204 would be in the same subnet (The subnet is then 192.168.0.xxx) whereas a device with a IP address of 172.168.0.3 won‘t be in the same subnet as the first digits are not 192.168.0.xxx HUB4000 Q – Quickstart Guide December 2012 Page 19 EXAMPLE: The following example shows a HiQnet system with a PC running System Architect, a DHCP router for automatic IP address management and 2 HUB4000 Qs. All IP addresses and subnets are configured right. System Architect will discover the HUB4000 Qs instantly and you are ready to work with the AKG wireless system. PC IP adress: 192.168.0.3 Subnet: 255.255.255.0 Router (DHCP) IP adress: 192.168.0.1 Subnet: 255.255.255.0 HUB4000 Q 'Hub 1' IP adress: 192.168.0.21 Subnet: 255.255.255.0 HUB4000 Q 'Hub 2' IP adress: 192.168.0.22 Subnet: 255.255.255.0 EXAMPLE: The following example shows a HiQnet system with a PC running System Architect, a router (DHCP turned off) and one HUB4000 Q. The PC is in the right subnet but it‘s IP address is configured wrong. System Architect will not discover the HUB4000 Q because there is no proper network connection between the PC and the HUB4000 Q. The IP address of the PC should be 192.168.0.10. Then the PC would be configured right. Router (NO DHCP) IP adress: 192.168.0.1 Subnet: 255.255.255.0 PC IP adress: 172.168.1.133 Subnet: 255.255.255.0 HUB4000 Q 'Hub 2' IP adress: 192.168.0.22 Subnet: 255.255.255.0 FAQ 6-3: Do i need to configure my Windows firewall? It is recommended to switch of your Windows firewall. FAQ 6-4: How do i setup my network router? Normally you can do this within your internet browser by typing in the IP address of your wireless router in the adress bar of internet explorer. By default most router use the IP address 192.168.0.1. Please refer to the documentation/manual of your network router. HUB4000 Q – Quickstart Guide December 2012 Page 20 FAQ 6-5: How should i configure my network? There are multiple possible configurations which are possible. The three most common configurations are: 1 - PC, multiple HUB4000 Qs, DHCP router This is the recommended configuration. The PC is connected via a network router with DHCP to the multiple HUB4000 Qs. The network router takes care of the IP address and subnet settings of the PC and HUB4000 Qs. Make sure that the PC and the HUB4000 Qs are configured to receive IP settings via DHCP. See FAQ 3, 5, 6-1, 6-2, 6-4, 14. PC IP adress: 192.168.0.3 Subnet: 255.255.255.0 Router (DHCP) IP adress: 192.168.0.1 Subnet: 255.255.255.0 HUB4000 Q 'Hub 1' IP adress: 192.168.0.21 Subnet: 255.255.255.0 HUB4000 Q 'Hub 2' IP adress: 192.168.0.22 Subnet: 255.255.255.0 2 - PC, multiple HUB4000 Qs, network switch The PC is connected via a network switch to the multiple HUB4000 Qs. The network settings must be set manually at the PC and HUB4000 Qs. Make sure that the PC and the HUB4000 Qs have the right IP settings. See FAQ 3, 5, 6-1, 6-2, 6-4, 14. PC IP adress: 192.168.0.3 Subnet: 255.255.255.0 HUB4000 Q 'Hub 1' IP adress: 192.168.0.21 Subnet: 255.255.255.0 Switch HUB4000 Q 'Hub 2' IP adress: 192.168.0.22 Subnet: 255.255.255.0 3 - PC, a single HUB4000 Qs, connected via a crossover network cable The PC is connected via a crossover network cable to a single HUB4000 Q. The network settings must be set manually at the PC and the HUB4000 Q. HUB4000 Q – Quickstart Guide December 2012 Page 21 Make sure that the PC and the HUB4000 Qs have the right IP settings. See FAQ 3, 5, 6-1, 6-2, 6-4, 14. PC IP adress: 192.168.0.3 Subnet: 255.255.255.0 HUB4000 Q 'Hub 1' IP adress: 192.168.0.21 Subnet: 255.255.255.0 FAQ 7: How long does it need till the HUB4000 Q gets an IP address Be aware that the complete IP address negotiation process can last up to 5 minutes. The first time the HUB4000 Q receives an IP address, the address is stored in the device’s memory. The next time the HUB4000 Q starts, the HUB4000 Q uses the stored IP address if DIP switch configuration 1 was choosen (see FAQ 6-1). That saves a lot of start-up time. FAQ 8: What is the functionality of the eight slot LEDs: Each of the eight slots of the HUB4000 Q has a dedicated blue slot LED on the front of the HUB4000 Q. The slot LED is off if no device is connected to that slot. The slot LED lights nearly permanently (actually corresponding to the net-traffic) if a device is connected to the HUB4000 Q and the device is turned on. If the device is turned off the slot LED blinks periodically to indicate that the device is turned off. FAQ 9: I see 2 HUB4000 Q at the Venue View, but if I click on one HUB4000 Q icon I just can control one HUB4000 Q. To be able to control multiple HUB4000 Qs from a single window you have to create a Master Control Panel. Read through FAQ 10 about how to create a Master Control Panel. FAQ 10: How can I control multiple HUB4000 Qs within a single panel? CREATE a MASTER CONTOL PANEL! Select all HUB4000 Q icons at Venue View which should be added to the Master Control Panel. Right click on one of the selected HUB4000 Q icons. Select from the Context Menu ‘Create Master Control Panel’ – ‘AKG HUB4000 Q’. Then a Master Control Panel for all the selected HUB4000 Qs is created. The Master Control Panel is able to control all AKG devices of all HUB4000 Qs from a single panel. FAQ 11: After System Architect is coming online a stripe with red background is showing up on the HUB4000 Q product panel HUB4000 Q – Quickstart Guide December 2012 Page 22 The red background of a Stripe indicates a MISMATCH between the physical device, connected to the HUB4000 Q and its dedicated Stripe. The Mismatch can be resolved in two ways: 1. Resolve at System Architect: Double click on the Mismatching stripe at the ‘Resolve Mismatch’ button. The Mismatch will resolve by deleting the offline plug-in Stripe and retrieving all information of the physical AKG Device connected to the hardware HUB4000 Q and creating a new matching Stripe for that physical AKG Device. ATTENTION: All settings of the offline Stripe will be LOST! 2. Resolve at the physical HUB4000 Q: User can resolve the Mismatch by changing the physical AKG Device which causes a Mismatch. The ‘Expected device’ label gives you information about the expected device which was configured offline. Take a note which physical AKG Device is expected with which Band Variant, at which Slot. Disconnect the Mismatching physical AKG Device from the hardware HUB4000 Q and connect a physical AKG Device of the Device Type with the Band Variant of the expected physical AKG Device. The Mismatch at the plug-in will be automatically resolved. FAQ 12: The HUB4000 Q is going Online/Offline after some time – or – The Meters, buttons and other controls are not/or very slow reacting See the FAQ 13, 2-4! FAQ 13: The HUB4000 Q is part of a Cobranet System and behaves very strange. The HUB goes Online/Offline, is not or slow reacting If the HUB4000 Q is part of a Cobranet System the network settings must be set very carefully. If Cobranet Broadcast messages/streams are used the HUB is spamed with these messages and cannot receive or send HiQnet messages fast enough. It is recommended to setup a separated VLAN for all HiQnet devices like the HUB4000 Q and a separate Cobranet VLAN. Then the Cobranet messages are not received from the HUB4000 Q. You can also use networkswitches which support Ethertype filtering and filter the Cobranet Ethernet messages at the port of the switch to which the HUB4000 Q is connected. If you need further help on this issue please contact: [email protected] FAQ 14: How can I set the IP settings of my PC? - The IP settings of your PC can be found at the Windows Control Panel/Network Settings. HUB4000 Q – Quickstart Guide December 2012 Page 23 XP o o Windows XP: - Click Start Button/Settings/Control Panel - At Control Panel click at Network Settings - At Network Settings double click the HiQnet network Windows Vista: - Click Start Button/Control Panel Vista - o At Control Panel click on ‘Network and Sharing Center’ and click on the ‘View status’ link of the HiQnet network (Unidentified network at this example) Windows 7: - Click Start Button/Control Panel - At Control Panel click on ‘Network and Sharing Center’ and click on ‘Connections’ link of the HiQnet network HUB4000 Q – Quickstart Guide December 2012 Page 24 - This opens the Local Area Connection Status panel. Here you can see the status of your network. - Click at the Properties Button - Double Click at the Internet Protocol 4 (TCP/IPv4) entry - At the Internet Protocol Version 4 (TCP/IPv4) Properties panel you can set the PCs network settings for this network. If you choose ‘Obtain an IP address automatically’ the PC tries to get an IP address with DHCP or AutoIP. You can also define a static IP address and subnet at ‘Use the following IP address’. See FAQ 6-2 for more information about setting an IP address FAQ 15: System Architect crashes when starting 1 Click Setup! System Architect 1 Click Setup only works with 32 bit versions of Windows operating systems. With 64 bit versions of Windows operating system System Architect is crashing when launching 1 Click Setup. This issues is known and AKG is working on a solution to fix it. FAQ 16: Environment Scan doesn‘t work, or is very slow! Normally your PC doesn‘t fullfil the minumum requirements if environment scan doesn‘t work. Please check your PCs specification and the minumum requirements at FAQ 13+2-4. HUB4000 Q – Quickstart Guide December 2012 Page 25 FAQ 16-1: At devicegrid at column ‘Band‘ ‘RF Error‘ is shown! At Stripe Info Menu ,‘RF Error‘ is shown! This means that the band is not supported by System Architect. Please contact [email protected] for further assistance. FAQ 17: SST4 is not able to scan! The SST4 is a stereo stationary transmitter of an In Ear Monitoring system which means that it is only able to transmit RF signals. It cannot receive RF signals and for that reason it is not able to perform an environment scan. If you want to perform an environment scan at the bands of your SST4s you need to connect either SR4000/4500 or DSR700 to your HUB4000 Qs. FAQ 18: I cannot update the firmware of SR4000! The firmware of SR4000 cannot be updated due to technical reasons. FAQ 19: After loading a venue file audio and RF meters are not working any more! This is a known issue. AKG will fix this bug as soon as possible. However closing all Custom control panels and docking and floating the product panel or master control panel solves the problem. HUB4000 Q – Quickstart Guide December 2012 Page 26 Release Notes HUB4000 Q/AKG System Architect plug release 3.9 – December 2012 The newest software release 3.9 for the HUB4000 Q includes an improved firmware for the HUB4000 Q and an improved and enhanced plug-in for System Architect 3.4. No hardware changes have been made to the HUB4000 Q. This release is just a software update, which means that all HUB4000 Qs can be used to run software version 3.9 after a firmware update. It is recommended to install the latest System Architect version and to update the HUB4000 Q’s firmware to version 3.9. Please download the latest version of System ArchitectTM control software from http://hiqnet.harmanpro.com/downloads.php The latest System Architect version 3.4 or higher includes all software modules for the HUB4000 Q. Before System Architect and the new HUB4000 Q plug-in can be used, the HUB4000 Q firmware must be updated with the System Architect firmware updater to the latest version of firmware which is already included in System Architect 3.4. Please refer to the System Architect help file how to update the firmware of the HUB4000 Q! It is recommended to use DSR700 with firmware higher than 15.17.15 and SR4000 with firmware version 1.22 to have access to all features of the AKG HiQnet plug-in 3.6. See the unsupported features and known issues list below for further information. Please contact technical support how to update SR4000s: [email protected] HUB4000 Q – Quickstart Guide December 2012 Page 27 New Features and enhancements: • New 1 Click Setup Calculation algorithm which will find a higher count and more robust frequencies • 1 Click Setup Xpert allows advanced options like excluding frequency ranges, TV channels or single frequencies from calculation • Support of DSR700 V2 and SST4500 IEM • RF Monitor allows recording of RF data from all devices • General improvements and enhancements at the System Architect plug-in Unsupported features and know issues: This chapter explains which features are not supported at which firmware version of AKG devices: General: • After loading of Venue files audio and RF meters are not working --> Closing all Custom control panels and docking and floating the product panel or master control panel solves the problem. DSR700 • SYSTEM ARCHITECT WORKS ONLY WITH DSR700 FIRMWARE 2.1 OR HIGHER • IT IS RECOMMENDED TO UPDATE ALL DSR700s TO A NEWER/HIGHER FIRMWARE VERSION (Firmware 2.1 is included at System Architect 3.4) --> Please use the Firmware Update tool within the AKG HUB4000 Q panel to update DSR700 --> go to HUB4000 Q Panel/Menu/Tools/Firmwareupdate --> or contact [email protected] for further help • Mismatching stripes/devices can just resolved with receiving settings from hardware device SST4 - Firmware version 3.30: • SYSTEM ARCHITECT WORKS ONLY WITH LATEST INCLUDED SST4 and SST4500 IEM FIRMWARE --> Please use the Firmware Update tool within the AKG HUB4000 Q panel to update SST4 HUB4000 Q – Quickstart Guide December 2012 Page 28 --> go to HUB4000 Q Panel/Menu/Tools/Firmwareupdate --> or contact [email protected] for further help SR4000 - Firmware version 1.10: • No Environment Scan is possible • Clearing States is not possible • Locate is not possible • IT IS RECOMMENDED TO UPDATE THE SR4000 (Version 1.10) TO FIRMWARE VERSION 1.22 --> Please contact [email protected] for further help © AKG Acoustics, December 2012 HUB4000 Q – Quickstart Guide