1
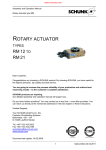
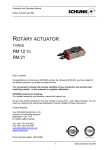
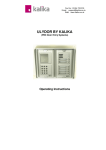
BD Accuri C6 Flow Cytometer Instrument Manual TABLE OF CONTENTS 1 INTRODUCTION ................................................................................................................. 1 1.1 About This Manual ..................................................................................................... 1 1.2 Delivery and Inspection ............................................................................................. 1 1.3 BD Accuri C6 Flow Cytometer Specifications............................................................. 2 2 SAFETY PRECAUTIONS .................................................................................................... 3 2.1 Safety and Limitations Manual ................................................................................... 3 2.2 Operational Considerations ....................................................................................... 3 2.2.1 Ambient Temperature and Humidity ............................................................... 3 2.2.2 Area of Use .................................................................................................... 3 2.2.3 Approved Reagents ....................................................................................... 3 2.2.4 Material Safety Data Sheets (MSDS) ............................................................. 4 3 SETTING UP THE BD ACCURI C6 FLOW CYTOMETER ................................................... 5 3.1 BD Accuri C6 Flow Cytometer Layout ........................................................................ 5 3.2 Configuring the Computer Settings ............................................................................ 5 3.2.1 Setting up the Computer ................................................................................ 5 3.2.2 Changing the Workstation Computer Settings for Windows® 7 ....................... 6 3.2.3 Viewing .c6 and .c6t File Extensions in Windows 7 ........................................ 6 3.3 Setting Up the BD Accuri C6 Flow Cytometer ............................................................ 7 3.3.1 Setting Up the Reagent Bottles and Fluidics .................................................. 8 3.3.2 Connecting the Cables ................................................................................... 9 3.4 Installing Software ................................................................................................... 10 3.4.1 Installing BD Accuri C6 Software .................................................................. 10 3.5 Starting Up the BD Accuri C6 Flow Cytometer ......................................................... 10 3.6 Turning Off the BD Accuri C6 Flow Cytometer ......................................................... 11 4 MAINTENANCE ................................................................................................................. 13 4.1 Automated Preventive Maintenance Notification ...................................................... 13 4.2 Cleaning the SIP ...................................................................................................... 14 4.3 Cleaning the Flow Cell ............................................................................................. 14 4.3.1 Running the Unclog Cycle ............................................................................ 14 4.3.2 Running an Extended Clean of the Flow Cell ............................................... 15 4.4 Decontamination Fluid Cycle ................................................................................... 15 4.5 Cleaning Fluid Cycle ................................................................................................ 15 4.6 Purging Air from the BD Accuri C6 Flow Cytometer ................................................. 16 4.7 Emptying the Waste Container ................................................................................ 16 4.8 Filling the Fluid Bottles ............................................................................................. 17 4.9 Replacing the Fluidic Bottle Filters ........................................................................... 17 4.10 Inspecting the Fluidics Lines .................................................................................... 18 4.11 Replacing the In-line Sheath Filter ........................................................................... 18 4.12 Replacing the Peristaltic Pump Tubing .................................................................... 19 5 TROUBLESHOOTING AND TECHNICAL SUPPORT........................................................ 21 5.1 Troubleshooting ....................................................................................................... 21 5.2 Cleaning and Decontamination—Standard Procedure ............................................. 24 5.3 Limited Warranty ..................................................................................................... 25 5.4 Extended Warranties ............................................................................................... 25 5.5 Technical Support .................................................................................................... 25 5.6 Ordering Information ................................................................................................ 27 7820018 Rev-2 i BD Accuri C6 Flow Cytometer Instrument Manual FIGURES AND TABLES Figure 1-1. The BD Accuri C6 Flow Cytometer System ............................................................. 1 Table 1-3. BD Accuri C6 Flow Cytometer Specifications ............................................................ 2 Table 2-1. Approved Reagents .................................................................................................. 3 Figure 3-1. BD Accuri C6 Flow Cytometer Optics and Fluidics (Top View, Lid Open) ................ 5 Figure 3-2. In-line Sheath Filter ................................................................................................. 7 Figure 3-3. Interference Filter .................................................................................................... 7 Figure 3-4. Fluidics harness ...................................................................................................... 8 Figure 3-5. Proper Attachment of Fluidics Lines ........................................................................ 9 Figure 3-6. Cable Connections .................................................................................................. 9 Figure 3-7 SIP and Sample Stage ............................................................................................10 Figure 3-8. Improper Shut down Message................................................................................11 Table 4-1. BD Accuri C6 Flow Cytometer Replacement Parts/Reagents List ............................13 Figure 4-1. Automated Preventive Maintenance Notification Window .......................................14 Figure 4-2. Waste Line Quick Disconnect.................................................................................17 Figure 4-3. In-line Sheath Filter ................................................................................................18 Figure 4-4. Peristaltic Pumps and Luer Locks ..........................................................................19 Figure 4-5. Removing Peristaltic Pump Retainer Clip ...............................................................19 Figure 4-6. Sliding Luer Lock Fittings Off of Pump Head ..........................................................20 Figure 5-1. Browse For Folder Dialog Box................................................................................22 Figure 5-2. Update Driver Software – Cytometer, Second Dialog Box ......................................22 Figure 5-3. Windows Security Window .....................................................................................23 Figure 5-4. Update Driver Software – Cytometer, Successfully updated your driver software ...23 Figure 5-5.The C6 Software Status Message Box – C6 is connected and ready .....................23 ii 7820018-01 Rev-2 BD Accuri C6 Flow Cytometer Instrument Manual The BD Accuri™ C6 flow cytometer offers an entirely new vision for the role of flow cytometry in life science research. Designed from the ground up to be compact and easy to use, the BD Accuri C6 flow cytometer fits in any lab and is readily accessible to all researchers—experts and novices alike. Figure 1-1. The BD Accuri C6 Flow Cytometer System The BD Accuri C6 flow cytometer system includes BD Accuri C6 Software for controlling the instrument, generating statistics, and analyzing results. This manual provides information on cytometer requirements and specifications, setup, and maintenance. It also includes common troubleshooting help and service information. For information on using BD Accuri C6 Software, see the BD Accuri C6 Software User Guide. For information on installing and using the BD CSampler™, see the BD Accuri CSampler Software User Guide. Carefully inspect all cartons upon receipt of the cytometer. If there are any signs of mishandling or damage, file a claim with the carrier immediately. If the shipment is separately insured, file a claim with the insurer. ITEMS NOT PROVIDED Surge suppressor or uninterruptible power supply (UPS). A model rated at a minimum of 1000 VA is recommended for use with the cytometer, computer, and monitor. Microsoft® Office™ or equivalent Anti-virus software. This system is intended for use as a stand-alone station, not as part of a network. 7820018-01 Rev-2 1 BD Accuri C6 Flow Cytometer Instrument Manual Table 1-3. BD Accuri C6 Flow Cytometer Specifications Laser Excitation Laser Profile Laser Power Scatter Detection Emission Detection 488 nm (rated at 20,000 hr life) 640 nm (rated at 20,000 hr life) 10 x 75 µm 14.7 mW 640 nm Diode Red Laser 20 mW 488 nm Solid State Blue Laser Forward (0 degrees, +/-13) Side (90 degrees, +/-13) 4 colors, standard optical filters Optical Alignment Flow Cell Minimum Detectable Particle Size Minimum Sample Volume Pre-Set Flow Rates and Core Sizes Custom Sample Flow Rates Custom Core Diameter Recommended Sheath Fluid Maximum Events Per Sample Florescence Sensitivity, MESF* Scatter Resolution Fluorescence Linearity Fluorescence Precision Data Acquisition Rate Power Requirements Typical Power Consumption Heat Output Operating Ranges Instrument Size Foot Print with Fluid Bottles Weight Fluid bottle capacity Signal Processing Computer Interface Warranty FL1 533/30 nm (e.g. FITC/GFP) FL2 585/40 nm (e.g. PE/PI) FL3 > 670 nm (e.g. PerCP, PerCP-Cy™5.5, PE-Cy7) FL4 675/25 nm (e.g. APC) Fixed alignment 200 µm ID quartz capillary 0.5 µm 300 µL (in 12 x 75 mm tube) Slow: 14 µL/min, 10 µm core Medium: 35 µL/min, 16 µm core Fast: 66 µL/min, 22 µm core 10 – 100 µL/min 5 – 40 µm 0.22 µm filtered, deionized (DI) water 1 million events per well FITC < 150; PE < 100 Resolves human peripheral blood lymphocytes, monocytes, and granulocytes 2 ± 0.05% for chick erythrocyte nuclei (CEN) ≤ 3% CV for CEN 10,000 events/second, maximum 100 - 240 VAC, 50/60 Hz 154 VA 240 Btu/hour maximum output 15 - 30° C; < 80% relative humidity 11”H x 14.75”W x 16.5”D (27.9 x 37.5 x 41.9 cm) 11”H x 21.5”W x 16.5”D (27.9 x 54.6 x 41.9 cm) 30 lbs (13.6 kg) 2 L sheath fluid, 2 L waste, 250 mL cleaner, 250 mL decontamination 24-bit datapath USB 2.0 1 year *MESF values determined using Thermo Scientific Cyto-Cal™ Multifluor Plus Violet Beads. 2 7820018-01 Rev-2 BD Accuri C6 Flow Cytometer Instrument Manual Refer to the BD Accuri C6 Safety and Limitations Manual (PN 7820091) for complete safety information. When setting up the cytometer, note the details in the following sections to maximize the instrument’s performance. Operating temperature of the cytometer is between 15°C and 30°C (59°F and 86°F). Operating humidity is < 80% relative humidity. The cytometer is designed to fit on a laboratory bench top. Keep a perimeter of at least six (6) inches (15 cm) around the instrument and computer for proper ventilation and to protect the instrument and computer from liquid spills. Take special care while handling fluids around the cytometer. Ensure that uncontained fluids do not enter the instrument or computer. Clean up spills immediately. Never place anything on top of the cytometer, including sample tubes and racks. Turn off the instrument and unplug the power cord before manually cleaning the cytometer. Only approved fluids should be used in the operation or cleaning of this instrument. See the following table for a list of approved reagents. Table 2-1. Approved Reagents Fluid Sheath fluid Cleaning solution Decontamination solution Extended flow cell clean Description 0.22 µm filtered, deionized (DI) water with or without bacteriostatic concentrate solution (PN 653156) Cleaning concentrate solution (PN 653157) diluted according to package instructions Decontamination concentrate solution (PN 653154) diluted according to package instructions Extended flow cell cleaning solution (PN 653159) Do not use household bleach as a decontamination solution. It contains fluorescent whitening agents that may interfere with fluorescence detection. 7820018 Rev-2 3 BD Accuri C6 Flow Cytometer Instrument Manual To obtain an MSDS, visit www.AccuriCytometers.com or contact: 4 In the USA: Email [email protected] Call Accuri Technical Support at 1.734.994.8000 Outside the USA Visit www.AccuriCytometers.com for country-specific contact information. 7820018-01 Rev-2 BD Accuri C6 Flow Cytometer Instrument Manual Perform all of the procedures in this chapter before running any experimental samples. The cytometer is composed of fluidics, optics, and electronics subsystems that work together to analyze cell populations. The following figures show the major components of the fluidics and optics subsystems. Sheath pump Waste pump Blue laser Red laser Optical assembly In-line sheath filter Figure 3-1. BD Accuri C6 Flow Cytometer Optics and Fluidics (Top View, Lid Open) Set up the computer, monitor, keyboard, and mouse according to manufacturer’s instructions. Computers come preinstalled with Windows® 7 Professional. Contact Accuri Technical Support for assistance with other operating systems. 7820018 Rev-2 5 BD Accuri C6 Flow Cytometer Instrument Manual Install the software on the computer before connecting the USB cable to the cytometer. NOTE: We recommend making the following changes to the C6 workstation computer in order to achieve the best possible work environment and to avoid unexpected software computer issues that could potentially result in a loss of data. 3.2.2 Changing the Workstation Computer Settings for Windows 7 Skip this section if your computer has BD Accuri C6 Software preinstalled. 1. Go to Start (circular icon located in the lower left-hand corner) / select Control Panel. 2. Select “Appearance and Personalization” 3. Turn off the Sleep Settings. a. From the column on the left, select “System and Security” then “Power Options” b. Select “Change when the computer sleeps” from the left hand margin (alternatively select “change plan settings” from the main window). c. From the Edit Plan Settings window, change the “Put the computer to sleep” setting to “Never” using the drop-down function (we also suggest setting the “Turn off the display” setting to Never). d. Select “Save Changes”. Then close the control panel window. 4. Optimize Monitor Display Settings. (From Start / Control Panel / Appearance and Personalization) a. Select “Display”, select “Adjust Resolution” from the column on the left. (Alternatively select “Adjust screen resolution” directly from the Display section of the main Appearance and Personalization window). Then select (highlight) Monitor 1. b. Ensure the Resolution is set to the maximum setting or to at least 1152 x 864. Change the setting using the slider under the “Resolution” field’s drop down menu, if necessary. c. Select “Apply”, then select “OK” and close the Personalization window. To view hidden file extensions which distinguish BD Accuri C6 Software files (.c6) from BD Accuri C6 Software template files (.c6t): 1. Click on the Windows Start button and select Control Panel from the pop-up menu. 2. Select “Tools” from the menu bar. 3. Click on “View” tab 4. Click “Show hidden files and folders” 5. Deselect “Hide extensions for known file types” 6 7820018-01 Rev-2 BD Accuri C6 Flow Cytometer Instrument Manual 6. Select “Apply,” then “OK” to save changes and close dialog box. 1. Remove the cytometer and other components from the shipping boxes. 2. With the front of the cytometer facing toward you, lift the top cover. 3. Verify that the in-line sheath filter is installed. If it is not installed, see section 4.11 for instructions on replacing the filter. Figure 3-2. In-line Sheath Filter 4. Verify that there are no disconnected electronic cables on the optics assembly. 5. Verify that the interference filters are firmly seated (Figure 3.3). The standard interference filters are labeled as follows: FL1—533/30 FL2—585/40 FL3—670LP FL4—675/25 Interference filter Figure 3-3. Interference Filter Never run the cytometer without interference filters installed. Running the cytometer without the filters may damage the instrument. 7820018 Rev-2 7 BD Accuri C6 Flow Cytometer Instrument Manual 6. Gently close the cytometer cover. Make sure the cover is securely positioned. If the cover is not closed securely, the cytometer will not function. 7. Place the fluidics bottle tray in a convenient location near the perimeter of the cytometer. Do not place the fluidics bottle tray on top of the cytometer. 1. Fill the sheath bottle with sheath fluid. 2. Dilute the decontamination concentrate (PN 653154) and cleaning concentrate (PN 653157) solutions as instructed and fill decontamination and cleaner bottles, respectively. Close the bottles securely. Do not over tighten. 3. Add approximately 100 mL of 0.5% NaOCl to the Waste bottle. 4. Place the bottles in the fluidics bottle tray. Fluidics harness Figure 3-4. Fluidics harness 5. Slide the red tab on the black end of the fluidics harness to the unlock position and attach the black end of the fluidics harness to the back of the cytometer. 6. Slide the red tab to the lock position. 7. Attach the other end of the fluidics harness to the appropriate bottles: Red line—waste bottle Blue line—sheath bottle Yellow line—decontamination bottle Green line—cleaner bottle 8 7820018-01 Rev-2 BD Accuri C6 Flow Cytometer Instrument Manual Figure 3-5. Proper Attachment of Fluidics Lines 1. Plug the cord from the power supply into the back of the cytometer. Power jack USB port BD CSampler serial cable (used with BD CSampler only) Figure 3-6. Cable Connections 2. Attach the black power cord to the power supply and plug into a standard outlet. Only operate this instrument from a supply source that incorporates a third-wire protective grounding conductor. A surge suppressor or power strip is recommended. 3. Connect the USB cable to the back of the cytometer. Do not plug the USB cable into the computer yet. To prevent putting pressure on the fluidics lines and USB cable connection, do not place the cytometer against a wall or another object. 7820018 Rev-2 9 BD Accuri C6 Flow Cytometer Instrument Manual This section provides details on installing BD Accuri C6 Software and the BD Accuri C6 flow cytometer driver. In most cases, BD Accuri C6 Software will be pre-installed. If software is installed, skip to section 3.5. 1. Ensure the USB cable is not connected between the computer and cytometer. 2. Start up the computer and monitor. 3. Insert the provided BD Accuri C6 Software CD. In the CD directory, double-click on BD Accuri C6 Software Installer.exe. 4. Follow the instructions in the installation wizard. 1. Check fluid levels in all bottles, ensuring that the Waste is empty and the Sheath, Cleaner and Decontamination bottles are full. 2. Gently push the sample stage back, remove and discard the SIP cover and place a tube containing at least 2 mL of 0.22 µm filtered, DI water on the SIP. SIP Collar SIP Sample Stage Figure 3-7 SIP and Sample Stage NOTE: The sample stage can accommodate several types of tubes, including any brand of 12x75 mm tube and most microcentrifuge tubes 3. While holding the sample tube in place, pull the sample stage forward to support the tube. The stage clicks into place. The sample tube does not form a seal at the top of the SIP. While inserting the SIP in the tube, be careful not to bend or catch the SIP on the outside of the tube. 10 7820018-01 Rev-2 BD Accuri C6 Flow Cytometer Instrument Manual 4. Firmly press the power button on the front of the unit to turn on the cytometer. During start up, the BD Accuri C6 Software Traffic Light turns yellow and the cytometer pumps start to run. When powered on, the cytometer automatically flushes the fluidics lines with sheath. This process takes approximately five minutes. Do not open the lid of the cytometer during the startup process. Opening the lid interrupts the laser warm-up and extends the time before data can be acquired. 5. When the BD Accuri C6 Software Traffic Light turns green and BD Accuri C6 Software displays the message C6 is connected and ready, run 0.22 µm filtered, DI water for at least 15 minutes before processing samples. 6. Validate cytometer performance. See the BD Accuri C6 Software User’s Guide for details on instrument validation using the validation beads provided with the cytometer. 1. Place a tube with 2 mL of decontamination solution on the SIP. 2. Select an empty data well in the Collect Tab of BD Accuri C6 Software. 3. Set the time limit for two minutes and the fluidics speed to fast. 4. Click on the RUN button. 5. Once the run is finished, remove the tube of decontamination solution from the SIP. 6. Place a tube with 2 mL of 0.22 µm filtered, DI water on the SIP and advance to any empty data well. 7. Set the time limit for two minutes and fluidics to Fast. 8. Click on the RUN button. 9. When the run is finished, leave the tube on the SIP. 10. Press the power button. The shutdown cycle runs for approximately 15 minutes, then the cytometer automatically powers off. Depressing the power button for five seconds or longer bypasses the autofluidic shutdown cycle. If the cytometer is shut down in this manner, BD Accuri C6 Software displays the following message during the next start up: Figure 3-8. Improper Shut down Message When this occurs, the cytometer takes additional time to recover and return to the green light ready state. 7820018 Rev-2 11 BD Accuri C6 Flow Cytometer Instrument Manual NOTE: It is not necessary to exit BD Accuri C6 Software or turn off the computer before turning off the cytometer. 12 7820018-01 Rev-2 BD Accuri C6 Flow Cytometer Instrument Manual Changing the in-line sheath filter, fluidic bottle filters, and peristaltic pump tubing every two months is recommended. Heavy use of the cytometer may warrant more frequent changes. The following table lists the parts and reagents that are required for regular maintenance. Table 4-1. BD Accuri C6 Flow Cytometer Replacement Parts/Reagents List Part Number 653146 653147 653148 653149 653150 653154 653155 653156 653157 653158 653159 653160 Description Peristaltic Pump Tubing (Set of 2) Sheath bottle filter (1 large) and Decon/Cleaner Bottle Filters (2 small) In-line Sheath Filters (1 ea.) BD Accuri C6 Flow Cytometer 1-year Maintenance Kit contains: (12) Peristaltic Pump Tubing, (6) Sheath Bottle Filter, (12) Decontamination/Cleaner Bottle Filters, and (6) In-line Sheath Filters BD Accuri C6 Flow Cytometer 2-Month Maintenance Kit contains (2) Peristaltic Pump Tubing, (1) Sheath Bottle Filter, (2) Decon/Cleaner Bottle Filters and (1) In-line Sheath Filter Decontamination Concentrate Solution (makes 200 mL) Decontamination Concentrate Solution (makes 1 L) Bacteriostatic Concentrate Solution (for treating 10 L Sheath Fluid) (10 vials) Cleaning Concentrate Solution (makes 1 L) BD Accuri C6 Flow Cytometer Fluid Kit: contains concentrate for making 1 L each of Cleaning and Decontamination Solutions, Bacteriostatic Concentrate for treating 10 L of Sheath, and 8 mL of Extended Flow Cell Clean Extended Flow Cell Clean Solution BD Accuri C6 Flow Cytometer Starter Kit: Contains concentrate to make 1 L each of Cleaning and Decontamination Solutions, Bacteriostatic Concentrate to treat 10 L of Sheath,8 mL of Extended Flow Cell Clean, and 4 mL of both 6- and 8-Peak Validation Beads Visit www.accuricytometers.com for a complete list of available parts and reagents. An automated notification and reminder system is contained in the BD Accuri C6 Software to alert the user to perform the recommended preventive maintenance as described in this manual. This includes removal and replacement of the peristaltic pump tubing, in-line sheath filter and the fluidic bottle filters. 7820018 Rev-2 13 BD Accuri C6 Flow Cytometer Instrument Manual BD Accuri C6 Software will trigger the notification based on the volume of sheath run through the system or on the date since maintenance was last performed. BD Accuri C6 Software will display this notification based on whichever trigger is reached first. The notification appears as a pop-up window that allows the user to choose between ‘Remind me later’ or ‘Maintenance is complete’. Selecting ‘Maintenance is complete’ will re-start both triggers. Selecting ‘Remind me later’ will set the notification to remind the user in 5 days. Figure 4-1. Automated Preventive Maintenance Notification Window Run the backflush cycle as needed to clean the SIP and remove clogs at the base of the SIP. 1. Place a blotter or empty sample tube under the SIP to catch dripping fluid. 2. Do one of the following: Click on the Backflush button in the Collect tab. Select Instrument > Run Backflush Cycle Clean the flow cell as a part of regular maintenance or to correct performance issues of the cytometer. The unclog cycle purges the flow cell of debris. 1. Remove the sample tube from the SIP and place a blotter or empty sample tube under the SIP to catch dripping fluid. 2. Do one of the following: 14 7820018-01 Rev-2 BD Accuri C6 Flow Cytometer Instrument Manual Click on the Unclog button in the Collect tab. Select Instrument > Run Unclog Cycle. For a thorough cleaning of the flow cell, perform an extended flow cell clean. During extended flow cell cleaning, the flow cell fills completely with cleaning solution from the sample tube on the SIP. This cycle automatically shuts down the cytometer with cleaning reagent in the flow cell, allowing the flow cell to soak. 1. Place a tube with at least 500 µL of Extended Flow Cell Clean Solution (PN 653159) on the SIP. Never run the Extended Clean of Flow Cell cycle without a tube containing at least 500 µL of fluid. 2. Select Instrument > Extended clean of flow cell. 3. After the cytometer is automatically shut down, allow the cytometer to rest for at least 30 minutes (up to overnight for a more thorough cleaning). 4. Replace the tube of Extended Flow Cell Clean Solution with a tube of 2 mL 0.22 µm filtered, DI water. 5. Restart the cytometer. The cytometer performs a longer fluidics startup cycle and the Software displays the message Extra startup time needed due to cleaning or improper shutdown. This longer cycle purges cleaning reagent from the flow cell. 6. Run 0.22 µm filtered, DI water for 10 minutes on fast speed. 7. Operate the cytometer as usual. The BD Accuri C6 automatically runs the decontamination fluid cycle when the system is shut down normally. The decontamination fluid cycle lasts about 15 minutes. To manually run the decontamination fluid cycle: 1. Place a tube with 2mL of 0.22 µm filtered, DI water on the SIP. 2. Select Instrument > Run decontamination fluid cycle. The cleaning fluid cycle pulls cleaner fluid from the cleaner tank and runs it through the fluidic lines of the fluidics system. After filling the system with cleaner fluid, the cleaning fluid cycle purges the cytometer with fresh sheath fluid and performs a backflush. This cycle takes about five minutes. 1. Place a tube of cleaning solution (PN 653157) on the SIP. 2. Select Instrument > Run cleaning fluid cycle. 7820018 Rev-2 15 BD Accuri C6 Flow Cytometer Instrument Manual Purge air from the cytometer if any of the following is true: The cytometer is being set up for the first time. The cytometer has not been used for more than two days. A sample has been run dry or the cytometer has been running without sheath in the sheath bottle. To purge air from the cytometer: 1. Place a tube containing sheath on the SIP. NOTE: If performing an air purge at any time other than initial setup, skip steps 2-3. 2. Select Instrument > Run decontamination fluid cycle. 3. Wait approximately 15 minutes for the decontamination fluid cycle to complete. 4. Set the run time in the software control panel to five minutes and click on the Run button. Allow the cytometer to run until it stops automatically. NOTE: The peristaltic pumps will make a rhythmic sound while running. This is normal. 5. Click on the Run button again, wait for 30 seconds, and click on the Pause button to stop the pumps. 6. Repeat step 5 two more times to purge bubbles from the system. Empty the waste bottle daily or when prompted by BD Accuri C6 Software to prevent spillover. Biological samples are potentially dangerous and/or life threatening. Adhere to proper handling procedures for samples and reagents at all times. Wear appropriate laboratory attire such as protective gloves and eyewear during this procedure. 1. Disconnect the quick connect waste line from the top of the waste bottle. 16 7820018-01 Rev-2 BD Accuri C6 Flow Cytometer Instrument Manual Waste line quick disconnect Figure 4-2. Waste Line Quick Disconnect 2. Remove the bottle lid. 3. Dispose of waste according to local regulations. 4. Add approximately 100 mL of 0.5% NaOCl to the Waste bottle. 5. Replace the lid. 6. Reattach the waste line to the top of the bottle. Before turning on the cytometer, visually check all the bottles and fill the sheath, decontamination, and cleaning solution bottles as needed. NOTE: The cytometer is a non-pressurized system. If necessary, any of the bottles can be opened while the cytometer is powered on. NOTE: BD Accuri C6 Software displays a message when the fluid bottles need attention or if a bottle level sensor is improperly connected. Each of the sheath, cleaner, and decontamination bottles contain a disk filter. Replace these filters (PN 653147) every two months. Wear appropriate safety attire such as protective gloves and eyewear when performing this procedure. 1. Disconnect the quick connect lines from the top of each bottle. 2. Carefully remove the lid from each bottle. 3. Disconnect the filter luer lock at the end of the fluidic tubing. Discard the filter according to standard laboratory protocols and regulations. 4. Replace the filter with the appropriate part: Sheath bottle—large disk filter Cleaner and decontamination bottles—small disk filter 5. Reassemble the bottles and reconnect the quick connect lines. 7820018 Rev-2 17 BD Accuri C6 Flow Cytometer Instrument Manual 6. Place a tube with 2 mL of 0.22 µm filtered, DI water on the SIP and run for one minute. Check the cytometer periodically to ensure there are no fluid leaks or crimped lines. 1. Turn off the cytometer. 2. Open the top cover. 3. Visually inspect for fluid leaks by looking for small pools of liquid near any of the visible luer lock connections. 4. Visually inspect for dried residue or slight discoloration of the metal fluidics tray plate, making sure to look under the glovebox and under the cytometer. 5. If any evidence of a leak is seen, contact Accuri Technical Support immediately. Do not attempt to repair the instrument. Any evidence of fluid coming from, or near, a red or clear line should be considered a biological hazard. Do not attempt to clean up the fluid without gloves and other safety attire. Dispose of all cleaning materials as if biologically contaminated. Replace the in-line sheath filter (PN 653148) every two months. If the cytometer is used daily for more than a few hours, replace the filter monthly. Wear appropriate safety attire such as protective gloves and eyewear when performing this procedure. 1. Turn off and unplug the cytometer. 2. Gently lift the cytometer cover. 3. Remove the plastic storage compartment. 4. Twist the luer locks on the in-line sheath filter to disconnect the locks. 5. Discard the filter according to standard laboratory protocols and regulations. In-line sheath filter Figure 4-3. In-line Sheath Filter 6. Install a new in-line sheath filter (PN 653148). This filter has a male and female end to ensure that it can only be installed in the correct orientation. 7. Replace the storage compartment. 18 7820018-01 Rev-2 BD Accuri C6 Flow Cytometer Instrument Manual 8. Gently close the cytometer cover. 9. Place a sample tube with 2mL of 0.22 µm filtered, DI water on the SIP. 10. Plug in and turn on the cytometer. 11. Purge any air from the instrument (see section 4.6). Replace the pump tubing (PN 653146) every two months. Replace both pieces of tubing at the same time. Tubing comes in contact with biological samples and therefore should be considered hazardous. Wear gloves and appropriate safety gear during this procedure. There are two peristaltic pumps: a sheath pump and a waste pump. 1. Turn off and unplug the cytometer. 2. Lift the cytometer lid. 3. Disconnect the luer locks from the peristaltic pumps by unscrewing them. Blue tubing is connected to the sheath pump and red tubing to the waste pump. Sheath pump Waste pump Figure 4-4. Peristaltic Pumps and Luer Locks 4. Squeeze the grip marks on the pump element retainer clip to remove the clip. Figure 4-5. Removing Peristaltic Pump Retainer Clip 7820018 Rev-2 19 BD Accuri C6 Flow Cytometer Instrument Manual 5. Pull the luer lock connectors outward and slide the luer lock fittings off the pump head. Figure 4-6. Sliding Luer Lock Fittings Off of Pump Head 6. Remove the peristaltic pump tubing and discard according to standard laboratory protocols and regulations. 7. Replace with new peristaltic pump tubing (PN 653146) by sliding the luer lock fittings on the pump head. 8. Snap the pump element retainer clip into place. Reconnect the luer lock fittings on the outside of the pumps. Ensure the blue and red tubes are not crimped or over tightened. Ensure that the luer lock fittings are connected to the correct tubing elements. 9. Gently close the cytometer cover. 10. Place a sample tube with sheath on the SIP. 11. Plug in and turn on the cytometer. 12. Purge air from the cytometer (see section 4.6). 20 7820018-01 Rev-2 BD Accuri C6 Flow Cytometer Instrument Manual This section provides troubleshooting and technical support information. This section contains basic troubleshooting guidelines. Follow the procedures listed below. If problems persist after performing troubleshooting, contact Accuri Technical Support. 1. Make sure the power supplies and cords are plugged into an appropriate outlet. 2. Check the outlet to make sure it is functioning properly. 1. Make sure the USB cable is properly attached to the cytometer and computer. It may take several seconds for the port to recognize the cytometer. 2. Switch the USB cable to a different port on the computer. 3. Make sure the BD Accuri C6 flow cytometer driver was properly installed on the computer by doing the following, in order: Double-click the BD Accuri C6 Software icon on your computer desktop to open BD Accuri C6 Software. (See the BD Accuri C6 Software User’s Guide or Quick Start Guide Collection for instructions on using BD Accuri C6 Software.) Connect the USB cable from the C6 to one of the computer USB ports. CAUTION: Do not plug the USB cable for the cytometer into any USB ports on the computer monitor. NOTE: Windows will attempt to auto install the BD Accuri C6 driver. The attempt will end with a message stating “Device driver was not successfully installed.” This is as expected. After the C6 Device driver fails to auto install, Click the “Start” button (round button with the Windows logo on the lower left of the screen). Select Devices and Printers. You should see an icon labeled Cytometer that has a yellow symbol with an exclamation point in it. Right-click on the Cytometer icon and select Properties. Once the properties window opens, select the Hardware tab. With the hardware tab open, click the Properties button. Click the Change Settings button. When the settings window opens, click the Update Driver button. When the driver update window opens, select Browse my computer for driver software. 7820018 Rev-2 21 BD Accuri C6 Flow Cytometer Instrument Manual Navigate to the location of the driver software and specify the following path: C:\Program Files\BD Accuri\BD Accuri C6 Software\libraries Then click on the OK button to enter the selected path into the Browse window. Figure 5-1. Browse For Folder Dialog Box Click the Next button. Figure 5-2. Update Driver Software – Cytometer, Second Dialog Box 22 When the Windows Security dialog box shown below opens, click on Install this driver software anyway. 7820018-01 Rev-2 BD Accuri C6 Flow Cytometer Instrument Manual Figure 5-3. Windows Security Window Windows will start the installation of the driver for the C6 cytometer. Once completed, you have successfully installed the driver software. When prompted, click the Close button. Figure 5-4. Update Driver Software – Cytometer, Successfully updated your driver software With the C6 driver installed and the USB cable properly connected, BD Accuri C6 Software will indicate that it recognizes the C6 by displaying a green traffic light and the message “C6 is connected and ready”. Figure 5-5.The C6 Software Status Message Box – C6 is connected and ready 7820018 Rev-2 23 BD Accuri C6 Flow Cytometer Instrument Manual 1. Pause and restart the sample. 2. Run a backflush or unclog (see sections 4.2 and 4.3.1). 3. Run the validation beads (PN 653144 or 653145) (see the BD Accuri C6 Software User Guide for details). If the beads look acceptable, there may be a problem with the sample. If the beads are out of performance specification, perform a decontamination fluid cycle (see section 4.4) and run the beads again. If they are still out of specification, call Accuri Technical Support. 1. Place a tube of cleaning solution on the SIP and run for five minutes. 2. Run 0.22 µm filtered, DI water for one minute on Fast fluidics speed. 3. Check to see if the event rate is restored. 1. Check the levels in the sheath and waste bottles. 2. Check to see if any of the external fluidic lines are crimped. 3. Run a backflush to see if the SIP is clogged (see section 4.2). 4. Make sure the peristaltic pump tubing and retainer clips are properly attached (see section 4.12). 5. Restart BD Accuri C6 Software. 1. Check for a large air bubble in the in-line sheath filter. If so, replace the filter (see section 4.11). 2. There could be a clog in the line. Run backflush or unclog. 3. The peristaltic pump tubing may need to be replaced (see section 4.12). For additional technical support, view the frequently asked questions (FAQs) at www.AccuriCytometers.com/customer_support/faqs/ or contact Accuri Technical Support if a problem persists. This procedure should be performed when preparing the system for storage or shipping it for service. Contact Accuri Technical Support for more information on shipping. Visit www.AccuriCytometers.com for information on service contracts. Take appropriate safety measures such as wearing gloves and proper laboratory attire while performing this procedure. 1. Turn on the Cytometer and open the BD Accuri C6 Software. 24 7820018-01 Rev-2 BD Accuri C6 Flow Cytometer Instrument Manual 2. Place a sample tube containing 3 mls of diluted Decontamination Fluid (PN 653154) on the SIP and run the instrument for 5 minutes on FAST. 3. Place a sample tube containing 3 mls of 0.22 µm filtered, DI water on the SIP and run the instrument for 2 minutes on FAST. 4. From the Instrument menu in BD Accuri C6 Software, activate the manual decontamination fluid cycle by selecting “Run Decontamination Fluid Cycle”. 5. When the Decontamination Fluid Cycle is complete, turn off the BD Accuri C6 6. Remove tube of 0.22 µm filtered, DI water from SIP. 7. Disconnect the fluidic harness from the C6 and the fluid bottles, empty the four fluid bottles, and wipe down the outside of the instrument with 70% ethanol. 8. Pack the C6, fluid bottles and tray, fluidic harness, and power supply in the Pelican Case. When disconnecting the fluidic harness from the cytometer, always disconnect from the bottle end of the harness first to prevent fluid leaks. NOTE: Contact Accuri Technical Support if you are having difficulty performing this procedure due to instrument malfunction, or you need further guidance on the process. Limited Warranty period is one (1) year from the earlier of, (i) first operation of the Products by Buyer or (ii) ten (10) days after shipment of the Products to Buyer. This Limited Warranty covers software and firmware, and defects in material and workmanship under normal use and does not apply to ordinary wear and tear. For more detailed information, refer to the warranty information at www.AccuriCytometers.com. Extended warranties are available. Visit www.AccuriCytometers.com for information. For Technical Support, contact: In the USA: Accuri Cytometers Inc. 173 Parkland Plaza Ann Arbor, MI 48103 USA Phone: +1.734.994.8000 Fax: +1.734.994.8002 Email: [email protected] 7820018 Rev-2 25 BD Accuri C6 Flow Cytometer Instrument Manual Europe, Middle East and Africa BD Biosciences Erembodegem-Dorp 86 9320 Erembodegem Belgium Phone: +32 53 720 882 Customer Support: [email protected] Technical Support: [email protected] Canada BD Biosciences 2100 Derry Rd West, Suite 100 Mississauga, Ontario Canada L5N 0B3 Email: [email protected] Direct Phone Numbers Austria: 0810 101 807 Belgium: 078 166 050 Canada: 1.800.268.5430 Denmark: 8025 0622 Finland: 0800 915582 France: 0811 290 069 Germany: 0180 100 1732 Ireland: 1850 930 396 Italy: 840 999 926 Netherlands: 0900 0400 142 Norway: 800 17 382 Poland: 00800 121 4744 26 7820018-01 Rev-2 BD Accuri C6 Flow Cytometer Instrument Manual Visit www.AccuriCytometers.com or www.BDBiosciences.com for a complete list of parts and reagents. Regional Offices bdbiosciences.com/offices Asia Pacific Singapore Tel 65.6861.0633 Fax 65.6860.1590 China Tel 86.21.3210.4610 Fax 86.21.5292.5191 India Tel 91.124.2383566 Fax 91.124.2383224/25/26 Australia/New Zealand Australia Toll Free: 1800 656 100 Tel 61.2.8875.7000 Fax 61.2.8875.7200 [email protected] New Zealand Toll Free: 088 572.468 Tel 64.9.574.2468 Fax 64.9.571.2469 [email protected] Europe BD Biosciences Tel 32.2.400.98.95 Fax 32.2.401.70.94 bdbiosciences.com/eu [email protected] Canada BD Biosciences Toll Free 888.259.0187 Tel 905.542.8028 Fax 888.229.9918 bdbiosciences.com/ca [email protected] Japan Nippon Becton Dickinson Toll Free 0120.8555.90 Tel 81.24.593.5405 Fax 81.24.593.5761 United States BD Biosciences Toll Free 877.232.8995 Fax 800.325.9637 bdbiosciences.com [email protected] Microsoft Office and Windows 7are trademarks of Microsoft Corporation. ©2012 For Research Use only. Not for diagnostic or therapeutic procedures. Class 1 Laser Product. BD Accuri, BD Accuri C6 Software, BD Accuri CSampler Software, BD CSampler, and “Science is hard. Flow cytometry should be easy.” are trademarks of Becton Dickinson and Company. ©2012 7820018 Rev-2 27