1
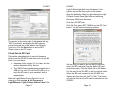
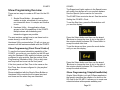
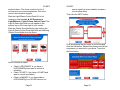
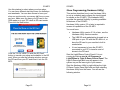
G3-MP3 Director Show Director with MP3 Player [Included with LOR1602MP3g3] User Manual December 6, 2012 V1.00 Copyright © Light O Rama, Inc. 2006-2012 G3-MP3 Table of Contents Introduction ...................................................................... 4 What’s in the Box ............................................................. 4 G3-MP3 Built into LOR1602MP3g3 ................................. 5 G3-MP3 as a Stand Alone Unit........................................ 6 Hardware Utility Version .................................................. 6 Important Considerations................................................. 7 Component Locations ...................................................... 8 LOR1602MP3g3 .......................................................... 8 G3-MP3 Stand-alone ................................................... 9 Audio Output ................................................................ 9 Aux Header - Interactive Inputs ................................... 9 Network Connections................................................... 9 Power Input................................................................ 10 SD Card Slot .............................................................. 11 Status LED................................................................. 11 Front Panel Buttons & Display ....................................... 11 Special Options.......................................................... 13 Setting the G3-MP3’s Clock & Day ................................ 15 Clock & Day Set from Front Panel ............................. 15 Clock Set with Hardware Utility .................................. 16 Clock Set via SD Card ............................................... 17 Show Programming Overview ....................................... 19 Show Programming (Front Panel Control) ................. 19 Show Programming (SimpleShowBuilder) ................. 20 Show Programming (Hardware Utility) ...................... 24 When Show Plays .................................................. 26 Plays Anytime Show .............................................. 26 Scheduled Show .................................................... 27 How Show Plays .................................................... 28 Triggered Show ..................................................... 29 Adding Sequences to the Show ............................. 31 Interactive Trigger Connections ..................................... 36 Firmware Update: G3-MP3 ............................................ 38 Firmware Update: LOR1602MP3g3 .............................. 40 Specifications................................................................. 43 Introduction The G3-MP3 Director is a compact, powerful LightO-Rama Show Director with an MP3 Player that is designed to take the place of your PC. It is available as part of the LOR1602MP3g3 Show-in-a-Box 16 channel lighting controller or as a stand-alone unit. It directs one or two high speed networks of Light-ORama (LOR) controllers while simultaneously playing MP3 audio files. The on-board real time clock with power-fail backup can be used to schedule shows. Six trigger inputs allow shows to be started by external events, usually momentary switches and/or motion detectors. The Windows Showtime software can used to design and build sequences. Sequences are lighting and servo controller commands that may be choreographed to audio. User created sequences and pre-programmed musical sequences available from LOR and other vendors are then arranged into Shows. These Shows are transferred to an SD card, along with the scheduling and trigger information. The SD card is inserted into the G3-MP3 Director which then directs the LOR controllers in your display and plays any associated audio. What’s in the Box Your G3-MP3 Director or LOR1602MP3g3 Show-ina-Box includes a USB SD card reader/writer, a class 4 (or higher) 500 MB (or larger) SD card and a G3MP3 User Manual. The LOR1602MP3g3 also includes the LOR1602Wg3 User Manual. These manuals are also available at www.lightorama.com ► Datasheets ► G3-MP3/LOR1602Wg3 User Manual. Page 4 G3-MP3 G3-MP3 Built into LOR1602MP3g3 The LOR1602MP3g3 Show-in-a-Box is a 16 channel, 30 amp lighting controller with an internal G3-MP3 Director. The G3-MP3 is mounted on a plate inside the controller. Remove the bottom two screws from the front cover and lift the cover off to expose the G3-MP3. See the following picture: G3-MP3 G3-MP3 as a Stand Alone Unit If you have a G3-MP3 Director as a stand-alone unit, it comes housed in a metal enclosure as shown in the following picture: Hardware Utility Version If your Hardware Utility has an LOR MP3 tab on the upper left of the LOR Control window (initial window) you will be able to put a show on an SD card for your G3-MP3. The recommended minimum version of the Hardware Utility to access most G3-MP3 functions is 2.3.4. To access all features of the G3MP3, Hardware Utility version 3.9 or greater is required. The version of the Hardware Utility appears in the title bar to the right of “Light-O-Rama Hardware.” This version is the same for all programs in a ShowTime software release. If the version you have does not support the features you want to use or there is no version number at all, then you need a new Hardware Utility. You may have to renew your software license to activate the latest version of the Page 5 Page 6 G3-MP3 ShowTIme software. Software is available here: www.lightorama.com ► Software ► Download. Important Considerations The G3-MP3 Director is normally powered by the nearest Light O Rama controller or a USB485B PC adapter. Use a 50’ or less CAT5e LAN cable to connect the G3-MP3 to either of these devices. Longer cables may have an unacceptable voltage drop that may cause erratic operation. G3-MP3 Component Locations LOR1602MP3g3 LOW1602Wg3 Lighting Controller Circuit Board is underneath the metal panel Four digit display Push buttons The front panel buttons are only active when there is no SD card inserted. SD cards can be formatted FAT16 or FAT32. SD cards supplied by LOR will already be formatted and ready for use. A 500MB SD card can hold approximately four hours of MP3 audio and controller commands. Songs (audio files) for use with the G3-MP3 must be encoded as MP3 files. Constant Bit Rate (CBR) at 128K bits/second is best. See www.lightorama.com ► Support ► User Manuals ► “Preparing MP3s” Audio Output Network connections to additional controllers Auxiliary Header SD Memory Card Slot Hole for Audio & Network Cables Fuses The battery backup power for the G3-MP3’s real time clock should keep the clock going up to 10 years. The real time clock is needed only for scheduled shows. Page 7 Status LED Page 8 G3-MP3 G3-MP3 Stand-alone Four digit display CTB32L controller connection Power Input Push buttons G3-MP3 57.6Kbps and 115.2Kbps, the G3-MP3 supports 500Kbps to better handle displays with large numbers of RGB pixels. The left two network connectors (RJ12 & RJ45) are for network 1. They are also used for all Hardware Utility interactions with the G3-MP3 and/or the underlying CTB32L controller in the case of a LOR1602MP3g3. The right RJ45 is used for the second network, Aux A. If the SD card did not specify “Dual Network Director” or there was no Aux A network information written to the SD card, then the Regular network is transmitted on this connection. Audio Output SD Memory Card Slot Network connections to additional controllers Auxiliary Header Status LED Audio Output This is a standard 1/8” stereo mini-jack. It supplies line-level output. You can directly plug headphones or an FM transmitter into this jack. Use an amplifier to drive speakers. Aux Header - Interactive Inputs The Aux Header is at the bottom center of the G3MP3 can be used to trigger shows with momentary contact switches or motion detectors. See the Interactive Trigger Inputs section for more info. Network Connections The G3-MP3 supports two LOR networks, doubling the bandwidth to your display. In addition to the traditionally supported network speeds of 19.2Kbps, Page 9 Power Input Normally, power is supplied by the attached controller in the case of the LOR1602MP3g3 or via the network jacks which are connected to LOR controllers. There is also an auxiliary barrel connector on the stand-alone version of the G3MP3. It can be used to supply power if the G3-MP3 is more than 50’ from the nearest controller or the controller does not supply auxiliary power the G3-MP3 is to be connected to a PC without using a USB485B powered adapter or an attached lighting controller (I.e. using a USB485 or SC485 adapter) the G3-MP3 is to be put on a timer or switch to control it Use a center-positive 12 VDC power adapter to supply external power to G3-MP3 if needed. Page 10 G3-MP3 Plugging in a power adapter disconnects the power from the network connectors. G3-MP3 Press Select to set the G3-MP3’s. See the section Clock Set from Front Panel for more info. SD Card Slot The SD card is inserted into the SD card slot with the gold connectors facing down. Press the card into the slot until it “clicks” into place. To remove the card, press the card into the slot and it will spring eject. When running one or both networks at 500Kbps a Class 4 or higher SD card is required. Press Select to set the show start time. See the section Show Programming (Front Panel Control) for more info. Status LED No SD card inserted: Flashes twice/second for no communications from PC (no heartbeat seen) Steady on for communications from PC detected (heartbeat detected) SD card inserted: On if communications falls more than 0.05 seconds behind. (The sequence currently playing wants to send more commands than the communications speed can handle.) Front Panel Buttons & Display When no SD card is inserted, the front panel buttons are active. Pressing the mode button will step through the available options: Page 11 Press Select to set the show end time. See the section Show Programming (Front Panel Control) for more info. This mode only appears if a CTB32L controller is connected to the G3-MP3 via the top ribbon cable connector and the CTB32L controller has firmware version 1.08 or later. This is the case for a LOR1602MP3g3 Show-in-a-Box controller. Pressing Select turns control of the front panel display, ▲, ▼ and Select buttons over to the CTB32L controller so that it can be configured. See the LOR1602Wg3 User Manual for more info. Pressing the Mode button again returns control to the G3-MP3. Page 12 G3-MP3 Press Select to set special options. The Mode button will now step through a sub-menu of additional options and then return to the top menu. The sub menu options are: Press Select to change one of these options. See the next section for an explanation of the options. Special Options G3-MP3 When this option has been selected, use the ▲ and ▼buttons to select the show that will run or ALL to run all shows. Press Select to set your choice. When this option is selected, use the ▲ and ▼buttons to select how often a show plays. This option only affects shows that are configured by the Hardware Utility to always run and loop continuously. This option will not override scheduling options set by the Hardware Utility. Options are: LOOP – loop continuously 10-n – play once every 10 minutes 15-n – play once every 15 minutes 30-n – play once every 30 minutes 60-n – play once every 60 minutes OnCE – play one time Press Select to set your choice. When this option has been selected, use the ▲ and ▼buttons to change the day-of-the-week. Press Select again to set it. Complex schedules possible with the Hardware Utility may require that the G3MP3 know this. Page 13 When this option is selected, use the ▲ and ▼buttons to select what to do with the lights Page 14 G3-MP3 between shows. This option is only active is the Repeat option was used to select other than ‘LOOP.’ G3-MP3 Then press Select. Press the mode button until the following appears: On – lights are on between shows OFF – lights are off between shows Setting the G3-MP3’s Clock & Day Clock & Day Set from Front Panel This section describes how to set the G3-MP3’s clock using the buttons to the right of the display. The buttons are only active when no SD card is inserted. Press the Mode button until the following is displayed: Then press Select. The current time will flash for about 5 seconds. Use the ▲ and ▼buttons to change the time. PM is indicated by the dot to the right of the minutes. Press Select again to set the time. To set the day-of-the-week, press the Mode button until the following appears: Then press Select. The display will begin flashing the day of the week. Use the ▲ and ▼buttons to change the day and press Select to again to set the day of the week. Clock Set with Hardware Utility This section describes how to use the Hardware Utility to set the G3-MP3’s real time clock via the RS485 adapter. You must have the following: Hardware Utility version 2.3.4 or later, see the section Hardware Utility Version No SD card in the G3-MP3 The G3-MP3 powered (see the Power Input section) and connected to the PC via one of the RS485 adapters Start the LightORama Control Panel if it is not running by clicking start ► All Programs ► LightORama ► Light-O-Rama Control Panel. The Light-O-Rama light bulb icon will appear in the system tray on the lower right of your screen. Start the Hardware Utility by right-clicking the LightO-Rama Control Panel light bulb and selecting Hardware Utility from the menu. Click the LOR MP3 tab. You will see the following window: Page 15 Page 16 G3-MP3 G3-MP3 Light-O-Rama light bulb icon will appear in the system tray on the lower right of your screen. Start the Hardware Utility by right-clicking the LightO-Rama Control Panel light bulb and selecting Hardware Utility from the menu. Click the LOR MP3 tab. Click the Only place SET TIME file on the SD Card button. You will see the following window: The section at the lower right of the window will say “MP3 Connected” and display the MP3 player’s current time and day of the week in the Remote Time box. Click the Set button to set the MP3 Player’s time to the PC’s time. Clock Set via SD Card This section describes how to use the Hardware Utility to set the G3-MP3’s real time clock via the SD Card. You must have: Hardware Utility version 2.3.4 or later, see the section Hardware Utility Version The USB SD card reader/writer plugged into a USB port on your PC with the SD card in it, or have the SD card in your machine’s built in reader/writer Start the LightORama Control Panel if it is not running by clicking start ► All Programs ► LightORama ► Light-O-Rama Control Panel. The Page 17 Set the time you want to put on the SD card and select the SD card drive from the Select SD card drop-down menu. Click the Write File to SD button. Put this card in the G3-MP3 to set its real time clock. When the SD card is placed in the G3-MP3, the display will show time set “tInE” & “Set.” The time is only set the first time the SD card is inserted into the G3-MP3. Page 18 G3-MP3 Show Programming Overview There are two ways to create an SD card for the G3MP3. 1. Simple Show Builder – this application creates a single, scheduled or runs anytime, non-interactive show. It is simple and intuitive to use. G3-MP3 The Repeat and Lights options in the Special menu will modify how shows set to run anytime behave. See the Special Options section for more info. The G3-MP3 time must also be set. See the section Setting the G3-MP3’s Clock. To set the Start time, press the Mode button until you see this display: 2. Hardware Utility – this application allows access to the full capabilities of the G3-MP3. Multiple shows with scheduling and interactive triggers are possible. The next sections explain how to use these tools to create show(s) on the SD card. Hardware Utility versions before 3.9 will not give you access to all the features available with the G3-MP3. Press the Select button and then use the ▲and ▼buttons to change the time. A dot to the right of the minutes display indicates PM. Press Select to accept the show start time. Show Programming (Front Panel Control) To set the show end time, press the mode button until you see this display: To use the front panel scheduling capability of the G3-MP3, you must put your show(s) on the SD card using the Hardware Utility and those shows must be configured to play anytime. See the section Show Programming (Hardware Utility.) Only a daily start and stop time can be set via the front panel. If the front panel set Start Time is the same as the End Time, then shows configured to ‘play anytime’ play anytime. Shows scheduled with the Simple Show Builder or Hardware Utility override the front panel start and end times and run when they are scheduled. Page 19 Press the Select button and then use the ▲and ▼buttons to change the time. A dot to the right of the minutes display indicates PM. Press Select to accept the show end time. Show Programming (SimpleShowBuilder) Simple Show Builder is a Light O Rama application that greatly simplifies the creation of a show on the SD card for the G3-MP3. It allows you to create one scheduled show with separate weekday and Page 20 G3-MP3 weekend hours. The show consists of a list of musical and non-musical sequences. This show cannot use interactive triggers. G3-MP3 want to specify a show schedule (creates a runs anytime show) Then click the NEXT button. Start the LightORama Control Panel if it is not running by clicking start ► All Programs ► LightORama ► Light-O-Rama Control Panel. The Light-O-Rama light bulb icon will appear in the system tray on the lower right of your screen. Start the Simple Show Builder by right-clicking the Light-O-Rama Control Panel light bulb and selecting Simple Show Builder from the menu. Click a sequence that you want in your show and click the Add button. Repeat this process until all the sequences you want are in your show. Then click the Next button. How to choose an option: Check “LOR1602MP3” is you have a LOR1602MP3g3 and want to include a schedule. Check “DC-MP3” if you have a G3-MP3 and want to include a schedule. Check “mDM-MP3” if you have either a LOR1602MP3g3 or a G3-MP3 and do not Page 21 Page 22 G3-MP3 Use this window to select when your show plays. You can have different start/stop times for weekdays and weekends. You can also choose to have your show run continuously, once every half hour or once per hour. Make sure you have your SD card in the USB reader or in your PC’s built-in SD card reader. Then click the Next button: G3-MP3 Show Programming (Hardware Utility) This section describes how to use Hardware Utility to set up, schedule and configure the input triggers for shows on the G3-MP3. The Hardware Utility provides the greatest flexibility by making available all features of the G3-MP3. Hardware Utility version 3.9 or later is required to access all capabilities of the G3-MP3. You must have: Click the “CLICK HERE To write the SD Card” button to transfer your show and schedule to the SD card. When you see the following window, remove the SD card from your PC and insert it into the G3MP3: Hardware Utility version 2.3.4 or later, see the Hardware Utility Versions section. The USB SD card reader/writer plugged into a USB port on your PC with the SD card in it, or have the SD card in your machine’s built in reader/writer It is not necessary to have the G3-MP3 connected to your PC to transfer a set of shows to the SD card Start the LightORama Control Panel if it is not running by clicking start ► All Programs ► LightORama ► Light-O-Rama Control Panel. The Light-O-Rama light bulb icon will appear in the system tray on the lower right of your screen. Start the Hardware Utility by right-clicking the LightO-Rama Control Panel light bulb and then selecting Hardware Utility from the menu. You will see the following window: Page 23 Page 24 G3-MP3 G3-MP3 Make sure the Old Firmware box in the Scheduling / Show Options section is NOT checked. You can build up to nine (9) shows; their names are Show01, Show02, … Show09. Use this window to set up a single show. You will repeat this process for each show you transfer to the SD card. When Show Plays Under the Select When Show Plays section choose one of the following options: Click the LOR MP3 tab on the upper left and you will see this window: (The G3-MP3 happens to be connected to the PC in this example. This is not necessary to create your shows on the SD card): Plays anytime powered – This show will be one in possibly a list of shows that will play when the G3-MP3 is powered. No trigger or schedule is needed to start this show. Plays During Scheduled Time – This show will play using a schedule you will set. When you select this radio button, a “Set Show Options” window will pop up to allow you to set the schedule for this show. Plays When Triggered – This show will play when its trigger input is activated. You have a choice of six trigger inputs to assign to the show and a choice of whether the trigger switch is normally open or normally closed. When you select one of the trigger inputs (1, 2, 3, 4, 5 or 6) the Show number is forced to that switch number. I.e. Show03 will be used for trigger input 3. Plays Anytime Show If you select this option, you will not be using either scheduling or triggering for this show. Skip to the Adding Sequences to the Show section. Page 25 Page 26 G3-MP3 Scheduled Show If you select Plays During Scheduled Time, you will see this window: G3-MP3 When you are satisfied with your schedule, click the OK button. How Show Plays Use the Select How Show Plays section to choose how the show will play during the scheduled time periods. If you select… These are the default scheduling parameters. Click the boxes next to any days for which you wish to change the start/end times. Use the Start Hour/Min and End Hour/Min sections to select the times you want. Click the Change Selected Days button to change the start/end times for the selected days. To prevent the show from running on a particular day set the Start Hour/Min and the End Hour/Min to the same value. To have shows run back to back, set the start time of the second show to the end time of the first show. Only one show can play at a time. If you schedule two or more shows during the same time period, precedence is given to the lowest numbered show. Page 27 Loop though Showlist continuously – Sequences in the show play in order and repeat continuously from the start time until the end time. Play through Showlist one time only – Sequences in the show play in order one time unless the time period is less than the show’s length. Repeat the Show – Sequences in the show play once per hour, half-hour, quarter hour or 10 minutes. If you select either of Play through Showlist one time only or Repeat the Show, then you must choose what to do while the show is not playing during the scheduled time period. Use the Action to take between shows section to select one of: Lights On – all lights will be on between shows Lights Off – all lights will be off between shows Filler Seq – runs this sequence between shows. This can only be an animation sequence. Click the Select Filler Sequence button to pick an animation sequence to use between playing the show sequences. Page 28 G3-MP3 G3-MP3 Note that if you have more than one unscheduled, untriggered show and you want them to play in order when no scheduled or triggered show is playing, don’t use “Play through Showlist one time only.” If you use this option, you will have specified what to do when the show ends (Lights on, Lights Off or Filler Sequence.) These options will prevent the next unscheduled, untriggered show from starting. Skip down to Adding Sequences to the Show. Triggered Show While interactive is active, any show not associated with a trigger will run as scheduled, these shows may be interrupted by shows 1-6 being triggered. Triggered shows do not follow scheduled times. They run when triggered. A triggered show does follow the rules for run once or run continuously. If you set a triggered show to run continuously, then you will not be able to stop it without resetting the G3-MP3 once it has been triggered. If you select Plays when triggered, you will see this window: Notice that two new option sections have appeared, Select Switch Number and Trigger Switch Type. Select one of the six radio buttons under “Select Switch Number” to assign an input trigger to this show. Select the radio button under “Trigger Switch Type” for the switch type that you will be using to start this show, either a normally open switch or a normally closed switch. See the Interactive Inputs and Interactive Trigger Connections sections for more information on input triggers. Use the Select How Show Plays section to choose how the show will play when triggered. If you select… Page 29 Loop though Showlist continuously – Sequences in the show play in order and repeat continuously. Play through Showlist one time only – Sequences in the show play in order one time. Page 30 G3-MP3 G3-MP3 Repeat the Show – Sequences in the show play once per hour, half-hour, quarter hour or 10 minutes. Adding Sequences to the Show Use the MP3 Player Showlist section to add sequences to the show. Add Sequence button to select a sequence to add to this Showlist Remove Sequence button to delete the selected sequence from the Showlist Move Up button to move a selected sequence up in the Showlist Move Down button to move the select sequence down in the Showlist For example, click the Add Sequence button and you will see a Open file box listing the sequences loaded on you PC. The sequence file Open window follows: Page 31 Choose a sequence from this list or browse to another folder and select a sequence, and then click the Open button. The sequence will be added to your show. Repeat this process until all the sequences you want in your show have been added. In the following example, five sequences (and any associated music files) have been added to the show: Page 32 G3-MP3 When the Showlist has been constructed, you may use the Optional Start Sequence section to select a sequence that will start this show. This can be an animation only or musical sequence. This sequence runs at the start of the show. For Loop Continuously and Play Showlist Once, this start sequence plays once. For scheduled shows, Play show once per… this start sequence plays at the start of each hourly/half-hourly/quarter-hourly/10 minute show. Now that this show has been setup, you must select some final options and transfer this show to the SD memory card. Click the Create Show button and you will see the following window: G3-MP3 If this show is started by a trigger input, the show number will be grayed out and assigned by the trigger input number. For Plays anytime and scheduled shows, you can pick a show number from the Assign this show a number drop-down menu. Use the Select Drive with the SD card section to choose the SD card. The drop-down menu will default to the first removable drive on your system. If you forgot to plug the SD card/SD card writer into the PC, do it now and click the Refresh Drive List button. Use the Select Options section to select the following: Page 33 Lock Step – [This is not supported by RGB controllers and should not be selected] This Page 34 G3-MP3 option causes the G3-MP3 to send all controller commands ahead of time for the next time slice and then give a global “everybody do their commands” command. This has the effect of eliminating the communication line delays when you have a large number of controller/channels. This is a recommended setting. This option is not supported by CTB08 and MC-P cards and requires firmware version 3.0 or above for 16 channel controller cards. Add file to SD card to set the MP3 player’s internal clock – This option puts a file with the current time on the SD card. The G3-MP3 will set its real time clock to this time when the SD card is inserted into the player for the first time. Don’t take too long to transfer the card! SD Card is for NEW G3 Dual Network Director – This will allow you to set the communications speed of the Aux network if checked. Use the Select Communication Speed(s) section to assign network speeds. If one or both networks are set to 500Kbps, a Class 4 or higher SD card is required. G3-MP3 Repeat the above process for each show to be transferred to the SD card. Interactive Trigger Connections The following diagram shows the connection of a normally-open momentary contact switch (‘B’ trigger 2) and a normally-closed motion detector switch (‘A’ trigger 1): G3-MP3 Aux Header IN 1 IN 3 +10V IN 4 IN 6 GRND IN 2 N/C +5V IN 5 Finally, click the Place Show on the SD Card button to write the current show, schedule and possibly current time to the SD card. You will see this window when it is done: A Page 35 P W R Page 36 B G3-MP3 The input pins (‘1’ through ‘6’) are pulled to +5v with an on-board resistor. One or more of these input pins is connected to the GRND pin through your trigger switches. These inputs can be configured by the Hardware Utility for normally open switches (NO,) meaning that the switch closes the circuit when activated or normally closed switches (NC,) meaning the switch opens the circuit when activated. Most motion detectors contain NC switches. Both +10 volts DC and +5 volts DC are provided at this connector to power external devices. Maximum total current draw is 500ma. The preceding diagram shows both trigger switches in their ‘off’ (untriggered) position. The Hardware Utility would be used to configure Show01 for the motion detector (‘A’) as follows: Plays when triggered selected Select Switch Number would have radio button ‘1’ selected Trigger Switch Type would have radio button Norm Closed selected. Show02 for the momentary push button (‘B’) would be configured as follows: Plays when triggered selected Select Switch Number would have radio button ‘2’ selected Trigger Switch Type would have radio button Norm Open selected. Page 37 G3-MP3 Firmware Update: G3-MP3 This section describes how to update the G3-MP3 firmware for both the stand-alone unit and the unit built into the LOR1602MP3g3. You must have: Hardware Utility version 2.3.4 or later, see the section Hardware Utility Version No SD card in the G3-MP3 G3-MP3 should be displaying the time The G3-MP3 powered (see the Power Input section) and connected to the PC via Net 1. Use a USB or serial adapter to connect the G3-MP3 to the PC. Do not use wireless. Get the latest firmware. www.lightorama.com ► Support ► Firmware. Note the name of the firmware file, G3-MP3-Vn_mm (n_mm is the version number) and save it on your PC in My Documents\Light-ORama\Firmware. Start the LightORama Control Panel if it is not running by clicking start ► All Programs ► LightORama ► Light-O-Rama Control Panel. The Light-O-Rama light bulb icon will appear in the system tray on the lower right of your screen. Start the Hardware Utility by right-clicking the LightO-Rama Control Panel light bulb and selecting Hardware Utility from the menu. Click the Firmware button in the LOR Control tab and you will see this window: Page 38 G3-MP3 G3-MP3 In Step 3 – Press Download Button, click the Download button. The firmware download will start automatically. The Update progress bar will fill from left to right. When the new firmware is loaded, the Status will change to “Successful” and the G3-MP3 will reboot. Firmware Update: LOR1602MP3g3 This section describes how to update 16 channel lighting controller that is part of the LOR1602MP3g3 Show-in-a-Box.. In Step 1 – Select Unit, choose the MP3 Player radio button. In Step 2 – Select firmware file, click the Open button. The window will look like this: You must have: Hardware Utility version 2.3.4 or later, see the section Hardware Utility Version No SD card in the G3-MP3 G3-MP3 should be displaying the time The LOR1602MP3g3 connected to the PC via Net 1. Use a USB or serial adapter to connect the G3-MP3 to the PC. Do not use wireless. Get the latest firmware. www.lightorama.com ► Support ► Firmware. Note the name of the firmware file, CTB32LG3-Vn_mm (n_mm is the version number) and save it on your PC in My Documents\Light-O-Rama\Firmware. Start the LightORama Control Panel if it is not running by clicking start ► All Programs ► LightORama ► Light-O-Rama Control Panel. The Light-O-Rama light bulb icon will appear in the system tray on the lower right of your screen. Browse to the firmware file and click Open. Page 39 Page 40 G3-MP3 G3-MP3 Start the Hardware Utility by right-clicking the LightO-Rama Control Panel light bulb and selecting Hardware Utility from the menu. Click the Refresh button to find the controllers. Select the controller you want to update from the drop-down menu next to the refresh button. The window will look like this: In Step 1 – Select Unit, choose the Selected Unit listed above radio button. In Step 2 – Select firmware file, click the Open button. The window will look like this: Click the Firmware button in the LOR Control tab and you will see this window: Browse to the firmware file and click Open. Page 41 Page 42 G3-MP3 In Step 3 – Press Download Button, click the Download button. The firmware download will start automatically. The Update progress bar will fill from left to right. When the new firmware is loaded, the Status will change to “Successful” and the controller will reboot. Specifications Dimensions Display Storage Audio Format Networks Power input Interactive trigger inputs Power output 7 7/8”W x 1 1/4”H x 4 "D LED four digit numeric Up to 8 GB SD card MP3 Two, individually selected speeds of 19.2K, 57.6K, 115.2K & 500Kbps (Regular and Aux A) 100 milliamps, 12 volts DC Power barrel to DC adapter LOR network connection to controller(s) Ribbon cable to CTB32L controller Six (Shows 1, 2, 3, 4, 5 and 6) Each configurable for Normally Open (NO) or Normally Closed (NC) switches Input header +5 volts +10 volts Maximum total draw 500ma Light-O-Rama, Inc. Tel: (518) 539-9000 Fax: (518) 538-0067 [email protected] Page 43