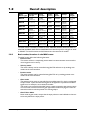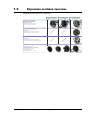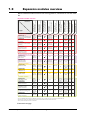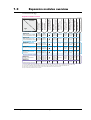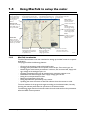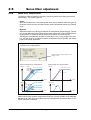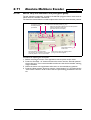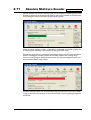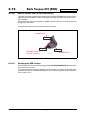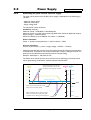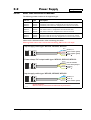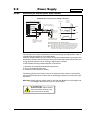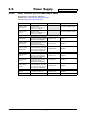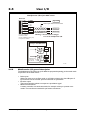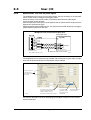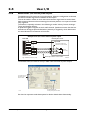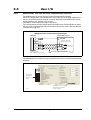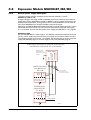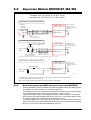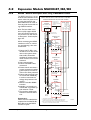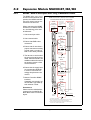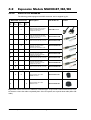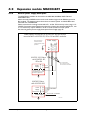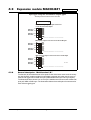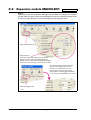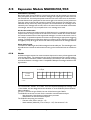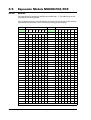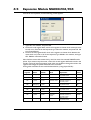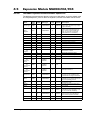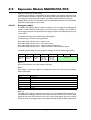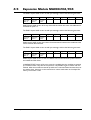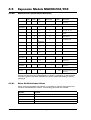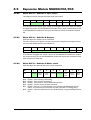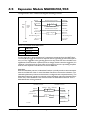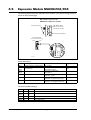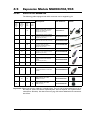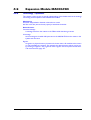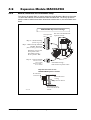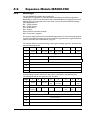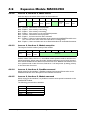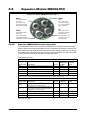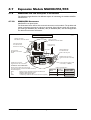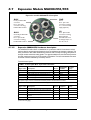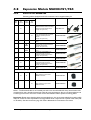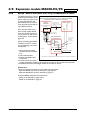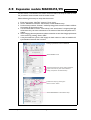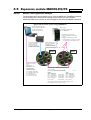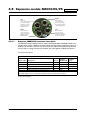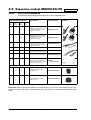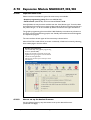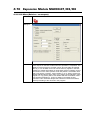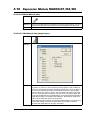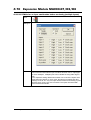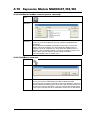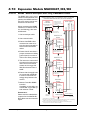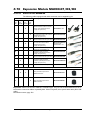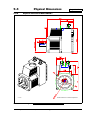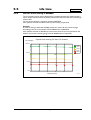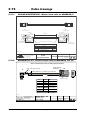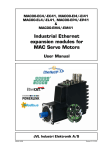
1
MAC050 - MAC141
MAC400 - MAC402 - MAC800
MAC1500 - MAC3000
Integrated Servo Motors
User Manual
Including expansion modules
JVL Industri Elektronik A/S
LB0047-32GB
Revised 11.th. November 2014
Important
User Information
!
Warning
!
The MAC series of products are used to control electrical and
mechanical components of motion control systems.
You should test your motion system for safety under all potential
conditions. Failure to do so can result in damage to equipment
and/or serious injury to personnel.
Please contact your nearest JVL representative in case of technical assistance. Your nearest contact can be found on our web site www.jvl.dk
Copyright 1998-2014, JVL Industri Elektronik A/S. All rights reserved.
This user manual must not be reproduced in any form without prior written
permission of JVL Industri Elektronik A/S.
JVL Industri Elektronik A/S reserves the right to make changes to information contained in this manual without prior notice.
Similarly JVL Industri Elektronik A/S assumes no liability for printing errors
or other omissions or discrepancies in this user manual.
MacTalk and MotoWare are registered trademarks
JVL Industri Elektronik A/S
Blokken 42
DK-3460 Birkerød
Denmark
Tlf. +45 45 82 44 40
Fax. +45 45 82 55 50
e-mail: [email protected]
Internet: http://www.jvl.dk
Contents
1
Introduction .................................................................................................................... 3
1.1
1.2
1.3
1.4
Features .............................................................................................................................................................. 4
Overall description ............................................................................................................................................. 5
Expansion modules overview ........................................................................................................................... 10
Using MacTalk to setup the motor ................................................................................................................... 14
2
Function description ..................................................................................................... 19
2.1
2.2
2.3
2.4
2.5
2.6
2.7
2.8
2.9
2.10
2.11
2.12
2.13
2.14
2.15
Using Position mode ......................................................................................................................................... 20
Gear Mode ........................................................................................................................................................ 21
Coil Mode ......................................................................................................................................................... 24
Analogue bi position mode ............................................................................................................................... 27
Analogue to position mode ............................................................................................................................... 28
Mechanical Zero search .................................................................................................................................... 32
Error messages and error handling ................................................................................................................... 40
Under Voltage Handling .................................................................................................................................... 51
Servo filter adjustment ...................................................................................................................................... 52
Using external SSI encoder ............................................................................................................................... 58
Absolute Multiturn Encoder ............................................................................................................................. 64
Rotary table option ........................................................................................................................................... 73
Power Save ....................................................................................................................................................... 79
Scope Function ................................................................................................................................................. 80
Safe Torque Off (STO) ..................................................................................................................................... 81
3
Hardware description ................................................................................................... 83
3.1
3.2
3.3
3.4
Connector overview......................................................................................................................................... 84
Power Supply.................................................................................................................................................... 85
Serial interface ................................................................................................................................................ 106
User I/O .......................................................................................................................................................... 107
4
Expansion Modules ..................................................................................................... 115
4.1
4.2
4.3
4.4
4.5
4.6
4.7
4.8
4.9
4.10
Expansion Module MAC00-CS ....................................................................................................................... 116
Expansion Module MAC00-B1/B2/B4 ............................................................................................................. 117
Expansion module MAC00-B41 ...................................................................................................................... 133
Expansion module MAC00-Exx4 .................................................................................................................... 150
Expansion Module MAC00-FC2/FC4 ............................................................................................................. 151
Expansion Module MAC00-FD4 ..................................................................................................................... 208
Expansion Module MAC00-FP2/FP4 .............................................................................................................. 232
Expansion Module MAC00-FS1/FS4 ............................................................................................................... 252
Expansion module MAC00-P4/P5 .................................................................................................................. 258
Expansion Module MAC00-R1/R3/R4 ............................................................................................................. 274
5
Appendix ..................................................................................................................... 313
5.1
5.2
5.3
5.4
5.5
5.6
5.7
5.8
5.9
5.10
5.11
5.12
5.13
5.14
5.15
5.16
5.17
Technical Data ................................................................................................................................................ 314
Torque Curves ................................................................................................................................................ 320
Efficiency curve ............................................................................................................................................... 323
Physical Dimensions ........................................................................................................................................ 324
Life time .......................................................................................................................................................... 333
Installation instructions ................................................................................................................................... 336
Emergency stop considerations ...................................................................................................................... 339
Trouble-shooting guide ................................................................................................................................... 345
Bus serial communication ............................................................................................................................... 347
Serial communication ...................................................................................................................................... 350
MacTalk communication ................................................................................................................................. 357
Internal registers ............................................................................................................................................. 361
Connecting to other equipment ..................................................................................................................... 391
Accessories ..................................................................................................................................................... 394
Cable drawings ............................................................................................................................................... 396
CE Declaration of Conformity ........................................................................................................................ 397
UL Certificate of Compliance ......................................................................................................................... 399
JVL Industri Elektronik A/S - User Manual - Integrated Servo Motors MAC050 - 3000
1
2
JVL Industri Elektronik A/S - User Manual - Integrated Servo Motors MAC050 - 3000
1
Introduction
JVL Industri Elektronik A/S - User Manual - Integrated Servo Motors MAC050 - 3000
3
1.1
Features
The MAC series of brushless servo motors with
integrated electronics represents a major step forward in motion control systems. All of the necessary electronics for a servo system are integrated
into the motor itself.
Traditional motor systems typically have the controller and drive electronics placed some distance
away from the motor. This increases machine
costs and has the negative effect that installation
time and costs are a major part of the total expense of building machinery.
The basic idea of the MAC motor is to minimise
these costs, but also to make a component that is
much better protected against electrical noise
which can be a typical problem when using long
cables between a controller and motor.
All user inputs and outputs are filtered, which
means that the MAC motors will work properly
even in an environment with a high level of electrical noise.
The major advantages are:
• Lower installation costs
• Faster installation
• Quiet and maintenance-free operation
• Replacement for pneumatic solutions
• Replacement for step motors, offering much
faster response
• Great flexibility due to many I/O possibilities and
many functions.
• Less machine space required.
• Fewer possibilities for wiring errors.
4
Main Features:
• Low cost and high performance make the
MAC series ideal for high-volume applications
• Pulse and direction inputs make it possible
to replace step motors.
• Quadrature input for gearing applications.
• ±10V input for controlling speed and
torque
• 2 ch. Quadrature output to master controller when used as driver.
• Accepts position and velocity commands
sent via RS232/422 interface.
• Wide supply voltage range 12 to 48VDC, 90
to 240VAC and 3 x 400-480VAC.
• Excellent efficiency compared to
step motors.
• Resolution 4096, 8000 or 8192 cpr.
• Wide variety of expansion modules which
can be mounted internally:
- Profibus DP module
- CAN-Open® or DeviceNet module
- Ethernet modules
- nano-PLC w/graphic programming
- Several module connector options
- Custom-designed modules on request
• Outputs for In position and Error
indication.
• High order digital filter which only needs a
single inertia adjustment.
• Standard NEMA23 flange.
• Built-in sensors make the motor stay stationary when powering up.
• Easy and simple Windows program - MacTalk available for installation/setup.
• High-efficiency power stage keeps temperature at a low level.
• CE approved. UL recognized (MAC400 and
800 - MAC1500 & 3000 pending)
JVL Industri Elektronik A/S - User Manual - Integrated Servo Motors MAC050 - 3000
1.2
Overall description
Basic MAC motor block diagram including motor and feedback devices
Power supply
+24VDC
Motor dependent
1x 12-48VDC
1x 115/230VAC or
3x 400-480VAC
Motor dependent
Ground+Earth
Multifunction I/O1
User I/O connectors
AIN1 & 2
Analogue
inputs ±10V
A1+
A1
3-phase
motor driver
Analogue inputs
Level shifter
and filter
Current
Sensing
A2+
A2
U
V
W
High speed
A/D converter
High speed
digital logic
array
2 Digital NPN
outputs showing
motor status
3-phase
brushless
motor
Optional
brake
2 channel
differential
Transceiver
B1
Output 1
Multifunction I/O2
Power Dump
for absorbing
regenerative
energy
B1+
Output 2
Serial interface
Switchmode
Power
Supply
ABZ
or
Data
Optical
incr. or abs.
encoder
32 Bit ARM
Micro processor
64MHz
2 channel
differential
Transceiver
B2+
B2
+5VDC Out
Receive
Transmit
Ground
Asynchronous
serial interface
TT1543-01GB
All the internal building blocks of the MAC motor are shown in the illustration above.
The central microprocessor takes care of all the processes in the motor via the various
I/O blocks such as the serial interface, differential transceiver (Multifunction I/O) and the
motor driver sections.
Please notice that the MAC400, 402, 800, 1500 and MAC3000 have 2 supply voltages
which offers the possibility to remove energy to the motor but keep having the control
core active and thereby keeping position values and other dynamic parameters.
JVL Industri Elektronik A/S - User Manual - Integrated Servo Motors MAC050 - 3000
5
1.2
Overall description
Basic
Motor Type
Continuous
Torque
Peak
Torque
Power
(cont.)
Nom.
Speed
Flange
Total
length
MAC50
0.11 Nm
(15.58 oz-in)
0.32Nm
(45.3 oz-in)
46 Watt
4000 RPM
NEMA23
57x57mm
(2.3”x2.3”)
111.2 mm,
(4.38”)
MAC95
0.22 Nm
(31.15 oz-in)
0.62 Nm
(87.8 oz-in)
92 Watt
4000 RPM
NEMA23
57x57mm
(2.3”x2.3”)
130.5 mm
(5.13”)
MAC140
0.32 Nm
(45.32 oz-in)
0.9 Nm
(127.45 oz-in)
134 Watt
4000 RPM
NEMA23
57x57mm
(2.3”x2.3”)
152.5 mm
(6”)
MAC141
0.48 Nm
(67.97 oz-in)
1.59 Nm
(225.16 oz-in)
134 Watt
2700 RPM
NEMA23
57x57mm
(2.3”x2.3”)
172.0 mm
(6.77”)
MAC400
1.27 Nm
(180 oz-in)
3.8 Nm
(538.1 oz-in)
400 Watt
3000 RPM
60x60mm
(2.86”x2.86”)
192.0 mm
(7.56”)
MAC402
1.27 Nm
(180 oz-in)
3.8 Nm
(538.1 oz-in)
400 Watt
3000 RPM
60x60mm
(2.86”x2.86”)
192.0 mm
(7.56”)
MAC800
2.38 Nm
(337 oz-in)
7.2 Nm
(1019.6 oz-in)
750 Watt
3000 RPM
80x80mm
(3.14”x3.14”)
175 mm
(6.89”)
MAC1500
4.78 Nm
(676.91 oz-in)
14.33 Nm
(2030.7 oz-in)
1500 Watt
3000 RPM
130x130mm
(5.12”x5.12”)
205.0 mm
(8.07”)
MAC3000
9.56 Nm
(1353.8 oz-in)
28.7 Nm
(4061.4 oz-in)
3000 Watt
3000 RPM
130x130mm
(5.12”x5.12”)
255 mm
(10.04”)
The MAC motor is available in 6 different sizes: MAC050, MAC95, MAC140, MAC141,
MAC400, MAC800, MAC1500 and MAC3000 with continuous power ratings from 46W
to 3000W. The basic functions and I/O features are the same for all models.
1.2.1
6
Basic modes/functions in the MAC motor
The MAC motor offers the following functions.
- Passive mode.
The motor will be in a completely passive state but communication is active and internal registers can be set up.
-
Velocity mode.
The motor velocity can be controlled using MacTalk software or by sending commands via the serial interface.
-
Position mode
The motor position can be controlled using MacTalk or by sending position commands via the serial interface.
-
Gear mode
The position of the motor is controlled by the multifunction I/O, which is configured
as input. Either a pulse and direction signal can be applied or a quadrature A and B
signal from, for example, an incremental encoder.
This mode is very powerful if the MAC motor is used to upgrade a step motor system
or if the motor is used in electronic gear applications such as a flying saw where an
external encoder tracks the position of a moving object.
-
Gear Follow Mode
Same mode as gear mode, except that the input pulses are not buffered so that control strictly follows the input pulses.
JVL Industri Elektronik A/S - User Manual - Integrated Servo Motors MAC050 - 3000
1.2
Overall description
-
Analogue Velocity Mode
The motor velocity is controlled by a voltage applied at the ±10V analogue input.
This mode can be used in several applications but typical applications include maintaining variable but constant speed in feeding mechanisms or as a slave driver in multiaxis systems with a master position controller for several axes.
-
Analogue Velocity (with deadband) Mode.
Same function as Analogue Velocity Mode but a deadband around zero is inserted.
The deadband is +/-600mV. This feature is useful if a potentiometer or similar device
is used to control the speed of the motor, since the motor will be stationary if the
input voltage is almost at zero.
-
Analogue Velocity/Gear Mode.
This mode is similar to Gear mode but it is possible to increase or decrease the position of the motor by adjusting the voltage applied to the ±10V input. A typical application is feeding mechanisms that require “on-the-fly” adjustment.
-
Velocity/Analogue torque Mode.
The motor torque is fully controlled by a voltage applied at the ±10V analogue input.
This mode is useful if the motor is used for winding applications where a constant
torque is required in the process. Another typical application is as a slave driver in
multi-axis systems with a master position controller for several axes. The update frequency is 521 Hz. Use Analogue Torque (Direct) if a higher bandwidth is required.
-
Analogue Torque (Direct) Mode.
Same function as Analogue Torque mode but the update frequency is much higher
(7812Hz). Please note that the top speed and acceleration are NOT controlled in this
mode. Use Analogue Torque Mode if this limitation is required.
-
Analogue Gear Mode.
This mode is somewhat similar to Gear mode or Analogue Velocity/Gear mode. The position of the motor is controlled by the multifunction I/O, which is configured as input.
Either a pulse and direction signal can be applied or a quadrature A and B signal from,
for example, an incremental encoder.
The gear ratio specified will determine the basic gear ratio between the applied pulses and the motor movement. The special feature in this mode is that the basic gear
ratio can be changed +/-5% depending on the voltage applied to the analogue input.
+10V will adjust the gear ratio +5% higher and -10V will lower the gear ratio 5%.
A typical application is feeding mechanisms that require “on-the-fly” adjustment.
-
Coil Mode.
Similar to gear mode but the position range can be limited in such a manner that the
motor changes direction every time the upper limit is reached and also if the lower
limit is reached. Both limits can be adjusted. The mode is intended to be used for controlling a wire/cable guider on a winding machine. The guide will follow the position
of the coil driven by a “main motor” and using this mode it is possible to feed the wire
in a very precise position regardless of the speed at which the “main motor” is running.
(continued next page)
JVL Industri Elektronik A/S - User Manual - Integrated Servo Motors MAC050 - 3000
7
1.2
8
Overall description
-
Analogue bi position mode
The motor will move a certain distance or go to one of 2 positions depending on the
voltage at the analogue input. The voltage at the analogue input will be seen as a digital
signal, meaning either logic low or logic high.
The distance or positions can be set up in 2 internal registers and saved permanently
in the motor.
-
Analogue to position
The position of the motor will change proportionally with the voltage at the analogue
input, between the zero position and a predefined position.
A typical apllication could be controlling a valve position using a voltage or a current
control signal.
JVL Industri Elektronik A/S - User Manual - Integrated Servo Motors MAC050 - 3000
1.2
Overall description
All the motor families with subfeatures is shown below.
5V TTL
19.2kbaud
Full Duplex
RS422 (3)
19.2kbaud
Full Duplex
RS422 (3)
2.5Mhz or
150kHz (LP)
RS422 (3)
4096 cpr
No
Motor stat. AMP
IP67
2 x NPN Molex
(1)
25mA
JST
MAC400-D2 (-D3)
5V TTL
19.2kbaud
Full Duplex
RS422 (3)
19.2kbaud
Full Duplex
RS422 (3)
2.5Mhz or
150kHz (LP)
RS422 (3)
8192 cpr
No
Motor stat. AMP
IP55
2 x NPN Molex
(IP66)
25mA
JST
MAC400-D5 (-D6)
5V TTL
19.2kbaud
Full Duplex
RS422 (3)
19.2kbaud
Full Duplex
RS422 (3)
2.5Mhz or
150kHz (LP)
No
Motor stat. AMP
IP55
2 x NPN Molex
(IP66)
25mA
JST
MAC402-D2 (-D3)
5V TTL
19.2kbaud
Full Duplex
RS422 (3)
19.2kbaud
Full Duplex
RS422 (3)
2.5Mhz or
150kHz (LP)
No
Motor stat. AMP
2 x NPN Molex IP55
(IP66)
25mA
JST
MAC402-D5 (-D6)
5V TTL
19.2kbaud
Full Duplex
RS422 (3)
19.2kbaud
Full Duplex
RS422 (3)
2.5Mhz or
150kHz (LP)
RS422 (3)
8192 cpr
No
Motor stat. AMP
2 x NPN Molex IP55
(IP66)
25mA
JST
MAC800-D2 (-D3)
5V TTL
19.2kbaud
Full Duplex
RS422 (3)
19.2kbaud
Full Duplex
RS422 (3)
2.5Mhz or
150kHz (LP)
RS422 (3)
8000 cpr
(8192)
No
Motor stat. AMP
IP55
2 x NPN Molex
(IP66)
25mA
JST
MAC800-D5 (-D6)
5V TTL
19.2kbaud
Full Duplex
RS422 (3)
19.2kbaud
Full Duplex
RS422 (3)
2.5Mhz or
150kHz (LP)
RS422 (3)
8000 cpr
(8192)
No
Motor stat. AMP
IP55
2 x NPN Molex
(IP66)
25mA
JST
MAC1500-D2 (-D3)
5V TTL
19.2kbaud
Full Duplex
RS422 (3)
19.2kbaud
Full Duplex
RS422 (3)
2.5Mhz or
150kHz (LP)
RS422 (3)
8192 cpr
No
Motor stat. AMP
IP55
2 x NPN Molex
(IP66)
JST
25mA
MAC1500-D5 (-D6)
5V TTL
19.2kbaud
Full Duplex
RS422 (3)
19.2kbaud
Full Duplex
RS422 (3)
2.5Mhz or
150kHz (LP)
RS422 (3)
8192 cpr
No
Motor stat. AMP
IP55
2 x NPN Molex
(IP66)
25mA
JST
MAC3000-D2 (-D3)
5V TTL
19.2kbaud
Full Duplex
RS422 (3)
19.2kbaud
Full Duplex
RS422 (3)
2.5Mhz or
150kHz (LP)
RS422 (3)
8192 cpr
No
Motor stat. AMP
2 x NPN Molex IP55
(IP66)
25mA
JST
MAC3000-D5 (-D6)
5V TTL
19.2kbaud
Full Duplex
RS422 (3)
19.2kbaud
Full Duplex
RS422 (3)
2.5Mhz or
150kHz (LP)
RS422 (3)
8192 cpr
No
Motor stat. AMP
IP55
2 x NPN Molex
(IP66)
25mA
JST
Protection class
MAC50,95,140,141-A3
Ext. connector type
Motor stat. AMP
2 x NPN Molex IP42
JST
25mA
Integrated brake
For indicating the motor status
or as output from the program
Digital user outputs
No
Digital user inputs
RS422 (3)
2.5Mhz or RS422 (3)
150kHz (LP) 4096 cpr
Pulse outputs
RS422 (3)
19.2kbaud
Full Duplex
Pulse inputs
5V TTL
19.2kbaud
Full Duplex
Balanced async.
serial interface
MAC50,95,140,141-A1
Type
Unbalanced async.
serial interface
For control of program flow
or motor start/stop
90 degree phase shifted
outputs from internal encoder
Accepts pulse and direction or
quadrature encoder signal
For controlling speed/torque
Also used for zero search
±10V Analogue input
TT0933-02GB
For setup/sending commands
Feature
For setup/sending commands
MAC Motors feature overview
Basic MAC motors
Basic MAC motors IP42
Basic MAC motors IP67
Basic MAC motor IP55 (IP66)
Basic MAC motor IP55 (IP66)
Basic MAC motor IP55 (IP66)
Basic MAC motor IP55 (IP66)
Basic MAC motor IP55 (IP66)
Basic MAC motor IP55 (IP66)
Basic MAC motor IP55 (IP66)
Basic MAC motor IP55 (IP66)
Basic MAC motor IP55 (IP66)
Basic MAC motor IP55 (IP66)
RS422 (3)
8192 cpr
RS422 (3)
8192 cpr
JVL Industri Elektronik A/S - User Manual - Integrated Servo Motors MAC050 - 3000
9
1.3
Expansion modules overview
JVL offers a wide variety of expansion modules to adapt the MAC motor to almost any
kind of application. The expansion module is easily mounted inside the motor. Only one
expansion module can be mounted.
The table below gives a brief overview of the features offered by the basic MAC motor
and the features that are available in each expansion module.
DSUB Connectors
Basic modules
MAC00-B1
Cable glands
M12 Connectors
MAC00-B4
MAC00-B2
MAC00-B1, B2, B4
Connector module w/RS232
RS485 (non isolated) and LED’s
MAC00-B41
No
tp
la
nn
ed
No
tp
Connector module
with Optical isolated RS232, Rs485
6 General digital I/O
Support 2 multifunction I/O ports.
la
nn
ed
MAC00-B41
Industrial Ethernet modules
MAC00-EC4, EI4, EL4, EM4, EP4
No
t
pl
an
ne
d
pl
an
ne
d
EtherCAT© module
EthernetIP© module
Powerlink© module
Modbus TCP/IP© module
Profinet© module
No
t
MAC00-EC4
MAC00-EI4
MAC00-EL4
MAC00-EM4
MAC00-EP4
ed
No
t
pl
an
n
pl
an
n
No
t
MAC00-EC41 EtherCAT© module
MAC00-EI41 EthernetIP© module
MAC00-EL41 Powerlink© module
MAC00-EM41 Modbus TCP/IP© module
MAC00-EP41 Profinet© module
ed
Industrial Ethernet modules extended IO
Wireless modules
Fieldbus modules
CANopen
Supports DS402
tp
No
MAC00-FC4
MAC00-FC2
No
tp
la
nn
ed
MAC00-FC2, FC4
la
nn
ed
la
nn
ed
tp
No
MAC00-FB4 Wireless Bluetooth module
MAC00-EZ4 Wireless Zigbee (IEEE 802.15.4) module
MAC00-EW4 Wireless WLAN module
MAC00-FB4, EZ4 and EW4
MAC00-FD4
pl
an
ne
d
No
t
No
t
pl
an
ne
d
MAC00-FD4
Multiaxis modules
MAC00-FS1, FS4
High speed serial RS485
Multiaxis 460kbaud
MAC00-FS1
MAC00-FS4
No
tp
la
nn
ed
Profibus DP
12Mbit with 6(4) Inputs
and (2) outputs
MAC00-FP4
No
tp
la
nn
ed
MAC00-FP2
MAC00-FP2, FP4
TT1033-02GB
10
JVL Industri Elektronik A/S - User Manual - Integrated Servo Motors MAC050 - 3000
Expansion modules overview
Expansion module overview (continued).
DSUB Connectors
Programmable modules
MAC00-R1
Cable glands
MAC00-R3
M12 Connectors
MAC00-R4
MAC00-R1, R3, R4
Nano PLC with graphic programming
interface 8 input and 4 outputs.
Process control modules
tp
No
No
Process module 4-20mA input and output
galvanic isolated. Only M12 Connectors
tp
MAC00-P4
la
nn
ed
la
nn
ed
MAC00-P4
Rear plates
pl
an
n
pl
an
n
MAC00-00
No
t
Process module 4-20mA input and output
galvanic isolated. Harting and M12 Connectors
ed
MAC00-P5
ed
MAC00-P5
No
t
1.3
MAC00-01
MAC00-02
MAC00-CSxx
MAC00-00/01/02 and MAC00-CS
Rearplates with or without
cable glandsConn.
No electronic features included
TT1176-02GB
JVL Industri Elektronik A/S - User Manual - Integrated Servo Motors MAC050 - 3000
11
1.3
Expansion modules overview
Below af detailed module overview also covering features, connectors etc. for each module.
No
Motor stat. Cable IP67
2 x NPN Gland (1)
25mA
MAC00-B1
RS232
RS422 (3)
19.2kbaud RS485 19.2k
Full Duplex Full Duplex
RS422 (3)
2.5Mhz or
150kHz (LP)
RS422 (3)
No
Motor stat. DSUB
PNP 10-32V Plug- IP42
100mA
able
MAC00-B2
RS232
RS422 (3)
19.2kbaud RS485 19.2k
Full Duplex Full Duplex
RS422 (3)
2.5Mhz or
150kHz (LP)
RS422 (3)
No
Motor stat. Cable IP67
PNP 10-32V Gland (1)
100mA
MAC00-B4
RS232
RS422 (3)
19.2kbaud RS485 19.2k
Full Duplex Full Duplex
RS422 (3)
2.5Mhz or
150kHz (LP)
RS422 (3)
No
Motor stat. M12 IP67
PNP 10-32V Conn. (1)
100mA
MAC00-B41
RS232
RS422 (3)
19.2kbaud RS485 19.2k
Full Duplex Full Duplex
RS422 (3)
2.5Mhz or
150kHz (LP)
RS422 (3)
6 In/Out.
(selectable)
5-30V
No
No
1 Input
Opto isol.
5-30V
M12 IP67
1 Output
PNP 10-32V Conn. (1)
15mA
RS422 (3)
4 Inputs
Opto isol.
5-30V
2 Outputs M12 IP67
PNP 10-32V Conn. (1)
15mA
Protection class
RS422 (3)
Ext. connector type
RS422 (3)
2.5Mhz or
150kHz (LP)
Basic modules
Conn. module w/cable glands
No electronic features added
Connector module w/DSUB
connectors
Connector module w/cable
glands (2)
Connector module
w/M12 connectors
Connector module
w/M12 connectors
No
M12 IP67
Conn. (1)
Industrial Ethernet modules
MAC00-Ex4
5V TTL
19.2kbaud
Full Duplex
MAC00-Ex41
RS232
RS422 (3)
19.2kbaud RS485 19.2k
Full Duplex Full Duplex
Ethernet module
Basic version
Ethernet module
Extended version
No
RS422 (3)
2.5Mhz or
x2 150kHz (LP)
Wireless modules
MAC00-FB4
RS232
RS422 (3)
19.2kbaud RS485 19.2k
Full Duplex Full Duplex
No
RS422 (3)
No
Motor stat. M12 IP67
PNP 10-32V Conn. (1)
100mA
MAC00-FZ4
RS232
RS422 (3)
19.2kbaud RS485 19.2k
Full Duplex Full Duplex
No
RS422 (3)
No
Motor stat. M12 IP67
PNP 10-32V Conn. (1)
100mA
MAC00-EW4
RS232
RS422 (3)
19.2kbaud RS485 19.2k
Full Duplex Full Duplex
No
RS422 (3)
No
Motor stat. M12 IP67
PNP 10-32V Conn. (1)
100mA
MAC00-FC2
RS232
19.2kbaud
Full Duplex
No
No
No
6 Inputs
Opto isol.
5-30V
2 Outputs Cable IP67
PNP 10-32V Gland (1)
25mA
MAC00-FC4
RS232
19.2kbaud
Full Duplex
No
(4)
No
No
4 Inputs
Opto isol.
5-30V (4)
2 Outputs M12 IP67
PNP 10-32V Conn. (1)
25mA (4)
RS232
19.2kbaud
Full Duplex
No
(4)
No
No
4 Inputs
Opto isol.
5-30V (4)
2 Outputs M12 IP67
PNP 10-32V Conn. (1)
25mA (4)
MAC00-FP2
RS232
19.2kbaud
Full Duplex
No
No
No
6 Inputs
Opto isol.
5-30V
2 Outputs Cable IP67
PNP 10-32V Gland (1)
25mA
MAC00-FP4
RS232
19.2kbaud
Full Duplex
No
No
No
4 Inputs
Opto isol.
5-30V (4)
2 Outputs M12 IP67
PNP 10-32V Conn. (1)
25mA (4)
Bluetooth module
Zigbee module
- IEEE 802.15.4
WLAN module
Fieldbus modules
CAN-Open module
w/cable glands
CAN-Open module
w/M12 connectors
MAC00-FD4
DeviceNet module
w/M12 connectors
Profibus DP w/cable glands
Profibus DP
w/M12 connectors
(4)
1) All these modules offer IP67 protection class. Please notice that the final protection class is limited by the actual motor used.
2) Can be ordered without cable (eg. MAC00-CS) or with cable in lengths of 2, 10 or 20 metres (eg. MAC-CS-10).
3) Either pulse input, pulse output or serial must be chosen. Not all of them at the same time.
4) Only a total of 4 I/O terminals are available.
Continued next page.
12
JVL Industri Elektronik A/S - User Manual - Integrated Servo Motors MAC050 - 3000
Integrated brake
For indicating the motor status
or as output from the program
Digital user outputs
RS422 (3)
19.2kbaud
Full Duplex
Digital user inputs
5V TTL
19.2kbaud
Full Duplex
Pulse outputs
MAC00-CS (2)
Type
Pulse inputs
For control of program flow
or motor start/stop
90 degree phase shifted
outputs from internal encoder
Accepts pulse and direction or
quadrature encoder signal
For controlling speed/torque
Also used for zero search
Balanced async.
serial interface
±10V Analogue input
Unbalanced async.
serial interface
Feature
TT1544-01GB
For setup/sending commands
For setup/sending commands
Expansion module overview.
1.3
Expansion modules overview
Continued from last page
Integrated brake
Protection class
Ext. connector type
For indicating the motor status
or as output from the program
Digital user outputs
For control of program flow
or motor start/stop
Digital user inputs
90 degree phase shifted
outputs from internal encoder
Pulse outputs
Accepts pulse and direction or
quadrature encoder signal
Pulse inputs
For controlling speed/torque
Also used for zero search
±10V Analogue input
For setup/sending commands
TT1175-02GB
Balanced async.
serial interface
Type
Unbalanced async.
serial interface
Feature
For setup/sending commands
Expansion module overview.
Multiaxis modules
MAC00-FS1
RS232
19.2kbaud
Full Duplex
RS485
460kBaud
Opto isol.
RS422 (3)
2.5Mhz or
150kHz (LP)
RS422 (3)
4 Inputs
Opto isol.
5-30V
2 Outputs DSUB
PNP 10-32V Plug- IP42
able
25mA
MAC00-FS4
RS232
19.2kbaud
Full Duplex
RS485
460kBaud
Opto isol.
RS422 (3)
2.5Mhz or
150kHz (LP)
RS422 (3)
4 Inputs
Opto isol.
5-30V
2 Outputs M12 IP67
PNP 10-32V Conn. (1)
25mA
RS485 High Speed. w/DSUB
connectors. Multiaxis control
RS485 High Speed. w/M12
connectors. Multiaxis control
Programmable modules
MAC00-R1
RS232
RS485
19.2kbaud 19.2kbaud
Full Duplex Half Duplex
No
No
8 Inputs
Opto isol.
5-30V
4 Outputs DSUB
PNP 10-32V Plug- IP42
300mA
able
MAC00-R3
RS232
19.2kbaud
Full Duplex
RS485
19.2kbaud
HalflDuplex
No
No
8 Inputs
Opto isol.
5-30V
4 Outputs Cable IP67
PNP 10-32V Gland (1)
300mA
MAC00-R4
RS232
19.2kbaud
Full Duplex
RS485
19.2kbaud
HalflDuplex
No
No
8 Inputs
Opto isol.
5-30V
4 Outputs M12 IP67
PNP 10-32V Conn. (1)
300mA
Nano PLC w/ DSUB connect.
Nano PLC w/cable glands (2)
Nano PLC w/M12 circular
connectors
Process Control modules
MAC00-P4
RS232
RS422 (3)
19.2kbaud RS485 19.2k
Full Duplex Full Duplex
RS422 (3)
2.5Mhz or
150kHz (LP)
RS422 (3)
3 Inputs
NO iso.!
5-30V
2 Outputs M12 IP67
PNP 10-32V Conn. (1)
100mA
MAC00-P5
RS232
RS422 (3)
19.2kbaud RS485 19.2k
Full Duplex Full Duplex
RS422 (3)
2.5Mhz or
150kHz (LP)
RS422 (3)
No
1 Output M12+ IP67
PNP 10-32V Hart. (1)
100mA
Conn.
Process module 4-20mA
w/ only M12
Process module 4-20mA
w/M12+Harting connectors
1) All these modules offer IP67 protection class. Please notice that the final protection class is limited by the actual motor used.
2) Can be ordered without cable (eg. MAC00-CS) or with cable in lengths of 2, 10 or 20 metres (eg. MAC-CS-10).
3) Either pulse input, pulse output or serial must be chosen. Not all of them at the same time.
4) Only a total of 4 I/O terminals are available.
JVL Industri Elektronik A/S - User Manual - Integrated Servo Motors MAC050 - 3000
13
1.4
Using MacTalk to setup the motor
Setup save/open
The complete setup
can be either saved
or reloaded from a
file using these
buttons
System control
Use these buttons to save data
permanently, reset the motor etc.
Error Handling
Use these fields to define error
limits for the position range etc.
Motor status
This field shows the
actual motor load,
position and speed etc.
Startup mode
The basic functionality
of the MAC motor is
set up in this field.
Inputs
This field shows the
actual supply voltage,
the speed at the pulse
input and the voltage
at the analogue input.
Errors
If a fatal error occurs,
information will be
displayed here.
Profile Data
All the main parameters for controling the motor behaviour
are set up in this field.
Zero Search
All the parameters regarding
the position zero search can
be specified here.
1.4.1
Input/Outputs
The functionality of the I/O's
is specified here.
Undervoltage handling
Determine what happens if the supply
voltage gets too low..
MAC motor connection
information Always shows
if the motor is on line or not.
TT0914GB
MacTalk introduction
The MacTalk software is the main interface for setting up the MAC motor for a specific
application.
The program offers the following features:
-
Choice of the operating mode of the MAC motor.
Changing main parameters such as speed, motor torque, Zero search type, etc.
Monitoring the actual motor parameters in real time, such as motor load, supply voltage, voltage at the analogue input, etc.
Changing protection limits such as position limits, maximum position error.
Determine what should happen if the supply voltage gets too low.
Saving all current parameters to disc.
Restoring all parameters from disc.
Saving all parameters permanently in the motor.
Updating the motor firmware or MacTalk software from the internet or a file.
The main window of the program changes according to the selected mode, thus only
showing the relevant parameters for operation in the selected mode.
The following pages describe the actual window for each mode and how the parameters
affect the MAC motor operation.
14
JVL Industri Elektronik A/S - User Manual - Integrated Servo Motors MAC050 - 3000
1.4
Using MacTalk to setup the motor
1.4.2
Toolbar description
The toolbar at the top of the MacTalk window contains the most commonly used features.
Open
Opens a setup file from disc and downloads the setup to the motor. If no motor is connected, the setup is shown in MacTalk and can be edited and saved to disc again.
Save
Saves the actual setup from the motor to a file. If no motor is connected, the actual offline settings (including module setups and program) will be saved.
Save in flash
The complete current setup of the basic motor will be saved permanently in the flash
memory. If the motor is powered down or reset, the saved setup will be used.
Reset position
Resets the position counter to 0. The content of the position counter can be monitored
in the right side of the main screen as “Actual position”.
Clear errors
Clears all the errors (if any). Please note that if an error is still present, the motor will
remain in the actual error state.
Reset motor
Reset the motor. Same as doing a power off / on operation.
Filter setup
Short-cut to the servo filter setup screen.
Stop motor
Stops the motor immediately using a controlled deceleration ramp and puts the motor
into passive mode. If a program is present this is stopped as well.
This button shall be considered as a functional stop button and is available also by using
the keyboard shortcut CTRL+F8.
Pressing the “STOP” button will immediately stop the motor by changing the currently
running mode to “passive” using a fast controlled deceleration curve.
Using a MAC motor or a module that enables the user to execute RxP programs this
execution is also halted to prevent the motor from starting up if a startup-mode is setup
from a program.
Warning! Do not consider this button as an appropriate Emergency stop. Always fit an Emergency stop circuitry to your motor setup.
MacTalk Address
Only if more than one motor is connected to the same interface. The address specified
in this field determines with which motor line communication is made.
JVL Industri Elektronik A/S - User Manual - Integrated Servo Motors MAC050 - 3000
15
1.4
1.4.3
Using MacTalk to setup the motor
Saving or opening a setup file to/from disc
The complete motor setup can be saved to disc or retrieved from disc and transferred
to the motor. The setup files can be saved anywhere on the hard disc or to a floppy disc.
Saving and opening a file over a network is also possible.
The setup files use the extension .MAC. By default, the setup files are saved in the same
directory where MacTalk itself is also installed. Other directories can be selected.
From file to motor.
Use Open to select a file containing the desired motor setup.
When opening the file the setup will simultaneously be sent
to the motor.
Remember to use the Save in flash button if the setup must
be permanently saved in the motor.
From motor to file.
Use Save or Save as to save the actual setup in a motor as a
setup file. Make sure that the motor is on-line with MacTalk,
otherwise only the MacTalk default setup is saved.
TT1020GB
In case where a motor is present and a disc file is opened the user is prompted for keeping the connection or going offline and displaying the file content. The following message
box appears.
Transfers data to the motor
and display the data in
MacTalk afterwards.
Going off/line and displays
the data in MacTalk.
TT1153GB
If the user decides to go offline the following textbox is presented.
TT1151GB
16
JVL Industri Elektronik A/S - User Manual - Integrated Servo Motors MAC050 - 3000
1.4
Using MacTalk to setup the motor
Pressing “OK” disconnects the motor from the PC application and all data can be edited
without any interruption in the motor. The following MacTalk view is presented.
TT1152GB
As seen in the bottom info line, the motor is disconnected and the filedata is currently
present in MacTalk. To re-establish communication with the motor, simply press the
“Go Online” button and if any data has been changed a warning box appears enabling the
user to save current data before re-establishing communication with the motor as this
will overwrite existing data in MacTalk.
If data is changed in MacTalk the user is warned that current data in MacTalk may be
overwritten and needs to be saved. The following warning message box appears.
TT1154GB
Choosing “No” will immediately upload all motor data, presing “Yes” will save all data in
the open file.
JVL Industri Elektronik A/S - User Manual - Integrated Servo Motors MAC050 - 3000
17
1.4
1.4.4
Using MacTalk to setup the motor
Motor “TEST” function
When setting up a servo system its convenient to test the that the motor movement is
stable and smooth.
For this purpose the TEST tab can be used.
At this tab its possible to setup the motor in position mode and define 2 positions where
the motor can move cyclic in between. A delay between each motion can also be defined.
The speed and acceleration used during this process is the general parameters defined at
the Main tab. All parameters can be changed dynamically during operation.
Select the «Tests» tab
Defines if motor
movement should
proceed before
motor reach position
or not.
Recommended to
keep this activated
(default).
1
Define
position 1
3
Define
position 2
Set motor In
position mode
4
TT1529-01GB
2
Optionally:
Define a delay (pause) at each position before
continuing the movement.
Finally push the Start
botton and the motorwill
start moving if the speed
and other general
parameters are set to
propper values.
Velocity
Illustration of the motor movement when the «Test» function is used.
P1
P2
P1
P2
0
Delay 1
Delay 2
Delay 1
Delay 2
Please notice that the movement is fully controlled by MacTalk.
If the communication cable is un-plugged the movement will stop at the last demanded
position. Also some slight timing variations may exist depending at the windows operation system and which other application running at the PC at the same time.
Important: Make sure that no other communication takes place when using the Test
function since it may interrupt the function of the test.
18
JVL Industri Elektronik A/S - User Manual - Integrated Servo Motors MAC050 - 3000
2
Function description
JVL Industri Elektronik A/S - User Manual - Integrated Servo Motors MAC050 - 3000
19
2.1
2.1.1
Using Position mode
Position mode
Follow the description below to set up the MAC motor in Position mode.
The MacTalk program is used to set up the motor initially. During normal operation, positioning commands can either be given through MacTalk or via one of the serial interfaces. The main window in MacTalk is as follows when position mode is selected.
Reset Position
Use this button to reset the
actual position counter
Error Handling
Use these fields to define error
limits for the position range etc.
Motor status
This field shows the
actual motor load,
position and speed etc.
Startup mode
Choose Position mode
Inputs
This field shows the
actual supply voltage.
Profile Data
All the main parameters for the
motion profile
are setup in this
field.
Errors
If a fatal error occurs,
information will be
displayed here.
Run Status
The motor status
can be monitored here.
Motion Parameters
The desired position
and the "in position"
window can be
specified here.
Zero Search
All the parameters regarding
the position zero search can
be specified here. See the
Mechanical zero search chapter.
Startup Mode
Reset Position
Error Handling
Input/Outputs
Motor Status
Inputs
20
Input/Outputs
The functionality of the I/O's is specified
here. In position mode, only Pulse Output
or Serial Interface is relevant.
MAC motor connection information
Always shows if the motor is on line or not.
TT0926GB
Select position mode in this field.
The counter which keeps track of the actual position can be reset using this button.
Worst case limits for the position range can be set up here. Please
consult the Error Handling chapter for details.
The multifunction I/O terminals can be defined here. In Position
mode these terminals can either work as a quadrature output from
the internal encoder or as a serial RS422 interface for commands sent
from a master controller. See also the Multifunction I/O general description, page 110.
The actual mode, speed, position, position error, load torque, load
current, regenerative energy (returned energy from the motor) can
be monitored here.
The supply voltage can be measured here.
JVL Industri Elektronik A/S - User Manual - Integrated Servo Motors MAC050 - 3000
2.2
Gear Mode
Main parameters used in gear mode
Error Handling
Use these fields to define error
limits for the maximum follow error etc.
Input/Outputs
The I/O Type must be setup as pulse input.
The input type must also be setup for the
actual pulse type (quadrature or pulse/dir.).
Motor status
This field shows the
actual motor load,
position and speed etc.
Startup mode
Choose “Gear mode”
or Gear (Follow)
Inputs
This field shows the
actual supply voltage
and velocity at pulse
input
Profile Data
All these parameters
can be used to limit the
motion. For example
the maximum torque
or velocity.
Errors
If a fatal error occurs,
information will be
displayed here.
Run Status
The motor status
can be monitored here.
Gear factor
The ratio between
the incomming pulses
and the actual motor
movement is specified
here.
Zero Search
Zero search can also be used. During zero search
the gear mode will be set inactive. See also the Zero
Search chapter.
2.2.1
TT0968GB
Gear Mode - overall description
In gear mode, the motor follows a pulse signal applied to the Multifunction I/O terminals.
The ratio between the incoming pulses and the motor movement can be adjusted to a
desired value. A ratio from 1024:1 down to 1:1024 can be selected. Typically this mode
is used if the MAC motor is incorporated into an application where movement needs to
be synchronized with an external movement. Another typical application is the replacement of step motors, since the MAC motor in Gear Mode can work like a step motor
using pulse and direction.
The following setup must be done to operate in gear mode (listed according to importance).
Startup Mode Select Gear Mode in this field.
Gear Factor This field defines the ratio between incoming pulses and the motor
movement. If the preferred motor direction needs to be reversed, the
sign in the “output” field must be inverted.
Example: 1024 must be -1024 to reverse the direction of movement.
Input/Outputs The multifunction I/O terminals must be set to “pulse input” since gear
mode uses the incoming pulses at this input to control the motor movement. Also the “Input type” must be selected. Choose “Quadrature” if
an incremental encoder is connected or “pulse-direction” if it is a step
motor signal. See also Multifunction I/O general description, page 110.
(Continued next page)
JVL Industri Elektronik A/S - User Manual - Integrated Servo Motors MAC050 - 3000
21
2.2
Gear Mode
Profile data
In gear mode, motor movement is fundamentally controlled from the
external signal source, but via the 4 parameters specified in “Profile
data” field it is possible to add limitations to speed, etc.
“Velocity”
The velocity field can be used to limit the maximum speed of the motor. Example - if an external encoder is producing a frequency which
theoretically should give a MAC motor speed of 10000 RPM, the
speed can be limited to 4000 RPM (max. allowed speed for the
MAC). The motor will be unstable and go in error within some time
since it is not able to run at 10000 RPM. Note that no pulses are lost
if the velocity is limited. They are simply remembered and used when
the input frequency falls to a level at which the motor is able to follow.
“Acceleration”
The acceleration parameter can be useful in systems in which the signal source instantaneously applies a high frequency without any acceleration. Under this condition, the MAC motor will take care of
making a controlled acceleration and deceleration. Note that no pulses are lost if the acceleration is limited. They are simply remembered
and used when motor velocity reaches a level corresponding to the
input frequency.
“Torque”
The maximum torque can be limited in the range 0-300%. 300%
corresponds to the rated peak torque of the MAC motor used.
“Load”
The Load parameter is the overall gain in the position/velocity filter
and ensures that the motor is stable with the actual mechanical inertia
used in the application. See also the filter setup chapter for further
details.
22
Error Handling
Worst case limits for the position range and follow error (maximum
position error) can be set up here. Please consult the Error Handling
chapter for details.
Motor Status
The actual mode, speed, position, position error, load torque, load
current, regenerative energy (energy returned from the motor) can
be monitored here.
Inputs
The supply voltage can be measured here.
Zero search
In typical gear mode applications the motor is moving relatively without any absolute zero point, but for applications that require a specific mechanical zero position, the general Zero search in the MAC
motor can be used. Please consult the chapter Mechanical Zero
search, page 32.
JVL Industri Elektronik A/S - User Manual - Integrated Servo Motors MAC050 - 3000
2.2
Gear Mode
Example 1:
Encoder (quadrature) input.
An external encoder feeds the MAC motor. The I/O type is set to
“Pulse input“ and “Input type” is set to “Quadrature” in order to decode the encoder signal. The encoder is connected to the A and B
terminals (Multifunction I/O’s). See also Multifunction I/O used as pulse
inputs, page 111.
The resolution of the external encoder is 500 ppr. The MAC motor
itself has 1024ppr (MAC50-141) or 2000 ppr (MAC800). If this application requires that the MAC motor rotates 1 rev. each time the external encoder has rotated 1 rev., the Input parameter is set to 500
(external encoder) and the Output parameter is set to 1024 or 2000.
Now the ratio between the external encoder and the MAC motor
will be 1:1. Ensure the “Profile data” is set to proper values in order
not to limit motor operation unintentionally.
Example 2:
Pulse and direction input.
A step motor system is replaced by a MAC motor, meaning that the
MAC motor receives a pulse and direction signal which is a very common signal format in step motor applications.
The I/O type is set to “Pulse input“ and “Input type” is set to “Pulsedirection” in order to decode the input signal. The pulse signal is connected to the A terminals (Multifunction I/O) and the direction signal
is connected to the B terminals (Multifunction I/O’s).
See also Multifunction I/O used as pulse inputs, page 111.
The MAC motor is replacing a step motor system with 400 steps per
revolution, which means that when the pulse source produce 400
pulses, it expects the MAC motor to rotate one revolution.
The MAC motor itself has 1024ppr (MAC50-141) or 2000ppr
(MAC800). If this application requires that the MAC motor rotates 1
revolution each time 400 pulses are received, the Input parameter is
set to 800 since the MAC motor detects on both the rising and falling
edge of the input signal.
The Output parameter is set to 4096 or 8000 since the number of
counts (edges) on the internal encoder is 4096 or 8000. Now the
MAC motor will move 1 revolution if 400 pulses is applied to the
pulse input. Ensure the “Profile data” is set to proper values in order
not to limit motor operation unintentionally.
The following table can be used as guide for setting up typical gear ra
tios:
Pulse and direction gear ratio setup - “Commonly used ratios”
Applied number of pulses
per MAC motor revolution.
Input
register
Output
register
MAC50-141
MAC800
200
400
4096
8000
400
800
4096
8000
500
1000
4096
8000
800
1600
4096
8000
1000
2000
4096
8000
2000
4000
4096
8000
4096 (Same as motor resolution)
8192
4096
8000
JVL Industri Elektronik A/S - User Manual - Integrated Servo Motors MAC050 - 3000
23
2.3
2.3.1
Coil Mode
Coil Mode - overall description
The Coil Mode is similar to gear mode but the position range can be limited in such a
manner that the motor changes direction every time 2 predefined limits (upper and lower) are reached. Both limits are fully adjustable. The mode is intended to be used for controlling a wire/cable guider on a winding machine. The guide will follow the position of
the coil driven by a “main motor” like it was mechanically connected by a transmission,
and by using this mode it is possible to steer the wire to the desired position at the coil,
also when the “main motor” changes speed. Since Coil Mode is very similar to Gear
mode, it is recommended that the gear mode setup instructions are followed before using the additional features described in this section. See Gear Mode, page 21.
Coil mode
MAC motor
Position
MAC motor position versus position of master encoder
P4
P3
P5
Start position
P2
P1
P6
Start direction
Master encoder
position
Notes:
P1, P2, P3 and P4 can be changed at any time. It is allowed to set P1=P2 and P3 = P4
The position of the motor is always locked to the external encoder like it was a mechanical gear (pulse by pulse).
TT0993GB
When coiling a thick thread compared to the coil, and the number of windings per layer
are few, it is preferable to stop the traverse motion while one winding is coiled at the top
of the previous winding at the edges. Therefore the edges can be cut off at the positions
given by registers P2 and P3, as shown in the illustration above.
When starting a new coil, you must specify the starting position, and the starting direction
of the MAC motor to achieve repeatability. The starting position, related to the basic
function shown in the illustration above, is given by the value of register P5. The starting
direction is given by the value of register P6, which value must be +1 or -1 for either a
positive or negative direction.
A typical setup could be:
P1 = 10000
P2 = 12000
P3 = 58000
P4 = 60000
P5 = 12000
P6 = 1
Left position limit of basic function
Left cut off position
Right cut off position
Right position limit of basic function
Starting position ( at left edge )
Start traversing right (positive direction)
Positioning at the start position is initiated by setting the analogue input, (AIN), high.
When setting this input low, the MacMotor will resume normal coiling function.
24
JVL Industri Elektronik A/S - User Manual - Integrated Servo Motors MAC050 - 3000
2.3
Coil Mode
The rules for setting up P1 ... P6 are:
P1 <= P2 <= P3 <= P4
P1 <= P5 <= P4
P6 = +1 or -1
2.3.2
The gear ratio in coil mode
The gearing ratio must be specified in the exact same manner as GEAR mode, using the
Input and Output registers. See Gear Mode - overall description, page 21.
2.3.3
Initiating Zero search in coil mode
The MAC motor can be set up to make an initiating Zero search at power up. When using
the sensor Zero search modes, the Zero search function uses the analogue input as zero
sensor input and the coiling function uses the signal to sense the ’go to start position command’. Still the two signals can be coupled in parallel if the Zero search sensor is activated
away from normal working area (Normally open).
In conjunction with the above setup for registers P1 ... P6, the setup for the Zero search
could therefore be:
Zero search type: “Sensor 1”
Zero search velocity: -100
Zero search position: -2000
Start mode: Coil Mode
Having ended the power-up Zero search, you must give the MAC motor an initial startposition command before starting the first coil process.
2.3.4
Filter setup in coil mode
Recommended filter setting for this application (using the filter selector).
Please note that the filter setting can also depend on other factors such as the inertia, friction etc. in the actual system.
Current filter: Medium or high.
Position filter: x-y coordinate = 3, 3 ( fast, almost hard )
Follow error type: Static, degree = 75%
Remember load factor to finely adjust the LOAD factor (MacTalk main tab).
Other settings, ( recommended ):
-
Max velocity: Set limit higher than the normal speed used
Acceleration: Set high value (example 300000 RPM/sec)
Torque: 300%
Gear factor: Set value
Follow error: 0
Function error: 0
JVL Industri Elektronik A/S - User Manual - Integrated Servo Motors MAC050 - 3000
25
2.3
2.3.5
Coil Mode
Register overview in MacTalk
The following screen is shown in MacTalk when selecting Coil Mode.
Main parameters used in coil mode
Startup mode
Choose “Coil mode”
Profile Data
All these parameters
can be used to limit the
motion. For example
the maximum torque
or velocity.
Coil mode parameters
Set P1 to P6 in this
field according to
the description in
this chapter.
Gear factor
The ratio between
the incomming pulses
and the actual motor
movement is specified
here.
TT1127GB
The general setup, such as selecting maximum velocity, gear ratio and input type setup,
is similar to Gear Mode. Only the Coil Mode parameters differ from Gear Mode.
For details of the overall setup, please See Gear Mode, page 21.
26
JVL Industri Elektronik A/S - User Manual - Integrated Servo Motors MAC050 - 3000
2.4
2.4.1
Analogue bi position mode
Analogue Bi-position Mode - overall description
For primitive positioning purposes, the basic MAC motor offers the Analogue bi-position
mode. The Analogue bi-position mode offers:
The motor will move a certain distance or go to one of 2 positions depending on the voltage at the analogue input. The voltage at the analogue input will be seen as a digital signal
meaning either logic low or logic high.
The distance or positions can be setup in 2 internal registers and saved permanently in
the motor.
Concerning the trigger level at the input and how to change please consult Analogue input, page 107
JVL Industri Elektronik A/S - User Manual - Integrated Servo Motors MAC050 - 3000
27
2.5
2.5.1
Analogue to position mode
“Analogue to position” Mode - overall description
In Analogue to position mode, the motor follows an analogue input voltage applied to the
analogue input (AIN / AIN1).
The distance that the motor is moving as a funtion of full voltage (+10V or -10V) is defined by the “Full range” register expressed in encoder counts.
The absolute position when 0V is applied is defined by the “Offset” register.
For filtering away any noise at the input signal the “Hysteresis” register can be used.
“Analogue to position” mode
MAC motor position versus applied analogue input voltage
MAC motor
absolute position
Counts positive direction
Offset
“Full range”
-10V
Input voltage
“Full range”
+10V
(+/- 10VDC)
Counts negative direction
The 3 parameters in MacTalk
most relevant for this mode.
TT1182GB
28
JVL Industri Elektronik A/S - User Manual - Integrated Servo Motors MAC050 - 3000
2.5
Analogue to position mode
Error Handling
Use these fields to define error
limits for the maximum follow error etc.
Main parameters used in
analogue to position mode
Motor status
This field shows the
actual motor load,
position and speed etc.
Startup mode
Choose
”Analogue to position”
Inputs
This field shows the
actual supply voltage
and velocity at pulse
input
Profile Data
All these parameters
can be used to limit the
motion. For example
the maximum torque
or velocity.
Errors
If a fatal error occurs,
information will be
displayed here.
Run Status
The motor status
can be monitored here.
Analogue to position
setup
The desired position
range, optional position
offset and hysteresis is
specified here.
Zero Search
Zero search can also be used. During zero search
the “Analogue to position” mode will be set inactive. See also the Zero Search chapter.
TT1181GB
The following setup parameters can be necessary or convenient to use in the “Analogue
to position” mode.
Startup Mode Select “Analogue to Position” Mode in this field.
Analogue to position parameters
This area is used to define the range and offset for the motor movement
versus the analogue input (see curve on the previous page).
Profile data
In this mode, the motor movement is fundamentally controlled from the
external signal source, but via the 4 parameters specified in “Profile data” field it is possible to add limitations to speed, etc.
“Velocity”
The velocity field can be used to limit the maximum speed of the motor.
Example - if an external encoder is producing a frequency which theoretically should give a MAC motor speed of 10000 RPM, the speed can
be limited to 4000 RPM (max. allowed speed for the MAC). The motor
will be unstable and go in error in a short time since it is not able to run
at 10000 RPM. Note that no pulses are lost if the velocity is limited.
They are simply remembered and used when the input frequency falls
to a level at which the motor is able to follow.
(Continued next page)
JVL Industri Elektronik A/S - User Manual - Integrated Servo Motors MAC050 - 3000
29
2.5
Analogue to position mode
“Acceleration”
The acceleration parameter can be useful in systems in which the
voltage source instantaneously applies a rapid change without any
ramp acceleration. Under this condition, the MAC motor will take
care of making a controlled acceleration and deceleration. Note that
no position information is lost if the acceleration is limited. The target
position is always respected and used.
“Torque”
The maximum torque can be limited in the range 0-300%. 300%
corresponds to the rated peak torque of the MAC motor used.
“Load”
The Load parameter is the overall gain in the position/velocity filter
and ensures that the motor is stable with the actual mechanical inertia
used in the application. See also the chapter Servo filter adjustment,
page 52 for further details.
30
Error Handling
Worst case limits for the position range and follow error (maximum
position error) can be set up here. Please consult the chapter Error
messages and error handling, page 40 for details.
Motor Status
The actual mode, speed, position, position error, load torque, load
current, regenerative energy (energy returned from the motor) can
be monitored here.
Inputs
The supply voltage and actual voltage at the analog input can be measured here.
Zero search
In typical gear mode applications the motor is moving relatively without any absolute zero point but for applications that require a specific
mechanical zero position, the general Zero search in the MAC motor
can be used. Please consult the chapter Mechanical Zero search, page
32.
JVL Industri Elektronik A/S - User Manual - Integrated Servo Motors MAC050 - 3000
2.5
Analogue to position mode
Example:
A voltage source feeds the MAC140 motor that has 4096 counts per
revolution (standard).
The desired working range is 5000 counts (approx. one revolution)
and it is desired to have an offset from the zero point where the Zero
search was done of 1000 counts (1/4 motor revolution).
Therefore the “Offset” register is set to 1000 counts and the “Full
range” register is set to 5000 counts. Please notice that a bit rounding
is done since the analogue input and also the motor encoder has a
limited resolution.
In addition its desired to have a certain filtering at the input meaning
that the motor should not move unless the input voltage changes
more than what correspond to a movement of 50 counts.
As a result the “Hysteresis” register is set to 50 counts.
Ensure the “Profile data” containing motor “Velocity”, “Acceleration” etc. is set to proper values in order not to limit motor operation
unintentionally.
Setup in MacTalk
JVL Industri Elektronik A/S - User Manual - Integrated Servo Motors MAC050 - 3000
31
2.6
2.6.1
Mechanical Zero search
Mechanical Zero search modes
In all positioning systems there is a requirement to be able to find a mechanical zero position after the system is powered up or at specific times during operation. For this purpose the MAC motor offers 5 different Zero search modes which can be selected in the
MacTalk main window or by sending a command at one of the serial interfaces.
The 5 different Zero search modes can in addition be selected to be started automatically
after power up of the motor or done by sending a command during normal operation to
the motor.
Select the Zero search mode
using this field. The selected format will
be used as follows :
- Immediately after the motor is powered up
(only the “Power up ....” Formats)
- If a search is initiated via the serial
interface or
- From an expansion module (MAC00-R1,
R4, -FP4, EC4 etc.).
Please note that the 3 formats for
“Power up” Zero search must not be
selected if an expansion module is used
(MAC00-R1, R3 or FP2). If an automatic
zero search after “Power up” is required
when using one of these modules, the
function must be enabled on the product tab
for the actual module. (See also the chapters
describing the expansion modules) TT0919GB
The menu offers 11 choices:
Type
Availability
MAC050-141
2.6.2
32
Precision Ext. sensor needed
MAC400-3000
Disabled (no Zero search)
Yes
Yes
-
-
Power up: Torque
Yes
Yes
Low
No
Power up: Sensor type 1
Yes
Yes
Medium
Yes
Power up: Sensor type 2
Yes
Yes
High
Yes
Power up: Enc. Index
No
Yes
High
No
Power up: Enc. quick index
No
Yes
Medium
No
Torque
Yes
Yes
Low
No
Sensor type 1
Yes
Yes
Medium
Yes
Sensor type 2
Yes
Yes
High
Yes
Enc. Index
No
Yes
High
No
Enc. quick index
No
Yes
Medium
No
Overall Zero search mode descriptions
Disabled (default)
The Zero search is disabled.
Power up: Torque
Similar to “Torque” but the Zero search will automatically
be started after power up.
Power up: Sensor type 1 Similar to “Sensor type 1” but the Zero search will automatically be started after power up.
JVL Industri Elektronik A/S - User Manual - Integrated Servo Motors MAC050 - 3000
2.6
Mechanical Zero search
Power up: Sensor type 2
Similar to “Sensor type 2” but the Zero search will automatically be started after power up.
Power up: Enc. Index
Similar to “Enc. Index” but the Zero search will automatically be started after power up.
Power up: Enc. quick index Similar to “Enc. Index” but the Zero search will automatically be started after power up.
Torque
Sensor type 1
Sensor type 2
Enc. Index
Enc. quick index
The Zero search will start searching for Zero until a mechanical “collision” occurs. The point at which the motor torque is equal to the specified value of the Zero
search torque is defined as the zero position.
The Zero search function will start seeking for Zero until
an external sensor is activated. The point at which the
sensor is activated is defined as zero. The active sensor
level can be changed by changing the sign at the value
specified in the Zero search torque field.
Like above (Sensor type 1) but after the sensor is activated the direction of movement is reversed and the
point at which the sensor is disabled is defined as zero.
The Zero search function will move exactly 1.5 motor
revolution and detect where the internal encoder index
pulse is detected. The position where the index pulse
was found is defined as zero. This Zero search mode is
very much similar to Enc. quick index but is much more
precise and take some seconds.
The Zero search function will move the motor until the
index position is detected. Then it reverses back to this
position. The position where the index was detected is
defined as zero. This Zero search mode is very similar to
Enc. index but is much faster and is not as precise
The following sections explain in detail the functionality of the 5 fundamental Zero search
modes.
2.6.3
Starting a Zero search
If the Zero search mode is set to Disabled, no Zero search is done at any time.
If one of the 5 modes Power up: Torque, Sensor type 1, Sensor type 2, Enc. index or Enc.
quick index is selected, the respective Zero search mode will be executed every time the
MAC motor is powered up.
The Zero search can also be initiated by sending a specific command via one of the serial
interfaces — please consult the technical manual (LB0048-xx) for more details or see the
individual detailed Zero search descriptions in the next pages.
JVL Industri Elektronik A/S - User Manual - Integrated Servo Motors MAC050 - 3000
33
2.6
Mechanical Zero search
2.6.4
“Torque” Zero search
Torque Zero search is carried out according to the following illustration.
Zero search position is an optional
offset. This position is preset to the positioncounter after the zero point is found.
Select the mechanical zero
search mode in this field.
Zero search velocity defines the velocity
used during Zero search. The sign of the
specified velocity defines the zero search
direction.
Zero search torque is used as the
trip level when the zero position is reached
Velocity
Acceleration
is specified by
the general acceleration parameter
under “Profile data”
in MAC-Talk
When the torque rises
higher than the value
specified in the field Zero
search Torque the speed will
drop to zero. And the actual
position is set to the value
specified in Zero search position.
The speed and acceleration
is set to the general setting
in MacTalk under “Profile data”
Time
Torque
Zero search
started
Home
Torque
Time
Zero search
active
Move away from
collision point
The move is done
in 500mS with the “zero
search velocity”
Move to position 0
(only if “Zero search
position” was <>0)
TT0921GB
The Zero search method using a torque as a reference is a cheap, simple way to find the
mechanical zero position, but please be aware of following critical points.
- Make sure that the Zero search torque is set to a proper value higher than the mechanical friction in the system in order to avoid a faulty zero point being found. It is a
good idea to let the motor run in velocity mode with the same velocity and observe
what the actual motor torque is. This value can be observed in the status area in the
right side of the main window. Set the Zero search torque to a value 10-20% higher
than the actual torque observed during this procedure.
- To improve the repeatability precision of the zero point make sure that the mechanical “collision” point is as stiff and well-defined as possible.
34
JVL Industri Elektronik A/S - User Manual - Integrated Servo Motors MAC050 - 3000
2.6
2.6.5
Mechanical Zero search
“Sensor type 1” Zero search
Sensor type 1 Zero search is carried out according to the following illustration.
Select the mechanical zero
search mode using this field.
The position is sampled in the exact
position where the sensor was
activated. The motor then decelerates
and moves the reverse distance back
to the position where the sensor was
activated.
Zero search position is an optional
offset. See description in
other chapter.
Zero search velocity defines the
velocity used during Zero search.
The sign of the specified velocity Sensor status
defines the zero search direction.
Zero search torque is used as the
trip level when the zero position
is reached.
1=active high -1=active low.
Zero search
started
TT0922GB
The Zero sensor must be connected to the analogue input (AIN), which during Zero
search functions as a digital input. For connection information and electrical specification,
see Analogue input, page 107.
2.6.6
“Sensor type 2” Zero search
Sensor type 2 Zero search is carried out according to the following illustration.
Velocity
Zero search position is an optional
offset. See description in
other chapter.
Zero search velocity defines the
velocity used during Zero search. Sensor
status
The sign of the specified velocity
defines the zero search direction.
Zero search torque is used as the
trip level when the zero position is
reached.
+1=active high -1=active low.
Select the mechanical Zero
search format in this menu.
When the zero search sensor is activated, the
motor decelerates and starts to move in
the reverse direction with 1/64 of Zero search
Velocity. When the edge of the Zero search
sensor is passed the motor stops and the
zero position is found.
Acceleration specified by
the general acceleration
parameter under the “Profile
data” in MAC-Talk
Time
Zero search
started
In this example the
active sensor level
is set to high
(Home Torque=1)
Time
TT0924GB
The Zero sensor must be connected to the analogue input (AIN), which during Zero
search, functions as a digital input.
For connection information and electrical specification, see Analogue input, page 107.
JVL Industri Elektronik A/S - User Manual - Integrated Servo Motors MAC050 - 3000
35
2.6
2.6.7
Mechanical Zero search
Only MAC400 to 3000
“Enc. Index” Zero search
The internal optical encoder in the MAC motor also contains a so called index pulse
which is a very short (4 counts) distance which is only present (active) one time per motor revolution. For applications where the working range is always less or equal one revolution this pulse can be used as the mechanical zero avoiding having any external sensors
involved which simplify the mechanics and the cabling.
This Zero search mode is similar to the “Enc. Quick Index” Zero search mode except that
its done slower but also with a much better precision since the index pulse is sampled
with a tolerance of +/- 100µS but will need a few seconds to do depending on the Zero
search speed and overall acceleration used.
When the “Enc. Index” Zero search is carried out the motor will be moving exactly 1.5
revolution in total. Then a pause of 1.3 seconds is used to stabilize the motor position
and do various calculations.
Select the mechanical zero
search mode using this field.
The index position is sampled in the exact
position where it was detected (+/- 100µS)
during the movement of 1.5 revolution.
Velocity
The position where the index pulse
was found + the distance moved since
is applied to the Actual position counter.
The Zero search is finished and
the selected startup mode is used.
Zero search position is an optional
offset. See description in
other chapter.
Zero search velocity defines the
Zero search
velocity used during Zero search.
1.3 Sec.
The sign of the specified velocity Index status started
defines the zero search direction.
The index is detected
Zero search torque is NOT used
somewhere in this range
in this zero search mode.
TT1187GB
2.6.8
Configuration via motor registers.
When the configuration is done by channels other than MacTalk such as Ethernet, Profibus, CAN-open etc. or just a simple interface connection to the basic motor the following description must be followed.
Start the “Enc. Index” Zero search:
Write the decimal value 25 into the MODE_REG (register 2). This will immidiately start
the Zero search. The value is expressed in 32 bits unsigned.
Set the Zero search velocity:
Write the velocity value into the register V_HOME (register 40). Notice that the sign will
determine the Zero search direction.
A velocity expressed as 100 RPM must be written as 277 (1 RPM = 2.77). The value is
expressed in 32 bits signed.
Concerning setting of Zero search position see Making a Zero point offset, page 38
36
JVL Industri Elektronik A/S - User Manual - Integrated Servo Motors MAC050 - 3000
2.6
2.6.9
Mechanical Zero search
Only MAC400 to 3000
“Enc. Quick Index” Zero search
The internal optical encoder in the MAC motor also contains a so called index pulse
which is a very short (4 counts) distance which is only present (active) one time per motor revolution.
For applications where the working range is always less or equal one revolution this pulse
can be used as the mechanical zero avoiding having any external sensors involved which
simplify the mechanics and the cabling.
This Zero search mode is similar to the “Enc. Index” Zero search mode except that its
done much faster but also with a larger tolerance since the index pulse is sampled with a
tolerance of +/- 1.3mS but without any delays involved in the Zero search.
When “Enc. Quick Index” Zero search is carried out the motor will start moving until the
index pulse is met. The motor will then decelerate and move backward to the point
where the index pulse was detected.
Select the mechanical zero
search mode using this field.
The index position is sampled in the exact
position where it was sampled (+/- 1.3mS)
The motor then decelerates
and moves the reverse distance back
to the position where the index was found.
Velocity
Zero search position is an optional
offset. See description in
other chapter.
Zero search velocity defines the
velocity used during Zero search.
The sign of the specified velocity Index status
defines the zero search direction.
Zero search torque is NOT used
in this zero search mode.
The motor reaches the position where
the index pulse was found and the Zero search is
finished and the selected startup mode is used.
Zero search
started
TT1188GB
2.6.10
Configuration via motor registers.
When the configuration is done by channels other than MacTalk such as Ethernet, Profibus, CAN-open etc. or just a simple interface connection to the basic motor the following description must be followed.
Start the “Enc. Quick Index” Zero search:
Write the decimal value 26 into the MODE_REG (register 2). This will immidiately start
the Zero search. The value is expressed in 32 bits unsigned.
Set the Zero search velocity:
Write the velocity value into the register V_HOME (register 40). Notice that the sign will
determine the Zero search direction.
A velocity expressed as 100 RPM must be written as 277 (1 RPM = 2.77). The value is
expressed in 32 bits signed.
Concerning setting of Zero search position see Making a Zero point offset, page 38
JVL Industri Elektronik A/S - User Manual - Integrated Servo Motors MAC050 - 3000
37
2.6
2.6.11
Mechanical Zero search
Making a Zero point offset
Common for all the Zero search modes, it can optionally be chosen to define the zeropoint as a value other than zero (position 0).
When is it useful to use the zero point offset?
- If it is desired that the position interval under normal operation is always convenient
positive values from 0 to +n, instead of a mixture of negative and positive values. This
can occur if the zero point sensor is placed a long distance away from the normal positioning interval or inside the normal positioning interval.
- If an automatic move to an initial position is desired after a power-up Zero search.
The offset value must be specified in the “Zero search position” field.
The total Zero search will be performed in following order.
1. The Zero search is started either automatically (power up) or initiated by command
from the interface or via an expansion module.
2. The basic Zero search is completed and the position counter is set to the value specified in the Zero search position field.
3. If the Zero search position value is different from position, the motor will now move
to position 0.
4. The Zero search is now completed and the motor will switch to normal operation
which means the mode selected in the “Startup mode” field in the main window.
The illustration below shows the complete cycle.
The motor will always go to position 0
after a complete zero search is done this
causes the motor to move the difference
between 0 and the value specified in the
“Zero search position” field.
Velocity
The speed and acceleration
is set to the general setting
in MacTalk under “Profile data”
Zero search in progress
velocity etc. depends on
the actual zero search mode.
Zero search
started
After the basic zero search has
been done, the actual position counter
is set to the value specified in the
“Zero search position” register
Time
Actual position counter
is now zero (position 0).
Zero search complete.
TT0951GB
38
JVL Industri Elektronik A/S - User Manual - Integrated Servo Motors MAC050 - 3000
2.6
2.6.12
Mechanical Zero search
Find index position after Zero search
The motor offers 2 unique points per revolution called the index points. These points are
found by the internal hall sensors and are always the same.
By enabling the ’Find index after Zero search’ feature, an extra precise zero point can be
defined.
This feature is intended to be used if the external sensor does not offer the desired precision. The feature can be used after each of the basic Zero search modes including the
torque Zero search mode.
Enable the index search feature in the Main window.
Select “Find index after homing”
using this field.
TT0974GB
When the feature is selected, it is very important that the external Zero search sensor is
adjusted to the correct position range with a certain margin to the index points to ensure
the same index is always found during every Zero search. If the external sensor is activated too close to the index points, it can cause the motor to finalize the Zero search with
reference to the wrong index point, which in practice will constitute an error of 0.5 motor revolution. Adjustment of the Zero search point must be done regardless of which of
the 6 (3) Zero search formats is selected.
The illustration below shows the MacTalk Tests tab which must be used for adjusting the
Zero search point.
Press this botton to see
where the zero search
sensor (sensor search mode) or
mechanical stop (torque search
mode) is located.
The actual position will be
displayed by the little white dot
in the left side of the window.
TT0975-02GB
Ensure that the zero point test is made several times to ensure that the white dot is located in the acceptable interval each time.
JVL Industri Elektronik A/S - User Manual - Integrated Servo Motors MAC050 - 3000
39
2.7
Error messages and error handling
Error Handling
Use these fields to define error
limits for the maximum follow error etc.
TT0969GB
2.7.1
Error messages and error handling
The MAC motor incorporates 5 fundamental parameters used for protection-related
purposes. They all have effect regardless of the operation mode the motor is set up to
use.
Follow error
It is possible to define the maximum allowable difference between the actual position of
the motor and the desired position. Depending on the setting of the servo filter etc., this
position difference will change. For protection it can be useful to define that the difference is not allowed to exceed for example 500 counts (the motor has 4096 counts per
rev. fixed). If a mechanical collision occurs, the position difference will typically be exceeded and cause a follow error making the motor passive with no further movement.
The default is 0, meaning that the feature is disabled.
Function error
Similar to Follow Error but the number of difference counts is only measured from the
point where the peak torque is reached, making it impossible for the motor to follow the
commanded movement. Default is 0, meaning that the feature is disabled.
Position limit min. and max.
Same as the physical limit switches but performed by software. Default is 0, meaning that
the feature is disabled.
Error acceleration
If an unrecoverable error occurs, it can be expedient to use a controlled deceleration instead of a sudden stop. If the inertia in the system is high and the mechanical parts are
weak, a sudden stop can cause damage and unintended behaviour. Use this parameter
to define the deceleration during an unrecoverable error. Default is 0, meaning that the
feature is disabled.
40
JVL Industri Elektronik A/S - User Manual - Integrated Servo Motors MAC050 - 3000
2.7
2.7.2
Error messages and error handling
Monitoring errors and warnings
When using the MacTalk PC-program any error or warning is shown in ’Status’’ field at
the main tab.
General error and warning monitoring area
In this area actual values for the motor operation is
monitored continously. Most of these monitored
values will trip a corresponding error message.
Example : The error message ‘Overload’ will be
tripped if the the monitored value ‘Motor load (mean)’
gets above 99%. Therefore make sure that the value
during normal operation have a proper margin to 100%.
Actual error(s) are shown here if any
Warnings and status information are presented here
TT1170GB
2.7.3
Error message ’Ohmis losses too high’
The following list show the possible error messages, the cause of the error and possible
actions to prevent the error from happening.
Each error can also be monitored by reading the error status register (register 35) by
using software packages like the OCX driver or MacRegIO.
Message no. / Message
1 / ’Overload’
Type / Motor action
Unrecoverable error / Motor is set in passive mode.
Error condition
The calculated accumulated loos in the motor and electronics
above limit. The actual level of losses can be observed in the
’Motor load (mean)’ field (see the screen dump above).
Possible cause of this error
The motor has been loaded above maximum continuous torque
rating for too long time, causing a critical internal temperature.
Solutions to avoid error
- Reduce average motor load.
- Reduce the speed and/or acceleration.
- Adjust servo filter to a stable behaviour during any event.
- Make sure that the supply voltage is at the specified level.
How to return to normal
operation
- Reset the motor, clear the error bit(s) in register 35 or cycle the
power.
Error bit / Firmware name
Bit 0 / ’I2T_ERR’
JVL Industri Elektronik A/S - User Manual - Integrated Servo Motors MAC050 - 3000
41
2.7
Error messages and error handling
2.7.4
Error message ’Follow error’
2.7.5
Message no. / Message
2 / ’Follow error’
Type / Motor action
Unrecoverable error / Motor is set in passive mode.
Error condition
The actual difference between the actual motor position and the
intended position is higher than the value specified in the ’Maximum follow error’ field in MacTalk.
Possible cause of this error
The motor has been applied too high a load or the ’maximum follow error’ value have been set at an unrealistic low value in regards to the actual hardness of the servo filter.
Solutions to avoid error
- Increase the ’’Maximum follow error’ value.
- Adjust the servo filter hardness to a more aggressive value.
- Make sure that the torque setting is not limiting the motor
movement.
- Set the ’Maximum follow error’ to 0 (default) which will disable the detection of this error type.
How to return to normal
operation
- Reset the motor, clear the error bit(s) in register 35 or cycle the
power.
Error bit / Firmware name
Bit 1 / ’FLW_ERR’
Error message ’Function error’
Message no. / Message
3 / ’Function error’
Type / Motor action
Unrecoverable error / Motor is set in passive mode.
Error condition
If the actual load torque of the motor gets higher than the specified torque setting permits it will cause the motor to slip away
from where it is supposed to be. If the number of motor counts
missing in this situation gets higher than the value specified in
the ’Maximum function error’ field in MacTalk it will trigger the
’function error’. If the actual motor torque never reaches the value specified in the ’torque’ field this error will never be triggered.
The above condition is valid when the motor is operated in Position mode, Biposition mode, or Analogue to position mode.
Possible cause of this error
The motor has been applied too high a load or the ’maximum
function error’ value have been set at an unrealistic low value in
regards to the ’torque’ setting.
Solutions to avoid error
42
- Increase the ’Maximum follow error’ value.
- Adjust the servo filter hardness to a more aggressive value.
- Make sure that the torque setting is not limiting the motor
movement.
- Set the ’Maximum function error’ to 0 (default) which will disable the detection of this error type.
How to return to normal
operation
- Reset the motor, clear the error bit(s) in register 35 or cycle the
power.
Error bit / Firmware name
Bit 2 / ’FNC_ERR’
JVL Industri Elektronik A/S - User Manual - Integrated Servo Motors MAC050 - 3000
2.7
2.7.6
Error messages and error handling
Error message ’Regenerative overload’
Message no. / Message
4 / ’Regenerative overload’
Type / Motor action
Unrecoverable error / Motor is set in passive mode.
Error condition
The amount of power dissipated in the motors built-in power
dump (breaking) resistor is above safe limit.
This error is tripped if the ’Regenerative load’ is >99%.
The regenerative load value can be monitored in the ’Motor status field’.
Possible cause of this error
The returned amount of energy from the motor has been too
high. This can typically happen if:
- The motor decelerate a large load inertia too fast.
- The motor is forced backwards.
- The servo filter or ’Load’ parameter is not adjusted to a stable
motor operation and the motor tends to oscillate causing energy to flow forward and backward from/to the motor.
In all situations the motor will start to work as a generator that
generate energy backward into the drive electronics.
Solutions to avoid error
- Decrease the load inertia.
- Decrease the top speed and/or the acceleration value.
- Make sure that the supply voltage is within nominal range in
order to leave extra capacity at the internal capacitors.
How to return to normal
operation
- Reset the motor, clear the error bit(s) in register 35 or cycle the
power.
Error bit / Firmware name
Bit 3 / ’UIT_ERR’
Error message 5, 6 and 7 do not exist since bits are used for other status purposes.
2.7.7
Error message ’Position Limit Exceeded’
Message no. / Message
8 / ’Position Limit Exceeded’
Type / Motor action
Unrecoverable error / Motor is set in passive mode.
Error condition
The actual position of the motor is outside the value(s) specified
in the ’position limit min.’ or ’position limit max.’ specified in the
’error handling’ area of the main tab in MacTalk.
Possible cause of this error
The motor has been commanded outside the value(s) specified in
the ’position limit min.’ or ’position limit max.’ registers.
Be aware that the error can happen even if the motor is in passive mode and the motor is forced outside this range.
Solutions to avoid error
- Set the position limits descriped above to more realistic values.
- Make sure that the position limits also cover worst case situations such as position overshot (if using a soft filter).
How to return to normal
operation
- Reset the motor, clear the error bit(s) in register 35 or cycle the
power.
Error bit / Firmware name
Bit 7 / ’PLIM_ERR’
JVL Industri Elektronik A/S - User Manual - Integrated Servo Motors MAC050 - 3000
43
2.7
Error messages and error handling
2.7.8
Error message ’Temperature too high’ (only MAC400 to MAC3000)
Message no. / Message
9 / ’Temperature too high’
Type / Motor action
Unrecoverable error / Motor is set in passive mode.
Error condition
The temperature has been higher than 84°C (183F) which is not
allowed.
Please note that this error is only available in MAC400, MAC800,
MAC1500 and MAC3000 since MAC050-141 do not include a
temperature measurement circuit.
Possible cause of this error
2.7.9
- The ambient temperature is higher than allowed - max is
+40°C/104°F.
- The motor is build into an environment where it can not dissipate enough heat.
- The motor is not mounted on a proper mechanical structure
where heat can be dissipated.
Solutions to avoid error
- Make precautions to decrease the surounding ambient temperature.
- Lower the speed and or load on the motor.
How to return to normal
operation
- Reset the motor, clear the error bit(s) in register 35 or cycle the
power.
Error bit / Firmware name
Bit 8 / ’DEGC_ERR’
Error message ’Low AC-voltage’ (only MAC400 to MAC3000)
Message no. / Message
10 / ’Low AC-voltage’
Type / Motor action
Unrecoverable error / Motor is set in passive mode.
Error condition
The mains supply is not connected or the mains voltage is too
low.
Please note that this message is only available in MAC400 and
MAC800 since MAC050-141 do not include AC supply.
Possible cause of this error
- The mains supply is not connected correctly.
- The external fuse has blown.
Solutions to avoid error
- Make sure that the external fuse is OK and that the mains supply is connected correctly according to the chapter Power Supply, page 85.
How to return to normal
operation
- Reset the motor, clear the error bit(s) in register 35 or cycle the
power.
See also the chapter Under Voltage Handling, page 51.
Error bit / Firmware name
Bit 9 / ’UV_ERR’
Error message 11 do not exist since bits are used for other status purposes.
44
JVL Industri Elektronik A/S - User Manual - Integrated Servo Motors MAC050 - 3000
2.7
Error messages and error handling
2.7.10
Error message ’Phase error’ (only MAC050 to 141)
2.7.11
Message no. / Message
12 / ’Phase error’
Type / Motor action
Unrecoverable error / Motor is set in passive mode.
Error condition
The motor phase current has been measured to be Out of Range
and the motor driver is shut down to prevent permanent failure.
Please note that this message is only available in MAC050 to
MAC141.
Possible cause of this error
- The servofilter (control loop) is unstable.
- The motor has been physically blocked.
- The motor has been running into a sudden mechanical collision.
Solutions to avoid error
- Make sure that the servo filter is not set to an extreme unrealistic setting compared to the nature of the actual load. See
also Servo filter adjustment, page 52.
- Avoid that the motor during normal operation is meeting a mechanical collision or an extreme overload situation.
How to return to normal
operation
- Reset the motor, clear the error bit(s) in register 35 or cycle the
power.
Error bit / Firmware name
Bit 11 / ’IX_ERR’
Error message ’Overvoltage on bus’ (only MAC400 to MAC3000)
Message no. / Message
12 / ’Overvoltage on bus’
Type / Motor action
Unrecoverable error / Motor is set in passive mode.
Error condition
The internal busvoltage has been higher than 450VDC which is
not allowed in order to prevent damages of the motor.
Please note that this message is only available in MAC400 and
MAC800.
Possible cause of this error
- The internal brake resistor is not sufficient to handle the
amount of returned energy from the motor. Use an external resistor or if already present lower the value of the resistor.
- The mains supply voltage is too high.
Solutions to avoid error
- Make sure that the mains voltage is within specified voltage
range.
- If this error only happens during a motor movement the error
can probably be avoided by connecting an external power
dump resistor or decrease the ohmic value if a resistor is already present. See also Connecting an external power dump resistor, page 99.
How to return to normal
operation
- Reset the motor, clear the error bit(s) in register 35 or cycle the
power.
Error bit / Firmware name
Bit 11 / ’OV_ERR’
JVL Industri Elektronik A/S - User Manual - Integrated Servo Motors MAC050 - 3000
45
2.7
Error messages and error handling
2.7.12
Error message ’UnderVoltage on Bus’ (only MAC050 to 141)
2.7.13
46
Message no. / Message
13 / ’UnderVoltage on Bus’
Type / Motor action
Unrecoverable error / Motor is set in passive mode.
Error condition
The voltage of the DC powersupply has been measured to be
lower than the limit selected in the register ’Min voltage’. This
has resulted in an error as configured in the setup of ’Undervoltage handling’. See also Under Voltage Handling, page 51.
Please note that this message is only available in MAC050 to
MAC141.
Possible cause of this error
- The current rating of the external power supply is too small.
- The power supply is not able to deliever the required peak currents that the motor need. This is a typical problem when using
switch mode power supply.
- The power cable is under dimensioned.
- The under voltage min. setting must be decreased.
Solutions to avoid error
- Use a power supply with a higher current rating.
- Use a power cable with at least 0,75mm² wires (up to cable
lengths of 10m. If the power cable is longer, use 1,5mm² or use
multiple wires in parallel.
- Connect a capacitor across the supply line close to the motor.
Especially if using a switch mode power supply this will help.
See also Power supply (only MAC050 to 141), page 85.
How to return to normal
operation
- Reset the motor, clear the error bit(s) in register 35 or cycle the
power.
Error bit / Firmware name
Bit 12 / ’UV_ERR’
Error mess. ’Peak error, motor overcurrent’ (only MAC400 to 3000)
Message no. / Message
13 / ’Peak error, motor overcurrent’
Type / Motor action
Unrecoverable error / Motor is set in passive mode.
Error condition
The motor phase current has been measured to be Out of Range
and the motor driver is shut down to prevent permanent failure.
Please note that this message is only available in MAC400 and
MAC800.
Possible cause of this error
- The servofilter (control loop) is unstable.
- The motor has been physically blocked.
- The motor has been running into a sudden mechanical collision.
- The actual AC supply voltage is too low to run the motor at the
actual speed.
Solutions to avoid error
- Make sure that the servo filter is not set at an extreme unrealistic setting compared to the nature of the actual load. See
also Servo filter adjustment, page 52.
- Avoid that the motor during normal operation is meeting a mechanical collision or an extreme overload situation.
How to return to normal
operation
- This error type is not software resetable. Cycle the control voltage (24VDC).
Error bit / Firmware name
Bit 12 / ’IPEAK_ERR’
JVL Industri Elektronik A/S - User Manual - Integrated Servo Motors MAC050 - 3000
2.7
Error messages and error handling
2.7.14
Error message ’Overspeed’ (only MAC400 to MAC3000)
Message no. / Message
14 / ’Overspeed’
Type / Motor action
Unrecoverable error / Motor is set in passive mode.
Error condition
The actual velocity (speed) has been higher than allowed.
Please note that this message is only available in MAC400 and
MAC800.
Possible cause of this error
- Velocity too high.
- Servofilter is not stiff enough and speed may overshoot during
start and/or stop or when sudden load changes happens.
This error is triggered at 4300 RPM (MAC400) and 3600 RPM
(MAC800).
Solutions to avoid error
- Make sure that the velocity setting is within specified range
(0-3000 RPM nominal).
- Make sure that the servo filter is set to stable setting in order
to avoid overshoots during acceleration or similar. See also
Servo filter adjustment, page 52.
How to return to normal
operation
- Reset the motor, clear the error bit(s) in register 35 or cycle the
power.
Error bit / Firmware name
Bit 13 / ’SPEED_ERR’
Error message 15 do not exist since bits are used for other status purposes.
2.7.15
Error message ’SSI Read error’ (only MAC050 to 141)
Message no. / Message
16 / ’SSI Read error’
Type / Motor action
Unrecoverable error / Motor is set in passive mode.
Error condition
An external SSI encoder has been enabled but communication
with the encoder has failed.
Possible cause of this error
- The encoder is not connected correctly.
- The format chosen is not compatible with the actual encoder.
- Improper cabling have been used.
Solutions to avoid error
- Use proper cabling between the motor and the external SSI encoder. A screened cable with twisted pair wires is recommended.
- Make sure that the right SSI format is selected.
How to return to normal
operation
- Reset the motor, clear the error bit(s) in register 35 or cycle the
power.
Error bit / Firmware name
Bit 15 / ’SSI_ERR’
JVL Industri Elektronik A/S - User Manual - Integrated Servo Motors MAC050 - 3000
47
2.7
Error messages and error handling
2.7.16
Error message ’Internal Encoder error’ (only MAC400 to MAC3000)
2.7.17
2.7.18
48
Message no. / Message
16 / ’Internal Encoder error’
Type / Motor action
Unrecoverable error / Motor is set in passive mode.
Error condition
A malfunction in the internal encoder has been detected.
Possible cause of this error
- The encoder disc is broken because the motor have been exposed to mechanical shock. Typical the shaft have been hit very
hard during mounting of the motor.
Solutions to avoid error
- Do not expose the shaft or the motor for mechanical shocks.
How to return to normal
operation
Return the motor for service.
Error bit / Firmware name
Bit 15 / ’INDEX_ERR’
Error message ’Invalid Filter settings’ (only MAC400 to MAC3000)
Message no. / Message
17 / ’Invalid Filter settings’
Type / Motor action
Unrecoverable error / Motor is set in passive mode.
Error condition
The servo filter settings are not within valid ranges.
Possible cause of this error
- The setup file used has been corrupted.
- The setup file used is an old type not compatible with the actual motor version.
Solutions to avoid error
- Select a new filter or contact your JVL.
How to return to normal
operation
- Correct the servo filter setting.
See also Servo filter adjustment, page 52.
- Cycle the 24VDC power.
Error bit / Firmware name
Bit 16 / ’OLD_FILTER’
Error mess. ’Control voltage unstable’ (only MAC400 to MAC3000)
Message no. / Message
18 / ’Control voltage unstable’
Type / Motor action
Unrecoverable error / Motor is set in passive mode.
Error condition
The control voltage (24VDC at the P+ and P- terminals) has been
unstable and detected outside the specified voltage range for a
too long time.
Possible cause of this error
- The control voltage has been detected outside the nominal
voltage range.
- The voltage has been applied too slowly with variations.
Solutions to avoid error
- Make sure that the voltage is stable in the specified voltage interval.
- Make sure that the voltage is applied in less than 500mS.
How to return to normal
operation
- Cycle the 24VDC power. A reset will not clear the error.
Error bit / Firmware name
Bit 17 / ’U24V ’
JVL Industri Elektronik A/S - User Manual - Integrated Servo Motors MAC050 - 3000
2.7
2.7.19
Error messages and error handling
Error message ’PWM locked’ (only MAC400 to MAC3000)
Message no. / Message
21 / ’PWM Locked’
Type / Motor action
Unrecoverable error / Motor is set in passive mode.
Error condition
An unrecoverable error has occured and the motor output driver
is shut down in order to prevent any further damages.
This error always takes place in combination with one or more
other errors. These errors can be one of following:
- “Peak error, motor over current” (Bit 12) The motor current has
been significantly higher than allowed during normal operation.
- “Internal Encoder Error” (Bit 15). The internal encoder has a
fault.
- “Invalid Filter settings” (Bit 16). The actual filter used is an old
version or corrupted because wrong values have been transfered to the motor.
- “Control voltage unstable” (Bit 17). The 24V control voltage has
been unstable.
2.7.20
Possible cause of this error
This error is always followed by other error messages. See individual description of these errors. See also error condition above.
Solutions to avoid error
- See other error messages that follows this error.
How to return to normal
operation
- This error type is not software resetable. Cycle the control voltage (24VDC).
Error bit / Firmware name
Bit 20 / ’PWM_LOCKED’
Error message ’Modbus Com. Error’ (only MAC400 to MAC3000)
Message no. / Message
22 / ’Modbus Com. Error’
Type / Motor action
Unrecoverable error / Motor is set in passive mode.
Error condition
Modbus communication has not been possible due to a communication error.
Possible cause of this error
- The motor is setup as master but it has not been possible to
reach a slave motor.
- The motor is setup as a slave but do not receive any position
information
Solutions to avoid error
- If the actual system is a master/slave configuration, make sure
that a slave motor is present.
- Make sure that the cabling is made in a proper manner with
twisted pair wires and screened cable.
- Make sure that the opposite unit in the communication system
uses same parameters such as baudrate etc.
- Adjust the time out register.
How to return to normal
operation
- The error is cleared if error free communication is re-established but the motor need to be re-entered in the desired operation mode.
- Try to save actual settings and restart the motor by a reset or
cycle the power (24VDC).
Error bit / Firmware name
Bit 21 / ’COM_ERR’
JVL Industri Elektronik A/S - User Manual - Integrated Servo Motors MAC050 - 3000
49
2.7
Error messages and error handling
2.7.21
Error message ’Current loop error’ (only MAC400 to MAC3000)
Message no. / Message
23 / ’Current loop error’
Type / Motor action
Unrecoverable error / Motor is set in passive mode.
Error condition
Error only relevant when using the MAC00-P5 module.
The 4-20mA input at the MAC00-P5 module has been detected
lower than 2,0mA which is outside normal range.
Possible cause of this error
2.7.22
50
- Cable fault.
- Fault in the external 4-20mA source that feed the MAC00-P5
current input.
Solutions to avoid error
- Check the cable feeding the 4-20mA input.
- Make sure that the 4-20mA signal stay at a level higher than
2,0mA.
How to return to normal
operation
- Reset the motor, clear the error bit(s) in register 35 or cycle the
24VDC power.
Error bit / Firmware name
Bit 22 / ’CURLOOP_ERR’
Error message ’Slave error’ (only MAC400 to MAC3000)
Message no. / Message
24 / ’Slave Error’
Type / Motor action
Unrecoverable error / Motor is set in passive mode.
Error condition
- Modbus communication with a slave motor has not been possible due to a communication error.
- A connected slave motor has discovered an error. See the slave
error register.
Possible cause of this error
- The motor is setup as master but it has not been possible to
reach a slave motor.
- A connected slave motor has discovered an error. See the slave
error register.
Solutions to avoid error
- If the actual system is a master/slave configuration make sure
that a slave motor is present.
- Make sure that the cabling is made in a proper manner with
twisted pair wires and screened cable.
- Make sure that the opposite unit in the communication system
uses same parameters such as baudrate etc.
How to return to normal
operation
- Reset the motor, clear the error bit(s) in register 35 or cycle the
24VDC power.
Error bit / Firmware name
Bit 23 / ’SLAVE_ERR’
JVL Industri Elektronik A/S - User Manual - Integrated Servo Motors MAC050 - 3000
2.8
Under Voltage Handling
Undervoltage Handling
Use these fields to define
the behaviour of the motor
when mains power disappear.
TT1130GB
2.8.1
Undervoltage handling
The MAC motor offers the possibility to define the behaviour during and after the mainsvoltage disappear. This situation could for example be during an emergency stop which
causes the mains supply to be cut while the control voltage is still applied to the motor.
3 options exist:
2.8.2
Undervoltage -> Set error bit
Default = Off.
If this option is selected an under voltage will be handled like an error situation and the
corresponding error bit will be set. The motor is stopped using the “error deceleration’
before the motor is switched to passive mode, like any other error situation.
When the main power is re-applied the motor will stay in passive mode and report and
under voltage error. To get the motor back in normal operation the error must be
cleared and a operation mode must be selected.
If this function is activated it will have first priority and the error deceleration will be used
compared to the 2 other options “Undervoltage -> Stop controlled and go to passive”
and “Undervoltage -> Set volocity to 0” which both uses normal deceleration.
2.8.3
Undervoltage -> Stop controlled and go to passive
Default = Off
This option makes the motor decelerating according to the normal acceleration parameter and go to passive mode when the mains power is removed. When main power is
re-applied the motor stay in passive mode. To get the motor back in normal operation
an operation mode must be selected.
2.8.4
Undervoltage -> Set velocity to 0
Default = Off.
This option simply just set the velocity to 0 causing the motor to decelerate and stay stationary (except in “torque direct mode”) when mains power is removed. The velocity
setting will stay at 0 also after the main power is re-applied. A velocity value (>0RPM)
must be written into the velocity register to get the motor moving again.
JVL Industri Elektronik A/S - User Manual - Integrated Servo Motors MAC050 - 3000
51
2.9
Servo filter adjustment
2.9.1
Servo filter adjustment
The MAC motor contains a higher-order digital filter regulation core. The purpose of the
filter is to ensure that the desired speed, torque and/or position are achieved and secondly that stability is obtained.
The motor’s default setting (when delivered) is normally appropriate for most applications. The only necessary adjustment is the LOAD parameter which is available via the
Main setup in the MacTalk software. For more demanding applications, the Filter selector
can be used.
2.9.2
Adjusting the LOAD parameter
The LOAD parameter must be increased proportional to the inertia of the payload in the
system. The default value of the LOAD parameter is 1.0000.
The proper LOAD value must be determined as follows.
LOAD=(Motor inertia+Load inertia)/Motor inertia.
Adjust Load according to the attached inertia.
Example:
A system uses a MAC800. The MAC800 has a motor inertia
of 0.92kg/cm² (according to technical data in appendix).
If the load inertia is 9.2kg/cm² (motor intertia x 10) the Load
needs to be adjusted to
LOAD=(Motor inertia+Load inertia)/Motor inertia
TT1022GB
LOAD=(0.92 + 9.2) / 0.92 = 11
If the load inertia is not fully known, it is highly recommended to slowly increase the
LOAD parameter until the motor starts to be unstable and noisy. Then decrease the value 20-30% to obtain a certain safety margin.
Remember to save the adjustment permanently in the motor by pressing the “Save in
flash” button.
2.9.3
52
Exceptions when adjusting LOAD
Precautions must be taken if the transmission from the motor to the load is elastic or involves a certain amount of backlash. A typical situation where precautions must be taken
is when using a belt drive actuator, since the motor’s forces may have to be transmitted
past a gear, for example, and then the belt until the payload is finally met. This “transmission chain” is typically very elastic and the gear will contain a certain amount of backlash.
The main problem is that the motor does not directly “see“ the final payload.
When the motor starts to rotate, it will not “sense” the payload before the backlash distance is passed and the belt is tightened. It is therefore not a linear system and the LOAD
cannot be increased as much as in theory.
JVL Industri Elektronik A/S - User Manual - Integrated Servo Motors MAC050 - 3000
2.9
2.9.4
Servo filter adjustment
Filter selector basics
If the desired motor response cannot be achieved using only the LOAD parameter, the
filter selector can be used.
The filter selector can be found in the MacTalk upper toolbar.
Using the Filter selector, the “personality” of the motor response can be optimised to
specific applications. The following overall behaviours can be adjusted:
- Follow error during movement and/or when the motor is stationary.
- Stability with a high load inertia.
- Stability if the load inertia changes during operation.
- Motor noise
The filter selector is in principle the same for the complete MAC motor range except that
the MAC50 to MAC141 also include the possibility to adjust the current filter.
MAC050, 95, 140 and 141
Filter selector:
MAC400 and 800
Filter selector:
TT1024GB
JVL Industri Elektronik A/S - User Manual - Integrated Servo Motors MAC050 - 3000
53
2.9
2.9.5
Servo filter adjustment
Adjusting the current filter (only MAC050 to 141)
The current filter is adjustable in the MAC050 to MAC141 models. This feature is useful
if the audible noise from the motor needs to be decreased. Please note that the bandwidth of the current filter will also be lowered which can cause efficiency at higher speeds
also to be lowered. As shown in the selector box below, it is not recommended to select
the “Low noise” filter if the motor is operated above 3000 RPM (MAC141: 2000 RPM).
A general recommendation is to select the high noise filter since it has the best dynamic
performance.
MAC050, 95, 140 and 141
Current filter selector:
TT1025GB
2.9.6
Adjusting the Position/Velocity filter
The Position/Velocity filter is the main filter which sets up the main response performance of the motor.
Velocity/position
filter selector:
Fastness
Velocity
Commanded velocity
Actual velocity
Time
Fastness:
The relationship between a slow and
a fast filter is seen as the ability to
track the commanded velocity within
time. By choosing a faster filter the
velocity reaches the required velocity
faster.
1 2 3 4 5
Follow error
/ Torque
Applied torque
Follow error
Hardness
Time
TT1026GB
Hardness:
The follow error is decreased by choosing
a harder filter but the stability is also
decreased.
The 5 levels of hardness will affect the
motor torque in the following manner.
In case of certain follow error the torque
is integrated up to 300% (full torque).
54
300% motor torque is produced when
these follow errors are present:
Column 1 : Follow error of 8000 counts
Column 2 : Follow error of 2000 counts
Column 3 : Follow error of 500 counts
Column 4 : Follow error of 125 counts
Column 5 : Follow error of 1 count (no error is accepted)
JVL Industri Elektronik A/S - User Manual - Integrated Servo Motors MAC050 - 3000
2.9
2.9.7
Servo filter adjustment
Damping
In almost any application it can be useful to damp (suppress) certain oscillations.
The damping selector can be used for this purpose.
The following damping types are available:
-
None
Damping feature is disabled.
-
Low frequency
When selecting Low frequency, oscillations caused by a poor mechanical transmission
can be reduced. Poor mechanical transmission means backlash in the coupling or
elastic toothbelts, etc. The filter becomes more tolerant to variations in the inertia
which normally can cause the motor to become unstable.
-
High frequency
When selecting High frequency, oscillations at higher frequencies will be reduced. This
can typically occur if the filter starts to oscillate at a frequency related to the sample
frequency. Often this can be heard as an audible noise.
-
High+Low frequency (only available on MAC400-800)
This is a combination of High and Low frequency settings.
-
Low+Low frequency (only available on MAC400-800)
This setting is similar to Low frequency but adds extra tolerance to variations in the
inertia.
Damping selector:
TT1027GB
JVL Industri Elektronik A/S - User Manual - Integrated Servo Motors MAC050 - 3000
55
2.9
2.9.8
Servo filter adjustment
Follow error compensation
This feature makes it possible to achieve a minimum position error during movement
(dynamically). The 2 main types are:
- Static
Will reduce follow error at constant speed, which can be useful for electronic gear applications since the motor will follow exactly what is demanded without any position
error.
- Dynamic
Will reduce follow error during acceleration or deceleration (speed changes). This feature is intended to be used for applications which require that a commanded speed or
target position is reached as fast as possible but without any overshoots etc.
The Dynamic compensation provides 3 levels (Dyn 1 to 3). Using a higher Dyn number, the filter order is increased and better performance may be possible, but will depend on the actual application.
Follow error compensation:
The best result is normally obtained in the
range 90-110%.
TT1028GB
Dynamic follow error compensation
Static follow error compensation
Velocity
Velocity
DYN3
DYN2
DYN1
None
Commanded velocity
Commanded velocity
Actual velocity
Actual velocity
Time
Follow error
None
DYN1
DYN2
DYN3
Time
Follow error
Static
Time
Time
Please note that the dynamic compensation level Dyn 3 is only available on the MAC400800 but for all motor sizes the available dynamic compensation is limited to Dyn 1 or 2 if
a slow main filter is selected.
56
JVL Industri Elektronik A/S - User Manual - Integrated Servo Motors MAC050 - 3000
2.9
Servo filter adjustment
2.9.9
Transferring and saving the filter
After setting the filter choices, the filter can be transferred to the motor.
The complete setup including the filter configuration can also be saved to and later recalled from disc by using the Open and Save buttons in the toolbar.
2.9.10
Additional adjustment
Now the desired filter is set up in the motor and the performance can be tested. Further
improvement may be required and typically it may be necessary to experiment in order
to obtain an optimum result.
Please note that the LOAD parameter must still be used to adjust the inertia ratio between the motor and load. See also Adjusting the LOAD parameter, page 52.
JVL Industri Elektronik A/S - User Manual - Integrated Servo Motors MAC050 - 3000
57
2.10
Using external SSI encoder
Only MAC050 to 141
SSI Control
section
The FastMac
commands field
Power
management
Input/Output
setup
TT1155GB
2.10.1
SSI Encoder
SSI support is added to the MAC50-141 series of servomotors, this feature is very useful
to determine the absolute position of the motor shaft if an encoder is connected directly
to this or another encoder position.
The SSI interface
When the differential lines are used for SSI, the A1+/- lines work as a Clock signal from
the motor to the encoder, while the B1+/- signals work as a Data signal from the encoder to the motor.
n*T
t1
CLOCK
T
1
a
DATA
t3
2
n
MSB
n+1
3
n-1
1
0
LSB
t2
TT1158GB
The figure above shows the SSI protocol principle. The Clock line is normally high. When
a reading is requested, the Clock goes low for t1 micro seconds to allow the encoder to
sample and prepare a value. On the first rising edge of the Clock (1), no sampling is done,
but on the second rising edge of the Clock (2) the first data bit is read from the Data line.
Shortly after reading the bit value, the motor will set the Clock high and execute another
cycle, where the data bit is sampled just before each rising Clock. After the last data bit
has been sampled, the Clock stays high.
In the MAC-motor several registers are available for storing values for different purposes.
Position registers P1-P8 (available from MacTalk etc.) are used to hold SSI positions.
58
JVL Industri Elektronik A/S - User Manual - Integrated Servo Motors MAC050 - 3000
2.10
Using external SSI encoder
Only MAC050 to 141
When the motor starts up during power on or a software reset the SSI encoder is read
4x and the value is decoded from Gray-code to an absolute position with an 25bit accuracy (25-bit signed).
This position is scaled to fit motor resolution and then saved in position register P7 (register 61) as a 32-bit signed value.
The SSI encoder feature is based on an external encoder resolution of 1024 cnt/rev. (256
pulses/rev.) this value is scaled to fit the motor resolution which is 4096 cnt/rev.
SSI is a serial protocol without any error detection or correcting features so in order to
determine if the correct value is read, the value is read 4 times and the same value need
to be read all 4 times.
If this value has changed during the read cycle, the error register 35 bit 15 is set and also
bit 15 in the SSI control register 178.
If this error condition has happened be sure to clear the error in register 178 before doing a save in flash operation.
2.10.2
Encoder positioning and usage
A new position is calculated based on the encoder position stored in P7 and a previously
saved value (a position sample) in register P6.
This value stores in P6 is a position reference stored when a position reset is done.
The calculation is as follows:
P8 = (P7 - P6) + P5
The P5 value is used when an offset is to be added to the position. So the desired ’0’ position is saved into P6 and the actual position (from the encoder) is saved into P7 and then
again P5 is used to offset this position.
Example 1:
The encoder shaft is connected to the motor shaft, meaning that 1 revolution at the external encoder is equal 4096 motor counts.
Motor start up, encoder reading = 12288 (random position)
Motor P_IST = P_SOLL = 12288
This position we want to define as position 0 so we run the position reset procedure
(see Reset position procedure) and store 12288 into P6.
The motor is reset (software reset or power cycle) and the new position is calculated by:
P4 is by default 0, so
P8 = (12288 - 12288)
P8 = 0
This value is transferred to P_IST and P_SOLL, so
P_IST = P_SOLL = P8 = 0.
Now the encoder position 12288 is defined as position 0 in the system.
Example 2:
Let's say that we need to define a fixed position as position = 100 because
we want our motor to be 100 counts from the actual 0-position at exactly this physical
position.
JVL Industri Elektronik A/S - User Manual - Integrated Servo Motors MAC050 - 3000
59
2.10
Using external SSI encoder
Only MAC050 to 141
We set P5 = 100 and save this position into flash (set register 211 = 2).
In the previous example we set the 0-position to 12288 counts. So by setting P5 = 100
will result in the same position being :
P8 = (P7 - P6) + P5
P8 = (12288-12288) + 100
P8 = 100
Which again will be transferred to P_IST and P_SOLL if synchronization bit is set in the
SSI-setup register at startup.
2.10.3
Registers used by SSI
Register 178, SSI_SETUP_BITS1 where:
Bit:
0
1
2
3
4 - 14
15
Function:
SSI Enable/
Disable
Not used
Synchronize
P_IST=P8,
P_SOLL=P8
SSI reset
position
(P6=current
position)
Future
options
SSI
Read Error
SSI enable will setup the motor to read the SSI at startup. The Synchronize bit transfers
the position calculated in P8 into P_IST and P_SOLL.
SSI Reset position is used to preset a position to the value stored in P5. Default P5=0.
Bit15=1 indicates a read failure, that is different values are read within the 4 times the
values is read.
60
Register 57 P5
32-bit signed
Holds the preset value that is used when a reset position is done
Register 59 P6
32-bit signed
Holds the encoder value when the last Reset position was done. This
value is used as a refence at startup to calculate the actual position.
Register 61 P7
32-bit signed
Holds the newly read encoder value, scaled into motor counts.
Register 63 P8
32-bit signed
Holds the calculated position, that is transferred to P_IST and P_SOLL
if the synchronization bit is set up in the setup register 178.
JVL Industri Elektronik A/S - User Manual - Integrated Servo Motors MAC050 - 3000
2.10
2.10.4
Using external SSI encoder
Only MAC050 to 141
Encoder connections:
Using the LIKA rotary encoder MMC60 connected to the MAC00-B4 module the PIN
configuration is as follows:
The encoder is connected to the IO-plug using the 8-pin female M12 -plug.
M12-Pin
Signal
Colour (LIKA Encoder cable)
Description
1
A+
White
Clock +
2
A-
Brown
Clock -
3
B+
Green
Data +
4
B-
Yellow
Data -
5
N.C
-
O1 from motor
6
O+
Red
24V supply to encoder
7
Gnd
Black + Shield
Gnd and shielding
8
N.C
-
See Mac-manual for further details regarding the IO connection in the module.
Because the plug doesn't support a 24V power outlet, O1 or O2 can be used to supply
the power to the encoder unit. To be able to do this register 161 needs to be setup.
Bit 3 and bit 4 in register 161 indicates whether IO1 and IO2 are user controlled or setup
as previously as IO1 indicating ’In position’ and IO2 indicating errors.
Example:
IO2 is used as 24V power supply to the encoder so we need IO2 as user controlled output and set the output to source the O+ voltage.
Register 161 bit 4 needs to be on
Register 161 = 16 (0x10)
Register 179, bit0 and bit1 holds the output value, but they are inverted so for IO2 to be
high (O+) bit1 needs to be 0.
So we hold the register to the default value 179 = 0 and IO2 will source power to the
encoder.
When IO2 is on (O+), the red LED inside the motor is lit. This is normally used for error
indication when the IO2 isn't setup for user control.
JVL Industri Elektronik A/S - User Manual - Integrated Servo Motors MAC050 - 3000
61
2.10
2.10.5
Using external SSI encoder
Only MAC050 to 141
Setup SSI using MacTalk
To setup the MAC-motor for reading the SSI encoder value at startup, first set the I/O
setup for using SSI input. This means that the A and B input -channels are setup for input
on both. Because the plugs doesn't support any 24V supply output for supplying the encoder, both IO1 and IO2 can be used for this purpose.
TT1159GB
Output 2 is selected for driving
the power supply to the encoder.
This will setup the Multiturn I/O for using
both A and B channel in communicating
with the encoder using SSI
SSI setup on the advanced tab.
This section gains access to the registers 178, for setting up the SSI functionality previously described.
The SSI position is stored in register P8, which is displayed under this section too. The
value is also accessible from the register-tab.
Reset position procedure
To reset the motor to a specific position, first read the SSI encoder value by setting register 211 = 1
This will reset the motor and read the SSI value. Next set the Reset-bit in the SSI_SETUP
register (register 178 bit 3). Now the encoder value has been transferred to P6 and
needs to saved in flash. The Flash saving procedure is done by writing 211 = 2.
This will also reset the motor and calculate the new position based on the saved value.
If a preset value is to be used instead of 0, this value is entered in P4 and will automatically
be used when the motor starts up (previously explained).
If this preset value is to be used, simply write the position to position register P4 (register
55) and save the value to flash memory by writing 211 = 2.
Read SSI procedure.
Every time the motor is power cycled or a software is commanded the SSI encoder is
read at startup.
To do a software reset simply write register 211 = 1 and let the motor startup. The
reading and the startup will take approximately 1-2 seconds.
62
JVL Industri Elektronik A/S - User Manual - Integrated Servo Motors MAC050 - 3000
2.10
Using external SSI encoder
Only MAC050 to 141
I/O Setup
Because of the strict timing in the motor it is not possible to read the encoder value when
motor has started. This is due to strict timing control in the motor.
As a new feature the MAC40-141 firmware now supports setting up IO1 and IO2 as user
controllable. IO1 and IO2 is settable from these controls.
When all values has been setup, remember to save in flash and/or into a .mac file before
removing power from the motor.
If an encoder is available on the motor, the actual position value is read as soon as the
motor start-up after a reset.
JVL Industri Elektronik A/S - User Manual - Integrated Servo Motors MAC050 - 3000
63
2.11
2.11.1
Absolute Multiturn Encoder
Only MACxxx-yy-Fzzz
Introduction
The absolute multi-turn encoder is an option with the MAC400, MAC800, MAC1500
and MAC3000 motors.
The option offers the advantage that once the mechanical zero point is defined there will
be no need for any Zero search or initialization sequence after power up since the motor
always knows where it is with reference to the original defined zero point regardless that
power have been removed for shorter or longer time.
Please notice that ONLY MAC400, MAC800, MAC1500 and MAC3000 motors with the
“F” extension contains this feature (MACxxx-yy-Fzzz).
The built-in multi-turn encoder is using a mechanical technology with the advantage that
no battery is used to hold the position after power off. A battery needs replacement after
a certain operating time or a certain number of charging and recharging cycles.
Basic encoder operation (default)
The encoder position is however locked to a specific mechanical zero position and a fixed
position range. Therefore the encoder position can not be manipulated as flexible as for
the standard encoder type since some upper and lower limits in the working range need
to be respected in order to avoid overflow/wrap around issues during operation. The encoder position can maximum operate in the range from -2047 to +2047 mechanical revolutions.
The following pages describe the basic operation and how to set the zero point.
Extended encoder operation (selectable)
For applications that require a larger position range or applications that require that the
motor position is still valid even if the maximum position range is exceeded the extended
encoder operation can be selected.
The main advantage of the extended encoder operation is that the position range is 4
times higher and the overflow/wrap around is handled in a manner that the position data
is still valid after any condition that would normally have caused the position data to be
lost or invalid such as power cycling, reset or save in flash.
The full description of the extended encoder operation can be found in the section Extended encoder operation - detailed description., page 69
64
JVL Industri Elektronik A/S - User Manual - Integrated Servo Motors MAC050 - 3000
2.11
2.11.2
Absolute Multiturn Encoder
Only MACxxx-yy-Fzzz
How to setup the mechanical zero point (quick guide).
The tab “Absolute positioning” is visible in the MacTalk program when a motor with absolute multi-turn encoder is connected.
The functions showed below are used to adjust and monitor the actual encoder position.
Press “Save in flash”
to store the modified
encoder position
permanent
Pressing the “Reset Position” botton
will reset the the absolute position (P_IST)
Select this tab when adjusting the encoder position
Usefull information exist here
(see also later in his chapter)
The Actual Position
of the motor.
TT1180GB
Physical position of the encoder.
This value is not possible to change and
must stay within +/-16.777.216 counts.
Make sure to clear any existing value
(if any) in the offset register.
Procedure for adjusting the zero point:
1. Before mounting the motor in the application connect power to the motor.
2. Press the “Set offset = 0” botton and move the motor until the “Encoder position”
shows close to 0. This is recommended to make sure that the full encoder working
range is available.
3. Mount the motor in the application and move it to the intended zero position.
4. Press the “Reset position” button to reset the “Actual position” (P_IST) and press the
“Save in flash” button in order to store the zero point setting permanent in the motor.
JVL Industri Elektronik A/S - User Manual - Integrated Servo Motors MAC050 - 3000
65
2.11
2.11.3
Absolute Multiturn Encoder
Only MACxxx-yy-Fzzz
How to stay within the encoder working range (detailed guide)
The motor is equipped with a offset register that holds an encoder position offset.
When 24V power has been applied the motor will read the position from the encoder
and set the actual shaft position according to this calculation:
Absolute (motor) position (P_IST) = Absolute_Encoder_Position + Encoder_Offset
So if the motor shaft is placed in position 1000 and the offset is set to -1000 the motor
will set the actual position register (P_IST) to 0.
The encoder has a limitation in the dynamic working range to be +/- 16.777.216 counts
which corresponds to +/- 2048 shaft revolutions. Within this range the offset can be
placed at any point but considerations regarding the wrap around of the position value
must be made. Cycling 24V power for the motor when the shaft is placed in a wrapped
position results in an unexpected position.
Example 1: The motor position has been reset when the Absolute_Encoder_Position
was 16.000.000. This limits the positive working range to approx. 94 motor shaft revolutions which may cause an overflow and failure sitation if the motor moves more than
94 revolutions during operation.
Example 2: Let's assume the motor has moved 100 revs. Placing the motor (MAC400) in
the actual position = 819.200 counts.
Now the motor is reset (24V control power is cycled) the motor wakes up and reads the
Absolute_Encoder_Position which in the mean time has been wrapped around to the
position -16.735.232. Now the offset is used to calculate the actual shaft position of the
motor:
Actual (motor) position (P_IST) = -16.735.232 + (-16.000.000)
Actual (motor) position (P_IST) = -32.735.232 !!
Which is not exactly what was expected because the encoder passed its working range.
66
JVL Industri Elektronik A/S - User Manual - Integrated Servo Motors MAC050 - 3000
2.11
Absolute Multiturn Encoder
Only MACxxx-yy-Fzzz
MacTalk visualize the encoder position in real time and makes the resetting far less complicated by displaying the actual encoder position and the free number of revolutions before reaching the wrap-around point of the encoder position.
When the motor position is within -15.000.000 to 15.000.000 the encoder position bar
is coloured green indicating a safe position for doing a position reset.
Outside this range the bar is coloured red indicating a range that is not recommended for
position resetting the encoder position since it leaves a minor free working range.
The free working range is displayed under the bar as positive and negative motor revolutions available before wrap-around.
Of cause resetting outside the recommended range is possible but care must be taken.
Trying to reset the motor position in the red area results in a warning dialog that appears
in MacTalk.
JVL Industri Elektronik A/S - User Manual - Integrated Servo Motors MAC050 - 3000
67
2.11
2.11.4
Absolute Multiturn Encoder
Only MACxxx-yy-Fzzz
For MAC800 users only:
Please observe the motor position scaling used. The motor resolution is by default 8000
counts/rev. The absolute build in encoder uses 8192 counts/rev. therefore scaling is done
when the position is reset. This may cause some confusion since the actual shaft position
is not the same as the absolute encoder position.
So with the motor in position mode, ordering a movement to motor position = 100.000
counts, results in a encoder position of 97.656 due to the larger encoder resolution (8192
counts/rev).
2.11.5
Resetting the position when not using MacTalk.
The procedure for adjusting the an encoder offset and thereby resetting a certain motor
position to be zero position (Actual position = 0) is basically described in 4 steps:
1. Read register 226 which is the absolute encoder position value.
2. Multiply the position value (from above) by -1 (inverse the sign).
Notice: that if “Inverted motor direction” is selected skip this step and proceed to
step 3.
3. Store the value in register 225 which is the offset register.
4. Save the offset value permanently in the flash memory. This procedure is basically performed from the command register 211 by writing 211 = 2. When using a bus module
please refer to the manual of actual type of bus module to do the save in flash operation. Please notice that if the value is not stored in the flash memory the zero point is
lost after a power cycle.
For MAC800 users:
The MAC800 is default set to a resolution of 8000 counts/rev. compared to other motors
which have 8192 counts/rev. as default.
The MAC800 default resolution can be changed from 8000 to 8192 by setting bit 21 to
0 in register 39 (HW_SETUP). Default it is set to 1.
If the default has not been changed the 4 step procedure shown above can simply be used
If the default have been changed and the MAC800 is set to 8192 counts/rev. (bit 21=0)
1. Read register 226 which is the absolute encoder position value.
2. Register 225 = - (8192*(register 226)) / 8000. Remember that the result must be negated before entering it into register 225.
3. Save the offset value permanently in the flash memory. This procedure is basically performed from the command register 211 by writing 211 = 2. When using a bus module
please refer to the manual of actual type of bus module to do the save in flash operation. Please notice that if the value is not stored in the flash memory the zero point is
lost after a power cycle.
68
JVL Industri Elektronik A/S - User Manual - Integrated Servo Motors MAC050 - 3000
2.11
2.11.6
Absolute Multiturn Encoder
Only MACxxx-yy-Fzzz
Extended encoder operation - detailed description.
As mentioned earlier in this chapter the encoder position is partly mechanical based and
have a total resolution of +/-2048 mechanical revolutions.
When using the encoder in basic operation (default) the overall position counter will stay
valid as long as the power is continuously applied to the motor and no reset is executed.
If the power is cycled, the motor is reset or the parameters are saved in flash memory
only position data in the range +/-2048 are kept valid.
When using the extended encoder operation any position outside the range +/-2047 will
be saved in the flash memory before any event that will normally cause it to be lost.
By doing this it is accomplished that the overall position counter is fully restored with the
actual motor position after power up, reset or a save in flash operation.
Please notice that the position value can only be restored fully if the motor shaft has been
moved less than +/-2048 revolutions during power off.
The full position range in the overall position counter is +/-8192 motor shaft revolutions.
The resolution per revolution is default 8192 counts/rev.
2.11.7
Extended encoder operation - When using MacTalk.
1
Select this to enable
the extended encoder
operation
TT1272-01GB
3
Finish the encoder setup
by clicking «Save in flash»
to store the new setup
permanent
2
Click «Reset position» to
set the overall position
counter to zero
Following sequence is recommended for setup of the extended encoder operation.
1. Enable the extended encoder option at the “Advanced” tab.
2. Move the mechanics to the desired position where the zero point shall be and press
“Reset position”. After doing this the actual motor position will be set to 0.
3. Finish the setup by pressing the “Save in flash” in order to store the settings permanently in the motor.
JVL Industri Elektronik A/S - User Manual - Integrated Servo Motors MAC050 - 3000
69
2.11
Absolute Multiturn Encoder
Only MACxxx-yy-Fzzz
The actual position value of the motor can always be seen in the status area of MacTak
as shown below.
The actual position of the motor
TT1273-01GB
2.11.8
Extended encoder operation - When NOT using MacTalk.
The procedure for adjusting the an encoder offset and thereby resetting a certain motor
position to be zero position (Actual position = 0) is basically described in 4 steps:
1. Set bit 7 in register 236 which will activate the extended encoder operation.
2. Write 0 or another position value to register 4 (P_NEW). The actual motor position
will preset to the value written here in the next steps of this sequence.
3. To actually preset the position value one of the following actions can be done
Write 247 to register 211 (COMMAND) or alternatively set bit 6 in register 36
(CNTRL_BITS) without changing the other bits.
4. Save the new settings permanently in the flash memory. This procedure is basically
performed from the command register 211 by writing 211 = 2. When using a bus
module please refer to the manual of actual type of bus module to do the save in flash
operation.
Please notice that if the value is not stored in the flash memory the zero point is lost
after a power cycle and the extended encoder option will not be activated.
For MAC800 users:
The encoder resolution at the MAC800 with absolute multi-turn encoder is default 8192.
The resolution can optionally be set to 8000 by setting bit 21 in register 39
(HW_SETUP).Remember to save the change in flash memory according to step 4 shown
above.
70
JVL Industri Elektronik A/S - User Manual - Integrated Servo Motors MAC050 - 3000
2.11
2.11.9
Absolute Multiturn Encoder
Only MACxxx-yy-Fzzz
Extended encoder operation - endless relative moves.
In some applications the motor keeps moving in one direction with a certain length per
move.
Since the position counter have a limited working range this kind of operation will sooner
or later cause an overflow/wrap around situation.
To avoid the overflow/wrap around situation the actual motor position can be offset via
a command. This offset can be done at any time without losing any position information.
This feature is very helpful since the position counter will stay inside the working range.
Follow this setup sequence for doing a relative position offset:
1. To specify the offset distance write the desired offset distance (counts) to register 4
(P_NEW).
2. To actually offset the position value, one of the following actions can be done
- Write 248 to register 211 (COMMAND) or alternatively...
- Set bits 6 land 8 in register 36 (CNTRL_BITS) without changing the other bits.
This will add the value given in point 1 above to both the actual position and the target position.
To actually perform a relative movement, there are two safe options and one not so safe/
precise.
Option 1, relative moves using P_SOLL.
1. Prepare for relative movements using register 3 (P_SOLL) by executing FastMac
command 117 (96+21). This only has to be done once after start up. It selects what
will happen when a position register, one of P1 through P8, is activated by a FastMac
command.
2. Prepare the relative distance to move by writing it to one of the general purpose P1
through P8 position registers.
3. Execute a FastMac command that 'activates' the Px register. See the section for your
specific MAC00-xx interface module on how to execute FastMac commands.
This type of relative movement will set P_SOLL (target position)= P_IST (actual position)+ Px in a safe way that avoids the type of error described in option 3 below. Note
that P_SOLL and P_IST will sooner or later exceed the operating range if this method is
used repeatedly, so you will need to use the relative position offset method described for
the absolute encoder in Extended Encoder operation.
Option 2, relative moves using P_FNC.
1. Prepare for relative movements using P_FNC by executing FastMac command 118
(96+22). This only has to be done once after start up. It selects what will happen
when a position register, one of P1 through P8, is activated by a FastMac command.
2. Prepare the relative distance to move by writing it to one of the general purpose P1
through P8 position registers.
3. Execute a FastMac command that 'activates' the Px register. See the section for your
specific MAC00-xx interface module on how to execute FastMac commands.
This type of relative movement will not change PSOLL, so no wrap-around handling is
needed.
JVL Industri Elektronik A/S - User Manual - Integrated Servo Motors MAC050 - 3000
71
2.11
Absolute Multiturn Encoder
Only MACxxx-yy-Fzzz
Option 3 (the unprecise one):
Write a value to the target position register 3 (P_SOLL) that is the actual position plus/
minus the distance to move. This is unsafe/inaccurate because the actual position may
have changed in the time it took to read the value, do the calculation and write back the
new target position. This may still work on some applications, or even be desirable, but
note that a position error might accumulate over time.
In some applications, it may be useful to prepare several position distances in the different P1 through P8 registers, and then activate them using different FastMac commands.
72
JVL Industri Elektronik A/S - User Manual - Integrated Servo Motors MAC050 - 3000
2.12
2.12.1
Rotary table option
General description
The Rotary table option, also sometimes called Dividing head, Indexing table or turntable
option, makes the motor work in three different ways that limits the actual position and
target position to a smaller position range than normal. This is useful for supporting some
mechanical systems.
One of the strong features of this is the motor’s ability to calculate the shortest movement to a new target position automatically.
The option can also be used to have the motor always move in the same direction for
any target position value even if the new target position value is below the old position
in this case the motor will turn in the configured CW or CCW direction until it returns
to the lower target position.
The actual position will not overflow even when always running in the same position for
any length of time.
The general idea is to define a range of positions by a Minimum and a Maximum value
that can be freely selected within the normal position range of the motor (-67 million
count to + 67 million counts). Whenever the actual position exceeds the maximum it will
wrap around and continue from the minimum position while still running in the same direction.
Also when moving below the minimum position it will wrap around and continue to
count down from the maximum position.
During operation the motors main operation mode is usually set to Position mode
(MODE_REG = 2), and the motor is commanded to a new target position by writing a
new value to the Target Position, register 3, P_SOLL. See also - Modes other than Position
mode, page 78.
The value written to P_SOLL should be within the rotary table position range. If the value
is outside the working range specified by “Turn table pos. min.” or “Turn table pos. max”
it will be clipped to be within the values specified by “Turn table pos. min.” or “Turn table
pos. max”. To make a full turn in CW or CCW mode, a multiturn operation is supported
see following illustration. The registers normally used for software position limits are
used to define the rotary table working range in rotary table operation.
(Continued next page)
JVL Industri Elektronik A/S - User Manual - Integrated Servo Motors MAC050 - 3000
73
2.12
Rotary table option
The 5 operation options for the Rotary Table operation are shown in the following
scheme:
Basic setup:
Working range min./max= 0 to 7999 counts
equal to one revolution.
Examples based on MAC800
Situation 1
Situation 2
Start
End
1
Singleturn CW rotation
End
Start
Setup : Start position 0
Target postion = 3000
Setup : Start position 3000
Target postion = 0
Start
2
End
Singleturn CCW rotation
Start
End
Setup : Start position 0
Target postion = 5000
Setup : Start position 5000
Target postion = 0
Start
3
Start
Shortest path
End
End
Setup : Start position 0
Target postion = 3000
Setup : Start position 0
Target postion = 5000
Start
4
End
Multiturn CW rotation
Start
End
Setup: Start position 0
Target postion = 19000
Result: P_SOLL = 3000
since the remainder after
19000 / 8000 is 3000.
5
Setup : Start position 3000
Target postion = -1000
Result: Actual position (P_SOLL)
=0 since the value is limited to
the working range minimum
Start
End
Multiturn CCW rotation
Start
Setup : Start position 5000
Target postion = 12345
Result: Actual position (P_SOLL)
= 7999 since the value is
imited against the working
range maximum
End
Setup: Start position 0
Target postion = -21000
Result: P_SOLL = 5000
since the remainder after
21000 / 8000 is 5000.
In general, Actual position (P_SOLL) will be modified to be within the valid rotary table position working range
if a value outside this range is written to the Actual position register (P_SOLL).
When using the multiturn options (4 and 5) the position is limited as follows:
- Multiturn CW rotation (4). Values below working range minimum are limited to the minimum.
- Multiturn CCW rotation (5). Values above working range maximum are limited to the maximum.
74
JVL Industri Elektronik A/S - User Manual - Integrated Servo Motors MAC050 - 3000
TT1186GB
2.12
2.12.2
Rotary table option
Configuration via MacTalk.
When using MacTalk for configuration the following parameters are used:
The desired “Rotary table”
function is selected here
at the “Advanced” tab
The working range can be defined here
after selecting the type of rotary table
operation.
Minimum is the lowest position possible
to reach and maximum is the highest position
that can be reached. Both in encoder counts.
Both values are refering to the zero
position found during the optional zero search
or alternatively the zero point defined if using
an absolute multiturn encoder.
After the setup is done please remember to save it
in the permanent memory by pressing the “Save in flash” bootton.
JVL Industri Elektronik A/S - User Manual - Integrated Servo Motors MAC050 - 3000
TT1185GB
75
2.12
2.12.3
Rotary table option
Configuration via motor registers.
When the configuration is done by channels other than MacTalk such as Ethernet, Profibus, CAN-open etc. or just a simple interface connection to the basic motor the following description must be followed.
The main rotary table operation is selected by bits 24 and 25 in Register 39, HW_SETUP.
An addition the option to support multiturn rotary table operation is selected by by bit
26 in Register 39, HW_SETUP.
Register 28, MIN_P_IST
Holds the minimum position for the rotary table working range.
Register 30, MAX_P_IST
Holds the maximum position for the rotary table working range.
Note that the firmware will swap the min. and max. values if the minimum is larger
than the maximum at startup.
Register 39, HW_SETUP
Bits 24, 25 and 26 only. The value of bits 25 and 24 define the rotary table options:
Bit 26
Bit 25
Bit 24
0
0
0
0
0
1
0
1
0
0
1
1
1
0
0
1
0
1
1
1
0
1
1
1
Operation selected
No Rotary table operation (normal motor operation
with full position range)
Always CW rotary table operation.
Always CCW rotary table operation.
Shortest path rotary table operation.
Illegal setting.
Always CW rotary table operation
with multiturn operation.
Always CCW rotary table operation
with multiturn operation.
Illegal setting.
Bit 26 in register 39, HW_SETUP, select the multiturn operation. This bit is used only
with the CW and CCW operations and allows complete turns to end at the same mechanical position as it started from by specifying a target position, P_SOLL, that lies outside the rotary table position range. For instance, if the working range is 0..7999 (a range
of 800 valid positions, one full motor shaft revolution on the MAC800) and the current
target position is at 3000 writing 11000 (3000 + 8000) will make the motor perform exactly one full turn and leave both P_SOLL and P_IST_TURNTABLE at 300 afterwards.
In general, P_SOLL will be modified to be within the valid rotary table position working
range if a value outside this range is written to P_SOLL.
Important: Please remember to save the setup in permanent memory (save in flash) before the setup is applied and used by the motor.
76
JVL Industri Elektronik A/S - User Manual - Integrated Servo Motors MAC050 - 3000
2.12
2.12.4
Rotary table option
Status read out via MacTalk.
When status read out is done via the MacTalk program data is presented as follows:
“Actual position”
is indicating the position
and stays within the
min. and max. limits
defined.
2.12.5
Status read out via motor registers.
When status read out is done by channels other than MacTalk such as Ethernet, Profibus,
CAN-open etc. or just a simple interface connection to the basic motor the following description must be followed.
Register 25, P_IST_TURNTABLE
Holds the actual position within the rotary table working range.
Register 27, TURNTAB_COUNT
Is a counter that keeps track of wrap-arounds since the last reset of the motor. This
register can be written to another value by the user at any time.
Register 10, P_IST
Is still the 'real' actual position 'inside' the motor but should generally not be used in
rotary table operation. P_IST will be modified by the firmware as a result of writes to
P_SOLL.
2.12.6
Rotary table notes
- Start up positions.
Normally the motors will start up with a zero value in P_IST and P_SOLL when using a
standard encoder or with the position read from an absolute encoder (possibly offset by
the P_OFFSET register).
In case the rotary table position range does not include the start up value, the start up
value is modified by adding or subtracting N times the number of valid position in the rotary table position range until it is inside this range.
JVL Industri Elektronik A/S - User Manual - Integrated Servo Motors MAC050 - 3000
77
2.12
Rotary table option
- Valid position range.
Whenever the motor needs to perform a wrap-around it moves the value of P_IST outside the valid rotary table position range.
For normal operation, without multi-turn:
When operation “Always CW” is selected P-IST can temporarily be moved up to one full
working range below MIN_P_IST.
When operation “Always CCW” is selected P-IST can temporarily be moved up to one full
working range above MAX_P_IST.
With Shortest Path , P_IST can be moved both one full working range above MAX_P_IST
or below MIN_P_IST.
When setup for operation as either “Multiturn CW rotation” or “Multiturn CCW rotation”
the number of ranges P_IST can temporarily move outside the working range depends
on the value written to P_SOLL and will be the number of full turns required plus one.
This is important to keep in mind if it causes P_IST to exceed the motors absolute position working range of -67 million to + 67 million.
- Modes other than Position mode
With the HW_SETUP bits 24 and/or 25 set main motor modes other than Position mode
also work slightly different.
The software position limits do not cause the motor to go into Passive mode if/when
P_IST exceeds any of these limits.
Register 25, P_IST_TURNTAB is still updated to show the actual position relative to the
rotary table position range - even while P_IST gets outside MIN_P_IST or MAX_P_IST.
One common way to do manual adjustment of the motor is to make a JOG function by
using Velocity mode. After a JOG function the P_IST may be left outside the rotary table
position range, so switching back to Position mode may cause the motor to move 'unexpectedly'. It is generally recommended to set the maximum velocity V_SOLL, to zero
when exiting a JOG operation and update P_IST and P_SOLL to desired values before
setting V_SOLL back to a non-zero value.
78
JVL Industri Elektronik A/S - User Manual - Integrated Servo Motors MAC050 - 3000
2.13
2.13.1
Power Save
Only MAC050 to 141
Power Save
The MAC50-141 firmware supports a function to save power in Position mode and Analogue bi-position mode that can automatically set the motor into Passive mode during
pauses in movements, and restore the original mode when a new movement is required.
This can be useful for battery powered applications as well as general power and cost
savings and to reduce audible and electrical noise.
The power save function is enabled when bit 0 in register 180, SETUP_BITS, is set to
one.
When Power Save is enabled, the motor is set into Passive mode after the actual position
has been within the In Position Window for one second. This position, where Passive
mode was entered, is then remembered, and as soon as the actual position gets farther
from the remembered position than the value in the In Position Window register, the
motor is set back into the original Position or Analogue bi-position mode.
Cautions.
When Power Save is enabled, some functions may work differently from what is expected. For instance, in Analogue bi-position mode, changing the Low or High Position values
will not have effect until the motor is set back into active mode by turning the axis or reselecting the active mode.
Also with under-voltage conditions, where the motor is set to enter Passive mode and
restore the original mode when the voltage gets back to normal, can leave the motor in
Passive mode, so in this case under-voltage handling should rather set an error bit that
should be monitored.
In some tricky cases, when the motor is Power Saved and the axis turns very slowly away
from the saved position, the motor will stay in Passive mode until the actual position has
moved twice the distance that is stored in the In Position window register. This happens
because the motor initially wakes up at the correct distance, but will re-enter Passive
mode immediately because it was not outside the In Position window long enough to resume the original active mode. This issue can be reduced by selecting a better value for
the In Position window register.
JVL Industri Elektronik A/S - User Manual - Integrated Servo Motors MAC050 - 3000
79
2.14
2.14.1
Scope Function
Scope Function
Preliminary - this function is still under development.
The Scope function is a 4 channel oscilloscope that is, a very good and necessary function
for testing a new application or finding errors in an existing system.
The Setup has to be selected to set up the Scope function correctly before use. Most registers in the MAC motors can be chosen for viewing, different trigger functions can be
selected, saving and loading scope pictures are possible etc.
TT1110GB
TT1106GB
80
JVL Industri Elektronik A/S - User Manual - Integrated Servo Motors MAC050 - 3000
2.15
2.15.1
Safe Torque Off (STO)
Only MAC400,1500&3000
Introduction to the STO function.
The STO function can be used for disabling the energy to the motor. The motor will
thereby be set in a state where it produces no torque.
The STO function have its own input connector mounted at the front of the motor.
It is a 2 input system and it is required that both inputs are activated (applied with a voltage) before the motor is energized and can operate normally.
The STO is only available on following products MAC400, MAC1500, MAC3000 in the
standard versions.
The STO input connector is placed as shown below. The illustration is based on the
MAC400 motor but the STO connector is placed similar at the MAC1500 and MAC3000.
Safe Torque Off (STO)
Connector
TT1270-01GB
!
Important general information:
- The STO function is not approved by any third party laboratory (only pendent)
- Please notice that removing the energy from the motor by use of the STO function do
not necessarily stop the motor rotation since any attached load inertia will have an influence when the movement is stopped fully.
- The person that install and service the motor must have a general knowledge concerning electrical equipment and safety functions.
- The STO function is considered as functional and reliable for 20 years.
JVL Industri Elektronik A/S - User Manual - Integrated Servo Motors MAC050 - 3000
81
2.15
2.15.2
Safe Torque Off (STO)
Only MAC400,1500&3000
How to connect and use the STO function.
The STO connector contains the 2 enable inputs STOA and STOB. Both inputs must be
applied nominal +24VDC in order to energize the motor and make any motor movement possible.
If only one of the inputs is not applied +24VDC the internal STO circuit will remove the
energy from the motor.
The illustration below shows the pinout of the connector.
STOA input
Pin 1
Pin 4
Disable output
(do not connect)
2.15.3
82
Pin 3
TT1271-01GB
STOB input
Disabling the STO function.
If the STO function is not needed the plug JVLtype WI1028-M08M3STO must be inserted in the STO connector.
The need of this external plug to disable the STO function is to obtain a high safety level
and make sure that no misunderstandings will occur concerning whether the STO function is active or not.
JVL Industri Elektronik A/S - User Manual - Integrated Servo Motors MAC050 - 3000
3
Hardware description
JVL Industri Elektronik A/S - User Manual - Integrated Servo Motors MAC050 - 3000
83
3.1
Connector overview
Connector overview for the basic MAC motors
Basic MAC050-141 motor
Rear end
Error LED (red)
Basic MAC-400 motor
2
Basic MAC-800 motor
Rear end
1
2
1
2
3
3
1
M2.5 mounting threads for
expansion module.
Power LED (green)
3
3
2
1
User I/O
RS232 Interface
Signal levels 5V
4 - Ground
3 - Transmit Tx (5V)
2 - Receive Rx (5V)
1 - +5VDC out (max. 30mA)
Connector cable part:
Manufacturer : JST
Type : ZHR-4 (1.5mm pitch)
Crimp contacts : SZH-002T-P0.5
1 - GND
2 - AIN
3 - O1
4 - O2
5 - A+
6 - A7 - B+
8 - B-
Main signal ground
Analogue input +/- 10V
Power Supply
2 1
Status outputs
Multifunction I/O
- see text.
(Maximum 5V)
Connector cable part:
Manufacturer: AMP
Housing: 770602-8 (2.54mm pitch), Crimp contacts: 770601-1
3.1.1
M2.5 mounting threads
for expansion module.
M2.5 mounting threads for
expansion module.
+12-48VDC
GND
Connector :
Manufacturer : Molex
Housing: 09-91-0200 (3.96 pitch)
Crimp contacts: 08-50-106
TT1161GB
Connector description
The basic MAC motor is equipped with 3 connectors.
- RS232 Interface
The motor setup and monitoring is done via this interface. The windows-based
MacTalk software must be installed on a computer and used for this purpose. It is
also possible to send position, velocity and other commands from, for example, a
PLC if MacTalk is not used.
-
User I/O
This connector includes all the main I/O necessary to run the motor in gear mode,
velocity mode, etc. An analogue input (±10V) can be used for velocity or torque
control or it can be used for a Zero search sensor. 2 Status outputs are also available
to show the actual status of the motor. Terminals 5 to 8 are multifunction terminals,
where the specific function of the terminals depends on the motor setup.
The functions can be only one of following:
1. Pulse outputs. The internal encoder-pulses are output as a quadrature signal.
2. Pulse inputs. e.g. an external encoder can be connected for gearing applications.
3. RS422 communication. This interface is intended for permanent connection.
-
Power Supply
Connect the main supply to this connector. The voltage must be within the range
12 to 48VDC nominal. Please note that the MAC400 and 800 only accepts +18 to
30 VDC. For further information about the MAC400 and 800 main supply,
See How to connect power supply (only MAC400), page 89 and How to connect the power supply (only MAC800), page 97.
A connector kit is available “MAC00-CONKIT1”. See Accessories, page 394.
84
JVL Industri Elektronik A/S - User Manual - Integrated Servo Motors MAC050 - 3000
3.2
Power Supply
Only MAC050 to 141
Basic MAC motor
Rear end
Error LED (red)
Power LED (green)
Power Supply
2 1
Connector :
Manufacturer : Molex
Type : 09-91-0200 (3.96 pitch)
Fuse T10A
+12-48VDC
(See text)
= < 3metres
The distance between the
MAC motor and the
capacitor must be less
than 3 metres otherwise
the peak performance of
the motor is reduced.
3.2.1
+
+
A 4700µF/50V capacitor
in the power supply output is recommended.
Power Supply
12-48VDC
Earth
TT0910GB
Power supply (only MAC050 to 141)
The power supply must be connected to the terminals marked +48V and GND.
The supply voltage can be in the range 12VDC up to 48VDC; however the maximum
speed of the motor (4000 RPM) is based on 48VDC. A lower voltage will decrease speed
performance.
This curve below shows the relationship between voltage and recommended speed.
Speed in RPM
MAC50, 95, 140
4000
3000
Restricted area
motor losses will
be too high
MAC141
Max 2800 RPM@48VDC)
2000
1000
0
Safe operation area
0
12
24
36
48
Operation below 12V is not recommended
Supply
Voltage (VDC)
TT0925GB
If a supply voltage lower than 48VDC is used, it will not influence the motor torque unless
the corresponding speed at this voltage is overridden. The MAC motor continuously
measures the actual supply voltage and optimises the current control filter. This feature
ensures that the motor always produces full torque within the safe area of operation.
3.2.2
Power supply grounding (only MAC050 to 141)
No additional grounding/earthing of the motor is necessary since the complete motor
housing is connected directly to pin 2 of the Power Supply connector.
The overall earthing of the system must be done at a central point close to the power
supply.
JVL Industri Elektronik A/S - User Manual - Integrated Servo Motors MAC050 - 3000
85
3.2
3.2.3
Power Supply
Only MAC050 to 141
Dimensioning power supply and fuse (Only MAC050 to 141)
The power supply must be dimensioned according to the actual motor size (MAC050,
95, or 140/141).
The size of the pre-fuse also depends on the actual model of the MAC motor.
Use the following table to select the power supply and fuse ratings.
Desired
voltage
MAC050
MAC095
MAC140 or 141
-
Supply
rating
Fuse size
Supply
rating
Fuse size
Supply
rating
Fuse size
12VDC
20W
T4A
40W
T6.3A
60W
T10A
24VDC
40W
T4A
80W
T6.3A
160W
T10A
48VDC
80W
T4A
160W
T6.3A
320W
T10A
See also Power Supplies, page 395 in the appendix which shows the standard power supplies that JVL can offer.
3.2.4
86
Emergency stop
Please consult the chapter: Emergency stop considerations, page 339
JVL Industri Elektronik A/S - User Manual - Integrated Servo Motors MAC050 - 3000
3.2
3.2.5
Power Supply
Only MAC050 to 141
Estimating the peak current from the supply.
The peak current drawn from the DC power supply is dependant on the following parameters:
- Maximum motor speed
- Maximum load torque
- Supply voltage used
The calculation is done as follows:
Conditions (example)
Maximum speed = 2500 RPM = 262 Radians/sec.
Maximum torque= 0.9 Nm (peak torque) @ MAC140 is used with 300% (full torque)
Supply voltage = 24VDC nominal
Worst case efficiency of the MAC50-141 motors = 0.8 (80%)
Power calculation:
Power = (speed x torque)/efficiency = (262 x 0.9)/0.8 = 295W
Current calculation:
Current at peak torque = power / supply voltage = 295/24 = 12.3Amp.
Please note that the peak current is only at maximum during for example an acceleration
or deceleration. The peak current can be reduced if the “Torque” setting is lowered. The
peak current will decrease proportionally with the Torque setting.
Example : Half torque = half peak current.
The below curve shows how the power and current are behaving as a function of the
motor speed during acceleration, constant speed and deceleration.
Speed
(RPM)
Current and power rises to max
during acceleration. The inertia in
the system need to get up in speed.
4000
3000
Supply Supply
Current Power
(A)
(W)
+15
+300
+10
+200
+5
+100
0
0
-5
-100
-10
-200
-15
-300
2000
1000
Average supply power
0
Lower current and power since only
friction exist at constant speed
When decreasing speed - power (energy)
will be returned to the supply and cause
a negative current flowing in the supply line.
JVL Industri Elektronik A/S - User Manual - Integrated Servo Motors MAC050 - 3000
Time
TT1276-02GB
87
3.2
3.2.6
Power Supply
Only MAC400
Power supply circuitry (only MAC400)
The MAC400 supply is split into 2 individual circuits with full galvanic isolation between
the circuits. The control circuitry requires a voltage in the range 18 to 30VDC and the
power circuity must be supplied with 90 to 240VAC. Having 2 independent supply circuits offers the feature that the supply voltage for the power circuitry (90-240VAC) can
be removed for safety reasons, while the control circuitry can continue operating and
thus keep the position counter updated and keep other vital functions such as communication active.
MAC400 Supply diagram
P+/- must be permanently connected
if control circuitry
must be keept active
while main power is
disconnected.
Power
Supply
18-30VDC
+
E
P+
Control Core
Opto
Isolators
PIsolation barrier
Optional
PD
BO
CM
PE
230VAC
Power dump
Power dump output
Bus output (320VDC Nom.)
Dump
resistor
Bus common
Overvolt.
Protection
Mains
Filter
L2
+
Driver
-
M
N
115VAC
Inrush
limiter
L1
PE
EMERGENCY
STOP and RELAY
See section 5.6.2 for
further information
115VAC
230VAC
L1
L2
N
Single phase
90 - 240VAC
+ Earth
PE
TT1171GB
The circuit above is shown with an emergency relay (box) which can be omitted if the
application does not require this safety feature. There are shown examples of Emergency
stop and relay in section 5.6.2
The internal power dump is intended to cover 90% of all applications but if the error
message “overvoltage” is monitored, an external power dump resistor must be connected between the terminals PD and BO.
3.2.7
88
Emergency stop
Please consult the chapter: Emergency stop considerations, page 339
JVL Industri Elektronik A/S - User Manual - Integrated Servo Motors MAC050 - 3000
3.2
3.2.8
Power Supply
Only MAC400
How to connect power supply (only MAC400)
The power supply for the control circuitry is connected through the expansion module
at the terminals called P+ and P- or directly at the internal power supply connector.
The power circuitry must be applied according to the illustration below.
MAC400 supply connection
TT1172GB
PDO connector (Female)
Main power connector (male)
Control power (+18-30VDC) must
be connected to the P+ and P- terminal
at the expansion module.
See the actual module used, for details
of connection.
Main power, internal bus voltage and power
dump are accessible through these connectors.
Mains power must be 115 or 230VAC.
Main power connector
N (Neutral)
A
PDO connector
L1 (115VAC)
B
CM (Common)
Polarization
guides
C
B
A
C
PE (Earth)
PD (Power dump output)
L2 (230VAC)
PE (Earth)
BO (Bus out 325VDC)
Terminal descriptions:
L1 115VAC input (phase) WARNING: Please be aware that high voltage is present
also when terminal is unconnected !.
L2 230VAC input (phase) WARNING: Please be aware that high voltage is present
also when terminal is unconnected !.
N
115/230VAC input (neutral).
PE Earth must be used with the DC-bus and the PD terminals.
PD Power dump output - see also Connecting an external power dump resistor, page 99.
BO Bus output (nom. 325VDC).
CM Common. Ground for the internal DC-bus.
C A U TIO N
- R isk of electric
sh ock. D iscon nect all p ow er an d
w ait 5 m in. before servicing
3.2.9
MAC400 Grounding
Make sure that the machine part on which the MAC400 is mounted is properly grounded
to the main part (body) of the machine in order to avoid major ground/earth current to
flow through the motor and cause interference to other signal groups such as interface
cables.
JVL Industri Elektronik A/S - User Manual - Integrated Servo Motors MAC050 - 3000
89
3.2
Power Supply
Only MAC400
3.2.10
Sizing the external fuse (Prefuse).
When using 115V supply voltage:
To met UL requirements, the prefuse must be a class RK5 such as the type FRN-R-10
(10Amp.) from manufacturer: Cooper Bussmann INC.
When using 230V supply voltage:
Prefuse T6.3A@230VAC type gG, Do or Dz in the phase line Rated for600V/150kA.
3.2.11
Connecting an external power dump resistor
MAC400 with external power dump connection.
BO-PD (V)
PD activated
when voltage
exceeds 400V
Note ! : Its only necessary to
connect screen to signal source.
Time
Voltage (V)
CM
PD
400V
R
Use a value of 33
to 68 Ohm/50W
Wirewound
Screen
PE
Energy fed back from
the motor to the DC bus
BO
Nom. 325VDC
Time
Velocity
TT1173GB
Shielding/housing must
be connected to earth
Time
Terminal description for the “Dump” connector.
CM = Common. Is internally connected to the ground of the DC bus.
Is only intended to be used if multiple motors share DC-bus.
BO = Bus output. The internal DC bus is connected to this terminal.
PD = Power Dump output. Behind this terminal is placed a switch
(IGBT transistor) which connect the terminal to the internal
bus ground if the voltage become higher than 400VDC.
The internal power dump can absorb up to 6W continuously and 1.4kW peak, which is
considered as appropriate for most applications.
However should a situation occur in which the connected load inertia is too large or the
deceleration too fast, the internal power dump will not be able to absorb all the returned
energy and will report the error message “regenerative overload”.
In this situation the only possible solutions are as follows:
1. Decrease the acceleration/deceleration parameter.
2. Lower the attached load inertia.
3. Connect an external power resistor.
The drawing above shows how to connect an external power resistor. A wirewound
type is recommended since it will be able to absorb higher peak power than other types
of resistors.
Warnings: Ensure that the resistor value is between 33 to 68 Ohm/50W since the output otherwise can be damaged. Also avoid short-circuit of the output.
C A U TIO N
- R isk o f electric
shock. D isconn ect all po w er an d
w ait 5 m in. before servicin g
90
JVL Industri Elektronik A/S - User Manual - Integrated Servo Motors MAC050 - 3000
3.2
3.2.12
Power Supply
Only MAC400
Power cable acessories for MAC400
The following standard cables can be supplied by JVL
JVL no.
Type
Description
WP0002
MAC400
115/230VAC power cable 2 m. Straight M16 conn and free end. Female
WP0005
MAC400
115/230VAC power cable 5 m. Straight M16 conn and free end. Female
WP0020
MAC400
115/230VAC power cable 20 m. Straight M16 conn and free end. Female
WP0102
MAC400
Brake resistor cable 2 m. Straight M16 conn and free end. Male
WP0105
MAC400
Brake resistor cable 5 m. Straight M16 conn and free end. Male
WP0120
MAC400
Brake resistor cable 20 m. Straight M16 conn and free end. Male
WP0402
MAC400
230V power cable with earth 2m. Straight M16 conn and free end. Female
WP0405
MAC400
230V power cable with earth 5m. Straight M16 conn and free end. Female
WP0420
MAC400
230V power cable with earth 20m. Straight M16 conn and free end. Female
Please use the illustration below when connecting the cables.
Warning: Please notice that it can be fatal connecting 230V to the 115V input.
Input supply cable type: WP0002, WP0005, WP0020
Blue
Neutral / 0
Input 115VAC (phase)
Input 230VAC (phase)
Grn./Yel.
Earth “ ”
Red
Brown
Power dump / DC output cable type: WP0102, WP0105, WP0120
White
Yellow
Brown
Bus Out 325VDC
Power Dump Output
Common
Grn./Yel.
Earth “ ”
Input supply cable type: WP0402, WP0405, WP0420
Blue
Grn./Yel.
Brown
TT1194GB
Neutral / 0
Earth “ ”
Input 230VAC (phase)
General information:
Make sure that any unused wires are isolated and stay unconnected
JVL Industri Elektronik A/S - User Manual - Integrated Servo Motors MAC050 - 3000
91
3.2
3.2.13
Power Supply
Only MAC400
Power connector parts for MAC400
Manufacturer : Hummel AG - Germany.
General web: http://www.hummel-group.com
US web: http://www.sealconusa.com
Used for
Part description
Power 115/230VAC
Connector kit with all necessary
connector parts.
Hummel part no. JVL part no.
MAC400-CONKIT1-PWR
Contains: 1pcs. WG0227 4pcs.
WG0229, 1pcs. WG0230
Connector kit with all necessary
Brake resistor/DC bus connector parts.
MAC400-CONKIT1-DCPD
Contains: 1pcs. WG0226 4pcs.
WG0228, 1pcs. WG0230
Individual connector components:
Power 115/230VAC
Power 115/230VAC
Power 115/230VAC
Power 115/230VAC
Brake resistor/DC bus
Brake resistor/DC bus
Brake resistor/DC bus
Brake resistor/DC bus
Brake resistor/DC bus
-
92
M16 Female conn insert nylon
Accepts 3 + PE crimp sockets
Use 1 pcs. per connector.
M16 Crimp socket (female)
Accepts 0.34 to 1.5mm² wires /
AWG16 to AWG22.
Use 4 pcs. per connector.
M16 Straigth metal housing
Accepts cable with outer dia.
5.0 to 9.0mm / 0.2” to 0.53”
Use 1 pcs. per connector.
Optional - same as above but
90 degree housing.
M16 Male conn insert nylon.
Accepts 3 + PE crimp pins.
Use 1 pcs. per connector.
M16 Crimp pin (male)
Accepts 0.34 to 1.5mm² wires /
AWG16 to AWG22.
Use 4 pcs. per connector.
M16 Straigth metal housing
Accepts cable with outer dia.
5.0 to 9.0mm / 0.2” to 0.53”
Use 1 pcs. per connector.
Optional - same as above but
90 degree housing.
Metal protection cap. Mounted
if connector is not in use
Crimp tool
7003.9431.02
WG0227
7010.9816.02
WG0229
7810.4000.00
WG0230
7830.4000.00
WG0231
7003.9431.01
WG0226
7010.9816.01
WG0228
7810.4000.00
WG0230
7830.4000.00
WG0231
7010.9001.62
WG0224
7.000.900.904
Not for sale
JVL Industri Elektronik A/S - User Manual - Integrated Servo Motors MAC050 - 3000
3.2
3.2.14
Power Supply
Only MAC402
How to connect power supply (only MAC402)
The power supply for the control circuitry is connected through the expansion module
at the terminals called P+ and P- or directly at the internal power supply connector.
The power circuitry must be applied according to the illustration below.
MAC402 supply connection
TT1274-11GB
Main power connector (male)
Control power (+18-30VDC) must
be connected to the P+ and P- terminal
at the expansion module.
See the actual module used, for details
of connection.
Main power is applied to this connector.
The applied voltage must be nominally
within 12 to 48VDC.
Main power connector
M- (GND)
5
M- (GND)
M- (GND)
6
4
Polarization
guides
PE (Earth)
3
M+ (12-48VDC)
M+ (12-48VDC)
Terminal descriptions:
M+ 12-48VDC nominal
(Pin 1, 2 and 3)
3.2.15
2
1
M+ (12-48VDC)
WARNING: Please use connections from all 3 indicated
pins in order to spread the current over all pins in the connector. This will extend the lifetime of the contacts.
M- GND
(Pin 4, 5 and 6)
WARNING: Please use connections from all 3 indicated
pins in order to spread the current over all pins in the connector. This will extend the lifetime of the contacts.
PE Earth
(Pin PE)
Connect to machine ground to assure that the potential
of the motor is earthed.
MAC402 Grounding
Make sure that the machine part on which the MAC402 is mounted is properly grounded
to the main part (body) of the machine in order to avoid major ground/earth current to
flow through the motor and cause interference to other signal groups such as interface
cables.
JVL Industri Elektronik A/S - User Manual - Integrated Servo Motors MAC050 - 3000
93
3.2
3.2.16
Power Supply
Only MAC402
Power cable acessories for MAC402
The following standard cables can be supplied by JVL
JVL no.
Type
Description
WP0502
MAC402
12-48VDC power cable 2 m. Straight M16 conn and flying end. Female
WP0505
MAC402
12-48VDC power cable 5 m. Straight M16 conn and flying end. Female
WP0520
MAC402
12-48VDC power cable 20 m. Straight M16 conn and flying end. Female
Please use the illustration below when connecting the cables.
Input supply cable type: WP0502, WP0505, WP0520
Type A - Present type
1
2
3
4
5
6
M+ (12-48VDC)
M+ (12-48VDC)
M+ (12-48VDC)
M- (GND)
M- (GND)
M- (GND)
Earth “ ”
Screen - (connect to GND)
Type B - Newer type
1
2
3
4
5
6
M+ (12-48VDC)
M+ (12-48VDC)
M+ (12-48VDC)
M- (GND)
M- (GND)
M- (GND)
Earth “ ”
Screen - (connect to GND)
TT1275GB
94
General information:
Make sure that any unused wires are isolated and stay unconnected
JVL Industri Elektronik A/S - User Manual - Integrated Servo Motors MAC050 - 3000
3.2
3.2.17
Power Supply
Only MAC402
Power connector parts for MAC402
Manufacturer : Hummel AG - Germany.
General web: http://www.hummel-group.com
US web: http://www.sealconusa.com
Used for
Part description
Power 12-48VDC
Connector kit with all necessary
connector parts.
Hummel part no. JVL part no.
MAC402-CONKIT1-PWR
Contains: 1pcs. WG0253 7pcs.
WG0254, 1pcs. WG0230
Individual connector components:
Power 12-48VDC
Power 12-48VDC
Power 12-48VDC
Power 12-48VDC
-
M16 Female conn insert nylon
Accepts 6+ PE crimp sockets
Use 1 pcs. per connector.
M16 Crimp socket (female)
Accepts 0.34 to 1.5mm² wires /
AWG16 to AWG22.
Use 7pcs. per connector.
M16 Straigth metal housing
Accepts cable with outer dia.
5.0 to 9.0mm / 0.2” to 0.53”
Use 1 pcs. per connector.
Optional - same as above but
90 degree housing.
Crimp tool
7003.9431.02
WG0253
7010.9812.12
WG0254
7810.4000.00
WG0230
7830.4000.00
WG0231
7000.9009.04
Not for sale
JVL Industri Elektronik A/S - User Manual - Integrated Servo Motors MAC050 - 3000
95
3.2
3.2.18
Power Supply
Only MAC800
Power supply circuitry (only MAC800)
The MAC800 supply is split into 2 individual circuits with full galvanic isolation between
the circuits. The control circuitry requires a voltage in the range 18 to 30VDC and the
power circuity must be supplied with 90 to 240VAC (Set by solder jumper Using 115V
supply voltage (only MAC800), page 98). Having 2 independent supply circuits offers the
feature that the supply voltage for the power circuitry (90-240VAC) can be removed for
safety reasons, while the control circuitry can continue operating and thus keep the position counter updated and keep other vital functions such as communication active.
MAC800 Supply diagram
P+/- must be permanently connected
if control circuitry
must be keept active
while main power is
disconnected.
Power
Supply
18-30VDC
+
E
P+
Control Core
Opto
Isolators
PIsolation barrier
Optional
PD
BO
CM
90-240VAC
Power dump
Power dump output
Bus output (320VDC Nom.)
Dump
resistor
Bus common
Safety Overvolt.
Fuse Protection
Mains
Filter
Inrush
limiter
L1
+
Driver
-
N
M
PE
115VAC setup
EMERGENCY
STOP and RELAY
See section 5.6.2 for
further information
L1
N
PE
Single phase
90 - 240VAC
+ Earth
TT1162GB
The circuit above is shown with an emergency relay (box) which can be omitted if the
application does not require this safety feature. There are shown examples of Emergency
stop and relay in section 5.6.2. The internal power dump is intended to cover 90% of all
applications but if the error message “overvoltage” is monitored, an external power
dump resistor must be connected between the terminals PD and BO.
3.2.19
Emergency stop
Please consult the chapter: Emergency stop considerations, page 339.
3.2.20
Sizing the external fuse (Prefuse).
When using 115V supply voltage:
To met UL requirements, the prefuse must be a class RK5 such as the type FRN-R-15
(15Amp.) from manufacturer: Cooper Bussmann INC.
When using 230V supply voltage:
Prefuse T10A@230VAC type gG, Do or Dz in the phase line Rated for600V/150kA.
96
JVL Industri Elektronik A/S - User Manual - Integrated Servo Motors MAC050 - 3000
3.2
3.2.21
Power Supply
Only MAC800
How to connect the power supply (only MAC800)
The power supply for the control circuitry is connected through the expansion module
at the terminals called P+ and P- or directly at the internal power supply connector.
The power circuitry must be applied according to the illustration below.
MAC800 supply connections
Remove the lit to access the internal supply terminals
L1
N
PE (Earth)
PE (Earth)
PD
BO
CM
Control power (+18-30VDC) must
be connected to the P+ and P- terminal
at the expansion module.
See the actual module used, for details
of connection.
Main power, internal bus voltage and power
dump are accessible through these spring
contacts placed under the top lid.
TT0990GB
Mains power must be 115 or 230VAC.
Terminal descriptions:
L1
115/230VAC input (phase). (The voltage range is set by solder jumper)
N
115/230VAC input (neutral). (The voltage range is set by solder jumper)
See Using 115V supply voltage (only MAC800), page 98.
PE
Earth must be used with the DC-bus and the PD terminals.
PD
Power dump output - see also Connecting an external power dump resistor, page 99.
BO Bus output (nom. 325VDC).
CM Common. Ground for the internal DC-bus.
Important notes:
- If 115VAC is used as supply voltage the MAC800 must be set up for this. See
Using 115V supply voltage (only MAC800), page 98.
- Screened cables is recommended.
C A U TIO N
- R isk of electric
sh ock. D iscon nect all p ow er an d
w ait 5 m in. before servicing
3.2.22
MAC800 Grounding
Make sure that the machine part on which the MAC800 is mounted is properly grounded
to the main part (body) of the machine in order to avoid major ground/earth current to
flow through the motor and cause interference to other signal groups such as interface
cables.
JVL Industri Elektronik A/S - User Manual - Integrated Servo Motors MAC050 - 3000
97
3.2
Power Supply
Only MAC800
This solder jumper
must be shorted
if 115V is used as
supply voltage
Warnings:
Make always sure to switch
off power for 5 min. before
operating inside the motor.
Do not short-ciruit this
jumper if 230V is used
as supply voltage.
Internal damaged
will occur.
TT1057GB
3.2.23
Using 115V supply voltage (only MAC800)
When using 115VAC supply voltage, the MAC800 will be able to operate within a limited
speed range.
The motor efficiency and dynamic response will however not be optimal.
To optimise the performance it is recommended the internal jumper shown above is soldered. By doing this the internal bus voltage will remain at the nominal value of 325VDC
when 115VAC is applied.
To check that the jumper is set properly, the bus voltage displayed in the MacTalk main
screen must show approximately 325VDC. If the jumper is not set correctly, the voltage
shown will only be half of this value (160-170VDC).
Important !:
Make sure that the jumper is not short-circuited if 230VAC is applied since this will cause
fatal damage to internal components.
The MAC800 motor is configured by default for 230VAC supply (jumper not short-circuited) on delivery.
C A U TIO N
- R isk o f electric
shock. D isconn ect all po w er an d
w ait 5 m in. before servicin g
3.2.24
98
Prefuse when using 115V supply (only MAC800)
To fulfil UL requirements, the prefuse must be a class RK5 such as the type FRN-R-15
(15Amp.) from manufacturer: Cooper Bussmann INC.
See also Power supply circuitry (only MAC800), page 96
JVL Industri Elektronik A/S - User Manual - Integrated Servo Motors MAC050 - 3000
3.2
3.2.25
Power Supply
Only MAC800
Connecting an external power dump resistor
MAC800 with external power dump connection.
Connector box for power and power dump.
L1
N
PE (Earth)
PE (Earth)
PD
BO
CM
BO-PD (V)
PD activated
when voltage
exceeds 400V
Note ! : Its only necessary to
connect screen to signal source.
Time
Voltage (V)
Energy fed back from
the motor to the DC bus
400V
R
Not less than
68 Ohm/100W
Wirewound
Screen
Nom. 325VDC
Time
Velocity
TT1013GB
Main earth.
Always make sure that
the motor is connected
to earth.
Shielding/housing must
be connected to earth
Time
Terminal description for the “Dump” connector.
CM = Common. Is internally connected to the ground of the DC bus.
Is only intended to be used if multiple motors share DC-bus.
BO = Bus output. The internal DC bus is connected to this terminal.
PD = Power Dump output. Behind this terminal is placed a switch
(IGBT transistor) which connect the terminal to the internal
bus ground if the voltage become higher than 400VDC.
The internal power dump can absorb up to 9W continuously and 2.5kW peak, which is
considered as appropriate for most applications.
However should a situation occur in which the connected load inertia is too large or the
deceleration too fast, the internal power dump will not be able to absorb all the returned
energy and will report the error message “regenerative overload”.
In this situation the only possible solutions are as follows:
1. Decrease the acceleration/deceleration parameter.
2. Lower the attached load inertia.
3. Connect an external power resistor.
The drawing above shows how to connect an external power resistor. A wirewound
type is recommended since it will be able to absorb higher peak power than other types
of resistors.
Warnings: Ensure that the resistor value is not lower than 68 Ohm since the output can
be damaged. Also avoid short-circuit of the output.
C A U TIO N
- R isk of electric
sh ock. D iscon nect all p ow er an d
w ait 5 m in. before servicing
JVL Industri Elektronik A/S - User Manual - Integrated Servo Motors MAC050 - 3000
99
3.2
3.2.26
Power Supply
Only MAC1500/3000
Power supply circuitry (only MAC1500 & 3000)
The MAC1500 & MAC3000 supply is split into 2 individual circuits with full galvanic isolation between the circuits. The control circuitry requires a voltage in the range 18 to
30VDC and the power circuity must be supplied with 3phase 400 to 480VAC. Having 2
independent supply circuits offers the feature that the supply voltage for the power circuitry (400-480VAC) can be removed for safety reasons, while the control circuitry can
continue operating and thus keep the position counter updated and keep other vital functions such as communication active.
MAC1500 & 3000 Supply diagram
P+/- must be permanently connected
if control circuitry
must be keept active
while main power is
disconnected.
Power
Supply
18-30VDC
+
E
P+
Control Core
Opto
Isolators
PIsolation barrier
Optional
PD
BO
CM
PE
400-480VAC
400-480VAC
400-480VAC
Power dump
Power dump output
Bus output (560-680VDC Nom.)
Dump
resistor
Bus common
Overvolt.
Protection
Mains
Filter
(Common mode)
L1
+
Inrush
limiter
Driver
-
L2
M
L3
PE
EMERGENCY
STOP and RELAY
See section 5.6.2 for
further information
400-480VAC
400-480VAC
400-480VAC
Earth
L1
L2
L3
Three phase supply
3 x 400-480VAC nominal
+ Earth
PE
TT1249GB
The circuit above is shown with an emergency relay (box) which can be omitted if the
application does not require this safety feature. There are shown examples of Emergency
stop and relay in section 5.6.2
The internal power dump is intended to cover 90% of all applications but if the error
message “overvoltage” is monitored, an external power dump resistor must be connected between the terminals PD and BO.
100
JVL Industri Elektronik A/S - User Manual - Integrated Servo Motors MAC050 - 3000
3.2
3.2.27
Power Supply
Only MAC1500/3000
Current consumption
The supply current measured in each of the 3 supply phases is as follows:
MAC1500 at nominal shaft load (at 3000RPM)
@400VAC
@460VAC
@480VAC
2.53 ARMS
2.17 ARMS
2.08 ARMS
MAC1500 at peak shaft load (at 3000RPM)
@400VAC
@460VAC
@480VAC
7.59 ARMS
6.50 ARMS
6.24 ARMS
MAC3000 at nominal shaft load (at 3000RPM)
@400VAC
@460VAC
@480VAC
5.06 ARMS
4.34 ARMS
4.16 ARMS
MAC3000 at peak shaft load (at 3000RPM)
@400VAC
@460VAC
@480VAC
15.18 ARMS
13.00 ARMS
12.48 ARMS
Please notice that the current values shown above is nominal values. Higher values may
appear depending on the quality of the supply.
3.2.28
Emergency stop
Please consult the chapter: Emergency stop considerations, page 339
JVL Industri Elektronik A/S - User Manual - Integrated Servo Motors MAC050 - 3000
101
3.2
3.2.29
Power Supply
Only MAC1500 & 3000
How to connect power supply (only MAC1500 & MAC3000)
The low voltage (24VDC) power supply for the control circuitry is connected through
the expansion module at the terminals called P+ and P- or directly at the internal power
supply connector. The Main power (400-480VAC nom.) must be applied according to
the illustration below.
Main power input connector
Pin
Pin 6: Not in use - Do not connect !
: PE (Earth)
Pin 4: L2 (V phase 400-480VAC)
Pin 2: L1 (U phase 400-480VAC)
Pin 1: Not in use - Do not connect !
Pin 5: L3 (W phase 400-480VAC)
Terminal descriptions:
L1 400-480VAC input (U phase)
WARNING: Please be aware that high voltage can
be present also when the terminal is unconnected !.
L2 400-480VAC input (V phase) WARNING: Please be aware that high voltage can
be present also when the terminal is unconnected !.
L3 400-480VAC input (W phase) WARNING: Please be aware that high voltage can
be present also when the terminal is unconnected !.
PE Earth - make sure to connect this terminal to a proper ground in order to avoid electrical shock.
C A U TIO N
- R isk o f electric
shock. D isconn ect all po w er an d
w ait 5 m in. before servicin g
3.2.30
Sizing the external fuse (Prefuse).
To met UL requirements, the prefuse must be a class RK5 such as the type FRN-R-8
(8Amp.) for MAC1500 and FRN-R-15 (15Amp.) for MAC3000 from manufacturer:
Cooper Bussmann INC.
3.2.31
MAC1500 & 3000 Grounding
Make sure that the machine part on which the MAC1500 or 3000 is mounted is properly
grounded to the main part (body) of the machine in order to avoid major ground/earth
current to flow through the motor and cause interference to other signal groups such as
interface cables.
102
JVL Industri Elektronik A/S - User Manual - Integrated Servo Motors MAC050 - 3000
3.2
3.2.32
Power Supply
Only MAC1500 & 3000
Power dump connector
Power dump connector
Pin 5: Not in use - Do not connect !
Pin 4: Not in use - Do not connect !
Pin 6: CM (Common / bus ground)
Pin
: PE (Earth)
Pin 2: BO (Bus out 560-680VDC)
Pin 1: PD (Power dump output)
JVL Industri Elektronik A/S - User Manual - Integrated Servo Motors MAC050 - 3000
103
3.2
3.2.33
Power Supply
Only MAC1500 & 3000
Power connector parts for MAC1500 & 3000
Manufacturer : Hummel AG - Germany.
General web: http://www.hummel-group.com
US web: http://www.sealconusa.com
Used for
Power 3 phase
400-480VAC
Brake resistor/
DC bus
Part description
Hummel part no. JVL part no.
Connector kit with all necessary
connector parts.
MAC1530-CONKIT1-PWR
Contains: 1pcs. WG0241 4pcs.
WG0243, 1pcs. WG0245
Connector kit with all necessary
connector parts.
MAC1530-CONKIT1-DCPD
Contains: 1pcs. WG0240 4pcs.
WG0242, 1pcs. WG0245
Individual connector components:
Power 3 phase
400-480VAC
Power 3 phase
400-480VAC
Power 3 phase
400-480VAC
Brake resistor/
DC bus
Brake resistor/
DC bus
Brake resistor/
DC bus
Brake resistor/
DC bus
-
104
M23 Female conn insert nylon
Accepts 3 + PE crimp sockets
Use 1 pcs. per connector.
M23 Crimp socket (female)
Accepts 0.75-2.5mm² wires /
AWG14 to AWG18.
Use 4 pcs. per connector.
M23 Straigth metal housing
Accepts cable with outer dia.
7.0 to 12.0mm / 0.28” to 0.47”
Use 1 pcs. per connector.
M23 Male conn insert nylon.
Accepts 3 + PE crimp pins.
Use 1 pcs. per connector.
M23 Crimp pin (male)
Accepts 0.75-2.5mm² wires /
AWG14 to AWG18.
Use 4 pcs. per connector.
M23 Straigth metal housing
Accepts cable with outer dia.
7.0 to 12.0mm / 0.28” to 0.47”
Use 1 pcs. per connector.
Metal protection cap. Mounted
if connector is not in use
Crimp tool
7.084.951.102
WG0241
7.010.942.002
WG0243
7.550.500.000
WG0245
7.084.951.101
WG0240
7.010.942.001
WG0242
7.550.500.000
WG0245
7.010.908.102
WG0252
7.000.900.901
Not for sale
JVL Industri Elektronik A/S - User Manual - Integrated Servo Motors MAC050 - 3000
3.2
3.2.34
Power Supply
Only MAC1500 & 3000
Power cable acessories for MAC1500 & 3000
The following standard cables can be supplied by JVL
JVL no.
Type
Description
WP3405
MAC1500/3000
400 to 480VAC 3-phase power cable 5 m.
Straight M23 conn and free end. Female
Please use the illustration below when connecting the cables.
Input supply cable type: WP3405
1
2
3
Grn./Yel.
TT1250GB
Input 400-480VAC (ph.L1)
Input 400-480VAC (ph.L2)
Input 400-480VAC (ph.L3)
Earth “ ”
General information:
Make sure that any unused wires are isolated and stay unconnected
JVL Industri Elektronik A/S - User Manual - Integrated Servo Motors MAC050 - 3000
105
3.3
3.3.1
Serial interface
Interface Connection
The Controller Interface is based on an asynchronous serial interface.
3 interface signals, Rx, Tx and ground are used. The interface can be used directly with
the serial COM port of any standard PC or PLC by using the optional cable type RS2329-1-MAC which has an integrated RS232 converter. Another possibility is to use one of
the expansion modules for the MAC motor which also include an RS232 and RS485 converter. See also Accessories, page 394.
Asynchronous
Serial Interface
Connector located inside the Basic MAC motor
4 - Ground
3 - Transmit Tx (5V level)*
2 - Receive Rx (5V level)
1 - +5VDC out (max. 30mA)
Connector cable part:
Manufacturer : JST
Type : ZHR-4 (1.5mm pitch)
Crimp contacts : SZH-002T-P0.5
* MAC400 and 800 uses 3.3V as Tx level
3.3.2
106
TT0912GB
RS232 Interface signal levels
Please note that the signal levels are 0 to +5V(3.3V)DC and are thus not according to
the RS232 standard which requires +/-12V nominal at the RX and TX signals. However
the protocol used is equivalent to the RS232 protocol.
If the Basic MAC motor is implemented in an OEM application where an internal processor communicates with the MAC motor, the TX and RX terminals can normally interface
directly.
JVL Industri Elektronik A/S - User Manual - Integrated Servo Motors MAC050 - 3000
3.4
User I/O
Note ! : screen only
connected to signal source.
User I/O
1 - GND
2 - AIN
3 - O1
4 - O2
5 - A+
6 - A7 - B+
8 - BConnector cable part:
Manufacturer: AMP
Housing: 770602-8 (2.54mm pitch)
Crimp contacts: 770601-1
3.4.1
Screen
Axis controller
or
Potentiometer
Ground
±10V out
1 = Main signal ground
2 = Analogue input +/- 10V
In some operation modes the analog input is used as digital input.
The trigger level is then fixed to 7.5V
TT0913GB
Analogue input
The analogue input can be used for two purposes in the basic MAC motor.
1. As an analogue control input when the MAC motor is used for either velocity control
or torque control.
2. As a Zero Sensor input when the MAC motor is used in position or gear mode.
For further information see Mechanical Zero search, page 32
The input is automatically used as an analogue ±10V input when the Start-up
mode in the MacTalk main window is set
to one of the 7 modes such as Analogue
Torque, Velocity or Velocity/Gear as
shown in the accompanying illustration.
These 7 modes uses the
analogue input as reference.
JVL Industri Elektronik A/S - User Manual - Integrated Servo Motors MAC050 - 3000
TT0915GB
107
3.4
3.4.2
User I/O
Analogue input used as digital input
The analogue input is used as digital input in some modes.
This can for example be in zero search mode where the input can be connected to an
external sensor that detects when the motor have reached the mechanical zero point.
The default trigger level is 7.5V meaning that a voltage above 7.5V is seen as logic high
(active) and a voltage below 7.5V is seen as logic low (passive).
Chaning the input trigger level
The trigger level can be changed by inserting an offset voltage in the offset field/register.
Example:
If 5V is desired as trigger level an offset voltage of 7.5V - 5V = +2.5 must be inserted in
the offset register.
Below is shown how this is done in MacTalk.
TT1177-01GB
108
JVL Industri Elektronik A/S - User Manual - Integrated Servo Motors MAC050 - 3000
3.4
User I/O
Status outputs of the MAC motor
Power Supply
Max. 32VDC
User I/O
1 - GND
2 - AIN
3 - O1
4 - O2
5 - A+
6 - A7 - B+
8 - BConnector cable part:
Manufacturer: AMP
Housing: 770602-8 (2.54mm pitch)
Crimp contacts: 770601-1
+
Load
Load
Max. 25mA per output
Note: The outputs are not shortcircuit protected
MAC motor NPN outputs
O1
470pF
EMC filter
O2
470pF
EMC filter
GND
TT0917GB
3.4.3
Status Outputs
The status outputs O1 and O2 indicate the actual status of the MAC motor.
Each output is an NPN (!) type, which means that the load must be placed between the
output and a positive supply. Note that several of the expansion modules for the MAC
motor offer PNP output (source output). For further details about a specific expansion
module, please see other sections of this manual.
O1
This output functions as an “In Position” or “at velocity” output depending on
which mode is selected. The position interval can be setup using the MacTalk program.
O2
This output is normally passive but if an unrecoverable error occurs, it will be activated to indicate that normal operation of the motor has been interrupted and
no further operation is possible until a reset or power down has been made.
An unrecoverable error can be one of the following conditions:
(!) :
Please note that when mounting an expansion module in the motor the output
type and performance may change. Please check the description of the actual
module to make sure how the outputs are configured.
JVL Industri Elektronik A/S - User Manual - Integrated Servo Motors MAC050 - 3000
109
3.4
User I/O
Multifunction I/O's of the MAC motor
User I/O
1 - GND
2 - AIN
3 - O1
4 - O2
5 - A+
6 - A7 - B+
8 - BConnector cable part:
Manufacturer: AMP
Housing: 770602-8 (2.54mm pitch)
Crimp contacts: 770601-1
Signal GND
Twisted pair cable is recommended
Channel A
Channel B
Warning ! : Do not connect voltages
> 5V to the multifunction I/O
Internal Multifunction I/O
circuitry in the MAC motor
A+
A-
B+
BBidirectional
transceiver
at each I/O
GND
TT0918GB
3.4.4
Multifunction I/O general description
The Multifunction I/O can be set up for different purposes depending on the actual mode
of operation of the MAC motor.
• Pulse inputs
When the motor is set to Gear mode, it will follow pulses at the A and B inputs. 2
input formats can be selected: pulse and direction or quadrature.
• Encoder output
The internal encoder-pulses are output as a quadrature signal.
• RS422 communication
A master controller can send commands, for example velocity or position commands. This interface is intended for permanent connection.
110
JVL Industri Elektronik A/S - User Manual - Integrated Servo Motors MAC050 - 3000
3.4
3.4.5
User I/O
Multifunction I/O used as pulse inputs
The Multifunction I/O can be set up as pulse inputs, which is necessary to run the MAC
motor in Gear mode or Analogue velocity/gear mode.
When the motor is set to Gear mode, it will follow pulses at the A and B inputs.
2 input formats can be selected.
Pulse and direction.The A input must be applied with the pulses and the B input must be
applied with the direction signal.
Quadrature.Also called encoder format. The pulses at the A and B channel are 90 degree
phase-shifted to determine direction.
Multifunction I/O's used as balanced pulse input
User I/O
External pulse source
1 - GND
2 - AIN
3 - O1
4 - O2
5 - A+
6-A
7 - B+
8-B
Connector :
Manufacturer : AMP
Type : 770602-8 (2.54mm/0.1" pitch)
Signal GND
A
B
From internal
Control circuitry
RS422 outputs (balanced)
Twisted pair cable is recommended
TT0927GB
The Multifunction I/O’s must be set up in MAC-Talk to function as inputs. Also, an input
filter and the preferred direction of movement can be selected.
The pulse inputs are
only used in Gear
and Analogue Velocity/
Gear mode.
TT0928GB
The pulse input can be set to fast
or slow bandwith which means
2.5MHz or 150kHz. Also, the
direction of movement can be inversed.
The input format
quadrature or pulse
and direction can be
selected here.
The Multifunction I/O's
are setup as inputs
See also the descriptions of Gear and Analog Velocity/Gear modes for further details
about functionality.
JVL Industri Elektronik A/S - User Manual - Integrated Servo Motors MAC050 - 3000
111
3.4
3.4.6
User I/O
Multifunction I/O used as pulse outputs
The Multifunction I/O can be set up as pulse outputs. When this configuration is selected,
the internal encoder signal will be available at the outputs.
This can be useful in modes in which the internal encoder signal must be used as feedback to external electronics for monitoring the real-time position, or as a part of a closedloop regulation.
This feature is especially relevant in the following 4 modes: Velocity, Position, Analogue
Torque and Analogue Velocity.
A quadrature signal will appear at the A and B channel. Quadrature means that the two
channels are 90 degree phase shifted either positively or negatively, which determines
the actual direction of movement of the motor.
Multifunction I/O's used as balanced pulse output
User I/O
External pulse receiver
1 - GND
2 - AIN
3 - O1
4 - O2
5 - A+
6-A
7 - B+
8-B
Connector :
Manufacturer : AMP
Type : 770602-8 (2.54mm/0.1" pitch)
Signal GND
Termination resistors 120270 Ohm are recommended
A
B
To internal
control circuitry
RS422 inputs (balanced)
Twisted pair cable is recommended
TT0930GB
The Multifunction I/O’s must be set up in MAC-Talk to function as pulse outputs.
The pulse output can
be useful in one of
these 4 modes.
TT0929GB
The Multifunction I/O's
are setup as outputs in this field
See also the respective mode descriptions for further details about functionality.
112
JVL Industri Elektronik A/S - User Manual - Integrated Servo Motors MAC050 - 3000
3.4
3.4.7
User I/O
Multifunction I/O used as serial communication interface
The Multifunction I/O can be set up as a serial communication interface.
When this configuration of the Multifunction I/O is selected, the A and B channels function as a receive and transmit channel via which commands to the MAC motor can be
transmitted from, for example, a PC or PLC.
This feature can be used in all modes of operation.
The communication protocol is described in the MAC motor Technical Reference Guide,
which must be requested separately and is not part of this user manual. See also MacTalk
communication, page 357.
Multifunction I/O's used as balanced serial interface
User I/O
External RS422 com. port
1 - GND
2 - AIN
3 - O1
4 - O2
5 - A+
6-A
7 - B+
8-B
Connector :
Manufacturer : AMP
Type : 770602-8 (2.54mm/0.1" pitch)
Signal GND
Termination resistor 120270 Ohm is recommended
A
B
To/from internal
control circuitry
RS422 I/O (balanced)
Twisted pair cable is recommended
TT0932GB
The Multifunction I/O’s must be set up in MacTalk to function as a serial communication
interface.
The serial communication can
be used in all
modes
TT0931GB
The Multifunction I/O's are setup
as a serial data communication
interface in this field
JVL Industri Elektronik A/S - User Manual - Integrated Servo Motors MAC050 - 3000
113
114
JVL Industri Elektronik A/S - User Manual - Integrated Servo Motors MAC050 - 3000
4
Expansion Modules
JVL Industri Elektronik A/S - User Manual - Integrated Servo Motors MAC050 - 3000
115
4.1
4.1.1
Expansion Module MAC00-CS
Expansion module MAC00-CS — overall description
The MAC00-CS module is the simplest expansion module in the series of modules since
no electronics are included. The MAC00-CS is simply a rear plate rated for IP67, but includes cables for power and I/O signals. The MAC00-CS connects directly into the basic
MAC motor with all connectors available except for the serial communication (asynchronous com port).
Applications:
- Closed loop operation with a master controller.
- “Stand alone” axis with pulse and direction input.
- Simple speed control of conveyor system or feeding mechanism.
- Dispenser systems.
- .....and many more.
MAC00-CS is available in following versions:
Type
Cable length
MAC00-CS-02
2m / 79”
MAC00-CS-10
10m / 394”
MAC00-CS-20
20m / 787”
The cable connections are as follows:
Power cable
I/O cable
“Power supply” connector in basic motor
Wire
colour
“I/O” connector
in basic motor
Function
Wire
colour
“P+” (Main PWR) / pin 1
Red
“GND” / pin 1
Signal ground
White/Orange
Black
“AIN” / pin 2
Analogue input
Orange
Screen
“O1” / pin 3
Output 1
White/Green
“O2” / pin 4
Output 2
Green
“A+” / pin 5
Multifunction I/O “A+” Max 5V !
White/Blue
“A-” / pin 6
Multifunction I/O “A-” max 5V !
Blue
“B+” / pin 7
Multifunction I/O “B+” max 5V !
White/Brown
“B-” / pin 8
Multifunction I/O “B-” max 5V !
Brown
“P-” (GND) / pin 2
The housing (GND) of the motor is connected to the cable screen
For details of the description of each signal and how to connect and use these, please refer to the description of the basic motor: section 3
116
JVL Industri Elektronik A/S - User Manual - Integrated Servo Motors MAC050 - 3000
4.2
Expansion Module MAC00-B1/B2/B4
MAC00-B4
With M12 connectors
MAC00-B2
With cable glands
MAC00-B1
With DSUB connectors
4.2.1
Expansion modules MAC00-B1, B2 and B4 — overall description
The expansion modules MAC00-B1, B2 and B4 can be mounted in all the standard MAC
motors up to MAC800. These modules are among the simplest and lowest cost modules
in the product range. The modules contain no intelligence (microprocessor).
The MAC00-B1, B2 or B4 expansion module offers an industrial interface that mates with
the standard MAC motor and offers a number of feature enhancements, including:
• Different kinds of connectors for more reliability (compared to the basic motor itself).
• Full RS232 protocol support for use with standard serial cable.
• Full RS485 protocol support for multipoint communication up to 100m.
• Sourcing (PNP) outputs for status signals O1 and O2 instead of sinking (NPN).
• Only MAC00-B1: LEDs to indicate: O1, O2 output status. Zero switch (analogue input) status and Input power status.
• Only MAC00-B2 and B4: Dual supply. The main supply can be removed but the control circuitry is kept active and position data and communication are still functional.
Typical applications for these expansion modules are:
• Closed loop systems with an overall controller involved.
• Replacement for pneumatic cylinders using the “Air Cylinder mode”
• Dispenser systems
• Simple velocity or torque control via +/-10V input.
• Machine adjustment/setup by sending RS232 or RS485 commands.
The B1, B2 and B4 are equivalent except for the following hardware differences:
Type
Protection
Class
Connectors
Dual
Supply
I/O and interface
Power supply
LEDs at I/O
MAC00-B1
IP42
DSUB 9 pole
3 pole Phoenix
Yes
No
MAC00-B2
IP67/IP65*
Cable glands
Cable glands
No
Yes
M12
M12
No
Yes
IP67/IP65*
MAC00-B4
Note*: IP65 on MAC400-800
JVL Industri Elektronik A/S - User Manual - Integrated Servo Motors MAC050 - 3000
117
4.2
Expansion Module MAC00-B1/B2/B4
4.2.2
General hardware aspects
All internal and external main connections can be seen in the illustration below.
Please note that a few features are only available in MAC00-B4 and partly in B2.
Basic MAC motor with MAC00-B1, B2 or B4 module inserted.
MAC00-B1/B2/B4 expansion module
Power supply
MAC50-141: +12-48V
MAC800: +12-32V
P+
P-
Fuse F10A
Power ground (P-) is not connected in the MAC00-Bx module
Control
Supply
Analogue input
or Zero search input
±10V nom. or up to 32V
AIN
GND
Multifunction I/O
B+
This GND is only available at the MAC00-B1
At the MAC00-B2 and B4 the P- or OCM is
used as ground for AIN
Status outputs
RS485 Interface
These terminals are
not available at the
external connector at
MAC00-B4. Use the
internal switch to
enable the feature
RS232 Interface
A
Analogue input
A
Multifunction I/O
(Bidirectional)
B
PNP Output
Driver
2 channel
differential
Transceiver
B
Tx
Tx-PD
Rx
GND
AIN
GND
B+
O1
O2
O2
OCM
TERM
Power supply
A+
Overvoltage
protection
BO+
O1
(MAC050 to 800)
P+
P-
Control supply only in MAC00-B2 and B4.
This feature makes it possible to keep
communication and position data active
while main power P+ is removed.
A+
A-
Basic MAC motor
Interface
Control
RX
TX
GND
Status outputs
Asynchronous
interface
Asynchronous
serial interface
TT1052GB
4.2.3
118
General hardware description
The MAC00-B1, B2 and B4 modules offer the following external connections.
• Power supply (P+/P-)
These terminals are used for the main supply of the motor. A voltage between +12
and 48VDC (MAC50-141) and +12-32VDC (MAC400-800) must be connected.
• Analogue input (AIN)
The analogue input is used either as an analogue input or digital input. When used as
an analogue input, it can control velocity, torque or position depending on which
mode is set for motor operation. When used for digital input, it can be used in position-related modes for the external zero-search sensor. Also in “Air Cylinder Mode”
the analogue input is used as a trigger input.
For a functional description, please refer to General Analogue input (AIN) description
when using MAC00-Bx, page 121.
(continued)
JVL Industri Elektronik A/S - User Manual - Integrated Servo Motors MAC050 - 3000
4.2
Expansion Module MAC00-B1/B2/B4
• Multifunction I/O (A+,A- , B+and B-)
The functionality of these terminals is the same as for the basic MAC motor. They
can be set up in 3 different configurations.
- Pulse inputs - for functional description please refer to Multifunction I/O used as
pulse inputs, page 111 and General description: “General description: “Multifunction
I/O” when using a Bx module, page 124
- Pulse outputs - for functional description please refer to Multifunction I/O used as
pulse outputs, page 112 and
- RS422 interface - for functional description please refer to Multifunction I/O general description, page 110.
Important !:
Remember to configure “I/O type” as “Pulse Input” in MacTalk if none of the 4 terminals A+, A-, B+ and B- is used (the multifunction I/O’s). This must be done to
avoid random function of the motor since the multifunction I/Os are defined as “Serial data” as default.
• Status outputs (O1, O2, O+, and OCM)
The status outputs O1 and O2 (PNP outputs) indicate the actual status of the MAC
motor.
O1 This output functions as an “In Position” or “at velocity” output depending on
which operating mode is selected. The position interval can be set up using the
MacTalk program.
O2 This output is normally passive but if an unrecoverable error occurs, it will be
activated to indicate that normal operation of the motor has been interrupted
and no further operation is possible until a reset or power down has been made.
• RS485 Interface (A-, B+ and GND)
Serial balanced interface for connection to a PC or a controller. The protocol is similar to the RS232 or USB interface, which means that all registers/parameters in the
motor can be monitored or changed. The RS485 is recommended for longer distances or in noisy environments.
• RS232 Interface (Rx, Tx and GND)
Serial unbalanced interface for connection to a PC or a controller. The protocol is
similar to the USB or RS485 interface, which means that all registers/parameters in
the motor can be monitored or changed. RS232 is not recommended for long distances (>10m).
The MAC motor uses “binary” communication protocol which makes it possible to access all the internal registers. Please consult MacTalk communication, page 357 for further
details.
JVL Industri Elektronik A/S - User Manual - Integrated Servo Motors MAC050 - 3000
119
4.2
Expansion Module MAC00-B1/B2/B4
4.2.4
General power supply description
The power supply must be connected to the terminals marked P+ and P-.
MAC50, 95, 140 or 141:
A supply voltage in the range 12VDC to 48VDC can be used. However the maximum
speed of the motor (4000 RPM) is based on 48VDC. A lower voltage will decrease the
speed/torque performance, and in general it is not recommended to run the motor at
more than 2000 RPM if, for example, 24VDC is used as the supply.
Optionally, the MAC00-B2 and B4 modules also offer a control voltage input (O+) which
means that the internal control circuitry will be kept powered when the main supply
(P+) is removed. See also the description: Power supply (only MAC050 to 141), page 85.
MAC400 or 800
For the MAC400-800, the main supply is 115/230VAC connected at separate terminals.
The P+ power supply terminal only serves as a supply to the internal control circuitry.
The voltage must stay in the range +12-32VDC. See also the How to connect the power
supply (only MAC800), page 97 or Power supply circuitry (only MAC800), page 96.
Power supply connections to a MAC140 and a MAC800
mounted with a MAC00-B1, B2 or B4 modules.
+12-32VDC
MAC50-141 Motor
with MAC00-B1,
B2 or B4
Power
Supply
(control voltage)
(Bus voltage)
+12-48VDC
Power supply
GND
Make sure that all
involved units are
connected to the same
potential
It is recommended
that a separate supply
line is used for each motor.
P+
P-
Control voltage O+
Only MAC50-141 with
B2 or B4 (Optional)
MAC800 Motor
with MAC00-B1,
B2 or B4
Power
Supply
P+
P-
Main supply
Max. 32VDC !
Mains 230VAC
TT1053GB
120
JVL Industri Elektronik A/S - User Manual - Integrated Servo Motors MAC050 - 3000
4.2
Expansion Module MAC00-B1/B2/B4
Analogue input connection at the MAC motor
mounted with a MAC00-B1, B2 or B4 modules.
Connected to a external controller
Position or
velocity
controller
MAC motor
+MAC00-B1, B2 or B4
±10V out
Ground
Make sure that all
involved units are
connected to the same
potential
AIN (analogue input)
GND (ground) *
Screen
Note ! : screen only
connected to signal source.
Connected to a potentiometer
If only 24V supply is available
insert a 2.7k resistor here.
Power supply
10VDC
Screen
2kOhm potentiometer
(JVL typeno. “POT2K”)
MAC motor
+MAC00-B1, B2 or B4
Make sure that all
involved units are
connected to the same
potential
AIN (analogue input)
GND (ground) *
Note ! : screen only
connected to signal source.
This example only covers 0-10V but other configurations do of course also exist, such as 0-5V or +/-10V.
Connected to a zero search switch
MAC motor
+MAC00-B1, B2 or B4
Zero search switch
Power supply
10-32VDC
Make sure that all
involved units are
connected to the same
potential
AIN (analogue input)
GND (ground) *
TT1055GB
* The GND used with the AIN is not equal for all modules. See the specific hardware description of the actual module
to make sure that the intended GND terminal is used.
Note: Do not apply voltages higher than 32V to the analogue input (AIN)
4.2.5
General Analogue input (AIN) description when using MAC00-Bx
When a MAC00-B1, B2 or B4 module is mounted in the MAC motor, the analogue input
is available in the same manner as in the basic motor itself.
The analogue input can be used for several applications and the function of the analogue
input is determined by the mode in which the motor is set to operate.
Typically the input is used for controlling the velocity, torque or position of the motor
but the input is also used as digital input for Zero search or in “Air Cylinder Mode” where
it is used as trigger input for the movement done by the motor.
For further information concerning physical connections, see the individual chapters for
each module type: General description MAC00-B1, page 126, General description MAC00B2, page 127, or General description MAC00-B4, page 129.
JVL Industri Elektronik A/S - User Manual - Integrated Servo Motors MAC050 - 3000
121
4.2.6
RS232 - General description when using a MAC00-Bx module
The RS232 interface is considRS232 network with 2 x MAC140 and 1 x MAC800
ered the main interface to the
mounted with MAC00-B1, B2 or B4 modules.
motor when the motor is set
up using the MacTalk winCentral
Make sure that all
Power supply
involved units are
dows software from a PC or
Controller
connected to the same
from any kind of controller us(for example a PC)
potential
ing a RS232 interface.
Opto isolation *
(Bus voltage)
GND
+12-32VDC
Tx
Rx
GND
Note:The basic MAC motor
does not fully support RS232
since the interface signals are
only 5V levels. See also the basic description - Serial interface,
page 106.
+12-48VDC
Expansion Module MAC00-B1/B2/B4
(control voltage)
4.2
Screen
Screen connected
to GND in each end
MAC50-141
Motor
*** Address=1
Connectors:
Please read the individual description for the MAC00-B1,
B2 or B4 to see the RS232
connector layout.
122
**
Screen
1 Ensure that Tx-PD is connected to TX on one of the
units in the system. Note
that the B1, B2 and B4
modules all contain a termination resistor which can be
activated.
2 Use screened cable.
3 Ensure that GND is also
connected.
4 Ensure that all units have a
proper connection to safety
ground (earth) in order to
refer to the same potential.
5 Ensure that the supply lines
are connected individually
in order to minimise the
voltage drop between the
motors.
6 Master Controller RS485
interface:
If available, it is strongly recommended a type with optical isolation is used.
7 The interface cable length
should not exceed 10 metres.
Rx
RS232
Tx
Tx-PD Interface
GND Power P+
Supply PControl voltage
Only MAC50-141
with B2 or B4
O+
MAC50-141
Motor
*** Address=2
Rx
RS232
Tx
Tx-PD Interface
GND Power P+
Supply P-
Screen
When connecting the RS232
interface to a PC or controller, the following rules must
be followed:
Control voltage
Only MAC50-141
with B2 or B4
O+
MAC800
Motor
*** Address=3
Rx
RS232
Tx
Tx-PD Interface
GND Power P+
Supply PUp to 7
Motors
Main supply
Max. 32VDC !
Mains 230VAC
* Opto isolation is recommended.
** At least one unit on the line must be terminated. The MAC00-B1, B2
and B4 contain this feature. See the individual module descriptions.
*** Each unit connected must be setup with an address via The MacTalk program.
If only one unit is connected no address is needed.
JVL Industri Elektronik A/S - User Manual - Integrated Servo Motors MAC050 - 3000
TT0907GB
Expansion Module MAC00-B1/B2/B4
4.2.7
RS485 - General description when using a MAC00-Bx module
The RS485 offers more noiseRS485 network with 2 x MAC140 and 1 x MAC800
immune communication compared to the RS232 interface.
mounted with MAC00-B1, B2 or B4 modules.
Up to 32 motors can be conCentral
Make sure that all
Power supply
nected to the same line.
involved units are
Controller
1 Use twisted-pair cable
2 Use screened cable
(B u s vo ltag e )
+ 12-48VD C
A
B
GND
**
GND
+ 12-32VD C
connected to the same
potential
Opto isolation *
Screen connected
to GND in each end
S cre e n
When connecting the RS485
interface to a central controller, the following rules must
be followed:
(for example a PC)
(co n tro l vo ltag e)
4.2
MAC50-141
Motor
*** Address=1
A
RS485
B
Interface
GND
4 Ensure that all units have a
proper connection to safety
ground (earth) in order to
refer to the same potential.
S c re e n
3 Ensure that GND is also
connected.
5 The last unit in each end of
the network must be terminated. Note that the B1, B2
and B4 modules all contain a
termination resistor which
can be activated.
Control voltage
Only MAC50-141
with B2 or B4
O+
*** Address=2
A
RS485
B
Interface
GND
Power
Supply
7 Master Controller RS485
interface:
If available, it is strongly recommended a type with optical isolation is used.
Connectors:
Please read the individual description for the MAC00-B1,
B2 or B4 to see the connector
layout.
P+
P-
MAC50-141
Motor
S cre e n
6 Ensure that the supply lines
are connected individually
in order to minimise the
voltage drop between the
motors.
Power
Supply
P+
P-
Control voltage O+
Only MAC50-141 with
B2 or B4 (Optional)
MAC800
Motor
*** Address=3
A **
RS485
B
Interface
GND
Power
Supply
Up to 32
Motors
P+
P-
Main supply
Max. 32VDC !
Mains 230VAC
TT1049GB
* Opto isolation is recommended.
** The last unit at each end of the line must be terminated. The MAC00-B1, B2
and B4 contain this feature. See the individual module descriptions.
*** Each unit connected must be setup with an address via The MacTalk program.
If only one unit is connected no address is needed.
JVL Industri Elektronik A/S - User Manual - Integrated Servo Motors MAC050 - 3000
123
4.2
Expansion Module MAC00-B1/B2/B4
Input type setup for all common output types
The Dip switch is located at the rear side on all
3 module types MAC00-B1, B2 and B4.
Dip-Switch setting
Balanced or "push-pull" output connected
to the A and B input
ON
1 2 3 4
NPN
A+
PNP
INPUT
SETUP + NPN
B PNP
OFF
OFF
OFF
OFF
Dipswitch 5+6 only at MAC00-B4. Please consult the B4 chapter.
NPN (sink) output connected to the A and B input
ON
NPN
PNP
INPUT
SETUP + NPN
B PNP
1 2 3 4
A+
ON
OFF
ON
OFF
Dipswitch 5+6 only at MAC00-B4. Please consult the B4 chapter.
PNP (source) output connected to the A and B input
PNP
ON
NPN
PNP
INPUT
SETUP + NPN
B
1 2 3 4
A+
OFF
ON
OFF
ON
TT0937GB
Dipswitch 5+6 only at MAC00-B4. Please consult the B4 chapter.
4.2.8
General description: “Multifunction I/O” when using a Bx module
The function of the Multifunction I/O is equal to that of the basic motor with the exception that the B1, B2 or B4 modules include an overvoltage protection and a dip-switch to
set up what kind of signal source feeds the input (if the Multifunction I/O is set up as inputs).
The illustration above shows how to set up the Multifunction I/O terminals as balanced/
push pull, NPN or PNP input. The illustrations below show examples of connections for
each of these signal types.
4.2.9
Connecting an NPN signal source to the Multifunction I/O
The drawing below shows how to connect an NPN source to the MAC00-B1, B2 or B4
multifunction I/Os. The diagram shows the A channel. The B channel must be connected
in the same manner. Ensure that the A- and B- terminals are unconnected in order to
maintain proper function.
Warning: Voltages higher than 5V must under no circumstance be connected directly to
the input since this will damage the input permanently.
NPN (sink) output connected to the A and B input
MAC motor with MAC00-B1, B2 and B4 expansion module
Signal source (PLC)
A+
PNP
INPUT
SETUP + NPN
B
NPN
PNP
A+
A-
NPN
Output
switch
B+
BGround
GND
ON
OFF
ON
OFF
Dipswitch 5+6 only at MAC00-B4.
Please consult the B4 chapter.
Warning:
Never connect voltages
higher than 5V directly to
the A or B terminals since
this can damage the inputs.
If used, the B+ terminal must be connected in the same manner as the A+ terminal.
124
ON
Dip-Switch setting:
1 2 3 4
The A- and B- terminals must be left unconnected.
JVL Industri Elektronik A/S - User Manual - Integrated Servo Motors MAC050 - 3000
TT0942GB
4.2
Expansion Module MAC00-B1/B2/B4
4.2.10
Connecting a PNP signal source to the Multifunction I/O
The drawing below shows how to connect a PNP source to the MAC00-B1, B2 or B4
multifunction I/Os. The diagram shows the A channel. The B channel must be connected
in the same manner.
Ensure that the A- and B- terminals are unconnected in order to maintain proper function.
Warning: Voltages higher than 5V must under no circumstance be connected directly to
the input since this will damage the input permanently. Use a proper resistor as indicated
in the table below.
PNP (source) output connected to the A and B input
Power
Supply
5-32VDC
+
PNP
Output
switch
Optional
resistor
See table
Dip-Switch setting:
NPN
A+
PNP
INPUT
SETUP + NPN
B PNP
B+
A+
Warning:
Never connect voltages
higher than 5V directly to
the A or B terminals since
this can damage the inputs.
OCM
If used, the B+ terminal must be connected in the same manner as the A+ terminal.
The A- and B- terminals must be left unconnected.
TT0941GB
Connecting a balanced/push-pull signal to the Multifunction I/O
The drawing below shows how to connect a balanced or push-pull signal source to the
MAC00-B1, B2 or B4 multifunction I/Os. Use twisted-pair cable for the balanced signals
in order to ensure noise immunity.
Note: If inputs are used in pulse-direction format input A (A+/A-) is pulse input and input
B (B+/B-) is direction input.
Warning: Voltages higher than 5V must under no circumstance be connected directly to
the input since this will damage the input permanently. Use a proper resistor as indicated
in the table below.
Balanced or push-pull output connected to the A and B input
MAC motor with MAC00-B1, B2 or B4 expansion module
BOCM
Signal GND
RS422 outputs (balanced)
Twisted pair cable is recommended
OFF
OFF
OFF
OFF
A
B+
B
1 2 3 4
A-
From internal
Control circuitry
NPN
A+
PNP
INPUT
SETUP + NPN
B PNP
ON
A+
A
P u ls /d ir
Dip-Switch setting:
External pulse source
F o rm a t
Q u a d ra tu re
4.2.11
OFF
ON
OFF
ON
Dipswitch 5+6 only at MAC00-B4.
Please consult the B4 chapter.
BA-
Ground
1 2 3 4
Signal source (PLC)
MAC motor with MAC00-B1, B2 or B4 expansion module
Resistor size
0 Ohm (none)
390 Ohm
1 kOhm
1.2 kOhm
1.8 kOhm
2.7 kOhm
3.3 kOhm
ON
Supply:
5VDC
8VDC
12VDC
15VDC
18VDC
24VDC
30VDC
B
Dipswitch 5+6 only at MAC00-B4.
Please consult the B4 chapter.
Warning:
Never connect voltages
higher than 5V directly to
the A or B terminals since
this can damage the inputs.
TT0943GB
JVL Industri Elektronik A/S - User Manual - Integrated Servo Motors MAC050 - 3000
125
4.2
Expansion Module MAC00-B1/B2/B4
4.2.12
General description MAC00-B1
The MAC00-B1 expansion module is an industrial interface that mates with the standard
MAC motor and offers a number of feature enhancements, including:
• Standard 9-pin D-SUB connectors for additional reliability.
• Addition of a Zero switch input for locating a mechanical zero point of the actuator
when used in position-related modes.
• Plugable screw terminal connector for power supply and Zero switch.
• LEDs to indicate: O1 and O2 output status, Zero switch (analogue input) status.
Input power status.
• Full RS232 and RS485 protocol support for use with standard 9-pin DSUB.
• Sourcing (PNP) outputs for status signals O1 and O2 instead of sinking (NPN).
The following illustration shows all the connectors on the MAC00-B1 module.
MAC00-B1 connector descriptions
IN/OUT
General I/O
Signal ground
OCM (GND)
Balanced pulse in- or outputs used for
Pulse and direction signals or
Quadrature encoder signal
Optional these terminals can be
used for the MAC high speed
communication using RS422
B-
5
9
4
3
B+
O1
6
1
A+
O2
7
2
A-
O+
8
AIN
LED’s for showing the output status of
O1 and O2. Notice that LED’s are only
active if the O+ terminal is supplied.
Industri Elektronik
IN/OUT
SETUP
Status outputs
Default:
O1 = In position output
O2 = Error output
Analogue input +/-10V.
Optional zero sensor input
O1
O2
LED for showing the voltage level at
the analogue input (AIN).
LED for showing the voltage level at
the power supply input (P+)..
Option MAC00-B1
RS232 Connections
RS485 Connections
Power/Analogue input
SETUP
1
6
2
RS232 Rx
7
3
RS232 TX
Tx-PD
Terminator
8
4
RS485 ASignal ground
RS232 Note !
The TX-PD terminal must
be connected to Tx (pin 3)
if the MAC motor is not
using addressing
9
5
RS485 B+
(for RS232 and RS485
RS232 Interface between MAC motor and a PC.
MAC00-B1
PC
P+ (Main power +12-48(32)VDC *)
AIN (Analog input / zero switch input **)
P- (Power ground - also for AIN)
Notes :
* MAC50-141:
P+ is main supply terminal
Apply +12-48VDC.
MAC800:
P+ is the control supply terminal
Apply +12-32VDC (max 32V!)
** Do not apply higher voltages
than 32VDC to the AIN terminal.
7
5
Gnd
3
Tx
Tx
Rx
Rx
Gnd
7
2
1
5
3
2
1
Use JVL programming cable type RS232-9-1
for connecting to PC.
126
TT0900GB
JVL Industri Elektronik A/S - User Manual - Integrated Servo Motors MAC050 - 3000
4.2
Expansion Module MAC00-B1/B2/B4
Shown from front:
Shown from rear (inside):
RS485 Balanced
serial interface
O+
O1
O2
OCM
GND
B
A
TERM
Status Outputs
“IN/OUT SETUP” cable enters here
DipSwitch for setting signal source type
for the Multifunction I/O when used as
pulse inputs.
BB+
AA+
RS232 Unbalanced
serial interface
TT0935GB
4.2.13
GND
RX
TX
TXPD
Power Supply and
analogue input
Multifunction I/O
“POWER” cable enters here
P+
AIN
P-
General description MAC00-B2
The MAC00-B2 expansion module is an industrial interface that mates with the standard
MAC motors and offers a number of feature enhancements, including:
• IP67 protection if mounted on basic MAC050-141 motor with the IP67 option, and
IP65 on MAC400-600
• Direct cable connection through sealed compression cable glands.
• Addition of a Zero switch input for locating a mechanical zero point of the actuator
when used in position-related modes.
• Screw terminals (internal) for all signal lines, power supply and Zero switch.
• Full RS232 protocol support
Note: The basic MAC motor is only equipped with a low-voltage serial interface that
requires the use of the RS232-9-1-MAC option cable which has integrated electronics to boost the voltage levels.
• Full RS485 protocol support for multipoint communication up to 100m.
• Sourcing (PNP) outputs for status signals O1 and O2. The basic MAC motors offers
sinking (NPN).
JVL Industri Elektronik A/S - User Manual - Integrated Servo Motors MAC050 - 3000
127
4.2
Expansion Module MAC00-B1/B2/B4
4.2.14
MAC00-B2 option with cables
The ‘MAC00-B2’ type number designation only covers the basic module without any cables.
If a number is added after the basic type number, for example MAC00-B2-10, this suffix
indicates that the module is fitted with 2x10m of cable. One cable is used for the power
supply and analogue input, and the other cable covers all the signal lines, i.e. RS232,
RS485, status outputs and multifunction I/O. See the following tables.
Power cable (Cable 1) - Internal connector J4
Signal name
Pin no.
Description
Wire colour
P-
3
Power supply ground
White
AIN
2
Analogue input (AIN)
Green
P+
1
Power supply +12-48VDC Nom.
Yellow /
Brown
Signal cable (Cable 2) - Internal connectors J5-8
Signal name
Pin no.
Description
Wire colour
O+
J5/1
Status Outputs. Positive supply - Max. 30VDC
Red
O1
J5/2
Status Outputs. Output 1 - PNP(sourcing) max. 25mA
Grey
O2
J5/3
Status Outputs. Output 2 - PNP(sourcing) max. 25mA
Pink
OCM
J5/4
Status Outputs. Output ground
Blue
B-
J6/1
Multifunction I/O. Terminal B-.
Brown/Green
B+
J6/2
Multifunction I/O. Terminal B+.
Connect to ground (GND J7/4 or J8/4) if not used ***
White/Green
A-
J6/3
Multifunction I/O. Terminal A-.
Grey/Pink
A+
J6/4
Multifunction I/O. Terminal A+.
Connect to ground (GND J7/4 or J8/4) if not used ***
Red/Blue
TXPD *
J7/1
TX
J7/2
RX
J7/3
RS232 Interface. Receive. Connect to ground if not used.
White
GND
J7/4
RS232 Interface. Ground for RS232
Brown
TERM **
J8/1
RS485 Interface. Terminator. Connect to “A” (J8/2) if MAC
motor is the last node on the interface bus.
Important: Do not connect if not used.
Purple
A-
J8/2
RS485 Interface. A terminal.
Important: Do not connect if not used.
Yellow/Brown
B+
J8/3
RS485 Interface. B terminal
Important: Do not connect if not used.
White/Yellow
GND
J8/4
RS485 Interface. Signal ground.
Black
RS232 Interface. Transmit pull-down
(Connect to TX if addressing is not used).
RS232 Interface. Transmit
(Connect to TXPD if addressing is not used).
Green
Yellow
Cable Screen
The cable-screen is internally connected to motor housing. Externally it must be connected to earth.
* Connect to the TX terminal if the module is the only or the last node on the line in order to terminate the line.
** Connect to the A terminal if the module is the only or the last node on the line in order to terminate the line.
*** Remember to configure “I/O type” as “Pulse Input” in MacTalk if none of the 4 terminals A+, A-, B+ and Bare used (the multifunction I/Os). This must be done to avoid random function of the motor since the multifunction I/Os are defined as “Serial data” by default.
Important: Please note that the cables are a standard type. They are not recommended for use in cable chains or where the cable is repeatedly bent. If this is
required, use a special robot cable (2D or 3D cable).
128
JVL Industri Elektronik A/S - User Manual - Integrated Servo Motors MAC050 - 3000
4.2
Expansion Module MAC00-B1/B2/B4
Expansion module MAC00-B4 front plate
IO
PWR
Basic I/O’s
M12 - 8pin male
connector including:
Multifunction I/O’s (A+...)
and O1, O2, GND and
the analogue input AIN
Power supply
M12 - 5pin male
connector including:
P+ (primary supply), and O+
(secondary supply) and P-
COM1
COM2
Communication 2
M12 - 5pin female
connector including:
RS232, RS485
Communication 1
M12 - 8pin female
connector including:
RS232 and RS485
interface
TT1015-02GB
4.2.15
General description MAC00-B4
The MAC00-B4 expansion module is protection class IP67 (MAC050-141) and is basically similar to the B1 and B2 modules except that it offers M12 circular industrial connectors which makes the module flexible and robust.
Additional features are:
-
Secondary power supply input which can be used to keep the control core alive during emergency situations
Dual interface connectors make it easy to daisy chain with other motors at the RS232
or RS485 interface.
-
4.2.16
Expansion MAC00-B4 hardware description
The MAC00-B4 offers IP67 (MAC050-141) protection and M12 connectors which
makes it ideal for automation applications where no additional protection is desired. The
M12 connectors offer solid mechanical protection and are easy to unplug compared to
the B2 module with cable glands.
The connector layout:
“PWR” - Power input. M12 - 5pin male connector
Signal name
Description
Pin no.
JVL Cable
WI1000M12F5T05N
P+
Main supply +12-48VDC. Connect with pin 2 *
1
Brown
1
P+
Main supply +12-48VDC. Connect with pin 1 *
2
White
1
P-
Main supply ground. Connect with pin 5 *
3
Blue
1
O+
Output supply / Control voltage +12-30VDC.
4
Black
1
P-
Main supply ground. Connect with pin 3 *
5
Grey
1
Isolation
group
* Note: P+ and P- are each available at 2 terminals. Make sure that both terminals are connected in order
to split the supply current in 2 terminals and thereby avoid an overload of the connector.
(Continued next page)
JVL Industri Elektronik A/S - User Manual - Integrated Servo Motors MAC050 - 3000
129
4.2
Expansion Module MAC00-B1/B2/B4
“IO” - Basic I/O’s. M12 - 8pin male connector.
Signal name
Description
Pin no.
JVL Cable
WI1000-M12
F8T05N
A+
Multifunction I/O terminal A+
1
White
1
A-
Multifunction I/O terminal A-
2
Brown
1
B+
Multifunction I/O terminal B+
3
Green
1
B-
Multifunction I/O terminal B-
4
Yellow
1
O1
Digital output 1 - PNP output
5
Grey
1
O2
Digital output 2 - PNP output
6
Pink
1
OCM
Ground intended to be used together with the
other signals in this connector.
7
Blue
1
AIN
Analogue input +/- 10V or used for Zero search
Use the OCM terminal (pin 7) as ground for the
analogue input.
8
Red
1
Isolation
group
“COM1” - Communication connector 1. M12 - 8pin female connector.
Description
Pin no.
JVL Cable
WI1000-M12
M8T05N
Not used
1
White
RS232: TX
RS232 interface. Transmit terminal
Leave open if unused.
2
Brown
1
RS232: RX
RS232 interface. Receive terminal
Leave open if unused.
3
Green
1
GND
Ground intended to be used together with the
other signals in this connector,
4
Yellow
1
RS485: B+
RS485 interface. Leave open if unused
5
Grey
1
RS485: A-
RS485 interface. Leave open if unused
6
Pink
1
Not used
7
Blue
Not used
8
Red
Signal name
Isolation
group
“COM2” - Communication connector 2. M12 - 5pin female connector
Signal name
Description
Pin no.
JVL Cable
WI1000M12
M5T05N
RS232 Rx
RS232 interface receive terminal.
Leave open if unused
1
Brown
1
RS232 Tx
RS232 interface transmit terminal.
Leave open if unused
2
White
1
RS485 B+
RS485 interface. Leave open if unused
3
Blue
1
RS485 A-
RS485 interface. Leave open if unused
4
Black
1
GND
Interface ground (same as main ground).
5
Grey
1
For complete drawings of the M12 cables please see the appendix
Cable drawings, page 396.
130
JVL Industri Elektronik A/S - User Manual - Integrated Servo Motors MAC050 - 3000
Isolation
group
4.2
Expansion Module MAC00-B1/B2/B4
4.2.17
MAC00-B4 dip-switch setup
The 6 pole dip-switch is placed on the rear side of the MAC00-B4 module. The following
illustration shows how to set up the switch.
MAC00-B4 Dip switch settings
Main fuse 10Amp.
Replace only with:
Schurter type
Rear side of the MAC00-B4
“3402.0040.11”
expansion module
or
Littlefuse type
“451-10A”
Mini dip-switch
OFF
ON
1
2
3
4
5
6
Dip-Switch for
Input type setup
Dip 5 - RS232 TxPD
Dip 6 - RS485 Term.
SW1
Default switch setting:
As shown above. Dip1-6=OFF,ON,OFF,ON,ON,OFF
- Input A and B is setup for PNP outputs.
- RS232 TxPD (Transmit pull-down) is enabled.
- RS485 Termination is disabled.
Input type setup (only switch 1-4)
TT1031GB
Balanced or "push-pull" output connected
to the A and B input
1
2
3
4
5
6
OFF
OFF
OFF
OFF
-
SW1
NPN (sink) output connected to the A and B input
1
2
3
4
5
6
ON
OFF
ON
OFF
-
PNP (source) output connected to the A and B input
SW1
1
2
3
4
5
6
OFF
ON
OFF
ON
-
SW1
RS232 TxPD setup (only switch 5)
One of the motors connected to an RS232 line must have this switch set to “ON” but only at one !.
1
2
3
4
5
6
ON/OFF
-
SW1
RS485 Term. setup (only switch 6)
The last motors connected to an RS485 line must have this switch set to “ON” but only at one !.
1
2
3
4
5
6
ON/OFF
SW1
JVL Industri Elektronik A/S - User Manual - Integrated Servo Motors MAC050 - 3000
131
4.2
Expansion Module MAC00-B1/B2/B4
4.2.18
Cables for the MAC00-B4
The following cables equipped with M12 connector can be supplied by JVL.
MAC00-B4 Connectors
Description
JVL Order no.
RS232 Interface cable. Connects
directly from MAC00-R4 to PC
Length: 5m (197 inch)
RS232-M12-1-5-5
X
Cable (Ø5.5mm) with M12 female
5-pin connector loose wire ends
0.35mm² (22AWG) and foil screen.
Length: 5m (197 inch)
WI1000-M12F5T05N
X
Same as above but 20m (787 inch)
WI1000-M12F5T20N
X
Cable with M12 male 5-pin connector loose wire ends 0.35mm²
(22AWG) and screen.
See also type RS232-M12-1-5-5.
WI1000-M12M5T05N
X
Same as above but 20m (787 inch)
WI1000-M12M5T20N
X
Cable with M12 female 8-pin
connector loose wire ends
0.22mm² (24AWG) and screen.
Length: 5m (197 inch)
WI1000-M12F8T05N
X
Same as above but 20m (787 inch)
WI1000-M12F8T20N
X
Cable with M12 male 8-pin
connector loose wire ends
0.22mm² (24AWG) and screen.
Length: 5m (197 inch)
WI1000-M12M8T05N
X
Same as above but 20m (787 inch)
WI1000-M12M8T20N
“IO”
8pin
Male
“COM1”
8pin
Female
“COM2”
5pin
Female
Picture
“PWR”
5pin
Male
X
Protection caps. Optional if connector is not used to protect from dust / liquids.
X
X
X
X
IP67 protection cap for M12
female connector.
WI1000-M12FCAP1
IP67 protection cap for M12
male connector.
WI1000-M12MCAP1
Important: Please note that the cables are a standard type. They are not recommended for use in cable chains or where the cable is repeatedly bent. If this is required, use a special robot cable (2D or 3D
cable).
132
JVL Industri Elektronik A/S - User Manual - Integrated Servo Motors MAC050 - 3000
4.3
Expansion module MAC00-B41
Only MAC400 to 3000
MAC00-B41
seen from rear side
TT1133GB
4.3.1
Expansion module MAC00-B41 — overall description.
The expansion module MAC00-B41can ONLY be mounted in the MAC400 and
newer versions of the MAC800 motor (serial numbers >85000).
Please notice that the module CAN NOT be used in the MAC050 to 141 motors.
This module is among the simplest and lowest cost modules in the product range.
The modules contain no intelligence (microprocessor) meaning that all functionalety
is controlled via the basic motor.
The MAC00-B41expansion module offers an industrial interface (M12 connectors)
and a number of feature enhancements, including:
•
•
•
•
•
Standard M12 connectors for optimum reliability
Optical isolated communication covering RS232, RS485 and USB (2.0)
Full RS232 protocol support for use with standard serial cable.
Full RS485 protocol support for multipoint communication up to 100m.
6 high speed I/O channels that individually can be used as inputs or outputs. Each
channel can (when used as output) source up to 300mA.
• Dual supply. The main supply can be removed but the control circuitry is kept active
and position data and communication are still functional.
• Standard M12 connectors for optimum reliability
Typical applications for these expansion modules are:
• Closed loop systems with an overall controller involved.
• Replacement for pneumatic cylinders using the “Air Cylinder mode”
• Dispenser systems.
• Machine adjustment/setup by sending RS232 or RS485 commands.
• Standalone PLC with userprogram stored in the basic motor.
JVL Industri Elektronik A/S - User Manual - Integrated Servo Motors MAC050 - 3000
133
4.3
Expansion module MAC00-B41
4.3.2
Overall hardware description
All internal and external main connections can be seen in the illustration below.
Only MAC400 to 3000
Basic MAC motor with MAC00-B41 module inserted.
MAC00-B41 expansion module
Power supply
P+ : (MAC400) +12-32V
CVI : (MAC400) +12-32V
P+
P-
Fuse F10A
Power ground (P-) is not connected in the MAC00-B41 module
or Zero search input
±10V nom. or up to 32V
Multifunction I/O 1
Multifunction I/O 2
GND
A1+/A2+/B2+/-
CVO
IO1
High speed I/O’s
2
AIN1/2
B1+/-
IO2
IO3
MAC400 any SN
or MAC800 with SN>85000
P+
P-
Power supply
Control
Supply
CVI
Self healing fuse
Itrip = 750mA
2 Analogue inputs
Basic MAC motor
AIN1/2 Analogue input
GND
2
Overvoltage
protection
and
Dipswitch
setup
Multifunction I/O 1
(Bidirectional)
2
A2+/B2+/-
Multifunction I/O 2
(Bidirectional)
Not used
O1
O2
Status outputs
(-)
I/O channel
(Bidirectional)
2
PNP Output
source driver
or
Input
A1+/B1+/-
2
IO4
IO5
IO6
GND
RS485 Termination dipswitch
RS485 Interface
(Isolated)
A
2 channel
differential
Transceiver
RX
TX
B
GND
Asynchronous
interface
Interface
isolation
Tx
RS232 Interface
(Isolated)
Rx
Asynchronous
serial interface
IGND
TT1136GB
4.3.3
134
General hardware description
The MAC00-B41 module offers the following external connections.
• Power supply (P+/P-/CVI)
These terminals are used for the main supply of the motor. A voltage between +12
and 32VDC (MAC400, MAC800, MAC1500 and MAC3000) must be connected.
• Analogue inputs (AIN1 and AIN2)
The analogue inputs are used either as analogue input or digital input. The primary
analogue input is AIN1. When used as analogue input, it can control velocity, torque
or position depending on which mode is set for motor operation. When used for digital inputs, it can be used in position-related modes for the external zero-search sensor. Also in “Air Cylinder Mode” the analogue input is used as a trigger input.
For a functional description, please refer to Analogue input, page 107.
(continued)
JVL Industri Elektronik A/S - User Manual - Integrated Servo Motors MAC050 - 3000
4.3
Expansion module MAC00-B41
Only MAC400 to 3000
• Multifunction I/O 1 and 2 (A1± ,B1± , A2± and B2±)
The functionality of these terminals is the same as for the basic MAC motor. They
can be set up in 3 different configurations.
- Pulse inputs - for functional description please refer to Multifunction I/O used as
pulse inputs, page 111 and General description: “Multifunction I/O” when using a Bx
module, page 124
- Pulse outputs - for functional description please refer to Multifunction I/O used as
pulse outputs, page 112 and
- RS422 interface - for functional description please refer to Multifunction I/O used
as serial communication interface, page 113.
Important !:
Remember to configure “I/O type” as “Pulse Input” in MacTalk if none of the 8 terminals A1/2+, A1/2-, B1/2+ and B1/2- is used (the multifunction I/O’s). This must
be done to avoid random function of the motor since the multifunction I/Os are defined as “Serial data” as default.
• High speed I/O’s (IO1, IO2, IO3, IO4, IO5, IO6, CVO, and GND)
Each of the high speed IO’s can be used as either an input or as an output.
The I/O’s can be read or set from the serial interface (RS232 or RS485) or they can
be operated from the user program stored in the motor.
• RS485 Interface (A-, B+ and GND)
Serial balanced interface for connection to a PC or a controller. The protocol is similar to the RS232 or USB interface, which means that all registers/parameters in the
motor can be monitored or changed. The RS485 is recommended for longer distances or in noisy environments.
• RS232 Interface (Rx, Tx and GND) and USB interface.
Serial unbalanced interface for connection to a PC or a controller. The protocol is
similar to the RS485 interface, which means that all registers/parameters in the motor can be monitored or changed. RS232 is not recommended for long distances
(>10m) and USB is not recommended for distances >2m.
The MAC motor uses “binary” communication protocol which makes it possible to access all the internal registers. Please consult MacTalk communication, page 357 for further
details.
4.3.4
Hardware overview
MAC00-B41 seen from rear side
Interconnect to motor
Contains all internal signals
between module and motor.
Main fuse 10Amp.
Replace only with:
Schurter type
“3402.0040.11”
or
Littlefuse type
“451-10A”
TT1146GB
Setup dipswitch
- Multifunction I/O setup
- RS485 termination
Default switch setting:
Dip1-10 = OFF,ON,OFF,ON,OFF,ON,OFF,ON,OFF,OFF
- Input Ax and Bx for both MF I/O’s are setup for PNP outputs.
- RS485 Termination is disabled.
JVL Industri Elektronik A/S - User Manual - Integrated Servo Motors MAC050 - 3000
135
4.3
4.3.5
Expansion module MAC00-B41
Only MAC400 to 3000
General power supply description
The MAC00-B41 module can be used in the MAC400, MAC800, MAC1500 and
MAC3000 motor.
Notice that only MAC800 motors with serial numbers higher than 85000 support the
B41 module. The diagram below shows how to connect power to a MAC400 motor
mounted with a MAC00-B41.
Please notice that the voltage connected to P+ and/or CVI must stay in the range +1232VDC. Precautions must therefore be taken if the system also contains MAC50, 95, 140
or 141 which may require 48VDC in order to reach maximum motor speed.
See also the general power supply description Power Supply, page 85.
Power supply connections to a MAC140 and a MAC400
mounted with a MAC00-B1, B2 or B4 and B41 modules.
(control voltage)
+12-32VDC
(Bus voltage)
+12-48VDC
Power supply
GND
Make sure that all
involved units are
connected to the same
potential
MAC50-141 Motor
with MAC00-B1,
B2 or B4
Power
Supply
It is recommended
that a separate supply
line is used for each motor.
P+
P-
Control voltage
O+
Only MAC50-141 with
B2 or B4 (Optional)
MAC400 Motor
with MAC00-B41
Power
Supply
Control Volt.
P+
PCVI
Main supply
Max. 32VDC !
Mains 115 or 230VAC
TT1137GB
136
JVL Industri Elektronik A/S - User Manual - Integrated Servo Motors MAC050 - 3000
4.3 Expansion module MAC00-B41
Only MAC400 to 3000
Analogue input connection at the MAC motor
mounted with a MAC00-B41 module.
Connected to a external controller
Position or
velocity
controller
MAC motor
+MAC00-B41
±10V out
Ground
Make sure that all
involved units are
connected to the same
potential
AIN1 (analogue input)
GND (ground)
Screen
Note ! : screen only
connected to signal source.
Connected to a potentiometer
If only 24V supply is available
insert a 2.7k resistor here.
Power supply
10VDC
Screen
2kOhm potentiometer
(JVL typeno. “POT2K”)
MAC motor
+MAC00-B41
Make sure that all
involved units are
connected to the same
potential
AIN1 (analogue input)
GND (ground)
Note ! : screen only
connected to signal source.
This example only covers 0-10V but other configurations do of course also exist, such as 0-5V or +/-10V.
Connected to a zero search switch
MAC motor
+MAC00-B41
Zero search switch
Power supply
10-32VDC
Make sure that all
involved units are
connected to the same
potential
AIN1 (analogue input)
GND (ground)
TT1138GB
Note: Do not apply voltages higher than 32V to the analogue input (AIN)
4.3.6
Using the analogue inputs (AIN1 or AIN2).
When a MAC00-B41 module is mounted in the MAC400 motor, the analogue inputs is
available in the same manner as in the basic motor itself.
The analogue inputs can be used for several applications and the function of the analogue
input is determined by the mode in which the motor is set to operate.
Typically the inputs is used for controlling the velocity, torque or position of the motor
but the input is also used as digital input for Zero search or in “Air Cylinder Mode” where
it is used as trigger input for the movement done by the motor.
For further information concerning physical connections, see the Expansion MAC00-B41
connector description, page 147.
JVL Industri Elektronik A/S - User Manual - Integrated Servo Motors MAC050 - 3000
137
4.3
Expansion module MAC00-B41
4.3.7
RS232 - General description when using the MAC00-B41 module
The RS232 interface is considered the main interface to the RS232 connection between a PC or central controller
to MAC400 with a MAC00-B41 module.
motor when the motor is set
up using the MacTalk winCentral
Make sure that all
Power supply
involved units are
dows software from a PC or
Controller
connected to the same
from any kind of controller us(for example a PC)
potential
ing a RS232 interface.
Opto isolation *
When connecting the RS232
interface to a PC or controller, the following rules must
be followed:
+12-32VDC
GND
Tx
Rx
IGND
Screen connected
to GND in each end
Screen
Note:The basic MAC motor
does not fully support RS232
since the interface signals are
only 5V levels. See also the basic description - Serial interface,
page 106.
Only MAC400 to 3000
MAC400 Motor
with MAC00-B41
Rx
RS232
Tx
Interface
IGND Power P+
Supply P-
Max. 32VDC !
Contr. Voltage CVI
1 Only one motor can be
connected at the interface
Mains 230VAC
Main supply
line. Use the RS485 if multiple units have to be connected at the same time.
2 Use screened cable.
TT1143GB
* Opto isolation is recommended if connection is permanent.
3 Ensure that IGND (interface ground) is also connected.
4 Ensure that all units have a proper connection to safety ground (earth) in order to refer
to the same potential.
5 The RS232 interface cable length should not exceed 10 metres.
Connectors:
To see the specific connector pin-out please see the chapter Expansion MAC00-B41 connector description, page 147.
A finished RS232 cable also exist. Please see Cables for the MAC00-B41, page 149
138
JVL Industri Elektronik A/S - User Manual - Integrated Servo Motors MAC050 - 3000
Only MAC400 to 3000
Screen
1 Use twisted-pair cable
3 Ensure that GND is also
connected.
Power
Supply
P+
P-
Control voltage
Only MAC50-141
with B2 or B4
O+
A
B
GND
(Bus voltage)
+12-48VDC
+12-32VDC
(control voltage)
*** Address=2
RS485
Interface
1 2 3 4 5 6 7 8 9 10
P+
P-
Control voltage
O+
Only MAC50-141 with
B2 or B4 (Optional)
MAC800 Motor
with MAC00-B41
ON
Power
Supply
7 Master Controller RS485
interface:
If available, it is strongly recommended a type with optical isolation is used.
Connectors:
To see the specific connector
pin-out please see the chapter
Expansion MAC00-B41 connector description, page 147.
A finished RS485 cable also
exist. Please see Cables for the
MAC00-B41, page 149
*** Address=1
RS485
Interface
MAC50-141
with B1, B2 or B4
5 The last unit in each end of
the network must be terminated. Note that the B1, B2
and B4, B41 modules all
contain a termination resistor which can be activated.
6 Ensure that the supply lines
are connected individually
in order to minimise the
voltage drop between the
motors.
MAC50-141
with B1, B2 or B4
A
B
GND
2 Use screened cable
4 Ensure that all units have a
proper connection to safety
ground (earth) in order to
refer to the same potential.
GND
A
B
IGND
RS485 - General description when using a MAC00-Bx module
The RS485 offers more noiseRS485 network with 2 x MAC140 and 1 x MAC400
immune communication commounted with MAC00-B1, B2, B4 and B41 modules.
pared to the RS232 interface.
Up to 32 motors can be conCentral
Make sure that all
Power supply
involved units are
nected to the same line.
Controller
connected to the same
The RS485 interface in the
(for example a PC)
potential
MAC00-B41 module is galOpto isolation *
**
vanical isolated.
When connecting the RS485
interface to a central controlScreen connected
ler, the following rules must
to GND in each end
be followed:
Screen
4.3.8
Expansion module MAC00-B41
Screen
4.3
ON
ON
To activate
the termination
set dip 9+10 in
position “ON”
*** Address=3
A **
RS485
B
Interface
IGND Power P+
Supply P-
Max. 32VDC !
Contr. Voltage CVI
Up to 32
Motors
Main supply
Mains 230VAC
TT1144GB
* Opto isolation is recommended.
** The last unit at each end of the line must be terminated. The MAC00-B1, B2
and B4, B41 contain this feature. See the individual module descriptions.
*** Each unit connected must be setup with an address via The MacTalk program.
If only one unit is connected no address is needed.
JVL Industri Elektronik A/S - User Manual - Integrated Servo Motors MAC050 - 3000
139
4.3
Expansion module MAC00-B41
Only MAC400 to 3000
Input type setup for all common output types
The Dip switch is located at the rear side.
Dip-Switch setting
Balanced or "push-pull" output connected
to the A1/2 and B1/2 inputs
NPN
PNP
NPN
B1+ PNP
NPN
Multifunction2
INPUTSETUP
A2+ PNP
NPN
B2+ PNP
1 2 3 4 5 6 7 8
A1+
ON
Multifunction1
INPUTSETUP
OFF
OFF
OFF
OFF
OFF
OFF
OFF
OFF
Dipswitch 9+10 : RS485 termination - see communication chapter
NPN (sink) output connected to the A and B input
NPN
PNP
NPN
B1+ PNP
NPN
Multifunction2
INPUTSETUP
A2+ PNP
NPN
B2+ PNP
1 2 3 4 5 6 7 8
A1+
ON
Multifunction1
INPUTSETUP
ON
OFF
ON
OFF
ON
OFF
ON
OFF
Dipswitch 9+10 : RS485 termination - see communication chapter
PNP (source) output connected to the A and B input
A2+ PNP
NPN
B2+ PNP
1 2 3 4 5 6 7 8
NPN
Multifunction2
INPUTSETUP
ON
NPN
A1+
PNP
Multifunction1
INPUTSETUP B1+ NPN
PNP
OFF
ON
OFF
ON
OFF
ON
OFF
ON
TT1139GB
Dipswitch 9+10 : RS485 termination - see communication chapter
4.3.9
General description: “Multifunction I/O”.
The function of the Multifunction I/O is equal to that of the basic motor with the exception that the B41 module include an overvoltage protection and a dip-switch to set up
what kind of signal source feeds the input (if the Multifunction I/O is set up as inputs).
The illustration above shows how to set up the Multifunction I/O terminals as balanced/
push pull, NPN or PNP input. The illustrations below show examples of connections for
each of these signal types.
140
JVL Industri Elektronik A/S - User Manual - Integrated Servo Motors MAC050 - 3000
4.3
4.3.10
Expansion module MAC00-B41
Only MAC400 to 3000
Connecting an NPN signal source to the Multifunction I/O
The drawing below shows how to connect an NPN source to the MAC00-B41 multifunction I/Os. The diagram shows the A channel. The B channel must be connected in
the same manner. Ensure that the Ax- and Bx- terminals are unconnected in order to
maintain proper function.
Warning: Voltages higher than 5V must under no circumstance be connected directly to
the input since this will damage the input permanently.
NPN (sink) output connected to the A and B input
Dip-Switch setting:
Multifunction 1
INPUT SETUP
A1+
NPN
PNP
NPN
B1+ PNP
NPN
Multifunction 2
INPUT SETUP
A1+ or A2+
A2+ PNP
NPN
B2+ PNP
1 2 3 4 5 6 7 8
Signal source (PLC)
Warning:
Never connect voltages
higher than 5V directly to
the A or B terminals since
this can damage the inputs.
ON
The negative input terminals (Ax- and Bx-)
must be left unconnected.
MAC motor with MAC00-B41 expansion module
ON
OFF
ON
OFF
ON
OFF
ON
OFF
A1- or A2-
NPN
Output
switch
B1+ or B2+
B1- or B2-
Dipswitch 9+10 :
RS485 termination
- see communication chapter
GND
Ground
If used, the B+ terminal must be connected in the same manner as the A+ terminal.
4.3.11
TT1140GB
Connecting a PNP signal source to the Multifunction I/O
The drawing below shows how to connect a PNP source to the MAC00-B41 multifunction I/Os. The diagram shows the A channel. The B channel must be connected in the
same manner.
Ensure that the Ax- and Bx- terminals are unconnected in order to maintain proper function.
Warning: Voltages higher than 5V must under no circumstance be connected directly to
the input since this will damage the input permanently. Use a proper resistor as indicated
in the table below.
PNP (source) output connected to the A and B input
Power
Supply
5-32VDC
+
PNP
Output
switch
Optional
resistor
See table
MAC motor with MAC00-B41 expansion module
Warning:
Never connect voltages
higher than 5V directly to
the A or B terminals since
this can damage the inputs.
Multifunction 1
INPUT SETUP
A1+
NPN
PNP
NPN
B1+ PNP
NPN
Multifunction 2
INPUT SETUP
A1+ or A2+
A2+ PNP
NPN
B2+ PNP
OFF
ON
OFF
ON
OFF
ON
OFF
ON
A1- or A2B1+ or B2+
B1- or B2-
Ground
Dip-Switch setting:
1 2 3 4 5 6 7 8
Signal source (PLC)
Resistor size
0 Ohm (none)
390 Ohm
1 kOhm
1.2 kOhm
1.8 kOhm
2.7 kOhm
3.3 kOhm
ON
Supply:
5VDC
8VDC
12VDC
15VDC
18VDC
24VDC
30VDC
Dipswitch 9+10 :
RS485 termination
- see communication chapter
GND
If used, the B+ terminal must be connected in the same manner as the A+ terminal.
The negative input terminals (Ax- and Bx-) must be left unconnected.
JVL Industri Elektronik A/S - User Manual - Integrated Servo Motors MAC050 - 3000
TT1141GB
141
4.3
4.3.12
Expansion module MAC00-B41
Only MAC400 to 3000
Connecting a balanced/push-pull signal to the Multifunction I/O
The drawing below shows how to connect a balanced or push-pull signal source to the
MAC00-B41 multifunction I/Os. Use twisted-pair cable for the balanced signals in order
to ensure noise immunity.
Note: If inputs are used in pulse-direction format input A (Ax+/Ax-) is pulse input and
input B (Bx+/Bx-) is direction input.
Warning: Voltages higher than 5V must under no circumstance be connected directly to
the input since this will damage the input permanently. Use a proper resistor as indicated
in the table below.
Balanced or push-pull output connected to the A and B input
MAC motor with MAC00-B41 expansion module
A1- or A2-
From internal
Control circuitry
B1+ or B2+
B
B1- or B2GND
Signal GND
Puls/dir
Format
Multifunction 1
INPUT SETUP
A1+
NPN
PNP
NPN
B1+ PNP
NPN
A
Multifunction 2
INPUT SETUP
A2+ PNP
NPN
B2+ PNP
1 2 3 4 5 6 7 8
A1+ or A2+
A
Quadrature
Dip-Switch setting:
ON
External pulse source
Warning:
Never connect voltages
higher than 5V directly to
the A or B terminals since
this can damage the inputs.
OFF
OFF
OFF
OFF
OFF
OFF
OFF
OFF
B
Dipswitch 9+10 :
RS485 termination
- see communication chapter
RS422 outputs (balanced)
Twisted pair cable is recommended
TT1142GB
142
JVL Industri Elektronik A/S - User Manual - Integrated Servo Motors MAC050 - 3000
4.3
4.3.13
Expansion module MAC00-B41
Only MAC400 to 3000
Example - how to use gearmode with MAC00-B41.
The MAC00-B41 module offers a number of I/O possibilities that makes it very convienient to use in Electronic gear applications.
An external encoder with various output configurations can easily be connected to one
of the multifunction I/O channels and also signals like Enable/disable motor can be established using one of I/O terminals (I/O1 to I/O6).
The following pages describe in details how to get the wirering sorted and also how to
setup the motor in general.
The example will cover:
- Hardware : Connecting the encoder to the MAC00-B41
- Setting up relevant parameters for using gear mode
- Optionally setting up input 1 for enabling/disabling motor operation (enable input)
- Optionally setting up input 2 as a “coupling” input for enabling the motor to follow
the encoder or staying stationary at 0 RPM (keeping the position).
Step 1
Start by connecting the encoder to the multifunction IO channel 1 according to the illustration below.
This example is showing an encoder equipped with a 24V PNP (source) output.
A serial resistor must be inserted since the IO channels at the MAC00-B41 is made for
handling RS422 levels which means that no more than 5V must be applied. Higher levels
will be destructive !.
Remember to set the internal dipswitch correctly in order to setup the module to handle
a signal source with a PNP output.
See also General description: “Multifunction I/O”., page 140 for configurering the MAC00B41 to other I/O’s formats than the PNP used in this example.
Concerning the physical connector layout of the IO2 connector - please see Expansion
MAC00-B41 connector description, page 147.
Connecting a 24V PNP (source) encoder to the MAC00-B41 module
MAC motor with MAC00-B41 expansion module
2.7k
Output A
Output B
Ground
IO2 Pin1
A1+
Multifunction1
INPUTSETUP
Multifunction 2
INPUT SETUP
Not used in
this example
A1+
NPN
PNP
NPN
B1+ PNP
NPN
A2+ PNP
NPN
B2+ PNP
1 2 3 4 5 6 7 8
Screened cable is
recommended
Dip-Switch setting:
ON
Incremental encoder
with 24V PNP single
ended output
Warning:
Never connect voltages
higher than 5V directly to
the A or B terminals since
this can damage the inputs.
OFF
ON
OFF
ON
A1 - : Leave unconnected
2.7k
IO2 Pin4
B1+
B1 - : Leave unconnected
IO2 Pin2
Dipswitch 9+10 :
RS485 termination
- see communication chapter
GND
Important ! : The negative input terminals (A1- and B1-) must be left unconnected.
If possible avoid connecting the terminals to the cable since internal capacitances in the cable can interfere
TT1189GB
Continued at next page.
JVL Industri Elektronik A/S - User Manual - Integrated Servo Motors MAC050 - 3000
143
4.3
Expansion module MAC00-B41
Only MAC400 to 3000
Step 2
Now the motor need to be setup in gear mode and the Multifunction I/O 1 must be setup
as pulse input in order to accept the applied encoder signal.
This is done in the MacTalk windows software. See illustration below.
Select gear mode
Select Quadrature input in order
to enable the encoder pulses
at Multifunction IO channel 1
to control the motor motion.
TT1190GB
The desired gear ratio and other relevant motion parameters may also be necessary to
setup. Please see the general gear mode description - Gear Mode - overall description,
page 21
Now the motor should move accordingly to the connected external encoder using the
Gear mode.
Continued at next page.
144
JVL Industri Elektronik A/S - User Manual - Integrated Servo Motors MAC050 - 3000
4.3
Expansion module MAC00-B41
Only MAC400 to 3000
Step 3
Optionally an input can be used for enabling the motor in gear mode or making it passive
(current less) which means that the shaft is not kept in position (the shaft is released).
The illustration below shows how this setup can be done using the MacTalk program.
Select the Advanced tab
Setup as shown
The result will be that input 1 (IO1) is used for selecting
the motor mode (Gear or Passive mode). Index 1 and
Index 2 is refering to the mode registers which are shown below.
The Mode field is found in the lower
part of the register tab. Set the
Mode reg. 1 and 2 as shown in order
to set the motor in Passive mode or
Gear mode depending on the state
of input 1 selected above.
Select the Registers tab
TT1191GB
Continued at next page
JVL Industri Elektronik A/S - User Manual - Integrated Servo Motors MAC050 - 3000
145
4.3
Expansion module MAC00-B41
Only MAC400 to 3000
Step 4
Optionally an input can be used for enabling motor movement according to the external
encoder when the input is active or decelerating the motor to a stationary position when
the input is passive.Setup the motor according to the following illustration.
Select the Advanced tab
Setup as shown
The result will be that input 2 (IO2) is used for
setting the motor speed to 0 RPM (stationary
position) or any velocity above 0 RPM allowing the
motor to move according to the external encoder.
The Velocity field is found in the lower
left part of the register tab. Set the
Velocity 1 to 0 and Velocity 2 to the
desired speed when input 2 is active.
Note that the unit will toggle from RPM
to cnt./smp. when activated by the mouse
Select the Registers tab
TT1192GB
146
JVL Industri Elektronik A/S - User Manual - Integrated Servo Motors MAC050 - 3000
4.3
Expansion module MAC00-B41
Only MAC400 to 3000
Expansion module MAC00-B41 front plate
PWR
IO1
Basic I/O’s
M12 - 8pin male
connector including:
6 I/O’s (IO1 to IO6)
CVO and GND.
Power supply
M12 - 5pin male
connector including:
P+ (primary supply), and CVI
(secondary supply) and P-
COM
IO2
Communication
M12 - 8pin female
connector including:
RS232, RS485 and
USB interface
Extended I/O’s
M12 - 12pin female
connector including:
Multifunction ch. 1 + 2
and 2 analogue inputs
TT1132GB
4.3.14
Expansion MAC00-B41 connector description
The MAC00-B41 offers IP65 protection and M12 connectors which makes it ideal for automation applications where no additional protection is desired. The M12 connectors offer solid mechanical protection and are easy to unplug compared to modules with cable
glands or DSUB connectors.
The connector layout:
“PWR” - Power input. M12 - 5pin male connector
Signal name
Description
Pin no.
JVL Cable
WI1000M12F5T05N
P+
Main supply +12-48VDC. Connect with pin 2 *
1
Brown
1
P+
Main supply +12-48VDC. Connect with pin 1 *
2
White
1
P-
Main supply ground. Connect with pin 5 *
3
Blue
1
CVI
Control and user output supply +12-30VDC.
Connect MAXIMUM 30VDC to this terminal
4
Black
1
P-
Main supply ground. Connect with pin 3 *
5
Grey
1
Isolation
group
* Note: P+ and P- are each available at 2 terminals. Make sure that both terminals are connected in order
to split the supply current in 2 terminals and thereby avoid an overload of the connector.
(Continued next page)
JVL Industri Elektronik A/S - User Manual - Integrated Servo Motors MAC050 - 3000
147
4.3
Expansion module MAC00-B41
Only MAC400 to 3000
“IO1” - Basic I/O’s. M12 - 8pin male connector.
Signal name
Description
Pin no.
JVL Cable
WI1000-M12
F8T05N
Isolation
group
(See note)
I/O1
I/O channel 1 - Can be used as input or output
1
White
1
I/O2
I/O channel 2 - Can be used as input or output
2
Brown
1
I/O3
I/O channel 3 - Can be used as input or output
3
Green
1
I/O4
I/O channel 4 - Can be used as input or output
4
Yellow
1
I/O5
I/O channel 5 - Can be used as input or output
5
Grey
1
I/O6
I/O channel 6 - Can be used as input or output
6
Pink
1
CVO
Supply output. Connected internally to the CVI
terminal in the PWR connector.
DO NOT connect >30V to this terminal !
7
Blue
1
GND
Ground intended to be used together with the
other signals in this connector.
8
Red
1
“COM” - Communication connector - M12 - 8pin female connector.
Signal name
Description
Pin no.
JVL Cable
WI1000-M12
M8T05N
Isolation
group
(See note)
USB: D-
USB interface. Negative data terminal
1
White
2
RS232: TX
RS232 interface. Transmit terminal
Leave open if unused.
2
Brown
2
RS232: RX
RS232 interface. Receive terminal
Leave open if unused.
3
Green
2
IGND
Isolated interface ground to be used together
with the other signals in this connector,
4
Yellow
2
RS485: A-
RS485 interface. Leave open if unused
5
Grey
2
RS485: B+
RS485 interface. Leave open if unused
6
Pink
2
USB: D+
USB interface. Positive data terminal
7
Blue
2
USB: VBUS
USB interface. Supply input 5VDC nominal
8
Red
2
Isolation
group
(see note)
“IO2” - I/O connector 2. M12 - 12pin female connector
148
Signal name
Description
Pin no.
JVL Cable
WI1009M12
M12T05N
A1+
Multifunction I/O1 terminal A1+
1
Brown
1
GND
Ground intended to be used toghether with the
other signals in this connector
2
Blue
1
A1-
Multifunction I/O1 terminal A1-
3
White
1
B1+
Multifunction I/O1 terminal B1+
4
Green
1
A2+
Multifunction I/O2 terminal A2+
5
Pink
1
B1-
Multifunction I/O1 terminal B1-
6
Yellow
1
B2+
Multifunction I/O2 terminal B2+
7
Black
1
A2-
Multifunction I/O2 terminal A2-
8
Grey
1
5VO
5V out - max 100mA
9
Red
1
B2-
Multifunction I/O2 terminal B2-
10
Violet
1
AIN1
Analogue input1 ±10V or used for Zero search
11
Grey/pink
1
AIN2
Analogue input2 ±10V
12
Red/blue
1
JVL Industri Elektronik A/S - User Manual - Integrated Servo Motors MAC050 - 3000
4.3
Expansion module MAC00-B41
4.3.15
Cables for the MAC00-B41
The following cables equipped with M12 connector can be supplied by JVL.
MAC00-B41 Connectors
Description
JVL Order no.
X
RS232 Interface cable. Connects
directly from MAC00-B41 to a PC
Length: 5m (197 inch)
RS232-M12-1-5-8
X
RS485 Interface cable. Connects
directly from MAC00-B41 to a PC
with a RS485 Com. port.
Length: 5m (197 inch)
RS485-M12-1-5-8
X
USB Interface cable. Connects
directly from MAC00-B41 to a PC
with a USB Com. port.
Length: 5m (197 inch)
USB-M12-1-5-8
X
Cable (Ø5.5mm) with M12 female
5-pin connector loose wire ends
0.35mm² (22AWG) and foil screen.
Length: 5m (197 inch)
WI1000-M12F5T05N
X
Same as above but 20m (787 inch)
WI1000-M12F5T20N
X
Cable with M12 male 12 pin
straight connector, loose wire ends.
WI1009-M12M12T05N
X
Same as above but 20m (787 inch)
WI1009-M12M12T20N
X
Cable with M12 female 8pin
straight connector, loose ends.
WI1000-M12F8T05N
X
Same as above but 20m (787 inch)
WI1000-M12F8T20N
X
Cable with M12 male 8-pin
connector loose wire ends
0.22mm² (24AWG) and screen.
Length: 5m (197 inch)
WI1000-M12M8T05N
X
Same as above but 20m (787 inch)
WI1000-M12M8T20N
“IO1”
8pin
male
“IO2”
12pin
Female
“COM”
8pin
Female
Only MAC400 to 3000
Picture
“PWR”
5pin
Male
(picture comming soon)
Protection caps. Optional if connector is not used to protect from dust / liquids.
X
X
X
X
IP67 protection cap for M12
female connector.
WI1000-M12FCAP1
IP67 protection cap for M12
male connector.
WI1000-M12MCAP1
Important: Please note that the cables are a standard type. They are not recommended for use in cable chains or where the cable is repeatedly bent. If this is required, use a special robot cable (2D or 3D
cable).
JVL Industri Elektronik A/S - User Manual - Integrated Servo Motors MAC050 - 3000
149
4.4
4.4.1
Expansion module MAC00-Exx4
Industrial Ethernet modules
The documentation for the industrial Ethernet modules is very extensive and has therefore been placed as a seperate user manual LB0056-xx.
The complete user manual can be downloaded using this link : www.jvl.dk
Following Ethernet modules are available : EthernetIP, ProfiNET, EtherCAT, Powerlink
and soon available Sercos III.
MAC800 users - Important: Please notice that MAC800 motors with a serial number
lower than 85000 do NOT support the Ethernet modules.
150
JVL Industri Elektronik A/S - User Manual - Integrated Servo Motors MAC050 - 3000
4.5
Expansion Module MAC00-FC2/FC4
MAC00-FC4
With M12 connectors
4.5.1
MAC00-FC2
With cable glands
TT1005GB
Introduction to this section
Section 4.3 in the MAC050-141& MAC400-800 user manual deals with JVLs expansion
modules MAC00-FC2/FC4, which are used too build in a MAC motor on a CANopen®
network.
This sections covers:
-
General introduction, a section with general information about CANopen®,
from section 4.3.1 to section 4.3.6
-
Setting up the Baud-rate, node-id and termination of the CAN bus. Covers also the
wiring of the CAN bus. From section 4.3.7 to section 4.3.15
-
How to use CanOpenExplorer and Mac-Talk debug window.
From section 4.3.16 to section 4.3.20.
-
Survey over Communication specific objects and manufacturer specific objects in the
DS301standard. Communication objects are the general information about the settings in the module, where the Manufacturer specific object are the settings of input/
output and the motor parameters. This section also covers the settings of the transmit and receive PDOs in the module. From section 4.3.21 to section 4.3.37.
-
Survey over objects which are used in connection with the DSP-402 standard. From
section 4.3.38 to section 4.3.45.
-
Cables for the MAC00-FC4 section 4.3.46
-
Section with more detail explanations to the CANopen® theory, particularly DS301. From section 4.3.47 to section 4.3.53.
JVL Industri Elektronik A/S - User Manual - Integrated Servo Motors MAC050 - 3000
151
4.5
Expansion Module MAC00-FC2/FC4
4.5.2
CANopen® Introduction
The MAC00-FC2 and FC4 expansion modules are CANopen® slaves. With these modules, all of the registers in the MAC motor can be accessed over a CANopen® network.
The modules implement an object dictionary that follows the CiA® DS-301 standard.
The modules contain a number of statically mapped PDOs that can be used to access the
most common registers. The MAC00-FC2 and FC4 also support the DSP-402 standard
from CiA®.
Expansion modules MAC00-FC2 and FC4 can be mounted on the standard MAC motors
MAC50, MAC95, MAC140, MAC141, MAC400 and MAC800.
Both modules offer the same functionality but with the following hardware differences:
Type
MAC00-FC2
Protection
class
IP67/IP65*
IP67/IP65*
MAC00-FC4
Note*: IP65 on MAC400-800
Connectors
I/O and interface
Power supply
Bus interface
Cable glands
(Mini crimp connectors internally
Cable glands
(Screw terminals internally)
Cable glands x 2
(Screw terminals internally)
M12
M12
M12 (x2)
The MAC00-FC2 module can be delivered with cable in selected lengths. Cables with
M12 connectors can also be supplied for the MAC00-FC4 module.
The MAC00-FC2/FC4 expansion modules is designed to be used on a CANbus, CANopen® DS-301 and CANopen® DSP-402, do not use the module together with CANKingdom or DeviceNet.
4.5.3
CiA® membership
CiA® (CAN in Automation) is a non-profit society, the object of the society is to promote CAN (Controller-Area-Network) image and to provide a path for future developments of the CAN protocol. CiA® specifications cover physical layer definitions as well
as application layer and device profile descriptions.
In order to receive the CANopen® standard, is it necessary to obtain a membership of
the society. The fee for the membership is depending on how many employees you company has. A membership runs from January 1st until December 31st every year. Your
membership is renewed automatically unless you cancel it in writing by the end of a calendar year. Companies applying for membership after July 1st pay just 50 % of the membership for that year.
On www.can-cia.org/cia/application.html can you download a application file in PDF format and fill it in.
When you have received you license from CiA®, you have to be aware that the standards will be sent on a CD. All of the CiA specifications can be ordered on this web-page:
http://www.can-cia.org/index.php?id=6
152
JVL Industri Elektronik A/S - User Manual - Integrated Servo Motors MAC050 - 3000
4.5
Expansion Module MAC00-FC2/FC4
4.5.4
CANopen® network
The CAN bus, is a serial bus with multi-master capabilities where different products from
different manufacturers can communicate with each other. This could be devices as
PLCs, motors, sensors and actuators. Message types have higher priority and are sent
first, for time critical applications. New devices can easily be integrated on a existing bus,
without the need to reconfigure the entire network. The devices are connected through
a 2 wire bus cable, and data is transmitted serially.
Terminator
Terminator
CAN_H
CAN Node
master
CAN network
4.5.5
CAN Node
slave
CAN Node
slave
CAN_L
TT1092GB
CANopen®, general information
CANopen® is a CAN-based higher level protocol. The purpose of CANopen® is to give
an under stable and unique behaviour on the CAN network. The CAN network is the
hardware level of the system, and CANopen® is the software level. CANopen® is based
on the communication profile described in CiA® DS-301, and it specifies all of the basic
communication mechanisms.
CiA® DS-301contains message types on the lowest software level. The DSP-402 CANopen® standard defines the device profile and the functional behaviour for servo drive
controllers, frequency inverters and stepper motor. The DSP-402 is a higher software
level, and it use the DS-301 communication, but is making the device independent of the
manufacturer. If the devices using only the DSP- 402 it is possible that some general data
can be lost.
The CAN bus with real-time capabilities work in accordance with the ISO11898 standard. The major performance features and characteristic of the CAN protocol are described below:
Message-oriented protocol:
The CAN protocol does not exchange data by addressing the recipient of the message,
but rather mark each transmitted message with a message identifier. All nodes in the network check the identifier when they receive a message to see whether it is relevant for
them, messages can there for, be accepted by none, one, several or all participants.
Prioritsation of messages:
As the identifier in a message also determines its priority for accessing the bus, it is possible to specify a correspondingly rapid bus access for messages according to their importance. Especially important messages can thus gain access to the bus without a
prolonged wait-time, regardless of the loading on the bus at that moment.
This characteristic mean that especially important messages are transmitted with priority
even in exceptional situations, thereby ensuring proper functioning of a system even during phases of restricted transmission capacity.
JVL Industri Elektronik A/S - User Manual - Integrated Servo Motors MAC050 - 3000
153
4.5
Expansion Module MAC00-FC2/FC4
Multi-Master capability:
Bus access rights are not issued by a mean-level control unit (bus master) per network.
Each participant can rather start to send a message with equal rights as soon as the bus
has become free. If several participants access the bus at the same time, an arbitration
process allocates each participant the bus access right in line with the priority of the message they want to send at that particular moment. Each participant can therefore communicate directly with every other participant. As the transmission of a message can be
initiated by the message source itself, then in the case of event-controlled transmission
of messages, the bus is only occupied when a new message is on-hand.
No-loss bus arbitration:
As the bus is accessed at random under the CAN protocol, it is possible that several participants want to occupy the bus at the same time. In other random bus access routines,
this causes the destruction of the suppressed messages. In order to solve such a bus access conflict, a repeated occupation of the bus is required using an appropriate triggering
strategy. The CAN protocol therefore deploys a routine to ensure that the message with
the highest priority at any given time is sent without any destruction of message contents.
Short block length:
The maximum data length of a CAN message is limited to 8 bytes. This data length is usually sufficient to transmit the information occurring in the lowest field area in a CAN message.
4.5.6
Header
A CAN message transmits the communications object and a variety of management and
control information. The management and control information bits are used to ensure
error free data transmission, and are automatically removed from the received message
and inserted before a message is sent. A simplified CANopen® message could be as the
figure below:
0....8 Byte
11 bit
Header
0
1
2
3
4
5
6
7
Data frame
TT1093GB
The two bit fields “Header” and “Data” form the simplified CANopen® message. The
11-bit Header are also designated as the identifier or as the COB-ID (Communication
Object identifier).
JVL uses 11-bit format type CAN A, but not 29-bit format type CAN B.
The COB-ID carries out two task for the controller communications object.
- Bus arbitration: Specification of transmission priorities.
- Identification of communications objects.
The COB-ID comprising two sections:
- Function code, 4 bit in size (0....15)
- Node address (Node ID), 7 bit in size (0....127). See section 4.3.12.
154
JVL Industri Elektronik A/S - User Manual - Integrated Servo Motors MAC050 - 3000
4.5
Expansion Module MAC00-FC2/FC4
The function code classifies the communications objects, and controls the transmission
priorities. Objects with a small function code are transmitted with high priority. For example, in the case of a simultaneous bus access an object with the function code “1” is
sent before an object with the function code “3”.
Node address:
Every device is configured before network operation with a unique 7-bit long node address between 1 and 127. The device address “0” is reserved for broadcast transmissions, in which message, are sent simultaneously to all devices.
PDO, SDO, EMCY, NMT and heartbeat are using the header frame for communication
on the CANopen® bus.
4.5.7
Connecting MAC00-FC2/FC4 to the CAN bus
Before you connect the MAC00-FC2/FC4 to the CAN bus shall the Baud-rate, the
Node-ID and the termination must be selected.
On the serial bus it is possible to have a transmission speed (Baud-rate) of max. 1000
Kbit/s and a min. of 10 Kbit/s. The Baud-rate depends on the cable length, and the wires
cross-section, the table below have some recommendations for networks with less than
64 nodes. Recommended bus cable cross-section are according to CiA®:
Bus Distance
(m)
Cross-section (mm2)
Terminator
(ohm)
Baud-rate
(Kbit/s)
25
0.25-0.34
120
1000
100
0.34-0.6
150-300
500
250
0.34-0.6
150-300
250
500
0.5-0.6
150-300
125
500
0.5-0.6
150-300
100
1000
0.75-0.8
150-300
50
The bus wires may be routed in parallel, twisted and/or shielded, depending on EMC requirements. The layout of the wiring should be as close as possible to a single line structure, in order to minimize reflections. The cable stubs for connection of the bus node
shall be as short as possible, especially at high bit rates. The cable shielding in the house
shall have a large contact area. For a drop cable a wire cross-section of 0.25 to 0.34 mm²
would be an appropriate choice in many cases. In section 4.3.46 of this chapter there is
an overview showing various JVL standard cables. All the JVL cables are twisted and
shielded.
For bus lenghts greater than 1 km, a bridge or repeater device is recommended. galvanic
isolation between the bus nodes is optional. The MAC00-FC2 and FC4 modules the galvanic isolation is integrated to obtain best possible immunity against noise and differences
in the voltage potential between the nodes.
JVL Industri Elektronik A/S - User Manual - Integrated Servo Motors MAC050 - 3000
155
4.5
Expansion Module MAC00-FC2/FC4
4.5.8
Necessary accessories to MAC-FC2/FC4:
On our web page www.jvl.dk you can, under the downloads menu find the EDS file for
the MAC00-FC2/FC4 module, in the menu Field bus Interface Specifications Files.
EDS means Electronic Data Sheet. This file contains the information about the MAC00FC2/FC4 settings, that is required to configure the setup and program in the master.
The MAC00-FC2/FC4 is a slave module on the CAN-bus, the master can be for example
a PLC or a PC. If you are using a PLC as master, then make sure that it is provided with
a CANopen® communications module, and that the correct programming tools are
available. For getting support to the PLC master, it is more rewarding to use the PLC
vendor.
If you are using a PC as master JVL have some tools that can help you when you are installing and using the MAC00-FC2/FC4.
The latest firmware for the MAC00-FC2/FC4 module is in the menu downloads/firmware. In the menu for programs you can find the program CanOpen Explorer, this is a
free-ware program.
The CanOpen Explorer program can be used to load the EDS file, and operate with the
motor. The CanOpenExplorer program shall use a special dongle for communication
with the PC, see section 4.3.17 for further information about the dongle. The PC has to
be provided with a CANopen® communications module. In section 4.3.46 there is a survey of cables JVL can supply, for the CAN-bus.
The MacTalk program can be used to monitor various operations and make the initial set
up on the motor see section 1.1 for setting up the MAC motor. In the menu for programs
you can find the program MacTalk, but be aware that this is not a free-ware program.
Please contact your JVL representative for further information.
4.5.9
EDS (Electronic data Sheet)
In order to give the user of CANopen® more support, are the device description available in a standardised way, and it gives the opportunity to create standardised tools for
configuration of CANopen® devices, designing networks with CANopen® devices and
managing project information on different platforms. The EDS file are ASCII-coded.
4.5.10
Preparing the hardware
To make the selection of the Baud-rate, Node-ID and Line termination on the MAC00FC2/FC4 module is it necessary to dismantle the module from the motor, and select it
via the two Dip switches on the rear side of the module, notice that MAC00-FC4 include
one more Dip switch, see section 4.3.15:
Cable glands
Internal circuit boards
TT1069GB
156
CAN-open and I/O
connectors.
Dip Switches placed
on the rear side of the
module
JVL Industri Elektronik A/S - User Manual - Integrated Servo Motors MAC050 - 3000
4.5
Expansion Module MAC00-FC2/FC4
4.5.11
Baud-rate:
The Baud-rate can be set according to the following table, and is selected on the Dip
switch SW1 dip 8-10, as shown on the figure below:
Baud-rate
Dip Switch no. (SW1)
10
9
8
1000 kbit
OFF
OFF
OFF
500 kbit (factory default)
OFF
OFF
ON
250 kbit
OFF
ON
OFF
125 kbit
OFF
ON
ON
100 kbit
ON
OFF
OFF
50 kbit
ON
OFF
ON
20 kbit
ON
ON
OFF
10 kbit
ON
ON
ON
The factory default settings sets the module to have a Baud-rate of 500 kbit.
The Baud-rate is the external communication speed. Please notice that internal execution time can be the main limitation meaning that data will be received at the selected
Baud-rate but not necessarily executed at the same time.
The Baud-rate setting can only be done in the hardware, it is not possible to set this by
using the MacTalk software.
MAC00-FC2 and FC4 Dip switch settings
Rear side of the MAC00-FC2 or FC4
expansion module
Mini dip-switch
OFF
Dip 1-7 - Node-id setting
(address range 0-127)
Dip 8-10 - Baud rate
(Baud rate setting 10k to 1000k)
SW1 Default: Switch1-8 “ON”
and Switch 9+10 “OFF”
ON
1
2
3
4
5
6
7
8
9
0
SW1
TT1070GB
JVL Industri Elektronik A/S - User Manual - Integrated Servo Motors MAC050 - 3000
157
4.5
Expansion Module MAC00-FC2/FC4
4.5.12
Node-ID:
The node-ID can be selected on the Dip switch SW1 Dip 1-7. The address can be set
according to the following table:
If the node-id is set to 127, the node address will be set to the same as the motor address
(can be defined in MacTalk), which is the factory setting for the modules.
Node-id
Dip Switch no. (SW1)
7
0
6
5
4
3
2
Node-id
1
Reserved (illegal setting)
Dip Switch no. (SW1)
7
6
5
4
3
2
1
31
OFF
OFF
ON
ON
ON
ON
ON
1
OFF
OFF
OFF
OFF
OFF OFF
ON
32
OFF
ON
OFF
OFF
OFF OFF
OFF
2
OFF
OFF
OFF
OFF
OFF
ON
OFF
33
OFF
ON
OFF
OFF
OFF OFF
ON
3
OFF
OFF
OFF
OFF
OFF
ON
ON
34
OFF
ON
OFF
OFF
OFF
ON
OFF
4
OFF
OFF
OFF
OFF
ON
OFF
OFF
35
OFF
ON
OFF
OFF
OFF
ON
ON
5
OFF
OFF
OFF
OFF
ON
OFF
ON
36
OFF
ON
OFF
OFF
ON
OFF
OFF
6
OFF
OFF
OFF
OFF
ON
ON
OFF
37
OFF
ON
OFF
OFF
ON
OFF
ON
7
OFF
OFF
OFF
OFF
ON
ON
ON
38
OFF
ON
OFF
OFF
ON
ON
OFF
8
OFF
OFF
OFF
ON
OFF OFF
OFF
39
OFF
ON
OFF
OFF
ON
ON
ON
9
OFF
OFF
OFF
ON
OFF OFF
ON
40
OFF
ON
OFF
ON
OFF OFF
OFF
10
OFF
OFF
OFF
ON
OFF
ON
OFF
41
OFF
ON
OFF
ON
OFF OFF
ON
11
OFF
OFF
OFF
ON
OFF
ON
ON
42
OFF
ON
OFF
ON
OFF
ON
OFF
12
OFF
OFF
OFF
ON
ON
OFF
OFF
43
OFF
ON
OFF
ON
OFF
ON
ON
13
OFF
OFF
OFF
ON
ON
OFF
ON
44
OFF
ON
OFF
ON
ON
OFF
OFF
14
OFF
OFF
OFF
ON
ON
ON
OFF
45
OFF
ON
OFF
ON
ON
OFF
ON
15
OFF
OFF
OFF
ON
ON
ON
ON
46
OFF
ON
OFF
ON
ON
ON
OFF
16
OFF
OFF
ON
OFF
OFF OFF
OFF
47
OFF
ON
OFF
ON
ON
ON
ON
17
OFF
OFF
ON
OFF
OFF OFF
ON
48
OFF
ON
ON
OFF
OFF OFF
OFF
18
OFF
OFF
ON
OFF
OFF
ON
OFF
49
OFF
ON
ON
OFF
OFF OFF
ON
19
OFF
OFF
ON
OFF
OFF
ON
ON
50
OFF
ON
ON
OFF
OFF
ON
OFF
20
OFF
OFF
ON
OFF
ON
OFF
OFF
51
OFF
ON
ON
OFF
OFF
ON
ON
21
OFF
OFF
ON
OFF
ON
OFF
ON
52
OFF
ON
ON
OFF
ON
OFF
OFF
22
OFF
OFF
ON
OFF
ON
ON
OFF
53
OFF
ON
ON
OFF
ON
OFF
ON
23
OFF
OFF
ON
OFF
ON
ON
ON
54
OFF
ON
ON
OFF
ON
ON
OFF
24
OFF
OFF
ON
ON
OFF OFF
OFF
55
OFF
ON
ON
OFF
ON
ON
ON
25
OFF
OFF
ON
ON
OFF OFF
ON
56
OFF
ON
ON
ON
OFF OFF
OFF
26
OFF
OFF
ON
ON
OFF
ON
OFF
57
OFF
ON
ON
ON
OFF OFF
ON
27
OFF
OFF
ON
ON
OFF
ON
ON
58
OFF
ON
ON
ON
OFF
ON
OFF
28
OFF
OFF
ON
ON
ON
OFF
OFF
59
OFF
ON
ON
ON
OFF
ON
ON
29
OFF
OFF
ON
ON
ON
OFF
ON
60
OFF
ON
ON
ON
ON
OFF
OFF
30
OFF
OFF
ON
ON
ON
ON
OFF
61
OFF
ON
ON
ON
ON
OFF
ON
Table continued on next page
158
JVL Industri Elektronik A/S - User Manual - Integrated Servo Motors MAC050 - 3000
4.5
Expansion Module MAC00-FC2/FC4
Address table continued from previous page
Node-id
Dip Switch no. (SW1)
Node-id
7
6
5
4
3
2
1
62
OFF
ON
ON
ON
ON
ON
OFF
63
OFF
ON
ON
ON
ON
ON
64
ON
OFF
OFF
OFF OFF
65
ON
OFF
OFF
66
ON
OFF
67
ON
68
Dip Switch no. (SW1)
7
6
5
4
3
2
1
95
ON
OFF
ON
ON
ON
ON
ON
ON
96
ON
ON
OFF
OFF OFF
OFF
OFF
OFF
OFF
97
ON
ON
OFF
OFF OFF
OFF
ON
OFF OFF
OFF
ON
98
ON
ON
OFF
OFF OFF
ON
OFF
OFF
OFF OFF
ON
OFF
99
ON
ON
OFF
OFF OFF
ON
ON
OFF
OFF
OFF OFF
ON
ON
100
ON
ON
OFF
OFF
ON
OFF
OFF
ON
OFF
OFF
OFF
ON
OFF
OFF
101
ON
ON
OFF
OFF
ON
OFF
ON
69
ON
OFF
OFF
OFF
ON
OFF
ON
102
ON
ON
OFF
OFF
ON
ON
OFF
70
ON
OFF
OFF
OFF
ON
ON
OFF
103
ON
ON
OFF
OFF
ON
ON
ON
71
ON
OFF
OFF
OFF
ON
ON
ON
104
ON
ON
OFF
ON
OFF
OFF
OFF
72
ON
OFF
OFF
ON
OFF
OFF
OFF
105
ON
ON
OFF
ON
OFF
OFF
ON
73
ON
OFF
OFF
ON
OFF
OFF
ON
106
ON
ON
OFF
ON
OFF
ON
OFF
74
ON
OFF
OFF
ON
OFF
ON
OFF
107
ON
ON
OFF
ON
OFF
ON
ON
75
ON
OFF
OFF
ON
OFF
ON
ON
108
ON
ON
OFF
ON
ON
OFF
OFF
76
ON
OFF
OFF
ON
ON
OFF
OFF
109
ON
ON
OFF
ON
ON
OFF
ON
77
ON
OFF
OFF
ON
ON
OFF
ON
110
ON
ON
OFF
ON
ON
ON
OFF
78
ON
OFF
OFF
ON
ON
ON
OFF
111
ON
ON
OFF
ON
ON
ON
ON
79
ON
OFF
OFF
ON
ON
ON
ON
112
ON
ON
ON
OFF OFF
OFF
OFF
80
ON
OFF
ON
OFF OFF
OFF
OFF
113
ON
ON
ON
OFF OFF
OFF
ON
81
ON
OFF
ON
OFF OFF
OFF
ON
114
ON
ON
ON
OFF OFF
ON
OFF
82
ON
OFF
ON
OFF OFF
ON
OFF
115
ON
ON
ON
OFF OFF
ON
ON
83
ON
OFF
ON
OFF OFF
ON
ON
116
ON
ON
ON
OFF
ON
OFF
OFF
84
ON
OFF
ON
OFF
ON
OFF
OFF
117
ON
ON
ON
OFF
ON
OFF
ON
85
ON
OFF
ON
OFF
ON
OFF
ON
118
ON
ON
ON
OFF
ON
ON
OFF
86
ON
OFF
ON
OFF
ON
ON
OFF
119
ON
ON
ON
OFF
ON
ON
ON
87
ON
OFF
ON
OFF
ON
ON
ON
120
ON
ON
ON
ON
OFF
OFF
OFF
88
ON
OFF
ON
ON
OFF
OFF
OFF
121
ON
ON
ON
ON
OFF
OFF
ON
89
ON
OFF
ON
ON
OFF
OFF
ON
122
ON
ON
ON
ON
OFF
ON
OFF
90
ON
OFF
ON
ON
OFF
ON
OFF
123
ON
ON
ON
ON
OFF
ON
ON
91
ON
OFF
ON
ON
OFF
ON
ON
124
ON
ON
ON
ON
ON
OFF
OFF
92
ON
OFF
ON
ON
ON
OFF
OFF
125
ON
ON
ON
ON
ON
OFF
ON
93
ON
OFF
ON
ON
ON
OFF
ON
126
ON
ON
ON
ON
ON
ON
OFF
94
ON
OFF
ON
ON
ON
ON
OFF
127
Node id will be the same as for the motor
JVL Industri Elektronik A/S - User Manual - Integrated Servo Motors MAC050 - 3000
159
4.5
Expansion Module MAC00-FC2/FC4
4.5.13
Bus termination.
If the MAC00-FC2/FC4 is the last device on the CAN bus the module have a build-in terminator of 120 ohm. The dip switch (SW2) is used to enable termination. When both
switches are on, the termination is enabled. In order to guarantee perfect operation of
the CAN bus, bus terminating resistors must be provide at both ends of the bus cable.
The figure below shows the termination selection:
Dip 1-2 - Line termination
Both set to ON =
Term. enabled
Both set to OFF =
Term. disabled
SW2 Default: Switch1 + 2 “OFF”
1
2
SW2
TT0971GB
The factory default settings are OFF on both dip switches, an the line termination are off.
CAN bus connectors:
The MAC00-FC2/FC4 are not using 9-pin D-sub connectors and none of the cables JVL
supplies are provided with 9-pin D-sub, but the PIN configuration is also shown in table
below.
Signal
Description
MAC00-FC2
MAC00-FC4
D-sub
-
Reserved
CAN_L
CAN_L bus line (Low)
B+
Pin 5
Pin 2
CAN_GND
CAN Ground
GND
Pin 3
Pin 3
-
Reserved
(CAN_SHLD)
Optional CAN Shield
(GND)
Optional CAN Ground
CAN_H
CAN_H bus line (High)
-
Reserved (error line)
Pin 8
CAN_V+
Optional CAN ext. + supply
Pin 9
Pin 1
Pin 4
GND
Pin 1
A-
Pin 4
Pin 5
Pin 6
Pin 7
On the next page are there drawings off the 9-pin D-sub and the 5-pin style connector.
160
JVL Industri Elektronik A/S - User Manual - Integrated Servo Motors MAC050 - 3000
4.5
Expansion Module MAC00-FC2/FC4
4.5.14
CanOpenExplorer program
The CanOpenExplorer is a program that was developed for internal use only, especially
in the production, but the program have features that is nice to have, and make it more
easily to start up the MAC motor when this is supply with a MAC00-FC2/FC4 modul.
The program can write and send SDOs, PDOs, SYNC and heartbeat message, and finally
it can reads EDS files.
4.5.15
An overall method for communication test
Depending on which type of master and software solution there are available, shall these
parts be available:
PLC: PLC with a CANopen® module and software that can communicate with this
module. The CANopen® module shall be connected to a CAN bus, as shown in
section 4.3.14 and section 4.3.15. To set up the master, download the EDS file
from the JVL web page, see section 4.3.8. This file contains all register set-up
data for in the MAC00-FC2/FC4. The node-ID, the Baud-rate, and the termination resistor, has to be selected on the module, see from section 4.3.11 to
section 4.3.13. And the power supply has to be connected to the motor as shown
in section 3.2.5.
PC:
PC with a CAN adaptor and software that can communicate with this module,
or if the CanOpen Explorer software is used the PCAN-USB Dongle from
Peak-system that is connected to a USB port on the PC. Peak systems web page
are www.peak-system.com here are a list of distributors. If MacTalk is used, the
PC and the MAC00-FC2/FC4 are connected via the RS232 interface on the
MAC00-FC2/FC4module. To set up the master, download the EDS file from the
JVL web-page, see section 4.3.8. This file contains all register set-up in the
MAC00-FC2/FC4. The node-ID, the Baud-rate, and the termination resistor,
has to be selected on the module, see from section 4.3.11 to section 4.3.13, and
the power supply has to be connected to the motor as shown in section 3.2.5.
If CanOpenExplorer is used, see the following method to test the motor communication:
-
Load CanOpenExplorer.
Connect the motor to the USB port via the Dongle.
Connect power supply, see section 3.2.5.
Run the CanOpenExplorer program on the PC.
1: Select the correct node ID, in the slave.
2: Select the EDS file, for all the MAC motors it is MAC00-fc.eds.
3: Load the EDS file by pressing load.
TT1073GB
2
1
3
JVL Industri Elektronik A/S - User Manual - Integrated Servo Motors MAC050 - 3000
161
4.5
Expansion Module MAC00-FC2/FC4
4: Select here on the +the manufacturer specific register.
5: Select thereafter the object 0x2012. Object 0x2012 contains the motor parameters.
TT1074GB
4
5
6: Point to the sub register 0x02, which is the register which determines in which mode
the motor will operate.
TT1075GB
6
162
JVL Industri Elektronik A/S - User Manual - Integrated Servo Motors MAC050 - 3000
4.5
Expansion Module MAC00-FC2/FC4
Press W on the keyboard, and the following screen appears:
TT1076GB
7: Type 02 in the window, and press OK.
8: Click on the sub register 0x05, which is the register to choose which velocity the motor will run in. Press W on the keyboard, type 100 in the window, and press OK. 100
is in Counts/Sample.
9: Click on the sub register 0x03, which is the register to choose which distance the
motor shall run. Press on W on the keyboard, type 20000 in the window, and type
OK. 20000 is in Encoder Counts
Now shall the motor shaft rotate slowly, until the motor has counted 20000 Encoder
pulses. If you want to stop the motor, when click on sub register 0x02 and write 0 in the
window, and it will switch to passive mode. Now it is possible to change the value in the
register and change the speed and distance for the motor.
If using other software the test could be described as, (using object 2012h):
Subregister
Name
Width
02h
Mode_Reg
16 bit
05h
V_SOLL
16 bit
03h
P_SOLL
32 bit
02h
Mode_Reg
16 bit
Unit
Operation
Value
Set up the motor
in position mode
02h
Counts/sample
Sets up the desired velocity
100h
Encoder count
The motor rotates the
desired numbers of
encoder pulses
20000
Sets the motor
to passive mode
00h
Returning the motor with higher velocity
02h
Mode_Reg
16 bit
05h
V_SOLL
16 bit
03h
P_SOLL
32 bit
02h
Mode_Reg
16 bit
Set up the motor
in position mode
02h
Counts/sample
Sets up the desired velocity
200h
Encoder
count
The motor rotates the
desired numbers of
encoder pulses
-20000
Sets the motor
in passive mode
00h
JVL Industri Elektronik A/S - User Manual - Integrated Servo Motors MAC050 - 3000
163
4.5
Expansion Module MAC00-FC2/FC4
4.5.16
How to use CanOpenexplorer
After startup, the name and details of the HW-interface, like PCAN_USB should appear
upper left.
When you turn on a motor/CAN node after having started CanOpenexplorer, the Data
Window (large center right), there will come a message with the number 0x7xx, where
xx is the node ID - for instance, 0x704 will indicate node 4. Set the Node ID field top
center to that value (4).
Make sure the right EDS_file is loaded. The program loads a hard-coded default file - either smc75.eds or mac00-fc.eds. It is also possible to load another EDS file by writing the
file name in the “EDS file” field top center and pressing the load button. Note that the
EDS view (large center left panel) will add the new file at the bottom but not clear the
existing file(s) loaded.
Normal operation will be to select an object in the EDS view pane, and press either R for
read or W for write. Pressing R should read the value, and that is successful if no error
pops up. pressing w for write will pop up a small window, where the present value is displayed in both decimal and hex. It is then possible to write a new value either in decimal
or in hex using a 0x prefix, like 0x185 to enable the first TPDO on node 5 (by clearing
the high bit). If the Add to list checkbox is checked, the object will be added to the user
SDO list as a write SDO. Pressing A performs a read and Adds it to the user SDO list
pane (lower right) as a read SDO.
The SDOs in the user SDO pane can be rearranged by dragging them with the mouse.
Double click on a user SDO list, will execute the operation, either reading or writing.
The bus state can be changed using the NMT buttons lower left, like Operational to enable PDOs.
The button read user SDOs will read all of the “R” type object in the user SDO list. This
is useful for updating a larger number of values in the EDS view.
The button read user SDOs will write all of the “W” type object in the user SDO list. This
is useful for automated testing.
Entries can be deleted from the user SDO list by selecting them with the mouse and
pressing the delete key.
The sync Time field top right sets the time in milli-seconds for the SYNC messages to be
sent out. SYNCs can be started and stopped using the buttons Enable Sync and the Stop
button to the right of it.
The Guard Time field below the Sync Time field works like SYNC-just for the Guarding
message.
The close button exits the program after saving the list of user SDOs, which will be automatically reloaded on the next program start.
164
JVL Industri Elektronik A/S - User Manual - Integrated Servo Motors MAC050 - 3000
4.5
Expansion Module MAC00-FC2/FC4
4.5.17
MacTalk CAN debug window
The hardware CAN Node chip have a Node Control Register, this controls the initialization, defines the node specific interrupt handling and selects an operation mode. The
Node Control Register have a field call LEC (Last Error Code), this bit field indicates if
the latest CAN message has been correct (No error) or it indicates the type of error,
which has been detected.
The register contains the following fields:
Bit
15-8
7
6
5
4
3
Field
0
BOFF
EWRN
0
RXOK
TXOK
Read
X
X
X
X
X
X
X
X
X
Write
2
1
0
LEC
Where:
Field
Meaning
LEC
Last Error Code
TXOK
Message Transmitted Successfully
0
No successful transmission since last flag reset
1
A message has been transmitted successfully (error free
and acknowledged by at least one other node)
Message Received
Successfully
0
No successful reception since last flag reset.
1
A message has been received successfully.
0
No warning limit exceeded.
1
One of the error counters in the Error Management Logic
reached the error warning limit of 96
0
CAN controller is not in the bus-off state.
1
CAN controller is in the bus-off state
RXOK
EWRN
BOFF
Value
Description
See table below
Error Warning Status
Bus-Off Status
Table for last Error code
LEC
Meaning
Description
000
No error
The latest transfer on the CAN bus has been completed successfully
001
Stuff error
More than 5 equal bits in a sequence have occurred in a part of a received
message where this is not allowed
010
Form error
A fixed format part of a received frame has the wrong format
011
Ack error
The transmitted message was not acknowledged by another node
100
Bit1 error
During a message transmission the CAN node tried to send a recessive level
(1), but the monitored bus value was dominant (outside the arbitration field
and the acknowledge slot)
101
Bit0 error
Two different conditions are signaledby this code:
1. During transmission of a message (or acknowledge bit, active error flag,
overload flag), the CAN node tried to send a dominant level (0), but the
monitored bus value has been recessive.
2. During bus-off recovery, this code is set each time a sequence of 11 recessive bits has been monitored. The CPU may use this code as an indication,
that the bus is not continuously disturbed
110
CRC error
The CRC check sum of the received message was incorrect
111
Reserved
JVL Industri Elektronik A/S - User Manual - Integrated Servo Motors MAC050 - 3000
165
4.5
Expansion Module MAC00-FC2/FC4
Select the MAC00-FCx tab. See the figure below:
TT1098GB
And example of an error message are shown in the figure above
On this error message is there a “Bit0 error” condition on the CAN bus, and the CAN
bus is in the bus-off-state, and a error counter in EWRN has reached the error limits.
To get this information convert 67h to binary 1100111.
166
JVL Industri Elektronik A/S - User Manual - Integrated Servo Motors MAC050 - 3000
4.5
Expansion Module MAC00-FC2/FC4
4.5.18
The DS301 specified Communications objects are:
The different communications objects are shown in table below, to get the default value
in CanOpenExplorer, press on R on the keyboard, and the actual value will be shown.
Name
Index
(hex)
Sub
Index
Data Type
Read
only
Default
Description
0x20192
Contains information about the
device type. See note at top of next
page. Mandatory.
Device type
1000
UNSIGNED32
X
Error
Register
1001
UNSIGNED8
X
Reservation
register
This is the mapping error register,
and it is part of the emergency object. If some of the sub index are
high, an error has occured. See
also section 4.3.21. Mandatory
0
Generic error. Mandatory
1
Current
2
Voltage
3
Temperature
4
Communication (Overrun)
5
Device profile specific
6
Reserved
7
Manufactor specific
1004
Reservation of PDOs
0
X
Reserved numbers of PDOs
1
X
Reserved numbers of syncPDOs
2
X
Reserved numbers of asyncPDOs
Manufacturer device
name
1008
VISIBLE
STRING
X
JVL A/S
Manufacturer hardware
version
1009
VISIBLE
STRING
X
1.0
Manufacturer software
version
100A
VISIBLE
STRING
X
Guard time
100C
UNSIGNED16
Inform about the Guard time in milliseconds. Is only mandatory if the
module does not support heartbeat
Life time
factor
100D
UNSIGNED8
Is the factor, that guard time is multiplicered with, to give the life time for
the node quarding protocol
Heartbeat
time
1017
UNSIGNED8
If the Heartbeat timer is not 0,
Heartbeat is used.
Identity
object
1018
IDENTITY
X
0
1..4
X
4h
Number of entries. Mandatory
1
UNSIGNED32
X
0x0117
Vendor ID, contains a unique value
allocated to each manufactor. 117h
is JVLs vendor ID. Mandatory.
2
UNSIGNED32
X
0x0100
Product Code, identifies a specific
device version. The MAC00-FC2
/FC4 has the product code 100h
3
UNSIGNED32
X
0x20020
Revision number.
4
UNSIGNED32
X
Example: Version x.x
Contain general information about
the module
Serial number
JVL Industri Elektronik A/S - User Manual - Integrated Servo Motors MAC050 - 3000
167
4.5
Expansion Module MAC00-FC2/FC4
Note to “device type” (index 1000).
The device type register is composed of 2 16-bit registers, one register describes which
device profile the module is supports, and the other state which type of motors the module is supports, and possible I/O module. The default value 0192h inform that the
DSP402 Device profile are supported, and the value 0002h announce that the MAC00FC2/FC4 module supports servo drives.
4.5.19
Emergency object
The EMCY (emergency) object is used to transfer an error message to the CANopen®
master, or also to another node which can process the error message. The reaction on
the emergency object is not specified. An emergency object is transmitted only once per
“error event”
The MAC00-FC supports the EMC object (Emergency).
The following error codes can be generated:
Errorcode 1001h: Generic error - Motor error
Errorcode 1002h: Generic error - Limit switch error
Errorcode 1003h: Generic error - Internal communication error
Errorcode 1004h: Generic error - Queue overflow in communication queue.
The EMCY object 1001h are sent as an 8 bit header, an have the following structure:
Byte 0
Byte 1
Byte 2
Byte 3
Byte 4
CANopen®
error code:
MSB 10
CANopen®
error code:
LSB 01
CANopen®
8-bit error
register
MAC motors
ERR_STAT
MSB 16-bit
error register
MAC motors
ERR_STAT
LSB 16-bit
error register
Byte 5
Byte 6
Byte 7
Reserved
Byte 0-1:
Shows which Generic error the module is sending.
Byte 2:
Error register. In the error register it is indicated to which error class the error belongs.
Motor status table:
Bit 0
Overload
Bit 1
Follow error
Bit 2
Function error
Bit 3
Regenerative error
Bit 4
In position
Bit 5
Accelerating
Bit 6
Decelerating
Bit 7
Position
Byte 3-4:
The ERR_STAT register is located in the motor, not in the MAC00-FC2/4 module, but
the SendEmc01 message is sent from the module firmware whenever it receives a status
byte from the motor where the error-bit is set, it then reads register 35 from the motor.
When the error is no longer present, the module will send a NoError EMCY object once.
168
JVL Industri Elektronik A/S - User Manual - Integrated Servo Motors MAC050 - 3000
4.5
Expansion Module MAC00-FC2/FC4
The EMCY object 1002h is sent as an 8 byte message, and has the following structure:
Byte 0
Byte 1
Byte 2
Byte 3
Byte 4
Byte 5
Byte 6
Byte 7
CANopen®
error code:
MSB 10
CANopen®
error code:
LSB 02
CANopen®
8-bit error
register
0
0
0
0
0
EMCY/object 1002h is sent when any of the HW end limits are active. No additional information in bytes 3-7.
The EMCY object 1003h is sent as an 8 byte message, and has the following structure:
Byte 0
Byte 1
Byte 2
Byte 3
Byte 4
Byte 5
Byte 6
Byte 7
CANopen®
error code:
MSB 10
CANopen@
error code:
LSB 03
CANopen@
8-bit error
register
0
0
0
0
0
EMCY/object 1003h is sent when internal communication between the module and the
motor has been disconnected.
The EMCY object 1004h is sent as an 8 byte message, and has the following structure:
Byte 0
Byte 1
Byte 2
Byte 3
Byte 4
Byte 5
Byte 6
Byte 7
CANopen®
error code:
MSB 10
CANopen®
error code:
LSB 04
CANopen®
8-bit error
register
0
0
0
0
0
EMCY/object 1004h is sent in case of overflow in the communications queue between
the module and the motor.
In MAC00-FC2/FC4 none of the error control is enabled then the modules are started
up, because if there is any fault in the system it is impossible to get in contact with the
module. After the module has started up and there is communication between the master and the slave, then turn on the wanted error control mechanism in the object Dictionary, see section 4.3.20.
JVL Industri Elektronik A/S - User Manual - Integrated Servo Motors MAC050 - 3000
169
4.5
Expansion Module MAC00-FC2/FC4
4.5.20
Manufacturer specific object dictionary
Index
(hex)
Sub
Index
Command
2010
0
UNSIGNED
8
Module
parameters
2011
0
UNSIGNED
8
X
1
UNSIGNED
8
X
2
UNSIGNED
8
3
UNSIGNED
8
X
Motor Status
4
UNSIGNED
16
X
Last Motor Error
5
UNSIGNED
8
6
UNSIGNED
8
7
UNSIGNED
8
Input setup
8
UNSIGNED
8
Setup bits
0
UNSIGNED
8
n
UNSIGNED
32
Access to the motor
parameter n
Executes a FastMac
command
Motor
parameters
2012
Type
FastMac
Command
2013
0
UNSIGNED
8
Homing
Torque
2100
0
UNSIGNED
16
Read only
Default
Description
Execute a MAC00-FCx
command
8
Subindex count
Input status
IN1 - IN4, NL, PL
Output
Output setup
0x3F
X
254
1000
Input active level
Subindex count
Defines the torque limit
used during homing with
DSP-402
Writing to these object in CanOpenExplorer is done by pressing W, on the keyboard
when the register in the folder Manufacturer specific is selected. Reading is done by
pressing R.
4.5.21
170
Object 2010h-Subindex 0 Reset
When writing to this object (sub index 0), it is possible to execute some special commands for the MAC00-FCx module. The following commands are available:
Number
Function
0
No operation
1
Reset limit error
2
Reset communication error
3-255
Reserved
JVL Industri Elektronik A/S - User Manual - Integrated Servo Motors MAC050 - 3000
4.5
Expansion Module MAC00-FC2/FC4
4.5.22
Object 2011h – Subindex 1 Input status
This object is used to read out the actual value of the inputs.
Bit
Input
7
6
Reserved
5
4
3
2
1
0
PL
NL
IN4
IN3
IN2
IN1
PL is the positive limit switch input, and NL is the negative limit switch input. IN1-IN4 is
the digital user inputs. On the MAC00-FC2 module are the input connected via J2, and
on the MAC00-FC4 module are the input connected via the M12 connectors marked
I/O.
4.5.23
Object 2011h – Subindex 2 Outputs
With this object the outputs can be controlled.
The value written to this object is directly shown on the outputs if the outputs are not
set to use the default function (see subindex 5).
Bit
7
6
5
Output
4
3
2
Reserved
1
0
O2
O1
01 and 02 are the digital user output 1 and 2. On the MAC00-FC2 module the outputs
are connected via J4, and on the MAC00-FC4 module the outputs are connected via the
M12 connectors marked I/O.
4.5.24
Object 2011h – Subindex 3 Motor status
With this object the status of the motor can be monitored.
Bit
7
6
5
Data
Reserved
Deceleration
Acceleration
4
3
In position Reserved
2
1
0
Limit
switch
Error
Disconnected
Motor
Error
Bit 6:
Bit 5:
Bit 4:
Bit 2:
Bit 1:
Equals 1, if the velocity is decreasing.
Equals 1, if the velocity is increasing.
Equals 1, if the motor is at the commanded position.
Equals 1, if a limit switch has been activated.
Equals 1, if there is a communication error between the MAC00-FC and the
motor. This could occur if the motor has been reset due to a voltage drop.
Bit 0: Equals 1, if there is a fatal motor error. Read subindex 4 to get extended information.
JVL Industri Elektronik A/S - User Manual - Integrated Servo Motors MAC050 - 3000
171
4.5
Expansion Module MAC00-FC2/FC4
4.5.25
Object 2011h – Subindex 4 Last motor status
When a fatal motor error occurs, the ERR_STAT register from the MAC motor is received and can be read from this object.
Motor status table:
Bit 0
Bit 1
Bit 2
Bit 3
Bit 4
Bit 5
Bit 6
Bit 7
4.5.26
Overload
Follow error
Function error
Regenerative error
In position
Accelerating
Decelerating
Position
Object 2011h – Subindex 5 Output setup
This object is used to control the function of the outputs. When bit x = 0, the outputs
are controlled by the object 2011h, subindex 2.
When bit x = 1, the output is controlled by the default function. The default function for
O1 is “In position” and for O2 “Error”.
Bit
7
6
5
Output
4.5.27
2
Reserved
7
Input
1
0
O2
O1
6
Reserved
5
4
3
2
1
0
PL
NL
IN4
IN3
IN2
IN1
Object 2011h – Subindex 7 Input setup
With this object the dedicated function of the inputs can be enabled. When the corresponding bit is 0, the input functions as a normal input. When the corresponding bit is 1,
the dedicated function of the input will be enabled. When the end limit inputs NL or PL
are enabled and one of these is activated, the error action will be executed. The error
action is defined in object 2011h subindex 8.
Bit 1 - “Input Mirror”. Setting this bit will transfer the state of the inputs NL, PL, IN1-4
to the “Input” register in the basic motor. This is usefull if the inputs are used in for example a “eRxP” program (graphic programming).
Notice that only MAC00-FCx Firmware newer than 3.00 supports this feature.
Bit
Input
172
3
Object 2011h – Subindex 6 Input active level
With this object the active level of the inputs can be selected. When bit x = 0, the input
is active low and when bit x = 1, the input is active high.
The default setup for the output is active high.
Bit
4.5.28
4
7
6
Reserved
5
4
3
PL
NL
Reserved
2
1
Input
Mirror
JVL Industri Elektronik A/S - User Manual - Integrated Servo Motors MAC050 - 3000
0
4.5
Expansion Module MAC00-FC2/FC4
4.5.29
Object 2011h – Subindex 8 Setup bits
This object is used for auxiliary setup of the module
Bit
Setup
7
6
Endless
relative
Error
action
5
4
3
Reserved
2
1
0
SCAN_
V_IST
SCAN_
P_IST
SCAN_P_IST: When this bit is 1, the P_IST is scanned all the time. The transmit PDO21
will then send the last scanned position instead of reading the position.
SCAN_V_IST: When this bit is 1, the V_IST is scanned all the time. The transmit PDO22
will then send the last scanned velocity instead of reading the velocity.
Endless relative: When this bit is 1, the endless relative position mode is used when doing
relative positioning in DSP-402. When using this mode, absolute positioning can no longer be used.
Error action: 0= set motor in passive mode, 1 = stop motor by setting velocity to zero.
JVL Industri Elektronik A/S - User Manual - Integrated Servo Motors MAC050 - 3000
173
4.5
Expansion Module MAC00-FC2/FC4
4.5.30
Object 2012h – Motor parameters
With this object all the registers of the MAC motor can be accessed. All the registers are
accessed as 32 bit. When reading and writing to 16 bit registers, the values are automatically converted in the module. In addition to these features listed in the table below,
many more are accessible. In total, the MAC motor contains more than 150 internal registers such as nominal velocity, actual position, etc. But please note that several registers
are not for the normal user and damage may occur if the contents of these registers is
changed. The table shows the most commonly used registers.
Subindex
Read/
Write
Default
(Hex)
Name
Data
type
00
Number of entries
UNSIGNED8
Read
253
01
PROG_VERSION
VISIBLE_STRING
Read
120
02
MODE_REG
UNSIGNED16
Write
03
P_SOLL
UNSIGNED32
Write
Encoder
counts
The commanded
position
05
V_SOLL
UNSIGNED16
Write
Counts/
sample
Desired velocity
06
A_SOLL
UNSIGNED16
Write
Counts/
sample2
The maximum allowed acceleration
07
T_SOLL
UNSIGNED16
Write
0A
P_IST
UNSIGNED32
Read
Encoder
counts
The actual position
0C
V_IST
UNSIGNED16
Read
Counts/
sample
The actual velocity
0E
GEAR_1=0
Integer
Write
Gear output factor
used in gear mode
0F
GEAR_2=0
Word
Write
Gear input factor
used in gear mode
10
I2T
Word
Read
Motor temperature
calculated
11
I2tLIM
Word
Read
Error trip level used
for I2T register
1C
MIN_P_IST
Long int
Read
(HEX)
Unit
Description
0: Passive mode
1: Velocity mode
2: Position mode
3: Gear mode
4: Analog Torque mode
5: Analog Velocity mode
6: Analog Velocity/Gear
mode
7-11: Reserved
12: Torque Zero Search
13: Sensor type1 Zero
search
14: Sensor type2 Zero
search
The maximum
allowed torque
Encoder
counts
Software position
limit-positive
Continued next page
174
JVL Industri Elektronik A/S - User Manual - Integrated Servo Motors MAC050 - 3000
4.5
Expansion Module MAC00-FC2/FC4
Subindex
(Hex)
Name
Data
type
Read/
Write
1E
MAX_P_IST
Long int
20
ACC_EMERG
21
Default
Unit
Description
Read
Encoder
counts
Software position limit
negative
Word
Write
Counts/
sample2
The maximum allow deceleration when a Unrecoverable error has
occurred
INPOSWIN
Word
Write
Encoder
counts
If actual position is within
this window, the motor is
in position
22
INPOSCNT
Word
Samples
The number of samples
the motor has to be within
the pos. interval spec.in
INPOSWIN
23
ERR_STAT
Unsigned16
Read
(HEX)
Motor status:
Bit 0: Overload
Bit 1: Follow error
Bit 2: Function error
Bit 3: Regenerative error
Bit 4: In position
Bit 5: Accelerating
Bit 6: Decelerating
Bit 7: Position limits error
4.5.31
Object 2013h – Subindex 0 FastMac command.
When writing to this object, a FastMac command is executed. Please refer to the
MAC00-FPx section for a description of the FastMac commands.
4.5.32
Enable and Disable PDOs
In the CANOpen® profile it is only possibly to have four transmit and four receive PDOs
enabled at the same time. In the MAC00-FC2/FC4 all PDOs are disabled when the module is booted up, the user has to choose which PDOs the application will use, and enable
these.
To enable or disable a PDO it is necessary to write to the MSB (bit 31) in the PDO COBID entry in the PDO communication parameter Record. The COB-ID register is sub-index 1h, and the value range of this register is UNSIGNED32.
The PDOs are enabled when bit 31 is 0, and is disabled when bit 31 is 1.
JVL Industri Elektronik A/S - User Manual - Integrated Servo Motors MAC050 - 3000
175
4.5
Expansion Module MAC00-FC2/FC4
The table below shows default value of the COB-ID:
PDO
Subindex
Type
Description
Default
Access
type
21
1
Receive
COB-ID
Nodeid+0x80000200
r/w
1
Transmit
COB-ID
Nodeid+0x80000180
r/w
1
Receive
COB-ID
Nodeid+0x80000300
r/w
1
Transmit
COB-ID
Nodeid+0x80000280
r/w
1
Receive
COB-ID
Nodeid+0x80000400
r/w
1
Transmit
COB-ID
Nodeid+0x80000380
r/w
1
Receive
COB-ID
Nodeid+0x80000500
r/w
1
Transmit
COB-ID
Nodeid+0x80000480
r/w
1
Transmit
COB-ID
Nodeid+0x80000480
r/w
22
23
24
25
Remark: Some PLC’s count PDO’s starting from 1. Other PLC’s count from 0. If counting
from 0 please subtract 1 from the above mentioned PDO numbers.
4.5.33
Receive PDOs
The PDOs 1-20 are reserved for use with the DSP-402 (CANopen® motion control
profile). The following receive PDOs are available:
Receive PDO 21:
This PDO can be used to update the position. The data in the PDO is written directly to
the position register and if the motor is in position mode, it will start moving to that po
sition.
Byte
0
1
Data
2
3
P_SOLL
Object
4
5
6
7
Reserved
Reserved
Reserved
Reserved
2012h, sub 3
Receive PDO 22:
With this PDO it is possible to update the velocity, acceleration and torque.
Byte
0
Data
Object
1
2
3
4
5
6
7
V_SOLL
A_SOLL
T_SOLL
MODE_REG
2012h, sub 5
2012h, sub 6
2012h, sub 7
2012, sub 2
Receive PDO 23:
This PDO sets a new operating mode for the motor.
Byte
Data
Object
0
1
2
3
4
5
6
7
FastMac
Command
Reserved
Reserved
Reserved
Reserved
Reserved
Reserved
Reserved
2013h,
sub 0
Add 96 to the FastMac command number. For example command 23 becomes 119 (decimal)
176
JVL Industri Elektronik A/S - User Manual - Integrated Servo Motors MAC050 - 3000
4.5
Expansion Module MAC00-FC2/FC4
Receive PDO 24:
This PDO updates the outputs.
Byte
4.5.34
0
1
2
Data
Output
data
Reserved
Reserved
Object
2011h,
sub 2
3
4
Reserved
5
6
7
Reserved Reserved Reserved Reserved
Transmit PDOs
The transmit PDOs 1-20 are reserved for use with the DSP-402 (CANopen® motion
control profile).
All of the transmit PDOs support synchronous transmission, and PDO 25 also supports
asynchronous transmission.
Transmit PDO 21:
With this PDO the actual position can be read.
Byte
0
1
4
5
6
7
P_IST
Motor Status
Inputs
Reserved
Reserved
2012h, sub 10
2011h, sub 3
2011h, sub 1
Data
Object
2
3
Transmit PDO 22:
With this PDO the actual velocity can be read.
Byte
0
Data
1
V_IST
Object
2
3
4
Reserved
Reserved
Reserved
5
6
Reserved Reserved
7
Reserved
2012h, sub 12
Transmit PDO 23:
With this PDO the actual torque can be read.
Byte
0
Data
1
VF_OUT
Object
2
3
Reserved Reserved
4
Reserved
5
6
7
Reserved Reserved Reserved
2012h, sub 121
Transmit PDO 24:
With this PDO the value of the analog input can be read.
Byte
Data
Object
0
1
ANINP
2
3
4
Reserved
Reserved
Reserved
5
6
Reserved Reserved
7
Reserved
2012h, sub 122
JVL Industri Elektronik A/S - User Manual - Integrated Servo Motors MAC050 - 3000
177
4.5
Expansion Module MAC00-FC2/FC4
Transmit PDO 25:
With this PDO the motor status, inputs and last error can be read.
This PDO also supports asynchronous transmission. If this PDO is in asynchronous
mode, it will be transmitted every time the run status or inputs are changed.
Byte
4.5.35
0
1
2
3
Data
Motor
Status
Inputs
Last motor error
Object
2011h,
sub 3
2011h,
sub 1
2011h, sub 4
4
Reserved
5
6
Reserved Reserved
7
Reserved
Transmission time
Due to the internal communication between the motor and the MAC00-FCx, the PDOs
takes a certain time to process. The following table shows the processing time for the
PDOs
PDO number
21
22
23
24
25
Receive PDO
8.5ms
21ms
<1ms
<1ms
-
Transmit PDO
12.5ms
(<1ms)*
10.5ms
(<1ms)**
10.5ms
10.5ms
<1ms
*:
Note that Transmit PDO21 is faster if P_IST scanning is enabled. (See object 2011h
subindex 8).
** : Note that Transmit PDO22 is faster if V_IST scanning is enabled. (See object 2011h
subindex 8).
If the received PDOs are transmitted faster than the internal processing time, an internal
queue overflow occurs (See emergency object). If the SYNC object interval is smaller
that the processing time of the active transmit PDOs, an internal queue overflow error
occurs.
178
JVL Industri Elektronik A/S - User Manual - Integrated Servo Motors MAC050 - 3000
4.5
Expansion Module MAC00-FC2/FC4
4.5.36
DSP-402 Support
Introduction
The MAC00-FCx supports the DSP-402 standard from CiA®
(http://www.can-cia.com/).
Please refer to this standard for full details of the functions.
The DSP-402 is only a standard proposal and might be changed in the future. We reserve
the right to change future firmware versions to conform to new versions of the standard.
Not all of the functionality, described in DSP-402, is supported. But all the mandatory
functions are supported.
The following operation modes is supported:
- Profile position mode
- Velocity mode
- Homing mode
Precondition:
Before the DSP-402 mode can be used, the firmware in the FCx module must be updated to at least version 1.3.
The start mode of the motor must be set to passive.
No power up Zero searches must be selected.
If absolute movement is used, the ’resynchronize after passive mode’ must be set.
When using DSP-402 mode, manipulating parameters with object 2012h or 2013h can
corrupt the behaviour of the DSP-402 functions. Also be aware that manipulating parameters in MacTalk should be avoided when using DSP-402.
JVL Industri Elektronik A/S - User Manual - Integrated Servo Motors MAC050 - 3000
179
4.5
Expansion Module MAC00-FC2/FC4
4.5.37
Supported objects
Most of the DSP402 parameters start up in the module with-coded values. A few of them
are set depending on the motor type the module is attached to - either MAC50-141 or
MAC400-800. None of the parameters can be saved to flash in the module.
The following table shows the additional object dictionary defined for DSP-402 support.
The numbers in brackets, in the update/write field, bold, refer to the formula for the
factors in the section 4.3.40
(hex)
Subindex
Motor_type
6402
0
10
Motor_catalog_number
6403
0
MACxxx
Motor_manufacturer
6404
0
JVL A/S
http_motor_catalog_address
6405
0
www.JVL.dk
Supported_drive_modes
6502
0
45
Drive_catalog_number
6503
0
MACxxx
Drive_manufacturer
6504
0
JVL A/S
http_drive_catalog_address
6505
0
www.JVL.dk
Digital_inputs
60FD
0
Digital_outputs_numbers_of_entries
60FE
0
Digital_outputs_Physical_outputs
60FE
1
HW output
0
Imm. See formula (7)
in section 4.3.40
Digital_outputs_Bit_mask
60FE
2
HW output
0
Imm. See formula (7)
in section 4.3.40
Name
Desc
COB
ID
Motor
register
InitValue
Scalefactor
to motor
Update/
write
Device data
Digital I/O
When HW inputs or
motor status (change)
See formula (6) in section 4.3.40
Motor
status
2
Device control
Abort_connection_option_code
N/U
6007
0
Error_code
N/U
603F
0
Controlword
6040
0
Statusword
6041
0
Quick_stop_ortion_code
605A
2
Modes_of_operation
6060
0
Mode_of_operation_display
6061
0
Position_actual_value
6064
0
Target_position
607A
0
Software_position_limit_number_
of_entries
607D
0
0
Software_position_limit_
Min_position_limit
607D
1
0
0
Software_position_limit_
Max_position_limit
607D
2
0
0
Position_window
6067
0
Z1
100
Position_factor
Imm.
Position_window_time
6068
0
INPOSCNT
6
SamleFreq/1000
Imm
Used in state machine
Profile Position parameters
Max_motor_speed
N/U
6080
0
Profile_velocity
N/U
P1
1/Position_factor
BusyRead
Position_factor
Positionmode when bit
in Controlword is set
5000 or 4000
6081
0
V1
100
Velocity_factor
Imm
Profile_acceleration
6083
0
A1
15000
Acceleration_
factor
Imm
Quick_stop_deceleration
6085
0
A2
50000
Acceleration_
factor
Imm
6086
0
Motion_profile_type
N/U
0
Continued on next page
180
JVL Industri Elektronik A/S - User Manual - Integrated Servo Motors MAC050 - 3000
4.5
Expansion Module MAC00-FC2/FC4
(hex)
Subindex
Motor
register
6069
0
V_IST
606B
0
Velocity_actual_value
606C
0
V_IST
1/(Velocity_factor*16)
BusyRead
Velocity_window
606D
0
Z1
100
Velocity_factor/16
Imm
Velocity_window_time
606E
0
INPOSCNT
6
SampleFreq/1000
Imm
Imm + StartVelocity mode
Imm
Name
Desc
COB
ID
Initial
Value
Scalefactor to
motor
Update/
write
Profile velocity mode
Velocity_sensor_actual_value
Velocity_demand_value
N/U
BusyRead
(Copied from target
velocity on updated)
Target_velocity
60FF
0
V1
50
Velocity_factor or
Velocity_factor depending on polarity
Max_torque
6072
0
T1 and
TSOLL
1000
1.023
Home_offset
607C
0
P_HOME
Homing_method
6098
0
6099
0
Horming_speeds_Speeds_
during_search_for_switch
6099
1
V1
50
+/- Velocity_factor
At homing
Horming_speeds_Speeds_
during_search_for_zero
6099
2
V2
50
Velocity_factor
At homing
Homing_acceleration
609A
0
ASOLL
5000
Acceleration_factor
At homing
Homing mode
Homing_speeds_number_
of_entries
RO
During homing
See (8) in section
4.3.40
See homing describ.
2
Factors
Position_notation_index
N/U
6089
0
0
Postion_dimension_index
N/U
608A
0
0xAC
Velocity_notation_index
N/U
608B
0
0
Velocity_dimension_index
N/U
608C
0
0xA4
Accelleration_Notation_index
N/U
608D
0
0
Accelleration_dimension_index
N/U
608E
0
0
Position_encoder_resolution_
number_of_entries
RO
608F
0
2
Position_encoder_resolution_
Encoder_increment
608F
1
4096 or
8000
Not CF_Upd,
>Position_factor
Position_encoder_resolution_
Motor_revolution
608F
2
1
CF_Upd,
>Position_factor
Velocity_encoder_resolution_
number_of_entries
RO
6090
0
2
Velocity_encoder_resolution_
encoder_increments_per_second
N/U
6090
1
4096 or
8000
Velocity_encoder_resolution_
motor_resolution_s_per_second
N/U
6090
2
1
Gear_ratio_number_of_entries
RO
6091
0
2
Gear_ratio_Motor_revolutions
6091
1
CF Upd,>
Position_factor
Gear_ratio_Shaft_revolutions
6091
2
CF Upd,>
Position_factor
Feed_constant_number_
of_entries
RO
6092
0
2
See formula (4) in
section 4.3.40
Feed_constant_Feed
N/U
6092
1
4096 or
8000
In CF_Upd
6092
2
1
CF Upd,
>Position_factor
>Feed_constant
>PFactorNumerator
Feed_constant_
Shaft_revolutions
Position_factor_number_
of_entries
RO
6093
0
2
See formula (1) in
section 4.3.40
Position_factor_Numerator
N/U
6093
1
1
In CF_Upd
See formula (5) in
section 4.3.40
6093
2
Position_factor_Feed_constant
Continued on next page
JVL Industri Elektronik A/S - User Manual - Integrated Servo Motors MAC050 - 3000
181
4.5
Expansion Module MAC00-FC2/FC4
Name
Desc.
COB
ID (hex)
Subindex
Veloctity_encoder_factor_
number_of_entries
RO
6094
0
2
See formula (2)
in section 4.3.40
6094
1
4096 or 8000
CF_Upd,
>Velocity_factor
2
60
CF_Upd,
>Velocity_factor
Velocity_encoder_factor_
Numerator
Velocity_encoder_factor_
Divisor
Acceleration_factor_number_
of_entries
Motor
register
Initial
Value
Scalefactor
to motor
RPM
6094
RO
6097
0
2
See formula (3)
in section 4.3.40
6097
1
4096 or 8000
CF_Upd.>
Acceleration_
factor
60
CF_Upd Acceleration_factor
Acceleration_factor_
Numerator
Acceleration_factor_Divisor
RPM
6097
2
Polarity
Bit7:
InvPos.
Bit6:
InvVel.
607E
0
CF_Upd,
>Position_factor
>Velocity_factor
Not CF_Upd,
>Velocity_factor
>Acceleration_
factor
520.833 or
770
SampleFreq
Homing_Torque
Update/
write
T_HOME
500 in V2.0,
30 in V2.1
1.023
At start of
homing
2100
0
Inputs status
2011
1
Outputs
2011
2
Motor status
2011
3
Last motor status
2011
4
0
See section 4.3.27
Output setup
2011
5
0
See section 4.3.28
Input active level
2011
6
0x3F
See section 4.3.29
Input setup
2011
7
0
See section 4.3.30
Setup bits
2011
8
See section 4.3.31
Data (256 motor registers)
2012
x
See section 4.3.32
Fastcommand (Send FastMac
command)
2013
0
See section 4.3.33
Module Parameters:
182
See section 4.3.24
0
See section 4.3.25
See section 4.3.26
JVL Industri Elektronik A/S - User Manual - Integrated Servo Motors MAC050 - 3000
4.5
Expansion Module MAC00-FC2/FC4
4.5.38
Factors
Position_factor. (1) in section 4.3.39
The position factor is the relation between the user unit and the internal position unit
(counts). The position factor is automatically calculated when the feed constant (Object
6092h) and gear ratio (Object 6091h) are set.
Example:
We have a MAC motor with a 3.5:1 gear box connected to a belt drive. The diameter of
the drive wheel is 12.4 cm. We want the unit of position to be in millimetres.
The circumference of the drive wheel is 389.56mm (124mm*pi). The parameters should
be set as follows:
Object
Name
Value
6091h subindex 1
Gear_ratio_Motor_revolutions
35
6091h subindex 2
Gear_ratio_Shaft_revolutions
10
6092h subindex 1
Feed_constant_Feed
38956
6092h subindex 2
Feed_constant_Shaft_revolutions
100
Please note that it is not necessary to set the encoder resolution. This is automatically set
by the module.
Positions_factor formula:
Position_factor=
Gear_ratio_Motor_rev.*Feed_constant_Shaft_Rev.*Position_encoder_res._Encoder_Increments
Feed_constant_Feed*Feed_constant_Shaft_rev.*Position_encoder_res._Motor_rev.
or as and object:
Position_factor=
Object 6091sub1*Object 6092sub2*Object 608Fsub1
Object 6092sub1*Object 6092sub2*Object 608Fsub2
The Position_factor is calculated to in the above example:
Position_factor=
35*100*4096
38956*10*1
=
36,8
for a MAC50-141. For and MAC800, shall 4096 be chanced to 8000.
Velocity_encoder_factor. (2) in section 4.3.39.
This factor is used to convert the user unit into the internal unit (counts/sec).
The factor is adjusted via object 6094h.
Example 1:
We have a MAC800 motor with 8000 counts/revolution. We want the user unit of the
velocity to be in RPM. The parameters should be set as follows:
Object
Name
Value
6094h subindex 1
Velocity_encoder_factor_Numerator
8000
6094h subindex 2
Velocity_encoder_factor_Divisor
60
JVL Industri Elektronik A/S - User Manual - Integrated Servo Motors MAC050 - 3000
183
4.5
Expansion Module MAC00-FC2/FC4
Velocity_encoder_factor formula:
Velocity_encoder_factor=
Velocity_encoder_factor_Numerator
Velocity_encoder_factor_Divisor
*
16
SampleFreq
notice that the samplefrequens is differens in MAC050-141.
Or as and object:
Velocity_encoder_factor=
Object 6094sub1
16
*
Object 6094sub2
Samplefreq
The Velocity_encoder_factor in example 1 is calculated to:
Velocity_encoder_factor=
8000
60
*
16
=
770
2,77 RPM
Example 2:
We have a MAC800 motor with 8000 counts/revolution and the same belt drive as in the
above example under Position_Factor. We want the user unit of the velocity to be in
mm/s. The parameters should be set as follows:
Object
Name
Calculated value
Value
6094h subindex 1
Velocity_Encoder_Factor_
Numerator
389.56/(3.5*8000)
=0.013913
13913
6094h subindex 2
Velocity_Encoder_Factor_Divisor
1
1000000
The Velocity_encoder_factor in example 2 is calculated to:
Velocity_encoder_factor=
13913
1000000
*
16
770
=
0,000289 mm
Acceleration_factor. (3) in section 4.3.39.
This factor is used to convert the user unit into the internal unit (counts/sec²).
The factor is adjusted via object 6097h.
Example 1:
We have a MAC800 motor with 8000 counts/revolution. We want the user unit of the
acceleration to be in RPM/s. The parameters should be set as follows:
Object
Name
Value
6097h subindex 1
Acceleration_factor_Numerator
8000
6097h subindex 2
Acceleration_factor_Divisor
60
Acceleration_factor formula:
Acceleration_factor=
184
Acceleration_factor_Numerator
Acceleration_factor_Divisor
*
16
SampleFreq*SampleFreq
JVL Industri Elektronik A/S - User Manual - Integrated Servo Motors MAC050 - 3000
4.5
Expansion Module MAC00-FC2/FC4
or as and object:
Acceleration_factor=
Object 6097sub1
Object 6097sub2
*
16
Samplefreq*Samplefreq
notice that the samplefrequens is differens in MAC050-141.
The Acceleration_factor in example 1 is calculated to:
Accelerationr_factor=
8000
*
60
16
770*770
=
0,003598 RPM/s
Example 2:
We have a MAC800 with 8000 counts/rev. and the same belt drive as in the above example under Position_Factor. We want the user unit of the acceleration to be in mm/s².
The parameters should be set as follows:
Object
Name
Calculated value
Value
6097h subindex 1
Acceleration_Encoder_Factor_
Numerator
389.56/(3.5*8000)
=0.013913
13913
6097h subindex 2
Acceleration_Encoder_Factor_
Divisor
1
1000000
The Acceleration_factor in example 2 is calculated to:
Accelerationr_factor=
13913
*
1000000
16
770*770
=
3,75*10-7 mm/s2
Feed_constant_factor. (4) in section 4.3.39.
Feed_constant_factor formula:
Feed_constant_factor=
Feed_constat_Feed
Feed_constant_Shaft_revolutions
or as and object:
Feed_constant_factor=
Object 6092sub1
Object 6092sub2
Position_factor_Numerator (5) in section 4.3.39.
Position_factor_Numerator formula
Position_factor_Numerator=
Feed_constant_Feed*Position_factor
Feed_constant_Shaft_revolutions
or as and object:
Position_factor_Numerator=
Object 6092sub1*Position_factor
Object 6092sub2
JVL Industri Elektronik A/S - User Manual - Integrated Servo Motors MAC050 - 3000
185
4.5
Expansion Module MAC00-FC2/FC4
Digital Inputs (6) in section 4.3.39.
Bits 31:
Bits 23:
Bit 2:
Bits 1:
Bits 5:
24 The Motor Status register (2011-3)
16 HardWareInputs (2011-1) - the 6 HW-inputs on the module
Home sensor state
0
4 from (HardwareInputs ANDed with InputSetup (2011-7)) - (in reality in
puts 5 and 6)
DititalInputs= ((UINT32)Inputs<<16)
((UINT32)MotorStatus<<24
(((Inputs & InputSetup)>>4) & 0x3)
(unsigned char)P5_P0<<2
Outputs (7) in section 4.3.39.
Outputs=((DigitalOutputs & OutputMask)>>16) & 0x3
Note that the module outputs come from the manufacturer specific bits 17:16 and that
bit 0, Set Brake, is not implemented.
Home offset (8) in section 4.3.39.
P_Home=-(PositionFactor*HomeOffset)+HomeTable[Method].HomeOffset*IndexDistance*UseIndex
4.5.39
Changing operation mode
A change of operation mode is only possible when the operation mode is not enabled.
There are two exceptions and one is when changing from homing mode to profile position mode. This is possible when the homing sequence is completed and can be done
even though the operation mode is enabled. The other exception is when changing from
profile position mode into velocity mode.
4.5.40
Profile position mode
This mode can be used for positioning where a movement profile can be set up. The acceleration and maximum velocity can be programmed.
In this mode, both absolute and relative moves are supported. The type of move is selected via bit 6 (abs/rel) in the status word. When a relative move is selected, the type of
relative move is dependent on the setup in object 2011h subindex 8.
It is also possible to select different movement modes. This is done using bit 5 (change
set immediately) in the status word. When this bit is 0 and a move is in progress, the new
set-point is accepted. But the new set-point and profile are not activated before the previous movement is finished. When this bit is 1, the new set-point is activated instantly and
the motor will move to the new position with the new profile parameters.
Please note:
- The torque limit that is used during the profile can be set via object 6072h.
- The register L1 (object 2012 subindex 81) is used to select the load factor when the
profile is started. If a different load factor is required, this register must be set correctly.
186
JVL Industri Elektronik A/S - User Manual - Integrated Servo Motors MAC050 - 3000
4.5
Expansion Module MAC00-FC2/FC4
4.5.41
Velocity mode
In this mode the motor runs at a selected velocity. A new velocity can be selected and
the motor will then accelerate/decelerate to this velocity.
The maximum slippage error is not supported in this mode.
Please note:
- The torque limit can be set via object 6072h.
4.5.42
Homing mode
In this mode different homing sequences can be initiated. The standard homing modes
from section 4.3.22 are supported.
The home sensor must be connected to the AIN input on the module.
If the end limit inputs must be active during the homing sequence, they must be enabled
via object 2011h subindex 7.
The sensors should be connected to the appropriate inputs NL and PL.
The torque limit used during homing is selected via object 2100h. The unit of this is object is the same as other torque objects, e.g. Object 6072h.
There are also 4 manufacturer specific methods. These are listed in the table below.
Method
Uses
index
Description
-1
Yes
Torque homing in negative direction and afterwards homing on the
index pulse.
-2
Yes
Torque homing in positive direction and afterwards homing on the index pulse.
-3
No
Torque homing in negative direction.
-4
No
Torque homing in positive direction.
Please note that you should always use a home offset (object 607Ch) when using torque
homing. This is to ensure that the motor moves away from the end limit. The sign of the
home offset should be the opposite of the homing direction. For example, when using a
negative homing direction, the home offset could be 5000.
JVL Industri Elektronik A/S - User Manual - Integrated Servo Motors MAC050 - 3000
187
4.5
Expansion Module MAC00-FC2/FC4
4.5.43
Supported PDOs
Receive PDOs
no.
Mapping
object
index
Mapping object
name
Comment
1
6040h
Controlword
Controls the state machine
2
6040h
6060h
Modes of operation
Controls the state machine and modes of operation
3
6040h
607Ah
Controlword
Target position (pp)
Controls the state machine and the target position (pp)
4
6040h
60FFh
Controlword
Target velocity (pv)
Controls the state machine and the target velocity (pv)
7
6040h
60FEh
Controlword
Digital outputs
Controls the state machine and the digital outputs
PDO
Transmit PDOs
no.
Mapping
object
index
Mapping object
name
Event
driven
Comment
1
6041h
Statusword
Yes
Shows status
2
6041h
6061h
Modes of operation
Yes
Shows status and the current mode of
operation
3
6041h
6064h
Statusword
Position actual value
No
Shows status and the current position (pp)
4
6041h
606Ch
Statusword
Velocity actual value
No
Shows status and the current velocity (pv)
7
6041h
60FDh
Statusword
Digital inputs
Yes
Controls the state machine and the digital
inputs
PDO
188
JVL Industri Elektronik A/S - User Manual - Integrated Servo Motors MAC050 - 3000
4.5
Expansion Module MAC00-FC2/FC4
4.5.44
CANopen® DS-301 device profiles
Standardized devices in CANopen® have their characteristics described in a device profile. For each device profile, particular data and parameters are strictly defined, data and
parameters are know as objects in CANopen. Objects perform all processes in CANopen®, they can perform various task, it can be as a communication object or as device
specific objects, where they are directly related to the device. A communication object
can transport data to the bus control and establish connection, or supervise the network
devices.
The application layer makes it possible to exchange meaningful real-time-data across the
CAN network, the format of this data and it’s meaning must be known by the producer
and the consumer(s). There are encoding rules that define the representation of values
of data types and the CAN network transfer syntax for the representations. Values are
represented as bit sequences. Bit sequences are transferred in sequences of octets
(byte). For numerical data types the encoding is with the lowest byte first.
Every object is described and classified in the object dictionary (or index) and is accessible
though the network. They are addressed using a 16 bit index so that the object dictionary
may contain a maximum of 65536 entries.
Supported by
MAC00-FC2/FC4
Index (Hex)
Object
0000-
Not used
0001-001F
Static data types
0020-003F
Complex data types
0040-005F
Manufacturer specific Data Types
0060-0FFF
Reserved for further use
1000-1FFF
Communication Profile area DS301
Yes
2000-5FFF
Manufacturer specific profile area
Yes
6000-9FFF
Standardised Device Profile area (DSP-402)
Yes
A000-FFFF
Reserved for further use
Index 0001-001F:
Static data types contain type definitions for standard data types like boolean, integer,
floating point etc. These entries are included for reference only, they cannot be read or
written.
Index 0020-003F:
Complex data types are pre-defined structures that are composed out of standard data
types and are common to all devices.
Index 0040-005F:
Manufacturer specific data types are also structures composed of standard data types but
are specific to a particular device.
Index 1000-1FFF:
The communication Profile area contains the parameters for the communication profile
on the CAN network. These entries are common to all devices.
Index 2000-5FFF:
The manufacturer specific profile area, for truly manufacturer specific functionally.
JVL Industri Elektronik A/S - User Manual - Integrated Servo Motors MAC050 - 3000
189
4.5
Expansion Module MAC00-FC2/FC4
Index 6000-9FFF:
The standardised device profile area, contains all data objects common to a class of devices that can be read or written via the network. The drives profile uses entries from
6000h to 9FFFh to describe the drive parameter and the drive functionality. Within this
range up to 8 devices can be described. In such a case the device are denominated Multi
Device Modules. Multi Device Module are composed of up to 8 device profile segments.
By this feature it is possible to build devices with multiple functionality. The different device profile entries are shifted with 800h.
A 16-bit index is used to address all entries within the object dictionary. In case of a simple variable this references the value of this variable directly. In case of records and arrays
however, the index addresses the whole data structure. To allow individual elements of
structures of data to be accessed via the network a sub-index has been defined. For single
object dictionary entries such as and Unsigned8, Boolean, Integer32, the value for the
sub-index is always zero. For complex object dictionary entries such as arrays or records
with multiple data fields the sub-index refers to fields within a data-structure pointed to
by the main index. Index counting starts with one.
The DS-301standard is the application and the communications profile for a CANopen®
bus, and is the interface between the devices and the CAN bus. It defines the standard
for common data and parameter exchange between other bus devices, and it controls
and monitors the devices in the network. In the table below are listed some of the communications profile objects:
Data
Transfer
Parameter
Transfer
Special
functions
PDO
Process Data Objects
SDO
Service Data Objects
SYNC
Synchronisation
EMCY
Emergency
The access from the CAN network is done through data objects PDO (Process Data Object) and SDO (Service Data Object).
4.5.45
Boot up telegram
After the initialization phase, a CANopen® slave log on with a boot up message. The
node address of the slave is contained in this. This allows a CANopen® master to know
which slaves are connected to the network. The protocol uses the same identifier as the
error control protocols, see the figure below:
NMT Slave
NMT Master
COB-ID = 700h + Node-ID
Indication
0
Request
TT1085GB
One data byte is transmitted with value 0.
190
JVL Industri Elektronik A/S - User Manual - Integrated Servo Motors MAC050 - 3000
4.5
Expansion Module MAC00-FC2/FC4
4.5.46
PDO (Process Data Object):
PDO: Performs real time transfers, and the transfer of PDOs are performed without a
protocol. PDOs are used in two ways, for data transmission and for data reception.
PDOs can bundle all objects from the object data directory, and a PDO can handle max
8 bytes of data in the same PDO. The PDO can consist of multiple objects.
Other PDOs characteristic is, that it doesn’t reply when it is receiving data, this for making the data transfer fast. It has a high priority identifier.
PDO connections follow the Producer/Consumer model. Whereby a normal PDO connection follows the Push model and a RTR connection the Pull model.
Objects are mapped in a PDO. This mapping is an agreement between the sender and
receiver as to which object is located at which position in the PDO. This means that the
sender knows at which position in the PDO it should write data and the receiver knows
to where it should transfer data which it received.
The PDOs correspond to entries in the Device Object Dictionary and provide the interface to the application objects. Data type and mapping of application objects into a PDO
is determined by a corresponding PDO mapping structure within the Device object Dictionary. Number and length of PDOs of a device is application specific and have to be
specified within the device profile
Write PDO service:
The Write PDO service is unacknowledged. There is a PDO producer which sends its
PDO to the PDO consumer. There can be 0 or more consumers in the network. For
receive PDOs, MAC00-FC2/FC4 is the consumer and for Transmit PDOs, the producer.
The following figure shows a Write PDO service:
PDO Producer
Request
PDO Consumers
0
L = 0....8
Proces data
Indication
TT1086GB
Read PDO service:
The read PDO service is an acknowledged service. One of the several PDO consumers
send a RTR message to the network. After it has received the RTR message, the PDO
producer sends the requested PDO. This service is used for RTR queries. Using this service, an actual value can be interrogated independently of the selected cycle time. The
following figure show a read PDO service:
PDO Producer
PDO Consumers
Request
Indication
Response
0
L = 0....8
Proces data
Confirmation
TT1087GB
JVL Industri Elektronik A/S - User Manual - Integrated Servo Motors MAC050 - 3000
191
4.5
Expansion Module MAC00-FC2/FC4
PDO identifier:
In the CANOpen® profile it is only possibly to have four transmit and four receive PDOs
enabled at the same time. In the MAC00-FC2/FC4 all PDOs are disabled when the module is booted up, the user has to choose which PDOs the application is to use, and enable
these.
The PDO configuration can be seen either in the EDS-file or in the CanOpen Explorer
program, here the communication and the mapping parameter are shown.
There are two standard methods to map the PDOs in CAN-Open, there is an static mapping and a dynamic mapping. In the static PDO mapping all PDOs are mapped in accordance with some fixed non-modifiable setting in the relevant PDO. In the dynamic PDO
mapping the setting for a PDO can be modified. It is also allowed to have flexible combination of different process data during operation. The MAC00-FC2/FC4 module, use
only static mapping.
4.5.47
SDO (Service Data Objects):
SDO: can access all entries in the object directory, but they are normally used in the initialization, during the boot up procedure. Some SDOs characteristic are:
-
Confirmed transfer of objects
Data transfer/exchange is always non-synchronous
Values greater than 4 bytes are transferred (Normal transfer)
Values not more than 4 bytes are transferred (Expedited transfer)
Basically a SDO is transferred as a sequence of segments. Prior to transferring the segment there is an initialization phase where client and server prepare themselves for
transferring the segment. For SDOs, it is also possible to transfer a data set of up to four
bytes during the initialisation phase. This mechanism is called an expedited transfer.
Down loading SDO protocol
The download SDO protocol is used to write the values of the object directory into the
drive
Client
Server
7...5
CCS=1
Request
4
X
3...2
n
1
e
0
Confirm
TT1088GB
192
4
1
0
7...5
SCS=3
4...0
X
d
m
0
s
1
m
4
reserved
8
Indication
8
Response
JVL Industri Elektronik A/S - User Manual - Integrated Servo Motors MAC050 - 3000
4.5
Expansion Module MAC00-FC2/FC4
Upload SDO protocol
The upload SDO protocol is used to read the values in the object directory of the drive.
Client
Server
1
0
7...5
CCS=2
Request
0
7...5
SCS=2
Confirm
TT1088GB
m
4...0
X
4
X
3...2
n
1
e
0
s
1
m
4
reserved
4
d
8
Indication
8
Response
Table for upload and download SDO protocol.
CCS:
Download
Upload
1: Initiate
download
request
2: Initiate
upload
request
SCS:
n:
e:
s:
m:
3: Initiate
download
response
Only valid if e=1 and s=1
otherwise 0. If valid it
indicates the number of
bytes in d that do not
contain data. Bytes
[8-n,7] do not contain
data
Transfer
type: 0=
normal
transfer
1=
expedited
transfer
Size indicator: 0=data
set size is
not indicated 1=data
set size is
indicated
Multiplexer.
It reprensents the
index/subindex of the
data to be
transfer by
the SDO
Only valid if e=1 and s=1
otherwise 0. If valid it
indicates the number of
bytes in d that do not
contain data. Bytes
[8-n,7] do not contain
data
Transfer
type: 0=
normal
transfer
1=
expedited
transfer
Size indicator: 0=data
set size is
not indicated 1=data
set size is
indicated
2: Initiate
upload
response
Multiplexer.
It reprensents the
index/subindex of the
data to be
transfer by
the SDO
CCS:Client command specified.
SCS:Server commander specified.
JVL Industri Elektronik A/S - User Manual - Integrated Servo Motors MAC050 - 3000
193
4.5
Expansion Module MAC00-FC2/FC4
Table for upload and download SDO protocol (continued)
d:
X:
Reserved:
Download
e=0, s=0:
d is reserved for further use
e=0, s=1:
d contains the number of bytes to be downloaded.
Byte 4 contain the lsb and byte 7 contain the msb
e=1, s=1:
d contain the data of length 4-n to be downloaded,
the encoding depends on the type of the data reference by index and sub-index.
not used,
always 0
Reserved for further
use, always 0
Upload
e=0, s=0:
d is reserved for further use
e=0, s=1:
d contains the number of bytes to be uploaded.
Byte 4 contain the lsb and byte 7 contain the msb
e=1, s=1:
d contain the data of length 4-n to be uploaded,
the encoding depends on the type of the data reference by index and sub-index.
not used,
always 0
Reserved for further
use, always 0
Abort SDO transfer protocol:
SDO tasks, which the MAC00-FC2/FC4 cannot process are responded to using an abort
SDO protocol. If the module does not respond in the expected time, the CANOpen®
master also sends an abort SDO.
The following figure show a abort SDO transfer protocol:
Client/Server
Server/Client
0
Request
1
7...5
CS=4
4...0
X
m
4
d
8
Indication
TT1090GB
There are various abort codes in CANopen®, these are listed in the table below:
Abort code
Description
0503 0000h
Toggle bit not alternated
0504 0000h
SDO Protocol timed out
0504 0001h
Client/server command specified not valid or unknown
0504 0002h
Invalid block size (block mode only)
0504 0003h
Invalid sequence number (block mode only)
0504 0004h
CRC error (block mode only)
0504 0005h
Out of memory
0601 0000h
Unsupported access to an object
0601 0001h
Attempt to read a write only object
0601 0002h
attempt to write a read only object
0602 0000h
Object does not exit in the object dictionary
0604 0041h
Object cannot be mapped to the PDO
Table continued on next page.
194
JVL Industri Elektronik A/S - User Manual - Integrated Servo Motors MAC050 - 3000
4.5
Expansion Module MAC00-FC2/FC4
Address table continued from previous page:
4.5.48
Abort code
Description
0604 0042h
The number and length of the objects to be mapped would exceed PDO length
0604 0043h
General parameter incompatibility reason
0606 0000h
Access failed due to an hardware error
0607 0010h
Data type does not match, length of service parameter does not match
0607 0012h
Data type does not match, length of service parameter too high
0607 0013h
Data type does not match, length of service parameter too low
0609 0011h
Sub-index does not exist
0609 0030h
Value range of parameter exceeded (only for write access)
0609 0031h
Value of parameter written too high
0609 0032h
Value of parameter written too low
0609 0036h
Maximum value is less than minimum value
0800 0000h
General error
0800 0020h
Data cannot be transferred or stored to the application
0800 0021h
Data cannot be transferred or stored to the application because of local control
0800 0022h
Data cannot be transferred or stored to the application because of the present device
state
0800 0023h
Object dictionary dynamic generation fails or no object dictionary is present (e.g. object
dictionary is generated from file and generation fails because of an file error).
SYNC (Synchronisation Object)
A SYNC producer sends the synchronization object cyclically a broadcast telegram. The
SYNC telegram defines the basics clock cycle of the network. The time between the
SYNC telegram is set using the object Communication Cycle period (1006h). In order to
obtain a precise (accurate) cycle between the SYNC signals, the SYNC telegram is sent
with a high-priority identifier. This can be modified using the object (1005h). The SYNC
transfer applies the producer/consumer push model and is non-confirmed.
SYNC Producer
Request
SYNC Consumers
L=0
Indication
TT1091GB
The SYNC does not carry any data (L=0). The identifier of the SYNC object is located
at object 1005h.
JVL Industri Elektronik A/S - User Manual - Integrated Servo Motors MAC050 - 3000
195
4.5
Expansion Module MAC00-FC2/FC4
4.5.49
NMT (Network Management services)
The Network Management is structured according to nodes and follows a master-slave
structure. NMT objects are used for executing NMT services. Through NMT services,
nodes are initialised started, monitored, resetted or stopped. All nodes are regarded as
NMT slaves. An NMT slave is uniquely identified in the network by its Node-ID. NMT
requires that one device in the network fulfils the function of the NTM master. The NMT
master controls the state of the NMT slaves. The state attribute is one of the values
(Stopped, Pre-operational, Operational, initialising). The module control services can be
performed with a certain node or with all nodes simultaneously. The NMT master controls its own NTM state machine via local services, which are implementation dependent. The Module Control Service except Start Remote Node can be initiated by the local
application.
A general NMT protocol:
NMT master
Request
NMT Slave (s)
0
CS
1
Node-ID
COB-ID = 0
2
Indication
Indication
Indication
TT1081GB
TT1082GB
Where CS is the NMT command specified. The Node-ID of the NMT slave as assigned
by the NMT master in the Node Connect protocol, or 0. If 0, the protocol addresses all
NMT slaves.
CS =
Operation
1
Start Remote Node
2
Stop Remote Node
128
Enter Pre Operational
129
Reset Node
130
Reset Communication
Start Remote Node:
This is an instruction to transition from the Pre-Operational to Operational communications state. The drive can only send and receive process data when it is in the Operational
state.
Stop Remote Node:
This is an instruction to transition from Pre-Operational into stopped or from Operational into Stopped. In the stopped state, the nodes can only process NMT instructions.
Enter Pre Operational:
This is an instruction to transition from Operational or Stopped into Pre-Operational. In
the Pre-Operational state, the node cannot process any PDOs. However, it can be parameterized or operated via SDO. This means setpoint can also be entered.
196
JVL Industri Elektronik A/S - User Manual - Integrated Servo Motors MAC050 - 3000
4.5
Expansion Module MAC00-FC2/FC4
Reset Node:
This is an instruction to transition from Operational, Pre-Operational or Stopped to initialization. After the Reset Node instruction, all objects (1000h-9FFFh) are reset into the
Voltage On stage.
Reset Communication:
This is an instruction to transition from Operational or Stopped to Initialization. After the
Reset Communication instruction, all communication objects (1000h-1FFFh) are reset
into the initial state.
In the various communication states, nodes can only be accessed via CANOpen® using
specific communication services. Further, the nodes in the various states only send
specific telegram. This is clearly shown in the following table:
Initializing
Pre-Operational
PDO
X
X
Synchronization Object
X
X
X
X
X
X
Boot-Up Object
Network Management object
Stopped
X
SDO
Emergency Object
4.5.50
Operational
X
X
Error Control Services
There exist two possibilities to perform Error Control:
- Node Guarding/Life Guarding
- Heartbeat
With Node Guarding, the CANopen® master sends, to each slave an RTR telegram (Remote Transmit request) with the COB-ID 1792 (700h) + node-ID.
The slave responds, with the same COB-ID, with its communications state. This means
either Pre-Operational, Operational or stopped.
The CANopen® slave also monitors the incoming RTR telegram from the master.
The cycle of the incoming RTR telegrams is set by using the Guard Time Object.
The numbers of RTR telegrams which can fail as a maximum before the slave initiates a
Life Guarding event is defined using the Life time factor object.
The Node Life Time is calculated from the product of the Guard Time and Life Time Factor. This is the maximum time which the slave waits for an RTR telegram.
JVL Industri Elektronik A/S - User Manual - Integrated Servo Motors MAC050 - 3000
197
4.5
Expansion Module MAC00-FC2/FC4
The figure below show a Node Guarding/Life Guarding protocols
COB-ID = 700h + Node-ID
Remote transmit request
Request
Confirmation
Node
Life
time
Node
Guard
time
7
t
Indication
Response
6....0
s
COB-ID = 700h + Node-ID
Request
Remote transmit request
Confirmation
7
t
Indication
Response
6....0
s
Node Guarding event
Life Guarding event
Indication
Indication
TT1083GB
Where s is the state of the NMT slave:
s
NMT state
4
Stopped
5
Operational
7
Pre-operational
t: is the toggle bit, it alternate between 2 consecutive responses from the NMT Slave.
The value of the toggle-bit of the first response after the guarding protocol becomes active, is 0. The Toggle Bit in the guarding protocol is only reset to 0 when the NMT message Reset Communication is passed (no other change of state resets the toggle bit). If a
response is received with the same value of the toggle-bit as in the preceding response
then the new response is handled as if it was not received.
Heartbeat:
With the Heartbeat protocol, a Heartbeat Producer cyclically sends its communications
state to the CAN bus. One or more Heartbeat Consumers receive the indication. The
relationship between producer and consumer is configured via the object dictionary. The
Heartbeat Consumer guards the reception of the Heartbeat within the Heartbeat Consumer time. If the Heartbeat is not received within the Heartbeat Consumer Time a
Heartbeat Event will be generated.
Heartbeat producer
Heartbeat consumer
COB-ID = 700h + Node-ID
Request
7
r
6....0
s
Heartbeat
producer time
Request
TT1084GB
198
7
r
6....0
s
Indication
Heartbeat
consumer time
Indication
Heartbeat
consumer time
Heartbeat Event
JVL Industri Elektronik A/S - User Manual - Integrated Servo Motors MAC050 - 3000
4.5
Expansion Module MAC00-FC2/FC4
Where r is reserved (always 0).
s: is the state of the Heartbeat producer:
s
NMT state
0
Boot up
4
Stopped
5
Operational
7
Pre-operational
Only one communication monitoring service may be activated. This is either Node
Guarding/Life Guarding or Heartbeat. If the Heartbeat Producer Time is configured on
a device the Heartbeat Protocol begins immediately. If a device starts with a value for the
Heartbeat Producer Time different from 0 the Heartbeat Protocol starts on the state
transition from Initialising to Pre-operational. In this case the Boot-up Message is regarded as first heartbeat message. If the Heartbeat producer time is not 0 the heartbeat protocol is used.
In MAC00-FC2/FC4 none of the error control is enabled then the modules are started
up, because if there is any fault in the system it is impossible to get in contact with the
module. After the module has started up and there is communication between the master and the slave, then turn on the wanted error control mechanism in the object Dictionary, see section 4.4.20.
JVL Industri Elektronik A/S - User Manual - Integrated Servo Motors MAC050 - 3000
199
4.5
Expansion Module MAC00-FC2/FC4
CAN bus connectors - continued.
5-pin style connector
9-pin D-sub connector
5
5
4
3
3
4
1
2
2
1
Male - front view
Female - front view
1 2 3 4 5
5 4 3 2 1
6 7 8 9
Male - front view
9 8 7 6
Female - front view
TT1096GB
4.5.51
MAC00-FC2 Connectors
Rear plate layout:
Expansion module MAC00-FC2 front plate
PWR
I/O
M16 cable gland
Available signals:
RS232 Interface general
I/O’s such as analogue
input (AIN), O1, O2,
IN1-IN4, NL, PL
and secondary supply
(optional).
Power
M12 - 5pin male
connector including:
P+, P-.
BUS2
BUS1
Second CANopen
connector
M16 cable gland
supporting screen.
Primary CANopen
connector. M16 cable
gland supporting screen
TT1007GB
The MAC00-FC2 module is function as node in the CAN bus network, and the following
terminals are available : B+ and A- are “Bus in”, and B+ and A- are “Bus out”. The connectors are placed on the dismantled module as the figure show below:
Cable glands
Internal circuit boards
TT1069GB
200
CAN-open and I/O
connectors.
Dip Switches placed
on the rear side of the
module
JVL Industri Elektronik A/S - User Manual - Integrated Servo Motors MAC050 - 3000
4.5
Expansion Module MAC00-FC2/FC4
The illustration below shows all the internal connectors in the module. The CAN bus and
power connectors are easy-to-use screw terminals. If the I/Os are used, they require a
JVL cable type WG0402 (2m), WG0410 (10m) or WG0420 (20m). See also the appendix
for cable and connector accessories.
Overview MAC00-FC2 connectors
Interface connector
Output connector
See table for connection details
See table for connection details
Mounting hole used
to fit the connector
board to the rear plate
Input connector
TT0972GB
Power connection
to the basic motor
Mounting hole used
to fit the connector
board to the rear plate
Fuse T10A
See table for connection
details
CANopen output connector
(signal to next node in the chain)
Power connector
CANopen input connector
(signal from last node in the chain)
“Bus-In” and “Bus-Out”
Please note that these two connectors are
internally hardwired (no electronics added in between).
Terminal description:
Signal ground can optionally be used for the cable screen
DGND
CANopen signal line - high
ACANopen signal line - low
B+
5VDC
Optional : External termination network.
Connect power supply to these
2 terminals (+12-48VDC)
CANopen signal definitions
MAC00-FC2 Typically
name
used
names
Standard
wire colour
GRN
CAN_H
(none)
B+ RED
CAN_L
(none)
A-
The MAC00-FC2 type number only covers the basic module, i.e. without any cables.
JVL Industri Elektronik A/S - User Manual - Integrated Servo Motors MAC050 - 3000
201
4.5
Expansion Module MAC00-FC2/FC4
4.5.52
MAC00-FC2 with cables (optional)
If a number is added after the basic type number, for example MAC00-FC2-10, this suffix
indicates that the module is fitted with 10 m of cable in the I/O. The I/O cable covers all
the signal lines, i.e. RS232, Digital input 1-4, Limit inputs NL and PL and the Digital outputs 1-4
Digital Inputs - Internal connector J2
Signal name
Pin no.
Description
Wire colour
IN1
1
Digital input 1
Red/black
IN2
2
Digital input 2
Green/black
IN3
3
Digital input 3
Violet
IN4
4
Digital input 4
Violet/white
NL
5
Negative limit input - If not used, do not connect.
Grey
PL
6
Positive limit input - If not used, do not connect.
Grey/black
IO-
7
I/O ground. This ground is shared with the output
ground
Pink/black
NC
8
(Reserved)
Black/white
CV
9
Secondary supply. Used during emergency stop
Light green **
CV
10
Secondary supply. Used during emergency stop
White
Digital Outputs - Internal connector J4
Signal name
Pin no.
Description
Wire colour
O+
1
Supply for outputs - Must be connected to an ext.
supply.
Red/white
O1
2
Digital output 1 - PNP output
Green/white
O2
3
Digital output 2 - PNP output
Yellow/black
NC
4
(Reserved)
Blue/white
NC
5
(Reserved)
Orange/white
NC
6
(Reserved)
Brown/white
NC
7
(Reserved)
Pink
8
I/O ground. This ground is shared with the input
ground
Black
IO-
Interface - including analogue input - Internal connector J1
Signal name
Pin no.
Description
Wire colour
TXPD
1
Transmit pull-down (Connect to TX if addr. not used).
Red
TX
2
RS232 Transmit (Connect to TXPD if addr. not used).
Green **
RX
3
RS232 Receive
Yellow
GND
4
Ground for RS232
Blue
AIN
5
Analogue input +/-10V or Zero sensor input
Orange
GND
6
Ground for AIN
Brown
Cable Screen
The cable-screen is internally connected to motor housing. Externally it must be connected to earth.
Unused wire
Orange/Black - is not used internally. It must be left unconnected.
** : The light green wire (CV) can be difficult to distinguish from the green wire (TX) on some cables.
202
JVL Industri Elektronik A/S - User Manual - Integrated Servo Motors MAC050 - 3000
4.5
Expansion Module MAC00-FC2/FC4
4.5.53
MAC00-FC2 - How to connect the RS232 interface
This has to be done if MacTalk is used in the CAN-Open configuration.
The illustration below shows how to connect the MAC00-FC2 directly to a PC COM
port. The drawing is based on standard cables from JVL, type WG0402, WG0410 or
WG0420. See also Accessories, page 394 for a complete list of cables and connectors.
If the MAC motor is connected to the same RS232 line as other motors, the terminal TXPD should only be connected at one of the motors.
If one of JVL’s standard RS232 cables (RS232-9-1 or -n) is used between the DSUB connector shown and the PC com port, the RX and TX pins must be swapped since they
cross in these standard cables.
How to connect the MAC00-FC2 RS232 interface
PC RS232
COM port
5
GND
3
Tx
Remember to connect TX-PD (Red)
to TX (Green) in order to achieve
stable communication
Screen terminated
to the GND terminal
Screen
2
1
Rx
If the RS232 lines are extended
through another cable this cable
must also be screened
Connector:
Cable = Female 9pin DSUB
At PC = Male 9pin DSUB
Red
Green
Yellow
Blue
JVL cable WG04xx
standard I/O
cable (24 wire)
Interface connector
(incl. analogue input)
Screen
Screen must be
connected to
main ground
at rear cover.
MAC00-FC2 internal
connector bard
TT0973GB
If JVL’s standard programming
cable type RS232-9-1 or -n is
used between the shown
connector and the PC, the RX
and TX signals must be swapped.
Tx to pin 2 and Rx to pin 3.
JVL Industri Elektronik A/S - User Manual - Integrated Servo Motors MAC050 - 3000
203
4.5
Expansion Module MAC00-FC2/FC4
Expansion module MAC00-FC4 front plate
PWR
BUS1
Power
M12 - 5pin male
connector including:
P+, P- and secondary
supply (optional).
Primary CANopen
connector.
M12 - 5pin male
connector including:
CANopen interface
I/O
M12 - 8pin female
connector including:
RS232 Interface
Selectable I/O’s such
as analogue input, O1,
O2, IN1, NL, PL.
BUS2
Second CANopen
connector
M12 - 5pin female
connector including:
CANopen interface
TT1006GB
4.5.54
MAC00-FC4 connectors, rear plate layout
The set up of Baud-rate, Node-ID and terminator are selected in the same way as in the
MAC00-FC2 module.
Expansion MAC00-FC4 Hardware description:
The MAC00-FC4 offers IP67 on MAC050-141 and IP65 on MAC400-800 protection and
M12 connectors which makes it ideal for automation applications where no additional
protection is desired. The M12 connectors offer solid mechanical protection and are easy
to unplug compared to the FC2 module which has cable glands. The signals available are
slightly restricted compared to the FC2 module since only 4 I/O terminals are available.
The I/Os connected to these 4 terminals must be selected by a small dip-switch, see the
drawing below the I/O table on the next page.
The connector layout:
“PWR” - Power input. M12 - 5-pin male connector
Signal name
Description
Pin no.
JVL Cable
WI1000M12
F5T05N
P+
Main supply +12-48VDC. Connect with pin 2 *
1
Brown
1
P+
Main supply +12-48VDC. Connect with pin 1 *
2
White
1
P-
Main supply ground. Connect with pin 5 *
3
Blue
1
CV
Control voltage +12-48VDC.
4
Black
1
P-
Main supply ground. Connect with pin 3 *
5
Grey
1
Isolation
group
* Note: P+ and P- is each available at 2 terminals. Make sure that both terminals are connected in order to
split the supply current in 2 terminals and thereby avoid an overload of the connector.
“BUS1” - CAN-open interface. M12 - 5-pin male connector
204
Signal name
Description
Pin no.
Cable:
WI1006M12F5SxxR
CAN_SHLD
Shield for the CAN interface - internally connected to the motor housing
1
Bare
2
CAN_V+
Reserved for future purpose - do not connect
2
Red
2
CAN_GND
CAN interface ground
3
Black
2
CAN_H
CAN interface. Positive signal line
4
White
2
CAN_L
CAN interface. Negative signal line
5
Blue
2
Isolation
group
JVL Industri Elektronik A/S - User Manual - Integrated Servo Motors MAC050 - 3000
4.5
Expansion Module MAC00-FC2/FC4
“BUS2” - CANopen® interface. M12 - 5-pin female connector
Signal name
Description
Pin no.
Cable:
WI1006M12M5SxxR
CAN_SHLD
Shield for the CAN interface - internally connected to the
motor housing
1
Bare
2
CAN_V+
Reserved for future purpose - do not connect
2
Red
2
CAN_GND
CAN interface ground
3
Black
2
CAN_H
CAN interface. Positive signal line
4
White
2
CAN_L
CAN interface. Negative signal line
5
Blue
2
Isolation
group
“IO” - I/Os and RS232 interface. M12 - 8-pin female connector.
Signal name
Description
Function
Pin no.
JVL Cable
WI1000-M12
M8T05N
IOC
I/O terminal C.
SW3 DIP 5 = OFF : PL input
SW3 DIP 5 = ON : O1 output
1
White
3
Tx
RS232 interface - transmit output
Important !: DIP1 must be turned ON. If addressing is
used it must be turned ON at minimum one
of the connected motors.
2
Brown
1
Rx
RS232 interface - receive input
3
Green
1
GND
RS232 Ground - also used with analogue input
4
Yellow
1
5
Grey
3 (1 when
used as
AIN)
6
Pink
3
7
Blue
3
8
Red
3
IOA
I/O terminal A.
SW3 DIP 2 = ON and DIP3 = OFF
: AIN (Analogue input)
SW3 DIP2 = OFF and DIP 3 = ON
: O2 (output 2)
(AIN is the analogue input. Remember to use the GND terminal
with AIN !).
IOB
I/O terminal B.
SW3 DIP 4 = OFF : IN1
(input 1)
SW3 DIP 4 = ON : O1
(output 1)
IO-
I/O ground to be used with IN1, NL, PL, O1, O2
IOD
I/O terminal D.
SW3 DIP 6 = OFF : NL
(negative limit input)
SW3 DIP 6 = ON : O+
(output supply)
Isolation
group
Cable Screen
Some standard cables with M12 connector offer a screen around the cable. This screen on some cables is
fitted to the outer metal at the M12 connector. When fitted to the MAC00-FC4 module, this means that the
screen will have contact with the complete motor housing and thereby also the power ground (main ground).
Isolation groups
The MAC00-FC4 offers optical isolation at the digital inputs and outputs (IN1, NL, PL and O1-2). The table
shows a number for each pin. This number refers to the isolation group to which each pin is connected.
Isolation group 1 means that the terminal refers to the main ground (P-, GND and the motor housing).
Isolation group 2 means that the terminal refers to the CAN interface ground (CAN_GND).
Isolation group 3 means that the terminal refers to the I/O ground (IO-)
Regarding the setting of SW3, see on next page.
JVL Industri Elektronik A/S - User Manual - Integrated Servo Motors MAC050 - 3000
205
4.5
Expansion Module MAC00-FC2/FC4
The drawing below shows the SW3 Dip-switch location. The various settings of SW3 is
shown on the previous page.
Dip switch location on the
MAC00-FC4 Expansion module
Dip Switch SW3
placed on the rear
side of the module
M12 Connectors
Internal circuit boards
Mini dip-switch
(shown with default setting)
OFF
ON
1
2
3
4
5
6
SW3
SW3
TT1072GB
Switch description:
SW3
Description
Function
Signal name
Dip 1
RS232 interface - transmit output
ON = Enable
Tx
Dip 2
Dip 3
I/O terminal A
DIP2=ON and DIP3=OFF :
AIN (Analogue input)
IOA
Dip 2
Dip 3
I/O terminal A
DIP2=OFF and DIP3=ON :
O2 (output 2)
IOA
Dip 4
I/O terminal B
DIP4=ON : Output 1
DIP4=OFF : Input 1
IOB
Dip 5
I/O terminal C
DIP5=ON : O1 output
DIP5=OFF : PL (positive limit input)
IOC
Dip 6
I/O terminal D
DIP6=ON : O+ (Output supply)
DIP6=OFF : NL (Negative limit input)
IOD
The factory default setting is:
SW3
ON
Dip 1
X
Dip 2
Dip 3
X
Function
RS232 interface Enable
X
Dip 4
206
OFF
X
O2 (output 2)
Input 1
Dip 5
X
O1 output
Dip 6
X
O+ (output supply)
JVL Industri Elektronik A/S - User Manual - Integrated Servo Motors MAC050 - 3000
4.5
Expansion Module MAC00-FC2/FC4
4.5.55
Cables for the MAC00-FC4
The following cables equipped with M12 connector can be supplied by JVL.
MAC00-FC4 Connectors
Description
JVL Order no.
RS232 Interface cable. Connects
directly from MAC00-FC4 to PC
Length: 5m (197 inch)
RS232-M12-1-8
X
Cable (Ø5.5mm) with M12 female
5-pin connector loose wire ends
0.35mm² (22AWG) and foil screen.
Length: 5m (197 inch)
WI1000-M12F5T05N
X
Same as above but 20m (787 inch)
WI1000-M12F5T20N
X
Cable with M12 male 8-pin
connector loose wire ends
0.22mm² (24AWG) and screen.
Length: 5m (197 inch)
WI1000-M12M8T05N
X
Same as above but 20m (787 inch)
WI1000-M12M8T20N
X
CANopen® cable with M12 male 5-pin
connector, loose ends and screen.
Length: 5m (197 inch).
WI1006-M12M5S05R
X
Same as above but 15m (591 inch)
WI1006-M12M5S15R
X
CANopen® cable with M12 female
5-pin connector, loose ends and
screen.
Length: 5m (197 inch)
WI1006-M12F5S05R
X
Same as above but 15m (591 inch)
WI1006-M12F5S15R
CANopen® male M12 termination
resistor.
WI1008-M12M5STR4
“BUS1”
5-pin
Male
B-coded
“BUS2”
5-pin
Female
B-coded
“I/O”
8-pin
Female
“PWR
”
5-pin
Male
X
Photo
Termination resistor
X
Protection caps. Optional if connector is not used, to protect from dust / liquids.
X
X
X
X
IP67 protection cap for M12
female connector.
WI1000-M12FCAP1
IP67 protection cap for M12
male connector.
WI1000-M12MCAP1
Important: Please note that the cables are a standard type. They are not recommended for use in cable chains or where the cable is repeatedly bent. If this is required, use a special robot
cable (2D or 3D cable). See also Accessories, page 394 where additional M12 connectors
are shown.
JVL Industri Elektronik A/S - User Manual - Integrated Servo Motors MAC050 - 3000
207
4.6
Expansion Module MAC00-FD4
FD4
MAC00-FD4
With M12 connectors
4.6.1
TT1018GB
DeviceNet Introduction
The MAC00-FD4 module allows you to connect a JVL MacMotor to a DeviceNet network.
Using this module, all the registers in the MAC motor can be accessed over a DeviceNet
network.
The module supports Baud-rates of 125, 250 and 500kbit. The module includes galvanic
isolation between the motor and the DeviceNet network. The Baud-rate and node id
must be configured via the internal dip switch before the module is connected to the network. The module supports polled IO with 8 bytes in and 8 bytes out.
The specification of the IO is according to the position controller device type.
Important:
Please refer to the following sections of the DeviceNet specifications for additional information:
1
2
3
4
5
6
Volume II, Section 3-12: Position Controller.
Volume II, Section 6-24: Position Controller Supervisor Object.
Volume II, Section 6-25: Position Controller Object.
Volume II, Section 6-14: Parameter Object.
Volume I, Appendix H: DeviceNet Error Codes
Volume I, Appendix J: Data Type Specification
The expansion module MAC00-FD4 can be mounted in standard MAC motors MAC50,
MAC95, MAC140, MAC141, MAC400, and MAC800.
The connectors are grouped as follows:
Type
MAC00-FD4
Protection
Connectors
class
I/O and interface
Power supply
Bus interface
IP67/IP65*
M12
M12
M12 (x2)
Note*: IP65 on MAC400-800
Cables with M12 connectors can be supplied for the MAC00-FD4 module.
The first part of this section deals with the software features of the module. Please see
the later pages of this section for specific information about the hardware such as connection schemes etc.
208
JVL Industri Elektronik A/S - User Manual - Integrated Servo Motors MAC050 - 3000
4.6
4.6.2
Expansion Module MAC00-FD4
Terminology / Symantics
This chapter is ment to give an overall understanding of the fundamentals in terminology
concerning the description of the MAC00-FD4 module.
Numbering:
All values are specified in decimal unless other is noted.
0x1234 or #1234 (omron format) specify a hexadecimal number.
General terms:
Command message.
A message sent from the master to the FD4 module describing a certain.
IO-message.
An IO-message is a bundle of 8 bytes sent to the MAC00-FD from the master in the
system and visa versa.
Register.
A register is a physical memory location in the basic motor. All variables to be written
or read a available as a register. For example the desired motor velocity can be set
by writting to register 5. For a general motor register overview please consult MacTalk communication, page 357.
JVL Industri Elektronik A/S - User Manual - Integrated Servo Motors MAC050 - 3000
209
4.6
4.6.3
Expansion Module MAC00-FD4
Node-id, Baud-rate and Termination setup
The 10-way dip switch (SW1) is used to select the node ID and the Baud-rate. Switches
1-6 select the node ID, and switches 8-9 select the Baud-rate. The 2-way dip switch
(SW2) is used to enable termination. When both switches are on, the termination is enabled.
MAC00-FD4 Dip switch settings
Mini dip-switch
OFF
Dip 1-6 - Node-id setting
(address range 0-63)
Dip 7 - Node-id set by software
Dip 8-9 - Baud rate
(Baud rate setting 125k to 500k)
Dip-switch 10 is not used.
Set in position “ON”.
SW1 default settings =
all set in position “ON”
Dip 1-2 - Line termination
Both set to ON =
Term. enabled
Both set to OFF =
Term. disabled
ON
Rear side of the MAC00-FD4
expansion module
1
2
3
4
5
6
7
8
9
0
SW1
1
2
SW2
SW2 default settings =
Both switches in position “OFF”
Dip-switch location on the
MAC00-FD4 Expansion module
M12 external
connectors
Basic MAC motor
housing
Internal circuit boards
TT1017GB
210
Dip Switches placed
on the rear side of the
module
JVL Industri Elektronik A/S - User Manual - Integrated Servo Motors MAC050 - 3000
4.6
Expansion Module MAC00-FD4
The node-id can be set according to the below table:
Node-id
Dip Switch no. (SW1)
6
0
5
4
3
2
Node-id
1
Reserved (illegal setting)
Dip Switch no. (SW1)
6
5
32
ON
OFF
4
3
2
1
OFF OFF
OFF
OFF
1
OFF
OFF
OFF
OFF OFF
ON
33
ON
OFF
OFF OFF
OFF
ON
2
OFF
OFF
OFF
OFF
ON
OFF
34
ON
OFF
OFF OFF
ON
OFF
3
OFF
OFF
OFF
OFF
ON
ON
35
ON
OFF
OFF OFF
ON
ON
4
OFF
OFF
OFF
ON
OFF
OFF
36
ON
OFF
OFF
ON
OFF
OFF
5
OFF
OFF
OFF
ON
OFF
ON
37
ON
OFF
OFF
ON
OFF
ON
6
OFF
OFF
OFF
ON
ON
OFF
38
ON
OFF
OFF
ON
ON
OFF
7
OFF
OFF
OFF
ON
ON
ON
39
ON
OFF
OFF
ON
ON
ON
8
OFF
OFF
ON
OFF OFF
OFF
40
ON
OFF
ON
OFF
OFF
OFF
9
OFF
OFF
ON
OFF OFF
ON
41
ON
OFF
ON
OFF
OFF
ON
10
OFF
OFF
ON
OFF
ON
OFF
42
ON
OFF
ON
OFF
ON
OFF
11
OFF
OFF
ON
OFF
ON
ON
43
ON
OFF
ON
OFF
ON
ON
12
OFF
OFF
ON
ON
OFF
OFF
44
ON
OFF
ON
ON
OFF
OFF
13
OFF
OFF
ON
ON
OFF
ON
45
ON
OFF
ON
ON
OFF
ON
14
OFF
OFF
ON
ON
ON
OFF
46
ON
OFF
ON
ON
ON
OFF
15
OFF
OFF
ON
ON
ON
ON
47
ON
OFF
ON
ON
ON
ON
16
OFF
ON
OFF
OFF OFF
OFF
48
ON
ON
OFF OFF
OFF
OFF
17
OFF
ON
OFF
OFF OFF
ON
49
ON
ON
OFF OFF
OFF
ON
18
OFF
ON
OFF
OFF
ON
OFF
50
ON
ON
OFF OFF
ON
OFF
19
OFF
ON
OFF
OFF
ON
ON
51
ON
ON
OFF OFF
ON
ON
20
OFF
ON
OFF
ON
OFF
OFF
52
ON
ON
OFF
ON
OFF
OFF
21
OFF
ON
OFF
ON
OFF
ON
53
ON
ON
OFF
ON
OFF
ON
22
OFF
ON
OFF
ON
ON
OFF
54
ON
ON
OFF
ON
ON
OFF
23
OFF
ON
OFF
ON
ON
ON
55
ON
ON
OFF
ON
ON
ON
24
OFF
ON
ON
OFF OFF
OFF
56
ON
ON
ON
OFF
OFF
OFF
25
OFF
ON
ON
OFF OFF
ON
57
ON
ON
ON
OFF
OFF
ON
26
OFF
ON
ON
OFF
ON
OFF
58
ON
ON
ON
OFF
ON
OFF
27
OFF
ON
ON
OFF
ON
ON
59
ON
ON
ON
OFF
ON
ON
28
OFF
ON
ON
ON
OFF
OFF
60
ON
ON
ON
ON
OFF
OFF
29
OFF
ON
ON
ON
OFF
ON
61
ON
ON
ON
ON
OFF
ON
30
OFF
ON
ON
ON
ON
OFF
62
ON
ON
ON
ON
ON
OFF
31
OFF
ON
ON
ON
ON
ON
63
ON
ON
ON
ON
ON
ON
JVL Industri Elektronik A/S - User Manual - Integrated Servo Motors MAC050 - 3000
211
4.6
Expansion Module MAC00-FD4
The Baud-rate can be set according to the below table:
Baud-rate
Dip Switch no. (SW1)
10
9
8
7
1-6
125 kbit
X
OFF
OFF
X
See table above
250 kbit
X
OFF
ON
X
See table above
500 kbit
X
ON
OFF
X
See table above
Reserved
X
ON
ON
X
See table above
X = Not used. For future purposes - set in position off
212
JVL Industri Elektronik A/S - User Manual - Integrated Servo Motors MAC050 - 3000
4.6
4.6.4
Expansion Module MAC00-FD4
IO-messages.
The JVL MAC00-FD module offers 8 byte I/O.
These bytes are organized in a standard frame specified by the ODVA organisation.
Depending on what kind of information that is needed different message types are used.
Message types are organized in the lower bit 0-4 in byte 2 and the different message
types supported are:
0x1: "Target position"
0x2: "Target velocity"
0x3: "Acceleration"
0x5: "Torque"
0x1B: "Position controller attribute"
0x1F: "Parameter" (register)
For setting a target position the Command Message type 0x1 is used. Accessing registers
directly in the motor message type 0x1F is used. For a general motor register overview
please consult MacTalk communication, page 357.
The outputs define a Command message covering the message types 0x1, 0x2, 0x3, 0x5
with the following format:
Byte
7
6
5
4
3
2
1
0
0
Enable
-
Hard stop
Smooth
stop
Direction
(vel. mode)
-
-
Load
Data
1
0x1
2
0x1
Command message type
3
0x1
Response message type
4
Data value byte 0
5
Data Value byte 1
6
Data Value byte 2
7
Data Value byte 3
Corresponding response frame from the motor is formated in the following way.
The message frame for the types 0x1, 0x2, 0x3, 0x5.
Byte
7
6
5
4
3
2
1
0
0
Enable
-
Hard Stop
Smooth
Stop
Direction
(V. Mode)
-
-
Load
data
Reverse
limit
Forward
limit
-
1
2
3
0x1
Load
Complete
0x1
-
-
-
Response Message Type
4
Data value byte 0
5
Data Value byte 1
6
Data Value byte 2
7
Data Value byte 3
JVL Industri Elektronik A/S - User Manual - Integrated Servo Motors MAC050 - 3000
213
4.6
Expansion Module MAC00-FD4
The message frame for the type 0x1F is formatted according to the following:
Byte
7
6
5
4
3
2
1
0
0
Enable
-
Hard stop
Smooth
stop
Direction
(vel. mode)
-
-
Load
Data
1
2
Register number to get
0x1
Command message type
3
Register number to set
4
Data value byte 0
5
Data Value byte 1
6
Data Value byte 2
7
Data Value byte 3
The procedure is to setup the frame with the correct values and then set the "Load" -bit
in byte 0 as the last operation. This will load the frame into the motor and thereby set
the register value desired.
In response the motor will return a "Response" frame with the data from the register value that has been requested in the sent frame.
Semantics:
Load Data: Transition from 0->1 initiates the data loading in the motor. The frame is
setup with all data and then this bit is set to make the motor load the data.
Direction:
When the motor is used in velocity mode this bit is used to control the direction of the movement. When velocity mode is used through
Smooth stop: Bring the motor to stop using standard configured deceleration
(deceleration ramp is the same as the acceleration ramp).
214
Hard stop:
Bring the motor to an immediate stop.
Enable:
Bring the motor into an active mode clearing this bit will bring the motor
into "Passive" -mode.
JVL Industri Elektronik A/S - User Manual - Integrated Servo Motors MAC050 - 3000
4.6
Expansion Module MAC00-FD4
The response frame from the motor is formated as follows.
Byte
7
6
5
4
3
2
1
0
0
Enable
-
-
-
General
fault
On Target
position
-
Profile in
progress
Reverse
limit
Forward
limit
-
1
2
3
Register number to get
Load
Complete
-
-
-
-
0x1
0x1F
4
Data value byte 0
5
Data Value byte 1
6
Data Value byte 2
7
Data Value byte 3
Semantics:
Load complete: Indicates that the motor has read the frame.
Reverse limit: By using limit switches to limit the travel distance of the motor this bit
indicates that the motor encountered the reverse limit switch at the input.
Forward limit: By using limit switches to limit the travel distance of the motor this bit
indicates that the motor encountered the forward limit switch at the input.
4.6.5
Object class 0x64.
Each instance has 2 attributes.
With this class all parameters in the motor can be written and read.
The instance number refers to the parameter number in the motor.
Attribute 1 = Value
Attribute 2 = Parameter size in bytes
JVL Industri Elektronik A/S - User Manual - Integrated Servo Motors MAC050 - 3000
215
4.6
4.6.6
Expansion Module MAC00-FD4
Object class 0x65
Instance 1 (I/O Setup)
Attribute ID Access rule Data type Description
Parameter
mapping
The total number of supported
attributes
-
Reserved
-
1
Get
USINT
2
-
-
3
Get
BYTE
Show the input status. IN1-4, NL, PL
240 (0xF0)
4
Get/Set
BYTE
Set the output level
241 (0xF1)
5
Get/Set
BYTE
Input active level
242 (0xF2)
6
Get/Set
BYTE
Input setup
243 (0xF3)
7
Get/Set
BYTE
Output setup
244 (0xF4)
Instance 2 (Status)
Attribute ID Access rule Data type Description
1
Get
USINT
2
-
-
3
Get
BYTE
Parameter
mapping
The total number of supported
attributes
-
Reserved
-
Motor status
245 (0xF5)
Instance 3 (Commands)
Attribute ID Access rule Data type Description
216
Parameter
mapping
The total number of supported
attributes
-
Reserved
-
1
Get
USINT
2
-
-
3
Get/Set
BYTE
Module setup
246 (0xF6)
4
Set
USINT
Execute FastMac Command
247 (0xF7)
5
Set
USINT
MAC00-FDx command
248 (0xF8)
JVL Industri Elektronik A/S - User Manual - Integrated Servo Motors MAC050 - 3000
4.6
4.6.7
Expansion Module MAC00-FD4
Instance 1, Attribute 3, Input status
This object is used to read out the actual value of the inputs.
Bit
7
Input
4.6.8
6
Reserved
5
4
3
2
1
0
PL
NL
IN4
IN3
IN2
IN1
Instance 1, Attribute 4, Outputs
With this object the outputs can be controlled.
The value written to this object is directly shown on the outputs if the output is not set
to use its default function (see attribute 7).
Bit
7
6
5
Output
4.6.9
2
Reserved
7
Input
1
0
O2
O1
6
Reserved
5
4
3
2
1
0
PL
NL
IN4
IN3
IN2
IN1
Instance 1, Attribute 6, Input setup
With this object, the dedicated function of the inputs can be enabled. When the corresponding bit is 0 the input function is as a normal input. When the corresponding bit is 1
the dedicated function of the input will be enabled. When the end limit inputs NL or PL
are enabled and one of these is activated, the error action will be executed. The error
action is defined in instance 3, attribute 3.
Bit
7
Input
4.6.11
3
Instance 1, Attribute 5, Input active level
With this object the active level of the inputs can be selected. When bit x = 0 the input
is active low and when bit x = 1 the input is active high.
The default setup for the output is active high.
Bit
4.6.10
4
6
Reserved
5
4
PL
NL
3
2
1
0
Reserved
Instance 1, Attribute 7, Output setup
This object is used to control the function of the outputs. When bit x = 0 the output is
controlled by attribute 4.
When bit x = 1 the output is controlled by the default function. The default function for
O1 is ’In position’ and for O2 ’Error’.
Bit
Output
7
6
5
4
Reserved
3
2
1
0
O2
O1
JVL Industri Elektronik A/S - User Manual - Integrated Servo Motors MAC050 - 3000
217
4.6
4.6.12
Expansion Module MAC00-FD4
Instance 2, Attribute 3, Motor status
With this object, the status of the motor can be monitored.
Bit
7
6
5
4
3
2
1
0
Data
-
Deceleration
Acceleration
In
position
-
Limit
switch
error
Disconnected
Motor
error
Bit 7:
Bit 6:
Bit 5:
Bit 4:
Bit 3:
Bit 2:
Bit 1:
Unused - reserved for future purposes.
Equals 1, if the velocity is decreasing.
Equals 1, if the velocity is increasing.
Equals 1, if the motor is in the commanded position.
Unused - reserved for future purposes.
Equals 1, if a limit switch has been activated.
Equals 1, if there is a communication error between the MAC00-FDx and the motor. This can occur if the motor was reset due to a voltage drop.
Bit 0: Equals 1, if there is a fatal motor error. Read subindex 4 for extended information.
4.6.13
Instance 3, Attribute 3, Module setup bits
This object is used for auxiliary setup of the module.
Bit
Setup
7
6
Endless
relative
Error
action
5
4
3
2
1
0
Reserved
Endless relative: When this bit is 1, the endless relative position mode is used for incremental positioning. When using this mode, absolute positioning can no longer be used.
Error action: Determines the action in the event of an error. Bit6 set to 0 will set the motor in passive mode in case of an error, Bit6 set to 1 will stop motor by setting velocity
to 0 in the event of an error.
4.6.14
Instance 3, Attribute 4, FastMac command
When writing to this attribute, a FastMac command is executed. Please refer to the
MAC00-FPx section for a description of the FastMac commands.
4.6.15
Instance 3, Attribute 5, Module command
When writing to this attribute, it is possible to execute some special commands on the
MAC00-FDx module.
The following commands are available:
218
Number
Function
0
No operation
1
Reset limit error
2
Reset communication error
3-255
Reserved
JVL Industri Elektronik A/S - User Manual - Integrated Servo Motors MAC050 - 3000
4.6
Expansion Module MAC00-FD4
4.6.16
Object class 0xF (Parameter)
This object class is the parameter class defined by the DeviceNet standard.
The attributes that are mapped into this object are from object class 0x64 and 0x65.
Instance 0-239 is mapped to the value attribute in object class 0x64 from the corresponding instance.
Instance 240-255 is mapped to attributes from object class 0x65. Refer to the description
of this object class for the mappings.
4.6.17
Object class 0x24 (Position Controller Supervisor)
This object class is the Position controller supervisor object, as defined in the DeviceNet
standard.
The following class attributes are supported: 1,2,3,6,32,33.
The following attributes are supported for instance 1: 1,3,5,6,7.
4.6.18
Object class 0x25 (Position Controller)
This object class is the position controller object, as defined in the DeviceNet standard.
The following attributes are supported for instance 1:
1,2,3,6,7,8,10,11,12,13,14,17,20,21,25,45,48,49,52,54,55,58.
The range for attribute 25:Torque is 0-1023.
The following additional manufacturer-specific attributes are supported:
Attribute ID Access rule Data type Description
Search mode. This mode will be used next time the controller is enabled and the selected mode is position. This
value will be cleared after the enable.
100
Get/Set
USINT
101
Get/Set
DINT
The Zero search offset in counts
102
Get/Set
DINT
The velocity to use during Zero search in encoder counts
per second.
103
Get/Set
DINT
The torque limit to use during Zero search. The range is
-1023 to 1023. A negative torque value means that the
zero sensor is active low.
104
Get/Set
BOOL
Use Index. If this is enabled, the zero point will be corrected with reference to the motors index mark.
JVL Industri Elektronik A/S - User Manual - Integrated Servo Motors MAC050 - 3000
219
4.6
4.6.19
Expansion Module MAC00-FD4
Examples - Typical needed actions in a DeviceNet system.
A number of typical actions is often needed in a system with DeviceNet interface to perform the desired operation in the system.
This chapter have some important guidelines on how to handle these typical actions and
issues.
Addressing registers in the motor using explicit messaging and I/O-messages.
Although the basic positioning handling is done using the standard Position controller specified from the ODVA organisation it is sometimes necessary to access the registers directly. This section covers the various ways of doing this on top of a more thorough
explanation on the different data formats. For a general motor register overview please
consult MacTalk communication, page 357.
Register addressing in the motor:
To access the registers in the motor there are 2 ways of doing this. Either use explicit
messages or the I/O message approach.
Explicit register access:
To access the registers in the motor explicit (not cyclic), use the object 0x64 with the
instance number as a reference to the register number and the attribute as the
amount of bytes that needs to be handled.
Example: The velocity of the motor needs to be set. In order to do this the velocity
register (register 5 named “V_SOLL”) must be used.
To setup the explicit message, setup the following parameters as follows:
Object 0x64
Instance: 5 (register 5, V_SOLL register)
Attribute 1: Data (for write operation)
Attribute 2: Bytes (write operation)
I/O-message access (cyclic transmission):
To gain access to the motor registers directly using the I/O-message approach simply
use the command message type 0x1F. Please see IO-messages., page 213 in order to
see deatails concerning the 0x1F message frame.
JOG function.
Often it is necessary to run the motor a certain distance in positive or negative direction
in order to find a certain reference point or similar.
The MAC motor can be controlled in several different modes. Typically used modes are
“Position" -mode for positioning purpose or "Velocity" -mode which control the motor
movement without taking any notice of the actual position.
If a JOG function is needed it is strongly recommended to use the velocity mode since
the position mode or related modes involves a number of registers and is more complex
compared to the velocity mode.
In velocity mode, none of the position related registers are of particular interest but the
actual position counter is still updated continuously.
220
JVL Industri Elektronik A/S - User Manual - Integrated Servo Motors MAC050 - 3000
4.6
Expansion Module MAC00-FD4
Performing the JOG function in velocity only requires that the velocity register (V_SOLL
- register 5) is used.
A way of implementing "JOG" -functionality is basically to change actual mode to "Velocity" and control the velocity and acceleration.
The following guideline can be used.
1. Set velocity = 0 (register 5 ), to avoid immediate movement when the mode is
changed to velocity.
2. Change the mode to Velocity mode (register 2 = 1), now the mode is changed but
the velocity is set to 0 so the motor stay stationary.
3. According to the direction, change the velocity to a positive value to run CW or negative to run CCW. Please remember that this value is scaled depending on the motor
type used. The value is written into the velocity register (register 5 / V_SOLL)
MAC50-140 the scaling is [RPM] x 2.097, so 1000 RPM = 2097 [counts/smpl.]
MAC400 the scaling is [RPM] x 2.837, so 1000 RPM = 2837 [counts/smpl.]
MAC800 the scaling is [RPM] x 2.771, so 1000 RPM = 2771 [counts/smpl.]
4. To stop the motor set the velocity to 0. This will force the motor to decelerate and
stay stationary keeping the actual position obtained after running with a velocity > 0.
Optional:
If the motor needs to be switched into a position related mode the actual position counter and some other position related registers need to be modified or reset.
Otherwise the motor will return to the original motor position which was present before
the JOG function was executed.
A simple way of doing this, is to send the special command 247 to the “Special command"
-register, register number 211.
JVL Industri Elektronik A/S - User Manual - Integrated Servo Motors MAC050 - 3000
221
4.6
Expansion Module MAC00-FD4
Zero search - how to activate.
In almost any system which is using some kind of position related mode it is necessary to
find the mechanical zero point before normal operation of the motor can take place.
Following description gives a guide line on how to activate the build-in Zero search function.
It is necessary to determine which kind of Zero search type that needs to be activated.
The MAC motors offers a number of various Zero search types. Please consult the chapter Mechanical Zero search, page 32 which explain in details which Zero search functions
that exist and how they perform the Zero search.
Please find the section specifying the object 0x25 that can be accessed explicitly for configuration from the Devicenet network.
Another method for doing Zero search is to setup the motor for doing Zero search at
startup selecting one of the “Power-up” Zero search modes. This can be done from the
MacTalk configuration software and can be setup permanent in the motor without any
further actions done through the DeviceNet interface. Please consult the chapter Mechanical Zero search, page 32.
If this method is prefered the motor will automaticaly perform the Zero search every time
the motor is powered up or the 24V control supply is cycled.
Reading and clearing error codes.
The register 35 is a combined error/status -register that represent the actual information
about errors and the current motor status (accelerating, decelerating, motor in position)
etc.
All this information is put into a single register that can be read all the time.
To clear the errors either write register 35= 0
Another method is to execute the special command 225. This is done by writing to register 211 which will clear any actual errors.
Please notice that some errors are regarded as fatal and needs 24V power cycle to be
cleared. Please consult the chapter Error messages and error handling, page 40 for further
details about all the error types and what may have caused the error situation.
Resetting the position.
Sometimes it is necessary to reset the actual position counter.
When done manually it requires writing to multiple registers and special handling of the
motor.
All this can be done by sending a the special command 247 to the command register 211
which will set the actual and requested position = 0.
The motor will stay stationary if it is set in a position related mode afterwards.
222
JVL Industri Elektronik A/S - User Manual - Integrated Servo Motors MAC050 - 3000
4.6
4.6.20
Expansion Module MAC00-FD4
Example - How to implement with a Omron PLC:
How to implement a JOG function using Omron PLC system.
This example sets the motor into velocity mode and sets a velocity depending on which
direction to go and returns in Position mode when the joggin is finished.
Notice that Omron uses the syntax #1234 indicating a hexadecimal number in contrast
to elsewhere in this chapter where the syntax 0x1234 is used for indicating a hexadecimal
number.
1. Start by setting the velocity to 0, to prevent the motor from moving anywhere when
the mode is set to "velocity".
Please observe that all values are 16bit and refers to the cyclic IO of 8 bytes each way.
Please find the section covering IO-messages.
Basically this example uses the Register message type and accesses the registers relevant for this operation. That is P_SOLL, V_SOLL and the mode register.
Word 0: #0381
Word 1: #053F
Word 2: #0000
Word 3: #0000
;Set the bits in the structure and get register 3=P_IST actual position
;Register 5, V_SOLL, use command message = 31 + 32
;Value=0
;Value=0
2. Next step is to set the motor into velocity mode by writing register 2 = 1:
Word 0: #0381
Word 1: #023F
Word 2: #0001
Word 3: #0000
;Set the bits in the structure and get register 3=P_IST actual position
;Register 2, MODE, use command message = 31 + 32
;Value=1, velocity mode
;Value=0
3. Now we set the velocity depending on which direction we want to use, we set either
positive or negative value, we will set register 5, V_SOLL for this purpose.
Word 0: #0381
Word 1: #053F
Word 2: #07D0
Word 3: #0000
;Set the bits in the structure and get register 3=P_IST actual position
;Register 5, MODE, use command message = 31 + 32
;Value=2000, velocity mode appx. 957 RPM (scaling: 2.1 x RPM)
;-
4. Now the motor runs CW looking on the shaft.
If we want to go the other way we send:
Word 0: #0381
Word 1: #053F
Word 2: #F830
Word 3: #FFFF
;Set the bits in the structure and get register 3=P_IST actual position
;Register 5, MODE, use command message = 31 + 32
;Value=-2000, velocity mode appx. -957 RPM (scaling: 2.1 x RPM)
;-
5. If a motor stop is desired now there is several ways, one way is to set velocity = 0:
Word 0: #0381
Word 1: #053F
Word 2: #0000
Word 3: #0000
;Set the bits in the structure and get register 3=P_IST actual position
;Register 2, MODE, use command message = 31 + 32
;Value=0
;-
JVL Industri Elektronik A/S - User Manual - Integrated Servo Motors MAC050 - 3000
223
4.6
Expansion Module MAC00-FD4
6. Now the motor is stopped at a stationary position, this position we want to set to 0,
so we are using a special command. Write to command register 211. The command is
247:
Word 0: #0381 ;Set the bits in the structure and get register 3=P_IST actual position
Word 1: #D33F ;Register 211, Command, use command message = 31 + 32
Word 2: #00F7 ;Value=247
Word 3: #0000 ; This will set the 2 registers P_IST = P_NEW and P_SOLL = P_NEW per default
P_NEW = 0, so this will automatically set these registers to 0.
P_NEW has register number 163.
7. Now return to standard position control.
We set the mode back to position (remember, velocity = 0):
Word 0: #0381
Word 1: #023F
Word 2: #0002
Word 3: #0000
;Set the bits in the structure and get register 3=P_IST actual position
;Register 2, Command, use command message = 31 + 32
;Value=2 = position mode
;-
8. Next we must set the max. velocity to use
Word 0: #0381 ;Set the bits in the structure and get register 3=P_IST actual position
Word 1: #053F ;Register 5, MODE, use command message = 31 + 32
Word 2: #07D0 ;Value=2000, velocity mode appx. 957 RPM (scaling: 2.1 x RPM)
Word 3: #0000 ;
9. From here we can either use the standard position controller and change the message
type to "Target position" and maybe set the incremental -bit if necessary.
Word 0: #0381 ;Set the bits in the structure and get register 3=P_IST actual position
Word 1: #2121 ;Use target position message type
Word 2: #07D0 ;Value=2000, since we are running "incremental" the shaft position
;is moved by 2000 counts
Word 3: #0000 ; .........
Please also consult the user documentation for the Omron PLC and for a general motor
register overview please consult MacTalk communication, page 357.
224
JVL Industri Elektronik A/S - User Manual - Integrated Servo Motors MAC050 - 3000
5
4
2
JVL Industri Elektronik A/S - User Manual - Integrated Servo Motors MAC050 - 3000
1
M12 Female connector
“BUS2”
DeviceNet Interface
M12 Male connector
“BUS1”
DeviceNet Interface
7
1
3
6
4
5
5
2
8
2
O2
3
3
5
DeviceNet
Transceiver +
DC-DC conv.
RS232
serial interface
Optocoupler
+ Driver
Optocoupler
Opto-isolation
V-
CAN_L
CAN_H
V+
Rx
4
Tx-PD
Tx
1
2
O1
4
IO-
O+
PL
NL
IN1
2
6
Interface
Control
Control
core
Power supply for the module
Power ground (P-) is not connected in the MAC00-FD4 module
6
5
SW3
CV
1
4
3
“I/O”
Digital inputs and outputs
Voltage range 5-28 (32)V
3
1
P+
P-
MAC00-FD4 expansion module
GND
TX
RX
AIN
GND
O1
O2
B
B+
A
A+
5V
P+
P-
Asynchronous
interface (5V)
TT1019GB
or Zero search input
±10V nom. or up to 32V
Analogue input
Status outputs
Multifunction I/O
(setup as “serial data”)
Internal power supply
(processor and encoder)
Power supply
(MAC050 to 800)
Basic MAC motor
4.6.21
2
MAC50-141: +12-48V and MAC400/800: +24V
“PWR”
Power supply
Basic MAC motor with MAC00-FD4 module inserted.
4.6
Expansion Module MAC00-FD4
Hardware in general
The schematic below shows the MAC00-FD4 module mounted inside the basic MAC
motor. For further details regarding the external connectors, please see Expansion
MAC00-FD4 hardware description, page 226
225
4.6
Expansion Module MAC00-FD4
Expansion module MAC00-FD4 front plate
PWR
BUS1
Power
M12 - 5pin male
connector including:
P+, P- and secondary
supply (optional).
Primary DeviceNet
connector.
M12 - 5pin male
connector including:
DeviceNet interface
I/O
M12 - 8pin female
connector including:
RS232 Interface
Selectable I/O’s such
as analogue input, O1,
O2, IN1, NL, PL.
BUS2
Second DeviceNet
connector
M12 - 5pin female
connector including:
DeviceNet interface
FD4
TT1016GB
4.6.22
Expansion MAC00-FD4 hardware description
The MAC00-FD4 offers IP67 protection on MAC050-141 and M12 connectors which
make it ideal for automation applications where no additional protection is desired. The
M12 connectors offer solid mechanical protection and are easy to operate. The I/O signals available are restricted since only 4 I/O terminals are available. The I/Os connected
to these 4 terminals must be selected via a small dip-switch.
The connector layout:
“PWR” - Power input. M12 - 5-pin male connector
Signal name
Description
Pin no.
JVL Cable
WI1000M12
F5T05N
P+
Main supply +12-48VDC. Connect with pin 2 *
1
Brown
1
P+
Main supply +12-48VDC. Connect with pin 1 *
2
White
1
P-
Main supply ground. Connect with pin 5 *
3
Blue
1
CV
Control voltage +12-48VDC.
4
Black
1
P-
Main supply ground. Connect with pin 3 *
5
Grey
1
Isolation
group
* Note: P+ and P- is each available at 2 terminals. Make sure that both terminals are connected in order to
split the supply current in 2 terminals and thereby avoid an overload of the connector.
“BUS1” - DeviceNet interface. M12 - 5-pin male connector
Signal name
Description
Pin no.
Cable: user
supplied
Isolation
group
Drain
Shield for the DeviceNet interface - internally
connected to the motor housing
1
-
2
V+
DeviceNet supply. Note that the MAC00-FP4
only senses at this terminal. The MAC00-FP4
contains its own power supply
2
-
2
V-
DeviceNet ground
3
-
2
CAN_H
DeviceNet interface. Positive signal line
4
-
2
CAN_L
DeviceNet interface. Negative signal line
5
-
2
(Continued next page)
226
JVL Industri Elektronik A/S - User Manual - Integrated Servo Motors MAC050 - 3000
4.6
Expansion Module MAC00-FD4
“BUS2” - DeviceNet interface. M12 - 5-pin female connector
Signal name
Description
Pin no.
Cable: user
supplied
Isolation
group
Drain
Shield for the DeviceNet interface - internally connected to the motor housing.
1
-
2
V+
DeviceNet supply. Note that the MAC00-FP4 only
senses at this terminal. The MAC00-FP4 contains
its own power supply.
2
-
2
V-
DeviceNet ground.
3
-
2
CAN_H
DeviceNet interface. Positive signal line.
4
-
2
CAN_L
DeviceNet interface. Negative signal line.
5
-
2
“IO” - I/O’s and RS232 interface. M12 - 8-pin female connector.
Signal name
Description
Function
Pin no.
JVL Cable
WI1000-M12
M8T05N
IOC
I/O terminal C.
SW3-5 = OFF : PL input
SW3-5 = ON : O1 output
1
White
3
Tx
RS232 interface - transmit output
Important !: DIP1 must be turned ON. If addressing is
used it must be turned ON at minimum one
of the connected motors.
2
Brown
1
Rx
RS232 interface - receive input
3
Green
1
GND
RS232 Ground - also used with analogue input
4
Yellow
1
5
Grey
3
(1 when
used as
AIN)
Isolation
group
IOA
I/O terminal A.
SW3-2 = ON and SW3 DIP3 = OFF :
AIN (Analogue input)
SW3-2 = OFF and SWDIP 3 = ON :
O2 (output 2)
(AIN is the analogue input. Remember to use the GND terminal with
AIN)
IOB
I/O terminal B.
SW3-4 = OFF : IN1 (input 1)
SW3-4 = ON : O1 (output 1)
6
Pink
3
IO-
I/O ground to be used with IN1, NL, PL, O1, O2
7
Blue
3
8
Red
3
IOD
I/O terminal D.
SW3-6 = OFF : NL
(negative limit input)
SW3-6 = ON : O+
(output supply)
Cable Screen
Some standard cables with M12 connector offer a screen around the cable. This screen on some cables is
fitted to the outer metal of the M12 connector. When fitted to the MAC00-FD4 module, this means that the
screen will have contact with the complete motor housing and thereby also the power ground (main ground).
Isolation groups
The MAC00-FD4 offers optical isolation at the digital inputs and outputs (IN1, NL, PL and O1-2). The table
shows a number for each pin. This number refers to the isolation group to which the pin is connected.
Isolation group 1 means that the terminal refers to the main ground (P-, GND and the motor housing).
Isolation group 2 means that the terminal refers to the DeviceNet interface ground (V-).
Isolation group 3 means that the terminal refers to the I/O ground (IO-)
Defaults: Dip1-6 : ON, ON, OFF, OFF, ON, ON = TXPD:ON / IOA:AIN / IOB:IN1 / O1 / O+
4.6.23
General wirering considerations
Due to the nature of Devicenet needing a handshake procedure at initialization it is NOT recommended to power cycle 24V while the Devicenet bus system is running. If MAC400/800 motor
types are used, keep the 24V control power on but cut the AC-voltage for the motor. In this way
the DeviceNet connection is kept but the motor is held powerless and all motor movement is
inhibited.
For the smaller series of MAC-motors (50-141) there is a separate power connection for the motor driver (P+ terminal) which can be disabled while the control power (the CV terminal) is kept
supplied with 24VDC without loss of communication.
JVL Industri Elektronik A/S - User Manual - Integrated Servo Motors MAC050 - 3000
227
4.6
4.6.24
Expansion Module MAC00-FD4
Connecting MAC00-FD4 to the DeviceNet-bus
Before you connect the MAC00-FD4 to the DeviceNet-bus make sure that the Baudrate, the Node-ID and the termination is setup to the desired values.
On the DeviceNet bus it is possible to have a transmission speed (Baud-rate) of maximum 500 Kbit/s and a minimum of 125 Kbit/s. The Baud-rate depends on the cable
length, and the wires cross-section. The table below have some recommendations for
networks with less than 64 nodes. Recommended bus cable cross-section are according
to CiA®:
Bus Distance
(m)
Cross-section (mm2)
Terminator
(ohm)
Baud-rate
(Kbit/s)
100
0.34-0.6
150-300
500
250
0.34-0.6
150-300
250
500
0.5-0.6
150-300
125
The bus wires may be routed in parallel, twisted and/or shielded, depending on EMC requirements. The layout of the wirering should be as close as possible to a single line structure, in order to minimize reflections. The cable stubs for connection of the bus node
shall be as short as possible, especially at high bit rates. The cable shielding in the house
shall have a large contact area. For a drop cable a wire cross-section of 0.25 to 0.34 mm²
would be an appropriate choice in many cases. In section 4.3.46 of this chapter there is
an overview showing various JVL standard cables. All the JVL cables are twisted and
shielded.
For bus lenghts greater than 500m, a bridge or repeater device is recommended.
Galvanic isolation between the bus nodes is optional. In the MAC00-FD4 modules the
galvanic isolation is integrated to obtain best possible immunity against noise and differences in the voltage potential between the nodes.
228
JVL Industri Elektronik A/S - User Manual - Integrated Servo Motors MAC050 - 3000
4.6
4.6.25
Expansion Module MAC00-FD4
Necessary accessories to MAC-FD4:
On our web page www.jvl.dk you can, under the downloads menu, find the EDS file for
the MAC00-FD4 module, in the menu Field bus Interface Specifications Files.
EDS means Electronic Data Sheet. This file contains the information about the MAC00FD4 settings, that may be required to configure the setup and program in the master.
The MAC00-FD4 is a slave module on the DeviceNet-bus line, the master can be for example a PLC or a PC. If you are using a PLC as master, then make sure that it is provided
with a DeviceNet® communications module, and that the correct programming tools
are available. For getting support to the PLC master, it is more rewarding to use the PLC
vendor.
The MacTalk program can be used to monitor various operations and make the initial set
up on the motor see also Using MacTalk to setup the motor, page 14.
MacTalk is not a free-ware program. Please contact your JVL representative for further
information.
JVL Industri Elektronik A/S - User Manual - Integrated Servo Motors MAC050 - 3000
229
4.6
4.6.26
Expansion Module MAC00-FD4
Hardware I/O setup
The drawing below shows the SW3 Dip-switch location. The various settings of SW3 is
shown on the previous page.
Switch description:
SW3
Description
Function
Signal name
Dip 1
RS232 interface - transmit output
ON = Enable
Tx
Dip 2
Dip 3
I/O terminal A
DIP2=ON and DIP3=OFF :
AIN (Analogue input)
IOA
Dip 2
Dip 3
I/O terminal A
DIP2=OFF and DIP3=ON :
O2 (output 2)
IOA
Dip 4
I/O terminal B
DIP4=ON : Output 1
DIP4=OFF : Input 1
IOB
Dip 5
I/O terminal C
DIP5=ON : O1 output
DIP5=OFF : PL (positive limit input)
IOC
Dip 6
I/O terminal D
DIP6=ON : O+ (Output supply)
DIP6=OFF : NL (Negative limit input)
IOD
The factory default setting is:
SW3
ON
Dip 1
X
Dip 2
Dip 3
X
Function
RS232 interface Enable
X
Dip 4
230
OFF
X
O2 (output 2)
Input 1
Dip 5
X
O1 output
Dip 6
X
0+ (output supply)
JVL Industri Elektronik A/S - User Manual - Integrated Servo Motors MAC050 - 3000
4.6
Expansion Module MAC00-FD4
4.6.27
Cables for the MAC00-FD4
The following cables equipped with M12 connector can be supplied by JVL.
MAC00-FD4 Connectors
Description
JVL Order no.
RS232 Interface cable. Connects
directly from MAC00-FD4 to PC
Length: 5m (197 inch)
RS232-M12-1-8
X
Cable (Ø5.5mm) with M12 female
5-pin connector loose wire ends
0.35mm² (22AWG) and foil screen.
Length: 5m (197 inch)
WI1000-M12F5T05N
X
Same as above but 20m (787 inch)
WI1000-M12F5T20N
X
Cable with M12 male 8-pin
connector loose wire ends
0.22mm² (24AWG) and screen.
Length: 5m (197 inch)
WI1000-M12M8T05N
X
Same as above but 20m (787 inch)
WI1000-M12M8T20N
X
DeviceNet cable with M12 male 5pin connector, loose ends
and screen.
Length: 5m (197 inch).
WI1006-M12M5S05R
X
Same as above but 15m (591 inch)
WI1006-M12M5S15R
X
Devicenet cable with M12 female
5-pin connector, loose
ends and screen.
Length: 5m (197 inch)
WI1006-M12F5S05R
X
Same as above but 15m (591 inch)
WI1006-M12F5S15R
Loose DeviceNet male M12
termination resistor.
WI1008-M12M5STR4
“BUS1”
5-pin
Male
B-coded
“BUS2”
5-pin
Female
B-coded
“I/O”
8-pin
Female
Photo
“PWR”
5-pin
Male
X
Termination resistor
X
Protection caps. Optional if connector is not used, to protect from dust / liquids.
X
X
X
X
IP67 protection cap for M12
female connector.
WI1000-M12FCAP1
IP67 protection cap for M12
male connector.
WI1000-M12MCAP1
Important: Please note that the cables are a standard type. They are not recommended for use in cable chains or where the cable is repeatedly bent. If this is required, use a special robot cable (2D or 3D
cable). See also Accessories, page 394 where additional M12 connectors are shown.
JVL Industri Elektronik A/S - User Manual - Integrated Servo Motors MAC050 - 3000
231
4.7
4.7.1
Expansion Module MAC00-FP2/FP4
MAC00-FP2
MAC00-FP4
With cable glands
With M12 connectors
TT1010GB
Profibus module MAC00-FP2 and FP4 Introduction
The MAC00-FP2 and FP4 are Profibus-DP slaves. They are capable of running at Baudrates up to 12Mbit.
All the registers1 of the MAC motor can be read and written.
The modules include 6 inputs, 2 of which are end-limit inputs. These can be read from
the Profibus-DP. The end-limit inputs can automatically halt the motor. The other inputs
can be used to activate different movements.
The MAC motor is controlled by writing to the input data (9 bytes).
The expansion modules MAC00-FP2 and FP4 can be mounted on standard MAC motors
MAC50, MAC95, MAC140, MAC141, MAC400 and MAC800.
Both modules offer the same functions but with the following hardware differences:
Type
Protection
class
Connectors
I/O and interface
Power supply
Bus interface
MAC00-FP2
IP67/IP65*
Cable glands
(Mini crimp connectors internally
Cable glands
(Screw terminals
internally)
Cable glands x 2
(Screw terminals
internally)
MAC00-FP4
IP67/IP65*
M12
M12
M12 B-coded (x2)
Note*: IP65 on MAC400-800
Both modules are delivered without any cables as standard.
Optionally the MAC00-FP2 module can be delivered with cable in selected lengths. Also
cables for the MAC00-FP4 with M12 connectors are available.
The first part of this section deals with the common features of both modules. Please see
the latter pages for specific information about each module, such as example connection
diagrams.
1
2
232
A list of the typically used registers can be found in Serial Quick Guide (MacTalk protocol), page 357.
The FlexMac commands are described in FastMac commands, page 240.
JVL Industri Elektronik A/S - User Manual - Integrated Servo Motors MAC050 - 3000
4.7
Expansion Module MAC00-FP2/FP4
4.7.2
MAC00-FP2 and FP4 Address and Termination setup
Each unit connected to the Profibus must be set up with a unique address.
The illustration below shows how the address and termination can be set on the internal
dip switch. The dip switch is located on the internal circuit board.
MAC00-FP2 and FP4 Dip switch settings
Please notice that in newer modules
with firmware 3.01 or newer the address
Mini dip-switch
can only be set by software
OFF
Dip 1-7 - Address setting
(address range 0-127)
Dip 8 - Address set by software
Dip 9-10 - Line termination
Both set to ON =
Term. enabled
Both set to OFF =
Term. disabled
Rear side of the MAC00-FP2 or FP4
expansion module
ON
1
2
3
4
5
6
7
8
9
0
SW1
Notes.
SW1 default setting: All switches set to “ON”
except 9+10 which are “OFF” which corresponds to
- Address is set by software / - Termination disabled
“Address set by software” (DIP8) means that
the profibus address will automatically be set
to the same value as the motor address
Dip switch location on the
MAC00-FP2 Expansion module
Cable glands
Basic MAC motor
housing
Internal circuit boards
Profibus and I/O
connectors.
Dip Switch placed
on the rear side of the
module
TT0946GB
Important: On newer modules with firmware 3.01 or 3.02 the dip switch 1 to 8 has
been disabled and the address can only be set in software by using for example MacTalk.
Please contact your JVL distributor if it is crucial to use the dip switch for address setup.
JVL Industri Elektronik A/S - User Manual - Integrated Servo Motors MAC050 - 3000
233
4.7
Expansion Module MAC00-FP2/FP4
4.7.3
Output data (Master->Slave)
The MAC00-FP2/FP4 module contains 9 bytes of output data.
Address
Name
Description
0
Write data 3 (MSB)
Data to write to register
1
Write data 2
--- “ ---
2
Write data 1
--- “ ---
3
Write data 0 (LSB)
--- “ ---
4
Write register selector
The register to write
5
Read register selector
The register to read
6
Direct register
Direct FlexMac command
7
Command
Bits for commanding reads/write
8
Input setup
Bits for input setup
Write data
For 16 bit registers, the data must be placed in Write data 0 and Write data 1.
For 32 bit registers, the data must be placed in Write data 0-3.
Write register selector
The number of the register to write to should be placed here. The register must be in
the range 1-255.
Read register selector
The number of the register to read from should be placed here. The register must be in
the range 1-255.
Direct register
This register can be used to execute a FlexMac2 command. When writing to this
Register, the command will be executed immediately. The bit 0-6 is the command, and
bit 7 is not used. If the same command is to be executed twice, bit 7 can be toggled.
The command is accepted when the “Last direct register”, in the input data, has the same
value as this register.
234
JVL Industri Elektronik A/S - User Manual - Integrated Servo Motors MAC050 - 3000
4.7
Expansion Module MAC00-FP2/FP4
Command
Bit
7
6
5
4
3
2
1
0
Function
Write
Toggle
Read
Toggle
Write
32 bit
Read
32 bit
Auto
write
Auto
read
Reserved
Reserved
Bit 7 (Write toggle) is used for writing data to the selected register (Write register selector). When this bit is toggled, writing is executed. The write command is accepted when Bit 7 in the command status (output data byte 7) is equal to this bit.
Bit 6 (Read toggle) is used for reading data from the selected register (Read register selector). When this bit is toggled, reading is executed. The read command is accepted when Bit 6 in the command status (output data byte 7) is equal to this bit.
Bit 5 (Write 32 bit) Set this to 1 if writing to a 32 bit register and 0 if writing to a 16 bit
register.
Bit 4 (Read 32 bit) Set this to 1 if reading from a 32 bit register and 0 if reading from a
16 bit register.
Bit 3 (Auto write) When this bit is 1, the data written in write data 0-3, is transferred to
the MAC motor immediately, regardless of the write toggle bit.
Bit 2 (Auto read) When this bit is 1, the data in read data 0-3 is updated all the time, regardless of the read toggle bit.
Bit 1and Bit 0 should be 0.
Input setup
Bit
7
6
5
4
Function
-
Reset end limit
PL Enable
NL Enable
3
2
1
0
Input mode
Bit 6
(Reset end-limit) When this bit is 1, the end limit condition is reset, if no end
limits are activated.
Bit 5
(PL Enable) When this bit is 1, the positive end-limit is enabled.
Bit 4
(NL Enable) When this bit is 1, the negative end-limit is enabled.
Bit 3-0
(Input mode) these bits select the current input mode. See section Input modes,
page 238 for details.
JVL Industri Elektronik A/S - User Manual - Integrated Servo Motors MAC050 - 3000
235
4.7
4.7.4
Expansion Module MAC00-FP2/FP4
Write to a register example
If a new velocity need to be written to the motor it is done after this step by step procedure.
1. Write the new speed value to the 4 databytes (32 bits) on address 0 to 3.
2. Setup the register number where the data must be written to.
In this case its the velocity register which is register 5 so this number must be written
into the “write register selector” address 4.
3. In the “Command” register at address 7 the “Write 32bit” and the “Write toggle”
must be toggled.
4. Wait until the “Write toggle” bit in the “Command status” register is the same as the
“write toggle” in the “Command” register. Only when they are equal the write cycle
is completely finished.
Definitions:
Toggle: Change to opposite state. (from 0 to 1 or from 1 to 0). On bit level it correspond
to making an inverse of the bit.
236
JVL Industri Elektronik A/S - User Manual - Integrated Servo Motors MAC050 - 3000
4.7
Expansion Module MAC00-FP2/FP4
4.7.5
Input data (Slave->Master)
The MAC00-FP2/4 contains 8 bytes of input data.
Address Name
Description
0
Read data 3 (MSB)
Data read from register
1
Read data 2
--- “ ---
2
Read data 1
--- “ ---
3
Read data 0
--- “ ---
4
Motor status
Status bits for the motor
5
Input status
Status of inputs
6
Last direct register
Last accepted direct FlexMac command
7
Command Status
Status bits for commands
Read Data
For 16 bit registers, the read value will be placed in Read data 0 and Read data 1.
For 32 bit registers, the read value will be placed in Read data 0-3.
Motor status
Bit
7
6
5
4
3
Function
-
Decelerating
Accelerating
In position -
2
1
0
-
-
Error
Bit 6 (Decelerating) this bit is 1 when the motor is decelerating.
Bit 5 (Accelerating) this bit is 1 when the motor is accelerating.
Bit 4 (In position) this bit is 1 when the motor has reached its commanded position.
Bit 0 (Error) this bit is 1 when a motor error has occurred.
Input status
Bit
7
6
5
4
3
2
1
0
Function
-
-
PL
NL
IN4
IN3
IN2
IN1
Bit 5 (PL) Positive limit input.
Bit 4 (NL) Negative limit input.
Bit 3-0 (INx) user inputs.
Last direct register
See Direct register, page 234 for details.
JVL Industri Elektronik A/S - User Manual - Integrated Servo Motors MAC050 - 3000
237
4.7
Expansion Module MAC00-FP2/FP4
Command status
Bit
7
6
Function
Write Toggle Read Toggle
5
4
-
-
3
2
1
0
Status
Bit 7
(Write Toggle) this bit indicates when writing is completed. See Command, page
235 for details.
Bit 6
(Read Toggle) this bit indicates when reading is completed. See Command, page
235 for details.
Bit 3-0 (Status) These bits indicate the status of the MAC00-FP2/FP4. The following sta
tus codes are possible:
4.7.6
Code
Description
0
OK – Idle
1
Executing Input
2
Executing Output
3
Limit switch active
4
Profi error
5
Connecting to MAC motor
Input modes
The 4 user inputs can be used to execute different move commands.
The following input modes can be selected:
Mode
Description
0
Passive
1
Absolute+Relative
2-14
Reserved
15
Custom
Passive mode (0)
When this mode is selected, the user inputs are ignored.
The inputs can be read in output data 5 for other purposes.
Absolute + Relative mode (1)
When this mode is selected. the inputs have the following functions:
IN1: Selects the absolute position in position register 1.
IN2: Selects the absolute position in position register 2.
IN3: Moves relative the distance in position register 3.
IN4: Moves relative the distance in position register 4.
The action is executed when an inactive-to-active transition is detected on the input.
Custom mode (15)
When this mode is selected, the action of each input can be selected with the slave parameters. See Slave parameters, page 239.
238
JVL Industri Elektronik A/S - User Manual - Integrated Servo Motors MAC050 - 3000
4.7
Expansion Module MAC00-FP2/FP4
4.7.7
Slave parameters
When configuring the profibus, it is possible to set some parameters for the slave. These
parameters are setup during startup and cannot be changed during operation.
XX Input level
Using these parameters, the input level of the inputs IN1, IN2, IN3, IN4, NL and PL can
be selected.
Possible values:
Active high
Active low
: The input will be active, when a signal is applied.
: The input will be active, when no signal is applied.
End-limit action
Using this parameter, the action taken when an end limit is activated can be selected.
Possible values:
Velocity = 0 :
When the end-limit is activated, the velocity will be set to 0 and the
motor will decelerate and stop. If the motor should run again, the
user must manually set a new velocity.
Passive mode : When the end-limit is activated, the actual mode will be changed to
passive. In passive mode the motor is short-circuited and can be rotated.
In firmware version 1.4 or higher, the “end-limit action’ is also active if the Profibus is going off-line but it needs to be online before it goes off line before the feature is enabled.
Input debounce
Using this parameter, an input filter can be activated.
Possible values:
Disabled
Enabled
No filtering will be done on the inputs.
The inputs are filtered, resulting in better noise immunity but slower
response. When the filter is enabled, there will be a delay at the input
of about 5ms.
Input x action
Using these parameters, up to 3 actions can be assigned to each input.
These actions are used when the custom input mode is selected. See Input modes, page
238.
The action is defined by a FlexMac command. See FastMac commands, page 240.
Possible values are 0-127, where 0 represents no action.
JVL Industri Elektronik A/S - User Manual - Integrated Servo Motors MAC050 - 3000
239
4.7
Expansion Module MAC00-FP2/FP4
4.7.8
FastMac commands
Using the FastMac commands, it is possible to activate a set of registers and set the mode
of the motor using a single command. The command is composed of two parts. The first
part is the mode that the motor will use.
The following 4 modes can be selected:
Value
Motor mode after command
Format
0
Passive
Command = 0 + Register N
32
Velocity
Command = 32 + Register N
64
Position
Command = 64 + Register N
96
<No change>
Command = 96 + Sub-command N
The second part of the command is a register number or sub-command number.
The following table shows the register numbers:
N
Register
N
Register
N
Register
N
Register
0
P1
8
V1
16
A1
24
L1
1
P2
9
V2
17
A2
25
L2
2
P3
10
V3
18
A3
26
L3
3
P4
11
V4
19
A4
27
L4
4
P5
12
V5
20
T1
28
Z1
5
P6
13
V6
21
T2
29
Z2
6
P7
14
V7
22
T3
30
Z3
7
P8
15
V8
23
T4
31
Z4
The following table shows the sub-commands:
240
N
Command
N
Command
0
No operation
16
Start search zero
1
Reset error
17
No operation
2
P_SOLL = 0
18
No operation
3
P_IST = 0
19
Reserved
4
P_FNC = 0
20
Select absolute position mode
5
V_SOLL = 0
21
Select relative position mode using P_SOLL
6
T_SOLL = 0
22
Select relative position mode using P_FNC
7
Reset IN_POS, ACC,DEC
23
No operation
8
P_FNC = ( FLWERR - P7 ) * 16
24
No operation
9
P_FNC = ( FLWERR - P8 ) * 16
25
No operation
10
Reserved
26
No operation
11
Reserved
27
No operation
12
Activate P1,V1,A1,T1,L1,Z1
28
No operation
13
Activate P2,V2,A2,T2,L2,Z2
29
No operation
14
Activate P3,V3,A3,T3,L3,Z3
30
Reserved
15
Activate P4,V4,A4,T4,L4,Z4
31
Reserved
JVL Industri Elektronik A/S - User Manual - Integrated Servo Motors MAC050 - 3000
4.7
Expansion Module MAC00-FP2/FP4
Examples of FastMac commands
Change velocity mode and activate register V1 :
32 + 8= FastMac command 40
Activate register P5 and change to position mode
64 + 4 = FastMac command 68
Activate register T3 and change to position mode
64 + 22 = FastMac command 86
Activate P0,V0,A0,T0,L0 and Z0 without changing the mode:
96 + 12 = FastMac command 108
JVL Industri Elektronik A/S - User Manual - Integrated Servo Motors MAC050 - 3000
241
4.7
Expansion Module MAC00-FP2/FP4
4.7.9
MAC00-FP2 and FP4 description of connections
The following pages describe the different aspects of connecting the modules MAC00FP2 and FP4.
4.7.10
MAC00-FP2 Connectors
MAC00-FP2 rear plate layout:
The illustration below shows all the internal connectors in the module. The profibus and
power connectors are easy-to-use screw terminals. If the I/Os are used, they require a
JVL cable type WG0402 (2m), WG0410 (10m) or WG0420 (20m). See also the appendix
for cable and connector accessories.
Overview MAC00-FP2 connectors
Interface connector
See table for connection details
Output connector
See table for connection details
Mounting hole used
to fit the connector
board to the rear plate
Input connector
See table for connection
details
TT0965GB
Power connection
to the basic motor
Mounting hole used
to fit the connector
board to the rear plate
Fuse T10A
Profibus output connector
(signal to next node in the chain)
Profibus input connector
(signal from last node in the chain)
“Profibus-In” and “Profibus-Out”
Please note that these two connectors are
internally hardwired (no electronics added in between).
Terminal description:
GND
Signal ground can optionally be used for the cable screen
Negative profibus signal line (Green)
APositive profibus signal line (Red)
B+
+5VDC output to be used for external termination (optional)
5VDC
242
Connect power supply to these
2 terminals (+12-48VDC)
Profibus signal definitions
MAC00-FP2
name
Standard
wire colour
Name at modules
with SN<30000
B+
Red
xA/xP
A-
Green
xB/xN
JVL Industri Elektronik A/S - User Manual - Integrated Servo Motors MAC050 - 3000
4.7
Expansion Module MAC00-FP2/FP4
4.7.11
MAC00-FP2 option with cables (optional)
The MAC00-FP2 type number only covers the basic module, i.e. without any cables.
If a number is added after the basic type number, for example MAC00-B2-10, this suffix
indicates that the module is fitted with 10 m of cable in the I/O. The I/O cable covers all
the signal lines, i.e. RS232, Digital input 1-4, Limit inputs NL and PL and the Digital outputs 1-4.
Please note the WG0420 table below is not valid for cables delivered before 1.10.2002.
Digital Inputs - Internal connector J2
Signal name
Pin no.
Description
Wire colour
IN1
1
Digital input 1
Red/black
IN2
2
Digital input 2
Green/black
IN3
3
Digital input 3
Violet
IN4
4
Digital input 4
Violet/white
NL
5
Negative limit input - If not used, do not connect.
Grey
PL
6
Positive limit input - If not used, do not connect.
Grey/black
IO-
7
I/O ground. Shared with the output ground (O-)
Pink/black
NC
8
(Reserved)
Black/white
CV
9
Secondary supply. Used during emergency stop *
Light green **
CV
10
Secondary supply. Used during emergency stop *
White
Digital Outputs - Internal connector J4
Signal name
Pin no.
Description
Wire colour
O+
1
Supply for outputs - Must be connected to an ext.
supply.
Red/white
O1
2
Digital output 1 - PNP output - Max. 25mA
Green/white
O2
3
Digital output 2 - PNP output - Max. 25mA
Yellow/black
NC
4
(Reserved)
Blue/white
NC
5
(Reserved)
Orange/white
NC
6
(Reserved)
Brown/white
NC
7
(Reserved)
Pink
8
I/O ground. This ground is shared with the input
ground
Black
IO-
Interface - including analogue input - Internal connector J1
Signal name
Pin no.
Description
Wire colour
TXPD
1
Transmit pull-down (Connect to TX if addr. not used)
Red
TX
2
RS232 Transmit (Connect to TXPD if addr. not used).
Green **
RX
3
RS232 Receive (connect to GND if not used).
Yellow
GND
4
Ground for RS232
Blue
AIN
5
Analogue input +/-10V or Zero sensor input
Orange
GND
6
Ground for AIN
Brown
Cable Screen
The cable-screen is internally connected to motor housing. Externally it must be connected to earth.
Unused wire
Orange/Black - is not used internally. It must be left unconnected.
* : The VC terminals are only available on modules with serial number >25000
** : The light green wire (CV) can be difficult to distinguish from the green wire (TX) on some cables.
Important: Please note that the cables are a standard type. They are not recommended
for use in cable chains or where the cable is repeatedly bent. If this is required, use a special robot cable (2D or 3D cable).
JVL Industri Elektronik A/S - User Manual - Integrated Servo Motors MAC050 - 3000
243
4.7
Expansion Module MAC00-FP2/FP4
4.7.12
Assembly instructions for profi cables
Remove the insulation from the cable, as shown in the accompanying picture.
16
36
4
All values in millimetres
Fit the plastic part of the gland on the cable, and fold the
screen around it. Remember to first feed the cable
through the nut.
Feed the cables through the cable glands in the rear plate
of the module and tighten the nuts.
Screw the wires into the module. The red wire must go
into the B+terminal, and the green must go into the Aterminal.
The input and output terminals can be swapped if required. The is no difference between input and output on
the board which means that it is purely hard-wired.
Attach the circuit board to the rear plate with the two
screws. REMEMBER to use the spring washers included.
The table below shows the difference between Siemens
naming conventions and the naming on the MAC00-FPx.
244
MAC00-FPx
name
Siemens
name
Standard
wire colour
B+
B
Red
A-
A
Green
IMPORTANT:
use spring washer
JVL Industri Elektronik A/S - User Manual - Integrated Servo Motors MAC050 - 3000
4.7
Expansion Module MAC00-FP2/FP4
4.7.13
MAC00-FP2 - How to connect the RS232 interface
The illustration below shows how to connect the MAC00-FP2 directly to a PC COM
port. The drawing is based on standard cables from JVL, type WG0402, WG0410 or
WG0420. See also Accessories, page 394 for a complete list of cables and connectors.
If the MAC motor is connected to the same RS232 line as other motors, the terminal TXPD should only be connected at one of the motors. If one of JVL’s standard RS232 cables
(RS232-9-1 or -n) is used between the DSUB connector shown and the PC com port,
the RX and TX pins must be swapped since they cross in these standard cables.
How to connect the MAC00-FP2 RS232 interface
PC RS232
COM port
5
GND
3
Tx
2
1
Remember to connect TX-PD (Red)
to TX (Green) in order to achieve
stable communication
S
creenterm
inated
totheG
N
Dterm
inal
JVL cable WG04xx
standard I/O
cable (24 wire)
Red
Green
Yellow
Blue
Screen
Rx
If the RS232 lines are extended
through another cable this cable
must also be screened
Connector:
Cable = Female 9pin DSUB
At PC = Male 9pin DSUB
Interface connector
(incl. analogue input)
Screen
Screen must be
connected to
main ground
at rear cover.
MAC00-FP2 internal
connector bard
TT0966GB
If JVL’s standard programming cable type RS232-9-1 or -n is
used between the shown connector and the PC the RX
and TX signal must be swapped. Tx to pin 2 and Rx to pin 3.
4.7.14
Operation with dual supply for emergency situations
In many applications it is intended that positional data and other setup information is retained during an emergency situation. It is however also required by law in many countries that the main power for energizing the motor is removed in such a situation.
To meet both of these requirements, the MAC motor equipped with a MAC00-FPx
module offers a secondary supply input called “CV”. If the main supply at the P+ terminal
is removed, the internal control circuitry can be kept “alive” by maintaining a supply at
the “CV” terminal.
MAC motor with module
Expansion module
From main supply
(12-48VDC)
P+
Optional *
Secondary supply
(12-48VDC)
CV
GND
Main supply
Power supply
and control
circuitry
Basic MAC motor
To motordriver
Internal supply voltages
and communication
P-
TT0976GB
* The “CV” terminal can be left open if not used.
JVL Industri Elektronik A/S - User Manual - Integrated Servo Motors MAC050 - 3000
245
4.7
Expansion Module MAC00-FP2/FP4
Expansion module MAC00-FP4 front plate
PWR
BUS1
Power
M12 - 5pin male
connector including:
P+, P- and secondary
supply (optional).
Primary Profibus-DP
connector.
M12 - 5pin male
connector including:
Profibus-DP interface
I/O
M12 - 8pin female
connector including:
RS232 Interface
Selectable I/O’s such
as analogue input, O1,
O2, IN1, NL, PL.
BUS2
Secondary Profibus-DP
connector:
M12 - 5pin female
connector including:
Profibus-DP interface
TT1008GB
4.7.15
Expansion MAC00-FP4 hardware description
The MAC00-FP4 offers IP67 on MAC050-141 protection and M12 connectors which
make it ideal for automation applications where no additional protection is desired. The
M12 connectors offer solid mechanical protection and are easy to unplug compared to
the FP2 module which has cable glands. The signals available are restricted compared to
the FP2 module since only 4 I/O terminals are available. The I/Os connected to these 4
terminals must be selected by a small dip-switch.
The connector layout:
“PWR” - Power input. M12 - 5-pin male connector
Signal name
Description
Pin no.
JVL Cable
WI1000M12
F5T05N
P+
Main supply +12-48VDC. Connect with pin 2 *
1
Brown
1
P+
Main supply +12-48VDC. Connect with pin 1 *
2
White
1
P-
Main supply ground. Connect with pin 5 *
3
Blue
1
CV
Control voltage +12-48VDC.
4
Black
1
P-
Main supply ground. Connect with pin 3 *
5
Grey
1
Isolation
group
* Note: P+ and P- are each available at 2 terminals. Make sure that both terminals are connected in order
to split the supply current in 2 terminals and thereby avoid an overload of the connector.
“BUS1” - Profibus-DP interface. M12 - 5-pin male connector
Signal name
Description
Pin no.
Cable: user
supplied
Isolation
group
-
Reserved for future purpose - do not connect
1
-
2
A-
Terminal A (Siemens syntax) for the Profibus-DP
interface
2
-
2
DGND
Profibus-DP interface ground
3
-
2
B+
Terminal A (Siemens syntax) for the Profibus-DP
interface
4
-
2
SHIELD
Cable shield. Internally conn. to the motor housing.
5
-
2
(Continued next page)
246
JVL Industri Elektronik A/S - User Manual - Integrated Servo Motors MAC050 - 3000
4.7
Expansion Module MAC00-FP2/FP4
MAC00-FP4 connection description - continued.
“BUS2” - Profibus-DP Interface. M12 - 5-pin female connector
Signal name
Description
Pin
no.
Cable: user
supplied
Isolation
group
5VDC
5V output. Can be used for ext. termination (Max 40mA)
1
-
2
A-
Terminal A (Siemens syntax) for the Profibus interface
2
-
2
DGND
Profibus-DP interface ground
3
-
2
B+
Terminal B (Siemens syntex) for the Profibus interface.
4
-
2
SHIELD
Cable shield. Internally connected to the motor housing.
5
-
2
“IO” - I/Os and RS232 interface. M12 - 8-pin female connector.
Function
Pin
no.
JVL Cable
WI1000-M12
M8T05N
Isolation
group
1
White
3
Signal name
Description
IOC
I/O terminal C.
Tx
RS232 interface - transmit output
Important !: DIP1 must be turned ON. If addressing is
used it must be turned ON at minimum one
of the connected motors.
2
Brown
1
Rx
RS232 interface - receive input
3
Green
1
GND
RS232 Ground - also used with analogue input
4
Yellow
1
5
Grey
3 (1 when
used as
AIN)
6
Pink
3
7
Blue
3
8
Red
3
DIP 5 = OFF : PL input
IOA
I/O terminal A.
DIP 5 = ON (default)
O1 (output PNP 25mA)
DIP 2 = ON(default) and
DIP 3 = OFF (default): AIN
(Analogue in or Zero search input)
DIP2 = OFF and DIP 3 = ON : O2
(output 2 / PNP 25mA)
DIP 4 = OFF (default): IN1 (input 1)
IOB
I/O terminal B.
IO-
I/O ground to be used with IN1, NL, PL, O1, O2
IOD
I/O terminal D.
DIP 4 = ON : O1 (PNP 25mA)
(output 1)
DIP 6 = OFF: NL
(negative limit input)
DIP 6 = ON(default): O+ (outp.sup.)
Cable Screen
Some standard cables with M12 connector offer a screen around the cable. This screen on some cables is
fitted to the outer metal at the M12 connector. When fitted to the MAC00-FP4 module, this means that the
screen will have contact with the complete motor housing and thereby also the power ground (main ground).
DIP-switch default setting
The Dip-switches are default set to the following positions:
DIP1 (TX-PD)=ON
DIP2 (AIN to IOA terminal) = ON
DIP3 (O2 to IOA terminal) = OFF
DIP4 (O1 to IOB) = OFF
DIP5 (O1 to IOC) = ON
DIP6 (O+ to IOD) = ON
Isolation groups
The MAC00-FP4 offers optical isolation at the digital inputs and outputs (IN1, NL, PL and O1-2). The table
shows a number for each pin. This number refers to the isolation group to which the pin is connected.
Isolation group 1 means that the terminal refers to the main ground (P-, GND and the motor housing).
Isolation group 2 means that the terminal refers to the Profibus-DP interface ground (DGND).
Isolation group 3 means that the terminal refers to the I/O ground (IO-)
JVL Industri Elektronik A/S - User Manual - Integrated Servo Motors MAC050 - 3000
247
4.7
Expansion Module MAC00-FP2/FP4
4.7.16
Cables for the MAC00-FP4
The following cables equipped with M12 connector can be supplied by JVL.
MAC00-FP4 Connectors
Description
JVL Order no.
RS232 Interface cable. Connects
directly from MAC00-FP4 to PC
Length: 5m (197 inch)
RS232-M12-1-5-8
X
Cable (Ø5.5mm) with M12 female
5-pin connector loose wire ends
0.35mm² (22AWG) and foil
screen.
Length: 5m (197 inch)
WI1000-M12F5T05N
X
Same as above but 20m (787 inch)
WI1000-M12F5T20N
X
Cable with M12 male 8-pin
connector loose wire ends
0.22mm² (24AWG) and screen.
Length: 5m (197 inch)
WI1000-M12M8T05N
X
Same as above but 20m (787 inch)
WI1000-M12M8T20N
X
Profibus DP cable with M12 male
5pin connector B-coded, loose ends
and screen.
Length: 5m (197 inch).
WI1026-M12M5S05R
X
Same as above but 15m (591 inch)
WI1026-M12M5S15R
X
Profibus DP cable with M12 female
5-pin connector B-coded, loose
ends and screen.
Length: 5m (197 inch)
WI1026-M12F5S05R
X
Same as above but 15m (591 inch)
WI1026-M12F5S15R
“BUS1”
5-pin
Male
B-coded
“BUS2”
5-pin
Female
B-coded
“I/O”
8-pin
Female
Photo
“PWR”
5-pin
Male
X
Loose connectors and termination resistor
X
X
X
Loose Profibus DP male M12
connector. B-coded.
Internal screw terminals.
WI1028-M12M5VC1
Loose Profibus DP female M12
connector. B-coded.
Internal screw terminals.
WI1028-M12F5VC1
Profibus DP male M12 termination
resistor. B-coded.
WI1028-M12M4STR3
Protection caps. Optional if connector is not used, to protect from dust / liquids.
X
X
X
X
IP67 protection cap for M12
female connector.
WI1000-M12FCAP1
IP67 protection cap for M12
male connector.
WI1000-M12MCAP1
Important: Please note that the cables are a standard type. They are not recommended for use in cable chains or where the cable is repeatedly bent. If this is required, use a special robot cable (2D or 3D
cable). See also Accessories, page 394 where additional M12 connectors are shown.
248
JVL Industri Elektronik A/S - User Manual - Integrated Servo Motors MAC050 - 3000
4.7
Expansion Module MAC00-FP2/FP4
4.7.17
GSD file for the MAC00-FP2 and FP4
The GSD file must be used to configure the PLC or master controller used for the Profibus communication. The file is shown here but is also available on disc. Please contact
your nearest JVL representative.
GSD file:
; COM PROFIBUS V 3.3, GSD'-Xport
; Time Stamp: 01/31/00, 12:36:39
#Profibus_DP
; <Unit-Definition-List>
GSD_Revision=1
Vendor_Name=’JVL IND EL’
Model_Name=’MAC00-FP’
Revision=’0.0’
Ident_Number=0x06BC
Protocol_Ident=0
Station_Type=0
Hardware_Release=’1.1’
Software_Release=’1.2’
9.6_supp=1
19.2_supp=1
93.75_supp=1
187.5_supp=1
500_supp=1
1.5M_supp=1
3M_supp=1
6M_supp=1
12M_supp=1
MaxTsdr_9.6=60
MaxTsdr_19.2=60
MaxTsdr_93.75=60
MaxTsdr_187.5=60
MaxTsdr_500=100
MaxTsdr_1.5M=150
MaxTsdr_3M=250
MaxTsdr_6M=450
MaxTsdr_12M=800
Implementation_Type=’VPC3’
Bitmap_Device=’DPLINK_’
; Slave-Specification:
Freeze_Mode_supp=0
Sync_Mode_supp=0
Auto_Baud_supp=1
Min_Slave_Intervall=1
Max_Diag_Data_Len=8
Modul_Offset=0
Slave_Family=0
OrderNumber=’MAC00-FPx’
JVL Industri Elektronik A/S - User Manual - Integrated Servo Motors MAC050 - 3000
249
4.7
Expansion Module MAC00-FP2/FP4
; UserPrmData: Length and Preset:
PrmText=1
Text(0)=’Active low’
Text(1)=’Active high’
EndPrmText
PrmText=2
Text(0)=’Velocity = 0’
Text(1)=’Passive mode’
EndPrmText
PrmText=3
Text(0)=’Disabled’
Text(1)=’Enabled’
EndPrmText
ExtUserPrmData=1 ’IN1 Input level’
Bit(0) 1 0-1
Prm_Text_Ref=1
EndExtUserPrmData
ExtUserPrmData=2 ’IN2 Input level’
Bit(1) 1 0-1
Prm_Text_Ref=1
EndExtUserPrmData
ExtUserPrmData=3 ’IN3 Input level’
Bit(2) 1 0-1
Prm_Text_Ref=1
EndExtUserPrmData
ExtUserPrmData=4 ’IN4 Input level’
Bit(3) 1 0-1
Prm_Text_Ref=1
EndExtUserPrmData
ExtUserPrmData=5 ’NL Input level’
Bit(4) 1 0-1
Prm_Text_Ref=1
EndExtUserPrmData
ExtUserPrmData=6 ’PL Input level’
Bit(5) 1 0-1
Prm_Text_Ref=1
EndExtUserPrmData
ExtUserPrmData=7 ’Endlimit action’
Bit(0) 0 0-1
Prm_Text_Ref=2
EndExtUserPrmData
ExtUserPrmData=8 ’Input 1 Action’
UnSigned8 0 0-255
EndExtUserPrmData
250
JVL Industri Elektronik A/S - User Manual - Integrated Servo Motors MAC050 - 3000
4.7
Expansion Module MAC00-FP2/FP4
ExtUserPrmData=9 ’Input 2 Action’
UnSigned8 0 0-255
EndExtUserPrmData
ExtUserPrmData=10 ’Input 3 Action’
UnSigned8 0 0-255
EndExtUserPrmData
ExtUserPrmData=11 ’Input 4 Action’
UnSigned8 0 0-255
EndExtUserPrmData
ExtUserPrmData=12 ’Input debounce’
Bit(1) 0 0-1
Prm_Text_Ref=3
EndExtUserPrmData
ExtUserPrmData=13 ’Input noise filter’
Bit(2) 0 0-1
Prm_Text_Ref=3
EndExtUserPrmData
Max_User_Prm_Data_Len=15
User_Prm_Data_Len=15
User_Prm_Data=0x0,0x3F,0x0,0,0,0,0,0,0,0,0,0,0,0,0
Ext_User_Prm_Data_Const(0) = 0x0,0x3F,0x0,0,0,0,0,0,0,0,0,0,0,0,0
Ext_User_Prm_Data_Ref(1)=1
Ext_User_Prm_Data_Ref(1)=2
Ext_User_Prm_Data_Ref(1)=3
Ext_User_Prm_Data_Ref(1)=4
Ext_User_Prm_Data_Ref(1)=5
Ext_User_Prm_Data_Ref(1)=6
Ext_User_Prm_Data_Ref(2)=7
Ext_User_Prm_Data_Ref(2)=12
Ext_User_Prm_Data_Ref(2)=13
Ext_User_Prm_Data_Ref(3)=8
Ext_User_Prm_Data_Ref(4)=8
Ext_User_Prm_Data_Ref(5)=8
Ext_User_Prm_Data_Ref(6)=9
Ext_User_Prm_Data_Ref(7)=9
Ext_User_Prm_Data_Ref(8)=9
Ext_User_Prm_Data_Ref(9)=10
Ext_User_Prm_Data_Ref(10)=10
Ext_User_Prm_Data_Ref(11)=10
Ext_User_Prm_Data_Ref(12)=11
Ext_User_Prm_Data_Ref(13)=11
Ext_User_Prm_Data_Ref(14)=11
; <Module-Definition-List>
Module=’MAC00-FP’ 0x13,0x10,0x10,0x10,0x10,0x23,0x20,0x20,0x20,0x20,0x20
EndModule
JVL Industri Elektronik A/S - User Manual - Integrated Servo Motors MAC050 - 3000
251
4.8
Expansion Module MAC00-FS1/FS4
MAC00-FS4
MAC00-FS1
With M12 connectors
4.8.1
With D sub connectors
TT1068GB
High speed serial RS485 module MAC00-FS1 and FS4 Introduction
The MAC00-FS1 and FS4 are used for high speed RS485 communication typically in multi
axis systems. They are capable of running at Baud-rates up to 460kbit.
All the registers of the MAC motor can be read and written.
The modules includes a few inputs and outputs, 2 of which can be defined as end-limit
inputs. These can be read from the RS485 interface.
The MAC motor is controlled by writing to the internal registers in the motor.
The expansion modules MAC00-FS1 and FS4 can be mounted on the standard MAC motors MAC50, MAC95, MAC140, MAC141, MAC400-800.
Both modules offer the same functions but with the following hardware differences:
Type
Protection
class
MAC00-FS1
IP42
IP67/IP65*
MAC00-FS4
Note*: IP65 on MAC400-800
Connectors
I/O.
Power supply
RS232/485
DSUB 15 pole
3 pole Phoenix
DSUB 9 pole
M12 connector 8pin
male and female
M12 connector
5pin male
M12 connector
5pin female
Both modules are delivered without any cables as standard.
Optional the MAC00-FS4 module can be delivered with cables in 5 or 20m length.
The pages in the first part of this section concern the common features of both modules.
Please consult the last pages in this section to see specific information about each module
such as example connection diagrams.
252
JVL Industri Elektronik A/S - User Manual - Integrated Servo Motors MAC050 - 3000
4.8
Expansion Module MAC00-FS1/FS4
4.8.2
General description MAC00-FS1
The MAC00-FS1 expansion module is an industrial interface that mates with the standard
MAC motor and offers a number of feature enhancements, including:
• Standard 9-pin D-SUB connectors for additional reliability.
• Addition of a Zero switch input for locating a mechanical zero point of the actuator
when used in position-related modes.
• Plugable screw terminal connector for power supply and Zero switch.
• LEDs to indicate: O1 and O2 output status, Zero switch (analogue input) status.
Input power status.
• Full RS232 and RS485 protocol support for use with standard 9-pin DSUB.
• Sourcing (PNP) outputs for status signals O1 and O2 instead of sinking (NPN).
The following illustration shows all the connectors on the MAC00-FS1 module.
MAC00-B1 connector descriptions
IN/OUT
General I/O
Signal ground
OCM (GND)
Balanced pulse in- or outputs used for
Pulse and direction signals or
Quadrature encoder signal
Optional these terminals can be
used for the MAC high speed
communication using RS422
B-
5
9
4
3
B+
O1
6
1
A+
O2
7
2
A-
O+
8
AIN
LED’s for showing the output status of
O1 and O2. Notice that LED’s are only
active if the O+ terminal is supplied.
Industri Elektronik
IN/OUT
SETUP
Status outputs
Default:
O1 = In position output
O2 = Error output
Analogue input +/-10V.
Optional zero sensor input
O1
O2
LED for showing the voltage level at
the analogue input (AIN).
LED for showing the voltage level at
the power supply input (P+)..
Option MAC00-B1
RS232 Connections
RS485 Connections
Power/Analogue input
SETUP
1
6
2
RS232 Rx
7
3
RS232 TX
Tx-PD
Terminator
8
4
RS485 ASignal ground
RS232 Note !
The TX-PD terminal must
be connected to Tx (pin 3)
if the MAC motor is not
using addressing
9
5
RS485 B+
(for RS232 and RS485
RS232 Interface between MAC motor and a PC.
MAC00-B1
PC
P+ (Main power +12-48(32)VDC *)
AIN (Analog input / zero switch input **)
P- (Power ground - also for AIN)
Notes :
* MAC50-141:
P+ is main supply terminal
Apply +12-48VDC.
MAC800:
P+ is the control supply terminal
Apply +12-32VDC (max 32V!)
** Do not apply higher voltages
than 32VDC to the AIN terminal.
7
5
Gnd
3
Tx
Tx
Rx
Rx
Gnd
7
2
1
5
3
2
1
Use JVL programming cable type RS232-9-1
for connecting to PC.
TT0900GB
JVL Industri Elektronik A/S - User Manual - Integrated Servo Motors MAC050 - 3000
253
4.8
Expansion Module MAC00-FS1/FS4
Expansion module MAC00-FS4 front plate
PWR
IO1
Power supply
M12 - 5pin male
connector including:
P+ (primary supply), and CV
(secondary supply) and P-
Basic I/O’s
M12 - 8pin male
connector including:
Digital inputs 1 to 4, and
O1, O2, IO supply.
IO2
Extended I/O’s
M12 - 8pin female
connector including:
Multifunction I/O’s (A+...),
analogue input AIN, and
RS232 interface and GND
COM
RS485 Communication
M12 - 5pin female
connector including:
RS485 Interface.
TT1058GB
4.8.3
Expansion MAC00-FS4 hardware description
The MAC00-FS4 offers a IP67 on MAC050-141 protection and M12 connectors which
makes it ideal for automation applications where no additional protection is desired. The
M12 connectors offers a solid mechanical protection and are easy to operate.
The connector layout:
“PWR” - Power input. M12 - 5pin male connector
Signal name
Description
Pin no.
JVL Cable
WI1000M12F5T05N
P+
Main supply +12-48VDC. Connect with pin 2 *
1
Brown
1
P+
Main supply +12-48VDC. Connect with pin 1 *
2
White
1
P-
Main supply ground. Connect with pin 5 *
3
Blue
1
CV
Control voltage +12-48VDC.
4
Black
1
P-
Main supply ground. Connect with pin 3 *
5
Grey
1
Isolation
group
* Note: P+ and P- is each available at 2 terminals. Make sure that both terminals are connected in order to
split the supply current in 2 terminals and thereby avoid an overload of the connector.
“COM” - Interface RS485. M12 - 5pin female connector
Signal name
Description
Pin no.
JVL Cable
WI1000M12
M5T05N
-
Leave open
1
Brown
1
-
Leave open
2
White
1
RS485 A-
RS485 interface positive terminal.
Leave open if unused
3
Blue
2
RS485 B+
RS485 interface negative terminal.
Leave open if unused
4
Black
2
GND
Interface ground
5
Grey
2
Isolation
group
(Continued next page)
254
JVL Industri Elektronik A/S - User Manual - Integrated Servo Motors MAC050 - 3000
4.8
Expansion Module MAC00-FS1/FS4
(Continued from last page)
“IO1” - Basic I/O’s. M12 - 8pin male connector.
Signal name
Description
Pin no.
JVL Cable
WI1000-M12
F8T05N
IN1
Digital input 1
1
White
3
IN2
Digital input 2
2
Brown
3
IN3
Digital input 3
3
Green
3
IN4
Digital input 4
4
Yellow
3
O1
Digital output 1 - PNP output
Output current maximum 25mA
5
Grey
3
O2
Digital output 2 - PNP output
Output current maximum 25mA
6
Pink
3
O+
Output supply +5-32VDC. Used for O1-4.
Not used/necessary for using IN1-8
7
Blue
3
IO-
I/O ground. Used for IN1-8 and O1-4.
8
Red
3
Isolation
group
Isolation
group
“IO2” - Extended I/O’s. M12 - 8pin female connector.
Signal name
Description
Pin no.
JVL Cable
WI1000-M12
M8T05N
AIN1
Analogue input +/-10V. Directly connected to
basic motor
1
White
1
Tx
RS232 interface - transmit output
2
Brown
1
Rx
RS232 interface - receive input
3
Green
1
GND
RS232 Ground - also used with analogue input
4
Yellow
1
A+
Multifunction I/O terminal A+. Maximum 5V !
5
Grey
1
A-
Multifunction I/O terminal A-. Maximum 5V !
6
Pink
1
B+
Multifunction I/O terminal B+. Maximum 5V !
7
Blue
1
B-
Multifunction I/O terminal B-. Maximum 5V !
8
Red
1
Cable Screen
Some standard cables with M12 connector offers a screen around the cable. This screen is at some cables
fitted to the outer metal at the M12 connector. When fitted to the MAC00-FS4 modul this means that the
screen will get in contact with the complete motor housing and thereby also the power ground (main ground).
Isolation groups
The MAC00-FS4 offers optically isolation at the digital inputs and outputs (IN1-4 and O1-2). In the table is
shown a number for each pin. This number refers to which isolation group the terminal is connected to.
Isolation group 1 means that the terminals refers to the main ground (P-, GND and the motor housing).
Isolation group 2 means that the terminals refer only to the RS485 interface.
Isolation group 3 means that the terminals refer to the I/O ground (IO-).
JVL Industri Elektronik A/S - User Manual - Integrated Servo Motors MAC050 - 3000
255
4.8
Expansion Module MAC00-FS1/FS4
MAC00-FS4 Dip switch settings
Mini dip-switch
Dip 1-6 - I/O setup
Makes it possible to
share I/O signals in
the same cable
OFF
Function:
1: Connect CV to O+
2: Connect P- to IO3: Connect IN3 to AIN
4: Connect IN4 to AIN
5: Connect O1 to AIN
6: Connect O2 to AIN
To activate the mentioned
connection please set the
actual switch to position “ON”
ON
Rear side of the MAC00-FS4
expansion module
1
2
3
4
5
6
SW1B
SW1B default settings =
1, 2 and 4 set in position “ON”
3, 5 and 6 set in position “OFF”
Dip 1-2 - Line termination
Both set to ON =
Term. enabled
Both set to OFF =
Term. disabled
SW2 default settings =
Both switches in position “OFF”
Mini dip-switch
1
2
OFF
SW2
Dip 1-10 - For Future use
SW1 default settings =
all set in position “ON”
SW1A
Dip switch location on the
MAC00-FS4 Expansion module
M12 external
connectors
ON
1
2
3
4
5
6
7
8
9
0
Module seen from rear side
Basic MAC motor
housing
SW1B
I/O setup
Internal circuit boards
Dip Switches placed
on the rear side of the
module
TT1017GB
256
SW1A
For Future use
SW2
Line termination
JVL Industri Elektronik A/S - User Manual - Integrated Servo Motors MAC050 - 3000
4.8
Expansion Module MAC00-FS1/FS4
4.8.4
Cables for the MAC00-FS4
Following cables equipped with M12 connector can be supplied from JVL.
MAC00-FS4 Connectors
Description
JVL Order no.
RS232 Interface cable. Connects
directly from MAC00-R4 to PC
Length: 5m (197 inch)
RS232-M12-1-5-5
X
Cable (Ø5.5mm) with M12 female
5-pin connector loose wire ends
0.35mm² (22AWG) and foil
screen.
Length: 5m (197 inch)
WI1000-M12F5T05N
X
Same as above but 20m (787
inch)
WI1000-M12F5T20N
(X)
Note1
Cable with M12 male 5-pin connector loose wire ends 0.35mm²
(22AWG) and screen.
Length: 5m (197 inch)
WI1000-M12M5T05N
(X)
Note1
Same as above but 20m (787
inch)
WI1000-M12M5T20N
X
Cable with M12 female 8-pin
connector loose wire ends
0.22mm² (24AWG) and screen.
Length: 5m (197 inch)
WI1000-M12F8T05N
X
Same as above but 20m (787
inch)
WI1000-M12F8T20N
X
Cable with M12 male 8-pin
connector loose wire ends
0.22mm² (24AWG) and screen.
Length: 5m (197 inch)
WI1000-M12M8T05N
X
Same as above but 20m (787
inch)
WI1000-M12M8T20N
“IO1”
8pin
Male
“IO2”
8pin
Female
“COM”
5pin
Female
Picture
“PWR”
5pin
Male
X
Protection caps. Optional if connector(s) needs to be protected from dust / liquids.
X
X
X
X
IP67 protection cap for M12
female connector.
WI1000-M12FCAP1
IP67 protection cap for M12
male connector.
WI1000-M12MCAP1
Note 1: The illustrated cable is not twisted pair and is not recommended for noisy environment. We
recommend to use a shielded twisted pair cable for noisy applications. Also it is recommended to use
a metal type connector where the screen can be terminated to obtain optimal screening effect.
Important: Please notice that the cables are a standard type. It is not recommended to be used in cable
chains or where the cable repeatable are being bended. If this is required use a special robot cable (2D
or 3D cable). See also Accessories, page 394 where additional M12 connectors are shown.
JVL Industri Elektronik A/S - User Manual - Integrated Servo Motors MAC050 - 3000
257
4.9 Expansion module MAC00-P4/P5
Only MAC400-3000
MAC00-P5
With Harting industrial
+M12 connectors
TT1163GB
MAC00-P4
With M12 industrial
connectors
4.9.1
Expansion module MAC00-P4 and P5 — overall description.
Important !: please notice that this module will only function in MAC800 motors with a
serial number greater than 85000. All MAC400 motors supports this module.
The MAC00-P4 and P5 is an expansion module for the integrated servomotors MAC400
and MAC800. Please notice that the module can NOT be used in the MAC050-141.
The module is intended to be used for control application requiring an analogue 4-20mA
interface to a master controller.
The interface is consisting of a 4-20mA input to control the motor position and a 4-20mA
output to indicate the actual position. Both offers full galvanic isolation from other electrical circuitries inside the motor and also in between.
An output is also available to indicate if any error has occurred that prevent the motor
from doing the intended operation. This output is also galvanic isolated.
If a second motor need to function as a slave the MAC00-P4 and P5 modules also offers
this possibility. A high speed communication interface makes it possible to handle a secondary motor configured as "slave" which means that the communication protocol always makes sure that the slave follows the master motor. In case of an error in either
the slave or master any further motion is stopped in both motors.
The modules contain no intelligence (microprocessor) meaning that all functions are controlled via the basic motor in which the module is installed.
The MAC00-P4 and P5 expansion modules offers an industrial interface (M12 connectors
+ Harting) and a number of feature enhancements, including:
•
•
•
•
•
•
•
•
•
•
258
Both modules shown
in a MAC400 motor
Standard M12 and Harting connectors for optimum reliability
4-20mA analogue input. Resolution 16 bit (65535 steps). Galvanic isolated.
4-20mA analogue output. Resolution 16 bit (65535 steps). Galvanic isolated.
Error output. Galvanic isolated.
Communication interface to slave motor (includes +24V power to the slave motor)
Optical isolated RS232 communication to PC or external master
Optical isolated RS485 to slave motor (Closed protocol)
Full RS232 protocol support for use with standard serial cable.
RS232 Communication interface to a PC for setup and monitoring use.
Supply input for the control section in the motor. Is also used to the slave motor if
present.
JVL Industri Elektronik A/S - User Manual - Integrated Servo Motors MAC050 - 3000
4.9 Expansion module MAC00-P4/P5
4.9.2
Only MAC400-3000
Overall hardware description
All internal and external main connections can be seen in the illustration below.
Basic MAC motor with MAC00-P4 or P5 module inserted.
Basic MAC motor
MAC00-Px expansion module
CVI1/CVI2 : +12-32V
“CVI1” do not exist at MAC00-P5
int. supply is wired to “P+”
CVI1
Supply output
CVI2
(to/from slave motor)
4-20mA Input
Fuse F10A
P+
P-
Power supply
P+ : +12-32V
P+
P-
Power supply
Control
Supply
Isolation zone 2
4-20mA
Input
16bit resolution
AIN
O1
O2
Status outputs
A1+/B1+/-
Multifunction I/O 1
(Bidirectional)
AIN1/2
Analogue input
(standard)
AIN
Not used
Internal supply ON/OFF
4-20mA
Output
16bit resolution
AOUT1
AOUT2
I/O control and
galvanic isolation
Isolation zone 3
4-20mA output
(MAC400, 800, 1500 or 3000)
Not used
Isolation zone 1
Status outputs
(OUT2 only at
MAC00-P4)
IO+
OUT1/2
Inputs for
general use
(only at MAC00-P4)
IN2-4/
AIN1/2
2
3
Status
Outputs
(PNP)
Digital and
analog input
for general use
2
GND
IO1-4
I/O channel
(Bidirectional)
3
Isolation zone 4
RS485 Termination dipswitch
RS485 Interface
A-
(Closed protocol not for general use)
2 channel
differential
Transceiver
A2+/B2+/-
Tx
Rx
RS232 Interface
Asynchronous
serial interface
Galvanic
isolation
B+
GND
RX
TX
GND
IGND
Multifunction I/O 2
(Bidirectional)
Asynchronous
interface
TT1169-03GB
Only available at MAC00-P4
4.9.3
Each isolation zone have not galvanic contact with any other circuitry.
General hardware description
The MAC00-Px module offers the following external connections.
• Power supply (P+/P-/CVI1/CVI2)
These terminals are used for the main supply of the motor. A voltage between +12
and 32VDC (MAC400) must be connected to P+ and optionally CVI1 (CVI1 only exist at the MAC00-P4 module). CVI2 is hardwired to CVI1 and is intended to be used
for supplying a slave motor or receiving supply from a master motor.
This simplifies the cable connections since it is available in the same connector as the
RS485 slave communication.
• Status outputs (OUT1, OUT2 and IO+)
OUT1 is an error output which indicates when an error exist. OUT2 is for future options. IO+ is the overall supply of the outputs and must be applied with 5-32VDC.
The outputs are PNP (source) outputs. The outputs are galvanic isolated from all other terminals and circuits.
JVL Industri Elektronik A/S - User Manual - Integrated Servo Motors MAC050 - 3000
259
4.9 Expansion module MAC00-P4/P5
Only MAC400-3000
• 4-20mA Analogue input (AIN+ and AIN-)
The analogue input is read by the motor and will typically be used with the motor set
in “Analogue to position mode”. In this configuration the motor position will follow
the analogue input proportional in a user defined working range.
The analogue input has a resolution of 16 bit corresponding to the rang 0 to 20mA
divided into 65536 steps. The input is galvanic isolated from all other terminals and
circuits.
• 4-20mA Analogue output (AOUT+ and AOUT-)
The analogue output is monitoring the actual position when the motor is set in “Analogue to position mode”. In this configuration the output value will be from 4 to
20mA proportional to the actual motor position in a user defined working range.
The analogue output has a resolution of 16 bit corresponding to the rang 4 to 20mA
divided into 65536 steps. The output is galvanic isolated from all other terminals and
circuits.
• RS485 Interface (A-, B+ and IGND)
Serial balanced interface for connection to a slave motor.
• RS232 Interface (Rx, Tx and IGND)
Serial unbalanced interface for connection to a PC or a controller. All registers/parameters in the motor can be monitored or changed. RS232 is not recommended for
long distances (>10m).
The MAC motor uses “binary” communication protocol which makes it possible to access all the internal registers. Please consult MacTalk communication, page 357 for further
details.
4.9.4
Hardware overview
MAC00-P4 or MAC00-P5 seen from rear side
(SW2) Supply select for 4-20mA output
- Enable the internal supply = Set
switch 1 to “ON” and set switch 2
to “OFF”
- Disable internal supply and select
external supply = set switch 1
to “OFF” and switch 2 to “ON”
Main fuse 10Amp.
Replace only with:
Schurter type
“3402.0040.11”
or
Littlefuse type
“451-10A”
TT1164GB
260
Interconnect to motor
Contains all internal signals
between module and motor.
(SW1) RS485 Modbus termination resistor
- Resistor enabled = both switches set to “ON”
(recommended)
- Resistor disabled = both switches set to “OFF”
Default switch setting:
SW1 : (1)ON, (2)ON = RS485 Termination is enabled
SW2 : (1)OFF, (2)ON = 4-20mA supplied from external source.
JVL Industri Elektronik A/S - User Manual - Integrated Servo Motors MAC050 - 3000
4.9 Expansion module MAC00-P4/P5
General power supply description
The MAC00-P5 module can only be used in the MAC400 motor. The diagram below
shows how to connect power to a MAC400 motor mounted with a MAC00-P5.
Please notice that the voltage connected to CVI1 and P+(only -MAC00-P4) must stay in
the range +12-32VDC. Precautions must therefore be taken if the system also contains
MAC50, 95, 140 or 141 which may require 48VDC in order to reach maximum motor
speed.
See also the general power supply description Power Supply, page 85.
Typical power supply connection to a MAC140 and a MAC400
mounted with a MAC00-B1, B2 or B4 and Px modules.
+12-32VDC
(Bus voltage)
(control voltage)
Power supply
+12-48VDC
Make sure that all
involved units are
connected to the same
potential
GND
4.9.5
Only MAC400-3000
MAC50-141 Motor
with MAC00-B1,
B2 or B4
Power
Supply
It is recommended
that a separate supply
line is used for each motor.
P+
P-
Control voltage
O+
Only MAC50-141 with
B2 or B4 (Optional)
The terminal P+
do not exist on
MAC00-P5.
Use only CVI1
MAC400 Motor
with MAC00-Px
P+
GND
Control Volt. CVI1
Power
Supply
Main supply
Max. 32VDC !
Mains 115 or 230VAC
TT1168GB
JVL Industri Elektronik A/S - User Manual - Integrated Servo Motors MAC050 - 3000
261
4.9 Expansion module MAC00-P4/P5
+12-32VDC
Tx
Rx
GND
Note:The basic MAC motor
does not fully support RS232
since the interface signals are
only 5V levels. See also the basic description - Serial interface,
page 106.
GND
RS232 - General description when using the MAC00-P4/5 module
The RS232 interface is considered the main interface to the RS232 connection between a PC or central controller
motor when the motor is set
to MAC400 with a MAC00-Px module.
up using the MacTalk winCentral
Make sure that all
Power supply
dows software from a PC or
involved units are
Controller
connected to the same
from any kind of controller us(for example a PC)
potential
ing a RS232 interface.
Opto isolation *
Screen connected
to GND in each end
Screen
4.9.6
Only MAC400-3000
MAC400 Motor
with MAC00-Px
Rx
RS232
Tx
Interface
IGND Power P+
When connecting the RS232
interface to a PC or controller, the following rules must
be followed:
Supply
The terminal P+
do not exist on
MAC00-P5.
Use only CVI1
Max. 32VDC !
P-
Contr. Voltage CVI1
TT1167GB
1 Only one motor can be
Mains 115/230VAC
Main supply
connected at the interface
line.
2 Use screened cable.
* Opto isolation is recommended if the Rs232 connection is a permanent installation.
3 Ensure that GND is also
connected.
4 Ensure that all units have a
proper connection to safety ground (earth) in order to refer to the same potential.
5 The RS232 interface cable length should not exceed 10 metres.
Connectors:
To see the specific connector pin-out please see the chapter
- Expansion MAC00-P4 connector description, page 268 or
- Expansion MAC00-P5 connector description, page 271
A finished RS232 cable also exist. Please see
- Cables for the MAC00-P4, page 270 or
- Cables for the MAC00-P5, page 273
262
JVL Industri Elektronik A/S - User Manual - Integrated Servo Motors MAC050 - 3000
4.9 Expansion module MAC00-P4/P5
How to connect the 4-20mA output
The 4-20mA output (terminal AOUT1 and AOUT2) can be configured in 2 ways.
-
The MAC00-P4 or P5 module provide the supply to the 4-20mA signal
Dip switch setting as seen below: 1 = ON and 2 = OFF
The receiver of the 4-20mA signal from the MAC00-P4 or P5 module takes care of
the supply to produce the 4-20mA signal.
Dip switch setting as seen below: 1 = OFF and 2 = ON.
The dip switch is located on the rear part of the circuit board.
Receiver
with out
supply
MAC00-P4 or P5
4-20mA output circuitry
2 1
Receiver
WITH own
supply
2 1
ON
+B24V
ON
Int. supply ON/OFF
R20
1
2
220R/1%
ON
4.9.7
Only MAC400-3000
BGND
4
3
F6
0.22R/2%
L11
TF0018
SW2
NHDS-02-T-TR
mA
L12
TF0018
Q1
BCX55
1000mW
From/to
4-20mA
controller
R14
2k0/0.1%
AOUT1
+
mA
AOUT2
Power Supply
Typ. 24VDC
D7
4448-115
R21
130R/0.1%
BGND
TT1278-01GB
JVL Industri Elektronik A/S - User Manual - Integrated Servo Motors MAC050 - 3000
263
4.9 Expansion module MAC00-P4/P5
4.9.8
Only MAC400-3000
Basic setup of the “Master” motor.
Following steps must be followed
1. Enter the program “MacTalk” version 1.60 or newer.
2. Set the motor in "Analogue to position” mode in order to control the actual motor
position by an analogue input.
3. Max velocity, Acceleration, torque etc. must be adjusted for the actual application.
This can be done now or at any other time.
4. At the “Advanced” tab select “Paired Master” under Modbus setup.
5. Select AIN3 as analogue input in order to use the 4-20mA input at the MAC00-P4/5
module instead of the default input (AIN1).
Setting up the Master motor in MacTalk
Select Analogue to position mode.
Setup the desired max velocity and acceleration.
Torque and Load may also need a different
setting compared to the default setup.
TT1197GB
Select Paired Master in the Modbus setup.
Select ANINP3 in as process input - this is the
4-20mA input at the P4/5 module.
264
JVL Industri Elektronik A/S - User Manual - Integrated Servo Motors MAC050 - 3000
4.9 Expansion module MAC00-P4/P5
Only MAC400-3000
(Master setup continued)
6. Go to the "Registers" tab and define the desired working range by entering a number
in "P2" after following formulars
For linear applications (spindle actuator): P2=WR / SP * GR * CPR * 32 / 52428
Notes:
WR =
SP =
GR =
CPR =
Working range in mm
Spindle pitch (linear motion per spindle revolution)
Gear ratio between motor and spindle (if any). Set to 1.00 if none
Counts per motor revolution (MAC400, 1500 and 3000: 8192 CPR /
MAC800: 8000 CPR).
For rotary applications: P2 = WR / 360 * GR * CPR * 32 / 52428
Notes:
WR = Working range in degrees
GR = Gear ratio between motor and output shaft (if any) - set to 1.00 if none
CPR = Counts per motor revolution (MAC400, 1500 and 3000: 8192 CPR /
MAC800: 8000 CPR).
Setting up the Master motor in MacTalk
The calculated working range constant is typed in here.
Finally remember to «Save in flash» in order to save all the
settings permanent in the motor.
TT1198GB
4.9.9
Basic setup of the “Slave” motor.
If a second motor with a syncronous movement is needed the MAC00-P4/5 offers the
posibility to connect 2 MAC motors in a master/slave configuration.
The 5pin M12 male connector located at the MAC00-P4/5 is the master/slave connector.
By connecting the 5 pins in the master mot or to the equivalent pins in the slave motor
all communication and also 24V supply is taken care of in the slave motor (see supply options at previous page).
Beside these connections only 115/230VAC need to be supplied the slave motor.
Continued next page
JVL Industri Elektronik A/S - User Manual - Integrated Servo Motors MAC050 - 3000
265
4.9 Expansion module MAC00-P4/P5
Only MAC400-3000
If a slave motor is connected to the master the slave needs to be setup in order to establish permanent communication with the master motor.
Please following these steps to setup the slave motor
1. Enter the program “MacTalk” version 1.50 or newer.
2. At the “Advanced” tab select “Paired Slave” under Modbus setup.
3. Set the startup mode to “Position”-mode. By doing this the motor will start to follow
the position of the master motor.
4. It is recommended to set the “max velocity” and “acceleration” to appropriate high
values since they can cause a limitation in the motion of the slave compared to the
master.
6. After changing relevant parameters please remember to save the changes permanent
in the motor by pressing “Save in flash”.
7. It may be needed to cycle the 24V supply for both motors in order to establish full
syncronization between the 2 motors.
Setting up the Slave motor in MacTalk
Select Position mode.
Setup the desired max velocity and acceleration.
Torque and Load may also need a different
setting compared to the default setup.
TT1199GB
Finalize the setup by pressing the
«Save in Flash» button.
Select Paired Slave in the Modbus setup.
266
JVL Industri Elektronik A/S - User Manual - Integrated Servo Motors MAC050 - 3000
4.9 Expansion module MAC00-P4/P5
4.9.10
Only MAC400-3000
Master/slave application example.
The illustration below shows exactly how 2 motors installed with a MAC00-P4 module
can be connected in a master/slave coupling using the cable JVL type: WI1005M12F5TF5T03P which contains an internal supply for the slave and a RS485 connection.
Typical master/slave system using MAC00-P4
PC with MacTalk for general
setup and system optimization
or customised programs
based on JVL OCX driver
Power supply
115/230VAC to 24VDC/75W
JVL type: PSU24-75
Two slave supply options exist:
1. Power cable similar to the master
supply
2. Using the master/slave sync. cable
(see below) but Pin 1 and 4 (P+ and CVI)
must be shorted in the PWR connector.
4-20mA IN/OUT signal
to master controller.
Including various I/O
signals. JVL cable type:
WI1009-M12M12T05N
Power cable supplying
24V to the module(s)
JVL cable type:
WI1000-M12F5T05N
Master
RS232 communication
cable.
JVL cable type:
RS232-M12-1-5-5
Communication
«COM» Connector
Pin 1 - RS232 receive (RX)
Pin 2 - RS232 transmit (TX)
Pin 3 - RS232 ground
Pin 4 - Do not connect !
Pin 5 - Do not connect!
Slave
Power and syncronisation connection between
master and slave.
JVL cable type: WI1005-M12F5TF5T03P
Master
«SLV» Connector
Pin 1 - serial data APin 2 - serial data B+
Pin 3 - Supply ground
Pin 4 - P+ supply
Pin 5 - Screen
Connected to
Connected to
Connected to
Connected to
Connected to
TT1196GB
Slave
«SLV» Connector
Pin 1 - serial data APin 2 - serial data B+
Pin 3 - Supply ground
Pin 4 - P+ supply
Pin 5 - Screen
Important: The cable must be made with twisted pair wires
for the Data A- and B+ lines (pin 1 and 2)
JVL Industri Elektronik A/S - User Manual - Integrated Servo Motors MAC050 - 3000
267
4.9 Expansion module MAC00-P4/P5
Only MAC400-3000
Expansion module MAC00-P4 front plate
CNT
Basic I/O’s
M12 - 12pin female
connector including:
4-20mA in- and out
and 2 outputs and 2
analogue inputs
PWR
COM
SLV
Power supply
M12 - 5pin male
connector including:
P+ (supply), and CVI1
(output supply) and P-
Communication
M12 - 5pin female
connector including:
RS232 and Slave
RS485 interface *
Slave Connector
M12 - 5pin male
connector including:
RS485 and CVI2 supply
for the slave motor.
TT1195GB
4.9.11
Expansion MAC00-P4 connector description
The MAC00-P4 offers IP65 protection when used at MAC400 or MAC800 and M12 connectors which makes it ideal for process control and automation applications where no
additional protection is desired. The M12 connectors offer solid mechanical protection
and are easy to unplug compared to modules with cable glands or DSUB connectors.
The connector layout:
“PWR” - Power input. M12 - 5pin male connector
Signal name
Description
Pin no.
JVL Cable
WI1000M12F5T05N
P+
Main supply +12-48VDC. Connect with pin 2 *
1
Brown
1
P+
Main supply +12-48VDC. Connect with pin 1 *
2
White
1
P-
Main supply ground. Connect with pin 5 *
3
Blue
1
CVI1
Output supply / Control voltage +12-32VDC.
4
Black
1
P-
Main supply ground. Connect with pin 3 *
5
Grey
1
Isolation
group
* Note: P+ and P- are each available at 2 terminals. Make sure that both terminals are connected in order
to split the supply current in 2 terminals and thereby avoid an overload of the connector.
(Continued next page)
268
JVL Industri Elektronik A/S - User Manual - Integrated Servo Motors MAC050 - 3000
4.9 Expansion module MAC00-P4/P5
Only MAC400-3000
“CNT” - Control I/O. M12 - 12pin female connector
Signal name
Description
Pin no.
JVL Cable
WI1009M12M12T05N
AIN+
4-20mA input. Positive terminal
3
White
2
AIN-
4-20mA input. Negative terminal
1
Brown
2
AOUT1
4-20mA output. Positive terminal. Apply 7 to
24V to this terminal if internal AOUT supply is
disabled.
9
Red
3
AOUT2
4-20mA output. Negative terminal.
2
Blue
3
O+
Supply term. to the OUT1 and 2 circuitry.
Apply 5 - 32VDC
11
Grey/Pink
1
OUT1
Output 1 - Default : Error output. PNP ouput.
6
Yellow
1
OUT2
Output 2. PNP ouput.
4
Green
1
CVI1
Control supply input +12-28VDC. Consumption typical 350mA @ 24VDC and 700mA
@24VDC if a slave motor is connected.
At MAC00-P4 the CVI1 is hardwired to the
CVI terminal (pin 4) at the power connector.
At MAC00-P5 the CVI1 is not present but
CVI1 is internally hardwared to P+.
12
Red/Blue
0
P-
Main ground to be used with CVI1 and IN2-4.
10
Violet
0
IN2 / AIN1
General digital input and analogue input 1
Notice that analogue input 1 is used for Zero
search
5
Pink
0
IN3 / AIN2
General digital input and analogue input 2
8
Grey
0
IN4
General digital input
7
Black
0
Isolation
group
* Note: Isolation group indicate which terminals/circuits that a galvanic connected to each other. In other
words group 1, 2, 3 and 4 are all fully independantly isolated from each other. Group 0 correspond to the
housing of the motor which may also be connected to earth via the 115/230VAC power inlet.
“COM” - Communication connector - M12 - 5pin female connector.
Pin
no.
JVL Cable
“RS232-M12-15-5”
Isolation
group
(See note)
Signal name
Description
RS232: RX
RS232 interface. Receive terminal
Leave open if unused.
1
Brown
4
RS232: TX
RS232 interface. Transmit terminal
Leave open if unused.
2
White
4
IGND
Ground intended to be used together with the
other signals in this connector.
3
Blue
4
RS485: A-
RS485 Modbus *. Leave open if unused
4
Black
4
RS485: B+
RS485 Modbus *. Leave open if unused
5
Grey
4
JVL Cable
“WI1005-M12F5TF5T03P”
Isolation
group
(see note)
“SLV” - Slave connector - M12 - 5pin male connector
*
Signal name
Description
Pin
no.
RS485 A-
RS485 Modbus *. Positive data signal
1
1
4
RS485 B+
RS485 Modbus *. Negative data signal
4
4
4
CVI2
Supply output (optionally input) +12-28VDC
Hardwired internally to CVI1.
2
2
0
GND
Ground to be used with CVI2.
This ground is hardwired internally to the main
power ground P-.
3
3
0
IGND
Ground intended to be used together with the
other signals in this connector.
5
Screen wire
4
The RS485 pins in “COM” and “SLV” is not for general use but only for master/slave
configuration.
JVL Industri Elektronik A/S - User Manual - Integrated Servo Motors MAC050 - 3000
269
4.9 Expansion module MAC00-P4/P5
4.9.12
Cables for the MAC00-P4
The following cables equipped with connectors can be supplied by JVL.
MAC00-P4 Connectors
“SLV”
5pin
male
Only MAC400-3000
“CNT”
12pin
Female
Description
JVL Order no.
X
RS232 Interface cable. Connects
directly from MAC00-P4 to a PC
Length: 5m (197 inch)
RS232-M12-1-5-5
X
RS485 Interface cable. Connects
directly from MAC00-P4 to a PC
with a RS485 Com. port.
Length: 5m (197 inch)
RS485-M12-1-5-5
“COM”
5pin
Female
Picture
“PWR”
5pin
Male
X
X
Cable (Ø5.5mm) with M12 female
5-pin connector loose wire ends
0.35mm² (22AWG) and foil screen.
Length: 5m (197 inch)
WI1000-M12F5T05N
X
X
Same as above but 20m (787 inch)
WI1000-M12F5T20N
X
Cable with M12 male 12 pin
straight connector, loose wire ends.
WI1009-M12M12T05N
X
Same as above but 20m (787 inch)
WI1009-M12M12T20N
RS485 Interface cable. Connects directly from a master to a
slave motor via the SLV connector. Length: 3m (197 inch)
WI1005M12F5TF5T03P
X
Protection caps. Optional if connector is not used to protect from dust / liquids.
X
X
X
X
IP67 protection cap for M12
female connector.
WI1000-M12FCAP1
IP67 protection cap for M12
male connector.
WI1000-M12MCAP1
Important: Please note that the cables are a standard type. They are not recommended for use in cable chains or where the cable is repeatedly bent. If this is required, use a special robot cable (2D or 3D
cable).
270
JVL Industri Elektronik A/S - User Manual - Integrated Servo Motors MAC050 - 3000
4.9 Expansion module MAC00-P4/P5
Only MAC400-3000
Expansion module MAC00-P5 front plate
Slave connection (SLV)
M12 - 5pin male
connector includes:
- RS485 modbus
- 24VDC to slave
Control I/O (CNT)
Harting 3HAN 8pin male
Contains
- 4-20mA input
- 4-20mA output
- Error output
- 24VDC supply input
Communication (COM)
M12 - 5pin female
connector includes:
- RS232 interface
- RS485 Modbus (same as SLV)
TT1165GB
4.9.13
Expansion MAC00-P5 connector description
The MAC00-P5 offers IP67 only IP65 on MAC400-800 protection and M12 connectors
which makes it ideal for process control and automation applications where no additional
protection is desired. The M12 and Harting connectors offer solid mechanical protection
and are easy to unplug compared to modules with cable glands or DSUB connectors.
The connector layout:
“CNT” - Control I/O. Harting 3HAN - 8pin male connector
Signal name
Description
Pin no.
JVL Cable
WI10xxxxx
Isolation
group
AIN+
4-20mA input. Positive terminal
1
Blue
2
AIN-
4-20mA input. Negative terminal
2
Red
2
AOUT+
4-20mA output. Positive terminal. Apply 7 to
24V to this terminal if internal AOUT supply is
disabled.
3
Grey
3
AOUT-
4-20mA output. Negative terminal.
4
Yellow
3
O+
Supply term. to the error output.
Apply 24VDC
5
Green
1
OUT1
Error output. PNP ouput.
6
Brown
1
P+ (CVI1)
Control supply input +12-28VDC. Consumption typical 350mA @ 24VDC and 700mA
@24VDC if a slave motor is connected.
At MAC00-P5 the CVI1 is not present but
CVI1 is internally hardwared to P+.
7
White
0
P-
Main ground to be used with CVI1 and CVI2
8
Black (y)
0
* Note: Isolation group indicate which terminals/circuits that a galvanic connected to each other. In other
words group 1, 2, 3 and 4 are all fully independantly isolated from each other. Group 0 correspond to the
housing of the motor which may also be connected to earth via the 115/230VAC power inlet.
(Continued next page)
JVL Industri Elektronik A/S - User Manual - Integrated Servo Motors MAC050 - 3000
271
4.9 Expansion module MAC00-P4/P5
Only MAC400-3000
“COM” - Communication connector - M12 - 5pin female connector.
Signal name
Description
Pin no.
JVL Cable
“RS232M12-1-5-5”
Isolation
group
(See note)
RS232: TX
RS232 interface. Transmit terminal
Leave open if unused.
1
Brown
4
RS232: RX
RS232 interface. Receive terminal
Leave open if unused.
2
White
4
IGND
Ground intended to be used together with the
other signals in this connector,
3
Blue
4
RS485: A-
RS485 Modbus *. Leave open if unused
4
Black
4
RS485: B+
RS485 Modbus *. Leave open if unused
5
Grey
4
Isolation
group
(see note)
“SLV” - Slave connector - M12 - 5pin male connector
*
272
Signal name
Description
Pin no.
JVL Cable
“WI1005M12F5TF5T
03P”
RS485 A-
RS485 Modbus *. Positive terminal
1
1
4
RS485 B+
RS485 Modbus *. Negative terminal
4
4
4
CVI2
Supply output (optionally input) +12-28VDC
Hardwired internally to CVI1.
2
2
0
GND
Ground to be used with CVI2.
This ground is hardwired internally to the main
power ground P-.
3
3
0
IGND
Multifunction I/O2 terminal B2+
5
Screen wire
4
The RS485 pins in “COM” and “SLV” is not for general use but only for master/slave
configuration.
JVL Industri Elektronik A/S - User Manual - Integrated Servo Motors MAC050 - 3000
4.9 Expansion module MAC00-P4/P5
4.9.14
Cables for the MAC00-P5
The following cables equipped with connectors can be supplied by JVL.
MAC00-P5 Connectors
“CNT”
Harting
8pin
male
Only MAC400-3000
“COM”
M12 con.
5pin
Female
Description
JVL Order no.
RS232 Interface cable. Connects
directly from MAC00-P5 to a PC
Length: 5m (197 inch)
RS232-M12-1-5-5
X
RS485 Interface cable. Connects
directly from a master to a slave
motor. Length: 3m (197 inch)
WI1005-M12F5TF5T03P
X
Cable with M12 female 5 pin
straight connector, loose ends.
Length: 5m (197 inch)
WI1000-M12F5T05N
X
Same as above but 20m (787 inch)
WI1000-M12F5T20N
Please contact JVL for further details
-
Picture
“SLV”
M12con.
5pin
Male
X
X
Protection caps. Optional if connector is not used to protect from dust / liquids.
X
X
IP67 protection cap for M12
female connector.
WI1000-M12FCAP1
IP67 protection cap for M12
male connector.
WI1000-M12MCAP1
Important: Please note that the cables are a standard type. They are not recommended for use in cable chains or where the cable is repeatedly bent. If this is required, use a special robot cable (2D or 3D
cable).
JVL Industri Elektronik A/S - User Manual - Integrated Servo Motors MAC050 - 3000
273
4.10 Expansion Module MAC00-R1/R3/R4
MAC00-R1
4.10.1
MAC00-R4
MAC00-R3
With DSUB connectors
With M12 connectors
With cable glands
Expansion modules MAC00-R1, R3 and R4 overall description
The expansion modules MAC00-R1, R3 and R4 can be mounted on standard MAC motors MAC50, MAC95, MAC140, MAC141, MAC400 and MAC800.
These option modules are also called “nanoPLC” modules as they perform like a small
programmable logic controller with a small number of digital I/Os.
The module makes it possible to perform simple positioning, speed and/or torque control via 8 digital inputs which all are galvanically isolated and can be operated with 24V
control signals from for example a PLC or external sensors.
Typical applications for these expansion modules are in stand-alone systems where the
MAC motor must be able to operate as a complete positioning system without the need
for an external PLC or computer. Please note that it is also possible to change or read
parameters such as position, speed etc. during operation using the serial interface.
Applications typically include:
- Replacement for pneumatic cylinders.
- Dispenser systems
- Turntables
- Simple pick and place systems
- Machine adjustment/setup.
All of the modules offer the same functions but with the following hardware differences:
Type
Protection
class
Connectors
I/O and interface
Power supply
LEDs at I/O
MAC00-R1
IP42
DSUB 9 pole
3 pole Phoenix
Yes
MAC00-R3
IP67/IP65*
Cable glands
Cable glands
No
M12
M12
No
IP67/IP65*
MAC00-R4
Note*: IP65 on MAC400-800
The MAC00-R3 module can also be delivered with cable in selected lengths. Cables with
M12 connectors can also be supplied for the MAC00-R4 module.
The first part of this section deals with the common features of both modules. Please see
the latter pages of the section for see specific information about each module (for example, connection diagrams).
274
JVL Industri Elektronik A/S - User Manual - Integrated Servo Motors MAC050 - 3000
4.10 Expansion Module MAC00-R1/R3/R4
4.10.2
Important before use
Please note that two different types of firmware setup are available.
- Graphic programming setup (Firmware MAC00-RxP).
- Fixed formats (MAC00-Rx). See User Manual LB0047-18GB
Until Q3 2004, the only firmware available was the “fixed format type”. Since this date
the fixed format firmware has not been updated and the Graphic Programming Setup is
the preferred type, i.e. all new modules by default contain this new type of firmware.
The graphic programming firmware offers 100% flexibility since almost any function in
the motor can be controlled using simple, user-friendly commands that are built together
as a sequential program.
The user interface of both types of firmware setup is shown below.
Note: If MacTalk is used off line (no motor connected), all tabs can be seen by selecting
Show hidden pages in the View menu.
Graphic programming.
The module setup with graphic programming
firmware (MAC00-RxP).
Simple user-friendly commands can be built
together forming a program with the desired
function for the application.
The function of each input and output can be
user defined
TT1078GB
4.10.3
How to set up the desired firmware
Use the following step-by-step instruction to set up the desired firmware.
(continued next page).
JVL Industri Elektronik A/S - User Manual - Integrated Servo Motors MAC050 - 3000
275
4.10 Expansion Module MAC00-R1/R3/R4
Step 1
Determine which firmware you want to use:
Graphic programming (MAC00-RxP).
Step 2
Choose the Firmware update in the Updates menu.
Step 3
Make sure that the checkbox “Show all files”
is checked.
Select the desired firmware, MAC00-RxP.
Note that there may exist more than one
version. Choose the newest version.
Press Start to download the selected firmware.
The progress counter will now rise from 0
to 100%.
Step 4
When the download process is finished, the status
shows “Done”.
Also “Current version” has changed to the actual
downloaded version meaning that the firmware in
the module is now changed permanently.
Step 5
The on-line information shown in the lower right
corner of the MacTalk main window will now
show the complete type of firmware and version.
Step 6
The MAC00-RxP tab is now available among
the other standard tabs.
Proceed with the setup and/or programming
according to the description for each firmware
type.
TT1079GB
276
JVL Industri Elektronik A/S - User Manual - Integrated Servo Motors MAC050 - 3000
4.10 Expansion Module MAC00-R1/R3/R4
4.10.4
Getting started with MAC00-RxP
When using the MAC00-R1, R3 or R4 module with MAC00-RxP firmware, almost any
kind of program can be created using a set of user-friendly icons.
To create a program, first of all it must be determined whether the application requires
that the motor always stays within the allowed position range which is +/- 67.108.863
counts or if the application requires that the motor mostly moves in only one direction,
meaning that sooner or later it will pass the maximum limit of counts mentioned above.
Typical applications for the two program types are:
Relative + Absolute
XY tables
Pick and place robots
Valve actuators
Endless relative
Dispensers for film, labels etc.
Dosing pumps
Turntables
Torque-controlled screw machines
Make the choice on the MAC00-RxP tab.
Choose one of these program types
Or
Optionally upload the actual program
stored in the module last time.
TT0980GB
After making one of these 3 choices above, the program window will be opened.
JVL Industri Elektronik A/S - User Manual - Integrated Servo Motors MAC050 - 3000
277
4.10 Expansion Module MAC00-R1/R3/R4
4.10.5
MAC00-RxP Main window
The main window for creating a new program or editing a program is shown below:
MAC00-RxP Status texts
The message Program not transferred means
that there is a difference between the program
seen on the screen and the actual program in
the module. This can happen if the program
have been edited but not transferred.
Status: Running (or Stopped) refers to the
program in the module.
MAC00-RxP menu
Main menu for creating a new program,
Verifying program size and other basic
details for the MAC00-RxP module.
Transfer & Start
Will transfer the complete
program and start it.
Use Stop or Pause to stop it.
Stop
Use this button if the program
must be stopped.
Program lines
Each button represents a program
line. By pushing the button a command can be entered at the program
line.
Pause
Use this button if the program must
be paused. Paused means that the actual
program line executed is temporarily paused.
When paused, the single step feature can be
used to debug the program.
TT0981GB
278
JVL Industri Elektronik A/S - User Manual - Integrated Servo Motors MAC050 - 3000
4.10 Expansion Module MAC00-R1/R3/R4
4.10.6
MAC00-RxP menu
The MAC00-RxP menu found at the top of the main window gives access to following
possibilities:
MAC00-RxP menu:
Described elsewhere in this chapter
Upload the program from the module to MacTalk
Program + Source
Shows the memory usage if the program
(compiled)+source program and remarks
is downloaded into the module.
Program + Source - REM
Same as above but without remarks.
Program only
Same as above but without source
program and remarks.
Checksum
Shows the checksum of the complete
program downloaded into the module.
The checksum is unique and can be used
to verify whether the program in the
module matches the original program or
not.
Lines
The number of program lines used in the
source program (MacTalk)
Mode
Specify the program type actually used.
Enable input filter
Enables an oversampling filter at the inputs IN1 to IN8.
This feature can be used to remove noise from the inputs.
Skip initialization (advanced)
Bypasses internal initialization routines after powerup.
(Only for very special use).
Program + Source + Remarks
Default. Choosing this will transfer everything into the
module memory. This can be an advantage if remarks
and source program must be uploaded to MacTalk later.
Program + Source
Same as above but without remarks.
Program only
Only the compiled program is transfered.
TT0982GB
JVL Industri Elektronik A/S - User Manual - Integrated Servo Motors MAC050 - 3000
279
4.10 Expansion Module MAC00-R1/R3/R4
4.10.7
How to build a program
When choosing New program in the MAC00-RxP menu or entering MacTalk for the first
time, programming can be started.
Press the button at line 1 and a tool box will pop up.
1
Press the first button to create
the first program line.
The “Select command” box will
pop up.
2
Choose the desired command.
In this example it is desired to
wait for an input to be activated
before further program execution.
3
Choose to wait until input 5
is high and press OK
4
The command is inserted at the
previous selected program line
TT0983GB
280
Continued
JVL Industri Elektronik A/S - User Manual - Integrated Servo Motors MAC050 - 3000
4.10 Expansion Module MAC00-R1/R3/R4
5
Press the second button to create
the second program line
6
Choose the movement type needed.
Relative: Move x counts forward with
reference to the actual position.
Absolute: Move to the x position with
reference to the zero search position.
7
The relative move command just
entered is converted into a program
line.
8
Multiple program lines are
entered by the user forming
the last part of the program.
9
Now the program is finished.
Press the “Transfer & Start”
button.
Now the program will be transfered
and stored permanently in the module.
The program will be executed
immidiately
TT0984GB
Continued
JVL Industri Elektronik A/S - User Manual - Integrated Servo Motors MAC050 - 3000
281
4.10 Expansion Module MAC00-R1/R3/R4
10
Now the program is running
continuously. The actual program
line which is executed is shown
by the small red arrow.
11
By choosing the “Pause” button, the
program is paused. After it is paused,
it is possible to single step through
each program line which can be a
useful feature to debug the program
since the action in each line can be
closely observed.
12
When the program is finished, it can
be saved on the harddisc or floppy
disc. Please be aware that when
saving the program it is the complete
program including the overall setup
of the motor such as servofilter, I/O
setup etc. Everything is stored in a file
with the extension .MAC. Later it can
be opened and restored in the motor.
TT0985GB
4.10.8
General programming hints
When a program is built and saved, the following hints may be useful to ensure that the
program behaves as expected.
1. When transferring the program to the module it is saved permanently in the memory
and the program will be executed each time the motor is switched on.
2. Before making a program, ensure that the basic parameters for controlling acceleration, torque, safety limits, etc. are set to proper values. When saving the program on
the hard disk or floppy disk, all of these basic parameters will be saved together with
the program as a complete motor setup package.
3. A program line can be edited by double-clicking the command text.
4. When the cursor is placed on top of the command icon, an edit menu can be called
up with a right-click.
282
JVL Industri Elektronik A/S - User Manual - Integrated Servo Motors MAC050 - 3000
4.10 Expansion Module MAC00-R1/R3/R4
4.10.9
Command toolbox description
The toolbox used for programming comprises 16 different command types.
The idea is for the commands to give easy access to the most common functions in the
motor. Some functions may seem to be missing at first sight but the buttons “Set register
in the MAC motor” or “Wait for a register value before continuing” give direct access to
+50 registers down in the basic MAC motor, such as the gear ratio or the actual torque
register.
In total this provides a very powerful programming tool since >95% of a typical program
can be built using the simple command icons and the remaining part is obtained by accessing the basic motor registers directly.
A short description of all 16 command icons is given below.
Use: Initiates any
motor movement
relative or absolute.
Use: Inserts a remark/
Comment in the program
source code.
Use: Set the motor in the
desired mode such as
position- or velocity mode.
Use: Set a certain
state at one or multiple
digital outputs.
Use: Unconditional
jump from one
program line to another.
Use: Conditional jump
from one program line
to another. Input dependent
Use: Inserts a delay in
the program specified
in milliseconds.
Use: Wait for a certain
state at one or multiple
digital inputs.
Use: Write a value to
almost any register in the
basic MAC/MIS motor.
Use: Conditional jump
from one program line to
another. Register dependent
Use: Wait for a certain
state at one or more of
the digital inputs.
Use: Save the actual motor
position to an intermediate
register.
Use: Initiates a zero
search to a sensor or
a torque (no sensor).
Use: Preset the position
counter to a certain value.
Use: Change mode
and activate register
using a single
command.
Use: Binary format
instead of graphic
commands.
TT1103-02GB
Use: Performs a
calculation using
register values
and contants.
Use: Compares two
registers to each other
before jumping or
moving in the program.
JVL Industri Elektronik A/S - User Manual - Integrated Servo Motors MAC050 - 3000
283
4.10 Expansion Module MAC00-R1/R3/R4
4.10.10
RxP Command Reference
4.10.10.1 Enter your own remarks
Icon:
Dialogue:
Function:
Inserts a remark/comment in the source code. The program line will not
do anything, but can make the source code easier to read. This can be
very important, if other programmers have to review or work on the code,
or if the program is only worked on infrequently.
4.10.10.2 Set operation mode
Icon:
Dialogue:
Function:
284
Sets the operating mode for the motor. When the program encounters a
program line with this command, the motors operating mode will be set to
the specified mode. This allow you to use different operating modes in
different parts of the program. For a detailed description of the individual
operating modes, refer to section 1.2.1
JVL Industri Elektronik A/S - User Manual - Integrated Servo Motors MAC050 - 3000
4.10 Expansion Module MAC00-R1/R3/R4
4.10.10.3 Move operations
Icon:
Function:
The Move command is very flexible, with five different operating modes.
Each mode will be described in its own section
4.10.10.4 Move Relative
Icon:
Dialogue:
Function:
Performs a movement relative to the current position. The distance
moved is measured in encoder counts, and can either be entered directly, or taken from three memory registers in the RxP module. For further
information on using these memory registers, refer to the sections on the
“Save position” and “Set position” commands. Note that if you specify a
velocity, motor register no. 5 (V_SOLL) will be over written with this
velocity value. Also, if you specify an acceleration, motor register no. 6
(A_SOLL) will be overridden with the acceleration value you specified.
Register no. 49 (P1) is always over written by this command If the “Wait
for in position” option is checked, the program will wait until the motor has
finished the movement, before proceeding to the next program line. If this
option is not checked, the program will start the movement, then
immediately start executing the next command. The motor will finish the
movement on its own, unless it is given other instructions by the program.
JVL Industri Elektronik A/S - User Manual - Integrated Servo Motors MAC050 - 3000
285
4.10 Expansion Module MAC00-R1/R3/R4
4.10.10.5 Move (Relative + velocity change at a distance)
Icon:
Dialogue:
Function:
286
Performs a relative movement, and changes velocity a specified distance
before reaching the new position. The distance are measured in encoder
counts, and can either be entered directly, or taken from three memory
registers in the RxP module. For further information on using these
memory registers, refer to the sections on the “Save position” and “Set
position” commands.
Note that motor register no. 5 (V_SOLL) will be over written with the
value specified in the “New velocity” field. Also, if you specify an
acceleration, motor register no. 6 (A_SOLL) will be over written with the
acceleration value you specified. Register no. 49 (P1) is always
overridden by this command. This command always wait until the
movement is finished, before proceeding to the next line in the program.
JVL Industri Elektronik A/S - User Manual - Integrated Servo Motors MAC050 - 3000
4.10 Expansion Module MAC00-R1/R3/R4
4.10.10.6 Move (Relative + set outputs)
Icon:
Dialogue:
Function:
Performs a movement relative to the current position, and sets one or
more outputs on the RxP module when the operation is completed. The
distance moved is given in encoder counts, and can either be entered
directly, or can be taken from one of three memory register in the RxP
module. For further information on using these memory registers, refer to
the sections on the “Save position” and “Set position” commands. Note
that if you specify a velocity, motor register no. 5 (V_SOLL) will be over
written with this velocity value. Also, if you specify an acceleration, motor
register no. 6 (A_SOLL) will be over written with the acceleration value
you specified. Register no. 49 (P1) is always over written by this
command. This command always wait until the movement is finished,
before proceeding to the next line in the program.
JVL Industri Elektronik A/S - User Manual - Integrated Servo Motors MAC050 - 3000
287
4.10 Expansion Module MAC00-R1/R3/R4
4.10.10.7 Move (Absolute)
Icon:
Dialogue:
Function:
288
Moves to an absolute, non-relative position. The position is given in
encoder counts, and can either be entered directly, or can be taken from
one three memory register in the RxP module. For further information on
using these memory registers, refer to the sections on the “Save position”
and “Set position” commands.
Note that if you specify a velocity, motor register no. 5 (V_SOLL) will be
overwritten with this velocity value. Also, if you specify an acceleration,
motor register no. 6 (A_SOLL) will be over written with the acceleration
value you specified. If the “Wait for in position” option is checked, the
program will wait until the motor has finished the movement, before
proceeding to the next program line. If this option is not checked, the
program will start the movement, then immediately start executing the
next command. The motor will finish the movement on its own, unless it
is given other instructions by the program.
JVL Industri Elektronik A/S - User Manual - Integrated Servo Motors MAC050 - 3000
4.10 Expansion Module MAC00-R1/R3/R4
4.10.10.8 Move (Sensor)
Icon:
Dialogue:
Function:
Performs a movement in the direction specified, until an input condition
is satisfied. The motor then moves the distance specified, before
stopping. The motor will not move farther than the Safety distance
specified, regardless of whether the input condition is satisfied. The
distances are measured in encoder counts, and can either be entered
directly, or can be taken from one of three memory register in the RxP
module. For further information on using these memory registers, refer to
the sections on the “Save position” and “Set position” commands.
Note that if you specify a velocity, motor register no. 5 (V_SOLL) will be
over written with this velocity value. Also, if you specify an acceleration,
motor register no. 6 (A_SOLL) will be over written with the acceleration
value you specified. Register no. 49 (P1) is always overridden by this
command This command always wait until the movement is finished,
before proceeding to the next line in the program.
JVL Industri Elektronik A/S - User Manual - Integrated Servo Motors MAC050 - 3000
289
4.10 Expansion Module MAC00-R1/R3/R4
4.10.10.9 Set outputs
Icon:
Dialogue:
Function:
290
Sets one or more outputs on the RxP module. When setting a single
output, you can specify the length (in milliseconds) of a pulse to send out
on that output. When setting multiple outputs, you can specify whether to
set each output high, low, or leave it in its current state
JVL Industri Elektronik A/S - User Manual - Integrated Servo Motors MAC050 - 3000
4.10 Expansion Module MAC00-R1/R3/R4
4.10.10.10Unconditional jump
Icon:
Dialogue:
None. After selecting this command, the mouse cursor changes. The next
program line that you click on will become the destination for the jump.
Function:
Jumps to another line in the program
4.10.10.11Conditional jump (single input)
Icon:
Dialogue:
Function:
Tests for an input condition, before either jumping to another line in the
program, or moving on to the next line in the program. If the condition is
met, the command jumps to the specified program line. If the condition is
not met, the program proceeds to execute the next line in the program.
When “input type” is set to “single”, the command can test a single input
for one of four possible conditions: the input is low, the input is high, the
input has transitioned to low (Falling Edge), or the input has transitioned to
high (Rising Edge). If transitions are tested for, the transition must have
taken place during the last 30 microseconds.
After pressing the OK button, the dialogue will disappear, and the mouse
cursor will change. The next program line that you click on will then
become the destination for the jump command
JVL Industri Elektronik A/S - User Manual - Integrated Servo Motors MAC050 - 3000
291
4.10 Expansion Module MAC00-R1/R3/R4
4.10.10.12Conditional jump (multiple input)
Icon:
Dialogue:
Function:
292
Tests for an input condition, before either jumping to another line in the
program, or moving on to the next line in the program. If the condition is
met, the command jumps to the specified program line. If the condition
is not met, the program proceeds to execute the next line in the program.
When “input type” is set to “Multiple”, Multiple inputs can be tested for
being either high or low.
The “Operand” setting determines whether one or all of the inputs must
meet their test criterion. If set to “And”, all inputs must match their test
settings. If set to “Or”, only one input need to match its test setting.
Inputs that are set to “Don’t care” are not tested.
After pressing the OK button, the dialogue will disappear, and the mouse
cursor will change. The next program line that you click on will then
become the destination for the jump command.
JVL Industri Elektronik A/S - User Manual - Integrated Servo Motors MAC050 - 3000
4.10 Expansion Module MAC00-R1/R3/R4
4.10.10.13Wait for (x) ms before continuing
Icon:
Dialogue:
Function:
Causes the program to pause for a number of milliseconds, before
continuing. The longest pause that can be specified is 65535 milliseconds. The shortest pause that can be specified is 0 milliseconds.
Note that this command over writes Timer 1 in the RxP modules memory.
JVL Industri Elektronik A/S - User Manual - Integrated Servo Motors MAC050 - 3000
293
4.10 Expansion Module MAC00-R1/R3/R4
4.10.10.14Wait for an input combination before continuing (single input)
Icon:
Dialogue:
Function:
294
Waits for a specified input condition to occur. The next line in the program
will not be executed until the input condition has been met. If “Input type”
is set to “Single”, the command will wait for one of four things to happen
on the specified input: that the input tests as high, that the input tests as
low, that the input transitions from high to low (Falling Edge). The input is
tested with 30 microsecond intervals.
JVL Industri Elektronik A/S - User Manual - Integrated Servo Motors MAC050 - 3000
4.10 Expansion Module MAC00-R1/R3/R4
4.10.10.15Wait for an input combination before continuing (multiple inputs)
Icon:
Dialogue:
Function:
Waits for a specified input condition to occur. The next line in the program
will not be executed until the input condition has been met. If “Input type”
is set to “Multiple”, multiple inputs can be tested for being either high or
low.
The “Operand” setting determines whether one or all of the inputs must
meet their test criterion. If set to “And” all inputs must match their test
settings. If set to “Or” only one input need to match its test setting. Inputs
that are set to “Don’t care” are not tested. The inputs are tested with
30 microsecond intervals.
JVL Industri Elektronik A/S - User Manual - Integrated Servo Motors MAC050 - 3000
295
4.10 Expansion Module MAC00-R1/R3/R4
4.10.10.16Sets a register in the MAC-motor
Icon:
Dialogue:
Function:
Sets a register in the motor to a specified value. The register is selected
from a list of known, user-accessible registers. The value can either be
entered as native motor units, or it can be entered as generic engineering
units. The dialogue shown provides an example: register no. 3 (P_SOLL,
or requested position, depending on your preference) can either be set to
an integer number of encoder counts, or it can be set to a non-integer
number of revolutions.
4.10.10.17Jump according to a register in the MAC motor
Icon:
Dialogue:
Function:
296
Tests a register in the motor against a specified value, before either
jumping to another line in the program, or moving on to the next line in the
program.
If the condition is met, the command jumps to the specified program line.
If the condition is not met, the program proceeds to execute the next line
in the program. The value can either be entered as native motor units, or it
can be entered as generic engineering units.
The dialogue shown provides an example: register no. 10 (P_IST, or
Actual position, depending on your preference) must be equal to 0
revolutions, if the jump is to be made. The position that the register is
tested against can be specified as an integer number of encoder counts,
or it can be specified as a non-integer number of revolutions.
After pressing the OK button, the dialogue will disappear, and the mouse
cursor will change. The next program line that you click on will then
become the destination for the jump command.
JVL Industri Elektronik A/S - User Manual - Integrated Servo Motors MAC050 - 3000
4.10 Expansion Module MAC00-R1/R3/R4
4.10.10.18Wait for a register value before continuing
Icon:
Dialogue:
Function:
Tests
a register in the motor against a specified value, and waits until the
specified condition is met. The value can either be entered as native
motor units, or it can be entered as native motor units, or it can be
entered as generic engineering units.
The dialogue shown provides an example: register no. 10 (P_IST, or
Actual position, depending on your preference) must be less than 0
revolutions, before the program can continue.
The position that the register is tested against can be specified as an
integer number of encoder counts, or it can be specified as a non-integer
number of revolutions.
4.10.10.19Save position
Icon:
Dialogue:
Function:
Saves the current position, from register no. 10 (P_IST), to one of three
locations in memory on the RxP module. The saved position(s) can then
be used wherever a position or distance is needed in a move command.
JVL Industri Elektronik A/S - User Manual - Integrated Servo Motors MAC050 - 3000
297
4.10 Expansion Module MAC00-R1/R3/R4
4.10.10.20Set position
Icon:
Dialogue:
Function:
Sets the current position, held in register no. 10 (P_IST), to one of three
position values stored in memory on the RxP module. This is the reverse
of the “Save position” command.
4.10.10.21Send FastMac command (change mode and activate register)
Icon:
Dialogue:
Function:
298
FastMAC commands are also sometimes referred to as FlexMAC commands. The advantage of these commands is avery low communications
overhead. FastMAC/FlexMAC are described in detail in section 4.5.7.
However, a brief summary is in order.
If “Mode” is set to one of “Passive”, “Velocity”, or “Position”, the motor will
switch into that mode. Also, one of the passive motor registers will be
activated, in the sense that its value will be written to the corresponding
active motor register, which actually controls motor behaviour. In the
example above, the value in register no. 65 (V1) will be written to register
no. 5 (V_SOLL). Move operations will then take place at that velocity.
JVL Industri Elektronik A/S - User Manual - Integrated Servo Motors MAC050 - 3000
4.10 Expansion Module MAC00-R1/R3/R4
4.10.10.22Send FastMac command (macro command)
Icon:
Dialogue:
Function:
If “Mode” is set to “Command”, the motor does not necessarily change
mode, but it can be ordered to carry out a series of predetermined
operations.
Describing all the FastMAC commands is beyond the scope of this
section, but as an example, you can activate four different sets of
registers, but as an example, you can activate four different sets of
registers, each controlling position, velocity, acceleration, torque, load
factor, and in position window, all with a single command.
For further details, refer to section 4.9.7.
4.10.10.23Binary command
Icon:
Dialogue:
Function:
MacTalk RxP module programs are sent to the motor in a compact binary
format, which is then interpreted by the RxP modules firmware.
The existing set of graphic commands covers most situations, but when
special needs arise, anything that can be done with the RxP module can
be done with a binary command. If you find yourself with special needs,
that are not covered by the other commands, contact JVL for assistance.
JVL Industri Elektronik A/S - User Manual - Integrated Servo Motors MAC050 - 3000
299
4.10 Expansion Module MAC00-R1/R3/R4
4.10.10.24Calculator (basic)
Icon:
Dialogue:
Function:
300
Performs a calculation using register values, contants, and the four basic
arithmetic operations: +, -, * and /. The result is stored in a register.
Arithmetic operations take place in the order they are specified.
Operands/arguments can be either integer constants or registers.
The caption of the dialogue box shows the resulting expression in
traditional in fix format. It is continuously updated as you type in the
expression.
Note that if you write a value to a register, using this command, that value
is always measured in native motor units. Conversion from generic engineering units is only supported for the commands “Set a register in the
MAC motor”.
“Jump according to a register in the MAC motor”, and “Wait for a register
value before continuing”.
JVL Industri Elektronik A/S - User Manual - Integrated Servo Motors MAC050 - 3000
4.10 Expansion Module MAC00-R1/R3/R4
4.10.10.25Calculator (Options)
Icon:
Dialogue:
Function:
The options tab contains various settings that affect the operation of the
Calculator command. “Calculation precision” is, at the time of writing,
locked to 32-bit precision. This is not an error, and should not be reported.
“Register listing and naming” provides an alternative method of entering
ata into the dialogue, by selecting “simple list with short firmware names”.
Instead of selecting, for example, “3 Requested position” to access
register no. 3, you can simply type “P_SOLL”. If you wish to enter a
constant, you simply enter the digits-the dialogue will not mistake the
constant for a register number.
If you are in doubt about a register name, look at the expression in the
caption of the dialogue box. A recognized register name will appear in the
expression. An unrecognized register name will appear as a zero. You
can switch between the two methods of data entry at any time.
JVL Industri Elektronik A/S - User Manual - Integrated Servo Motors MAC050 - 3000
301
4.10 Expansion Module MAC00-R1/R3/R4
4.10.10.26Jump according to a comparison
Icon:
Dialogue:
Function:
302
Compares two registers to each other, before either jumping to another
line in the program, or moving on to the next line in the program. If the
condition is met, the command jumps to the specified program line. If the
condition is not met, the program proceeds to execute the next line in the
program.
Any two registers can be compared to each other, but the command
does not do anything beyond comparing the register numerical values,
as measured in native motor units. To ensure comparisons are
meaningful, it is preferable to compare registers that hold the same type
of information, in the same binary format.
In the example above, two position registers are compared. Both hold
position information, both measure position in encoder counts. Such a
comparison will always yield meaningful, predictable results. For other
types of registers, consult section 5.6.
JVL Industri Elektronik A/S - User Manual - Integrated Servo Motors MAC050 - 3000
4.10 Expansion Module MAC00-R1/R3/R4
4.10.11
General hardware aspects
All internal and external main connections are shown in the illustration below.
Basic MAC motor with MAC00-R1, R3 or R4 module inserted.
Basic MAC motor
MAC00-R1/R3/R4 expansion module
Power supply
MAC50-141: +12-48V
MAC400/800: +24V
Analogue input
or Zero search input
±10V nom. or up to 32V
P+
P-
MAC00-R4 offers
a common I/O
ground (IO-)
and ICM + OCM
are not present
RS485 Interface
Power ground (P-) is not connected in the MAC00-Rx module
AIN
GND
This GND is only available at the MAC00-R3 and R4
At the MAC00-R1 the P- is used as ground for AIN
Optocoupler
8
IN1-8
Digital inputs
and outputs
Voltagerange 5-32V
Power supply
AIN
GND
Analogue input
A
B+
Control
core
O+
Optocoupler
+ Driver
4
Multifunction I/O
(setup as “serial data”)
B
4
O1
O2
OCM
Status outputs
2 channel
differential
Transceiver
A
B
RX
Interface
Control
RS232 Interface
P+
P-
A+
8
ICM
(IO-)
O1-4
(MAC050 to 800)
Tx
Tx-PD
Rx
GND
TX
GND
Asynchronous
serial interface
Asynchronous
interface
TT1011GB
The following illustration shows how the I/O are internally connected.
MAC00-R1/R3/R4 input and output circuitry
Opto isolation
IN1
Opto coupler
Infineon type
SFH6943
Opto couplers
Infineon type
SFH6943
5-32VDC
Opto isolation
Reverse polarity
protection
O+
1uF
5.6kOhm
O1
4.7nF
IN2
IN3
4
O2
4
O3
IN4
O4
Control
Core
IN5
4 pcs. PNP outputs
Max. 500mA per output
output driver:
VN340 (ST)
IN6
IN7
4 pcs.
10kOhm
pull-down
OCM
4
On the MAC00-R1 a LED is
connected between each of
the outputs (O1-4) to OCM
IN8
On the MAC00-R4 module, input ground (ICM)
and output ground (OCM) are tied together
internally to a common connector terminal (IO-)
ICM
TT1012GB
8
Connections to the interface and basic motor
JVL Industri Elektronik A/S - User Manual - Integrated Servo Motors MAC050 - 3000
303
4.10 Expansion Module MAC00-R1/R3/R4
Screen connected
to GND in each end
MAC50-141
Motor
2 Use screened cable
A
B
GND
Screen
3 Ensure that GND is also
connected in order to assure the same potential between all the connected
nodes.
4 Ensure that all units have a
proper connection to safety
ground (earth) in order to
refer to the same potential.
304
Power
Supply
P+
P-
Control voltage
Only MAC50-141
with R1, R3 or R4
O+
A
B
GND
*** Address=2
RS485
Interface
Power
Supply
P+
P-
Screen
Control voltage
O+
Only MAC50-141 with
R1, R3 or R4
MAC800
Motor
7 Master Controller RS485
interface:
If available, it is strongly recommended a type with optical isolation is used.
Connectors:
Please read the individual description for the MAC00-R1,
R3 or R4 to see the connector
layout.
*** Address=1
RS485
Interface
MAC50-141
Motor
5 The last unit in each end of
the network must be terminated. Use a termination
resistor in the range 120220 Ohm between line A
and B.
6 Ensure that the supply lines
are connected individually
in order to minimise the
voltage drop between the
motors.
(Bus voltage)
A
B
GND
GND
**
Screen
1 Use twisted-pair cable
potential
Opto isolation *
+12-48VDC
(for example a PC)
When connecting the RS485
interface to a central controller, the following rules must
be followed:
(control voltage)
RS485 - General description when using a MAC00-Rx module
The RS485 offers more noiseRS485 network with 2 x MAC140 and 1 x MAC800
immune communication commounted with MAC00-R1, R3 or R4 modules.
pared to the RS232 interface.
Up to 32 motors can be conCentral
Make sure that all
Power supply
involved units are
Controller
nected to the same line.
connected to the same
+12-32VDC
4.10.12
**
A
B
GND
*** Address=3
RS485
Interface
Power
Supply
Up to 32
Motors
P+
P-
Main supply
Max. 32VDC !
Mains 230VAC
TT1532-01GB
* Opto isolation is recommended.
** The last unit at each end of the line must be terminated. Please connect a terminating
resistor in the range 12 0 to 220 Ohm between the A and B lines.
*** Each unit connected must be setup with an address via The MacTalk program.
If only one unit is connected no address is needed.
JVL Industri Elektronik A/S - User Manual - Integrated Servo Motors MAC050 - 3000
4.10 Expansion Module MAC00-R1/R3/R4
4.10.13
Expansion MAC00-R1 hardware description
The illustration below shows the I/O connections on the MAC00-R1 expansion module.
MAC00-R1 connector descriptions
IN / O U T
User Inputs
Common ground
The inputs must
be supplied from a PNP/
source output 5-24V
IN5
IN4
ICM
IN3
IN8
IN2
IN7
IN1
IN6
5
10
4
3
2
1
15
14
9
8
7
13
12
11
6
OCM
O+
O4
O3
O2
O1
User outputs
PNP/source type
24V/300mA per output
Connector: DSUB 15pin male High Density type.
RS232 Connections
RS485 Connections
S ETU P
1
RS232 Rx
2
RS232 TX
3
RS485 ASignal ground
4
5
6
7
8
9
RS232 Interface between MAC motor and a PC.
RS232 Note !
The TX-PD terminal must
be connected to Tx (pin 3)
if the MAC motor is not
using addressing
Tx-PD
Terminator
RS485 B+
MAC00-B1
PC
7
5
Gnd
3
Tx
Tx
Rx
Rx
Gnd
7
2
1
5
3
2
1
(for RS232 and RS485
TT0938GB
Use JVL programming cable type RS232-9-1
for connecting to PC.
All inputs have a common ground ICM and all the outputs uses OCM as ground. O+ is
the supply terminal for the output circuitry and must be supplied with a voltage from 632VDC. The outputs are short-circuit protected.
The input and output circuitry are optically isolated from each other and also from the
other parts of the MAC00-R1 or R3.
JVL Industri Elektronik A/S - User Manual - Integrated Servo Motors MAC050 - 3000
305
4.10 Expansion Module MAC00-R1/R3/R4
4.10.14
Expansion MAC00-R3 hardware description
The illustration below shows the I/O connections on the MAC00-R3 expansion module.
TT0938GB
The MAC00-R3 expansion module is an industrial interface that mates with the standard
MAC motor and offers a number of feature enhancements including:
• Protection IP67 if mounted on basic MAC motor (IP67 type: MAC050-141).
• Direct cable connection through sealed compression cable glands.
• Addition of a Zero switch input for locating a mechanical zero point of the actuator
when used in position related modes.
• Miniature connectors (internal) for all signal lines including RS232/485 interface and
Zero search switch. Molex 3.96mm connector for power supply.
• Full RS232 protocol support
Note: The basic MAC motor is only equipped with a low-voltage serial interface that
requires the use of the RS232-9-1-MAC option cable, which has integrated electronics to boost the voltage levels.
• Full RS485 protocol support for multipoint communication up to 100m.
• Sourcing (PNP) outputs for status signals O1 and O2 instead of sinking (NPN).
306
JVL Industri Elektronik A/S - User Manual - Integrated Servo Motors MAC050 - 3000
4.10 Expansion Module MAC00-R1/R3/R4
4.10.15
MAC00-R3 option with cables
The MAC00-R3 type number only covers the basic module without any cables.
If a number is added after the basic type number, for example MAC00-R3-10, this suffix
indicates that the module is fitted with 2x10m of cable. 1 cable comprises the power supply and analogue input. The other cable covers all the signal lines, i.e. RS232, RS485, status outputs and multifunction I/O.
Power cable - Cable 1 - JVL type no. WG0302 (2m) or WG0320 (20m)
Power Supply
Signal name
P+
PScreen
Description
Positive supply terminal +12 to 48VDC
Negative supply terminal (ground)
Screen to minimize noise
Wire colour
Red
Black (or white)
Screen (connected internally to P-)
Signal cable - Cable 2- JVL type no. WG0420 (20m).
Digital Inputs - Internal connector J2
Signal name
IN1
IN2
IN3
IN4
IN5
IN6
IN7
IN8
ICM
NC
Description
Digital input 1
Digital input 2
Digital input 3
Digital input 4
Digital input 5
Digital input 6
(Reserved)
(Reserved)
Input ground. This ground is used for IN1 to IN8
Reserved for future features - Do not connect this wire.
Wire colour
Red/black
Green/black
Violet
Violet/white
Grey
Grey/black
Pink/black
Black/white
Light green **
White
Digital Outputs - including analogue input - Internal connector J4
Signal name
O+
Description
Supply for outputs - Must be connected to an ext. supply.
Wire colour
Red/white
OCM
Output ground. This ground is used together with O1-O4
Green/white
O1
O2
O3
O4
Digital output 1 - PNP output
Digital output 2 - PNP output
Digital output 3 - PNP output
Digital output 4 - PNP output
Yellow/black
Blue/white
Orange/white
Brown/white
AIN
Analogue input +/-10V (also used for Zero search sensor).
Pink
GND
I/O ground. This ground is shared with the input ground
Black
Interface - Internal connector J1
Signal name
TXPD
TX
RX
GND
RS485 B+
RS485 A-
Description
Transmit pull-down - connect with TX if addressing is not used
RS232 Transmit - If not used, do NOT connect !
Remember to connect with TXPD if addressing is not used
RS232 Receive - If not used, do NOT connect !
Ground for RS232 and RS485
RS485 - If not used, do NOT connect !
RS485 - If not used, do NOT connect !
Wire colour
Red
Green **
Yellow
Blue
Orange
Brown
Cable Screen
The cable-screen is internally connected to motor housing. Externally it must be connected to earth.
Unused wire
Orange/Black - is not used internally. It must be left unconnected.
** : The light green wire (ICM) can be difficult to distinguish from the green wire (TX) on some cables.
Important: Please note that the cables are a standard type. They are not recommended
for use in cable chains or where the cable is repeatedly bent. If this is required, use a special robot cable (2D or 3D cable).
JVL Industri Elektronik A/S - User Manual - Integrated Servo Motors MAC050 - 3000
307
4.10 Expansion Module MAC00-R1/R3/R4
4.10.16
Connecting the RS232 interface of the MAC00-R3 module
The illustration below shows how to connect the MAC00-R3 directly to a PC COM port.
The drawing is based on standard cables from JVL, types WG0402, WG0410 or
WG0420. See also Accessories, page 394 for a complete list of cables and connectors.
Please remember to connect the TX and TX-PD wires from the MAC00-R3 together to
achieve stable operation.
If the MAC motor is connected to the same RS232 line as other motors, the terminal TXPD should only be connected on one of the motors.
If one of JVL’s standard RS232 cables (RS232-9-1 or -n) is used between the DSUB connector shown and the PC com port, the RX and TX pins must be swapped since they
cross in these standard cables.
How to connect the RS232 interface of the MAC00-R3
JVL cable WG04xx
standard I/O
cable (24 wire)
S
creenterm
inated
totheG
N
Dterm
inal
PC RS232
COM port
5
GND
3
Tx
Screen
2
1
Rx
If the RS232 lines are extended
through another cable this cable
must also be screened
Connector:
Cable = Female 9pin DSUB
At PC = Male 9pin DSUB
If JVL’s standard programming
cable type RS232-9-1 or -n is
used between the shown
connector and the PC the RX
and TX signal must be swapped.
Tx to pin 2 and Rx to pin 3.
308
Blue
Yellow
Green
Red
Interface connector
Screen
Screen must be
connected to
main ground
at rear cover.
Remember to connect TX-PD (Red)
to TX (Green) in order to achieve
stable communication
MAC00-R3 internal
connector board
JVL Industri Elektronik A/S - User Manual - Integrated Servo Motors MAC050 - 3000
TT0967GB
4.10 Expansion Module MAC00-R1/R3/R4
Expansion module MAC00-R4 front plate
PWR
IO1
Power
M12 - 5pin male
connector including:
P+ and P-
Basic I/O’s
M12 - 8pin male
connector including:
IN1-4 and O1-2
O+ and IO-
COM
Interface RS232 and RS485
M12 - 5pin female
connector including:
RS232 RX and TX
RS485 A and B
GND
IO2
Extended I/O’s
M12 - 8pin female
connector including:
IN5-8 and O3-4
AIN and GND
TT0986GB
4.10.17
Expansion MAC00-R4 hardware description
The MAC00-R4 offers IP67 on MAC050-141 protection and M12 connectors which
make it ideal for automation applications where no additional protection is desired. The
M12 connectors offer solid mechanical protection and are easy to unplug compared to
the R3 module which has cable glands. All the available signals are the same as used in the
other R modules except for TX-PD which is converted into an internal dip-switch.
The connector layout:
“PWR” - Power input. M12 - 5-pin male connector
Signal name
Description
Pin no.
JVL Cable
WI1000M12
F5T05N
P+
Main supply +12-48VDC. Connect with pin 2 *
1
Brown
1
P+
Main supply +12-48VDC. Connect with pin 1 *
2
White
1
P-
Main supply ground. Connect with pin 5 *
3
Blue
1
Unused
Future option
4
Black
-
P-
Main supply ground. Connect with pin 3 *
5
Grey
1
Isolation
group
* Note: P+ and P- is each available at 2 terminals. Make sure that both terminals are connected in order to
split the supply current between 2 terminals and thereby avoid an overload of the connector.
“COM” - Interface RS232 and RS485. M12 - 5-pin female connector
Signal name
Description
Pin no.
JVL Cable
WI1000M12
M5T05N
RS232 Rx
RS232 interface receive terminal.
Leave open if unused
1
Brown
1
RS232 Tx
RS232 interface transmit terminal.
Leave open if unused. - Important, see note1:
2
White
1
RS485 B+
RS485 interface terminal.
Leave open if unused
3
Blue
1
RS485 A-
RS485 interface terminal.
Leave open if unused
4
Black
1
GND
Interface ground (same as main ground).
5
Grey
1
Isolation
group
Note 1: See also Dip switch for RS232 TxPD (Transmit pull-down), page 310
(Continued next page)
JVL Industri Elektronik A/S - User Manual - Integrated Servo Motors MAC050 - 3000
309
4.10 Expansion Module MAC00-R1/R3/R4
(Continued from previous page)
“IO1” - Basic I/O’s. M12 - 8-pin male connector.
Signal name
IN1
IN2
IN3
IN4
Description
Digital input 1
Digital input 2
Digital input 3
Digital input 4
Pin no.
1
2
3
4
JVL Cable
WI1000-M12
F8T05N
White
Brown
Green
Yellow
O1
Digital output 1 - PNP output
5
Grey
2
O2
Digital output 2 - PNP output
Output supply +8-32VDC. Used for O1-4.
Not used/necessary for using IN1-8
I/O ground. Used for IN1-8 and O1-4.
6
Pink
2
7
Blue
2
8
Red
2
Pin no.
1
2
3
4
5
6
JVL Cable
WI1000-M12
M8T05N
White
Brown
Green
Yellow
Grey
Pink
Isolation
group
2
2
2
2
2
2
7
Blue
1
8
Red
1
O+
IO-
Isolation
group
2
2
2
2
“IO2” - Extended I/Os. M12 - 8-pin female connector.
Signal name
IN5
IN6
IN7
IN8
O3
O4
AIN
GND
Description
Digital input 5
Digital input 6
Digital input 7
Digital input 8
Digital output 3 - PNP output
Digital output 4 - PNP output
Analogue input +/-10V
(also used for Zero search sensor).
Ground for AIN. This ground is shared with
the main ground
Cable Screen
Some standard cables with M12 connectors offer a screen around the cable. This screen on some cables
is fitted to the outer metal at the M12 connector. When fitted to the MAC00-R4 module, this means that the
screen will have contact with the complete motor housing and thereby also the power ground (main ground).
Isolation groups
The MAC00-R4 offers optical isolation at the digital inputs and outputs (IN1-8 and O1-4). The table above
shows a number for each pin. This number refers to the isolation group to which the terminal is connected.
Isolation group 1 means that the terminal refers to the main ground.
Isolation group 2 means that the terminal refers to the I/O ground (IO-).
4.10.18
Dip switch for RS232 TxPD (Transmit pull-down)
Default factory
setting are: On
Then SW1 is on, TX
and TX-PD are wired
together.
ON
TT1129GB
If the MAC motor is connected to the same RS232 line as other motors, the terminal
TX-PD should only be connected on one of the motors.
310
JVL Industri Elektronik A/S - User Manual - Integrated Servo Motors MAC050 - 3000
4.10 Expansion Module MAC00-R1/R3/R4
4.10.19
Cables for the MAC00-R4
The following cables equipped with M12 connector can be supplied by JVL.
MAC00-R4 Connectors
Description
JVL Order no.
RS232 Interface cable. Connects
directly from MAC00-R4 to PC
Length: 5m (197 inch)
RS232-M12-1-5-5
Photo
“IO1” “IO2”
“COM” “PWR”
8-pin 8-pin
5-pin
5-pin
Male Female Female Male
X
X
Cable (Ø5.5mm) with M12 female 5
pin connector loose ends 0.35mm²
WI1000-M12F5T05N
(22AWG) and screen.
Length: 5m (197 inch)
X
Same as above but 20m (787 inch) WI1000-M12F5T20N
X
Cable with M12 male 5-pin connecWI1000-M12M5T05N
tor loose wire ends 0.35mm²
See also type:
(22AWG) and screen.
RS232-M12-1-5-5
Length: 5m (197 inch).
X
Same as above but 20m (787 inch) WI1000-M12M5T20N
X
Cable with M12 female 8-pin
connector loose wire ends
0.22mm² (24AWG) and screen.
Length: 5m (197 inch)
X
Same as above but 20m (787 inch) WI1000-M12F8T20N
WI1000-M12F8T05N
X
Cable with M12 male 8-pin
connector loose wire ends
0.22mm² (24AWG) and screen.
Length: 5m (197 inch)
X
Same as above but 20m (787 inch) WI1000-M12M8T20N
WI1000-M12M8T05N
Protection caps. Optional if connector is not used, to protect from dust / liquids.
X
X
X
X
IP67 protection cap for M12
female connector.
WI1000-M12FCAP1
IP67 protection cap for M12
male connector.
WI1000-M12MCAP1
Important: Please note that the cables are a standard type. They are not recommended for use in cable chains or where the cable is repeatedly bent. If this is required, use a special robot cable (2D or 3D
cable).
See also Accessories, page 394
JVL Industri Elektronik A/S - User Manual - Integrated Servo Motors MAC050 - 3000
311
312
JVL Industri Elektronik A/S - User Manual - Integrated Servo Motors MAC050 - 3000
5
Appendix
JVL Industri Elektronik A/S - User Manual - Integrated Servo Motors MAC050 - 3000
313
5.1
Technical Data
General
Only MAC050 to 141
All data are specified for the MAC motor only, i.e. without any expansion module mounted.
Technology
Controller capacity
Speed range
Amplifier control system
Filter
Feedback
Input power supply
Current consumption
Control modes
Flange and shaft dimension
AC-servomotor (brushless) with built-in 1024 PPR encoder, hall sensors and 3-phase servo amplifier/controller
MAC050
MAC095
MAC140
MAC141
Rated output @4000 RPM
46W
92W
134W
134W
Rated Torque RMS Nm/(oz-in)
0.11 / (15.6)
0.22 / (31.2)
0.32 / (45.3)
0.48 / (68)
Peak Torque Nm/(oz-in)
0.32 / (45.3)
0.62 / (88)
0.90 / (127.5)
1.59 / (225.2)
Torque @200RPM with 20:1 gear. Nm/(oz-in)
2.0 / (283)
4.1/ (581)
6.0 / (850)
9.0 / (1275)
Inertia kgcm² / (oz-in-sec²)
0.075(0.0011) 0.119(0.0017) 0.173(0.0025) 0.227(0.0032)
Maximum angular acceleration
85300rad/sec² 85300rad/sec² 85300rad/sec² 85300rad/sec²
Length mm/(inch)
112/(4.409)
131/(5.157)
153/(6.024)
172/(6.772)
Weight (kg) (without expansion module)
0.60
0.85
1.10
1.33
0-4000RPM with full torque @48VDC. Max 4000 RPM (0-2700RPM for MAC141)
Sinusoidal wave PWM control. 15.75kHz switching
4.th. order filter with only one inertia load factor parameter to be adjusted. Expert tuning also available
Incremental A and B encoder 4096 CPR. (Physical 1024 PPR)
Single supply 12-48VDC (absolute max=50VDC. Power consumption with no load: Active/not active = 10/8W
MAC050
MAC095
MAC140
MAC141
Avg. current consump. @ 48VDC/Nom. load (ADC) 2 (4000RPM)
4 (4000RPM) 6 (4000RPM)
6 (2700RPM)
Avg. current consump. @ 24VDC/Nom. load (ADC) 2 (2000RPM)
4 (2000RPM) 6 (2000RPM)
6 (1350RPM)
Peak supply current (worst case)
6A peak
12A peak
16A peak
16A peak
* ±10V Speed and Torque. A+B encoder outputs
* Pulse/direction and 90° phase shifted A++B (Incremental)
* RS422 or RS232 (5V) position and parameter commands
* Gear mode with analogue input speed offset + different options
* Sensor Zero search or mechanical Zero search
NEMA23 compatible. Front: 58 x 58mm. Rear: Ø58. Shaft Ø6.35mm
POSITION (pulse inputs)
Command input pulse
Input frequency
Electronic gear
Follow error register
In position width
Pulse/direction or 90° phase shifted A+B. RS422. Logic 0=<2.0V. Logic 1=>3.0V. Max voltage at A+, A-, B+ and B- = 5.5V.
0-2.5MHz or 0-150kHz with input filter
A/B: A=-10000 to 10000, B=1 to 10000. Simulation of all step resolutions for easy replacement of step motor systems.
32 bit
0-32767 pulses
Position range
32 bit. Infinity, Flip over at ±231 pulses.
POSITION (serial communication)
Communication facility
Communication Baud-rate
Position range
Speed range
Acceleration range
Addressing
Number of parameters.
Speed variance
From PLC, PC etc via RS422 or asynchronous serial port RS232 with special cable. MacTalk JVL commands, special
commands with high security.
19200 bit/sec. (19.2kBaud)
±67.000.000
0-4000 RPM. Digital resolution 0.477 RPM
248 - 397.364 RPM/sec
Point to point on RS422. Up to 32 units on the same serial RS232/RS485 interface with built-in expansion module. Address range 1-254
Standard 85. With MacRegIO software 156 (Only for experts)
Max. ±4 RPM variance between command and actual speed.
SPEED/ TORQUE
Analogue speed/torque input.
Analogue input tolerance
Sampling rate at analogue input
Encoder output signals
Analogue speed input
Zero speed determination.
Speed variance at rated speed
Torque limit in speed mode
Analogue torque input
Torque control accuracy
9 bit + sign. Nom. input voltage ±10V. 10kOhm input resistance. Voltage range max. -10 to +32VDC. Offset typical ±50mV.
Typical ±1%. Max. 5% (Possible to make software adjustment to minimize gain and offset errors)
521 Hz
A+,A-,B+,B-, RS422. Line driver 5V outputs (SN75176). 90° Phase shifted.
+voltage -> CW rotation. Shaft view
0 - rated speed.
Initial error @20°C: ±0,5%
Power Supply: ±10%: 0.0%
Load 0-300%: ±0.0%
Ambient temperature 0-40°C: ±0,1%
0-300% by parameter
+voltage (positive torque) -> CW rotation. Shaft view
±10% @ 20°C (Reproducibility)
VARIOUS
Electromechanical brake
Regenerative
Protective functions.
LED functions
Output signals
Zero search
Shaft load maximum
Standards
Protection
Usage / Storage Temperature
314
This option is not available on these motor sizes. Use the MAB23x - see Brakes and shaft reinforcement, page 395
Integrated power dump. 3W can be absorbed continuously. External attachment is possible
Error trace back.Overload (I²T), Regenerative overload, follow error, function error, regenerative overload (over voltage),
software position limit. Abnormality in flash memory, under voltage, over current.
Power (Green LED), Error (Red LED). Note that the LED’s are only visible when no module is mounted.
2 general purpose NPN <32V/25 mA outputs. Error and In position.
1: Automatic Zero search with sensor connected to input (2 formats)
2: Mechanical Zero search without sensor. (Torque controlled)
Radial load: 75N (20mm from flange). Axial load: 15N.
CE approved/UL pending
IP42 or IP67 (IP55 on request)
Ambient 0 to +40°C (32-104°F)/ -20 to +85°C. (-4 to 185 °F) (Humidity 90%).
JVL Industri Elektronik A/S - User Manual - Integrated Servo Motors MAC050 - 3000
5.1
Technical Data
Only MAC400
General
All data are specified for the MAC motor only, i.e. without any expansion module mounted.
Technology
Controller capacity
AC-servomotor (brushless) with built-in 2048 PPR encoder, hall sensors and 3 phase servo amplifier/controller
MAC400-D2 & -D3
MAC400-D5 & -D6 (w/brake)
Rated output @3000 RPM
400W
400W
Rated Torque RMS / Peak Torque
1.28Nm / 3.8Nm
1.28Nm / 3.8Nm
Inertia (kgcm²)
0.34 (kgcm²)
0.36 (kgcm²)
Maximum angular acceleration
- rad/sec²
- rad/sec²
Length
191mm
225mm
Weight (without expansion module)
2.3kg
2.8kg
Audible noise level (measured in 30cm distance)
(to be defined) dB(A)
Backlash (when brake is activated)
< ±1 degree
0-3000RPM with nom. torque. (max 3500RPM shortterm). Overspeed protection trips at >4300RPM. Motor will shut
down.
Sinusoidal wave PWM control. 20kHz switching
6.th. order filter with only one inertia load factor parameter to be adjusted.
Expert tuning also available for professionals.
Incremental A and B encoder 8192 CPR. (Physical 2048 PPR). Optional multiturn absolute encoder.
115/230/240VAC (±10%) for main power circuit. 18-32VDC for control circuit.
Consumption at 115-240VAC - see power supply section.
Control circuitry consumption: MAC400D1, 2 and 3 (wo/brake) = Typical 0.22A @ 24VDC(5.3W).
Control circuitry consumption: MAC400D4, 5 and 6 (w/brake) = Typical 0.58A @ 24VDC(14W).
* ±10V Speed and Torque. A+B encoder outputs
* Pulse/direction and 90° phase shifted A++B (Incremental)
* RS422 or RS232 (5V) position and parameter commands
* Gear mode with analogue input speed offset + different options
* Sensor Zero search or mechanical Zero search
Front: 60x60mm. Rear: 63x115mm. Shaft Ø14mm
Speed range
Amplifier control system
Filter
Feedback
Input power supply
Control modes
Flange and shaft dimension
POSITION (pulse inputs)
Command input pulse
Input frequency
Electronic gear
Follow error register
In position width
Pulse/direction or 90° phase shifted A+B. RS422
0-8 MHz. 0-1 MHz with input filter
A/B: A= -10000 to 10000, B=1 to10000. Simulation of all step resolutions.
32 bit
0-32767 pulses
Position range
32 bit. Infinity, Flip over at ±231 pulses.
POSITION (serial communication)
Communication facility
Communication Baud-rate
Position range
Speed range
Digital resolution
Acceleration range
Addressing
Number of parameters.
Speed variance
From PLC, PC etc via RS422 or asynchronous serial port RS232 with special cable. MacTalk JVL commands, special
commands with high security.
19200 bit/sec. (19.2kBaud)
±67 000 000
0-3000 RPM.
0.3606 RPM
250 - 444.675 RPM/sec
Point to point on RS422. Up to 32 units on the same serial RS232/RS485 interface with built-in expansion module. Address range 1-254
Standard 85. With MacRegIO software 156 (Only for experts)
Max ±4 RPM variance between command and actual speed.
SPEED/ TORQUE
Analogue speed/torque input.
Sampling rate at analogue input
Encoder output signals
Analogue speed input
Zero speed determination.
Speed variance at rated speed
Torque limit in speed mode
Analogue torque input
Torque control accuracy
11bit + sign. Nom. input voltage ±10V. 10kOhm input resistance. Voltage range max. -10 to +32VDC. Offset typical
±50mV.
750 Hz
A+,A-,B+,B-, RS422. Line driver Typical 1.1 - 3.7 Volt outputs (SN75176). 90° Phase shifted.
+voltage -> CW rotation. Shaft view
0 - rated speed.
Initial error @20°C: ±0,0%
Power Supply: ±10%: 0.0%
Load 0-300%: ±0.0%
Ambient temperature 0-40°C: ±0,0005% (±50ppm)
0-300% by parameter
+voltage (positive torque) -> CW rotation. Shaft view
±10% @ 20°C (Reproducibility)
VARIOUS
Electromechanical brake
Regenerative
Protective functions.
LED functions
Output signals
Zero search
Shaft load maximum
Optional brake(-D4 option)
Rated power rate. (motor)
Mechanical time constant. (motor)
Electrical time constant. (motor)
Standards
Protection
Usage / Storage Temperature
Optional feature. The brake is activated automatically when an unrecoverable error situation occur.
Integrated power dump. External attachment is possible
Error trace back.Overload (I²T), Regenerative overload, follow error, function error, regenerative overload (over voltage),
software position limit. Abnormality in flash memory, under voltage, over current, temperature too high.
Power (Green LED), Error (Red LED). Note that the LED’s are only visible when no module is mounted.
3 general purpose NPN 30V/25 mA outputs. Error and In position.
1: Automatic Zero search with sensor connected to input (2 formats)
2: Mechanical Zero search without sensor. (Torque controlled)
Radial load: 24.5kg (13.5mm from flange). Axial load: 9.8kg.
Controlled automatic or from input. 3.25Nm, inertia 0.22cm2, turn on time: 50ms, turn off time: 15ms
50.0 kW/s
0.59±10% ms
3.5±10% ms
CE approved/UL pending.
IP55 (IP42 and IP67 on request)
Ambient 0 to +40°C (32-104°F)/ Storage (power not applied): -20 to +85°C. (-4 to 185°F) (Humidity 90%).
Temperature warning is given before reaching max.
Temperature shut down and error message generated at 84°C (183F).
JVL Industri Elektronik A/S - User Manual - Integrated Servo Motors MAC050 - 3000
315
5.1
Technical Data
Only MAC402
General
All data are specified for the MAC motor only, i.e. without any expansion module mounted.
Technology
Controller capacity
AC-servomotor (brushless) with built-in 2048 PPR encoder, hall sensors and 3 phase servo amplifier/controller
MAC402-D2 & -D3
MAC402-D5 & -D6 (w/brake)
Rated output @3000 RPM
400W
400W
Rated Torque RMS / Peak Torque
1.28Nm / 3.8Nm
1.28Nm / 3.8Nm
Inertia (kgcm²)
0.34 (kgcm²)
0.36 (kgcm²)
Maximum angular acceleration
- rad/sec²
- rad/sec²
Length
191mm
225mm
Weight (without expansion module)
2.3kg
2.8kg
Audible noise level (measured in 30cm distance)
(to be defined) dB(A)
Backlash (when brake is activated)
< ±1 degree
0-3000RPM with nom. torque. (max 3500RPM shortterm). Overspeed protection trips at >4300RPM. Motor will shut
down.
Sinusoidal wave PWM control. 20kHz switching
6.th. order filter with only one inertia load factor parameter to be adjusted.
Expert tuning also available for professionals.
Incremental A and B encoder 8192 CPR. (Physical 2048 PPR). Optional multiturn absolute encoder.
Nominal 12-48VDC (±10%) for main power circuit. Recommended also for 12V battery applications. Consumption at 1248VDC - see power supply section. 18-32VDC for control circuit.
Control circuitry consumption: MAC400D1, 2 and 3 (wo/brake) = Typical 0.22A @ 24VDC(5.3W).
Control circuitry consumption: MAC400D4, 5 and 6 (w/brake) = Typical 0.58A @ 24VDC(14W).
* ±10V Speed and Torque. A+B encoder outputs
* Pulse/direction and 90° phase shifted A++B (Incremental)
* RS422 or RS232 (5V) position and parameter commands
* Gear mode with analogue input speed offset + different options
* Sensor Zero search or mechanical Zero search
Front: 60x60mm. Rear: 63x115mm. Shaft Ø14mm
Speed range
Amplifier control system
Filter
Feedback
Input power supply
Control modes
Flange and shaft dimension
POSITION (pulse inputs)
Command input pulse
Input frequency
Electronic gear
Follow error register
In position width
Pulse/direction or 90° phase shifted A+B. RS422
0-8 MHz. 0-1 MHz with input filter
A/B: A= -10000 to 10000, B=1 to10000. Simulation of all step resolutions.
32 bit
0-32767 pulses
Position range
32 bit. Infinity, Flip over at ±231 pulses.
POSITION (serial communication)
Communication facility
Communication Baud-rate
Position range
Speed range
Digital resolution
Acceleration range
Addressing
Number of parameters.
Speed variance
From PLC, PC etc via RS422 or asynchronous serial port RS232 with special cable. MacTalk JVL commands, special
commands with high security.
19200 bit/sec. (19.2kBaud)
±67 000 000
0-3000 RPM.
0.3606 RPM
250 - 444.675 RPM/sec
Point to point on RS422. Up to 32 units on the same serial RS232/RS485 interface with built-in expansion module. Address range 1-254
Standard 85. With MacRegIO software 156 (Only for experts)
Max ±4 RPM variance between command and actual speed.
SPEED/ TORQUE
Analogue speed/torque input.
Sampling rate at analogue input
Encoder output signals
Analogue speed input
Zero speed determination.
Speed variance at rated speed
Torque limit in speed mode
Analogue torque input
Torque control accuracy
11bit+sign. nom. input voltage ±10V. 10kOhm input resistance. Voltage range max. -10 to +32VDC. Offset typical ±50mV.
750 Hz
A+,A-,B+,B-, RS422. Line driver Typical 1.1 - 3.7 Volt outputs (SN75176). 90° Phase shifted.
+voltage -> CW rotation. Shaft view
0 - rated speed.
Initial error @20°C: ±0,0%
Power Supply: ±10%: 0.0%
Load 0-300%: ±0.0%
Ambient temperature 0-40°C: ±0,0005% (±50ppm)
0-300% by parameter
+voltage (positive torque) -> CW rotation. Shaft view
±10% @ 20°C (Reproducibility)
VARIOUS
Electromechanical brake
Regenerative
Protective functions.
LED functions
Output signals
Zero search
Shaft load maximum
Optional brake(-D4 option)
Rated power rate. (motor)
Mechanical time constant. (motor)
Electrical time constant. (motor)
Standards
Protection
Usage / Storage Temperature
316
Optional feature. The brake is activated automatically when an unrecoverable error situation occur.
Integrated power dump. External attachment is possible
Error trace back.Overload (I²T), Regenerative overload, follow error, function error, regenerative overload (over voltage),
software position limit. Abnormality in flash memory, under voltage, over current, temperature too high.
Power (Green LED), Error (Red LED). Note that the LED’s are only visible when no module is mounted.
3 general purpose NPN 30V/25 mA outputs. Error and In position.
1: Automatic Zero search with sensor connected to input (2 formats)
2: Mechanical Zero search without sensor. (Torque controlled)
Radial load: 24.5kg (13.5mm from flange). Axial load: 9.8kg.
Controlled automatic or from input. 3.25Nm, inertia 0.22cm2, turn on time: 50ms, turn off time: 15ms
50.0 kW/s
0.59±10% ms
3.5±10% ms
CE approved/UL pending.
IP55 (IP65 on request)
Ambient 0 to +40°C (32-104°F)/ Storage (power not applied): -20 to +85°C. (-4 to 185°F) (Humidity 90%).
Temperature warning is given before reaching max.
Temperature shut down and error message generated at 84°C (183F).
JVL Industri Elektronik A/S - User Manual - Integrated Servo Motors MAC050 - 3000
5.1
Technical Data
General
Only MAC800
All data are specified for the MAC motor only, i.e. without any expansion module mounted.
Technology
Controller capacity
Speed range
Amplifier control system
Filter
Feedback
Input power supply
Control modes
Flange and shaft dimension
AC-servomotor (brushless) with built-in 2000 PPR encoder, hall sensors and 3 phase servo amplifier/controller
MAC800-D2/-D3
MAC800-D5/-D6 (w. brake)
Rated output @3000 RPM
746W
746W
Rated Torque RMS / Peak Torque
2.38Nm / 6.8Nm
2.38Nm / 6.8Nm
Inertia (kgcm²)
0.91 (kgcm²)
1.13 (kgcm²)
Maximum angular acceleration
40000rad/sec²
40000rad/sec²
Length
170mm
210mm
Weight (without expansion module)
3.5kg
4.3kg
Audible noise level (measured in 30cm distance)
65 dB(A)
Backlash (when brake is activated)
±0.5 degree
0-3000RPM with full torque. Max 3500 RPM. Overspeed protection if speed >3600 = Motor will go in passive mode
Sinusoidal wave PWM control. 20kHz switching
6.th. order filter with only one inertia load factor parameter to be adjusted.
Expert tuning also available for professionals.
Incremental A and B encoder 8000 CPR. (Physical 2000 PPR). Optional multiturn absolute encoder.
115/230/240VAC (±10%) for main power circuit. 18-32VDC for control circuit.
Consumption at 115-240VAC - see power supply section.
Control circuitry consumption: MAC800D1, 2 and 3 (wo/brake) =0.25A @ 24VDC(6W).
Control circuitry consumption: MAC800D4, 5 and 6 (w/brake) =0.75A @ 24VDC(18W).
* ±10V Speed and Torque. A+B encoder outputs
* Pulse/direction and 90° phase shifted A++B (Incremental)
* RS422 or RS232 (5V) position and parameter commands
* Gear mode with analogue input speed offset + different options
* Sensor Zero search or mechanical Zero search
Front: 80x80mm. Rear: 80x113mm. Shaft Ø19mm
POSITION (pulse inputs)
Command input pulse
Input frequency
Electronic gear
Follow error register
In position width
Pulse/direction or 90° phase shifted A+B. RS422
0-8 MHz. 0-1 MHz with input filter
A/B: A= -10000 to 10000, B=1 to10000. Simulation of all step resolutions.
32 bit
0-32767 pulses
Position range
32 bit. Infinity, Flip over at ±231 pulses.
POSITION (serial communication)
Communication facility
Communication Baud-rate
Position range
Speed range
Digital resolution
Acceleration range
Addressing
Number of parameters.
Speed variance
From PLC, PC etc via RS422 or asynchronous serial port RS232 with special cable. MacTalk JVL commands, special
commands with high security.
19200 bit/sec. (19.2kBaud)
±67 000 000
0-3000 RPM.
0.3606 RPM
250 - 444.675 RPM/sec
Point to point on RS422. Up to 32 units on the same serial RS232/RS485 interface with built-in expansion module. Address range 1-254
Standard 85. With MacRegIO software 156 (Only for experts)
Max ±4 RPM variance between command and actual speed.
SPEED/ TORQUE
Analogue speed/torque input.
Sampling rate at analogue input
Encoder output signals
Analogue speed input
Zero speed determination.
Speed variance at rated speed
Torque limit in speed mode
Analogue torque input
Torque control accuracy
11bit + sign. Nom. input voltage ±10V. 10kOhm input resistance. Voltage range max. -10 to +32VDC. Offset typical
±50mV.
750 Hz
A+,A-,B+,B-, RS422. Line driver Typical 1.1 - 3.7 Volt outputs (SN75176). 90° Phase shifted.
+voltage -> CW rotation. Shaft view
0 - rated speed.
Initial error @20°C: ±0,0%
Power Supply: ±10%: 0.0%
Load 0-300%: ±0.0%
Ambient temperature 0-40°C: ±0,0005% (±50ppm)
0-300% by parameter
+voltage (positive torque) -> CW rotation. Shaft view
±10% @ 20°C (Reproducibility)
VARIOUS
Electromechanical brake
Regenerative
Protective functions.
LED functions
Output signals
Zero search
Shaft load maximum
Optional brake(-D4 option)
Rated power rate. (motor)
Mechanical time constant. (motor)
Electrical time constant. (motor)
Standards
Protection
Usage / Storage Temperature
Optional feature. The brake is activated automatically when an unrecoverable error situation occur.
Integrated power dump. External attachment is possible
Error trace back.Overload (I²T), Regenerative overload, follow error, function error, regenerative overload (over voltage),
software position limit. Abnormality in flash memory, under voltage, over current, temperature too high.
Power (Green LED), Error (Red LED). Note that the LED’s are only visible when no module is mounted.
3 general purpose NPN 30V/25 mA outputs. Error and In position.
1: Automatic Zero search with sensor connected to input (2 formats)
2: Mechanical Zero search without sensor. (Torque controlled)
Radial load: 18kg (20mm from flange). Axial load: 11kg.
Controlled automatic or from input. 3.25Nm, inertia 0.22cm2, turn on time: 50ms, turn off time: 15ms
62.8 kW/s
0.428±10% ms
4.122±10% ms
CE approved/UL recognized file number E254947
IP55 (IP42 and IP67 on request)
Ambient 0 to +40°C (32-104°F)/ -20 to +85°C. (-4 to 185°F) (Humidity 90%). Error on 75°C (167°F)
Temperature shut down and error message generated at 73°C (163F). The heatsink fan starts at 55°C (131F).
JVL Industri Elektronik A/S - User Manual - Integrated Servo Motors MAC050 - 3000
317
5.1
Technical Data
Only MAC1500
General
All data are specified for the MAC motor only, i.e. without any expansion module mounted.
Technology
Controller capacity
AC-servomotor (brushless) with built-in 2048 PPR encoder, hall sensors and 3 phase servo amplifier/controller
MAC1500-D2 or D3 MAC1500-D5 or D6 (w. brake)
Rated output @3000 RPM
1500W
1500W
Rated Torque RMS / Peak Torque
5.0Nm / 15.0Nm
5.0Nm / 15.0Nm
Inertia
13.96 kgcm²
14.1 kgcm²
Maximum angular acceleration
40000rad/sec²
40000rad/sec²
Length
250mm / 9.843”
305.86mm / 12.042”
Weight (without expansion module)
10.95kg
13.15kg
Audible noise level (measured in 30cm distance)
65 dB(A)
Backlash (when brake is activated)
±0.5 degree
0-3000RPM with full torque. Max 3500 RPM. Overspeed protection if speed >3600 = Motor will go in passive mode
Sinusoidal wave PWM control. 5kHz switching
6.th. order filter with only one inertia load factor parameter to be adjusted.
Expert tuning also available for professionals.
Incremental A and B encoder 8192 CPR. (Physical 2048 PPR/lines per rev.). Optional multiturn absolute encoder.
3 phase supply 400 to 480AC for driver circuit. Absolute max 550VAC ! 18-32VDC for control circuit.
Control circuitry consumption: MAC1500-D1, 2 and 3 (wo/brake) =0.3A @ 24VDC(8W).
Control circuitry consumption: MAC1500-D4, 5 and 6 (w/brake) =1.2A @ 24VDC(24W).
* ±10V Speed and Torque. A+B encoder outputs
* Pulse/direction and 90° phase shifted A++B (Incremental)
* RS422 or RS232 (5V) position and parameter commands
* Gear mode with analogue input speed offset + different options
* Sensor Zero search or mechanical Zero search
Front: 130x130mm. Rear: 130x203mm(excl. connectors). Shaft Ø24.0mm +0/-0.013mm
Speed range
Amplifier control system
Filter
Feedback
Input power supply
Control modes
Flange and shaft dimension
POSITION (pulse inputs)
Command input pulse
Input frequency
Electronic gear
Follow error register
In position width
Pulse/direction or 90° phase shifted A+B. RS422
0-8 MHz. 0-1 MHz with input filter
A/B: A= -10000 to 10000, B=1 to10000. Simulation of all step resolutions.
32 bit
0-32767 pulses
Position range
32 bit. Infinity, Flip over at ±231 pulses.
POSITION (serial communication)
Communication facility
Communication Baud-rate
Position range
Speed range
Digital resolution
Acceleration range
Addressing
Number of parameters.
Speed variance
From PLC, PC etc via RS422 or asynchronous serial port RS232 with special cable. MacTalk JVL commands, special
commands with high security.
19200 bit/sec. (19.2kBaud)
±67 000 000
0-3000 RPM.
0.3606 RPM
250 - 444.675 RPM/sec
Point to point on RS422. Up to 32 units on the same serial RS232/RS485 interface with built-in expansion module. Address range 1-254
Standard 85. With MacRegIO software 156 (Only for experts)
Max ±4 RPM variance between command and actual speed.
SPEED/ TORQUE
Analogue speed/torque input.
Sampling rate at analogue input
Encoder output signals
Analogue speed input
Zero speed determination.
Speed variance at rated speed
Torque limit in speed mode
Analogue torque input
Torque control accuracy
11bit + sign. Nom. input voltage ±10V. 10kOhm input resistance. Voltage range max. -10 to +32VDC. Offset typical
±50mV.
750 Hz
A+,A-,B+,B-, RS422. Line driver Typical 1.1 - 3.7 Volt outputs (Driver: SN75176). 90° Phase shifted.
+voltage -> CW rotation. Shaft view
0 - rated speed.
Initial error @20°C: ±0,0%
Power Supply: ±10%: 0.0%
Load 0-300%: ±0.0%
Ambient temperature 0-40°C: ±0,0005% (±50ppm)
0-300% by parameter
+voltage (positive torque) -> CW rotation. Shaft view
±10% @ 20°C (Reproducibility)
VARIOUS
Electromechanical brake
Regenerative
Protective functions.
LED functions
Output signals
Zero search
Shaft load maximum
Optional brake (-D5 or D6 option)
Standards
Protection
Usage / Storage Temperature
318
Optional feature. The brake is activated automatically when an unrecoverable error situation occur.
Integrated power dump. External attachment is possible
Error trace back.Overload (I²T), Regenerative overload, follow error, function error, regenerative overload (over voltage),
software position limit. Abnormality in flash memory, under voltage, over current, temperature too high.
Power (Green LED), Error (Red LED). Note that the LED’s are only visible when no module is mounted.
3 general purpose NPN 30V/25 mA outputs. Error and In position.
1: Automatic Zero search with sensor connected to input (2 formats)
2: Mechanical Zero search without sensor. (Torque controlled)
Radial load: xxN (xxmm from flange). Axial load: xxkg.
Controlled automatic or from input. xxNm, turn on time: 50ms, turn off time: 15ms
CE approved/UL recognized file number E254947 - 20120725 Pending
IP55 (-D2 or D5 version). IP67 (D3 or D6 version)
Ambient 0 to +40°C (32-104°F)/ Storage (power not applied): -20 to +85°C. (-4 to 185°F) (Humidity 90%).
Temperature warning is given before reaching max.
Temperature shut down and error message generated at 84°C (183F). The heatsink fan starts at 55°C (131F).
JVL Industri Elektronik A/S - User Manual - Integrated Servo Motors MAC050 - 3000
5.1
Technical Data
Only MAC3000
General
All data are specified for the MAC motor only, i.e. without any expansion module mounted.
Technology
Controller capacity
AC-servomotor (brushless) with built-in 2048 PPR encoder, hall sensors and 3 phase servo amplifier/controller
MAC3000-D2 or D3 MAC3000-D5 or D6 (w. brake)
Rated output @3000 RPM
3000W
3000W
Rated Torque RMS / Peak Torque
9.55Nm / 28.7Nm
9.55Nm / 28.7Nm
Inertia (kgcm²)
27.83 kgcm²
27.98 kgcm²
Maximum angular acceleration
40000rad/sec²
40000rad/sec²
Length
312mm / 12.276”
366mm / 14.439”
Weight (without expansion module)
13.2kg
17.1kg
Audible noise level (measured in 30cm distance)
65 dB(A)
Backlash (when brake is activated)
±0.5 degree
0-3000RPM with full torque. Max 3500 RPM. Overspeed protection if speed >3600 = Motor will go in passive mode
Sinusoidal wave PWM control. 5kHz switching
6.th. order filter with only one inertia load factor parameter to be adjusted.
Expert tuning also available for professionals.
Incremental A and B encoder 8192 CPR. (Physical 2048 PPR/lines per rev.). Optional multiturn absolute encoder.
3 phase supply 400 to 480AC for driver circuit. Absolute max 550VAC !. 18-32VDC for control circuit.
Control circuitry consumption: MAC3000-D1, 2 and 3 (wo/brake) =0.3A @ 24VDC(8W).
Control circuitry consumption: MAC3000-D4, 5 and 6 (w/brake) =1.2A @ 24VDC(24W).
* ±10V Speed and Torque. A+B encoder outputs
* Pulse/direction and 90° phase shifted A++B (Incremental)
* RS422 or RS232 (5V) position and parameter commands
* Gear mode with analogue input speed offset + different options
* Sensor Zero search or mechanical Zero search
Front: 130x130mm. Rear: 130x203mm(excl. connectors). Shaft Ø24.0mm +0/-0.013mm
Speed range
Amplifier control system
Filter
Feedback
Input power supply
Control modes
Flange and shaft dimension
POSITION (pulse inputs)
Command input pulse
Input frequency
Electronic gear
Follow error register
In position width
Pulse/direction or 90° phase shifted A+B. RS422
0-8 MHz. 0-1 MHz with input filter
A/B: A= -10000 to 10000, B=1 to10000. Simulation of all step resolutions.
32 bit
0-32767 pulses
Position range
32 bit. Infinity, Flip over at ±231 pulses.
POSITION (serial communication)
Communication facility
Communication Baud-rate
Position range
Speed range
Digital resolution
Acceleration range
Addressing
Number of parameters.
Speed variance
From PLC, PC etc via RS422 or asynchronous serial port RS232 with special cable. MacTalk JVL commands, special
commands with high security.
19200 bit/sec. (19.2kBaud)
±67 000 000
0-3000 RPM.
0.3606 RPM
250 - 444.675 RPM/sec
Point to point on RS422. Up to 32 units on the same serial RS232/RS485 interface with built-in expansion module. Address range 1-254
Standard 85. With MacRegIO software 156 (Only for experts)
Max ±4 RPM variance between command and actual speed.
SPEED/ TORQUE
Analogue speed/torque input.
Sampling rate at analogue input
Encoder output signals
Analogue speed input
Zero speed determination.
Speed variance at rated speed
Torque limit in speed mode
Analogue torque input
Torque control accuracy
11bit + sign. Nom. input voltage ±10V. 10kOhm input resistance. Voltage range max. -10 to +32VDC. Offset typical
±50mV.
750 Hz
A+,A-,B+,B-, RS422. Line driver Typical 1.1 - 3.7 Volt outputs (Driver: SN75176). 90° Phase shifted.
+voltage -> CW rotation. Shaft view
0 - rated speed.
Initial error @20°C: ±0,0%
Power Supply: ±10%: 0.0%
Load 0-300%: ±0.0%
Ambient temperature 0-40°C: ±0,0005% (±50ppm)
0-300% by parameter
+voltage (positive torque) -> CW rotation. Shaft view
±10% @ 20°C (Reproducibility)
VARIOUS
Electromechanical brake
Regenerative
Protective functions.
LED functions
Output signals
Zero search
Shaft load maximum
Optional brake (-D5 or D6 option)
Standards
Protection
Usage / Storage Temperature
Optional feature. The brake is activated automatically when an unrecoverable error situation occur.
Integrated power dump. External attachment is possible
Error trace back.Overload (I²T), Regenerative overload, follow error, function error, regenerative overload (over voltage),
software position limit. Abnormality in flash memory, under voltage, over current, temperature too high.
Power (Green LED), Error (Red LED). Note that the LED’s are only visible when no module is mounted.
3 general purpose NPN 30V/25 mA outputs. Error and In position.
1: Automatic Zero search with sensor connected to input (2 formats)
2: Mechanical Zero search without sensor. (Torque controlled)
Radial load: xxN (xxmm from flange). Axial load: xxkg.
Controlled automatic or from input. Brake torque: 16Nm, turn on time: 16ms, turn off time (motor released): 55ms
CE approved/UL recognized file number E254947 - 20130524 Pending
IP55 (-D2 or D5 version). IP67 (D3 or D6 version)
Ambient 0 to +40°C (32-104°F)/ Storage (power not applied): -20 to +85°C. (-4 to 185°F) (Humidity 90%).
Temperature warning is given before reaching max.
Temperature shut down and error message generated at 84°C (183F). The heatsink fan starts at 55°C (131F).
JVL Industri Elektronik A/S - User Manual - Integrated Servo Motors MAC050 - 3000
319
5.2
Nm
Torque Curves
MAC050 Torque versus speed
Oz./Inch
1.0
142
0.8
113
0.6
85
0.4
57
0.2
28
Conditions:
Supply voltage = 24 or 48VDC
Ambient temperature = 20°C
Torque setting = 100%
Load setting = 1.0
RPM
0
1000
Nm
2000
3000
MAC095 Torque versus speed
Only MAC050 to 141
Operation above 4000 RPM
can be done, but the losses in
the motor make it impossible
to operate in this area cyclicly
Please note that 2800 RPM
is the maximum recommended
speed for the MAC141.
= Peak Torque @48V
4000
= Average Torque @48V
Oz./Inch
1.0
142
0.8
113
0.6
85
0.4
57
= Peak Torque @24V
= Average Torque @24V
Speed versus supply voltage
Speed in RPM
MAC50, 95, 140
4000
Restricted area
motor losses will
be too high
3000
0.2
28
RPM
0
1000
Nm
2000
3000
MAC140 Torque versus speed
4000
0.8
113
0.6
85
0.4
57
0.2
28
0
12
24
36
48
RPM
0
1000
Nm
2000
3000
MAC141 Torque versus speed
4000
Oz./Inch
248.5
1.75
213
177.5
142
106.5
71
35.5
0
1000
2000
2800 3000
RPM
4000
TT0911GB
Operation above 2800 RPM is not recommended.
320
Supply
Voltage (VDC)
Operation below 12V is not recommended
Oz./Inch
142
Safe operation area
1000
0
1.0
MAC141
Max 2800 RPM
@48VDC
2000
JVL Industri Elektronik A/S - User Manual - Integrated Servo Motors MAC050 - 3000
5.2
Torque Curves
Nm
MAC400 Torque versus speed
Oz./Inch
5.0
708
4.0
566
3.0
425
2.0
283
1.0
142
Conditions:
Supply voltage = 90-240VAC
Ambient temperature < 40°C
Torque setting = 300% (max)
Load setting = 1.0
Operation above 3000 RPM
can be done, but the losses in
the motor makes it impossible
to operate in this area cyclicly.
RPM
0
1000
2000
3000
Only MAC400/800
Please be aware that an overspeed
error will occur if the speed gets
equal or higher than 3600 RPM.
4000
>3600RPM =
Overspeed error
= Peak torque
= Average torque
Nm
MAC800 Torque versus speed
Oz./Inch
8.0
1133
7.0
991
6.0
850
5.0
708
4.0
566
3.0
425
2.0
283
1.0
142
RPM
0
1000
2000
3000
TT0992GB
4000
>3600RPM =
Overspeed error
JVL Industri Elektronik A/S - User Manual - Integrated Servo Motors MAC050 - 3000
321
5.2
Torque Curves
Nm
Oz./Inch
MAC402 Torque versus speed
5.0
708
4.0
566
3.0
425
2.0
283
1.0
142
Conditions:
Supply voltage = 12-48VDC
Ambient temperature < 40°C
Torque setting = 300% (max)
Load setting = 1.0
Operation above 3000 RPM
can be done, but the losses in
the motor makes it impossible
to operate in this area cyclicly.
RPM
0
1000
2000
3000
Only MAC402
Please be aware that an overspeed
error will occur if the speed gets
equal or higher than 3600 RPM.
4000
>3600RPM =
Overspeed error
= Peak Torque @12V
= Peak Torque @18V
= Peak Torque @24 to 48V
= Average Torque @12V
= Average Torque @18V
= Average Torque @24 to 48V
Speed versus supply voltage
Speed in RPM
MAC402
4000
Restricted area
motor losses will
be too high
3000
2000
Safe operation area
1000
0
0
12
24
36
48
Supply
Voltage (VDC)
Operation below 12V is possible
but at lower speed.
The motor shuts down at <8VDC
322
JVL Industri Elektronik A/S - User Manual - Integrated Servo Motors MAC050 - 3000
TT1531-01GB
5.3
5.3.1
Efficiency curve
Only MAC050 to 141
Motor efficiency curve
The curve below shows the efficiency of the MAC140 motor as a function of speed.
The efficiency is based on the difference in the total amount of electrical power applied
to the motor compared with the mechanical output power on the shaft.
%
Conditions:
Supply voltage = 24/48VDC
Load = 0.32Nm
Ambient temperature = 20°C
Torque setting = 100%
Load setting = 1.0
MAC140 Typical efficiency at rated load
100
80
60
Operation above 4000 RPM
can be done, but the losses in
the motor make it impossible
to operate in this area cyclicly.
40
= 48VDC supply
20
RPM
0
1000
2000
3000
= 24VDC supply
4000
TT0954GB
The power consumption for the internal circuitry (microprocessor etc.) is typically <
3.5W. In the speed range from 0 to 500 RPM this internal power consumption starts to
be a dominant part of total power consumption which explains that the efficiency is lower.
JVL Industri Elektronik A/S - User Manual - Integrated Servo Motors MAC050 - 3000
323
5.4
Physical Dimensions
5.4.1
Only MAC050 to 141
Physical dimensions MAC050 to MAC141
Shown without expansion module
MAC50-A1 = 111.2
MAC95-A1 = 131.5
MAC140-A1 = 150.5
MAC141-A1 = 172.0
0
[4.38"]
[5.18"]
[5.93"]
[6.77"]
80.0 [3.15"]
15.0
[0.6"]
Digital Drive
AC-Brushless Servo Motor
Ø6.35
+0/-0.013
[0.25 +0/-0.0005"]
M2.5 mounting
hole for expansion
module.
Front (Shaft)
Standard NEMA23
M2.5 mounting
hole for expansion
module.
4 x Ø5.2 [0.2"]
58.7 [2.31"] Max
Rear (Connections)
5.5
[0.22"]
Max. 1.574 [0.062”]
Ø38.1 +0/-0.05
[1.5 +0/-0.002"]
47.15 [1.86"]
Ø59.0 [2.32"]
Max. 20.57
[0.810’’]
47.15 [1.86"]
58.7 [2.31"] Max
All dimensions in mm/inch
Download CAD drawings from www.jvl.dk/default.asp?Action=Details&Item=426
324
JVL Industri Elektronik A/S - User Manual - Integrated Servo Motors MAC050 - 3000
TT0902GB
5.4
5.4.2
Physical Dimensions
Only MAC400
Physical dimensions MAC400
Download CAD drawings from www.jvl.dk/default.asp?Action=Details&Item=426
JVL Industri Elektronik A/S - User Manual - Integrated Servo Motors MAC050 - 3000
325
5.4
5.4.3
Physical Dimensions
Only MAC800
Physical dimensions MAC800
Shown with a MAC00-FP2
(Profibus) module mounted
119.5 [4.71"]
a
30 [1.18"]
3 [0.12"]
37 [1.46"]
Ø70 +0/-0.03
[2.76 +0/-0.0011"]
3 [0.12"]
8 [0.31"]
l
40 [1.57"]
6 [0.24"]
63.64 [2.5"]
80 [3.15"]
6 [0.24"]
63.64 [2.5"]
3.5 [0.14"]
d=90 [3.54"]
4xØ5.5 [0.217"]
Ø70 +0/-0.03
[2.76 +0/-0.0018"]
Model
l
MAC800-D1/D2
175 [6.89"]
13.8 [0.54"]
a
MAC800-D3
201.6 [7.94"]
19.8 [0,78"]
MAC800-D4/D5
209 [8.23"]
48.8 [1,92"]
MAC800-D6
233.7 [9.2"]
51.8 [2,039"]
80 [3.15"]
All dimensions in millimetres/inches
TT0989GB
Download CAD drawings from www.jvl.dk/default.asp?Action=Details&Item=426
326
JVL Industri Elektronik A/S - User Manual - Integrated Servo Motors MAC050 - 3000
5.4
Physical Dimensions
5.4.4
Only MAC1500
Physical dimensions MAC1500-D1
TT1245GB
All dimensions in millimetres/inches
Download CAD drawings from www.jvl.dk/default.asp?Action=Details&Item=426
JVL Industri Elektronik A/S - User Manual - Integrated Servo Motors MAC050 - 3000
327
5.4
5.4.5
Physical Dimensions
Only MAC1500
Physical dimensions MAC1500-D2 & -D3
TT1538-01GB
Download CAD drawings from www.jvl.dk/default.asp?Action=Details&Item=426
328
JVL Industri Elektronik A/S - User Manual - Integrated Servo Motors MAC050 - 3000
5.4
5.4.6
Physical Dimensions
Only MAC1500
Physical dimensions MAC1500-D5 & -D6 (with brake)
TT1540-01GB
Download CAD drawings from www.jvl.dk/default.asp?Action=Details&Item=426
JVL Industri Elektronik A/S - User Manual - Integrated Servo Motors MAC050 - 3000
329
5.4
5.4.7
TT1246GB
Physical Dimensions
Only MAC3000
Physical dimensions MAC3000-D1
All dimensions in millimetres/inches
Download CAD drawings from www.jvl.dk/default.asp?Action=Details&Item=426
330
JVL Industri Elektronik A/S - User Manual - Integrated Servo Motors MAC050 - 3000
5.4
5.4.8
Physical Dimensions
Only MAC3000
Physical dimensions MAC3000-D2 & -D3
TT1539-01GB
Download CAD drawings from www.jvl.dk/default.asp?Action=Details&Item=426
JVL Industri Elektronik A/S - User Manual - Integrated Servo Motors MAC050 - 3000
331
5.4
5.4.9
Physical Dimensions
Only MAC3000
Physical dimensions MAC3000-D5 & -D6
TT1541-01GB
Download CAD drawings from www.jvl.dk/default.asp?Action=Details&Item=426
332
JVL Industri Elektronik A/S - User Manual - Integrated Servo Motors MAC050 - 3000
5.5
5.5.1
Life time
Only MAC141
Life time of ball bearings in MAC141
The curve below can be used to determine the relation between the radial load at the
motor output shaft and where the load is placed at the shaft with reference to the flange
of the motor.
The curves are based on a continous speed of 3000 RPM.
If the speed is lowered the lifetime will increase inversly proportional.
Example:
A motor is having a radial load of 200N placed with center 10 mm from the flange.
According to the curve the lifetime will be 19000 hours at 3000 RPM.
If the speed is lowered to 300 RPM (10 times lower than the curve is specified at) the
lifetime will increase 10 times giving a total of 190000 hours of operation.
JVL Industri Elektronik A/S - User Manual - Integrated Servo Motors MAC050 - 3000
333
5.5
5.5.2
Life time
Only MAC400
Life time of ball bearing in MAC400
The curve below can be used to determine the relation between the radial load at the
motor output shaft and where the load is placed at the shaft with reference to the flange
of the motor.
The curves are based on a continous speed of 3000 RPM.
If the speed is lowered the lifetime will increase inversly proportional.
Example:
A motor is having a radial load of 200N placed with center 15 mm from the flange.
According to the curve the lifetime will be 102000 hours at 3000 RPM.
If the speed is lowered to 300 RPM (10 times lower than the curve is specified at) the
lifetime will increase 10 times giving a total of 1020000 hours of operation.
334
JVL Industri Elektronik A/S - User Manual - Integrated Servo Motors MAC050 - 3000
5.5
5.5.3
Life time
Only MAC800
Life time of ball bearing in MAC800
The curve below can be used to determine the relation between the radial load at the
motor output shaft and where the load is placed at the shaft with reference to the flange
of the motor.
The curves are based on a continous speed of 3000 RPM.
If the speed is lowered the lifetime will increase inversly proportional.
Example:
A motor is having a radial load of 200N placed with center 20 mm from the flange.
According to the curve the lifetime will be 68000 hours at 3000 RPM.
If the speed is lowered to 300 RPM (10 times lower than the curve is specified at) the
lifetime will increase 10 times giving a total of 680000 hours of operation.
Expected ball bearing life time V.S. distance
Life time(hrs)
1000000
100N
200N
300N
400N
500N
100000
10000
1000
10
15
20
25
30
35
Distance (mm)
JVL Industri Elektronik A/S - User Manual - Integrated Servo Motors MAC050 - 3000
TT1059GB
335
5.6
5.6.1
Installation instructions
Mounting a gear or a brake at the motor
When a gear or a brake is to be mounted on the front end of a motor it is very important
that this is done in the right way since a wrong way of mounting may have fatal influence
at lifetime of the motor or gear/brake and performance.
Please follow this instruction step by step to make sure that the mounting is done with a
good result.
1
Step 1 - Make sure that the shaft collar is oriented correctly in order to
assure that the right tension around the motor shaft is possible.
Hint: Tighten the shaft collar gently just to keep it in the right position.
!
The inner and outer slit
is NOT aligned. Make sure
they are aligned as shown
at right illustration
2
The inner and outer slit
is aligned as they should.
Step 2 - Mount the gear or brake at the motor but make sure to fasten the
4 shaft bolt first before fastening the shaft collar.
Its recommended to use Locktite 278 in the threats to make sure that the
bolts stay in place.
!
Do NOT tighten the shaft collar
before the flange bolts are tightend
336
Flange bolts properly mounted
and tightend.
TT1536-01GB
JVL Industri Elektronik A/S - User Manual - Integrated Servo Motors MAC050 - 3000
5.6
Installation instructions
3
Step 3 - Final stage. Fasten the shaft collar with a torque of according to
the scheme below.
Please notice that it can be fatal not to use the specified torque since the
shaft may slip over time and cause a position offset.
F1
Use a precise torque wrench
to fasten the screw in the shaft collar.
Gears (Product type to be mounted)
Gear series
Used with motor type
HTRG05
HTRG05
HTRG06
HTRG06
HTRG08
HTRG08
HTRG08
HTRG10
MAC050 to MAC141 (Ø6.35 shaft)
MIS230-233 (Ø6.35 shaft)
MAC050 to MAC141 (Ø6.35 shaft)
MAC400-402 (Ø14 shaft)
MIS340-341 (Ø9.53 shaft)
MIS340-342 (Ø12 shaft)
MAC800 (Ø19 shaft)
MAC800 (Ø19 shaft)
Torque (F1)
5Nm
5Nm
5Nm
11Nm
5Nm
8Nm
11Nm
11Nm
Brakes (Product type to be mounted)
Brake series Used with motor type
MAB23x
MAB23x
MAB34x
MAC050 to MAC141 (Ø6.35 shaft)
MIS230-233 (Ø6.35 shaft)
MIS340-341 (Ø9.53 shaft)
Torque (F1)
3Nm
3Nm
5Nm
TT1537-01GB
JVL Industri Elektronik A/S - User Manual - Integrated Servo Motors MAC050 - 3000
337
5.6
5.6.2
Installation instructions
Precautions when installing MAC800-D6
MAC800-D6 is offering IP65 protection. To obtain this protection degree it is very important that the various components are mounted and fasten properly according to the
illustration below.
T
th
m
S
338
e
n
a
o
lcrw
u
d
fm
stb
h
i
.5
2
M
tyrsxih
n
f1
d
le
m
w
ku
,a
0
g
d
n
ityrh
g
fF
,ku
slcw
a
m
e
o
h
o
t4
la
d
se
c
tfo
e
k
iM
lsu
b
ca
rh
ze
a
licb
sg
d
n
n
im
yru
b
h
p
d
ste
lfa
E
sig
O
u
q
o
n
h
vilg
B
G
5
9
0
1
T
tsA
a
p
w
rd
e
1
m
N
.0
td
n
u
e
ra
,o
h
i
n
r
o
m
e
th
n
e
ig
sh
lW
ra
JVL Industri Elektronik A/S - User Manual - Integrated Servo Motors MAC050 - 3000
5.7
5.7.1
Emergency stop considerations
Emergency stop
Fundamental considerations regarding the safety of machines:
In the construction of machines there are several basic requirements that a machine
manufacturer or producer must fulfil. It is the machine manufacturer’s responsibility
to ensure that applicable regulations are fulfilled.
The following presents a broad overview of the applicable regulations in Europe
(the EEC). If a machine manufacturer markets its products in other countries, it is
the manufacturer’s responsibility to ensure compliance with local national regulations.
It cannot therefore be assumed that a machine that is produced in accordance with
European requirements will automatically also comply with regulations that are
applicable in other markets, even though these are acknowledged in several countries.
The most important European regulation in this context is the Machinery Directive,
which in Denmark is implemented via the Danish Working Environment Authority’s
Executive Order no. 561.
This Executive Order prescribes requirements to ensure that machines are safe, that
a technical dossier including a health and safety risk analysis is prepared, and that the
machine is supplied together with instructions for use a EC declaration of conformity and
furthermore that the machine is CE marked.
The Essential Health and Safety Requirements are specified in the Directive’s appendix 1.
To ensure compliance with these requirements, it is advantageous to use various
standards which are described later.
Overall, the most important requirement is to fulfil the Machinery Directive’s
requirements regarding safety integration, which in brief can be described as follows:
-
1.st. priority: the machine’s construction must ensure that is it not dangerous.
Example:
The machine construction is such that it is not possible to come into contact with rotating
parts of other potentially dangerous components, either during operation, set-up or
maintenance.
-
2nd priority: in cases where it is not always possible to achieve a construction that
does not present a potential hazard, additional protective measures must be
incorporated to eliminate risk.
Example:
No direct access to rotating or other potentially hazardous parts and components is
possible without the removal of a screen, guard, protective cover or other means of
protection.
-
3rd priority: to the extent where a machine construction and the built-in safety
measures still leave some potential risk, clear warnings of hazard must be given using
signs on the machine itself, and by information in the operation manual and by
training if necessary.
It is the risk evaluation of the machine that determines what is necessary to fulfil the
essential health and safety requirements of the Machinery Directive and thus also which
protective measures are required.
It is also the risk assessment that determines whether an emergency stop function is
required.
JVL Industri Elektronik A/S - User Manual - Integrated Servo Motors MAC050 - 3000
339
5.7
Emergency stop considerations
An emergency stop is not required only in cases where it is completely evident that an
emergency stop would not prevent an injury, minimise an injury or stop an injury.
In practice this means that essentially all machines must incorporate an emergency stop
function.
It must be emphasised that a machine’s emergency stop function is NOT a preventive
measure, but is regarded as a supplementary measure. This means that the protective
measures that must be implemented as a result of the machine’s risk assessment cannot
be replaced by an emergency stop function.
The protective measures required must be implemented such that they are reliable, i.e.
not themselves prone to error or failure. The extent to which this is required depends
on the risk that the actual protective measure is designed to eliminate, i.e. the greater
the hazard, the more secure and reliable the protective measure.
Protective measures and the emergency stop function are often implemented using the
machine’s electrical control system.
For guidelines on how the control system’s safety related components can be
implemented, related standards can be used.
5.7.2
EN 60204-1
DS/EN 60204-1 is applicable for the general requirements of a machine’s electrical
systems. This standard defines several stop categories, paragraph 9.2.2 Stop functions
in DS/EN 60204-1
There are three categories of stop function as follow:
-
Stop category 0: stopping by immediate removal of power to the machine
actuators (i.e. an uncontrolled stop – paragraph 3.56 in DS/EN 60204-1).
-
Stop category 1: a controlled stop (paragraph 3.11 in DS/EN60204-1) with power
available to the machine actuators to achieve the stop and then removal of power
when the stop is achieved..
-
Stop category 2: a controlled stop with power left available to the machine actuators.
Requirements are given that a stop function must be incorporated (paragraph
9.2.5.3 Stop in DS/EN 60204-1)
Stop category 0 and/or category 1 and/or category 2 stop functions shall be provided as
indicated by the risk assessment and the functional requirements of the machine
(paragraph 4.1in DS/EN 60204-1).
NOTE: The supply disconnecting device (paragraph 5.3 in DS/EN 60204-1) when
operated achieves a stop category 0. Stop functions shall override related start functions
(see §9.2.5.2 in DS/EN 60204-1).
Similarly, requirements are specified for the implementation of an emergency stop function:
340
JVL Industri Elektronik A/S - User Manual - Integrated Servo Motors MAC050 - 3000
5.7
Emergency stop considerations
Paragraph 9.2.5.4.2 Emergency stop (DS/EN 60204-1)
Principles for the design of emergency stop equipment, including functional aspects, are
given in ISO 13850.
The emergency stop shall function either as a category 0 or as a category 1 stop (paragraph 9.2.2 in DS/EN 60240-1). The choice of the stop category of the emergency stop
depends on the results of a risk assessment of the machine.
In addition to the requirements for stop functions (paragraph 9.2.5.3 in DS/EN 60204-1),
the emergency stop function has the following requirements:
-
-
it shall override all other functions and operations in all modes.
power to the machine actuators that can cause a hazardous situation(s) shall be either
removed immediately (category 0 stop) or shall be controlled in such a way to stop
the hazardous motion as quickly as possible (stop category 1) without creating other
hazards.
reset shall not initiate a restart.
Considerations are also given regarding the safety and reliability of control circuits:
5.7.3
Paragraph 9.4 Control functions in the event of failure
Paragraph 9.4.1 General requirements (DS/EN 60204-1)
Where failures or disturbances in the electrical equipment can cause a hazardous
situation or damage to the machine or to the work in progress, appropriate measures
shall be taken to minimize the probability of the occurrence of such failure or
disturbances. The required measures and the extent to which they are implemented,
either individually or in combination, depend on the level of risk associated with the
respective application (paragraph 4.1in DS/EN 60204-1).
The electrical control circuits shall have an appropriate level of safety performance that
has been determined from the risk assessment at the machine. The requirements of IEC
62061 and/or ISO 13849-1:1999, ISO 13849-2:2003 shall apply.
Measures to reduce those risks include, but are not limited to:
-
Protective devices on the machine (for example. interlocks guards, trip devices),
Protective interlocking of the electrical circuit,
use of proven circuit techniques and components (paragraph 9.4.2.1 in DS/EN
60204-1)
provision of partial or complete redundancy (paragraph 9.4.2.2 in DS/EN 60204-1)
or diversity (paragraph 9.4.2.3 in DS/EN 60204-1),
Provision for functional tests (paragraph 9.4.2.4 in DS/EN 60204-1).
As noted, reference is made to several other standards which describe how safety related parts of the control system can be implemented.
In practice DS/EN 954-1 can be used, although this will be superseded by DS/EN ISO
13849-1 in 2009. The principles of both standards is the same: to first determine the
required level of safety and reliability of the control circuits and thereafter design the
safety related components of the control system to achieve the required level.
In DS/EN 954-1 the architecture of the safety related circuits is used exclusively as the
goal for the level of safety. The standard prescribes 5 categories: B, 1, 2, 3, and 4, where
B represents the lowest level and 4 the highest.
JVL Industri Elektronik A/S - User Manual - Integrated Servo Motors MAC050 - 3000
341
5.7
Emergency stop considerations
DS/EN ISO 13849-1 utilizes another criterion for safety level called the ”Performance
level” - PL – in which both the architecture and the component’s failure rate are included.
5 PL levels are defined: a, b, c, d, and e, where a represents the lowest level and e the
highest.
If DS/EN ISO 13849-1 is used, information regarding the components’ failure rates
(MTTF – mean time to failure) must be obtained from the component manufacturer.
For a more detailed description of the principles and requirements above, see the relevant standards.
The following drawings illustrates examples of the design of safety circuits for an emergency stop and enclosure system, stop category 0, which fulfils the requirements of
category 4 in accordance with DS/EN 954-1.
The achievable PL level in accordance with DS/EN ISO 13849 will depend on the MTTF
of the components used; using the solutions shown, typically a minimum PL level d would
be achieved.
342
JVL Industri Elektronik A/S - User Manual - Integrated Servo Motors MAC050 - 3000
5.7
Emergency stop considerations
The enclosure system shown utilizes a manual reset, which is a requirement if personnel
may be located inside the enclosure. If this is not the case, an automatic reset can be
used.
In the case of rotating parts in particular, it may be necessary to take component rundown into account, and therefore it is essential to ensure that access cannot be obtained
to hazardous areas until the rotating part has come to a standstill. Alternatively, the enclosure can be equipped with an electro-mechanical lock that only allows the enclosure
to be opened when the rotational movement has stopped. The latter solution must be
implemented with the same levels of safety as those prescribed by the machine’s risk assessment of the guard device implemented.
JVL Industri Elektronik A/S - User Manual - Integrated Servo Motors MAC050 - 3000
343
5.7
Emergency stop considerations
The examples shown are implemented using equipment from Fa. Pilz, and have been
chosen to provide the most simple cabling as possible. Other components and solutions
can of course be used.
In the construction of the machine and its safety control systems, efforts should always
be made to achieve solutions that ensure the requirements of control systems are as low
as possible, in accordance with the principles of safety integration mentioned above.
344
JVL Industri Elektronik A/S - User Manual - Integrated Servo Motors MAC050 - 3000
5.8
Trouble-shooting guide
5.8.1
Troubles related to communication with the motor
Problem : “RS232 - MacTalk is not communicating with the motor”
The status at the bottom of the screen shows “*** No Connection ***” but the power
LED on the motor is lit and the serial cable is connected.
Action :
- Check that the right COM port is selected in the MacTalk “Setup” menu. If a USB
to RS232 converter is used, the COM port normally must be selected as COM3 or
COM4.
- Check that the connection to the motor is made according to the specifications. If
using only one motor on the RS232 line, the TX-PD must be shorted to TX, otherwise communication can be very unstable. See also the individual descriptions by
each module in chapter 4.
- Ensure that a firmware update has not been interrupted before the communication
problem was observed. If such an update is aborted/interrupted, it must be restarted
and completed before the internal processor is back to normal and can handle communication.
5.8.2
Troubles related to the setup of the motor
Problem : “The motor is not behaving as expected”
Action 1:
Check that the following registers are set properly:
“Torque” : 300%
“Velocity” : >0
“Acceleration” : >0
“Load” : 1.00
“In position window” : If set too low, it can cause the motor to remain stationary.
Please note that if an expansion module is mounted, it can overrule some of these parameters. Disable the expansion module by setting “I/O type” = “Pulse input” in order
to disable the internal communication between the module and the motor. After the
fault diagnosis/correction is complete, remember to switch “I/O type” back to “Serial
data”.
Action 2:
Load default by using the “Load default” function in the “Motor” menu.
Alternatively clear the complete memory by using the “Update Firmware” option in
the “Updates” menu.
Problem : “The parameter setup is lost after reset”
The parameters must be saved permanently in the motor using the “Save in flash” button at the top of the main window. When activating this button, the motor will go into
passive mode while the parameters are saved. After 5-10 seconds the motor will start
up again with the new parameters. If the motor still starts up with the default setup or
a setting made at a much earlier stage, the save procedure has failed.
Action :
Ensure that the motor has the newest firmware (>V5.1). The firmware version for the
actual motor can be seen in the status bar.
Ensure also that the MacTalk program is the newest version (>V1.21).
Both Motor and MacTalk can be updated from the internet using the “Update” menu
at the top of the main screen.
JVL Industri Elektronik A/S - User Manual - Integrated Servo Motors MAC050 - 3000
345
5.8
5.8.3
Trouble-shooting guide
Troubles related to mechanical motor behaviour
Problem : “The motor oscillates or shakes”
The movement of the motor is very unstable and/or the motor oscillates when stationary.
Action :
- Ensure that the LOAD parameter is adjusted to a proper value. Default is 1.00 but
when a load is added to the motor, it can be set to a higher value. If the LOAD parameter is set to a value that is too high (or low), the motor can be very unstable.
- Check also that the maximum speed is set within the allowable range specified for
the actual supply voltage - see Power supply (only MAC050 to 141), page 85 where a
graph illustrates the relationship between supply voltage and recommended speed.
- If none of the above mentioned solutions solves the problem, the filter used in the
MAC motor may not be able to handle the actual load. Use the filter-optimise function
or contact your nearest JVL representative.
Problem : “After power up the motor oscillates and there is no communication”
The LOAD parameter value is set too high and is causing the total supply current to
rise above the limit which the power supply can handle. This situation can typically occur if the motor is dismounted from the mechanical load for which the LOAD has been
adjusted. Normally the motor will start to oscillate if the LOAD is increased above 1.41.8. Default is 1.0 without any mechanical load connected.
Action :
The fact that the power supply is overloaded makes the supply voltage drop below the
level at which the internal microprocessor in the MAC motor is operational. The only
work-around solution to this is a firmware update but all the parameters will be reset
to default !
Choose “update firmware” in the “Update” menu and switch on the motor. The firmware update will “catch” the motor before it starts to oscillate and refresh all the settings in the motor.
346
JVL Industri Elektronik A/S - User Manual - Integrated Servo Motors MAC050 - 3000
5.9
5.9.1
Bus serial communication
Important information concerning RS-232.
Be sure to read this before trying to use RS-232 with any of the JVL modules or motors.
Also if you do not plan to use multidrop.
The widely used RS-232 connection is a point-to-point solution, where two systems are
connected by at least three wires: A common Grounds and two data wires, where data
is transmitted serially from TxD (Transmit Data) pin on the sender to a RxD (Receive Data) pin on the receiver. In addition to this, sometimes hardware handshake signals are
used.
The baud-rate and address factory setting are set to 19200 baud and comport 1. The unit
can be set up via the MacTalk program. The motor shall be terminated, the MAC-B1, B2
and B4 expansion modul contain this feature. Opto isolation is recommended, and always use screen cable. The interface cable should not exceed more than10 meters. Make
sure that GND is also connected.
The special RS-232 multidrop solution used with the products covered by this manual allows more than two systems to be connected using the same wires.
With standard RS-232 the TxD pin in each end drives the signal to both high and low voltage levels, and it is an error to connect two or more TxD lines together since they would
conflict and generate invalid signal levels.
With the JVL multidrop RS-232 solution, the TxD line is only pulled to an active high
through a diode on the modules, and the line has a passive pull-down resitor that connect
the line to a negative supply voltage. This allows more than one module to drive the line,
but only one module can communicate data at a time.
JVL Industri Elektronik A/S - User Manual - Integrated Servo Motors MAC050 - 3000
347
5.9
Bus serial communication
The typical use scenario is that one PC or PLC is connected to two or more JVL modules
and each module has it’s own unique address, so the PC/PLC can address one module at
a time and receive an answer on the shared line. It can then address the next module with
another address. For this to work, exactly one of the modules on the line must have the
passive pull-down resistor enabled. If there is only one module connected to the PC/
PLC, that module must have its pull-down resitor enabled.
In the JVL documentation, this system is called TXPD (for TX data resistor Pull-Down).
TXPD is enabled by setting DIP switches on the expansion modules, find the module in
section 4 of this user manual.
The baud-rate and the address factory setting are set to 19200 baud and address 1. Opto
isolation is recommended, and always use screen cable. The interface cable should not
exceed more than 10 meters. Make sure that GND is also connected.
5.9.2
Important information concerning RS-485
Please read this before using RS-485 serial-port. This note describes some important details of using this interface.
The most important difference to a standard RS-485 solution is that the MAC00-xx
modules drive the line transmit mode for up to one byte-time longer than required.
348
JVL Industri Elektronik A/S - User Manual - Integrated Servo Motors MAC050 - 3000
5.9
Bus serial communication
The MAC00-xx modules translate between the 5V (TTL level) RS-232 used by the basic
motors (MAC050, MAC095, MAC140, MAC141, MAC800) and standard RS-485 and
RS232 signals
Since the RS-485 interfaces use the standard two-wire coupling, data can travel in only
one direction at a time, witch means that the line is either in a state where all nodes
‘listen’ or in a state where one node transmits while all the other nodes ‘listen’.
Ideally the node that transmits should stop driving the lines as soon as the last (stop) bit
in the last byte it wants to transmit has been sent out. This would allow the other nodes
to start transmitting as soon as possible.
It is a classical problem that a device that translates between RS-232 and two-wire RS485 does not have access to a hardware signal that tells it when to change transmit/listen
direction.
On the MAC00-xx modules, the direction is controlled by monitoring activity on the RS232 transmit signal and drive the RS-485 line for one byte-time at 19200 baud after the
last activity was detected.
On the MAC00-xx modules, the direction is controlled by monitoring activity on the RS232 transmit signal and drive the RS-485 line for one byte-time at 19200 baud after the
last activity was detected.
Depending on the data in the last byte transmitted, the line may then be reased from just
after the last bit has been transmitted or not until a full byte length after the last byte has
been transmitted.
It is required that all other nodes on the RS-485 bus do not start transmitting until a full
byte-time has passed since the last byte of a telegram from a MAC00-xx module has been
transmitted.
It is a common requirement in many protocols to require a pause of 1.5 bytes-times or
more between telegrams. With the JVL MacTalk protocol, this pause can be considered
to be two byte-times at 19200 baud and six byte-times at 57600 baud.
JVL Industri Elektronik A/S - User Manual - Integrated Servo Motors MAC050 - 3000
349
5.10
5.10.1
Serial communication
Controlling the MAC motors and MAC00-xx modules using serial communications.
Introduction:
This chapter provides information on the operations that can be performed over serial
lines, either RS-232 or RS-485. In addition to regular register reads and writes, a number
of typical operations like Reset and Save in Flash memory is described.
Additionally, this chapter describes how the MacTalk Windows™ program performs
some of the more special operations available from the MacTalk program menus and
buttons.
General information:
There are two serial channels to the basic MAC motors. One of them always uses the
MacTalk protocol and the other one always uses the FastMac protocol.
Communications can be used simultaneously on both channels.
The FastMac channel is a point-to-point connection where there can be only one client
communicating with the basic motor, while the MacTalk channel can be used to connect
several motors to one controlling computer or PLC.
The FastMac channel consists of two sets of differential signals, one for data sent to the
motor and one for data sent from the motor. This provides a high degree of noise immunity which allows the protocol to have less overhead for error checking and thus work
very fast.
Both of these protocols use binary data rather than text data. It is not possible to use a
text terminal program like Windows Hyper Terminal to communicate on any of these
protocols.
Depending on the type of MAC00-xx module mounted on the motor, the MacTalk channel can be made available as RS-232 or RS-485 and on the wireless modules as a BlueTooth serial port or a virtual COM port over TCP/IP.
Note that the MAC00-xx modules drive the RS-232 and RS-485 lines in a slightly nonstandard way, which must be taken into account. This is described in detail elsewhere in
this manual, but the overall differences are that, for RS-485, the modules drive the line in
transmission mode up to approximately 560 micro-seconds longer than necessary and
for RS-232, the TxD line is only driven actively high, while it must be pulled passively low
by a resistor (provided on the module and selectable via a DIP-switch). This special nonstandard RS-232 coupling allows several motors to be connected to a single controlling
computer or PLC, much like RS-485.
The MAC motors can be mounted with either ‘intelligent’ MAC00-xx modules that have
an integrated processor to handle the communications to the basic motor or they can be
mounted with ‘dummy’ modules that just do minimal hardware translation of the signals
but allows the user access to the FastMac protocol.
When mounted with ‘intelligent’ modules, the MacTalk channel is shared between the
modules and the basic motor. This means that data received on the module interface will
be received by both the module and the motor at the same time, while data sent from
either the module or the motor will be combined in hardware and sent via the module
interface (connectors or cables).
350
JVL Industri Elektronik A/S - User Manual - Integrated Servo Motors MAC050 - 3000
5.10
Serial communication
Some telegrams are handled and answered by the motor and other telegrams are handled and answered by the module. No telegrams are handled by both the motor and the
module except for the command to select a baud rate of 57600 baud.
An exception to this coupling is the series of MAC00-FSx modules. These ‘intelligent’
modules do not use the FastMac channel, but allows the user exclusive access to it. They
share the MacTalk channel in the same way as the other ‘intelligent’ modules, but with
the additional functionality that the FSx module uses the MacTalk channel to communicate with the basic motor. This means that the motor can experience conflicting traffic
when both the FSx module and an outside computer try to talk on the line at the same
time. The FSx module detects traffic and will only start sending data to the motor on the
MacTalk channel after the channel has been idle for several seconds. On FSx modules the
RS-232 line should therefore be used only for setup and firmware updates, and the highspeed RS-485 line of the FSx modules should be used for all production data traffic.
Capabilities of the FastMac protocol:
The FastMac protocol can be used to read and write all registers in the basic motor via
telegrams termed FlexMac commands. It also has a number of single-byte commands
that can copy dedicated preloaded registers into their corresponding target registers, select modes of operation and reset certain errors. In addition a special sequence can
change from 19200 to 57600 baud.
The FastMac protocol can not be used to reset the basic motor, perform save in the motors flash memory, enter or exit Safe Mode, read the motors sample buffer or read a
block of registers from the motor. These operations are not available through register
reads and writes. This implies that intelligent modules cannot be used to reset the motor
from their fieldbusses.
Capabilities of the MacTalk protocol:
The MacTalk protocol can be used to read and write all registers and can execute the set
of commands that the FastMac protocol cannot.
The MacTalk protocol can not be used to send single-byte commands, but the same operations can be performed through register reads and writes.
The error/status register:
This section describes how to handle the bitmapped combined error and status register
Register 35, including how to clear errors, describes errors that can not be cleared without power cycling the motor, identifies best practice ways of operating the register for a
number of typical applications. Some of these applications include how to control whether the motor performs relative or absolute position movements and how to move back
into the normal working range after having been outside it.
This section does not describe all the bits in detail, but describes the different groups of
functions the bits in this register can assume.
Note that even though the Error/Status register bits are similar in the MAC050-141 and
the MAC800 motors, they are not the same. The bits that have a Control function can
be located either in Register 35, Error/Status or in Register 36, ControlBits, at another
motor type. Check the technical manual for the product you’re using, and be aware of
the differences if you’re combining MAC050-141 motor with MAC800 motors in the
same application.
JVL Industri Elektronik A/S - User Manual - Integrated Servo Motors MAC050 - 3000
351
5.10
Serial communication
There are three groups: Errors, Status and Control bits.
Errors are grouped into Temperature related errors, Electrical errors, and Mechanical
errors. Some errors can be reset from the serial lines, while other errors are so critical
that the motor can not continue safe operation, so to continue operation the power to
the motor must be turned off and then on again.
Status bits simply reflect the updated normal status of the motor, like whether the target position or velocity has been reached. Some status bits can be considered earlywarning bits like that the voltage of the control power supply has been measured to a
low value. If the voltage is measured to an even lower voltage, the motor will stop with
a hard error that requires reset because the risk of continuing operation is too high after
the control circuits may have been partly reset and entered an indeterminate state.
Control bits include bit 14 in MAC800 that must be set by the user to be able to move
the motor back into the position limit range. The motor will not move if software position limits are active (non-zero) and the motor has moved outside the limits. The typical
case is when the motor is normally working in Position mode where the software position limits will automatically prevent it from moving outside the limits, and then if the motor is switched into another mode, like Velocity mode, where position limits do not
apply, and run outside the position range.
Another example is bit 9 in the on the MAC050-141 motors. When using FastMac commands to transfer one of the P1..P8 register to P_SOLL, bit 9 selects whether to simply
copy the value or to add it to the existing contents of P_SOLL.
See the Technical Manual for the MAC50.141 and the Technical manual for the MAC800
for accurate bit descriptions.
Resetting the motor and module:
This section describes the ways to reset the motor and/or the module, and makes several
notes on things to consider to prepare for a reset and how to continue operation after a
reset.
Reset errors
Some errors can be reset from software, while others are simply too critical to attempt
further operation and require the power supply to be turned off and then on again to reset the errors.
There are basically two ways of resetting the errors in the Error/status register 35.
One way is to read the entire register, then zero the error bits but leave the other bits
unchanged, and finally write the entire register back to the motor. This is the method to
use with the MacTalk protocol.
The other way is to send a single-byte FastMac command of 97 (decimal) / 61 (hex). All
intelligent modules provide a way to send FastMac commands, either over the fieldbus
or from the nano-PLC program.
Mode 256..258
As described under the Reset command, there are a small number of operations that
manage copying of default register values between the factory default values, the values
last saved by the user through a Save in Flash operation, and the actual working register
values kept in RAM.
This section describes how to use these operations in a best practice way.
352
JVL Industri Elektronik A/S - User Manual - Integrated Servo Motors MAC050 - 3000
5.10
Serial communication
Changing baud rate
This section describes how to change between the baud rates supported by the motors
and modules in those cases where that is allowed.
At every start-up, both the basic motors and the MAC00-xx modules start at a speed of
19200 bits per second on both the FastMac channel and the MacTalk channel. Note that
the speed will not be saved in the motor or module flash memory, which ensures that
another motor or module can be easily interchanged.
The speed can then be changed to 57600 baud, but can not be changed back to 19200
baud without resetting the motor and module.
At the time of this writing, only MAC800 and the MAC00-FCx modules support 57600
baud.
To change the speed on the FastMac channel with intelligent modules follow these steps:
1: The basic motor must be set to passive mode (the mode register, register 2, must be
zero).
2: Send a special command to the module through its Fieldbus interface. For the
MAC00-FCx this is CANopen®, and a command is sent by writing a value via SDO to
object 2010 hex.
When the command number 5 is written to object 2010, the module will perform the
steps to change the baud rate in both the module and the basic motor, but only on the
FastMac channel – the MacTalk channel is unaffected. This change of baudrate will last
about eight milliseconds, during which no other communications can occur between the
module and the motor.
To change the speed on the MacTalk channel follow these steps:
1: Set the motor to Safe Mode (the mode register, register 2, must be 15).
2: Send a special command telegram of <58><58><58><FF><00><AA><AA>,
where the <FF><00> is the motor address. As usual this can be <FF><00> to
address any motor or the address of a specific motor followed by a bitwise inverted
byte. E.g. <04><FB>.
3: Wait for 10 milliseconds for a reply. If a reply of <11><11><11> is received, it
means the motor can not change to the new baudrate, probably because it is not in
Safe Mode or if some other error has occurred. If no reply is received within the 10
ms, it can be assumed that the motor has changed to 57600 baud, and further
communications can continue at the higher speed.
General notes on the MAC00-xx interface modules operation
Modules generally have two functions. One is to translate between an industrial fieldbus
like CANopen®, DeviceNet, ProfiBus and high speed RS-485. The other is to execute
small userdefined programs much like a traditional PLC. During execution, the modules
communicate extensively with the basic motor over a serial connection that is typically
much slower than the fast fieldbusses.
The following points are important to consider to understand the limitations regarding
module capabilities:
- When writing a value to the basic motor via an intelligent module, the write
operation is queued up in a buffer in the module, which can typically hold up to 16
operations. The values are written to the motor at the speed of the FastMac channel,
either 19200 or 57600 baud. The FastMac protocol has some overhead, and the
basic motor only performs operations once per sample period, so a full register write
(or read) can take up to almost 20 milliseconds at 19200 baud. The normal time is
10.5 to 15 milliseconds for a single register transfer.
JVL Industri Elektronik A/S - User Manual - Integrated Servo Motors MAC050 - 3000
353
5.10
Serial communication
-
-
When reading one or more register values from the basic motor, the remaining
operation of the module waits for the operation(s) to complete before continuing
operation. For the fieldbus modules, this means that the response time for a read
operation can be quite long, since in addition to the requested read operation, other
read and write operations can be queued up and must complete before the
requested read operation can be completed and the value can be returned over to
fieldbus. For the PLC-like modules, the long transmission time means that a program
line that manipulates a motor register in a way that requires reading can take 20 or
more milliseconds to execute.
Some fieldbusses, like CANopen® expect that the motor is able to transmit a value
when it has changed more than a certain amount since the last time it was
transmitted. The current fieldbus modules do not have this capability since it would
load the serial link to the motor too much to continuously poll the value of motor
registers.
Module register addressing and module commands
Some of the modules have registers to control their behaviour. These register are addressed in another way than the registers in the basic motor. Examples include registers
that control digital inputs and outputs local to the module.
Additionally, the modules containing a nano-PLC have 256 bytes of memory local to the
module, that can be used to create variables that can be used during program execution,
typically for calculations. These local memory variables are much faster to use than the
registers in the basic motor since they are not transmitted over the relatively slow serial
line.
These module register are available over the MacTalk protocol and over the fieldbusses.
On the MacTalk protocol, the module registers are addressed differently for each module type.
The general idea is that each module type has its own range of commands that is different
from the range used by the basic motor.
The three special commands Reset Motor, Clear Errors and Save in Flash:
Save in Flash:
Pressing this button in MacTalk will send a special command over the serial line (RS-232
or RS-485) that will cause the motor and module (if present) to save the setup registers
to flash memory. Flash memory is permanent storage that will keep its value even though
the power supply has been turned off.
At the next power up, the motor and module will load the saved values from flash. Note
that the motor, but not the module, will automatically perform a reset as soon as it has
finished the Save in Flash operation.
The operations performed by MacTalk are:
1: Set the motor into Safe Mode by sending a telegram of <54><54><54><FF>
<00><AA><AA> and wait for an answer with data <11><11><11>. If the
motor uses an address instead of using the broadcast address 255 (FF), substitute the
<FF><00> with <address><inverted address>. See the MacTalk protocol
description for more information.
2: Continue sending the telegram <56><56><56><FF><00><AA><AA> and
wait for the <11><11><11> sequence. As soon as any communications error
occurs, like a wrong answer or a missing answer/timeout, it means the motor has
started its reset sequence. Again, you can substitute a specific motor address for the
broadcast address <FF><00>.
354
JVL Industri Elektronik A/S - User Manual - Integrated Servo Motors MAC050 - 3000
5.10
Serial communication
3: If a module is present, send a Module Reset telegram to the module. See the section
Reset Motor below for details on resetting a module. Note that the different module
types require different telegrams to reset.
Saving to flash can only be done over the serial lines RS-232 and RS-485. It can not be
done over any of the fieldbus modules with ProfiBus, CANopen®, DeviceNet or the
high-speed RS-485 FSx modules. Also the Rx and RxP modules can not cause a Save in
Flash from the nano-PLC program. Note that the Bluetooth and WLAN modules are
similar to the RxP modules in that the wireless link replaces the RS-485 interface. It is
therefore supported to send Reset sequences over Bluetooth and WLAN.
Note that saving parameters to flash can only be performed a few thousand times before
the flash wears out. The number of times may differ significantly between units. If the
flash wears out, the motor will load a default set of register values at start up. The electronics in the motor must be repaired or replaced to be able to save reliably to flash
again. JVL recommends to avoid saving in flash when it is not strictly necessary.
Clear Errors:
Pressing this button will clear the error-bits in the Error/Status motor register 35.
With the MAC800 motor, MacTalk will normally write a value of zero to register 35.
However, if the Position Limits error bit is set, it will pop up and ask the user if the position limits should be temporarily disabled until the position is back inside the limits set.
This is to handle the situations where the motor is moved outside the position limits
while working in another mode, like Velocity mode. If the user answers Yes to the
prompt, MacTalk will write the value 4000 hex, where only bit 14 is set. Bit 14 will be
cleared automatically by the MAC800 firmware as soon as the actual position is again inside the position limits. If bit 14 is not set, the motor will refuse to move while outside
the position limits – at least in one of the directions, depending on the firmware version
With the MAC50-141 motors, MacTalk will normally write a value to register 35 where
all bits are zero except it will leave 9 and 10 unchanged. This means it will perform a bitwise ORing of the value last read from the register with 600 hex, and then write the result back to register 35.
Other than that, MacTalk handles the Position Limits bits just like with the MAC800, see
the above paragraph for more information.
Reset Motor:
Pressing this button will send a reset command to the motor and to the module, if present.
The operations performed by MacTalk are:
4: Set the motor into Passive Mode (set register 2 = to zero) by sending a telegram of
<52><52><52><FF><00><02><FD><00><FF><00><FF><AA><AA>
and wait for an answer with data <11><11><11>. If the motor uses an address
instead of using the broadcast address 255 (FF), substitute the <FF><00> with
<address><inverted address>. See the MacTalk protocol description for more
information.
5: Continue sending the telegram <57><57><57><FF><00><AA><AA> and
wait for the <11><11><11> sequence. As soon as any communications error
occurs, like a wrong answer or a missing answer/timeout, it means the motor has
started its reset sequence. Again, you can substitute a specific motor address for the
broadcast address <FF><00>.
JVL Industri Elektronik A/S - User Manual - Integrated Servo Motors MAC050 - 3000
355
5.10
Serial communication
6: If a module is present, send a Module Reset telegram to the module. See the section
Reset Motor below for details on resetting a module. Note that the different module
types require different telegrams to reset.
The motor can only be Reset over the serial lines RS-232 and RS-485 – or by switching
the power supply off and on. It can not be done over any of the fieldbus modules with
ProfiBus, CANopen®, DeviceNet or the high-speed RS-485 FSx modules. The Bluetooth and WLAN modules can use reset since their wireless links replace the RS-485 interface, but note that it may take longer after a reset before a connection can be reestablished.
As an alternative to Reset, there are ways to load all the register values from factory defaults or the last set of values saved to user flash. Note however, that loading all the registers will not clear all types of errors. This is intentional, since some errors are so serious
that the motor can not continue safe operation. The errors that can not be cleared without power cycling are XXXX XXXX XXXX.
To use the functions to manipulate factory defaults and/or user flash, three steps must be
taken:
1: Set the motor into Safe Mode by writing the value 15 to the mode register (register
2).
2: Write one of the values described below to the mode register.
3: Wait for the mode register to automatically change away from that value – this will
typically take a few tens of milliseconds, but may vary. Just continue reading the
register until the value changes. After this, set the motor into the desired operating
mode.
With the MAC50-141 motors, the following functions are currently implemented:
100h (256): Load factory defaults AND save to user flash
101h (257): Load factory defaults (do NOT save to user flash)
102h (258): Load all registers from user flash.
With the MAC800 motor, the following functions are currently implemented:
100h (256): Load factory defaults AND save to user flash
101h (257): Load all registers from user flash.
102h (258): Save all registers to user flash
Note that after loading all register from either user flash or the factory defaults, the firmware will clear or preset some of the registers, like clearing the follow error and setting
the actual position to zero to resemble a cold start after power up.
The value 100h (256 decimal) is also used by the Load Defaults function on the Motor
menu in MacTalk.
356
JVL Industri Elektronik A/S - User Manual - Integrated Servo Motors MAC050 - 3000
5.11
MacTalk communication
Only MAC050 to 141
When using the RS232 or RS422 serial links, it is possible to access all the internal registers in the motor.
This gives the same possibilities as using the general installation and monitoring program
MacTalk.
In addition to these features, many more are accessible. In total, the MAC motor contains
more than 200 internal registers such as nominal velocity, actual position, etc. but please
note that several registers are not for the normal user and damage may occur if the contents of these registers is changed.
The following pages descripe the communication protocol that is used when communicating with the MAC50 - 141 motors.
5.11.1
Serial Quick Guide (MacTalk protocol)
This section describes control of the MAC motor via the serial interface (RS232/485 connector on the MAC00-B1 or equivalent module).
The interface is RS232 compatible and uses 19200 baud with 8 data bits and no parity.
The MAC motor is completely controlled by reading and writing to registers.
The registers are numbered 1-255. The width of the registers is 16 bits or 32 bits.
To protect the communication from errors, the data is transmitted twice.
First the data byte is transmitted and then an inverted version (255-x) is transmitted.
The easiest way to become familiar with the registers and MAC communication is to use
the MacRegIO program. This program lists all of the registers, and the serial commands
sent and received can be monitored.
JVL Industri Elektronik A/S - User Manual - Integrated Servo Motors MAC050 - 3000
357
5.11
5.11.2
MacTalk communication
Only MAC050 to 141
Writing to a register
Controller sends
MAC motor response
<Write><Address><RegNum><Len><Data><End>
<Accept>
Block description
Block Name
Protected (1)
Example
Description
<Write>
No
52h,52h,52h
Write command
<Address>
Yes
07h,F8h (Address 7)
The address of the MAC motor
<RegNum>
Yes
05h,FAh (RegNum 5)
The register number to write to
<Len>
Yes
02h,FDh (Len = 2)
The number of data bytes
<Data>
Yes
E8h,17h, 03h,FCh
(Data = 1000)
The data to write to the register
<End>
No
AAh, AAh
Command termination
<Accept>
No
11h, 11h,11h
Accept from MAC motor
(1) Protected means that these data must be sent twice, first non-inverted and then inverted.
Example 1:
Writing 600 (258h) to register 5 (16 bit) to the MAC motor with address 8.
Transmit:52h,52h,52h - 08h,F7h - 05h,FAh - 02h,FDh - 58h,A7h,02h,FDh - AAh, AAh
Response:11h,11h,11h
Example 2:
Write 230,000 (38270h) to register 3 (32 bit) to the MAC motor with address 7.
Transmit:52h,52h,52h - 07h,F8h - 03h,FCh - 04h,FBh 70h,8Fh,82h,7Dh,03h,FCh,00h,FFh - AAh, AAh
Response:11h,11h,11h
358
JVL Industri Elektronik A/S - User Manual - Integrated Servo Motors MAC050 - 3000
5.11
5.11.3
MacTalk communication
Only MAC050 to 141
Reading from a register
Controller sends
MAC motor response
<Read><Address><RegNum><End>
<Write><Address><RegNum><Len><Data><End>
Block description
Block
Name
Protected
(1)
Example
Description
<Read>
No
50h,50h,50h
Read command
<Address>
Yes
07h,F8h (Address 7)
The address of the MAC motor
<RegNum>
Yes
05h,FAh (RegNum 5)
The register number to read
<End>
No
AAh, AAh
Command termination
<Write>
No
52h,52h,52h
Write command
<Address>
Yes
00h,FFh (Address 0)
This will always be 0, because this is
the
address of the master
<RegNum>
Yes
05h,FAh (RegNum 5)
This will always be the same as
requested
<Len>
Yes
04h,FBh (Len = 4)
The length will always be 4
<Data>
Yes
E8h,17h, 03h,FCh,
00h, FFh, 00h,FFh
(Data = 1000)
The data read from the register
<End>
No
AAh, AAh
Command termination
(1) Protected means that these data must be sent twice, first non inverted and then inverted.
Example 1:
Reading the value of register 5 from MAC motor with address 8.
Transmit: 50h,50h,50h - 08h,F7h - 05h,F6h - AAh, AAh
Response: 52h,52h,52h - 00h,FFh - 05h,F6h - 04h,FBh 58h,A7h,02h,FDh,00h,FFh,00h,FFh - AAh, AAh
The value of register 5 was 500 (258h).
Example 2:
Reading the value of register 3 from MAC motor with address 8.
Transmit:50h,50h,50h - 08h,F7h - 03h,FCh - AAh, AAh
Response:52h,52h,52h - 00h,FFh - 05h,F6h - 04h,FBh 70h,8Fh,82h,7Dh,03h,FCh,00h,FFh - AAh, AAh
The value of register 3 was 230,000 (38270h).
JVL Industri Elektronik A/S - User Manual - Integrated Servo Motors MAC050 - 3000
359
5.11
5.11.4
MacTalk communication
Only MAC050 to 141
Application examples
Setting mode 1 (Position mode)
This command writes 1 to register 2 (MODE_REG) on motor 8.
Transmit: 52h,52h,52h - 08h,F7h - 02h,FDh - 02h,FDh - 01h,FEh,00h,FFh - AAh, AAh
Response: 11h,11h,11h
Setting position 100,000
This command writes 100,000 to register 3 (P_SOLL) on motor 8.
Transmit:52h,52h,52h - 07h,F8h - 03h,FCh - 04h,FBh A0h,5Fh,86h,79h,01h,FEh,00h,FFh - AAh, AAh
Response:11h,11h,11h
Reading the motor status
This command reads register 35 (ERR_STAT) from motor 8
Transmit:50h,50h,50h - 08h,F7h - 23h,DCh - AAh, AAh
Response:52h,52h,52h - 00h,FFh - 23h,DCh - 04h,FBh 10h,EFh,00h,FFh,00h,FFh,00h,FFh - AAh, AAh
The motor responded with ERR_STAT = 0010h - meaning “In Position”.
Setting the maximum speed
This command sets the maximum speed to 1000 RPM = 2097 pulses/sample (2097 =
831h).
This is done by writing to register 5 (V_SOLL)
Transmit: 52h,52h,52h - 08h,F7h - 05h,FAh - 02h,FDh - 31h,CEh,08h,F7h - AAh, AAh
Response: 11h,11h,11h
Reading the actual position
This command reads register 10 (P_IST) from motor 8
Transmit: 50h,50h,50h - 08h,F7h - 0Ah,F5h - AAh, AAh
Response: 52h,52h,52h - 00h,FFh - 0Ah,F5h - 04h,FBh 08h,F7h,BDh,42h,03h,FCh,00h,FFh - AAh, AAh
The position was 245,000 (3BD08h)
360
JVL Industri Elektronik A/S - User Manual - Integrated Servo Motors MAC050 - 3000
5.12
5.12.1
Internal registers
Internal registers in the MAC motors
In order to control the operation of the motor a larger number of registers exist.
These are accessible via the serial communication channels or via one of the industrial
bus modules such as the Ethernet modules, Profibus or CAN-open modules.
The general windows installation and monitor program MacTalk also have access to most
of these registers. MacTalk offers a more user friendly and easy to understand interface.
It may however be necessary to access the registers directly in for example systems using
one of the many industrial bus modules as mentioned above.
For this purpose the next pages show the complete list of registers and explain the function of each register.
Please notice that the registers in the MAC50 to 141 is not fully equal to the registers in
the MAC400 and 800 motors.
Each group of motors therefore have its own register list.
Most of the most common used registers are though equal but scaling and the length
(16bit or 32bit) of the registers may vary from between the 2 motor families.
JVL Industri Elektronik A/S - User Manual - Integrated Servo Motors MAC050 - 3000
361
5.12
5.12.2
Internal registers
Only MAC50 - 141
MAC50 to 141 register list.
The following list is only valid for the MAC50, MAC95, MAC140 and MAC141 motors
including sub-versions.
Reg.
Nr.
0
1
Firmware / MacRegIo
Name
N/A
PROG_VERSION
2
MODE_REG
MacTalk
Name
N/A
Displayed on
bottom right
status line.
Startup mode /
Change
actual mode
Range /
Default
N/A
Size /
Access
N/A
Unit
Description
N/A
Dummy register, do not use
Firmware version number.
The actual operating mode of the drive.
In general, the motor will either be passive,
attempt to reach a certain position, attempt to
maintain a constant velocity or attempt to
produce a constant torque. The various modes
define the main type of operation as well as
what determines the setpoint for that operation.
The special cases 256..258 are used to perform
a few special operations on the entire set of
registers.
Supported values are:
0 : Passive mode. The axis is not controlled
by the drive, and can easily be moved by
hand or external mechanics.
1 : Velocity mode. The drive will attempt to
run the motor at a constant velocity
selected by Reg5, V_SOLL, without
violating the maximum torque or
acceleration.
2 : Position mode. The drive will at all times
attempt to move the actual motor position
to the position selected by Reg3, P_SOLL,
without violating the maximum velocity,
torque or acceleration.
3 : Gear Position mode.
4 : Analogue torque mode.
5 : Analogue velocity mode.
6 : Analog Velocity Gear mode.
7 : Manual current mode.
8 : Step response test mode.
9 : Internal test mode.
10 : Brake mode.
11 : Stop mode.
12 : Torque based zero search mode.
13 : Forward/only zero search mode.
14 : Forward+backward zero search mode.
15 : Safe mode.
16 : Analogue velocity with deadband mode.
17 : Velocity limited Analog Torque mode.
18 : Analogue gear mode.
19 : Coil mode.
20 : Analogue bi-position mode.
21 : Analogue to position mode.
22 : Internal test mode.
23 : Internal test mode.
24 : Gear follow mode.
25 : IHOME mode.
256
257
258
3
P_SOLL, 32-bit
Position
4
(high word of
P-SOLL)
-
362
-67M +67M
-
32 bit
R/W
The target position that the drive will attempt
reach in position related modes.
-
JVL Industri Elektronik A/S - User Manual - Integrated Servo Motors MAC050 - 3000
5.12
Internal registers
Reg.
Nr.
Firmware /
MacRegIo Name
MacTalk
Name
5
V_SOLL
Max. Velocity
6
A_SOLL
Acceleration
7
T_SOLL
Torque
8
10
P_FNC, 32-bit
(Sometimes named
P_SIM)
(high word of
P_FNC/P_SIM)
P_IST, 32 -bit
11
12
13
(high word of P_IST)
V_IST
KVOUT
14
15
16
17
GEARF1
GEARF2
I2T
I2TLIM
18
19
UIT
UITLIM
20
FLWERR, 32-bit
21
(high word of
FLWERR)
FLWERRMAX, 32-bit
9
22
23
24
(high word of
FLWERRMAX)
FNCERR, 32-bit
Range /
Default
Size /
Access
Unit
Only MAC50 - 141
Description
The maximum velocity the motor is allowed to
use.
0-1023
Counts/
Sample
The maximum acceleration in counts/sample2
the drive is allowed to use during normal
operation. Also note Reg32, ACC_EMERG,
used during emergency stops.
-
The maximum torque that the drive is allowed to
use.
The value 1023 corresponds to 300% of
nominal load, and is the absolute maximum
peak torque allowed. The value 341 gives 100%
(nominal load).
Counts
Actual position
Load factor
-
The actual motor position measured by the
internal encoder. Updated every 1.9ms. Note
that this register is maintained incrementally,
which means that the user can update it to
offset the working range. When updating when
the drive is not in Passive mode, P_IST and
P_SOLL should be updated together in an
atomic operation, using Reg163, P_NEW, or
other special measures. Also note that the
firmware will change this register after a zero
search operation has completed.
Actual velocity of the drive.
Ratio of the total inertia driven by the drive to
the inertia of the motors rotor itself.
Gear factor 1, Nominator
Gear factor 2, Denominator
Energy dissipated in the motor windings.
Safety limit for I2T above. Motor will set an error
bit if I2T gets above I2TLIMIT.
Energy dissipated in the internal power dump.
Limit for Reg18, UIT. Motor will set an error bit if
UIT gets above UITLIM
A measure of how far the drive is from its ideal
regulation goal. This value is calculated
differently in the various modes, and can mean
things like pulses from theoretical position or
difference in actual velo city to V_SOLL.
Contact JVL for more detailed information for
specific modes.
When Reg20, FLWERR, exceeds this limit, an
error bit is set in Reg35, ERR_STAT, and the
motor will stop if Reg22 is non-zero. Usually this
value is set experimentally to detect situations
where a movement is blocked or fails.
Shows how much the motor is behind the ideal
movement; precise operation depends on
mode. When this accumulated value exceeds
Reg26, FNCERRMAX, the FNC_ERR bit is set
in Reg35, ERR_STAT and the motor will stop.
TT1521GB
JVL Industri Elektronik A/S - User Manual - Integrated Servo Motors MAC050 - 3000
363
5.12
Internal registers
Reg.
Nr.
Firmware /
MacRegIo Name
25
26
27
(high word of FNCERR)
FNCERRMAX, 32-bit
(hi-word of
FNCERRMAX)
MIN_P_IST, 32 -bit
(hi-word of MIN_P_IST)
MAX_P_IST, 32 -bit
(hi-word of
MAX_P_IST)
ACC_EMERG
INPOSWIN
INPOSCNT
ERR_STAT
28
29
30
31
32
33
34
35
MacTalk
Name
Range /
Default
Size /
Access
Unit
Only MAC50 - 141
Description
Bit 0, I2T_ERR
Too much energy dissipated in the motor
windings. Set when Reg16, I2T, exceeds
Reg17, I2TLIM
Bit 1, FLW_ERR
The actual position is too far behind the ideal
position. Set when FLWERRMAX is non-zero,
and FLWERR exceeds FLWERRMAX.
Bit 2, FNC_ERR
The value of Reg24, FNCERR, exceeded the
value of Reg26, FNCERRMAX.
Bit 3, UIT_ERR
The value of Reg18, UIT, exceeded the value of
Reg19, UITLIM.
Bit 4, IN_POS
For position-related modes: The actual position
was detected to be inside the InPosition window
(Reg33, INPOSWIN) at least the number of
times defined in Reg34, INPOSCNT. For other
modes: Depends on mode; for velocity related
modes, this bit means AtVelocity; for other more
special modes, this bit is calculated differently,
ask JVL for details.
Bit 5, ACC_FLAG
The drive is currently accelerating (the velocity
is increasing).
Bit 6, DEC_FLAG
The drive is currently decelerating (the velocity
is decreasing).
Bit 7, PLIM_ERR
One of the software position limits was
exceeded,, drive will go into stop mode, then
passive mode automatically.
Bit 8, FRAME_ERR_TX
A framing error was detected during the last
reception on the FastMac protocol.
Continued next page
TT1522GB
364
JVL Industri Elektronik A/S - User Manual - Integrated Servo Motors MAC050 - 3000
5.12
Internal registers
Reg.
Nr.
Firmware /
MacRegIo Name
35
ERR_STAT
(cont. from last page)
MacTalk
Name
Range /
Default
Size /
Access
Unit
Only MAC50 - 141
Description
Bit 9, RELPOSPSOLL
Bit 10, RELPOSPFNC
These two bits determine what will happen
when one of the eight general purpose position
registers, P1-P8 is activated through either a
FastMac command (including activating s
register group), through writing to Reg43,
P_REG_P,on changes in bi -position mode or
during manual resynchronization.
If both are zero, the P register gets copied to
the target register(s).
If Bit 9 is set, the value of Reg3, P_SOLL, is
added to the target register(s) to make a
relative movement.
If Bit 10 is set, the value of Reg8, P_FNC, is
added to the target register(s) to make a
relative movement.
Bit 11, IX_ERR
The current in at least one of the motor
windings was measured to be too high, possibly
because of bad current loop filter settings.
Values for the current filter have been
overwritten with default values. Specifically
registers 106 through 111, 127 and 128.
Bit 12, UV_ERR
The motor power supply voltage (Reg151,
U_SUPPLY) was measured to be below the
value in Reg152, U_MIN_SUP and the drive
was configured to set an error bit in case of
undervoltage.
Bit 13, UV_DETECT
The motor power supply voltage (Reg151,
U_SUPPLY) was measured to be below1.25
times the value in Reg152. This is a warning
bit, not an error.
Bit 14, DIS_P_LIM
When this bit is set (during zero search or by
the user), the drive will disable its position limits
so it can move also outside the position limit
range. This bit is cleared automatically when
the actual position gets inside the position
range again.
Bit 15, SSI_ERROR
TT1523GB
JVL Industri Elektronik A/S - User Manual - Integrated Servo Motors MAC050 - 3000
365
5.12
Internal registers
Reg.
Nr.
Firmware /
MacRegIo Name
36
CNTRL_BITS
37
38
39
40
41
42
43
44
45
46
47
48
49
50
51
52
53
54
55
56
57
58
59
STARTMODE
P_HOME, 32-bit
(hi-word of P_HOME)
V_HOME
T_HOME
HOMEMODE
P_REG_P
V_REG_P
A_REG_P
T_REG_P
L_REG_P
Z_REG_P
POS0 / P1, 32-bit
(hi-word of P1)
POS1 / P2, 32-bit
(hi-word of P2)
POS2 / P3, 32-bit
(hi-word of P3)
POS3 / P4, 32-bit
(hi-word of P4)
POS4 / P5, 32-bit
(hi-word of P5)
POS5 / P6, 32-bit
60
61
62
63
64
65
66
67
68
69
70
71
72
73
74
75
76
77
78
79
80
(hi-word of P6)
POS6 / P7, 32-bit
(hi-word of P7)
POS7 / P8, 32-bit
(hi-word of P8)
VEL0 / V1
VEL1 / V2
VEL2 / V3
VEL3 / V4
VEL4 / V5
VEL5 / V6
VEL6 / V7
VEL7 / V8
ACC0 / A1
ACC1 / A2
ACC2 / A3
ACC3 / A4
TQ0 / T1
TQ1 / T2
TQ2 / T3
TQ3 / T4
MacTalk
Name
Range /
Default
Size /
Access
Unit
Only MAC50 - 141
Description
Bit 0, USRINTF0
Bit 1, USRINTF1
Bit 2, PULSEDIR
Bit 3, INPSIGN
Bit 4, HICLK
Bit 5, HALL_INT
Bit 6, RECORDBIT
Bit 7, REWINDBIT
Bit 8, RECINNERBIT
Bit 9, AUTO_RESYNC
Bit 10, MAN_RESYNC
Bit 11, INDEX_HOME
Bit 12, REL_RESYNC
Bit 13, HALL_C
Bit 14, HALL_B
Bit 15, HALL_A
Velocity used during Zero Search/Homing
Negative => home on falling edge of AN_INP
Used by FastMac commands
Bit 0, COIL_START_DIR
Bit 1, COIL_POS_CMD
Bit 2, COIL_PWR_CMD
Bit 3, COIL_POS_ACCEPT
Bit 4, COIL_PWR_FLASH
TT1524GB
366
JVL Industri Elektronik A/S - User Manual - Integrated Servo Motors MAC050 - 3000
5.12
Internal registers
Reg.
Nr.
Firmware /
MacRegIo Name
81
82
83
84
85
86
87
88
89
90
91
92
93
94
95
96
97
98
99
100
101
102
103
104
105
106
107
108
109
110
111
112
113
114
115
116
117
118
119
120
LOAD0 / L1
LOAD1 / L2
LOAD2 / L3
LOAD3 / L4
ZERO0 / Z1
ZERO1 / Z2
ZERO2 / Z3
ZERO3 / Z4
KFF3
KFF2
KFF1
KFF0
KVFX4
KVFX3
KVFX2
KVFX1
KVFY3
KVFY2
KVFY1
KVFY0
GEARB
KVB3
KVB2
KVB1
KVB0
KIFX2
KIFX1
KIFY1
KIFY0
KIB1
KIB0
SAMPLE1
SAMPLE2
SAMPLE3
SAMPLE4
REC_CNT
FNC_OUT
FF_OUT
VB_OUT
V_EXT
121
122
123
124
125
126
127
128
129
130
131
132
133
134
135
136
137
138
139
140
141
142
VF_OUT
ANINP
ANINP_OFFSET
ELDEGN_OFFSET
ELDEGP_OFFSET
PHASE_COMP
AMPLITUDE
MAN_I_NOM
MAN_ALPHA
UMEAS
I_NOM
PHI_SOLL
IA_SOLL
IB_SOLL
IC_SOLL
IX_SELECT
IA_IST
IB_IST
IC_IST
IA_OFFSET
IB_OFFSET
IC_OFFSET
MacTalk
Name
Range /
Default
Size /
Access
Unit
Only MAC50 - 141
Description
Velocity of external encoder (Pulse In)
in counts per sample
TT1525GB
JVL Industri Elektronik A/S - User Manual - Integrated Servo Motors MAC050 - 3000
367
5.12
Internal registers
Reg.
Nr.
Firmware /
MacRegIo Name
143
144
145
146
147
148
149
150
151
152
153
154
160
ELDEG_IST
V_ELDEG
UA_VAL
UB_VAL
UC_VAL
KIA
KIB
KIC
U_SUPPLY
MIN_U_SUP
MOTORTYPE
SERIALNUMBER, 32bit
(hi-word of
SERIALNUMBER)
MYADDR
HWVERSION
CHECKSUM, 32-bit
(hi-word of
CHECKSUM)
UV_HANDLE
161
INV_OUTPUT
162
163
164
165
166
167
INDEX_OFFSET
P_NEW, 32-bit
(hi-word of P_NEW)
FILTERID, 32-bit
(hi-word of FILTERID)
HARDWARELIM
168
HOMING_DONE
155
156
157
158
159
MacTalk
Name
Range /
Default
Size /
Access
Unit
Only MAC50 - 141
Description
Bit 0, SET_UV_ERR
Bit 1, UV_GO_PASSIVE
Bit 2, unused
Bit 3, UV_VSOLL0
Bit 0, INV_INPOSOUT
Bit 1, INV_ERROROUT
Bit 2, INVROTDIR
Bit 3, O1USERCTRL
Bit 4, O2USERCTRL
Bit 0, HW_PLIM_NEG
Bit 1, HW_PLIM_POS
Bit 2, HW_PLIM_IN1
Bit 3, HW_PLIM_IN2
Bit 4, HW_PLIM_IN3
Bit 5, HW_PLIM_IN4
Bit 6, HW_PLIM_IN5
Bit 7, HW_PLIM_IN6
Bit 8, HW_PLIM_ANINP
Bit-0 set every time a zero search has
completed. Not cleared by firmware, except
after reset.
TT1526GB
368
JVL Industri Elektronik A/S - User Manual - Integrated Servo Motors MAC050 - 3000
5.12
Internal registers
Reg.
Nr.
Firmware /
MacRegIo Name
169
170
171
172
173
174
175
176
177
178
GROUP_ID
GROUP_SEQ
MONITOR_CMP
MONITOR_REG1
MONITOR_REG2
MONITOR_ACT
MONITOR_SRC
MONITOR_DST
MONITOR_SAV
SSI_BITS1
179
OUTPUT_CTRL
180
181
182
SETUP_BITS
V_IST_MAX
UART1_SETUP
MacTalk
Name
Range /
Default
Size /
Access
Unit
Only MAC50 - 141
Description
Bit 0, SSI_ENABLE
Bit 1, SSI_DIR
Bit 2, SSI_POS_SYNC
Bit 3, SSI_RESET
Bit 4, SSI_NOCHECK
Bit 15, SSI_ERROR_CNTL
Bit 0, OUTPUT_O1
Bit 1, OUTPUT_O2
Bit 0, POWERSAVE_ENABLED
0, 1, 2
Selects what protocol to run on the RS422 lines
that can be used for Pulse In, Pulse Out or
Serial Data. The selection in this register is
used only if the lowest two bits in Reg36,
CNTRL_BITS are set to Serial Data.
Values of Reg182, UART1_SETUP:
0: Autodetect incoming 1 Megabit Modbus
telegrams for a few seconds after startup. Stay
in Modbus if any valid Modbus telegrams
detected, else switch to 19200 baud FastMac
and stay in Fastmac.
1: Run the FastMac protocol at 19200 baud
from the beginning and stay in FastMac.
2-65535: Run 1 Megabit/s Modbus from the
beginning and stay in Modbus.
183
184
185
186
187
188
189
190
191
192
193
194
195
196
197
STATUS_BITS
MODE0 / M1
MODE1 / M2
MODE2 / M3
MODE3 / M4
HWI0, 32-bit
(hi-word of HWI0)
HWI1, 32-bit
(hi-word of HWI1)
HWI2, 32-bit
(hi-word of HWI2)
HWI3, 32-bit
(hi-word of HWI3)
HWI4, 32-bit
(hi-word of HWI4)
TT1527GB
JVL Industri Elektronik A/S - User Manual - Integrated Servo Motors MAC050 - 3000
369
5.12
Internal registers
Reg.
Nr.
Firmware /
MacRegIo Name
198
199
200
201
202
203
204
205
206
207
208
209
210
211
212
213
214
215
216
217
218
219
220
221
222
223
224
225
226
227
228
229
230
231
232
233
234
235
236
237
238
239
240
241
242
243
244
245
246
247
248
249
250
251
252
253
254
HWI5, 32-bit
(hi-word of HWI5)
HWI6, 32-bit
(hi-word of HWI6)
HWI7, 32-bit
(hi-word of HWI7)
COMMAND
FIELDBUS_ADDR
FIELDBUS_SPEED
-
MacTalk
Name
Range /
Default
Size /
Access
Unit
Only MAC50 - 141
Description
Reserved for future purposes
Reserved for future purposes
Reserved for future purposes
Reserved for future purposes
Reserved for future purposes
Reserved for future purposes
Reserved for future purposes
Reserved for future purposes
Reserved for future purposes
Reserved for future purposes
Reserved for future purposes
Reserved for future purposes
Reserved for future purposes
Reserved for future purposes
Reserved for future purposes
Reserved for future purposes
Reserved for future purposes
Reserved for future purposes
Reserved for future purposes
Reserved for future purposes
Reserved for future purposes
Reserved for future purposes
Reserved for future purposes
Reserved for future purposes
Reserved for future purposes
Reserved for future purposes
Reserved for future purposes
Reserved for future purposes
Reserved for future purposes
Reserved for future purposes
Reserved for future purposes
Reserved for future purposes
Reserved for future purposes
Reserved for future purposes
Reserved for future purposes
Reserved for future purposes
Reserved for future purposes
Reserved for future purposes
Reserved for future purposes
Reserved for future purposes
Reserved for future purposes
Reserved for future purposes
Reserved for future purposes
Reserved for future purposes
Reserved for future purposes
Reserved for future purposes
Reserved for future purposes
Reserved for future purposes
TT1528GB
370
JVL Industri Elektronik A/S - User Manual - Integrated Servo Motors MAC050 - 3000
5.12
5.12.3
Internal registers
Only MAC400 to 3000
MAC400, 402, 800, 1500 and 3000 register list.
The following list is only valid for the MAC400, MAC402, MAC800, MAC1500 and
MAC3000 motors.
The list is valid from firmware version 2.07 or newer.
Reg.
Nr.
0
1
Firmware /
MacRegIo Name
N/A
PROG_VERSION
2
MODE_REG
MacTalk
Name
N/A
Displayed on
bottom right
status line.
Startup
mode /
Change
actual mode
Range /
Default
N/A
-
0..25,
256,
257,
258 /
0 (passive)
Size /
Access
N/A
/
R
Word
/
RW
Unit
Description
N/A
-
Dummy register, do not use.
Firmware version
-
The actual operating mode of the drive.
In general, the motor will either be passive, attempt to
reach a certain position, attempt to maintain a
constant velocity or attempt to produce a constant
torque. The various modes define the main type of
operation as well as what determines the setpoint for
that operation.
The special cases 256..258 are used to perform a few
special operations on the entire set of registers.
Supported values are:
0 = Passive mode. The axis is not controlled by the
drive, and can easily be moved by hand or external
mechanics.
1 = Velocity mode. The drive will attempt to run the
motor at a constant velocity selected by Reg5,
V_SOLL, without violating the maximum torque or
acceleration.
2 = Position mode. The drive will at all times attempt
to move the actual motor position to the position
selected by Reg3, P_SOLL, without violating the
maximum velocity, torque or acceleration.
3 = Gear Position mode.
4 = Analogue torque mode.
5 = Analogue velocity mode.
6 = Analog Velocity Gear mode.
7 = Manual current mode.
8 = Step response test mode.
9 = Internal test mode.
10 = Brake mode.
11 = Stop mode.
12 = Torque based zero search mode.
13 = Forward/only zero search mode.
14 = Forward+backward zero search mode.
15 = Safe mode.
16 = Analogue velocity with deadband mode.
17 = Velocity limited Analog Torque mode.
18 = Analogue gear mode.
19 = Coil mode.
20 = Analogue bi-position mode.
21 = Analogue to position mode.
22 = Internal test mode.
23 = Internal test mode.
24 = Gear follow mode.
25 = IHOME mode.
256:
257:
258:
JVL Industri Elektronik A/S - User Manual - Integrated Servo Motors MAC050 - 3000
371
5.12
Reg.
Nr.
3
Internal registers
Firmware /
MacRegIo
Name
P_SOLL
MacTalk
Name
Size /
Access
Unit
Description
Encoder
counts
Encoder
counts
The target position that the drive will attempt to
reach in position related modes.
Used to update both P_IST and P_SOLL in a
single atomic operation to prevent motor
movements during the change.
P_NEW holds either an absolute position or a
relative position.
After writing a value to P_NEW, update both bits
8 and 6 in Reg36, CNTRL_BITS.
Bit 8, SYNCPOSREL, will select a relative
position update when set or an absolute update
when cleared.
Setting bit 6, SYNCPOSMAN, executes the
P_IST+P_SOLL update, that is, either both are
set equal to P_NEW, or P_NEW is added to both,
using signed addition. P_FUNC is updated
accordingly.
The undocumented FastMac commands 23 and
24 can also be used to set these bits and perform
the same absolute and relative updates.
This is useful for expanding the logical position
range beyond +/- 2^31.
Desired velocity 1 RPM=2.77056 counts/sample.
Example: To obtain 100 RPM, V_SOLL must be
set to 277.
The desired nominal acceleration.
1000 RPM/s = 3.598133 counts/Sample²
Example: To obtain 100000 RPM/s, A_SOLL
must be set to 360.
The maximum torque that the drive is allowed to
use.
The value 1023 corresponds to 300% of nominal
load, and is the absolute maximum peak torque
allowed. The value 341 gives 100% (nominal
load).
4
P_NEW
(not present)
±2^31
/0
Word /
RW
Word /
RW
5
V_SOLL
Max
Velocity
Na /
277(100RPM)
Word /
RW
Acceleration
na /
18
Word /
RW
Cnt’s/
Sample²
Word /
RW
-
Word /
RW
Word /
RW
Encoder
counts
Encoder
counts
6
A_SOLL
Max
Velocity
Range/
Default
±
2^31
/0
Cnt’s/
sample
(5003RPM/s²)
Torque
0-1023
/
1023(300%)
Only MAC400 to 3000
7
T_SOLL
8
P_FNC
9
INDEX_OFFSET
(not present)
10
P_IST
Actual
Position
±2^31 /
0
Word /
RW
Encoder
counts
11
V_IST_16
Actual
Velocity
12
V_IST
(not present)
13
KVOUT
Load
Na /
0
Na /
0
Na /
65536(1.0)
Word /
R
Word /
R
Fixed16
/
RW
Enc.cnt’s/
Sample/16
Enc.cnt’s/
Sample
-
Updated after a Zero Search to show at what
single-turn encoder position the zero point was
detected. This is used by MacTalk on the Test tab
to show if the zero search resulted in a valid zero
position.
The actual motor position measured by the
internal encoder. Updated every 1.3ms (or every
2.6 ms with Reg157, OUTLOPDIV=2) Note that
this register is maintained incrementally, which
means that the user can update it to offset the
working range. When updating when the drive is
not in Passive mode, P_IST and P_SOLL should
be updated together in an atomic operation, using
Reg4, P_NEW, or other special measures. Also
note that the firmware will change this register
after a zero search operation has completed.
V_IST (actual velocity) measured over 16
samples. Same unit as V_SOLL (register 5).
Actual velocity. 1RPM=0.17316 counts/sample.
Must be set to the ratio between the total inertia
driven by the motor relative to the motors own
rotor inertia. So for at motor shaft that is not
mechanically connected to anything, this value
should be 1.0.
The load factor is perhaps the single most
important value of the filter setup. Always try to
set this right before experimenting with filter
setups.
TT1501GB
372
JVL Industri Elektronik A/S - User Manual - Integrated Servo Motors MAC050 - 3000
5.12
Internal registers
Reg.
Nr.
14
Firmware /
MacRegIo Name
GEARF1
15
GEARF2
16
I2T
17
MacTalk
Name
Gear
factor
Input
Gear
Only MAC400 to 3000
Range/
Default
Na /
2000
Size /
Access
Word /
RW
Unit
Description
-
The nominator used to scale / gear pulses from an
external encoder/source. Used in gear modes.
Na /
500
Word /
RW
-
The denominator used to scale / gear pulses from an
external encoder/source. Used in gear modes.
Output
Motor
Load
(mean)
Na /
0
Word /
R
-
I2TLIM
(not
present)
Na /
100000
Word /
R
-
18
UIT
RegenRative
Load
Na /
0
Word /
R
19
UITLIM
(not
present)
Na /
2322
Word /
R
20
FLWERR
Na /
0
Word /
RW
Encoder
counts
21
U_24V
22
FLWERRMAX
Na /
0
Na /
0
Word /
R
Word /
RW
The calculated power dissipated in the motor, and thus
an approximated value for the rise in temperature inside
the physical motor. See also I2TLIM (Reg 17).
MacTalk value is calculated as [%]=I2T/I2TLIM x 100
The limit for the value of Reg16, I2T, where bit 0,
I2T_ERR, in Reg35, ERR_STAT will be set and the
motor will change into passive mode.
The calculated power dissipated in the internal power
dump/brake resistors, and thus a way to estimate their
rise in temperature. See also UITLIM (Reg 19)
MacTalk value is calculated as [%]=UIT/UITLIM x 100
The limit for the value of Reg18, UIT, where bit 3,
UIT_ERR, in Reg35, ERR_STAT will be set and the
motor will change into passive mode.
A measure of how far the drive is from its ideal
regulation goal. This value is calculated differently in
the various modes, and can mean things like ‘pulses
from theoretical position’ or ‘difference in actual velocity
to V_SOLL’. Contact JVL for more detailed information
for specific modes.
The internal control voltage measured.
Encoder
counts
23
UV_HANDLE
- Set
error bit
- Go to
passive
- Set
velocity
to 0
Na /
0
Word /
RW
24
FNCERR
(not
present)
Na /
0
Word /
RW
Encoder
counts
25
P_IST_TURNTAB
(not
present)
Na /
0
Word /
R
-
26
FNCERRMAX
(not
present)
27
TURNTAB_COUNT
(not
present)
Na /
0
Na /
0
Word /
RW
Word /
RW
Encoder
counts
-
28
MIN_P_IST
(not
present)
Na /
0
Word /
RW
Encoder
counts
29
DEGC
(not
present)
Na /
0
Word /
R
-
When Reg20, FLWERR, exceeds this limit, bit 1,
FLW_ERR, in Reg35, ERR_STAT, is set and the motor
will stop if Reg22 is non-zero. Usually this value is set
experimentally to detect situations where a movement
is blocked or fails.
Bits to determine what will happen when the main
supply voltage to the motor is below the threshold for
motor operation. Any combination of the following bits
can be set.
Bit 0: Set bit 9, UV_ERR, in Reg35, ERR_STAT.
Bit 1: Perform a controlled stop, then go passive.
Bit 2: Set V_SOLL to zero, do not go passive.
Shows how much the motor is behind the ideal
movement; precise operation depends on mode. When
this accumulated value exceeds Reg26, FNCERRMAX,
the FNC_ERR bit is set in Reg35, ERR_STAT and the
motor will stop.
Displays the actual position, like P_IST, but is offset by
N times the rotary table working range so
P_IST_TURNTAB is always between MIN_P_IST and
MAX_P_IST. Used mainly with the Rotary table option.
The limit used with Reg24, FNCERR.
Holds a count of the number of times the value of
Reg25, P_IST, wraps around one of its limits,
MIN_P_IST or MAX_P_IST. Used only with the Rotary
table option. Counts up or down depending on the
direction of the wrap around.
Used to define and enable the minimum software
position limit, so the motor will stop (and enter passive
mode) if the value of P_IST (the actual position) gets
below this value. If MIN_P_IST is zero, the low position
limit will not be enabled.
The temperature measured inside the drive.
TT1502GB
JVL Industri Elektronik A/S - User Manual - Integrated Servo Motors MAC050 - 3000
373
5.12
Internal registers
Reg.
Nr.
30
Firmware /
MacRegIo Name
MAX_P_IST
MacTalk
Name
31
Only MAC400 to 3000
Size /
Access
Word /
RW
Unit
Description
(not
present)
Range/
Default
Na /
0
Encoder
counts
DEGCMAX
(not
present)
Na /
690(84’C)
Word /
R
-
32
ACC_EMERG
(not
present)
INPOSWIN
(not
present)
Word /
RW
Word /
RW
-
33
Na /
0
Na /
100
Used to define and enable the maximum software
position limit, so the motor will stop (and enter passive
mode) if the value of P_IST (the actual position) gets
above this value. If MAX_P_IST is zero, the high
position limit will not be enabled. In Rotary Table
operation, this limit is used as the higher wrap-around
position count
The maximum value of Reg29, DEGC, before the motor
will set the Temperature error bit in ERR_STAT and
change into Passive mode. Same scaling as Reg29,
DEGC.
Acceleration to use during emergency stops.
Encoder
counts
The value of this parameter depends on the operating
mode. In all cases it helps to define when the motor is
InPosition and thus will set the InPosition bit in the
ERR_STAT regis ter.
For normal Position related modes, the motor is
considered to be in position when the actual position is
less than INPOSWIN encoder counts away from its
target position P_SOLL and have been detected to be
so at least INPOSCNT times.
34
INPOSCNT
(not
present)
Na /
3
Word /
RW
-
35
ERR_STAT
(not
present)
Na /
0
Word /
RW
-
For Velocity related modes, the concept of InPosition
will instead mean AtVelocity and work in a similar way
that the actual velocity V_IST must have been
measured INPOSCNT consecutive times to be within
INPOSWIN counts/sample before the InPosition bit is
set in Reg35, ERR_STAT.
The number of consecutive times the In Position
condition must have been met before the InPosition bit
is set in ERR_STAT. See description above for
INPOSWIN.
Bit 0, I2T_ERR
Set when the calculated thermal energy stored in the physical
motor exceeds a limit. Condition is that Reg16, I2T gets larger
than Reg17, I2TLIM.
Bit 1, FLW_ERR
Set if the follow error in Reg20, FLWERR, gets larger than
Reg22, FLWERRMAX. Never set if Reg22, FLWERRMAX is
zero.
Bit 2, FNC_ERR
Set if the function error in Reg24, FNCERR, get slarger than
Reg26, FNCERRMAX. Never set if Reg26, FNCERRMAX is
zero.
Bit 3, UIT_ERR
Set when the calculated energy/temperature in the internal
brake resistor (power dump) get dangerousl high.
Bit 4, IN_POS
In Position mode, status of when/whether the motor position is
inside the inposition window defined by RegReg33,
INPOSWIN, for the number of samples defined in Reg34,
INPOSCNT. In Velocity mode, this bit means rather ‘At
Velocity’. For other modes, like Torque modes, see the
technical manual for details of how the inposition status is
calculated/maintained.
Bit 5, ACC_FLAG
Set when the motor is accelerating, which means that the
velocity changes from a higher value to a lower value over tah
latest samples. Please note that, when the velocity is negative,
this flag is set when the velocity changes from a more negative
value to a less negative value (closer to zero). This may not be
intuitive, but can be said to be mathematically correct, and is
maintained for backwards compatibility reasons.
TT1503GB
374
JVL Industri Elektronik A/S - User Manual - Integrated Servo Motors MAC050 - 3000
5.12
Reg.
Nr.
35
Internal registers
Firmware /
MacRegIo
Name
ERR_STAT
MacTalk
Name
Range/
Default
Size /
Access
Unit
Description
(not
present)
Na /
0
Word /
RW
-
Bit 6, DEC_FLAG
Only MAC400 to 3000
Set when the motor is decelerating. Please see the description for
ACC_FLAG above to understand the behaviour with negative velocity.
Bit 7 PLIM_ERR
Set when one of the software position limits in Reg28 and Reg30 have
been exceeded. Note that there is an option to temporarily disable
position limits to be able to be move inside the position limit range
again.
Bit 8, DEGC_ERR
Temperature error; set when the value in Reg29, DEGC, exceeds the
value in Reg31, DEGCMAX.
Bit 9, UV_ERR
Under voltage error; can be set when either the AC sense detects
missing 230 or 120 V AC input, or when the DC bus voltage get below
a threshold voltage of approximately 80 V DC. Note that this error will
only get set if bit 0 in Reg23, UV_HANDLE, is set. The AC sense input
is not used with MAC402.
Bit 10, UV_DETECT
Reflects the current status of missing AC input or low DC bus voltage,
on the same condition as UV_ERR above. The bit will be cleared
when the under voltage condition is no longer present for about one
second. Note that there is a hysteresis built-in, so the DC bus voltage
must be 1.25 times higher than the cut-off voltage threshold before the
under voltage condition is cleared.
Bit 11, OV_ERR
Overvoltage error; gets set when the DC bus voltage is measured to
be above 450 V for MAC400 and MAC800, or 1000 V DC for
MAC1500 and MAC3000, or 54 V DC for MAC402. Overvoltage often
comes when the motor is braking a large inertia and the internal or
external power dump/brake resistor can no longer accumulate the
energy. It can also come from connecting a too high AC or DC supply
voltage, perhaps by connecting 230VAC to the 120 VAC input on
MAC400.
Bit 12, IPEAK_ERR
A much too high current was measured in one or more of the motor
phases. This can happen if the supply voltage is too low relative to the
rotational speed. It can also happen in more extreme short-time
overload conditions. This error requires a reset or power cycling of the
drive since it cannot be cleared using the normal Clear Errors
mechanisms.
Bit 13, SPEED_ERR
The velocity was measured to be higher than a limit for an average of
16 samples. This limit is normally 3600 RPM for MAC800, MAC1500
and MAC3000, and it is 4300 RPM for MAC400 and MAC402. There is
an option in later firmware to increase the speed error limit to 4000
RPM on MAC800 for shorter movements.
Bit 14, DIS_P_LIM
This bit is not an error or status bit, but rather a command bit.
When this is set, the motor will stay in an active mode and allow
moves even though one of the software position limits defined by
Reg28 and Reg30 is exceeded. The bit is automatically cleared once
the position gets inside the valid position range.
Bit 15, INDEX_ERR
The bit is set if an encoder error is detected. This can be a real
encoder hardware error or excessive electrical noise. The motor must
be reset or power cycled to clear this error.
Bit 16, OLDFILTERR
This bit is no longer used. It could detect if a previous version of the
velocity filters was found, or loaded, that did not work with newer
firmware.
TT1533-01GB
JVL Industri Elektronik A/S - User Manual - Integrated Servo Motors MAC050 - 3000
375
5.12
Reg.
Nr.
35
Internal registers
Firmware /
MacRegIo
Name
ERR_STAT
MacTalk
Name
Range/
Default
Size /
Access
Unit
Description
(not
present)
Na /
0
Word /
RW
-
Bit 17, U24V_ERR
Only MAC400 to 3000
This error bit get set if the control voltage, normally at 24VDC, is
measured to be below 12 V (9V on MAC402). The motor must be
reset or power cycled to clear this error. It is considered unsafe to
continue, because the electronics may not work correctly, and may
have lost data.
Bit 18, SHORT_CIRC
This bit is not used with the 400 Watts or higher motors.
Bit 19, VAC_ON
Reflects the status of detection of the mains AC input (230 or 120
VAC). This bit is set when AC is detected and cleared when AC is not
detected. The motor will refuse to enter an active mode if it detects
that AC is not present. It will refuse to activate the power dump/brake
resistor if it determines that this bit is set.
Bit 20, PWM_LOCKED
A critical error has occurred that makes further motor operation too
unsafe to continue. The motor must be reset to clear this error. The
cause of this error is one or more of bits IPEAK_ERR, INDEX_ERR,
OLDFILTER, U24V_ERR. At least one of these bits will be set when
PWM_LOCKED is set.
Bit 21, COMM_ERR
Communications error (master or slave timeout with Modbus-Gear
mode).
Bit 22, CURLOOP_ERR
Less than 2 mA was detected on the 4-20 mA input on the MAC00P4/P5 module for more than 100 ms
Bit 23, SLAVE_ERR
One or more error bits were set in an ERR_STAT reading from the
Modbus slave or COMM_ERR
Bit 24, ANY_ERR
single bit to make easier on PLCs to chefkc if the motor has any error
bits set. Reflect the logical operation of:
(ERR_STAT and ALL_ERROR_BITS) different from zero)
Bit 25, INIT_ERR:
Set if error was detected during motor startup that could prevent
reliable operation. This includes mainly that the shaft moved at the
time the encoder Hall information was read, so there is a great risk
that the motor will start with an uncontrolled movement and possibly
go into error. This bit can also catch some types of internal
misconfigurations, like hardware version checks, mainly to help JVL
production employees.
Bit 26, FLASH_ERR
An error was detected related to the internal flash memory during
startup. In most cases, this is related to the use of the multi-turn
absolute encoder value saved in flash at power down, and restored
during power up.
Bit 27, STO_ALARM_ERR
This bit gets set if the supervisor circuitry of the Safe Torque Off
(STO) system detects an error. This will normally indicate an error in
the electronics.
Bits 28, 29: Unused so far. (firmware v2.06, July 2013)
Bit 30, OUT1_STATUS
Status of the physical pin normally used for the IN_POSITION
signal/hardware output. The pin can also be used for user defined
purposes and this bit will reflects its state also in this case.
Bit 31, OUT2_STATUS
Status of the physical pin normally used for the ERROR_OUT
signal/hardware output. The pin can also be used for user defined
purposes and this bit will reflects its state also in this case.
TT1534-01GB
376
JVL Industri Elektronik A/S - User Manual - Integrated Servo Motors MAC050 - 3000
5.12
Reg.
Nr.
36
Internal registers
Firmware /
MacRegIo Name
CNTRL_BITS
MacTalk
Name
(not
present)
Range/
Default
Na /
32
Size /
Access
Word /
RW
Unit
Description
-
Bit 0, RECORDBIT
Only MAC400 to 3000
Set by the user to start or continue the sampling of register values,
using the Classic scope system. This bit will clear itself when the
sample buffer has been filled.
Bit 1, REWINDBIT
If set, the index into the sample buffer will be zeroed and sampling will
continue if in progress. This bit is typically set together with
RECORD_BIT above.
Bit 2, RECINNERBIT
If set, the samplinG7scope system samples at 100 microseconds
between samples instead of the normal 1.3milliseconds. Normally
used only for internal JVL development and service purposes.
Bit 3, RELPOSPSOLL
Bit 4, RELPOSPFNC
These two bits select what happens if one of the general-purpose
position registers, P1 through P8 is ‘activated’ by a FastMac
command. If one of these is set, this activates a relative movement
rather than the absolute position move that happens if none of these
bits are set. If RELPOSPSOLL is set alone, the value of the selected
P1-P8 register is added to the target position register Reg3, P_SOLL.
If RELPOSPFNC is set, the value of the selected P1-P8 is added to
an internal variable that will generate the movement, leaving P_SOLL
unchanged. This is used for ‘endless relative’ movements, since it will
not cause any overflow of the target position, but note that the actual
position will wrap around at +/-2^31 (2,147,483,648 counts) without
problems for the movement.
Note that these bits also control the movements in Analogue Biposition mode in similar ways.
Bit 5, SYNCPOSAUTO
If set when switching mode from Passive mode into an active mode,
The follow error and the function error are zeroed, and the actual
position is transferred to the P_FNC register, to avoid initial
movement.
Bit 6, SYNCPOSMAN
Set to manually synchronize the position by copying the value
of P_NEW, to P_IST, P_SOLL, and P_FNC, with proper
scaling. In other words, set:
P_IST = P_NEW,
P_SOLL = P_NEW,
P_FNC = (P_NEW + FLWERR)*16.
See also bit 8 below.
Note that this operation is performed as an atomic
(unbreakable) operation, and is currently the only way to
perform this perfect synchronization.
Bit 7, MAN_NO_BRAKE
Bit 8, SYNCPOSREL
When set, modifies the manual synchronization performed by
bit 6 above to use relative synchronization rather than
absolute synchronization. In other words, set:
P_IST = P_IST + P_NEW,
P_SOLL = P_SOLL + P_NEW,
P_FNC = P_FNC + (P_NEW + FLWERR)*16.
TT1504GB
JVL Industri Elektronik A/S - User Manual - Integrated Servo Motors MAC050 - 3000
377
5.12
Reg.
Nr.
36
Internal registers
Firmware /
MacRegIo
Name
CNTRL_BITS
MacTalk
Name
Range/
Default
Size /
Access
Unit
Description
(not
present)
Na /
32
Word /
RW
-
(Continued)
Only MAC400 to 3000
Bit 9, INDEX_HOME
Bit10, FWTRIGBITS
When set, use the advanced sampling with firmware trigger
conditions - when 0, use backwards compatible sampling
Bit 11, SAMPLING_BIT
Set when sampling is active after trigger has been detected
Bit 12, TRIGGER_ARMED_BIT
Set when sampling is active but trigger has not been detected
yet
Bit 13, ADVSAMPLE_BIT
If set, enables div-shift, min/max/avg + bitfield sampling.
37
START_MODE
(not
present
but is
preset as
function
of the
mode
register)
Na /
0
Word /
RW
-
Determines in what mode the motor should start after power
on and after a Zero Search.
This register works closely together with Reg2, MODE_REG.
Bits [31:16] are reserved.
Bits [15:8] are used to select the type of zero search to
perform when the FastMac command (16 + 96) is received.
This should be one of 12, 13, 14, or zero.
Bits [7:0] select the value to transfer to Reg2, MODE_REG at
motor power up and after a zero search has completed.
If bits [15:8] are non-zero the motor will remain in Passive
mode at power up regardless of the value in bits [7:0]. The
intention is then to wait for a FastMac command 16 + 96. It is
also possible to simply write a new value to Reg2,
MODE_REG to change mode.
38
P_HOME
Zero
search
position
Na /
-10000
Word /
RW
Encoder
counts
The offset value to use to adjust P_IST at the end of a Zero
Search.
39
HW_SETUP
(not
present)
Na /
9
Word /
RW
-
Bit 0, DIRAWR
Bit 1, DIRBWR
Bit 2, PULSEOUT
Bit 3, XSEL1
Bit 4, XPRINP
Pulse/Direction or Quadrature input type.
Bit 5, NOFILT
Disable lowpass filtering of external encoder pulses.
Bit 6, INVXDIR
Bit 7, INVROTDIR
Bit 8, USER_INPOS
Bit 9, USER_ERROR
Error output pin is controlled by the user via RegXX
Bit 10, INV_INPOS_OUT
Bit 11, INV_ERROR_OUT
Bit 12, CMP_ERROR_OUT
If set, OUT2_PIN is controlled by (P_IST > CMP_POS0)
(continued next page)
TT1535-01GB
378
JVL Industri Elektronik A/S - User Manual - Integrated Servo Motors MAC050 - 3000
5.12
Reg.
Nr.
39
Internal registers
Firmware /
MacRegIo
Name
HW_SETUP
(continued from last
page)
Only MAC400 to 3000
MacTalk
Name
Range/
Default
Size /
Access
Unit
Description
(not
present)
Na /
9
Word /
RW
-
Bit 13, PULSE_8000
If set, rescale the 8192 encoder pulses to 8000 for MAC800
compatibility and better Vel-filter performance
Bits 14..15: reserved
Bit 16, DIRCDWR
Direction signal for the MultiFuncIo2 A channel (or both A and
B?)
Bit 17, SELINDEX
Not used - prepared to select between encoder A or Index
signal -> MultF.
Bit 18, ALWAYS_COOL
Bit 19, POSITION_CAPTURE_UP
Used to enable SW position capture based on analogue input
rising edge
Bit 20, POSITION_CAPTURE_DN
Used to enable SW position capture based on analogue input
falling edge
Bit 21, PULSE_8000
If set, rescale the 8192 encoder pulses to 8000 for MAC800
compatibility and better Vel-filter performance
Bit 22, ENC_SCALING
Reserved for freely selectable encoder scaling.
Bit 23, SBUF_2048
Set to use a sample buffer length of 2048. Use 512 if not set
(backwards compatible).
Velocity to use during a zero search operation (Homing
operation). After the operation has completed, the drive will go
back to using the regular V_SOLL.
Torque to use during a zero search operation (Homing
operation). After the operation has completed, the drive will go
back to using the regular T_SOLL.
Defines if the motor should start a zero search immediately after
start up, as well as the type of zero search to perform when a
FastMac command is received.
Bits 7..0 define the zero search mode the motor should start up
in. If this value is zero, the motor will not perform a zero search
at startup, but will start up in the mode selected by Reg37,
START_MODE. See bits 15..8 below for an exception!
Bits 15..8 define what mode the motor will set when it receives
a FastMac command (96+16). NOTE that if all these bits are
non-zero the motor will start up in passive mode instead of
starting in START_MODE!
Bit 16 is set after a zero search has completed, and can thus be
used to test if the motor has performed a zero search at least
once after +24V was last turned on.
After a zero search has completed, the motor will always
change into the mode defined by Reg 37, START_MODE
(unless an error occurs that will stop the motor and set
ERR_STAT bit(s)).
When set to 1..8, copies one of POS0..POS7 to P_SOLL, then
resets to 0
When set to 1..8, copies one of VEL0..VEL7 to V_SOLL, then
resets to 0
When set to 1..4, copies one of ACC0..ACC3 to A_SOLL, then
resets to 0
When set to 1..4, copies one of TQ0..TQ3 to T_SOLL, then
resets to 0
When set to 1..4, copies one of LOAD0..LOAD3 to KVOUT then
resets to 0
When set to 1..4, copies one of ZERO0..ZERO3 to INPOSWIN,
then resets to 0
40
V_HOME
(not
present)
Na /
-138
Word /
RW
-
41
T_HOME
(not
present)
Na /
341
Word /
RW
-
42
HOME_MODE
(not
present)
Na /
0
Word /
RW
-
43
P_REG_P
(not
present)
V_REG_P
(not
present)
45
A_REG_P
(not
present)
46
T_REG_P
(not
present)
47
L_REG_P
(not
present)
48
Z_REG_P
(not
present)
Word /
RW
Word /
RW
Word /
RW
Word /
RW
Word /
RW
Word /
RW
-
44
0-8 /
0
0-8 /
0
0-4 /
0
0-4 /
0
0-4 /
0
0-4 /
0
-
TT1505GB
JVL Industri Elektronik A/S - User Manual - Integrated Servo Motors MAC050 - 3000
379
5.12
Reg.
Nr.
Internal registers
Only MAC400 to 3000
MacTalk
Name
Range/
Default
Size /
Access
Unit
49
Firmware /
MacRegIo
Name
POS0
Description
Position1
(P1)
CAPCOM0
(not
present)
51
POS1
Position2
(P2)
52
CAPCOM1
(not
present)
53
POS2
Position3
(P3)
54
CAPCOM2
(not
present)
55
POS3
Position4
(P4)
56
CAPCOM3
(not
present)
57
POS4
Position5
(P5)
58
CAPCOM4
(not
present)
59
POS5
Position6
(P6)
60
CAPCOM5
(not
present)
61
POS6
Position7
(P7)
62
CAPCOM6
(not
present)
63
POS7
Position8
(P8)
64
CAPCOM7
(not
present)
65
VEL0
Velocity 1
(V1)
Word /
RW
Word /
RW
Word /
RW
Word /
RW
Word /
RW
Word /
RW
Word /
RW
Word /
RW
Word /
RW
Word /
RW
Word /
RW
Word /
RW
Word /
RW
Word /
RW
Word /
RW
Word /
RW
Word /
RW
-
50
Na /
0
Na /
0
Na /
0
Na /
0
Na /
0
Na /
0
Na /
0
Na /
0
Na /
0
Na /
0
Na /
0
Na /
0
Na /
0
Na /
0
Na /
0
Na /
0
Na /
277(100RPM)
66
VEL1
VEL2
Velocity register V8 - see also register 65.
VEL3
-
Velocity register V8 - see also register 65.
69
VEL4
-
Velocity register V8 - see also register 65.
70
VEL5
-
Velocity register V8 - see also register 65.
71
VEL6
-
Velocity register V8 - see also register 65.
72
VEL7
Word /
RW
Word /
RW
Word /
RW
Word /
RW
Word /
RW
Word /
RW
Word /
RW
-
68
Na /
277(100RPM)
Na /
277(100RPM)
Na /
277(100RPM)
Na /
277(100RPM)
Na /
277(100RPM)
Na /
277(100RPM)
Na /
277(100RPM)
-
67
Velocity 2
(V2)
Velocity 3
(V3)
Velocity 4
(V4)
Velocity 5
(V5)
Velocity 6
(V6)
Velocity 7
(V7)
Velocity 8
(V8)
Velocity register V1. Used with the fastmac protocol or
by the MAC00-R1/3/4 nanoPLC module. See also
V_SOLL (register 5) which have the same scaling.
Velocity register V8 - see also register 65.
-
Velocity register V8 - see also register 65.
-
TT1506GB
380
JVL Industri Elektronik A/S - User Manual - Integrated Servo Motors MAC050 - 3000
5.12
Reg.
Nr.
Internal registers
MacTalk
Name
Range/
Default
Size /
Access
Unit
73
Firmware
/
MacRegIo
Name
ACC0
(not
present)
Na /
18(5003RPM/s²)
Word /
RW
74
ACC1
(not
present)
Na /
18(5003RPM/s²)
Word /
RW
75
ACC2
(not
present)
Na /
18(5003RPM/s²)
Word /
RW
76
ACC3
(not
present)
Na /
18(5003RPM/s²)
Word /
RW
Enc.cnt’s
Per
sample²
Enc.cnt’s
Per
sample²
Enc.cnt’s
Per
sample²
Enc.cnt’s
Per
sample²
77
TQ0
Torque 1
(T1)
Na /
1023(300%)
Word /
RW
78
TQ1
79
TQ2
80
TQ3
81
LOAD0
82
LOAD1
83
LOAD2
84
LOAD3
Torque 2
(T2)
Torque 3
(T3)
Torque 4
(T4)
Load 1
(L1)
Load 2
(L2)
Load 3
(L3)
Load 4
(L4)
85
ZERO0
(not
present)
86
ZERO1
(not
present)
87
ZERO2
(not
present)
88
ZERO3
(not
present)
89
MODE0
(not
present)
90
MODE1
(not
present)
91
MODE2
(not
present)
92
MODE3
(not
present)
93
HWI0
(not
present)
Na /
1023(300%)
Na /
1023(300%)
Na /
1023(300%)
Na /
0
Na /
0
Na /
0
Na /
0
Na /
0
Na /
0
Na /
0
Na /
0
Na /
0
Na /
0
Na /
0
Na /
0
Na /
0
Word /
RW
Word /
RW
Word /
RW
Word /
RW
Word /
RW
Word /
RW
Word /
RW
Word /
RW
Word /
RW
Word /
RW
Word /
RW
Word /
RW
Word /
RW
Word /
RW
Word /
RW
Word /
RW
Only MAC400 to 3000
Description
-
Torque register T1. Used with t he fastmac protocol or
by the MAC00-R1/3/4 nanoPLC module. See also
T_SOLL (register 7)
Torque register T2 - see also register 77.
-
Torque register T2 - see also register 77.
-
Torque register T2 - see also register 77.
-
HardWare Inputs Regs 93-104, HWI0-11, allow the digital
inputs from Reg106 to control the values of other motor
registers.
The most common use is to copy one of two values to a
target register. This can be used to switch between two
velocities, positions or modes. For instance to switch
between two target positions, set Reg49, POS0 to 1000
and Reg51, POS1 to 2000 and set the motor into position
mode. Then P_SOLL can be set to receive either the value
1000 or 2000 depending on the voltage on the digital input
(the Input State)
The copying is executed every 1.3 ms. The digital inputs
can thus be considered level-triggered rather than edgetriggered.
(Contrinued next page)
TT1507GB
JVL Industri Elektronik A/S - User Manual - Integrated Servo Motors MAC050 - 3000
381
5.12
Reg.
Nr.
93
Internal registers
Firmware /
MacRegIo
Name
HWI0
(Continued
from last
page)
Only MAC400 to 3000
MacTalk
Name
Range/
Default
Size /
Access
Unit
Description
(not
present)
Na /
0
Word /
RW
-
Each of the HW!0-11 registers have the following bit fields:
Bits [31:24]: Destination register used (only) when bits [3:0] equals
7.
Bits [23:16]: Source register number 0..254 for DI=1
Bits [15:8]: Source register number 0..254 for DI=0
Bits [7:4]: Select digital input bit number in Reg106.
Bits [3:0]: Target register selection. 0=None, 1=MODE_REG,
2=V_SOLL, 3=P_SOLL, 4=A_SOLL, 5=T_SOLL, 6=INPOSWIN,
7=Register number from bits [31:24].
When the value of bits [3:0] are one of 1..6, the two source registers
are implicitly fixed to the corresponding group of register, and the
value of bits [23:16] and bits [15:8] are used as an index into that
group of registers. For instance if bits [3:0] equals 3, the values of
bits [23:16] and bits [15:8] must be in the range 1..8 to select POS1
..POS8 for source registers to copy into P_SOLL.
When the value of bits [3:0] equals 7, the values of bits [23:16] and
[15:8] hold the full register numbers in the range 1-254.
For more advanced use, any of the source register or index values
can be set to zero, which means DoNothing. This effectively means
that in one of the Input States a source register will be copied to the
target register, while in the other Input State no copying will happen
so the target register will not be modified by the digital input.
The 12 HWI functions are executed every 1.3 ms in the order from
HWI0 to HWI11. NO other operations happen in between
regardless of communications and other parallel operations. It is
therefore safe to rely on stable register values and consistent digital
input values during the execution of the 12 HWI functions.
This implies that HWI function with higher numbers have higher
priority because they are executed later, and that it is safe to
change the same target register several times during the HWI
evaluation.
Note that each of the HWI function can use any of the digital inputs,
and that more than one HWI function can use the same digital input.
A typical HWI application is Jogging, where two pushbuttons
connected to two separate digital inputs are used to move the motor
position manually. This can be realized with a HWI setup like:
HWI0 uses Digital Input 1:
ON => MODE_REG=1 (velocity mode)
OFF => MODE_REG=3 (gear mode)
HWI1 also uses Digital Input 1:
ON => V_SOLL=+100RPM
OFF => V_SOLL = 3000 RPM
HWI2 uses Digital Input 2:
ON => MODE_REG=1 (velocity mode)
OFF => MODE_REG=3 (gear mode)
HWI3 also uses Digital Input 2:
ON => V_SOLL=-100RPM
OFF => V_SOLL = 3000 RPM
This will keep the motor in Gear mode with a maximum velocity of
3000 RM when none of the pushbuttons are activated, and change
to Velocity mode wit either +100 or -100 RPM as long as one of the
pushbuttons are held active. In this setup Digital Input 2 will have
higher priority than Digital Input 1, because it is evaluated later and
overwrites V_SOLL in case both buttons are held down.
TT1508GB
382
JVL Industri Elektronik A/S - User Manual - Integrated Servo Motors MAC050 - 3000
5.12
Reg.
Nr.
Internal registers
Only MAC400 to 3000
MacTalk
Name
Range/
Default
Size /
Access
Unit
Description
94
Firmware /
MacRegIo
Name
HWI1
(not present)
See Reg93, HWI0, for description
HWI2
(not present)
-
See Reg93, HWI0, for description
96
HWI3
(not present)
-
See Reg93, HWI0, for description
97
HWI4
(not present)
-
See Reg93, HWI0, for description
98
HWI5
(not present)
-
See Reg93, HWI0, for description
99
HWI6
(not present)
-
See Reg93, HWI0, for description
100
HWI7
(not present)
-
See Reg93, HWI0, for description
101
HWI8
(not present)
-
See Reg93, HWI0, for description
102
HWI9
(not present)
-
See Reg93, HWI0, for description
103
HWI10
(not present)
-
See Reg93, HWI0, for description
104
HWI11
(not present)
-
See Reg93, HWI0, for description
105
MAC00_TYPE
(not present)
Word /
RW
Word /
RW
Word /
RW
Word /
RW
Word /
RW
Word /
RW
Word /
RW
Word /
RW
Word /
RW
Word /
RW
Word /
RW
Word /
RW
-
95
Na /
0
Na /
0
Na /
0
Na /
0
Na /
0
Na /
0
Na /
0
Na /
0
Na /
0
Na /
0
Na /
0
Na /
0
-
106
MAC00_1 /
Digital Inputs
I/O
management
Na /
0
Word /
RW
-
Identifies the Generation-2 module type autodetected at
startup. 0 = No Gen2 module found, 1=MAC00-B41,
2=MAC00-P4 or MAC00-P5 found.
The registers from 106 to 120 are used to support different
interface modules with the Generation-2 connectors. The
function of these registers will be different depending on
which module is mounted in the motor. The Gen.2 module
type is detected automatically by the motor at start up.
Reg106, Digital inputs, is a bitmapped value where bits [15:8]
show the status of hardware signals in the basic motor as
described below, while bits [7:0] show the status of the digital
inputs from the MAC00-B41 module.
Be aware that bits [15:0] in Reg215, IO_POLARITY, can be
set to invert the value of the corresponding bits [15:0] in this
register.
Bits [15:12] show the values of the four RS-422 signals.
These are intended mostly for serial communications to
some modules or to use Modbus RS485, but they can be
used as digital inputs provided that the input voltage is kept
within -7 to +12 volts. These are differential signals, so to use
them as single-ended inputs, one of the differential lines
must be kept at a constant voltage in between the high and
low thresholds for the single-ended line.
At the time of this writing, bits [15:12] are supported on
MAC400, but not yet on MAC800.
Bit 15: Multifunction 1, channel B
Bit 14: Multifunction 1, channel A
Bit 13: Multifunction 2, channel B
Bit 12: Multifunction 2, channel A
Bits [10:8] show the status of the analogue inputs ANINP2,
ANINP1 and ANINP. Status will be high (logic 1) when the
value of the analogue line is above 5.0 volts. This threshold
can be adjusted by modifying the corresponding
ANINPx_OFFSET registers. This way it is possible to use the
analogue inputs as digital inputs with adjustable thresholds in
the range -10V to +10V.
Bit 10: ANINP2 (not signal conditioned)
Bit 9: ANINP1 (not signal conditioned)
Bit 8: ANINP (signal conditioned)
To use ANINP3 (availab le on the MAC00-P4 and MAC00-P5
modules as analogue current loop 4-20 mA) use Reg222,
IOSETUP to make ANINP reflect the (signal conditioned)
value of this input, so the digital status will be shown in Bit 8.
To use ANINP2 as a signal conditioned input, use a similar
trick so IOSETUP is set to make ANINP reflect the signal
conditioned value of ANINP2 in bit 8.
Bits 6, 7, and 11 are unused.
JVL Industri Elektronik A/S - User Manual - Integrated Servo Motors MAC050 - 3000
383
5.12
Reg.
Nr.
107
Internal registers
Firmware /
MacRegIo Name
MAC00_2
MacTalk
Name
(not present)
Range/
Default
Na /
0
Size /
Access
Word /
RW
Only MAC400 to 3000
Unit
Description
-
Shows various status bits for the currently mounted Gen2
module.
For the MAC00-B41:
Bit 0: Digital Output overload. This shows the staus of the
output driver chip that controls the six digital outputs. The
overload status can be set if either an overcurrent
condition or a too high temperature is detected. This
status bit is cleared when these conditions are no longer
present.
108
MAC00_3
(not present)
109
MAC00_4
(not present)
110
MAC00_5
(not present)
111
MAC00_6
(not present)
112
MAC00_7
(not present)
113
MAC00_8 /
B41_DO /
Digital outputs
I/O
management
Na /
0
Na /
0
Na /
0
Na /
0
Na /
0
Na /
0
Word /
RW
Word /
RW
Word /
RW
Word /
RW
Word /
RW
Word /
RW
-
Bit 1: CVO voltage detected. This bit reflects if the voltage
at the CVO terminal is above a hardwired default value.
CVO is the supply voltage for the digital outputs.
N/U
-
N/U
-
N/U
-
N/U
-
N/U
-
Bits [5:0] of this register controls the digital outputs O6..O1
on the MAC00-B41 module. Each bit that is set here will
enable the corresponding PNP output.
It is possible to overwrite these bits by using Registers
115-120, see below.
114
115
MAC00_9 /
B41_DOSTATUS
MAC00_10 /
B41_CONF0
I/O
management
(not present)
Na /
0
Na /
0
Word /
RW
Word /
RW
-
-
Also Reg215, IO_POLARITY, will invert the value of these
bits before there are written to the hardware.
Shows the status of each of the six digital outputs actually
written to the hardware.
This value will be Reg113, possibly modified by Regs115 120 and finally possibly having some bits inverted by
Reg215.
Controls IO1 on MAC00-B41 (bit 0 in B41_DO).
Each of the B41_CONF5..CONF0 registers can be used
to modify the corresponding digital outputs by effectively
overwriting bits [5:0] in Reg113, B41_DO.
They can be set to replace the corresponding bit in
B41_DO with any bit from any motor register in the range
1..254, typically status bits from Reg35, ERR_STAT, for
instance bits INPOS or ANY_ERR.
Bits [31:24]: reserved
Bits [23:16]: Source register number, 1..254.
Bits [15:5]: Reserved
Bits [4:0]: Bit number in source register to use.
116
117
118
119
120
MAC00_11 /
B41_CONF1
MAC00_12 /
B41_CONF2
MAC00_13 /
B41_CONF3
MAC00_14 /
B41_CONF4
MAC00_15 /
B41_CONF5
(not present)
(not present)
(not present)
(not present)
(not present)
Na /
0
Na /
0
Na /
0
Na /
0
Na /
0
Word /
RW
Word /
RW
Word /
RW
Word /
RW
Word /
RW
-
Reg215, IO_POLARITY, will be applied after these
registers to allow general inversion of each digital output
bit.
Controls IO2 on MAC00-B41 (bit 1 in B41_DO).
See Reg115, B41_CONF0 for description.
Controls IO3 on MAC00-B41 (bit 2 in B41_DO).
See Reg115, B41_CONF0 for description.
Controls IO4 on MAC00-B41 (bit 3 in B41_DO).
See Reg115, B41_CONF0 for description.
Controls IO5 on MAC00-B41 (bit 4 in B41_DO).
See Reg115, B41_CONF0 for description.
Controls IO6 on MAC00-B41 (bit 5 in B41_DO).
See Reg115, B41_CONF0 for description.
TT1510GB
384
JVL Industri Elektronik A/S - User Manual - Integrated Servo Motors MAC050 - 3000
5.12
Reg.
Nr.
Internal registers
MacTalk
Name
Range/
Default
Size /
Access
Unit
121
Firmware /
MacRegIo
Name
KFF5
KFF5
KFF4
KFF4
123
KFF3
KFF3
124
KFF2
KFF2
125
KFF1
KFF1
126
KFF0
KFF0
127
KVFX6
(not
present)
128
KVFX5
(not
present)
129
KVFX4
(not
present)
130
KVFX3
(not
present)
131
KVFX2
(not
present)
132
KVFX1
(not
present)
133
KVFY5
(not
present)
134
KVFY4
(not
present)
135
KVFY3
(not
present)
136
KVFY2
(not
present)
137
KVFY1
(not
present)
138
KVFY
(not
present)
139
KVB4
(not
present)
140
KVB3
(not
present)
141
KVB2
(not
present)
142
KVB1
(not
present)
143
KVB0
(not
present)
144
KIFX2
(not
present)
145
KIFX1
(not
present)
146
KIFY1
(not
present)
147
KIFY0
(not
present)
148
KIB1
(not
present)
149
KIB0
(not
present)
Word /
RW
Word /
RW
Word /
RW
Word /
RW
Word /
RW
Word /
RW
Word /
RW
Word /
RW
Word /
RW
Word /
RW
Word /
RW
Word /
RW
Word /
RW
Word /
RW
Word /
RW
Word /
RW
Word /
RW
Word /
RW
Word /
RW
Word /
RW
Word /
RW
Word /
RW
Word /
RW
Word /
R
Word /
R
Word /
R
Word /
R
Word /
R
Word /
R
-
122
Na /
0
Na /
0
Na /
0
Na /
0
Na /
0
Na /
0
Na /
0
Na /
0
Na /
0
Na /
0
Na /
0
Na /
0
Na /
0
Na /
0
Na /
0
Na /
0
Na /
0
Na /
0
Na /
0
Na /
0
Na /
0
Na /
0
Na /
0
Na /
0
Na /
0
Na /
0
Na /
0
Na /
0
Na /
0
Only MAC400 to 3000
Description
-
Filter coefficients used by the velocity and position regulator
loops. These values should be loaded only from MacTalk, and not
modified by the user, since this can have dangerous effects.
-
Filter coefficients used by the current loop for low-level control f
the phase currents. These values are fixed and should not be
modified by the user.
-
TT1511GB
JVL Industri Elektronik A/S - User Manual - Integrated Servo Motors MAC050 - 3000
385
5.12
Reg.
Nr.
Internal registers
150
Firmware /
MacRegIo
Name
<reserved>
151
<reserved>
152
<reserved>
153
<reserved>
154
<reserved>
155
ID_RESERVED
156
S_ORDER
157
OUTLOOPDIV
MacTalk
Name
Range/
Default
Size /
Access
Unit
(not
present)
(not
present)
(not
present)
(not
present)
(not
present)
(not
present)
(not
present)
-
Na /
0
Word /
RW
-
(not
present)
Na /
0
Word /
RW
-
Only MAC400 to 3000
Description
-
<reserved>
An S-profile can be used to modify/smooth the acceleration at the
beginning and end of a change in velocity. This is useful to
prevent overshoot.
The value of zero disables the S-profile so the normal A_SOLL is
used. Values 1..8 can be used to select a progressively smoother
S-profile, with 8 being the smoothest (and slowest).
The value of S_ORDER may not be changed unless the motor is
in Passive mode (MODE_REG=0).
Divider value for the velocity loop. With the standard value of 1,
the velocity loop is recalculated every 1.3 ms. With a value of 2,
the loop is recalculated every 2.6 ms, which can give better
performance for slow movements and/or large inertia.
It is absolutely necessary to use a different set of filters in
Regs121-142 when changing this value.
To change this value from MacTalk, and gain access to the
extended filters, open the Filter Setup window, then hold down
both the Control and Shift keys and double-click on the text ‘More’
to the left of the ‘Stability’ slider (at the green end). After entering
the correct password, Sample Frequency can be selected and
MacTalk will use the appropriate filter set. Note that the units of all
velocity-related register, measured in counts/sample will now be
doubled, and all acceleration-related registers, measured in
2
Counts/sample , will be four times larger.
TT1512GB
386
JVL Industri Elektronik A/S - User Manual - Integrated Servo Motors MAC050 - 3000
5.12
Reg.
Nr.
158
Internal registers
Firmware /
MacRegIo Name
SAMPLE1
MacTalk
Name
(not
present)
159
SAMPLE2
(not
present)
160
SAMPLE3
(not
present)
161
SAMPLE4
(not
present)
162
REC_CNT
(not
present)
163
V_EXT
(not
present)
164
GV_EXT
(not
present)
165
G_FNC
(not
present)
166
FNC_OUT
(not
present)
167
FF_OUT
(not
present)
168
VB_OUT
(not
present)
169
VF_OUT
Actual
torque
170
ANINP
(not
present)
171
ANINP_OFFSET
(not
present)
172
ELDEG_OFFSET
(not
present)
173
PHASE_COMP
(not
present)
174
AMPLITUDE
(not
present)
175
MAN_I_NOM
(not
present)
176
MAN_ALPHA
(not
present)
177
UMEAS
(not
present)
178
I_NOM
(not
present)
179
PHI_SOLL
(not
present)
180
IA_SOLL
(not
present)
181
IB_SOLL
(not
present)
182
IC_SOLL
(not
present)
Range/
Default
Na /
0
Size /
Access
Word /
RW
Only MAC400 to 3000
Unit
Description
-
SAMPLE1..4 controls the scope/sample function.
Na /
0
Na /
0
Na /
0
0-511 or
0..2047
/
0
Word /
RW
Word /
RW
Word /
RW
Word /
RW
-
Na /
0
Na /
0
Na /
0
Na /
0
Na /
0
Na /
0
Na /
0
Na /
0
Na /
0
Na /
0
Na /
0
Na /
0
Na /
0
Na /
0
Na /
0
Na /
0
Na /
0
Na /
0
Na /
0
Na /
0
Word /
R
Word /
R
Word /
R
Word /
R
Word /
R
Word /
R
Word /
RW
Word /
RW
Word /
RW
Word /
R
Word /
R
Word /
R
Word /
RW
Word /
RW
Word /
R
Word /
R
Word /
R
Word /
R
Word /
R
Word /
R
-
-
-
Register number, bit field and min/max/average sample
type for the first value in each sample.
Register number, bit field and min/max/average sample
type for the second value in each sample.
Register number, bit field and min/max/average sample
type for the third value in each sample.
Register number, bit field and min/max/average sample
type for the fourth value in each sample.
Index into the sample buffer used for scope functionality.
The length of the sample buffer, and thus the range of this
parameter if determined by bit 23, SBUF_2048, in Reg39,
HW_SETUP. See document/section “YY” for further
information on the sample system.
Unscaled/Raw velocity of external encoder input in pulses
per 1.3ms.
Velocity of external encoder input V_EXT, after being
scaled by the ratio GEARF1/GEARF2
-
<used with motor current loop>
-
<used with motor current loop>
-
<used with motor current loop>
-
<used with motor current loop>
-
<used with motor current loop>
-
<used with motor current loop>
-
<used with motor current loop>
-
<used with motor current loop>
-
<used with motor current loop>
-
<used with motor current loop>
-
<used with motor current loop>
TT1513GB
JVL Industri Elektronik A/S - User Manual - Integrated Servo Motors MAC050 - 3000
387
5.12
Internal registers
Reg.
Nr.
183
Firmware /
MacRegIo Name
IA_IST
MacTalk
Name
184
IB_IST
(not
present)
185
IC_IST
(not
present)
186
IA_OFFSET
(not
present)
187
IB_OFFSET
(not
present)
188
KIA
(not
present)
189
KIB
(not
present)
190
ELDEG_IST
(not
present)
191
V_ELDEG
(not
present)
192
UA_VAL
(not
present)
193
UB_VAL
(not
present)
194
UC_VAL
(not
present)
195
EMK_A
(not
present)
196
EMK_B
(not
present)
197
EMK_C
(not
present)
198
U_BUS
Bus
voltage
199
U_BUS_OFFSET
(not
present)
200
TC0_CV1
(not
present)
201
TC0_CV2
(not
present)
(not
present)
Range/
Default
Na /
0
Na /
0
Na /
0
Na /
0
Na /
0
Na /
0
Na /
0
Na /
0
Na /
0
Na /
0
Na /
0
Na /
0
Na /
0
Na /
0
Na /
0
Na /
0
Na /
0
Na /
0
Size /
Access
Word /
R
Word /
R
Word /
R
Word /
R
Word /
R
Word /
R
Word /
R
Word /
R
Word /
R
Word /
R
Word /
R
Word /
R
Word /
R
Word /
R
Word /
R
Word /
R
Word /
R
Word /
R
Word /
R
Only MAC400 to 3000
Unit
Description
-
<used with motor current loop>
-
<used with motor current loop>
-
<used with motor current loop>
-
<used with motor current loop>
-
<used with motor current loop>
-
<used with motor current loop>
-
<used with motor current loop>
-
<used with motor current loop>
-
<used with motor current loop>
-
<used with motor current loop>
-
<used with motor current loop>
-
<used with motor current loop>
-
<used with motor current loop>
-
<used with motor current loop>
-
<used with motor current loop>
-
-
The actual voltage of the internal DC bus, updated every
100 us. One count corresponds to ~0.888V.
Factory offset used to calibrate the measurement of
Reg198, U_BUS.
<used by JVL only to monitor internal timing´>
-
<used by JVL only to monitor internal timing´>
-
TT1514GB
388
JVL Industri Elektronik A/S - User Manual - Integrated Servo Motors MAC050 - 3000
5.12
Reg.
Nr.
202
Internal registers
Firmware /
MacRegIo Name
MY_ADDR
MacTalk
Name
(not
present)
Range/
Default
Na /
0
Size /
Access
Word /
RW
Only MAC400 to 3000
Unit
Description
-
The motor address used for the MacTalk protocol. The
motor will respond to telegrams with this address or the
broadcast address 255.
MY_ADDR can also be used for the Modbus protocol if
selected in Reg213, UART1_SETUP:
203
MOTOR_TYPE
(not
present)
Na /
0
Word /
R
-
204
SERIAL_NUMBER
(not
present)
HW_VERSION
(not
present)
Word /
R
Word /
R
-
205
Na /
0
Na /
0
-
Further, MY_ADDR can be read and used by the fieldbus
modules for CANopen, DeviceNet and Profibus to define
their address on the fieldbus, if not selected by DIPswitches on the MAC00-xx module.
Value read from factory flash memory to identify the type
of motor: 12=MAC400, 13=MAC400B, 14=MAC800,
15=MAC800B.
Value read from factory flash memory to show the JVL
serial number of the motor.
Bits [23:20]: Value read from factory flash memory to
identify the Main version of the bootloader.
Bits [19:16]: Value read from factory flash memory to
identify the Minor version of the bootloader.
Bits [7:4]: Value read from factory flash memory to identify
the Main version of the PCB controller board hardware.
Bits [3:0]: Value read from factory flash memory to identify
the Minor version of the PCB controller board hardware.
206
CHKSUM
(not
present)
207
USEROUTVAL
208
Word /
R
Word /
RW
-
(not
present)
Na /
0
Na /
0
COMM_ERRS
(not
present)
Na /
0
Word /
RW
-
209
INDEX_IST
(not
present)
Word /
R
-
210
HW_PLIM
(not
present)
COMMAND_REG
(not
present)
212
UART0_SETUP
213
UART1_SETUP
MacTalk
Baudrate
Serial data
214
EXTENC_BITS
(not
present)
215
INPUT_LEVELS
(not
present)
216
ANINP1
(not
present)
217
ANINP1_OFFSET
(not
present)
218
ANINP2
(not
present)
219
ANINP2_OFFSET
(not
present)
220
ANINP3
(not
present)
221
ANINP3_OFFSET
(not
present)
Word /
RW
Word /
RW
Word /
RW
Word /
RW
Word /
RW
Word /
RW
Word /
RW
Word /
RW
Word /
RW
Word /
RW
Word /
RW
Word /
RW
-
211
0..8191
or
0..7999
Na /
0
Na /
0
Na /
0
Na /
0
Na /
0
Na /
0
Na /
0
Na /
0
Na /
0
Na /
0
Na /
0
Na /
0
-
-
The remaining bits are reserved.
Value read from factory flash memory to show the
checksums of the firmware and the bootloader.
The values of bits [1:0] are output to the standard
InPosition and ErrorOut hardware signals if the
corresponding bits [9:8], USER_INPOS and
USER_ERROR, in Reg39, HW_SETUP are set.
Counts the number of communication errors that have
occurred on the MacTalk serial interface. Errors can be
framing errors and protocol data errors.
Actual single-turn position of the internal encoder, valid for
both incremental and absolute encoders.
Hardware position limits – used by the MAC00-FSx
module.
1=Reset, 2=Save to flash and reset,
128..255 = Execute FastMac commands.
0=9600, 1=19200, 2=38400, 3=57600, 4=115200,
5=230400 baud.
This register selects the type of protocol to use on the
Serial Data interface. See section “XX”.
Supports setup of signals used for label dispenser
functionality with the MAC00-B41 module.
-
TT1515GB
JVL Industri Elektronik A/S - User Manual - Integrated Servo Motors MAC050 - 3000
389
5.12
Internal registers
Reg.
Nr.
222
Firmware /
MacRegIo Name
IOSETUP
MacTalk
Name
223
Only MAC400 to 3000
Size /
Access
Word /
RW
Unit
Description
(not
present)
Range/
Default
Na /
0
-
ANOUT1
(not
present)
Na /
0
Word /
RW
-
224
ANOUT1_OFFSET
(not
present)
P_OFFSET
(not
present)
226
P_MULTITURN
(not
present)
227
AIFILT_MAXSLOPE
(not
present)
228
AIFILT_FILTFACT
(not
present)
229
P_QUICK
N/A
Word /
RW
Word /
RW
Word /
RW
Word /
RW
Word /
RW
Word /
RW
-
225
Na /
0
Na /
0
Na /
0
Na /
0
Na /
0
Na /
0
Selects what hardware analogue input signal that goes to
the main ANINP register and controls some filtering/signal
conditioning.
The value written here by the user, or by the firmware, will
be output to the 4-20 mA hardware output on the MAC00P5/P4 modules.
Offset that is added to ANOUT1 before writing to
hardware.
Used to adjust the zero position for absolute multi-turn
encoders.
The full multi-turn position read directly from the absolute
encoder, if mounted.
230
XREG_ADDR
(not
present)
Na /
0
Word /
RW
-
231
XREG_DATA
(not
present)
Na /
0
Word /
RW
-
-
The actual position of the internal encoder. Much like
P_IST, but updated every 100us. P_IST is updated only
once every 1.3ms (or 2.6 ms for OUTLOOPDIV=2).
Address of extended registers, XREGs.
A positive value will write the contents of Reg231,
XREG_DATA, to that register.
A negative value will cause the value of that XREG to be
writen to XREG_DATA.
After the reading or writing operation has completed,
XREG_ADDR will be set to zero.
The first NN XREGs are used for configuration of the
switchboard for hardware signals that can be routed in
several ways through the FPGA in MAC800 HW 1.8 and
later or MAC400 HW1.? And later.
Data to or from extended registers. See XREG_ADDR for
description
TT1516GB
390
JVL Industri Elektronik A/S - User Manual - Integrated Servo Motors MAC050 - 3000
5.13
5.13.1
Connecting to other equipment
Connecting the MAC motor to a Jetter PLC type Nano-B/C/D
In many applications a PLC is used as the central “intelligence”. To adapt the MAC motor
in such types of applications, an axis module on the PLC is often used. The illustration
below shows how to connect the MAC motor with a Jetter PLC type Nano-B/C/D
equipped with a servo axis controller module type JX2-SV1.
PLC type Jetter Nano-B/C/D + JX2-SV1
ENC
A-OUT
DSUB 15Pin Male
DSUB 9Pin Male
(seen from cable side) (seen from cable side)
MAC motor with expansion
module MAC00-B1
Use twisted pairs if possible
1
2
3
4
Screen
5
6
7
9
10
11
12
13
1
2
3
4
6
7
8
9
5
14
15
8
GND
BB+
AA+
5
4
3
2
1
9
8
7
6
Pins 8 to 15 are left
unconnected
O+
O2
O1
AIN
Screen
TT0952GB
IN/OUT
DSUB 9Pin female
(seen from cable side)
Remember to use shielded cables !
Connection scheme:
MAC motor IN/OUT
9-pole connector (MAC00B1)
Jetter JX2-SV1
9-pole connector
Jetter JX2-SV1
15-pole connector
Pin 1
Pin 2 + 4
Pin 2
Pin 3 + 5
Pin 3
Pin 6
Pin 4
Pin 7
Pin 5
Pin 8
Pin 6
Pin 9
Pin 1
The illustration can also be used as a common diagram for other PLC manufacturers
since the fundamental principle is to feed an analogue control voltage from the axis module to the MAC motor dictating the speed or torque. The MAC motor returns the internal encoder signal back to the PLC module in order to let the PLC know what the actual
velocity and/or position is.
Standard cables:
If the MAC00-B4 expansion module with M12 connectors is used, JVL can offer a standard cable type WI0040. This cable connects directly between the MAC00-B4 module and
the Jetter JX2-SV1.
JVL Industri Elektronik A/S - User Manual - Integrated Servo Motors MAC050 - 3000
391
5.13
5.13.2
Connecting to other equipment
How to set up the MAC motor for the JX2-SV1
The following illustration shows how to set up the MAC motor. Remember to select the
“Save in flash” button after the setup is done in order to save the changes permanently.
Set up “Startup mode”
for “Analog velocity” in
order to enable the
analogue input for
controlling the velocity
of the MAC motor from
the PLC output.
Set up the Multifunction I/O
as “Pulse Output”. This setting
will enable the internal encoder
pulses to be present at the terminals
A and B. This signal is send back
to the PLC module.
Optional:
Adjust the analogue input in order
to optain 0.00V at the analogue input
when the PLC is transmitting what is
supposed to be 0.00V.
Adjust the acceleration to
the maximum allowable in
order to avoid that the MAC
motor itself interferes with the
PLC control-loop.
5.13.3
Adjust the speed to the
maximum allowable in
order to avoid that the MAC
motor itself interferes with the
PLC control-loop.
Zero search mode:
Normally “Disabled”
(PLC takes care of
zero search).
TT0953GB
Setup in Jetter JX2-SV1 - Mode 2
Set up the registers as follows (when the SV1 module is placed as the first intelligent module after the CPU, i.e. module no. = 2, meaning registers are numbered 121xx):
12198 = 2
; Mode (0...3)
12117 = 1024 ; Encoder lines
12118 = 2000 ; Max. speed in RPM which the MAC + SV1 combination can reach.
; This value will depend on the supply voltage. Please consult the
; description Power supply (only MAC050 to 141), page 85.
12121 = 2000 ; Example - ref. value for setpoint speed in register 12103.
12103 = 1000 ; Example - meaning 100.0% of maximum speed, i.e. 2000 RPM.
Adjust the following register values when commissioning the servo solution:
12116 = xxx
12110 = yyy
; Offset value for the analogue output. The MAC motor should not drift
; and at nominal position 0 (zero), R12102, the SV1 must be able to
; to control the axis very close to actual position 0, R12109.
; P-gain.
Please also follow the instructions in the JX2-SV1 user manual.
Remark:
392
If the MAC motor is supplied by 24VDC, the setup for the MAC motor
must be 3000 RPM - even though the MAC itself is not allowed to run
more than 2000 RPM at this voltage. Do not worry, the SV1 module
controls and limits the speed correctly. See also Power supply (only
MAC050 to 141), page 85.
JVL Industri Elektronik A/S - User Manual - Integrated Servo Motors MAC050 - 3000
5.13
5.13.4
Connecting to other equipment
Setup in Jetter JX2-SV1 - Mode 3
Same as for mode 2 but the MAC motor must be set up in “Analogue torque direct”.
Set up the mode register: 12198 = 3; Mode (0...3)
See also - Setup in Jetter JX2-SV1 - Mode 2, page 392 - for set up of other SV1 registers.
Adjust the registers for Digital Speed Control:
12124 = xxx ; Proportional gain (speed).
12126 = xxx ; Integral gain.
12127 = xxx ; Current limitation, a value of 2047 corresponds to 10.0V.
12128 = xxx ; Present integral gain.
12129 = xxx ; Limitation of the integral gain.
Please also follow the instructions in the JX2-SV1 user manual.
5.13.5
Connect the MAC motor to Jetter PLC with JX2-SM2 axis module
The Jetter PLC can be supplied with the module JX2-SM2 which transmits a pulse and
direction signal instead of a +/-10V signal as on the JX2-SV1 module. Each pulse represents a certain distance of movement and the direction signal determines the direction.
Connection scheme:
MAC motor IN/OUT
9-pole connector (MAC00-B1)
Jetter JX2-SM2
9-pole connector
Pin 1
A+
Pin 1
STEP+
Pin 2
A-
Pin 6
STEP-
Pin 3
B+
Pin 2
DIR+
Pin 4
B-
Pin 7
DIR-
Pin 5
GND
Pin 4 + 9
GND
All 4 dip-switches on the rear side of the MAC00-B1 module must be switched to position “off”.
5.13.6
How to set up the MAC motor for the JX2-SM2
The following illustration shows how to set up the MAC motor. Remember to select the
“Save in flash” button after the setup is done in order to save the changes permanently.
Set up “Startup mode”
for “Gear” in order
to enable the pulse and
direction input for
controlling the position
of the MAC motor via
the pulse and direction
signal.
Set up the Multifunction I/O
as “Pulse Input”. This setting
will setup the Multifunction I/O
as 2 balanced inputs. The A input
will be the pulse input and the B
input will be the direction input.
Choose “Pulse-Direction format.
Setup the gear-ratio
to 1024 for input and
output.
Adjust the acceleration to
the maximum allowable in
order to avoid that the MAC
motor itself interferes with the
PLC control-loop.
Adjust the speed to the
maximum allowable in
order to avoid that the MAC
motor itself interferes with the
PLC control-loop.
Zero search mode:
Normally “Disabled”
(PLC takes care of
zero search).
JVL Industri Elektronik A/S - User Manual - Integrated Servo Motors MAC050 - 3000
TT0955GB
393
5.14
Accessories
The following accessories are available for the MAC motor series.
5.14.1
Cables
RS232-9-1
Setup and communication cable. Length 3 m
Standard RS232 cable that is used for connecting MAC motors with an integrated expansion module to a standard computer serial COM port.
The following expansion modules include an RS232 COM port based on a 9-pole DSUB
connector which matches the RS232-9-1:
MAC00-B1
MAC00-R1
RS232-9-1-MAC
Setup and communication cable. Length 3 m.
Setup and communication cable used for the BASIC MAC motor which is NOT equipped
with a full RS232 interface. The cable can be used between the BASIC MAC motor and
a standard RS232 COM port.
WG0302 (2m) or WG0320 (20m)
Power cable with 2 x 0.75mm² inner wires + screen. The colour is black.
The cable is fitted with a Molex connector at one end. The other end is open.
This cable can be used together with the following units.
MAC50 to 141 Fits directly to the 2-pole power connector inside the basic MAC motor.
MAC00-CS
Passes through the -CS module and connects to the basic MAC motor.
MAC00-R3
Passes through the -R3 module and connects to the basic MAC motor.
Optional : If the Molex connector is cut off, the cables can also be used for:
MAC00-B2
Connects to the 3-pole screw terminal named “power”.
MAC00-FP2
Connects to the 2-pole screw terminal named “power”.
WG0402 (2m) or WG0420 (20m)
I/O cable with 12 twisted pairs (24 wires)+ screen. The colour is black. The cable is fitted at one end with - 1 pcs. 6-pole connector, 1 pcs. 8-pole connector and 1 pcs. 10-pole
connector. The other end is open.
The cable can be used with following units.
MAC00-FP2
MAC00-R3
Connects inside to all the I/Os +RS232 interface. Only the power and
profibus connections are not covered by this cable.
Connects inside to all the I/Os +RS232/RS485 interface.
WG0502 (2m) or WG0520 (20m)
I/O cable for the basic MAC motors. The cable has 4 twisted pairs (8 wires)+ screen.
The colour is black. The cable is fitted with an AMP connecter at one end which fits the
8-pole I/O connector inside the basic MAC motor. The other end is open.
The cable can be used with following units.
MAC50 to 141 Fits directly to the 8-pole I/O connector inside the basic MAC motor.
MAC00-CS
Passes through the -CS module and connects to the basic MAC motor.
394
JVL Industri Elektronik A/S - User Manual - Integrated Servo Motors MAC050 - 3000
5.14
5.14.2
Accessories
Connectors / connector kits
MAC00-CONKIT1
This kit contains all 3 connectors for the Basic Mac Motor.
Power connector:
JVL no. 3069-02
JVL no. 2478-TL
RS232 Connector: JVL no. WG0200
I/O Connector:
Housing 2p. Pitch 3.96mm (Molex no. 09-91-0200).
Crimp contacts (Molex no. 08-50-0106).
Since this connector is very small (pitch=1.5mm), it
is supplied as an assembled connector with 65mm
cable. WG0200 is the JVL number.
JVL no. 254H08
Housing 8p. Pitch 2.54mm (AMP no. 770602-8)
JVL no. 4809C-P914L Crimp contacts (AMP no. 770601-1)
By ordering this connector kit, all of the above-mentioned parts are included. Please ensure that a proper crimp tool is used when the contacts are fitted. The type numbers
mentioned in brackets are the original type numbers from either Molex or AMP.
5.14.3
Power Supplies
PSU00-PD1
Combined power dump, resistor, and capacitor unit. For a complete power supply system, only a transformer with a secondary winding supplying 32VAC is required.
For systems with up to 5-8 MAC motors, this unit can serve as a central power dump
unit.
The capacitor offers an efficient and economical way of storing the energy returned from
the motors during deceleration of high inertias. See also www.jvl.dk
PSU48-240
A compact switch-mode power supply with 240W output power at 48VDC.
The power supply is UL and CSA approved. It is protected against overvoltage, overtemperature and short-circuit or overload of the output. The power supply can either be
mounted on a DIN rail or “wall” mounted. See also the data-sheet LD0047-xx which can
be downloaded at www.jvl.dk
Other power supplies:
JVL offers a wide range of power supplies in the power range 45W up to 1.5kW with the
output voltages 24 and 48VDC. They all uses switch-mode technology in order to minimize physical dimensions and for easy adaption to mains voltages in the range 90 to
240VAC.
The product range covers the following types: PSU05-045, PSU24-075, PSU24-240,
PSU48-240, PSU48-800, PSU48-1000, PSU48-1500.
See also the data-sheet LD0058 (overview) or LD0053 (detailed) which can be downloaded at www.jvl.dk.
5.14.4
Brakes and shaft reinforcement
2 brake units are available for the MAC50-141 motors. The MAB23x-01 offers 10mm a
output shaft and MAB23x-02 offers 6.35mm output shaft. Both types can be mounted
directly on all the MAC50-141 motors and require 24VDC applied to release the motor
No brakes are available for the MAC400 and 800 since they are constructed with an integrated brake which is a part of the order number for the complete motor.
See also the data-sheet LD0055-xx which can be downloaded at www.jvl.dk.
JVL Industri Elektronik A/S - User Manual - Integrated Servo Motors MAC050 - 3000
395
5.15
5.15.1
Cable drawings
WI1005-M12F5TF5T03P - Master/slave cable for MAC00-P4/5
J1
J2
M12 5-pin female
M12 5-pin female
Green (RS485 A-)
White (24V)
300cm (3m)
W1
Green
2 5 1
3
4
(RS485 A-)
White (+24V)
2 5 1
3
4
Brown
Yellow
(GND)
(RS485 B+)
Brown (GND)
Connector seen
from soldering side
Yellow (RS485 B+)
Screen (GND)
Screen (GND)
Terminated in the connector entry
Connector seen
from soldering side
Parts List
Pos.
JVL Part No.
Qty.
J1
WI1008-M12F5SS1
1 pcs.
J2
1 pcs.
WI1008-M12F5SS1
W1
300cm
WH0002-R2x2x0.25+SC
LT0153-12GB
JVL Industri Elektronik A/S
Blokken 42 • DK-3460 Birkerød
Tel: +45 4582 4440
Fax: +45 4582 5550
5.15.2
WI1005-M12F5TF5T03P
RS 485
kommunikationskabel
Version - 1.2 Date: 8-7-09
Approved by:
Drawn by:
JVJ/BVJ
RS232-M12-1-5-5 - communication cable for MAC00-B4, R4, etc.
RS232 communication cable for MAC expansion modules
J1
DSUB Connector.
Female 9pin.
M12, 5 pin male connector
Ø6±0.2mm
J2
Cable, Black PVC, UL 22 AWG, 5 core screened.
6
7
8
9
1
2
3
4
5
5 metre
Max.
15.6mm
J1
Cable
J2
Pin no.
Color
1
Brown
3
2
White
2
3
Blue
4
Black
5
Not connected
Grey
Screen
Finger screws (2 pcs)
Pin no.
Blue and Black is not
connected and must
each be insulated
5
Housing
J2 Pin 1, 4, 6, 7, 8, 9 must be left open
LT0056-12
JVL Industri Elektronik A/S
Blokken 42 • DK-3460 Birkerød
Tel: +45 4582 4440
Fax: +45 4582 5550
396
RS232-M12-1-5-5
Interface cable
M12 to DSUB
Version - 1.2 Date: 27-9-06
Approved by:
BVJ - 1.2
Drawn by:
JVJ
JVL Industri Elektronik A/S - User Manual - Integrated Servo Motors MAC050 - 3000
5.16
CE Declaration of Conformity
EU - Declaration of Conformity
Manufacturer
Company Name:
Address:
Telephone:
E-mail:
Web:
JVL Industri Elektronik A/S
Blokken 42
DK-3460 Birkerød
Denmark
+45 45 82 44 40
[email protected]
www.jvl.dk
Hereby declare that:
Product
No.:
Name:
Type:
alone or combined with one of the
following expansion modules:
MAC50, MAC95, MAC140, and MAC141
Integrated AC Servo Motor
Series -A1, -A2 and -A3
MAC00-B1 / MAC00-B2 / MAC00-B4 /
MAC00-B41 / MAC00-CS / MAC00-P5 /
MAC00-EC4/41 / MAC00-EI4/41 /
MAC00-EL4/41 / MAC00-EM4/41 /
MAC00-EP4/41 / MAC00-FS1 / MAC00-FS4 /
MAC00-R1 / MAC00-R3 / MAC00-R4 /
MAC00-FP2 / MAC00-FP4 / MAC00-FC2 /
MAC00-FC4 / MAC00-FD4
- is in conformity with:
DIRECTIVE 2004/108/EC OF THE EUROPEAN PARLIAMENT AND OF THE COUNCIL of
15 december 2004 on the approximation of the laws of the Member States relating to
electromagnetic compatibility.
was manufactured in conformity with the following national standards that
implements a harmonised standard:
EN 61800-3 Adjustable speed electrical power drives systems - Part 3:
EMC product standard including specific test methods
July 2014
Bo V. Jessen
Technical Director
JVL Industri Elektronik A/S
TT0970-02GB (LX0015-04GB)
JVL Industri Elektronik A/S - User Manual - Integrated Servo Motors MAC050 - 3000
397
5.16
CE Declaration of Conformity
EU - Declaration of Conformity
Manufacturer
Company Name:
Address:
Telephone:
E-mail:
Web:
JVL Industri Elektronik A/S
Blokken 42
DK-3460 Birkerød
Denmark
+45 45 82 44 40
[email protected]
www.jvl.dk
Hereby declare that:
Product
No.:
Name:
Type:
alone or combined with one of the
following expansion modules:
MAC400, MAC800, MAC1500 and MAC3000
Integrated AC Servo Motor
Series -D2, -D3, D4, D5 and -D6
MAC00-B1 / MAC00-B2 / MAC00-B4 /
MAC00-B41 / MAC00-CS / MAC00-P5 /
MAC00-EC4/41 / MAC00-EI4/41 /
MAC00-EL4/41 / MAC00-EM4/41 /
MAC00-EP4/41 / MAC00-FS1 / MAC00-FS4 /
MAC00-R1 / MAC00-R3 / MAC00-R4 /
MAC00-FP2 / MAC00-FP4 / MAC00-FC2 /
MAC00-FC4 / MAC00-FD4
- is in conformity with:
DIRECTIVE 2004/108/EC OF THE EUROPEAN PARLIAMENT AND OF THE COUNCIL of
15 december 2004 on the approximation of the laws of the Member States relating to
electromagnetic compatibility.
was manufactured in conformity with the following national standards that
implements a harmonised standard:
EN 61800-3 Adjustable speed electrical power drives systems - Part 3:
EMC product standard including specific test methods
July 2014
Bo V. Jessen
Technical Director
JVL Industri Elektronik A/S
TT1077-02GB (LX0021-02GB)
398
JVL Industri Elektronik A/S - User Manual - Integrated Servo Motors MAC050 - 3000
5.17
UL Certificate of Compliance
C E R T I F I C AT E O F C O M P L I A N C E
Certificate Number
Report Reference
Issue Date
Issued to:
20120131-E254947
E254947-20070109
2012-JANUARY-31
JVL INDUSTRI ELEKTRONIK A/S
BLOKKEN 42 3460 BIRKEROED DENMARK
This is to certify that
representative samples of
POWER CONVERSION EQUIPMENT
Power Conversion Equipment, Cat. Nos. MAC400, MAC800, followed by D,
followed by 2, 3, 5 or 6
Power Conversion Equipment Accessory, Low Voltage Expansion Modules,
Cat. Nos. MAC00-B1, MAC00-B2, MAC00-B4, MAC00-B41, MAC00-CS,
MAC00-FB4, MAC00-FC4, MAC00-FD4, MAC00-FP2, MAC00-FP4, MAC00FR4, MAC00-FS1, MAC00-FS4, MAC00-R1, MAC00-R3, MAC00-R4, ,
MAC00-P4, MAC00-P5, MAC00-EC4, MAC00-EI4, MAC00-EL4, MAC00-EP4,
MAC00-ES4, MAC00-EM4, MAC00-Ex4 and MAC00-EW4
Have been investigated by UL in accordance with the Standard(s) indicated on
this Certificate.
Standard(s) for Safety:
Additional Information:
POWER CONVERSION EQUIPMENT, UL 508C
See the UL Online Certifications Directory at www.ul.com/database for
additional information
Only those products bearing the UL Recognized Component Mark should be considered as being covered by UL's
Recognition and Follow-Up Service.
The UL Recognized Component Mark generally consists of the manufacturer’s identification and catalog number, model
number or other product designation as specified under “Marking” for the particular Recognition as published in the
appropriate UL Directory. As a supplementary means of identifying products that have been produced under UL’s
Component Recognition Program, UL’s Recognized Component Mark:
, may be used in conjunction with the required
Recognized Marks. The Recognized Component Mark is required when specified in the UL Directory preceding the
recognitions or under “Markings” for the individual recognitions.
The final acceptance of the component is dependent upon its installation and use in complete equipment submitted to UL
LLC.
Look for the UL Recognized Component Mark on the product.
William R. Carney, Director, North American Certification Programs
UL LLC
Any information and documentation involving UL Mark services are provided on behalf of UL LLC (UL) or any authorized licensee of UL. For questions, please
contact a local UL Customer Service Representative at www.ul.com/contactus
Page 1 of 1
Note : MAC1500 and MAC3000 are UL Pending.
JVL Industri Elektronik A/S - User Manual - Integrated Servo Motors MAC050 - 3000
399
400
JVL Industri Elektronik A/S - User Manual - Integrated Servo Motors MAC050 - 3000
6
Index
A
Absolute multiturn encoder 64
Accessories 394–395
AIN 24, 35, 116, 118, 121, 128, 130, 1
34, 137, 148, 187, 202, 205, 227, 243
, 247, 259–260, 307, 310
Air Cylinder mode 8, 117–118, 121, 133–
134, 137
Overall description 27
Analogue Gear Mode 7
Analogue Input 107–108
AIN 24, 35, 116, 118, 121, 128, 130,
134, 137, 148, 187, 202, 205, 227
, 243, 247, 259–260, 307, 310
Analogue Torque mode 7–8, 27, 107, 112
Analogue Velocity mode 7, 112
Analogue Velocity/Gear mode 7, 111
B
Balanced/push-pull signal 125, 142, 264–
265
Baud
Rate
57
157, 208, 210, 212, 232, 314, 3
Brakes 314, 395
C
Cable Connection 116
Cable connection tables 395
Cables 116, 128, 132, 149, 152, 203, 2
07–208, 231–232, 243–
245, 248, 270, 273–274, 307–
308, 311, 391, 394
CAN-Open 4, 176–177, 204–205
Introduction 152
CE approval 4, 314, 397
CE requirements 397
Coil mode 7
Filter setup 25
Gear ratio 25
Overall description 24–26
Register overview 25–26
Zero search 25
Connecting to other equipment 391–393
Connector overview 84
Connectors 84, 116–117, 122–
123, 126, 128–130, 132–133, 138–
139, 147–149, 152, 202–205, 207–
208, 225–227, 231–232, 242–
243, 245–248, 253, 258, 262, 268–
274, 304, 306–
311, 345, 357, 391, 393–395
Connector Kit MAC00CONKIT1 84, 395
DSUB 117, 126, 203, 245, 253, 274,
308, 394
Interface connection 106
M12 117, 129–130, 132, 147–
149, 152, 204–205, 207–208, 226–
227, 231–232, 246–248, 268–
274, 309–311, 391
Power Supply 84–
85, 89, 93, 97, 102, 395
User I/O 84
D
Damping 55
Declaration of Conformity 397
DeviceNet 4, 219, 226–227, 231
Introduction 208
Dimensions 324
MAC050-141 324
MAC400 and 800 325
Dip-switch settings 124, 131, 140, 157–
159, 204–205, 208, 210–212, 226–
227, 233, 246–247, 309
DSP-402 Support 152, 170, 173, 176–
177, 180
DSUB 117, 126, 203, 245, 253, 274, 30
8, 394
Dual Supply 117, 133, 245, 258
E
Efficiency curves
MAC050-141 323
Emergency Object 168
Error acceleration 40
Error handling 40
Error acceleration 40
Follow error 40
Function error 40
Position limit min. and max. 40
Error output 4
Ethernet 4
Expansion modules 115
MAC00-B1/B2/B4 117, 120–
125, 127, 129–132, 134–140, 142–
149, 259–262, 264, 268–269, 272–
273
MAC00-CS 116
MAC00-FC2/FC4 151, 153, 173–
174, 180, 187, 207
MAC00-FD4 208, 211–213, 225–227
MAC00-FP2/FP4 232, 234–235, 238–
244, 246, 248–249, 251
JVL Industri Elektronik A/S - User Manual - Integrated Servo Motors MAC050 - 3000
401
6
Index
MAC00-R1/R3/R4 274–276, 278–
281, 283, 305, 308–309
F
Features 4
Basic operating modes 6
Overall description 5–6
Filter selector basics 53
Filter set-up
Coil mode 25
FlexMac commands 232, 234, 237, 239–
240
Follow error 40, 53, 314
compensation 56
Function description 19–27, 30–32, 34–
35, 38–40, 52–57
Function error 40
Fuse 86
Prefuse, MAC800 only 98
G
Gear mode 6, 21–26, 30–
31, 84, 107, 110–111, 314
Gear ratio 7, 23, 26, 183, 283
Coil Mode 25
GND 85, 116, 119, 122–
123, 128, 130, 135, 138–
139, 148, 202, 204–
205, 227, 243, 246–
247, 260, 262, 269, 272, 304, 307, 30
9–310, 393
Grounding 85, 89, 97, 102, 106, 116, 12
2–123, 128–130, 138–139, 147–
148, 202, 204–205, 226–
227, 243, 246–247, 262, 268–
269, 271, 304–305, 307, 309–310
MAC800, power supply 97
Power supply grounding MAC050-141 85
GSD file 249
H
Hardware
Connector overview 84
Power supply 85–86, 88–90, 93–
94, 96–100, 102–103
Serial interface 106
User I/O 107, 110, 112–113
High frequency damping 55
Home sensor 35
Homing mode 187
I
In position output 4
Inputs
See also AIN
Analogue input 107–108
Multifunction I/O 5–7, 20–
21, 23, 28, 31, 110–
113, 116, 119, 124–
125, 128, 130, 135, 140–
142, 148, 264–265
Pulse inputs 21, 23, 31, 84, 110–
111, 119, 128, 135, 314, 345
Quadrature input 6–
7, 21, 23, 31, 110–111
Introduction
Features 4, 12
Overall description 5–6
IP42 117, 274, 314
IP67 116–
117, 127, 129, 132, 149, 152, 204, 20
7–208, 226, 231–
232, 246, 248, 270, 273–
274, 306, 309, 311, 314
J
Jetter JX2-SM2 393
Jetter JX2-SV1 391–393
Jetter PLC 391, 393
JX2-SM2 393
JX2-SV1 392
L
LOAD parameter 25, 52–53, 57, 346
Low frequency damping 55
M
M12 117, 129–130, 132, 147–
149, 152, 204–205, 207–208, 226–
227, 231–232, 246–248, 268–
274, 309–311, 391
MAC00-B1/B2/B4 Expansion
Modules 117, 120–125, 127, 129–
132, 134–140, 142–149, 259–
262, 264, 268–269, 272–273
Overall description 117, 133, 258
General analogue input (AIN) 121, 137
General hardware
aspects 118, 134, 259
MAC00-B2 with cables 128
MAC00-B4 cables 132, 149, 270, 273
Multifunction I/O 124, 140
Power supply 120, 136, 261
RS232 122, 138, 262–263
RS485 123, 139, 304
MAC00-CONKIT1 395
MAC00-CS Expansion module 116
JVL Industri Elektronik A/S - User Manual - Integrated Servo Motors MAC050 - 3000
402
6
Index
MAC00-FC2/FC4 Expansion
Modules 151, 153, 173–
174, 180, 187, 207
CAN-Open 152
MAC00-FC2 cables 152
MAC00-FC2 RS232 interface cables 203
MAC00-FC4 cables 207
Transmit PDOs 177
MAC00-FD4 Expansion Module 208, 211–
213, 225–227
Cables 208, 231
DeviceNet 208
Hardware, general 225
Node-id, Baud Rate, Termination 210
Position controller 213
MAC00-FP2/FP4 Expansion
Modules 232, 234–235, 238–
244, 246, 248–249, 251
Address, Termination 233
Assembly instruction for profi cables 244
Cables 232
Connectors 242
Dual-supply operation 245
FlexMac commands 240
GSD file 249
Input data (Slave-Master) 237
Input modes 238
MAC00-FP2 RS232 cable 245
MAC00-FP2 with cables 243
MAC00-FP4 cables 248
Profibus 232
RS232 245
Slave parameters 239
MAC00-R1/R3/R4 Expansion Modules 274–
276, 278–281, 283, 305, 308–309
General description 274
Command toolbox description 283
Firmware setup 275
MAC00-R3 cables 274
MAC00-R3 RS232 cable 308
MAC00-R3 with cables 307
MAC00-R4 cables 311
Programming hints 282
Rx (fixed format) 275
RxP (Graphic programming) 275–
276, 278–281, 283
MAC050-141
Adjusting the current filter 54
Efficiency curves 323
Physical dimensions 324
Power supply 85–86
Power supply dimensioning 86
Power supply grounding 85
Serial communication 357–360
Technical data 314
Torque curves 320
MAC800
Physical dimensions 325
Power dump resistor 99
Power supply circuitry 96
Power supply connection 97
Power supply grounding 97
Prefuse 98
Technical data 317–319
Torque curves 321
Using 115V supply 98
MacTalk 4, 6, 15–
16, 20, 25, 32, 39, 52–
53, 84, 98, 107, 109, 113, 119, 122,
128, 135, 138, 158, 179, 262, 275, 28
0, 314, 345, 357
Coil mode register overview 25–26
Introduction 14
Main Features 4
Master-Slave Output Data
MAC00-FP2/FP4 Expansion Modules
Output data (Master-Slave) 234
Mechanical zero
search 14, 22, 25, 30, 32, 34–
35, 38–39, 84, 107, 117–118, 134
See also Zero search
Multifunction I/O 5, 21, 28, 110–113
See also Inputs
MAC00-B1/B2/B4 124, 140
N
nano-PLC 4, 274
Node-id 158–159, 210–211
NPN 109, 117, 124, 126–127, 140–
141, 253, 306, 314
O
O1 Output 109
See also Outputs
O2 Output 109
See also Outputs
Operating modes
Analogue Gear mode 7
Analogue Torque mode 7
Analogue Velocity mode 7
Analogue Velocity/Gear mode 7
Changing operation modes 186
Coil mode 24–26
Gear mode 6, 21–23, 30–31
JVL Industri Elektronik A/S - User Manual - Integrated Servo Motors MAC050 - 3000
403
6
Index
Introduction 6
Passive mode 6
Position mode 6, 20
Velocity mode 6
Oscillation 55, 346
Outputs
Multifunction I/O 110–113
See also Inputs
Pulse outputs 112
Quadrature output 20–
21, 84, 110, 112
Status outputs O1, O2 109, 116–
117, 119, 126–
128, 130, 135, 148, 171–
172, 202, 205, 217, 227, 243, 247,
253, 306–307, 310
Overall description of the MAC motors 5–6
P
Passive mode 6
PDOs 152, 173, 176–178, 188
PLC 84, 106, 113, 249, 314, 391, 393
nano-PLC 4
PNP 109, 117, 119, 124–
128, 130, 135, 140–
141, 202, 243, 247, 253, 306–
307, 310
Position controller 7, 208, 213, 219
Position limit min. and max. 40
Position mode 6, 20
Using Position mode 20
Position/Velocity filter 54
Power dump 88–89, 96–
97, 100, 314, 395
MAC800 99
Power Supplies 86, 395
Power Supply 84–86, 88–90, 93–94, 96–
100, 102–103, 116
Circuitry, MAC800 96
Dimensioning, MAC050-141 86
Grounding MAC050-141 85
MAC00-B1/B2/B4 118, 134, 259
MAC800 connection 97
MAC800 grounding 97
Power dump resistor, MAC800 99
Using 115V, MAC800 only 98
Prefuse 98
Profibus 4, 201, 233, 239, 242, 246–
249, 394
Introduction 232
Profile position mode 186
Pulse inputs 111
See Inputs
Pulse outputs 112
See also Outputs
Push-pull signal 125, 142, 264–265
Q
Quadrature input
See Inputs
Quadrature Output
See Outputs
R
Register overview
Coil mode 25–26
RS232 4, 84, 106, 117, 128–
129, 133, 202, 258, 306–
308, 314, 345, 357, 394–395
Interface signal levels 106
MAC00-B1/B2/B4 122, 138, 262–263
MAC00-FP2/FP4 Expansion Modules 245
RS485 106, 117, 133, 258, 306–
307, 309, 314, 394
MAC00-B1/B2/B4 123, 139, 304
Rx (fixed formats) 275
RxP (Graphic programming) 275, 277
S
Saving, retrieving disk files 16
Serial communication 113, 116, 314
MAC050-141 357–360
Serial Interface 106, 127, 306, 357
Multifunction I/O 113
Signal levels 106
Servo filter adjustment 52–57
Additional adjustment 57
Adjusting the LOAD parameter 52
Current filter adjustment (MAC050-141
only) 54
Damping 55
Filter selector basics 53
Follow error compensation 56
Position/Velocity filter 54
Transferring, saving filter 57
Setting up the MAC Motor 14–15
Disk files 16
MacTalk 14
Toolbar description 15
Shaft reinforcements 395
Signal levels, serial interface 106
Slave-Master 237
SSI interface 58
Status outputs
See Outputs
JVL Industri Elektronik A/S - User Manual - Integrated Servo Motors MAC050 - 3000
404
6
Index
T
Technical data
MAC050-141 314
MAC800 317–319
Termination 207, 210, 231, 233, 247–
248
Torque curves
MAC050-141 320
MAC400, MAC800 321
Torque zero search 32, 34
Trouble-shooting 345–346
U
UL approval 4
USB 130, 148, 345
User I/O 84, 107, 110, 112–113
Analogue input 107–108
Multifunction I/O 110–113
Status outputs 109
V
Velocity mode 6, 187
Z
Zero search 14, 22, 25, 30, 32, 34–
35, 38–39, 84, 107, 117–
118, 121, 126–
127, 130, 134, 137, 148, 179, 202, 21
9, 240, 243, 253, 269, 272, 306–
307, 310, 314
Coil mode 25
Index position after zero search 39
Modes 32
Sensor type 33
Sensor type 1 35–37
Sensor type 2 35
Starting a zero search 33
Torque 32, 34
Zero point offset 38
JVL Industri Elektronik A/S - User Manual - Integrated Servo Motors MAC050 - 3000
405
6
Index
JVL Industri Elektronik A/S - User Manual - Integrated Servo Motors MAC050 - 3000
406