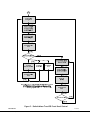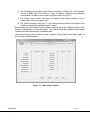
1
Technical Manual User’s Manual The most important thing we build is trust. The most important thing we build is trust. Messenger 2 Transmitter – Camera Mount (M2T-C) OPERATIONS MANUAL 100-M0084X3 12 OCT 12 GMS INC. doing business as Cobham Tactical Communications and Surveillance Cobham Tactical Communications and Surveillance 1916 Palomar Oaks Way Ste 100 Carlsbad, CA 92008 T:760-496-0055 F: 760-496-0057 www.cobham.com/tcs Table of Contents 1. Acronyms ....................................................................................................................................................................................................6 2. Introduction .............................................................................................................................................................................................7 2.1 About the Manual.....................................................................................................................................................................................7 2.2 Warranty .......................................................................................................................................................................................................7 2.3 Safe Operating Procedures ..................................................................................................................................................................7 3. General System Information ........................................................................................................................................................8 3.1 Overview .......................................................................................................................................................................................................8 3.2 Key System Features...............................................................................................................................................................................8 3.3 Theory of Operation ...............................................................................................................................................................................9 4. Initial Checkout ..................................................................................................................................................................................10 4.1 Included Items ........................................................................................................................................................................................10 4.2 Getting Started .......................................................................................................................................................................................10 5. Hardware Overview ...........................................................................................................................................................................12 5.1 M2T-C Connectors ...............................................................................................................................................................................12 5.1.1 RF Output (J7).................................................................................................................................................................................12 5.1.2 DRL Antenna Port (J8) ................................................................................................................................................................12 5.1.3 SD/HD SDI_ASI IN (J1) ..............................................................................................................................................................13 5.1.4 ASI Out (J2) .....................................................................................................................................................................................13 5.1.5 Audio inputs (channels 1 and 2) (J3 & J4).........................................................................................................................13 5.1.6 Composite Video input (J6) .....................................................................................................................................................13 5.1.7 Control & Optional Interfaces (J5) .......................................................................................................................................13 5.2 Audio Input Configurations ..............................................................................................................................................................14 5.3 Power Switch ...........................................................................................................................................................................................14 5.4 Front Panel Control Keypad & LCD Display...............................................................................................................................15 5.4.1 LCD Menu .........................................................................................................................................................................................15 5.4.2 Explanation of the LCD Displays ...........................................................................................................................................18 6. Software Overview ............................................................................................................................................................................22 6.1 Product Control & Status Monitoring Approach ....................................................................................................................22 6.2 System Requirements..........................................................................................................................................................................22 6.3 Installation ................................................................................................................................................................................................22 6.4 M2T Configurator Functions ...........................................................................................................................................................23 6.4.1 Administrator Setup & Usage .................................................................................................................................................24 6.4.2 Function Buttons ..........................................................................................................................................................................30 6.4.3 Field Definitions ............................................................................................................................................................................31 6.4.4 Input Mode - Switching between SDI in or ASI in .......................................................................................................32 6.4.5 Audio Enable - Switching between Analog audio and Embedded SDI audio..................................................33 6.4.6 Pull-Down Menu Definitions ...................................................................................................................................................34 7. Specifications .......................................................................................................................................................................................46 100-M0084X3 GMS INC. doing business as Cobham Tactical Communications and Surveillance 2 of 55 www.cobham.com/tcs 7.1 Video Encoding (HD) ...........................................................................................................................................................................46 7.2 Video Encoding (SD) ............................................................................................................................................................................46 7.3 Audio Encoding ......................................................................................................................................................................................47 7.4 Transport Stream ...................................................................................................................................................................................47 7.5 Control ........................................................................................................................................................................................................47 7.6 COFDM RF Output.................................................................................................................................................................................47 7.7 Modulation ...............................................................................................................................................................................................48 7.8 Standard DVB-T Compliant ..............................................................................................................................................................48 7.9 High Throughput Option ....................................................................................................................................................................48 7.10 Power ........................................................................................................................................................................................................48 7.11 Environmental ......................................................................................................................................................................................48 7.12 Physical ....................................................................................................................................................................................................48 7.13 Physical Interfaces .............................................................................................................................................................................48 7.14 Scrambling Option..............................................................................................................................................................................49 7.15 User Data Option ................................................................................................................................................................................49 7.16 Data Return Link (DRL)(Option) ....................................................................................................................................................49 8. D/C (Down Converter) IF frequencies explained ........................................................................................................50 8.1 IF Frequencies .........................................................................................................................................................................................50 8.2 Local and Remote Power for Down Converters ......................................................................................................................50 8.2.1 Remote Power ................................................................................................................................................................................50 8.2.2 Local Power .....................................................................................................................................................................................50 9. Cable Losses ...........................................................................................................................................................................................52 9.1 Coax Cable ................................................................................................................................................................................................52 10. Fan Filter Maintenance ...............................................................................................................................................................53 List of Tables Table 1 - Control DB-15 Connector Pin Out .......................................................................................................................................... 13 Table 2 - M2T Field Definitions .................................................................................................................................................................... 31 Table 3 – DB-9 Connector Pin Out for the D/C..................................................................................................................................... 51 100-M0084X3 GMS INC. doing business as Cobham Tactical Communications and Surveillance 3 of 55 www.cobham.com/tcs List of Figures Figure 1 – Basic M2T-C Link Setup ............................................................................................................................................................. 10 Figure 2 – M2T-C Connectors....................................................................................................................................................................... 12 Figure 3 – Local Control and Power ........................................................................................................................................................... 14 Figure 4 – Front Panel Control ...................................................................................................................................................................... 15 Figure 5 – Default Menu Tree LCD Front Panel Control ................................................................................................................... 17 Figure 6 – M2T Configurator ......................................................................................................................................................................... 23 Figure 7 – M2T Configurator Main Screen ............................................................................................................................................. 24 Figure 8 – Administrator Login ..................................................................................................................................................................... 25 Figure 9 – Password Entry Screen ............................................................................................................................................................... 25 Figure 10– Access Control Sub Menu ....................................................................................................................................................... 25 Figure 11 – Main Access Control ................................................................................................................................................................. 26 Figure 12 – Encoder Access Control Window ....................................................................................................................................... 27 Figure 13 – TS PID Access Control Window .......................................................................................................................................... 27 Figure 14 – Scrambling Access Control Window (optional)........................................................................................................... 28 Figure 15 – Scrambling Access Control Window................................................................................................................................. 28 Figure 16 – Other Access Control Window ............................................................................................................................................ 29 Figure 17 – Admin Password Window ...................................................................................................................................................... 29 Figure 18 – Input Mode ................................................................................................................................................................................... 33 Figure 19 – Audio Selection ........................................................................................................................................................................... 34 Figure 20 – Configuration Pull Down Menus ......................................................................................................................................... 35 Figure 21 – Special Setup Sub Menu ......................................................................................................................................................... 35 Figure 22 – Channel Plan Opening Screen .............................................................................................................................................. 36 Figure 23 – Channel Mode Selections ...................................................................................................................................................... 36 Figure 24 – User Defined Channel Mode Screen................................................................................................................................. 37 Figure 25 – HD Setup ........................................................................................................................................................................................ 38 Figure 26 – Scrambling Set-Up ..................................................................................................................................................................... 39 Figure 27 – Scrambling Key Set-Up............................................................................................................................................................ 39 Figure 28 – User Data Setup .......................................................................................................................................................................... 41 Figure 29 – Others .............................................................................................................................................................................................. 42 Figure 30 – Transport Stream Setup .......................................................................................................................................................... 43 Figure 31 – Help Menu ..................................................................................................................................................................................... 43 Figure 32 – Channel Rate Guide ................................................................................................................................................................... 44 Figure 33 – FW Version .................................................................................................................................................................................... 44 Figure 34 – About Box ...................................................................................................................................................................................... 45 Figure 35 – BDC Connectors ......................................................................................................................................................................... 51 Figure 36 – Fan Maintenance........................................................................................................................................................................ 53 List of Appendices Appendix A - Cable, M2T-C External Breakout Cable ....................................................................................................54 Appendix B - Default Groups ...........................................................................................................................................................55 100-M0084X3 GMS INC. doing business as Cobham Tactical Communications and Surveillance 4 of 55 www.cobham.com/tcs Revision History Version Date Main Changes from Previous version Edited by X2A 23 Sep 2009 Firmware update – PSF support was added to code RM X2B 2 Jun 2010 Added embedded Audio Functions, ASI IN, and new GUI TG X2C 15 Jul 2010 Updated Audio Section TG X2D 19 Oct 2010 Added fan maintenance section TG Expanded encoder only mode TS bit rate X2E 25 Jan 2011 Improved Transport Stream Set Screen DRF Linked PID range to carrier mode (2k/4k) Updated to latest format. X3 12 Oct 2012 Modified scrambling section to support AES-C128 and AES-C 256. 100-M0084X3 GMS INC. doing business as Cobham Tactical Communications and Surveillance YW 5 of 55 www.cobham.com/tcs 1. Acronyms This section lists and describes the various acronyms used in this document. Name 16 QAM 64 QAM A/V AES ASI BDC or BDCC COFDM CVBS/Y C D/C DRL FEC GUI HD I/O Kbaud Kbps Mbps MER MPEG MSR M2D M2T M2L NTSC PAL QPSK RF RX S/N THD SD SDI TX VDC Meaning 16-state Quadrature Amplitude Modulation 64-state Quadrature Amplitude Modulation Audio/Video Advanced Encryption System (32 bit) Asynchronous Serial Interface Block down converter Coded Orthogonal Frequency Division Multiplexing Composite video/Luminance with S-video Chroma video Down-Converter Data Return Link Forward Error Correction Graphical User Interface High Definition Input/ Output Kilobaud per second Kilobits per second Megabits per second Modulation Error Rate Moving Picture Experts Group Messenger Smart Receiver Messenger Two Decoder Messenger Two Transmitter Messenger Two Link National Television System Committee Phase Alternation Line Quadrature Phase Shift Keying Radio Frequency Receiver Signal-to-Noise Ratio Total Harmonic Distortion Standard Definition Serial Digital Interface Transmitter Volts (Direct Current) 100-M0084X3 GMS INC. doing business as Cobham Tactical Communications and Surveillance 6 of 55 www.cobham.com/tcs 2. Introduction 2.1 About the Manual Cobham Tactical Communications & Surveillance User Manuals focus on providing the end user an easy to understand operational instructions to quickly setup and deploy the equipment. The Cobham Technical Operation Manuals focus on the technical details and setup of the equipment. The Technical Manuals also provide a more in depth explanation of the settings and specifications of the equipment that technicians can use to verify the operational status. 2.2 Warranty Cobham offers a 12 month standard product warranty. During this period, should the customer encounter a fault with the equipment we recommend the following course of action: Check the support section of the website for information on that product and any software/firmware upgrades. If fault persists call our support line and report the fault. If fault persists and you are informed to return the product, please obtain an RMA number from the Cobham support department or website and ship the equipment with the RMA number displayed and a description of the fault. Please email the support section the airway bill/consignment number for tracking purposes. Depending on the nature of the fault, Cobham endeavor to repair the equipment and return it to the customer within 14 days of the item arriving at our workshops. Obviously it is impossible to cater for all types of faults and to manage 100% replacement part availability, and delays are sometimes inevitable. Please contact Cobham for details of packages that can be tailored to meet your individual needs, whether they are service availability, technical training, local geographic support or dedicated spares holdings. 2.3 Safe Operating Procedures Ensure that the power supply arrangements are adequate to meet the requirements of VETA product. Operate within the environmental limits specified for the product. Only authorized, trained personnel should open the product. There are no functions that required the User to gain access to the interior of the product. 100-M0084X3 GMS INC. doing business as Cobham Tactical Communications and Surveillance 7 of 55 www.cobham.com/tcs 3. General System Information 3.1 Overview Cobham introduces the Broadcast industry’s first AVC / h.264 COFDM wireless Camera-Mount transmitter for transport of Standard (SD) plus High Definition (HD) audio /video streams. The Messenger 2 Series (M2) product line incorporates many of the original “Messenger” product line capabilities with two major upgrades. The M2 series incorporates the AVC compression technology with one frame delay which replaces the MPEG-2 compression, and they cover all the SD and HD formats up to 1080P. One of the biggest problems encountered in the transition from an analog to a digital A/V platform has been the inherent digital coding delay that in some digital systems are 1.5 seconds or more for HD. The M2T-C employs a specially designed ‘Ultra-Low Delay’ coding technology, which provides 44mS (~ 1 frame) end-to-end system delay when using Cobham’s AVC Decoder. This ensures that the picture you see is what is happening now; crucial for applications such as sports and news coverage! The internal Data Return Link (DRL) provides a bi-directional serial data path (up to 115.2 kBaud) that can be used for a variety of remote control and communications requirements including control of all of the M2T operating parameters and enables the addition of camera control, audio communication and many other special features. This manual provides information on how to operate the M2T-C as well as pertinent technical information related to the overall system. Refer to the model identifier (on-line document, 100MNI0063 - latest revision) at Cobham website, http://www.cobham.com/tcs, for available frequency and power configurations along with options. 3.2 Key System Features Built–In AVC / h.264 Encoder SD and HD formats up to 1080p Low Power Consumption (16.5 Watts) Low System Latency (1 frame with Cobham AVC Decoder) Local Control plus Data Return Link User Data Support AES 128/256 Bit Security COFDM Modulation w/Local Control Output Frequency: 1 to 7 GHz (In–Bands) High-Throughput 4 K option for maximum link performance Rugged and Compact Portable Design Companion COFDM receiver with Maximal-Ratio Pre-Detect Diversity reception 100-M0084X3 GMS INC. doing business as Cobham Tactical Communications and Surveillance 8 of 55 www.cobham.com/tcs 3.3 Theory of Operation The Messenger 2 Transmitter – Camera-mount (M2T-C) accepts Standard Definition (SD) or High Definition (HD) 4:2:2 digital video or analog SD video and analog stereo audio inputs (Mic or Line level). The video is compressed according to the Advanced Video Compression (AVC) /h.264 specifications. The low-latency AVC Encoder supports the Baseline Profiles with resolutions from 480 to 1080 with support for either interlaced or progressive formats. The audio is compressed using MPEG layer II compression. Low rate user data up to 38.4K Baud can be optionally supported. The audio, video and user data packets PES streams are multiplexed with basic service data to indicate the service name. The stream can be scrambled with AES scrambling system to provide protection in sensitive applications. A complete Cobham Messenger 2 Camera Link for wireless camera application includes the Messenger 2 Transmitter – Camera mount (M2T-C), the Messenger Smart Receiver (MSR), a Messenger Two Decoder (M2D) and one or several external Block Down – Converters (BDC), as shown in the figure 1 below. The M2T-C provides professional Audio/Video (A/V) interfaces and processing. All versions of the Messenger Digital Link family use a robust digital modulation system known as Coded Orthogonal Frequency Division Multiplexed (COFDM) that provides frequency diversity and powerful Forward Error Correction (FEC) algorithms. The Messenger Smart Receiver (MSR) provides for Spatial Pre-Detect Maximal-Ratio Diversity Combining of up to six independent antennas per MSR to increase the Signal Strength, Signal-to-Noise Ratio and combat short delay spread multipath reflections found in indoor environments. There is a dramatic increase in the operating threshold when multiple high-gain antennas and Block DownConverters (BDC) are used with the MSR, greatly enhancing link robustness when operating at the high data rates as required for HD transmission. The MSR outputs a transport stream simultaneously over ASI and SPI interfaces. External Audio/Video/Data MPEG Decoders are sold separately that support HD or SD AVC Decoding. The 4 K HIGH-THROUGHPUT OPTION enables user-selectable options to set bandwidths from 6 MHz to 16 MHz and to double the throughput of our standard M2T (Up to 63 Mbps!). Using 4 K carriers and the 16 MHz bandwidth, the link can support HD operation with > 12 Mbps while running QPSK and ½ FEC. This increases link robustness and provides an additional 13.5 dB increase in link margin (>4.7 x increase in operating range!) for the same throughput rate in a standard HD MPEG-2 DVB-T system! With the HIGH-THROUGHPUT OPTION you can run with fully DVB-T compliant 2 K carriers and bandwidths of 6, 7, or 8 MHz. When switched to 4 K carriers user can select 12, 14 or 16 MHz bandwidth. The 4 K HIGH-THROUGHPUT OPTION is also useful when transmitting multiple video streams through one transmitter. This option requires a special receiver configuration. Please contact Cobham Sales for additional information. 100-M0084X3 GMS INC. doing business as Cobham Tactical Communications and Surveillance 9 of 55 www.cobham.com/tcs 4. Initial Checkout 4.1 Included Items The standard M2T-C kit includes the following items: M2T-C unit. M2T-C full breakout cable (Cobham part number 780-C0291) (Power, A/V input, User Data, Control interfaces) NOTE: Based on customer application Cobham may deliver a receiving system, additional cables and antennas. Contact Cobham for further information. The device is pre-configured by Cobham prior to shipment (based on customer requirements), thus is ready to work “right out of the box”. 4.2 Getting Started Prior to installing a M2T-C unit into the desired target environment, an initial checkout should be performed to ensure proper operation of the unit. The initial checkout consists of configuring a basic MT2-C link. Figure 1 shows a basic standard M2T-C wireless link configuration. (NOTE: MSR, M2D and D/C units and their associated hardware are sold separately). The steps necessary to setup the configuration shown in Figure 1 are shown below. High throughput optional M2T-C require additional hardware (which includes two MSRs, a DDP plug in card and a combiner). Figure 1 – Basic M2T-C Link Setup 100-M0084X3 GMS INC. doing business as Cobham Tactical Communications and Surveillance 10 of 55 www.cobham.com/tcs 1. Install Omni-directional antennas onto the M2T-C transmitter RF output port and at the receiver end Down-Converter(s) RF input port. Note: Transmitters should not be powered on without a load attached to the RF output connector. The internal PA could be damaged. 2. Attach an SDI video source to the M2T-C SDI BNC (J1) video input. A composite signal can also be applied to the M2T-C BNC J6 composite in connector however keep in mind that the video source must match the configuration group setting of the transmitter. Refer to section 5.4.2.1.4, “TX HD Enc Setup” configuration group display, section 6.1 and section 6.4.2 on the selection of the transmitter (M2T-C) groups, the use of the keypad and the navigation of the menus. 3. The MSR should be pre-configured from the factory (refer to the Cobham web site for the online manual). In short ensure the MSR is powered, has a cable from the ASI out to the decoder ASI input, that each tuner has a RF cable which runs to each block down converter (each tuner is provided power either through the MSR or locally) and is set to the same RF frequency as the transmitter. 4. Attach a video cable from the video out of the decoder to a video monitor. Refer to the decoder’s operational manual for proper setup. 5. Provide power to the M2T-C (+12 Volts) by switching on the power switch to the down position. This is a three-position switch. The down position allows an IDX or AB battery to power the unit. In the up position external power through the DB-15 connector (J5) can be provided to power up the unit. In the middle position the unit is off. The LCD backlight display will light up immediately upon power although no meaningful characters are displayed until the unit has fully initialized (approx. 20 seconds). 6. Turn on the video source and video monitor equipment. 7. After approximately 20 seconds the link should be established and video provided by the source should be displayed on the monitor. An optional computer with the MSR control software installed can be used to monitor the receive parameters such as BER, MER and Signal to Noise. This connection can be through the USB or RS232 port. The initial checkout described above is simply to check the basic video operation of the M2T-C unit. For further details on monitoring and controlling the M2T-C using Cobham’s MS Windows-based M2TC Configurator software program, see Section 6.4. 100-M0084X3 GMS INC. doing business as Cobham Tactical Communications and Surveillance 11 of 55 www.cobham.com/tcs 5. Hardware Overview The basic M2T transmitter configuration is outlined in this section: Figure 2 – M2T-C Connectors 5.1 M2T-C Connectors There are eight connectors located on the M2T-C unit as shown in Figure 2. They are for interfacing the RF, DRL, SD/HDSDI/ASI, Audio, Video (component & composite), and Control signals. There is also an on/off power switch shown in Figure 3. 5.1.1 RF Output (J7) The M2T-C uses a female ‘N’ Type bulkhead connector for its ‘RF Output’ port. The antenna is attached here. Note: Transmitters should not be powered on without a load attached to the RF output. Doing so could damage the internal Power Amplifier (PA). 5.1.2 DRL Antenna Port (J8) The M2T-C uses a female SMA bulkhead connector for the DRL (Data Return Link) port. The DRL allows remote control of M2T-C operating parameters and the ability to control external devices. 100-M0084X3 GMS INC. doing business as Cobham Tactical Communications and Surveillance 12 of 55 www.cobham.com/tcs Features like camera control, tally, pan and tilt control can be accomplished using additional third party hardware. This is an optional module. 5.1.3 SD/HD SDI_ASI IN (J1) A female BNC connector is provided for SD-SDI or HD-SDI video input streams. The input bit rate is 270 Mbps for SD and 1.485 Gbps for HD. In addition this input connector can be used as an input for ASI DVB compliant Transport Streams. See section 6, software overview, for details on Input Modes. The section explains how to switch from SDI IN to ASI IN using the Cobham Tactical Communication & Surveillance M2T Configurator. 5.1.4 ASI Out (J2) A female BNC connector is provided for DVB-ASI Transport Stream Output. The output bit rate is 270 Mbps. This transport stream does not include the SI tables, User-Data, or AES encryption which is added later in the processing chain. 5.1.5 Audio inputs (channels 1 and 2) (J3 & J4) Two female XLR connectors are provided for balanced 600 Ohm audio input (see section 5.2 for other audio input configurations). The audio signal can be set for line or mic level. If audio is not used it’s a good idea to disable audio inputs, either through the front panel keypad (see section 5.4.2.1.6) or using Cobham M2T-C Configurator (see section 6.4.5). 5.1.6 Composite Video input (J6) A female BNC connector is provided for composite video input. For this input to function correctly the transmitter must be set up for SD mode by selecting the correct video Group using either the PC control application software (Cobham M2T-C Configurator, see section6.4) or the front control panel (see section 5.4). 5.1.7 Control & Optional Interfaces (J5) The Control connector is a female, DB-15. It is used to provide the interface for USB signals (control and monitoring), external power, and the Pb (blue) and C/Pr (red) portions of component video (the composite input, J6, is used as the “Y” portion of component video). The C/Pr is also used as the “C” portion of S-Video (also using the composite input, J6, as the “Y” portion of S-Video). Additionally, the bi-directional DRL’s external two wire RS-485 connections are provided. Note that the multi-drop RS-485 interface can be used to access multiple devices. This includes RS-232 devices using external third party conversion modules. A Cobham external break out cable (# 780C0291) is available which incorporates the pin outs for the I/O connector as shown in Table 1. Table 1 - Control DB-15 Connector Pin Out Pin 1 2 3 4 5 6 7 Signal Gnd/Pb Pb C/Pr Gnd/Pr RS-485USB_DATA USB_PWR_RESET Notes GND/Pb Pb, Component Video 5.1.7.1 C/Pr, S-Video/Component Video GND Pr DRL RS-485- (B) inverted USB MINUS USB POWER/RESET 100-M0084X3 GMS INC. doing business as Cobham Tactical Communications and Surveillance 13 of 55 www.cobham.com/tcs Pin 8 9 10 11 12 13 14 15 Signal USER DATA TX USER DATA RX RS-485+ USB_DATA + USB_GND GND/PWR +12 PWR +12 PWR Notes USER DATA TRANSMIT USER DATA RECEIVE 5.1.7.2 DRL RS-485 + (A) non-inverted USB PLUS USB GND POWER GND + 12 VDC POWER + 12 VDC POWER 5.2 Audio Input Configurations The default audio input configuration is balanced 600 Ohm input impedance. Other configurations are possible and they are listed below, however any changes to the default must be made at the factory since it involves opening up the transmitter. Possible configurations include: Balanced 600 Ohm impedance (default configuration) Balanced high input impedance (>2 K) Single ended high input impedance (>2 K) Single ended 600 Ohm impedance 5.3 Power Switch The power switch is a three-position switch (Figure 3). In the down position power is sourced from a battery (IDX or AB). In the up position external power is provided through the DB-15 connector, J5, pins 13 (GND), 14 and 15 (+12 Vdc). When the power switch is in the center position the M2T-C is off. See Figure 3. The backlight of the LCD serves as a power indicator and lights immediately upon power up. It takes approximately 20 seconds for the transmitter to fully initialize. Figure 3 – Local Control and Power 100-M0084X3 GMS INC. doing business as Cobham Tactical Communications and Surveillance 14 of 55 www.cobham.com/tcs 5.4 Front Panel Control Keypad & LCD Display The Front Panel Control consists of a LCD and a four-button keypad. (Figure 4) Figure 4 – Front Panel Control Upon power up of the transmitter the LCD backlight lights (indicating to the user power has been applied), displays “ TX is booting….wait, then very briefly displays the M2T-C logo and the software major release date such as ‘July23 2009 11’ before jumping to the opening RF Frequency Display. Keep in mind because of the complexity of the unit there are many parameters that can be changed only by using the PC GUI control software (Cobham Configurator) which is explained in section 6.4. Note: The PC GUI control software (see section 6) may interfere with requests made from the LCD front panel controls. Hence, before using the LCD front panel controls ensure the PC GUI software is disconnected from the transmitter. Also note the following menu structure corresponds to the latest firmware installed into the transmitter. Your display may vary a little depending on the firmware installed at the time of the transmitter build. Refer to earlier versions of this manual for other menu structures. 5.4.1 LCD Menu The following items can be accessed through the keypad using the and , , and the arrows. The Main Menu consists of the following displays: • TX RF FREQ • VIDEO LOCKED (status screen) • TX HD ENC SETUP • TX POWER LEVEL • ENTR DETAIL MENU • TX AUDIO • TX AUDIO GAIN (if available) The Detail Menu (sub-menu of less used functions) consist of the following displays: • TX CHANNEL MODE 100-M0084X3 GMS INC. doing business as Cobham Tactical Communications and Surveillance 15 of 55 www.cobham.com/tcs • TX DELAY MODE • TX RF ON/OFF • TX LCD Backlight • EXIT DETAIL MENU The menu flowchart trees are shown in Figure 5 below. 100-M0084X3 GMS INC. doing business as Cobham Tactical Communications and Surveillance 16 of 55 www.cobham.com/tcs Figure 5 – Default Menu Tree LCD Front Panel Control 100-M0084X3 GMS INC. doing business as Cobham Tactical Communications and Surveillance 17 of 55 www.cobham.com/tcs 5.4.2 Explanation of the LCD Displays When the unit is first powered up the LCD backlight lights up, serving as a power indicator; however, no meaningful characters are displayed until the unit has fully initialized which takes approximately 20 seconds. 5.4.2.1 Main Menu Note that most of the displays in the main menu (except for the VIDEO LOCKED/UNLOCK status display) will time out after about 10 seconds. After that time the LCD automatically jumps to the TX RF FREQ display. 5.4.2.1.1 Opening Display Upon power up the LCD very briefly displays the M2T-C logo and software version number and then jumps to the opening RF Frequency Display. 5.4.2.1.2 ‘TX RF FREQ’ Display The TX RF FREQ display shows the current RF frequency setting in MHz. The frequency can be changed with the UP or DOWN arrow. Changes will not take place until the ENTR key is pressed. As the frequency is changed the “2250.0 MHz” portion of the display flashes indicating a change is taking place however if the ENTR key is not pressed after approximately 10 seconds (or the CTRL key is pressed) the frequency resets itself to the original frequency. The RF frequency displayed is in the band that is purchased, for example, S2 band, C1 band, etc. and may not reflect the numbers shown in the examples below. IF for any reason the RF is disabled (intentionally or not) or if the Video becomes unlocked, this display will indicate to the user by flashing “RF IS OFF”, or by flashing “VIDEO UNLOCK”. This is a very useful indication to let the user know that perhaps the video input to the transmitter is not connected or maybe the RF was turned off and hasn’t been turned back on. The next display is presented with the press of the CTRL key. 5.4.2.1.3 ‘VIDEO LOCKED/VIDEO UNLOCK’ Display This screen shows the current status of the video if is locked or unlock and what video format the transmitter has been set to. It will display on one line, alternating between parts of the message the transmitter video setup format such as “TX Video set to …..SDI 1080i 29.97. Keep in mind this is only a status screen. Video formats (associated with configuration groups) cannot be changed here. If a change is desired it must be done in the next display ‘Tx HD Enc Setup’. The next display is presented with the press of the CTRL key. 5.4.2.1.4 ‘Tx HD Enc Setup’ Configuration Group Display The Tx HD Enc Setup display shows the current configuration group selected and within this display a different configuration group can be selected. A group number (GP1 in this example) is associated with each group. The video frame size (1080i) and video frame rate (29.97) in this example is part of the title for this group. There are other very important parameters associated with each configuration group which are factory defaulted (Appendix B -) The parameters can be viewed, changed and saved using the Cobham 100-M0084X3 GMS INC. doing business as Cobham Tactical Communications and Surveillance 18 of 55 www.cobham.com/tcs Configurator (as explained in section 6) along with the group titles. Group selection can be changed with the UP or DOWN arrow. The “TX” portion of the display flashes indicating a change is in process but does not take effect until the ENTR key is pressed. Appendix B lists the default Groups that the M2T-C supports. NOTE: Keep in mind the RF frequency (along with several other important parameters) is tied in to the configuration group. Hence changing a configuration group will also change the RF frequency. Thus there are two ways to change the RF frequency, directly from the TX RF FREQ display or by changing the configuration group from the TX HD Enc Setup display. The next display is presented with the press of the CTRL key. 5.4.2.1.5 ‘ENTR DETAIL MENU’ Display Pressing the ENTR key directs the user to the detail sub-menu where the TX Channel Mode, TX Delay Mode, TX RF ON/OFF, and the TX LCD Backlight screens are accessed (see section 5.4.2.2 below). Pressing the CTRL key takes the user to the TX Audio screen still in the main menu, The next display is presented with the press of the CTRL key. 5.4.2.1.6 ‘Tx Audio’ Display The current audio setting is displayed here. In addition audio selections can be changed by use of the UP or DOWN arrow. The three selections are: “OFF”, “Analog Audio” or “SDI” audio. Keep in mind SDI audio selections have two channels associated with each selection. The choices are Ch1-2, Ch 3-4, and so on up to Ch 15-16. Based on the parameters of the current embedded audio in the SDI stream, that is which audio groups and which channels are active, the user can select two channels from the stream. If the ‘Tx Audio’ display shows that audio is “OFF” or “SDI” audio is active then the press of the CTRL key jumps to the opening TX RF FREQ screen. There is no ‘Tx Audio Gain’ display associated with either of these selections. The next display is presented with the press of the CTRL key if Analog Audio is active. 5.4.2.1.7 ‘TX Audio Gain’ Display (if available) The TX Audio Gain display shows the current gain setting for analog audio only. This menu is not available if audio has been turned to ‘OFF’ or if ‘SDI’ audio has been selected. In this example it reads “50”. The range is from 0 to 100. Pressing the UP or DOWN arrow will either increase or decrease the current value (value eventually wraps around). The gain value entered takes place immediately. The next display is presented with the press of the CTRL key, which is the return to the TX RF FREQ display. 5.4.2.2 DETAIL MENU Unlike the main menu displays these displays do not time out. The user needs to manually get back to the main menu (by using the key pad) or on a power cycle the transmitter will default to the TX RF FREQ menu. 5.4.2.2.1 ‘TX Channel Mode’ Display The TX Channel Mode display allows customers to choose different channel plans: manual channel mode (default), user defined, new BAS (S2 band only), and old BAS (S2 band only). 100-M0084X3 GMS INC. doing business as Cobham Tactical Communications and Surveillance 19 of 55 www.cobham.com/tcs Pressing the UP or DOWN arrow toggles the display between these plans. The “TX” portion of the display flashes as a change takes place (up or down arrows are pressed) but does not take place until the ENTR key is pressed. Once a pre-defined channel plan is selected the channels can then be selected from the TX RF FREQ display or by selecting a different configuration group (under the TX HD Enc Setup display). A more detailed description of the channel plans is explained in section 7.3.6.2.1.1, the software overview. The next display is presented with the press of the CTRL key. 5.4.2.2.2 ‘TX Delay Mode’ Display The M2T-C transmitter encoder is associated with two different delay modes (keep in mind that the type of decoder used can also add delays): Normal – this mode gives the best picture but the delay is longer than the ultra-low mode. Ultra-Low – this mode is the default which can only be used with Cobham Tactical Communication & Surveillance M2D HD decoder and offers the fastest <44 mS system latency. Pressing the UP or DOWN arrow toggles the display between these two modes. The “TX” portion of the display flashes indicating a change is in process but does not take effect until the ENTR key is pressed. The next display is presented with the press of the CTRL key. 5.4.2.2.3 ‘TX RF’ Display This display allows the user to turn OFF the RF or if the RF is OFF already then to turn it back ON. One of four options can be selected by using the UP or DOWN arrows. The options are: • RF OFF w/o saving to EEPROM. The RF is turned OFF, but on the next power cycle the transmitter RF mode is determined by the previous saved state. • RF OFF w/saving to EEPROM. The RF is turned OFF and on the next power cycle of transmitter the RF remains OFF. • RF ON w/o saving to EEPROM. The RF is turned ON and the next power cycle of the transmitter RF mode is determined by the previous saved state. • RF ON w/saving to EEPROM. The RF is turned ON and on the next power cycle of transmitter the RF remains ON. The next display is presented with the press of the CTRL key. 5.4.2.2.4 ‘Tx LCD Backlight’ Display The TX LCD Backlight display shows the current status of the backlight, on or auto. Pressing the UP or DOWN arrow toggles the display between ON or AUTO. Change does not take place until the ENTR key is pressed. Pressing any key on the keypad activates the LCD backlight automatically for approximately 20 seconds if the backlight is set for AUTO. The backlight also lights immediately upon power up serving as a power indicator. The next display is presented with the press of the CTRL key. 100-M0084X3 GMS INC. doing business as Cobham Tactical Communications and Surveillance 20 of 55 www.cobham.com/tcs 5.4.2.2.5 ‘EXIT DETAIL MENU’ Display This display allows user to exit the detail menu and return to the main menu. Pressing the CTRL key takes you back to the TX Channel Mode display which is a continuation of the detail menu. Pressing the ENTR key takes the user to the main menu TX RF FREQ display. 100-M0084X3 GMS INC. doing business as Cobham Tactical Communications and Surveillance 21 of 55 www.cobham.com/tcs 6. Software Overview 6.1 Product Control & Status Monitoring Approach Cobham Tactical Communications & Surveillance transmitters provide programmable presets or set-up groups that can be configured through special programming software by administrators. Set-up “Groups” are selected by the user through either the transmitter’s group select switches on the side of the transmitter or remotely through the M.S. Windows Application programs (see section 7.3.1, software overview below). The M2T allows 20 set-up groups. Administrators define the set-up groups for specific applications. Each set-up group (see appendix B for default configuration group set-ups) completely defines all of the transmitter’s set-up parameters including Center Frequency, output RF Power Level, Modulation Parameters, Video, Audio, User Data and Encryption. Each set-up group can be completely different from any other group. Field personnel can select specific set-up groups via pre-determined guidance from the administrators. Matching the transmitter operation to the receiver operation is as simple as selecting the same set-up groups. For example: If the transmitter is set to preset #19, then the receiver needs to be set to preset #19 for them to operate together. It should also be noted that Cobham Tactical Communications & Surveillance transmitters are designed to remember the last set of saved settings and will always power-up in the saved set-up group settings that it had prior to shut-down. A PC based application (MS Windows) called the Cobham Tactical Communications & Surveillance M2T Configurator has been developed to provide in depth control, configuration and monitoring of the transmitter. This Graphical User Interface (GUI) program provides the end user with a straightforward way to interface with the M2T. During normal operation the M2T Configurator GUI does not need to be active and can be disconnected from the transmitter unit. 6.2 System Requirements The Cobham Tactical Communications & Surveillance M2T Configurator program has been developed and tested on Windows XP SP3, Windows Vista (32 and 64 bit), and Windows 7 (32 and 64 bit). Although the Cobham Tactical Communications & Surveillance M2T Configurator program may work properly on other operating systems, no support or assistance can be provided with regards to other operating systems. 6.3 Installation The following instructions outline the installation process for the Cobham Tactical Communications & Surveillance M2T Configurator program: 1. Insert provided CD-ROM into the computer. 2. View the folders (and files) on the CD-ROM and double click on the ‘setup.exe’ file. This launches the Cobham Tactical Communications & Surveillance M2T Setup program and several initial setup files are copied to the computer. 100-M0084X3 GMS INC. doing business as Cobham Tactical Communications and Surveillance 22 of 55 www.cobham.com/tcs 3. After the initial setup files are copied over, the Cobham Tactical Communications & Surveillance M2T Setup program prompts the user to close any applications that are running. Once all other programs are exited, click on the ‘OK’ button. 4. The Cobham Tactical Communications & Surveillance M2T Setup program prompts the user to click on the ‘computer icon’ button to begin installation. If desired, the user can change the destination directory from the default. Click on the ‘computer icon’ button. 5. The Cobham Tactical Communications & Surveillance M2T Setup program then prompts the user to ‘Choose Program Group’. If desired, the user can change the program group from the default. Click on the ‘Continue’ button. 6. After installing the program, the Cobham Tactical Communications & Surveillance M2T_Setup program shows a status window stating that the setup was completed successfully. Click ‘OK’. 7. The USB drivers can be installed now. View the folders on the CD and open the USB folder “USB_9052151”. Open the file named “ AN232-05_how to install.pdf” and follow the step-bystep instructions on how to load the USB drivers. 6.4 M2T Configurator Functions The M2T Configurator program provides the user access to many different configuration, control and monitoring options. When the M2T Configurator program is launched, the screen shown in Figure 6 is displayed. The user should first select the serial port their computer is connected to via the Serial Port Selector and Status region. Use the pull down menu to select a port. If the selected serial port is valid, the gray-colored status box will show ‘Ready’. Figure 6 – M2T Configurator The M2T also works with a USB connection (correct drivers need to be loaded which are provided on the CD). The computer maps the USB port to an active RS-232 COM port. You need to check which port the computer has mapped the RS-232 COM port (this may also change each time the transmitter is booted). Check the port by right clicking on “My Computer” icon and select “properties”. Under the “Hardware” tab select “Device Manager” button (you can also get to the same menu from the “Control 100-M0084X3 GMS INC. doing business as Cobham Tactical Communications and Surveillance 23 of 55 www.cobham.com/tcs Panel” under the “Start” button and click on the “System” icon). Then select the “Ports (COM & LPT)”. Under this section the computer shows which port has been mapped to which COM port. Note this COM port and use it when selecting the COM port under the “Serial Port Selector and status” of the M2T Configurator software. The Device Selector region allows the end user to select from various devices. Presently the existing selections are reserved for future devices. To start the application, select the ‘M2T’ check box in the Device Selector region. Once the box is selected, the opening screen as shown in Figure 7 appears. The M2T Configurator program contains function buttons and configurable settings. The following sections explain, in detail, the various options available. Figure 7 – M2T Configurator Main Screen 6.4.1 Administrator Setup & Usage Under the “Configuration” pull down menu click on the “Administrator Login” sub menu; an administrator login box appears, see Figure 8 below. Type in the appropriate password (initial password is “admin”) and then return to the main opening screen by clicking “OK”. 100-M0084X3 GMS INC. doing business as Cobham Tactical Communications and Surveillance 24 of 55 www.cobham.com/tcs Figure 8 – Administrator Login Figure 9 – Password Entry Screen This time under the “Configuration” pull down menu the “Access Control” sub menu appears (see Figure) Figure 10– Access Control Sub Menu Click on this submenu and it brings up six Access control tabs. Here the Administrator defines the user’s rights by clicking on the radio buttons under “User”. They are briefly explained below: 1. The “Main Access Control” (see Figure 11). The parameters associated mostly with the video and RF setups of the transmitter are located under this tab (elements the user would normally see from the front page of the GUI as shown in Figure 7 above). 2. The “Encoder Setup Access Control” (see Figure 12). The encoder parameters such as Video delay mode and GOP length are listed here. 3. The “TS PID Access Control”(see Figure 13). The various PIDs which are changeable are listed here. 100-M0084X3 GMS INC. doing business as Cobham Tactical Communications and Surveillance 25 of 55 www.cobham.com/tcs 4. The “Scrambling and User Data Access Control (see Figure 14 & Figure 15). If these options are not available then the message in Figure 14 appears. Otherwise the parameters associated with scrambling and user data are listed as shown in Figure 15. 5. The “Others Access Control” (see Figure 16) contains various other parameters such as ‘power mode’, ‘spectrum inversion’, etc. 6. The “Admin Password” (see Figure 17). The administrator password can be changed in this window or reset back to the default which is “admin”. Before exiting any of the ‘Access Control‘ windows, ensure to click on the “Update” and then “Save” buttons; if the intention is to save the changes. The “Update” button only implements the changes until the next time the transmitter is powered cycled. After making changes return to the main screen, under the “Configuration” menu select “Logoff” to exit the Access Control windows. Figure 11 – Main Access Control 100-M0084X3 GMS INC. doing business as Cobham Tactical Communications and Surveillance 26 of 55 www.cobham.com/tcs Figure 12 – Encoder Access Control Window Figure 13 – TS PID Access Control Window 100-M0084X3 GMS INC. doing business as Cobham Tactical Communications and Surveillance 27 of 55 www.cobham.com/tcs Figure 14 – Scrambling Access Control Window (optional) Figure 15 – Scrambling Access Control Window 100-M0084X3 GMS INC. doing business as Cobham Tactical Communications and Surveillance 28 of 55 www.cobham.com/tcs Figure 16 – Other Access Control Window Figure 17 – Admin Password Window 100-M0084X3 GMS INC. doing business as Cobham Tactical Communications and Surveillance 29 of 55 www.cobham.com/tcs 6.4.2 Function Buttons “Reset Tx”: Clicking on this button re-boots the transmitter re-initializing the M2T to a known state. Be aware that it may take approximately 30 seconds for the transmitter to fully initialize. “Enable All” Button: Clicking on this button enables all the check boxes on the screen. This operation is done to prepare all the fields to be written to (or read from). Alternatively, the end user can individually select a given field by using the mouse and clicking its corresponding check box (individual selection of a given field speeds up the read write operations significantly). “Disable All” Button: Clicking on this button disables all the check boxes on the screen. This operation is done to inhibit all the fields to be written to (or read from). Alternatively, the end user can individually deselect a given field by using the mouse and clicking its corresponding check box. “Query” Button: Clicking on this button performs a read operation on all the fields that have their check box enabled. Once clicked, all the selected fields will be read back reflecting their current configuration. “Update” Button: Clicking on this button performs a write operation on all the fields that have their check box enabled. Once clicked, all the selected fields will be written to with the value denoted in their respective field (text box). “Store All Setup Pages” Button: Clicking on this button stores all setup pages, even if they are not shown. “CLR” Button: Clicking on this button clears out all fields on the screen, regardless of whether the fields’ check boxes are selected or not. This button proves useful when the end user wants to verify that a write operation has been correctly performed. An example scenario would be to 1) enable all fields, 2) change desired field(s), 3) perform an ‘Update’ (write) operation, 4) perform a ‘CLR’ operation and 5) perform a ‘Query’ operation. As a result of the ‘Query’ operation, the fields on the screen should all update to those values that were written during the ‘Update’ operation. “Load Group” Button: The data structure of the M2T is organized into “Groups” of selected fields. A Group contains the following fields (refer to Figure 7 above): Carrier Mode, Modulation Mode, COFDM Bandwidth, COFDM mode, Guard Interval, Modulation FEC, Video Frame Size, Video Frame Rate and Input Mode. Clicking on the ‘Load Group’ button loads the selected Group to be operated on by the M2T. A Group can be selected by selecting Group Name under the pull down text box “Group Name (16Chars)” or by its Group Number under the “Group No” pull down text box. Note: After selecting a group by either its’ group number or group name you must click on the “Load Group” button for the group to take effect. The M2T allows up to 20 group types to be stored in the non-volatile memory each with its’ own unique Group name and associated Group Number. The unit is provided with 20 established groups (see page 55 ) in which the parameters have been carefully chosen for optimal performance. The end user has the ability to change the name of a group (limited to 16 characters), and to change the parameters of the fields associated with a group. Once the group is saved (pressing the “stored all setup pages”) the default parameters of the existing group are overwritten. 100-M0084X3 GMS INC. doing business as Cobham Tactical Communications and Surveillance 30 of 55 www.cobham.com/tcs The sequence to change the default parameters of any group or group name is as follows: First load a group by clicking on the “Load Group” button. After the group loads change the parameters as desired (group name can also be changed) and then click on the “Update” button. To save the changes click on the “Stored All Setup Pages” button. Note: Clicking on the ‘Update’ button only implements any changes made temporary (until the transmitter is re-powered). The ‘Stored All Setup Pages’ must be clicked on for the changes to be saved and stored permanently. 6.4.3 Field Definitions The fields as shown in Figure 7 of the main screen (above) are defined below in Table 2. The Table also indicates if the field is a read or a write field or both. Table 2 - M2T Field Definitions Field Group No. Group Name R/W Description R/W The number assigned to a specific video group R/W The name assigned to a specific video group RF Freq (MHz) R/W RF output frequency. Desired frequency is entered in MHz (i.e., 1.296GHz would be entered as 1296). Carrier Mode R/W The number of Carriers within a COFDM carrier: Selects 2 K carriers per COFDM or 4 K carriers (optional) per COFDM. Modulation Mode R/W Modulation mode. Desired modulation mode is selected from the following values: COFDM (default), Off (shuts off modulation) or I/Q CAL ON (puts unit in calibration mode). COFDM Bandwidth R/W COFDM transmit bandwidth. Desired bandwidth is selected from the following values: 6, 7 or 8 MHz in 2 K carrier mode or 12, 14 or 16 MHz in 4 K carrier mode. COFDM Mode R/W COFDM modulation type. Desired COFDM modulation type is selected from the following values: QPSK, 16 QAM or 64 QAM Mod Guard Interval R/W Modulation guard interval size. Desired modulation guard interval size is selected from the following values: 1/32, 1/16, 1 /8, or 1/4 Modulation FEC R/W Modulation FEC (Forward Error Correction) rate. Desired modulation FEC rate is selected from the following values: 1 /2, 2/3, 3/4, 5/6, 7/8 . Video Frame Size R/W Video frame size (resolution). “i” stands for interlaced; ‘p” stands for progressive. Video Frame Rate R/W Video Frame Rate in number of frames per second. Only legitimate video frame rates are shown for the selected video frame size. 100-M0084X3 GMS INC. doing business as Cobham Tactical Communications and Surveillance 31 of 55 www.cobham.com/tcs Field R/W Description Input Mode R/W Default mode is SDI (serial digital interface). Supports both HD SDI and SD SDI. User can also select ASI when there is a need to transmit an ASI stream. Analog Video TS (transport stream, video) Locked Status R/W Video input format. Desired video input format is selected from the following values: PAL, NTSC, S-video PAL, S-video NTSC, and Component Video. R Video lock status. This read-only field indicates that the M2T has line-locked onto the SD or SDI video input signal. This is not meant as an indicator of the correct video input format only that video is detected on the input and the transmitter is able to lock to it. Audio Enable R/W Analog audio or embedded SDI audio. Desired mode of operation of the audio is selected from the following values: OFF/Analog/SDI (CH 1-2, up to CH 15-16.) Audio Level R/W Choice between microphone or line level audio (only applies to analog audio) Audio Gain R/W Adjustable gain values are adjustable between 0-100 (only applies to analog audio). AES Mode (optional feature) R/W The encryption can be turned ‘OFF’ here or a selection can be make from the four selections offered (128, 256 bit), however it must be previous setup under ‘Configuration’ menu under sub-menu ‘SPECIAL SETUP\SCRAMBLING’. This is an option that may or may not be activated. Power Level Channel Rate (Mbps) Unit Name Unit Number R/W Power level choices for the RF output are ‘HIGH’ or ‘LOW’. These levels (the amount of attenuation associated with high and low) are user defined under the ‘Configuration’ menu under sub-menu, ‘SPECIAL SETUP\ OTHERS’ R Channel rate is displayed in Mbps and is based on parameters selected such as COFDM mode, FEC and Guard Interval. See Channel Rate Guide under the HELP menu. R/W Allows the user to assign a unique unit name to the M2T. R/W Allows the user to assign a unique unit number to the M2T 6.4.4 Input Mode - Switching between SDI in or ASI in The default mode for the “Input Mode” field is SDI in. However a user can select the input mode for ASI in if there is a need to transmit an ASI stream. See Figure 18 below. If the ASI input mode is selected then other fields which are not associated with transmitting an ASI stream are disabled. For example the “Video Frame Size”, “Video Frame Rate”, “Audio Enable” and “Audio Gain” are fields which are not needed and hence disabled. Keep in mind when transmitting an ASI stream ensure the transmitter channel rate is set to at least 10% above the data rate of the input ASI stream. 100-M0084X3 GMS INC. doing business as Cobham Tactical Communications and Surveillance 32 of 55 www.cobham.com/tcs Figure 18 – Input Mode 6.4.5 Audio Enable - Switching between Analog audio and Embedded SDI audio The M2T supports 2 analog audio channels or up to two channels of SDI embedded audio. It also supports balanced input and single ended inputs (see 5.2 and 5.1.5 for configurations supported). Under the “Audio Enable” field there are three basic selections: OFF (no audio on the Transport stream) Analog audio SDI CH 1-2 to SDI CH 15-16 (see Figure 19 below) When choosing SDI audio, selections are based the ability of the transmitter to support two audio channels. Hence depending on the parameters of the embedded audio in the SDI stream, that is which group is activated (1 to 4) and which audio channels are activated (1 to 16) the user is able to select up to two channels (SDI CH 1-2 to SDI CH 15-16) to place on the Transport Stream. 100-M0084X3 GMS INC. doing business as Cobham Tactical Communications and Surveillance 33 of 55 www.cobham.com/tcs Figure 19 – Audio Selection 6.4.6 Pull-Down Menu Definitions There are several different pull-down menus that are included in the M2T Configurator program. Each of these pull-down menus contains further user-configurable options or commands. The following sections describe these menus in detail. 6.4.6.1 File You can exit the program by clicking on the ‘X’ box in the upper right hand corner or by clicking on the ‘File’ menu and choosing ‘Exit’. You can save the settings before exiting by clicking on the ‘Store All Setup Pages’ button on the front page or by choosing the ‘Save Parameters’ under the ‘File’ menu. 6.4.6.2 Configuration This pull-down menu (Figure 20) contains several different configuration options. These are outlined below: 100-M0084X3 GMS INC. doing business as Cobham Tactical Communications and Surveillance 34 of 55 www.cobham.com/tcs Figure 20 – Configuration Pull Down Menus 6.4.6.2.1 Special Setup This menu selection has a sub menu as indicated by the arrow to the right of the name (see Figure 21). Figure 21 – Special Setup Sub Menu 6.4.6.2.1.1 Channel Plan The Channel Plan default channel mode is Manual as shown in the opening screen in Figure 22. The other channel modes available are User Defined, and for S2 band units New BAS and Old BAS. Use the pull down box to select the channel mode and then click on the “APPLY” button The RF channel mode selected here is also reflected in the ‘RF Freq (MHz)’ text box on the front page of the Cobham Tactical Communications & Surveillance configurator and also displayed on the LCD display under the main menu under the ‘TX RF FREQ’ display. Manual mode – allows user to select frequencies in pre-determined frequency step sizes (for example 250 kHz for S2 band and 1 MHz for frequencies other than S2 band) in the band which was purchased. User Defined (Figure 24) – this channel plan is defaulted with 30 pre-defined channels initially but any channel and channel label can be modified. Select the ‘User Defined’ channel mode using the pull down box and then click on the ‘Apply’ button. Then click on the ‘Change’ button. Enter the frequency in the “Center Freq (MHz)” text box and the label in the “Channel Label” text box as shown. Then click on the ‘Accept’ button to save or ‘Cancel’ to cancel the operation. 100-M0084X3 GMS INC. doing business as Cobham Tactical Communications and Surveillance 35 of 55 www.cobham.com/tcs New BAS – (only applies to S2 Band units) this channel plan is pre-determined frequency plan with 30 channels. Select ‘New BAS’ from the pull down box and click on the ‘Apply’ button. Old BAS – (only applies to S2 Band units) this channel plan is pre-determined frequency plan with 30 channels. Select ‘Old BAS’ from the pull down box and click on the ‘Apply’ button. Figure 22 – Channel Plan Opening Screen Figure 23 – Channel Mode Selections 100-M0084X3 GMS INC. doing business as Cobham Tactical Communications and Surveillance 36 of 55 www.cobham.com/tcs Figure 24 – User Defined Channel Mode Screen 6.4.6.2.1.2 Encoder Setup This menu selection (see Figure 25) displays the following choices: ‘Encoder Mode’ – There are two selections from this pull-down menu, ‘Tx Encoder’ or ‘Encoder Only’. ‘Tx Encoder’ is the default mode in which the transmitter module provides an external clock source for the encoder and the transmitter COFDM modulator limits the high end of bit rate to 32 Mbps (64 Mbps using the 4 K highthroughput option). When the “Encoder Only” mode is selected an internal clock source (from the encoder module itself) is used as the source. The bit rate is limited from 6 to 70 Mbps. The encoder module can be used as a standalone module encoding rates up to 70 Mbps using the ASI out (J2) port of the M2T. This Transport Stream does not include the SI tables, User-Data, or AES encryption which is added later in the processing chain. Note: If the transmitter is suspected of having RF interference the user can test the encoder section of the M2T by attaching a cable from the ASI port (J2) to a decoder ASI input port directly. GOP Length - User can select GOP (Group of pictures) length when in Normal mode only .Choices includes 10, 20, 30, 40 or 50 GOP. In Ultra-low delay mode there are no choices. Video Delay Mode – User can select from two different delay modes involving different tradeoffs: Normal – this mode gives the best picture but the delay is longer than the other two modes however it can be used with commercial decoders. 100-M0084X3 GMS INC. doing business as Cobham Tactical Communications and Surveillance 37 of 55 www.cobham.com/tcs Ultra-Low – this mode is the default mode and can only be used with Cobham Tactical Communications & Surveillance Tactical Communication & Surveillance HD decoder. It offers the fastest < 44 mS system latency. Additional Video Delay (frames) Additional video delay (in units of frames) from 0 to 500 can be added. Audio Lip Sync (“auto” mode is set to a constant value; “manual” selection here allows user to select various values to line up audio and video if “auto” mode is not sufficient. Audio PTS Delta Delay (frames) Additional audio delay (in units of frames, fractional quantities allowed) can be added. Figure 25 – HD Setup 6.4.6.2.1.3 Scrambling (Optional) Scrambling can only be displayed when any of the encryption options have been purchased. User can select Scrambling Mode and enter the encryption key from the scrambling page (see Error! Reference source not found. & Error! Reference source not found.). 100-M0084X3 GMS INC. doing business as Cobham Tactical Communications and Surveillance 38 of 55 www.cobham.com/tcs . Figure 26 – Scrambling Set-Up Figure 27 – Scrambling Key Set-Up Select Scrambling Mode: The following scrambling modes are supported (based on the purchased encryption options): OFF- Scrambling (Encryption) turned OFF (disabled). AES-C128 Do Not store the key in the Tx – Scrambling is turned ON (enabled). Available only when AES-C 128 Encryption option is purchased. AES-C128 Store the key in the Tx – Scrambling is turned ON (enabled). Available only when AES-C 128 Encryption option is purchased. AES-C256 Do Not store the key in the Tx – Scrambling is turned ON (enabled). Available only when AES-C 256 Encryption option is purchased. AES-C256 Store the key in the Tx – Scrambling is turned ON (enabled). Available only when AES-C 256 Encryption option is purchased. 100-M0084X3 GMS INC. doing business as Cobham Tactical Communications and Surveillance 39 of 55 www.cobham.com/tcs Bcrypt128 Do Not store the key in the TX - Scrambling is turned ON (enabled). Available only when AES-Bcrypt 128 Encryption option is purchased. Bcrypt128 Store the key in the Tx – Scrambling is turned ON (enabled). Available only when AES-Bcrypt 128 Encryption option is purchased. Bcrypt256 Do Not store the key in the Tx – Scrambling is turned ON (enabled). Available only when AES-Bcrypt 256 Encryption option is purchased. Bcrypt256 Store the key in the Tx – Scrambling is turned ON (enabled). Available only when AES-Bcrypt 256 Encryption option is purchased. Note1: The “AES MODE” field on the front page of the GUI (see Figure 7 above) will automatically update according to any of the choices selected in this section. Note2: For scrambling mode with “Do Not store the key in the Tx”, the key code won’t be stored in the transmitter’s memory and it will be lost when the unit is powered-down. The key code must be entered every time when “Do Not store the key in the Tx” mode is selected or the power is reapplied. For scrambling mode with “Store the key in the Tx”, the key code is stored in the transmitter’s memory. When power is removed the Key Code will not be lost. Apply – Click on this button to set the scrambling mode. Input Security Key Enter the Key code. Encryption key for AES-C128 or Bcrypt128 is a series of 32 Hex characters. Encryption key for AES-C256 or Bcrypt256 is made of a series of 32 Hex characters for the lower key and a series of 32 Hex characters for the upper key. Set Key – Click on this button to set the key code to the transmitter. Save – Click on this button to save the settings otherwise the transmitter will resort back to the defaults after a power cycle. Exit - Exit the scrambling mode 6.4.6.2.1.4 User Data (Optional) User Data (this menu may not be available if the option has not been purchased). This option requires Cobham Tactical Communications & Surveillance DDPC card with AES option on RX side. M2T transmitters with ‘User Data’ option can simultaneously transmit video/audio and ASCII user data. Baud rates up to 38400 (encoder dependent) are supported. Input ASCII data is injected into the ‘Data’ port of the transmitter using the format: 8 data bits, no parity, 2 stop bits (when transmitting continuous data) and no flow control. Received user data is taken from the Cobham Tactical Communications & Surveillance MSR receiver on the DDPC RS232 User data port. This pull down menu displays the following (see Figure 28): 100-M0084X3 GMS INC. doing business as Cobham Tactical Communications and Surveillance 40 of 55 www.cobham.com/tcs User Data Baud Rate: Baud rate is selected with this pull down box. High end baud rate is limited to 38400. User Data PID: If ‘OFF’ is selected ‘User Data’ is disabled. When ‘Insert User Data’ is selected ‘User Data’ is enabled. Default PID is shown in text box in which user can change, however note that PIDs are limited to the range 0x0001 – 0x1FFF, and the receive side user data PID must match this PID. Reset Tx: Clicking on this button resets the transmitter to a known state. Transmitter needs to be reset after changing user data PID. Update: When any change is made, baud rate selection, new PID, etc, click on the ‘Update’ button so that the changes take effect. Exit: Clicking on this button exits the window. Figure 28 – User Data Setup 6.4.6.2.1.5 Others This menu displays the following (see Figure 29) Low Power Att (0dB –12dB) – When in low power mode the RF attenuator range is from 0 to 12 dB, attenuated in 1 dB increments. High Power Att (0-12dB) - When in high power mode the RF attenuator range is 0 to 12dB, attenuated in 1 dB increments. COFDM Spectrum Inversion – Choices include normal or inverted. The transmitter is configured with the receiver it ships with and the inversion mode does not require changing. However if a different receiver is used the inversion mode may be required to be changed. Some receivers will accept either inversion modes. RF Power Mode – Can be used to put the Transmitter in a Sleep Mode, where the Encoder functions and many of the Power Regulators are shut down enabling a saving in current (approx. 40%) when the Transmitter is not active. Group Switches – This setting has no function in the M2T-C. 100-M0084X3 GMS INC. doing business as Cobham Tactical Communications and Surveillance 41 of 55 www.cobham.com/tcs Figure 29 – Others 6.4.6.2.2 Transport Stream The transport stream menu (reference Figure 30) displays the parameters of the current transport stream (of the transmitter). The fields are read/write-able. Normally the fields require no manipulation and should work quite well as defaulted from the factory. However, high end users may have a need to change the transport stream parameters. Entry of information into this screen’s fields can be done in either decimal or hexadecimal. Hexadecimal is specified by a “0x” prefix. The information is always displayed in hexadecimal. The 13-bit packet ID (PID) values are limited based on the selection of the Carrier Mode from the main screen. In the 2 k carrier mode, the PIDs are limited from 0x020 to 0x1FFE. In the 4k carrier mode, the upper limits of the PIDs are restricted to 0x00FE. These limitations are available to the user in the form of tool tips that can be displayed by hovering the cursor over the associated entry field. In addition the NIT (network information table, PID 0x0010) and the SDT (service description table, PID 0x0011) are also added to the Transport Stream when transmitting out through the RF port. These two tables are not added when using the ASI stream (ASI OUT-BNC connector) out of the transmitter. 100-M0084X3 GMS INC. doing business as Cobham Tactical Communications and Surveillance 42 of 55 www.cobham.com/tcs Figure 30 – Transport Stream Setup TS Version Number, Video Stream ID, and Audio 1 Stream ID are not currently changeable. 6.4.6.2.3 Ctrl Port Baud Rate The control port baud rate menu allows different baud rates to be selected. Some computers may need the baud rate adjusted for optimal communications. 6.4.6.3 Help Figure 31 – Help Menu This pull-down menu contains information about the M2T firmware and the M2T Configurator software. This information is outlined below: Channel Rate Guide: This selection pulls up a table that displays the relationship between the Modulation mode, Modulation Guard Interval and FEC mode resulting in the bit rate displayed in ‘Mbps’. For example with a modulation mode of 16 QAM, a guard interval of 1/8 and a FEC of 2/3 the bit rate displayed is 14.745 Mbps. Table values will change depending on COFDM Bandwidth selected. See Figure 32. FW version: This selection pulls up a window that displays the M2T unit serial number and current versions of firmware. See Figure 33. About: This selection pulls up a window that displays the Version Number of the M2T Configurator program. See Figure 34. 100-M0084X3 GMS INC. doing business as Cobham Tactical Communications and Surveillance 43 of 55 www.cobham.com/tcs Figure 32 – Channel Rate Guide Figure 33 – FW Version 100-M0084X3 GMS INC. doing business as Cobham Tactical Communications and Surveillance 44 of 55 www.cobham.com/tcs Figure 34 – About Box 100-M0084X3 GMS INC. doing business as Cobham Tactical Communications and Surveillance 45 of 55 www.cobham.com/tcs 7. Specifications The following sections outline the overall specifications for the M2T-C unit. 7.1 Video Encoding (HD) Interfaces: HD-SDI (1.4875Gbps) Standards: SMPTE-274 M, -293 M, -294 M, -296 M Compression Standard: AVC / h.264 (per ISO/IEC 14496-10) Motion Est. Range: +/-192 Horiz., +/-128 Vert. Video formats/resolutions supported: Format Resolution @ Frame Rate 1080i 1920x1080i @ 23.98/24/25/29.97/30 fps 1080PsF 1920X1080i @ 23.98/24/25/29.97/30 fps 1080p 1920x1080 @ 23.98/24/25/29.97/30 fps 720p ** 1280x720 @ 50/59.94/60 fps Variable GOP Structure: I-only and IP PsF supported with Interlaced Format Profiles: supported BP@HL **Video bit rates: HDTV to 50 Mbps ***System Latency: <44 mS(Ultra-Low Mode using Cobham Tactical Communications & Surveillance M2D decoder) Connector: BNC-F 7.2 Video Encoding (SD) Interfaces: SDI, Component, Composite or S-Video Standards: SMPTE-282 M Compression Standard: AVC / h.264 (Per ISO/IEC 14496-10) Motion Est. Range: +/- 192 Horiz., +/- 128 Vert. Video format standards: NTSC or PAL Format 576i 480i Resolution @Frame Rate 720x576 @ 25/29.97 fps (PAL) 720x480i @ 25/29.97 fps (NTSC) Variable GOP Structure: I-only and IP Profiles: BP@ML **Video bit rates: to 50 Mbps *** System Latency: <44 mS (Ultra-Low Mode using Cobham Tactical Communications & Surveillance decoder) Connectors: BNC-F, p/o DB-15F 100-M0084X3 GMS INC. doing business as Cobham Tactical Communications and Surveillance 46 of 55 www.cobham.com/tcs 7.3 Audio Encoding Analog Audio: Dual, Line-Level or Mic-Level, Differential or Single-Ended, Clip Level 12dBm (see section 5.1.1.8 for audio input configuration setups) Input Impedance: 600 Ohms or 2 K Ohms (see section 5.1.1.8 for audio input configuration setups). Standards: SMPTE-272M, -299M Digital Audio: Supports up to 2 channels of audio embedded in the SDI stream Compression Standard: MPEG layer II Audio Enable: OFF/Analog/SDI Bit Rates: 256 kbit/s/ch Sampling Frequency: 32 kHz, 44.1 kHz or 48 kHz THD: < 0.1% maximum Response: 20 Hz to 20 kHz, +/- 0.25 dB Crosstalk: >55 dB minimum S/N: >60 dB RMS Connector: XLR-F (Qty 2) 7.4 Transport Stream Standard: per ISO/IEC 13818-1 Packet Size: 188 byte Bit Rate: Automatically set from active service settings. ASI Output ASI Input Connector: BNC-F Note: ASI input is shared with the SDI input (see hardware section 5.1). Input mode (SDI or ASI) must be switched using Cobham Tactical Communications & Surveillance PC GUI. See software under section 7.3.4. If transmitting an ASI stream ensure the transmitter channel rate is set to at least 10% above the data rate of the input ASI stream. 7.5 Control The M2T-C can be controlled locally via internal control panel or remotely through USB-1 via a MS Windows based application. The DRL can also be used to control the transmitter remotely. 7.6 COFDM RF Output Output Frequency: 1 to 7 GHz (In-Bands) Bandwidth: Selectable 6, 7 or 8 MHz Standard 6, 7, 8, 12, 14, 16 MHz Optional* RF Output Power: Standard - Up to 200 mW 2 W available for L/S Band Connector: N-Type Female Note: Transmitters should not be powered on without a load. Doing so could cause the output PA to stop working. A proper heat sink is also required. 100-M0084X3 GMS INC. doing business as Cobham Tactical Communications and Surveillance 47 of 55 www.cobham.com/tcs 7.7 Modulation Modulation Type: COFDM w/ QPSK, 16 QAM or 64 QAM 7.8 Standard DVB-T Compliant FEC: 1/2, 2/3, 3/4, 5/6, 7/8 Guard Intervals: 1/32, 1/16, 1/8, 1/4 Spurious: 50dBc Number of C-OFDM Carriers: 2 k 7.9 High Throughput Option FEC: 1/2, 2/3, 3/4, 5/6, 7/8 Guard Intervals: 1/32, 1/16, 1/8, 1/4 Spurious: 50dBc Number of COFDM Carriers: 4 k Carriers 7.10 Power DC Input Voltage Range: 9 to 15 VDC ****Power Consumption: approx. 16 Watts (ASIC version) Power supplied via battery connector or through DB-15 connector. (DB-15F pins 14, 15 +Vcc, Pin 13 GND) 7.11 Environmental Operational Temperature: -10 to +65 C Humidity: Up to 100% (non-condensing) 7.12 Physical Dimensions (less connectors): 10.5” (L) x 5.25” (W) x 1.85” (H) 26.67 cm x 13.34 cm x 4.7 cm Weight: 3.7 lbs (1.68 kilograms) 7.13 Physical Interfaces RF Antenna Port DRL Antenna Port Composite Input ASI Out SDI/HDSDI Input Audio Inputs Control/Optional N-Type-F SMA F BNC-F BNC-F BNC-F 3-pin XLR-F DB-15F 100-M0084X3 GMS INC. doing business as Cobham Tactical Communications and Surveillance 48 of 55 www.cobham.com/tcs 7.14 Scrambling Option Type: 128/256 Bit Advanced Encryption Standard (AES) Key Storage: User Controlled, Local or Remote Implementation: Everything except TS Header Requires: DDPC with AES Option on RX side 7.15 User Data Option Protocol: RS232C, Asynchronous, 8 Bits, No Parity, 2 Stop Bits (when sending continuous data). Data Rate: Selectable, Up to 38.4 kBaud User Data PID: Selectable Connector: p/o DB-15 Requires DDPC with AES Option on Rx Side 7.16 Data Return Link (DRL)(Option) Frequency: 902-928 MHz Modulation: FHSS Output Power: Up to 1W, adjustable Data Rates: Up to 115.2K baud, Full Duplex Interface: RS485C via DB-15F (RS232C Converters Available) * With 4 K High-Throughput Option ** COFDM modulator limits high end of bit rate to 32 Mbps or 64 Mbps*. *** End to End System Latency Delay is Decoder Dependent **** When Data Return Link is off. 100-M0084X3 GMS INC. doing business as Cobham Tactical Communications and Surveillance 49 of 55 www.cobham.com/tcs 8. D/C (Down Converter) IF frequencies explained 8.1 IF Frequencies MSR receivers (and many other digital receivers) are capable of receiving direct frequencies in the range of approximately 49 MHz to 861 MHz. If the transmitter is not in this range then a downconverter (also refer to a BDC, block down converter) is used to convert the frequency to this range. The frequency out of the down-converter is called the IF (intermediate frequency) which is fed to the receiver. Down-converters have a LO (local oscillator) which is mixed with the transmitter frequency (M2T) and converts it to the IF frequency. MSR receivers need to know the LO (local oscillator) of the downconverter and the RF frequency of the transmitter. It then automatically calculates the IF frequency. The IF frequency changes as the RF frequency changes,. However, the LO remains constant. On non- Cobham Tactical Communications & Surveillance receivers it may be necessary to program the receiver with the IF frequency directly. The user may have to do the simple math to arrive at the IF frequency so that it can be entered into the receiver. The down-converter LO must be known. The math involve is as follows: “LO – transmitter frequency (or transmitter frequency – LO) = IF frequency”. For example, it the transmitter is set for 2000 MHz and the LO of the down-converter is 2800 MHz then the IF frequency is 800 MHz (2800-2000 = 800). The receiver will need to be set to 800 MHz to receive the transmitter frequency of 2000 MHz. Each time the transmitter frequency is changed the IF must be re-calculated and entered into the receiver. It must also be mentioned, as you may have noticed with the equation “LO-transmitter frequency or transmitter frequency – LO” that two answers are possible. For example 2800-2000 = 800 or 2000-2800 = -800. The negative answer may indicate the receiver wants the signal to be inverted. See section 6.3.3.2 for inverting the signal. 8.2 Local and Remote Power for Down Converters Customers have the option of using remote or local power. 8.2.1 Remote Power Remote power is provided from the MSR through the BNC connector from each of the tuners located on the rear panel. Power is turned on through the software control application (refer to the MSR online manual). The +12 Vdc provided from the receiver will travel through the coax cable to the D/C. If the D/C is located relatively close to the receiver then using remote power makes sense. However, if the D/C is located at great distances away from the receiver there may be excessive DC voltage drop in the coax cable (due to cable resistances). If this is the case then local DC power should be considered as discussed below. If unsure of the DC voltage drop measure the DC voltage present (using a DMM) at the end of the coax cable run; the D/C normal operating voltage is approximately +12 Vdc but can operate down to +10 Vdc. 8.2.2 Local Power Local power is provided by applying +12 Vdc to pin 1, GND to pin 3 of the DB-9 connector located on the bottom of the D/C. The +12 Volt power supply must be able to source at least 500 mA. The power switch (located on the side of the D/C) enables the user to control the ‘ON’/’OFF’ positions for local power. If using local power then the remote power should be set to “OFF”. 100-M0084X3 GMS INC. doing business as Cobham Tactical Communications and Surveillance 50 of 55 www.cobham.com/tcs Figure 35 – BDC Connectors Table 3 – DB-9 Connector Pin Out for the D/C Pin Signal 1 +12 Vdc 3 2, 4-9 GND NC Notes Power supply must be able to source at least 500 mA. Voltage should not drop below +10 Vdc. Power ground Not Connected 100-M0084X3 GMS INC. doing business as Cobham Tactical Communications and Surveillance 51 of 55 www.cobham.com/tcs 9. Cable Losses 9.1 Coax Cable Cable losses must be taken into consideration if the D/C is located a great distance from the receiver. As mentioned above long cable runs can contribute to more resistance in the lines and also can contribute to signal attenuation because of the additional capacitance. Even when using a good coax cable such as RG59/U the attenuation of the signal can be significant. For example, RG59/U coax will drop approximately 2 dB per 100 feet at 50 MHz and 8 dB per 100 feet at 900 MHz. The intermediate frequency (IF) in this system can fall between 49 MHz to 850 MHz. An inline amplifier matching the cable losses should be considered if losses exceed 6 dB. 100-M0084X3 GMS INC. doing business as Cobham Tactical Communications and Surveillance 52 of 55 www.cobham.com/tcs 10. Fan Filter Maintenance At least twice a year the filters for the two external fans should be cleaned. The recommended procedure is to use compressed air, blowing through the fans in the direction indicated, see Error! Reference source not found. below. The debris exits through the cooling fins as shown. Don’t use excessive air pressure, start with a reasonable setting, around 30 PSI and increase as necessary to clean the filters noting that excessive pressure may damage the fan housing or the fans. Figure 36 – Fan Maintenance 100-M0084X3 GMS INC. doing business as Cobham Tactical Communications and Surveillance 53 of 55 www.cobham.com/tcs Appendix A - Cable, M2T-C External Breakout Cable 100-M0084X3 GMS INC. doing business as Cobham Tactical Communications and Surveillance 54 of 55 www.cobham.com/tcs Appendix B - Default Groups Group # Video Frame Video Rate Chroma Format Input Mode RF FREQ COFDM Mode COFDM BW MOD GI MODFEC Carrier Mode Audio Enable Audio_ Mic/Lin e Level AudioLevel AES High/Lo w Power GP1 1080i 29.97 4:2:0 SDI 2200 16 QAM 8 MHz 1/32 2/3 2K ON LINE 50 OFF High GP2 1080i 29.97 4:2:0 SDI 2300 16 QAM 8 MHz 1/32 2/3 2K ON LINE 50 OFF High GP3 1080i 25 4:2:0 SDI 2400 16 QAM 8 MHz 1/32 2/3 2K ON LINE 50 OFF High GP4 1080i 30 4:2:0 SDI 2200 64 QAM 8 MHz 1/32 2/3 2K ON LINE 50 OFF High GP5 1080i 23.98 4:2:0 SDI 2400 16 QAM 8 MHz 1/32 2/3 2K ON LINE 50 OFF High GP6 1080p 29.97 4:2:0 SDI 2200 16 QAM 8 MHz 1/32 2/3 2K ON LINE 50 OFF High GP7 1080p 29.97 4:2:0 SDI 2300 16 QAM 8 MHz 1/32 2/3 2K ON LINE 50 OFF High GP8 1080p 25 4:2:0 SDI 2400 16 QAM 8 MHz 1/32 2/3 2K ON LINE 50 OFF High GP9 1080p 30 4:2:0 SDI 2200 64 QAM 8 MHz 1/32 2/3 2K ON LINE 50 OFF High GP10 1080psf 24 4:2:0 SDI 2400 16 QAM 8 MHz 1/32 2/3 2K ON LINE 50 OFF High GP11 1080psf 30 4:2:0 SDI 2200 16 QAM 8 MHz 1/8 2/3 2K ON LINE 50 OFF High GP12 720p 59.94 4:2:0 SDI 2300 16 QAM 8 MHz 1/8 2/3 2K ON LINE 50 OFF High GP13 720p 50 4:2:0 SDI 2400 16 QAM 8 MHz 1/8 2/3 2K ON LINE 50 OFF High GP14 720p 60 4:2:0 SDI 2200 16 QAM 8 MHz 1/8 2/3 2K ON LINE 50 OFF High GP15 720p 60 4:2:0 SDI 2400 64 QAM 8 MHz 1/8 2/3 2K ON LINE 50 OFF High GP16 480i 29.97 4:2:0 SDI 2200 QPSK 8 MHz 1/8 2/3 2K ON LINE 50 OFF High GP17 480i 29.97 4:2:0 SDI 2400 QPSK 8 MHz 1/8 2/3 2K ON LINE 50 OFF High GP18 576i 25 4:2:0 SDI 2300 QPSK 8 MHz 1/8 2/3 2K ON LINE 50 OFF High 25 4:2:0 Comp 2450 QPSK 8 MHz 1/8 2/3 2K ON LINE 50 OFF High 29.97 4:2:0 COMP 2400 QPSK 8 MHz 1/8 2/3 2K ON LINE 50 OFF High GP19 GP20 PAL Comp NTSC Comp 100-M0084X3 GMS INC. doing business as Cobham Tactical Communications and Surveillance 55 of 55 www.cobham.com/tcs