1
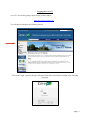
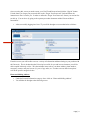
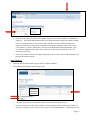
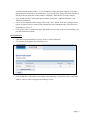
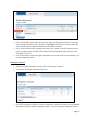
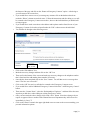
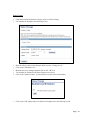
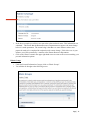
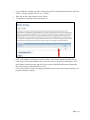
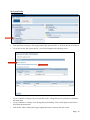
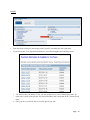
Self-Service eApps End User Manual Access to: eProfile (Personal Information) ePay (Paycheck Data) Index Topic Page # • Logging into Core-CT 3 • Home and Mailing Address 4 • Phone Numbers 6 • Email Addresses 7 • Emergency Contacts 8 • Name Change 10 • Ethnic Groups 11 • My System Profile 13 • Payroll (Pay Stub History) 14 • Core-CT Availability 15 • Questions 15 Page | 2 Logging into Core-CT Core-CT is accessed by going to the following website address: http://www.core-ct.state.ct.us/ You will then be brought to the following website: ' Click on the “login” option in the upper left hand corner and you will then be brought to the following login page Page | 3 Once accessing this screen you need to enter your User ID and Password and click the “Sign In” button. If in the future you forget your password click on the “Forgot Your Password?” link and follow the instructions to have it sent to you. In order to utilize the “Forgot Your Password” feature you need to first set this up. You can do so by going to the separate procedure document entitled “Password Reset Instructions.” • After successfully logging into Core-CT you will be brought to a screen that looks as follows: From this screen you will be able to access a variety of information and data relating to your position with the University. This is the data that the University has on file for you and in some instances you will be able to update it directly on-line. This data includes items such as your home address, phone number, emergency contact, and your last two (2) years of pay stubs, etc. In order to access these items please refer to the specific categories below: Home and Mailing Address • • Under the Personal Information category above click on “Home and Mailing Address” You will then be brought to the following screen: Page | 4 123 Jones Avenue Danbury, CT 06811 • • • • • You will now be able to see the home address that WCSU has on file for you. If this address is not correct and you need to update it please click on the “Edit” button at the right hand side of the screen as noted by the red arrow above. Once you have done so you will be brought to an “Edit Home Address” screen where you can enter the necessary changes to your address After entering your changes click on the “Save” button. You will then receive the below confirmation: Click on the “OK” button and you will then be brought back to the following screen: Page | 5 123 J ones Avenue Danbury, CT 0 6810 _________________ 62 Frost R oad Bethel, CT 06801 • • In the above example you will now see that the status next to your new address is “Submitted for Approval.” This means that the Human Resources Department must approve the address change before it is made permanent. The reason being is that there are some instances where some paperwork needs to be completed in conjunction with an address change. If this is the case in your instance you will be contacted by a member of the Human Resources Department. Once your address change has been approved you will receive an automated email from Core-CT informing you of such. Click on the “Home” button in the upper right hand corner to return to the screen containing your personal information options. Phone Numbers • • Under the Personal Information category click on “Phone Numbers” You will then be brought to the following screen: 203-‐837-‐8665 860-‐999-‐0789 860-‐999-‐0789 • • You will now be able to see the phone numbers that WCSU has on file for you In some instances you will be able to delete or directly change a phone number that is listed. In the above example you can see next to the red arrow on the right that there is a darkened trash can Page | 6 • • • under the column entitled “Delete.” If you would like to delete this phone number click on the darkened trash can and follow the instructions. If you would like to change this phone number go directly in the box under the column entitled “Telephone” and make the necessary changes. If you would also like to add another phone number click on the “Add Phone Number” and follow the instructions. Once you have made the above changes click on the “Save” button. Since these changes do not require an approval from a member of the Human Resources Department they will become live immediately in Core-CT. Click on the “Home” button in the upper right hand corner to return to the screen containing your personal information options. Email Addresses • • Under the Personal Information Category click on “Email Addresses” You will then be brought to the following screen: • If you would like to add another email address other than what is listed click on the “Add Email Address” and you will be brought to the following screen: Page | 7 • • • Click on the triangle noted by the red arrow above and you will be given a listing of Email Type choices (campus, dormitory, home, and other). Highlight the Email Type you want to enter and enter the Email address in the box under the “Email Address” column. Once you have made the above changes click on the “Save” button. Since these changes do not require an approval from a member of the Human Resources Department they will become live immediately in Core-CT. Click on the “Home” button in the upper right hand corner to return to the screen containing your personal information options. Emergency Contacts • • Under the Personal Information Category click on “Emergency Contacts” You will then be brought to the following screen: • If you click on the name of either of the above emergency contacts it will show you more detailed information for them (ie: address and phone number). After reviewing the information scroll to Page | 8 • • • the bottom of the page and click on the “Return to Emergency Contacts” option. After doing so you will return to the screen above. If you would like to remove one of your emergency contacts click on the darkened trash can under the “Delete” column next to their name. Follow the instructions and after doing so you will be returned to the Emergency Contact screen above, however the individual that you deleted will no longer appear. If you would like to make corrections to the address and/or phone number listed for one of your Emergency Contacts click on the red pencil under the “Edit” column next to the individual. You will then be brought to the following screen: 18 Car Street Edna, TX 77957 • • • • • • • • • Click on the “Edit Address” box Make the necessary changes and then click on the “OK” box Then scroll to the bottom of the screen and make any necessary changes to the telephone number that is listed and also add another phone number if necessary. Once this has been completed click on the “Save” button. You will then receive a message that states “The Save was successful.” Click on the “OK” box and you will then be returned to the Emergency Contacts screen If you would like to add an additional Emergency Contact click on the “Add Emergency Contact” button. Then enter the “Contact Name”, select the “Relationship to Employee” and then follow the same steps that you did above when editing an existing Emergency Contact. Once you have made the above changes click on the “Save” button. Since these changes do not require an approval from a member of the Human Resources Department they will become live immediately in Core-CT. Click on the “Home” button in the upper right hand corner to return to the screen containing your personal information options. Page | 9 Name Change • • Under the Personal Information Category click on “Name Change” You will then be brought to the following screen: • • • • • Enter the effective date of the change in the box next to “Change As Of:” Click on the “Edit Name” box Make the necessary changes and then click on the “OK” box You will then be returned to the Name Change screen above Click on the “Submit” button. You will then receive the below confirmation: • Click on the “OK” button and you will then be brought back to the following screen: Page | 10 • • In the above example you will now see next to the red arrow that it states “This information was submitted.” This means that the Human Resources Department must approve the name change before it is made permanent. The reason being is that there are some instances where some paperwork needs to be completed in conjunction with a name change. If this is the case in your instance you will be contacted by a member of the Human Resources Department. Click on the “Home” button in the upper right hand corner to return to the screen containing your personal information options. Ethnic Groups • • Under the Personal Information Category click on “Ethnic Groups” You will then be brought to the following screen: Page | 11 • • • • • • If you would like to change the ethnic code that is listed click on the darkened trash can under the “Delete” category and then click on “Yes – Delete” Then click on the “Add an Ethnic Group” button You will then be brought to the following screen: Click on the triangle as noted by the red arrow above and select the appropriate Ethnic Group Click on the “Save” button and then click “OK” once you receive the save confirmation. Since these changes do not require an approval from a member of the Human Resources Department they will become live immediately in Core-CT. Click on the “Home” button in the upper right hand corner to return to the screen containing your personal information options. Page | 12 My System Profile • • From the Home screen go to the category titled “My System Profile” as noted by the above red arrow If you click on the “My System Profile” you will be brought to the following screen: • If you would like to change your password click on the “Change Password” option above and follow the instructions. If you would like to “Change or set up forgotten password help” click on this option as noted above and follow the instructions. Click on the “Home” button in the upper right hand corner to return to the main screen • • Page | 13 Payroll • • From the Home screen go to the category titled “Payroll” as noted by the above red arrow If you click on the “View Paycheck Information” you will be brought to the following screen: • • You will now have the ability to view you most recent two (2) years of detailed pay stubs. In order to do so click on the specific “Pay Period End Date” that corresponds to the “Advice/Check Date”. Once you do so you will be able to view the specific pay stub Page | 14 Core-CT Availability Core-CT is only available for use during the following time periods: Monday – Sunday (4:00am –8:00pm *) * On the Thursday in the middle of the pay period every two (2) weeks the system becomes unavailable at 2:00pm instead of 8:00pm Questions If you have any questions or concerns regarding the use of Core-CT please feel free to contact Ms. Lisa Lengel, Assistant Director of Human Resources – Benefits Administration, in the Human Resources Department at 203-837-8666 or via email at [email protected]. Page | 15