1
SPEVAL Software User Manual
Document Reference:
SUM/A18-0300
Issue:
3.00
Authors:
Per Sandved Hustad
Anthony Crowson
Date:
24/10/96
SPEVAL
Cray
Software User Manual
Systems
a
Abstract
This is the SPEVAL (SPacecraft EVALuation) User Manual. SPEVAL is a Motif Window
based system developed at ESOC. It supports operational users to monitor the long-term
behaviour of spacecraft housekeeping parameters and provides Graphical and Alphanumeric
output of the data. The projects supported by SPEVAL are ERS-1, ERS-2, ISO and CLUSTER.
Abstract
iii
Reference: SUM/A18-0300
Volume: A18
Issue: 3.00
b
Cray
Systems
Document Status Sheet
DOCUMENT STATUS SHEET
1.DOCUMENT TITLE: SPEVAL Software User Manual
2.DOCUMENT REFERENCE NUMBER: SUM/A18-0300
3.ISSUE
4.REVISION
5.Date
REASON FOR CHANGE
Draft
0
9 Mar. 1995
First Issue
Draft
01
24 Mar 1995
UDS Instruction section
Issue 1
00
07 Apr 1995
Issue 1
Issue 2
00
09 Oct 1995
SPEVAL Release 2.0
Issue 3
00
15 May 1996
SPEVAL Release 3.0
Document Status Sheet
iv
SPEVAL
Cray
Software User Manual
Systems
c
Document Change Records
DCR NO
01
DATE
09-OCT 1995
ORIGINATOR
P.Hustad
DOCUMENT CHANGE RECORD
APPROVED BY
1.DOCUMENT TITLE: SPEVAL Software User Manual
2.DOCUMENT REFERENCE NUMBER: SUM/A18-0200
DOCUMENT ISSUE/REVISION NUMBER:
PAGE
PARAGRAPH
REASON FOR CHANGE
N/A
N/A
SPEVAL Release 2.0. Multiple Time Windows
N/A
N/A
SPEVAL Release 2.0. Multiple Databases
N/A
N/A
SPEVAL Release 2.0. Command History, dump logs and
scrolling logs implemented.
N/A
N/A
SPEVAL Release 2.0 Multiple Data streams implemented
Document Change Record
v
Reference: SUM/A18-0300
Volume: A18
Issue: 3.00
Cray
Systems
DCR NO
02
DATE
15-MAY 1996
ORIGINATOR
P.Hustad
A. Crowson
DOCUMENT CHANGE RECORD
APPROVED BY
1.DOCUMENT TITLE: SPEVAL Software User Manual
2.DOCUMENT REFERENCE NUMBER: SUM/A18-0300
DOCUMENT ISSUE/REVISION NUMBER: 3.0
PAGE
PARAGRAPH
REASON FOR CHANGE
All
All
Display File Selection Boxes Activation Buttons in figures.
Tutorial Sections changed to use File Selection Boxes.
page 33
3.11
Loading User Data Sets into PV-Wave : New Tutorial
page 40
4.1
Caution about reloading proforma after recompile
page 41
4.1.1
COMPILE : The /LINES and /TICKS qualifiers are now
accepted for Graphical Proforma. /DATABASE_TIME: new
command line argument. Black disallowed.
page 57
4.4
SPEVAL File Selection Boxes : New section.
page 64
4.6
Commands menu: new options
page 69ff
4.6.4
Job Control Window : New section.
page 72ff
4.6.5
SPEVAL Control - Direct Load of UDS : New section
page 74ff
4.7
Save Case Definer Window : improved descriptions, new
functions
page 166
4.9.1
TM (Alphanumeric List) Window : Data,Time,Validity
Quality shown as colours and character codes. (Also visible
in Alphanumeric Display Window)
page 184
4.12
PV-Wave SPEVAL procedures : New Section
page 185
4.12.1
GRPH_LOAD_UDS : New Section
page 187
4.12.2
GRPH_MATCH_DATA : New Section
page 190
4.13
Hex Dump : New utility program
page 195
4.14
X_Clear : New command
page 196
Appendix A
SPEVAL file types : New Appendix
page 197
Appendix B
SPEVAL PV-Wave Variables : New PV-Wave variables
Document Change Record
vi
SPEVAL
Cray
Software User Manual
Systems
d
Table of Contents
a Abstract . . . . . . . . . . . . . . . . . . . . . . . . . . . . . . . . . . . . . . . . . . . . . . . . . . . . . . . . . . . . . . iii
b Document Status Sheet . . . . . . . . . . . . . . . . . . . . . . . . . . . . . . . . . . . . . . . . . . . . . . . . . . iv
c Document Change Records . . . . . . . . . . . . . . . . . . . . . . . . . . . . . . . . . . . . . . . . . . . . . . . v
d Table of Contents . . . . . . . . . . . . . . . . . . . . . . . . . . . . . . . . . . . . . . . . . . . . . . . . . . . . . . vii
1 Introduction . . . . . . . . . . . . . . . . . . . . . . . . . . . . . . . . . . . . . . . . . . . . . . . . . . . . . . . . . 1
1.1 Intended readership . . . . . . . . . . . . . . . . . . . . . . . . . . . . . . . . . . . . . . . . . . . . . . . 1
1.2 Applicability statement . . . . . . . . . . . . . . . . . . . . . . . . . . . . . . . . . . . . . . . . . . . . 1
1.3 Purpose . . . . . . . . . . . . . . . . . . . . . . . . . . . . . . . . . . . . . . . . . . . . . . . . . . . . . . . . 1
1.4 How to use this document . . . . . . . . . . . . . . . . . . . . . . . . . . . . . . . . . . . . . . . . . . 1
1.5 Related documents . . . . . . . . . . . . . . . . . . . . . . . . . . . . . . . . . . . . . . . . . . . . . . . 2
1.6 Conventions . . . . . . . . . . . . . . . . . . . . . . . . . . . . . . . . . . . . . . . . . . . . . . . . . . . . 2
1.7 Problem Reporting Instructions . . . . . . . . . . . . . . . . . . . . . . . . . . . . . . . . . . . . . 2
2 Overview . . . . . . . . . . . . . . . . . . . . . . . . . . . . . . . . . . . . . . . . . . . . . . . . . . . . . . . . . . . 3
3 Instruction . . . . . . . . . . . . . . . . . . . . . . . . . . . . . . . . . . . . . . . . . . . . . . . . . . . . . . . . . . . 4
3.1 Starting SPEVAL . . . . . . . . . . . . . . . . . . . . . . . . . . . . . . . . . . . . . . . . . . . . . . . . 5
3.2 Exiting SPEVAL . . . . . . . . . . . . . . . . . . . . . . . . . . . . . . . . . . . . . . . . . . . . . . . . . 8
3.3 Retrieving Long Term Archival TM Data . . . . . . . . . . . . . . . . . . . . . . . . . . . . . 9
3.4 Loading a Save Case . . . . . . . . . . . . . . . . . . . . . . . . . . . . . . . . . . . . . . . . . . . . . . 13
3.5 Filtering Retrievals . . . . . . . . . . . . . . . . . . . . . . . . . . . . . . . . . . . . . . . . . . . . . . . 15
3.6 Generating Statistics . . . . . . . . . . . . . . . . . . . . . . . . . . . . . . . . . . . . . . . . . . . . . . 19
3.7 Using Multiple Time Windows . . . . . . . . . . . . . . . . . . . . . . . . . . . . . . . . . . . . . . 22
3.8 Out-of-Limits data . . . . . . . . . . . . . . . . . . . . . . . . . . . . . . . . . . . . . . . . . . . . . . . . 25
3.9 Editing the Summary Save Case . . . . . . . . . . . . . . . . . . . . . . . . . . . . . . . . . . . . . 26
3.10 Producing User Data Set (UDS) Files . . . . . . . . . . . . . . . . . . . . . . . . . . . . . . . . . 30
3.11 Loading User Data Sets into PV-Wave . . . . . . . . . . . . . . . . . . . . . . . . . . . . . . . . 33
3.12 Using Graphics output with PV-Wave . . . . . . . . . . . . . . . . . . . . . . . . . . . . . . . . 35
4 Reference . . . . . . . . . . . . . . . . . . . . . . . . . . . . . . . . . . . . . . . . . . . . . . . . . . . . . . . . . . . 38
4.1 Proforma Editor . . . . . . . . . . . . . . . . . . . . . . . . . . . . . . . . . . . . . . . . . . . . . . . . . . 39
4.1.1
COMPILE . . . . . . . . . . . . . . . . . . . . . . . . . . . . . . . . . . . . . . . . . . . . . . . . . 41
4.1.2
Field Proformae . . . . . . . . . . . . . . . . . . . . . . . . . . . . . . . . . . . . . . . . . . . . . 50
4.1.3
EXTRACT . . . . . . . . . . . . . . . . . . . . . . . . . . . . . . . . . . . . . . . . . . . . . . . . . 51
4.2 Time Specification Fields . . . . . . . . . . . . . . . . . . . . . . . . . . . . . . . . . . . . . . . . . . 52
4.3 Jump To Time Window . . . . . . . . . . . . . . . . . . . . . . . . . . . . . . . . . . . . . . . . . . . 55
4.4 SPEVAL File Selection Boxes . . . . . . . . . . . . . . . . . . . . . . . . . . . . . . . . . . . . . . 57
4.5 Row Selection Modes . . . . . . . . . . . . . . . . . . . . . . . . . . . . . . . . . . . . . . . . . . . . . 62
4.6 SPEVAL Control . . . . . . . . . . . . . . . . . . . . . . . . . . . . . . . . . . . . . . . . . . . . . . . . 64
4.6.1
SPEVAL Control - File . . . . . . . . . . . . . . . . . . . . . . . . . . . . . . . . . . . . . . . 66
4.6.2
SPEVAL Control - Commands . . . . . . . . . . . . . . . . . . . . . . . . . . . . . . . . . 67
4.6.3
SPEVAL Control - Help. . . . . . . . . . . . . . . . . . . . . . . . . . . . . . . . . . . . . . . 68
4.6.4
Job Control Window. . . . . . . . . . . . . . . . . . . . . . . . . . . . . . . . . . . . . . . . . . 69
4.6.5
SPEVAL Control - Direct Load of UDS . . . . . . . . . . . . . . . . . . . . . . . . . . 72
4.7 Save Case Definer Window . . . . . . . . . . . . . . . . . . . . . . . . . . . . . . . . . . . . . . . . 74
4.7.1
Save Case - TM Extraction Processing Options. . . . . . . . . . . . . . . . . . . . . 77
4.7.2
Save Case - Time Options Button . . . . . . . . . . . . . . . . . . . . . . . . . . . . . . . 78
4.7.3
Save Case - Default . . . . . . . . . . . . . . . . . . . . . . . . . . . . . . . . . . . . . . . . . . 79
4.7.4
Save Case - Load . . . . . . . . . . . . . . . . . . . . . . . . . . . . . . . . . . . . . . . . . . . . 80
4.7.5
Save Case - Validate. . . . . . . . . . . . . . . . . . . . . . . . . . . . . . . . . . . . . . . . . . 81
4.7.6
Save Case - Save. . . . . . . . . . . . . . . . . . . . . . . . . . . . . . . . . . . . . . . . . . . . . 82
Table of Contents
vii
Reference: SUM/A18-0300
Volume: A18
Issue: 3.00
Cray
Systems
4.7.7
Save Case - Submit. . . . . . . . . . . . . . . . . . . . . . . . . . . . . . . . . . . . . . . . . . . 83
4.7.8
Save Case - Cancel . . . . . . . . . . . . . . . . . . . . . . . . . . . . . . . . . . . . . . . . . . . 87
4.7.9
Save Case - External Definition (EDEF) . . . . . . . . . . . . . . . . . . . . . . . . . . 88
4.7.9.1 Save Case - EDEF- Spacecraft . . . . . . . . . . . . . . . . . . . . . . . . . . . . . . . 90
4.7.9.2 Save Case - EDEF - Save Case ID. . . . . . . . . . . . . . . . . . . . . . . . . . . . . 92
4.7.9.3 Save Case - EDEF - Description . . . . . . . . . . . . . . . . . . . . . . . . . . . . . . 94
4.7.9.4 Save Case - EDEF - Save Case Nature . . . . . . . . . . . . . . . . . . . . . . . . . 95
4.7.10 Save Case - Data. . . . . . . . . . . . . . . . . . . . . . . . . . . . . . . . . . . . . . . . . . . . . 97
4.7.10.1 Save Case - Data - Data Source . . . . . . . . . . . . . . . . . . . . . . . . . . . . . . . 98
4.7.10.2 Save Case - Data - Data Streams . . . . . . . . . . . . . . . . . . . . . . . . . . . . . . 99
4.7.10.3 Save Case - Data - S/C Database . . . . . . . . . . . . . . . . . . . . . . . . . . . . . . 101
4.7.10.4 Save Case - Data - Data Type . . . . . . . . . . . . . . . . . . . . . . . . . . . . . . . . 103
4.7.11 Save Case - Simple Extraction Processing (SEP) . . . . . . . . . . . . . . . . . . . 106
4.7.12 Save Case - Simple Time . . . . . . . . . . . . . . . . . . . . . . . . . . . . . . . . . . . . . . 108
4.7.13 Save Case - Output . . . . . . . . . . . . . . . . . . . . . . . . . . . . . . . . . . . . . . . . . . . 110
4.7.13.1 Save Case - Output - Output Type. . . . . . . . . . . . . . . . . . . . . . . . . . . . . 112
4.7.13.2 Save Case - Output - Output To. . . . . . . . . . . . . . . . . . . . . . . . . . . . . . . 114
4.7.13.3 Save Case - Output - Display Type . . . . . . . . . . . . . . . . . . . . . . . . . . . . 115
4.7.13.4 Save Case - Output - Field Proforma. . . . . . . . . . . . . . . . . . . . . . . . . . . 117
4.7.13.5 Save Case - Output - User Data Set . . . . . . . . . . . . . . . . . . . . . . . . . . . . 119
4.7.14 Save Case - TM Extraction (TME). . . . . . . . . . . . . . . . . . . . . . . . . . . . . . . 121
4.7.14.1 Save Case - TME - Proforma ID . . . . . . . . . . . . . . . . . . . . . . . . . . . . . . 124
4.7.14.2 Save Case - TME - Proforma Type . . . . . . . . . . . . . . . . . . . . . . . . . . . . 126
4.7.14.3 Save Case - TME - Parameter List . . . . . . . . . . . . . . . . . . . . . . . . . . . . 127
4.7.14.4 Save Case - TME - Time Filters . . . . . . . . . . . . . . . . . . . . . . . . . . . . . . 130
4.7.14.5 Save Case - TME - Data Filters (all) . . . . . . . . . . . . . . . . . . . . . . . . . . . 132
4.7.14.6 Save Case - TME - Data Filters (status) . . . . . . . . . . . . . . . . . . . . . . . . 134
4.7.14.7 Save Case - TME - Data Filters (analogue) . . . . . . . . . . . . . . . . . . . . . . 136
4.7.14.8 Save Case - TME - OK . . . . . . . . . . . . . . . . . . . . . . . . . . . . . . . . . . . . . 140
4.7.14.9 Save Case - TME - Commit. . . . . . . . . . . . . . . . . . . . . . . . . . . . . . . . . . 141
4.7.14.10 Save Case - TME - Load Proforma. . . . . . . . . . . . . . . . . . . . . . . . . . . . 142
4.7.14.11 Save Case - TME - Update from Proforma. . . . . . . . . . . . . . . . . . . . . . 143
4.7.14.12 Save Case - TME - Cancel . . . . . . . . . . . . . . . . . . . . . . . . . . . . . . . . . . 144
4.7.15 Save Case - Time Options (TO) Window . . . . . . . . . . . . . . . . . . . . . . . . . 145
4.7.15.1 Save Case - TO - Retrieval Window Type . . . . . . . . . . . . . . . . . . . . . . 147
4.7.15.2 Save Case - TO- OK . . . . . . . . . . . . . . . . . . . . . . . . . . . . . . . . . . . . . . . 148
4.7.15.3 Save Case - TO - Commit . . . . . . . . . . . . . . . . . . . . . . . . . . . . . . . . . . . 149
4.7.15.4 Save Case - TO - Load. . . . . . . . . . . . . . . . . . . . . . . . . . . . . . . . . . . . . . 150
4.7.15.5 Save Case - TO - Default . . . . . . . . . . . . . . . . . . . . . . . . . . . . . . . . . . . . 151
4.7.15.6 Save Case - TO - Validate . . . . . . . . . . . . . . . . . . . . . . . . . . . . . . . . . . . 152
4.7.15.7 Save Case - TO - Cancel . . . . . . . . . . . . . . . . . . . . . . . . . . . . . . . . . . . . 153
4.7.15.8 Save Case - TO - One Time Window . . . . . . . . . . . . . . . . . . . . . . . . . . 154
4.7.15.9 Save Case - TO - Repeated Time Windows . . . . . . . . . . . . . . . . . . . . . 155
4.7.15.10 Save Case - TO - Irregular Time Windows . . . . . . . . . . . . . . . . . . . . . 157
4.8 Key Accelerators in Alphanumeric Windows . . . . . . . . . . . . . . . . . . . . . . . . . . 160
4.9 Standard Alphanumeric List Windows . . . . . . . . . . . . . . . . . . . . . . . . . . . . . . . . 162
4.9.1
TM (Alphanumeric List) Window . . . . . . . . . . . . . . . . . . . . . . . . . . . . . . . 166
4.9.2
Statistics Window . . . . . . . . . . . . . . . . . . . . . . . . . . . . . . . . . . . . . . . . . . . . 168
4.9.3
OOL (Out-of-Limits) Window . . . . . . . . . . . . . . . . . . . . . . . . . . . . . . . . . . 171
4.9.4
Totals Window . . . . . . . . . . . . . . . . . . . . . . . . . . . . . . . . . . . . . . . . . . . . . . 174
Table of Contents
viii
SPEVAL
Cray
Software User Manual
Systems
4.10 Alphanumeric Display Window . . . . . . . . . . . . . . . . . . . . . . . . . . . . . . . . . . . . . 176
4.11 Graphical Window . . . . . . . . . . . . . . . . . . . . . . . . . . . . . . . . . . . . . . . . . . . . . . . 178
4.11.1 Graphical Window - View . . . . . . . . . . . . . . . . . . . . . . . . . . . . . . . . . . . . . 181
4.12 PV-Wave SPEVAL procedures . . . . . . . . . . . . . . . . . . . . . . . . . . . . . . . . . . . . . 184
4.12.1 GRPH_LOAD_UDS . . . . . . . . . . . . . . . . . . . . . . . . . . . . . . . . . . . . . . . . . 185
4.12.2 GRPH_MATCH_DATA . . . . . . . . . . . . . . . . . . . . . . . . . . . . . . . . . . . . . . 187
4.13 Hex Dump . . . . . . . . . . . . . . . . . . . . . . . . . . . . . . . . . . . . . . . . . . . . . . . . . . . . . . 190
4.14 X_Clear . . . . . . . . . . . . . . . . . . . . . . . . . . . . . . . . . . . . . . . . . . . . . . . . . . . . . . . . 195
Appendix A SPEVAL file types . . . . . . . . . . . . . . . . . . . . . . . . . . . . . . . . . . . . . . . . . . . . 196
Appendix B SPEVAL PV-Wave Variables . . . . . . . . . . . . . . . . . . . . . . . . . . . . . . . . . . . 197
Appendix C SPEVAL Messages . . . . . . . . . . . . . . . . . . . . . . . . . . . . . . . . . . . . . . . . . . . 201
Appendix D Glossary . . . . . . . . . . . . . . . . . . . . . . . . . . . . . . . . . . . . . . . . . . . . . . . . . . . . 207
Appendix E Index . . . . . . . . . . . . . . . . . . . . . . . . . . . . . . . . . . . . . . . . . . . . . . . . . . . . . . . 208
Table of Contents
ix
Reference: SUM/A18-0300
Volume: A18
Issue: 3.00
Cray
Systems
Table of Contents
x
SPEVAL
Cray
Software User Manual
Systems
List of Figures
DECWindow Session Manager (host is CSPEVL). . . . . . . . . . . . . . . . . . . . . . . . . . . . . . .
SPEVAL Control. . . . . . . . . . . . . . . . . . . . . . . . . . . . . . . . . . . . . . . . . . . . . . . . . . . . . . . . .
Time Specification field example (2 fields) . . . . . . . . . . . . . . . . . . . . . . . . . . . . . . . . . . . .
Jump To Time Window. . . . . . . . . . . . . . . . . . . . . . . . . . . . . . . . . . . . . . . . . . . . . . . . . . . .
Example of a SPEVAL File Selection Box (Proforma Selection) . . . . . . . . . . . . . . . . . . .
Text Field with a File Selection Box activation Push Button . . . . . . . . . . . . . . . . . . . . . . .
Pop Up Message - Could not resolve directory. . . . . . . . . . . . . . . . . . . . . . . . . . . . . . . . . .
List Selection Example (6 selected rows) . . . . . . . . . . . . . . . . . . . . . . . . . . . . . . . . . . . . . .
SPEVAL Main Control Window and Icon . . . . . . . . . . . . . . . . . . . . . . . . . . . . . . . . . . . . .
Save Case - File Menu . . . . . . . . . . . . . . . . . . . . . . . . . . . . . . . . . . . . . . . . . . . . . . . . . . . .
Save Case - Commands Menu . . . . . . . . . . . . . . . . . . . . . . . . . . . . . . . . . . . . . . . . . . . . . .
Speval Control - Help Menu . . . . . . . . . . . . . . . . . . . . . . . . . . . . . . . . . . . . . . . . . . . . . . . .
SPEVAL - Job Control Window . . . . . . . . . . . . . . . . . . . . . . . . . . . . . . . . . . . . . . . . . . . . .
SPEVAL Control - Direct Load of UDS Window . . . . . . . . . . . . . . . . . . . . . . . . . . . . . . .
Save Case Definer Window and Icon . . . . . . . . . . . . . . . . . . . . . . . . . . . . . . . . . . . . . . . . .
Save Case - TM Extraction Processing Button . . . . . . . . . . . . . . . . . . . . . . . . . . . . . . . . . .
Save Case - Time Options Button . . . . . . . . . . . . . . . . . . . . . . . . . . . . . . . . . . . . . . . . . . . .
Save Case - Default Button . . . . . . . . . . . . . . . . . . . . . . . . . . . . . . . . . . . . . . . . . . . . . . . . .
Save Case - Load Button. . . . . . . . . . . . . . . . . . . . . . . . . . . . . . . . . . . . . . . . . . . . . . . . . . .
Save Case - Validate Button . . . . . . . . . . . . . . . . . . . . . . . . . . . . . . . . . . . . . . . . . . . . . . . .
Save Case - Save Button . . . . . . . . . . . . . . . . . . . . . . . . . . . . . . . . . . . . . . . . . . . . . . . . . . .
Save Case - Submit Button . . . . . . . . . . . . . . . . . . . . . . . . . . . . . . . . . . . . . . . . . . . . . . . . .
Save Case - Cancel Button . . . . . . . . . . . . . . . . . . . . . . . . . . . . . . . . . . . . . . . . . . . . . . . . .
Save Case - External Definition (ED EF) Form.. . . . . . . . . . . . . . . . . . . . . . . . . . . . . . . . .
Save Case - EDEF - Spacecraft Option Menu . . . . . . . . . . . . . . . . . . . . . . . . . . . . . . . . . .
Save Case - EDEF - Save Case ID . . . . . . . . . . . . . . . . . . . . . . . . . . . . . . . . . . . . . . . . . . .
Save Case Description (Pane extended) . . . . . . . . . . . . . . . . . . . . . . . . . . . . . . . . . . . . . . .
Save Case Nature Option Menu . . . . . . . . . . . . . . . . . . . . . . . . . . . . . . . . . . . . . . . . . . . . .
Save Case - Data Form.. . . . . . . . . . . . . . . . . . . . . . . . . . . . . . . . . . . . . . . . . . . . . . . . . . . .
Save Case - Data - Data Source Option Menu . . . . . . . . . . . . . . . . . . . . . . . . . . . . . . . . . .
Save Case - Data - Data Streams. . . . . . . . . . . . . . . . . . . . . . . . . . . . . . . . . . . . . . . . . . . . .
Save Case - Data - S/C Database (Current At: Option). . . . . . . . . . . . . . . . . . . . . . . . . . . .
Save Case - Data - Data Type (showing ERS Scrolling Log). . . . . . . . . . . . . . . . . . . . . . .
Save Case - Simple Extraction Processing (SEP) form (4 configurations). . . . . . . . . . . . .
Save Case - Simple Time. . . . . . . . . . . . . . . . . . . . . . . . . . . . . . . . . . . . . . . . . . . . . . . . . . .
Save Case - Output (different configurations). . . . . . . . . . . . . . . . . . . . . . . . . . . . . . . . . . .
Save Case - Output - Output Type Option Menu . . . . . . . . . . . . . . . . . . . . . . . . . . . . . . . .
Save Case - Output - Output To Option Menu . . . . . . . . . . . . . . . . . . . . . . . . . . . . . . . . . .
Save Case - Output - Display Type radio Buttons (one layout) . . . . . . . . . . . . . . . . . . . . .
Save Case - Output - Field Proforma Text Field (for Stats) . . . . . . . . . . . . . . . . . . . . . . . .
Save Case - Output - User Data Set text field . . . . . . . . . . . . . . . . . . . . . . . . . . . . . . . . . . .
TM Extraction Window . . . . . . . . . . . . . . . . . . . . . . . . . . . . . . . . . . . . . . . . . . . . . . . . . . .
SPEVAL filtering data Flow Diagram . . . . . . . . . . . . . . . . . . . . . . . . . . . . . . . . . . . . . . . .
TM Extraction Parameter List. . . . . . . . . . . . . . . . . . . . . . . . . . . . . . . . . . . . . . . . . . . . . . .
TM Extraction - Time Filters Form. . . . . . . . . . . . . . . . . . . . . . . . . . . . . . . . . . . . . . . . . . .
TM Extraction - Data Filters (all) . . . . . . . . . . . . . . . . . . . . . . . . . . . . . . . . . . . . . . . . . . . .
TM Extraction - Data Filters (status) . . . . . . . . . . . . . . . . . . . . . . . . . . . . . . . . . . . . . . . . .
TM Extraction - Data Filters (analogue) . . . . . . . . . . . . . . . . . . . . . . . . . . . . . . . . . . . . . . .
List of Figures
5
6
52
55
57
59
60
62
64
66
67
68
69
72
74
77
78
79
80
81
82
83
87
88
90
92
94
95
97
98
99
101
103
106
108
110
112
114
115
117
119
121
122
127
130
132
134
136
xi
Reference: SUM/A18-0300
Volume: A18
Issue: 3.00
Cray
Systems
Example of All already calculated Statistics or Merge of All Already Calculated Statistics 138
Time Options Window (showing repeated time windows). . . . . . . . . . . . . . . . . . . . . . . . . 145
Save Case - TO - One Time Window configuration . . . . . . . . . . . . . . . . . . . . . . . . . . . . . . 154
Save Case - TO - Repeated Time Windows configuration . . . . . . . . . . . . . . . . . . . . . . . . . 155
Save Case - TO - Irregular Time Windows configuration . . . . . . . . . . . . . . . . . . . . . . . . . 157
Alphanumeric List Window (Statistics) . . . . . . . . . . . . . . . . . . . . . . . . . . . . . . . . . . . . . . . 162
TM (Alphanumeric List) Window . . . . . . . . . . . . . . . . . . . . . . . . . . . . . . . . . . . . . . . . . . . 166
Statistics Window . . . . . . . . . . . . . . . . . . . . . . . . . . . . . . . . . . . . . . . . . . . . . . . . . . . . . . . . 168
OOL Window . . . . . . . . . . . . . . . . . . . . . . . . . . . . . . . . . . . . . . . . . . . . . . . . . . . . . . . . . . . 171
Totals Window . . . . . . . . . . . . . . . . . . . . . . . . . . . . . . . . . . . . . . . . . . . . . . . . . . . . . . . . . . 174
Alphanumeric Display Window . . . . . . . . . . . . . . . . . . . . . . . . . . . . . . . . . . . . . . . . . . . . . 176
Graphical Window (shown in reverse video) . . . . . . . . . . . . . . . . . . . . . . . . . . . . . . . . . . . 178
Graphical Window - View PullDown Menu. . . . . . . . . . . . . . . . . . . . . . . . . . . . . . . . . . . . 181
Graph Zoom resulting in “No Data Points in selected range” . . . . . . . . . . . . . . . . . . . . . . 183
List of Figures
xii
Cray
Reference: SUM/A18-0300
Volume: A18
Issue: 3.00
1
Introduction
1.1
Intended readership
Systems
This document applies to Spacecraft Analysts and Spacecraft Controllers on ERS-1, ERS-2,
ISO and CLUSTER.
It is assumed that the User has some experience with Window systems. I.e. the User should
know the basic terminologies like “Mouse”, “Menu” etc.
SPEVAL is not a very complicated system. The Window items contains self-explanatory text
and functionalities, and the Reference section contains entries covering the items.
It is, however recommended (even for experienced Window system Users) to have a glance
through the examples in the Instruction section. Certain items, e.g. how to list SPEVAL specific files are explained here.
1.2
Applicability statement
This SUM applies to SPEVAL Version 3.0. See section 1.7 on page 2 of how to find out the
current SPEVAL Version number.
1.3
Purpose
SPEVAL is an integrated archive, retrieval and display system for spacecraft housekeeping
data (TM, OOL), and may be used for short and long term analysis of events and trends. This
Software User Manual covers the complete SPEVAL system.
1.4
How to use this document
This document is divided into the following sections:
• Introduction. This section covers the overall structure of the User Manual. It describes the
intended Users, SUM Conventions etc. The section is stand-alone.
• Overview. This section describes the fundamental principles of SPEVAL. It describes central terminologies used in the User Manual. The section is stand-alone.
• Instruction. This section contains a number of Tutorial sections, intended for all Speval
Users. The tutorials provide quick “tours” through different SPEVAL operations. Items referenced in this section (e.g a Window name) may be found in the Reference section.
• Reference. This section contains look-up sections of all the SPEVAL Window items (e.g
Buttons, Windows etc.). It also contains a reference to the off-line SPEVAL Proforma Editor Utilities. Each section contains a list of the possible error messages which are associated
with the item. The error messages are listed alphabetically in Appendix C.
•
•
Appendix B contains the SPEVAL variables which are exported to PV-Wave. This section
is useful for persons using PV-Wave to process SPEVAL generated data.
Introduction
1
SPEVAL
Cray
Software User Manual
Systems
•
Appendix C contains an alphabetical list of the SPEVAL messages which are output to the
screen. This section relates to the Reference section, because the actual error message
meaning and recovery procedures are described here.
•
Appendix D contains a Glossary list of the terminologies used in this User Manual.
•
Appendix E contains an Index list of SPEVAL items and operations. This section refers to
both the Instruction and Reference sections.
1.5
Related documents
Using DECwindows Motif for OpenVMS
This Manual describes the DEC Session Manager and terminal windows. It also
gives an introduction to typical Motif Window terminologies. The manual exists on
line and may be invoked from the DEC Session Manager | Application |
Bookreader. It is found under the entry Programming Tools and Languages >
DECwindows Motif <1.2> for OpenVMS VAX.
PV-Wave Command Language Programming and User Guide.
These Manuals explain the PV-Wave programming language.
Cluster Command History Display User Guide.
This User Manual describes the Cluster Command History (CHF) display.
1.6
Conventions
The following conventions are used in this User Manual:
• SPEVAL Window related item names appear in italic typeface. One example is:
Save Case - Load , which identifies an item contained in the Save Case Definer Window
(here the Load Push Button).
• SPEVAL output messages are shown in the Courier typeface. One example is
“File not Found”
• Command Line input messages are shown in bold Courier typeface. One example is
CSPEVL $ DIR *.*
which identifies that the input expected is “DIR *.*”.
1.7
Problem Reporting Instructions
The last pages of this manual contains the SPEVAL Software Problem Report (SPR) form as
well as an example form. If you encounter a problem with SPEVAL, please fill in the form as
indicated (non-shaded fields only) and mail it to the SPEVAL maintenance team.
Note that if relevant, you should save the Save Case definitions used when the problem was
encountered and refer it in the SPR form. This is of great importance to the Software maintenance team when reproducing the problem. See section 4.6.3 on page 68 on how to get the
current SPEVAL release number.
Introduction
2
SPEVAL
Cray
Software User Manual
Systems
2
Overview
SPEVAL stands for SPacecraft EVALuation system. It is an integrated archive, retrieval and
display system for spacecraft housekeeping data (TM, TC, OOL and log files), and may be
used for short and long term analysis of events and trends.
The archive portion of SPEVAL consists of the data automatically received from the Control
Centre and the data sets produced by SPEVAL. SPEVAL produced data sets may be divided
into two types: the Summary which is produced automatically on a daily basis, and User Data
Sets which are produced in response to User requests.
User requests for retrieval are made in the form of a Save Case. This is a retrieval and display
strategy that a User must define in order to retrieve and display data. Save Cases are defined by
the Save Case Definer.
The Save Case Definer is the main User input for SPEVAL. It allows the user to define the data
source, the type of data, the processing required on the data and the display types once the
retrieval has completed. The definition for the required processing involves proforma; these are
compiled lists of parameters, which once loaded into the Save Case may have time, data and
statistics filters applied to them. Once the Save Case has been submitted by the User, the
remainder of the retrieval and display processing is driven automatically by SPEVAL.
TM data may be displayed in the following formats:- Alphanumeric List, Alphanumeric Display and Graph. In addition to these display types, there are dedicated displays for Statistics
and Totals. Finally, retrieved data may be exported from the Graph task into a third party analysis and display tool called PV-Wave. This tool supports its own command language which
may be further used to define additional processing and displays.
Overview
3
SPEVAL
Cray
Software User Manual
Systems
3
Instruction
Instruction
4
SPEVAL
Cray
Software User Manual
Systems
3.1
Starting SPEVAL
Functional Description
This section describes how to start the SPEVAL system. The SPEVAL User Interface displays
on any computer supporting the standard X-11 protocol, and it will not be explained in detail
how to set up the connection between your terminal (or X-Server) and the host computer.
There exists two standard possibilities to start SPEVAL:
• Starting SPEVAL from the DECWindows Session Manager. If you run SPEVAL from a PC
(supporting eXceed), your PC should have been configured so that when login in to the
Spacecraft host computer, the DECWindows Session Manager appears on your terminal
screen.
• Starting SPEVAL from the DCL Command line. If you run SPEVAL from a SUN (e.g. via
Telnet), this is probably the way you would activate SPEVAL.
Cautions and Warnings
There exists known problems with some X-server protocol software. E.g. eXceed is not always
stable and there have been incidents where the X-connection crashes the server. You should
therefore ensure that all applications on your terminal (e.g. Text Editors) are in a recoverable
state before starting SPEVAL.
Procedures
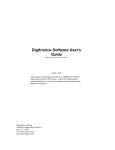
Starting SPEVAL from the Session Manager
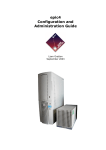
For this startup, the DECWindow Session Manager should appear on your terminal as shown
in Figure 1.
Figure 1DECWindow Session Manager (host is CSPEVL)
1. Start SPEVAL by Selecting the Applications > SPEVAL option from the Application PullDown Menu, then wait some seconds. The SPEVAL Session Control window should be displayed as indicated in Figure 2 on page 6. If the Application Menu does not have any
entries called SPEVAL, contact Software Support.
Starting SPEVAL from the DCL Command line
For this startup, it is not required that the Session Manager is displayed on your terminal.
1. Before logging onto the Project computer (here CSPEVL), you must ensure that your terminal will accept an X-request from the host computer. On Unix systems, this might be done
via the xhost command:
<Unix>: xhost CSPEVL
After having set up the privileges, log in as follows:
<prompt>: telnet CSPEVL
Instruction
5
SPEVAL
Cray
Software User Manual
Systems
You will be prompted for the username and password. If the login fails, telnet will issue an
error.
2. If successfully logged into the host, you must set the host DISPLAY variable to your terminals address, specified as an IPC address (here “131.176.73.11”) or a LAT address (here
“LAT_08002B3AEA90”
<CSPEVL>: SET DISPLAY/CREATE/NODE=131.176.73.11/TRANS=TCPIP (IP-address)
<CSPEVL>: SET DISPLAY/CREATE/NODE=LAT_08002B3AEA90/TRANS=LAT (LAT-address)
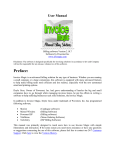
3. Start SPEVAL by typing the following command:
<CSPEVL>: SPEVAL
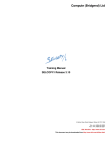
Wait some seconds. The SPEVAL Session Control window should be displayed as indicated
in Figure 2 on page 6.
Figure 2SPEVAL Control
Possible Errors and their Causes
SPEVAL Control Window doesn’t display on the terminal.
If you have started SPEVAL via the DCL command line, check that the IPC or LAT display
you have specified is correct by typing the command:
<CSPEVL>: SHOW DISPLAY
If the display name is in correspondence with the terminal address, check that your terminal
have been set up to accept the X-connection from the host. On Unix systems this might be
done by typing the command line:
<Unix>: xhost
which lists all the hosts which the terminal accepts an X-connection from.
If you have started SPEVAL via the Session Manager, SPEVAL Control should always be
Instruction
6
SPEVAL
Cray
Software User Manual
Systems
displayed. In this case, contact Software Support.
SPEVAL Control shows unreadable fonts
Your X-terminal doesn’t supply the standard fonts used by SPEVAL. Contact Software Support.
Instruction
7
SPEVAL
Cray
Software User Manual
Systems
3.2
Exiting SPEVAL
Functional Description
This section describes how to exit the SPEVAL system.
Cautions and Warnings
You will not be warned about unsaved data (e.g. in the Save Case Definer) when exiting SPEVAL. You should therefore ensure that any valuable Save Case definitions have been saved
before exiting the task.
Procedures
1. Exit SPEVAL by Selecting the File | Exit option from the SPEVAL Control Pull-Down
Menu, then wait some seconds. The SPEVAL Session Control window and all open Save
Case Definers and Output Windows should disappear.
Possible Errors and their Causes
SPEVAL Control Window doesn’t disappear.
If the SPEVAL Control Message are shows the message
“ Some tasks are still starting - retry in a minute or so
“SPEVAL is still initialising. Wait some time and retry the operation again. If the Window
still fails to exit, you should contact Software Support.
Instruction
8
SPEVAL
Cray
Software User Manual
Systems
3.3
Retrieving Long Term Archival TM Data
Functional Description
This section describes how to retrieve Long Term Archival (LTA) Telemetry data and to display it in Graphical and Alphanumeric Windows. SPEVAL retrieves data via the Save Case
Definer window, and the retrieval definitions which this tutorial creates will be saved for later
use.
Cautions and Warnings
None.
Procedures
Set Up
It is assumed that you have started SPEVAL and that the Session Control Window is displayed
on your terminal. If the Session Control Window is iconified, de-iconify it by double-clicking
on the icon.
There must also have been defined at least one Graphical Proforma for your Spacecraft computer in the standard SPEVAL Proforma directories. You may check this by on the DCL Command line typing the following command (here the spacecraft is ERS-2) by typing:
CSPEVL: DIR SPVL_PROFORMA_DIR:ERS2*.GRAPH
For ISO, you type
CSPEVL: DIR SPVL_PROFORMA_DIR:ISO*.GRAPH
and so on.
If no file names are listed, the tutorial cannot be performed. In this case, contact Software Support. Otherwise, note the file name of at least one Proforma. E.g. if a file name displays
ERS2_TR01.GRAPH, the text “TR01” should later be entered in the Save Case Definer.
Input Operations
1. Start the Save Case Definer Window by choosing Commands | Save Case Definer option
from the Commands Pull Down Menu. An initialised Save Case Definer Window will be
displayed on the Screen.
2. The Save Case - EDEF- Spacecraft should by default have been set to the project Spacecraft. If not, set it to the correct Spacecraft (e.g. ERS2).
Instruction
9
SPEVAL
Cray
Software User Manual
Systems
3. Enter the name “TUTORIAL_1” in the Save Case - EDEF - Save Case ID text field as indicated below. (‘EDEF’ is the User Manual shortening for “External Definition”). The string
will, together with the Spacecraft ID define the file name of the Save Case Definitions..
4. Specify the Graphical TM Proforma name to use for the retrieval in the Save Case - Simple
Extraction Processing (SEP) Form by single-clicking on the File Box Selector Button. The
Proforma File Selection Box will pop up, by default displaying all the Graphical Proforma
Instruction
10
SPEVAL
Cray
Software User Manual
Systems
in the SCOS Proforma directory
5. Optionally, you can click on the Show Description radio Button. The Proforma List will be
updated to show the description for each Proforma. Note however that the List update might
take some time because SPEVAL must open each Proforma file in order to get the description. Select a Proforma from the list by double-clinking on a Proforma ID in the list. The
File Selection Box disappears and the Proforma ID you selected appears in the Save Case Simple Extraction Processing (SEP) form.
6. Enter the Start Time and End Time for the retrieval. If the spacecraft is different from ERS2, it is assumed that you have some knowledge about which time period the Parameters in
the Proforma provided data. If SPEVAL fails to retrieve data for this time period, a failure
message will be displayed and no Output Windows will be created. The time you have to
wait depends on the amount of data which have been requested for retrieval. For e.g. a time
span of one year, you must expect to wait a considerable time before the SPEVAL Control
Window displays the Retrieval exit status. For ERS-2, you may use the time-span as indicated below. Ensure that the Start and End Times are entered correctly.
Instruction
11
SPEVAL
Cray
Software User Manual
Systems
7. Navigate to the Save Case - Output form. Since this retrieval does not support statistics
information, the Stats radio Button must be set neutral (one click with Mouse Button 1) as
indicated. NOTE: If the Stats radio Button is invisible, it is probably because the Save Case
Definer Window has been re-sized. In this case, make the Save Case Definer Window larger
by clicking MB1 on the Window borders, then dragging MB1 vertically.
8. The Save Case Definition should now be syntactically valid. Press the Save Case - Validate
Button. The SPEVAL Control Window will be displayed in the front of the Save Case
Definer window. If the validation was successful, the message displayed will be
“Validation completed - no errors found”
If another message is displayed, the Save Case definitions are in error. In this case, consult
the alphabetical message section in Appendix C on page 201. After correcting any syntax
errors, start from step 8. again.
9. Optionally, you can now view all the Parameters defined in the Proforma by pressing the
Save Case - TM Extraction Processing Options Button. The TM Extraction Processing Window will in this case display a list of all the Parameters. After inspecting the window, click
OK.
10.Save the Save Case Definitions permanent to file by choosing the Save Case - Save Button.
The SPEVAL Control Window will display a message something like
“Save Case saved to file - ERS2_TUTORIAL_1.SVC”
Note that you can submit an unsaved Save Case for retrieval.
11.Submit the Save Case for retrieval by pressing the Save Case - Submit Button. The SPEVAL Control Window should display the message
“Save Case submitted for retrieval”
If this is not the case, and the Save Case can be validated, issue a SPR and exit SPEVAL.
12.SPEVAL will now retrieve the data. The retrieval success message is
“ << Loading retrieved data << “
If the message displayed is
“ No data was found for this retrieval “,
Instruction
12
SPEVAL
Cray
Software User Manual
Systems
you should increase the retrieval time range (step 6.), then save and submit the Save Case
again. Otherwise, consult the Error Messages in Appendix C on page 201.
13.If the retrieval was successful, SPEVAL will display the retrieved data in the 3 windows.
See the “Standard Alphanumeric List Windows” on page 162, “Alphanumeric Display Window” on page 176 and “Graphical Window” on page 178 for description of the display windows and how to navigate in them.
Possible Errors and their Causes
Retrieval initialises but no display Windows come up.
The most plausible reason is that SPEVAL is still retrieving the data. If you don’t see any
messages after the ” Save Case submitted for retrieval “ message, this will
be the case.
Retrieval fails.
If the message displays “ No data was found for this retrieval “ you
should increase the retrieval time range (step 6.), then save and submit the Save Case again.
Otherwise, consult the Error Messages in Appendix C on page 201.
Instruction
13
SPEVAL
Cray
Software User Manual
Systems
3.4
Loading a Save Case
Functional Description
This section describes how to load an already existing Save Case. The tutorial assumes that
you have at least saved one Save Case before.
Cautions and Warnings
None.
Procedures
Set Up
It is assumed that you have started SPEVAL and that the Session Control Window is displayed
on your terminal. If the Session Control Window is iconified, de-iconify it by double-clicking
on the icon.
Input Operations
1. Start the Save Case Definer Window by choosing Commands | Save Case Definer option
from the Commands Pull Down Menu. An initialised Save Case Definer Window will be
displayed on the Screen.
2. The Save Case - EDEF- Spacecraft should by default have been set to the project Spacecraft. If not, set it to the correct Spacecraft (e.g. ERS2).
3. Navigate to the File Selection Box Button to the right of the Save Case - EDEF - Save Case
ID field, then single click on the button.
The File Selection Box will appear, by default displaying all Save Cases in your private
Save Case directory.
Instruction
14
SPEVAL
Cray
Software User Manual
Systems
4. Optionally, you can click on the Show Description radio Button. The Save Case List will be
updated to show the first line of the description for each Save Case. Note however that the
List update might take some time because SPEVAL must open each Save Case file in order
to get the description. Select a Save Case from the list by double-clinking on an item in the
list. The File Selection Box disappears and the Save Case ID you selected appears in the
Save Case - EDEF - Save Case ID text field.
5. Press the Save Case - Load Button. The Save Case Definer Window will be update with the
contents of the Save Case you’ve specified.
Possible Errors and their Causes
No Save Case is Loaded.
The only reason for this error should be that the combination of the Spacecraft and the Save
Case ID have produced a file name not found in the SPVL_SAVE_CASE_DIR. Check the
state of these items.
Instruction
15
SPEVAL
Cray
Software User Manual
Systems
3.5
Filtering Retrievals
Functional Description
This section describes how to use the SPEVAL Retrieval filter utilities. SPEVAL offers the
possibilities to filter TM data in several ways, and a subset of these operations are shown here.
• Time filtering of TM data. The retrieved data will be filtered to only include every second
sample of each data point.
• Filter out BDQ (Bad Data Quality) data.
• For one Status Parameter, only retrieve the value when equal to a specific status. (E.g only
retrieve the value when the Status is “OFF”). Note that you can only use this option for status parameters having a corresponding Status Text Set. E.g. specifying “1” for a one-bit Status Parameter without any Status Text Sets would retrieve 0 values.
• For one numerical or analogue Parameters, only retrieve the data immediately before and
after each time the Hard High Limits and Hard Low Limits are crossed.
The output of the filtered retrieval will be shown in the Alphanumeric Display Window and
TM (Alphanumeric List) Window .
It is assumed that you have defined a basic TM Save Case as described in the tutorial in section
3.3 on page 9. This Save Case will be used as the basis for the Save Case “TUTORIAL_2”
defined in this section.
Cautions and Warnings
None.
Procedures
Set Up
It is assumed that you have started SPEVAL and that the Save Case Window is displayed on
your terminal. There must also have been defined at least one Alphanumeric Proforma for your
Spacecraft computer in the standard SPEVAL Proforma directories. You may check this by on
the DCL Command line typing the following command (here the spacecraft is ERS-2) by typing:
CSPEVL: DIR SPVL_PROFORMA_DIR:ERS2*.ALPHA
For ISO, you type
CSPEVL: DIR SPVL_PROFORMA_DIR:ISO*.ALPHA
and so on.
If no file names are listed, the tutorial cannot be performed. In this case, contact Software Support. Otherwise, note the file name of at least one Proforma. E.g. if a file name displays
ERS2_TR01.ALPHA, the text “TR01” should later be entered in the Save Case Definer.
NOTE: Ideally, you should choose a Proforma containing both Status and Numerical Parameters. If the Proforma contains only one of the types, not all the filters may be applied.
Instruction
16
SPEVAL
Cray
Software User Manual
Systems
Input Operations
1. Load an existing Save Case, e.g. “TUTORIAL_1”. (see section 3.4 on page 13).
2. Press the Save Case - TM Extraction Processing Options Button. The Save Case - TM
Extraction (TME) Window will display at the terminal screen, obscuring the Save Case
Definer Window. The Save Case - TME - Parameter List should display all the Parameters
currently defined in the Save Case Proforma. Note that the Save Case - TME - Proforma ID
Text field will display the currently existing Proforma ID. If no filters have previously been
defined for this Save Case, the Parameter filter characteristics are generated from the Proforma specifications. If the Proforma (or any Parameter in the Proforma) have specified the
MODE_DEPENDENT Flag, the list will indicate that only Invalid Data (ID) are filtered out
from the retrieval.
3. If you started of with “TUTORIAL_1”, the Save Case - TME - Proforma ID will display
the Proforma ID for this tutorial and the Save Case - TME - Proforma Type is set to
“Graphical”. In this case, enter the Proforma ID of an Alphanumeric Proforma and change
the Proforma Type to “Alphanumeric”. Then press the Save Case - TME - Load Proforma
button. The Save Case - TME - Parameter List will be updated to display the new Proforma
definitions. Note that this definitions will not be copied to the main Save Case Definer window unless you press the Save Case - TME - OK or Save Case - TO - Commit buttons
(described in step 15.).
4. Move the pointer to the Save Case - TME - Time Filters form. Use the rectangular Pane in
the bottom right of the form to display all the fields if necessary.
5. Set up the time filter as indicated, then press the Apply Button. All the Parameters in the list
will be updated to display “every 2 samples”, indicating that only each 2’nd sample of the
Parameter is retrieved.
Instruction
17
SPEVAL
Cray
Software User Manual
Systems
6. Select one single parameter by pressing MB1 on an arbitrary row.
7. Move the pointer to the Save Case - TME - Data Filters (all) form. Use the rectangular
Pane in the bottom right of the form to display all the fields if necessary.
8. Set up the General TM filter as indicated, then press the Apply Button. The single highlighted Parameter in the list will be updated to display “BDQ” (Bad Data Quality) but no
“ID” (Invalid Data), indicating that only BDQ data is filtered out in the retrieval.
9. Select one single Status parameter by holding the <CNTRL> key, then pressing MB1 on an
arbitrary row (this deselects any previously selected parameters: pressing MB1 without
<CNTRL> selects the new parameter in addition to previously selected ones. See “Row
Selection Modes” on page 62. for a full description of SPEVAL row selection. If the Parameter list does not display any Status Parameters, you cannot apply the Status filters. In this
case, start from step 12.
10.Move the pointer to the Save Case - TME - Data Filters (status) form. Use the rectangular
Pane in the bottom right of the form to display all the fields if necessary.
11.Set up the Status filter as indicated, then press the Apply Button. The single highlighted
Parameter in the list will be updated to display “Equal to Status OFF”. This means
that only samples of the Parameter will be retrieved which are OFF. NOTE however that
SPEVAL will not complain if the Status Text Set for the Parameter doesn’t have any entry
Instruction
18
SPEVAL
Cray
Software User Manual
Systems
for OFF. In this case, no values for the Parameter would be retrieved.
12.Select one single numerical parameter by pressing MB1 on an arbitrary row. If the Parameter list does not display any numerical Parameters, you cannot apply the these filters. In this
case, start from step 15.
13.Move the pointer to the Save Case - TME - Data Filters (analogue) form. Use the rectangular Pane in the bottom right of the form to display all the fields if necessary.
14.Set up the Numeric filter as indicated, then press the Apply Button. The single highlighted
Parameter in the list will be updated to display “Limits: HHB,HHB,HLB,HLA”. This
means that SPEVAL only retrieves samples of the Parameter immediately before and after a
Hard High or Hard Low Limit crossing.
15.Press the Save Case - TME - OK Button. The Window will disappear, bringing you back to
the Save Case Definer.
16.Define the name of the new Save Case by entering a name (e.g. “TUTORIAL_2”) in the
Save Case - EDEF - Save Case ID field.
17.Save the Save Case Definitions permanent to file by choosing the Save Case - Save Button.
The SPEVAL Control Window will display a message something like
“Save Case saved to file - ERS2_TUTORIAL_2.SVC”
Note that you can submit an unsaved Save Case for retrieval.
18.Submit the Save Case for retrieval by pressing the Save Case - Submit Button. The SPEVAL Control Window should display the message
“Save Case submitted for retrieval”
If this is not the case, see the error messages reference in Appendix C on page 201.
19.SPEVAL will now retrieve the data. The time you have to wait depends on the amount of
data which have been requested for retrieval. If the retrieval was successful, SPEVAL will
display the retrieved data in the 3 windows.
Instruction
19
SPEVAL
Cray
Software User Manual
Systems
Possible Errors and their Causes
Retrieval starts but no display Windows come up.
The most plausible reason is that SPEVAL is still retrieving the data. If you don’t see any
messages after the ” Save Case submitted for retrieval “ message, this will
be the case.
Retrieval fails.
If the message displays “ No data was found for this retrieval “ you
should increase the retrieval time range (step 6.), then save and submit the Save Case again.
Otherwise, consult the Error Messages in Appendix C on page 201.
Instruction
20
SPEVAL
Cray
Software User Manual
Systems
3.6
Generating Statistics
Functional Description
This section describes how to use the SPEVAL Retrieval statistics utilities. On request, SPEVAL offers the possibilities to generate statistics for the TM data (done at retrieval time) and to
display the Statistical Information in a Statistics Window . A description of the Statistics Window and itsfields may be found in section 4.9.2 on page 168.
Since SPEVAL only provides statistics for Numerical and Analogue Parameters, the Proforma
used for this tutorial must reference at least one Numerical or Analogue Parameter.
It is assumed that you have defined a basic TM Save Case as described in the tutorial in section
3.3 on page 9. This Save Case will be used as the basis for the Save Case “TUTORIAL_3”
defined in this section.
Cautions and Warnings
None.
Procedures
Set Up
It is assumed that you have started SPEVAL and that the Save Case Window is displayed on
your terminal. There must also have been defined at least one Alphanumeric or Graphical Proforma for your Spacecraft computer in the standard SPEVAL Proforma directories. Moreover,
the Proforma used MUST contain a reference to at least one numerical Parameter.
Input Operations
1. Load an existing Save Case, e.g. “TUTORIAL_1”. (see 3.4 on page 13).
2. Press the Save Case - TM Extraction Processing Options Button. The Save Case - TM
Extraction (TME) Window will display at the terminal screen, obscuring the Save Case
Definer Window. The Save Case - TME - Parameter List should display all the Parameters
currently defined in the Save Case Proforma. Note that the Save Case - TME - Proforma ID
Text field will display the currently existing Proforma ID.
.
3. Enter the name of an existing Proforma containing numerical parameters in the Save Case TME - Proforma ID field and set the Proforma Type accordingly.
Instruction
21
SPEVAL
Cray
Software User Manual
Systems
4. Press the Load Proforma Button. The Save Case - TME - Parameter List will be updated
with the Parameters defined in the Proforma. Note that at least one Parameter should display
“numeric” as the Parameter type. This definitions will not be copied to the main Save Case
Definer window unless you press the Save Case - TME - OK or Save Case - TO - Commit
buttons.
5. Move the pointer to the Save Case - TME - Data Filters (analogue) form. Use the rectangular Pane in the bottom right of the form to display all the fields if necessary.
6. Set up the Numeric filter as indicated, then press the Apply Button. All the numerical
Parameters in the list will be updated to display “Statistics From Data Points”.
This means that SPEVAL generates statistics for the Parameters at retrieval time.
7. Press the Save Case - TME - OK Button. The Window will disappear, bringing you back to
the Save Case Definer. Note that the Proforma Id and Proforma Type in the Save Case Simple Extraction Processing (SEP) form now will be updated.
8. In the Save Case Definer Window, set up the Save Case - Output Form to only include statistics in the output.
9. Submit the Save Case for retrieval by pressing the Save Case - Submit Button. The SPEVAL Control Window should display the message
“Save Case submitted for retrieval”
If this is not the case, and the message displayed is “ No stats data is expected
for Stats display since no parameters have stats filters “, it
indicates that none of the Parameters in the Proforma were of type numerical. In this case,
you must select a new Proforma, starting from step 3.. For other error messages, see
Appendix C on page 201.
10.SPEVAL will now retrieve the data. The time you have to wait depends on the amount of
data which have been requested for retrieval. If the retrieval was successful, SPEVAL will
display the retrieved data in the statistic windows and any other window you have specified.
Instruction
22
SPEVAL
Cray
Software User Manual
Systems
Possible Errors and their Causes
Retrieval initialises but no display Windows come up.
The most plausible reason is that SPEVAL is still retrieving the data. If you don’t see any
messages after the ” Save Case submitted for retrieval “ message, this will
be the case.
Retrieval fails.
If the message displays “ No data was found for this retrieval “ you
should increase the retrieval time range, then save and submit the Save Case again. Otherwise, consult the Error Messages in Appendix C on page 201.
Instruction
23
SPEVAL
Cray
Software User Manual
Systems
3.7
Using Multiple Time Windows
Functional Description
SPEVAL offers the possibility to specify a range of time windows used when retrieving the
data. This options is especially useful for retrievals spanning a long time period (say a month),
but only data for particular times are of interest.
This tutorial shows how to retrieve data for a one week time period. The data is retrieved
between 22.00 and 23.00 on a daily basis.
Cautions and Warnings
None.
Procedures
Set Up
It is assumed that you have started SPEVAL and that the Save Case Window is displayed on
your terminal. There must also have been defined at least one Alphanumeric or Graphical Proforma for your Spacecraft computer in the standard SPEVAL Proforma directories
Input Operations
1. Load an existing Save Case, e.g. “TUTORIAL_1”. (see 3.4 on page 13).
2. Press the Save Case - Time Options Button Button. The Save Case - Time Options (TO)
Window will be displayed at the terminal screen, obscuring the Save Case Definer Window.
The window will display one time window with the same time period as specified in the
Save Case - Simple Time window.
3. Set the Save Case - TO - Retrieval Window Type to “Repeated Time Windows”. The window will change layout as shown below. For details about the fields and push-buttons see
“Save Case - Time Options (TO) Window” on page 145.
Instruction
24
SPEVAL
Cray
Software User Manual
Systems
4. Fill in the form as indicated below. This defines a retrieval starting on day 27, 22.00, ending
at day 34, 23:00. The data will only be retrieved on a daily basis, between 22.00 and 23.00
for one week. I.e. the Window Length is 1 hour and the Repeat Period is 7 days. The “/D”
qualifier means “Delta Time”. For a detailed description of the SPEVAL time field syntax,
see “Time Specification Fields” on page 52.
5. Press the Validate Button in the Time Options Window. The SPEVAL Control window
should display the message
“Time validation completed - no errors found”
If this is not the case, the expected time syntax is incorrect. See Appendix C on page 201
for an alphabetical list of the error messages. After correcting the errors start from step 5.
again.
6. Press the OK Button. The Time Options Window will disappear, and the Save Case will
have been updated with the new time window specification. Note that the Save Case - Simple Time window now displays the text: “Repeated time windows have been
defined. See Time Options ....”.
7. Define the name of the new Save Case by entering a name (e.g. “TUTORIAL_3”) in the
Save Case - EDEF - Save Case ID field.
8. Save the Save Case Definitions permanent to file by choosing the Save Case - Save Button.
The SPEVAL Control Window will display a message something like
“Save Case saved to file - ERS2_TUTORIAL_3.SVC”
Note that you can submit an unsaved Save Case for retrieval.
9. Submit the Save Case for retrieval by pressing the Save Case - Submit Button. The SPEVAL Control Window should display the message
“Save Case submitted for retrieval”
If this is not the case, see the error messages reference in Appendix C on page 201.
10.SPEVAL will now retrieve the data. The time you have to wait depends on the amount of
data which have been requested for retrieval. If the retrieval was successful, SPEVAL will
display the retrieved data in the any of the windows which were specified.
Possible Errors and their Causes
Retrieval starts but no display Windows come up.
The most plausible reason is that SPEVAL is still retrieving the data. If you don’t see any
messages after the ” Save Case submitted for retrieval “ message, this will
Instruction
25
SPEVAL
Cray
Software User Manual
Systems
be the case.
Retrieval fails.
If the message displays “ No data was found for this retrieval “ you
should change the “Overall Start Time” time, (step 4.), then save and submit the Save Case
again. For other messages, consult the Error Messages in Appendix C on page 201.
Instruction
26
SPEVAL
Cray
Software User Manual
Systems
3.8
Out-of-Limits data
Functional Description
This section describes how to use the SPEVAL Out-of-Limits retrieval utility. SPEVAL displays OOL information for a specific time range in a standard OOL (Out-of-Limits) Window
described in section 4.9.3 on page 171.
Cautions and Warnings
None.
Procedures
Set Up
It is assumed that you have started SPEVAL and that the Save Case Window is displayed on
your terminal.
Input Operations
1. Load an existing Save Case, e.g. “TUTORIAL_1” (see 3.4 on page 13).
2. Set the Save Case - Data - Data Type to “Out Of Limits”. The Save Case - Simple Extraction Processing (SEP) Form and the Save Case - Output Form will change layout, defaulting the OOL Display output.
3. Enter the Start Time and End Time for the retrieval. If SPEVAL fails to retrieve data for this
time period, a failure message will be displayed and no Output Windows will be created.
4. Submit the Save Case for retrieval by pressing the Save Case - Submit Button. The SPEVAL Control Window should display the message “Save Case submitted for
retrieval”
For error messages, see Appendix C on page 201.
5. SPEVAL will now retrieve the data. The time you have to wait depends on the amount of
data which have been requested for retrieval. If the retrieval was successful, SPEVAL will
display the retrieved data in the OOL window.
Possible Errors and their Causes
Retrieval initialises but no display Windows come up.
The most plausible reason is that SPEVAL is still retrieving the data. If you don’t see any
messages after the ” Save Case submitted for retrieval “ message, this will
be the case.
Retrieval fails.
If the message displays “ No data was found for this retrieval “ you
should increase the retrieval time range (step 3.), then save and submit the Save Case again.
Otherwise, consult the Error Messages in Appendix C on page 201.
Instruction
27
SPEVAL
Cray
Software User Manual
Systems
3.9
Editing the Summary Save Case
Functional Description
This section describes how to update the (global) Summary Save Case. For the current SPEVAL release, there exist one Summary Save Case per spacecraft. The Summary Save Case
defines the data to be regularly retrieved (currently once every day) into the Summary data
area.
The Summary Save Case always have the name “SUMMARY”, and is stored in the public
Save Case directory. The default TM Proforma used by the Save Case is called “SUMM” and
is also stored in the public area.
If no SUMMARY Save Case has been defined in the public Save Case directory, the Tutorial
shows how to define it and how to copy it to the public Save Case directory.
Cautions and Warnings
NOTE(1): If you have a Save Case named “SUMMARY” in the private Save Case directory,
this definition will take precedence over the Save Case in the public area on load and save
operations. Note however, that SPEVAL will never submit private “SUMMARY” Save Cases
for retrieval. The same arguments yield for the “SUMM” Proforma file name.
NOTE (2): If you edit the Summary Save Case, it might interfere with other users, since there
exist only one Summary Save Case per spacecraft.
NOTE(3): Always validate a SUMMARY Save Case before saving it and copying it to the public Save Case directory. Otherwise, SPEVAL will fail to submit the Save Case.
Procedures
Set Up
It is assumed that you have started SPEVAL and that the Save Case Window is displayed on
your terminal.
Find out if a public SUMMARY Save Case has been defined by issuing the DCL command:
CSPEVL: DIR SPVL_PUBLIC_SAVE_CASES:*_SUMMARY.SVC
Find out if a private SUMMARY Save Case has been defined by issuing the DCL command:
CSPEVL: DIR SPVL_PRIVATE_SAVE_CASES:*_SUMMARY.SVC
Find out if a public SUMM Proforma has been defined by issuing the DCL command:
CSPEVL: DIR SPVL_PUBLIC_PROFORMAE:*_SUMM.PARAM
Find out if a private SUMM Proforma has been defined by issuing the DCL command:
CSPEVL: DIR SPVL_PRIVATE_PROFORMAE:*_SUMM.PARAM
If a SUMMARY Save Case exists both in the private and public area, you should rename the
private version in order to avoid confusion. The same arguments yield for the SUMM Proforma.
Instruction
28
SPEVAL
Cray
Software User Manual
Systems
Input Operations
When no public SUMM Proforma exists.
1. In this case, you must use the SPEVAL Proforma Editor to define and compile a SUMM
Proforma. Use a Text Editor (e.g. LSE) to define a simple proforma. The example below
defines a Summary Proforma for ERS-2 containing one Parameter which values are
retrieved:
DEFINE PARAMETER_SET SUMM
“Summary “ /spacecraft=ERS_2
PARAMETER F102
/mode_dependent /nocalibrated /commutation=SINGLE= 1
END
2. Save the Proforma definition to the file name: SUMM.PROFORMA
3. Issue the DCL command
CSPEVL: @PRJPROF:PROF_COMMANDS
This makes the “COMPILE” command available.
4. Compile the proforma and store it in the Public Proforma directory by typing:
CSPEVL: COMPILE SUMM.PROFORMA
5. Copy the compiled proforma file to the public proforma directory by issuing:
CSPEVL: COPY ERS2_SUMM.PARAM _CSPEVL: SPVL_PUBLIC_PROFORMAE:
The compiled proforma will now be accessed by the Public Summary Save Case.
6. Delete the local copy of the compiled proforma file by issuing:
CSPEVL: DELETE ERS2_SUMM.PARAM;*
This deletes all versions of the compiled summary Proforma.
When no public Summary Save Case exist
1. In this Case, you must define a SUMMARY Save Case and copy it over to the public area.
Set the Save Case - EDEF - Save Case Nature to “Summary” as indicated. Note that after
the Save Case Nature has been set to Summary, the Save Case ID field will be set to “summary” and turns non-editable.
2. Edit the Save Case definitions as required.
Instruction
29
SPEVAL
Cray
Software User Manual
Systems
3. Press the Save Case - Validate Button. If the validation fails, you should correct any errors
and repeat the step. An invalid Summary Save Case should never be copied to the public
area.
4. Save the Save Case definitions (in the private area) by pressing the Save Case - Save Button. A “DIR” on the SPVL_PRIVATE_SAVE_CASES directory should now display the private Save Case name.
5. From a DECTEM window, copy the private Save Case definition to the public area by typing:
CSPEVL: COPY SPVL_PRIVATE_SAVE_CASES:ERS_SUMMARY.SVC _CSPEVL: SPVL_PUBLIC_SAVE_CASES:
This copies your private Save Case definition to the Public Save Case. This Save Case will
now be used by Speval to retrieve the data on a regular basis.
6. Delete the private Save Case definition by entering:
CSPEVL: DELETE SPVL_PRIVATE_SAVE_CASES:ERS_SUMMARY.SVC;
This deletes ALL versions of the private summary Save Case.
When a Public Summary Save Case exist
1. In this case, you must rename any “Summary” Save Cases in the private area to another
name. Enter e.g.:
CSPEVL: RENAME SPVL_PRIVATE_SAVE_CASES:ERS_SUMMARY.SVC;* _CSPEVL: SPVL_PRIVATE_SAVE_CASES:ERS_SUMMARY_OLD;*
2. Set the Save Case - EDEF - Save Case Nature to “Summary”. Note that after the Save Case
Nature has been set to Summary, the Save Case ID field will be set to “summary” and turns
non-editable.
3. Press the Save Case - Load Button. The public Summary Save Case will be loaded into the
Save Case Definer. You can now inspect and edit the definitions, but you will not be allowed
to submit the Save Case, since this is only done on a daily basis.
4. Press the Save Case - Validate Button. If the validation fails, you should correct any errors
and repeat the step. An invalid Summary Save Case should never be copied to the public
area.
5. Save the Save Case definitions (in the private area) by pressing the Save Case - Save Button.
6. From a DECTEM window, copy the private Save Case definition to the public area by typing:
CSPEVL: COPY SPVL_PRIVATE_SAVE_CASES:ERS_SUMMARY.SVC _CSPEVL: SPVL_PUBLIC_SAVE_CASES:
This copies your private Save Case definition to the Public Save Case. This Save Case will
now be used by Speval to retrieve the data on a regular basis.
7. Delete the private Save Case definition by entering:
Instruction
30
SPEVAL
Cray
Software User Manual
Systems
CSPEVL: DELETE SPVL_PRIVATE_SAVE_CASES:ERS_SUMMARY.SVC;
This deletes ALL versions of the private summary Save Case.
8. A “DIR” on the SPVL_PRIVATE_SAVE_CASES directory should now NOT display any
public Save Case names.
Possible Errors and their Causes
No public SUMMARY Save Case can be loaded even if “DIR” shows that there exists one.
The most plausible reason is that the Save Case Nature has not been set to summary. Otherwise, contact Software Support.
The SPEVAL Summary retrieval does not reflect the SUMM Proforma.
The most plausible reason is that the “SUMM” Proforma used by SPEVAL is different from
the Proforma you have inspected. If any “SUMM” Proforma exists in the private Proforma
directory, this Proforma will be displayed in the Save Case definer, but the Proforma used
by Speval will be the public one. Rename all private “SUMM” Proforma files.
Instruction
31
SPEVAL
Cray
Software User Manual
Systems
3.10 Producing User Data Set (UDS) Files
Functional Description
This section describes how to use the SPEVAL User Data Set (UDS) files. This utility allows
you to save the data from retrievals into UDS file. Later on, you can retrieve the data from the
UDS file for e.g. display or printing.
Cautions and Warnings
None.
Procedures
Set Up
It is assumed that you have started SPEVAL and that the Save Case Window is displayed on
your terminal.
Input Operations
1. Load an existing Save Case, e.g. “TUTORIAL_1”. (see 3.4 on page 13).
2. Set the Save Case - EDEF - Save Case Nature to “User Data Set”. The Save Case - Output
Form will change layout, prompting for a UDS file ID.
3. Enter the a string, e.g. “TUTORIAL_4” in the Save Case - Output - User Data Set field.
The field specifies that the output from the retrieval should be a UDS file which have the
filename “TUTORIAL_4.UDS”, directory “SPVL_USER_DATA_SET_DIR”.
4. Enter a new Save Case Name in the Save Case - EDEF - Save Case ID field, e.g.
“TUTORIAL_4”. Then save the Save Case by pressing the Save Case - Save button.
5. Submit the Save Case for retrieval by pressing the Save Case - Submit Button. The SPEVAL Control Window should display the message “Save Case submitted for
retrieval”
For error messages, see Appendix C on page 201.
6. SPEVAL will now retrieve the data. The time you have to wait depends on the amount of
data which have been requested for retrieval. If the retrieval was successful, SPEVAL will
display a message similar to:
User Data Set produced.File name: CLUV3$DKA100:[ME]TUTORIAL_4.UDS;0
The directory specifies the full path to the filename. The “;0” extension means that a new
version of the UDS file has been created (i.e. no old versions have been overwritten). You
have now permanently saved all the data from the retrieval in the UDS file. The next steps
Instruction
32
SPEVAL
Cray
Software User Manual
Systems
will retrieve the data from the UDS files and display it in a Alphanumeric Display Window.
7. Re-load the original Save Case you used, (see step 1.) Note that in this case, the Save Case
- EDEF - Save Case Nature should be “Display Output”, not “User Data Set”.
8. Set the Save Case - Data - Data Source to “User Data Set”. The User Data Set ID Text field
will turn visible.
9. Press the Push Button to the right of the User Data Set ID text field. The Speval File Selection Box will be displayed, and the name “TUTORIAL_4” will be displayed in the list.
10.Double-click on the “TUTORIAL_4” item. The File Selection Box will disappear and the
The User Data Set ID Text field displays the item you just selected.
11.Submit the Save Case for retrieval by pressing the Save Case - Submit Button. The SPEVAL Control Window should display the message “Save Case submitted for
retrieval”
For error messages, see Appendix C on page 201.
12.SPEVAL will now retrieve the data from the UDS file. The time you have to wait depends
on the amount of data which have been requested for retrieval. If the retrieval was successful, SPEVAL will display the message “Retrieved Data Loaded” and the Output
windows will display the data which were stored in the UDS file.
Possible Errors and their Causes
UDS Retrieval initialises but no display Windows come up.
The most plausible reason is that SPEVAL is still retrieving the data from the UDS file. If
you don’t see any messages after the ” Save Case submitted for retrieval “
Instruction
33
SPEVAL
Cray
Software User Manual
Systems
message, this will be the case.
Retrieval fails.
If the message displays “ No data was found for this retrieval “ you
should increase the retrieval time range, then save and submit the Save Case again. Otherwise, consult the Error Messages in Appendix C on page 201.
Instruction
34
SPEVAL
Cray
Software User Manual
Systems
3.11 Loading User Data Sets into PV-Wave
Functional Description
This section describes how to load SPEVAL generated User Data Set (UDS) files into interactive PV-Wave. It is assumed that you know how to produce User Data Sets. If not you should
first perform the Tutorial “Producing User Data Set (UDS) Files” on page 30.
The Tutorial demonstrates how to use PV-Wave to “smooth” or “spike suppress” TM data by
using the PV-WAVE SMOOTH function.
Cautions and Warnings
None.
Procedures
Set Up
It is assumed that you have produced a User Data Set file containing Telemetry Data. If you
follow the steps described in Section 3.10, your output UDS file should contain TM data. Note
the name of the UDS file which was produced.
You will also need to start a DECterm window. Do this by selecting the Application > DECterm item from the Application Menu in the Session Manager.
Input Operations
1. On the DECterm command line. type
$ SET DEF SPVL_PRIVATE_USER_DATA_SETS:
$ WAVE GRPH_USER
The first line sets the current directory to your standard “Private” User Data Set directory, so
that you do not need to enter the full file specification when loading a UDS file from PVWave. The second line starts up PV-Wave, displaying the standard PV-Wave prompt and
compiling the SPEVAL PV-Wave procedures.
2. At the PV-Wave prompt, load the TM UDS file which you previously have produced. E.g. if
the UDS file name is “TUTORIAL_4”, enter the following:
WAVE > GRPH_LOAD_UDS, ‘TUTORIAL_4.UDS’
PV-Wave will now call SPEVAL procedures to load the contents of the UDS into internal
PV-Wave variables. If the operation is successful, you should expect to see the following:
Loading TUTORIAL_4.UDS
% Compiled module: GRPH_READ_PTVS_DATA.
WAVE >
If not, consult “GRPH_LOAD_UDS” on page 185 for possible error messages and their
cause.
3. Use the PRINT command to pick out a TM parameter of interest by issuing:
Instruction
35
SPEVAL
Cray
Software User Manual
Systems
WAVE > PRINT, PARAMETER.NAME
PV-Wave prints out all the TM parameter names which existed in the UDS file.
4. Pick out the TM Parameter of interest, e.g. ‘C1234’ which data is to be spike suppressed.
Then preprocess the data by issuing:
WAVE > GRPH_MATCH_DATA, SELECT=’C1234’,/MATCH,/AFTER
This command creates the NEW_DATA structure, containing only the C1234 data. The
/MATCH qualifier specifies that all times before the first occurrence of the parameter
should be neglected. A new time array, NEW_TIME is produced. The /AFTER qualifier
specifies that the data should be extrapolated. I.e. for points in time where no data exists, the
corresponding datum is filled with the previous existing datum.
5. Use PV-Wave to spike-suppress the data by issuing
WAVE > TMP = SMOOTH(NEW_DATA._C1234,5)
This constructs a new, smoothed data array TMP. The smoothing window is of size 5 elements.
6. Plot the smoothed data against time by issuing:
WAVE > PLOT, NEW_TIME, TMP, XTYPE=2
PV-Wave will now plot the smoothed data against the matching time array. Note that we
must use the NEW_TIME array since the /MATCH qualifier was specified.
Exit the PV-Wave by typing
WAVE > EXIT
Possible Errors and their Causes
Wave fails to call GRPH_LOAD_UDS and GRPH_LOAD_DATA.
You are probably starting PV-Wave from a user account which has not been registered by
SPEVAL. I.e. the SPEVAL procedures are unknown to PV-Wave. Contact Software Support
to register as a SPEVAL user.
Instruction
36
SPEVAL
Cray
Software User Manual
Systems
3.12 Using Graphics output with PV-Wave
Functional Description
This section describes how to use the SPEVAL interface with PV-Wave. SPEVAL allows you
to dump all the data in a Graphical Window in a PV-Wave readable format. You can later use
the powerful PV-Wave command language to analyse the data, generating new data and re-plot
the data in new configurations.
The tutorial will show a simple PV-Wave application. Two numerical Telemetry Parameters
will be extracted from the Long Term Archive (LTA) and plotted in the Graphical Window .
The Parameters (and time) will be dumped, and we will use PV-Wave to construct a new graph
given as
2
y ( t ) = P1 ( t ) + P2 ( t )
2
where P1 and P2 are the original Telemetry values (as a function of time) and y is the resulting
dependent variable. Since we cannot assume that both parameters contain data for all the
unique times, we will use the SPEVAL function GRPH_MATCH_DATA to match the two data
arrays to the unique times as follow:
• Find the first time for which both P1 and P2 have at least had one valid data point.
• For all subsequent times, extrapolate from the last valid data points in order to obtain data
points for all the remaining unique times.
Cautions and Warnings
None.
Procedures
Set Up
It is assumed that you have started SPEVAL and that the Save Case Window is displayed on
your terminal. There must also have been defined at least one Graphical Proforma for your
Spacecraft computer in the standard SPEVAL Proforma directories. Moreover, the Proforma
used MUST contain a reference to at least two numerical Parameters.
Input Operations
1. Load the existing Save Case, e.g. “TUTORIAL_1”. (see 3.4 on page 13).
2. Submit the Save Case for retrieval by pressing the Save Case - Submit Button. The SPEVAL Control Window should display the message
“Save Case submitted for retrieval”
SPEVAL will now retrieve the data. The time you have to wait depends on the amount of
data which have been requested for retrieval. If the retrieval was successful, SPEVAL will
display the retrieved data in the Graphics windows and any other window you have specified.
3. Choose the Commands | Dump for Interactive Wave Push Button in the top left of the
Graphical Window as shown in the figure below. The SPEVAL Control Window will display a message, confirming that the data has been numbed to a specific file (here called
SPVL_OUTPUT_DIR:SPVL_H0_01_GRPH.DUMP
Instruction
37
SPEVAL
Cray
Software User Manual
Systems
4. Bring up a DECTERM Window (via the Session Manager).
5. On the command line, type (not including the prompt)
CSPEVL $ WAVE GRPH_USER
Pv-Wave will now start up and you get the PV-Wave prompt (normally “WAVE> ”).
6. Type
WAVE> restore,filename=’spvl_output_dir:spvl_h0_01_grph.dump’
This will load the PV-Wave variables which have been generated with the
Commands | Dump for Interactive option.
7. Type
WAVE> INFO
PV-Wave will display all the SPEVAL generated user variables (arrays and scalars) as follows (see Appendix B on page 197)
TIME - contains all the discrete times in the plot.
DISPLAY - Contains the display information for the dumped plot.
PARAMETER - Contains all the Parameter names, type, etc. for the dumped plot.
DATA - Contains the actual values for the current plot.
TIMES - Contains indexes into the TIME array.
GRAPH - Contains the Graph plotting information.
TEXT_TABLE - Contains all the text tables (used by Status Parameters).
8. Get a list of all the Parameters in the plot and their types by typing
WAVE > PRINT,PARAMETER.NAME,PARAMETER.DATATYPE
You can also get a detailed description of all the PARAMETER structure members by typing e.g.
WAVE > INFO,PARAMETER(0), /STRUCT
This shows all the structure fields for the first parameter in the list.
9. Pick out two of the REAL Parameters (here arbitrary called “P1” and “P2”). Then match the
data arrays by the following command:
Instruction
38
SPEVAL
Cray
Software User Manual
Systems
WAVE > GRPH_MATCH_DATA,/MATCH,SELECT=[‘P1’,’P2’],/AFTER
10.Define the function y as follows (note the underline character “_” in front of the parameter):
WAVE > Y = NEW_DATA._P1^2 + NEW_DATA._P2^2
11.Plot the function y against time by entering the following:
WAVE > PLOT,NEW_TIME,Y, XTYPE=2
PV-Wave will plot the function y against time and display it in a simple graphical Window.
Possible Errors and their Causes
Retrieval initialises but no display Windows come up.
The most plausible reason is that SPEVAL is still retrieving the data. If you don’t see any
messages after the ” Save Case submitted for retrieval “ message, this will
be the case.
Retrieval fails.
If the message displays “ No data was found for this retrieval “ you
should increase the retrieval time range, then save and submit the Save Case again. Otherwise, consult the Error Messages in Appendix C on page 201.
Interactive PV Wave does not display graph of y.
Check that the PV-Wave Graphics Window is not obscured by other windows (this Window
does not always pop up to the front of the Workstation screen).
Instruction
39
SPEVAL
Cray
Software User Manual
Systems
4
Reference
Reference
40
SPEVAL
Cray
Software User Manual
Systems
4.1
Proforma Editor
Description
The SPEVAL Proforma Editor allows you to define Proforma defining the Parameters to be
retrieved, their display characteristics and layout. By using a normal Text Editor utility (e.g
LSE), you enter the Proforma definitions which are compiled using the SPEVAL Proforma
Compiler.
Proforma Types
The Proforma Editor defines the following types of Proforma:
• Alphanumeric Proforma. These Proforma defines the layout for TM Parameters in Alphanumeric Display and Alphanumeric List Windows. The binary file extension is “.ALPHA”.
• Graphics Proforma. These Proforma defines the layout for TM Parameters in Graphical
Windows as well as in Alphanumeric Display and Alphanumeric List Windows. The binary
file extension is “GRAPH”.
• Parameter Proforma. These Proforma may not be used to display any data. They are only
used in order to define the Parameters which are retrieved. You would define a Parameter
Proforma if the output from the retrieval was the Summary or a UDS (User Data Set) file.
The binary file extension is “PARAM”.
• Field Proforma. This Proforma defines the column layout in the Statistics Window , the
OOL (Out-of-Limits) Window and the Totals Window . The binary file extension is
“FIELD”.
Proforma directories
SPEVAL searches 3 different directories in order to find the binary Proforma definitions which
are specified in a Save Case definitions (in the following order):
• SPVL_SCOS_PROFORMAE. This directory contains all the Proforma as imported from
SCOS. The Proforma are automatically imported by SPEVAL.
• SPVL_PRIVATE_PROFORMA. This directory contains the user defined Proforma binaries. The Proforma defined here cannot be accessed by other Users. Note that this directory
takes precedence of the Public Proforma directory.
• SPVL_PUBLIC_PROFORMA. This directory contains Proforma which are shared by several users. An example of Proforma which are stored in this directories are the standard
Field Proforma.
SPEVAL Proforma Commands
The Proforma Editor consists of three DCL commands. These are made available to your process by executing
@PRJPROF:PROF_COMMANDS
The commands are
• The COMPILE command compiles a file containing a text definition of a proforma into a
binary form usable by SPEVAL software.
• The EXTRACT command converts a binary proforma definition into a readable text file,
which can also be compiled again. This allows an existing proforma to be modified even if
Proforma Editor
41
SPEVAL
Cray
Software User Manual
Systems
the original source description no longer exists -- it is also useful if a new proforma is to be
based on one imported from SCOS.
• The TRANSLATE command is reserved for use by SPEVAL software. It translates Proforma held in SCOS derived database format into text format suitable for processing by the
COMPILE command.
Cautions and Warnings
If you create a save case containing a proforma, and then update the proforma and re-compile
it, the new definition will NOT be imported automatically into the save case. To use the
updated version of the proforma, you must reload it into the save case (e.g. as described in section 4.7.14.11 on page 143.)
Syntax
For the Proforma Text File syntax, see section 4.1.1 on page 41.
Examples
Not Applicable.
Possible Errors
See the relevant sub-sections.
Cross Reference
Item
4.1.1 COMPILE page 41
4.1.3 EXTRACT page 51
4.1.2 Field Proformae page 50
Proforma Editor
42
SPEVAL
Cray
Software User Manual
Systems
4.1.1
COMPILE
Description
This command converts a proforma source file into a binary proforma. The source file can be
created using a text editor; the syntax is described below.
Syntax: COMPILE filename [/DATABASE_TIME = <date-time>]
filename
File name of source proforma file. By convention, proforma source files have an
extension of ”.proforma” and a file name which corresponds to the proforma
name. It is possible to define more than one proforma in a single source file, but
they must all be for the same spacecraft.
/DATABASE_TIME
This qualifier allows you to specify the database to use for the Proforma compilation. The default is “NOW” which uses the latest existing database for the compilation.
The result of compilation is one binary file for each proforma defined in the source file. The
output file name has the form
sc_id.type
where
sc
identifies the spacecraft (e.g. ERS2, CLU4, ISO_)
id
is the 1-4 character proforma identifier
type
is one of ALPHA, GRAPH, PARAM, FIELD for alphanumeric, graphic, parameter, set, and field proformae respectively.
Remember that the output filename(s) incorporate the proforma id(s), regardless of the name
of the input file.
Cautions and Warnings
Not applicable.
Syntax
Proforma Source Format
A proforma definition consists of a DEFINE statement, followed by one or more PARAMETER statements, optionally one or more GRAPH statements for graphic proformae only, and
finally an END statement.
DEFINE proforma-type proforma-id "title" /SPACECRAFT=sc-id
[/MODE_DEPENDENT] [/GRAPHS=n] [/DEFAULT_COLOUR=colour] [/SCOS]
proforma-type
is
one
of
the
keywords
ALPHANUMERIC_PROFORMA,
Proforma Editor
43
SPEVAL
Cray
Software User Manual
Systems
GRAPHIC_PROFORMA, PARAMETER_SET, FIELD_PROFORMA. Alphanumeric and graphic proformae specify a set of parameters and details of how they
should be displayed to the user. Parameter sets only specify a set of parameters,
and can be used to retrieve data into user data sets, but not directly to display. Field
proformae are special proformae which specify the layout of statistics, out-of-limits, and totals displays. The parameters applicable to field proformae are described
in section 4.1.2 on page 50.
proforma-id
is an identifier of up to 4 characters. Any of the characters A-Z, 0-9, $, _ (underscore), - (hyphen) may be used.
title
is the display title, containing up to 32 characters. It should be enclosed in double
quotes (").
/SPACECRAFT=sc-id
specifies the spacecraft for which the proforma applies. Valid options are ISO,
ERS_2, ERS_1, KIRUNA_2, KIRUNA_1, CLUSTER_1, CLUSTER_2,
CLUSTER_3, CLUSTER_4, SCS.
/[NO]MODE_DEPENDENT
specifies default mode-dependency for parameters which are supplied without an
explicit mode-dependency qualifier. The default is /MODE_DEPENDENT. Note
that if this option is specified, SPEVAL will be defaulted not to retrieve ID (Invalid
Data) for the specified Parameters.
/GRAPHS=n
(only applicable to graphic proformae) specifies the number of graphs on an
graphic display, in the range 1-4.
/DEFAULT_COLOUR=colour
(only applicable to graphic proformae) the default colour to be used for parameter
plots and graph axes, if no colour is explicitly given. The default is WHITE.
/SCOS
This qualifier is reserved for use by SPEVAL software. It indicates that a proforma
has been imported from a SCOS spacecraft database.
PARAMETER param-id [/[NO]CALIBRATED]
[/COMMUTATION=commutation_option] [/[NO]MODE_DEPENDENT]
[/[NO]ALPHANUMERIC] [/DISPLAY_FIELD=n] [/LIST-FIELD=n]
[/FORMAT=format] [/BACKGROUND=colour] [/FOREGROUND=colour]
[/GRAPH=graph_number] [/ON_X_AXIS] [/COLOUR=colour]
[/LINE=line_style] [/SYMBOL=symbol] [/SCALING=scaling]
[/SHOW_LIMITS] [/STEPPED_PLOT] [/NUMERIC_LABELS]
param-id
the parameter id as held in the spacecraft database.
General qualifiers: applicable to alphanumeric and graphic proformae and
to parameter sets.
/[NO]CALIBRATED
specifies that the parameter is to be calibrated. This is the default; to prevent cali-
Proforma Editor
44
SPEVAL
Cray
Software User Manual
Systems
bration, specify /NOCALIBRATED. This parameter is ignored for parameters
which cannot be calibrated. For status parameters, use the FORMAT qualifier to
determine whether status strings or numeric values are displayed.
/COMMUTATION={ALL | SINGLE=number}
By default, all commutations of all commutated parameters are retrieved. Note:
unlike SCOS proformae, it is not possible to specify that different commutations of
one parameter are displayed in different positions. If more than one commutation
of a parameter is specified in a proforma definition, all occurrences are changed by
the proforma compiler to retrieve ALL commutations. This qualifier is only relevant for retrievals from the long-term archive: commutated values are not identified
as such in user data sets or in the summary.
/[NO]MODE_DEPENDENT
specifies that the parameter should, or should not, be mode-dependent, i.e. if the
parameter has a validity parameter, it will only be retrieved when the value of the
validity parameter is True. If no validity parameter is available, the qualifier is
ignored and the parameter data is retrieved. If neither /MODE_DEPENDENT nor
/NOMODE_DEPENDENT is specified, the default is determined by the value
given in the DEFINE command. Note that if MODE_DEPENDENT is specified,
SPEVAL will be defaulted not to retrieve ID (Invalid Data) for the specified Parameters.
Alphanumeric qualifiers: applicable to alphanumeric and graphic proformae.
/[NO]ALPHANUMERIC
specifies whether a parameter should or should not appear in the alphanumeric display and alphanumeric list. The default is /ALPHANUMERIC for alphanumeric
and graphic proformae. The main use of /NOALPHANUMERIC is in graphic proformae, if a single parameter is to be plotted more than once (e.g. as an X and a Y
parameter), to prevent it from appearing more than once in the alphanumeric windows.
/DISPLAY_FIELD=n
the field position in the alphanumeric display at which the parameter should be
shown. Fields are numbered 1-32 from top to bottom in the left-hand column, and
33-64 from top to bottom in the right-hand column (like SCOS 64-parameter
ANDs.) If this position is not specified, the parameter is placed in the next field
after the previous parameter. If it is not specified for any parameter, they are placed
in consecutive fields starting from field 1 (top left.)
/LIST_FIELD=n
the column position in the alphanumeric list to display the parameter. Columns are
numbered 1-64 from left to right. If the column is not specified, the parameter is
placed in the next field after the previous parameter. If it is not specified for any
parameter, they are placed in consecutive columns starting from column 1 (leftmost column.)
/FORMAT={DECIMAL | HEXADECIMAL | OCTAL | BINARY | STRING | FIXED:n |
ENGINEERING | SHORTEST | DEFAULT}
Alphanumeric display format for the parameter. FIXED:n specifies fixed-point
format with n decimal places (default is 2). SHORTEST displays the data either in
fixed or exponential (engineering) format, whichever allows more precision. Specify STRING (or DEFAULT) to display status parameter data as status strings. The
default format, if DEFAULT or no format is specified, depends on the parameter
type as defined in the spacecraft database at the time the proforma is compiled.
Proforma Editor
45
SPEVAL
Cray
Software User Manual
Systems
/BACKGROUND=colour
Not supported for this release.
/FOREGROUND=colour
Not supported for this release.
Graphic qualifiers: applicable to graphic proformae only.
/GRAPH=graph_number
specifies the graph on which the parameter is to be plotted. This must be at least 1,
and no higher than the number of graphs given in the preceding DEFINE statement. This qualifier must be provided in order to plot a parameter; if it is not
present, the parameter will only appear in the alphanumeric windows. If a parameter is to appear on more than one graph, with other attributes the same, specify e.g.
/GRAPH=(1,4).
/[NO]ON_X_AXIS
identifies the independent parameter for a parameter-vs- parameter plot. This may
only be used for one parameter per graph, but each graph in a graphic display may
have a different x-axis parameter. Parameter-vs-parameter graphs may be mixed
with parameter-vs-time graphs on a single graphic display. The default is
/NOON_X_AXIS.
/COLOUR=colour
specifies the colour to plot a parameter. Valid colours are WHITE, YELLOW,
MAGENTA, CYAN, BLUE, GREEN, RED (but not black since the background is
black!). If no colour is specified, the default provided in the DEFINE statement is
used; if this was also not specified, the default colour is WHITE.
/LINE=style
defines the line style used to connect data points. Valid options are NONE, SOLID,
LONG_DASHES, DASHED, DOTTED, DOT_DASH. The default is SOLID.
/SCALING= {AUTOMATIC | (MINIMUM=n, MAXIMUM=n)}
define axis scaling policy. If AUTOMATIC (the default) is specified, an axis scale
is chosen which includes all the data points. I explicit minimum and maximum values are given, this scale is used even if some data points are off the axis and therefore not displayed.
/[NO]SHOW_LIMITS
plots the hard and soft limits for the parameter, if they are defined and fit within the
range plotted. Limits are plotted in the same colour as the parameter data, with
fixed line styles of DOTTED for soft limits and DASHED for hard limits. Note (i)
automatic scaling is based only on the parameter values, so if a parameter is within
limits, the limits will normally not be visible on the graph; (ii) for this release, only
fixed limits will be plotted. Limits based on relational parameters are not yet supported by SPEVAL. The default is /NOSHOW_LIMITS
/SYMBOL=symbol
(positional) defines the symbol used to mark each parameter data point. Valid symbol names are PLUS, ASTERISK, DOT, DIAMOND, TRIANGLE, SQUARE, X..
The default is no symbol.
/[NO]NUMERIC_LABELS
for status parameters, displays the y-axis labels as numerical values (max range is
0-255) rather than the actual status string values. The default is
/NONUMERIC_LABELS
Proforma Editor
46
SPEVAL
Cray
Software User Manual
Systems
/[NO]STEPPED_PLOT
Not supported for this release.
Proforma Editor
47
SPEVAL
Cray
Software User Manual
Systems
GRAPH graph_number [/COLOUR=colour]
[/LINES=n] [/TICKS=n] [/[NO]STACK_PARAMETERS]
[/[NO]MERGE_Y_AXES][/X_AXIS_TIME_WIDTH=n]
[/TEN_CM_TIME_WIDTH]
GRAPH graph_number
Identifies the Graph for which the definitions should yield. graph_number is in the
range 1-4, but must not exceed the number specified in the Proforma GRAPHS
qualifier.
/COLOUR=colour
specifies the colour to plot the graph axes. Valid colours are WHITE, YELLOW,
MAGENTA, CYAN, BLUE, GREEN, RED, BLACK. The default is WHITE.
/LINES=(x=n,y=m)
specificies the number of gridlines for the x and y axis.
/TICKS=(x=n,y=m)
specifies the number of ticks on the x and y axis.
/[NO]STACK_PARAMETERS
specifies whether the parameter in the graph should have their y-axis stacked on
top of each other or not. If /NOSTACK_PARAMETERS, the y-axis are displayed
left-to right. If /STACK_PARAMETERS, each y-axis is displayed above the previous one. The default is /NOSTACK_PARAMETERS. STACK_PARAMETERS
and MERGE_Y_AXES are mutually exclusive.
/[NO]MERGE_Y_AXES
specifies whether the parameters in the graph should have one single merged x-axis
or not. If /MERGE_Y_AXES, the graph contains one y-axis without any axis
labels. The actual plot-range for each parameter will be displayed in the graph
header. If /NOMERGE_Y_AXES, each parameter has a separate y-axis.
The default is /NOMERGE_Y_AXES. STACK_PARAMETERS and
MERGE_Y_AXES are mutual exclusive.
/X_AXIS_TIME_WIDTH
Not supported for this release.
/TEN_CM_TIME_WIDTH
Not supported for this release.
Examples
Graphics Proforma
DEFINE GRAPHIC_PROFORMA BATT "Battery Temperatures" /spacecraft=ISO /graphs=2 /default_colour=green
PARAMETER P241 /colour=cyan /graph=1 /scaling=(min=-20,max=20)
PARAMETER P244 /colour=red
/graph=2 /scaling=(min=-20.8,max=-20.2)
PARAMETER P245 /colour=blue /graph=2 /scaling=automatic
END
This defines a graphic display, id BATT, with two axes, drawn in green, with 3 parameters. The
first parameter, P241, is drawn on the first axis with a scale from -20 to 20; the other two are
drawn on the second axis in red and blue, scaled from -20.8 to -20.2 and automatically respectively. All are plotted with solid lines and no symbols, by default.
Alphanumeric Proforma
DEFINE ALPHANUMERIC_PROFORMA 6000 “TC ANSWER" /spacecraft=ERS_2
Proforma Editor
48
SPEVAL
Cray
Software User Manual
Systems
PARAMETER G500
/background=BLACK /foreground=CYAN /list_field=1 /display_field=1
/format=STRING /mode_dependent /nocalibrated /commutation=SINGLE=1
PARAMETER G501
/background=BLACK /foreground=CYAN /list_field=2 /display_field=2
/format=STRING /mode_dependent /nocalibrated /commutation=SINGLE=1
END
This defines a graphic display, id 6000, with two parameters. Parameter G500 is displayed in
row 1 on the Alphanumeric Display and Column 1 on the Alphanumeric List. Parameter G501
is displayed in row 2on the Alphanumeric Display and Column 2 on the Alphanumeric List.
Both Parameters are displayed as raw (uncalibrated) values. For both Parameters, only the first
commutation in the SCOS Packet will be displayed.
Parameter Proforma
DEFINE PARAMETER_SET
/spacecraft=ERS_2
PARAMETER F102 /mode_dependent
/nocalibrated
PARAMETER A100P /mode_dependent
/nocalibrated
END
SUMM “Summary
“-
/commutation=SINGLE= 1
/commutation=SINGLE= 1
This defines a retrieval proforma , id SUMM, with two parameters which are retrieved (but not
displayed at retrieval time) .
Field Proforma
DEFINE FIELD_PROFORMA OOLS
“Partial OOL Display “ /spacecraft=ERS_2
PARAMETER P_NAME /background=WHITE
/foreground=BLACK
/display_field= 1
/format=STRING
PARAMETER CUR_V /background=WHITE
/foreground=BLACK
/display_field= 2
/format=FIXED: 2
PARAMETER COR_V /background=WHITE
/foreground=BLACK
/display_field= 4
/format=FIXED: 2
END
/list_field=
1
/list_field=
2
/list_field=
4
This defines a OOL (out-of-limits) field Proforma, containing only a sub-set of the possible
OOL fields to display, namely the Parametere Name (P_NAME), the Current Value (CUR_V)
and the correct value (COR_V).
Possible Errors
If the Proforma compilation fails, messages will be written to the standard output. The following table identifies the message ID and the corresponding meaning.
Error Message
PROF-W-TRUNCATED
Meaning
An input string was too long and has been truncated.
Shorten the string if the truncation is not acceptable.
Proforma Editor
49
SPEVAL
Cray
Software User Manual
Systems
Error Message
Meaning
PROF-W-ATOSCALE
Minimum and maximum values must be different for
fixed scales. Automatic scaling has been selected. Specify
different values, or automatic scaling.
PROF-W-ONE_OR_ALL
All occurrences of a parameter in a proforma must specify
either the same single commutation, or ALL commutations. It is not possible to retrieve two different commutations, or to display a single commutation in one field and
all commutations in another. All commutations will be
displayed at each position specified for this parameter.Correct proforma specification in line with restriction
PROF-E-CANTMODSCOS
SCOS proforma definitions may not be updated or superseded on SPEVAL. Use a new name to save the updated
proforma.
PROF-E-WRITEFAIL
An error occurred trying to write a proforma binary file. A
secondary message should explain the problem; if it does
not, consult software support.
PROF-E-CANTOPENOUT
An error occurred trying to open an output file. A secondary message should explain the problem; if it does not,
consult software support.
PROF-F-NOTPROFORMA
An input file does not contain a valid proforma. Check
that the correct file is specified.
PROF-F-CLIERR
The program has probably been invoked using RUN rather
than as a proper DCL command. Use SET COMMAND
PRJPROF:PROF_COMMANDS to define the correct
DCL commands.
PROF-F-NOSPACECRAFT
No spacecraft id was given on the DCL command line.
Specify a valid spacecraft code on the command line
PROF-F-BADTYPE
No valid proforma type was specified.Specify a valid proforma type on the command line.
PROF-F-NOLUN
Program tried to use too many Fortran logical units at
once. Notify software support.
PROF-F-NODATABASE
The spacecraft derived database was not accessible. Contact software support.
PROF-F-NOSUCHPARAM
A non-existent parameter is referenced in a proforma
definition. Check parameter name and spelling and recompile.
PROF-F-NOSUCHSC
An unsupported spacecraft name was used. The proforma
cannot be compiled. Correct the name and recompile
PROF-F-DEFINEFIRST
A DEFINE proforma command must be used before a
GRAPH or PARAMETER command. Correct the input
and recompile.
PROF-F-GRAPHNUM
The given graph number is greater than the number of
graphs specified in the DEFINE command. Correct the
input and recompile.
PROF-F-TOOMANYPARAMS
Too many parameters were defined for the type of proforma. Reduce the number and recompile.
PROF-F-WRNGPROFTYPE
The wrong proforma type was specified for the given
parameter type. Define graphic parameters in graphic proformae, and alphanumeric parameters in alphanumeric or
graphic proformae.
PROF-F-ONEXAXIS
Only one x-axis parameter may be specified per graph
Reduce the number and recompile.
Proforma Editor
50
SPEVAL
Cray
Software User Manual
Systems
Error Message
Meaning
PROF-F-INVNUM
An invalid numeric value was specified
Correct the number and recompile.
PROF-F-MAXGRAPH
Too many graphs were requested.
Correct the number and recompile.
PROF-F-FATALERR
A fatal error was detected. The proforma compilation cannot continue. Panic.
PROF-F-INVCOMMAND
An input command line is invalid
Correct the input and recompile
PROF-F-CANTOPENFILE
The proforma compiler could not open the input file
Supply the correct file name. Note that the directory
defaults to SPVL_PROFORMA_DIR: if not specified.
PROF-F-GETFILENAME
The proforma compiler could not get the name of the file
to compile. Software Support
PROF-F-BADFIELDNUM
Alphanumeric list and display field numbers must be in
the range 0 - 64. This message may result from a parameter automatically being given the next field number after
the previous one, if no number is explicitly given. Correct
and recompile.
PROF-F-FIELDINUSE
Only one parameter can be displayed in a given field, and
a previous parameter in the same proforma has already
used this field number. This message may result from a
parameter automatically being given the next field number
after the previous one, if no number is explicitly given.
Correct and recompile.
PROF-F-CANTCALIB
Only numeric parameters which have a calibration curve
can be calibrated. This parameter cannot be calibrated.
Specify /NOCALIBRATED or omit the qualifier altogether.
PROF-F-BADFORMAT
A display format was specified which is incompatible
with the parameter’s underlying type. Note that a numeric
parameter which can be calibrated is considered integer
when raw and real when calibrated.Specify a valid format,
or don’t specify a format and allow a default format to be
supplied.
Cross Reference
Item
4.6.1 SPEVAL Control - File page 66
Proforma Editor
51
SPEVAL
Cray
Software User Manual
Systems
4.1.2
Field Proformae
Description
The layouts of the special displays for OOL, statistics, and totals are defined exactly as for
alphanumeric lists, using fixed "pseudo-parameter" names to identify the different fields.
While defaults are provided by the system, each user can create his own private layouts to
restrict or change the order of the columns.
The possible field types are described in the following sections:
• Statistics Display “pseudo parameters” are listed in section 4.9.2 on page 168.
• OOL Display “pseudo parameters” are listed in section 4.9.3 on page 171.
• Totals Display “pseudo parameters” are listed in section 4.9.4 on page 174.
Cautions and Warnings
Not applicable.
Syntax
Not Applicable.
Examples
This example shows a definition for a statistics display for ERS-2 which shows only the minimum, maximum, and average:
DEFINE FIELD_PROFORMA ST_1
PARAMETER
P_NAME
PARAMETER
MAX_V
PARAMETER
MIN_V
PARAMETER
AVGE
END
"AC's Statistics Display"
/spacecraft=ers_2
Since the qualifier /LIST_POSITION is not given for any column (pseudo-parameter), they
will appear in the first four columns in the order specified.
Possible Errors
For error messages, see the COMPILE section.
Cross Reference
Item
4.1.1 COMPILE page 41
4.9.2 Statistics Window page 168
4.9.3 OOL (Out-of-Limits) Window page 171
4.9.4 Totals Window page 174
Proforma Editor
52
SPEVAL
Cray
Software User Manual
Systems
4.1.3
EXTRACT
Description
This command converts a binary proforma into a text proforma. The source file can then be
edited using a text editor.
Cautions and Warnings
None.
Syntax
$ EXTRACT proforma-filename [/OUTPUT=file]
Note that the default location for the proforma file is SPVL_PROFORMAE, which by default
searches SCOS proformae, the user's private proformae (by default in his login directory), and
SPEVAL public proformae, in that order.
If /OUTPUT is not specified, the output file is proforma-id.PROFORMA in the current default
directory.
Examples
Not Applicable.
Possible Errors
If the Proforma extraction fails, messages will be written to the standard output. The following
table identifies the message ID and the corresponding meaning.
Error Message
Meaning
PROF-E-EXTRACTFAIL
A proforma file appeared to be valid but caused errors during processing. Consult software support
PROF-E-WRITEFAIL
An error occurred trying to write a proforma binary file. A
secondary message should explain the problem; if not,
consult software support.
PROF-E-READFAIL
An error occurred trying to read a proforma binary file. A
secondary message should explain the problem; if not,
consult software support.
Cross Reference
Item
4.1.1 COMPILE page 41
Proforma Editor
53
SPEVAL
Cray
Software User Manual
Systems
4.2
Time Specification Fields
Time Type
Time Field
Expected Syntax
Minimum format
Figure 3Time Specification field example (2 fields)
Description
This section describes the standard SPEVAL time specification syntax. In several SPEVAL
windows (e.g. the Save Case Definer), there are Text Fields which must be filled with a valid
time specification. SPEVAL defines the following types of time formats:
• Calendar. This format is reserved for future releases.
• Year & Day. Currently the only allowed format. The format can be specified as Year & Day
Absolute (an absolute date) or Year & Day Delta (Delta time).
• Mod. Jul Day. This format is reserved for future releases.
• Orbit & Offset. This format is reserved for future releases.
Each Time Format has its own syntax, usually indicated by the “Expected Syntax” Label to the
right of the Time field. See the Syntax section for the explanation of the labels.
Cautions and Warnings
None.
Syntax
The SPEVAL Time Syntax (usually displayed to the right of each Time Input Field) is specified as follows:
• Each alphabetical letter (A- Z, a-z) designates a placeholder for alphanumeric characters.
The letters form logical groups. E.g. “yy” translates to a two-letter specification for “Year”.
Note that this is not the case if the letter is preceded by the character “/” as described below.
All other characters should be specified “as is”.
• Letters preceded by a “/” are mandatory and should be written as specified including the “/”
character. E.g. if the format specifies “/D’, you must write “/D” in the text field.
• Each group of Uppercase letters signals the minimum allowed format for specifying the
current time format. E.g. if the format specifies “yyyy-ddD HH.mm.ss.cc”, the minimum
time format allowed will be a 4 letter word (including the blank), such as “1 24” (day 1,
hour 24). The rest of the fields will be filled with default values.
• Lowercase letters signal an expansion of the minimum allowed format. The minimum
allowed format can be extended either way (left or right). E.g. if you want to specify the
Time Specification Fields
54
SPEVAL
Cray
Software User Manual
Systems
minutes for the minimum format “D HH”, you may specify “1 23 1”. (day 1, hour 23,
minute 1).
Table 1: gives the SPEVAL time syntax formats. Table 2: shows the special character placeholders.
Table 1: SPEVAL Time Formats
Time syntax
Expanded
Year & Day Absolute
yyy-ddD HH.mm.ss.cc
Year & Day Delta
dddD HH.mm.ss.cc /D
Table 2: Time Format Placeholders
Placeholder
Meaning
y,Y
Year. The default value is the current year (e.g. 1995).
d,D
Day of Year. (1-365) (1-366 for leap years)
h,H
Hours. (0-23).
m,M
Minutes(0-59). The default is 0.
s,S
Seconds.(0-59). The default is 0.
c,C
Milliseconds (0-99). The default is 0.
Examples
Year & Day Absolute
“1995-365 23.59.59.99” Specifies the last millisecond in 1995.
“1 00” Specifies the first date in the current year (expanded to e.g. 1995-001
00.00.00.00)
Year & Day Delta
“9999 10 /D” Specifies a time offset on 9999 days, 10 hours.
“1 2.10 /D” Specifies a time offset on 1 day, 2 hours and 10 minutes.
Time Specification Fields
55
SPEVAL
Cray
Software User Manual
Systems
Possible Errors
Error Message
Meaning
Field has invalid format
Time field syntax in error. Specify the syntax according to
the expected time format (default is Year & Day).
Field contains no input
A mandatory time input field is empty.
Field is all blanks
A mandatory time field contains only (invisible) blanks
Field is too short for defaulting
The characters specified in the time field (Uppercase characters in the syntax diagrams) were to few to be expanded
to the full time format.
Field has invalid use of annotator
A “/” character followed by a character is unrecognised
for the current time format.
Mismatch between required time format &
actual format
The time syntax has been recognised but is not in the
required format. This message will be issued if you for
instance have specified a “Delta Time” format in the Start
Time Text Field.
End time is equal to or before start
time
This message is issued only for Time fields consisting of a
Start Time and End Time field. Both formats are recognised, but the start time is not after the end time.
Unable to fully validate because start
time is invalid
This message is issued only for Time fields consisting of a
Start Time and End Time fields. The verification of the
Start Time failed, so the End Time cannot be verified fully.
Cross Reference
The following table shows the SPEVAL windows which contain time input fields.
Item
4.3 Jump To Time Window page 55
4.7.12 Save Case - Simple Time page 108
4.7.14.4 Save Case - TME - Time Filters page 130
4.7.15.8 Save Case - TO - One Time Window page 154
4.7.15.9 Save Case - TO - Repeated Time Windows page 155
4.7.15.10 Save Case - TO - Irregular Time Windows page 157
Time Specification Fields
56
SPEVAL
Cray
Software User Manual
Systems
4.3
Jump To Time Window
Required Time
OK
Apply
Cancel
Figure 4Jump To Time Window
Description
This Window is displayed when choosing the Commands | Jump To Time Button in Standard
Alphanumeric List Windows or the Alphanumeric Display Window . The window makes it
possible to display the Data Rows for a particular time. SPEVAL will find the time closest to
the value you enter in the Required Time Text Field and position the Scrollbars and the window
contents accordingly.
If the time you have entered is outside the In Table Start and End Time specified in the Window
Area header, SPEVAL will position the window contents on the first (last) record of the
retrieved data.
The three push buttons are as follows:
OK
Pressing this button activates the time search. If the time search was successful, the
window contents are positioned according to the time you have entered, and the
Jump To Time Window disappears from the screen. If the time you have entered is
invalid, the Message Area will display a failure message and the display window
contents remains unchanged.
APPLY
This button is functionally equal to the OK Button, but the Jump To Time Window
do not disappear from the screen after button activation.
CANCEL
Pressing this button cancels the Jump To Time Window . The display window contents remain unchanged.
Cautions and Warnings
None.
Syntax
The syntax for the Required Time Text Field is the standard SPEVAL Year & Day Time syntax,
described in section 4.2 on page 52.
Examples
“1995-001 16.15” means: Day one of 1995, 16.15.
Jump To Time Window
57
SPEVAL
Cray
Software User Manual
Systems
Possible Errors
If an invalid syntax has been specified in the Required Time field, the Message Area Window
will display on of the messages described in section 4.2.
Cross Reference
Item
4.9 Standard Alphanumeric List Windows page 162
4.2 Time Specification Fields page 52
Jump To Time Window
58
SPEVAL
Cray
Software User Manual
Systems
4.4
SPEVAL File Selection Boxes
Figure 5Example of a SPEVAL File Selection Box (Proforma Selection)
Description
The SPEVAL File Selection Boxes allows you to select Save Cases, Proforma, User Data Set
(UDS) files and ERS Scrolling Logs from a list of existing files or items. You can use the
Source Directory Radio Buttons to navigate between the different “Private”, “Public” and
“SCOS” directories. The File Selection Boxes also allow you to view the description for Save
Cases, Proforma and ERS Log ID’s (For UDS files, no descriptions are available).
By double-clicking on an item in the list or selecting an item, then clicking the OK button,
SPEVAL constructs the file name to use for the corresponding operation by using the currently
selected Source, ID and Type. Further action depends on which way you activated the File
Selection Box. E.g. if you activated the Box by pressing the Push Button in the Save Case EDEF - Save Case ID field, the default OK action is just to display the selected Save Case ID
in the text field.
Note: When the File Selection Box is selected, all other Session Control Windows will turn
insensitive. This means that you cannot e.g. enter text in the Save Case Definer Window if a
File Selection Box is visible.
The standard File Selection Box controls are the following:
ID Text Field
This text field allows you to directly enter the ID of the item to be selected. If you
Jump To Time Window
59
SPEVAL
Cray
Software User Manual
Systems
activated the File Selection Box from a normal Text Field Push Button, the contents of the text field will be mirrored in the File Selection Box ID Text Field.
Pressing the return button in this field has the same effect as pressing the OK Button.
Type Option Menu
This Option Menu allow you to select the subtype of the item to be selected. E.g.
for SPEVAL TM Proforma File Selection Boxes, the Types available are “Alpha”,
“Graph” and “Parameter Only”, representing Alphanumeric, Graphical and Parameter Proforma respectively. Selecting an option from this Menu updates the Item
List to only display the items having the selected subtype. I.e. it is impossible to
display both Alphanumeric and Graphical Proforma at the same time.
Source
This is a selection of exclusive Radio Buttons. Each Radio Button corresponds to a
directory search path. E.g. for SPEVAL TM Proforma File Selection Boxes, the
available sources are “SCOS Proforma”, “Private Proforma” and “Public Proforma”. The corresponding directories are SPVL_SCOS_PROFORMAE,
SPVL_PRIVATE_PROFORMAE and SPVL_PUBLIC_PROFORMAE.
Selecting a radio button will update the Item List to only display the items residing
in the selected directory.
Item List
The List shows SPEVAL Items and their description. The items which are displayed depends on the Source directory chosen, the Filter Text and the Type Option
Menu state. Single-clicking on one item will copy the item ID to the ID Text Field.
Double-clicking on an item has the same function as first single-clicking on it, then
pressing the OK Button.
Show Description
If set, the Item List displays the description as well as the ID. For Save Cases, only
the first line of description is displayed. Note that the Item List will be updated
much slower when the Show Description radio Button is set. The reason is that
each Save Case File/ Proforma File must be opened and read in order to get the
description line. For Save Cases, only the first line of the possibly multi-line
description is displayed.
Filter
The Filter Text Field allows you to enter a wildcard text string to only display the
items having an ID matching the wildcard specification. E.g. specifying “PF*” in
this field updates the Item List to only display items starting with “PF”. Note that it
is not possible to filter on the description field of the items.
OK
Pressing this button constructs a file name from the current ID, Type and Source
Settings. Further action depends on which way you activated the File Selection
Box as indicated in Table 2:
Table 3: File Selection Box - OK actions
Activated From
Item Type
Save Case - EDEF - Save Case ID
Save Case
Jump To Time Window
Action
Full file name constructed and stored.
ID displayed in the Save Case ID Text
Field.
60
SPEVAL
Cray
Software User Manual
Systems
Table 3: File Selection Box - OK actions
Activated From
Item Type
Action
Save Case - Simple Extraction
Processing (SEP)
Proforma
Full file name constructed and stored.
ID displayed in the Proforma ID Text
Field. Proforma Type set to the same as
selected in the File Selection Box
“Type” Option Menu.
Save Case - TME - Proforma ID
Proforma
Same as above.
Save Case - Output - Field Proforma
Proforma
Same as above.
Save Case - Data - Data Source
UDS
Full file name constructed and stored.
ID displayed in the User Data Set ID
field.
Save Case - Data - Data Type
(ERS2 Scrolling Logs)
Logs
ID displayed in the Log ID field.
SPEVAL Control - Direct Load of
UDS
UDS/UCH
See Section 4.6.5 on page 72
FILTER APPLY
This button updates the Item List with the current filter settings.
CANCEL
Pressing this button cancels the File Selection Box without altering any data.
File Selection Boxes and Text Fields - directories
Normally, the File Selection Box is activated from a Text Field (e.g as in the Save Case Definer
Window) as shown in Figure 6.
Figure 6Text Field with a File Selection Box activation Push Button
You may enter the ID directly in the Text Field, but the File Selection Box gives you the opportunity to explicit select the underlying directory. As an example, say that two versions of the
Proforma “PF30” exist, one in the “Public” Proforma directory and one in your “Private” Proforma directory. Entering “PF30” directly in the Proforma ID text field makes SPEVAL always
select the version in the “Private” directory since, by default SPEVAL always search the SCOS
directory first, then the Private and then the Public directory.
Using the File Selection Box allows you to use the Source Radio Buttons to navigate between
the Private and the Public Proforma directories. When you press the OK Button, the corresponding directory is stored in the Save Case Definer together with the Proforma ID. I.e. you
may choose any of the two different versions of the “PF30” Proforma.
Jump To Time Window
61
SPEVAL
Cray
Software User Manual
Systems
Cautions and Warnings
Non-resolvable directories
When the File Selection Box is activated from a Text Field, any existing full filename is used to
set the correct Source Directory Radio Button. However, the File Selection Box will complain
if the directory specification in the full filename does not match any of the standard File Selection Box directories. If a user for instance has chosen to re-define his
SPVL_PRIVATE_PROFORMA directory from e.g. DISKA:[HUSTAD.PROF] to
DISKA:[HUSTAD.PRIVATE_PROFORMA], then opening an existing Save Case containing a
private Proforma, the File Selection Box will display the following message:
Figure 7Pop Up Message - Could not resolve directory
In this case, clicking on the “Private Proforma” Radio Button, would update the file specification to point to the correct directory.
NOTE: Even if you have re-defined any of your Private SPEVAL directories, you do NOT need
to manually update all the affected Save Cases. When validating or submitting a Save Case,
SPEVAL first tries to the full file name stored. If the file cannot be found, SPEVAL searches all
the standard directories and uses the first file matching the “ID” and “Type” fields.
Syntax
Not Applicable.
Examples
Figure 5 shows the File Selection Box for TM Proforma. If the OK Button is clicked, SPEVAL
would construct the Proforma file name (spacecraft is “ERS2”)
“SPVL_SCOS_PROFORMAE:ERS2_AM04.GRAPH” .
Possible Errors
The File Selection Box do not generate error messages. If an error is detected in an existing
filename (picked up by the File Selection Box when activated), the File Selection Box displays
a Pop-Up error box similar to Figure 7. The possible error text messages are the following:
Pop-Up Message
Meaning
Could not resolve directory <dir>
Please re-specify.
The filename contained a directory specification which
did not match any of the allowed File Selection Box
search directories. See the “Cautions and Warning” section for possible reasons.
Could not resolve filename <filename>
The filename could not be parsed. This message will
appear if you have entered e.g. “...” in the Text Field, then
activates the File Selection Box
Jump To Time Window
62
SPEVAL
Cray
Software User Manual
Systems
Pop-Up Message
Meaning
Could not resolve file-type: <filetype>
Please re-specify.
The filetype could not be matched to any of the filetypes
in the “Type” Option Menu. Contact Software Support.
Please specify a directory
None of the Source directory Radio Buttons have been
selected. Select one.
Cross Reference
Item
4.6.5 SPEVAL Control - Direct Load of UDS page 72
4.7.9.2 Save Case - EDEF - Save Case ID page 92
4.7.1 Save Case - TM Extraction Processing Options page 77
4.7.13.4 Save Case - Output - Field Proforma page 117
4.7.14.1 Save Case - TME - Proforma ID page 124
4.7.10.1 Save Case - Data - Data Source page 98
Jump To Time Window
63
SPEVAL
Cray
Software User Manual
Systems
4.5
Row Selection Modes
Selected Rows
Figure 8List Selection Example (6 selected rows)
Description
This section describes the SPEVAL List Selection Modes. In several SPEVAL windows (e.g.
the Standard Alphanumeric List Windows ), you can select specific rows of data for processing. Examples of processing options are:
• Selecting rows for printing.
• Selecting rows for filtering.
The SPEVAL Row Selection modes make it possible to select separate rows and range of rows
with combinations of MB1 (Mouse Button 1), the <CNTRL> button and the <SHIFT> buttons.
Selected rows are shown with a blue background colour.
NOTE: If you haven’t selected any row, SPEVAL interprets this as all rows being selected.
The different selection modes are described in table Table 4:
Table 4: List Selection Modes
Action
Result
MB1 Down on an unselected
row
Select the row without unselecting other rows.
MB1 Down on a selected row.
Unselects all selected rows in the selected range which the
row belongs to.
Holding the <CNTRL> key,
then pressing MB1 on an unselected row.
Uniquely selects the row. (All other rows are unselected).
Holding the <CNTRL> key,
then pressing MB1 on a selected
row.
Unselects all selected rows. This means in fact that all the
rows will be processed as selected (see NOTE)
Holding the <SHIFT> key, then
pressing MB1 on an unselected
row.
Selects a range of rows. The range will extend all the rows
between (and including) the current row and the nearest
selected one.
Row Selection Modes
64
SPEVAL
Cray
Software User Manual
Systems
Table 4: List Selection Modes
Action
Result
Holding the <SHIFT> key, then
pressing MB1 on a selected row.
unselects a range of rows. The range will extend all the rows
between (and including) the current row and the nearest
unselected one.
Cautions and Warnings
None.
Syntax
Not Applicable.
Examples
To select all rows in a Window:
Clink MB1 on the (unselected) first row. Navigate to the last row in the Window
(using the Scrollbars if necessary). While holding the <SHIFT> key down, press
MB1 on the last row. All rows will turn selected.
Possible Errors
None.
Cross Reference
The following table shows the SPEVAL windows which contains selectable rows.
Item
4.7.14 Save Case - TM Extraction (TME) page 121
4.9.1 TM (Alphanumeric List) Window page 166
4.9.2 Statistics Window page 168
4.9.3 OOL (Out-of-Limits) Window page 171
4.9.4 Totals Window page 174
Row Selection Modes
65
SPEVAL
Cray
Software User Manual
Systems
4.6
SPEVAL Control
Commands Menu
Session ID
File Menu
Help Menu
Last Submission Start
Last Submission End
Message Area
Figure 9SPEVAL Main Control Window and Icon
Description
The SPEVAL Control Window is the top-level window within the system. It will pop up when
you have started SPEVAL and remains active for the complete session. Whenever SPEVAL
issues a message, the Window will be displayed in the front and if iconified, it will be de-iconified.
The SPEVAL Control window contains the following items:
Session ID
This two character field is only visible if you have started multiple SPEVAL sessions (see below). In this case, the Session ID identifies the session which this
SPEVAL Control Window controls. The first session is identified by the User
Acronym character (e.g. “H”) plus the number 0.
File Menu.
Currently the only entry in this Menu is the Exit Push-Button.
Commands Menu.
This Menu allows you to activate the Save Case Definer, to perform direct load of a
UDS file and to activate the Retrieval Job Control Window.
Help Menu.
This Menu displays the current Speval version number.
Last Submission Start Time Text Field.
The field shows the time the last Save Case Submission was initialised.
Last Submission End Time Text Field.
The field shows the time the last Save Case Submission was terminated.
Message Area.
This window displays all the SPEVAL User messages as well as the time each
message was generated.
SPEVAL Control
66
SPEVAL
Cray
Software User Manual
Systems
Starting Multiple Sessions
There is nothing preventing you from starting multiple SPEVAL Sessions (up to 8 is possible).
In this case, all the SPEVAL Windows belonging to the Session will display the Session ID in
the Window Header. The Session ID is a combination of your SPEVAL User ID character and
the Session number. For example, Figure 2 on page 6 shows that the SPEVAL Control Window is one of Several Sessions (the first session has the number 0). The User ID character is
“H”.
Cautions and Warnings
Not applicable.
Syntax
Not Applicable.
Examples
Figure 9 on page 64 shows the standard SPEVAL Control Window. The Message Area displays messages related to a Save Case submission.
Possible Errors
See the relevant sub-sections.
Cross Reference
Item
4.6.1 SPEVAL Control - File page 66
4.6.2 SPEVAL Control - Commands page 67
4.6.3 SPEVAL Control - Help page 68
SPEVAL Control
67
SPEVAL
Cray
Software User Manual
Systems
4.6.1
SPEVAL Control - File
File | Exit
Figure 10Save Case - File Menu
Description
The Save Case File Menu is invoked by pressing MB1 on the File Push Button in the SPEVAL
Control header. Currently, the only item in the list is the File | Exit Push Button.
Pressing the Exit Button will, under normal circumstances force the SPEVAL system to exit.
In special circumstances, the File | Exit will only generate an Informational message displayed
in the Message Area. This will for example be the case if you have pressed the button while
some SPEVAL tasks are still initialising.
Cautions and Warnings
File | Exit will exit the SPEVAL system without giving you any warnings about unsaved data.
You should ensure that you have saved any Save Case definitions before pressing this button.
Syntax
Not Applicable.
Examples
Not Applicable.
Possible Errors
Error Message
Meaning
Some tasks are still starting - retry
in a minute or so
Session Control has detected that some SPEVAL tasks are
still initialising. If you really MUST exit, you can use the
CLOSE option in the Pulldown Menu in the top left corner
of the Motif Window frame.
Cross Reference
Item
4.6.1 SPEVAL Control - File page 66
SPEVAL Control
68
SPEVAL
Cray
Software User Manual
Systems
4.6.2
SPEVAL Control - Commands
Figure 11Save Case - Commands Menu
Description
The Save Case - Commands Menu is invoked by pressing MB1 on the Commands Push Button
in the SPEVAL Control header. The menu consists of one Push Button.
Save Case Definer Button
This Button allows you to start the Save Case Definer Window . If the Window is
already activated, it will pop up in the front of the Workstation Screen. The Window is described in Section 4.7 on page 74.
Load UDS Button
This Button activates a File Selection Box for direct load of UDS files. The Load
UDS Box is described in Section 4.6.5 on page 72
Control Jobs Button
This Button activates the SPEVAL Job Control Window, allowing you to monitor
and abort Retrieval Jobs. The Window is described in Section 4.6.4 on page 69
Cautions and Warnings
None.
Syntax
Not Applicable.
Examples
Not Applicable.
Possible Errors
None.
Cross Reference
Item
4.7 Save Case Definer Window page 74
SPEVAL Control
69
SPEVAL
Cray
Software User Manual
Systems
4.6.3
SPEVAL Control - Help
Help on Version
Help on SPEVAL
Figure 12Speval Control - Help Menu
Description
The Save Case - Help Menu is invoked by pressing MB1 on the Help Push Button in the SPEVAL Control header. The menu consists of two Push Buttons.
Help on Version Button
Activating this button displays the current SPEVAL version you are using. This
version number should be used when issuing any software problem report concerning SPEVAL.
Help on SPEVAL Button
Activating this button brings up a message window referencing the Software User
Manual as the help document.
Cautions and Warnings
None.
Syntax
Not Applicable.
Examples
Not Applicable.
Possible Errors
None.
Cross Reference
Item
4.6 SPEVAL Control page 64
SPEVAL Control
70
SPEVAL
Cray
Software User Manual
Systems
4.6.4
Job Control Window
Figure 13SPEVAL - Job Control Window
Description
The Job Control Window is invoked by selecting the Commands | Control Jobs Push Button
from the SPEVAL Control Commands Menu. The Window displays a list of all outstanding
Retrieval jobs which were started under your user account. I.e. even if you have started
Retrievals from several different SPEVAL Sessions, each Job Control Window displays all the
outstanding jobs for all your Sessions. The Job Control Window is automatically updated every
20’th second with the new Retrieval Job Status. You can accelerate the update time at any time
by re-selecting the Commands | Control Jobs Button also when the Job Control Window is visible. This will immediately update the Job List to display the most current information.
By selecting a job entry, then pressing the Abort Job Button, SPEVAL stops the Retrieval Job.
Note that the Job Control Window will not display entries for jobs started from the SPEVAL
Control - Direct Load of UDS Window. These jobs are not Retrieval Jobs and hence do not
have an entry in the SPEVAL Job tables.
The Job Control Window provides the following items:
Job List
the Job List displays one entry per outstanding Retrieval Jobs. The List allows you
to select one single entry which may be aborted by later selecting the Abort Job
Button. The headers are as follows:
Mission
Displays the Spacecraft ID for which the current job is executing. See
SPEVAL Control
71
SPEVAL
Cray
Software User Manual
Systems
Section 4.7.9.1 on page 90 for possible SPEVAL spacecraft IDs.
SaveCase
Displays the Save Case ID which was used to submit the Retrieval Job.
Submission-Time
Displays the time the Retrieval Job was submitted.
Node
Displays the Hostname of the node actually performing the Retrieval.
If you are running a remote retrieval from the Long Term Archive
(LTA) from a remote SPEVAL node, you should expect the node name
to be different from your local SPEVAL node. If you are retrieving
from User Data Set files, the Node will always display the local node,
Status
Displays the current Batch queue status of the retrieval job. The following types are possible:
Table 5: SPEVAL Job Status
String
Meaning
[Remote]
Retrieval running on remote node. The Job Status is
unknown since the local SPEVAL node cannot inquire the
system to return information about the current job.
Unknown
Unknown RCTL job status. This might show up if a job
which is expected to be found on the batch queue
does not have an entry yet. If the status does not change in 20
seconds, contact Software Support.
No Entry
No batch queue entry found for the submission job. The job
has probably just been started. If the status does not change
in 20 seconds, contact Software Support.
Starting
Job is starting
Executing
Job is executing
Pending
Job is Pending.
Aborting
Job is aborting.
Aborted
This status is displayed if you have aborted the current job
and SPEVAL aborted the job successfully. The job entry will
be removed the next time the Job List is updated (every 20’th
seconds).
Not Aborted
This status is displayed if you have aborted the current job
but SPEVAL failed to satisfy the request. In this case, an
error message will be displayed in the Message Area.
Abort Job
Pressing this Button causes that the currently selected job to be aborted. If the job
is running on a local node, you should expect the Status field to be changed to
“Aborted” after a few seconds. If the Retrieval Job is running on a remote node, the
Status field may take several minutes to update.
SPEVAL Control
72
SPEVAL
Cray
Software User Manual
Systems
Cancel
This Button removes the Job Control Window from the display. It does not cancel
any abort job request.
Cautions and Warnings
None.
Syntax
Not Applicable.
Examples
Figure 13 shows the Job Control Window . The User has 2 outstanding Retrieval jobs. Both
are executing.
Possible Errors
The following messages might be displayed in the SPEVAL Control Message Area as reply to
an “Abort Job” Button Press.
Error Message
Meaning
Aborted job submitted at <date-time>
Informational. The job which was submitted at the displayed time has been successfully aborted
Failed to abort Job submitted at <datetime>
The requested Save Case Retrieval Job could not be
aborted. This message may be displayed if you try to abort
the same job twice and the job has been aborted on the
first try but the Job Control list has not yet been updated
Error processing the list of outstanding Retreival jobs.
Internal Error. Contact Software Support.
Error processing a request to abort an
outstanding Retreival job
Internal Error. Contact Software Support.
Cross Reference
Item
4.6.2 SPEVAL Control - Commands page 67
SPEVAL Control
73
SPEVAL
Cray
Software User Manual
Systems
4.6.5
SPEVAL Control - Direct Load of UDS
Figure 14SPEVAL Control - Direct Load of UDS Window
Description
The Direct Load of UDS Window invoked by selecting the Commands |Load UDS from the
SPEVAL Control Commands Menu. The Window displays the standard SPEVAL File Selection Boxes properties, and you should consult this section for further information.
The Direct Load of UDS Window allows you to speed up the loading of a User Data Set for display in the Alphanumeric/Graphical Windows without having to Retrieve the data from the
UDS file first. By double-clicking on an item in the list or entering a UDS ID in the ID field,
then pressing the OK Button, SPEVAL will load the contents of the UDS file.
SPEVAL will automatically select the display windows to use as follows:
• If the UDS file contains normal TM data, SPEVAL uses the Proforma embedded in the UDS
to decide upon the types of Display Windows. If the Proforma is of type Graphical, the
Graphical Window and the Alphanumeric Windows will be used. If the Proforma is of type
Alphanumeric, only the Alphanumeric Windows will be used. If the Proforma is of type
“Parameter Only”, SPEVAL cannot load the User Data Set, since no display information is
available.
• For other data than TM (e.g. Scrolling Logs, OOL), SPEVAL uses the Standard Windows
associated with the data type.
If SPEVAL manages to load the specified UDS, the Direct Load of UDS Window disappears,
an the Message Area displays the “Loading Retrieved Data” message. If SPEVAL fails to load
the contents, the Window remains visible, and the Message Area displays the cause of error.
NOTE: The SPEVAL Control Window and the Save Case Window cannot receive any inputs
SPEVAL Control
74
SPEVAL
Cray
Software User Manual
Systems
when the Direct Load of UDS Window is displayed on the Screen. I.e. you will have to explicit
cancel the Direct Load of UDS Window in order to continue working with other Windows.
Cautions and Warnings
Loading very large UDS files into SPEVAL may take long time. It is recommended to start off
with smaller UDS files.
A Direct Load of UDS will not have an entry in the Job Control Window .
Syntax
Not Applicable.
Examples
Figure 14 shows the Window layout.
Possible Errors.
The following error messages may be generated when pressing the OK Button. The error messages are normally followed by a beep signal, and the File Selection Box remains visible. Note
that you cannot scroll the Session Control Message Area when the File Selection Box is visible
(use the cancel button if required)..
Error Message
Meaning
File <file-name> not found
The specified file has not been found. Check filename and
directory.
UDS file <file-name> is corrupted
The User Data Set file could not be read properly. This
could happen if another file type has been renamed to a
UDS extension. Otherwise contact Software Support
UDS file <file-name> contains no data
for display
The User Data Set file contains no data which can be displayed.
Another display retrieval job running Parallel display jobs not possible
PEVAL cannot have two outstanding retrieval jobs
directed for display. Wait until the previous display
retrieval job finishes or start another SPEVAL session and
re-submit.
UDS file <file-name> contains no Alphanumeric or Graphical Proforma. Cannot
be displayed
The User Data Set file contains no “alphanumeric” or
“graphical” proforma. The Save Case used to generate the
UDS file in the first place probably contained a “Parameter Only” Proforma. In order to display the contents of the
UDS file, you must retrieve from it using a Save Case
strategy and specifying a valid Proforma.
Cross Reference
Item
4.4 SPEVAL File Selection Boxes page 57
SPEVAL Control
75
SPEVAL
Cray
Software User Manual
Systems
Save Case Definer Window
Time Options
TM Extraction Options
Output
Form
Time Input
Form
Extraction
Processing
Form
Internal
Definition
External
Definition
Default
Load
Validate
Save
Submit
Cancel
4.7
Figure 15Save Case Definer Window and Icon
Description
The Save Case Definer consists of a top-level window filling almost the entire workstation
screen. The window allows you to define specific criteria for retrieval of SPEVAL data and to
retrieve the data. Examples of those criteria are:
• The Spacecraft (e.g. ISO,CLUSTER) for which the data is retrieved.
• The Data Source for the retrieval. The source is normally the Long Term Achieve (LTA), but
you can also retrieve data from the Summary or from a User Data Set file.
Save Case Definer Window
76
SPEVAL
Cray
Software User Manual
Systems
• The time-span which the data set is retrieved for.
• The Parameters contributing to the retrieval definitions.
• The output method for the data. This is normally a Graphical or Alphanumeric window, but
you can also redirect the output to a User Data Set file.
Each Retrieval and Display strategy is called a Save Case, and the Save Case Definer allows
you to:
• Load existing Save Case Definitions.
• Defining new Save Case Definitions.
• Saving Save Case Definitions to file.
• Submitting Save Case Definitions for retrieval. The submission will retrieve the data and
display it in Graphical/Alphanumeric windows as defined by the current Save Case definition.
Currently, the Save Case Definer allows you to define retrieval definitions for the following
types of data:
• Normal TM (Telemetry Data). This option allows you to view a set of TM Parameters and
their values for a particular time-span.
• OOL (Out-of-Limits) data. This option allows you to view all OOL generated parameters
for a particular time-span.
• Statistical Information for TM Data. This option allows you to view statistical information
for a set of TM Parameters. Examples are Minimum and Maximum values, Standard Deviation and Data Quality for a particular time-span.
• Totals. This option allows you to view the number of data points which have been retrieved
for a Save Case.
• Cluster and ERS Telecommand (TC) history.
• Cluster and ERS Logs.
Cautions and Warnings
See the relevant sub-sections.
Syntax
Not Applicable.
Examples
Not Applicable.
Possible Errors
This window provides no direct actions. See the relevant sub-sections for possible error messages.
Cross Reference
Item
4.7.3 Save Case - Default page 79
Save Case Definer Window
77
SPEVAL
Cray
Software User Manual
Systems
Item
4.7.4 Save Case - Load page 80
4.7.5 Save Case - Validate page 81
4.7.6 Save Case - Save page 82
4.7.7 Save Case - Submit page 83
4.7.8 Save Case - Cancel page 87
4.7.9 Save Case - External Definition (EDEF) page 88
4.7.10 Save Case - Data page 97
4.7.11 Save Case - Simple Extraction Processing (SEP) page 106
4.7.12 Save Case - Simple Time page 108
4.7.15 Save Case - Time Options (TO) Window page 145
4.7.13 Save Case - Output page 110
Save Case Definer Window
78
SPEVAL
Cray
Software User Manual
Systems
4.7.1
Save Case - TM Extraction Processing Options
Figure 16Save Case - TM Extraction Processing Button
Description
This Push Button is located at the bottom left in the Save Case Definer window. When pressed,
the button activates the Save Case - TM Extraction (TME) Window. If the Window is already
active, it will be brought to the front of the Screen, and no data will be lost.
Cautions and Warnings
None.
Syntax
Not Applicable.
Examples
Not Applicable.
Possible Errors
None.
Cross Reference
Item
4.7 Save Case Definer Window page 74
4.7.14 Save Case - TM Extraction (TME) page 121
Save Case Definer Window
79
SPEVAL
Cray
Software User Manual
Systems
4.7.2
Save Case - Time Options Button
Figure 17Save Case - Time Options Button
Description
This Push Button is located at the bottom in the Save Case Definer window. When pressed, the
button activates the Save Case - Time Options (TO) Window . If the Window is already active,
it will be brought to the front of the Screen, and no data will be lost.
Cautions and Warnings
None.
Syntax
Not Applicable.
Examples
Not Applicable.
Possible Errors
None.
Cross Reference
Item
4.7 Save Case Definer Window page 74
4.7.15 Save Case - Time Options (TO) Window page 145
Save Case Definer Window
80
SPEVAL
Cray
Software User Manual
Systems
4.7.3
Save Case - Default
Figure 18Save Case - Default Button
Description
This Push Button is located at the bottom left in the Save Case Definer window. The Button
resets the current Save Case definition to the default SPEVAL configuration
Cautions and Warnings
Pressing this Push Button will override all unsaved Save Case definitions. You will not be
given a warning if you have unsaved data.
Syntax
Not Applicable.
Examples
Not Applicable.
Possible Errors
None.
Cross Reference
Item
4.7 Save Case Definer Window page 74
4.7.6 Save Case - Save page 82
Save Case Definer Window
81
SPEVAL
Cray
Software User Manual
Systems
4.7.4
Save Case - Load
Figure 19Save Case - Load Button
Description
This Push Button is located at the bottom left in the Save Case Definer window. The Button
allows you to load the contents of existing Save Cases.
When pressing the Button, the Save Case ID specified in the Save Case - EDEF - Save Case
ID Text Field and the Spacecraft specified in the Save Case - EDEF- Spacecraft Option
Menu are combined to form the unique file name of the Save Case ID. If SPEVAL finds the
Save Case file, the contents are loaded into the Save Case Definer Window . Otherwise, a message is displayed in the Message Area Window and the Save Case Definer Window remains
unchanged.
To get a list of the save cases available for the selected spacecraft, use the File Selection Button
by the Save Case ID field (see 4.7.9.2 Save Case - EDEF - Save Case ID page 92)
Cautions and Warnings
Pressing this Push Button will override all unsaved Save Case definitions. You will not be
given a warning if you have unsaved data.
Syntax
Not Applicable.
Examples
Not Applicable.
Possible Errors
The possible error messages are listed under the Save Case ID Text Field.
Cross Reference
Item
4.7 Save Case Definer Window page 74
4.7.9.2 Save Case - EDEF - Save Case ID page 92
4.7.9.1 Save Case - EDEF- Spacecraft page 90
4.7.6 Save Case - Save page 82
Save Case Definer Window
82
SPEVAL
Cray
Software User Manual
Systems
4.7.5
Save Case - Validate
Figure 20Save Case - Validate Button
Description
This Push Button is located at the bottom left in the Save Case Definer Window . The Button
validates (syntax checks) the Save Case Definitions you have defined but does not save or submit it.
If the Validation succeeds, the Message Area Window displays the message “Validation
completed - No errors found”, otherwise a failure message is logged.
Cautions and Warnings
None.
Syntax
Not Applicable.
Examples
Not Applicable.
Possible Errors
For possible error messages, see the relevant section. E.g. if the Error Message is preceded by
“External Definition ~ Save Case ID”, see section 4.7.9.2 Save Case - EDEF - Save Case ID
page 92.
Cross Reference
Item
4.7 Save Case Definer Window page 74
Save Case Definer Window
83
SPEVAL
Cray
Software User Manual
Systems
4.7.6
Save Case - Save
Figure 21Save Case - Save Button
Description
This Push Button is located at the bottom left in the Save Case Definer Window . When pressing the Button, the Save Case ID specified in the Save Case - EDEF - Save Case ID Field and
the Spacecraft ID specified in the Save Case - EDEF- Spacecraft Menu are combined to form
the unique file name of the Save Case ID.
Note that you will be allowed to save the Save Case definitions even when they are invalid.
However, you will not be allowed to save if the Save Case ID Text Field contains invalid characters. In order to guarantee that you save a consistent Save Case, you should first validate it
using the Save Case - Validate Button.
Cautions and Warnings
You will not be given a warning if the Save Case ID you have specified overwrites an already
existing Save Case. E.g. if you use this button to “copy” Save Case Definitions, be sure that the
Save Case ID you have specified does not already exist.
Syntax
Not Applicable.
Examples
Not Applicable.
Possible Errors
For possible error messages, see the relevant section. E.g. if the Error Message is preceded by
“External Definition ~ Save Case ID”, see section 4.7.9.2 Save Case - EDEF - Save Case ID
page 92.
Cross Reference
Item
4.7.5 Save Case - Validate page 81
4.7.9.2 Save Case - EDEF - Save Case ID page 92
4.7.9.1 Save Case - EDEF- Spacecraft page 90
Save Case Definer Window
84
SPEVAL
Cray
Software User Manual
Systems
4.7.7
Save Case - Submit
Figure 22Save Case - Submit Button
Description
This Push Button is located at the bottom middle in the Save Case Definer window. The Button
allows you to submit the current Save Case Definitions for retrieval and display in the Graphical and/or Alphanumeric Display Windows (or as output to a User Data Definition file).The
processing of the request goes as follows:
• SPEVAL validates the current Save Case Definitions. This process is a superset of the validation which is performed when you press the Save Case - Validate Button. If the validation
fails, a message will be displayed in the Message Area and further processing stopped.
• If the Save Case Definition is valid, SPEVAL submits it for Retrieval Control. The SPEVAL
Control - Last Submission Start Text Field will display the current time, and the SPEVAL
Control - Last Submission End Text Field will be cleared. The Message Area will display
the message “Save Case submitted for retrieval control”.
• After a time span (a few seconds to several hours), The SPEVAL Control - Last Submission
End Text Field will be initialised with the current time and the data you have requested for
retrieval will be displayed in the Graphical and/or Alphanumeric windows or output to the
UDS file. The time before the Save Case Submission have finished depends in a high degree
on the time span you have specified and the number of Parameters which are to be retrieved.
Note that, after a submission you don’t need to wait for a Submission End Message. You will
be allowed to perform other SPEVAL tasks (e.g. defining a new Save Case or perform another
submission). Note however that SPEVAL will not allow you to perform two concurrent submissions for data display (one retrieval to UDS and one to display is accepted). In order to perform concurrent submissions to display, you must start a second SPEVAL session as explained
in “SPEVAL Control” on page 64.
Cautions and Warnings
Submitting a Save Case will not automatically save the current Save Case definitions. In order
to Save the Save Case Definitions, you must use the Save Case - Save Button.
Syntax
Not Applicable.
Examples
Not Applicable.
Possible Errors
The following error messages are error messages generated from the Retrieval phase of the
retrieval. Messages related to the Save Case Validation phase are always described under the
relevant section. E.g. if the Error Message is preceded by “External Definition ~ Save Case
Save Case Definer Window
85
SPEVAL
Cray
Software User Manual
Systems
ID”, see section 4.7.9.2 Save Case - EDEF - Save Case ID page 92.
Message
Meaning
Display Save Case has already been submitted - parallel retrievals of this
type are not supported
You have already submitted a Save Case for retrieval, and
the previous retrieval has not yet finished. Wait until the
retrieval confirmation message before issuing another
retrieval request.
Save Case submitted for retrieval
Informational. The Save Case is valid and is currently
being submitted.
<< Loading retrieved data <<
Informational. The retrieval was successful (partial or
full). SPEVAL is currently processing the data for display.
No data was found for this retrieval
The SPEVAL Retriever has failed to find any data for the
specified time range. I.e. none of the Parameters defined
in the associated Proforma had values for the time range
specified in the Save Case - Simple Time fields.
No parameters found after ANDing PTVS
with Proforma
This message should only be issued if you have performed
a OOL,Statistic or Totals retrieval. It indicates that the
Field Proforma used for the Retrieval contains field names
not recognised. Check the field proforma you have used.
Retrieved data loaded
Informational. Save Case submission has finished.
An internal error has occurred, please
Contact Software support
The message specifies an internal error. Contact Software
Support.
No data was found for Parameter <parameter>
Partial.The SPEVAL Retriever has failed to find any data
for the parameter in the specified time range. Specify a
larger time range and/or change the Parameter Proforma.
Check the Save Case data filters.
Internal PTVS Error occured
The message specifies an internal error. Contact Software
Support.
Failed to open PTVS file: cannot carry
on with retrieval
FILE I/O Error encountered. Contact Software Support
Failed to create ptvs file: cannot
carry on with retrieval
Check file protection and disk quotas. If still disk space,
contact Software Support.
Device Full: cannot carry on with
retrieval
The disk is full. Contact Software Support
Device not ready: cannot carry on with
retrieval
Problems with the device I/O. Contact Software Support
zero parameters defined in proforma
This message could be issued if you have define your own
field Proforma or TM Proforma and the Proforma contains
zero Parameters. Check the Source Proforma
Failed to find processes ID and Packet
Type for Packet <packet_id>
The Process ID and Packet Type could not be found in the
DB for the Packet ID. This message could be issued if you
are accessing an out-of-date Database.
Parameter <parameter> is of type constant. Cannot be retrieved
A Parameter in the Proforma was of type constant. The
Parameter cannot be retrieved. Remove the Parameter
from the Source Proforma.
failed to find Packet ID for parameter
<parameter>
Some parameters were located in Packets which could not
be found in the Long Term Archive.
failed to map to SCOS database:
retriever stopped
The Retriever failed to map to the derived SCOS database.
Contact Software Support.
Save Case Definer Window
86
SPEVAL
Cray
Software User Manual
Systems
Message
Meaning
No database is valid for the specified
time
The Retriever did not found any database which was valid
for the specified time.This message may be issued if the
<Current At> or <Current at Generation> Database option
has been specified in the Save Case Definer, but no database has been found for the specified time. Specify a later
time or use the <Latest> option.
Text Table could not be found for
Parameter <parameter>
Partial. The retrieved Status Parameter referenced Text
Tables which were not found in the LTA. Status strings for
the Parameter cannot be displayed.
Cannot retrieve any data. Parameters
were not located in packets correctly
The derived DB specifies packet locations which are outside the packet boundaries. The retriever has been
stopped.The message may be issued if a out-of-date Database has been used. Try to repeat the Retrieval using the
“Current” Database option.
failed to get PNT pointer for parameter
<parameter>
The parameter did not exist in the SCOS database. Normally, the Proforma Editor prevents specifying non-existing Parameters. The message can however be issued if the
Proforma has been compiled with another version of the
database.
Retrieval reached end-of-file
The Retrieval time window extends the LTA time window.
No action required.
Failed to write to PTVS: disk full
Disk is full. Contact Software Support.
Parameter <parameter> changed in SCOS
DB.
Partial. The Parameter characteristics (e.g. parameter
type) changed between two Databases. The retriever cannot retrieve more values of the Parameter in the new DB.
In order to examine the Parameter Values after the DB
change, choose a Retriever start-time which is equal to or
greater than the DB change time.
Save Case specified an output nature
for Param <parameter> that the
retriever did not recognise
The Parameter output nature is unknown to the Retriever
process. Contact Software Support
Parameter characteristics couldn’t be
formed for Param <parameter>
Partial. In order to examine the Parameter Values after the
DB change, choose a Retriever start-time which is equal to
or greater than the DB change time.
Internal error: scrolling log format is
invalid
The format of a scrolling log was wrongly defined internally. Contact Software Support
This type of retrieval function is not
yet implemented
A type of retrieval was requested which has not yet been
implemented. Be patient. Supply money and/or beer.
Internal error: cannot access scrolling
log database
The scrolling log database could not be found. Software
Support.
The ERS scrolling log <log_id> is not
defined
An ERS scrolling log display was requested which is not
defined. Check spelling and respecify
Cannot process dump log since no time
correlation coefficients are available
No time correlation coefficients are available near the time
of the dump requested. Software Support
Dump at <id> was truncated on output
<n> of <m> lines are shown>
The text of a dump was truncated on output. This is due to
a buffer size being increased in CMCS and not reflected
on SPEVAL. Software Support
Incomplete CHB dump detected at <id>
events may be missing
An incomplete CHB dump was found with the given
SCET. The dump was not processed, and any events contained in it, but not in other dumps, will be missing from
the output.
Couldn’t read from tape drive
ISO retrieval failed to read from the tape drive. Contact
Software Support and/or operator
Save Case Definer Window
87
SPEVAL
Cray
Software User Manual
Systems
Message
Meaning
Operator cancelled mount request
Operator cancelled the mount request. Ask operator.
Failed to mount tape <tape_label>. Only
data from n tapes are retrieved
Tape mount failed and no more tapes will be read. Note
however that the data already successfully retrieved will
be displayed. See the event log or ask the operator.
Could not load alphanumeric data into
memory (probably resource constraints)
It was not possible to load the required data into memory
for alphanumeric displays. If thisis a recurrent problem, it
may be possible to increase system resource quotas to allevaite it - contact Software Support.
Cross Reference
Item
4.7.5 Save Case - Validate page 81
4.7.6 Save Case - Save page 82
4.6 SPEVAL Control page 64
4.7.12 Save Case - Simple Time page 108
Save Case Definer Window
88
SPEVAL
Cray
Software User Manual
Systems
4.7.8
Save Case - Cancel
Figure 23Save Case - Cancel Button
Description
This Push Button is located at the bottom right in the Save Case Definer window. The Button
allows you to quit the Save Case Definer Window.
Cautions and Warnings
Pressing this Push Button will disregard all unsaved data. If you want to save the data before
cancelling the Window, use the Save Case - Save Button.
Syntax
Not Applicable.
Examples
Not Applicable.
Possible Errors
None.
Cross Reference
Item
4.7 Save Case Definer Window page 74
4.7.6 Save Case - Save page 82
Save Case Definer Window
89
SPEVAL
Cray
Software User Manual
Systems
4.7.9
Save Case - External Definition (EDEF)
Spacecraft
Save Case Nature
Save Case ID
Save Case Description
Pane
Figure 24Save Case - External Definition (ED EF) Form.
Description
This Form is Located at the top of the Save Case Definer Window . It contains the following
items:
• The Spacecraft for which the Save Case is defined (e.g. ERS-2,CLUSTER). This item is
described in section 4.7.9.1 on page 90.
• A Save Case ID field, displaying the Save Case (file) ID of the current definitions. This item
is described in section 4.7.9.2 on page 92.
• A Save Case Description field, displaying the description of the Save Case. This item is
described in section 4.7.9.3 on page 94.
• A Save Case Nature field, displaying the type (e.g. Summary, Output) of the Save Case.
This item is described in section 4.7.9.4 on page 95.
• A Pane, allowing you to extend the size of the form. This item is useful if the Save Case
Description extends multiple lines.
Cautions and Warnings
None.
Syntax
Not Applicable.
Examples
Not Applicable.
Possible Errors
None.
Cross Reference
Item
4.7 Save Case Definer Window page 74
4.7.9.2 Save Case - EDEF - Save Case ID page 92
Save Case Definer Window
90
SPEVAL
Cray
Software User Manual
Systems
Item
4.7.9.3 Save Case - EDEF - Description page 94
4.7.9.4 Save Case - EDEF - Save Case Nature page 95
Save Case Definer Window
91
SPEVAL
Cray
Software User Manual
Systems
4.7.9.1
Save Case - EDEF- Spacecraft
Figure 25Save Case - EDEF - Spacecraft Option Menu
Description
This Option Menu defines the Spacecraft ID (e.g. CLUSTER,ERS-2) which the Save Case is
defined for. Note that, together with the Save Case - EDEF - Save Case ID field, the Spacecraft defines the Save Case file name. This means that when loading a Save Case definition,
you should specify both the Spacecraft and the Save Case ID.
The visibility of the Menu items depends on the Spacecraft which your host computer is connected to as follows:
ERS-2:
• ERS-2
• KIRUNA 2
ERS-1:
• ERS-1
• KIRUNA 1
ISO:
• ISO
CLUSTER:
• CLUSTER-1
• CLUSTER-2
• CLUSTER-3
• CLUSTER-4
SCOS
• SCOS
Cautions and Warnings
None.
Syntax
Not Applicable.
Save Case Definer Window
92
SPEVAL
Cray
Software User Manual
Systems
Examples
Figure 24 on page 88 shows the Spacecraft Option Menu. The Spacecraft defined is ERS-2.
Possible Errors
None.
Cross Reference
Item
4.7.10 Save Case - Data page 97
4.7.9.2 Save Case - EDEF - Save Case ID page 92
Save Case Definer Window
93
SPEVAL
Cray
Software User Manual
Systems
4.7.9.2
Save Case - EDEF - Save Case ID
Figure 26Save Case - EDEF - Save Case ID
Description
This Text Field is located in the Save Case - External Definition (EDEF) form. It has the following function:
• On a Save Case Load, the field (in combination with the Save Case - EDEF- Spacecraft
Option Menu) specifies the complete ID of the Save Case to load.
• On a Save Case Save, the field (in combination with the Save Case - EDEF- Spacecraft
Option Menu) specifies the complete ID which the definitions are saved under.
Note that for Summary Save Cases, this field will be non-editable and always display the
“summary” text string. The field will change to editable when setting the Save Case - EDEF Save Case Nature different from “Summary”.
File Selection Box Button
Clicking on the Push Button to the right of the Text Fields displays a SPEVAL File Selection
Box. The Box will be initialised to reflect the directory in which the Save Case resides. Clicking the File Selection Box OK button updates the Save Case - EDEF - Save Case ID field with
the selected Save Case ID, but without performing any “Load” or “Save” operations.
Cautions and Warnings
You will not be given a warning if you do a “Save As” operation, thereby specifying an ID of
an already defined Save Case in this field.
Syntax
<save_case_id>: String, 1-20 characters. May contain alphanumeric characters and “$”,”-”
and “_” characters. Uppercase and lowercase characters are considered equal.
Examples
“$A-01_1” is a valid Save Case ID.
“TM_A001” and “tm_a001” refers to the same Save Case ID.
“TM A” is INVALID. (Contains interleaved blanks).
“%TM” is INVALID. (Contains the “%” character).
Save Case Definer Window
94
SPEVAL
Cray
Software User Manual
Systems
Possible Errors
Error Message
Meaning
File not found
The file has not been found (on a Load Operation). Check
the spelling, the Spacecraft and the Save Case Nature
which has been entered.
Use only letters, numbers, and the following: ”_”, ”-”, ”$”
Invalid letters in the Save Case ID text field.
Field contains no input
Save Case ID field contains no letters.
Wildcards in file names are not supported
One or more “*” in the Save Case ID.
Field contains embedded blanks - Use
only letters, numbers, and the following: ”_”, ”-”, ”$”
Embedded blanks are not allowed in the Save Case ID.
Field is all blanks
Save Case ID contains (hidden) blanks. Use the <backspace> key to ensure that all blanks are removed.
Cross Reference
Item
4.7.9 Save Case - External Definition (EDEF) page 88
4.7.5 Save Case - Validate page 81
4.7.4 Save Case - Load page 80
4.7.6 Save Case - Save page 82
4.7.9.1 Save Case - EDEF- Spacecraft page 90
Save Case Definer Window
95
SPEVAL
Cray
Software User Manual
Systems
4.7.9.3
Save Case - EDEF - Description
Figure 27Save Case Description (Pane extended)
Description
This Text Field is located in the Save Case - External Definition (EDEF) form. It displays
(optionally) the Description of the Save Case identified in the Save Case - EDEF - Save Case
ID field. You may scroll the description using the Vertical Scrollbar located to the right of the
Text Window. Alternatively, you can use extend the Pane as shown in Figure 27.
Cautions and Warnings
None.
Syntax
<save_case_desc>: String (0-540) characters.
Examples
Figure 27 shows a Save Case Description extending multiple lines,
Possible Errors
None.
Cross Reference
Item
4.7.9 Save Case - External Definition (EDEF) page 88
Save Case Definer Window
96
SPEVAL
Cray
Software User Manual
Systems
4.7.9.4
Save Case - EDEF - Save Case Nature
Figure 28Save Case Nature Option Menu
Description
This Option Menu is located in the Save Case - External Definition (EDEF) form. It displays
the Save Case Nature of the current definitions. The following types are possible:
• Display Output (Default). This option specifies that the data retrieved (when the Save Case
is submitted) is displayed on the Workstation screen only.
• User Data Set. This option specifies that the retrieved data is stored in a UDS (User Data
Set) File. Note that in this case, the Save Case - Output - User Data Set field must contain
a valid UDS ID. The data can later be retrieved from the UDS file by specifying User Data
Set in the Save Case - Data - Data Source and the UDS ID in the Text field.
• Summary. This option specifies that retrieved data is stored in the Global Summary. In this
case, the data is added to the existing Summary. (see also warning).
• Time Definition file. This option is reserved for future releases.
Cautions and Warnings
Specifying large User Data Set Save Cases will occupy a large amount of disk space.
Summary Save Cases must be copied to the Public area if they should have any effect.
Syntax
Not Applicable.
Examples
Figure 28 shows the Option Menu.
Possible Errors
For error messages related to the User data Set ID, see section 4.7.13.5 on page 119.
Save Case Definer Window
97
SPEVAL
Cray
Software User Manual
Systems
Cross Reference
Item
4.7.9 Save Case - External Definition (EDEF) page 88
4.7.10.1 Save Case - Data - Data Source page 98
4.7.13.1 Save Case - Output - Output Type page 112
4.7.13.5 Save Case - Output - User Data Set page 119
Save Case Definer Window
98
SPEVAL
Cray
Software User Manual
Systems
4.7.10 Save Case - Data
User Data Set ID
Data Streams
Data Source
S/C Database
Data Type
Figure 29Save Case - Data Form.
Description
This form is located in the Save Case Definer Window . The form contains items defining the
following properties:
• The Data Source to be accessed when a Save Case submission is committed. This item is
described in section 4.7.10.1 on page 98.
• The Data Streams to be used when the Data Source is the Long Term Archive. This item is
described in section 4.7.10.2 on page 99
• The SC/Database, specifying which Database (e.g. Latest) from which to load the retrieved
data. The item is described in section 4.7.10.3 on page 101.
• The Data Type (e.g. TM or OOL) of the retrieved/saved data. This item is described in section 4.7.10.4 on page 103.
Cautions and Warnings
None.
Syntax
Not Applicable.
Examples
Figure 29 shows a typical Save Case configuration. TM data will be retrieved from the long
term archive using the latest ERS-2 database. The User Data Set ID field is not visible.
Possible Errors
None.
Cross Reference
Item
4.7.9.4 Save Case - EDEF - Save Case Nature page 95
4.7.9.1 Save Case - EDEF- Spacecraft page 90
4.7.10.2 Save Case - Data - Data Streams page 99
Save Case Definer Window
99
SPEVAL
Cray
Software User Manual
Systems
Item
4.7.10.3 Save Case - Data - S/C Database page 101
4.7.10.4 Save Case - Data - Data Type page 103
Save Case Definer Window
100
SPEVAL
Cray
Software User Manual
Systems
4.7.10.1 Save Case - Data - Data Source
Figure 30Save Case - Data - Data Source Option Menu
Description
This Option Menu defines the Data Source to be used for a SPEVAL data retrieval. The following choices are possible:
• Long Term Archive (LTA). This choice is the default. It specifies that the data which is
retrieved is the data as received from the Control Centre. For ERS-2 and CLUSTER, the
LTA’s are stored on magnetic disks. ISO has the data stored partly on disks, partly on DAT
tapes.
• Summary Data. This choice specifies that the data is retrieved from the Spacecraft Summary. There exist only one Summary per Spacecraft. In order to examine the Save Case definitions used to define the regular retrieval for the project summary, you may open the Save
Case name “SUMMARY” .
• User Data Set. This choice specifies that the data should be retrieved from an existing UDS
file (created from a previous Retrieval). In this case, a Text Field to the right of the Option
Menu will be visible, and the UDS ID should be entered here; for a list of available data
sets, click on the File Selection Box button to the right of the text field. For the syntax of the
UDS ID and the resulting file name, see section 4.7.13.5 on page 119.
Cautions and Warnings
If the entire contents of a User Data Set is to be retrieved, and displayed using the originally
specified proforma, it is much quicker to load it directly (see 4.6.5 SPEVAL Control - Direct
Load of UDS page 72).
Syntax
See section 4.7.13.5 on page 119 for the syntax of the UDS ID.
Examples
Figure 29 on page 97 shows the Option Menu. The current Data Source defined is “Long Term
Achieve”. The position of the User Data Set ID Text field is indicated.
Possible Errors
None.
Cross Reference
Item
4.7.10 Save Case - Data page 97
4.7.13.5 Save Case - Output - User Data Set page 119
Save Case Definer Window
101
SPEVAL
Cray
Software User Manual
Systems
4.7.10.2 Save Case - Data - Data Streams
Figure 31Save Case - Data - Data Streams.
Description
This Option Menu is only visible when the Save Case - Data - Data Source is set to Long
Term Archive and when the Save Case - Data - Data Type is set to TM or OOL. It allows you
to specify the data streams to be used for a SPEVAL retrieval.
The options are as follows:
• All. This choice is the default. It specifies that all the data streams should be retrieved.
• Specific. In this case, a text field will be visible allowing you to specify a list of specific data
streams (-9 to 9) to be retrieved.
When the Save Case definer validates the data stream list you have specified, any duplicates
will be removed, and the list put on a standard comma-separated form (see Examples).
Cautions and Warnings
None.
Syntax
<data_stream_list>: List of data stream numbers in the range -9 to 9. The numbers can be separated by commas, blanks or no separator (see examples). Multiple occurrences of a data
stream number will be filtered out.
Examples
The following data stream lists are functionally identical. They specify that the data streams
“-9”, ”0”, and “9” should be retrieved:
-9, 0, 9
-909
-9 0 9
-9 -0 +0 9 9 9
The Save Case definer will convert the list format to the standard format:
-9, 0, 9
Possible Errors
Error Message
Meaning
Invalid data stream - following are
valid examples: ”-1,0,+1”, ”-1 0 1”,
”-101”
The “specific” data stream option has been chosen but the
syntax is incorrect.
Save Case Definer Window
102
SPEVAL
Cray
Software User Manual
Systems
Cross Reference
Item
4.7.10 Save Case - Data page 97
4.7.10.4 Save Case - Data - Data Type page 103
Save Case Definer Window
103
SPEVAL
Cray
Software User Manual
Systems
4.7.10.3 Save Case - Data - S/C Database
Figure 32Save Case - Data - S/C Database (Current At: Option).
Description
This Option Menu allows you to specify the derived Data Base to be used for the Save Case
Retrieval. SPEVAL archives each database as received from the Mission Control Centre. The
DB information is used to calibrate the data, to find the Parameter locations in the SCOS packets and so on.
The selectivity of the different options depends on the SC mission and the data type retrieved
as shown in the table below. Note that the Latest option always is selectable.
The following database choices are possible:
• Current At data Generation. Specifies that the retrieved data should be matched against the
database which was valid at the time the data was generated. This means that SPEVAL may
use several databases during one retrieval.
• Latest. Access the Latest Version of the Derived Database.
• Current At. If this option is chosen, a Time Specification Field will be displayed to the right
of the Option Menu, allowing you to specify the time for which the database should yield.
Data types for where “Current At data
Generation” and “Current At” are possible
Comment
ERS 1
ERS 2
KIRUNA 1
KIRUNA 2
TM
TC
TC retrieval does currently not
access any database.
CLUSTER
TM
Chronological History Buffer Log
Monitoring Table Log
Time-tagged Commands Buffer Log
Backup-Up Time-tagged Commands Buffer Log
Macro Commands Buffer Log
Survival Mode Extension Buffer Log
Cluster TC retrieval (from the
Command History File) does
not access any Database. The
Command History file is selfcontaining.
ISO
TM
SCOS
TM
Mission
Cautions and Warnings
The retrieval will fail if the Current At data Generation or Current At options are specified and
no database is valid for the current time.
Syntax
Not Applicable.
Save Case Definer Window
104
SPEVAL
Cray
Software User Manual
Systems
Examples
Figure 32 on page 101 shows the Option Menu. The current choice is “Current At:”.
Possible Errors
None
Cross Reference
Item
4.7.10 Save Case - Data page 97
4.7.10.4 Save Case - Data - Data Type page 103
Save Case Definer Window
105
SPEVAL
Cray
Software User Manual
Systems
4.7.10.4 Save Case - Data - Data Type
Figure 33Save Case - Data - Data Type (showing ERS Scrolling Log).
Description
This Option Menu defines the Data Types to be retrieved. The options in the Menu are mission
specific, but TM and OOL data are common for all spacecrafts.
ERS Scrolling Log File Selection Box Button
For ERS Scrolling Logs, a Log ID text field and a File Selection Box Push Button will be visible as shown in Figure 33. The File Selection Box displays a number of Scrolling Log ID’s
together with their description.
The tables below list the different Data Type options.
Table 6: ERS1, ERS2, KIRUNA1 and KIRUNA2 data types
Data type
Comment
TM
Specifies that Telemetry data is retrieved. The
Proforma in the Save Case - Simple Extraction Processing (SEP) form is used to identify
the Parameters. This is the only option where
statistical processing is possible.
OOL
Specifies that Out-of-Limits data is retrieved.
Note that when this option is chosen, the Save
Case - Simple Extraction Processing (SEP)
form will be inhibited and the Save Case Output form will only allow you to specify
output of OOL data.
TC
Specifies that Telecommanding data is
retrieved.
Scrolling Log
Specifies that the Scrolling Log history is
retrieved.
Table 7: CLUSTER data types
Data type
Comment
TM
As for ERS/KIRUNA
OOL
As for ERS/KIRUNA
Save Case Definer Window
106
SPEVAL
Cray
Software User Manual
Systems
Table 7: CLUSTER data types
Data type
Comment
TC
Specifies that Telecommanding data is
retrieved. For CLUSTER, the TC history is
displayed in the same type of window as used
by the CMCS.
Time Correlation File
Not implemented in SPEVAL Version 3.0
Orbit Event File
Not implemented in SPEVAL Version 3.0
Ground Station Schedule File
Not implemented in SPEVAL Version 3.0
Spacecraft Schedule File
Not implemented in SPEVAL Version 3.0
OBRQ File
Not implemented in SPEVAL Version 3.0
Chronological History Buffer Log
Specifies that the Chronological History
Buffer Log is retrieved.
Monitoring Table Log
Specifies that the Monitoring Table Log is
retrieved.
Time-Tagged Commands Buffer Log
Specifies that the Time-Tagged Commands
Buffer Log is retrieved.
Backup-Up Time-Tagged Commands Buffer Log
Specifies that the Backup-Up Time-Tagged
Commands Buffer Log is retrieved
Macro Commands Buffer Log
Specifies that the Macro Commands Buffer
Log
Survival Mode Extension Buffer Log
Specifies that the Survival Mode Extension
Buffer Log is retrieved.
Table 8: ISO data types
Data type
Comment
TM
As for ERS/KIRUNA
OOL
As for ERS/KIRUNA
Save Case Definer Window
107
SPEVAL
Cray
Software User Manual
Systems
Table 9: SCOS data types
Data type
Comment
TM
As for ERS/KIRUNA
OOL
As for ERS/KIRUNA
Cautions and Warnings
None.
Syntax
Not Applicable.
Examples
Figure 29 on page 97 shows the Option Menu. The data type is “Out of Limits” (OOL).
Possible Errors
An invalid Scrolling Log ID in the Scrolling Log ID Text Field implies a subsequent Retrieval
failure.
Cross Reference
Item
4.7.10 Save Case - Data page 97
4.7.11 Save Case - Simple Extraction Processing (SEP) page 106
4.7.13 Save Case - Output page 110
Save Case Definer Window
108
SPEVAL
Cray
Software User Manual
Systems
4.7.11 Save Case - Simple Extraction Processing (SEP)
Layout A
Layout B
Layout C
Layout D
Figure 34Save Case - Simple Extraction Processing (SEP) form (4 configurations).
Description
This Form is located in the middle of the Save Case Definer window. It allows you to specify
the primary Proforma and Proforma Type for the retrieval. As indicated in Figure 34, the form
may take three distinct layouts. The appearance of the different forms depends on the Save
Case - EDEF - Save Case Nature and the Save Case - Data - Data Type items,
Table 10: Simple Extraction Processing (SEP) form layout
Save Case Nature
SC Data Type
Layout
Comment
Summary
Only TM possible
B
Proforma id is fixed to be “SUMM”
and Proforma Type fixed to “Parameter
Only”
UDS/ Display Output
TM
A
TC
D (ERS)
C (others)
Only possible to specify TC Extraction
type for ERS/KIRUNA. For CLUSTER, specified at display time.
others
C
No proforma may be specified
The following fields are considered:
Save Case - SEP - Proforma ID
Specifies the name of the Proforma to use. The directories which will be searched
for the Proforma is the logical name SPVL_PROFORMA_DIR. For Summary
Save cases, the field will be initialised with the Proforma ID “SUMM”. See below
Save Case Definer Window
109
SPEVAL
Cray
Software User Manual
Systems
for the expected filename extensions.
Save Case - SEP- Proforma Type
Specifies the type of the Proforma identified in the Proforma ID field. The following types are possible:
Parameter Only
This option will be the only choice if the Save Case - EDEF - Save
Case Nature is set to Summary and is also selectable for User Data Set
types. It simply specifies that the Parameter extraction processing cannot be identified as Graphical or Alphanumeric, since the data is not
displayed. In this case, the Proforma file name extension is expected to
be “PARAM”.
Alphanumeric
This option specifies that the Proforma to use is of type Alphanumeric.
In this case, the Proforma file name is expected to be “ALPHA”.
Graphical.
This option specifies that the Proforma to use is of type Graphical. In
this case, the Proforma file name extension is expected to be
“GRAPH”.
Save Case - SEP - Extraction Type
Specifies the type of TC data extraction for ERS/KIRUNA:
Brief
Each command is summarized on a single line.
Full
The full command details are retrieved.
Cautions and Warnings
If a proforma is updated (using the Proforma Editor) after it is included in a save case, the new
version will not automatically be imported into the save case. To use the new version, explicitly
reload it as described in section 4.7.14.11 on page 143
Syntax
.<proforma_id>: String, 1-4 characters. May contain alphanumeric characters and “$”,”-” and
“_” characters. Uppercase and lowercase characters are considered equal.
Examples
Spacecraft “ERS-2:, Proforma ID “SUMM” + Summary Save Case Nature produces the Proforma file name “ERS2_SUMM.PARAM”.
Possible Errors
For errors concerning the Proforma ID, see 4.7.14.1 on page 124.
Cross Reference
Item
4.7.9.4 Save Case - EDEF - Save Case Nature page 95
4.7.10.4 Save Case - Data - Data Type page 103
Save Case Definer Window
110
SPEVAL
Cray
Software User Manual
Systems
4.7.12 Save Case - Simple Time
Start Time
End Time
Figure 35Save Case - Simple Time.
Description
These two fields are central within the Save Case Definer window. They specify the start and
end time for the retrieval which is started when you press the Save Case - Submit Button. Note
that for Summary Save Cases, these two fields are not displayed. If you want to retrieve using
multiple time windows, see “Save Case - Time Options (TO) Window” on page 145. If the
Time Options window contains “Repeated Time Windows” or “Irregular Time Windows”, the
Save Case - Simple Time window will be inhibited.
Currently, the only format allowed is the “Year & Day” format as indicated in Figure 35. The
complete syntax for this format is described in section 4.2 on page 52. You must always specify an end time greater than the start time. Otherwise, any Save Case Submit or Validate will
fail.
Cautions and Warnings
Specifying a large time range may increase the retrieval time drastically. It is recommended to
start of with smaller time scales in order to get an indication of how long larger retrievals will
take.
Syntax
A complete syntax for the time fields is given in section 4.2 on page 52.
Examples
Figure 35 specifies a retrieval starting at day 1994, day 27, 09:00, ending at day 28 14:10.
Possible Errors
See section 4.2 on page 52. Additional error messages are the following:
Error Message
Meaning
Design constraint: time range is too
big for stats data ( reduce to <= 497
days )
SPEVAL cannot handle statistics retrieval for more than
497 days. Either (1) turn of the statistics retrieval options
in the Save Case - TME - Data Filters (analogue) , or (2)
reduce the time window.
Save Case Definer Window
111
SPEVAL
Cray
Software User Manual
Systems
Cross Reference
Item
4.2 Time Specification Fields page 52
4.7.15 Save Case - Time Options (TO) Window page 145
4.7.7 Save Case - Submit page 83
Save Case Definer Window
112
SPEVAL
Cray
Software User Manual
Systems
4.7.13 Save Case - Output
Display
Output
User
Data
Set
Summary
Figure 36Save Case - Output (different configurations).
Description
This Form, located in the lower part of the Save Case Definer Window defines the output possibilities for the retrieval associated with the Save Case. The form layout varies according to
the following other Save Case items (as well as the items defined in the form):
•
Save Case - EDEF - Save Case Nature . The maximum visible fields for each of the 3 Save
Case Natures are shown in Figure 36.
•
Save Case - Data - Data Type . If the Save Case Data Type is set different from TM, the
Display Type is limited to one type of display. In this case, no Graphical interface will be
possible. See Save Case - Data - Data Type for a list of these display Windows.
The form contains the following items:
• The Output, allowing you to specify whether to output data points or totals of data points.
These items are described in detail in section 4.7.13.1 on page 112.
• The Output To (i.e. Screen, Printer or File). This item is described in detail in 4.7.13.2 on
page 114.
• An Output User Data Set. This item is described in detail in 4.7.13.5 on page 119.
• A Display Type radio Button Group. It defines the different windows which the retrieved
data should be displayed in. The buttons are described in 4.7.13.3 on page 115.
• Field Proforma text fields. These field allow you to define alternative column layouts for the
display of OOL, Statistics and Totals Windows. The fields are described in detail in section
4.7.13.4 on page 117.
Save Case Definer Window
113
SPEVAL
Cray
Software User Manual
Systems
Cautions and Warnings
None.
Syntax
Not Applicable.
Examples
Not applicable.
Possible Errors
Not Applicable.
Cross Reference
Item
4.7.13.2 Save Case - Output - Output To page 114
4.7.13.3 Save Case - Output - Display Type page 115
4.7.13.4 Save Case - Output - Field Proforma page 117
4.7.13.5 Save Case - Output - User Data Set page 119
Save Case Definer Window
114
SPEVAL
Cray
Software User Manual
Systems
4.7.13.1 Save Case - Output - Output Type
Figure 37Save Case - Output - Output Type Option Menu
Description
This Option Menu specifies the nature of the data after a successful retrieval. It is always visible. The Menu choices are as follows:
Data Points
This Button specifies that the data which have been retrieved should be displayed
or printed to file. The Button is always selectable.
Totals From Data Points
This button specifies that “Totals” information should be displayed. The different
items for this option are described under the “Totals Window” on page 174. The
Button is not selectable if the Save Case - EDEF - Save Case Nature is set to
Summary.
All Already Calculated Totals
This button specifies that “Totals” information should be displayed. E.g. if the
Save Case - Data - Data Source is set to Summary, and the Summary UDS file
used for the retrieval contains one or more “Totals” records, the retrieval will
retrieve all the records and display them. The Button is only selectable if the Save
Case - Data - Data Source is set to Summary or User Data Set.
Merge of All Already Calculated Totals
This button specifies that merge “Totals” information should be displayed. E.g. if
the Save Case - Data - Data Source is set to Summary, and the Summary UDS file
used for the retrieval contains one or more “Totals” records, the retrieval will
retrieve all the records, merge them into one, and display it. The Button is only
selectable if the Save Case - Data - Data Source is set to Summary or User Data
Set.
Note: Retrieval from a UDS file specifying the All Already Calculated Totals or Merge of All
Already Calculated Totals might give some unexpected results. The reason is that the “Totals”
records are stored in the UDS file using the time key of the actual Save Case submission time,
not the actual time span the Totals have been collected for. (See Examples and the related section “Save Case - TME - Data Filters (analogue)” on page 136).
Cautions and Warnings
Syntax
Not Applicable.
Examples
Say that the current day is 1-OCT 1995. If you do a “Totals from Data Points” retrieval from
the Long Term Archive, specifying a UDS file as the output and the time range 1-JUL-1995 to
1-AUG-1995, the single “Totals” record will be stored in the UDS file with the time stamp
according to e.g. 1-OCT 1995 14.00.00. Now, doing a retrieval from the UDS file specifying
Save Case Definer Window
115
SPEVAL
Cray
Software User Manual
Systems
All Already Calculated Totals or Merge of All Already Calculated Totals, using the (same) time
range 1-JUL-1995 to 1-AUG-1995 would produce zero ouput records. In order to find the
Totals record you must specify a time range covering the sumbission time (1-OCT 1995
14.00.00).
Possible Errors
None.
Cross Reference
Item
4.7.9.4 Save Case - EDEF - Save Case Nature page 95
4.7.13.2 Save Case - Output - Output To page 114
4.7.13.5 Save Case - Output - User Data Set page 119
Save Case Definer Window
116
SPEVAL
Cray
Software User Manual
Systems
4.7.13.2 Save Case - Output - Output To
Figure 38Save Case - Output - Output To Option Menu
Description
This Option Menu is located in the Save Case - Output window. It will only be visible if the
Save Case - EDEF - Save Case Nature is “Display Output”.The Button allows you to specify
the Output direction of the Save Case retrieval as follows:
• Screen. Outputs the data in one or more X-Windows as defined by the Save Case - Output Display Type radio Buttons.
• Printer. This Button is reserved for future releases. You can however print the contents of a
particular display window by choosing the File | Output > Print in the corresponding display window.
• File. This Button is reserved for future releases. You can however print the contents of a particular display window to a text file by choosing the File | Output > Text in the corresponding display window. For Graphics Windows, you can choose the File | Output > Postscript
or the File | Ouput > EPS option. EPS stands for Encapsulated Postscript.
Cautions and Warnings
None.
Syntax
Not Applicable.
Examples
Not Applicable.
Possible Errors
None.
Cross Reference
Item
4.7.13 Save Case - Output page 110
4.7.13.1 Save Case - Output - Output Type page 112
4.7.13.2 Save Case - Output - Output To page 114
Save Case Definer Window
117
SPEVAL
Cray
Software User Manual
Systems
4.7.13.3 Save Case - Output - Display Type
Figure 39Save Case - Output - Display Type radio Buttons (one layout)
Description
These items determines where to display the retrieved data for Save Cases of type “Display
Output”. At any time, the possible choices depends on other fields in the Save Case Definer as
follows:
If the Save Case - Output - Output Type is “Totals From Data Points”, the only possible Display Window will be the Totals Window. In this case, the Save Case - Output - Field Proforma
field will display the name of the Totals Proforma used for column display definitions. The
layout of this window is described in section 4.9.4 on page 174. The table below lists the possible data types when the Save Case - Output - Output Type is set to “Data Points”:
Table 11: Save Case - Output - Display Type options
SC Data
Type
Display Types
possible
TM
Alphanumeric List
When set, the radio button specifies that the Alphanumeric List
Window should be displayed after the retrieval. The layout of this
window is described section in 4.9.1 on page 166.
Alphanumeric Display
When set, the radio button specifies that the Alphanumeric Display
Window should be displayed after the retrieval. The layout of this
window is described in section 4.10 on page 176.
Graph
When set, the radio button specifies that the Statistics Window
should be displayed after the retrieval. In this case, the Save Case Output - Field Proforma field will display the name of the Stats
Proforma used for column display definitions.The layout of this
window is described in section 4.9.2 on page 168.
Stats
When set, the radio button specifies that the Statistics Window
should be displayed after the retrieval. In this case, the Save Case Output - Field Proforma field will display the name of the Stats
Proforma used for column display definitions.The layout of this
window is described in section 4.9.2 on page 168.
Comment
Save Case Definer Window
118
SPEVAL
Cray
Software User Manual
Systems
Table 11: Save Case - Output - Display Type options
SC Data
Type
Display Types
possible
OOL
OOL Display
When set, the radio button specifies that the Statistics Window
should be displayed after the retrieval. In this case, the Save Case Output - Field Proforma field will display the name of the OOL
Proforma used for column display definitions.The layout of this
window is described in section 4.9.3 on page 171.
TC
Telecommand
For CLUSTER, the Command History display will show the Command History. For ESR/Kiruna, the Command History is displayed
in one of the Standard Alphanumeric List Windows described in
section 4.9 on page 162
Logs files
as for Data Type
Log files will be displayed in one of the Standard Alphanumeric
List Windows described in section 4.9 on page 162. The format of
the columns will be as described in the MCS SUMs.
Comment
Cautions and Warnings
None.
Syntax
Not Applicable.
Error Messages
Message
Meaning
No stats data is expected for Stats
display since no parameters have stats
filters
The STATS option has been specified but no TM Parameters have their statistics filters turned on. Either (a) Turn
off the Statistics or (b) define statistical filters via the TM
Extraction Window.
No TM data is expected for TM displays
since all parameters have stats filters
The Alphanumeric Display, Alphanumeric List or Graph
option have been turned on, but only Statistics filters have
been specified (only statistics is produced). Either (a) turn
off the option(s) or (b) turn off the statistic filters.
Cross Reference
Item
4.7.13 Save Case - Output page 110
4.7.13.1 Save Case - Output - Output Type page 112
4.7.14.7 Save Case - TME - Data Filters (analogue) page 136
4.9 Standard Alphanumeric List Windows page 162
4.10 Alphanumeric Display Window page 176
Save Case Definer Window
119
SPEVAL
Cray
Software User Manual
Systems
Item
4.11 Graphical Window page 178
4.9.1 TM (Alphanumeric List) Window page 166
4.9.2 Statistics Window page 168
4.9.3 OOL (Out-of-Limits) Window page 171
4.9.4 Totals Window page 174
Save Case Definer Window
120
SPEVAL
Cray
Software User Manual
Systems
4.7.13.4 Save Case - Output - Field Proforma
Figure 40Save Case - Output - Field Proforma Text Field (for Stats)
Description
These text fields specify a name of a Field Proforma to use when displaying OOL, Statistics
and Totals windows. When SPEVAL displays the retrieved data, the Proforma is used to determine the layout of the corresponding Window columns. The text fields will only be visible if
the Save Case - EDEF - Save Case Nature is “Display Output”.
The fields may be located at different positions in the Save Case - Output form:
• The OOL Field Proforma field specifies the name of the OOL Proforma to be used for display of SCOS OOL packets. The default name for this field is “OOLS”. See section 4.9.3
on page 171 for the possible column layout of this window.
• The Stats Field Proforma field specifies the name of the Stats Proforma to be used for display of SPEVAL Statistics. The default name for this field is “STATS”. See section 4.9.2 on
page 168 for the possible column layout of this window.
• The Totals Field Proforma field specifies the name of the Totals Data Points Proforma to be
used for display of the number of data points retrieved. The default name for this field is
“TOTS”. See section 4.9.4 on page 174 for the possible column layout of this window.
Cautions and Warnings
None.
Syntax
Not Applicable.
Possible Errors
Error Message
Meaning
File not found
The Proforma file has not been found. Check the spelling.
Use only letters, numbers, and the following: ”_”, ”-”, ”$”
Invalid letters in the Field Proforma text field.
Field contains no input
Field Proforma field contains no letters.
Wildcards in file names are not supported
One or more “*” in the Field Proforma.
Field contains embedded blanks - Use
only letters, numbers, and the following: ”_”, ”-”, ”$”
Embedded blanks are not allowed in the Field Proforma.
Field is all blanks
Field Proforma ID contains (hidden) blanks. Use the
<backspace> key to ensure that all blanks are removed.
Save Case Definer Window
121
SPEVAL
Cray
Software User Manual
Systems
Cross Reference
Item
4.7.13 Save Case - Output page 110
4.9.2 Statistics Window page 168
4.9.1 TM (Alphanumeric List) Window page 166
4.9.3 OOL (Out-of-Limits) Window page 171
Save Case Definer Window
122
SPEVAL
Cray
Software User Manual
Systems
4.7.13.5 Save Case - Output - User Data Set
Figure 41Save Case - Output - User Data Set text field
Description
This Text Field is only visible if the Save Case - EDEF - Save Case Nature is “User Data
Set”. In this case, it specifies the name of the User Data Set in which to store the retrieved data.
The file will be stored in the directory identified by the logical name
SPVL_USER_DATA_SET_DIR.
As for Save Cases and Proforma, there exists a private
(SPVL_PRIVATE_USER_DATA_SETS) and a public
(SPVL_PUBLIC_USER_DATA_SETS) UDS directory. The private directory has precedence
over the public one.
Cautions and Warnings
None.
Syntax
<user_data_set_id>: String, 1-20 characters. May contain alphanumeric characters and “$”,”-”
and “_” characters. Uppercase and lowercase characters are considered equal.
The expanded file name will be “<spacecraft_id>_<user_data_set_id>.UDS”
Examples
A User Data Set ID defined for ERS-2 named “USER_DSET_01” will produce the file name
“ERS2_USER_DSET_01.UDS”, and will be stored in SPVL_USER_DATA_SET_DIR.
Possible Errors
Error Message
Meaning
Use only letters, numbers, and the following: ”_”, ”-”, ”$”
Invalid letters in the UDS text field.
Field contains no input
UDS field contains no letters.
Wildcards in file names are not supported
One or more “*” in the UDS ID.
Field contains embedded blanks - Use
only letters, numbers, and the following: ”_”, ”-”, ”$”
Embedded blanks are not allowed in the UDS ID.
Field is all blanks
UDS ID contains (hidden) blanks. Use the <backspace>
key to ensure that all blanks are removed.
Save Case Definer Window
123
SPEVAL
Cray
Software User Manual
Systems
Cross Reference
Item
4.7.9.4 Save Case - EDEF - Save Case Nature page 95
4.7.9.1 Save Case - EDEF- Spacecraft page 90
Save Case Definer Window
124
SPEVAL
Cray
Software User Manual
Systems
4.7.14 Save Case - TM Extraction (TME)
Proforma ID
Proforma Type
Parameter list
Time Filters
Data Filters (all)
Data Filters
(status)
Data Filters
(Analogue)
OK
Commit
Load
Proforma
Update
from
Proforma
Cancel
Figure 42TM Extraction Window
Description
This Window is activated by pressing the Save Case - TM Extraction Processing Options in
the Save Case Definer window. The Window offers a wide range of filter possibilities which
are used at retrieval time (not display time).
• A Proforma ID and Proforma Type field, allowing you to specifying the name and type of
an existing proforma which may be loaded into the window using the Load Proforma or
Update from Proforma Button.
• A Parameter List displaying all the Proforma Parameters and their filter characteristics. You
can select individual or ranges of Parameters for retrieval filtering.
• A Time Filter Form, allowing you to define time characteristic filters for the retrieval (e.g
every nth sample).
• A Data Filter (All) Form, defining filter characteristics which may be applied to all types of
TM Parameters.
• A Data Filter (Status) Form, defining filter characteristics which may be applied to all types
Save Case - TM Extraction (TME)
125
SPEVAL
Cray
Software User Manual
Systems
of Status Parameters.
• A Data Filter (Analogue) Form, defining filter characteristics which may be applied to all
types of numerical (analogue and integer) Parameters.
• An OK Button, allowing you to Save and Close the Window contents to the Save Case. Note
however that the changes are not saved permanently to file.
• A Commit Button, allowing you to save the Window contents without closing the Window.
Note however that the changes are not saved permanently to file.
• A Load Proforma Button. this button loads in an existing Proforma (specified in the Proforma ID field), resetting any Parameter and filter characteristics.
• A Update From Proforma Button. This button loads in an existing Proforma (specified in
the Proforma ID field). Proforma parameters which already are in the Parameter List inherit
the existing characteristics. New parameters are highlighted.
Filtering Mechanisms
SPEVAL allows you to define a wide range of filters to be applied to each the Parameters in the
Parameter List. However, some of the filter options are mutually exclusive as indicated in Figure 43.
TM data points
TM Stats
Data Store
Filter Process
TM Filters
Data Flow
Stats Processing
TM Status/Numeric
Filters
Time Filters
TM Output
Stats Output
Figure 43SPEVAL filtering data Flow Diagram
The flow diagram specifies which types of filters may be applied to a particular data type.
There are two types of input data to the filtering process:
• TM Stats corresponds to all already calculated statistics and the merge of all calculated statistics. This data type would be the input to the filtering process if you are retrieving the data
Save Case - TM Extraction (TME)
126
SPEVAL
Cray
Software User Manual
Systems
from a UDS (User Data Set) or a Summary and the retrieved data is statistics.
• TM data points corresponds to all other data.
The arrows indicates the possible filter mechanisms which may be applied to the different
input types. For example, you can apply the general TM Filters to TM data points but not to the
TM Stats. Moreover, you cannot apply both the TM Status/Numeric filters and the Stats
Processing Filters to a Parameter because the filters are mutually exclusive.
Cautions and Warnings
None.
Syntax
Not Applicable.
Examples
Not Applicable.
Possible Errors
None.
Cross Reference
Item
4.7.1 Save Case - TM Extraction Processing Options page 77
4.7.14.1 Save Case - TME - Proforma ID page 124
4.7.14.2 Save Case - TME - Proforma Type page 126
4.7.14.3 Save Case - TME - Parameter List page 127
4.7.14.4 Save Case - TME - Time Filters page 130
4.7.14.5 Save Case - TME - Data Filters (all) page 132
4.7.14.6 Save Case - TME - Data Filters (status) page 134
4.7.14.7 Save Case - TME - Data Filters (analogue) page 136
4.7.14.8 Save Case - TME - OK page 140
4.7.14.9 Save Case - TME - Commit page 141
4.7.14.11 Save Case - TME - Update from Proforma page 143
4.7.14.10 Save Case - TME - Load Proforma page 142
4.7.14.12 Save Case - TME - Cancel page 144
Save Case - TM Extraction (TME)
127
SPEVAL
Cray
Software User Manual
Systems
4.7.14.1 Save Case - TME - Proforma ID
Description
This Text Field is located at the top left of the Save Case - TM Extraction (TME) Window. It
specifies the name of an alternative Proforma to be used when retrieving the data. The field
defaults to the Proforma ID which have been specified in the Save Case - Simple Extraction
Processing (SEP) Form. By entering a Proforma ID in the field, then pressing the Save Case TME - Load Proforma or Save Case - TME - Update from Proforma Button, SPEVAL will
load the proforma and update the Parameter List.
Cautions and Warnings
NOTE: If you specify an alternative Proforma, you must use the “Load” or “Update” Button
for the change to have any effect in the Save Case Definitions.
Syntax
<proforma_id>: String, 1-4 characters. May contain alphanumeric characters and “$”,”-” and
“_” characters. Uppercase and lowercase characters are considered equal.
The expanded file name will be “<spacecraft_id>_<proforma_id>.<proforma_type_ext>”
Examples
A Graphics Proforma ID defined for ERS-2 named “A-01” will produce the file name
“ERS2_A-01.GRAPH”, and the directories searched are the ones identified by the logical
name SPVL_PROFORMA_DIR.
Possible Errors
Error Message
Meaning
File not found
The file has not been found (on a Load Operation). Check
the spelling, the Spacecraft and the Proforma Type which
has been entered.
Use only letters, numbers, and the following: ”_”, ”-”, ”$”
Invalid letters in the Proforma ID text field.
Field contains no input
Proforma ID field contains no letters.
Wildcards in file names are not supported
One or more “*” in the Proforma ID.
Field contains embedded blanks - Use
only letters, numbers, and the following: ”_”, ”-”, ”$”
Embedded blanks are not allowed in the Proforma ID.
Field is all blanks
Proforma ID contains (hidden) blanks. Use the <backspace> key to ensure that all blanks are removed.
Cross Reference
Item
4.7.11 Save Case - Simple Extraction Processing (SEP) page 106
4.7.14.2 Save Case - TME - Proforma Type page 126
Save Case - TM Extraction (TME)
128
SPEVAL
Cray
Software User Manual
Systems
Item
4.7.14.10 Save Case - TME - Load Proforma page 142
4.7.14.11 Save Case - TME - Update from Proforma page 143
4.7.14.3 Save Case - TME - Parameter List page 127
Save Case - TM Extraction (TME)
129
SPEVAL
Cray
Software User Manual
Systems
4.7.14.2 Save Case - TME - Proforma Type
Description
This Option Menu is located at the top left of the Save Case - TM Extraction (TME) Window.
It specifies the type of an alternative Proforma to be used when retrieving the data. The field
defaults to the Proforma Type which have been specified in the Save Case - Simple Extraction
Processing (SEP) Form. The Proforma Type decides which filename extension SPEVAL looks
for as follows:
• Parameter Only. Filename extension is “.PARAM”.
• Alphanumeric. Filename extension is “.ALPHA”.
• Graphical. Filename extension is “.GRAPH”.
Cautions and Warnings
None.
Syntax
Not Applicable.
Examples
A Graphics Proforma ID defined for ERS-2 named “A-01” will produce the file name
“ERS2_A-01.GRAPH”, and the directories searched are SPVL_PROFORMA_DIR.
Possible Errors
Not Applicable.
Cross Reference
Item
4.7.11 Save Case - Simple Extraction Processing (SEP) page 106
4.7.14.1 Save Case - TME - Proforma ID page 124
Save Case - TM Extraction (TME)
130
SPEVAL
Cray
Software User Manual
Systems
4.7.14.3 Save Case - TME - Parameter List
Figure 44TM Extraction Parameter List
Description
This List is located at the top of the Save Case - TM Extraction (TME) Window. It shows all
the Save Case TM Parameters and their current filter characteristics.
You may select single parameters or ranges of parameters for filtering as indicated in Figure
44. For a description of the SPEVAL List selection mechanisms, see section 4.5 on page 62. It
should be noted that applying invalid filter characteristics to a particular parameter (e.g. applying Status Filters to a numerical Parameter) will have no effect.
The Parameters displayed in the list reflect unique Parameters defined in the Proforma displayed in the Save Case - TME - Proforma ID field. You can override the standard Save Case
Proforma (displayed in the Proforma ID field when the TM Extraction Window is activated)
with a new proforma name, then applying the Load Proforma or Update from Proforma Buttons. In this case, the List will be updated, showing the new Parameters.
Note that the filter characteristics in the list displays the filters previously applied to the Parameters, not necessary the current filter settings.
Note also that the Parameter List displays unique Parameters. E.g. if a Parameter is specified
twice in the Proforma (with different layout), if will only appear once on the Parameter List.
The List header consists of the following items:
S/C
This is the spacecraft which the Parameter belongs to.
C
The column displays whether the Parameter is calibrated (C) or Uncalibrated
(blank).
ID
This column gives the Parameter name.
Description
This column displays the Parameter description.
Type
This column displays the SPEVAL type of the Parameter. The possible Parameters
types are:
Save Case - TM Extraction (TME)
131
SPEVAL
Cray
Software User Manual
Systems
• status. The Parameter is a Status Parameter. For these Parameters
• numeric. The Parameter either an Analogue Parameter or an Integer Parameter.
• ascii. The Parameter is a Text Parameter.
Time Filter
This column displays the Time filters which have been applied to the Parameter
(For how to define time filters, see section 4.7.14.4 on page 130). The Parameters
may be retrieved according to n’th samples or Delta Time as follows:
Delta Time
every <Year & Day Delta>, where the syntax is as described in section
4.2 on page 52. A Parameter value is only retrieved if the time offset from the previous retrieved value is greater or equal to <Day & Year Delta>. The first parameter value is always retrieved. E.g. if the first parameter value for a specific day
occurs at time 9.00, then at 9.05, 9.10, 9.20 and 9.30, and you specify a Delta Time
of 7 minutes, you will get the values for the times 9.00, 9.10, 9.20 and 9.30. The
parameter value for 9.05 is not retrieved because its offset from the previous
retrieved value (5 minutes) is less than <Day & Year Delta>.
N’th Sample
every <n> samples, where <n> is the n’th sample to retrieve. E.g. if you
specify 2 in this field, all the odd (1,3,5 etc.) occurrences of the Parameter will be
retrieved.
Data Filter
This column specifies all the possible data filters currently applied to the Parameter. The default is taken from the Proforma definitions. Each filter code is described
in Table 12:
Table 12: Data filter codes
Code
Meaning
BTQ
(All Parameters). Filter out Bad Time Quality Parameters.
BTQ Parameters are found by analysing the SCOS Packet
header.
BDQ
(All Parameters). Filter out Bad Data Quality Parameters.
BDQ Parameters are found by analysing the SCOS Packet
header.
ID
(All Parameters). Filter out Invalid Parameter data.
Immediately Before Status
Change.
(Status Parameters). Only retrieve the values immediately
before a Status Change (e.g if ON goes to OFF, retrieve ON)
Immediately after Status
Change.
(Status Parameters). Only retrieve the values immediately
after a Status Change (e.g if ON goes to OFF, retrieve OFF)
Immediately Before & After
Status change.
(Status Parameters). Only retrieve the values before and after
a status change. (e.g. if ON goes to OFF, retrieve ON and
OFF).
Equal To Status <STATUS>
(Status Parameters). Only retrieve the values which status is
equal to <STATUS> E.g. if <STATUS> is ON, return ON.
Note that you may only specify one status text string in this
field. It is for instance NOT possible to retrieve both the ON
and OFF value by entering e.g. “ON,OFF”.
Save Case - TM Extraction (TME)
132
SPEVAL
Cray
Software User Manual
Systems
Table 12: Data filter codes
Code
Meaning
Limits: <limits>
(Numerical Parameters). The <limits> text string consists of
the 3 letters entries below.
HHB
Retrieve values before a Hard High Limit crossing.
HHA
Retrieve values after Hard High Limit crossing.
SHB
Retrieve values before a Soft High Limit crossing.
SHA
Retrieve values after a Soft High Limit crossing.
SLB
Retrieve values before a Soft Low Limit crossing.
SLA
Retrieve values after a Soft Low Limit crossing.
SHB
Retrieve values before a Soft High Limit crossing.
SHA
Retrieve values after a Soft High Limit crossing.
statistics from data points
(Numerical parameters). For these Parameters, generate
SPEVAL Statistics Data. The data can be displayed in the
Statistics Window.
Cautions and Warnings
None.
Syntax
The syntax of the fields have been defined in the Description.
Examples
Figure 44 on page 127 shows the filter specifications for a set of numerical parameters.
Possible Errors
None.
Cross Reference
Item
4.7.14.4 Save Case - TME - Time Filters page 130
4.7.14.5 Save Case - TME - Data Filters (all) page 132
4.7.14.6 Save Case - TME - Data Filters (status) page 134
4.7.14.7 Save Case - TME - Data Filters (analogue) page 136
4.7.14.10 Save Case - TME - Load Proforma page 142
4.7.14.11 Save Case - TME - Update from Proforma page 143
Save Case - TM Extraction (TME)
133
SPEVAL
Cray
Software User Manual
Systems
Item
4.5 Row Selection Modes page 62
Save Case - TM Extraction (TME)
134
SPEVAL
Cray
Software User Manual
Systems
4.7.14.4 Save Case - TME - Time Filters
Apply
Filter On/Off
Filter Types
Figure 45TM Extraction - Time Filters Form
Description
This Form is located below the Parameter List in the Save Case - TM Extraction (TME) Window. It allows you to specify various time filters applied when SPEVAL is retrieving the Save
Case TM data. The default state of this form is “No Filter”, i.e. that all the Parameter values are
retrieved.
By selecting Parameters in the Save Case - TME - Parameter List , then pressing the Apply
Button, all the selected Parameters will be updated to reflect the current filter definitions.
The following items are defined in this window:
Apply Button
Pressing this Button applies the current time filter specifications to the selected
Parameters in the Parameter List. If “No Filter” has been specified, all the filters
will be cleared.
No Filter
This exclusive Radio Button specifies that no filter should be applied to the
selected Parameters. When this state is chosen, the other fields in the form will be
insensitive
Filter to Retrieve One Value
This exclusive Radio Button specifies that time filters should be applied to the
Parameters, namely “every delta time” or “every sample”
Every Delta Time
This exclusive Radio Button specifies that the data should be retrieved every
<Day & Year Delta>, where the <Day & Year Delta> syntax is as described
in section 4.2 on page 52. A Parameter value is only retrieved if the time offset
from the previous retrieved value is greater or equal to <Day & Year Delta>. The
first parameter value is always retrieved. E.g. if the first parameter value for a specific day occurs at time 9.00, then at 9.05, 9.10, 9.20 and 9.30, and you specify a
Delta Time of 7 minutes, you will get the values for the times 9.00, 9.10, 9.20 and
9.30. The parameter value for 9.05 is not retrieved because its offset from the previous retrieved value (5 minutes) is less than <Day & Year Delta>.
Every N Samples
This exclusive radio Button specifies that the data should be retrieved as every n’th
Save Case - TM Extraction (TME)
135
SPEVAL
Cray
Software User Manual
Systems
sample. E.g. if you specify 2 in this field, all the selected parameters will have the
1st, 3rd, 5th etc. sample retrieved.
Cautions and Warnings
None.
Syntax
Not Applicable.
Examples
Figure 45 on page 130 shows a Time Filter definitions which will retrieve TM Parameter Values every 44 hours (1 day, 20 hours).
Possible Errors
None.
Cross Reference
Item
4.7.14.3 Save Case - TME - Parameter List page 127
Save Case - TM Extraction (TME)
136
SPEVAL
Cray
Software User Manual
Systems
4.7.14.5 Save Case - TME - Data Filters (all)
Apply
Filter On/Off
RTQ
BDQ
ID
Figure 46TM Extraction - Data Filters (all)
Description
This Form is located in the Save Case - TM Extraction (TME) form. It allows you to specify
various filters for all TM Parameters, applied when SPEVAL is retrieving the Save Case TM
data. By selecting Parameters in the Save Case - TME - Parameter List , then pressing the
Apply Button, all the selected Parameters will be updated to reflect the current filter definitions.
The default state of this form is “No Filter”. Note however, that fresh Parameters often will
have been set to filter out the ID (Invalid Data) records. This depends on the
MODE_DEPENDENCY qualifier in the TM Proforma. In order to override this filter, you
must explicitly select the Parameters, specifying “No Filter” and applying the current filter definitions.
The following items are defined in this window:
Apply Button
Pressing this Button applies the current time filter specifications to the selected
Parameters in the Parameter List. If “No Filter” has been specified, all the filters
will be cleared.
No Filter
This exclusive Radio Button specifies that no filter should be applied to the
selected Parameters. When this state is chosen, the other fields in the form will be
insensitive
Filter Out
This exclusive Radio Button specifies that the TM filter should be applied to the
Parameters, namely one or several of the RTQ, BDQ and ID options
BTQ
This Radio Button specifies that Bad Time Quality Parameter values should be filtered out during the retrieval. The definition of Bad Time Quality Parameter values
is mission specific.
BDQ
This Radio Button specifies that Bad Data Quality Parameter values should be filtered out during the retrieval. The definition of Bad Data Quality Parameter values
is mission specific.
Save Case - TM Extraction (TME)
137
SPEVAL
Cray
Software User Manual
Systems
ID
This Radio Button specifies that Invalid Parameter values should be filtered out
during the retrieval. The definition of Invalid Parameters is mission specific.
Cautions and Warnings
None.
Syntax
Not Applicable.
Examples
Figure 46 on page 132 shows a TM Filter definitions which filter out all TM Parameter Values
classified as “Invalid Data”.
Possible Errors
None.
Cross Reference
Item
4.7.14.3 Save Case - TME - Parameter List page 127
4.1.1 COMPILE page 41
Save Case - TM Extraction (TME)
138
SPEVAL
Cray
Software User Manual
Systems
4.7.14.6 Save Case - TME - Data Filters (status)
Apply
Filter On/Off
Figure 47TM Extraction - Data Filters (status)
Description
This Form is located in the Save Case - TM Extraction (TME) form. It allows you to specify
various filters for all TM Status Parameters, applied when SPEVAL is retrieving the Save Case
TM data. By selecting Parameters in the Save Case - TME - Parameter List , then pressing the
Apply Button, all the selected Status Parameters will be updated to reflect the current filter definitions. Parameters different from Status will remain unchanged when this filter is applied.
The default state of the form is “No Filter”, i.e. no Parameters are filtered out.
The following items are defined:
Apply Button
Pressing this Button applies the current status filter specifications to the selected
Status Parameters in the Parameter List. If “No Filter” has been specified, all the
status filters will be cleared.
No Filter
This exclusive Radio Button specifies that no filter should be applied to the
selected Status Parameters. When this state is chosen, the other fields in the form
will be insensitive
Filter to Retrieve Values
This exclusive Radio Button specifies that the Status filter should be applied to the
Parameters, namely the options below:
Immediately Before Status
Immediately After Status
These Radio Buttons specify that only the Parameters values should be retrieved
before or after a Status Change.
Equal to Status
This Exclusive Radio Button only retrieves the values which status is equal to the
specified Status String. E.g. if the status is ON, only retrieve the values which are
ON. Note that you may only specify one status text string in this field. It is for
instance NOT possible to retrieve both the ON and OFF value by entering e.g.
“ON,OFF”.
Cautions and Warnings
None.
Save Case - TM Extraction (TME)
139
SPEVAL
Cray
Software User Manual
Systems
Syntax
Not Applicable.
Examples
Figure 47 on page 134 shows a TM Status Filter definitions which only includes the Status
Parameter Values immediately before and after a status change.
Possible Errors
None.
Cross Reference
Item
4.7.14.3 Save Case - TME - Parameter List page 127
Save Case - TM Extraction (TME)
140
SPEVAL
Cray
Software User Manual
Systems
4.7.14.7 Save Case - TME - Data Filters (analogue)
Apply
Filter On/Off
Figure 48TM Extraction - Data Filters (analogue)
Description
This Form is located in the Save Case - TM Extraction (TME) Window. It allows you to specify various filters for all TM Analogue and Numerical Parameters, applied when SPEVAL is
retrieving the Save Case TM data. By selecting Parameters in the Save Case - TME - Parameter List , then pressing the Apply Button, all the selected numeric Parameters will be updated to
reflect the current filter definitions. Parameters different from numeric will remain unchanged
when this filter is applied. The default state of the form is “No Filter”, i.e. no Parameters are
filtered out.
If the filter is applied, it allows you to define two mutual exclusive options:
• Limit Crossing filters. These filters specify retrieval of Parameters dependent on when they
crossed the predefined Limits.
• Others (The Following Statistics). These filters currently only allows you to specify that the
Parameters should be prepared for the SPEVAL Statistics as explained below.
As well as the two options being mutually exclusive, you are not allowed to combine the
Numerical Filters with all other Filter types. Figure 43 on page 122 displays the SPEVAL filters data flow diagram, indicating the allowed states.
NOTE: If you specify (and apply) the “Limit crossing filters”, but have specified “None” in all
the 4 Option Menus, no data will be retrieved for the filtered Parameters. However, the Save
Case - TME - Parameter List will not indicate that no data is retrieved. In this case, the Message Area will display the warning message referenced in the Error Section.
The following items are defined:
Apply Button
Pressing this Button applies the current numerical filter specifications to the
selected Numerical Parameters in the Parameter List. If “No Filter” has been specified, all the numerical filters will be cleared.
Save Case - TM Extraction (TME)
141
SPEVAL
Cray
Software User Manual
Systems
No Filter
This exclusive Radio Button specifies that no filter should be applied to the
selected Numerical Parameters. When this state is chosen, the other fields in the
form will be insensitive
Filter to Retrieve
This exclusive Radio Button specifies that the numeric filters should be applied to
the Parameters, namely the options below:
Values with Respect to Limit Crossings
This Radio Buttons specify that the Parameter Values should be filtered according
to the 4 Limit Crossing Option Menus. Each menu is independent and gives you
the choice to retrieve values before, after (or both before and after) the Parameter
values have crossed the corresponding Limit. NOTE: If “None” is specified, no
values will be retrieved for the corresponding Limit crossing.
(HH) Hard High
If this Option Menu is set different from “None”, SPEVAL will retrieve Parameter
Values crossing the Hard High Limits.
(HL) Hard Low
If this Option Menu is set different from “None”, SPEVAL will retrieve Parameter
Values crossing the Hard Low Limits.
(SH) Soft High
If this Option Menu is set different from “None”, SPEVAL will retrieve Parameter
Values crossing the Soft High Limits.
(HL) Soft Low
If this Option Menu is set different from “None”, SPEVAL will retrieve Parameter
Values crossing the Soft Low Limits.
The Following
This Exclusive Radio Button effectively disregards the filter specifications in the
Limit Crossing Option Menus. Instead, you can prepare the data in different ways
setting the Option Menu to the right of the Button as follows:
Statistics from data Points
If this filter is chosen, SPEVAL will generate statistics (e.g. maximum and minimum values) for the selected parameters. This data may be displayed in the Statistics Window .
All already calculated Statistics
This option is only selectable if the Save Case - Data - Data Streams is “User Data
Set” or “Summary”. In this case, all the already calculated statistics (stored in the
Summary or in the UDS file) will be retrieved. (See also below).
Merge of All already calculated Statistics
This option is only selectable if the Save Case - Data - Data Streams is “User Data
Set” or “Summary”. In this case, all the already calculated merged statistics (stored
in the Summary or in the UDS file) will be retrieved. (See also below).
Note: Retrieval from a UDS file specifying the All already calculated Statistics or Merge of All
Already Calculated Statistics might give some unexpected results. The reason is that the “Statistics ” records (one per time window/parameter) are stored in the UDS file using the time key
of the Statistics Start period. (See Examples).
Cautions and Warnings
If you specify (and apply) the “Limit crossing filters”, but have specified “None” in all the 4
Save Case - TM Extraction (TME)
142
SPEVAL
Cray
Software User Manual
Systems
Option Menus, no data will be retrieved for the filtered Parameter. In this case, the Message
Area will display a Warning message.
Syntax
Not Applicable.
Examples
Example 1
Figure 49 illustrates the unexpected side-effects which may occur when retrieving All already
calculated Statistics or Merge of All Already Calculated Statistics from a UDS file. Initially a
retrieval of Statistics using 3 time windows are successfully stored in a UDS file. The actual
time stamp of each record is equal to the corresponding window start time. Retrieval 1 and
Retrieval 2 specifies the UDS file as the data source, and All already calculated Statistics or
Merge of All Already Calculated Statistics as the data filter type. Retrieval 1 returns all the
records since the retrieval time-span covers all the UDS record time-stamps. Retrieval 2 returns
“No data found”, since the time-span specified do not cover any of UDS time-stamps.
Time period 1
Time period 2
Time period 3
Retrieval of Statistics into
UDS file.
Time stamps of Statistics
records in UDS File.
Retrieval from UDS of Merge or All Already Calculated Statistics
Retrieval 1: All records
found.
Retrieval 2: No records
found
Figure 49Example of All already calculated Statistics or Merge of All Already Calculated Statistics
Example 2
Figure 48 on page 136 shows a TM numerical Filter definitions which specifies the retrieval of
Limit-crossing Parameters according to the following criteria:
• No reports are given for Parameters crossing the HH (Hard High) Limit
• For the other limits, the Parameter Value immediately before and after the Limit Crossing
will be retrieved.
Possible Errors
Error Message
Limit Crossings of None-None-None-None
would result in no data retrieved
Meaning
(Warning) A Limit Filter has been applied, but all the
Limit Crossing Option Menus have been set to “None”.
This implies that no data will be retrieved for the filtered
Parameters!.
Save Case - TM Extraction (TME)
143
SPEVAL
Cray
Software User Manual
Systems
Cross Reference
Item
4.7.14.3 Save Case - TME - Parameter List page 127
4.9.2 Statistics Window page 168
Save Case - TM Extraction (TME)
144
SPEVAL
Cray
Software User Manual
Systems
4.7.14.8 Save Case - TME - OK
Description
This Push Button is located in the bottom of the Save Case - TM Extraction (TME) window. It
updates the Save Case definitions with any Proforma you have loaded and all filter definitions
applied to the TM Parameters. The Proforma ID and Type will overwrite the definitions in the
Save Case - Simple Extraction Processing (SEP) form. The Window disappears after the Button has been pressed. The definitions will however not be saved to file. In order to save them
permanently, you must use the Save Case - Save Button.
Note that if you have specified an alternative Proforma Id in the Save Case - TME - Proforma
ID field, the Proforma definitions will only be saved in the Save Case if you successfully have
applied the Proforma definitions (using the Load Proforma or Update from Proforma Buttons).
The same strategy applies for the filter specifications. You must have applied any new filter
definitions in order to make them permanent visible in the Save Case Definition.
Cautions and Warnings
None.
Syntax
Not Applicable.
Examples
Not Applicable.
Possible Errors
None
Cross Reference
Item
4.7.14.9 Save Case - TME - Commit page 141
4.7.14.1 Save Case - TME - Proforma ID page 124
4.7.14.2 Save Case - TME - Proforma Type page 126
4.7.11 Save Case - Simple Extraction Processing (SEP) page 106
4.7.14.10 Save Case - TME - Load Proforma page 142
4.7.14.11 Save Case - TME - Update from Proforma page 143
Save Case - TM Extraction (TME)
145
SPEVAL
Cray
Software User Manual
Systems
4.7.14.9 Save Case - TME - Commit
Description
This Push Button has the same functionality as the Save Case - TME - OK Button. The only
difference is that the Save Case - TM Extraction (TME) Window remains visible after a Button
press.
Cautions and Warnings
Same as for Save Case - TME - OK .
Syntax
Not Applicable.
Examples
Same as for Save Case - TME - OK .
Possible Errors
Same as for Save Case - TME - OK .
Cross Reference
Item
4.7.14.8 Save Case - TME - OK page 140
Save Case - TM Extraction (TME)
146
SPEVAL
Cray
Software User Manual
Systems
4.7.14.10 Save Case - TME - Load Proforma
Description
This Push Button allows you to load the Parameter Definitions from an alternative TM Proforma (Graphical or Alphanumeric) into the Save Case - TM Extraction (TME) Window. The
TME Proforma ID and Proforma Type are used to construct the file name of the Proforma to
import.
The Save Case - TME - Parameter List will be updated to display all the Parameters in the
Proforma with the default filters applied. No permanent changes will be done to the Save Case
when this Button is pressed. In order to make the changes permanent, use the Save Case TME - OK or Save Case - TME - Commit Buttons.
Note that an alternative to this Button is the Save Case - TME - Update from Proforma Button.
The “Update” Button maintains the filter definitions for any Parameters in the current (old) list
which also are found in the imported (new) Proforma.
Cautions and Warnings
None.
Syntax
Not Applicable.
Examples
Not Applicable.
Possible Errors
See Save Case - TME - Proforma ID for Proforma error messages.
Cross Reference
Item
4.7.14.11 Save Case - TME - Update from Proforma page 143
4.7.14.1 Save Case - TME - Proforma ID page 124
4.7.14.2 Save Case - TME - Proforma Type page 126
4.7.14.3 Save Case - TME - Parameter List page 127
4.7.14.8 Save Case - TME - OK page 140
4.7.14.9 Save Case - TME - Commit page 141
Save Case - Time Options
147
SPEVAL
Cray
Software User Manual
Systems
4.7.14.11 Save Case - TME - Update from Proforma
Description
This Push Button allows you to load the Parameter Definitions from an alternative TM Proforma (Graphical or Alphanumeric) into the Save Case - TM Extraction (TME) Window, without clearing any filters you may already have set up on parameters that exist in the new
proforma. The TME Proforma ID and Proforma Type are used to construct the file name of the
Proforma to import.
Use this button to reload a proforma you have updated and recompiled, so that the new version
is used next time you submit this save case.
The Save Case - TME - Parameter List will be updated to display all the Parameters in the
Proforma as follows:
• If a Parameter in the Proforma is found in the (old) Parameter List, the Parameter’s filter
definitions remain unchanged.
• If a Parameter in the Proforma is not found in the Parameter List, the Parameter will be initialised with the default filter definitions and highlighted in blue. You can hence directly
apply the current filter definitions to the new Parameters without having to explicitly select
them.
No permanent changes will be done to the Save Case when this Button is pressed. In order to
make the changes permanent, use the Save Case - TME - OK or Save Case - TME - Commit
Buttons.
Note that an alternative to this Button is the Save Case - TME - Load Proforma Button. The
“Load” Button imports a Proforma, resetting all filters to their default.
Cautions and Warnings
None.
Syntax
Not Applicable.
Examples
Not Applicable.
Possible Errors
See Save Case - TME - Proforma ID for Proforma error messages.
Cross Reference
Item
4.7.14.10 Save Case - TME - Load Proforma page 142
4.7.14.1 Save Case - TME - Proforma ID page 124
4.7.14.2 Save Case - TME - Proforma Type page 126
4.7.14.3 Save Case - TME - Parameter List page 127
4.7.14.8 Save Case - TME - OK page 140
Save Case - Time Options
148
SPEVAL
Cray
Software User Manual
Systems
Item
4.7.14.9 Save Case - TME - Commit page 141
Save Case - Time Options
149
SPEVAL
Cray
Software User Manual
Systems
4.7.14.12 Save Case - TME - Cancel
Description
This Push Button cancels the Save Case - TM Extraction (TME) Window and removes it from
the screen. All changes since the last OK or Commit will be disregarded.
Cautions and Warnings
None.
Syntax
Not Applicable.
Examples
Not Applicable.
Possible Errors
None.
Cross Reference
Item
4.7.14 Save Case - TM Extraction (TME) page 121
4.7.14.8 Save Case - TME - OK page 140
4.7.14.9 Save Case - TME - Commit page 141
Save Case - Time Options
150
SPEVAL
Cray
Software User Manual
Systems
4.7.15 Save Case - Time Options (TO) Window
Retrieval Window Type
OK
Commit
Load
Validate
Default Time Format
Default
Cancel
Figure 50Time Options Window (showing repeated time windows)
Description
This Window is activated by pressing the Save Case - Time Options Button in the Save Case
Definer window. The Window offers a wide range of retrieval time-window options.
The time window options are the following:
• One Time Window. This option is functionally identical to the Save Case - Simple Time
form.The option is described on page 154.
• Repeated Time Windows. This options allows you to specify a repeated set of time windows
for the retrieval. You may e.g. specify that the data should be retrieved only between 9 and
10 for a period of one month. The option is described in detail on page 155.
• Irregular Time Windows. This options allows you to specify up to 30 time windows for the
retrieval. Each time window specifies the start time and end time for one retrieval period.
The option is described in detail on page 157.
An OK Button, allowing you to save and close the Window contents. The time definitions will
however not be saved to file. In order to save them permanently, you must use the Save Case Save Button. The button is described on page 148.
• A Load Button. Pressing this button has no effect !.
• A Commit Button, allowing you to save the Window contents to the Save Case without closing the Window. The button is described on page 149.
• A Validate Button, validating the current contents of the Time Options Window. The button
Save Case - Time Options
151
SPEVAL
Cray
Software User Manual
Systems
is described on page 152.
• A Default Button, allowing you to reset the Window Contents to the default values. The button is described on page 151.
• A Cancel Button, allowing you to quit the Window, disregarding any uncommitted changes.
The button is described on page 153.
Cautions and Warnings
None.
Syntax
Not Applicable at this level.
Examples
See the relevant sub-sections.
Possible Errors
None.
Cross Reference
Item
4.7.2 Save Case - Time Options Button page 78
4.7.15.1 Save Case - TO - Retrieval Window Type page 147
4.7.15.2 Save Case - TO- OK page 148
4.7.15.3 Save Case - TO - Commit page 149
4.7.15.5 Save Case - TO - Default page 151
4.7.15.6 Save Case - TO - Validate page 152
4.7.15.7 Save Case - TO - Cancel page 153
4.7.15.8 Save Case - TO - One Time Window page 154
4.7.15.9 Save Case - TO - Repeated Time Windows page 155
4.7.15.10 Save Case - TO - Irregular Time Windows page 157
Save Case - Time Options
152
SPEVAL
Cray
Software User Manual
Systems
4.7.15.1 Save Case - TO - Retrieval Window Type
Description
This Option Menu is located in the left of the Save Case - Time Options (TO) Window . It
determines the type of time windows used for the retrieval as the following three options:
• One Time Window. This option is functionally identical to the Save Case - Simple Time
form described on page 108.
• Repeated Time Windows. This options allows you to specify a repeated set of time windows
for the retrieval. You may e.g. specify that the data should be retrieved only between 9 and
10 for a period of one month. The option is described in detail on page 155.
• Irregular Time Windows. This options allows you to specify up to 30 time windows for the
retrieval. Each time window specifies the start time and end time for one retrieval period.
The option is described in detail on page 157.
Cautions and Warnings
None.
Syntax
Not Applicable.
Examples
Not Applicable.
Possible Errors
None.
Cross Reference
Item
4.7.12 Save Case - Simple Time page 108
4.7.15.8 Save Case - TO - One Time Window page 154
4.7.15.9 Save Case - TO - Repeated Time Windows page 155
4.7.15.10 Save Case - TO - Irregular Time Windows page 157
Save Case - Time Options
153
SPEVAL
Cray
Software User Manual
Systems
4.7.15.2 Save Case - TO- OK
Description
This Push Button is located in the bottom of the Save Case - Time Options (TO) Window . It
updates the Save Case definitions with any time window specification you have specified. The
time specifications will override the definitions in the Save Case - Simple Time form. The definitions will however not be saved to file. In order to save them permanently, you must use the
Save Case - Save Button.
The Window disappears after the Button has been pressed. An alternative is to use the Save
Case - TO - Commit Button which leaves the window.
Cautions and Warnings
No validation checking is performed when pressing this Button. Use the Save Case - TO - Validate Button first.
Syntax
Not Applicable.
Examples
Not Applicable.
Possible Errors
None. Window contents are not validated!
Cross Reference
Item
4.7.15 Save Case - Time Options (TO) Window page 145
4.7.15.3 Save Case - TO - Commit page 149
4.7.15.6 Save Case - TO - Validate page 152
Save Case - Time Options
154
SPEVAL
Cray
Software User Manual
Systems
4.7.15.3 Save Case - TO - Commit
Description
This Push Button has the same functionality as the Save Case - TO- OK Button. The only difference is that the Save Case - Time Options (TO) Window remains visible after a Button
press.
Cautions and Warnings
Same as for Save Case - TO- OK .
Syntax
Not Applicable.
Examples
Same as for Save Case - TO- OK .
Possible Errors
Same as for Save Case - TO- OK .
Cross Reference
Item
4.7.15.2 Save Case - TO- OK page 148
Save Case - Time Options
155
SPEVAL
Cray
Software User Manual
Systems
4.7.15.4 Save Case - TO - Load
THIS BUTTON IS NOT SUPPORTED !
Save Case - Time Options
156
SPEVAL
Cray
Software User Manual
Systems
4.7.15.5 Save Case - TO - Default
Description
This Push Button resets all the fields in the Save Case - Time Options (TO) Window to default
(empty) values. All the time specification fields will be cleared, and the Save Case - TO Retrieval Window Type is set to the “One Time Window” option. Note also that the contents of
the Save Case - Simple Time window in the main Save Case will be cleared.
Cautions and Warnings
Pressing this button will cancel all changes since a last “Commit” or “OK”.
Syntax
Not Applicable.
Examples
Not Applicable.
Possible Errors
None.
Cross Reference
Item
4.7.15 Save Case - Time Options (TO) Window page 145
4.7.15.3 Save Case - TO - Commit page 149
4.7.15.2 Save Case - TO- OK page 148
4.7.15.1 Save Case - TO - Retrieval Window Type page 147
Save Case - Time Options
157
SPEVAL
Cray
Software User Manual
Systems
4.7.15.6 Save Case - TO - Validate
Description
This Push Button validates the current contents of the Save Case - Time Options (TO) Window
but does not save the contents. If the Validation succeeds, the Message Area Window displays
the message “Time Validation completed - No errors found”, otherwise a failure message is
logged.
Cautions and Warnings
None.
Syntax
Not Applicable.
Examples
Not Applicable.
Possible Errors
For possible error messages, see the relevant section. E.g. if the Error Message is preceded by
“Save Case - Time - Repeated Time Windows”, see section 4.7.15.9 Save Case - TO Repeated Time Windows page 155.
Cross Reference
Item
4.7.15 Save Case - Time Options (TO) Window page 145
4.7.15.2 Save Case - TO- OK page 148
4.7.15.8 Save Case - TO - One Time Window page 154
4.7.15.9 Save Case - TO - Repeated Time Windows page 155
4.7.15.10 Save Case - TO - Irregular Time Windows page 157
4.2 Time Specification Fields page 52
Save Case - Time Options
158
SPEVAL
Cray
Software User Manual
Systems
4.7.15.7 Save Case - TO - Cancel
Description
This Push Button cancels the Save Case - Time Options (TO) Window and removes it from the
screen. All changes since the last OK or Commit will be disregarded.
Cautions and Warnings
None.
Syntax
Not Applicable.
Examples
Not Applicable.
Possible Errors
None.
Cross Reference
Item
4.7.15 Save Case - Time Options (TO) Window page 145
4.7.15.2 Save Case - TO- OK page 148
4.7.15.3 Save Case - TO - Commit page 149
Save Case - Time Options
159
SPEVAL
Cray
Software User Manual
Systems
4.7.15.8 Save Case - TO - One Time Window
Start Time
End Time
Figure 51Save Case - TO - One Time Window configuration
Description
This configuration applies when the Save Case - TO - Retrieval Window Type is set to “One
Time Window”. The “Start Time” and “End Time” fields are identical to that described in the
Save Case - Simple Time form described on page 78.
Cautions and Warnings
Same as for Save Case - Simple Time .
Syntax
Same as for Save Case - Simple Time .
Examples
See Save Case - Simple Time .
Possible Errors
Same as for Save Case - Simple Time .
Cross Reference
Item
4.7.12 Save Case - Simple Time page 108
4.7.15 Save Case - Time Options (TO) Window page 145
Save Case - Time Options
160
SPEVAL
Cray
Software User Manual
Systems
4.7.15.9 Save Case - TO - Repeated Time Windows
Overall Start Time
Overall End Time
Window Length
Repeat Period
Figure 52Save Case - TO - Repeated Time Windows configuration
Description
This configuration applies when the Save Case - TO - Retrieval Window Type is set to
“Repeated Time Windows”. The window allows you to specify an indefinite number of
repeated time windows for the retrieval. If you e.g. only are interested in retrieving data for a
specific hour on a daily basis, this is the Time Window configuration to use.
The configuration consists of the following items:
Overall Start Time
Time Specification Field specifying the overall start time for the retrieval. The time
specification must always be given as absolute time.
Overall End Time
Time Specification Field specifying the overall end time for the retrieval. The time
specification may be given as absolute time or delta time (relating to the Overall
Start Time).
Window Length
Time Specification Field specifying the size of the actual retrieval window. The
time specification must be given as delta time.
Repeat Period
Time Specification Field specifying the time between the start of two consecutive
time windows. The time specification must be given as delta time.
Cautions and Warnings
Time Windows and Statistics processing
Specifying repeated time windows for statistics processing will generate one statistics for each parameter per Time Window. If you e.g. have a Proforma with 10
parameter and specify 5 time windows, the Statistics Window will display 50 lines
of statistics records.
Save Case - Time Options
161
SPEVAL
Cray
Software User Manual
Systems
Syntax
The syntax of the fields is the same as described in “Time Specification Fields” on page 52
with the following additions:
• The “Repeat Period” must be equal to or greater than the “Window Length”.
Examples
Overall Start Time:
Overall End Time:
Window Length:
Repeat Period:
1995-110 22.00.00.00
1 00.00.00.00 /D
0 00.10.00.00 /D
0 01.00.00.00 /D
This example specifies that the data should be retrieved 24 hours, starting from day 110, 22.00.
The data will be retrieved 10 minutes every hour as follows: 22.00 - 22.10, 23.00 - 23.10, 00.00
- 00.10, 01.00 - 01.10 ...., ...., 21.00 - 21.10. I.e. 24 time windows have been specified.
Overall Start Time:
Overall End Time:
Window Length:
Repeat Period:
1995-110 22.00.00.00
1 00.00.00.00 /D
0 01.00.00.00 /D
0 01.00.00.00 /D
This example specifies that the data should be retrieved 24 hours, starting from day 110, 22.00.
Since the “Window Length” is equal to the “Repeat Period”, all the data for the 24 hours will
be retrieved. I.e. it would probably be easier to specify the retrieval from the Save Case - TO One Time Window configuration.
Possible Errors
See “Time Specification Fields” on page 52. In addition, the following error messages may be
generated from this configuration:
Error Message
Meaning
“Repeat Period” is less than “Window
Length”
You have specified a repeat period which is less than the
window length. This would imply overlapping time windows, not supported by SPEVAL.
Cross Reference
Item
4.7.12 Save Case - Simple Time page 108
4.7.15 Save Case - Time Options (TO) Window page 145
Save Case - Time Options
162
SPEVAL
Cray
Software User Manual
Systems
4.7.15.10 Save Case - TO - Irregular Time Windows
Entry Formats
Time Rows
Figure 53Save Case - TO - Irregular Time Windows configuration
Description
This configuration applies when the Save Case - TO - Retrieval Window Type is set to “Irregular Time Windows”. The window allows you to specify up to 30 irregular time windows for the
retrieval. You can inserting and removing entries by choosing options from the “Window n”
Option Menu as explained below.
When validating an Irregular Time Window specification, SPEVAL scans each Time Row window starting from Window 1. Empty Time Rows are only allowed if all Time Rows after the
first empty one also are empty.
The following items exists for this configuration:
Entry Formats
These items consist of a “Start” and an “End” Option Menu, allowing you to toggle
the Time Formats for all the Start and End Time Window specifications in the time
Rows. Currently, only the “Year and Day” option is selectable.
Time Rows
Each Time Row specify an irregular retrieval window. Blank Time Rows are not
interpreted. Each Row consist of the “Window n”, “Start” and “End” fields.
Window n
Each Time Row is labelled by a “Window n” option menu, identifying the Time
Window row as reference in error messages. The Option Menu contains the following choices:
Default
Clears the Window “Start” and “End” times to empty fields
Insert
Inserts a new Time Row above the current one. The “Window n” labels
are updated to reflect the new order. Note that this option cannot be
Save Case - Time Options
163
SPEVAL
Cray
Software User Manual
Systems
used to “cut and paste” Time Rows.
Remove
Deletes the current Time Row. The “Window n” labels are updated.
Note that this option cannot be used to “cut and paste” Time Rows.
Start
Each Time Row has a “Start” Time Specification Field, specifying the retrieval
window start time. The time must always be entered as “absolute”.
End
Each Time Row has a “End” Time Specification Field, specifying the retrieval window end time. The time may be entered as “absolute” or “delta”.
Cautions and Warnings
Time Windows and Statistics processing
Specifying irregular time windows for statistics processing will generate one statistics for each parameter per Time Window. If you e.g. have a Proforma with 10
parameter and specify 5 time windows, the Statistics Window will display 50 lines
of statistics records.
Syntax
The syntax of the fields is the same as described in “Time Specification Fields” on page 52
with the following additions:
• Overlapping Time Windows are not allowed. I.e. the end of one time window must be less
than the start of the next one.
• An empty Time Row is only allowed if all the Time Rows below it are empty.
Examples
Window
Window
Window
Window
1
1
2
2
Start: 1995-110
End:
1
Start: 1995-120
End:
0
22.00.00.00
00.00.00.00 /D
00.00.00.00
01.00.00.00 /D
This example specifies that the data should be retrieved in 2 irregular time windows. Time
Window 1 covers the range from day 110, 22.00 to day 111, 22.00 (24 hours). Time Window 2
covers the range from day 120, 00.00 to day 120, 01.00 (1 hour).
Possible Errors
See “Time Specification Fields” on page 52. In addition, the following error messages may be
generated from this configuration:
Error Message
Meaning
Overlaps next window start time - overlapping windows are not supported
An irregular time window overlaps the start of the next
window. In this case, the identification part of the message
identifies the actual Time Row.
Save Case - Time Options
164
SPEVAL
Cray
Software User Manual
Systems
Cross Reference
Item
4.7.12 Save Case - Simple Time page 108
4.7.15 Save Case - Time Options (TO) Window page 145
Save Case - Time Options
165
SPEVAL
Cray
Software User Manual
Systems
4.8
Key Accelerators in Alphanumeric Windows
Description
The Alphanumeric List and Alphanumeric Display windows contains Scrollbars to navigate
through the possible large display area. For the Alphanumeric List Window, you may do all
operations by moving the Scrollbars. For the Alphanumeric Display Window, you must use the
navigation keys as explained in the table below. Note that some display Windows (e.g. Cluster
Logs) is a combination of the two types of Windows.
Table 13: Alphanumeric Windows Key Accelerators
Key
Alphanumeric List
Alphanumeric Display
<key-left>
Moves the Window contents one
data column left.
No action.
SHIFT <key-left>
Moves the Window contents to
the far left data column.
No action.
<key-right>
Moves the Window contents one
data column right.
No action.
SHIFT <key-right>
Moves the Window contents to
the far right data column
No action.
<key-down>
Moves the Window contents one
time row down.
No action.
SHIFT <key-down>
Moves the Window contents to
the far bottom time row.
No action.
<key-up>
Moves the Window contents one
time row up.
No action.
SHIFT <key-up>
Moves the Window contents to
the far top time row
No action.
<next> (VAX)
<page_down> (PC)
No action.
Moves to the next packet contents
from the retrieval
SHIFT <next> (VAX)
SHIFT <page_down> (PC)
No action.
Moves to the last packet contents
from the retrieval
<prev> (VAX)
<page_up> (PC)
No action.
Moves to the previous packet contents from the retrieval
SHIFT <prev> (VAX)
SHIFT <page_up> (PC)
No action.
Moves to the first packet contents
from the retrieval
Cautions and Warnings
None.
Syntax
Not Applicable.
Examples
Not applicable.
Save Case - Time Options
166
SPEVAL
Cray
Software User Manual
Systems
Possible Errors
None.
Cross Reference
Item
4.9 Standard Alphanumeric List Windows page 162
4.10 Alphanumeric Display Window page 176
Save Case - Time Options
167
SPEVAL
Cray
Software User Manual
Systems
4.9
Standard Alphanumeric List Windows
Window Type
File Menu
Commands Menu
Time Info
Column Headers
Times
Data
Scrollbars
Figure 54Alphanumeric List Window (Statistics)
Description
The standard Alphanumeric List Windows offer a standardized display interface of data points
for a certain time-span. After a successful Save Case submission, one or more of the windows
will pop up on the screen, displaying the data you have requested for retrieval.
Currently, the types of windows belonging to this group are the following:
• The TM (Alphanumeric List) Window. This window is only displayed if you have specified
the Save Case Display Type as Alphanumeric List.
• The Statistics Display Window. This window is only displayed if you have specified the
Save Case Display Type as Stats.
• The OOL (Out-of-Limits) Display Window. This window is only displayed if you have specified the Save Case Data Type as Out of Limits.
• The Totals Display Window. This window is only displayed if you have specified the Save
Case Output to Totals From Data Points, All Already Calculated Totals, or Merge of All
Already Calculated Totals.
Each of the above window types are described in detail in the sub-sections.
The Standard Alphanumeric List Windows allows you to select any set of data for printing to
printer or file. For the different selection modes, see the Selecting Data section below.
The Window consists of the following fields as indicated in Figure 54 on page 162:
File Menu
This pull-down menu only contains the File | Exit Button. Selecting this button will
exit the current Window from the Display but does not influence other SPEVAL
Windows.
Standard Alphanumeric List Windows
168
SPEVAL
Cray
Software User Manual
Systems
Commands Menu
This pull-down menu contains two entries, the Jump To Time Button and the Output Button. The Jump To Time Button displays when pressed the Jump To Time
Dialog Window as described in section 4.3 on page 55. The Output Button displays a pull-right menu with the following items:
Print
This option specifies that the window contents or selected data are
printed on the default printer. The default printer queue name is displayed in the Message Window once a print request has been issued.
Text
This option specifies that the window contents or selected data are
written to an ASCII file. The file structure is paginated exactly as for
the Print option above and is suitable for printing.
Export
This option specifies that the window contents or selected data are
written to an ASCII file. The file structure is suitable for import into
spreadsheet packages (e.g. EXCEL) and is structured as follows:
•Line 1: the proforma ID, title, and display type
•Line 2: Start date and time of the dataset
•Line 3: End date and time of the dataset
•Line 4: Date and time that the file was produced
•Line 5, 6 and 7 contain column headers: the parameter description, ID, and units respectively
•Lines 8 to the end contain the time and data fields, delimited by semicolons, aligned under
the column headers. If there is no data for an individual parameter for a specific time, the
field between the semicolon delimiters is filled with blanks; the delimiters are still present.
Window Type
The Window Type is visible in the Window Header Pane. The field identifies the
standard Alphanumeric List Window, as described above. For multiple sessions,
the Window also includes the SPEVAL Session ID.
Time Info
These fields display the Start Date & Time and End Date and Time for the data
which are displayed in the window as year-day hh.mm.ss.tt.
The entries in the Displayed column show the start and end time for the data which
is visible in the Window.
The entries in the In Table column show the start and end time for the data in the
complete window.
Times
This column will always be located in the far left of the window, even if the horizontal Scrollbar is moved. It displays all the unique times for which there exist data
values and are displayed as day hh.mm.ss.tt for the retrieval. The entries are
ordered from top to bottom for increasing times.
Note that for OOL and Totals Display Windows, there might be multiple entries
having the same time, since in this case, each row in the table corresponds to the
values for a parameter at a particular time instance.
Column Headers
These fields are located above each data column in the Window and remains positioned above the data columns also when the horizontal Scrollbar is moved. They
display the name and the description of each data column. For the TM Windows,
Standard Alphanumeric List Windows
169
SPEVAL
Cray
Software User Manual
Systems
the headers will always display the name and the description of the TM Parameters
which have been retrieved. For the Statistical, OOL and Totals Windows, the column headers display the column type name and description. For a complete list of
the possible column types for Statistical, OOL and Totals Windows, see the relevant sections.
Data
Each data column displays a data value for the corresponding time displayed in the
Times Column. The data display format depends on the underlying data type and
the display format which was specified in the Save Case Proforma. If an entry is
blank, it indicates that no value has been found for this particular time instance.
The supported display formats are shown in Table 14:
Table 14: Alphanumeric Windows display formats
Format
Style
Comment
Decimal
<number>
A number without decimal
places or trailing letters.
This is the default format
for Status Parameters without
a Text Table.
Binary
<number>b
A number followed by the letter “b”
Octal
<number>o
A number followed by the letter “o”
Hexadecimal
<number>x
A number followed by the letter “x”
Fixed,
Shortest,
Engineering
<floating>
A number with a decimal sign and, for
Shortest and Engineering an exponent.
Field width overflow
“*******”
A numeric value has been converted to a
string, but would overflow the column
width. This would e.g. be the case if you
specifiy a binary display format for a large
unsigned integer value.
Status Parameter
(within range)
String
For Status parameters with a Text Table,
the default format is the actual Status Text
String
Status Parameter
(without range)
“*******”
SPEVAL always displays out-of-range Status Values (parameter has a Text Table) as
“********”. No “last-value” is supported.
ASCII String
String
The String will be truncated if its length is
larger than the display column size.
Numeric overflow
“xxxx
Numeric overflow in conversion of numeric
parameters.
Unconverted
“?????????”
In this case, SPEVAL has failed to convert
the data. The most plausible explanation id
that the Proforma specifies an inconvertible
data type. (E.g. a numerical parameter cannot be displayed as Text)Contact Software
Support.
Scrollbars
The Vertical and Horizontal Scrollbars are used to navigate through the possible
large Work Area of the Window. The Horizontal Scrollbar moves the Column
Headers and Data columns left -right in order to see the Data columns which are
Standard Alphanumeric List Windows
170
SPEVAL
Cray
Software User Manual
Systems
currently not visible. The Vertical Scrollbar moves each time - data row in the Window up- down in order to see the times which are currently not visible. The scollbar operations can be accelerated by the cursor keys as described in “Key
Accelerators in Alphanumeric Windows” on page 160.
Cautions and Warnings
None. This is a read-only Window.
Syntax
Not Applicable.
Examples
Figure 54 on page 162 shows a Statistical Display Window. There are only 4 rows of data displayed, so the Displayed and In Table times shows the same time range. Two data column
headers are visible, the “END_T” (end time) column an the “P_NAME” (Parameter Name)
column. For explanation of the different column types for the Statistical Display Windows, see
section 4.9.2 on page 168.
Possible Errors
None.
Cross Reference
Item
4.8 Key Accelerators in Alphanumeric Windows page 160
4.9.1 TM (Alphanumeric List) Window page 166
4.9.2 Statistics Window page 168
4.9.3 OOL (Out-of-Limits) Window page 171
4.9.4 Totals Window page 174
Standard Alphanumeric List Windows
171
SPEVAL
Cray
Software User Manual
Systems
4.9.1
TM (Alphanumeric List) Window
TM Proforma Name
Column Headers
Qulity
Indicators
Empty Values
Figure 55TM (Alphanumeric List) Window
Description
This Window shows normal TM Parameter Values for the time range specified when submitting a Save Case. The window will only be created if you have specified the Save Case - Data
type as TM, the Save Case - Output - Output Type to Data Points and the Alphanumeric List as
an option in the Save Case - Output - Display Type .
The general window properties, (e.g. the Commands Menu and the Scrollbars) are described in
section 4.9 on page 162. The following Window Items are special properties for the Alphanumeric List Window:
TM Proforma Name
The Header of the Window will display the TM Proforma name and description
which have been used to select the TM Parameters displayed in the Column Headers.
Column Headers
The Column Headers show the name and description of each TM Parameter displayed.
Empty Values
Empty values (blanks) for a particular time simply means that no value was
retrieved for the TM Parameter for this time.
Quality Indicators
The Quality Indicators indicates whether the datum is Bad Data Quality (BDQ),
Bad Time Quality (BTQ) or Invalid (by mode-dependency). The Quality is indicated both with a colour code and a one character code to the right of the datum
field. Note that only one code is displayed even if the datum might be e.g. both
BDQ and BTQ. In this case, the BDQ code would be displayed since it has a higher
TM (Alphanumeric List) Window
172
SPEVAL
Cray
Software User Manual
Systems
priority than BDQ. The different Quality types and their priority are shown in
Table 14:
Table 15: Alphanumeric List Data Quality Codes
Priority
Quality Type
Colour
Code
1
Bad Data Quality (BDQ)
Green
d
2
Bad Time Quality (BTQ)
Yellow
t
3
Validity Quality
Grey
v
Cautions and Warnings
None. This is a read only window.
Syntax
Not Applicable.
Examples
Figure 55 on page 166 shows the Alphanumeric List Window. The TM Proforma used to generate the Parameters is “T027 - GYROS - COMBINED PARAMETERS(RTF)”. All the
Parameter values are displayed in the decimal notation.
Possible Errors
If the Window fails to be displayed, the Message Area will display a failure message. For the
possible error messages, see section 4.7.7 on page 83.
Cross Reference
Item
4.9 Standard Alphanumeric List Windows page 162
4.7.7 Save Case - Submit page 83
4.7.11 Save Case - Simple Extraction Processing (SEP) page 106
4.7.13.3 Save Case - Output - Display Type page 115
4.7.10.4 Save Case - Data - Data Type page 103
TM (Alphanumeric List) Window
173
SPEVAL
Cray
Software User Manual
Systems
4.9.2
Statistics Window
TM Proforma Name
Column Headers
Times
Figure 56Statistics Window
Description
This Window shows statistical information for the time range you specified when submitting a
Save Case. The window will only be displayed if the following is satisfied:
• The Save Case - Data - Data Type must be TM.
• The Save Case - Output - Output Type must be Data Points.
• The Save Case - Output - Display Type radio buttons must have specified Stats as an
option.
• Statistic filters must have been applied to at least one Parameter.
The general window properties, (e.g. the Commands Menu and the Scrollbars) are described in
section 4.9 on page 162. The following Window Items are special properties for the Statistics
Window:
TM Proforma Name
The Header of the Window will display the TM Proforma which have been used to
select the Parameters which contribute to the Statistics.
Times
For the Statistical Window, the Times column displays the start time for the collection of the statistics. The end time for the collection is shown under the Column
Header “END_T”.
Column Headers
The Column Headers shows the name and type of each Statistics field for which
you have requested the output values. The number of columns and their placement
depends on the Field Proforma which was specified in the Save Case - Output Field Proforma Text field. The default field proforma name for statistics is called
STAT, and contains all the possible statistics columns types. The types are
Statistics Window
174
SPEVAL
Cray
Software User Manual
Systems
described in Table 16:
Table 16: STATS Column Headers
Name
Type
Format
Meaning
START_T
Statistics Period Start
Time.
Day & Time
Gives the start time for all the statistics shown
in the row. Will always be the same as the
Time Column on the left.
END_T
Statistics Period End
Time.
Day & Time
Gives the end time for all the statistics shown
in the row. The start time for the row is shown
in the Time Column on the left.
P_NAME
TM Parameter Name
Text
Name of the TM Parameter for which this data
row is collected.
P_DESCR
TM Parameter Description
Text
Description of the TM Parameter.
MAX_T
Maximum Value Time
Stamp.
Day & Time
Time for which the maximum value of the
Parameter has been recorded within the data
collection period. If the same value occurs
several times in the period, this is the last time
at which the value was observed.
MAX_V
Maximum Value
As for TM*
Maximum value of the Parameter within the
data collection period. The format is dependent on the TM Parameter. (See footnote)
MIN_T
Minimum Value Time
Stamp.
Day & Time
Time for which the minimum value of the
Parameter has been recorded within the data
collection period. If the same value occurs
several times in the period, this is the last time
at which the value was observed.
MIN_V
Minimum Value
As for TM*
Minimum value of the Parameter within the
data collection period. The format is dependent on the TM Parameter. (See footnote)
AVGE
Average Value
Floating Point
Average Value of the Parameter within the
data collection period.
SIGMA
Standard Deviation
Floating Point
Standard Deviation ( σ ) of the Parameter
within the data collection period.
DATA_Q
% Data Quality.
Decimal
Gives the data quality for the data collection
period (0-100)
TIME_Q
% Time Quality.
Decimal
Gives the time quality for the data collection
period (0-100)
VLD_Q
% Validity Quality.
Decimal
Gives the Validity Parameter quality for the
data collection period (0-100)
N_OF_D
Number of data points.
Decimal
Gives the number of data points used to generate the statistics for the Parameter for this collection period.
As for TM*: The Value is displayed as specified by the Parameter Type and the display format in the TM
Proforma used to generated the Parameters.
Statistics Window
175
SPEVAL
Cray
Software User Manual
Systems
Cautions and Warnings
NOTE: For Long Term Archival (LTA) Statistics, the START_T and END_T fields will correspond to the defined collection window (retrieval window) as specified in the Save Case - Simple Time fields. For other data sources (UDS and Summary), the Start and End Times for the
actual retrieved data. This differences is not a bug, but reflects the fact that the LTA retains all
the data possible whereas the Summary and the UDS only contains a subset.
An example is if you have retrieved data between say, day 1 and day 10 from the LTA. A
Parameter which only have values for day 2 and day 5, will still display the START_T as “day
1” and “END_T” as “day 10”. When however, the Parameter is retrieved from the Summary or
UDS file (for day 1 to day 10), the START_T will display “day 2” and the END_T “day 5”.
Syntax
Not Applicable.
Examples
Figure 56 on page 168 shows the Statistical Window. The TM Proforma used to generate the
Parameters is “A001”.
Possible Errors
If the Window fails to be displayed, the Message Area will display a failure message. For the
possible error messages, see section 4.7.7 on page 83.
Cross Reference
Item
4.9 Standard Alphanumeric List Windows page 162
4.7.7 Save Case - Submit page 83
4.7.11 Save Case - Simple Extraction Processing (SEP) page 106
4.7.13.4 Save Case - Output - Field Proforma page 117
4.7.13.3 Save Case - Output - Display Type page 115
4.7.10.4 Save Case - Data - Data Type page 103
Statistics Window
176
SPEVAL
Cray
Software User Manual
Systems
4.9.3
OOL (Out-of-Limits) Window
Name
Column Headers
Figure 57OOL Window
Description
This Window shows OOL (Out-of-limits) information for the time range specified when submitting a Save Case. The window will only be created if the following conditions are met:
• The Save Case - Data - Data Type must be OOL.
• The Save Case - Output - Display Type must specify Data Points.
Note that no TM Proforma can be associated with a OOL Display. All the OOL Parameters for
a particular time period will be displayed in this window.
The general window properties, (e.g. the Commands Menu and the Scrollbars) are described in
section 4.9 on page 162. The following Window Items are special properties for the OOL Window:
Name
The Header of the Window will always display “Out of Limits Display”, since no
TM Proforma are associated with the display.
Times
For the OOL Window, the time the OOL packet was generated, not the time the
actual parameter generated an OOL record. For the actual time the parameter generated an OOL record, consult the column header name OOL_T below.
Column Headers
The Column Headers shows the name and type of each OOL field for which you
have requested the output values. The number of columns and their placement
depends on the Field Proforma which was specified in the Save Case - Output Field Proforma Text field. The default field proforma name for OOL is called
OOLS, and contains all the possible columns types for Out-of-Limits data. The
OOL (Out-of-Limits) Window
177
SPEVAL
Cray
Software User Manual
Systems
types are described in Table 17:
Table 17: OOL Column Headers
Name
Type
Format
Meaning
P_NAME
Parameter Name.
Text
Name of the Parameter which is OOL.
CUR_V
Current Value of the
Parameter.
Parameter
Default*
The Value of the Parameter for this time.
COR_V
Correct Value of the
Parameter.
See right.
The correct value for the Parameter. Normally
the same as Parameter Default. If the Parameter is Status and have a corresponding Status
Check Set table, the field will display
<SET n> where n identifies the Status Check
Set number (1-16). (See also Cautions and
Warnings).
P_UNIT
Parameter Unit
Text
Displays the Unit of the Parameter
P_DESC
Parameter Description
Text
Displays the description of the Parameter.
REL_P
Relational Parameter.
Text
Displays the name of the Relational Parameter
for this Parameter. If the field is blank, the
Parameter has no relational Parameter.
PIF_C
OOL Type (PC/IC/FC)
Text
Gives the Previous Check, Intermediate Check
and Final Check results for this Parameter. The
Column Field contains a 6 character long
string. The first 2 characters are the Previous
Check Result, the middle 2 the Intermediate
Check Result and the last 2 the Final Check
Result. E.g. as in the string “wl__HL”. The
character codes are explained in Table 18:
FLAG
General Utility Flag
Decimal
Displays the General Utility Flag for the
Parameter.
OOL_T
Time OOL record generated
Year & Day
Displays the time the Parameter generated the
OOL record.
Parameter Default*: The Value is displayed as specified by the Parameter Type (since no Proforma is associated with the OOL).:
Table 18: PIF_C (OOL character codes)
Code
Meaning
__
No value. For non-supercommutated, this will always be the Intermediate Check Code, since Intermediate Checks do not exists for
these Parameters.
wL
Value within Limits.
HL
Value smaller than Hard Low Limit.
HH
Value larger than Hard High Limit.
SL
Value smaller than Soft Low Limit.
OOL (Out-of-Limits) Window
178
SPEVAL
Cray
Software User Manual
Systems
Table 18: PIF_C (OOL character codes)
Code
Meaning
SH
Value larger than Soft High Limit.
CO
Status Consistency Check has failed.
FX
The Fixed Status Check Set check has failed.
Cautions and Warnings
If you observe the value <SET **> in the COR_V column, note that this probably has to do
with changes done to the SCOS derived file format (introduced in SCOS Version 17.1). If the
OOL Values was generated with an earlier version of SCOS (e.g. Version 16.0) you should
expect to observe this peculiarity. If you are sure that SCOS Version 17.1 or later was used to
generate the values, please issue an SPR.
Syntax
Not Applicable.
Examples
Figure 57 on page 171 shows the OOL Window.
Possible Errors
If the Window fails to be displayed, the Message Area will display a failure message. For the
possible error messages, see section 4.7.7 on page 83.
Cross Reference
Item
4.9 Standard Alphanumeric List Windows page 162
4.7.7 Save Case - Submit page 83
4.7.11 Save Case - Simple Extraction Processing (SEP) page 106
4.7.13.4 Save Case - Output - Field Proforma page 117
4.7.13.3 Save Case - Output - Display Type page 115
OOL (Out-of-Limits) Window
179
SPEVAL
Cray
Software User Manual
Systems
4.9.4
Totals Window
Name
Column Headers
Figure 58Totals Window
Description
This Window shows Save Case Totals information for the Save Case which you have submitted. In the current SPEVAL Release Version 3.0, the Window will always display only one data
row.
The window will only be created and displayed in the following cases:
• The Totals From Data Points or All Already Calculated Totals or Merge of All Already Calculated Totals must have been specified as an option in the Save Case - Output - Display
Type .
NOTE: When SPEVAL retrieves from the LTA, there are some differences between the
retrieval of “Data Points” and “Totals”. For data points, SPEVAL is able to trap (and filter)
duplicate values. For Totals however, SPEVAL cannot check for duplicate values. Consequently, duplicates will cause double counting. I.e. for a given retrieval, the LTA Totals might
be higher than the totals from a UDS (User Definition Set) File. The difference between the
two will reveal the number of duplicates.
The general window properties, (e.g. the Commands Menu and the Scrollbars) are described in
section 4.9 on page 162. The following Window Items are special properties for the Totals
Window:
Name
The Header of the Window will display “Totals Display”.
Times
For the Totals Window, the time the Save Cases was submitted. Should always display the same time as the SUB_T column.
Column Headers
The Column Headers shows the name and type of each Totals field for which you
have requested the output values. The number of columns and their placement
depends on the Field Proforma which was specified in the Save Case - Output -
Totals Window
180
SPEVAL
Cray
Software User Manual
Systems
Field Proforma Text field. The default field proforma name for Totals is called
TOTS, and contains all the possible columns types for Totals data. The types are
described in Table 19:
Table 19: Totals Column Headers
Name
Type
Format
Meaning
N_OV_V
Value
Decimal
The total number of values (data rows) which
was found the last time the Save Case was submitted.
SC_ID
Save Case ID.
Text
Name of the Save Case.
SUB_T
Save Case submission
time.
Year & Day
Last time the Save Case was submitted. Will
always display the same value as the Times
column.
Cautions and Warnings
None.
Syntax
Not Applicable.
Examples
Figure 58 on page 174 shows the Totals Window. The Save Case ID is “totals”.
Possible Errors
If the Window fails to be displayed, the Message Area will display a failure message. For the
possible error messages, see section 4.7.7 on page 83.
Cross Reference
Item
4.9 Standard Alphanumeric List Windows page 162
4.7.7 Save Case - Submit page 83
4.7.13.4 Save Case - Output - Field Proforma page 117
4.7.13.1 Save Case - Output - Output Type page 112
Totals Window
181
SPEVAL
Cray
Software User Manual
Systems
4.10 Alphanumeric Display Window
Name
Time Info
Quality Indicators
Column 1
Column 2
Figure 59Alphanumeric Display Window
Description
This Window shows all the TM Parameters defined in the Save Case TM Proforma for a particular point in time. By using the <PREV> and <NEXT> keys, you can navigate the window
contents forwards and backwards within the time range defined for this submission as
explained below.
The Window will only be displayed if the Save Case which has been submitted fulfils the following criteria:
• The Save Case - Data - Data Type must be TM.
• The Save Case - Output - Output Type must be Data Points.
• The Save Case - Output - Display Type radio buttons must have specified Alphanumeric
Display as an option.
• As least one of the Parameters must not have the Statistic Filters applied.
The Window Data Area is divided into two main columns as indicated in Figure 60. Each column displays a maximum of 32 Parameters, corresponding to the maximum of 64 Parameter
which you can define in a SCOS TM Proforma. Each column displays the Parameter ID,
Description, Unit and the current value for the particular time.
The Window contains the following items:
File Menu
This pull-down menu only contains the File | Exit Button. Selecting this buttons
will exit the current Window but does not influence other SPEVAL Windows.
Alphanumeric Display Window
182
SPEVAL
Cray
Software User Manual
Systems
Commands Menu
This pull-down menu contains two entries, the Jump To Time Button and the Output Button. The Jump To Time Button displays when pressed the Jump To Time
Window as described in section 4.3.
Window Name
The Window Name is visible in the Window Header Pane. The field identifies the
TM Proforma used, and the Window Type “Alphanumeric Display”.
Time Info
These fields display the Start Date & Time and End Date and Time for the data
which are displayed in the window as year-day hh.mm.ss.tt.
The entries in the Displayed column show the time for the data which is currently
visible in the Window.
The entries in the In Table column show the start and end time for the data in the
complete retrieved set.
Quality Indicators
The Quality Indicators indicate Bad Data Quality (BDQ), Bad Time Quality (BTQ)
and Validity Quality. They have the same layout as described for “TM (Alphanumeric List) Window” on page 166.
Navigating Using the keyboard
When started, the Alphanumeric Display Window will display the Parameter values for the
first time in the time range. You can navigate through all the unique times in the Retrieval by
using the keyboard as described in “Key Accelerators in Alphanumeric Windows” on
page 160.
Cautions and Warnings
None.
Syntax
Not Applicable.
Examples
Figure 59 on page 176 shows the Alphanumeric Display Window.
Possible Errors
If the Window fails to be displayed, the Message Area will display a failure message. For the
possible error messages, see section 4.7.7 on page 83.
Cross Reference
Item
4.8 Key Accelerators in Alphanumeric Windows page 160
4.7.7 Save Case - Submit page 83
4.7.13.3 Save Case - Output - Display Type page 115
4.7.13.1 Save Case - Output - Output Type page 112
4.3 Jump To Time Window page 55
Alphanumeric Display Window
183
SPEVAL
Cray
Software User Manual
Systems
4.11 Graphical Window
TM Proforma
Time Info
Y-axes
X-axes
Figure 60Graphical Window (shown in reverse video)
Description
This SPEVAL Graphics Window offers high-resolution colour plots of parameters vs. time or
parameters vs. parameters. There may be up to 4 graphs displayed in a Graphical Window as
indicated in Figure 60 (shown on white background for visibility). Each Parameter can be
plotted using different colours, line style and symbol style on a black background.
The Commands Menu offers the possibility to dump the Window contents as Encapsulated
Postscript (EPS), Normal Postscript (PS) and printed as numerical values.
The View Menu allows you to zoom the graphs in a number of different ways as well as scrolling the grahical data. See “Graphical Window - View” on page 181 for these options.
The Window will only be displayed if the Save Case which has been submitted fulfils the following criteria:
• The Save Case - Data - Data Type must be TM.
• The Save Case - SEP- Proforma Type must be Graphical.
• The Save Case - Output - Output Type must be Data Points.
Graphical Window
184
SPEVAL
Cray
Software User Manual
Systems
• The Save Case - Output - Display Type radio buttons must have specified Graph as an
option.
• The relevant Parameters must not have the Statistics Filters applied. In this case, only Statistics would be generated.
The Window contains the following items:
File Menu
This pull-down menu only contains the File | Exit Button. Selecting this buttons
will exit the current Window but does not influence other SPEVAL Windows.
Commands Menu
This pull-down menu contains two entries, as follows:
Output
This Pull-right Menu gives the options to print the Graphics on a
printer, output it to EPS (Encapsulated Postscript) File or PS (Postscript) File.
Dump for Interactive Wave
This Button dumps the data in a format which may be used in interactive PV-Wave sessions. See “Using Graphics output with PV-Wave” on
page 35 for this option.
Option Menu
This Menu allows you to specify colour printing of the Graph (in conjunction with
the Commands - Output option). Note that SPEVAL possibly directs the output to a
different (colour) printer if this option is selected. If no colour printer exists, the
plot will be printed in gray-scale.
Wiew Menu
This Menu displays a number of different zoom and view options. The options are
described in “Graphical Window - View” on page 181.
Window Name
The Window Name is visible in the Window Header Pane. The field identifies the
TM Proforma used.
Time Info
These fields display the Start Date & Time and End Date and Time for the data
which are displayed in the window as year-day hh.mm.ss.tt.
Y-axes
For each Graph, there may be multiple Y-axis as indicated in Figure 60. For Status
Parameters, each y-axis displays the corresponding Status Text String for the
Parameter Value. The Parameter names associated with the plot will appear above
the axes.
X-axes
For each graph, there will be one x-axis. Note that the time ranges displayed under
the X-axis has a different format than for the Time Info. The x-axis displays the
times as year-month-day-sec. Here <day> means day-of-month, not the day offset
from the start of the year.
Cautions and Warnings
None.
Graphical Window
185
SPEVAL
Cray
Software User Manual
Systems
Syntax
Not Applicable.
Examples
Figure 60 on page 178 shows the Graphics Window.
Possible Errors
If the Window fails to be displayed, the Message Area will display a failure message. For the
possible error messages, see section 4.7.7 on page 83.
Cross Reference
Item
4.7.7 Save Case - Submit page 83
4.7.7 Save Case - Submit page 83
4.7.13.3 Save Case - Output - Display Type page 115
4.7.13.1 Save Case - Output - Output Type page 112
4.3 Jump To Time Window page 55
Graphical Window
186
SPEVAL
Cray
Software User Manual
Systems
4.11.1 Graphical Window - View
Figure 61Graphical Window - View PullDown Menu
Description
This Menu is located in the Window Pane of the Graphical Window . The View Menu allows
you to zoom the graphs in a number of different ways, to define crosshair cursors and to scroll
zoomed data.
Multiple Zooms
Since the SPEVAL Graphical Window may displays up to 4 graphs and each graph may contain several stacked y-axis, or slices, you may specify the slices to zoom using one of the Zoom
all Graphs, Zoom one Graph and Zoom one Slice entries as described below.
Zoom and Mouse Button usage
When you select the Zoom all Graphs, Zoom one Graph and Zoom one Slice entries in the
menu, one or several zoom rectangles will be displayed. You can manipulate the zoom rectangles with the 3 mouse buttons (MB) in the following ways:
• Pressing MB1 on a zoom rectangle, then dragging the Mouse will move the zoom rectangle(s).
• Pressing MB2 on a zoom rectangle, then dragging the Mouse will re-size the rectangle(s).
• Pressing MB3 in the Graphical Window zooms the graphs using the current zoom rectangle(s).
The View Menu contains the following items:
Graphical Window
187
SPEVAL
Cray
Software User Manual
Systems
Zoom all graphs
Creates one zoom rectangle for each graph in the graphical window. Stacked y-axis
counts as several slices. E.g. if there are 3 graphs, one of which have 2 stacked yaxes, there will be 2 + 2 zoom rectangles. The zoom rectangles will move and
rescale synchronously. When MB3 is pressed, each curve is rescaled to display the
data in that zoom rectangle.
Zoom one Graph
Creates zoom rectangles only for one graph. If the graph contains stacked y-axes,
each stacked y-axis will have a corresponding zoom rectangle. Clicking MB3 will
zoom the Graph.
Zoom one Slice
For stacked y-axes, this option only creates one zoom rectangle. The zoom rectangle can be moved between different curves, but you cannot cover several curves.
Pressing MB3 will only zoom the curve which the zoom rectangle covered. For
non-stacked y-axes, the option is functionally identical to Zoom one Graph.
Pan Left
Pan Right
Pan Up
Pan Down
Moves the current data wiew window left, right up or down. The wiew window is
always moved a half screen width or height for each operation. These 4 entries
makes it possible to scroll zoomed data. Note that you can use the keyboard keys as
accelerators for these options:
• <key-left> corresponds to Pan Left.
• <key-right> corresponds to Pan Right.
• <key-down> corresponds to Pan Down.
• <key-up> corresponds to Pan Up.
Zoom Out
Zooms each slice in the current display out with a factor of 2.
Zoom In
Zooms each slice in the current display in with a factor of 2.
Cancel Zoom
Cancels the zoom rectangles. In order to return to the un-zoomed display, use the
“Full Display” option.
Previous Zoom
Displays the previous zoom view. The zoom view history only contains the current
view and the previous view, so you cannot “rewind” more than one zoom.
Full Display
Re-creates the original (un-zoomed) display.
Refresh Graph
Redraws the graphic display.
Crosshair Cursor
Creates a crosshair cursor with vertical and horizontal crosshairs. Helpful to map
data points to their numeric values. Re-selecting this option toggles between crosshair cursors and standard cursors.
Cautions and Warnings
None.
Graphical Window
188
SPEVAL
Cray
Software User Manual
Systems
Syntax
Not Applicable.
Examples
N/A
Possible Errors
If a Zoom or Scroll operation results in zero data for a curve, the corresponding graph displays
the message “No Data Points in selected range”. Note that the message is issued when there are
no underlying data points inside the zoom rectangle, even if a connecting line intersects the
rectangle Figure 62 illustrates this side-effect. Data poinst are marked as small rectangles.
Since the zoom rectangle does not encompass any data points, a zoom operation would result
in the “No Data Points in selected range” message..
Figure 62Graph Zoom resulting in “No Data Points in selected range”
Cross Reference
Item
4.11 Graphical Window page 178
4.1.1 COMPILE page 41 (Stacked y-axis)
Graphical Window
189
SPEVAL
Cray
Software User Manual
Systems
4.12 PV-Wave SPEVAL procedures
Description
SPEVAL offers the possibility to import TM User Data Set (UDS) files into PV-Wave and perform further operations on the data. By using the powerful PV-Wave Command Language, you
can manipulate the data, defining your own plots, etc. SPEVAL currently offers to utility PVWave procedures, both described in the following sections:
• GRPH_LOAD_UDS. This procedure loads a TM User Data Set file into PV-Wave.
• GRPH_MATCH_DATA. This procedure is used to match the different data arrays to times
and to select specific parameters for further processing.
Cautions and Warnings
None.
Syntax
In order to make the SPEVAL PV-Wave procedures available from within interactive wave,
start up wave by the following command:
$ WAVE GRPH_USER
Alternatively, you can perform the setup from within Wave by at the Wave prompt typing:
WAVE> @GRPH_USER
Examples
For examples, see the sub-sections.
Possible Errors
If PV-Wave fails to find the GRPH_USER startup file, it will issue a message like
% Can’t open file for input: grph_user
no such file or directory
The only reason for this error message should be that the account you have started PV-Wave
from is not an registered SPEVAL account. Contact Software Support in this case.
Cross Reference
Item
4.7.7 Save Case - Submit page 83
4.7.13.3 Save Case - Output - Display Type page 115
4.7.13.1 Save Case - Output - Output Type page 112
4.3 Jump To Time Window page 55
PV-Wave SPEVAL procedures
190
SPEVAL
Cray
Software User Manual
Systems
4.12.1 GRPH_LOAD_UDS
Description
This is one of the SPEVAL PV-Wave procedures made available for interactive PV-Wave
usage. It takes as argument the name of a existing User Data Set file (must contain TM data)
and loads the contents into the following PV-Wave data structures:
• PARAMETER
• DATA
• TIMES
• TIME
• TEXT_TABLES
The GRAPH and DISPLAY structures are not initialised. See Appendix B for an explanation
of the SPEVAL PV-Wave variables.
Cautions and Warnings
Loading very large UDS files into PV-Wave may take a considerable amount of time. It is recommended to start of with smaller UDS files.
GRPH_LOAD_UDS cannot load non-TM UDS files. Files containing e.g. TC,OOL or Statistics data but no TM data will be rejected.
Syntax
PV-Wave must have been started with the “WAVE GRPH_USER” option.
WAVE > GRPH_LOAD_UDS,‘<uds_file_name>’
<uds_file_name> : full filename of an existing User Data Set file to load into PV Wave. Must
be surrounded by single quotes.
Examples
The following example starts up PV-Wave from the command line, then load in the User Data
Set “MY_UDS” from the standard “Private” User Data Set directory. The User then prints out
a list of all the Parameters which have been loaded.
$ WAVE GRPH_LOAD
....
....
WAVE> GRPH_LOAD_UDS ‘SPVL_PRIVATE_USER_DATA_SETS:MY_UDS.UDS’
Loading SPVL_PRIVATE_USER_DATA_SETS:MY_UDS.UDS
% Compiled module: GRPH_READ_PTVS_DATA.
WAVE> PRINT, PARAMETER.NAME
C124
C134
F980
G126
G128
G134
I109
I113
L300
WAVE>
PV-Wave SPEVAL procedures
191
SPEVAL
Cray
Software User Manual
Systems
Possible Errors
The following SPEVAL error messages may be issued:
Error Message
Meaning
Failed to load <file_name>
General error message. Signals that load of the UDS file
has failed. Previous error messages should explain the
cause of error.
File <filename> not a UDS file
The named file could not be interpreted as a SPEVAL
UDS file. Check file name and file extension.
Unexpected argument(s) UDS_FILE_NAME,
expected STRING
PV-Wave function has been called with wrong arguments.
Check allowed syntax as listed in the SUM
UDS file contains no TM Parameters
The UDS file contains no Telemetry Parameters.
Check the Save Case used to generate the file
The UDS file contains no Telemetry Data
Check the Save Case used to generate the file
UDS file contains no TM data - Cannot
be loaded into Wave
The User Data Set file contained no Telemetry data.
This message will appear if you try to load a UDS file
containing e.g. TC, OOL etc. Select a UDS file containing
TM data.
Internal Error - Contact Software
Support
A low-level error has occurred.
Cross Reference
Item
4.12 PV-Wave SPEVAL procedures page 184
Appendix B SPEVAL PV-Wave Variables page 197
PV-Wave SPEVAL procedures
192
SPEVAL
Cray
Software User Manual
Systems
4.12.2 GRPH_MATCH_DATA
Description
This is SPEVAL PV-Wave procedure made available for interactive PV-Wave usage. It is used
to match the different TM Parameters DATA arrays against each other and against the TIME
array. See Appendix B for an explanation of the SPEVAL PV-Wave variables DATA and
TIMES.
When data for several TM Parameters are imported into PV-Wave, SPEVAL stores all the discrete times in the TIME structure. The TIMES structure (parallel to the DATA) structure is
used to index each data point into the TIME structure. GRPH_MATCH_DATA creates new
data structures in order to make the plotting and manipulation of data easier. After a successful
run of GRPH_MATCH_DATA, the following new data structures are created:
• NEW_DATA. This is a structure containing all the matched data for the selected parameters.
As opposite to the DATA structure, all the data arrays in the NEW_DATA structure have the
same number of elements, and match the number of elements in the TIME array or the
NEW_TIME array (see below)
• NEW_DATA_VALID. This is a structure parallel to the NEW_DATA structure. Each element flags whether the corresponding element in the NEW_DATA structure is original data
or padded data. If 1, the corresponding data element is original, if 0 padded.
• NEW_TIME. This array is only created if the /MATCH qualifier is specified. It contains a
subset of the elements in the TIME array. The NEW_TIME and NEW_DATA arrays have a
one-to-one match. E.g. NEW_DATA(0).(10) always corresponds to the time
NEW_TIME(10).
Cautions and Warnings
None.
Syntax
PV-Wave must have been started with the “WAVE GRPH_USER” option.
GRPH_MATCH_DATA, [SELECT = <parameters>] /MATCH
[/NONE | /AFTER | /ALL]
SELECT= <parameters>
This optional qualifier specifies a list of parameters to be selected from the original
PARAMETER structure. The NEW_DATA and NEW_DATA_VALID structures
will only contain elements appearing in the <parameters> list. E.g.
SELECT=[‘G123’,’F123’] only includes Parameter G123 and F123 in the
NEW_DATA and NEW_DATA_VALID structures. If unspecified, all parameters
in the PARAMETER array will be selected.
/MATCH
This qualifier is used to match the NEW_DATA TM data arrays to start from the
time where all the Parameters have at least one valid value. E.g. if there are two
parameters in the DATA array, the first parameter has the first value at time t1 and
the second parameter at time t2, a NEW_TIME array will be generated, starting
from time t2. The NEW_DATA and NEW_DATA_VALID are changed to match
the NEW_TIME array. If unspecified, the NEW_TIME structure will be unde-
PV-Wave SPEVAL procedures
193
SPEVAL
Cray
Software User Manual
Systems
fined.
NOTE: If the MATCH qualifier has been used, always refer to the NEW_TIME,
not the TIME array.
[/ALL | /AFTER | /NONE]
These qualifiers specifies how to process invalid data elements, i.e. times for where
the corresponding Parameter has no data. The default is /NONE. Note that none of
the qualifiers affect the NEW_DATA_VALID structure.
/NONE
Invalid numeric data elements are left as zero. Invalid strings are left as
blank padded strings.
/AFTER
Invalid data elements before the first valid element are left as zero or
blank strings. Invalid elements occurring after than the first valid element inherits the value of the last valid element.
/ALL
Invalid data elements before the first valid element are set to the first
valid element. Invalid elements after than the first valid element inherits the value of the last valid element.
Examples
The following example starts up PV-Wave from the command line, then load in the User Data
Set “MY_UDS” from the standard “Private” User Data Set directory. The User then plots
parameter C124 against parameter C134. Empty data values are filled with the previous valid
value.
$ WAVE GRPH_LOAD
....
....
WAVE> GRPH_LOAD_UDS ‘SPVL_PRIVATE_USER_DATA_SETS:MY_UDS.UDS’
Loading SPVL_PRIVATE_USER_DATA_SETS:MY_UDS.UDS
% Compiled module: GRPH_READ_PTVS_DATA.
WAVE> PRINT, PARAMETER.NAME
C124
C134
F980
G126
G128
G134
I109
I113
L300
WAVE> GRPH_MATCH_DATA,SELECT=[‘C124’,’C134’],/MATCH,/AFTER
WAVE> PLOT,NEW_DATA._C124,NEW_DATA._C134
WAVE>
This example assumes that a UDS file already has been loaded with GRPH_LOAD_UDS.
GRPH_MATCH_DATA is used to prepare for a plot of the Parameter C124 .The sinus function
of the parameter is then plotted against time.
WAVE> GRPH_MATCH_DATA,SELECT=[‘C124’],/MATCH,/AFTER
WAVE> PLOT,NEW_TIME, SIN(NEW_DATA._C124), XTYPE = 2
WAVE>
The following example demonstrates the difference between the /NONE, /AFTER and /ALL
qualifiers. A UDS file containing 5 times have been loaded. Parameter C124 has values 1.1, 3.3
and 5.5 occurring at t1,t3 and t5. Note that the NEW_DATA_VALID is unaffected by the qualifiers.
PV-Wave SPEVAL procedures
194
SPEVAL
Cray
Software User Manual
Systems
WAVE> GRPH_MATCH_DATA,/NONE
WAVE> PRINT,NEW_DATA._C123, NEW_DATA_VALID._C123
0.000000
1.100000
0.000000
3.300000
0.000000
5.500000
0 1 0 1 0 1
WAVE> GRPH_MATCH_DATA,/AFTER
WAVE> PRINT,NEW_DATA._C123, NEW_DATA_VALID._C123
0.000000
1.100000
1.100000
3.300000
3.300000
5.500000
0 1 0 1 0 1
WAVE> GRPH_MATCH_DATA,/ALL
WAVE> PRINT,NEW_DATA._C123, NEW_DATA_VALID._C123
1.100000
1.100000
1.100000
3.300000
3.300000
5.500000
0 1 0 1 0 1
Possible Errors
The following SPEVAL error messages may be issued:
Error Message
Meaning
Unexpected argument(s) <argument name>,
expected <argument type>
PV-Wave function has been called with wrong argument
type for <argument name>.
Check allowed syntax as listed in the SUM
Parameter <param> not found in the
PARAMETER array
PV-Wave function has been called with a TM parameter
name which is not found.
Use “PRINT,PARAMETER.NAME “ to get a list of all
existing parameter
PV-Wave data <data_name> not existing
or unexpected type, use INFO
SPEVAL PV-Wave procedure has been called with unexpected data. This message will appear if you call
GRPH_MATCH_DATA before calling
GRPH_LOAD_UDS. In this case, SPEVAL has no data to
operate on. Use the PV-Wave INFO command to list all
available data.
Cross Reference
Item
4.12 PV-Wave SPEVAL procedures page 184
4.12.1 GRPH_LOAD_UDS page 185
Appendix B SPEVAL PV-Wave Variables page 197
PV-Wave SPEVAL procedures
195
SPEVAL
Cray
Software User Manual
Systems
4.13 Hex Dump
Description
The Hexadecimal dump utility can be used to examine the SPEVAL Time-ordered Record Set
(TRS) files used for archiving SCOS packets, Telecommand History and Scrolling Logs. Database files cannot be examined with this utility.
The utility allows you to:
• Dump the contents of a TRS file (dump record keys). In this mode, Hex Dump displays the
time-key and the record length.
• The contents of records stored in a TRS file (full mode). In this mode, Hex Dump displays
the actual record contents in different formats (e.g. INTEGER*2, INTEGER*4).
Syntax
Hex Dump should be started from DCL prompt, as follows
$ hexd_dump
The user is requested to answer the following questions:
Enter the id of the spacecraft ? (max 4 chars-”SCS_”)
A string of up to 4 char. is expected. It represents the spacecraft identification.
Enter the id of the packet ? (max 8 chars-”SWS.EXP”)
A string of up to 8 char. is expected. This string represents the packet identification, with format XXXX.XXX.
Enter the datastream number ?
A number from -127 to 127 is expected. It represents the datastream number, if empty then all
datastreams are valid.
Entering Ctrl-Z to any of the above questions will cause the utility to exit directly.
The key span of the TRS file is then displayed:
KEY SPAN IS zzzzzzzzzzzzzzzz - zzzzzzzzzzzzz
(HEX)
yyyy.ddd.hh.mm.ss.xxx - yyyy.ddd.hh.ss.xxx (ASD TIME)
showing the lowest and the highest keys (note that the ASD format is only displayed for valid
time key values).
The next question:
START and STOP keys?
requests the user to define the range of the records to be examined. No records below the spec-
PV-Wave SPEVAL procedures
196
SPEVAL
Cray
Software User Manual
Systems
ified start key or above the specified stop key will be processed. If the start key is omitted, all
records up to the stop key will be processed. If only the start key is supplied, all records above
the specified key will be processed.
Both values will be separated by a coma. If only an end key is to be supplied (defaulting the
start key to the lowest in the file), input a comma followed by the end key.
Care must be taken when using ASD time format, the following formats will be accepted:
YYYY.DDD.HH.MM.SS.MSC
or
HH
HH.MM
HH.MM.SS
HH.MM.SS.MSC
DDD.time (where time is one of the above)
YY.DDD.time
YYYY.DDD.time
That format is less accurate than the VAX time format displayed in HEX. form. Two different
but close key values can be displayed within the same ASD form.
The utility will then enter the brief (or key) mode.
The screen will be cleared and the display format described in Table 20: appears.
In line 1, the TRS directory name and file name are displayed in BOLD characters. Line 3 is a
title line describing the information displayed in lines 4 to 23.
Table 20: Hex Dump display formats
Key (HEX)
record in hexadecimal format
Key (ASD)
record key in ASD time format
R. Len.
record length in bytes
Line 24 displays the commands available
After displaying the first 20 keys (if any) from the key window supplied by the user, the first
line rendition is changed to bold.
The BOLD line indicates the "current record". Pressing the M key will switch the display mode
to full (or record) mode and will give the user the possibility to examine the contents of the
current record.
Table 21: summarises the commands available and their use in both modes.
PV-Wave SPEVAL procedures
197
SPEVAL
Cray
Software User Manual
Systems
Table 21: Hex Dump Commands
Command
Brief (or Key) mode
Full (or record) mode
<KEY-UP>
Gets previous record as current one (Previous line becomes BOLD)
Scrolls up screen one line (no action if
already on beginning of record
<KEYDOWN>
Gets next record as current record
(Next line becomes BOLD)
Scroll down screen one line (no
action if already end of record)
F
Forward one screen
Forward one screen
B
Backward one screen
Backward one screen
Not Applicable
Sets type of dumps in full mode into
dump as byte array
dump as integer*2 array
dump as integer*4 array
dump as integer*8 array
Switch into Full mode
Switch back to brief mode
1
2
4
8
M
+
N/A
Get next record
-
N/A
Get previous record
P
Ctrl-Z
Print current record
Print current record
Exit from Hex Dump
Exit from Hex Dump
When switching into full mode, the central portion of the screen is cleared and the current
record is dumped in the mode selected. If no mode has been selected yet, the record buffer is
dumped as a byte array. In all modes (1,2,4 or 8), 32 bytes are dumped on each line.
In modes 1,2 and 4, bytes are grouped and ordered 1, 2, or 4 at a time. Changing from one
mode to another will ease the reading of the data. In front of each line, the offset number of the
first displayed unit is given, i.e. if mode 1 is selected, the number of the first byte is given.
Note that printouts will be made in the currently selected mode and sent to the default printer.
Examples
The following example read for spacecraft ERS-2, the content of the records stored for Packet
Id A023.SPS in the period of time 16:10 to 16:12 day 115 in 1995.
$ hexd_dump
Enter the id of the spacecraft ? (max 4 chars-"SCS_"
ers2
Enter the id of the packet ? (max 8 chars-"SWS.EXP")
a023.sps
Enter the datastream number ?
<RETURN>
Key span is
0097279FAA214720
0098F6B01ECC1D30
(HEX)
1993.256.09.20.19.090
- 1995.115.16.14.35.139(ASD TIME)
PV-Wave SPEVAL procedures
198
SPEVAL
Cray
Software User Manual
Systems
START and STOP keys ......................... ?
1995.115.16.00,1995.115.16.12
Then the first 20 records in this period appear on the screen (if they exist) displayed in Brief
Mode format
Packet Name:
SPVL_TRS_ERS2_DIR:ERS2_A023_SPS
Key (HEX)
Key (ASD)
98F6AF5D150CB0 1995.115.16.09.10.139
len
512
and one record at a time when changed to Full mode by pressing M:
Packet Name:
SPVL_TRS_ERS2_DIR:ERS2_A023_SPS
98F6AF5D150CB0 1995.115.16.09.10.139
1
33
65
97
129
161
193
225
257
289
321
353
385
417
449
481
0B01FBE6
31393935
36374646
38374646
39374646
36374646
41303039
43303039
32374646
42303038
44303038
42374646
44303039
46303038
31303041
33303042
00004000
2E313135
46464639
46464639
46464639
46303037
43303038
43303038
46303530
35303036
35303036
46303036
46303039
44303038
43303041
38303041
B00C155D
2E31362E
43303032
43303032
43303032
44303032
42353032
42353032
30303032
44303032
44303032
46303032
33303032
33303032
32303032
43303030
512
AFF69800
30392E31
30343338
30343338
30343338
30343834
30343333
30343333
30343333
30343333
30343130
30343930
30343930
30343931
30343931
30303030
00000000
302E3133
37374646
41374646
42374646
44303731
42303039
44303039
41303038
43303038
41374646
43303039
45303041
30303042
32303042
30303030
00000000
39D8004B
46464639
46464639
46464639
37463845
43303038
43303038
35303036
35303036
46303037
32303038
38303039
38303041
32303041
30303030
00000000
44303032
43303032
43303032
43353032
39353032
42353032
42353032
44353032
44353032
42303032
36303032
43303032
43303032
36303032
30000000
00000000
30343338
30343338
30343338
30343733
30343333
30343333
30343930
30343333
30343333
30343130
30343930
30343930
30343931
30343931
00000000
VALID commands are : Down/Up arrow,F,B,1,2,4,8,M,+,-,P,Ctr-Z ?
now pressing M again changes back to Brief Mode.
Pressing Ctrl-Z, you can exit.
PV-Wave SPEVAL procedures
199
SPEVAL
Cray
Software User Manual
Systems
Possible Errors
Error Message
Meaning
Invalid Spacecraft Id
Spacecraft ID should have have 4 characters, ie ISO_
Invalid Packet format
Packet ID should be in same way as for SCOS:
<Process ID (4 char.)> . < Packet type (3 chars.)>
Invalid datastream number
Valid values are between -127 and 127, including 0 and -0
Error opening the file <file_name>
The file does not exist a file for this packet Id, or there was
a typing error
No data found for this Packet Id and
this Datastream
The file does not contain data for the search criteria
entered..
BEG. of window/file reach
When moving backwards the first record in hte file or in
the window (up 1000 records backwards) was reached
END of window/file reach
When moving forwardslast record in hte file was reached
Cross Reference
None.
PV-Wave SPEVAL procedures
200
SPEVAL
Cray
Software User Manual
Systems
4.14 X_Clear
Description
Occasionally, when first starting a new session after a network or X server failure, it may be
impossible to start DECterms or SPEVAL sessions. This is due to existing processes not having been correctly notified of the failure.
The x_clear command has been provided to remove any such defunct processes.
Syntax
The command is issued from the DCL prompt:
$ x_clear
The user is requested to confirm the action:
Warning: All your SPEVAL windows and all your DECterms on ALL displays
will be terminated
Continue with clear-up? [NO]:
Type yes to continue. After a few seconds, it should now be possible to start DECterms or
SPEVAL sessions from the Session Manager menu as normal.
Since, if this command is needed, there is probably no DECterm to issue it at, there are two
other ways to get a DCL prompt:
1. Log into the system remotely using e.g. telnet and issue the command from there
2. From the Session Manager “Applications” menu, select the option “FileView”. When the
FileView window appears, select from the “Utilities” menu the option “DCL Command”.
This will in turn produce a window similar to a DECterm in which you can enter x_clear
as described above.
Examples
$ x_clear
Warning: All your SPEVAL windows and all your DECterms on ALL displays will
be terminated
Continue with clear-up? [NO]: y
%RUN-S-PROC_ID, identification of created process is 00027B56
Possible Errors
None.
Cross Reference
None.
PV-Wave SPEVAL procedures
201
SPEVAL
Cray
Software User Manual
Systems
Appendix A SPEVAL file types
SPEVAL file types and their meaning are listed in Table 19:. The table contains the following
columns:
• Extension. The file extension. E.g. file “ERS2__SAVE_CASE.SVC” has Extension SVC.
• Format. ASCII or Binary. ASCII files can be loaded into a Text Editor. Binary files are in
SPEVAL specific format
• Comment. Explains the file usage.
Table 22: SPEVAL file types
Extension
Format
Comment
SVC
Binary
Save Case file definition. This file is loaded into the Save Case
Definer on a “Load: operation. File name is always preceded by the
spacecraft name,
PROFORMA
ASCII
Proforma source file definition.
GRAPH
Binary
Compiled Graphical Proforma file
ALPHA
Binary
Compiled Alphanumeric Proforma file
PARAM
Binary
Compiled Parameter Proforma file
FIELD
Binary
Compiled Field Proforma file
UDS
Binary
User Data Set file.
UCH
Binary
User Data Set file - special for Cluster Command History
TDS
Binary
Temporary User Data Set File
TCH
Binary
Temporary Cluster Command History user data set file
DUMP
Binary
PV-Wave output file from the Graphical Window - Dump data to
PV-Wave.
PS
ASCII
Postscript file. Output from Graphical Window
PSC
ASCII
Colour Postscript file. Output from Graphical Window
EPS
ASCII
Encapsulated Postscript file. Output from Graphical Window.
EPSC
ASCII
Colour Encapsulated Postscript file.
Output from Graphical Window
TXT
ASCII
Alphanumeric data. Output from Alphanumeric Windows
DAT
ASCII
Alphanumeric Export data. Output from Alphanumeric Windows.
PV-Wave SPEVAL procedures
202
SPEVAL
Cray
Software User Manual
Systems
Appendix B SPEVAL PV-Wave Variables
This section describes the SPEVAL exported PV-Wave variables. The section might be useful
when using PV-Wave to examine dumped SPEVAL variables (from the Graphical Window ) or
you are using the SPEVAL PV-Wave procedures GRPH_LOAD_UDS and
GRPH_MATCH_DATA.
The data imported from SPEVAL to PV-Wave format is listed below
NOTE: PV-Wave array indexes always start at 0 (first element)
TIME
This is an array of time points in double-precision floating-point format. Times are
represented as Julian days from the PV-Wave base date (1-Jan-1752). The array
contains all the unique times contributing to the dumped plot or which are existing
in the UDS file. (See also TIMES)
NEW_TIME
This array is generated by a call to GRPH_MATCH_DATA with the /MATCH
qualifier specified. It contains a subset of the values in the TIME array. See
GRPH_LOAD_DATA for further information.
DISPLAY
This is a single structure defining the overall display information for the dumped
plot. The structure is left un-initialised if the data has been imported via
GRPH_LOAD_UDS. The structure contains the following entries:
MISSION
This identifies the current mission (e.g. ERS2).
ID
This is the Display ID, generated from the SPEVAL Proforma ID.
HEADER
This is the Display Header, generated from the SPEVAL Proforma
Header.
TYPE
The Proforma type. This is an internal SPEVAL variable.
NUM_PARAMETERS
The number of total parameters displayed in the plot.
NUM_GRAPHS
The number of graphs displayed in the plot.
PARAMETER
This is an array of structures. Each structure corresponds to a Parameter, contain-
SPEVAL PV-Wave Variables
203
SPEVAL
Cray
Software User Manual
Systems
ing the following entries:
NAME
Parameter Name.
DESCRIPTION
Parameter Description.
UNITS
Parameter Unit.
Y_MIN
Minimum Y-Value when plotting the Parameter.
T_MAX
Maximum Y-Value when plotting the Parameter.
COLOUR
Plot colour.
CALIBRATED
1: Parameter values are calibrated. 0: Parameter values are uncalibrated.
VALUES
Number of total values which the Parameter contains for this plot.
TEXT_TABLE
Index into the TEXT_TABLE array for the Parameter. (0 if no Text
Table)
DATATYPE
The Parameter data type. (As string)
LIMITS_VALID
Array (4 elements). If one element is 1, the corresponding LIMITS element displays a valid Hard Limit for the Parameter.
LIMITS
Array (4 elements). Gives the Hard Limit for the Parameter.
LINESTYLE
Gives the plot linestyle as a number
SYMBOL
Gives the plot symbol as a number.
LIMIT_DISPLAYED
If 1, the Limits are displayed for this Parameter. If 0, no Limits are displayed for the Parameter.
STATUS_AS_NUM_ON_AXIS
If 1 and Status Parameter, the y-axis displays numerical values instead
of the actual Status Texts. If 0, Status Texts are displayed.
DATA
This is one single structure. Each structure member is named after the parameter
which is corresponds to. Each structure member is an array (of varying size).
E.g. if two Parameters “O321” and “O322” has been plotted, the DATA structure
will contain two structure members. The arrays can be accessed in two different
ways, namely:
DATA._O321 (note the underscore)
or, by index
DATA.(0)
Individual array components are indexed by e.g. DATA.(1)(9) (to index the 10’th
element).
SPEVAL PV-Wave Variables
204
SPEVAL
Cray
Software User Manual
Systems
NEW_DATA
This structure is generated by a call to GRPH_MATCH_DATA. The structure type
is similar to the data structure, but each data element has a one-to-one correspondence with the corresponding time in the TIME array (or the NEW_TIME array if
the /MATCH qualifier has been used). E.g. the corresponding data element for the
10’th time in the TIME array for parameter 0321 is given by
NEW_DATA._0321(9).
NEW_DATA_VALID
This structure is generated by a call to GRPH_MATCH_DATA. The structure
members and array sizes are the same as in NEW_DATA, but each value signals
whether the corresponding data element existed (=1) or did not exist (=0) for the
corresponding time. E.g. to check if a value exists for the 10’th time in the TIME
array for parameter 0321, inspect NEW_DATA_VALID._0321(9).
TIMES
This is a structure parallel to the DATA structure (each structure field is the name
of a Parameter), but each array element index into the corresponding TIME element for the corresponding data point. E.g. the corresponding time for the 10’th Y
value for parameter O321 is given by TIME(TIMES._O321(9)) or alternatively
with indexes
TIME(TIMES.(0)(9))
GRAPH
This is an array of structures, sized to the numbers of graphs which have been displayed in the plot. The structure is left un-initialised if the data has been loaded via
GRPH_LOAD_UDS. Each structure contains the following members:
X_AXIS_TYPE
This string defines the plot type as ‘TIME’ (plot against time) or
‘PARAM’ (plot against parameter).
X_AXIS_PARAMETER
This integer indexes into the PARAMETER array, identifying the Xaxis Parameter for the plot.
Y_AXIS_PARAMETER
This array (size 8) indexes into the PARAMETER array, identifying
the Y-axis Parameters for the plot.
N_OF_Y_AXIS_PARAMETERS
The number of y-axis parameters plotted in this graph.
COLOUR
Graph x-axis colour.
TEXT_TABLE
This is an array of structures. NOTE: even if there are no Status Parameters in the
plot, there will always be 1 or more TEXT_TABLE structures (because PV-Wave
cannot handle arrays of 0 elements). Each structure has the following members:
ID
Text Table ID.
N_INIT_STRINGS
Number of Status Text Strings defined for this Text Table.
STRING
Array of strings (maximum 256). Each string gives the Status Text for
the corresponding Status Value. Unused strings are initialised with the
“********” string.
SPEVAL PV-Wave Variables
205
SPEVAL
Cray
Software User Manual
Systems
SPEVAL PV-Wave Variables
206
SPEVAL
Cray
Software User Manual
Systems
Appendix C SPEVAL Messages
This list shows the messages displayed in the SPEVAL Session Control Message Area. The
page numbers refer to the page on which the message meaning and help text is defined. For
messages which may be issued by several Speval Items (e.g. "File not Found"), the second
indentation level refers to the corresponding item.
Looking up messages
When the SPEVAL Session Control WIndow displays a message, it will always be on the
form:
[<message_originator> :] <message_text>
where the optional <message_originator> is the SPEVAL object (e.g. the "Save Case ~ Simple
Time" Window) originating the message, and <message_text> is the actual message. The colon
(":") is used to separate the two items.
Note that this appendix is indexed on the message_text only.
Examples are:
"Save Case ~ Simple Time: End time is equal to or before start
time"
Here, the refererence page is listed under E ("End time is ....").
"No data found for this retrieval"
Here, the <message_originator> is missing, and the reference page is listed under N.
Message List
Symbols
“Repeat Period” is less than “Window Length” 156
A
Aborted job submitted at 71
An internal error has occured, please Contact Software support 84
Another display retrieval job running - Parallel display jobs not
possible 73
B
BEG. of window/file reach (Hex Dump) 194
C
Cannot process dump log since no time correlation coefficients
are available 85
Cannot retrieve any data. Parameters were not located in packets
correctly 85
Could not load alphanumeric data into memory (probably resource
constraints) 86
Could not resolve directory Please re-specify
SPEVAL Messages
201
Cray
Reference: SUM/A18-0300
Volume: A18
Issue: 3.00
Systems
Pop Up Message 60
Could not resolve filename
Pop Up Message 60
Could not resolve file-type
Please re-specify
Pop Up Message 60
Couldn’t read from tape drive 85
D
Design constraint: time range is too big for stats data ( reduce
to 108
Device Full: cannot carry on with retrieval 84
Device not ready: cannot carry on with retrieval 84
Display Save Case has already been submitted - parallel retrievals of this type are not supported 84
Dump at <id> was truncated on output <n> of <m> lines are shown 85
E
END of window/file reach (Hex Dump) 194
End time is equal to or before start time 54
Error opening the file (Hex Dump) 194
Error processing a request to abort an outstanding Retreival job
71
Error processing the list of outstanding Retreival jobs. 71
F
Failed to abort Job submitted at 71
Failed to create ptvs file: cannot carry on with retrieval 84
failed to find Packet ID for parameter <parameter> 84
Failed to find processes ID and Packet Type for Packet
<packet_id> 84
failed to get PNT pointer for parameter <parameter> 85
Failed to load (PV-Wave) 186
failed to map to SCOS database: retriever stopped 84
Failed to mount tape <tape_label>. Only data from <n> tapes are
retrieved 86
Failed to open PTVS file: cannot carry on with retrieval 84
Failed to write to PTVS: disk full 85
Field contains embedded blanks - Use only letters, numbers, and
the following
”_”, ”-”, ”$”
Field Proforma 117
Proforma ID 124
UDS 119
Field contains embedded blanks - Use only letters, numbers, and
the following: ”_”, ”-”, ”$” 93
Field contains no input
Field Proforma 117
Proforma ID 124
Save Case ID 93
time fields 54
SPEVAL Messages
202
SPEVAL
Cray
Software User Manual
Systems
UDS 119
Field has invalid format
time fields 54
Field has invalid use of annotator 54
Field is all blanks
Field Proforma 117
Proforma ID 124
Save Case ID 93
time fields 54
UDS 119
Field is too short for defaulting 54
File not a UDS file (PV-Wave) 186
File not found 73
File not found
Field Proforma 117
Proforma ID 124
Save Case ID 93
I
Incomplete CHB dump detected at <id> events may be missing 85
Internal Error - Contact Software Support (PV-Wave) 186
Internal error: cannot access scrolling log database 85
Internal error: scrolling log format is invalid 85
Internal PTVS Error occured 84
Invalid data stream - following are valid examples: ”-1,0,+1”,
”-1 0 1”, ”-101” 99
Invalid datastream number (Hex Dump) 194
Invalid Packet format (Hex Dump) 194
Invalid Spacecraft Id (Hex Dump) 194
L
Limit Crossings of None-None-None-None would result in no data
retrieved 138
Loading retrieved data 84
M
Mismatch between required time format & actual format 54
N
No data found for this Packet Id and this Datastream (Hex Dump)
194
No Data Points in selected range 183
No data was found for Parameter <parameter> 84
No data was found for this retrieval 84
No database is valid for the specified time 85
No parameters found after ANDing PTVS with Proforma 84
No stats data is expected for Stats display since no parameters
have stats filters 116
No TM data is expected for TM displays since all parameters have
stats filters 116
SPEVAL Messages
203
Cray
Reference: SUM/A18-0300
Volume: A18
Issue: 3.00
Systems
O
Operator cancelled mount request 86
Overlaps next window start time - overlapping windows are not
supported 158
P
Parameter not found in the PARAMETER array (PV-Wave) 189
Parameter <parameter> changed in SCOS DB. 85
Parameter <parameter> is of type constant. Cannot be retrieved 84
Parameter characteristics couldn’t be formed for Param <parameter> 85
Please specify a directory
Pop Up Message 60
PROF-E-CANTMODSCOS 48
PROF-E-CANTOPENOUT 48
PROF-E-EXTRACTFAIL 51
PROF-E-READFAIL 51
PROF-E-WRITEFAIL 48, 51
PROF-F-BADFIELDNUM 49
PROF-F-BADFORMAT 49
PROF-F-BADTYPE 48
PROF-F-CANTCALIB 49
PROF-F-CANTOPENFILE 49
PROF-F-CLIERR 48
PROF-F-DEFINEFIRST 48
PROF-F-FATALERR 49
PROF-F-FIELDINUSE 49
PROF-F-GETFILENAME 49
PROF-F-GRAPHNUM 48
PROF-F-INVCOMMAND 49
PROF-F-INVNUM 49
PROF-F-MAXGRAPH 49
PROF-F-NODATABASE 48
PROF-F-NOLUN 48
PROF-F-NOSPACECRAFT 48
PROF-F-NOSUCHPARAM 48
PROF-F-NOSUCHSC 48
PROF-F-NOTPROFORMA 48
PROF-F-ONEXAXIS 48
PROF-F-TOOMANYPARAMS 48
PROF-F-WRNGPROFTYPE 48
PROF-W-ATOSCALE 48
PROF-W-ONE_OR_ALL 48
PROF-W-TRUNCATED 47
PV-Wave data not existing or unexpected type, use INFO (PV-Wave)
189
R
Retrieval reached end-of-file 85
Retrieved data loaded 84
SPEVAL Messages
204
SPEVAL
Cray
Software User Manual
Systems
S
Save Case specified an output nature for Param <parameter> that
the retriever did not recognise 85
Save Case sumbitted for retrieval 84
Some tasks are still starting - retry in a minute or so
when exiting 66
T
Text Table could not be found for Parameter <parameter> 85
The ERS scrolling log <log_id> is not defined 85
The UDS file contains no Telemetry Data (PV-Wave) 186
This type of retrieval function is not yet implemented 85
U
UDS file
contains no Alphanumeric or Graphical Proforma. Cannot
be displayed 73
UDS file contains no data for display 73
UDS file is corrupted 73
UDS file contains no TM data - Cannot be loaded into Wave (PVWave) 186
UDS file contains no TM Parameters (PV-Wave) 186
Unable to fully validate because start time is invalid 54
Unexpected argument(s) , expected (PV-Wave) 189
Unexpected argument(s) UDS_FILE_NAME, expected STRING (PV-Wave)
186
Use only letters, numbers, and the following
”_”, ”-”, ”$”
Field Proforma 117
Proforma ID 124
UDS 119
Use only letters, numbers, and the following: ”_”, ”-”, ”$”
Save Case ID 93
W
Wildcards in file names are not supported
Field Proforma 117
Proforma ID 124
Save Case ID 93
UDS 119
Z
zero parameters defined in proforma 84
SPEVAL Messages
205
Cray
Reference: SUM/A18-0300
Volume: A18
Issue: 3.00
Systems
SPEVAL Messages
206
SPEVAL
Cray
Software User Manual
Systems
Appendix D Glossary
<key-down>: The key used to navigate down
<key-left>: The key used to navigate left
<key-left>:The key used to navigate left
<key-right>: The key used to navigate right
<key-up>: The key used to navigate up
<next>: the key used to navigate to the next page
<prev>: The kay used to navigate to the previous page
BDQ: Bad Data Quality
BTQ: Bad Time Quality
DCL: Digital Command Language
DECTERM: Standard DEC Command Language interface window
EDEF: External Definition (Save Case)
EPS:Encapsulated Postscript
eXceed: PC Software supporting the X11 protocol
ID: Identifier or Invalid Data
LTA: Long Term Archieve
MB1: Mouse Button 1
Navigating:in Alphanumeric Window;Keys:navigating with in Alphanumeric Window
OOL: Out of Limits
PS: Postscript
PV-Wave: Tool to display graphics
Save Case: SPEVAL Window defining a Retrieval & Display strategy
SCOS: Sattelite Control & Operating System
SEP: Simple Extraction Processing (Save Case)
Session ID: A two character field displayed in the Window Header.
Identifies the User and the Session Number (e.g. H1)
SPEVAL: Acronym for SPacecraft EVALuation
TM: Telemetry
TME: TM Extraction (Save Case)
TRS: Time-ordered Record Set
UDS: User Data Set
X-11: Standard Network protocol supporting X-Windows
X-Server: Terminal displaying X-Windows
Glossary
207
Cray
Reference: SUM/A18-0300
Volume: A18
Issue: 3.00
Systems
Appendix E Index
Symbols
'??????'
displayed in Alphanumeric Windows 164
“*******”
displayed in Alphanumeric Windows 164
A
Abort Job 70
Absolute Time
syntax of 53
All Already Calculated Totals
as output type in Save Case 112
ALPHANUMERIC
qualifier in Proforma 43
Alphanumeric Display Window 176
specifying in Save Case 115
Alphanumeric List Window 166
specifying in Save Case 115, 116
Alphanumeric Proforma
example of 46, 47
Alphanumeric Windows 162
analogue Parameters
filtering 136
AVGE
in Statistics Window 169
B
BACKGROUND
qualifier in Proforma 44
Backup-Up Time-Tagged Commands Buffer Log
specifying to retrieve 104
Bad Data Quality
see BDQ
Bad Time Quality
see BTQ
BDQ
indicated in Alphanumeric Windows 166
specifying in Save Case filter 132
BTQ
specifying in Save Case filter 132
C
Calendar Time 52
CALIBRATED
qualifier in Proforma 42
Cancelling
Save Case 87
Chronological History Buffer Log
Index
208
SPEVAL
Cray
Software User Manual
Systems
specifying to retrieve 104
Clearing hung DECterm processes 195
CLUSTER
Command History Display 116
CO
in OOL Window 173
Colour
as Quality Indicators in Alphanumeric Windows 167
specifying background 44
specifying for graphs axes 42
specifying foreground 44
specifying in parameter plot 44, 46
Colour printing
of Graphics 179
Command History Display
specifying 116
COMMUTATION
qualifier in Proforma 43
COMPILE
Proforma 41
Control Centre
and Long Term Archieve 98
COR_V
in OOL Window 172
CUR_V
in OOL Window 172
D
DATA
PV-Wave Variable 198
Data Points
as Output Type in Save Case 112
Data quality 166
Data Source
in Save Case 98
Data Streams
specifying in Save Case 99
Data Type
in Save Case 103
DATA_Q
in Statistics Window 169
Database
spacecraft 101
specifying version 101
Day of Year
syntax of 53
DECterm
can’t start 195
DEFAULT_COLOUR
qualifier in Proforma 42
Index
209
Cray
Reference: SUM/A18-0300
Volume: A18
Issue: 3.00
Systems
Delta Time
syntax of 53
Derived parameters, see PV-Wave SPEVAL procedures 184
Description
of a Save Case 94
Directory
Proforma directories 39
UDS files 119
DISPLAY
PV-Wave Variable 197
Display Formats
in Alphanumeric Windows 164
Display Output
Save Case Nature 95
DISPLAY_FIELD
qualifier in Proforma 43
Duplicate data
in Totals Windows 174
E
END_T
in Statistics Window 169
Entry Formats
in Irregular Time Windows 157
EPS
Encapsulated Postscript 114
Error Messages
how to look up 201
index of 201
EXCEL
exporting SPEVAL data to 163
Exiting
Alphanumeric WIndows 162
SPEVAL 8
Export
of data to spreadsheets 163
EXTRACT
Proforma 50, 51
F
Field Proforma 50
example of 47
File
output from Retrieval 114
File Selection Box 57
Filter
default from Proforma 128
Filtering
flow diagram for Save Case 122
of retrievals 15
Index
210
SPEVAL
Cray
Software User Manual
Systems
Filters
Data Filters (all) 132
Time Filter 130
FLAG
in OOL Window 172
FOREGROUND
qualiifier in Proforma 44
FORMAT
qualifier in Proforma 43
Formats
in Alphanumeric Windows 164
FX
in OOL Window 173
G
GRAPH
PV-Wave Variable 199
qualifier in Proforma 44, 46
Graphical Window 178
specifying in Save Case 115
Graphics Proforma
example of 46
GRAPHS
qualifier in Proforma 42
Ground Station Schedule File
specifying to retrieve 104
GRPH_LOAD_UDS 185
GRPH_MATCH_DATA 187
H
Help
on SPEVAL 68
on Version 68
Help Menu 64
Hex Dump 190, 195
HH
in OOL Window 172
HL
in OOL Window 172
Hours
syntax of 53
I
ID
of a Save Case 92
specifying Invalid Data (ID) filtering in Proforma Editor 43
specifying invalid data filtering in Save Case 133
SPEVAL Session ID 65
Invalid Data
see ID
Irregular Time Windows 157
Index
211
Cray
Reference: SUM/A18-0300
Volume: A18
Issue: 3.00
Systems
J
Job
aborting 70
Jump to Time Window 55
K
Keyboard
navigation keys 160
L
Last Submission End Time 64
Last Submission Start Time 64
Limits
showing in parameter plots 44
LINE
specifying linestyle in parameter plot 44
LINES
qualifier in Proforma 46
List
parameter list in Save Case 127
LIST_FIELD
qualifier in Proforma 43
Listing
Proforma 9
Listing files 57
Lists
selecting rows in 62
Loading
Proforma 142
Save Case 13, 80
Long Term Archieve
as data source in Save Case 98
Long Term Archive data
retrieving 9
M
Macro Commands Buffer Log
specifying to retrieve 104
MAX_T
in Statistics Window 169
MAX_V
in Statistics Window 169
Merge of All Already Calculated Totals
as output type in Save Case 112
MERGE_Y_AXES
qualifier in Proforma 46
Message Area 64
Messages
how to look up 201
index of 201
Index
212
SPEVAL
Cray
Software User Manual
Systems
Milliseconds
syntax of 53
MIN_T
in Statistics Window 169
MIN_V
in Statistics Window 169
Minutes
syntax of 53
Mod. Jul Day Time 52
MODE_DEPENDENT
qualifier in Proforma 42, 43
Monitoring Table Log
specifying to retrieve 104
Multiple SPEVAL Sessions 65
N
N_OF_D
in Statistics Window 169
N_OV_V
in Totals Window 175
Nature
of a Save Case 95
NEW_DATA
PV-Wave Variable 199
NEW_DATA_VALID
PV-Wave Variable 199
NEW_TIME
PV-Wave variable 197
numeric parameters
filtering 136
NUMERIC_LABELS
qualifier in Proforma 44
O
OBRQ File
specifying to retrieve 104
OOL
retrieving 25
specifying filter in Save Case 136
specifying to retrieve 103
OOL Window 171
OOL_T
in OOL Window 172
Orbit & Offset Time 52
Orbit Event File
specifying to retrieve 104
Output
specifying types of 110
to file 114
to Printer 114
Index
213
Cray
Reference: SUM/A18-0300
Volume: A18
Issue: 3.00
Systems
to Screen 114
Overall End Time
in Save Case - Time Options Window 155
Overall Start Time
in Save Case - Time Options Window 155
P
P_DESC
in OOL Window 172
P_DESCR
in Statistics Window 169
P_NAME
in OOL Window 172
in Statistics Window 169
P_UNIT
in OOL Window 172
PARAMETER
PV-Wave Variable 197
Parameter
list in Save Case 127
Parameter ID
specifying in Proforma 42
Parameter Proforma
example of 47
PIF_C
in OOL Window 172
Printer
output from Retrieval 114
Printing
graphics 179
of displayed data 163
specifying colour printer 179
Proforma
Alphanumeric 107
ALPHANUMERIC qualifier 43
and default Save Case data filters 128
BACKGROUND qualifier 44
CALIBRATED qualifier 42
COLOUR qualifier 44, 46
COMMUTATION qualifier 43
compiling a 41
DEFAULT_COLOUR qualifier 42
directories 39
DISPLAY_FIELD qualifier 43
Editor 39
examples of 46
extracting a 51
Field Proforma 50
FOREGROUND qualifier 44
FORMAT qualifier 43
Index
214
SPEVAL
Cray
Software User Manual
Systems
GRAPH qualifier 44, 46
Graphical 107
GRAPHS qualifier 42
LINE qualifier 44
LINES qualifier 46
LIST_FIELD qualifier 43
listing directories 9
loading 142
loading from the Save Case Extraction Processing window 137
MERGE_Y_AXES qualifier 46
MODE_DEPENDENT qualifier 42, 43
NUMERIC_LABELS qualifier 44
ON_X_AXIS qualifier 44
Parameter Only 107
param-id qualifier 42
proforma-id 42
proforma-type qualifier 41
SCALING qualifier 44
SCOS qualifier 42
SHOW_LIMITS qualifier 44
SPACECRAFT qualifier 42
specifying in Save Case 106
specifying in TM extraction Window 124
STACK_PARAMETERS qualifier 46
STEPPED_PLOT qualifier 45
SYMBOL qualifier 44
TICKS qualifier 46
title qualifier 42
TRANSLATE 40
type in Save Case 107
update from (in Save Case) 143
PV-Wave
DATA Variable 198
DISPLAY Variable 197
dumping Speval data to 178
GRAPH Variable 199
PARAMETER Variable 197
starting from command line 36
TEXT_TABLE Variable 199
TIME Variable 197
TIMES Variable 199
using with SPEVAL 35
Q
Quality Indicators
in Alphanumeric Windows 166
R
Refresh Graph 182
REL_P
Index
215
Cray
Reference: SUM/A18-0300
Volume: A18
Issue: 3.00
Systems
in OOL Window 172
Repeat Period
in Save Case - Time Options Window 155
Resetting
a Save Case 79
Retrieval
aborting 70
from the Save Case 83
of LTA TM Data 9
of OOL data 25, 103
of Scrolling Logs 103
of TC data 103
of TM data 103
specifying filter in 15
Time range 108
Row Selection Modes 62
Rows
Selecting all in a Window 63
S
Save Case
cancelling a 87
Data Filter (analogue) 136
Data Filters (all) 132
Data Filters (status) 134
Data Source 98
Data Streams 99
Data Type 103
description of 94
Display Type 115
External Defition Form 88
ID of 92
Load Button 80
Loading a 13
Nature 95
Output Form 110
Output Type 112
overwriting existing 82
resetting to default 79
Save Button 82
Simple Extraction Processing Form 106
Simple Time 108
Spacecraft 90
Spacecraft Database 101
starting 64
submitting 83
Summary data source 98
Time Filter 130
Time Options Button 78
Time range for retrieval 108
Index
216
SPEVAL
Cray
Software User Manual
Systems
Tm Extraction Processing Options Button 77, 78, 79, 80, 81, 82, 83, 87, 90
TM Extraction Window 121
User Data Set data source 98
Validate Button 81
Window 74
Saving
a Save Case 82
SC_ID
in Totals Window 175
SCALING
qualifier in Proforma 44
SCOS
qualifier in Proforma 42
Screen
as Output from retrieval 114
Scrollbars
and cursor keys 160
Scrolling Log
specifying to retrieve 103
Seconds
syntax of 53
Selecting rows in Speval Lists 62
SET
in OOL Window 173
SH
in OOL Window 173
SIGMA
in Statistics Window 169
SL
in OOL Window 172
Slices in Graphical Windows 181
Smoothing of data from PV-Wave 33
Software Problem Report
see SPR
SPACECRAFT
qualifier in Proforma 42
Spacecraft
S/C Database version 101
specifying in Save Case 90
Spacecraft Schedule File
specifying to retrieve 104
SPEVAL
exiting 8
help on 68
messages 201
multiple sessions in 65
starting 5
SPEVAL Control 64
Commands Menu 64
File | Exit 66
Index
217
Cray
Reference: SUM/A18-0300
Volume: A18
Issue: 3.00
Systems
Help Menu 64
Last Submission End Time 64
Last Submission Start Time 64
Message Area 64
Spike Suppression
from PV-Wave 33
SPR
how to issue 2
STACK_PARAMETERS
qualifier in Proforma 46
Stacked y-axis 46
START_T
in Statistics Window 169
Starting
Save Case 64
SPEVAL 5
Statistics
all already calculated 137
and multiple time windows 155, 158
from data points 137
generating 19
merge of all already calculated 137
specifying filter in Save Case 136
Start Time and End Time differences between LTA and UDS/Summary 170
Statistics Window 168
specifying in Save Case 115
Status Parameters
filtering 134
Status Text Set
Status Parameter without a Status Text Set 15
STEPPED_PLOT
qualifier in Proforma 45
SUB_T
in Totals Window 175
Submitting a Save Case for retrieval 83
Summary
data source in Save Case 98
editing a Save Case 26
Save Case Nature 95
Survival Mode Extension Buffer Log
specifying to retrieve 104
SYMBOL
in parameter plot 44
T
TC
specifying to retrieve 103
TC Extraction Type
specifying in Save Case 107
TEXT_TABLE
Index
218
SPEVAL
Cray
Software User Manual
Systems
PV-Wave Variable 199
TICKS
qualifier in Proforma 46
TIME
PV-Wave Variable 197
Time
absolute time 53
Calendar Time 52
delta time 53
Jump to Time Window 55
Mod. Jul Day 52
Orbit & Offset 52
specifying retrieval time range 108
Year & Day 52
Time Correlation File
specifying to retrieve 104
Time Definition file
Save Case Nature 95
Time Fields
syntax specification 52
Time Filters
in Save Case 130
Time quality 166
Time range
specifying in retrieval 108
Time Rows
in irregular Time Windows 157
Time Windows
and statistics 155, 158
entry formats 157
irregular 157
Overall End Time 155
Overall Start Time 155
overlapping 158
Repeat Period 155
repeated 155
single 154
Window Length 155, 158
TIME_Q
in Statistics Window 169
TIMES
PV-Wave Variable 199
Times
on Graph X-axis 179
Time-Tagged Commands Buffer Log
specifying to retrieve 104
TM
specifying to retrieve 103
TM Extraction WIndow
in Save Case 121
Index
219
Cray
Reference: SUM/A18-0300
Volume: A18
Issue: 3.00
Systems
Totals
difference in total counts between LTA and UDS files 174
Totals From Data Points
as Output Type in Save Case 112
Totals Window 174
TRS 190
U
UDS
Save Case Nature 95
UDS Files
retrieving into 30
User Data Set
data source in Save Case 98
User Data Set ID
specifying output in Save Case 119
V
Validate
Save Case 81
Validity Quality
indicated in Alphanumeric Windows 166
Version
SPEVAL 68
VLD_Q
in Statistics Window 169
W
Window Length
in Save Case - Time Options Window 155, 158
wL
in OOL Window 172
X
X_Clear 195
X-axis
and times 179
specifying parameter for 44
Y
Y-axes
merging 46
Year
syntax of 53
Year & Day Time 52
Z
Zoom 181
Index
220
SPEVAL
SPR No:
SOFTWARE PROBLEM REPORT
TYPE:
OD Ref:
Title:
Date:
Originator:
System:
Facility:
Problem description:(Originator)
Description of environment: (Originator)
Attatchment(s): (Originator)
Recommended solution: (Investigator)
Date:
Investigator:
Board
Status
Release
Date
Fac release
SPEVAL
SPR No:
SOFTWARE PROBLEM REPORT
TYPE:
Title: ERS 2 Scrolling Log Internal error message
OD Ref:
QER-12
Date:
95.11.22
Originator:
Q.ERULANT
System:
Facility:
Problem description:(Originator)
When retrieving the ERS-2 scrolling log using the save case QER_12, the SPEVAL Session Control
Window displays the message "Alphanumeric List: Internal Error - This task is now exiting". (The
message is not listed in the SUM).
Time of Submission : 3-MARS 1996, ca. 13:30
Description of environment: (Originator)
Machine : E2SPVL.
Spacecraft: ERS-2
Save Case: QER_12.
Attatchment(s): (Originator)
Printout of SPEVAL Session Control message.
Recommended solution: (Investigator)
Date:
Investigator:
Board
Status
Release
Date
Fac release