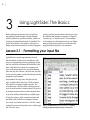
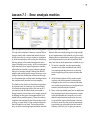
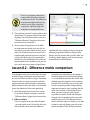
1
Researcher’s Workbench
User Manual
Elijah Mayfield
David Adamson
Carolyn P. Rosé
Spring 2014
LightSide: Research Workbench User’s Manual
Co-authors can be contacted at the following addresses:
Elijah Mayfield: [email protected]
David Adamson: [email protected]
Carolyn Rosé: [email protected]
Work related to this project was funded through the Pittsburgh Science of Learning Center, the Office of
Naval Research Cognitive and Neural Sciences Division, the National Science Foundation, Carnegie Mellon University, and others.
Special thanks to Moonyoung Kang, Sourish Chaudhuri, Yi-Chia Wang, Mahesh Joshi, Philip Gianfortoni,
Gregory Dyke, and Eric Rosé for collaboration and contributions to past versions of LightSide.
LightSide is released under the GPL version 3. The GNU General Public License is a free, copyleft license
for software and other kinds of works. This manual is released until the GFDL version 1.3. The GNU Free
Documentation License is a form of copyleft intended for use on a manual, textbook or other document
to assure everyone the effective freedom to copy and redistribute it, with or without modifications, either
commercially or non-commercially. These licenses are available in full at http://www.gnu.org/licenses .
| iii
Table of Contents
1
Machine Learning Made Easy
1
Organization . . . . . . . . . . . . . . . . . . 1
Workflow . . . . . . . . . . . . . . . . . . . . 1
2
Installation and Setup
3
Checking your Java VM. . . . . . . . . . . . . . 3
Frequent Troubles. . . . . . . . . . . . . . . . 3
Installing & Running LightSide. . . . . . . . . . 4
System Resources. . . . . . . . . . . . . . . . 4
Bug Hunting . . . . . . . . . . . . . . . . . . . 5
3
Using LightSide: The Basics
6
Lesson 3.1 - Formatting your input file. . . . . . . 6
Lesson 3.2 - Feature extraction setup. . . . . . . 7
Lesson 3.3 - Exploring a feature table. . . . . . . 8
Lesson 3.4 - Machine learning setup. . . . . . . . 9
Lesson 3.5 - Prediction on new data . . . . . . . 10
4
Advanced Feature Extraction
12
Lesson 4.1 - Complex text representation. . . . . 12
Lesson 4.2 - Column features . . . . . . . . . . 16
Lesson 4.3 - Regular expressions . . . . . . . . . 17
Lesson 4.4 - Stretchy patterns. . . . . . . . . . 18
Lesson 4.5 - Character N-Grams . . . . . . . . . 20
Lesson 4.6 - Parse features . . . . . . . . . . . 20
iv
| TABLE OF CONTENTS
5
Data Restructuring
21
Lesson 5.1 - Filtering features. . . . . . . . . . 21
Lesson 5.2 - Combining features . . . . . . . . . 22
Lesson 5.3 - Combining feature tables . . . . . . 23
Lesson 5.4 - Multilevel modeling. . . . . . . . . 24
6
Advanced Machine Learning
25
Lesson 6.1 - Machine learning algorithms. . . . . 25
Lesson 6.2 - Validation techniques. . . . . . . . 28
Lesson 6.3 - Numeric Prediction . . . . . . . . . 30
7
Error Analysis
Lesson 7.1 - Error analysis metrics. . . . . . . .
Lesson 7.2 - Deep analysis plugins . . . . . . . .
Lesson 7.3 - A worked example . . . . . . . . .
8
Model Comparison
42
Lesson 8.1 - Basic model comparison. . . . . . . 42
Lesson 8.2 - Difference matrix comparison . . . . 43
A Glossary of Common Terms B
31
33
36
39
45
Extending with Plugins
47
The Plugin Architecture. . . . . . . . . . . . . 47
Compiling Your Plugin. . . . . . . . . . . . . . 48
Your Development Environment. . . . . . . . . 48
Feature Extraction . . . . . . . . . . . . . . . 48
Other Plugins . . . . . . . . . . . . . . . . . 48
| v
A Message from the Authors
Hi!
We’re glad you’re using LightSide. We’re pretty certain that for beginner or intermediate users of machine learning for text, we’ve found the best tradeoff between usability and power that currently exists.
However, we know we’re not perfect and the codebase is ever evolving. For you as a reader, this means
there are two things you should keep in mind.
First, we published this PDF in February 2014. I don’t know when you’re reading this, but it’s probably a
lot later than that and we’ve probably done some amazing things with the program since this was written. That means that the screenshots you see in this document might not line up perfectly with what’s on
your screen. Don’t panic! That probably just means you’re using the most recent version of the program,
which doesn’t match this document perfectly. For reference, this manual assumes LightSide version
2.2.11.
Second, there will be bugs. Not any major earth-shattering bugs (if those were obvious, we would have
fixed them), but minor inconveniences that you can only really discover after prodding the system with
a stick for a while. You’ve probably found a clever and esoteric sequence of steps that we hadn’t even
dreamed of testing.
If you think that there’s something that’s wrong, that doesn’t behave the way the user’s manual says it
should, or that just confuses you, don’t hesitate to get in touch. Helping you understand machine learning is our job. We’re excited to hear from you because we like it when people use our program.
Happy trails!
Elijah Mayfield
[email protected]
David Adamson
[email protected]
Carolyn Penstein Rosé
[email protected]
vi| | 1
1
Machine Learning Made Easy
Welcome to LightSide! We’ve built a tool that lets
you hit the ground running with your data, putting
as much of the research workflow for machine
learning as possible into an easy, point-and-click
interface. With those tools, you’re likely to hit the
upper bound of what standard machine learning
can do for you when working with text classification and regression problems.
Organization
In this manual, we try to provide detail for how to
make use of every interface option. Chapters 2 and
3 will get you going in the most basic possible way,
teaching you how to install LightSide, extract features from a text, train a model, and predict labels
for new data.
The next few chapters - 4, 5, and 6 - teach you how
to optimize your machine learning performance.
We give you a suite of tools for extracting features,
editing feature tables, and changing the parameters for machine learning algorithms. Beyond that,
though, we believe that there’s a lot to be learned
simply from exploring your data, attempting to
judge why a decision was made by machine learning, where its errors are likely to fall, and how you
might be able to adjust performance and behavior
in the future based on what you’ve seen in your
data. For those processes, chapters 7 and 8 will
give you a starting point within our interface.
For reference, Appendix A covers a set of common
terms that can end up being confusing. By follow-
ing these vocabulary conventions you’ll be sure to
have a smoother conversation as you explore the
opportunities available with machine learning.
If you’re really hoping to push the state of the art,
then the user interface that we’ve built might not
be sufficient for you. For the dedicated researcher
with some programming experience, therefore,
we also offer access to several points within the
LightSide workflow where you can add new
components that you’ve programmed yourself.
Conveniently, adding one component has no effect
on the rest of the workflow, meaning that you can
easily tweak performance and behavior at one
point in the pipeline and still take advantage of
every other process along the way. These plugin
options are described in Appendix B.
Workflow
LightSide is divided into a series of six tabs following the entire process of machine learning. In
the first, Extract Features, training documents are
converted into feature tables. Next, in Restructure
Plugins, we have built several tools which allow users to manually adjust the resulting feature tables.
In Build Model, the third tab, modern algorithms
are used to discover latent patterns in that feature
table. The classifier that results is able to reproduce
human annotation.
The next three tabs allow users to explore those
trained models and use them to annotate new
data. In the fourth tab, Explore Results, offers error
2| analysis tools that allow researchers to understand
what their models do well and why they fail in
some cases. The fifth, Compare Results, allows
users to look at specific differences between two
different trained models to understand both gaps
in performance as a whole and individually. The
final tab, Predict Labels, allows us to use the resulting trained models to annotate new data that no
humans have labeled.
The simplest workflow, for those with basic
machine learning needs, comes from the first and
third tabs. In each case we progress from an input
data structure to an output data structure:
Documents → Extract Features → Feature Table
Feature Table → Build Model → Trained Model
Each tab in the interface which builds these successive steps is structured with the same basic
workflow, as illustrated in Figure 1.
The top half of each tab is dedicated to configuring your next step of action. As you move from
left to right, your configuration becomes more
fine-grained. You begin on the left by defining what
data you are working with; in the middle you select
which functions within LightSide to use; and on the
right you configure the specific settings you want
to use for that function.
The middle bar in each tab is where you perform
the tab’s action. On the left, in bold, is the button
to begin the action. On the right a progress bar will
appear as the process is running, informing you
that the process is running.
The bottom half of each screen informs you of the
result of the action you perform – descriptions of
the new data object you’ve created. Again, the left
side of the the screen defines which object you’re
looking at, while specific information about that
object is located in the bottom right.
Figure 1. Basic LightSide workflow.
| 3
2
Installation and Setup
Checking your Java VM
First thing’s first. Before you ever attempt to use
LightSide, you’re going to need to have Java installed on your computer. If you’re on a Mac, this is
easy - everything should have come preconfigured.
For Windows users, you might have to work a little
harder, unless you’ve been using your computer
for awhile. If you’re certain that you have Java
installed, feel free to move on to the next section.
If not, then open a command line window. How do
you do that on your computer? It depends:
Mac OS X
♦♦
Open Finder
♦♦
Click ‘Applications’ then ‘Utilities’.
♦♦
Double-click ‘Terminal’.
Windows
♦♦
Open the start menu and search for ‘cmd’.
♦♦
Click the ‘cmd’ icon.
Linux
♦♦
Click ‘Applications’ then ‘Administration’.
♦♦
Click ‘Terminal’.
Once you have a command line window open, type
‘java -version’ and press Enter.
If Java is already installed on your computer, you
will receive a response that includes information
about the installation. This isn’t important to you;
it simply needs to be present. You’re in luck! You
can run LightSide right now, so move on to “Installing & Running LightSide.”
If, on the other hand, you’re told “java - command
not found” or some variant, then you need to
install Java. Head to the following website:
http://java.com/download
From that link, you’re going to be looking for the
link labeled “Free Java Download”. Follow the
instructions that you get on installing that program
and repeat our command line steps when you’re
finished, to ensure that Java is fully installed.
Frequent Troubles
For Windows users in particular, your computer
might claim Java is installed, but still fail to run
LightSide. This is probably because of your system’s environment variables.
Here’s what you need to do in a few common versions of Windows. First, when you installed Java,
where did it go? It probably gave you a name for
the installation, like “jdk1.6.0_27”. Similarly, it was
probably installed in a directory, something similar
to “C:\Program Files\Java\jdk1.6.0_27\bin”. Copy
that down in a text document for later. Next, click
these buttons in order:
4| Windows 7
♦♦
Start, Computer, System Properties, Advanced
System settings, Envrionment Variables, System Variables, PATH.
Windows Vista
♦♦
Start, My Computer, Properties, Advanced, Environment Variables, System Variables, PATH.
Windows XP
♦♦
Start, Control Panel, System, Advanced, Environment Variables, System Variables, PATH.
System Resources
Memory Usage
With large data or complex feature sets, the
amount of memory assigned to LightSide
might not be enough - the workbench can become
slow and unresponsive. By default, LightSide is
configured to use 4 GB of RAM on Mac OS X or
Linux, but only 1 GB on Windows. This is because
of the larger array of old computers in use with a
Windows operating system. You can change the
amount of RAM assigned to LightSide, using a text
editor like NotePad or TextEdit:
You now have a window open with a long string of
text. Paste the install folder name plus a semicolon
at the start of that string, like this:
♦♦
Open run.sh in a text editor
C:\Program Files\Java\jdk1.6.0_27\bin;
♦♦
Change the value in the line MAXHEAP=”4G”
Remember, this goes at the beginning of the PATH
variable. Next, to finalize the path change, click
“OK” three times.
Installing & Running
LightSide
Now that Java is installed and working on your
computer, you can use LightSide. All the files that
you need for basic use are available for download
from the homepage at www.Lightsidelabs.com.
Once you download the program, it comes as a .zip
file. Use your favorite archive manager to extract it
into a folder, which you should put somewhere for
easy access, like your Desktop.
To run LightSide, open this folder. Depending on
the operating system you’re using, you will need
to use a different icon to run LightSide: on a Mac,
LightSide.app; on Windows, LightSide.bat; and on
Linux, simply use run.sh.
Mac OS X, Linux
Windows
♦♦
Open lightside.bat in a text editor
♦♦
Change the value in the line set memory=1G
To conserve memory at the cost of deep document-level analysis, you may also want to turn off
“Track Feature Hit Locations” under certain feature
extractors. See Chapter 4 for more details.
Even after allocating more RAM,
you may run out of memory (or
come close) sometimes. In the bottom right corner of the interface,
LightSide informs you how close it’s
getting and will give you a warning if
you’re getting close to running out.
Remember to clear feature tables
and trained models from LightSide
periodically.
| 5
You can track LightSide’s memory usage in the
bottom right corner of the workbench interface (1).
Multiple Processors
The current version of LightSide supports multithreaded feature extraction and model validation.
If your computer has more than one processor,
LightSide will share the work across all of them.
However, especially for cross-validating large models, this can occupy quite a bit of RAM, and may
also slow down other parts of your computer. Click
the
arrow icon near the bottom right corner of
the workbench to turn multithreading on or off.
Bug Hunting
LightSide is a complex tool, and is under constant
development - and while you can count on the
basic workflows we describe to be there for you,
there may be some sequence of actions you take
that doesn’t work the way it should.
When something breaks, please let us know!
Use the
“Report a Bug” link (3) in the bottom
lefthand corner of the workbench to send us a
message - please be as specific as you can. What
dataset were you using, with which feature extractors? Which machine learning algorithm? What
were you doing when things stopped behaving as
expected?
You’ll also find a file called “lightside_log.log” in
your LightSide folder - this contains the console
output from all your recent runs of the workbench,
with the newest at the bottom. There might be
some clue in this log as to what went wrong - take
a look, and inlcude the log in your bug report.
Figure 2. Getting under the hood.
3
2
1
6| 3
Using LightSide: The Basics
Before getting into complex uses of LightSide,
we’re going to walk through a simple example
with the sentiment_sentences dataset, which is included in the default distribution of LightSide. The
goal of this dataset is very simple - the input is a
single sentence (extracted from reviews of popular
movies), and the goal of machine learning is to predict whether that sentence is positive or negative
(“thumbs up” or “thumbs down”). The examples
in this chapter use that dataset and you can follow
along yourself, ensuring that you understand the
program before using it on your own data.
Lesson 3.1 - Formatting your input file
LightSide has a simple representation format.
Data should be contained in a spreadsheet, with
every row representing a training example, except
the first, which lists the names of the fields of your
data. Each field of your data is in a separate column. In the simple sentiment_sentences dataset,
there are only two columns - the text that you wish
to use as training data, and the label that should be
assigned to each instance.
An example of this is given in the figure to the
right, viewed in Microsoft Excel. The first column
is the positive or negative label to predict. The
second column is the text field, containing the entirety of each instance in training data. Every row is
an example instance with a human-assigned label.
If you have additional metadata or multiple types
of text (for instance, both a separate subject and
text field), each should be in a separate column.
Your entire set of data must be in a CSV file - easily
created from common formats such as .xls through
the “Save As” menu.
Figure 3. A subset of the sentiment_sentences.csv dataset,
showing the appropriate file format for training data.
| 7
Lesson 3.2 - Feature extraction setup
The first tab, Extract Features, moves from your
input file into a feature table. The first work that
needs to be done is simply converting that file into
an object in the LightSide pipeline:
1. The
Load button gives a file browser to
find your data. By default, it opens the “data”
folder within LightSide’s folder.
If your file was saved in an encoding besides
Unicode (UTF-8), select the encoding from
the dropdown menu in the file browser. For
example, CSV files created on Windows may
need to use the “windows-1252” encoding.
Figure 4. Options for loading files into LightSide.
2. When you choose a file, it will be loaded and
the name will appear in the dropdown menu.
That training set can be deleted by clicking the
adjacent
Delete button.
Deleting an object in one part of the
interface deletes it throughout the
entire program. If, for instance, you
delete a feature table in the Build
Models tab, it will also disappear
from the Extract Features tab.
3. Details about the file you used to load, and the
settings for the document list, are displayed in
the description box. Details can be viewed by
opening the
description triangles.
4. The label that LightSide will attempt to predict
will be shown in the “Class:” dropdown box.
You can change this selection to match your
prediction task, though the software attempts
to make an educated guess.
5. LightSide also attempts to guess the type of
data that you’ve included, either nominal (pre-
Figure 5. The feature extraction process in LightSide.
dicting a label) or numeric (predicting a real
number value). You can change this if it guesses
incorrectly.
6. Additionally, you can choose the fields to treat
as text for extracting features, and again,
LightSide will attempt to make an educated
guess by simply loading in the file.
After configuring this section of the interface, you
8| have informed LightSide of the data you want to
use. Next, you need to choose features to extract.
7. The list of feature extractors that you want to
use is in the middle of the top panel. For most
tasks, you will only want to use the “Basic Features” extractor, which you can check.
8. Once you’ve chosen which extractors to use,
they can be configured in the top right corner.
For Basic Features, the easiest choice is to use
the preconfigured “bag-of-words” features.
9. To extract features, you simply click the large
Extract button on the middle bar of the first
interface. A progress bar will appear.
10. If you’re creating multiple feature tables to
compare, they can be renamed based on the
configuration options that you choose.
11. If you made a mistake during configuration or
extraction is too slow, the
Cancel button
will stop the process when it is convenient
for the program. If you need the process to
be stopped immediately, that button will be
replaced with the
Emergency Cancel
button. That will stop the process in a messy
way which may occasionally interfere with
future actions until you close the program.
You can use multiple extractors at
once - just tick both boxes before
you click ‘Extract’. Their features
will be added together.
Lesson 3.3 - Exploring a feature table
Once you’ve extracted a table, it’s useful to
understand what features have been extracted.
Note that this is not where features should be
optimized, especially if you plan to test your performance using cross-validation; the statistics and
data in this interface use the entire training set and
results in overfitting, which is poor methodology.
3. To determine features that are particularly effective for a single class value, you can choose
a “target” label - in this case, either positive or
negative. All remaining optimization metrics
will be oriented towards that target.
4. The set of metrics that can explore features
within a feature table is provided in the bottom
1. The dropdown box in the bottom left corner
allows you to choose the feature table to explore. If you wish to save a model for later use,
the
Save button gives you the option to
do that, and the
Load button loads those
files directly, rather than re-extracting features
on every use of the software. The Save feature
also allows users to copy the feature table to
common formats from other programs, notably CSV and ARFF, in a dropdown menu.
2. Details about the configuration choices made
when extracting features are available in the
description triangles for
extraction
plugins and
the resulting feature table.
Figure 6. Interface for exploring extracted features in a table.
| 9
middle panel. Those options will populate the
per-feature exploration panel.
5. That panel can be filtered by name using the
text field labeled “Search”.
6. The features contained in a table are finally
listed in the bottom right corner. Each row
represents, in this case, a feature and not an
instance within the feature table. Columns are
added based on the metrics chosen; rows are
removed if they do not match the search filter.
7. If you wish to explore a set of metrics for features in a feature tablefor external analysis, the
Export button produces a CSV file.
♦♦
Total Hits - the number of documents in the
training set that contain this feature.
♦♦
Target Hits - The number of documents with
the target annotation (see step 3) containing
this feature.
♦♦
Precision/Recall/F-Score - Measures of
sensitivity and specificity that are common in
language technologies research.
♦♦
Kappa - the discriminative ability over chance
of this feature for the target annotation.
♦♦
Correlation - For numeric prediction, Pearson’s
r between class value and feature alone (uninformative for nominal classification).
There are several metrics for evaluating your extracted features:
Lesson 3.4 - Machine learning setup
With a feature table in hand, we can now train a
model that can replicate human labels. To do this,
we’ll skip the Restructure Table tab for now and
move directly to Build Model. For information on
restructuring and how to use it to improve performance on your models, see Chapter 5.
This interface, luckily, follows the same general
workflow as the first tab. On the top half of the
screen, configuration options become more specific as you move from left to right. After clicking
the Train button, the resulting model is described
on the bottom half. Specifically, once you’re on the
Build Model tab, take the following steps:
1. Choosing a feature table takes place on the
top left corner of the screen; again, you have
the option of opening saved feature tables and
saving existing ones to disk for future use with
the
Save and
Load buttons.
Figure 7. The model building process within LightSide.
2. The algorithms in the top middle panel are
selectable by radio button, with the most
common options available by default. If there
is a particular algorithm available in Weka but
not accessible through our interface, you can
access it the Weka (All) option. The Linear Re-
10| gression learner is included, but is only suitable
for numeric prediction, not label classification.
3. Once an algorithm is selected, it can be configured more specifically in the top right panel;
however, the default settings are difficult to
improve upon.
4. For testing performance of your models, we
use randomized 10-fold cross-validation by
default. We also offer several other options for
other methods of validation; advice on using
that interface is available in Lesson 6.2.
5. Once configured, the Train button is in the
same place as the Extract button on the first
tab - the leftmost side of the middle bar.
6. Again, if multiple machine learning models are
being trained, they can be named for clarity.
7. The resulting model fills the bottom half of
the screen, and the series of steps that you
pursued are shown in the
learning plugin
and
trained model description triangles.
8. The reliability of the model is given in the
bottom middle panel; by default, we report
accuracy and kappa for nominal classifications,
and correlation and mean squared error for
numeric classifications.
9. A slightly more detailed description of the accuracy is given via a confusion matrix, describing the types of errors that are being made by
a model. This confusion matrix is also often
called a contingency table; accurate decisions
are made along the diagonal, with prediction
labels represented in each column and actual
labels in each row.
There’s an extensive amount of optimization that
can be done at this point, based on the reported
performance. Understanding what to do in order
to push past this baseline from your first model is
one of the most imaginative and creative parts of
machine learning, and makes up the bulk of chapters 4-8 of this user manual. For now, though, we
move on to the use of the model once trained.
Lesson 3.5 - Prediction on new data
This lesson is solely for annotating
data automatically with no human
label. It provides no statistics about
reliability, and is not designed for
evaluating a model directly.
For using a test set, see Lesson 6.2.
Having finished optimization of our machine learning model - which takes up the 4th and 5th tabs
of LightSide - we can now load new data into the
final tab for annotation using automated methods.
This tab is the only one without a description of the
resulting model, and its interface is simpler than
much of the rest of the program:
1. Choose a trained model in the top left corner
panel - either pick one you’ve just trained in
the workbench, or use the
Load button to
continue working with one you saved earlier.
2. Choose a data file for automated annotation
in the next panel down. This file should be formatted in exactly the same way as the initial
training set, but can be missing the class value
column. Every other column must be named
identically and text should be preprocessed or
formatted in the same way that your training
data was formatted.
Alternatively, LightSide can display the validation results from the testing phase of model
| 11
building. Whether you evaluated your model
with cross-validation or on a separate test set,
check the “Show Validation Results” if you’d
like to add the model’s test predictions to a
copy of your original validation data set.
3. Select a name for the prediction result. Check
the “Overwrite Columns” box if you’d like to replace an exisiting column with the same name.
Check the “Show Label Distribution” box if
you’d like to add columns to show the model’s
probability distribution for each prediction.
4. Press the “Predict” button to create a copy of
the selected data set, with the new prediction
columns added.
5. The data set with the new prediction column
will appear in the main section of the window
after the prediction is complete.
6. To save these predictions to a file in CSV
format, use the
Export button in the top
right corner of the screen.
1
2
4
6
5
3
Figure 8. Predicting labels on new data with LightSide.
In Chapter 6, we explain the options available in
the Build Model tab, including both algorithm
choices and the validation options available beyond 10-fold cross-validation.
We move into error analysis in chapter 7, allowing
users to thoroughly explore individual models by
examining the features used in those models, the
individual documents in your training set which are
classified correctly or incorrectly, and the methods
that can be used by humans to intuitively justify
and define the behavior of automated methods.
That’s it! This chapter presented the basic overview for all of the steps in the simplest LightSide
interface, showing you how to start with a training
set and move all the way to automated annotation
of new data. Subsequent chapters explore these
issues further, in the order that they appear in the
workflow; one chapter is dedicated to each tab.
Finally, in Chapter 8, we define the process of
model comparison. This means looking at two
models, rather than just one, which is crucial for
the iterative development cycle of machine learning. By observing behavior differences that happen
as a result of researcher decisions, we can better
lead to strong results on new data.
In Chapter 4, we return to the Extract Features tab.
We dive into much more detail about the options
available in the interface, beyond unigram features.
These chapters must be presented in a linear order
originally, of course, but they are a circular process;
lessons learned in error analysis leads to better
understanding of what features to extract, how
to manually tune and restructure a feature table,
and the type of machine learning algorithm that
may lead to better results. Thus in real use there is
no “waterfall” approach to machine learning that
works; success relies on thoughtful iteration.
Chapter 5 describes the Data Restructuring tab,
which was skipped entirely in this chapter. This
mostly has to do with postprocessing of your feature table based on intuition that you’ve gleaned
from error analysis, and allows a great deal of
manual tweaking of performance.
Good luck!
12| 4
Advanced Feature Extraction
The most important part of machine learning for
text is getting your representation right. The transition from sentences and paragraphs to feature
vectors in a table is a lossy one and every time you
extract features, you’re making countless simplifying assumptions.
In the previous chapter, we used the “bag-ofwords” representation of text, and for many purposes this is good enough. However, it has many
limits and in this chapter we point you at several
ways that you might be able to overcome those
limits, giving access to more nuanced representations of text that can improve model performance.
We begin by discussing the basics of n-grams and
part-of-speech tagging. These are representations
that you’ll encounter in essentially any field that
uses natural language text. We move on to discussing ways that you might incorporate metadata,
like age or gender, into your prediction via column
features. Next, we give a few examples of more
complex representations of text that can be useful
as feature spaces, including our implementation of
stretchy patterns, which are powerful and expressive for advanced users moving beyond n-grams.
With this chapter in hand, you’ll be able to represent text data effectively and thoughtfully.
Lesson 4.1 - Complex text representation
The “Basic Features” plugin, which we used in
Lesson 3.2, allows you to configure exactly which
standard text features you extract from your documents. Beyond unigrams, we explain the other
settings in this model here.
1. N-Grams
A unigram feature marks the presence or absence
of a single word within a text. Bigrams, naturally,
represent the presence of two words next to one
another, and trigrams are three consecutive words.
This part’s important! These longer n-grams are
only catching words that are precisely adjacent,
and they’re remembering order. You’d expect “to
the” to mean something different from “the to”.
Thus, while not capturing entire phrases, we can
assume that bigrams and trigrams are able to represent phrases or collocations of words that often
appear together.
2. POS N-Grams.
The part of speech tags of words can sometimes
be a useful indicator for a classifier, serving as a
capable proxy for more complex syntactic features.
However, parts of speech as used by LightSide are
much more complex than you’re probably used
to! While many English courses only teach eight
traditional parts of speech (verbs, nouns, and
so on), LightSide’s parts of speech are based in
computational linguistics research with more than
| 13
30 possibilities, such as “VBP” (a non-third-person
singular verb in the present tense) or “PRP” (a
personal pronoun, such as “he” or “we”). There are
also some specialized tags like “BOL,” which simply represents the start of a paragraph, and “EOL,”
whih is the same for teh end of a paragraph. A list
of POS tags can be found at
http://www.clips.ua.ac.be/pages/mbsp-tags
1
2
3
In LightSide, we include the option of extracting
bigrams that have been abstracted to the level
of these part of speech-tags. For instance, the
sentence “We are young” would get the following
bigram features extracted:
4
BOL_PRP: The beginning of a line, followed by a
personal pronoun.
7
5
6
8
PRP_VBP: A personal pronoun followed by a nonthird-person singular present verb.
VBP_JJ: That same verb part-of-speech tag, followed by an adjective.
9
JJ_EOL: An adjective followed by the line’s end.
Figure 9. Basic feature extraction options in LightSide.
By extracting part-of-speech n-grams, you are
capturing some of this simply syntax and structure
from a text and using it to predict the annotation
that you are interested in, in addition to using the
content representation of bag-of-words features.
5. Count Occurences and Normalization
LightSide uses the Stanford POS tagger.
3. Word/POS Pairs
Sometimes word usages vary with their part of
speech. This extracts a feature for every uniqe pairing of surface-form word and POS tag.
4. Line Length
This adds a single feature indicating how many
words are in a document. It will always be a numeric value.
Experience suggests that n-gram features should
use the representation that makes the fewest assumptions, and that’s most flexible for an algorithm to work with. Thus, by default each feature
represents a word and each word gets a value of
“true” if it was present in the text at least once, and
“false” if it wasn’t. However, there are cases where
it might matter how much a given word was used
in a text. If you check “Count Occurences”, each
basic text feature’s value will be numeric, counting
the occurrences of the feature in a document. The
features themselves will stay the same, in terms of
how many there are and what they represent.
In practice, using counts often serves a proxy for
line length; many models do this by a tendency to
put high weight on stopwords. Binary features are
14| most useful when you are uncertain of the exact
length of a text, or when you believe that length
will vary.
Checking the “Normalize N-Gram Counts” box will
normalize the value of each numeric n-gram by the
length of a document, resulting in features that
indicate the proportion of the document covered
by each word.
6. Include Punctuation.
If you uncheck this option, unigrams representing
things like periods, commas, or quotation marks
will be thrown out of the model. It’ll reduce your
feature space by a few dimensions, and might
be helpful if you have a particularly noisy dataset
that you’re using. However, punctuation can be a
crucial source of information for some tasks. Don’t
be too quick to toss these out.
7. Stem N-Grams
Stemming gets at the idea of reducing words to
their base form, so that “walk,” “walks,” and “walking,” and so on all count as the same basic concept.
With stemming, those words would be represented by a single “walk” feature, losing inflection but
gaining generality. Note that stemming is different
from lemmatization, which is a little more extreme
(for instance, the lemma of “better” is “good”).
LightSide only performs the simpler stemming
algorithm, and does not offer that complex lemmatization out of the box.
Before moving into representations beyond this
basic plugins, there are two additional options that
can be useful.
8. Stopwords
LightSide comes with a list of common words that
don’t carry any meaning about the actual content
of a text. Instead, they serve as function words,
connecting one piece of content to another. These
are common things like “and” or “the” and in total
we include 118 of them as “stopwords”.
“Skip Stopwords in N-Grams” will build n-grams
by passing over stopwords - so the first part of
this sentence will contain the bigram features
“BOL_first”, “first_part”, and “part_sentence”,
but not (for example) “the_first” or “part_of”. If
you suspect that your classification task is more
about content than style, selecting this option may
reduce noise in your feature space.
“Ignore All-stopword N-Grams” will remove all
unigram stopword features from your feature set.
Bigrams and trigrams will be skipped only if all the
words in it are stopwords.
The “Contains Non-Stopwords” feature gives a
single true or false value based on whether there
was at least one content word in a text. This isn’t so
useful in longer texts, where the value will always
be true; however, in other settings, such as instant
message conversations, some lines may only contain “ok” or “you” without new content.
9. Track Feature Hit Location
LightSide remembers the location of each feature hit it extracts from each document - this is
to allow you to perform deep error-analysis on
development data after you’ve built and evaluated
a model. However, all this extra information can
take up quite a bit of RAM! Uncheck this option to
extract slimmer feature tables.
| 15
10. Differentiate Text Fields
If your documents have multiple text fields (like
subject line and body text in an email) then you’ll
have to decide whether those columns ought to
pool together into the same set of features, or if
they should be treated separately. There are many
cases where words have special meaning depending on the setting they’re in – consider the unigram
“Fwd” in the subject of an email compared to
“FWD” in a forum post about automobiles. By differentiating these columns, you’re giving flexibility
to the models you’ll be building later.
10
11
11. Rare Threshold
For many learning algorithms, features are not
valuable if they are extremely uncommon. A
feature that only appears once out of ten thousand examples is not going to lead to a generally
useful rule. For this reason, we include the option
to exclude features that don’t occur a minimum
number of times. By default, LightSide is set to remove all features that don’t appear in at least five
documents. This value can be changed, depending
on your dataset. For very small datasets, a lower
threshold may be useful, and for some feature
extractors (like Stretchy Patterns), a much higher
threshold might be appropriate.
Figure 10. Feature extraction configuration outside of plugins.
16| Lesson 4.2 - Column features
There may be additional information or meta-data
in your CSV, besides text, that you want to use for
your classification task. For instance, if you know
you’ll be working with only a limited number of
users, you may want to include a feature based on
who wrote a text; in a controlled study, you may
include information about the condition that a
dataset took place in; and for data collected from
specific users, you may include metadata such
as age and gender. This information should be
entered into columns in the same format as text;
however, it shouldn’t really be extracted as if it
was merely a source of unstructured information.
Instead, to extract that information directly into
features, we use this second plugin. To do so:
1. Select the Column Features checkbox in
the Feature Extractor Plugins tab. You may
choose to leave Basic Text Features checked if
you wish to extract features from text alongside your metadata.
2. In the new configuration panel that appears
on the right, you’ll see a list of all the available
columns, excluding the one you selected as
text columns or your class label. Select the columns you want to include - each will appear as
a feature in your feature table. Note that some
columns are unsuitable as features - those that
have columns unique to each instance (such as
a timestamp or message ID) are useless, and
columns that give you direct information about
your task’s class label are likely unfair.
3. LightSide automatically guesses at the type
of information in these columns - if all values
in a column are numbers, then it will be able
to treat the column as a numeric feature. To
change the feature type, use the drop-down
menu in the middle column. The “Expand to
1
2
3
4
Figure 11. User interface for extracting column features.
Boolean” option will convert a nominal or
numeric column into a set of boolean features,
one for every unique value in the column. Such
features are exclusive - any given document
will have a value of “true” for only one of the
column’s expanded features.
4. You can quickly select All or None of the columns with the buttons at the bottom of the
configuration panel if you wish to include all
metadata that you’ve included in a data file.
Again, be cautious of accidentally including
columns that unfairly represent your data, like
unique document IDs or duplicates of the class
value column.
| 17
Lesson 4.3 - Regular expressions
Sometimes a word (or n-gram) is not enough – the
feature you’re interested in is a complex pattern
in text. Instead of defining an entire new type of
feature, you might just want to look for one or a
handful of specific patterns. The best way to do
this is by defining regular expressions. These are a
powerful tool for defining arbitrary text patterns
to be specified. They’re very common in computer
science, but if you’re not familiar with regular expression syntax, we’ll walk through some basics.
Some symbols that might be useful are:
♦♦
* allows the previous part of the regex to repeat, but it is not necessary.
♦♦
+ is the same, but requires the previous part to
match at least once.
♦♦
? allows the previous part to happen either
once or not at all, but does not match further.
♦♦
. is a wildcard, matching any one character.
♦♦
Certain character classes are predefined, like
\w (any character A-Z), \d (any digit 0-9), and \s
(any type of space character).
Here’s a quick reference that can cover most of
these basics in more detail:
http://bit.ly/Zu0ame
For a quick example, try out this pattern:
buffalo(\sbuffalo)+
This expression is searching for the word “buffalo”
at least two times, separated by spaces, but it can
match any number of times, as in “I hear that Buffalo buffalo buffalo Buffalo buffalo, except when
they don’t.” Our regular expressions are case-insensitive and they match on subsequences within
an instance.
Figure 12. User interface for extracting regular expressions.
Here’s how to use these expressions to create
hand-crafted features:
1. Check the Regular Expressions box under
Feature Extractor Plugins. This adds a new
configuration panel to the configuration area
on the right.
2. Enter a regular expression in the text field,
then press the
Add button to add it to
the list of expressions you’re searching for as
features.
3. You may load regular expression feature definitions from a text file - one regular expression
feature per line. Select the
Load button to
find your expression list file.
4. All active regular expressions appear in the list
in the center of the configuration panel.
5. Delete unwanted expressions by selecting
one or more in the regular expression list and
pressing the
Delete button.
6. By default, regular expression features have
true/false values, where a true value indicates
a pattern match. Check the “Count Occurrences” box to count occurrences within each
document; the feature will then be numeric.
18| Lesson 4.4 - Stretchy patterns
The Stretchy Patterns Plugin extracts features that
are like “n-grams with gaps”, allowing potentially
rich features that might capture structure or style
despite simple variations in surface presentation.
While stretchy patterns are less expressive than
finding every possible regular expression, they
allow you to extract a range of possible patterns,
instead of specifying each one individually.
As a basic example, consider the sentence,
“I am the model of a modern major general”
The unigrams that appear in this sentence are just
vocabulary - “I”, “am”, “the”, and so on. Bigrams,
similarly, represent immediately adjacent words
like “I am” or “am the”.
With stretchy patterns, on the other hand, we can
represent words that are close together but need
not be directly adjacent, like “I [GAP] model” or
“modern [GAP] general”. These gaps mean that
features which would be similar but not identical with n-grams can be collapsed into a single
feature, potentially improving performance for the
models using those features, especially if they are
added in addition to basic features.
Here are the basics of the tool.
1. Check the Stretchy Patterns box under the
Feature Extractor Plugins menu.
2. Pattern Length
In the new panel that shows up in the configuration area, you’ll see two double-handled sliders.
The ends of the first slider defines the minimum
and maximum pattern length. The image in Figure
12 shows pattern lengths set to between 2, at a
minimum, and 4, at a maximum.
Figure 13. User interface for extracting stretchy patterns.
3. Gap Length
You also need to know how many words a gap is allowed to skip (which can be as little as zero, if you
want adjacent words to be captured with stretchy
patterns). Remember that each gap counts for only
one “word” - even if there are many words in a gap.
4. Including part-of-speech tags
You can choose whether your stretchy patterns can
include surface-level words, part of speech tags,
or both. Use these checkboxes to select what the
basic “tokens” of your patterns will be.
Longer pattern lengths and a wider
range of gap lengths can generate
tens of millions of features and eat
up a LOT of memory - increase these
values with extreme caution.
| 19
5. Categories
An option for extending these patterns based on
qualitative analysis of your data is to add classes
of words that take the place of basic tokens. We
call these “categories.” For example, a set of words
like “happy, glad, delighted, enthused” might be
part of a HAPPY category. These categories make
an individual pattern feature more likely to match
against a larger set of similar texts, and can be
used to cluster together contextual features that
you believe are useful for your data.
Categories are specified in plain-text files, where
the first line is the name of the category and every
following line contains a single word or part of
speech tag that belongs to this category. A word or
POS tag may belong to more than one category.
Use the “Add...” button to load one or more category file into the plugin, and if you want to start
fresh, remove the categories you’ve selected with
the “Clear” button.
A default set of categories is distributed with
LightSide in the tools/categories folder. This
includes basic groups like positive and negative
words, pronouns, and so on.
6. Additional options
To reduce the space of possible stretchy patterns,
and to focus your features on your categories
instead of the noisy patterns that might otherwise
dominate your feature table, you may elect to
require that all extracted patterns contain at least
one category token, or that categories always
subsume their basic tokens. These options are
available through checkboxes. If this second box is
unchecked, you’ll get multiple pattern features for
each stretch of text that contains a category word:
one stretchy pattern with, and one without, the
word converted to a category.
The third and fourth checkboxes allow you to
choose whether your categories match against
surface words or part-of-speech tags. For instance,
included within the default LightSide distribution
is a category called “POS-PRONOUN.” This groups
together many different types of pronouns: personal pronouns like “we,” possessive pronouns like
“my,” wh- pronouns like “who” and wh- possessive
pronouns like “whose.” By clustering these into a
single category and extracting stretchy patterns
which match any of them, features may generalize
in a way they couldn’t with basic n-grams.
7. Numeric features
By default, this extractor produces true/false
features that indicate whether a given pattern is
present in a given document. To count occurrences
instead, check the “Count Pattern Hits” box. This
behaves similarly to the same option in the regular
expressions feature extractor.
There are many different aspects of this tool and
this lesson only covers the very basics.For more
information, see:
P. Gianfortoni, D. Adamson, and C.P. Rosé. ”Modeling of Stylistic Variation in Social Media with
Stretchy Patterns.” Proceedings of the First Workshop on Algorithms and Resources for Modelling of
Dialects and Language Varieties. 2011.
E. Mayfield, D. Adamson, A.I. Rudnicky, and C.P.
Rosé. “Computational Representation of Discourse
Practices Across Populations in Task-Based Dialogue.” Proceedings of the International Conference
on Intercultural Collaboration. 2012.
20| Lesson 4.5 - Character N-Grams
Sometimes a word is too much - unigrams’ insensitivity to variations in spelling and usage may miss
something special that’s happening within a word,
or across word boundaries, at the level of letters
and symbols. Just as you can extract word-level
unigrams, bigrams, and trigrams, you can extract
“character n-grams” comprised of spans of characters. For example, “ex” is one possible character
bigram from “for example”, and “r ex” is a character 4-gram across a word boundary.
1. Check the “Character N-Grams” box under
Feature Extractor Plugins.
2. Use the sliders to select the minimum and
maximum number of characters in each extracted span.
1
2
3
4
Figure 14. User interface for extracting character n-grams.
3. Leave “Extract Across Whitespace” checked
to include the spaces between words in your
n-grams. Otherwise, n-grams will only be
extracted within words.
4. Leave “Include Punctuation” checked to
include punctuation marks in your n-grams.
Otherwise, they will be stripped from the
extracted features.
Lesson 4.6 - Parse features
2
1
3
4
Figure 15. User interface for extracting parse features.
LightSide uses the Stanford Parser (version 3.2,
as of this printing) to extract production rules and
dependency relations from a text.
Production rules are parts of parse trees, capturing the grammatical structure of a sentence.
Dependencies capture the grammatical relations
between words in a sentence.
For more information, refer to
http://nlp.stanford.edu/software/lex-parser.shtml
and http://nlp.stanford.edu/software/stanforddependencies.shtml
1. Check the “Parse Features” box under Feature
Extractor Plugins.
2. Leave “Production Rules” checked to extract
individual parse-tree branches, like
“NP -> DT NNS” or “S -> NP VP”
3. Check the “Leaf Productions” box to include
terminal branches like “NNS -> mountains”
4. Check the “Dependency Relations” box to extract dependency relations, like “nsubj(love, i)”
Parsing is slow! If you’ve got time
to kill, or a small dataset, go for it.
Otherwise, consider POS bigrams as
a lightweight proxy for these highoverhead features.
| 21
5
Data Restructuring
The automatic feature extraction of the Extract
Features tab has limits. For some types of adjustment to your feature space, it makes more
sense to make incremental changes to an existing
feature space, either algorithmically or through
manual changes. For these changes, we’ve built a
second tab, called Restructure Features.
As with the previous chapter, we’ve included
several example tools for restructuring your data,
and again we introduce them in order of difficulty.
We begin with two simple tools for manually editing your feature space; we then introduce a third
restructuring tool, using statistical techniques
for domain adaptation in a feature space, which
requires more elaborate explanation. Both types of
adjustment to a feature space can make sense in
different contexts.
Lesson 5.1 - Filtering features
There may be cases where you want to manually
remove certain features from an existing feature
table, in the same way the Basic Features extractor
plugin automatically removes stopword features.
You may also want to explore the isolated effects
of just a few features on the classifier. The “Filter
Features” plugin is for exactly such situations.
1. Select the Filter Feature Values checkbox
from the Filters Available panel of the Restructure Data tab.
2. If you wish to delete specific features, select
“Remove” from the drop-down menu. If you
wish to keep only a selected subset of features,
select “Retain” instead.
3. Select “Selected Feature Hits” from the next
menu if you wish to only remove (or retain)
the feature hits, and leave the documents
themselves intact. Select “Documents with
Features” if you wish to remove (or retain) entire documents based on whether or not they
contain the selected features.
4. You can search for features by name - type part
of the name of a given feature in the list to filter the feature display. Use the “Sort Selected”
button to move all currently selected features
to the top for easy review (it’s easy to forget
which few features you’ve selected, among
thousands).
5. Click on a feature to select it for removal (or retention). You can select a range of features and
select or de-select them with the space bar.
6. Some simple feature metrics are included to
aid in your selection. Use the “Target” menu to
select which class label the metrics describe.
Be cautioned that using such metrics to cherrypick features may be “cheating”, especially if
you evaluate your model with cross-validation.
22| 7. Press the “Restructure” button to transform
the feature Table. As with feature extraction, you can prune rare features with the
“Rare Threshold” - this may come into play if
removing documents reduces the frequency of
certain already nearly-rare features.
8. The restructured feature table is displayed in
the bottom left panel. Details are now added
about the
restructure plugins you used,
and facts about the modified table, in the description panel. You can now move on or may
continue with additional restructuring.
9. The restructured feature table can be explored
just as described in Lesson 3.3 - you can use the
“Features in Table” display to verify that the
features you’ve removed are indeed absent.
Figure 16. Restructuring with filtered features.
Lesson 5.2 - Combining features
You may have reason to suspect that certain
features are especially meaningful when they
co-occur, or when they are treated as interchangeable. The “Combine Features” restructuring plugin
allows you to create new features from logical
combinations of existing true/false features.
1. Select the Combine Features checkbox in the Filters Available panel of the Restructure Data tab.
2. You can search for features by name - type part
of the name of a given feature in the list to filter the feature display. Use the “Sort Selected”
button to move all currently selected features
to the top for easy review (it’s easy to forget
which few features you’ve selected, among
thousands).
3. Some simple feature metrics are included to
aid in your selection. Use the “Target” menu to
select which class label the metrics describe.
Figure 17. Restructuring user interface for combining features.
4. Click on a feature to select it as part of a combination. You can select a range of features and
select or de-select them with the space bar.
| 23
5. Press the “AND”, “OR”, or “NOT” button to
create a logical composition of the selected
features. All selected features will be included.
Some examples include:
♦♦
AND[ketchup, mustard, relish] will be true
only on documents containing all three unigram features.
♦♦
OR[very_happy, feeling_better, less_angry,
entirely_joyful] will be true any document containing one or more of the given bigrams.
♦♦
NOT[buffalo, wings] will be true for every
document containing neither buffalo nor wings.
6. The new features appear in a table below the
original feature table - they may be selected
and recombined with the original features us-
ing the same logical operators.
(Note that the
features you initially selected are still selected
by default, in the original table)
7. New combinations that are no longer desired
can be selected, then removed with the “Delete” button.
8. Press the “Restructure” button to transform
the feature Table.
9. The restructured feature table is displayed in
the bottom left panel. The description now has
two new entries, showing the
restructure
plugins you used, and facts about the modified table. This new feature table may be used
to train models, or may be used as input for
another round of restructuring.
Lesson 5.3 - Combining feature tables
[Plugin In Progress] This is a brand-new plugin
that still needs to be polished. The user interface,
this documentation, and the plugin’s functionality could all stand to be improved. However, it’s
proved remarkably useful for experimentation with
complex documents - there’s no other way to extract one set of features from one text column, and
a different set for a second text column, to form a
single feature table.
1. In the Extract Features tab, build two (or more)
feature tables using the same document list,
with the same class value, but with whatever
variations in feature extraction settings and
selected text columns you choose.
2. Then switch to the Restructure Data tab, and
select one of the feature tables in the lefthand
panel.
3. Select the “Combine Feature Tables” plugin
from the middle panel.
4. In the righthand panel (“Configure Combine
Feature Tables”), select the second feature
table. Again, verify that the document list and
class value are identical.
5. Press the big “Restructure” button in the action
bar - a new, combined feature table will appear
in the Restructured Tables list. You can combine additional tables with this new table by
repeating the process.
Note that while this approach will work for crossvalidation, it DOES NOT yet work for evaluating
test sets or making predictions on new data. This
is because we don’t currently store the nested
collection of feature extractor settings that would
be required to apply this restructuring “recipe” to
brand-new data. Stay tuned for new releases, and
let your favorite LightSide developer know you’re
interested!
24| Lesson 5.4 - Multilevel modeling
The Multilevel Modeling plugin works by creating
copies of features based upon the “domains” each
document occurs within. If a feature has different
significance in one or more domains, a globallydefined feature may confuse a model with “noise”
that is actually meaningful variation by domain.
For example, certain words or phrases may be
politically charged in some states or countries,
but utterly benign in others. By including a unique
copy of a feature for each domain it occurs in (in
addition to the original “generic” version of the
feature), we can capture this variance in a way
that’s accessible to traditional machine learning
algorithms.
3. Select the sets of features to model with your
chosen levels. For convenience, most features
are grouped by the plugin that extracted them.
4. Click the “Add Domain” button to add your
selected domain to the plugin’s setting. Repeat
this process to add domains constructed from
additional levels and feature sets, as needed.
5. Press the “Restructure” button to build your
new feature table. Depending on the size and
shape of your levels, the restructured table
may have significantly more features than the
original.
For example, if your selected level represented
US states, your new feature table will have up
to 51 times as many features! (50 sets of features, one per state, plus the original “generic”
set). Note that rare feature thresholding is applied during restructuring, so particularly rare
domain-occurences (like “blizzard” in Arizona)
may be excluded.
Read more about Multilevel Modeling at http://
www.bristol.ac.uk/cmm/learning/multilevel-models/
what-why.html
Basic Domain Adaptation
Also called FEDA, or “Frustratingly Easy Domain
Adaptation”, this is a simple way to capture a
single level of variation within a feature space.
For more about FEDA, see Haumé 2007:
http://arxiv.org/abs/0907.1815
1
1. Select a feature table from the lefthand panel
of the “Restructure Data” tab, then tick the box
next to the Multilevel Modeling plugin.
2. The first table under “Configure Multilevel
Modeling” allows you to select the “level”
or domain you’d like to use to distinguish
your features. These are the unused columns
(excluding text and class value columns) from
your original document list.
(You can also create nested domains using this
interface, but that is beyond the current scope of
this lesson.)
2
4
5
Figure 18. Basic Domain Adaptation
3
| 25
6
Advanced Machine Learning
Lesson 3.4 introduced the basic machine learning setup, with the default Naïve Bayes classifier
and cross validation. This will get you through the
interface, but it doesn’t allow for much flexibility.
For more advanced applications, you may wish
to select particular machine learning algorithms.
These are described in Lesson 6.1.
In this chapter, we discuss methods of testing the
performance of your model. Of course, there’s no
substitute for real-world application of a model,
but before that point you need to know the level of
performance that you can expect. There are many
methods of evaluating performance, and tenfold
cross validation is but one. In some cases, it might
be appropriate to hold out a separate test set or
perform a more refined cross-validation method.
Those nuances are discussed in Lesson 6.2.
Finally, we also turn briefly at the end of this
chapter to the question of numeric prediction.
Most of the work that you’ll be doing with LightSide, if you’re anything like our average user, is a
classification task. However, there are definitely
applications where you want to predict a real-valued number, and we have many options built into
LightSide for doing just that. Lesson 6.3 gives you
a jumpstart on that set of interface options.
Lesson 6.1 - Machine learning algorithms
LightSide provides a handful of straightforward
point-and-click interfaces to the most common
machine learning algorithms. Following our introduction to the workflow in Chapter 1, these algorithms are selectd in the top middle panel. Each of
these algorithms offer basic configuration options,
which are visible in the top right panel.
Those give you the basic set of tools you’re likely
to need; however, sometimes there are esoteric
needs we haven’t predicted. Finally, because of
those rare cases, we also expose the entire Weka
suite of algorithms, which gives you a much wider
variety of classifiers, wrappers, and feature selection methods if you have prior experience for picking the algorithm that best fits your dataset.
1. Learning Plugins and
2. Configuration Options
There are endless variants on machine learning algorithms, but each follows the same general trend
of attempting to learn a set of rules, based on
training examples, that will allow it to assign a label to a document. We’ve already filtered through
those options and provided the ones that are most
likely to work in a wide variety of situations (Naïve
Bayes, Logistic Regression, and Support Vector
Machines) as well as Decision Trees, which are less
useful for bag-of-words feature spaces but are
extremely powerful in other circumstances.
26| ♦♦
Logistic Regression
The workhorse of natural language processing
research, logistic regression (also known as a maximum entropy or log-linear model) has many of
the same design benefits as Naïve Bayes – it scales
well to multiple classes, it’s extraordinarily efficient, and will often give you the best performance
for text data.
Figure 19. Training configuration in the Build Models tab.
We’ll cover linear regression in Lesson 6.3. This
algorithm is only useful for numeric predictions –
those cases where rather than predicting a label,
you’ll get a real-valued number out of your algorithm. Linear Regression is also extremely slow for
larger inputs, making it a less ideal choice for the
high number of features common with text.
♦♦
Naïve Bayes Made famous for its effectiveness at email spam
filtering, Naïve Bayes is a good option for basic
text classification problems. It works well with
a large number of fairly weak predictors, and it
extends very nicely to classification tasks with
multiple labels (as opposed to binary true/false
distinctions). Naïve Bayes looks at each piece of
evidence for a certain prediction individually, not
attempting to guess or learn any dependencies
between attributes.
Configuration options: The “Supervised Discretization” and “Kernel Estimator” options may be appropriate for working with numeric feature values,
but are generally unimportant.
Configuration options: Logistic regression also
benefits from easy integration with regularization,
an approach to machine learning that tries to find
the fewest possible features to use for prediction,
dropping the weighted input of as many features
as possible to zero. We offer three types of regularization in the default interface, which are honestly
best evaluated through trial and error.
♦♦
Support Vector Machines
Support vector machines focus only on the
marginal instances, places where decisions for a
classifier are going to be hard, and mostly ignores
the simple cases. This forms a nice easy “decision
surface” – on one side, you can label things positive, and on another, label them negative. If you
have exactly two options that you’re planning to
choose between, they’re fantastic. However, they
tend to be terribly plodding when you have a labeling task with many possible labels – they’re really
optimized for yes/no choices.
Configuration Options: We offer two implementations of SVM. LibLINEAR is fast and efficient, and
Weka’s SMO allows you to edit the exponent of
the SVM, which roughly corresponds to the level
of interaction effect that you expect to see in your
feature space (an exponent of 2 allows for secondorder interaction terms, kind of). For linear SVM
(exponent 1), you can see each feature’s SVM
weights in the Explore Results tab (Chapter 7).
| 27
♦♦
Decision Trees
All of the above algorithms, to a greater or lesser
extent, treat each feature as independent. They
don’t vary a feature’s importance based on its
context. Decision trees try and account for that information when assigning labels. However, they’re
fairly slow and ineffective when working with
sparse, high-dimensional feature tables, such as
the ones you get from text. They’re also unstable
and fairly unpredictable, so you’ll never be quite
sure what you’ll get out of a decision tree classifier
(logistic regression and the others are much more
predictable).
Configuration Options: Decision trees in LightSide
are implemented with J48, which is a Java conversion of the popular C4.5 decision algorithm. There
are several parameters that you can tweak, and
they’ll make a slight difference; as with so many
things in machine learning, these numbers respond
best to trial and error optimization on your dataset. Be careful not to spend too much time tuning
these settings, as they’ll likely lead to overfitting
which will not carry over to real world applications
of your model.
3. Access to Weka
Other algorithms which are commonly used and
may be helpful for certain tasks are MultilayerPerceptron, Winnow (in the functions folder) and JRip
(in the rules folder). Advanced users may wish to
use AttributeSelectedClassifier, Bagging, Stacking,
or AdaBoost, located in the meta folder, which allow you to perform ensemble learning or advanced
feature selection.
4. Feature Selection
To focus on the most strongly discriminating
features for classification, we can apply a feature
selection algorithm before passing the feature
table to the machine learning algorithm. Check
the “Use Feature Selection” box in the action bar
to enable feature selection. In the text field, enter
the number of features you want to select (greater
than zero, and less than the number of features in
your feature table).
For nominal class values, LightSide’s feature selection uses the Chi-Square test of independence
between features and class values. The features
that are most independent from the class labels
will be selected first. For numeric class values,
feature selection is done based on correlation with
the class value - the selected features will be highly
correlated with the classification, yet uncorrelated
to each other.
When combined with well-motivated feature
extraction, this suite of options will get you well on
the way to being able to automatically label new
data. However, you’re going to need to know how
to validate that performance before using it - on to
the next lesson!
28| Lesson 6.2 - Validation techniques
In order to test the validity of the model we train,
we need to test its performance on held-out data.
One way of doing so, the most common in many
fields, is to keep a separate, labeled test set of
documents that match the format of the original
training data. By training a model on one set and
testing it on this held-out set, you can see how it
will peform against data it was not trained on. We
let you do this with our Supplied Test Set option.
However, with limited training data, this is not as
attractive - we need all the data we can get!
Another approach, called cross validation, is to
slice up the training data into “folds”, and hold out
one fold each turn. In ten-fold cross validation, for
instance, we’ll split our training set into tenths.
Then, as a first pass, we’ll use the first 9 subsets as
training data and treat the last one as our held-out
test set. That’ll give us one measure of accuracy.
We can do it again, though, by now taking subsets
1-8 and that tenth set, training a separate model,
and testing it on subset 9. By continuing this
multiple times, we get a set of guesses at accuracy;
each of those uses as much of our training data as
we can afford; and because we have many measures we can trust the number as more reliable.
Your final model, to be used on real-world data,
isn’t actually any of the models trained using crossvalidation. Those each used only some portion of
your data, and each one will vary substantially.
Instead, for 10-fold cross-validation, for instance,
we’ll then train an 11th model which uses all of our
training data. It’s that final model that goes out in
the real world once it’s been trained.
Of course, there are ways to add nuance to this.
One of the biggest assumptions that you make
with your data when using our default cross-validation is that there are no subsets or overlaps that
Figure 20. Configuration for cross-validation evaluation.
we should be aware of within your data - that any
given training example is independent of any other
example. This obviously isn’t always the case,
though - for instance, collecting multiple training
examples from the same author, within the same
classroom, or from the same session of a study
might cause overfitting in an educational dataset.
To rectify this, we’ve also included some clever
ways of sorting your data into folds manually,
either within a single file or by separating those
folds into many files. To find out what you have to
do, read on!
| 29
Here are your basic options for validation:
♦♦
Cross-Validation
1. “Random” Folds
The default setting performs N-fold cross validation. N models are built, each on (1 - 1/N)% of
the data, and tested on the remaining (1/N)%.
Instances are chosen in a round-robin fashion, for
instance, in 5-fold cross validation, the 1st, 6th,
11th, etc. instances are chosen for testing in the
first fold, followed by the 2nd, 7th, 12th, etc. held
out in the second fold.
2. Fold By File
This setting assumes that your document list was
built from multiple files. For each fold of cross
validation, all but one file is used for training, and
the remaining file is used for testing.
3. Fold By Annotation
This setting assumes that your document list has
an additional column that can be used to distinguish sets of documents from each other. Select
the column to fold by from the drop-down menu.
For each fold of cross validation, documents
matching all but one label from this column are
used for training, and documents matching the
remaining label are used for testing.
4. Number of Folds
“Auto” folds defaults to 10 folds for random crossvalidation, and to the number of files or labels for
cross validation by file or annotation, respectively.
You can also manually set the number of folds - up
to the number of documents for random folds, or
the number of files or labels when folding by file or
annotation. When the number of folds is smaller
than this maximum, all the documents in each additional file or label will be assigned to the existing
fold in a round-robin fashion.
Figure 21. Evaluation through use of a supplied test set.
♦♦
Supplied Test Sets
One model is built, on your full training set, and it
is evaluated on a second feature table from a file
that you select.
5. Select “Supplied Test Set” in the center panel.
6. Load a new document list from a CSV, or select
one from the drop-down menu.
Testing a model on the same data set
that you used for training is meaningless for validation and will display
a warning. If you only have one data
set, use cross-validation instead.
7. The training set you loaded is displayed below.
Ensure that any columns you used for text,
class label, or column features in the training
set are present in this test set, with exactly the
same column headers.
♦♦
No Evaluation
If you’re training a model for some later use and
don’t particularly care about validating it, can select the “No Evaluation” option - however, all you’ll
be able to do with it is predict labels on new data.
30| Once you’ve trained a model, you’re ready to look
at its actual performance. This is presented at the
bottom of the Build Model tab after you click Train.
You can view your model’s validation results in two
different ways:
8. Evaluation Metrics
The fastest way of judging a model is by its aggregate statistics - how many examples it labeled
correctly (Accuracy, as a percentage) and how well
it performed above chance (Kappa). This interface
is also easily extensible to allow you to add your
own metrics.
9. Confusion Matrix
You can also look at the particular types of errors
that a model is making through a confusion matrix.
In this representation, all labels in your data are
given their own row, and those same labels are
duplicated as columns representing the predictions that are made by the model. Thus, a single
cell in this table is the intersection of a predicted
label and actual label, while the value given in that
cell reports the number of training examples that
match those actual and predicted labels.
In the example in Figure 20, for instance, look at
the top left cell, with the value 4217 and the row
Figure 22. The model output user interface after training.
label “neg” and column label “neg”. This example,
drawn from a sentiment analysis, reports that out
of over 10,000 documents, 4,217 of them were
negative documents which were correctly predicted as negative by the machine learning model
that you’re evaluating. On the other hand, look at
the next value, in the top right corner. This 1,114
is at the intersection of the row label “neg” and
column label “pos”, and represents the fact that
over 1,000 documents (roughly 20% of all negative
documents) were misclassified as positive by your
trained model.
As can be expected, the goal when evaluating
these confusion matrices is to check the diagonal
cells. Along the diagonal, the intersection of idential row and column labels mean that the model
has predicted a document’s label correctly. Other
cells, however, all represent incorrect predictions.
To facilitate this evaluation at a glance, we color
code these cells based on the number of documents that fall into any given category.
See Chapter 7 for many details about deeper error
Lesson 6.3 - Numeric Prediction
If the value you want to learn to predict is a continuous number, LightSide provides direct access
to Linear Regression, plus numeric forms of SMO
and Decision Trees. Other numeric algorithms are
accessible through the generic Weka plugin.
Configuration options: Linear Regression’s options
allow you to select various methods for selecting a
suitable subset of your features (or possibly all of
them), based on the Akaike information metric.
Instead of Accuracy and Kappa, model performance is displayed in terms of Pearson’s Correlation Coefficient (R) and Mean Squared Error. Better
models will have correlations closer to 1, and MSEs
closer to zero.
LightSide won’t let you use a numeric method with a nominal prediction
task, or vice-versa. If the “Train” button is disabled, make sure your data
agrees with your algorithm.
| 31
7
Error Analysis
Machine learning is an iterative process with three
main steps. First, to take your data from unstructured text to something useful for quantitative
analysis, you must perform some sort of feature
extraction to generate a feature table (Chapters 4
and 5). Next, that feature table must be parsed and
used to train a model that can discover the latent
pattern in those features (Chapter 6). Finally, the
performance of that model needs to be analyzed,
so that you know where you’ve gone in the right
direction and where your model is hitting a wall.
Many people forget this final step. Once a baseline
number is reported, the story ends for many machine learning packages. With LightSide, we want
to open up that analysis step, asking researchers
to look at their own data and deeply understand
the behavior of their models rather than trusting
a high-dimensional feature space and relying on
arcane statistical techniques. Are they effective?
Probably. But if you can’t explain the reason behind that effectiveness, it will be difficult to apply
the models you train in a real-world setting with
any sort of validity or acceptance from those who
could be affected by that model’s decisions.
LightSide is designed to open up that analysis
component. We take two approaches to understanding your data. First, we want to look at
individual features, to know what parts of your representation are causing the most shift in a model’s
accuracy. Next, though, is to move beyond the aggregate and start looking at where those features
occur in individual instances. Only by really reading
the text of the examples that you’re evaluating can
you make any progress towards building meaning.
By doing this, we make machine learning iterative.
There is no longer a stopping point at a model’s
accuracy calculation, after which you simply throw
up your hands and accept the performance that’s
been reported to you. Instead, there’s a deep
process of understanding that can come next,
which will allow you to know where to adjust
your model’s tuning, where to add finesse to your
feature space representations, and how you might
make your model better.
This is an extraordinarily complicated goal. Understanding machine learning is not something that
can be undertaken with no assistance. To that end,
we’ve developed the Explore Results tab within
LightSide solely to assist by giving tools. However,
because of the depth available, it’s not going to be
easy off the bat. If you don’t understand a particular part of the interface, though, that doesn’t mean
that you can’t use other parts. Even using a subset
of the tools we use gives you more control over
your data than you’re likely to get elsewhere.
In this chapter, we’re going to take a slightly different approach to teaching. First, I’ll walk through
every part of the user interface with an explanation
of its function, but little exposition. At the end of
the chapter, we’ll go through a worked example of
a dataset that can be analyzed using these tools, to
show how you might have an impact on your own
understanding of your model.
32| But first, we’ll start by listing some assumptions
we make about the error analysis process. This
informs the design of the Explore Results tab, and
motivates the walkthrough in Lesson 7.3.
1. You care about specific types of mistakes.
It’s insufficient to simply state that your model
has an accuracy of 75.7%. That’s a quarter of
the time that it gets things wrong, and that
will make up a wide swath of different creative
uses of language with which these writers are
mischievously fooling your system! We want
to break down those errors and look at specific
reasons for misclassification.
2. Confusion matrices provide a coarse but effective way of identifying types of mistakes.
In a binary task with two possible labels, there
will be two error cells in a confusion matrix
– those documents which were predicted as
positive but which were actually negative, and
those which were predicted to be negative but
which were actually positive. No better division
of two types of error could be imagined! This is
a fundamentally different type of error (in fact,
it has close relationships to Type I and Type II
errors in the social sciences) and it makes sense
to start there.
3. Features are one of the most important
sources of error.
While differences in classification algorithms
may account for a substantial number of differences in model performance, at the end of
the day, what matters in an input document is
the way it is represented and the features that
comprise that representation.
4. “Confusing” features are those that mostly
appear in misclassified documents.
This does not mean that the feature itself is
to blame, of course – it may simply appear in
contexts which are generally misleading or
inscrutable for machine learning classification.
5. Relative ranking of confusing features is
more important than an absolute number.
We want to know what the most confusing
features are; we don’t actually care, though, if
we have an overall metric of “confusingness.”
Error analysis is more art than science, remember, and as such giving human researchers a
set of possible leads to follow and explore is
more important than assigning a specific number to a specific dimension in a specific model.
6. Above all else, to understand data,
you must look at that data.
It does very little good to pontificate on percentage accuracy and other statistics if you
have no idea what actual linguistic patterns
are occurring in your data, and the ways that
these patterns are predictable (or not) to your
automated classifier.
With these principles in mind, we can move to a
concrete discussion of the error analysis interface.
| 33
Lesson 7.1 - Error analysis metrics
Figure 23. Exploration by confusion matrix cell and by feature in LightSide’s Explore Results interface.
The top of this interface is feature-oriented. We’re
trying to look inside a model and identify the particular clues that it’s using as evidence. Importantly, all of the techniques we’re using for identifying
decision points in this model are agnostic to the
type of classifier you’re using - all of our techniques
work identically for a logistic regression classifier,
a Naïve Bayes classifier, or even a learning plugin
that you’ve written yourself. Rather than look at
weights and model-specific uses of features, we’re
trying to find the distribution of features throughout documents that surfaces when looking at what
the model actually decides for test examples.
This leads to the chance to draw false conclusions.
In decision trees, for instance, only a small handful of features are going to be in the tree at all. If
you want to look at exactly what your model is
doing; however, more often you’re simply going to
be looking for the types of examples where your
model fails or performs poorly. These documents
might be characterized by the features the model
is using, or more likely, by the contextual features
that it’s explicitly not using. These often tell the
story of what is not being captured better than the
features that are actually being given high weight.
In your explanation of the behavior of your model,
keeping these complexities in mind will ensure that
your interpretation of your data is justified. With
that, let’s look at what options are available to you.
1. To load in a data file, use the same loading
interface as in other workbench tabs. We’re
not creating new data structures in this tab,
but the beginning of the process remains the
same.
2. All of the descriptions of this model remain
in place, and can be opened via description
triangles so that you’re sure about what data
you’re analyzing and how you configured your
model to be extracted and trained.
3. Now, in the top middle panel, we’ve duplicated
the confusion matrix that was given as output
in the Build Model tab. However, we’ve also
added in radio buttons to allow you to focus
on a particular type of classification. Remember from Lesson 6.2 that each cell represents
a particular type of mistake that the model is
making. In this cell, you’re going to want to
34| look for the largest values that are not along
the diagonal - these are the sources of most of
your model’s error and are fertile ground for
improvement.
4. Once you have singled out a particular cell,
your next goal is to look for the features that
characterize that cell. Every feature in your
feature table appears in the list in the top right.
5. This table can be filtered by keyword through
the search bar at the top.
6. The table can also be exported to CSV to allow
analysis in other programs, if necessary.
7. By far the most important thing that we can
do, however, is sort that list of features so
that the most relevant ones appear at the top.
To do this we’ve provided a set of evaluation
criteria that you can choose between; in fact,
you can even have multiple criteria selected at
once to see them in parallel and sort the table
in various directions.
Before you can make much use of these evaluations, however, you’re going to need to know what
they’re for. In a nutshell, here are the default sortAll of these criteria are conditioned
on the confusion matrix cell that
you’ve selected (Step 3). Their values
will change when you select a different cell, as the types of features that
lead to different types of errors are
likely to be varied.
ing methods that we include within LightSide.
♦♦
Frequency
This is the simplest measurement you can get - it
simply measures how many documents in your selected cell contain the feature that you’ve chosen.
In text, this list will be dominated by stopwords,
which are far more likely to occur in all documents. A non-stopword that registers highly on a
list sorted by Frequency is likely to be extremely
domain-specific and relevant, but may not contribute to the model.
♦♦
Average Value
The previous measure, frequency, did not account
for two major things: how many total documents
are in a cell, and what value a feature has in those
documents. Consider, for instance, our earlier example of two cells, one with over 4,000 examples
and one with 1,000 examples. If a feature appears in 900 documents within a cell, that means
something very different in those two cases - a
feature that is only in fewer than a quarter of all
documents classified this way and a feature that is
in over 90%.
Average value accounts for this. For binary features, the average value reports an equivalent to
the percentage of documents that contain that
feature. If using a numeric feature such as line
length, it will simply report the average across all
documents in a cell.
♦♦
Horizontal Difference
The average value of a feature is going to be different between each cell of a confusion matrix. This
value begins to answer the question of how much
that difference really means between cells. For this
metric, we take the average value of the cell you’ve
selected and compare it to the cell in that row that
is along the diagonal of corect predictions. By subtracting the two you can measure the difference in
average values for instances in the different cells.
This tells you something important, because the
instances in these two cells have the same true
label; the model should be predicting their label
identically, but it isn’t. what you’re trying to find
out is which features are the most different between the places where the machine learning has
| 35
correctly identified a label, and the places where
it has made a mistake. Those features with the
largest horizontal value are more likely to occur in
contexts that are confusing to a model.
With this metric, we can also sort by an absolute
value, rather than the raw Difference. This means
that you’ll be able to see both types of horizontal
difference at the top of the list, rather than at the
top and bottom independently. These two types
are the places where a feature didn’t occur in the
incorrectly predicted documents, but often did in
the context of correctly predicted documents; and
the places where a feature is frequently present in
misclassified documents but not in the correctlypredicted instances.
These two types of horizontal difference are both
important but are telling you different things. In
the first, the feature may either be highly weighted
in the model itself, or it may occur in the easy
cases where there is no doubt about an instance’s
label even if the feature is not predictive itself. In
the second, though, these features are weighted
because they appear in deceptive instances. Either
they are strongly indicative of another label but
happen to occur in other places, or they occur in
places where the text is ambiguous. The quintessential example of this is the word “but” - a word
which can totally pivot the meaning of a sentence.
♦♦
Vertical Difference
Vertical difference behaves similarly to horizontal
difference and has very similar options, such as an
Absolute version which we also include. It differs
in one key respect - rather than shifting over to the
diagonal cell in the same row as your selected cell,
it compares against the diagonal cell in the same
prediction column.
This has a substantial effect. Now, you are no
longer evaluating the difference between two
cells. Instead, you’re trying to find similarities.
Why would an instance in the error cell fall into the
same prediction category as the instances which
were correctly predicted with this label? The best
way to use this measure is in conjunction with the
Frequency metric, attempting to find features that
both have a very similar distribution (Vertical Difference near zero) and a large number of hits.
♦♦
Linear Model Weight
Some models, including basic configurations of
SVM and Logistic Regression, calculate per-feature
“weight” values. For every feature in an instance,
the model multiplies the instance’s feature value
(1 or 0, for binary features) by the model’s feature
weight, and adds these numbers up. A larger total
means the model is more likely to select that class
label for the instance. For SVM with SMO, there’s
a separate feature weight for every pairing of class
labels, and the label that “wins” the most pairings
is predicted for an instance. For LibLINEAR’s SVM
and Logistic Regression, there’s one feature weight
per class. Each cell in the confusion matrix represents one of these sets of feature weights.
♦♦
Influence
Our final measure attempts to capture the innate
influence of a feature by testing how classification would be different if that feature were added
or removed to instances. In general, this metric
differs by column, rather than by cell, and its value
is measured in terms of an effect size in standard
deviations, rather than a raw score which is calculated from the instances in a cell itself.
Despite being somewhat decoupled from individual cells, this measure tends to have a very
strong ability to sort features based on an intuitive
judgment of how closely they ought to be associated with a particular prediction label. It should be
thought of as characterizing the overall prediction
of a model for a given class, rather than attempting to define the quirks of a single error cell in the
36| Lesson 7.2 - Deep analysis plugins
While the top half of the Explore Results screen
gives you access to the confusion matrix and a
single list of features, the bottom half enables
a very deep dive into particular aspects of your
model, comparisons across cells, and distributions
of predictions. We explain three of these interfaces
in this lesson - the Highlighted Feature Details,
Label Distribution, and Document Display plugins.
In the Highlighted Feature Details plugin, you’re
able to get an extended view of the metrics that
are being calculated in the table in the top half of
the Explore Results interface.
1. Before you can use this interface, you’ll need
to select some number of metrics from the top
interface, as in the previous lesson.
Before this plugin can do anything,
you need to highlight both a confusion matrix cell and a feature from
the top right panel. Without those
selections, nothing will appear.
2. Next, select the Highlighted Feature Details
plugin from the action bar.
3. For every metric that you’ve chosen above,
you can see the value of that metric in every
cell, for the feature that you’ve chosen. This
gives you a broader picture of what this feature
looks like across all cells in a confusion matrix,
instead of the single value that you get from
the sorted list.
Figure 24. Highlighted Feature Details in error analysis.
Average Value, Horizontal Difference, and Influence open simultaneously. This will tell you, for an
individual feature, its aggregate distribution over
your entire set of data, the particular difference
that it made for the error cell that you’ve highlighted, and its overall impact on the prediction label
that you’re trying to understand better.
Beyond that, though, you’ll likely want to know
more about individual instances, which is where we
move on to other interfaces.
♦♦
Label Distribution
4. As with many tables throughout the LightSide
workflow, you can export these individual conExport button.
fusion matrices with the
Here you can see not just the overall prediction
that was made by machine learning, but also its
confidence in that prediction. This plugin makes a
big assumption - that your machine learning classifier has some way of gauging confidence. In many
cases, such as with decision trees, this is simply
untrue, and this interface won’t tell you anything
of interest. On the other hand, for many classifiers
you’ll learn just what you were hoping to learn.
With experience, you’ll know the right combination
of metrics to use in order to quickly understand
your data. In many cases, the best subset is to have
The interface works by assuming that rather than
a label, you are instead receiving from your model
a distribution of predictions - a percentage chance
| 37
with the
8
5
6
7
While this is useful, the real way to learn more
about your data is to move beyond aggregate
measures and instead look at the real data, including reading those examples.
♦♦
Figure 25. Label distributions in the Explore Results tab.
that a document has a certain label. These will
add up to 1, but may be overwhelmingly weighted
in one direction, or broadly distributed across all
options. A distrbution that’s closer to even means
that the classifier is uncertain about its prediction.
In the case of logistic regression in particular, this
is a very good measure of confidence. For other
classifiers, like Naïve Bayes, it is harder to interpret
meaningfully (the results from Bayes tend to be
overconfident, with distributions typically placing
over 99% of the weight on a single label).
Understanding these predictions is straightforward
with this interface.
5. Every testing instance appears in its own row,
with a column for actual and predicted value.
Export button.
Documents Display
By default, this interface will give you a list of all
documents in your training set. This can be narrowed down, however.
9. If you have selected a feature in the top right
panel, then you can filter to only include documents that contain that feature. Additionally,
the location in a text where that feature appears will be highlighted in yellow.
10. If you have performed some filter like in the
previous step, you can also reverse it - effectively showing all documents that don’t include
that feature at all.
11. If you have selected a particular cell within a
confusion matrix, then you can select the option to only view those documents that fall into
that combination of actual and predicted label.
6. Next, the probability for each possible label
appears in its own row, shading coded by the
predicted chance that a given row’s instance
should be labeled with that value (darker
means more confident). Predictions which
were made correctly will appear in shades of
blue, while incorrect predictions appear in
shades of orange. In a perfect world, you want
to see a lot of blue, and very few orange rows,
with only light orange shading if it does occur.
7. Next to these columns, the remainder of the
space is taken up by the text of each instance.
8. As per usual, these results can be exported to
CSV for analysis or use outside of LightSide,
Figure 26. Options for filtering documents to browse by hand.
38| 12. Once you’ve selected the types of filters you
want to apply, you’re left with a set of checkboxes, each corresponding to a single instance
that meets all of your criteria. By checking the
box for that instance, LightSide will display its
entire text for reading and analysis, with highlighting of your selected feature.
Of course, looking for evidence from a single document is never going to be sufficient in itself, so it’s
always useful to look through as many examples
from any given set of filters as possible. By looking
through a great pile of data, you’ll be able to see
patterns emerge that wouldn’t be explained simply
by looking at errors statistically. To understand
how to do this best takes time. In the next lesson,
we talk about how to do this with a single example
dataset, the sentence-level sentiment analysis
data that comes distributed with LightSide.
1
2
4
Figure 27. Error analysis in depth, with a worked example.
3
| 39
Lesson 7.3 - A worked example
Let’s explore the “Explore Model” error analysis
interface using a model built using one of our
example datasets, sentiment_sentences.csv. This
dataset has about 10,000 example sentences, half
of which are positive and half of which are negative. Some of these are obvious, as in “this warm
and gentle romantic comedy has enough interesting characters to fill several movies, and its ample
charms should win over the most hard-hearted
cynics.” Others are a little more cryptic, requiring
more domain knowledge - “an afterschool special
without the courage of its convictions.” and others
are difficult even for humans to clearly categorize “somewhere short of tremors on the modern b-scene
: neither as funny nor as clever , though an agreeably
unpretentious way to spend ninety minutes.”
For this lesson, we’ll assume a model built from
standard unigram features, using Logistic Regression and 5-fold cross-validation. If need be, you
can review the overviews of Feature Extraction and
Model Building in Chapter 3.
You can tell quite a bit about a model
with just a glance at the Explore
Model interface - but you may need
to expand LightSide’s window and
adjust a few panel sizes to see it all at
once without resorting to scroll bars.
Make sure your newly trained model is highlighted
in the leftmost panel.
1. Select an Error Cell. Let’s explore the bottom
left corner, representing instances which were
predicted to be negative-sentiment but which
were actually positive.
2. Select evaluations to view. It can be useful to
keep Frequency, Average Value, and Horizon-
tal Difference open – this lets us rank features
by how deceptive they seem, but also to get
a handle on whether they’re very common. A
feature which is very confusing when it occurs,
but is in fewer than 0.1% of the documents
being classified, is not the low-hanging fruit
to target in an initial exploration of your data.
At the same time, a feature that’s extremely
common in your data isn’t going to tell you
much if it appears in every single cell of your
confusion matrix with great frequency.
3. Select a feature to analyze. This is where
things get tricky. Now that we have a list of
features (top right) and values have been calculated for the selected evaluations, we need
to start diving in to them. For this tutorial,
we’ll investigate the word “too” – it’s near the
top of my list in terms of Horizontal Comparison, and it’s at least somewhat frequent,
occurring in 49 different training instances in
the single cell that I’ve selected.
4. Select a plugin for model exploration.
This is where we find out everything we can
about our data. LightSide ships with four
exploration plugins, and in this tutorial, we’re
going to explore two of them in depth.
Digging Deeper
Now that we’ve chosen a cell, a feature, and a
plugin, we can start really understanding what’s
going on in our data. LightSide has determined,
through the Horizontal Comparison metric, that
the feature “too” is problematic for prediction. In
order to understand this, we’re first going to look
at the Highlighted Feature Details plugin.
40| Figure 28. Highlighted Feature Details
This plugin shows the values for the feature you’ve
selected for every possible cell in your confusion
matrix. This is an important contrast – in the top
right corner, that feature list is only giving you the
value of an evaluation for the cell you’ve clicked.
Here, we can look in more detail at particular cells.
Let’s zoom in on the two simplest metrics, Most
Frequent and Average Value, for a better understanding of what’s going on.
This doesn’t mean that the word “too” is indicative
of a negative review – on its own, it doesn’t appear
to have any meaning at all, certainly not in comparison to an obvious adjective like “best” or “awful”. Instead, it means that we have to look deeper
at the context of that feature. To do this, we can
switch plugins to the Documents Display, finding it
in the drop-down box which we singled out before,
in the middle of the screen.
Our confusion matrix is back! However, this time
it has values for the evaluations, not for classification. What this is telling us is that 49 instances in
the bottom left cell contained the word “too”; by
contrast, only 22 in the top right cell, predicted
positive but actually negative, had the word “too”
in them. These numbers are useless without a little
context, though; after all, the top left cell has 4,019
instances while the bottom left (our selected cell)
only had 1,312. For that, we turn to the Average
Value confusion matrix. This shows that while the
word “too” is very uncommon in both cells where
the prediction is positive, it is much more common
for those cells where the prediction was negative.
In fact, it almost quadruples the frequency!
Documents Display
Where do we get “quadruples”? Among the
sentences in the training set, think about the 5,331
instances labeled as positive. Among the 4,019
of those which were correctly labeled, the word
“too” only appears in fewer than 1% of them. On
the other hand, in positive sentences which were
misclassified, it occurs in nearly 4% of instances!
1. Select the Documents Display plugin. Switch
from Highlighted Feature Details to Documents Display. This lets us get away from the
abstraction of confusion matrices to start the
analysis of real text.
2. Filter the documents. Initially, the list of
instances in the bottom left corner includes
every example in your dataset. By selecting
the “Filter documents by selected feature”
checkbox, we’ll narrow the selection down to
only the sentences containing the word “too”
in them somewhere. Then, by checking “Documents from selected cell only” we narrow the
selection down again, only showing the documents which both have that feature and which
were misclassified in that way.
3. Select documents to view. The documents in
this bottom left list match the characteristics
you’re filtering for. Clicking a checkbox next
| 41
to any instance will add the document to the
display panel in the bottom right of the screen.
4. Browse through the documents - From here,
we can really start going deep into the text.
Once you’ve selected a few documents out
of the list of options that match your criteria.
Note that “too”, the feature we selected earlier, is highlighted wherever it appears within
the text. Examining multiple examples within
a specific subdivision of a subdivision of your
data, you can really get an understanding for
what contexts that particular feature is appearing in; this, combined with knowing that
they were misclassified, gives you a lens into
your own data.
This type of error analysis can lead to bottom-up,
empirical inspiration for what to do next with your
model. Now that we know that one possible source
of error is contrastive discourse marking – sentences which had both positive and negative attributes,
played off each other in the sentence structure but
ignored in the bag-of-words model of machine
learning – we can start to engineer new features
and representations which might make sense of
this information.
In our case, we can start gathering example sentences. The first sentence I selected for viewing
was “there’s something auspicious, and daring, too,
about the artistic instinct that pushes a majorityoriented director like steven spielberg to follow a.i.
with this challenging report so liable to unnerve the
majority.” This sentence is positive, but it sure isn’t
universal praise. In fact, the word “too” here is
tagging on additional descriptors after the overall
appraisal.
1
2
3
Figure 29. Documents Display in Depth
The next sentence we selected? “well-acted, welldirected and, for all its moodiness, not too pretentious.” Here we see an addition of negative aspects
being used to contrast with the positive elements
of the one-sentence review. While humans know
that this contrastive discourse function is being
used by the writer, no such recognition exists in
the machine’s model; it simply recognizes that
the document contains the relatively rare features
“well-acted” and “well-directed”, along with recognizable negative words “moodiness” and “pretentious”. Given this conflicting information and no
way of reconciling them, each of these features
will add up to an overall judgment that attempts to
make sense of this mixed bag.
4
42| 8
Model Comparison
The previous chapter introduced you to the tools
that you can use to explore a single model. In many
cases, though, you have multiple different configurations that you want to explore. By making incremental changes to your algorithms and feature
extraction methods, you might see a performance
gain as measured by plain accuracy. However, this
still leaves many questions unanswered. Is the
difference statistically significant, or mere noise?
Even if it’s significant, what is it actually doing? Are
there specific types of errors that are now more or
less common? Are you happy with the differences?
These are questions that we aim to address with
the Compare Models tab. While the interface is
still new and has fewer features than the previous chapter, it gives a starting point that’s still
far above the use of plain accuracy differences to
judge model performance. In Lesson 8.1, we’ll give
the basics of statistical significance tests and comparing the confusion matrix of a cell. In Lesson 8.2,
then, we talk about exploring the instances that
are being classified differently across models.
Lesson 8.1 - Basic model comparison
Before you get anywhere, you’ll need to have
at least two trained models (of course, you can
always have more). From there you can get started
on comparison. We don’t currently offer any way
to compare three or more models simultaneously.
In your comparison, you should think of one of
your models as the “baseline” - that is, the default
assumption you’re making for a level of accuracy
that you can expect. Then, your second model is
the competition - the attempt to improve upon
that baseline. While this isn’t a necessary framing
of model comparison, it’s a convenient one.
1. After you’ve trained both models in the Build
Models tab, select the first (baseline) model
on the lefthand side of “Compare Models”. As
always, you can load saved models (and save
models for later use) using the
Load buttons.
Save and
2. Select the model you want to compare against
(the “competing model”) on the righthand side
using the same procedure.
The full description tree for each model is also displayed, so you can investigate, or remind yourself
of, the differences in configuration (feature extractor settings, machine learning algorithm, etc) that
may have led to any differences in performance.
3. For the most basic tests, select the “Basic
Model Comparison” plugin from the action bar.
4. A selection of basic model performance metrics (accuracy and kappa) are displayed, for
direct numeric comparison of the two models.
| 43
Don’t try to compare performance
across models that were evaluated
on different test sets. The differences
won’t be meaningful and there’s no
realistic way to make a statistical
comparison. LightSide might also
misbehave in unpredictable ways.
5. The confusion matrices for each model are also
shown below. To compare models further and
dig deeply into confusion matrices, select the
“Difference Matrices” plugin from the action
bar and move on to Lesson 8.2.
6. We can assess the significance of the difference between two models’ accuracy with 0-1
loss (either you predict a label correctly or you
don’t). Each instance receives a score of 1 if a
trained model predicted the correct class and
0 if it got the label wrong. By comparing the
differences in the distributions of 1s and 0s between datasets with a student’s t-test, we can
give a quick and easy measure of significance.
Figure 30. Basic model comparison in LightSide.
LightSide will color code this measure, with green
indicating a significant difference. Beyond that,
though, this first interface tells you fairly little, and
for more in-depth digging, you’ll want to move on
to the difference matrix interface.
Lesson 8.2 - Difference matrix comparison
To investigate further into exactly where two models differ in their classification on the same dataset, use the “Difference Matrix” plugin. Remember,
it doesn’t make any sense to compare confusion
matrices between models that were evaluated on
different data sets from each other, or that had different class labels which they were predicting.
1. After following the instructions from Lesson
8.1 to choose models to compare, select the
“Difference Matrix” plugin from the action bar.
2. Difference Matrix
This is our display at the top of the left panel
- we made up the name. Each cell in this modified confusion matrix shows the difference
(competing minus baseline) in the number of
instances assigned to the cell (predicted label
vs. actual label) between the two models. Blue
shading represents a positive value, meaning
that the cell is more likely to occur in the data
from the competing model. Orange shading
represents a negative value, meaning that the
cell is more common in the baseline matrix).
What you want to see in a good competing model is a stretch of blue cells along the
diagonal, with an abundance of orange in the
remaining error cells. This difference matrix,
like the confusion matrix in Chapter 7, has radio
buttons in each cell, allowing you to dive into
specific examples. That’ll be important later:
44| what you’ll want to do is identify cases where
specific behavior differs between models.
3. The confusion matrices for each model are also
shown separately, for reference.
4. Differences by Instance
In this panel, you can view the text of the documents (instances) that fall into the selected cell
of the difference matrix. Using the radio buttons at the top, you can choose to see those
instances that are only present in one model or
the other in that cell (how the models disagree
in their classification), or those instances that
are assigned to that cell by both models (how
the models agree). Those latter cases are
likely to be the most stable, places where your
changes had little or no effect. The former, on
the other hand, are your examples not just of
aggregate statistics, but of real differences
in what the model decided based on your
changes.
5. The full text of each matching instance is
displayed in the rest of the panel. For data sets
with very long instances, this can be a prohibitively large amount of text to scroll through,
but in general it is a useful first pass.
Figure 31. Exploring with the difference matrix interface.
You’ve made it through our lessons on LightSide. If
you really want to dig in further, the next step is to
start working with code, moving beyond the user
interface. For that, you can turn quickly to Appendix B, where we give some basic advice for working
along those lines. This should be a good place for
us to stop, though, and let you take over with your
own data.
| 45
A
Glossary of Common Terms
Annotation
Class Value
The class value of an instance; alternatively, the
process of labeling a corpus of instances.
The label of an instance to predict using machine
learning.
Bag-of-Words
Corpus
A particular type of feature space consisting solely
of unstructured n-grams.
A collection of annotated example instances used
as a training set for a classifier (plural corpora).
Baseline
Features
The most straightforward algorithm and feature
space available for a classification task.
The list of independent variables, each with a
simple nominal or numeric value, that represent an
instance.
Binary Classification
Any classification task where there are only two
possible outputs, essentially reducing machine
learning to answering a yes/no question.
Feature Extraction
The process of converting an instance to a feature
vector, or converting a corpus into a feature table.
Classifier
Feature Space
The result of training, a model that predicts an annotation for an instance, given its features.
The set of possible features that can be used by a
classification model.
Classification
Feature Table
The process of using machine learning to perform
annotation on an instance.
The set of feature vectors extracted from instances
in a training corpus.
46| Feature Vector
Stemming
A representation of the features in a single instance; a single row in a feature table.
The process of simplifying a word into a simpler
form, by removing pluralization, verb tense, and
so on.
Instance
A single example document that can be labeled,
either with an existing human label (for training) or
to be automatically graded (for testing).
Stopword
A function word like “the” or “and” which does not
contribute to the content of a document.
Kappa
Supervised Learning
A metric of performance of an annotator or classifier, measuring accuracy after accounting for
chance guessing.
Any type of machine learning which uses training
data to build a model. There is also an entire field
of unsupervised learning, which involves exploring
data without knowing exactly what you’re looking for; this is not possible with LightSide in any
meaningful sense.
Log-Linear Classifier
Another term for a logistic regression classifier.
Maximum Entropy Classifier
Training
Another term for a logistic regression classifier.
The process of using an example corpus to build a
model that can reproduce human annotation.
Metadata
String
Any information about an instance that isn’t contained in that instance’s text.
A series of characters that make up text.
N-Grams
A simple feature space for text instances representing the possible words in a vocabulary (unigrams) or adjacent phrases of length N or more.
Prediction
The output of a classifier for classifying a single
instance.
| 47
B
Extending with Plugins
LightSide can do a lot - but it might not always be
quite able to do what you need, out of the box. If
you’re a halfway-decent Java programmer, you
can easily add new functionality to just about any
stage of the pipeline.
The Plugin Architecture
LightSide is a pipeline, broadly structured as Load
Documents, Extract Features, Restructure Tables,
Build Models, and Explore Results. Each of these
pipeline stages is manifested through one or more
plugins that implement a standard interface for
that stage. LightSide links them all together, and
allows the user to choose and configure the plugins
to apply in each stage.
LightSide’s plugins are stored in the plugins/
directory. All of the built-in LightSide plugins are
in genesis.jar. Exaclty which plugins are loaded is
determined by plugins/config.xml.
An example config entry is shown below - for any
new plugin you load, make sure the jarfile and
classname values are correct.
<plugin>
<name>Example Plugin</name>
<author>Your Fine Self</author>
<version>1.0</version>
<description>
A really great plugin
</description>
<jarfile>example.jar</jarfile>
<classname>
example.features.ExamplePlugin
</classname>
</plugin>
The various kinds of SIDEPlugin are described below. In addition to methods particular to its pipeline stage, each plugin also implements a shared
set of methods that allow a plugin to be configured
(via UI and settings-map) and loaded. These methods are described in the extended description of
Feature Extraction plugins, later in this chapter.
Core Plugins
•
FileParser - load a file from disk and convert
it into a DocumentList, the structure used
to store text and column information for a
dataset. LightSide comes with only one parser
plugin, CSVParser. If you add additional parsers, LightSide will be able to load additional
file formats.
•
FeaturePlugin - extract features from a
document list. This is the most likely place for
new plugin development. See the extended
description later in this chapter.
•
RestructurePlugin - take an exisiting feature
table and transform it. Restructuring might
involve collapsing documents, inferring new
features, or collapsing old ones.
•
WrapperPlugin - adjust the feature table or
prediction results, just before or just after
learning. FeatureSelection is the prime example, where a subset of features is picked
on each fold before passing it to the learning
plugin.
48| •
LearningPlugin - do machine learning! Each
LearningPlugin represents an approach to
training a model from labeled data, and for
using the trained model for later prediction. All
of the LearningPlugins that ship with LightSide are wrapped around Weka classifiers.
Evaluation Plugins
•
FeatureMetricPlugin - calculate statistics
about individual features. TableFeatureMetricPlugins apply to untrained feature tables,
while ModelFeatureMetricPlugins use the
results of model evaluation to capture per-feature statistics for post-training error analysis.
•
ModelMetricPlugin - calculate holistic statistics about trained models - LightSide’s built-in
BasicModelEvaluation plugin reports Accuracy and Kappa.
•
EvaluateOneModelPlugin - provides a user
interface for advanced error analysis, given
a selected trained model and (potentially) a
highlighted feature.
•
EvaluateTwoModelPlugin - provides a user
interface for comparing the results from two
trained models.
Your Development
Environment
We’ve been developing LightSide in Eclipse - you
can use any environment you like, but our descriptions here will likely include some Ecliptical
assumptions.
Dependencies
For developing a plugin, you’ll have to link your
new codebase against LightSide. LightSide depends on most of the libraries within the lib/ folder,
and (for the sake of the Weka LearningPlugins) on
the various jars in the wekafiles/ folder as well. See
the classpath in run.sh for a complete list. While
your own project may not need to link against
these to compile, if you intend to run LightSide
from within your IDE, you’ll have to make sure it
knows where they are.
Feature Extraction
There’s a nicely documented dummy extractor in
the plugins/example/ folder. It’s been used as the
template for several of the newer extractors in this
version of LightSide.
Compiling Your Plugin
Each neccessary Feature Extractor method is described in comments within the example code.
The minimum necessary steps for compiling your
own plugin are given below, assuming you’ve got
the JDK. In a terminal on Linux or a Mac:
Other Plugins
> LIGHTSIDE=/path/to/LightSide
> javac -classpath $LIGHTSIDE/bin
example/features/*.java
> jar -cf example.jar example/
> cp example.jar $LIGHTSIDE/plugins/
[Edit plugins/config.xml]
The required interface for each plugin superclass
is defined in src/edu/cmu/side/plugin/. You can find
the source for all the plugins that ship with LightSide within genesis.jar (you can open a JAR file as if
it were a zip file, though you might need to make a
copy and change its extension to .zip first).
Good luck!
Researcher’s User Manual
LightSide Labs - 5888 Ellsworth Ave Suite 200 - Pittsburgh, PA 15232 - www.lightsidelabs.com