1
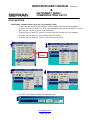
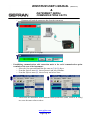
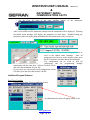
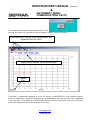
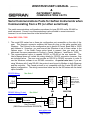
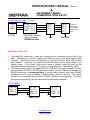
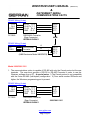
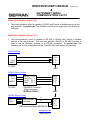
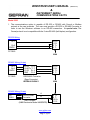
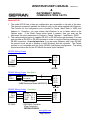
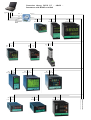
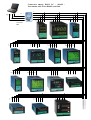
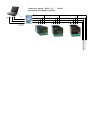
WINSTRUM USER’s MANUAL
(Version 4.3)
&
INSTRUMENT SERIAL
COMMUNICATIONS FACTS
This document contains two sections. The first section is the Winstrum User’s Manual and the second
section contains communications information for all Gefran instruments.
Winstrum User’s Manual.................................Page 2
Serial Communications Facts.........................Page 12
www.gefran.com
Page 1 of 23
WINSTRUM USER’s MANUAL
(Version 4.3)
&
INSTRUMENT SERIAL
COMMUNICATIONS FACTS
Winstrum User’s Manual
Winstrum is a Windows-based software for reading and writing all parameters in a single instrument via
a serial connection. The Winstrum software is supplied as a kit that includes an interface cable
necessary for instruments without the serial communications option. The cable has a 9-pin connector at
one end for connecting to the PC’s RS-232 serial port. The other end has a 3-pin connector for attaching
to the instrument 3-pin configuration port. When using this port, the communications protocol is limited
to the Gefran Cencal Protocol. When an instrument has the serial communications option installed,
either the configuration port or the serial communication option terminals at the rear of the instrument
may be used. In the later case, the user must include an RS-232 to RS-485 converter for instrument
models that are not capable of RS-232 connection directly (See Table 1). The user will also have the
ability to choose between Gefran Cencal and Modbus RTU Protocols. See the Serial Communications
Facts Section for more details.
Winstrum will provide the following functions:
- Storage of instrument configurations for rapid instrument programming
- Real-time trending of up to five parameters with adjustable scales and time bases
- Ability to print the Trend Graphs and store Trend data for use Excel spreadsheets
- Graphic display of Custom Linearization data
- Quick access for Help on each instrument parameter
SYSTEM REQUIREMENTS
Pentium 90MHz cpu or higher.
Monitor VGA 800x600.
24 MB of RAM for Windows 95/98, 32 MB for Windows NT/2000.
Microsoft Windows NT 3.51 or later or Microsoft Windows 95/98 or later or Microsoft Windows
2000/XP.
o Min. 15 MB available on disk.
o
o
o
o
INSTALLATION
1. If a previous version of this program already exists on your computer, uninstall it before installing
the new version.
2. Insert the CD into the drive or navigate to the folder where the downloaded files are stored.
3. Wait for the automatic start of the setup program - or - manually start it launching the start.exe
program.
4. The set-up procedure will display further instructions on screen in order to complete the installatio n
in C:\Winstrum directory (don’t modify the default directory suggested).
5. If a previous version of Winstrum program has already been installed, you might be asked to keep
the following files, as they are newer: MFC40.DLL - GSWDLL32.DLL - GSW32.EXE - VOC0.STR
- VOC1.STR – VOC2.STR – VOC3.STR. Choose “ No ” for each file so that they will be re-written
every time.
6. From the “ START “ menu, select Programs , then click on WINSTRUM.
www.gefran.com
Page 2 of 23
WINSTRUM USER’s MANUAL
(Version 4.3)
&
INSTRUMENT SERIAL
COMMUNICATIONS FACTS
IMPORTANT NOTES
-
The program provides the selection of language, serial port (from COM1 to COM6) and Baud rate
(1200, 2400, 4800, 9600, 19200 baud).
When a new instrument is selected, standard configuration data are displayed on screen.
Configuration data can be printed and files can be stored. File name extension must be: “.dat”.
When selecting a parameter, a double-click of the mouse left key will display on screen its Help page
with a description of the current setting.
PC-INSTRUMENT CONNECTION (without serial comms option installed)
Use the connection cable supplied with the program (standard length: 2 m.).
Connect the 9-pin female connector to the PC serial port.
Connect the 3-pin connector to the plug on the side of the instrument.
Upper View
9-pin connector to PC COM port
1
2
TX
3
RX
4
DTR
5
GND
6-9
PC-INSTRUMENT CONNECTION (with serial comms option installed)
-
-
An instrument capable of RS232 serial connection (See Table 1) can be connected directly:
PC: 9-pin connector
<< >>
Instrument
o pin 2 Tx -----------------------------------Rx
o pin 3 Rx -----------------------------------Tx
o pin 5 GND------------------------------------ GND
An instrument capable of only RS485 connection will require a RS232/485 converter be used.
www.gefran.com
Page 3 of 23
WINSTRUM USER’s MANUAL
(Version 4.3)
&
INSTRUMENT SERIAL
COMMUNICATIONS FACTS
CD CONTENT
LibraryX.Y
Autorun.inf
Gefran.ico
Readme.doc
Readme_eng.doc
Liesmich_deu.doc
Readme_fr.doc
Setup.exe
Setup.lst
Start.exe
Winstrum.CAB
FILE DESCRIPTION
The installed files are the following:
- Strum.up
file containing the last selection references.
- Readme.doc
description of set- up and PC-Instrument connection in Italian language.
- Readme_eng.doc description of set- up and PC-Instrument connection in English language.
- Liesmich_deu.doc description of set- up and PC-Instrument connection in German language.
- Readme_fr.doc
description of set- up and PC-Instrument connection in French language.
- Voc0.str
menu strings in Italian language.
- voc1.str
menu strings in English language.
- voc2.str
menu strings in German language.
- voc3.str
menu strings in French language.
- Flgita.ico
Italian flag icon.
- Flguk.ico
U.K. flag icon.
- Flggerman.ico
German flag icon.
- Flgfran.ico
French flag icon.
File definition depending on extension:
“instrument”.cfg
configuration file.
“instrument”_0.man Italian language strings.
“instrument”_1.man English language strings.
“instrument”_2.man German language strings.
“instrume nt”_2.man French language strings.
“instrument”.std
standard data file.
*.dat
stored data file.
Where “ instrument ” means the instrument model.
www.gefran.com
Page 4 of 23
WINSTRUM USER’s MANUAL
(Version 4.3)
&
INSTRUMENT SERIAL
COMMUNICATIONS FACTS
USING WINSTRUM
-
Establishing communications using the Programming Cable:
o Connect the instrument to the serial port on the computer and turn on the instrument.
o From the Instruments menu (1), choose the instrument that you have connected. (Select
the Firmware Version closest to your instrument)
o From the Options menu (2), choose Com and select the Com port for your computer.
o From the Options menu (3), choose Baud and select 19200.
o From the Options menu (4), choose Protocol and select Cencal.
Firmware
Version
o Press the Read button to initiate an instrument read.
www.gefran.com
Page 5 of 23
WINSTRUM USER’s MANUAL
(Version 4.3)
&
INSTRUMENT SERIAL
COMMUNICATIONS FACTS
o
Winstrum will read the parameter data from the instrument
o Winstrum will update the display.
-
Establishing communications with connection made to the serial communication option
terminals at the rear of the instrument:
o Select the Com port and Baud Rate the same as (2) & (3) above.
o From the Options menu (8), choose Protocol and select Modbus.
o From the Options menu (9), choose Parity and select None.
o Ensure that the instrument serial communications parameters (Baud, Protocol & Parity)
are set to the same values as above.
www.gefran.com
Page 6 of 23
WINSTRUM USER’s MANUAL
(Version 4.3)
&
INSTRUMENT SERIAL
COMMUNICATIONS FACTS
o Set the Code ID value to the same
-
Modbus address of the instrument.
o Repeat Step (5) above.
After a successfull read, the parameter settings from the instrument will be displayed. Selecting
the tabbed menu headings will display the parameters for that menu. Double-clicking any
parameter value will display help information for that parameter & value (see below).
-
-
From here you can click and edit any parameter in
each of the tabbed menu headings.
Once all
parameters have been set to the desired values, press
the Write button to send the data to the instrument.
- The configuration can be saved to disk for
safekeeping and for programming multiple
instruments with the same data. Choose File then SaveAs
and select the destination for your file.
If you wish to use a previously saved configuration, choose
File then Open and select the desired *.dat file.
Additional Program Features
Real-Time Trending
Choose Options then Trend to enable this feature.
An additional menu item will appear called Trend.
www.gefran.com
Page 7 of 23
WINSTRUM USER’s MANUAL
(Version 4.3)
&
INSTRUMENT SERIAL
COMMUNICATIONS FACTS
Select Trend from the menu. The window below will appear. Here is where you can configure up to
five parameter variables to trend.
Enter the desired Duration of the Trend
Enter the desired Logging Time
(Period)
Enter the Y axis values
Select the number of
parameters to trend (Max 5)
Select the parameter from the drop-down and set the Min
& Max range for the parameter as set in the instrument
Select OK.
www.gefran.com
Page 8 of 23
WINSTRUM USER’s MANUAL
(Version 4.3)
&
INSTRUMENT SERIAL
COMMUNICATIONS FACTS
A new button is present in the data window called Trend.
Pressing this button will begin the trend and a graphical display window will appear.
Control buttons to Stop the Trend, Display Max & Min
values and Print the Trend
Display control features. Active feature in Red.
Elapsed
Time
Trend data is continuously appended to a text file named trendDDMMYY.txt in the default program
directory C:\Winstrum. If you stop and restart the Trend during the same day, the data will be appended
to the same file. If you intend to trend different data at several times during the same day, you should
rename the default trend file before starting the next trend.
www.gefran.com
Page 9 of 23
WINSTRUM USER’s MANUAL
(Version 4.3)
&
INSTRUMENT SERIAL
COMMUNICATIONS FACTS
The Header Button
Pressing this button will open an edit window.
Here you can edit text that will be appended to the saved configuration files (*.dat). You can enter
descriptive information about the configuration and it’s use and it will be saved at the end of each file.
Linear
Enabling the Linear feature is accomplished by choosing Options and then
selecting Linear.
A new button will appear that, when pressed, will display a graphical view
of the Custom Linearization parameters for this configuration file.
www.gefran.com
Page 10 of 23
WINSTRUM USER’s MANUAL
(Version 4.3)
&
INSTRUMENT SERIAL
COMMUNICATIONS FACTS
Refresh button on Toolbar
Pressing this button will restore a factory default set of values for all
parameters.
Troubleshooting
-
-
Serial Error messages are usually the result of incorrect wiring or mismatched serial comm
parameters between the instrument and the program. Re-check settings for Protocol, address,
Baud Rate & Parity. If using the 3-pin programming port, ensure tha t Winstrum is set to Cencal
Protocol, 19200 Baud. Check that the correct COM Port for your PC is selected.
If your instrument is equipped with the RS485 Serial Comm option then, the 3-pin programming
port or the rear terminals may be used for PC connection.
If Serial Comm errors are present when using RS485 2-wire connection, try reversing the A & B
wires. Polarity reference between manufacturers is not always consistent.
For additional assistance, contact your local Gefran distributor or:
GefranISI, Inc.
8 Lowell Ave
Winchester, MA 01890
Phone
781-729-5249
Fax
781-729-1468
Toll Free
888-888-4474
[email protected]
www.gefran.com
Page 11 of 23
WINSTRUM USER’s MANUAL
(Version 4.3)
&
INSTRUMENT SERIAL
COMMUNICATIONS FACTS
Serial Communications Facts for Gefran Instruments when
Communicating from a PC (or other serial host)
The serial communications configurations are shown for types RS-232 and/or RS-485 for
each instrument. Current Loop communications is also possible in some instruments
however it is not shown here due to the limited field use.
Model 600 / 1200 / 1300
1. The model 600 series has a three pin configuration port accessible on the side of the
case. This three-pin connector matches the three pin plug on the cable supplied with
Winstrum. The Protocol for the configuration port is preset to Cencal, Baud Rate is 19200
and Address is 1 therefore, you must ensure that Winstrum is set to these values in the
Options menu. If the Serial Comm option board is present, then you must set the
instrument Ser menu parameters to Protocol = Cencal, Address = 1 and Baud = 19200.
2. The communications option is capable RS-232 or RS-485 at the rear terminals. The
User’s Manual does not include the wiring details for RS-232 connection however, they
are included below. The user must provide an RS-232 to RS-485 converter in order to
use the Winstrum software in an RS-485 connection. A special note here; if you are
using Winstrum with 2-wire RS-485, the protocol must be set to Modbus in both Winstrum
and the controller. The Cencal protocol is not compatible with the 2-wire RS-485 (halfduplex) configuration. The wiring connections below are for the 600 series with the serial
option installed.
RS-232 Wiring
See Note 1
Tx 3
12 R+
11 R10 T+
9 T-
Rx 2
GND 5
19 R+
20 R21 T+
22 T-
Jumpers on
Serial Comm
Option Board
must be set to
4-wire.
PC DB-9
RS-485 Wiring (2-wire)
PC
DB-9
600
See Note 1
RS232/RS485
Converter
B
A
User Provided
(B&B Electronics Model 485SD9TB)
9 T10 T+
11 R12 R+
www.gefran.com
Page 12 of 23
1200/1300
21
22
WINSTRUM USER’s MANUAL
(Version 4.3)
&
INSTRUMENT SERIAL
COMMUNICATIONS FACTS
RS-485 Wiring (4-wire) See Note 1
Tx 3
Rx 2
GND 5
PC DB-9
21 Rx T+ 6
19-20 Tx T- 7
13-22 R+ 4
GND
R- 5
12 R+
11 R10 T+
9 T-
RS232/485 Converter
(Rear Connector)
GEFRAN CLB94-2
19 R+
20 R21 T+
22 T-
600
Jumpers on
Serial Comm
Option Board
must be set to
4-wire.
1200/1300
Model 800 / 1600 / 1800
1. The model 800 series has a three pin configuration port accessible on the side of the
case. This three-pin connector matches the three pin plug on the cable supplied with
Winstrum. The Protocol for the configuration port is preset to Cencal, Baud Rate is 19200
and Address is 1 therefore, you must ensure that Winstrum is set to these values in the
Options menu. If the Serial Comm option board is present, then you must set the
instrument Ser menu parameters to Protocol = Cencal, Address = 1 and Baud = 19200.
2. The communications option is capable RS-232 or RS-485 at the rear terminals. The user
must provide an RS-232 to RS-485 converter in order to use the Winstrum software in an
RS-485 connection. A special note here; if you are using Winstrum with 2-wire RS-485,
the protocol must be set to Modbus in both Winstrum and the controller. The Cencal
protocol is not compatible with the 2-wire RS -485 (half-duplex) configuration. The wiring
connections below are for the 800 series with the serial option installed.
RS-232 Wiring
TX - 3
RX - 2
GND - 5
R+ - 24
T+ - 26
GND - 25
GND - 27
R+ - 15
T+ - 17
GND - 16
GND - 18
PC DB-9
1600 / 1800
800
www.gefran.com
Page 13 of 23
WINSTRUM USER’s MANUAL
(Version 4.3)
&
INSTRUMENT SERIAL
COMMUNICATIONS FACTS
RS-485 Wiring (4-wire)
Tx 3
Rx 2
GND 5
21 Rx T+ 6
19-20 Tx T- 7
13-22 R+ 4
GND
R- 5
PC DB-9
24 +
25 R26 T+
27 T-
RS232/485 Converter
(Rear Connector)
GEFRAN CLB94-2
1600 / 1800
15 +
16 R17 T+
18 T-
or
800
RS-485 Wiring (2-wire)
PC
DB-9
A
RS232/RS485
B
Converter
User Provided
(B&B Electronics Model 485SD9TB)
24 +
25 R26 T+
27 T-
15 +
16 R17 T+
18 T-
Model 40TB
1. The model 40TB has a three pin configuration port accessible on the side of the case.
This three-pin connector matches the three pin plug on the cable supplied with Winstrum.
The Protocol for the configuration port is preset to Cencal, Baud Rate is 19200 and
Address is 1 therefore, you must ensure that Winstrum is set to these values in the
Options menu. If the Serial Comm option board is present, then you must set the
instrument Ser menu parameters to Protocol = Cencal, Address = 1 and Baud = 19200.
2. The communications option is capable RS-232 or RS-485 at the rear terminals. The user
must provide an RS-232 to RS-485 converter in order to use the Winstrum software in an
RS-485 connection. A special note here; if you are using Winstrum with 2-wire RS-485,
the protocol must be set to Modbus in both Winstrum and the controller. The Cencal
protocol is not compatible with the 2-wire RS -485 (half-duplex) configuration. The wiring
connections below are for the 40TB with the serial option installed.
RS-232 Wiring
TX - 3
RX - 2
GND - 5
PC
DB-9
RX - 24
TX - 26
GND - 25
GND - 27
40TB
www.gefran.com
Page 14 of 23
WINSTRUM USER’s MANUAL
(Version 4.3)
&
INSTRUMENT SERIAL
COMMUNICATIONS FACTS
RS-485 Wiring (4-wire)
Tx 3
Rx 2
GND 5
PC DB-9
21 Rx T+ 6
19-20 Tx T- 7
13-22 R+ 4
GND
R- 5
24 R+
25 R26 T+
27 T-
RS232/485 Converter
(Rear Connector)
GEFRAN CLB94-2
40TB
RS-485 Wiring (2-wire)
PC
DB-9
A
RS232/RS485
B
Converter
User Provided
(B&B Electronics Model 485SD9TB)
24 R+
25 R26 T+
27 T-
Model 1000/1001/1101
1. The communications option is capable of RS-485 with only the Cencal protocol at the rear
terminals. The user must provide a RS-232 to RS-485 Converter in order to use the
Winstrum software from a PC. A special notes; 1) The Cencal protocol is not compatible
with the 2-wire RS-485 (half-duplex) configuration. 2) From serial number 0320xxxx and
higher, the Winstrum programming port is present.
RS-485 Wiring (4-wire)
Tx 3
Rx 2
GND 5
PC DB-9
21 Rx T+ 6
19-20 Tx T- 7
13-22 R+ 4
GND
R- 5
8 R+
9 R10 T+
11 T-
RS232/485 Converter
(Rear Connector)
GEFRAN CLB94-2
1000/1001/1101
www.gefran.com
Page 15 of 23
WINSTRUM USER’s MANUAL
(Version 4.3)
&
INSTRUMENT SERIAL
COMMUNICATIONS FACTS
Model 2301 (Software Version 5.x)
1. The communications option is capable of RS-485 with Cencal or Modbus protocol at the
rear terminals. A special note; This Software Version is not supported in the Winstrum
Software.
Model 2301 (Software Version 7.x)
1. The communications option is capable of RS-232 or RS-485 with Cencal or Modbus
protocol at the rear terminals. The user must provide a RS-232 to RS-485 Converter in
order to use the Winstrum software in an RS-485 connection. A special note; The
Cencal protocol is not compatible with the 2-wire RS-485 (half-duplex) configuration.
RS-232 Wiring
Tx 3
10 R+
11 R8 T+
9 T-
Rx 2
GND 5
PC DB-9
2301
RS-485 Wiring (4-wire)
Tx 3
Rx 2
GND 5
PC DB-9
21 Rx T+ 6
19-20 Tx T- 7
13-22 R+ 4
GND
R- 5
10 R+
11 R8 T+
9 T-
RS232/485 Converter
(Rear Connector)
GEFRAN CLB94-2
2301
RS-485 Wiring (2-wire)
PC
DB-9
A
RS232/RS485
B
Converter
User Provided
(B&B Electronics Model 485SD9TB)
www.gefran.com
Page 16 of 23
8 T+
9 T10 +
11 R-
WINSTRUM USER’s MANUAL
(Version 4.3)
&
INSTRUMENT SERIAL
COMMUNICATIONS FACTS
Model 2300
1. The communications option is capable of RS-232 or RS-485 with Cencal or Modbus
protocol at the rear terminals. The user must provide a RS-232 to RS-485 Converter in
order to use the Winstrum software in an RS-485 connection. A special note; The
Cencal protocol is not compatible with the 2-wire RS-485 (half-duplex) configuration.
RS-232 Wiring
Tx 3
10 R+
11 R8 T+
9 T-
Rx 2
GND 5
PC DB-9
2300
RS-485 Wiring (4-wire)
Tx 3
Rx 2
GND 5
PC DB-9
21 Rx T+ 6
19-20 Tx T- 7
13-22 R+ 4
GND
R- 5
10 R+
11 R8 T+
9 T-
RS232/485 Converter
(Rear Connector)
GEFRAN CLB94-2
2300
RS-485 Wiring (2-wire)
PC
DB-9
A
RS232/RS485
B
Converter
User Provided
(B&B Electronics Model 485SD9TB)
www.gefran.com
Page 17 of 23
8 T+
9 T10 R+
11 R-
WINSTRUM USER’s MANUAL
(Version 4.3)
&
INSTRUMENT SERIAL
COMMUNICATIONS FACTS
Model 2308
1. The communications option is capable of RS-485 with Cencal or Modbus protocol at the
rear terminals. The user must provide a RS-232 to RS-485 Converter in order to
communicate from a PC. A special note; The Cencal protocol is not compatible with the
2-wire RS-485 (half-duplex) configuration.
RS-485 Wiring (4-wire)
Tx 3
Rx 2
GND 5
PC DB-9
21 Rx T+ 6
19-20 Tx T- 7
13-22 R+ 4
GND
R- 5
18 R+
19 R20 T+
21 T-
RS232/485 Converter
(Rear Connector)
GEFRAN CLB94-2
2308
RS-485 Wiring (2-wire)
PC
DB-9
A
RS232/RS485
B
Converter
User Provided
(B&B Electronics Model 485SD9TB)
20 T+
21 T18 R+
19 R-
Model I300
1. The communications option is capable of RS-485 with J-Bus or Modbus protocol at the
rear terminals. The user must provide a RS-232 to RS-485 Converter in order to
communicate from a PC.
RS-485 Wiring (2-wire)
PC
DB-9
A
RS232/RS485
B
Converter
User Provided
(B&B Electronics Model 485SD9TB)
www.gefran.com
Page 18 of 23
25 (A)
24 (B)
I300
WINSTRUM USER’s MANUAL
(Version 4.3)
&
INSTRUMENT SERIAL
COMMUNICATIONS FACTS
Model 40T-48
1. The model 40T-48 has a three pin configuration port accessible on the side of the case.
This three-pin connector matches the three pin plug on the cable supplied with Winstrum.
The Protocol for the configuration port is preset to Cencal, Baud Rate is 19200 and
Address is 1 therefore, you must ensure that Winstrum is set to these values in the
Options menu. If the Serial Comm option board is present, then you must set the
instrument Ser menu parameters to Protocol = Cencal, Address = 1 and Baud = 19200.
3. The communications option is capable RS-232 or RS-485 at the rear terminals. The user
must provide an RS-232 to RS-485 converter in order to use the Winstrum software in an
RS-485 connection. A special note here; if you are using Winstrum with 2-wire RS-485,
the protocol must be set to Modbus in both Winstrum and the controller. The Cencal
protocol is not compatible with the 2-wire RS -485 (half-duplex) configuration. The wiring
connections below are for the 40T-48 with the serial option installed.
RS-232 Wiring (3-wire)
Tx 3
12 R+
11 R10 T+
9 T-
Rx 2
GND 5
PC DB-9
40T-48
RS-485 Wiring (2-wire) See Note 1
PC
DB-9
B
RS232/RS485
A
Converter
User Provided
(B&B Electronics Model 485SD9TB)
9 T10 T+
11 R12 R+
40T-48
RS-485 Wiring (4-wire) See Note 1
Tx 3
Rx 2
GND 5
PC DB-9
21 Rx T+ 6
19-20 Tx T- 7
13-22 R+ 4
GND
R- 5
RS232/485 Converter
(Rear Connector)
GEFRAN CLB94-2
www.gefran.com
Page 19 of 23
12 R+
11 R10 T+
9 T-
Connection among: RS232 PC – ADAM –
Instruments with RS485 serial link
GND RX TX
5
2
3
RX 3
TX
DATA +
2
DATA -
GND 5
(B)
15-17
Connettore
DB9
(B)
10
(A)
9
(B)
(A)
9A-11A 8A-10A
(B)
8-10
(A)
9-11
(B)
10
(A)
16-18
(B)
24-26
(B)
4
(A)
9
(B)
(A)
9A-11A 8A-10A
(B)
18-20
(A)
25-27
(B)
24-26
(A)
2
(B)
(A)
8A-10A 9A-11A
(A)
19-21
(B)
24-26
20
(A)
25-27
(A)
25-27
Connection among: RS232 PC – ADAM –
Instruments with 4-wire RS485 serial link
TRX 3
GND RX TX
5
2
3
TX
2
T+
RR+
GND 5
T- T+ R- R+
27 26 25 24
T- T+ R- R+
27 26 25 24
T- T+ R- R+
11 10 9 8
Connettore
DB9
T- T+ R- R+
11 10 9 8
T- T+ R- R+
10A 11A 8A 9A
T- T+ R- R+
9 8 11 10
T- T+ R- R+
11 10 9 8
T- T+ R- R+
10A 11A 8A 9A
T- T+ R- R+
10A 11A 8A 9A
T- T+ R- R+
9 8 11 10
T- T+ R- R+
27 26 25 24
T- T+ R- R+
21 20 19 18
33
T- T+ R- R+
10A 11A 8A 9A
T- T+ R- R+
11 10 9 8
Connection among: RS232 PC – ADAM –
Instruments with RS485 serial link
TGND RX TX
5
2
3
RX 3
T+
R-
TX
2
GND
5
Connettore
DB 9 poli
R+
T- T+ R- R+
18 17 16 15
T- T+ R- R+
9 10 11 12
T- T+ R- R+
9 10 11 12
WINSTRUM USER’s MANUAL
(Version 4.3)
&
INSTRUMENT SERIAL
COMMUNICATIONS FACTS
Note 1: Beginning with serial number 02391574 for the model 600 Controller and serial
number 02384876 for the model 40T-48 Indicator, the Serial Communication Option will be
set as RS-485 2-Wire and Modbus Protocol standard as indicated in the Instrument User’s
Manual. Units prior to these serial numbers were set to RS-485 4-wire standard. All Model
1200/1300 are set to RS-485 2-Wire as standard.
Table 1:
Gefran
Instrument
600/1200/1300 *
4-40T *
40TB
GEFLEX
800/1600/1800
2301
2300
2308
1000/1001/1101
3500/4500
3400/4400
2351
Default
Serial
Config ***
RS-232 RS-485
2-Wire
Modbus19200-None-1
Modbus19200-None-1
Cencal-1200-1
Modbus19200-None-1
Cencal-1200-1
Cencal-1200-1
Cencal-1200-1
Cencal-1200-1
Cencal-1200-1
Cencal-1200-1
Cencal-1200-1
Cencal-1200-1
RS-485
4-Wire
Modbus Cencal
Winstrum
Protocol Protocol Programming
Port
X
X
X
X
X
X
X
X
X
X
X
X
X
X
X
X
X
X
X
X
X
X
X
X
X
X
X
X
X
X
X
X
X
X
X
X
X
X
X
X
X
X
X
X
X
X
X
X
X
X
X
X
X
X
X
X**
* For 600 series and 4-40T instruments ordered without serial interface, default configuration becomes :
Cencal-19200-1
** from Serial # 0320xxxx
*** Protocol, Baud, Parity, Address
For additional assistance, contact your local Gefran distributor or:
Gefran Spa,
Via Sebina 74
Provaglio d'Iseo, BS 25050
Phone
+39 0309888.1
Fax
+39 0309839063
[email protected]
www.gefran.com
Page 23 of 23


![2308 (PDF/131Ko) [F]](http://vs1.manualzilla.com/store/data/006354194_1-c5492b6e29b762ae89a93d5ab72c5466-150x150.png)