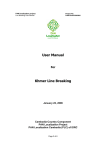
1
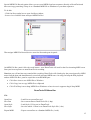
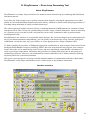
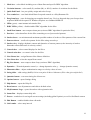
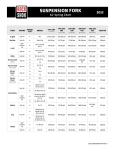
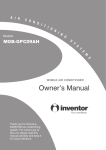
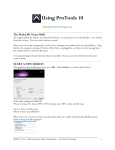
DrumTools Performance Designer User's Manual Copyright © 2000-2005 by MusicLab, Inc. Contents I. Intro........................................................................................................................ 5 II. DrumTools PD Main Components...................................................................... 6 III. Working with DrumTools PD ............................................................................. 6 Installation............................................................................................................. 6 Launching DrumTools PD ..................................................................................... 6 Creating Drum Part with DrumTools PD ............................................................... 8 DrumTools Sequencer ......................................................................................................... 8 SlicyDrummer track - Creating Drum Loop......................................................................... 10 Fill-in Drummer track(s) - Creating Drum Fills .................................................................... 10 Out Port bar........................................................................................................................ 11 Previewing drum sounds .................................................................................................... 11 Creating DrumTools configuration Template...................................................................... 12 Exporting Drum Part ........................................................................................... 12 Saving Drum Parts and Styles ............................................................................ 13 Using DrumTools PD in a host sequencer .......................................................... 13 Trigger Notes ..................................................................................................................... 13 Synchronization.................................................................................................................. 13 Legato/Non-Legato triggering............................................................................................. 13 Sustain Pedal ..................................................................................................................... 13 Performance control........................................................................................................... 14 MIDI Record from host sequencer ..................................................................................... 14 DrumTools PD Menu Bar .................................................................................... 15 File ..................................................................................................................................... 15 Edit ..................................................................................................................................... 16 Transport............................................................................................................................ 16 View ................................................................................................................................... 16 Options............................................................................................................................... 16 Preset Styles....................................................................................................... 16 IV. SlicyDrummer – Drum Loop Generating Tool ............................................... 18 About SlicyDrummer ........................................................................................... 18 Interface overview............................................................................................... 18 Keyboard shortcuts ............................................................................................. 20 Working with SlicyDrummer ................................................................................ 20 2 Selecting Part for the Slice.................................................................................. 20 Editing Drum Loop .............................................................................................. 20 Editing beats ....................................................................................................... 21 Snap to Grid feature........................................................................................................... 21 Performance Controls ......................................................................................... 21 Editing Drum sound ............................................................................................ 22 Options................................................................................................................ 22 Saving Drum Loops ............................................................................................ 22 Quick Pad panel.................................................................................................. 22 Exporting Drum Loop .......................................................................................... 23 V. Fill-in Drummer - Drum Fill Generating Tool .................................................. 24 About Fill-in Drummer ......................................................................................... 24 Interface overview............................................................................................... 25 Keyboard shortcuts ............................................................................................. 26 Working with Fill-in Drummer .............................................................................. 26 Selecting Drum Fill .............................................................................................. 26 Fill Library........................................................................................................................... 26 Selecting Fill....................................................................................................................... 27 Assigning Measure............................................................................................................. 27 Playing Fill.......................................................................................................................... 27 Using Track Masking Panel ................................................................................ 27 Controlling Punch in/out Time Points ................................................................................. 27 Controlling Note Mixing ...................................................................................................... 27 Editing Fill ........................................................................................................... 28 Editing beats ...................................................................................................................... 28 Snap to Grid feature........................................................................................................... 28 Transforming Instrumentation ............................................................................................ 28 Manual Transformation (Changing Drum set) .................................................................... 28 Automatic Transformation .................................................................................................. 29 Trimming fill........................................................................................................................ 29 Adjusting Performance Controls......................................................................................... 29 Modifying Dynamics ........................................................................................................... 29 Creating Crescendo/Decrescendo ..................................................................................... 29 Adjusting Swing.................................................................................................................. 29 Quantize............................................................................................................................. 29 Individual Drum bar controls............................................................................................... 29 3 Bar Inspector...................................................................................................................... 29 Changing output Drum note ............................................................................................... 30 Using Quick Pads ............................................................................................... 30 Saving Fill ........................................................................................................... 30 Exporting fill ........................................................................................................ 30 Using Drag and Drop ......................................................................................................... 30 Importing Fills to Fill-in Drummer Library ............................................................ 30 Options................................................................................................................ 30 Contact Info............................................................................................................ 31 How to Register ..................................................................................................... 31 4 DrumTools Performance Designer I. Intro DrumTools Performance Designer is a powerful VSTi drum tool allowing for instant creation of 1-8 measure professionally sounding drum performances including drum loops, fills, intros, endings, solo, and then simply trigger them by MIDI notes from your sequencer to easily turn separate performances into complete drum track perfectly matching your song. Features: • 8-measure drum sequencer • SlicyDrummer and Fill-in Drummer intelligent drum part generating MIDI plug-ins • Unique real-time drum performance customizing algorithms • Sub-hosting any third party soft synth and sampler for drum sounds • VSTi, DXi, and stand-alone run • Full synchronization with host sequencer (tempo, start/stop) • 12 Parts/pads triggered by MIDI notes from host sequencer • Total visualization of all performed material (beats/notes, position cursor, edits) • Import third party MIDI files • MIDI file and Audio file Export, Drag'n'Drop and Copy/Paste 5 II. DrumTools PD Main Components DrumTools Performance Designer consists of four main components: • Drum sequencer - 3-track sequencer allowing to create up to12 individual 1-8 measure drum performances (parts), that can be triggered by MIDI notes from the host sequencer MIDI track and/or external MIDI keyboard • SlicyDrummer - drum loop generating MIDI tool • Fill-in Drummer - drum fill generating MIDI tool • Output Port - allows to send generated MIDI drum part to any sub-hosted sampler/synthesizer or any free MIDI out port, as well as to record MIDI file from host sequencer. III. Working with DrumTools PD Installation 1. 2. 3. 4. 5. If you have any previous version of the DrumTools Performance Designer installed, uninstall it. Launch DrumToolsSetup.exe file. Follow onscreen instructions. Restart the computer (if required during the installation process). The DrumTools PD installation is completed. Launching DrumTools PD Launching DrumTools as a Stand-alone To launch DrumTools PD go to Start menu/Programs/MusicLab/DrumTools and select DrumTools icon, or alternatively double-click DrumTools.exe file in the installation folder: DrumTools will open Equipment DataBase dialog where you can make the needed audio settings and browse for your VSTi directory: 6 Click OK to start scanning your VSTi, DXi instruments, and MIDI ports. That may take some additional time if you have a lot of VSTi’s on your computer. When scanning is completed DrumTools opens its main panel and asks you to select the Out Port: Select any VSTi, DXi, DLS synth/sampler, or a MIDI out port from tree view list of available ones, and click Open icon (alternatively double-click the needed item) to load the selected synth or to connect DrumTools to selected MIDI out port. Note, that DrumTools audio engine has one Stereo output, so if loaded sampler has multiple audio outputs they will be not supported. Now DrumTools PD is ready to work. /DrumTools generates MIDI drum performances and has no internal sounds. So for producing sound you need to output DrumTools to any third party synth or sampler, i.e. assign it as an Out Port device./ You can later rescan your VST/DX instruments using the Out Port window: 7 1. Open Out Port window by clicking the black triangle in Out Port bar 2. Select VSTi or DXi item and click Refresh button at the right 3. Click Exit button to close the Out Port window. You can also remove the unnecessary VSTi/DXi names from the list of available Out Ports by using Delete button. Launching DrumTools as VSTi/DXi in a host sequencer In your sequencer launch DrumTools PD as a normal VSTi/DXi. That will open DrumTools VSTi/DXi panel: Click Connect button. That will launch DrumTools in a separate window, or will connect DrumTools to your host audio output in case it is already running standalone. Create MIDI track in your host sequencer and assign DrumTools PD as output for the MIDI track - DrumTools is ready to work. Note. Only one DrumTools engine can work at a time. So you can’t use more than one instance of DrumTools both in standalone or VSTi/DXi run. Creating Drum Part with DrumTools PD DrumTools Sequencer On launching DrumTools you see the main panel that represents 3-track sequencer driving SlicyDrummer, drum loop generating tool on the first track, as well as two Fill-in Drummers, drum fill generating tools on the second and third tracks: Pad Section At the left of DrumTools main panel there is Pad Section that allows to create up to 12 individual drum Parts consisting of 1-8 measure drum loop performed by SlicyDrummer and/or two various drum fills (bridge/intro/ending) in the assigned measures performed by two Fill-in Drummers: 8 To select Part click on the Part pad (<Ctrl+(1, 2, 3…0)>, <Ctrl+’+/-‘> - navigation through Parts). If you run DrumTools as VSTi/DXi in your host sequencer you can trigger 12 various Parts by 12 MIDI notes from host MIDI track or external MIDI keyboard along with the song. /Note: In standalone mode you can’t trigger/select Parts from MIDI keyboard/ Click on Drummer/Out Port track to select it. That will open the appropriate window under DrumTools main panel where you can do edits/settings (use <Ctrl+Up/Down Arrow> to navigate through tracks). To set the number of measures for the Part simply click the respective figure (1-8). Ex.: clicking on figure 4 creates 4 measure Part indicated with dark blue color of the part of strip: To assign measure for the fill click on Fill-in Drummer track(s) in the needed place under the measure number: red drum icon moves to the measure you clicked showing you when the fill will be played along with the Part: Track Control columns P (Preset) – save/load preset for Drummers and Out Port D (Dock) – tear off/attach Drummer/Out Port window M (Mute) – mute/unmute track Transport section Vol – master volume (not available for MIDI out port), click and drag to adjust Pan – master panning (not available for MIDI out port), click and drag to adjust 9 Tempo – current tempo (follows tempo value of host sequencer and can be changed manually only in standalone run) (Copy) – Click to copy the resulting MIDI/Audio file of the current Part to clipboard, Paste it to any application supporting copy/paste Standard MIDI file or wave file (Drag’n’Drop) – Click to drag’n’drop the resulting MIDI or Audio file of the current Part to Windows or host sequencer, or any application supporting drag’n’drop of Standard MIDI file/wave file Metronome On/Off (to adjust the sound volume go to Options menu->Metronome) Play/Stop (<Spacebar>) Looping On/Off SlicyDrummer track - Creating Drum Loop SlicyDrummer is a unique and powerful MIDI tool allowing to instantly create/customize professionally sounding drum loops. Click on SlicyDrummer track to open its window. Load the pre-recorded loop from the combo box tree view in the upper part, or create your own loop using SlicyDrummer options. /Note that SlicyDrummer doesn’t allow using other than pre-recorded material because of its complex Rhythm Composing algorithm. But you can use the Fill-in Drummer tool for playing third party MIDI loops by simply copying single-track MIDI files to its User folder in the installation directory/ See SlicyDrummer section for more details. Fill-in Drummer track(s) - Creating Drum Fills Fill-In Drummer is a powerful MIDI tool allowing to instantly create/customize professionally sounding drum fills. It includes a massive library of factory pre-recorded drum fills, intros, and endings, and also lets you create your own fill libraries or use third party MIDI files. 10 Click on Fill-in Drummer track to open its window. Select the appropriate folder or subfolder in the Fill Library tree view. Select the fill from Fill List by clicking its name. Assign measure number for the fill in the Measure box in the upper part of the plug-in window or simply click on the Fill-in Drummer track in the needed place under the measure number: red drum icon moves to the place you clicked showing you when the fill will be played along with the Part. DrumTools Performance Designer allows to use two Fill-in Drummers on separate tracks for creating two individual drum fills in different measures of the Part. See Fill-in Drummer section for more details. Out Port bar Out Port allows you to load any VST/DXi/DLS synth or sampler you have installed on your computer, as well as to connect DrumTools to any available MIDI out port, and use them as sound modules for performing MIDI drum part created within DrumTools. Click on black triangle at the right of Out Port bar to open its window, and select the needed Out Port in the tree view. That will load the selected VSTi/DXi/DSL sampler to DrumTools or connect DrumTools output to the selected MIDI out port. In Out Port bar you can set MIDI channel, Bank select Method, Bank, Program Change for the loaded synthesizer/sampler. Previewing drum sounds You can preview/select the output drum sounds of your synth/sampler loaded to DrumTools right from SlicyDrummer/Fill-in Drummer windows. 11 Click on the output drum note box at the right of any instrument bar in Slicy/Fill-in Drummer window to open Note Names list: Right click items to preview the available sounds. Click to assign the needed one as an output note for the instrument. Creating DrumTools configuration Template If you want to save the current configuration including all Out Port settings for future use you can create various Templates within DrumTools. To create/open configuration template go to File menu-> Template. Note that if you check ‘Reload last state at start up’ item in Options menu all current settings and edits including Drummers, Parts, Out Port will be saved on closing the DrumTools and will be automatically loaded on the next launch. To load default settings for Drummers go to File menu->Open Style and open Default.dts file included with the DTStyles folder in the installation directory Exporting Drum Part DrumTools PD allows you to instantly transform the created drum Part to both Standard MIDI file (*.mid) and Audio file (*.wav). MIDI file Export Export - Use Export MIDI item from File menu to export the selected Part as a MIDI file Copy - Use Copy Result -> MIDI item from Edit menu, or simply click on Copy icon to copy MIDI file to clipboard. Drag’n’Drop – click on D’n’D icon and drag the resulting MIDI file to Windows or any application supporting drag and drop MIDI. /You have to previously select MIDI item in Options menu ->Copy/Drag Format/ Audio file Export Export - Use Export Audio item from File menu to export the selected Part as a wave file Copy - Use Copy Result -> Wave item from Edit menu, or simply click on Copy icon to copy wave file to clipboard. Drag’n’Drop – click on D’n’D icon and drag the resulting Part to Windows or any application supporting drag and drop. /You have to previously select Wave item in Options menu->Copy/Drag Format/ 12 Saving Drum Parts and Styles You can save the current Part including all SlicyDrummer and Fill-in Drummers edits as DrumTools Part file (*.dtp) to Windows for future use. Go to File menu and select Save Part item. Use Open Part item to load the saved Part to any current Part pad (Alternatively drag a *.dtp file onto DrumTools panel). You can save the whole set of 12 Parts as a DrumTools Style file (*.dts). Use Open Style item from File menu to load the whole Part set to DrumTools (Alternatively drag a *.dts file onto DrumTools panel). /A number of Demo Styles are included within DTStyles folder in DrumTools installation directory/ Using DrumTools PD in a host sequencer Trigger Notes Running DrumTools PD in a host sequencer lets you easily create the complete drum track by triggering various drum Parts created in DrumTools by MIDI notes from a MIDI track or external MIDI keyboard along with the song. /On the first launch Part pads are numbered (1, 2, 3…0). To change numbers to note symbols go to View menu and select Note Names for Parts item/ Any of the 12 Parts created within DrumTools can be triggered by appropriate MIDI note of any octave # (note symbol of a Part pad corresponds to a trigger key/note name). So you can combine individual drum Parts into continuous performance by writing various trigger notes along with the song in a MIDI track outputted to DrumTools, or alternatively play trigger notes on your MIDI keyboard via host’s MIDI track. Synchronization Note that though DrumTools uses host’s tempo value, the Part starts to play with the start time of a trigger note. So if trigger note doesn’t exactly match the beginning of measure DrumTools playback will not be synchronized to the measure position of the song. Legato/Non-Legato triggering The newly triggered Part will always playback from the very beginning if its trigger note does not overlap the previous one (i.e. played non-legato way). In case trigger notes overlap each other (i.e. played legato way) or the Sustain Pedal is pressed, the next triggered Part will not start from the beginning but will continue playback keeping beat and measure position of the previously performed Part. Check ‘1-st measure on Legato’ item in Options menu if you want the newly triggered part start from the first measure while keeping the beat position. Sustain Pedal You can use Sustain Pedal to emulate Legato mode when triggering Parts from a MIDI keyboard. If Sustain Pedal is pressed (On position) any newly triggered Part will continue playback keeping beat and measure position of the previously performed Part. 13 Performance control DrumTools trigger mode allows to control playback Dynamics as well as to trigger Accent (kick+crash cymbal hit) to add real-time nuances to the performance. Dynamics: • Use trigger note velocity to change dynamics of the currently triggered Part (Strength value allows to decrease/increase the depths of effect, 0% = no effect) • Use Pitch Bender to continuously change dynamics along with the song • Use Internal Velocity to adjust dynamics for performing Parts regardless of trigger note or internal sequencer is used for playback (100 = no changes) (Options menu->Velocity Control->Playback) Accent DrumTools PD features Velocity Switch Accent option that lets you perform Kick+Crash hit (Accent Note 1 and 2) in any desired place of the song by simply increasing the trigger note velocity value. You can set the suitable Velocity Threshold and output velocity value (Accent Velocity) for the Accent notes, as well as time interval (Accent Duration) during which the Accent hit mutes other instruments playback. Also you can assign two different Crash Cymbal notes/sounds for black and white trigger key groups individually (Accent Note 2a (White), Accent Note 2b (Black)). (Options menu->Velocity Control->Accent) MIDI Record from host sequencer When using trigger notes in host sequencer for creating drum performance with DrumTools you can transform the whole performed part to MIDI notes for additional editing in a MIDI track of your host sequencer. 14 Special MIDI File Record option allows you to record MIDI from host sequencer directly to DrumTools and then save/copy-paste/drag’n’drop it as a Standard MIDI file to Windows or your host sequencer. To do this: - Click Out Port combo box to open Out Port window, - In tree view click MLi item and open MIDI File Rec. That assigns MIDI File Record device as an Out Port and opens its panel: On MIDI File Rec. panel click red record button – now DrumTools will wait for the first incoming MIDI event. Start your host sequencer to start DrumTools recording. Note that you will not hear any sound while recording. DrumTools will silently play the part triggered by MIDI notes from the host and simultaneously record all generated MIDI notes. On song end stop the host playback and use MIDI File Rec. panel to export the recorded MIDI part: • Click Save icon to save MIDI file to Windows • Click Copy icon to copy MIDI file to clipboard • Click D’n’Drop icon to drag MIDI file to Windows or host in case it supports drag’n’drop MIDI DrumTools PD Menu Bar File Open Part Save Part - Load Part to current Part pad - Save current Part as DrumTools file (*.dtp) Open Style Save Style - Load Style (12 Part set) to DrumTools - Save the whole 12 Part set as DrumTools Style file (*.dts) Export MIDI - Export current Part as a Standard MIDI file (*.mid) 15 Export Audio - Export current Part as a wave file (*.wav) Template - Save/Load current configuration including all Out Port settings Exit - Close DrumTools Edit Copy Result - Copy current Part to clipboard as a Standard MIDI file or Audio file (in sub-menu choose between MIDI or Wave) Copy Part Paste Part - Copy current Part as a DrumTools file to clipboard - Paste Part from clipboard to current Part pad Transport Play Loop Metronome Measures - Start/Stop DrumTools internal sequencer (<Spacebar>) - Cycle the current Part - Internal Metronome On/Off - Select number of measures for current Part View Part Auto Switch - Allow DrumTools to automatically switch to the triggered Part (that can use more CPU) ToolTips - Allow tooltips Note Names for Parts - Choose between figures and note symbols on Part pads Options Audio Stream Copy/Drag Format - Open Audio Streaming dialog for audio settings (available only in Standalone run) - Choose between MIDI file and Audio file for Copy/Drag the resulting Part from DrumTools Velocity Control - Open Playback or Accent settings dialog 1st measure on Legato- When checked the newly triggered Part starts from its first measure if trigger notes are played Legato (overlapping each other or played with Sustain Pedal On). Out Port Refresh Port Info VST directory Metronome - Open Out Port dialog - Refresh Out Port synth info (bank names, program names, etc.) - Open VST Directory browser window - Adjust internal Metronome volume Reload last state - When checked all current settings and edits will be saved on closing and loaded on launching the DrumTools Preset Styles A number of ready-to-use DrumTools Styles are included in DTStyles folder within the installation directory (by default: C/Program Files/MusicLab/DrumTools PD): Dance(120-130).dts, Funk(90-110).dts, HardRock, 16th(75-110), etc. You can load Style to DrumTools from File menu (Open Style) or by simply dragging any *.dts file from Windows directly onto DrumTools main panel. Each preset Style contains 12 Parts featuring ready drum loops and fills in various music styles. The name of 16 the Style file contains the preferable tempo range and some rhythmic information (swing, basic rhythm durations). You can select/preview Parts of the loaded Style by clicking on the appropriate Part pad or triggering it by appropriate key/note from host sequencer MIDI track or a MIDI keyboard controller (triggering Parts by MIDI notes is available only via host sequencer). 17 IV. SlicyDrummer – Drum Loop Generating Tool About SlicyDrummer SlicyDrummer is a simple, but powerful tool for instant creation of drum loops by combining individual drum instrument patterns. It provides user with a unique way to quickly construct drum loops by selecting the appropriate prerecorded pattern for each individual drum instrument from the library, which saves him from the annoying procedure of searching among thousands of readily available drum loops. The software package includes a massive library, containing hundreds of MIDI patterns for a number of drum instruments (kick, snare, hi-hat, ride cymbal) and percussions (conga, cowbell, tambourine, maracas, hand clap, etc.). Patterns are pre-recorded in such a way that they can be easily combined to make up professionally sounding drum loops. SlicyDrummer's user interface is exceptionally simple and easy. By scroll-selecting the prerecorded patterns for any of your drum instruments independently, you can quickly create drum loops of any sonically appropriate combination, exactly the same way you would try to create appropriate face image with photo robot. To further simplify the procedure of finding the appropriate combination an Auto-compose feature based on the Intelligent Drum Rhythm Compose technology (IDRC) has been incorporated in the program. Auto-compose feature allows the user to momentarily create various, and more importantly, unpredictable combinations as easily as pressing a single button, which turns the procedure of creating drum loops into an interesting and entertaining experience. Moreover, any automatically created combination can be further edited by replacing any drum pattern for a particular instrument. This opens a great perspective of having virtually unlimited number of combinations and edits, which makes SlicyDrummer a truly unique and limitless source of drum loops or any rhythmic information. Interface overview 18 1. Mode box – select Mode including a set of drum Parts and specific IDRC algorithm 2. Variation buttons – select small (S), medium (M), or full (L) number of variations for the Mode 3. Quick Pad Panel - lets you quickly assign and select Loops 4. Tree combo box – save/load edited Drum Loop and controls as a SlicyDrummer file 5. Drag from here – pane for dragging out complete drum Loop. Use it to drag and drop your Loop to host sequencer MIDI track export it to Windows Explorer as a Standard MIDI file 6. LEDs (green) - mute/unmute/solo/unsolo Slice 7. IDRC LEDs (yellow) - disable/enable IDRC algorithm for the Slice 8. Small Note button - auto-compose drum part (activates IDRC algorithm for particular Slice) 9. Part box – select drum Part for the Slice containing a set of prerecorded patterns 10. Strokes boxes – set minimum and maximum possible number of strokes to filter patterns of the current Part 11. Pattern selector – scroll-select pattern for the Slice using cursor keys 12. Strokes view - displays rhythmic content and dynamics of current pattern (color intensity of strokesdiamonds reflects difference in velocity values) 13. Controls box – select control displays for the Slices 14. Control value box – set control value for the Slice 15. Note Names box – assign Drumset Note Names definition 16. Note Name box– select the output Drum sound 17. Big Note button – auto-compose drum Loop (activates IDRC algorithm) 18. Dynamics – 2D main dynamics control (x – change dynamics value, y – change dynamics center) 19. Humanize slider – adjusts randomization range to velocity values of notes 20. Swing slider – adds swing (shuffle) feel to even pairs of 8th or 16th notes (50% value gives triplet feel) 21. Quantize button – sets exact timing for all note-ons 22. Options button – opens Settings dialog 23. Help button – opens the Help file 24. Reset button - sets all parameters and edits to default values 25. SlicyDrummer Logo – opens About box with registration info 26. Status Bar – displays context help info 27. Presets - combo box for saving all current settings (including global Options), as well as Pad Panel content 28. Edit Button – enables/disables beat edit mode 29. Grid combo – select snap interval 19 Keyboard shortcuts F1 - open Help file Up/Down arrow keys - Slice selection Left/Right arrow keys - change pattern for selected Slice <Ctrl>+Left/Right arrow keys – change patterns for selected Slice using IDRC algorithm <Tab>, <Shift>+<Tab> – navigate through Slice controls +/- (numpad), mouse wheel – change focused control value <Enter> - auto-compose drum Loop P– auto-compose drum part for selected Slice <Ctrl>+P – disable/enable auto-compose algorithm for selected Slice M, – mute/unmute selected Slice <Ctrl>+M, right-click LED – solo/unsolo selected Slice 1, 2, 3, 4..- 0 - Quick Pads remote selection <Backspace> - clear pattern from selected Slice <Ctrl>+<Backspace> - clear patterns from all Slices <Insert> - auto name/save new Loop to tree combo box <Delete> - delete Loop from tree combo box S – "save as" current Loop <Shift>+S – save (overwrite) current Loop Working with SlicyDrummer Selecting Part for the Slice Click the Part box at the left edge of the Slice and select Part name from popup menu. The patterns of the Part will be loaded to the Slice’s pattern list and its icon will be displayed in the Part box. Percussion Slices (the three on the top) include the "universal" Part containing rhythm patterns that can be used with any percussion or drum sound. When choosing this set you can manually select the needed drum sound in the Note Name box at the right edge of the Slice. Editing Drum Loop 1. Start DrumTools sequencer to hear SlicyDrummer playing. The initial Drum Loop will repeat over and over as long as the sequencer is running. 2. Click green LEDs at the left edge to mute or solo individual Slice. Turning this LED off will mute the Slice. Clicking it again unmutes it. You can also quickly solo/unsolo the Slice by right-clicking (or <Ctrl>+leftclicking) the LED. 3. Use cursor keys at the right and left of Pattern selector to manually scroll-select patterns for the individual Slice with a mouse (alternatively use Left/Right arrow keys of the computer keyboard). 4. Compose drum Loop, using IDRC algorithm: 20 Click big Note button at the lower part of IDRC column to activate Auto-compose algorithm. SlicyDrummer will automatically construct the drum Loop finding the most appropriate combination of patterns for all Slices simultaneously. Click small Note button to compose drum part for a particular Slice. Other parts will stay unchanged. Click yellow LED in IDRC column to disable/enable IDRC algorithm for particular Slice (LED will be turned off). In this case clicking big Note button (auto-compose Loop) will not affect the pattern of the Slice, while patterns in other Slices (not muted) will be automatically changed. You can manually find the needed pattern for any Slice (Kick, for example) and let the SlicyDrummer to automatically find the most appropriate patterns for other drum instruments using big Note button (you have to previously disable auto-compose algorithm for Kick Slice by turning off the yellow LED of the Slice). Clicking big Note button again and again you can get the great variety of drum Loops matching the individual instrument pattern(s) of your choice. Editing beats SlicyDrummer allows to insert/delete/move individual beats to create your own drum patterns and save them as complete loops within the plug-in for future use: Press Edit button to enable edit mode Click pattern view to insert beats Double click the beat to delete it (alternatively <Ctrl>+click) Drag the beat left or right to move it to a new location Drag the beat up or down to change velocity value Snap to Grid feature SlicyDrummer allows to use snap grid that makes it easier to edit beats. Click Snap Grid resolution combo box and select standard note duration for the snap interval. From then on, when you insert or move beats, they will be snapped to the nearest point on the Snap Grid. To disable the Snap Grid, select '--' item in the combo box menu. Performance Controls Main Controls Use Dynamics 2D controller to change the difference in velocity between loud and soft notes for all Slices simultaneously. Drag the pointer with a mouse to change dynamics. Dragging by x-direction increases/decreases the dynamics value, while y-direction changes the dynamics center (threshold between the lowest and highest velocity value of notes in each pattern of current Loop). Use Humanize slider to randomly change velocity values of the notes. Use Swing slider to add swing (shuffle) feel to the performance (50% value gives triplet feel). Press Quantize button to set exact timing for all note-ons. Note: the values of Main controls are not saved within Quick Pads and SlicyDrummer files (*.sdl), but can be saved within plug-in presets. Individual Slice controls Select Velo+ control to add/reduce velocity value to the notes. 21 Select Time+ control to apply offset to the start time of the notes. Select Dyn% control to set the strength (in percents) of main Dynamics controller adjustments for the Slice. Use <+>/<-> (numpad) keys to change values for selected control of the Slice. Enter desired value with numeric keys; change it with up/down arrow keys or mouse wheel. Note: individual Slice control values are saved in Quick Pads and SlicyDrummer files (*.sdl). Editing Drum sound Drum sound name (the output note) is displayed in the Note Name box at the right edge of the Slice. Selecting a Part for the Slice will automatically set the respective output drum sound(s) in the Note Name box. Usually it matches the name of the Part you select for the Slice (Kick, Snare, Ride, Cowbell, etc.). You can easily change the output note for any Slice by clicking Note Name box and selecting the appropriate sound name from the popup menu. You can assign the required Drumset Note Names definition by selecting it in the Note Names combo box at the upper right corner of plug-in’s window. The assignment you make determines the drum note names that you see in the popup menu of Note Name box of the Slice. Options Click Options button to make settings in the opening dialog: Drum Map - create your output maps for drum sounds. All Drum maps will be automatically saved within the SlicyDrummer for future use Drag’n’Drop options: • Measures - set number of measures for drag and drop exporting the Drum Loop to MIDI track • Single Track/Multiple Tracks – choose format of resulting MIDI clip • Limit Velocity – set the range of output velocity values for main Dynamics controller Saving Drum Loops Use tree combo box to save the current Drum Loop and edits as a SlicyDrummer file (*.sld): Click Save icon (or press S key). In the opened dialog box you can create folders and subfolders to organize your Drum Loops. Quick Save - <Shift>+click (or press <Shift>+S) to overwrite current Loop. Click Delete icon (or press <Delete> key) to delete Drum Loop from the list. Press <Insert> to automatically name and save new Loop. A number of factory loops are included with the SlicyDrummer installation (Dance, Funk, Pop, etc.). Quick Pad panel Pad Panel lets you quickly assign and select up to 10 Loops Click any Pad of Quick Pad panel. Create new Drum Loop, or copy/paste Loop from other Pad, or load previously saved one from Loops file selector. All Quick Pad contents is saved within DrumTools Part/Style files. Use computer keys (1, 2, 3…- 0) to select Pads. 22 Exporting Drum Loop To export drum loop simply drag the current Loop from ‘Drag from here’ pane at the right corner of SlicyDrummer window and drop it to the needed measure of your host’s MIDI track (or to Windows for exporting Loop as a Standard MIDI file). You can define the number of measures in the resulting MIDI file in the Drag’n’Drop options/Measures edit box of the Options dialog. There you can also choose single track or multi-track format of the resulting MIDI file. 23 V. Fill-in Drummer - Drum Fill Generating Tool About Fill-in Drummer A drum fill is a short (1 measure or so), but very important musical element. Without drum fills performed in appropriate places any basic rhythm part, even the most sophisticated one, would sound monotonous and uninteresting. Fills work as bridges between parts of a composition, 4 or 8-measure rhythm sections, or as intros or endings. Creation of drum fills in a MIDI track (in practice a short solo part with lots of various drum instruments) is quite a complicated task even for an experienced musician, requiring quite a lot of hand work and time. Fill-In Drummer is a unique and powerful MIDI tool specially developed for work with drum fills. It includes a massive library of factory pre-recorded drum fills, intros, and endings and also lets you use your own fill libraries. A unique Fill Modifying System has been developed, which allows you to easily transform instrumentation, trim length, and adjust dynamics of a drum fill to better fit it to your musical needs. This provides you with practically unlimited number of variations and edits of the prerecorded drum fills and lets you quickly perfect your basic rhythm part with pro quality drum fills, breaks, intros, and endings you can ever imagine. Special Mixing System has been incorporated in the program which allows you to intelligently combine drum fill with basic rhythm part easily controlling punch in/out time and avoiding undesirable rhythm ‘gaps’ and double drum notes in the resulting track. All this does the drum fill related work easy and fascinating with the Fill-in Drummer. 24 Interface overview 1. Fill Library tree view – select folder containing sets of prerecorded fills 2. Fill List view – select fill from the list 3. Quick Pad Panel – lets you quickly assign and select fills 4. Measure box – assign measure number for the plug-in to play the selected fill 5. Track+Plugin Mixer – (not available within DrumTools PD) 6. Time Locators – control masking time areas within the fill, as well as trim the fill from the beginning and/or the end 7. Auto Locate button – switches between automatic and manual mode for Time Locators activity 8. Track Masking Panel – filters backing track notes passing through the plug-in 9. Drag from here – pane for dragging out current drum fill to MIDI track 10. Help button – opens the Help file 11. Options button – opens Settings dialog 12. Drum Instrument bar – displays notes of individual drum part of the current fill 13. Drum Button – exclude/include drum instrument from/to Drum set 14. Extra drum bar – displays all unmapped drum notes of the fill 15. LEDs – mute/unmute/solo individual drum part 25 16. Transform button – transform the instrumentation of the fill 17. Compare button – compare with to the original instrumentation/revert to last edits 18. Controls box – select control displays for drum parts 19. Control value box – set control value for the part 20. Note Names Definition box – select Drumset Note Names definition from the list of available ones 21. Note Name box – select the output Drum sound/note for the part 22. Velocity Envelope – create automated crescendi/decrescendi for the fill 23. Dynamics – main dynamics 2D controller (x – change dynamics value, y – change dynamics center) 24. Swing slider – adds swing (shuffle) feel to even pairs of 8th or 16th notes (50% value gives triplet feel) 25. Swing duration box – select 8th or 16th note duration to apply swing feel to 26. Quantize button – sets exact timing for all note-ons 27. Quantize resolution box – select grid resolution (note duration) to apply quantization 28. Reset button – sets all parameters and edits to default values 29. Save button – click to save current fill to USER folder 30. Presets – combo box for saving all current settings (including global Options), as well as Pad Panel content as a Cakewalk plug-in preset 31. Status bar – displays main controller values and context help info 32. Edit Button – enables/disables beat edit mode 33. Grid combo – select snap interval Keyboard shortcuts F1 - open Help file Up/Down arrow keys - Drum bar selection +/- (numpad), mouse wheel – change focused control value <Enter> - auto-transform fill M, left click LED – mute/unmute selected drum bar <Ctrl>+M, right-click LED – solo/unsolo selected drum bar 1, 2, 3, 4..- 0 - Quick Pads remote selection Working with Fill-in Drummer Selecting Drum Fill Fill Library On the left hand side of the plug-in window there are Fill Library view consisting of Folder tree view pane and Fill List pane. Three upper folders of the tree view contain a few sets of factory prerecorded drum fills: 26 1. Full measure – full measure fills 2. Intro – 1-measure fills with the rests at the beginning 3. Ending – 1-measure fills with the rests at the end User folder is empty. You can copy there any favorite fill from the default Library, as well as create your own libraries by importing drum fills in Standard MIDI file format (you can create fill in a MIDI track and drag’n’drop it to the Fill Library view, or place the appropriate MIDI files directly to the User folder in Windows Explorer). Selecting Fill 1. Select the appropriate folder or subfolder in the Fill Library tree view. The list of available fills will load to the Fill List pane. 2. Select the fill from the Fill List by clicking its name. All notes of the fill will appear on the Drum instrument bars of the Fill view in the center of the plug-in window. Assigning Measure Assign measure number in the Measure box in the upper part of the plug-in window. Note that on starting the DrumTools Fill-in Drummer will play the selected fill only once in the certain measure of the Part you’ve previously assigned in the Measure box. Playing Fill Start DrumTools and the Fill-in Drummer will play the selected fill in the assigned measure of the Part. Using Track Masking Panel In the upper part of the plug-in window there is Track Masking Panel, which allows you to intelligently mask (filter) notes of backing loop played by SlicyDrummer in various ways while the fill is playing. NOTE. Track Masking Panel has no effect if SlicyDrummer is muted. You only can use Time Locators for trimming the fill. Controlling Punch in/out Time Points Move the red Time Locators to create Time Areas displaying punch in/out time points, i.e. time when backing track goes to fill (left Locator point) and time when the fill goes to backing track again (right Locator point). Dark color of Time Area shows that track is masked (is silent over the Area time), while light color appoints that track notes are passing through the plug-in. With Time Locators you can create up to three Time Areas: left, middle, and right, thus controlling punch in/out points within the measure. Time Locators work in both automatic and manual modes. When the automatic mode is selected (pressed Auto Locate button to the left of Locator slider) the Locators will be set automatically on loading new fill: if there are rests at the beginning of the fill left Locator goes to the first note position; if there are rests at the end of the fill, right Locator goes to the last note position. In manual mode (Auto Locate button unpressed) the Locators don’t change their positions on selecting fills. Controlling Note Mixing Track Masking Panel also lets you mix notes playing from SlicyDrummer and Fill-in Drummer simultaneously in an intelligent way. This allows you to avoid ‘gaps’ in basic loop occurring if you simply mute the track while the fill is playing, and at the same time to avoid the double drum notes playing, which can cause undesirable ‘chorus’ effect. This can be done automatically in the Fill-in Drummer by using special note filtering 27 adjustment – Mask Mode. You can assign Mask Mode for every Time Area individually. Clicking on Time Area pane switches between various available Mask Modes for the Area: - Mask All (dark colored Area pane) – filters all notes playing from SlicyDrummer - Mask Drum set (half and light Area pane) – filters only notes mapped to currently active Drum set of the Fill view (all pressed Drum buttons) - Mask Instrument (stripped Area pane) – filters only drum notes used in the current fill - Through (light colored Area pane) – all notes of the SlicyDrummer play through the plug-in untouched. Editing Fill In the center of the plug-in window you see 10 horizontal bars representing individual drum instruments. To the left of the instrument bars there are buttons with drum icons showing the drum instrument the bar is mapped to: Bass Drum, Snare Drum, Close Hi- Hat, Open Hi- Hat, 4 Toms, and Crash Cymbal. X icon bar represents all unmapped drum notes. On selecting the fill its notes are displayed in the appropriate bar as diamonds colored relatively to their velocity values (the brighter the diamond - the higher velocity value of the note). Editing beats Fill-in Drummer allows to insert/delete/move individual beats to create your own fills and save them within the plug-in for future use. • Press Edit button to enable edit mode • Click drum bar to insert beats • Double click the beat to delete it (alternatively <Ctrl>+click) • Drag the beat left or right to move it to a new location • Drag the beat up or down to change velocity value Snap to Grid feature Fill-in Drummer allows using snap grid that makes it easier to edit beats. Click Snap Grid resolution combo box and select standard note duration for the snap interval. From then on, when you insert or move beats, they will be snapped to the nearest point on the Snap Grid. To disable the Snap Grid, select '--' item in the combo box menu. Transforming Instrumentation Fill-in Drummer allows you to drastically modify the existing fill in various ways even without adding/deleting individual notes. This gives you practically endless amount of variations of the existing material and also lets you quickly adjust the fill to your musical needs. Manual Transformation (Changing Drum set) To change the current Drumset for the fill click Drum button to make it inactive. This will exclude the appropriate drum instrument from Drum set used for mapping fill notes. The fill will be rearranged automatically so that all notes of the excluded instrument(s) move to the relative drum(s). Click Drum button once more to make it active. Right-clicking Drum button will Solo/Unsolo the instrument in the Drum set. Changing the Drum set lets you force Fill-in Drummer to play any existing fill with the other drum instruments, never loosing whole rhythm formula of the original fill, as well as keeping drum melody, dynamics and timing untouched. You can easily transform the instrumentation of the fill up to the single drum instrument to create numerous variations of the existing material. 28 Press Comp (Compare) button to hear the original instrumentation; unpress it to revert to last edits. Automatic Transformation Click Xform (Transform) button. This will automatically rearrange the whole instrumentation of the fill and create a variation of the fill close by rhythm, polyphony, melody and dynamics to the original. Clicking Xform button over and over again allows you to momentarily create a lot of variations of the same fill. Click Comp (Compare) button to hear the original instrumentation; unpress it to revert to last edits. Trimming fill You can also modify any fill by trimming it from the beginning or/and the end with the help of left and right Time Locators. In this case the shaded notes of the fill outside Locators will not sound. This lets you easily create a lot of new variations of the fill playing in various sections of measure. Adjusting Performance Controls Modifying Dynamics Use Dynamics 2D controller to change the difference in velocity between loud and soft notes for all drum parts simultaneously. Drag the pointer with a mouse to change dynamics. Dragging by x-direction increases/decreases the dynamics value, while y-direction changes the dynamics center (threshold between the lowest and highest velocity value of notes). Creating Crescendo/Decrescendo Create automated crescendi/decrescendi by drawing velocity envelope by dragging any of three nodes to any direction. Right click to Envelope pane to disable/enable the envelope or switch between Velo+ and Real Velocity modes. Adjusting Swing Use Swing slider to add swing (shuffle) feel to the performance (50% value gives triplet feel). In the Swing duration box select 8th or 16th note duration to apply swing feel to. Quantize Press Quantize button to set exact timing for all note-ons. In the Resolution combo box select the appropriate grid resolution value (note duration) to apply quantization. Individual Drum bar controls Bar Inspector Adjust the sound of the fill using individual drum inspector controls at the right edge of every Drum bar: • Select Velo+ control to add/reduce velocity value to the notes. • Select Time+ control to apply offset to the start time of the notes. • Select Dyn% control to set the strength (in percents) of main Dynamics 2D controller adjustments for the part. Use <+>/<-> (numpad) keys to change values for selected control of the drum bar. Enter desired value with numeric keys; change it with up/down arrow keys or mouse wheel 29 Changing output Drum note Drum sound name (the output note) is displayed in the Note Name box at the right edge of the Drum Instrument bar. You can easily change the output note for any drum part by clicking Note Name box and selecting the appropriate sound name from the popup menu. You can assign the required Drumset Note Names definition by selecting it in the Note Names combo box at the upper right corner of plug-in’s window. The assignment you make determines the drum note names that you see in the popup menu of Note Name box of the Drum Instrument bar. Using Quick Pads At the left upper corner of Fill-in Drummer window there is Quick Pad panel which lets you quickly assign and select up to 10 Fills and variations. Click any Pad of Quick Pad panel. Select fill from the Library, or copy/paste fill from other Pad. You can save the whole Pads content within DrumTools Part/Style files. Use computer keys (1, 2, 3…- 0) to select Pads. Saving Fill Press Save button to save the fill to User folder. Exporting fill Using Drag and Drop To export the current fill simply drag it from ‘Drag from here’ pane at the right corner of Fill-in Drummer window and drop it to the needed measure of your host’s MIDI track (or to Windows for exporting fill as a Standard MIDI file. Importing Fills to Fill-in Drummer Library You can import your own fill libraries to the USER folder and use them with the Fill-in Drummer. To import fill to USER folder: 1. Inside Fill-in Drummer drag the edited fill from the ‘Drag from here’ pane of the plug-in directly to the Fill Library view. 2. Simply place Standard MIDI file with previously created fill to USER folder in Windows Explorer. Note: you can also copy third party MIDI drum loop (Standard MIDI file) to Fill-in Drummer User Folder and cycle it with the Fill-in Drummer using DrumTools PD sequencer looping. Options Click Options button to make settings in the opening dialog: Drum Map - create your output maps for drum sounds. All Drum maps will be automatically saved within the Fill-in Drummer for future use Limit Velocity – set the range of output velocity values for main Dynamics controller 30 Troubleshooting • • • You can't run more than one DrumTools PD instance at a time. DrumTools audio engine has one Stereo output, so if loaded sampler has multiple audio outputs they will be not supported. You can’t save DrumTools PD settings and edits within your host’s project file. To workaround that you have to previously save all Parts/Drummers edits for your song as a DrumTools Style file (*.dts) to Windows (File/Save Style), or the whole current state including Parts/Drummers/Out Port edits and settings as a Template within DrumTools (File menu/Template) for future use with your host’s project. Contact Info Web site: http://www.musiclab.com/ Technical support: [email protected] How to Register This is full-featured 21 days time limited version. Be sure to register if you wish to remove the time limitation. 1. After purchasing the DrumTools PD you will receive registration email containing DrumTools PD serial number and license key (drmt.key) file needed to register DrumTools PD. 2. Save the attached drmt.key file to your hard disk (for instance, on the desktop). 3. Launch DrumTools PD, open the About screen from Help menu: 4. Click “Enter reg. info” box to open Registration dialog: 31 5. Press 'Browse' button and select/open drmt.key file saved at the step 2 (if you followed the instructions it should be located on the desktop) 6. Press Next button to confirm the registration. Enjoy working with DrumTools Performance Designer. 32